SYSTEM SOFTWARE UPDATES - Ghostlighttrails1.ghostlight.uk.com/manuals/Trails-UK-Manual.pdf ·...
35
SYSTEM SOFTWARE UPDATES This PSP™Game includes System Software update data for the PSP™ system. An update will be required if an “update request” message is displayed on-screen at game start-up. Performing a System Software update The update data is displayed with the icon shown here on the Home Menu. By following the on-screen instructions, you can update the System Software of the PSP™ system. Before performing the update, check the version number of the update data. · During an update, do not remove the AC Adaptor. · During an update, do not turn off the power or remove the PSP™Game. · Do not cancel the update before completion as this may cause damage to the PSP™ system. Checking that the update was successful Select “Settings” from the Home Menu, and then select the “System Settings” option. Select “System Information” and if the “System Software” version number displayed on-screen matches the version number of the update data, then the update was successful. For details on System Software updates for the PSP™ system, refer to the following website: eu.playstation.com PARENTAL CONTROL This PSP™Game software has a preset Parental Control Level based on its content. You can set the Parental Control Level on the PSP™ system to restrict the playback of a PSP™Game with a Parental Control Level that is higher than the level set on the PSP™ system. For more information, please refer to the PSP™ system Instruction Manual. This game is classified according to the PEGI rating system. The PEGI rating marks and content descriptors are displayed on the game package (except where, by law, another rating system applies). The relationship between the PEGI rating system and the Parental Control Level is as follows: In rare cases, the Parental Control Level of this product may be higher than the age rating which applies in your country, because of differences in the age rating systems in the various countries in which this product is sold. You may need to reset the Parental Control Level on your PSP™ system to enable play. PARENTAL CONTROL LEVEL PEGI RATING AGE GROUP 9 7 5 3 2 ULES-01556 FOR PERSONAL USE ONLY: this software is licensed for play on authorised PSP™ (PlayStation®Portable) systems only. All unauthorised access, use or transfer of the product or its underlying copyright and trademark works is prohibited. See eu.playstation.com/terms for full usage rights. Library programs ©1997-2011 Sony Computer Entertainment Inc. exclusively licensed to Sony Computer Entertainment Europe (SCEE). RESALE AND RENTAL ARE PROHIBITED UNLESS EXPRESSLY AUTHORISED BY SCEE. Licensed for sale only in Europe, the Middle East, Africa, India and Oceania. “2”, “PlayStation”and“7” are trademarks or registered trademarks of Sony Computer Entertainment Inc. The Legend of Heroes: Trails in the Sky ©2004-2011 Nihon Falcom Corporation. Licensed to and published by Ghostlight LTD. Developed by Nihon Falcom Corporation. Made in Austria. All rights reserved. anual Uk_DM.indd 1 15/9/11 14:52:07
Transcript of SYSTEM SOFTWARE UPDATES - Ghostlighttrails1.ghostlight.uk.com/manuals/Trails-UK-Manual.pdf ·...

SYSTEM SOFTWARE UPDATESThis PSP™Game includes System Software update data for the PSP™ system. An update will be required if an “update request” message is displayed on-screen at game start-up.
Performing a System Software updateThe update data is displayed with the icon shown here on the Home Menu.
By following the on-screen instructions, you can update the System Software of the PSP™ system. Before performing the update, check the version number of the update data.
· During an update, do not remove the AC Adaptor. · During an update, do not turn off the power or remove the PSP™Game. · Do not cancel the update before completion as this may cause damage to the PSP™ system.
Checking that the update was successfulSelect “Settings” from the Home Menu, and then select the “System Settings” option. Select “System Information” and if the “System Software” version number displayed on-screen matches the version number of the update data, then the update was successful.
For details on System Software updates for the PSP™ system, refer to the following website: eu.playstation.com
PARENTAL CONTROLThis PSP™Game software has a preset Parental Control Level based on its content. You can set the Parental Control Level on the PSP™ system to restrict the playback of a PSP™Game with a Parental Control Level that is higher than the level set on the PSP™ system. For more information, please refer to the PSP™ system Instruction Manual.
This game is classified according to the PEGI rating system. The PEGI rating marks and content descriptors are displayed on the game package (except where, by law, another rating system applies). The relationship between the PEGI rating system and the Parental Control Level is as follows:
In rare cases, the Parental Control Level of this product may be higher than the age rating which applies in your country, because of differences in the age rating systems in the various countries in which this product is sold. You may need to reset the Parental Control Level on your PSP™ system to enable play.
PARENTAL CONTROL LEVEL PEGI RATING AGE GROUP
97532
ULES-01556FOR PERSONAL USE ONLY: this software is licensed for play on authorised PSP™ (PlayStation®Portable) systems only. All unauthorised access, use or transfer of the product or its underlying copyright and trademark works is prohibited. See eu.playstation.com/terms for full usage rights. Library programs ©1997-2011 Sony Computer Entertainment Inc. exclusively licensed to Sony Computer Entertainment Europe (SCEE). RESALE AND RENTAL ARE PROHIBITED UNLESS EXPRESSLY AUTHORISED BY SCEE. Licensed for sale only in Europe, the Middle East, Africa, India and Oceania.
“2”, “PlayStation”and“7” are trademarks or registered trademarks of Sony Computer Entertainment Inc. The Legend of Heroes: Trails in the Sky ©2004-2011 Nihon Falcom Corporation. Licensed to and published by Ghostlight LTD. Developed by Nihon Falcom Corporation. Made in Austria. All rights reserved.
Manual Uk_DM.indd 1 15/9/11 14:52:07

2
Setting Up . . . . . . . . . . . . . . 1Basic Controls . . . . . . . . . . . . 2Game Screen. . . . . . . . . . . . . 3Camp Menu . . . . . . . . . . . . . 5In-Game Notebooks . . . . . . . . 12Combat . . . . . . . . . . . . . . . . 15Shops & Facilities . . . . . . . . . . 24Quartz & Arts . . . . . . . . . . . . 26Credits . . . . . . . . . . . . . . . . 30
Contents
Manual Uk_DM.indd 2 15/9/11 14:52:08

1SETTING UPSet up the PSP™ system according to the instructions in its instruction manual. Turn the PSP™ system on and the POWER indicator will light up green. The XMB™ Menu will be displayed. Open the disc cover and insert The Legend of Heroes: Trails in the Sky Portable disc with the label side facing the rear of the PSP™ system and then securely close the disc cover.
Select the Ç icon from the XMB™ Menu and then select the Å icon. An image of the software will be displayed. Select the image and press the S button to commence loading.
PLEASE NOTE: the information in this manual was correct at the time of going to print, but some minor changes may have been made late in the product’s development. All screenshots for this manual have been taken from the English version of this product, and some screenshots might have been taken from pre-completion screens that differ slightly from those in the fi nished product.
MEMORY STICK DUO™To save game settings and progress, insert a Memory Stick Duo™ into the Memory Stick Duo™ slot of the PSP™ system. Saved game data can be loaded from the same Memory Stick Duo™ or any Memory Stick Duo™ containing previously saved game data.
XMB™ Menu
1
Manual Uk_DM.indd 1 15/9/11 14:52:09

Basic Controls2
Directional buttons/Analog stick: • Move your party or highlight a menu option • During movement, you may press and hold the ≈ button to walk
more slowly.
L button/R button • Rotate the camera
≈ button • Select a menu option, speak with a character or examine an object
Ω button • Cancel or close
ç button + Directional button: • +Left : Open Bracer Notebook • +Up: Open Recipe Book • +Right: Open Monster Guide • +Down: Open map of Liberl Kingdom • During battle, activate S-Break for the character corresponding
with the directional button pressed
√ button • Hold to display map labels for guidance / Hold during battle to
display party and enemy status
START button • Open camp menu / Skip movie scene
SELECT button • Enlarge or shrink the mini-map / Press during battle to enable or
disable battle voices
Directional buttons L button R button
ç button
≈ button√ button
Ω button
Analog stick START button
SELECTbutton
Manual Uk_DM.indd 2 15/9/11 14:52:09

ç button
≈ button√ button
Ω button
In-Game DisplayDuring normal gameplay, your game screen should look very similar to the one pictured below. You’ll be guiding your characters through many screens just like this as the adventure commences.
Current Status HP (Hit Points) EP (Energy Points) CP (Craft Points) yellow-green = 1-100, solid green = 101-200
Game Screen
3
Manual Uk_DM.indd 3 15/9/11 14:52:11

Game Screen
Map DisplayMini-MapDisplays your immediate surroundings. Th e red arrow represents your current party, and the direction it points is the relative direction your party is facing. Yellow-shaded sections represent entrances/exits that connect with other maps. In addition, buildings are color-coded based on their functions within the game world.
PLEASE NOTE that there do exist predetermined locations (inside buildings or dungeons, for example) where the mini-map will NOT display.
Expanding the Mini-MapPressing the SELECT button will expand the mini-map to fi ll the screen for more detailed viewing. While in this mode, you may use the directional buttons to scroll the map as needed, or the ≈ button to zoom in for a closer look. Pressing the ≈ button again will zoom out, and pressing the Ω button or SELECT button again will exit back to the main game screen.
Liberl Kingdom MapPressing the ç button and the down button together will bring up a map of Liberl Kingdom. While this map is displayed, you may use the directional buttons to scroll as needed, or the ≈ button to zoom in for a closer look. While zoomed in, you may press and hold the √ button to display the names of major roadways. When fi nished, you may press ≈ again to zoom out, and/or the Ω button or ç button again to exit back to the main game screen.
PLEASE NOTE that roadway names are sometimes only visible on the √ button display aft er townsfolk specifi cally refer you to those locations, or aft er you’ve visited them personally.
Displays your immediate surroundings. Th e
button to zoom in for a closer look. Pressing
a closer look. While zoomed in, you may press and hold the √
4
Manual Uk_DM.indd 4 15/9/11 14:52:12

55
From this menu, you may view detailed character statuses, examine or change character equipment, manipulate orbments (setting quartz, utilizing healing arts, etc.), use items, alter the game’s confi guration options and/or save or load gameplay session data.
StatusTh is tab displays a selected character’s current status.
Character SelectYou may select the character whose status you wish to view from this list.
Money On Hand and PlaytimeDisplays the total amount of “mira” (the game world’s currency) possessed by your party, as well as the total amount of time you’ve spent playing the game thus far.
Detailed Character InformationPressing the left button or right button will switch between the regular status display and the craft display for that character.
Name: Character’s name Craft s: Known craft sStatus: S-Craft s: Known S-Craft s Level: Current EXP level HP: “Health points” – 0 = death EP: “Energy points” – needed for using arts (magic) CP: “Craft points” – needed for using craft s (special techniques) EXP: Current experience points NEXT: Amount of EXP needed to reach the next LevelParameter: STR: Strength: Determines damage amount infl icted upon enemies when attacking DEF: Defense: Determines damage amount mitigated from enemy assaults ATS: Art Strength: Determines damage amount infl icted upon enemies when using arts ADF: Art Defense: Determines damage amount mitigated from enemy arts SPD: Speed: Determines duration between actions during combat DEX: Dexterity: Determines combat accuracy AGL: Agility: Determines ability to dodge enemy attacks MOV: Movement: Determines movement limit per turn during combat RNG: Range: Determines attack range during combat
Camp Menu
Manual Uk_DM.indd 5 15/9/11 14:52:13

Camp Menu6
EquipTh is tab allows you to view and/or change your characters’ current armaments.
Character SelectYou may select the character whose armaments you wish to evaluate from this list.
Equips (Current Equipment) Displays the selected character’s current armaments, including a weapon, a piece of armor, footwear and two accessories.
Equippable ItemsDisplays a list of items the selected character is able to equip in the selected armament slot.
StatusWhen selecting a new armament from the list of equippable items, this display will indicate any changes to the character’s status that will occur if the highlighted armament is equipped.- Green = improvement, Red = detriment.
Changing Equipment1. Select the character whose equipment you wish to change. A list
of equippable items will display on the right side of the screen.2. Select the type of equipment you wish to change. Th e list of
equippable items will adjust itself accordingly.3. Choose the item you wish to equip.
PLEASE NOTE that while navigating these equipment menus, you may use the left button or right button to switch character displays on the fl y.
you wish to evaluate from this list.
Item DescriptionDisplays a detailed textual description of the highlighted item.
Manual Uk_DM.indd 6 15/9/11 14:52:13

7
OrbmentTh is tab allows you to view the individual orbments used by each of your characters. You may also view or change the quartz set into these orbments, confi rm which orbal arts each character has available and/or make use of certain healing arts. Note, however, that in order to use healing arts, you must have a suffi cient amount of EP (energy points) available.
PointsDisplays the total number of elemental attribute points that have been set on each line. See “Lines” below and “Elemental Attributes” on page 8 for more information.
SlotsDisplays which quartz are set into the various slots of this orbment.
Character SelectYou may select the character whose orbment you wish to view from this list.
Orbal ArtsDisplays a list of all magic (arts) currently usable by the selected character.
Quartz/Art DescriptionDisplays a detailed textual description of the highlighted quartz or art.
OrbmentVisually displays the slot and line structure of the selected character’s orbment.
LinesLines that bind together each of the slots on this orbment.
SlotsHoles cut into the orbment, designed for the insertion of quartz. Closed slots may be opened at an orbal factory.
Manual Uk_DM.indd 7 15/9/11 14:52:14

Camp Menu8
StatusWhen selecting a new quartz from the list, this display will indicate any changes to the character’s status that will occur if the highlighted quartz is equipped.- Green = improvement, Red = detriment.
Changing Quartz1. Select the character whose quartz you wish to change. Th e
orbment information for that character will display on the right side of the screen.
2. Select a slot. Th e quartz list and status display will update themselves accordingly.
3. Choose the quartz you wish to set.
PLEASE NOTE that some slots will ONLY accept quartz of one specifi c elemental attribute, as indicated by the colors along their edges:
Elemental AttributesYellow: Earth Blue: Water Red: Fire Green: WindBlack: Time Gold: Space Silver: Mirage White: None (all attributes OK)
Using Orbal Arts1. Select the character whose arts you wish to use. Th e orbment
information for that character will display on the right side of the screen.
2. Select the desired healing art. Th e cursor will then move to the character select column on the left side of the screen.
3. Choose the character upon which to use this art.
PLEASE NOTE that while navigating the orbment menu, you may use the left button or right button to switch character displays on the fl y.
Quartz List
Manual Uk_DM.indd 8 15/9/11 14:52:15

9
ItemsTh is tab allows you to view and/or use any of the items your party currently has on hand.
SepithAmount of each type of sepith crystal currently on hand (max 9999).
Character SelectYou may select the character from this list upon whom you wish to use an item.
Item ListA list of items your party currently has on hand.
Item DescriptionA detailed textual description of the currently highlighted item.
Display TabsAs gameplay progresses, you’ll fi nd yourself in possession of a very large number of items. While browsing the item list, the left button or right button can be used to cycle through these tabs, which allow you to pick and choose a specifi c type of item to list. Th is helps speed up the browsing process, ensuring you’ll be able to fi nd the item you’re looking for more quickly and easily.
Item name
Item icon (indicates type of item)
Number of this item owned (max 99)
Manual Uk_DM.indd 9 15/9/11 14:52:15

Camp Menu10
Using Items1. Select the item you wish to use.2. If the item is readable (as in a book or a newspaper), its contents
will be displayed for you to read. If the item is intended for healing or is otherwise consumable, select “Use” to continue. If the item is designed for use on the entire party, a confi rmation message will be displayed, asking if you’re certain you wish to use the item. If it’s an item designed for use on a single character, the cursor will move to the character select column on the left side of the screen.
3. Choose the character upon whom to use this item (when applicable).
Discarding Items1. Select the item you wish to discard.2. Select “Discard” from the options presented to you.3. A confi rmation message will be displayed, asking if you’re certain
you wish to discard the item. Answer yes, and 1 of that item will be removed from your inventory.
PLEASE NOTE that items may only be discarded one at a time. Also note that some items may not be discarded at all, and thus do not off er you this option when selected.
Manual Uk_DM.indd 10 15/9/11 14:52:16

11
TacticsTh is tab allows you to confi gure the party’s walk order, battle formation and S-Breaks.
Character PositionTh e line of characters depicted here represents the line order of the characters in your party as you walk around on the main game screen. To exchange two characters, simply select the fi rst, then the second; the two will immediately switch places.
Battle PositionTh e 7x5 grid depicted here represents the basic formation your characters will take upon fi rst engaging enemies in battle. To change any character’s position, simply move the cursor to the space occupied by that character and press the ≈ button, then move the cursor to the desired location and press the ≈ button again. Note that the lower-left edge of this grid represents the direction from which enemies will be advancing, so it’s likely best to ensure that long-range attackers and lightly-defended characters occupy positions closer to the opposite edge.
Set S-BreakEach character may choose one S-Craft to set as his/her “S-Break.” In the event that more than one S-Craft is available for this purpose, this option will help you pick the one you’d like to use. Simply highlight the currently-set S-Break for any character and press the ≈ button, then choose the desired S-Craft from the resulting list. For more information on using S-Breaks, please see page 36.
11
TacticsTh is tab allows you to confi gure the party’s walk order, battle formation and S-Breaks.
Character PositionTh e line of characters depicted here represents the line order of the characters in your party as you walk around on the main game screen. To exchange two characters, simply select the fi rst, then the second; the two will immediately switch places.
Battle PositionTh e 7x5 grid depicted here represents the basic formation your characters will take upon fi rst engaging enemies in battle. To change any character’s position, simply move the cursor to the space occupied by that character and press the ≈ button, then move the cursor to the desired location and press the ≈ button again. Note that the lower-left edge of this grid represents the direction from which enemies will be advancing, so it’s likely best to ensure that long-range attackers and lightly-defended characters occupy positions closer to the opposite edge.
Set S-BreakEach character may choose one S-Craft to set as his/her “S-Break.” In the event that more than one S-Craft is available for this purpose, this option will help you pick the one you’d like to use. Simply highlight the currently-set S-Break for any character and press the ≈ button, then choose the desired S-Craft from the resulting list. For more information on using S-Breaks, please see page 20.
Manual Uk_DM.indd 11 15/9/11 14:52:17

In-Game Notebooks12
During the early stages of the game, your main characters Estelle and Joshua will come into possession of a “Bracer Notebook,” a “Recipe Book” and a “Monster Guide.” Each of these notebooks is automatically updated as bracer tasks are acquired or advanced, new recipes are learned or new monsters are encountered. Th ese notebooks may be consulted by holding the ç button while pressing the left button, up button or right button, respectively. Alternatively, you may consult these notebooks by selecting them from the “Books” tab of the “Items” menu.
Bracer Notebook (ç button + left button)Contains information on jobs acquired from the Bracer Guild bulletin boards, as well as pertinent notes both related to these jobs and related to being a bracer in general.
Job TabsNo mark: Unfi nished job – in progress ! mark: Completed job that has not yet been reported to the Bracer GuildO mark: Completed job that HAS been properly reported to the Bracer Guild mark: Failed job – time limit has passed without completion
Selecting a job from the job tabs on the left will alter the data displayed in the regional tab on the right accordingly, presenting you with the full job description, payment information, the client's name, etc. In addition, as work progresses toward the job’s completion, a record of this progress will automatically be added to the regional tab, complete with relevant hints and a detailed account of the specifi c events that have occurred thus far.
Memo TabsContain a record of your current bracer standing, as well as magic lists and other information that may prove vital to your adventure.
Regional TabsContain a record of important information pertaining to the jobs you’ve undertaken in the indicated regions of Liberl. Upon fi rst acquiring the Bracer Notebook, only a “Rolent” tab exists, but as you continue your adventure and visit the Bracer Guilds in other lands, tabs will be created for those regions as well.
Manual Uk_DM.indd 12 15/9/11 14:52:17

13
Recipe Book (ç button + up button)Eat and learn! Th is notebook contains information on how to prepare the various foods you’ve eaten thus far on your adventure.
To make food, you must have a “recipe” and “ingredients.”Recipe: Learned by eating food at inns or restaurants, or by using food items.Ingredients: Obtained through purchase, or taken from monsters.
In addition, there exist both “sit-down” and “to-go” meals.Sit-Down: Food eaten together with friends. Has an immediate eff ect on the entire party.To-Go: Food obtained as an item and taken with you for use at your leisure.
Making a Meal1. Select the recipe from your Recipe Book for the food item you
wish to make.2. Select the number of that food item you wish to make and
choose “OK.” Th e food item will then be made on the spot. If it’s a sit-down meal, its eff ects will immediately be applied to every member of your party. If it’s a to-go meal, that item will be added to your inventory in the quantity you specifi ed.
Recipe ListWhite – You know how to make this food, and you have all the ingredients.Gray – You can’t make this food, or you’re missing some ingredients.
Description of Food ItemIndicates whether the food item is a sit-down or to-go meal, as well as the eff ect it has on those who eat it.
IngredientsLists the ingredients needed to make the food, as well as the amount of each ingredient required. Th is information is formatted as follows: [Amount needed] / [Amount on hand]. If you do not have enough of a particular ingredient on hand, the entire line will be written in red.
Manual Uk_DM.indd 13 15/9/11 14:52:18

In-Game Notebooks14
Monster Guide (ç button + right button)Contains information on all the monsters you’ve fought thus far during your adventure.
Table of Contents (sorted by region)A full listing of monsters fought in the specifi ed region. You may cycle through the diff erent regions of Liberl by pressing the left button or right button, or alternately by pressing the L button or R button.
Viewing Monster InformationSelecting a monster from the table of contents and pressing the ≈ button will yield detailed information on that monster. If you wish to browse through the pages of the Monster Guide without returning to the table of contents, you may press the left button or right button on this screen (or the L button or R button, if you’d prefer).
Th e level of detail in these informational pages varies based on which of the following three conditions are true:
• Monster has been encountered
• Monster has been defeated
• Monster has been defeated by a party member equipped with the “Information” quartz
by region)A full listing of monsters
through the diff erent
pressing the left button or
Manual Uk_DM.indd 14 15/9/11 14:52:18

Combat 15
Battle BasicsEngaging EnemiesTouching a monster or enemy character while moving around the game world will trigger the start of battle.
Flow of BattleOnce battle begins, all player characters and all enemy characters will take turns entering commands until one side or the other has been completely wiped out. Th e order in which combat commands are entered is determined by the SPD (speed) attribute of each participant. In the end, if all enemy characters are defeated while at least one player character remains alive, then you’ve won the battle. If all player characters are defeated, however, it’s Game Over. For more information on combat outcomes, please see page 23.
CommandsAs each of your characters’ turns come around, he/she will be prompted to perform an action from the following list. For more information on the functionality of these actions, please refer to the page number indicated.
Attack page 19 Craft page 19
Move page 19 Item page 20
Art page 19 Run page 20
Choosing a TargetAft er selecting a battle command for one of your characters, you’ll be prompted to choose a target for that command (when applicable). Some commands target specifi c enemies or allies, while others target a specifi c ground location or area of eff ect. For more information, please see page 21.
S-BreakUnder certain conditions, one of your characters may be able to instantly perform an S-Craft technique, “butting in line” to insert himself/herself into the very next spot on the turn order list regardless of his/her SPD (speed) attribute. Th is is called an “S-Break.” For more information, please see page 20.
on the turn order list regardless of his/her SPD (speed) attribute.
Manual Uk_DM.indd 15 15/9/11 14:52:19

Combat16
Gaining the Upper HandDepending on how you initially come into contact with an enemy during the main game, you may enter battle with a tactical advantage or disadvantage. If you manage to sneak around behind the enemy and touch it from the back, you will take the upper hand at the start of combat; if, instead, the enemy manages to sneak up on you and touch one of your party members’ backs, the enemy will take the upper hand.
Advantageous Disadvantageous (Sneak up from behind) (Party is taken by surprise)
In addition, please be aware that on the main game screen, prior to entering combat, enemies are less visible to you the farther away they are. As you draw nearer an enemy, it will come into focus, and as you distance yourself from it, it will begin to disappear.
Other Pertinent Information• Viewing Monster Details page 20• Status Eff ects page 22
Don’t forget to set up a useful battle formation!Th e starting locations of your party members upon fi rst entering combat can sometimes spell the diff erence between victory and defeat—so make certain you take the time to adjust them whenever any changes are made to your party makeup! For more information on setting battle formations, please see “Battle Position” on page 11.
Advantageous
Don’t forget to set up a useful battle formation!
victory and defeat—so make
Advantageous Disadvantageous Advantageous
Manual Uk_DM.indd 16 15/9/11 14:52:20

17
Battle ScreenTh e battlefi eld for all combat in this game consists of a patch of land occupying a 17x17 grid. Although the action is shown in an isometric perspective by default, the camera may be freely rotated via the L button or R button during the command entry phase of combat. While actions are occurring, however, the camera will be locked in place.
AT bar AT bonus
Character status
Character Statuses:
Break ButtonWhen conditions are right, you may press the ç button + one of the directional buttons to activate a character’s S-Break, boosting that character’s assigned S-Craft technique into the very next spot on the turn order list (see page 20 for more information). Th e directional button used in this combination determines which character’s S-Break to employ, as per the following chart: Character: ç button + Left Up Right Down
Current HPCurrent EP
Face Portrait Th e character’s expression will change along with his/her health.
CP GaugeIncreases whenever damage is dealt or taken. Max is 200.
Current HPCurrent EP
Increases whenever
Current HPCurrent EP
Increases whenever
4321
1 2 3 4
Manual Uk_DM.indd 17 15/9/11 14:52:21

Combat18
AT BarShort for “attack turn,” the AT bar determines the turn order for all combat participants – both player characters and enemies. Th e participant shown on top is currently active, the one immediately below him/her is next in line, etc. If an “A” is depicted on the icon, that participant is currently preparing to use arts, and if a “C” is depicted on the icon, that participant is currently preparing to use craft s. Th e border color of the icon indicates the participant’s relationship to you: a red border indicates an enemy or attack target, and a blue border indicates a friend or healing target.
AT BonusesDuring each battle, bonus eff ects are randomly attached to certain combat turns on the AT bar. When the corresponding turn comes around, the participant set for that turn (be it player OR enemy) will receive the bonus indicated. When the order of characters on the AT bar is modifi ed by an art or S-Break, however, the AT bonuses remain unmoved, making it possible to cast or break your way onto the bar and steal an enemy’s bonus.
Guest CharactersOccasionally, a non-playable character will accompany you along your way for a short period of time. When this happens, that character’s face portrait and status will appear on the top-left corner of the screen. When his/her turn comes up on the AT bar, he/she will move and act automatically – player input is not possible.
PLEASE NOTE that if a guest character’s HP drops to 0, a Game Over will be triggered instantly, whether or not the rest of the party is still alive. As such, it is recommended that you take great care to keep your guest characters healthy via healing items or arts. Once battle ends, all guest characters will fully recover their HP, so the biggest concern is ensuring that all guest characters survive every battle to the end.
Possible AT bonuses are as follows:HP HEAL - 10% or 50% of HP is recovered.
EP HEAL - 10% or 50% of EP is recovered.
CP UP - CP is raised by 10% or 50%.
STR UP - Damage dealt by attacks or magic this turn is increased by 10% or 50%.
CRITICAL - Power of attack, magic or healing is 1.5x normal this turn.
SEPITH UP - Additional sepith is taken from combat targets this turn.
HP HEALof HP is recovered.
EP HEALof EP is recovered.
CP UP10% or 50%.
STR UPattacks or magic this turn is increased by 10% or 50%.
CRITICALattack, magic or healing is 1.5x normal this turn.
SEPITH UPsepith is taken from combat targets this turn.
and status will appear on the top-left corner of the screen.
Manual Uk_DM.indd 18 15/9/11 14:52:22

19
AttackCommences a regular attack. Aft er selecting this command, you will be prompted to choose a target. As long as the chosen target is close enough, your character will automatically walk over to that target and attack. If the chosen target is farther away than the character’s MOV (movement) attribute + weapon range, your character will simply walk as close to it as his/her MOV will allow, and the turn will end without damage being dealt.
MoveMoves your character to a specifi ed location on the battle map. Aft er selecting this command, you will be prompted to choose a destination on the grid. Your character will then walk there, and his/her turn will end – however, since no action was taken, that character’s next turn will come by much more quickly than it otherwise would have.
ArtInstructs your character to begin the process of casting magic via arts. Aft er selecting this command, you will be prompted to choose an art, then choose a target (be it friend, enemy or area of eff ect). All arts require time to cast, so your character’s turn will end at this point, and the art will be cast during his/her next turn on the AT bar. You will be able to confi rm where this turn will fall prior to fi nalizing the spell-cast, so it is recommended you pay careful attention to the AT bar (and AT bonuses) before choosing your spell target.
Craft (S-Craft )Instructs your character to use a craft or S-Craft . Aft er selecting this command, you will be prompted to choose a target (be it friend, enemy or area of eff ect).
Craft s• Unique abilities each character can use. As your
characters gain in level, they will learn new craft s. In order for one of your characters to execute a craft , he/she must have an adequate amount of CP (craft points) available. CP is gained both by dealing damage and by taking it.
S-Craft s• Th e strongest, most intense craft s available. When a
character uses an S-Craft , ALL of his/her CP will be drained. S-Craft s may only be used when a character’s CP surpasses 100, and are signifi cantly more powerful if used when that character’s CP reaches its max of 200.
Possible AT bonuses are as follows:
Battle Commands (Expanded)
Manual Uk_DM.indd 19 15/9/11 14:52:22

Combat20
ItemInstructs your character to use a healing, food or other item. Aft er selecting this command, you will be prompted to choose an item, then to choose a target for that item’s eff ects (when applicable). Unlike arts, the eff ects of items are instantaneous.RunInstructs your characters to retreat from battle. Aft er selecting this command, you will be asked to confi rm whether or not you really wish to run. Even if you select “Yes” and fl ee successfully, please note that the enemy will continue to wander the map, and may try to attack you again. It is recommended you distance yourself from the enemy as soon as possible aft er running from battle.S-BreakInstructs the selected character to utilize a chosen S-Craft technique immediately, disregarding his/her turn on the AT bar. Whenever a character’s CP surpasses 100, his/her “Break Button” will begin to glow, indicating that he/she is eligible to use an S-Break at your leisure.
Activating S-Breaks• Th ere are two ways to activate a character’s S-Break. One
method is to press the ≈ button aft er highlighting that character via the left button or right button. Th e other is to use the specifi c ç button combination for that character: ç button + left button for the fi rst, ç button + up button for the second, ç button + right button for the third and ç button + down button for the fourth character in your party. Once the S-Break has been selected, you will be prompted to choose a target for the corresponding S-Craft (be it a friend, enemy or area of eff ect), aft er which point all of the S-Break character’s CP will be drained, and the S-Craft will be executed.
Please refer to “Set S-Break” on page 11 for more information on using S-Breaks.
Monster InformationWhen selecting an enemy target for an attack, art or craft , you may elect to press and hold the √ button to view detailed information about that enemy, as well as place an HP bar beneath every battle participant (for easy reference at a glance).• HP: Monster’s current HP and max HP• Cond: Monster’s current status ailments (poisoned, petrifi ed, etc.)• Elemental Effi cacy (%): Eff ectiveness of elemental attacks or arts (Earth, Water, Fire, Wind), with a 100% value being roughly equivalent to a normal, non-elemental attack (maximum value is 200%). Th e farther right this gauge stretches, the more eff ective an attack of the corresponding elemental will be – the shorter it is, the less eff ective such an attack will be.
information about that enemy, as well as place an HP bar beneath
Manual Uk_DM.indd 20 15/9/11 14:52:23

21
Area of Eff ect & Eff ect TypeCertain eff ects are centered around a selected battle participant (or participants), while others are centered around a selected plot of land on the battle grid. In some cases, a circle is used to indicate the area of eff ect, with gradation animated to clearly identify the epicenter and range of the intended target area. Other eff ects project out from the caster in a large, thick straight line.If the attack, art or craft is an off ensive technique, its eff ect boundaries will be displayed in yellow. If it’s a recovery technique, its eff ect boundaries will be displayed in blue.
In general, these are the eff ect types present during battle:Self Only the caster him/herself is aff ected.Single Target Only one single friendly or enemy target of the player’s choosing
is aff ected.Area of Eff ect (Circle, Line) All enemies standing within a carefully determined circle or
thick line are aff ected. Th e method in which the scope of this circle or line is decided varies, but tends to fall into one of the following patterns:1. Determined by caster’s position Th e attack/art/craft will aff ect all viable targets inside a circle,
with the caster/attacker at its center.2. Determined by target’s position Th e attack/art/craft will aff ect all viable targets inside a circle,
with the target at its center. Alternatively, it may aff ect all viable targets along a line traced between the attacker/caster and the target.
3. Determined by selected fi eld location Th e attack/art/craft will aff ect all viable targets inside a circle
that’s centered on a fi eld location of your choice. Alternatively, it will aff ect all viable targets along a line traced between the attacker/caster and a fi eld location of your choice.
All Targets All friendly or enemy targets on the battlefi eld are aff ected.
Circle determined by fi eld location
Line determined by enemy target
Manual Uk_DM.indd 21 15/9/11 14:52:23

Combat22
Icon Name Eff ect Description Wears Off Curable
Poison Receive damage aft er each turn yes yes
Seal Cannot attack or use craft s/S-Craft s yes yes
Freeze Miss turn + damage aft er turn yes yes
Petrify Miss turn + if attacked, K.O. NO yes
Sleep Miss turn + if attacked, wake up yes yes
Faint Miss turn yes yes
Mute Cannot use arts yes yes
Confuse Uncontrollably attack enemies + allies yes yes
Blind DEX & AGL down yes yes
Rage Focus attacks on provoker yes yes
Immune All damage ineff ective, one time only NO NO
MOV Range of movement increases yes NO
AGL Agility up yes NO
STR/ Physical attacks up/down yes NO
DEF/ Physical defense up/down yes NO
SPD/ Speed up/down yes NO
K.O. HP is 0; character is knocked out NO yes
Status Eff ectsWhenever a helpful support art – or not-so-helpful status altering attack – is used on a party member, he/she may become aff ected by one of the status eff ects indicated below. If this occurs, the icon corresponding to the status eff ect will be displayed right above that character’s HP bar.
Manual Uk_DM.indd 22 15/9/11 14:52:24

23
Icon Name Eff ect Description Wears Off Curable
Poison Receive damage aft er each turn yes yes
Seal Cannot attack or use craft s/S-Craft s yes yes
Freeze Miss turn + damage aft er turn yes yes
Petrify Miss turn + if attacked, K.O. NO yes
Sleep Miss turn + if attacked, wake up yes yes
Faint Miss turn yes yes
Mute Cannot use arts yes yes
Confuse Uncontrollably attack enemies + allies yes yes
Blind DEX & AGL down yes yes
Rage Focus attacks on provoker yes yes
Immune All damage ineff ective, one time only NO NO
MOV Range of movement increases yes NO
AGL Agility up yes NO
STR/ Physical attacks up/down yes NO
DEF/ Physical defense up/down yes NO
SPD/ Speed up/down yes NO
K.O. HP is 0; character is knocked out NO yes
Combat OutcomesIf all enemies are defeated, a battle victory screen will be displayed. On this screen, set amounts of EXP (experience points) will be awarded to each surviving player character, and the party as a whole will receive a set amount of sepith (as well as an occasional item reward or two). If any characters received enough EXP from this battle to level-up, those characters will also have their EXP levels increased by 1.
PLEASE NOTE, however, that characters who did not survive the battle (K.O. status) will not gain any EXP at all from the proceedings.
Game OverIf the HP of ALL player characters drops to 0, or if the HP of ANY guest character drops to 0 (regardless of party member HP), the game will end, and a screen similar to the one pictured here will be displayed.
RetrySelect this option to retry the battle. If Retry Off set is enabled, the diffi culty level of the battle will be reduced each time this option is selected.
Title ScreenSelect this option to quit and return to the game’s title screen. Any unsaved progress will be lost, so please be certain of your decision!
diffi culty level of the battle will be reduced each time this option
Select this option to quit and return
please be certain of your decision!
Select this option to quit and return
Manual Uk_DM.indd 23 15/9/11 14:52:25
Shops & Facilities24
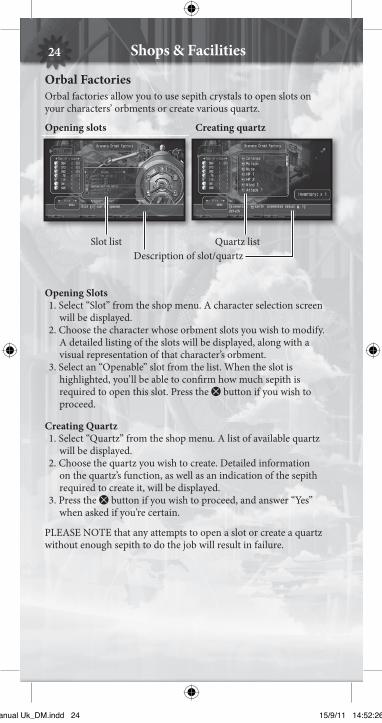
Orbal FactoriesOrbal factories allow you to use sepith crystals to open slots on your characters’ orbments or create various quartz.
Opening slots Creating quartz
Slot list Quartz listDescription of slot/quartz
Opening Slots1. Select “Slot” from the shop menu. A character selection screen
will be displayed.2. Choose the character whose orbment slots you wish to modify.
A detailed listing of the slots will be displayed, along with a visual representation of that character’s orbment.
3. Select an “Openable” slot from the list. When the slot is highlighted, you’ll be able to confi rm how much sepith is required to open this slot. Press the ≈ button if you wish to proceed.
Creating Quartz1. Select “Quartz” from the shop menu. A list of available quartz
will be displayed.2. Choose the quartz you wish to create. Detailed information
on the quartz’s function, as well as an indication of the sepith required to create it, will be displayed.
3. Press the ≈ button if you wish to proceed, and answer “Yes” when asked if you’re certain.
PLEASE NOTE that any attempts to open a slot or create a quartz without enough sepith to do the job will result in failure.
Manual Uk_DM.indd 24 15/9/11 14:52:26

25
Bracer GuildsTh ese buildings serve as the regional headquarters for all bracers. Inside, you may examine and accept bracer quests, as well as fi le reports for successfully-completed jobs. Whenever your characters fi nish a bracer quest, it is always recommended that you return to the nearest Bracer Guild at your earliest convenience in order to report on your success and check the board for any new requests that have been submitted in the interim.
Checking For Work1. Examining the bulletin board at the center of each guild will
allow you to confi rm all tasks that are presently available, as well as any that may already be in progress.
2. Selecting the name/title of a bracer quest will show you all its details. Once you’ve done this, that request is automatically added to your Bracer Notebook for future reference.
PLEASE NOTE that the time limit for a job can be approximated by its “term length,” which is indicated next to its name on this board. “S” = short, “M” = medium, and “L” = long. Jobs marked with an “S” on the bulletin board should be completed as soon as possible, as the window of opportunity to do so is very small!
Reporting a Job Well Done1. When speaking with the receptionist at any Bracer Guild, you
may select “Report” to inform him/her of all the tasks you’ve completed thus far.
2. As you complete bracer quests, you’ll receive BP (bracer points), which contribute toward raising your rank and bracer status. You’ll also receive monetary rewards for each successfully-completed task, and may be given a bonus item as well. Th e exact amount and quality of your reward will depend on the speed, effi ciency and thoroughness of your work.
Manual Uk_DM.indd 25 15/9/11 14:52:26

Quartz & Arts26
General Information• Setting quartz into an orbment allows you to use arts.• Th e arts you can use will diff er depending on the confi guration
of this quartz.• Each quartz carries with it a boost to the associated party
member’s attributes.• Quartz creation and slot opening services are off ered at orbal
factories, in exchange for set amounts of sepith.
Key TerminologyOrbmentA personal-use orbal device capable of a multitude of functions, all of which depend upon the exact confi guration of the quartz slotted within them. Orbments are unique to each individual, and may be fully customized based on the elemental attributes of each slot, as well as the way in which these slots connect to form complete circuits (known as “lines”).
SepithA septium fragment possessing properties of Earth, Water, Fire, Wind, Time, Space or Mirage. Th ese fragments comprise the building blocks of quartz, and are generally acquired by defeating monsters in battle.
QuartzA crystal made from septium fragments called “sepith.” When placed into orbment slots, quartz can boost various attributes of that orbment’s bearer. In addition, based on the confi guration of quartz within an orbment, the bearer is granted magical abilities known as “orbal arts.” Quartz may be craft ed only by the professional artisans employed at orbal factories, and oft en require large amounts of sepith to be formed properly.
by the professional artisans employed at
Manual Uk_DM.indd 26 15/9/11 14:52:27

27Quartz & Arts
SlotA hole in an orbment designed for quartz. Some slots have an elemental affi nity, and only quartz with the same affi nity may be set within them. Although every orbment has six slots available, only the center slot is open at fi rst – the rest must be opened at an orbal factory, which requires ample amounts of sepith. Th e more slots open in a character’s orbment, however, the more EP that character has available.
Orbal ArtMagical eff ects brought about by orbments. Th e arts available to any given character are determined by the quartz confi gurations within his/her orbment.
ElementalTh ere are seven diff erent varieties of sepith, quartz and art, each with its own unique characteristics:
Elemental Color Characteristics
Earth Brown Physical damage, defense, etc.
Water Blue Recovery, cold attacks, etc.
Fire Red Off ense, fl ame attacks, etc.
Wind Green Evasion, gale attacks, etc.
Time Black Action speed, art speed, etc.
Space Gold Movement, eff ect range, etc.
Mirage Silver Perception, awareness, etc.
EP (Energy Points)Energy stored in orbments, required to perform orbal arts. Th e amount of EP available to an orbment’s bearer is generally equivalent to the number of open slots in that orbment, but some people are also more naturally “attuned” to this energy than others. EP that’s been spent can be recovered with a good night’s sleep, or by using any of a number of restorative items.
Manual Uk_DM.indd 27 15/9/11 14:52:28

28
Let’s Make Some Art!Th e better you understand the confi guration of quartz within an orbment (and its relation to orbal arts), the more fun this game is likely to be for you. Th at said... let’s make some art, shall we?
Example: Granting Estelle the ability to use the “Fire Bolt EX” art.1. Let’s browse through the “Magic” section of “Memo1” in the
Bracer Notebook, and try to fi nd out which elementals are needed to cast Fire Bolt EX.
2. Now, let’s browse the “Quartz” section of “Memo1” to fi nd out what combination of quartz will meet these requirements.
Th e total elemental values match!
3. Perfect! So, let’s confi rm which slots are open on each of Estelle’s two lines, and see if we can pull this off .
4. Lookin’ good! Now, let’s get those quartz set! If the three quartz noted in step 2 are all placed on the same line, Estelle will be able to use Fire Bolt EX!
2. Now, let’s browse the “Quartz” section of “Memo1” to fi nd out what combination of quartz will meet these requirements.
Th e total elemental values match!
Th e total elemental values match!
3. Perfect! So, let’s confi rm which slots are open on each of Estelle’s two lines, and see if we can pull this off .
Beginning from the middle slot of a character’s orbment, you can follow a set path outward across open slots along the orbment’s edge, eventually ending aft er tracing through anywhere from one to six slots. Th is is known as a line, and lines may be visually confi rmed via the Orbment tab in the Camp Menu (see page 7). In the image on the right, you can see that there are two lines of open quartz slots available to Estelle: 123 and 14. Elemental totals available to the orbment’s bearer are calculated based on these lines.
Fire Bolt EX
Fire Bolt EX
Strike
Fire Wind Space
Sheild 1 Move 1
unopened slot
Manual Uk_DM.indd 28 15/9/11 14:52:28

29Quartz & Arts
Good Example Bad Example
Th e necessary quartz are all Th e necessary quartz are set on the same line. spread out between each of Estelle’s two lines.
• Th e arts each character can use are determined by the elemental totals of the quartz on each line.
• For the sake of using high-end arts, it is highly recommended that each character open all slots on his/her orbment as soon as possible.
• Lines diff er from orbment to orbment, and characters with high magic profi ciency tend to have longer lines available to them.
• Lists of orbal arts and quartz can be referenced on the “Memo1” tab of the Bracer Notebook in-game. Please see page 12 for more information.
Some examples of other characters’ lines:
KloeAll of Kloe’s slots are connected on a single line, allowing her to chain large numbers of quartz together and use much more advanced arts than many other characters.
ZaneZane’s slots are split up into four smaller lines, disallowing all but the simplest of quartz chains and thus restricting him from using any high-end arts.
PLEASE NOTE that if you do not have enough slots open for a desired quartz combination, you may visit an orbal factory to have new slots opened (assuming you have enough sepith for the task). For more information, please see “Orbal Factories” on page 24.
Th e necessary quartz are all Th e necessary quartz are set on the same line. spread out between each of Estelle’s two lines.
unopened slot
Manual Uk_DM.indd 29 15/9/11 14:52:29

Credits30
– Development Members – Nihon Falcom CorporationProgrammersHideyuki Yamashita Noriyuki ChiyodaTakayuki Kusano Toru EndoGraphic ArtistsKazuki Nagao Takeshi ArakiShinichi ItoSeiji Murakami Hidenori Tanaka Hiroyuki Yabuki Maiko Yoshida Nobuo Hayashi Syunsuke ItoYoshie Sato Scenario Writers / Event Script EditorsHisayoshi TakeiriYoshihiro KondaSyuuji NishitaniHomare KarusawaMusic Composers / Sound Team jdkHayato SonodaYukihiro JindoTheme song “Hoshi No Arika” Vocals: u-miChorus: Kazuko ItoLyrics: Hideaki HamadaArrangement: Kohei Wada Recording: Kazuhiro Miyasaka (PRESSTONE)Public Relations Hidefumi Inaya Atsushi HoshinoFumika Murakami IllustratorYou Shiina Special Thanks ASCII MEDIA WORKS Inc.Field Y Kure Software Koubou Corporation.CoordinatorMieko IshikawaDirectorToshihiro Kondo ProducerMasayuki Kato
Manual Uk_DM.indd 30 15/9/11 14:52:29

31
– North American Localization –English Text Translation byJohn SearsJeff NussbaumChris Cruz
XSEED GamesLocalization SpecialistThomas LipschultzSenior EditorJessica M. ChavezLocalization ManagerKenji HosoiProduct CoordinatorChristine NakashimaProduct ManagerJimmy SogaDirector of PublishingKen BerryAccount AnalystShiho YamaguchiFinanceKenzo NogimuraPresidentJun Iwasaki
Special ThanksJennifer ChavezKirsten MillerMichael CunninghamDaniel PrescottONE PR StudiosPole 2 Win AmericaStudio QED, Inc.Virtual InteractiveGame TestersJoseph JinJerry YoungJesse UnickChris Craig
Manual Uk_DM.indd 31 15/9/11 14:52:30

32 Follow Us
Ghostlight EU Localisation: QA testersRoss BrierleyBen Rogers Graphic DesignerPaul Morgan ProducerSteven Barber Senior ProducerAlasdair Evans Development ManagerDaren Morgan Head of DevelopmentStephen Morgan DirectorKhaled Lababedi www.ghostlight.uk.com
Manual Uk_DM.indd 32 15/9/11 14:52:31

33
Ghostlight has lots more exciting products available! Go to our web-site to see more info on your favourite Ghostlight games, visit exclu-sive mini sites for our products and stay updated on the latest JRPG goodness. We’re also on Facebook and Twitter, so now its even easier to stay updated.
Go to www.ghostlight.uk.com and follow us on:
Manual Uk_DM.indd 33 15/9/11 14:52:32