SYNCHRONOUS DIGITAL HIERARCHY … tuote jonka Nokia Networks julkistaa osaksi uutta Nokia Flexihub...
56
LAPPEENRANTA UNIVERSITY OF TECHNOLOGY Department of Electrical Engineering SYNCHRONOUS DIGITAL HIERARCHY IMPLEMENTATION TO A RADIO TRANSMISSION NODE MASTER’S THESIS The topic of the Thesis has been confirmed by the Department Council of the Department of Electrical Engineering on 5th December 2006 Supervisor: M.Sc. Jari Hasu Examiner: Professor Pertti Silventoinen M.Sc. Juha-Pekka Ström Espoo, 10 December 2006 Mikko Rautio Suvelantie 14 A 2 02760 Espoo +358 50 4861384
Transcript of SYNCHRONOUS DIGITAL HIERARCHY … tuote jonka Nokia Networks julkistaa osaksi uutta Nokia Flexihub...

LAPPEENRANTA UNIVERSITY OF TECHNOLOGY
Department of Electrical Engineering
SYNCHRONOUS DIGITAL HIERARCHY
IMPLEMENTATION TO A RADIO TRANSMISSION NODE
MASTER’S THESIS
The topic of the Thesis has been confirmed by the Department Council of the
Department of Electrical Engineering on 5th December 2006
Supervisor: M.Sc. Jari Hasu
Examiner: Professor Pertti Silventoinen
M.Sc. Juha-Pekka Ström
Espoo, 10 December 2006
Mikko Rautio
Suvelantie 14 A 2
02760 Espoo
+358 50 4861384

Forewords
People forget how fast you did a job -- but they remember how well you did it.
– Howard W. Newton
This Thesis is the end of a long journey but in the same time it is the beginning of another.
First of all, I would like to thank Nokia Networks R&D for giving me this opportunity to
finish my studies with this Master’s Thesis. I would like to thank Jari Hasu for supervising
my Thesis and Pertti Silventoinen for examining my Master of Science Thesis.
Moreover, I wish to thank everyone here at Nokia Networks who had the time to discuss
and advice me. Of course, all of this would not have been possible without that motivating
working atmosphere created by every colleague here in Nokia Networks R&D Kilo site.
Most of all I would like to thank my parents for their love and motivation during all these
years. Without your support this Thesis would never have seen the daylight. And thank you
Tiina for your patience.
Espoo, Finland 10th of December 2006
Mikko Rautio
ii

ABSTRACT
Lappeenranta University of Technology
Department of Electrical Engineering
Mikko Rautio
Synchronous Digital Hierarchy implementation to a Radio Transmission Node
Master’s Thesis
2006
52 pages, 30 figures and 10 tables
Examiners: Professor Pertti Silventoinen, M. Sc. Juha-Pekka Ström
Keywords: SDH, STM-1, OC-3, Overhead bytes
Markets are becoming more and more competitive and manufacturers must always bring
something new to the customers. SDH Plug-in unit is the product which Nokia Networks is
releasing as part of the Nokia Flexihub Node. Target is to generate a VC-12 channelized
STM-1 unit to enable efficient connectivity from upper hierarchy network elements to the
high capacity PDH radio transmission node.
Before we have a ready product in the market there is a huge amount of work behind it.
Different documents have been made and contracts agreeded. For example requirement
specification must be ready to know what is wanted. Before this we must understand how
SDH works and how overhead bytes are handled. Also the chipset selection causes
problems because there are lots of different chipsets available for SDH.
Reliable transmission is important for operators and it is the reason why we must think of
protection and how to implement it. Also synchronization is a mandatory part of SDH and
good implementation is important also. Alarms must be handled and considered how they
are managed without system overload. The content of this Thesis is the SDH-system,
overhead byte handling and the requirement specification.
iii

TIIVISTELMÄ
Lappeenrannan Teknillinen Yliopisto
Sähkötekniikan Osasto
Mikko Rautio
Synkronisen Digitaalisen Hierarkian toteuttaminen Radiosiirtolaitteessa.
Diplomityö
2006
52 sivua, 30 kuvaa ja 10 taulukkoa
Tarkastajat: Professori Pertti Silventoinen, DI Juha-Pekka Ström
Hakusanat: SDH, STM-1, OC-3, Otsikkotavut
Kiristyville markkinoille on aina tuotava jotain uutta tarjottavaa ja SDH-kortti on yksi
sellainen tuote jonka Nokia Networks julkistaa osaksi uutta Nokia Flexihub Nodea.
Tavoitteena on suunnitella VC-12 kanavoitu STM-1 kortti yhdistämään ylemmän tason
tietoliikenneverkko suuren kapasiteetin radioon.
Ennen kuin markkinoilla on valmis tuote, on sen takana valtaisa määrä työtä. Erilaisia
dokumentteja on pitänyt tuottaa ja sopimuksia tehdä. Esimerkiksi vaatimusmäärittelyt on
oltava selvät, jotta tiedetään mitä tuotteelta halutaan. Tätä ennen on kuitenkin pitänyt
ymmärtää miten SDH toimii ja miten otsikkotavuja käsitellään. Myös erilaiset piirivalinnat
aiheuttavat miettimistä, sillä markkinoilla on runsaasti valmiita piirejä SDH signaalin
käsittelyyn.
Varma tiedonsiirto on tärkeää puhelinoperaattorille ja siksi joudutaan miettimään
varmennuksia ja niiden toteuttamista. Myös synkronointi on tärkeä osa SDH järjestelmää
ja sen toteuttaminen hyvin on tärkeää. Hälytykset on otettava huomioon ja mietittävä,
miten niiden käsittely saadaan hoidettua järkevästi, ilman että mikään järjestelmän osa
ruuhkautuu kohtuuttomasti. Tässä Diplomityössä on tutustuttu SDH-järjestelmään,
otsikkotavujen käsittelyyn ja vaatimusmäärittelyihin.
iv

TABLE OF CONTENTS
1. Introduction.................................................................................................................... 4
2. Flexihub environment .................................................................................................... 5
3. What is Synchronous Digital Hierarchy ........................................................................ 7
3.1 Benefits of SDH ...................................................................................................... 8
3.2 Synchronous Transport Modules of SDH............................................................... 9
3.3 Product Guidelines ................................................................................................ 13
4. Requirement Specification for SDH/STM-1 PIU........................................................ 14
4.1 Standards for SDH ................................................................................................ 14
4.2 SONET and SDH .................................................................................................. 17
4.3 Requirement Specification; planning and implementation ................................... 17
4.4 Protection .............................................................................................................. 22
4.4.1 Radiopath protection...................................................................................... 23
4.5 FPGA and its function........................................................................................... 24
4.6 Synchronization Requirements ............................................................................. 26
5. Handling the Overhead bytes....................................................................................... 28
5.1 STM-1 Frame ........................................................................................................ 28
5.1.1 VC-4 Path Overhead...................................................................................... 29
5.1.2 The AU-4 Pointer........................................................................................... 33
5.1.3 Regeneration Section Overhead (RSOH) ...................................................... 34
5.1.4 Multiplexer Section Overhead (MSOH)........................................................ 35
5.1.5 TUG-3............................................................................................................ 36
5.1.6 TUG-2............................................................................................................ 37
5.1.7 TU-12............................................................................................................. 37
5.1.8 VC-12 frame .................................................................................................. 39
5.2 Alarms ................................................................................................................... 41
5.3 User configurations ............................................................................................... 44
5.4 Control Interface ................................................................................................... 45
6. Chipset selection and criterias ..................................................................................... 46
7. Implementation of STM-1 PIU.................................................................................... 48
8. Conclusion ................................................................................................................... 51
REFERENCES: ................................................................................................................... 52
1

Definitions, Terminology and Abbreviations Hz Hertz [1/s]
2G/3G 2nd generation/3rd generation
AIS Alarm Indication Signal
ANSI American National Standards Institute
AU Administrave Unit
APS Automatic Protection Switching
AUG Administrave Unit Group
BBE Background Block Error
BIP Bit Interleaved Parity
CRC Cyclic Redundancy Check
CV Code Violation
DCC Data Communication Channel
EBER Excessive Bit Error Rate
EMC Electromagnetic Compatibility
ES Errored Seconds
FPGA Field Programmable Gate Array
HDLC High Level Data Link Control
HSB Hot Stand By
HW Hardware
IC Integrated Circuit
ICE Incoming Error Count
ITU International Telecommunication Union
LOP Loss of Pointer
LOS Loss of Signal
MSOH Multiplexer Section Overhead
MSP Multiplex Section Protection
NDF New Data Flag
OC Optical Carrier
OEI Outgoing Error Indication
ODI Outgoing Defect Indication
OOF Out of Frame
OSI Open System Interconnection
2

PDH Plesiochronous Digital Hierarchy
PIU Plug-In Unit
PLM Pay Load Mismatch
POH Path Overhead
PRC Primary Reference Clock
R&D Research & Development
RBER Residual Bit Error Rate
RDI Remote Defect Indication
REI Remote Error Indication
RSOH Regenrator Section Overhead
RTL Register Transfer Level
SDH Synchronous Digital Hierarchy
SFP Small Form Factor Pluggable
SEC Synchronous Equipment Clock
SES Severely Errored Seconds
SIF Serial Interface
SONET Synchronous Optical Network
STM-1 Synchronous Transport Module -1
STS Synchronous Transport Signal
SW Software
TCOH Tandem Connection Overhead
TCM Tandem Connection Moditoring
TIM Trail Identifier Mismatch
TOAC Transport Overhead Access
TU Tributary Unit
TX/RX Transmit/Receive
UAS Unavailable Seconds
VC Virtual Container
3

1. INTRODUCTION
Competition is getting even harder between telecommunication vendors and required
capacity is increasing all the time. It is important to develop networks to transfer more and
more bytes from one place to another. 2G/3G traffic and services have increased the
capacity needed in telecommunication networks and it is mandatory for networks to handle
large amounts of data in a fast and reliable way. Of course one possibility would be
Ethernet traffic, but in cellular transmission networks there are strict requirements for
delay, data loss and synchronization and this is why the Ethernet is not yet supported.
One answer to increasing network data traffic is Synchronous Digital Hierarchy, SDH. For
example 63 2Mbit/s E1 signals need a remarkable amount of wires, while SDH needs only
two fibers. Nokia Networks has a product called Nokia Flexihub Node and it was decided
to have a new plug-in unit there: VC-12 channelized SDH/STM-1 PIU. Also the ANSI
markets have to be considered, which means support for VC-11 channelized STS-3.
SDH is a synchronous transmission system where all the bit rates of the basic signals are
derived from the same clock source. SDH has many different hierarchy levels and the
STM-1 is the basic module with a bit rate of 155.52 Mbit/s.
Internally the FlexiHub and the connected FlexiHopper XC radio work without SDH
functionality. The SDH signal is terminated to E1/T1 signals in this unit, so the unit
functionality is terminal multiplexer.
Before we have a ready STM-1 card ready for market, there is a huge amount of work and
meetings behind it. One has to make a requirement specification, so one knows what one
really wants. Many chip manufacturers have SDH-mapper chips in their product catalog,
so one has to make a decision which manufacturer’s chip to use. Also one must decide how
to handle overhead bytes and how to implement all this in network manager software.
Synchronization has to be considered and FPGA which controls the traffic has to be
specified. After all these decisions we have a huge amount of data and the last thing to do
is decide which features are implemented and which are not. Because of time-to-market
pressures the implementation has to be phased and the first phase must contain only the
necessary functionality and nothing more to reduce the development time to a minimum.
4

2. FLEXIHUB ENVIRONMENT
Nokia FlexiHub Node is based on the use of plug-in units (PIUs). All functions are
implemented with PIUs; and the only fixed part is Nokia FlexiHub Case 2U, which has six
slots for PIUs and one fan unit slot. The FlexiHub Fan Unit must be equipped.
Nokia Flexihub environment is very good platform for the new plug-in units. It is designed
as hub concept, so future aspects are in Flexihub design. FlexiHopper XC radio is capable
of transmitting 40*E1 signals over a radio hop, in the future higher capacities. The
FlexiHub can be either single hop, which means that hop is not protected. Single hop
includes one Main unit, LIC card and 40E1 IF card in indoor unit and one radio. Protected
hop is the MSP 1+1 protected and it includes 2 Main units, 2 LICs and one 40E1 IF card
and 2 radios. This means that hop is HSB whole time and if one unit gets broken the other
unit starts to transmit.
There are various plug-in units under development to the Flexihub XC and the STM-1 card
is just one of them.
In figure 1 is shown the FlexiHub Node in single configuration and in figure 2 is shown 38
GHz radio for the FlexiHub.
Figure 1 Flexihub Node (Indoor unit). Photo: Nokia Networks Oyj
5

Figure 2 Nokia FlexiHopper XC radio Photo: Nokia Networks Oyj
When the FlexiHub node is used as a protection mode it looks as presented in figure 3.
Figure 3 Nokia FlexiHub Node in protection mode. Image: Nokia Networks Oyj, Product Description [5]
6

In basic configuration the FlexiHopper XC supports one radio direction. It means that there
is one extended flexbus cable connector and it is possible to connect one radio there. In the
frontpanel there are also the DCN, LMP and Q1 connectors for management purposes. In
40E1 Interface card there are connectors for E1 cables and we have released a bundle
cable, which can be used to connect the indoor unit to the separate connector panel.
Connector panel then supports both 120Ω and 75Ω connector types and can be used to
connect incoming and outgoing E1’s to the node.
3. WHAT IS SYNCHRONOUS DIGITAL HIERARCHY
More and more demands focus to telecommunication networks nowadays and traditional
2Mbit/s E1-signal is getting inadequate. Also the fact that every 2Mbit/s E1 signal requires
two or even four wires, if we are using differential signals, which means that after a radio
hop there are lots of wires coming out from the FlexiHub Node. For example 63 E1 signals
need 252 wires when signals are differential and that is a quite thick cable to handle.
SDH (Synchronous Digital Hierarchy) is a standard for synchronized data transmission. In
the SDH all equipment in the network are synchronized to the same clock. SDH is mainly
meant for use on optical fibers, but the signal can also be transferred via electric interface.
In USA there is in use basically same system as SDH, but is has some differences. This
system is called SONET (Synchronous Optical Network) and its standards and features are
presented later. SONET was published by ANSI. Both SDH and SONET have good
network management possibilities and expandability of network is quite easy. Compared to
old standard, PDH (Plesiochronous Digital Hierarchy), both SDH and SONET are cheaper
per transmitted bit and have higher data rates. [3]
Synchronous data transmission systems have been developed to solve some defects that
plesiochronous systems had. Synchronous data transmission systems are very suitable for
optical transmission and give possibility to add or drop lower level channels straight from
the upper level. This is because signal multiplexing is done by byte by byte – not bit by bit
and no bit stuffing is used. This requires all signals to have the same frequency. In the
7

network there is one extremely accurate clock source which gives reference to all clocks in
the network and all clocks are synchronized to that master clock.
In figure 4 is shown a synchronous transmission system. The whole transmission networks
runs with one master clock and all clocks in network are synchronized to this primary
reference clock.
Figure 4 Synchronous transmission system and example how primary reference clock is distributed in transmission system 3.1 Benefits of SDH
SDH offers lots of advantages. Some of them are listed below.
• Equipment from different manufacturers’ can be connected together in the same network
• Remote test access and maintenance from a central location
• High transfer rates (Modern SDH-systems it is possible to reach even 10Gbit/sec transfer rate. That is why SDH is very suitable to use in trunk networks)
• Cross connect functionality can be distributed around the network
• Good availability and network management
8

• Reliability of ring networks using path protection
• SDH allows existing PDH hierarchies to be transported in the SDH frames [1][5] 3.2 Synchronous Transport Modules of SDH
In SDH network there is a hierarchy for different data transfer rates. There are four
standardized transport modules and they are called STM-N, where N=1, 4, 16, or 64. The
bigger the N, the bigger the transfer rate. Data speed at Mbit/sec can be calculated by
multiplying the N with 155.52 as seen in table 1 below. [2][10]
Table 1. SDH hierarchy levels and speeds
Hierarchy level Speed Mbit/sec
STM-1 155, 520
STM-4 622, 080
STM-16 2488, 320
STM-64 9953, 280
Higher transmission rates are supposed to be used in trunk networks and smaller rates in
regional or local networks. Figure 5 shows an example how to combine SDH and PDH.
9

Figure 5 SDH network which is connected to a PDH network. The picture also shows how different SDH speeds are used in the network Optical fibers are mostly used in the SDH networks. They are not so vulnerable to
interference and fibers can reach high transfer rates. On the other side, the installation of
fibers is quite expensive. Other way to transfer SDH is radiolinks. Radiolinks are a good
choice when the network is needed quickly or it has to be built to an environment where
installing cables is not possible. To mention some disadvantages, the radiolinks have
restricted bandwidth and the weather can affect their quality. [1][6]
In the SDH networks there are lots of different network elements. Important network
elements are for example terminal multiplexers. Terminal Multiplexers can accept a wide
range of tributaries and offer a number of possible input and output data rates. In figure 6 is
presented an SDH terminal multiplexer. [1]
In a SDH multiplexer the tributaries are mapped into the transmission payloads known as
Virtual Containers, which are transported trough the SDH network. The most common
tributary to SDH is 2Mbit/s and it is called VC-12. Maximum of 63*2Mbit/s signals can be
multiplexed into 63*VC-12 and these are then multiplexed into a VC-4. [1][2]
10

Figure 6 SDH Terminal multiplexer. Terminal multiplexer can handle different incoming data speeds and multiplex them into a SDH signal
Other network equipment is a regenerator. The regenerator is basically just a repeater.
Digital cross connector is network equipment which allows setting up semi-permanent
connections between different containers inside the STM-1 signal. In figure 7 is presented
a digital cross connect. [1][2]
One of the major advantages of the SDH is its ability to add or drop tributaries directly
from the higher order bit streams, because all virtual containers are in their fixed places. In
figure 8 is presented the SDH Add/Drop multiplexer
Figure 7 SDH Digital Cross Connect. It is capable of mapping tributaries from one STM-1 to another. It can also for example map all tributaries from one source to two different fibers.
11

Figure 8 Add/Drop Multiplexer is capable of adding and/or dropping VC’s in/out an SDH frame. It is a very usable piece of equipment that can be used to drop a few E1's from a chain or ring to a tail site. Figure 9 shows a simplified SDH/STM-1 ring network. Because it is a ring, the node is not
totally silenced if fiber is cut in somewhere between the nodes. Node gets data from other
direction, and survives the cable cut. [1]
Figure 9 Simplified SDH/STM-1 ring network
12

SDH network equipment allows different network topologies. Four main Network
topologies are Point-to-point, Chain, Ring and Mesh.
A Point-to-Point network structure has a terminal multiplexer at each end of the
transmission link. The reliability of a point-to-point network can be increased by applying
a section of 1+1 protection. In a chain network Add/Drop multiplexers provide the ability
to insert and remove traffic from the main transmission path. This type of network can be
grown by branching other networks from it. In a ring network there are basically just
Add/Drop multiplexers and the traffic is routed trough all of them. This is possible because
a modern fibre has a great transmission bandwidth. A mesh network is basically big cross
connection where the links are routed to the right node and it looks a little like net, because
there is a connection from every node to each other. [1][5]
3.3 Product Guidelines
From customer side it has been obvious that the STM-1 card is needed to the Flexihub
family. Increasing capacities and competition between the product manufacturers has
opened a gap for our product.
Main customers for the STM-1 Plug-in Unit are operators which want to connect their
radio network to the part of their SDH/STM-1 network. STM-1 offers various benefits
compared to traditional E1 –connection. For example the wiring is much easier, because
we don’t need to use huge amounts of E1 wires. And of course the transport capacity is
much higher than normal E1’s.
Markets are worldwide, because many operators around the world have Nokia FlexiHopper
family products in their equipment racks and the STM-1 PIU is natural add-on to their
transmission systems. Flexihoppers can be used as connecting base stations to each other
and the base station controller. With protection feature, it is good choice to sites that are
hard to reach.
13

4. REQUIREMENT SPECIFICATION FOR SDH/STM-1 PIU
The planning of new product starts with many meetings and writing a requirement
specification. The requirement specification includes basically all requirements what are
wanted. It is also basically the guide for designers that they know what is wanted. When
the requirement specification is ready it is possible to start working with a system
architecture guide and a functional specification. Other document what is needed is the
product description.
4.1 Standards for SDH
The ITU-T has standardized SDH in the following recommendations:
• SDH Frame Structures and Multiplexing – G.707
o Network node interface for the synchronous digital hierarchy (SDH)
• SDH Optical Interfaces – G.957
o Optical interfaces for equipments and systems relating to the synchronous
digital hierarchy
• SDH Electrical Interfaces – G.703
o Physical/electrical characteristics of hierarchical digital interfaces
• SDH Jitter Tolerance – G.957
o Optical interfaces for equipments and systems relating to the synchronous
digital hierarchy
• SDH Pointer Sequences – G.783
o Characteristics of synchronous digital hierarchy (SDH) equipment
functional blocks
• SDH Error Analysis – G.826, G.821
o Error performance of an international digital connection operating at a bit
rate below the primary rate and forming part of an Integrated Services
Digital Network [1][2][7]
These are practical guidelines in the R&D because all products must be type approved by a
third party and they test all equipment against the standards. This is because it is important
that the different manufacturers’ products work with each other and don’t cause any
14
problems in a network. Almost every operator has different manufaturers’ equipment in
their sites and the new equipment must also work with older ones.
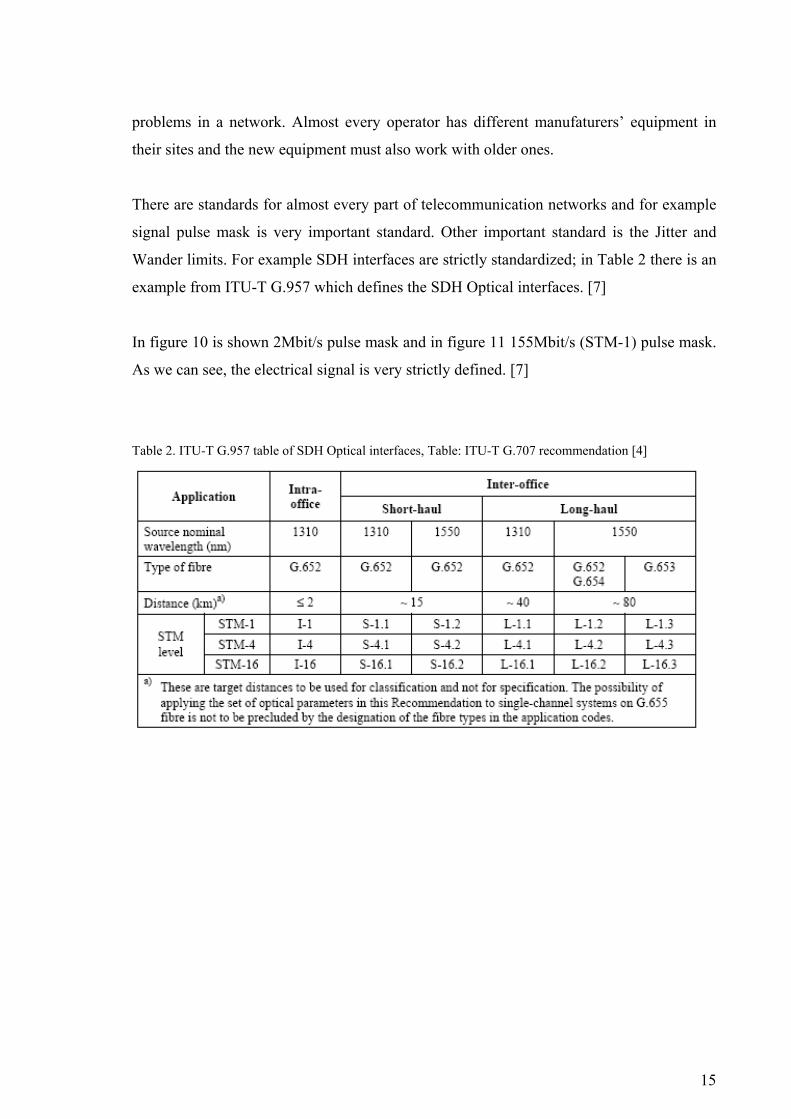
There are standards for almost every part of telecommunication networks and for example
signal pulse mask is very important standard. Other important standard is the Jitter and
Wander limits. For example SDH interfaces are strictly standardized; in Table 2 there is an
example from ITU-T G.957 which defines the SDH Optical interfaces. [7]
In figure 10 is shown 2Mbit/s pulse mask and in figure 11 155Mbit/s (STM-1) pulse mask.
As we can see, the electrical signal is very strictly defined. [7]
Table 2. ITU-T G.957 table of SDH Optical interfaces, Table: ITU-T G.707 recommendation [4]
15

Figure 10 2M signal pulse mask. Picture: ITU-T G.707 recommendation [4]
Figure 11 155M signal pulse mask. Picture: ITU-T G.707 recommendation. [4]
16

4.2 SONET and SDH
There are standards for both SONET and SDH systems. Product under development should
be able to handle both systems so we need to investigate the standards for both systems.
First release is going to be just a STM-1 card and later releases support OC-3. In this study
I focus mainly to the SHD Standards. Here is a small comparison of SDH and SONET.
The basic level of SONET is called Synchronous Transport Signal level 1 (STS-1). This
frame is comprised of 9 rows by 90 columns giving a total of 6480 bits per frame. The bit
rate of STS-1 signal is 51,84 Mbit/s and it can transport 45Mbit/s DS3. If the SONET
signals are optical they are also known as Optical Carriers (OC). Therefore an STS-3 is
also known as an OC-3 and STS-12 is an OC-12. It must be noted that although an SDH
STM-1 has the same bit rate as the SONET STS-3, the two signals contain different frame
structures. In table 3 is presented SDH and SONET bit rates. [1][10]
Table 3. SDH and SONET bit rate comparison
SDH Bit Rate SONET Bit Rate
STM-0 STS-1 51.84 Mbit/s
STM-1 155.52Mbit/s STS-3 155.52 Mbit/s
STS-9 466.56 Mbit/s
STM-4 622.08 Mbit/s STS-12 622.08 Mbit/s
STS-24 1244.16 Mbit/s
STS36 1866.24 Mbit/s
STM-16 2488.32 Mbit/s STS48 2488.32 Mbit/s
4.3 Requirement Specification; planning and implementation
The main purpose of the product is to have STM-1 VC-12 and OC-3 VC-11 channellized
interface for the FlexiHub Node product. The card is used for making cabling simpler in a
site where there are many E1 connections and making connection to the SDH/SONET
network.
17

In figure 12 is shown SDH multiplexing structure. Our equipment is a VC-12 channelized
so its path is VC-12 → TU-12 → (x3) TUG-2 → (x7) TUG-3 → (x3) VC-4 → AU-4 →
AUG-1 → STM-1. Path speeds are: [4]
• VC-12 is a Virtual Container for the 1st level of the PDH at 2 MBit/s
• TU-12 is a Tributary Unit for the 1st level of the PDH at 2Mbit/s
• TUG-2 is a Tributary Unit Group for the 2nd level of the PDH at 6Mbit/s
• TUG-3 is a Tributary Unit Group for the 3rd level of the PHD at 34Mbit/s
• VC-4 is a Virtual Container for the 4th level of the PDH at 140Mbit/s
• AU-4 is an Administrave Unit for the 4th level of the PHD at 140Mbit/s
• AUG-1 is an Administrave Unit group and can contain three AU-3’s ore one AU-4
• STM-1 is the Synchronous Transport Module number 1 and the primary rate for the
SDH at 155.520Mbit/s [1][4]
Figure 12 SDH multiplexing structure. Picture: ITU-T G.707 recommendation [4]
18

In case we use this card in a SONET network the VC-11 multiplexing structure is as
follows: VC-11 → TU-11 → (x4) TUG-2 → (x7) VC-3 → AU-3 → (x3) AUG-1 → STS-3
Functionality of the product is terminal multiplexer. Idea here is to terminate the STM-1
and the OC-3 interfaces to this card. Maximum capacity of the card is 63E1’s and 84T1’s.
[4]
There are several categories in the requirement specification. Categories are generic,
interfaces, frame formats and multiplexing structure, startup and SW upgrades
management, configuration, alarms, performance monitoring, protection, production
testing, synchronization, testing and development needs, environment and operations. So
the list is quite massive and there are lots of items that have to be defined. Here is short
presentation of the categories.
Generic specifications are mostly general requirements. For example here are the
requirements for re-use of existing SW and HW. Other requirement which belong to this
category is a PIU Type.
Interfaces are bigger group which define the interfaces of the the PIU. The question is that
do we want to have optical, electrical or both interfaces and how it will be implemented.
For example we want one optical interface and we want that it will be implemented with a
SFP-module. This is because we want optical interface to support long haul, short haul and
multimode. Unit should also detect its SFP module (Small Form Factor Pluggable module
is an optical connector which supports connector change with swapping the module) and
find out whether it is electrical or optical. Also this SFP module should be hotswappable.
Frame formats and multiplexing structure is an important chapter but mostly it is quite the
same as the standards. Frame formats are standardized quite heavily, so main function in
this chapter is to note them down. So multiplexing structure for the STM-1 and the SONET
are mentioned and signal mapping is defined.
Startup and SW upgrades section includes mainly specifications how the unit behaves in
startup and after the SW upgrade. Main idea is that the unit starts in basic settings and after
startup reads the configuration instructions. And after the SW upload unit should work as
earlier, but with newer SW.
19

The management section is specifying the management of this STM-1 PIU. Main things
are that the management shall be done with Flexihopper Element Manager and via Main
unit. In addition to the Network Mahagement interfaces (Ethernet and Q1) of the Main
Unit, management information shall also be transmitted in the DCC bytes in the MSOH or
RSOH of the SDH/SONET, but not in both at the same time. The management protocol
used in these DCC channels shall be IP-DCN
Configuration section there is defined the default configuration. The default configuration
shall be as follows: SDH mode, VC-12 signal structure, no payload going in either
direction, all identifications in their default values, signal label: unequipped (also in each
VC-12) and mimimum number of alarms existing. Unit must also be installed before it is
visible in the management software.
Alarms section is an important section because the alarms will tell to the other units in a
SDH network is some unit working propely or not. Even alarms are defined very well in
the standards it is important to repeat them in the requirement specification because we
don’t use all the alarms found in the standards. The alarms are covered later in this
document.
In the performance monitoring section there are requirements which define how
performance is monitored. For example our unit shall provide the following performance
monitoring in the High Order Path: UAS-B3 Unavailable Seconds, ES-B3 Errored
Seconds, SES-B3 Severely Errored Seconds and CV (Code Violation).
Protection section will explain requirements for the unit protection. This unit is required to
support the MSP 1+1 protection switching and only one protected pair shall be installed.
So this means that the HW is doubled and the protection is done with another identical
unit. Of course it is possible to use additional STM-1 PIUs as independent units. The
protection criterias are mainly part of the SW requirements, but main idea is that if the
signal is lost or there are lots of errors the switching between units is done. It is also
possible to force protection switch with the SW regardless of the HW status.
20

Production testing is a small requirement group because it shall be quite same to all
products in the family. This chapter only specifies that the SW used in the production
testing shall be the same as customer deliveries. It also specifies some SW commands
which are needed in the production testing.
Synchronization is big group because it is very important in the SDH that all the equipment
in network is synchronized. Main idea is that the outgoing traffic has to be synchronized to
incoming clock and if this is not possible then it has to be synchronized to the internal
clock. A synchronization need also a priorisation list, that node knows which unit’s
received signal clock is used as master clock. The synchronization is inspected later in this
document.
Testing and development needs cover the requirements which are related to the R&D
testing interfaces. In this time it means that the unit must have serial and Ethernet interface
available for testing purposes.
Environment requirements cover lots of different issues. For example this chapter covers
the physical environment requirements which consist of storage, transport, operation and
safety requirements. Also the electromagnetic compatibility and reliability belongs here.
Environment requirements there are specifications for package requirements, resistance to
corrosion and operating temperatures Safety requirements include requirements for
mechanical safety. Environmental requirements include general environmental
requirements for the Nokia Network products and assembly and disassembly instructions.
EMC requirements cover standardized EMC requirements. Reliability requirements cover
general reliability issues.
In the operations section there is various requirements which cover for example general
issues, materials and purchasing, product structure and product control, assembly and final
assembly and production testing and testability. These requirements are common to the
whole product family.
21

4.4 Protection
Because this unit is planned to be as part of the radio network it is important that it is
possible to protect this unit in case of unit malfunction. The radiolinks are often placed in
sites that aren’t always easy to reach, so it is important that in case unit goes broken, it is
still able to continue transmitting. Of course the protection is important, because this unit is
designed to be part of SDH network and needs to work properly there also. The SDH
multiplexing structure allows efficient and independent protection of STM-N multiplex
sections as well as the VC-4, VC-3 and VC-12 path protection.
There are two main types of protection in the SDH networks; Multiplexer Section
Protection and path protection. Path protection can be provided by passing a Virtual
Container over two separate routes simultaneously and the receiving end decides
independently which VC to accept when certain alarm conditions occur. The multiplexer
section protection has two standard section protection methods; 1+1 protection and 1: N
protection. [1][2]
In the 1+1 protection the same signal is transmitted simultaneously on two separate
multiplex sections which are known as active and protection sections. The receiving end
monitors the condition of the STM-N signals received from both sections and selects the
appropriate signal. In normal conditions the receiving end uses the signal from the active
unit and switches to the protecting unit when the active signal is either lost or it have lots
of errors. In figure 13 is shown 1+1 protection and in figure 14 is shown protection after
the active line is cut. [1][2][3]
Figure 13 1+1 Protection
22
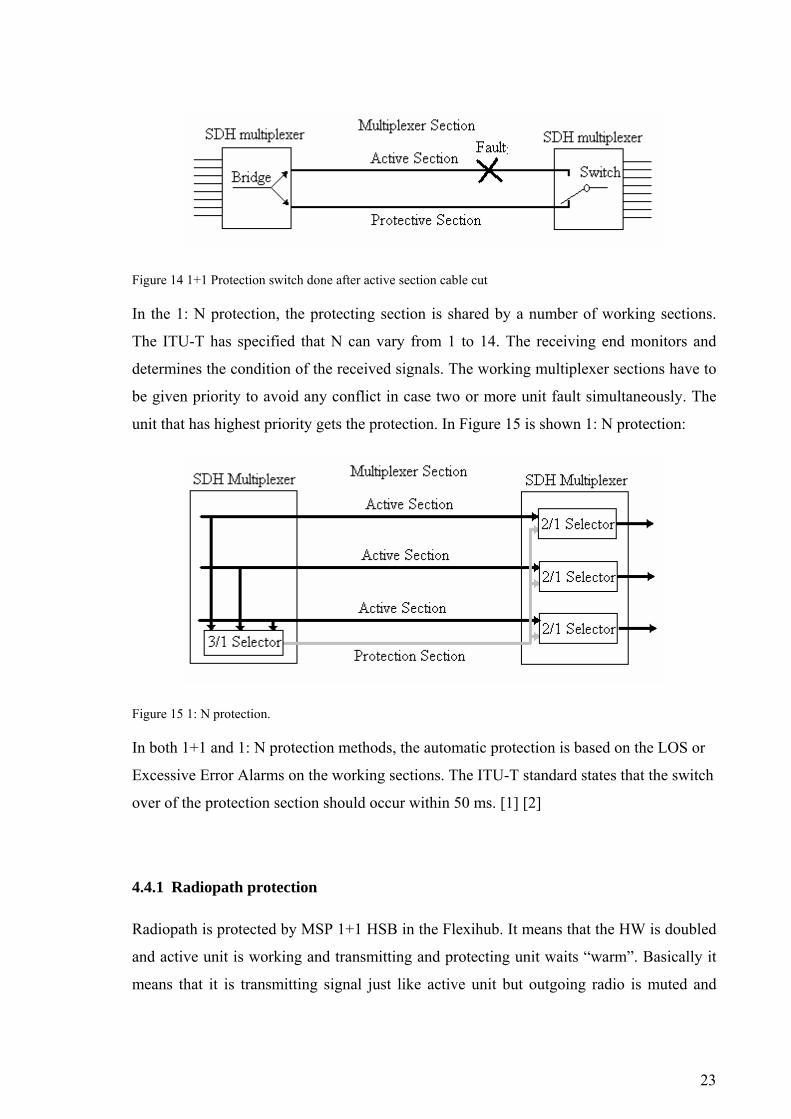
Figure 14 1+1 Protection switch done after active section cable cut In the 1: N protection, the protecting section is shared by a number of working sections.
The ITU-T has specified that N can vary from 1 to 14. The receiving end monitors and
determines the condition of the received signals. The working multiplexer sections have to
be given priority to avoid any conflict in case two or more unit fault simultaneously. The
unit that has highest priority gets the protection. In Figure 15 is shown 1: N protection:
Figure 15 1: N protection. In both 1+1 and 1: N protection methods, the automatic protection is based on the LOS or
Excessive Error Alarms on the working sections. The ITU-T standard states that the switch
over of the protection section should occur within 50 ms. [1] [2]
4.4.1 Radiopath protection
Radiopath is protected by MSP 1+1 HSB in the Flexihub. It means that the HW is doubled
and active unit is working and transmitting and protecting unit waits “warm”. Basically it
means that it is transmitting signal just like active unit but outgoing radio is muted and
23

incoming signal is cut away so that it does not cause interference to active unit signal. In
figure 16 is shown basic 1+1 HSB protected radio hop.
Figure 16 MSP 1+1 HSB protected radio Hop The protection switch is finally done by software and the criterias are also defined detailer
in the SW specification, but basically it is so that if signal is lost or RBER ratio goes low,
then the protection switch is done. Of course if the HW failure is detected it always leads
to switch. When the switch is done alarm is raised at management software.
4.5 FPGA and its function
FPGA has a very important role in this product. The major function of the FPGA is to
connect the SDH/SONET mapper chip E1/T1 lines to the Backplane SIF signals. SIF
(Serial Interface) is a Nokia proprietary serial (Clock and Data) point-to-point high speed
connection in the Node backplane. These SIFs are connected to every card slot positions so
therefore the STM-1 PIU is able to transfer data to any unit and it is able to receive data
from any slot.
When we start to design a new FPGA for new product the steps are as follows: First there
is a pre-study where the essential requirements of the circuit and project (Functions
proposed for the FPGA implementation, technology requirements) are gathered and
documented during the pre-study phase in order to create a starting point for later phases.
[8]
24

The next phase is a requirement baseline where all requirements are carefully gathered.
Close co-operation with system- and SW-designers is required in order to specify the
FPGA design’s requirements and features. In the requirement baseline phase there is made
the project planning, software issues and resources are checked and the FPGA device is
selected in this phase. Also a tool selection and configuration strategy must be defined. [8]
The next phase is a specification baseline. Top-level and basic structure is already
described in the requirement baseline and this specification phase describes FPGA design’s
all features and functions in detail. The implementation can be started during the
specification or after it is completed. [8]
Then there is a 1st RTL release. The content of the 1st RTL release is depending on the HW
schedule and availability. The main idea could be that the 1st RTL release only covers the
skeleton architecture of the design. This release contains RTL VHDL release, test bench
design, trial synthesis and documentation. [8]
The 2nd RTL release increases the features and functions of the 1st RTL release. Also the
testing of the 1st RTL release should start in lab with real HW at this phase. Otherwise the
same steps than in the 1st RTL release should be done. More effort is set to physical
implementation and for example the pin locations and timing requirements are defined. [8]
Then the 1st full version release for lab tests is released and this phase finally integrates all
the parts of the specified FPGA design. This 1st full release should be used in both FPGA
specific and system level tests. Especially the module/unit level verification starts to take
more responsibility in FPGA’s testing in real application. [8]
Purpose of Final release phase is to enable final verification of the FPGA design and
ensure that the circuit completely fulfills its requirements. The VHDL codes must be
frozen and only testing will continue after this phase. The changes to RTL level can be still
made, if new problems are found during the verification. Naturally changes on RTL level
means that whole physical implementation must be done from the beginning and re-
running the verification for the modified parts. [8]
The previous was a very roughly shortened version of the FPGA implementation. But it
gives reference how big issue is the FPGA in this process.
25

The FPGA implements the following major functionalities: Interface to the STM-1/OC-3
mapper device (Agere Ultramapper-Full Transport), assignment of 84 E1/T1 channels into
the FH XC IU-OU frame, extraction of 84 E1/T1 channels from FH XC IU-OU frame,
connection to five serial interface (SIF) connections to the backplane, processor interface
for the FPGA register configuration, selection of backplane reference clocks and interface
to the STM-1 clock synchronizer and control logic for the same. Major FPGA interfaces
are shown in figure 17. The FPGA also handles the cross connecting the E1/T1s and signal
framing operations.
Figure 17 Major FPGA Interfaces. There are 6 SIFs to connect FPGA to cards in other slot positions and processor interface for communication purposes. 84*E1/T1 RX/TX Data/Clock pairs are connected to SDH mapper chip. Clock Synchronization interface is for synchronization. 4.6 Synchronization Requirements
Synchronization is very important in the SDH because all equipment in the network has to
be synchronized. The synchronization is standardized quite well and the various clocks that
are being used in the SONET/SDH and synchronization reference clocks are with accuracy
26

pertaining to SEC (Synchronous Equipment clock) as defined in the ITU-T G.813 (option
1 and 2) standards.
In this product the synchronization architecture is based on few basic requirements and
synchronization buses. In the backplane there are four synchronization buses that are used
to synchronize units. These buses are named as SDH and PHD. In figure 18 is shown the
synchronization bus structure.
Figure 18 Synchronization bus structure in backplane. Synchronization bus has 8 kHz frequency.
Frequency of these synchronization buses is 8 KHz. The node clock accuracy shall be ±20
ppm in the SONET mode (as specified in option 2 of G.813) and ±4.6 ppm in the SDH
mode (as specified in option 1 of G.813), except in free-run when an accuracy of ±20 ppm
is accepted. Also one very important requirement for the clock is that the node clock shall
not require calibration in the field.
One general requirement is that all outgoing SDH traffic has to be synchronized to some
incoming clock. This is mandatory, because if SDH system loses its synchronization it will
27

collapse. Another requirement is that it has to be possible to synchronize outgoing SDH
traffic to either an SDH or PDH incoming clock. This is required, because we might have a
situation that the SDH clock signal is not available. Moreover the SDH cards shall be able
to drive both the SDH and PDH synchronization lines. And the SDH cards shall only listen
to the SDH synchronization lines. If there are several SDH or PDH cards in rack, the units
have a synchronization priority. This means that there is a list, which defines which card is
the master and other cards use this masters incoming clock signal to synchronize their
outgoing traffic. There are also much more requirements, but these are the main principles
for this product.
5. HANDLING THE OVERHEAD BYTES
The Overhead bytes have a very important role in SDH system. They carry all the status
information of signal and network. So that’s why it is very important to take care that
everything is correct in overhead. For example if signal label byte is somehow wrong, the
receiving end cannot unframe the signal and it seems to be just nonsense. In next section it
is explained STM-1 frame structure and overhead byte functions. [1][4]
5.1 STM-1 Frame
The STM-1 section overhead is divided into three categories;
• VC-4 Path Overhead (POH) of 576Kbit/s
• Multiplexer Section Overhead (MSOH) of 2.88Mbit/s
• Regeneration Section Overhead (RSOH) of 1.728Mbit/s
Complete STM-1 Frame is shown in figure 19 below. [1][4]
28

Figure 19 STM-1 frame structure includes Regeneration Section Overhead, AU Pointer, Multiplex Section Overhead and STM-1 Payload 5.1.1 VC-4 Path Overhead
VC-4 Path Overhead (576 Kbit/s) contains the following bytes: VC-4 Path Overhead is
shown in figure 20 below. [1][4]
Figure 20 VC-4 Path Overhead
29

J1 (Path Trace)
This byte is used to transmit repetitively a path access point identifier so that a path
Receiving terminal can verify its continued connection to the intended transmitter. A 16-
byte frame is defined for the transmission of an access point identifier. This 16-byte frame
is identical to the 16-byte frame for the description of the byte J0. At international
boundaries, or at the boundaries between the networks of different operators, the format is
defined in standard G.831 and shall be used unless otherwise mutually agreed by the
operators providing the transport. Within a national network or within the domain of a
single operator, this path access point identifier may use a 64-byte frame [4]
B3 (Parity Error Check) Path BIP-8
This provides bit error monitoring over path using an even parity code, BIP-8. The
calculation of errors is carried out over all the bits of previous VC-4 before scrambling
C2 (Signal Label)
This byte indicates the composition of the VC-4 and is based on HEX code as follows:
Table 4. C2-byte Signal label definitions [1] [4]
MSB LSB Hex Code Interpretation 0000 0000 00 Unequipped 0000 0001 01 Reserved 0000 0010 02 TUG-Structure 0000 0011 03 Locked TU-n 0000 0100 04 Asynchronous mapping of 34 368 Kbit/s or 44 736 Kbit/s into
to container-3 0000 0101 05 Experimental mapping 0001 0010 12 Asynchronous mapping of 139 264 Kbit/s into to container-4 0001 0011 13 ATM mapping 0001 0100 14 MAN DQDB mapping 0001 0101 15 FDDI mapping 0001 0110 16 Mapping of HDLC/PPP 0001 0111 17 Reserved for proprietary use 0001 1000 18 Mapping of HDLC/LAPS 0001 1001 19 Reserved for proprietary use 0010 0000 20 Asynchronous mapping of ODUk (k=1,2) into VC-4-Xv
(X=17,68)
30

0001 1010 1A Mapping of 10Gbit/s Ethernet frames 0001 1011 1B GFB mapping 0001 1100 1C Mapping of 10 Gbit/s fiber channel frames 1100 1111 CF Reserved 1011 0000 1101 1111
D0-DF Reserved for proprietary use
1110 0001 1111 1100
E1-FC Reserved for national use
1111 1110 FE Test Signal O.181 specific unmapping 1111 1111 FF VC-AIS
G1 (Path Status)
This byte can be used to send back to the VC-4 path originator, the path terminating status
and performance. The information contained within this byte is REI (Remote Error
Indication) and RDI (Remote Defect Indication) G1-byte coding is shown in table 5 and
REI coding values in table 6.
Table 5. G1-byte bit values
Table 6. REI-Coding values
REI Coding Meaning
0000 0 errors
0001 1 error
0010 2 errors
… …
1000 8 errors
All other combinations from 1001 to 1111 means 0 errors
Bits 1 through 4 convey the count of interleaved-bit blocks that have been detected in error
by the trail termination sink using the path BIP-8 code (B3). This count has nine legal
31

values, namely 0-8 errors. The remaining seven possible values represented by these four
bits can only result from some unrelated condition and shall be interpreted as zero errors.
Bit 5 is set to 1 to indicate a VC-4 path Remote Defect Indication (RDI); otherwise it is set
to 0. The VC-4 path RDI is sent back towards the trail termination source if either an AU-
4/AU-3 or TU-3 server signal failure or trail signal failure is being detected by the trail
termination sink. RDI does not indicate remote payload or adaptation defects.
Bits 6 and 7 are reserved for an optional use. If this option is not used, bits 6 and 7 shall be
set to 00 or 11. A receiver is required to be able to ignore the contents of these bits. The
use of the optional function is at the discretion of the owner of the trail termination source
generating the G1 byte. Bit 8 is allocated for future use. This bit has no defined value. The
receiver is required to ignore its content.
F2 (User Communication Channel)
This byte is allocated for user communication purposes between path terminals. No need
for us to implement this byte, because we are not supporting user communication channel.
H4 (Position Indicator)
This byte provides a multiframe position indicator for TU structured payloads. The H4
byte will locate the phase position of the TU-12 Pointer bytes (V1, V2, V3 and V4)
The last two bits of the H4 byte indicate the frame in the TU-12 multiframe. All the other
bits in the H4 byte are set to 1.
F3 (User Communication Channel)
This byte is allocated for user communication purposes between path terminals
K3 (Automatic protection Switching (APS) Channel)
Bits 1-4 of this byte are allocated for APS control for higher order path level. Bits 5-8 are
not defined. The receiver is required to ignore their content
32

N1 (Tandem Connection Monitoring)
This byte is allocated for the Tandem Connection Overhead (TCOH) which carries out
Tandem Connection Monitoring (TCM)
Bits 1-4 are used as Tandem Connection Incoming Error Count (IEC)
Bits 5-8 can be used to provide messages that support tandem connection maintenance
such as: TC-REI, OEI, TC-APid, TC, RDI or ODI
5.1.2 The AU-4 Pointer
AU-4 Pointer value is a binary number with a range on 0-782 which indicates the offset, in
three-byte increments, between the AU-4 Pointer bytes and the first byte on VC-4. AU-4
Pointer is shown in figure 21.
Figure 21 AU-4 Pointer, Y-bytes are 1001SS11 (S=spare bits), 1-bytes are 11111111
The H3 bytes are used for justification opportunity purposes. (Negative or positive)
AU-4 Pointer is contained in H1 and H2 bytes. The pointer value Contained in these two
bytes indicates the location of the first byte of VC-4 (J1)
33

5.1.3 Regeneration Section Overhead (RSOH)
Regenrator Section Overhead and Multiplexer Section Overhead bytes are shown in figure
22. [1][4]
Figure 22 Regenerator Section Overhead and Multiplexer Section Overhead bytes Regeneration Section Overhead (RSOH) of 1.728Mbit/s contains following bytes shown in table 7. Table 7. Regenrator Section Overhead bytes [1] [4]
Byte Description
A1, A2 Frame Alignment A1=11110110 (F6 hex) A2=00101000 (28 hex) B1 This byte is used for regenerator section error monitoring. It uses an even
parity BIP-8, to check for errors and is calculated before scrambling process. The BIP-8 is computed over all bits of the previous STM-N frame after scrambling and is placed in byte B1 of the current frame before scrambling.
D1-D3 A 192 Kbit/s data communication channel (DCC) used for network management of the regenerator section. (alarms, maintenance, monitor, administrator, etc)
E1 This is an orderwire channel for voice communication. E1 is part of RSOH and may be accessed by regenerators. No need for us, some proper pattern to fill these bytes.
F1 User defined channel. This byte is reserved for user purposes. (E.g. to provide temporary voice/data channel connections for special maintenance purposes).
J0 Regenerator Section Trace. It is used to transmit the Regenerator Section Access Point Identifier so that a section receiver can verify its continued
34

connection to the intended transmitter. J0 uses a 16 byte frame including CRC. Within a national network, or within the domain of a single operator, this section access point identifier may use either a single byte (containing the code 0-255) or the access point identifier format as defined in clause 3/G.831. At international boundaries, or at the boundaries between the networks of different operators, the format defined in clause 3/G.831 shall be used unless otherwise mutually agreed by the operators providing the transport.
X Bytes reserved for future use
Media dependant types. The definition of these media-dependent bytes is outside the scope of this Recommendation. -T Rec. G.707/Y.1322 (12/2003). For SDH radio these bytes are defined in ITU-R Recommendation F.750.
5.1.4 Multiplexer Section Overhead (MSOH)
Multiplexer Section Overhead (MSOH) of 2.88Mbit/s contains following bytes shown in table 8:
Table 8. Multiplexer Section Overhead bytes [1] [4]
Byte Description
B2 These bytes are used for multiplexer section error monitoring. It uses even parity BIP-24 to check for errors. BIP- 24 is computed over all bits of the previous STM-N frame except for the first three rows of SOH and is placed in bytes B2 of the current frame
D4-D12 A 576 Kbit/s data communication channel (DCC) used for network management of the multiplexer section. (Alarms, maintenance, control, monitoring, administration, etc)
E2 This is an orderwire channel for voice communication. E2 is part of MSOH and may be accessed at multiplexer section terminating equipment.
K1, K2 (Bits 1-5) Automatic Protection Switching (APS) signaling channel for the multiplexer section. The APS protocol is specified in G.783 and G.841
K2 (Bits 6-8) These three bits contain the Multiplexer Section Remote Defection Indication (MS-RDI). It is used to return an indication to the transmit end that the receive end has detected an incoming section failure or an MS-AIS. MS-RDI is generated by inserting a "110" code in positions 6, 7 and 8 of the K2 byte before scrambling.
M1 Multiplexer Section Remote Error Indication (MS-REI). These errors are detected using the B2 byte which employs BIP-24
S1 (Bits 5-8) These four bits are allocated to carry the Synchronization Status
35
Messages. Table below gives the assignment of bit patterns to the four synchronization levels agreed to within ITU-T. Two additional bit patterns are assigned: one to indicate that quality of the synchronization is unknown and the other to signal that the section should not be used for synchronization. The remaining codes are reserved for quality levels defined by individual Operators.
X Bytes reserved for future national use
5.1.5 TUG-3
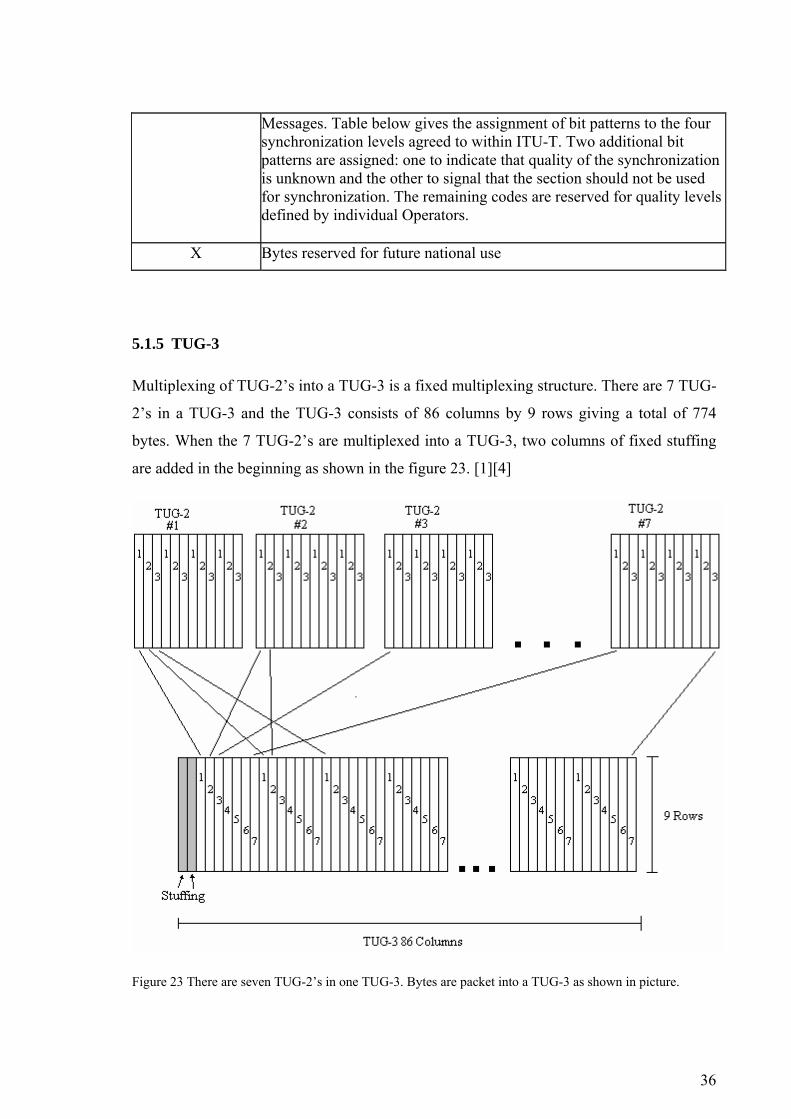
Multiplexing of TUG-2’s into a TUG-3 is a fixed multiplexing structure. There are 7 TUG-
2’s in a TUG-3 and the TUG-3 consists of 86 columns by 9 rows giving a total of 774
bytes. When the 7 TUG-2’s are multiplexed into a TUG-3, two columns of fixed stuffing
are added in the beginning as shown in the figure 23. [1][4]
Figure 23 There are seven TUG-2’s in one TUG-3. Bytes are packet into a TUG-3 as shown in picture.
36

5.1.6 TUG-2
The group of TU’s is called Tributary Unit Group (TUG) and there are 3 TU-12’s
contained in a TUG-2. TUG is a simply a grouping of TU’s. No additional overheads are
added to form the TUG. TUG-2 is 12 columns wide and 9 rows high TUG-2 occupies
about 6.9Mbit/s of capacity. In figure 24 it is presented how TU-12’s are grouped into a
TUG-2. [1][4]
Figure 24 There are three TU-12’s in one TUG-2. Bytes are packed in TUG-2 as shown in picture
5.1.7 TU-12
TU-12 occupies 4 columns (36 bytes) of a 125 µsec frame and therefore takes up 2.304
Mbit/sec of bandwidth. TU-12 multiframe has 144 bytes. V1, V2, V3 and V4 bytes are
located at the top of the first columns contained in each VC frame. These four frames make
up what is known as a VC-12 multiframe. [1][4]
TU-12 Pointer is contained in the V1 and V2 bytes. The position in the multiframe of V1,
V2, V3 and V4 is indicated by a special byte H4 which is located in VC-4 POH. Pointer
37

value counts from 0-139 for a TU-12. TU-12 multiframe transport capacity is 2.048Mbit/s.
How VC-12 is packed into a TU-12 is shown in figure 25. [1][4]
Figure 25 VC-12 Frame is packed into a TU-12 multiframe as shown in picture. V5-byte is the first byte in VC-12 and V1, V2, V3 and V4 are in fixed positions
V1 and V2 taken together as one 16 bit word contain a pointer value which locates the first
byte of the VC-12 (the V5 Byte). Byte meanings are shown in table 9.
Table 9. V1 and V2 bytes
N Bits contain New Data Flag (NDF)
• 0110 Normal Operation
• 1001 Indicates new data in the payload and the pointer value has
changed accordingly
38

S Bits indicate the type of TU
• 00 TU-2
• 10 TU-12
• 11 TU-11
• D Bits (Decrement) are inverted to indicate negative justification
• I Bits (Increment) are inverted to indicate positive justification
• Pointer Range for TU-12 is 0 to 139
V3 is the Pointer Action Byte. Under normal operating conditions, this byte contains no
valid tributary information
V4 is currently reserved and has no function allocated to it
V5 is the first byte in the VC-12
• The V5 byte and all the other bytes of the VC-12 can float with respect to the
pointer bytes
5.1.8 VC-12 frame
VC-12 Frame (140 bytes, 500 micro-seconds) consists V5 –Byte, J2 –Byte, N2 –Byte and
K4 –Byte. VC-12 transport capacity is 2.048Mbit/sec
V5-Byte
V5-byte bit values are shown in table 10.
Table 10. V5-byte values and meanings
• BIP-2 (Bit Interleaved Parity)
• Bit 1 odd number bits (1,3,5,7)
• Bit 2 even number bits (2,4,6,8)
39

• REI (Remote Error Indication)
• Is returned to the originating end of VC when error occurs in BIP-2 block
• RFI (Remote failure Indication)
Bit 4 is a VC-11 byte synchronous path Remote Failure Indication (RFI). This bit is
set to one if a failure is declared, otherwise it is set to zero. The VC-11 path RFI is
sent back by the VC-11 termination. The use and content of this bit are undefined
for VC-2 and VC-12.
• L1, L2, L3 (Signal Label)
• With these three bits (L1, L2, L3) eight binary values are possible:
• 000 Indicates that the VC path is unequipped
• 001 Indicates that the VC path is equipped – non specific payload
• 010 Indicates Asynchronous mapping
• 011 Indicates Synchronous mapping
• 100 Indicates byte Synchronous mapping
• 101 Extended Signal Label
• 110 Test Signal (using O.181 specific mapping)
• 111 VC-AIS used in networks that support tandem connection
• RDI (Remote Defect Indication)
• Is set to 1, if either TU-2/TU-1 path AIS or signal failure condition is being
received, otherwise it is set to 0
J2 Byte (Path Trace)
J2 is used to transmit repetitively a Low Order Path Access Point Identifier so that a path
receiving terminal can verify its continued connection to the intended transmitter. Uses 16
byte frame specified in G.831 and includes a CRC error check. Byte J2 is used to transmit
repetitively. This path access point identifier uses the format defined in standard G.831. A
16-byte frame is defined for the transmission of path access point identifiers. This 16-byte
frame is identical to the 16-byte frame defined for the description of the byte J0
40

N2 Byte (TCM)
• N2 is allocated to provide Tandem Connection Monitor (TCM) function.
Bits 1-4 are used as an incoming error count (ICE) including an incoming
AIS and bits 5-8 are used as a communication channel that includes the
following messages:
• Tandem Connection Remote Error Indication (TC-REI)
• Outgoing Error Indication (OEI)
• Tandem Connection Outgoing Defect Indication (TC-REI)
• Tandem Connection Access Point Identifier (TC-APID)
K4 Byte (Automatic Protection Switching Control)
Bits 1-4 of the K4 Byte are allocated for signaling the lower order path APS control. Bits
5-8 are allocated to convey to the transmitter the status and performance of the complete
trail such as PLM, AIS or LOP
This bit is allocated to an extended signal label. If the signal label in V5 bits 5 through 7 is
101, the contents of the extended signal label is valid and is described below. For all other
values of V5 bits 5 through 7 the extended signal label bit is undefined and should be
ignored by the receiver. [1] [4]
Bits 5 to 7 of K4 are reserved for an optional use, which is out of scope, because it is not
implemented. But if this option is not used, these bits shall be set to "000" or "111". A
receiver is required to be able to ignore the contents of these bits. The use of the optional
function is at the discretion of the owner of the trail termination source generating the K4
byte. Bit 8 of K4 is reserved for a lower order path data link. [1][4]
5.2 Alarms
There are several alarms defined in the SDH standards. These alarms go through the Fault
Handler component (running on the STM-1/OC-3 PIU) to the application SW running on
the Indoor Unit Main card. Because there are lots of alarms, we must control that the
alarms won’t cause too much processor load in the unit, main processor or in the
41

management SW. That’s why alarms must be filtered and they must have some sort of
hierarchy level related to the alarm severity. Also the alarm showed in management system
shall be clear to network operator.
Different alarms are divided to the HW Failure alarms, alarms in regenerator section
overhead, alarms in multiplexer section overhead, alarms at high order path and alarms at
low order path.
Alarms in the RSOH include LOS, LOF and RS-TIM. It has to be noticed that the RS-TIM
won't lead to an RDI sent in reverse direction. MSOH level alarms include AU-AIS, AU-
LOP, MS-RDI, MS-AIS and EBER. Alarms at high order path are HP-RDI, HP-PLM
(High order path path label mismatch), HP- UNEQ (High order path unequipped), HP-
TIM (High order path trace id mismatch), HP-UNEQ. Again, the HP-TIM won't lead to an
RDI sent in reverse direction. Low order parh alarms are TU-AIS, TU-LOP, LP-RDI, LP-
UNEQ (Low order path unequipped), LP-TIM (Low order path trace id mismatch), LP-
PLM, LP-UNEQ. LP-TIM won't lead to an RDI sent in reverse direction. Some of the
major alarms are introduced next. [1][4][9]
LOS (Loss of Signal) is raised when the synchronous signal level drops below the treshold
at which a BER of 1 in 103 is predicted. The LOS can be caused by a cable cut, equipment
fault or anything that causes physical signal loss. The LOS state will clear when 2
consecutive framing patterns are recieved and no new LOS condition is detected.[1][4]
OOF (Out of Frame) state occurs when 4 or in some implementations 5 consecutive SDH
frames are recieved with invalid (errored) framing patterns. (A1 and A2 bytes in
Regenrator Section Overhead are invalid). The OOF state will clear when 2 consecutive
SDH frames are recieved with valid framing patterns.[1][4]
LOF (Loss of Frame) is raised after the OOF state has existed for a specified time in
msecs. The LOF state clears when an “in frame” condition exists continously for a
specified time in msecs. [1][4]
LOP (Loss of Pointer) state occurs when N consecutive invalid pointers are recieved or n
consecutive New Data Flags are recieved, where n=8,9,10. The LOP state is cleared when
3 equal valid pointers or 3 consecutive AIS indications are recieved. [1][4]
42

MS-AIS (Multiplexer Section Alarm Indication Signal) This alarm is sent by a Regenrator
Section Terminating equipment to alert that is has detected LOS or LOF state. The MS-
AIS is detected by terminating equipment when bits 6 to 8 in K2 byte are set all to 111 for
3 consecutive frames. Removal is detected by terminating equipment when 3 consecutive
frames are received with a pattern other than 111 in bits 6-8 bits in K2 byte.[1][4]
AU-4 AIS (Administave Unit Alarm Indication Signal) This alarm is sent by a multiplexer
section terminating equipment to alert that is has detected LOP or AU path AIS. Alarm is
sent to the higer order path equipment. AU-4 AIS is indicated by transmitting an all 1’s
pattern in the entire AU-4. The AU-4 AIS removal is detected after 3 valid AU-4 Pointers
with normal NDF’s (New Data Flag) or a single valid AU pointer with NDF enabled.[1][4]
TU-12 AIS (Tributary Unit Alarm Indication Signal) This alarm is sent downstream to
alert the Lower Order Path terminating equipment that the Higher order path has detected
TU-12 LOP or TU-12 Path AIS. The TU-12 AIS is indicated by transmitting an all 1’s
pattern in the entire TU-12, i.e all 1’s in pointer bytes V1, V2, V3 and V4 and all other
bytes in in VC. The TU-12 AIS removal is detected after 3 valid AU-4 Pointers with
normal NDF’s (New Data Flag) or a single valid AU pointer with NDF enabled.[1][4]
MS-RDI (Multiplexer Section – Remote Defect Indication) This is sent by a Multiplexer
Section terminating equipment within 250µsecs of detecting LOS, LOF or MS-AIS on an
incoming signal. An MS-RDI is indicated by setting bits 6-8 of the transmitted K2 byte to
110. It is detected when this condition occurs in three consecutive frames. It is removed
when three consecutive frames are received other than 110 in bits 6-8 of the K2 byte. It is
also good to notice, that transmission of the MS-AIS (111 in bytes 6-8 in K2) overrides
MS-RDI.[1][4]
HP-RDI (Higher Order Path – Remote Defect Indication) This is generated in response to a
received VC-4 AIS or Loss of Pointer. It is sent back to its associated Higher Order Path
terminating equipment. This alarm is indicated by setting bit 5 of the VC-4 Path Overhead
G1 byte to 1. It is detected when G1 bit 5 is set to 1 for ten consencutive frames. Removal
is detected when this bit 5 is set to 0 for ten consencutive frames.[1][4]
HP-TIM (Higner Order path – Trail Identifier Mismatch) This indicates mismatch of the
VC-4 Path trace byte J1. This is also called a Trail Identifier byte. HP-TIM could occur for
43

example of incorrect cross-connection. A similar alarm can also be raised for the Lower
Order Path, LP-TIM. This is located in the J2 Byte in VC-12.[1][4]
In figure 26 is shown situation where cable is cut. The following regenrator from cut gets
LOS and next to it get MS-AIS and backwards is sent RDI.
Figure 26 Situation when the cable is cut. The first node downstream gets LOS and the next ones get MS-AIS. RDI is sent upstream.
5.3 User configurations
Using the overhead bytes means that some of the bytes must be user configurable. All
configurations which user has access to are done by the Element Manager SW.
Some features that should be user configurable are Synchronization Priority List settings,
meaning that user can configure which STM-1 Unit is the master unit and synchronizes the
other STM-1 cards. User can also configure the card for use in the SDH or SONET
networks. Also protection settings and Asynchronous/Byte synchronous mapping settings
shall be user configurable.
Alarms should be noted and alarm severity must be shown in the user interface. Cross
connections should be possible to configure by the Element Manager. J1 Path Trace setting
should also be user configurable. Also the SW upload option should be implemented in the
manager SW. This is mandatory because easy SW upgrade is one important thing for the
maintenance and testing.
44

5.4 Control Interface
The control interface for our STM-1 Plug-in unit is IP based. The main unit has two
management interfaces in the front panel: DCN and LMP ports. If the management traffic
is coming from DCC bytes via STM-1 interface, our STM-1 card is transparent to the
management traffic. The DCC bytes are taken out from the STM-1 frame in Agere
Ultramapper and transferred then to the microprocessor HDLC controller in HDLC frames.
Then the DCC bytes are transferred to the Main unit processor via backplane Ethernet. The
Main unit processor handles then the bytes and sends possible control information back to
the STM-1 card. In figure 27 is shown the basic principle of the DCC byte handling.
Figure 27 Basic principle of DCC byte handling. Bytes come from Fibre and they are processed in Agere Ultramapper. Then the bytes are taken to the Main unit processor via HDLC Controller. The Main unit management software is practically a router which just routes the
management traffic to the correct cards. For example if we want to send management
traffic from Main Unit to STM-1 PIU, we sent it to the correct unit via backplane Ethernet.
The other control protocols are Q3 and OSI, but we decided not to support these in this
product.
45

6. CHIPSET SELECTION AND CRITERIAS
The chipset selection for the STM-1 card is important part of the product development
process, because it reflects very much to the future of this product. In this case the chipset
means the functional part which unmaps the E1/T1’s from the STM-1 frame and
terminates the overhead. Things that affect the chip selection are price, number of chips
and data input method to mention a few.
Price is one of the most important criterias. Everyone can understand that couple of euros
count if units are manufactured in large amounts. Number of chips is also important
because if functionality is divided to several chips all those chips need to be wired and this
takes space from the board. Also the board layout is more difficult with multichip system
than single chip system. Data input method means in which format the chipset accepts the
E1/T1 signals. There were several possibilities but our favorable way is that the chipset
accepts normal E1/T1 signal and Clock signals instead of some kind of serial bus traffic,
which means more work for the FPGA team. This normal E1/T1 signal input/output is
favourable because now it is possible to copy the E1/T1 implementation from the existing
design.
For our solution some requirements were defined. The chipset should be capable of
handling both byte synchronous and asynchronous mapping. Also we should have access
to the overhead bytes, especially the DCCm and the DCCr bytes.
Several chipsets were investigated and the final candidates were Agere Ultramapper Full
Transport/All Inclusive, PCM Temux 168 and Transwitch based solution. Transwitch was
rejected quite soon, because their solution needed 5 ICs and this was simply too much
chips to be added to the board. PCM solution also needed 3 chips and interface to the
FPGA is H-MVIP bus, so it was also rejected. Therefore final solution was Agere
Ultramapper.
Agere Ultramapper offers a very good solution packed in one single chip. Agere
Ultramapper terminates 84 DS1/J1 or 63E1 framed or unframed signals. It supports 1+1,
1:1 or 1: N protection schemes with dedicated interfaces and full processing for all
line/section/path overhead with inhabitable automatic generation of AIS, RDI, REI, and N
times filtering on critical overhead. So these and many other features mean that the Agere
Ultramapper is very suitable for our product. [12]
46

Agere Ultramappers main function is map/unmap E1’s from/to STM-1 signal and transfer
them to the FPGA. Figure 28 shows this principle.
Figure 28 Main function of Agere Ultramapper is to transmit E1/T1’s from fibre to FPGA
More detailed functional block is shown in figure 29.
Figure 29 Detailed functional block diagram of Agere Ultramapper. High speed TX/RX signals from the SFP module are taken to the Agere Ultramapper Full
Transport and it terminates the STM-1 frame. Then chip gives either DCCr or DCCm bytes
straight to the microprocessor to process. This is user configurable, so user can decide
whether he wants to use the regenerator section overhead bytes or the multiplexer section
overhead bytes. After the STM-1 frame is unmapped, the Ultramapper transfers E1/T1
signals to the FPGA so that each E1/T1 data and clock signal is transferred separately. [12]
47

For overhead handling Agere Ultramapper offers good possibilities. Many overhead bytes
Ultramapper handles automatically. For example on the receive side, the Agere
Ultramapper Full Transport includes: J1 monitoring, B3 BIP-8 checking, C2 signal label
monitoring, REI-P and RDI-P detection (G1), H4 multiframe monitoring, F2, F3, and K3
automatic protection switch monitoring, N1 tandem connection monitoring, Signal degrade
BER and signal fail BER detection, Path overhead access channel (RPOAC) drop, AIS-
P/HO-AIS insertion, Automatic AIS generation (with individual inhibit) and the J1 monitor
(as found in the TMUX block) provides the following four modes of operation (16 byte or
64 byte):SONET mode, SDH mode, User mode and Single byte mode.[12]
Also transmit/receive path section/line overhead byte handling is done automatically quite
well. Practically only the DCC bytes must transmit to the Ultramapper via TOAC from
processor. To get access to these DCC bytes an interface called TOAC is used. The TOAC
interface can be configured for three modes of operation: D1-D3, D4-D12 and full access.
In D1-D3 mode the TOAC clocks are configured to operate at 192 kbit/s. This means that
we can get access to the DCC bytes in regenerator section overhead. In D4—D12 mode,
the TOAC clocks are configured to operate at 576 kbits/s and now we have access to the
DCC bytes in the multiplexer section overhead bytes. [12]
In full access mode, frequency is 5.184 MHz, the frame repetition rate is 8 kHz and
consists of either 27 bytes, 81 bytes, or 324 bytes per frame. In the receive path, all
transport overhead bytes are available from the TOAC. In the transmit path, some bytes
cannot be inserted because they are calculated by device, inserted through the
microprocessor interface, or fixed to a specific value. We are not interested in full access
mode, because it is not planned to be used. [12]
7. IMPLEMENTATION OF STM-1 PIU
After we have made and approved the requirement specification the next step is the
architecture specification and first drafts of schematics and layout. In this case of course
we must have a software specification and a product description ready. When first versions
of the schematics are ready, they are reviewed and approved. After that the first protos can
be made. When we have the first proto ready then it starts massive testing and sw
48
implementation. This is the basic routine work which just has to be made and possible
errors in schematics and layout designs must be found before the second proto round is
made. It is very important to find possible errors, because the proto rounds are expensive
and if we can reduce one proto round it saves a lot of money.
Normal errors in first protos are wrong component values, which can be caused by just
misunderstanding a datasheet. Some other errors are layout errors in the circuit board,
mismatch in voltages or clock signals, soldering problems and even missing components
can be seen. Normally these kinds of errors are easy to find and fix, but sometimes it takes
a very long time to find out why some proto board don’t work. Examples of these errors
are wrong clock signal values, damaged components and also some SW related problems,
which seems like HW problems.
Simultaneously with the R&D testing another project is ongoing. The production unit
tester development is going on at the production. It is important to have proper tools to test
the units when they come out of the assembly line. Requirements for production tester
must be noticed in the schematics, because testing is done mainly with the boundary scan
and BSCAN needs some lines and components added to circuit board. In figure 30 is
shown figure for a proto series and unit tester development.
As we can see from the figure 30, proto rounds in the R&D and production tester
development are two parallel projects. They support each other, because tester developers
may notice some errors that are not noticed in the R&D.
49

Figure 30 R&D Process and Production Tester Development are two parallel projects and they support each other
50

8. CONCLUSION
I must say that this project was one of the most interesting projects I have ever been
involved with. I have seen how the new product has being planned and designed and I have
been a part of this project.
This project has taught me how things are made in Nokia Networks R&D and what is the
process when new equipment is planned to be brought to the market. One major issue is
market demand, which defines the schedule and changes to it. Because we are doing this
product to customers we have to be aware of their demands. The customer demands also
may affect the schedules, because sometimes a big customer wants some feature earlier
than we have planned to release them. This may lead to a situation where some features are
priorized more than others to make the wanted features available earlier. Of course this
leads to a situation that some features are going to be late because of the changed schedule.
It was a surprise to me how much work there is behind a market ready product. Many
documents and specifications have to be written before we even have a first proto in our
hands. After we have all required documents ready then the proto rounds starts. And again,
it takes lots of money and time to fix all the problems.
Major archievements of this project were requirement specification of STM-1 PIU,
implementation of the required overhead byte handling and the synchronization concept.
While writing a requirement specification, I learned the SDH principles. The SDH is an
excellent way to transmit large amounts of data and it is a very suitable interface for a
microwave radio system. Moreover, the lab work has become familiar and I have learned
to use measurement tools I didn’t even know.
On the other hand, work goes on. The product is not even close to customer deliveries, so
there is much work to do. SW implementation, stability tests and cost reduction are the
next challenges. As I have learned, the work never ends in R&D.
51
REFERENCES:
[1] Lynross Training and Consultancy: SDH principles and functions, Course
T203 material
[2] Telecommunication System Engineering (Fourth Edition), Published Online
08 Dec 2004, Roger L. Freeman, Print ISBN: 0471451339, Online ISBN:
0471728489
[3] Mike Sexton, Andy Reid: Transmission Networking: SONET and
Synchronous Digital Hierarchy, ISBN 0-89006-551-9, 1992
[4] ITU-T-G.707 Recommendation (12/03)
[5] Nokia FlexiHub Product Description
[6] Next Generation Network Services, Neill Wilkinson, Published Online: 23
Apr 2002, Print ISBN: 0471486671, Online ISBN: 0470858567
[7] ITU-T-G.957 Recommendation (03/06)
[8] Nokia document; FPGA Design Flow, approved by Pertti Huttunen, 2004
[9] IEEE releases, Design of TU-11/TU-12 level switching Structure in Optical
Transmission Equipment, 1997, JiHoon Bang, YongSerk Kim
[10] Broadband Signaling Explained, 27 Sep 2001, Dick Knight, Online ISBN-10:
0470841575, John Wiley & Sons, Ltd
[11] Fundamentals of Telecommunications (2nd edition), Wiley Series in
Telecommunications and Signal Processing, published 27 Jan 2005, Roger L.
Freeman, Online ISBN-10: 0471720941
[12] Agere Ultramapper Datasheets, Agere Networking Systems
http://www.agere.com/networking/mappers.cfm
52