SYM-O-NET USER GUIDE fileSYMONET USER GUIDE Version 2.0 3 MANUFACTURER’S DECLARATION OF CONFORMITY...
62
SYMONET USER GUIDE Version 2.0 1 SYM-O-NET USER GUIDE
Transcript of SYM-O-NET USER GUIDE fileSYMONET USER GUIDE Version 2.0 3 MANUFACTURER’S DECLARATION OF CONFORMITY...

SYMONET USER GUIDE Version 2.0 1
SYM-O-NET
USER GUIDE

SYMONET USER GUIDE Version 2.0 2
Copyright 1998-2013, The Symmetron Company.
Second Edition in English, May 2013.
No part of this publication may be reproduced, stored in a retrieval system, or transmitted, in any form by any means, without the prior written permission of Symmetron Company. Information furnished by Symmetron is believed to be accurate and reliable; however, no responsibility is assumed for its use. No license is granted by implication or otherwise.
Symmetron is a registered trademark and Stylitis and Sym-o-net are
trademarks of the Symmetron Company. All other trademarks belong to their respective owners.
WARRANTY
The Symmetron Company warrants its products shall be free from defects on
materials and workmanship under normal use for the period of 1 year.
Symmetron's obligation under this warranty shall not arise until buyer returns the defective product, freight prepaid to Symmetron's facility or another specified location.
The only responsibility of Symmetron under this warranty is, at its option, to
replace or repair, free of charge, any defective component of such products.
THE WARRANTY DOES NOT EXTEND TO AND SHALL NOT APPLY TO:
1. Products which have been repaired or altered by other than Symmetron's personnel, unless Buyer has properly altered or repaired the products in
accordance with procedures previously approved in writing by Symmetron. 2. Products which have been subject to misuse, neglect, accident, improper
installation, or direct lightning strikes.
THE WARRANTY AND REMEDIES SET FORTH ABOVE ARE IN LIEU OF ALL OTHER
WARRANTIES EXPRESSED OR IMPLIED, ORAL OR WRITTEN, EITHER IN FACT OR
BY OPERATION OF LAW.
THE SYMMETRON COMPANY SHALL HAVE NO LIABILITY FOR INCIDENTAL OR CONSEQUENTIAL DAMAGES OF ANY KIND ARISING OUT OF THE SALE,
INSTALLATION, OR USE OF ITS PRODUCTS.
RETURN OUTSIDE GREECE Contact Symmetron for authorization and shipping instructions.
SYMMETRON ELECTRONIC APPLICATIONS TEL: +30-210-603-4002 FAX: +30-210-603-4003
e-mail: [email protected]
Internet: http://www.symmetron.gr/ Made in Greece.
Σχόλιο [N1]:

SYMONET USER GUIDE Version 2.0 3
MANUFACTURER’S DECLARATION OF CONFORMITY
I, the undersigned, hereby declare that the equipment specified conforms to the
below Directives and Standards.
Standards to which Conformity is Declared
EMC Emmisions: ΕΝ55022, EN61000-4-3
EMC Immunity: EN61000-4-2, EN61000-4-4, EN61000-4-5, EN61000-4-6
Safety: EN61010-1
Description of Equipment Modem for automated remote GPRS/data connections.
Model Sym-o-net
Batch of product covered
Serial numbers: from 50 to 2000
Date and Place
Pikermi, Attica, Greece, December 31, 2002.
Authorized signatory on behalf of the manufacturer
N. Hadzidakis
Name: N. E. Hadzidakis
Title: Director
N. Hadzidakis – T. Katsabakou Co.
N. Hadzidakis – T. Katsabakou Co.
1, Antikyhtiron St. 15344 Gerakas, Greece

SYMONET USER GUIDE Version 2.0 4
CONTENTS
GENERALLY ABOUT SYM-O-NET ................................................................ 6
A. STARTING UP - LOCAL SETUP .......................................................... 7
B. CONNECT VIA THE GPRS NETWORK VIA A DYNAMIC IP SIM CARD (CLIENT MODE) ............................................................................................ 14
0. DIAMESON SETTINGS ............................................................................................................ 14
1. STARTING UP - LOCAL SETUP ................................................................................................. 16
2. CONNECTION TYPE SELECTION (client mode) .................................................................... 16
3. REMOTE CONNECTION IN CLIENT MODE .......................................................................... 18 i. Connect to a datalogger via Stylitis Explorer ........................................................... 18
ii. Connect to a datalogger via Opton 4 ...................................................................... 22
iii. Connect to a Sym-o-net’s DEVICE port via SymonetCOM ....................................... 25
C. MULTIPLE SYM-O-NET CONNECTION IN A VIRTUAL WIRELESS RS-485 NETWORK VIA THE GPRS NETWORK ................................................ 28
0. DIAMESON SETTINGS ............................................................................................................ 28
1. STARTING UP- LOCAL SETUP .............................................................................................. 30
2. CONNECTION TYPE SELECTION (client mode) ...................................................................... 31
3. REMOTE COMMUNICATION WITH THE NETWORK DEVICES VIA THE
NETWORK’S USER (via SymonetCOM) ......................................................................................... 33
D. CONNECT VIA THE GPRS NETWORK VIA A STATIC IP SIM CARD (SERVER MODE) .......................................................................................... 36
1. STARTING UP- LOCAL SETUP .............................................................................................. 36
2. CONNECTION TYPE SELECTION (server mode) .................................................................. 36
3. REMOTE CONNECTION IN SERVER MODE ......................................................................... 39 i. Connect to a datalogger via Stylitis Explorer ........................................................... 39
ii. Connect to a datalogger via Opton 4............................................................. 42
iii. Connect to a Sym-o-net’s DEVICE port via SymonetCOM ....................................... 45
E. CONNECT VIA A DATA CALL VIA A DATA SIM CARD (DATA MODE) ....................................................................................................................... 48
1. STARTING UP- LOCAL SETUP .............................................................................................. 48

SYMONET USER GUIDE Version 2.0 5
2. CONNECTION TYPE SELECTION (data mode) ................................................................... 48
3. REMOTE CONNECTION WITH THE DATALOGGER .......................................................... 50 i. Connect to a datalogger via Stylitis Explorer ........................................................... 51
ii. Connect to a datalogger via Opton 4 ...................................................................... 54
APPENDIX A: FILES SENT VIA EMAIL ....................................................... 57
APPENDIX B: MANAGEMENT OF ENCRYPTED EMAILS ......................... 58
APPENDIX C: GENERAL NOTES ................................................................ 62

SYMONET USER GUIDE Version 2.0 6
GENERALLY ABOUT SYM-O-NET
The Sym-o-net gives you the capability to achieve connections with it, via various ways. You
can connect remotely to its modem and:
- Connect to any serial device, as if it were connected to your PC.
- Device baud rates supported: 1200~38400 (default: 9600).
- There is also an option supporting 3 serial devices, with which you can connect with
one device at a time (with the same modem).
Sym-o-net’s modem can be ON (available for communication) certain times of the day, to
save power consumption. Moreover, for the 3 device option, each serial device may be
available at different times (the corresponding DEVICE port is open).
NOTE: You can also use it with a Symmetron Stylitis-41 or Stylitis-101 datalogger, connected
to DEVICE 1 port. In this case, there is the extra capability of automatically receiving the data
via an encrypted email (according to the PASSWORD) at least once a day. For more details
about setting the email parameters, about the files received, and about managing them,
please refer to the corresponding chapters below and to APPENDIX A and APPENDIX B.
The types of connection to the Sym-o-net, along with the steps to achieve them are explained
analytically below.

SYMONET USER GUIDE Version 2.0 7
A. STARTING UP - LOCAL SETUP
Connect a NULL MODEM DB9F to DB9F cable between the device’s MASTER port and
a computer COM port.
If the Sym-o-net has already a SIM card and is already powered, omit the next 3 steps.
Place your SIM Card in the corresponding slot of the Sym-o-net (depending on the
connection type you wish- see next chapters- select the appropriate SIM card type-
GPRS or data) and screw an Antenna to the corresponding connector.
Connect the Sym-o-net to the power supply (recommended 12V DC between the
‘12~18VDC’ and ‘GND’ pins.
Sym-o-net red LEDs will be steadily lit for a few seconds.
Some of the leds will flash intermittently for about half a minute, until the MODEM led and
the DEVICE 1 led are permanently lit.
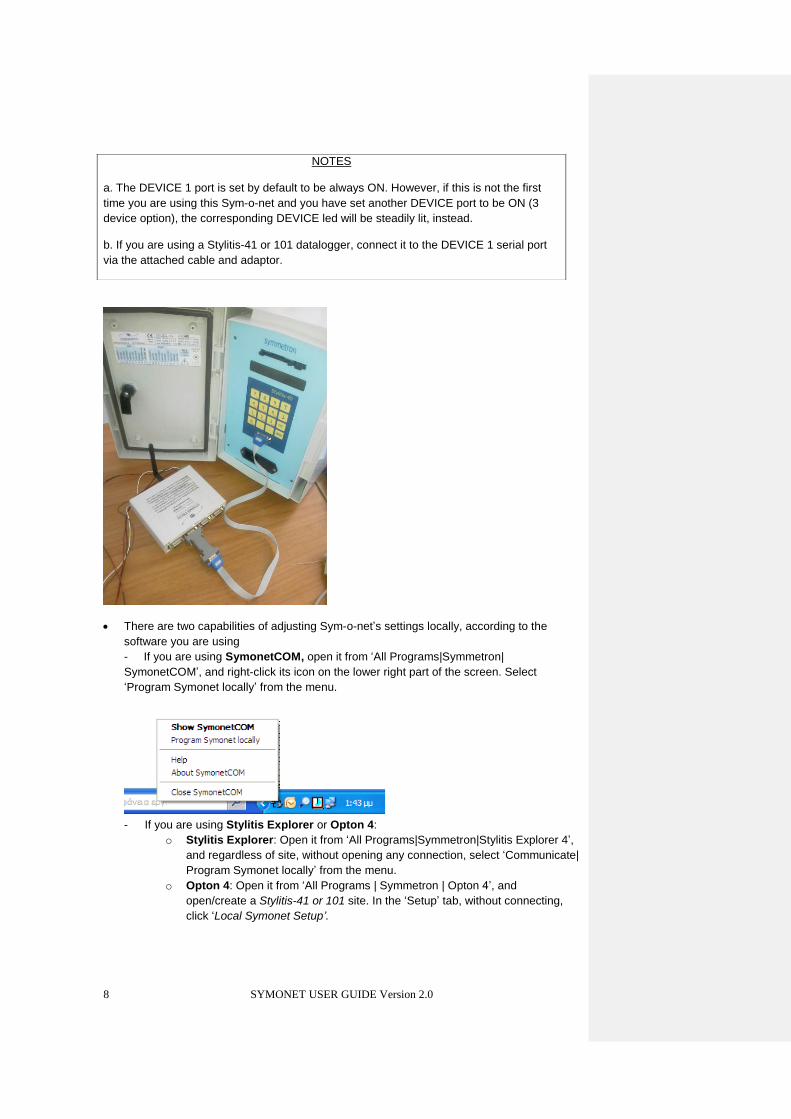
SYMONET USER GUIDE Version 2.0 8
There are two capabilities of adjusting Sym-o-net’s settings locally, according to the
software you are using
- If you are using SymonetCOM, open it from ‘All Programs|Symmetron|
SymonetCOM’, and right-click its icon on the lower right part of the screen. Select
‘Program Symonet locally’ from the menu.
- If you are using Stylitis Explorer or Opton 4:
o Stylitis Explorer: Open it from ‘All Programs|Symmetron|Stylitis Explorer 4’,
and regardless of site, without opening any connection, select ‘Communicate|
Program Symonet locally’ from the menu.
o Opton 4: Open it from ‘All Programs | Symmetron | Opton 4’, and
open/create a Stylitis-41 or 101 site. In the ‘Setup’ tab, without connecting,
click ‘Local Symonet Setup’.
NOTES
a. The DEVICE 1 port is set by default to be always ON. However, if this is not the first
time you are using this Sym-o-net and you have set another DEVICE port to be ON (3
device option), the corresponding DEVICE led will be steadily lit, instead.
b. If you are using a Stylitis-41 or 101 datalogger, connect it to the DEVICE 1 serial port
via the attached cable and adaptor.
SYMONET USER GUIDE Version 2.0 9
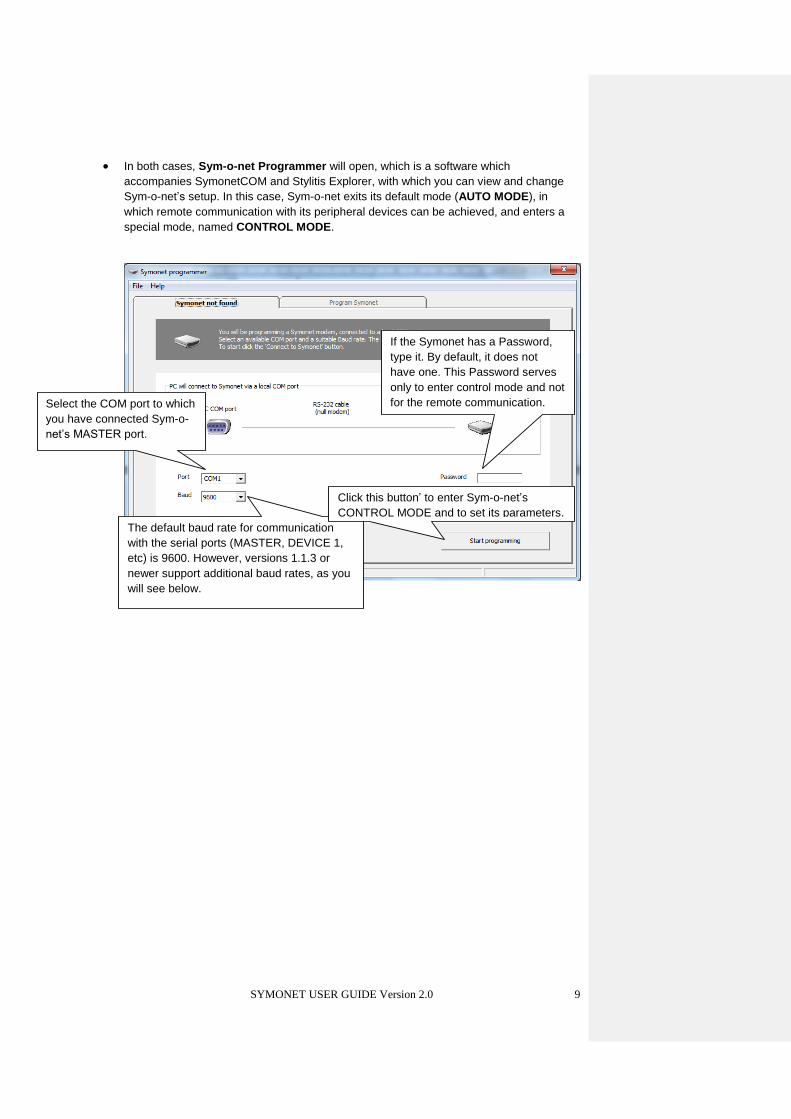
In both cases, Sym-o-net Programmer will open, which is a software which
accompanies SymonetCOM and Stylitis Explorer, with which you can view and change
Sym-o-net’s setup. In this case, Sym-o-net exits its default mode (AUTO MODE), in
which remote communication with its peripheral devices can be achieved, and enters a
special mode, named CONTROL MODE.
If the Symonet has a Password,
type it. By default, it does not
have one. This Password serves
only to enter control mode and not
for the remote communication. Select the COM port to which
you have connected Sym-o-
net’s MASTER port.
The default baud rate for communication
with the serial ports (MASTER, DEVICE 1,
etc) is 9600. However, versions 1.1.3 or
newer support additional baud rates, as you
will see below.
Click this button’ to enter Sym-o-net’s
CONTROL MODE and to set its parameters.

SYMONET USER GUIDE Version 2.0 10
After a few seconds, the ‘Program Symonet’ tab opens, which contains the summary of
all Sym-o-net settings. By clicking on a group of settings, the corresponding form opens
to be edited. You can also change some other settings, as you can see below.
The remaining settings concern the connection type you will use and the settings of a
data email from a Stylitis-41 or Stylitis-101 data logger (if you are using one). These
settings will be discussed in the corresponding chapters, according to the connection type
you wish to achieve. Specifically:
o If you wish a connection via the GPRS network via a dynamic IP SIM card (via
Diameson server), click here.
o If you wish multiple Sym-o-net connection in a network, via the GPRS network,
via Diameson server (virtual wireless RS-485 network), click here.
o If you wish a connection via the GPRS network via a static IP SIM card, click
here.
o If you wish a connection via data callk via a data SIM card, click here.
When you finish editing the settings, click the ‘Write Setup to Symonet’ button. When you
have written the settings, click ‘Finish programming’ in order to exit CONTROL MODE
and return to AUTO MODE.
Click ‘Set’
to set your
computer’s
time.
If you just wish for a DEVICE port to be
permanently ON, click the corresponding
Device. Symonet will exit CONTROL MODE
and this tab will close. This DEVICE port will
stay open until its OFF time (see ‘Peripheral
Schedule’ form below), at which the
Peripheral Schedule is activated.
Select a different baud rate for all Sym-o-
net’s serial ports. (1)
If you wish to change the Password, click
‘Change’ and type the new one. (in order
to deactivate it, leave the field blank). (3)
Serial Number,
F/W version,
and power
supply info are
displayed.
..computer’s
time.
If you are using Sym-o-net with a
Stylitis-41 or Stylitis-101 datalogger,
check this check box.(2)
Type a mobile phone number which will
receive an alarm SMS if the power
supply is found below 11V. Leave the
field blank to deactivate this operation.
Click on one
of these time
schedules to
edit them. (4)

SYMONET USER GUIDE Version 2.0 11
NOTES
1. Select the baud rate of the MASTER port and the DEVICE port(s). The available baud
rates are: 1200~38400. If you change it, Sym-o-net with F/W version 2.0.0 or newer will
be automatically reset after you click ‘Finish Programming’. (about 3 minutes required)
For older versions, you must reset the power supply manually, for the new baud rate to
be applied, or it will be reset automatically at 23:30, as it does every day.
2. i. This option is available only in Sym-o-net version 2.0.0 or newer. This option enables
data emailing, while the baud rate is locked to 9600. If the check box is unchecked, you
can change baud rate, but you cannot enable data emailing, since you are not using a
Stylitis datalogger.
ii. These versions also support password synchronization (see note 2.ii.).
For older versions, data emailing is always enabled, while password synchronization is
not supported.
3. i. In case you are opening Sym-o-net Programmer via SymonetCOM, and you are
changing Sym-o-net’s Password, a message will appear, which induces you to also
change the Password of the GPRS connection you are using, in case you wish to
reconnect. This applies in case of a connection in client mode (see chapter B.3.ii.) and in
server mode (see chapter D.3.ii.).
ii. In case you are using a Stylitis data logger, you are opening Sym-o-net Programmer
via Stylitis Explorer. For Symonet versions 2.0.0 or newer and for Stylitis-41 versions
45.1 or newer and for Stylitis-101 versions 6.12 or newer, password synchronization
with the data logger is supported. Sym-o-net and the data logger always need to have the
same password. Therefore when Sym-o-net needs it, it will read the data logger’s
password, and it will replace its password with this one. Therefore, changing Sym-o-net’s
password is meaningless. For older Symonet or data logger versions, you must make
sure that the Sym-o-net and the data logger always have the same password.
Otherwise, Symonet may lock the data logger!
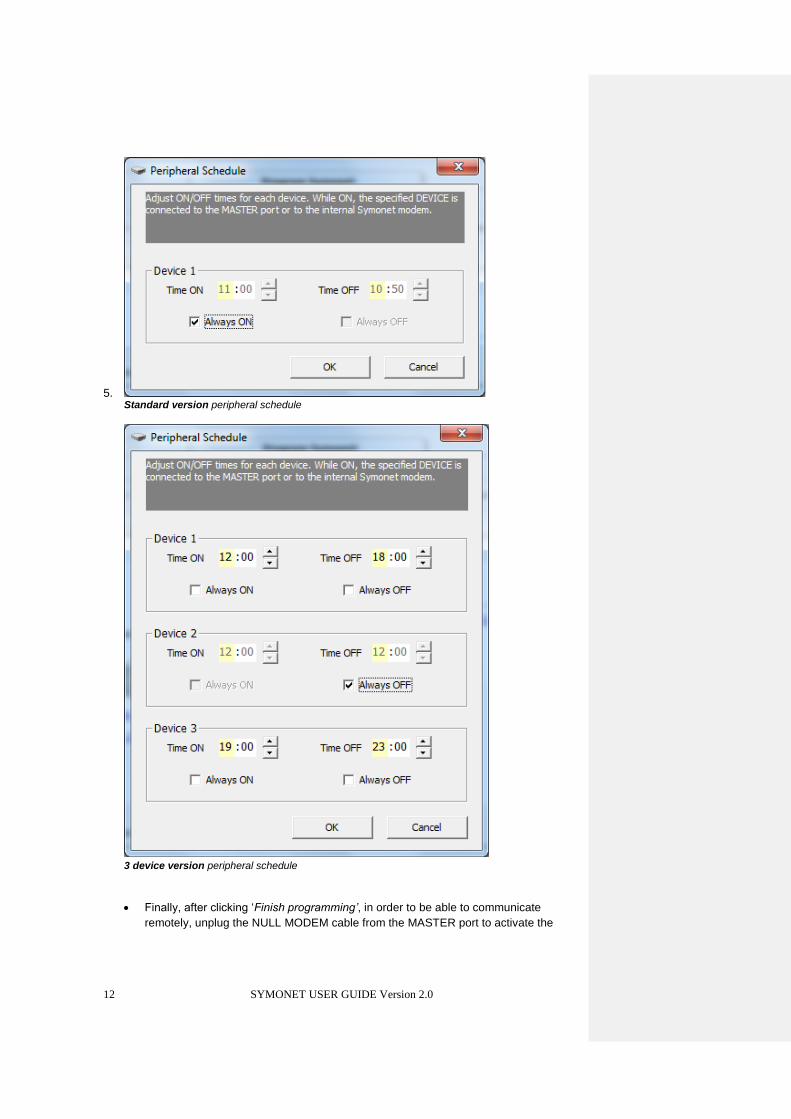
4. i. The peripheral schedule gives you the capability to switch on the modem’s power and
activate each Sym-o-net peripheral DEVICE port, between certain hours of the day, in
order to communicate with the corresponding device. In Sym-o-net’s standard version,
only DEVICE 1’s schedule is available, while in the 3 device version all 3 devices’
schedule is available (see screen shots below).
ii. You can type/select multiples of 10 minutes in the fields, ie the time ’10:56’, for
instance, is not valid. Alternatively, check or uncheck the ‘Always ON’ or ‘Always OFF’
check boxes, in order for a port and device to be active all day or to be never active.
However, at least one DEVICE port needs to be open for at least 1 hour.
iii. For the 3 device version: It is not recommended to have common active time periods
for the DEVICE ports, because only one port can be available at a time. That is, for
instance, it is not advised for the DEVICE 1 to be active from 09:00 to 12:00 and DEVICE
2 from 11:00 to 14:00. If you do so, DEVICE 1 has greater priority than DEVICE 2 and
DEVICE 2 has greater priority than DEVICE 3. Therefore, in the example above, DEVICE
1 will be active, from 09:00 to 12:00 and DEVICE 2 from 12:00 to 14:00.
SYMONET USER GUIDE Version 2.0 12
5. Standard version peripheral schedule
3 device version peripheral schedule
Finally, after clicking ‘Finish programming’, in order to be able to communicate
remotely, unplug the NULL MODEM cable from the MASTER port to activate the

SYMONET USER GUIDE Version 2.0 13
modem (as long as the cable is plugged and the COM port is open, the modem is
deactivated- the green MODEM STATUS led is off).
In this state, after about 1 minute, the DEVICE port you have selected to be active will
be open, according to the ‘Peripheral Schedule’ and the MODEM led and the
corresponding DEVICE led, will be steadily lit. The green MODEM STATUS led will
be flashing slowly (mainly OFF-instantly ON, indicating that the modem is registered
in the network). In this state, you will be able to communicate remotely with the
device you have connected to the specific DEVICE port, according to the connection
type you are using (see next chapters).
However, if at this time, no device is programmed to be available, the modem will be
off and no port will be open. This is indicated by the MODEM led which flashes
intermittently, while all the other leds are off.

SYMONET USER GUIDE Version 2.0 14
B. CONNECT VIA THE GPRS NETWORK VIA A DYNAMIC IP
SIM CARD (client mode)
By connecting to the Sym-o-net via the GPRS network, its SIM card is charged, according to
the data sent and not to the connection’s duration. Specifically, in this case, you will need a
GPRS SIM card in the Sym-o-net, but not an expensive static IP one, but a dynamic IP one.
You will use Diameson Gateway, a software server developed by Symmetron to which the
Symonet will be a GPRS client. If you are using Symmetron’s Diameson, omit the steps
below. Just inform us about your user name, so that we can register your Symonets in our
Diameson database. If you wish to use your own Diameson, (in a computer of your local
network), follow the steps below. Otherwise, omit them and go to 1. STARTING UP -LOCAL
SETUP.
0. DIAMESON SETTINGS
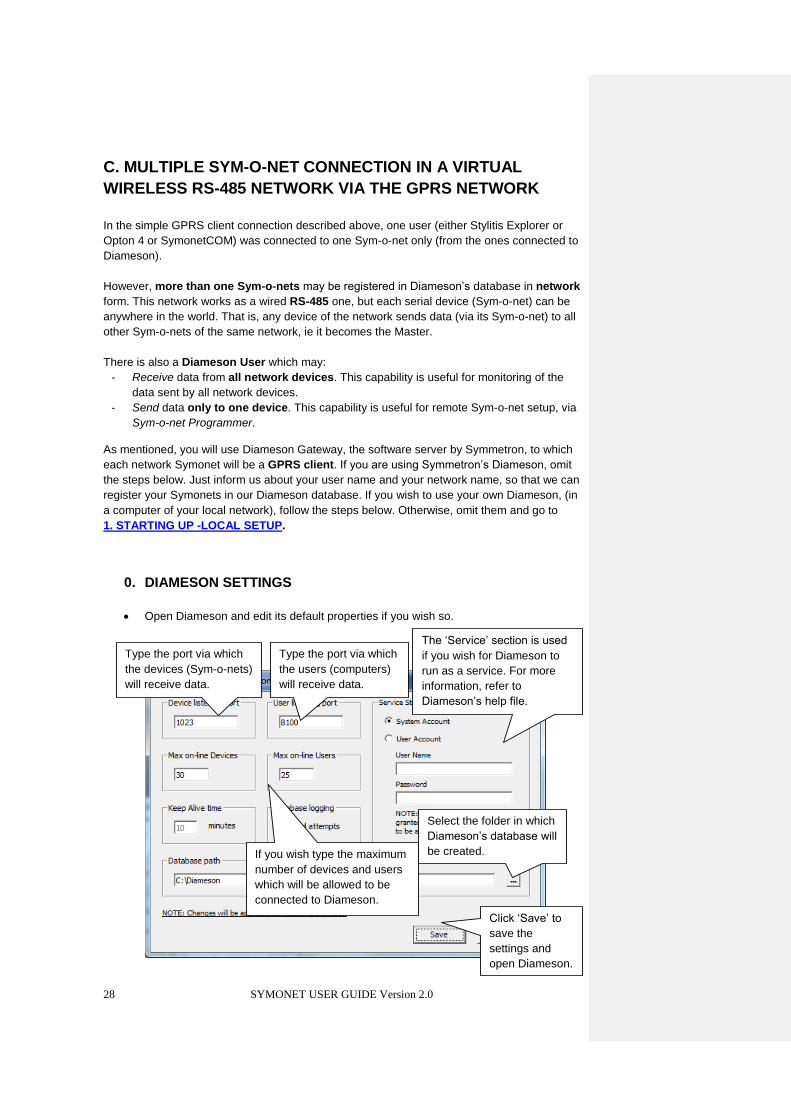
Open Diameson and edit its default properties if you wish so.
If Diameson is running in a LAN computer make sure the computer’s IP address is
static. Set your router to redirect these two ports to this computer’s (local) IP.
Furthermore, add these ports to the Firewall Exceptions of this computer.
Open Diameson’s database via Diameson Manager (select the Diameson.mdb
database via the Diameson Manager’s ‘File|Open’ menu).
Type the port via which
the devices (Sym-o-nets)
will receive data.
Type the port via which
the users (computers)
will receive data.
If you wish type the maximum
number of devices and users
which will be allowed to be
connected to Diameson.
Select the folder in which
Diameson’s database will
be created.
Click ‘Save’ to
save the settings
and open
Diameson.
The ‘Service’ section is used
if you wish for Diameson to
run as a service. For more
information, refer to
Diameson’s help file.

SYMONET USER GUIDE Version 2.0 15
Now this device will have the right to connect to Diameson, which uses the specific
database. Repeat for as many users and devices as you wish.
a. Open the Users
table (Click Show).
b. Click ‘+’ to
add a new user.
c. Type the User
Name you wish. d. If you wish, type more
features for the user. Its
‘Status’ must be ‘Enabled’
(it is the default value).
e. Click ‘v’ to
save the user.
a. Open the Devices
table (Click Show).
b. Click ‘+’ to add a
device (Sym-o-net).
c. Select the
UserName you
created
previously.
e. If you wish, type
more features for the
device. Its ‘Status’
must be ‘Enabled’ (it is
the default value),
while its ‘Type’ does
not affect the system’s
operation, but for
archiving reasons,
select ‘Symonet
Modem’.
f. Click ‘v’ to save
the device.
d. Type the Sym-
o-net’s Serial
Number.

SYMONET USER GUIDE Version 2.0 16
1. STARTING UP - LOCAL SETUP
Follow exactly the same steps as in the chapter A. STARTING UP –LOCAL SETUP. Set the
Sym-o-net’s parameters discussed in this chapter (see corresponding screen shot and notes).
2. CONNECTION TYPE SELECTION (client mode)
Afterwards, set the following parameters:
NOTES
1. If you change the modem’s operation, Sym-o-net with F/W version 2.0.0 or newer will
be automatically reset after you click ‘Finish Programming’. (about 3 minutes
required) For older versions, and for baud rates different from 9600, you are advised
to reset the power supply manually, for the new baud rate to be applied, or it will be
reset automatically at 23:30, as it does every day.
2. If you are using Symmetron’s Diameson, leave the default values: ‘1.diameson.net’
and ‘1023’ for IP address and port respectively.
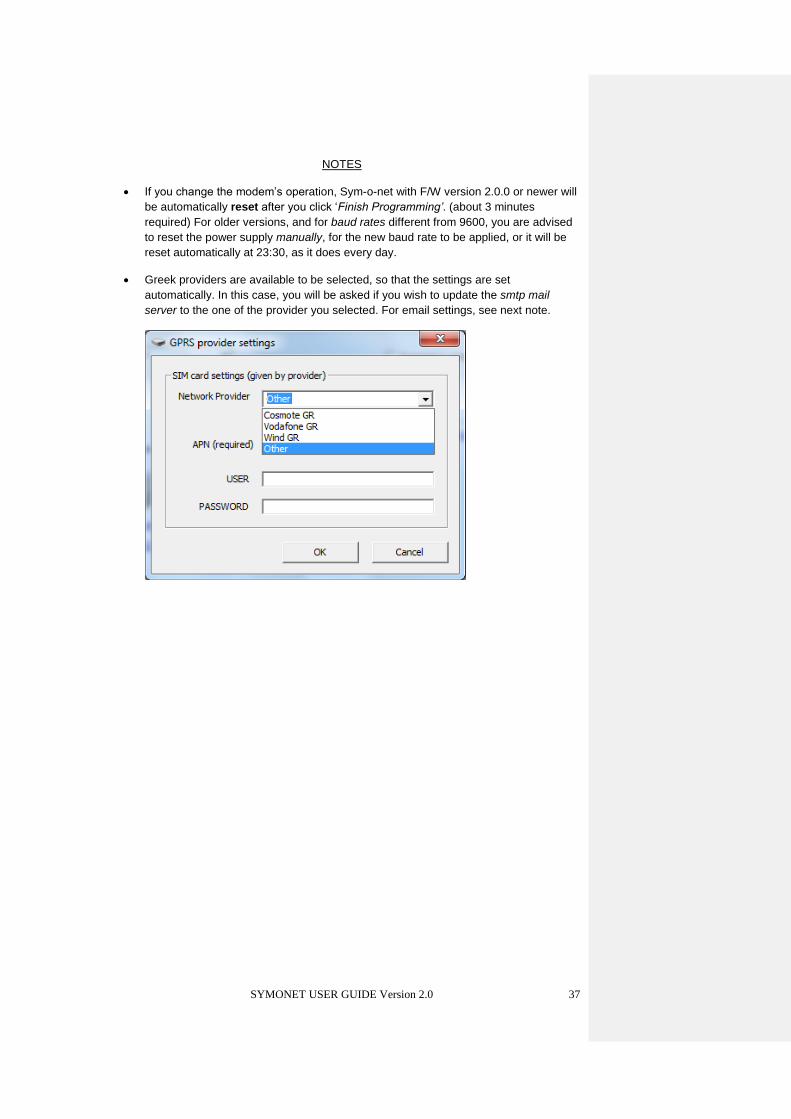
3. Greek providers are available to be selected, so that the settings are set
automatically. In this case, you will be asked if you wish to update the smtp mail
server to the one of the provider you selected. For email settings, see next note.
Select the ‘Symonet
is Diameson GPRS
client’ option. (1)
Set Diameson’s
IP address and
device listening
port settings. (2)
Set your SIM card
provider settings
(APN, user name,
password). (3)
If you are using a Stylitis
datalogger, you can enable
encrypted (according to the
password) data emailing, at
least once a day. (4)
SYMONET USER GUIDE Version 2.0 17
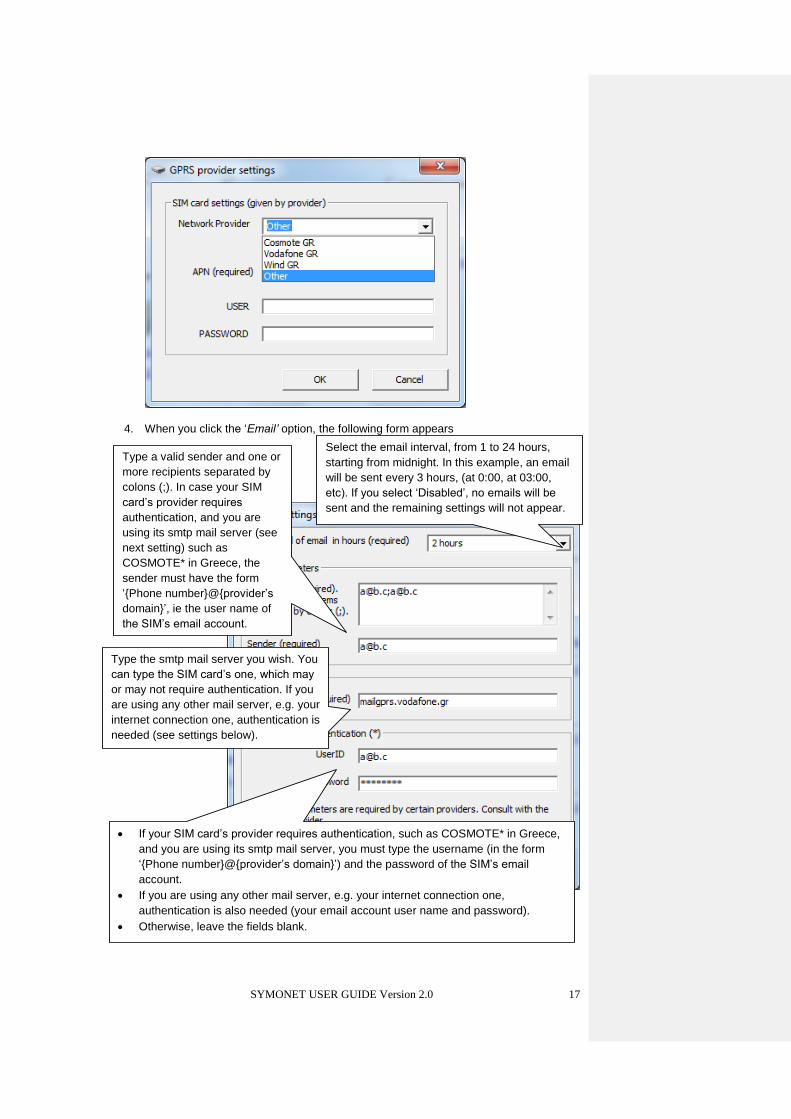
4. When you click the ‘Email’ option, the following form appears
Select the email interval, from 1 to 24 hours,
starting from midnight. In this example, an email
will be sent every 3 hours, (at 0:00, at 03:00,
etc). If you select ‘Disabled’, no emails will be
sent and the remaining settings will not appear.
Type a valid sender and one or
more recipients separated by
colons (;). In case your SIM
card’s provider requires
authentication, and you are
using its smtp mail server (see
next setting) such as
COSMOTE* in Greece, the
sender must have the form
‘{Phone number}@{provider’s
domain}’, ie the user name of
the SIM’s email account.
If your SIM card’s provider requires authentication, such as COSMOTE* in Greece,
and you are using its smtp mail server, you must type the username (in the form
‘{Phone number}@{provider’s domain}’) and the password of the SIM’s email
account.
If you are using any other mail server, e.g. your internet connection one,
authentication is also needed (your email account user name and password).
Otherwise, leave the fields blank.
Type the smtp mail server you wish. You
can type the SIM card’s one, which may
or may not require authentication. If you
are using any other mail server, e.g. your
internet connection one, authentication is
needed (see settings below).
SYMONET USER GUIDE Version 2.0 18
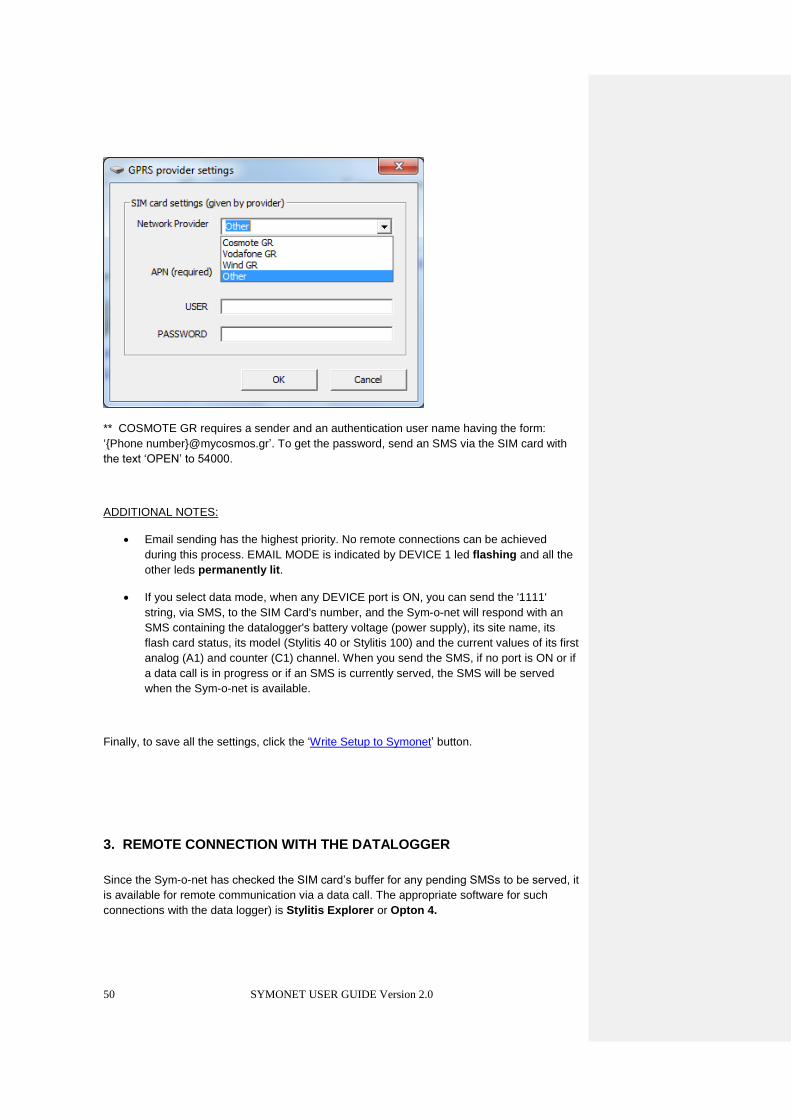
* COSMOTE GR requires a sender and an authentication user name having the form:
‘{Phone number}@mycosmos.gr’. To get the password, send an SMS via the SIM card with
the text ‘OPEN’ to 54000.
NOTE: Email sending has the highest priority. No remote connections can be achieved during
this process. EMAIL MODE is indicated by DEVICE 1 led flashing and all the other leds
permanently lit.
Finally, to save all the settings, click the ‘Write Setup to Symonet’ button.
3. REMOTE CONNECTION IN CLIENT MODE
Since the Sym-o-net has been connected to Diameson, it is available for remote
communication via the GPRS network and the internet. The appropriate software for such
connections depends on the devices you have connected to the Sym-o-net’s DEVICE port(s).
In case you are using only a Stylitis-41 or 101 datalogger (connected to the DEVICE 1 port as
stated above), the appropriate software is Stylitis Explorer or Opton 4, while if you are using
any other serial devices as well or only other serial devices, connected to any DEVICE ports,
the appropriate software is SymonetCOM.
i. Connect to a datalogger via Stylitis Explorer
Open Stylitis Explorer and create a new site, by selecting ‘Site|Create new Site’
from the menu. The site’s Properties will appear.

SYMONET USER GUIDE Version 2.0 19
Click OK
Create a connection via the ‘Communicate|New Connection’ menu.
Select the model
of the Stylitis
datalogger you
are using.
Type the Password you wish for Sym-o-
net and the data logger. If Sym-o-net’s
F/W version is older than 2.0.0, make sure
that the two passwords are the same.
Type the Sym-o-net’s
Serial Number.

SYMONET USER GUIDE Version 2.0 20
Select a name for the connection in the ‘General’ tab and click OK.
Select this connection by double-clicking its file (.cem) from Stylitis Explorer, or via
the ‘Communicate|Ethernet’ menu.
Click ‘Connect’ in ‘Stylitis Communication’ window. Your computer will be connected
to Sym-o-net. If it is time for DEVICE 1 to be active (according to the ‘Peripheral
Schedule’), click ‘Activate’ to communicate with the datalogger.
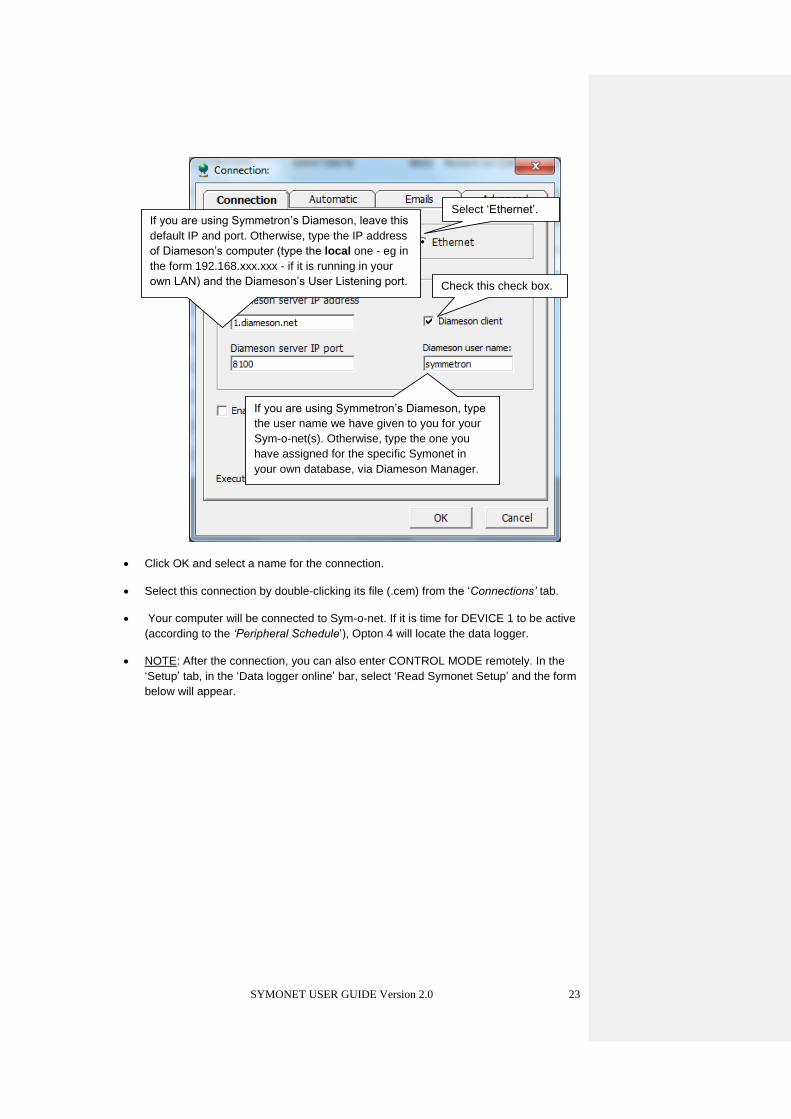
NOTE: After the connection, you can also enter CONTROL MODE remotely. The
‘Symonet modem options’ option on the upper left part of the ‘Stylitis Communication’
window is activated. If you click on it, the form below will appear.
Select ‘Ethernet’.
If you are using Symmetron’s Diameson, leave this
default IP and port. Otherwise, type the IP address
of Diameson’s computer (type the local one - eg in
the form 192.168.xxx.xxx - if it is running in your
own LAN) and the Diameson’s User Listening port.
If you are using Symmetron’s Diameson, type
the user name we have given to you for your
Sym-o-net(s). Otherwise, type the one you
have assigned for the specific Symonet in
your own database, via Diameson Manager.
Check this check box.

SYMONET USER GUIDE Version 2.0 21
By selecting ‘Program Symonet options’ and clicking ‘Start wizard’, Sym-o-net
Programmer appears again.
This default COM port is
virtual. You cannot change it.
Click ‘Start programming’ to
enter Sym-o-net’s CONTROL
MODE remotely.
No baud rate selection is available,
because the connection with the
Sym-o-net is remote.
Sym-o-net’s Password must be the
same with the one of the datalogger,
therefore it is retrieved automatically
from the Site Properties.

SYMONET USER GUIDE Version 2.0 22
ii. Connect to a datalogger via Opton 4
Open Opton 4 and open the ‘Sites’ bar on the centre part of ‘Start’ tab. Select any one of
the first 3 options, to open the ‘Sites’ tab. In ‘Sites’ tab, create a new site, via the options
of the ‘Site Folders’ bar on the left. The site properties will appear.
Click OK
The 5 tabs of the new site will open. Create a connection in the site’s ‘Connections’
tab, by selecting ‘+New Connection’ in the ‘Communication’ bar on the left part.
Select the model
of the Stylitis
datalogger you
are using.
Type the Password you wish for Sym-o-
net and the data logger. If Sym-o-net’s
F/W version is older than 2.0.0, make sure
that the two passwords are the same.
Type the Sym-o-net’s
Serial Number.
SYMONET USER GUIDE Version 2.0 23
Click OK and select a name for the connection.
Select this connection by double-clicking its file (.cem) from the ‘Connections’ tab.
Your computer will be connected to Sym-o-net. If it is time for DEVICE 1 to be active
(according to the ‘Peripheral Schedule’), Opton 4 will locate the data logger.
NOTE: After the connection, you can also enter CONTROL MODE remotely. In the
‘Setup’ tab, in the ‘Data logger online’ bar, select ‘Read Symonet Setup’ and the form
below will appear.
Select ‘Ethernet’. If you are using Symmetron’s Diameson, leave this
default IP and port. Otherwise, type the IP address
of Diameson’s computer (type the local one - eg in
the form 192.168.xxx.xxx - if it is running in your
own LAN) and the Diameson’s User Listening port.
If you are using Symmetron’s Diameson, type
the user name we have given to you for your
Sym-o-net(s). Otherwise, type the one you
have assigned for the specific Symonet in
your own database, via Diameson Manager.
Check this check box.

SYMONET USER GUIDE Version 2.0 24
By selecting ‘Program Symonet options’ and clicking ‘Start wizard’, Sym-o-net
Programmer appears again.
This default COM port is
virtual. You cannot change it.
Click ‘Start programming’ to
enter Sym-o-net’s CONTROL
MODE remotely.
No baud rate selection is available,
because the connection with the
Sym-o-net is remote.
Sym-o-net’s Password must be the
same with the one of the datalogger,
therefore it is retrieved automatically
from the Site Properties.

SYMONET USER GUIDE Version 2.0 25
iii. Connect to a Sym-o-net’s DEVICE port via SymonetCOM
SymonetCOM is a software which, besides opening Sym-o-net Programmer locally, enables
remote GPRS communication with a Sym-o-net, and specifically with a peripheral device,
connected to the corresponding DEVICE port. In client mode, it presupposes that the Sym-o-
net is connected to Diameson.
Open SymonetCOM from ‘All Programs|Symmetron|SymonetCOM’.
Type a connection
name to create.
Go to the ‘Edit’ tab. Select ‘Diameson client.
If you are using Symmetron’s
Diameson, leave this default IP and
port. Otherwise, type the IP address
of Diameson’s computer (type the
local one - eg in the form
192.168.xxx.xxx if it is running in
your own LAN) and the Diameson’s
User Listening port.
If you are using Symmetron’s Diameson, type the user
name we have given to you for your Sym-o-net(s). Other-
wise, type the one you have assigned for the specific
Symonet in your own database, via Diameson Manager.
Type the
Symonet’s
Serial Number
and Password.
Click this button to
save the connection.
Select
‘Diameson
client.
Select a virtual or
physical COM
port number,
according to your
needs. For
details see the
notes below.

SYMONET USER GUIDE Version 2.0 26
* This has a meaning only in the 3 device version. In the standard one, it is not allowed.
COM PORT NOTES
- Select a virtual COM port, in order to create it. In this case, it will be available to open it
via another software (via a “local” connection via this COM port), such as Symonet
Programmer (via the ‘Symonet Wizard’ button) or HyperTerminal. In this case, the
communication will be remote, but you will use a virtual ‘local’ port. The program you will
select will open the port. Therefore, it will define the ‘Baud rate’, ‘Parity’, ‘Length bits’ and
‘Stop bits’ parameters and not SymonetCOM, which just creates the port. When you are
done using the program, close it to close the port and then press ‘Disconnect’.
- Select a physical COM port, ie an existing one in your computer, in order to open it. In
this case, you cannot use the port via a program (since it is already open), but you can
connect an external device to your COM port which will send commands to the Sym-o-
net (and hence to your remote devices). In this case, you must define the ‘Baud rate’,
‘Parity’, ‘Length bits’ and ‘Stop bits’ parameters, (the ones at which the external device
operates) because now the program which opens the COM port is SymonetCOM.
After the connection succeeds, the ‘Symonet Wizard’ button is activated. If you click
it, Symonet Programmer appears again.
Select a Sym-o-net DEVICE
port, which will be activated
after the connection
succeeds. You can also
change it, after the
connection succeeds.
Go to the
connection’s tab Click the ‘Connect’
button, which becomes
‘Disconnect’.
All the connection
activities, along with the
selection of the DEVICE
port, will appear here.
When the connection succeeds,
these squares will become green.

SYMONET USER GUIDE Version 2.0 27
This default COM port is
virtual. You cannot change it.
Click ‘Start programming’ to
enter Sym-o-net’s CONTROL
MODE remotely.
No baud rate selection is available,
because the connection with the
Sym-o-net is remote.
Sym-o-net’s Password must match
Diameson’s connection, therefore it is
retrieved automatically from the
connection’s parameters.
SYMONET USER GUIDE Version 2.0 28
C. MULTIPLE SYM-O-NET CONNECTION IN A VIRTUAL
WIRELESS RS-485 NETWORK VIA THE GPRS NETWORK
In the simple GPRS client connection described above, one user (either Stylitis Explorer or
Opton 4 or SymonetCOM) was connected to one Sym-o-net only (from the ones connected to
Diameson).
However, more than one Sym-o-nets may be registered in Diameson’s database in network
form. This network works as a wired RS-485 one, but each serial device (Sym-o-net) can be
anywhere in the world. That is, any device of the network sends data (via its Sym-o-net) to all
other Sym-o-nets of the same network, ie it becomes the Master.
There is also a Diameson User which may:
- Receive data from all network devices. This capability is useful for monitoring of the
data sent by all network devices.
- Send data only to one device. This capability is useful for remote Sym-o-net setup, via
Sym-o-net Programmer.
As mentioned, you will use Diameson Gateway, the software server by Symmetron, to which
each network Symonet will be a GPRS client. If you are using Symmetron’s Diameson, omit
the steps below. Just inform us about your user name and your network name, so that we can
register your Symonets in our Diameson database. If you wish to use your own Diameson, (in
a computer of your local network), follow the steps below. Otherwise, omit them and go to
1. STARTING UP -LOCAL SETUP.
0. DIAMESON SETTINGS
Open Diameson and edit its default properties if you wish so.
Type the port via which
the devices (Sym-o-nets)
will receive data.
Type the port via which
the users (computers)
will receive data.
If you wish type the maximum
number of devices and users
which will be allowed to be
connected to Diameson.
Select the folder in which
Diameson’s database will
be created.
Click ‘Save’ to
save the
settings and
open Diameson.
The ‘Service’ section is used
if you wish for Diameson to
run as a service. For more
information, refer to
Diameson’s help file.

SYMONET USER GUIDE Version 2.0 29
If Diameson is running in a LAN computer make sure the computer’s IP address is
static. Set your router to redirect these two ports to this computer’s (local) IP.
Furthermore, add these ports to the Firewall Exceptions of this computer.
Open Diameson’s database via Diameson Manager (select the Diameson.mdb
database via the Diameson Manager’s ‘File|Open’ menu).
Afterwards, repeat for every network Sym-o-net (register all Serial Numbers,
while their network name must be the same):
a. Open the
Users table
(Click Show).
b. Click ‘+’ to
add a new user.
c. Type the User
Name you wish. e. If you wish, type more
features for the user. Its
‘Status’ must be
‘Enabled’ (it is the
default value).
f. Click ‘v’ to
save the user.
d. Type your
network name.

SYMONET USER GUIDE Version 2.0 30
Now all Sym-o-nets will have the right to connect to Diameson, which uses the
specific database.
This way, all the devices and the user belong to the same network.
1. STARTING UP- LOCAL SETUP
For each Sym-o-net you wish to be connected to Diameson in network, follow exactly the
same steps as in the chapter A. STARTING UP –LOCAL SETUP Set the Sym-o-net’s
parameters discussed in this chapter (see corresponding screen shot and notes).
a. Open the Devices
table (Click Show).
b. Click ‘+’ to add a
device (Sym-o-net).
c. Select the
UserName
you created
previously.
g. Click ‘v’ to save
the device.
d. Type each
Sym-o-net’s
Serial Number.
f. If you wish, type
more features for the
device. Its ‘Status’
must be ‘Enabled’ (it is
the default value),
while its ‘Type’ does
not affect the system’s
operation, but for
archiving reasons,
select ‘Symonet
Modem’.
e. Type the
User’s network
name you typed
before.

SYMONET USER GUIDE Version 2.0 31
2. CONNECTION TYPE SELECTION (client mode)
Afterwards, set the following parameters:
NOTES
1. If you change the modem’s operation, Sym-o-net with F/W version 2.0.0 or newer will
be automatically reset after you click ‘Finish Programming’. (about 3 minutes
required) For older versions, and for baud rates different from 9600, you are advised
to reset the power supply manually, for the new baud rate to be applied, or it will be
reset automatically at 23:30, as it does every day.
2. If you are using Symmetron’s Diameson, leave the default values: ‘1.diameson.net’
and ‘1023’ for IP address and port respectively.
3. Greek providers are available to be selected, so that the settings are set
automatically. In this case, you will be asked if you wish to update the smtp mail
server to the one of the provider you selected. For email settings, see next note.
Select the ‘Symonet
is Diameson GPRS
client’ option. (1)
Set Diameson’s
IP address and
device listening
port settings. (2)
Set your SIM card
provider settings
(APN, user name,
password). (3)
If you wish, change Sym-
o-net’s Password (the one
used for the connection to
Diameson).
Email capability is disabled in this
Sym-o-net operation, since Stylitis
data loggers cannot be used
(disabled feature.

SYMONET USER GUIDE Version 2.0 32
Finally, to save all the settings, click the ‘Write Setup to Symonet’ button.

SYMONET USER GUIDE Version 2.0 33
3. REMOTE COMMUNICATION WITH THE NETWORK DEVICES VIA THE
NETWORK’S USER (via SymonetCOM)
Since the Sym-o-nets have been connected to Diameson, they can communicate with each
other according to the RS-485 protocol, as described before.
Moreover, the network’s user can monitor all devices’ activity and connect with only one to
send data to it (usually to set the Sym-o-net setup via Sym-o-net Programmer). Since
communication with dataloggers is not available in this mode, this user cannot be Stylitis
Explorer or Opton 4, but only SymonetCOM, a software which, besides opening Sym-o-net
Programmer locally, enables remote GPRS communication with the network Sym-o-nets.
Open SymonetCOM from ‘All Programs|Symmetron|SymonetCOM’.
Type a connection
name to create.
Go to the ‘Edit’ tab. Select ‘Diameson client.
If you are using Symmetron’s
Diameson, leave this default IP and
port. Otherwise, type the IP address
of Diameson’s computer (type the
local one - eg in the form
192.168.xxx.xxx if it is running in
your own LAN) and the Diameson’s
User Listening port.
If you are using Symmetron’s Diameson, type the
network user name we have given to you for your
Sym-o-nets. Otherwise, type the one you have
assigned for the network Symonets in your own
database, via Diameson Manager.
Type the one
Symonet’s Serial
Number and
Password to which
you wish to send data.
Click this button to
save the connection.
Select
‘Diameson
client.
Select a virtual or
physical COM
port number,
according to your
needs. For
details see the
notes below.

SYMONET USER GUIDE Version 2.0 34
* This has a meaning only in the 3 device version. In the standard one, it is not allowed.
COM PORT NOTES
- Select a virtual COM port, in order to create it. In this case, it will be available to open it via
another software (via a “local” connection via this COM port), such as Symonet Programmer
(via the ‘Symonet Wizard’ button) or HyperTerminal. In this case, the communication will be
remote, but you will use a virtual ‘local’ port. The program you will select will open the port.
Therefore, it will define the ‘Baud rate’, ‘Parity’, ‘Length bits’ and ‘Stop bits’ parameters and
not SymonetCOM, which just creates the port. When you are done using the program, close
it to close the port and then press ‘Disconnect’.
- Select a physical COM port, ie an existing one in your computer, in order to open it. In this
case, you cannot use the port via a program (since it is already open), but you can connect
an external device to your COM port which will send commands to the Sym-o-net (and hence
to your remote devices). In this case, you must define the ‘Baud rate’, ‘Parity’, ‘Length bits’
and ‘Stop bits’ parameters, (the ones at which the external device operates) because now the
program which opens the COM port is SymonetCOM.
- You will need this COM port to open a software (via a virtual COM port), like HyperTerminal,
to monitor data sent by all network Sym-o-nets or to communicate with a specific Sym-o-net
(via a virtual or physical COM port).
Select a Sym-o-net DEVICE
port, which will be activated
after the connection
succeeds. You can also
change it, after the
connection succeeds.
Go to the
connection’s tab Click the ‘Connect’
button, which becomes
‘Disconnect’.
All the connection
activities, along with the
selection of the DEVICE
port, will appear here.
When the connection succeeds,
these squares will become green.

SYMONET USER GUIDE Version 2.0 35
After the connection succeeds, the ‘Symonet Wizard’ button is activated. If you click
it, Symonet Programmer appears again for communication (programming) of one
Sym-o-net.
This default COM port is
virtual. You cannot change it.
Click ‘Start programming’ to
enter Sym-o-net’s CONTROL
MODE remotely.
No baud rate selection is available,
because the connection with the
Sym-o-net is remote.
Sym-o-net’s Password must match
Diameson’s connection, therefore it is
retrieved automatically from the
connection’s parameters.

SYMONET USER GUIDE Version 2.0 36
D. CONNECT VIA THE GPRS NETWORK VIA A STATIC IP SIM
CARD (server mode)
There is an extra capability for a computer’s connection to the Sym-o-net via the GPRS
network. You can use a static IP SIM card. In this case you do not need Diameson, because
Sym-o-net itself will operate as a server (it will be set in server mode) and it will be able to
receive only one client at a time.
1. STARTING UP- LOCAL SETUP
Follow exactly the same steps as in the chapter A. STARTING UP –LOCAL SETUP. Set the
Sym-o-net’s parameters discussed in this chapter (see corresponding screen shot and notes).
2. CONNECTION TYPE SELECTION (server mode)
Afterwards, set the following parameters:
Select the ‘Symonet
is GPRS server’
option. (1)
Set your SIM card
provider settings
(APN, user name,
password). (2)
If you are using a Stylitis
datalogger, you can enable
encrypted (according to the
password) data emailing, at
least once a day. (3)
Select the port of Sym-o-
net via which it will receive
the client. Any valid port
number is acceptable.
SYMONET USER GUIDE Version 2.0 37
NOTES
If you change the modem’s operation, Sym-o-net with F/W version 2.0.0 or newer will
be automatically reset after you click ‘Finish Programming’. (about 3 minutes
required) For older versions, and for baud rates different from 9600, you are advised
to reset the power supply manually, for the new baud rate to be applied, or it will be
reset automatically at 23:30, as it does every day.
Greek providers are available to be selected, so that the settings are set
automatically. In this case, you will be asked if you wish to update the smtp mail
server to the one of the provider you selected. For email settings, see next note.

SYMONET USER GUIDE Version 2.0 38
When you click the ‘Email’ option, the following form appears
* COSMOTE GR requires a sender and an authentication user name having the form:
‘{Phone number}@mycosmos.gr’. To get the password, send an SMS via the SIM card with
the text ‘OPEN’ to 54000.
NOTE: Email sending has the highest priority. No remote connections can be achieved during
this process. EMAIL MODE is indicated by DEVICE 1 led flashing and all the other leds
permanently lit.
Finally, to save all the settings, click the ‘Write Setup to Symonet’ button.
Select the email interval, from 1 to 24 hours,
starting from midnight. In this example, an email
will be sent every 3 hours, (at 0:00, at 03:00,
etc). If you select ‘Disabled’, no emails will be
sent and the remaining settings will not appear.
Type a valid sender and one or
more recipients separated by
colons (;). In case your SIM
card’s provider requires
authentication, and you are
using its smtp mail server (see
next setting) such as
COSMOTE* in Greece, the
sender must have the form
‘{Phone number}@{provider’s
domain}’, ie the user name of
the SIM’s email account.
If your SIM card’s provider requires authentication, such as COSMOTE* in Greece,
and you are using its smtp mail server, you must type the username (in the form
‘{Phone number}@{provider’s domain}’) and the password of the SIM’s email
account.
If you are using any other mail server, e.g. your internet connection one,
authentication is also needed (your email account user name and password).
Otherwise, leave the fields blank.
Type the smtp mail server you wish. You
can type the SIM card’s one, which may
or may not require authentication. If you
are using any other mail server, e.g. your
internet connection one, authentication is
needed (see settings below).

SYMONET USER GUIDE Version 2.0 39
3. REMOTE CONNECTION IN SERVER MODE
Since the Sym-o-net has been registered to the network as a server, it is available for remote
communication via the GPRS network and the internet. The appropriate software for such
connections, which will have the role of the client, depends on the devices you have
connected to the Sym-o-net’s DEVICE port(s). In case you are using only a Stylitis-41 or 101
datalogger (connected to the DEVICE 1 port as stated above), the appropriate software is
Stylitis Explorer, while if you are using any other serial devices as well or only other serial
devices, connected to any DEVICE ports, the appropriate software is SymonetCOM.
i. Connect to a datalogger via Stylitis Explorer
Open Stylitis Explorer and create a new site, by selecting ‘Site|Create new Site’
from the menu. The site’s Properties will appear.
Click OK
Create a connection via the ‘Communicate|New Connection’ menu.
Select the model
of the Stylitis
datalogger you
are using.
Type the Password you wish for Sym-o-net
and the data logger. If Sym-o-net’s F/W
version is older than 2.0.0, make sure that
the two passwords are the same.
Type the Sym-
o-net’s Serial
Number.

SYMONET USER GUIDE Version 2.0 40
Select a name for the connection in the ‘General’ tab and click OK.
Select this connection by double-clicking its file (.cem) from Stylitis Explorer, or via
the ‘Communicate|Ethernet’ menu.
Click ‘Connect’ in ‘Stylitis Communication’ window. Your computer will be connected
to Sym-o-net. If it is time for DEVICE 1 to be active (according to the ‘Peripheral
Schedule’), click ‘Activate’ to communicate with the datalogger.
NOTE: After the connection, you can also enter CONTROL MODE remotely. The
‘Symonet modem options’ option on the upper left part of the ‘Stylitis Communication’
window is activated. If you click on it, the form below will appear.
Select ‘Ethernet’.
Type the SIM card’s static IP address
and the Server IP port you selected
before via Symonet Programmer.
Do not check this check box.

SYMONET USER GUIDE Version 2.0 41
By selecting ‘Program Symonet options’ and clicking ‘Start wizard’, Sym-o-net
Programmer appears again.
This default COM port is
virtual. You cannot change it.
Click ‘Start programming’ to
enter Sym-o-net’s CONTROL
MODE remotely.
No baud rate selection is available,
because the connection with the
Sym-o-net is remote.
Sym-o-net’s Password must be the
same with the one of the datalogger,
therefore it is retrieved automatically
from the Site Properties.

SYMONET USER GUIDE Version 2.0 42
ii. Connect to a datalogger via Opton 4
Open Opton 4 and open the ‘Sites’ bar on the centre part of ‘Start’ tab. Select any one of
the first 3 options, to open the ‘Sites’ tab. In ‘Sites’ tab, create a new site, via the options
of the ‘Site Folders’ bar on the left. The site properties will appear.
Click OK
The 5 tabs of the new site will open. Create a connection in the site’s ‘Connections’
tab, by selecting ‘+New Connection’ in the ‘Communication’ bar on the left part.
Select the model
of the Stylitis
datalogger you
are using.
Type the Password you wish for Sym-o-
net and the data logger. If Sym-o-net’s
F/W version is older than 2.0.0, make sure
that the two passwords are the same.
Type the Sym-o-net’s
Serial Number.

SYMONET USER GUIDE Version 2.0 43
Click OK and select a name for the connection.
Select this connection by double-clicking its file (.cem) from the ‘Connections’ tab.
Your computer will be connected to Sym-o-net. If it is time for DEVICE 1 to be active
(according to the ‘Peripheral Schedule’), Opton 4 will locate the data logger.
NOTE: After the connection, you can also enter CONTROL MODE remotely. In the
‘Setup’ tab, in the ‘Data logger online’ bar, select ‘Read Symonet Setup’ and the form
below will appear.
Select ‘Ethernet’.
Do not check this
check box.
Type the SIM card’s
static IP address and the
Server IP port you
selected before via
Symonet Programmer.

SYMONET USER GUIDE Version 2.0 44
By selecting ‘Program Symonet options’ and clicking ‘Start wizard’, Sym-o-net
Programmer appears again.
This default COM port is
virtual. You cannot change it.
Click ‘Start programming’ to
enter Sym-o-net’s CONTROL
MODE remotely.
No baud rate selection is available,
because the connection with the
Sym-o-net is remote.
Sym-o-net’s Password must be the
same with the one of the datalogger,
therefore it is retrieved automatically
from the Site Properties.

SYMONET USER GUIDE Version 2.0 45
iii. Connect to a Sym-o-net’s DEVICE port via SymonetCOM
SymonetCOM is a software which, besides opening Sym-o-net Programmer locally, enables
remote GPRS communication with a Sym-o-net, and specifically with a peripheral device,
connected to the corresponding DEVICE port. In server mode, it presupposes that the Sym-o-
net is registered in the network as a server.
Open SymonetCOM from ‘All Programs|Symmetron|SymonetCOM’.
Type a connection
name to create.
Go to the ‘Edit’ tab.
Select ‘Symonet client’.
Type the SIM card’s static IP
address and the Server IP port
you selected before via Symonet
Programmer.
Type the
Symonet’s
Password.
Click this button to
save the connection.
Select
‘Diameson
client.
Select a virtual
or physical
COM port
number,
according to
your needs. For
details see the
notes below.

SYMONET USER GUIDE Version 2.0 46
* This has a meaning only in the 3 device version. In the standard one, it is not allowed.
COM PORT NOTES
- Select a virtual COM port, in order to create it. In this case, it will be available to open it
via another software (via a “local” connection via this COM port), such as Symonet
Programmer (via the ‘Symonet Wizard’ button) or HyperTerminal. In this case, the
communication will be remote, but you will use a virtual ‘local’ port. The program you will
select will open the port. Therefore, it will define the ‘Baud rate’, ‘Parity’, ‘Length bits’ and
‘Stop bits’ parameters and not SymonetCOM, which just creates the port. When you are
done using the program, close it to close the port and then press ‘Disconnect’.
- Select a physical COM port, ie an existing one in your computer, in order to open it. In
this case, you cannot use the port via a program (since it is already open), but you can
connect an external device to your COM port which will send commands to the Sym-o-
net (and hence to your remote devices). In this case, you must define the ‘Baud rate’,
‘Parity’, ‘Length bits’ and ‘Stop bits’ parameters, (the ones at which the external device
operates) because now the program which opens the COM port is SymonetCOM.
Go to the
connection’s tab Click the ‘Connect’
button, which becomes
‘Disconnect’.
All the connection
activities, along with the
selection of the DEVICE
port, will appear here.
When the connection succeeds,
these squares will become green.
Select a Sym-o-net DEVICE
port, which will be activated
after the connection
succeeds. You can also
change it, after the
connection succeeds.

SYMONET USER GUIDE Version 2.0 47
After the connection succeeds, the ‘Symonet Wizard’ button is activated. If you click
it, Symonet Programmer appears again.
This default COM port is
virtual. You cannot change it.
Click ‘Start programming’ to
enter Sym-o-net’s CONTROL
MODE remotely.
No baud rate selection is available,
because the connection with the
Sym-o-net is remote.
Sym-o-net’s Password must match
Diameson’s connection, therefore it is
retrieved automatically from the
connection’s parameters.

SYMONET USER GUIDE Version 2.0 48
E. CONNECT VIA A DATA CALL VIA A DATA SIM CARD (data
mode)
Besides a GPRS connection, you can also achieve a simple data call to Sym-o-net’s SIM card
via a GSM modem connected to your computer. For this operation, you need a GSM data
SIM card for the Sym-o-net and one for your computer’s modem. The one in your computer’s
modem is time-charged.
1. STARTING UP- LOCAL SETUP
Follow exactly the same steps as in the chapter A. STARTING UP –LOCAL SETUP. Set the
Sym-o-net’s parameters discussed in this chapter (see corresponding screen shot and notes).
2. CONNECTION TYPE SELECTION (data mode)
Afterwards, set the following parameters:
NOTES
1. If you change the modem’s operation, Sym-o-net with F/W version 2.0.0 or newer will be
automatically reset after you click ‘Finish Programming’. (about 3 minutes required) For
older versions, and for baud rates different from 9600, you are advised to reset the power
supply manually, for the new baud rate to be applied, or it will be reset automatically at
23:30, as it does every day.
Select the ‘Symonet
accepts data calls’
option. (1)
If you are using a Stylitis
datalogger, you can enable
encrypted (according to the
password) data emailing, at
least once a day. (2)

SYMONET USER GUIDE Version 2.0 49
2. When you click the ‘Email’ option, the following form appears
* Greek providers are available to be selected, so that the settings are set automatically. In
this case, you will be asked if you wish to update the smtp mail server to the one of the
provider you selected. For email settings, see next note.
Select the email interval, from 1 to 24 hours,
starting from midnight. In this example, an
email will be sent every 3 hours, (at 0:00, at
03:00, etc). If you select ‘Disabled’, no
emails will be sent and the remaining
settings will not appear.
Type a valid sender and one or more
recipients separated by colons (;). In
case your SIM card’s provider requires
authentication, and you are using its
smtp mail server (see next setting) such
as COSMOTE** in Greece, the sender
must have the form ‘{Phone
number}@{provider’s domain}’, ie the
user name of the SIM’s email account.
Set your SIM card
provider settings
(APN, user name,
password). (*)
Type the smtp mail server you wish. You can
type the SIM card’s one, which may or may not
require authentication. If you are using any other
mail server, e.g. your internet connection one,
authentication is needed (see settings below).
If your SIM card’s provider requires authentication, such as COSMOTE** in Greece,
and you are using its smtp mail server, you must type the username (in the form
‘{Phone number}@{provider’s domain}’) and the password of the SIM’s email
account.
If you are using any other mail server, e.g. your internet connection one,
authentication is also needed (your email account user name and password).
Otherwise, leave the fields blank.
SYMONET USER GUIDE Version 2.0 50
** COSMOTE GR requires a sender and an authentication user name having the form:
‘{Phone number}@mycosmos.gr’. To get the password, send an SMS via the SIM card with
the text ‘OPEN’ to 54000.
ADDITIONAL NOTES:
Email sending has the highest priority. No remote connections can be achieved
during this process. EMAIL MODE is indicated by DEVICE 1 led flashing and all the
other leds permanently lit.
If you select data mode, when any DEVICE port is ON, you can send the '1111'
string, via SMS, to the SIM Card's number, and the Sym-o-net will respond with an
SMS containing the datalogger's battery voltage (power supply), its site name, its
flash card status, its model (Stylitis 40 or Stylitis 100) and the current values of its first
analog (A1) and counter (C1) channel. When you send the SMS, if no port is ON or if
a data call is in progress or if an SMS is currently served, the SMS will be served
when the Sym-o-net is available.
Finally, to save all the settings, click the ‘Write Setup to Symonet’ button.
3. REMOTE CONNECTION WITH THE DATALOGGER
Since the Sym-o-net has checked the SIM card’s buffer for any pending SMSs to be served, it
is available for remote communication via a data call. The appropriate software for such
connections with the data logger) is Stylitis Explorer or Opton 4.

SYMONET USER GUIDE Version 2.0 51
i. Connect to a datalogger via Stylitis Explorer
Open Stylitis Explorer and create a new site, by selecting ‘Site|Create new Site’
from the menu. The site’s Properties will appear.
Click OK
Create a connection via the ‘Communicate|New Connection’ menu.
Select the model
of the Stylitis
datalogger you
are using.
Type the Password you
wish for Sym-o-net. Make
sure that the datalogger
also has this Password.
Type the Sym-
o-net’s Serial
Number.

SYMONET USER GUIDE Version 2.0 52
Select a name for the connection in the ‘General’ tab and click OK.
Select this connection by double-clicking its file (.crm) from Stylitis Explorer, or via the
‘Communicate|Remote’ menu.
Click ‘Connect’ in ‘Stylitis Communication’ window. Your computer will be connected
to Sym-o-net. If it is time for DEVICE 1 to be active (according to the Peripheral
Schedule), click ‘Activate’ to communicate with the datalogger.
NOTE: After the connection, you can also enter control mode remotely. The ‘Symonet
modem options’ option on the upper left part of the ‘Stylitis Communication’ window is
activated. If you click on it, the form below will appear.
Select ‘Remote’. Type the phone
number of the Sym-
o-net’s SIM card.
‘Remote’.
Select ‘Modem on {the
COM port to which
your computer’s
modem is connected}’.
Select ‘9600’
and ‘Tone’.
SYMONET USER GUIDE Version 2.0 53
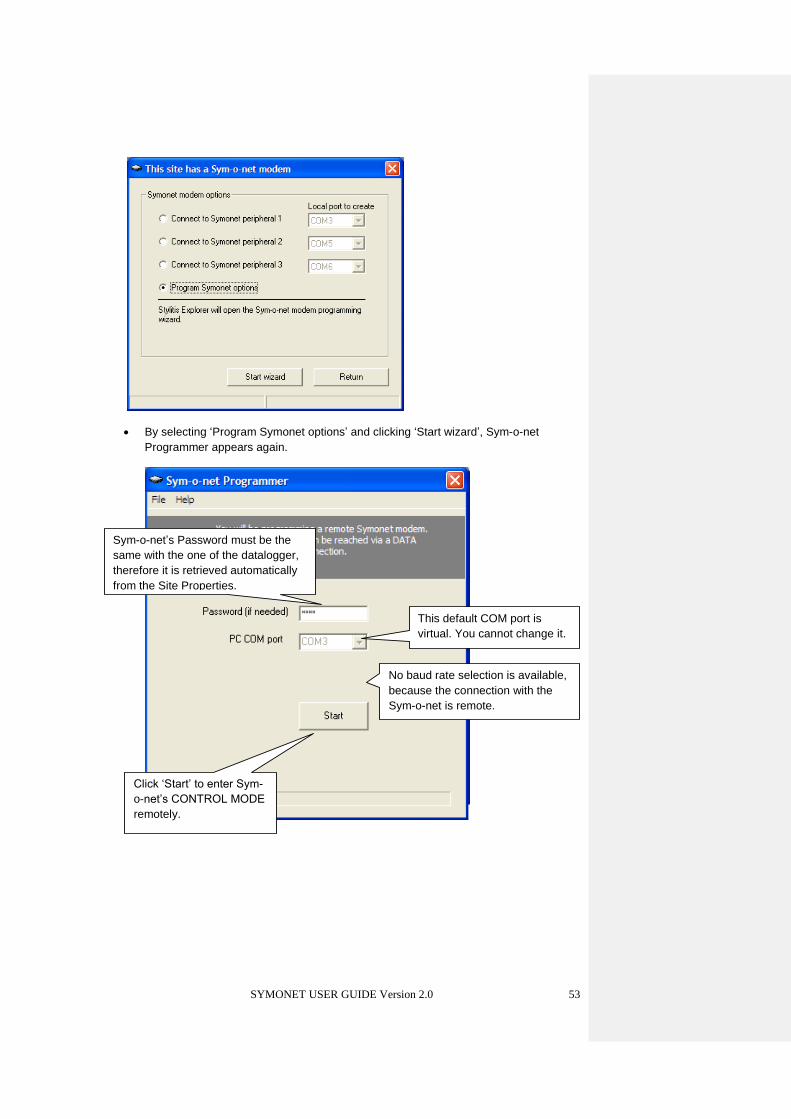
By selecting ‘Program Symonet options’ and clicking ‘Start wizard’, Sym-o-net
Programmer appears again.
This default COM port is
virtual. You cannot change it.
Click ‘Start’ to enter Sym-
o-net’s CONTROL MODE
remotely.
No baud rate selection is available,
because the connection with the
Sym-o-net is remote.
Sym-o-net’s Password must be the
same with the one of the datalogger,
therefore it is retrieved automatically
from the Site Properties.

SYMONET USER GUIDE Version 2.0 54
ii. Connect to a datalogger via Opton 4
Open Opton 4 and open the ‘Sites’ bar on the centre part of ‘Start’ tab. Select any one of
the first 3 options, to open the ‘Sites’ tab. In ‘Sites’ tab, create a new site, via the options
of the ‘Site Folders’ bar on the left. The site properties will appear.
Click OK
The 5 tabs of the new site will open. Create a connection in the site’s ‘Connections’
tab, by selecting ‘+New Connection’ in the ‘Communication’ bar on the left part.
Select the model
of the Stylitis
datalogger you
are using.
Type the Password you wish for Sym-o-
net and the data logger. If Sym-o-net’s
F/W version is older than 2.0.0, make sure
that the two passwords are the same.
Type the Sym-o-net’s
Serial Number.

SYMONET USER GUIDE Version 2.0 55
Click OK and select a name for the connection.
Select this connection by double-clicking its file (.crm) from the ‘Connections’ tab.
Your computer will be connected to Sym-o-net. If it is time for DEVICE 1 to be active
(according to the ‘Peripheral Schedule’), Opton 4 will locate the data logger.
NOTE: After the connection, you can also enter CONTROL MODE remotely. In the
‘Setup’ tab, in the ‘Data logger online’ bar, select ‘Read Symonet Setup’ and the form
below will appear.
Select ‘Serial/RS232’.
Type the phone
number of the Sym-
o-net’s SIM card.
‘Remote’.
Select ‘Modem on {the
COM port to which
your computer’s
modem is connected}’.
Select ‘9600’

SYMONET USER GUIDE Version 2.0 56
By selecting ‘Program Symonet options’ and clicking ‘Start wizard’, Sym-o-net
Programmer appears again.
This default COM port is
virtual. You cannot change it.
Click ‘Start programming’ to
enter Sym-o-net’s CONTROL
MODE remotely.
No baud rate selection is available,
because the connection with the
Sym-o-net is remote.
Sym-o-net’s Password must be the
same with the one of the datalogger,
therefore it is retrieved automatically
from the Site Properties.
SYMONET USER GUIDE Version 2.0 57
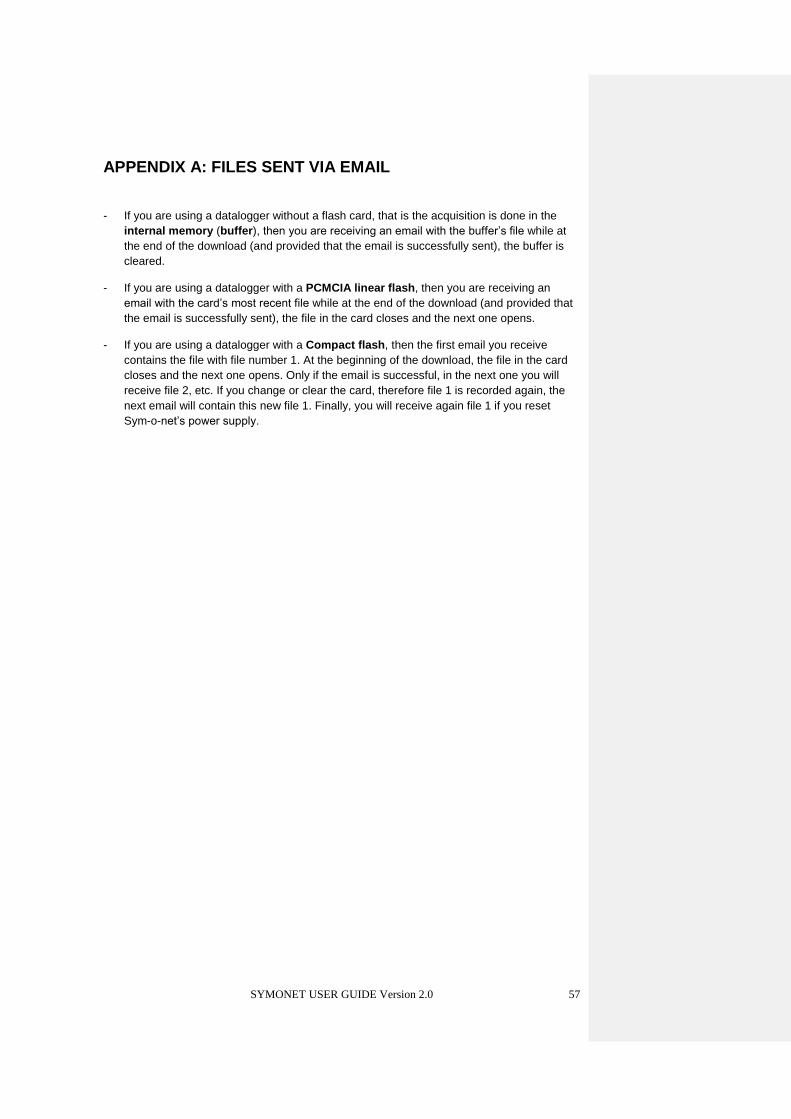
APPENDIX A: FILES SENT VIA EMAIL
- If you are using a datalogger without a flash card, that is the acquisition is done in the
internal memory (buffer), then you are receiving an email with the buffer’s file while at
the end of the download (and provided that the email is successfully sent), the buffer is
cleared.
- If you are using a datalogger with a PCMCIA linear flash, then you are receiving an
email with the card’s most recent file while at the end of the download (and provided that
the email is successfully sent), the file in the card closes and the next one opens.
- If you are using a datalogger with a Compact flash, then the first email you receive
contains the file with file number 1. At the beginning of the download, the file in the card
closes and the next one opens. Only if the email is successful, in the next one you will
receive file 2, etc. If you change or clear the card, therefore file 1 is recorded again, the
next email will contain this new file 1. Finally, you will receive again file 1 if you reset
Sym-o-net’s power supply.

SYMONET USER GUIDE Version 2.0 58
APPENDIX B: MANAGEMENT OF ENCRYPTED EMAILS
Instead of manually saving each file sent to you via email in the corresponding site folder,
there is a second method, via Stylitis Explorer, which is useful for an automated mass
import of files in one or all your sites.
The first step is to select the site folders to which these files will be imported. For each site,
with the “Site|Site Properties” option from the menu, the site's properties appear. In the
"Information" tab, the Serial Number of the Sym-o-net to which the datalogger is connected
must be defined ("Sym-o-net S/N" field), along with the datalogger's Password ("Password"
field), which must be the same with the Sym-o-net's Password, and its model ("Model" field),
ie S40 or S100. Of course, the process can be repeated for more sites, in each one of which
a different datalogger corresponds, therefore a different Sym-o-net, as well.
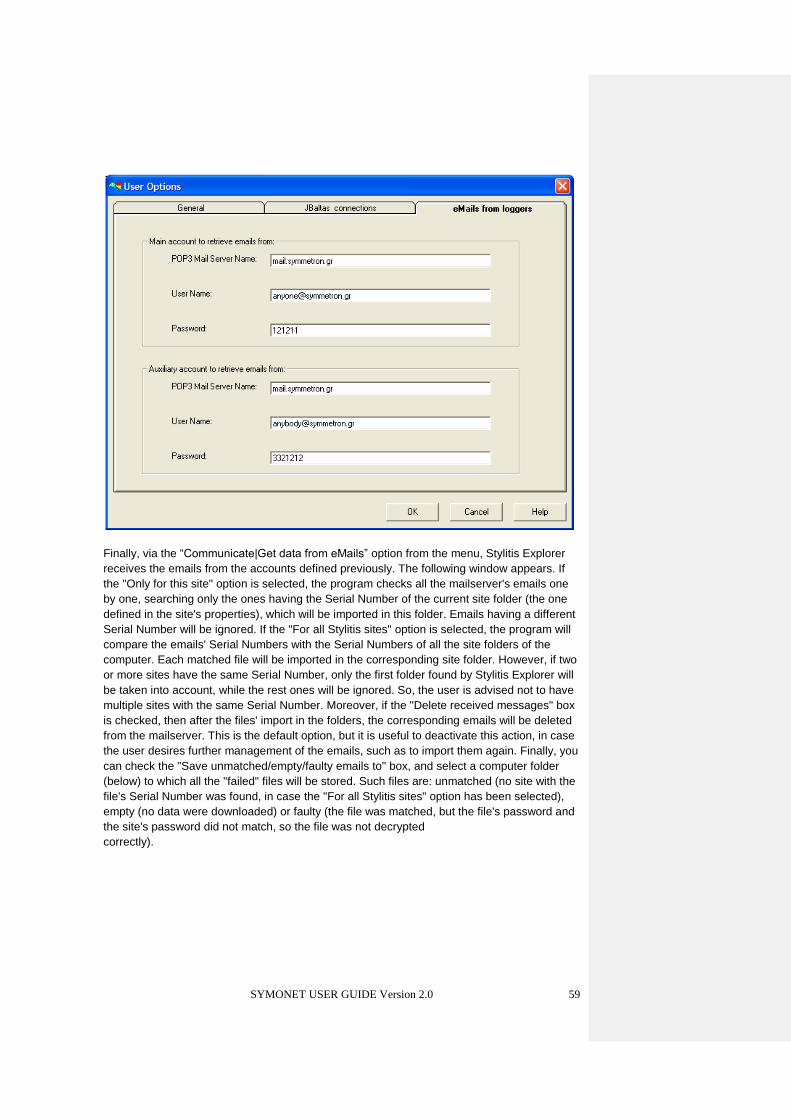
Next, the appropriate email recipients must be defined, via the “File|User Options” menu, and
specifically in the "eMails from loggers" tab, which appears in the following screen shot.
Before that, the user must have created one or two accounts which will receive emails, via the
mailserver of the connection they use. However, the emails from these accounts must not be
automatically receivede by a program which will delete them from the mailserver, such as
Outlook. Create these accounts by entering in the mailserver as an administrator. Next, in this
tab, such an account must definitely be defined (main account) on the tab's upper half, and,
optionally, a second one (auxiliary). The account's settings which must be typed in the
corresponding fields are its Mail Server, its User Name and its Password.
SYMONET USER GUIDE Version 2.0 59
Finally, via the “Communicate|Get data from eMails” option from the menu, Stylitis Explorer
receives the emails from the accounts defined previously. The following window appears. If
the "Only for this site" option is selected, the program checks all the mailserver's emails one
by one, searching only the ones having the Serial Number of the current site folder (the one
defined in the site's properties), which will be imported in this folder. Emails having a different
Serial Number will be ignored. If the "For all Stylitis sites" option is selected, the program will
compare the emails' Serial Numbers with the Serial Numbers of all the site folders of the
computer. Each matched file will be imported in the corresponding site folder. However, if two
or more sites have the same Serial Number, only the first folder found by Stylitis Explorer will
be taken into account, while the rest ones will be ignored. So, the user is advised not to have
multiple sites with the same Serial Number. Moreover, if the "Delete received messages" box
is checked, then after the files' import in the folders, the corresponding emails will be deleted
from the mailserver. This is the default option, but it is useful to deactivate this action, in case
the user desires further management of the emails, such as to import them again. Finally, you
can check the "Save unmatched/empty/faulty emails to" box, and select a computer folder
(below) to which all the "failed" files will be stored. Such files are: unmatched (no site with the
file's Serial Number was found, in case the "For all Stylitis sites" option has been selected),
empty (no data were downloaded) or faulty (the file was matched, but the file's password and
the site's password did not match, so the file was not decrypted
correctly).

SYMONET USER GUIDE Version 2.0 60
By pressing the "Import" button, the import of the attached encrypted files in the
corresponding site folders begins. In the window's Tasks tab, the process is described via
messages. Firstly, all the computer's sites are checked, if "For all Stylitis sites" has been
selected before. Missing (deleted) folders or folders with same Serial Number with one of the
folders already found, will be ignored. Next, the main account will be checked. The email
headers will be found, and afterwards, each email will be processed one by one. The
corresponding messages, for each file, besides the first line which is the email's subject,
describe 4 steps of the process, as it is apparent in the screen shot above: Importing the
authentic encrypted files (.bin) in a subfolder of the site, named "eMails", which is
automatically created ("Saving" line), decrypting these files to compressed ones, which will
be put in the site folder ("Decrypted" line), renaming these compressed files to a form which
is recognizable by the user, ie in the 'dnDDMMYY.xxx' form ("Renamed" line), and finally
decompressing them in the site folder ("Decompressed" line). It is worthy of note that the
program searches for emails with encrypted files, which correspond to the specific Serial
Number defined in the site's properties. However, if the site's Password is not correct (the
same with the one of the datalogger), the decryption will not be done correctly, therefore
invalid files will be produced in the site folder (files with extensions .000, .001, .002, etc),
which of course cannot be decompressed. The corresponding message in the 4th line,
instead of "Decompressed", will be: "!File not recognized". This is the case of a faulty file,
as mentioned above, so if you have checked the "Save unmatched/empty/faulty emails to"
box, it will be saved in the folder defined. Furthermore, if the corresponding datalogger does
not have a Password, the email's file will not be encrypted, but a normal compressed file.
Such files are recognized by Stylitis Explorer as compressed, and after being imported in the
"eMails" folder (in their original form, with extension .bin), they will simply be copied in the site
folder (the "Decrypted" line becomes:"Copied") and then renamed in the familiar form:
'dnDDMMYY.xxx'.

SYMONET USER GUIDE Version 2.0 61
When the process is completed, in the window's "List" tab, all the emails managed will appear
in a list form, along with their features (sender, recipient, subject, etc). In the last column
("Status"), if the file was successfully imported, decrypted and decompressed, the
corresponding value will be "Imported".
Finally during the process, the "Exit" button becomes "Stop" and if it is re-pressed, the
process is interrupted. After the end of the process, the button becomes again "Exit", to close
the window.

SYMONET USER GUIDE Version 2.0 62
APPENDIX C: GENERAL NOTES
i. The following general rule applies: When the MODEM LED and a DEVICE LED are
continuously flashing, you can communicate remotely via the methods described or
locally via the corresponding DEVICE port (it is active) or the MASTER port. If at least
one LED is flashing intermittently, the Sym-o-net is in the middle of a process, which
(except for the email) lasts one minute maximum. More specifically, if only the MODEM
LED is flashing intermittently, the modem is off and no DEVICE port is open (according
to the ‘Peripheral Schedule’). In these states, remote and local communication is not
available.
ii. To communicate from an active peripheral (DEVICE) port, via a computer COM port (via
the Sym-o-net Programmer, HyperTerminal, etc), a straight cable DB9 male-female is
needed, while to communicate from the MASTER port, a NULL MODEM DB9 female-
female is needed.
iii. If you wish to send emails from Stylitis (41 or 101) dataloggers or SMS from Stylitis
dataloggers (only in data mode), you must make sure that you have connected a
datalogger to DEVICE 1 peripheral port via a DB9 NULL MODEM cable and that the
datalogger’s Password is the same with the Sym-o-net’s Password (if the datalogger
has a Password). Otherwise, the Sym-o-net will give a wrong Password to the datalogger
to communicate with it, and the datalogger will be locked!