Syllabus Plus manual 2006 - RMIT Universitymams.rmit.edu.au/9zbjeuiso51lz.pdf · SYLLABUS PLUS 2007...
35
SYLLABUS PLUS 2007 Timetabling/Room Booking Manual Updated with STS requirements Objectives – At the end of this training module you will be able to: • Filter activities/classes by Department or Location • Change an existing activity/class • Create a new activity/class • Delete an activity/class • Check availability of Locations • Optional Extras: staffing, activity groups, same time activities • Basic Printing and Reporting
Transcript of Syllabus Plus manual 2006 - RMIT Universitymams.rmit.edu.au/9zbjeuiso51lz.pdf · SYLLABUS PLUS 2007...

SYLLABUS PLUS
2007
Timetabling/Room Booking
Manual
Updated with STS requirements
Objectives – At the end of this training module you will be able to:
• Filter activities/classes by Department or Location
• Change an existing activity/class
• Create a new activity/class
• Delete an activity/class
• Check availability of Locations
• Optional Extras: staffing, activity groups, same time activities
• Basic Printing and Reporting

____________________________________________________________________________________
____________________________________________________________________________________________________________________________
S:\Space Management\S+-Timetabling-Room Bookings\Training Manuals\Syllabus Plus manual 2006.doc Page 2 of 35
TABLE OF CONTENTS
Terminology................................................................................................................................................. 3
How do I change Activities? ....................................................................................................................... 5
How can I create new Activities?.............................................................................................................. 17
How to delete Activities? ........................................................................................................................... 21
Check availability of a Location ............................................................................................................... 22
Optional Extras ......................................................................................................................................... 24
Basic Printing and Reporting ................................................................................................................... 29
Basic Overview of Commands used in Object Screen ............................................................................. 35

____________________________________________________________________________________
____________________________________________________________________________________________________________________________
S:\Space Management\S+-Timetabling-Room Bookings\Training Manuals\Syllabus Plus manual 2006.doc Page 3 of 35
TERMINOLOGY
Terminology
Syllabus Plus AMS
Department Academic Group
Department Academic Org.
Programme of Study Academic Program
Module Course
Activity Class
Locations Facility
Zone Campus
Named Availability /Week
Pattern Term

____________________________________________________________________________________
____________________________________________________________________________________________________________________________
S:\Space Management\S+-Timetabling-Room Bookings\Training Manuals\Syllabus Plus manual 2006.doc Page 4 of 35
Open Syllabus & Login
Open Syllabus Plus with the Image that was created when you first logged in.
If this is your first time logging into Syllabus Plus, please refer to the How to Login manual and
then proceed to the next step.
Filter by Department or Location
1. When the Module or Activity screen is open, click on View, Filter on the menu bar.
2. In the Filter Activities by box select Department or Location (from the drop down list).
3. In the Objects list select your department name. (Eg. Chemistry, Food Science, Property Services) or
select one or more locations (hold down the Ctrl to select more than one)
4. Click Filter.
It is recommended that you use the filter option
every time you enter a particular screen in
Syllabus Plus.
Short Cut Key – Ctrl + I

____________________________________________________________________________________
____________________________________________________________________________________________________________________________
S:\Space Management\S+-Timetabling-Room Bookings\Training Manuals\Syllabus Plus manual 2006.doc Page 5 of 35
HOW DO I CHANGE ACTIVITIES?
You will be able to make all required changes in the Activities Window
TIMETABLER>ACTIVITIES on the menu bar
Step 1 – Filter and Find Activities
Filter By Department (see instructions above).
To find an activity in the Activity window simply press the button of the first letter, and then the second
letter and then the third letter, etc until you get to the activity you are looking for.
For example, if I wanted to find BUSM-1102 in the activity list I would press the ‘B’ on the keyboard
and the system would take me to the first activity beginning with B, then ‘U’ and the system would take
me to the first activity beginning with BU. You can continue with this pattern until you locate the
activity you are looking for.

____________________________________________________________________________________
____________________________________________________________________________________________________________________________
S:\Space Management\S+-Timetabling-Room Bookings\Training Manuals\Syllabus Plus manual 2006.doc Page 6 of 35
Step 2 – Changing Day and Time of an Activity
Click on the TIMETABLE tab
1. Click on one block in the Greyed out section on the Week Pattern Grid
2. Click on the Unschedule Button
This will unschedule the Activity and you will notice that the Activity has been replaced by a yellow
diamond and the Schedule button is now activated.

____________________________________________________________________________________
____________________________________________________________________________________________________________________________
S:\Space Management\S+-Timetabling-Room Bookings\Training Manuals\Syllabus Plus manual 2006.doc Page 7 of 35
You can now change the time or day by following the instructions below.
Click on the ID Tab
1. Select Day by ticking the corresponding box
2. Select the Time from Drop Down List
3. Modify
Go back to the TIMETABLE TAB
You will notice that the diamond has moved to the new day and time and can be scheduled.
1. Click on the Schedule Button.
2. WRITEBACK

____________________________________________________________________________________
____________________________________________________________________________________________________________________________
S:\Space Management\S+-Timetabling-Room Bookings\Training Manuals\Syllabus Plus manual 2006.doc Page 8 of 35
You will be able to see the Activity has been Scheduled and at the bottom of the screen the system
shows the login ID who scheduled the activity and the date and time it was scheduled.

____________________________________________________________________________________
____________________________________________________________________________________________________________________________
S:\Space Management\S+-Timetabling-Room Bookings\Training Manuals\Syllabus Plus manual 2006.doc Page 9 of 35
Step 3 – Changing a Location
To change the location of an activity you will again need to unschedule the activity before any changes
can be made. (Refer to Step 2.)
There are two methods for selecting a location. You can PRESET a location, that is you choose the
room you want this activity scheduled into, or there is WILDCARD where you don’t mind what room
you are allocated to as long as it meets to required specifications you select in the suitability list.
Booking Multiple Teaching Spaces
When using the STS you cannot book more than one teaching space to an activity. If you want to book
a lab and a classroom for one class then you will need to create two activities in Syllabus Plus.
However the students will only see one of these classes on STS. If both classes were to be shown on
STS then how would the students know which classroom to turn up to?
Example: CIVE-1107 Tutorial is to be booked into 010.13.018 (classroom) and 010.12.024 (lab)
Therefore two activities need to be created in Syllabus Plus. One should book the classroom only and
the other activity should book the lab. Fill in the section ID of the activity booked into the classroom
with the correct details. Put EXCLUDE in the section ID of the activity booked into the lab. All
students will now arrive at the classroom for their first class and the lecturer can then advise the
students on when they will be required at the other room.
PRESET Location
Click on RESOURCE tab
1. Enter Size Plan of Class
By entering the class size you discard all locations that are too small for the class size.
2. Highlight the room you wish to book.
3. Modify

____________________________________________________________________________________
____________________________________________________________________________________________________________________________
S:\Space Management\S+-Timetabling-Room Bookings\Training Manuals\Syllabus Plus manual 2006.doc Page 10 of 35
Click on TIMETABLE tab
If a yellow diamond appears on the screen the room is available and you can schedule the activity.
1. Click on the Schedule Button
2. WRITEBACK.
If there is no yellow diamond, you will need to choose another location on the Resource tab.

____________________________________________________________________________________
____________________________________________________________________________________________________________________________
S:\Space Management\S+-Timetabling-Room Bookings\Training Manuals\Syllabus Plus manual 2006.doc Page 11 of 35
WILDCARD Location
Click on RESOURCE tab
1. Enter Size Plan of Class.
2. From the Drop Down List choose Wildcard
3. Choose Suitabilities from the list. To select more than one hold down the CRTL key.
A list of Suitabilities is attached at the back of this manual.
Each time you choose a suitability the location list will discard those rooms that do not match the
suitabilities. The rooms displayed are those that match the suitabilities you have chosen and can
accommodate the class size.
Click on TIMETABLE tab
If a yellow diamond appears on the screen then a room matching the selected suitabilities is available
and you can schedule the activity.
4. Click on the Schedule Button
5. WRITEBACK.
If there is no yellow diamond, then you will need to review the suitabilities selected or consider another
day or time or both.

____________________________________________________________________________________
____________________________________________________________________________________________________________________________
S:\Space Management\S+-Timetabling-Room Bookings\Training Manuals\Syllabus Plus manual 2006.doc Page 12 of 35
Step 4 – Changing a Named Availability
You can change the Semester an activity runs in via the Availability tab within the Activities window.
To change the semester of an activity you will again need to unschedule the activity before any changes
can be made. (Refer to Step 2.)
Click on AVAILABILITY tab
1. Highlight your preferred Named Availability
2. Modify
Click on TIMETABLE tab
If a yellow diamond appears on the screen then a room matching the selected suitabilities is available
and you can schedule the activity.
3. Click on the Schedule Button
4. WRITEBACK.
If there is no yellow diamond, then you will need to review the suitabilities selected or consider another
day or time or both.

____________________________________________________________________________________
____________________________________________________________________________________________________________________________
S:\Space Management\S+-Timetabling-Room Bookings\Training Manuals\Syllabus Plus manual 2006.doc Page 13 of 35
Defining your own Week Pattern
1. On the Availability tab of the activity, select NONE from the top of the Availabilities list.
2. Click on the week/s in the week pattern box. (The top line.) That is select the weeks that this
activity is actually going to be held on. The points below list how you can select the weeks you
want.
• If it is a single occurrence click on the week you want it to occur.
• If it is a monthly event click on the week of the first occurrence and then hold [CTRL] and
click on all other weeks the event will take place.
• If it is an event where it occurs 3 weeks in a row click on the week of the first occurrence
and hold down the Shift key and click with your mouse on the last week of the event to
highlight the 4 week period.

____________________________________________________________________________________
____________________________________________________________________________________________________________________________
S:\Space Management\S+-Timetabling-Room Bookings\Training Manuals\Syllabus Plus manual 2006.doc Page 14 of 35
Step 5 – Changing other data in the ID TAB
Duration
To change the duration of an activity you will again need to unschedule the activity before any changes
can be made. (Refer to Step 2.)
Click on ID tab
1. Use the up and down arrows the change the time. Remember that the time is in half hour
periods.
2. Modify
Click on TIMETABLE tab
If a yellow diamond appears on the screen then a room matching the selected suitabilities is available
and you can schedule the activity.
3. Click on the Schedule Button
4. WRITEBACK.
Activity Type
To change Activity Type you DO NOT need to unschedule the activity.
1. Select Activity Type from the Type drop down list
2. Modify
3. WRITEBACK
Activity Name
To change Activity Name you DO NOT need to unschedule the activity.
1. Simply type in the name box to change.
2. Modify
3. WRITEBACK
Naming Convention for ALL semester activities (must be followed).
1. Always use the Course Code (AMS Subj Area and AMS Catalogue Number) ECON-1010
2. S1 or S2 to identity the semester
3. D or E to identify whether the class is to be held in the Day or Evening
4. A character to identify the type of class and well as a number.
• L=Lecture
• T=Tutorial
• S=Seminar
• C=Class
• W=Workshop
• B=Lab
For a lecture and two tutorials the activity names will look as follows:
ECON-1010-S1-D-L1 ECON-1010-S1-D-T2 ECON-1010-S1-D-T1

____________________________________________________________________________________
____________________________________________________________________________________________________________________________
S:\Space Management\S+-Timetabling-Room Bookings\Training Manuals\Syllabus Plus manual 2006.doc Page 15 of 35
SECTION ID Field
The section ID field in the Activity ID screen is used to link Syllabus Plus data with the student’s
enrolment data obtained from the AMS. Therefore the data format shown below must be followed.
1. In the section ID field put in the AMS semester code, the AMS class number and lecture or
tutorial number.
Eg. 0450-9998-L1 or 0450-7755-T1
2. Modify
3. WRITEBACK
This task can be completed via an automatic upload. This method is quicker and saves
you having to go into each record individually to update the section ID. A spreadsheet will be sent to you; you fill in the Section ID column on the spreadsheet and send back to the Timetabling Office who will upload within a few hours.
If the activity is not to be displayed on STS then the word EXCLUDE should be typed into the Section
ID field.

____________________________________________________________________________________
____________________________________________________________________________________________________________________________
S:\Space Management\S+-Timetabling-Room Bookings\Training Manuals\Syllabus Plus manual 2006.doc Page 16 of 35
STEP 6 – Adding Notes about the Booking
Click on User Text tab
You can enter any information about this booking into User Text 1. Please refrain from using User
Text 2 to 5 as we may have special functions for them down the track.

____________________________________________________________________________________
____________________________________________________________________________________________________________________________
S:\Space Management\S+-Timetabling-Room Bookings\Training Manuals\Syllabus Plus manual 2006.doc Page 17 of 35
HOW CAN I CREATE NEW ACTIVITIES?
Step 1 – Open Module Screen
TIMETABLER>MODULE on the menu.
This will open up the Module Screen where you can view all the modules in the home list.
Step 2 – Filter Modules by Department
See Page 4 for Filtering instructions
The screen will display all modules (courses) owned by your school. If you are missing any Modules
please call the central room booking office.
Step 3 – Generate Activities
On the ID tab
1. Click on GENERATE button
This will bring up the Generate Activities/Sets for Module window.

____________________________________________________________________________________
____________________________________________________________________________________________________________________________
S:\Space Management\S+-Timetabling-Room Bookings\Training Manuals\Syllabus Plus manual 2006.doc Page 18 of 35
You will need to set the following:
• Number of Activities: use up & down arrows to make number activities required.
• Name: Select <Module>/<Type>
• Type: From the drop down list select the type of activity. (Lecture, Tutorial etc.)
• Planned Size: Enter the planned or estimated size of the class/activity.
• Duration: Enter the duration of the class/activity, remember it is in half hour periods.
• Click on Generate Button
Once you have pressed the generate button you will be returned to the Module Screen.
You will see that the activity has been generated.
To open the new activity in the Activity Window double click on it.

____________________________________________________________________________________
____________________________________________________________________________________________________________________________
S:\Space Management\S+-Timetabling-Room Bookings\Training Manuals\Syllabus Plus manual 2006.doc Page 19 of 35
Step 4 – Enter Day and Time Information
The name, department, planned size, type and duration information was entered when the activity was
generated from the module screen.
1. Select Day by ticking the corresponding box
2. Select the Time from Drop Down List
3. Enter a Description for the Activity. You can copy and paste this from the module window.
4. Modify
Step 5 – Set Activity Name and Section ID
Change the activity name as per university naming convention outlined on page 13.
Complete the section ID field, as per instructions on page 14.
Click Modify

____________________________________________________________________________________
____________________________________________________________________________________________________________________________
S:\Space Management\S+-Timetabling-Room Bookings\Training Manuals\Syllabus Plus manual 2006.doc Page 20 of 35
Step 6 – Attach Location to Activity
Click on Resource tab
As described on pages 9, 10 and 11 you can either PRESET or WILDCARD a location. See pages 9 to
11 for instructions.
Remember to Modify
Step 6 – Select a Named Availability
Click on Availability tab
1. From the list selected the preferred Named Availability (Semester week pattern).
2. If there are none that match the teaching week pattern then contact the central timetable group
who will create one to match.
3. MODIFY
Step 7 – Schedule Activity
Click on TIMETABLE tab
1. Click on one of the grey boxes on the week pattern grid.
2. If there is a yellow diamond click on the Schedule button, if no diamond then the preset
location is not available or there is no location available to match the selected wildcard
options. GO BACK to RESOURCE tab to resolve.
3. WRITEBACK

____________________________________________________________________________________
____________________________________________________________________________________________________________________________
S:\Space Management\S+-Timetabling-Room Bookings\Training Manuals\Syllabus Plus manual 2006.doc Page 21 of 35
HOW TO DELETE ACTIVITIES?
To delete an activity it doesn’t matter what tab is selected (ID, Timetable etc).
1. Select the activity to be deleted from the home list in the Activity window. Make sure there is a
faint dotted line around the activity name in the list.
2. Press the DELETE button on your keyboard.
3. You will be asked if you are sure you want to delete the activity. Click on YES (if you are sure,
remember there is no way to undo a deletion).
4. WRITEBACK
(Note the faint doted line around the activity.)

____________________________________________________________________________________
____________________________________________________________________________________________________________________________
S:\Space Management\S+-Timetabling-Room Bookings\Training Manuals\Syllabus Plus manual 2006.doc Page 22 of 35
CHECK AVAILABILITY OF A LOCATION
It is possible to check the availability of a room without making a booking first.
TIMETABLER>LOCATIONS on the menu bar
1. In the home list select the room you want to check.
2. The ID tab will display information about the room. Name, description, controlling department,
capacity and utilisation chart.
____________________________________________________________________________________
____________________________________________________________________________________________________________________________
S:\Space Management\S+-Timetabling-Room Bookings\Training Manuals\Syllabus Plus manual 2006.doc Page 23 of 35
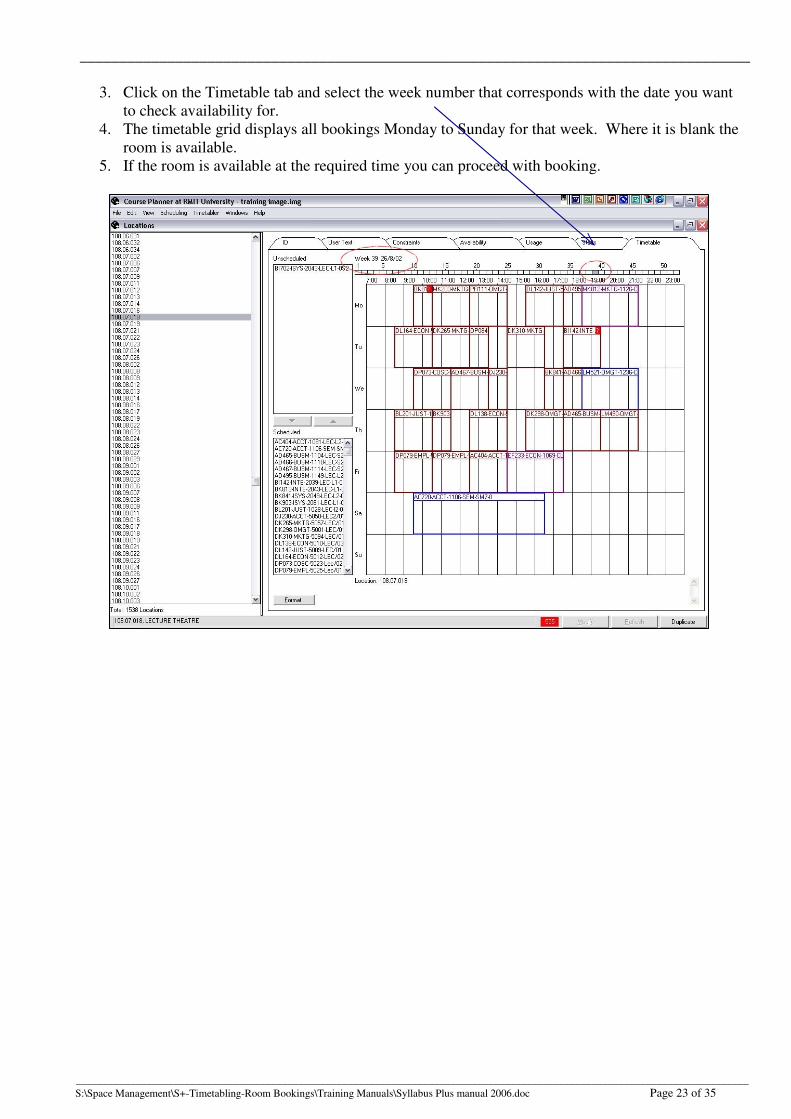
3. Click on the Timetable tab and select the week number that corresponds with the date you want
to check availability for.
4. The timetable grid displays all bookings Monday to Sunday for that week. Where it is blank the
room is available.
5. If the room is available at the required time you can proceed with booking.

____________________________________________________________________________________
____________________________________________________________________________________________________________________________
S:\Space Management\S+-Timetabling-Room Bookings\Training Manuals\Syllabus Plus manual 2006.doc Page 24 of 35
OPTIONAL EXTRAS
Staffing
If you would like to be able to produce staff timetables using Syllabus Plus, the Staff window is
available to use. You can add staff as you make each booking or go back later and add staff to an
existing booking.
Add Staff names to Syllabus Plus
1. Select Timetabler>Staff from the menu bar
2. Type in the staff member’s name in the name box. (Surname, First Name)
3. Put the staff member’s e number in the hostkey box. (e00001)
4. In the description box put the staff member’s full name with title. (Prof. First name Surname)
5. Put the staff member’s email address in the email address box
6. Click on the NEW button
7. To enter more staff simply type over these details and click on the DUPLICATE button.
8. There is a user text tab, if you would like to enter information about this staff member. Please
use USER TEXT 1 only.
9. WRITEBACK

____________________________________________________________________________________
____________________________________________________________________________________________________________________________
S:\Space Management\S+-Timetabling-Room Bookings\Training Manuals\Syllabus Plus manual 2006.doc Page 25 of 35
Add Staff to an Existing Booking
1. Open the activity window and select the activity on the home list.
2. Click on the RESOURCE tab.
3. Choose the staff member from the list.
4. MODIFY 5. Click on TIMETABLE tab.
6. Click in one of the greyed out weeks on the week pattern grid.
7. Click on the Scheduling on the menu bar
8. Choose Schedule Special from the list
9. Tick the Staff box and click Ok
10. The staff member has now been added to your booking.
11. WRITEBACK
Add Staff as you Make a New Booking
1. Follow all the normal instructions to create a New Activity
2. When you get to the RESOURCE tab to add the location, also choose the staff member from
the list.
3. MODIFY 4. Continue with the normal procedure to assign the Named Availability and then Schedule the
activity.

____________________________________________________________________________________
____________________________________________________________________________________________________________________________
S:\Space Management\S+-Timetabling-Room Bookings\Training Manuals\Syllabus Plus manual 2006.doc Page 26 of 35
Activity Groups
In Syllabus Plus we have the ability to group activities together. You might use this function to create a
timetable for a cohort of students, or to group together activities in the same discipline.
TIMETABLER>GROUPS>ACTIVITY GROUPS
To create an Activity Group
1. Highlight an Activity Group in the home list
2. Click on the Duplicate Button
This will copy the Activity Group in the home list which you can then Modify and link the
Activities.
3. Modify Name - Unique Name that you wish to create
4. Enter Description - Long Description of Name
5. Select Department - The department which Activity Group belongs to.
6. Highlight activities in the Members box that you want to be in the Activity Group. Hold down
the CTRL button to select more than one.
7. Modify
8. WRITEBACK
For a faster more efficient way to create a Activity Group
1. Select Activities from the Activity window that you want to group together. You can filter first
to reduce the activities list.
2. Click on Edit>Create Group on the menu bar
3. Enter Name, Description and choose a department
4. Modify
5. WRITEBACK

____________________________________________________________________________________
____________________________________________________________________________________________________________________________
S:\Space Management\S+-Timetabling-Room Bookings\Training Manuals\Syllabus Plus manual 2006.doc Page 27 of 35
Same Time Activities
A same time activity is where two or more different course codes are taught at the same time in the
same room by the same teacher. In Syllabus Plus we are unable to ‘double book’ a room, therefore we
cannot just book the different activities into the room they are sharing. We have developed a work
around that allows the STS to function properly and allows the room to be booked once.
We are using a method where we create an activity for each of the course codes attending the class and
a dummy activity which is a combination of all the course codes.
Example
BAFI-1086 and BAFI-2081 are same time activities. In Syllabus Plus you create three activities as
follows
1. BAFI-1086-S1-D-L1, section ID should be entered as normal
2. BAFI-2081-S1-D-L1, section ID should be entered as normal
3. *BAFI1086-BAFI2081-S1-D-L1, section ID should be set to EXCLUDE
For the two real activities you select the semester they are running (Availability Tab) and then ensure
on the resource tab that the staff and location are set to NONE. See diagram below.
For the dummy activity select the staff, preset or wildcard the location and choose the semester. See
diagram below.
On
the
du
m
my
acti
vit
y
sel
ect
the
Del
ive
ry Tab. This is where we need to link the dummy activity to the two real activities.
____________________________________________________________________________________
____________________________________________________________________________________________________________________________
S:\Space Management\S+-Timetabling-Room Bookings\Training Manuals\Syllabus Plus manual 2006.doc Page 28 of 35
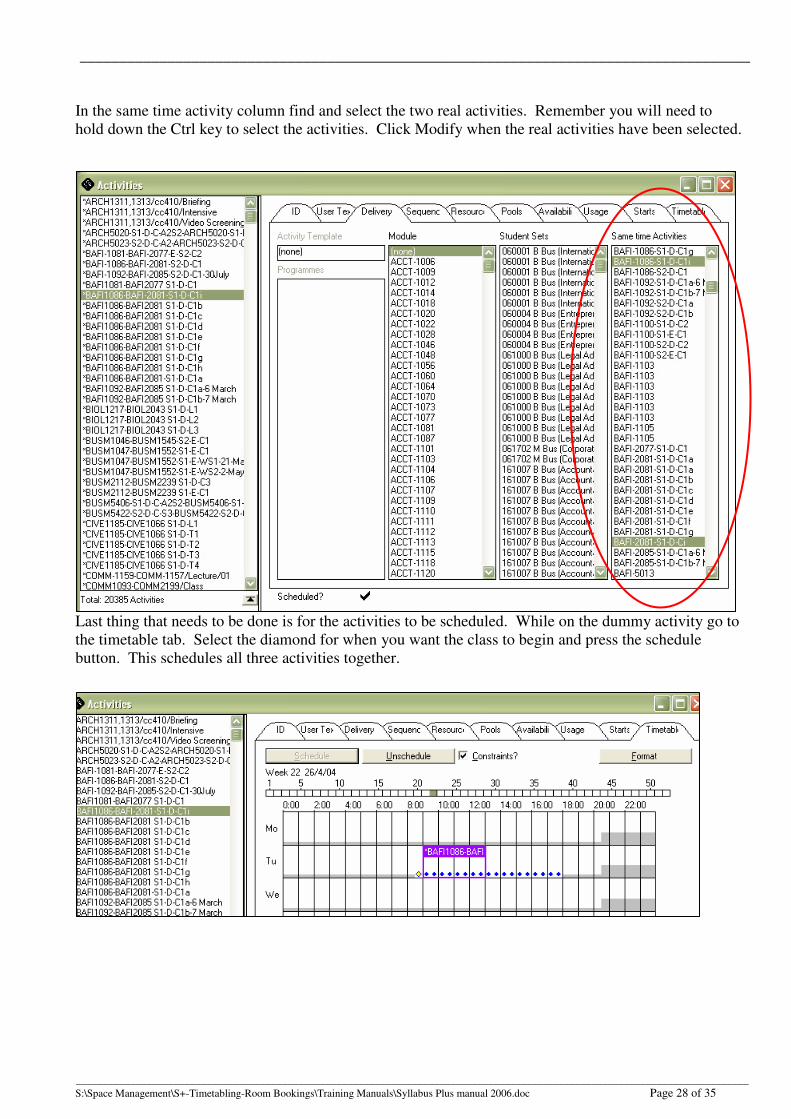
In the same time activity column find and select the two real activities. Remember you will need to
hold down the Ctrl key to select the activities. Click Modify when the real activities have been selected.
Last thing that needs to be done is for the activities to be scheduled. While on the dummy activity go to
the timetable tab. Select the diamond for when you want the class to begin and press the schedule
button. This schedules all three activities together.

____________________________________________________________________________________
____________________________________________________________________________________________________________________________
S:\Space Management\S+-Timetabling-Room Bookings\Training Manuals\Syllabus Plus manual 2006.doc Page 29 of 35
BASIC PRINTING AND REPORTING
Loading templates to the new image
Importing printing templates is a task that only needs to be done once per image. As soon as you create
a new image, the next step you must complete is the loading of templates.
1. When logged into Syllabus Plus click File � Template Organiser.
2. When the Template Organiser box comes up, click Open.
3. Browse until you find the file default.ptm
(path C:\Program Files\Scientia\Syllabus Plus 3.2.1\Printing\default.ptm)
4. Click Open
____________________________________________________________________________________
____________________________________________________________________________________________________________________________
S:\Space Management\S+-Timetabling-Room Bookings\Training Manuals\Syllabus Plus manual 2006.doc Page 30 of 35
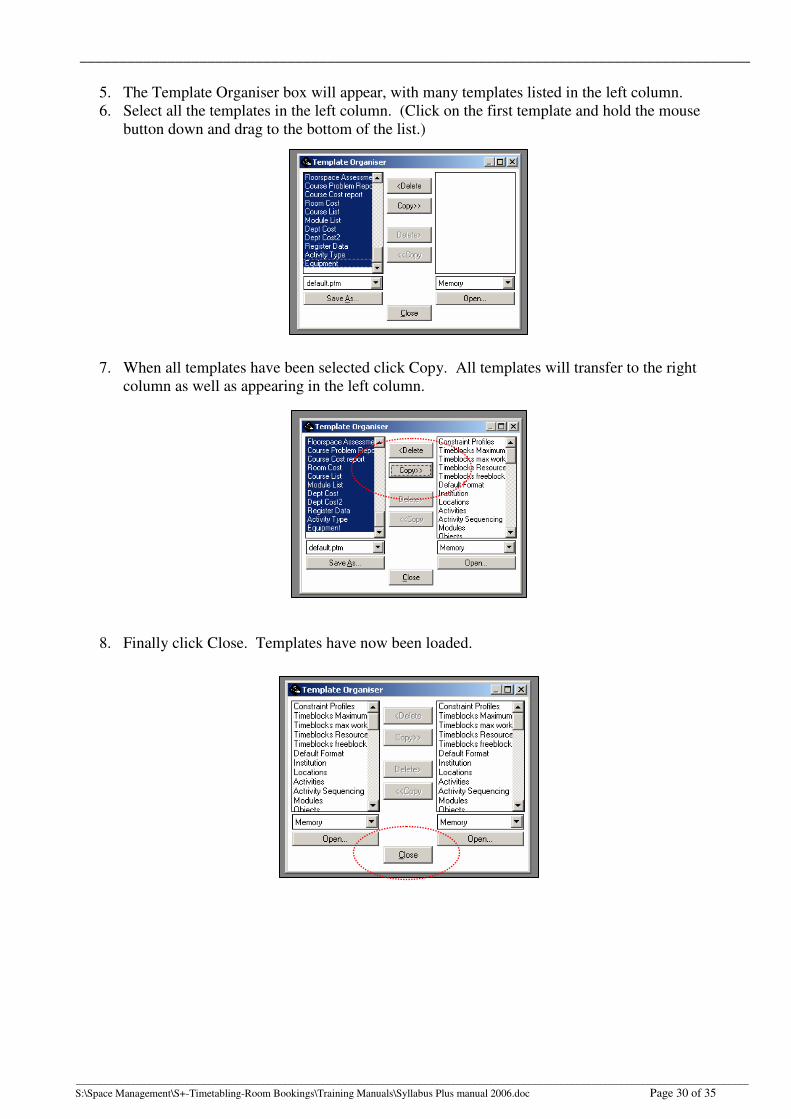
5. The Template Organiser box will appear, with many templates listed in the left column.
6. Select all the templates in the left column. (Click on the first template and hold the mouse
button down and drag to the bottom of the list.)
7. When all templates have been selected click Copy. All templates will transfer to the right
column as well as appearing in the left column.
8. Finally click Close. Templates have now been loaded.

____________________________________________________________________________________
____________________________________________________________________________________________________________________________
S:\Space Management\S+-Timetabling-Room Bookings\Training Manuals\Syllabus Plus manual 2006.doc Page 31 of 35
Printing a Room Timetable
1. Click Timetabler>Locations on the menu bar.
2. Select a room from the home list. You can select more than one room from the location list and
get a multiple page report for the week/s selected. The timetable for each room will appear on a
new page. To select more than one room on the location list either click and drag or use [CTRL]
and click on the rooms you require timetables for.
3. Click File then Print from the menu bar.

____________________________________________________________________________________
____________________________________________________________________________________________________________________________
S:\Space Management\S+-Timetabling-Room Bookings\Training Manuals\Syllabus Plus manual 2006.doc Page 32 of 35
4. In the Print Style window select Individual from the box in the top left corner and Location
Individual from the box below it.
5. Select the Period and Days you wish to display. In the example below we have chosen 8.30am
to 5.30pm Monday to Friday only.
6. Lastly select the week/s you wish to print. We have chosen week 25 below. Note you can
choose more than one week.
7. Click Preview to view the report.
To make the timetable more user friendly follow the instructions below.
8. Click on Printer Set-up and select
Landscape and Ok
9. Double click anywhere on the grid to
open the Cell Editor window.
10. Click in the box that says < Name >
11. From the drop down list next to
Wrap/Force, choose Word/Char
12. Tick the box next to Fill Space?
13. Click Apply and Ok
14. To Print click on Print All

____________________________________________________________________________________
____________________________________________________________________________________________________________________________
S:\Space Management\S+-Timetabling-Room Bookings\Training Manuals\Syllabus Plus manual 2006.doc Page 33 of 35
Quick Booking Confirmation
1. In the Activity window click on the activity a confirmation is required for.
2. Click on View>Describe from the menu bar
3. A new window will open with the booking details described in word. You can copy and paste
this into an email or word document and print.

____________________________________________________________________________________
____________________________________________________________________________________________________________________________
S:\Space Management\S+-Timetabling-Room Bookings\Training Manuals\Syllabus Plus manual 2006.doc Page 34 of 35
Timetable Spreadsheet Report
1. Request a file called Regular Dept Update.ptm from the Uni Timetabling Office, please save it
to the following location
C:\Program Files\Scientia\Syllabus Plus 3.4\Splus\Printing
2. Log into Syllabus Plus 3.4 as normal.
3. Go to the Template Organiser ( File � Template Organiser)
4. Under the left hand box click on Open and find the file Regular Dept Update.ptm in the Printing
folder then click on Open.
5. Select Regular Dept Update in the box on the left and click on the Copy button, now click close.
6. To print a list of your activities go to the Activities window (Timetabler � Activities) and
highlight the activities you want to report on. An easy way is to filter the activities by your
department.
7. Click on File � Print and the Print Style box will appear. Click on Spreadsheet in the top box
and choose Regular Dept Update in the box below it.
8. You can now click on Preview and Print the report or click on File and save the report as a text
file and open in Excel.

____________________________________________________________________________________
____________________________________________________________________________________________________________________________
S:\Space Management\S+-Timetabling-Room Bookings\Training Manuals\Syllabus Plus manual 2006.doc Page 35 of 35
Basic Overview of Commands used in Object Screens
These are regular functions you will be using.
• You can highlight an object in the home list by clicking once with the left mouse button
• Double clicking on an object in a list opens the objects window.
• To deselect an object simply hold the CRTL key and left click on the mouse.
• Highlighting more than one object in a list can be achieved by clicking and dragging on the
mouse. If you wish to click on separate objects not listed one after the other then use the CTRL
key and highlight required modules or activities.
• The control key allows the deselection of the current object in the home list and clears all links.
• To delete an object you can highlight the object in the home list and use the delete button on the
keyboard to delete. You will be asked if you really want to do this. Remember there is no Undo
button.
• To duplicate an object based on an existing one, the system copies all the attributes of the
selected object to the new on. When creating independent objects it better to clear all fields of
information before setting new attributes.
• Modify – Allows user to modify all data that has been changed.
• Writeback – Allows user to Writeback the data to the database.
• Refresh – Refreshes user’s image from the database.
• Browse – allows users to view only the linked objects.
• Filter – allows users filter objects and screens to allow for easier use of screens.