Swivel Boom w/ Arm - Monoxivent
9
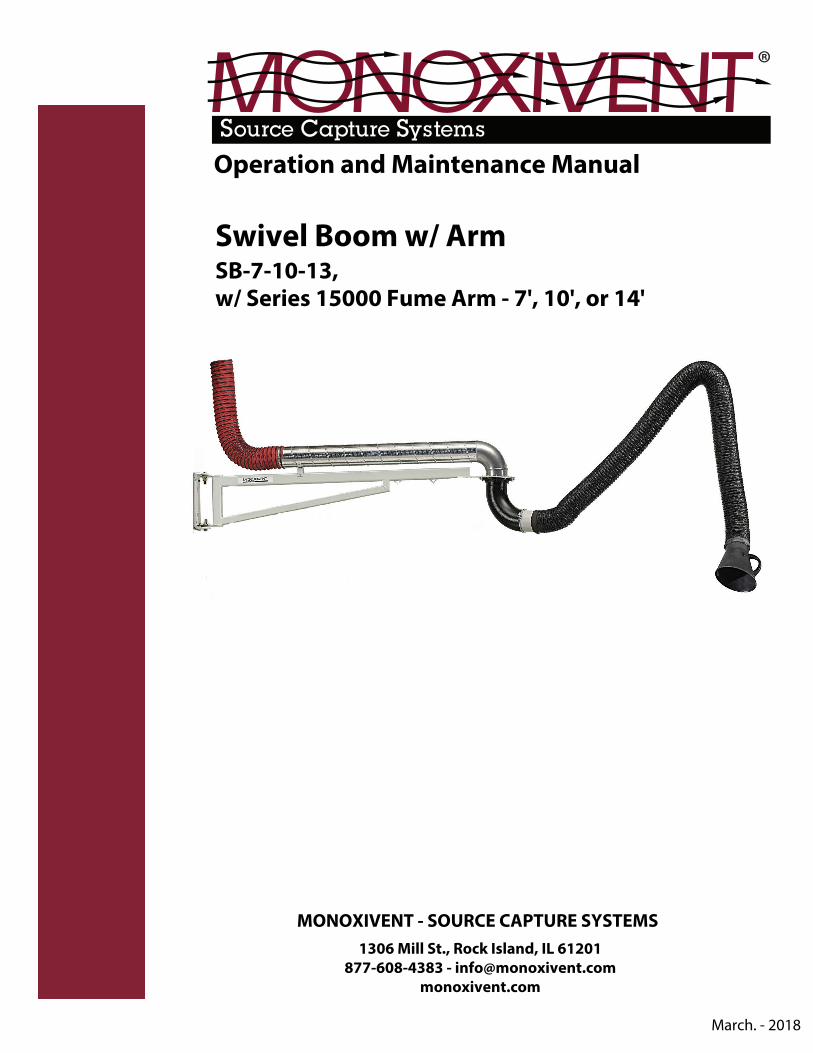
MONOXIVENT - SOURCE CAPTURE SYSTEMS 1306 Mill St., Rock Island, IL 61201 877-608-4383 - [email protected] monoxivent.com Swivel Boom w/ Arm SB-7-10-13, w/ Series 15000 Fume Arm - 7', 10', or 14' Operation and Maintenance Manual March. - 2018
Transcript of Swivel Boom w/ Arm - Monoxivent
MONOXIVENT - SOURCE CAPTURE SYSTEMS
1306 Mill St., Rock Island, IL 61201877-608-4383 - [email protected]
monoxivent.com
Swivel Boom w/ ArmSB-7-10-13, w/ Series 15000 Fume Arm - 7', 10', or 14'
Operation and Maintenance Manual
March. - 2018
Brady
Rectangle
Brady
Line
brady
Pencil
brady
Rectangle
Swivel Boom W/ Flex Arm
11306 Mill St., Rock Island, IL 61201 877-608-4383
[email protected] monoxivent.com
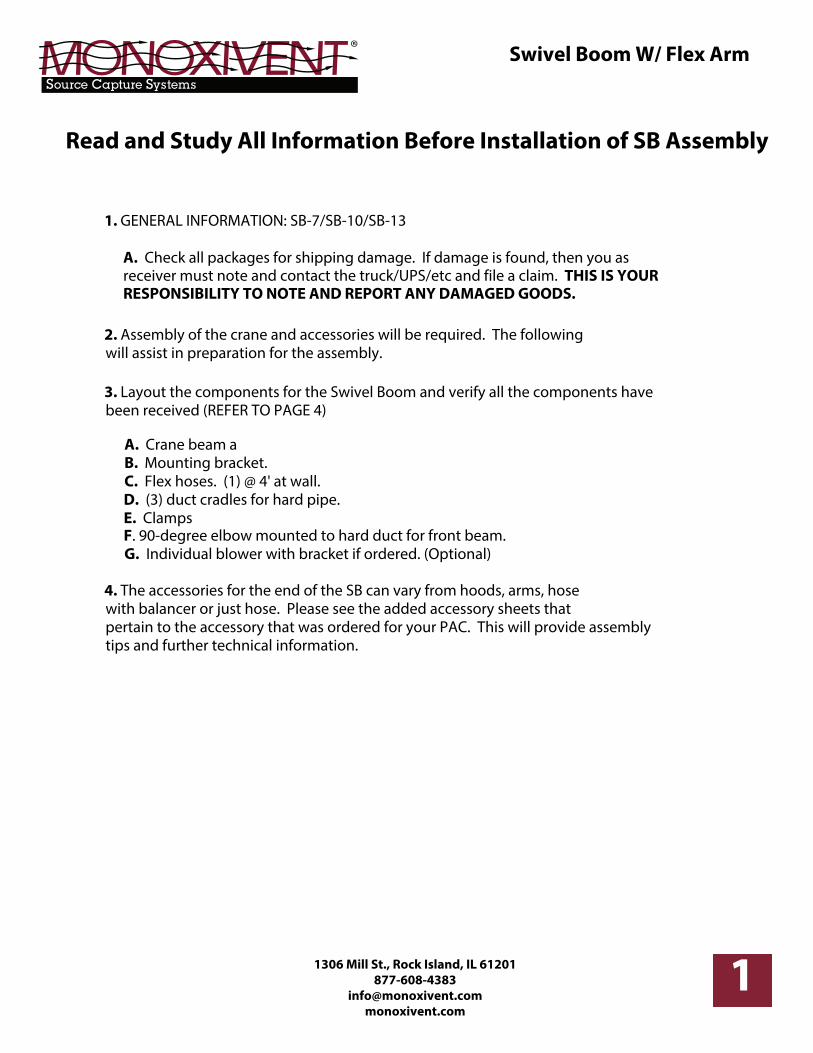
1. GENERAL INFORMATION: SB-7/SB-10/SB-13
A. Check all packages for shipping damage. If damage is found, then you asreceiver must note and contact the truck/UPS/etc and file a claim. THIS IS YOURRESPONSIBILITY TO NOTE AND REPORT ANY DAMAGED GOODS.
2. Assembly of the crane and accessories will be required. The followingwill assist in preparation for the assembly.
3. Layout the components for the Swivel Boom and verify all the components havebeen received (REFER TO PAGE 4)
A. Crane beam aB. Mounting bracket. C. Flex hoses. (1) @ 4' at wall.D. (3) duct cradles for hard pipe.E. ClampsF. 90-degree elbow mounted to hard duct for front beam. G. Individual blower with bracket if ordered. (Optional)
4. The accessories for the end of the SB can vary from hoods, arms, hosewith balancer or just hose. Please see the added accessory sheets thatpertain to the accessory that was ordered for your PAC. This will provide assembly tips and further technical information.
Read and Study All Information Before Installation of SB Assembly
Brady
Line
Brady
Line

Swivel Boom W/ Flex Arm
21306 Mill St., Rock Island, IL 61201 877-608-4383
[email protected] monoxivent.com
Installation Tips
1. Support structure for the SB must be solid and secure. The structure to whichthe SB will be mounted should be carefully reviewed for its strength. If there is any question or doubt about the structure, a structural engineer or other experienced person should be consulted. RESPONSIBILITY AND LIABILITY OF SUCH SUPPORT STRUCTURE IS SOLELY UPON THE PERSON() SELECTING SUCH SUPPORT STRUCTURE.
2. After selection of the support structure, a decision on how the main supportbracket of the SB should be installed. The mounting bracket must be installed perfectly vertical to prevent drifting of the SB. Depending upon installation equipment, it maybe determined that the bracket should be removed from the SB and installed to ensure the vertical accuracy of the bracket. The bracket can then be attached back onto the SB. All hardware must be reinstalled exactly as original (see drawing of bracket, page 6). Tighten hardware sufficiently enough so SB swings firmly yet freely.
3. Refer to drawing on page 3 for further installation tips and guidelines.
Brady
Line
Brady
Line

Swivel Boom W/ Flex Arm
31306 Mill St., Rock Island, IL 61201 877-608-4383
[email protected] monoxivent.com
Installation of Duct & Hose
1. Install hard spiral with elbow. Put elbow into the elbow flange and set hard duct onto cradle. Using the pre-drilled holes in the cradle and elbow flange as guides. Secure with the supplied self-tapping screws.
2. Install the 4' flex hose in the center pivot point and secure with clamps.Install the 4' flex hose to the hard duct at wall mount bracket.
3. Hose at the wall mount bracket will either clamp to a vertical duct branchor to an optional blower and bracket if so supplied.
Flex Hose
Ductwork Elbow
Brady
Line
Brady
Line
brady
Rectangle
Swivel Boom W/ Flex Arm
4
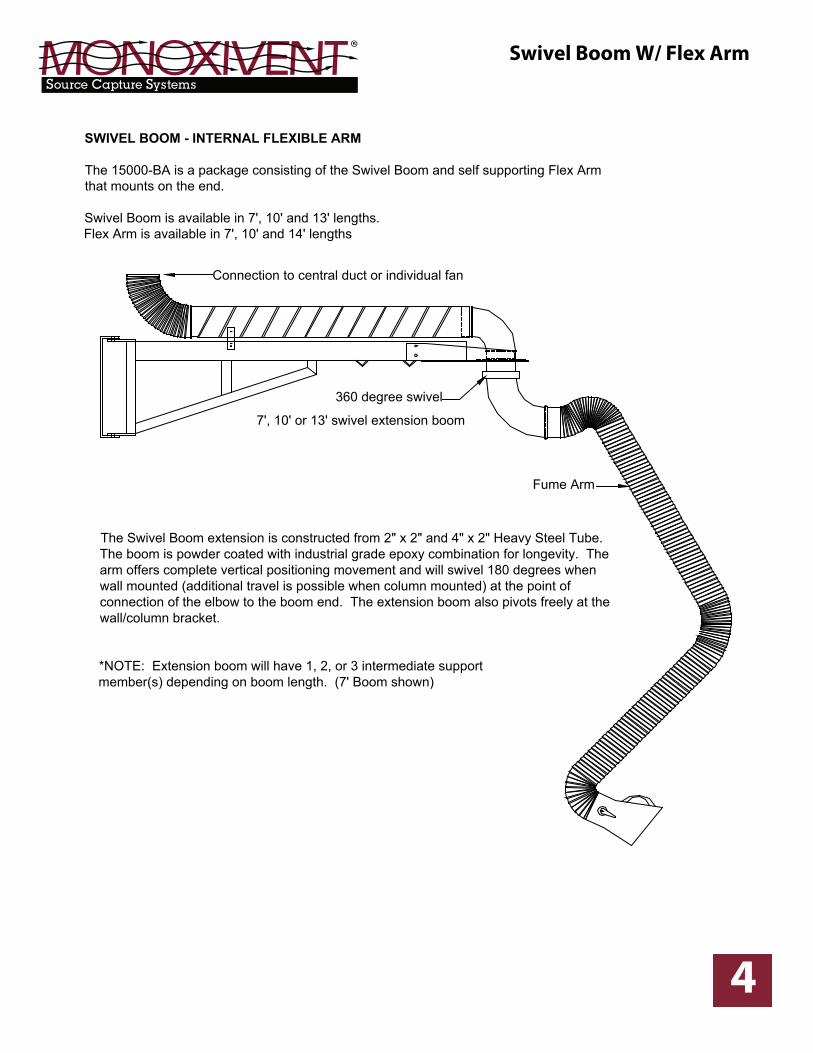
SWIVEL BOOM - INTERNAL FLEXIBLE ARM
The 15000-BA is a package consisting of the Swivel Boom and self supporting Flex Armthat mounts on the end.
Swivel Boom is available in 7', 10' and 13' lengths.Flex Arm is available in 7', 10' and 14' lengths
Connection to central duct or individual fan
360 degree swivel
7', 10' or 13' swivel extension boom
Fume Arm
The Swivel Boom extension is constructed from 2" x 2" and 4" x 2" Heavy Steel Tube. The boom is powder coated with industrial grade epoxy combination for longevity. The arm offers complete vertical positioning movement and will swivel 180 degrees when wall mounted (additional travel is possible when column mounted) at the point of connection of the elbow to the boom end. The extension boom also pivots freely at the wall/column bracket.
*NOTE: Extension boom will have 1, 2, or 3 intermediate supportmember(s) depending on boom length. (7' Boom shown)
Brady
Line
Brady
Line

Swivel Boom W/ Flex Arm
51306 Mill St., Rock Island, IL 61201 877-608-4383
[email protected] monoxivent.com
Flex Arm Assembly Information
Receiving:
Check all packages for shipping damage. If damage is found then you, as the receiver, must note the damage at time of receipt or contact the carrier and file a damage receipt claim. As the reciever, this is your responsibility.
General Information for the 15000-D Duct Mount Arm:
There will be some assembly required for the arm. Please check for all components before starting.
1. Check components for duct mount arms.
1. Arm with internal support structure2. Base bracket mounted to arm3. Hose installed on arm4. 90 degree elbow with black nylon swivel collar5. Steel 360 degree clamp with rubber seal6. 8 hole steel flange assembly
2. Slide hose away from the base bracket. Please note there is a bolt with a red painted head. This bolt isin a hole marked "2". Remove this bolt and pivot the bracket 90 degrees so the hole marked "1" will line up with the hole in the bracket. Now replace the red bolt and nut and bring to a snug fit. (see attached drawing)
3. Attach the 90 degree elbow to the arm bracket. Note the elbow and the bracket have small matingflange. There is a rubber gasket that seals the flanges of flanges. Be sure that the elbow and arm are in a perfect vertical position before tightening the clamp. Arm and elbow should be vertical. (see attached drawing)
Brady
Line
Brady
Line

Swivel Boom W/ Flex Arm
61306 Mill St., Rock Island, IL 61201 877-608-4383
[email protected] monoxivent.com
Flex Arm Assembly Information
4. With assistance, mount the assembled arm and elbow to the mounted 8 hole flange. The elbow hasa mounted 8 hole black nylon swivel collar. Bolt the elbow/arm assembly to the 8 hole flange on the 6" vertical duct. Snug bolts to hold the elbow/arm to the flange. Do not over tighten bolts. Be sure elbow/arm swivel freely at the flange.
5. The arm will need final adjustment/tuning for easiest movement and to say in place uponpositioning. You will find friction pads and adjustment pivot joints in four places:
1. Pivot point at the bracket2. Pivot point in the center of the arm3-4. Pivot points at hood location.
Only put enough tension on these pivot joints to hold the arm in any position it is placed. The arm final adjustment is key to the arm being user friendly. Do not over tighten the pivot joint friction disks. Depending on arm usage and movement, occasional adjustments may be required. Based upon the arms application, cleaning of the internal support structure may require shceduled cleaning.
Please contact the factory for any questions or further assistance.
Brady
Line
Brady
Line

Swivel Boom W/ Flex Arm
71306 Mill St., Rock Island, IL 61201 877-608-4383
[email protected] monoxivent.com
Flex Arm Assembly Information
The drawing shows the 90 degree elbow clamped to the white base bracket of the arm. Drawing also shows how the white base bracket has been re-positioned so the bracket is 90 degrees to the arm support.
Note the drawing shows correct positioning of the red head bolt and its' location in hole "1".
Full 360 Degree Clamp with Rubber Seal Gasket
Bracket
Red bolt head location for wall/column mount arm. Mount in hole "1" as shown.
Arm Support Structure
90 Degree Swivel ElbowBlack Nylon Swivel Collar
This is the new location for the red bolt. This is how the joint should look when it is ready to be mounted.
Brady
Line
Brady
Line
brady
Line
brady
Rectangle
Swivel Boom W/ Flex Arm
81306 Mill St., Rock Island, IL 61201 877-608-4383
[email protected] monoxivent.com
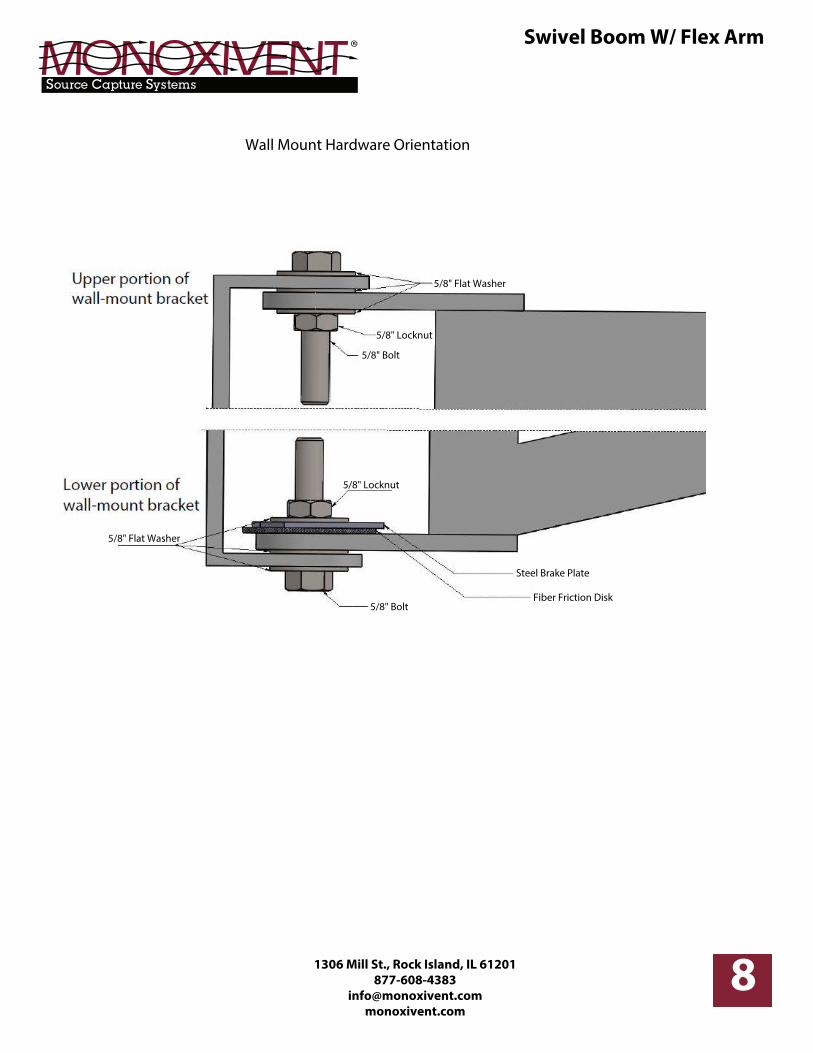
Wall Mount Hardware Orientation
5/8" Flat Washer
5/8" Locknut
5/8" Bolt
Fiber Friction Disk
Steel Brake Plate
5/8" Locknut
5/8" Flat Washer
5/8" Bolt
Brady
Line
Brady
Line
brady
Rectangle
brady
Rectangle
brady
Rectangle
brady
Rectangle