SVG1000 Wireless IP PBX System User Manual€¦ · SVG1000 Wireless IP PBX User Manual STEPHEN...
69
SVG1000 Wireless IP PBX User Manual STEPHEN TECHNOLOGIES CO.,LIMITED - 1 - WWW.STEPHEN-TELE.COM SVG1000 Wireless IP PBX System User Manual [V 1.3] STEPHEN TECHNOLOGIES CO.,LIMITED ALL RIGHTS RESERVED
Transcript of SVG1000 Wireless IP PBX System User Manual€¦ · SVG1000 Wireless IP PBX User Manual STEPHEN...

SVG1000 Wireless IP PBX User Manual
STEPHEN TECHNOLOGIES CO.,LIMITED - 1 - WWW.STEPHEN-TELE.COM
SVG1000 Wireless IP PBX System
User Manual [V 1.3]
STEPHEN TECHNOLOGIES CO.,LIMITED ALL RIGHTS RESERVED

SVG1000 Wireless IP PBX User Manual
STEPHEN TECHNOLOGIES CO.,LIMITED - 2 - WWW.STEPHEN-TELE.COM
Table of Contents
Chapter 1. Introduction................................................................................................................ 4
Chapter 2. Feature List................................................................................................................ 4
Chapter 3. SVG1000 at Glance .................................................................................................... 6
3.1 Front Panel View ................................................................................................................ 6
3.2 Rear Panel View ................................................................................................................. 7
3.3 Two Typical Connections with SVG1000.............................................................................. 8
Chapter 4. Network Basic Setup .............................................................................................. 10
4.1 Setting LAN Connections.................................................................................................. 10
4.2 Create New WAN Connections......................................................................................... 12
4.3 Modify an Existing Connection.......................................................................................... 21
4.4 Delete an Existing Connection.......................................................................................... 22
4.5 Modem Setup ................................................................................................................... 22
Chapter 5. Network Advanced Setup ....................................................................................... 23
5.1 Advanced Tab Main Page................................................................................................ 23
5.2 Voice............................................................................................................................... 24
5.3 UPnP ............................................................................................................................... 25
5.4 SNTP ............................................................................................................................... 25
5.5 SNMP .............................................................................................................................. 27
5.6 TR-069............................................................................................................................ 29
5.7 Port Forwarding ............................................................................................................... 30
5.8 IP Filters.......................................................................................................................... 31
5.9 LAN Clients...................................................................................................................... 33
5.10 TR-068 WAN Access..................................................................................................... 33
5.11 Bridge Filters.................................................................................................................. 34
5.12 Web Filters..................................................................................................................... 35
5.13 Dynamic DNS Client ...................................................................................................... 36
5.14 Static Routing ................................................................................................................ 37
5.15 Dynamic Routing ........................................................................................................... 37
5.16 Policy Database............................................................................................................. 38
5.17 Ingress ........................................................................................................................... 39
5.18 Egress........................................................................................................................... 42
5.19 Shaper ........................................................................................................................... 45
5.20 Web Access Control ...................................................................................................... 46
5.21 SSH Access Control ...................................................................................................... 47
5.22 Voice Provision .............................................................................................................. 48
Chapter 6. Wireless Setup ...................................................................................................... 49
6.1 Main Setup Page .............................................................................................................. 49
6.2 Wireless Setup.................................................................................................................. 50
6.3 Wireless Configuration...................................................................................................... 52
6.4 Multiple SSID.................................................................................................................... 54

SVG1000 Wireless IP PBX User Manual
STEPHEN TECHNOLOGIES CO.,LIMITED - 3 - WWW.STEPHEN-TELE.COM
6.5 Wireless Security .............................................................................................................. 55
6.6 Wireless Management ...................................................................................................... 60
6.7 WDS ................................................................................................................................ 62
Chapter 7. IP-PBX Setup .......................................................................................................... 64
7.1 PBX General.................................................................................................................... 65
7.2 Local Extension ............................................................................................................... 66
7.3 Exterior Line..................................................................................................................... 68
7.4 PBX Dial Plan .................................................................................................................. 69
7.5 PBX Utilities Setup........................................................................................................... 70
7.6 PBX Status Display.......................................................................................................... 71
Chapter 8. Tools Page ............................................................................................................ 74
8.1 System Commands.......................................................................................................... 74
8.2 Remote Log ..................................................................................................................... 76
8.3 User Management ........................................................................................................... 77
8.4 Update Gateway .............................................................................................................. 79
8.5 Ping Test Page ................................................................................................................ 79
8.6 Modem Test..................................................................................................................... 80
Chapter 9. Dialing Rules .......................................................................................................... 82
Appendix A、Specifications ...................................................................................................... 84
Appendix B、AP Parameters ................................................................................................... 89
Appendix C、Frequently Asked Questions .............................................................................. 90
Appendix D、Glossary ............................................................................................................. 91
Appendix E、Contact Information ............................................................................................ 95
Chapter 1. Introduction
Thank you for choosing the CHIMA ( Stephen Technologies ) Residential Gateway SVG1000.The system is generally designed as a
unified box integrating ADSL Modem, Router, WLAN AP and IP-PBX together. The CHIMA SVG1000 Wireless VoIP Gateway is capable
of supporting feature-rich user experience for many usage scenarios for the small business (SMB) and Residential markets.
Networks are useful tools for sharing Internet access and computer resources. Multiple computers can share Internet access, so you
don’t need more than one high-speed Internet connection and you can browse web, play network game, listen to MP3, download
internet resources and so on. With Internet phone service, your Internet access can now be shared by your Internet phones as well.
You will be able to make phone calls using your Internet phone service account, this can save your phone costs greatly.
This user manual covers the steps for setting up a network system with SVG1000. Most users will
Only need to use “Chapter 4: Network Basic Setup “ and “Chapter 7: IP-PBX Setup”. When you’re finished, then you are ready to
make calls within your system as well as calls to the outside world.
Chapter 2. Feature List
• ADSL Modem

SVG1000 Wireless IP PBX User Manual
STEPHEN TECHNOLOGIES CO.,LIMITED - 4 - WWW.STEPHEN-TELE.COM
- 1 ADSL/FXO Port(RJ11) - ADSL Standards Supported (1.413, G.DMT 992.1, ADSL2, ADSL2+) - Maximal downlink speed:24Mbps, uplink speed: 2.3Mbps - Support 8 channels PVC
• WLAN - 802.11 b/g compatibility - Automatic speed (6, 9, 12, 18, 24, 36, 48, 54M for 802.11g; 1, 2, 5.5, 11M for 802.11.b) - Scope of signal cover : indoors:35~100 meters; outdoors :120~400 meters - Security (WEP, 802.1x, WPA, WPA2) - Multiple SSID - WDS ( Wireless Distribution System ) - 802.11e/WMM
• Ethernet Interface - 4 10/100 Base-T RJ45 standard Ethernet interface - 10/100 Ethernet Auto-Sensing - Auto-detect straight-through or crossover
•••• IP-PBX - Converge analog exterior lines, analog phone, SIP exterior lines and local extensions - Build in a SIP registrar server and a proxy server, support standard SIP terminals - SIP-to-PSTN and PSTN-to- SIP switching - Support 20 SIP exterior line - Support 100 local extensions - Support 1 analog phone(expansible to 2~4 FXS port) - Support 1 analog line(expansible to 2~4 FXO port) - Remote extension - Call Forward - Call Transfer - Call Conferences - Music on Hold - Flexible Dial Plan customize - Status Display of All Connections - Voice mail for each extensions - Voice mail to email delivery - Read and manage voice mail via analog phone or any SIP phone - Customize individual phone prompt voice via analog phone or any SIP phone - Support multiple CODEC(G.711a、G.711u、G.729、G.723.1) • Advanced Service Features - Routing (RIP v1/2, IGMP proxy, IP forwarding) - Enhanced QoS architecture (Ingress, Egress, Shaper) and Policy Routing - WAN protocols (PPPoE, DHCP, Static, PPPoA, CLIP, Bridged) - Stateful packet inspection (SPI) Firewall - NAT/NAPT - Secure HTTP server (HTTPS) - DHCP Sever/Client/Relay - IP filter - DMZ

SVG1000 Wireless IP PBX User Manual
STEPHEN TECHNOLOGIES CO.,LIMITED - 5 - WWW.STEPHEN-TELE.COM
- Port forward - VLAN support - LAN isolate - Bridge filter - Configurable static/dynamic routing - UPnP Internet gateway device (IGD) - SNTP - Dynamic DNS support • Management - Web-based customer-extendible configuration manager - SNMP - Telnet, SSH, TFTP - Diagnostics and test capabilities - TR-068 WAN Access - TR-069 (CPE WAN-side management)
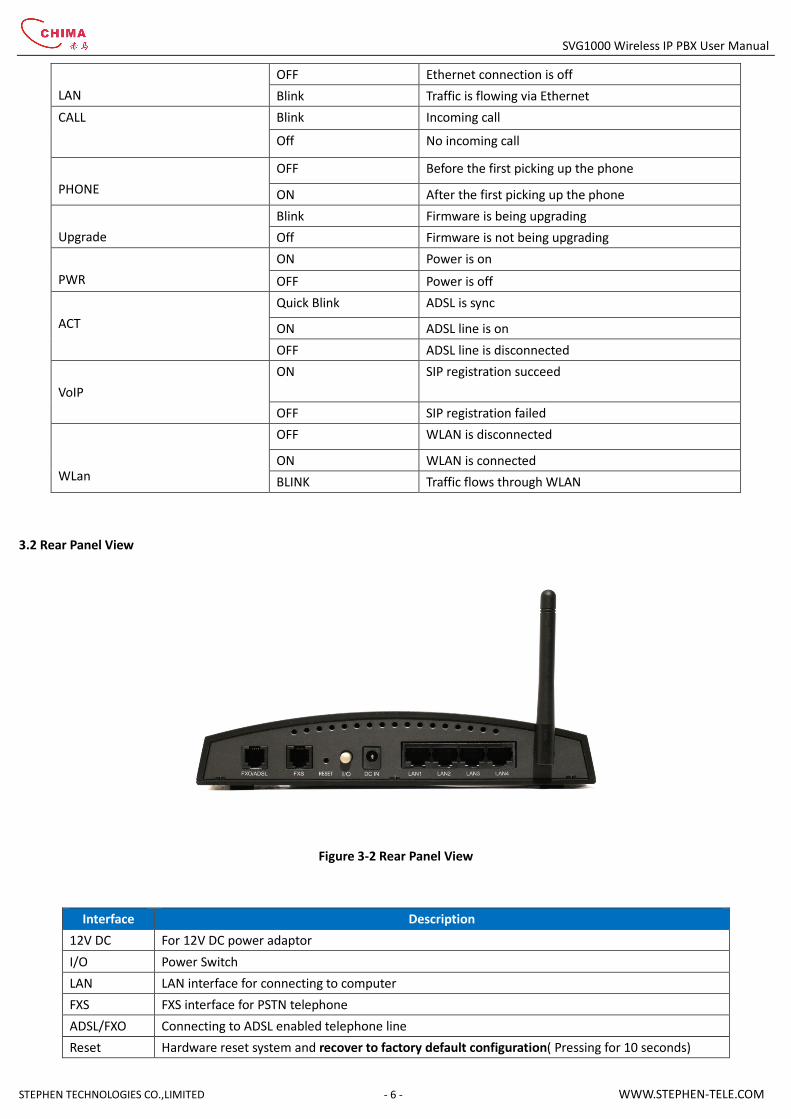
Chapter 3. SVG1000 at Glance
3.1 Front Panel View
Figure 3-1 Front Panel View
>> LED Status Description
LED Status Description
ON Ethernet connection is on
SVG1000 Wireless IP PBX User Manual
STEPHEN TECHNOLOGIES CO.,LIMITED - 6 - WWW.STEPHEN-TELE.COM
LAN
OFF Ethernet connection is off
Blink Traffic is flowing via Ethernet
CALL Blink Incoming call
Off No incoming call
PHONE
OFF Before the first picking up the phone
ON After the first picking up the phone
Upgrade
Blink Firmware is being upgrading
Off Firmware is not being upgrading
PWR
ON Power is on
OFF Power is off
ACT
Quick Blink ADSL is sync
ON ADSL line is on
OFF ADSL line is disconnected
VoIP
ON SIP registration succeed
OFF SIP registration failed
WLan
OFF WLAN is disconnected
ON WLAN is connected
BLINK Traffic flows through WLAN
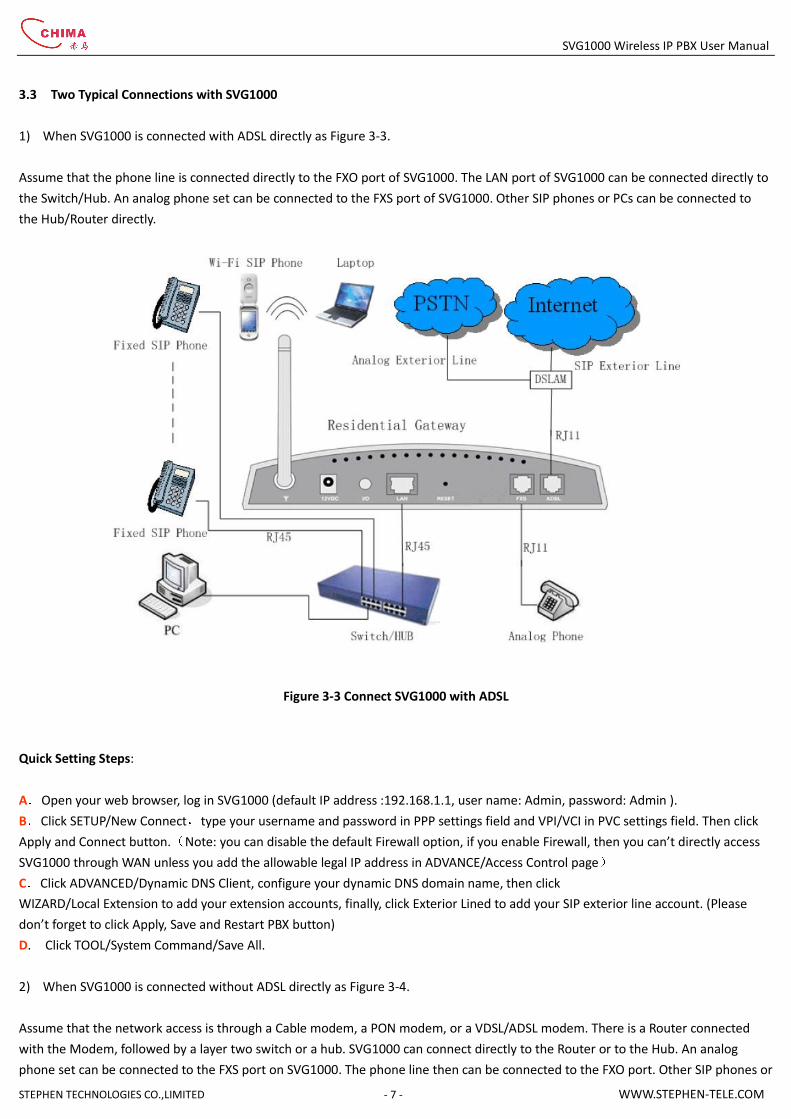
3.2 Rear Panel View
Figure 3-2 Rear Panel View
Interface Description
12V DC For 12V DC power adaptor
I/O Power Switch
LAN LAN interface for connecting to computer
FXS FXS interface for PSTN telephone
ADSL/FXO Connecting to ADSL enabled telephone line
Reset Hardware reset system and recover to factory default configuration( Pressing for 10 seconds)
SVG1000 Wireless IP PBX User Manual
STEPHEN TECHNOLOGIES CO.,LIMITED - 7 - WWW.STEPHEN-TELE.COM
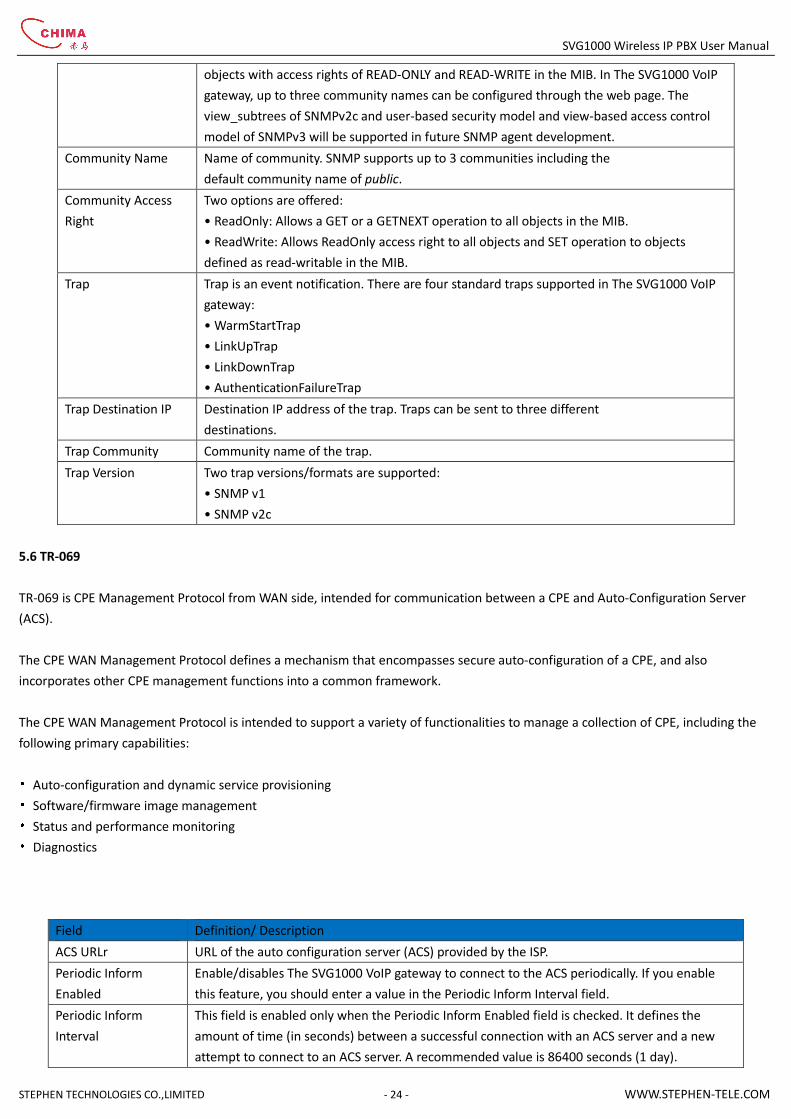
3.3 Two Typical Connections with SVG1000
1) When SVG1000 is connected with ADSL directly as Figure 3-3.
Assume that the phone line is connected directly to the FXO port of SVG1000. The LAN port of SVG1000 can be connected directly to
the Switch/Hub. An analog phone set can be connected to the FXS port of SVG1000. Other SIP phones or PCs can be connected to
the Hub/Router directly.
Figure 3-3 Connect SVG1000 with ADSL
Quick Setting Steps:
A.Open your web browser, log in SVG1000 (default IP address :192.168.1.1, user name: Admin, password: Admin ).
B.Click SETUP/New Connect,type your username and password in PPP settings field and VPI/VCI in PVC settings field. Then click
Apply and Connect button.(Note: you can disable the default Firewall option, if you enable Firewall, then you can’t directly access
SVG1000 through WAN unless you add the allowable legal IP address in ADVANCE/Access Control page)
C.Click ADVANCED/Dynamic DNS Client, configure your dynamic DNS domain name, then click
WIZARD/Local Extension to add your extension accounts, finally, click Exterior Lined to add your SIP exterior line account. (Please
don’t forget to click Apply, Save and Restart PBX button)
D. Click TOOL/System Command/Save All.
2) When SVG1000 is connected without ADSL directly as Figure 3-4.
Assume that the network access is through a Cable modem, a PON modem, or a VDSL/ADSL modem. There is a Router connected
with the Modem, followed by a layer two switch or a hub. SVG1000 can connect directly to the Router or to the Hub. An analog
phone set can be connected to the FXS port on SVG1000. The phone line then can be connected to the FXO port. Other SIP phones or

SVG1000 Wireless IP PBX User Manual
STEPHEN TECHNOLOGIES CO.,LIMITED - 8 - WWW.STEPHEN-TELE.COM
PCs can be connected to the Hub/Router directly.
Figure 3-3 Connect SVG1000 without ADSL Directly
Quick Setting Steps:
A....Open your web browser, log in SVG1000 (default IP address :192.168.1.1, user name: Admin, password: Admin ). Click SETUP/LAN
Configuration/configure to modify the default IP address to a new IP address which is different from, but in the same subnet as the IP
address of Router in “Use the following Static IP address” field. Type the IP address of Router both in “Default Gateway” field and
“Relay IP” field (If Router runs as DHCP server).
B. Click ADVANCED/Dynamic DNS Client, configure your dynamic DNS domain name. then click
WIZARD/General,select “Enable PBX NAT” and copy your domain name to “External IP of PBX” filed.
C.Click Local Extension to add your extension accounts and click Exterior Line to add your sip exterior line accounts((Please don’t
forget to click Apply, Save and Restart PBX button).
D.Click TOOL/System Command/Save All.
E.Finally, log in your Router to make DMZ or port forward settings for SVG1000.(The default SIP server port of SVG1000 is 5070,
ports of RTP streams is 11000~20000).
(NOTE: step B and E are not necessary unless you want to use dynamic domain name without DSL
connection)
Chapter 4. Network Basic Setup
The Setup tab allows you to perform basic interface configuration functions.
4.1 Setting LAN Connections
The SVG1000 VoIP gateway provides LAN configuration for multiple LAN bridge groups. Up to five LAN bridge groups are supported.
The LAN interfaces could include: Ethernet, WLAN (Primary SSID), SSID1, SSID2, and SSID3. It is possible to assign any LAN interface

SVG1000 Wireless IP PBX User Manual
STEPHEN TECHNOLOGIES CO.,LIMITED - 9 - WWW.STEPHEN-TELE.COM
to any bridge group but only one group, except that the Ethernet interface needs to stay in LAN group 1. Each LAN group can then be
configured with static IP address, dynamic IP address, or be unmanaged (no IP).
Figure 4-1 LAN Configuration main Page
Click Configuration/configure, you can change some default settings for your LAN configuration as Figure 4-2.
Generally, you do not need to change these default settings, if necessary, you can also change IP address, default gateway and DHCP
here. Notice that you can also view the status of advanced services that can be applied to this LAN group. A green status indicates
that the services have been enabled, while a red status indicates that the service is currently disabled

SVG1000 Wireless IP PBX User Manual
STEPHEN TECHNOLOGIES CO.,LIMITED - 10 - WWW.STEPHEN-TELE.COM
Figure 4-2 LAN Connection Setup Page
4.2 Create New WAN Connections
4.2.1 Create PPPOE Connection
Figure 4-3 shows the default New Connection Setup page, which defaults to the PPPoE
Connection Setup page.
Notice this page can be logically divided into three sections. Section A
includes settings specific to the connection type. Section B (VLAN settings) and Section C (PVC
settings) remain the same for all six connection types.
Figure 4-3 New WAN Connection Setup Page
Configure a PPPoE Connection
1. On the Setup main page, click New Connection.
The default PPPoE Connection Setup page (Figure 4-2) is displayed.
2. Enter a unique name for the PPPoE connection in the Name field.
The name must not have spaces and cannot begin with numbers. In this case, the unique
name is PPPoE1.
3. The Network Address Translation (NAT) and the Firewall options are enabled by default.
Leave these in the default mode.
Note: NAT enables the IP address on the LAN side to be translated to IP address on the
WAN side. If NAT is disabled, you cannot access the Internet.
4. In the PPP Settings section, enter values from DSL service provider or your ISP.
5. In the PVC Settings section, enter values for the VPI and VCI.
Note: Your DSL service provider or your ISP supplies these values. In this case, the DSL
service provider is using 0,35. Leave the default value if you are unsure or if the ISP did not

SVG1000 Wireless IP PBX User Manual
STEPHEN TECHNOLOGIES CO.,LIMITED - 11 - WWW.STEPHEN-TELE.COM
provide this information.
6. Select the Quality of Service (QoS). Leave the default value if you are unsure or if the ISP did not provide this information.
7. Click Apply to complete the connection setup. This temporarily activates this connection as
shown in Figure 4-4.
Figure 4-4 PPPoE Connection Setup
A new link is created for this connection in the left-hand column. You can connect, disconnect,
apply, delete, or cancel this connection using the buttons at the bottom of this page.
Note: The changes take effect when you click Apply; however, if the SVG1000 configuration
is not saved, these changes will be lost upon SVG1000 reboot.
Figure 4-5 System Commands Page
8. To make the change permanent, click Tools (at the top of the page) and select System
Commands.

SVG1000 Wireless IP PBX User Manual
STEPHEN TECHNOLOGIES CO.,LIMITED - 12 - WWW.STEPHEN-TELE.COM
Figure 4-6 Connection Status Page
9. On the System Commands page (Figure 4-5), click Save All.
10. To check the status, click Status (at the top of the page) and select Connection Status.
Figure 4-5 shows the Connection Status page.
4.2.2 Static IP Connection Setup
Figure 4-7 illustrates the default Static Connection Setup page.
Figure 4-7 Static connection Page
Configure a Static Connection
1. On the Setup main page, click New Connection.
The default PPPoE Connection Setup page (Figure 4-3) is displayed.
2. Select Static from Type field.
The default Static Connection Setup page (Figure 4-7) is displayed.
3. Enter a unique name for the Static connection in the Name field.
The name must not have spaces and cannot begin with numbers. In this case, the unique

SVG1000 Wireless IP PBX User Manual
STEPHEN TECHNOLOGIES CO.,LIMITED - 13 - WWW.STEPHEN-TELE.COM
name is Static1.
4. The Network Address Translation (NAT) and the Firewall options are enabled by default.
Leave these in the default mode.
5. In the Static Settings section, select the Encapsulation Type (LLC or VC).
Note: If you are not sure, just use the default mode.
6. Based upon the information your DSL/ISP provided, enter your assigned IP Address, Subnet
Mask, Default Gateway (if provided), and Domain Name Services (DNS) values (if
provided).
7. For the static configuration, you can also select a Bridged connection or a Routed
connection.
8. In the PVC Settings section, enter values for the VPI and VCI.
9. Note: Your DSL service provider or your ISP supplies these values. In this case, the DSL
service provider is using 0,35. ). Leave the default value if you are unsure or if the ISP did not
provide this information.
10. Select the Quality of Service (QoS). Leave the default value if you are unsure or if the ISP
did not provide this information.
11. Click Apply to complete the connection setup. This temporarily activates this connection as
shown in Figure 4-8.
Figure 4-8 Static IP Connection Setup
A new link has been created for this connection in the left-hand column. You can apply, delete,
or cancel this connection using the buttons on this page.

SVG1000 Wireless IP PBX User Manual
STEPHEN TECHNOLOGIES CO.,LIMITED - 14 - WWW.STEPHEN-TELE.COM
Note: The changes take effect when you click Apply; however, if the SVG1000 configuration is
not saved, these changes will be lost upon SVG1000 reboot.
12. To make the change permanent, click Tools at the top of the page and select System
Commands.
13. At the System Commands page (Figure 4-4), click Save All.
14. To check the status, click Status at the top of the page and select Connection Status.
4.2.3 DHCP Connection Setup
Figure 4-9 shows the default Dynamic Host Configuration Protocol (DHCP) Connection Setup
page.
Figure 4-9 DHCP Connection Setup
Configure a DHCP Connection
1. On the Setup main page, click New Connection.
2. Select DHCP from Type field..
The default DHCP Connection Setup page (Figure 4-8) is displayed.
3. Enter a unique name for the static connection in the Name field.
The name must not have spaces and can not begin with numbers. In this case, the unique
name is DHCP1.
4. The Network Address Translation (NAT) and the Firewall options are enabled by default.
Leave these in the default mode.
5. If your DSL line is connected and your DSL/IPS provider is supporting DHCP, you can click
Renew and the gateway retrieves an IP Address, Subnet Mask, and Gateway Address.

SVG1000 Wireless IP PBX User Manual
STEPHEN TECHNOLOGIES CO.,LIMITED - 15 - WWW.STEPHEN-TELE.COM
At any time, you can release the DHCP address by clicking Release, and renew the DHCP
address by clicking Renew.
6. Under PVC Settings, enter values for the VPI and VCI.
7. Note: Your DSL service provider or your ISP supplies these values. In this case, the DSL
service provider is using 0,35. Leave the default value if you are unsure or if the ISP did not
provide this information.
8. Select the Quality of Service (QoS). Leave the default value if you are unsure or if the ISP
did not provide this information.
9. Click Apply to complete the connection setup. This temporarily activates this connection as
shown in Figure 4-10.
Figure 4-10 DHCP Connection Setup
A new link has been created for this connection in the left-hand column. You can apply, delete,
or cancel this connection using the buttons on this page.
Note: The changes take effect when you click Apply; however, if the SVG1000 configuration is
not saved, these changes will be lost upon SVG1000 reboot.
10. To make the change permanent, click Tools at the top of the page and select System
Commands.
11. At the System Commands page (Figure 7), click Save All.
12. To check the status, click Status at the top of the page and select Connection Status.

SVG1000 Wireless IP PBX User Manual
STEPHEN TECHNOLOGIES CO.,LIMITED - 16 - WWW.STEPHEN-TELE.COM
4.2.4 Bridged Connection Setup
Figure 4-11 shows the default Bridged Connection Setup page.
Figure 4-11 Bridge Connection Setup
Configure a Bridge Connection
1. On the Setup main page, click New Connection.
The default PPPoE Connection Setup page (Figure 4-3) is displayed.
2. Select Bridge from Type field..
The default Bridge Connection Setup page (Figure 4-11) is displayed.
3. Enter a unique name for the Bridged connection in the Name field.
The name must not have spaces and cannot begin with numbers. In this case, the unique
name is Bridge 1.
4. The NAT and the Firewall options are enabled by default. Leave these in the default mode.
5. In the Bridge Settings section, select the Encapsulation Type (LLC or VC).
Note: If you are not sure, just use the default mode.
6. In the PVC Settings section, enter values for the VPI and VCI.
7. Note: Your DSL service provider or your ISP supplies these values. In this case, the DSL
service provider is using 0,35. Leave the default value if you are unsure or if the ISP did not
provide this information.
8. Select the Quality of Service (QoS). Leave the default value if you are unsure or if the ISP
did not provide this information.

SVG1000 Wireless IP PBX User Manual
STEPHEN TECHNOLOGIES CO.,LIMITED - 17 - WWW.STEPHEN-TELE.COM
9. Click Apply to complete the connection setup. This temporarily activates this connection as
shown in Figure 4-12.
Figure 4-12 Bridged Connection Setup
A new link has been created for this connection in the left-hand column. You can apply, delete,
or cancel this connection using this page.
Note: The changes take effect when you click Apply; however, if the SVG1000 configuration is
not saved, these changes will be lost upon SVG1000 reboot.
10. To make the change permanent, click Tools at the top of the page and select System
Commands.
11. At the System Commands page (Figure 4-5) click Save All.
12. To check the status, click Status (at the top of the page) and select Connection Status.
4.3 Modify an Existing Connection
Use the following procedures to modify a WAN connection.
Modify a WAN Connection
1. On the Setup main page, select the connection you want to modify from the left-hand column.
Note: Up to eight WAN connections of all types are supported.
2. Make modifications on the individual connection page.
Note: Some fields are disabled after initial creation.
Note: You must enter your password again.
3. Click Apply to temporarily activate the changes you made.

SVG1000 Wireless IP PBX User Manual
STEPHEN TECHNOLOGIES CO.,LIMITED - 18 - WWW.STEPHEN-TELE.COM
Note: The changes take effect when you click Apply; However, if the SVG1000 configuration
is not saved, these changes will be lost upon SVG1000 reboot.
4. To make the change permanent, click Tools at the top of the page and select System
Commands.
5. On the System Commands page, click Save All.
4.4 Delete an Existing Connection
Use the following procedures to delete a WAN connection.
Delete A WAN Connection
1. On the Setup main page, select the connection you want to modify from the left-hand column.
2. Click Delete on the particular Connection Setup page.
Note: The changes take effect when you click Delete; however, if the SVG1000 configuration
is not saved, these changes will be lost upon SVG1000 reboot.
3. To make the change permanent, click Tools at the top of the page and select System
Commands.
4. At the System Commands page, click Save All.
4.5 Modem Setup
The Modem Setup page allows you to select from the following modulation types:
MMODE (MultiMode): (the modulation is automatically detected) • T1413: ANSI T1.413-1998 • GDMT (G Discrete Multi-Tone): G.dmt (G.992.1) • GLITE: G.lite (G.992.2)
Figure 4-13 Modem Setup

SVG1000 Wireless IP PBX User Manual
STEPHEN TECHNOLOGIES CO.,LIMITED - 19 - WWW.STEPHEN-TELE.COM
Chapter 5. Network Advanced Setup
The Advanced tab allows you to perform advanced configuration functions for existing connections.
5.1 Advanced Tab Main Page
The Advanced tab allows you to perform advanced configuration functions for existing connections including:
• Enabling and disabling of key features including voice, voice provision, UPnP, SNTP, SNMP,
TR-069, IP QoS, RIP, access control, TR-068 WAN access, and multicasting
• QoS (ingress, egress, shaper) and policy routing
• Management of LAN port interfaces, packet flow, and filtering
At least one WAN connection must be configured before implementing advanced WAN configuration features. At least one LAN
group must be defined before implementing advanced LAN configuration features. Figure 5-1 shows the Advanced main page, which
is accessed by clicking the Advanced tab at the top of the page. This page provides access to the following
configuration pages: voice, UPnP, SNTP, SNMP, TR-069, Port Forwarding, IP Filters, LAN Clients, LAN Isolation, TR-068, Bridge Filters,
Web Filters, Dynamic DNS Client, IGMP Proxy, Static Routing, Policy Routing, Ingress, Egress, Shaper, Web/SSH Access Control.

SVG1000 Wireless IP PBX User Manual
STEPHEN TECHNOLOGIES CO.,LIMITED - 20 - WWW.STEPHEN-TELE.COM
Figure 5-1 Advanced Tab Main Page
5.2 Voice
Figure 5-2 shows the default Voice page, which is accessed by clicking the Voice link. This page allows you to enable or disable voice
on a single WAN connection. When voice is enabled, there is a green status indicator next to the Voice link. When voice is disabled,
the status indicator is red. At least one WAN connection must be configured in order to access the Voice Setup page. While up to
eight WAN connections can be configured on the SVG1000 VoIP gateway, only one connection can be selected to enable voice. By
default, voice is automatically enabled on the first WAN connection you create. Each additional WAN connection you create is added
to the list of Available Connections that are also candidates for enabling voice.
Figure 5-2 Voice Page
5.3 UPnP
Universal plug and play (UPnP), NAT, and firewall traversal allow traffic to pass through the SVG1000 VoIP gateway for applications
using the UPnP protocol. This feature requires one active WAN connection. In addition, the PC should support this feature. In the
presence of multiple WAN connections, select a connection on which the incoming traffic is present, for example, the default WAN
connection.
Figure 5-3 shows the default UPnP page

SVG1000 Wireless IP PBX User Manual
STEPHEN TECHNOLOGIES CO.,LIMITED - 21 - WWW.STEPHEN-TELE.COM
Figure 5-3 UPnP Page
5.4 SNTP
Simple network timing protocol (SNTP) is a protocol used to synchronize the system time to the public SNTP servers. It uses the UDP
protocol on port 123 to communicate between clients and servers. Figure 5-4 shows the default SNTP page.
When the SNTP feature is enabled, your RG starts querying for the time clock information from the primary SNTP server. If it fails to
get a valid response within the Timeout period, it makes additional attempts based on the number specified in the Retry Count field
before moving to the Secondary SNTP server. If it fails to get a valid response from Secondary STNP server within the specified retry
count, it starts querying the Tertiary SNTP server. If it fails to get a valid response from all the servers, then the program stops. Once a
valid response is received from one of the servers, the program goes to sleep for number of minutes specified in the Polling Interval
field before starting the whole process again.

SVG1000 Wireless IP PBX User Manual
STEPHEN TECHNOLOGIES CO.,LIMITED - 22 - WWW.STEPHEN-TELE.COM
Figure 5-4 SNTP Page
Field Definition/ Description
Primary SNTP Server The IP address or the host name of the primary SNTP server. This can be provided by ISP or
user-defined.
Secondary SNTP
Server
The IP address or the host name of the secondary SNTP server. This can be provided by ISP or
user-defined.
Tertiary SNTP
Server
The IP address or the host name of the tertiary SNTP server. This can be provided by
ISP or user-defined.
Timeout If The SVG1000 VoIP gateway failed to connect to a SNTP server within the Timeout period, it retries
the connection.
Polling Interval The amount of time between a successful connection with a SNTP server and a new attempt to
connect to an SNTP server.
Retry Count The number of times The SVG1000 VoIP gateway tries to connect to an SNTP server before it tries to
connect to the next server in line.
Time Zone The time zone in which The SVG1000 VoIP gateway resides.
Day Light Check/uncheck this option to enable/disable daylight saving time (DST). Note: DST is not
automatically enabled or disabled. You need to manually enable and disable it.
5.5 SNMP
Simple network management protocol (SNMP) is a troubleshooting and management protocol that uses the UDP protocol on port
161 to communicate between clients and servers. Figure 5-5 shows the default SNMP page.

SVG1000 Wireless IP PBX User Manual
STEPHEN TECHNOLOGIES CO.,LIMITED - 23 - WWW.STEPHEN-TELE.COM
Figure 5-5 SNMP Page
SNMP uses a Manager- Management information base (MIB)-Agent solution to fulfill network management needs. The manager is a
separate station that can request data from an SNMP agent, which resides in each modem on the network.
The agent uses the MIBs as dictionaries of manageable objects. The SNMP agent supports GET, SET, GETNEXT, and TRAP for four
groups with MIB-II: System, Interface, IP, and ICMP. The SNMP agents support three community names authentication. Following
table describes the SNMP Management page fields.
Field Definition/ Description
Enable SNMP Agent The SNMP agent is enabled by default.
Enable SNMP Traps SNMP traps are enabled to send by default.
Name An administratively-assigned name for The SVG1000 VoIP gateway.
Location The physical location of The SVG1000 VoIP gateway.
Contact Contact person and/or contact information for The SVG1000 VoIP gateway.
Vendor OID Vendor object identifier. The vendor's authoritative identification of the network
management subsystem contained in the entity. This value is allocated within the SMI
enterprises subtree (1.3.6.1.4.1).
Community SNMP defines a community to be a relationship between an SNMP agent and one or more
SNMP managers. Once the clear-text community name corresponds to a community known
to the receiving SNMP entity, the sending SNMP entity is considered to be authenticated as
a member of that community and is granted different levels of access: read-only or
read-write. The combination of community access mode and a MIB-managed project
defines the community profile for each
object. The community profile defines the operations that can be applied to the object. In
The SVG1000 VoIP gateway, a default community name of public with access mode of
readonly is created in the configuration file. It allows a GET or a GETNEXT operation to all
SVG1000 Wireless IP PBX User Manual
STEPHEN TECHNOLOGIES CO.,LIMITED - 24 - WWW.STEPHEN-TELE.COM
objects with access rights of READ-ONLY and READ-WRITE in the MIB. In The SVG1000 VoIP
gateway, up to three community names can be configured through the web page. The
view_subtrees of SNMPv2c and user-based security model and view-based access control
model of SNMPv3 will be supported in future SNMP agent development.
Community Name Name of community. SNMP supports up to 3 communities including the
default community name of public.
Community Access
Right
Two options are offered:
• ReadOnly: Allows a GET or a GETNEXT operation to all objects in the MIB.
• ReadWrite: Allows ReadOnly access right to all objects and SET operation to objects
defined as read-writable in the MIB.
Trap Trap is an event notification. There are four standard traps supported in The SVG1000 VoIP
gateway:
• WarmStartTrap
• LinkUpTrap
• LinkDownTrap
• AuthenticationFailureTrap
Trap Destination IP Destination IP address of the trap. Traps can be sent to three different
destinations.
Trap Community Community name of the trap.
Trap Version Two trap versions/formats are supported:
• SNMP v1
• SNMP v2c
5.6 TR-069
TR-069 is CPE Management Protocol from WAN side, intended for communication between a CPE and Auto-Configuration Server
(ACS).
The CPE WAN Management Protocol defines a mechanism that encompasses secure auto-configuration of a CPE, and also
incorporates other CPE management functions into a common framework.
The CPE WAN Management Protocol is intended to support a variety of functionalities to manage a collection of CPE, including the
following primary capabilities:
• Auto-configuration and dynamic service provisioning • Software/firmware image management • Status and performance monitoring • Diagnostics
Field Definition/ Description
ACS URLr URL of the auto configuration server (ACS) provided by the ISP.
Periodic Inform
Enabled
Enable/disables The SVG1000 VoIP gateway to connect to the ACS periodically. If you enable
this feature, you should enter a value in the Periodic Inform Interval field.
Periodic Inform
Interval
This field is enabled only when the Periodic Inform Enabled field is checked. It defines the
amount of time (in seconds) between a successful connection with an ACS server and a new
attempt to connect to an ACS server. A recommended value is 86400 seconds (1 day).

SVG1000 Wireless IP PBX User Manual
STEPHEN TECHNOLOGIES CO.,LIMITED - 25 - WWW.STEPHEN-TELE.COM
ACS Connect By clicking the ACS Connect button, you manually connect The SVG1000 VoIP gateway to the
ACS.
Figure 5-6 TR-069 Page
5.7 Port Forwarding
The port forwarding (or virtual server) feature allows you to direct incoming traffic to specific LAN hosts based on a protocol port
number and protocol.
Using the Port Forwarding page, you can provide local services (for example, web hosting) for people on the Internet or play Internet
games. Port forwarding is configurable per LAN group.
A database of predefined port forwarding rules allows you to apply one or more rules to one or more members of a defined LAN
group.
You can view the rules associated with a predefined category and add the available rules for a given category. You can also create,
edit, or delete your own port forwarding rules.

SVG1000 Wireless IP PBX User Manual
STEPHEN TECHNOLOGIES CO.,LIMITED - 26 - WWW.STEPHEN-TELE.COM
Figure 5-7 Port Forwarding Page
5.8 IP Filters
The IP filtering feature allows you to block specific applications/services based on the IP address of a LAN device.
You can use the IP Filters page (Figure 5-8) to block specific traffic (for example, block web access) or any traffic from a host on your
local network.
A database of predefined IP filters allows you to apply one or more filtering rules to one or more members of a defined LAN group.
You can view the rules associated with a predefined filter and add the available rules for a given category. You can also create, edit, or
delete your own IP filter rules.

SVG1000 Wireless IP PBX User Manual
STEPHEN TECHNOLOGIES CO.,LIMITED - 27 - WWW.STEPHEN-TELE.COM
Figure 5-8 IP Filters Page
Field Definition/ Description
Select LAN Group Select the LAN group to which the IP fIlters feature will be applied.
LAN IP Select the IP address in the given LAN group to which the IP Filters feature will be applied. field.
Block All Traffic When checked, complete network access is blocked for the specific IP address.
Block Outgoing Ping Blocking outgoing ping (ICMP) generated from a particular LAN IP can be
used if your host has a virus that attempts a Ping-of-Death Denial of Service attack.
Custom IP Filters This link takes you to the Custom IP Filters page.
Available Rules Predefined and user-defined IP filtering rules for each category.
Applied Rules Lists the IP filtering rules you elect to apply for each given category.
5.9 LAN Clients
The LAN clients feature allows you to see all the hosts on the LAN segment. Each host is qualified to be either dynamic (host obtained
a lease from this RG) or static (host has a anually-configured IP address).
You can add a static IP address (belonging to the RG’s LAN subnet) using the LAN Clients page (Figure 5-9). Any existing static entry
falling within the DHCP server's range can be deleted and the IP address is made available for future allocation.

SVG1000 Wireless IP PBX User Manual
STEPHEN TECHNOLOGIES CO.,LIMITED - 28 - WWW.STEPHEN-TELE.COM
Figure 5-9 LAN Clients Page
5.10 TR-068 WAN Access
The TR-068 WAN Access page (Figure 5-10) enables you to give temporary permission to someone (such as technical support staff) to
be able to access your RG from the WAN side. From the moment the account is enabled, the user is expected to log in within 20
active minutes, otherwise the account expires. Once the user has logged in, if the session remains inactive for more than 20 minutes,
the user will be logged out and the account expires.
Field Definition/ Description
WAN Update Check this field to give the account read and write access.
WAN Access Check this field to give the account read-only access.
User Name User Name of the WAN access account.
Password Password of the WAN access account.
Port Enter the port number to be opened for the temporary WAN access.

SVG1000 Wireless IP PBX User Manual
STEPHEN TECHNOLOGIES CO.,LIMITED - 29 - WWW.STEPHEN-TELE.COM
Figure 5-10 LAN Clients Page
5.11 Bridge Filters
The bridge filtering mechanism provides a way for you to define rules to allow or deny frames through the bridge based on source
MAC address, destination MAC address, frame type, and physical ports.
When bridge filtering is enabled, each frame is examined against every defined filter rule in sequence. When a match is found, the
appropriate filtering action (allow or deny) is performed.
Note that the bridge filter only examines frames from interfaces that are part of the bridge itself. Up to 20 filter rules are supported
with bridge filtering.
SVG1000 Wireless IP PBX User Manual
STEPHEN TECHNOLOGIES CO.,LIMITED - 30 - WWW.STEPHEN-TELE.COM
Figure 5-11 Bridge Filters Page
5.12 Web Filters
The Web Filters page (Figure 5-12) allows you to manage the type of web content that passes through your RG.
Figure 5-12 Web Filters Page
5.13 Dynamic DNS Client

SVG1000 Wireless IP PBX User Manual
STEPHEN TECHNOLOGIES CO.,LIMITED - 31 - WWW.STEPHEN-TELE.COM
Each time your RG connects to the Internet, your ISP assigns a different IP address to your RG.
In order for you or other users to access your RG from the WAN-side, you need to manually track the IP that is currently used.
The Dynamic DNS feature allows you to register your RG with a DNS server and access your RG
each time using the same host name.
The Dynamic DNS Client page (Figure 5-13) allows you to enable or disable the Dynamic DNS feature.
Figure 5-13 Dynamic DNS Client Page
Field Definition/ Description
Connection The SVG1000 VoIP gateway can support eight PVC WAN connections. You can choose one of
them if necessary, or you can choose a LAN connection when no WAN connection.
DDNS Server This is where you select the server from different DDNS service providers. A charge may occur
depends on the service you select.
Enable DDNS Client Enables/disables the DDNS client feature for the WAN connection. This field is disabled by
default.
Register a New
Domain Name
If you have not a registered domain name, you can click this link to register a new domain name
with the specified DDNS server
User Name User name assigned by the DDNS service provider.
Password Password assigned by the DDNS service provider.
Domain Name Domain name to be registered with the DDNS server.
5.14 Static Routing
The Static Routing page (Figure 5-14) enables you to define routes for specific subnets on the WAN/LAN side. The SVG1000 VoIP
gateway allows you to manually program The SVG1000 VoIP gateway's routing table. Up to 16 static routes can be added.

SVG1000 Wireless IP PBX User Manual
STEPHEN TECHNOLOGIES CO.,LIMITED - 32 - WWW.STEPHEN-TELE.COM
Figure 5-14 Static Routing Page
5.15 Dynamic Routing
The dynamic routing feature enables The SVG1000 VoIP gateway to dynamically define routes for WAN and LAN subnets. Dynamic
routing uses routing information protocol (RIP) for exchanging routing information with other routers in the network. It is supported
across both WAN and LAN
interfaces.
Any RIP-enabled router sends out automatic update packets containing its own routing table on a periodic basis (every 30 seconds).
Similarly,it accepts such periodic updates from other routers and adds, deletes, or modifies routes in its own routing table
accordingly. The router is also expected to receive requests for its routing table and respond accordingly. Use the Dynamic Routing
page (Figure 5-15) to define dynamic routing routes for the available interfaces.
Figure 5-15 Dynamic Routing Page
5.16 Policy Database

SVG1000 Wireless IP PBX User Manual
STEPHEN TECHNOLOGIES CO.,LIMITED - 33 - WWW.STEPHEN-TELE.COM
The Policy Database Configuration page (Figure 5-16) is accessed by selecting Policy Database on the Advanced home page. This page
enables you to configure policy routing and QoS. The policy routing configuration is discussed as follows.
Figure 5-16 Policy Database Page
Field Definition/ Description
Ingress Interface The incoming traffic interface for a Policy Routing rule. Selections include LAN interfaces, WAN
interfaces, Locally generated (traffic), and not applicable. Examples of Locally generated traffic
are: voice packets, packets generated by applications such as DNS, DHCP, etc.
Destination Interface The outgoing traffic interfaces for a Policy Routing rule. Selections include LAN Interfaces and
WAN interfaces.
DiffServ Code Point The diffServ code point (DSCP) field value ranges from 1 to 255. This field
cannot be configured alone, additional fields like IP, Source MAC, and/or Ingress Interface should
be configured.
Class of Service The selections are (in the order of priority): CoS1, CoS2, CoS3, CoS4, CoS5,CoS6, and N/A.
Source IP The IP address of the traffic source.
Mask The source IP netmask. This field is required if the source IP has been entered.
Protocol The selections are TCP, UDP, ICMP, Specify, and none. If you choose Specify,you need to enter the
protocol number in the box next to the Protocol field. This field cannot be configured alone,
additional fields like IP, Source MAC, and/or Ingress Interface should be configured. This field is
also required if the source port or destination port has been entered.
Source Port The source protocol port. You cannot configure this field without entering the protocol first.
Destination Port The destination protocol port or port range. You cannot configure this field without entering the
protocol first.
Source MAC The MAC address of the traffic source.
Local Routing Mark This field is enabled only when Locally Generated is selected in the Ingress Interface field. The
mark for DNS traffic generated by different applications are described below:
• Dynamic DNS: 0xE1 • Dynamic Proxy: 0xE2
• Web Server: 0xE3 • MSNTP: 0xE4
• DHCP Server: 0xE5 • IPtables Utility: 0xE6
• PPP Deamon: 0xE7 • IP Route: 0xE8

SVG1000 Wireless IP PBX User Manual
STEPHEN TECHNOLOGIES CO.,LIMITED - 34 - WWW.STEPHEN-TELE.COM
• ATM Library: 0xE9 • NET Tools: 0xEA
• RIP: 0xEB • RIP v2: 0xEC
• UPNP: 0xEE • Busybox Utility: 0xEF
• Configuration Manager: 0xF0 • DropBear Utility: 0xF1
• Voice: 0
5.17 Ingress
The Ingress page enables you to configure QoS for packets as soon as they come into The SVG1000 VoIP gateway. This page is
accessed by selecting Ingress on the Advanced main page. The domain mappings are converted to CoS (the common language) so
that the priority marking is carried over. There are four modes that are discussed below:
Ingress Untrusted Mode
Untrusted is the default Ingress page setting for all interfaces. In this mode, no domain mapping is honoured in The SVG1000 VoIP
gateway. All packets are treated as CoS6 (best effort) as shown in Figure 5-17.
Figure 5-17 Ingress Untrusted mode Page
Ingress Layer 2 Configuration
Layer 2 page ((Figure 5-18) enables you to map an incoming packet with VLAN priority to CoS. This feature is only configurable on the
WAN interfaces as VLAN is only supported on the WAN side in the current software release.
Field Definition/ Description
Interface Select the WAN interface here to configure the CoS for incoming traffic. Only WAN
interface can be selected as VLAN is currently supported only on the WAN side.
Class of Service The selections are (in the order of descending priority): CoS1, CoS2, CoS3,CoS4, CoS5,
and CoS6.
User Priority The selections are 0, 1, 2, 3, 4, 5, 6, 7.

SVG1000 Wireless IP PBX User Manual
STEPHEN TECHNOLOGIES CO.,LIMITED - 35 - WWW.STEPHEN-TELE.COM
Figure 5-18 Ingress Layer 2 configuration Page
Ingress Layer 3 Configuration
The Layer 3 page (Figure 5-19) allows you to map ToS bits of incoming packets from the IP network to CoS for each WAN/LAN
interface.
Field Definition/ Description
Interface For both WAN and LAN interfaces, you can configure QoS for layer 3 (IP) data traffic.
Class of Service This CoS field allows you to map incoming layer 3 WAN/LAN packets to one of the following CoS (in
the order of descending priority): CoS1, CoS2, CoS3, CoS4, CoS5,and CoS6.
ToS The type of service field takes values from 0 to 255.
Default Non IP A static CoS can be assigned to all layer 3 incoming packets (per interface) that do not have an IP
header, such as PPP control packets and ARP packets. The default is CoS1 (recommended).

SVG1000 Wireless IP PBX User Manual
STEPHEN TECHNOLOGIES CO.,LIMITED - 36 - WWW.STEPHEN-TELE.COM
Figure 5-19 Ingress Layer 3 configuration Page
Ingress Static Configuration
The Ingress - Static page enables you to configure a static CoS for all packets received on a WAN or LAN interface.
5.18 Egress
For packets going out of The SVG1000 VoIP gateway, the marking (CoS) need to be translated to the mappings understood by the
network domains. The reverse CoS and domain mapping is configured using the Egress page (Figure 5-20). This page is access by
selecting Egress on the Advanced main page.
No Egress Mode
The default Egress page setting for all interfaces is No Egress. In this mode, the domain mappings of the packets are untouched.
Figure 5-20 No Egress Mode Page

SVG1000 Wireless IP PBX User Manual
STEPHEN TECHNOLOGIES CO.,LIMITED - 37 - WWW.STEPHEN-TELE.COM
Egress Layer 2 Configuration
The Egress Layer 2 page (Figure 5-21) enables you to map the CoS of an outgoing packet to user priority bits, which is honoured by
the VLAN network. Again, this feature is only configurable on the WAN interfaces as VLAN is only supported on the WAN side in the
current release.
Field Definition/ Description
Interface Select the WAN interface to configure the QoS for outgoing packets. LAN interface can not be
selected as VLAN is currently supported on the WAN side only.
Unclassified Packet Some locally generated packets might not have been classified and thus do not have a CoS value,
such as PPP control packet and ARP packet. You can define the CoS for all unclassified outgoing
packets on layer 2 using this field, which will then pick up the user priority bits based on the
mapping rules you create. The selections are (in the order of descending priority): CoS1, CoS2,
CoS3, CoS4, CoS5, and CoS6. The default value is CoS1 (recommended).
User Priority The selections are 0, 1, 2, 3, 4, 5, 6, 7.
Class of Service The selections are (in the order of descending priority): CoS1, CoS2, CoS3,CoS4, CoS5, and CoS6.
Figure 5-21 Egress Layer 2 configuration Page
Egress Layer 3 Configuration
The Egress Layer 3 page (Figure 5-22) enables you to map CoS to ToS so that the priority marking of outgoing packets can be carried
over to the IP network.
Field Definition/ Description
Interface Select the WAN/LAN interface here to configure the QoS for outgoing traffic to the IP network.
Default Non-IP Locally generated packets (such as ARP packets) do not have a CoS marking. You can define the
CoS for all unclassified outgoing packets on layer 3 using this field. The selections are (in the
order of descending priority): CoS1, CoS2, CoS3, CoS4, CoS5, and CoS6. The default value is CoS1

SVG1000 Wireless IP PBX User Manual
STEPHEN TECHNOLOGIES CO.,LIMITED - 38 - WWW.STEPHEN-TELE.COM
(recommended).
Translated ToS The Type of Service field takes values from 1 to 255. The selections are 0, 1, 2,3, 4, 5, 6, 7.
Class of Service The selections are (in the order of descending priority): CoS1, CoS2, CoS3,CoS4, CoS5, and CoS6.
Figure 5-22 Egress Layer 3 configuration Page
5.19 Shaper
The Shaper Configuration page (Figure 5-23) is accessed by selecting Shaper on the Advanced main page. Three shaper algorithms
are supported: HTB, Low Latency Queue Discipline, PRIOWRR.
Figure 5-23 Shaper Configuration Page

SVG1000 Wireless IP PBX User Manual
STEPHEN TECHNOLOGIES CO.,LIMITED - 39 - WWW.STEPHEN-TELE.COM
Field Definition/ Description
Interface The selections are WAN/LAN interfaces except WLAN, which does not support Shaper feature. This
field needs to be selected before shaper configuration.
Max Rate This field is applicable for the HTB Queue Discipline and Low Latency Queue Discipline, both are
rate-based shaping algorithms.
HTB Queue Discipline The hierachical token bucket queue discipline is a rate-based shaping algorithm. This algorithm
rate shapes the traffic of a class over a specific interface. All CoSx traffic is assigned a specific rate
to which data will be shaped to. For example: If CoS1 is configured to 100Kbps then even if
300Kbps of CoS1 data is being transmitted to the interface only 100Kbps will be sent out.
Low Latency Queue
Discipline
This is similar to the above algorithm except that CoS1 is not rate limited. So in the example above
CoS1 data is not rate limited to 100Kbps but instead all 300Kbps is transmitted. The side effect is
that a misconfigured stream can potentially take all bandwidth.
PRIOWRR This is a priority based weighted round robin algorithm operating on CoS2-CoS6.CoS1 queues have
the highest priority and are not controlled by the WRR algorithm.
5.20 Web Access Control
The Web Access Control page (Figure 5-24) allows you to access the SVG1000 VoIP gateway remotely via the web from the WAN side.
Figure 5-24 Web Access Control Page
Field Definition/ Description
Enable Enables/disables the remote web access feature.
Choose a connection Select the WAN connect over which the remote web access feature is enabled.
Remote Host IP Enter the IP address of the remote host.
Remote Netmask Enter the netmask of the remote host.
Redirect Port You can enter a port number in this field that is different from the well-known IP port number 80.
The port number that you enter will be viewed externally and mapped to port 80 internally in
The SVG1000 VoIP gateway.

SVG1000 Wireless IP PBX User Manual
STEPHEN TECHNOLOGIES CO.,LIMITED - 40 - WWW.STEPHEN-TELE.COM
5.21 SSH Access Control
The SSH Access Control page (Figure 5-25) allows you to access The SVG1000 VoIP gateway remotely via SSH from the WAN side. The
configuration of a WAN IP address for SSH access control is very similar to the configuration of a WAN IP address for Web access
control. Refer to ‘‘Web Access Control Page’’ for field descriptions.
Figure 5-25 SSH Access Control Page
5.22 Voice Provision
Figure 5-26 shows the default Voice Provision page. The Voice Provisioning page (Figure 57) allows you to define voice DNS servers,
view provisioning status, and access the voice parameters configuration page.

SVG1000 Wireless IP PBX User Manual
STEPHEN TECHNOLOGIES CO.,LIMITED - 41 - WWW.STEPHEN-TELE.COM
Figure 5-26 Voice Provision Page
Field Definition/ Description
Provisioning Status Provides the provisioning status: Provisioned or Not provisioned. This is a viewonly field.
Voice DNS Server 1 The IP address of the primary voice DNS server provided by the voice service provider.
Voice DNS Server 2 The IP address of the secondary voice DNS server provided by the voice service provider.
The Voice Parameters page (Figure 5-27) can be accessed by clicking the Configure Voice Parameters link on the Provisioning page.
Figure 5-27 Voice Parameters Page
Chapter 6. Wireless Setup
The Wireless LAN tab allows you to perform WLAN interface configuration functions.
6.1 Main Setup Page
Figure 6-1 shows the Wireless main page, which is accessed by clicking the Wireless tab at the top of the page. This page provides
access to the following wireless configuration pages:
• Setup • Configuration • Multiple SSID • Security • Management

SVG1000 Wireless IP PBX User Manual
STEPHEN TECHNOLOGIES CO.,LIMITED - 42 - WWW.STEPHEN-TELE.COM
• WDS • Log Out
Figure 6-1 Wireless Main Page
6.2 Wireless Setup
Figure 6-2 shows the default Wireless Setup page, which is accessed by clicking the Setup link.
This page provides basic access point (AP) parameter settings.
Figure 6-2 Wireless setup Page
Field Definition/ Description
Enable AP Enables/disables the access point.
SSID The service set identifier of the AP, which is the only SSID your AP broadcasts (if hidden SSID is
disabled). The default is ParaAP and you can assign a unique SSID to your AP. The SSID is up to 32
characters.
Hidden SSID Enables/disables the hidden SSID feature. When hidden SSID is enabled, the SSID is removed from
the beacon frames the AP transmits, thus the AP will not be seen by any other station.

SVG1000 Wireless IP PBX User Manual
STEPHEN TECHNOLOGIES CO.,LIMITED - 43 - WWW.STEPHEN-TELE.COM
Channel B/G The channel on which the AP and the wireless stations communicate.
Different domains have different ranges of channels. For FCC in 2.4 GHz,
the default channel is 11.
802.11 Mode You can select from the following modes:
• Mixed mode: Both 802.11b and g modes are supported. The legacy supported rates information
element (SR IE) contains the 802.11b legacy supported rates and the additional OFDM supported
rates. Extended SR IE contains the extended supported rates, if present. Beacon & Probe Response
Frames are sent in b rate.
• 11b only Mode: The legacy SR IE contains only the 802.11b legacy
supported rates. The extended SR IE is not present.
• 11b+ Mode: Similar to the 802.11b-only mode except that 22Mbps
PBCC rate/modulation is included, which is TI proprietary.
• 11g only Mode: The legacy SR IE contains only the OFDM additional supported rates. The
extended SR IE contains the extended supported rates, if present.
4X Enables/disables the 4x feature for 802.11g mode.
User Isolation When checked, wireless users will not be able to directly access other wireless users.
QoS Support Enables/disables the WLAN QoS Support
ENABLE USER ISOLATION
Follow the following procedures to enable user isolation:
1. Select User Isolation checkbox.
2. Click Apply.
3. Click Restart Access Point at the bottom of the page, which takes you to the System
Commands page
4. Click Save All in the System Commands page
6.3 Wireless Configuration
You can access the Wireless Configuration page (Figure 5) by clicking the Configuration link. This page provides the advanced wireless
network parameter settings.
Figure 6-3 Wireless Configuration Page

SVG1000 Wireless IP PBX User Manual
STEPHEN TECHNOLOGIES CO.,LIMITED - 44 - WWW.STEPHEN-TELE.COM
Field Definition/ Description
Beacon Period The time interval between beacon frame transmissions, which ranges from 0 -65535 msec. The
default value of this field is 100 msec.
DTIM period Delivery traffic identification map period: The number of beacon frame
transmissions before frames that are targeted for stations operating in low power mode, will be
transmitted. The default value of this field is 3.
RTS threshold
Request to send threshold: The number of bytes in a Mac protocol data unit (MPDU) below which an
RTS/CTS handshake will not be performed. The default value is 2347; however, when 4x is enabled
on the setup page, the RTS threshold value changes to 4096.
Fragmentation
Threshold
The minimum length of a frame that will be fragmented. The default value is 2346; however, when
4x is enabled on the Setup page, the fragmentation threshold value changes to 4096.
Power Level The Tx output power percentage compared to the maximum Tx power: full,75%, 50%, 25%, and 6%.
Multi Domain
Capability
This feature can only be configured on a hidden page by the OEM/ODM. It is not recommended that
the end users configure this feature.
Country String This feature can only be configured on the hidden page by the OEM/ODM. It is not recommended
that the end users configure this feature.
Current Reg. Domain This feature can only be configured on the hidden page by the OEM/ODM. It is not recommended
that the end users configure this feature.
Private Reg. Domain This feature can only be configured on the hidden page by the OEM/ODM. It is not recommended
that the end users configure this feature.
6.4 Multiple SSID
The Enable SSID field allows you to create multiple SSIDs for the AP. The Multiple SSID feature supports up to two SSID (one primary
and one secondary).
Figure 6-4 Wireless Multiple SSID Page
Field Definition/ Description
Enable Multiple SSID Enables/disables multiple SSID.
Secondary SSID The secondary SSID of the AP, is up to 32 characters and is unique from the primary SSID.
VLAN ID The VLAN ID of the secondary SSID, which has a unique value between 1-
4095 .

SVG1000 Wireless IP PBX User Manual
STEPHEN TECHNOLOGIES CO.,LIMITED - 45 - WWW.STEPHEN-TELE.COM
6.5 Wireless Security
Figure 6-5 shows the default Wireless Security page, which provides the following wireless network security options:
• None: No security used.
• Wired equivalent privacy (WEP): Enable legacy stations to connect the AP.
• 802.1x: Enable stations with 802.1x capability to connect the AP.
• Wi-Fi protected access (WPA): Enable stations with WPA capability to connect the AP.
Figure 6-5 Wireless Security Page
6.5.1 Wireless Security – WEP
WEP is a security protocol for WLAN. WEP provides security by encrypting the data that is sent over the WLAN. The SVG1000 VoIP
gateway supports three levels of WEP encryption:
• 64-bit encryption
• 128-bit encryption
• 256-bit encryption
With WEP, the receiving station must use the same key for decryption. Each radio network interface card (NIC) and AP, therefore,
must be manually configured with the same key. Figure 10 shows the default setting of the WEP Wireless Security page.

SVG1000 Wireless IP PBX User Manual
STEPHEN TECHNOLOGIES CO.,LIMITED - 46 - WWW.STEPHEN-TELE.COM
Figure 6-6 Wireless Security-WEP Page
Field Definition/ Description
Enable WEP
Wireless Security
Check this field to enable WEP wireless security on the selected SSID.
Authentication Type Authentication algorithm to use when the security configuration is set to Legacy. When the
security configuration is set to 802.1x or WPA, the authentication algorithm is always open. This
field is enabled when the WEP security field is checked. There are three options:
• Open (default): In open-system authentication, the access point accepts any station without
verifying its identify.
• Shared: Shared-key authentication requires a shared key (WEP encryption key) be distributed
to the stations before attempting authentication.
• Both: If both is selected, the access point will perform shared-key authentication,then
open-system authentication.
Encryption Key
This field is enabled when the WEP security is checked to identify the key value that is used
when the security configuration is set to WEP. The key length must match the WEP cipher.
WEP Cipher
This field is enabled when the WEP security field is checked. You can select from 64 bits, 128
bits, and 256 bits. The WEP cipher that is used when the security configuration is set to WEP.
This field is not used when the security configuration is set to 802.1x and WPA.
Note: After clicking Apply , please click Restart Access Point at the bottom of the page, which takes you to the System Commands
page, then click Save All in the System Commands page.
6.5.2 Wireless Security – 802.1x
802.1x is a security protocol for WLAN. It is a port-based network access control that keeps the network port disconnected until
authentication is completed. 802.1x is based on extensible authentication protocol (EAP).
EAP messages from the authenticator to the authentication server typically use the remote authentication dial-in user service
(RADIUS) protocol.
Figure 6-6 shows the default setting of the Wireless Security - 802.1x page.

SVG1000 Wireless IP PBX User Manual
STEPHEN TECHNOLOGIES CO.,LIMITED - 47 - WWW.STEPHEN-TELE.COM
Figure 6-7 Wireless Security----802.1x Page
Field Definition/ Description
Server IP Address The IP address of the RADIUS server. Used for authentication.
Port The protocol port of the RADIUS server.
Secret The secret that the AP shares with the RADIUS server. You can enter up to 63 alpha-numeric
characters in this field.
Group Key Interval The group key interval that is used to distribute the group key to 802.1x
and WPA stations. The default value of this field is 3600 seconds.
6.5.3 Wireless Security – WPA
WPA is a security protocol for WLAN. WPA uses a sophisticated key hierarchy that generates new
encryption keys each time a mobile device establishes itself with an AP. Protocols including 802.1X, EAP,and RADIUS are used for
strong authentication. Like WEP, keys can still be entered manually (pre-shared keys); however, using a RADIUS authentication server
provides automatic key generation and enterprise wide authentication. WPA uses temporal key integrity protocol (TKIP) for data
encryption. WPA2, also known as 802.11i, uses advanced encryption standard counter mode CBC-MAC protocol (AES-CCMP) for data
encryption. Figure 6-8 shows the default setting of the Wireless Security - WPA page.
Figure 6-8 Wireless Security-WPA Page

SVG1000 Wireless IP PBX User Manual
STEPHEN TECHNOLOGIES CO.,LIMITED - 48 - WWW.STEPHEN-TELE.COM
Field Definition/ Description
Select an SSID and its
Security Level
If multiple SSID is enabled, use this drop-down menu to select the SSID that
you want to apply wireless security to.
WPA Enables stations that support WPA v.1 to connect to the AP.
WPA2 Enables stations that support WPA v.2 to connect to the AP.
AnyWPA Enables stations that support WPA v.1 and WPA v.2 to connect to the AP.
Enable WPA2
Preauthentication
Enables/disables WPA2 pre-authentication. This field is activated only when WPA2 or AnyWPA is
enabled.
Group Key Interval This value is measured in seconds.
Radius Server When selected, the WPA stations authenticate with the RADIUS server using extensible
authentication protocol - transport layer security (EAP-TLS) over 802.1x.
IP Address IP address of the RADIUS server.
Port The protocol port of the RADIUS server.
Secret The secret that the AP shares with the RADIUS server. You can enter up to 63 alpha-numeric
characters in this field.
Pre-shared Key When selected, the WPA stations do not authenticate with the RADIUS server using EAP-TLS.
Instead they share a pre-shared secret with the AP (ASCII format).
String Pre-shared key string. The PSK string needs to be entered in the first-time configuration of each
station. You can enter 8 - 63 alpha-numeric characters in this field.
6.6 Wireless Management
The wireless management function gives another level of security to your AP. It allows you to create an allowed access list or a
banned access list (not both) and view a list of stations associated with your access point.
6.6.1 Access List
By clicking Management from the left-hand navigation list, you are taken to the default Access List page (Figure 6-9)
Figure 6-9 Wireless Management-Access List Page
Create an Allowed or Banned Access List

SVG1000 Wireless IP PBX User Manual
STEPHEN TECHNOLOGIES CO.,LIMITED - 49 - WWW.STEPHEN-TELE.COM
1. Check Enable Access List.
2. Select Allow to create an allowed access list or Ban to create a banned list..
3. Enter a MAC address of an allowed or banned station, then click Add.
4. Repeat this step for each station you want to add to your access list.
5. Click Apply, to save your settings, click Restart Access Point, then click Save All.
6.6.2 Associated Stations
By clicking Associated Stations on the Wireless Management page, you are taken to the Associated Stations page (Figure 6-10).
This page allows you to see a list of all stations associated with the access point. You can ban any stations on the list by clicking Ban
Station next to the MAC Address. If the Allowed Access list is enabled, this station will be deleted from the Allowed Access List. If the
Banned Access list is enabled, this station will be added to the Banned Access List. To save your settings, click Restart Access Point,
then click Save All.
Figure 6-10 Wireless Management-Associated Stations Page
6.7 WDS
Wireless distribution system (WDS) is a system that interconnects BSS to build a premise wide network. WDS network allows users of
mobile equipment to roam and stay connected to the available network resources. You can configure your RG/AP as WDS mode
using the WDS page (Figure 6-11).
Figure 6-11 WDS Page

SVG1000 Wireless IP PBX User Manual
STEPHEN TECHNOLOGIES CO.,LIMITED - 50 - WWW.STEPHEN-TELE.COM
Field Definition/ Description
WDS Mode
The following WDS modes are available:
• Bridge: In Bridge mode, the AP basic service set (BSS) service is enabled.
• Repeater: In Repeater mode, the AP BSS is disabled when connection to the upper layer AP is
established.
• Crude: In Crude mode, the AP BSS service is always enabled; however,
the links between APs are configured statically and are not maintained.
• Disabled (Default): WDS inactive.
In Both Bridge and Repeater modes, WDS uses management protocol to
establish and maintain links between APs.
WDS Name
The WDS name is used to identify WDS network. The field takes up to eight characters. Two or
more WDS networks may exist in the same area.
Activate as Root
This field must be checked for the root device in WDS hierarchy. Only one WDS root device may
exist in WDS network. This field is not applicable for Crude mode.
WDS Privacy
Checking this field commands WDS manager to use a secured connection between APs in the
WDS network. Security settings must be the same in all APs in the WDS network.
Note: WDS privacy is not supported in Crude mode.and WPA stations. The default value of this
field is 3600 seconds.
Secret The 32-character alpha-numeric privacy key.
Uplink Connection
Check Box
The BSS ID of the upper device in the WDS hierarchy. This uplink cannot be configured if Root is
enabled.
Downlink Connection
Check Boxes
The BSS ID of the lower device in the WDS hierarchy connected to this AP. Up to four downlinks
can be configured.
Chapter 7. IP-PBX Setup
Click WIZARD . Figure 7-1 shows the WIZARD page.
Figure 7-1 PBX Wizard Page
7.1 PBX General

SVG1000 Wireless IP PBX User Manual
STEPHEN TECHNOLOGIES CO.,LIMITED - 51 - WWW.STEPHEN-TELE.COM
On PBX General page, users can setup some general settings. Figure 7-2 shows the default General page.
Figure 7-2 PBX General Page
Field Definition/ Description
Enable PBX Select this checkbox to enable PBX functionality. This option is enabled by default
PBX is listening at
port
user can change the SIP port, the default port number is 5070
Enable PBX NAT If SVG1000 runs under a NAT environment, select this checkbox
(For a sample, as Figure 1-2)
External IP of PBX If SVG1000 runs under a NAT environment, enter the external IP address
of PBX
Password for
customizing
switchboard
User can access the customization switchboard system by dialing phone
number“7777”, then user would be required to enter the password, the
default password is 314159, user can change the password here
Password for
non-local
FXO user
If this password is not null, non-local user can’t make a call through FXO
port of SVG1000. The purpose of the password is to restrict non-local user make an illegal call
through FXO port of SVG1000.
Note: To validate the changes permanently, please click Apply, Save, Restart buttons.
7.2 Local Extension
On PBX Local Extension page, users can add or delete an extension. Figure 7-3 shows the default PBX Local Extension page.
Field Definition/ Description
“1-20”,“21-40”, “41-60” Denote the scope of local user number
New extension number Local extension number that user want to add or delete. such as “100”, “201”
Password This password of local extension is used to verify the identity of local extension
Voicemail password This password is required when users access voicemail
Alternative number if
unavailable
When current extension number is unavailable, RG forwards incoming call to this alternative
number, it can be “local number” , “prefix + exterior SIP number” or “PSTN number”. Note:
please register this RG to exterior SIP server if you enter “prefix + exterior SIP number”.
Email address The voicemail can be forwarded to this email address, and it is also stored in SVG1000.

SVG1000 Wireless IP PBX User Manual
STEPHEN TECHNOLOGIES CO.,LIMITED - 52 - WWW.STEPHEN-TELE.COM
Figure 7-3 PBX Local Extension
ADD A LOCAL EXTENSION
Follow the following procedures to add an local extension:
1. On the WIZARD page, click Local Extension.
2. Select “Add” checkbox.
3. Enter your extension number, password, voicemail password and Email address (Optional) in the corresponding fields.
4. Click Apply, Save, Restart PBX buttons to validate the changes permanently
DELETE A LOCAL EXTENSION
Follow the following procedures to delete an extension:
1. On the WIZARD page, click Local Extension.
2. Select the extension number which you want to delete from Select User menu,
then select “Delete” checkbox.
3. Click Apply, Save, Restart PBX buttons to validate the changes permanently.
7.3 Exterior Line
SVG1000 can also be registered to remote SIP servers or another SVG1000 as a client, so local uses can communicate with exterior
line users. Figure 7-4 shows the default PBX Exterior Line page.
Figure 7-4 PBX Exterior Line

SVG1000 Wireless IP PBX User Manual
STEPHEN TECHNOLOGIES CO.,LIMITED - 53 - WWW.STEPHEN-TELE.COM
Field Definition/ Description
New registration
server name
Description to this registration, you can input anything here, like “broadvoice”,
“local office”, etc.
Phone number The phone number that SVG1000 is used as a client.
Authentication Name Input when remote SIP server requires authentication.
Password Input when remote SIP server requires authentication.
Server address The IP address or domain name of the SIP server. This information should be obtained from VoIP
service provider.
Server port The port number of the SIP server.
Dialing prefix When local users want to make a call to exterior line SIP user, they must dial this prefix first. (The
prefix MUST be a number which starts with a non-zero digit,such as
1,2,3,4,5,6,7,8,91,92,93,94,…99)
Password for nonlocal
user
If this password is not null, when non-local user make a call through SVG1000, he
will be required to enter this password.
Note: The maximum number of exterior registration servers is 20.
ADD AN EXTERIOR SIP SERVER
Use the following procedures to add an exterior SIP server:
1. On the WIZARD page, click Exterior Line.
2. Select Add checkbox.
3. Enter New registration server name, Phone number, Server address, Server port, Local number,
Dialing prefix, if needed, with Authentication Name and Password in the corresponding fields .
4. Click Apply, Save, Restart PBX buttons to validate the changes permanently.
DELETE AN EXTERIOR SIP SERVER
Use the following procedures to delete an exterior SIP server:
1. On the WIZARD page, click Exterior Line.
2. Select the exterior SIP server which you want to delete from Select Exteror Line pop-up menu, then select Delete checkbox.
3. Click Apply, Save, Restart PBX buttons to validate the changes permanently
7.4 PBX Dial Plan
On PBX Dial Plan page, users can customize the dial plan for the incoming calls from exterior SIP users and PSTN users.
Figure 7-5 PBX Dial Plan

SVG1000 Wireless IP PBX User Manual
STEPHEN TECHNOLOGIES CO.,LIMITED - 54 - WWW.STEPHEN-TELE.COM
Figure 7-5 shows a sample of PBX Dial Plan page.
Field Definition/ Description
Primary Destination When there is a incoming call from exterior line, user can set the first response destination, such
as switchboard or certain phone number
Alternative
Destination
When there is a incoming call from exterior line, if the primary destination is unavailable in 20
seconds, the call would be forwarded to the alternative destination
7.5 PBX Utilities Setup
Through PBX Utilities, users can select a SMTP server to relay email.
NOTE: You must enter a valid SMTP server to make “voicemail to email” functionality works. Besides this, a WAN connection is
needed to deliver your email successfully.
Figure 7-6 shows the default PBX Utilities page.
Field Definition/ Description
SMTP server address Enter a SMTP mail server name, such as “smtp.163.com”, ”mail.stephen-tele.com”
SMTP server port The SMTP mail server port, usually it is 25 the alternative destination
SMTP username Your SMTP username
SMTP password Your SMTP password
Email Address User email address that is applied for the SMTP server
Figure 7-6 PBX Utilities
7.6 PBX Status Display
• Click STATUS page, then click PBX clients on the left column, users can view PBX status of registered clients, Figure 7-7 shows a PBX
clients status page for an example.
• Click STATUS on the top main page, then click PBX registrations on the left column, users can view PBX registration status. Figure
7-8 shows a PBX registrations status page for an example.

SVG1000 Wireless IP PBX User Manual
STEPHEN TECHNOLOGIES CO.,LIMITED - 55 - WWW.STEPHEN-TELE.COM
• Click STATUS on the top main page, then click PBX Channel Status on the left column, users can view current PBX channels status.
Figure 7-9 shows a PBX Channels Status page for an example.
NOTE: A channel means a conversation between different users.
Figure 7-7 PBX clients status
Figure 7-8 PBX registrations status

SVG1000 Wireless IP PBX User Manual
STEPHEN TECHNOLOGIES CO.,LIMITED - 56 - WWW.STEPHEN-TELE.COM
Figure 7-9 PBX Channels StatusFigure 7-9 PBX Channels Status
Chapter 8. Tools Page
Figure 8-1 shows the Tools main page, which is accessed by clicking Tools at the top of the page. This page provides access to the
following tools pages:
• System Commands • Remote Log • User Management • Update Gateway • Ping Test • Modem Test
Figure 8-1 Tools Main Page

SVG1000 Wireless IP PBX User Manual
STEPHEN TECHNOLOGIES CO.,LIMITED - 57 - WWW.STEPHEN-TELE.COM
8.1 System Commands
Figure 8-2 shows the default System Commands page, which is accessed by clicking the System
Commands link at the left of the Tools page.
Figure 8-2 System Command Page
Field Definition/ Description
Save All This button allows you to permanently save the current configuration of The SVG1000 VoIP
gateway. If you restart the system without saving your configuration, The SVG1000 VoIP gateway
reverts to the previously saved configuration.
Restart This button allows you to restart the system. If you have not saved your
configurations, The SVG1000 VoIP gateway reverts to the previously saved configuration upon
restarting.Note: Connectivity to the unit will be lost. You can reconnect after the unit reboots.
Restart Access Point This button allows you to restart the wireless AP. It is important to restart the AP any time you
change your wireless settings.
Restore Defaults Use this button to restore the factory default configuration.
Note: Connectivity to The SVG1000 VoIP gateway will be lost. You can reconnect after The
SVG1000 VoIP gateway
reboots.
Restart PBX This button allows you to restart the PBX
8.2 Remote Log
Figure 8-3 shows the default Remote Log page, which is accessed by clicking the Remote Log link at the left of the Tools page. The
remote log feature is used in conjunction with the PC tool (software provided with your RG).
For PPPoE and PPPoA connections, you can select Debug in the Log Level field if you want to log the connection information. This is
helpful when trying to debug connection problems. The remote log feature allows you to forwards all logged information to one (or
more) remote syslog server. The type of information forwarded to the remote server depends upon the Log level.
Each log message is assigned a severity level, which indicates how seriously the triggering event affects RG functions. When you
configure logging, you must specify a severity level. Log messages that are rated at that level or higher are sent to the syslog server

SVG1000 Wireless IP PBX User Manual
STEPHEN TECHNOLOGIES CO.,LIMITED - 58 - WWW.STEPHEN-TELE.COM
and can be viewed using the syslog server application, which can be downloaded from the web or comes with a linux machine.
Figure 8-3 Remote Log Page
Field Definition/ Description
Log Level here are eight log levels listed below in order of severity:
• Panic: System panic or other condition that causes The SVG1000 VoIP gateway to stop
functioning.
• Alert: Conditions that require immediate correction, such as a corrupted system database.
• Critical: Critical conditions, such as hard drive errors.
• Error: Error conditions that generally have less serious consequences than errors in the
emergency, alert, and critical levels.
• Warning: Conditions that warrant monitoring.
• Notice: Conditions that are not errors but might warrant special handling.
• Info: Events or non-error conditions of interest.
• Debug: Software debugging message. Specify the level only when so directed by a technical
support representative. The default log level is Notice.
Note: When you select a log level, all log information within this severity level and levels above
(meaning, more severe levels) will be sent to the remote host.
Add an IP Address You should enter the IP address of the remote host to which you want the log information be
forwarded. You can add more than more IP address, and any IP address you add here appears in
the drop-down list of the next field: Select a logging destination.
Select a Logging
Destination
You can select a destination IP address from the drop-down list. This defines where the log
information will be sent. You can customize the destination list using the Add and Delete
buttons.
8.3 User Management
Figure 6-4 shows the User Management page, which is accessed by clicking User Management at the left of the Tools page. This page
allows you to change your login name and password.

SVG1000 Wireless IP PBX User Manual
STEPHEN TECHNOLOGIES CO.,LIMITED - 59 - WWW.STEPHEN-TELE.COM
Figure 8-4 User Management Page
Field Definition/ Description
User Name Admin is your default user name. You can enter your new user name here.
Password Admin is your default password. You can enter your new password here.
Note: If you forget your password, you can press and hold the reset to factory
default button for 10 seconds (or more). The SVG1000 VoIP gateway will reset to its factory
default configuration and all custom configuration will be lost.
Confirmed Password Enter your new password here again to confirm.
Idle Timeout The default is 30 minutes. You will need to log back onto The SVG1000 VoIP gateway after your
session has been inactive for 30 minutes. You can change the timeout here.
8.4 Update Gateway
Figure 8-5 shows the Update Gateway page, which is accessed by clicking the Update Gateway link at the left of the Tools page. This
page allows you to update The SVG1000 VoIP gateway’s firmware, voice provision file, and/or configurations files.

SVG1000 Wireless IP PBX User Manual
STEPHEN TECHNOLOGIES CO.,LIMITED - 60 - WWW.STEPHEN-TELE.COM
Figure 8-5 Update Gateway Page
8.5 Ping Test Page
Once you have your RG configured, it is a good idea to make sure you can ping the network. Figure 6 shows the default Ping Test
page, which is accessed by clicking the Ping Test link from the left of the Tools page.
If you can ping an IP on the WAN side successfully, you should be able to surf the Internet.
Figure 8-6 Ping Test Page
8.6 Modem Test
The Modem Test page is used to check the connectivity to the WAN. This test may take a few seconds to complete. Before running
this test, make sure you have at least one WAN connection configured and have a valid DSL link. If the DSL link is not connected, the
test will fail. Also make sure the DSLAM supports this feature. Not all DSLAMs have F4 and F5 support. F4/F5 cells are used for
operation, administration, and maintenance (OAM) on ATM level. They are used for two main purposes:
• Fault management (detection and notification) • Loopback testing and link integrity
The ATM OAM is divided into several levels: • F4: VP level. OAM information flows between network elements (NEs) used within virtual paths to report an unavailable path or a
virtual path (VP) that cannot be guaranteed. Segment flows are processed, as well as end-to-end flows that terminate in the
management processor.
• F5: VC level. OAM information flows between network elements (NEs) used within virtual connections to report degraded virtual
channel (VC) performance such as late arriving cells, lost cells, and cell insertion problems. Segment flows are processed, as well as
end-to-end flows that terminate in the management processor. Both F4 and F5 flows can be configured as one of the test types:
• Segment: This test verifies that ATM continuity exists between the virtual channel link segment from The SVG1000 VoIP gateway to
the DSL provider network (typically this is a DSLAM at the DSL provider site).
• End-to-End: This test verifies ATM connectivity of the virtual channel link with the ATM endpoint, such as a remote broadband
access router located at the DSL provider or ISP site.
Figure 8-7 shows the Modem Test page with two WAN connections (PPPoE and Bridge) pre-configured. The Modem Test page is

SVG1000 Wireless IP PBX User Manual
STEPHEN TECHNOLOGIES CO.,LIMITED - 61 - WWW.STEPHEN-TELE.COM
accessed by clicking the Modem Test link at the left of the Tools page.
Figure 8-7 Modem Test Page
Chapter 9. Dialing Rules
For an example, figure 9-1 shows a network topology structure of SVG1000 .

SVG1000 Wireless IP PBX User Manual
STEPHEN TECHNOLOGIES CO.,LIMITED - 62 - WWW.STEPHEN-TELE.COM
Figure 9-1 A sample of SVG1000 network topology structure
A dialing flow is showed as following.
1) Call out:
2) Call In:
NOTE:
1) Prefix is the number that you typed in “WIZARD->Exterior Line->Dialing Prefix” field.
2) The number of the analog phone which is connected to FXS is 1001.
Voicemail Management:
Voicemail can be accessed by dialing “8888”. After entering your mailbox number and password, you will know how many voicemail
messages you have in this gateway box. After hearing the prompt voice, you can make a response as below:
Press ‘1’: Read voicemail messages; • Press ‘4’ Play previous message • Press ‘5’ Repeat current message • Press ‘6’ Play next message • Press ‘7’ Delete current message
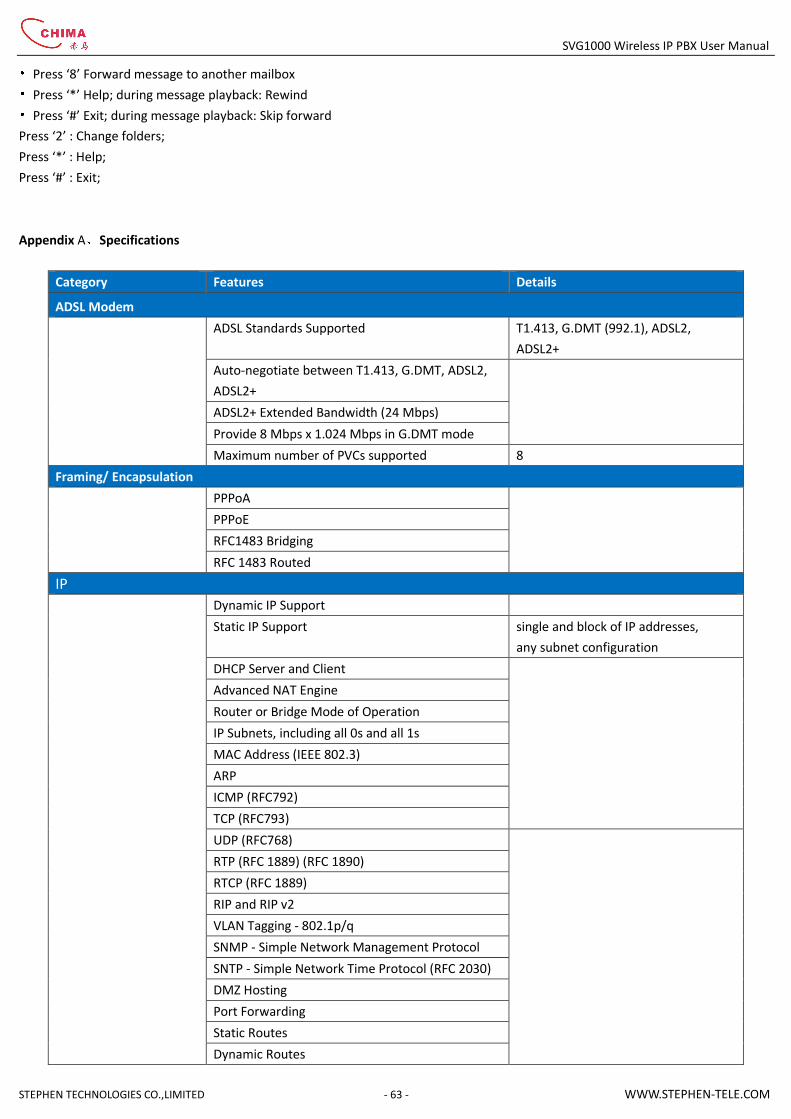
SVG1000 Wireless IP PBX User Manual
STEPHEN TECHNOLOGIES CO.,LIMITED - 63 - WWW.STEPHEN-TELE.COM
• Press ‘8’ Forward message to another mailbox • Press ‘*’ Help; during message playback: Rewind • Press ‘#’ Exit; during message playback: Skip forward
Press ‘2’ : Change folders;
Press ‘*’ : Help;
Press ‘#’ : Exit;
Appendix A、Specifications
Category Features Details
ADSL Modem
ADSL Standards Supported T1.413, G.DMT (992.1), ADSL2,
ADSL2+
Auto-negotiate between T1.413, G.DMT, ADSL2,
ADSL2+
ADSL2+ Extended Bandwidth (24 Mbps)
Provide 8 Mbps x 1.024 Mbps in G.DMT mode
Maximum number of PVCs supported 8
Framing/ Encapsulation
PPPoA
PPPoE
RFC1483 Bridging
RFC 1483 Routed
IP
Dynamic IP Support
Static IP Support single and block of IP addresses,
any subnet configuration
DHCP Server and Client
Advanced NAT Engine
Router or Bridge Mode of Operation
IP Subnets, including all 0s and all 1s
MAC Address (IEEE 802.3)
ARP
ICMP (RFC792)
TCP (RFC793)
UDP (RFC768)
RTP (RFC 1889) (RFC 1890)
RTCP (RFC 1889)
RIP and RIP v2
VLAN Tagging - 802.1p/q
SNMP - Simple Network Management Protocol
SNTP - Simple Network Time Protocol (RFC 2030)
DMZ Hosting
Port Forwarding
Static Routes
Dynamic Routes

SVG1000 Wireless IP PBX User Manual
STEPHEN TECHNOLOGIES CO.,LIMITED - 64 - WWW.STEPHEN-TELE.COM
Enhanced QoS architecture Ingress, Egress, Shaper and Policy
Routing
Ethernet
10/100 Ethernet Auto-Sensing
4 port Ethernet
Auto-detect straight-through or crossover
Wireless
802.11 b/g Maximum 54Mbps
WEP 64/128/256 bits
802.1x
WPA, WPA2
Multiple SSID
802.11e/WMM
WDS
RF Power 20dBm
Antenna Type External with diversity
IP-PBX/ VoIP
VoIP call to PSTN switching
2 RJ-11 Analog VoIP Ports Built In 1FXS & 1FXO
Provide POTS fail over on the VoIP RJ-11
FXS relay on FXO port
PSTN call to VoIP switching
Extensions support 1 RJ-11 FXS, multiple wireless or
wired VoIP clients
Internal switching
VoIP clients to VoIP clients, RJ-11 to
VoIP clients, VoIP clients to RJ-11
Remote extensions
Simultaneous PSTN number and multiple VoIP
phone numbers supported
Multiple local phone numbers
Voice mail for each extensions
Voice mail to email delivery
CODEC support G.711a, G.711u, G.729, G.723.1
DTMF support
Voice Activity Detection (VAD) support
Line Echo Cancellation G.168 compliant
Silence Suppression (SID)
Caller ID Support (Name & Number)
Assignment of Extension
Assignment of Dial plan
Call Forward
Call Transfer
Music on Hold support
Conference Calls support
Status Display of All Connections
Voicemail management through phone
Filtering / Access Control
IP port and port range filtering

SVG1000 Wireless IP PBX User Manual
STEPHEN TECHNOLOGIES CO.,LIMITED - 65 - WWW.STEPHEN-TELE.COM
MAC filtering and tracking
Application filtering (single and range) on LAN
Firewall logging
LAN sub-grouping and isolation Create isolation between WLAN,
Ethernet ports, USB ports
802.1x and RADIUS client
CPE Configuration
RS-232 Serial interface(optional)
Command line interface with full configuration
capabilities through RS-232(optional)
GUI interface through web browser
SNMP support
uPnP
Telnet
Tftp
SSH
TR-068
TR-069
User firmware update through WEB interface
Physical Dimensions/ Environment
Dimension 205.7mm x 149.8mm x 37.8mm
Work temperature 0℃~+45℃
Storage temperature -20℃~+80℃
Work humidity 10% ~ 85%
Storage humidity 5% ~ 90%
Power supply 12V DC,1A
Appendix B、AP Parameters
Network criterion IEEE 802.11b/g
Frequency scope 2.40G-2.4835G
Modulation 802.11b:DBPSK,DQPSK, CCK
802.11g:BPSK,QPSK,16QAM,64QAM
RF power (maximum) 20dBm
AP capability
Number of
connected user
50~80Pcs/AP (Proposal)
channel 11 (America and Canada)
13 (Europe and China)
14 (Japan)
Data speed 1, 2, 5.5, 11, for 802.11.b
6, 9, 12, 18, 24, 36, 48, 54 for 802.11g
1 Mbps DBPSK @ 0.81Mbps
2 Mbps DQPSK @ 1.58Mbps
5.5 Mbps CCK @ 4.07Mbps

SVG1000 Wireless IP PBX User Manual
STEPHEN TECHNOLOGIES CO.,LIMITED - 66 - WWW.STEPHEN-TELE.COM
The rate of
efficient load
6 Mbps [email protected]
9 Mbps [email protected]
11 Mbps CCK @ 7.18Mbps
12 Mbps BPSK @8.31 Mbps
18 Mbps [email protected] Mbps
24 Mbps [email protected] Mbps
36 Mbps [email protected] Mbps
48 Mbps [email protected] Mbps
54 Mbps 64QAM @26.12 Mbps
Security 64-bit/128-bit WEP, WPA, 802.1X
User isolation MAC layer
MAC filter
Ethernet interface
MAC filter
support
Idleness MAC filter support
Authentication
DHCP client and static IP support
802.1X, Radius Client support
DHCP server support
Mode (LAN port) Router, Bridge, PPPoE user
The type of LAN port 10/100Mb automatic detect IEEE802.3
The scope of
signal cover (m)
outdoors 120~400
indoors 35~100
Antenna type Internal Diversity with Connector
Appendix C、Frequently Asked Questions
① How do I configure the IP-PBX on SVG1000?
Open your web browse to log in SVG1000, click WIZARD/General, change the default domain name to yourself domain name in
“DDNS Domain Name” filed, click Local Extension to add your local extension accounts and click Exterior Line to add your SIP exterior
line accounts. When you are finished, you can register your Wi-Fi phone or other SIP-phone to the SVG1000 with your DDNS domain
name. Please refer to “Chapter 7. IP-PBX Setup” for details.
② How do I make a phone call?
After IP-PBX has been configured, you can make phone calls to local extension or PSTN by dialing the number directly, or to SIP
exterior line user by dialing the number with a specific prefix, through the analog phone connected to FXS port of SVG1000 or your
Wi-Fi phone or other SIP-phone registered to SVG1000. For external calls, follow the instructions of your ITSP. For more information,
contact your ITSP.
③ How do I view the register status for local extension and exterior line?
Click WIZARD/PBX Clients for the registration status of local extensions, and WIZARD/PBX Registrations for the registration status of
SIP exterior line.

SVG1000 Wireless IP PBX User Manual
STEPHEN TECHNOLOGIES CO.,LIMITED - 67 - WWW.STEPHEN-TELE.COM
④ Why can not I make calls through FXO port of SVG1000 when SVG1000 is connected with a DSL splitter?
It’s maybe be caused by the quality or type of your splitter. If this, you can connect your phone line to the ADSL/FXO port of
SVG1000 directly without splitter. So, you can make calls through FXO port and access Internet at the same time.
⑤ What is the “RESET” button on SVG1000?
Press the “RESET” button for 10 seconds to recover to factory default configuration. Once you do this, your configurations will be
lost. Only when you forget your password or IP address, you can do it.
Appendix D、Glossary
Term Meaning
AES-CCMP advanced encryption standard - counter mode CBC-MAC protocol
ALG application level gateway
AP access point
BE best effort
BSS basic service set
CBR constant bit rate
CCK complementary code key
CDVT cell delay variation tolerance
CID caller ID
CLI common language infrastructure
CLIP classical IP over ATM
CTS clear to send
DDNS Dynamic DNS, see DNS
DHCP dynamic host configuration protocol
DMZ demilitarized zone
DNS domain name server
DSL digital subscriber line
DST daylight saving time
DTIM delivery traffic identification map
EAP-TLS extensible authentication protocol - transport layer security
EF expedited forwarding
ERP extended rate phy
FCS frame check sequence
FXS Foreign Exchange Station
FXO Foreign Exchange Office
FTP file transfer protocol
GDMT G discrete multi-tone
ICMP Internet control message protocol
IDEA International data encryption algorithm
IEEE institute of electrical and electronics engineers

SVG1000 Wireless IP PBX User Manual
STEPHEN TECHNOLOGIES CO.,LIMITED - 68 - WWW.STEPHEN-TELE.COM
IGD Internet gateway device
IGMP Internet group management protocol
IP Internet protocol
IP PBX Internet Protocol Private Branch Exchange
LAN local area network
LED light emitting diode
LLC logical link control
MAC medium access control
MBS maximum burst size
MIB management information base
MMODE multi-mode
MPDU Mac protocol data unit
MSDU MAC service data unit
MTA Media terminal adapter
MTU maximum transmit unit
NAPT network address port translation
NAT network address translation
NIC network interface card
NSP network support package
OFDM orthogonal frequency division multiplexing
PBCC packet binary convolution coding
PCR peak cell rate
PPP point-to-point
PPPoA PPP over ATM, see PPP
PPPoE PPP over ethernet, see PPP
PSK pre-shared key
PVC permanent virtual circuit
QoS quality of service
RADIUS remote authentication dial-in user service
RC4 rivest cipher 4
RG residential gateway
RIP routing information protocol
RTS request to send
SCR sustained cell rate
SNMP simple network management protocol
SNTP simple network timing protocol
SPI stateful packet inspection
SS IE supported rates information element
SSH secure shell
SSID service set identifier
TCP transmission control protocol
TFTP trivial file transfer protocol
TKIP temporal key integrity protocol
UDP user datagram protocol
UPnP universal plug and play
USB universal serial bus
VBR variable bit rate
VC virtual circuit
VCI virtual channel identifier

SVG1000 Wireless IP PBX User Manual
STEPHEN TECHNOLOGIES CO.,LIMITED - 69 - WWW.STEPHEN-TELE.COM
Vendor vendor object identifier.
VLAN virtual LAN, see LAN
VPI virtual path identifier
WAN wide area network connection
WDS Wireless distribution system
WEP wired equivalent privacy
WiFi Wireless Fidelity
WLAN Wireless Local Area Network
WMM WLAN MultiMedia
WPA Wi-Fi protected access
WRR weighted round robin
Copyright Notice:
No part of this document may be reproduced, transmitted, transcribed, stored in a retrieval system, or translated
into any language, in any form or by any means, electronic, mechanical, magnetic, optical, chemical, manual or
otherwise without the prior written permission of Stephen Technologies Co.,Limited.
Disclaimer Notice:
No license is granted, implied or otherwise, under any patent or patent rights of Stephen Technologies Co.,LTD.
Stephen Technologies Co.,LTD, makes no warranties, implied or otherwise, in regard to this document and to the
products described in this document. The information provided by this document is believed to be accurate and
reliable to the publication date of this document. However, Stephen Technologies Co.,LTD assumes no responsibility
for any errors in this document. Furthermore, Stephen Technologies Co.,LTD, assumes no responsibility for the use
or misuse of the information in this document and for any patent infringements that may arise from the use of this
document. The information and product specifications within this document are subject to change at any time,
without notice and without obligation to notify any person of such change.
STEPHEN TECHNOLOGIES CO.,LIMITED
5/F, Building NO.1, TongXin Industry Zone, HengGang
Town, LongGang District, Shenzhen, G.D, China, 518115
Tel: +86 755 89352606
Fax:+86 755 89352612
Website: www.stephen-tele.com
Email: [email protected]