SUSPENSION SETUP GUIDE€¦ · filled bottles on the bike or hydration pack on your back, climb...
29
SUSPENSION SETUP GUIDE Copyright 2014 BikeBoardMedia, Inc. - Written by Tyler Benedict. This guide may be shared freely with anyone you want as a PDF or printed file. If you wish to republish parts of it, you must credit Bikerumor.com as the source and link to http://www.bikerumor.com
Transcript of SUSPENSION SETUP GUIDE€¦ · filled bottles on the bike or hydration pack on your back, climb...

SUSPENSIONSETUP GUIDE
Copyright 2014 BikeBoardMedia, Inc. - Written by Tyler Benedict. This guide may be shared freely with anyone you want as a PDF or printed file. If you wish to republish parts of it, you must credit Bikerumor.com as the source and link to http://www.bikerumor.com

SUSPENSION SETUP GUIDE
PART 1 - SET YOUR SAG PROPERLYAt virtually every mountain bike and suspension launch we at-tend, we’re told to simply sit on the bike while someone slides the “fun-o-meter” ring to the base of the fork or shock, then we hop off and see where it lies. If it’s in the ballpark, we gear up and head out, fiddling with the settings as we ride.
Recently, I had some time with Rockshox brand ambassador and SRAM MTB marketing manager Duncan Riffle, who also
happens to be a 2x U.S. National Downhill Champ and former World Cup DH com-petitor, so we discussed the finer points of suspension set up. The result is this 6-part series, with additional input from Manitou’s Eric Porter, who’s raced professionally in XC/DH/DS/DJ over the past 11 years, and Mark Fitzsimmons, Fox Racing Shox’s race program manager and pro athlete suspension tuner. As you’ll see throughout the multi-part story, there’s quite an art to getting it all dialed, but when you do, it’s pure magic on the trail.
So, ready to rethink everything about how your suspension is set up? Good. We’ll start with sag, which is the amount of travel your suspension moves through just by adding your own weight (body, clothes, pack, etc.) to the bike. This puts the suspension into an active state, letting it react in both direc-tions, keeping your tire glued to the dirt. To get it right, there are two things to consider: Rider position and amount of sag. We’ll start
with properly positioning yourself on the bike so that sag is set based on your actual riding.
But first, make sure your fork and shock both have their com-pression damping set to their fully Open/Descend positions, then hop on the bike…

SUSPENSION SETUP GUIDE
“Understand that when you set your sag, it has nothing to do with your body weight (sitting) directly over the BB or shock,” says Riffle. “It has everything to do with how your weight is pressing on the bike in a neutral ride position. So, ob-viously, you’re going to want to set your sag accordingly.”
These images illustrate the difference rider position makes. With the same air pressure in the shock, it’s showing almost 40% sag when seated and just 28% in an aggressive standing position.
To figure out how you should set it up, Fitzsimmons breaks it out like so:
• Downhill bike: Set sag in a standing attack position.
• Trail/Enduro bike: Set Sag in a seated position for every day riding and stand-ing if you are bike park riding.
• Cross Country bike: Set sag in the seated position.
It’s very beneficial to have a friend help you balance the bike and move the O-rings for you. With your usual riding gear on, including filled bottles on the bike or hydration pack on your back, climb aboard the bike. Once in position, bounce up and down a few times without holding the brakes, then settle into the desired position. Once there, hold steady while your friend slides the O-rings against the canister/lowers, then slowly lean over and climb off the bike. Don’t hop off – that movement can compress the suspension further and move the rings. If you want to be absolutely sure, have a third friend record the measurements while you’re still on the bike.
SUSPENSION SETUP GUIDE
HOW MUCH SAG SHOULD I RUN?Generally speaking, somewhere between 15% and 40%. Riffle’s preferred starting point is between 25% and 30% for his 160mm to 200mm travel bikes. When he was racing downhill, it was more like 30% to 35%, depending on the bike and the course. Cross Country bikes generally have a much shorter stroke to work with and get away with a little less, unless it’s a really rough course.
“Most bikes feel good between 20-30% sag, I like 25-30% most of the time,” says Porter. “If you are doing a ton of climbing you may like it closer to 20%.”
Ultimately, it depends on four things:
1) The bike you’re riding – how much travel does it have? How aggressive is its leverage ratio? If it’s a shorter travel bike, then you’ve got less to work with and should start off on the lower end of the spectrum, around 25%. If your bike has a high leverage ratio, then it can muscle through the travel too easily if you’re running too much sag, too, so start on the low end. Reverse that for longer travel bikes or those with weak leverage ratios.
2) The terrain you’re riding – more aggressive terrain means your shock is going to see a wider variety of impact forces, so you’ll need to experiment more to make sure you’re not bottoming out too frequently but that you’re still…
3) Getting full use of the bike’s travel – This one’s is the most tangible of the four and is easily measured with the little rubber ring around the stanchion or shock shaft. If you’re leaving travel on the table, then you haven’t made the most of your available suspension, and thus your bike’s potential performance.
4) Your preference – Ultimately, the bike should feel right to you while still getting all of its travel on most rides. Setting the sag at the proper point and while in the proper riding position is a good start to achieving this.
Lest you worry about sagging too far into your travel affecting the performance, the suspension’s compression settings are based on speed, not position. So more or less sag won’t affect damping performance. It does play a role in spring curves, though, which is a story for another time.

SUSPENSION SETUP GUIDE
WHAT ABOUT FORKS?Setting the sag on your fork can be a little different. You don’t necessarily need the same percentage of sag on the front of the bike, it’s more about finding the right balance from front to back.
Fox’s Fitzsimmons says “If you race or ride at a faster pace, sag should be set up 15-20% on the fork and 20-25% on the shock. If you are a weekend hobby rider, 20% in the fork and 25% in the shock.”
Porter adds: “When checking the fork sag, you are looking for closer to 10-15% if you are sitting on the bike. This is more accurate than ever due to how good the new class of trail forks are (Manitou Mattoc, Rockshox Pike, Fox 36, etc.). When setting up the fork air pressure, I usually start out where the manufacturer recommends, then I set up the rear, then I cruise around in the parking lot bouncing up and down to make sure that the air pressure feels balanced between the front and the back. Having a balanced bike is very important to making a bike feel good on the trail.”
For hardtails, it’s about finding the point where the fork is supple off the top and able to move through it’s full range of travel when it hits the biggest obstacle or drop on the trail.
From my own experience, after talking to Riffle on the trail, I ended up running more sag on the rear -changing from roughly 22% up to 30%- which let my 100mm Niner JET 9 RDO really soak up the little stuff. Mind you, I was happy with the bike’s performance before, but setting the shock up a little softer made a noticeable improvement in its small bump absorption with no discernible downside. Even if you think you’re happy with your current set up, I’d recommend experimenting throughout your next few rides.
For forkslike Manitou &
Fox without sagindicators printedon the stanchions,
the Saggle can help.

SUSPENSION SETUP GUIDE
PART 2 - RUN IT WIDE OPEN (MOSTLY)For as long as there’ve been multi-mode rear shocks with some manner of pedal platform, I’ve been trying to set up my shock for optimum performance in “Pedal” mode. My thinking was, by running it in the middle setting, I could keep the shock ready for anything. Switch it one way to climb and the other to descend. In reality, that might just have been limiting the performance of the shock, not letting me get the most out of it.
Since all manufacturers suggest setting sag with the shock and fork in full open (or Descend, etc.) mode, it stands to reason you’re setting it up to perform best in that position, right? In addition to Riffle, Porter and Fitzsimmons. we’ve added Josh Coaplen (Cane Creek’s VP of engineering) to the conversation.
First up, a little clarification of what exactly we’re talking about: When you’re setting your fork or shock to a particular mode (open, descend, trail, pedal, climb, whatever), you’re changing the low speed compression. For Fox forks, that means anything in the zero to five inches per second compression speed. Other brands are likely similar. This affects the suspension’s performance when you’re braking (at the fork), pedaling hard or while standing, railing corners and rollers and any-thing else that’s not a quick hit or hard land-ing. Those quicker, bigger hits are controlled by your high speed compression, and most
products out there have fixed high speed circuits that are not easily user tunable. Cane Creek’s Double Barrel is the obvious exception.
Now it’s time to tune those compression settings…

SUSPENSION SETUP GUIDE
SHOCKSAn important point to make before we get started is that your fork and shock settings likely need to be different since their be-havior affects the bike in very different ways. We’ll start with the shock, which everyone says should generally be run wide open.
“When we’re talking about a shock like the Monarch with three different settings -open, pedal and lock- it’s going to be most supple and most reactive when you have it open all the way,” says Riffle. “If ‘trail’ is the only type of riding you’re doing, then you want the shock set up to work as well as possible for that type of riding, and you’ll get that by keeping the shock fully open. You’re going to have the most control, it’s going to stick to the ground better and simply work the best.
“The full open position is really the shock’s neutral setting. That’s where it’s performing the way it’s supposed to, the way the engineers designed it to work. The ‘pedal’ setting is just that, for when you need a bit firmer platform to get up and pedal or hustle.
“But as soon as you start seeing more diverse terrain -roots, rocks, sharp edges- you’re increasing the shaft speed of your shock. So you want your settings to be open so it absorbs those bumps rather than resists them. That means the shock is tak-ing the hit and absorbing that energy rather than you, the rider, which is why we have suspension in the first place.”
Coaplen offers a similar opinion:
“What we’ve run across is there are two camps on this, and it
really comes down to prefer-ence. As a rider, do you con-sider ‘up’ and ‘horizontal’ the same? There are some riders that consider any flat sections the same as ‘climbing’, then run the Climb Switch all the way to the start of the descent. If you ride the flats like you do the downhills, actively hammering the bike through the turns and moving around a lot, then you’d only use the Climb Switch on the actual climbs. Most of our product’s riders lean toward the more aggressive side and tend to only flick the Climb Switch on while ascending.
Meanwhile, Fox offers a variation on that, suggesting beginner and average riders start with that middle setting, then adjusting based on trail conditions.
“You’re going to get the best bump absorption performance wide open, for sure,” says Fitzsimmons. “Mountain bike sus-pension is unique as it sees more than terrain inputs. It almost equally sees rider input, as well. (The low speed compression velocities) are affected by rider input such as pedaling motion, pumping, and out of saddle pedaling. The middle setting is helping mitigate pedaling influence rather than bump absorp-tion, so use it when appropriate.”

SUSPENSION SETUP GUIDE
But, Fox’s PR manager Mark Jordan expands to say that for more experienced riders, it may make more sense to set it up in the mode you’re going to use. So, if you’re only seeing more XC-ish trail without a huge variation between climbs and de-scents, then it is indeed perfectly OK to set it all up in and leave it in Descend mode since that’s where the suspension works best. Or even to set sag in Trail mode if you’re going to be pedaling constantly. But, if you’ve got a wide range of inclines and declines to deal with, the additional settings can be used to create a firmer feel when desired.
Coaplen adds: “Anytime you’re not adjusting your suspension for the trail conditions you’re actually on, you could argue you’re compromising your performance.”
It also depends on the bike. With more active suspensions (like FSR), you might end up using the climb mode more frequently. On others, the Trail/Pedal/Middle mode might be plenty ad-equate to provide a more solid platform without ruining the shock’s ability to track terrain on the climbs.
FORKSIt’s worth noting that most bicycle manufacturers work closely with the suspension brands to custom tune shocks for a particu-lar frame. This includes internal shim and port sizes, air canister size or coil spring rate and other details that get things in the right ballpark for the leverage ratio and intended use of the bike. That’s not the case with forks – what you’re buying after-market is almost certainly the exact same fork that comes spec’d on a wide variety of bikes, so it’s even more critical that you find the right settings for your bike and riding style.
Where rear shocks are taking a secondary hit, the fork is charged with absorbing impact and keeping the front end under control. And we don’t mean steering – it has to prevent diving in while

SUSPENSION SETUP GUIDE
simultaneously floating over the little stuff to maintain traction. Set it too soft and it’ll dive under braking, limiting it’s effective-ness, or tip the nose too low in a G-out or off a drop, potentially sending the rider over the bars.
Part of the solution is to set it with slightly less sag than the shock, which we discussed in Part One. The other is allowing it to have a bit of platform, as opposed to it running full open like the shock. To get that “platform” is pretty easy, just dial back the low speed compression settings a few clicks from full open. A well designed adjuster, which most modern forks have, cre-ates the impression of a platform with only minimal impact on high speed compression.
There are a variety of controls available from different brands, but most offer some manner of low speed compression adjust-ment. It could be in dial form, as found on the Fox 36 shown directly above or Manitou’s below, that allows a lot of variation between full open and closed. Or it could be in fixed incre-ments, like their CTD, or the Rockshox Charger Damper RCT3, which provides a top level Open/Pedal/Locked with a secondary low speed control knob to fine tune that middle setting.
Manitou’s longstanding ABS+ is a simple low speed compres-sion adjustment. The middle pic shows my preferred setting, about three clicks from full open. Their new Mattoc adds high speed compression controls with their new MC2 damper, as does the Fox 36’s dual dial.
Most riders we’ve talked to like running Fox’s forks in Trail mode, even on the descents, since the Descend mode can blow through the travel a little too easily. Porter, who rode for Fox
before Manitou, says “Sometimes Trail mode on the downhills actually feels better than descend because it has more damping control and will stay higher in the travel.
“If you are a ‘set it and forget’ it type of person, I would recom-mend trail mode, or on the Manitou Mattoc and McLeod that I run, this would be one click in from fully open. This will keep it smooth on the trail, keep you riding high in your travel, and still be open enough for good small bump sensitivity and good feel on big hits.”
Fitzsimmons concurs: “With CTD, you have Climb, Trail and De-scend modes, and on the top Factory level product, Trail has its own three settings (T1/T2/T3). The average rider should start in “T2″ position. This is basically the middle compression setting.”
That’s the trick – keeping the fork riding high in its travel. Not only does it keep your geometry and riding position the best, but it keeps the fork in its most supple position and ready for action when the going gets really rough. Adding a bit of low speed compression damping achieves just that.
SUSPENSION SETUP GUIDE
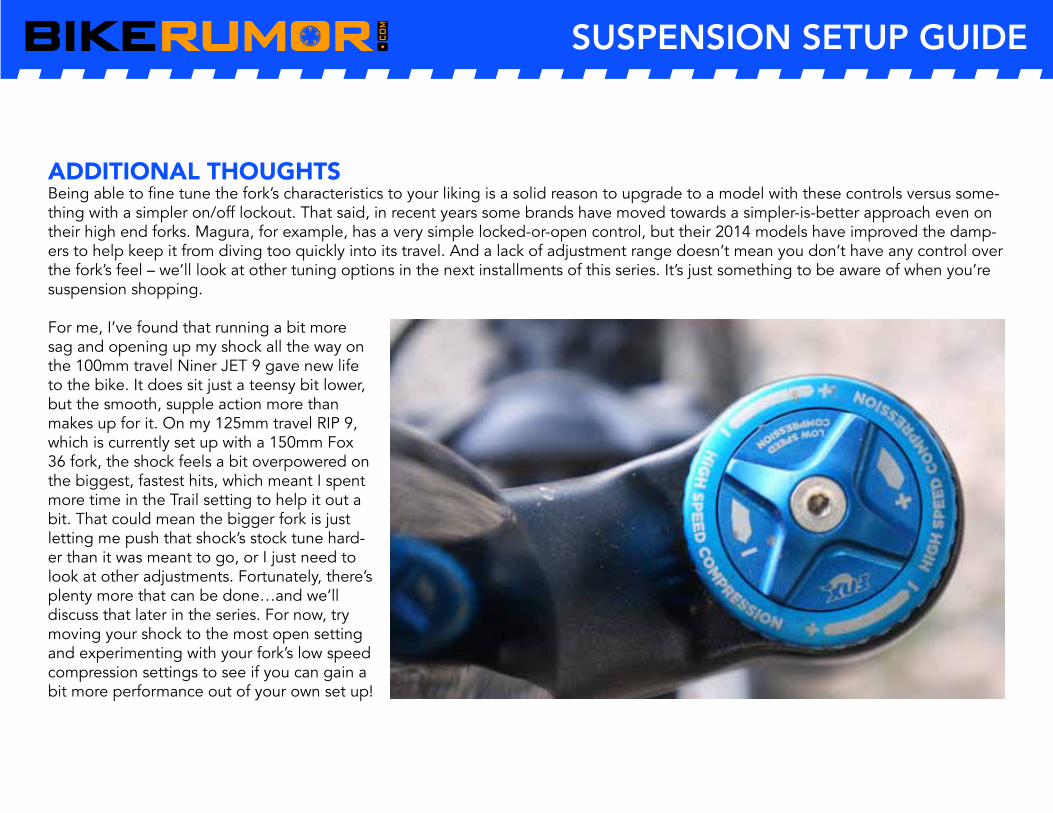
ADDITIONAL THOUGHTSBeing able to fine tune the fork’s characteristics to your liking is a solid reason to upgrade to a model with these controls versus some-thing with a simpler on/off lockout. That said, in recent years some brands have moved towards a simpler-is-better approach even on their high end forks. Magura, for example, has a very simple locked-or-open control, but their 2014 models have improved the damp-ers to help keep it from diving too quickly into its travel. And a lack of adjustment range doesn’t mean you don’t have any control over the fork’s feel – we’ll look at other tuning options in the next installments of this series. It’s just something to be aware of when you’re suspension shopping.
For me, I’ve found that running a bit more sag and opening up my shock all the way on the 100mm travel Niner JET 9 gave new life to the bike. It does sit just a teensy bit lower, but the smooth, supple action more than makes up for it. On my 125mm travel RIP 9, which is currently set up with a 150mm Fox 36 fork, the shock feels a bit overpowered on the biggest, fastest hits, which meant I spent more time in the Trail setting to help it out a bit. That could mean the bigger fork is just letting me push that shock’s stock tune hard-er than it was meant to go, or I just need to look at other adjustments. Fortunately, there’s plenty more that can be done…and we’ll discuss that later in the series. For now, try moving your shock to the most open setting and experimenting with your fork’s low speed compression settings to see if you can gain a bit more performance out of your own set up!

SUSPENSION SETUP GUIDE
PART 3 - SET YOUR REBOUND TO MAXIMIZE TRACTIONAs a quick primer, your compression and rebound circuits con-trol the motion of the suspension by controlling the rate of movement. Without it, you’d basically be riding a pogo stick. They do this by forcing oil through an orifice, and the size of that hole controls the speed at which the oil flows through it. Smaller holes mean slower oil flow, which means more damp-ing. Bigger holes mean less damping, which equals faster move-
ment. There are two types of control over hole size. Usually for low speed, you have a fixed port size with a needle or some other barrel that opens or closes access to that port in steps. High speed compression is typically handled with a spring or shim stack holding a seal over larger ports. With enough force, the shims flex or the spring is compressed and the ports are opened, letting more oil flow through to handle big hits. The strength of the shims/spring dictates the amount of force required to flex them. Your particular fork or shock may operate differently, but the principle is the same: Control oil flow and you control the rate of compression or rebound.
Here’s how to use that to your advantage and help keep the rubber on the trail.
For all intents and purposes, low speed com-pression damping was covered in Part Two, but as far as it’s effect on traction goes, our experts had a few things to add:
“If your compression is too stiff, your wheels will not absorb impacts as well as they could, instead bouncing up,” says Riffle. “On repetitive hits, it ends up lifting up off the ground as it resists the impacts, which can be felt as chatter. On the flip side, how do you know when your compression is too soft? Easy, when you’re blowing through your travel, getting to the bottom of your travel on high speed, repetitive hits or you’re bottoming out too frequently.”
Virtually all rebound dials have a wide range of adjustment.

SUSPENSION SETUP GUIDE
Fox’s Fitzsimmons adds: “Traction is affected by the amount of weight on each wheel, the tire, and how quickly the wheel is able to follow the surface. Damping (and spring) must also work with the natural frequency of the tire and its characteristics. On a fork, the best traction is achieved when it is consistently loaded and able to follow the terrain at the speed a rider is traveling. If there is too much damping, the suspension is unable to absorb the obstacles in the terrain causing it to deflect. If there is not enough damping, the suspension will load and unload too quickly causing too much weight transfer and a loss of traction.”
If you’re fortunate enough to have equipment that lets you adjust high speed compression, that’ll let you tweak how the fork and shock respond to big hits and landings, but the low speed compression plays a larger role in maintaining constant traction.
Cutaway of a 2010 Fox shock shows the needle at the end of the rebound port. Dialing the red knob pushes the tip closer to the opening, leaving less room for oil to flow and making it rebound slower. The compression circuit is at top right.

SUSPENSION SETUP GUIDE
Let’s say you’ve followed the advice so far and are now running a bit more sag and opened up your compression damping, but maybe it feels like you’re just blowing through your travel when it gets rough. Before you dial it back again, it might be time to speed up your rebound damping. Rebound is arguably more important to traction, yet it’s more often set up improperly.
“I think rebound adjust is the most overlooked setting on suspension,” Porter explains. “So many people set up their rebound too slow, either because they don’t know any better, or because they don’t want to get bucked when going off of jumps, compressions, etc. When your rebound is set too slow your fork or shock will pack up. That means the hits will be coming one after another faster than the fork or shock has enough time to extend again. You basically want your rebound as fast as you can get it without feeling like a pogo stick and bouncing around on the trail. You definitely want some control, but you want it to be on the fast side. If your rebound is too fast on the other hand, it will be extending too quickly in between hits and will be bouncing you upwards, and therefore bounc-ing your tire knobs off of the trail.”
“Rebound has an even more profound effect on traction than compression,” says Riffle. “If your rebound is too slow, then the compression setting might be dialed, but the wheel won’t return to the ground quick enough. It ends up having the same feeling as too-slow compression in that the wheel isn’t able to maintain contact with the ground. It’s a huge misconception is that when their rebound is too slow that their compression is too stiff. This keeps you in the bottom part of your travel, which is known as packing up. It’ll feel like you’re gliding over bumps and the hits will feel harsher.
“If you’re rebound is too fast, a multitude of things can happen. It’ll feel like you have a spring in the back, giving you the ‘huckle buck’ and possibly ejecting you for no rea-son. It can also feel similar to the chattery feeling over re-petitive hits, except that it’s happening because the wheel is returning too fast and can start to resist the compression a little.”

SUSPENSION SETUP GUIDE
So what’s the sweet spot?
“When the bike feels supple, controlled and stable,” says Riffle. “You don’t want it to blow through travel, and you don’t want to start chattering and having the wheels skip away from you in the corners. You also want front-to-rear balance. If you can compress your suspension and feel one end of the bike compress or re-bound faster, then you’re not where you want to be, and that’s really done by feel. We can’t tell you specific numbers because it’s so different for each bike because of leverage ratios, head angles and more.”
Porter adds that “you want your fork and shock to match the trail, always putting the tire back on the ground, but not so quickly that it bounces back upwards.”
Now, are you ready for a really techy answer?
Coaplen, who helps develop and tests Cane Creek’s suspension, brings the engineer’s perspective: “Damping is always opposite the direction of velocity. One nice rule to remember is that compression damping tries to keep the wheel on the ground, rebound damp-ing tries to keep the wheel off the ground.”
Sound backwards? Just remember, the damping is what resists movement. So, dialing back the damping from 100% allows movement. Controlled movement. Just the kind we like. The damping circuits built into our forks and shocks control the movement enough to let the tire move up just quick enough to absorb the bump, then let it back down just quick enough to immediately get back in contact with the ground.
Fortunately, the rest of Coaplen’s advice is in laymen’s terms:
“First up, the tire is the most important part of your setup with regards to traction. If you have too high air pressure in your tires, the best suspension the world won’t help you. As you will likely hear from everyone because its true, (damping settings) are highly depen-dent on user preference. Assuming we’re discussing low speed compression (LSC) and low speed rebound (LSR) damping, too much
SUSPENSION SETUP GUIDE
LSR damping will not allow the wheel to track terrain, leading to skipping. Another problem with too much LSR (when no HSR circuit exists) is packing up, obviously a bad thing. Too little rebound damping will feel like an uncontrolled spring (which it is!), but I suggest running rebound as quickly as possible while staying out of the uncontrolled spring range.
“One beauty of the Climb Switch on our Double Barrel shocks is that rebound can be run faster (less damping) in “open” mode than is allowed by other shocks. This is because a shock properly damped in rebound for “fast riding” will feel too bouncy and annoying when climbing with your weight back and on saddle. If you only have one setting, you’re compromising between performance when you’re seated and when you’re standing and descending. So, if you’re not running a Double Barrel with CS, I’d recommend setting rebound damping a hair slower for climb-ing and a hair faster for descending.”
That last bit mirrors much of what we’ve heard throughout this series: It’s OK to change it based on the course you’re riding.
So, where to start?
My recommendation is finding a short, mild descent that lets you get some speed, carve a few turns and hit a couple roots/ruts/rocks and small drops or jumps. Something between 30-60 seconds long so you can quickly ride back to the top and repeat. At the top, open your shock’s rebound all the way and make a run. Then do it again with your rebound as set as slow as it’ll go. Go back and forth for a couple runs until you get a good feel for each setting. Now, do the same with the fork, making sure your slowest setting actually lets it return quick enough to prevent nose diving. By moving from one extreme to the other with one component at a time, you’ll get a good sense of what fast and slow rebound settings feel like. You almost certainly won’t settle at either end of the spectrum, but it provides good base knowledge from which you can find your ideal settings.

SUSPENSION SETUP GUIDE
PART 4 - FIX YOUR RIDE BY ADJUSTING AIR VOLUMEIn Part One, we discussed the most basic of starting points to get your suspension set up properly: Sag. In Part Two, we covered most of the compression damping settings, followed by rebound in Part Three. Those were the low hanging fruit and, for most riders, should put you in a pretty happy place on your bike. After all, most bike manufacturers work very closely with suspension brands to develop a shock tune specific to the bike
it’s going on. But, shocks and forks are tuned to work best for a broad range of riders, and sometimes your size, weight or riding style put you on the fringes (or beyond) of that range, letting the standard external controls getting you only part of the way there.
“We always use sag as a starting point, but it’s not an absolute for everyone,” says Darren Murphy, owner of PUSH Industries, a suspension tuner out of Loveland, CO. “A lot of people lock into that, though, and running more or less sag than is recommended is not a bad thing. Don’t feel like you have to lock into a certain number. Everyone’s riding style and size are different.
“But when you’ve gone through the com-pression and rebound settings and the ride quality is good but you’re either not getting through all the travel or your bottoming out all the time, that’s when you should start look-ing at your air volume.”
Fortunately, it’s easier than ever to adjust air volume…
Rockshox Bottomless Tokens take up space in the positive air chamber, letting you
adjust air volume in about five minutes.

SUSPENSION SETUP GUIDE
Before we dive in, it’s worth a look at leverage ratios. This only re-ally applies to rear shocks, and it’s important to understand why your bike has the shock that it does. The leverage ratio is the ratio of rear wheel travel to shock stroke movement. We’ll use the Niner JET9 RDO (100mm rear travel) and RIP9 RDO (125mm rear travel) as our examples. The RIP9 gets a much lower volume shock (left) than the JET9 (right).
The amount of travel has little to do with how much air volume the shock needs. It’s mainly about how much leverage the suspension has to compress the shock, aka Leverage Ratio. From the simplest perspective, a 100mm bike with a 50mm shock stroke would have a 2:1 leverage ratio. Pivot placement and kinematics also come into play, too. Niner’s product manager Barrett James explains:
“There’s a beginning and ending leverage ratio, and it changes as the bike moves through its travel based on where the pivots are and how things move (aka Kinematics). So, the numbers here are rough averages across the travel for each. The JET9 has about a 2.1:1 ratio and the RIP9 has a 2.4:1. The RIP9 doesn’t just have a higher overall leverage ratio, it has a much stronger beginning leverage ratio than the JET9. Both have a falling ratio, meaning the leverage ratio gets weaker as it moves through the travel, but the RIP9’s falls farther. In other words, it has a wider spectrum of change.
“A larger volume air shock is easier to activate, so the JET9 gets a bigger volume shock because its leverage ratio is lower. The RIP has a smaller volume shock because the frame has more leverage over it. If it had a high volume shock, it’d smash through the travel way too fast. ”

SUSPENSION SETUP GUIDE
BUT SHOULD YOU GO BIGGER OR SMALLER?All else being equal, larger volume shocks will move through their travel much easier with a smoother, more linear ramp at the end of their travel. Smaller volume shocks will feel firmer and ramp much more progres-sively. Controlling the air volume lets you take more control over the progressive nature of the fork or shock’s compression, which can be a more powerful tuning tool for bigger or smaller riders at either end of the weight spectrum.
“It’s a common misconception that heavier riders need larger air volume and lighter riders need less,” says Dar-ren. “In reality, it’s the opposite.”
“Smaller, lighter riders in particular will benefit from a shock that moves easier in the first half of its travel, and that’s when you might want to increase your air volume,” says Barrett. “You’ll get the softer top end, helping you stay in the sweet spot of your travel, then allow it to ramp up appropriately at the bottom.”
Monarch Solo Air spring rate compared to the Debonair and a coil spring. The larger volume Debonair also smooths out the curve, making it more linear through the bulk of its travel.

SUSPENSION SETUP GUIDE
So, if your sag is set properly but you’re not able to use all of your travel, you could either remove air spacers or go with a larger volume shock. The lat-ter was the premise behind the Rockshox Debonair upgrade kit:
“We want the most supple and soft top end because that equates to traction,” adds Duncan Riffle, former U.S. DH champ and current SRAM MTB PR manager. “It should be conforming to every little bump on the ground (and the increased air volume achieves that).”
A larger volume shock can also be used to tweak the feel of shorter travel bikes:
“When you have more volume, you have a much more adjustable range with a longer, slower ramp,” says Riffle. “This can be particularly helpful for mak-ing shorter travel 100/120mm bikes that have short stroke shocks to feel ‘bigger’ and more plush.”
“The tradeoff was that sometimes meant you’d blow through your travel or have excessive brake dive. The solution is reducing air volume (with Bottomless Tokens or Spacers) in the positive air chamber. This keeps the top end supple while giving it a higher ramp to prevent bottoming out. I suggest when you add a spacer, you can try going a little lower air pressure. That’ll make it even more supple off the top but the reduced volume helps control bottom out.”
The Debonair replaces the standard Monarch outer can with an inner can and outer sleeve. The inner can maintains the proper interior diam-eter for the seals, but vents air into the external chamber to increase volume.

SUSPENSION SETUP GUIDE
And that leads into the other end of the spectrum, reducing volume. Say you’re a bigger rider and things feel good but you’re blowing through the travel. Or, you ride terrain that’s a notch above what your bike is rated for and the rear end feels way too soft. If you simply increase air pressure, you won’t be as sagged into the travel and you’re moving the air spring rate up all the way through the travel. The curve will follow the same pattern, it’ll just move up on the graph. And it won’t feel nearly as good or track the ground as well.
Reducing the air volume, though, will keep the graph in the softer range at the beginning of travel, then let it ramp faster in the sec-ond half of the travel to prevent it from bottoming too harshly or too often.
Air volume changes aren’t just for making it work for larger and smaller riders, they can also be done simply to improve ride feel. Mani-tou sponsored rider and veteran pro mountain biker Eric Porter explains:
“If your suspension feels too linear, then it’s time to adjust the volume. In the end you want to be using all of your travel without having a hard bottom out. It’s great to hit something big, have it feel smooth, and then look down and see that you used everything you had but it didn’t smash the bottom. Reducing the volume with a spacer can also make it feel more supportive, so if you like to pop off of lips and roots and whatever, less volume can help because it will ramp up more as you compress it.”
I’d add that it can also be a way to help an overwhelmed rear shock keep up with a longer travel fork, a common spec these days given the popularity of enduro.
Fox offers a range of air volume spacers to change, and they’re incredibly easy to install. The spacer is the white clip shown at right.

SUSPENSION SETUP GUIDE
WHAT ABOUT SUSPENSION FORKS?Since forks are not affected by linkages, leverage ratios or anything other than your body weight, it’s a little simpler to see how changing the air volume can help. Unfortunately, you may only be able to move in one direction – smaller.
Current forks from Magura, Rockshox and Fox (and likely others) use simple-to-install volume spacers. Sometimes, your stock fork or shock may have spacers preinstalled. Bike brands will spec not only specific damping tunes but also specific size spacers. So, you may be able to remove what’s already in there to increase the volume. If not, you’ll only be able to reduce the volume, which has this effect:
This chart shows the spring curve for a Rockshox fork with 0/1/2/3 Bottomless Tokens in it. The first half of the travel sees minimal changes, it’s the second half that gets way more progressive. Like the rear end, if you want to keep the soft feel at the top of the fork but are bottoming out to fre-quently, try adding a spacer to reduce air volume.

SUSPENSION SETUP GUIDE
REAL WORLD EXAMPLESNiner’s sponsored riders Chloe Woodruff and Evelyn Dong are both about 115 pounds and ride extra small JET9 RDOs. Both had their shocks tuned by PUSH to better suit their diminutive size. Darren says the stock Fox shock had a mid-level 0.6 cubic inch air volume reducer/spacer in it, so the girls were having to run really low air pressure in order to get full travel. But that meant it wasn’t providing good overall ride quality. If they put more air in it to get the sag in the right range, they’d only get about 70%-80% of the travel. The solution was to put a smaller reducer in. The smallest Fox provides is a 0.2, but PUSH machined it down to 0.15. (They also completely changed out the damping mechanisms, but that’s another story)
For me personally, the white Fox spacer you see inserted into the shock above was for the RIP9 RDO I’m testing. I have the bike set up with the massive 150mm Fox 36 fork up front, which gets 25mm more travel than the rear. On big mountain descents and runs like Beech Mountain’s DH course, the rear end was simply overpowered when using the fork for what it’s worth. Keep in mind, I’m also 6’2” and, when fully geared up for “enduro”, have a package weight of about 205lbs. Adding the spacer to the shock helped give it a bit firmer cushion at the end of its stroke, feeling like I had more travel to use rather than blowing through it. The fun-o-meter sag ring showed I was still getting full travel, it just felt much more supportive on the big hits and drops. Which is exactly what I wanted.
Spacers and kits are pretty cheap and available through any good bike shop, which can also do the install if you don’t have the tools. Fortunately, both fork and shock spacer installs are super simple, often requiring nothing more than a socket set and/or bench vise. The Fox shock spacer install took me 15 minutes including taking the shock on and off the bike. Most brands have downloadable step by step instructions from their websites, too. Or you could send your parts off to a pro like PUSH or Suspension Experts. If you’re not afraid of tin-kering, some (most) of the spacers we’ve seen can be drilled out or cut down to customize the air volume adjustment, but you run the risk of voiding your warranty. If you do, just make sure no sharp edges or burrs are outward facing, and as always, you do this at your own discretion and risk. All I’m saying is I’ve seen it done.
If you do change your air volume, then it’s time to head back to the be-ginning of the series to set your sag and damping again. Then, if things still don’t seem right, it might be time to look at the overall tune... Fox offers various
size spacers (the bluepiece) for their FLOAT forks.

SUSPENSION SETUP GUIDE
PART 5 - IS YOUR SUSPENSION HUMMING THE RIGHT TUNE?Like a song stuck in your head, the internal damping tune of your suspension is what makes it sing. So far, we’ve covered everything you can do yourself: Setting Sag (Part 1), dialing your compression (Part 2) and rebound (Part 3) damping, and ad-justing air volume (Part 4). For the vast majority of riders, these user-friendly adjustments are going to get your mountain bike tackling the terrain like a champ.
But, as with anything made to work as well as possible across as broad a spectrum as pos-sible, there’s always a chance it’s not going to work right for you. And if none of the other tricks worked, you could look at a new sus-pension fork or shock that has more adjust-ability built in. Or you could just order a new shock with a softer or firmer tune directly from Fox, Rockshox, Manitou, DT Swiss, Magura or whomever. That might be an easier solution then sending it off for custom tuning, but it would be missing the point.
“For a custom tune, we consider rider weight, riding style and, for rear shocks, the lever-age ratio curve,” says Kevin Booth, founder of Suspension Experts. “The manufactur-ers don’t always have all of this information available to them, so it’s not possible to offer the perfect fork or shock out of the box. So while stock suspension comes out of a factory designed around an “average” sized rider, it
has to be able to function for a rider that is anywhere from 100 lbs. to 300 lbs. It’s easy to see the opportunity to make it work better. To accommodate this broad range of potential riders, the external knobs tend to offer very coarse adjustments …swing-ing wildly from one extreme end of the adjustment range to the other. A suspension tuner’s job is to narrow that range of adjust-ment to work well for a particular bike (leverage ratio curve) and rider (weight).”
Many shocks have tune markerson the outside to show how the frame
manufacturer spec’d them. It’s Greek to most of us, but suspension tuners will
use that info as a starting point.

SUSPENSION SETUP GUIDE
That means even a different stock tune is still going to be made to fit a very wide range of riders rather than you, specifically. So, how do you know when it’s time to look at a custom tune?
First things first, what are we talking about when referring to a suspension component’s “tune” as opposed to the spring curve? Here’s the geeked out answer from Cane Creek’s suspension engineer Josh Coaplen:
“The difference between spring rate and compression tune is fairly simple, but so often misunderstood. Spring rate is not dependent on shaft veloc-ity. That is, the spring force at any given displacement does not matter how slowly or quickly the shock is cycled. F=k(x)x. That is, Spring Force = spring rate (which in the case of air springs is a function of displacement) x displace-ment. Note, no dependence on shaft speed.
“The compression damping (in dampers that do not have position sensi-tive damping, like Double Barrel shocks) is independent of displacement. That is, if the shaft is being compressed at 30in/s, a certain damping force is achieved, regardless of where the shock is in stroke (Of course, shocks with Boost Valves, SPC, and other position sensitive dampers vary from this rule). F=c(v)v. That is, Damper Force = damping rate (which is always at least a weak function of velocity, sometimes highly variable) x shaft speed. Note, it does not depend on position.
“I’ve found it easiest to think of it this way: First, assume sag is set properly, nothing works if that isn’t roughly right. If the shock/fork is using too much travel (bottoming) very often, the spring rate is off. Examples of this: bounc-ing in the parking lot, on jump faces, and in long berms when there bike settles in (not “chop berms”). These are (typically) “slow speed” events, so the HSC is not relevant. When a shock behaves like this, it needs more spring progressivity (for an air spring) or a higher rate (for a coil). If the shock bot-toms harshly in very rare but hard hits, then the HSC is the likely culprit.”

SUSPENSION SETUP GUIDE
When it comes to what that typically means for you, Rockshox’s Duncan Riffle sums it up nicely: “Spring rate is for the person, tune is for the bike manufacturer.”
Indeed, the compression tune is dictated by how the oil flows through the compression damping circuit. That circuit can be made up of timing ports, needles and/or shim stacks. The size of the holes and ports and the strength and stack design of the shims controls how quickly oil can flow through them. The holes are typically what control low speed damping, letting oil flow through holes and ports. Smaller holes constrict the flow more and vice versa. The shim stacks are typically designed to flex under a certain amount of pressure, which lets them flex when a higher speed oil flow pushes them open and, thus, controls high speed damping. The suspen-sion manufacturer or tuner can change these to get the tune just right. Rarely are these adjustments able to be performed by the end user.
We trust that the bike and suspension brands got it right, but here’s how you can tell:
“Once you’ve set your sag for your spring rate,” continues Riffle, “then it’s all about your compression tune. For instance, assuming you have the right spring rate, then you look at how quickly and easily (or rarely and difficultly) you’re able to blow through your travel. If things aren’t as supple as you want it to be even in the wide open setting and at the top of the travel, then you need a less firm com-pression tune.
“But if it’s too soft, and even in your Pedal/Trail setting the fork or shock is wallowing into its travel and bottoming out frequently, then you want to firm up your compression tune.”
Booth concurs: “Assuming the spring curve (rate) is now correct; it’s time to start thinking about ride quality. Proper suspension setup allows a rider to focus on what’s ahead instead of what’s underneath their wheels. Does the bike remain composed in that rocky sec-tion? Does it recover well after landing a jump?
“Forces delivered to a damper change according to how far the spring medium is compressed. This is the argument for separate high and low-speed adjustments for both the compression and rebound circuits. Any modern sophisticated suspension will have these separate circuits but more often than not, what you are adjusting externally with your control knobs is the low-speed portion of a given damping circuit, with high-speed forces being controlled internally with shim stacks or poppet valves (there are plenty of exceptions).”
Let’s say you’ve tried the entire range of external compression adjustments available and things still aren’t right. Then you’re a candi-date for tweaking your tune.

SUSPENSION SETUP GUIDE
Booth started us off explaining how most suspension components are made to fit a wide range of riders and bikes. Darren Murphy, founder of PUSH Industries, adds:
“There are certain rider weights that generally struggle to work with stock OEM components, 130lbs-and-under and 215lbs-and-above. Stock suspension components and adjustment ranges are generally more applicable to 150-190lb rider weights with average riding skill level.
“So, suspension tuning is tool to meet the end user’s expectations. You can certainly have two different riders purchase the same bike but have different experiences. This is where the role of the suspension tuner really comes in. Product managers from the suspension company and the bike company have to sit down across from each other and decide what is the best overall fit for a shock absorber specification that will be best for the largest variety of riders. As a suspension tuner, we get to work with the end user to find out the things that the rider does and does not like about their bike and make adjustments and modifications to meet that need.”
Should you do it?
Opting to have your suspension professionally tuned isn’t something to be taken lightly. Prices for rebuilds and mild tuning start at about $150 for modern forks and shocks and go up from there, sometimes pushing close to $400 or more. Plus shipping each way. Not to mention the downtime. You should consider whether your current bike and equipment is worth the investment, or if an upgrade to a better (not just different, but better) part or even bike might be more worthwhile. But, if you’re happy with your setup and just want to eke more performance out of it, or if you’re at the extremes of rider weights, then a custom tune could be just the ticket.
Even if you’re not planning on getting your stock suspension tuned, the informa-tion here is worth keeping in mind if you’re replacing a worn out or broken piece. Call the suspension manufacturer and discuss what those letters and numbers mean and see what your options are. Most major brands can build the shock to spec for the bike it’s going on, which means they can build to your spec using various off the shelf parts. That doesn’t mean they’ll dial it down at the same level as Suspension Experts or PUSH, but they may be able to get you closer.
Fast Suspension offersfork & shock tuningservices in Europe.

SUSPENSION SETUP GUIDE
PART 6 - HOW OFTEN SHOULD YOU BOTTOM OUT?This is the final installment in our Suspension Setup Series, and it’s a fairly simple recap to the in depth process of properly set-ting up your mountain bike’s fork and shock. Assuming you’ve followed the series, your suspension should be pretty well dialed, leaving one big question: How often should you be bot-toming out?
“Every ride. If your bike is set up properly for the course you’re riding, you should use full travel on the biggest hit/drop/jump of your ride. Otherwise, you’re not fully utilizing your shock and the fun-o-meter isn’t maxing out.”
That’s from Duncan Riffle, 2x U.S. National Downhill Champ, former World Cup DH com-petitor and SRAM MTB marketing manager. We also spoke with Manitou’s Eric Porter, who’s raced professionally in XC/DH/DS/DJ over the past 11 years; Mark Fitzsimmons, Fox Racing Shox’s race program manager and pro athlete suspension tuner; and Josh Co-aplen, Cane Creek’s VP of Engineering.
Here’s what they had to say…
“From the very beginning of Blackbox race testing,” says Riffle, “they cemented into my head you should get full extension of your travel on every ride.”
At face value, that makes sense. After all, why leave any of your bike’s performance on the table? But the full extent of your travel should be reserved for the biggest hits on the ride, and it’s not just about reaching bottom out. It’s also about the qual-ity of that bottom out.
“I’d suggest setting up fork/shock to use all travel on every ride… at least once,” says Coaplen. “However, if that ‘one fea-

SUSPENSION SETUP GUIDE
ture’ that uses all the travel (jump landing, g-out, berm) is more frequent than once a ride, then using all the travel as frequently as that feature exists is optimal. Of course, there are exceptions. For example, I’m way over-biked right now. I’m riding a Enduro 29, mostly in Bent Creek. I don’t always use all the travel if I’m just out for a cruise. Having said that, using all the travel does not mean bottoming harshly. If you feel either shock or fork hit hard (rattles you) on a typical feature, it is time to add more air/up the spring progressivity/buy a stiffer coil.”
That last part is important. If your bottom out is too harsh, it’s time to revisit the other steps to setting up your suspension. If you’ve tried all that and things are still pretty rough at the limits of your bike’s travel, then it might be time to swap suspension parts or even go with a bigger bike. Conversely, if you’re never bottoming out, you too could have “too much bike”.
As with the other settings, things arent’ nec-essarily the same front to rear.
“You should bottom out a couple of times a ride on the trail you ride the most and feel the most confident on,” says Fitzsimmons. “If the terrain is steep, it will be hard to bot-tom out the fork unless it’s a jump, drop off, or impacting large braking holes entering a turn. You shouldn’t bottom by just riding into obstacles such as square edge rocks. If you do, the chances of a flat tire are pretty high.”
Ultimately, this and everything else comes down to feel. Hard and fast rules rarely apply to every rider on every ride.
“I’ve heard before that you should bottom out once or twice a ride, that’s how you know you are set up right,” Porter told us. “I don’t believe that necessarily, I think you should bottom out only when you think you should, if

SUSPENSION SETUP GUIDE
that makes any sense. If you ride a medium rough trail and aren’t smashing everything, you probably won’t use all of your travel really. I look at my last inch of travel as my insurance policy, I want it there when I really need it, not just when every big rock comes along. Forks are so tuneable now that you can really set your compression damping to keep you from smashing the bottom, the Manitou Mattoc even has HBO adjust built in, which stands for Hydraulic Bottom Out, and you can tune how the last inch of travel feels, and keep yourself from ever feeling a harsh bottom out.”
And with that, we conclude Bikerumor’s master class in mountain bike suspension set up. You now have everything you need to set up your current suspension and evaluate and maximize its performance. Enjoy the ride!
Huge thanks to everyone that provided their expertise for this series. Here are links to the participating brands:
Rockshox.com RideFox.com CaneCreek.com ManitouMTB.com
PushIndustries.com MTBSuspensionExperts.com NinerBikes.com