SuSE Linux Enterprise Server / Administration · Introduction AbouttheManual This book helps you...
353
SuSELinux EnterpriseServer8 for IBM iSeries and IBM pSeries Administration
Transcript of SuSE Linux Enterprise Server / Administration · Introduction AbouttheManual This book helps you...

SuSELinuxEnterpriseServer8
for IBM iSeries and IBM pSeries
Administration

Edition 2004
Copyright ©
This publication is intellectual property of SuSE Linux AG.
Its contents can be duplicated, either in part or in whole, provided that a copyrightlabel is visibly located on each copy.
All information found in this book has been compiled with utmost attention to de-tail. However, this does not guarantee complete accuracy. Neither SuSE Linux AG,the authors, nor the translators shall be held liable for possible errors or the conse-quences thereof.
Many of the software and hardware descriptions cited in this book are registeredtrademarks. All trade names are subject to copyright restrictions and may be regis-tered trade marks. SuSE Linux AG essentially adheres to the manufacturer’s spelling.Names of products and trademarks appearing in this book (with or without specificnotation) are likewise subject to trademark and trade protection laws and may thusfall under copyright restrictions.
The following are trademarks of International Business Machines Corporation in theUnited States, other countries, or both: IBM, AS/400, AIX, OS/400, iSeries, pSeries,Redbook, DB2, and PowerPC.
Please direct suggestions and comments to [email protected]
Authors: Frank Bodammer, Stefan Dirsch, Roman Drahtmüller, Karl Eichwalder,Werner Fink, Dennis Geider, Carsten Groß, Olaf Hering, AndreasJaeger, Jana Jaeger, Klaus Kämpf, Olaf Kirch, Hubert Mantel, MichaelMatz, Johannes Meixner, Lars Müller, Anas Nashif, Susanne Ober-hauser, Edith Parzefall, Peter Poeml, Marc Rührschneck, MarcusSchaefer, Klaus Singvogel, Andreas Schwab, Martin Sommer, KlausG. Wagner, Christian Zoz
Translators: Rebecca Ellis, Olaf NiepoltEditors: Antje Faber, Dennis Geider, Roland Haidl, Jana Jaeger,
Edith Parzefall, Peter Reinhart, Marc Rührschneck, Thomas Schraitle,Martin Sommer, Rebecca Walter
Layout: Manuela Piotrowski, Thomas SchraitleSetting: LATEX
This book has been printed on 100 % chlorine-free bleached paper.
Introduction
About the Manual
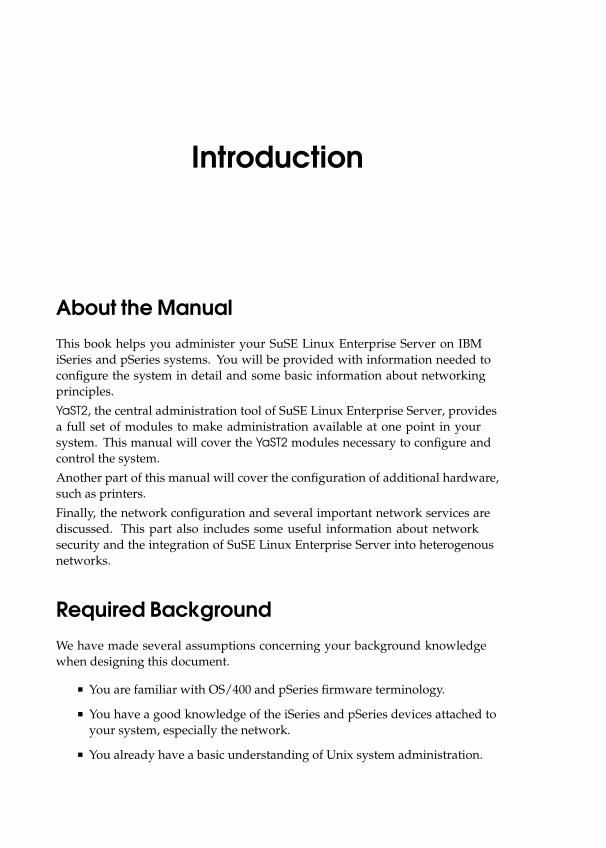
This book helps you administer your SuSE Linux Enterprise Server on IBMiSeries and pSeries systems. You will be provided with information needed toconfigure the system in detail and some basic information about networkingprinciples.
YaST2, the central administration tool of SuSE Linux Enterprise Server, providesa full set of modules to make administration available at one point in yoursystem. This manual will cover the YaST2 modules necessary to configure andcontrol the system.
Another part of this manual will cover the configuration of additional hardware,such as printers.
Finally, the network configuration and several important network services arediscussed. This part also includes some useful information about networksecurity and the integration of SuSE Linux Enterprise Server into heterogenousnetworks.
Required Background
We have made several assumptions concerning your background knowledgewhen designing this document.
You are familiar with OS/400 and pSeries firmware terminology.
You have a good knowledge of the iSeries and pSeries devices attached toyour system, especially the network.
You already have a basic understanding of Unix system administration.

Typographical Conventions
The following typographical conventions are used in this book:
Text layout MeaningYaST programs
/etc/passwd file or directory names
〈parameter〉 when entering a command, parametershould be replaced by the actual value,excluding the angle brackets.
PATH the environment variable PATH
192.168.1.2 the value of a variable. In this case,192.168.1.2
ls the command ls
news the user news
earth:~ # ls Input of ls in the command shell of theuser root in his home directory of the host“Earth”
newbie@earth:~ > ls Input of ls in the command shell of usernewbie in his home directory on the host“Earth”
C:\> fdisk DOS prompt with the command inputfdisk�� ��Alt A key to press. Keys to press sequentiallyare separated by spaces.�� ��Ctrl +
�� ��Alt +�� ��Del Keys to press simultaneously are grouped
with the ‘+’ sign.
"Permission denied" System messages
‘System Update’ Menu items, buttons, labels
Nuremberg, 26th January 2004
Your SuSE team
iv

Contents
Introduction . . . . . . . . . . . . . . . . . . . . . . . . . . . . . . . . . iii
I Configuration 1
1 YaST2 in Text Mode (ncurses) 3
Invocation and Usage . . . . . . . . . . . . . . . . . . . . . . . . . . . . 4
Module Operation . . . . . . . . . . . . . . . . . . . . . . . . . . . . . . 5
Invoking the Various Modules . . . . . . . . . . . . . . . . . . . . . . . 6
YaST Online Update . . . . . . . . . . . . . . . . . . . . . . . . . . . . . 6
2 YaST2 in Graphics Mode 9
Starting YaST2 . . . . . . . . . . . . . . . . . . . . . . . . . . . . . . . . 10
Software . . . . . . . . . . . . . . . . . . . . . . . . . . . . . . . . . . . . 10
Change Installation Source . . . . . . . . . . . . . . . . . . . . . . 11
YaST Online Update (YOU) . . . . . . . . . . . . . . . . . . . . . . 11
Install and Remove Software . . . . . . . . . . . . . . . . . . . . . 12
System Update . . . . . . . . . . . . . . . . . . . . . . . . . . . . . 14
Patch CD Update . . . . . . . . . . . . . . . . . . . . . . . . . . . . 15
Hardware . . . . . . . . . . . . . . . . . . . . . . . . . . . . . . . . . . . 15
Printer . . . . . . . . . . . . . . . . . . . . . . . . . . . . . . . . . . 15
Display and Input devices (SaX2) . . . . . . . . . . . . . . . . . . . 15
Hardware Information . . . . . . . . . . . . . . . . . . . . . . . . . 15
Network/Basic . . . . . . . . . . . . . . . . . . . . . . . . . . . . . . . . 16
Network Card Configuration . . . . . . . . . . . . . . . . . . . . . 16
E-Mail . . . . . . . . . . . . . . . . . . . . . . . . . . . . . . . . . . 16
Network/Advanced . . . . . . . . . . . . . . . . . . . . . . . . . . . . . 18
Configuring an NFS Server . . . . . . . . . . . . . . . . . . . . . . 18
Configuring NIS . . . . . . . . . . . . . . . . . . . . . . . . . . . . 18
Host Name and DNS Configuration . . . . . . . . . . . . . . . . . 18
Configuring Routing . . . . . . . . . . . . . . . . . . . . . . . . . . 18
Security and Users . . . . . . . . . . . . . . . . . . . . . . . . . . . . . . 19
User Administration . . . . . . . . . . . . . . . . . . . . . . . . . . 19
Group Administration . . . . . . . . . . . . . . . . . . . . . . . . . 19
Security Settings . . . . . . . . . . . . . . . . . . . . . . . . . . . . 20
Firewall . . . . . . . . . . . . . . . . . . . . . . . . . . . . . . . . . 22
System . . . . . . . . . . . . . . . . . . . . . . . . . . . . . . . . . . . . 24
Creating a System Backup . . . . . . . . . . . . . . . . . . . . . . . 24
Restore . . . . . . . . . . . . . . . . . . . . . . . . . . . . . . . . . 24
Sysconfig Editor . . . . . . . . . . . . . . . . . . . . . . . . . . . . 25
Runlevel Editor . . . . . . . . . . . . . . . . . . . . . . . . . . . . . 26
Expert Partitioning . . . . . . . . . . . . . . . . . . . . . . . . . . . 26
Logical Volume Manager (LVM) . . . . . . . . . . . . . . . . . . . 27
Soft RAID . . . . . . . . . . . . . . . . . . . . . . . . . . . . . . . . 28
Time Zone Selection . . . . . . . . . . . . . . . . . . . . . . . . . . 29
Language Selection . . . . . . . . . . . . . . . . . . . . . . . . . . . 29
Miscellaneous . . . . . . . . . . . . . . . . . . . . . . . . . . . . . . . . . 30
Start Protocol . . . . . . . . . . . . . . . . . . . . . . . . . . . . . . 30
System Protocol . . . . . . . . . . . . . . . . . . . . . . . . . . . . . 30
Loading a Vendor’s Driver CD . . . . . . . . . . . . . . . . . . . . 30
vi Contents
3 The X Window System 33
Historical Background . . . . . . . . . . . . . . . . . . . . . . . . . . . . 33
Version 4.x of XFree86 . . . . . . . . . . . . . . . . . . . . . . . . . . . . 34
Configuration with SaX2 . . . . . . . . . . . . . . . . . . . . . . . . . . 35
SaX2— Main Window . . . . . . . . . . . . . . . . . . . . . . . . . 36
Display . . . . . . . . . . . . . . . . . . . . . . . . . . . . . . . . . 37
Graphics Card . . . . . . . . . . . . . . . . . . . . . . . . . . . . . 38
Colors and Resolutions . . . . . . . . . . . . . . . . . . . . . . . . 39
3D Acceleration . . . . . . . . . . . . . . . . . . . . . . . . . . . . . 39
Image Position and Size . . . . . . . . . . . . . . . . . . . . . . . . 39
Multihead . . . . . . . . . . . . . . . . . . . . . . . . . . . . . . . . 40
Input Devices . . . . . . . . . . . . . . . . . . . . . . . . . . . . . . 41
AccessX . . . . . . . . . . . . . . . . . . . . . . . . . . . . . . . . . 42
Optimizing the Installation of the X Window System . . . . . . . . . . . 43
Integrating Additional (True Type) Fonts . . . . . . . . . . . . . . . 48
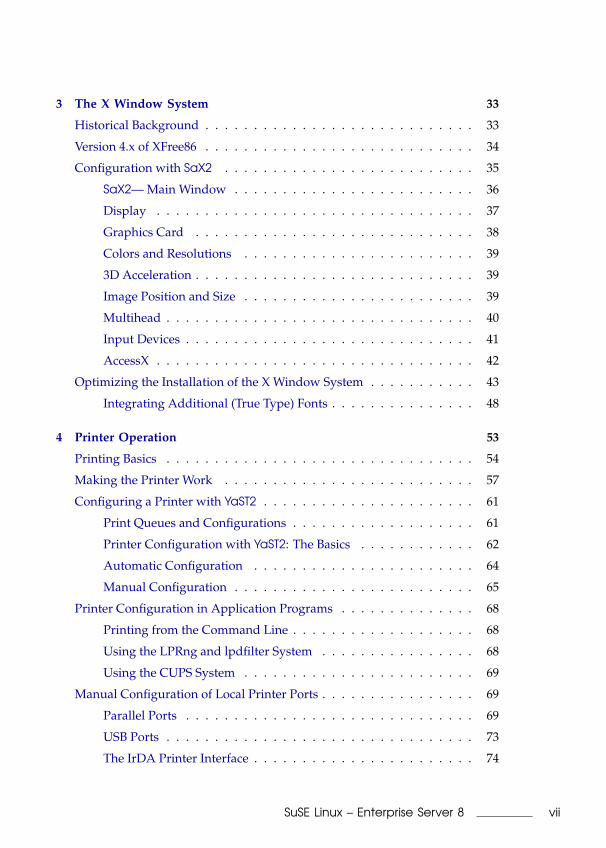
4 Printer Operation 53
Printing Basics . . . . . . . . . . . . . . . . . . . . . . . . . . . . . . . . 54
Making the Printer Work . . . . . . . . . . . . . . . . . . . . . . . . . . 57
Configuring a Printer with YaST2 . . . . . . . . . . . . . . . . . . . . . . 61
Print Queues and Configurations . . . . . . . . . . . . . . . . . . . 61
Printer Configuration with YaST2: The Basics . . . . . . . . . . . . 62
Automatic Configuration . . . . . . . . . . . . . . . . . . . . . . . 64
Manual Configuration . . . . . . . . . . . . . . . . . . . . . . . . . 65
Printer Configuration in Application Programs . . . . . . . . . . . . . . 68
Printing from the Command Line . . . . . . . . . . . . . . . . . . . 68
Using the LPRng and lpdfilter System . . . . . . . . . . . . . . . . 68
Using the CUPS System . . . . . . . . . . . . . . . . . . . . . . . . 69
Manual Configuration of Local Printer Ports . . . . . . . . . . . . . . . . 69
Parallel Ports . . . . . . . . . . . . . . . . . . . . . . . . . . . . . . 69
USB Ports . . . . . . . . . . . . . . . . . . . . . . . . . . . . . . . . 73
The IrDA Printer Interface . . . . . . . . . . . . . . . . . . . . . . . 74
viiSuSE Linux – Enterprise Server 8
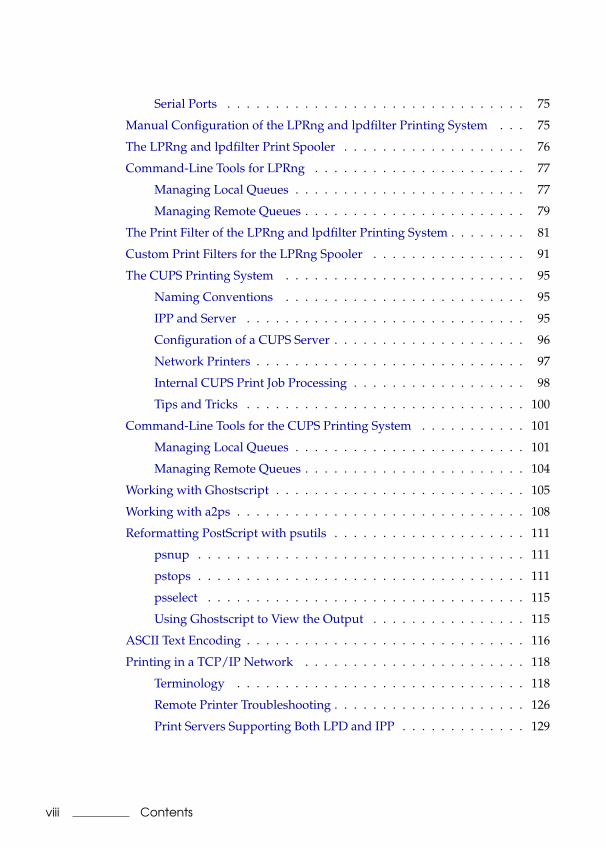
Serial Ports . . . . . . . . . . . . . . . . . . . . . . . . . . . . . . . 75
Manual Configuration of the LPRng and lpdfilter Printing System . . . 75
The LPRng and lpdfilter Print Spooler . . . . . . . . . . . . . . . . . . . 76
Command-Line Tools for LPRng . . . . . . . . . . . . . . . . . . . . . . 77
Managing Local Queues . . . . . . . . . . . . . . . . . . . . . . . . 77
Managing Remote Queues . . . . . . . . . . . . . . . . . . . . . . . 79
The Print Filter of the LPRng and lpdfilter Printing System . . . . . . . . 81
Custom Print Filters for the LPRng Spooler . . . . . . . . . . . . . . . . 91
The CUPS Printing System . . . . . . . . . . . . . . . . . . . . . . . . . 95
Naming Conventions . . . . . . . . . . . . . . . . . . . . . . . . . 95
IPP and Server . . . . . . . . . . . . . . . . . . . . . . . . . . . . . 95
Configuration of a CUPS Server . . . . . . . . . . . . . . . . . . . . 96
Network Printers . . . . . . . . . . . . . . . . . . . . . . . . . . . . 97
Internal CUPS Print Job Processing . . . . . . . . . . . . . . . . . . 98
Tips and Tricks . . . . . . . . . . . . . . . . . . . . . . . . . . . . . 100
Command-Line Tools for the CUPS Printing System . . . . . . . . . . . 101
Managing Local Queues . . . . . . . . . . . . . . . . . . . . . . . . 101
Managing Remote Queues . . . . . . . . . . . . . . . . . . . . . . . 104
Working with Ghostscript . . . . . . . . . . . . . . . . . . . . . . . . . . 105
Working with a2ps . . . . . . . . . . . . . . . . . . . . . . . . . . . . . . 108
Reformatting PostScript with psutils . . . . . . . . . . . . . . . . . . . . 111
psnup . . . . . . . . . . . . . . . . . . . . . . . . . . . . . . . . . . 111
pstops . . . . . . . . . . . . . . . . . . . . . . . . . . . . . . . . . . 111
psselect . . . . . . . . . . . . . . . . . . . . . . . . . . . . . . . . . 115
Using Ghostscript to View the Output . . . . . . . . . . . . . . . . 115
ASCII Text Encoding . . . . . . . . . . . . . . . . . . . . . . . . . . . . . 116
Printing in a TCP/IP Network . . . . . . . . . . . . . . . . . . . . . . . 118
Terminology . . . . . . . . . . . . . . . . . . . . . . . . . . . . . . 118
Remote Printer Troubleshooting . . . . . . . . . . . . . . . . . . . . 126
Print Servers Supporting Both LPD and IPP . . . . . . . . . . . . . 129
viii Contents
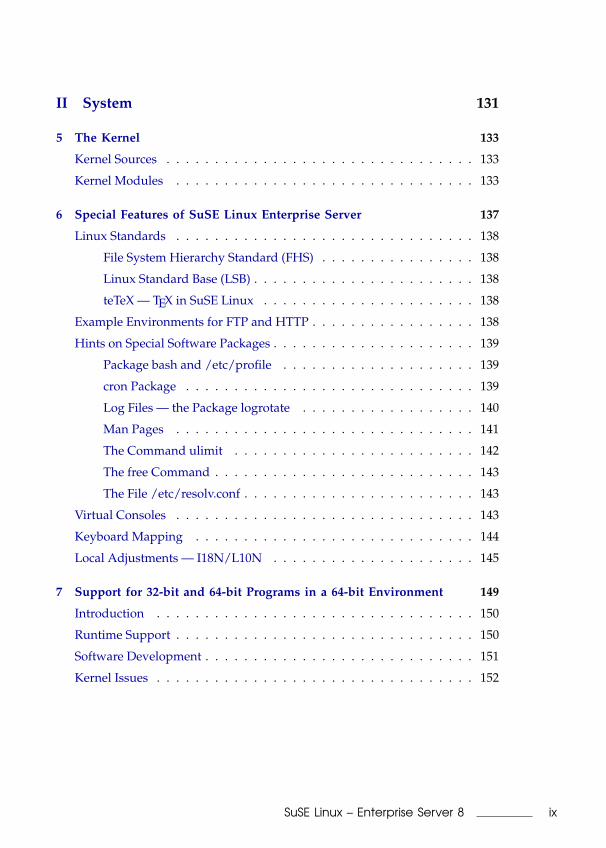
II System 131
5 The Kernel 133
Kernel Sources . . . . . . . . . . . . . . . . . . . . . . . . . . . . . . . . 133
Kernel Modules . . . . . . . . . . . . . . . . . . . . . . . . . . . . . . . 133
6 Special Features of SuSE Linux Enterprise Server 137
Linux Standards . . . . . . . . . . . . . . . . . . . . . . . . . . . . . . . 138
File System Hierarchy Standard (FHS) . . . . . . . . . . . . . . . . 138
Linux Standard Base (LSB) . . . . . . . . . . . . . . . . . . . . . . . 138
teTeX — TEX in SuSE Linux . . . . . . . . . . . . . . . . . . . . . . 138
Example Environments for FTP and HTTP . . . . . . . . . . . . . . . . . 138
Hints on Special Software Packages . . . . . . . . . . . . . . . . . . . . . 139
Package bash and /etc/profile . . . . . . . . . . . . . . . . . . . . 139
cron Package . . . . . . . . . . . . . . . . . . . . . . . . . . . . . . 139
Log Files — the Package logrotate . . . . . . . . . . . . . . . . . . 140
Man Pages . . . . . . . . . . . . . . . . . . . . . . . . . . . . . . . 141
The Command ulimit . . . . . . . . . . . . . . . . . . . . . . . . . 142
The free Command . . . . . . . . . . . . . . . . . . . . . . . . . . . 143
The File /etc/resolv.conf . . . . . . . . . . . . . . . . . . . . . . . . 143
Virtual Consoles . . . . . . . . . . . . . . . . . . . . . . . . . . . . . . . 143
Keyboard Mapping . . . . . . . . . . . . . . . . . . . . . . . . . . . . . 144
Local Adjustments — I18N/L10N . . . . . . . . . . . . . . . . . . . . . 145
7 Support for 32-bit and 64-bit Programs in a 64-bit Environment 149
Introduction . . . . . . . . . . . . . . . . . . . . . . . . . . . . . . . . . 150
Runtime Support . . . . . . . . . . . . . . . . . . . . . . . . . . . . . . . 150
Software Development . . . . . . . . . . . . . . . . . . . . . . . . . . . . 151
Kernel Issues . . . . . . . . . . . . . . . . . . . . . . . . . . . . . . . . . 152
ixSuSE Linux – Enterprise Server 8
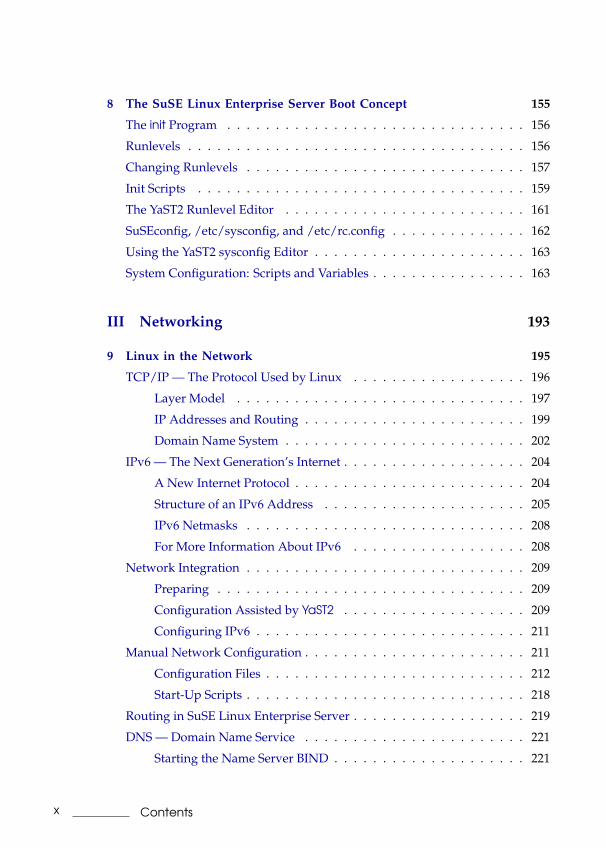
8 The SuSE Linux Enterprise Server Boot Concept 155
The init Program . . . . . . . . . . . . . . . . . . . . . . . . . . . . . . . 156
Runlevels . . . . . . . . . . . . . . . . . . . . . . . . . . . . . . . . . . . 156
Changing Runlevels . . . . . . . . . . . . . . . . . . . . . . . . . . . . . 157
Init Scripts . . . . . . . . . . . . . . . . . . . . . . . . . . . . . . . . . . 159
The YaST2 Runlevel Editor . . . . . . . . . . . . . . . . . . . . . . . . . 161
SuSEconfig, /etc/sysconfig, and /etc/rc.config . . . . . . . . . . . . . . 162
Using the YaST2 sysconfig Editor . . . . . . . . . . . . . . . . . . . . . . 163
System Configuration: Scripts and Variables . . . . . . . . . . . . . . . . 163
III Networking 193
9 Linux in the Network 195
TCP/IP — The Protocol Used by Linux . . . . . . . . . . . . . . . . . . 196
Layer Model . . . . . . . . . . . . . . . . . . . . . . . . . . . . . . 197
IP Addresses and Routing . . . . . . . . . . . . . . . . . . . . . . . 199
Domain Name System . . . . . . . . . . . . . . . . . . . . . . . . . 202
IPv6 — The Next Generation’s Internet . . . . . . . . . . . . . . . . . . . 204
A New Internet Protocol . . . . . . . . . . . . . . . . . . . . . . . . 204
Structure of an IPv6 Address . . . . . . . . . . . . . . . . . . . . . 205
IPv6 Netmasks . . . . . . . . . . . . . . . . . . . . . . . . . . . . . 208
For More Information About IPv6 . . . . . . . . . . . . . . . . . . 208
Network Integration . . . . . . . . . . . . . . . . . . . . . . . . . . . . . 209
Preparing . . . . . . . . . . . . . . . . . . . . . . . . . . . . . . . . 209
Configuration Assisted by YaST2 . . . . . . . . . . . . . . . . . . . 209
Configuring IPv6 . . . . . . . . . . . . . . . . . . . . . . . . . . . . 211
Manual Network Configuration . . . . . . . . . . . . . . . . . . . . . . . 211
Configuration Files . . . . . . . . . . . . . . . . . . . . . . . . . . . 212
Start-Up Scripts . . . . . . . . . . . . . . . . . . . . . . . . . . . . . 218
Routing in SuSE Linux Enterprise Server . . . . . . . . . . . . . . . . . . 219
DNS — Domain Name Service . . . . . . . . . . . . . . . . . . . . . . . 221
Starting the Name Server BIND . . . . . . . . . . . . . . . . . . . . 221
x Contents
The Configuration File /etc/named.conf . . . . . . . . . . . . . . . 222
For More Information . . . . . . . . . . . . . . . . . . . . . . . . . 230
NIS — Network Information Service . . . . . . . . . . . . . . . . . . . . 231
NIS Master and Slave Server . . . . . . . . . . . . . . . . . . . . . 231
The NIS Client Module of YaST2 . . . . . . . . . . . . . . . . . . . 233
Manual Installation of an NIS Client . . . . . . . . . . . . . . . . . 233
NFS — Shared File Systems . . . . . . . . . . . . . . . . . . . . . . . . . 235
Importing File Systems with YaST2 . . . . . . . . . . . . . . . . . . 235
Importing File Systems Manually . . . . . . . . . . . . . . . . . . . 235
Exporting File Systems with YaST2 . . . . . . . . . . . . . . . . . . 236
Exporting File Systems Manually . . . . . . . . . . . . . . . . . . . 236
DHCP . . . . . . . . . . . . . . . . . . . . . . . . . . . . . . . . . . . . . 239
The DHCP Protocol . . . . . . . . . . . . . . . . . . . . . . . . . . 239
DHCP Software Packages . . . . . . . . . . . . . . . . . . . . . . . 239
The DHCP Server dhcpd . . . . . . . . . . . . . . . . . . . . . . . . 240
Assigning Fixed IP Addresses to Hosts . . . . . . . . . . . . . . . . 242
The Finer Points . . . . . . . . . . . . . . . . . . . . . . . . . . . . 243
10 Heterogenous Networks 245
Samba . . . . . . . . . . . . . . . . . . . . . . . . . . . . . . . . . . . . . 246
Installing and Configuring the Server . . . . . . . . . . . . . . . . . 247
Samba as Login Server . . . . . . . . . . . . . . . . . . . . . . . . . 251
Installing Clients . . . . . . . . . . . . . . . . . . . . . . . . . . . . 252
Optimization . . . . . . . . . . . . . . . . . . . . . . . . . . . . . . 253
Netatalk . . . . . . . . . . . . . . . . . . . . . . . . . . . . . . . . . . . . 253
Configuring the File Server . . . . . . . . . . . . . . . . . . . . . . 254
Configuring the Print Server . . . . . . . . . . . . . . . . . . . . . . 258
Starting the Server . . . . . . . . . . . . . . . . . . . . . . . . . . . 258
xiSuSE Linux – Enterprise Server 8
11 Internet 261
Proxy Server: Squid . . . . . . . . . . . . . . . . . . . . . . . . . . . . . 262
About Proxy Caches . . . . . . . . . . . . . . . . . . . . . . . . . . 262
Some Facts About Cache Proxying . . . . . . . . . . . . . . . . . . 262
System Requirements . . . . . . . . . . . . . . . . . . . . . . . . . 264
Starting Squid . . . . . . . . . . . . . . . . . . . . . . . . . . . . . . 265
The Configuration File /etc/squid.conf . . . . . . . . . . . . . . . 267
Transparent Proxy Configuration . . . . . . . . . . . . . . . . . . . 272
Squid and Other Programs . . . . . . . . . . . . . . . . . . . . . . 275
More Information on Squid . . . . . . . . . . . . . . . . . . . . . . 279
12 Secure Networks 281
Masquerading and Firewalls . . . . . . . . . . . . . . . . . . . . . . . . 282
Masquerading Basics . . . . . . . . . . . . . . . . . . . . . . . . . . 282
Firewalling Basics . . . . . . . . . . . . . . . . . . . . . . . . . . . 284
SuSEfirewall2 . . . . . . . . . . . . . . . . . . . . . . . . . . . . . . 285
SSH — Secure Shell, the Safe Alternative . . . . . . . . . . . . . . . . . . 287
The OpenSSH Package . . . . . . . . . . . . . . . . . . . . . . . . . 288
The ssh Program . . . . . . . . . . . . . . . . . . . . . . . . . . . . 288
scp — Secure Copy . . . . . . . . . . . . . . . . . . . . . . . . . . . 289
sftp — Secure File Transfer . . . . . . . . . . . . . . . . . . . . . . 289
The SSH Daemon (sshd) — Server-Side . . . . . . . . . . . . . . . 289
SSH Authentication Mechanisms . . . . . . . . . . . . . . . . . . . 290
X, Authentication, and Other Forwarding Mechanisms . . . . . . . 292
Network Authentication — Kerberos . . . . . . . . . . . . . . . . . . . . 292
Kerberos Terminology . . . . . . . . . . . . . . . . . . . . . . . . . 293
How Kerberos Works . . . . . . . . . . . . . . . . . . . . . . . . . 294
Users’ View of Kerberos . . . . . . . . . . . . . . . . . . . . . . . . 297
For More Information . . . . . . . . . . . . . . . . . . . . . . . . . 298
Installing and Administering Kerberos . . . . . . . . . . . . . . . . . . . 299
Choosing the Kerberos Realms . . . . . . . . . . . . . . . . . . . . 299
Setting up the KDC Hardware . . . . . . . . . . . . . . . . . . . . . 300
xii Contents
Clock Synchronization . . . . . . . . . . . . . . . . . . . . . . . . . 301
Log Configuration . . . . . . . . . . . . . . . . . . . . . . . . . . . 301
Installing the KDC . . . . . . . . . . . . . . . . . . . . . . . . . . . 302
Configuring Kerberos Clients . . . . . . . . . . . . . . . . . . . . . 305
Managing Principals . . . . . . . . . . . . . . . . . . . . . . . . . . 307
Enabling PAM Support for Kerberos . . . . . . . . . . . . . . . . . 309
Setting up Network Servers for Kerberos . . . . . . . . . . . . . . . 312
Configuring sshd for Kerberos Authentication . . . . . . . . . . . . 313
Using LDAP and Kerberos . . . . . . . . . . . . . . . . . . . . . . 314
A Manual Page of e2fsck 315
B The GNU General Public License 319
Bibliography 327
xiiiSuSE Linux – Enterprise Server 8


Part I
Configuration


1Ya
ST2in
TextM
od
e(n
cu
rses)
YaST2 in Text Mode (ncurses)
This chapter addresses above all system administrators and experts who donot run an X server on their systems and who have to rely on the text-basedinstallation tool.
This chapter provides basic information on starting and operating YaST2 in textmode (ncurses). It furthermore explains how you can perform an automaticonline update of your system in order to always keep it at the newest level.
Invocation and Usage . . . . . . . . . . . . . . . . . . . . . 4Module Operation . . . . . . . . . . . . . . . . . . . . . . . 5Invoking the Various Modules . . . . . . . . . . . . . . . . 6YaST Online Update . . . . . . . . . . . . . . . . . . . . . . 6
Invocation and Usage
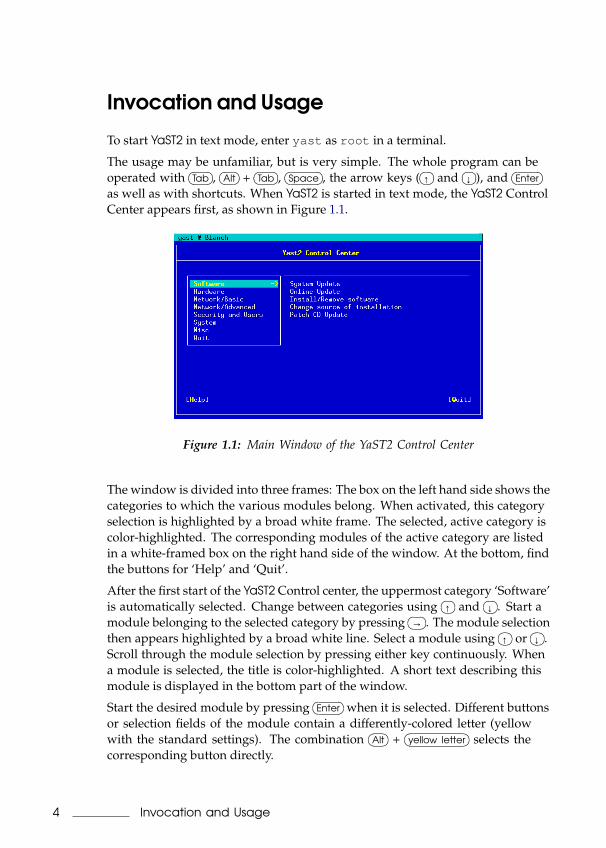
To start YaST2 in text mode, enter yast as root in a terminal.
The usage may be unfamiliar, but is very simple. The whole program can beoperated with
�� ��Tab ,�� ��Alt +
�� ��Tab ,�� ��Space , the arrow keys (
�� ��↑ and�� ��↓ ), and
�� ��Enter
as well as with shortcuts. When YaST2 is started in text mode, the YaST2 ControlCenter appears first, as shown in Figure 1.1.
Figure 1.1: Main Window of the YaST2 Control Center
The window is divided into three frames: The box on the left hand side shows thecategories to which the various modules belong. When activated, this categoryselection is highlighted by a broad white frame. The selected, active category iscolor-highlighted. The corresponding modules of the active category are listedin a white-framed box on the right hand side of the window. At the bottom, findthe buttons for ‘Help’ and ‘Quit’.
After the first start of the YaST2 Control center, the uppermost category ‘Software’is automatically selected. Change between categories using
�� ��↑ and�� ��↓ . Start a
module belonging to the selected category by pressing�� ��→ . The module selection
then appears highlighted by a broad white line. Select a module using�� ��↑ or
�� ��↓ .Scroll through the module selection by pressing either key continuously. Whena module is selected, the title is color-highlighted. A short text describing thismodule is displayed in the bottom part of the window.
Start the desired module by pressing�� ��Enter when it is selected. Different buttons
or selection fields of the module contain a differently-colored letter (yellowwith the standard settings). The combination
�� ��Alt +�� ��yellow letter selects the
corresponding button directly.
4 Invocation and Usage
1Ya
ST2in
TextM
od
e(n
cu
rses)
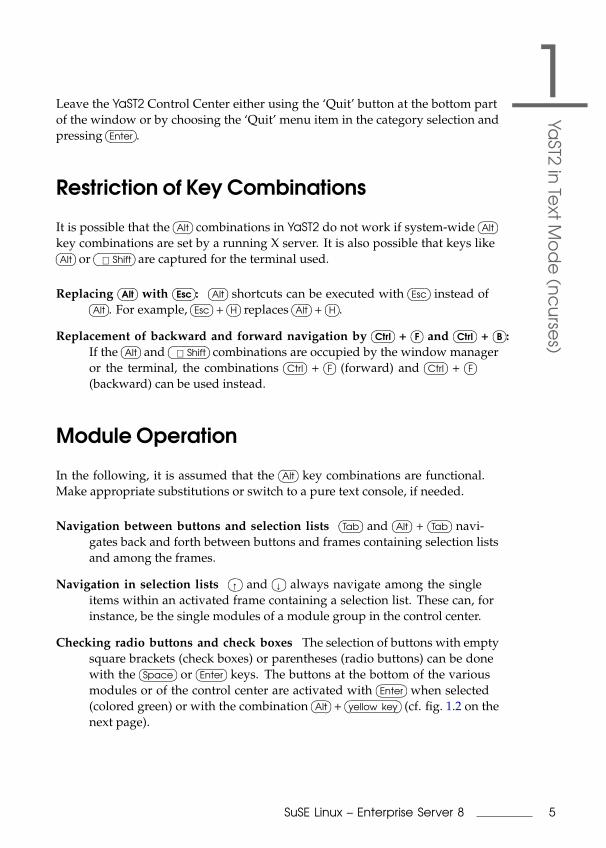
Leave the YaST2 Control Center either using the ‘Quit’ button at the bottom partof the window or by choosing the ‘Quit’ menu item in the category selection andpressing
�� ��Enter .
Restriction of Key Combinations
It is possible that the�� ��Alt combinations in YaST2 do not work if system-wide
�� ��Alt
key combinations are set by a running X server. It is also possible that keys like�� ��Alt or�� ��⇑ Shift are captured for the terminal used.
Replacing�� ��Alt with
�� ��Esc :�� ��Alt shortcuts can be executed with
�� ��Esc instead of�� ��Alt . For example,�� ��Esc +
�� ��H replaces�� ��Alt +
�� ��H .
Replacement of backward and forward navigation by�� ��Ctrl +
����F and�� ��Ctrl +
�� ��B :If the
�� ��Alt and�� ��⇑ Shift combinations are occupied by the window manager
or the terminal, the combinations�� ��Ctrl +
����F (forward) and�� ��Ctrl +
����F
(backward) can be used instead.
Module Operation
In the following, it is assumed that the�� ��Alt key combinations are functional.
Make appropriate substitutions or switch to a pure text console, if needed.
Navigation between buttons and selection lists�� ��Tab and
�� ��Alt +�� ��Tab navi-
gates back and forth between buttons and frames containing selection listsand among the frames.
Navigation in selection lists�� ��↑ and
�� ��↓ always navigate among the singleitems within an activated frame containing a selection list. These can, forinstance, be the single modules of a module group in the control center.
Checking radio buttons and check boxes The selection of buttons with emptysquare brackets (check boxes) or parentheses (radio buttons) can be donewith the
�� ��Space or�� ��Enter keys. The buttons at the bottom of the various
modules or of the control center are activated with�� ��Enter when selected
(colored green) or with the combination�� ��Alt +
�� ��yellow key (cf. fig. 1.2 on thenext page).
5SuSE Linux – Enterprise Server 8
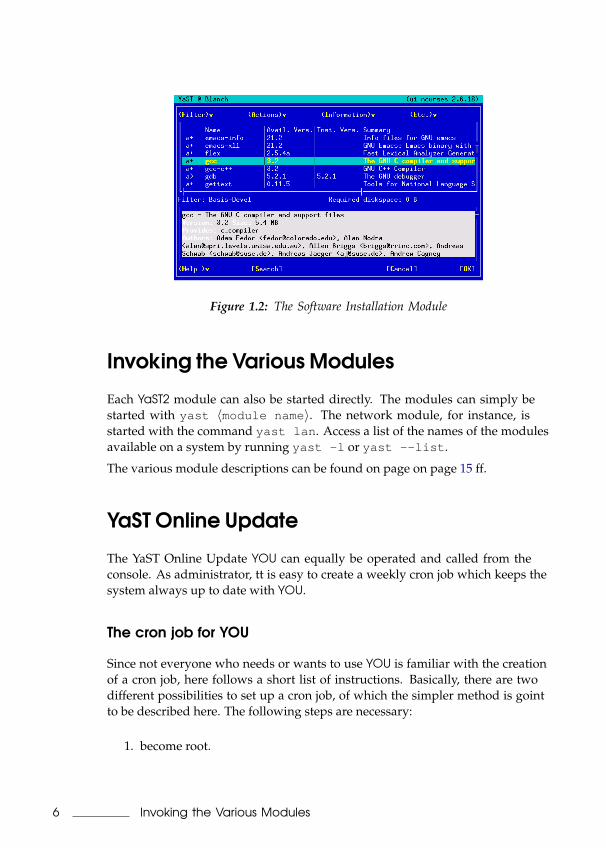
Figure 1.2: The Software Installation Module
Invoking the Various Modules
Each YaST2 module can also be started directly. The modules can simply bestarted with yast 〈module name 〉. The network module, for instance, isstarted with the command yast lan . Access a list of the names of the modulesavailable on a system by running yast -l or yast --list .
The various module descriptions can be found on page on page 15 ff.
YaST Online Update
The YaST Online Update YOU can equally be operated and called from theconsole. As administrator, tt is easy to create a weekly cron job which keeps thesystem always up to date with YOU.
The cron job for YOU
Since not everyone who needs or wants to use YOU is familiar with the creationof a cron job, here follows a short list of instructions. Basically, there are twodifferent possibilities to set up a cron job, of which the simpler method is gointto be described here. The following steps are necessary:
1. become root.
6 Invoking the Various Modules

1Ya
ST2in
TextM
od
e(n
cu
rses)
2. start the crontab editor with the command crontab -e .
3. Press i for the insertion mode of the called program vi
4. Enter the following lines:
MAILTO=” ”13 3 * * 0 /sbin/yast2 online_update auto.get
53 3 * * 0 /sbin/yast2 online_update auto.install
The first five elements of the last two lines have the following mean-ing when read from left to right: 13=minutes, 3=hours, *=day of themonth is unregarded, *=month of the year is unregarded, 0=Sunday.This therefore means, that the first entry starts the cron job every Sun-day at 3:13 a.m. The second job starts 40 minutes later at 3:53 a.m. Theline MAILTO” ” prevents that root receives the output of YaST2-ncursesas an e-mail and can of course be omitted.
CautionEnter arbitrary times of the hour for the cron jobs and possi-bly not necessarily the times from the example above since thiswould overload the FTP server or respectively the maximumallowable number of concurrent connections would get readilyexceeded.
Caution
5. Save the cron job with the key sequence (to be pressed subsequentially)�� ��Esc :wq , or alternatively�� ��Esc ZZ.
The cron daemon is automatically being restarted and your cron job is added tothe file /var/spool/cron/tabs/root .
7SuSE Linux – Enterprise Server 8

2Ya
ST2in
Gra
ph
ics
Mo
de
YaST2 in Graphics Mode
YaST2 assists in extending your SuSE Linux Enterprise Server system withadditional hardware components, such as a printer, configuring and installingsystem services, Internet access, and software, or deleting undesired packages.
Starting YaST2 . . . . . . . . . . . . . . . . . . . . . . . . . 10Software . . . . . . . . . . . . . . . . . . . . . . . . . . . . . 10Hardware . . . . . . . . . . . . . . . . . . . . . . . . . . . . 15Network/Basic . . . . . . . . . . . . . . . . . . . . . . . . . 16Network/Advanced . . . . . . . . . . . . . . . . . . . . . . 18Security and Users . . . . . . . . . . . . . . . . . . . . . . . 19System . . . . . . . . . . . . . . . . . . . . . . . . . . . . . 24Miscellaneous . . . . . . . . . . . . . . . . . . . . . . . . . . 30
Starting YaST2
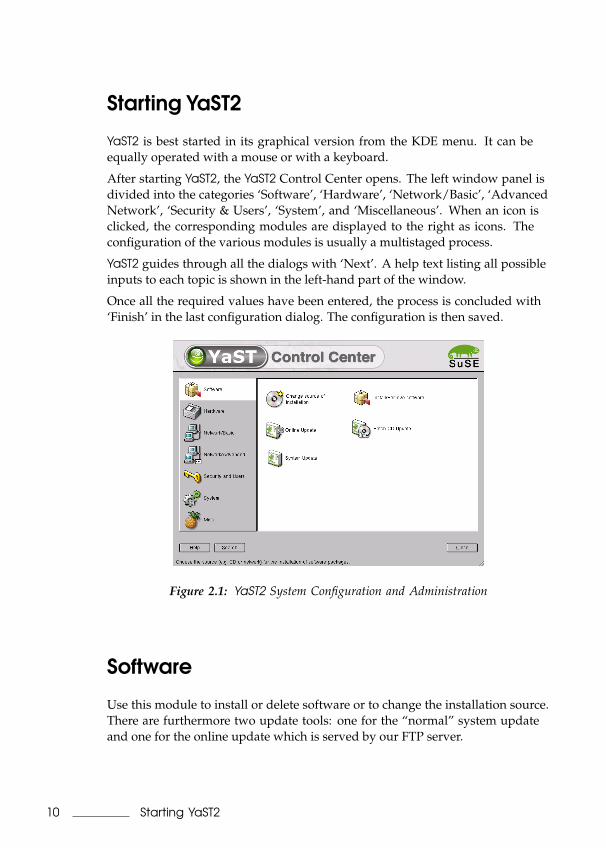
YaST2 is best started in its graphical version from the KDE menu. It can beequally operated with a mouse or with a keyboard.
After starting YaST2, the YaST2 Control Center opens. The left window panel isdivided into the categories ‘Software’, ‘Hardware’, ‘Network/Basic’, ‘AdvancedNetwork’, ‘Security & Users’, ‘System’, and ‘Miscellaneous’. When an icon isclicked, the corresponding modules are displayed to the right as icons. Theconfiguration of the various modules is usually a multistaged process.
YaST2 guides through all the dialogs with ‘Next’. A help text listing all possibleinputs to each topic is shown in the left-hand part of the window.
Once all the required values have been entered, the process is concluded with‘Finish’ in the last configuration dialog. The configuration is then saved.
Figure 2.1: YaST2 System Configuration and Administration
Software
Use this module to install or delete software or to change the installation source.There are furthermore two update tools: one for the “normal” system updateand one for the online update which is served by our FTP server.
10 Starting YaST2
2Ya
ST2in
Gra
ph
ics
Mo
de
Change Installation Source
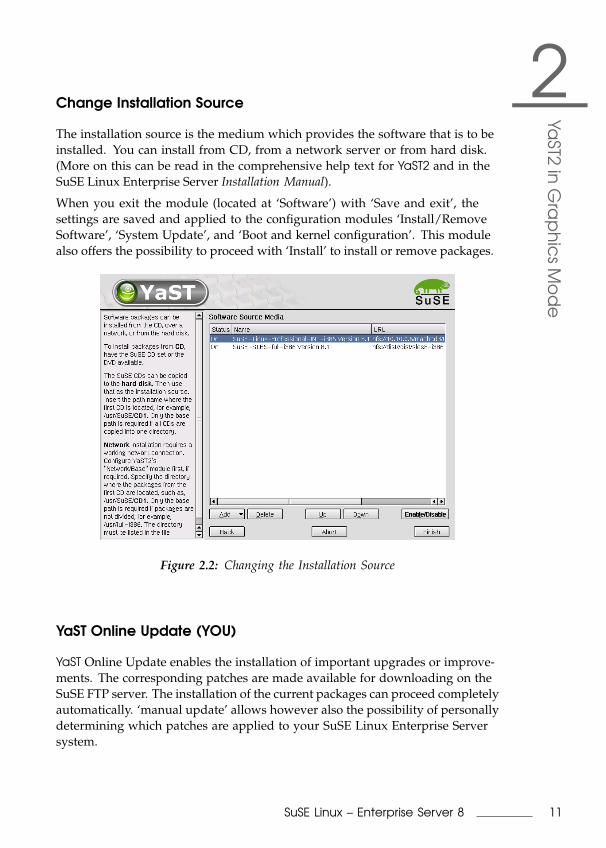
The installation source is the medium which provides the software that is to beinstalled. You can install from CD, from a network server or from hard disk.(More on this can be read in the comprehensive help text for YaST2 and in theSuSE Linux Enterprise Server Installation Manual).
When you exit the module (located at ‘Software’) with ‘Save and exit’, thesettings are saved and applied to the configuration modules ‘Install/RemoveSoftware’, ‘System Update’, and ‘Boot and kernel configuration’. This modulealso offers the possibility to proceed with ‘Install’ to install or remove packages.
Figure 2.2: Changing the Installation Source
YaST Online Update (YOU)
YaST Online Update enables the installation of important upgrades or improve-ments. The corresponding patches are made available for downloading on theSuSE FTP server. The installation of the current packages can proceed completelyautomatically. ‘manual update’ allows however also the possibility of personallydetermining which patches are applied to your SuSE Linux Enterprise Serversystem.
11SuSE Linux – Enterprise Server 8
Selecting ‘Next’ downloads a list of all available patches (in case that ‘manualupdate’ was chosen). Here, select the packages for installation or simply acceptYaST2’s suggestion installation. The online update will be completed by clickingon ‘Next’ or ‘Finish’.
Online Update from the Console
The Online Update can also be started in a shell. As root , load the current patchlist and all related RPMs from the first server in the /etc/suseservers listusing the command:
earth:/root # yast2 online_update .auto.get
To load only certain patches, add options to the command. Among theseoptions are security , recommended , document , YaST2, and optional .security retrieves security-related patches, recommended fetches updatesrecommended by SuSE, document provides you with information on thepatches or on the FTP server, YaST2 fetches YaST2 patches, and optionalgets minor updates. Information on these patches is stored in /var/lib/YaST2/you/<basearch>/update/<productname>/<version>/patches . This information is only readable for root .
The command for downloading the security patches, for example, is:
earth:/root # yast2 online_update .auto.get security
When you enter .auto.get , by default the SuSE FTP server list is loadedinto /etc/suseservers . To disable this, deactivate the function in the/etc/sysconfig/onlineupdate . To do this, set yes to no in the lineYAST2_LOADFTPSERVER="yes".
The patches can now be installed with
earth:/root # yast2 online_update .auto.install
This command installs all fetched patches. To just install a group, use thesame options as in .auto.get .
This method can be fully automated. The system administrator is able todownload the packages overnight, for example, then install the ones neededthe next morning.
Install and Remove Software
This module provides services for installing, updating, and removing soft-ware from your system. To install from CD, insert the first CD in the drive.
12 Software
2Ya
ST2in
Gra
ph
ics
Mo
de
The Selection Filter
With ‘Filter’ at the top left of the main window, define the criterion for dis-playing the package selection. The default setting is ‘Package groups’.
These package groups are displayed in a tree structure on the left-hand side.If you click one of the main groups (for example, ‘Development’ or ‘Docu-mentation’), all program packages belonging to this main group are listed atthe top of the right frame. If you click one of the subgroups, the right frameonly displays the packages of the respective subgroup.
Another interesting filter is the one that displays packages according to ‘Se-lections’. You may have noticed this filter during the installation if you en-tered the software settings in the suggestion screen. Using the ‘Selections’filter, install predefined selections for specific utilization areas with a singleclick. This is the only filter for which you can activate something in the leftframe at this stage. If you click the check boxes of the selections in the leftframe, all packages of the respective selection will be installed. If you dese-lect a package from the standard selection (such as KDE), all related packageswill be uninstalled when you confirm. Along with each selection, the rightframe displays the packages belonging to this selection together with theircurrent state. Select and deselect individual packages as desired. The prede-fined selections include ‘Development’, ‘KDE’, or ‘Web Server’.
The Package Window
The package window to the left displays the following information for eachpackage (from left to right): the status, the package name, a brief description,the size, the version, and the source column, which allows you to install thesource code of the package.
The status of the package is indicated by various icons. The following areavailable:
is not and will not be installed
will be installed due to manual selection
will be installed because it is required by another selected package (de-pendency)
will be replaced by a newer version (update)
will be deleted (uninstalled)
is “taboo”: prevents a package from being selected automatically due toa dependency of other packages (recommended only for experts)
13SuSE Linux – Enterprise Server 8
blocked: prevents a package from being updated or deleted (useful forpackages that were compiled manually or originate from other sources)
has been renamed: this status cannot be selected manually (applies topackages that were replaced by a new package with a different name)
Switch the status by clicking the icon to the left of the package name. Onlyapplicable ones are offered, which means a package that is not installed can-not have the status “uninstall”.
CautionYou have the possibility to mark installed packages for deletion. Ob-serve the alerts and do not delete any packages of the Linux basesystem.
Caution
The Info Window
The frame at the bottom rights displays several tabs under which to find in-formation about the currently selected package, such as a detailed descrip-tion, technical data, a list of files installed with this package, the packagesthis package requires, the packages that require this package, and possibleconflicts with other packages already installed or selected for installation.
The Search
‘Search’ opens a search dialog in which you can search for specific packagenames or parts of package names. In the search result, determine what to dowith the packages found.
System Update
Use this module to keep your system up to date. It can be started at differentstages in the process. YaST2 recognizes which packages need to be updatedor you can decide on your own which package should be updated.
This function is useful when an important binary file has been accidently re-moved. The update module will list the appropriate software package andmark it for update. Thus, the timeconsuming search for the appropriate soft-ware package is done automatically.
14 Software
2Ya
ST2in
Gra
ph
ics
Mo
de
Patch CD Update
Unlike the Online Update, the patches are not downloaded from the FTPserver but installed from CD-ROM.
After the patch CD is inserted, all the patches stored on the CD will be readinto and displayed in the YaST2 module screen. Select which one to installfrom the patch list. If you forgot to put the CD into the drive, a warning willappear. Then insert the CD and resume updating the patch CD.
Hardware
New hardware must first be installed and connected according to the ven-dor’s instructions. Connect the external devices such as printer or modemand start the corresponding YaST2 module. The majority of conventional de-vices will automatically be recognized by YaST2, at which point, the technicalinformation is displayed. If autodetection fails, YaST2 will present a devicelist (model, manufacturer, etc.) from which to select the appropriate device.
The configuration tools needed for configuring the various devices can befound under ‘Hardware’. Refer to the hardware information for data pertain-ing to the hardware autodetected by YaST2.
Printer
All printers connected to your system can be configured with this module.Local and network printers are supported. This discussed in more detail inchapter Printer Operation on page 53.
Display and Input devices (SaX2)
This module handles the configuration of the graphical interface X11 and in-put devices in systems supporting a graphical interface. This module can alsobe used for changing an already existing X11 configuration (for instance thecolor depth). Chapter The X Window System on page 33 provides all the nec-essary details.
Hardware Information
YaST2 performs a hardware detection for the configuration of hardware com-ponents. The detected technical data is displayed in this screen.
15SuSE Linux – Enterprise Server 8
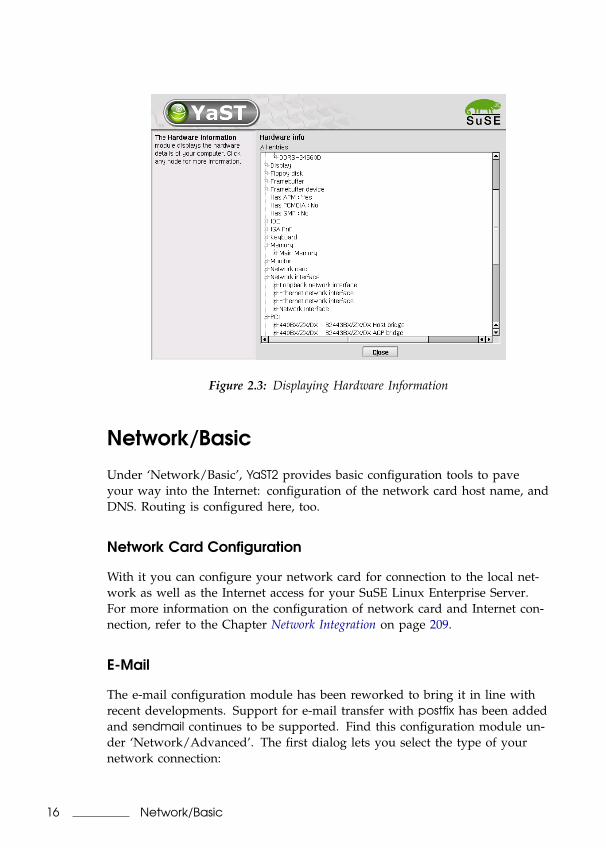
Figure 2.3: Displaying Hardware Information
Network/Basic
Under ‘Network/Basic’, YaST2 provides basic configuration tools to paveyour way into the Internet: configuration of the network card host name, andDNS. Routing is configured here, too.
Network Card Configuration
With it you can configure your network card for connection to the local net-work as well as the Internet access for your SuSE Linux Enterprise Server.For more information on the configuration of network card and Internet con-nection, refer to the Chapter Network Integration on page 209.
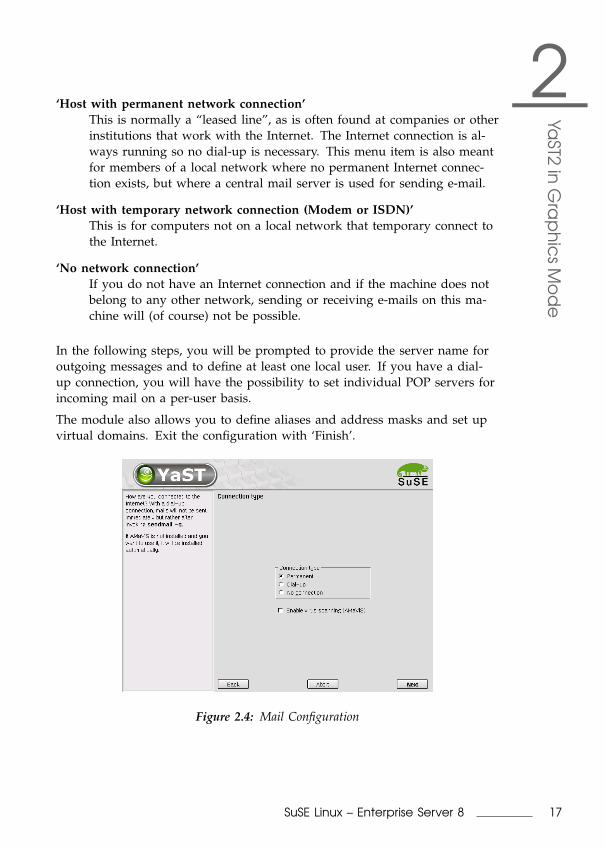
The e-mail configuration module has been reworked to bring it in line withrecent developments. Support for e-mail transfer with postfix has been addedand sendmail continues to be supported. Find this configuration module un-der ‘Network/Advanced’. The first dialog lets you select the type of yournetwork connection:
16 Network/Basic
2Ya
ST2in
Gra
ph
ics
Mo
de
‘Host with permanent network connection’This is normally a “leased line”, as is often found at companies or otherinstitutions that work with the Internet. The Internet connection is al-ways running so no dial-up is necessary. This menu item is also meantfor members of a local network where no permanent Internet connec-tion exists, but where a central mail server is used for sending e-mail.
‘Host with temporary network connection (Modem or ISDN)’This is for computers not on a local network that temporary connect tothe Internet.
‘No network connection’If you do not have an Internet connection and if the machine does notbelong to any other network, sending or receiving e-mails on this ma-chine will (of course) not be possible.
In the following steps, you will be prompted to provide the server name foroutgoing messages and to define at least one local user. If you have a dial-up connection, you will have the possibility to set individual POP servers forincoming mail on a per-user basis.
The module also allows you to define aliases and address masks and set upvirtual domains. Exit the configuration with ‘Finish’.
Figure 2.4: Mail Configuration
17SuSE Linux – Enterprise Server 8
Network/Advanced
For network administrators, there are modules for starting and stopping sys-tem services such as NFS client and server, routing, expert networking, andNIS client. ‘Network for Experts’ offers the same functionality as ‘Networkcard configuration’ under ‘Network/Basic’, so you can still configure othernetwork interfaces, such as a modem, here.
Configuring an NFS Server
A system on your network can very quickly be turned into an NFS serverwith the help of YaST2. This is a server that makes directories and files avail-able to those clients permitted access. Many applications and files can, forexample, be made available to multiple users without installing them locallyon each system. Details on the configuration of a system as an NFS servercan be found in NFS — Shared File Systems on page 235.
Configuring NIS
As soon as various Unix systems in a network seek access to common re-sources, it must be ensured that the user and group IDs are harmonizedacross all systems. The network becomes transparent and the user alwaysencounters the same environment no matter which system is used.
NIS — Network Information Service on page 231 describes how NIS can be con-figured as a client and as a server.
Host Name and DNS Configuration
The host name and the DNS data are set here. A later modification of thesesettings should be avoided as these parameters are necessary for the properoperation of the network. Refer to Network Integration on page 209 and DNS— Domain Name Service on page 221.
Configuring Routing
Routing equally represents an important parameter for the configuration of anetwork. Network Integration on page 209 contains a complete explanation ofrouting under Linux.
18 Network/Advanced
2Ya
ST2in
Gra
ph
ics
Mo
de
Security and Users
User Administration
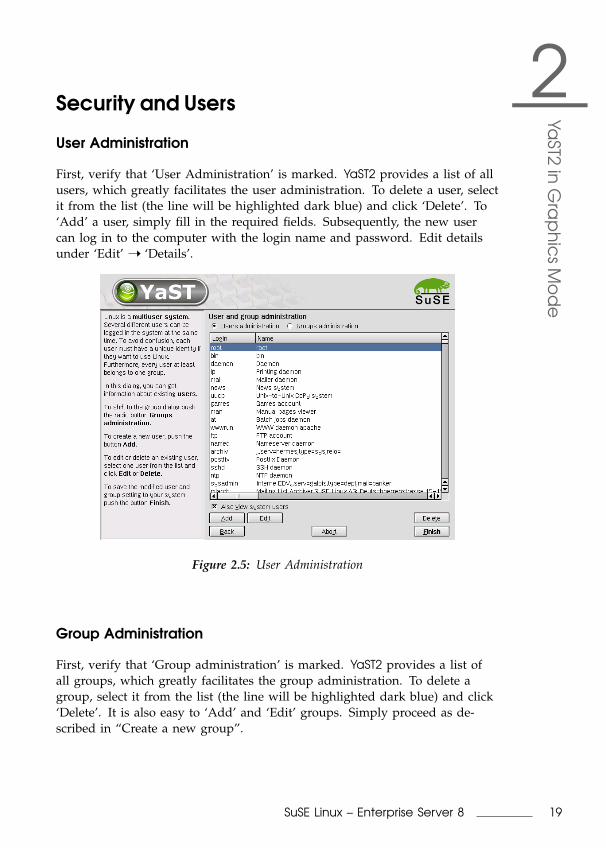
First, verify that ‘User Administration’ is marked. YaST2 provides a list of allusers, which greatly facilitates the user administration. To delete a user, selectit from the list (the line will be highlighted dark blue) and click ‘Delete’. To‘Add’ a user, simply fill in the required fields. Subsequently, the new usercan log in to the computer with the login name and password. Edit detailsunder ‘Edit’ ➝ ‘Details’.
Figure 2.5: User Administration
Group Administration
First, verify that ‘Group administration’ is marked. YaST2 provides a list ofall groups, which greatly facilitates the group administration. To delete agroup, select it from the list (the line will be highlighted dark blue) and click‘Delete’. It is also easy to ‘Add’ and ‘Edit’ groups. Simply proceed as de-scribed in “Create a new group”.
19SuSE Linux – Enterprise Server 8
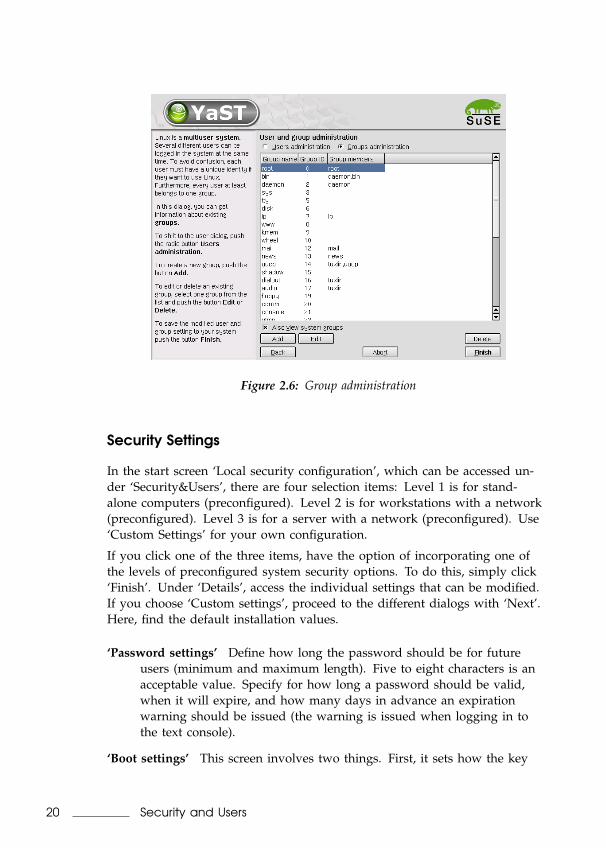
Figure 2.6: Group administration
Security Settings
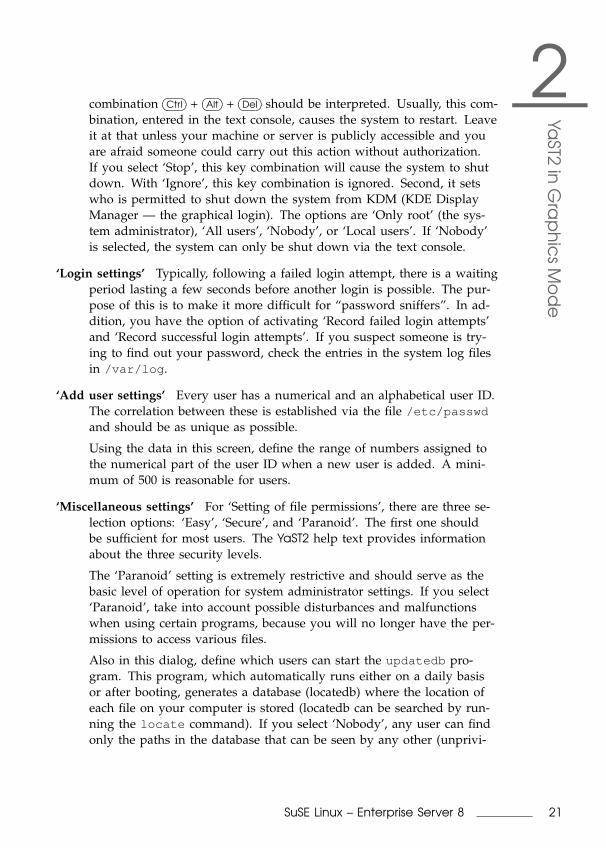
In the start screen ‘Local security configuration’, which can be accessed un-der ‘Security&Users’, there are four selection items: Level 1 is for stand-alone computers (preconfigured). Level 2 is for workstations with a network(preconfigured). Level 3 is for a server with a network (preconfigured). Use‘Custom Settings’ for your own configuration.
If you click one of the three items, have the option of incorporating one ofthe levels of preconfigured system security options. To do this, simply click‘Finish’. Under ‘Details’, access the individual settings that can be modified.If you choose ‘Custom settings’, proceed to the different dialogs with ‘Next’.Here, find the default installation values.
‘Password settings’ Define how long the password should be for futureusers (minimum and maximum length). Five to eight characters is anacceptable value. Specify for how long a password should be valid,when it will expire, and how many days in advance an expirationwarning should be issued (the warning is issued when logging in tothe text console).
‘Boot settings’ This screen involves two things. First, it sets how the key
20 Security and Users
2Ya
ST2in
Gra
ph
ics
Mo
de
combination�� ��Ctrl +
�� ��Alt +�� ��Del should be interpreted. Usually, this com-
bination, entered in the text console, causes the system to restart. Leaveit at that unless your machine or server is publicly accessible and youare afraid someone could carry out this action without authorization.If you select ‘Stop’, this key combination will cause the system to shutdown. With ‘Ignore’, this key combination is ignored. Second, it setswho is permitted to shut down the system from KDM (KDE DisplayManager — the graphical login). The options are ‘Only root’ (the sys-tem administrator), ‘All users’, ‘Nobody’, or ‘Local users’. If ‘Nobody’is selected, the system can only be shut down via the text console.
‘Login settings’ Typically, following a failed login attempt, there is a waitingperiod lasting a few seconds before another login is possible. The pur-pose of this is to make it more difficult for “password sniffers”. In ad-dition, you have the option of activating ‘Record failed login attempts’and ‘Record successful login attempts’. If you suspect someone is try-ing to find out your password, check the entries in the system log filesin /var/log .
‘Add user settings’ Every user has a numerical and an alphabetical user ID.The correlation between these is established via the file /etc/passwdand should be as unique as possible.
Using the data in this screen, define the range of numbers assigned tothe numerical part of the user ID when a new user is added. A mini-mum of 500 is reasonable for users.
‘Miscellaneous settings’ For ‘Setting of file permissions’, there are three se-lection options: ‘Easy’, ‘Secure’, and ‘Paranoid’. The first one shouldbe sufficient for most users. The YaST2 help text provides informationabout the three security levels.
The ‘Paranoid’ setting is extremely restrictive and should serve as thebasic level of operation for system administrator settings. If you select‘Paranoid’, take into account possible disturbances and malfunctionswhen using certain programs, because you will no longer have the per-missions to access various files.
Also in this dialog, define which users can start the updatedb pro-gram. This program, which automatically runs either on a daily basisor after booting, generates a database (locatedb) where the location ofeach file on your computer is stored (locatedb can be searched by run-ning the locate command). If you select ‘Nobody’, any user can findonly the paths in the database that can be seen by any other (unprivi-
21SuSE Linux – Enterprise Server 8
leged) user. If root is selected, all local files are indexed, because theuser root , as superuser, may access all directories.
Another option is to activate ‘Omit current directory from the path ofuser root’, a reasonable selection.
Press ‘Finish’ to complete your security configuration.
Figure 2.7: Security Settings
Firewall
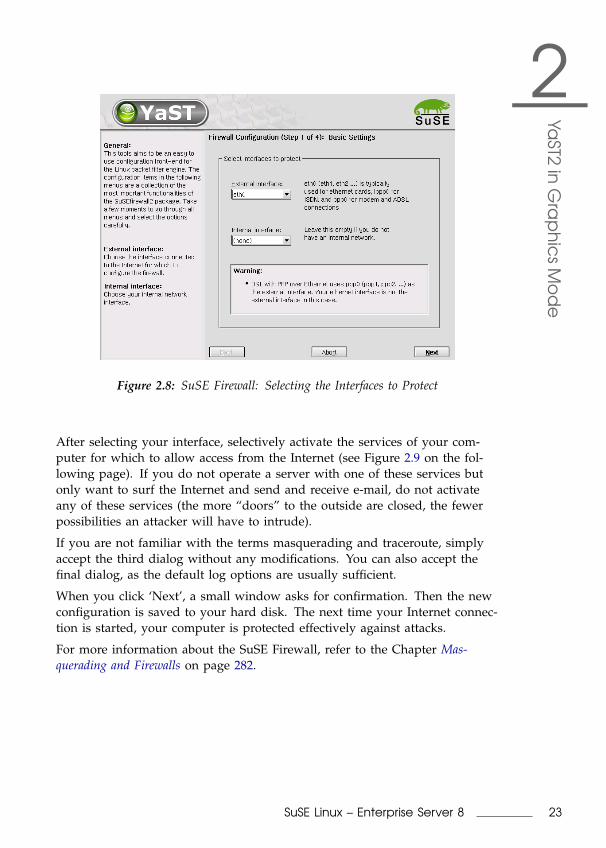
This module can be used to activate and configure the SuSE Firewall. If youare connected to the Internet, you should make use of this protective mea-sure. The SuSE Firewall protects you efficiently.
When the module is started, four dialogs appear consecutively. In the firstdialog, select the interface you want to protect (see Figure 2.8 on the nextpage). ‘External interface’ is the interface for the Internet. ‘Internal interface’is only required if you are located in an internal network and intend to usethe firewall to protect your computer against internal attacks. In this case,your computer would be in a “demilitarized zone” (DMZ). Normally, a con-figuration with DMZ is only used for company networks.
22 Security and Users
2Ya
ST2in
Gra
ph
ics
Mo
de
Figure 2.8: SuSE Firewall: Selecting the Interfaces to Protect
After selecting your interface, selectively activate the services of your com-puter for which to allow access from the Internet (see Figure 2.9 on the fol-lowing page). If you do not operate a server with one of these services butonly want to surf the Internet and send and receive e-mail, do not activateany of these services (the more “doors” to the outside are closed, the fewerpossibilities an attacker will have to intrude).
If you are not familiar with the terms masquerading and traceroute, simplyaccept the third dialog without any modifications. You can also accept thefinal dialog, as the default log options are usually sufficient.
When you click ‘Next’, a small window asks for confirmation. Then the newconfiguration is saved to your hard disk. The next time your Internet connec-tion is started, your computer is protected effectively against attacks.
For more information about the SuSE Firewall, refer to the Chapter Mas-querading and Firewalls on page 282.
23SuSE Linux – Enterprise Server 8
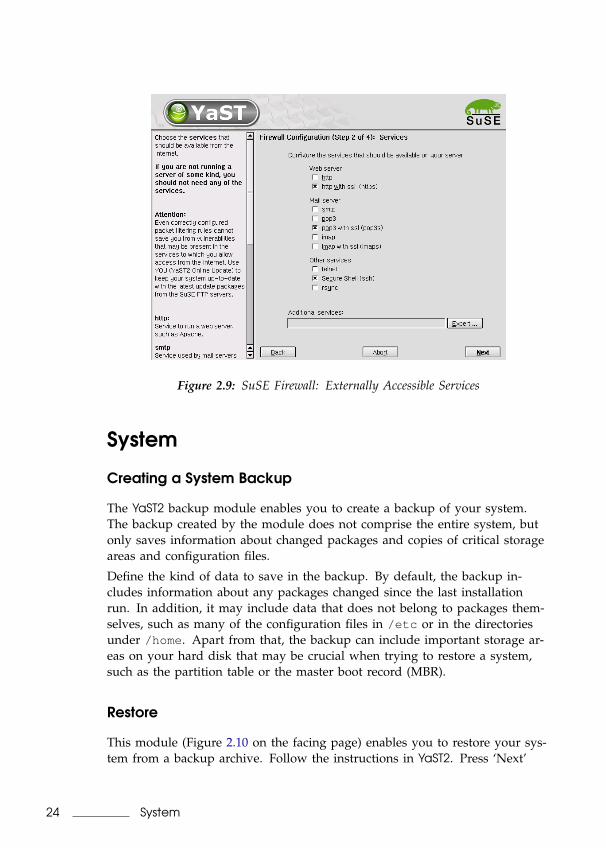
Figure 2.9: SuSE Firewall: Externally Accessible Services
System
Creating a System Backup
The YaST2 backup module enables you to create a backup of your system.The backup created by the module does not comprise the entire system, butonly saves information about changed packages and copies of critical storageareas and configuration files.
Define the kind of data to save in the backup. By default, the backup in-cludes information about any packages changed since the last installationrun. In addition, it may include data that does not belong to packages them-selves, such as many of the configuration files in /etc or in the directoriesunder /home . Apart from that, the backup can include important storage ar-eas on your hard disk that may be crucial when trying to restore a system,such as the partition table or the master boot record (MBR).
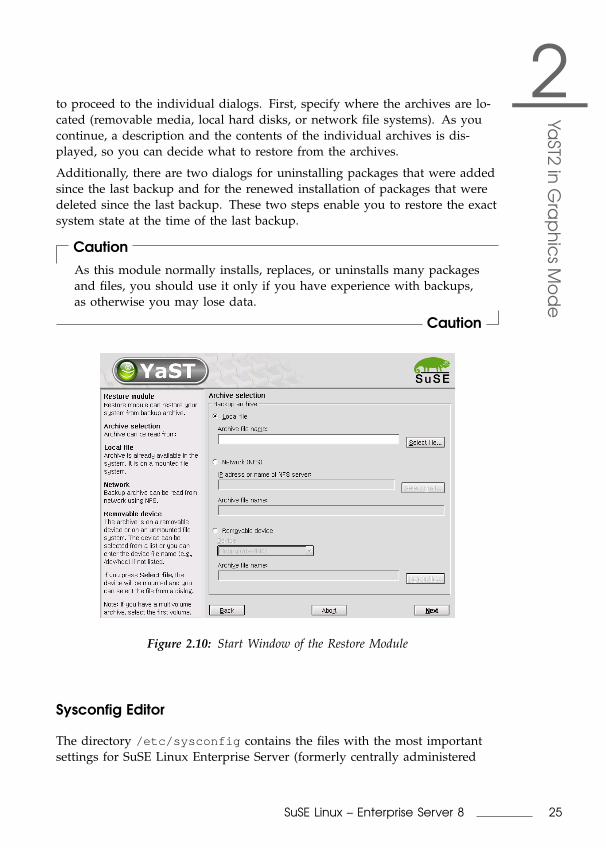
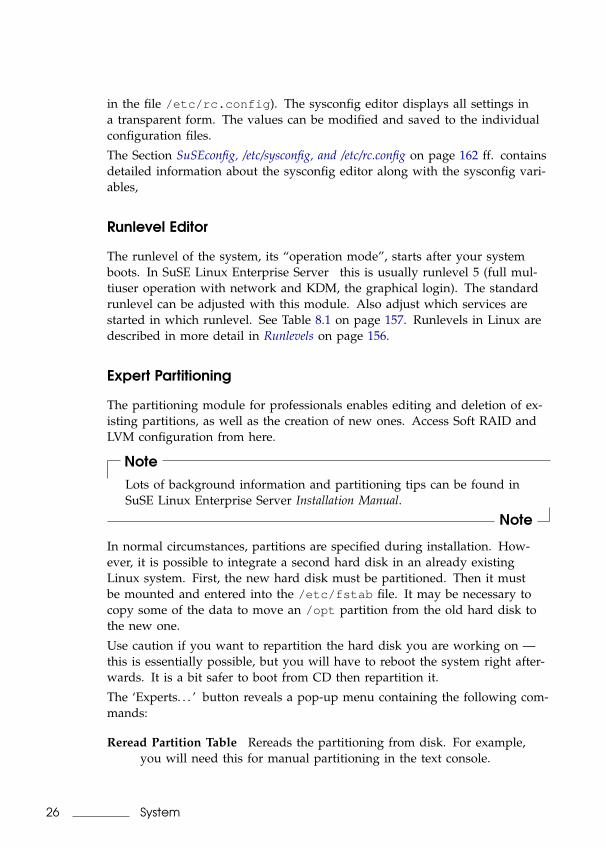
Restore
This module (Figure 2.10 on the facing page) enables you to restore your sys-tem from a backup archive. Follow the instructions in YaST2. Press ‘Next’
24 System
2Ya
ST2in
Gra
ph
ics
Mo
de
to proceed to the individual dialogs. First, specify where the archives are lo-cated (removable media, local hard disks, or network file systems). As youcontinue, a description and the contents of the individual archives is dis-played, so you can decide what to restore from the archives.
Additionally, there are two dialogs for uninstalling packages that were addedsince the last backup and for the renewed installation of packages that weredeleted since the last backup. These two steps enable you to restore the exactsystem state at the time of the last backup.
CautionAs this module normally installs, replaces, or uninstalls many packagesand files, you should use it only if you have experience with backups,as otherwise you may lose data.
Caution
Figure 2.10: Start Window of the Restore Module
Sysconfig Editor
The directory /etc/sysconfig contains the files with the most importantsettings for SuSE Linux Enterprise Server (formerly centrally administered
25SuSE Linux – Enterprise Server 8
in the file /etc/rc.config ). The sysconfig editor displays all settings ina transparent form. The values can be modified and saved to the individualconfiguration files.
The Section SuSEconfig, /etc/sysconfig, and /etc/rc.config on page 162 ff. containsdetailed information about the sysconfig editor along with the sysconfig vari-ables,
Runlevel Editor
The runlevel of the system, its “operation mode”, starts after your systemboots. In SuSE Linux Enterprise Server this is usually runlevel 5 (full mul-tiuser operation with network and KDM, the graphical login). The standardrunlevel can be adjusted with this module. Also adjust which services arestarted in which runlevel. See Table 8.1 on page 157. Runlevels in Linux aredescribed in more detail in Runlevels on page 156.
Expert Partitioning
The partitioning module for professionals enables editing and deletion of ex-isting partitions, as well as the creation of new ones. Access Soft RAID andLVM configuration from here.
NoteLots of background information and partitioning tips can be found inSuSE Linux Enterprise Server Installation Manual.
Note
In normal circumstances, partitions are specified during installation. How-ever, it is possible to integrate a second hard disk in an already existingLinux system. First, the new hard disk must be partitioned. Then it mustbe mounted and entered into the /etc/fstab file. It may be necessary tocopy some of the data to move an /opt partition from the old hard disk tothe new one.
Use caution if you want to repartition the hard disk you are working on —this is essentially possible, but you will have to reboot the system right after-wards. It is a bit safer to boot from CD then repartition it.
The ‘Experts. . . ’ button reveals a pop-up menu containing the following com-mands:
Reread Partition Table Rereads the partitioning from disk. For example,you will need this for manual partitioning in the text console.
26 System

2Ya
ST2in
Gra
ph
ics
Mo
de
Adopt Mount Points from Existing /etc/fstab This will only be relevant dur-ing installation. Reading the old fstab is useful for completely rein-stalling your system rather than just updating it. In this case, it is notnecessary to enter the mount points by hand.
Delete Partition Table and Disk Label This completely overwrites the oldpartition table. For example, this can be helpful if you have problemswith unconventional disk labels. Using this method, all data on thehard disk will be lost.
Logical Volume Manager (LVM)
The Logical Volume Manager (LVM) enables flexible distribution of hard diskspace over several file systems. As it is difficult to modify partitions on arunning system, LVM was developed: it provides a virtual “pool” (VolumeGroup — VG for short) of memory space, from which logical volumes (LV)can be generated if needed. The operating system will access these instead ofthe physical partitions.
Features:
Several hard disks or partitions can be combined into a large logicalpartition.
If a LV (e. g., /usr ) is full, it can be enlarged with the appropriate con-figuration.
With the LVM, even append hard disks or LVs in a running system.However, “hot–swappable” hardware, designed for these types of inter-ventions, is required for this.
Implementing LVM already makes sense for heavily used home PCs or smallservers. If you have a growing data stock, as in the case of databases, MP3archives, or user directories, the Logical Volume Manager is just the rightthing for you. This would allow you file systems that are larger than phys-ical hard disk. Another advantage of the LVM is up to 256 LVs can be added.Keep in mind that working with the LVM is very different than working withconventional partitions.
The annex of the SuSE Linux Enterprise Server Installation Manual containsdetailed instructions on the configuration and management of LVM.
Instructions and further information on configuring the “Logical VolumeManager” (LVM) can be found in the official LVM HOWTO and the SuSEdocumentation:
27SuSE Linux – Enterprise Server 8
http://www.sistina.com/lvm/Pages/howto.html
http://www.suse.com/us/support/oracle/ .
Soft RAID
The purpose of RAID (Redundant Array of Inexpensive Disks) is to combineseveral hard disk partitions into one large “virtual” hard disk for the opti-mization of performance and data security. Using this method, however, oneadvantage is sacrificed for another. “RAID level” defines the pool and com-mon triggering device of the all hard disks, known as the RAID controller.A RAID controller mostly uses the SCSI protocol, because it can drive morehard disks better than the IDE protocol. It is also better able to process paral-lel running commands.
Instead of a RAID controller, which can often be quite expensive, the SoftRAID is also able to take on these tasks. SuSE Linux Enterprise Server offersthe option of combining several hard disks into one Soft RAID system withthe help of YaST2 — a very reasonable alternative to Hardware RAID.
Customary RAID Levels
RAID 0 This level improves the performance of your data access. Actually,this is not really a RAID, because it does not provide data backup, butthe name “RAID 0” for this type of system has become the norm. WithRAID 0, two hard disks are pooled together. The performance is verygood — although the RAID system will be destroyed and your datalost, even if just one of the many remaining hard disks fails.
RAID 1 This level provides more than adequate backup for your data, sincethe data is copied to another hard disk 1:1. This is known as “harddisk mirroring” — if a disk is destroyed, a copy of its contents is lo-cated on another one. All of them except one could be damaged with-out endangering your data. The writing performance suffers a little inthe copying process when using RAID 1 (ten to twenty percent slower),but read access is significantly faster in comparison to any one of thenormal physical hard disks, because the data is duplicated so can beparallel scanned.
RAID 5 RAID 5 is an optimized compromise between the two other lev-els in terms of performance and redundancy. The hard disk potentialequals the number of disks used minus one. The data is distributedover the hard disks as with RAID 0. “Parity blocks”, created on one of
28 System
2Ya
ST2in
Gra
ph
ics
Mo
de
the partitions, are there for security reasons. They are linked to eachother with XOR — thus enabling the contents, via XDR, to be recon-structed by the corresponding parity block in case of system failure.With RAID 5, no more than one hard disk can fail at the same time.If one is destroyed, it must be replaced as soon as possible to save thedata.
Instructions and further information on the configuration of Soft RAID can befound in the following HOWTOs:
/usr/share/doc/packages/raidtools/Software-RAID-HOWTO.html
http://www.LinuxDoc.org/HOWTO/Software-RAID-HOWTO.html
or in the Linux RAID mailinglist at:
http://www.mail-archive.com/[email protected]
There you will also find assistance should you unexpectedly encounter anyserious difficulty.
Time Zone Selection
The time zone was already set during the installation, but you can makechanges here. Click your country or region in the list and select ‘Local time’or ‘GMT’ (Greenwich Mean Time). ‘GMT’ is often used in Linux systems.Machines with additional operating systems, such as Microsoft Windows,mostly use the local time.
Language Selection
Here, set the language for your Linux system. The language can be changedat any time. The language selected in YaST2 applies to the entire system,including YaST2 and the desktop environment KDE 3.
29SuSE Linux – Enterprise Server 8
Miscellaneous
Start Protocol
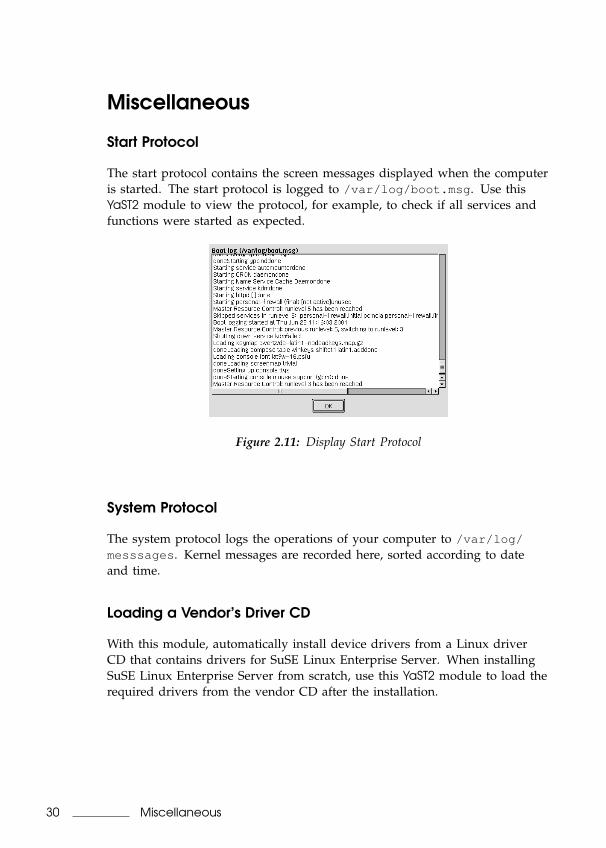
The start protocol contains the screen messages displayed when the computeris started. The start protocol is logged to /var/log/boot.msg . Use thisYaST2 module to view the protocol, for example, to check if all services andfunctions were started as expected.
Figure 2.11: Display Start Protocol
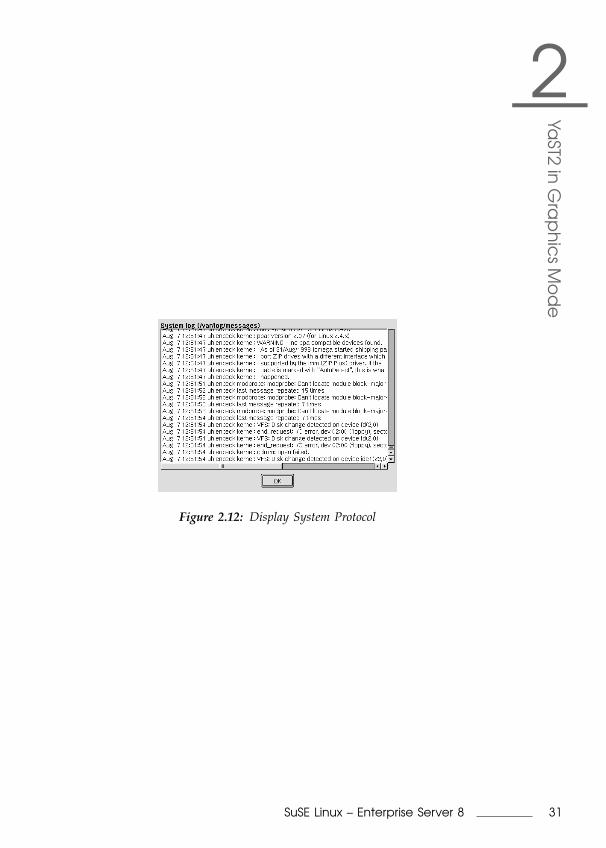
System Protocol
The system protocol logs the operations of your computer to /var/log/messsages . Kernel messages are recorded here, sorted according to dateand time.
Loading a Vendor’s Driver CD
With this module, automatically install device drivers from a Linux driverCD that contains drivers for SuSE Linux Enterprise Server. When installingSuSE Linux Enterprise Server from scratch, use this YaST2 module to load therequired drivers from the vendor CD after the installation.
30 Miscellaneous
2Ya
ST2in
Gra
ph
ics
Mo
de
Figure 2.12: Display System Protocol
31SuSE Linux – Enterprise Server 8

3Th
eX
Win
do
wSyste
m
The X Window System
Historical Background
The X Window System is the de facto standard GUI for UNIX. Yet the X Win-dow System is far more than this — X11 is a network-based system. Applica-tions running on the machine earth can display their results on the machinesun , provided the two machines are connected via a network. The networkcould be a local one (LAN) or a connection between computers thousands ofmiles away via the Internet.
X11 was first developed as an enterprise of DEC (Digital Equipment Corpo-ration) and the project Athena at MIT (Massachusetts Institute of Technol-ogy). The first release of X11R1 was in September 1987. Since release 6, the XConsortium, Inc. has been responsible for the development of the X WindowSystem.
XFree86 ™ is a freely available implementation of X servers for PC systems.It was developed by a handful of ambitious programmers who founded theXFree86 team in 1992. In 1994, this team went on to found The XFree86Project, whose aim is to continue research and development on X11 and toprovide it to the public. Since March 2000, the completely revised majorrelease XFree86-4.0 has been available for download from http://www.XFree86.org . By default, SuSE Linux Enterprise Server installs XFree86-4.0.Below, take a closer look at the features of this version.
SuSE would like to thank the XFree86 team for their help and for their per-mission to include beta servers on our CD’s1, without which their productionwould have been much more difficult, if at all possible.
1Parts of this documentation are taken from chapter XFree86 Konfigurieren from [HHMK96]which was kindly given to us by Dirk Hohndel
The next sections are about configuring the X server. For this purpose SaX2will be discussed, a simple tool for configuring the X Window System.
CautionBe very careful when configuring your X Window System. Never startthe X Window System until the configuration is finished. A wronglyconfigured system can cause irreparable damage to your hardware(this applies especially to fixed-frequency monitors). The authors ofthis book and SuSE cannot be held responsible for damage. This in-formation has been carefully researched, but this does not guaranteethat all methods presented here are correct and will not damage yourhardware.
Caution
Version 4.x of XFree86
This version of SuSE Linux Enterprise Server comes with version 4.x ofXFree86 which differs from the previously used version 3.3 in a number ofways. Overall there are hardly any differences for the user when operatingthe graphical desktop. Applications, such as the graphical desktops KDE orGNOME, behave with the new version in the same way as version 3.3.6 in-cluded in earlier versions.
Advantages
The new X server is no longer a monolithic program, but just a relativelysmall basic scaffolding to which the necessary program modules can be lateradded, if and when required. For example, there are no longer many dif-ferent X servers for different graphics cards as in the previous version, butjust one executable program called XFree86, which can be found in the direc-tory /usr/X11R6/bin . This is also the actual X server. The graphics driver,which then takes on the task of controlling the graphics card, is a loadablemodule.
A similar method is used to support the various input devices, fonts, or Xprotocols. This again consists of individual modules that can be later loadedby the X server. As a rule, you do not need to worry about these modules.The configuration of the modules to operate the graphical desktop on yourcomputer is managed as far as possible by SaX2.
34 Version 4.x of XFree86
3Th
eX
Win
do
wSyste
m
Through this module concept, it is easy for a vendor to implement a driverfor exotic hardware, such as touch screens or new graphics cards. The devel-opers have even ensured that the necessary modules for various operatingsystems only need to be made available once, which means that a graphicsdriver module compiled in FreeBSD, for example, can also be used in Linuxand vice versa. This portability, however, is limited to the same hardwareplatform: a module compiled for Linux on PowerPCs cannot be used on anIntel PC.
Support for the mouse has also been significantly improved. Especially underheavy loads, the reaction of the mouse to mouse movements is considerablyfaster and more direct than with the previous XFree86 X server. Overall, theoutput speed has also been improved, so graphics operations are generallyperformed more quickly than on the old X server due to the completely re-vised XAA (XFree86 Acceleration Architecture).
Compared to XFree86 3.3.x, the configuration file has a slightly different for-mat and is now located in /etc/X11/XF86Config . For fine-tuning yourX configuration, details on the structure of the configuration file and how itfunctions can be found in Section Optimizing the Installation of the X WindowSystem on page 43.
Error logging has also been improved. The X server creates a very detailedlog file, which you can always find after the X server has started in the file/var/log/XFree86.0.log . One of the further features of this version isthe support of special options, such as True Type fonts. Other features alsoinclude the provision of gamma correction of the screen.
Configuration with SaX2
Normally, the graphical interface is set up during the installation. To im-prove the values or connect a different monitor in the running system, usethis YaST2 module. The current configuration is saved before any changes aremade.
Configuration uses the same dialog as during the installation of SuSE LinuxEnterprise Server. Choose between ‘Text mode only’ and the graphical inter-face. The current values are displayed for the latter: the screen resolution,the color depth, the refresh rate, and the vendor and type of your monitor,if it was autodetected. If you are in the process of installing your system orhave just installed a new graphics card that you want to initialize, a smalldialog appears, asking whether to activate 3D acceleration for your graphicscard.
35SuSE Linux – Enterprise Server 8
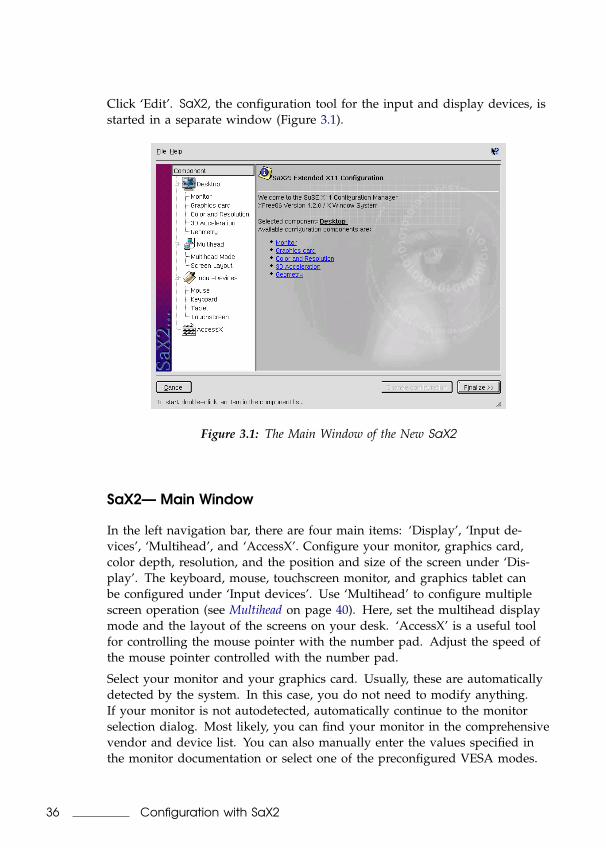
Click ‘Edit’. SaX2, the configuration tool for the input and display devices, isstarted in a separate window (Figure 3.1).
Figure 3.1: The Main Window of the New SaX2
SaX2— Main Window
In the left navigation bar, there are four main items: ‘Display’, ‘Input de-vices’, ‘Multihead’, and ‘AccessX’. Configure your monitor, graphics card,color depth, resolution, and the position and size of the screen under ‘Dis-play’. The keyboard, mouse, touchscreen monitor, and graphics tablet canbe configured under ‘Input devices’. Use ‘Multihead’ to configure multiplescreen operation (see Multihead on page 40). Here, set the multihead displaymode and the layout of the screens on your desk. ‘AccessX’ is a useful toolfor controlling the mouse pointer with the number pad. Adjust the speed ofthe mouse pointer controlled with the number pad.
Select your monitor and your graphics card. Usually, these are automaticallydetected by the system. In this case, you do not need to modify anything.If your monitor is not autodetected, automatically continue to the monitorselection dialog. Most likely, you can find your monitor in the comprehensivevendor and device list. You can also manually enter the values specified inthe monitor documentation or select one of the preconfigured VESA modes.
36 Configuration with SaX2
3Th
eX
Win
do
wSyste
m
After you click ‘Finish’ in the main window following the completion of thesettings for your monitor and your graphics card, test your settings. Thus,ensure that your configuration is suitable for your devices. If the image isnot steady, terminate the test immediately by pressing
�� ��Esc and reduce therefresh rate or the resolution and color depth. Regardless of whether you runa test, all modifications are only activated when you restart the X server.
Display
If you go to ‘Edit configuration’ ➝ ‘Properties’, a window with the tabs‘Monitor’, ‘Frequencies’, and ‘Expert’ appears.
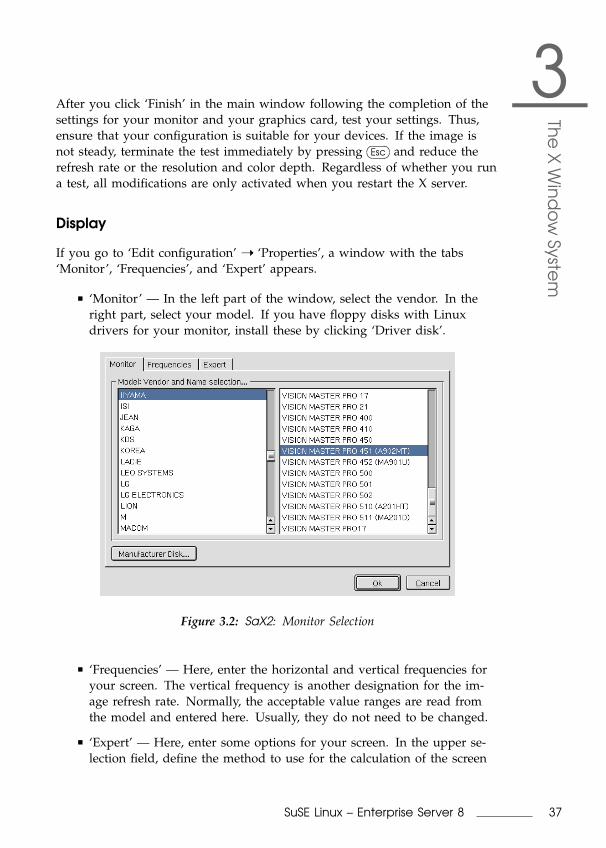
‘Monitor’ — In the left part of the window, select the vendor. In theright part, select your model. If you have floppy disks with Linuxdrivers for your monitor, install these by clicking ‘Driver disk’.
Figure 3.2: SaX2: Monitor Selection
‘Frequencies’ — Here, enter the horizontal and vertical frequencies foryour screen. The vertical frequency is another designation for the im-age refresh rate. Normally, the acceptable value ranges are read fromthe model and entered here. Usually, they do not need to be changed.
‘Expert’ — Here, enter some options for your screen. In the upper se-lection field, define the method to use for the calculation of the screen
37SuSE Linux – Enterprise Server 8
resolution and screen geometry. Do not change anything unless themonitor is addressed incorrectly and the display is not stable. Further-more, you can change the size of the displayed image and activate thepower saving mode DPMS.
Graphics Card
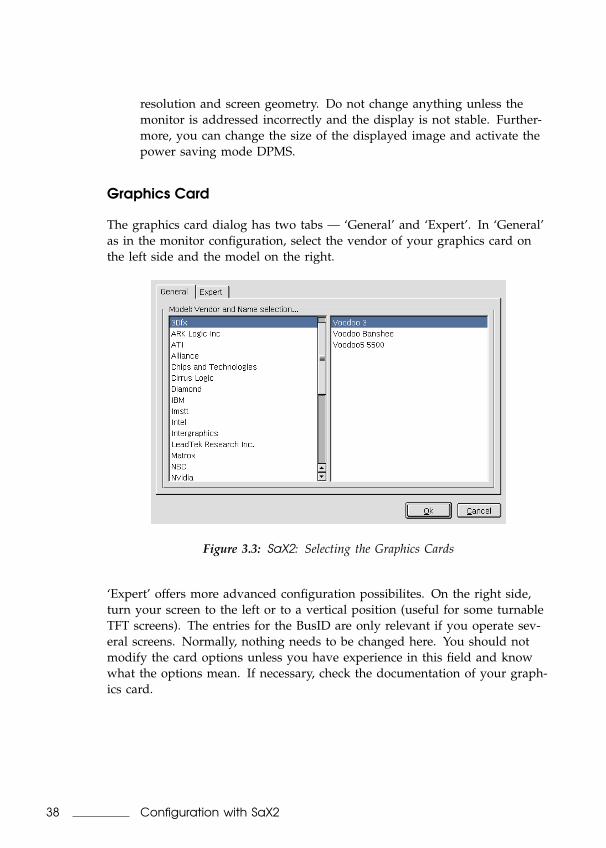
The graphics card dialog has two tabs — ‘General’ and ‘Expert’. In ‘General’as in the monitor configuration, select the vendor of your graphics card onthe left side and the model on the right.
Figure 3.3: SaX2: Selecting the Graphics Cards
‘Expert’ offers more advanced configuration possibilites. On the right side,turn your screen to the left or to a vertical position (useful for some turnableTFT screens). The entries for the BusID are only relevant if you operate sev-eral screens. Normally, nothing needs to be changed here. You should notmodify the card options unless you have experience in this field and knowwhat the options mean. If necessary, check the documentation of your graph-ics card.
38 Configuration with SaX2
3Th
eX
Win
do
wSyste
m
NoteThe configuration of graphics cards exclusively supported byXFree86 3.3.6 is no longer included in the installation. This affectscards like older S3 PCI cards. Instead, depending on the graphics card,YaST2 configures the framebuffer without acceleration or the generic16-color VGA driver for these graphics cards. If your card is affected,repeat the configuration with XFree86 3.3.6 using SaX 1. For this pur-pose, enter the command sax on the command line.
Note
Colors and Resolutions
Here, see three tabs — ‘Colors’, ‘Resolution’, and ‘Expert’.
‘Colors’ — Depending on the hardware used, select a color depth of 16,256, 32768, 65536, or 16.7 million colors (4, 8, 15, 16, or 24 bit). For areasonable display quality, set at least 256 colors.
‘Resolution’ — When the hardware is detected, the resolution isqueried. Therefore, the module usually only offers resolution and colordepth combinations that your hardware can display correctly. Thiskeeps the danger of damaging your hardware with wrong settings verylow in SuSE Linux Enterprise Server. If you change the resolution man-ually, consult the documentation of your hardware to make sure thevalue set can be displayed.
‘Expert’ — In addition to the resolutions offered in the previous tab,this tab enables you to add your own resolutions, which will subse-quently be included for selection in the tab.
3D Acceleration
Optionally activate the 3D acceleration of your graphics card. A dialog isdisplayed in which to activate the 3D properties of your graphics card.
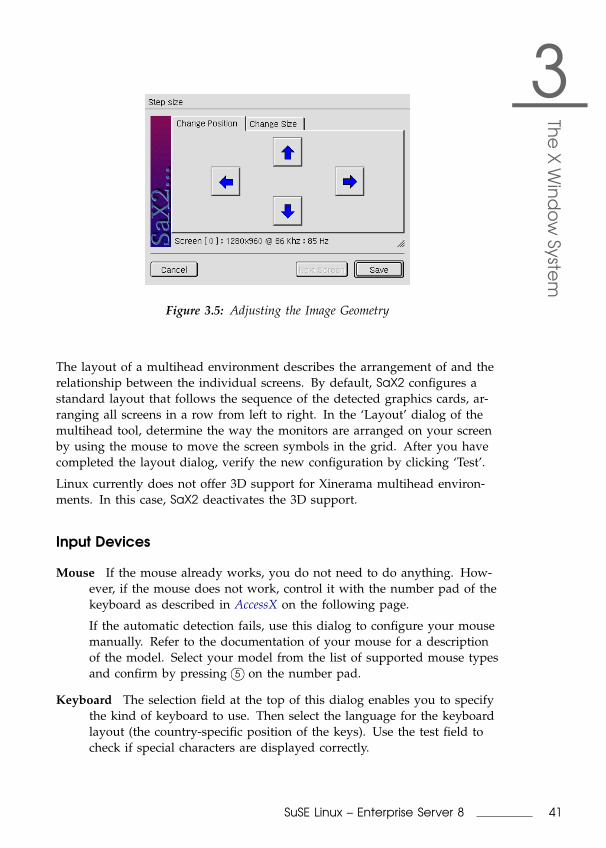
Image Position and Size
Under these two tabs, precisely adjust the size and the position of the imagewith the arrows (see Figure 3.5 on page 41). If you have a multihead envi-ronment (more than one screen), use the ‘Next screen’ button to move to the
39SuSE Linux – Enterprise Server 8
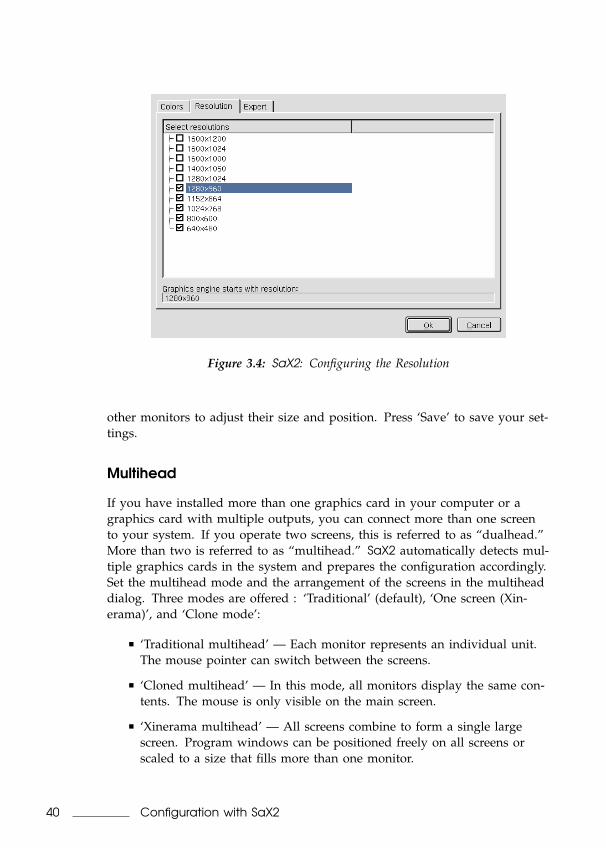
Figure 3.4: SaX2: Configuring the Resolution
other monitors to adjust their size and position. Press ‘Save’ to save your set-tings.
Multihead
If you have installed more than one graphics card in your computer or agraphics card with multiple outputs, you can connect more than one screento your system. If you operate two screens, this is referred to as “dualhead.”More than two is referred to as “multihead.” SaX2 automatically detects mul-tiple graphics cards in the system and prepares the configuration accordingly.Set the multihead mode and the arrangement of the screens in the multiheaddialog. Three modes are offered : ‘Traditional’ (default), ‘One screen (Xin-erama)’, and ‘Clone mode’:
‘Traditional multihead’ — Each monitor represents an individual unit.The mouse pointer can switch between the screens.
‘Cloned multihead’ — In this mode, all monitors display the same con-tents. The mouse is only visible on the main screen.
‘Xinerama multihead’ — All screens combine to form a single largescreen. Program windows can be positioned freely on all screens orscaled to a size that fills more than one monitor.
40 Configuration with SaX2
3Th
eX
Win
do
wSyste
m
Figure 3.5: Adjusting the Image Geometry
The layout of a multihead environment describes the arrangement of and therelationship between the individual screens. By default, SaX2 configures astandard layout that follows the sequence of the detected graphics cards, ar-ranging all screens in a row from left to right. In the ‘Layout’ dialog of themultihead tool, determine the way the monitors are arranged on your screenby using the mouse to move the screen symbols in the grid. After you havecompleted the layout dialog, verify the new configuration by clicking ‘Test’.
Linux currently does not offer 3D support for Xinerama multihead environ-ments. In this case, SaX2 deactivates the 3D support.
Input Devices
Mouse If the mouse already works, you do not need to do anything. How-ever, if the mouse does not work, control it with the number pad of thekeyboard as described in AccessX on the following page.
If the automatic detection fails, use this dialog to configure your mousemanually. Refer to the documentation of your mouse for a descriptionof the model. Select your model from the list of supported mouse typesand confirm by pressing
����5 on the number pad.
Keyboard The selection field at the top of this dialog enables you to specifythe kind of keyboard to use. Then select the language for the keyboardlayout (the country-specific position of the keys). Use the test field tocheck if special characters are displayed correctly.
41SuSE Linux – Enterprise Server 8
The status of the check box used for activating and deactivating the en-try of accented letters depends on the respective language and does notneed to be changed. Click ‘Finish’ to apply the new settings to yoursystem.
Touchscreen Currently XFree86 only supports Microtouch and Elo Touch-Systems touchscreens. SaX2 can only autodetect the monitor, not thetoucher. The toucher is treated as an input device. Configure thetoucher as follows:
1. Start SaX2 and select ‘Input devices’ ➝ ‘Touchscreens’.
2. Click ‘Add’ and add a touchscreen.
3. Save the configuration by clicking ‘Finish’. You do not need to testthe configuration.
Touchscreens feature a variety of options and usually have to be cali-brated first. Unfortunately, there is no general tool for this purpose inLinux. The standard configuration contains suitable default values forthe dimensions of the touchscreen. Normally, no additional configura-tion is required.
Graphics Tablet Currently XFree86 only supports a limited number ofgraphics tablets. SaX2 enables the configuration of graphics tablets con-nected to the USB port or the serial port. From the configuration per-spective, a graphics tablet is like a mouse — as an input device. Thefollowing procedure is recommended:
1. Start SaX2 and select ‘Input devices’ ➝ ‘Graphics tablet’.
2. Click ‘Add’, select the vendor from the following dialog, and adda graphics tablet from the selection list.
3. Mark the check boxes to the right if you have connected a pen oreraser.
4. If your tablet is connected to the serial port, verify the port./dev/ttyS0 refers to the first serial port. /dev/ttyS1 refers tothe second. Additional ports use similar notation.
5. Save the configuration by clicking ‘Finish’.
AccessX
If you operate your computer without a mouse and activate AccessX in SaX2,you can control the mouse pointer on your screen with the number pad of
42 Configuration with SaX2
3Th
eX
Win
do
wSyste
m
your keyboard. Use�� ��% as the left mouse button.
�� ��X works as the middlemouse button. Use
����– as the right mouse button. Press one of those keys toselect a button. Then release it and use
����5 ,�� ��+ , and
����0 to click, double-click,or lock the button. Locking is a way of simulating keeping a button pressed.�� ��Del releases the button locked by
����0 . Move the cursor using the number padkeys
����1 ,����2 ,
����3 ,����4 ,
����6 ,����7 ,
����8 , and����9 . Use the slider to determine the speed
of the mouse pointer when the respective keys are pressed.
Optimizing the Installation of the X WindowSystem
This section describes the configuration file, /etc/X11/XF86Config . Eachsection starts with the keyword Section <name of section> and ends withEndSection. Below is a rough outline of the most important sections.
Afterwards, learn how to integrate additional fonts and how to configure in-put devices. This is also managed in certain sections of the XF86Config file,of course, although integrating an additional font requires the help of exter-nal programs, which are included with SuSE Linux Enterprise Server or arepart of the default installation. The methods discussed here aim to illustratethe possibilities available and serve as an incentive, but they do not claim tocover all eventualities.
The programs SaX2 and xf86config (for XFree86-4.0) create the fileXF86Config , by default in /etc/X11 . This is the primary configuration filefor the X Window System. Find all the settings here concerning your graph-ics card, mouse, and monitor.
XF86Config is divided into several sections, each one dealing with a certainaspect of the configuration. A section always has the same form:
Section 〈name of section 〉entry 1entry 2entry n
EndSection
The following types of sections exist:
43SuSE Linux – Enterprise Server 8
Files This section describes the paths used for fonts and the RGBcolor table.
ServerFlags General switches are set here.InputDevice Input devices are configured in this section. In contrast
to XFree86-3.3, keyboards, mice, and special input devices(touch pad, joysticks, etc.) are configured via this section.Important terms here are Driver and the options defined byProtocol and Device.
Monitor Describes the monitor used. The individual elements ofthis are the name, which is referred to later in the Screendefinition, the bandwidth, and the allowed sync frequencies(HorizSync and VertRefresh). Settings are given in MHz,kHz, and Hz. Normally, the server refuses any mode linethat does not correspond with the specification of the moni-tor. This is to prevent too high frequencies from being sentto the monitor by accident.
Modes The mode line parameters are stored here for the specificscreen resolutions. These parameters can be calculatedby SaX2 on the basis of the values given by the user andnormally do not need to be changed. You can intervenemanually at this point, however, if, for example, you wantto connect a fixed frequency monitor. An exact explanationof the individual parameters would be too much for thisbook. Find details on the meaning of individual numbervalues in the HOWTO file /usr/share/doc/howto/en/XFree86-Video-Timings-HOWTO.gz .
Device This section defines a specific graphics card. It is referencedby its descriptive name.
Screen This section puts together a Driver (e. g., vga2), a monitor,and a Device to form all the necessary settings for XFree86.In the Display subsection, specify the size of the virtualscreen (Virtual, the ViewPort, and the Modes) used withthis virtual screen.
ServerLayout This section defines the layout of a single or multihead con-figuration. The input devices InputDevice and the displaydevices Screen are combined into one section.
Table 3.1: Sections in /etc/X11/XF86Config
We will now take a closer look at Monitor, Device, and Screen. Further in-
44 Optimizing the Installation of the X Window System
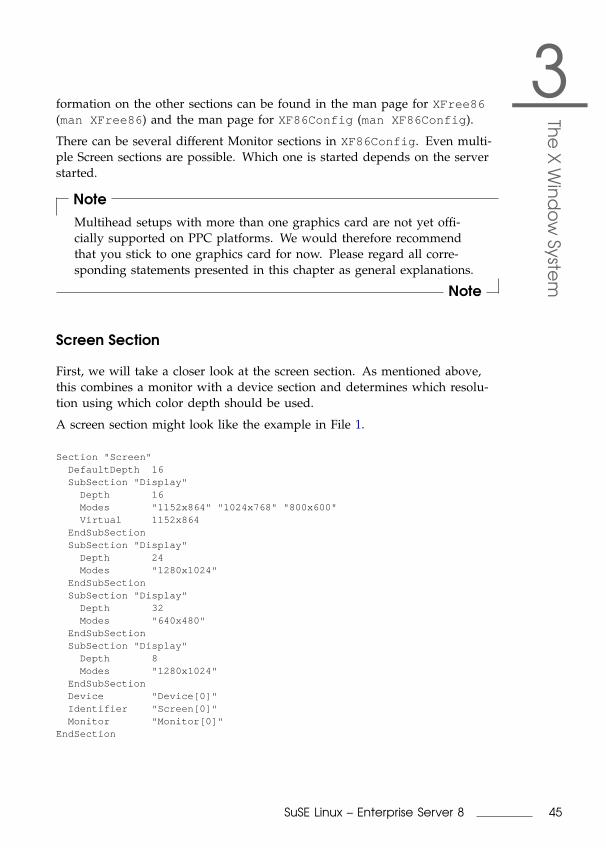
3Th
eX
Win
do
wSyste
m
formation on the other sections can be found in the man page for XFree86(man XFree86 ) and the man page for XF86Config (man XF86Config ).
There can be several different Monitor sections in XF86Config . Even multi-ple Screen sections are possible. Which one is started depends on the serverstarted.
NoteMultihead setups with more than one graphics card are not yet offi-cially supported on PPC platforms. We would therefore recommendthat you stick to one graphics card for now. Please regard all corre-sponding statements presented in this chapter as general explanations.
Note
Screen Section
First, we will take a closer look at the screen section. As mentioned above,this combines a monitor with a device section and determines which resolu-tion using which color depth should be used.
A screen section might look like the example in File 1.
Section "Screen"DefaultDepth 16SubSection "Display"
Depth 16Modes "1152x864" "1024x768" "800x600"Virtual 1152x864
EndSubSectionSubSection "Display"
Depth 24Modes "1280x1024"
EndSubSectionSubSection "Display"
Depth 32Modes "640x480"
EndSubSectionSubSection "Display"
Depth 8Modes "1280x1024"
EndSubSectionDevice "Device[0]"Identifier "Screen[0]"Monitor "Monitor[0]"
EndSection
45SuSE Linux – Enterprise Server 8
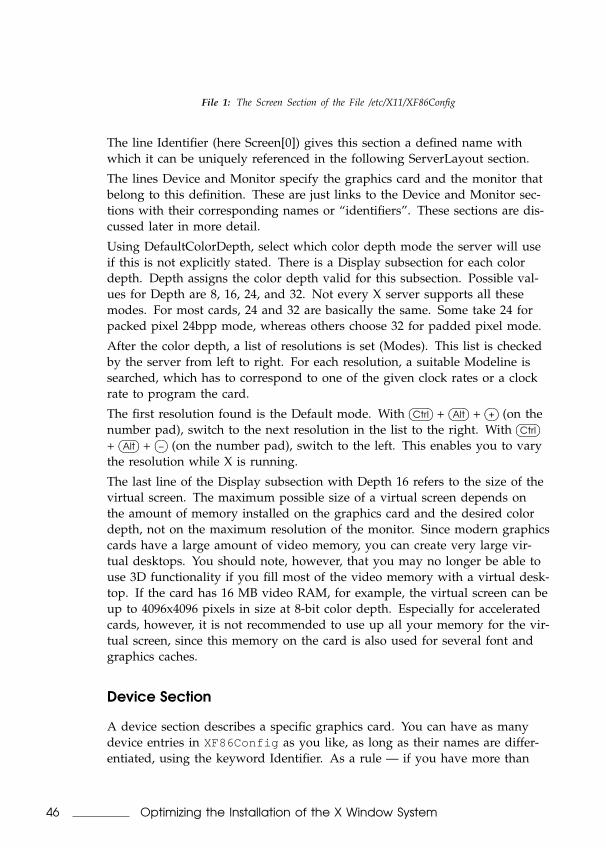
File 1: The Screen Section of the File /etc/X11/XF86Config
The line Identifier (here Screen[0]) gives this section a defined name withwhich it can be uniquely referenced in the following ServerLayout section.
The lines Device and Monitor specify the graphics card and the monitor thatbelong to this definition. These are just links to the Device and Monitor sec-tions with their corresponding names or “identifiers”. These sections are dis-cussed later in more detail.
Using DefaultColorDepth, select which color depth mode the server will useif this is not explicitly stated. There is a Display subsection for each colordepth. Depth assigns the color depth valid for this subsection. Possible val-ues for Depth are 8, 16, 24, and 32. Not every X server supports all thesemodes. For most cards, 24 and 32 are basically the same. Some take 24 forpacked pixel 24bpp mode, whereas others choose 32 for padded pixel mode.
After the color depth, a list of resolutions is set (Modes). This list is checkedby the server from left to right. For each resolution, a suitable Modeline issearched, which has to correspond to one of the given clock rates or a clockrate to program the card.
The first resolution found is the Default mode. With�� ��Ctrl +
�� ��Alt +�� ��+ (on the
number pad), switch to the next resolution in the list to the right. With�� ��Ctrl
+�� ��Alt +
����– (on the number pad), switch to the left. This enables you to varythe resolution while X is running.
The last line of the Display subsection with Depth 16 refers to the size of thevirtual screen. The maximum possible size of a virtual screen depends onthe amount of memory installed on the graphics card and the desired colordepth, not on the maximum resolution of the monitor. Since modern graphicscards have a large amount of video memory, you can create very large vir-tual desktops. You should note, however, that you may no longer be able touse 3D functionality if you fill most of the video memory with a virtual desk-top. If the card has 16 MB video RAM, for example, the virtual screen can beup to 4096x4096 pixels in size at 8-bit color depth. Especially for acceleratedcards, however, it is not recommended to use up all your memory for the vir-tual screen, since this memory on the card is also used for several font andgraphics caches.
Device Section
A device section describes a specific graphics card. You can have as manydevice entries in XF86Config as you like, as long as their names are differ-entiated, using the keyword Identifier. As a rule — if you have more than
46 Optimizing the Installation of the X Window System
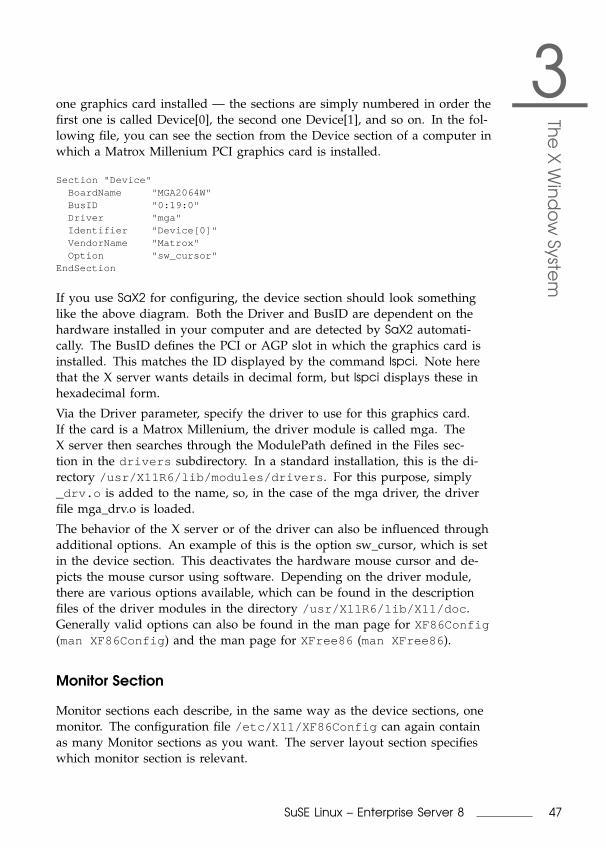
3Th
eX
Win
do
wSyste
m
one graphics card installed — the sections are simply numbered in order thefirst one is called Device[0], the second one Device[1], and so on. In the fol-lowing file, you can see the section from the Device section of a computer inwhich a Matrox Millenium PCI graphics card is installed.
Section "Device"BoardName "MGA2064W"BusID "0:19:0"Driver "mga"Identifier "Device[0]"VendorName "Matrox"Option "sw_cursor"
EndSection
If you use SaX2 for configuring, the device section should look somethinglike the above diagram. Both the Driver and BusID are dependent on thehardware installed in your computer and are detected by SaX2 automati-cally. The BusID defines the PCI or AGP slot in which the graphics card isinstalled. This matches the ID displayed by the command lspci. Note herethat the X server wants details in decimal form, but lspci displays these inhexadecimal form.
Via the Driver parameter, specify the driver to use for this graphics card.If the card is a Matrox Millenium, the driver module is called mga. TheX server then searches through the ModulePath defined in the Files sec-tion in the drivers subdirectory. In a standard installation, this is the di-rectory /usr/X11R6/lib/modules/drivers . For this purpose, simply_drv.o is added to the name, so, in the case of the mga driver, the driverfile mga_drv.o is loaded.
The behavior of the X server or of the driver can also be influenced throughadditional options. An example of this is the option sw_cursor, which is setin the device section. This deactivates the hardware mouse cursor and de-picts the mouse cursor using software. Depending on the driver module,there are various options available, which can be found in the descriptionfiles of the driver modules in the directory /usr/X11R6/lib/X11/doc .Generally valid options can also be found in the man page for XF86Config(man XF86Config ) and the man page for XFree86 (man XFree86 ).
Monitor Section
Monitor sections each describe, in the same way as the device sections, onemonitor. The configuration file /etc/X11/XF86Config can again containas many Monitor sections as you want. The server layout section specifieswhich monitor section is relevant.
47SuSE Linux – Enterprise Server 8
Monitor definitions should only be set by experienced users. A critical partof the monitor section is the mode lines, which set horizontal and verticaltimings for the appropriate resolution. The monitor properties, especially theallowed frequencies, are stored in the monitor section.
CautionUnless you have an in-depth knowledge of monitor and graphics cardfunctions, nothing should be changed in the mode lines, since thiscould cause severe damage to your monitor.
Caution
For those who want to develop their own monitor descriptions, the docu-mentation in /usr/X11/lib/X11/doc might come in handy. The section[FCR93] deserves a special mention. It describes, in detail, how the hardwarefunctions and how mode lines are created.
Luckily a “manual” setting of the mode lines is hardly ever needed nowa-days. If you are using a modern multisync monitor, the allowed frequenciesand optimal resolutions can, as a rule, be read directly from the monitor bythe X server via DDC, as described in the SaX2 configuration section. If thisis not possible for some reason, you can also use one of the VESA modes in-cluded in the X server. This will function with practically all graphics cardand monitor combinations.
Integrating Additional (True Type) Fonts
A standard X11R6 X server installation also includes a large number of fonts.These can be found in the directory /usr/X11R6/lib/X11/fonts , each di-vided into logically connected groups in subdirectories. Make sure that onlysubdirectories of the X server are used that:
are entered in the files section, Files of the file /etc/X11/XF86Configas FontPath.
contain a valid fonts.dir file.
were not closed while the X server was running using the commandxset −fp or were started while the X server was running using thecommand xset +fp.
Since version 4.0, XFree86 can use not only its own format Type1 (aPostscript format) for scalable fonts and pcf for bitmap ones, but also the
48 Optimizing the Installation of the X Window System
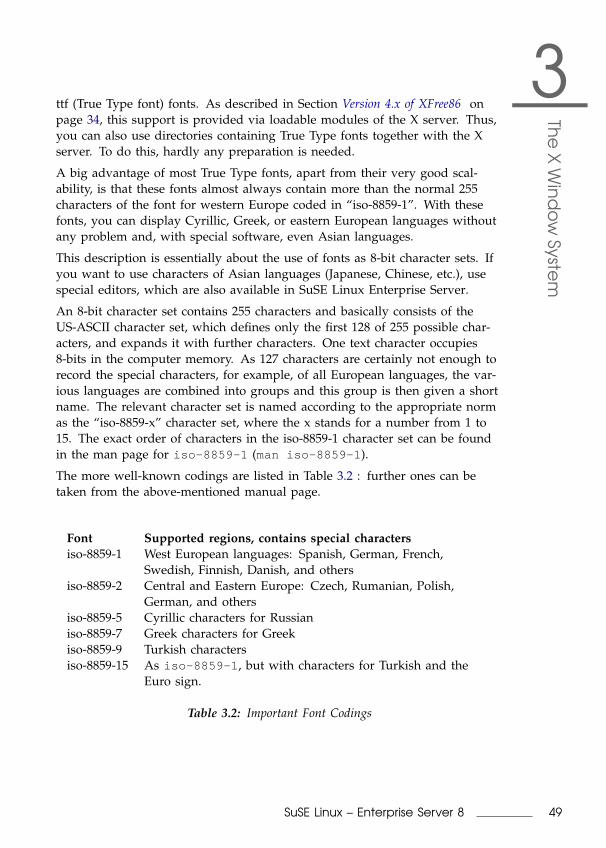
3Th
eX
Win
do
wSyste
m
ttf (True Type font) fonts. As described in Section Version 4.x of XFree86 onpage 34, this support is provided via loadable modules of the X server. Thus,you can also use directories containing True Type fonts together with the Xserver. To do this, hardly any preparation is needed.
A big advantage of most True Type fonts, apart from their very good scal-ability, is that these fonts almost always contain more than the normal 255characters of the font for western Europe coded in “iso-8859-1”. With thesefonts, you can display Cyrillic, Greek, or eastern European languages withoutany problem and, with special software, even Asian languages.
This description is essentially about the use of fonts as 8-bit character sets. Ifyou want to use characters of Asian languages (Japanese, Chinese, etc.), usespecial editors, which are also available in SuSE Linux Enterprise Server.
An 8-bit character set contains 255 characters and basically consists of theUS-ASCII character set, which defines only the first 128 of 255 possible char-acters, and expands it with further characters. One text character occupies8-bits in the computer memory. As 127 characters are certainly not enough torecord the special characters, for example, of all European languages, the var-ious languages are combined into groups and this group is then given a shortname. The relevant character set is named according to the appropriate normas the “iso-8859-x” character set, where the x stands for a number from 1 to15. The exact order of characters in the iso-8859-1 character set can be foundin the man page for iso-8859-1 (man iso-8859-1 ).
The more well-known codings are listed in Table 3.2 : further ones can betaken from the above-mentioned manual page.
Font Supported regions, contains special charactersiso-8859-1 West European languages: Spanish, German, French,
Swedish, Finnish, Danish, and othersiso-8859-2 Central and Eastern Europe: Czech, Rumanian, Polish,
German, and othersiso-8859-5 Cyrillic characters for Russianiso-8859-7 Greek characters for Greekiso-8859-9 Turkish charactersiso-8859-15 As iso-8859-1 , but with characters for Turkish and the
Euro sign.
Table 3.2: Important Font Codings
49SuSE Linux – Enterprise Server 8
The user must then — depending on the language used — select the match-ing encoding. Especially when transferring texts between different comput-ers, the encoding used must also be transferred. The advantage of this proce-dure is obvious: To receive support for regional special characters, you onlyneed to select the correct encoding and immediately most programs will beable to portray these special characters, since almost all programs use an 8-bit value (one byte) to represent a text character. If the wrong encoding ischosen, the special characters will be wrongly depicted. With most X applica-tions, as well as with the KDE desktop, you can usually select the coding ofthe character set when you are configuring the font to use. In X applications,the encoding is usually referred to as Encoding.
The disadvantage of this method is that some language combinations are im-possible: You cannot, for example, easily write a German text with umlautsin which you mention Russian place names in Cyrillic.
This dilemma can only be solved using a different approach — with the useof Unicode. Unicode codes characters, unlike ASCII, with two or even morebytes, allowing considerably more characters to be represented. Only if youuse Unicode can you depict Asian languages with more than 127 characters,such as Chinese, Japanese, or Korean, on the computer. The disadvantageof this method is that most existing software cannot handle these charac-ters and that you can only read or write texts yourself with Unicode char-acters using special software. For more information on using Unicode fontsin Linux, see http://www.unicode.org . It is expected that, in the future,more and more programs will support Unicode characters. SuSE Linux Enter-prise Server offers the program yudit to enter texts in Unicode. The programyudit can be found in the package yudit and, after installation, via the SuSEmenu, under Office ➝Editors.
After these observations, we now have a step-by-step description of the in-stallation of additional fonts, using the example here of True Type fonts.
Locate the fonts to install in your X Window System. If you have licensedTrue Type fonts, you can simply use these on your system. Mount the parti-tion containing these fonts.
You should create a font directory — if this does not yet exist — andchange to it. SuSE Linux Enterprise Server already has a directory called/usr/X11R6/lib/X11/fonts/truetype . You can copy the relevant fontsto this directory.
earth:/root # cd /usr/X11R6/lib/X11/fonts/truetype
Create links to the ttf files and create the font directory. For True Typefonts, you will additionally need a special program called ttmkfdir, package
50 Optimizing the Installation of the X Window System
3Th
eX
Win
do
wSyste
m
ttmkfdir , to create the file fonts.dir . Traditional X fonts are only in-cluded using the command mkfontdir. Instead of the path 〈/path/to/the/fonts 〉, set the corresponding path in which these fonts are located.
earth:/usr/X11R6/lib/X11/fonts/truetype #ln -s 〈/pfad/zu/den/fonts 〉/*.ttf .
earth:/usr/X11R6/lib/X11/fonts/truetype #ttmkfdir | sed s/ˆ[0-9]*// >fonts.scale.myfonts
earth:/usr/X11R6/lib/X11/fonts/truetype #/sbin/conf.d/SuSEconfig.fonts
If the X server is already running, you can now make the fonts dynamicallyavailable. To do this enter:
earth:~ # xset +fp /usr/X11R6/lib/X11/fonts/truetype
TipThe xset command accesses the X server via the X protocol. It musttherefore have access permissions for the X server currently running.You can find more on this in the man page for xauth (man xauth )
Tip
To set up the fonts permanently, add this search path to the file XF86Config .You can use SaX2 to do this. To change the fonts path, you must select the‘Custom’ configuration mode of SaX2. In ‘Path dialog’, add the directory,with ‘Add’, to the directories already listed.
Test if the fonts were set up correctly. To do this, use the command xlsfonts.If the fonts are correctly installed, the list of all installed fonts, including thenewly installed True Type Fonts, is displayed. You can also use the KDE fontmanager, which displays the installed fonts with an sample text. This can bestarted in the KDE Control Center.
earth:~ # xlsfonts
These newly installed fonts can then be used in all X applications.
51SuSE Linux – Enterprise Server 8


4Prin
terO
pe
ratio
n
Printer Operation
This chapter provides some background about the inner workings of theprinting system. The numerous examples show how the different parts of theprinting system are related to each other. The chapter should help you findsolutions for possible problems and point you in the right direction wheneveryour printer does not work as expected. Both the LPRng and lpdfilter printsystem and the CUPS print system are discussed in detail.
Printing Basics . . . . . . . . . . . . . . . . . . . . . . . . . 54Making the Printer Work . . . . . . . . . . . . . . . . . . . 57Configuring a Printer with YaST2 . . . . . . . . . . . . . . 61Printer Configuration in Application Programs . . . . . . . 68Manual Configuration of Local Printer Ports . . . . . . . . 69Manual Configuration of the LPRng and lpdfilter Printing
System . . . . . . . . . . . . . . . . . . . . . . . . . . . 75The LPRng and lpdfilter Print Spooler . . . . . . . . . . . 76Command-Line Tools for LPRng . . . . . . . . . . . . . . . 77The Print Filter of the LPRng and lpdfilter Printing System 81Custom Print Filters for the LPRng Spooler . . . . . . . . 91The CUPS Printing System . . . . . . . . . . . . . . . . . . 95Command-Line Tools for the CUPS Printing System . . . 101Working with Ghostscript . . . . . . . . . . . . . . . . . . . 105Working with a2ps . . . . . . . . . . . . . . . . . . . . . . . 108Reformatting PostScript with psutils . . . . . . . . . . . . . 111ASCII Text Encoding . . . . . . . . . . . . . . . . . . . . . 116Printing in a TCP/IP Network . . . . . . . . . . . . . . . . 118
Printing Basics
On a Linux system, printers are managed via print queues. Before any datais printed, it is sent to the print queue for temporary storage. From there,it is retrieved by a print spooler, which sends it to the printing device in therequired order.
However, this data is predominantly not available in a form that can be pro-cessed by the printer. A graphical image, for example, first needs to be con-verted into a format which the printer is able to understand. This conver-sion into a printer language is achieved with a print filter, a program which iscalled by the print spooler to translate data as needed, such that the printercan handle them.
TipPrinitng with SuSE Linux Enterprise ServerThis chapter describes the configuration and use of printers on allSuSE Linux Enterprise Server platforms. Some functions, especiallyhardware issues, may not be available on your platform.
Tip
Important Standard Printer Languages
ASCII text Most printers are at least able to print ASCII text. The few de-vices that cannot print ASCII text directly should be able to understandone of the other standard printer languages mentioned below.
PostScript PostScript is the established printer language under Unix andLinux. PostScript output can be printed directly by PostScript-capableprinters, but these are relatively expensive. PostScript is a powerfulyet complex language that requires the printer itself to perform veryCPU-intensive operations before actually putting something on paper.Adding to the price of PostScript printers are licensing costs.
PCL3, PCL4, PCL5e, PCL6, ESC/P, ESC/P2, and ESC/P raster If a PostScriptprinter is not available, the print filter uses the program Ghostscriptto convert PostScript data into one of these other standard languages.Ghostscript uses different drivers for different printers to make use ofspecific features offered by the various models, such as color settings,as much as possible.
54 Printing Basics
4Prin
terO
pe
ratio
n
Processing Print Jobs
1. A print job is started by the user either from the command line or fromwithin an application.
2. The corresponding print data is temporarily stored in the print queue,from which it is retrieved by the print spooler, which in turn sends it tothe print filter.
3. The print filter will perform the following steps:
(a) The filter determines the format of print data.
(b) Print data is converted into PostScript (if not in PostScript formatalready). ASCII text, for instance, is converted into PostScript us-ing the filter program a2ps .
(c) The PostScript data is converted into another printer language, ifnecessary.
If the printer is a PostScript model, the data is sent to it withno further processing.If the printer is not a PostScript printer, the programGhostscript is run and uses one of its drivers to convert datainto the language of the printer model. This generates thedata that is finally sent to the printer.
4. As soon as all the data of the print job has been sent to the printer, theprint spooler deletes it from the print queue.
Available Printing Systems
SuSE Linux Enterprise Server supports two different printing systems:
LPRng and lpdfilter — This is a traditional printing system consisting ofthe print spooler LPRng and the print filter lpdfilter. The configurationof this system must be entirely defined by the system administrator.Normal users can only choose between different print queues that havealready been set up. To allow users to choose between different optionsfor a given printer, a number of print queues need to be defined be-forehand — each for a different printer configuration. For plain black-and-white printers, such as most laser printers, it is sufficient to definejust one configuration (the standard queue). For modern color inkjet
55SuSE Linux – Enterprise Server 8
printers, define several configurations, for example, one for black-and-white printing, one for color printing, and maybe another one for high-resolution photograph printing. Setting up the printer with predefinedconfigurations has the advantage that the system administrator has alot of control over the way in which the device is used. On the otherhand, there is the disadvantage that users cannot set up the printer ac-cording to the job at hand, so maybe they will not be able to make useof the many options offered by modern printers unless the administra-tor has defined the corresponding print queues beforehand.
CUPS — CUPS allows users to set different options for each print job anddoes not require that the entire configuration of the print queue is pre-defined by the system administrator. With CUPS, printer options arestored in a PPD (PostScript printer description) file for each queue andcan be made available to users in printer configuration dialogs. By de-fault, the PPD file gives users control over all printer options, but thesystem administrator may also limit printer functionality by editing thefile.
Both printing systems cannot be installed at the same time, because there areconflicts between them. However, YaST2 allows you to choose either and toswitch between them. See Configuring a Printer with YaST2 on page 61.
General Troubleshooting Hints
The documentation included with SuSE Linux Enterprise Server mostly de-scribes general printing problems and ways to solve them. Many of the morespecific issues are covered by articles in the support database. The supportdatabase be accessed as part of the SuSE help system, but the most up-to-date version of this database is available online at http://sdb.suse.de/en/sdb/html/ .
A good starting point to deal with printer problems are the support databasearticles Installing a Printer and Printer Configuration with SuSE Linux 8.0, whichyou can find by searching for the keyword “printer”, or online at http://sdb.suse.de/en/sdb/html/jsmeix_print-einrichten.html andhttp://sdb.suse.de/en/sdb/html/jsmeix_print-einrichten-80.html . You may also want to read the general support database articles thatdescribe the most important known problems and issues of each SuSE LinuxEnterprise Server version in one central place: Known Problems and SpecialFeatures in SuSE Linux 8.1 athttp://sdb.suse.de/en/sdb/html/bugs81.html
56 Printing Basics
4Prin
terO
pe
ratio
n
Known Problems and Special Features in SuSE Linux 8.0 athttp://sdb.suse.de/en/sdb/html/bugs80.html
If you do not find your problem described in the documentation or in thesupport database, we are glad to provide help through our support ser-vices. Information about these can be found at http://www.suse.de/en/services/support/index.html .
Making the Printer Work
General Requirements
Your printer must be supported by SuSE Linux Enterprise Server. Tosee whether this is the case, consult the following sources:
SuSE printer database — http://cdb.suse.de or http://hardwaredb.suse.de/ (click ‘Englisch’ to get the English ver-sion.) The Ghostscript drivers listed on these pages correspond tothe ones that can be selected for the corresponding printer modelin the printer configuration dialog of YaST2.
The linuxprinting.org printer database — http://www.linuxprinting.org/ ➝ ‘The Database’ (http://www.linuxprinting.org/database.html ) orhttp://www.linuxprinting.org/printer_list.cgi
Ghostscript — http://www.cs.wisc.edu/~ghost/
The SuSE Linux Enterprise Server Ghostscript driver list — /usr/share/doc/packages/ghostscript/catalog.devices Thisfile lists the Ghostscript drivers included with the current versionof SuSE Linux Enterprise Server. This is an important detail be-cause sometimes you find Ghostscript drivers mentioned on theInternet that require Aladdin Ghostscript, while SuSE Linux En-terprise Server comes with GNU Ghostscript (due to licensing rea-sons). In most cases, GNU Ghostscript already includes a driversuitable for your printer.
The printer has been properly connected to the interface over which itwill communicate. For details, read Manual Configuration of Local PrinterPorts on page 69 and Manual Configuration on page 65.
You should be using one of the standard kernels included on CD, not acustom kernel built yourself. If you have problems with your printer,
57SuSE Linux – Enterprise Server 8
install one of the SuSE standard kernels first and reboot before lookingfurther into the problem.
You should have installed the ‘Default System’ to make sure that allrequired packages are there. As long as you have not deselected (unin-stalled) any of the packages of the standard system after installation,you are set to continue. Otherwise, install the ‘Default System’ withYaST2. None of the ‘Minimum System’ installs fulfill all the require-ments to make the printing system work.
Finding the Right Printer Driver
You do not need any particular driver if your printer is a PostScript model.If that is not the case, you need a Ghostscript driver to produce the data foryour specific printer. For non-PostScript devices, the Ghostscript driver isthe determining factor as far as printer output is concerned. Choosing theright driver and the right options for it has a big influence on its quality. TheGhostscript drivers available for specific models are listed in the sources men-tioned in General Requirements on the page before.
If you cannot find a specific Ghostscript driver for your printer, it may bepossible to use another driver already available. Also, some manufactur-ers support Linux, so your manufacturer might be able to provide specificGhostscript driver information. If not, they may be able to provide other in-formation to assist in selection:
Find out whether your printer is compatible with a model supportedby Linux. You may then be able to use the driver for the compatiblemodel.
For printers to be compatible, they should be able to work correctly us-ing the same binary control sequences. Both printers must understandthe same language on the hardware level without relying on additionaldriver software to emulate it.
A similar model name does not always mean the hardware is reallycompatible. Printers that appear very similar on the outside sometimesdo not use the same printer language at all.
Check if your printer supports a standard printing language by askingthe manufacturer or checking the technical specifications in the printermanual.
58 Making the Printer Work
4Prin
terO
pe
ratio
n
PCL5e or PCL6 Printers that understand the PCL5e or PCL6 languagenatively should work with the ljet4 Ghostscript driver and pro-duce output at a resolution of 600x600 dpi. Often, PCL5e is mis-taken for PCL5.
PCL4 or PCL5 Printers that understand the PCL4 or PCL5 languagenatively should work with one of the following Ghostscriptdrivers: laserjet, ljetplus, ljet2p, or ljet3. Output resolution is lim-ited to 300x300 dpi, however.
PCL3 Printers that understand the PCL3 language natively shouldwork with one of these Ghostscript drivers: deskjet, hpdj, pcl3,cdjmono, cdj500, or cdj550.
ESC/P2, ESC/P or ESC/P raster Printers that understand ESC/P2,ESC/P, or ESC/P raster natively should work with the stcolorGhostscript driver or with the uniprint driver in combination witha suitable *.upp parameter file (e. g., stcany.upp ).
The Issue with GDI Printers
Given that most Linux printer drivers are not written by the maker of thehardware, it is crucial that the printer can be driven through one of the gen-erally known languages, such as PostScript, PCL, or ESC/P. Normal print-ers understand at least one of the common languages. In the case of a GDIprinter, the manufacturer has decided to build a device that relies on its ownspecial control sequences. Such a printer only runs under the operating sys-tem versions for which the manufacturer has included a driver. Because itcannot be operated through one of the known languages, it must be consid-ered nonstandard and cannot be used with Linux or can only be used withdifficulty.
GDI is a programming interface developed by Microsoft for graphical de-vices. There is not much of a problem with the interface itself, but thefact that GDI printers can only be controlled through the proprietary lan-guage they use is an issue. A better name for them would be “proprietary-language-only printers.”
On the other hand, there are printers that can be operated both in GDI modeand in a standard language mode, but they need to be switched accordingly.If you use Linux together with another operating system, it may be possiblethat the driver set the printer to GDI mode when you last used it. As a re-sult, the printer will not work under Linux. There are two solutions for this:switch the printer back to standard mode under the other operating system
59SuSE Linux – Enterprise Server 8
before using it under Linux or use only the standard mode, even under theother operating system. In the latter case, it may turn out that printing func-tionality is limited, such as to a lower resolution.
There are also some very special printers that implement a rudimentary setof a standard printer language, for example, only the operations necessary forthe printing of raster images. Sometimes these printers can be used in a nor-mal way, as many Ghostscript drivers only use the printer as a raster imagedevice anyway. On the negative side, you may be unable to print ASCII textdirectly. This should not be too much of a problem, however, as ASCII textis mostly printed through Ghostscript and not directly. The only problem oc-curs when some of these printers need to be explicitly switched before theycan print raster images. This requires sending a special control sequence tothem — something that can only be achieved with a special driver, but notthrough Ghostscript.
For some GDI printers, you may be able to obtain Linux drivers directly fromthe manufacturer. There is no guarantee that such vendor-made drivers willwork with other or future Linux versions.
In any case, the above is only true for GDI models. By contrast, printers thatunderstand one of the standard languages do not depend on a particular op-erating system nor do they require a particular Linux version. However, theyoften produce the highest quality of output when used with a vendor-madedriver.
To sum all this up, SuSE Linux Enterprise Server does support the GDI print-ers listed below. They can be configured using the printer configurationmodule of YaST2. Be aware that their use will always be rather problematic.Some models might refuse to work at all or their functionality might be lim-ited, for example, to low-resolution black-and-white printing. SuSE does nottest GDI printers, so cannot guarantee that this list is correct:
Brother HL 720/730/820/1020/1040, MFC 4650/6550MC/9050, andcompatible models.
HP DeskJet 710/712/720/722/820/1000, and compatible models.
Lexmark 1000/1020/1100/2030/2050/2070/3200/5000/5700/7000/7200,Z11/42/43/51/52, and compatible models. Lexmark makes its ownLinux drivers available at:http://www.lexmark.com/printers/linuxprinters.html
Oki Okipage 4w/4w+/6w/8w/8wLite/8z/400w and compatible mod-els.
60 Making the Printer Work
4Prin
terO
pe
ratio
n
Samsung ML-200/210/1000/1010/1020/1200/1210/1220/4500/5080/6040and compatible models.
To our knowledge, the following GDI printers are not supported by SuSELinux Enterprise Server (this list is not complete by any means):
Brother DCP-1000, MP-21C, WL-660
Canon BJC 5000/5100/8000/8500, LBP 460/600/660/800, MultiPASSL6000
Epson AcuLaser C1000, EPL 5500W/5700L/5800L
HP LaserJet 1000/3100/3150
Lexmark Z12/22/23/31/32/33/82, Winwriter 100/150c/200
Minolta PagePro 6L/1100L/18L, Color PagePro L, Magicolor6100DeskLaser, Magicolor 2 DeskLaser Plus/Duplex
Nec SuperScript 610plus/660/660plus
Oki Okijet 2010
Samsung ML 85G/5050G, QL 85G
Sharp AJ 2100, AL 1000/800/840/F880/121
Configuring a Printer with YaST2
Print Queues and Configurations
In most cases, you will want to set up more than one print queue for the fol-lowing reasons:
If you have more than one printer, you need at least one queue for eachof them.
The print filter can be configured differently for each print queue. Byhaving different queues for one printer, operate it with different config-urations.
61SuSE Linux – Enterprise Server 8
If your model is a plain black-and-white printer, such as most laser printers,it will be sufficient to configure just one standard queue. Color inkjets, on theother hand, require at least two different queues (configurations):
A standard lp configuration for quick black-and-white printouts at lowcost. An lp queue should always be defined, because this is also thetraditional name of the default queue under Linux.
A color configuration or queue used for color printing.
Printer Configuration with YaST2: The Basics
Start the YaST2 printer configuration by selecting it from the YaST2 ControlCenter or by entering yast2 printer in a command line as root . Enteryast2 printer .nodetection to suppress printer autodetection. Formore details about autodetection, see Parallel Ports on page 69.
The YaST2 printer configuration always defines settings for both printing sys-tems at the same time. With each change, a configuration is written for bothCUPS and LPRng and lpdfilter. This configuration data is stored in the YaST2printer database /usr/lib/YaST2/data/printerdb/suse.prdb . How-ever, not every option is available for both printing systems. Certain optionsare only supported by either CUPS or LPRng and lpdfilter. YaST2 providesinformation about this whenever necessary.
Easily switch back and forth between CUPS and LPRng using the YaST2printer configuration dialog. Configurations that are supported by both print-ing systems are available for use immediately after switching from one sys-tem to another. However, not every configuration is completely identical un-der both systems even if it valid for both systems, because of their differentcapabilities.
The YaST2 printer configuration module allows you to select from and toswitch between printing systems as described below.
CUPS as a server If you have a printer connected locally to the computer,CUPS needs to run as a server. This requires a number of packages beinstalled:
package cups-libs
package cups-client
package cups
62 Configuring a Printer with YaST2
4Prin
terO
pe
ratio
n
package cups-drivers
package cups-drivers-stp
CUPS in client-only mode CUPS may be installed as a client only, providedthat there is a CUPS network server running within your local networkand you want to use its queues for printing. With this setup, only spec-ify the CUPS network server. Only the following packages are needed:
package cups-libs
package cups-client
LPRng The LPRng and lpdfilter printing system should be installed if thelocal network only offers an lpd network server, not a CUPS one, (seeThe LPRng and lpdfilter Print Spooler on page 76) and if you want to usethe queues for printing. The following packages are required for thissetup:
package lprng
package lpdfilter
The package cups-client and the package lprng are mutually exclusive— they must not be installed at the same time. The package cups-libsmust always be installed because certain programs, such as Samba, are linkedagainst these libraries.
The printing system as a whole requires a number of additional packages,although the ‘Default system’ should have installed them for you already.The most important ones are:
package ghostscript-library
package ghostscript-fonts-std
package ghostscript-x11
package a2ps
package file
You can run the YaST2 printer configuration even without any of the printingsystems installed. YaST2 saves all configuration data to /var/lib/YaST2/printers . When you install a printing system later, or when changingfrom one system to another one, YaST2 relies on this data to create the actualprinter configuration.
63SuSE Linux – Enterprise Server 8
The YaST2 printer configuration modules display all configurations that couldbe created without errors. However, as the actual configurations are onlywritten upon finishing the YaST2 printer configuration module, it is a goodidea to restart the module afterwards to check for any errors.
The YaST2 printer configuration also strictly distinguishes between queuescreated through YaST2 itself (YaST2 queues) and queues created through othermeans (non-YaST2 queues). Non-YaST2 will never be touched by YaST2. Con-flicts may arise if queues have identical names. For instance, you may firstcreate a YaST2 queue named color for one of the printing systems thenchange to another printing system manually (not using YaST2). If you createdanother color queue manually at this point and started the YaST2 printerconfiguration after that, the manually-created queue would be overwritten bythe YaST2 queue of the same name.
When editing a queue, you can tell YaST2 whether it shall be in charge of it.For instance, you could turn a YaST2 queue into a non-YaST2 queue to pre-vent it from being overwritten in the way assumed above. Conversely, youcould also use this to turn a non-YaST2 queue into a YaST2 queue to deliber-ately overwrite an existing configuration with YaST2.
Automatic Configuration
Depending on how much of your hardware can be autodetected and onwhether your printer model is included in the printer database, YaST2 willeither autoconfigure your printer or offer a reasonable selection of settingsthat then need to be adjusted manually.
YaST2 can configure your printer automatically if these conditions are ful-filled:
The parallel port or USB interface was set up automatically in the cor-rect way and the printer model connected to it was autodetected.
Your printer’s ID, as supplied to YaST2 during hardware autodetection,is included in the printer database. Given that this ID may be differentfrom the actual name of the model, you may need to select the modelmanually.
The printer database includes at least one configuration for your model,which is assumed to be fully working and valid for both CUPS andLPRng.
64 Configuring a Printer with YaST2
4Prin
terO
pe
ratio
n
Each configuration should be tested with the print test function of YaST2 tosee whether it works as expected. For many configurations included in theprinter database, there is no absolute guarantee that they will work as theyhad to be written without any direct help from printer makers. The YaST2test page also provides important information about the printer configurationselected.
Manual Configuration
If one of the conditions for automatic configuration is not fulfilled or if youwant your own customized setup, configure the printer manually, at leastto some extent. The following is an overview of the options to set duringmanual configuration:
Hardware port (interface)
If YaST2 was able to autodetect the printer model, you may safelyassume that the printer connection works as far as the hardware isconcerned. You may then leave this part untouched.
If YaST2 has not autodetected the printer model, there may havebeen some problem on the hardware level. Some manual inter-vention is needed to configure the physical connection. Manualconfiguration requires specification of the port to which the printeris connected. /dev/lp0 is the first parallel port. /dev/usb/lp0is the port for a USB printer. Always test this setting from withinYaST2 to see whether the printer is actually responding at the se-lected interface.A printer connected to the first parallel port is a fairly safe bet. Inthis case, the BIOS settings for this port should look like this:
. IO address: 378 (hexadecimal)
. Interrupt: (not relevant)
. Mode: Normal , SPP, or Output-Only .
. DMA: Disabled
If the printer does not respond at the first parallel port with thesesettings, you may need to change the IO address to have the ex-plicit form of 0x378 under the BIOS menu item that lets you con-figure the advanced settings for parallel ports. If your machinehas two parallel ports with IO addresses 378 and 278 (hexadec-imal), change them to read 0x378 and 0x278 , respectively. Forfurther details on the topic, see Parallel Ports on page 69.
65SuSE Linux – Enterprise Server 8
Queue name The name of the queue is used frequently when issuing printcommands. The name should be rather short and consist of lowercaseletters (and maybe numbers) only. The following additional optionsmay be defined for the LPRng and lpdfilter printing system:
Define a queue named raw to use for special cases where printdata shall not be converted by a print filter, but sent to the printerin raw form. Accordingly, when printing through the raw queue,print data must already be available in a format (language) yourprinter model can understand.
For each queue, define whether an explicit form feed is needed.If enabled, the spooler sends a form feed command at the endof each print job to eject the last page. Normally, the Ghostscriptdriver takes care of this and you can leave this disabled.
Ghostscript driver and printer language The Ghostscript driver and theprinter language depend on your printer model. Select a default config-uration suitable for your model then change it in an additional dialogas needed.
For non-PostScript models, all printer-specific data is produced by theGhostscript driver. Therefore, the driver configuration (both choosingthe right driver and the correct options for it) is the single most im-portant factor determining the output quality. Your settings affect theprinter output on a queue-by-queue basis.
If your printer was autodetected, which means the model is includedin the printer database, you will be presented with a choice of possibleGhostscript drivers and with several output options, for example:
black-and-white at 300 dpi
LPRng only: grayscale at 300 dpi
color at 300 dpi
CUPS only: color at 600 dpi
photo at 600 dpi
YaST2 indicates whether these options are supported by each print-ing system. Each default configuration includes a suitable Ghostscriptdriver and, if available, a number of options for the driver related tooutput quality. If there are specific options for the driver, use the extradialog to change these as needed. Click the respective value. If thereare further configuration options, the subitems are indented in the list.
66 Configuring a Printer with YaST2
4Prin
terO
pe
ratio
n
Not all combinations of driver options work with every printer model.This is especially true for higher resolutions.
Always check whether your settings work as expected by printing theYaST2 test page. If the output is garbled (for example, with severalpages almost empty), you should be able to stop the printer by first re-moving all sheets then stopping the test print from within YaST2. How-ever, in some cases the printer will refuse to resume work if you do so.It may be better to stop the test print first and wait for the printer toeject all pages by itself.
If your model was not found in the printer database, YaST2 allows youto choose from a number of generic Ghostscript drivers for the stan-dard printing languages. To use a Ghostscript driver not included inthe default configuration offered by YaST2, try to find it under the man-ufacturer name. For the CUPS printing system, the following specialconfiguration options are available:
With the CUPS system, normally PPD files are stored in /usr/lib/YaST2/data/printerdb . These must exactly match the en-tries in the YaST2 printer database. The YaST2 PPD files are basedon the PPD files that come with package cups-drivers andpackage cups-drivers-stp . Selecting a printer manually meansselecting any other PPD file (instead of a YaST2 PPD file), suchas one of the files included with package cups-drivers andpackage cups-drivers-stp , which are stored in /usr/share/cups/model/ . However, as there is no entry for such a PPD filein the YaST2 database, the default configuration provided by thefile cannot be changed with YaST2. Change the default settings ina different way, as described in Specifying Options for Queues onpage 103.
Other special settings These special settings can be accessed through anextra submenu. Unless you are sure what these options mean, do notchange the defaults.
For the CUPS printing system, the following special settings are avail-able:
Restricting printer use for certain users.
Queue status: whether the queue is started or stopped andwhether it is ready to accept new print jobs.
Banner page: whether to print out a banner (cover) page at thebeginning of each print job and which one. Similarly, whether toadd a banner page at the end of each print job and which one.
67SuSE Linux – Enterprise Server 8
For the LPRng and lpdfilter printing system, change the followinghardware-independent settings:
The page layout can be changed for ASCII text printouts (but notfor graphics or documents created with special application pro-grams).
You can define an ascii print queue for special cases. Theascii queue forces the print filter to produce ASCII text out-put, which may be necessary for some text files that the print filterdoes not automatically recognize as such, for example, PostScriptsource code.
Country-specific settings can be changed to ensure the correctcharacter encoding when sending ASCII text to the printer andwhen printing plain text in HTML pages from Netscape.
Printer Configuration in Application Programs
Application programs rely on the existing print queues in a way that is verysimilar to how they are used on the command line. In an application, printeroptions are not configured directly, but rather through the existing queues ofthe system.
Printing from the Command Line
Print from the command line using the command lpr -Plp filename ,where filename is the name of the file to send to the printer. In this exam-ple, the default print queue used is lp , but the -P option allows specificationanother queue. For instance, the command lpr -Pcolor filename tellsthe printing system to use the color queue.
Using the LPRng and lpdfilter System
With this printing system, applications can use the lpr command for print-ing. To make this work, use the application’s printer configuration to selectone of the existing queues (e. g., lp or color ) or use the application’s printdialog to directly enter the corresponding command (e. g., lpr -Plp or lpr-Pcolor ).
68 Printer Configuration in Application Programs
4Prin
terO
pe
ratio
n
Using the CUPS System
The package cups-client includes some command-line tools to print withCUPS. One of them is the lpr command, which enables use of the com-mands described above under CUPS, too.
In addition, there are several graphical tools for CUPS, such as xpp or theKDE program kprinter , which allow you to choose among queues and tochange both CUPS standard options and printer-specific options as madeavailable through the PPD file.
Manual Configuration of Local Printer Ports
Parallel Ports
For the most part, printers are connected to a Linux system through a par-allel port. Printers on parallel ports are handled by the parport subsystemof the Linux kernel. The basics of parallel port configuration with YaST2 aredescribed in Manual Configuration on page 65. The paragraphs below providemore in-depth information on the topic.
The parport subsystem manages parallel ports only through the corre-sponding architecture-specific kernel modules after these are loaded. Amongother things, this allows for several devices, such as a parallel port ZIP driveand a printer, to be linked to one parallel port at the same time. Device filesfor parallel printers are counted beginning with /dev/lp0 . With a SuSELinux Enterprise Server standard kernel, printing over the parallel port re-quires that the modules parport , parport_pc , and lp are loaded. This isachieved by kmod (the kernel module loader). Normally, these modules areloaded automatically as soon as some process requests access to the devicefile.
If the kernel module parport_pc is loaded without any parameters, it triesto autodetect and autoconfigure all available parallel ports. This may notwork in some very rare cases and cause a system lock-up. If that should hap-pen, configure it manually by explicitly providing the correct parameters forthe parport_pc module. This is also the reason why printer autodetectioncan be disabled for YaST2 as described in Configuring a Printer with YaST2 onpage 61.
Manual Configuration of Parallel Ports
The first parallel port (/dev/lp0 ) is configured with an entry in /etc/modules.conf , as shown in File 2.
69SuSE Linux – Enterprise Server 8
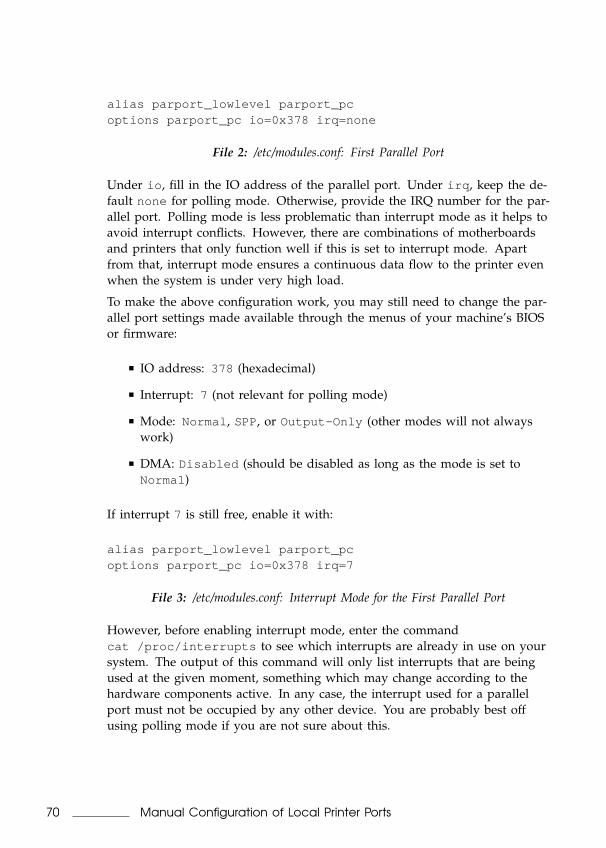
alias parport_lowlevel parport_pcoptions parport_pc io=0x378 irq=none
File 2: /etc/modules.conf: First Parallel Port
Under io , fill in the IO address of the parallel port. Under irq , keep the de-fault none for polling mode. Otherwise, provide the IRQ number for the par-allel port. Polling mode is less problematic than interrupt mode as it helps toavoid interrupt conflicts. However, there are combinations of motherboardsand printers that only function well if this is set to interrupt mode. Apartfrom that, interrupt mode ensures a continuous data flow to the printer evenwhen the system is under very high load.
To make the above configuration work, you may still need to change the par-allel port settings made available through the menus of your machine’s BIOSor firmware:
IO address: 378 (hexadecimal)
Interrupt: 7 (not relevant for polling mode)
Mode: Normal , SPP, or Output-Only (other modes will not alwayswork)
DMA: Disabled (should be disabled as long as the mode is set toNormal )
If interrupt 7 is still free, enable it with:
alias parport_lowlevel parport_pcoptions parport_pc io=0x378 irq=7
File 3: /etc/modules.conf: Interrupt Mode for the First Parallel Port
However, before enabling interrupt mode, enter the commandcat /proc/interrupts to see which interrupts are already in use on yoursystem. The output of this command will only list interrupts that are beingused at the given moment, something which may change according to thehardware components active. In any case, the interrupt used for a parallelport must not be occupied by any other device. You are probably best offusing polling mode if you are not sure about this.
70 Manual Configuration of Local Printer Ports

4Prin
terO
pe
ratio
n
Configuring Additional Parallel Ports
Configure a second parallel port (/dev/lp1 ) by adding the correspondingentries to /etc/modules.conf , as shown in File 4. In this case, the defaultIO address should be set to 278 (hexadecimal). This may be changeable onthe hardware level, for example, by setting a jumper on an ISA expansioncard.
alias parport_lowlevel parport_pcoptions parport_pc io=0x378,0x278 irq=none,none
File 4: /etc/modules.conf: Two Parallel Ports
Special ISA PnP and PCI Expansion Cards
If you do not know the IO address of an additional parallel port, find it first.
ISA PnP Cards If the card has a means to set the IO address and the inter-rupt to a fixed value (by setting a jumper, for instance), do so beforeproceeding with the configuration.
If that is not the case, the values for IO address, interrupt, and modeare set for the card by the system on boot. To find out which valueshave been set for your ISA PnP card, look for them in the boot mes-sages, as stored in /var/log/boot.msg , or with pnpdump (includedin package isapnp ).
PCI Cards Find possible IO addresses and interrupts for PCI cards by enter-ing the command /sbin/lspci -v . The output should be similar toOutput 1.
00:0a.0 Parallel controller: ...... IRQ 10I/O ports at b400I/O ports at b000I/O ports at a800I/O ports at a400
Output 1: Partial Output of lspci -v for a PCI Interface Card
Each parallel port is assigned a pair of IO addresses set off by 400 (hex-adecimal). In our example, one IO port corresponds to b000 and b400 .
71SuSE Linux – Enterprise Server 8
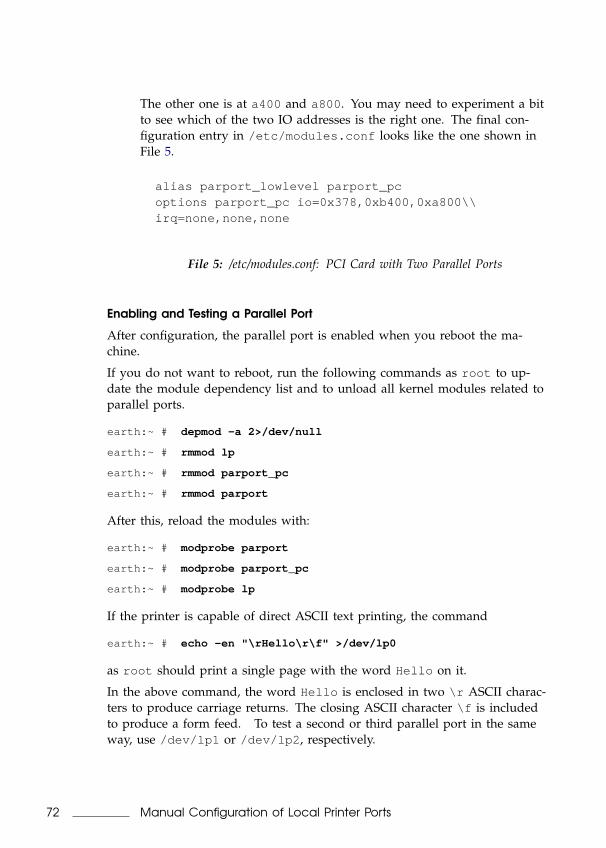
The other one is at a400 and a800 . You may need to experiment a bitto see which of the two IO addresses is the right one. The final con-figuration entry in /etc/modules.conf looks like the one shown inFile 5.
alias parport_lowlevel parport_pcoptions parport_pc io=0x378,0xb400,0xa800\\irq=none,none,none
File 5: /etc/modules.conf: PCI Card with Two Parallel Ports
Enabling and Testing a Parallel Port
After configuration, the parallel port is enabled when you reboot the ma-chine.
If you do not want to reboot, run the following commands as root to up-date the module dependency list and to unload all kernel modules related toparallel ports.
earth:~ # depmod -a 2>/dev/null
earth:~ # rmmod lp
earth:~ # rmmod parport_pc
earth:~ # rmmod parport
After this, reload the modules with:
earth:~ # modprobe parport
earth:~ # modprobe parport_pc
earth:~ # modprobe lp
If the printer is capable of direct ASCII text printing, the command
earth:~ # echo -en "\rHello\r\f" >/dev/lp0
as root should print a single page with the word Hello on it.
In the above command, the word Hello is enclosed in two \r ASCII charac-ters to produce carriage returns. The closing ASCII character \f is includedto produce a form feed. To test a second or third parallel port in the sameway, use /dev/lp1 or /dev/lp2 , respectively.
72 Manual Configuration of Local Printer Ports
4Prin
terO
pe
ratio
n
USB Ports
First, make sure interrupt is enabled for USB in your machine’s BIOS. In anAward BIOS, for example, go to the menu ‘PNP AND PCI SETUP’ and setthe entry ‘USB IRQ’ to Enabled . The wording of these menus and entriesmay vary depending on the BIOS type and version.
Test whether the USB printer is responding by entering the commandecho -en "\rHello\r\f" >/dev/usb/lp0 as root . If there is only oneUSB printer connected to the machine and this printer is able to print ASCIItext directly, this should print a single page with the word Hello on it.
Some USB printers may need a special control sequence before acceptingdata over a USB line. The following command, entered as one line withoutspaces or line breaks, sends a control sequence for an Epson Stylus ColorUSB printer:
echo -en "\x0\x0\x0\x1b\x01\x40\x45\x4a\x4c\x20\x31\x32\x38\x34\x2e\x34\x0a\x40\x45\x4a\x4c\x20\x20\x20\x20\x20\x0a" >/dev/usb/lp0
In most cases, you should be able to get information about the printer manu-facturer and the product name by entering cat /proc/bus/usb/devices .If this does not display any information, it will usually be for one of thesereasons:
The USB system has not detected the device (yet), maybe even becauseit is disconnected from power, so there is no communication betweenthe system and the printer.
The USB system has detected the device, but neither the manufac-turer or the product name are known to it. Accordingly, nothing is dis-played, but the system can communicate with the printer.
Sometimes it may happen that the USB printer does not respond anymore,for instance, after unplugging it in the middle of a print job. In such a case,the following commands should be sufficient to restart the USB system:
earth:~ # rchotplug stop
earth:~ # rchotplug start
If you are not successful with these commands, terminate all processes thatuse /dev/usb/lp0 , unload all USB printer–related kernel modules, andreload these modules. Before doing so, use lsmod to check which USB mod-ules are loaded (usb-uhci , usb-ohci , or uhci ) and how they depend oneach other. For instance, the entry
73SuSE Linux – Enterprise Server 8
usbcore ... [printer usb-uhci]
in the output of lsmod shows that the module usbcore is being used bymodules printer and usb-uhci . Accordingly, modules printer andusb-uhci need to be unloaded before unloading usbcore .
As root , enter the following commands (replace usb-uhci with uhci orusb-ohci depending on your USB system):
earth:~ # fuser -k /dev/usb/lp0
earth:~ # rchotplug stop
earth:~ # rmmod printer
earth:~ # rmmod usb-uhci
earth:~ # umount usbdevfs
earth:~ # rmmod usbcore
earth:~ # modprobe usbcore
earth:~ # mount usbdevfs
earth:~ # modprobe usb-uhci
earth:~ # modprobe printer
earth:~ # rchotplug start
If you have more than one USB printer connected to the system, there is aspecial issue to consider: All connected devices are autodetected by the USBsubsystem with the first USB printer being addressed as device /dev/usb/lp0 and the second one as /dev/usb/lp1 . Depending on the model, USBprinters can be detected even when they are powerless. Some have the built-in capability to be queried by the system even when powered off. Therefore,to avoid that the system confuses different printers, switch on all printersbefore booting and try to leave them connected to power all the time.
The IrDA Printer Interface
With IrDA, the system uses an infrared interface to emulate a parallel port.To do so, the Linux drivers provide a simulated parallel port under the de-vice name of /dev/irlpt0 . A printer connected through infrared is handledin the same way as any other parallel printer except it is made available tothe system under the name of /dev/irlpt0 instead of /dev/lp0 .
Test the connection to an IrDA printer by entering the commandecho -en "\rHello\r\f" >/dev/irlpt0 as root . If the printer is able
74 Manual Configuration of Local Printer Ports
4Prin
terO
pe
ratio
n
to print ASCII text directly, this should print a single page with the wordHello on it.
Regardless of the outcome of the above test, the printer should appear in theoutput of irdadump . If this does not list your printer, there may be somekind of connection problem or the device is powered off. If the above com-mand does not produce any output at all, you have probably not started theIrDA service yet (it is not started automatically upon booting). The IrDA ser-vice can be started and stopped with the commands:
earth:~ # rcirda start
earth:~ # rcirda stop
Serial Ports
To use a printer connected to a serial port in combination with the LPRngprinting system, read the document /usr/share/doc/packages/lprng/LPRng-HOWTO.html , in particular, the section file:/usr/share/doc/packages/lprng/LPRng-HOWTO.html#SECSERIAL . More information canbe obtained from the man page for printcap (man printcap ) as well as inthe support database by searching for the keyword “serial”.
Manual Configuration of the LPRng and lpdfil-ter Printing System
Normally, the printing system is configured with YaST2 as described in Con-figuring a Printer with YaST2 on page 61. SuSE Linux Enterprise Server alsoincludes the program lprsetup, which is a bare-bones command-line tool forthe configuration of the LPRng and lpdfilter printing system. When settingup a printer with YaST2, it collects all necessary data then runs lprsetup in-ternally with all the necessary options to write the actual LPRng and lpdfilterconfiguration.
lprsetup is intended as an expert tool. As such, it will not provide any helpto find the correct values for printer options. To see a brief list of the avail-able command line options for lprsetup , enter lprsetup -help , or lookup the man page for lprsetup (man lprsetup ) and the man page forlpdfilter (man lpdfilter ) for further details.
For information regarding Ghostscript drivers and driver-specific options,read Finding the Right Printer Driver on page 58 and Working with Ghostscripton page 105.
75SuSE Linux – Enterprise Server 8
The LPRng and lpdfilter Print Spooler
The print spooler used by the LPRng/lpd printing system is LPRng (packagelprng ). The print spooler lpd, or line printer daemon, is usually started au-tomatically on boot. More specifically, the script /etc/init.d/lpd is runas part of the boot procedure. After this, the print spooler runs as a dae-mon in the background. Start and stop it manually with rclpd start andrclpd stop .
These are the configuration files of LPRng:
/etc/printcap definitions of the system’s print queues
/etc/lpd.conf global print spooler configuration
/etc/lpd.perms permission settings
According to the script /etc/init.d/lpd , the command rclpd startalso runs the command checkpc -f as a subprocess, which in turn createsspool directories with the appropriate permissions in /var/spool/lpd ac-cording to the queues defined in /etc/printcap . When started, the printspooler first reads the entries in /etc/printcap to see which print queueshave been defined. The spooler’s task is then to manage any jobs queued forprinting. In particular, the spooler:
manages local queues by passing the print data of each job to a printfilter (if necessary) and sending it to the printer or to another queueafterwards
handles jobs in the order in which they have been queued
monitors the status of queues and printers and provides status informa-tion when requested
listens on port 515 to accept or rejects print jobs from remote hosts des-tined for local queues, depending on the configuration
forwards print jobs to remote print spoolers (listening on port 515 onother hosts) for printing through remote queues.
To learn more about the details of this mechanism, read the LPRng Howto(file:/usr/share/doc/packages/lprng/LPRng-HOWTO.html ) or con-sult the man page for printcap (man printcap ) and the man page forlpd (man lpd ).
76 The LPRng and lpdfilter Print Spooler
4Prin
terO
pe
ratio
n
Command-Line Tools for LPRng
This section only provide a short overview of the available tools. For details,consult the LPRng Howto, in particular, section file:/usr/share/doc/packages/lprng/LPRng-HOWTO.html#LPRNGCLIENTS .
Managing Local Queues
Printing Files
Details on how to use the lpr command can be found in the LPRng Howto(file:/usr/share/doc/packages/lprng/LPRng-HOWTO.html#LPR ).The following only covers some basic operations.
To print a file, you normally must enter lpr -P 〈queuename〉 〈filename 〉.If you leave out the -P 〈queuename〉 parameter, the printing system defaultsto the value of the environment variable PRINTER. The same is true for thecommands lpq and lprm . See the man page for lpr (man lpr ), the manpage for lpq (man lpq ), and the man page for lprm (man lprm ) for moreinformation. The environment variable PRINTER is set automatically on lo-gin. Display its current value with echo $PRINTER . Change it to expand toanother queue by entering:
newbie@earth:~ > export PRINTER= 〈queuename〉
Checking the Status
By entering lpq -P 〈queuename〉, check the status of print jobs handled bythe specified queue. If you specify all as the queue name, lpq displays in-formation for all jobs in all queues.
With lpq -s -P 〈queuename〉, tell lpq to display only a minimum of in-formation. lpq -l -P 〈queuename〉 tells lpq to be more verbose. Withlpq -L -P 〈queuename〉, lpq displays a detailed status report, which willcome in handy when trying to track down errors.
For further information, see Managing Remote Queues on page 79, the manpage for lpq (man lpq ), and section file:/usr/share/doc/packages/lprng/LPRng-HOWTO.html#LPQ of the LPRng Howto.
Removing Jobs from the Queue
The command lprm -P 〈queuename〉 〈jobnumber 〉 removes the print jobwith the specified number from the specified queue, provided that you own
77SuSE Linux – Enterprise Server 8
the job. A print job is owned by the user who started it. Display both theownership and the job number of print jobs with lpq .
The command lprm -Pall all removes all print jobs from all queues forwhich you have the required permissions. root may remove any jobs in anyqueues regardless of permissions.
More information can be obtained in the man page for lprm (man lprm )and in the LPRng Howto (file:/usr/share/doc/packages/lprng/LPRng-HOWTO.html#LPRM).
Controlling the Queues
The command lpc option 〈queuename〉 displays the status of the speci-fied queue and allows changing it. The most important options are:
help Display a short overview of the available options.
status 〈queuename〉 Display status information.
disable 〈queuename〉 Do not accept new jobs for the specified queue.
enable 〈queuename〉 Accept new jobs for the specified queue.
stop 〈queuename〉 Stop printing from the specified queue. If a job is be-ing printed, it will be completed.
start 〈queuename〉 Enable printing from the specified queue.
down 〈queuename〉 Has the effect of disable and stop combined.
up 〈queuename〉 Has the effect of enable and start combined.
abort 〈queuename〉 Has the effect of down, but aborts all current printjobs immediately. Aborted jobs are preserved, however, and can be re-sumed after restarting the queue with up .
root permissions are required to control printer queues with the above com-mands. Options can be supplied to lpc directly on the command line (asin lpc status all ). You can also run the program without any options,which starts it in dialog mode — it opens the lpc> command prompt. Thenenter the options at the prompt. To leave the program, enter either quit orexit .
If you were to enter lpc status all , the output could look like this:
78 Command-Line Tools for LPRng
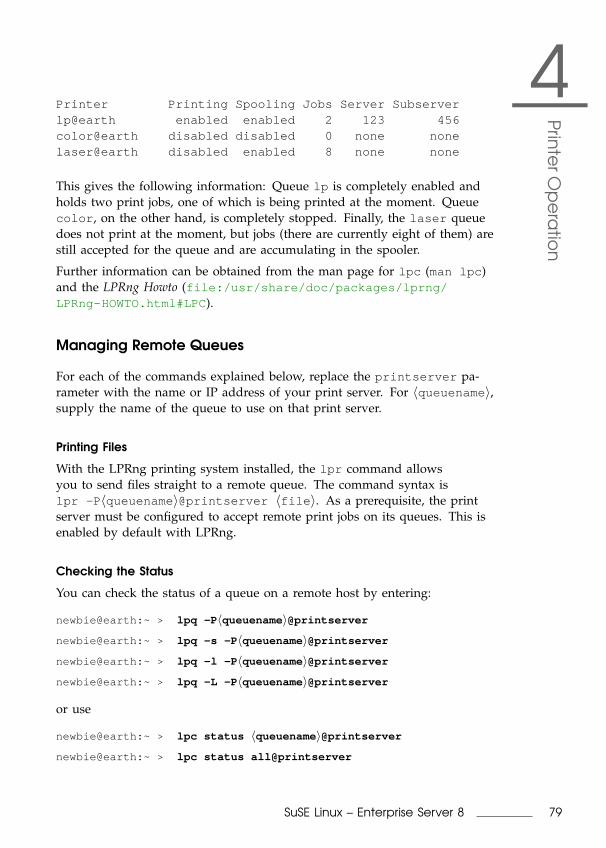
4Prin
terO
pe
ratio
n
Printer Printing Spooling Jobs Server Subserverlp@earth enabled enabled 2 123 456color@earth disabled disabled 0 none nonelaser@earth disabled enabled 8 none none
This gives the following information: Queue lp is completely enabled andholds two print jobs, one of which is being printed at the moment. Queuecolor , on the other hand, is completely stopped. Finally, the laser queuedoes not print at the moment, but jobs (there are currently eight of them) arestill accepted for the queue and are accumulating in the spooler.
Further information can be obtained from the man page for lpc (man lpc )and the LPRng Howto (file:/usr/share/doc/packages/lprng/LPRng-HOWTO.html#LPC ).
Managing Remote Queues
For each of the commands explained below, replace the printserver pa-rameter with the name or IP address of your print server. For 〈queuename〉,supply the name of the queue to use on that print server.
Printing Files
With the LPRng printing system installed, the lpr command allowsyou to send files straight to a remote queue. The command syntax islpr -P 〈queuename〉@printserver 〈file 〉. As a prerequisite, the printserver must be configured to accept remote print jobs on its queues. This isenabled by default with LPRng.
Checking the Status
You can check the status of a queue on a remote host by entering:
newbie@earth:~ > lpq -P 〈queuename〉@printserver
newbie@earth:~ > lpq -s -P 〈queuename〉@printserver
newbie@earth:~ > lpq -l -P 〈queuename〉@printserver
newbie@earth:~ > lpq -L -P 〈queuename〉@printserver
or use
newbie@earth:~ > lpc status 〈queuename〉@printserver
newbie@earth:~ > lpc status all@printserver
79SuSE Linux – Enterprise Server 8
To list the names of and display status information on all queuesof a print server, use either lpq -s -Pall@printserver orlpc status all@printserver , provided that LPRng is used on the printserver, too.
If printing over a remote queue does not work, querying the status of thequeues helps determine the cause of the problem. If LPRng is installed onthe print server, enter lpq -L -P 〈queuename〉@printserver to get a de-tailed status report for troubleshooting.
Removing Jobs from the Queue
The commands
newbie@earth:~ > lprm -P 〈queuename〉@printserver 〈jobnumber 〉
newbie@earth:~ > lprm -P 〈queuename〉@printserver all
newbie@earth:~ > lprm -Pall@printserver all
delete all print jobs in remote queues that have been issued under your username. root has no special privileges on remote queues. The parameter allonly works if LPRng is used on the print server host as well.
Using Command-Line Tools for LPRng Troubleshooting
Print jobs are kept in the queue even if you shut down a machine duringa printout, and thus they are still there after rebooting. To remove a faultyprint job, use the commands described above. Rebooting will not removethem.
For example, it sometimes happens that the host to printer connection sufferssome kind of fault, after which the printer is unable to interpret data cor-rectly. This can cause it to spit out large amounts of paper with meaninglessbabble on it.
1. In the case of an inkjet model, remove all paper from the trays. Openthe paper tray if you have a laser model.
2. In most cases, the print job is still in the queue after that. Print jobs areremoved from the queue only after all data has been sent to the printer.Check with lpq or lpc status to see which queue is printing thendelete the job in question with lprm .
80 Command-Line Tools for LPRng
4Prin
terO
pe
ratio
n
3. The printer may produce some output even after deleting the job fromthe queue. To stop this, use the commands fuser -k /dev/lp0 for aprinter on the first parallel port or fuser -k /dev/usb/lp0 for thefirst USB printer to terminate all processes still using the printer device.
4. Do a complete reset of the printer by switching it off. Wait a few sec-onds before putting the paper back into the trays and switching thedevice back on.
The Print Filter of the LPRng and lpdfilter Print-ing System
The print filter used in conjunction with LPRng is lpdfilter, which is installedas a package with the same name. The following is a detailed descriptionof the steps involved in processing a print job. If you need to know aboutthe inner workings of the print filter, read the scripts powering it (in partic-ular, /usr/lib/lpdfilter/bin/if ) and probably also follow the stepsdescribed in Troubleshooting Hints for lpdfilter on page 90.
1. The print filter (/usr/lib/lpdfilter/bin/if ) determines whichoptions to use as passed to it by the print spooler and specified bythe print job’s control file. Options for the queue to use are also gath-ered from /etc/printcap and /etc/lpdfilter/ 〈queuename〉/conf(where 〈queuename〉 is the name of the actual queue).
2. The filter determines the file type using the script /usr/lib/lpdfilter/bin/guess to run file on each file in question. The out-put of file is used to determine the type according to the entries inthe file /etc/lpdfilter/types .
If the ascii queue has been specified, the print filter is forced totreat the file as ASCII text.
If a queue other than ascii has been specified, the printer filtertries to autodetect the file type.
3. The file is converted into a printer-specific data stream according to thefile type and the type of queue to use:
81SuSE Linux – Enterprise Server 8
If the raw queue has been specified, print data is usually sentstraight to the printer or forwarded to another queue. However,data may also undergo a simple conversion through recode , ifso specified in /etc/lpdfilter/ 〈queuename〉/conf . To havean “absolute” raw filter — one that bypasses lpdfilter entirely —remove the line :if=/usr/lib/lpdfilter/bin/if:\ for thecorresponding queue in /etc/printcap .
If the queue specified is not a raw queue:
(a) If the data is not in PostScript format, it is first convertedinto PostScript by running /usr/lib/lpdfilter/filter/type2ps on it (where type is the actual file type determinedfor the data in question). For example, ASCII text is con-verted into PostScript with /usr/lib/lpdfilter/filter/ascii2ps , which in turn relies on a2ps to obtain the cor-rect character encoding defined for the queue. This ensuresthat country-specific special characters are printed correctlyin plain text files. For details, see the man page for a2ps(man a2ps).
(b) If necessary, PostScript data can be converted again if a suit-able script is placed in /etc/lpdfilter/ 〈queuename〉/pre(where 〈queuename〉 is the name of the actual queue to use).
(c) PostScript data is converted into another printer language, asneeded.
. If the printer is PostScript capable, the data is sent di-rectly to the printer (or forwarded to another queue).However, data can be further processed using the Bashfunctions “duplex” and “tray”, which are defined in/usr/lib/lpdfilter/global/functions , to en-able duplex printing and paper tray selection throughPostScript commands (which requires that the PostScriptprinter has this functionality).
. If the printer is not PostScript capable, Ghostscriptuses a driver suitable for the native printer languageof the model to produce the printer-specific data thatis finally sent to the printer (or forwarded to anotherqueue). Ghostscript-relevant parameters are stored ei-ther in the cm line of /etc/printcap or in the file/etc/lpdfilter/ 〈queuename〉/upp (where 〈queuename〉is the name of the actual queue to use). If so desired, theGhostscript output can be reformatted again, if a suitablescript is placed in /etc/lpdfilter/ 〈queuename〉/post
82 The Print Filter of the LPRng and lpdfilter Printing System
4Prin
terO
pe
ratio
n
(where 〈queuename〉 is the name of the actual queue touse).
(d) The printer-specific data is transferred to the printer(or to another queue). Control sequences for a specificprinter can be sent to the printer both before and af-ter the data stream. These must be specified in /etc/lpdfilter/ 〈queuename〉/conf .
Configuration of lpdfilter
Normally, the printing system is configured with YaST2 (as describedin Configuring a Printer with YaST2 on page 61), which includes thesetup of lpdfilter . Some of the more special settings, however, canonly be changed by editing the configuration files of the print filter byhand. For each queue, a dedicated configuration file is written to /etc/lpdfilter/ 〈queuename〉/conf (where 〈queuename〉 is the name of the actualqueue to be used).
Customization of lpdfilter
1. By default, files not in PostScript format are converted into that for-mat with /usr/lib/lpdfilter/filter/type2ps (where type isthe actual type of the file in question). If a suitable script is placedin /etc/lpdfilter/ 〈queuename〉/type2ps, it will be used for thePostScript conversion of the file. The script must be able to accept dataon stdin and to output data in PostScript format on stdout .
2. If so desired, an additional step can be performed to reformatPostScript data, which requires a suitable script be placed in /etc/lpdfilter/ 〈queuename〉/pre . This may be a script to add customPostScript preloads, for example. The script must be able to accept dataon stdin and to output data in PostScript format on stdout . Someprograms to reformat PostScript are included in the package psutils .In particular, the program pstops is capable of performing extensivetransformations. See the man page for pstops (man pstops ) for de-tails.
3. Special Ghostscript parameters: When writing the configura-tion with YaST2, Ghostscript parameters are stored in /etc/lpdfilter/ 〈queuename〉/upp (where 〈queuename〉 is the name of theactual queue to use), but custom Ghostscript parameters can also be
83SuSE Linux – Enterprise Server 8
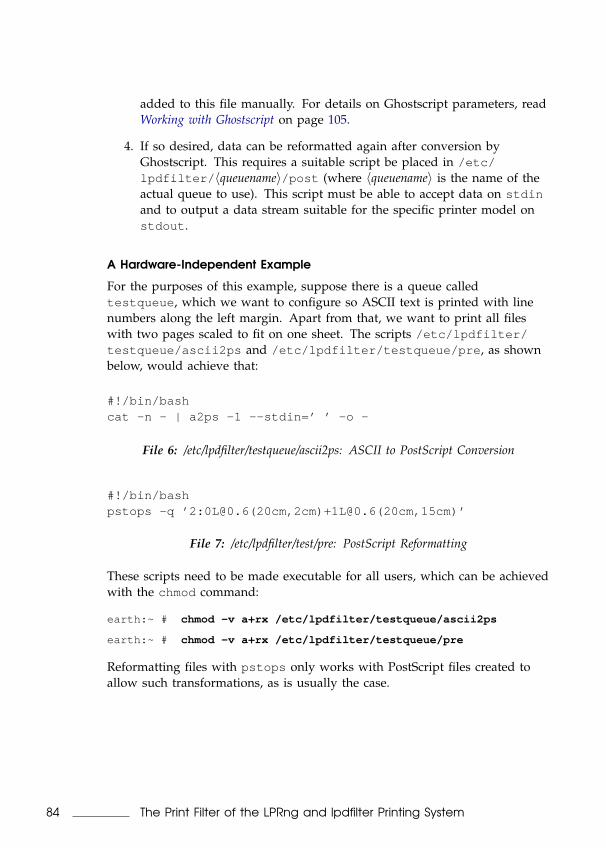
added to this file manually. For details on Ghostscript parameters, readWorking with Ghostscript on page 105.
4. If so desired, data can be reformatted again after conversion byGhostscript. This requires a suitable script be placed in /etc/lpdfilter/ 〈queuename〉/post (where 〈queuename〉 is the name of theactual queue to use). This script must be able to accept data on stdinand to output a data stream suitable for the specific printer model onstdout .
A Hardware-Independent Example
For the purposes of this example, suppose there is a queue calledtestqueue , which we want to configure so ASCII text is printed with linenumbers along the left margin. Apart from that, we want to print all fileswith two pages scaled to fit on one sheet. The scripts /etc/lpdfilter/testqueue/ascii2ps and /etc/lpdfilter/testqueue/pre , as shownbelow, would achieve that:
#!/bin/bashcat -n - | a2ps -1 --stdin=’ ’ -o -
File 6: /etc/lpdfilter/testqueue/ascii2ps: ASCII to PostScript Conversion
#!/bin/bashpstops -q ’2:[email protected](20cm,2cm)[email protected](20cm,15cm)’
File 7: /etc/lpdfilter/test/pre: PostScript Reformatting
These scripts need to be made executable for all users, which can be achievedwith the chmod command:
earth:~ # chmod -v a+rx /etc/lpdfilter/testqueue/ascii2ps
earth:~ # chmod -v a+rx /etc/lpdfilter/testqueue/pre
Reformatting files with pstops only works with PostScript files created toallow such transformations, as is usually the case.
84 The Print Filter of the LPRng and lpdfilter Printing System
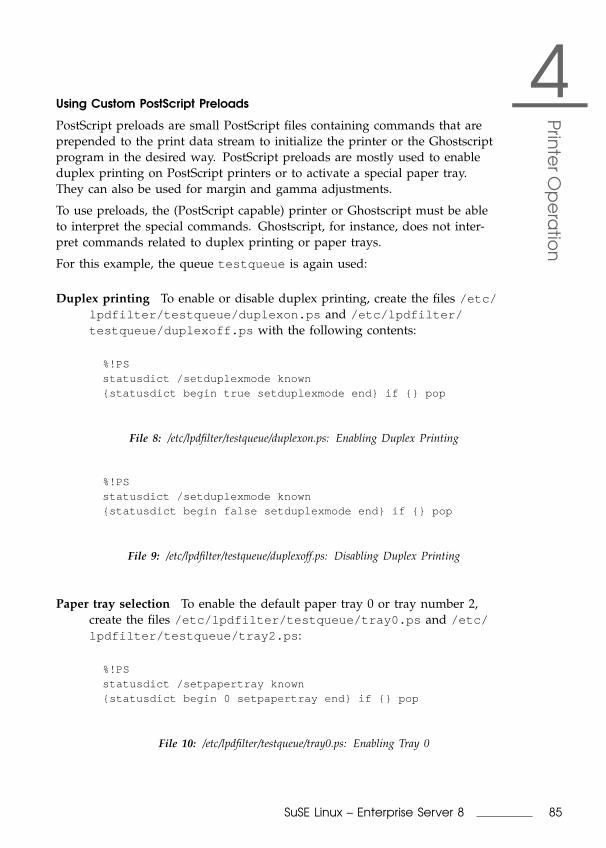
4Prin
terO
pe
ratio
n
Using Custom PostScript Preloads
PostScript preloads are small PostScript files containing commands that areprepended to the print data stream to initialize the printer or the Ghostscriptprogram in the desired way. PostScript preloads are mostly used to enableduplex printing on PostScript printers or to activate a special paper tray.They can also be used for margin and gamma adjustments.
To use preloads, the (PostScript capable) printer or Ghostscript must be ableto interpret the special commands. Ghostscript, for instance, does not inter-pret commands related to duplex printing or paper trays.
For this example, the queue testqueue is again used:
Duplex printing To enable or disable duplex printing, create the files /etc/lpdfilter/testqueue/duplexon.ps and /etc/lpdfilter/testqueue/duplexoff.ps with the following contents:
%!PSstatusdict /setduplexmode known{statusdict begin true setduplexmode end} if {} pop
File 8: /etc/lpdfilter/testqueue/duplexon.ps: Enabling Duplex Printing
%!PSstatusdict /setduplexmode known{statusdict begin false setduplexmode end} if {} pop
File 9: /etc/lpdfilter/testqueue/duplexoff.ps: Disabling Duplex Printing
Paper tray selection To enable the default paper tray 0 or tray number 2,create the files /etc/lpdfilter/testqueue/tray0.ps and /etc/lpdfilter/testqueue/tray2.ps :
%!PSstatusdict /setpapertray known{statusdict begin 0 setpapertray end} if {} pop
File 10: /etc/lpdfilter/testqueue/tray0.ps: Enabling Tray 0
85SuSE Linux – Enterprise Server 8
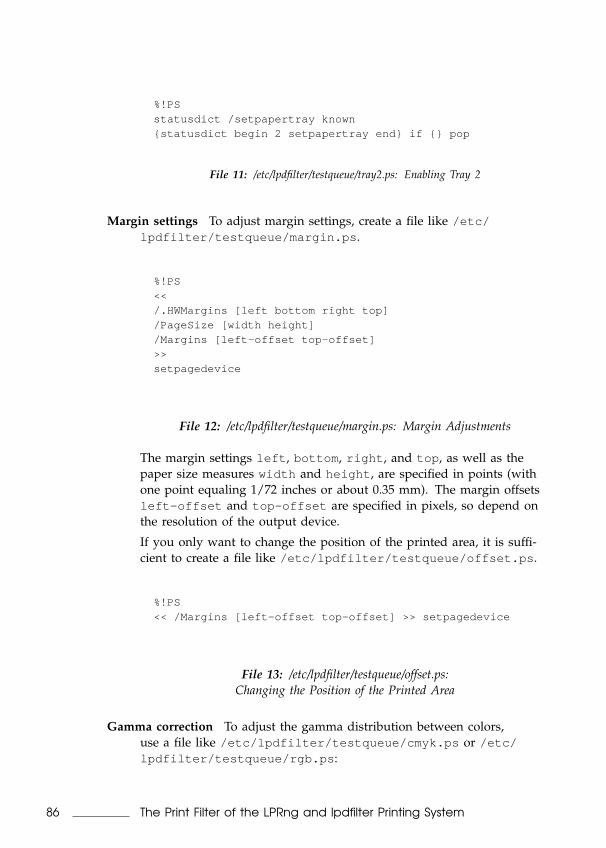
%!PSstatusdict /setpapertray known{statusdict begin 2 setpapertray end} if {} pop
File 11: /etc/lpdfilter/testqueue/tray2.ps: Enabling Tray 2
Margin settings To adjust margin settings, create a file like /etc/lpdfilter/testqueue/margin.ps .
%!PS<</.HWMargins [left bottom right top]/PageSize [width height]/Margins [left-offset top-offset]>>setpagedevice
File 12: /etc/lpdfilter/testqueue/margin.ps: Margin Adjustments
The margin settings left , bottom , right , and top , as well as thepaper size measures width and height , are specified in points (withone point equaling 1/72 inches or about 0.35 mm). The margin offsetsleft-offset and top-offset are specified in pixels, so depend onthe resolution of the output device.
If you only want to change the position of the printed area, it is suffi-cient to create a file like /etc/lpdfilter/testqueue/offset.ps .
%!PS<< /Margins [left-offset top-offset] >> setpagedevice
File 13: /etc/lpdfilter/testqueue/offset.ps:Changing the Position of the Printed Area
Gamma correction To adjust the gamma distribution between colors,use a file like /etc/lpdfilter/testqueue/cmyk.ps or /etc/lpdfilter/testqueue/rgb.ps :
86 The Print Filter of the LPRng and lpdfilter Printing System
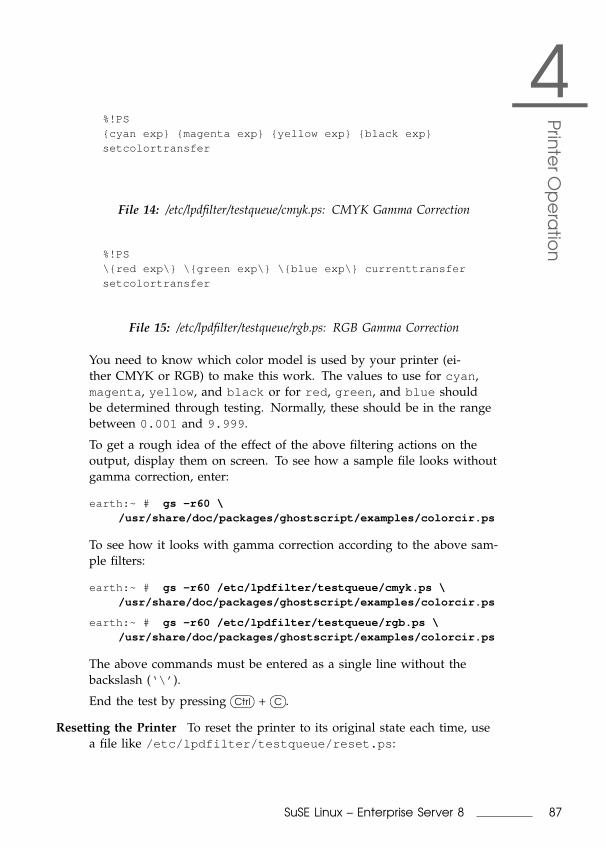
4Prin
terO
pe
ratio
n
%!PS{cyan exp} {magenta exp} {yellow exp} {black exp}setcolortransfer
File 14: /etc/lpdfilter/testqueue/cmyk.ps: CMYK Gamma Correction
%!PS\{red exp\} \{green exp\} \{blue exp\} currenttransfersetcolortransfer
File 15: /etc/lpdfilter/testqueue/rgb.ps: RGB Gamma Correction
You need to know which color model is used by your printer (ei-ther CMYK or RGB) to make this work. The values to use for cyan ,magenta , yellow , and black or for red , green , and blue shouldbe determined through testing. Normally, these should be in the rangebetween 0.001 and 9.999 .
To get a rough idea of the effect of the above filtering actions on theoutput, display them on screen. To see how a sample file looks withoutgamma correction, enter:
earth:~ # gs -r60 \/usr/share/doc/packages/ghostscript/examples/colorcir.ps
To see how it looks with gamma correction according to the above sam-ple filters:
earth:~ # gs -r60 /etc/lpdfilter/testqueue/cmyk.ps \/usr/share/doc/packages/ghostscript/examples/colorcir.ps
earth:~ # gs -r60 /etc/lpdfilter/testqueue/rgb.ps \/usr/share/doc/packages/ghostscript/examples/colorcir.ps
The above commands must be entered as a single line without thebackslash (‘\’ ).
End the test by pressing�� ��Ctrl +
�� ��C .
Resetting the Printer To reset the printer to its original state each time, usea file like /etc/lpdfilter/testqueue/reset.ps :
87SuSE Linux – Enterprise Server 8
%!PSserverdict begin 0 exitserver
File 16: /etc/lpdfilter/testqueue/reset.ps: Printer Reset
To activate one of the above PostScript preloads, create a file similar to/etc/lpdfilter/testqueue/pre :
#!/bin/bashcat /etc/lpdfilter/testqueue/preload.ps -
File 17: /etc/lpdfilter/testqueue/pre: Activating a PostScript Preload
In this file, replace preload.ps with the name of your custom preload file.In addition, make this script executable and readable for all users, which canbe achieved with chmod in the following way:
earth:~ # chmod -v a+rx /etc/lpdfilter/testqueue/pre
earth:~ # chmod -v a+r /etc/lpdfilter/testqueue/preload.ps
Use the mechanism described above to insert PostScript commands not onlybefore the print data, but also after it. For instance, with a script like /etc/lpdfilter/testqueue/pre , reset the printer to its original state after eachprint job is finished:
%
#!/bin/bashcat /etc/lpdfilter/testqueue/preload.ps -/etc/lpdfilter/testqueue/reset.ps
File 18: /etc/lpdfilter/testqueue/pre: Insert-ing a PostScript Preload and a PostScript Reset
A Sample GDI Printer Configuration
This section provides an example for the customized configuration of a gdiprint queue. As explained in The Issue with GDI Printers on page 59, it is of-ten nearly impossible to make such printers run under Linux. However, spe-cial driver programs are available for some GDI models. In most cases, they
88 The Print Filter of the LPRng and lpdfilter Printing System
4Prin
terO
pe
ratio
n
are designed to run as Ghostscript add-ons with the driver reformatting theGhostscript output into the printer’s own language. Often these drivers makelimited use of the printer’s functionality, however, allowing only black-and-white printing, for example.
If such a driver is available, Ghostscript can be used with it in the followingway (also see Working with Ghostscript on page 105):
1. Ghostscript converts the PostScript data into a raster of pixel dots thenuses one of its drivers to convert the rasterized image into a formatappropriate for the GDI driver at a suitable resolution. Data is thenpassed to the GDI driver.
2. The rasterized image is converted by the GDI driver into a data formatsuitable for the printer model.
For the steps described below, it is assumed that a GDI printer driver suit-able for SuSE Linux Enterprise Server 8.1 is already installed or can be down-loaded from the Internet. It is also assumed that the driver works in the waydescribed above. In some cases, you may need some familiarity with the waysource code is handled under Unix or how to unpack such sources (from.zip or .tar.gz archives or maybe from .rpm packages.
After unpacking such an archive, you will often find the latest installationinstructions included in some of the files, typically in READMEor INSTALL ,or even in a doc subdirectory. If you have downloaded a .tar.gz archive,you usually need to compile and install the driver yourself.
For the purposes of the example explained below, the following setup is as-sumed:
The driver program has been installed as /usr/local/bin/printerdriver .
The required Ghostscript driver is pbmraw with an output resolution of600 dpi.
The printer is connected to the first parallel port — /dev/lp0 .
The Ghostscript driver and the resolution may be different for your printer.Read the documentation included with the driver to find out about these.
First, create the gdi queue. To do so, log in as root and run lprsetup, asfollows:
89SuSE Linux – Enterprise Server 8
earth:~ # lprsetup -add gdi -lprng -device /dev/lp0 \-driver pbmraw -dpi 600 -size a4dj -auto -sf
This command must be entered as a single line without the backslash (‘\’ ).
Now, create the script /etc/lpdfilter/gdi/post :
#!/bin/bash/usr/local/bin/printerdriver 〈gdi_driver_parameters 〉
File 19: /etc/lpdfilter/gdi/post: Running the GDI Printer Driver
Read the documentation of the driver program to find out which options ex-ist for it. Specify them under 〈gdi_driver_parameters〉 as needed. Make thescript executable for all users, and restart the print spooler:
earth:~ # chmod -v a+rx /etc/lpdfilter/gdi/post
earth:~ # rclpd stop
earth:~ # rclpd start
From now on, users should be able to print with this command:
newbie@earth:~ > lpr -Pgdi 〈filename 〉
Troubleshooting Hints for lpdfilter
Enable different debug levels for lpdfilter by uncommenting (remov-ing the ‘#’ sign in front of) the corresponding line of the main filter script/usr/lib/lpdfilter/bin/if .
# DEBUG="off"# DEBUG="low"DEBUG="medium"# DEBUG="high"
File 20: /usr/lib/lpdfilter/bin/if: Debug Levels
With DEBUG="low" enabled, the program logs its stderr output to the file/tmp/lpdfilter.if-$$.XXXXXX (where $$ is the process ID and XXXXXXa unique random string).
With DEBUG="medium" enabled, the program logs, in addition to its ownerror output, the stderr output of the scripts in /usr/lib/lpdfilter/
90 The Print Filter of the LPRng and lpdfilter Printing System
4Prin
terO
pe
ratio
n
filter , if these scripts are run by /usr/lib/lpdfilter/bin/if . Thedebugging output is written to /tmp/lpdfilter.name-$$.XXXXXX (wherename is the name of the script that is run and $$.XXXXXX a string composedin the way described above).
With DEBUG="high" enabled, all error output is logged as above. Addi-tionally, all output normally destined to the printer is redirected to a log filenamed /tmp/lpdfilter.out-$$.XXXXXX (where $$.XXXXXX is a stringcomposed in the way described above).
To avoid loosing control over the logging activity, you may want to removethe log files with rm -v /tmp/lpdfilter* before each new test run.
Custom Print Filters for the LPRng Spooler
The aim of this section is not to show you how to build an alternative tolpdfilter, but rather to lay out the inner workings of the Linux printing en-gine. We do this by demonstrating how to write a custom printer filter. Theexample explained below has been kept simple to show just the basic mecha-nism. This is also the reason why no provisions are made in the filter scriptsto do any error checking. The following example is based on the assumptionthat the printer is connected to the first parallel port (/dev/lp0 ).
Any print filter must accept data from the print spooler on standard input.The filter must then convert the data into the printer-specific format andissue it on standard output. Now the print spooler takes care of the dataagain and makes sure it is transferred from the filter’s standard output tothe /dev/lp0 printer device. This is where the Linux kernel comes in: ittransfers all data arriving at the printer device to the corresponding IO ad-dress (e. g., 0x378 ). The printer receives this data over the parallel line andinterprets it to print accordingly.
On most systems, normal users do not have direct access to the printer de-vice, therefore root permissions are needed for the commands below. Also,in any commands like cat ascii-file >/dev/lp0 , replace ascii-filewith the name of an existing ASCII file.
Basic Filtering Operations
You can print with the simple commandecho -en "\rHello\r\f" >/dev/lp0 . This, however, does not ac-tivate the print spooler nor does it use any filter. It writes to the printer
91SuSE Linux – Enterprise Server 8
device /dev/lp0 directly. The command sends the ASCII signs ‘\r’ , ‘H’ ,‘e’ , ‘l’ , ‘l’ , ‘o’ , ‘\r’ , and ‘\f’ directly to the printer device. TheASCII character for carriage return, ‘\r’ , causes the carriage (printer head)to return to its start position. The ASCII form feed character, ‘\f’ , causesthe printer to eject the page.
The commands cat ascii-file >/dev/lp0 andecho -en "\f" >/dev/lp0 still do not activate the spooler or a printfilter, but again send characters directly to the printer device /dev/lp0 .The first command sends the characters of the ASCII file to the printer. Thesecond one adds a form feed character to eject the page.
Under Linux, ASCII text lines are separated only by a line feed character. Bycontrast, line breaks under DOS/Windows consist of a line feed ASCII char-acter and a carriage return ASCII character. If you enter the commands
earth:~ # cat /etc/SuSE-release >/dev/lp0
earth:~ # echo -en "\f" >/dev/lp0
to send an ASCII file directly to the printer, the output will probably looklike:
SuSE Linux 8.1 (i386)VERSION = 8.1
The reason is that the printer only performs a line feed but no carriage return(since there is actually no carriage return character between the two lines).
However, it is possible to tell printers to perform both a line feed and a car-riage return whenever a line feed character is sent. With the escape sequence\033&k2G , all printers that understand the PCL3 language can be recon-figured to perform both a line feed and a carriage return upon receivingan ASCII line feed character. Send the escape sequence to the printer withecho -en "\033&k2G" >/dev/lp0 after which it should interpret linebreaks in the expected way when printing an ASCII file.
Another problem may arise when trying to print country-specific characters,such as umlauts. DOS and Windows use an encoding for these that is dif-ferent from Linux. Printers are mostly preconfigured for the DOS/Windowsenvironment. As a remedy, enter
earth:~ # cp ascii-file ascii-file.ibmpc
earth:~ # recode lat1..ibmpc ascii-file.ibmpc
to first copy ascii-file to ascii-file.ibmpc then recode it accordingto the DOS/Windows standard. After that, the commands
92 Custom Print Filters for the LPRng Spooler
4Prin
terO
pe
ratio
n
earth:~ # cat ascii-file.ibmpc >/dev/lp0
earth:~ # echo -en "\f" >/dev/lp0
should print both the umlauts and the line breaks in the correct way. Notethat the special escape sequence to correct the line break behavior is nolonger needed, because the file has been recoded to have DOS/Windows linebreaks and umlauts.
To sum this up, the sequence of commands
earth:~ # cp ascii-file ascii-file.ibmpc
earth:~ # recode lat1..ibmpc ascii-file.ibmpc
earth:~ # cat ascii-file.ibmpc >/dev/lp0
earth:~ # echo -en "\f" >/dev/lp0
should correctly print an ASCII file on any printer that accepts ASCII directlyand is preconfigured for the DOS/Windows character encoding. Having ar-rived at this point, you may want to automate this by creating a print filterthat reformats ASCII text for your printer according to the above steps.
A Sample Custom Print Filter
First, become root and create a subdirectory for the custom filter thenchange into that subdirectory:
earth:~ # mkdir /usr/local/myprinterfilter
earth:~ # cd /usr/local/myprinterfilter
Now, create a Bash script (basically a text file) named asciifilter with thecontents shown in File 21.
#!/bin/bash
# make a temporary fileINPUT="$(mktemp /tmp/asciifilter.$$.XXXXXX)"
# first store everything from stdin in $INPUT# to have the input as a regular filecat >$INPUT
# recode the INPUTrecode lat1..ibmpc $INPUT
93SuSE Linux – Enterprise Server 8
# add a form feed at the end of $INPUT# to get the last page out of the printerecho -en "\f" >>$INPUT
# send $INPUT to stdoutcat $INPUT
# remove the INPUT filerm $INPUT
File 21: /usr/local/myprinterfilter/asciifilter
Make this script executable for all users by entering
earth:~ # chmod -v a+x /usr/local/myprinterfilter/
earth:~ # chmod -v a+rx /usr/local/myprinterfilter/asciifilter
Now use lprsetup to create a new print queue (enter lprsetup --helpto see what the options do). The queue name used in our example is af , for“ascii filter.”
earth:~ # lprsetup -add af -lprng -device /dev/lp0 -raw -sf
In the af entry of /etc/printcap , look for the ifline, and replace /usr/lib/lpdfilter/bin/if with/usr/local/myprinterfilter/asciifilter , such that the com-plete af entry looks similar to File 22.
af:\:cm=lpdfilter drv= method=raw color=no:\:lp=/dev/lp0:\:sd=/var/spool/lpd/af:\:lf=/var/spool/lpd/af/log:\:af=/var/spool/lpd/af/acct:\:if=/usr/local/myprinterfilter/asciifilter:\:la@:mx#0:\:tr=:cl:sh:
File 22: /etc/printcap: Custom Filter Entry
Finally, stop then restart the print spooler with
earth:~ # rclpd stop
earth:~ # rclpd start
From now on, every user should be able to print through the new af queuewith the command lpr -Paf ascii-file .
94 Custom Print Filters for the LPRng Spooler

4Prin
terO
pe
ratio
n
The CUPS Printing System
Naming Conventions
Client or client program refers to a program that sends print jobs to a CUPSdaemon. A daemon is a local service that accepts print jobs either to forwardthem or to process them locally. Server refers to a daemon that is able to de-liver print data to one or more printers. Each server functions as a daemonat the same time. In most cases, however, there is no special distinction tomake between a server and a daemon, neither from the developer or fromthe user standpoint.
IPP and Server
Print jobs are sent to servers by CUPS-based programs, such as lpr ,kprinter , or xpp , and with the help of the Internet Printing Protocol, IPP. IPPis defined in RFC-2910 and RFC-2911 (see http://www.rfc-editor.org/rfc.html ). IPP is somewhat similar to HTTP with identical headers but dif-ferent content data. It also uses its own dedicated communication port 631,which has been registered with IANA (the Internet Authority for NumberAllocation).
Print data is transferred to a CUPS daemon, which is also acting as a localserver in most cases. Other daemons can be addressed using the environ-ment variable CUPS_SERVER.
With the help of the broadcast function of the CUPS daemon, locally man-aged printers can be made available elsewhere in the network (using UDPport 631). They then appear as print queues on all other daemons configuredto accept and use these broadcast packets. This makes it possible to “see”printers on other hosts after booting without configuring them locally, some-thing that may be quite useful in corporate networks. On the other hand,this feature may pose a security risk if the host is connected to the Internet.When enabling printer broadcasting, make sure the daemon broadcasts intothe local network only, access is limited to clients on the LAN, and the publicIP address (the one used for the Internet connection) is not within the localIP range. Otherwise, remote users relying on the same ISP would be able to“see” and use the broadcast printers as well. In addition to that, such broad-casts mean more network traffic so may increase connection costs. Preventa local printer from broadcasting IPP packets into the Internet by configur-ing the SuSEfirewall accordingly. No extra configuration is needed to receivebroadcast IPP packets. A broadcast address must only be specified for outgo-ing print jobs. This may be configured with YaST2, for example.
95SuSE Linux – Enterprise Server 8
IPP is used for the communication between a local and a remote CUPS dae-mon or server. More recent network printers also have built-in support forthis protocol (there are a number of models from different makers). Findmore information about this on the web pages of manufacturers or in yourprinter’s manual. IPP is also supported by Windows 2000 (and newer Mi-crosoft systems), although originally the implementation was somewhatflawed. These problems may have disappeared or it may be necessary to in-stall a Service Pack to repair them.
Configuration of a CUPS Server
There are many ways to set up a printer with CUPS and to configure thedaemon: with command-line tools, with YaST2, with the KDE Control Center,or even through a web browser interface. The following sections are limitedto the command-line tools and to YaST2.
CautionWhen using the web browser interface for CUPS configuration, beaware that there is a risk of compromising the root password.The password will be transmitted as plain text if the URL speci-fied includes the real host name. Therefore, you should always usehttp://localhost:631/ as the host address.
Caution
For the above reason, the CUPS daemon can only be accessed for admin-istration if addressed as localhost (which is identical to the IP address127.0.0.1 ) by default. Entering a different address returns an error mes-sage, even if it is valid.
To configure a locally connected printer, first set up a CUPS daemon onthe local host. To do so, install package cups together with the PPD filesprovided by SuSE as included in package cups-drivers and packagecups-drivers-stp . After that, start the server as root with the command/etc/rc.d/cups restart . If you configure it with YaST2, the above stepsare already covered by selecting CUPS as the printing system and installing aprinter.
PPD (PostScript Printer Description) files contain options for printer modelsin the form of a standard set of PostScript commands. They are required forprinter installation under CUPS. SuSE Linux Enterprise Server comes withprecompiled PPD files for many printers from a number of manufacturers.Manufacturers may also offer PPD files for their PostScript printers on web
96 The CUPS Printing System
4Prin
terO
pe
ratio
n
sites and installation CDs (often in an area called something like “WindowsNT Installation”).
You may also run a CUPS daemon locally to have all printers broadcast byother servers available on the local host although no printer is connectedlocally. Then easily use these printers from within KDE applications andOpenOffice, for example.
Broadcasting can be enabled either with YaST2 or by setting the Browsingdirective to On (the default) and the BrowseAddress directive to a sensi-ble value, like 192.168.255.255 , in the file /etc/cups/cupsd.conf .After that, tell the CUPS daemon explicitly to grant access to incomingpackets, either under <Location /printers> or, preferably, under<Location /> , where you would have to include a line like Allow Fromsome-host.mydomain (see file:/usr/share/doc/packages/cups/sam.html ). When finished editing the file, tell the daemon to reread its con-figuration by entering the command /etc/rc.d/cups reload as root .
Network Printers
Network printers are either printers that have a built-in print server inter-face (such as the JetDirect interface in some HP printers) or printers con-nected to a print server box or a router box, which is also enabled as a printserver. Windows machines offering printer shares are not print servers in thestrict sense (though CUPS can handle them easily in a way similar to printservers).
In most cases, a network printer supports the LPD protocol, which usesport 515 for communication. Check lpd availability with the command:netcat -z hostname.domain 515 && echo ok || echo failed
If such a server is available, CUPS can be configured to access it under a de-vice URI, an address in the form lpd://server/queue . Read about theconcept of device URIs in file:/usr/share/doc/packages/cups/sam.html .
However, you should probably not use the LPD protocol for a networkprinter, but rather the printer’s built-in port 9100 if available (HP, Kyocera,and many others) or port 35 (QMS). In this case, the device URI must havethe form socket://server:port/ .
To use printers made available through Windows, install packagesamba-client first and configure this package — enable the correct “Work-group” and make other settings. A device URI for Windows printers maybe specified in several ways, but the most frequent one has the syntax
97SuSE Linux – Enterprise Server 8
smb://user:password@host/printer . For other configurations, seefile:/usr/share/doc/packages/cups/sam.html and the man pagefor smbspool (man smbspool ).
If you have a small network consisting of several (Linux) machines and haveset up a print server for it, you will want to avoid configuring the printer foreach and every client host. Achieve this by enabling the broadcast functionof the daemon (see above). Thus, when you modify the configuration (for in-stance, to use the new standard paper size Letter ), it is sufficient to do thisonce on the server side (also see Specifying Options for Queues on page 103).Although the configuration is saved locally on the server side, it is propa-gated to all clients in the network with the help of the CUPS tools and theIPP protocol.
Internal CUPS Print Job Processing
Conversion into PostScript
Basically the CUPS daemon should be able to handle any file type, althoughPostScript is always the safest bet. CUPS processes non-PostScript files byidentifying the file type according to /etc/cups/mime.types first thenconverting the file into PostScript by calling the appropriate conversion toolfor it as defined in /etc/cups/mime.convs . With CUPS, files are con-verted into PostScript on the server side rather than on the client side (as isthe case with the traditional LPR-type spoolers). This feature was introducedto ensure that special conversion operations necessary for a particular printermodel are only performed on the corresponding server machine, which hasboth advantages and disadvantages.
Accounting
After conversion into PostScript, CUPS calculates the number of pages foreach print job. This is done with the help of pstops (an internal version ofthe program located at /usr/lib/cups/filter/pstops ). The accountingdata for print jobs are written to /var/log/cups/page_log . Each line inthis file contains the following information:
printer name (for example, lp )
user name (for example, root )
job number
date and time (in square brackets)
98 The CUPS Printing System
4Prin
terO
pe
ratio
n
current page number
number of copies
Other Filtering Programs
CUPS can also use other, special filters, if the corresponding printing optionshave been enabled. These are the most important ones:
psselect: Allows limiting the printout to certain pages of a document.
ps-n-up: Allows the printing of several pages on one sheet.
Read file:/usr/share/doc/packages/cups/sum.html on how to en-able the various options.
Conversion into the Printer-Specific Language
The next step in the CUPS printing mechanism is the conversion into theprinter-specific data format. To do so, CUPS runs a filter (e. g., /usr/lib/cups/filter/cupsomatic ), which should be specified in the PPD file in-stalled for the printer model. If this is not the case, the system assumes thatthe printer is a PostScript model. All device-dependent printing options, suchas the resolution and paper size, are processed by this script. Writing a cus-tom printer-specific filter script is not a trivial task and therefore best left to aspecialist.
Transferring Data to the Printer
As the final step, CUPS calls one of its back-ends. A back-end is a spe-cial filter that transfers print data to a device or to a network printer (seefile:/usr/share/doc/packages/cups/overview.html ). The back-endmaintains the communication with the device or network printer (as speci-fied through a device URI during configuration). If the back-end is usb , forexample, CUPS runs /usr/lib/cups/backend/usb , which in turn opens(and locks) the corresponding USB device file, initializes it, and passes thedata coming from the print filter. When the job is finished, the back-endcloses the device and unlocks it.
The following back-ends are currently available: parallel , serial ,usb , ipp , lpd , http , socket (included in package cups ). There are alsocanon and epson (included in cups-drivers-stp ) and smb (included insamba-client ).
99SuSE Linux – Enterprise Server 8
Filterless Printing
To print files without any filtering, use the command lpr with its -l optionor alternatively use the lp command with the -oraw option. However, print-ers mostly do not function when doing so, because the Ghostscript interpreteris not called (by cupsomatic , for example) or due to the lack of some otherimportant filtering action. Filtering may also be disabled with other CUPStools, which have similar options to achieve this.
Tips and Tricks
OpenOffice
When printing from OpenOffice applications, CUPS is supported such that arunning CUPS daemon is autodetected and queried for available printers andoptions (this is different from StarOffice 5.2, where it was still necessary toperform a setup for each printer). An extra CUPS setup from within OpenOf-fice should no longer be necessary.
If you want to use special CUPS programs for printing from OpenOffice, youshould not rely on graphical tools (such as kprinter or xpp ) to trigger theactual print command. Graphical tools may insist on opening their own di-alog windows and thus cause OpenOffice to hang whenever they are acti-vated.
Printing to or from Windows Machines
Printers connected to a Windows machine can be addressed through a de-vice URI such as smb://server/printer . If you want to print froma Windows machine to a CUPS server, change the Samba configurationfile /etc/samba/smb.conf to include the entry printing = cups orprinting = CUPS then restart the smb server. See file:/usr/share/doc/packages/cups/sam.html for details.
Setting up a Raw Printer
A raw printer can be set up by leaving out the PPD file during configuration,which effectively removes all filtering and accounting features from CUPS.However, this also means that data must already be available in the printer-specific format. Tests at SuSE have shown that this often does not work verywell, therefore we currently cannot recommend this setup.
100 The CUPS Printing System

4Prin
terO
pe
ratio
n
Custom Printer Options
Custom printer options (for example, a different default resolution) can bestored in the file ~/.lpoptions . If the corresponding printer is removed onthe server side, several CUPS tools, such as kprinter and xpp , assume theprinter is still there so allow you to select it. This leads to a number of prob-lems. You should probably open ~/.lpoptions and remove the “offending”lines from the file, at least if you are experienced enough with the printingsystem.
Compatibility with LPR-Type Printing Systems
CUPS can be configured to accept print jobs from LPR-type printing systems.Either use YaST2 to make the necessary changes to /etc/inetd.conf or usesome other means to remove the comment signs from the beginning of theprinter line in /etc/inetd.conf . To switch back to LPRng, reinsert thecomment sign.
Command-Line Tools for the CUPS PrintingSystem
The command-line tools of the CUPS printing system and their manual pagesare included in package cups-client . Further documentation is providedby the package cups and installed in /usr/share/doc/packages/cups ,in particular the CUPS Software Users Manual, found at /usr/share/doc/packages/cups/sum.html and the CUPS Software Administrators Manualat /usr/share/doc/packages/cups/sam.html If a CUPS daemon runslocally on your host, you should also be able to access the documentation athttp://localhost:631/documentation.html .
As a general rule, it is useful to remember that CUPS command-line toolssometimes require options be supplied in a certain order. Consult the corre-sponding manual pages if you are unsure about specific options.
Managing Local Queues
Printing Files
To print a file, enter a “System V style” print command like
newbie@earth:~ > lp -d 〈queuename〉 〈file 〉
101SuSE Linux – Enterprise Server 8
or a “Berkeley style” command like
newbie@earth:~ > lpr -P 〈queuename〉 〈file 〉
Additional information can be obtained with the man page for lpr(man lpr ) and the man page for lp (man lp ), as well as in the section“Using the Printing System” of the CUPS Software Users Manual (file:/usr/share/doc/packages/cups/sum.html#USING_SYSTEM ).
The -o parameter allows specification of a number of important options,some of which directly influence the type of printout. More informationis available in the man page for lpr (man lpr ) and the man page for lp(man lp ) as well as in the section “Standard Printer Options” of the CUPSSoftware Users Manual (file:/usr/share/doc/packages/cups/sum.html#STANDARD_OPTIONS).
Checking the Status
To check the status of a queue, enter the “System V style” commandlpstat -o 〈queuename〉 -p 〈queuename〉 or the “Berkeley style” com-mand lpq -P 〈queuename〉. If you do not specify a queue name, the com-mands will display information on all queues. With lpstat -o , the outputwill show all active print jobs in the form of a 〈queuename〉-〈jobnumber〉 list-ing.
With lpstat -l -o 〈queuename〉 -p 〈queuename〉, the output is moreverbose. lpstat -t or lpstat -l -t displays the maximum amount ofavailable information.
For additional information, consult the man page for lpq (man lpq ) andthe man page for lpstat (man lpstat ), and read the section “Using thePrinting System” of the CUPS Software Users Manual (file:/usr/share/doc/packages/cups/sum.html#USING_SYSTEM ).
Removing Jobs from the Queue
You can enter the “System V style” commandcancel 〈queuename〉- 〈jobnumber 〉 or the “Berkeley style” com-mand lprm -P 〈queuename〉 〈jobnumber 〉 to remove the jobwith the specified number from the specified queue. For addi-tional information, consult the man page for lprm (man lprm )and the man page for cancel (man cancel ) and read the sec-tion “Using the Printing System” of the CUPS Software Users Manual(file:/usr/share/doc/packages/cups/sum.html#USING_SYSTEM ).
102 Command-Line Tools for the CUPS Printing System
4Prin
terO
pe
ratio
n
Specifying Options for Queues
To see how to specify hardware-independent options that affect the typeof printout, read the section “Standard Printer Options” in the CUPS Soft-ware Users Manual (file:/usr/share/doc/packages/cups/sum.html#STANDARD_OPTIONS). The section “Saving Printer Options and De-faults”, which is found at file:/usr/share/doc/packages/cups/sum.html#SAVING_OPTIONS , explains how to save option settings.
Printer-specific options affecting the type of printout are stored in thePPD file for the queue in question. They can be listed with the commandlpoptions -p 〈queuename〉 -l . The output has the following form:
option/text: value value value ...
The currently active setting is marked with an asterisk (‘*’ ) to the left, forexample:
PageSize/Page Size: A3 *A4 A5 Legal LetterResolution/Resolution: 150 *300 600
According to the above output, the PageSize is set to A4 and theResolution to 300 dpi.
The command lpoptions -p 〈queuename〉 -o option=value changesthe value for the given option. With the above sample settings in mind, usethe command lpoptions -p 〈queuename〉 -o PageSize=Letter to setthe paper size for the specified queue to Letter .
If the above lpoptions command is entered by a normal user, the new set-tings are stored for that user only, in the file ~/.lpoptions . By contrast,if the lpoptions command is entered by root , the settings specified arestored in /etc/cups/lpoptions and become the default for all local usersof the queue. The PPD file is not touched by this, however.
If (and only if) you change the contents of a PPD file for a given queue, thenew settings apply to all users in the local network who print through thisqueue. The system administrator can change the defaults of a PPD file with acommand like:
earth:~ # lpadmin -p 〈queuename〉 -o option=value
Accordingly, to change the default paper size of the sample queue to Letterfor all users in the local network, enter the command:
earth:~ # lpadmin -p 〈queuename〉 -o PageSize=Letter
103SuSE Linux – Enterprise Server 8
Managing Remote Queues
In the examples below, replace printserver with the name or the IP ad-dress of your actual print server and queuename with the name of the re-mote queue on the print server. Given that this section only covers the ba-sic commands, you may also want to read Section Managing Local Queues onpage 101, which explains more options and includes pointers to additionalsources of information.
Printing Files
Print a file either with a “System V style” command likelp -d 〈queuename〉 -h printserver 〈filename 〉 or with a “Berkeleystyle” command like lpr -P 〈queuename〉@printserver 〈filename 〉. Inboth cases, this starts a print job for the specified queue on the given printserver.
The print server must have been configured to accept jobs on its queues fromyour host. In its default configuration, the CUPS daemon does not allow this,but you can easily enable the feature with the help of the YaST2 printer con-figuration module.
Checking the Status
Xheck the status of a remote queue on a printserver with the “System V style” commandlpstat -h printserver -o 〈queuename〉 -p 〈queuename〉.
Removing Jobs from the Queue
With the “System V style” commandcancel -h printserver 〈queuename〉- 〈jobnumber 〉, remove theprint job with the specified job number from the specified queue on the givenprint server.
Using Command-Line Tools for CUPS Troubleshooting
In the case of a broken print job, the troubleshooting procedure is basi-cally the same as the one described in Using Command-Line Tools for LPRngTroubleshooting on page 80, with the difference that CUPS requires differentcommands for the second step:
1. Remove all paper from the printer so the printer stops working.
104 Command-Line Tools for the CUPS Printing System
4Prin
terO
pe
ratio
n
2. Check which queue is currently printing by entering lpstat -o (orlpstat -h printserver -o , respectively) then remove the trouble-making print job with cancel 〈queuename〉- 〈jobnumber 〉 (or withcancel -h printserver 〈queuename〉- 〈jobnumber 〉, respectively).
3. If necessary, use the fuser command to kill leftover programs.
4. Do a complete reset of the printer.
Working with Ghostscript
Ghostscript is a program that accepts PostScript and PDF files as input thenconverts them into several other formats. Ghostscript includes a number ofdrivers to achieve this. These are sometimes also referred to as “devices.”
Ghostscript converts files in two steps:
1. PostScript data is rasterized — the graphical image is broken up intoa fine-grained raster of pixel dots. This step is performed indepen-dently from the Ghostscript driver used later. The finer the raster (thehigher the resolution), the higher the output quality. On the otherhand, doubling the resolution both horizontally and vertically (for ex-ample) means that the number of pixels must quadruple. Accordingly,the computer needs four times the CPU time and amount of memory todouble the resolution.
2. The dot matrix that makes up the image is converted into the desiredformat (a printer language, for example) with the help of a Ghostscriptdriver.
Ghostscript can also process PostScript files to display them on screen or con-vert them into PDF documents.
To display PostScript files on screen, you should probably use the programgv (rather than relying on bare Ghostscript commands), which gives a moreconvenient graphical interface to work with Ghostscript.
Ghostscript is a very big program package and has a large number ofcommand-line options. Apart from the information available with the theman page for gs (man gs), the most important part of the documenta-tion is the list of Ghostscript drivers, which is found in /usr/share/doc/packages/ghostscript/catalog.devices and the files /usr/share/
105SuSE Linux – Enterprise Server 8
doc/packages/ghostscript/doc/index.html , /usr/share/doc/packages/ghostscript/doc/Use.htm , /usr/share/doc/packages/ghostscript/doc/Devices.htm , /usr/share/doc/packages/ghostscript/doc/hpdj/gs-hpdj.txt , /usr/share/doc/packages/ghostscript/doc/hpijs/hpijs_readme.html , and /usr/share/doc/packages/ghostscript/doc/stp/README .
When executed from the command line, Ghostscript processes any optionsand then presents you with its own GS>prompt. Exit from this dialog modeby entering quit .
If you enter gs -h , Ghostscript displays its most important options andlists the available drivers. This listing, however, only includes genericdriver names, even for drivers that support many different models, suchas uniprint or stp . The parameter files for uniprint and the modelssupported by stp are explicitly named in /usr/share/doc/packages/ghostscript/catalog.devices .
Sample Operations with Ghostscript
Find a number of PostScript examples in the directory /usr/share/doc/packages/ghostscript/examples . The “color circle” in /usr/share/doc/packages/ghostscript/examples/colorcir.ps is well suited fortest printouts.
Displaying PostScript under X
Under X, the graphical environment, use gs to view a PostScript file onscreen. To do so, enter the following command as a single line, omitting thebackslash (‘\’ ):
newbie@earth:~ > gs -r60 \/usr/share/doc/packages/ghostscript/examples/colorcir.ps
In the above command, the -r options specifies the resolution, which mustbe appropriate for the output device (printer or screen). Test the effect ofthis option by specifying a different value, for example, -r30 . To close thePostScript window, press
�� ��Ctrl +�� ��C in the terminal window from which gs
was started.
Conversion into PCL5e
The conversion of a PostScript file into the printer-specific format of a PCL5eor PCL6 printer can be achieved with a command like
106 Working with Ghostscript
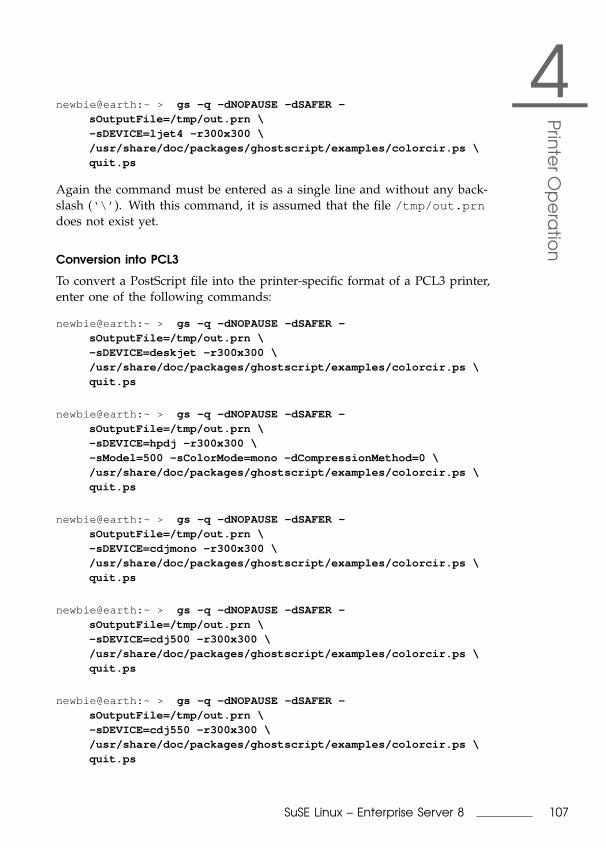
4Prin
terO
pe
ratio
n
newbie@earth:~ > gs -q -dNOPAUSE -dSAFER -sOutputFile=/tmp/out.prn \-sDEVICE=ljet4 -r300x300 \/usr/share/doc/packages/ghostscript/examples/colorcir.ps \quit.ps
Again the command must be entered as a single line and without any back-slash (‘\’ ). With this command, it is assumed that the file /tmp/out.prndoes not exist yet.
Conversion into PCL3
To convert a PostScript file into the printer-specific format of a PCL3 printer,enter one of the following commands:
newbie@earth:~ > gs -q -dNOPAUSE -dSAFER -sOutputFile=/tmp/out.prn \-sDEVICE=deskjet -r300x300 \/usr/share/doc/packages/ghostscript/examples/colorcir.ps \quit.ps
newbie@earth:~ > gs -q -dNOPAUSE -dSAFER -sOutputFile=/tmp/out.prn \-sDEVICE=hpdj -r300x300 \-sModel=500 -sColorMode=mono -dCompressionMethod=0 \/usr/share/doc/packages/ghostscript/examples/colorcir.ps \quit.ps
newbie@earth:~ > gs -q -dNOPAUSE -dSAFER -sOutputFile=/tmp/out.prn \-sDEVICE=cdjmono -r300x300 \/usr/share/doc/packages/ghostscript/examples/colorcir.ps \quit.ps
newbie@earth:~ > gs -q -dNOPAUSE -dSAFER -sOutputFile=/tmp/out.prn \-sDEVICE=cdj500 -r300x300 \/usr/share/doc/packages/ghostscript/examples/colorcir.ps \quit.ps
newbie@earth:~ > gs -q -dNOPAUSE -dSAFER -sOutputFile=/tmp/out.prn \-sDEVICE=cdj550 -r300x300 \/usr/share/doc/packages/ghostscript/examples/colorcir.ps \quit.ps
107SuSE Linux – Enterprise Server 8
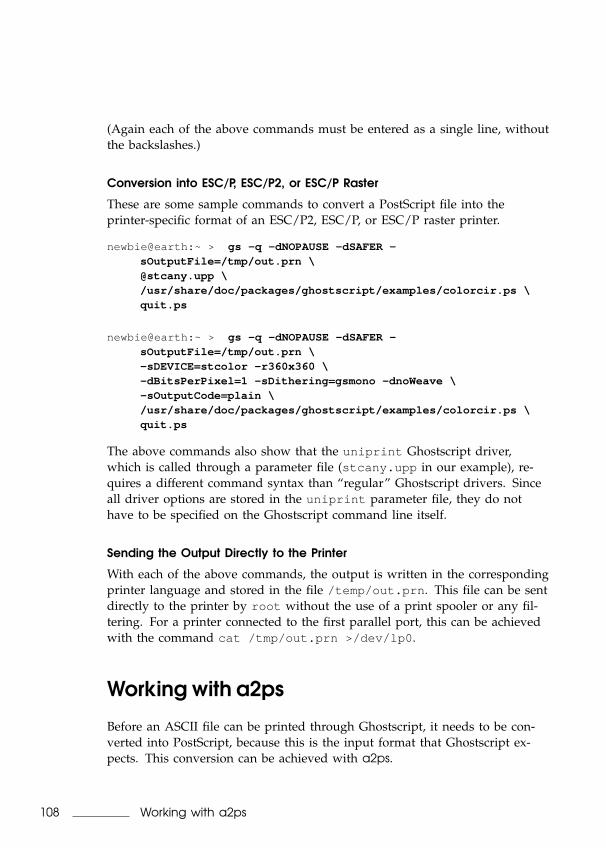
(Again each of the above commands must be entered as a single line, withoutthe backslashes.)
Conversion into ESC/P, ESC/P2, or ESC/P Raster
These are some sample commands to convert a PostScript file into theprinter-specific format of an ESC/P2, ESC/P, or ESC/P raster printer.
newbie@earth:~ > gs -q -dNOPAUSE -dSAFER -sOutputFile=/tmp/out.prn \@stcany.upp \/usr/share/doc/packages/ghostscript/examples/colorcir.ps \quit.ps
newbie@earth:~ > gs -q -dNOPAUSE -dSAFER -sOutputFile=/tmp/out.prn \-sDEVICE=stcolor -r360x360 \-dBitsPerPixel=1 -sDithering=gsmono -dnoWeave \-sOutputCode=plain \/usr/share/doc/packages/ghostscript/examples/colorcir.ps \quit.ps
The above commands also show that the uniprint Ghostscript driver,which is called through a parameter file (stcany.upp in our example), re-quires a different command syntax than “regular” Ghostscript drivers. Sinceall driver options are stored in the uniprint parameter file, they do nothave to be specified on the Ghostscript command line itself.
Sending the Output Directly to the Printer
With each of the above commands, the output is written in the correspondingprinter language and stored in the file /temp/out.prn . This file can be sentdirectly to the printer by root without the use of a print spooler or any fil-tering. For a printer connected to the first parallel port, this can be achievedwith the command cat /tmp/out.prn >/dev/lp0 .
Working with a2ps
Before an ASCII file can be printed through Ghostscript, it needs to be con-verted into PostScript, because this is the input format that Ghostscript ex-pects. This conversion can be achieved with a2ps.
108 Working with a2ps
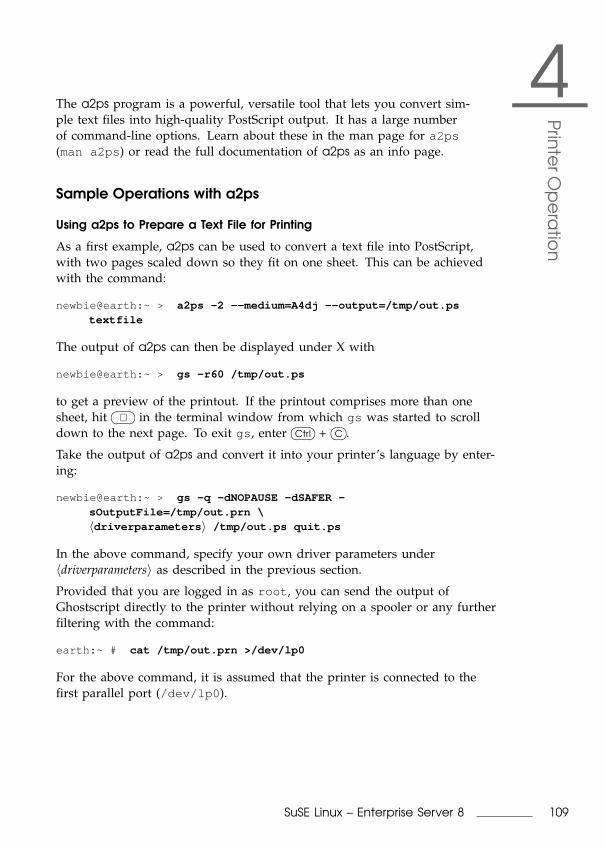
4Prin
terO
pe
ratio
n
The a2ps program is a powerful, versatile tool that lets you convert sim-ple text files into high-quality PostScript output. It has a large numberof command-line options. Learn about these in the man page for a2ps(man a2ps) or read the full documentation of a2ps as an info page.
Sample Operations with a2ps
Using a2ps to Prepare a Text File for Printing
As a first example, a2ps can be used to convert a text file into PostScript,with two pages scaled down so they fit on one sheet. This can be achievedwith the command:
newbie@earth:~ > a2ps -2 --medium=A4dj --output=/tmp/out.pstextfile
The output of a2ps can then be displayed under X with
newbie@earth:~ > gs -r60 /tmp/out.ps
to get a preview of the printout. If the printout comprises more than onesheet, hit
�� ��↵ in the terminal window from which gs was started to scrolldown to the next page. To exit gs , enter
�� ��Ctrl +�� ��C .
Take the output of a2ps and convert it into your printer’s language by enter-ing:
newbie@earth:~ > gs -q -dNOPAUSE -dSAFER -sOutputFile=/tmp/out.prn \〈driverparameters 〉 /tmp/out.ps quit.ps
In the above command, specify your own driver parameters under〈driverparameters〉 as described in the previous section.
Provided that you are logged in as root , you can send the output ofGhostscript directly to the printer without relying on a spooler or any furtherfiltering with the command:
earth:~ # cat /tmp/out.prn >/dev/lp0
For the above command, it is assumed that the printer is connected to thefirst parallel port (/dev/lp0 ).
109SuSE Linux – Enterprise Server 8
Printing Business Cards
To demonstrate the possibilities of a2ps, this section shows how to use theprogram to make and print a stack of simple business cards. First, create aplain text file called card that contains the necessary data as shown in 23.
Title FirstName LastNameStreetPostalCode CityE-mail: user@domainPhone: AreaCode-Number-Extension
File 23: card: Business Card Data File
Append a form feed character (\f) to this to ensure that a2ps treats each cardas an individual page.
newbie@earth:~ > echo -en "\f" >>card
Now, multiply the contents of the file to have a set of 10 cards in one cardsfile:
newbie@earth:~ > for i in $(seq 1 10) ; do cat card >>cards ;done
Use cat cards | wc -L to find out how many characters the longest lineof cards contains.
Now do the actual PostScript conversion. We want ten cards per sheetprinted in two columns with five cards each with a box or frame aroundthem. We also want to use the maximum font size as allowed by the longestline and no additional header or footer lines. All this can be done with thecommand:
newbie@earth:~ > a2ps -i -j --medium=a4dj --columns=2 --rows=5 \--no-header --chars-per-line=number --output=cards.ps cards
This command must be entered on a single line without the backslash (‘\’ ).For number , fill in the number of characters in the longest line as determinedabove.
Finally, preview the printout with gs -r60 cards.ps then send the outputto the printer as described in the previous section. Alternatively, print the filein the normal way with lpr card.ps .
110 Working with a2ps
4Prin
terO
pe
ratio
n
Reformatting PostScript with psutils
To use one of the reformatting programs described below, generate aPostScript input file by printing to a file, such as /tmp/in.ps , from withinan application. Check with file /tmp/in.ps to see whether the generatedfile is really in PostScript format.
The package psutils includes a number of programs to reformat PostScriptdocuments. The program pstops , in particular, allows you to perform ex-tensive transformations. Details can be obtained in the man page for pstops(man pstops ). The package psutils is not included in the standard setupof SuSE Linux Enterprise Server, so you may need to install it.
The following commands only work if the application program has createda PostScript file which is appropriate for such reformatting operations. Thisshould mostly be the case, but there are some applications that cannot gener-ate PostScript files in the required way.
psnup
The command psnup -2 /tmp/in.ps /tmp/out.ps takes /tmp/in.psas its input and transforms it into the output file /tmp/out.ps in such away that two pages are printed side by side on one sheet. However, with thecontents of two pages being included on one, the complexity of the resultingdocument is much higher and some PostScript printers may fail to print it,especially if they are equipped with only a small amount of standard mem-ory.
pstops
The program pstops allows you to change the size and posi-tioning of PostScript documents. For example, the commandpstops ’1:[email protected](2cm,3cm)’ /tmp/in.ps /tmp/out.ps scales thedocument by a factor of 0.8, which effectively scales down an A4 page fromabout 21x30 cm to about 17x24 cm. This, in turn, leaves an additional mar-gin of about 4 cm on the right and 6 cm on the top. Therefore, the documentis also shifted by 2 cm towards the right and 3 cm towards the top to getroughly the same margins everywhere.
This pstops command shrinks the page by quite an amount and also pro-vides for relatively wide margins, so it should generate a page that is almostalways printable — even with those applications that are far too optimistic
111SuSE Linux – Enterprise Server 8
about the limits set by your printer. You can use a command like the abovefor those cases where the application’s printer output in /etc/in.ps is toolarge for the printable area.
As another example, the commands
newbie@earth:~ > pstops ’1:[email protected](2cm,3cm)’ /tmp/in.ps/tmp/out1.ps
newbie@earth:~ > psnup -2 /tmp/out1.ps /tmp/out.ps
place two heavily scaled-down pages on one sheet, leaving quite a lot ofspace between them. To improve this, include instructions to position eachof the pages individually:
newbie@earth:~ > pstops ’2:[email protected](20cm,2cm)[email protected](20cm,15cm)’ \/tmp/in.ps /tmp/out.ps
The above command needs to be entered as a single line without the ‘\’ .
The following is a step-by-step explanation of the page specifications as ex-pressed by pstops ’2:[email protected](20cm,2cm)[email protected](20cm,15cm)’ :
2:0 ... +1 Two pages are merged into one and pages are counted modulo 2,which means that each page gets the logical number 0 or 1, respec-tively.
[email protected](20cm,2cm) Pages with the logical number 0 are turned to the left by90 degrees and scaled down by a factor of 0.6. They are then shifted tothe right by 20 cm and to the top by 2 cm.
[email protected](20cm,15cm) To match the above reformatting, pages with the logicalnumber 1 are turned to the left by 90 degrees, and scaled down by afactor of 0.6. They are then shifted to the right by 20 cm and to the topby 15 cm.
Visualization of the pstops Example
In the case of PostScript files, the origin of coordinates is located in the bot-tom left corner of a page in normal position, as indicated by the ‘+’ . This isa page with the logical number 0, which has three lines of text:
112 Reformatting PostScript with psutils

4Prin
terO
pe
ratio
n
+
After turning it to the left by 90 degrees, it looks like this:
+
Now, scale it by a factor of 0.6:
+
Finally, move it to the right by 20 cm and up by 2 cm:
+
113SuSE Linux – Enterprise Server 8
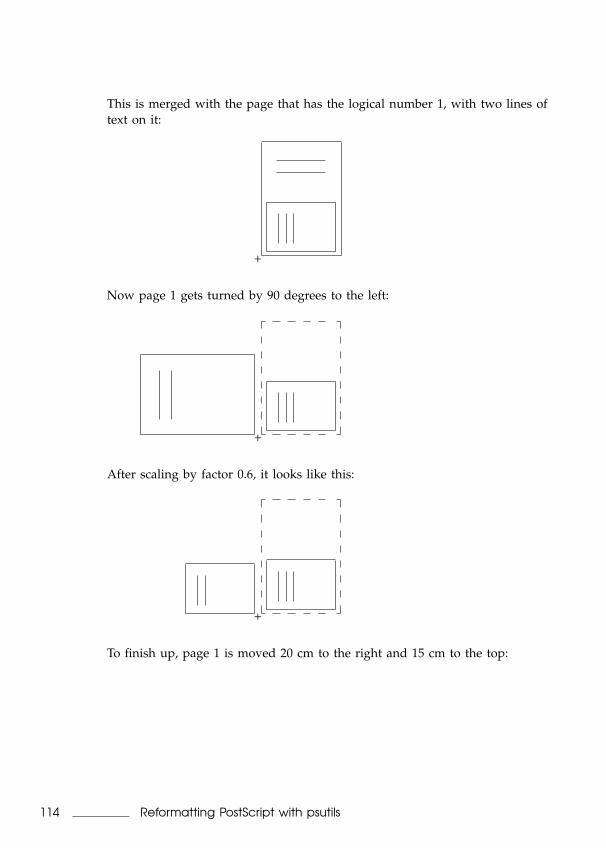
This is merged with the page that has the logical number 1, with two lines oftext on it:
+
Now page 1 gets turned by 90 degrees to the left:
+
After scaling by factor 0.6, it looks like this:
+
To finish up, page 1 is moved 20 cm to the right and 15 cm to the top:
114 Reformatting PostScript with psutils
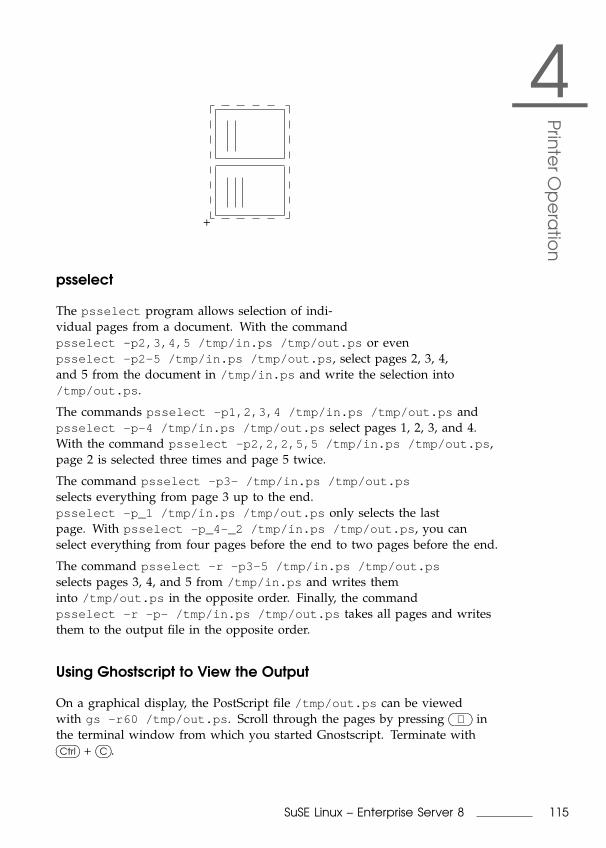
4Prin
terO
pe
ratio
n
+
psselect
The psselect program allows selection of indi-vidual pages from a document. With the commandpsselect -p2,3,4,5 /tmp/in.ps /tmp/out.ps or evenpsselect -p2-5 /tmp/in.ps /tmp/out.ps , select pages 2, 3, 4,and 5 from the document in /tmp/in.ps and write the selection into/tmp/out.ps .
The commands psselect -p1,2,3,4 /tmp/in.ps /tmp/out.ps andpsselect -p-4 /tmp/in.ps /tmp/out.ps select pages 1, 2, 3, and 4.With the command psselect -p2,2,2,5,5 /tmp/in.ps /tmp/out.ps ,page 2 is selected three times and page 5 twice.
The command psselect -p3- /tmp/in.ps /tmp/out.psselects everything from page 3 up to the end.psselect -p_1 /tmp/in.ps /tmp/out.ps only selects the lastpage. With psselect -p_4-_2 /tmp/in.ps /tmp/out.ps , you canselect everything from four pages before the end to two pages before the end.
The command psselect -r -p3-5 /tmp/in.ps /tmp/out.psselects pages 3, 4, and 5 from /tmp/in.ps and writes theminto /tmp/out.ps in the opposite order. Finally, the commandpsselect -r -p- /tmp/in.ps /tmp/out.ps takes all pages and writesthem to the output file in the opposite order.
Using Ghostscript to View the Output
On a graphical display, the PostScript file /tmp/out.ps can be viewedwith gs -r60 /tmp/out.ps . Scroll through the pages by pressing
�� ��↵ inthe terminal window from which you started Gnostscript. Terminate with�� ��Ctrl +
�� ��C .
115SuSE Linux – Enterprise Server 8
As a graphical front-end for Ghostscript, use gv . To view the above-mentioned output file, for example, enter gv /tmp/out.ps . The programis especially useful whenever there is a need to zoom in or out a documentor to view it in landscape orientation (although this has no effect on the filecontents). It can also be used to select individual pages, which then can beprinted directly from within gv .
ASCII Text Encoding
In plain text files, each character is represented as a certain numeric code.Characters and their matching codes are defined in code tables. Dependingon the code tables used by an application and by the print filter, the samecode may be represented as one character on the screen and as another onewhen printed.Standard character sets only comprise the range from code 0 to code 255. Ofthese, codes 0 through 127 represent the pure ASCII set, which is identicalfor every encoding. Iit comprises all “normal” letters as well as digits andsome special characters, but none of the country-specific special characters.Codes 128 through 255 of the ASCII set are reserved for country-specific spe-cial characters, such as umlauts.However, the number of special characters in different languages is muchlarger than 128. Therefore, codes 128 to 255 are not the same for each coun-try. Rather, the same code may represent different country-specific characters,depending on the language used.The codes for Western European languages are defined by ISO-8859-1 (alsocalled Latin 1). The ISO-8859-2 encoding (alias Latin 2) defines the charactersets for Central and Eastern European languages. Code 241 (octal), for exam-ple, is defined as the (Spanish) inverted exclamation mark in ISO-8859-1, butthe same code 241 is defined as an uppercase A with an ogonek in ISO-8859-2. The ISO-8859-15 encoding is basically the same as ISO-8859-1, but, amongother things, it includes the Euro currency sign, defined as code 244 (octal).
A Sample Text
The commands below must be entered as a single line without any of thebackslashes (‘\’ ) at the end of displayed lines.Create a sample text file with:
newbie@earth:~ > echo -en "\rCode 241(octal): \\241\r\nCode 244(octal): \244\r\f" >example
116 ASCII Text Encoding
4Prin
terO
pe
ratio
n
Visualizing the Sample with Different Encodings
Under X, enter these commands to open three terminals:
newbie@earth:~ > xterm -fn -*-*-*-*-*-*-14-*-*-*-*-*-iso8859-1 \-title iso8859-1 &
newbie@earth:~ > xterm -fn -*-*-*-*-*-*-14-*-*-*-*-*-iso8859-15\-title iso8859-15 &
newbie@earth:~ > xterm -fn -*-*-*-*-*-*-14-*-*-*-*-*-iso8859-2 \-title iso8859-2 &
Use the terminals to display the sample file in each of them withcat example . The “iso8859-1” terminal should display code 241 as theinverted (Spanish) exclamation mark and code 244 as the general currencysymbol. The “iso8859-15” terminal should display code 241 as the inverted(Spanish) exclamation mark, and code 244 as the Euro symbol. The “iso8859-2” terminal should display code 241 as an uppercase A with an ogonek andcode 244 as the general currency symbol.
Due to the fact that character encodings are defined as fixed sets, it is notpossible to combine all the different country-specific characters with eachother in an arbitrary way. For example, the A with an ogonek cannot be usedtogether with the Euro symbol in the same text file.
To obtain more information (including a correct representation of each char-acter), consult the corresponding man page in each terminal — the man pagefor iso_8859-1 (man iso_8859-1 ) in the “iso8859-1” terminal, the manpage for iso_8859-15 (man iso_8859-15 ) in the “iso8859-15” terminal,and the man page for iso_8859-2 (man iso_8859-2 ) in the “iso8859-2”terminal.
Printing the Sample with Different Encodings
When printed, ASCII text files, such as the example file, are treated in a sim-ilar way according to the encoding set for the print queue used. However,word processor documents should not be affected by this, because their printoutput is in PostScript format (not ASCII).
Consequently, when printing the above example file, characters are repre-sented according to the encoding set for ASCII files in your printing system.You can also convert the text file into PostScript beforehand to change thecharacter encoding as needed. The following a2ps commands achieve thisfor the example file:
117SuSE Linux – Enterprise Server 8
newbie@earth:~ > a2ps -1 -X ISO-8859-1 -o example-ISO-8859-1.psexample
newbie@earth:~ > a2ps -1 -X ISO-8859-15 -o example-ISO-8859-15.ps example
newbie@earth:~ > a2ps -1 -X ISO-8859-2 -o example-ISO-8859-2.psexample
Then print the files example-ISO-8859-1.ps , example-ISO-8859-15.ps , and example-ISO-8859-2.ps to get printouts with different encod-ings.
Printing in a TCP/IP Network
Find extensive documentation about the LPRng printing system in theLPRng-Howto in /usr/share/doc/packages/lprng/LPRng-HOWTO.htmland on the CUPS printing system in the CUPS Software Administrators Manualin /usr/share/doc/packages/cups/sam.html .
Terminology
Print serverPrint server refers to a complete, dedicated printing host with the re-quired CPU power, memory, and hard disk space.
Print server box, network printer
Print server box refers to a computer with relatively limited re-sources, which is equipped with both a TCP/IP network link anda local printer port. This includes “router boxes” with a built-inprinter port.
A network printer is a printer device with its own TCP/IP port. Ba-sically, it is a printer with an integrated print server box. Networkprinters and print server boxes are handled in essentially the sameway.
There is an important distinction to be made between a network printeror a print server box on the one hand and a true print server on theother. As a somewhat special case, there are large printer devicesthat have a complete print server included with them to make themnetwork-capable. These are treated like print servers because clientswill talk to the printer only through the server and not directly.
118 Printing in a TCP/IP Network
4Prin
terO
pe
ratio
n
TCP/IP Printing Protocols
The following lists the different methods that can be used to implementprinting on a TCP/IP network. The decision of which one to use does notso much depend on the hardware, but more on the possibilities offered byeach protocol. Accordingly, the YaST2 printer configuration asks you to selecta protocol and not a hardware device when setting up network printing.
Printing over the LPD protocolPrint jobs are forwarded to a remote queue over the LPD protocol. Toallow this, the protocol must be supported both on the client and theserver side.
Client side
LPRngThe lpd of LPRng supports the LPD protocol. For remoteprinting, a local queue must be set up through which the locallpd can forward the print job to a remote queue, using theLPD protocol.LPRng also allows network printing without a local lpd run-ning. With this method, the lpr included in package lprnguses the protocol to directly forward a print job to the remotequeue.
CUPSCUPS has support for the LPD protocol, but only through theCUPS daemon cupsd . To enable this, a local queue must beset up through which the print job can be relayed by the localcupsd to the remote queue using the LPD protocol.
Server side
Print serverThe printer must be connected locally to the print server andthe print server itself must support the LPD protocol.
Network printer or print server boxThe print server box or network printer must support theLPD protocol (which should normally be the case).
Printing over the IPP protocolPrint jobs are forwarded to a remote queue over the IPP protocol. Toallow this, the protocol must be supported both on the client and theserver side.
119SuSE Linux – Enterprise Server 8
Client side
LPRngLPRng does not yet support the IPP protocol.
CUPSCUPS supports the IPP protocol through cupsd . For thismethod, a local queue must be set up, which can be used bycupsd to forward print jobs to a remote queue using the IPPprotocol.CUPS also allows network printing without a local cupsdrunning. With this method, the program lp included in pack-age cups-client or the programs xpp or kprinter use theIPP protocol to directly forward a print job to a remote queue.
Server side
Print serverThe printer must be connected locally to the print server andthe print server itself must support the IPP protocol.
Network printer or print server boxThe print server box or network printer must support the IPPprotocol, which is only the case with some recent devices.
Direct remote printing through TCP socketsWith this method, there is no print job that gets relayed to a remotequeue. No protocol capable of handling print jobs and queues is in-volved in the process (neither LPD nor IPP). Rather, printer-specificdata is transferred to a remote TCP port via TCP sockets, which mustbe supported both on the client and on the server side.
Client side
LPRng and lpdfilterThe lpd of the LPRng printing system supports streamingdata directly via TCP sockets. To enable this, there must be alocal queue that can be used by the local lpd to convert thedata of each print job into the printer-specific format (with thehelp of lpdfilter) and to transfer them to the remote TCP portvia TCP sockets after conversion.With LPRng, it is also possible to implement this methodwithout a local lpd . This requires that the lpr (included inpackage lprng ) is called with the -Y option to transfer datadirectly to the remote TCP port via TCP sockets. For detailson this, see the man page for lpr (man lpr ). However, there
120 Printing in a TCP/IP Network
4Prin
terO
pe
ratio
n
is no print filter involved at all, which means that print datamust be in the printer-specific format from the beginning.
CUPSCUPS supports the direct transfer of print data via TCP sock-ets, but only if cupsd is running. To enable this method,there must be a local queue that can be used by the localcupsd to convert the data of each print job into the printer-specific format and to stream data to the remote TCP port viaTCP sockets after conversion.
Server side
Network printer or print server boxPrint server boxes and network printers normally keep a TCPport open to transfer a data stream in the printer-specific for-mat directly to the printer.HP network printers, in particular, HP JetDirect print serverboxes, use port 9100 as the default for this kind of datastream. JetDirect print server boxes with two or three localprinter ports listen on TCP ports 9100, 9101, and 9102. Thesame ports are used by many other print server boxes. If youare not sure about this, ask the manufacturer or consult theprinter manual to find out which port is used by your de-vice for raw socket printing. Additional information aboutthis can be found in the LPRng-Howto (file:/usr/share/doc/packages/lprng/LPRng-HOWTO.html ), especiallyfile:/usr/share/doc/packages/lprng/LPRng-HOWTO.html#SECNETWORK, file:/usr/share/doc/packages/lprng/LPRng-HOWTO.html#SOCKETAPI , and file:/usr/share/doc/packages/lprng/LPRng-HOWTO.html#AEN4858 .
Printing over the SMB protocolWith this method, print jobs are converted into the printer-specific for-mat first then transferred via the SMB protocol to a remote share thatrepresents a remote printer. Both the client and the server side mustsupport the SMB protocol. Although neither LPRng and lpdfilter orCUPS have direct support for the SMB protocol, they can support it in-directly with the help of smbclient and smbspool , respectively. Bothprograms are included in package samba-client .
Client side
121SuSE Linux – Enterprise Server 8
LPRng and lpdfilterLPRng needs lpdfilter to support the SMB protocol. Theremust be a local queue through which the local lpd can con-vert the print job into the printer-specific format with the helpof lpdfilter. The latter then forwards the data with the help ofsmbclient to the remote share, using the SMB protocol.
CUPSThere must be a local queue that can be used by the localcupsd to convert data into the printer-specific format. Afterthat, data is transferred to the remote share by smbspool us-ing the SMB protocol.
Server side
SMB print serverThe printer must be connected to an SMB print server. Thelatter is usually a DOS or Windows machine, although itcould also be a Samba server powered by Linux.The SMB print server must support the SMB protocol andaccess to the printer (to the corresponding share) must havebeen enabled on the server side.
Filtering for Network Printers
This section describes the possible ways to implement filtering for networkprinters. Independently from the filtering method used, there should be ex-actly one point in the entire process chain where the input file is convertedinto the final format — the one your printer requires to put the data on pa-per (PostScript, PCL, ESC/P).
The conversion must be accomplished somehow somewhere by a printer fil-ter. It should run on a machine with sufficient CPU power and disk spaceto handle the task. This is especially true when using Ghostscript to convertdata for high-resolution color and photo printouts on non-PostScript devices.Network printers and print server boxes usually do not have any built-in fil-tering capabilities, so they mostly require a print server.
If your printer is a PostScript model, you may be able to do without a printserver. Also, PostScript printers are often able to autodetect whether their in-put is in ASCII or PostScript format and switch accordingly. If you expectto print ASCII texts with country-specific characters in them, it may be nec-essary to set the printer to a certain character encoding and to use a2ps toconvert the ASCII input into a PostScript file with that encoding. However,as long as the printing volume is not too high, a PostScript printer does not
122 Printing in a TCP/IP Network
4Prin
terO
pe
ratio
n
usually require a dedicated print server as most applications are able to pro-duce ASCII or PostScript output.
Network printers and print server boxes, on the other hand, often do nothave the resources to handle higher printing volumes on their own. You willthen need a dedicated print server with sufficient disk space to store all theprint jobs queued temporarily.
Prerequisites
The printer model must be supported by SuSE Linux Enterprise Server, be-cause print data must be converted into the printer-specific language by afilter, as described for local printers (see Manual Configuration of Local PrinterPorts on page 69 and the subsequent sections).
Terminology
A client is the host on which the print job is issued.
Print server box also refers to network printers (and not only printserver boxes in the narrower sense), because both are treated the sameway.
Print server refers to a central, dedicated host that handles all print jobsfrom all the network’s clients. A print server can either send data to alocally connected printer or transfer it to print server boxes through aTCP/IP network.
Forwarding (queue) refers to a queue that forwards or relays print jobs toremote queues, but does not do any filtering.
Filter (queue) refers to a queue that filters (converts) print jobs.
A prefilter (queue) is a queue that filters print jobs then transfers the re-sulting data to a forwarding queue on the same host.
A forwarding filter (queue) is a queue that filters print jobs and forwardsthe resulting data to a remote queue.
Streaming filter (queue) refers to a queue that filters print jobs thenstreams the resulting data to a remote TCP port.
The above terms may be combined with LPD(-based), IPP(-based), orSMB(-based) to indicate the protocol used in conjunction with themethod.
123SuSE Linux – Enterprise Server 8
Possible Filtering Methods for Network Printing
Print server box with filtering by clientThe filtering is performed on the client side. A complete printing sys-tem must run on the client — either the LPRng and lpdfilter system orthe complete CUPS printing system.
Client using the LPD protocol (LPRng or CUPS)
Prefilter followed by forwarding (LPRng only)This is the classic remote printing solution involving twoqueues on the client side, one for filtering and one for for-warding.
1. Client: The prefilter queue converts the print job into theprinter format then transfers the data to the forwardingqueue as a new print job.
2. Client: The forwarding queue relays the print data to theprint server box (LPD-based forwarding).
3. LPD print server box: The print data is transferred to theprinter.
Forwarding filter (LPRng or CUPS) With this method, filteringand forwarding is performed by one queue. If used withthe LPRng printing system, the method is also called “lprbounce” or “lpd bounce”.
1. Client: The print job is converted into the printer formatand forwarded to the print server box (LPD-based for-warding filter).
2. LPD print server box: The print data is transferred to theprinter.
Client using the IPP protocol (CUPS only)
Forwarding filter (CUPS only)
1. Client: The print job is converted into the printer formatand forwarded to the print server box (IPP-based forward-ing filter).
2. IPP print server box: The print data is transferred to theprinter.
Client using TCP socket (LPRng or CUPS)
Streaming filter (LPRng or CUPS)
1. Client: The print job is converted into the printer formatand streamed to the print server box (streaming filter).
124 Printing in a TCP/IP Network
4Prin
terO
pe
ratio
n
2. Print server box: The print data is transferred to theprinter.
Print server box with filtering by print serverBecause the filtering is performed on the print server, the latter mustrun a complete printing system (including the corresponding daemon),either the LPRng/lpdfilter or the CUPS printing system.
On the other hand, running a complete printing system on the clientside is not strictly required (because the server does all the filtering),provided the client issues print jobs with the lpr command (in the caseof LPRng) or with lp , xpp , or kprinter (in the case of CUPS) andjobs are directly sent to the print server. In either case, the print servermust support the protocol used by the client (either LPD or IPP).
When the print server receives a print job, it processes it in the sameway as described above for a client. The client may use one protocolto send print jobs to the print server and the latter another protocol tosend data to the print server box.
Client using the LPD protocol (LPRng only)
Direct print command (LPRng only)1. Client: Sends the print job directly to the print server
with the lpr command.2. LPD print server: Converts the print job into the printer
format and sends the data to the print server box.
Forwarding (LPRng only)1. Client: Forwards the print job to the print server (LPD-
based forwarding).2. LPD print server: Converts the print job into the printer
format and sends the data to the print server box.
Client using the IPP protocol (CUPS only)
Direct print command (CUPS only)1. Client: Sends the print job directly to the print server us-
ing the lp command or the programs xpp or kprinter .2. IPP print server: Converts the print job into the printer
format and sends the data to the print server box.
Printer connected to a print server with filtering by the print serverIf the print server has a local printer connected to it, the procedure isthe same as described under Print server box with filtering by print server,with the difference that it sends the data to the printer.
125SuSE Linux – Enterprise Server 8
Printer connected to a print server with filtering by the clientThis is probably not such a good idea, regardless of whether you havean LPD or an IPP print server. To implement this, you would need toinstall and configure a complete printing system on each client host.As a better solution, consider a printer connected to a print server withfiltering by the print server.
SMB print server with filtering by clientFiltering cannot be easily implemented on an SMB print server. In thatsense, an SMB print server is treated in the same way as a print serverbox.
Client using the SMB protocol (LPRng or CUPS)
SMB-based forwarding filter (LPRng or CUPS)1. Client: Converts the print job into the printer format and
forwards the data to the SMB print server (SMB-basedforwarding filter).
2. SMB print server: Sends the data to the printer.
Remote Printer Troubleshooting
Checking the TCP/IP networkFirst, make sure everything is in order with the TCP/IP network ingeneral, including name resolution (see Chapter Linux in the Networkon page 195).
Checking the filter configurationConnect the printer to the first parallel port of your computer. Totest the connection, initially set it up as a local printer to exclude anynetwork-related problems. Then find the correct Ghostscript driver andthe other configuration options until the printer works without prob-lem.
Testing a remote lpdThe command netcat -z host 515 && echo ok || echo failedtests whether lpd can be reached via TCP on port 515 of host . If lpdcannot be reached in this way, it is either not running at all or there issome basic network problem.
If you are logged in as root , enter the commandecho -e "\004queue" | netcat -w 2 -p 722 host 515to get a (possibly very long) status report about the queue on thehost , provided that lpd is running and the host is reachable. If the
126 Printing in a TCP/IP Network
4Prin
terO
pe
ratio
n
daemon does not respond, it is either not running at all or there is abasic network problem. If lpd does respond, the output should give anidea why printing through the queue on host does not work. Theseare some examples:
lpd: your host does not have line printer accesslpd: queue does not existprinter: spooling disabledprinter: printing disabled
Output 2: lpd Status Messages
If you get messages like the ones above, the problem lies with the re-mote lpd .
Testing a remote cupsdThe command netcat -z host 631 && echo ok || echo failedtests whether cupsd can be reached via TCP on port 631 of host . Ifcupsd cannot be reached in this way, it is either not running at all orthere is some basic network problem.
With the command lpstat -h host -l -t , get a (possibly verylong) status report about all queues on host , provided that cupsd isrunning and the host is reachable.
With the command echo -en "\r" | lp -d queue -h host , senda print job consisting of a single carriage return character with which totest whether the queue on host is accepting any jobs. This test com-mand should not print out anything or only cause the printer to ejectan empty page.
Testing a remote SMB serverAs a basic test of an SMB server, enter:
earth:~ # echo -en "\r" | smbclient ’//HOST/SHARE’’PASSWORD’ \-c ’print -’ -N -U ’USER’ && echo ok || echo failed
This command must be entered as a single line without the backslash(‘\’ ). For HOST, enter the host name of the Samba server. For SHARE,enter the name of the remote queue. For PASSWORD, enter the pass-word string. Replace USERwith the user name. This test command
127SuSE Linux – Enterprise Server 8

should not print out anything or only cause the printer to eject anempty page.
The command smbclient -N -L host displays any shares on thehost that are currently available. Details on this can be obtained fromthe man page for smbclient (man smbclient ).
Troubleshooting an unreliable network printer or print server boxSpoolers on print server boxes often become unreliable when havingto deal with relatively high printing volumes. As the cause of this lieswith the server side spooler, there is mostly no way to fix this.
As a workaround, however, circumvent the spooler on the print serverbox by using TCP sockets to directly stream data to the printer con-nected to the host. This turns the print server box into a mere dataconverter between the two different data streams (TCP/IP network andlocal printer line), which effectively makes the printer behave like a lo-cal printer although it is connected to the print server box. Without thespooler acting as an intermediary, this method also gives much moredirect control over the printer device in general.
To use this method, you need to know the corresponding TCP port onthe print server box. If the printer is switched on and properly con-nected, you should be able to determine the TCP port a minute or soafter booting the print server box with the program nmap. Runningnmap on the print server box may return an output similar to this:
Port State Service23/tcp open telnet80/tcp open http515/tcp open printer631/tcp open cups9100/tcp open jetdirect
You can log in on the above print server box with telnet to lookfor important information or to change basic configuration options.
The above print server runs an HTTP daemon, which can providedetailed server information or allow you to set specific printingoptions.
The print spooler running on the print server box can be reachedover the LPD protocol on port 515.
The print spooler running on the print server box can also bereached over the IPP protocol on port 631.
128 Printing in a TCP/IP Network
4Prin
terO
pe
ratio
n
The printer connected to the print server box can be accessed di-rectly via TCP sockets on port 9100.
Print Servers Supporting Both LPD and IPP
Supporting Both Protocols through CUPS
By default, the CUPS daemon only supports the IPP protocol. However,the program /usr/lib/cups/daemon/cups-lpd from the package cupsmakes it possible for a CUPS daemon to accept print jobs arriving via theLPD protocol on port 515. This requires that the corresponding service is en-abled for inetd — either with YaST2 or by enabling the corresponding linein /etc/inetd.conf manually.
Supporting Both Protocols by Using LPRng and lpdfilter with CUPS
There may be situations where you want to run both LPRng and lpdfilterand CUPS on one system, maybe because you want to enhance the function-ality of LPD with some CUPS features or because you need the LPRng andlpdfilter system as an add-on for certain special cases.
Running the two systems together on the same system will lead to a numberof problems, however. Below, we list the most important of these and brieflyexplain the limitations resulting from them. The topic is too complex to de-scribe them in any greater detail here. There are several ways to solve theseissues, depending on the individual case.
You should not rely on YaST2 for configuration if you install both print-ing systems. The printer configuration module of YaST2 has not beenwritten with this case in mind.
There is a conflict between package lprng and package cups-client ,because they contain a number of files with identical names, such as/usr/bin/lpr and /usr/bin/lp . You should, therefore, not installpackage cups-client . This, however, means that no CUPS-basedcommand-line tools are available, but only those included with LPRng.You are still able to print through CUPS print queues from the X Win-dow System with xpp or kprinter , however, as well as from all appli-cation programs with built-in support for CUPS.
By default, cupsd creates the /etc/printcap file when startedand writes the names of CUPS queues to it. This is done to maintaincompatibility with applications that expect queue names in /etc/
129SuSE Linux – Enterprise Server 8

printcap to offer them in their print dialogs. With both printing sys-tems installed, disable this cupsd feature to reserve /etc/printcapfor exclusive use by the LPRng and lpdfilter printing system. As a re-sult, applications that get queue names only from /etc/printcap canuse only these local queues, but not the remote queues made availableby CUPS through the network.
130 Printing in a TCP/IP Network

Part II
System

5Th
eKe
rne
l
The Kernel
The kernel that is written to the harddisk during the installation is configuredto support as many hardware components and other kernel features as possi-ble.
Kernel Sources
To compile the kernel sources, the following packages must be installed: thekernel sources (package kernel-source ), the C compiler (package gcc ), theGNU binutils (package binutils ), and the include files for the C compiler(package glibc-devel ). We strongly recommend to install the C compilerin any case, since the C language is inseparable from UNIX operating sys-tems. To be able to compile a 64 bit Kernel on iSeries and pSeries, you alsoneed to install package cross-ppc64-gcc and package cross-ppc64-gcc .These packages enable the crosscompiling.
The iSeries kernel (and to a lesser extent, pSeries) needs some specific con-figuration options in order to run successfully. It is easiest to use a knownworking configuration file as the base for a new kernel config. The defaultconfiguration is stored in /boot/vmlinuz-<version>.config . To enablethe use of the crosscompiler, always add sh make_ppc64.sh as prefix tothe commands.
Kernel Modules
Many drivers and features no longer have to be compiled directly into thekernel, but can be loaded in the form of kernel modules while the system is
active. The kernel configuration determines which drivers are to be compiledinto the kernel and which ones are loaded as runtime modules.
Kernel modules are located at /lib/modules/<version> , <version> beingthe current kernel version.
Handling Modules
The following commands are available for your use:
insmodinsmod loads the requested module after searching for it in a subdirec-tory of /lib/modules/<version> . However modprobe (see below)should be preferred over insmod , as modprobe checks for dependen-cies and has more robust checking in general.
rmmodUnloads the requested module. This is only possible if this module isno longer needed. For example, it is not possible to unload the isofsmodule (the CD-ROM file system) as long as a CD is mounted.
depmodCreates the file modules.dep in /lib/modules/<version> , wherethe dependencies of all modules are defined. This is necessary to en-sure that all dependent modules are loaded together with the selectedones. If START_KERNELD is set in /etc/rc.config , this file is cre-ated each time the system is started.
modprobeLoads or unloads a given module under consideration of the dependen-cies of this module. This command is extremely powerful and can beused for a lot of things (e. g., testing all modules of a given type untilone is successfully loaded). In contrast to insmod, modprobe checks/etc/modules.conf and modules.dep and is the preferred way toload modules. For detailed information on this topic, please refer to thecorresponding manual page.
lsmodShows you which modules are currently loaded and by how manyother modules they are being used. Modules started by the kernel dae-mon have the tag autoclean , which shows that these modules will beremoved automatically when they reach their idle time limit.
134 Kernel Modules
5Th
eKe
rne
l
/etc/modules.conf
In addition, loading of modules is influenced by /etc/modules.conf . Seethe man page for depmod (man depmod).
The parameters for modules which access hardware directly and thereforeneed system-specific options can be entered in this file (e. g. CD-ROM driversor network drivers). Basically, the parameters entered here are the same asthose given at the kernel boot prompt, but in many cases the names whichare used at the boot prompt are different. If a module fails to load, try speci-fying the hardware in this file and use modprobe instead of insmod to loadthe module.
Modules.conf also gives the device names for the module. You shouldcheck this file if you think, for example, that your network device names anddrivers are mixed up.
135SuSE Linux – Enterprise Server 8

6Sp
ec
ialFe
ature
so
fSuSELin
uxEn
terp
riseSe
rver
Special Features of SuSELinux Enterprise Server
This chapter provides information on the Filesystem Hierarchy Standard (FHS)and Linux Standard Base (LSB), various software packages, and special fea-tures such as booting with “initrd”.
Linux Standards . . . . . . . . . . . . . . . . . . . . . . . . 138Example Environments for FTP and HTTP . . . . . . . . . 138Hints on Special Software Packages . . . . . . . . . . . . . 139Virtual Consoles . . . . . . . . . . . . . . . . . . . . . . . . 143Keyboard Mapping . . . . . . . . . . . . . . . . . . . . . . 144Local Adjustments — I18N/L10N . . . . . . . . . . . . . . 145
Linux Standards
File System Hierarchy Standard (FHS)
SuSE Linux Enterprise Server strives, as far as possible, to conform to theFile system Hierarchy Standard (FHS, package fhs ). See also http://www.pathname.com/fhs/ . For this reason, it is sometimes necessary to movefiles or directories to their “correct” places in the file system.
Linux Standard Base (LSB)
SuSE supports the Linux Standard Base project. Current information on thiscan be found at http://www.linuxbase.org .
The LSB specification version for 8.1 is 1.2. From now on, the Filesystem Hi-erarchy Standard (FHS) is included in the specification and defines settings,such as the package format and the initialization of the system. See ChapterThe SuSE Linux Enterprise Server Boot Concept on page 155.
The LSB specification currently only comprises the x86 architecture.
teTeX — TEX in SuSE Linux
TEX is a complete typesetting system which runs on various platforms. It isexpandable with macro packages like LATEX. It consists of very many singlefiles that have to be assembled according to the TEX Directory Structure (TDS)(ref. ftp://ftp.dante.de/tex-archive/tds/ teTeX is a compilation ofcurrent TEXapplications.
teTeX is employed in SuSE Linux Enterprise Server with a configuration thatcomplies with the requirements of both the TDS and the FHS.
Example Environments for FTP and HTTP
About FTP
To make it easier to set up an FTP server, the package ftpdir includes anexample environment. This is installed in /srv/ftp .
138 Linux Standards
6Sp
ec
ialFe
ature
so
fSuSELin
uxEn
terp
riseSe
rver
About HTTP
Apache is the standard web server in SuSE Linux Enterprise Server. To-gether with the installation of Apache, some example documents are madeavailable in /srv/www . To set up your own web server, include your ownDocumentRoot in /etc/httpd/httpd.conf and store your files (docu-ments, picture files) accordingly.
Hints on Special Software Packages
Package bash and /etc/profile
1. /etc/profile
2. ~/.profile
3. /etc/bash.bashrc
4. ~/.bashrc
Users can make personal entries in ~/.profile or in ~/.bashrc respec-tively. To ensure the correct processing of these files, it is necessary to copythe basic settings from /etc/skel/.profile or /etc/skel/.bashrc re-spectively into the home directory of the user. It is recommended to copy thesettings from /etc/skel following an update. Execute the following shellcommands to prevent the loss of personal adjustments:
mv ~/.bashrc ~/.bashrc.oldcp /etc/skel/.bashrc ~/.bashrcmv ~/.profile ~/.profile.oldcp /etc/skel/.profile ~/.profile
The personal adjustments then need to be copied back from the files *.old .
cron Package
The cron tables are now located in /var/cron/tabs . /etc/crontabserves as a system-wide cron table. Enter the name of the user who shouldrun the command directly after the time table (see File 24, here root is en-tered). Package-specific tables, located in /etc/cron.d , have the same for-mat. See the man page for cron (man 8 cron ).
139SuSE Linux – Enterprise Server 8
1-59/5 * * * * root test -x /usr/sbin/atrun && /usr/sbin/atrun
File 24: Example of an Entry in /etc/crontab
/etc/crontab cannot be processed with crontab -e . It must be loadeddirectly into an editor, modified, then saved.
A number of packages install shell scripts to the directories /etc/cron.hourly , /etc/cron.daily , /etc/cron.weekly , and /etc/cron.monthly , whose instructions are controlled by /usr/lib/cron/run-crons . /usr/lib/cron/run-crons is run every fifteen minutes fromthe main table (/etc/crontab ). This guarantees that processes that mayhave been neglected can be run at the proper time. Do not be surprised if,shortly after booting, the user nobody turns up in the process tables and ishighly active. This probably means that nobody is just updating the locate(see Section Settings for the Files in /etc/sysconfig on page 177).
The daily system maintenance jobs have been distributed to various scriptsfor reasons of clarity ( package aaa_base ). Apart from aaa_base , /etc/cron.daily thus contains for instance the components backup-rpmdb ,clean-tmp or clean-vi .
Log Files — the Package logrotate
There are a number of system services (“daemons”), which, along with thekernel itself, regularly record the system status and specific events to log files.This way, the administrator can regularly check the status of the system at acertain point in time, recognize errors or faulty functions, and troubleshootthem with pinpoint precision. These log files are normally stored in /var/log as specified by FHS and grow on a daily basis. The package logrotatepackage helps control the growth of these files.
Configuration
Configure logrotate with the file /etc/logrotate.conf . In particular,the include specification primarily configures the additional files to read.SuSE Linux Enterprise Server ensures that individual packages install filesin /etc/logrotate.d (e.g., syslog or yast ).
# see "man logrotate" for details# rotate log files weeklyweekly
140 Hints on Special Software Packages

6Sp
ec
ialFe
ature
so
fSuSELin
uxEn
terp
riseSe
rver
# keep 4 weeks worth of backlogsrotate 4
# create new (empty) log files after rotating old onescreate
# uncomment this if you want your log files compressed#compress
# RPM packages drop log rotation information into this directoryinclude /etc/logrotate.d
# no packages own lastlog or wtmp - we’ll rotate them here#/var/log/wtmp {# monthly# create 0664 root utmp# rotate 1#}
# system-specific logs may be also be configured here.
File 25: Example for /etc/logrotate.conf
logrotate is controlled through cron and it is called daily by /etc/cron.daily/logrotate .
Note
The create option reads all settings made by the administrator in/etc/permissions* . Ensure that no conflicts arise from any per-sonal modifications.
Note
Man Pages
For some GNU applications (e. g., tar) the man pages are no longer main-tained. They have been replaced by info files. info is GNU’s hypertext sys-tem. Typing info info gives a starting help for using info . info can belaunched via emacs -f info or on its own with info .
141SuSE Linux – Enterprise Server 8

The Command ulimit
With the ulimit (user limits) command, it is possible to set limits for the useof system resources and to have these displayed. ulimit is especially use-ful for limiting the memory available for applications. With this, an applica-tion can be prevented from using too much memory on its own, which couldbring the system to a standstill.
ulimit can be used with various options. To limit memory usage, use theoptions listed in Table 6.1.
-m maximum size of physical memory-v maximum size of virtual memory (swap)-s maximum size of the stack-c maximum size of the core files-a display of limits set
Table 6.1: ulimit : Setting Resources for the User
System-wide settings can be made in /etc/profile . There, creating corefiles must be enabled, needed by programmers for “debugging”. A normaluser cannot increase the values specified in /etc/profile by the systemadministrator, but he can make special entries in his own ~/.bashrc .
# Limits of physical memory:ulimit -m 98304
# Limits of virtual memory:ulimit -v 98304
File 26: ulimit: Settings in ~/.bashrc
Details of memory must be specified in KB. For more detailed information,see the man page for bash (man bash).
NoteNot all shells support ulimit directives. PAM (for instance,pam_limits ) offers comprehensive adjustment possibilities shouldyou depend on encompassing settings for these restrictions.
Note
142 Hints on Special Software Packages
6Sp
ec
ialFe
ature
so
fSuSELin
uxEn
terp
riseSe
rver
The free Command
The free command is somewhat misleading if your goal is to find out howmuch RAM is currently being used. The relevant information can be foundin /proc/meminfo . These days, users, who have access to a modern op-erating system such as Linux, should not really have to worry much aboutmemory. The concept of “available RAM” dates back to before the days ofunified memory management. The slogan free memory is bad memory applieswell to Linux. As a result, Linux has always made the effort to balance outcaches without actually allowing free or unused memory.
Basically, the kernel does not have direct knowledge of any applications oruser data. Instead, it manages applications and user data in a “page cache”.If memory runs short, parts of it will be either written to the swap partitionor to files, from which they can initially be read with the help of the mmapcommand (see the man page for mmap(man 2 mmap)).
Furthermore, the kernel also contains other caches, such as the “slab cache”where the caches used for network access are stored. This may explain dif-ferences between the counters in /proc/meminfo . Most, but not all of them,can be accessed via /proc/slabinfo .
The File /etc/resolv.conf
Domain name resolution is handled through the file /etc/resolv.conf .Refer to DNS — Domain Name Service on page 221 on this.
This file is updated by the script /sbin/modify_resolvconf exclusively,with no other program having permission to modify /etc/resolv.confdirectly. Enforcing this rule is the only way to guarantee that the system’snetwork configuration and the relevant files are kept in a consistent state.
Virtual Consoles
Linux is a multiuser and multitasking system. The advantages of these fea-tures can be appreciated, even on a stand-alone PC system.
In text mode, there are six virtual consoles available. Switch between themusing
�� ��Alt +�� ��F1 to
�� ��Alt +�� ��F6 . The seventh console is reserved for X11. More
or fewer consoles can be assigned by modifying the file /etc/inittab .
To switch to a console from X11 without leaving X11, use�� ��Ctrl +
�� ��Alt +�� ��F1 to�� ��Ctrl +
�� ��Alt +�� ��F6 .
�� ��Alt +�� ��F7 then returns to X11.
143SuSE Linux – Enterprise Server 8
Keyboard Mapping
To standardize the keyboard mapping of programs, changes were made tothe following files:
/etc/inputrc/usr/X11R6/lib/X11/Xmodmap/etc/skel/.Xmodmap/etc/skel/.exrc/etc/skel/.less/etc/skel/.lesskey/etc/csh.cshrc/etc/termcap/usr/lib/terminfo/x/xterm/usr/X11R6/lib/X11/app-defaults/XTerm/usr/share/emacs/ 〈VERSION〉/site-lisp/term/*.el/usr/lib/joerc
These changes only affect applications that make use of terminfo entries orwhose configuration files are changed directly (vi , less , etc.). Other non-SuSE applications should be adjusted to these defaults.
Under X, the compose key (“multikey”) can be accessed using the keycombination
�� ��Ctrl +�� ��⇑ Shift (right). Also see the corresponding entry in
/usr/X11R6/lib/X11/Xmodmap .
144 Keyboard Mapping

6Sp
ec
ialFe
ature
so
fSuSELin
uxEn
terp
riseSe
rver
Local Adjustments — I18N/L10N
SuSE Linux Enterprise Server is, to a very large extent, internationalized andcan be modified for local needs in a flexible manner. In other words, inter-nationalization (“I18N”) allows specific localizations (“L10N”). The abbrevia-tions I18N and L10N are derived from the first and last letters of the wordsand, in between, the number of letters omitted.
Settings are made via LC_* variables defined in the file /etc/sysconfig/language . This refers not only to “native language support”, but also tothe categories Messages (Language), Character Set, Sort Order, Time and Date,Numbers, and Money. Each of these categories can be defined directly via itsown variable or indirectly via a variable in the file language (see the manpage for locale (man 5 locale )).
1. RC_LC_MESSAGES, RC_LC_CTYPE, RC_LC_COLLATE, RC_LC_TIME,RC_LC_NUMERIC, RC_LC_MONETARY: These variables are passedto the shell without the RC_ prefix and determine the above categories.The files concerned are listed below.
The current setting can be shown with the command locale .
2. RC_LC_ALL: This variable (if set) overwrites the values of the variablesmentioned in item 1.
3. RC_LANG: If none of the above variables are set, this is the “fallback”.By default, SuSE Linux Enterprise Server only sets RC_LANG. Thismakes it easier for users to enter their own values.
4. ROOT_USES_LANG: A yes or no variable. If it is set to no , root al-ways works in the POSIX environment.
The other variables can be set via the sysconfig editor.
The value of such a variable contains the language code, country code, en-coding, and modifier. The individual components are connected by specialcharacters:
LANG=〈language 〉[[_ 〈COUNTRY〉].Encoding[@Modifier]]
Some Examples
You should always set the language and country codes together. Lan-guage settings follow the standard ISO 639 (http://www.evertype.com/standards/iso639/iso639-en.html and http://www.loc.
145SuSE Linux – Enterprise Server 8
gov/standards/iso639-2/ ). Country codes are listed in ISO 3166, see(http://www.din.de/gremien/nas/nabd/iso3166ma/codlstp1/en_listp1.html ). It only makes sense to set values for which usable descrip-tion files can be found in /usr/lib/locale . Additional description filescan be created from the files in /usr/share/i18n using the commandlocaledef . A description file for en_US.UTF-8 (for English and UnitedStates) can be created with:
earth: ~ # localedef -i en_US -f UTF-8 en_US.UTF-8
LANG=en_US.ISO-8859-1
This sets the variable to English language, country to United States, andthe character set to ISO-8859-1 . This character set does not supportthe Euro sign, but it will be useful sometimes for programs that havenot been updated to support ISO-8859-15 . The string defining thecharset (ISO-8859-1 in our case) will then be evaluated by programslike Emacs.
LANG=en_US.UTF-8
If you use a Unicode xterm, it is necessary to specify UTF-8 as well.To achieve this, make a small shell script called uxterm to start xtermwith UTF-8 loaded each time. See File 27.
%
#!/bin/bashexport LANG=en_US.UTF-8xterm -fn \’-Misc-Fixed-Medium-R-Normal--18-120-100-100-C-90-ISO10646-1’ \-T ’xterm UTF-8’ $*
File 27: uxterm to Start a Unicode xterm
SuSEconfig reads the variables in /etc/sysconfig/language andwrites the necessary changes to /etc/SuSEconfig/profile and /etc/SuSEconfig/csh.cshrc . /etc/SuSEconfig/profile is read or“sourced” by /etc/profile . /etc/SuSEconfig/csh.cshrc is sourcedby /etc/csh.cshrc . This makes the settings available system-wide.
146 Local Adjustments — I18N/L10N
6Sp
ec
ialFe
ature
so
fSuSELin
uxEn
terp
riseSe
rver
Settings for Language Support
Files in the category Messages are, as a rule, only stored in the language direc-tory (e. g., en) to have a fallback. If you set LANG to en,_US and the “mes-sage” file in /usr/share/locale/en_US/LC_MESSAGES does not exist, itwill fall back to /usr/share/locale/en/LC_MESSAGES .
A fallback chain can also be defined, for example, for Breton → French or forGalician → Spanish → Portuguese:
LANGUAGE="br_FR:fr_FR"LANGUAGE="gl_ES:es_ES:pt_PT"
If desired, use the Norwegian variants “nynorsk” and “bokmål” instead (withadditional fallback to no):
LANG="nn_NO"LANGUAGE="nn_NO:nb_NO:no"
or
LANG="nb_NO"LANGUAGE="nb_NO:nn_NO:no"
Note that in Norwegian, LC_TIME is also treated differently.
Possible Problems
The thousand comma is not recognized. LANG is probably set to en ,but the description the glibc uses is located in /usr/share/locale/en_US/LC_NUMERIC. LC_NUMERIC, for example, must be set toen_US.
For More Information
The GNU C Library Reference Manual, Chap. "Locales and International-ization"; included in package glibc-info .
Markus Kuhn, UTF-8 and Unicode FAQ for Unix/Linux, currently athttp://www.cl.cam.ac.uk/~mgk25/unicode.html .
Unicode-Howto, by Bruno Haiblefile:/usr/share/doc/howto/en/html/Unicode-HOWTO.html .
147SuSE Linux – Enterprise Server 8

7Sup
po
rtfor32-b
itan
d64-b
itProg
ram
sin
a64-b
itEnviron
me
nt
Support for 32-bit and64-bit Programs in a64-bit Environment
Although SuSE Linux Enterprise Server is available for multiple 64-bit plat-forms, this does not necessarily mean that all the applications contained in ithave yet been ported to 64-bit. However, SuSE Linux Enterprise Server sup-ports 32-bit applications to be run in a 64-bit environment. This chapter willbriefly show you how this support can be achieved on the SuSE Linux Enter-prise Server 64-bit platforms.
Introduction . . . . . . . . . . . . . . . . . . . . . . . . . . 150Runtime Support . . . . . . . . . . . . . . . . . . . . . . . . 150Software Development . . . . . . . . . . . . . . . . . . . . 151Kernel Issues . . . . . . . . . . . . . . . . . . . . . . . . . . 152
Introduction
SuSE Linux Enterprise Server for the 64-bit architectures ia64, ppc64, s390x,sparc64 and AMD Hammer is designed to run existing 32-bit applications forthe corresponding 32-bit architecture in the 64-bit environment out of the box.The corresponding 32-bit architectures are x86 for ia64, ppc for ppc64, s390for s390x and x86 for AMD Hammer. This support allows to run today yourfavorite 32-bit applications instead of waiting for the availability of a 64-bitport of it. The current ppc64 system is running in 32-bit mode, while you areable to run 64-bit applications.
For this 32-bit support, we have to look at these topics:
Runtime support How can 32-bit applications be executed?
Development support What needs to be done to build 32-bit applicationsthat run on both 32-bit and 64-bit architectures?
Kernel API How can 32-bit applications run under a 64-bit kernel?
Runtime Support
NoteConflicting 32-bit and 64-bit versions of applicationsIf your package is available both as 32-bit and 64-bit version, the par-allel installation of both 32-bit and 64-bit applications will conflict. Youhave to decide whether you want the 32-bit or 64-bit application andthen install and use that version.
Note
Each application needs a number of libraries for its correct execution. Unfor-tunately the names of the 32-bit and 64-bit libraries are the same, and there-fore they have to be differentiated somehow.
The 64-bit architectures ppc64, s390x, sparc64 and AMD Hammer all use thesame approach: To maintain compatibility with the 32-bit versions, the 32-bit libraries are exactly in the same place as in the 32-bit environment. Forexample the 32-bit version of libc.so.6 will be found in /lib/libc.so.6 inboth the 32-bit and 64-bit environments.
All 64-bit libraries and link objects are placed in directories named lib64 ,e.g. the 64-bit objects you would normally expect in /lib , /usr/lib , and
150 Introduction
7Sup
po
rtfor32-b
itan
d64-b
itProg
ram
sin
a64-b
itEnviron
me
nt
/usr/X11R6 are now found in /lib64 , /usr/lib64 , and /usr/X11R6/lib64 respectively, to make room for the 32-bit libs with the same base namein /lib , /usr/lib , and /usr/X11R6/lib .
In general, subdirectories of the link object directories that only contain word-size independent data have not been moved. For example, you will find theX11 fonts below /usr/X11R6/lib/X11/fonts as usual.
This setup is LSB (Linux Standards Base) and FHS (Filesystem Hierachy Stan-dard) compliant.
For ia64 — and also for the 64-bit Alpha platform — the 64-bit native li-braries are located in the default lib directories, there is neither a lib64nor a lib32 directory. Instead ia64 handles 32-bit x86 code as an emulation.A set of base libraries are installed in subdirectories of /usr/i386-linux .
LD_LIBRARY_PATH and LD_PRELOAD
LD_LIBRARY_PATH, and /etc/ld.so.conf are combined and containpaths to both 32- and 64-bit libraries. Applications (at least for PPC64) areeither 32- or 64-bit, not a mix and the loaded searches for the correct librarytype (32- or 64-bit) skipping libraries of the other type. If an applicationneeds a library but can not find a library of the correct type in the searchpath the application load will fail.
LD_PRELOADand /etc/ld.so.preload can also contain a mix of 32- and64-bit libraries. Avoid absolute paths (and path is a “/” in it) for preload.If the application must use an absolute preload path, create a shell scriptwrapper that sets LD_PRELOADonly for that application. If you use rela-tive library names for preload make sure that both 32- and 64-bit librariesexist (same name but different directories), and paths to both exist in LD_LIBRARY_PATHand or /etc/ld.so.conf .
Software Development
All 64-bit architectures support development of 64-bit objects. But the degreeof support for 32-bit compilation is architecture dependend. The differentpossibilities for the toolchain consisting of GCC, the GNU Compiler Collec-tion, and the binutils which include the assembler as and the linker ld are:
Biarch Compiler With a biarch development toolchain both 32-bit and 64-bit objects can be generated, the default is compilation of 64-bit objects.
151SuSE Linux – Enterprise Server 8
Using special flags 32-bit objects can be generated. The special flag forgcc is -m32 , the flags for binutils are architecture dependend but GCCwill pass the right flags to linker and assembler. A biarch developmenttoolchain currently exists for sparc64, which supports sparc and sparc64development, and for AMD Hammer which supports development forthe x86 and x86-64 instruction sets.
No Support SuSE does not support directly 32-bit software developmenton all platforms. If you like to develop s390 or x86 applications onzSeries or ia64 respectively, you should use the corresponding 32-bitSuSE Linux Enterprise Server Enterprise Server versions.
32-bit as default The PPC64 platform uses a 32-bit compiler by default. Forcompilation of 64-bit objects a cross compiler has to be used, the namesof the tools have a prefix of powerpc64-linux- , e.g. GCC is calledpowerpc64-linux-gcc. The compiler lives in /opt/cross/bin whichis by default in the user’s path. Future releases of SuSE Linux Enter-prise Server Enterprise Server for PPC64 should contain a biarch com-piler.
Note that header files have to be written in a way that they are architectureindependend and that both the 32-bit and 64-bit installed libraries shouldhave an API (application programming interface) that correspondends to theinstalled header files. The SuSE environment confirms to this but if you up-grade yourself libraries, you have to take care of these issues.
Kernel Issues
The 64-bit kernels for ia64, ppc64, s390x and AMD Hammer provide both a64-bit and a 32-bit kernel ABI (application binary interface), the latter is thesame as the ABI of the corresponding 32-bit kernel. This means that 32-bitapplications can interact with the 64-bit kernel the same way as with a 32-bitkernel.
Note that the 32-bit system call emulation of a 64-bit kernel does not supporta number of APIs that are used by system programs. Therefore a small num-ber of system programs, e.g. lspci or the LVM administration programs, needto exist as 64-bit programs to work correctly.
A 64-bit kernel can only load 64-bit kernel modules that are specifically com-piled for the kernel. It is not possible to use 32-bit kernel modules.
152 Kernel Issues

7Sup
po
rtfor32-b
itan
d64-b
itProg
ram
sin
a64-b
itEnviron
me
nt
TipSome applications need their own kernel-loadable modules. If you areplanning to use such a 32-bit application in the 64-bit environment,please contact your application provider and SuSE to make sure the64-bit version of the kernel-loadable module and the kernel API 32-bittranslations for that module are available.
Tip
153SuSE Linux – Enterprise Server 8

8Th
eSuSE
Linux
Ente
rprise
Serve
rBoo
tCo
nc
ep
t
The SuSE Linux EnterpriseServer Boot Concept
Booting and initializing a UNIX system can challenge even an experiencedsystem administrator. This chapter gives a short overview of the SuSE LinuxEnterprise Server boot concept. The new implementation is compatible withthe System Initialization section of the LSB specification (Version 1.2). Refer toSection Linux Standard Base (LSB) on page 138 for more information on LSB.
The init Program . . . . . . . . . . . . . . . . . . . . . . . . 156Runlevels . . . . . . . . . . . . . . . . . . . . . . . . . . . . 156Changing Runlevels . . . . . . . . . . . . . . . . . . . . . . 157Init Scripts . . . . . . . . . . . . . . . . . . . . . . . . . . . 159The YaST2 Runlevel Editor . . . . . . . . . . . . . . . . . . 161SuSEconfig, /etc/sysconfig, and /etc/rc.config . . . . . . . 162Using the YaST2 sysconfig Editor . . . . . . . . . . . . . . 163System Configuration: Scripts and Variables . . . . . . . . 163

The simple words "Uncompressing Linux..." signal that the kernel is takingcontrol of your hardware. It checks and sets your console — more precisely:the BIOS registers of graphics cards and output format — to read BIOS set-tings and to initialize basic hardware interfaces. Next, your drivers “probe”existing hardware and initialize it accordingly. After checking the partitionsand mounting the root file system, the kernel starts init, which “boots” (Unixjargon) the main system with all its programs and configurations. The ker-nel controls the entire system, including hardware access and the CPU timeprograms use.
The init Program
The program init is responsible for correctly initializing all system processes.Thus, it is the father of all processes in the entire system.
init takes a special role. It is started directly by the kernel and resists signal 9,which normally enables you to kill processes. All other programs are eitherstarted directly by init or by one of its “child” processes.
init is centrally configured via the /etc/inittab file. Here, the “runlevels”are defined (see Section Runlevels on this page). It also specifies which ser-vices and daemons are available in each of the levels.
Depending on the entries in /etc/inittab , several scripts are invokedby init. For reasons of clarity, these scripts all reside in the directory /etc/init.d .
The entire process of starting the system and shutting it down is maintainedby init. From this point of view, the kernel can be considered a backgroundprocess whose task it is to maintain all other processes and to adjust CPUtime and hardware access according to requests from other programs.
Runlevels
In Linux, runlevels define how the system is started. After booting, the sys-tem starts as defined in /etc/inittab in the line initdefault . Usuallythis is 3 or 5 (see Table 8.1 on the next page). An alternative to this is as-signing a special runlevel at boot time (e. g., at the boot prompt). The kernelpasses any parameters it does not need directly to init.
To change runlevels while the system is running, enter init with the appropri-ate number. Only the superuser is allowed to do this. init 1 brings you
156 The init Program

8Th
eSuSE
Linux
Ente
rprise
Serve
rBoo
tCo
nc
ep
t
Runlevel Meaning0 System haltS Single user mode; from boot prompt with US keyboard layout1 Single user mode2 Local multiuser without remote network (standard)3 Full multiuser with network4 Unused5 Full multiuser mode with network and xdm6 System reboot
Table 8.1: Valid Runlevels in Linux
to single user mode, which is used for the maintenance and administrationof your system. After finishing work in S mode, the system administratorcan change the runlevel to 3 again by typing init 3 . Now all essential pro-grams are started and users can log in and work with the system.
Table 8.1 below gives an overview of available runlevels. Runlevel 2 shouldnot be used on a system with a /usr partition mounted via NFS. You canhalt the system using init 0 or reboot it with init 6 .
If you have already installed and configured the X Window System prop-erly (Section The X Window System on page 33) and want users to log in viaa graphical user interface, change the runlevel to 5. Try it first by typinginit 5 to see whether the system works as expected. Afterwards, set thedefault runlevel to 5 in YaST2.
Changing Runlevels
Generally, a couple things happen when you change runlevels. First, stopscripts of the current runlevel are launched, closing down some programsessential for the current runlevel. Then start scripts of the new runlevel arestarted. Here, in most cases, a number of programs will be started.
To illustrate this, we will show you a change from runlevel 3 to 5:
The administrator (root ) tells init to change runlevels:
root@earth:/ > init 5
157SuSE Linux – Enterprise Server 8

init now consults its configuration file (/etc/inittab ) and realizes itshould start /etc/init.d/rc with the new runlevel as a parameter.
Now rc calls all the stop scripts of the current runlevel, but only forthose where there is no start script in the selected new runlevel. In ourexample, these are all the scripts that reside in /etc/init.d/rc3.d(old runlevel was 3) and start with a ‘K’ . The number following ‘K’guarantees a certain order to start, as there are some dependencies toconsider.
NoteThe names of the stop scripts always begin with ‘K’ for kill.Start scripts begin with ‘S’ for start.
Note
The last thing to start are the start scripts of the new runlevel. Theseare (in our example) in /etc/init.d/rc5.d and begin with an ‘S’ .The same procedure regarding the order in which they are started isapplied here.
When changing into the same runlevel as the current runlevel, init onlychecks /etc/inittab for changes and starts the appropriate steps (e. g., forstarting a getty on another interface).
158 Changing Runlevels
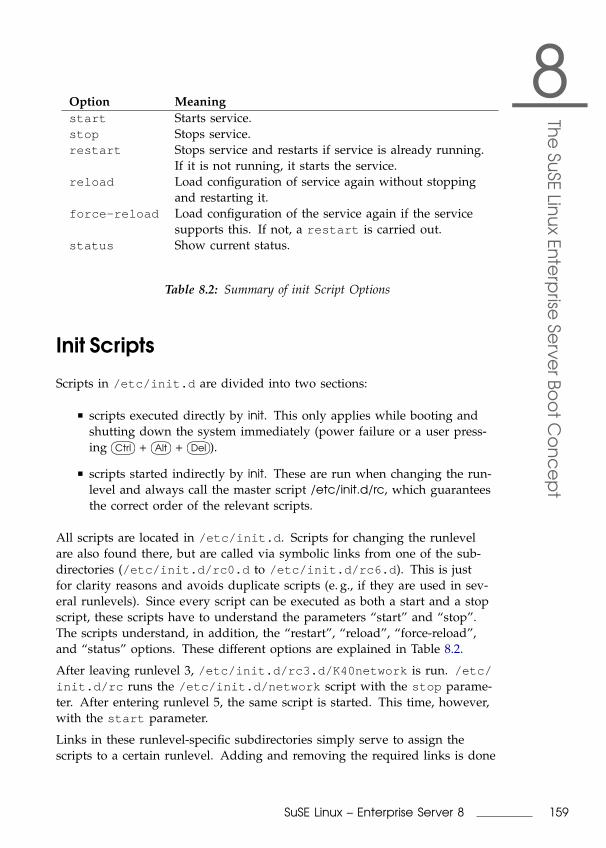
8Th
eSuSE
Linux
Ente
rprise
Serve
rBoo
tCo
nc
ep
t
Option Meaningstart Starts service.stop Stops service.restart Stops service and restarts if service is already running.
If it is not running, it starts the service.reload Load configuration of service again without stopping
and restarting it.force-reload Load configuration of the service again if the service
supports this. If not, a restart is carried out.status Show current status.
Table 8.2: Summary of init Script Options
Init Scripts
Scripts in /etc/init.d are divided into two sections:
scripts executed directly by init. This only applies while booting andshutting down the system immediately (power failure or a user press-ing
�� ��Ctrl +�� ��Alt +
�� ��Del ).
scripts started indirectly by init. These are run when changing the run-level and always call the master script /etc/init.d/rc, which guaranteesthe correct order of the relevant scripts.
All scripts are located in /etc/init.d . Scripts for changing the runlevelare also found there, but are called via symbolic links from one of the sub-directories (/etc/init.d/rc0.d to /etc/init.d/rc6.d ). This is justfor clarity reasons and avoids duplicate scripts (e. g., if they are used in sev-eral runlevels). Since every script can be executed as both a start and a stopscript, these scripts have to understand the parameters “start” and “stop”.The scripts understand, in addition, the “restart”, “reload”, “force-reload”,and “status” options. These different options are explained in Table 8.2.
After leaving runlevel 3, /etc/init.d/rc3.d/K40network is run. /etc/init.d/rc runs the /etc/init.d/network script with the stop parame-ter. After entering runlevel 5, the same script is started. This time, however,with the start parameter.
Links in these runlevel-specific subdirectories simply serve to assign thescripts to a certain runlevel. Adding and removing the required links is done
159SuSE Linux – Enterprise Server 8
by the program insserv (or by the link /usr/lib/lsb/install_initd )when installing and uninstalling packages. Refer to the man page forinsserv (man 8 insserv ).
Below is a short introduction to the boot and stop scripts launched first (orlast, respectively) as well as an explanation of the maintaining script.
boot Executed while starting the system directly using init. It is indepen-dent of the chosen runlevel and is only executed once. Here, file sys-tems are checked, the kernel daemon is launched, some unnecessaryfiles in /var/lock are deleted, and the network is configured for theloopback device (if it has been selected in /etc/rc.config ).
If an error occurs while automatically checking and repairing the filesystem, the system administrator can intervene after first entering theroot password.
Last to be executed is the script boot.local.
boot.local Here, enter additional commands to execute at boot beforechanging into a runlevel. It can be compared to AUTOEXEC.BATonDOS systems.
boot.setup General settings to make while changing from single user modeto another runlevel. Here, keyboard maps are loaded and the kerneldaemon is started, which loads modules automatically.
halt This script is only executed while changing into runlevel 0 or 6. Here,it is executed either as halt or as reboot . Whether the system shutsdown or reboots depends on how halt is called.
rc This script calls the appropriate stop scripts of the current runlevel andthe start scripts of the newly selected runlevel.
With this concept in mind, you can create your own scripts. A skeleton hasbeen prepared in /etc/init.d/skeleton . The exact format is describedin the LSB outline. This defines specifically the order of steps and in whichlevels the script should be processed.
Now, create the links in the corresponding rc?.d to your script to makesure it is launched when you change runlevels (see Section ChangingRunlevels on page 157 for script names). Refer to the man page for init.d(man 7 init.d ) and the man page for insserv (man 8 insserv ) forthe necessary technical background. Use the YaST2 Runlevel Editor to cre-ate these links with a graphical front-end. See The YaST2 Runlevel Editor onthe facing page.
160 Init Scripts
8Th
eSuSE
Linux
Ente
rprise
Serve
rBoo
tCo
nc
ep
t
CautionCreating your own init scriptsFaulty init scripts may hang up your machine. Handle them withutmost care and, if possible, subject them to heavy testing in the mul-tiuser environment. Some useful information on init scripts can befound in Section Runlevels on page 156.
Caution
The YaST2 Runlevel Editor
After this expert module starts, it is initialized. The current default runlevelis shown in the next dialog. This “operation mode” starts after your systemboots. In SuSE Linux Enterprise Server, this is usually runlevel 5 (full mul-tiuser operation with network and KDM, the graphical login). Runlevel 3also works well (full multiuser operation with network). With the help ofYaST2, a different default runlevel can be set. See Table 8.1 on page 157.
‘Edit’ continues to an overview of all the services and daemons, supple-mented with information as to whether they have been activated on yoursystem and for which runlevels. Highlight a line with the mouse and activatethe check boxes for runlevels ‘0’, ‘1’, ‘2’, ‘3’, ‘5’, ‘6’, and ‘S’ and, with that,state which service or daemon should be activated for which runlevel. Run-level 4 is undefined — this is always reserved for custom settings.
With ‘Start’ and ‘Stop’, decide whether a server should be implemented. Thecurrent status is checked via ‘Update’, if this has not already been done auto-matically. ‘Reset to default value’ allows you to restore the default settings totheir initial state following installation. ‘Activate service’ only appears if theservice is currently disabled. ‘Reset all services to default value’ restores allservices to their original state following installation. ‘Finish’ saves the systemconfiguration.
CautionChanging runlevel settingsFaulty runlevel settings may render a system unusable. Before ap-plying your changes, make absolutely sure you know about theirconsequences.
Caution
161SuSE Linux – Enterprise Server 8
SuSEconfig, /etc/sysconfig, and/etc/rc.config
The main configuration of SuSE Linux Enterprise Server can be done via theconfiguration files in /etc/sysconfig . /etc/rc.config , formerly themain configuration file of SuSE Linux Enterprise Server, is maintained as anempty file to allow your self-made scripts to source your settings and to ap-ply your own variables globally.
The configuration files in /etc/sysconfig are interpreted by single scripts.For example, the network configuration files are only read by the networkscripts.
Moreover, a large number of configuration files are generated from the set-tings in /etc/sysconfig . This is the task of /sbin/SuSEconfig . If youchange the network configuration, for example, the file /etc/host.conf isregenerated, as it depends on the configuration made.
If you change anything in those files manually, you need to run /sbin/SuSEconfig afterwards to make sure all changes to the appropriate con-figuration files are made at the correct places. If you change the configurationwith YaST2, it automatically executes /sbin/SuSEconfig and updates yourconfiguration files.
This concept enables you to make basic changes to your configuration with-out having to reboot the system. Since some changes are rather complex,some programs must be restarted for the changes to take effect. If the net-work configuration has changed, the network programs can be restarted us-ing the commands:
earth: # rcnetwork stop
earth: # rcnetwork start
As you can see, you can easily start and stop init scripts by hand.
Generally, we recommend the following steps for configuring your system:
Bring the system into single user mode (Runlevel 1) with init 1 .
Change the configuration files as needed. This can be done using aneditor of your choice or using the Sysconfig editor of YaST2.
Execute /sbin/SuSEconfig to make the changes take effect. If youhave changed the configuration files with YaST2, this is done automati-cally.
162 SuSEconfig, /etc/sysconfig, and /etc/rc.config

8Th
eSuSE
Linux
Ente
rprise
Serve
rBoo
tCo
nc
ep
t
Bring your system back to the previous runlevel with something likeinit 3 .
This procedure is mainly relevant if you have changed system-wide settings(such as network configuration). It is not necessary to go into single user modefor small changes, but it ensures all relevant programs are correctly restarted.
Tip
To disable the automatic configuration of SuSEconfig, set the variable〈ENABLE_SUSECONFIG〉 in /etc/sysconfig/suseconfig to no .Do not disable SuSEconfig if you want to use the SuSE installationsupport. It is also possible to disable the autoconfiguration partially.
Tip
Using the YaST2 sysconfig Editor
The files where the most important SuSE Linux Enterprise Server settings arestored are located in the /etc/sysconfig directory. This data used to bestored in a central file, /etc/rc.config . The sysconfig editor presents thesettings options in an easy-to-read manner. The values can be modified andsubsequently added to the individual configuration files in this directory. Ingeneral, it is not necessary to manually edit them, however, because thesefiles are automatically adjusted when installing a package or configuring aservice.
CautionModifications of /etc/sysconfig/ filesDo not modify the /etc/sysconfig files if you lack previous ex-perience and knowledge. It could do considerable damage to yoursystem.
Caution
System Configuration: Scripts and Variables
This section describes a selection of system parameters, including their de-fault settings. If you do not use YaST2 to change the configuration files in/etc/sysconfig , make sure you set empty parameters as two quotation
163SuSE Linux – Enterprise Server 8
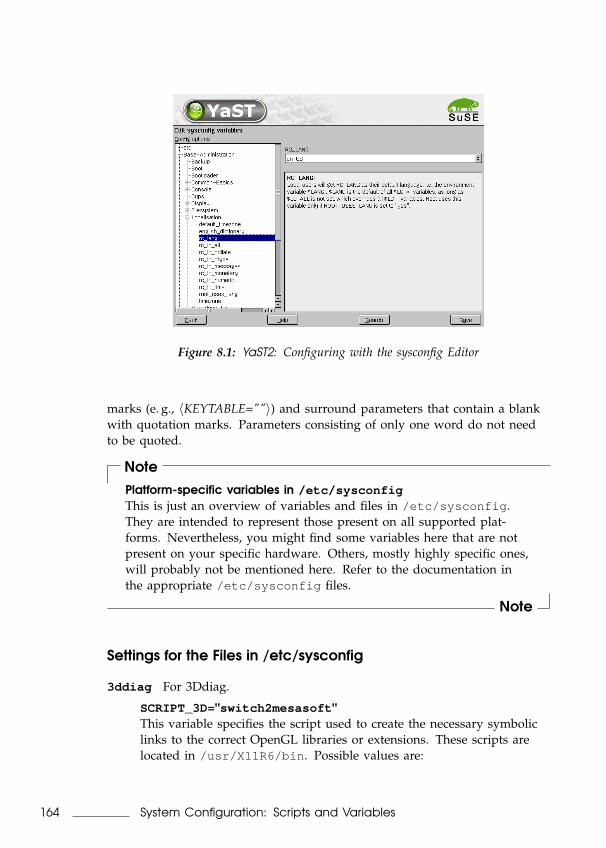
Figure 8.1: YaST2: Configuring with the sysconfig Editor
marks (e. g., 〈KEYTABLE=""〉) and surround parameters that contain a blankwith quotation marks. Parameters consisting of only one word do not needto be quoted.
NotePlatform-specific variables in /etc/sysconfigThis is just an overview of variables and files in /etc/sysconfig .They are intended to represent those present on all supported plat-forms. Nevertheless, you might find some variables here that are notpresent on your specific hardware. Others, mostly highly specific ones,will probably not be mentioned here. Refer to the documentation inthe appropriate /etc/sysconfig files.
Note
Settings for the Files in /etc/sysconfig
3ddiag For 3Ddiag.
SCRIPT_3D="switch2mesasoft "This variable specifies the script used to create the necessary symboliclinks to the correct OpenGL libraries or extensions. These scripts arelocated in /usr/X11R6/bin . Possible values are:
164 System Configuration: Scripts and Variables
8Th
eSuSE
Linux
Ente
rprise
Serve
rBoo
tCo
nc
ep
t
no execute no scriptswitch2mesasoft emulation of Mesa Software (works with all
graphics cards)switch2mesa3dfx Mesa/Glideswitch2nvidia_glx XFree86 4.x/NVIDIA_GLX
(NVIDIA_GLX/NVIDIA_kernel)switch2xf86_glx XFree86 4.x/DRI
Use 3Ddiag to determine the correct settings.
SuSEfirewall2 Activating firewall. See the readme file in packageSuSEfirewall2 .
amavis Activate the virus scanning facility AMaViS.
USE_AMAVIS="yes "Set to yes if you want to use the e-mail virus scanning facility AMaViSwithin sendmail or postfix. If set to yes , SuSEconfig creates the correctsendmail or postfix configuration for using AMaViS. For details, seeREADME.SuSEof the amavis package.
apache Configuration of the HTTP daemon Apache. This overview onlycovers the most important variables that need to be set by default orare vital for a basic understanding of Apache. Refer to the Apachedocumentation which you can install as package apache-doc for fur-ther information.
HTTPD_PERFORMANCE="slim "Specify the performance class of your Apache. Choose from slim ,mid , thick , and enterprise for the number of clients to server.SuSEconfig will set MinSpareServers , MaxSpareServers ,StartServers , and MaxClients accordingly (see /sbin/conf.d/SuSEconfig.apache )
HTTPD_START_TIMEOUT="2"Time-out during server start-up (in seconds). After this time, the statscript decides whether the httpd process has started without an error.You need to increase this value if you use mod_ssl and your certificateis passphrase protected.
HTTPD_SEC_ACCESS_SERVERINFO="no"Enable or disable the status module to provide server status andserver info .
HTTPD_SEC_SAY_FULLNAME="no"Which information should be provided at the bottom of server-generated documents (e.g., error messages)? yes provides version
165SuSE Linux – Enterprise Server 8
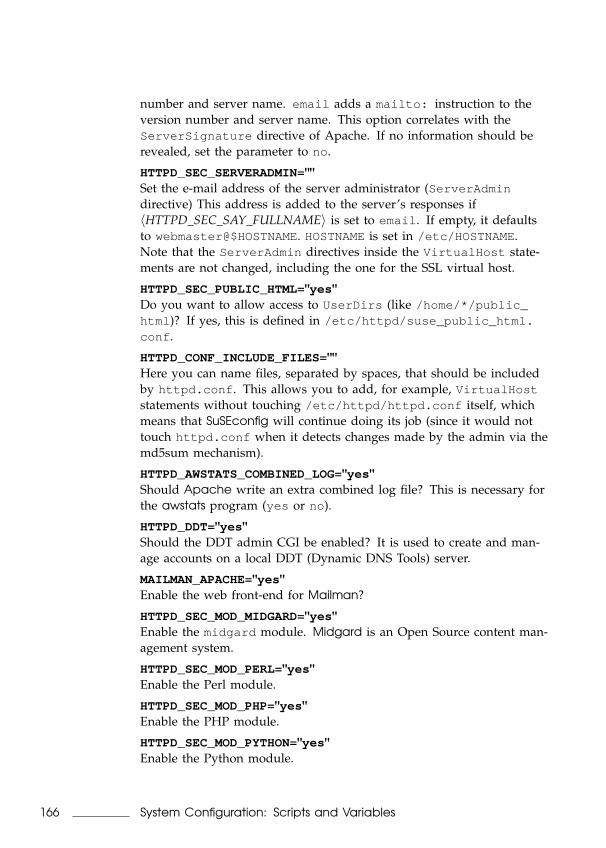
number and server name. email adds a mailto: instruction to theversion number and server name. This option correlates with theServerSignature directive of Apache. If no information should berevealed, set the parameter to no .
HTTPD_SEC_SERVERADMIN=""Set the e-mail address of the server administrator (ServerAdmindirective) This address is added to the server’s responses if〈HTTPD_SEC_SAY_FULLNAME〉 is set to email . If empty, it defaultsto webmaster@$HOSTNAME. HOSTNAMEis set in /etc/HOSTNAME .Note that the ServerAdmin directives inside the VirtualHost state-ments are not changed, including the one for the SSL virtual host.
HTTPD_SEC_PUBLIC_HTML="yes "Do you want to allow access to UserDirs (like /home/*/public_html )? If yes, this is defined in /etc/httpd/suse_public_html.conf .
HTTPD_CONF_INCLUDE_FILES=""Here you can name files, separated by spaces, that should be includedby httpd.conf . This allows you to add, for example, VirtualHoststatements without touching /etc/httpd/httpd.conf itself, whichmeans that SuSEconfig will continue doing its job (since it would nottouch httpd.conf when it detects changes made by the admin via themd5sum mechanism).
HTTPD_AWSTATS_COMBINED_LOG="yes "Should Apache write an extra combined log file? This is necessary forthe awstats program (yes or no).
HTTPD_DDT="yes "Should the DDT admin CGI be enabled? It is used to create and man-age accounts on a local DDT (Dynamic DNS Tools) server.
MAILMAN_APACHE="yes "Enable the web front-end for Mailman?
HTTPD_SEC_MOD_MIDGARD="yes "Enable the midgard module. Midgard is an Open Source content man-agement system.
HTTPD_SEC_MOD_PERL="yes "Enable the Perl module.
HTTPD_SEC_MOD_PHP="yes "Enable the PHP module.
HTTPD_SEC_MOD_PYTHON="yes "Enable the Python module.
166 System Configuration: Scripts and Variables
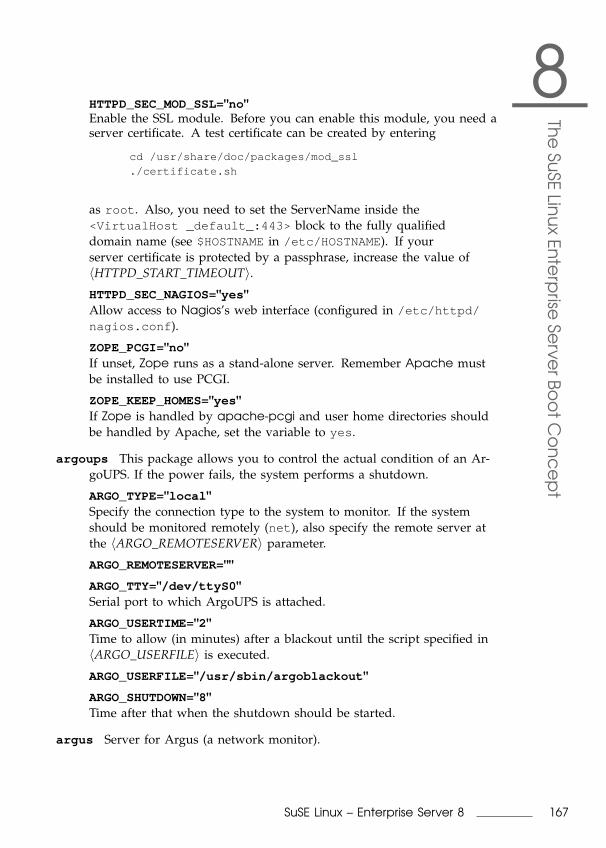
8Th
eSuSE
Linux
Ente
rprise
Serve
rBoo
tCo
nc
ep
t
HTTPD_SEC_MOD_SSL="no"Enable the SSL module. Before you can enable this module, you need aserver certificate. A test certificate can be created by entering
cd /usr/share/doc/packages/mod_ssl./certificate.sh
as root . Also, you need to set the ServerName inside the<VirtualHost _default_:443> block to the fully qualifieddomain name (see $HOSTNAMEin /etc/HOSTNAME ). If yourserver certificate is protected by a passphrase, increase the value of〈HTTPD_START_TIMEOUT〉.HTTPD_SEC_NAGIOS="yes "Allow access to Nagios’s web interface (configured in /etc/httpd/nagios.conf ).
ZOPE_PCGI="no"If unset, Zope runs as a stand-alone server. Remember Apache mustbe installed to use PCGI.
ZOPE_KEEP_HOMES="yes "If Zope is handled by apache-pcgi and user home directories shouldbe handled by Apache, set the variable to yes .
argoups This package allows you to control the actual condition of an Ar-goUPS. If the power fails, the system performs a shutdown.
ARGO_TYPE="local "Specify the connection type to the system to monitor. If the systemshould be monitored remotely (net ), also specify the remote server atthe 〈ARGO_REMOTESERVER〉 parameter.
ARGO_REMOTESERVER=""
ARGO_TTY="/dev/ttyS0 "Serial port to which ArgoUPS is attached.
ARGO_USERTIME="2"Time to allow (in minutes) after a blackout until the script specified in〈ARGO_USERFILE〉 is executed.
ARGO_USERFILE="/usr/sbin/argoblackout "
ARGO_SHUTDOWN="8"Time after that when the shutdown should be started.
argus Server for Argus (a network monitor).
167SuSE Linux – Enterprise Server 8
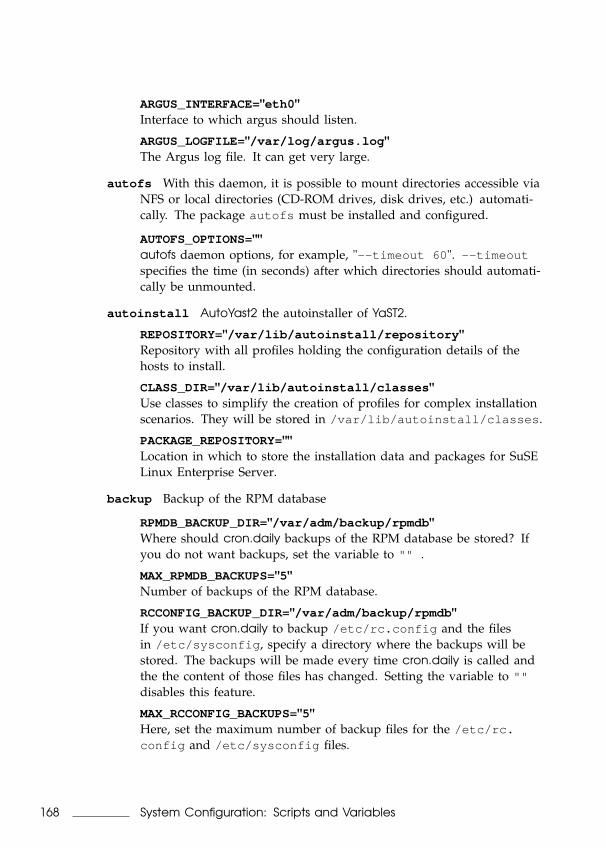
ARGUS_INTERFACE="eth0 "Interface to which argus should listen.
ARGUS_LOGFILE="/var/log/argus.log "The Argus log file. It can get very large.
autofs With this daemon, it is possible to mount directories accessible viaNFS or local directories (CD-ROM drives, disk drives, etc.) automati-cally. The package autofs must be installed and configured.
AUTOFS_OPTIONS=""autofs daemon options, for example, "--timeout 60 ". --timeoutspecifies the time (in seconds) after which directories should automati-cally be unmounted.
autoinstall AutoYast2 the autoinstaller of YaST2.
REPOSITORY="/var/lib/autoinstall/repository "Repository with all profiles holding the configuration details of thehosts to install.
CLASS_DIR="/var/lib/autoinstall/classes "Use classes to simplify the creation of profiles for complex installationscenarios. They will be stored in /var/lib/autoinstall/classes .
PACKAGE_REPOSITORY=""Location in which to store the installation data and packages for SuSELinux Enterprise Server.
backup Backup of the RPM database
RPMDB_BACKUP_DIR="/var/adm/backup/rpmdb "Where should cron.daily backups of the RPM database be stored? Ifyou do not want backups, set the variable to "" .
MAX_RPMDB_BACKUPS="5"Number of backups of the RPM database.
RCCONFIG_BACKUP_DIR="/var/adm/backup/rpmdb "If you want cron.daily to backup /etc/rc.config and the filesin /etc/sysconfig , specify a directory where the backups will bestored. The backups will be made every time cron.daily is called andthe the content of those files has changed. Setting the variable to ""disables this feature.
MAX_RCCONFIG_BACKUPS="5"Here, set the maximum number of backup files for the /etc/rc.config and /etc/sysconfig files.
168 System Configuration: Scripts and Variables

8Th
eSuSE
Linux
Ente
rprise
Serve
rBoo
tCo
nc
ep
t
clock time settings
GMT=""If your hardware clock is set to GMT (Greenwich Mean Time), set this to-u . Otherwise, set it to --localtime . This setting is important for theautomatic change from and to daylight savings time.
TIMEZONE=""The time zone is also important for the change from and to daylightsavings time. This sets /usr/lib/zoneinfo/localtime .
console Settings for the console.
FB_MODULES=""You may want to load a framebuffer display driver into your kernel tochange graphics modes and other things with fbset in console mode.Most people will not enter anything here, as it will not work withvesafb already active. It is advantageous to have framebuffer sup-port compiled into your kernel. Some XFree86 drivers (especially inXFree86-4.x) do not work well if you enable framebuffer text mode.
FBSET_PARAMS=""If your kernel has framebuffer support or loads it as a module, youmight want to change the resolution or other parameters. These canbe set with 〈FBSET_PARAMS〉. To get a list of possible parameters andtheir meanings, refer to the man page for fbset (man fbset ) or enterfbset -h in the console.
CautionSetting framebuffer parametersFramebuffer modes are extremely hardware dependent. A wrongdecision here might damage your monitor. Consider the follow-ing things before setting framebuffer modes:
vesafb does not (currently) support changing the display mode.
Do not set modes your monitor cannot handle. Watch out forthe maximum horizontal frequency. Old monitors might even bedamaged if you exceed their capabilities.
Caution
CONSOLE_FONT=""Font for the console loaded at boot. Additional settings are:〈CONSOLE_SCREENMAP〉, 〈CONSOLE_UNICODEMAP〉, and〈CONSOLE_MAGIC〉.
169SuSE Linux – Enterprise Server 8
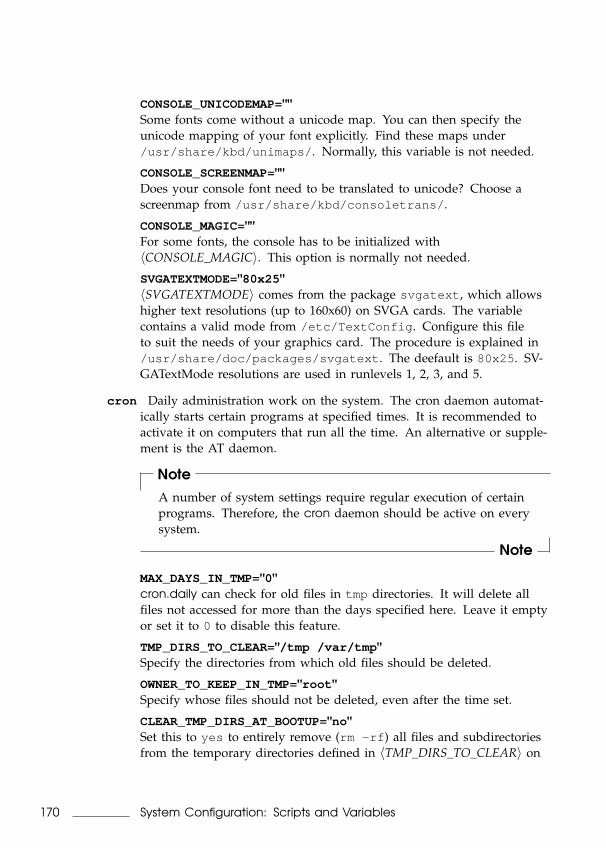
CONSOLE_UNICODEMAP=""Some fonts come without a unicode map. You can then specify theunicode mapping of your font explicitly. Find these maps under/usr/share/kbd/unimaps/ . Normally, this variable is not needed.
CONSOLE_SCREENMAP=""Does your console font need to be translated to unicode? Choose ascreenmap from /usr/share/kbd/consoletrans/ .
CONSOLE_MAGIC=""For some fonts, the console has to be initialized with〈CONSOLE_MAGIC〉. This option is normally not needed.
SVGATEXTMODE="80x25 "〈SVGATEXTMODE〉 comes from the package svgatext , which allowshigher text resolutions (up to 160x60) on SVGA cards. The variablecontains a valid mode from /etc/TextConfig . Configure this fileto suit the needs of your graphics card. The procedure is explained in/usr/share/doc/packages/svgatext . The deefault is 80x25 . SV-GATextMode resolutions are used in runlevels 1, 2, 3, and 5.
cron Daily administration work on the system. The cron daemon automat-ically starts certain programs at specified times. It is recommended toactivate it on computers that run all the time. An alternative or supple-ment is the AT daemon.
NoteA number of system settings require regular execution of certainprograms. Therefore, the cron daemon should be active on everysystem.
Note
MAX_DAYS_IN_TMP="0"cron.daily can check for old files in tmp directories. It will delete allfiles not accessed for more than the days specified here. Leave it emptyor set it to 0 to disable this feature.
TMP_DIRS_TO_CLEAR="/tmp /var/tmp "Specify the directories from which old files should be deleted.
OWNER_TO_KEEP_IN_TMP="root "Specify whose files should not be deleted, even after the time set.
CLEAR_TMP_DIRS_AT_BOOTUP="no"Set this to yes to entirely remove (rm -rf ) all files and subdirectoriesfrom the temporary directories defined in 〈TMP_DIRS_TO_CLEAR〉 on
170 System Configuration: Scripts and Variables
8Th
eSuSE
Linux
Ente
rprise
Serve
rBoo
tCo
nc
ep
t
boot. This feature ignores 〈OWNER_TO_KEEP_IN_TMP〉 — all files willbe removed without exception.
DELETE_OLD_CORE="no"Should old core files be deleted? If set to no , cron.daily will tell you ifit finds old core files. This feature requires 〈RUN_UPDATEDB〉 be setto yes and package findutils-locate needs to be installed.
MAX_DAYS_FOR_CORE="7"Maximum age of core files in days.
REINIT_MANDB="yes "Should the manual page database (mandb and whatis) be recreated bycron.daily?
DELETE_OLD_CATMAN="yes "Should old preformatted man pages (in /var/catman ) be deleted?
CATMAN_ATIME="7"How long (in days) should old preformatted man pages be kept beforedeleting them?
dhcpd Configure the DHCP server.
DHCPD_INTERFACE="eth0 "Enter a space-separated list of interfaces on which the DCHP servershould be listening.
DHCPD_RUN_CHROOTED="yes "Should dhcpd run in a “chroot jail”? Refer to dhcpd’s README.SuSE(/usr/share/doc/packages/dhcp/README.SuSE ) for further de-tails.
DHCPD_CONF_INCLUDE_FILES=""dhcpd.conf can contain include statements. If you enter the namesof any include files here, all conf files will be copied to \$chroot/etc/ when dhcpd is started in the chroot jail. /etc/dhcpd.conf isalways copied.
DHCPD_RUN_AS="nobody "Leave empty or enter root to let dhcpd run as root . Enter nobodyto run dhcpd as user nobody and group nogroup .
DHCPD_OTHER_ARGS=""Other arguments with which dhcpd should be started. See man dhcpdfor details.
dhcrelay DHCP Relay Agent. A DHCP relay agent allows you to relayDHCP (and Bootp) requests from one subnet without a DHCP server toone with a DHCP server.
171SuSE Linux – Enterprise Server 8
DHCRELAY_INTERFACES=""Interfaces on which the DHCP relay agent should listen (separarted byspaces).
DHCRELAY_SERVERS=""Specify a space-separated list of DHCP servers to be used by the DHCPrelay agent.
displaymanager Display manager configuration
DISPLAYMANAGER=""Set the display manager for login. Possible values: console , xdm (tra-ditional display manager of X Window System), kdm (display managerof KDE), gdm (display manager of GNOME), or wdm(“WINGs displaymanager”).
DISPLAYMANAGER_REMOTE_ACCESS="no"Allow remote access to your display manager. Default is no .
DISPLAYMANAGER_STARTS_XSERVER="yes "Display manager starts a local X server. Set to no for remote accessonly.
KDM_SHUTDOWN="auto "〈KDM_SHUTDOWN〉 determines who will be able to shutdown thesystem in kdm. Valid values are root , all , none , local , and auto .
KDM_USERS=""Enter a space-separated list of users for whom icons should be dis-played. If empty, the system defaults will be taken.
KDM_BACKGROUND=""Specify a special background for KDM.
KDM_GREETSTRING=""If you wish to be greeted by the system in a special way, enter thegreeting words here.
dracd Settings for the dracd and mail relaying using “POP-before-SMTP.”
DRACD_RELAYTIME="5"Postfix, on a POP server, remembers the IP address of an authenticatedhost for a certain time (time to live) and allows this host to send e-mail.After the time has expired, a new authentication is necessary. This timeto live is set in minutes.
DRACD_DRACDB="/etc/postfix/dracd.db "This is where dracdb is stored.
dvb Settings for your DVB card.
172 System Configuration: Scripts and Variables
8Th
eSuSE
Linux
Ente
rprise
Serve
rBoo
tCo
nc
ep
t
DVB_SOUND_CHIP="ti "Choose the sound chip on your DVB card — ti or crystal .
hardware Hardware settings
DEVICES_FORCE_IDE_DMA_ON=""Switch on DMA for the listed IDE devices.
DEVICES_FORCE_IDE_DMA_OFF=""Switch off DMA for the listed IDE devices.
hotplug Configuring the hotplug service.
HOTPLUG_DEBUG="default "This variable controls the amount of output of the hotplug service.With default , "", or no , it prints only few messages and errors tosyslog . Set it to off and it will be absolutely quiet. With verbose(or yes ), it prints some extra debug output. With max it will polluteyour syslog with every single detail.
HOTPLUG_START_USB="yes "Enable or disable USB hotplug event handling.
NoteDisabling USB hotplugDisabling USB hotplug while having the USB input devicesloaded as modules will render your keyboard unusable.
Note
HOTPLUG_USB_HOSTCONTROLLER_LIST="usb-uhci uhci usb-ohciehci-hcd "The host controller drivers will be probed in this order.
HOTPLUG_USB_MODULES_TO_UNLOAD="scanner "These modules should be unloaded on an USB “remove” event. Forsome devices, it is useful to reinitialize the hardware.
HOTPLUG_USB_NET_MODULES="pegasus usbnet catc kaweth CD-CEther "If one of these modules is loaded or unloaded, it is treated like a net-work device and the system creates a hardware description for the fol-lowing “net event”.
HOTPLUG_START_NET="yes "Enable or disable NET hotplug event handling.
HOTPLUG_NET_DEFAULT_HARDWARE=""One day in the future, there will be ways to obtain information onwhich type of hardware is behind a given network interface. Currently,
173SuSE Linux – Enterprise Server 8
there is no easy way to get this information. At the moment, we usethe following work-around: hardware descriptions are written at theUSB or PCI hotplug events then read by the NET event. If you plugseveral devices at a time, this might cause race conditions. If the work-around fails, the string in 〈HOTPLUG_NET_DEFAULT_HARDWARE〉is used when if{up,down} is called. Set it to what you use as hotplugNIC: pcmcia , usb , or firewire .
HOTPLUG_NET_TIMEOUT="8"Specify how long to wait for a hardware description from a USB orPCI event (in seconds). If this value equals 0, the hotplug servicewill not wait for a hardware description and always use the value of〈HOTPLUG_NET_DEFAULT_HARDWARE〉. The default value here is 8since some PCMCIA NICs need a long time for some negotiation jobs.
HOTPLUG_START_PCI="yes "Enable or disable PCI hotplug event handling.
HOTPLUG_PCI_MODULES_NOT_TO_UNLOAD=""These modules should not be unloaded on a PCI “remove” event, be-cause they cause too much trouble.
intermezzo Settings for the Intermezzo file system.
EXCLUDE_GID="63"Specify the group to exclude from replication.
irda IrDA is the infrared interface used, for example, by notebooks. To ac-tivate it permanently, call insserv /etc/init.d/irda .
IRDA_PORT="/dev/ttyS1 "Currently, the UART (SIR) mode is supported in the normal configu-ration. The variable 〈IRDA_PORT〉 sets the used serial port. Checkyour BIOS setup to find out which is correct. If you have a sup-ported FIR chipset, specify the name of the corresponding kernel mod-ule in 〈IRDA_PORT〉, for example, IRDA_PORT="toshoboe" . FIRmust be enabled in the BIOS setup first. Sometimes, you additionallyhave to disable the serial port, which would be used in SIR mode viasetserial /dev/ttyS<x> uart none
isdn/ Here you will find all the scripts needed for ISDN.
ispell Configuring the ispell spell checker.
ENGLISH_DICTIONARY="system american british "SuSEconfig.ispell maintains a symbolic link from the english (de-fault) dictionary to either american or british . If only one is in-
174 System Configuration: Scripts and Variables
8Th
eSuSE
Linux
Ente
rprise
Serve
rBoo
tCo
nc
ep
t
stalled, the link will point to this one. If both are installed, the space-separated value of 〈ENGLISH_DICTIONARY〉 takes effect. The magicword system expands to the system’s default language (as defined in/etc/sysconfig/language ’s 〈RC_LANG〉), if it is one of the Englishlanguages, and expands to the empty string otherwise. The symlinkwill point to the first installed dictionary in the list.
java Configuring Java.
CREATE_JAVALINK="yes "SuSEconfig can automatically create the links /usr/lib/java and/usr/lib/jre that point to a suitable JDK or JRE respectively ifyou set 〈CREATE_JAVALINK〉 to yes . If you are not satisfied with thechoice it makes, set 〈CREATE_JAVALINK〉 to no and set the link manu-ally.
JAVA_JRE_THREADS_TYPE="green "Configuration for the package java-jre . Set this to native if youwant real multithreading, for example, in combination with SMP sys-tems.
JAVA_THREADS_TYPE="green "Configuration for the package java . Set this to native if you wantreal multithreading, for example, in combination with SMP systems.
joystick Joystick configuration
GAMEPORT_MODULE_0=""Gameport module names, for example, ns558 for legacy gameport sup-port.
JOYSTICK_MODULE_0=""Joystick module names, usually analog .
JOYSTICK_MODULE_OPTION_0=""Joystick module options, such as js=gameport for analog.
JOYSTICK_CONTROL_0=""Control name of sound driver to activate (via alsactl).
JOYSTICK_CONTROL_PORT_0=""Port to use (via alsactl). Some sound cards, like ens1371, need the portaddress (typically 0x200).
kernel Kernel.
INITRD_MODULES=""This variable contains the list of modules to add to the initial ramdiskwith the script mk_initrd (like drivers for scsi controllers, lvm, orreiserfs).
175SuSE Linux – Enterprise Server 8
SHMFS_SIZE=""Size parameter for mounting the shmfs file system. The kernel defaultsto half the available RAM size, but this might not be enough for somespecial setups.
keyboard Keyboard layout.
KEYTABLE="de-latin1-nodeadkeys "Defines the key layout. If you use a US keyboard, this variable can re-main empty.
KBD_RATE="24.0 "Rate of automatic keyboard repetition. Set this to a value between 2and 30 times per second. The variable for the delay also needs to beset: 〈KBD_DELAY〉.KBD_DELAY="500 "Set the delay after which the automatic key repetition starts. Possiblevalues: 250 , 500 , 750 , and 1000 in milliseconds. Also set the variable〈KBD_RATE〉.KBD_NUMLOCK="bios "Set this to no and
�� ��NumLock will not be enabled at boot. Other optionsare yes , "" , or bios for BIOS setting.
KBD_SCRLOCK="no"Enable or disable
�� ��ScrollLock .
KBD_CAPSLOCK="no"Do not enable
�� ��CapsLock at boot time.
KBD_DISABLE_CAPS_LOCK="no"Disable
�� ��CapsLock and make it a normal Shift key?
KBD_TTY="tty1 tty2 tty3 tty4 tty5 tty6 "Limit
�� ��NumLock ,�� ��CapsLock , and
�� ��ScrollLock to certain TTYs. "" means all.
COMPOSETABLE="clear winkeys shiftctrl latin1.add "Compose tables to load. See /usr/share/doc/packages/kbd/README.SuSEfor further details on key tables.
language Settings for language and locale.
RC_LANG="en_US"Sets variable LANGfor locale. This is the default for local users,as long as no 〈RC_LC_*〉 variables are used. The respectivesysconfig variables are 〈RC_LC_ALL〉 (overwrites LC_* and LANG),〈RC_LC_MESSAGES〉, 〈RC_LC_CTYPE〉, 〈RC_LC_MONETARY〉,〈RC_LC_NUMERIC〉, 〈RC_LC_TIME〉, and 〈RC_LC_COLLATE〉.See Section Local Adjustments — I18N/L10N on page 145.
176 System Configuration: Scripts and Variables
8Th
eSuSE
Linux
Ente
rprise
Serve
rBoo
tCo
nc
ep
t
ROOT_USES_LANG="ctype "Should locale settings be used for root ? ctype means that root usesjust 〈LC_CTYPE〉.
locate The locate database allows files on the system to be found quickly.It is usually updated shortly after booting the system.
RUN_UPDATEDB="no"Should the database for locate (locate ) get updated once a day?More detailed configuration of updatedb is possible with the follow-ing variables.
RUN_UPDATEDB_AS="nobody "Specify the user executing updatedb. Default, for security reasons, isnobody .
UPDATEDB_NETPATHS=""Normally, uptdatedb only scans local hard disks, but can include netpaths in the database as well. If you specify directories here, they willbe scanned.
UPDATEDB_PRUNEPATHS="/mnt /media/cdrom /tmp /usr/tmp/var/tmp /var/spool /proc /media "Specify the directories to skip for the daily updatedb runs.
UPDATEDB_NETUSER=""User, such as nobody , to search net paths.
UPDATEDB_PRUNEFS=""Specify the type of file systems to exclude from the updatedb runs.
lvm The Logical Volume Manager.
mail Settings for e-mail.
FROM_HEADER=""From: line defined for the whole system. If "", the FQDN is used. SeeSection Domain Name System on page 202.
MAIL_CREATE_CONFIG="yes "Set this to no if SuSEconfig should not generate the configuration files(e.g., you want to generate /etc/sendmail.cf yourself). If you wantto generate a sendmail configuration /etc/sendmail.cf from param-eters given in /etc/sysconfig/sendmail , use yes .
NULLCLIENT=""A null client is a machine that can only send mail. It receives no mailfrom the network and it does not deliver any mail locally. A null clienttypically uses POP or NFS for mailbox access.
177SuSE Linux – Enterprise Server 8
SMTPD_LISTEN_REMOTE="no"Set this to yes if external e-mails should be accepted. This is necessaryfor any mail server. If set to no or empty, only mails from the localhost are accepted.
mouse Mouse settings
MOUSE=""Specify the interface to which the mouse is connected (e.g., /dev/ttySO ). YaST2 or SuSEconfig sets a link /dev/mouse pointing to thedevice.
GPM_PROTOCOL=""The gpm protocol for the mouse device from the variable MOUSE. Thedefault value is defined by YaST2.
GPM_PARAM=" -t $GPM_PROTOCOL -m $MOUSE"Default parameters for gpm.
network Directory for network configuration.
network/config Some general settings for network configuration.
DEFAULT_BROADCAST="+"〈DEFAULT_BROADCAST〉 is read when a 〈BROADCAST〉 is not setelsewhere. Choose from the following values: "" for no broadcastaddress, - for 〈IPADDR〉 without host bits, or + for 〈IPADDR〉 with allhost bits set.
CHECK_FOR_MASTER="yes "To require an interface (master) to be up before an alias (labeled ad-dress) can be set up, set 〈CHECK_FOR_MASTER〉 to yes . Technically,this is not neccessary, because labeled and unlabeled adresses are equiv-alent. This setting serves just for the convenience of ifconfig users.
CHECK_DUPLICATE_IP="yes "If ifup should check if an IP address is already in use, set this to yes .Make sure packet sockets (〈CONFIG_PACKET〉) are supported in thekernel, since this feature uses arping, which depends on that. Also beaware that this takes one second per interface. Consider that when set-ting up a lot of interfaces.
DEBUG="no"Switch on and off debug messages for all network configuration scripts.If set to no , most scripts still can enable it locally with -o debug .
USE_SYSLOG="yes "Should error messages from network configuration scripts go tosyslog ? If no, stderr is used.
178 System Configuration: Scripts and Variables
8Th
eSuSE
Linux
Ente
rprise
Serve
rBoo
tCo
nc
ep
t
MODIFY_RESOLV_CONF_DYNAMICALLY="yes "There are some services (ppp , ippp , dhcp-client , pcmcia , andhotplug ) that have to change /etc/resolv.conf dynamically atcertain times. To prevent these services from changing /etc/resolv.conf at all, set this variable to no . If unsure, leave it at the default,which is yes .
MODIFY_NAMED_CONF_DYNAMICALLY="no"Like 〈MODIFY_RESOLV_CONF_DYNAMICALLY〉, except it modifies/etc/named.conf . If unsure, leave it at the default, which is no .
network/dhcp Setting up DHCP (Dynamic Host Configuration Protocol).
NoteTo configure one or more interfaces for DHCP configura-tion, you have to change the 〈BOOTPROTO〉 variable in/etc/sysconfig/network/ifcfg-<interface> to dhcp(and possibly set 〈STARTMODE〉 to onboot ).
Note
Most of these options are used only by dhcpcd, not by theISC dhclient which uses a config file. Most of the options can be over-ridden by setting them in the ifcfg-* files, too.
DHCLIENT_BIN=""Which DHCP client should be used? If empty, dhcpcd is tried, thendhclient. Other possible values are dhcpcd for the DHCP client dae-mon or dhclient for the ISC dhclient.
DHCLIENT_DEBUG="no"Start in debug mode? Debug info will be logged to /var/log/messages for dhcpcd or to /var/log/dhclient-script for ISCdhclient.
DHCLIENT_SET_HOSTNAME="no"Should the DHCP client set the host name? If yes , take care that thehost name is not changed during a running X session or the 〈DISPLAY〉variable cannot be read anymore. As a consequence, no new windowscould be opened.
DHCLIENT_MODIFY_RESOLV_CONF="yes "Should the DHCP client modify /etc/resolv.conf at all? If not,set this to no . The default is yes . resolv.conf will also stay un-touched when 〈MODIFY_RESOLV_CONF_DYNAMICALLY〉 in /etc/sysconfig/network/config is set to no .
179SuSE Linux – Enterprise Server 8
DHCLIENT_SET_DEFAULT_ROUTE="yes "Should the DHCP client set a default route (default gateway)? Whenmultiple copies of dhcpcd run, it would make sense that only one ofthem does it.
DHCLIENT_MODIFY_NTP_CONF="no"Should the DHCP client modify the NTP configuration? If set to yes ,/etc/ntp.conf is rewritten (and restored upon exit). If this is un-wanted, set this variable to no . The default is no .
DHCLIENT_MODIFY_NIS_CONF="no"Should the DHCP client modify the NIS configuration? If set to yes ,/etc/yp.conf is rewritten (and restored upon exit). If this is un-wanted, set this variable to no . The default is no .
DHCLIENT_SET_DOMAINNAME="yes "Should the DHCP client set the NIS domain name? (Only valid if theserver supplies the nis domain option).
DHCLIENT_KEEP_SEARCHLIST="no"When writing a new /etc/resolv.conf , should the DHCP clienttake an existing search list and add it to the one derived from theDHCP server?
DHCLIENT_LEASE_TIME=""Specifies (in seconds) the lease time suggested to the server. The de-fault is infinite. For a mobile computer, you probably want to set thisto a lower value.
DHCLIENT_TIMEOUT="999999 "This setting is only valid for dhcpcd. Specify a time-out in seconds af-ter which dhcpcd terminates if it does not get a reply from the DHCPserver.
DHCLIENT_REBOOT_TIMEOUT=""This setting is only valid for dhcpcd. This time-out controls how longdhcpcd tries to reacquire a previous lease (init-reboot state), before itstarts getting a new one.
DHCLIENT_HOSTNAME_OPTION="AUTO"Specify a string used for the host name option field when dhcpcdsends DHCP messages. By default, the current host name is sent(AUTO), if one is defined in /etc/HOSTNAME . Use this variable to over-ride this with another host name or leave empty not to send a hostname.
DHCLIENT_CLIENT_ID=""Specifies a client identifier string. By default, the hardware address of
180 System Configuration: Scripts and Variables
8Th
eSuSE
Linux
Ente
rprise
Serve
rBoo
tCo
nc
ep
t
the network interface is sent as client identifier string, if none is speci-fied here.
DHCLIENT_VENDOR_CLASS_ID=""Specifies the vendor class identifier string. dhcpcd uses the defaultvendor class identifier string (system name, system release, and ma-chine type) if it is not specified.
DHCLIENT_RELEASE_BEFORE_QUIT="yes "Send a 〈DHCPRELEASE〉 to the server (sign off the address)? This maylead to getting a different address and host name next time an addressis requested. However, some servers require it.
DHCLIENT_SLEEP="0"Some interfaces need time to initialize. Add the latency time in secondsso these can be handled properly. This setting should be made on a perinterface basis, rather than here.
network/ifcfg-eth0 Configure the first network card. These settings canbe done with YaST2.
STARTMODE=""〈STARTMODE〉 tells ifup when a interface should be set up. Possiblevalues are onboot for an automatic start at boot time, manual whenifup is called manually, and hotplug when ifup is called by hotplugor pcmcia .
BOOTPROTO=""With 〈BOOTPROTO〉, choose between a static configuration withfixed IP addresses or dhcp.
IPADDR=""Set the IP adress if static configuration is desired.
NETMASK=""Specify the netmask of your net or subnet.
PREFIXLEN=""Alternatively, specify the prefix length.
NETWORK=""Specify the address of your network.
BROADCAST=""Enter the broadcast address of your network.
network/ifcfg-lo The loopback device.
network/wireless Configuring wireless LANs. Use the YaST2 networkmodules.
181SuSE Linux – Enterprise Server 8
news Settings for access to NNTP servers.
ORGANIZATION=""The text entered here will appear in every news posting sent from thismachine.
NNTPSERVER="news"Address of the news server. If you receive news via UUCP and theyare locally stored, set this variable to localhost .
nfs NFS server. The daemons rpc.nfsd and rpc.mountd are started simul-taneously.
REEXPORT_NFS="no"Set this variable to yes to reexport mounted NFS directories or Net-Ware volumes.
onlineupdate Settings for YaST2 Online Update.
YAST2_LOADFTPSERVER="yes "When starting YOU (YaST2 Online Update), should the default FTPserver list be updated via a call from wget to www.suse.de ? This listis stored under /etc/suseservers . Set the variable to no if you donot want to reload the FTP server list.
PROXY_USER=""Users of the proxy.
PROXY_PASSWORD=""Password for the proxy.
pcmcia PCMCIA System and PC Cards.
PCMCIA_SYSTEM="kernel "Set the variable to external or kernel . If only one of these systemsis installed, this variable will be ignored.
PCMCIA_PCIC=""Specify socket driver for the selected pcmcia system. Possible valuesare i82365 or tcic for external pcmcia system or yenta_socket ,i82365 , or tcic for kernel pcmcia. If it is left empty, the start scriptwill try to determine the correct driver or use a reasonable default.
PCMCIA_PCIC_OPTS=""Socket driver timing parameters. These parameters are described inman page i82365 (or man tcic ).
PCMCIA_CORE_OPTS=""pcmcia_core options as described in man pcmcia_core . For moreinformation, look for “CORE_OPTS” in the PCMCIA-HOWTO under/usr/doc/packages/pcmcia .
182 System Configuration: Scripts and Variables

8Th
eSuSE
Linux
Ente
rprise
Serve
rBoo
tCo
nc
ep
t
postfix Configuring postfix. Use the YaST2 mail module for this.
postgresql PostgreSQL.
POSTGRES_DATADIR="~postgres/data "Specify the directory in which the PostgreSQL database is to reside.
POSTGRES_OPTIONS=""Specify the options given to the PostgreSQL master daemon on start-up. See the manual pages for postmaster and postgres for valid op-tions. Do not put -D datadir here since it is set by the start-up scriptbased on the variable 〈POSTGRES_DATADIR〉 above.
powermanagement apmd.
APMD_WARN_LEVEL="10"If you like to be warned when battery capacity goes below a certainlevel, you can set this level here in percent of maximum battery capac-ity. Set it to 0 to switch this and the following three options off. De-fault value is 10 .
APMD_WARN_ALL="no"For apmd warnings to be sent to all terminals, set this to yes . Other-wise the warnings will be logged in your syslog file. Default is no .
APMD_WARN_STEP="0"This warning can be repeated every time the capacity has decreased by〈WARN_STEP〉% of the maximum battery capacity. 0 means off. De-fault is 0.
APMD_CHECK_TIME="0"By default apmd checks the battery status every time it receives anevent from the BIOS. For it to be checked more often, set it to a valuegreater than 0 seconds. Note that this will wake up your disk at everycheck. Default value is 0.
APMD_DEBUG="no"Make apmd and the apmd_proxy-script more verbose. Set this vari-able to yes to see when and how apmd_proxy is called. To see ev-erything printed to stdout and stderr within apmd_proxy, setit to error . If you are interested in every single command withinapmd_proxy, set it to all . Anything but no makes apmd itself ver-bose. Default value is no .
APMD_ADJUST_DISK_PERF="no"For saving power, you should let your hard disk spin down af-ter an idle time. That is not needed when on wall power. Set〈ADJUST_DISK_PERF〉 to yes if apmd should check this. Note that
183SuSE Linux – Enterprise Server 8
this does not help much if any process (like an text editor) writes fre-quently to your disk. Default value is no .
APMD_BATTERY_DISK_TIMEOUT="12"Specify the time-out for your disk to be spun down when on battery.As this time-out is not just a matter of minutes or seconds, refer to theman page for hdparm (man hdparm). This option will only be valid if〈ADJUST_DISK_PERF〉 has been set to yes . The default setting here is12 , which equals a time-out of one minute.
APMD_AC_DISK_TIMEOUT="0"See 〈BATTERY_DISK_TIMEOUT〉, only that this setting concerns ACpower. Default value is 0 for no spindown.
APMD_BATTERY_LOW_SHUTDOWN="0"When the battery capacity becomes very low, some laptop BIOSes senda “battery low” message. You can then let your machine shut down afew minutes later. Set the number of minutes here. The minumum is 1minute. A value of 0 switches off this behavior. The default value is 0.
APMD_SET_CLOCK_ON_RESUME="no"If you have problems with wrong time settings after a standby or sus-pend, set 〈SET_CLOCK_ON_RESUME〉 to yes . The kernel time will beset according to the value stored in the GMT variable. Default is no .
APMD_SUSPEND_ON_AC="yes "Set 〈SUSPEND_ON_AC〉 to no to avoid suspend and standby eventswhen your machine is connected to AC power. By default, suspendscan occur on either battery or AC power. A suspend requested by theuser is executed anyway.
APMD_PCMCIA_SUSPEND_ON_SUSPEND="no"If PCMCIA is compiled with APM support, cards are normally sus-pended before your system suspends. If you do not have APM supportin PCMCIA, you can let apmd do this job. Default is no .
APMD_PCMCIA_EJECT_ON_SUSPEND="no"PCMCIA cards can be more or less amenable to an APM suspendevent. If you have a card that cannot be suspended properly (such asa SCSI card), it should be “ejected” before entering suspend mode. Thecards are not physically ejected. Rather, the power to them is turnedoff via the cardctl eject command and is reactivated upon resume.Default value is no .
APMD_INTERFACES_TO_STOP=""If you have a built-in NIC that does not survive a suspend and resumecycle properly, add the interface name to this variable. It will then beshut down before suspend and brought up after resume. Default is "".
184 System Configuration: Scripts and Variables
8Th
eSuSE
Linux
Ente
rprise
Serve
rBoo
tCo
nc
ep
t
APMD_INTERFACES_TO_UNLOAD=""If it does not help to shut down the network interface via〈APMD_INTERFACES_TO_STOP〉, unload the module driving your NICat suspend and restart the network at resume.
APMD_LEAVE_X_BEFORE_SUSPEND="no"If your graphic device is not able to return properly from suspend,switch to text console before suspend and return to your X console af-ter resume. Default is no .
APMD_LEAVE_X_BEFORE_STANDBY="no"Sometime, it is needed for standby. Default is no .
APMD_LOCK_X_ON_SUSPEND="no"If you like apmd to lock your screen before suspend, set this variableto yes . If only one X server is running and no one is logged in at anyvirtual terminal, this can be considered a safe state. Together with anencrypted partition for your data, no one can access your data whenyour laptop is in this state. Default is no .
APMD_STOP_SOUND_BEFORE_SUSPEND="no"Sometimes the sound modules do not survive a suspend and re-sume cycle. In this case, everything seems to be OK, but youcannot hear anything. To avoid this, the sound modules can beunloaded before suspend. A reload of these modules will onlybe done if you use ALSA or OSS. If you use modules from thekernel, they will be reloaded automatically. If you like that, set〈APMD_STOP_SOUND_BEFORE_SUSPEND〉 to alsa , oss or kernel ,depending on what type of sound system you are using. To unload allsound modules succesfully, all sound applications that are currently us-ing some of them must be killed. Default value is no .
APMD_KBD_RATE=""It might be neccessary to reset the key repetition rate and delay. Youcan set the variables to any numeric value. The program kbdrate willselect the nearest possible values to these specified. To use the defaultvalues, just leave the variable empty. Default for both is "".
APMD_KBD_DELAY=""
APMD_TURN_OFF_IDEDMA_BEFORE_SUSPEND=""There are some notebooks that do not resume properly from suspendwhen the hard disk was in DMA mode. Add every disk here thatneeds DMA turned off. For /dev/hda , set it to hda . Several disks areseperated by spaces. Default is "".
printer Printer
185SuSE Linux – Enterprise Server 8
DEFAULT_PRINTER="lp "Name of the printer queue used when lpr is invoked with no -P .
proxy Proxy settings
HTTP_PROXY=""Some programs (e. g., lynx, arena, or wget) use a proxy server ifthis environment variable is set. SuSEconfig will set it in /etc/SuSEconfig/* . Example: "http://proxy.provider.com:3128/".
FTP_PROXY=""Proxy for FTP. Example: "http://proxy.provider.com:3128/" .
NO_PROXY="localhost "Exclude domains or subdomains from proxy use. Example:"www.me.de, do.main, localhost" .
security Settings for system security
CHECK_PERMISSIONS="set "Should SuSEconfig check file permissions using /etc/permissions ?Value set will correct false settings. warn produces warnings. Disablethis feature with no .
PERMISSION_SECURITY="easy local "In /etc/permissions.paranoid , /etc/permissions.secure ,and /etc/permissions.easy , three security levels are predefined.Enter easy , secure , or paranoid . If you select paranoid , some sys-tem sevices might not be available anymore. Explicitly enable them, ifneeded.
sendmail sendmail variables. Use the YaST2 mail module for configura-tion.
sound Sound configuration.
LOAD_SEQUENCER="yes "Load ALSA sequencer modules at boot? Sequencer modules are neces-sary only for handling MIDI devices. If you do not need MIDI, disablethis option. The modules can also be loaded automatically later if theyare needed.
ssh Before starting the “Secure Shell Daemon”, make sure a “host key” ex-ists. Consult the documentation in /usr/share/doc/packages/sshand the manual pages.
SSHD_OPTS=""Options for sshd.
186 System Configuration: Scripts and Variables
8Th
eSuSE
Linux
Ente
rprise
Serve
rBoo
tCo
nc
ep
t
suseconfig Settings for SuSEconfig.
ENABLE_SUSECONFIG="yes "Decide whether SuSEconfig should take care of updating the configura-tion. Do not disable SuSEconfig if you want to consult our InstallationSupport.
MAIL_REPORTS_TO="root "Select the user to which SuSEconfig should send e-mail reports createdduring the automatic system administration.
MAIL_LEVEL="warn "Set the variable to warn if only important messages should be sent. Setit to all if the log files should be mailed, too.
CREATE_INFO_DIR="yes "Set the variable to yes if a perl script should be used to generate thefile /usr/share/info/dir automatically. This file is the index for allinfo pages.
CHECK_ETC_HOSTS="yes "Defines whether SuSEconfig should check and modify /etc/hosts .
BEAUTIFY_ETC_HOSTS="no"Should /etc/hosts be sorted by SuSEconfig?
SORT_PASSWD_BY_UID="no"If this variable is set to yes, SuSEconfig sorts your /etc/passwd and/etc/group by “uid” and “gid”.
CWD_IN_ROOT_PATH="no"Should the current working directory (“.”) be in the path of user root ?For security reasons, this is not recommended. This setting is valid forall users with a “UID” below 100 (system users).
CWD_IN_USER_PATH="yes "Should the current working directory (“.”) be in the path for normalusers?
CREATE_PERLLOCAL_POD="yes "May SuSEconfig modify your perllocal.pod ?
UPDATE_GROFF_CONF="yes "Update DESCto get page sizes correct?
GROFF_PAGESIZE=""If the correct page size cannot be found in your printcap , this vari-able can be set to the following values: letter , legal , a4 , or b5 ,supported by both groff and ghostscript
sysctl System control at the kernel level
187SuSE Linux – Enterprise Server 8
IP_DYNIP ="no"Enable the “dynamic IP patch” at boot?
IP_TCP_SYNCOOKIES="yes "Enable “syn flood protection”? See /usr/src/linux/Documentation/Configure.help .
IP_FORWARD="no"If the host is supposed to forward to two network interfaces, set thisvariable to yes . This is usually applicable for routers or “masquerad-ing”. The script /etc/init.d/boot.proc enables IP forwarding withan entry in the /proc file system.
ENABLE_SYSRQ="no"If you set this to yes , you will have some control over the systemeven if it crashes, for example, during kernel debugging. Consult/usr/src/linux/Documentation/sysrq.txt for further informa-tion.
DISABLE_ECN="yes "If you have trouble connecting to some machines on the Internet withyour 2.4 kernel but there are no problems with 2.2, this may be due tobroken firewalls dropping network packets with the ECN (early conges-tion notification) flag set. Set this to yes to disable ECN at boot.
BOOT_SPLASH="yes "Set to no to turn off the splash screen on console 1 at boot (after kernelload).
syslog Configuring the syslog daemon.
SYSLOGD_ADDITIONAL_SOCKET_DHCP="/var/lib/dhcp/dev/log "The contents of this variable are added by the dhcp-server package.The file name mentioned here is added using -a <filename> as anadditional socket via 〈SYSLOGD_PARAMS〉 when syslogd is started.This additional socket is needed in case syslogd is restarted. Otherwise,a chrooted dhcpd will not be able to continue logging.
KERNEL_LOGLEVEL="1"Default log level for klogd.
SYSLOGD_PARAMS=""Parameters for syslogd, for example, -r -s my.domain.com .
syslog-ng Configuring syslog-ng.
SYSLOG_NG_REPLACE="yes "Replace the default syslog daemon? If set to no , syslog-ng will bestarted in addition to syslog.
188 System Configuration: Scripts and Variables
8Th
eSuSE
Linux
Ente
rprise
Serve
rBoo
tCo
nc
ep
t
SYSLOG_NG_PARAMS=""Parameters for syslog-ng. Refer to man 8 syslog-ng for details.
tetex TEX/LATEX.
CLEAR_TEXMF_FONTS="no"The automatic font generation of the TeX or LaTeX systems lo-cate the bitmap font into the directory /var/cache/fonts/ . If〈CLEAR_TEXMF_FONTS〉 is set to yes , this directory will be clearedof fonts not used in the last twenty days.
windowmanager Window manager.
DEFAULT_WM="kde "Here, set the default window manager, such as kde , gnome, or fvwm.
INSTALL_DESKTOP_EXTENSIONS="yes "Install the SuSE extensions for new users (theme and additional func-tions).
KDM_SHUTDOWN="auto "Specifies the users allowed to shut down or reboot the computer viakdm. Possible settings: root , all , none , local , and auto .
KDE_USE_FAM="no"Should KDE use the fam daemon? It only makes sense on NFSmounted directories.
KDE_USE_FAST_MALLOC="no"Use the improved malloc?
SUSEWM_UPDATE="yes "Should SuSEconfig.wm create system-wide configuration files for thewindow managers?
SUSEWM_WM="all "Space-separated list of window managers for which configuration filesshould be generated. Valid values are fvwm, fvwm2 , fvwm95 , bowman,mwm, ctwm, kwm, and all .
SUSEWM_XPM="yes "Set 〈SUSEWM_XPM〉 to yes for pixmaps in menus. The package3dpixms must be installed.
xdmsc Using X terminals.
START_RX="no"First, edit /etc/inittab to remove the comment from the line with/sbin/init.d/rx . Then 〈RX_XDMCP〉 and 〈RX_RHOST〉 must beset. Finally, set 〈START_RX〉 to yes to have an X terminal.
189SuSE Linux – Enterprise Server 8
RX_XDMCP="broadcast "xdm control protocol: query , indirect , or broadcast . For queryor indirect , set 〈RX_RHOST〉.RX_RHOST=""xdm host, necessary if 〈RX_XDMCP〉 is set to query or indirect .
RX_DSP=""Optional DISPLAY number, such as :1 or :2 . Default is DISPLAY :0 .
RX_BPP=""Optional color depth of the local X server.
RX_CLASS=""This is an optional class name for naming a resource class in remotexdm configuration.
xntp Starts the “Network Time Protocol (NTP) Daemon” of package xntp .Configuration is done in file /etc/ntp.conf .
XNTPD_INITIAL_NTPDATE="AUTO-2"A space-separated list of NTP servers to query for current time anddate before the local xntpd is started, for example, "sun .cosmos.com ".Set the value AUTOto query all servers and peers configured in /etc/ntpd.conf . The new default value is AUTO-2, which will query onlythe first two servers listed in /etc/ntpd.conf .Radio and modem clocks have addresses in the form 127.127.T.U ,where T is the clock type and U is a unit number in the range 0–3.Most of these clocks require a serial port or special bus peripheral.The particular device is normally specified by adding a soft link from/dev/device-U to the particular hardware device involved, whereU correspond to the unit number above. See /usr/share/doc/packages/xntp/html/refclock.htm .
ypbind Configuration of an NIS client. Additional information: The do-main name is set in /etc/defaultdomain . The server name will beentered in /etc/yp.conf directly during configuration with YaST2.
YPBIND_OPTIONS=""Extra options for ypbind.
YPBIND_LOCAL_ONLY="no"If this option is set, ypbind will only bind to the loopback interface andremote hosts cannot query it.
YPBIND_BROADCAST="no"If this option is set to yes , ypbind will ignore /etc/yp.conf and usea broadcast call to find a NIS server in the local subnet. Avoid usingthis, as it is a big security risk.
190 System Configuration: Scripts and Variables
8Th
eSuSE
Linux
Ente
rprise
Serve
rBoo
tCo
nc
ep
t
YPBIND_BROKEN_SERVER="no"Set this to yes if you have a NIS server in your network, which bindsonly to high ports over 1024. Since this is a security risk, you shouldconsider replacing the NIS server with another implementation.
ypserv Configuration of an NIS server.
YPPWD_SRCDIR="/etc "Specify the YP source directory where YP will search the source filesfor the passwd and group tables. Default is /etc
YPPWD_CHFN="no"Should a user be allowed to change his GECOS field using ypchfn?
YPPWD_CHSH="no"Should the user be allowed to change his default login shell usingypchsh?
zope Configuration of ZOPE systems.
ZOPE_FTP="yes "Should Zope be accessible via FTP?
ZOPE_FTP_PORT="8021 "If so, on which port?
ZOPE_HTTP_PORT="8080 "If you run Zope as a stand-alone server, which port should it occupy?
191SuSE Linux – Enterprise Server 8


Part III
Networking

9Lin
ux
inth
eN
etw
ork
Linux in the Network
Linux, really a child of the Internet, offers all the necessary networking toolsand features for integration into all types of network structures. An introduc-tion into the customary Linux protocol, TCP/IP, follows. The various servicesand special features of this protocol are discussed. Network access using anetwork card can be configured with YaST2. The central configuration filesare discussed and some of the most essential tools described. Only the fun-damental mechanisms and the relevant network configuration files are dis-cussed in this chapter.
TCP/IP — The Protocol Used by Linux . . . . . . . . . . . 196IPv6 — The Next Generation’s Internet . . . . . . . . . . . 204Network Integration . . . . . . . . . . . . . . . . . . . . . . 209Manual Network Configuration . . . . . . . . . . . . . . . 211Routing in SuSE Linux Enterprise Server . . . . . . . . . . 219DNS — Domain Name Service . . . . . . . . . . . . . . . . 221NIS — Network Information Service . . . . . . . . . . . . 231NFS — Shared File Systems . . . . . . . . . . . . . . . . . 235DHCP . . . . . . . . . . . . . . . . . . . . . . . . . . . . . . 239
TCP/IP — The Protocol Used by Linux
Linux and other Unix operating systems use the TCP/IP protocol. It not asingle network protocol, but a family of network protocols that offer variousservices. TCP/IP was developed based on an application used for militarypurposes and was defined in its present form in an RFC in 1981. RFC standsfor “Request for Comments”. They are documents that describe various Inter-net protocols and implemenation procedures for the operating system and itsapplications. Since then, the TCP/IP protocol has been refined, but the basicprotocol has remained virtually unchanged.
TipThe RFC documents describe the setup of Internet protocols. To ex-pand your knowledge about any of the protocols, the appropriate RFCdocument is the right place to start: http://www.ietf.org/rfc.html
Tip
The services listed in Table 9.1 are provided for the purpose of exchang-ing data between two Linux machines via TCP/IP. Networks, combined byTCP/IP, comprising a world-wide network are also referred to, in their en-tirety, as “the Internet.”
TCP Transmission Control Protocol: A connection-orientedsecure protocol. The data to transmit is first sent by theapplication as a stream of data then converted by the op-erating system to the appropriate format. The data arrivesat the respective application on the destination host inthe original data stream format in which it was initiallysent. TCP determines whether any data has been lost dur-ing the transmission and that there is no mix-up. TCP isimplemented wherever the data sequence matters.
UDP User Datagram Protocol: A connectionless, insecure pro-tocol. The data to transmit is sent in the form of pack-ets already generated by the application. The order inwhich the data arrives at the recipient is not guaranteedand data loss is a possibility. UDP is suitable for record-oriented applications. It features a smaller latency periodthan TCP.
Table 9.1: continued overleaf. . .
196 TCP/IP — The Protocol Used by Linux
9Lin
ux
inth
eN
etw
ork
ICMP Internet Control Message Protocol: Essentially, this is nota user-friendly protocol, but a special control protocolthat issues error reports and can control the behavior ofmachines participating in TCP/IP data transfer. In addi-tion, a special echo mode is provided by ICMP that can beviewed using the program ping.
IGMP Internet Group Management Protocol: This protocolcontrols the machine behavior when implementing IPmulticast. The following sections do not contain moreinfomation regarding IP multicasting, because of spacelimitations.
Table 9.1: Several Protocols in the TCP/IP Protocol Family
Almost all hardware protocols work on a packet-oriented basis. The data totransmit is packaged in “bundles”, as it cannot be sent all at once. This iswhy TCP/IP only works with small data packets. The maximum size of aTCP/IP packet is approximately sixty-four kilobytes. The packets are nor-mally quite a bit smaller, as the network software can be a limiting factor.The maximum size of a data packet on an ethernet is about fifteen hundredbytes. The size of a TCP/IP packet is limited to this amount when the data issent over an ethernet. If more data is transferred, more data packets need tobe sent by the operating system.
Layer Model
IP (Internet Protocol) is where the insecure data transfer takes place. TCP(Transmission Control Protocol), to a certain extent, is simply the upper layerfor the IP platform serving to guarantee secure data transfer. The IP layeritself is, in turn, supported by the bottom layer, the hardware-dependentprotocol, such as ethernet. Professionals refer to this structure as the “layermodel”. See Figure 9.1 on the next page.
The diagram provides one or two examples for each layer. As you can see,the layers are ordered according to “degrees of abstraction”. The bottommostlayer is very close to the hardware. The uppermost layer, however, is almosta complete abstraction of the hardware. Every layer has its own special func-tion, clarified in the following.
197SuSE Linux – Enterprise Server 8
Figure 9.1: Simplified Layer Model for TCP/IP
The special functions of each layer are already implicit in their description.For example, the network used (e.g., ethernet) is depicted by the bit transferand security layers.
While layer 1 deals with cable types, signal forms, signal codes, andthe like, layer 2 is responsible for accessing procedures (which hostmay send data?) and correcting errors. Layer 1 is called the bit transferlayer. Layer 2 is called security layer
Layer 3 is the communication layer and is responsible for remote datatransfer. The network layer ensures that the data arrives at the correctremote recipient and can be delivered.
Layer 4, the transport layer, is responsible for application data. Thetransport layer ensures the data arrives in the correct order and none islost. The security layer is only there to make sure that the data that hasarrived is correct. The transport layer protects data from being lost.
Finally, layer 5 is the layer where data is processed by the applicationitself.
For every layer to serve its designated function, additional information re-garding each layer must be saved in the data packet. This takes place in theheader of the packet. Every layer attaches a small block of data, called theprotocol header, to the front of each emerging packet. A sample TCP/IP datapacket travelling over an ethernet cable is illustrated in Figure 9.2 on the fac-ing page.
198 TCP/IP — The Protocol Used by Linux
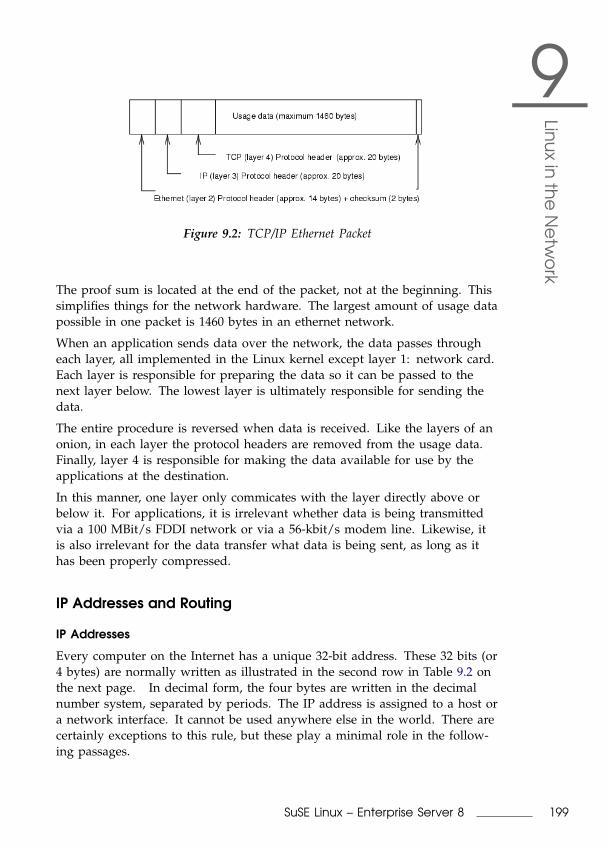
9Lin
ux
inth
eN
etw
ork
Figure 9.2: TCP/IP Ethernet Packet
The proof sum is located at the end of the packet, not at the beginning. Thissimplifies things for the network hardware. The largest amount of usage datapossible in one packet is 1460 bytes in an ethernet network.
When an application sends data over the network, the data passes througheach layer, all implemented in the Linux kernel except layer 1: network card.Each layer is responsible for preparing the data so it can be passed to thenext layer below. The lowest layer is ultimately responsible for sending thedata.
The entire procedure is reversed when data is received. Like the layers of anonion, in each layer the protocol headers are removed from the usage data.Finally, layer 4 is responsible for making the data available for use by theapplications at the destination.
In this manner, one layer only commicates with the layer directly above orbelow it. For applications, it is irrelevant whether data is being transmittedvia a 100 MBit/s FDDI network or via a 56-kbit/s modem line. Likewise, itis also irrelevant for the data transfer what data is being sent, as long as ithas been properly compressed.
IP Addresses and Routing
IP Addresses
Every computer on the Internet has a unique 32-bit address. These 32 bits (or4 bytes) are normally written as illustrated in the second row in Table 9.2 onthe next page. In decimal form, the four bytes are written in the decimalnumber system, separated by periods. The IP address is assigned to a host ora network interface. It cannot be used anywhere else in the world. There arecertainly exceptions to this rule, but these play a minimal role in the follow-ing passages.
199SuSE Linux – Enterprise Server 8
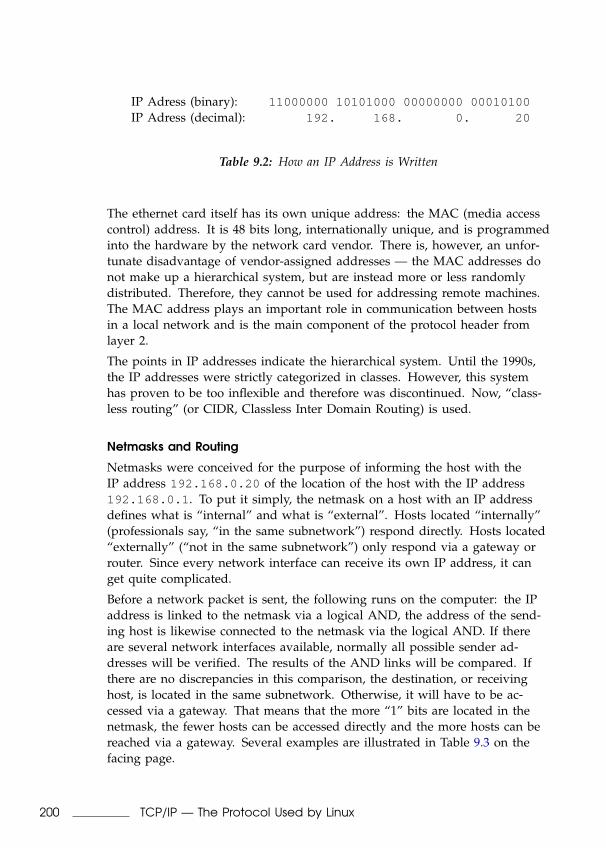
IP Adress (binary): 11000000 10101000 00000000 00010100IP Adress (decimal): 192. 168. 0. 20
Table 9.2: How an IP Address is Written
The ethernet card itself has its own unique address: the MAC (media accesscontrol) address. It is 48 bits long, internationally unique, and is programmedinto the hardware by the network card vendor. There is, however, an unfor-tunate disadvantage of vendor-assigned addresses — the MAC addresses donot make up a hierarchical system, but are instead more or less randomlydistributed. Therefore, they cannot be used for addressing remote machines.The MAC address plays an important role in communication between hostsin a local network and is the main component of the protocol header fromlayer 2.
The points in IP addresses indicate the hierarchical system. Until the 1990s,the IP addresses were strictly categorized in classes. However, this systemhas proven to be too inflexible and therefore was discontinued. Now, “class-less routing” (or CIDR, Classless Inter Domain Routing) is used.
Netmasks and Routing
Netmasks were conceived for the purpose of informing the host with theIP address 192.168.0.20 of the location of the host with the IP address192.168.0.1 . To put it simply, the netmask on a host with an IP addressdefines what is “internal” and what is “external”. Hosts located “internally”(professionals say, “in the same subnetwork”) respond directly. Hosts located“externally” (“not in the same subnetwork”) only respond via a gateway orrouter. Since every network interface can receive its own IP address, it canget quite complicated.
Before a network packet is sent, the following runs on the computer: the IPaddress is linked to the netmask via a logical AND, the address of the send-ing host is likewise connected to the netmask via the logical AND. If thereare several network interfaces available, normally all possible sender ad-dresses will be verified. The results of the AND links will be compared. Ifthere are no discrepancies in this comparison, the destination, or receivinghost, is located in the same subnetwork. Otherwise, it will have to be ac-cessed via a gateway. That means that the more “1” bits are located in thenetmask, the fewer hosts can be accessed directly and the more hosts can bereached via a gateway. Several examples are illustrated in Table 9.3 on thefacing page.
200 TCP/IP — The Protocol Used by Linux
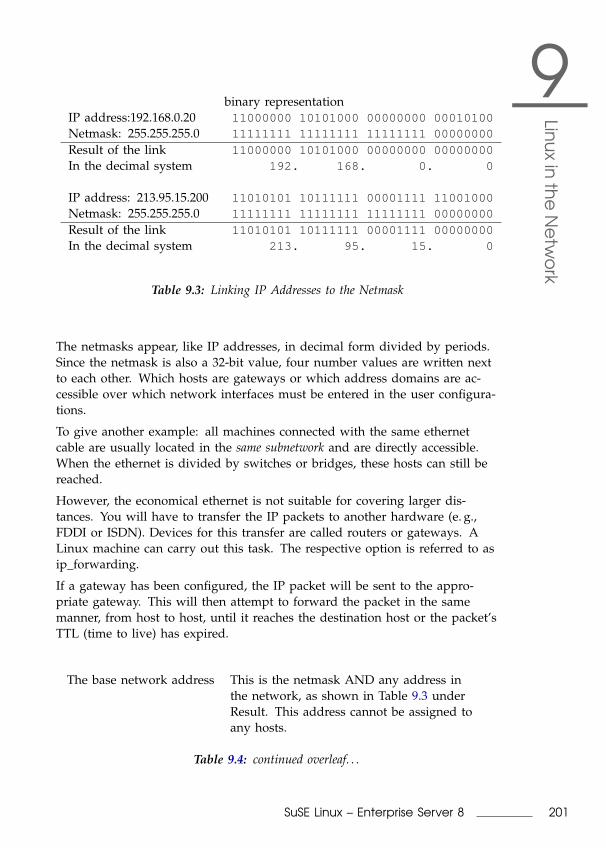
9Lin
ux
inth
eN
etw
ork
binary representationIP address:192.168.0.20 11000000 10101000 00000000 00010100Netmask: 255.255.255.0 11111111 11111111 11111111 00000000
Result of the link 11000000 10101000 00000000 00000000In the decimal system 192. 168. 0. 0
IP address: 213.95.15.200 11010101 10111111 00001111 11001000Netmask: 255.255.255.0 11111111 11111111 11111111 00000000
Result of the link 11010101 10111111 00001111 00000000In the decimal system 213. 95. 15. 0
Table 9.3: Linking IP Addresses to the Netmask
The netmasks appear, like IP addresses, in decimal form divided by periods.Since the netmask is also a 32-bit value, four number values are written nextto each other. Which hosts are gateways or which address domains are ac-cessible over which network interfaces must be entered in the user configura-tions.
To give another example: all machines connected with the same ethernetcable are usually located in the same subnetwork and are directly accessible.When the ethernet is divided by switches or bridges, these hosts can still bereached.
However, the economical ethernet is not suitable for covering larger dis-tances. You will have to transfer the IP packets to another hardware (e. g.,FDDI or ISDN). Devices for this transfer are called routers or gateways. ALinux machine can carry out this task. The respective option is referred to asip_forwarding.
If a gateway has been configured, the IP packet will be sent to the appro-priate gateway. This will then attempt to forward the packet in the samemanner, from host to host, until it reaches the destination host or the packet’sTTL (time to live) has expired.
The base network address This is the netmask AND any address inthe network, as shown in Table 9.3 underResult. This address cannot be assigned toany hosts.
Table 9.4: continued overleaf. . .
201SuSE Linux – Enterprise Server 8
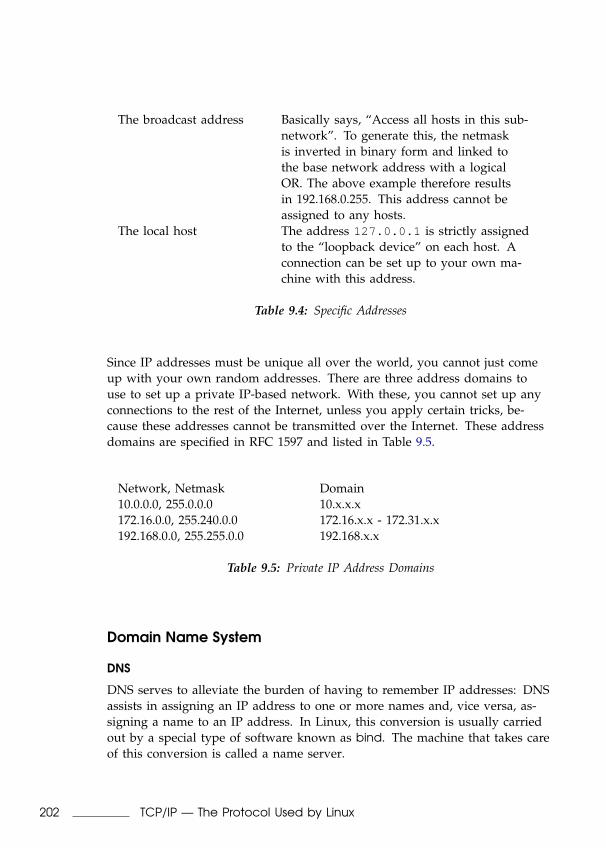
The broadcast address Basically says, “Access all hosts in this sub-network”. To generate this, the netmaskis inverted in binary form and linked tothe base network address with a logicalOR. The above example therefore resultsin 192.168.0.255. This address cannot beassigned to any hosts.
The local host The address 127.0.0.1 is strictly assignedto the “loopback device” on each host. Aconnection can be set up to your own ma-chine with this address.
Table 9.4: Specific Addresses
Since IP addresses must be unique all over the world, you cannot just comeup with your own random addresses. There are three address domains touse to set up a private IP-based network. With these, you cannot set up anyconnections to the rest of the Internet, unless you apply certain tricks, be-cause these addresses cannot be transmitted over the Internet. These addressdomains are specified in RFC 1597 and listed in Table 9.5.
Network, Netmask Domain10.0.0.0, 255.0.0.0 10.x.x.x172.16.0.0, 255.240.0.0 172.16.x.x - 172.31.x.x192.168.0.0, 255.255.0.0 192.168.x.x
Table 9.5: Private IP Address Domains
Domain Name System
DNS
DNS serves to alleviate the burden of having to remember IP addresses: DNSassists in assigning an IP address to one or more names and, vice versa, as-signing a name to an IP address. In Linux, this conversion is usually carriedout by a special type of software known as bind. The machine that takes careof this conversion is called a name server.
202 TCP/IP — The Protocol Used by Linux
9Lin
ux
inth
eN
etw
ork
The names make up a hierarchical system whereby each name component isdivided by points. The name hierarchy is, however, independent of the IPaddress hierarchy described above.
Examine a complete name like laurent.suse.de . This is written in the for-mat host.domain. A full name, referred to by experts as a “fully qualified do-main name” or FQDN for short, consists of a host name and a domain name(suse.de), including the top level domain or TLD (de).
TLD assignment has become, for historical reasons, quite confusing. For in-stance, three-letter domain names are used in the USA. In the rest of theworld, the two-letter ISO national codes are the standard.
In the early days of the Internet (before 1990), there was a file /etc/hostsfor the purpose of storing the names of all the machines represented overthe Internet. This quickly proved to be impractical in the face of the rapidlygrowing number of computers connected to the Internet. For this reason, adecentralized database was developed to store the host names in a widelydistributed manner. This database, similar to the name server, does not havethe data pertaining to all hosts in the Internet readily available, but can dis-patch requests to other name servers.
The top of the hierarchy is occupied by “root name servers”. These rootname servers manage the top level domains. The root name servers aremanaged by the Network Information Center, or NIC for short. The rootname server recognizes the name servers responsible for each top level do-main. More information about top level domain NICs is available at http://www.internic.net .
For your machine to resolve an IP address, it has to recognize at least onename server with an IP address. Configure a name server with the help ofYaST2. If you have a modem dial-up connection, you may not have to man-ually configure a name server at all. The dial-up protocol provides the nameserver address as the connection is being made.
DNS can do more than just resolve host names. The name server also“knows” which host is receiving e-mails for an entire domain, the mail ex-changer (MX). The configuration of name server access with SuSE LinuxEnterprise Server is described in Section DNS — Domain Name Service onpage 221.
whois
Closely related to DNS is the protocol whois. With this program, you canquickly find out who is responsible for any given domain.
203SuSE Linux – Enterprise Server 8
IPv6 — The Next Generation’s Internet
A New Internet Protocol
Due to the emergence of the WWW (World Wide Web), the Internet has ex-perienced explosive growth with an increasing number of computers com-municating via TCP/IP in the last ten years. Since Tim Berners-Lee at CERN(http://public.web.cern.ch/ ) invented the WWW in 1990, the numberof Internet hosts has grown from a few thousand to about 100 million.
An IP address “only” consists of 32 bits. Since quite a few IP addresses can-not be used due to organizational circumstances, many IP addresses are lost.The Internet is divided into subnetworks. The number of addresses availablein your subnet is the number of bits squared minus two. A subnetwork has,for example, two, six, or fourteen addresses available. To connect 128 hosts tothe Internet, for instance, you will need a “Class C” subnetwork with 256 IPaddresses, from which only 254 are usable. Two IP addresses are subtractedfrom the subnetwork — the broadcast address and the base network address.
Configuring a host in the TCP/IP network is relatively complicated. As youhave already seen, you will have to configure the following items on yourhost: IP address, subnetmask, gateway address (if available), and a nameserver. You will already have to know this information or receive it fromyour provider.
Every IP packet contains a proof total that verifies each routing procedureand will have to be recalculated. This is why very fast routers require a lot ofprocessor performance and are more expensive.
Some services have previously been implemented using broadcasts (for ex-ample, the Windows network protocol SMB). Hosts for which this service isirrelevant are, however, forced to process the packets and subsequently ig-nore them. This could lead to problems in high-speed networks.
The successor of the previous IP, IPv6, is a solution to all these problems.The main goal of its development was to expand significantly the rather lim-ited address space, to simplify the configuration of workstations, and to au-tomate them when possible. In this section, IPv4 or IP will be mentioned inreference to the Internet protocol currently used and IPv6 in reference to thenew version 6.
IPv6 is defined in more detail in RFC 1752. IPv6 uses 128-bit addresses sofeatures quadrillions of IP addresses, enough for even more general addressdistribution. This enormous amount of IPv6 addresses allows you to “en-large” even the smallest subnetwork to 48 bits.
204 IPv6 — The Next Generation’s Internet
9Lin
ux
inth
eN
etw
ork
This enables you, then, to utilize the above mentioned MAC address as anaddress component. As this address is entirely unique and is strictly definedby the hardware vendor, this will make your host configuration a lot easier.In reality, an EUI-64 token will be consolidated down to the first 64 bits. Indoing so, the last 48 bits of the MAC address will be removed and the re-maining 24 bits will contain special information on the token type. This alsoenables the assignment of an EUI-64 token to devices without a MAC address(PPP and ISDN connections).Furthermore, there has been a new development in IPv6: normally, severalIP addresses are assigned to a network interface. This has the advantage thatdifferent networks can be made accessible. One of them can be turned intoan automatically configured network. Specify the MAC address of the net-work card and a prefix and you will not have to configure anything else. Allhosts in the local network will be accessible right after starting IPv6 (“link-local address”).Moreover, the remaining configuration tasks on a workstation can be carriedout automatically to a greater extent. There is a special protocol for this pur-pose with which workstations can receive an IP address from a router.All IPv6 supported hosts absolutely require “multicast” support. Multicastcan aid several hosts in being accessible at the same time — they do not allhave to be set to (“broadcast”) or only one to (“unicast”), but, rather, a pair.Which of them that is depends on the application. However, a pair of well-defined multicast groups exists as well, for example, “all name servers multi-cast group” or “all routers multicast group.”As updating all hosts in the Internet from IPv4 to IPv6 is in no way feasible,there is a compatibility mode. This maps the previous addresses to IPv6 ad-dresses. At the same time, there are mechanisms such as “tunneling” — here,IPv6 packets are sent in the form of IPv4 packets. Of course, it is also possi-ble to convert IPv6 to IPv4. To reach an IPv6 host from a IPv4 host, the IPv6host absolutely has to have a IPv4 compatibility address.
Structure of an IPv6 Address
An IPv6 address, conditional upon 128 bits, is significantly longer than anIPv4 address with its 32 bits. An IPv6 address is consequently 16 bytes long.Due to the size factor, the new IPv6 addresses are written in a different for-mat than the IPv4 addresses used previously. Look at the examples in Ta-ble 9.6 on the following page.As you can see in the table, IPv6 addresses are represented by hexadeci-mal numbers. The hexadecimal numbers are represented in two-byte sege-ments separated by a colon. Therefore, there can only be a maximum of eight
205SuSE Linux – Enterprise Server 8
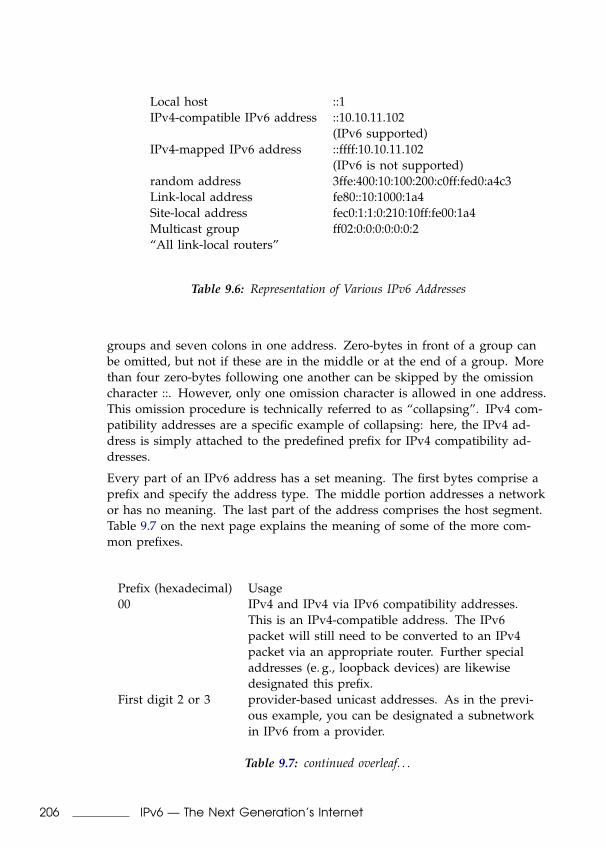
Local host ::1IPv4-compatible IPv6 address ::10.10.11.102
(IPv6 supported)IPv4-mapped IPv6 address ::ffff:10.10.11.102
(IPv6 is not supported)random address 3ffe:400:10:100:200:c0ff:fed0:a4c3Link-local address fe80::10:1000:1a4Site-local address fec0:1:1:0:210:10ff:fe00:1a4Multicast group ff02:0:0:0:0:0:0:2“All link-local routers”
Table 9.6: Representation of Various IPv6 Addresses
groups and seven colons in one address. Zero-bytes in front of a group canbe omitted, but not if these are in the middle or at the end of a group. Morethan four zero-bytes following one another can be skipped by the omissioncharacter ::. However, only one omission character is allowed in one address.This omission procedure is technically referred to as “collapsing”. IPv4 com-patibility addresses are a specific example of collapsing: here, the IPv4 ad-dress is simply attached to the predefined prefix for IPv4 compatibility ad-dresses.
Every part of an IPv6 address has a set meaning. The first bytes comprise aprefix and specify the address type. The middle portion addresses a networkor has no meaning. The last part of the address comprises the host segment.Table 9.7 on the next page explains the meaning of some of the more com-mon prefixes.
Prefix (hexadecimal) Usage00 IPv4 and IPv4 via IPv6 compatibility addresses.
This is an IPv4-compatible address. The IPv6packet will still need to be converted to an IPv4packet via an appropriate router. Further specialaddresses (e. g., loopback devices) are likewisedesignated this prefix.
First digit 2 or 3 provider-based unicast addresses. As in the previ-ous example, you can be designated a subnetworkin IPv6 from a provider.
Table 9.7: continued overleaf. . .
206 IPv6 — The Next Generation’s Internet
9Lin
ux
inth
eN
etw
ork
fe80 to febf link-local addresses with this prefix cannot berouted and, therefore, cannot be accessed in thesame subnetwork.
fec0 to feff site-local. These addresses can be routed, but onlyinternally within an organization. In this way,these addresses correspond to the previous “pri-vate” networks (for example, 10.x.x.x).
ff multicast IPv6 addresses beginning with ff aremulticast addresses.
Table 9.7: Various IPv6 Prefixes
207SuSE Linux – Enterprise Server 8

As you can already see above, special unicast addresses can get quite long.These can no longer simply be memorized. A functional name server istherefore even more important for IPv6 than for IPv4. Name servers are soimportant that there is even an autoconfiguration protocol for them.
IPv6 Netmasks
Netmasks are represented by IPv6 in a slightly different way. The catego-rization of networks in classes is no longer practical, since classless routingis used from the beginning and the small subnetwork can already take upany number of hosts. Since netmasks would get quite long if written out inthe previous manner, they will now be written in an entirely different format.The format
fec0:1:1:0:210:10ff:fe00:1a4/64
indicates that the last 64 bits make up the host segment and the first 64 bitsare the network segment.
To be more precise, the 64 means that the netmask is filled up, as indicatedat left, with 1 bits. Therefore, there are 64 one-bits in the netmask. As inIPv4, linking the netmask with the IP address with the logical AND defineswhether a host is located in the same or in a different subnetwork.
For More Information About IPv6
Of course, the above overview cannot and is not intended to be a compre-hensive introduction to the very extensive topic of IPv6. For a more in-depthintroduction in IPv6, refer to http://www.ipv6.org/ .
208 IPv6 — The Next Generation’s Internet

9Lin
ux
inth
eN
etw
ork
Network Integration
Currently TCP/IP is the standard network protocol. All modern operatingsystems can communicate via TCP/IP. Nevertheless, Linux also supportsother network protocols, such as IPX (previously) implemented by NovellNetware or Appletalk used by Macintosh machines. Only the integration ofa Linux machine into a TCP/IP network is discussed here. To integrate “ex-otic” arcnet, token rings, or FDDI network cards, refer to the kernel sourcesdocumentation at /usr/src/linux/Documentation .
Preparing
The machine has to have a supported network card. Normally, the networkcard will already be recognized during installation and the appropriate driverloaded. See if your card has been integrated properly by entering the com-mand ifstatus eth0 . The output should show the status of the networkdevice eth0.
If the kernel support for the network card is implemented as a module, as isusually the case with the SuSE kernel, the name of the module must be en-tered as an alias in /etc/modules.conf . For example, for the first ethernetcard:alias eth0 tulipThis will occur automatically if the driver support is started in the linuxrcduring the first installation. Otherwise, start it via YaST2 at a later time.
Configuration Assisted by YaST2
To configure the network card with YaST2, start the Control Center and se-lect ‘Network/Basic’ → ‘Network card configuration’. With ‘Add’, configurea new network card. With ‘Delete’, remove it from the configuration. With‘Edit’, modify the network card configuration.
When setting up network devices on iSeries, YaST2 will display any virtualethernet devices as ‘IBM virtual ethernet card’. Click ‘Finish installation’when completed.
If you have a mix of ethernet devices on your system, you must be awareof the device numbering. Write down which adapters are on the system,and how many of each. When a module is loaded, all the devices of thattype of assigned ‘ethx’ device names. So the first device you configure as‘eth0’, the other devices of the same type will take the ‘eth1’, ‘eth2’, etc, de-vice numbers. Take the example of two IBM 79c970 ethernet cards (Feature
209SuSE Linux – Enterprise Server 8
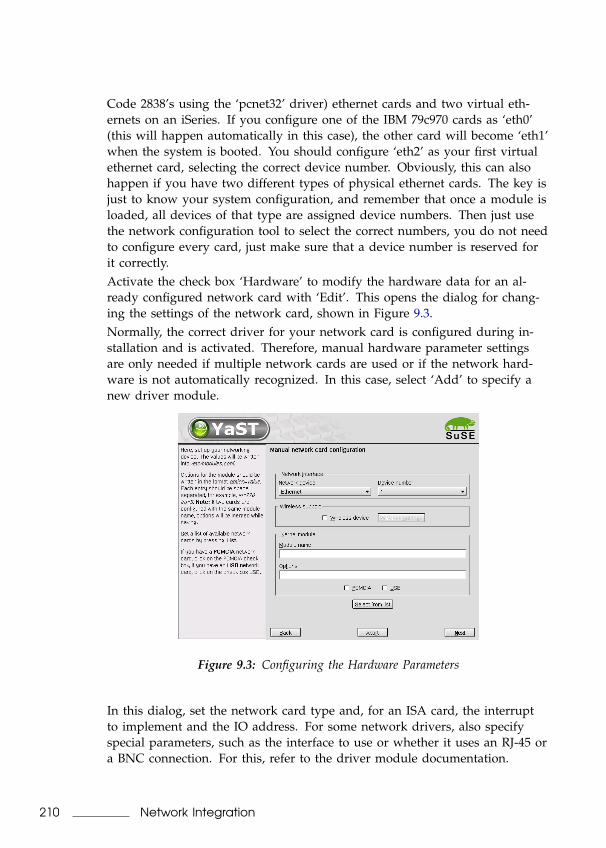
Code 2838’s using the ‘pcnet32’ driver) ethernet cards and two virtual eth-ernets on an iSeries. If you configure one of the IBM 79c970 cards as ‘eth0’(this will happen automatically in this case), the other card will become ‘eth1’when the system is booted. You should configure ‘eth2’ as your first virtualethernet card, selecting the correct device number. Obviously, this can alsohappen if you have two different types of physical ethernet cards. The key isjust to know your system configuration, and remember that once a module isloaded, all devices of that type are assigned device numbers. Then just usethe network configuration tool to select the correct numbers, you do not needto configure every card, just make sure that a device number is reserved forit correctly.Activate the check box ‘Hardware’ to modify the hardware data for an al-ready configured network card with ‘Edit’. This opens the dialog for chang-ing the settings of the network card, shown in Figure 9.3.Normally, the correct driver for your network card is configured during in-stallation and is activated. Therefore, manual hardware parameter settingsare only needed if multiple network cards are used or if the network hard-ware is not automatically recognized. In this case, select ‘Add’ to specify anew driver module.
Figure 9.3: Configuring the Hardware Parameters
In this dialog, set the network card type and, for an ISA card, the interruptto implement and the IO address. For some network drivers, also specifyspecial parameters, such as the interface to use or whether it uses an RJ-45 ora BNC connection. For this, refer to the driver module documentation.
210 Network Integration
9Lin
ux
inth
eN
etw
ork
After entering the hardware parameters, configure additional network inter-face data. Select ‘Interface’ in the dialog ‘Network base configuration’ to ac-tivate the network card and assign it an IP address. Select the card numberthen click ‘Edit’. A new dialog will appear in which to specify the IP ad-dress and other IP network data. Find information about assigning addressesto your own network in Section TCP/IP — The Protocol Used by Linux onpage 196 and Table 9.5 on page 202. Otherwise, enter the address assignedby your network administrator in the designated fields.
Configure a name server under ‘Host Name and Name Server’ so the nameresolution functions as described in Section DNS — Domain Name Service onpage 221. Via ‘Routing’, set up the routing. Select ‘Configuration for Experts’to make advanced settings.
With that, the network configuration is complete. YaST2 starts SuSEconfigand transfers the settings to the corresponding files (see Section Manual Net-work Configuration on this page). For the changes to take effect, the relevantprograms must be reconfigured and the required daemons must be restarted.This is done by entering the command rcnetwork restart .
Configuring IPv6
To configure IPv6, you will not normally need to make any changes on theindividual workstations. However, the IPv6 support will have to be loaded.Do this most easily by entering the command modprobe ipv6 .
Because of the autoconfiguration concept of IPv6, the network card is as-signed an address in the “link-local” network. Normally, no routing tablemanagement takes place on a workstation. The network routers can be in-quiried by the workstation, using the “router advertisement protocol”, forwhat prefix and gateways should be implemented.
The radvd program out of package radvd , series n (Network) can be used toset up an IPv6 router. This program informs the workstations which prefix touse for the IPv6 addresses and which routers.
To assign a workstation an IPv6 address easily, it is advisable to install andconfigure the router using the radvd program. The workstations will thenautomatically receive the IPv6 addresses assigned to them.
Manual Network Configuration
Manual configuration of the network software should always be the last alter-native. We recommend using YaST2.
211SuSE Linux – Enterprise Server 8
All network interfaces are set up with the script /sbin/ifup . To halt theinterface, use ifdown . To check its status, use ifstatus .
If you only have normal, built-in network cards, configure the inter-faces by name. With the commands ifup eth0 , ifstatus eth0 , andifdown eth0 , start, check, or stop the interface eth0 . The respective config-uration files are stored in /etc/sysconfig/network/ifcfg-eth0 . eth0is the name of the interface and the name of the configuration.
The network can alternatively be configured in relation to the hardware ad-dress (MAC address) of a network card. In this case, a configuration fileifcfg-<hardwareaddresswithoutcolon> is used. Use lowercase char-acters in the hardware address, as displayed by the command ip link(ifconfig shows uppercase letters). If ifup finds a configuration filematching the hardware address, a possibly existing file ifcfg-eth0 will beignored.
Configuration Files
This section provides an overview of the network configuration files and ex-plains their purpose and the format used.
/etc/sysconfig/network/ifcfg-*These files contain data specific to a network interface. They may be
named after the network interface (ifcfg-eth2 ), the hardware addressof a network card (ifcfg-000086386be3 ), or the hardware descrip-tion (ifcfg-usb ). If network aliases are used, the respective files arenamed ifcfg-eth2:1 or ifcfg-usb:1 . The script ifup gets the in-terface name and, if necessary, the hardware description as argumentsthen searches for the best matching configuration file.
The configuration files contain the IP address (BOOTPROTO="static",IPADDR="10.10.11.214") or the direction to use DHCP (BOOT-PROTO="dhcp"). The IP address may also include the netmask(IPADDR="10.10.11.214/16") or the netmask can be specified sepa-rately (NETMASK="255.255.0.0"). Refer to the man page for ifup(man ifup ) for the complete list of variables.
In addition, all the variables in the files dhcp , wireless , and configcan be used in the ifcfg-* files, if a general setting is only to be usedfor one interface. By using the variables POST_UP_SCRIPTand PRE_DOWN_SCRIPT, individual scripts can be run after starting or beforestopping the interface.
212 Manual Network Configuration
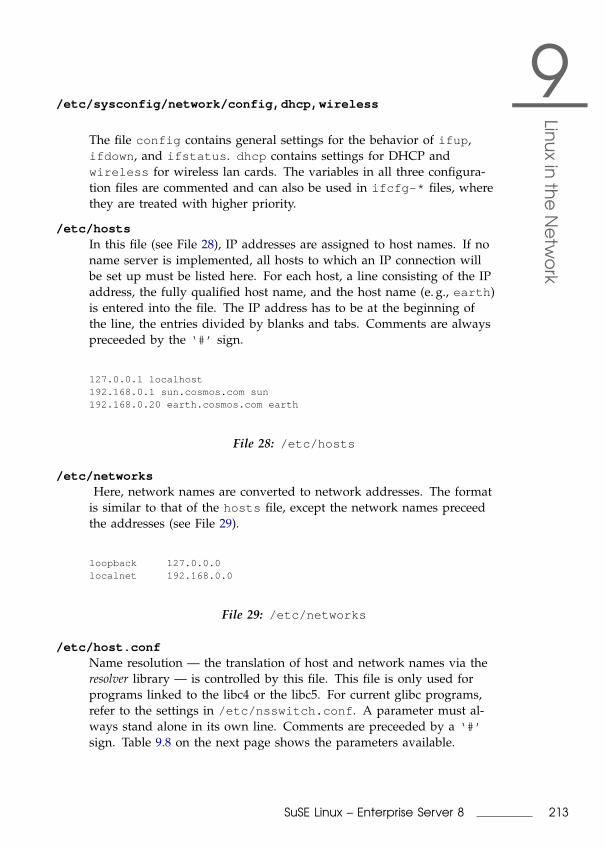
9Lin
ux
inth
eN
etw
ork
/etc/sysconfig/network/config,dhcp,wireless
The file config contains general settings for the behavior of ifup ,ifdown , and ifstatus . dhcp contains settings for DHCP andwireless for wireless lan cards. The variables in all three configura-tion files are commented and can also be used in ifcfg-* files, wherethey are treated with higher priority.
/etc/hostsIn this file (see File 28), IP addresses are assigned to host names. If noname server is implemented, all hosts to which an IP connection willbe set up must be listed here. For each host, a line consisting of the IPaddress, the fully qualified host name, and the host name (e. g., earth )is entered into the file. The IP address has to be at the beginning ofthe line, the entries divided by blanks and tabs. Comments are alwayspreceeded by the ‘#’ sign.
127.0.0.1 localhost192.168.0.1 sun.cosmos.com sun192.168.0.20 earth.cosmos.com earth
File 28: /etc/hosts
/etc/networksHere, network names are converted to network addresses. The format
is similar to that of the hosts file, except the network names preceedthe addresses (see File 29).
loopback 127.0.0.0localnet 192.168.0.0
File 29: /etc/networks
/etc/host.confName resolution — the translation of host and network names via theresolver library — is controlled by this file. This file is only used forprograms linked to the libc4 or the libc5. For current glibc programs,refer to the settings in /etc/nsswitch.conf . A parameter must al-ways stand alone in its own line. Comments are preceeded by a ‘#’sign. Table 9.8 on the next page shows the parameters available.
213SuSE Linux – Enterprise Server 8
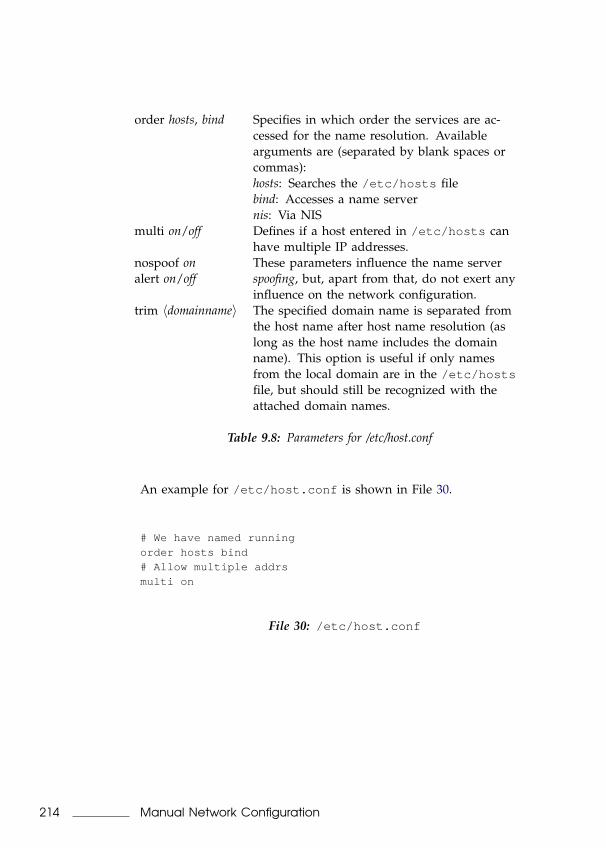
order hosts, bind Specifies in which order the services are ac-cessed for the name resolution. Availablearguments are (separated by blank spaces orcommas):hosts: Searches the /etc/hosts filebind: Accesses a name servernis: Via NIS
multi on/off Defines if a host entered in /etc/hosts canhave multiple IP addresses.
nospoof onalert on/off
These parameters influence the name serverspoofing, but, apart from that, do not exert anyinfluence on the network configuration.
trim 〈domainname〉 The specified domain name is separated fromthe host name after host name resolution (aslong as the host name includes the domainname). This option is useful if only namesfrom the local domain are in the /etc/hostsfile, but should still be recognized with theattached domain names.
Table 9.8: Parameters for /etc/host.conf
An example for /etc/host.conf is shown in File 30.
# We have named runningorder hosts bind# Allow multiple addrsmulti on
File 30: /etc/host.conf
214 Manual Network Configuration
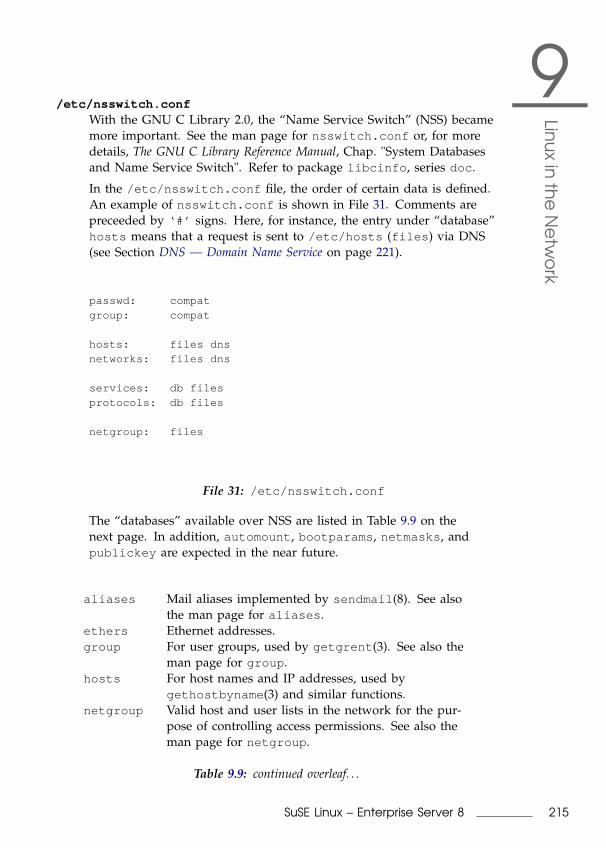
9Lin
ux
inth
eN
etw
ork
/etc/nsswitch.confWith the GNU C Library 2.0, the “Name Service Switch” (NSS) becamemore important. See the man page for nsswitch.conf or, for moredetails, The GNU C Library Reference Manual, Chap. "System Databasesand Name Service Switch". Refer to package libcinfo , series doc .
In the /etc/nsswitch.conf file, the order of certain data is defined.An example of nsswitch.conf is shown in File 31. Comments arepreceeded by ‘#’ signs. Here, for instance, the entry under “database”hosts means that a request is sent to /etc/hosts (files ) via DNS(see Section DNS — Domain Name Service on page 221).
passwd: compatgroup: compat
hosts: files dnsnetworks: files dns
services: db filesprotocols: db files
netgroup: files
File 31: /etc/nsswitch.conf
The “databases” available over NSS are listed in Table 9.9 on thenext page. In addition, automount , bootparams , netmasks , andpublickey are expected in the near future.
aliases Mail aliases implemented by sendmail (8). See alsothe man page for aliases .
ethers Ethernet addresses.group For user groups, used by getgrent (3). See also the
man page for group .hosts For host names and IP addresses, used by
gethostbyname (3) and similar functions.netgroup Valid host and user lists in the network for the pur-
pose of controlling access permissions. See also theman page for netgroup .
Table 9.9: continued overleaf. . .
215SuSE Linux – Enterprise Server 8
networks Network names and addresses, used bygetnetent (3).
passwd User passwords, used by getpwent (3). See also theman page for passwd .
protocols Network protocols, used by getprotoent (3). Seealso the man page for protocols .
rpc “Remote Procedure Call” names and addresses, usedby getrpcbyname (3) and similar functions.
services Network services, used by getservent (3).shadow “Shadow” user passwords, used by getspnam (3).
See also the man page for shadow .
Table 9.9: Available Databases via /etc/nsswitch.conf
The configuration options for NSS databases are listed in Table 9.10.
files directly access files, for example, to /etc/aliases .db access via a database.nis NIS, see also Section NIS — Network Information
Service on page 231.nisplusdns Only usable by hosts and networks as an exten-
sion.compat Only usable by passwd , shadow , and group as an
extension.also It is possible to trigger various reactions with cer-
tain lookup results. Details can be found in the manpage for nsswitch.conf .
Table 9.10: Configuration Options for NSS “Databases”
/etc/nscd.confThe nscd (Name Service Cache Daemon) is configured in this file (seethe man pages for nscd and nscd.conf ). This effects the data result-ing from passwd , groups , and hosts . The daemon must be restartedevery time the name resolution (DNS) is changed by modifying the/etc/resolv.conf file. Use rcnscd restart to restart it.
216 Manual Network Configuration
9Lin
ux
inth
eN
etw
ork
CautionIf, for example, the caching for passwd is activated, it will usu-ally take about fifteen seconds until a newly added user is rec-ognized by the system. By resarting nscd, reduce this waitingperiod.
Caution
/etc/resolv.confAs is already the case with the /etc/host.conf file, this file, by wayof the resolver library, likewise plays a role in host name resolution. Thedomain to which the host belongs is specified in this file (keywordsearch). Also listed is the status of the name server address (keywordname server) to access. Multiple domain names can be specified. Whenresolving a name that is not fully qualified, an attempt is made to gen-erate one by attaching the individual search entries. Multiple nameservers can be made known by entering several lines, each beginningwith name server. Comments are preceeded by ‘#’ signs.
An example of /etc/resolv.conf is shown in File 32.
# Our domainsearch cosmos.com
name server 192.168.0.1
File 32: /etc/resolv.conf
Some services, like pppd (wvdial), ipppd (isdn), dhcp (dhcpcd anddhclient), pcmcia, and hotplug, modify the file /etc/resolv.conf .To do so, they rely on the script modify_resolvconf .
If the file /etc/resolv.conf has been temporarily modified by thisscript, it will contain a predefined comment giving information aboutthe service by which it has been modified, about the location wherethe original file has been backed up, and hints on how to turn off theautomatic modification mechanism.
If /etc/resolv.conf is modified several times, the file will includemodifications in a nested form. These can be reverted in a clean wayeven if this reversal takes place in an order different from the order
217SuSE Linux – Enterprise Server 8
in which modifications where introduced. Services that may need thisflexibility include isdn, pcmcia, and hotplug.
If it happens that a service was not terminated in a normal, clean way,modify_resolvconf can be used to restore the original file. Also, onsystem boot, a check will be performed to see whether there is an un-cleaned, modified resolv.conf (e. g., after a system crash), in whichcase the original (unmodified) resolv.conf will be restored.
YaST2 uses the command modify_resolvconf check to find outwhether resolv.conf has been modified and will subsequently warnthe user that changes will be lost after restoring the file.
Apart from this, YaST2 will not rely on modify_resolvconf , whichmeans that the impact of changing resolv.conf through YaST2 is thesame as that of any manual change. In both cases, changes are madeon purpose and with a permanent effect, while modifications requestedby the above-mentioned services are only temporary.
/etc/HOSTNAMEHere is the host name without the domain name attached. This file isread by several scripts while the machine is booting. It may only con-tain one line where the host name is mentioned.
Start-Up Scripts
Apart from the configuration files described above, there are also variousscripts that load the network programs while the machine is being booted.This will be started as soon as the system is switched to one of the multiuserrunlevels (see also Table 9.11 on the next page).
/etc/init.d/network This script takes over the configuration forthe network hardware and software duringthe system’s start-up phase.
/etc/init.d/inetd Starts inetd. This is only necessary if youwant to log in to this machine over thenetwork.
/etc/init.d/portmap Starts the portmapper needed for the RPCserver, such as an NFS server.
/etc/init.d/nfsserver
Starts the NFS server.
Table 9.11: continued overleaf. . .
218 Manual Network Configuration
9Lin
ux
inth
eN
etw
ork
/etc/init.d/sendmail Controls the sendmail process./etc/init.d/ypserv Starts the NIS server./etc/init.d/ypbind Starts the NIS client.
Table 9.11: Some Start-Up Scripts for Network Programs
Routing in SuSE Linux Enterprise Server
The routing table is set up in SuSE Linux Enterprise Server via the configu-ration files /etc/sysconfig/network/routes and /etc/sysconfig/network/ifroute-* .
All the static routes required by the various system tasks can be entered inthe /etc/sysconfig/network/routes file: routes to a host, routes to ahost via a gateway, and routes to a network. For each interface that need in-dividual routing, define an additional configuration file: /etc/sysconfig/network/ifroute-* . Replace ‘*’ with the name of the interface. The en-tries in the routing configuration files look like this:
DESTINATION GATEWAY NETMASK INTERFACE [ TYPE ] [ OPTIONS ]DESTINATION GATEWAY PREFIXLEN INTERFACE [ TYPE ] [ OPTIONS ]DESTINATION/PREFIXLEN GATEWAY - INTERFACE [ TYPE ] [ OPTIONS ]
To omit GATEWAY, NETMASK, PREFIXLEN, or INTERFACE, write ‘-’ in-stead. The entries TYPE and OPTIONS may just be omitted.
The route’s destination is in the first column. This column may containthe IP address of a network or host or, in the case of reachable nameservers, the fully qualified network or host name.
The second column contains the default gateway or a gateway throughwhich a host or a network can be accessed.
The third column contains the netmask for networks or hosts behinda gateway. The mask is 255.255.255.255 , for example, for a hostbehind a gateway.
The last column is only relevant for networks connected to the localhost such as loopback, ethernet, ISDN, PPP, and dummy device. Thedevice name must be entered here.
219SuSE Linux – Enterprise Server 8

The following scripts in the directory /etc/sysconfig/network/scripts/ assist with the handling of routes:
ifup-route for setting up a route
ifdown-route for disabling a route
ifstatus-route for checking the status of the routes
220 Routing in SuSE Linux Enterprise Server

9Lin
ux
inth
eN
etw
ork
DNS — Domain Name Service
DNS (Domain Name Service) is needed to resolve the domain and hostnames into IP addresses. In this way, the IP address 192.168.0.20 is as-signed to the host name earth , for example. Before setting up your ownname server, read the general information on DNS in Section Domain NameSystem on page 202.
Starting the Name Server BIND
The name server BIND is already preconfigured in SuSE Linux, so you caneasily start it right after installing the distribution.
If you already have a functioning Internet connection and have entered127.0.0.1 as name server for the local host in /etc/resolv.conf , youshould normally already have a working name resolution without hav-ing to know the DNS of the provider. BIND carries out the name reso-lution via the root name server, a notably slower process. Normally, theDNS of the provider should be entered with its IP address in the config-uration file /etc/named.conf under forwarders to ensure effective andsecure name resolution. If this works so far, the name server will run as apure “caching-only” name server. Only when you configure its own zoneswill it become a proper DNS. A simple example of this can be found under/usr/share/doc/packages/bind8/sample-config . However, do notset up any official domains until assigned one by the responsible institution.Even if you have your own domain and it is managed by the provider, youare better off not to use it, as BIND would otherwise not forward any morerequests for this domain. The provider’s web server, for example, would notbe accessible for this domain.
To start the name server, enter rcnamed start at the command line asroot. If “done” appears to the right in green, named, as the name serverprocess is called, has been started successfully. Immediately test the func-tionality of the name server on the local system with the nslookup pro-gram. The local host should appear as the default server with the address127.0.0.1. If this is not the case, the wrong name server has probably beenentered in /etc/resolv.conf or this file does not exist. For the first test,enter nslookup “localhost” or “127.0.0.1” at the prompt, which should al-ways work. If you receive an error message instead, such as “No responsefrom server”, check to see if named is actually running using the commandrcnamed status . If the name server is not starting or is exhibiting faultybehavior, find the possible causes of this logged in /var/log/messages .
221SuSE Linux – Enterprise Server 8
If you have a dial-up connection, be sure that BIND8, once it starts, will re-view the root name server. If it does not manage this because an Internetconnection has not been made, this can cause the DNS requests not to be re-solved other than for locally-defined zones. BIND9 behaves differently, butrequires quite a bit more resources than BIND8.
To implement the name server of the provider or one already running onyour network as “forwarder”, enter one or more of these in the options sec-tion under forwarders. See File 33.
options {directory "/var/named";forwarders { 10.11.12.13; 10.11.12.14; };listen-on { 127.0.0.1; 192.168.0.99; };allow-query { 127/8; 192.168.0/24; };notify no;
};
File 33: Forwarding Options in named.conf
Adjust the IP addresses to your personal environment.
After options follows the zone, “localhost”, “0.0.127.in-addr.arpa”, and “.”entries. At least entries from “type hint” should exist. Their correspondingfiles never have to be modified, as they function in their present state. Also,be sure that a “;” follows each entry and that the curly braces are properlyset.
If you have made changes to the configuration file /etc/named.conf or tothe zone files, have BIND reread these files by entering rcnamed reload .Otherwise, completely restart the name server with rcnamed restart . Tostop the name server, enter rcnamed stop .
The Configuration File /etc/named.conf
Make all the settings for the name server BIND8 and BIND9 in the /etc/named.conf file. The zone data, consisting of the host names, IP addresses,and similar, for the domains to administer are stored in separate files in the/var/named directory.
The /etc/named.conf is roughly divided into two areas. One is the op-tions section for general settings and the other consists of zone entries for theindividual domains. Additional sections for logging and acl type entries canbe added. Comment lines begin with a ‘#’ sign or ‘//’ . A minimalistic/etc/named.conf looks like File 34.
222 DNS — Domain Name Service
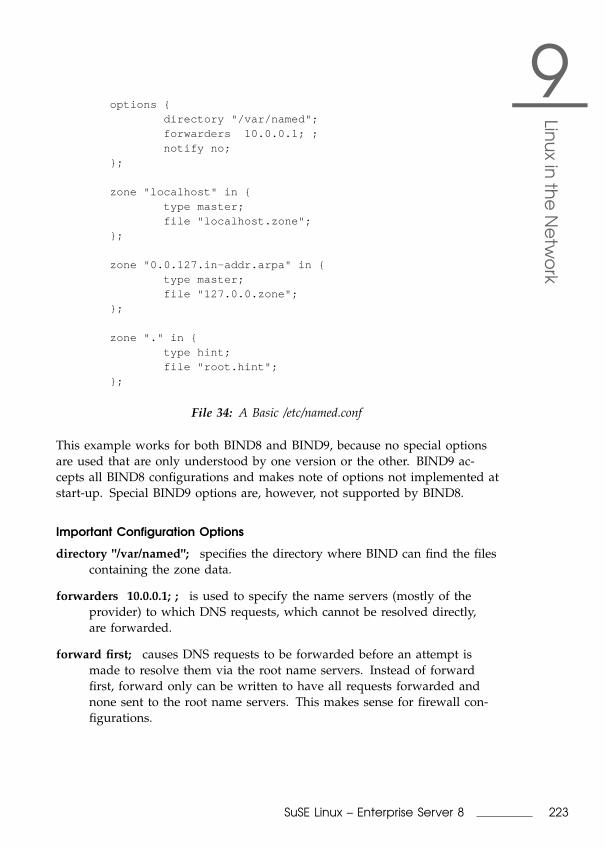
9Lin
ux
inth
eN
etw
ork
options {directory "/var/named";forwarders 10.0.0.1; ;notify no;
};
zone "localhost" in {type master;file "localhost.zone";
};
zone "0.0.127.in-addr.arpa" in {type master;file "127.0.0.zone";
};
zone "." in {type hint;file "root.hint";
};
File 34: A Basic /etc/named.conf
This example works for both BIND8 and BIND9, because no special optionsare used that are only understood by one version or the other. BIND9 ac-cepts all BIND8 configurations and makes note of options not implemented atstart-up. Special BIND9 options are, however, not supported by BIND8.
Important Configuration Options
directory "/var/named"; specifies the directory where BIND can find the filescontaining the zone data.
forwarders 10.0.0.1; ; is used to specify the name servers (mostly of theprovider) to which DNS requests, which cannot be resolved directly,are forwarded.
forward first; causes DNS requests to be forwarded before an attempt ismade to resolve them via the root name servers. Instead of forwardfirst, forward only can be written to have all requests forwarded andnone sent to the root name servers. This makes sense for firewall con-figurations.
223SuSE Linux – Enterprise Server 8
listen-on port 53 127.0.0.1; 192.168.0.1; ; tells BIND to which network inter-face and port to listen. The port 53 specification can be left out, since53 is the default port. If this entry is completely omitted, BIND acceptsrequests on all interfaces.
query-source address * port 53; This entry is necessary if a firewall is block-ing external DNS requests. This tells BIND to post requests externallyfrom port 53 and not from any of the ports greater than 1024.
allow-query 127.0.0.1; 192.168.1/24; ; defines the networks from whichclients can post DNS requests. The /24 at the end is an abbreviatedexpression for the netmask, in this case 255.255.255.0.
allow-transfer ! *; ; controls which hosts can request zone transfers. Thisexample cuts them off completely due to the ! *. Without this entry,zone transfers can be requested anywhere without restrictions.
statistics-interval 0; In the absence of this entry, BIND8 generates severallines of statistical information in /var/log/messages . Specifying0 suppresses these completely. Otherwise the time in minutes can begiven here.
cleaning-interval 720; This option defines at which time intervals BIND8clears its cache. This triggers an entry in /var/log/messages each timeit occurs. The time specification is in minutes. The default is 60 min-utes.
interface-interval 0; BIND8 regularly searches the network interfaces fornew or no longer existing interfaces. If this value is set to 0, this willnot be carried out and BIND8 will only listen at the interfaces detectedat start-up. Otherwise, the interval can be defined in minutes. The de-fault is 60 minutes.
notify no; no prevents other name servers from being informed whenchanges are made to the zone data or when the name server isrestarted.
224 DNS — Domain Name Service
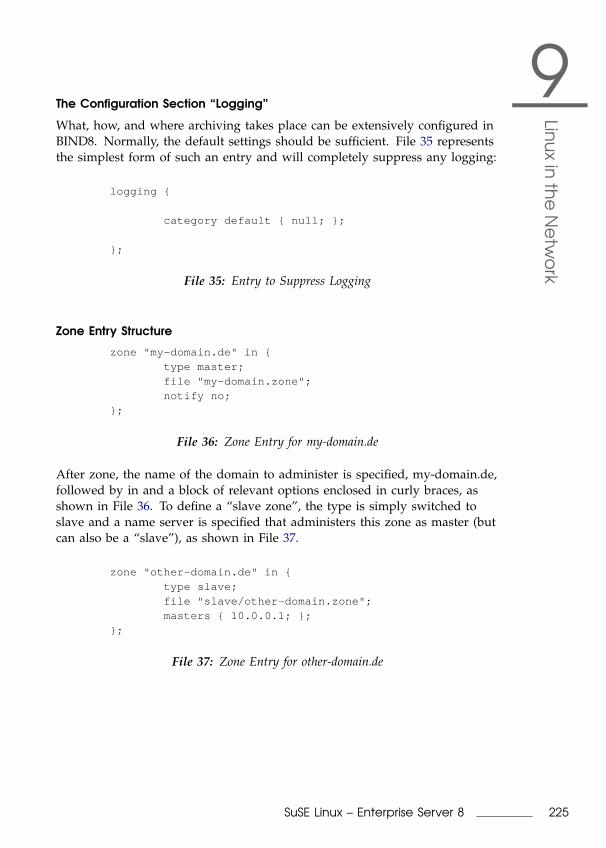
9Lin
ux
inth
eN
etw
ork
The Configuration Section “Logging”
What, how, and where archiving takes place can be extensively configured inBIND8. Normally, the default settings should be sufficient. File 35 representsthe simplest form of such an entry and will completely suppress any logging:
logging {
category default { null; };
};
File 35: Entry to Suppress Logging
Zone Entry Structure
zone "my-domain.de" in {type master;file "my-domain.zone";notify no;
};
File 36: Zone Entry for my-domain.de
After zone, the name of the domain to administer is specified, my-domain.de,followed by in and a block of relevant options enclosed in curly braces, asshown in File 36. To define a “slave zone”, the type is simply switched toslave and a name server is specified that administers this zone as master (butcan also be a “slave”), as shown in File 37.
zone "other-domain.de" in {type slave;file "slave/other-domain.zone";masters { 10.0.0.1; };
};
File 37: Zone Entry for other-domain.de
225SuSE Linux – Enterprise Server 8
The options:
type master; master indicates that this zone is administered on this nameserver. This assumes that your zone file has been properly created.
type slave; This zone is transferred from another name server. Must be usedtogether with masters.
type hint; The zone . of the type hint is used for specification of the rootname servers. This zone definition can be left alone.
file “my-domain.zone” or file “slave/other-domain.zone”; This entry spec-ifies the file where zone data for the domain is located. This file is notrequired by slaves, because its contents is read by another name server.To differentiate master and slave files, the directory slave is specifiedfor the slave files.
masters { 10.0.0.1; }; This entry is only needed for slave zones. It specifiesfrom which name server the zone file should be transferred.
allow-update { ! *; }; This options controls external write access, whichwould allow clients to make a DNS entry — something which is nor-mally not desirable for security reasons. Without this entry, zone up-dates are not allowed at all. Note that with the above sample entry, thesame would be achieved because ! * effectively bars any clients fromsuch access.
Structure of Zone Files
Two types of zone files are needed: one serves to assign IP addresses to hostnames and the other does the reverse — supplies a host name for an IP ad-dress.
‘.’ has an important meaning in the zone files here. If host names aregiven without ending with a ‘.’ , the zone will be appended. Thus, completehost names specified with a complete domain must end with a ‘.’ so thedomain is not added to it again. A missing point or one in the wrong placeis probably the most frequent cause of name server configuration errors.
The first case to consider is the zone file world.zone , responsible for thedomain world.cosmos , as in File 38 on the facing page.
226 DNS — Domain Name Service
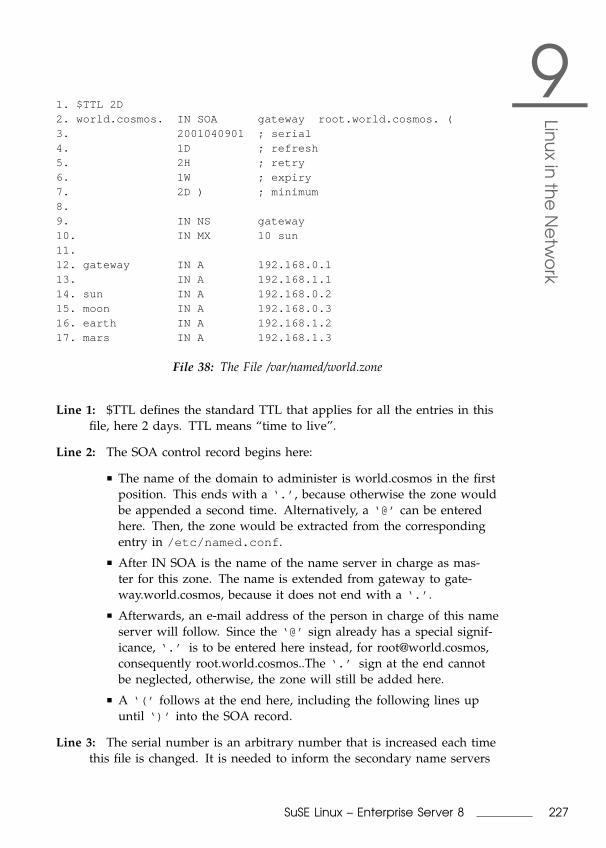
9Lin
ux
inth
eN
etw
ork
1. $TTL 2D2. world.cosmos. IN SOA gateway root.world.cosmos. (3. 2001040901 ; serial4. 1D ; refresh5. 2H ; retry6. 1W ; expiry7. 2D ) ; minimum8.9. IN NS gateway10. IN MX 10 sun11.12. gateway IN A 192.168.0.113. IN A 192.168.1.114. sun IN A 192.168.0.215. moon IN A 192.168.0.316. earth IN A 192.168.1.217. mars IN A 192.168.1.3
File 38: The File /var/named/world.zone
Line 1: $TTL defines the standard TTL that applies for all the entries in thisfile, here 2 days. TTL means “time to live”.
Line 2: The SOA control record begins here:
The name of the domain to administer is world.cosmos in the firstposition. This ends with a ‘.’ , because otherwise the zone wouldbe appended a second time. Alternatively, a ‘@’ can be enteredhere. Then, the zone would be extracted from the correspondingentry in /etc/named.conf .
After IN SOA is the name of the name server in charge as mas-ter for this zone. The name is extended from gateway to gate-way.world.cosmos, because it does not end with a ‘.’ .
Afterwards, an e-mail address of the person in charge of this nameserver will follow. Since the ‘@’ sign already has a special signif-icance, ‘.’ is to be entered here instead, for [email protected],consequently root.world.cosmos..The ‘.’ sign at the end cannotbe neglected, otherwise, the zone will still be added here.
A ‘(’ follows at the end here, including the following lines upuntil ‘)’ into the SOA record.
Line 3: The serial number is an arbitrary number that is increased each timethis file is changed. It is needed to inform the secondary name servers
227SuSE Linux – Enterprise Server 8
(slave servers) of changes. For this, a ten-digit number of the date andrun number, written as YYYYMMDDNN, has become the customaryformat.
Line 4: The refresh rate specifies the time interval at which the secondaryname servers verify the zone serial number. In this case, 1 day.
Line 5: The retry rate specifies the time interval at which a secondary nameserver, in case of error, attempts to contact the primary server again.Here, 2 hours.
Line 6: The expiration time specifies the time frame after which a secondaryname server discards the cached data if it has not regained contact tothe primary server. Here, it is a week.
Line 7: The minimum time to live states how long the results of the DNSrequests from other servers can be cached before they become invalidand have to be requested again.
Line 9: The IN NS specifies the name server responsible for this do-main. The same is true here that gateway is extended to gate-way.world.cosmos because it does not end with a ‘.’ . There can beseveral lines like this, one for the primary and one for each secondaryname server. If notify is not set to no in /etc/named.conf , all thename servers listed here will be informed of the changes made to thezone data.
Line 10: The MX record specifies the mail server that accepts, processes, andforwards e-mails for the domain world.cosmos. In this example, this isthe host sun.world.cosmos. The number in front of the host name is thepreference value. If there are multiple MX entries, the mail server withthe smallest value is taken first and, if mail delivery to this server fails,an attempt will be made with the next higher value.
Line 12–17: These are now the actual address records where one or moreIP addresses are assigned to the host names. The names are listed herewithout a ‘.’ , because they are entered without a domain added andcan all be appended with world.cosmos. Two IP addresses are assignedto the host gateway, because it has two network cards.
The pseudodomain in-addr.arpa is used to assist the reverse lookup of IP ad-dresses into host names. This will be appended, for this purpose, to the net-work components described here in reverse order. 192.168.1 is thus translatedinto 1.168.192.in-addr.arpa. See File 39.
228 DNS — Domain Name Service
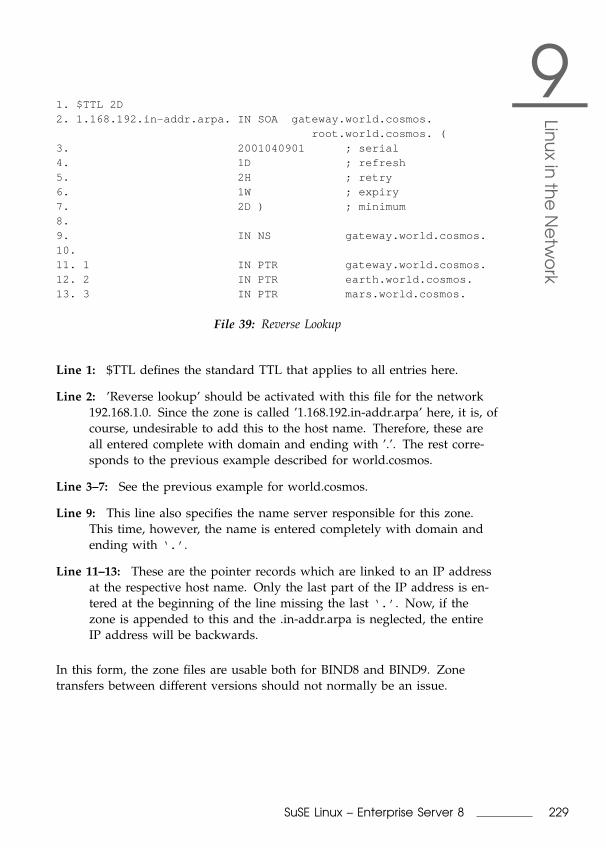
9Lin
ux
inth
eN
etw
ork
1. $TTL 2D2. 1.168.192.in-addr.arpa. IN SOA gateway.world.cosmos.
root.world.cosmos. (3. 2001040901 ; serial4. 1D ; refresh5. 2H ; retry6. 1W ; expiry7. 2D ) ; minimum8.9. IN NS gateway.world.cosmos.10.11. 1 IN PTR gateway.world.cosmos.12. 2 IN PTR earth.world.cosmos.13. 3 IN PTR mars.world.cosmos.
File 39: Reverse Lookup
Line 1: $TTL defines the standard TTL that applies to all entries here.
Line 2: ’Reverse lookup’ should be activated with this file for the network192.168.1.0. Since the zone is called ’1.168.192.in-addr.arpa’ here, it is, ofcourse, undesirable to add this to the host name. Therefore, these areall entered complete with domain and ending with ’.’. The rest corre-sponds to the previous example described for world.cosmos.
Line 3–7: See the previous example for world.cosmos.
Line 9: This line also specifies the name server responsible for this zone.This time, however, the name is entered completely with domain andending with ‘.’ .
Line 11–13: These are the pointer records which are linked to an IP addressat the respective host name. Only the last part of the IP address is en-tered at the beginning of the line missing the last ‘.’ . Now, if thezone is appended to this and the .in-addr.arpa is neglected, the entireIP address will be backwards.
In this form, the zone files are usable both for BIND8 and BIND9. Zonetransfers between different versions should not normally be an issue.
229SuSE Linux – Enterprise Server 8

For More Information
Documentation on package bind8 : file:/usr/share/doc/packages/bind8/html/index.html .
A sample configuration can be found at:/usr/share/doc/packages/bind8/sample-config
the man page for named (man 8 named) in which the rele-vant RFCs are named and the the man page for named.conf(man 5 named.conf
230 DNS — Domain Name Service
9Lin
ux
inth
eN
etw
ork
NIS — Network Information Service
As soon as multiple UNIX systems in a network want to access common re-sources, you have to make sure, for example, that all user and group iden-tities are the same for all machines in that network. The network should betransparent to the user: whatever machine a user uses, he will always findhimself in exactly the same environment. This is made possible by meansof NIS and NFS services. NFS distributes file systems over a network and isdiscussed in Section NFS — Shared File Systems on page 235.
NIS (Network Information Service) is a database service that enables accessto /etc/passwd , /etc/shadow , and /etc/group across a network. NIScan be used for other, more specialized tasks (such as for /etc/hosts or/etc/services ).
NIS Master and Slave Server
For installation, select ‘Network/Advanced’ in YaST2 then ‘Configure NISserver’. If a NIS server does not exist on your network, first activate ‘CreateNIS Master Server’ in the next screen. If you already have a NIS server (a“master”), add a NIS slave server if you are configuring a new subnetwork.
Enter the domain name at the top of the next configuration screen (Fig-ure 9.4 on the next page). In the check box underneath, define whether thehost should also be an NIS client.
Activate ‘Active NIS Slave Server Exists’ if your network has other NIS slaveservers. Select ‘Fast Map Distribution’ to speed up the data transfer from themaster to the slave server.
To allow users in your network to change their passwords on the NIS serverwith the command yppasswd , enable this option as well. “GECOS” meansthat the user can also change his name and address settings with the com-mand ypchfn . “SHELL” allows a user to modify his default shell with thecommand ypchsh .
Under ‘Other global settings...’, a menu appears (Figure 9.5 on page 233) inwhich to change the default directory (/etc ). In addition, passwords andgroups can be consolidated here. The setting should be left at ‘Yes’ so thefiles (/etc/passwd and /etc/shadow as well as /etc/group and /etc/gshadow ) can be synchronized. ‘OK’ returns to the previous screen. Click‘Next’.
If you previously enabled ‘Active NIS Slave Server exists’, give the hostnames to use as slaves. Specify the name and go to ‘Next’. The menu that
231SuSE Linux – Enterprise Server 8
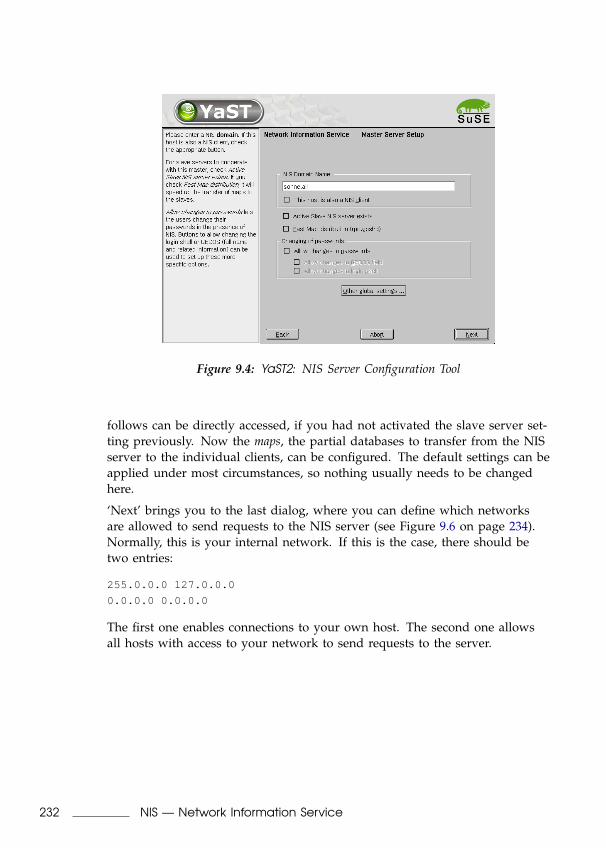
Figure 9.4: YaST2: NIS Server Configuration Tool
follows can be directly accessed, if you had not activated the slave server set-ting previously. Now the maps, the partial databases to transfer from the NISserver to the individual clients, can be configured. The default settings can beapplied under most circumstances, so nothing usually needs to be changedhere.
‘Next’ brings you to the last dialog, where you can define which networksare allowed to send requests to the NIS server (see Figure 9.6 on page 234).Normally, this is your internal network. If this is the case, there should betwo entries:
255.0.0.0 127.0.0.0
0.0.0.0 0.0.0.0
The first one enables connections to your own host. The second one allowsall hosts with access to your network to send requests to the server.
232 NIS — Network Information Service
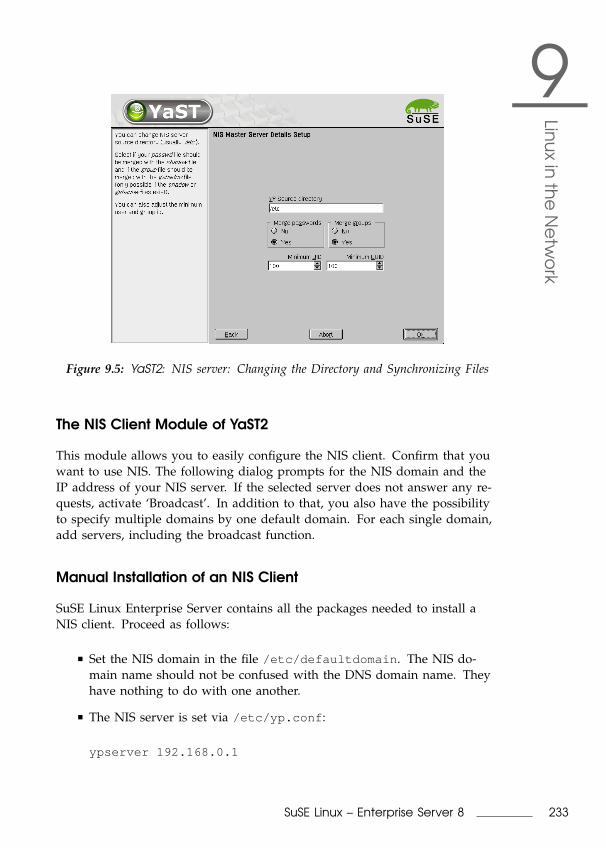
9Lin
ux
inth
eN
etw
ork
Figure 9.5: YaST2: NIS server: Changing the Directory and Synchronizing Files
The NIS Client Module of YaST2
This module allows you to easily configure the NIS client. Confirm that youwant to use NIS. The following dialog prompts for the NIS domain and theIP address of your NIS server. If the selected server does not answer any re-quests, activate ‘Broadcast’. In addition to that, you also have the possibilityto specify multiple domains by one default domain. For each single domain,add servers, including the broadcast function.
Manual Installation of an NIS Client
SuSE Linux Enterprise Server contains all the packages needed to install aNIS client. Proceed as follows:
Set the NIS domain in the file /etc/defaultdomain . The NIS do-main name should not be confused with the DNS domain name. Theyhave nothing to do with one another.
The NIS server is set via /etc/yp.conf :
ypserver 192.168.0.1
233SuSE Linux – Enterprise Server 8
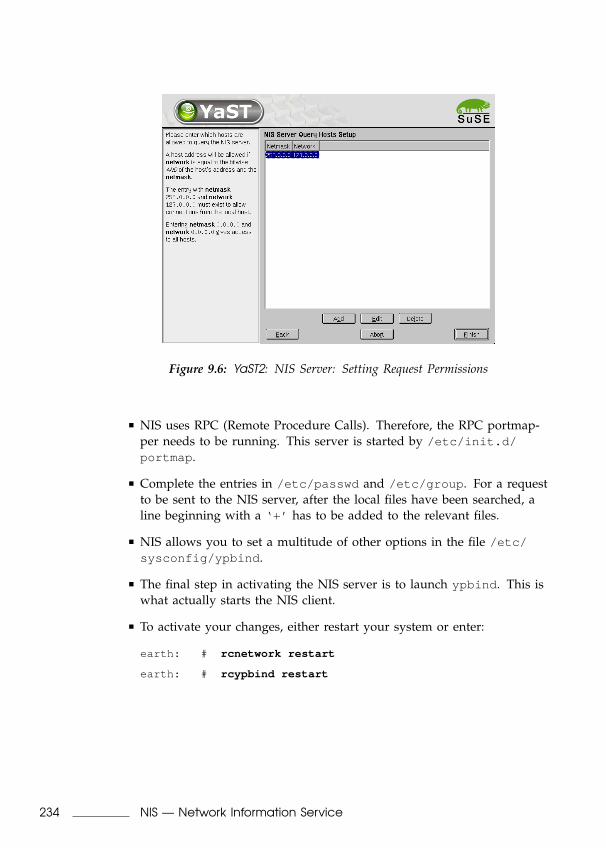
Figure 9.6: YaST2: NIS Server: Setting Request Permissions
NIS uses RPC (Remote Procedure Calls). Therefore, the RPC portmap-per needs to be running. This server is started by /etc/init.d/portmap .
Complete the entries in /etc/passwd and /etc/group . For a requestto be sent to the NIS server, after the local files have been searched, aline beginning with a ‘+’ has to be added to the relevant files.
NIS allows you to set a multitude of other options in the file /etc/sysconfig/ypbind .
The final step in activating the NIS server is to launch ypbind . This iswhat actually starts the NIS client.
To activate your changes, either restart your system or enter:
earth: # rcnetwork restart
earth: # rcypbind restart
234 NIS — Network Information Service
9Lin
ux
inth
eN
etw
ork
NFS — Shared File Systems
As mentioned in NIS — Network Information Service on page 231, NFS (to-gether with NIS) makes a network transparent to the user. With NFS, it ispossible to distribute file systems over the network. It does not matter atwhich terminal a user is logged in. He will always find himself in the sameenvironment.
As with NIS, NFS is an asymmetric service. There are NFS servers and NFSclients. A machine can be both — it can supply file systems over the net-work (export) and mount file systems from other hosts (import). Generally,these are servers with a very large hard disk capacity, whose file systems aremounted by other clients.
Importing File Systems with YaST2
Any user who is authorized to do so can mount NFS directories from anNFS server into his own file tree. This can be achieved most easily using theYaST2 module ‘NFS client’. Just enter the host name of the NFS server, thedirectory to import, and the mount point at which to mount this directorylocally. All this is done after clicking ‘Add’ in the first dialog.
Importing File Systems Manually
To import file systems from an NFS server, the only requirement is that theRPC portmapper is already running. Starting this server has already beencovered in connection with NIS (see Manual Installation of an NIS Client onthe preceding page). If this is the case, other file systems can be mounted (aslong as they are exported by the server) just as easily as local file systemsusing the program mount with the following syntax:
mount -t nfs 〈host 〉: 〈remote path 〉 〈local path 〉If user directories from the machine sun , for example, should be imported,the following command can be used:
earth:/ # mount -t nfs sun:/home /home
235SuSE Linux – Enterprise Server 8
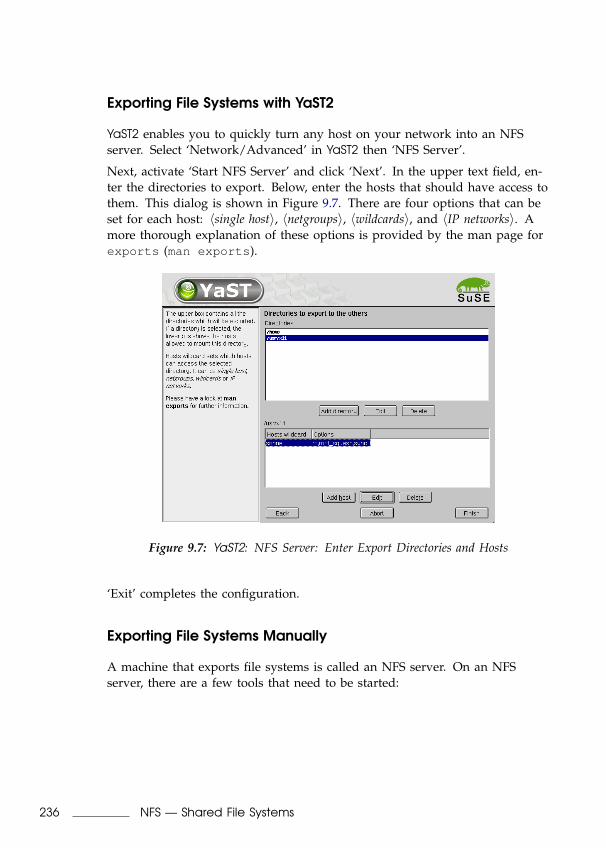
Exporting File Systems with YaST2
YaST2 enables you to quickly turn any host on your network into an NFSserver. Select ‘Network/Advanced’ in YaST2 then ‘NFS Server’.
Next, activate ‘Start NFS Server’ and click ‘Next’. In the upper text field, en-ter the directories to export. Below, enter the hosts that should have access tothem. This dialog is shown in Figure 9.7. There are four options that can beset for each host: 〈single host〉, 〈netgroups〉, 〈wildcards〉, and 〈IP networks〉. Amore thorough explanation of these options is provided by the man page forexports (man exports ).
Figure 9.7: YaST2: NFS Server: Enter Export Directories and Hosts
‘Exit’ completes the configuration.
Exporting File Systems Manually
A machine that exports file systems is called an NFS server. On an NFSserver, there are a few tools that need to be started:
236 NFS — Shared File Systems
9Lin
ux
inth
eN
etw
ork
RPC portmapper (rpc.portmap)
RPC mount daemon (rpc.mountd)
RPC NFS daemon (rpc.nfsd)
These are started by the scripts /etc/init.d/portmap and /etc/init.d/nfsserverat boot. Starting the RPC portmapper was described in Section Manual Instal-lation of an NIS Client on page 234. After these daemons have been started,the configuration file /etc/exports decides which directories should be ex-ported to which machines.
For each directory to export, one line is needed to specify which machinesmay access that directory with what permissions. All subdirectories of thisdirectory will automatically be exported as well. All authorized machinesare usually denoted with their full names (including domain name), but it ispossible to use wildcards like ‘*’ or ‘?’ . If no machine is specified here,any machine is allowed to import this file system with the given permissions.
Permissions of the file system to export are denoted in brackets after the ma-chine name. The most important options are:
ro file system is exported with read-only permission (de-fault).
rw file system is exported with read-write permission.root_squash This makes sure that the user root of the given ma-
chine does not have root specific permissions onthis file system. This is achieved by assigning user ID65534 to users with user ID 0 (root). This user IDshould be set to nobody
no_root_squash Does not assign user ID 0 to user ID 65534 (default).link_relative Converts absolute links (those beginning with ‘/’ ) to a
sequence of ‘../’ . This is only useful if the whole filesystem of a machine is mounted (default).
link_absolute Symbolic links remain untouched.map_identity User IDs are exactly the same on both client and server
(default).map-daemon Client and server do not have matching user IDs. This
tells nfsd to create a conversion table for user IDs.ugidd is required for this to work.
Table 9.12: Permissions for Exported File Systems
237SuSE Linux – Enterprise Server 8

Your exports file might look like File 40.
## /etc/exports#/home sun(rw) venus(rw)/usr/X11 sun(ro) venus(ro)/usr/lib/texmf sun(ro) venus(rw)/ earth(ro,root_squash)/home/ftp (ro)# End of exports
File 40: /etc/exports
File /etc/exports is read by mountd. If you change anything in this file,restart mountd and nfsd for your changes to take effect. This can easily bedone with rcnfsserver restart .
238 NFS — Shared File Systems
9Lin
ux
inth
eN
etw
ork
DHCP
The DHCP Protocol
The purpose of the “Dynamic Host Configuration Protocol” is to assign net-work settings centrally from a server rather than configuring them locally oneach and every workstation. A client configured to use DHCP does not havecontrol over its own static address. It is enabled to fully autoconfigure itselfaccording to directions from the server.
One way to use DHCP is to identify each client using the hardware addressof its network card (which is fixed in most cases) then supply that client withidentical settings each time it connects to the server. DHCP can also be con-figured so the server assigns addresses to each “interested” host dynamicallyfrom an address pool set up for that purpose. In the latter case, the DHCPserver will try to assign the same address to the client each time it receives arequest from it (even over longer periods). This, of course, will not work ifthere are more client hosts in the network than network addresses available.
With these possibilities, DHCP can make life easier for system administratorsin two ways. Any changes (even bigger ones) related to addresses and thenetwork configuration in general can be implemented centrally by editing theserver’s configuration file. This is much more convenient than reconfiguringlots of client machines. Also it is much easier to integrate machines, partic-ularly new machines, into the network, as they can be given an IP addressfrom the pool. Retrieving the appropriate network settings from a DHCPserver can be especially useful in the case of laptops regularly used in dif-ferent networks.
A DHCP server not only supplies the IP address and the netmask, but alsothe host name, domain name, gateway, and name server addresses to be usedby the client. In addition to that, DHCP allows for a number of other param-eters to be configured in a centralized way, for example, a time server fromwhich clients may poll the current time or even a print server.
The following section, gives an overview of DHCP without describing theservice in every detail. In particular, we want to show how to use the DHCPserver dhcpd in your own network to easily manage its entire setup fromone central point.
DHCP Software Packages
SuSE Linux comes with three packages related to DHCP. The first of these isthe DHCP server dhcpd distributed by the Internet Software Consortium, or
239SuSE Linux – Enterprise Server 8
ISC. This is the program that assigns and manages the corresponding infor-mation for the network. Normally with SuSE Linux, there is only this oneprogram available as far as the server is concerned, but you can choose be-tween two different DHCP client programs. SuSE Linux includes both thepackage dhclient , also from the ISC, and the “DHCP client daemon” pro-vided by the package dhcpcd .
SuSE Linux installs dhcpcd by default. The program is very easy to han-dle and will be launched automatically on each system boot to watch for aDHCP server. It does not need a configuration file to do its job and shouldwork out of the box in most standard setups.
If you administer a more complex network, you might need the ISC’sdhclient, which can be controlled via the configuration file /etc/dhclient.conf . No matter whether you want to include an additional domain in thesearch list or even to emulate the behavior of a Microsoft DHCP client — ifyou are knowledgeable about networks, you will find that the dhclient givesall the possibilities to make it function according to your needs, down to thelast detail.
The DHCP Server dhcpd
The core of any DHCP system is the dynamic host configuration protocol dae-mon. This server “leases” addresses and watches how they are used, accord-ing to the settings as defined in the configuration file /etc/dhcpd.conf . Bychanging the parameters and values in this file, a system administrator caninfluence the program’s behavior in numerous ways.
Look at a basic sample /etc/dhcpd.conf file:
default-lease-time 600; # 10 minutesmax-lease-time 7200; # 2 hours
option domain-name "kosmos.all";option domain-name-servers 192.168.1.1, 192.168.1.2;option broadcast-address 192.168.1.255;option routers 192.168.1.254;option subnet-mask 255.255.255.0;
subnet 192.168.1.0 netmask 255.255.255.0{
range 192.168.1.10 192.168.1.20;range 192.168.1.100 192.168.1.200;
}
File 41: The Configuration File /etc/dhcpd.conf
240 DHCP
9Lin
ux
inth
eN
etw
ork
This simple configuration file should be sufficient to get the DHCP server toassign IP addresses to the hosts of your network. One thing to remember,however, is to include a semicolon (;) at the end of each line. Without thatcharacter, dhcpd will not even start.
As you might have noticed, the above sample file can be subdivided intothree different sections. The first one defines how many seconds an IP ad-dress is “leased” to a requesting host by default (default-lease-time )before it should apply for renewal. The section also includes a statement onthe maximum period for which a machine may keep an IP address assignedby the DHCP server without applying for renewal (max-lease-time ).
In the second part, some basic network parameters are defined on a globallevel:
The line option domain-name defines the default domain of yournetwork.
With the entry option domain-name-servers , specify up to threevalues for the DNS servers used to resolve IP addresses into hostnames (and vice versa). Ideally, configure a name server on your ma-chine or somewhere else in your network before setting up DHCP. Thatname server should also define a host name for each dynamic addressand vice versa. To learn how to configure your own name server, readSection DNS — Domain Name Service on page 221.
The line option broadcast-address defines the broadcast addressto be used by the requesting host.
With option routers , tell the server where to send data packets thatcannot be delivered to a host on the local network (according to thesource and target host address and the subnet mask provided). In mostcases, especially in smaller networks, this router will be identical withthe Internet gateway.
With option subnet-mask , specify the netmask assigned to clients.
The last section of the file is there to define a network, including a subnetmask. To finish, specify the address range that the DHCP daemon should useto assign IP addresses to interested clients. In our example, clients may begiven any address between 192.168.1.10 and 192.168.1.20 , as well as192.168.1.100 and 192.168.1.200 .
After editing these few lines, you should be able to activate the DHCP dae-mon by issuing the command rcdhcpd start . The server is ready for use
241SuSE Linux – Enterprise Server 8

immediately after that. Do a basic check to see whether the configuration fileis syntactically correct by entering the command rcdhcpd syntax-check .If you encounter any unexpected problems with your configuration — theserver aborts with an error or does not return “done” on start — you shouldbe able to find out what has gone wrong by looking for information eitherin the main system log /var/log/messages or on console 10 (
�� ��Ctrl +�� ��Alt +�� ��F10 ).
Assigning Fixed IP Addresses to Hosts
Now that the server is set up to assign dynamic addresses, it is time to havea closer look at static addresses and the way to configure them. As men-tioned above, with DHCP it is also possible to assign a predefined, fixed ad-dress to one host each time the latter sends a request to the server.
As might be expected, addresses assigned explicitly will always take priorityover addresses from the pool of dynamic addresses. Furthermore, a static ad-dress will never expire in the way a dynamic address would, such as if therewere not enough addresses available so the server needed to redistributethem among hosts.
To identify a host configured to get a static address, the DHCP daemonfetches the hardware address of that host. This is a numerical code consist-ing of six octet pairs, fixed in most cases, and unique to each network devicesold in the world, e. g., 00:00:45:12:EE:F4 .
If the appropriate lines, like the ones in 42, are added to the configurationfile 41 on page 240, the DHCP daemon will assign the same set of data to thecorresponding host under all circumstances.
host earth {hardware ethernet 00:00:45:12:EE:F4;fixed-address 192.168.1.21;
}
File 42: Entry Added to the Configuration File
The structure of this entry should be almost self-explanatory: The first linesets the DNS name of the newly defined host (host host name) and the secondone its MAC address. On any network-enabled Linux host, this address canbe determined very easily with the command ifstatus plus the network
242 DHCP

9Lin
ux
inth
eN
etw
ork
device, for example, eth0. If the network card is not enabled, use the com-mand ifup eth0 first. The output should contain something like link/ether00:00:45:12:EE:F4.
In the above example, a host with a network card having the MAC address00:00:45:12:EE:F4 is assigned the IP address 192.168.1.21 and the hostname earth automatically.
The type of hardware to enter is ethernet in nearly all cases, thoughtoken-ring , which is often found on IBM systems, is also supported.
The Finer Points
As stated at the beginning of this chapter, these pages are only intendedto provide a brief survey of what you can do with DHCP. For more infor-mation, the page of the Internet Software Consortium on the subject (http://www.isc.org/products/DHCP/ ) will prove a good source to read aboutthe details of DHCP, including about version 3 of the protocol, currently inbeta testing. Apart from that, you can always rely on the man pages for fur-ther help. Try man dhcpd , man dhcpd.conf , man dhcpd.leases , andman dhcp-options . Also, several books about Dynamic Host ConfigurationProtocol have been published over the years that take an in-depth look at thetopic.
With dhcpd , it is even possible to offer a file to a requesting host, as definedwith the parameter filename, and that this file may contain a bootable Linuxkernel. This allows you to build client hosts which do not need a hard disk— they are enabled to load both their operating system and their networkdata over the network (diskless clients), which could be an interesting optionfor both cost and security reasons. Now add the package alice to all thisand you can do some really amazing things.
243SuSE Linux – Enterprise Server 8

10H
ete
rog
en
ous
Ne
two
rks
Heterogenous Networks
This chapter will provide the informations needed to let your Linux systemscommunicate with the Windows and Macintosh world.
Samba . . . . . . . . . . . . . . . . . . . . . . . . . . . . . . 246Netatalk . . . . . . . . . . . . . . . . . . . . . . . . . . . . . 253
Samba
With the program package Samba, convert any UNIX machine into a power-ful file and print server for DOS, Windows, and OS/2 machines. The SambaProject is run by the Samba Team and was originally developed by the Aus-tralian Andrew Tridgell.
Samba has now become a fully-fledged and rather complex product. Thissection presents an overview of its basic functionality. Samba offers plenty ofonline documentation. Enter apropos samba at the command line to dis-play some manual pages or just browse the /usr/share/doc/packages/samba directory if Samba is installed. There, find some more online docu-mentation and examples. A commented example configuration (smb.conf.SuSE) can be found in the examples subdirectory.
Samba uses the SMB protocol (Server Message Block) from the company Mi-crosoft, based on the NetBIOS services. Due to pressure from IBM, Microsoftreleased the protocol so other software manufacturers could establish connec-tions to a Microsoft domain network. Samba sets the SMB protocol on topof the TCP/IP protocol, so the TCP/IP protocol must also be installed on allclients.
NetBIOS
NetBIOS is a software interface (API) designed for communication betweenmachines. Here, a name service is provided. It enables machines connectedto the net to reserve names for themselves. After reservation, these machinescan be addressed by name. There is no central process that checks names.Any machine on the network can reserve as many names as it wants, pro-vided the name is not already in use. The NetBIOS interface can now be im-plemented for different network architectures. An implementation that worksrelatively closely with network hardware is called NetBEUI, but this is oftenreferred to as NetBIOS. Network protocols implemented with NetBIOS areIPX from Novell (NetBIOS via TCP/IP) and TCP/IP.
The NetBIOS names sent via TCP/IP have nothing in common with thenames used in /etc/hosts or those defined by DNS. NetBIOS uses its own,completely independent naming convention. However, it is recommended touse names that correspond to DNS host names to make administration easier.This is the default used by Samba.
Clients
All standard operating systems, such as DOS, Windows, and OS/2, supportthe SMB protocol. The TCP/IP protocol must be installed on all computers.
246 Samba
10H
ete
rog
en
ous
Ne
two
rks
Samba can also be used with all the various UNIX “flavors”.
SMB servers provide hardware space to their clients by means of shares.Here, a share includes a directory and its subdirectories. It is exported bymeans of a name and can be accessed by its name. The share name can beset to any name — it does not have to be the name of the export directory. Aprinter is also assigned a name. Clients can access the printer by its name.
Installing and Configuring the Server
First, install the package samba. The SMB services are started when the com-puter is booted. The services can be started manually with rcsmb start .With rcsmb stop , the services can be stopped.
The main configuration file of Samba is /etc/samba/smb.conf . Here, theentire service is configured. Basically, smb.conf is divided into two separatesections. In the [global] section, the central and general settings are made.The second section is the [share] section. Here, define the file and printershares. If a specific value from the [share] section should be made validfor all shares, this can be taken over into the [global] section, making itvalid for all shares system-wide and securing clarity of the configuration file.Since this central configuration file is accessed often, it is recommended tokeep it as short and free of comments as possible. The shorter this file, thefaster the server can respond.
The following sections provide an overview of some selected parameters.
The [global] Section
The following parameters of the [global] section need some adjustment tomatch the requirements of your network setup to let other machines accessyour Samba server via SMB in a Windows environment.
workgroup = TUX-NET This line assigns the Samba server to a work group.Replace TUX-NET with an appropriate work group of your network-ing environment. Your Samba server will appear under its DNS nameunless this name has been assigned to any other machine in the net.
If the DNS name is not available, set the server name usingnetbiosname=MYNAME . See man smb.conf for more details aboutthis parameter.
os level = 2 This parameter triggers whether your Samba server tries tobecome LMB “Local Master Browser” for its work group. Choose a
247SuSE Linux – Enterprise Server 8
very low value to spare the existing Windows net from any distur-bances caused by a misconfigured Samba server. More informationabout this important topic can be found in the files BROWSING.txtand BROWSING-Config.txt under the textdocs subdirectory of thepackage documentation.
As long as there is no other SMB server present in your network, suchas a Windows NT or 2000 server, and the Samba server should keep alist of all systems present in the local environment, set the os levelto a higher value (for example, 65). Your Samba server will thus bechosen as LMB for your local network.
When changing this setting, consider carefully how this could affectan existing Windows network environment. A misconfigured Sambaserver can cause severe trouble when trying to become LMB for itswork group. Contact your administrator and subject your configurationto some heavy testing either in an isolated network or at a noncriticaltime of day.
wins support and wins server If your Samba server should integrate intoan existing Windows network with a running WINS server, remove theleading semicolon in front of the wins server parameter and adjustthe IP address to the requirements of your network. If your Windowsmachines run in separate subnets, they should “see” each other, yourWindows network does not have a WINS server running, and yourSamba server should become the WINS server, uncomment the lineholding the wins support = yes parameter. Make sure you acti-vate this setting solely on a Samba server. Keep wins server inactivein this configuration.
Shares
The following examples illustrate how a CD-ROM drive and the user directo-ries (home directories) are made available to the SMB clients.
[cdrom]
;[cdrom]; comment = Linux CD-ROM; path = /media/cdrom; locking = no
File 43: A CD-ROM Share
To avoid having the CD-ROM drive accidentally made available, theselines are commented by default.
248 Samba
10H
ete
rog
en
ous
Ne
two
rks
[cdrom] and comment [cdrom] is the name of the share thatcan be seen by all SMB clients on the net. An additional commentcan be added to further describe the share.
path=/media/cdrom exports the directory /media/cdrom .
By means of a very restrictive default configuration, this kind of shareis only made available to the users present on this system. If this shareshould be made available to everybody, add a line guestok=yes tothe configuration. This setting gives read permissions to anyone on thenetwork. It is recommended to handle this parameter with great care.This applies even more to the use of this parameter in the [global]section.
[homes]The [home] share is of special importance here. If the user has a validaccount and password for the Linux file server and his own home di-rectory, he can be connected to it.
[homes]comment = Home Directoriesvalid users = %Sbrowseable = nowriteable = yescreate mask = 0640directory mask = 0750
File 44: The [homes] Share
[homes] As long as there is no other share using the share nameof the user connecting to the SMB server, a share is dynamicallygenerated using the [homes] share directives. The resulting nameof the share is identical to the user name.
valid users=%S %S is replaced by the concrete name of theshare as soon as a connection has been successfully established.For a [homes] share, this is always identical to the user’s name.As a consequence, access rights to a user’s share are restrictedexlusively to the user.
browseable = no This setting enables the share to be invisiblein the network environment.
249SuSE Linux – Enterprise Server 8
writeable = yes By default, Samba prohibits write access toany exported share by means of the read only = yes param-eter. If a share should be made available as writeable, you mustexplicitly state this using the writeable = yes parameter. Thisis normally desired for user directories.
create mask = 0640 Windows machines do not understandthe concept of UNIX permissions, so cannot assign permissionswhen creating a file. The parameter create mask assigns whatpermissions to use when a new file is created. This only appliesto shares with write permissions. In detail, this setting means thatthe owner of this file holds both read and write permissions. Themembers of his group have read access to this file. valid users= %Sprevents read access by the other members of the group.
Security Levels
The SMB protocol comes from the DOS and Windows world and directlytakes into consideration the problem of security. Each share access can beprotected with a password. SMB has three possible ways of achieving this:
Share Level Security: A password is firmly allocated to a share. Every-one who knows this password has access to that share.
User Level Security: This variation introduces the concept of the userin the SMB. Each user must register with the server with his own pass-word. After registering, the server can grant access to individual ex-ported shares independently of user names.
Server Level Security: To its clients, Samba pretends to be working inUser Level Mode. However, it passes on all password queries to an-other User Level Mode Server, which takes care of authentication. Thissetting expects an additional parameter (password server = ).
The differentiation between share, user, and server level security must bemade for the entire server. It is not possible to export some shares by ShareLevel Security and others by User Level Security. More information on thissubject can be found in the file /usr/share/doc/packages/samba/textdocs/security_level.txt .
250 Samba
10H
ete
rog
en
ous
Ne
two
rks
TipFor simple administration tasks with the Samba server, there is alsothe program swat. It provides a simple web interface with which toconveniently configure the Samba server. In a web browser, openhttp://localhost:901 and log in as user root . swat is also ac-tivated in the files /etc/inetd.conf and /etc/services . Moreinformation about swat can be found in its man page.
Tip
Samba as Login Server
In networks where predominantly Windows clients are found, it is oftenpreferable that users may only register with a valid account and password.This can be brought about with the help of a Samba server. In a pure Win-dows network, a Windows NT server takes on this task. This is configured asa Primary Domain Controller (PDC). The following entries must be made inthe [global] section of the smb.conf .
[global]workgroup = TUX-NETdomain logons = yesdomain master = yes
File 45: [Global] Section in smb.conf
If encrypted passwords are used for verification purposes, the Samba servermust be able to handle these. The entry encrypt passwords = yes inthe [global] section enable this functionality. In addition, it is necessary toprepare user accounts and passwords in an encryption format that conformswith Windows. This is done with the command smbpasswd -a name .Since, in accordance with the Windows NT domain concept, the computersthemselves need a domain account, this is created with the following com-mands:
251SuSE Linux – Enterprise Server 8
useradd machinename$smbpasswd -a -m machinename
File 46: Adding a Machine Account
With the useradd command, a dollar sign is added. The commandsmbpasswd includes this automatically when the -m parameter is used. Seethe commented sample configuration for the settings needed to automate thistask.
add user script = /usr/sbin/useradd -g machines \-c "NT Machine Account" -d \/dev/null -s /bin/false %m$
File 47: Automated Adding of a Machine Account
Installing Clients
First, it should be mentioned that clients can only access the Samba servervia TCP/IP. NetBEUI and NetBIOS via IPX are not available at the moment.Since TCP/IP is becoming more and more popular, even with Novell andMicrosoft, it is not certain whether this is going to change in the near future.
Windows 9x/ME
Windows 9x/ME already has built-in support for TCP/IP. However, this isnot installed as the default. To add TCP/IP, go to ‘Control Panel’ ➝ ‘System’and choose ‘Add’ ➝ ‘Protocols’ ➝ ‘TCP/IP from Microsoft’. Be sure to en-ter your network address and network mask correctly. After rebooting yourWindows machine, find the properly configured Samba server in networks(double-click the network icon on your desktop).
TipTo use a printer on the Samba server, install the standard or Apple-PostScript printer driver from the corresponding Windows version.It is best to link this to the Linux printer queue, which includes anautomatic apsfilter recognition.
Tip
252 Samba
10H
ete
rog
en
ous
Ne
two
rks
Optimization
socket options is one possible optimization provided with the sampleconfiguration that ships with your Samba version. Its default configurationrefers to a local Ethernet network. To get further information about socketoptions , refer to the man page for smb.conf (man smb.conf ), section“socket options” and to the man page for socket (man 7 socket ). Addi-tional optimization tips regarding speed can be found under /usr/share/doc/packages/samba/textdocs/Speed.txt and /usr/share/doc/packages/samba/textdocs/Speed2.txt .
The standard configuration under /etc/samba/smb.conf is designed toprovide sensible settings for most purposes. The settings here differ from alldefault settings made by the Samba team. Providing reasonable settings isvery difficult or rather impossible with regards to the network configurationor the name of the work group. Check the commented sample configurationunder examples/smb.conf.SuSE for further directions about the adjust-ment of the configuration to local requirements.
TipThe Samba team offers textdocs/DIAGNOSIS.txt , which is a step-by-step guide to check your configuration.
Tip
Netatalk
With the package netatalk , obtain a high-performance file and print serverfor MacOS clients. With it, access data on a Linux machine from a Macintoshor print to a connected printer.
Netatalk is a suite of Unix programs that run on kernel-based DDP (Data-gram Delivery Protocol) and implement the AppleTalk protocol family (ADSP,ATP, ASP, RTMP, NBP, ZIP, AEP, and PAP). AppleTalk is, in effect, an equiv-alent to the more familiar protocol known as TCP (Transmission Control Pro-tocol). It has counterparts to many services available on TCP/IP, includingservices for resolving host names and time synchronization. For example,the command nbplkup (NBP, Name Binding Protocol) is used instead ofnslookup (DNS, Domain Name Service) and aecho (AEP, AppleTalk EchoProtocol) instead of ping (ICMP ECHO_REQUEST, Internet Control MessageProtocol).
The three daemons described below are normally started on the server:
253SuSE Linux – Enterprise Server 8
atalkd (“AppleTalk Network Manager”) that somewhat correlates withthe programs ifconfig and routed
afpd (AppleTalk Filing Protocol daemon), which provides an interfacefor Macintosh clients to Unix file systems
papd (Printer Access Protocol daemon), which makes printers availablein the (AppleTalk) network.
Of course, you can export server directories not only via Netatalk, but also,at the same time, via Samba for Windows clients (see Section Clients onpage 246) and via NFS (see NFS — Shared File Systems on page 235), whichis very useful in heterogeneous network environments. This centralizes themanagement of data backup and user permissions on the Linux server.
Note:
Due to Macintosh client restrictions, the user passwords on the servercannot be longer than eight characters.
Macintosh clients cannot access Unix files with names longer than 31characters.
File names may not contain colons (‘:’ ) because they serve as pathname separators in MacOS.
The package netatalk has to be installed.
Configuring the File Server
In the default configuration, Netatalk is already fully functional as a fileserver for home directories of the Linux system. To use the extended fea-tures, define some settings in the configuration files. These are located in the/etc/atalk directory.
All configuration files are pure text files. Text that follows a hash mark ‘#’(comments) and empty lines can be disregarded.
Configuring the Network — atalkd.conf
Define, in /etc/atalk/atalkd.conf , over which interfaces services areprovided. This is usually eth0 , which means that it suffices if the only valueentered here is eth0 . In the example file that comes with Netatalk, this isthe case. Enter additional interfaces to use several network cards at the sametime. When the server is started, it will search the network for already exist-ing zones and servers and modify the corresponding lines by entering the setAppleTalk network addresses. You will then find a line such as
254 Netatalk
10H
ete
rog
en
ous
Ne
two
rks
eth0 -phase 2 -net 0-65534 -addr 65280.57
at the end of the file. To make more complex configurations, find examplesfor this in the configuration file. Find documentation on additional options inthe manual page of afpd.
Defining File Servers — afpd.conf
The afpd.conf file contains definitions for how your file server appears onMacOS machines as an item under the ‘Chooser’ dialog. As is the case withthe other configuration files, these also contain detailed comments explainingthe wide variety of options.
If you do not change anything here, the default server will simply be startedand displayed with the host name in the ‘Chooser’. Therefore, you do notnecessarily have to enter anything. However, you can give additional fileservers a variety of names and options here. For instance, to provide a spe-cific “guest server” where everybody can save files as “guest”,
"Guest server" -uamlist uams_guest.so
Define a server that denies guests access, but which is only accessible forusers who already exist in the Linux system with:
"Font server" -uamlist uams_clrtxt.so,uams_dhx.so
This behavior is controlled by the option uamlist , followed by a list of au-thentication modules to use, separated by commas. If you do not providethis option, all procedures are active by default.
An AppleShare server not only provides its services by default via AppleTalk,but also (“encapsulated”) via TCP/IP. The default port is 548. Assign dedi-cated ports to additional AppleShare servers (on the same machine) if theseare to likewise run via TCP. The availability of the service via TCP/IP enablesaccess to the server even over non-AppleTalk networks, such as the Internet.
In this case, the syntax would read:
"Font server" -uamlist uams_clrtxt.so,uams_dhx.so -port 12000
The AppleShare server, set to the port 12000, then appears in the networkwith the name “Font server” and will not allow guest access. In this way, itis also accessible via TCP/IP routers.
255SuSE Linux – Enterprise Server 8
The file AppleVolumes.default (described in detail below) defines whichdirectories located on the server are made available by each AppleShareserver as network “volumes”. Define other files containing unique descrip-tions for each AppleShare server using the option -defaultvol , such aswith (in one line):
"Guest server" -uamlist uams_guest.so -defaultvol/etc/atalk/AppleVolumes.guest
Further options are explained in the afpd.conf file itself.
Directories and Access Permissions — AppleVolumes.default
Here, define directories to export. The access permissions are defined viathe customary Unix user and group permissions. This is configured in theAppleVolumes.default file.
NoteHere, the syntax has partially changed. Take this into considerationif you are updating this version from a previous one. For example,it is now allow: instead of access= (a typical symptom would beif, instead of the drive descriptions, you were to see a display of thedrive options on the Mac clients in the ‘Chooser’.) Since the new filesare created with the .rpmnew endings during an update, it is possiblethat your previous settings may no longer function as a result of themodified syntax. We recommend creating backups of your configura-tion files, copying your old configurations from them into your newfiles, then renaming these files to the proper names. This way, you willbenefit from the current comments contained in the configuration files,which provide a detailed explanation of the diverse options.
Note
Along with AppleVolumes.default , additional files can be created, suchas AppleVolumes.guest , used by some servers (by giving the option-defaultvol in the afpd.conf file — see previous section).
The syntax
/usr/local/psfonts "PostScript Fonts"
indicates that the Linux directory /usr/local/psfonts located in the rootdirectory is available as an AppleShare volume with the name “PostScriptFonts”.
256 Netatalk
10H
ete
rog
en
ous
Ne
two
rks
Options are separated by a space and attached to the end of a line. A veryuseful option is the access restriction:
/usr/local/psfonts "PostScript Fonts" allow:User1,@group0
which restricts access to the volume “PostScript Fonts” to the user “User1”and all members of the group “group0”. The users and groups entered herehave to be known, of course, to the Linux system. Likewise, explicitly denyusers access with deny:User2 .
These restrictions only apply to access via AppleTalk and not to the normalaccess rights users have if they can log in to the server itself.
Netatalk maps the customary Resource Fork of MacOS files to.AppleDouble directories in the Linux file system. Using the noadoubleoption, set these directories to be created only when they are actually needed.Syntax:
/usr/local/guests "Guests" options:noadouble
Additional options and features can be found in the explanations included inthe file itself.
The tilde (‘~’ ) in this configuration file stands for the home directory foreach and every user on the server. This way, every user can easily access hishome directory without each one having to be explicitly defined here. Theexample file installed already includes a tilde, which is why Netatalk makesthe home directory available by default as long as you do not modify any-thing in this file.
afpd also searches for a file Applevolumes or .Applevolumes in the homedirectory of a user logged on to the system. Entries in this file supplementthe entries in the server files AppleVolumes.system and AppleVolumes.default to enable individual type and creator file specifications and to ac-cess specific directories. These entries are extensions and do not allow accessfor the user for whom access permission is denied from the server side.
The netatalk.pamd file is used, via PAM (pluggable authentication mod-ules), for authentication purposes. Using PAM is, however, irrelevant in thiscontext.
File Specifications — AppleVolumes.system
In the AppleVolumes.System file, define which customary MacOS type andcreator specifications are assigned to certain file endings. An entire series of
257SuSE Linux – Enterprise Server 8
default values are already predefined. If a file is displayed by a generic whiteicon, there is not yet an entry for it in this file. If you encounter a problemwith a text file belonging to another system, which cannot be opened prop-erly in MacOS or vice versa, check the entries there.
Configuring the Print Server
A laserwriter service is made available by configuring the papd.conf file.The printer must be already functioning locally via lpd, so configure a printeras described in the Reference Manual. If you can print a text file locally us-ing the command lpr file.txt , the first step has been successfully com-pleted.
You do not necessarily need to enter anything in papd.conf if a localprinter is configured in Linux, because print jobs can simply be forwardedto the print daemon lpd without additional specifications. The printer regis-ters itself in the AppleTalk network as Laserwriter. You can, however, extendyour printer entries by referring to File 48.
Printer_Reception:pr=lp:pd=/etc/atalk/kyocera.ppd
File 48: papd.conf
This causes the printer named Printer_Reception to appear as a ‘Chooser’item. The corresponding printer description file is usually provided by thevendor. Otherwise, refer to the file Laserwriter located in the ‘SystemExtensions’ folder. However, using this file, often you cannot use all of theprinter’s features.
Starting the Server
The server can be started at system boot time via its “init script” or manuallywith rcatalk start . The init script is located at /etc/init.d/atalk .
The actual starting of the server takes place in the background. It takes abouta minute until the AppleTalk interfaces are set up and responsive. Check forthe status as shown in the following (all servers are running if OK is reportedthree times):
258 Netatalk
10H
ete
rog
en
ous
Ne
two
rks
earth:~ # rcatalk status
Checking for service atalk:OKOKOK
Now it is time to go to a Mac running MacOS. Check for AppleTalk acti-vation, choose ‘Filesharing’, double-click ‘AppleShare’. The names of theservers should then appear in the window. Double-click a server and login. Choose the volume and there is your shared net volume, accessible fromwithin MacOS.
The procedure is a bit different for AppleShare servers configured to use TCPonly (and no DDP). To connect, press the ‘Server IP address’ button and enterthe respective IP address. If necessary, append the port number, separated bya colon (‘:’ ).
Additional Information
To take full advantage of all the options netatalk offers, read the correspond-ing manual pages. Find them by entering the command
earth:~ # rpm -qd netatalk
The /etc/atalk/netatalk.conf file is not used in our netatalk version,so disregard it.
Helpful URLs:
http://netatalk.sourceforge.net/
http://www.umich.edu/~rsug/netatalk/
http://thehamptons.com/anders/netatalk/
http://cgi.zettabyte.net/fom-serve/netatalk/cache/1.html
We do not currently recommend trying to access an AppleShare file systemhosted on a Macintosh from a Linux machine. Software is available, but it isin early development stages. For more information, refer to
http://www.panix.com/~dfoster/afpfs/
259SuSE Linux – Enterprise Server 8

11In
tern
etInternet
This chapter will provide details on the configuration of a proxy server,Squid. This service will accelerate your access to the resources of the worldwide web.
Proxy Server: Squid . . . . . . . . . . . . . . . . . . . . . . 262
Proxy Server: Squid
The following chapter describes how caching web sites assisted by a proxyserver works and what the advantages of using proxy servers are. The mostpopular proxy cache for Linux and UNIX platforms is Squid. We will discussits configuration, the specifications required to get it running, how to config-ure the system to do transparent proxying, how to gather statistics about thecache’s use with the help of programs like Calamaris and cachemgr, andhow to filter web contents with squidgrd.
About Proxy Caches
Squid acts as a proxy cache. It behaves like an agent that receives requestsfrom clients, in this case web browsers, and passes them to the specifiedserver provider. When the requested objects arrive at the agent, it stores acopy in a disk cache.
Benefits arise when different clients request the same objects: these will beserved directly from the disk cache, much faster than obtaining them fromthe Internet and, at the same time, saving overall bandwidth for the system.
TipSquid covers a wide range of features, including intercommunicatinghierarchies of proxy servers to divide the load, defining strict accesscontrol lists to all clients accessing the proxy, and, with the help ofother applications, allowing or denying access to specific web pages. Italso can obtain statistics about the most visited web sites, user usage ofthe Internet, and others.
Tip
Squid is not a generic proxy. It proxies normally only between HTTP con-nections. It does also support the protocols FTP, Gopher, SSL, and WAIS, butit does not support other Internet protocols, such as Real Audio, news, orvideoconferencing. Because Squid only supports the UDP protocol to providecommunication between different caches, many other multimedia programswill not be supported.
Some Facts About Cache Proxying
Squid and Security
It is also possible to use Squid together with a firewall to secure internal net-works from the outside using a proxy cache. The firewall denies all external
262 Proxy Server: Squid
11In
tern
et
services except for Squid, forcing all World Wide Web connections to be es-tablished by the proxy.
If it is a firewall configuration including a DMZ, set the proxy there. In thiscase, it is important that all computers in the DMZ send their log files tohosts inside the secured network.
One way to implement this feature is with the aid of a “transparent” proxy.It will be covered in Section Transparent Proxy Configuration on page 272.
Multiple Caches
“Multiple Caches” means configuring different caches so objects can be ex-changed between them, reducing the total system load and increasing thechances of finding an object already in the local network. It enables the con-figuration of cache hierarchies so a cache is able to forward object requests tosibling caches or to a parent cache. It can get objects from another cache inthe local network or directly from the source.
Choosing the appropriate topology for the cache hierarchy is very important,because we do not want to increase the overall traffic on the network. Forexample, in a very large network, it is possible to configure a proxy serverfor every subnetwork and connect it to a parent proxy, connected in its turnto the proxy cache from the ISP.
All this communication is handled by ICP (Internet Cache Protocol) runningon top of the UDP protocol. Data transfers between caches are handled usingHTTP (Hyper Text Transmission Protocol) based on TCP, but for these kindsof connections, it is preferable to use faster and simpler protocols capable ofreacting to incoming requests within a maximum of one or two seconds.
To find the most appropriate server from which to get the objects, one cachesends an ICP request to all sibling proxies. These will answer the requestsvia ICP responses with a HIT code if the object was detected or a MISS if itwas not. If multiple HIT responses were found, the proxy server will decidewhich server to download depending on factors such as which cache sent thefastest answer or which one is closer. If no satisfactory responses have beensent, the request will be sent to the parent cache.
TipTo avoid duplication of objects in different caches in our network,other ICP protocols are used such as CARP (Cache Array Routing Pro-tocol) or HTCP (HyperText Cache Protocol). The more objects main-tained in the network, the greater the possibility of finding the one wewant.
Tip
263SuSE Linux – Enterprise Server 8
Caching Internet Objects
Not all objects available in our network are static. There are a lot of dynam-ically generated CGI pages, visitor counters, or encrypted SSL content doc-uments. This is the reason objects like this are not cached: every time youaccess one, it will have changed.
The question remains as to how long all the other objects stored in the cacheshould stay there. To determine this, all objects in the cache are assigned oneof three states.
Web and proxy servers find out the status of an object by adding headersto these objects such as “Last modified” or “Expires” and the correspondingdate. Other headers specifying that objects must not be cached are used aswell.
Objects in the cache are normally replaced, due to a lack of free hard diskspace, using algorithms such as LRU (Last Recently Used). It consists of firstreplacing the less requested objects.
System Requirements
The most important thing is to determine the maximum load the system willhave to bear. It is, therefore, important to pay more attention to the loadpicks, because these might be more than four times the day’s average. Whenin doubt, it would be better to overestimate the system’s requirements, be-cause having Squid working close to the limit of its capabilities could lead toa severe loss in the quality of the service.
Speed: Choosing Fast Hard Disks
Speed plays an important role in the caching process, so should be of utmostconcern. In hard disks, this parameter is described as “random seek time”,measured in milliseconds. As a rule of thumb, the lower this value, the bet-ter.
Size of the Disk Cache
It depends on a few factors. In a small cache, the probability of a HIT (find-ing the requested object already located there) will be small, because thecache is easily filled so the less requested objects will be replaced by newerones. On the other hand, if 1 GB is available for the cache and the usersonly surf 10 MB a day, it will take more than 100 days to fill the cache.
Probably the easiest way to determine the needed cache size is to considerthe maximum transfer rate of our connection. With a 1 MB/s connection,
264 Proxy Server: Squid
11In
tern
et
the maximum transfer rate will be 125 KB/s . If all this traffic ends up inthe cache, in one hour it will add up to 450 MB and, assuming that all thistraffic is generated in only 8 working hours, it will reach 3.6 GB in one day.Because the connection was not used up to its maximum capacity, we couldassume that the total amount of data going through the cache is about 2 GB.In the example, to keep all the browsed data of one day in the cache, we willrequire 2 GB of disk space for Squid. Summing up, Squid tends to read andwrite smaller blocks from or to the disk, making it more important how fastit detects these objects on the disk than having a fast disk.
RAM
The amount of memory required by Squid directly correlates to the amountof objects allocated in the cache. Squid also stores cache object referencesand frequently requested objects in memory to speed up the retrieving of thisdata. The memory is one million times faster than a hard disk. Compare theseek time of a hard disk, about 10 milliseconds, with the 10 nanoseconds ac-cess time of the newer RAM memories.
It is very important to have more than enough memory for the Squid pro-cess, because the system performance will be dramatically reduced if it hasto be swapped to disk. To assist in cache memory management, use the toolcachemgr.cgi, as discussed in Section cachemgr.cgi on page 275.
CPU
Squid is not a program that requires intensive CPU usage. The load of theprocessor is only increased while the contents of the cache are being loadedor checked. Using a multiprocessor machine does not increase the perfor-mance of the system. To increase efficiency, it is better to buy faster disks oradd more memory.
Some examples of configured systems running Squid are available at http://wwwcache.ja.net/servers/squids.html .
Starting Squid
Squid is already preconfigured in SuSE Linux Enterprise Server, so you canstart it easily right after installation. A prerequisite for a smooth start is analready configured network, at least one name server and, of course, Internetaccess. Problems can arise if a dial-up connection is used with dynamic DNSconfiguration. In cases such as this, at least the name server should be clearlyentered, since Squid will not start if it does not detect a DNS in the /etc/resolv.conf .
265SuSE Linux – Enterprise Server 8
To start Squid, enter rcsquid start at the command line as root . For theinitial start-up, the directory structure must first be defined in /var/squid/cache . This is done by the start script /etc/init.d/squid automaticallyand can take a few seconds or even minutes. If done appears to the rightin green, Squid has been successfully loaded. Test Squid’s functionality onthe local system by entering localhost and Port 3128 as proxy in thebrowser. To allow all users to access Squid and thus the Internet, changethe entry in the configuration file /etc/squid.conf from http_accessdeny all to http_access allow all . However, in doing so, considerthat Squid is made completely accessible to anyone by this action. Therefore,define ACLs that control access to the proxy. More on this is available in Sec-tion Options for Access Controls on page 269.
If you have made changes in the configuration file /etc/squid.conf , in-struct Squid to load the changed file. Do this by entering rcsquid reloador restart Squid with rcsquid restart . With rcsquid status , de-termine whether the proxy is running and with rcsquid stop haltSquid. The latter can take a while, since Squid waits up to half a minute(shutdown_lifetime option in /etc/squid.conf ) before dropping theconnections to the clients then will still have to write its data to the disk. IfSquid is halted with kill or killall , this can lead to the destruction of thecache, which will then have to be fully removed to restart Squid.
If Squid dies after a short period of time, although it has seemingly beenstarted successfully, it can be the result of a faulty name server entry or amissing /etc/resolv.conf file. The cause of the start failure would thenbe logged by Squid in the /var/squid/logs/cache.log file.
If Squid should be loaded automatically when the system boots, reset theentry START_SQUID=noto START_SQUID=yes in the /etc/sysconfig/squid file.
An uninstall of Squid will neither remove the cache or the log files. Manuallydelete the /var/cache/squid directory.
Local DNS Server
Setting up a local DNS server, such as BIND-8 or BIND-9, makes absolutesense even if the server does not manage its own domain. It will then simplyact as a “caching-only DNS” and will also be able to resolve DNS requestsvia the root name server without requiring any special configuration. If youenter this in the /etc/resolv.conf with the IP address 127.0.0.1 forlocalhost, Squid will detect a valid name server when it starts up. Config-uring a name server is discussed in Section DNS — Domain Name Serviceon page 221. It is sufficient, however, to install the package and to boot it.
266 Proxy Server: Squid
11In
tern
et
The name server of the provider should be entered in the configuration file/etc/named.conf under forwarders along with its IP address. If you havea firewall running, even if it is just personal-firewall, make sure the DNS re-quests will be sent.
The Configuration File /etc/squid.conf
All Squid proxy server settings are made in the /etc/squid.conf file. Tostart Squid for the first time, no changes will be necessary in this file, butexternal clients will initially be denied access. The proxy needs to be madeavailable for the localhost, usually with 3128 as port. The options are exten-sive and therefore provided with ample documentation and examples in thepreinstalled /etc/squid.conf file. Nearly all entries begin with a # sign(the lines are commented out) and the relevant specifications can be found atthe end of the line. The given values almost always correlate with the defaultvalues, so removing the comment signs without changing any of the param-eters actually has little effect in most cases. It is better to leave the sample asit is and reinsert the options along with the modified parameters in the linebelow. In this way, easily interpret the default values and the changes.
If you have updated an earlier Squid version, it is recommended to edit thenew /etc/squid.conf and only apply the changes made in the previousfile. If you try to implement the old squid.conf again, you are running arisk that the configuration will no longer function, because options are some-times modified and new changes added.
General Configuration Options
http_port 3128 This is the port where Squid listens for client requests. Thedefault port is 3128 , but 8080 is also common. You have the optionhere of specifying several port numbers separated by blank spaces.
cache_peer <hostname> <type> <proxy-port> <icp-port> Here, enter a par-ent proxy as “parent”, for example, or use that of the provider. As<hostname> , the name and IP address of the proxy to use are enteredand, as <type> , parent . For <proxy-port> , enter the port num-ber that is also specified by the operator of the parent for use in thebrowser, usually 8080 . Set the <icp-port> to 7 or 0 if the ICP portof the parent is not known and its use is irrelevant to the provider. Inaddition, default and no-query should be specified after the portnumbers to strictly prohibit the use of the ICP protocol. Squid will thenbehave like a normal browser as far as the provider’s proxy is con-cerned.
267SuSE Linux – Enterprise Server 8
cache_mem 8 MB This entry defines the amount of memory Squid can usefor the caches. The default is 8 MB.
cache_dir ufs /var/cache/squid/ 100 16 256 The entry cache_dir definesthe directory where all the objects are stored on disk. The numbers atthe end indicate the maximum disk space in MBto use and the numberof directories in the first and second level. The ufs parameter shouldbe left alone. The default is 100 MB occupied disk space in the /var/cache/squid directory and creation of 16 subdirectories inside it, eachcontaining 256 more subdirectories. When specifying the disk space touse, leave sufficient reserve disk space. Values from a minimum of fiftyto a maximum of eighty percent of the available disk space make themost sense here. The last two numbers for the directories should onlybe increased with caution, because too many directories can also lead toperformance problems. If you have several disks that share the cache,enter several cache_dir lines.
cache_access_log /var/squid/logs/access.log path for log messages
cache_log /var/squid/logs/cache.log path for log messages
cache_store_log /var/squid/logs/store.log path for log messages
These three entries specify the path where Squid will log all its actions.Normally, nothing is changed here. If Squid is experiencing a heavyusage burden, it might make sense to distribute the cache and the logfiles over several disks.
emulate_httpd_log off If the entry is set to on , obtain readable log files.Some evaluation programs cannot interpret this, however.
client_netmask 255.255.255.255 With this entry, mask the logged IP ad-dresses in the log files to hide the clients’ identity. The last digit of theIP address will be set to zero if you enter 255.255.255.0 here.
ftp_user Squid@ With this, set the password Squid should use for theanonymous FTP login. It can make sense, however, to specify a valide-mail address here, because some FTP servers can check these for va-lidity.
cache_mgr webmaster An e-mail address to which Squid sends a message ifit unexpectedly crashes. The default is webmaster .
logfile_rotate 0 If you run squid -k rotate , Squid can rotate securedlog files. The files will be enumerated in this process and after reach-ing the specified value, the oldest file at that point will be overwrit-ten. This value here normally stands for 0 because archiving and
268 Proxy Server: Squid
11In
tern
et
deleting log files in SuSE Linux Enterprise Server is carried out by acronjob found in the configuration file /etc/logrotate.d/syslog .The period of time after which the files are deleted is defined in the/etc/sysconfig/aaa_base file via the MAX_DAYS_FOR_LOG_FILESentry.
append_domain <domain> With append_domain , specify which domain toappend automatically when none is given. Usually, your own domainis entered here, so entering wwwin the browser accesses your own webserver.
forwarded_for on If you set the entry to off , Squid will remove the IP ad-dress and the system name of the client from the HTTP requests.
negative_ttl 5 minutes; negative_dns_ttl 5 minutes Normally, you do notneed to change these values. If you have a dial-up connection, how-ever, the Internet may, at times, not be accessible. Squid will makea note of the failed requests then refuse to issue new ones, althoughthe Internet connection has been reestablished. In a case such as this,change the minutes to seconds then, after clicking on Reload in thebrowser, the dial-up process should be reengaged after a few seconds.
never_direct allow <acl_name> To prevent Squid from taking requestsdirectly from the Internet, use the above command to force connec-tion to another proxy. You need to have previously entered this incache_peer . If all is specified as the <acl_name> , force all requeststo be forwarded directly to the parent . This might be necessary, forexample, if you are using a provider that strictly stipulates the use ofits proxies or denies its firewall direct Internet access.
Options for Access Controls
Squid provides an intelligent system that controls access to the proxy. By im-plementing ACLs, it can be configured easily and comprehensively. This in-volves lists with rules that are processed sequentially. ACLs must be definedbefore they can be used. Some default ACLs, such as all and localhost ,already exist. After defining an ACL, implement it, for example, in conjunc-tion with http_access .
acl <acl_name> <type> <data> An ACL requires at least three specifica-tions to define it. The name <acl_name> can be chosen arbitrarily. For<type> , select from a variety of different options which can be foundin the ACCESS CONTROLSsection in the /etc/squid.conf file. The
269SuSE Linux – Enterprise Server 8
specification for <data> depends on the individual ACL type and canalso be read from a file, for example, via host names, IP addresses, orURLs. The following are some simple examples:
acl mysurfers srcdomain .my-domain.comacl teachers src 192.168.1.0/255.255.255.0acl students src 192.168.7.0-192.168.9.0/255.255.255.0acl lunch time MTWHF 12:00-15:00
http_access allow <acl_name> http_access defines who is allowed touse the proxy and who can access what on the Internet. For this, ACLswill have to be given. localhost and all have already been definedabove, which can deny or allow access via deny or allow . A list con-taining any number of http_access entries can be created, processedfrom top to bottom, and, depending on which occurs first, access willbe allowed or denied to the respective URL. The last entry should al-ways be http_access deny all . In the following example, thelocalhost has free access to everything while all other hosts are de-nied access completely.
http_access allow localhosthttp_access deny all
Another example, where the previously defined ACLs are used:The group teachers always has access to the Internet. The groupstudents only gets access Monday to Friday during lunch time.
http_access deny localhosthttp_access allow teachershttp_access allow students lunch timehttp_access deny all
The list with the http_access entries should only be entered, for thesake of readability, at the designated position in the /etc/squid.conffile. That is, between the text
# INSERT YOUR OWN RULE(S) HERE TO ALLOW ACCESS FROM YOUR CLIENTS
and the last
http_access deny all
270 Proxy Server: Squid
11In
tern
et
redirect_program /usr/bin/squidGuard With this option, a redirector, suchas SquidGuard, which is able to block unwanted URLs, can be spec-ified. Internet access can be individually controlled for various usergroups with the help of proxy authentication and the appropriateACLs. SquidGuard is a package in and of itself that can be separatelyinstalled and configured.
authenticate_program /usr/sbin/pam_auth If users must be authenticated onthe proxy, a corresponding program, such as pam_auth, can be spec-ified here. When accessing pam_auth for the first time, the user willsee a login window where the user name and password must be en-tered. In addition, an ACL is still required so only clients with a validlogin can use the Internet:
acl password proxy_auth REQUIRED
http_access allow passwordhttp_access deny all
The REQUIREDafter proxy_auth can be replaced with a list of permit-ted user names or with the path to such a list.
ident_lookup_access allow <acl_name> With this, have an ident requestrun for all ACL-defined clients to find each user’s identity. If you applyall to the <acl_name> , this will be valid for all clients. Also, an identdaemon must be running on all clients. For Linux, install the pidentdpackage for this purpose. For Windows, there is free software availableto download from the Internet. To ensure that only clients with a suc-cessful ident lookup are permitted, a corresponding ACL will also haveto be defined here:
acl identhosts ident REQUIRED
http_access allow identhostshttp_access deny all
Here, too, replace the REQUIREDwith a list of permitted user names.Using ident can slow down the access time quite a bit, because identlookups will be repeated for each request.
271SuSE Linux – Enterprise Server 8
Transparent Proxy Configuration
The usual way of working with proxy servers is the following: the webbrowser sends requests to a certain port in the proxy server and the proxyprovides these required objects, whether they are in its cache or not. Whenworking in a real network, several situations may arise:
For security reasons, it is recommended that all clients use a proxy tosurf the Internet.
All clients must use a proxy whether they are aware of it or not.
In larger networks already using a proxy, it is possible to spare yourselfthe trouble of reconfiguring each machine whenever changes are madein the system.
In all these cases, a transparent proxy may be used. The principle is veryeasy: the proxy intercepts and answers the requests of the web browser, sothat the web browser receives the requested pages without knowing fromwhere they are coming. This entire process is done transparently, hence thename.
Configuration Options in /etc/squid.conf
The options to activate in the /etc/squid.conf file to get the transparentproxy up and running are:
272 Proxy Server: Squid
11In
tern
et
httpd_accel_host virtual
httpd_accel_port 80 # the port number where the actual HTTP server islocated
httpd_accel_with_proxy on
httpd_accel_uses_host_header on
Firewall Configuration with SuSEfirewall2
Now redirect all incoming requests via the firewall with help of a port for-warding rule to the Squid port.
To do this, use the SuSE-provided tool SuSEfirewall2. Its configuration filecan be found in /etc/sysconfig/scripts/SuSEfirewall2-custom .Again, the configuration file consists of well-documented entries. Even to setonly a transparent proxy, you must configure a couple firewall options In ourexample:
Device pointing to the Internet: FW_DEV_WORLD="eth1"
Device pointing to the network: FW_DEV_INT="eth0"
Set ports and services (see /etc/exports ) on the firewall being accessedfrom untrusted networks such as the Internet. In this example, only web ser-vices are offered to the outside:
FW_SERVICES_EXTERNAL_TCP=“www”
Define ports or services (see /etc/exports ) on the firewall to be accessedfrom the secure network, both TCP and UDP services:
FW_SERVICES_INTERNAL_TCP=“domain www 3128”
FW_SERVICES_INTERNAL_UDP=“domain”
We are accessing web services and Squid (whose default port is 3128).
The service “domain” specified before stands for DNS or Domain NameServer. It is most common to use this service, otherwise we simply take itout of the above entries and set the following option to no:
FW_SERVICE_DNS=“yes”
The most important option is number 15:
273SuSE Linux – Enterprise Server 8

## 15.)# Which accesses to services should be redirected to a localport# on the firewall machine?## This can be used to force all internal users to surf via your# squid proxy, or transparently redirect incoming webtraffic to# a secure webserver.## Choice: leave empty or use the following explained syntax of# redirecting rules, separated by a space.# A redirecting rule consists of 1) source IP/net,# 2) destination IP/net, 3) original destination port and# 4) local port to redirect the traffic to, separated by a colon,# e.g. "10.0.0.0/8,0/0,80,3128 0/0,172.20.1.1,80,8080"#
File 49: Option 15 der Firewallkonfiguration
The comments above show the syntax to follow. First, the IP address and thenetmask of the “internal networks” accessing the proxy firewall. Second, theIP address and the netmask to which these clients “send” their requests. Inthe case of web browsers, specify the networks 0/0, a wild card that means“to everywhere”. After that, enter the “original” port to which these requestsare sent and, finally, the port to which all these requests are “redirected”. AsSquid supports more protocols than HTTP, redirect requests from other portsto our proxy, such as FTP (port 21), HTTPS, or SSL (port 443). The exam-ple uses the default port 3128. If there are more networks or services to add,they only need to be separated by a single blank character in the correspond-ing entry.
FW_REDIRECT_TCP="192.168.0.0/16,0/0,80,3128 192.168.0.0/16,0/0,21,3128"
FW_REDIRECT_UDP="192.168.0.0/16,0/0,80,3128 192.168.0.0/16,0/0,21,3128"
To start the firewall and the new configuration with it, change an entry in the/etc/sysconfig/SuSEfirewall2 file. The entry START_FW must be setto "yes".
Start Squid as shown in Section Starting Squid on page 265. To check if ev-erything is working properly, take a look at the Squid logs in /var/log/squid/access.log .
To verify that all ports are correctly configured, perform a port scan on themachine from any computer outside your network. Only the web services
274 Proxy Server: Squid
11In
tern
et
port (80) should be open. Do the port scan with nmap:
nmap -O IP_address
Squid and Other Programs
In the following section, see how other applications interact with Squid.cachemgr.cgi enables the system administrator to check the amount ofmemory needed for caching objects. squidgrd filters web pages. Calamarisis a report generator for Squid.
cachemgr.cgi
The cache manager (cachemgr.cgi) is a CGI utility for displaying statisticsabout the memory usage of a running Squid process. It is also a more conve-nient way to manage the cache and view statistics without logging the server.
Setup
First, a running web server on your system is required. To check if Apacheis already running, type, as root , rcapache status .
If a message like this appears:
Checking for service httpd: OKServer uptime: 1 day 18 hours 29 minutes 39 seconds
Apache is running on your machine. Otherwise, type rcapache start tostart Apache with the SuSE Linux default settings.
The last step to set it up is to copy the file cachemgr.cgi to the Apachedirectory cgi-bin :
cp /usr/share/doc/packages/squid/scripts/cachemgr.cgi
/srv/www/cgi-bin/
Cache Manager ACLs in /etc/squid.conf
There are some default settings in the original file required for the cachemanager:
acl manager proto cache_objectacl localhost src 127.0.0.1/255.255.255.255
275SuSE Linux – Enterprise Server 8
With the following rules:
http_access allow manager localhosthttp_access deny manager
the first ACL is the most important, as the cache manager tries to communi-cate with Squid over the cache_object protocol.
The following rules assume that the web server and Squid are running on thesame machine. If the communication between the cache manager and Squidoriginates at the web server on another computer, include an extra ACL as inFigure 50.
acl manager proto cache_objectacl localhost src 127.0.0.1/255.255.255.255acl webserver src 192.168.1.7/255.255.255.255 # IP of webserver
File 50: Access Rules
Then add the rules as in Figure 51.
http_access allow manager localhosthttp_access allow manager webserverhttp_access deny manager
File 51: Access Rules
Configure a password for the manager for access to more options like closingthe cache remotely or viewing more information about the cache. For this,configure the entry cachemgr_passwd with a password for the manager andthe list of options to view. This list appears as a part of the entry commentsin /etc/squid.conf .
Restart Squid with the option -k reconfigure every time the configurationfile is changed.
Viewing the Statistics
Go to the corresponding web site:http://webserver.example.org/cgi-bin/cachemgr.cgi
Press ‘continue’ and browse through the different statistics. More detailson each entry shown by the cache manager is in the Squid FAQ at http://www.squid-cache.org/Doc/FAQ/FAQ-9.html
276 Proxy Server: Squid
11In
tern
et
SquidGuard
This section is not intended to go through an extensive configuration ofSquidGuard, only to introduce it and give some advice on using it. Formore in-depth configuration issues, refer to the SquidGuard web site athttp://www.squidguard.org
SquidGuard is a free (GPL), flexible, and fast filter, redirector, and access con-troller plug-in for Squid. It lets you define multiple access rules with differ-ent restrictions for different user groups on a Squid cache. SquidGuard usesSquid’s standard redirector interface.
SquidGuard can be used for the following:
limit the web access for some users to a list of accepted or well-knownweb servers or URLs
block access to some listed or blacklisted web servers or URLs for someusers
block access to URLs matching a list of regular expressions or wordsfor some users
redirect blocked URLs to an “intelligent” CGI-based info page
redirect unregistered users to a registration form
redirect banners to an empty GIF
have different access rules based on time of day, day of the week, date,etc.
have different rules for different user groups
and much more
Neither SquidGuard or Squid can be used to:
Edit, filter, or censor text inside documents
Edit, filter, or censor HTML-embedded script languages such asJavaScript or VBscript
277SuSE Linux – Enterprise Server 8
Using SquidGuard
Install the package squidgrd . Edit a minimal configuration file /etc/squidguard.conf . There are plenty of configuration examples in http://www.squidguard.org/config/ . Experiment later with more compli-cated configuration settings.
The following step is to create a dummy “access denied” page or a more orless intelligent CGI page to redirect Squid if the client requests a blacklistedweb site. Using Apache is strongly recommended.
Now, tell Squid to use SquidGuard. Use the following entry in the /etc/squid.conf file:
redirect_program /usr/bin/squidGuard
There is another option called redirect_children configuring how many dif-ferent “redirect” (in this case SquidGuard) processes are running on the ma-chine. SquidGuard is fast enough to cope with lots of requests (SquidGuardis quite fast: 100,000 requests within 10 seconds on a 500MHz Pentium with5900 domains, 7880 URLs, 13780 in sum). Therefore, it is not recommendedto set more than 4 processes, because this may lead to an unnecessary in-crease of memory for the allocation of these processes.
redirect_children 4
Last of all, send a HUP signal to Squid to have it read the new configuration:
squid -k reconfigure
Test your settings with a browser.
Cache Report Generation with Calamaris
Calamaris is a Perl script used to generate reports of cache activity in ASCIIor HTML format. It works with native Squid access log files. The CalamarisHome Page is located at http://Calamaris.Cord.de/
The use of the program is quite easy. Log in as root , then:
cat access.log.files | calamaris [options] > reportfile
It is important when piping more than one log file that the log files arechronologically ordered, with older files first.
The various options:
-a normally used for the output of available reports
-w an HTML report
278 Proxy Server: Squid
11In
tern
et
-l a message or logo in the header of the report
More information on the various options can be found in the manual pageman calamaris .
A typical example is:
cat access.log.2 access.log.1 access.log | calamaris -a -w \
>/usr/local/httpd/htdocs/Squid/squidreport.html
This puts the report in the directory of the web server. Apache is requiredto view the reports.
Another powerful cache report generator tool is SARG (Squid Analysis Re-port Generator). More information on this can be found in the relevant Inter-net pages at http://web.onda.com.br/orso/
More Information on Squid
Visit the home page of Squid at http://www.squid-cache.org/ . Here,find the Squid User Guide and a very extensive collection of FAQs on Squid.
There is a Mini-Howto regarding transparent proxies in the packagehowtoen , under /usr/share/doc/howto/en/mini/TransparentProxy.gz
In addition, mailing lists are available for Squid at:[email protected] .
The archive for this is located at:http://www.squid-cache.org/mail-archive/squid-users/
279SuSE Linux – Enterprise Server 8

12Se
cu
reN
etw
orks
Secure Networks
Masquerading, Firewall, Kerberos and ssh represent four major tools for se-cure networking. This chapter will elaborate on their basic principles as wellas give detailed instructions on their use.
Masquerading and Firewalls . . . . . . . . . . . . . . . . . 282SSH — Secure Shell, the Safe Alternative . . . . . . . . . . 287Network Authentication — Kerberos . . . . . . . . . . . . 292Installing and Administering Kerberos . . . . . . . . . . . 299
Masquerading and Firewalls
Because of its outstanding network capabilities, Linux is frequently used as arouter operating system for dial-up or dedicated lines. “Router,” in this case,refers to a host with multiple network interfaces that transmits any packetsnot destined for one of its own network interfaces to another host commu-nicating with it. This router is often called a gateway. The packet filteringmechanism provided by the Linux kernel allows precise control over whichpackets of the overall traffic are transferred.
In general, defining the exact rules for a packet filter requires at least someexperience on the part of the administrator. For the less experienced user,SuSE Linux includes a separate package package SuSEfirewall2 intendedto make it easier to set up these rules.
SuSEfirewall2 is highly configurable, making it a good choice for a morecomplex packet filtering setup.
With this packet filter solution, a Linux machine can be used as a router withmasquerading to link a local network through a dial-up or dedicated connec-tion where only one IP address is visible to the outside world. Masqueradingis accomplished by implementing rules for packet filtering.
CautionThis chapter only describes standard procedures that should work wellin most situations. Although every effort has been made to provideaccurate and complete information, no guarantee is included. SuSEcannot be responsible for the success or failure of your security mea-sures. We do appreciate your criticism and comments. Although youmight not receive a direct answer from us, rest assured that sugges-tions for improvement will be taken seriously.
Caution
Masquerading Basics
Masquerading is the Linux-specific form of NAT (Network Address Trans-lation). The basic principle is not very complicated: Your router has morethan one network interface, typically a network card and a separate interfaceto the Internet (e.g an ISDN interface). While this interfaces links with theoutside world, the remaining ones are used to connect this router with theother hosts in your network. For example, the dial-up is conducted via ISDNand the network interface is ippp0 . Several hosts in your local network are
282 Masquerading and Firewalls
12Se
cu
reN
etw
orks
connected to the network card of your Linux router, in this example, eth0 .Hosts in the network should be configured to send packets destined outsidethe local network to this gateway.
NoteMake sure that both the broadcast addresses and the network masksare the same for all the hosts when configuring your network.
Note
When one of the hosts sends a packet destined for an Internet address,this packet is sent to the network’s default router. The router needs tobe configured to actually forward such packets. SuSE Linux does not en-able this with a default installation for security reasons. Set the variableIP_FORWARD, defined in the file /etc/sysconfig/network/options , toIP_FORWARD=yes. The forwarding mechanism is enabled after rebooting orissuing the command echo 1 > /proc/sys/net/ipv4/ip_forward .
The router has only one IP address visible from the outside, such as the IPaddress of the connected ISDN interface. The source address of transmittedpackets must be replaced with the router’s address to enable reply. The tar-get host only knows your router, not hosts in your internal network. Yourinternal host disguises itself behind the router, which is why the technique iscalled “masquerading”.
The router, as the destination of any reply packets, has to identify the incom-ing packets, change the target address to the intended recipient, and forwardit to that host in the local network. The identification of packets belong-ing to a connection handled by a masquerading router is done with the helpof a table kept in the kernel of your router while connected. By using theipchains and the iptables commands, the superuser (root ) can viewthese tables. Read the man pages for these commands for detailed instruc-tions. For the identification of single masqueraded connections, the sourceand target addresses, the port numbers, and the protocols involved are rele-vant. A router is capable of hiding many thousand connections per internalhost simultaneously.
With the routing of inbound traffic depending on the masquerading table,there is no way to open a connection to an internal host from the outside.For such a connection, there would be no entry in the table because it is onlycreated if an internal host opens a connection with the outside. In addition,any established connection is assigned a status entry in the table and this en-try cannot be used by another connection. A second connection would re-quire another status record. As a consequence of all this, you might expe-rience some problems with a number of applications, such as ICQ, cucme,
283SuSE Linux – Enterprise Server 8
IRC (DCC, CTCP), Quake, and FTP (in PORT mode). Netscape, as well as thestandard ftp program and many others, uses the PASV mode. This passivemode is much less problematic as far as packet filtering and masquerading isconcerned.
Firewalling Basics
“Firewall” is probably the most widely used term to describe a mechanismto control the data traffic between two networks and to provide and man-age the link between networks. There are various types of firewalls, whichmostly differ in regard to the abstract level on which traffic is analyzed andcontrolled. Strictly speaking, the mechanism described in this section is calleda “packet filter.” Like any other type of firewall, a packet filter alone doesnot guarantee full protection from all security risks. A packet filter imple-ments a set of rules related to protocols, ports, and IP addresses to decidewhether data may pass through. This blocks any packets that, according tothe address or destination, are not supposed to reach your network. Pack-ets sent to the telnet service of your hosts on port 23, for example, shouldbe blocked, while you might want people to have access to your web serverand therefore enable the corresponding port. A packet filter will not scan thecontents of any packets as long as they have legitimate addresses (e. g., di-rected to your web server). Thus, packets could attack your CGI server, butthe packet filter would let them through.
A more effective, more complex mechanism is the combination of severaltypes of systems, such as a packet filter interacting with an application gate-way or proxy. In this case, the packet filter rejects any packets destined todisabled ports. Only packets directed to the application gateway are allowedthrough. This gateway or proxy pretends to be the actual client of the server.In a sense, such a proxy could be considered a masquerading host on theprotocol level used by the application. One example for such a proxy isSquid, an HTTP proxy server. To use Squid, the browser needs to be config-ured to communicate via the proxy, so that any HTTP pages requested wouldbe served from the proxy cache rather than directly from the Internet. As an-other example, the SuSE proxy suite (package proxy-suite) includes a proxyfor the FTP protocol.
The following section focuses on the packet filter that comes with SuSELinux. For more information and links, read the Firewall HOWTO includedin package howtoen . If this package is installed, read the HOWTO withless /usr/share/doc/howto/en/Firewall-HOWTO.gz .
284 Masquerading and Firewalls
12Se
cu
reN
etw
orks
SuSEfirewall2
The configuration of SuSEfirewall2 requires a certain degree of experienceand understanding. Find documentation about SuSEfirewall2 in /usr/share/doc/packages/SuSEfirewall2 .
The configuration of SuSEfirewall2 is stored in the file /etc/sysconfig/SuSEfirewall2 . This firewall can also be configured with YaST2 (‘Security’➝ ‘Firewall’). In the following we demonstrate a successful configurationstep-by-step. For each configuration item, find a note as to whether it is rele-vant for firewalling or masquerading. Aspects related to the DMZ (or “demil-itarised zone”) are not covered here.
If your requirements are strictly limited to masquerading, only fill out itemsmarked masquerading.
First, use the YaST2 runlevel editor to enable SuSEfirewall2 in your run-level (3 or 5 most likely). It sets the symlinks for the SuSEfirewall2_*scripts in the /etc/init.d/rc?.d/ directories.
FW_DEV_WORLD (firewall, masquerading): The device linked to theInternet, such as eth0 or ippp0 .
FW_DEV_INT (firewall, masquerading): The device linked to the inter-nal, “private” network. Leave this blank if there is no internal networkand the firewall is supposed to protect only the one host.
FW_ROUTE (firewall, masquerading): If you need the masqueradingfunction, enter yes here. Your internal hosts will not be visible to theoutside, because their private network addresses (e. g., 192.168.x.x )are ignored by Internet routers.
For a firewall without masquerading, only set this to yes to allow ac-cess to the internal network. Your internal hosts need to use officiallyregistered IPs in this case. Normally, however, you should not allowaccess to your internal network from the outside.
FW_MASQUERADE (masquerading): Set this to yes if you need themasquerading function. It is more secure to have a proxy server be-tween the hosts of the internal network and the Internet.
FW_MASQ_NETS (masquerading): Specify the hosts or networks tomasquerade, leaving a space between the individual entries. For exam-ple, FW_MASQ_NETS="192.168.0.0/24 192.168.10.1".
285SuSE Linux – Enterprise Server 8
FW_PROTECT_FROM_INTERNAL (firewall): Set this to yes toprotect your firewall host from attacks originating in your internalnetwork. Services will only be available to the internal network ifexplicitly enabled. See also FW_SERVICES_INTERNAL_TCP andFW_SERVICES_INTERNAL_UDP.
FW_AUTOPROTECT_GLOBAL_SERVICES (firewall): This should nor-mally be yes .
FW_SERVICES_EXTERNAL_TCP (firewall): Enter the services thatshould be available, for example, "www smtp ftp domain 443" .Leave this blank for a workstation at home that is not intended to offerany services.
FW_SERVICES_EXTERNAL_UDP (firewall): Leave this blank if you donot run a name service that you want to make available to the outside.Otherwise, enter the ports to use.
FW_SERVICES_INTERNAL_TCP (firewall): This defines the servicesavailable to the internal network. The notation is the same as for exter-nal TCP services, but, in this case, refers to the internal network.
FW_SERVICES_INTERNAL_UDP (firewall): See above.
FW_TRUSTED_NETS (firewall): Specify the hosts you really trust(“trusted hosts”). Note, however, that these need to be protected fromattacks, too.
"172.20.0.0/16 172.30.4.2" means that all hosts which havean IP address beginning with 172.20.x.x and the host with the IPaddress 172.30.4.2 are allowed to pass information through the fire-wall.
FW_SERVICES_TRUSTED_TCP (firewall): Here, specify the port ad-dresses that may be used by the “trusted hosts”. For example, to grantthem access to all services, enter 1:65535 . Usually, it is sufficient toenter ssh as the only service.
FW_SERVICES_TRUSTED_UDP (firewall): Just like above, but for UDPports.
FW_ALLOW_INCOMING_HIGHPORTS_TCP (firewall): Set this toftp-data if you intend to use normal (active) FTP services.
FW_ALLOW_INCOMING_HIGHPORTS_UDP (firewall): Set this to dnsto use the name servers registered in /etc/resolv.conf . If you enteryes here, all high ports will be enabled.
286 Masquerading and Firewalls
12Se
cu
reN
etw
orks
FW_SERVICE_DNS (firewall): Enter yes if you run a name server thatshould be available to external hosts. At the same time, enable port 53under FW_TCP_SERVICES_*.
FW_SERVICE_DHCLIENT (firewall): Enter yes here if you usedhclient to assign your IP address.
FW_LOG_* (firewall): Specify the firewall’s logging activity. For normaloperation, it is sufficient to set FW_LOG_DENY_CRIT to yes .
FW_STOP_KEEP_ROUTING_STATE (firewall): Insert yes if you haveconfigured your dial-up procedure to work automatically via diald orISDN (dial-on-demand).
Now that you have configured SuSEfirewall2, do not forget to test your setup(for example, with telnet from an external host). Have a look at /var/log/messages , where you should see something like:
Feb 7 01:54:14 www kernel: Packet log: input DENY eth0PROTO=6 129.27.43.9:1427 195.58.178.210:23 L=60 S=0x00I=36981 F=0x4000 T=59 SYN (#119)
SSH — Secure Shell, the Safe Alternative
In these times of increasing networks, accessing a remote system also be-comes more common. Regardless of the activity, the person accessing thesystem must be authenticated.
Most users should know by now that the user name and password are onlyintended for individual use. Strict confidence pertaining to personal datais usually guaranteed between the employer, computer center, or serviceprovider. However, the ongoing practice of authenticating and transferringdata in clear text form is a frightening phenomenon. Most directly affectedare the commonly used services Post Office Protocol (POP) for retrieving mailand telnet for logging in on remote systems. Using these methods, user in-formation and data considered sensitive, such as the contents of a letter or achat via the talk command, travel openly and unsecured over the network.This encroaches on the user’s privacy and leaves such access methods opento misuse. Usually, this misuse occurs by accessing one system to attack an-other or to obtain administrator or root permissions.
287SuSE Linux – Enterprise Server 8
Any device involved in data transfer or operating on the local network, suchas firewall, router, switch, mail servers, or workstations, can also access thedata. There are laws prohibiting such behavior, but it is difficult to detect.
The SSH software provides the necessary protection. Complete authentication,usually user name and password, as well as the communication is encrypted.Even here, snatching the transferred data is possible, but the contents cannotbe deciphered by intruders without the key. This enables secure communica-tion via unsafe networks, such as the Internet. SuSE Linux Enterprise Serverprovides the package OpenSSH.
The OpenSSH Package
SuSE Linux installs the package OpenSSH by default. The programs ssh, scp,and sftp are then available as alternatives to telnet, rlogin, rsh, rcp, and ftp.
The ssh Program
Using the ssh program, it is possible to log in to remote systems and workinteractively. It replaces both telnet and rlogin. The symbolic name sloginpoints to ssh. For example, it is possible to log in to the host sun with thecommand ssh sun . The host then prompts for the password on sun .
Following successful authentication, work from the command linethere or use interactive applications. If the local user name is differentfrom the remote user name, log in using a different login name withssh -l augustine sun or ssh augustine@sun .
Furthermore, ssh offers the option of running commands on another system,as does rsh. In the following example, we will run the command uptime onthe host sun and create a directory with the name tmp . The program outputwill be displayed on the local terminal of the host earth .
newbie@earth:~ > ssh sun"uptime; mkdir tmp"
newbie@sun’s password:
1:21pm up 2:17, 9 users, load average: 0.15, 0.04, 0.02
Quotation marks are necessary here to send both instructions with one com-mand. It is only by doing this that the second command is likewise executedon sun .
288 SSH — Secure Shell, the Safe Alternative
12Se
cu
reN
etw
orks
scp — Secure Copy
scp copies files to a remote machine. It is the secure and encoded substitutefor rcp. For example, scp MyLetter.tex sun: copies the file MyLetter.tex from the machine earth to the machine sun . To give a different username, use the username@machine format.
After the correct password is entered, scp starts the data transfer and showsa series of stars, gradually marking the progress from left to right. In addi-tion, the estimated time of arrival will be shown in the right margin. All out-put can be suppressed by giving the option -q .
scp also provides a recursive copying feature for entire directories.scp -r src/ sun:backup/ copies the entire contents of the directorysrc/ including all subdirectories to the machine sun in the subdirectorybackup/ . If this subdirectory does not exist yet, it will be created automati-cally.
Via the option -p , scp leaves the time stamp of the files unchanged. -C com-presses the data transfer. This minimizes the data volume to be transferred,but creates heavier burden on the processor.
sftp — Secure File Transfer
Instead of scp, sftp can be used for secure file transfer. During the session,sftp provides many of the commands used by ftp. This may be an advan-tage over scp, especially when transferring data for which the file names areunknown.
The SSH Daemon (sshd) — Server-Side
To work with the SSH client programs ssh and scp, a server, the SSH dae-mon, has to be running in the background. This waits for its connections onTCP/IP port 22.
The daemon generates three key pairs when starting for the first time. Thekey pairs consist of a private and a public key. Therefore, this procedure isreferred to as public key–based. To guarantee the security of the communica-tion via SSH, only the system administrator can see the private key files. Thefile permissions are restrictively defined by the default setting. The privatekeys are only required locally by the SSH daemon and must not be given toanyone else. The public key components (recognizable by the name extension.pub ) are sent to the communication partner and are readable for all users.
289SuSE Linux – Enterprise Server 8
A connection is initiated by the SSH client. The waiting SSH daemon and therequesting SSH client exchange identification data comparing the protocol andsoftware versions and preventing connection to the wrong port. Since a childprocess of the original SSH daemon replies to the request, several SSH connec-tions can be made simultaneously.
The SSH protocol is available in two versions, 1 and 2, for the communica-tion between SSH server and SSH client. When using SSH with version 1,the server sends its public host key and a server key, regenerated by the SSHdaemon every hour. Both allow the SSH client to encrypt a freely chosen ses-sion key then send it to the SSH server. The SSH client also tells the serverwhich encryption method (cipher) to use.
SSH in version 2 does not require a server key. A Diffie-Helman algorithm isemployed instead for exchanging the keys.
The private host and server keys absolutely necessary for decoding the ses-sion key cannot be derived from the public parts. Only the SSH daemoncontacted can decipher the session key using its propietary keys (see also/usr/share/doc/packages/openssh/RFC.nroff ). This initial connec-tion phase can be watched closely using the SSH client program’s error searchoption -v . Version 2 of the SSH protocol is used by default, which howevercan be overridden to use version 1 of the protocol with the -1 switch. Bystoring all public host keys after initial contact in ~/.ssh/known_hostson the client side, so-called “man-in-the-middle” access attempts can be pre-vented. SSH servers that try to fraudulently use names and IP addresses ofothers will be exposed by a clear indicator. They will either be noticed due toa wrong host key which differs from ~/.ssh/known_hosts or they cannotdecipher the session key in the absence of an appropriate private counterpart.
It is recommended to securely archive the private and public keys stored in/etc/ssh/ externally. In this way, key modifications can be detected andthe old ones can be used again after a new installation. This spares users theunsettling warning. If it is verified that, despite the warning, it is indeed thecorrect SSH server, the existing entry regarding this system will have to beremoved from ~/.ssh/known_hosts .
SSH Authentication Mechanisms
Now the actual authentication will take place, which, in its simplest form,consists of entering a password as mentioned above. The goal of SSH wasto introduce a secure software that is also easy to use. As it is meant toreplace rsh and rlogin programs, SSH must also be able to provide an au-thentication method good for daily use. SSH accomplishes this by way of
290 SSH — Secure Shell, the Safe Alternative
12Se
cu
reN
etw
orks
another key pair generated by the user. The SSH package also provides ahelp program, ssh-keygen, for this. After entering ssh-keygen -t rsaor ssh-keygen -t dsa , the key pair will be generated and you will beprompted for the base file name in which to store the keys:
Enter file in which to save the key (/home/newbie/.ssh/id_rsa):
Confirm the default setting and answer the request for a passphrase. Evenif the software suggests an empty passphrase, a text from ten to thirty char-acters is recommended for the procedure described here. Do not use shortand simple words or phrases. Confirm by repeating the passphrase. Sub-sequently, you will see where the private and public keys are stored, in ourexample, the files id_rsa and id_rsa.pub .
Enter same passphrase again: Your identification has been
saved in /home/newbie/.ssh/id_rsa Your public key has been
saved in /home/newbie/.ssh/id_rsa.pub. The key fingerprint is:
79:c1:79:b2:e1:c8:20:c1:89:0f:99:94:a8:4e:da:e8 newbie@sun
Use ssh-keygen -p -t rsa or ssh-keygen -p -t dsa to change yourold passphrase.
Copy the public key component (id_rsa.pub in our example) to the remotemachine and save it there at the location ~/.ssh/authorized_keys2 . Youwill be asked to authenticate yourself with your passphrase the next time youestablish a connection. If this does not occur, verify the location and contentsof these files.
In the long run, this procedure is more troublesome than giving your pass-word each time. Therefore, the SSH package provides another tool, thessh-agent, which retains the private keys for the duration of an X session.The entire X session will be started as a child process of ssh-agents. Theeasiest way to do this is to set the variable usessh at the beginning of the.xsession file to yes and log in via a display manager such as KDM orXDM. Alternatively, enter ssh-agent startx.
Now you can use ssh or scp as usual. If you have distributed your pri-vate key as described above, you are no longer prompted for your pass-word. Take care of terminating your X session or locking it with a password-protection, for instance xlock.
All the relevant changes which resulted from the introduction of version 2 ofthe SSH protocol have also been documented in the file /usr/share/doc/packages/openssh/README.SuSE .
291SuSE Linux – Enterprise Server 8
X, Authentication, and Other Forwarding Mechanisms
Beyond the previously described security-related improvements, ssh also sim-plifies the use of remote X applications. If you run ssh with the option -X ,the DISPLAY variable will automatically be set on the remote machine and allX output will be exported to the remote machine over the existing ssh con-nection. At the same time, X applications started remotely and locally viewedwith this method cannot be intercepted by unauthorized persons.
By adding the option -A , the ssh-agent authentication mechanism will becarried over to the next machine. This way, you can work from different ma-chines without having to enter a password, but only if you have distributedyour public key to the destination hosts and properly saved it there.
Both mechanisms are deactivated in the default settings, but can be perma-nently activated at any time in the system-wide configuration file /etc/ssh/sshd_config or the user’s ~/.ssh/config .
ssh can also be used to redirect TCP/IP connections. In the follow-ing example, the SMTP and POP3 port is redirected through ssh:ssh -L 25:sun:25 sun . Here, each connection directed to “earth port25”, SMTP is redirected to the SMTP port on sun via an encrypted channel.This is especially useful for those using SMTP servers without SMTP-AUTHor POP-before-SMTP features. From any arbitrary location connected to anetwork, e-mail can be transferred to the “home” mail server for delivery. Ina similar manner, the following command forwards all port 110 and POP3requests on earth to the POP3 port of sun : ssh -L 110:sun:110 sun .
Both examples must be carried out by user root , because the connectionis made to privileged local ports. E-mail is sent and retrieved by normalusers in an existing SSH connection. The SMTP and POP3 host must be setto localhost for this.
Additional information can be found in the manual pages for each of theprograms described above and also in the files under /usr/share/doc/packages/openssh .
Network Authentication — Kerberos
An open network provides no means to ensure that a workstation can iden-tify its users properly except for the usual password mechanisms, which areinherently insecure. This means anyone could start any service pretending tobe someone else and fetch his mail or browse his private data. As a conse-quence, your networking environment must meet the following requirementsto be secure:
292 Network Authentication — Kerberos
12Se
cu
reN
etw
orks
Let all users prove their identity for each desired service and make sureno one can take the identity of someone else.
Make sure each network server also proves its identity. If you do not,an attacker might be able to impersonate the server and obtain sensitiveinformation transmitted to the server. This concept is called “mutualauthentication”, because the client authenticates to the server and viceversa.
Kerberos helps you meet the above requirements by providing strongly en-crypted authentication. The following sections show how this is achieved.Only the basic principles of Kerberos are discussed here. For detailed techni-cal instruction, refer to the documentation provided with your implementa-tion of Kerberos.
NoteThe original Kerberos was designed at the MIT. Besides theMIT Kerberos, there exist several other implementations of Kerberos.SuSE Linux Enterprise Server ships with a free implementation ofKerberos 5, the so-called Heimdal Kerberos 5 from KTH. Since the fol-lowing text covers features common to all versions, we will refer to theprogram itself as Kerberos as long as no Heimdal-specific informationis presented.
Note
Kerberos Terminology
The following glossary will help you cope with Kerberos terminology.
credential Users or clients need to present some kind of credentials that au-thorize them to request services. Kerberos knows two kinds of creden-tials — tickets and authenticators.
ticket A ticket is a per server credential used by a client to authenticate ata server from which it is requesting a service. It contains the name ofthe server, the client’s name, the client’s Internet address, a timestamp,a lifetime, and a random session key. All this data is encrypted usingthe server’s key.
authenticator Combined with the ticket, an authenticator is used to provethat the client presenting a ticket is really the one it claims to be. An
293SuSE Linux – Enterprise Server 8
authenticator is built of the client’s name, the workstation’s IP address,and the current workstation’s time all encrypted with the session keywhich is only known to the client and the server from which it is re-questing a service. An authenticator can only be used once, unlike aticket. A client can build an authenticator itself.
principal A Kerberos principal is unique entity (a user or service) to whichit can assign a ticket. A principal consists of the following components:
primary — the first part of a the principal, which can be the sameas your user name in the case of a user
instance — some optional information characterizing the primary.This string is separated from the primary by a ‘/’ .
realm — this specifies your Kerberos realm. Normally, your realmis your domain name in upper-case letters.
mutual authentication Kerberos ensures that both client and server can besure of each others identity. They will share a (session) key, which theycan use to comminicate securely.
session key Session keys are temporary private keys generated by Kerberos.They are known to the client and used to encrypt the communicationbetween the client and the server for which it requested and received aticket.
replay Almost all messages passed on in a network can get eavesdropped,stolen, and resent. In Kerberos context, this would be most dangerousif an attacker manages to obtain your request for a service containingyour ticket and authenticator. He could then try to resend it (“replay”)and to impersonate you. However, Kerberos implements several mech-anisms to deal with that problem.
server or service “Service” is used when we talk of a specific action to per-form. The process behind this action is referred to as a “server”.
How Kerberos Works
Kerberos is often called a third party trusted authentication service, whichmeans all its clients trust Kerberos judgement of another client’s identity.Kerberos keeps a database of all its users and their private keys.
To ensure Kerberos is worth all the trust put in it, run both the authentica-tion and ticket-granting server must be run on a dedicated machine. Make
294 Network Authentication — Kerberos
12Se
cu
reN
etw
orks
sure only the administrator can access this machine both physically and overthe network. Reduce the (networking) services run on it to the absolute mini-mum — do not even run sshd.
First contact Your first contact with Kerberos is quite similar to any loginprocedure at a normal networking system. Enter your user name. Thispiece of information and the name of the ticket-granting service aresent to the authentication server (Kerberos). If the authentication serverknows about your existence, it will generate a (random) session key forfurther use between your client and the ticket-granting server. Now theauthentication server will prepare a ticket for the ticket-granting server.The ticket contains the following information — all encrypted with asession key only the authentication server and the ticket-granting serverknow:
the names both of the client and the ticket-granting server
the current time
a lifetime assigned to this ticket
the client’s IP address
the newly-generated session key
This ticket is then sent back to the client together with the session key,again in encrypted form, but this time the private key of the client isused. This private key is only known to Kerberos and the client, be-cause it is derived from your user password. Now that the client hasreceived this response, you are prompted for your password. This pass-word is converted into the key that can decrypt the package sent by theauthentication server. The package is “unwrapped” and password andkey are erased from the workstation’s memory. As long as the lifetimegiven to the ticket used to obtain other tickets does not expire, yourworkstation can prove your identity.
Requesting a service To request a service from any server in the network,the client application needs to prove its identity to the server. There-fore, the application generates an authenticator. An authenticator con-sists of the following components:
the client’s principal
the client’s IP address
the current time
a checksum (chosen by the client)
295SuSE Linux – Enterprise Server 8
All this information is encrypted using the session key that the clienthas already received for this special server. The authenticator and theticket for the server are sent to the server. The server uses its copy ofthe session key to decrypt the authenticator, which gives him all infor-mation needed about the client requesting its service to compare it tothat contained in the ticket. The server verifies that the same client hassent both.
Without any security measures implemented on the server side, thisstage of the process would be an ideal target for replay attacks. Some-one could try to resend a request stolen off the net some time before.To prevent this, the server will not accept any request with a times-tamp and ticket received previously. In addition to that, a request witha timestamp differing too much from the time the request is receivedcan be ignored.
Mutual authentication Kerberos authentication can be used in both direc-tions. It is not only a question of the client being the one it claims tobe, the server should also be able to authenticate itself to the clientrequesting its service. Therefore, it sends some kind of authenticatoritself. It adds one to the checksum it received in the client’s authenti-cator and encrypts it with the session key, which is shared between itand the client. The client takes this response as a proof of the server’sauthenticity and they both start cooperating.
Ticket-granting — getting into contact with all servers Tickets are designedto be used for one server at a time. This implies that you have to geta new ticket each time you request another service. Kerberos imple-ments a mechanism to obtain tickets for individual servers. This serviceis called the “ticket-granting service”. The ticket-granting service is aservice just like any other service mentioned before, so uses the sameaccess protocols that have already been outlined. Any time an applica-tion needs a ticket that has not already been requested, it contacts theticket-granting server. This request consists of the following compo-nents:
the requested principal
the ticket-granting ticket
an authenticator
Like any other server, the ticket-granting server now checks the ticket-granting ticket and the authenticator. If they are considered valid, theticket-granting server builds a new session key to be used between the
296 Network Authentication — Kerberos
12Se
cu
reN
etw
orks
original client and the new server. Then the ticket for the new server isbuilt, containing the following information:
the client’s principal
the server’s principal
the current time
the client’s IP address
the newly-generated session key
The new ticket is assigned a lifetime, which is the lesser of the remain-ing lifetime of the ticket-granting ticket and the default for the service.The client receives this ticket and the session key, which are sent by theticket-granting service, but this time the answer is encrypted with thesession key that came with the original ticket-granting ticket. The clientcan decrypt the response without requiring the user’s password whena new service is contacted. Kerberos can thus acquire ticket after ticketfor the client without bothering the user more than once at login time.
Compatibility to Windows 2000 Windows 2000 contains a Microsoft imple-mentation of Kerberos 5. As SuSE Linux Enterprise Server makes useof the Heimdal implementation of Kerberos 5, you will find useful in-formation and guidance in the Heimdal documentation. See For MoreInformation on the following page.
Users’ View of Kerberos
Ideally, a user’s one and only contact with Kerberos happens during login athis workstation. The login process includes obtaining a ticket-granting ticket.At logout, a user’s Kerberos tickets are automatically destroyed, which hin-ders anyone else from impersonating this user when not logged in. The auto-matic destruction of tickets can lead to a somewhat awkward situation whena user’s login session lasts longer than the maximum lifespan given to theticket-granting ticket (a reasonable setting is 10 hours). However, the user canget a new ticket-granting ticket by running kinit. He simply needs to type inhis password again and Kerberos will make sure he gets access to any servicehe wants without being further troubled by authentication. Those interestedin a list of all the tickets silently acquired for them by Kerberos should runklist.
Here is a short list of some applications that use Kerberos authentication.These applications can be found under /usr/lib/heimdal/bin . They allhave the full functionality of their common UNIX and Linux brothers plusthe additional bonus of transparent authentication managed by Kerberos:
297SuSE Linux – Enterprise Server 8
telnet, telnetd
rlogin
rsh, rcp, rshd
popper, push
ftp, ftpd
su
imapd
pine
You will notice that you no longer have to type your password for usingthese applications because Kerberos has already proven your identity. ssh— if compiled with Kerberos support — can even forward all the ticketsacquired for one workstation to another one. If you use ssh to log in to an-other workstation, ssh makes sure the encrypted contents of the tickets areadjusted to the new situation. Simply copying tickets between workstationsis not sufficient as the ticket contains workstation specific information (theIP address). XDM and KDM offer Kerberos support, too. Read more aboutthe Kerberos network applications in the Kerberos V5 UNIX User’s Guide athttp://web.mit.edu/kerberos/www/krb5-1.2/krb5-1.2.5/doc/user-guide_toc.html
For More Information
SuSE Linux Enterprise Server contains a free implementation of Kerberoscalled Heimdal. Its documentation is installed along with the packageheimdal under /usr/share/doc/packages/heimdal/doc/heimdal.info . It is also available at the project’s home page at http://www.pdc.kth.se/heimdal/
This is the official site of the MIT Kerberos is http://web.mit.edu/kerberos/www/ . There you will find links to any other relevant resourceconcerning Kerberos.
A “classical” dialogue pointing out the principles of Kerberos is available athttp://web.mit.edu/kerberos/www/dialogue.html . It is a less tech-nical but still comprehensive read.
The paper at ftp://athena-dist.mit.edu/kerberos/doc/usenix.PSgives quite an extensive insight to the basic principles of Kerberos without
298 Network Authentication — Kerberos
12Se
cu
reN
etw
orks
being too much of a hard read. It also provides a lot of opportunities for fur-ther investigation and reading on Kerberos.
These links provide a short introduction to Kerberos and answer many ques-tions regarding Kerberos installation, configuration, and administration:http://web.mit.edu/kerberos/www/krb5-1.2/krb5-1.2.5/doc/user-guide_toc.htmlhttp://www.lns.cornell.edu/public/COMP/krb5/install/install_toc.htmlhttp://web.mit.edu/kerberos/www/krb5-1.2/krb5-1.2.5/doc/admin_toc.htmlThe official Kerberos FAQ is available at http://www.nrl.navy.mil/CCS/people/kenh/kerberos-faq.html .
The book Kerberos — A Network Authentication System by Brian Tung (ISBN0-201-37924-4) offers extensive information.
Installing and Administering Kerberos
This section will cover the installation of the Heimdal Kerberos implementa-tion as well as some aspects of administration. This section does, however,assume that you are familiar with the basic concepts of Kerberos (see alsoSection Network Authentication — Kerberos on page 292).
Choosing the Kerberos Realms
The “domain” of a Kerberos installation is called a Realm and is identified bya name, such as FOOBAR.COMor simply ACCOUNTING. Kerberos is sensitiveto uppercase and lowercase letters, so foobar.com is actually a different realmthan FOOBAR.COM. Use the case you prefer. It is common practice, however,to use uppercase realm names.
It is also a good idea to use your DNS domain name (or a subdomain, suchas ACCOUNTING.FOOBAR.COM). As we will see below, your life as adminis-trator can be much easier if you configure your Kerberos clients to locate theKDC and other Kerberos services via the DNS. To do so, it is helpful if yourrealm name is a subdomain of your DNS domain name.
Unlike the DNS name space, Kerberos is not hierarchical. You cannot set upa realm named FOOBAR.COM, have two “subrealms” named DEVELOPMENTand ACCOUNTINGunderneath it, and expect the two subordinate realms tosomehow inherit principals from FOOBAR.COM. Instead, you would have
299SuSE Linux – Enterprise Server 8
three separate realms for which you would have to configure “crossrealm”authentication for users from one realm to interact with servers or other usersfrom another realm.
For the sake of simplicity, assume you are setting up just one realm foryour entire organization. Setting up crossrealm authentication is describedin [Tun99], for instance. For the remainder of this section, the realm nameSAMPLE.COMis used in all examples.
Setting up the KDC Hardware
The first thing you need when you want to use Kerberos is a machine thatwill act as the Key Distribution Center, or KDC for short. This machine willhold the entire Kerberos user database with passwords and all information.
The KDC is the most important part of your security infrastructure — ifsomeone breaks into it, all user accounts and all of your infrastructure pro-tected by Kerberos is compromised. An attacker with access to the Kerberosdatabase can impersonate any principal in the database! Make sure youtighten security for this machine as much as possible:
Put the server machine into a physically secured location, such as alocked server room to which only a very few people have access.
Do not run any network applications on it except the KDC. This in-cludes servers and clients — for instance, the KDC should not importany file systems via NFS or use DHCP to retrieve its network configu-ration.
It is probably a good approach to install a minimal system first, thencheck the list of installed packages and remove any unneeded packages.This includes servers, such as inetd, portmap, and cups, as well as any-thing X11-based. Even installing an SSH server should be considered apotential security risk.
No graphical login is provided on this machine as an X server is a po-tential security risk. Kerberos provides its own administration interface.
Configure /etc/nsswitch.conf to use only local files for user andgroup lookup. Change the lines for passwd and group to look likethis:
passwd: filesgroup: files
300 Installing and Administering Kerberos
12Se
cu
reN
etw
orks
Edit the passwd , group , shadow , and gshadow files in /etc and re-move the lines that start with a + character (these are for NIS lookups).
Also consider disabling DNS lookups, because there is a potentialrisk involved. If there is a security bug in the DNS resolver library,an attacker might be able to trick the KDC into performing a DNSquery that triggers this bug. To disable DNS lookups, simply remove/etc/resolv.conf .
Disable all user accounts except root’s account by editing /etc/shadow and replacing the hashed passwords with * or ! characters.
Clock Synchronization
To use Kerberos successfully, make sure all system clocks within your orga-nization are synchronized within a certain range. The reason is that Kerberoswill try to protect you from “replayed” credentials. An attacker might be ableto observe Kerberos credentials on the network and reuse them to attack theserver. Kerberos employs several defenses to prevent this. One of them isthat it puts time stamps into its tickets. A server receiving a ticket with atime stamp that is not the current time will reject the ticket.
Of course, Kerberos will allow a certain leeway when comparing timestamps. However, computer clocks can be very inaccurate in keeping time— it is not unheard of for PC clocks to lose or gain half an hour over thecourse of a week. You should, therefore, configure all hosts on the networkto synchronize their clocks with a central time source.
A simple way to do so is by installing an NTP time server on one machineand have all clients synchronize their clocks with this server. Do this eitherby running an NTP daemon in client mode on all these machines or by run-ning ntpdate once a day from all clients (this solution will probably workfor a small number of clients only).
The KDC itself needs to be synchronized to the common time source as well.Since running an NTP daemon on this machine would be a security risk, it isprobably a good idea to do this by running ntpdate via a cron entry.
NTP configuration itself is beyond the scope of this section. For more infor-mation, refer to the NTP documentation included in your installed systemunder /usr/share/doc/packages/xntp-doc .
Log Configuration
By default, the Kerberos daemons running on the KDC host will log informa-tion to the syslog daemon. If you want to keep an eye on what your KDC
301SuSE Linux – Enterprise Server 8
is doing, you may want to process these log files regularly, scanning for un-usual events or potential problems.
Either do this by running a log scanner script on the KDC host itself or bycopying these files from the KDC to another host via rsync and perform thelog analysis there. Forwarding all log output via syslogd’s log forwardingmechanisms is not recommended, because information traverses the networkunencrypted.
Installing the KDC
This section covers the initial installation of the KDC, including creation of anadministrative principal.
Installing the RPMs
Before you can start, install the Kerberos software. On the KDC, install theheimdal and heimdal-lib RPMs:
earth:~ # rpm -ivh heimdal-0*.rpm heimdal-lib-0*.rpm
Editing krb5.conf
Then edit the configuration file /etc/krb5.conf . The file installed by de-fault contains various sample entries. Make sure you erase all of these entriesbefore starting.
krb5.conf is made up of several sections, each introduced by the sectionname included in brackets like [this] . The only section to consider rightnow is [libdefaults] , which should look like this:
[libdefaults]default_realm = SAMPLE.COMclockskew = 300
The default_realm line sets the default realm for Kerberos applications.clock_skew defines the the tolerance for accepting tickets with time stampsthat do not exactly match the KDC host’s clock. Usually, the clock skew isset to 300 seconds, or 5 minutes. This means a ticket can have a time stampsomewhere between 5 minutes ago and 5 minutes in the future from theserver’s point of view. When using NTP to synchronize all hosts, you canreduce this value to about one minute.
302 Installing and Administering Kerberos
12Se
cu
reN
etw
orks
Setting the Master Key
Your next step is to initialize the database where Kerberos keeps all informa-tion on principals. First, set the database master key, which is used to protectthe database from accidental disclosure, in particular when it is backed up toa tape.
The master key is derived from a pass phrase and is stored in a file calledthe stash file. This is so you do not need to type in the password every timethe KDC is restarted. Make sure you choose a good pass phrase, such as asentence from a book opened at a random page.
When you make tape backups of the Kerberos database (/var/heimdal/heimdal.db ), do not back up the stash file (which is in /var/heimdal/m-key ). Otherwise, everyone able to read the tape could also decrypt thedatabase. Therefore, it is also a good idea to keep a copy of the pass phrasein a safe or some other secure location, because you will need it when restor-ing your database from backup tape after a disaster.
To set the master key, invoke the kstash utility without arguments and enterthe pass phrase twice:
earth:~ # kstash
Master key:<enter pass phrase>Verifying password - Master key:<enter pass phrase again>
Creating the Realm
Finally, create entries for your realm in the Kerberos database. Invoke thekadmin utility with the -l option as shown. This option tells kadmin to ac-cess the database locally. By default, it will try to contact the Kerberos adminservice over the network. At this stage, this will not work because it is notrunning yet.
Now, tell kadmin to initialize your realm. It will ask you a number of ques-tions in return. It is best to accept the default offered by kadmin initially:
earth:~ # kadmin -l
kadmin> init SAMPLE.COMRealm max ticket life [unlimited]: <press return>Realm max renewable ticket life [unlimited]: <press return>
To verify that it did anything, use the list command:
303SuSE Linux – Enterprise Server 8
kadmin> list *[email protected]/[email protected]/[email protected]/[email protected]/[email protected]/[email protected]
This shows that there are now a number of principals in the database. All ofthese are for internal use by Kerberos.
Creating a Principal
Next, create two Kerberos principals for yourself: one “normal” principal foryour everyday work and one for administrative tasks relating to Kerberos.Assuming your login name is newbie , proceed as follows:
earth:~ # kadmin -l
kadmin> add newbieMax ticket life [1 day]: <press return>Max renewable life [1 week]: <press return>Principal expiration time [never]: <press return>Password expiration time [never]: <press return>Attributes []: <press return>[email protected]’s Password: <type password here>Verifying password: <re-type password here>
Accepting the defaults by pressing�� ��Enter is okay. Choose a good password.
Next, create another principal named newbie/admin by typingadd newbie/admin at the kadmin prompt. The admin suffixed to youruser name is what is a role. You will later use this administrative role whenadministering the Kerberos database.
Setting up Remote Administration
To be able to add and remove principals from the Kerberos database withoutaccessing the KDC’s console directly, tell the Kerberos admin server whichprincipals are allowed to do what.
Do this by editing the file /var/heimdal/kadmind.acl (ACL is an abbre-viation for Access Control List). The ACL file allows you to specify privilegeswith a fine degree of control. For details, refer to the man page for kadmind(man 8 kadmind ).
304 Installing and Administering Kerberos
12Se
cu
reN
etw
orks
Right now, just grant yourself the privilege to do anything you want with thedatabase by putting the following line into the file:
newbie/admin all
Replace the user name newbie with your own.
Starting the KDC
Start the KDC daemons. This includes the kdc itself (the daemon handlinguser authentication and ticket requests), kadmind (the server performing re-mote administration), and kpasswddd (handling user’s password change re-quests). To start the daemon manually, enter:
earth:~ # rckdc start
Starting kdc done
Also make sure the KDC is started by default when the server machine isrebooted. This is done with the command insserv kdc .
Configuring Kerberos Clients
When configuring Kerberos, there are basically two approaches you can take— static configuration via the /etc/krb5.conf file or dynamic configura-tion via DNS. With DNS configuration, Kerberos applications will try to lo-cate the KDC services via DNS records. With static configuration, you needto add the host names of your KDC server to krb5.conf (and update thefile whenever you move the KDC or reconfigure your realm in other ways).
DNS-based configuration is generally a lot more flexible and the amount ofconfiguration work per machine is a lot less. However, it requires that yourrealm name is either the same as your DNS domain or a subdomain of it.
Configuring Kerberos via DNS also creates some minor security issue, whichis that an attacker can seriously disrupt your infrastructure through yourDNS (by shooting down the name server, by spoofing DNS records, etc).However, this amounts to a denial of service at most. A similar scenario ap-plies to the static configuration case unless you enter plain IP addresses inkrb5.conf instead of host names.
305SuSE Linux – Enterprise Server 8
Static Configuration
With static configuration, add the following stanza to krb5.conf (wherekdc.sample.com is the host name of the KDC):
[realms]SAMPLE.COM = {
kdc = kdc.sample.comkpasswd_server = kdc.sample.comadmin_server = kdc.sample.com
}
If you have several realms, just add another statement to the [realms] sec-tion.
Also add a statement to this file that tells applications how to map hostnames to a realm. For instance, when connecting to a remote host, theKerberos library needs to know in which realm this host is located. Thismust be configured in the [domain_realms] section:
[domain_realm].sample.com = SAMPLE.COMwww.foobar.com = SAMPLE.COM
This tells the library that all hosts in the sample.com DNS domains arein the SAMPLE.COMKerberos realm. In addition, one external host namedwww.foobar.com should also be considered a member of the SAMPLE.COMrealm.
DNS-Based Configuration
DNS-based Kerberos configuration makes heavy use of SRV records (see(RFC2052) A DNS RR for specifying the location of services at http://www.ietf.org ). These records are not supported in earlier implementations ofthe BIND name server. At least BIND version 8 is required for this.
The name of a SRV record, as far as Kerberos is concerned, is always madeup like this: _service._proto.realm , where realm is the Kerberosrealm. Note that domain names in DNS are case insensitive, so case sen-sitive Kerberos realms break down when using this configuration method._service is a service name (different names are used when trying to contactthe KDC or the password service, for example). _proto can be either _udpor _tcp , but not all services support both protocols.
306 Installing and Administering Kerberos
12Se
cu
reN
etw
orks
The data portion of SRV resource records consists of a priority value, aweight, a port number, and a host name. The priority defines the order inwhich hosts should be tried (lower values indicate a higher priority). Theweight is there to support some sort of load balancing among servers ofequal priority. You will probably never need any of this, so it is okay to setthese to zero.
Heimdal Kerberos currently looks up the following names when looking forservices:
_kerberos This defines the location of the KDC daemon (the authentica-tion and ticket granting server). Typical records look like this:
_kerberos._udp.SAMPLE.COM. IN SRV 0 0 88 kdc.sample.com._kerberos._tcp.SAMPLE.COM. IN SRV 0 0 88 kdc.sample.com.
_kpasswd This describes the location of the password changing server.Typical records look like this:
_kpasswd._udp.SAMPLE.COM. IN SRV 0 0 464 kdc.sample.com.
Since kpasswdd does not support TCP, there should be no _tcp record.
_kerberos-adm This describes the location of the remote administrationservice. Typical records look like this:
_kerberos-adm._tcp.SAMPLE.COM. IN SRV 0 0 749 kdc.sample.com.
Since kadmind does not support UDP, there should be no _udp record.
As with the static configuration file, there is a mechanism to inform clientsthat a specific host is in the SAMPLE.COMrealm, even if it is not part of thesample.com DNS domain. This can be done by attaching a TXT record to_keberos.hostname , as shown here:
_keberos.www.foobar.com. IN TXT "SAMPLE.COM"
Managing Principals
You should now be able to perform Kerberos administration tasks remotelyusing the kadmin tool. First, you need to obtain a ticket for your admin prin-cipal then use that ticket when connecting to the kadmin server:
earth:newbie # kinit newbie/admin
307SuSE Linux – Enterprise Server 8
newbie/[email protected]’s Password: <enter password>
earth:newbie # /usr/sbin/kadmin
kadmin> privschange-password, list, delete, modify, add, get
Using the privs command, you can verify which privileges you have. The listshown above is the full set of privileges.
As an example, modify the principal newbie :
kadmin> mod newbieMax ticket life [1 day]:2 daysMax renewable life [1 week]:Principal expiration time [never]:2003-01-01Password expiration time [never]:Attributes []:
This changes the maximum ticket life time to two days and sets the expira-tion date for the account to January 1, 2003.
The basic kadmin commands are:
add 〈principal〉 add a new principal
modify 〈principal〉 edit various attributes of a principal, such as maximumticket life time and account expiration date
delete 〈principal〉 remove a principal from the database
rename 〈principal〉 〈newname〉 renames a principal to 〈newname〉
list 〈pattern〉 list all principals matching the given pattern. Patterns workmuch like the shell globbing patterns: list newbie* would listnewbie and newbie/admin in our example.
get 〈principal〉 display detailed information about the principal
passwd 〈principal〉 changes a principal’s password
At all stages, help is available by typing�� ��? and
�� ��Enter , including promptsprinted by commands, such as modify or add.
The init command used when initially creating the realm (as well as a fewothers) is not available in remote mode. To create a new realm, go to theKDC’s console and use kadmin in local mode (using the -l command lineoption).
308 Installing and Administering Kerberos
12Se
cu
reN
etw
orks
Enabling PAM Support for Kerberos
SuSE Linux Enterprise Server comes with a PAM module named pam_krb5 ,which supports Kerberos login and password update. This module can beused by applications, such as console login, su and graphical login applica-tions like KDM, where the user presents a password and would like the au-thenticating application to obtain an initial Kerberos ticket on his behalf. Toenable users to transparently update their Kerberos password through thestandard passwd utility (rather than having to invoke the kpasswd program),add pam_krb5 to the PAM configuration of passwd as well.
The pam_krb5 module was specifically not designed for network servicesthat accept Kerberos tickets as part of user authentication — that is an en-tirely different story.
In all cases, edit the PAM configuration files of those service to which to addKerberos support. The following applications can make use of pam_krb5 .Their corresponding pam configuration files are also listed.
login /etc/pam.d/loginsu /etc/pam.d/sukdm, gdm, xdm /etc/pam.d/xdmxlock /etc/pam.d/xlockpasswd /etc/pam.d/passwd
Using pam_krb5
You can use pam_krb5 in two ways, depending on whether you want tomake your KDC the primary authentication method and use passwords fromthe traditional password databases as a fallback only or if you want to keepthe traditional databases as primary source and just want to use pam_krb5to obtain Kerberos tickets for those users with principals in the KDC. Thelatter approach is especially useful while migrating from some other authenti-cation mechanism to Kerberos.
As Kerberos will only do the authentication, you still need a mechanism todistribute the remaining account information, such as the uid and home di-rectory. One such mechanism is LDAP. Using NIS for this is not an option,because Linux does not currently support any Kerberos security mechanismsfor RPC network services.
Optional pam_krb5
In this mode, the primary authentication is with the existing authenticationframework, such as user entries in the /etc/passwd file or a NIS database.
309SuSE Linux – Enterprise Server 8
The only difference is that, in addition, if there is a Kerberos principal associ-ated with the user, pam_krb5 will try to obtain a ticket on behalf of the user,using the password previously supplied.
Consider the PAM configuration file for su, for instance, which contains theselines for the auth service:
auth sufficient pam_rootok.soauth required pam_unix.so nullok
These two lines tell the PAM library that, when authenticating the user, itshould first call the pam_rootok module. If this module indicates success(which it does when the calling user is the root user), the su request shouldbe accepted without further authentication requests. Otherwise, PAM willproceed and call the pam_unix module, which performs the “traditional” au-thentication by prompting the user for a password, hashing it, and comparingit to the hashed password of the target user account.
To add optional Kerberos support, add another line after this one, whichlooks like this:
auth optional pam_krb5.so try_first_pass \missing_keytab_ok \ccache=SAFE \putenv_direct
This will invoke the pam_krb5 module and ignore any errors flagged by it(for example, when it was unable to obtain a ticket for the user). With thissetup, the password is always checked against password entries in the origi-nal authentication framework.
For other services, the changes made to the PAM configuration file are sim-ilar. It is usually best to add the pam_krb5 line after the one that callspam_unix or pam_unix2 .
Using pam_krb5 for Primary Authentication
If you have migrated all users to Kerberos, you can use pam_krb5 as theprimary authentication mechanism and fall back to the local password file ifthere is an error, for instance, because there is no principal for this user orthe KDC is down. With this setup, you would have all user accounts in theKerberos database by default and the fallback to the local password file existsonly for accounts like root.
The following example shows how to change /etc/pam.d/su to accomplishthis (note the additional use_first_pass argument to the pam_unix mod-ule):
310 Installing and Administering Kerberos
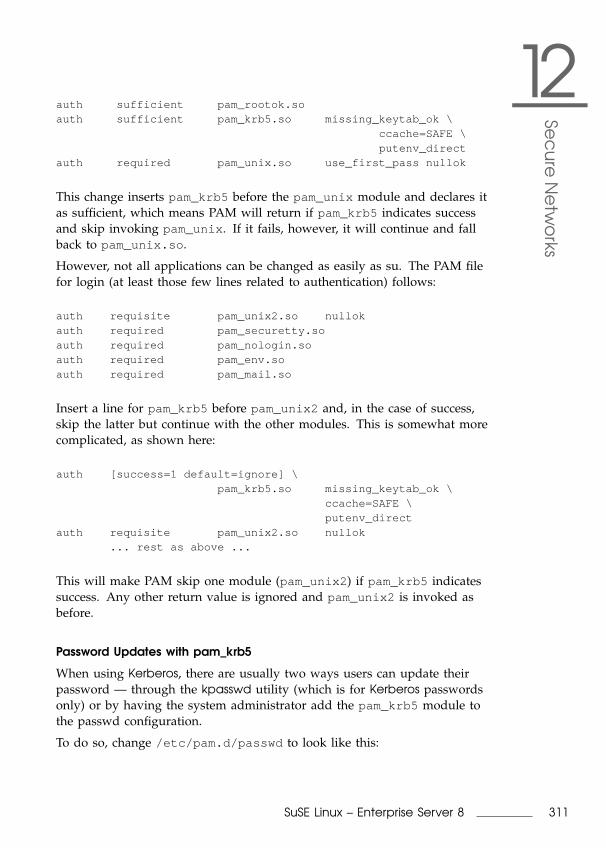
12Se
cu
reN
etw
orks
auth sufficient pam_rootok.soauth sufficient pam_krb5.so missing_keytab_ok \
ccache=SAFE \putenv_direct
auth required pam_unix.so use_first_pass nullok
This change inserts pam_krb5 before the pam_unix module and declares itas sufficient, which means PAM will return if pam_krb5 indicates successand skip invoking pam_unix . If it fails, however, it will continue and fallback to pam_unix.so .
However, not all applications can be changed as easily as su. The PAM filefor login (at least those few lines related to authentication) follows:
auth requisite pam_unix2.so nullokauth required pam_securetty.soauth required pam_nologin.soauth required pam_env.soauth required pam_mail.so
Insert a line for pam_krb5 before pam_unix2 and, in the case of success,skip the latter but continue with the other modules. This is somewhat morecomplicated, as shown here:
auth [success=1 default=ignore] \pam_krb5.so missing_keytab_ok \
ccache=SAFE \putenv_direct
auth requisite pam_unix2.so nullok... rest as above ...
This will make PAM skip one module (pam_unix2 ) if pam_krb5 indicatessuccess. Any other return value is ignored and pam_unix2 is invoked asbefore.
Password Updates with pam_krb5
When using Kerberos, there are usually two ways users can update theirpassword — through the kpasswd utility (which is for Kerberos passwordsonly) or by having the system administrator add the pam_krb5 module tothe passwd configuration.
To do so, change /etc/pam.d/passwd to look like this:
311SuSE Linux – Enterprise Server 8
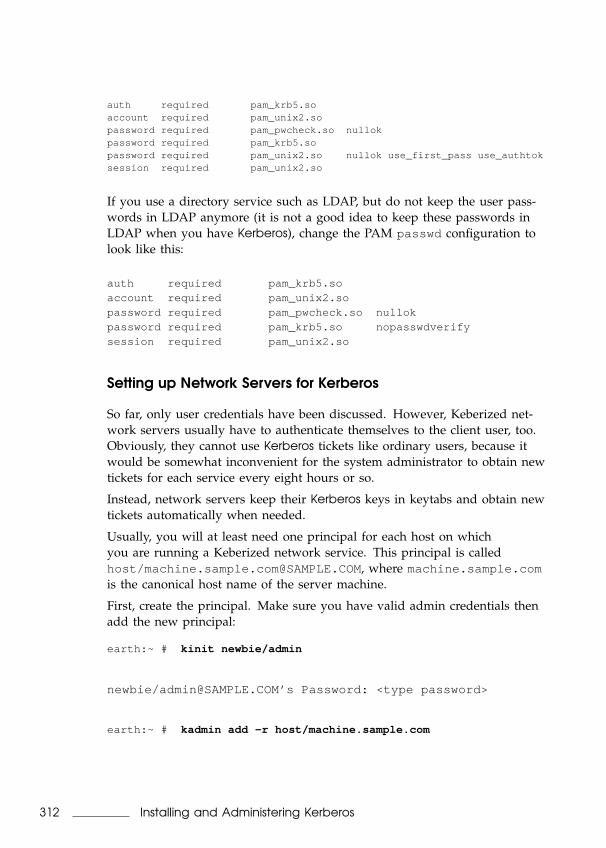
auth required pam_krb5.soaccount required pam_unix2.sopassword required pam_pwcheck.so nullokpassword required pam_krb5.sopassword required pam_unix2.so nullok use_first_pass use_authtoksession required pam_unix2.so
If you use a directory service such as LDAP, but do not keep the user pass-words in LDAP anymore (it is not a good idea to keep these passwords inLDAP when you have Kerberos), change the PAM passwd configuration tolook like this:
auth required pam_krb5.soaccount required pam_unix2.sopassword required pam_pwcheck.so nullokpassword required pam_krb5.so nopasswdverifysession required pam_unix2.so
Setting up Network Servers for Kerberos
So far, only user credentials have been discussed. However, Keberized net-work servers usually have to authenticate themselves to the client user, too.Obviously, they cannot use Kerberos tickets like ordinary users, because itwould be somewhat inconvenient for the system administrator to obtain newtickets for each service every eight hours or so.
Instead, network servers keep their Kerberos keys in keytabs and obtain newtickets automatically when needed.
Usually, you will at least need one principal for each host on whichyou are running a Keberized network service. This principal is calledhost/[email protected] , where machine.sample.comis the canonical host name of the server machine.
First, create the principal. Make sure you have valid admin credentials thenadd the new principal:
earth:~ # kinit newbie/admin
newbie/[email protected]’s Password: <type password>
earth:~ # kadmin add -r host/machine.sample.com
312 Installing and Administering Kerberos
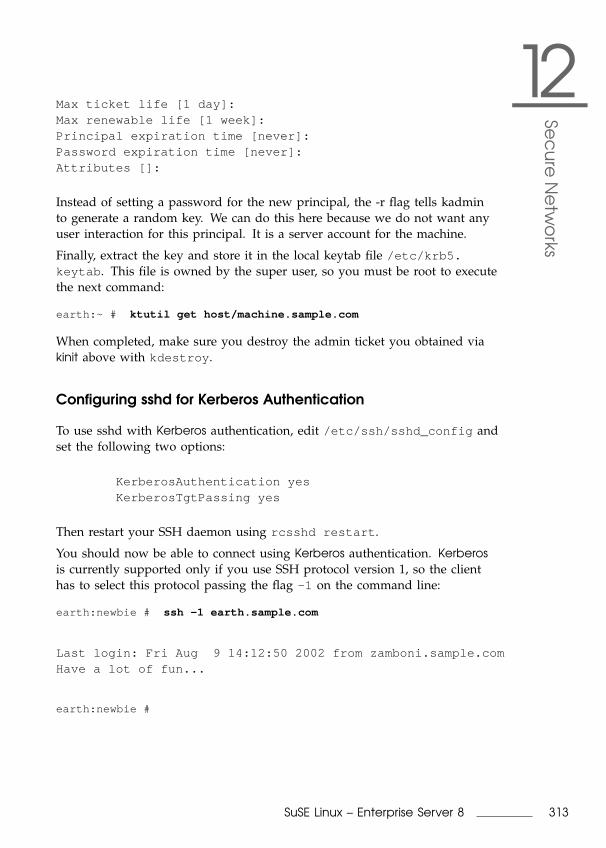
12Se
cu
reN
etw
orks
Max ticket life [1 day]:Max renewable life [1 week]:Principal expiration time [never]:Password expiration time [never]:Attributes []:
Instead of setting a password for the new principal, the -r flag tells kadminto generate a random key. We can do this here because we do not want anyuser interaction for this principal. It is a server account for the machine.
Finally, extract the key and store it in the local keytab file /etc/krb5.keytab . This file is owned by the super user, so you must be root to executethe next command:
earth:~ # ktutil get host/machine.sample.com
When completed, make sure you destroy the admin ticket you obtained viakinit above with kdestroy .
Configuring sshd for Kerberos Authentication
To use sshd with Kerberos authentication, edit /etc/ssh/sshd_config andset the following two options:
KerberosAuthentication yesKerberosTgtPassing yes
Then restart your SSH daemon using rcsshd restart .
You should now be able to connect using Kerberos authentication. Kerberosis currently supported only if you use SSH protocol version 1, so the clienthas to select this protocol passing the flag -1 on the command line:
earth:newbie # ssh -1 earth.sample.com
Last login: Fri Aug 9 14:12:50 2002 from zamboni.sample.comHave a lot of fun...
earth:newbie #
313SuSE Linux – Enterprise Server 8
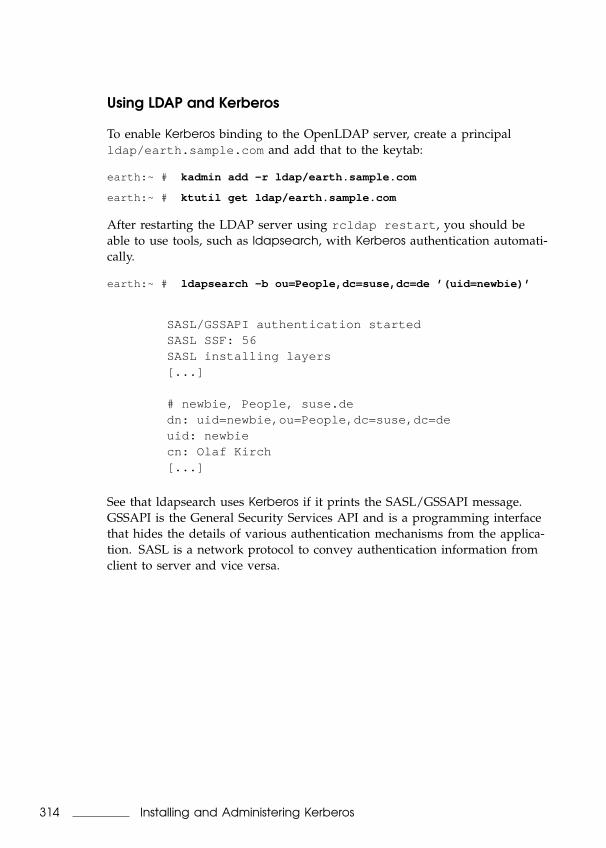
Using LDAP and Kerberos
To enable Kerberos binding to the OpenLDAP server, create a principalldap/earth.sample.com and add that to the keytab:
earth:~ # kadmin add -r ldap/earth.sample.com
earth:~ # ktutil get ldap/earth.sample.com
After restarting the LDAP server using rcldap restart , you should beable to use tools, such as ldapsearch, with Kerberos authentication automati-cally.
earth:~ # ldapsearch -b ou=People,dc=suse,dc=de ’(uid=newbie)’
SASL/GSSAPI authentication startedSASL SSF: 56SASL installing layers[...]
# newbie, People, suse.dedn: uid=newbie,ou=People,dc=suse,dc=deuid: newbiecn: Olaf Kirch[...]
See that ldapsearch uses Kerberos if it prints the SASL/GSSAPI message.GSSAPI is the General Security Services API and is a programming interfacethat hides the details of various authentication mechanisms from the applica-tion. SASL is a network protocol to convey authentication information fromclient to server and vice versa.
314 Installing and Administering Kerberos
AM
an
ualPa
ge
ofe
2fsck
Manual Page of e2fsck
E2FSCK(8) E2FSCK(8)
NAMEe2fsck - check a Linux second extended file system
SYNOPSISe2fsck [ -pacnyrdfvstFSV ] [ -b superblock ] [ -B block-size ] [ -l|-L bad_blocks_file ] [ -C fd ] [ -j external-journal ] [ device
DESCRIPTIONe2fsck is used to check a Linux second extended file sys-tem (e2fs). E2fsck also supports ext2 filesystems coun-taining a journal, which are also sometimes known as ext3filesystems.
device is the special file corresponding to the device(e.g /dev/hdc1).
OPTIONS-a This option does the same thing as the -p option.
It is provided for backwards compatibility only; itis suggested that people use -p option wheneverpossible.
-b superblockInstead of using the normal superblock, use analternative superblock specified by superblock.This option is normally used when the primarysuperblock has been corrupted. The location of thebackup superblock is dependent on the filesystem’sblocksize. For filesystems with 1k blocksizes, abackup superblock can be found at block 8193; forfilesystems with 2k blocksizes, at block 16384; andfor 4k blocksizes, at block 32768.
Additional backup superblocks can be determined byusing the mke2fs program using the -n option toprint out where the superblocks were created. The-b option to mke2fs, which specifies blocksize ofthe filesystem must be specified in order for thesuperblock locations that are printed out to beaccurate.
If an alternative superblock is specified and thefilesystem is not opened read-only, e2fsck willmake sure that the primary superblock is updatedappropriately upon completion of the filesystemcheck.
-B blocksizeNormally, e2fsck will search for the superblock atvarious different block sizes in an attempt to findthe appropriate block size. This search can befooled in some cases. This option forces e2fsck toonly try locating the superblock at a particularblocksize. If the superblock is not found, e2fsckwill terminate with a fatal error.
-c This option causes e2fsck to run the badblocks(8)program to find any blocks which are bad on thefilesystem, and then marks them as bad by addingthem to the bad block inode.
-C This option causes e2fsck to write completioninformation to the specified file descriptor sothat the progress of the filesystem check can bemonitored. This option is typically used by pro-grams which are running e2fsck. If the filedescriptor specified is 0, e2fsck will print a com-pletion bar as it goes about its business. Thisrequires that e2fsck is running on a video consoleor terminal.
-d Print debugging output (useless unless you aredebugging e2fsck).
-f Force checking even if the file system seems clean.
-F Flush the filesystem device’s buffer caches beforebeginning. Only really useful for doing e2fscktime trials.
-j external-journalSet the pathname where the external-journal forthis filesystem can be found.
-l filename
316 Manual Page of e2fsck
AM
an
ualPa
ge
ofe
2fsck
Add the blocks listed in the file specified byfilename to the list of bad blocks. The format ofthis file is the same as the one generated by thebadblocks(8) program.
-L filenameSet the bad blocks list to be the list of blocksspecified by filename. (This option is the same asthe -l option, except the bad blocks list iscleared before the blocks listed in the file areadded to the bad blocks list.)
-n Open the filesystem read-only, and assume an answerof ’no’ to all questions. Allows e2fsck to be usednon-interactively. (Note: if the -c, -l, or -Loptions are specified in addition to the -n option,then the filesystem will be opened read-write, topermit the bad-blocks list to be updated. However,no other changes will be made to the filesystem.)
-p Automatically repair ("preen") the file systemwithout any questions.
-r This option does nothing at all; it is providedonly for backwards compatibility.
-s This option will byte-swap the filesystem so thatit is using the normalized, standard byte-order(which is i386 or little endian). If the filesys-tem is already in the standard byte-order, e2fsckwill take no action.
-S This option will byte-swap the filesystem, regard-less of its current byte-order.
-t Print timing statistics for e2fsck. If this optionis used twice, additional timing statistics areprinted on a pass by pass basis.
-v Verbose mode.
-V Print version information and exit.
-y Assume an answer of ’yes’ to all questions; allowse2fsck to be used non-interactively.
EXIT CODEThe exit code returned by e2fsck is the sum of the follow-ing conditions:
0 - No errors1 - File system errors corrected2 - File system errors corrected, system should
be rebooted if file system was mounted4 - File system errors left uncorrected
317SuSE Linux – Enterprise Server 8

8 - Operational error16 - Usage or syntax error128 - Shared library error
SIGNALSThe following signals have the following effect when sentto e2fsck.
SIGUSR1This signal causes e2fsck to start displaying acompletion bar. (See discussion of the -C option.)
SIGUSR2This signal causes e2fsck to stop displaying a com-pletion bar.
REPORTING BUGSAlmost any piece of software will have bugs. If you man-age to find a filesystem which causes e2fsck to crash, orwhich e2fsck is unable to repair, please report it to theauthor.
Please include as much information as possible in your bugreport. Ideally, include a complete transcript of thee2fsck run, so I can see exactly what error messages aredisplayed. If you have a writeable filesystem where thetranscript can be stored, the script(1) program is a handyway to save the output of e2fsck to a file.
It is also useful to send the output of dumpe2fs(8). If aspecific inode or inodes seems to be giving e2fsck trou-ble, try running the debugfs(8) command and send the out-put of the stat(1u) command run on the relevant inode(s).If the inode is a directory, the debugfs dump command willallow you to extract the contents of the directory inode,which can sent to me after being first run through uuencode(1).
Always include the full version string which e2fsck dis-plays when it is run, so I know which version you are run-ning.
AUTHORThis version of e2fsck was written by Theodore Ts’o<[email protected]>.
SEE ALSOmke2fs(8), tune2fs(8), dumpe2fs(8), debugfs(8)
E2fsprogs version 1.25 September 2001 E2FSCK(8)
318 Manual Page of e2fsck
BTh
eG
NU
Ge
ne
ralPub
licLic
en
se
The GNU Gen-eral Public License
GNU General Public License
Copyright (C) 1989, 1991 Free Software Foundation, Inc.
59 Temple Place, Suite 330, Boston, MA 02111-1307, USA
Copyright (C) 1989, 1991 Free Software Foundation, Inc. 675 Mass Ave, Cam-bridge, MA 02139, USA Everyone is permitted to copy and distribute verba-tim copies of this license document, but changing it is not allowed.
Foreword
The licenses for most software are designed to take away your freedom toshare and change it. By contrast, the GNU General Public License is intendedto guarantee your freedom to share and change free software — to makesure the software is free for all its users. This General Public License appliesto most of the Free Software Foundation’s software and to any other programwhose authors commit to using it. (Some other Free Software Foundation soft-ware is covered by the GNU Library General Public License instead.) You canapply it to your programs, too.
When we speak of “free” software, we are referring to freedom, not price. OurGeneral Public Licenses are designed to make sure that you have the freedomto distribute copies of free software (and charge for this service if you wish),that you receive source code or can get it if you want it, that you can change
the software or use pieces of it in new free programs; and that you know youcan do these things.
To protect your rights, we need to make restrictions that forbid anyone todeny you these rights or to ask you to surrender the rights. These restrictionstranslate to certain responsibilities for you if you distribute copies of the soft-ware, or if you modify it.
For example, if you distribute copies of such a program, whether gratis orfor a fee, you must give the recipients all the rights that you have. You mustmake sure that they, too, receive or can get the source code. And you mustshow them these terms so they know their rights.
We protect your rights with two steps: (1) copyright the software, and (2)offer you this license which gives you legal permission to copy, distributeand/or modify the software.
Also, for each author’s protection and ours, we want to make certain thateveryone understands that there is no warranty for this free software. If thesoftware is modified by someone else and passed on, we want its recipientsto know that what they have is not the original, so that any problems intro-duced by others will not reflect on the original authors’ reputations.
Finally, any free program is threatened constantly by software patents. Wewish to avoid the danger that redistributors of a free program will individu-ally obtain patent licenses, in effect making the program proprietary. To pre-vent this, we have made it clear that any patent must be licensed for every-one’s free use or not licensed at all.
The precise terms and conditions for copying, distribution and modificationfollow.
GNU General, Public License
Terms and Conditions for Copying, Distribution and Modification
0. This License applies to any program or other work which contains a no-tice placed by the copyright holder saying it may be distributed under theterms of this General Public License. The “Program”, below, refers to any suchprogram or work, and a work based on the Program means either the Programor any derivative work under copyright law: that is to say, a work containingthe Program or a portion of it, either verbatim or with modifications and/ortranslated into another language. (Hereinafter, translation is included withoutlimitation in the term “modification”.) Each licensee is addressed as “you”.
Activities other than copying, distribution and modification are not coveredby this License; they are outside its scope. The act of running the Program isnot restricted, and the output from the Program is covered only if its contents
320 The GNU General Public License

BTh
eG
NU
Ge
ne
ralPub
licLic
en
se
constitute a work based on the Program (independent of having been madeby running the Program). Whether that is true depends on what the Programdoes.
1. You may copy and distribute verbatim copies of the Program’s sourcecode as you receive it, in any medium, provided that you conspicuously andappropriately publish on each copy an appropriate copyright notice and dis-claimer of warranty; keep intact all the notices that refer to this License andto the absence of any warranty; and give any other recipients of the Programa copy of this License along with the Program.
You may charge a fee for the physical act of transferring a copy, and youmay at your option offer warranty protection in exchange for a fee.
2. You may modify your copy or copies of the Program or any portion ofit, thus forming a work based on the Program, and copy and distribute suchmodifications or work under the terms of Section 1 above, provided that youalso meet all of these conditions:
a) You must cause the modified files to carry prominent notices statingthat you changed the files and the date of any change.
b) You must cause any work that you distribute or publish, that in wholeor in part contains or is derived from the Program or any part thereof,to be licensed as a whole at no charge to all third parties under theterms of this License.
c) If the modified program normally reads commands interactively whenrun, you must cause it, when started running for such interactive use inthe most ordinary way, to print or display an announcement includingan appropriate copyright notice and a notice that there is no warranty(or else, saying that you provide a warranty) and that users may redis-tribute the program under these conditions, and telling the user how toview a copy of this License. (Exception: if the Program itself is inter-active but does not normally print such an announcement, your workbased on the Program is not required to print an announcement.)
These requirements apply to the modified work as a whole. If identifiablesections of that work are not derived from the Program, and can be reason-ably considered independent and separate works in themselves, then this Li-cense, and its terms, do not apply to those sections when you distribute themas separate works. But when you distribute the same sections as part of a
321SuSE Linux – Enterprise Server 8

whole which is a work based on the Program, the distribution of the wholemust be on the terms of this License, whose permissions for other licenseesextend to the entire whole, and thus to each and every part regardless ofwho wrote it.
Thus, it is not the intent of this section to claim rights or contest your rightsto work written entirely by you; rather, the intent is to exercise the right tocontrol the distribution of derivative or collective works based on the Pro-gram.
In addition, mere aggregation of another work not based on the Programwith the Program (or with a work based on the Program) on a volume ofa storage or distribution medium does not bring the other work under thescope of this License.
3. You may copy and distribute the Program (or a work based on it, underSection 2) in object code or executable form under the terms of Sections 1 and2 above provided that you also do one of the following:
a) Accompany it with the complete corresponding machine–readablesource code, which must be distributed under the terms of Sections 1and 2 above on a medium customarily used for software interchange;or,
b) Accompany it with a written offer, valid for at least three years, to giveany third party, for a charge no more than your cost of physically per-forming source distribution, a complete machine–readable copy of thecorresponding source code, to be distributed under the terms of Sec-tions 1 and 2 above on a medium customarily used for software inter-change; or,
c) Accompany it with the information you received as to the offer to dis-tribute corresponding source code. (This alternative is allowed only fornoncommercial distribution and only if you received the program inobject code or executable form with such an offer, in accord with Sub-section b above.)
The source code for a work means the preferred form of the work for makingmodifications to it. For an executable work, “complete source code” meansall the source code for all modules it contains, plus any associated interfacedefinition files, plus the scripts used to control compilation and installation ofthe executable. However, as a special exception, the source code distributedneed not include anything that is normally distributed (in either source or
322 The GNU General Public License
BTh
eG
NU
Ge
ne
ralPub
licLic
en
se
binary form) with the major components (compiler, kernel, and so on) of theoperating system on which the executable runs, unless that component itselfaccompanies the executable.
If distribution of executable or object code is made by offering access to copyfrom a designated place, then offering equivalent access to copy the sourcecode from the same place counts as distribution of the source code, eventhough third parties are not compelled to copy the source along with the ob-ject code.
4. You may not copy, modify, sublicense, or distribute the Program except asexpressly provided under this License. Any attempt otherwise to copy, mod-ify, sublicense or distribute the Program is void, and will automatically ter-minate your rights under this License. However, parties who have receivedcopies, or rights, from you under this License will not have their licenses ter-minated so long as such parties remain in full compliance.
5. You are not required to accept this License, since you have not signed it.However, nothing else grants you permission to modify or distribute the Pro-gram or its derivative works. These actions are prohibited by law if you donot accept this License. Therefore, by modifying or distributing the Program(or any work based on the Program), you indicate your acceptance of this Li-cense to do so, and all its terms and conditions for copying, distributing ormodifying the Program or works based on it.
6. Each time you redistribute the Program (or any work based on the Pro-gram), the recipient automatically receives a license from the original licensorto copy, distribute or modify the Program subject to these terms and condi-tions. You may not impose any further restrictions on the recipients’ exerciseof the rights granted herein. You are not responsible for enforcing complianceby third parties to this License.
7. If, as a consequence of a court judgment or allegation of patent infringe-ment or for any other reason (not limited to patent issues), conditions areimposed on you (whether by court order, agreement or otherwise) that con-tradict the conditions of this License, they do not excuse you from the condi-tions of this License. If you cannot distribute so as to satisfy simultaneouslyyour obligations under this License and any other pertinent obligations, thenas a consequence you may not distribute the Program at all. For example, ifa patent license would not permit royalty–free redistribution of the Programby all those who receive copies directly or indirectly through you, then the
323SuSE Linux – Enterprise Server 8
only way you could satisfy both it and this License would be to refrain en-tirely from distribution of the Program.
If any portion of this section is held invalid or unenforceable under any par-ticular circumstance, the balance of the section is intended to apply and thesection as a whole is intended to apply in other circumstances.
It is not the purpose of this section to induce you to infringe any patents orother property right claims or to contest validity of any such claims; this sec-tion has the sole purpose of protecting the integrity of the free software dis-tribution system, which is implemented by public license practices. Manypeople have made generous contributions to the wide range of software dis-tributed through that system in reliance on consistent application of that sys-tem; it is up to the author/donor to decide if he or she is willing to distributesoftware through any other system and a licensee cannot impose that choice.
This section is intended to make thoroughly clear what is believed to be aconsequence of the rest of this License.
8. If the distribution and/or use of the Program is restricted in certain coun-tries either by patents or by copyrighted interfaces, the original copyrightholder who places the Program under this License may add an explicit ge-ographical distribution limitation excluding those countries, so that distri-bution is permitted only in or among countries not thus excluded. In suchcase, this License incorporates the limitation as if written in the body of thisLicense.
9. The Free Software Foundation may publish revised and/or new versionsof the General Public License from time to time. Such new versions will besimilar in spirit to the present version, but may differ in detail to addressnew problems or concerns.
Each version is given a distinguishing version number. If the Program spec-ifies a version number of this License which applies to it and “any later ver-sion”, you have the option of following the terms and conditions either ofthat version or of any later version published by the Free Software Foundation.If the Program does not specify a version number of this License, you maychoose any version ever published by the Free Software Foundation.
10. If you wish to incorporate parts of the Program into other free programswhose distribution conditions are different, write to the author to ask for per-mission. For software which is copyrighted by the Free Software Foundation,write to the Free Software Foundation; we sometimes make exceptions for this.
324 The GNU General Public License
BTh
eG
NU
Ge
ne
ralPub
licLic
en
se
Our decision will be guided by the two goals of preserving the free status ofall derivatives of our free software and of promoting the sharing and reuse ofsoftware generally.
No Warranty
11. Because the program is licensed free of charge, there is no warrantyfor the program, to the extent permitted by applicable law. Except whenotherwise stated in writing the copyright holders and/or other parties pro-vide the program “as is” without warranty of any kind, either expressedor implied, including, but not limited to, the implied warranties of mer-chantability and fitness for a particular purpose. The entire risk as to thequality and performance of the program is with you. Should the programprove defective, you assume the cost of all necessary servicing, repair orcorrection.
12. In no event unless required by applicable law or agreed to in writingwill any copyright holder, or any other party who may modify and/or re-distribute the program as permitted above, be liable to you for damages,including any general, special, incidental or consequential damages arisingout of the use or inability to use the program (including but not limited toloss of data or data being rendered inaccurate or losses sustained by youor third parties or a failure of the program to operate with any other pro-grams), even if such holder or other party has been advised of the possibil-ity of such damages.
End of Terms and Conditions
How to Apply These Terms to Your New Programs
If you develop a new program, and you want it to be of the greatest possi-ble use to the public, the best way to achieve this is to make it free softwarewhich everyone can redistribute and change under these terms.
To do so, attach the following notices to the program. It is safest to attachthem to the start of each source file to most effectively convey the exclusionof warranty; and each file should have at least the “copyright” line and apointer to where the full notice is found.
one line to give the program’s name and a brief idea of what it does.Copyright (C) 19yy name of authorThis program is free software; you can redistribute it and/or
modify it under the terms of the GNU General Public License as
325SuSE Linux – Enterprise Server 8
published by the Free Software Foundation; either version 2 ofthe License, or (at your option) any later version.
This program is distributed in the hope that it will be useful,but WITHOUT ANY WARRANTY; without even the implied war-ranty of MERCHANTABILITY or FITNESS FOR A PARTICULARPURPOSE. See the GNU General Public License for more details.
You should have received a copy of the GNU General PublicLicense along with this program; if not, write to the Free SoftwareFoundation, Inc., 675 Mass Ave, Cambridge, MA 02139, USA.
Also add information on how to contact you by electronic and paper mail.
If the program is interactive, make it output a short notice like this when itstarts in an interactive mode:
Gnomovision version 69, Copyright (C) 19yy name of authorGnomovision comes with ABSOLUTELY NO WARRANTY; for
details type ‘show w’. This is free software, and you are welcometo redistribute it under certain conditions; type ‘show c’ for de-tails.
The hypothetical commands show w and show c should show the appro-priate parts of the General Public License. Of course, the commands you usemay be called something other than show w and show c ; they could even bemouse–clicks or menu items — whatever suits your program.
You should also get your employer (if you work as a programmer) or yourschool, if any, to sign a “copyright disclaimer” for the program, if necessary.Here is a sample; alter the names:
Yoyodyne, Inc., hereby disclaims all copyright interest in theprogram ‘Gnomovision’ (which makes passes at compilers) writ-ten by James Hacker.
Signed by Ty Coon, 1 April 1989Ty Coon, President of Vice
This General Public License does not permit incorporating your program intoproprietary programs. If your program is a subroutine library, you may con-sider it more useful to permit linking proprietary applications with the li-brary. If this is what you want to do, use the GNU Library General Public Li-cense instead of this License.
326 The GNU General Public License

Bibliography
[Alm94] ALMESBERGER, Werner: LILO User’s guide, 1994. – (see file /usr/doc/lilo/user.dvi )
[Bai97] BAILEY, Edward C.: Maximum RPM. Red Hat, 1997. – (ISBN1-888172-78-9)
[CAR93] COSTALES, Bryan; ALLMAN, Eric ; RICKERT, Neil: sendmail.O’Reilly & Associates, Inc., 1993. – (ISBN 1-56592-056-2)
[CB96] CHESWICK, William R.; BELLOVIN, Steven M.: Firewalls und Sicher-heit im Internet. Addison Wesley GmbH, 1996. – (ISBN 3-89319-875-x)
[CR91] CAMERON, Debra; ROSENBLATT, Bill: Learning GNU Emacs.O’Reilly & Associates, Inc., 1991. – (ISBN 0 937175-84-6)
[CZ96] CHAPMAN; ZWICKY: Einrichten von Internet Firewalls. Sicherheit imInternet gewährleisten.. O’Reilly & Associates, Inc., 1996. – (ISBN3-930673312)
[Daw95] DAWSON, Terry: Linux NET-2/NET-3 HOWTO, v2.8, 07 Jan 1995. –(see file /usr/doc/howto/NET-2-HOWTO )
[FCR93] FANG, Chin; CROSSON, Bob ; RAYMOND, Eric S.: The Hitchhiker’sGuide to X386/XFree86 Video Timing (or, Tweaking your Monitorfor Fun and Profit), 1993. – (see file /usr/X11/lib/X11/doc/VideoModes.doc )
[Fri93] FRISCH, Æleen: Essential System Administration. O’Reilly & Asso-ciates, Inc., 1993. – (ISBN 0-937175-80-3)
[Gil92] GILLY, Daniel: UNIX in a nutshell: System V Edition. O’Reilly &Associates, Inc., 1992. – (ISBN 1-56592-001-5)

[GMS93] GOOSSENS, Michel; MITTELBACH, Frank ; SAMARIN, Alexander:The LATEX Companion. Addison Wesley GmbH, 1993. – (ISBN 3-54199-8)
[Gri94] GRIEGER, W.: Wer hat Angst vorm Emacs?. Addison Wesley GmbH,1994. – (ISBN 3-89319-620-X)
[GS93] GARFINKEL, Simson; SPAFFORD, Gene: Practical UNIX Security.O’Reilly & Associates, Inc., 1993. – (ISBN 0-937175-72-2)
[Her92] HEROLD, H.: UNIX Grundlagen. Addison Wesley GmbH, 1992. –(ISBN 3-89319-542-8)
[HHMK96]HETZE, Sebastian; HOHNDEL, Dirk; MÜLLER, Martin ; KIRCH,Olaf: Linux Anwenderhandbuch. 6. LunetIX Softfair, 1996. – (ISBN3-929764-05-9)
[Hof97] HOFFMANN, Erwin: EMail-Gateway mit qmail. In: iX 12 (1997), S.108ff
[Hun95] HUNT, Craig: TCP/IP Netzwerk Administration. O’Reilly & Asso-ciates, Inc., 1995. – (ISBN 3-930673-02-9)
[Kie95] KIENLE, Micheal: TIS: Toolkit für anwendungsorientierte Firewall-Systeme. In: iX 8 (1995), S. 140ff
[Kir95] KIRCH, Olaf: LINUX Network Administrator’s Guide. O’Reilly &Associates, Inc., 1995. – (ISBN 1-56592-087-2)
[Kof95] KOFLER, M.: Linux. Addison Wesley GmbH, 1995. – (ISBN 3-89319-796-6)
[Kop94] KOPKA, Helmut: LATEX-Einführung. Addison Wesley GmbH, 1994.– (ISBN 3-89319-664-1)
[Kun95] KUNITZ, Ulrich: Sicherheit fast kostenlos: Einrichtung eineskostenlosen Firewall-Systems. In: iX 9 (1995), S. 176ff
[Lam90] LAMB, Linda: Learning the vi Editor. O’Reilly & Associates, Inc.,1990. – (ISBN 0-937175-67-6)
[Lam94] LAMPORT, Leslie: LATEX User’s Guide and Reference Manual. AddisonWesley GmbH, 1994. – (ISBN 0-201-52983-1)
[Lef96a] LEFFLER, Sam: HylaFAX Home Page, 1996
[Lef96b] LEFFLER, Sam: TIFF Software, 1996
328 Bibliography
BSe
cu
reN
etw
orks
[OT92] O’REILLY, Tim; TODINO, Grace: Manging UUCP and Usenet.O’Reilly & Associates, Inc., 1992. – (ISBN 0-937175-93-5)
[Per94] PERLMAN, G.: Unix For Software Developers. Prentice-Hall, 1994. –(ISBN 13-932997-8)
[Pug94] PUGH, K.: UNIX For The MS-DOS User. Prentice-Hall, 1994. –(ISBN 13-146077-3)
[SB92] SCHOONOVER, M.; BOWIE, J.: GNU Emacs. Addison WesleyGmbH, 1992. – (ISBN 0-201-56345-2)
[Sch98] SCHEIDERER, Jürgen: Sicherheit Kostenlos - Firewall mit Linux. In:iX 12 (1998)
[Sto98] STOLL, Clifford: Kuckucksei; Die Jagd auf die deutschen Hacker, diedas Pentagon knackten. Fischer-TB.-Vlg., 1998. – (ISBN 3596139848)
[SuS02a] SuSE Linux. Basics. 1. Nürnberg : SuSE Linux AG, 2002
[SuS02b] SuSE Linux. User Guide. 1. Nürnberg : SuSE Linux AG, 2002
[SuS02c] SuSE Linux. Applications. 1. Nürnberg : SuSE Linux AG, 2002
[The96] THE XFREE86™-TEAM: XF86Config(4/5) - Configuration File forXfree86™, 1996. – Manual-Page zu XFree86™
[TSP93] TODINO, Grace; STRANG, John ; PEEK, Jerry: Learning the UNIXoperating system. O’Reilly & Associates, Inc., 1993. – (ISBN 1-56592-060-0)
[Tun99] TUNG, Brian: Kerberos: A Network Authentication System. Fischer-TB.-Vlg., 1999. – (ISBN 0-201-37924-4)
[Wel94] WELSH, Matt: Linux Installation and Getting Started. 2. SuSE LinuxAG, 1994. – (ISBN 3-930419-03-3)
[WK95] WELSH, Matt; KAUFMAN, Lars: Running Linux. O’Reilly & Asso-ciates, Inc., 1995. – (ISBN 1-56592-100-3)
329SuSE Linux – Enterprise Server 8

Index
symbols/etc/conf.modules . . . . . . . . . . . . . . . . . . 135/etc/modules.conf . . . . . . . . . . . . . . . . . . 135
Aaddresses
- IP . . . . . . . . . . . . . . . . . . . . . . . . . . . . . . . 199- MAC . . . . . . . . . . . . . . . . . . . . . . . . . . . . 199
Apache . . . . . . . . . . . . . . . . . . . . . . . . . . . . . . . . . . 139- Squid . . . . . . . . . . . . . . . . . . . . . . . . . . . . 275
APM . . . . . . . . . . . . . . . . . . . . . . . . . . . . . . . . . . . . 183AppleTalk . . . . . . . . . . . . . . . . . . . . . . see Netatalk
BBash
- .bashrc . . . . . . . . . . . . . . . . . . . . . . . . . . . 139- .profile . . . . . . . . . . . . . . . . . . . . . . . . . . 139- profile . . . . . . . . . . . . . . . . . . . . . . . . . . . 139
BIND . . . . . . . . . . . . . . . . . . . . . . . . . . . . . . . 221–229- BIND8 . . . . . . . . . . . . . . . . . . . . . . . . . . . 223- BIND9 . . . . . . . . . . . . . . . . . . . . . . . . . . . 223
booting . . . . . . . . . . . . . . . . . . . . . . . . . . . . . 155–191
Ccards
- graphics . . . . . . . . . . . . . . . . . . . . . . . . . . 38- network
· testing . . . . . . . . . . . . . . . . . . . . . . . . 209clients
- diskless . . . . . . . . . . . . . . . . . . . . . . . . . . 243commands
- free . . . . . . . . . . . . . . . . . . . . . . . . . . . . . . 143- lpr . . . . . . . . . . . . . . . . . . . . . . . . . . . . . . . . 68
conf.modules . . . . . . . . . . . . . . . . . . . . . . . . . 135configuration files . . . . . . . . . . . . . . . . . . . . . . . 212
- .bashrc . . . . . . . . . . . . . . . . . . . . . . 139, 142
- .lpoptions . . . . . . . . . . . . . . . . . . 100, 103- .profile . . . . . . . . . . . . . . . . . . . . . . . . . . 139- .xsession . . . . . . . . . . . . . . . . . . . . . . . . . 291- afpd.conf . . . . . . . . . . . . . . . . . . . . . . . . 255- AppleVolumes.default . . . . . . . . . . . 256- AppleVolumes.system . . . . . . . . . . . 257- atalk . . . . . . . . . . . . . . . . . . . . . . . . . . . . . 254- atalkd.conf . . . . . . . . . . . . . . . . . . . . . . 254- crontab . . . . . . . . . . . . . . . . . . . . . . . . . . 139- csh.cshrc . . . . . . . . . . . . . . . . . . . . . . . . . 146- cups
· lpoptions . . . . . . . . . . . . . . . . . . . . . 103- cupsd.conf . . . . . . . . . . . . . . . . . . . . . . . . 96- defaultdomain . . . . . . . . . . . . . . . . . . . 233- dhcp . . . . . . . . . . . . . . . . . . . . . . . . . . . . . 213- dhcpd.conf . . . . . . . . . . . . . . . . . . . . . . 240- exports . . . . . . . . . . . . . . . . 237, 238, 273- group . . . . . . . . . . . . . . . . . . . . . . . . . . . . 187- groups . . . . . . . . . . . . . . . . . . . . . . . . . . . 234- host.conf . . . . . . . . . . . . . . . . . . . 162, 213
· alert . . . . . . . . . . . . . . . . . . . . . . . . . . 214· multi . . . . . . . . . . . . . . . . . . . . . . . . . 214· nospoof . . . . . . . . . . . . . . . . . . . . . . . 214· order . . . . . . . . . . . . . . . . . . . . . . . . . 214· trim . . . . . . . . . . . . . . . . . . . . . . . . . . 214
- HOSTNAME . . . . . . . . . . . . . . . . . . . . 218- hosts . . . . . . . . . . . . . . . . . . . . . . . 187, 213- httpd.conf . . . . . . . . . . . . . . . . . . . . . . . 139- ifcfg-* . . . . . . . . . . . . . . . . . . . . . . . . . . . . 212- inetd.conf . . . . . . . . . . . . . . 100, 128, 251- inittab . . . . . . . . . . . . 143, 156, 158, 189- language . . . . . . . . . . . . . . . . . . . 145, 146- localtime . . . . . . . . . . . . . . . . . . . . . . . . 169- logrotate.conf . . . . . . . . . . . . . . . . . . . . 140- lpd.conf . . . . . . . . . . . . . . . . . . . . . . . . . . 76
- lpd.perms . . . . . . . . . . . . . . . . . . . . . . . . 76- lpdfilter . . . . . . . . . . . . . . . . . . . . . . . 81, 83- modules.conf . . . . . . . . . . . . . 69, 71, 72- named.conf . . . . . . . . . . . . 221–229, 267- netatalk.conf . . . . . . . . . . . . . . . . . . . . . 259- network . . . . . . . . . . . . . . . . . . . . . . . . . 213- networks . . . . . . . . . . . . . . . . . . . . . . . . 213- nscd.conf . . . . . . . . . . . . . . . . . . . . . . . . 216- nsswitch.conf . . . . . . . . . . . . . . . . . . . . 215- ntp.conf . . . . . . . . . . . . . . . . . . . . . . . . . 190- options . . . . . . . . . . . . . . . . . . . . . . . . . . 283- papd.conf . . . . . . . . . . . . . . . . . . . . . . . 258- passwd . . . . . . . . . . . . . . . . . . . . . 187, 234- printcap . . . . . . . . . . . . . . 76, 81, 82, 187- profile . . . . . . . . . . . . . . . . . 139, 142, 146- rc.config . . 26, see configuration files,
sysconfig- resolv.conf . . . . . . . . . . . . . 143, 217, 265- routes . . . . . . . . . . . . . . . . . . . . . . . . . . . 219- sendmail.cf . . . . . . . . . . . . . . . . . . . . . . 177- services . . . . . . . . . . . . . . . . . . . . . . . . . . 251- smb.conf . . . . . . . . . . . . . . . 100, 246, 247- squid . . . . . . . . . . . . . . . . . . . . . . . . . . . . 266- squid.conf . . . . . . . . . 266–273, 275, 278- squidguard.conf . . . . . . . . . . . . . . . . . 278- sshd_config . . . . . . . . . . . . . . . . . . . . . . 292- suseconfig . . . . . . . . . . . . . . . . . . . . . . . 163- SuSEfirewall2 . . . . . . . . . . . . . . . 285–287- suseservers . . . . . . . . . . . . . . . . . . . . . . 182- sysconfig . . . . . . . . . . . . . . . . . . . . 162–164- TextConfig . . . . . . . . . . . . . . . . . . . . . . . 170- wireless . . . . . . . . . . . . . . . . . . . . . . . . . 213- XF86Config . . . . . . . . . . . . . . . . . . . 35, 43
· device . . . . . . . . . . . . . . . . . . . . . . . . . 46· monitor . . . . . . . . . . . . . . . . . . . . . . . . 47· screen . . . . . . . . . . . . . . . . . . . . . . . . . 45
- yp.conf . . . . . . . . . . . . . . . . . . . . . 190, 233- ypbind . . . . . . . . . . . . . . . . . . . . . . . . . . 234
configuring . . . . . . . . . . . . . . . . . . . . . . . . . . . . . . 162- DHCP . . . . . . . . . . . . . . . . . . . . . . . . . . . 240- DNS . . . . . . . . . . . . . . . . . . . . . . . . . . . . . 221- graphics cards . . . . . . . . . . . . . . . . . . . . 38- IPv6 . . . . . . . . . . . . . . . . . . . . . . . . . . . . . 211- Netatalk . . . . . . . . . . . . . . . . . . . . . . . . . 254- networks
· manually . . . . . . . . . . . . . . . . . 211–220- printing . . . . . . . . . . . . . . . . . . . . . . . 61–68- routing . . . . . . . . . . . . . . . . . . . . . . . . . . 219- Samba . . . . . . . . . . . . . . . . . . . . . . 247–252- Squid . . . . . . . . . . . . . . . . . . . . . . . . . . . . 267- system . . . . . . . . . . . . . . . . . . . . . . . . . . . 163- YaST2 . . . . . . . . . . . . . . . . . . . . . . . . . . . . . . 9
consoles
- assigning . . . . . . . . . . . . . . . . . . . . . . . . 143- fonts . . . . . . . . . . . . . . . . . . . . . . . . . . . . . 169- framebuffer . . . . . . . . . . . . . . . . . . . . . . 169- switching . . . . . . . . . . . . . . . . . . . . . . . . 143
core files . . . . . . . . . . . . . . . . . . . . . . . . . . . . . . . . 142cron . . . . . . . . . . . . . . . . . . . . . . . . . . . . . . . . 139, 170
- removing core files . . . . . . . . . . . . . . 171- removing temporary files . . . . . . . 170
Ddaemons
- autofs . . . . . . . . . . . . . . . . . . . . . . . . . . . 168- lpd . . . . . . . . . . . . . . . . . . . . . . . . . . . . . . . 76- ssh . . . . . . . . . . . . . . . . . . . . . . . . . . . . . . 186
depmod . . . . . . . . . . . . . . . . . . . . . . . . . . . . . . . . . 134DHCP . . . . . . . . . . . . . . . . . . . . . . . . . 179, 239–243
- configuring . . . . . . . . . . . . . . . . . 240–243- dhcpd . . . . . . . . . . . . . . . . . . . . . . . 240–242- packages . . . . . . . . . . . . . . . . . . . . . . . . 239- server . . . . . . . . . . . . . . . . . . . . . . . 240–242- starting . . . . . . . . . . . . . . . . . . . . . . . . . . 241- static . . . . . . . . . . . . . . . . . . . . . . . . . . . . 242
display configuration . . . . . . . . . . . . . . . . . . . . . 15DMA
- disabling . . . . . . . . . . . . . . . . . . . . . . . . 173- enabling . . . . . . . . . . . . . . . . . . . . . . . . . 173
DNS . . . . . . . . . . . . . . . . . . . . . . . . . . . . . . . . 202–203- BIND . . . . . . . . . . . . . . . . . . . . . . . 221–229- configuring . . . . . . . . . . . . . . . . . 221–230- forwarding . . . . . . . . . . . . . . . . . . . . . . 222- logging . . . . . . . . . . . . . . . . . . . . . . . . . . 225- mail exchanger . . . . . . . . . . . . . . . . . . 203- NIC . . . . . . . . . . . . . . . . . . . . . . . . . . . . . 203- options . . . . . . . . . . . . . . . . . . . . . . . . . . 223- reverse lookup . . . . . . . . . . . . . . . . . . 228- server . . . . . . . . . . . . . . . . . . . . . . . . . . . . . 18- Squid and . . . . . . . . . . . . . . . . . . . . . . . 266- starting . . . . . . . . . . . . . . . . . . . . . . . . . . 221- top level domain . . . . . . . . . . . . . . . . 203- troubleshooting . . . . . . . . . . . . . . . . . . 221- zones . . . . . . . . . . . . . . . . . . . . . . . . . . . . 225
· files . . . . . . . . . . . . . . . . . . . . . . . . . . . 226DOS
- sharing files . . . . . . . . . . . . . . . . . . . . . 246driver CD . . . . . . . . . . . . . see YaST2,driver CDDVB cards . . . . . . . . . . . . . . . . . . . . . . . . . . . . . . 172Dynamic Host Configuration Protocol . . . see
DHCP
Ee-mail
- configuring with YaST2 . . . . . . . . . . 16e2fsck
332 Index
- man page . . . . . . . . . . . . . . . . . . . . . . . 315environment variables
- CUPS_SERVER . . . . . . . . . . . . . . . . . . . 95- PRINTER . . . . . . . . . . . . . . . . . . . . . . . . . 77
FFHS . . . . . . . . . . . . . . . . . . . see file systems, FHSfile systems
- FHS . . . . . . . . . . . . . . . . . . . . . . . . . . . . . 138- intermezzo . . . . . . . . . . . . . . . . . . . . . . 174- TeX and . . . . . . . . . . . . . . . . . . . . . . . . . 138
files- printing . . . . . . . . . . . . . . . . . . 77, 79, 101
Firewall . . . . . . . . . . . . . . . . . . . . . . . . . . . . . . . . . . 22firewalls . . . . . . . . . . . . . . . . . . . . . . . 282–284, 287
- packet filters . . . . . . . . . . . . . . . 282, 284- Squid and . . . . . . . . . . . . . . . . . . . . . . . 273- SuSEfirewall2 . . . . . 165, 282, 285–287
· configuring . . . . . . . . . . . . . . 285–287fonts
- Asian . . . . . . . . . . . . . . . . . . . . . . . . . . . . . 49- encodings . . . . . . . . . . . . . . . . . . . . . . . . 49- LaTeX . . . . . . . . . . . . . . . . . . . . . . . . . . . 189- TeX . . . . . . . . . . . . . . . . . . . . . . . . . . . . . . 189- Unicode . . . . . . . . . . . . . . . . . . . . . . . . . . 50- X . . . . . . . . . . . . . . . . . . . . . . . . . . . . . . . . . 48
FTP- servers . . . . . . . . . . . . . . . . . . . . . . . . . . 138
GGDM . . . . . . . . . . . . . . . . . . . . . . . . . . . . . . . . . . . . 172Ghostscript . . . . . . . . . . . . . . . . . . . . . . . . . . . . . . 104
- drivers . . . . . . . . . . . . . . . . . . . . . . . . . . . . 57GNU
- GPL . . . . . . . . . . . . . . . . . . . . . . . . . 319–326graphical interface . . . . . . . . . . . . . . . . . . . . . . . 15graphics adapter . . . . . . . . . . . . . . . . . . . . . . . . . 15group administration . . . . . . see YaST2,group
administrationgs . . . . . . . . . . . . . . . . . . . . . . . . . . . see Ghostscript
Hhardware . . see YaST2,hardware information
- DMA . . . . . . . . . . . . . . . . . . . . . . . . . . . . 173- hotplug . . . . . . . . . . . . . . . . . . . . . . . . . . 173- pcmcia . . . . . . . . . . . . . . . . . . . . . . . . . . 182- power management . . . . . . . . . . . . . 183
help- info pages . . . . . . . . . . . . . . . . . . . . . . . 141- man pages . . . . . . . . . . . . . . . . . . . . . . 141- X . . . . . . . . . . . . . . . . . . . . . . . . . . . . . . . . . 48
II18N . . . . . . . . . . . . . . . . . . . . . . . . . . . . . . . . . . . . 145info pages . . . . . . . . . . . . . . . . . . . . . . . . . . . . . . . 141
- index . . . . . . . . . . . . . . . . . . . . . . . . . . . . 187init . . . . . . . . . . . . . . . . . . . . . . . . . . . . . . . . . . . . . . 156
- inittab . . . . . . . . . . . . . . . . . . . . . . . . . . . 156- scripts . . . . . . . . . . . . . . . . . . . . . . 159–161
initrd . . . . . . . . . . . . . . . . . . . . . . . . . . . . . . . . . . . . 175insmod . . . . . . . . . . . . . . . . . . . . . . . . . . . . . . . . . . 134installation source . . . . see YaST2,installation
sourceinstalling
- autoinstaller . . . . . . . . . . . . . . . . . . . . . 168IP addresses . . . . . . . . . . . . . . . . . . . . . . . . 199–203
- classes . . . . . . . . . . . . . . . . . . . . . . . . . . . 200- dynamic . . . . . . . . . . . . . . . . . . . . . . . . . 188- IPv6 . . . . . . . . . . . . . . . . . . . . . . . . . 204–208
· configuring . . . . . . . . . . . . . . . . . . . 211· netmasks . . . . . . . . . . . . . . . . . . . . . 208· prefixes . . . . . . . . . . . . . . . . . . . . . . . 206· structure . . . . . . . . . . . . . . . . . . . . . . 205
- masquerading . . . . . . . . . . . . . . . 282–284- netmasks . . . . . . . . . . . . . . . . . . . . 200–202- private . . . . . . . . . . . . . . . . . . . . . . . . . . 202
IrDA . . . . . . . . . . . . . . . . . . . . . . . . . . . . . . . . . . . . 174
JJava . . . . . . . . . . . . . . . . . . . . . . . . . . . . . . . . . . . . . 175joysticks
- configuring . . . . . . . . . . . . . . . . . . . . . . 175
KKDM . . . . . . . . . . . . . . . . . . . . . . . . . . . . . . . . . . . . 172
- shut down from . . . . . . . . . . . . . . . . . . 21- shutting down . . . . . . . . . . . . . . . . . . 189
kernel . . . . . . . . . . . . . . . . . . . . . . . . . . . . . . . . . . . 133- modules . . . . . . . . . . . . . . . . . . . . . . . . . 133
kernels- caches . . . . . . . . . . . . . . . . . . . . . . . . . . . 143- modules
· loading . . . . . . . . . . . . . . . . . . . . . . . 175· network card . . . . . . . . . . . . . . . . . 209· parport . . . . . . . . . . . . . . . . . . . . . . . . 69
keyboard- CapsLock . . . . . . . . . . . . . . . . . . . . . . . . 176- delay . . . . . . . . . . . . . . . . . . . . . . . . . . . . 176- layout . . . . . . . . . . . . . . . . . . . . . . 144, 176- mapping . . . . . . . . . . . . . . . . . . . . . . . . 144
· compose . . . . . . . . . . . . . . . . . . . . . . 144· multikey . . . . . . . . . . . . . . . . . . . . . . 144
- NumLock . . . . . . . . . . . . . . . . . . . . . . . 176- repetition rate . . . . . . . . . . . . . . . . . . . 176
333SuSE Linux – Enterprise Server 8
LL10N . . . . . . . . . . . . . . . . . . . . . . . . . . . . . . . . . . . . 145language selection . . . . . . . . . . . . . . . . . . . . . . . . 29LANs
- configuring . . . . . . . . . . . . . . . . . 209–220Linux
- networks and . . . . . . . . . . . . . . . . . . . 195- sharing files with another OS . . 246,
253Linux Standard Base . . . . . . . . . . . . . . . . . . . . 138Local Area Networks . . . . . . . . . . . . . see LANslocale . . . . . . . . . . . . . . . . . . . . . . . . . . . . . . . . . . . . 176locate . . . . . . . . . . . . . . . . . . . . . . . . . . . . . . . . . . . . 177
- updatedb . . . . . . . . . . . . . . . . . . . . . . . . 177log files . . . . . . . . . . . . . . . . . . . . . . . . . . . . . . . . . 140
- Argus . . . . . . . . . . . . . . . . . . . . . . . . . . . 168- boot.msg . . . . . . . . . . . . . . . . . . . . . . . . . 71- messages . . . . . . . . . . . . . . . . . . . 221, 287- Squid . . . . . . . . . . . . . . . . . . 266, 268, 274- XFree86.0.log . . . . . . . . . . . . . . . . . . . . . 35
logging- logrotate
· configuring . . . . . . . . . . . . . . . . . . . 140Logical Volume Manager see YaST2,Logical
Volume Managerlogrotate . . . . . . . . . . . . . . . . . . . . . . . . . . . . . . . . 140lprsetup . . . . . . . . . . . . . . . . . . . . . . . . . . . . . . . . . . 75LSB . . . . . . . . . . . . . . . . see Linux Standard Baselsmod . . . . . . . . . . . . . . . . . . . . . . . . . . . . . . . . . . . 134LVM . . . . . . . . . . . . . . . . . . . . . . . . see YaST2,LVM
MMacOS
- sharing files . . . . . . . . . . . . . . . . . . . . . 253mail
- mail relay . . . . . . . . . . . . . . . . . . . . . . . 172man pages . . . . . . . . . . . . . . . . . . . . . . . . . . . . . . 141
- database . . . . . . . . . . . . . . . . . . . . . . . . . 171masquerading . . . . . . . . . . . . . . . . . . . . . . 282–284
- configuring with SuSEfirewall2 . 285- IP forwarding . . . . . . . . . . . . . . . . . . . 188- ipchains . . . . . . . . . . . . . . . . . . . . . . . . . 283- iptables . . . . . . . . . . . . . . . . . . . . . . . . . . 283- problems . . . . . . . . . . . . . . . . . . . . . . . . 283
memory- RAM . . . . . . . . . . . . . . . . . . . . . . . . . . . . 143
modprobe . . . . . . . . . . . . . . . . . . . . . . . . . . . . . . . 134modules . . . . . . . . . . . . . . . . . . . . . . . . . . . . . . . . . 133
- handling . . . . . . . . . . . . . . . . . . . . . . . . . 134modules.conf . . . . . . . . . . . . . . . . . . . . . . . . . 135mountd . . . . . . . . . . . . . . . . . . . . . . . . . . . . . . . . . 238mouse
- interface . . . . . . . . . . . . . . . . . . . . . . . . . 178
Nname servers . . . . . . . . . . . . . . . . . . . . . . . see DNSName Service Cache Daemon . . . . . . . . . . 216NAT . . . . . . . . . . . . . . . . . . . . . . see masqueradingNetatalk . . . . . . . . . . . . . . . . . . . . . . . . . . . . 253–259
- afpd . . . . . . . . . . . . . . . . . . . . . . . . . . . . . 254- AppleDouble . . . . . . . . . . . . . . . . . . . . 257- atalkd . . . . . . . . . . . . . . . . . . . . . . . . . . . 254- configuring . . . . . . . . . . . . . . . . . 254–258- guest servers . . . . . . . . . . . . . . . . . . . . 255- papd . . . . . . . . . . . . . . . . . . . . . . . . . . . . 254- permissions . . . . . . . . . . . . . . . . . . . . . 256- printing . . . . . . . . . . . . . . . . . . . . . . . . . 258- restrictions . . . . . . . . . . . . . . . . . . . . . . 254- starting . . . . . . . . . . . . . . . . . . . . . . . . . . 258- TCP/IP and . . . . . . . . . . . . . . . . . . . . . 255
network . . . . . . . . . . . . . . . . . . . . . . . . . . . . . . . . . . 16- configuration files . . . . . . . . . . 212–218- DHCP relay agent . . . . . . . . . . . . . . 171- DHCP server . . . . . . . . . . . . . . . . . . . . 171- YaST2 and . . . . . . . . . . . . . . . . . . . . . . . . 16
network card . . . . . . . . . . . . . . . . . . . . . . . . . . . . . 16Network File System . . . . . . . . . . . . . . . see NFSNetwork Information Service . . . . . . . see NISnetwork monitors
- Argus . . . . . . . . . . . . . . . . . . . . . . . . . . . 167networks . . . . . . . . . . . . . . . . . . . . . . . . . . . . . . . . 195
- authentication· Kerberos . . . . . . . . . . . . . . . . . 292–299
- base network address . . . . . . . . . . . 201- broadcast address . . . . . . . . . . . . . . . 202- configuring . . . . . . . 178, 209, 211–220
· IPv6 . . . . . . . . . . . . . . . . . . . . . . . . . . 211- DNS . . . . . . . . . . . . . . . . . . . . . . . . 202–203- integrating . . . . . . . . . . . . . . . . . . 209–220- IP addresses . . . . . . . . . . . . . . . . 199–203- ISDN . . . . . . . . . . . . . . . . . . . . . . . . . . . . 174- local host . . . . . . . . . . . . . . . . . . . . . . . . 202- mail . . . . . . . . . . . . . . . . . . . . . . . . . . . . . 177- monitors
· ArgoUPS . . . . . . . . . . . . . . . . . . . . . 167- netmasks . . . . . . . . . . . . . . . . . . . . . . . . 200- NFS . . . . . . . . . . . . . . . . . . . . . . . . . . . . . 182- printing . . . . . . . . . . . . . . . . . . . . . . . . . . . 97- printing in . . . . . . . . . . . . . . . . . . . . . . 117- routing . . . . . . . . . . . . . . . . . . . . . . 199–202- SSH . . . . . . . . . . . . . . . . . . . . . . . . . . . . . 186- TCP/IP . . . . . . . . . . . . . . . . . . . . . . . . . . 196- testing cards . . . . . . . . . . . . . . . . . . . . 209
news- servers . . . . . . . . . . . . . . . . . . . . . . . . . . 182
NFS . . . . . . . . . . . . . . . . . . . . . . . . . . . . . . . . . 235–238
334 Index
- clients . . . . . . . . . . . . . . . . . . . . . . . . . . . 235- exporting . . . . . . . . . . . . . . . . . . . . . . . . 236- importing . . . . . . . . . . . . . . . . . . . . . . . 235- mounting . . . . . . . . . . . . . . . . . . . . . . . . 235- permissions . . . . . . . . . . . . . . . . . . . . . 237- RPC . . . . . . . . . . . . . . . . . . . . . . . . . . . . . 234- server . . . . . . . . . . . . . . . . . . . . . . . . . . . 182- servers . . . . . . . . . . . . . . . . . . . . . . . . . . 236
NFS servers . . . . . . . . . . . . . . . . . . . . . . . . . . . . . . 18nfsd . . . . . . . . . . . . . . . . . . . . . . . . . . . . . . . . . . . . . 238NIS . . . . . . . . . . . . . . . . . . . . . . . . . . . . . . . . . 231–234
- client . . . . . . . . . . . . . . . . . . . . . . . . . . . . 190- installing . . . . . . . . . . . . . . . . . . . . . . . . 233- masters . . . . . . . . . . . . . . . . . . . . . 231–232- server . . . . . . . . . . . . . . . . . . . . . . . . . . . 233- Server . . . . . . . . . . . . . . . . . . . . . . . . . . . 191- slaves . . . . . . . . . . . . . . . . . . . . . . . 231–232
NNTP- servers . . . . . . . . . . . . . . . . . . . . . . . . . . 182
NSS . . . . . . . . . . . . . . . . . . . . . . . . . . . . . . . . . . . . . 215- databases . . . . . . . . . . . . . . . . . . . . . . . . 215
Oonline update . . . . . . see YaST2,online updateOpenOffice
- printing· CUPS . . . . . . . . . . . . . . . . . . . . . . . . . . 99
OpenSSH . . . . . . . . . . . . . . . . . . . . . . . . . . . see SSHOS/2
- sharing files . . . . . . . . . . . . . . . . . . . . . 246
Ppackage
- 3dpixms . . . . . . . . . . . . . . . . . . . . . . . . 189- a2ps . . . . . . . . . . . . . . . . . . . . . . . . . . . . . 63- aaa_base . . . . . . . . . . . . . . . . . . . . . . . 140- alice . . . . . . . . . . . . . . . . . . . . . . . . . . . 243- bind8 . . . . . . . . . . . . . . . . . . . . . . . . . . . 230- binutils . . . . . . . . . . . . . . . . . . . . . . . 133- cross-ppc64-gcc . . . . . . . . . . . . . 133- cups . . . . . . . . . . . . 62, 96, 99, 101, 128- cups-client . . 62, 63, 69, 101, 119,
128- cups-drivers . . . . . . . . . . . 63, 67, 96- cups-drivers-stp . 63, 67, 96, 99- cups-libs . . . . . . . . . . . . . . . . . . . 62, 63- dhclient . . . . . . . . . . . . . . . . . . . . . . . 240- dhcpcd . . . . . . . . . . . . . . . . . . . . . . . . . 240- fhs . . . . . . . . . . . . . . . . . . . . . . . . . . . . . . 138- file . . . . . . . . . . . . . . . . . . . . . . . . . . . . . 63- findutils-locate . . . . . . . . . . . . 171- ftpdir . . . . . . . . . . . . . . . . . . . . . . . . . 138- gcc . . . . . . . . . . . . . . . . . . . . . . . . . . . . . . 133
- ghostscript-fonts-std . . . . . . 63- ghostscript-library . . . . . . . . . 63- ghostscript-x11 . . . . . . . . . . . . . . 63- glibc-devel . . . . . . . . . . . . . . . . . . . 133- glibc-info . . . . . . . . . . . . . . . . . . . . 147- howtoen . . . . . . . . . . . . . . . . . . . 279, 284- isapnp . . . . . . . . . . . . . . . . . . . . . . . . . . . 71- kernel-source . . . . . . . . . . . . . . . . 133- libcinfo . . . . . . . . . . . . . . . . . . . . . . . 215- logrotate . . . . . . . . . . . . . . . . . . . . . 140- lpdfilter . . . . . . . . . . . . . . . . . . . . . . 63- lprng . . . . . . . . . 63, 76, 118, 120, 128- netatalk . . . . . . . . . . . . . . . . . . . . . . . 253- psutils . . . . . . . . . . . . . . . . . . . . 83, 110- radvd . . . . . . . . . . . . . . . . . . . . . . . . . . . 211- samba-client . . . . . . . . . . 97, 99, 121- squidgrd . . . . . . . . . . . . . . . . . . . . . . . 278- SuSEfirewall2 . . . . . . . . . . . 165, 282- ttmkfdir . . . . . . . . . . . . . . . . . . . . . . . . 50- xntp . . . . . . . . . . . . . . . . . . . . . . . . . . . . 190- yudit . . . . . . . . . . . . . . . . . . . . . . . . . . . . 50
partitioning . . . . . . . . . . see YaST2,partitioningPatch CD update . . . . . . see YaST2,patch CD
updatePCMCIA . . . . . . . . . . . . . . . . . . . . . . . . . . . . . . . . 182permissions . . . . . . . . . . . . . . . . . . . . . . . . . . . . . 186
- default . . . . . . . . . . . . . . . . . . . . . . . . . . . . 21- file permissions . . . . . . . . . . . . . . . . . 141
ports- IrDA . . . . . . . . . . . . . . . . . . . . . . . . . . 74–75- parallel . . . . . . . . . . . . . . . . . . . . . . . . 69–72- scanning . . . . . . . . . . . . . . . . . . . . . . . . . 275- serial . . . . . . . . . . . . . . . . . . . . . . . . . . . . . 75- USB . . . . . . . . . . . . . . . . . . . . . . . . . . . 73–74
PostgreSQL . . . . . . . . . . . . . . . . . . . . . . . . . . . . . . 183power management
- apmd . . . . . . . . . . . . . . . . . . . . . . . . . . . . 183printer installation . . . . . . . . . . . . . . . . . . . . . . . 15printing . . . . . . . . . . . . . . . . . . . . . . . . . . 15, 53–129
- applications, from . . . . . . . . . . . . . . . . 68- banners . . . . . . . . . . . . . . . . . . . . . . . . . . . 67- basics . . . . . . . . . . . . . . . . . . . . . . . . . 54–57- command line, from . . . . . . . . 68, 101- configuring . . . . . . . . . . . . . . . . . . . . 61–68
· CUPS . . . . . . . . . . . . . . . . . . . . . . 96–97· LPRng and lpdfilter . . . . . . . . . . . 75· ports . . . . . . . . . . . . . . . . . . . . . . . 69–75· YaST2 . . . . . . . . . . . . . . . . . . . . . . 62–68
- CUPS . . . . . . . . . . . . . . . . . . . . . . . . 94–104· OpenOffice . . . . . . . . . . . . . . . . . . . . 99
- default queue . . . . . . . . . . . . . . . . . . . 186- drivers . . . . . . . . . . . . . . . . . . . . . . . . 58–59- files . . . . . . . . . . . . . . . . . . . . . . 77, 79, 101
335SuSE Linux – Enterprise Server 8
- filters . . . . . . . . . . . . . . . . . . . . . . . . . . . . . 54· configuring . . . . . . . . . . . . . . . . . . . . 83· custom . . . . . . . . . . . . . . . . . . . . . 91–94· customizing . . . . . . . . . . . . . . . . . . . 83· lpdfilter . . . . . . . . . . . . . . . . . . . . 81–90· troubleshooting . . . . . . . . . . . . . . . . 90
- GDI printers . . . . . . . . . . . . . . . . . . 59–61· configuring . . . . . . . . . . . . . . . . . . . . 88· supported . . . . . . . . . . . . . . . . . . . . . 60
- Ghostscript· drivers . . . . . . . . . . . . . . . . . . . . . 57–59
- IPP . . . . . . . . . . . . . . . . . . . . . . . . . . . . . . . 95- jobs . . . . . . . . . . . . . . . . . . . . . . . . . . . . . . . 55
· processing . . . . . . . . . . . . . . . . . . . . . 98· removing . . . . . . . . . . . . . 77, 80, 102· status . . . . . . . . . . . . . . . . . 77, 79, 101
- languages . . . . . . . . . . . . . . . . . . . . . . . . . 54- lpc . . . . . . . . . . . . . . . . . . . . . . . . . . . . 78–79- lpq . . . . . . . . . . . . . . . . . . . . . . . . . . . . . . . 79- lpr . . . . . . . . . . . . . . . . . . . . . . . . . . . . 77, 79- lprsetup . . . . . . . . . . . . . . . . . . . . . . . . . . 75- network
· troubleshooting . . . . . . . . . . . . . . . 125- network printers . . . . . . . . . . . . . . . . . 97- networks . . . . . . . . . . . . . . . . . . . . . . . . 117- PPD . . . . . . . . . . . . . . . . . . . . . . . . . . . . . . 96- print server . . . . . . . . . . . . . . . . . . . . . 117- print server box . . . . . . . . . . . . . . . . . 117- printer languages . . . . . . . . . . . . . . . . . 54
· ASCII . . . . . . . . . . . . . . . . . . . . . . . . . . 54· ESC . . . . . . . . . . . . . . . . . . . . . . . . . . . . 54· PCL . . . . . . . . . . . . . . . . . . . . . . . . . . . 54· PostScript . . . . . . . . . . . . . . . . . . . . . . 54
- processing . . . . . . . . . . . . . . . . . . . . 55, 98- protocols . . . . . . . . . . . . . . . . . . . . . . . . 118- queues . . . . . . . . . . . . . . . . . . . . 54, 61–62
· controlling . . . . . . . . . . . . . . . . . 78–79· lp . . . . . . . . . . . . . . . . . . . . . . . . . . . . . . 62· managing . . . . . . . . . . . . . 77–80, 101· names . . . . . . . . . . . . . . . . . . . . . . . . . 66· options . . . . . . . . . . . . . . . . . . . . . . . 102· raw . . . . . . . . . . . . . . . . . . . . . . . . . . . . 82· remote . . . . . . . . . . . . . . . . . . . . . 79–80· removing jobs . . . . . . . . . . . . . 77, 80· selecting queues . . . . . . . . . . . . . . . 68· status . . . . . . . . . . . . . . . . . 77, 79, 101
- requirements . . . . . . . . . . . . . . . . . . . . . 57- Samba . . . . . . . . . . . . . . . . . . . . . . . . . . . 247- spoolers . . . . . . . . . . . . . . . . . . . . . . . . . . 54
· lpd . . . . . . . . . . . . . . . . . . . . . . . . . . . . 76- supported printers . . . . . . . . . . . . . . . 57- systems . . . . . . . . . . . . . . . . . . . . . . . . . . . 55- troubleshooting . . . . . . . . 56–57, 80–81
protocols- IPP . . . . . . . . . . . . . . . . . . . . . . . . . . . . . . . 95- SMB . . . . . . . . . . . . . . . . . . . . . . . . . . . . . 246
proxies- advantages . . . . . . . . . . . . . . . . . . . . . . 262- caches . . . . . . . . . . . . . . . . . . . . . . . . . . . 262- FTP . . . . . . . . . . . . . . . . . . . . . . . . . . . . . . 186- HTTP . . . . . . . . . . . . . . . . . . . . . . . . . . . . 186- Squid . . . . . . . . . . . . . . . . . . . . . . . 262–279- transparent . . . . . . . . . . . . . . . . . . . . . . 272
RRFCs . . . . . . . . . . . . . . . . . . . . . . . . . . . . . . . . . . . . 196rmmod . . . . . . . . . . . . . . . . . . . . . . . . . . . . . . . . . . 134root
- locale . . . . . . . . . . . . . . . . . . . . . . . . . . . . 177- working directory . . . . . . . . . . . . . . . 187
routing . . . . . . . . . . . . . . . . . . . . . . . . 199, 219–220- IP forwarding . . . . . . . . . . . . . . . . . . . 188- masquerading . . . . . . . . . . . . . . . 282–284- netmasks . . . . . . . . . . . . . . . . . . . . 200–202- routes . . . . . . . . . . . . . . . . . . . . . . . . . . . 219- static . . . . . . . . . . . . . . . . . . . . . . . . . . . . 219
RPM- database . . . . . . . . . . . . . . . . . . . . . . . . . 168
run level editor . . . . . . . . . . . . . . . . . . . . . . . . . . 26runlevels . . . . . . . . . . . . . . . . . . . . . . . . . . . . 156–158
- changing . . . . . . . . . . . . . . . . . . . . 157–158- editing in YaST2 . . . . . . . . . . . . . . . . 161
SSamba . . . . . . . . . . . . . . . . . . . . . . . . . . . . . . 246–253
- clients . . . . . . . . . . . . . . . . . . 246–247, 252- configuring . . . . . . . . . . . . . . . . . 247–252- help . . . . . . . . . . . . . . . . . . . . . . . . . . . . . 253- installing . . . . . . . . . . . . . . . . . . . . . . . . 247- login . . . . . . . . . . . . . . . . . . . . . . . . . . . . 251- names . . . . . . . . . . . . . . . . . . . . . . . . . . . 246- NetBIOS . . . . . . . . . . . . . . . . . . . . . . . . . 246- optimizing . . . . . . . . . . . . . . . . . . . . . . . 253- permissions . . . . . . . . . . . . . . . . . . . . . 250- printers . . . . . . . . . . . . . . . . . . . . . . . . . . 247- printing . . . . . . . . . . . . . . . . . . . . . . . . . 252- security . . . . . . . . . . . . . . . . . . . . . 250–251- servers . . . . . . . . . . . . . . . . . . . . . . 247–252- shares . . . . . . . . . . . . . . . . . . . . . . 247, 248- SMB . . . . . . . . . . . . . . . . . . . . . . . . . . . . . 246- starting . . . . . . . . . . . . . . . . . . . . . . . . . . 247- stopping . . . . . . . . . . . . . . . . . . . . . . . . . 247- swat . . . . . . . . . . . . . . . . . . . . . . . . . . . . . 251- TCP/IP and . . . . . . . . . . . . . . . . . . . . . 246
SaX2- multihead . . . . . . . . . . . . . . . . . . . . . . . . 40
336 Index
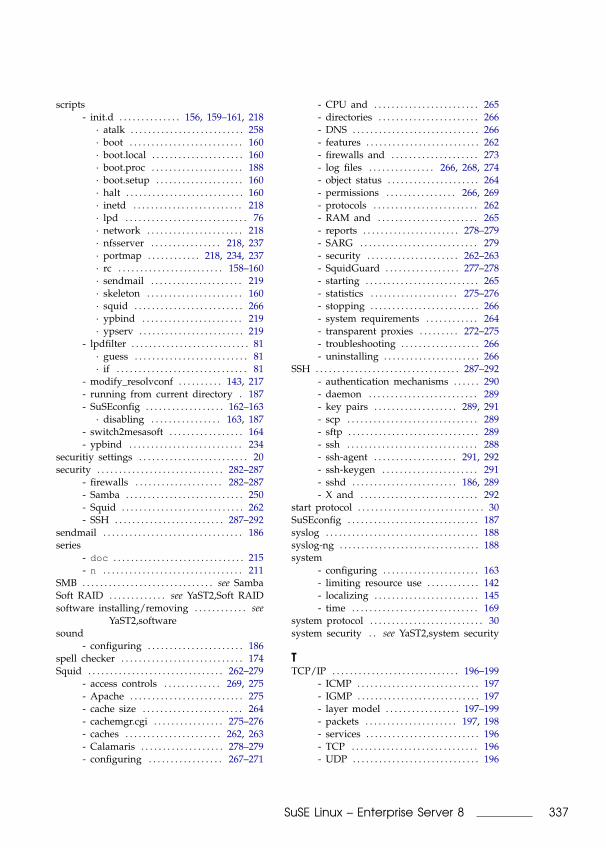
scripts- init.d . . . . . . . . . . . . . . 156, 159–161, 218
· atalk . . . . . . . . . . . . . . . . . . . . . . . . . . 258· boot . . . . . . . . . . . . . . . . . . . . . . . . . . 160· boot.local . . . . . . . . . . . . . . . . . . . . . 160· boot.proc . . . . . . . . . . . . . . . . . . . . . 188· boot.setup . . . . . . . . . . . . . . . . . . . . 160· halt . . . . . . . . . . . . . . . . . . . . . . . . . . . 160· inetd . . . . . . . . . . . . . . . . . . . . . . . . . 218· lpd . . . . . . . . . . . . . . . . . . . . . . . . . . . . 76· network . . . . . . . . . . . . . . . . . . . . . . 218· nfsserver . . . . . . . . . . . . . . . . 218, 237· portmap . . . . . . . . . . . . 218, 234, 237· rc . . . . . . . . . . . . . . . . . . . . . . . . 158–160· sendmail . . . . . . . . . . . . . . . . . . . . . 219· skeleton . . . . . . . . . . . . . . . . . . . . . . 160· squid . . . . . . . . . . . . . . . . . . . . . . . . . 266· ypbind . . . . . . . . . . . . . . . . . . . . . . . 219· ypserv . . . . . . . . . . . . . . . . . . . . . . . . 219
- lpdfilter . . . . . . . . . . . . . . . . . . . . . . . . . . . 81· guess . . . . . . . . . . . . . . . . . . . . . . . . . . 81· if . . . . . . . . . . . . . . . . . . . . . . . . . . . . . . 81
- modify_resolvconf . . . . . . . . . . 143, 217- running from current directory . 187- SuSEconfig . . . . . . . . . . . . . . . . . . 162–163
· disabling . . . . . . . . . . . . . . . . 163, 187- switch2mesasoft . . . . . . . . . . . . . . . . . 164- ypbind . . . . . . . . . . . . . . . . . . . . . . . . . . 234
securitiy settings . . . . . . . . . . . . . . . . . . . . . . . . . 20security . . . . . . . . . . . . . . . . . . . . . . . . . . . . . 282–287
- firewalls . . . . . . . . . . . . . . . . . . . . 282–287- Samba . . . . . . . . . . . . . . . . . . . . . . . . . . . 250- Squid . . . . . . . . . . . . . . . . . . . . . . . . . . . . 262- SSH . . . . . . . . . . . . . . . . . . . . . . . . . 287–292
sendmail . . . . . . . . . . . . . . . . . . . . . . . . . . . . . . . . 186series
- doc . . . . . . . . . . . . . . . . . . . . . . . . . . . . . . 215- n . . . . . . . . . . . . . . . . . . . . . . . . . . . . . . . . 211
SMB . . . . . . . . . . . . . . . . . . . . . . . . . . . . . . see SambaSoft RAID . . . . . . . . . . . . . see YaST2,Soft RAIDsoftware installing/removing . . . . . . . . . . . . see
YaST2,softwaresound
- configuring . . . . . . . . . . . . . . . . . . . . . . 186spell checker . . . . . . . . . . . . . . . . . . . . . . . . . . . . 174Squid . . . . . . . . . . . . . . . . . . . . . . . . . . . . . . . 262–279
- access controls . . . . . . . . . . . . . 269, 275- Apache . . . . . . . . . . . . . . . . . . . . . . . . . . 275- cache size . . . . . . . . . . . . . . . . . . . . . . . 264- cachemgr.cgi . . . . . . . . . . . . . . . . 275–276- caches . . . . . . . . . . . . . . . . . . . . . . 262, 263- Calamaris . . . . . . . . . . . . . . . . . . . 278–279- configuring . . . . . . . . . . . . . . . . . 267–271
- CPU and . . . . . . . . . . . . . . . . . . . . . . . . 265- directories . . . . . . . . . . . . . . . . . . . . . . . 266- DNS . . . . . . . . . . . . . . . . . . . . . . . . . . . . . 266- features . . . . . . . . . . . . . . . . . . . . . . . . . . 262- firewalls and . . . . . . . . . . . . . . . . . . . . 273- log files . . . . . . . . . . . . . . . 266, 268, 274- object status . . . . . . . . . . . . . . . . . . . . . 264- permissions . . . . . . . . . . . . . . . . 266, 269- protocols . . . . . . . . . . . . . . . . . . . . . . . . 262- RAM and . . . . . . . . . . . . . . . . . . . . . . . 265- reports . . . . . . . . . . . . . . . . . . . . . . 278–279- SARG . . . . . . . . . . . . . . . . . . . . . . . . . . . 279- security . . . . . . . . . . . . . . . . . . . . . 262–263- SquidGuard . . . . . . . . . . . . . . . . . 277–278- starting . . . . . . . . . . . . . . . . . . . . . . . . . . 265- statistics . . . . . . . . . . . . . . . . . . . . 275–276- stopping . . . . . . . . . . . . . . . . . . . . . . . . . 266- system requirements . . . . . . . . . . . . 264- transparent proxies . . . . . . . . . 272–275- troubleshooting . . . . . . . . . . . . . . . . . . 266- uninstalling . . . . . . . . . . . . . . . . . . . . . . 266
SSH . . . . . . . . . . . . . . . . . . . . . . . . . . . . . . . . . 287–292- authentication mechanisms . . . . . . 290- daemon . . . . . . . . . . . . . . . . . . . . . . . . . 289- key pairs . . . . . . . . . . . . . . . . . . . 289, 291- scp . . . . . . . . . . . . . . . . . . . . . . . . . . . . . . 289- sftp . . . . . . . . . . . . . . . . . . . . . . . . . . . . . . 289- ssh . . . . . . . . . . . . . . . . . . . . . . . . . . . . . . 288- ssh-agent . . . . . . . . . . . . . . . . . . . 291, 292- ssh-keygen . . . . . . . . . . . . . . . . . . . . . . 291- sshd . . . . . . . . . . . . . . . . . . . . . . . . 186, 289- X and . . . . . . . . . . . . . . . . . . . . . . . . . . . 292
start protocol . . . . . . . . . . . . . . . . . . . . . . . . . . . . . 30SuSEconfig . . . . . . . . . . . . . . . . . . . . . . . . . . . . . . 187syslog . . . . . . . . . . . . . . . . . . . . . . . . . . . . . . . . . . . 188syslog-ng . . . . . . . . . . . . . . . . . . . . . . . . . . . . . . . . 188system
- configuring . . . . . . . . . . . . . . . . . . . . . . 163- limiting resource use . . . . . . . . . . . . 142- localizing . . . . . . . . . . . . . . . . . . . . . . . . 145- time . . . . . . . . . . . . . . . . . . . . . . . . . . . . . 169
system protocol . . . . . . . . . . . . . . . . . . . . . . . . . . 30system security . . see YaST2,system security
TTCP/IP . . . . . . . . . . . . . . . . . . . . . . . . . . . . . 196–199
- ICMP . . . . . . . . . . . . . . . . . . . . . . . . . . . . 197- IGMP . . . . . . . . . . . . . . . . . . . . . . . . . . . . 197- layer model . . . . . . . . . . . . . . . . . 197–199- packets . . . . . . . . . . . . . . . . . . . . . 197, 198- services . . . . . . . . . . . . . . . . . . . . . . . . . . 196- TCP . . . . . . . . . . . . . . . . . . . . . . . . . . . . . 196- UDP . . . . . . . . . . . . . . . . . . . . . . . . . . . . . 196
337SuSE Linux – Enterprise Server 8
time zone selection . . . . . . . . . . . . . . . . . . . . . . 29time zones . . . . . . . . . . . . . . . . . . . . . . . . . . . . . . 169Tridgell, Andrew . . . . . . . . . . . . . . . . . . . . . . . . 246
Uulimit . . . . . . . . . . . . . . . . . . . . . . . . . . . . . . . . . . . 142
- options . . . . . . . . . . . . . . . . . . . . . . . . . . 142user administration . . . . . . . . . . see YaST2,user
administrationusers
- nobody . . . . . . . . . . . . . . . . . . . . . . . . . . 140- working directory . . . . . . . . . . . . . . . 187
VVariable
- CUPS_SERVER. . . . . . . . . . . . . . . . . . . . 95- LANG . . . . . . . . . . . . . . . . . . . . . . . . . . . . 176- LC_* . . . . . . . . . . . . . . . . . . . . . . . . . . . . 176- PATH . . . . . . . . . . . . . . . . . . . . . . . . . . . . . . iv- PRINTER . . . . . . . . . . . . . . . . . . . . . . . . . 77
variables- environment . . . . . . . . . . . . . . . . . . . . . 145
WWDM . . . . . . . . . . . . . . . . . . . . . . . . . . . . . . . . . . . 172web servers
- Apache . . . . . . . . . . . . . . . . . . . . . . . . . . 165- setting up . . . . . . . . . . . . . . . . . . . . . . . 139
whois . . . . . . . . . . . . . . . . . . . . . . . . . . . . . . . . . . . 203Windows
- sharing files . . . . . . . . . . . . . . . . . . . . . 246
XX . . . . . . . . . . . . . . . . . . . . . . . . . . . . . . . . . . . . . . . . . 33
- 3D . . . . . . . . . . . . . . . . . . . . . . . . . . . . . . . . 39- color depth . . . . . . . . . . . . . . . . . . . . . . 190- control protocols . . . . . . . . . . . . . . . . 190- default window manager . . . . . . . 189- display managers . . . . . . . . . . . . . . . 172- display numbers . . . . . . . . . . . . . . . . 190- drivers . . . . . . . . . . . . . . . . . . . . . . . . . . . . 47- fonts . . . . . . . . . . . . . . . . . . . . . . . . . . . . . . 48- GDM . . . . . . . . . . . . . . . . . . . . . . . . . . . . 172- history . . . . . . . . . . . . . . . . . . . . . . . . . . . . 33- KDM . . . . . . . . . . . . . . . . . . . . . . . . . . . . 172- multihead . . . . . . . . . . . . . . . . . . . . . . . . 40- optimizing . . . . . . . . . . . . . . . . . . . . . . . . 43- shutdown . . . . . . . . . . . . . . . . . . . . . . . 189- SSH and . . . . . . . . . . . . . . . . . . . . . . . . 292- virtual screen . . . . . . . . . . . . . . . . . . . . . 46- WDM . . . . . . . . . . . . . . . . . . . . . . . . . . . 172- XFree86 . . . . . . . . . . . . . . . . . . . . . . . . . . . 33
X Window System . . . . . . . . . . . . . . . . . . . . see X
X11 settings . . . . . . . . . . . . . . . . . . . . . . . . . . . . . . 15
YYaST
- ncurses . . . . . . . . . . . . . . . . . . . . . . . . . . . . 3- Tastaturbelegung . . . . . . . . . . . . . . . . . . 3- Textmodus . . . . . . . . . . . . . . . . . . . . . . . . . 3
YaST2- backup . . . . . . . . . . . . . . . . . . . . . . . . . . . 24- configuring system . . . . . . . . . . . . . . . . 9- display configuration . . . . . . . . . . . . . 15- DNS server . . . . . . . . . . . . . . . . . . . . . . . 18- firewall . . . . . . . . . . . . . . . . . . . . . . . . . . . 22- graphical interface . . . . . . . . . . . . . . . . 15- graphics card . . . . . . . . . . . . . . . . . . . . . 15- graphics cards . . . . . . . . . . . . . . . . . . . . 38- group administration . . . . . . . . . . . . . 19- hardware . . . . . . . . . . . . . . . . . . . . . . . . . 15- hardware information . . . . . . . . . . . . 15- installation source . . . . . . . . . . . . . . . . 11- language selection . . . . . . . . . . . . . . . . 29- Logical Volume Manager . . . . . . . . . 27- LVM . . . . . . . . . . . . . . . . . . . . . . . . . . . . . . 27- network . . . . . . . . . . . . . . . . . . . . . . . . . . 16- network configuration . . . . . . 209–211- NFS server . . . . . . . . . . . . . . . . . . . . . . . 18- NIS clients . . . . . . . . . . . . . . . . . . . . . . 233- NIS server . . . . . . . . . . . . . . . . . . . . . . . . 18- online update from console . . . . . . 12- partitioning . . . . . . . . . . . . . . . . . . . . . . . 26- patch CD update . . . . . . . . . . . . . . . . . 15- postfix . . . . . . . . . . . . . . . . . . . . . . . . . . . . 16- printer installation . . . . . . . . . . . . . . . . 15- printing . . . . . . . . . . . . . . . . . . . 15, 62–68
· suppressing autodetection . . . . . 62- rc.config . . . . . . . . . . . . . . . . . . . . . . . . . . 25- routing . . . . . . . 18, see YaST2, routing- runlevel editor . . . . . . . . . . . . . . 26, 161- sendmail . . . . . . . . . . . . . . . . . . . . . . . . . . 16- Soft RAID . . . . . . . . . . . . . . . . . . . . . . . . 28- software installation . . . . . . . . . . . . . . 12- software removal . . . . . . . . . . . . . . . . . 12- sysconfig editor . . . . . . . . . . . . . 25, 163- system security . . . . . . . . . . . . . . . . . . . 20- time zone selection . . . . . . . . . . . . . . . 29- update . . . . . . . . . . . . . . . . . . . . . . . . . . . . 14- user administration . . . . . . . . . . . . . . . 19- vendors driver CD . . . . . . . . . . . . . . . 30- YaST Online Update . . . . . . . . . . . . . 11- Yellow Pages . see YaST2, NIS server- YOU . . . . . . . . . . . . . . . . . . . . . . . . . . . . . . 11
YOU . . . . . . . . . . . . . . . . . . . . . . . . see YaST2,YOU- server list . . . . . . . . . . . . . . . . . . . . . . . 182
338 Index

YP . . . . . . . . . . . . . . . . . . . . . . . . . . . . . . . . . . see NIS ZZope
- configuring . . . . . . . . . . . . . . . . . . . . . . 191