Survey Safety Manual - Oregon Safety Manual . March 2013 . OREGON DEPARTMENT OF TRANSPORTATION ....
96
Survey Safety Manual March 2013 OREGON DEPARTMENT OF TRANSPORTATION GEOMETRONICS UNIT
-
Upload
nguyenthien -
Category
Documents
-
view
216 -
download
1
Transcript of Survey Safety Manual - Oregon Safety Manual . March 2013 . OREGON DEPARTMENT OF TRANSPORTATION ....

Survey Safety Manual March 2013
OREGON DEPARTMENT OF TRANSPORTATION
GEOMETRONICS UNIT


Table of Contents Introduction ............................................................................................ 1
Legal Requirements................................................................................ 1
Responsibilities ....................................................................................... 3 1.1 ODOT Safety and Employee Services Section.......................................3 1.2 Managers ...............................................................................................3 1.3 The Crew Chief ......................................................................................4 1.4 Individual Employee Responsibilities ....................................................5
Employee Safety...................................................................................... 9 2.1 New Employee Orientation ....................................................................9 2.2 Personnel and Routine Job Assignments ................................................9 2.3 Safety Training ..................................................................................... 10 2.4 Return to Work Program ...................................................................... 10 2.5 Reporting Unsafe Working Conditions ................................................ 11
Safety Equipment and Health ............................................................. 13 3.1 First Aid and Supplies .......................................................................... 14
Operational Safety ................................................................................ 17 4.1 Construction Operations ....................................................................... 17 4.2 Cutting Tools, Hand ............................................................................. 17 4.3 Digging Tools, Hand ............................................................................ 18 4.4 Driving Tools, Hand ............................................................................. 19 4.5 Electrical Equipment ............................................................................ 19 4.6 Fence Crossings .................................................................................... 19 4.7 Animal Hazards .................................................................................... 20 4.8 Heat Stress and Sun Exposure .............................................................. 20 4.9 Insect Bites and Stings.......................................................................... 21 4.10 Lasers ................................................................................................... 21 4.11 Lifting ................................................................................................... 22 4.12 Mountainous Terrain ............................................................................ 22 4.13 Night Operations .................................................................................. 22 4.14 Poisoning, Brush .................................................................................. 23 4.15 Power Lines .......................................................................................... 24 4.16 Power Tools .......................................................................................... 24 4.17 Pressurized Spray Cans ........................................................................ 24 4.18 Radio Transmitters ............................................................................... 25 4.19 Working near Railroads ........................................................................ 25
SURVEY SAFETY MANUAL i
4.20 Surveying Sights and Targets .......................................................... 26 4.21 Subsurface and Confined Work Spaces ........................................... 26 4.22 Manhole Covers and Grates ............................................................. 27 4.23 Working in Traffic ........................................................................... 29 4.24 Water Operations ............................................................................. 30 4.25 Vehicles ........................................................................................... 31 4.26 Basic Safety Rules of Operation ...................................................... 32 4.27 Flammables ...................................................................................... 33 4.28 Underground Utilities ...................................................................... 33
Temporary Traffic Control ................................................................. 35 5.0 Introduction...................................................................................... 36 5.01 Bicycle and Pedestrian Considerations ............................................ 37 5.02 Night Operations .............................................................................. 37 5.03 Flagging ........................................................................................... 38 5.1 Setting up the Work Zone ................................................................ 38 5.11 Temporary Traffic Control Zone Components ................................ 38 Figure 2-1S – General Details.......................................................... 39 5.12 Tapers .............................................................................................. 40 Tables 2-1S, 2S, 3S:Taper Lgths. and Channelization Devices .. 40-41 5.13 Device Spacing ................................................................................ 40 5.14 Device Placement ............................................................................ 42 Figure 2-3S – Cone Spacing Example ............................................. 43 5.15 Signs ................................................................................................ 44 Table 2-4S: Suggested Sign Spacing ............................................... 45 5.2 Equipment ........................................................................................ 46 5.21 Signs ................................................................................................ 46 5.22 Sign Supports ................................................................................... 46 5.23 Cones ............................................................................................... 46 5.24 Other ................................................................................................ 47 5.3 Traffic Control – Typical Applications ............................................ 48 5.31 Detail Drawings .............................................................................. 49 Figure 5-1S – Meaning of Symbols on Diagrams ............................ 49 Diagram 5-3S PCMS Details ........................................................... 50 Diagram 5-4S Extended Traffic Queues w/ Single Flagger ............. 51 Diagram 5-6S – Bicycle Signing Example ...................................... 53 5.32 Brief Road Work – Diagram 200S .............................................. 54-55 5.33 Work on Shoulder – Diagram 210S ............................................ 56-57 Table 5-2S: Device and Sign Guidelines for Shoulder Work .......... 56
ii OREGON DEPARTMENT OF TRANSPORTATION

5.34 Shoulder Work with Minor Road Encroachment – Diagram 300S ................................................................................. 58-59 5.35 Lane Closure with Flagging – Diagram 320S ................................ 60-61 5.36 Short Duration Operation Using Flaggers – Diagram 325S ................................................................................. 62-63 5.37 Self-Regulating Lane Closure – Diagram 350S ............................. 64-65 5.38 Work in Center of Low-Speed Road – Diagram 360S ................... 66-67 5.39 2+1 Travel Lanes – Work in Single Lane Direction – Diagram 400S ................................................................................. 68-69 5.40 2+1 Travel Lanes – Work in the Two-Lane Direction – Diagram 410S ................................................................................. 70-71 5.41 Work in a Continuous Left Turn Lane – Diagram 420S ................ 72-73 5.42 Diversion into a Continuous Left Turn Lane – Diagram 430S ................................................................................. 74-75 5.43 Right Lane Closure, Multi-Lane Non-Freeway Road – Diagram 500S ................................................................................. 76-77 5.44 Interior Lane Closure, Multi-Lane Non-Freeway Road – Diagram 510S ................................................................................. 78-79 5.45 Work in the Center of an Intersection – Diagram 630S.................. 80-81 5.46 Freeways ............................................................................................... 82 5.47 Freeway Shoulder Work – Diagram 710S ...................................... 82-83 5.48 Freeway Lane Closures – Diagram 720S ....................................... 84-85 5.49 Work Near an Exit Ramp – Diagram 730S .................................... 86-87
Job/Jobsite Hazard Assessment .......................................................... 89 6.0 Introduction .......................................................................................... 89 Sample Job Hazard Assessment Form .................................................. 91
SURVEY SAFETY MANUAL iii
Revision History
First Release v1.0
July 2009
---------------------
Release v2.0 Update to conform to current version of the Oregon Temporary Traffic Control Handbook
March 2013
--------------------
iv OREGON DEPARTMENT OF TRANSPORTATION

Introduction
This guide is only for Oregon Department of Transportation employees while performing survey work.
Highway surveying occurs in many different hazardous environments. Rugged terrain, high speed traffic, tools used, and construction equipment are some of the elements that typify survey hazards. Most people have one thing in common with many who have experienced an accident: they believe it could not happen to them. A meaningful safety program requires that each employee acknowledge that “it can happen to me.” Each must also ask, “What is my responsibility?” and “What can I do to keep it from happening?”
Legal Requirements
The Oregon Safe Employment Act requires every employer to provide a safe and healthy place of employment. The Oregon Occupational Safety and Health Administration (OR-OSHA) of the Department of Consumer and Business Services administers the Act and has a staff of Occupational Safety Compliance Officers who are authorized to inspect employees’ working conditions throughout the state. They may issue citations for violations of safety regulations which can result in penalties, including fines. These regulations describe the minimum acceptable conditions for the safety and health of employees.
The Oregon Department of Transportation (ODOT) has an active safety program administered by the Safety and Risk Manager, who, with the approval of the Director and Agency management, sets the safety standards. The program is developed to assure the maintenance of these standards and the compliance with OR-OSHA Occupational Safety and Health codes.
SURVEY SAFETY MANUAL 1

2 OREGON DEPARTMENT OF TRANSPORTATION

CHAPTER 1
Responsibilities 1.1 ODOT Safety and Employee Services Section
The ODOT Office of Employee Safety and Statewide Safety Team will conduct an active, effective safety program designed to keep the Department in compliance with the safety and health rules and regulations of the Oregon Occupational Safety and Health Division (OR-OSHA) and Oregon Department of Transportation (ODOT). This program may be delegated to the Region Safety and Health Managers. They will ensure that all equipment and materials are available to carry out this program.
The objective of the program is to prevent work-related injuries and deaths, improve employee health and well-being, and control worker’s compensation costs.
1.2 Managers The Manager is responsible for conditions and performance regarding safety, instructing subordinates about safety policies and practices affecting them and other crew members, and carrying out the more detailed safety procedures stated in this survey manual. The Manager must not knowingly permit an employee to work when his/her ability or alertness is impaired by fatigue or other factors, so that the employee or others might be exposed to injury. The Manager is also responsible for:
• New employee orientation. (See Chapter 2 for details.) • Personnel and routine job assignments. • Ensuring that proper safety equipment is available and used. • Safety training. • Formal corrective action. • Facilitating the Early Return to Work program. • Ensuring that regular safety meetings are held and documented.
SURVEY SAFETY MANUAL 3
1.3 The Crew Chief
The Crew Chief is responsible for seeing that all safety rules and procedures are followed and that all work is performed safely. Do not attempt to delegate this responsibility. The Crew Chief personally must ensure the use of the one best safe method for each operation.
As Crew Chief, you must see that a copy of the Survey Safety Manual is always available to members of your crew. You must enforce all elements of this manual. Job planning is one of your major responsibilities. Discuss the safety aspects of each job with the Manager or your supervisor before beginning a job.
• Incorporate safety in planning each survey. • Develop additional safety practices as required for each job. • Request enough personnel for safe surveying, for providing buddies,
spotters, flaggers, etc. • Always plan around hazards, especially life-threatening hazards such as
traffic. • Avoid assigning crew members to solo-type tasks that isolate them
from other personnel. Try to have each member working with a buddy. (This is especially important in high hazard areas, such as along roads and in remote desert and mountain areas.)
• If it is necessary to work alone, implement a communication plan per ODOT standard STD96010.
You are responsible for ensuring that each crew member possesses or has available the required personal safety equipment. You must see that employees use this equipment as required. If an employee refuses to use required equipment, do not allow him/her to work. Return the crew member to the office if practical and contact your supervisor.
It is your responsibility to make sure any new crew member has been through the employee orientation as outlined in Chapter 4 of this manual. Make sure they have been briefed and trained in the use and location of crew equipment, safety material, survey safety procedures, first aid supplies, and all other needed equipment.
4 OREGON DEPARTMENT OF TRANSPORTATION

It is your responsibility to immediately correct unsafe practices by any member of your crew. If an employee refuses to work safely or is inconsiderate of the safety of other crew members, return the employee to the office and contact your supervisor. If an employee seems to be under the influence of drugs or alcohol, do not let him/her work. If an employee is obviously under the influence, return him/her to the office and report the incident to your supervisor.
Continually monitor employee safety performance and attitudes. Advise your supervisor about each employee’s safety practices and attitudes. Your supervisor will need this information when doing the employee’s performance appraisal.
You are responsible for conducting tailgate safety meetings with crew members when situations occur where safety needs to be emphasized. Keep safety foremost in your crew member’s mind.
See that at least one member of your survey crew has a current first aid card and is willing to offer first aid. Employees should promptly give or obtain aid for an injured person. If first aid training is needed, advise your supervisor. Training will be arranged through the Region Safety and Health Manager. You should thoroughly investigate all accidents and injuries and take corrective action as appropriate. See that all required reports are promptly prepared and submitted.
Promptly notify the Manager and your Safety Manager of any OR-OSHA inspections, anticipated citations, or citations issued.
1.4 Individual Employee Responsibilities
Each employee is responsible for his/her own safety and the safety of co-workers.
Safe Practices. Each employee shall learn the personal and group accident preventions and injury treatments that are described herein and abide by them. Safety procedures and rules are not optional. Deviations are not allowed without prior formal approval. Each employee shall have a practical working knowledge of all of this section of the Manual. In addition, each employee shall be alert to possible violations of safety policies. If violations
SURVEY SAFETY MANUAL 5

are seen and you cannot correct them, you shall report them to your supervisor.
Operational Practices. Each employee must routinely:
• Report unsafe conditions or practices. (See the paragraph Reporting Unsafe Working Conditions below in this topic.)
• Promptly report all accidents and personal injuries to the supervisor. • Render or obtain aid, as needed, for injured persons. • Be alert for hidden hazards. • Be alert for hazards created by changing conditions, either natural or
man made. • Avoid horseplay and practical joking. • Store and secure all equipment and supplies when not in use. These
must not be hazardous to persons or to vehicular operation. • Help keep vehicle and office clean, sanitary, and litter free. • Set aside defective and unsafe tools and supplies for repair or
replacement. Report such problems to your supervisor. • Carry gear such as plumb bobs, hand levels, and hatchets in sheaths.
Do not carry such tools in pants pockets. • Heed all specific practices listed in Operational Safety, Chapter 4 of this
manual. • Not have or use on the job, or transport in state vehicles, any
hazardous or potentially hazard-causing items such as: fireworks, firearms and ammunition, intoxicating beverages and drugs, and pets.
• Before acting, mentally check the safety of each action. • Face oncoming traffic when working on foot and near or on a travel
way. If unable to face traffic, have a co-worker be a “spotter” and watch for you. (See spotter guidelines.) It is advisable to face traffic from any work site within the right-of-way, especially when near, at, or below roadbed level.
Safety Meetings. Attend and participate in tailgate meetings and monthly safety meetings.
6 OREGON DEPARTMENT OF TRANSPORTATION

Proper Attire. Each employee must provide and wear clothing and footwear that provide adequate protection. Survey employees shall wear clothing that completely covers the body, except the head, neck and arms below the point of the shoulders. Work clothing should provide protection from the sun’s rays, heat, cold, and vegetation. Wear clothing that will help keep you from being injured or diverted from safely performing the job at hand.
Foot protection shall meet the Department’s Personal Protective Equipment Policy.
Physical Condition. Each employee must report for work prepared to perform an alert, accident- free, full shift.
Employees will be free from the influence of drugs or alcohol. When a physician gives you a prescription, inquire if the drug might impair your safe functioning. If any impairment might result, ask the doctor what you can and cannot do while taking the medication. Notify your supervisor.
Do not report for work if you are under the influence of intoxicants. Do not report for work if any lingering effects from drinking or medication would diminish your alertness, keep you from reacting quickly, or impair your judgment.
Vehicular Operations. Transportation surveying requires vehicular operations. To operate state vehicles, an employee must:
• Possess a valid driver’s license.
• Attend a defensive driving class. Contact the Region Safety and Health Manager for information on class schedules.
Accident Studies. Vehicle accident reports and investigations must be completed promptly. Employees must participate or cooperate fully in determining the causes and prevention of accidents and injuries.
SURVEY SAFETY MANUAL 7

8 OREGON DEPARTMENT OF TRANSPORTATION

CHAPTER 2
Employee Safety
2.1 New Employee Orientation
Each new employee should be given a copy of the Survey Safety Manual to read and study. Supervisors should make certain the employee understands the basic requirements, and that each employee knows he/she is “responsible for his/her own safety and the safety of others.” Supervisors should be sure each employee knows how to access emergency aid for the areas where he/she works. If the survey crew does not have a radio with which to summon help, the location of the closest medical services should be known. At least one employee on a survey crew must have current first aid certification, and all field personnel should attend a Defensive Driver Training course at least once. The employee should also be briefed on:
• Medical care available through his/her employment.
• Worker’s compensation benefits.
• The role of the Region/District Safety Committee.
• The accident investigation process and its purpose.
• Accident and injury reporting and their purposes.
• His/her right to refuse to perform tasks that are dangerous or hazardous to his/her well being.
• His/her responsibilities in case of personal or motor vehicle accidents.
2.2 Personnel and Routine Job Assignments
Supervisors must consider several things when assigning work. Trained personnel shall be assigned to crews working on jobs that require hazardous tasks, such as using a chain saw, climbing/descending precipitous or slippery slopes, or driving on rough terrain or unimproved roads. Highly allergic personnel must be kept away from jobs where poison oak or other toxic vegetation or substances cannot be avoided.
SURVEY SAFETY MANUAL 9

Before assigning a crew to a new job, determine the hazards that are present and the preventive measures to be taken. Brief the Crew Chief accordingly. In high hazard areas, plan for and brief the Crew Chief on such things as narrow shoulders, escape routes, hospital locations, ambulance service, and rescue agencies. Surveys that are extremely hazardous because of immediate or short-term conditions should be postponed. Before assigning work on or alongside travel ways, determine which traffic controls are required to protect the crew and the public. If extra personnel are needed for flaggers or spotters, assign accordingly.
2.3 Safety Training
All personnel need to know about new safety equipment available and new techniques developed to aid in safe surveying. “Safety” as a topic should be on the agenda of each Crew Chief meeting. Each employee should be scheduled to attend training on “Monitoring Contractors for Safety.” Safety monitoring needs to be continuous. Immediately correct safety deficiencies that are seen on the job. Periodically rate the safety performance of Crew Chiefs and include it in their performance appraisal.
See that adequate safety equipment is in stock and that only safe supplies and equipment are issued. Whenever an employee refuses to work safely or when an employee’s performance is affected by the use of drugs or alcohol, proper corrective action should be taken. The supervisor should encourage the employee to use professional assistance such as the Employee Assistance Program.
2.4 Return to Work Program
When an employee is injured and requires medical attention, the supervisor should request a written medical report signed by the physician within 24 hours of the injury and request weekly status reports of his/her condition. Early release by the physician and return to work should be encouraged. Injured workers may be accommodated temporarily by changing work practices or schedules. Permanently restricted employees may be accommodated with work site modifications where reasonable. If the work site cannot be modified, positions that are suitable may be found outside the immediate work unit but within the section or region. If a permanently
10 OREGON DEPARTMENT OF TRANSPORTATION

restricted worker cannot be placed, the supervisor should contact the Region Personnel Officer. (See Early Return to Work Policy.)
2.5 Reporting Unsafe Working Conditions
All employees have a moral obligation to protect themselves, their co-workers, and the public by immediately reporting safety problems. Employees can report unsafe conditions by:
• Promptly telling his/her immediate supervisor. He/she is often in the best position to take corrective action. If employee’s supervisor is not available, use the chain of command.
• Refusing to work under unsafe conditions. If this occurs, the employee should give specific reasons to the supervisor in writing. The supervisor should request an immediate determination by the Region Safety and Health Manager or a Compliance Official of OR-OSHA as to whether the condition is safe or unsafe. The employee may elect to have a union steward or member of the immediate crew accompany the Region Safety and Health Manager on the safety inspection. Pending determination, the employee should be assigned work elsewhere if available. Time lost by the employee as a result of a refusal to perform work because it is unsafe, or time lost from being sent home shall not be paid for unless the employee’s claim is upheld.
Employees are not required to perform hazardous work or to operate hazardous equipment without at least one other person in the area, although the other person may be performing other related duties.
SURVEY SAFETY MANUAL 11

12 OREGON DEPARTMENT OF TRANSPORTATION

CHAPTER 3
Safety Equipment and Health Each employee is furnished personal safety items which must be prudently and consistently used. Regular issue items include a hard hat, soft cap, and safety vest.
An ANSI approved hard hat must be worn anytime there is a danger from falling or flying objects, or electrical hazards. Inspect the hard hat shell and cradle at least twice a year. If either becomes defective or deformed, replace it. Hard hats should be replaced as needed, based on regular inspection.
State issued or approved soft caps may be worn instead of hard hats in work areas not involving possible falling or flying objects, or electrical hazards. Soft caps may be purchased from the Storeroom, or commercial outlets. They must be highly visible and meet the requirements of the Department’s Personal Protective Equipment Policy. Caps not issued or approved by ODOT Safety are not to be worn while on duty.
A hard hat or approved soft cap must be worn by employees while on the roadway or right of way.
While working on the highway or right of way, outside upper body garments must be strong red, orange, strong yellow-green, or fluorescent versions of these colors and meet ANSI Class 2 requirements.
In addition to the regular issue safety equipment, employees may use such specialty items as:
• Safety Glasses – Wear these when exposed to flying particles, hazardous substances, injurious light rays, or while performing work where the expected hazard is from frontal impact only.
• Goggles – Wear mono-type ventilated goggles when exposed to blowing dust, swirling sand, or other windblown materials.
• Dust Masks – Use these when there is likelihood you will breathe excessive dust. (See ODOT Dust Mask Standard.)
• Gloves – Use them when working in poison oak, brushing line in thorny vegetation, or to protect against puncture, laceration, and splinter wounds.
SURVEY SAFETY MANUAL 13
• Hearing Protection – Whenever operating gasoline chain saws,
jackhammers, or other very noisy tools, use hearing protection. When an employee is exposed to noise levels above 90 decibels, hearing protection is required. Ear plugs and/or muffs shall be available.
• Safety Harnesses and Lifelines – Employees shall be secured by safety harnesses and lifelines whenever they work from unguarded surfaces above open pits or tanks; more than six-feet above water, ground, or floor; on a scaffold more than six feet above the surface; and in any areas where they would otherwise be exposed to dangerous falls.
Employees shall be protected by safety nets when the above procedures are impractical. When required, employees shall use lifelines which are at least 7/8”, wire-core manila rope. Before entering confined spaces, check with Region Safety and Health Manager.
3.1 First Aid and Supplies
One first aid kit should be provided for each employee who is isolated from the survey vehicle and other employees. The 16-unit kit should contain the following:
1 Package – Adhesive Tape, 1/2” x 90” Roll 2 Each – Triangular Bandage 2 Packages – 3” Bandage Compress 1 Package – 1” x 3” Adhesive Bandage (16) 1 Package – 2” Gauze Roller Bandage 1 Package – Bee Sting Relief Swabs 2 Each – 18” x 36” Gauze Compress 1 Package – Antiseptic Wipes 1 Pair – Scissors 1 Each – Rescue Blanket 1 Each – Micro-shield Breather 2 Pair – Gloves, Sterile
The kit should be stored in the primary survey vehicle. One kit should also be provided for each office or for each office unit that works isolated from other units. The kit should be stored where everyone can have easy access to it. All kits must be inspected periodically to ensure the supplies are
14 OREGON DEPARTMENT OF TRANSPORTATION
usable. In addition to the first aid kits, each office and vehicle should have a readily accessible copy of a current First Aid Pocket Reference Manual.
Drinking Water. Use only clean containers which have been designed and used only for drinking water. Communicable diseases have been traced to dirty and improperly maintained water containers. Do not use for cooling or storing canned beverages, juices, etc. Use disposable drinking cups. If ice is added to the water, it should be carried to the water in a sanitary container.
SURVEY SAFETY MANUAL 15

16 OREGON DEPARTMENT OF TRANSPORTATION

CHAPTER 4
Operational Safety
4.1 Construction Operations
Before starting work, employees need to determine potential hazards from the natural environment, the public, and the contractor’s operations. The Crew Chief and the contractor’s foreman should meet to discuss safety conditions in the work area and plan accordingly.
During work, employees should be extremely cautious around heavy and fast-moving equipment, especially on haul roads and around equipment with limited driver visibility. Do not rely on the operator’s visibility, judgment, or ability. Establish communication with the operator before walking in front of or behind any piece of equipment. Use spotters as conditions dictate. It may be necessary to suspend survey operations when uncontrollable hazards develop and to resume work only when safe working conditions have been restored.
Display and use safety devices and gear as required and as needed for maximum safety. Notify the Project Manager of any unsafe operations or conditions on the project, especially if there is a lack of cooperation from the contractor. Do not ride in or on the contractor’s construction equipment. Do not walk on girders or along edges of raised platforms without guardrails unless safety nets are in place or safety lines are used. Do not work on or traverse any walkway, ramp, or other elevated structure over six-feet tall without using a safety harness and lifeline unless guard rails or safety nets are provided. Appropriate training is also required.
4.2 Cutting Tools, Hand
Make sure you use the right type and size of tool for each operation. Keep all cutting tools sharp. When you sharpen a tool, use a file that has a handle. Turn dull saws in for replacement. When not in use, sheathe or store tools so the cutting edge is not exposed. Store and carry machetes and axes in the leather sheaths provided. Do not use tools with splintered or loose handles. It is important that you properly use each tool.
SURVEY SAFETY MANUAL 17
Machetes – Don’t sharpen machete blades without a hand guard within 6” of the handle. Use gloves to protect your hands, especially in briars or thorny bushes. While chopping, lean forward if possible and always chop away from the body. Swing with a full swing, but do not over swing or swing too hard. Before cutting larger vegetation, clear away small vines, etc. Do not use machetes for heavy cutting. If practical use long-handled lopping shears instead when cutting thorny bushes or briars.
Machetes are very dangerous if not used with extreme caution. Only use the machete when you have a firm grip on the handle and secure, balanced footing. Be careful to not over-swing or swing toward legs or feet. Take care to avoid glancing blows which can ricochet back toward the tool user. Do not allow co-workers to stand nearby.
Axes and Brush Hooks – Clear away any impeding light growth with a machete or hatchet before chopping. Make sure you allow ample space between adjacent choppers and keep others outside the area. Always carry an axe or brush hook with the handle gripped behind the head and the cutting edge facing outward. Do not use double-bit axes. For extended heavy brushing, use a small chain saw instead.
4.3 Digging Tools, Hand
These include tools such as picks, shovels, and digging bars. While using a pick, do not use a pick head that is either sharply pointed or badly blunted. Make certain the head is “bound” tightly to a good handle before swinging. Allow ample space for swinging and do not over swing on the back swing. You should wear eye protection when digging in very hard material. As you swing, squat by flexing the knees so the pick handle will be horizontal when the point strikes the earth. This will also keep the point away from your feet.
Use a round-pointed shovel for digging in hard earth. Do not use the shovel as a pry bar. Also, do not use the shovel as you would a digging bar. Place the blade of the shovel on the earth and force it into the ground with your foot. Always keep one foot on the ground.
When using a digging bar, work with the feet widespread. Hold the bar close to the body and lift and drop it vertically. Keep the point sharp enough to do the job without having to lift the bar excessively high. Do not use a bar that is bent.
18 OREGON DEPARTMENT OF TRANSPORTATION

4.4 Driving Tools, Hand
Always use the correct type and size tool for each driving operation. Check for defects before using. Do not use hatchets, axes, or other wood cutting or driving tools for driving or hammering metal. Never strike brittle or mushroomed metal with a hammer because bits of steel might chip off and cause serious injury. This especially applies to frost pins. Use safety glasses when driving or cutting metal. Do not use tools with splintered or loose handles or with mushroomed or cracked heads. Allow ample space for swinging and swing so that the handle is horizontal when the face of the driving head contacts the object being driven. With long-handled sledges, this requires flexing the knees to lower the body during the swing. When squatting, use either a short-handled tool, or keep the long handle from between your legs (to avoid groin injuries). Never hold an object for someone to drive by full-swinging. When driving masonry nails, spikes, and stakes into asphalt pavement or very hard earth, use extra care. Be sure the object being driven is well started before releasing it and driving it with full swings of the hammer.
4.5 Electrical Equipment Use only portable electric hand tools that are double insulated or that have a grounding wire. Do not remove grounding wires or prongs. Do not use any equipment that has a cord with broken insulation, or a damaged plug or socket. Do not use electrical equipment when you or the equipment is standing in water or on saturated soil.
4.6 Fence Crossings It is best to use gates whenever possible and avoid fence crossings. Do not attempt to carry anything when climbing on or over obstacles. Cross barbed wire fences at the center of a span and have a co-worker hold the wire(s) for you. When stepping over a barbed wire fence, lay a piece of heavy canvas, such as an empty materials bag, over the top strand.
SURVEY SAFETY MANUAL 19
4.7 Animal Hazards
You must assume that all animals are potentially dangerous. Have owner’s secure hostile-acting animals before entering enclosures containing such animals. Do not enter an enclosure with high fences if a hazardous animal is within. Carry a pointed lath or something similar to ward off an attacking animal. Retreat is usually advisable but do not turn your back and run unless you can reach a haven safely. Do not approach, attempt to capture, kill, or pet either domesticated or wild animals. This includes snakes and other reptiles. Be especially wary of animals that appear sick, animals with young, stallions, bulls, and guard dogs. Do not approach dead or seemingly dead animals, fowl, or reptiles.
4.8 Heat Stress and Sun Exposure Heat stress and damage to skin can result from the summer heat and excessive sunlight. Employees should follow the preventive measures listed below.
• Wear head coverings (a hard hat when required) that allow free air circulation and provide shade from the sun.
• Wear light-colored, loose-fitting clothing that minimizes skin exposure. Apply sun block to exposed skin.
• Drink enough fluids. Begin drinking before you feel thirsty. Water and “athletic” drinks like Gatorade are recommended. Caffeinated drinks (coffee, tea and sodas) are not as effective at keeping the body properly hydrated.
Crew Chiefs need to provide a constant, readily available supply of potable water and see that employees wear proper attire. When the heat is extreme and the survey requires considerable exertion, the Manager should schedule work for cooler times of the day.
A typical symptom of heat cramps is cramping of the muscles, especially in the legs, arms, and abdomen. It usually occurs when someone is doing strenuous activity in a warm environment, where large amounts of sweat are lost. Treatment includes direct pressure on the muscle, gentle steady stretching, and rest. Drink water to help balance sodium. If the problem persists, seek additional medical attention.
20 OREGON DEPARTMENT OF TRANSPORTATION

The signs and symptoms of heat exhaustion include sweating, weakness, dizziness, and headaches. The affected employee may also have pale tissue color, moist and clammy skin, and rapid, shallow breathing. The best treatment is rest and removal to a cooler temperature. Elevate the legs and give water if the employee is conscious. If the employee does not respond to rest and fluids, seek additional medical aid.
Heat stroke is the most serious. Symptoms are red color to the skin and the skin very hot and dry. Temperature can be 105° F and rising. Usually sweating stops but occasionally sweating continues. The affected employee may be disoriented and confused. There can be loss of consciousness or seizures. The employee needs to be cooled as quickly as possible. Use cold water, a cold bath, or blow cold air on the patient using ice and a fan. Do not, however, chill him/her. You need to get the temperature down to 103° F and maintain it at least that low. Seek medical attention immediately.
4.9 Insect Bites and Stings Some persons are highly allergic to the stings and bites of insects. More people in this country die from bee stings than from snake bites. If an employee is stung or bitten, apply a bee sting relief swab from the first aid kit. If the employee is allergic to bee stings, he/she may have an emergency kit of his/her own. Assist with the medication as requested and seek medical attention. Treat spider bites of either the black widow (hourglass) or the aggressive house (hobo) spider the same as snake bites. Seek medical attention immediately.
4.10 Lasers • All employees operating a laser EDM must be aware of the
following precautions:
• Do not look directly into a laser beam at close range.
• Do not look directly into a laser beam at any working range with binoculars or telescopes. The intensity of the beam is magnified by the square of the power of the optical instrument used.
• Do not expose the eyes to the laser for any prolonged time at any working range.
• Check operating instructions for eye protection.
SURVEY SAFETY MANUAL 21

4.11 Lifting
Lift only what you, or you and others, can safely handle. Do not be misled by bulk or lack of it. When you have any doubt, seek help or use a mechanical lifter. Check for splinters, sharp protrusions, spiders, snakes, stinging insects, and other hazards before lifting. Before you begin, plan how the lifting, moving, and setting down of the object is to be done. Be sure you have a safe, obstacle-free path of travel. If stooping is required, crouch as close to the load as possible. Firmly grasp the object, keeping the spine straight, and then lift by pulling it into the pelvic area. Reverse this process when setting things down. Always lift or lower objects with the leg muscles, not the back muscles, and do not twist your body while carrying the object. Move your feet to turn your body.
4.12 Mountainous Terrain Use ANSI approved safety lines and harnesses whenever injury could result from work on precipitous slopes or slippery rocks. Lifelines used on rock scaling operations, or in areas where the lifeline may be subjected to cutting or abrasion, should be a minimum of 7/8”, wire-core manila rope.
For all other lifeline applications, a minimum of 3/4”, manila or equivalent, with a minimum breaking strength of 5400 pounds, shall be used. Use knots that will not slip and be sure the line is securely anchored. Always wear a hard hat when safety lines are required. Obtain required training in use of this equipment.
When traversing hazardous areas, test your footing and determine a safe route before proceeding. Avoid risky shortcuts and do not run downhill. Use the buddy system in isolated areas. Never drink stream water or water from any untested source. Take drinking water with you.
4.13 Night Operations Hazards can become more dangerous at night. Therefore, surveying will not be done at night unless reasonable daylight alternatives have been considered. At night, make safety the number one priority. Allow extra time for all operations. Make certain there are enough personnel, equipment, and supplies. All crew members should be properly briefed and issued adequate equipment.
22 OREGON DEPARTMENT OF TRANSPORTATION
In mountainous areas, always use the buddy system. Use reflective material to flag safe roads and trails into work areas and to specific points. Radio communication for each work area is a necessity.
If traffic promises to be particularly hazardous, the crew should seek assistance from maintenance personnel or from the State Police. Include public safety in your survey planning. All personnel shall wear reflective vests when working anywhere where vehicles are likely to be moving.
Night surveys can disrupt traffic and arouse the curiosity of the local residents. If this seems likely, the crew should notify law enforcement agencies and the State Police. Consider giving advance public notice through local news media.
4.14 Poisoning, Brush Medical authorities agree that avoidance is the best prevention for poison oak dermatitis. This can be difficult and dermatitis can result without the plant ever having been touched. Sensitive people can react, often severely, from contact with implements, clothing, and other objects that have touched poison oak brush. Some ultra-sensitive people have reacted from sitting on vehicle seats where others have sat after being exposed to poison oak. Family members have reacted after handling the contaminated clothing of a spouse or parent. However, preventive measures can be taken to help minimize reactions.
The supervisor should keep highly allergic employees away from poison oak in all seasons of the year. Dermatitis can result from barren bushes or vines, as well as from fully leafed plants. Keep sensitive employees away from any exposed material. Machetes, tapes, and brush hooks can have the toxic, oily resin from poison oak on them. Adopt a survey plan that minimizes exposure. Be able to recognize the plant so you can avoid it.
The supervisor should encourage immune or less susceptible employees to substitute for allergic employees whenever intermittent exposure occurs on a project or task. Be aware that immunity can disappear; especially it seems with repeated exposure.
Wear long sleeves and gloves to minimize contact with the plant. Close cuffs and collars by taping and wear overalls for extra protection. Use sprays and creams before and after exposure. Poison oak first aid supplies should be carried in vehicles. Wash immediately after exposure five or six times with a strong laundry soap and tepid water. Rinse thoroughly after
SURVEY SAFETY MANUAL 23

washing. If exposure is continuous, every two hours or so stop and wash. If rubbing alcohol is available, apply to the washed areas and rinse with clear water.
Change your clothes and wash your boots each day after exposure. Use an environmentally safe cleaning agent, or take the clothes to a commercial cleaner.
When every precaution is not enough and dermatitis still develops, use medications which are made specifically for poison oak dermatitis. If it is very severe or persists, see your doctor.
4.15 Power Lines
Regard all power lines as dangerous. Contact the utility company if lines are down or power poles are damaged.
4.16 Power Tools
Power tool usage requires maximum alertness and adequate training. Employees must be given proper instruction before being allowed to operate powered equipment. Do not allow an employee to operate a power tool unless he/she has been trained in its use. Eye and hearing protection shall be used where chain saws, jackhammers, and ramsets are operated. Such protection must also be used by helpers. Nearby co-workers must use ear protection if the noise levels specified exceed 90 decibels.
4.17 Pressurized Spray Cans
Serious injuries and costly cleanup have resulted from improper handling of pressurized spray cans. Do not puncture or incinerate them. Store them at temperatures less that 120° F. Check with and dispose of through local refuse disposal systems. Use can poppers at local highway maintenance shops and Fleet equipment repair facilities. Do not discard any spray can in a receptacle that is normally accessible to children. Store cans in a secure place during transport.
24 OREGON DEPARTMENT OF TRANSPORTATION

4.18 Radio Transmitters
Mobile radio transmissions can set off explosive charges. Turn off radios and check with blasting supervisor before transmitting any messages.
4.19 Working near Railroads
Guidelines used when working within an operating right-of-way are for the safety of the surveyor and the railroad. These general guidelines are:
• Notify the railroad before entering any railroad right of way as per ORS 672.047, ORS 164.255(1)(c) and 49 CFR 214. In addition to notifying the railroad, follow the railroad’s safety plan.
• Apply for required permits before entering the railroad right of way.
• Always be alert around railroads. Railroad equipment is not always heard, especially if there is other noise. If a railroad car is coasting or if a train is moving slowly, hearing alone might not provide adequate protection. When necessary, use a spotter.
• Never crawl under stopped cars and do not cross tracks between closely spaced cars. They could be bumped at any time as the engineer and the brakeman work only one side of the train.
• Avoid use of the color red. To a trainman, red means immediate danger and “Stop”, without exception. Surveyors must not wear red vests or red clothing when working near rails. Red markers, flagging, or lights will not be used for any reason.
• Normally, do not use flares on highways at railroad crossings. Only use flares if unmovable, injured persons or disabled vehicles are on the tracks, or if you have found a condition that could derail the train.
• Do not leave protruding stakes or any holes within ten feet of the centerline of the tracks.
• Do not park vehicles within ten feet of the tracks. Train crews need this area for their operations.
• When taping across railroad tracks, support steel tapes above the rails at all times. The contacting of both rails at once by a steel tape can activate
SURVEY SAFETY MANUAL 25
signals. In switching areas, steel tapes can activate signals even when laid parallel to the track. Therefore, only let non-metallic tapes be grounded.
• Do not leave instruments or other equipment unattended on or near tracks.
4.20 Surveying Sights and Targets
Do not leave red heads, concrete-filled sight cans, or other similar sights where they might damage vehicles or be hazardous to pedestrians. All sights or points of any kind, both permanent and temporary, shall be guarded in a manner which protects the public as well as the survey point.
Do not use red flagging or red targets for signaling when working in or near traffic. Such signaling might confuse motorists. Be wary of using the standard surveying hand signals if they might confuse motorists.
4.21 Subsurface and Confined Work Spaces Do not enter permit required confined spaces unless properly trained and equipped. In general, use ladders for places and situations that are difficult to enter or reach. On sloping concrete slabs and hard earth slopes, be cautious of slipping on loose sand and grit. Be just as cautious on wet and slimy concrete channel bottoms. Always be aware of snakes and spiders in manholes, trenches, sewers, and drains. Have an outside observer, a buddy, in constant touch while subsurface work is in progress. Even though all other precautions are taken, use a lifeline whenever cave-ins or asphyxiation are at all possible.
On open excavations, if a trench is deeper than four feet, do not stand near, enter, or work in it unless a competent person has assessed the hazards and it is adequately shored or properly sloped. On contracts, check with the state inspector if you are unsure. If a trench is less than four feet deep, do not enter it if ground movement appears possible. Do not park vehicles near the edges of excavations.
Confined Spaces and Enclosed Facilities. A confined space is defined as a space having the following conditions:
• It is possible to enter.
• It has limited access or egress.
• It is not designed for continuous employee occupancy. 26 OREGON DEPARTMENT OF TRANSPORTATION
Permit required confined spaces are confined spaces that have known or suspected hazardous conditions that are potentially threatening to life and health. For example, manholes and underground utility vaults may have oxygen deficient atmospheres, contain toxic gases or have physical hazards (falls, moving machinery, water etc.)
Test for oxygen deficiency and for the presence of combustible gases or vapors. If you have any questions about entering and working in confined spaces, contact your Region Safety and Health Manager or the Office of Employee Safety. Use the pre-entry check list on your permit. Do not enter these spaces without required training and equipment.
Culverts
ODOT has a culvert advisory (ADV98004) allowing entry into culverts (without air quality monitoring) if all the following conditions are met:
• Inspection is the only task • Not deformed, bulging, crushed, or water running underneath • Less than 2 feet of standing water or less than a foot of water in a 4
foot or smaller culvert • No rapid moving water • Not planning to change air quality (painting, welding, etc.) • Detectable air flow (should be able to feel) • No sheen or hazmat present on water surface • Culvert is 36 inches or greater • No other conditions that may be IDLH (immediately dangerous to
life or health)
4.22 Manhole Covers and Grates Before removing a cover or grate, establish an area of protection, if required, by use of cones, barricades, or other traffic control devices. Leave the protection markers in place until the cover is again secured in the frame of the structure.
Check Personal Protective Equipment Policy for appropriate personal protective equipment before opening any manhole or grate. Complete air monitoring test.
Two tools which are specifically designed for unseating and moving covers and grates may be used:
• Manhole Cover Hooks: 28” long, four pounds, made of 5/8” octagonal, plated tool steel and hardened to prevent bending. Available from
SURVEY SAFETY MANUAL 27

Graybar Electric Company, stock number 8172 in the General Machine Products Co., Inc. catalog.
• Manhole Cover Lifter: 42½”, L-shaped lever with handle, foot, and swing-out hook with the same details as the cover hook. Available from Cross Bros., Inc., 5255 Sheila Street, Los Angeles, CA 90040.
When a cover or grate is stuck in its frame, remove any encrustation with a cold chisel. Then, place a block of wood on the cover near the rim and hit the block with a heavy hammer. Do this at different points until the cover is loosened. Do not use a flame to thaw ice around a cover. An explosion could result if gases are present in the facility. Try to avoid causing sparks by any of your activities. Use a railroad pick to complete the freeing operation.
To unseat a cover or grate, lift with a tool that provides adequate handhold and a positive hold on the cover. On a round manhole cover, engage the circumferential rib before lifting. Unseat the grate or cover about four inches by pulling and lifting with the leg and arm muscles. To avoid injuries such as spider bites and mashed fingers, never place the fingers or hands under a cover.
Use help to remove a cover, if available. Clear the area of any hazards to your footing. With your feet spread and footing secure, pull the cover clear of the frame and keep pulling until the cover or grate is in a non-hazardous location. Pull with the arm and leg muscles. Pull parallel to any traffic so you will not tumble into the path of a vehicle if your hook slips. Do not pull toward precipices or other hazards that are proximate to the manhole.
To replace a round cover or grate, stand parallel to the desired direction of travel with your toes in the clear. Place the point of the hook under the edge of the cover nearest you. Lift slightly and swing the cover toward the structure. Then move to the opposite side and repeat the lifting and swinging. Continue this alternate lifting and swinging until the cover is partially over the structure’s opening. With the hook, lift the edge that is farthest from the opening. Lift until the cover or grate slides into the frame of the structure. If a helper is available with another hook, stand on opposite sides of the cover and parallel to the direction of travel. Securely hook under the cover and slide it to the frame.
The procedure for rectangular covers or grates is basically the same, expect that you definitely need a helper; single grates weigh up to 326 pounds. When pulling the cover clear of the frame, be sure you pull in line with the frame so the cover cannot fall into the opening. When replacing, be sure
28 OREGON DEPARTMENT OF TRANSPORTATION

you pull straight into the frame so the cover or grate cannot fall into the opening.
When removing any sewer manhole covers, stay clear of the opening. Deadly gas might be concentrated beneath the lid. Try to avoid making sparks with ferrous metal tools. Never smoke or ignite matches when in underground facilities or over sewer manholes. Adhere to ODOT’s Permit Required Confined Space Program.
4.23 Working in Traffic When working in or near traffic, all personnel must be alert and watch out for each other. Additional help may be required to work safely. You may need to get help from Maintenance to close lanes or the shoulder when a fairly lengthy operation is anticipated, narrow shoulders with no escape route are encountered, or you are working in a heavy-use area. All crew members should maintain an awareness of the location of moving traffic, how to avoid it and, if needed, possible escape routes. This includes work on shoulders as well as on the traveled way. You should face oncoming traffic at all times or be guarded by a co-worker acting as a spotter. When working in a zone between two-way traffic, stand parallel to the traveled way and use a spotter. Move deliberately: Do not make sudden movements that might confuse a motorist and cause him/her to take evasive action, panic, or stop and cause an accident. Also, be careful and deliberate when using surveying hand signals. You don’t want motorists to mistake them for flagging signals and get confused. Use radios if available.
Use off-set lines as much as possible to avoid interrupting traffic. Minimize the crossing of traffic lanes. Drive around by way of ramps or surface streets to assure a safe crossing. When possible, work one side of the road at a time. For example, when cross sectioning, keep a Rodman on each side of the road if this will eliminate lane crossing. Whenever possible place a barrier vehicle or shadow vehicle between traffic and the workers. When carrying equipment, walk parallel to traffic and be careful to keep level rods, range poles, etc., from extending into a traffic lane. Avoid working near moving vehicles, e.g. rollers, graders, or restricted view equipment. Be especially careful when there are “competing” activities, such as vehicular accidents, maintenance activities, construction operations, or distracting objects alongside the road. Do not work within 1500 feet of such attention-grabbing activities or objects. Be constantly aware of possible quick escape routes to avoid dangerously veering traffic.
SURVEY SAFETY MANUAL 29

4.24 Water Operations • Employees working over or near water where danger of drowning exists
shall wear U.S. Coast Guard-approved life jackets or buoyant work vests.
• Prior to and after each use, the buoyant work vests or life jackets shall be inspected for defects which would alter their strength or buoyancy. Never use any defective unit.
• Ring buoys with at least 90 feet of line shall be provided and readily available for emergency rescue operations. Distance between ring buoys shall not exceed 200 feet.
• At least one lifesaving skiff shall be immediately available at locations where employees are working over or adjacent to water.
• Employees shall wear approved buoyant protective equipment at all times while working on or over water, such as:
– on floating pontoons, rafts, and floating stages.
– on open decks of floating plants (such as dredges, pile drivers, cranes, pond saws and similar types of equipment) which are not equipped with bulwarks, guardrails, or lifelines.
– during the construction, alteration, or repair of structures extending over or adjacent to water except when guardrails, safety nets, or safety harnesses and lifelines are used.
– working where there are potential drowning hazards, regardless of other safeguards provided (i.e. where lanyard length would allow immersion).
– on floating logs, boomsticks, and unguarded walkways.
– on boom boats and other work boats.
If in a boat, wear a life jacket. Work with a buddy and do not overload the boat. Use only boat operators who have been trained in boating safety. Always follow the common rules of boating safety.
Do not wade barefoot in the water. Wear your life jacket if the water is over knee deep. It is good practice to always work with a buddy. In still waters, wear chest waders and probe ahead with a pole for holes before proceeding. Limit wading to waist deep water. When working in moving water, do not wade in if the water is more than mid-thigh deep.
30 OREGON DEPARTMENT OF TRANSPORTATION
Only schedule work at the ocean shore for low tides. Never work in heavy surf. Always wear a life jacket. When working on inland shores, do not walk on floating debris and be cautious of recently puddled trenches and dredging fills.
4.25 Vehicles Defensive driving is the key to safe driving. Many accidents involving state vehicles have been the other party’s fault. However, some of them could have been prevented if the state driver had been driving defensively. The use of seat belts is mandatory for drivers and passengers in state vehicles and in private vehicles used on state business. The majority of vehicular accidents are of three types. They are:
• Backing – Whenever possible, park so that backing up is not necessary. Never back without first checking to the rear. When visibility is limited, use a second person to provide guidance. Never back into a traffic lane unless adequate visual checks are made.
• Colliding with the vehicle ahead – Follow at a safe distance. In inclement weather, increase this distance (at least two seconds) to allow for poor conditions. Observe conditions as far ahead as possible. Pay attention to traffic, stay alert, and check for clear areas incase evasive action is needed.
• Rear end collisions – If you are about to be rear ended when you are not moving and cannot take evasive action, firmly apply the brakes and press yourself against the seat back and headrest.
Adjust your speed to the weather. Posted speed limits are for ideal conditions only. Reduce speed in rain, snow, or patchy fog. In heavy fog park off the road and turn off all exterior lights except flashers; otherwise another driver might think you are still on the road and hit you from the rear. When roads are slippery, start braking earlier than you would under ideal conditions.
Do not drive unless you are physically and emotionally able to drive safely. Alcohol, fatigue, and illness slow reflexes. Some medicines impair driving performance. So called “stay awake” drugs are not effective.
Unless vehicles are being used as protective barriers, park them completely away from highway traffic. If a vehicle must be parked within 15 feet of a
SURVEY SAFETY MANUAL 31

traffic lane for more than fifteen minutes, and if the consequences of its being hit include possible injury to personnel, close the shoulder.
4.26 Basic Safety Rules of Operation In addition to the guidelines above, the following are some basic rules to be used while operating or riding in a state vehicle. Never let job urgency transcend safety. Use defensive driving techniques at all times. Allow for limited visibility, acceleration, braking, and the large size of survey vans and other heavily loaded survey vehicles. Check on the safety of the vehicles before operating them and do not knowingly operate an unsafe vehicle. Use seat belts and require all passengers to “buckle up” before the vehicle is under way. If you have been drinking alcohol or taking medications, drugs, or any substance that might impair your physical or mental faculties, do not drive. Do not stand in any part of the vehicle while it is in motion. Passengers must be seated with their seat belts fastened. Always park vehicles in a safe manner and in a safe place. Routinely double check to see that the hand brake is firmly set and the transmission is in low, reverse, or park if the vehicle has an automatic transmission. Turn the wheels when the parking site presents a possibility of a roll away. Chock blocks may also be used to avoid roll away.
When in doubt, check overhead clearances. Keep all tools and equipment securely fastened in their designated places. Obey all traffic laws, signs, speed limits, and signals. Keep all survey truck cabinets closed when not in use. Do not overload vehicles and never exceed the intended capabilities of a vehicle. Do not use a haul road when fast-moving dirt movers are operating on it. Obey the Vehicle Code at all times. The only time the Vehicle Code does not apply to public employees is when they are actually working on the surface of a highway. Verify the safety of each vehicle with a pre-drive check before operating it. This includes but is not limited to checking:
• Tires for inflation and adequate tread.
• All illuminating directional and warning lights, as well as gauge lights.
• Windshield wipers and condition of blades.
• Brakes and steering.
• Mirrors.
• Horns.
32 OREGON DEPARTMENT OF TRANSPORTATION
• door and hood latches, windows, seat belts, etc.
• Trunk or other storage for jack, lug wrench, reflectors or flares, tire chains, safety flares, spare tire, first aid kit, and fire extinguisher.
• Motor oil and coolant levels.
Do not have more than three people in the front seat of a vehicle. Except in emergencies, do not push a vehicle with another vehicle. Check the lug nuts on the survey vans weekly.
4.27 Flammables Carry flammables in approved safety cans. Use NiCad batteries for powering EDMs. If wet cell storage batteries must be used, carry them in tilt proof and splash proof boxes. Secure the boxes in the vehicle so they cannot shift or slide. Provide adequate ventilation.
4.28 Underground Utilities There are laws governing excavation where buried pipes, wires and cables are located. Caution should be used when any excavation or setting of survey points is done in an area that could contain an underground utility. As well as being an inconvenience to the public if service is disrupted, damaging an underground utility can be financially costly and a serious threat to health and safety. Calling before beginning any excavation prevents damage to underground facilities, service interruptions, and bodily injury. Contact the Utility Notification Center at 1-800-332-2344 to arrange to have underground utilities marked. You can call 811 from anywhere (in the country) and your call will be routed to your local One Call Center.
Locate requests are accepted over the phone, through a fax-a-locate program, or through the ITIC program (ITIC, a real-time interactive tool that allows you to enter your locate requests and updates live on-line with the Call center). Additional information about locates can be found at the Utility Notification Center, http://www.callbeforeyoudig.org/ at any time.
Refer to the ODOT Survey Policy and Procedure Manual for more specific information regarding ODOT policy on following the applicable Oregon Administrative Rules and the Oregon Utilities Coordinating Council — Standards Manual.
SURVEY SAFETY MANUAL 33

34 OREGON DEPARTMENT OF TRANSPORTATION

CHAPTER 5
Temporary Traffic Control For specific guidance regarding temporary traffic control, refer to the current edition of the Oregon Temporary Traffic Control Handbook for operations of three days or less (OTTCH). The OTTCH is the adopted supplement to the Manual on Uniform Traffic Control Devices (MUTCD).
Section 1.5 (Surveying and Similar Work) of the OTTCH refers to this ODOT Survey Safety Manual and states that it may be referenced for survey work. That statement is incorrect. All temporary traffic control, in place for three days or less, shall follow the standards and diagrams in the OTTCH.
The guidance in this chapter applies only to the Oregon Department of Transportation employees while performing survey work. For work other than survey or for other principles for temporary traffic control including the safety apparel, equipment standards, and specific device use the user is directed to consult the OTTCH.
The Temporary Traffic Control information in this manual is an effort to condense the principles and standards of the MUTCD and OTTCH into surveyor specific guidance, and does not replace the OTTCH.
User’s are encouraged to have in their possession a copy of the OTTCH, this guide does not have all necessary requirements and conditions shown within the OTTCH. The Diagrams shown within this guide differ only slightly from the Diagrams in the OTTCH and are numbered for easy reference back to the OTTCH. Diagram numbers are the same numbers as in the OTTCH with the addition of a suffix of “S” added to distinguish the diagrams as belonging to this guide.
The diagrams and instructions in this section in general are only meant as safety measures to protect a relatively stationary survey instrument operator and those crew members working in the same immediate work area. Safety measures appropriate for existing conditions need to be used for the safety of rodmen working outside of the area protected by traffic control for the instrument and operator. In order for rodmen, or others to collect data within the traveled way, traffic must be light enough, the spacing sufficient and visibility adequate to do so safely.
SURVEY SAFETY MANUAL 35
Consider the use of a lane closure when surveying within sections of highway that have a traffic hourly flow rate which exceeds 350 vehicles per hour. Possible options for estimating the hourly volume on a stretch of highway are discussed in Predicting the Presence of Adequate Gaps for Survey Activities on a Highway Centerline, January 2013. This document was written by Gary R. Obery, P.E. of the ODOT Traffic Engineering Services Unit and is available on the Geometronics website.
5.0 Introduction
The primary function of temporary traffic control is to provide safe and efficient movement of road users through or around survey work areas while protecting workers.
Surveying work may involve multiple, short-duration activities using lightweight, portable equipment and often a single support vehicle. Therefore, quick deployment and portability are important in minimizing worker exposure and risk of injury.
Several techniques can be employed to adequately protect workers involved with this type of work that may appear to deviate from typical applications.
• Portable Changeable Message Signs (PCMS), additional lighting and other more dominant devices such as high-intensity rotating, flashing, oscillating or strobe lights on work vehicles may replace more typical advance warning sign sequences.
• Advance warning signs should be used to indicate the presence of workers in the road, as appropriate.
• Work vehicles may be placed to provide additional protection to the workers.
• Use of a spotter is recommended for work within the road where the worker is unable to monitor or respond to traffic themselves.
If it is necessary to work alone, a job hazard assessment must be performed. If the assessment indicates special risks for the task being performed when working alone then a communication plan must be developed.
36 OREGON DEPARTMENT OF TRANSPORTATION

5.01 Bicycle and Pedestrian Considerations
Accommodate all road users (motorists, bicyclists, and pedestrians, including those with disabilities or visual impairments) at all times within a temporary traffic control work zone.
The placement of additional temporary signing and Traffic Control Devices (TCDs) for the control of non-motorized vehicles and pedestrians should be considered where a reasonable volume of users are expected and where work is expected to last longer than one hour.
Make every practical effort to satisfy the following:
1. Match the level of accommodation to the existing facilities available prior to the work.
2. Use appropriate TCD to keep bicycles and pedestrians outside active work spaces and away from work equipment.
3. Avoid placing bicycles and pedestrians in conflict with traffic, work site vehicles, materials or operations.
4. If using an alternate route, provide sufficient and appropriate advance warning and detour signing for bicycles and pedestrians.
5. Unless an alternate route is provided, maintain a 4-foot minimum width for bicycles.
For additional information and guidance regarding pedestrian facilities in a work zone, see OTTCH.
5.02 Night Operations
Working at night when there is less traffic on the road can be the only practical way to accomplish some work tasks. Any time drivers must use their headlights for visibility should be considered the same as night conditions. Use the following basic principles for adjusting your traffic control for night conditions:
• Use enough lighting to provide a safe work environment without creating glare in the path of road users.
• All devices, including flagger STOP/SLOW paddles, shall be retro reflective.
SURVEY SAFETY MANUAL 37

• Signs, cones and worker safety apparel used at night should be kept in
like new condition.
5.03 Flagging
When one direction of the road is closed and road users must alternately share the remaining open portion for both travel directions, flagging, pilot car operation or portable signals shall be used for the safety of workers and road users, including bicyclists and pedestrians. For more information on qualifications, principles and requirements for flaggers and flagging refer to Chapter 3 in the OTTCH.
5.1 Setting up the Work Zone
This section provides guidelines and procedures for setting up the work zone.
5.11 Temporary Traffic Control Zone Components
The temporary traffic control zone as shown in Figure 2-1S has four parts and extends from the initial advance warning signs through the last temporary traffic control device.
1. Advance Warning Area: An advance warning area is necessary for all traffic control zones.
2. Transition Area: In a transition area, traffic is channelized from normal public road lanes to the path required to move traffic around the work space.
3. Activity Area:
a. Buffer Space is a short section of clear road between the cone taper and the work space which can provide an extra margin of safety for both traffic and workers. Buffer spaces should be provided when space is available, but are optional.
b. Work Space is that portion of the road which contains the work activity and that is set aside exclusively for surveyors and equipment.
4. Termination Area: The termination area provides a short distance for traffic to clear the work space and return to normal operation.
38 OREGON DEPARTMENT OF TRANSPORTATION
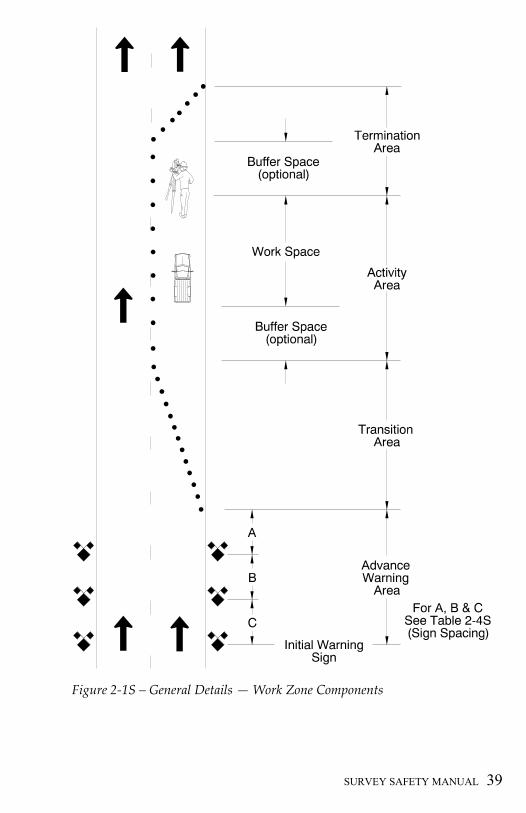
Figure 2-1S – General Details — Work Zone Components
SURVEY SAFETY MANUAL 39

5.12 Tapers
Taper lengths shown in the table or calculated are minimum taper lengths. Longer tapers may be necessary for drivability or to enhance driver performance (e.g. around vertical or horizontal curves or steep grades). To determine if a taper length is adequate or needs to be adjusted, monitor traffic as it maneuvers through the work zone.
Table 2-1S: Taper Length Formulas
Where: L = Taper length in feet W = Width of offset in feet S = Posted Speed in mph
Table 2-2S: Taper Types and Lengths
5.13 Device Spacing
• Taper Spacing: The distance between cones in the taper should equal the posted speed in feet, e.g. 55 mph = 55 feet.
POSTED or STATUTORY SPEED TAPER LENGTH, L (in feet)
40 MPH or Lower 60
WSL2
=
45 MPH or Higher SWL ×=
Taper Type Length (in feet)
Merging Taper (minimum) L
Shifting Taper (minimum) (1/2)L or L/2
Shoulder Taper (minimum) (1/3)L or L/3
Flagger (one-lane, two-way) Taper 50 – 100 feet
Downstream Taper 50 – 100 feet
40 OREGON DEPARTMENT OF TRANSPORTATION
Lane Width 10 Feet 11 Feet 12 Feet Shoulder
Tapers MERGING SHIFTING MERGING SHIFTING MERGING SHIFTING SHOULDER
MPH L Cones L/2 Cones L Cones L/2 Cones L Cones L/2 Cones L/3 Cones
20 70 5 35 3 75 5 40 3 80 5 40 3 25 3
25 105 6 55 3 115 6 60 4 125 6 65 4 35 3
30 150 6 75 4 165 7 85 4 180 7 90 4 50 3
35 205 7 105 4 225 8 115 5 245 8 125 5 70 4
40 270 8 135 5 295 9 150 5 320 9 160 5 90 4
45 450 11 225 6 495 12 250 7 540 13 270 7 150 6
50 500 11 250 6 550 12 275 7 600 13 300 7 170 6
55 550 11 275 6 605 12 305 7 660 13 330 7 185 6
60 600 11 300 6 660 12 330 7 720 13 360 7 200 6
65 650 11 325 6 715 12 370 7 780 13 390 7 220 7
70 700 11 350 6 770 12 385 7 840 13 420 7 235 7
“L” for shoulder taper equals Shoulder Width x Speed. Figures shown are for 10’ shoulders.
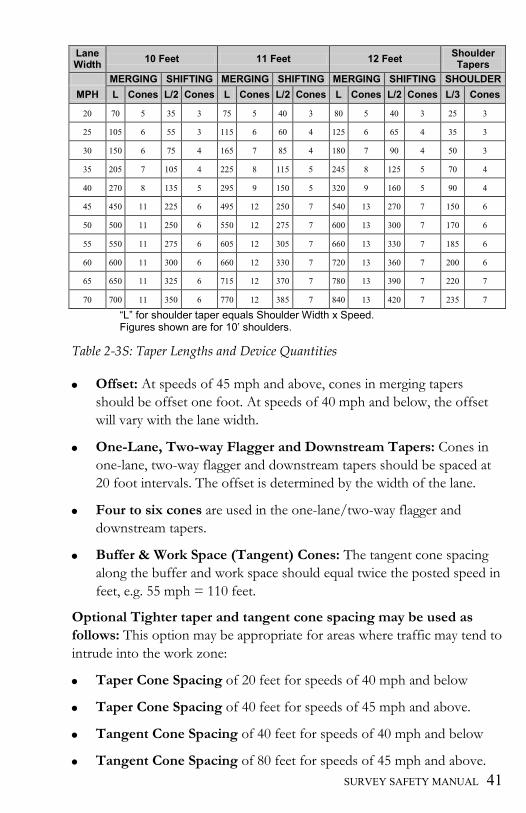
Table 2-3S: Taper Lengths and Device Quantities
• Offset: At speeds of 45 mph and above, cones in merging tapers should be offset one foot. At speeds of 40 mph and below, the offset will vary with the lane width.
• One-Lane, Two-way Flagger and Downstream Tapers: Cones in one-lane, two-way flagger and downstream tapers should be spaced at 20 foot intervals. The offset is determined by the width of the lane.
• Four to six cones are used in the one-lane/two-way flagger and downstream tapers.
• Buffer & Work Space (Tangent) Cones: The tangent cone spacing along the buffer and work space should equal twice the posted speed in feet, e.g. 55 mph = 110 feet.
Optional Tighter taper and tangent cone spacing may be used as follows: This option may be appropriate for areas where traffic may tend to intrude into the work zone:
• Taper Cone Spacing of 20 feet for speeds of 40 mph and below
• Taper Cone Spacing of 40 feet for speeds of 45 mph and above.
• Tangent Cone Spacing of 40 feet for speeds of 40 mph and below
• Tangent Cone Spacing of 80 feet for speeds of 45 mph and above. SURVEY SAFETY MANUAL 41

5.14 Device Placement
1) Determine the taper length and cone spacing using the Table 2-3S and Section 5.12, Device Spacing.
2) Placing the first cone. Starting at the work area or buffer, pace off the taper length along the edge of travel way or fog line. Place the first cone at the edge of travel way or fog line for merging and shifting taper, at the edge if travel way for shoulder work.
3) Placing the second cone in the taper. Start back towards the work space, walking along the edge of travel way a distance equal to the posted speed. Then move over one foot into the road way and place the second cone (See Figure 2-3S).
4) Placing the third cone. Again, move towards the work area a distance equal to the posted speed, move over two feet from the edge of travel way and place the third cone.
5) Placing the remaining cones in the taper. Continue moving back towards the work area, moving a foot more each time and placing a cone until reaching the end of the taper.
6) Ensure effective set-up of the work zone by driving or walking through it and adjust as necessary.
42 OREGON DEPARTMENT OF TRANSPORTATION

Figure 2-3S – Cone Spacing Example
SURVEY SAFETY MANUAL 43

5.15 Signs
Choosing Signs: Effective work zone signing tells the road user what action or direction to take. Avoid general warning signs without any specific action or condition. For instance, follow a SHOULDER WORK AHEAD by SHOULDER CLOSED sign rather than by a CAUTION sign.
The initial warning signs should indicate the type of work the driver can expect. Typical signs for survey crews include, but are not limited to:
SURVEY CREW AHEAD
SURVEY CREW
More information about work zone signing is available in the OTTCH.
Sign Placement: Sign spacing and placement in the OTTCH are for open, unobstructed road conditions. Placement should adequately control traffic and protect the work space. Consider the following when determining sign layout:
• Place the initial work advance signs such as SURVEY CREW AHEAD before entering a horizontal curve or before the crest of a hill if needed to provide adequate sight distance.
• If sign spacing needs to be adjusted, keep all the sign spacing distances similar to maintain driver expectancy.
• If a driveway comes in between the last work zone sign and the work, but the work zone is not apparent from the driveway approach, use a sign or cones at the driveway to alert users.
44 OREGON DEPARTMENT OF TRANSPORTATION

Standard Sign Spacing:
Distance A: is the distance from the last warning sign to the taper, flagger or work space. If only one sign is used, the placement will be based on distance A.
Distance B: is the distance between signs in the middle of a sign sequence.
Distance C: is the distance from the initial warning sign to the next sign in the sequence.
Posted Speed
Spacing Between Signs "Buffer" Space A B C
20 100 100 100
50 25 75 30 100 35
350 350 350 125
40 150 45
500 500 500 180
50 210 55 250
Freeways: 55
1000 1500 2640 250
60 285 65 325
• All spacing shown in feet. • Posted Speed: Equivalent to the existing, posted or
statutory speed. • Spacing “A” may be used as suggested trailing
distance for shadow vehicles. • Adjust spacing as field conditions require. • Non-Freeway sign spacing shall not exceed 2x the
dimensions shown. • Small adjustments to freeway sign spacing may be
made to fit field conditions, but spacing should not exceed 1.5 times the dimensions shown.
Table 2-4S: Suggested Sign Spacing and Buffer Length
SURVEY SAFETY MANUAL 45
5.2 Equipment All traffic control devices used on state highways shall be listed on the ODOT Qualified Products List.
5.21 Signs Unless otherwise noted, all warning signs used for temporary traffic control shall have standard black legends and borders on orange.
Temporary signs have the same shapes and colors as the permanent signs.
All warning and regulatory signs used for temporary traffic control shall be retro reflective.
Standard size of the diamond-shape advance warning signs is 36” x 36” except on freeways.
Standard size of the diamond-shape advance warning signs on freeways is 48” x 48”.
Signs on portable supports shall have two fluorescent orange or orange-red flags at least 16 inches square mounted at the top of the sign. Flags shall be mounted so that the entire sign legend is visible.
All signs shall have been crash tested as a combination with the sign support and/or any warning light attached and met the federal crash worthiness requirements. This can be researched on the Federal Highway Administration (FHWA) web site, or through the ODOT Qualified Products List.
5.22 Sign Supports Sign supports shall be crashworthy per National Cooperative Highway Research Program (NCHRP) 350 requirements. Signs may be mounted on portable sign supports. For frequently moving work, signs may be placed on a vehicle. Place ballast on portable sign supports or barricades only on the bottom feet or frame. Sign supports or barricades shall only be ballasted with 25 pound maximum sandbags.
5.23 Cones
Standard cone height is 28 inches. Cones used only during daylight and on low speed roads may have a minimum height of 18 inches. Twenty-eight (28) inch cones shall be used on roads with speeds of 45 mph or greater or
46 OREGON DEPARTMENT OF TRANSPORTATION
at night. All cones shall have a weighted base and be capable of remaining upright and in place during normal traffic flow and wind conditions common to the area.
Cones used at night shall be retro-reflectorized. Twenty-eight (28) inch cones shall have a minimum 6-inch wide retro-reflectorized band three to four inches below the top and a 4-inch wide band a minimum of two inches below the 6-inch band.
5.24 Other For more information on other Equipment such as Tubular Markers, Protection Vehicles, Truck-Mounted Attenuators (TMA), Lights, Arrow Boards and Portable Changeable Message Signs see the OTTCH.
SURVEY SAFETY MANUAL 47

5.3 Traffic Control – Typical Applications Typical Application diagrams do not cover every possible situation (see OTTCH for more diagrams).
Lane Closures, Diversions and Detours: Lane use changes should be well marked and the alternate path made clear to the traveling public. Extended traffic queues may result from the loss of road capacity, increasing the chance of collisions. Know the likely traffic volumes and conditions as well as possible and be prepared to install additional signing when needed.
Onsite conditions may vary requiring modification to the distances shown in the Typical Applications if the work is on a curving or hilly section of road. Look for a balance between giving warning in time, keeping the work signs free from other roadside clutter and having too much distance between the advance warning and the work so that road users are otherwise distracted or have forgotten the warning.
48 OREGON DEPARTMENT OF TRANSPORTATION

5.31 Detail Drawings The following tables and detail drawings should be used in developing and implementing your traffic control plan for any short term work.
Diagram 5-1S - Meaning of Symbols on Diagrams
SURVEY SAFETY MANUAL 49
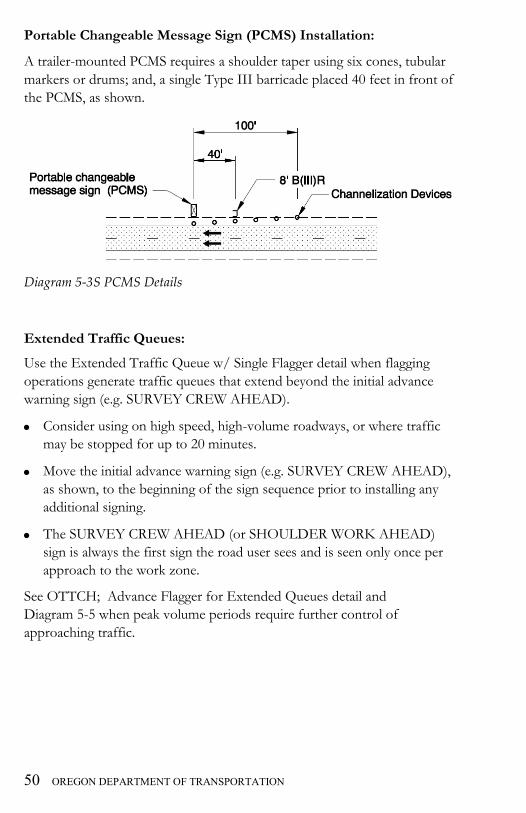
Portable Changeable Message Sign (PCMS) Installation: A trailer-mounted PCMS requires a shoulder taper using six cones, tubular markers or drums; and, a single Type III barricade placed 40 feet in front of the PCMS, as shown.
Diagram 5-3S PCMS Details
Extended Traffic Queues:
Use the Extended Traffic Queue w/ Single Flagger detail when flagging operations generate traffic queues that extend beyond the initial advance warning sign (e.g. SURVEY CREW AHEAD).
• Consider using on high speed, high-volume roadways, or where traffic may be stopped for up to 20 minutes.
• Move the initial advance warning sign (e.g. SURVEY CREW AHEAD), as shown, to the beginning of the sign sequence prior to installing any additional signing.
• The SURVEY CREW AHEAD (or SHOULDER WORK AHEAD) sign is always the first sign the road user sees and is seen only once per approach to the work zone.
See OTTCH; Advance Flagger for Extended Queues detail and Diagram 5-5 when peak volume periods require further control of approaching traffic.
50 OREGON DEPARTMENT OF TRANSPORTATION

Diagram 5-4S Extended Traffic Queues w/ Single Flagger
Sign Spacing and Buffer Lengths (feet)
Posted Speed
Spacing Between Signs Buffer Space A B C
20 100 100 100
50 25 75 30 100 35
350 350 350 125
40 150 45
500 500 500 180
50 210 55 250
SURVEY SAFETY MANUAL 51
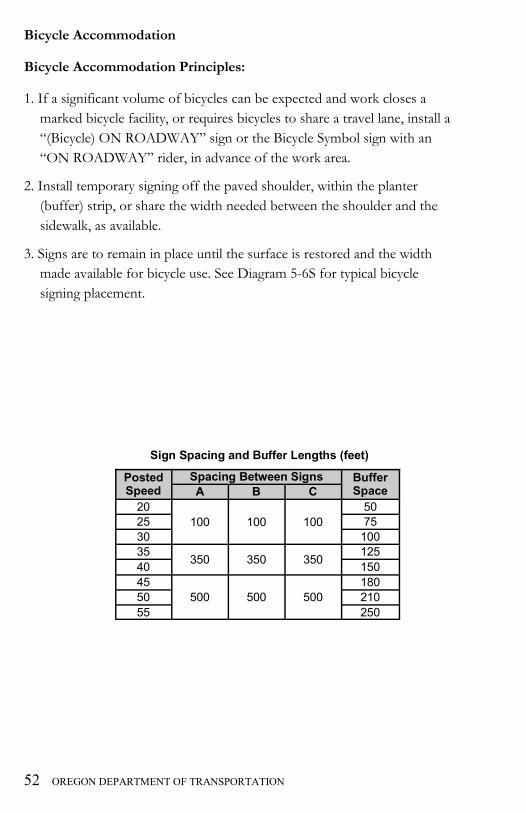
Bicycle Accommodation
Bicycle Accommodation Principles:
1. If a significant volume of bicycles can be expected and work closes a marked bicycle facility, or requires bicycles to share a travel lane, install a “(Bicycle) ON ROADWAY” sign or the Bicycle Symbol sign with an “ON ROADWAY” rider, in advance of the work area.
2. Install temporary signing off the paved shoulder, within the planter (buffer) strip, or share the width needed between the shoulder and the sidewalk, as available.
3. Signs are to remain in place until the surface is restored and the width made available for bicycle use. See Diagram 5-6S for typical bicycle signing placement.
Sign Spacing and Buffer Lengths (feet)
Posted Speed
Spacing Between Signs Buffer Space A B C
20 100 100 100
50 25 75 30 100 35
350 350 350 125
40 150 45
500 500 500 180
50 210 55 250
52 OREGON DEPARTMENT OF TRANSPORTATION

Figure 5-6S – Bicycle Signing Example
NOTES: • Bicycles on Roadway (CW11-1) sign should not
interrupt standard sequences. For example: o BE PREPARED TO STOP/Flagger Symbol o ___ LANE CLOSED AHEAD/Lane Ends
Symbol • Bicycles on Roadway sign typically follows ROAD
WORK AHEAD sign and used as general warning.
SURVEY SAFETY MANUAL 53

5.32 Short Duration Road Work - Diagram 200S
Diagram No. 200S covers activity in the roadway of 15 minutes or less with vehicles parked on the shoulder. Typical work includes tagging of survey markers, locating survey markers, monument recovery, setting control stations. Work in the roadway coincides with gaps in the traffic so flow is not impeded.
1. Do not use this diagram if traffic must be controlled to gain safe access to the work space due to conditions such as high travel speeds or traffic volumes. Use the appropriate lane closure layout.
2. Use truck-mounted flashing warning lights on all work vehicles.
3. For added visibility, truck-mounted arrow boards or PCMS in caution mode may be used.
4. The work vehicles should be parked as far off the travel lanes as practical.
5. If a ten-foot minimum travel lane can not be maintained or when opposing direction of traffic can not safely pass, use the appropriate lane closure diagrams such as Diagram No. 320S through Diagram No. 350S or Diagram 310 in the OTTCH.
6. The initial warning sign should be used if the sight distance is less than 750 feet and traffic volumes are over 400 ADT.
7. A spotter may be used to warn workers of approaching traffic. This is especially appropriate when sight distances are limited or speeds are high. See the spotter guidelines section in the OTTCH, Section 1.12, for additional information.
54 OREGON DEPARTMENT OF TRANSPORTATION
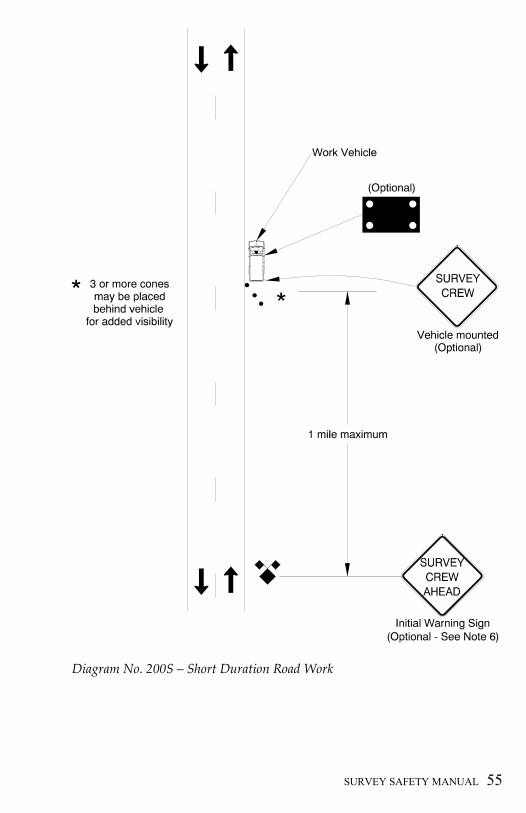
Diagram No. 200S – Short Duration Road Work
SURVEY SAFETY MANUAL 55

5.33 Work on Shoulder - Diagram 210S
Diagram No. 210S covers stationary work with surveyors or parked equipment on the shoulder. This diagram does not cover work on a freeway shoulder. See Diagram 710S for Freeway Shoulder work.
1. Vehicles should be parked as far off the roadway as practical.
2. Use truck-mounted flashing warning lights on all work vehicles.
3. For added visibility, truck-mounted arrow boards or PCMS in caution mode may be used.
4. Arrow panels in caution mode are recommended for work on roads with posted speeds of 45 mph or greater and high traffic volumes, greater than 2000 average daily traffic (ADT).
5. Requirements for signing and devices are shown in Table 5-2S below.
Table 5-2S: Device and Sign Guidelines for Shoulder Work
Proximity to Edge of Traveled Way More than 15 feet or behind Barrier or
Guardrail Less Than 15 Feet
Work in Place More than 1 Hour
Advance warning signs and devices
are optional.
One advance warning sign is required and two signs are recommended. Cone taper is required. Cones along the edge of traveled way are optional.
Work in Place Less Than 1 Hour Advance warning signs and devices are optional.
56 OREGON DEPARTMENT OF TRANSPORTATION

Diagram No. 210S – Work on Shoulder (Non-Freeway)
Sign Spacing and Buffer Lengths (feet)
Posted Speed
Spacing Between Signs Buffer Space A B C
20 100 100 100
50 25 75 30 100 35
350 350 350 125
40 150 45
500 500 500 180
50 210 55 250
SURVEY SAFETY MANUAL 57

5.34 Two-Lane, Two-Way Roads - Shoulder Work w/ Minor Road Encroachment - Diagram 300S
Diagram No. 300S covers work which will extend into a travel lane not on a freeway when the work space will leave at least a ten foot lane. If a ten-foot minimum travel lane can not be maintained or when traffic can not safely pass by in both lanes simultaneously, use the appropriate lane closure diagrams such as No. 320S through Diagram No. 350S or Diagram 310 in the OTTCH.
A lane closure may be appropriate for conditions such as high traffic volumes, high speeds, and inadequate approach sight distance to the work space, or heavy equipment adjacent to the travel lane.
1. Use truck-mounted flashing warning lights on all work vehicles.
2. For added visibility, truck-mounted arrow boards or PCMS in caution mode may be used.
3. Cones shall be placed along the entire length of the work space. If a protection vehicle is used and work is in place one hour or less, the taper and tangent devices may be omitted.
4. If the speed is 45 mph or higher, volumes exceed 2000 ADT, or there is limited sight distance, consider placing cones or tubular markers on centerline.
5. An arrow board in caution mode or truck-mounted PCMS with “SURVEY CREW” or other appropriate message may be used for higher visibility.
58 OREGON DEPARTMENT OF TRANSPORTATION
Sign Spacing and Buffer Lengths (feet)
Posted Speed
Spacing Between Signs Buffer Space A B C
20 100 100 100
50 25 75 30 100 35
350 350 350 125
40 150 45
500 500 500 180
50 210 55 250

Diagram No. 300S – Shoulder Work with Minor Road Encroachment
SURVEY SAFETY MANUAL 59
5.35 Two-Lane, Two-Way Roads - Lane Closure with Flagging - Diagram 320S Diagram No. 320S covers total closure of one lane of a two-lane, two-way roadway. The right-hand drawing illustrates the use of two flaggers, one for each approach. See the detail inset for the layout if using a single flagger to control both lanes of traffic on low volume roads (less than 400 ADT) with good sight distances as discussed below.
1. Use truck-mounted flashing warning lights on all work vehicles.
2. For added visibility, truck-mounted arrow boards or PCMS in caution mode may be used.
3. Flaggers at each approach are required if any of the following conditions exist: a. Night Operations. b. Work space is over 200 feet in length. c. Sight distance is less than 750 feet from each approach through the
lane closure. d. Traffic volumes are greater than 400 ADT.
4. The length between the Flagger Ahead signs shall not exceed one mile. Use OTTCH Diagram 340 - Lane Closure with Pilot Car if exceeding one mile.
5. Cones should be used to outline the work space when curves or other roadway alignments prevent clear direction for the motorists to pass the work zone safely.
6. Cones along the work space are recommended when posted speeds are 45 mph or greater, when working under heavy traffic or when travel lanes are narrower than 11 feet.
7. Extended queue signing (see Diagram 5-4S) should be used when traffic queues extend beyond the initial advance warning sign.
8. When flagging near an intersection, the “Flagger Ahead” sign should be visible to traffic entering from any side road. Additional advance warning and Flagger Ahead symbol signs may be placed on the side road(s).
9. Sign set-up and flagger placement shown in Drawing No. 320S may be used for intermittent full road closures of 20 minutes or less.
10. The “ONE LANE ROAD AHEAD” sign is optional and should be considered on high volume or high speed roads, or when extended queues may be expected.
60 OREGON DEPARTMENT OF TRANSPORTATION
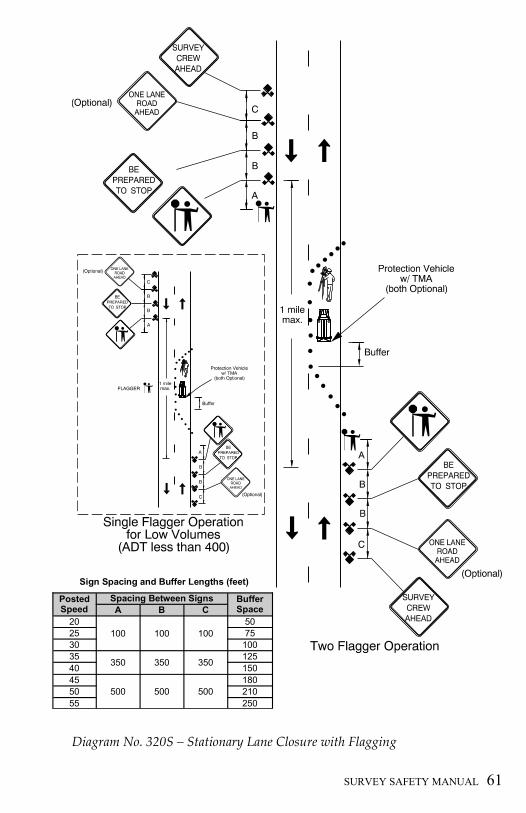
Diagram No. 320S – Stationary Lane Closure with Flagging
Sign Spacing and Buffer Lengths (feet)
Posted Speed
Spacing Between Signs Buffer Space A B C
20 100 100 100
50 25 75 30 100 35
350 350 350 125
40 150 45
500 500 500 180
50 210 55 250
SURVEY SAFETY MANUAL 61
5.36 Two-Lane, Two-Way Roads - Short Duration Operation Using Flaggers - Diagram 325S
Diagram No. 325S covers work activities that move along the road intermittently and involve frequent short stops. Only use this diagram when the work can move through a one mile segment in three hours or less.
1. Use truck-mounted high-intensity rotating, flashing, oscillating, or strobe warning lights with 360° visibility on all work vehicles.
2. Flaggers shall be stationed for the best visibility for the situation and within sight distance of the active work space except at curves or crests on the road.
3. When the Flagger is more than 1000 feet from the FLAGGER NEXT MILE sign, intermittent cones shall be placed on the shoulder. Cones should be spaced at intervals as indicated on the diagram.
4. Flaggers are required at each end of the work space if any of the following conditions exist:
a. Night operations, or
b. Work space is over 200 feet in length, or
c. Sight distance is less than 750 feet from each approach through the lane closure, or
d. Traffic volumes are greater than 400 ADT.
5. The length between Flagger Ahead signs shall not exceed one mile in length.
6. Extended queue signing (as shown on Diagram 5-4S) should be used when the line of vehicles (queue) stopped at the beginning of a work zone extends beyond the SURVEY CREW AHEAD signs.
7. When flagging near an intersection, the Flagger Ahead sign should be visible to traffic entering from any side road. Additional advance warning and Flagger Ahead signs may be placed on the side road(s).
8. The “ONE LANE ROAD AHEAD” sign is optional and should be considered on higher volume or higher speed roads, or when extended queues may be expected.
62 OREGON DEPARTMENT OF TRANSPORTATION

Diagram No. 325S – Operations with Moving Flagger Stations
Sign Spacing and Buffer Lengths (feet)
Posted Speed
Spacing Between Signs Buffer Space A B C
20 100 100 100
50 25 75 30 100 35
350 350 350 125
40 150 45
500 500 500 180
50 210 55 250
SURVEY SAFETY MANUAL 63

5.37 Two-Lane, Two-Way Roads - Self-Regulating Lane Closure - Diagram 350S
Diagram No. 350S covers closure of one lane of a low speed two-lane, two way road.
1. Use this diagram only if all of the following are true:
a. Work space is less than 200 feet.
b. The posted speed is 40 mph or less (unless not posted and speed governed by basic rule).
c. Average Daily Traffic (ADT) is less than 400.
d. Sight distance (in feet) is more than 750 at each end.
2. Use truck-mounted flashing warning lights on all work vehicles.
3. For added visibility, a truck-mounted arrow panel or PCMS in caution mode may be used.
4. A “RIGHT LANE ENDS” sign may be placed inside the cone taper for more emphasis.
64 OREGON DEPARTMENT OF TRANSPORTATION
Sign Spacing and Buffer Lengths (feet)
Posted Speed
Spacing Between Signs Buffer Space A B C
20 100 100 100
50 25 75 30 100 35
350 350 350 125
40 150 45
500 500 500 180
50 210 55 250

Diagram No. 350S – Self-Regulating Lane Closure
SURVEY SAFETY MANUAL 65

5.38 Two-Lane, Two-Way Roads - Work in Center of Low-Speed Road - Diagram 360S
Use Diagram No. 360S only on two-lane two-way roads with a posted speed of 40 mph or less (unless not posted and speed governed by basic rule); and when there is sufficient lane and shoulder width to allow a minimum of 10 feet on each side of the work space.
1. When work vehicle(s) are in the work space, use truck-mounted flashing warning lights on all vehicles. Allow a sufficient distance between the vehicle and work activity for safe run out if the vehicle is struck.
2. Cones and signs shown are required.
66 OREGON DEPARTMENT OF TRANSPORTATION
Sign Spacing and Buffer Lengths (feet)
Posted Speed
Spacing Between Signs Buffer Space A B C
20 100 100 100
50 25 75 30 100 35
350 350 350 125
40 150 45
500 500 500 180
50 210 55 250
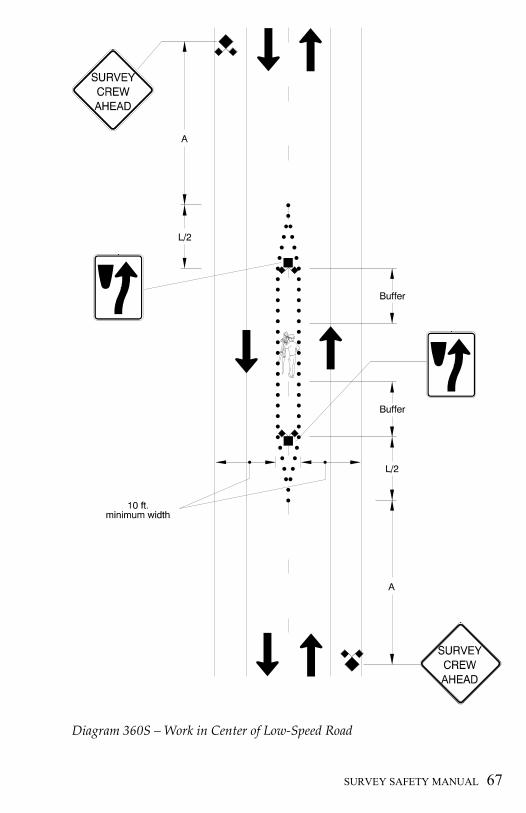
Diagram 360S – Work in Center of Low-Speed Road
SURVEY SAFETY MANUAL 67
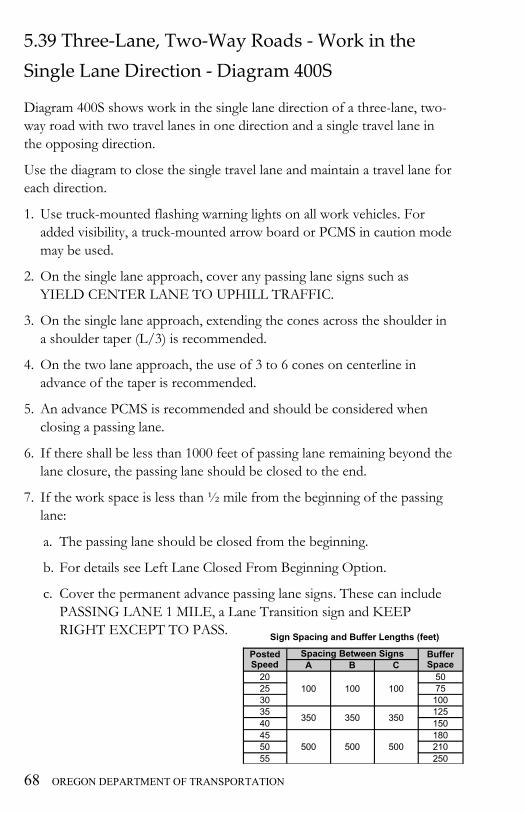
5.39 Three-Lane, Two-Way Roads - Work in the Single Lane Direction - Diagram 400S
Diagram 400S shows work in the single lane direction of a three-lane, two-way road with two travel lanes in one direction and a single travel lane in the opposing direction.
Use the diagram to close the single travel lane and maintain a travel lane for each direction.
1. Use truck-mounted flashing warning lights on all work vehicles. For added visibility, a truck-mounted arrow board or PCMS in caution mode may be used.
2. On the single lane approach, cover any passing lane signs such as YIELD CENTER LANE TO UPHILL TRAFFIC.
3. On the single lane approach, extending the cones across the shoulder in a shoulder taper (L/3) is recommended.
4. On the two lane approach, the use of 3 to 6 cones on centerline in advance of the taper is recommended.
5. An advance PCMS is recommended and should be considered when closing a passing lane.
6. If there shall be less than 1000 feet of passing lane remaining beyond the lane closure, the passing lane should be closed to the end.
7. If the work space is less than ½ mile from the beginning of the passing lane:
a. The passing lane should be closed from the beginning.
b. For details see Left Lane Closed From Beginning Option.
c. Cover the permanent advance passing lane signs. These can include PASSING LANE 1 MILE, a Lane Transition sign and KEEP RIGHT EXCEPT TO PASS. Sign Spacing and Buffer Lengths (feet)
Posted Speed
Spacing Between Signs Buffer Space A B C
20 100 100 100
50 25 75 30 100 35
350 350 350 125
40 150 45
500 500 500 180
50 210 55 250
68 OREGON DEPARTMENT OF TRANSPORTATION
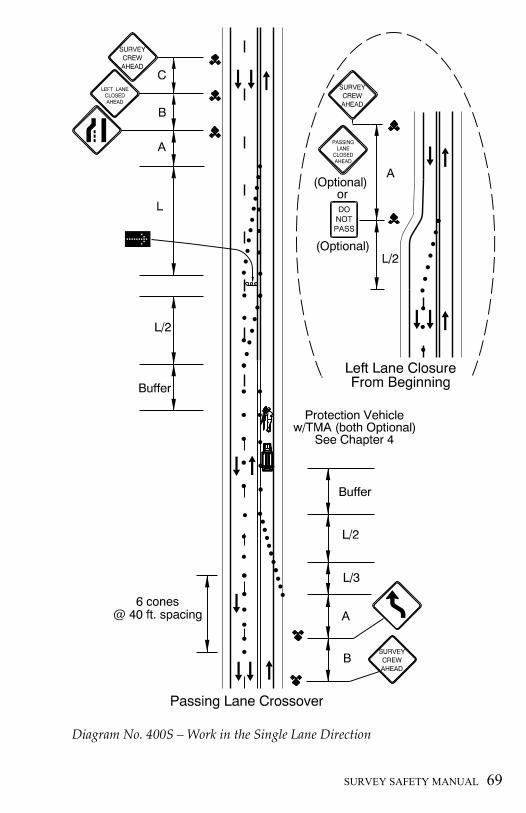
Diagram No. 400S – Work in the Single Lane Direction
SURVEY SAFETY MANUAL 69

5.40 Three-Lane, Two-Way Roads - Work in the Two-Lane Direction - Diagram 410S Diagram 410S shows work in the two-lane direction of a three-lane, two-way road with two travel lanes (e.g. a passing lane) in one direction and a single travel lane in the opposite direction. Use this diagram to close one lane of the two-lane direction; maintaining one open lane in each direction.
Refer to Diagram 500S for right lane closure information when the work is greater than 1/2 mile from the beginning of the passing lane.
1. Use truck-mounted flashing warning lights on all work vehicles. For added visibility, a truck-mounted arrow board or PCMS in caution mode may be used.
2. For added visibility, a truck-mounted arrow board or PCMS in caution mode may be used.
3. For a middle lane closure, 3 to 6 cones on centerline in advance of the closed area in the single lane direction may be used especially at speeds of 45 mph or greater.
4. For a right lane closure, cones may be placed on the yellow center line if lanes are narrow, sight distances are limited or the extra separation is needed for other conditions.
“PASSING LANE CLOSED AHEAD” and “DO NOT PASS” signs are optional.
5. On the single lane approach, cover any passing lane signs such as “YIELD CENTER LANE TO UPHILL TRAFFIC.”
6. An advance PCMS is recommended, and should be considered when closing a passing lane.
7. If there will be less than 1000 feet of passing lane remaining beyond the lane closure, the passing lane should be closed to the end.
8. If the work space is less than ½ mile from the beginning of the passing lane: a. The passing lane should be closed from the beginning. b. For left lane closure details, see Diagram 400S. c. Cover the permanent advance passing lane signs. These can
include “PASSING LANE 1 MILE,” the Lane Transition sign and “KEEP RIGHT EXCEPT TO PASS.”
70 OREGON DEPARTMENT OF TRANSPORTATION

Diagram No. 410S – Work in the Two-Lane Direction
Sign Spacing and Buffer Lengths (feet)
Posted Speed
Spacing Between Signs Buffer Space A B C
20 100 100 100
50 25 75 30 100 35
350 350 350 125
40 150 45
500 500 500 180
50 210 55 250
SURVEY SAFETY MANUAL 71

5.41 Three-Lane, Two-Way Roads - Work in a Continuous Left Turn Lane - Diagram 420S
Diagram 420S shows work in the continuous two-way left turn lane of a two-way road with three or more lanes.
1. Use truck-mounted flashing warning lights on all work vehicles.
2. For added visibility, a truck-mounted arrow board or PCMS in caution mode may be used.
3. For operations of more than one hour, cones and signs are required as shown. Protection vehicles are optional.
4. For operations between 15 minutes and one hour, including work that will relocate intermittently, cones are required and signs may be replaced by protection vehicles with flashing lights.
5. For operations of 15 minutes or less, signs and cones may be replaced by one or more protection vehicles with flashing lights.
6. When only one protection vehicle is used, the use of a spotter(s) is recommended to warn workers of approaching traffic.
72 OREGON DEPARTMENT OF TRANSPORTATION
Sign Spacing and Buffer Lengths (feet)
Posted Speed
Spacing Between Signs Buffer Space A B C
20 100 100 100
50 25 75 30 100 35
350 350 350 125
40 150 45
500 500 500 180
50 210 55 250

Diagram No. 420S – Work in a Continuous Left Turn Lane
SURVEY SAFETY MANUAL 73

5.42 Three-Lane, Two-Way Roads - Diversion into a Continuous Left Turn Lane - Diagram 430S Diagram 430S shows work in the travel lane(s) next to a continuous two-way left turn lane with one direction of traffic diverted into the continuous two-way left turn lane.
1. Use truck-mounted flashing warning lights on all work vehicles.
2. For added visibility, a truck-mounted arrow board or PCMS in caution mode may be used.
3. When two or more travel lanes are reduced to a single lane before the diversion, each lane shall be closed separately. Layout traffic control according to ODOT Standard Drawing TM 852 for 5-lane sections. TM852 can be found online at: http://www.oregon.gov/ODOT/HWY/ENGSERVICES/traffic_drawings.shtml#TM_800___Temp_Traffic_Control
4. A shifting taper (L/2) may be added in the diverted traffic direction across the continuous 2-way left turn lane (as shown). This option is recommended when the speed is 45 mph or greater
74 OREGON DEPARTMENT OF TRANSPORTATION
Sign Spacing and Buffer Lengths (feet)
Posted Speed
Spacing Between Signs Buffer Space A B C
20 100 100 100
50 25 75 30 100 35
350 350 350 125
40 150 45
500 500 500 180
50 210 55 250
Diagram No. 430S – Diversion into a Continuous 2-Way Left Turn Lane
SURVEY SAFETY MANUAL 75

5.43 Right Lane Closure, Multi-Lane Non-Freeway Road – Diagram 500S
Diagram No. 500S covers work which closes the right lane(s) of a multi-lane non-freeway road.
If closing more than one lane on a multi-lane road, provide a minimum tangent distance of 2L between the end of the first lane closure taper and the beginning of the second lane closure taper.
1. Use truck-mounted flashing warning lights on all work vehicles.
2. For added visibility, a truck-mounted arrow board or PCMS in caution mode may be used.
3. When the posted speed is 40 mph or less, the “RIGHT LANE CLOSED AHEAD” signs may be omitted.
4. Placement of signs in a non traversable median or other median that is not a two-way left turn lane is required for lane closures any time there is room for a truck to be parked on the left out of the travel lane. When there is no room for a truck to be parked on the left an additional “RIGHT LANE CLOSED AHEAD” sign should be placed on the right side and placement of signs in the median is optional.
5. If flagging is needed for work vehicle ingress/egress, use Flagger Layout Detail (see Inset).
76 OREGON DEPARTMENT OF TRANSPORTATION

Diagram No. 500S – Right Lane Closure on a Multi-Lane Road, Non-Freeway
Sign Spacing and Buffer Lengths (feet)
Posted Speed
Spacing Between Signs Buffer Space A B C
20 100 100 100
50 25 75 30 100 35
350 350 350 125
40 150 45
500 500 500 180
50 210 55 250
SURVEY SAFETY MANUAL 77
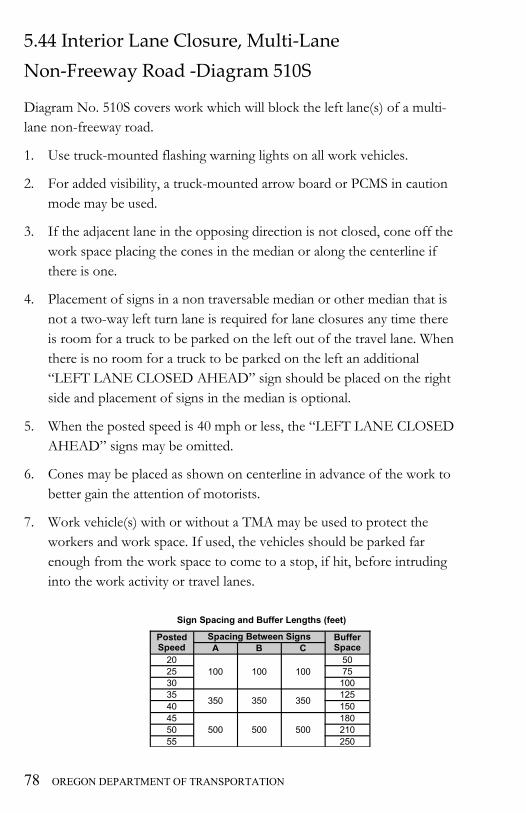
5.44 Interior Lane Closure, Multi-Lane Non-Freeway Road -Diagram 510S
Diagram No. 510S covers work which will block the left lane(s) of a multi-lane non-freeway road.
1. Use truck-mounted flashing warning lights on all work vehicles.
2. For added visibility, a truck-mounted arrow board or PCMS in caution mode may be used.
3. If the adjacent lane in the opposing direction is not closed, cone off the work space placing the cones in the median or along the centerline if there is one.
4. Placement of signs in a non traversable median or other median that is not a two-way left turn lane is required for lane closures any time there is room for a truck to be parked on the left out of the travel lane. When there is no room for a truck to be parked on the left an additional “LEFT LANE CLOSED AHEAD” sign should be placed on the right side and placement of signs in the median is optional.
5. When the posted speed is 40 mph or less, the “LEFT LANE CLOSED AHEAD” signs may be omitted.
6. Cones may be placed as shown on centerline in advance of the work to better gain the attention of motorists.
7. Work vehicle(s) with or without a TMA may be used to protect the workers and work space. If used, the vehicles should be parked far enough from the work space to come to a stop, if hit, before intruding into the work activity or travel lanes.
Sign Spacing and Buffer Lengths (feet)
Posted Speed
Spacing Between Signs Buffer Space A B C
20 100 100 100
50 25 75 30 100 35
350 350 350 125
40 150 45
500 500 500 180
50 210 55 250
78 OREGON DEPARTMENT OF TRANSPORTATION

Diagram No. 510S – Interior Lane Closure on a Multi-Lane Road, Non-Freeway
SURVEY SAFETY MANUAL 79
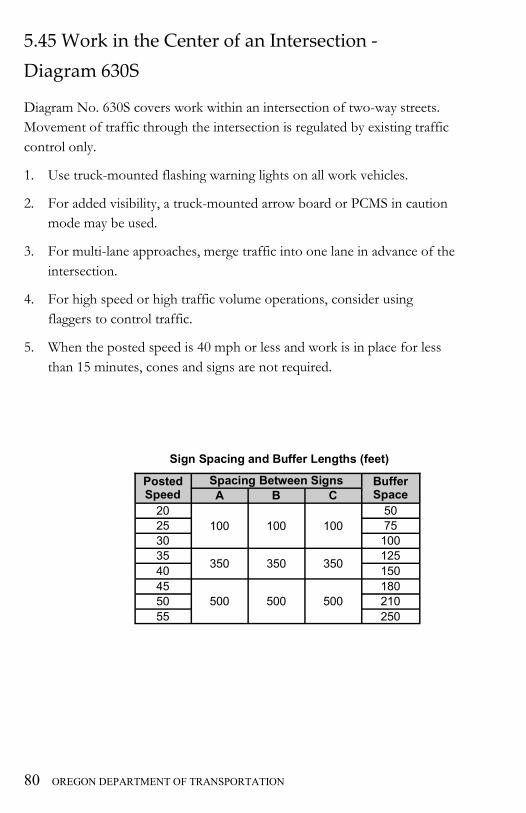
5.45 Work in the Center of an Intersection - Diagram 630S
Diagram No. 630S covers work within an intersection of two-way streets. Movement of traffic through the intersection is regulated by existing traffic control only.
1. Use truck-mounted flashing warning lights on all work vehicles.
2. For added visibility, a truck-mounted arrow board or PCMS in caution mode may be used.
3. For multi-lane approaches, merge traffic into one lane in advance of the intersection.
4. For high speed or high traffic volume operations, consider using flaggers to control traffic.
5. When the posted speed is 40 mph or less and work is in place for less than 15 minutes, cones and signs are not required.
80 OREGON DEPARTMENT OF TRANSPORTATION
Sign Spacing and Buffer Lengths (feet)
Posted Speed
Spacing Between Signs Buffer Space A B C
20 100 100 100
50 25 75 30 100 35
350 350 350 125
40 150 45
500 500 500 180
50 210 55 250

Diagram No. 630S – Work in the Center of an Intersection
SURVEY SAFETY MANUAL 81

5.46 Freeways
Freeways are defined by separation of traffic directions, high speed road design and controlled accesses. Freeways have only separated grade interchanges with exit and entrance ramps which are considered part of the freeway.
The high speeds and normally uninterrupted flow on freeways increases the risks for workers and road users. More visibility, better protection and earlier advance warning are needed for freeway work spaces than on other roads.
5.47 Freeway Shoulder Work - Diagram 710S
Diagram No. 710S covers stationary work with work operations and/or parked equipment on the shoulder and not encroaching on the travel lanes.
1. Use truck-mounted flashing warning lights on all work vehicles. For added visibility, a truck-mounted arrow board or PCMS in caution mode may be used.
2. For work that is in place less than 15 minutes and within 15 feet of the travel lane if more than 1000 feet of stopping sight distance is maintained, no signs or devices are needed.
3. The shoulder should be closed as shown with cones and a minimum of two signs for work lasting longer than 15 minutes and if the work is within 15 feet of the travel way.
4. If work is in the median, signs shall be on the left.
5. For work that moves frequently, advance warning signing may be placed to cover a distance that includes all work locations for a maximum 5 miles.
82 OREGON DEPARTMENT OF TRANSPORTATION
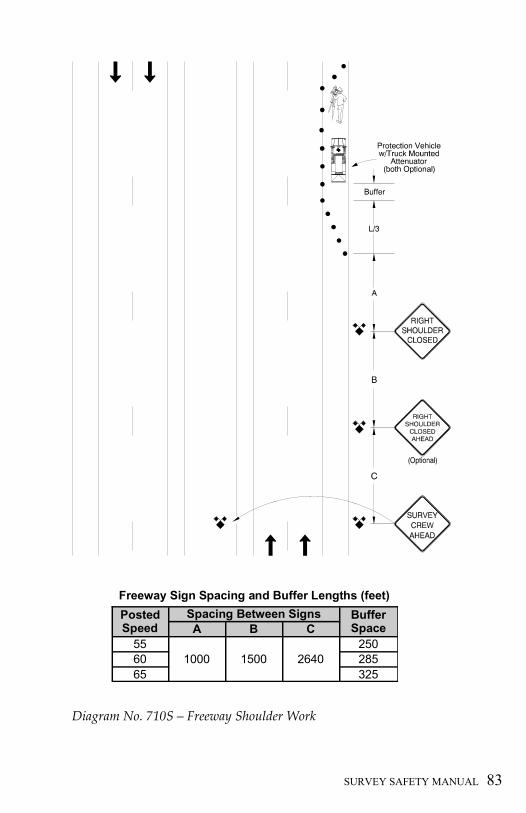
Diagram No. 710S – Freeway Shoulder Work
Posted Speed
Spacing Between Signs Buffer Space A B C
55 1000 1500 2640
250 60 285 65 325
Freeway Sign Spacing and Buffer Lengths (feet)
SURVEY SAFETY MANUAL 83

5.48 Freeway Lane Closures - Diagram 720S Diagram No. 720S covers lane closures on a freeway. It is recommended that lane closures only be in place during off peak hours. The traffic control should be placed during the lowest traffic volume period available.
1. A minimum of three advance warning signs is required.
2. Use truck-mounted flashing warning lights on all work vehicles.
3. For added visibility, a truck-mounted arrow board or PCMS in caution mode may be used.
4. An arrow panel or PCMS in arrow mode is required for each lane closure. Only one arrow panel per lane closure is allowed.
5. Placement of signs in a median is required for left lane closures or any time there is room for a truck to be parked on the left out of the travel lane.
6. When closing a right lane and it is not practical to install signs on the left shoulder, or there is inadequate room to park a truck on the left out of the travel lane:
a. Install an additional “RIGHT LANE CLOSED AHEAD” sign 1500 feet in advance of or following the other “RIGHT LANE CLOSED AHEAD” sign, or
b. Install a PCMS at least ½ mile before the initial advance warning sign. The PCMS should display the closure information “(RIGHT, LEFT, LANE or 2 LANES)” and the distance to the closure.
7. When an interior lane must be closed, close the adjacent lanes from the shoulder toward the work space. Start from the closest shoulder to minimize the number of closed lanes. When closing lanes from the median side extra attention should be given to advance warning and good sight exposure for the transition areas.
8. The length of lane closures should be adjusted and sign spacing may be lengthened to provide for safe transition movements in unusual situations such as crest or horizontal curves.
9. A downstream taper may be used at the end of the lane closure(s) to transition traffic back to normal lane use.
10. If traffic backs up beyond the initial advance warning signs, place additional appropriate advance warning signs.
84 OREGON DEPARTMENT OF TRANSPORTATION
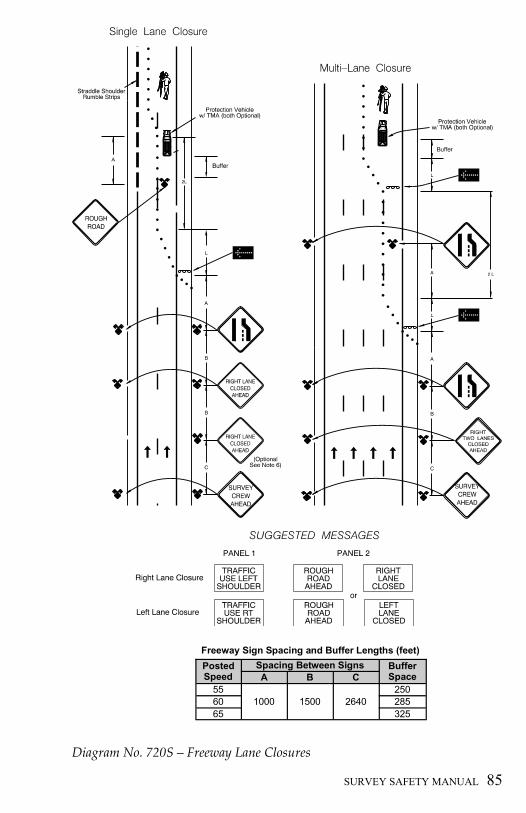
Diagram No. 720S – Freeway Lane Closures SURVEY SAFETY MANUAL 85
Posted Speed
Spacing Between Signs Buffer Space A B C
55 1000 1500 2640
250 60 285 65 325
Freeway Sign Spacing and Buffer Lengths (feet)

5.49 Freeway - Work Near an Exit Ramp – Diagram 730S Diagram No. 730S covers work that affects the approach to an exit ramp. The drawing shows work in the gore area. Similar traffic control would be placed for work near the entry area and shoulder. Traffic control should make the exit path clear to approaching motorists.
1. Use enough cones, barricades or tubular markers to provide a clear, smooth exit for motorists.
2. A white-on-green EXIT/arrow sign is required if the exit point is moved or re-shaped and the permanent sign is obscured or directs traffic inappropriately. Cover or remove inappropriate permanent EXIT/arrow signs.
3. A black-on-orange EXIT OPEN sign with an arrow or a PCMS, trailer or truck-mounted, may be used to indicate the point of exit in advance.
4. For multi-lane exits, keep exiting vehicles to one lane until past the work space.
5. Park equipment and vehicles inside the coned off area.
6. When closing a right lane and there is not room to park a truck on the left out of the travel lane, install an additional “RIGHT LANE CLOSED AHEAD” sign 1500 feet in advance of or following the other “RIGHT LANE CLOSED AHEAD” sign. An alternative to the additional advance warning sign is to install a PCMSPCMS as described in Note 7 below.
7. A PCMS located at least 1/2 mile before the initial advance warning sign is recommended. The PCMS should give the closed lane information (RIGHT, LANE or 2 LANES) and the distance ahead of the closure.
Posted Speed
Spacing Between Signs Buffer Space A B C
55 1000 1500 2640
250 60 285 65 325
Freeway Sign Spacing and Buffer Lengths (feet)
86 OREGON DEPARTMENT OF TRANSPORTATION

Diagram No. 730S – Work Near an Exit Ramp
SURVEY SAFETY MANUAL 87
CHAPTER 6
Job/Jobsite Hazard Assessment
6.0 Introduction
The purpose of the JHA is to enhance the safety program through an organized approach for looking at a given task, breaking it down into steps, analyzing each step for safety and operational needs, and providing recommendations for procedures that meet those needs.
Requiring JHAs helps assure employees on a job are aware of any job-specific hazards, helps communicate those hazards to all involved staff, and provides a record of efforts to ensure safe performance of both routine and non-routine tasks.
Surveyors encounter many types of hazardous conditions in the performance of their duties. The work is variable technically and geographically, and hazards range from traffic exposure to steep inclines to confined spaces such as sub-surface features. For each job that does not have Standard Operating Procedures, use the JHA Form and the following guide to assess and mitigate the hazards reasonably anticipated.
• Observe the Job/Task (if possible, or step through the tasks mentally)
• List Sequence or Steps of Job/Task
• Identify Potential Hazards at each step
• Recommend preventive actions or plans to mitigate the hazard
• Follow-Up to ensure the JHA covered all encountered hazards; refine as needed.
• Preventive/corrective actions include such things as:
• Traffic control
• Providing guards, safety devices, etc.
• Providing proper PPE
• Providing job instruction and/or training
88 OREGON DEPARTMENT OF TRANSPORTATION

JHAs should be developed for all new work and reviewed whenever a job changes significantly. A pre-task “tailgate” meeting should suffice to ensure all crew members are aware of identified and anticipated hazards. Completed JHAs should be kept on file for ready review. During a post-job follow-up, the JHA may be updated to include inputs from crew members.
Responsibilities: Supervisory or Lead staff (or their delegates) are responsible for conducting the JHA;
All crewmembers are responsible for following the completed JHA;
All employees are responsible for alerting Management and co-workers of known or anticipated hazards, including deficiencies in any JHA;
Detailed help in conducting an effective JHA can be found in ODOT Advisory ADV 99002 in the Safety & Health Manual or online at the Employee Safety Home page.
The Statewide Standard Survey JHA is form #734-2769 (6/09) and can be found at the following locations: If a Region chooses to develop their own form, the form must contain all of the elements of the standard and the Region must assume responsibility for their form. Internet: http://www.oregon.gov/ODOT/HWY/GEOMETRONICS/docs/jobsitehazardassesment.pdf Intranet: http://transnet.odot.state.or.us/hwy/Geometronics/Shared%20Documents/pdf/JobSiteHazardAssesment.pdf
SURVEY SAFETY MANUAL 89

90 OREGON DEPARTMENT OF TRANSPORTATION