SurePath How To for Clients Word August 2011 31 Introduction ... SurePath How To for Clients BEFORE...
39
SurePath How To for Client Users (Request Only Version) InSure Vision Technologies, LLC August 2011
Transcript of SurePath How To for Clients Word August 2011 31 Introduction ... SurePath How To for Clients BEFORE...

SurePath
How To for Client Users (Request Only Version)
InSure Vision Technologies, LLC August 2011

Printed in the United States of America All rights reserved. No part of this manual may be reproduced, stored in a retrieval system, or transcribed,
in any form or by any means, electronically, mechanically, photocopying, or otherwise, without prior express written permission of the publisher, InSure Vision Technologies, LLC ©
InSure Vision Technologies, LLC 5170 Sepulveda Blvd., Ste 200
Sherman Oaks, CA 91403 Published August 2011

Before You Begin ........................................................................................... 1 About this Manual........................................................................................................... 1 About InSure Vision Technologies (IVT) ...................................................................... 1 Requirements .................................................................................................................. 1
Technical Requirements .............................................................................................. 1 SureForm..................................................................................................................... 1 SurePath User Name and Password ............................................................................ 2
Support ............................................................................................................................ 3
Getting Started ............................................................................................... 4 How to Access the SurePath Logon Page ....................................................................... 4 How to Logon to SurePath .............................................................................................. 4 How to Exit SurePath...................................................................................................... 5 Start Page Overview ....................................................................................................... 6
Bond Requests ................................................................................................ 7 Introduction ..................................................................................................................... 7 How to Request a Bond .................................................................................................. 7 How to Edit a Request .................................................................................................. 12 How to Generate a Request List ................................................................................... 12
Bond List ....................................................................................................... 14 Introduction ................................................................................................................... 14 How to Generate a Bond List........................................................................................ 14 How to Modify the Bond List ....................................................................................... 15 How to Print the Bond List (Export to Excel) .............................................................. 16 How to Add Comments to the Bond List...................................................................... 17
Outstanding Liability .................................................................................. 18 Introduction ................................................................................................................... 18 How to Generate an Outstanding Liability Report ....................................................... 18 How to Change Outstanding Liability for One Bond ................................................... 19 How to Change Outstanding Liability for Multiple Bonds .......................................... 20
Bond Level Details ....................................................................................... 21 Introduction ................................................................................................................... 21 How to View and Print Bond Details ........................................................................... 21 How to View and Print the Bond Form ........................................................................ 23 How to Enter/Update Comments .................................................................................. 25 How to Attach a Document ........................................................................................... 25
Bid Bonds ...................................................................................................... 27 Introduction ................................................................................................................... 27 How to Generate an Outstanding Bid Bond Report...................................................... 27 How to Generate a Bid Bonds Past Bid Date Report.................................................... 28 How to View Bid Results ............................................................................................. 28 How to Enter Bid Results ............................................................................................. 28
Reports ......................................................................................................... 31 Introduction ................................................................................................................... 31 How to Generate a Standard Report from the Start Page ............................................. 32 How to Generate a Standard Report from Reports ....................................................... 33 How to Create a Custom Report ................................................................................... 34 How to Run a Custom Report ....................................................................................... 35
SurePath How To for Clients BEFORE YOU BEGIN
InSure Vision Technologies, LLC Page 1
Before You Begin ABOUT THIS MANUAL
This manual is written for client users without Power of Attorney that have been given access to SurePath by their agent.
ABOUT INSURE VISION TECHNOLOGIES (IVT) InSure Vision Technologies is the developer of the SurePath Network, a web-based surety bond processing system. IVT is a Microsoft Certified Solution Provider and has extensive experience in the surety industry, insurance corporate finance and the development of insurance related systems. We have special expertise in Internet development, including the transition from paper-based processes to digitally enhanced processes.
REQUIREMENTS Technical Requirements To use SurePath you need:
A computer with a Windows operating system. A broadband internet connection Internet Explorer 6.0 or higher.
SureForm SureForm is companion software to SurePath and is required to view and print the actual bond form.
SureForm must be installed on the computer from which it will be used. The SureForm software can be downloaded from the internet. If your company requires your Information Technology group to perform these downloads, please check with them before installing SureForm.
Continued on Next Page
BEFORE YOU BEGIN SurePath How To for Clients
Page 2 InSure Vision Technologies, LLC
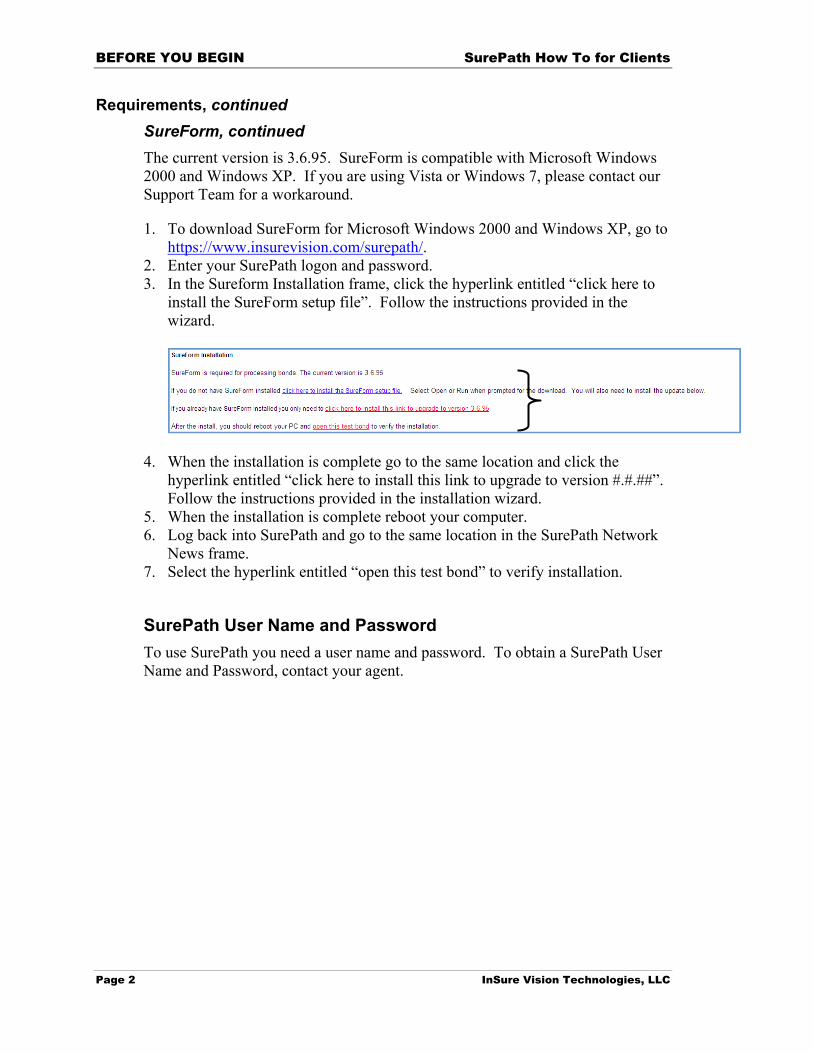
Requirements, continued SureForm, continued The current version is 3.6.95. SureForm is compatible with Microsoft Windows 2000 and Windows XP. If you are using Vista or Windows 7, please contact our Support Team for a workaround.
1. To download SureForm for Microsoft Windows 2000 and Windows XP, go to https://www.insurevision.com/surepath/.
2. Enter your SurePath logon and password. 3. In the Sureform Installation frame, click the hyperlink entitled “click here to
install the SureForm setup file”. Follow the instructions provided in the wizard.
4. When the installation is complete go to the same location and click the hyperlink entitled “click here to install this link to upgrade to version #.#.##”. Follow the instructions provided in the installation wizard.
5. When the installation is complete reboot your computer. 6. Log back into SurePath and go to the same location in the SurePath Network
News frame. 7. Select the hyperlink entitled “open this test bond” to verify installation.
SurePath User Name and Password To use SurePath you need a user name and password. To obtain a SurePath User Name and Password, contact your agent.

SurePath How To for Clients BEFORE YOU BEGIN
InSure Vision Technologies, LLC Page 3
SUPPORT For SurePath and SureForm phone or email support, please contact your agent.
For on-line support in SurePath: 1. Click the Help button, located on the navigation (button) bar on the left. 2. Click the For Clients button, located on the navigation bar across the top. 3. Click the appropriate hyperlink to display step-by-step instructions.
This document and scattered throughout SurePath are also support tools that provide step-by-step instructions for the basic processing functions within SurePath.
GETTING STARTED SurePath How To for Clients
Page 4 InSure Vision Technologies, LLC
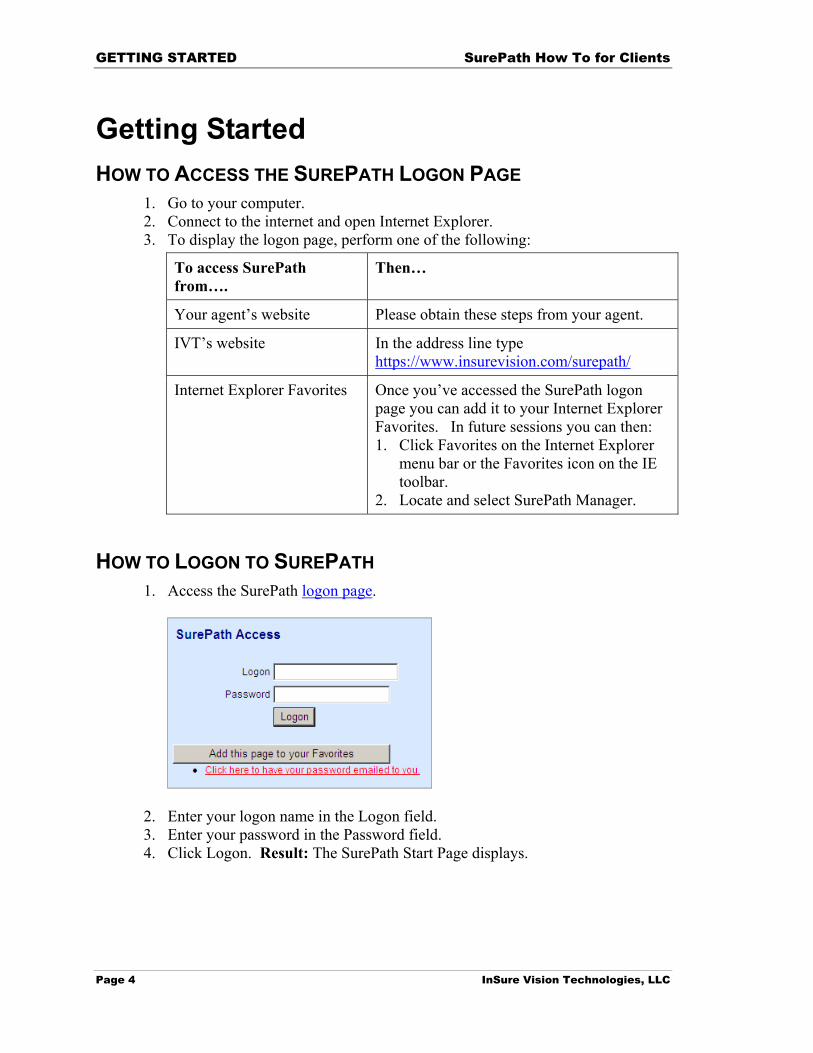
Getting Started HOW TO ACCESS THE SUREPATH LOGON PAGE
1. Go to your computer. 2. Connect to the internet and open Internet Explorer. 3. To display the logon page, perform one of the following:
To access SurePath from….
Then…
Your agent’s website Please obtain these steps from your agent.
IVT’s website In the address line type https://www.insurevision.com/surepath/
Internet Explorer Favorites Once you’ve accessed the SurePath logon page you can add it to your Internet Explorer Favorites. In future sessions you can then: 1. Click Favorites on the Internet Explorer
menu bar or the Favorites icon on the IE toolbar.
2. Locate and select SurePath Manager.
HOW TO LOGON TO SUREPATH 1. Access the SurePath logon page.
2. Enter your logon name in the Logon field. 3. Enter your password in the Password field. 4. Click Logon. Result: The SurePath Start Page displays.
SurePath How To for Clients GETTING STARTED
InSure Vision Technologies, LLC Page 5
HOW TO EXIT SUREPATH 1. Click the Exit button on the SurePath navigation bar.

GETTING STARTED SurePath How To for Clients
Page 6 InSure Vision Technologies, LLC
START PAGE OVERVIEW
Navigation Buttons provide quick access to
all SurePath functions. It
displays while performing most
functions enabling the user
to quickly maneuver in
SurePath.
This is the Start Page. It consists of frames of information that provide quick access to the most
frequently used functions. Click on any hyperlink to perform that function. To return to the Start Page at
any time, click the Start button.

SurePath How To for Clients BOND REQUESTS
InSure Vision Technologies, LLC Page 7
Bond Requests INTRODUCTION
SurePath has simplified the bond request process. To request and monitor the status of a bond follow these easy steps: 1. Enter your bond request in SurePath. 2. SurePath emails your agent. 3. Monitor the status of your request using SurePath’s Bond Request List. When
the agent executes the bond, the request is removed from the Request List. The bond execution is added to the Bond List.
This section provides step-by-step instructions for requesting the bond and generating the Bond Request List.
HOW TO REQUEST A BOND 1. Select one of the following as your first step:
From the…. Click the…
Navigation (button) bar on the left Request a Bond button.
SurePath Start Page here hyperlink in the Request Bond frame.
2. Click the hyperlink that best represents the type of bond you want to request.
Continued on Next Page

BOND REQUESTS SurePath How To for Clients
Page 8 InSure Vision Technologies, LLC
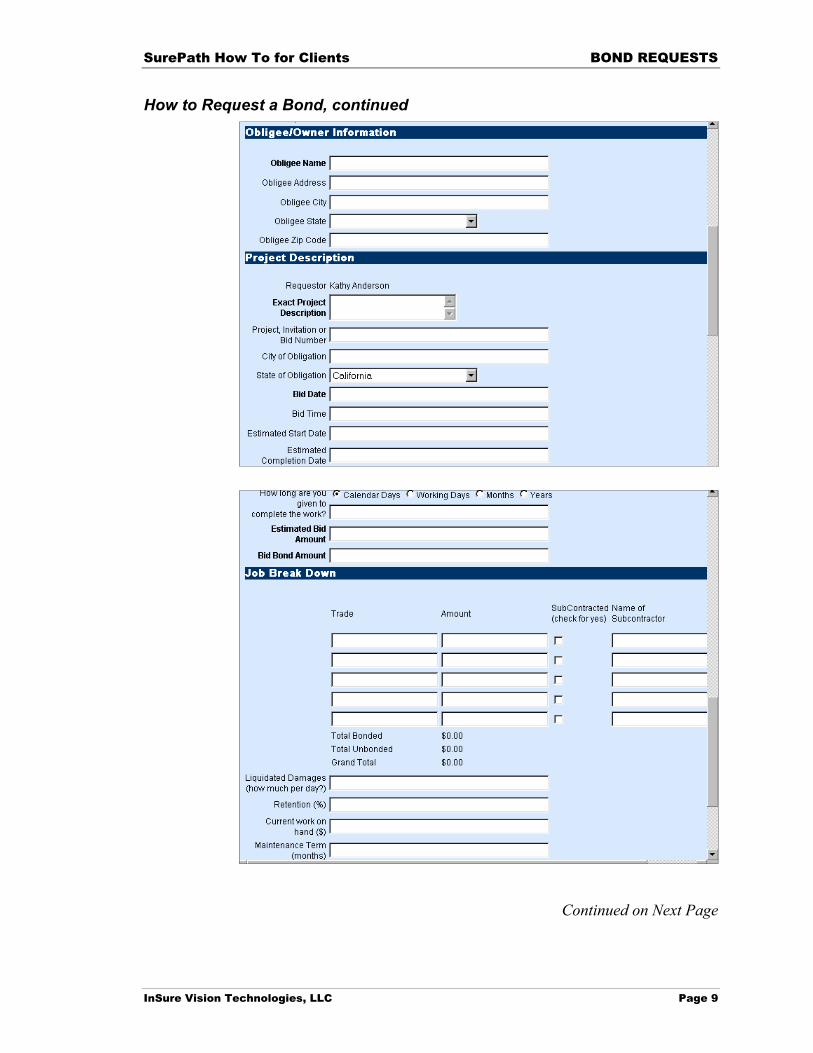
How to Request a Bond, continued 3. Complete the request form.
Tips: A sample request form is displayed below. Data entry fields vary depending on the type of bond selected.
Bolded fields are required by SurePath. For example, in the print screen below Principal Name is required, Principal Address is not.
The agent may have additional required fields but these are not bolded. Please discuss these requirements with the agent to expedite your requests.
Provide as much information as is possible to expedite the execution process.
Principal Information: The principal names and addresses have been entered by your agent. If the desired principal is not on the “Select the name of a standard principal” drop down list, select None and then provide the agent with as much information as is possible about the principal.
Type of Bond Form: Your agent may have provided you with a list of bond forms from which to select in order to expedite the execution process. If the form you want is not listed on the drop down list leave the field blank and then add any related comments in the Other Information / Remarks field.
If you prefer to use the keyboard, use [Tab] to move the cursor forward one field and [Shift]+[Tab] to move the cursor back. Do not use the [Enter] key.
Continued on Next Page
SurePath How To for Clients BOND REQUESTS
InSure Vision Technologies, LLC Page 9
How to Request a Bond, continued
Continued on Next Page

BOND REQUESTS SurePath How To for Clients
Page 10 InSure Vision Technologies, LLC
How to Request a Bond, continued
4. Perform one of the following as your next step: If you …. Then Go To …..
Want to attach a document to the request You can upload any type of file. However there is a file size limitation of 500KB per document. If a file exceeds this size you can break it into smaller documents or if scanned, change the resolution to compress the document.
Step 5
Don’t want to attach a document to the request Step 10
5. Click the Upload Document button. Result: The Upload document section displays next to the button.
6. Use the Browse button to select the document. 7. To rename the document (optional) enter a new name in the “Use the
following file name(hyperlink) field.
Continued on Next Page
SurePath How To for Clients BOND REQUESTS
InSure Vision Technologies, LLC Page 11
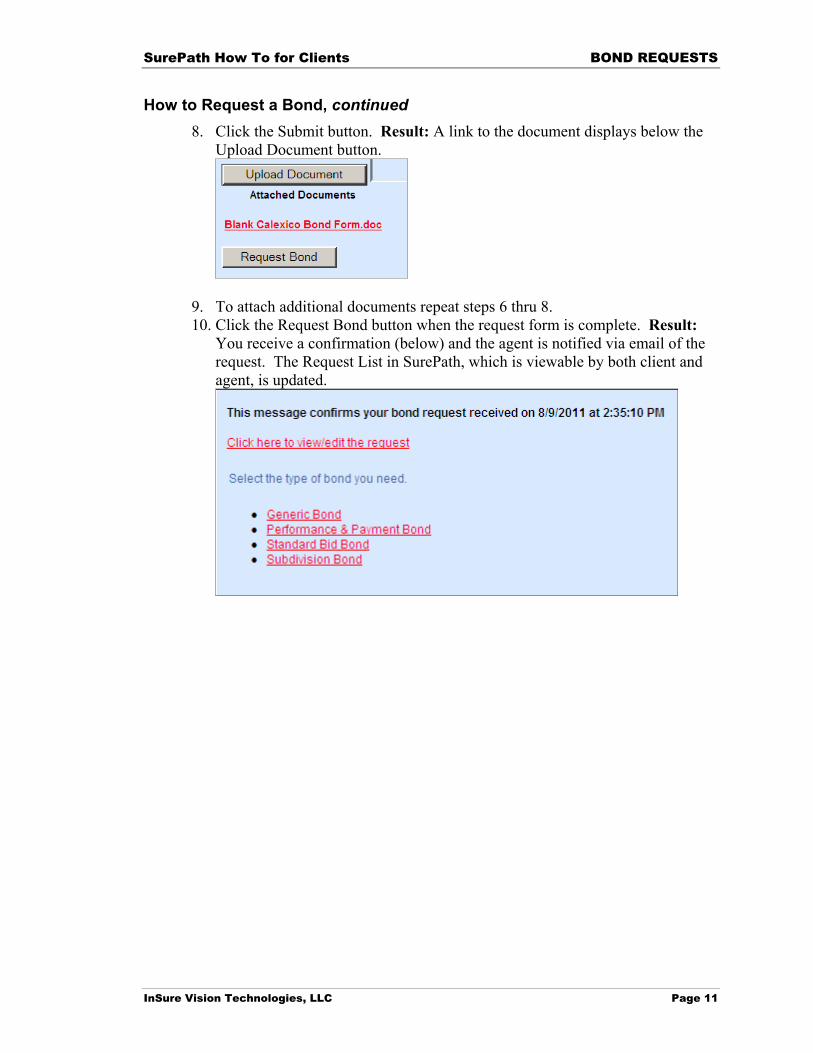
How to Request a Bond, continued 8. Click the Submit button. Result: A link to the document displays below the
Upload Document button.
9. To attach additional documents repeat steps 6 thru 8. 10. Click the Request Bond button when the request form is complete. Result:
You receive a confirmation (below) and the agent is notified via email of the request. The Request List in SurePath, which is viewable by both client and agent, is updated.
BOND REQUESTS SurePath How To for Clients
Page 12 InSure Vision Technologies, LLC
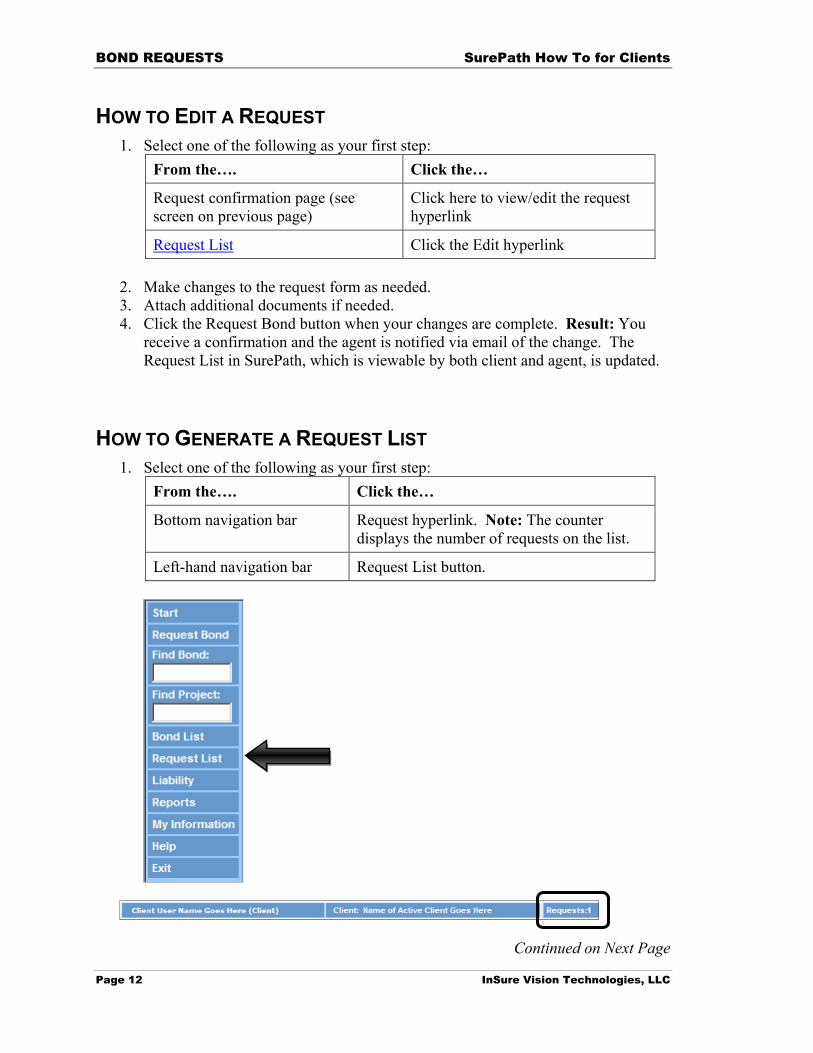
HOW TO EDIT A REQUEST 1. Select one of the following as your first step:
From the…. Click the…
Request confirmation page (see screen on previous page)
Click here to view/edit the request hyperlink
Request List Click the Edit hyperlink
2. Make changes to the request form as needed. 3. Attach additional documents if needed. 4. Click the Request Bond button when your changes are complete. Result: You
receive a confirmation and the agent is notified via email of the change. The Request List in SurePath, which is viewable by both client and agent, is updated.
HOW TO GENERATE A REQUEST LIST 1. Select one of the following as your first step:
From the…. Click the…
Bottom navigation bar Request hyperlink. Note: The counter displays the number of requests on the list.
Left-hand navigation bar Request List button.
Continued on Next Page
SurePath How To for Clients BOND REQUESTS
InSure Vision Technologies, LLC Page 13
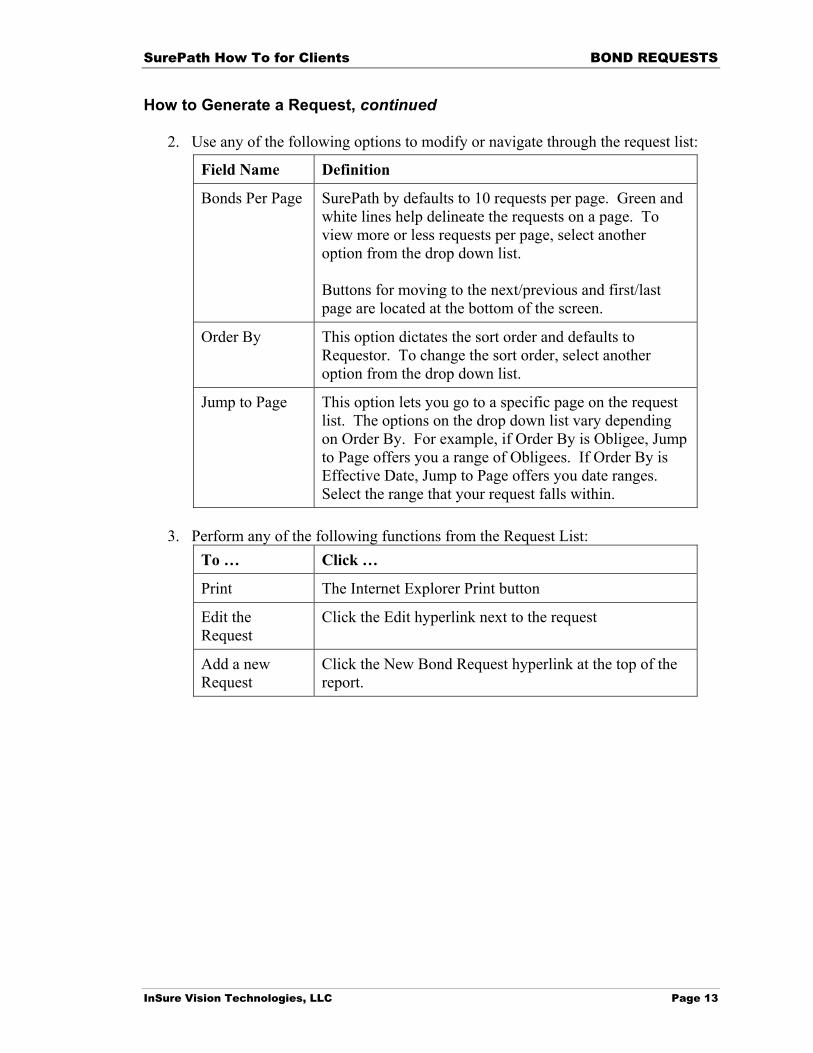
How to Generate a Request, continued
2. Use any of the following options to modify or navigate through the request list:
Field Name Definition
Bonds Per Page SurePath by defaults to 10 requests per page. Green and white lines help delineate the requests on a page. To view more or less requests per page, select another option from the drop down list. Buttons for moving to the next/previous and first/last page are located at the bottom of the screen.
Order By This option dictates the sort order and defaults to Requestor. To change the sort order, select another option from the drop down list.
Jump to Page This option lets you go to a specific page on the request list. The options on the drop down list vary depending on Order By. For example, if Order By is Obligee, Jump to Page offers you a range of Obligees. If Order By is Effective Date, Jump to Page offers you date ranges. Select the range that your request falls within.
3. Perform any of the following functions from the Request List:
To … Click …
Print The Internet Explorer Print button
Edit the Request
Click the Edit hyperlink next to the request
Add a new Request
Click the New Bond Request hyperlink at the top of the report.
BOND LIST SurePath How To for Clients
Page 14 InSure Vision Technologies, LLC
Bond List INTRODUCTION
SurePath keeps a list of all your bonds. When a bond is executed in SurePath this list is automatically updated. The bond list is available to you at any time.
Only executed bonds are viewable on the bond list. To see a list of bond requests, refer to the Bond Request section of this document.
The bond list is a launching place for several SurePath functions. From the Bond List the user can view Bond Details, bond-specific Comments or update Outstanding Liability.
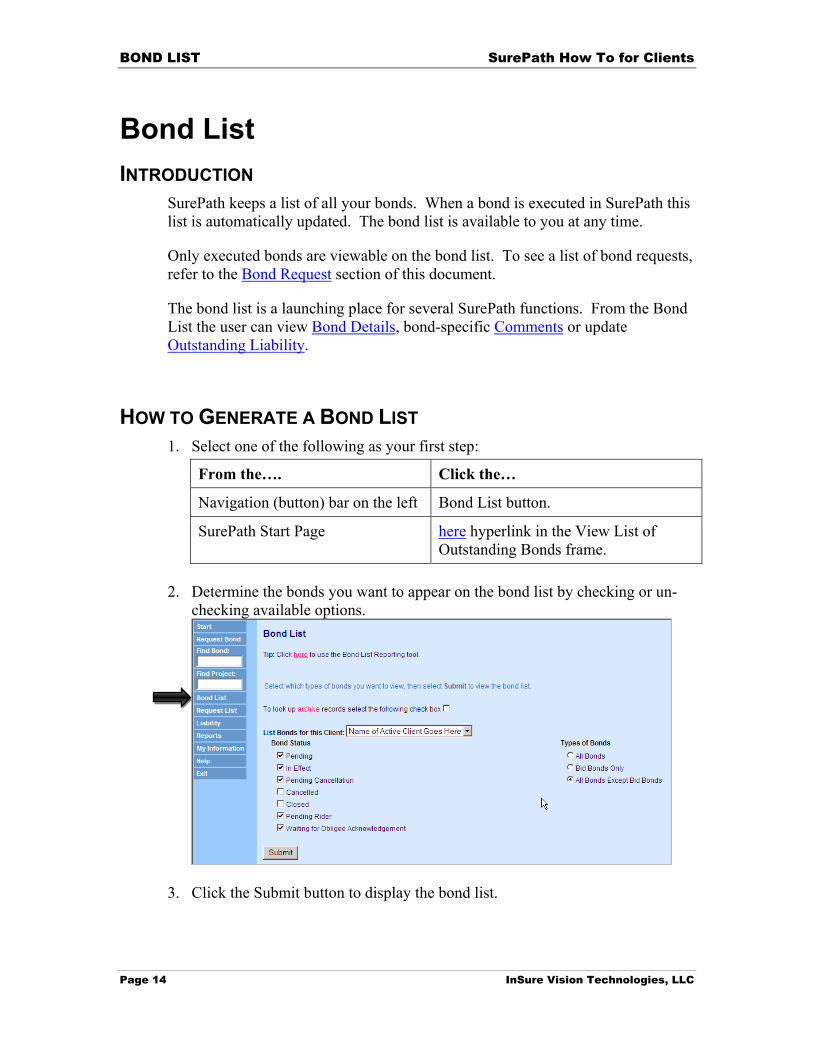
HOW TO GENERATE A BOND LIST 1. Select one of the following as your first step:
From the…. Click the…
Navigation (button) bar on the left Bond List button.
SurePath Start Page here hyperlink in the View List of Outstanding Bonds frame.
2. Determine the bonds you want to appear on the bond list by checking or un-
checking available options.
3. Click the Submit button to display the bond list.

SurePath How To for Clients BOND LIST
InSure Vision Technologies, LLC Page 15
HOW TO MODIFY THE BOND LIST 1. Display the bond list. Refer to the previous page for instructions on
displaying the bond list.
Continued on Next Page

BOND LIST SurePath How To for Clients
Page 16 InSure Vision Technologies, LLC
How to Modify the Bond List, continued 2. Use any of the following options to modify or navigate through the bond list:
Field Name Definition
Bonds Per Page SurePath by default displays 10 bonds per page. Green and white lines help delineate the bonds on a page. To view more or less bonds per page, select another option from the drop down list. Buttons for moving to the next/previous and first/last page are located at the bottom of the screen.
Order By This option dictates the sort order and defaults to Bond Number. To change the sort order, select another option from the drop down list.
Jump to Page This option lets you go to a specific page on the bond list. The options on the drop down list vary depending on Order By. For example, if Order By is Obligee, Jump to Page offers you a range of Obligees. If Order By is Effective Date, Jump to Page offers you date ranges. Select the range that your bond falls within.
Find Bond Number
This option takes you to the page in the bond list containing the bond number entered in this field.
HOW TO PRINT THE BOND LIST (EXPORT TO EXCEL) Important: You must have Excel 95 or better to print a bond list. Steps may vary by Excel version. 1. Generate a bond list. 2. Modify the bond list if needed. 3. Go to the bottom of the page. 4. Click the Import to Excel button. 5. At the prompt, “Please allow time for the report to download….”, click OK. 6. When prompted to open or save, select Save. 7. Assign the file a name and location in your local environment. 8. When prompted to open the file, select Open. Result: Excel opens and the
report displays. 9. Make and save changes in Excel as needed. 10. To return to SurePath, close the browser window.
SurePath How To for Clients BOND LIST
InSure Vision Technologies, LLC Page 17
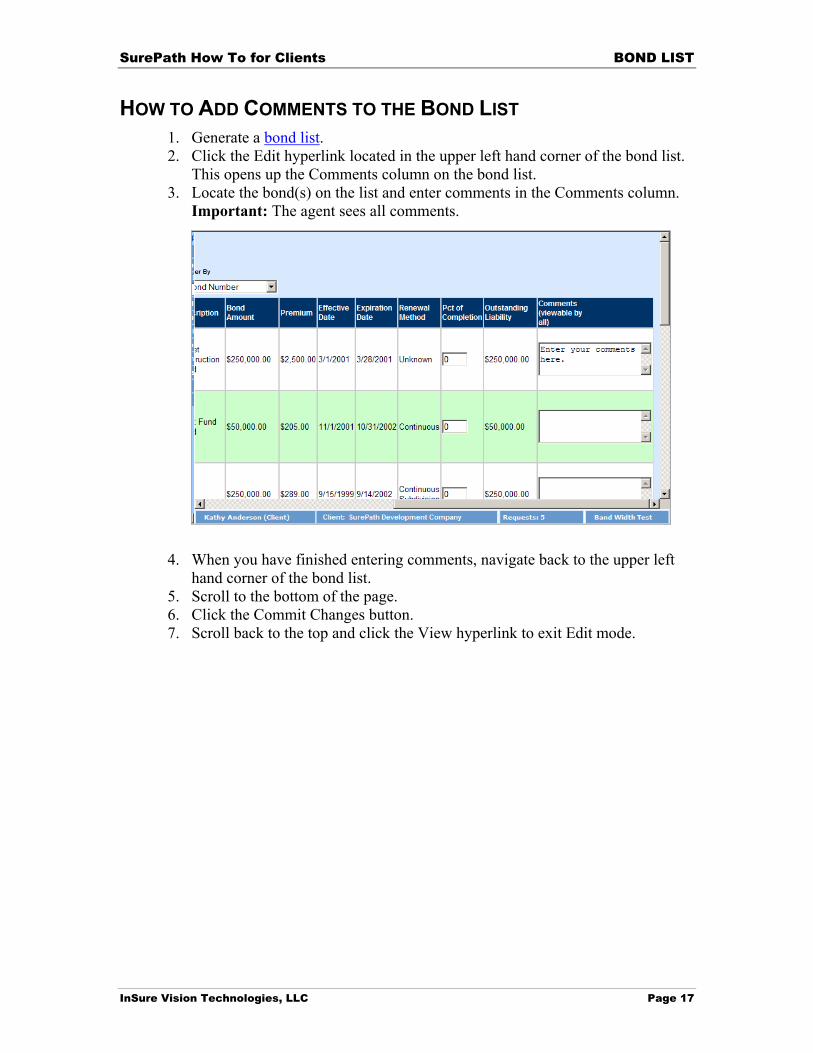
HOW TO ADD COMMENTS TO THE BOND LIST 1. Generate a bond list. 2. Click the Edit hyperlink located in the upper left hand corner of the bond list.
This opens up the Comments column on the bond list. 3. Locate the bond(s) on the list and enter comments in the Comments column.
Important: The agent sees all comments.
4. When you have finished entering comments, navigate back to the upper left hand corner of the bond list.
5. Scroll to the bottom of the page. 6. Click the Commit Changes button. 7. Scroll back to the top and click the View hyperlink to exit Edit mode.
OUTSTANDING LIABILITY SurePath How To for Clients
Page 18 InSure Vision Technologies, LLC
Outstanding Liability INTRODUCTION
SurePath adds and removes bonds from your outstanding liability as bonds are issued, cancelled/closed and opened/reinstated.
You may make interim changes to your outstanding liability if your agent has given you permission to do so.
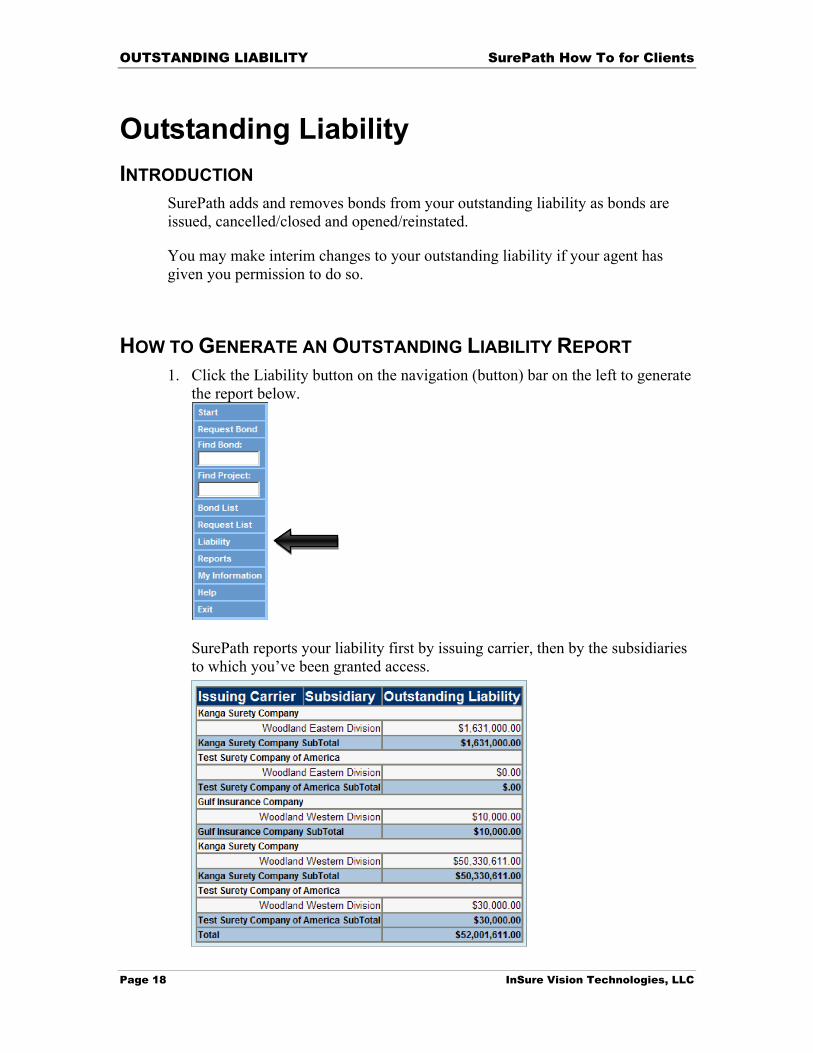
HOW TO GENERATE AN OUTSTANDING LIABILITY REPORT 1. Click the Liability button on the navigation (button) bar on the left to generate
the report below.
SurePath reports your liability first by issuing carrier, then by the subsidiaries to which you’ve been granted access.
SurePath How To for Clients OUTSTANDING LIABILITY
InSure Vision Technologies, LLC Page 19
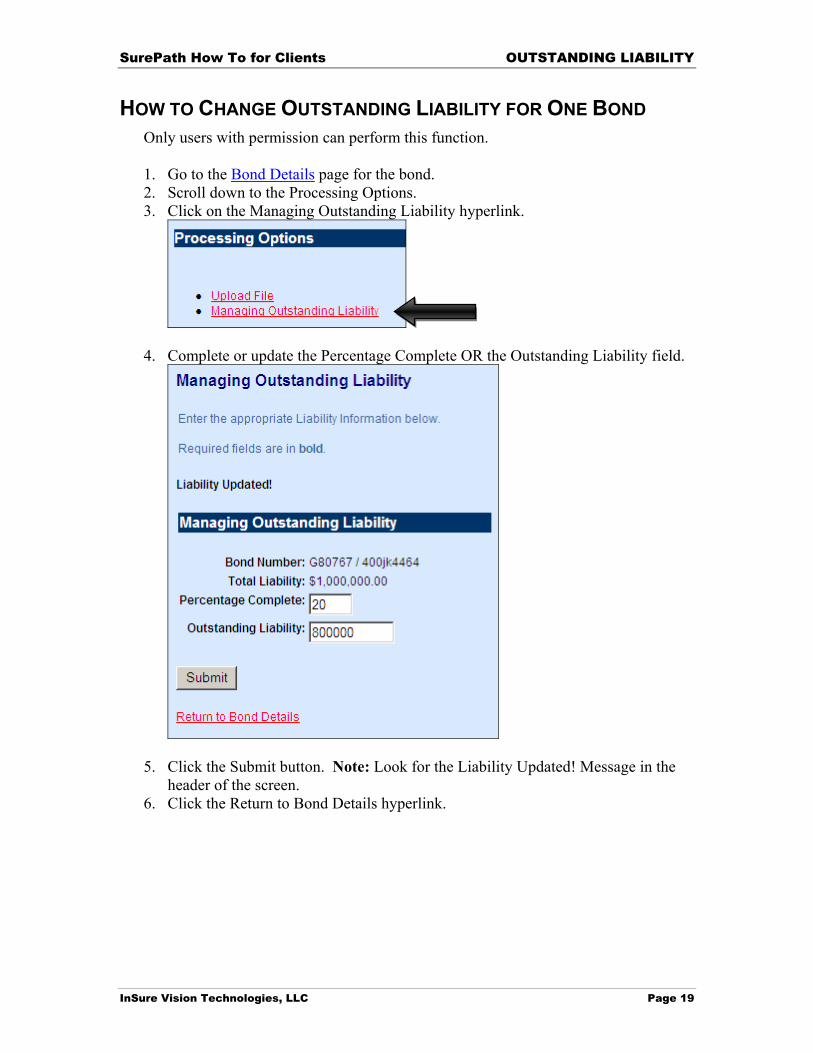
HOW TO CHANGE OUTSTANDING LIABILITY FOR ONE BOND Only users with permission can perform this function.
1. Go to the Bond Details page for the bond. 2. Scroll down to the Processing Options. 3. Click on the Managing Outstanding Liability hyperlink.
4. Complete or update the Percentage Complete OR the Outstanding Liability field.
5. Click the Submit button. Note: Look for the Liability Updated! Message in the header of the screen.
6. Click the Return to Bond Details hyperlink.
OUTSTANDING LIABILITY SurePath How To for Clients
Page 20 InSure Vision Technologies, LLC
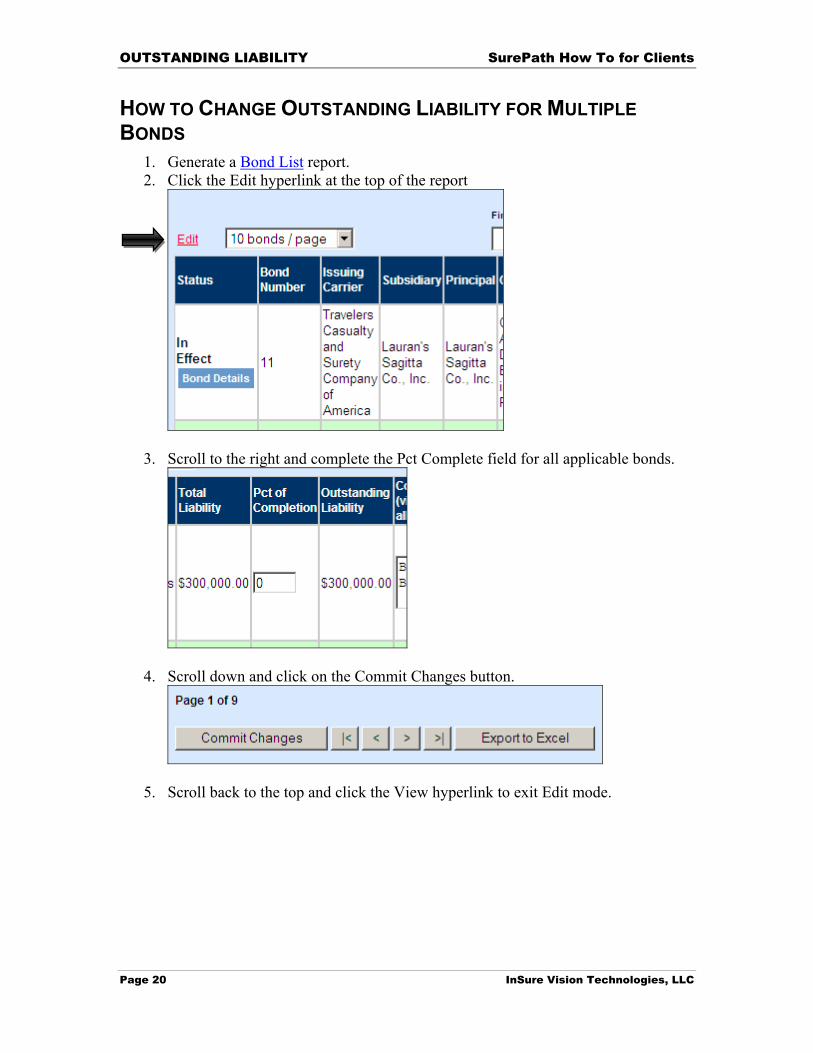
HOW TO CHANGE OUTSTANDING LIABILITY FOR MULTIPLE BONDS
1. Generate a Bond List report. 2. Click the Edit hyperlink at the top of the report
3. Scroll to the right and complete the Pct Complete field for all applicable bonds.
4. Scroll down and click on the Commit Changes button.
5. Scroll back to the top and click the View hyperlink to exit Edit mode.

SurePath How To for Clients BOND LEVEL DETAILS
InSure Vision Technologies, LLC Page 21
Bond Level Details INTRODUCTION
When a bond is executed the following happens: The Bond List is updated. A Bond Details or execution report is created A Bond Form is created.
The Bond List is discussed in the previous section of the manual. The Bond Details and Bond Form are discussed in this section of the manual.
From the Bond Details page you may: Review and/or print bond details Review and/or print the bond form Update the comments Attach a document (if the agency is licensed) Update outstanding liability (if you have permission) Update bid results
Please refer to other areas of the user manual for instruction on updating outstanding liability and bid results.
HOW TO VIEW AND PRINT BOND DETAILS 1. Select one of the following to display Bond Details.
If you …. Then…
Know the bond number
Type it in the Find Bond field in the Navigation (button) bar or the View List of Outstanding Bonds frame on the Start Page.
Do not know the bond number
1. Generate a report or bond list containing the bond. For instructions on generating a bond list, refer to page 14. For instructions on generating a different type of report, refer to page 31.
2. Click the Bond Details button or hyperlink.
Continued on Next Page

BOND LEVEL DETAILS SurePath How To for Clients
Page 22 InSure Vision Technologies, LLC
How to View and Print Bond Details, continued

SurePath How To for Clients BOND LEVEL DETAILS
InSure Vision Technologies, LLC Page 23
Continued on Next Page How to View and Print Bond Details, continued
2. To print Bond Details, open the drop down list in the upper right-hand corner of the Bond Details page and select Print View.
3. Print using Internet Explorer. 4. Use the Internet Explorer Back button to go back to Normal View.
HOW TO VIEW AND PRINT THE BOND FORM Important: You must have SureForm installed to perform these steps.
1. Go to Bond Details. 2. Scroll down to the Transaction History section of Bond Details. Documents
associated with various bond transactions are listed in the Document column as hyperlinks. If there is no hyperlink, there is no document.
Continued on Next Page
BOND LEVEL DETAILS SurePath How To for Clients
Page 24 InSure Vision Technologies, LLC
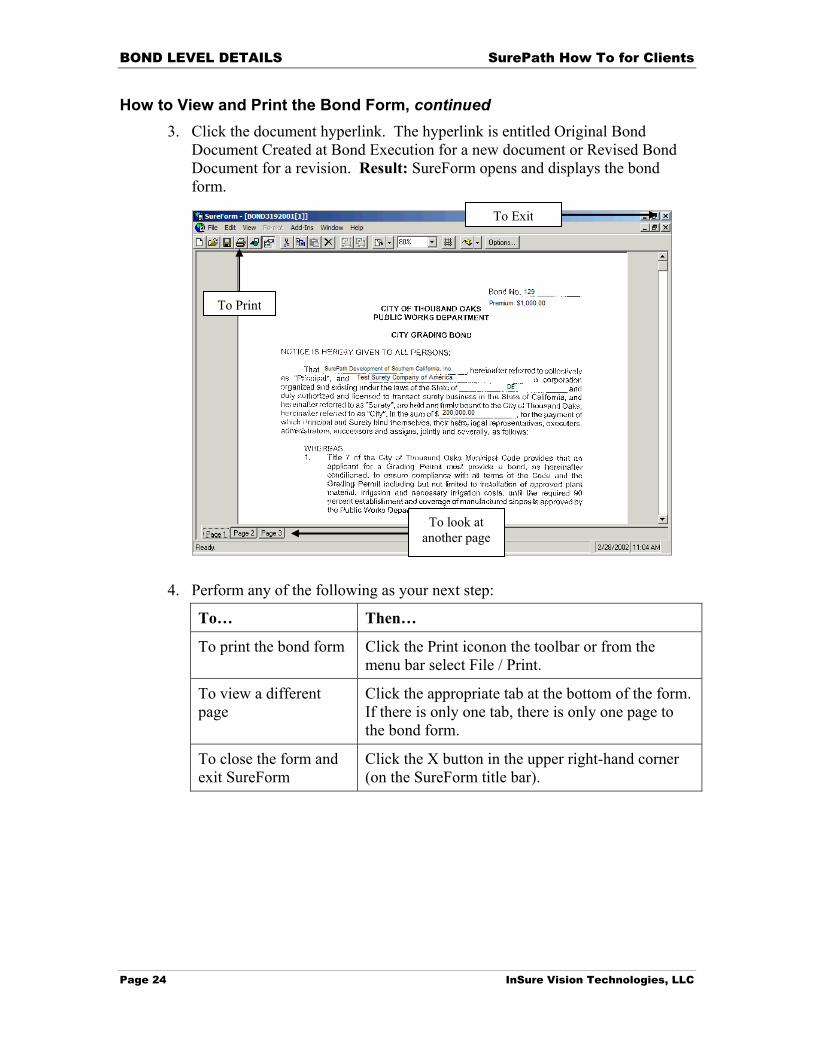
How to View and Print the Bond Form, continued 3. Click the document hyperlink. The hyperlink is entitled Original Bond
Document Created at Bond Execution for a new document or Revised Bond Document for a revision. Result: SureForm opens and displays the bond form.
4. Perform any of the following as your next step:
To… Then…
To print the bond form Click the Print iconon the toolbar or from the menu bar select File / Print.
To view a different page
Click the appropriate tab at the bottom of the form. If there is only one tab, there is only one page to the bond form.
To close the form and exit SureForm
Click the X button in the upper right-hand corner (on the SureForm title bar).
To Exit
To look at another page
To Print

SurePath How To for Clients BOND LEVEL DETAILS
InSure Vision Technologies, LLC Page 25
HOW TO ENTER/UPDATE COMMENTS 1. Go to Bond Details. 2. Add comments in the Comments box.
3. Click the Update Comments button. Note: The agent may get an email when Comments are updated.
HOW TO ATTACH A DOCUMENT If the option is not available the agent is not licensed for this feature.
1. Go to Bond Details. 2. Scroll down to the Processing Options section. 3. Click the Upload File hyperlink.
4. Click the Browse button and select the file you want to upload.
Continued on Next Page

BOND LEVEL DETAILS SurePath How To for Clients
Page 26 InSure Vision Technologies, LLC
How to Attach a Document, continued
5. To rename the document (optional) enter the new name in the Use the following file name(hyperlink) field.
6. If needed, modify the Transaction Description. 7. Click the Submit button. Result: You are returned to the Bond Details page; the
attachment is located in the Transaction History section.
8. Repeat steps 3 through 7 for additional attachments.
This is the Transaction Description
This is the file name
SurePath How To for Clients BID BONDS
InSure Vision Technologies, LLC Page 27
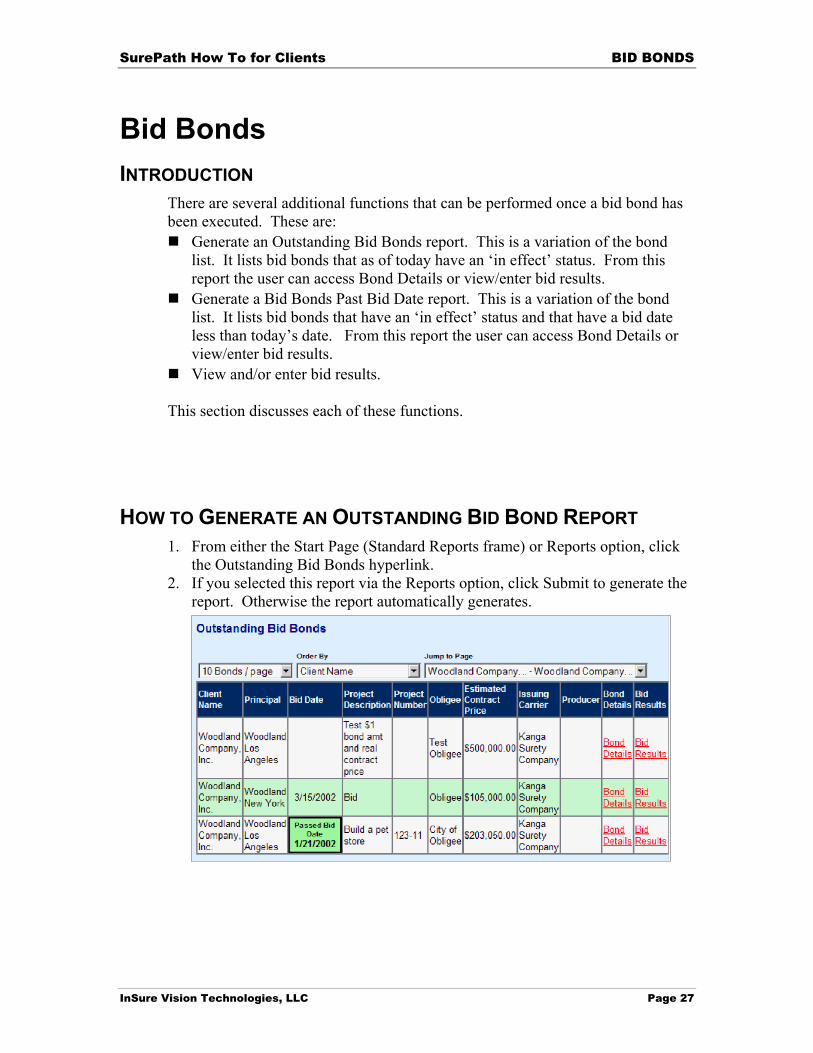
Bid Bonds INTRODUCTION
There are several additional functions that can be performed once a bid bond has been executed. These are:
Generate an Outstanding Bid Bonds report. This is a variation of the bond list. It lists bid bonds that as of today have an ‘in effect’ status. From this report the user can access Bond Details or view/enter bid results.
Generate a Bid Bonds Past Bid Date report. This is a variation of the bond list. It lists bid bonds that have an ‘in effect’ status and that have a bid date less than today’s date. From this report the user can access Bond Details or view/enter bid results.
View and/or enter bid results.
This section discusses each of these functions.
HOW TO GENERATE AN OUTSTANDING BID BOND REPORT 1. From either the Start Page (Standard Reports frame) or Reports option, click
the Outstanding Bid Bonds hyperlink. 2. If you selected this report via the Reports option, click Submit to generate the
report. Otherwise the report automatically generates.

BID BONDS SurePath How To for Clients
Page 28 InSure Vision Technologies, LLC
HOW TO GENERATE A BID BONDS PAST BID DATE REPORT 1. From the Reports option, click the Bid Bonds Past Bid Date hyperlink. 2. Click the Submit button.
HOW TO VIEW BID RESULTS 1. To access the Bid Results screen, perform one of the following:
Generate a Bid Bonds Past Bid Date report. Generate an Outstanding Bid Bond report. Go to the Bond Details page for the desired bid bond.
2. Locate the Bid Results hyperlink or button on the selected output. 3. Click Bid Results. Note: The agent may receive an email when bid results are
entered or updated.
HOW TO ENTER BID RESULTS 1. To access the Bid Results screen, perform one of the following:
Generate a Bid Bonds Past Bid Date report. Generate an Outstanding Bid Bond report. Go to the Bond Details page for the desired bid bond.
2. Locate the Bid Results hyperlink or button on the selected output. 3. Click Bid Results. Result: The Bid Result Page displays.
Continued on Next Page

SurePath How To for Clients BID BONDS
InSure Vision Technologies, LLC Page 29
How to Enter Bid Results, continued 4. Review the information in Project Information to verify you have selected the
correct bond.
5. To enter where you ranked in the bidding process, scroll down to the Your Bid Results section.
6. In the Where your Bid Ranked field, enter a number representing where you ranked in the bid process. For example, if you were 2nd bidder, enter 2. Result: If you ranked in the top 3, SurePath grays out your slot in the Bid Results section.
7. In the Your Bid Amount field, enter your bid amount. Note: Do not use $ or commas, only decimals.
8. To enter the top 3 bidders, scroll down to the Bid Results Information section.
9. In the Bidder Name field, enter the name of the bidder. Note: If you completed the Your Bid Results section and you ranked 1, 2 or 3 you do not need to complete your information in this section.
10. In the Bid Amount field, enter the bidder’s bid amount. Note: Do not use $ or commas, only decimals.
11. Enter comments in the Public Comments field if applicable.
Continued on Next Page

BID BONDS SurePath How To for Clients
Page 30 InSure Vision Technologies, LLC
How to Enter Bid Results, continued 12. Scroll down to the Bid Spread Percent section and review the bid spread
calculations.
13. Enter the Engineer’s Estimate if known. 14. Click the Update Bid Results&Comments button. Note: If you were not low
bidder SurePath automatically closes your bid bond. The agent may receive an email when bid results are added or updated.
SurePath How To for Clients REPORTS
InSure Vision Technologies, LLC Page 31
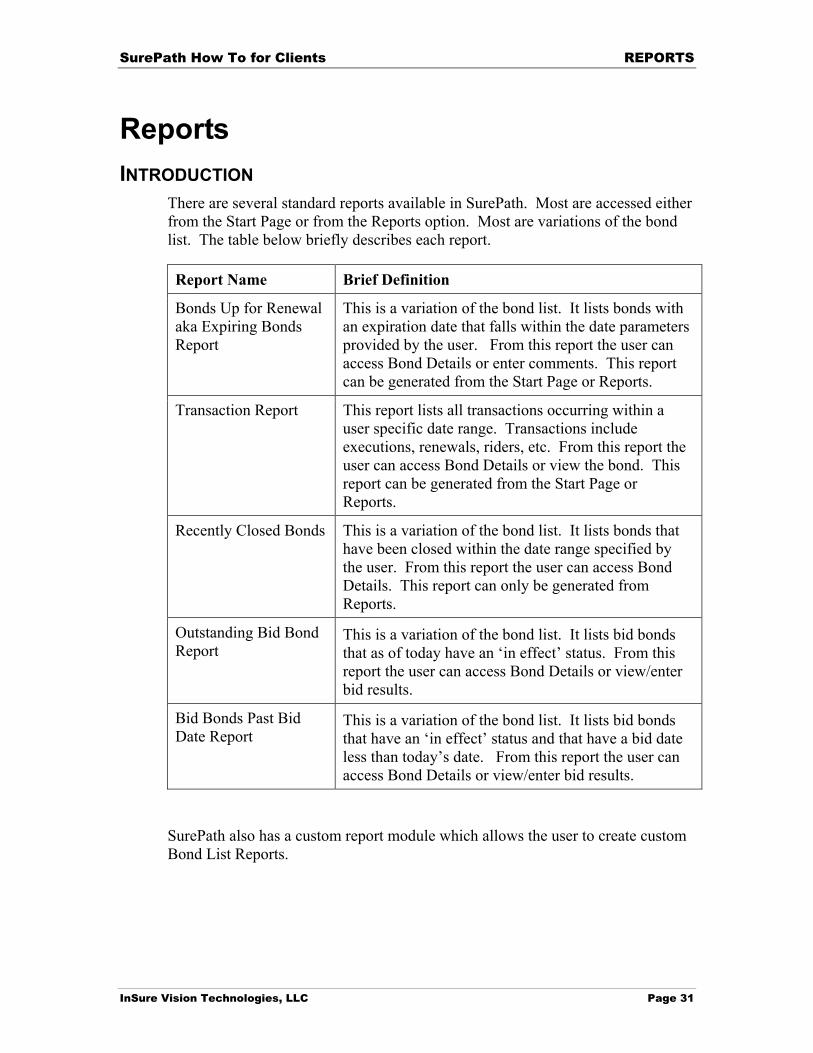
Reports INTRODUCTION
There are several standard reports available in SurePath. Most are accessed either from the Start Page or from the Reports option. Most are variations of the bond list. The table below briefly describes each report.
Report Name Brief Definition
Bonds Up for Renewal aka Expiring Bonds Report
This is a variation of the bond list. It lists bonds with an expiration date that falls within the date parameters provided by the user. From this report the user can access Bond Details or enter comments. This report can be generated from the Start Page or Reports.
Transaction Report This report lists all transactions occurring within a user specific date range. Transactions include executions, renewals, riders, etc. From this report the user can access Bond Details or view the bond. This report can be generated from the Start Page or Reports.
Recently Closed Bonds This is a variation of the bond list. It lists bonds that have been closed within the date range specified by the user. From this report the user can access Bond Details. This report can only be generated from Reports.
Outstanding Bid Bond Report
This is a variation of the bond list. It lists bid bonds that as of today have an ‘in effect’ status. From this report the user can access Bond Details or view/enter bid results.
Bid Bonds Past Bid Date Report
This is a variation of the bond list. It lists bid bonds that have an ‘in effect’ status and that have a bid date less than today’s date. From this report the user can access Bond Details or view/enter bid results.
SurePath also has a custom report module which allows the user to create custom Bond List Reports.

REPORTS SurePath How To for Clients
Page 32 InSure Vision Technologies, LLC
HOW TO GENERATE A STANDARD REPORT FROM THE START PAGE
1. Click the Start button to display the Start Page.
2. Scroll down to display the Standard Reports frame. 3. Click the hyperlink for the report you want to generate. 4. Set up any report parameters, such as dates, if prompted. 5. Click the Submit button.
SurePath How To for Clients REPORTS
InSure Vision Technologies, LLC Page 33
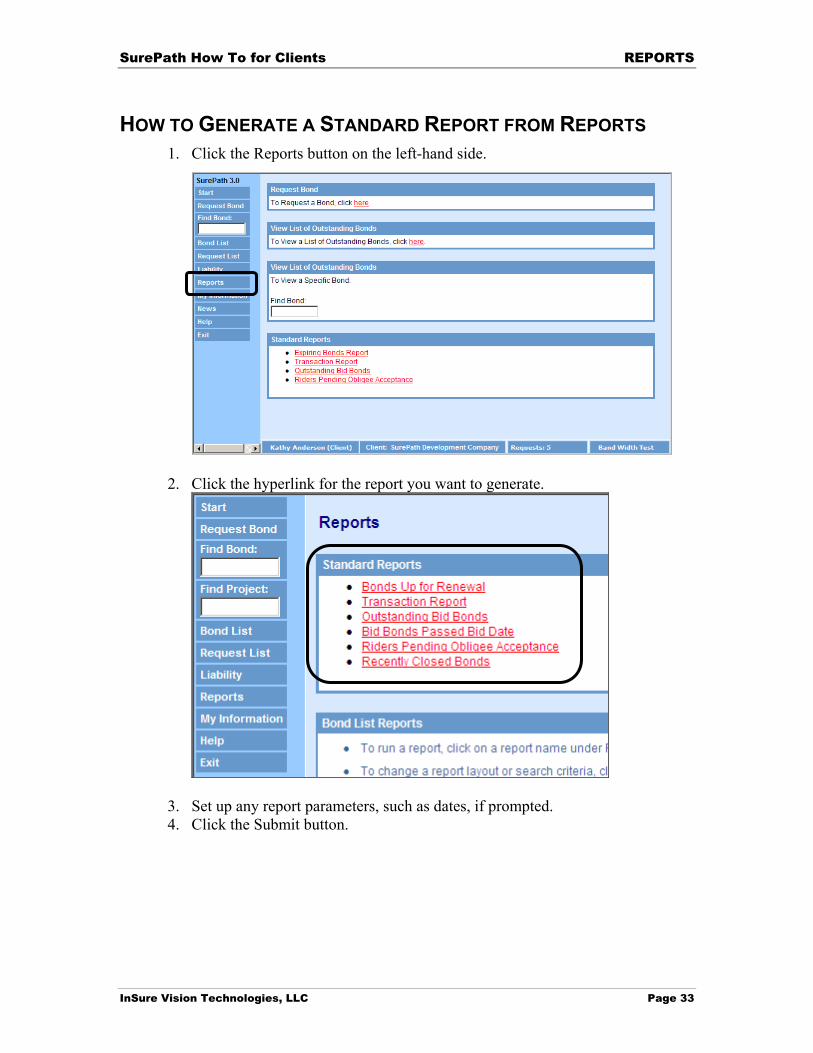
HOW TO GENERATE A STANDARD REPORT FROM REPORTS 1. Click the Reports button on the left-hand side.
2. Click the hyperlink for the report you want to generate.
3. Set up any report parameters, such as dates, if prompted. 4. Click the Submit button.
REPORTS SurePath How To for Clients
Page 34 InSure Vision Technologies, LLC
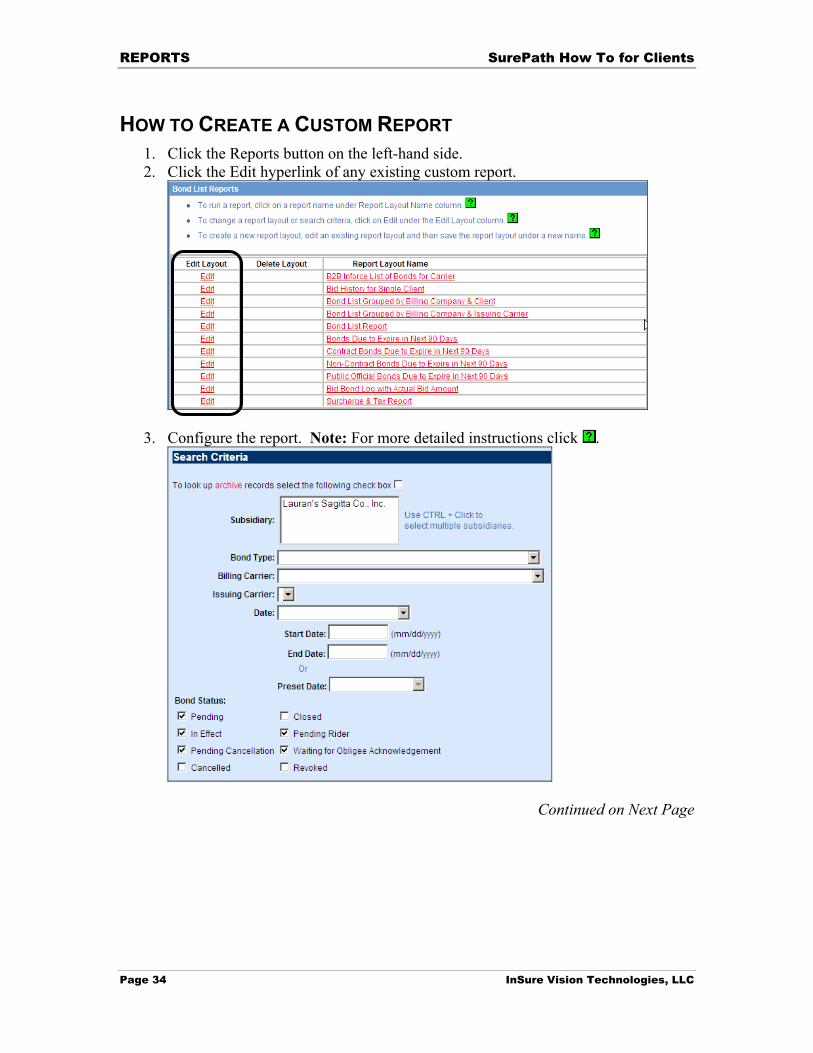
HOW TO CREATE A CUSTOM REPORT 1. Click the Reports button on the left-hand side. 2. Click the Edit hyperlink of any existing custom report.
3. Configure the report. Note: For more detailed instructions click .
Continued on Next Page
SurePath How To for Clients REPORTS
InSure Vision Technologies, LLC Page 35
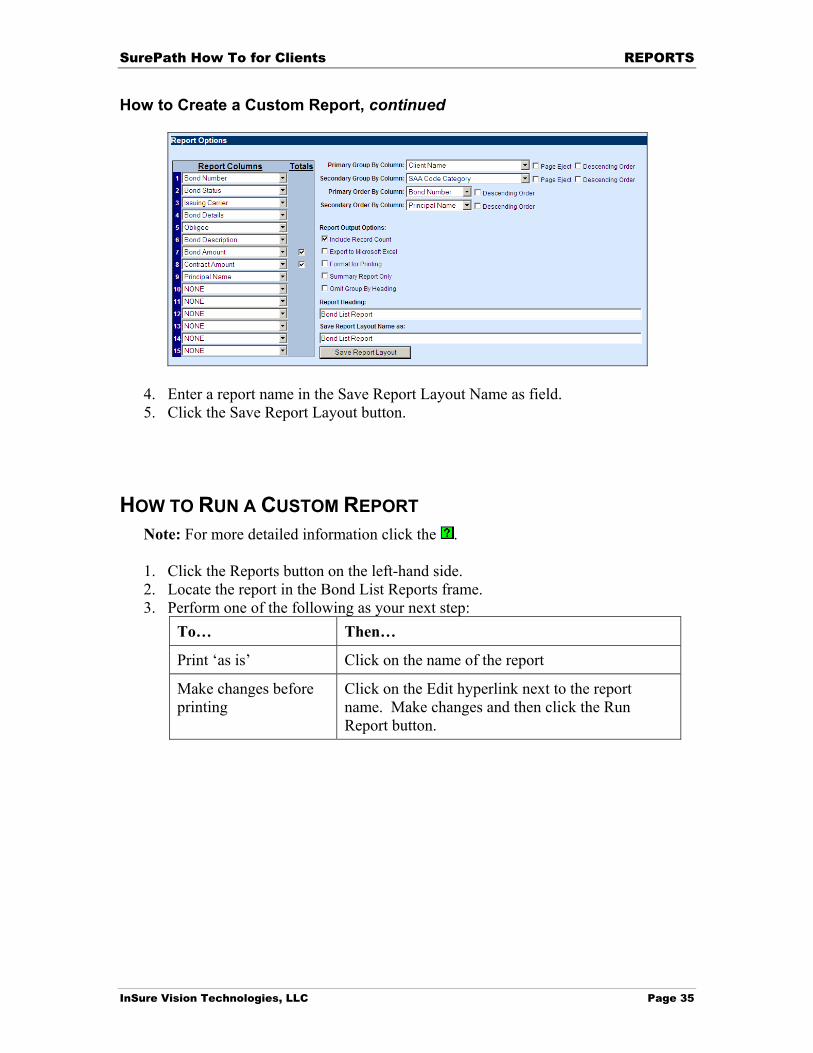
How to Create a Custom Report, continued
4. Enter a report name in the Save Report Layout Name as field. 5. Click the Save Report Layout button.
HOW TO RUN A CUSTOM REPORT Note: For more detailed information click the . 1. Click the Reports button on the left-hand side. 2. Locate the report in the Bond List Reports frame. 3. Perform one of the following as your next step:
To… Then…
Print ‘as is’ Click on the name of the report
Make changes before printing
Click on the Edit hyperlink next to the report name. Make changes and then click the Run Report button.