
Supporting Documents - OPWDD€¦ · Supporting Documents . Supporting documents can be uploaded to...
13
9/7/2012 1 Supporting Documents Supporting documents can be uploaded to CHOICES and attached to an individual’s record. The document then resides in CHOICES, and is available to be viewed by an authorized user in the future. Documents are uploaded to CHOICES by clicking the Supporting Documents button. This can be found in 2 places depending on whether the document is associated with a particular form, or simply uploaded as a reference document for the individual. Both will be shown below. NOTE: The following file types are allowable in this system Text & Documents Graphic Formats .txt Text File .gif Graphic Interchange Format .pdf Portable Document Format .jpg / .jpeg Joint Photographic Experts Group .doc / .docx / .xml MS Word .png Portable Network Graphics .wps MS Works .tif / .tiff Tagged Image File Format .rtf Rich Text Format Spreadsheets .xls / .xlsx / .xml MS Excel .wks MS Works The Maximum file size for the system is 50 Megabytes
Transcript of Supporting Documents - OPWDD€¦ · Supporting Documents . Supporting documents can be uploaded to...
9/7/2012 1
Supporting Documents
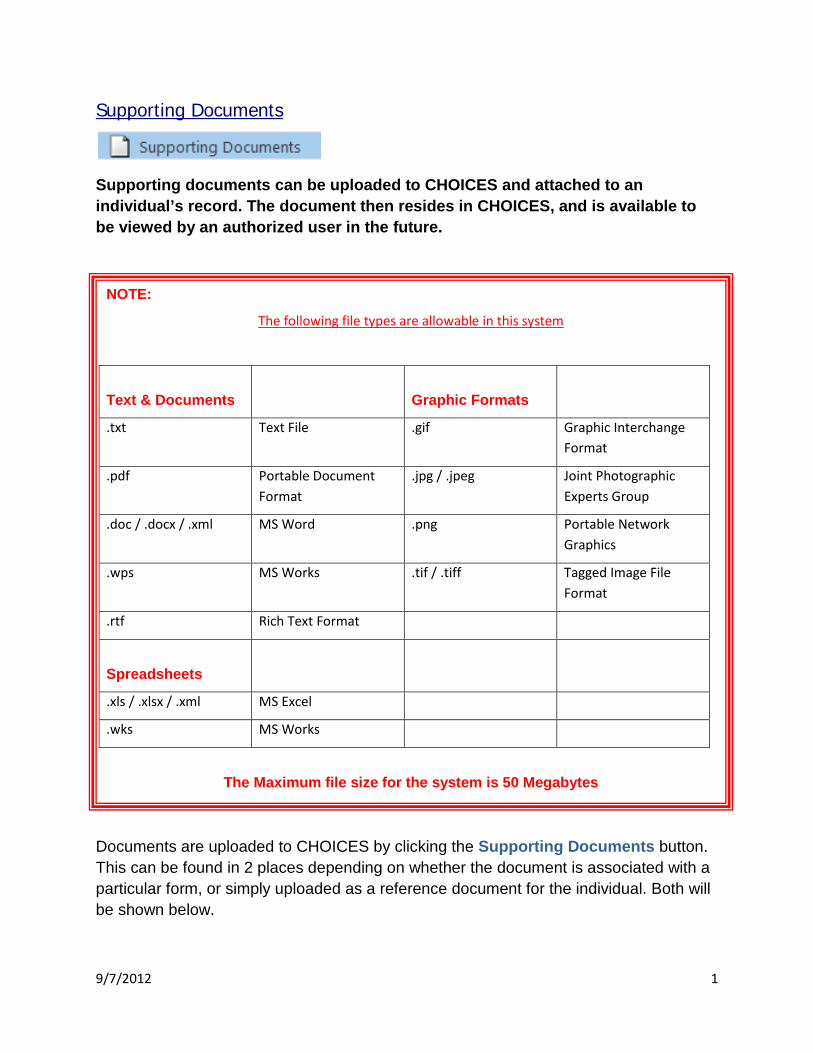
Supporting documents can be uploaded to CHOICES and attached to an individual’s record. The document then resides in CHOICES, and is available to be viewed by an authorized user in the future.
Documents are uploaded to CHOICES by clicking the Supporting Documents button. This can be found in 2 places depending on whether the document is associated with a particular form, or simply uploaded as a reference document for the individual. Both will be shown below.
NOTE:
The following file types are allowable in this system
Text & Documents
Graphic Formats
.txt Text File .gif Graphic Interchange Format
.pdf Portable Document Format
.jpg / .jpeg Joint Photographic Experts Group
.doc / .docx / .xml MS Word .png Portable Network Graphics
.wps MS Works .tif / .tiff Tagged Image File Format
.rtf Rich Text Format
Spreadsheets
.xls / .xlsx / .xml MS Excel
.wks MS Works
The Maximum file size for the system is 50 Megabytes
9/7/2012 2
Supporting Documents – Attach directly to a Form
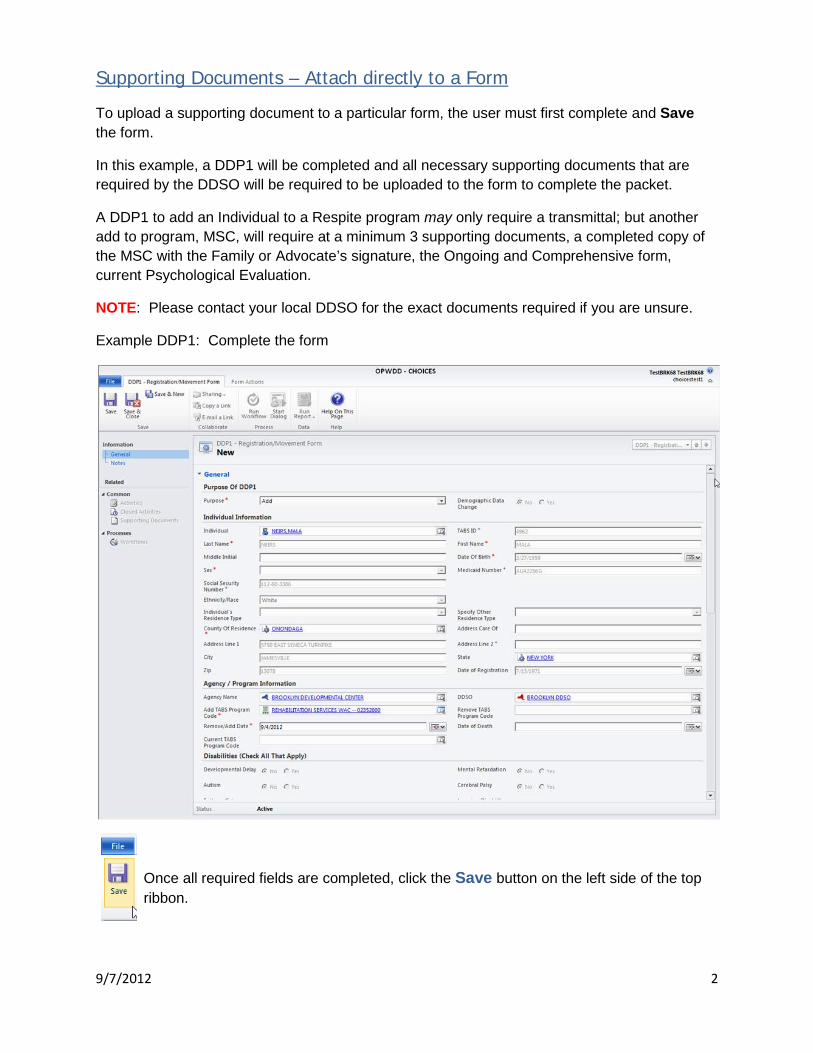
To upload a supporting document to a particular form, the user must first complete and Save the form.
In this example, a DDP1 will be completed and all necessary supporting documents that are required by the DDSO will be required to be uploaded to the form to complete the packet.
A DDP1 to add an Individual to a Respite program may only require a transmittal; but another add to program, MSC, will require at a minimum 3 supporting documents, a completed copy of the MSC with the Family or Advocate’s signature, the Ongoing and Comprehensive form, current Psychological Evaluation.
NOTE: Please contact your local DDSO for the exact documents required if you are unsure.
Example DDP1: Complete the form
Once all required fields are completed, click the Save button on the left side of the top ribbon.
9/7/2012 3
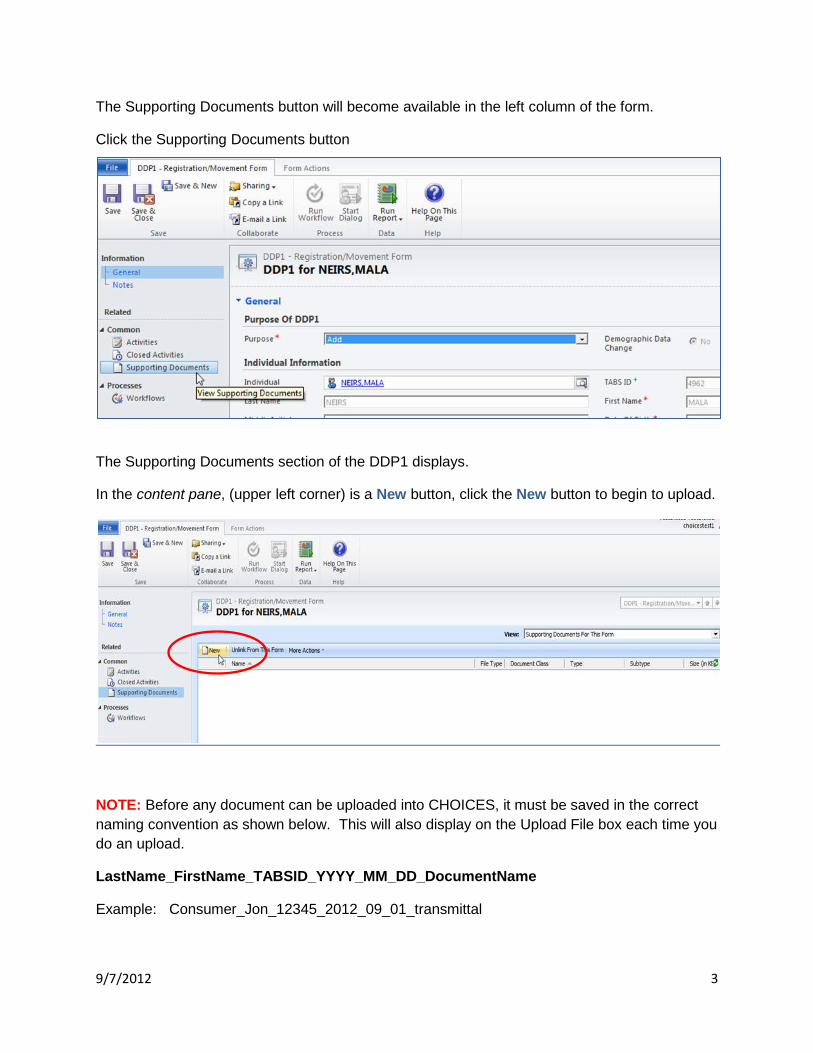
The Supporting Documents button will become available in the left column of the form.
Click the Supporting Documents button
The Supporting Documents section of the DDP1 displays.
In the content pane, (upper left corner) is a New button, click the New button to begin to upload.
NOTE: Before any document can be uploaded into CHOICES, it must be saved in the correct naming convention as shown below. This will also display on the Upload File box each time you do an upload.
LastName_FirstName_TABSID_YYYY_MM_DD_DocumentName
Example: Consumer_Jon_12345_2012_09_01_transmittal
9/7/2012 4
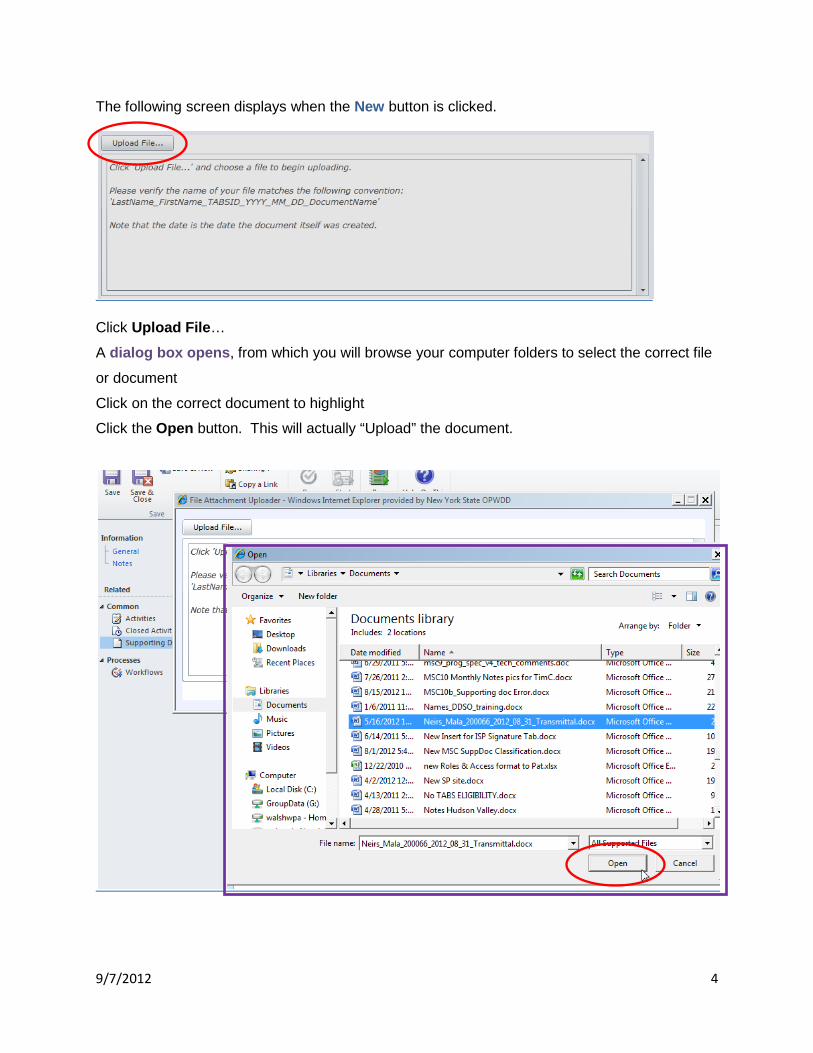
The following screen displays when the New button is clicked.
Click Upload File…
A dialog box opens, from which you will browse your computer folders to select the correct file
or document
Click on the correct document to highlight
Click the Open button. This will actually “Upload” the document.

9/7/2012 5
Once the document has finished uploading, the following message will display.
Click “OK” to close the dialog box.
The following screen is the additional information needed for the uploaded document.
This will classify, or categorize, the document that has been uploaded to the form.
Also, all documents attached to a form are copied over to the Individual’s record.
Document Class, Type and Subtype are all Required Fields (*), you must fill them in.
Start with Document Class by clicking on the down arrow and select the most appropriate Class from the list.
Once a Class is selected, the dependent field of Type will be available with the appropriate list relative to the Class you selected. Click on the Type down arrow and make the proper selection.
Do the same for “Subtype”.

9/7/2012 6
In this example, we are completing a DDP1 for an Add to Program. This particular program add requires a transmittal as a supporting document.
1. Class – our DDP1 is a Service Request so - Service Request/Change is appropriate 2. Type – our DDP1 is an add to program so – Registration/Program Adds is appropriate 3. Subtype – the supporting document is clearly a transmittal
After completing the 3 sections, Save & Close the classification screen.
NOTE: Be cautious that you are using the Save & Close on this screen and not the DDP1. If you use the wrong, Save & Close, you will close the DDP1 and wonder “what happened?” or “where is my form?”
After uploading all necessary supporting documents, click General, under Information, to return to the form’s information page.
You can now Submit the form, go to, Form Actions, on the ribbon, and click Submit .
9/7/2012 7
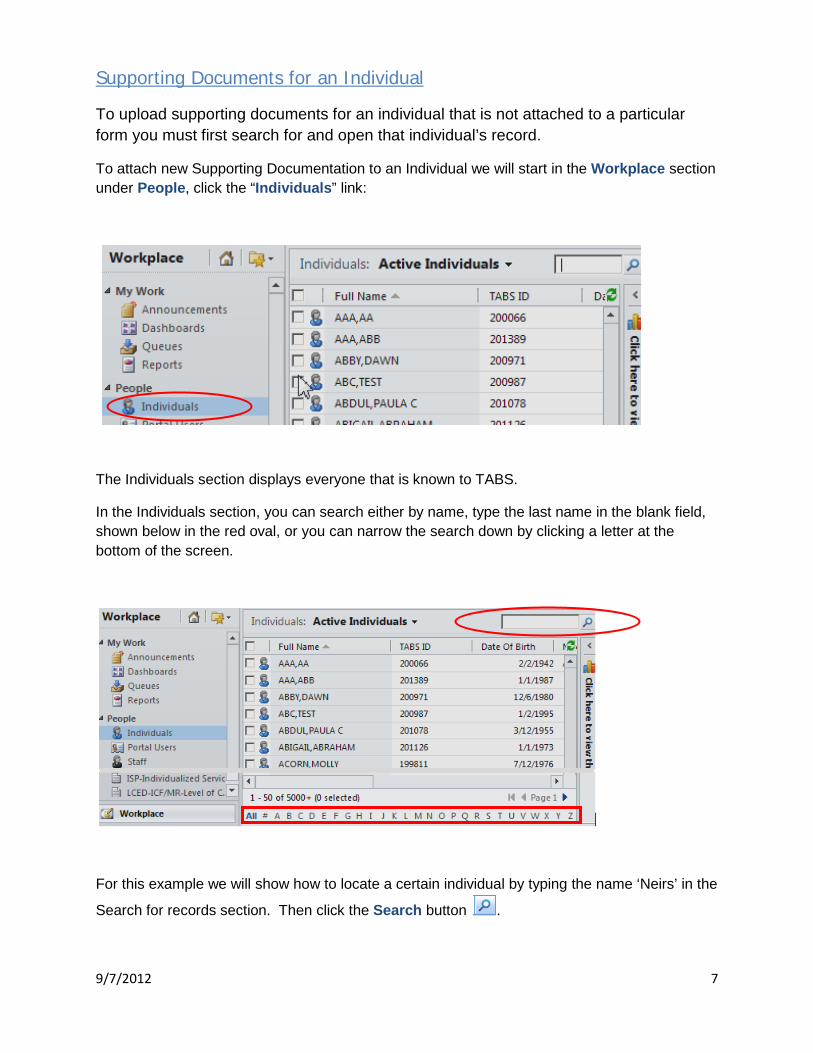
Supporting Documents for an Individual
To upload supporting documents for an individual that is not attached to a particular form you must first search for and open that individual’s record.
To attach new Supporting Documentation to an Individual we will start in the Workplace section under People, click the “Individuals” link:
The Individuals section displays everyone that is known to TABS.
In the Individuals section, you can search either by name, type the last name in the blank field, shown below in the red oval, or you can narrow the search down by clicking a letter at the bottom of the screen.
For this example we will show how to locate a certain individual by typing the name ‘Neirs’ in the
Search for records section. Then click the Search button .
9/7/2012 8
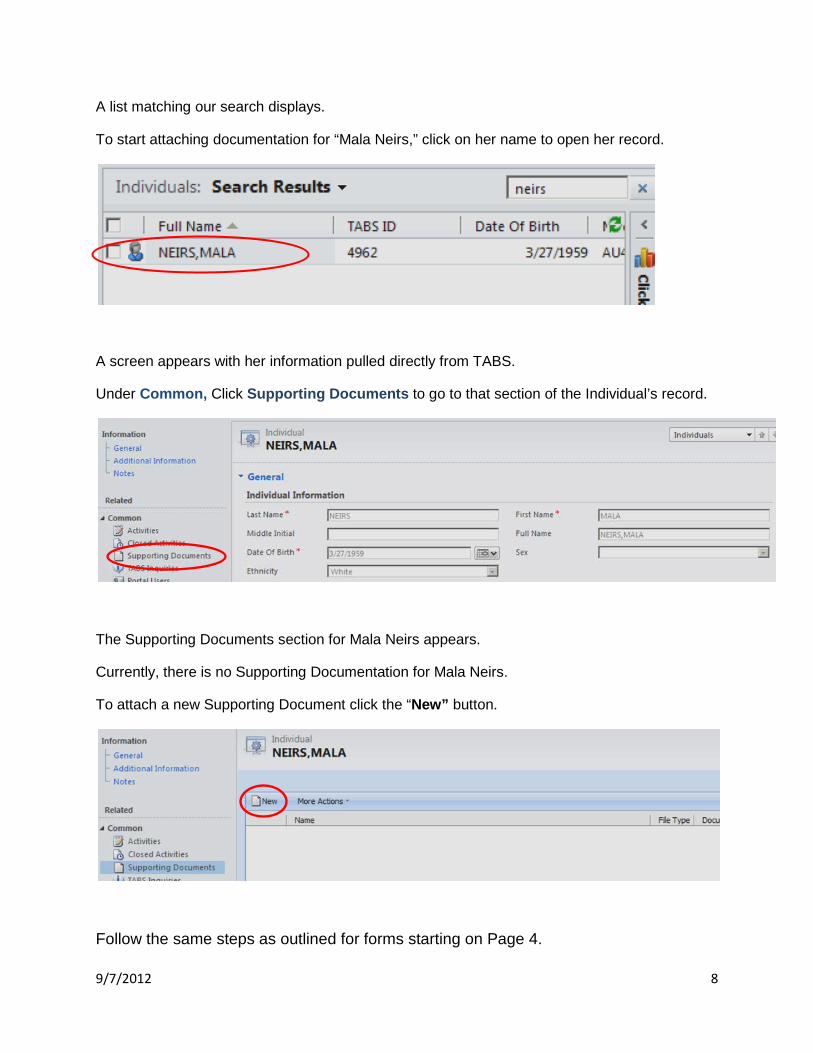
A list matching our search displays.
To start attaching documentation for “Mala Neirs,” click on her name to open her record.
A screen appears with her information pulled directly from TABS.
Under Common, Click Supporting Documents to go to that section of the Individual’s record.
The Supporting Documents section for Mala Neirs appears.
Currently, there is no Supporting Documentation for Mala Neirs.
To attach a new Supporting Document click the “New” button.
Follow the same steps as outlined for forms starting on Page 4.
9/7/2012 9
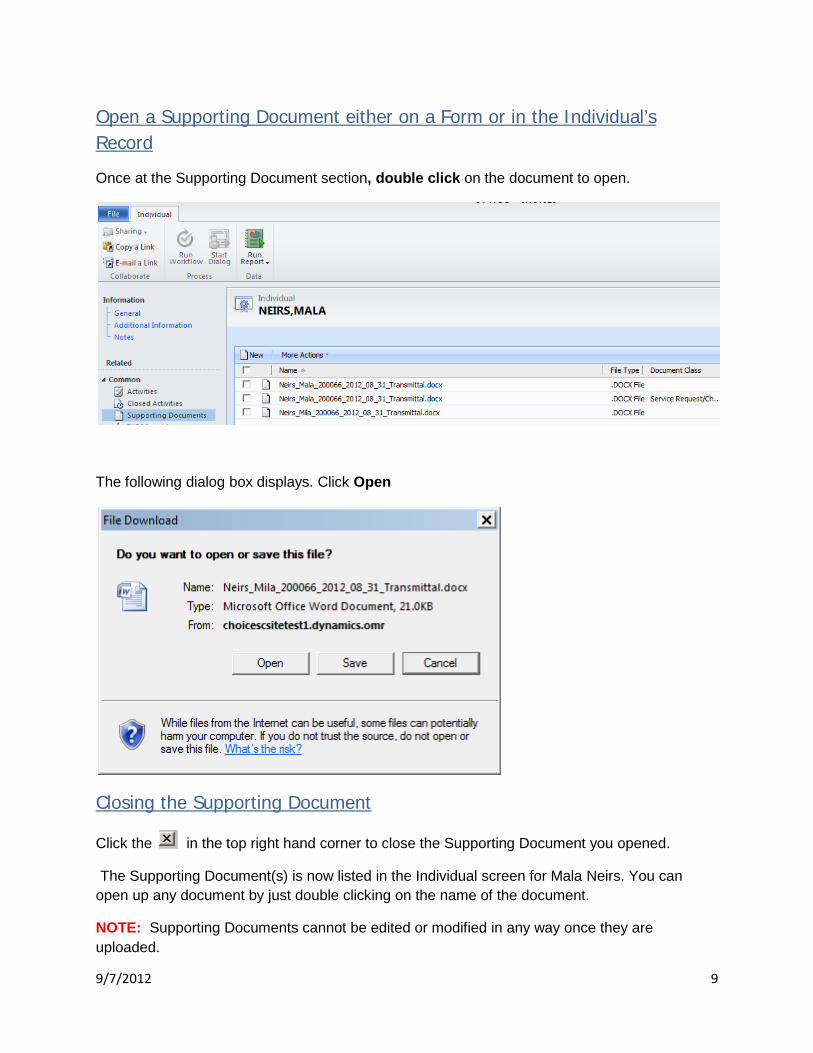
Open a Supporting Document either on a Form or in the Individual’s Record
Once at the Supporting Document section, double click on the document to open.
The following dialog box displays. Click Open
Closing the Supporting Document
Click the in the top right hand corner to close the Supporting Document you opened.
The Supporting Document(s) is now listed in the Individual screen for Mala Neirs. You can open up any document by just double clicking on the name of the document.
NOTE: Supporting Documents cannot be edited or modified in any way once they are uploaded.
9/7/2012 10
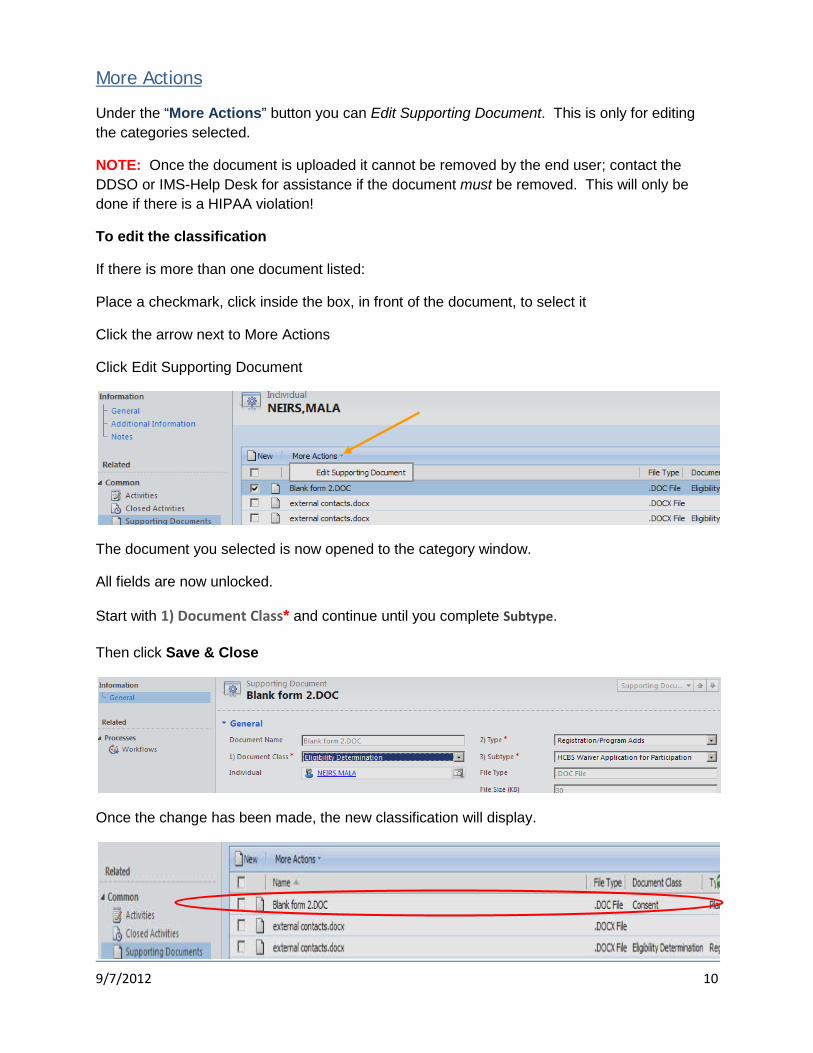
More Actions
Under the “More Actions” button you can Edit Supporting Document. This is only for editing the categories selected.
NOTE: Once the document is uploaded it cannot be removed by the end user; contact the DDSO or IMS-Help Desk for assistance if the document must be removed. This will only be done if there is a HIPAA violation!
To edit the classification
If there is more than one document listed:
Place a checkmark, click inside the box, in front of the document, to select it
Click the arrow next to More Actions
Click Edit Supporting Document
The document you selected is now opened to the category window.
All fields are now unlocked.
Start with 1) Document Class* and continue until you complete Subtype.
Then click Save & Close
Once the change has been made, the new classification will display.
9/7/2012 11
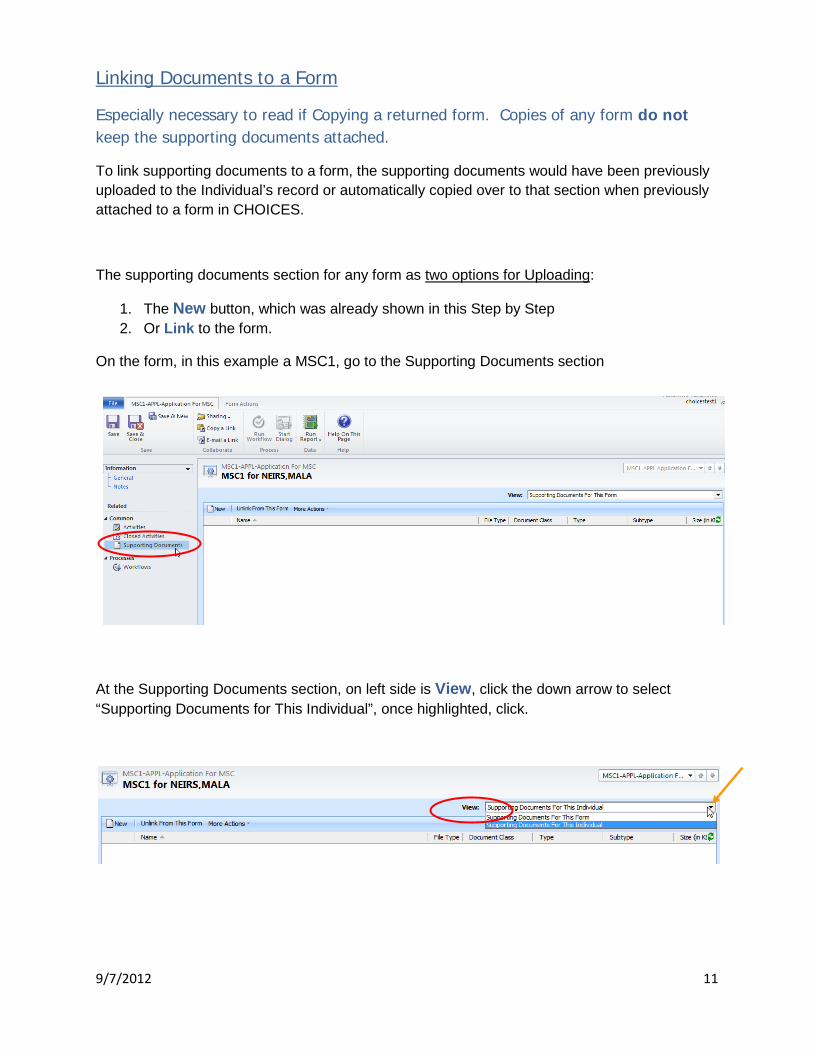
Linking Documents to a Form
Especially necessary to read if Copying a returned form. Copies of any form do not keep the supporting documents attached.
To link supporting documents to a form, the supporting documents would have been previously uploaded to the Individual’s record or automatically copied over to that section when previously attached to a form in CHOICES.
The supporting documents section for any form as two options for Uploading:
1. The New button, which was already shown in this Step by Step 2. Or Link to the form.
On the form, in this example a MSC1, go to the Supporting Documents section
At the Supporting Documents section, on left side is View, click the down arrow to select “Supporting Documents for This Individual”, once highlighted, click.
9/7/2012 12
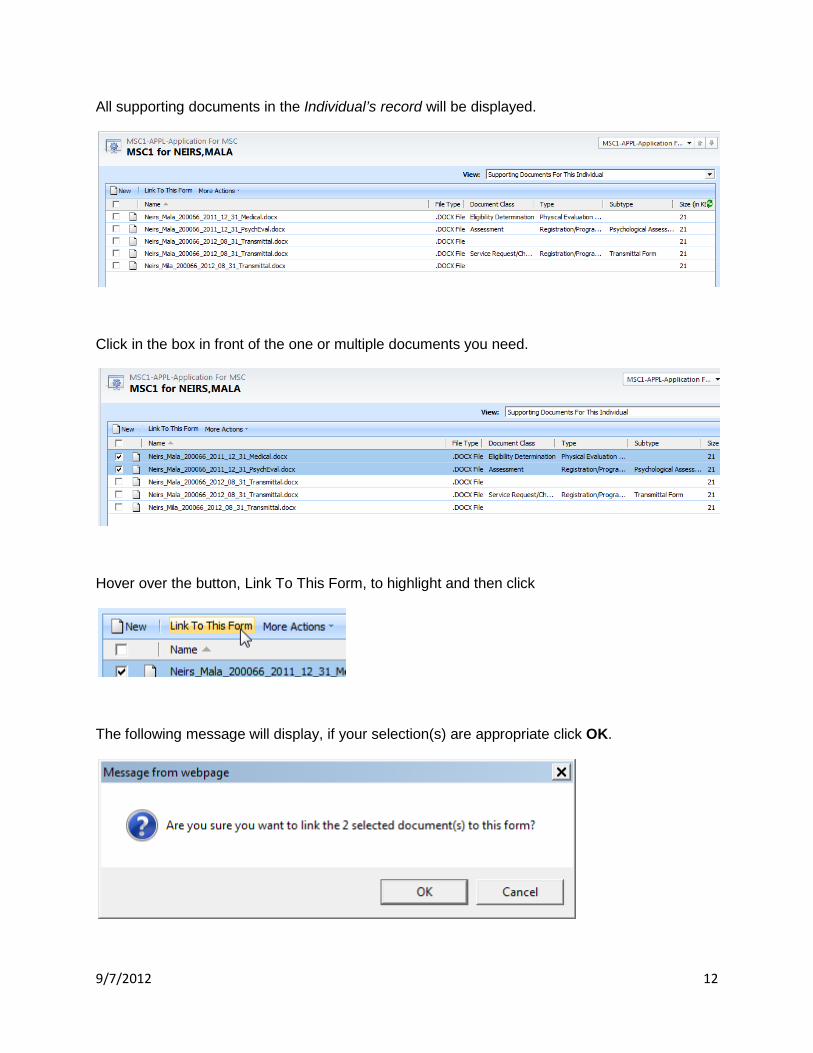
All supporting documents in the Individual’s record will be displayed.
Click in the box in front of the one or multiple documents you need.
Hover over the button, Link To This Form, to highlight and then click
The following message will display, if your selection(s) are appropriate click OK.
9/7/2012 13
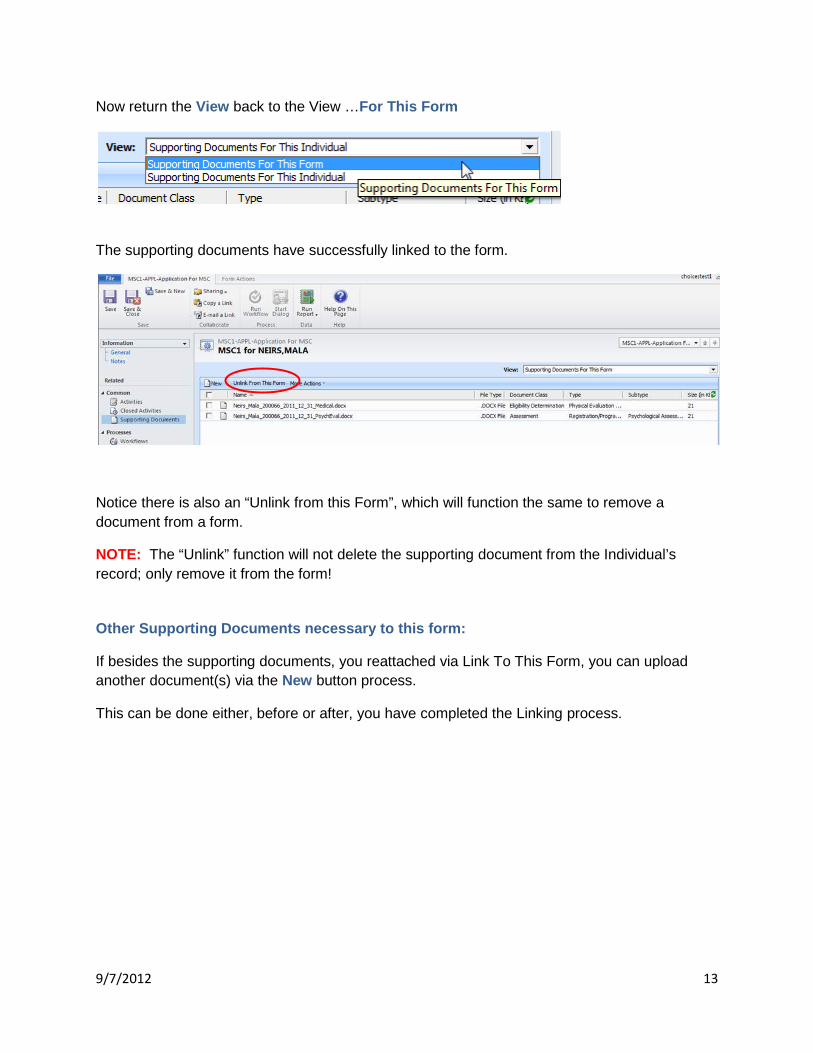
Now return the View back to the View …For This Form
The supporting documents have successfully linked to the form.
Notice there is also an “Unlink from this Form”, which will function the same to remove a document from a form.
NOTE: The “Unlink” function will not delete the supporting document from the Individual’s record; only remove it from the form!
Other Supporting Documents necessary to this form:
If besides the supporting documents, you reattached via Link To This Form, you can upload another document(s) via the New button process.
This can be done either, before or after, you have completed the Linking process.


![Spouse Application & Supporting Documents[1]](https://static.fdocuments.in/doc/165x107/544dbb65af7959f7138b5065/spouse-application-supporting-documents1.jpg)


