SUPPORT InstallingorUpgradingtoGroundWorkMonitor7.0.1 29Nov13 0225AM 4372
24
Installing or Upgrading to GroundWork Monitor 7.0.1 Installing GroundWork Monitor 7.0.1 Welcome to the installation Instructions for GroundWork Monitor Enterprise Edition, version 7.0.1. These instructions are maintained in the GroundWork Knowledge Base (kb.groundworkopensource.com). If you are reading these in a PDF or other offline form, you should check the online form for the most recent version. This document covers the installation of GWMEE 7.0.1 and upgrades from earlier versions. This document is supplemented by the release notes, which contain details of issues fixed, new features, and items of interest to those users who have customized or significantly enhanced GroundWork Monitor Enterprise. You can view the release notes here: 7.0.1 Release Notes for EE Installing GroundWork Monitor 7.0.1 Prerequisites System Requirements Platform Requirements System Configurations and Operating System Settings Java Compatibility Externally Defined User Nagios PostgreSQL Database Location Distributed Database Installation Overview Remote Database Install Installing A Remote Database Fresh Installation Disk Layout Software Preparation Installation Methods GUI Install Text Based Install Unattended Install Remote Install Install Questions Post-Install Configuration Default Login Information License Required for Login Optionally Disabling ntop Upgrade to 7.0.1 from a Previous Version Supported Upgrade Paths Upgrade Options MySQL-to-PostgreSQL Release Upgrade Procedure Install Cleanup Scripts Cleanup of MySQL Databases Inconsistent-Data Cleanup Purging Old Database Records Bringing the Cacti database up-to-date Final Pre-Upgrade Backup MySQL to PostgreSQL Data Migration Upgrade of GWMEE Components in MySQL-to-PostgreSQL Upgrade Final Steps in MySQL-to-PostgreSQL Upgrade PostgreSQL-to-PostgreSQL Release Upgrade Procedure Upgrade a Remote PostgreSQL Database Upgrade of GWMEE Components in PostgreSQL-to-PostgreSQL Upgrade Final Steps in PostgreSQL-to-PostgreSQL Upgrade Read Me First Before performing an installation, please review all current Technical Bulletins for this version so you can prepare for any additional steps required either before or after the process. Technical Bulletins for this version of the product are listed in the page of the . Technical Bulletins for 7.0.1 GroundWork Knowledge Base 7.0.1-1 Plugin Tables May Need Repair After Migration from MySQL to PostgreSQL Technical Bulletins for 7.0.1
-
Upload
quynh-nguyen -
Category
Documents
-
view
216 -
download
0
description
GroundWorkMonitor7
Transcript of SUPPORT InstallingorUpgradingtoGroundWorkMonitor7.0.1 29Nov13 0225AM 4372
Installing or Upgrading to GroundWork Monitor 7.0.1
Installing GroundWork Monitor 7.0.1Welcome to the installation Instructions for GroundWork Monitor Enterprise Edition, version 7.0.1. These instructions are maintained in theGroundWork Knowledge Base (kb.groundworkopensource.com). If you are reading these in a PDF or other offline form, you should check theonline form for the most recent version.
This document covers the installation of GWMEE 7.0.1 and upgrades from earlier versions.
This document is supplemented by the release notes, which contain details of issues fixed, new features, and items of interest to those users whohave customized or significantly enhanced GroundWork Monitor Enterprise. You can view the release notes here: 7.0.1 Release Notes for EE
Installing GroundWork Monitor 7.0.1Prerequisites
System RequirementsPlatform RequirementsSystem Configurations and Operating System SettingsJava CompatibilityExternally Defined User NagiosPostgreSQL Database LocationDistributed Database Installation Overview
Remote Database InstallInstalling A Remote Database
Fresh InstallationDisk LayoutSoftware PreparationInstallation Methods
GUI InstallText Based InstallUnattended InstallRemote InstallInstall Questions
Post-Install ConfigurationDefault Login InformationLicense Required for LoginOptionally Disabling ntop
Upgrade to 7.0.1 from a Previous VersionSupported Upgrade PathsUpgrade OptionsMySQL-to-PostgreSQL Release Upgrade Procedure
Install Cleanup ScriptsCleanup of MySQL Databases
Inconsistent-Data CleanupPurging Old Database RecordsBringing the Cacti database up-to-date
Final Pre-Upgrade BackupMySQL to PostgreSQL Data MigrationUpgrade of GWMEE Components in MySQL-to-PostgreSQL UpgradeFinal Steps in MySQL-to-PostgreSQL Upgrade
PostgreSQL-to-PostgreSQL Release Upgrade ProcedureUpgrade a Remote PostgreSQL DatabaseUpgrade of GWMEE Components in PostgreSQL-to-PostgreSQL UpgradeFinal Steps in PostgreSQL-to-PostgreSQL Upgrade
Read Me FirstBefore performing an installation, please review all current Technical Bulletins for this version so you can prepare for anyadditional steps required either before or after the process. Technical Bulletins for this version of the product are listed in the
page of the .Technical Bulletins for 7.0.1 GroundWork Knowledge Base
7.0.1-1 Plugin Tables May Need Repair After Migration from MySQL to PostgreSQL
Technical Bulletins for 7.0.1

Prerequisites
System Requirements
The system requirements are unchanged from the prior release. GroundWork recommends the following minimum hardware specification forcorrect operation in production:
64-bit CPU (required)2 CPU, 3 GHz P4 or equivalent4 GB RAM160 GB disk
Recommended hardware specification
Quad Core 2 class CPU8 GB RAM200 GB disk for system500 GB disk for application
For smaller environments and evaluations, GroundWork Monitor Enterprise Edition requires a minimum of 2GB of RAM and 4GB of disk forcorrect operation.
Performance on Small SystemsIf GroundWork Monitor is installed on a system with less than 4 GB of RAM, it will be configured to operate within the limitedresources. The system will have lower monitoring throughput and will only support a few concurrent users as a result.
Platform Requirements
GroundWork Monitor Enterprise Edition has been tested on the following platforms:
Red Hat Enterprise Linux 5 Server and 6 Server, 64-bit.CentOS 5 and 6, 64-bit.Novell SuSE Linux Enterprise Server 10 and 11, 64-bit.Ubuntu Server 8.04 LTS, 9.10, 10.04, 12.04, 64-bit. Releases before Ubuntu 12.04 are not recommended, because starting and stopping
on the earlier releases is broken.ntop
Special Considerations for Virtualized EnvironmentsMonitoring inherently has a continuous high-load resource profile. This must be taken into account when deciding whether torun in a virtualized environment, and if so, when allocating resources to a virtual host running the monitoring. If you try to installon a virtual host which has too much contention from other VMs on the same box, results are likely to be disappointing.
If you are installing in a virtualized environment, particularly VMware ESX, using a single virtual CPU is generallyrecommended. As with a standalone machine, a 64-bit virtual machine is required for the GWMEE 7.0.1 release. Installation ofVMware tools and configuration of host time synchronization is highly recommended in all VMware environments. VMwareappliances downloaded from GroundWork already have VMware tools installed, and it should not be necessary to re-install orupdate VMware tools for proper operation.
System Configurations and Operating System Settings
Please read the following requirements carefully before you install GWMEE packages:
GWMEE 7.0.1 must be installed on a 64-bit system. Note that GroundWork has dropped support for 32-bit systems as of the 6.6.0release.The GroundWork installer must be able to install into the file tree./usr/local/groundwork/The uid and gid of the user must both be 0.rootThe default group for the user must be .root rootThe user and group must be local to the system and not provided via directory services. Ideally, for a fresh install, thesenagiosuser/group names do not already exist on the system.If the user exists (not necessary), the default group for must be .nagios nagios nagiosMake sure that the system you install to does not have a pre-installed Apache server or PostgreSQL database.The partition that GroundWork Monitor is installed to must allow setuid execution.If SELinux is installed, disable it prior to installation. The permissive setting is insufficient; it must be set to disabled.

/etc/selinux/config
SELINUX=disabled
Disable it immediately, prior to running the GroundWork binary installer:
setenforce 0
Special Configuration for Virtualized EnvironmentsIf GWMEE is deployed under VMware, resource allocation is critical to performant operation of the monitoring.For a small-to-medium installation, only allocate 1 CPU to the virtual machine; allocating more CPUs cansometimes result in worse performance. For large installations, the situation is more complex, and testing isrequired to get optimal settings. (A full discussion of VMware configuration is beyond the scope of this installguide.)In a virtualized environment, a memory of 4 GB should be considered the absolute minimum. Areservationmemory reservation of 8 GB or larger is generally recommended. A memory of 8 GB or moreallocationshould be applied to the VM.If GWMEE is deployed under VMware, running X Windows on that VM is strongly discouraged. High rates ofinterrupts from the windowing system can have a significant negative effect on performance in a virtualizedenvironment, due to the extra overhead of switching CPUs between VM guest hosts.
Java Compatibility
GroundWork Monitor specifically requires Sun Microsystems' Java SDK version 1.7 Update 45. This software is included in the GroundWorkinstallation bundle. Under some circumstances, other Java packages can interfere with the Sun provided software. For Support to troubleshootany reported issues with your system, other Java packages must be removed prior to installation by following these steps, or equivalent steps onUbuntu-based systems.
Query for existing Java packages:
rpm -qa | grep -i javarpm -qa | grep -i jdk
Remove the RPMs using:
rpm -e <name of RPM package>
Examples of conflicting Java packages include:
java-1.4.2-gcj-compat-1.4.2.0-27jppgcc-java-3.4.6-3
Externally Defined User Nagios
GroundWork Monitor uses the user account named for access control to several components in the system. For this reason we prefernagiosthat the user NOT exist prior to installation; the installer will then create the user and group, its home directory, and its dot-file setup in thenagiosmanner we require. If you have any of the following conditions:
The user is already defined on the system.nagiosYou have modified to support maintaining this user in some place other than local password/shadow/group files./etc/nsswitch.confYou are using external authentication of another kind (e.g., LDAP) with the user defined in a way that will inhibit the GroundWorknagiosinstaller from creating this user and its home directory.
then you must disable and remove all traces of the user before the installation. To reenable such prior setup after the installation, younagiosmust take whatever steps are necessary to ensure that the user number is the same as that used by the GroundWork-installed user . Alsonagiosnote that if the user already exists before the installation, the home directory is assumed to exist, and reside at nagios nagios
./usr/local/groundwork/users/nagios
1. 2. 3.
4. 5.
6.
PostgreSQL Database Location
In a simple install, the PostgreSQL databases will reside on the GroundWork Monitor system itself. But some customers might prefer to run thedatabases on a separate machine. If that is the case for your installation, some special instructions must be followed.
The separate database install supports the same Operating Systems as GroundWork Monitor, which are:
Red Hat Enterprise Linux 5 Server and 6 Server, 64-bit.CentOS 5 and 6, 64-bit.Novell SuSE Linux Enterprise Server 10 and 11, 64-bit.Ubuntu Server 8.04 LTS, 9.10, 10.04, 12.04, 64-bit. Releases before Ubuntu 12.04 are not recommended, because starting and stopping
on the earlier releases is broken.ntop
The minimal system requirements for a separate database install are:
64-bit CPU (required)2 CPU, 3 GHz P4 or equivalent4 GB RAM80 GB disk
Distributed Database Installation Overview
To install a separate database, the same installer package (e.g., ) can be used. In general, the procedure to installgroundworkenterprise-7.0.1-br323-gw1896-linux-64-installer.run
GroundWork Monitor 7.0.1 with a separated database is the following:
Download the installation package to the database server which matches the requirements and specifications described above.Make sure you know the fully-qualified hostname and IP address of the GroundWork Monitor server which will access this database.Run the installer on the database server and select the database installation only (details are provided in the next section). Don't installthe GroundWork Monitor component. Make sure the database is installed and running before installing GroundWork Monitor on adifferent server.Download the installation package to the server where GroundWork Monitor will run.Run the installer on the GroundWork Monitor server and just install the GroundWork Monitor component. Do not install PostgreSQL,since it is running on a different server.When prompted, enter the location and password for the remote PostgreSQL install, and complete the installation.
More details on the installation steps can be found in the following chapters describing fresh installations or upgrades.
Remote Database Install
Having a separate database instance on a different machine than the GroundWork Monitor installation is supported in GWMEE 7.0.1. Theinstallation of a separate database instance is the same for new installations or upgrades of GroundWork Monitor. As outlined above, the remotedatabase instance must be installed prior to installing a new instance or upgrading from a previous release of GroundWork Monitor.
1.
2.
3.
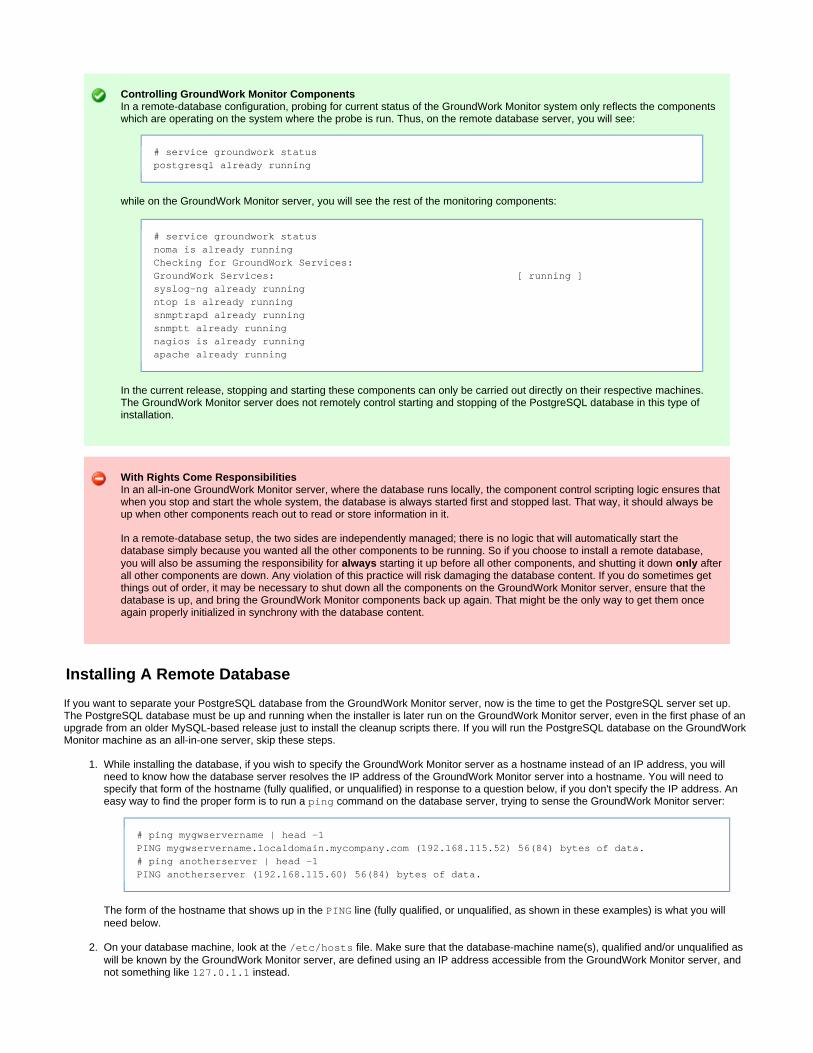
Controlling GroundWork Monitor ComponentsIn a remote-database configuration, probing for current status of the GroundWork Monitor system only reflects the componentswhich are operating on the system where the probe is run. Thus, on the remote database server, you will see:
# service groundwork statuspostgresql already running
while on the GroundWork Monitor server, you will see the rest of the monitoring components:
# service groundwork statusnoma is already runningChecking for GroundWork Services:GroundWork Services: [ running ]syslog-ng already runningntop is already runningsnmptrapd already runningsnmptt already runningnagios is already runningapache already running
In the current release, stopping and starting these components can only be carried out directly on their respective machines.The GroundWork Monitor server does not remotely control starting and stopping of the PostgreSQL database in this type ofinstallation.
With Rights Come ResponsibilitiesIn an all-in-one GroundWork Monitor server, where the database runs locally, the component control scripting logic ensures thatwhen you stop and start the whole system, the database is always started first and stopped last. That way, it should always beup when other components reach out to read or store information in it.
In a remote-database setup, the two sides are independently managed; there is no logic that will automatically start thedatabase simply because you wanted all the other components to be running. So if you choose to install a remote database,you will also be assuming the responsibility for starting it up before all other components, and shutting it down afteralways onlyall other components are down. Any violation of this practice will risk damaging the database content. If you do sometimes getthings out of order, it may be necessary to shut down all the components on the GroundWork Monitor server, ensure that thedatabase is up, and bring the GroundWork Monitor components back up again. That might be the only way to get them onceagain properly initialized in synchrony with the database content.
Installing A Remote Database
If you want to separate your PostgreSQL database from the GroundWork Monitor server, now is the time to get the PostgreSQL server set up.The PostgreSQL database must be up and running when the installer is later run on the GroundWork Monitor server, even in the first phase of anupgrade from an older MySQL-based release just to install the cleanup scripts there. If you will run the PostgreSQL database on the GroundWorkMonitor machine as an all-in-one server, skip these steps.
While installing the database, if you wish to specify the GroundWork Monitor server as a hostname instead of an IP address, you willneed to know how the database server resolves the IP address of the GroundWork Monitor server into a hostname. You will need tospecify that form of the hostname (fully qualified, or unqualified) in response to a question below, if you don't specify the IP address. Aneasy way to find the proper form is to run a command on the database server, trying to sense the GroundWork Monitor server:ping
# ping mygwservername | head -1PING mygwservername.localdomain.mycompany.com (192.168.115.52) 56(84) bytes of data.# ping anotherserver | head -1PING anotherserver (192.168.115.60) 56(84) bytes of data.
The form of the hostname that shows up in the line (fully qualified, or unqualified, as shown in these examples) is what you willPINGneed below.
On your database machine, look at the file. Make sure that the database-machine name(s), qualified and/or unqualified as/etc/hostswill be known by the GroundWork Monitor server, are defined using an IP address accessible from the GroundWork Monitor server, andnot something like instead.127.0.1.1
3.
4.
5.
6.
7.
8.
9. 10.
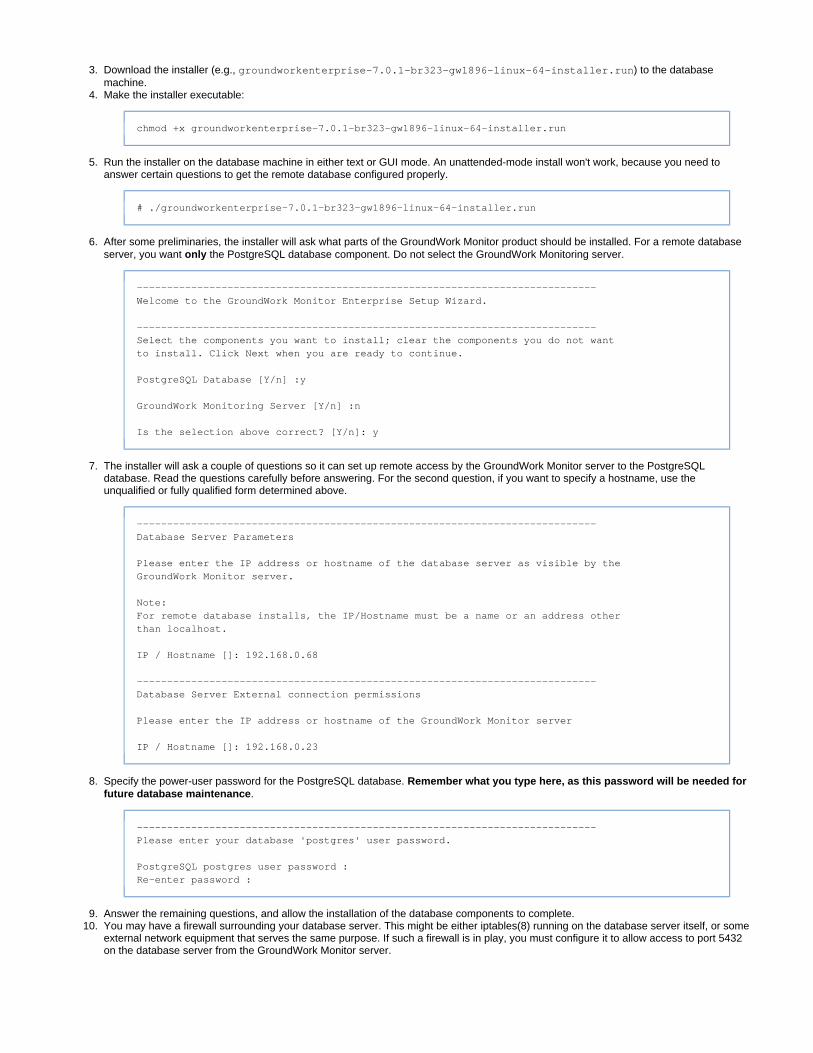
Download the installer (e.g., ) to the databasegroundworkenterprise-7.0.1-br323-gw1896-linux-64-installer.runmachine.Make the installer executable:
chmod +x groundworkenterprise-7.0.1-br323-gw1896-linux-64-installer.run
Run the installer on the database machine in either text or GUI mode. An unattended-mode install won't work, because you need toanswer certain questions to get the remote database configured properly.
# ./groundworkenterprise-7.0.1-br323-gw1896-linux-64-installer.run
After some preliminaries, the installer will ask what parts of the GroundWork Monitor product should be installed. For a remote databaseserver, you want the PostgreSQL database component. Do not select the GroundWork Monitoring server.only
----------------------------------------------------------------------------Welcome to the GroundWork Monitor Enterprise Setup Wizard.
----------------------------------------------------------------------------Select the components you want to install; clear the components you do not wantto install. Click Next when you are ready to continue.
PostgreSQL Database [Y/n] :y
GroundWork Monitoring Server [Y/n] :n
Is the selection above correct? [Y/n]: y
The installer will ask a couple of questions so it can set up remote access by the GroundWork Monitor server to the PostgreSQLdatabase. Read the questions carefully before answering. For the second question, if you want to specify a hostname, use theunqualified or fully qualified form determined above.
----------------------------------------------------------------------------Database Server Parameters
Please enter the IP address or hostname of the database server as visible by theGroundWork Monitor server.
Note:For remote database installs, the IP/Hostname must be a name or an address otherthan localhost.
IP / Hostname []: 192.168.0.68
----------------------------------------------------------------------------Database Server External connection permissions
Please enter the IP address or hostname of the GroundWork Monitor server
IP / Hostname []: 192.168.0.23
Specify the power-user password for the PostgreSQL database. Remember what you type here, as this password will be needed for.future database maintenance
----------------------------------------------------------------------------Please enter your database 'postgres' user password.
PostgreSQL postgres user password :Re-enter password :
Answer the remaining questions, and allow the installation of the database components to complete.You may have a firewall surrounding your database server. This might be either iptables(8) running on the database server itself, or someexternal network equipment that serves the same purpose. If such a firewall is in play, you must configure it to allow access to port 5432on the database server from the GroundWork Monitor server.

10.
Setup for an iptables FirewallSee in the GroundWork Knowledge Base for some clues as to how toHow to determine ports used by GroundWorkconfigure an firewall with regard to a remote PostgreSQL server.iptables
After these configuration steps are completed, the database component will be installed and started. You can now continue and install or upgradeGroundWork Monitor Enterprise on a different server pointing to the database server.
Fresh Installation
First Things FirstIf you want to use GroundWork Monitor with a remote database, first carry out the Remote Database Install procedure in thesection above, before taking the steps in this section for a fresh installation of GroundWork Monitor.
Disk Layout
First, decide which disk the GroundWork Monitor install will reside on. It will be placed in the directory, which by/usr/local/groundwork/default will usually reside on the system disk. If you wish to relocate the installation to a different drive, that is most easily done by setup beforethe installation proper. Your choices are:
Ignore the directory. The GroundWork installer will create it and set its ownership and permissions as/usr/local/groundwork/needed, on whatever disk/partition the directory resides on./usr/local/Leave a symlink at to point elsewhere. For instance, if I wanted to install the software under /usr/local/groundwork
(not that that's a good place to put it), I could create:/tmp/local/groundwork/
drwxr-xr-x 2 root root 4096 Feb 8 00:35 /tmp/local/groundworklrwxrwxrwx 1 root root 21 Feb 7 23:34 /usr/local/groundwork -> /tmp/local/groundwork
and then install the software. You need not create the user or group beforehand; the installer will do so as needed, and changenagiosthe ownership of the target directory accordingly. Regardless, the target directory should start with 755 permissions, as shown above.
Create the directory and mount some disk partition on that directory. After the mount, check the ownership/usr/local/groundwork/and permissions of the mount point:
drwxr-xr-x 2 root root 4096 Feb 5 19:45 /usr/local/groundwork
As before, the installer will adjust the ownership of the root of the mounted partition as needed during the installation process.
Software Preparation
Transfer the GroundWork Monitor Enterprise software to the server it is being installed on.
Change the permissions of the binary to executable. For example, with the 64-bit installer binary:
chmod +x groundworkenterprise-7.0.1-br323-gw1896-linux-64-installer.run
Installation Methods
The installer package supports 3 modes: GUI, text, and unattended. The default is GUI if an X server is running; otherwise, text mode will beused. GroundWork does not recommend running the X server in a production deployment, due to the unnecessary overhead.
GUI Install
From a system with X server running, simply double-click on the run file. Alternatively, go to the command shell and execute the downloaded file:
./groundworkenterprise-7.0.1-br323-gw1896-linux-64-installer.run
Text Based Install
From a command shell, execute the binary with the text-mode installation selected:
./groundworkenterprise-7.0.1-br323-gw1896-linux-64-installer.run --mode text
Unattended Install
From a command shell, execute the binary with the unattended-mode installation selected:
./groundworkenterprise-7.0.1-br323-gw1896-linux-64-installer.run --mode unattended
This will perform an unattended installation that will not prompt the user for any information.
Unattended Mode ConstraintsIf you run the installer using the command just displayed, the installation will fail because it tries to install the PostgreSQLdatabase without a password for the user. An installation like that is inherently insecure, and is not supported. For anpostgresunattended install, you must use the " " option, either on the command line or in an option--postgres_password passwordfile as described below.
Also, an unattended install will reference a local database only.
Passing the " " command line option lets you specify installation options in a separate file. The option file should contain--optionfile optionfileone line per option, using the format . You can use any of the options accepted by the installer. For information on valid options,key=valueexecute the binary with the switch. For example, to use a PostgreSQL password specified in the options, you could use:--help
./groundworkenterprise-7.0.1-br323-gw1896-linux-64-installer.run --mode unattended --optionfilegwinstall.ini
where the file contains:gwinstall.ini
postgresql_password=your_passwd
Remote Install
Using SSH, access a remote server and use the text based install (see above). This is the most common way to install GroundWork Monitorremotely. If you perform the remote install from a machine that runs an X server, you can use SSH with the option and run the install with the-XGUI mode. For example:
ssh -XC -l root target-machine ./groundworkenterprise-7.0.1-br323-gw1896-linux-64-installer.run
Install Questions
The installer asks questions that must be answered correctly for a successful install. Most of them are self-explanatory. Some of them are calledout here so we can comment on them.
Questions about the components to install:
----------------------------------------------------------------------------Select the components you want to install; clear the components you do not wantto install. Click Next when you are ready to continue.
PostgreSQL Database [Y/n] :
GroundWork Monitoring Server [Y/n] :
Is the selection above correct? [Y/n]:

If you are installing using a remote database, you must decline the installation of the PostgreSQL Database when you run the installer onthe GroundWork Monitor machine. Conversely, if you are installing an all-in-one server, where the PostgreSQL database will run locallyon the GroundWork monitor machine, specify instead that you want this component installed. In either case, the GroundWork MonitoringServer component must be installed on this machine.
The next question is about Log Archiving. You can either enable the Log Archiving capability (default) or disable it. For details on whatthis is all about, see the page. (That page is currently undergoing revision, and will be available shortly.)[GroundWork Archive Server]
----------------------------------------------------------------------------Log Archiving
Do you wish to have the installer enable a standard configuration of thelog-archive capability? [Y/n]:
End-stage activity:
----------------------------------------------------------------------------Setup has finished installing GroundWork Monitoring Server component on yourcomputer.
Starting servers .../
It says it has finished installing, but in fact it still has some work to do. Don't interrupt at this point; let it finish on its own. Meanwhile, thefirst character on that last line will keep spinning. This will take several minutes; don't panic.
Post-Install Configuration
Starting and Stopping GroundWork MonitorGroundWork Monitor includes all prerequisites and components within a single installation package. The software componentsof GroundWork Monitor are installed under , with the exception of the log rotation configuration and/usr/local/groundworkthe start/stop script named . The start/stop script is used indirectly, as follows:/etc/init.d/groundwork
service groundwork statusservice groundwork startservice groundwork stop
This script can also be used to stop, start, or restart individual services. For example:
service groundwork restart nagios
(The command generally resides in the directory [ , on Ubuntu]. That directory will normally beservice /sbin/ /usr/sbin/part of the user's command-search path. If not, you can run the script directly, as in "root /etc/init.d/groundwork
". The command is preferred because it is easier to remember and type.)/etc/init.d/groundwork start service
Default Login Information
There are 4 user-interface users defined in GroundWork by default:
root (password: root)admin (password: admin)operator (password: operator)user (password: user)
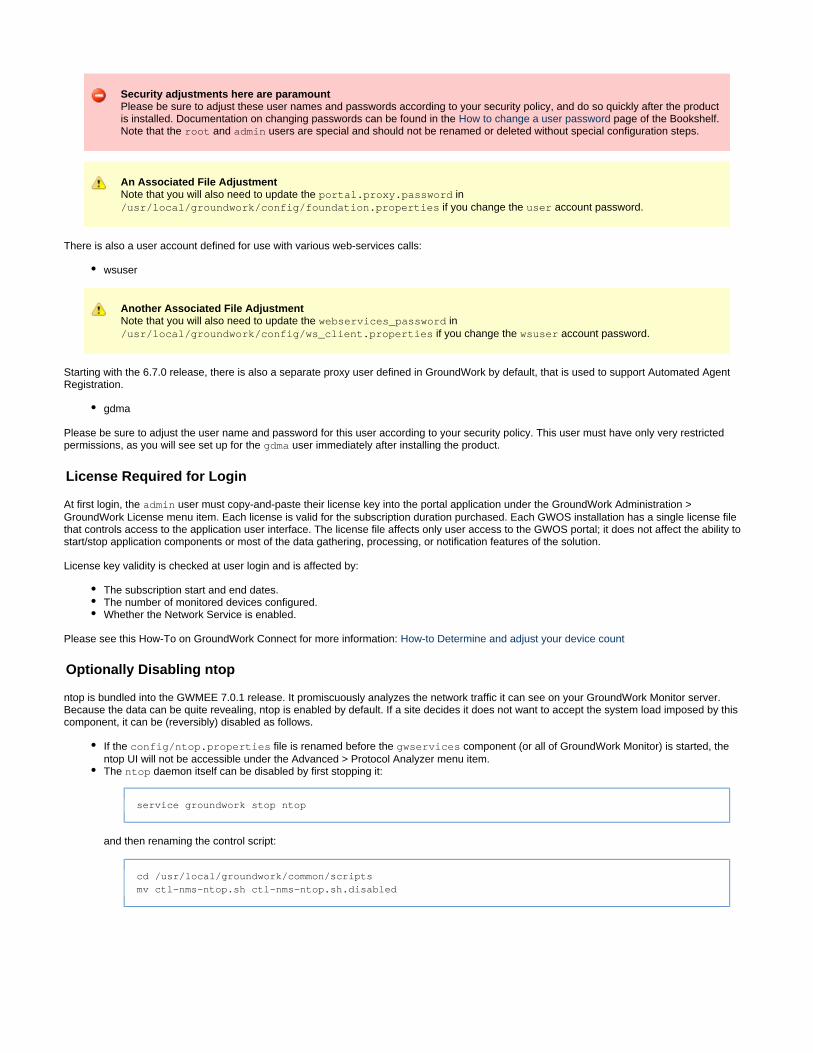
Security adjustments here are paramountPlease be sure to adjust these user names and passwords according to your security policy, and do so quickly after the productis installed. Documentation on changing passwords can be found in the page of the Bookshelf.How to change a user passwordNote that the and users are special and should not be renamed or deleted without special configuration steps.root admin
An Associated File AdjustmentNote that you will also need to update the in portal.proxy.password
if you change the account password./usr/local/groundwork/config/foundation.properties user
There is also a user account defined for use with various web-services calls:
wsuser
Another Associated File AdjustmentNote that you will also need to update the in webservices_password
if you change the account password./usr/local/groundwork/config/ws_client.properties wsuser
Starting with the 6.7.0 release, there is also a separate proxy user defined in GroundWork by default, that is used to support Automated AgentRegistration.
gdma
Please be sure to adjust the user name and password for this user according to your security policy. This user must have only very restrictedpermissions, as you will see set up for the user immediately after installing the product.gdma
License Required for Login
At first login, the user must copy-and-paste their license key into the portal application under the GroundWork Administration >adminGroundWork License menu item. Each license is valid for the subscription duration purchased. Each GWOS installation has a single license filethat controls access to the application user interface. The license file affects only user access to the GWOS portal; it does not affect the ability tostart/stop application components or most of the data gathering, processing, or notification features of the solution.
License key validity is checked at user login and is affected by:
The subscription start and end dates.The number of monitored devices configured.Whether the Network Service is enabled.
Please see this How-To on GroundWork Connect for more information: How-to Determine and adjust your device count
Optionally Disabling ntop
ntop is bundled into the GWMEE 7.0.1 release. It promiscuously analyzes the network traffic it can see on your GroundWork Monitor server.Because the data can be quite revealing, ntop is enabled by default. If a site decides it does not want to accept the system load imposed by thiscomponent, it can be (reversibly) disabled as follows.
If the file is renamed before the component (or all of GroundWork Monitor) is started, theconfig/ntop.properties gwservicesntop UI will not be accessible under the Advanced > Protocol Analyzer menu item.The daemon itself can be disabled by first stopping it:ntop
service groundwork stop ntop
and then renaming the control script:
cd /usr/local/groundwork/common/scriptsmv ctl-nms-ntop.sh ctl-nms-ntop.sh.disabled
1.
2. 3. 4. 5.
6.
7.
8. 9.
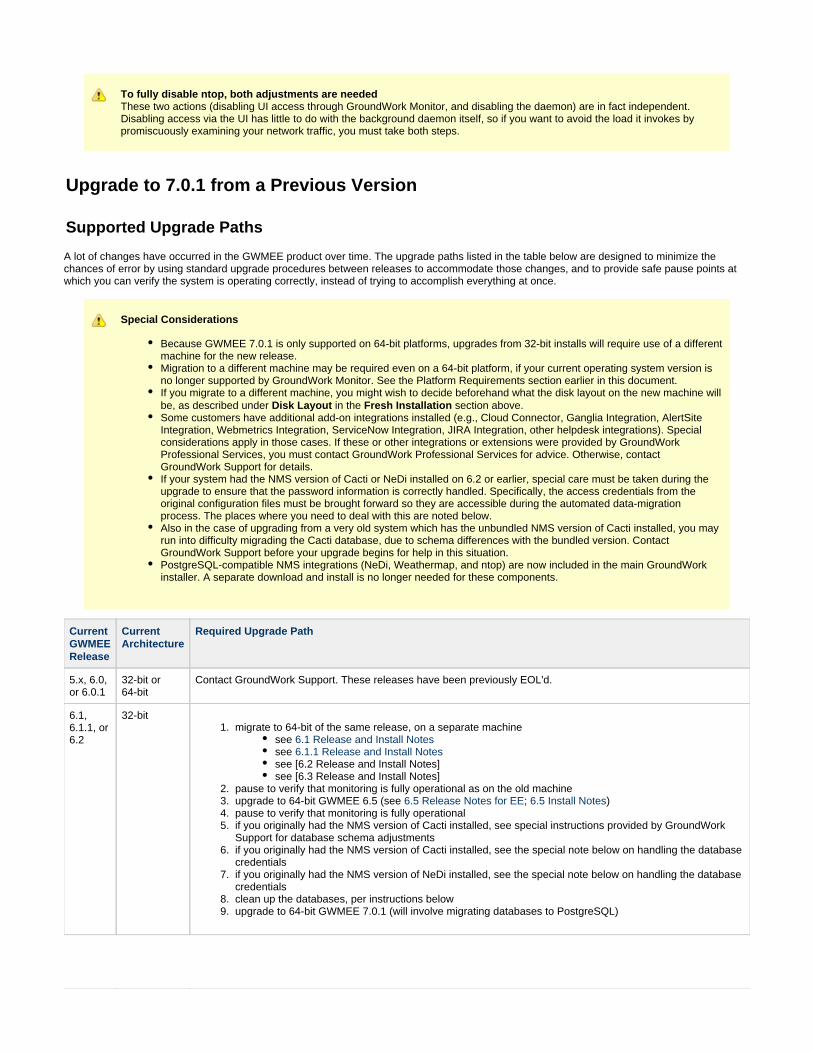
To fully disable ntop, both adjustments are neededThese two actions (disabling UI access through GroundWork Monitor, and disabling the daemon) are in fact independent.Disabling access via the UI has little to do with the background daemon itself, so if you want to avoid the load it invokes bypromiscuously examining your network traffic, you must take both steps.
Upgrade to 7.0.1 from a Previous Version
Supported Upgrade Paths
A lot of changes have occurred in the GWMEE product over time. The upgrade paths listed in the table below are designed to minimize thechances of error by using standard upgrade procedures between releases to accommodate those changes, and to provide safe pause points atwhich you can verify the system is operating correctly, instead of trying to accomplish everything at once.
Special Considerations
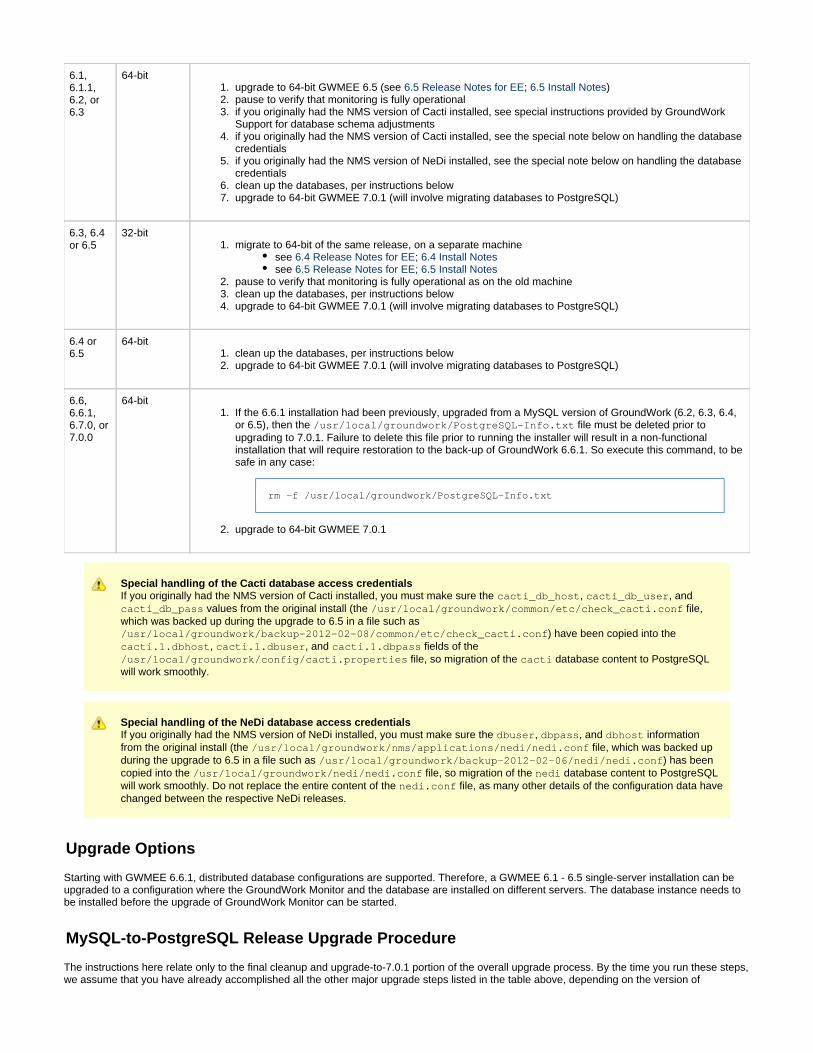
Because GWMEE 7.0.1 is only supported on 64-bit platforms, upgrades from 32-bit installs will require use of a differentmachine for the new release.Migration to a different machine may be required even on a 64-bit platform, if your current operating system version isno longer supported by GroundWork Monitor. See the Platform Requirements section earlier in this document.If you migrate to a different machine, you might wish to decide beforehand what the disk layout on the new machine willbe, as described under in the section above.Disk Layout Fresh InstallationSome customers have additional add-on integrations installed (e.g., Cloud Connector, Ganglia Integration, AlertSiteIntegration, Webmetrics Integration, ServiceNow Integration, JIRA Integration, other helpdesk integrations). Specialconsiderations apply in those cases. If these or other integrations or extensions were provided by GroundWorkProfessional Services, you must contact GroundWork Professional Services for advice. Otherwise, contactGroundWork Support for details.If your system had the NMS version of Cacti or NeDi installed on 6.2 or earlier, special care must be taken during theupgrade to ensure that the password information is correctly handled. Specifically, the access credentials from theoriginal configuration files must be brought forward so they are accessible during the automated data-migrationprocess. The places where you need to deal with this are noted below.Also in the case of upgrading from a very old system which has the unbundled NMS version of Cacti installed, you mayrun into difficulty migrading the Cacti database, due to schema differences with the bundled version. ContactGroundWork Support before your upgrade begins for help in this situation.PostgreSQL-compatible NMS integrations (NeDi, Weathermap, and ntop) are now included in the main GroundWorkinstaller. A separate download and install is no longer needed for these components.
CurrentGWMEERelease
CurrentArchitecture
Required Upgrade Path
5.x, 6.0,or 6.0.1
32-bit or64-bit
Contact GroundWork Support. These releases have been previously EOL'd.
6.1,6.1.1, or6.2
32-bitmigrate to 64-bit of the same release, on a separate machine
see 6.1 Release and Install Notessee 6.1.1 Release and Install Notessee [6.2 Release and Install Notes]see [6.3 Release and Install Notes]
pause to verify that monitoring is fully operational as on the old machineupgrade to 64-bit GWMEE 6.5 (see ; )6.5 Release Notes for EE 6.5 Install Notespause to verify that monitoring is fully operationalif you originally had the NMS version of Cacti installed, see special instructions provided by GroundWorkSupport for database schema adjustmentsif you originally had the NMS version of Cacti installed, see the special note below on handling the databasecredentialsif you originally had the NMS version of NeDi installed, see the special note below on handling the databasecredentialsclean up the databases, per instructions belowupgrade to 64-bit GWMEE 7.0.1 (will involve migrating databases to PostgreSQL)
1. 2. 3.
4.
5.
6. 7.
1.
2. 3. 4.
1. 2.
1.
2.
6.1,6.1.1,6.2, or6.3
64-bitupgrade to 64-bit GWMEE 6.5 (see ; )6.5 Release Notes for EE 6.5 Install Notespause to verify that monitoring is fully operationalif you originally had the NMS version of Cacti installed, see special instructions provided by GroundWorkSupport for database schema adjustmentsif you originally had the NMS version of Cacti installed, see the special note below on handling the databasecredentialsif you originally had the NMS version of NeDi installed, see the special note below on handling the databasecredentialsclean up the databases, per instructions belowupgrade to 64-bit GWMEE 7.0.1 (will involve migrating databases to PostgreSQL)
6.3, 6.4or 6.5
32-bitmigrate to 64-bit of the same release, on a separate machine
see ; 6.4 Release Notes for EE 6.4 Install Notessee ; 6.5 Release Notes for EE 6.5 Install Notes
pause to verify that monitoring is fully operational as on the old machineclean up the databases, per instructions belowupgrade to 64-bit GWMEE 7.0.1 (will involve migrating databases to PostgreSQL)
6.4 or6.5
64-bitclean up the databases, per instructions belowupgrade to 64-bit GWMEE 7.0.1 (will involve migrating databases to PostgreSQL)
6.6,6.6.1,6.7.0, or7.0.0
64-bitIf the 6.6.1 installation had been previously, upgraded from a MySQL version of GroundWork (6.2, 6.3, 6.4,or 6.5), then the file must be deleted prior to/usr/local/groundwork/PostgreSQL-Info.txtupgrading to 7.0.1. Failure to delete this file prior to running the installer will result in a non-functionalinstallation that will require restoration to the back-up of GroundWork 6.6.1. So execute this command, to besafe in any case:
rm -f /usr/local/groundwork/PostgreSQL-Info.txt
upgrade to 64-bit GWMEE 7.0.1
Special handling of the Cacti database access credentialsIf you originally had the NMS version of Cacti installed, you must make sure the , , and cacti_db_host cacti_db_user
values from the original install (the file,cacti_db_pass /usr/local/groundwork/common/etc/check_cacti.confwhich was backed up during the upgrade to 6.5 in a file such as
) have been copied into the /usr/local/groundwork/backup-2012-02-08/common/etc/check_cacti.conf, , and fields of the cacti.1.dbhost cacti.1.dbuser cacti.1.dbpass
file, so migration of the database content to PostgreSQL/usr/local/groundwork/config/cacti.properties cactiwill work smoothly.
Special handling of the NeDi database access credentialsIf you originally had the NMS version of NeDi installed, you must make sure the , , and informationdbuser dbpass dbhostfrom the original install (the file, which was backed up/usr/local/groundwork/nms/applications/nedi/nedi.confduring the upgrade to 6.5 in a file such as ) has been/usr/local/groundwork/backup-2012-02-06/nedi/nedi.confcopied into the file, so migration of the database content to PostgreSQL/usr/local/groundwork/nedi/nedi.conf nediwill work smoothly. Do not replace the entire content of the file, as many other details of the configuration data havenedi.confchanged between the respective NeDi releases.
Upgrade Options
Starting with GWMEE 6.6.1, distributed database configurations are supported. Therefore, a GWMEE 6.1 - 6.5 single-server installation can beupgraded to a configuration where the GroundWork Monitor and the database are installed on different servers. The database instance needs tobe installed before the upgrade of GroundWork Monitor can be started.
MySQL-to-PostgreSQL Release Upgrade Procedure
The instructions here relate only to the final cleanup and upgrade-to-7.0.1 portion of the overall upgrade process. By the time you run these steps,we assume that you have already accomplished all the other major upgrade steps listed in the table above, depending on the version of

1.
2.
3.
4. 5. 6. 7.
1.
2.
GroundWork Monitor you started with. That includes dealing with any Nagios, SSL, and LDAP configuration changes required by the intermediatereleases.
Pay Attention To All Upgrade InformationRead the release and install notes for the intermediate releases carefully, and make sure you deal with any issues describedthere. For some upgrade paths (e.g., 6.4 64-bit directly to 7.0.1), you won't experience the issues (e.g, LDAP configurationchanges, if your setup uses LDAP authentication) until you have finished the upgrade to the new, PostgreSQL-basedGroundWork Monitor release.
Scheduling Your UpgradeThe first steps below (through cleaning up the MySQL databases) take place on the existing installation, and should first beattempted well in advance of the planned upgrade. That's because the cleanup could take significant time and manual work.
The upgrade from previous MySQL-based releases (6.5 and before) to the latest GWMEE 7.0.1 release is divided into seven high-level steps,listed directly below. The upgrade from the previous PostgreSQL-based releases (6.6, 6.6.1, 6.7.0, or 7.0.0) is simpler, and is documented later.
(Possibly) Install a Remote Database — Perform this step only if you want to run the PostgreSQL database on a machine separatefrom the GroundWork Monitor server. The procedure for a remote database install was described earlier in this document. If you want aremote database, this step must be done before the rest of the steps listed here.Install Cleanup Scripts — The recommended procedure is to run the installer to install the cleanup/migration scripts, along withwhatever PostgreSQL components will be needed later for the full install.Cleanup of MySQL databases — This step is necessary so that data inconsistencies won't be migrated from MySQL to PostgreSQL.The PostgreSQL database adds constraints that were historically missing, and therefore some cleanup might be necessary. The sectionbelow provides the necessary information to clean up the databases prior to an upgrade to GWMEE 7.0.1. It also describes purging olddata that you ought not to bring forward at this time, and ensuring that the database schema on the source side matches the schema onthe target side of the migration.Final Pre-Upgrade Backup — For safety's sake, save a copy of the work done so far.MySQL to PostgreSQL data migration — This step includes the transfer of data stored in MySQL to the PostgreSQL instance.Upgrade of GWMEE components — All GroundWork components must be upgraded to the latest version.Final Steps — The installation is not complete until the license key is installed and monitoring is restarted to use the migratedconfiguration data with the new software.
Scrubbing your data is criticalPlease follow these instructions carefully, because a successful upgrade depends on having SQL data inconsistencies (voidpointers and duplicate entries) removed. Not applying the cleanup procedure will impact the upgrade and will likely result in afailure later in the process.
GroundWork supplies several scripts to assist in database cleanup. Full documentation for the cleanup process is available in a Technical Bulletin. The steps below document a simplified process that should suffice for most sites.
Troubleshooting AdviceAt several points in these procedures, you must create a current, complete system backup using the GroundWork backup utility.If you run into difficulty during the upgrade procedures and need to roll back to the previous setup, see the How to use the
page in the GroundWork Knowledge Base for instructions.GroundWork Monitor Backup and Restore Utility
Install Cleanup Scripts
You could download the cleanup tools from the page, and install them manually as described there. But it is easier to just runTechnical Bulletinthe first steps of the install process (that is, run the installer to install the PostgreSQL database components); that will install the cleanup scripts aswell. The later data-migration steps below assume you have followed this procedure..
Make sure that you have created a current backup of your entire current installation before you begin. See the separate How to use the document in the GroundWork Knowledge Base for details on how to create a backup.GroundWork Monitor Backup and Restore Utility
The installer proceed without a backup.cannotBy default, the backup tool creates its backup file in the directory, in a file such as:/tmp/
% ls -l /tmp/gw-backup-20120127141505.tar.gz-rw-r--r-- 1 root root 1358760701 Jan 27 14:23 /tmp/gw-backup-20120127141505.tar.gz
2.
3.
4.
5.
6.
7.
8.
9.
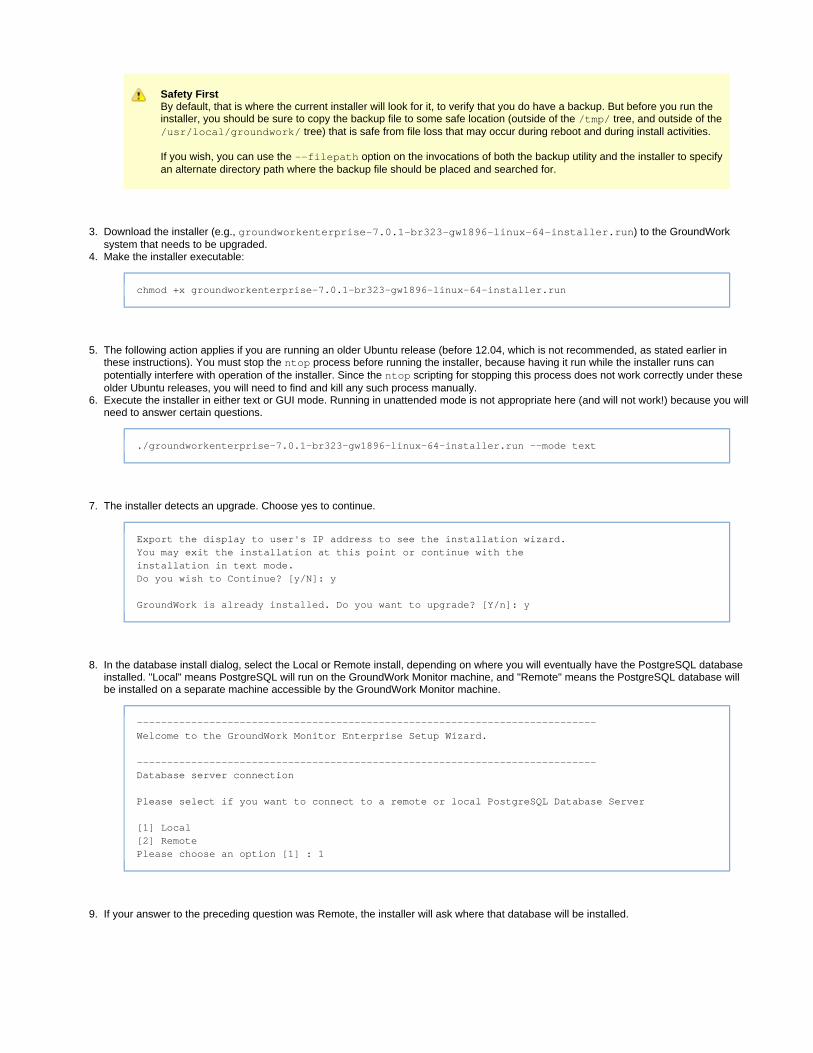
Safety FirstBy default, that is where the current installer will look for it, to verify that you do have a backup. But before you run theinstaller, you should be sure to copy the backup file to some safe location (outside of the tree, and outside of the/tmp/
tree) that is safe from file loss that may occur during reboot and during install activities. /usr/local/groundwork/
If you wish, you can use the option on the invocations of both the backup utility and the installer to specify--filepathan alternate directory path where the backup file should be placed and searched for.
Download the installer (e.g., ) to the GroundWorkgroundworkenterprise-7.0.1-br323-gw1896-linux-64-installer.runsystem that needs to be upgraded.Make the installer executable:
chmod +x groundworkenterprise-7.0.1-br323-gw1896-linux-64-installer.run
The following action applies if you are running an older Ubuntu release (before 12.04, which is not recommended, as stated earlier inthese instructions). You must stop the process before running the installer, because having it run while the installer runs canntoppotentially interfere with operation of the installer. Since the scripting for stopping this process does not work correctly under thesentopolder Ubuntu releases, you will need to find and kill any such process manually.Execute the installer in either text or GUI mode. Running in unattended mode is not appropriate here ( ) because you willand will not work!need to answer certain questions.
./groundworkenterprise-7.0.1-br323-gw1896-linux-64-installer.run --mode text
The installer detects an upgrade. Choose yes to continue.
Export the display to user's IP address to see the installation wizard.You may exit the installation at this point or continue with theinstallation in text mode.Do you wish to Continue? [y/N]: y
GroundWork is already installed. Do you want to upgrade? [Y/n]: y
In the database install dialog, select the Local or Remote install, depending on where you will eventually have the PostgreSQL databaseinstalled. "Local" means PostgreSQL will run on the GroundWork Monitor machine, and "Remote" means the PostgreSQL database willbe installed on a separate machine accessible by the GroundWork Monitor machine.
----------------------------------------------------------------------------Welcome to the GroundWork Monitor Enterprise Setup Wizard.
----------------------------------------------------------------------------Database server connection
Please select if you want to connect to a remote or local PostgreSQL Database Server
[1] Local[2] RemotePlease choose an option [1] : 1
If your answer to the preceding question was Remote, the installer will ask where that database will be installed.
9.
10.
11.
12.
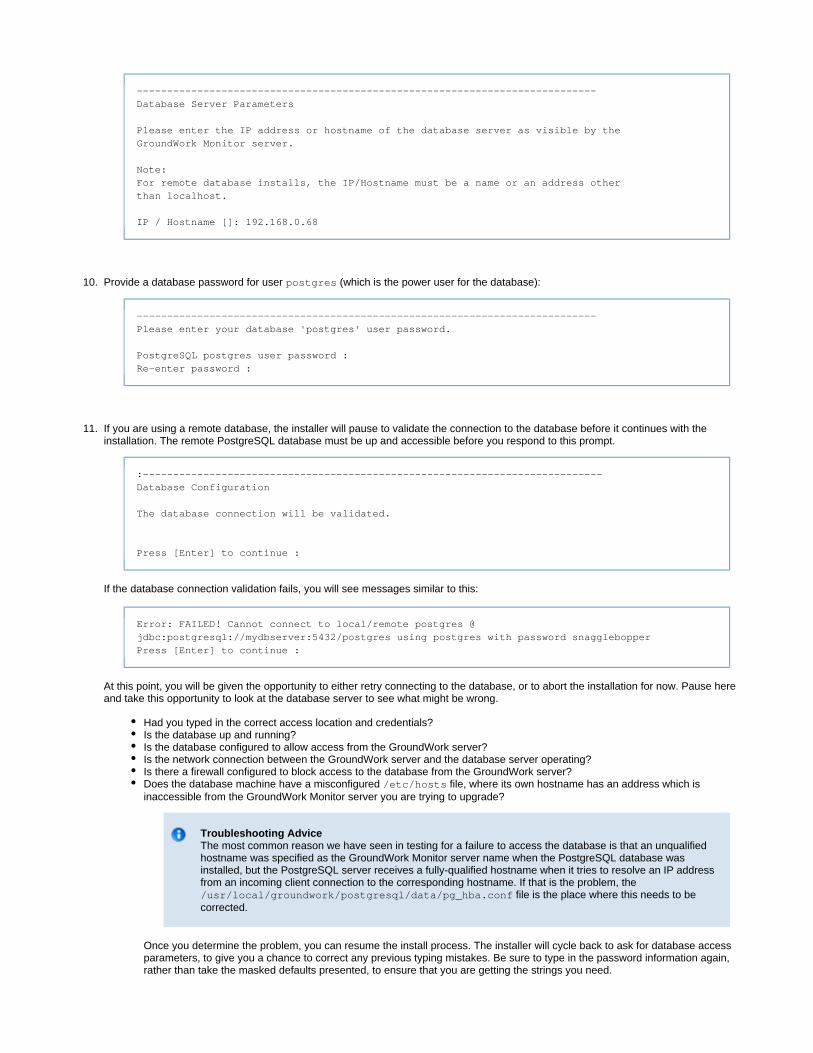
----------------------------------------------------------------------------Database Server Parameters
Please enter the IP address or hostname of the database server as visible by theGroundWork Monitor server.
Note:For remote database installs, the IP/Hostname must be a name or an address otherthan localhost.
IP / Hostname []: 192.168.0.68
Provide a database password for user (which is the power user for the database):postgres
----------------------------------------------------------------------------Please enter your database 'postgres' user password.
PostgreSQL postgres user password :Re-enter password :
If you are using a remote database, the installer will pause to validate the connection to the database before it continues with theinstallation. The remote PostgreSQL database must be up and accessible before you respond to this prompt.
:----------------------------------------------------------------------------Database Configuration
The database connection will be validated.
Press [Enter] to continue :
If the database connection validation fails, you will see messages similar to this:
Error: FAILED! Cannot connect to local/remote postgres @jdbc:postgresql://mydbserver:5432/postgres using postgres with password snagglebopperPress [Enter] to continue :
At this point, you will be given the opportunity to either retry connecting to the database, or to abort the installation for now. Pause hereand take this opportunity to look at the database server to see what might be wrong.
Had you typed in the correct access location and credentials?Is the database up and running?Is the database configured to allow access from the GroundWork server?Is the network connection between the GroundWork server and the database server operating?Is there a firewall configured to block access to the database from the GroundWork server?Does the database machine have a misconfigured file, where its own hostname has an address which is/etc/hostsinaccessible from the GroundWork Monitor server you are trying to upgrade?
Troubleshooting AdviceThe most common reason we have seen in testing for a failure to access the database is that an unqualifiedhostname was specified as the GroundWork Monitor server name when the PostgreSQL database wasinstalled, but the PostgreSQL server receives a fully-qualified hostname when it tries to resolve an IP addressfrom an incoming client connection to the corresponding hostname. If that is the problem, the
file is the place where this needs to be/usr/local/groundwork/postgresql/data/pg_hba.confcorrected.
Once you determine the problem, you can resume the install process. The installer will cycle back to ask for database accessparameters, to give you a chance to correct any previous typing mistakes. Be sure to type in the password information again,rather than take the masked defaults presented, to ensure that you are getting the strings you need.

12.
13.
14.
If all went well above, the installer will ask for final confirmation before installing the PostgreSQL components and the cleanup/migrationscripts on your GroundWork Monitor system. The message for a local-PostgreSQL install will look like this:
----------------------------------------------------------------------------Setup is now ready to begin installing PostgreSQL Database component on yourcomputer.
Do you want to continue? [Y/n]:
while the message for a remote-PostgreSQL install will look like this:
----------------------------------------------------------------------------Setup is now ready to begin installing PostgreSQL Database libraries on yourcomputer.
Do you want to continue? [Y/n]:
When you answer affirmatively to the preceding question, the PostgreSQL instance (for a local database) or client programs and libraries(for a remote database) and the data-cleanup/migration scripts are installed, while all the monitoring components remain untouched.After perhaps another simple pause and prompt, the installer will exit and will bring back the shell prompt where the installation started.The cleanup scripts are now installed on your machine under the appropriate pathnames.
Cleanup of MySQL Databases
Inconsistent-Data Cleanup
The simplest way to run the cleanup is to first run the master migration script with the option. This will check for data problems without actually-cchanging anything.
# /usr/local/groundwork/core/migration/postgresql/master_migration_to_pg.pl -cMaster Migration log file is: /tmp/migration.2013_11_18.20_59_20.log
=== Master Migration is starting up at Mon Nov 18 20:59:20 2013 ===NOTICE: no credentials file found for the ganglia data source.WARNING: Cannot find "alertsite" database access parameters.WARNING: Cannot find "HelpDeskBridgeDB" database access parameters.Enter the MySQL host machine [localhost]:Enter the MySQL port [3306]:Enter the MySQL administrator username [root]:Enter the MySQL administrator password: *****Re-enter the MySQL administrator password: *****Using MySQL host: localhostUsing MySQL port: 3306Using MySQL user: rootWARNING: The "nedi" database is not present on localhost, although its access credentials indicate that it might be. This database is being skipped during this migration.Checking GWCollageDB for void pointers ...Checking dashboard for void pointers ...Checking monarch for void pointers ...WARNING: Orphaned rows found for `service_id` in table `contact_service`WARNING: Orphaned rows found for `service_id` in table `contactgroup_service`WARNING: Orphaned rows found for `service_id` in table `service_overrides`FATAL: Error in running find_void_pointers for the monarch database.FATAL: Database validation has failed!FATAL: The MySQL databases have failed validation tests (see above). You must fix the stated problems before running this master migration script again.
Master Migration log file is: /tmp/migration.2013_11_18.20_59_20.logFATAL: master_migration_to_pg.pl failed; see the log file.#
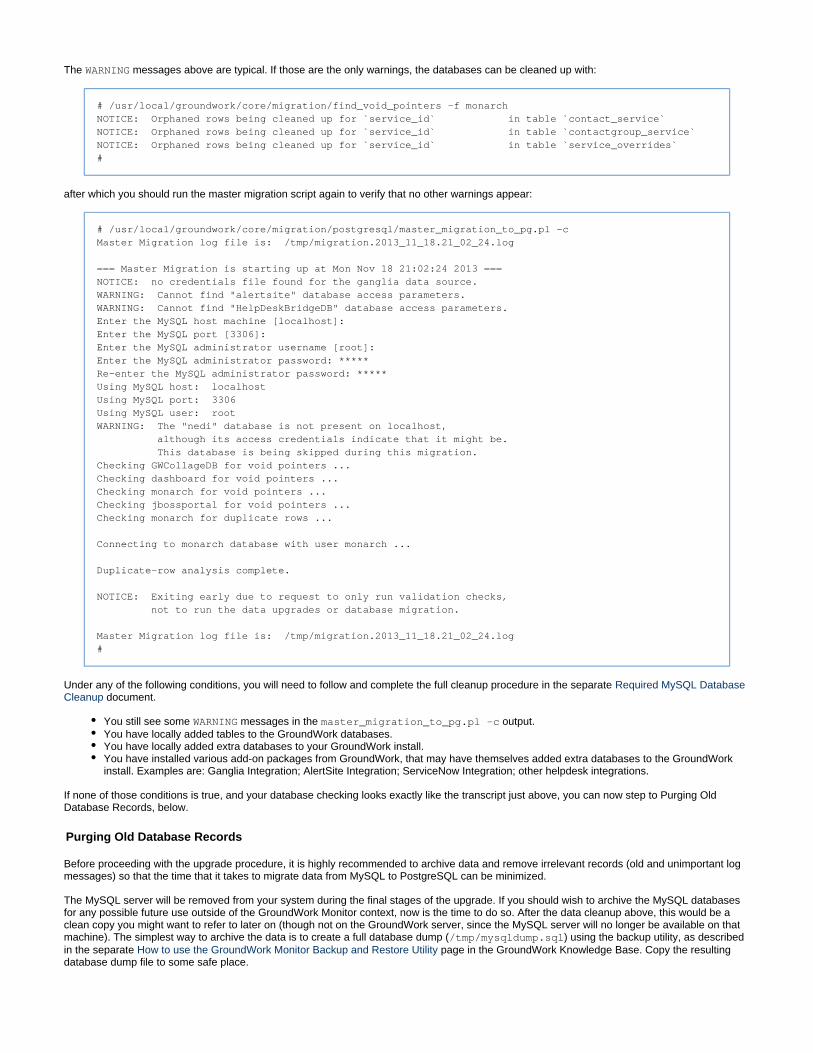
The messages above are typical. If those are the only warnings, the databases can be cleaned up with:WARNING
# /usr/local/groundwork/core/migration/find_void_pointers -f monarchNOTICE: Orphaned rows being cleaned up for `service_id` in table `contact_service`NOTICE: Orphaned rows being cleaned up for `service_id` in table `contactgroup_service`NOTICE: Orphaned rows being cleaned up for `service_id` in table `service_overrides`#
after which you should run the master migration script again to verify that no other warnings appear:
# /usr/local/groundwork/core/migration/postgresql/master_migration_to_pg.pl -cMaster Migration log file is: /tmp/migration.2013_11_18.21_02_24.log
=== Master Migration is starting up at Mon Nov 18 21:02:24 2013 ===NOTICE: no credentials file found for the ganglia data source.WARNING: Cannot find "alertsite" database access parameters.WARNING: Cannot find "HelpDeskBridgeDB" database access parameters.Enter the MySQL host machine [localhost]:Enter the MySQL port [3306]:Enter the MySQL administrator username [root]:Enter the MySQL administrator password: *****Re-enter the MySQL administrator password: *****Using MySQL host: localhostUsing MySQL port: 3306Using MySQL user: rootWARNING: The "nedi" database is not present on localhost, although its access credentials indicate that it might be. This database is being skipped during this migration.Checking GWCollageDB for void pointers ...Checking dashboard for void pointers ...Checking monarch for void pointers ...Checking jbossportal for void pointers ...Checking monarch for duplicate rows ...
Connecting to monarch database with user monarch ...
Duplicate-row analysis complete.
NOTICE: Exiting early due to request to only run validation checks, not to run the data upgrades or database migration.
Master Migration log file is: /tmp/migration.2013_11_18.21_02_24.log#
Under any of the following conditions, you will need to follow and complete the full cleanup procedure in the separate Required MySQL Database document.Cleanup
You still see some messages in the output.WARNING master_migration_to_pg.pl -cYou have locally added tables to the GroundWork databases.You have locally added extra databases to your GroundWork install.You have installed various add-on packages from GroundWork, that may have themselves added extra databases to the GroundWorkinstall. Examples are: Ganglia Integration; AlertSite Integration; ServiceNow Integration; other helpdesk integrations.
If none of those conditions is true, and your database checking looks exactly like the transcript just above, you can now step to Purging OldDatabase Records, below.
Purging Old Database Records
Before proceeding with the upgrade procedure, it is highly recommended to archive data and remove irrelevant records (old and unimportant logmessages) so that the time that it takes to migrate data from MySQL to PostgreSQL can be minimized.
The MySQL server will be removed from your system during the final stages of the upgrade. If you should wish to archive the MySQL databasesfor any possible future use outside of the GroundWork Monitor context, now is the time to do so. After the data cleanup above, this would be aclean copy you might want to refer to later on (though not on the GroundWork server, since the MySQL server will no longer be available on thatmachine). The simplest way to archive the data is to create a full database dump ( ) using the backup utility, as described/tmp/mysqldump.sqlin the separate page in the GroundWork Knowledge Base. Copy the resultingHow to use the GroundWork Monitor Backup and Restore Utilitydatabase dump file to some safe place.

1. 2.
3.
After possibly archiving your databases as just described, you should delete no-longer-relevant messages in the database. The steps for doing soare covered in the product Bookshelf, under Resources > SYSTEM MAINTENANCE > Data Retention. Pruning the table in the LogMessage
database, and secondarily the various tables in the database, is one of the most important actions you can take toGWCollageDB dashboardkeep the data-migration process from taking too long.
Bringing the Cacti database up-to-date
Some Cacti plugins modify existing tables in the database, or add new tables. Because of this, the PostgreSQL version of the cacti cactidatabase you will be migrating to includes all the modifications for the Cacti plugins that GroundWork supplies. This makes the MySQL andPostgreSQL schemas for the database compatible, so the migration can transfer existing data from any customer installation. If you have neverinstalled certain plugins on the MySQL side, then the schemas will be incompatible and later migration steps may fail.
To address this, you must log into the GroundWork Monitor UI, and navigate to Advanced > Network Graphing > Console > Plugin Management.There, you must ensure that the Discovery plugin is installed. If the colored circular button next to the plugin name is blue with aDiscoverydown-arrow, that means the plugin is currently uninstalled. Click that button to install the plugin. The plugin installation processing will modify thetable structures as needed.
Also at this point, if you started with a very old unbundled-NMS copy of Cacti, this is the place where you will need to apply some extra scriptingfrom GroundWork Support to modify the Cacti database schema to prepare it for the migration. Follow the procedure provided by GroundWorkSupport for this work.
Final Pre-Upgrade Backup
Now that you have a fully cleaned-up system, it is highly recommended that you take another complete system backup, to save the work so far incase you should need to roll back to this point for any reason. See the separate How to use the GroundWork Monitor Backup and Restore Utilitypage in the GroundWork Knowledge Base for details on how to create a backup. The installer proceed without a backup.cannot
By default, the backup utility creates its backup file in the directory, in a file such as:/tmp/
% ls -l /tmp/gw-backup-20120127141505.tar.gz-rw-r--r-- 1 root root 1358760701 Jan 27 14:23 /tmp/gw-backup-20120127141505.tar.gz
Safety FirstBy default, that is where the current installer will look for it, to verify that you do have a backup. But before you go any further,you should be sure to copy the backup file to some safe location (outside of the tree, and outside of the /tmp/
tree) that is safe from file loss that may occur during reboot and during install activities./usr/local/groundwork/
If you wish, you can use the option on the invocations of both the backup utility and the installer to specify an--filepathalternate directory path where the backup file should be placed and searched for.
MySQL to PostgreSQL Data Migration
The next step after the database cleanup is to migrate the data into the PostgreSQL instance. Depending on the size of the databases, thisprocedure can take some time. In order to minimize the Monitoring downtime, Nagios will continue to run while the database content istransferred. Only at the end of the upgrade process will the system be stopped for updating all the components.
Here are the steps to migrate the database content:
Pay attention to the Cacti and NeDi passwords as explained earlier, if you started with a release with the old NMS add-ons.Execute the master migration script, as shown here. The option is necessary, to invoke the full set of migration actions.-m
/usr/local/groundwork/core/migration/postgresql/master_migration_to_pg.pl -m
This will:
run the cleanup checks again to make sure the data has not been contaminated again since you previously cleaned it up;upgrade the database content to conventions used in the last MySQL-based release of GWMEE; andtransfer the data to corresponding PostgreSQL databases.
The master migration script will prompt for the database credentials (MySQL and PostgreSQL) and then perform the migration. The scripthas to complete without an error; otherwise, the installation as a whole cannot complete.
Upgrade of GWMEE Components in MySQL-to-PostgreSQL Upgrade
1.
2.
3.
4. 5.
6.
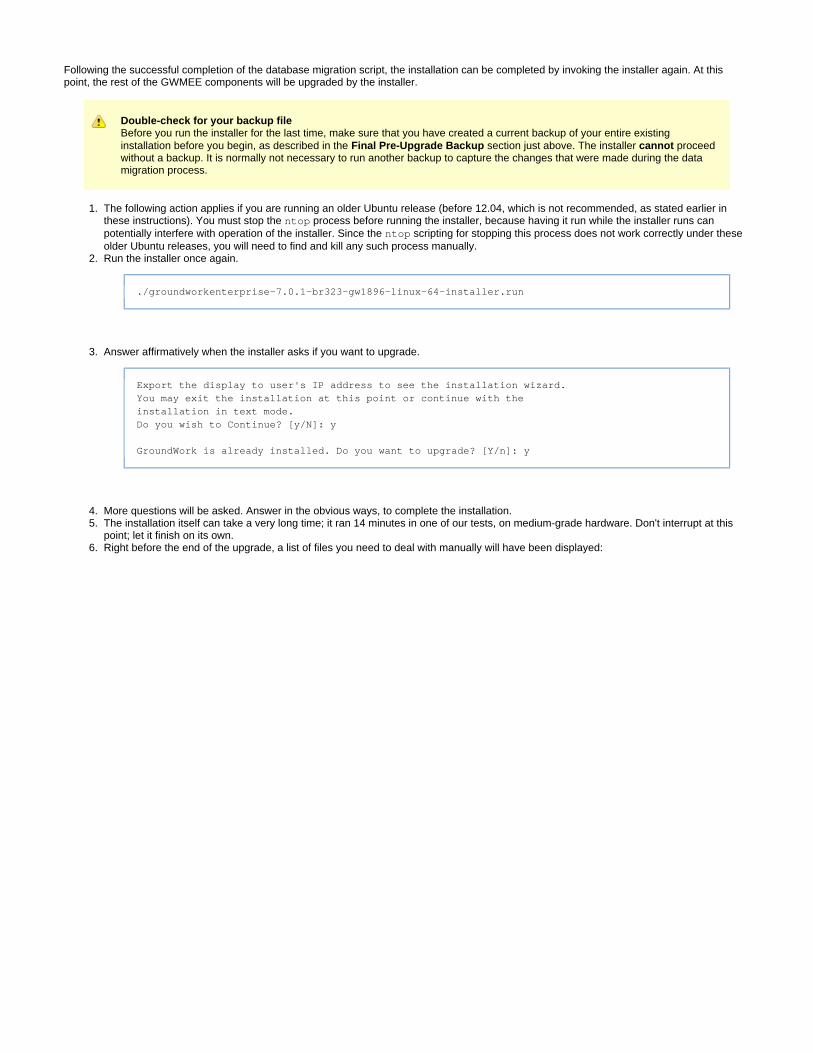
Following the successful completion of the database migration script, the installation can be completed by invoking the installer again. At thispoint, the rest of the GWMEE components will be upgraded by the installer.
Double-check for your backup fileBefore you run the installer for the last time, make sure that you have created a current backup of your entire existinginstallation before you begin, as described in the section just above. The installer proceedFinal Pre-Upgrade Backup cannotwithout a backup. It is normally not necessary to run another backup to capture the changes that were made during the datamigration process.
The following action applies if you are running an older Ubuntu release (before 12.04, which is not recommended, as stated earlier inthese instructions). You must stop the process before running the installer, because having it run while the installer runs canntoppotentially interfere with operation of the installer. Since the scripting for stopping this process does not work correctly under thesentopolder Ubuntu releases, you will need to find and kill any such process manually.Run the installer once again.
./groundworkenterprise-7.0.1-br323-gw1896-linux-64-installer.run
Answer affirmatively when the installer asks if you want to upgrade.
Export the display to user's IP address to see the installation wizard.You may exit the installation at this point or continue with theinstallation in text mode.Do you wish to Continue? [y/N]: y
GroundWork is already installed. Do you want to upgrade? [Y/n]: y
More questions will be asked. Answer in the obvious ways, to complete the installation.The installation itself can take a very long time; it ran 14 minutes in one of our tests, on medium-grade hardware. Don't interrupt at thispoint; let it finish on its own.Right before the end of the upgrade, a list of files you need to deal with manually will have been displayed:

6.
Warning: During the upgrade procedure, the following files were detected to havemodifications. They were backed up to this directory,/usr/local/groundwork/backup-2013-11-19-51d4. You will need to login in to thisserver and manually merge these files. Some files may appear in this listbecause you probably made local changes to certain options, and those changesshould now be brought forward. Some files may appear in this list simplybecause the content of the file has changed between releases. If that is thecase for a given file, and you had not changed any option values in the previousrelease, you should not need to do any work to merge the old and new copies atthis time.
List of modified files:-----------------------
/usr/local/groundwork/config/cacti.properties/usr/local/groundwork/config/console.properties/usr/local/groundwork/config/db.properties/usr/local/groundwork/config/foundation.properties/usr/local/groundwork/config/network-service.properties/usr/local/groundwork/config/perfdata.properties/usr/local/groundwork/config/status-feeder.properties/usr/local/groundwork/config/status-viewer.properties/usr/local/groundwork/config/ws_client.properties/var/spool/cron/nagios/usr/local/groundwork/apache2/conf/httpd.conf/usr/local/groundwork/core/monarch/automation/scripts/auto_add_gdma.pl/usr/local/groundwork/core/monarch/automation/scripts/gdma_auto.pl/etc/logrotate.d/groundwork/usr/local/groundwork/common/etc/syslog-ng.conf/usr/local/groundwork/config/bronx.cfg
Press [Enter] to continue :
For easy reference after the fact, especially if some of that info has scrolled off your screen, that same information is available at thispoint in the upgrade report in the file. /usr/local/groundwork/upgrade-report.txt
Once the installer has completely finished, you must compare the new copies of these files with the backup copies, and merge any localcustomizations in the old files into the new files. In certain cases, the backup copy may live under a different name. For the exampleabove, the new and old files would be found in the following locations. For simplicity of presentation, all the non-absolute pathnames inthis table are specified relative to the directory./usr/local/groundwork/
New file Backup copy of old file
apache2/conf/httpd.conf backup-2013-11-19-51d4/apache2/conf/httpd.conf
common/etc/syslog-ng.conf backup-2013-11-19-51d4/common/etc/syslog-ng.conf
config/bronx.cfg backup-2013-11-19-51d4/config/bronx.cfg
config/cacti.properties backup-2013-11-19-51d4/config/cacti.properties
config/console.properties backup-2013-11-19-51d4/config/console.properties
config/db.properties backup-2013-11-19-51d4/config/db.properties
config/foundation.properties backup-2013-11-19-51d4/config/foundation.properties
config/network-service.properties backup-2013-11-19-51d4/config/network-service.properties
config/perfdata.properties backup-2013-11-19-51d4/config/perfdata.properties
config/status-feeder.properties backup-2013-11-19-51d4/config/status-feeder.properties
config/status-viewer.properties backup-2013-11-19-51d4/config/status-viewer.properties
config/ws_client.properties backup-2013-11-19-51d4/config/ws_client.properties
core/monarch/automation/scripts/auto_add_gdma.pl backup-2013-11-19-51d4/monarch/automation/scripts/auto_add_gdma.pl
6.
core/monarch/automation/scripts/gdma_auto.pl backup-2013-11-19-51d4/monarch/automation/scripts/gdma_auto.pl
/etc/logrotate.d/groundwork backup-2013-11-19-51d4/etc/logrotate.d/groundwork.bak
/var/spool/cron/nagios backup-2013-11-19-51d4/crontab-nagios-2013-11-19
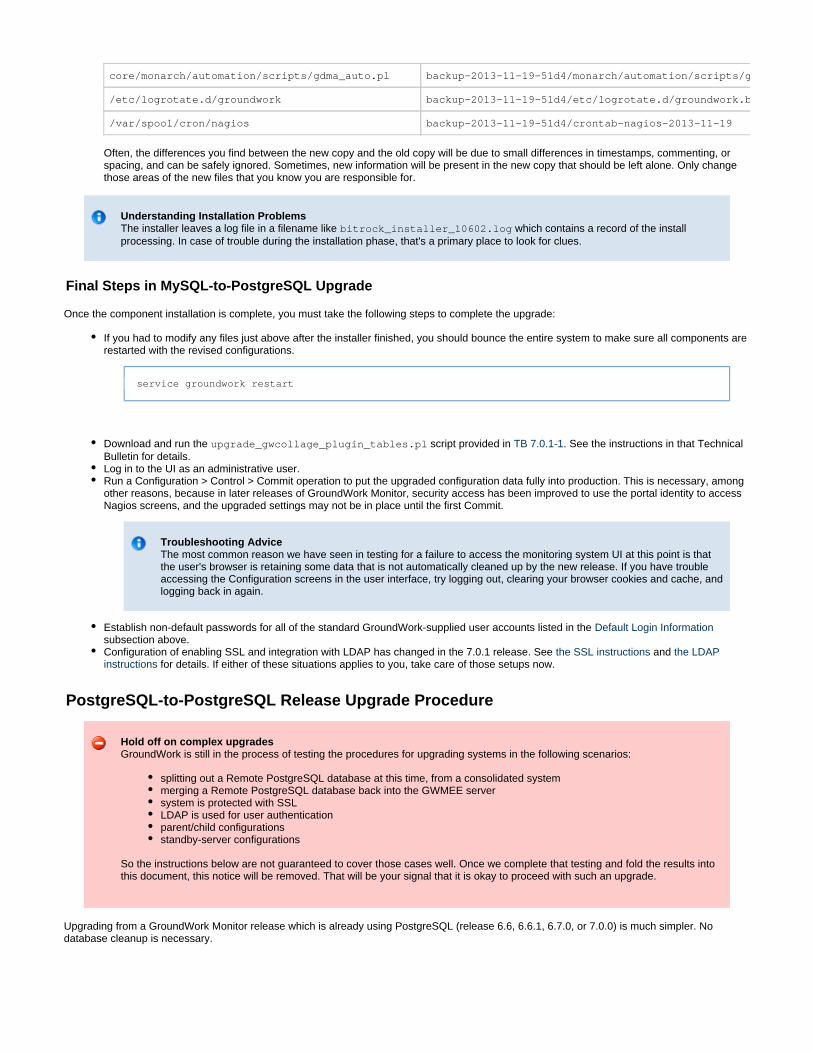
Often, the differences you find between the new copy and the old copy will be due to small differences in timestamps, commenting, orspacing, and can be safely ignored. Sometimes, new information will be present in the new copy that should be left alone. Only changethose areas of the new files that you know you are responsible for.
Understanding Installation ProblemsThe installer leaves a log file in a filename like which contains a record of the installbitrock_installer_10602.logprocessing. In case of trouble during the installation phase, that's a primary place to look for clues.
Final Steps in MySQL-to-PostgreSQL Upgrade
Once the component installation is complete, you must take the following steps to complete the upgrade:
If you had to modify any files just above after the installer finished, you should bounce the entire system to make sure all components arerestarted with the revised configurations.
service groundwork restart
Download and run the script provided in . See the instructions in that Technicalupgrade_gwcollage_plugin_tables.pl TB 7.0.1-1Bulletin for details.Log in to the UI as an administrative user.Run a Configuration > Control > Commit operation to put the upgraded configuration data fully into production. This is necessary, amongother reasons, because in later releases of GroundWork Monitor, security access has been improved to use the portal identity to accessNagios screens, and the upgraded settings may not be in place until the first Commit.
Troubleshooting AdviceThe most common reason we have seen in testing for a failure to access the monitoring system UI at this point is thatthe user's browser is retaining some data that is not automatically cleaned up by the new release. If you have troubleaccessing the Configuration screens in the user interface, try logging out, clearing your browser cookies and cache, andlogging back in again.
Establish non-default passwords for all of the standard GroundWork-supplied user accounts listed in the Default Login Informationsubsection above.Configuration of enabling SSL and integration with LDAP has changed in the 7.0.1 release. See and the SSL instructions the LDAP
for details. If either of these situations applies to you, take care of those setups now.instructions
PostgreSQL-to-PostgreSQL Release Upgrade Procedure
Hold off on complex upgradesGroundWork is still in the process of testing the procedures for upgrading systems in the following scenarios:
splitting out a Remote PostgreSQL database at this time, from a consolidated systemmerging a Remote PostgreSQL database back into the GWMEE serversystem is protected with SSLLDAP is used for user authenticationparent/child configurationsstandby-server configurations
So the instructions below are not guaranteed to cover those cases well. Once we complete that testing and fold the results intothis document, this notice will be removed. That will be your signal that it is okay to proceed with such an upgrade.
Upgrading from a GroundWork Monitor release which is already using PostgreSQL (release 6.6, 6.6.1, 6.7.0, or 7.0.0) is much simpler. Nodatabase cleanup is necessary.
1. 2.
3. 4.
1.
2.
3.
4.
5.
1.
2.
3.
4.
Moving the PostgreSQL DatabaseThis process only describes an upgrade that keeps the database where it already is, either separated from the GroundWorkMonitor server or on the same machine. Additional steps not documented here would be needed for an upgrade that wouldinvolve moving the PostgreSQL database to a separate machine. If you desire to run a separate database server, refer to theGroundWork Knowledge Base for further information.
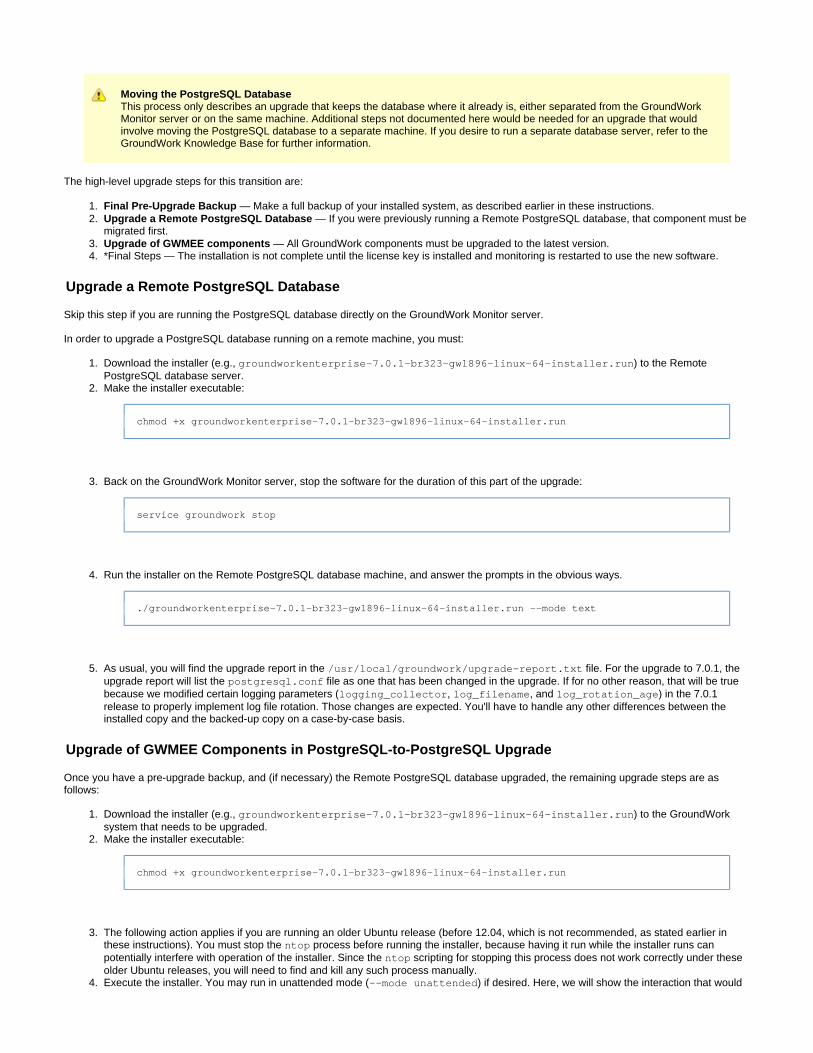
The high-level upgrade steps for this transition are:
Final Pre-Upgrade Backup — Make a full backup of your installed system, as described earlier in these instructions.Upgrade a Remote PostgreSQL Database — If you were previously running a Remote PostgreSQL database, that component must bemigrated first.Upgrade of GWMEE components — All GroundWork components must be upgraded to the latest version.*Final Steps — The installation is not complete until the license key is installed and monitoring is restarted to use the new software.
Upgrade a Remote PostgreSQL Database
Skip this step if you are running the PostgreSQL database directly on the GroundWork Monitor server.
In order to upgrade a PostgreSQL database running on a remote machine, you must:
Download the installer (e.g., ) to the Remotegroundworkenterprise-7.0.1-br323-gw1896-linux-64-installer.runPostgreSQL database server.Make the installer executable:
chmod +x groundworkenterprise-7.0.1-br323-gw1896-linux-64-installer.run
Back on the GroundWork Monitor server, stop the software for the duration of this part of the upgrade:
service groundwork stop
Run the installer on the Remote PostgreSQL database machine, and answer the prompts in the obvious ways.
./groundworkenterprise-7.0.1-br323-gw1896-linux-64-installer.run --mode text
As usual, you will find the upgrade report in the file. For the upgrade to 7.0.1, the/usr/local/groundwork/upgrade-report.txtupgrade report will list the file as one that has been changed in the upgrade. If for no other reason, that will be truepostgresql.confbecause we modified certain logging parameters ( , , and ) in the 7.0.1logging_collector log_filename log_rotation_agerelease to properly implement log file rotation. Those changes are expected. You'll have to handle any other differences between theinstalled copy and the backed-up copy on a case-by-case basis.
Upgrade of GWMEE Components in PostgreSQL-to-PostgreSQL Upgrade
Once you have a pre-upgrade backup, and (if necessary) the Remote PostgreSQL database upgraded, the remaining upgrade steps are asfollows:
Download the installer (e.g., ) to the GroundWorkgroundworkenterprise-7.0.1-br323-gw1896-linux-64-installer.runsystem that needs to be upgraded.Make the installer executable:
chmod +x groundworkenterprise-7.0.1-br323-gw1896-linux-64-installer.run
The following action applies if you are running an older Ubuntu release (before 12.04, which is not recommended, as stated earlier inthese instructions). You must stop the process before running the installer, because having it run while the installer runs canntoppotentially interfere with operation of the installer. Since the scripting for stopping this process does not work correctly under thesentopolder Ubuntu releases, you will need to find and kill any such process manually.Execute the installer. You may run in unattended mode ( ) if desired. Here, we will show the interaction that would--mode unattended
4.
5.
6. 7. 8.
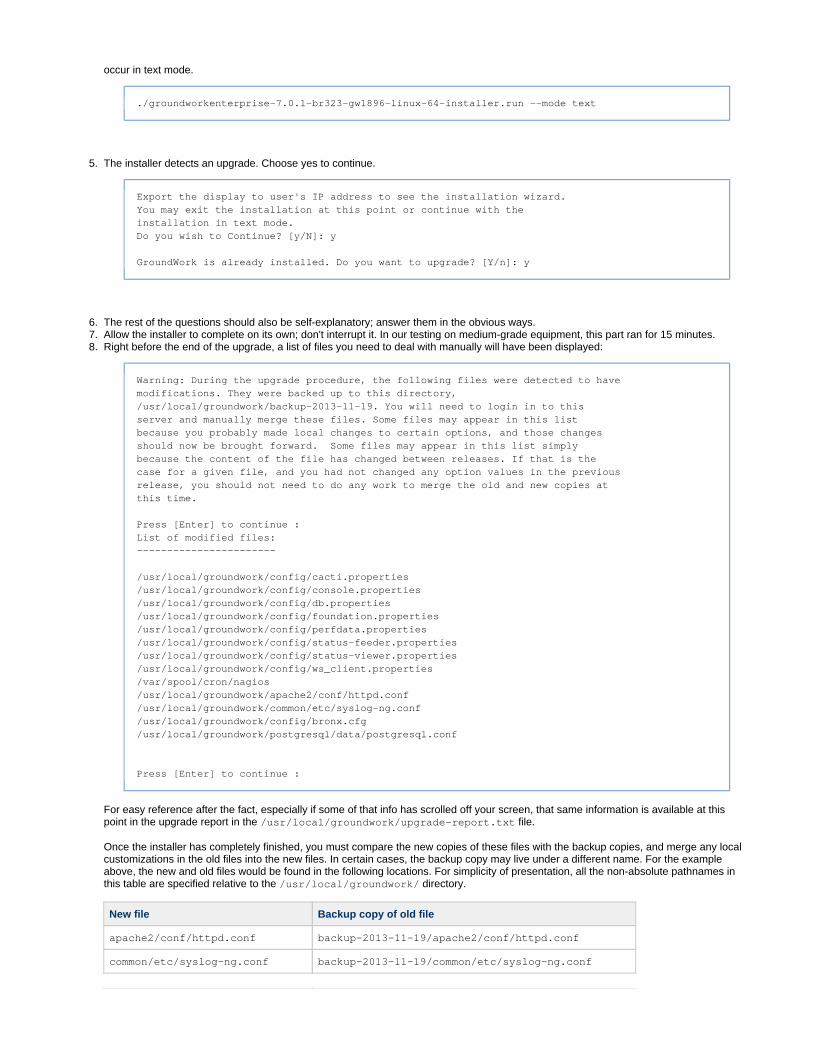
occur in text mode.
./groundworkenterprise-7.0.1-br323-gw1896-linux-64-installer.run --mode text
The installer detects an upgrade. Choose yes to continue.
Export the display to user's IP address to see the installation wizard.You may exit the installation at this point or continue with theinstallation in text mode.Do you wish to Continue? [y/N]: y
GroundWork is already installed. Do you want to upgrade? [Y/n]: y
The rest of the questions should also be self-explanatory; answer them in the obvious ways.Allow the installer to complete on its own; don't interrupt it. In our testing on medium-grade equipment, this part ran for 15 minutes.Right before the end of the upgrade, a list of files you need to deal with manually will have been displayed:
Warning: During the upgrade procedure, the following files were detected to havemodifications. They were backed up to this directory,/usr/local/groundwork/backup-2013-11-19. You will need to login in to thisserver and manually merge these files. Some files may appear in this listbecause you probably made local changes to certain options, and those changesshould now be brought forward. Some files may appear in this list simplybecause the content of the file has changed between releases. If that is thecase for a given file, and you had not changed any option values in the previousrelease, you should not need to do any work to merge the old and new copies atthis time.
Press [Enter] to continue :List of modified files:-----------------------
/usr/local/groundwork/config/cacti.properties/usr/local/groundwork/config/console.properties/usr/local/groundwork/config/db.properties/usr/local/groundwork/config/foundation.properties/usr/local/groundwork/config/perfdata.properties/usr/local/groundwork/config/status-feeder.properties/usr/local/groundwork/config/status-viewer.properties/usr/local/groundwork/config/ws_client.properties/var/spool/cron/nagios/usr/local/groundwork/apache2/conf/httpd.conf/usr/local/groundwork/common/etc/syslog-ng.conf/usr/local/groundwork/config/bronx.cfg/usr/local/groundwork/postgresql/data/postgresql.conf
Press [Enter] to continue :
For easy reference after the fact, especially if some of that info has scrolled off your screen, that same information is available at thispoint in the upgrade report in the file. /usr/local/groundwork/upgrade-report.txt
Once the installer has completely finished, you must compare the new copies of these files with the backup copies, and merge any localcustomizations in the old files into the new files. In certain cases, the backup copy may live under a different name. For the exampleabove, the new and old files would be found in the following locations. For simplicity of presentation, all the non-absolute pathnames inthis table are specified relative to the directory./usr/local/groundwork/
New file Backup copy of old file
apache2/conf/httpd.conf backup-2013-11-19/apache2/conf/httpd.conf
common/etc/syslog-ng.conf backup-2013-11-19/common/etc/syslog-ng.conf
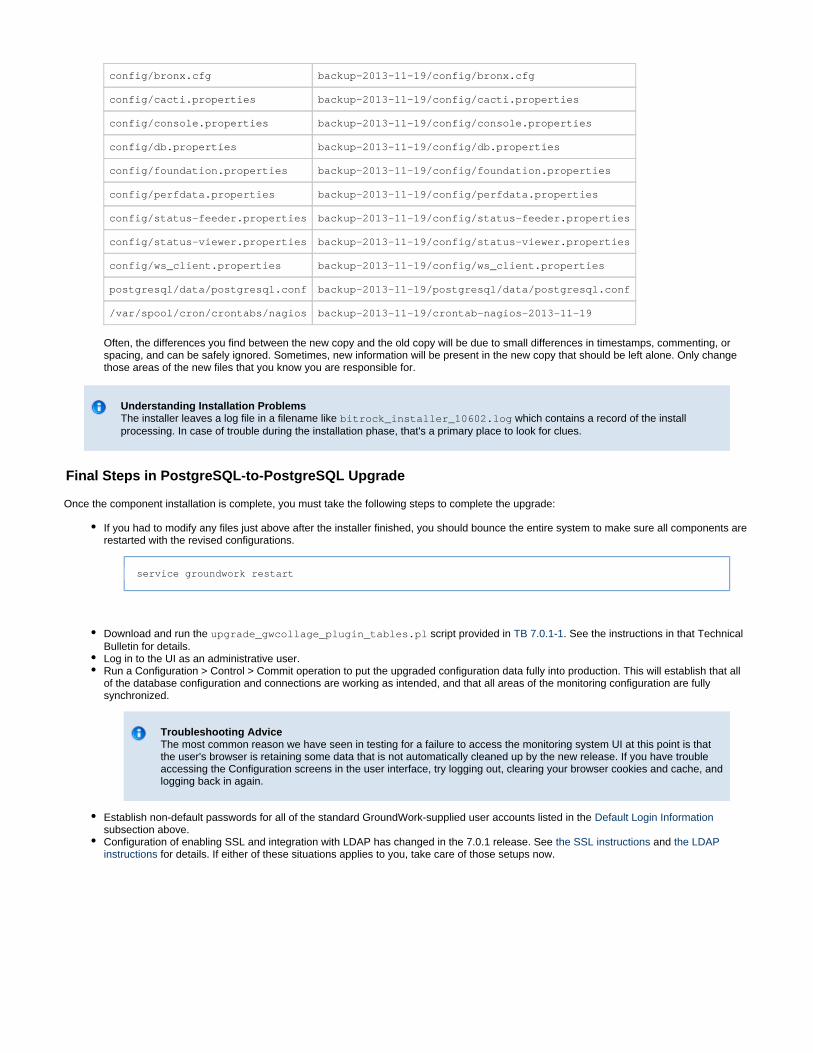
8.
config/bronx.cfg backup-2013-11-19/config/bronx.cfg
config/cacti.properties backup-2013-11-19/config/cacti.properties
config/console.properties backup-2013-11-19/config/console.properties
config/db.properties backup-2013-11-19/config/db.properties
config/foundation.properties backup-2013-11-19/config/foundation.properties
config/perfdata.properties backup-2013-11-19/config/perfdata.properties
config/status-feeder.properties backup-2013-11-19/config/status-feeder.properties
config/status-viewer.properties backup-2013-11-19/config/status-viewer.properties
config/ws_client.properties backup-2013-11-19/config/ws_client.properties
postgresql/data/postgresql.conf backup-2013-11-19/postgresql/data/postgresql.conf
/var/spool/cron/crontabs/nagios backup-2013-11-19/crontab-nagios-2013-11-19
Often, the differences you find between the new copy and the old copy will be due to small differences in timestamps, commenting, orspacing, and can be safely ignored. Sometimes, new information will be present in the new copy that should be left alone. Only changethose areas of the new files that you know you are responsible for.
Understanding Installation ProblemsThe installer leaves a log file in a filename like which contains a record of the installbitrock_installer_10602.logprocessing. In case of trouble during the installation phase, that's a primary place to look for clues.
Final Steps in PostgreSQL-to-PostgreSQL Upgrade
Once the component installation is complete, you must take the following steps to complete the upgrade:
If you had to modify any files just above after the installer finished, you should bounce the entire system to make sure all components arerestarted with the revised configurations.
service groundwork restart
Download and run the script provided in . See the instructions in that Technicalupgrade_gwcollage_plugin_tables.pl TB 7.0.1-1Bulletin for details.Log in to the UI as an administrative user.Run a Configuration > Control > Commit operation to put the upgraded configuration data fully into production. This will establish that allof the database configuration and connections are working as intended, and that all areas of the monitoring configuration are fullysynchronized.
Troubleshooting AdviceThe most common reason we have seen in testing for a failure to access the monitoring system UI at this point is thatthe user's browser is retaining some data that is not automatically cleaned up by the new release. If you have troubleaccessing the Configuration screens in the user interface, try logging out, clearing your browser cookies and cache, andlogging back in again.
Establish non-default passwords for all of the standard GroundWork-supplied user accounts listed in the Default Login Informationsubsection above.Configuration of enabling SSL and integration with LDAP has changed in the 7.0.1 release. See and the SSL instructions the LDAP
for details. If either of these situations applies to you, take care of those setups now.instructions