SunFounder - Robot Store | Robots | Robot Parts | Robot Kitssmart devices: 24-LED ring,...
52
Preface About SunFounder SunFounder is a technology company focused on Raspberry Pi and Arduino open source community development. Committed to the promotion of open source culture, we strive to bring the fun of electronics making to people all around the world and enable everyone to be a maker. Our products include learning kits, development boards, robots, sensor modules and development tools. In addition to high quality products, SunFounder also offers video tutorials to help you make your own project. If you have interest in open source or making something cool, welcome to join us! About the PiSmart Box The SunFounder PiSmart Box is an intelligent platform based on the Raspberry Pi, integrating the Speech to Text (STT), Text to Speech (TTS), and servo and motor control, suitable for robot control and experiment exploration. It includes a 5-channel 10-bit ADC and utilizes the 8 digital channels built in the Raspberry Pi, making DIY program easier and the human- computer interaction more intelligent and humanized. This manual includes the parts introduction and operation guide to use the box in a visual programming language software Dragit. For installation, check the video under VIDEO -> Projects -> PiSmart Box on our website www.sunfounder.com. Free Support If you have any TECHNICAL questions, add a topic under FORUM section on our website and we'll reply as soon as possible. For NON-TECH questions like order and shipment issues, please send an email to [email protected]. You're also welcomed to share your projects on FORUM. SunFounder
Transcript of SunFounder - Robot Store | Robots | Robot Parts | Robot Kitssmart devices: 24-LED ring,...

Preface
About SunFounder
SunFounder is a technology company focused on Raspberry Pi and Arduino open source
community development. Committed to the promotion of open source culture, we strive to
bring the fun of electronics making to people all around the world and enable everyone to
be a maker. Our products include learning kits, development boards, robots, sensor modules
and development tools. In addition to high quality products, SunFounder also offers video
tutorials to help you make your own project. If you have interest in open source or making
something cool, welcome to join us!
About the PiSmart Box
The SunFounder PiSmart Box is an intelligent platform based on the Raspberry Pi, integrating
the Speech to Text (STT), Text to Speech (TTS), and servo and motor control, suitable for robot
control and experiment exploration. It includes a 5-channel 10-bit ADC and utilizes the 8
digital channels built in the Raspberry Pi, making DIY program easier and the human-
computer interaction more intelligent and humanized.
This manual includes the parts introduction and operation guide to use the box in a visual
programming language software Dragit. For installation, check the video under VIDEO ->
Projects -> PiSmart Box on our website www.sunfounder.com.
Free Support
If you have any TECHNICAL questions, add a topic under FORUM section on our website
and we'll reply as soon as possible.
For NON-TECH questions like order and shipment issues, please send an email to
[email protected]. You're also welcomed to share your projects on FORUM.
SunFou
nder
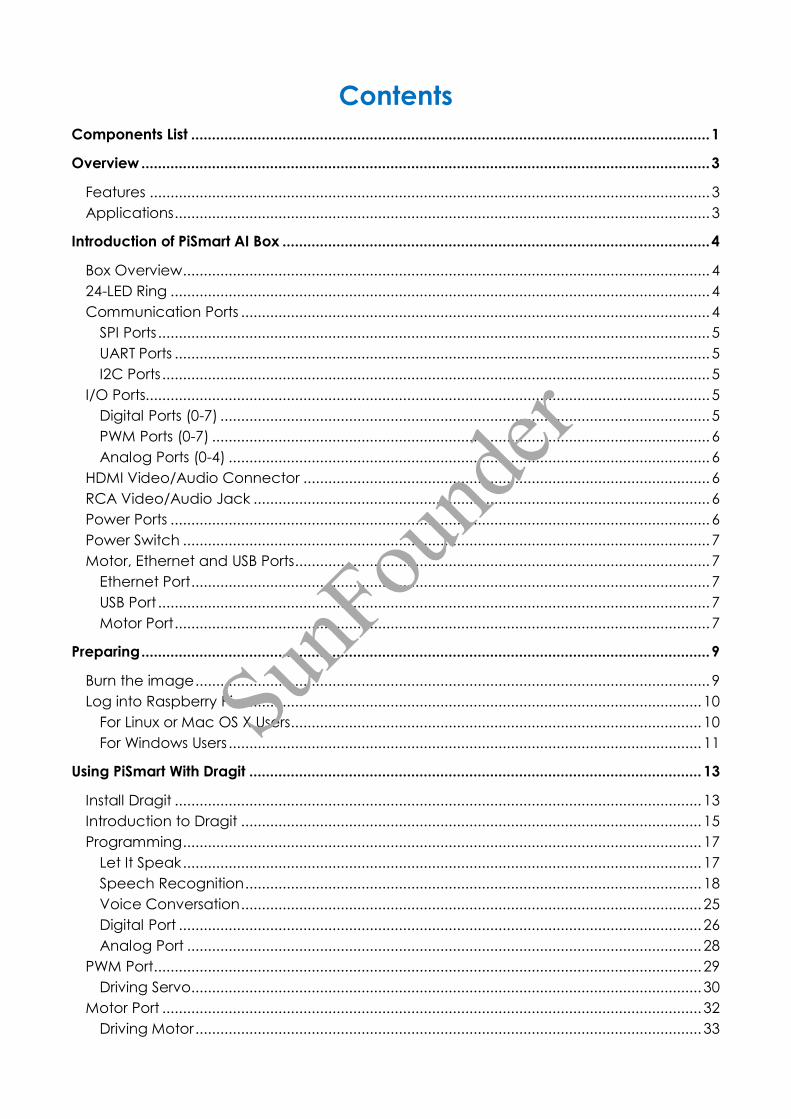
Contents
Components List ............................................................................................................................. 1
Overview ......................................................................................................................................... 3
Features ....................................................................................................................................... 3
Applications ................................................................................................................................. 3
Introduction of PiSmart AI Box ....................................................................................................... 4
Box Overview ............................................................................................................................... 4
24-LED Ring .................................................................................................................................. 4
Communication Ports ................................................................................................................. 4
SPI Ports ..................................................................................................................................... 5
UART Ports ................................................................................................................................. 5
I2C Ports .................................................................................................................................... 5
I/O Ports........................................................................................................................................ 5
Digital Ports (0-7) ...................................................................................................................... 5
PWM Ports (0-7) ........................................................................................................................ 6
Analog Ports (0-4) .................................................................................................................... 6
HDMI Video/Audio Connector .................................................................................................. 6
RCA Video/Audio Jack .............................................................................................................. 6
Power Ports .................................................................................................................................. 6
Power Switch ............................................................................................................................... 7
Motor, Ethernet and USB Ports .................................................................................................... 7
Ethernet Port ............................................................................................................................. 7
USB Port ..................................................................................................................................... 7
Motor Port ................................................................................................................................. 7
Preparing ......................................................................................................................................... 9
Burn the image ............................................................................................................................ 9
Log into Raspberry Pi................................................................................................................. 10
For Linux or Mac OS X Users ................................................................................................... 10
For Windows Users .................................................................................................................. 11
Using PiSmart With Dragit ............................................................................................................. 13
Install Dragit ............................................................................................................................... 13
Introduction to Dragit ............................................................................................................... 15
Programming ............................................................................................................................. 17
Let It Speak ............................................................................................................................. 17
Speech Recognition .............................................................................................................. 18
Voice Conversation ............................................................................................................... 25
Digital Port .............................................................................................................................. 26
Analog Port ............................................................................................................................ 28
PWM Port .................................................................................................................................... 29
Driving Servo ........................................................................................................................... 30
Motor Port .................................................................................................................................. 32
Driving Motor .......................................................................................................................... 33
SunFou
nder

Using PiSmart Box with Python ..................................................................................................... 35
pismart.py .................................................................................................................................. 35
adc.py........................................................................................................................................ 37
led.py ......................................................................................................................................... 38
motor.py .................................................................................................................................... 38
servo.py ...................................................................................................................................... 40
pwm.py ...................................................................................................................................... 41
tts.py ........................................................................................................................................... 42
stt.py ........................................................................................................................................... 43
amateur.py ................................................................................................................................ 45
SunFou
nder
1
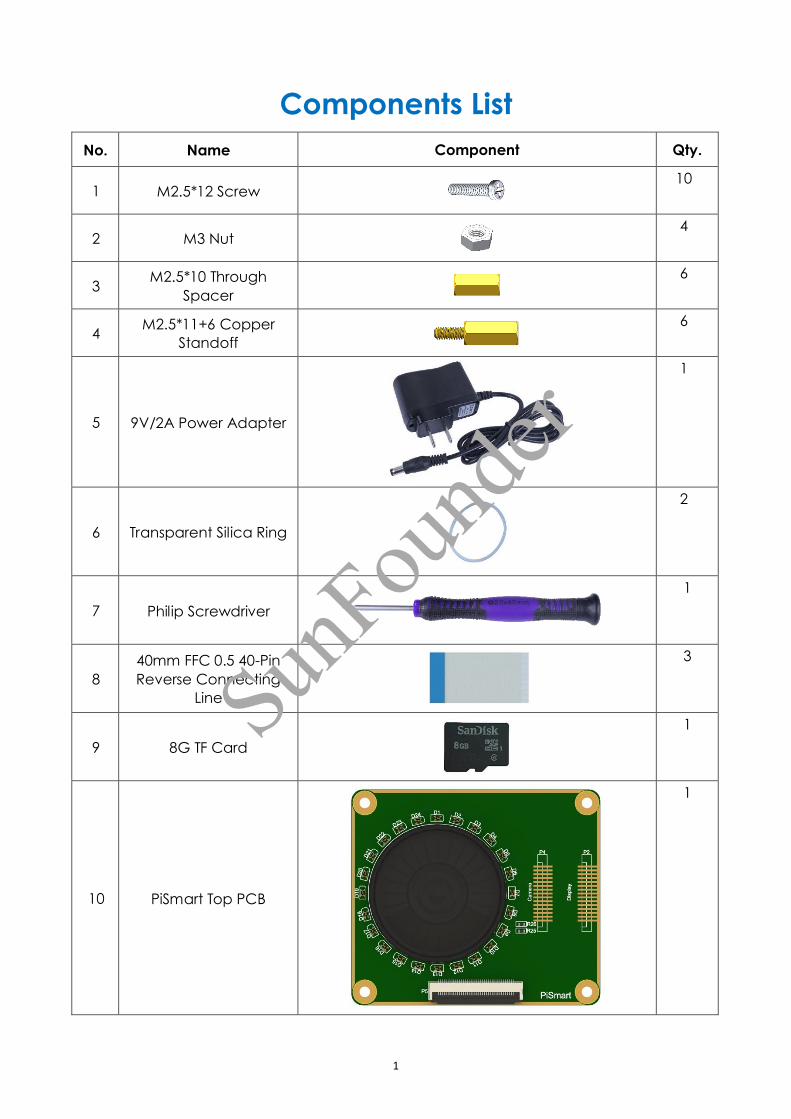
Components List
No. Name Component Qty.
1 M2.5*12 Screw
10
2 M3 Nut
4
3 M2.5*10 Through
Spacer
6
4 M2.5*11+6 Copper
Standoff
6
5 9V/2A Power Adapter
1
6 Transparent Silica Ring
2
7 Philip Screwdriver
1
8
40mm FFC 0.5 40-Pin
Reverse Connecting
Line
3
9 8G TF Card
1
10 PiSmart Top PCB
1
SunFou
nder
2
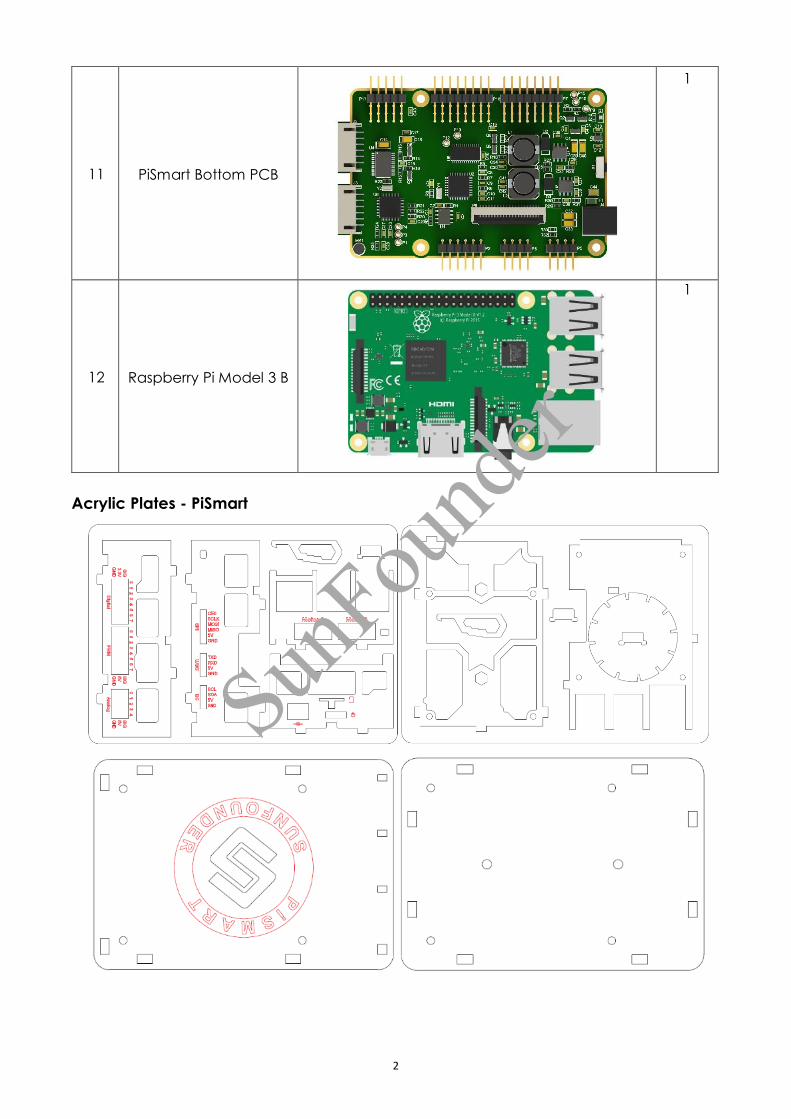
11 PiSmart Bottom PCB
1
12 Raspberry Pi Model 3 B
1
Acrylic Plates - PiSmart
SunFou
nder
3
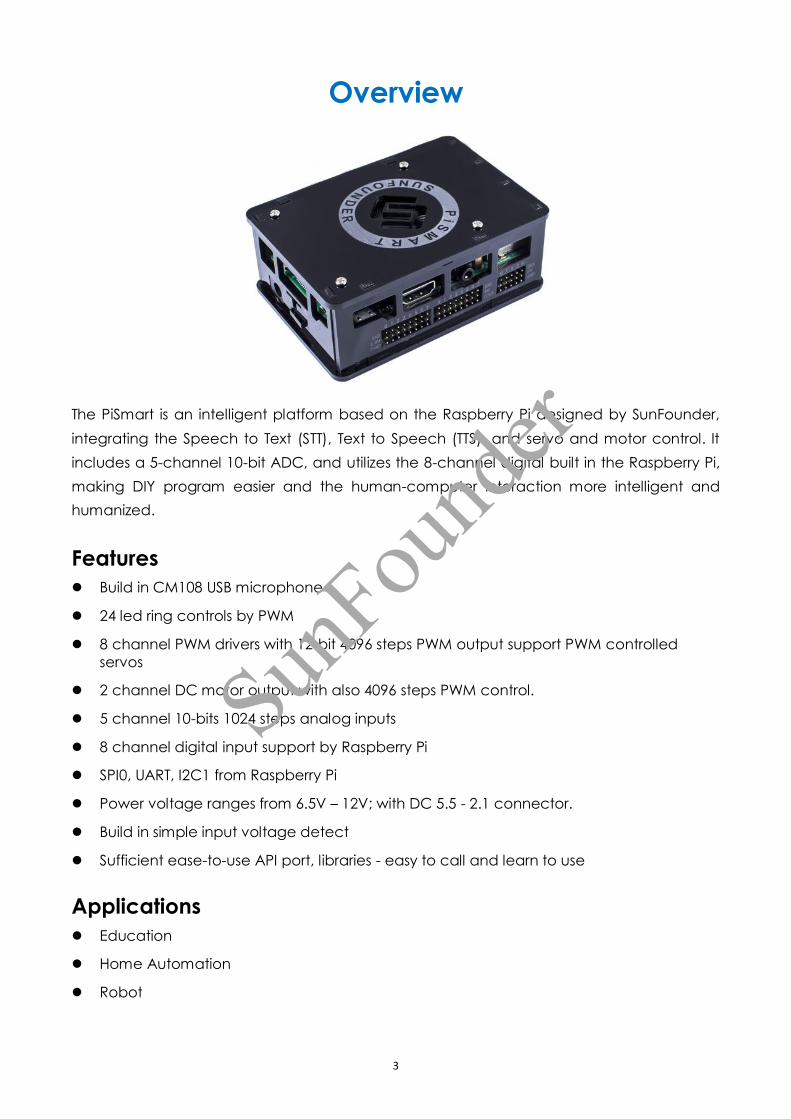
Overview
The PiSmart is an intelligent platform based on the Raspberry Pi designed by SunFounder,
integrating the Speech to Text (STT), Text to Speech (TTS), and servo and motor control. It
includes a 5-channel 10-bit ADC, and utilizes the 8-channel digital built in the Raspberry Pi,
making DIY program easier and the human-computer interaction more intelligent and
humanized.
Features
Build in CM108 USB microphone
24 led ring controls by PWM
8 channel PWM drivers with 12-bit 4096 steps PWM output support PWM controlled
servos
2 channel DC motor output with also 4096 steps PWM control.
5 channel 10-bits 1024 steps analog inputs
8 channel digital input support by Raspberry Pi
SPI0, UART, I2C1 from Raspberry Pi
Power voltage ranges from 6.5V – 12V; with DC 5.5 - 2.1 connector.
Build in simple input voltage detect
Sufficient ease-to-use API port, libraries - easy to call and learn to use
Applications
Education
Home Automation
Robot
SunFou
nder

4
Introduction of PiSmart AI Box
Note: For assembly of the PiSmart box, please refer to the video tutorials on our website:
https://www.sunfounder.com/video and go to Robot Kits -> PiSmart Car -> Part 2.
Box Overview
The PiSmart is an intelligent platform including various smart devices: 24-LED ring,
communication ports like SPI, UART, and I2C, I/O ports like digital, analog and PWM ones,
HDMI video/audio connector, motor port, Ethernet port, USB port, etc. Here a brief
description will be provided.
24-LED Ring
At the top of the PiSmart box, there lies a 24-LED ring which can be controlled by PWM signals
for different levels of brightness.
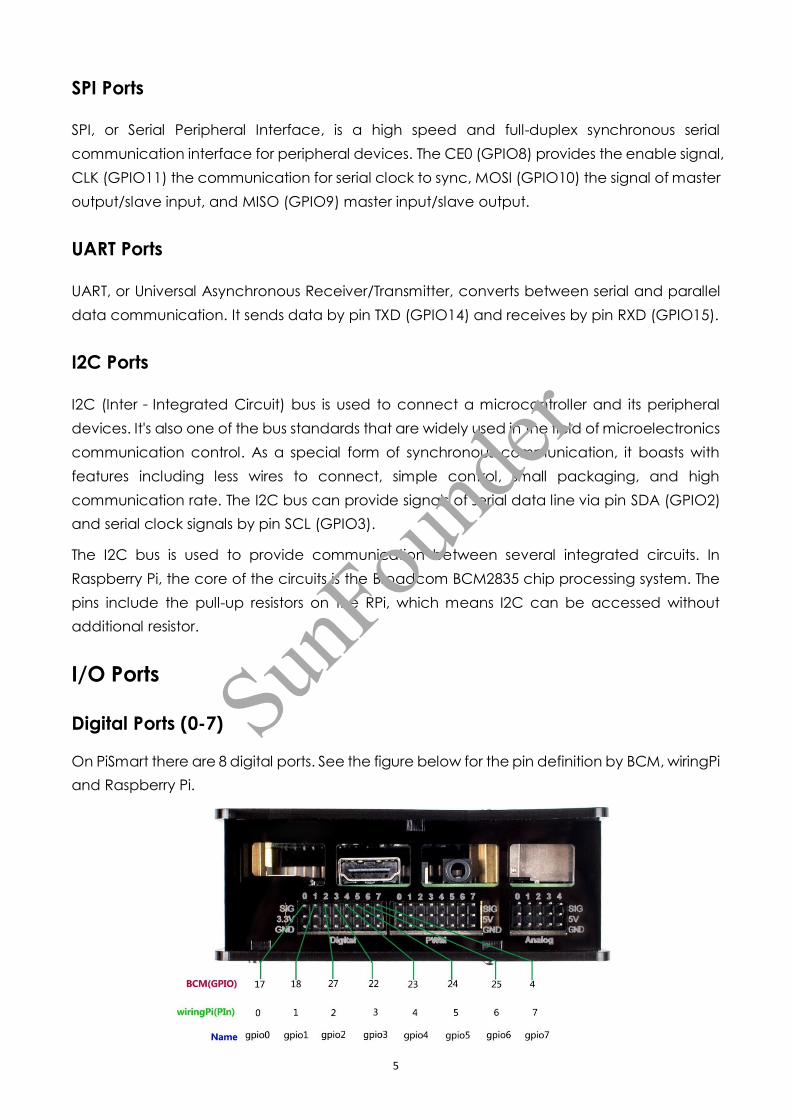
Communication Ports
The figure below shows how the pins of three types are defined by BCM, wiringPi and
Raspberry Pi. In the code later, BCM is always used.
SunFou
nder
5
SPI Ports
SPI, or Serial Peripheral Interface, is a high speed and full-duplex synchronous serial
communication interface for peripheral devices. The CE0 (GPIO8) provides the enable signal,
CLK (GPIO11) the communication for serial clock to sync, MOSI (GPIO10) the signal of master
output/slave input, and MISO (GPIO9) master input/slave output.
UART Ports
UART, or Universal Asynchronous Receiver/Transmitter, converts between serial and parallel
data communication. It sends data by pin TXD (GPIO14) and receives by pin RXD (GPIO15).
I2C Ports
I2C (Inter-Integrated Circuit) bus is used to connect a microcontroller and its peripheral
devices. It's also one of the bus standards that are widely used in the field of microelectronics
communication control. As a special form of synchronous communication, it boasts with
features including less wires to connect, simple control, small packaging, and high
communication rate. The I2C bus can provide signals of serial data line via pin SDA (GPIO2)
and serial clock signals by pin SCL (GPIO3).
The I2C bus is used to provide communication between several integrated circuits. In
Raspberry Pi, the core of the circuits is the Broadcom BCM2835 chip processing system. The
pins include the pull-up resistors on the RPi, which means I2C can be accessed without
additional resistor.
I/O Ports
Digital Ports (0-7)
On PiSmart there are 8 digital ports. See the figure below for the pin definition by BCM, wiringPi
and Raspberry Pi.
SunFou
nder
6
PWM Ports (0-7)
The PiSmart Box uses PCA9685, 12-bits 4096-steps I2C output chip, for all PWM output.
On board PCA9685 I2C address is set to 0x40.
Channel 0~7 expose at PWM Port of PiSmart AI Box (PWM 0~7).
For more detail of PCA9685, Please visit http://www.nxp.com/products/interfaces/ic-bus-
portfolio/ic-led-controllers/16-channel-12-bit-pwm-fm-plus-ic-bus-led-controller:PCA9685
Analog Ports (0-4)
There's an Atmega328 in PiSmart Box as an ADC chip providing 5-channel 10-bit ADC on
analog port.
HDMI Video/Audio Connector
The PiSmart reserves the Raspberry Pi's High Definition Multimedia Interface (HDMI). It's a
digital/audio connector technology, and the HDMI port is a digital one dedicated to video
transmission - it can transmit audio and image at the same time in a high speed, with no
need of D/A or A/D signal conversion before transmission.
RCA Video/Audio Jack
The RCA standard video input port, or AV port of the RPi is also reserved on PiSmart. The RCA
technology is not specifically designed for certain ports - it can be applied to both audio
and general video signals.
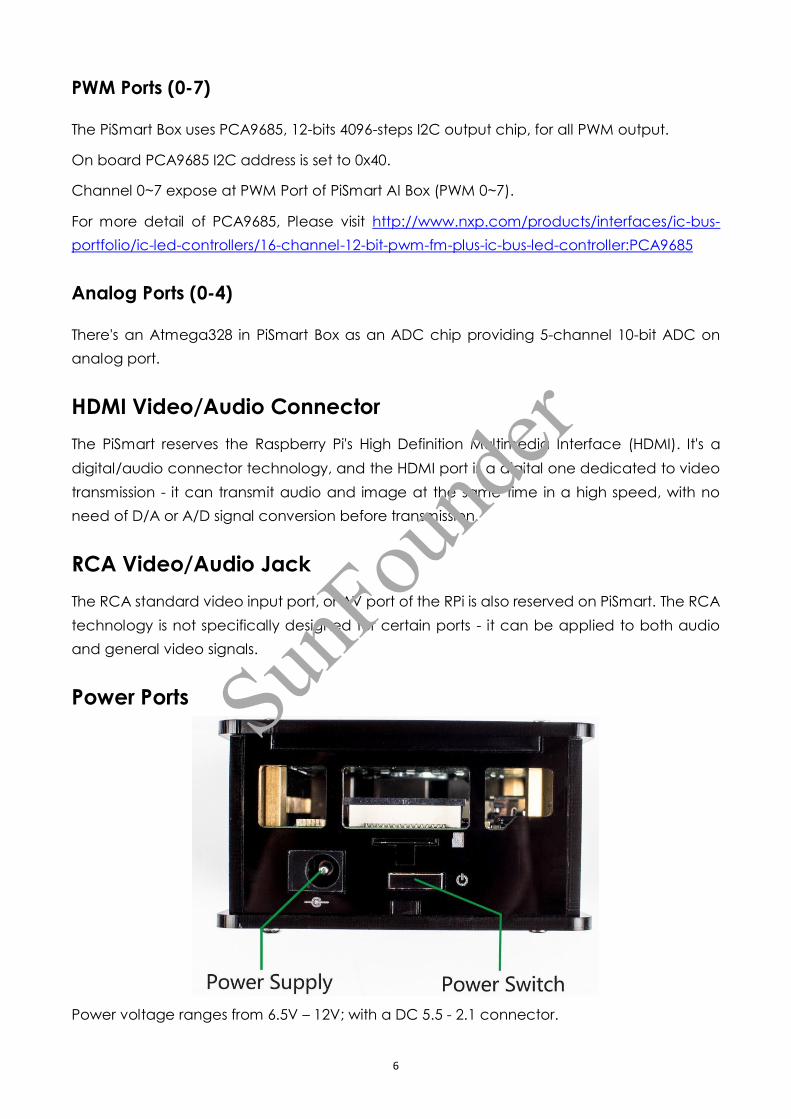
Power Ports
Power voltage ranges from 6.5V – 12V; with a DC 5.5 - 2.1 connector.
SunFou
nder
7
Power Switch
The power switch is controlled by the MCU Atmega328. Basically, there are 2 states: SLEEP
and RUNNING.
When the power cable is plugged in, the red LED indicator will light up and the MCU will turn
into the SLEEP mode.
When the button is pressed, the MCU is wakened from sleep and switches on the power of
the Raspberry Pi, so RPi is booted up too. This is the RUNNING mode.
When it's in the RUNNING mode, you can press again and hold the power switch for more
than 2 seconds. The MCU will go back to the SLEEP mode then.
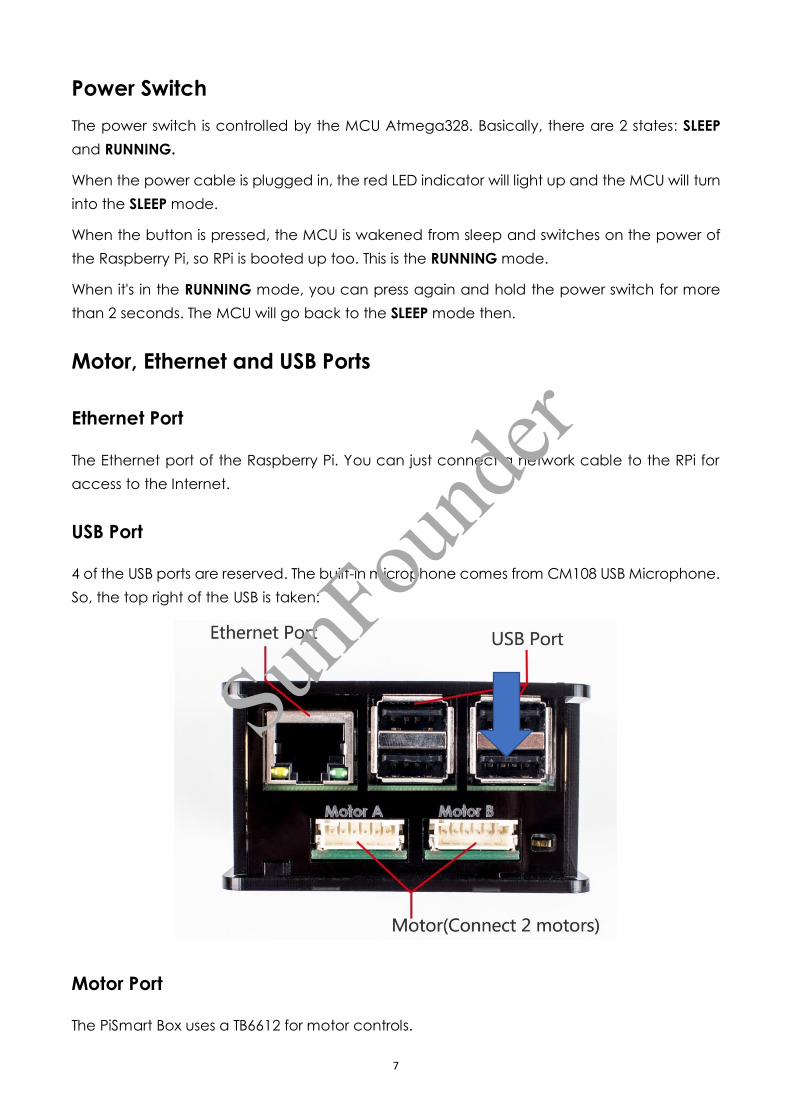
Motor, Ethernet and USB Ports
Ethernet Port
The Ethernet port of the Raspberry Pi. You can just connect a network cable to the RPi for
access to the Internet.
USB Port
4 of the USB ports are reserved. The built-in microphone comes from CM108 USB Microphone.
So, the top right of the USB is taken:
Motor Port
The PiSmart Box uses a TB6612 for motor controls.
SunFou
nder
8
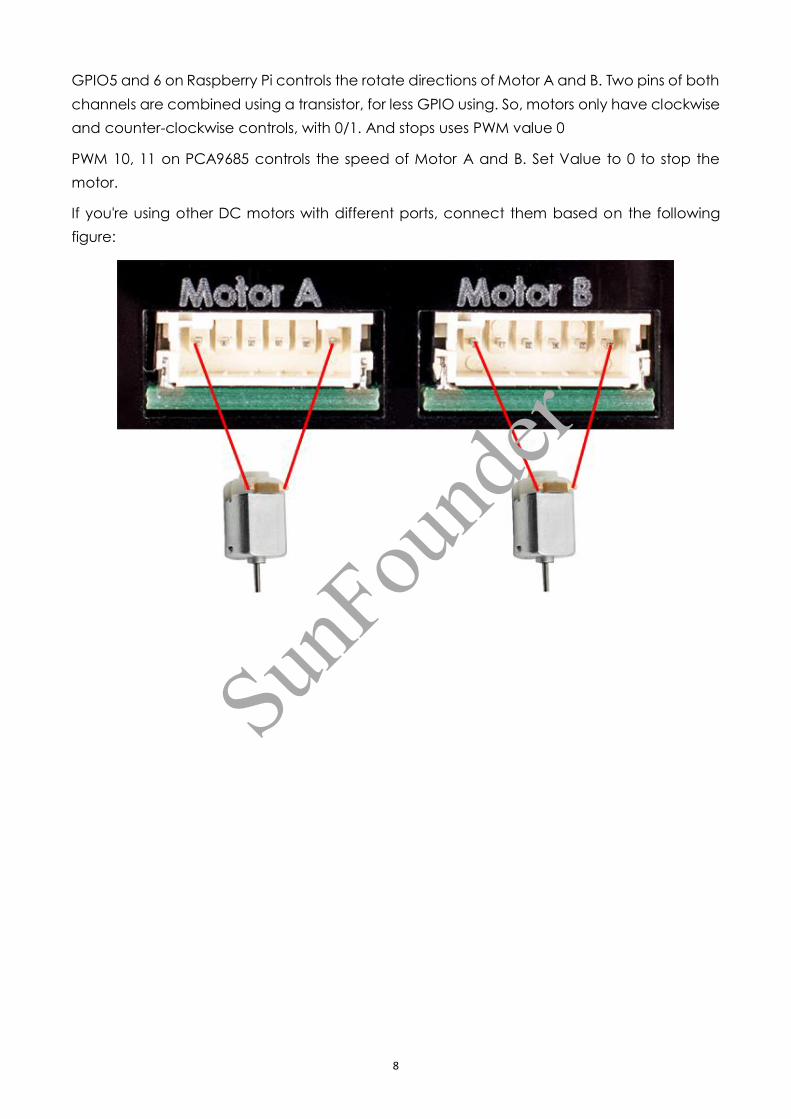
GPIO5 and 6 on Raspberry Pi controls the rotate directions of Motor A and B. Two pins of both
channels are combined using a transistor, for less GPIO using. So, motors only have clockwise
and counter-clockwise controls, with 0/1. And stops uses PWM value 0
PWM 10, 11 on PCA9685 controls the speed of Motor A and B. Set Value to 0 to stop the
motor.
If you're using other DC motors with different ports, connect them based on the following
figure:
SunFou
nder

9
Preparing
Burn the image
Take the following steps before inserting the TF card into the Raspberry Pi:
1) Prepare the tool of image burning. Such as win32DiskImager
2) Download the complete image on the official website at this link:
https://www.raspberrypi.org/downloads/raspbian/. Both the RASPBIAN STRETCH WITH
DESKTOP and RASPBIAN STRETCH LITE are available, but RASPBIAN STRETCH WITH DESKTOP
would be a better choice if you have no special requirements.
3) Unzip the downloaded package and you will see the xxxx-xx-xx-raspbian- stretch.img file
inside. Note: This file is NOT extractable.
4) Open the win32DiskImager and insert the SD card into the computer with a card reader.
Select the image file and the drive (the card) in the tool. Click Write to write the system
to the SD card. Wait for a while until the system is written to the card.
5) When the progress bar comes to the end and a prompt "write successful" appears, click
OK.
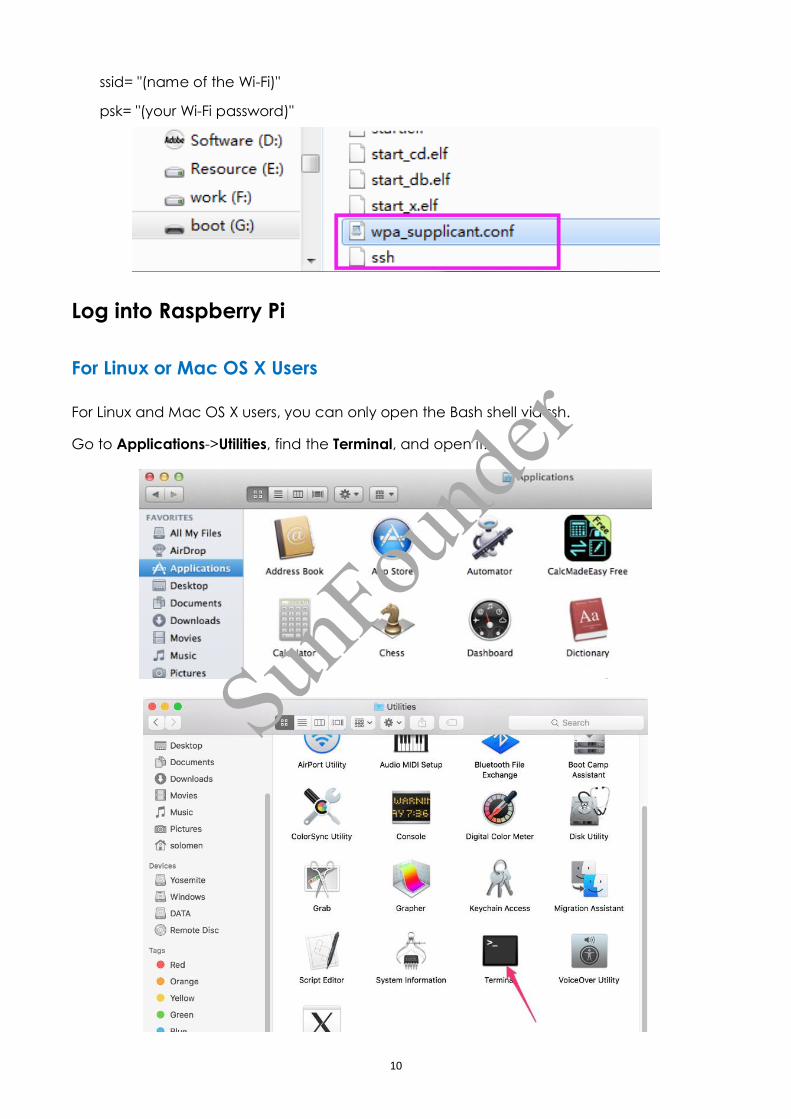
6) Create a blank file ssh under the /boot directory to enable remote login and delete the
suffix in the file name.
7) Create a WiFi configuration file wpa_supplicant.conf under /boot and add the following
to the file:
SunFou
nder
10
ssid= "(name of the Wi-Fi)"
psk= "(your Wi-Fi password)"
Log into Raspberry Pi
For Linux or Mac OS X Users
For Linux and Mac OS X users, you can only open the Bash shell via ssh.
Go to Applications->Utilities, find the Terminal, and open it.
SunFou
nder
11
Type in ssh pi@ip_address – ssh is the tool for remote login, pi, the user name, and ip_address,
as the name suggests, your Pi's IP address. For example:
Press Enter to confirm. If you get a prompt that no ssh is found, you need to install an ssh tool
like Ubuntu and Debian by yourself:
sudo apt-get install ssh
For other Linux platforms, please contact your supplier.
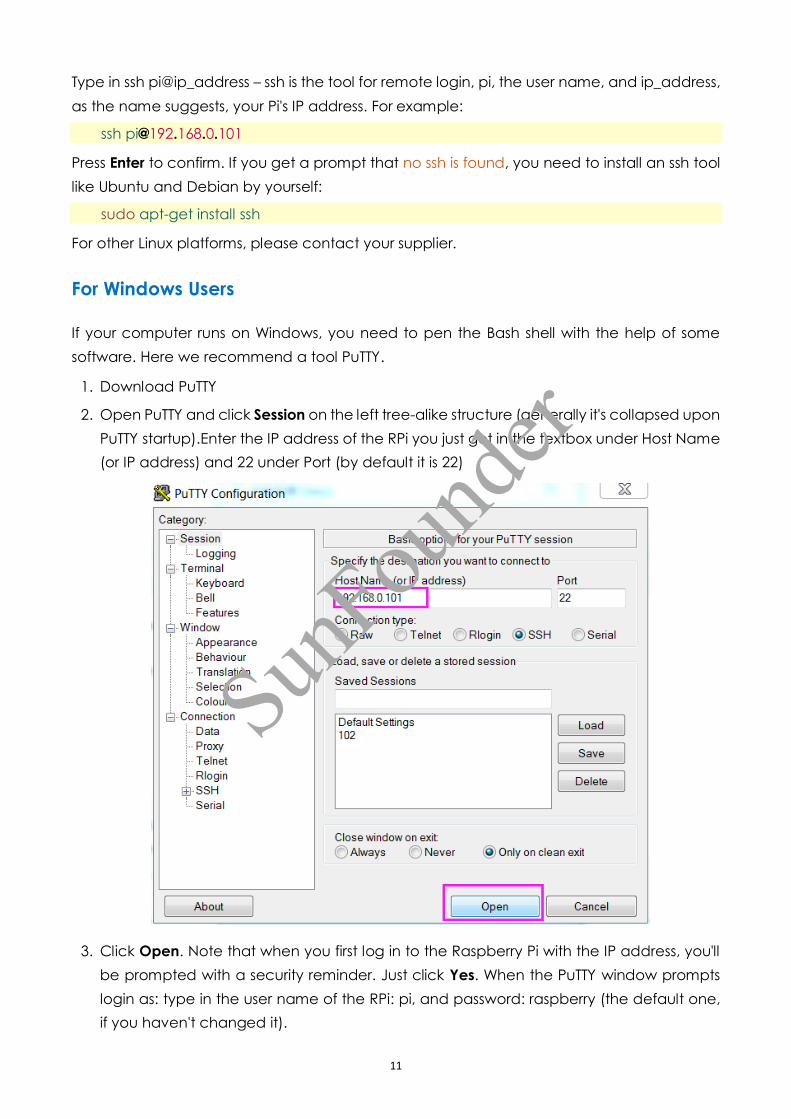
For Windows Users
If your computer runs on Windows, you need to pen the Bash shell with the help of some
software. Here we recommend a tool PuTTY.
1. Download PuTTY
2. Open PuTTY and click Session on the left tree-alike structure (generally it's collapsed upon
PuTTY startup).Enter the IP address of the RPi you just got in the textbox under Host Name
(or IP address) and 22 under Port (by default it is 22)
3. Click Open. Note that when you first log in to the Raspberry Pi with the IP address, you'll
be prompted with a security reminder. Just click Yes. When the PuTTY window prompts
login as: type in the user name of the RPi: pi, and password: raspberry (the default one,
if you haven't changed it).
SunFou
nder
12
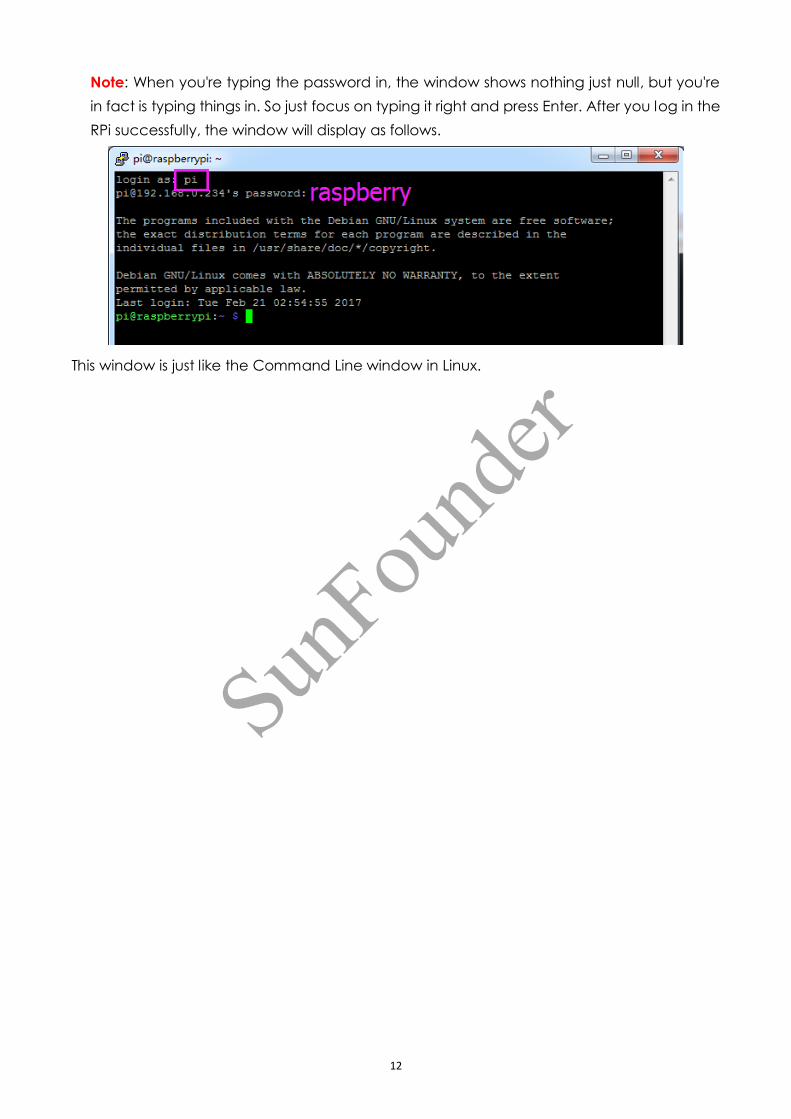
Note: When you're typing the password in, the window shows nothing just null, but you're
in fact is typing things in. So just focus on typing it right and press Enter. After you log in the
RPi successfully, the window will display as follows.
This window is just like the Command Line window in Linux.
SunFou
nder

13
Using PiSmart With Dragit
You can use the Python code to programme on PiSmart Box, more details please refer to the
last chapter Using PiSmart Box with Python.
Dragit can also be used to programing on Pismart Box, which is a visual programming
language software. The later chapter will introduce Dragit at full length. It is a very good
choice for those who are not willing to learn program language or who don't know much
about program.
Dragit will help you to know better on the logic of programing and you can learn better with
the help of the Dragit.
Install Dragit
Now you're on the RPi already. Open a terminal for command lines. Let's see what next.
1. Type in the command below:
wget https://s3.amazonaws.com/sunfounder/Raspberry/Dragit_installer.py
2. After download is done, type in the command to run:
sudo python Dragit_installer.py
3. Then you can see what to install. Switch to the one you'd like to install by the arrow key,
and check the box by Space bar.
SunFou
nder

14
Of course you need to select Dragit; meanwhile we need to use it on PiSmart, so select it too.
Then press Enter to confirm.
Then the program will process the installation. You need to wait for a while, and pay attention not
to disconnect the network during the process.
When the prompt appears as shown above, it means the installation is done. After installation,
reboot:
sudo reboot
On your computer/tablet, open a web browser (Chrome/Firefox/Safari recommended), enter
the IP address of the PiSmart and then 8000:
Example: 192.168.0.177:8000
SunFou
nder

15
Then you're in the Dragit window.
Introduction to Dragit
Dragit is a visual programming language software developed based on Snap! (check
http://snap.berkeley.edu/ for more). What's good about Dragit is that, the programming
process is visible with graphics. So you can just drag and drop the blocks (unit in the software)
to make the code to control the port, needing no knowledge of any programming
languages or syntaxes.
So now, let's explore the wonderful programming world in PiSmart, with Dragit!
Toolbar
SunFou
nder
16
On the Toolbar at top, besides file saving, settings and zoom in/out, there are also Execute,
Pause and Stop buttons.
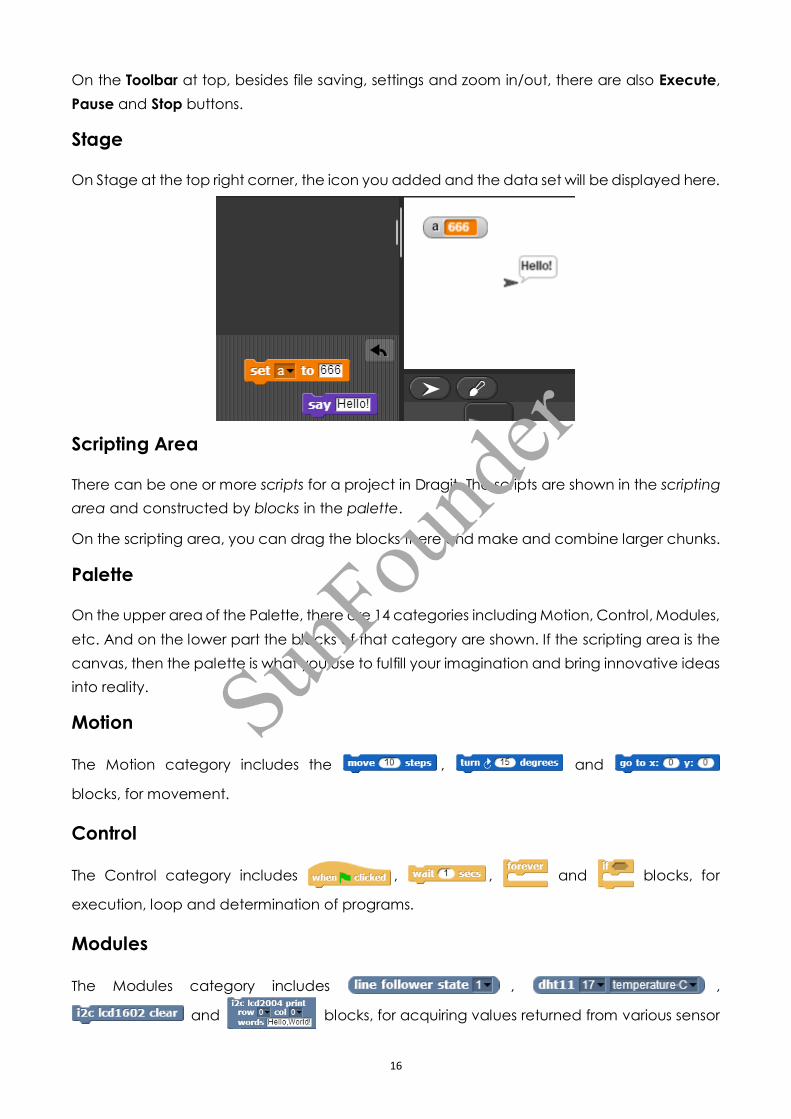
Stage
On Stage at the top right corner, the icon you added and the data set will be displayed here.
Scripting Area
There can be one or more scripts for a project in Dragit. The scripts are shown in the scripting
area and constructed by blocks in the palette.
On the scripting area, you can drag the blocks there and make and combine larger chunks.
Palette
On the upper area of the Palette, there are 14 categories including Motion, Control, Modules,
etc. And on the lower part the blocks of that category are shown. If the scripting area is the
canvas, then the palette is what you use to fulfill your imagination and bring innovative ideas
into reality.
Motion
The Motion category includes the , and
blocks, for movement.
Control
The Control category includes , , and blocks, for
execution, loop and determination of programs.
Modules
The Modules category includes , ,
and blocks, for acquiring values returned from various sensor
SunFou
nder
17
modules and control of the display module.
RaspberryPi
The RaspberryPi category includes , ,
and blocks, for GPIO port control and data collection of the Raspberry Pi.
PiCar_V, PiCar_S , and PiPlus
The PiCar_V, PiCar_S and PiPlus categories include blocks for control of these three robot and
learning kits.
PiSmart
The PiSmart category includes blocks for analog signal acquisition , digital signal
acquisition , speech , speech recognition , LED
control , motor control , servo control , and
dictionary setting .
Variables
The Variables category includes , , and blocks for
variable and block making, variable value setting and list creation.
Programming
The PiSmart Box is a multifunctional platform based on Raspberry Pi. Apart from the GPIO port
it leads out from the RPi, it also integrates functions like motor control, PWM output and
analog input. With the USB Microphone inside, it not only speaks to you but also listens - by
conversation, you can control it via speech. It is a great box with powerful functions all in one.
Let's check them out starting from simpler ones.
Note: Here we show its function by Dragit, the visual programming language software, and
also how to use the box with Dragit (for use of other robots or projects as you like).
Let It Speak
A speaker is integrated on PiSmart. We can enable it to speak for speech message feedback.
This function applies the block to produce speech.
1. In the palette area, click to select the PiSmart category.
SunFou
nder

18
1. Click and drag it into the scripting area:
2. So now in the scripting area there's already a block to control the PiSmart to speak. Let's
check how it is done with the block!
In the block, you can click the slot and enter what you want the PiSmart to say. By default
it's "Hello!".
Click the block and you'll hear what's said by the speaker of the PiSmart, and that's
exactly what's been entered in the slot. It's, Hello!
Now try your own words! Multiple words are supported. Just enter and click the block. See,
what you enter, what the PiSmart will say. It's perfectly your mouth!
OK, simply done. Let's move on to next adventure!
Speech Recognition
Now, the PiSmart can speak. Next, we need to make it understand our commands.
There is a MIC in the PiSmart as its “ear”. You only need to drag the corresponding blocks to
make it get your commands (but need to be preset).
Set Dictionary:
SunFou
nder
19
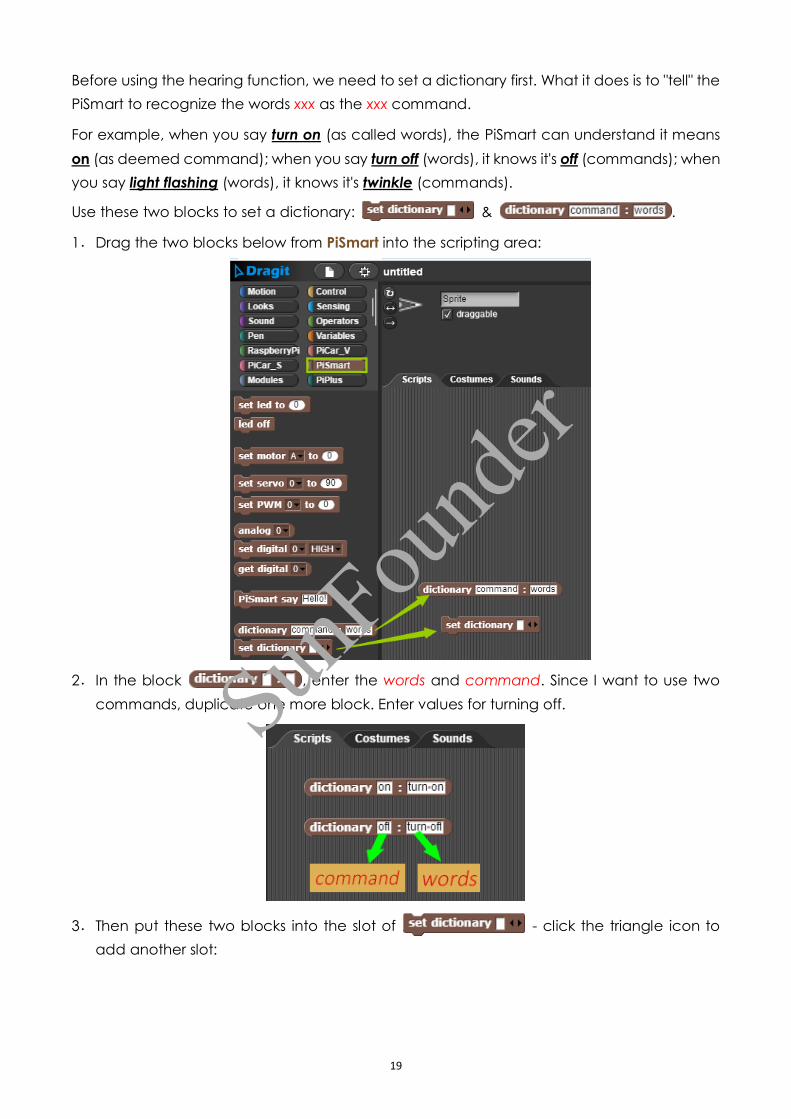
Before using the hearing function, we need to set a dictionary first. What it does is to "tell" the
PiSmart to recognize the words xxx as the xxx command.
For example, when you say turn on (as called words), the PiSmart can understand it means
on (as deemed command); when you say turn off (words), it knows it's off (commands); when
you say light flashing (words), it knows it's twinkle (commands).
Use these two blocks to set a dictionary: & .
1. Drag the two blocks below from PiSmart into the scripting area:
2. In the block , enter the words and command. Since I want to use two
commands, duplicate one more block. Enter values for turning off.
3. Then put these two blocks into the slot of - click the triangle icon to
add another slot:
SunFou
nder

20
4. Click this combined block. Then in the back-end system a file will be generated recording
the mapping between the words and the command. Call the .sps file.
When the file is created, the dictionary is done. Now we're ready for the hearing function.
Use Hear Blocks:
For the hearing function, blocks , , and are available.
1. Click the PiSmart category and drag these blocks from PiSmart into the scripting area:
2. Say "turn on" to the PiSmart and then click each and you can see a bubble is popped up
at the right side:
Now let's probe into details of each block:
- When the PiSmart "hears" words recorded in the .sps file, the bubble will
return true, otherwise false. So only recorded words will be heard and corresponding
result returned. For instance, in the example above, since only "turn on" and "turn off"
are recorded in the file, only when you speak these two phrases, will the command true
SunFou
nder

21
be returned.
- It returns what the PiSmart heard. Only when the words heard are
included in the .sps file, the corresponding result will be returned. For example,
previously only the commands on and off have been recorded, so only when you speak
"turn on" to the PiSmart, on will be returned; say "turn off", off will be returned.
- It verifies whether the command just entered has been heard. If yes, it will
return true,otherwise false. For example, if returns a command on,
will return true, when and will give back
false.
Since the Hear block returns the results of true or false, generally the Logic control blocks will
be used together for better performance of speech control.
Example: Use Speech to Control LED
Previously we've set a dictionary, with which we can make a program to control turning
on/off an LED.
1. Click the Control category and drag the following blocks into the scripting area:
2. Drag the block and drop to combine these blocks ( the maximum
brightness of LED light ring is 100),drag to the slot after if:
SunFou
nder

22
3. Click this combined block and say "turn on" to the PiSmart. Wow, the LEDs on the PiSmart
just light up!
To understand: When the PiSmart receives the command for the words "turn on", block
above will return true and the program will run the brightness setting in
block ; If no command is received, nothing will happen. Therefore, after
the LEDs light up, you need to click the led off block to turn them off.
4. Click the combined block again and the program will stop running.
5. Drag other two if blocks , so after the PiSmart "hears" "off", LEDs will be turned off. so after
the PiSmart "hears" "twinkle", LEDs will flashing 10 times.
Click the chunk block again. This time try to say "turn on" or "turn off" or "light flashing" to the
SunFou
nder

23
PiSmart and observe how the LEDs act. Interesting control, isn't it?
So when you say "turn on" to the robot, the LEDs will light up accordingly. If you say "turn off",
LEDs will dim then. If you say "light flashing ", LEDs will flashing 10 times. But if you say other
things, since no more is written in the combined block, it won't do anything and just stay the
status.
In this code, comparing to the time for lighting up and out the LED light, the time for flashing
it is too long. However, you can build a new chunk to take the place of this code.
Create a Block
Step 1: Click the Variables category and find the Make-a-block below and click it, and the
following window as shown in the figure will be popped up.
Step 2: Choose the category of the new block. Here you can classify it into the PiSmart
category. Click PiSmart and select it. Next step is to input the block name in the input box
and click OK. Then you will see a new pop-up window.
SunFou
nder

24
You will see a new pop-up window as shown in the below figure
Step 3: Drag the code which flashes the LED light into the new block and
combine them together and then click OK.
Click the PiSmart again and you will see a new block named as Led Flash shown
under that category.
Replace the old and long block with the new one, so then the program will become
SunFou
nder
25
much simpler with the same function.
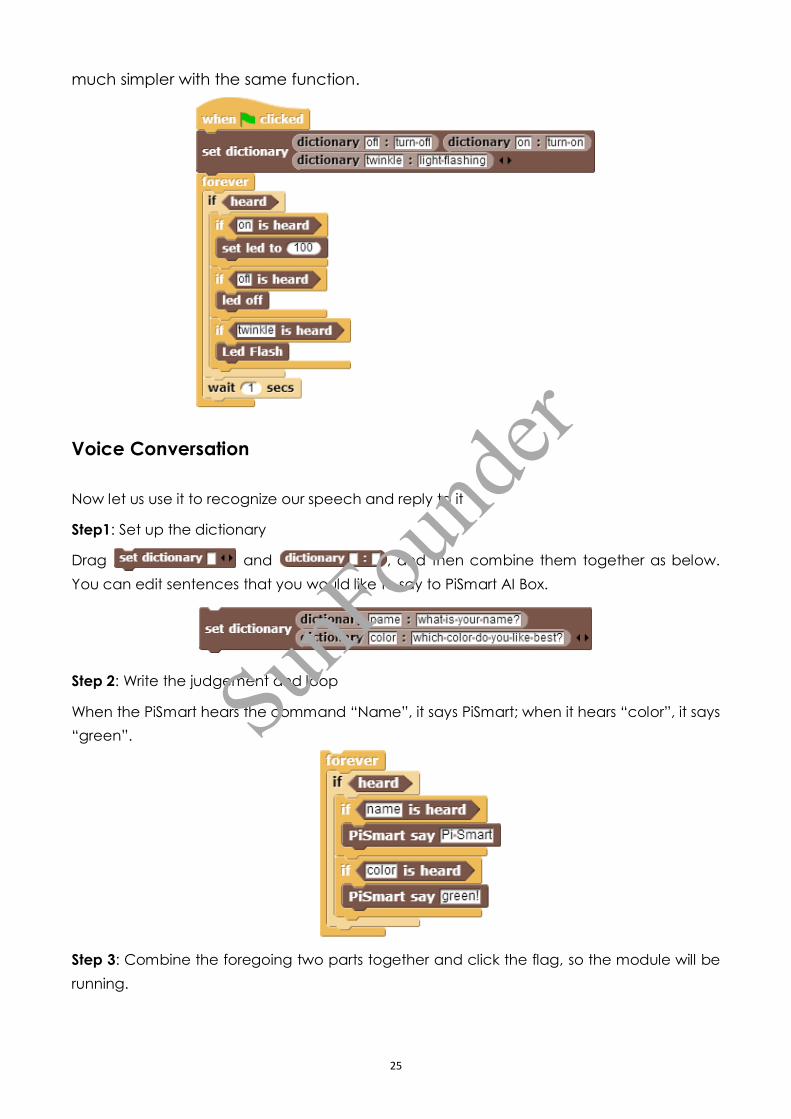
Voice Conversation
Now let us use it to recognize our speech and reply to it
Step1: Set up the dictionary
Drag and , and then combine them together as below.
You can edit sentences that you would like to say to PiSmart AI Box.
Step 2: Write the judgement and loop
When the PiSmart hears the command “Name”, it says PiSmart; when it hears “color”, it says
“green”.
Step 3: Combine the foregoing two parts together and click the flag, so the module will be
running.
SunFou
nder

26
Click the green flag on the top right corner, so the program will be running on the PiSmart.
You can click to pause the program and click to terminate it.
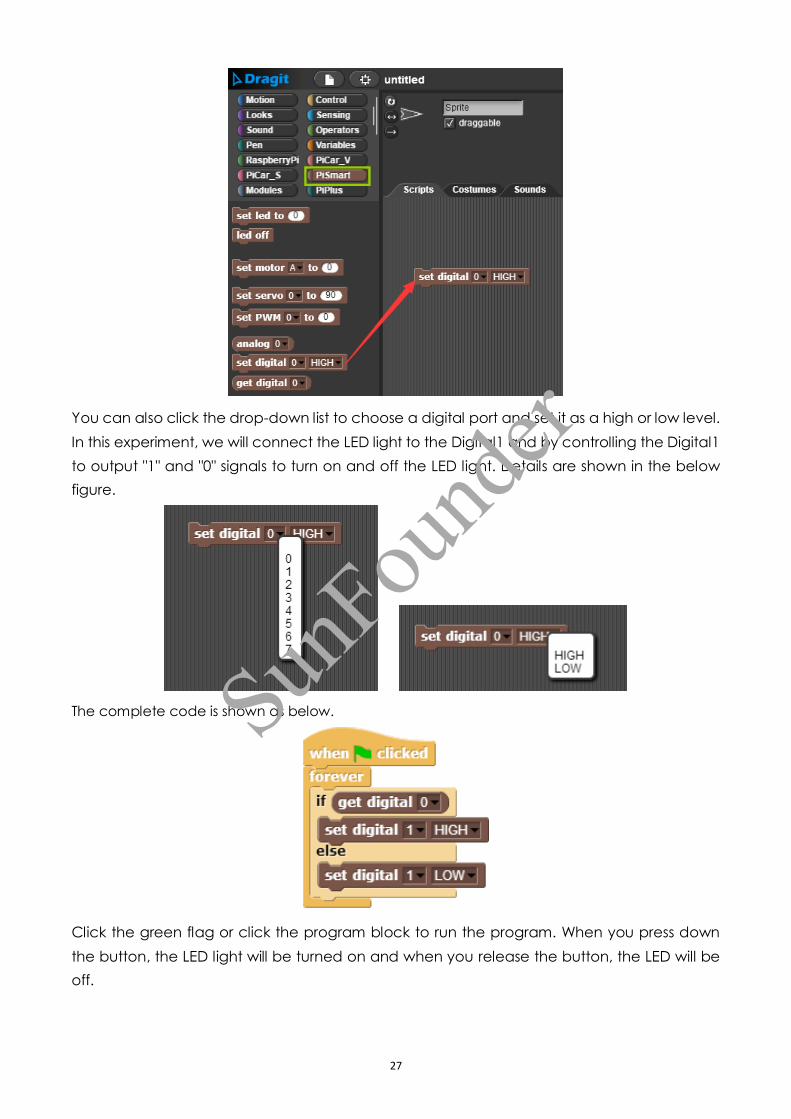
Digital Port
The digital port on the PiSmart can control the high and low electrical levels though digital
values (1 and 0). It can also judge the high and low of the input voltage and transfer it to
digital value (1, 0). In the following experiment, we will use the button switch to turn on and
off of the LED light, in which we can better learn its working principle.
Turn on and turn off the light
In the experiment, when you press down the button (means the input is high level "1"), the
LED will be on. When there is no button down (means the input is low level "0"), the LED will
be off.
Similarly, you can also drag out the block under PiSmart and use the
block to set the input value of the digital port.
SunFou
nder
27
You can also click the drop-down list to choose a digital port and set it as a high or low level.
In this experiment, we will connect the LED light to the Digital1 and by controlling the Digital1
to output "1" and "0" signals to turn on and off the LED light. Details are shown in the below
figure.
The complete code is shown as below.
Click the green flag or click the program block to run the program. When you press down
the button, the LED light will be turned on and when you release the button, the LED will be
off.
SunFou
nder
28
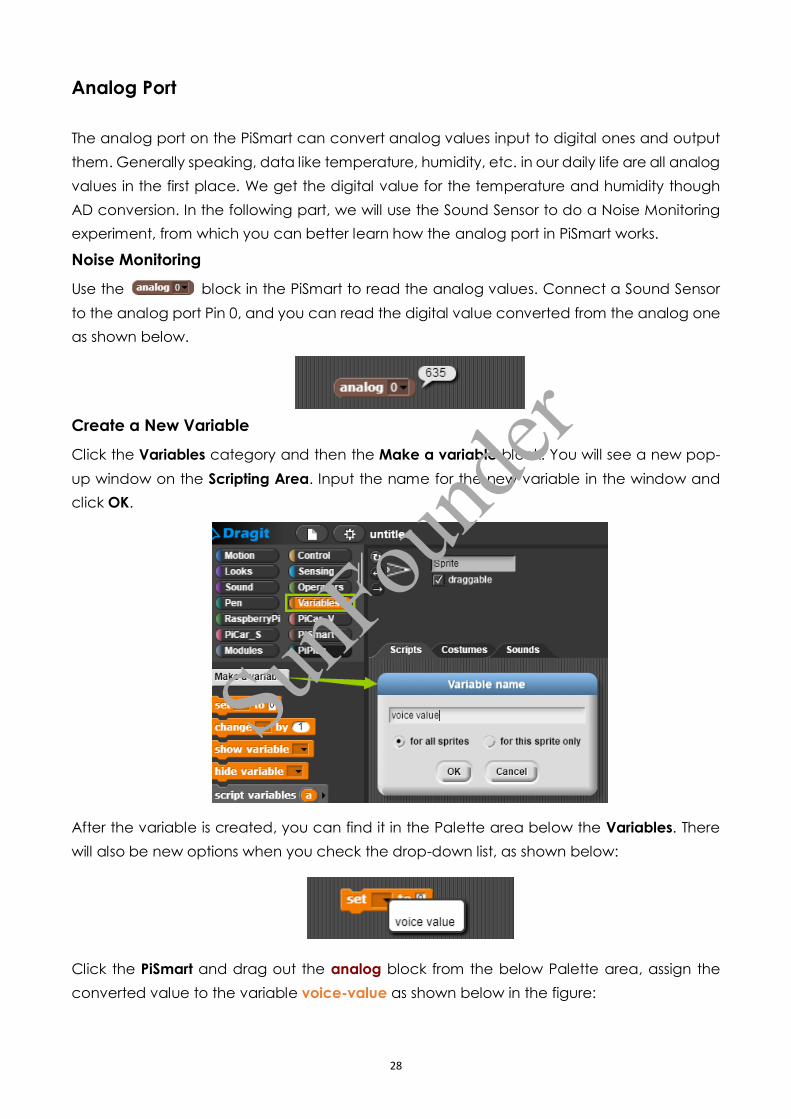
Analog Port
The analog port on the PiSmart can convert analog values input to digital ones and output
them. Generally speaking, data like temperature, humidity, etc. in our daily life are all analog
values in the first place. We get the digital value for the temperature and humidity though
AD conversion. In the following part, we will use the Sound Sensor to do a Noise Monitoring
experiment, from which you can better learn how the analog port in PiSmart works.
Noise Monitoring
Use the block in the PiSmart to read the analog values. Connect a Sound Sensor
to the analog port Pin 0, and you can read the digital value converted from the analog one
as shown below.
Create a New Variable
Click the Variables category and then the Make a variable block. You will see a new pop-
up window on the Scripting Area. Input the name for the new variable in the window and
click OK.
After the variable is created, you can find it in the Palette area below the Variables. There
will also be new options when you check the drop-down list, as shown below:
Click the PiSmart and drag out the analog block from the below Palette area, assign the
converted value to the variable voice-value as shown below in the figure:
SunFou
nder
29
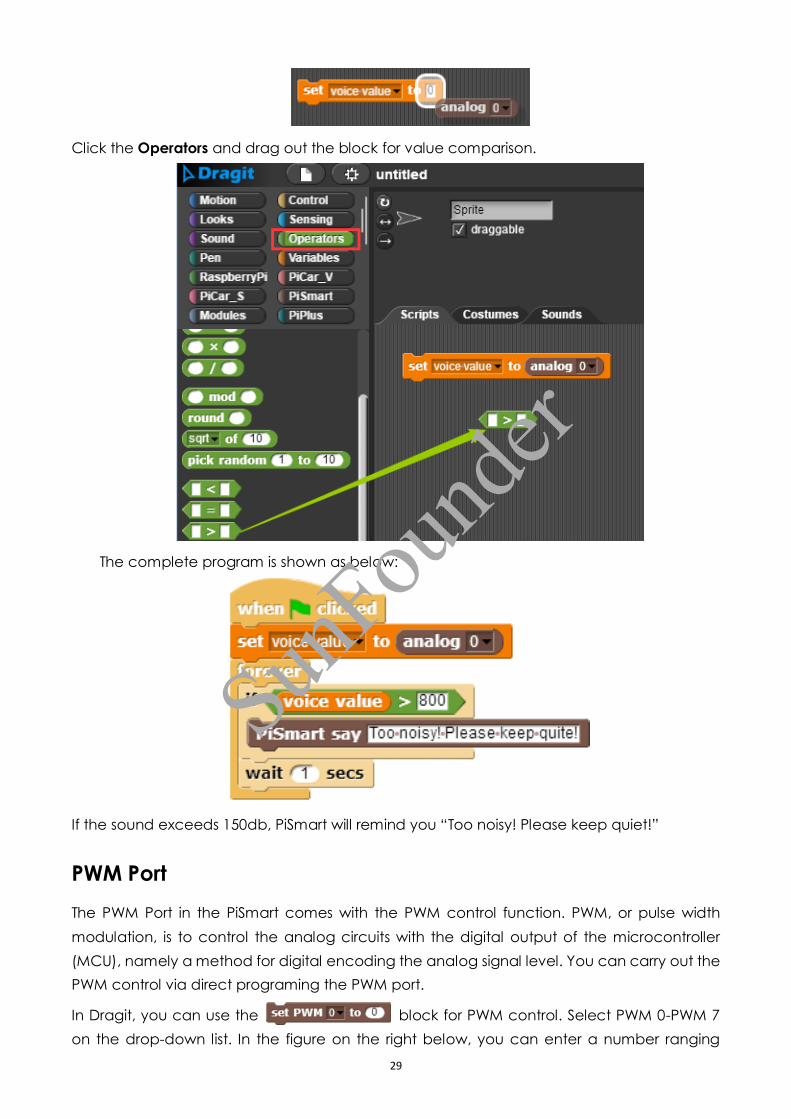
Click the Operators and drag out the block for value comparison.
The complete program is shown as below:
If the sound exceeds 150db, PiSmart will remind you “Too noisy! Please keep quiet!”
PWM Port
The PWM Port in the PiSmart comes with the PWM control function. PWM, or pulse width
modulation, is to control the analog circuits with the digital output of the microcontroller
(MCU), namely a method for digital encoding the analog signal level. You can carry out the
PWM control via direct programing the PWM port.
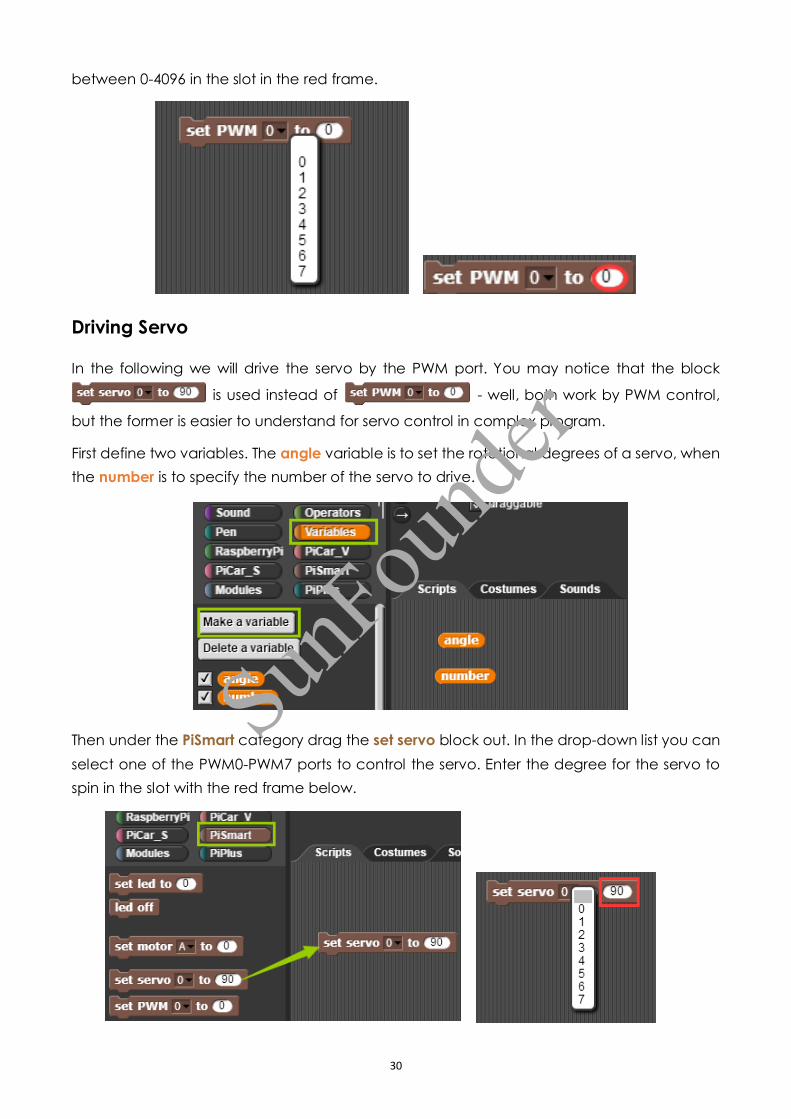
In Dragit, you can use the block for PWM control. Select PWM 0-PWM 7
on the drop-down list. In the figure on the right below, you can enter a number ranging
SunFou
nder
30
between 0-4096 in the slot in the red frame.
Driving Servo
In the following we will drive the servo by the PWM port. You may notice that the block
is used instead of - well, both work by PWM control,
but the former is easier to understand for servo control in complex program.
First define two variables. The angle variable is to set the rotational degrees of a servo, when
the number is to specify the number of the servo to drive.
Then under the PiSmart category drag the set servo block out. In the drop-down list you can
select one of the PWM0-PWM7 ports to control the servo. Enter the degree for the servo to
spin in the slot with the red frame below.
SunFou
nder
31
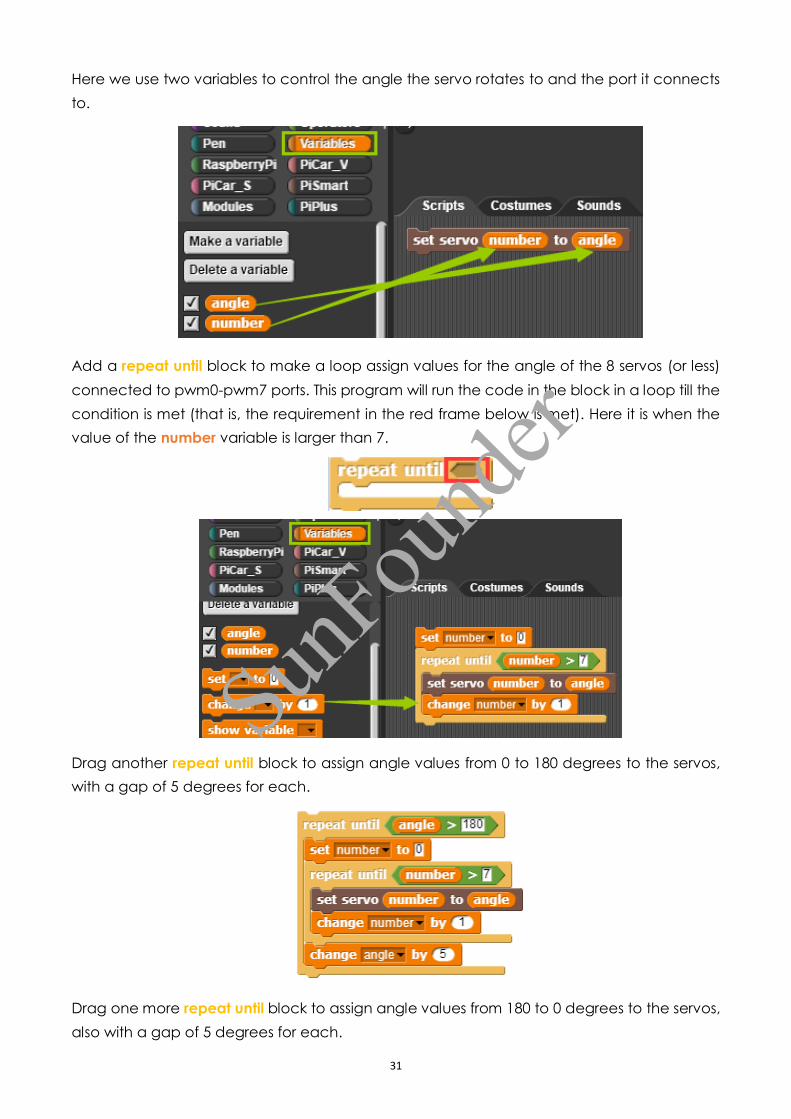
Here we use two variables to control the angle the servo rotates to and the port it connects
to.
Add a repeat until block to make a loop assign values for the angle of the 8 servos (or less)
connected to pwm0-pwm7 ports. This program will run the code in the block in a loop till the
condition is met (that is, the requirement in the red frame below is met). Here it is when the
value of the number variable is larger than 7.
Drag another repeat until block to assign angle values from 0 to 180 degrees to the servos,
with a gap of 5 degrees for each.
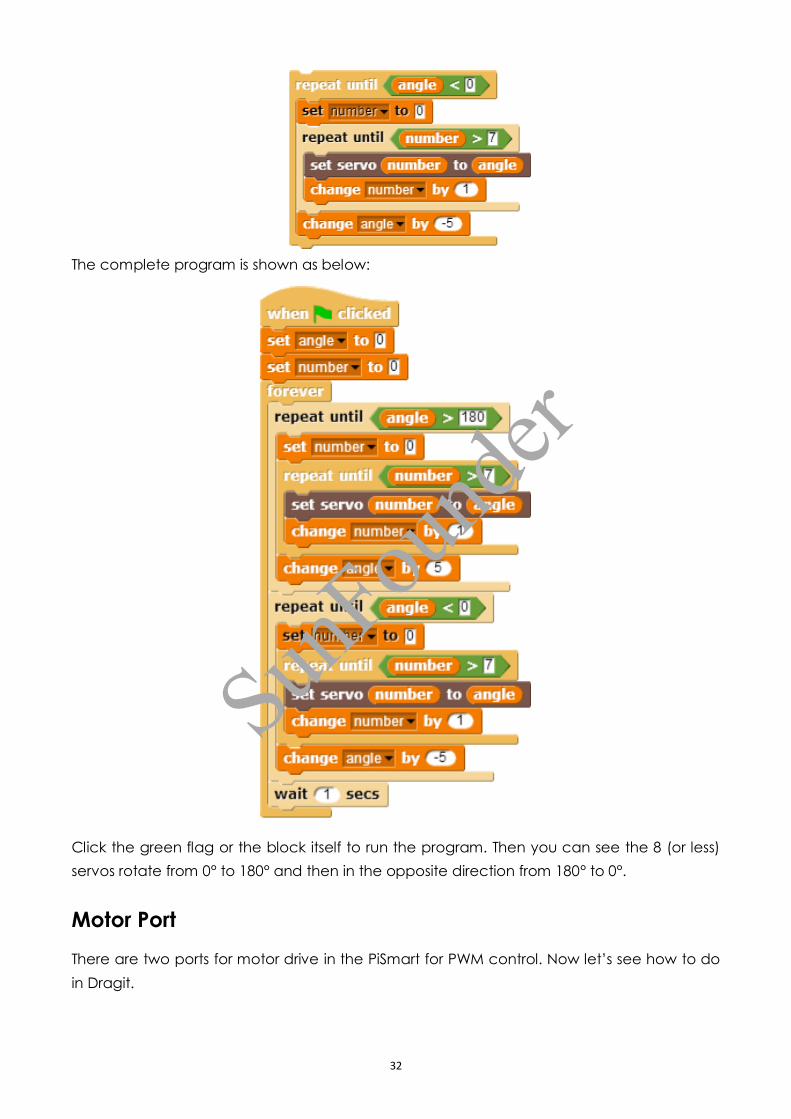
Drag one more repeat until block to assign angle values from 180 to 0 degrees to the servos,
also with a gap of 5 degrees for each.
SunFou
nder
32
The complete program is shown as below:
Click the green flag or the block itself to run the program. Then you can see the 8 (or less)
servos rotate from 0° to 180° and then in the opposite direction from 180° to 0°.
Motor Port
There are two ports for motor drive in the PiSmart for PWM control. Now let’s see how to do
in Dragit.
SunFou
nder
33
Driving Motor
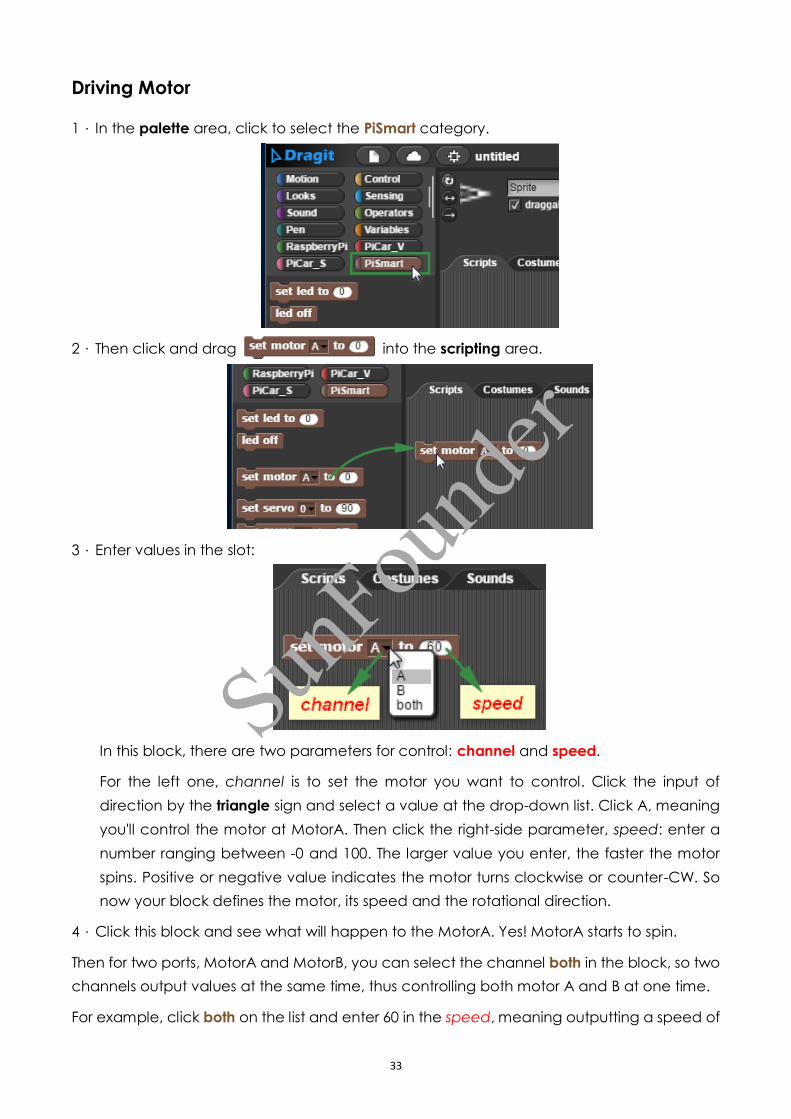
1. In the palette area, click to select the PiSmart category.
2. Then click and drag into the scripting area.
3. Enter values in the slot:
In this block, there are two parameters for control: channel and speed.
For the left one, channel is to set the motor you want to control. Click the input of
direction by the triangle sign and select a value at the drop-down list. Click A, meaning
you'll control the motor at MotorA. Then click the right-side parameter, speed: enter a
number ranging between -0 and 100. The larger value you enter, the faster the motor
spins. Positive or negative value indicates the motor turns clockwise or counter-CW. So
now your block defines the motor, its speed and the rotational direction.
4. Click this block and see what will happen to the MotorA. Yes! MotorA starts to spin.
Then for two ports, MotorA and MotorB, you can select the channel both in the block, so two
channels output values at the same time, thus controlling both motor A and B at one time.
For example, click both on the list and enter 60 in the speed, meaning outputting a speed of
SunFou
nder

34
60 to both motor A and motor B. Click the block then and the two motors turn at 60 speed.
5. Set different values to motor A and motor B, click the block and the two motors will rotate
in different speeds.
6. To stop the motors, just set the speed of both motors as 0:
7. Set the speed value of the two motors to negative and the motor will turn in the opposite
direction::
Future Learning:
There are still many expansion ports on the PiSmart like spi, I2C , UART, USB etc., enabling more
DIY possibilities for you.
In the future tutorials, we'll add more fun projects with sensors, and more blocks will be
complemented in the Dragit also in later versions. Follow our website www.sunfounder.com
for more updates!
If you have any questions or ideas you want to share, visit our FORUM and post anything.
SunFou
nder
35
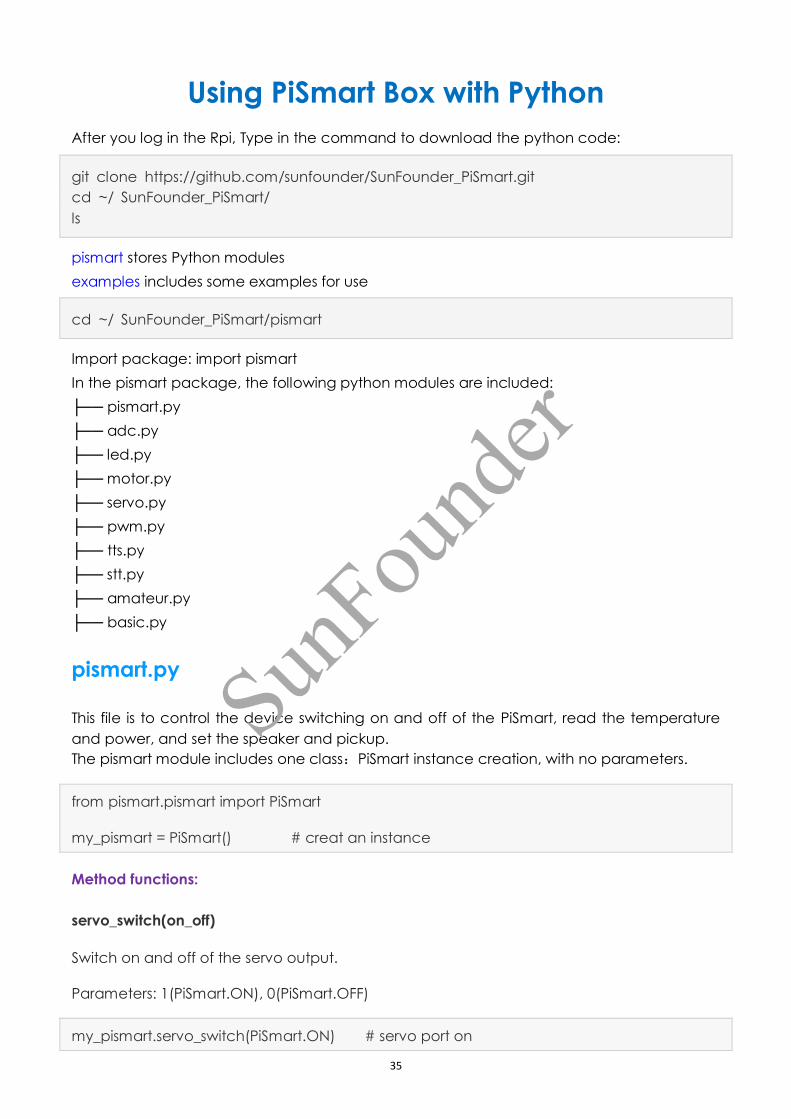
Using PiSmart Box with Python
After you log in the Rpi, Type in the command to download the python code:
git clone https://github.com/sunfounder/SunFounder_PiSmart.git
cd ~/ SunFounder_PiSmart/
ls
pismart stores Python modules
examples includes some examples for use
cd ~/ SunFounder_PiSmart/pismart
Import package: import pismart
In the pismart package, the following python modules are included:
├── pismart.py
├── adc.py
├── led.py
├── motor.py
├── servo.py
├── pwm.py
├── tts.py
├── stt.py
├── amateur.py
├── basic.py
pismart.py
This file is to control the device switching on and off of the PiSmart, read the temperature
and power, and set the speaker and pickup.
The pismart module includes one class:PiSmart instance creation, with no parameters.
from pismart.pismart import PiSmart
my_pismart = PiSmart() # creat an instance
Method functions:
servo_switch(on_off)
Switch on and off of the servo output.
Parameters: 1(PiSmart.ON), 0(PiSmart.OFF)
my_pismart.servo_switch(PiSmart.ON) # servo port on
SunFou
nder
36
my_pismart.servo_switch(PiSmart.OFF) # servo port off
motor_switch(on_off)
Switch on and off of the motor output.
Parameters: 1(PiSmart.ON), 0(PiSmart.OFF)
my_pismart.motor_switch(PiSmart.ON) # motor port on
my_pismart.motor_switch(PiSmart.OFF) # motor port off
speaker_switch(on_off)
Switch on and off of the speaker output.
Parameters: 1(PiSmart.ON), 0(PiSmart.OFF)
my_pismart.speaker_switch(PiSmart.ON) # speaker on
my_pismart.speaker_switch(PiSmart.OFF) # speaker off
power_voltage
Read the voltage of the power, return a float value.
bat_voltage = my_pismart.power_voltage # power voltage
power_type
Check and set the type of power supply, ranging in ['2S', '3S', 'DC']
pwr_type = my_pismart.power_type # get power type
my_pismart.power_type = '2S' # set power type
speaker_volume
Check and set sound volume of the speaker, ranging between [0-100]
spk_vol = my_pismart.speaker_volume # get speaker volume
my_pismart.speaker_volume = 60 # set speaker volume
capture_volume
Check and set the boost of the microphone, ranging between [0~100]
SunFou
nder
37
cap_vol = my_pismart.capture_volume # get capture volume
my_pismart.capture_volume = 100 # set capture volume
cpu_temperature
CHeck the temperature of the Raspberry Pi's CPU, returning a float value.
cpu_temp = my_pismart.cpu_temperature # get cpu temperature
cpu_usage
CHeck the usage of the Raspberry Pi's CPU, returning a float value.
cpu_usage = my_pismart.cpu_usage # get cpu usage
adc.py
Read the value of ADC from the PiSmart bottom plate.
Create an instance, with a parameter for analog channels, an integer ranging between
[0\~4].
from pismart.adc import ADC
my_A0 = ADC(0) # creat adc use chn 0
my_A1 = ADC(1)
read()
Read the analog value of ports, return an integer analog value.
No parameters.
A0_val = my_A0.read() # get analog val ch.0
A1_val = my_A1.read()
channel
Check and set channels, assignable with values ranging between [0~4].
A0_chn = my_A0.channel # get channel
my_A0.channel = 4 # set channel
SunFou
nder
38
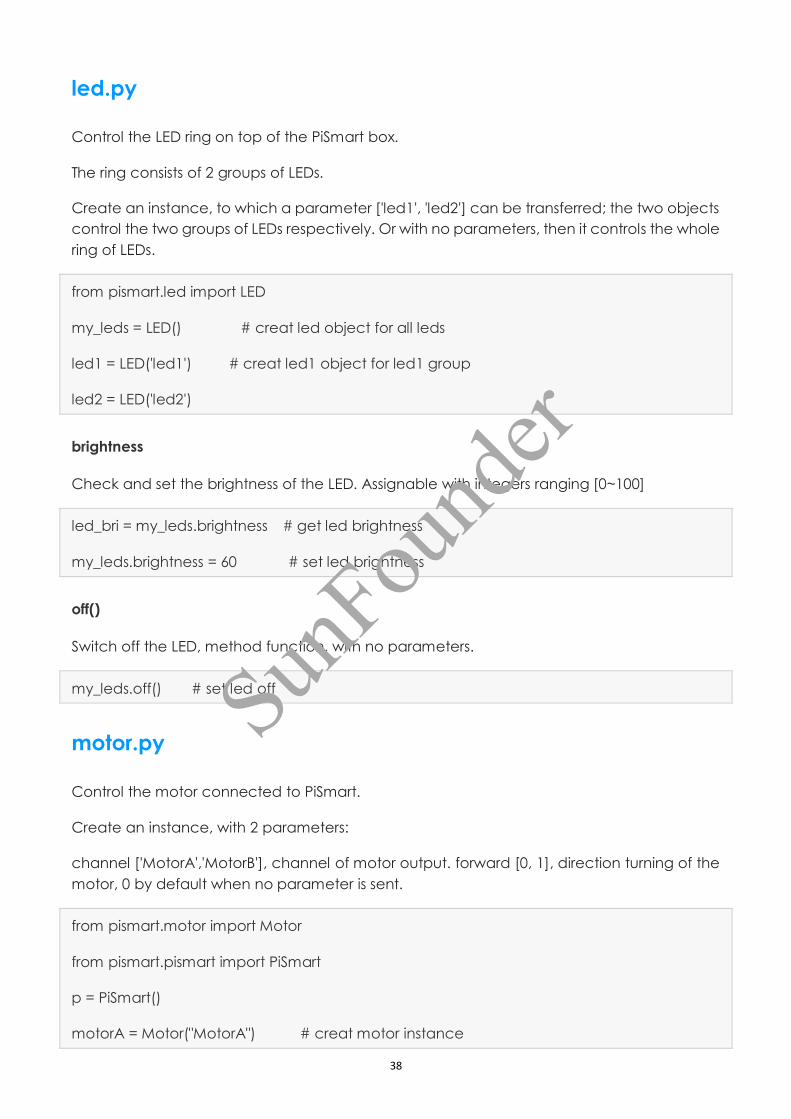
led.py
Control the LED ring on top of the PiSmart box.
The ring consists of 2 groups of LEDs.
Create an instance, to which a parameter ['led1', 'led2'] can be transferred; the two objects
control the two groups of LEDs respectively. Or with no parameters, then it controls the whole
ring of LEDs.
from pismart.led import LED
my_leds = LED() # creat led object for all leds
led1 = LED('led1') # creat led1 object for led1 group
led2 = LED('led2')
brightness
Check and set the brightness of the LED. Assignable with integers ranging [0~100]
led_bri = my_leds.brightness # get led brightness
my_leds.brightness = 60 # set led brightness
off()
Switch off the LED, method function, with no parameters.
my_leds.off() # set led off
motor.py
Control the motor connected to PiSmart.
Create an instance, with 2 parameters:
channel ['MotorA','MotorB'], channel of motor output. forward [0, 1], direction turning of the
motor, 0 by default when no parameter is sent.
from pismart.motor import Motor
from pismart.pismart import PiSmart
p = PiSmart()
motorA = Motor("MotorA") # creat motor instance
SunFou
nder

39
motorB = Motor("MotorB")
p.motor_switch(1) # motor switch on
forward_direction
Check and set the forward direction of the motor. Return 0 or 1, also can be set as 0 and 1.
direc = motorA.forward_direction # get motor forward direction
motorA.forward_direction = 0 # set motor forward direction
forward(speed)
Drive the motor to go forward in the speed of "speed".
motorA.forward(60) # drive motor forward as speed
backward(speed)
Drive the motor to go backward in the speed of "speed".
motorA.backward(60) # drive motor backward as speed
stop()
Drive the motor to stop.
motorA.stop() # motor off
speed
Set the speed of the motor, ranging between [0~100], integer, with the limited range.
motorA.speed = 60 # set motor speed
is_reversed
Set the motor to spin reversely, bool type, with warning of wrong types.
motorA.is_reversed = True # set motor turn reversed
end()
End the motor ojbect.
SunFou
nder
40
motorA.end() # motor end
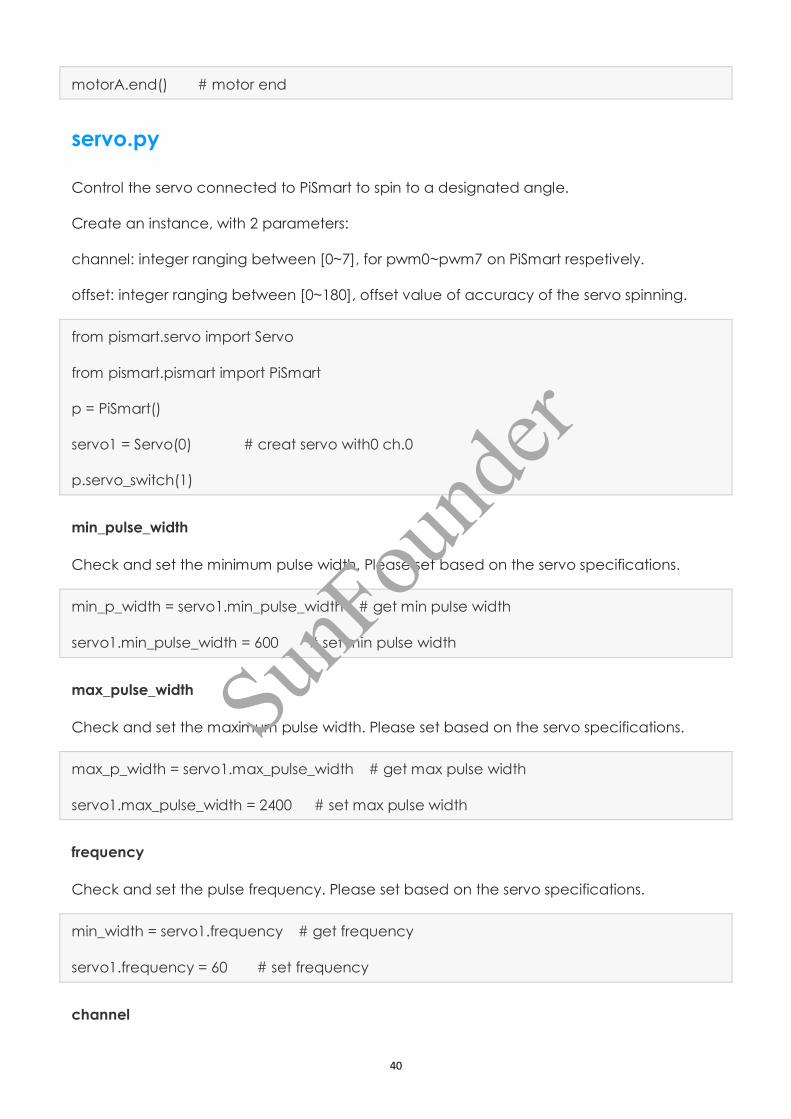
servo.py
Control the servo connected to PiSmart to spin to a designated angle.
Create an instance, with 2 parameters:
channel: integer ranging between [0~7], for pwm0~pwm7 on PiSmart respetively.
offset: integer ranging between [0~180], offset value of accuracy of the servo spinning.
from pismart.servo import Servo
from pismart.pismart import PiSmart
p = PiSmart()
servo1 = Servo(0) # creat servo with0 ch.0
p.servo_switch(1)
min_pulse_width
Check and set the minimum pulse width. Please set based on the servo specifications.
min_p_width = servo1.min_pulse_width # get min pulse width
servo1.min_pulse_width = 600 # set min pulse width
max_pulse_width
Check and set the maximum pulse width. Please set based on the servo specifications.
max_p_width = servo1.max_pulse_width # get max pulse width
servo1.max_pulse_width = 2400 # set max pulse width
frequency
Check and set the pulse frequency. Please set based on the servo specifications.
min_width = servo1.frequency # get frequency
servo1.frequency = 60 # set frequency
channel
SunFou
nder
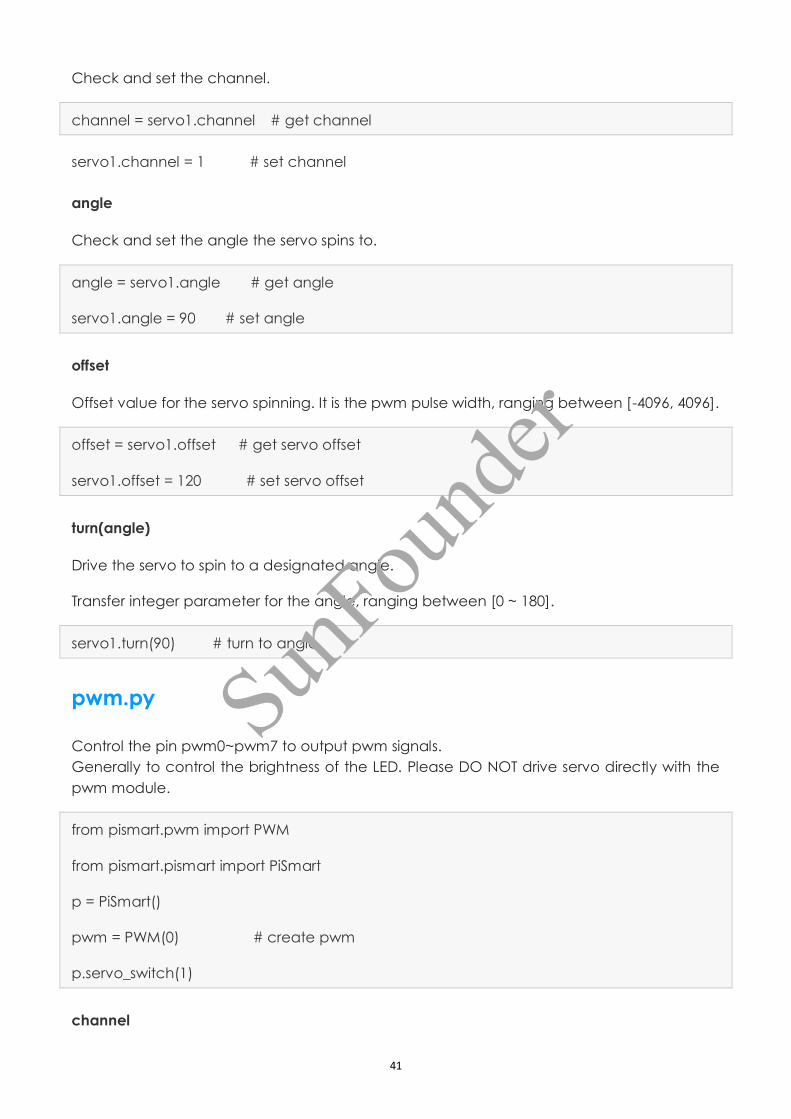
41
Check and set the channel.
channel = servo1.channel # get channel
servo1.channel = 1 # set channel
angle
Check and set the angle the servo spins to.
angle = servo1.angle # get angle
servo1.angle = 90 # set angle
offset
Offset value for the servo spinning. It is the pwm pulse width, ranging between [-4096, 4096].
offset = servo1.offset # get servo offset
servo1.offset = 120 # set servo offset
turn(angle)
Drive the servo to spin to a designated angle.
Transfer integer parameter for the angle, ranging between [0 ~ 180].
servo1.turn(90) # turn to angle
pwm.py
Control the pin pwm0~pwm7 to output pwm signals.
Generally to control the brightness of the LED. Please DO NOT drive servo directly with the
pwm module.
from pismart.pwm import PWM
from pismart.pismart import PiSmart
p = PiSmart()
pwm = PWM(0) # create pwm
p.servo_switch(1)
channel
SunFou
nder
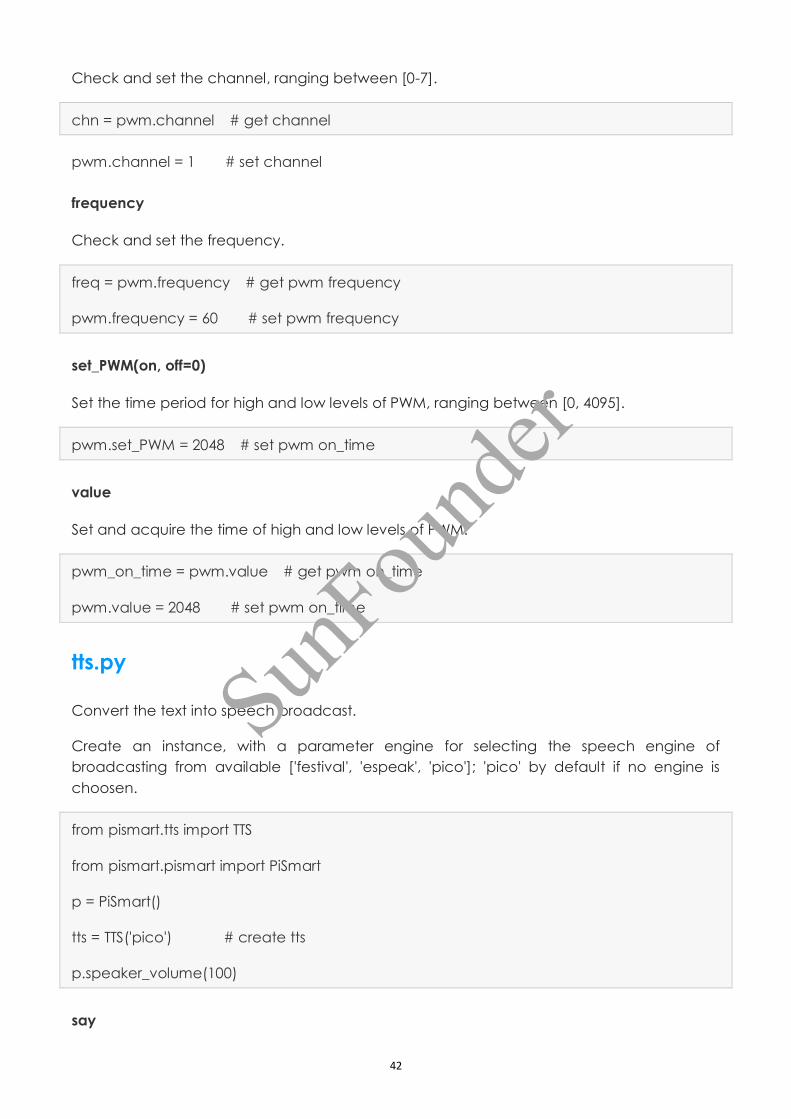
42
Check and set the channel, ranging between [0-7].
chn = pwm.channel # get channel
pwm.channel = 1 # set channel
frequency
Check and set the frequency.
freq = pwm.frequency # get pwm frequency
pwm.frequency = 60 # set pwm frequency
set_PWM(on, off=0)
Set the time period for high and low levels of PWM, ranging between [0, 4095].
pwm.set_PWM = 2048 # set pwm on_time
value
Set and acquire the time of high and low levels of PWM.
pwm_on_time = pwm.value # get pwm on_time
pwm.value = 2048 # set pwm on_time
tts.py
Convert the text into speech broadcast.
Create an instance, with a parameter engine for selecting the speech engine of
broadcasting from available ['festival', 'espeak', 'pico']; 'pico' by default if no engine is
choosen.
from pismart.tts import TTS
from pismart.pismart import PiSmart
p = PiSmart()
tts = TTS('pico') # create tts
p.speaker_volume(100)
say
SunFou
nder
43
Make the PiSmart broadcast the speech set.
Assign strings.
tts.say = "Hello, world!" # say words
engine
Check and set the speech engine.
Values available: ['festival', 'espeak', 'pico'].
engine = tts.engine # get tts engine
tts.engine = "espeak" # set tts engine
**engine_pa
rams(amp=None, speed=None, gap=None, pitch=None)**
Set the parameters of the engine. Available only when the espeak engine is selected. Four
parameters:
amp=None, amp should be in 0 to 200
speed=None, speed should be in 80 to 260 gap=None
pitch=None, pitch should be in 0 to 99
tts.engine = "espeak" # set espeak
tts.espeak_params(speed = 150)
stt.py
Convert speech into text for PiSmart, used in speech recognition.
Create an instance, parameters should be transferred: (dictionary, device=1,
namecalling=False, timeout=5.0, dictionaryupdate=False).
dictionary: File name of the dictionary under the same directory of the script.
device: Number of the sound card devices for the Raspberry Pi in PiSmart, 1 by default. If
other sound cards are used, assign a parameter based on the device number. name_calling:
Whether to turn on awaking by speaking the name, ranging in [True, False]. timeout: Time of
timeout to end awaking since no command is heard after name_calling.
dictionary_update: Whether to update the dictionary. The update can generate essential
dictionaries and intermediate files needed for speech recognition.
from pismart.tts import TTS
SunFou
nder
44
from pismart.pismart import PiSmart
p = PiSmart()
stt = STT('dictionary', name_calling=True, timeout=10.0, dictionary_update=True)
p.speaker_volume(100)
is_awake
Whether to be awakened. If it's awakened by its name, return True. Need to open
name_calling when the object is created.
if stt.is_awake: # need name_calling True
xxxx
heard
If some speech is heard, return True.
if stt.heard: # if heard do something
xxxx
recognize()
Enter the process of speech recognition. No parameters, no values returned.
while True:
stt.recognize() # begin recognize
update_dictionary()
Update the dictionary file. No parameters, return the value 0.
stt.update_dictionary() # update dictionary
end()
End the process of speech recognition.No parameters, no values returned.
stt.end()
An instance:
from pismart.pismart import PiSmart
SunFou
nder
45
from pismart.stt import STT
from pismart.tts import TTS
p = PiSmart()
sr = STT('dictionary', name_calling=True, timeout=10.0, dictionary_update=True)
p.speaker_switch(1)
pico = TTS('pico')
while True:
sr.recognize()
print "heard :%s"%sr.heard
if sr.heard:
result = sr.result
print "=============================="
print result
print "=============================="
if result == '__NAME__':
pico.say = 'Hello there'
else:
pico.say = result
amateur.py
Integration module. The amateur file integrates most of the control part for PiSmart, though
the debugging and customization is not deep enough.
from pismart.amateur import PiSmart
my_pismart = PiSmart()
xxx_init()
Initialize resources on the PiSmart, with no parameters. When the amateur instance is created,
all the initialization will be executed.
SunFou
nder
46
my_pismart.ADC_init()
my_pismart.Motor_init()
my_pismart.PWM_init()
my_pismart.Servo_init()
my_pismart.LED_init()
my_pismart.TTS_init()
my_pismart.STT_init()
my_pismart.All_init()
xxx_end()
End the processing of the resources on PiSmart. No parameters.
my_pismart.ADC_end()
my_pismart.Motor_end()
my_pismart.PWM_end()
my_pismart.Servo_end()
my_pismart.LED_end()
my_pismart.TTS_end()
my_pismart.STT_end()
my_pismart.end()
power_type
Power type, assignable with value in ['2S', '3S', 'DC'].
my_pismart.power_type = '2S'
power_voltage
Power voltage, returning a float value, unassignable.
power_voltage = my_pismart.power_voltage
speaker_volume
SunFou
nder
47
Set the sound volume of the speaker, assignable with value in [0 ~ 100].
my_pismart.speaker_volume = 60
capture_volume
Boost of microphone, assignable with value in [0 ~ 100].
my_pismart.capture_volume = 100
cpu_temperature
Temperature of the Raspberry Pi's CPU, returning a float value.
cpu_temp = my_pismart.cpu_temperature
A0 ~ A4
Values returned from analog pins A0~A4. Return integer values, unassignable.
A0_val = my_pismart.A0
A1_val = my_pismart.A1
Servo0 ~ Servo7
Output angles of servo when any servo is connected to pin pwm0~pwm7, assignable with
value in [0 ~ 180].
my_pismart.Servo0 = 90
my_pismart.Servo1 = 0
PWM0 ~ PWM7
Output duty cycle of pwm0~pwm7, assignable with value in [0 ~ 100].
my_pismart.Servo0 = 30
my_pismart.Servo1 = 90
LED
Brightness of the LEDs on top of the PiSmart, assignable with value in [0 ~ 100].
my_pismart.LED = 30
my_pismart.LED = 90
SunFou
nder
48
MotorA and MotorB
Rotating speed of the MotorA and MotorB, assignable with value in [0 ~ 100].
my_pismart.MotorA = 30
my_pismart.MotorB = 90
MotorA_reversed and MotorB_reversed
Rotating direction of the MotorA and MotorB, assignable with value in [True, False].
my_pismart.MotorA_reversed = False
my_pismart.MotorB_reversed = True
Say
Speech of the PiSmart, assigned with texts which the PiSmart will say.
my_pismart.Say = "Hello, world!"
listen
PiSmart will enter the process of listening, unassignable.
my_pismart.listen
heard
PiSmart is in the process of listening. Return True if any speech is heard. Unassignable.
if my_pismart.heard:
xxxx
result
After PiSmart heard something, result will acquire what's heard. Unassignable.
if my_pismart.result == "forward":
xxxx
An instance:
def loop():
my_pismart.listen # Begin to listen
if my_pismart.heard: # if heard something
SunFou
nder

49
if my_pismart.result == "forward": # if heard forward
# PiSmart Car move forward
my_pismart.MotorA = 60
my_pismart.MotorB = 60
my_pismart.Say = "I go forward!"
sleep(3)
SunFou
nder