
Success Manual Sensei Success Manual (Inium Platform Instruments) Table of Contents TABLE F COTTS...
78
Inium Platform Instruments Oticon Sensei Success Manual
Transcript of Success Manual Sensei Success Manual (Inium Platform Instruments) Table of Contents TABLE F COTTS...

Inium Platform Instruments
Oticon Sensei Success Manual

The Sensei Family 6 Introducing Sensei
7 Fitting ranges
8 New miniFit Receiver system
9 New Corda miniFit System
9 Fitting rationales
10 Feature Overview: SenseiPro and Sensei
11 Feature Style Quick Overview
12 Style and Color Overview
Working With Sensei 16 Customizing the RITE
17 miniFit receivers
19 Measuring the Ear for Correct Receiver length
19 Attaching the Receiver
20 Replacing the Receiver Unit
20 Attaching the Ear Grip (60 and 85 receivers only)
21 Inserting & Placing the Device on the Ear
22 Service & Maintenance
Sensei in Genie 26 Cable Overview
26 Connecting the Programming Module to BTE and RITE
27 nEARcom
27 ExpressLink
28 Navigating in Genie
28 Family Step - Select Family
29 Selection Step - Select Instruments
30 Selection Step - Receiver Selection
32 Selection Step – Acoustics
33 Selection Step – Detect
34 Selection Step - Pediatric Settings
36 Fitting Step
38 Fitting Step - Automatics
Oticon Sensei Success Manual (Inium Platform Instruments)
Table of Contents
TABLE OF CONTENTS THE SENSEI FAMILY WORKING WITH SENSEI SENSEI IN GENIE CONNECTLINE

Oticon Sensei Success Manual
40 Fitting Step - Other Fitting Tools
44 Fitting Step - EasyRECD™
50 Fitting Step - Program Manager
51 End Fitting
52 End Fitting - Buttons & Indicators
53 End Fitting - SmartFit Trainer™
54 Phone & DAI/FM
55 End Fitting - VoicePriority i™ and FM
56 End Fitting - Streamer Pro & FM
57 End Fitting - Printout
58 End Fitting - Validation Tools
ConnectLine 64 One Connectivity System to Empower All
Your Pediatric
65 Fitting ConnectLine in Genie
66 Fine Tuning ConnectLine
67 The Phone Tab
68 The Microphone Tab
69 The TV Tab
70 The Audio Tab
71 The FM Tab
72 The Telecoil Tab
73 Streamer Settings
74 The Configuration Tab
76 The Firmware Upgrade Tab
CONNECTLINE

The Sensei Family
TABLE OF CONTENTS
4
THE SENSEI FAMILY WORKING WITH SENSEI SENSEI IN GENIE CONNECTLINE

The Sensei Family
6 Introducing Sensei
7 Fitting Ranges
8 New miniFit Receiver system
9 New Corda miniFit system
9 Fitting Rationales
10 Feature Overview: SenseiPro and Sensei
11 Feature Style Quick Overview
12 Style and Color Overview
5
Oticon Sensei Success ManualCONNECTLINE

Introducing Sensei Oticon Sensei is built on the new Inium platform and is our best performing hearing solution for children, employing our finest technologies and audiology. As a result, we believe Sensei sets an entirely new standard for pediatric fittings. Sensei combines revolutionary audiological features with a robust design. This ensures the unique needs of all children, from infants to teens, are met. Sensei models include a RITE style BTE with three receiver options, and two BTE styles compatible with Corda miniFit .
Sensei is suitable for children with mild to severe hearing losses.
The advanced sound processing includes Speech Guard E, VoicePriority i and 10 kHz fitting bandwidth. Features that promote a better fitting include EasyRECDTM and SmartFit Train-erTM. A dedicated pediatric fitting mode makes fitting Sensei and adhering to best practice guidelines even more intuitive.
TABLE OF CONTENTS
6
THE SENSEI FAMILY WORKING WITH SENSEI SENSEI IN GENIE CONNECTLINE

Fitting Ranges
The fitting illustrations show all the possible fitting levels found across the complete style range.
The number refers to the maximum fitting level obtained by the instrument style related to the fitting range*. When an instrument is selected in Genie, its fitting level is always shown.
* For RITE styles, the maximum fitting level is calculated using the VAC rationale. Refer to the fitting illustration for calculating the fitting level using the DSL rationale.
RITE The grey area represents fitting range using a custom mold, bass and power Dome
The area marked by a thick line for the 60 and 85 receivers represents open Dome fitting range.
BTE The solid grey area represents custom mold (graph marked ‘75’ refers to BTE 312; ‘90’ graph represents the BTE 13 model). The area marked by a thick line represents Corda miniFit.
7
Oticon Sensei Success ManualCONNECTLINE

New miniFit Receiver System
For Sensei RITE instruments, the new miniFit receiver system is available. It contains three different receiver types with different output levels (i.e. fitting levels) which enable the creation of three different output levels from the instrument style.
The miniFit receivers are labeled according to their fitting level and called 60, 85 and 100. These fitting levels are based on the VAC rationale. If used with the DSL rationale, the fitting levels are closer to 50, 75 and 80.
A range of flexible custom solutions are available for the highest power receiver.
CAUTION: It is critical that the Receiver Fitting Level selected in the programming step matches the receiver attached to the actual instrument. If not, the output level of the instrument will not match the programmed settings and may cause damage to the child’s hearing.
RITE and Corda should not be fit to children 0 – 36 months. Detachable parts such as miniFit domes could represent a choking hazard.
TABLE OF CONTENTS
8
THE SENSEI FAMILY WORKING WITH SENSEI SENSEI IN GENIE CONNECTLINE

New Corda miniFit System
Corda MiniFit Corda MiniFit tubes come in two sizes: 0.9 mm and 1.3 mm. Thin (0.9 mm) Corda tubes should only be used with Sensei BTE 312.
Power (1.3 mm) Corda tubes should only be used with Sensei BTE 13. CAUTION: RITE and Corda should not be fit to children 0 – 36 months. Detachable parts such as miniFit domes could represent a choking hazard
Fitting Rationales
Oticon Sensei has a range of fitting rationales available. These include DSL v5.0a Pediatric and Adult, NAL NL1 and NAL NL2. There are 10 frequency shaping bands in the Sensei Pro, and 8 available in the Sensei. There are also gain adjustments for soft, moderate and loud inputs.
If performing test box or real ear measurements, it is easy match prescribed targets using the precise fine tuning tools.
9
Oticon Sensei Success ManualCONNECTLINE

Feature Overview: SenseiPro and Sensei
Feature Style Overview
Feature Sensei Pro Sensei
Speech Guard E Yes No
SmartFit Trainer Yes No
Easy RECD Yes No
VoicePriority i Yes Yes
Inium feedback shield Yes Yes
Binaural Synchronization (automatics)
Yes No
Binaural Coordination (Push button)
Yes Yes
Noise Management TriState TriState
Adaptive Directionality Multi band Single band
Power Bass Yes No
Music Widening Yes No
Fitting bands 10 8
Soft, Moderate and Loud gain adjustment
Yes Yes
FM compatibility filter Yes Yes
FM Super Silencer Yes Yes
TABLE OF CONTENTS
10
THE SENSEI FAMILY WORKING WITH SENSEI SENSEI IN GENIE CONNECTLINE

Feature Style Quick Overview
Feature RITE BTE 13 BTE 312
Rationales DSL v5.0a PediatricsDSL v5.0a AdultNAL-NL1NAL-NL2
DSL v5.0a PediatricsDSL v5.0a AdultNAL-NL1NAL-NL2
DSL v5.0a PediatricsDSL v5.0a AdultNAL-NL1NAL-NL2
T-Coil Yes Yes Yes
Auto Phone Yes Yes Yes
Push Button Yes Yes Yes
Volume control Yes Yes Yes
ConnectLine Yes Yes Yes
FM/DAI Yes Yes Yes
Battery Size 312 13 312
11
Oticon Sensei Success ManualCONNECTLINE

Style and Color Overview
TABLE OF CONTENTS
12
THE SENSEI FAMILY WORKING WITH SENSEI SENSEI IN GENIE CONNECTLINE

Color Overview
Sensei Power Flex Molds
13
Oticon Sensei Success ManualCONNECTLINE

Working With Sensei
TABLE OF CONTENTS
14
THE SENSEI FAMILY WORKING WITH SENSEI SENSEI IN GENIE CONNECTLINE

Working With Sensei
16 Customizing the RITE
17 miniFit receiver
19 Measuring the Ear for Correct Receiver Length
19 Attaching the Receiver
20 Replacing the Receiver Unit
20 Attaching the Ear Grip (60 and 80 receivers only)
21 Inserting & Placing the Device on the Ear
28 Service and Maintenance
15
Oticon Sensei Success ManualCONNECTLINE

Customizing the RITE
To get the best performance, best cosmetics and most comfortable fit, consider the following:
• Determine whether the RITE is the best style solution based on age of the child, features, handling and cosmetics.• Select correct Receiver specifications including fitting level and unit length.• Select correct dome size or whether a custom mold is needed.• Ensure proper insertion of the Receiver in the canal when placing the instrument on the ear.• Use of the ear grip for retention is available with the 60 Receiver if required.• NOTE: The ear grip is not available with the 85 or 100 Receiver.• Use the tamper resistant battery door, or the Switch Free accessory. Switch Free replaces the push button with a plastic insert.
NOTE: RITE styles are not recommended for children 0-36 months.
RITE The grey area represents fitting range using a custom mold, bass and power DomeThe area marked by a thick line for the 60 and 85 receivers represents open Dome fitting range.
TABLE OF CONTENTS
16
THE SENSEI FAMILY WORKING WITH SENSEI SENSEI IN GENIE CONNECTLINE
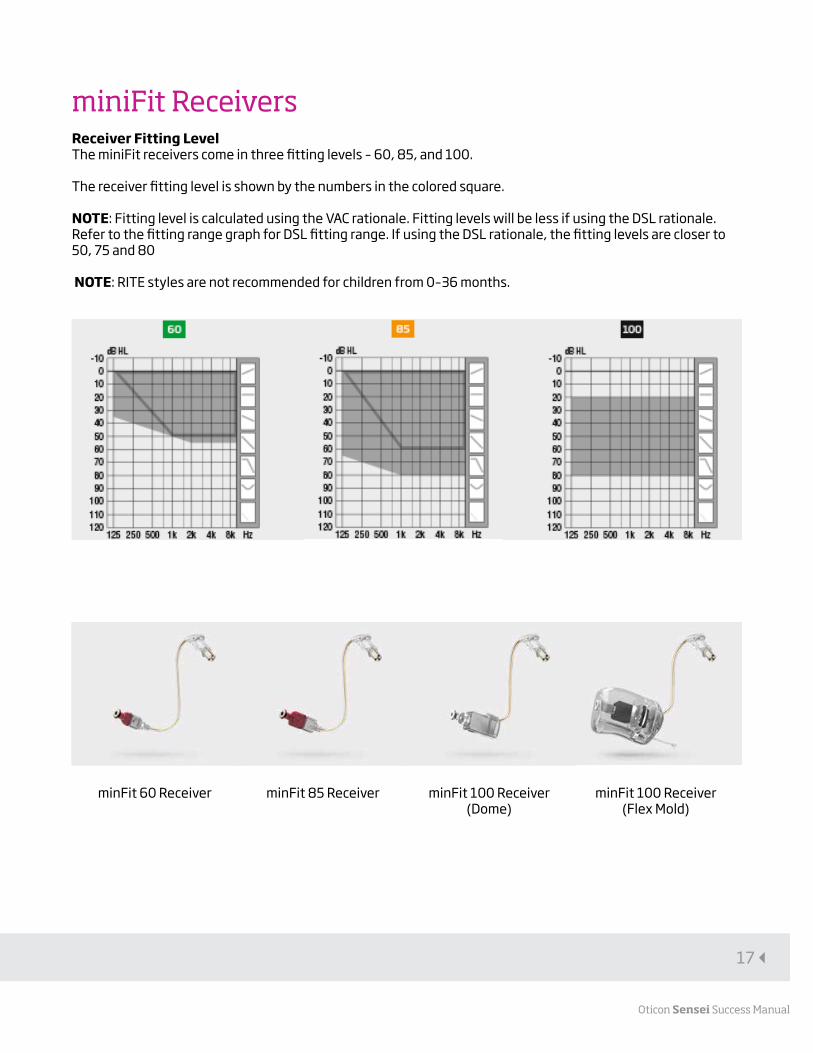
miniFit Receivers
Receiver Fitting Level The miniFit receivers come in three fitting levels – 60, 85, and 100. The receiver fitting level is shown by the numbers in the colored square. NOTE: Fitting level is calculated using the VAC rationale. Fitting levels will be less if using the DSL rationale. Refer to the fitting range graph for DSL fitting range. If using the DSL rationale, the fitting levels are closer to 50, 75 and 80
NOTE: RITE styles are not recommended for children from 0–36 months.
minFit 60 Receiver minFit 85 Receiver minFit 100 Receiver (Dome)
minFit 100 Receiver (Flex Mold)
17
Oticon Sensei Success ManualCONNECTLINE

Receiver Length Five receiver lengths are available for the three receiver fitting levels, 60, 85 and 100. Number 1 is the shortest and 5 is the longest. The length is marked with a number on the receiver. The lengths most commonly used for children are size 1, and 2. The 60 and 85 Receivers are also available in a sixth length, size 0 version for children with small ears.
NOTE: RITE styles are not recommended for children 0-36 months.
Receiver Markings The Receiver tip is color coded red (right) or blue (left) to indicate which ear the device must be used for. The number indicates the length of the Receiver.
TABLE OF CONTENTS
18
THE SENSEI FAMILY WORKING WITH SENSEI SENSEI IN GENIE CONNECTLINE

Measuring the Ear for Correct Receiver Length
Attaching the Receiver
The Receiver attachment to the hearing instrument is the same for all three Receiver types. Insert the Receiver into the shell until it snaps into place.
CAUTION: Sensei RITE instruments must only be fitted with miniFit receivers (type 60, 85 and 100). Do not use previous generation receivers with Sensei instruments. Do not mix receivers with Agil, Acto or Ino instruments.
The packaging for miniFit receiver is black to clearly indicate that they are the new type receivers.
The correct measurement corresponds to the middle of the ear canal as shown us-ing the measuring tool. The measurement is the same for all domes and custom earpieces.
The goal is for the Receiver to sit comfort-ably and be hidden in the ear canal, and for the wire to be flush with the head.
1 2 3
19
Oticon Sensei Success ManualCONNECTLINE

Replacing the Receiver Unit
The best way to replace the Receiver is by using the Multi Tool with the dedicated extension point. The extension point is placed on the tip.
Press the Receiver locking lever through the hole to release the Receiver unit and gently pull the Receiver unit out.
Attaching the Ear Grip (60 & 80 Receivers Only)
The Ear Grip can be used for better receiver retention when using the 60 or 85 receivers. The Ear Grip is designed to work for either the right or left ear.
Attaching the Ear Grip Slide the ear grip onto the Receiver. Make sure the Ear Grip is turned the right way – stopping at the locking point when a click is felt. Then the dome can placed on the receiver.
If the Ear Grip is too long in the concha it may be trimmed. Use caution not to leave a pointed end as this may irritate the ear.
Removing the Ear Grip Remove the dome. Slide the Ear Grip off the front of the receiver.
TABLE OF CONTENTS
20
THE SENSEI FAMILY WORKING WITH SENSEI SENSEI IN GENIE CONNECTLINE

Inserting & Placing the Device on the Ear
1. Insert the earpiece into the ear canal.
2. Place the hearing device behind the ear. The Receiver Unit with the correct earpiece should be placed far enough into the canal so that the wire lies flush with the child’s head. When looking at the child face-to-face you should not see the Receiver wire sticking out.
3. If necessary, add the ear grip for extra retention when using the 60 or 85 Receivers.
1 2 3
21
Oticon Sensei Success ManualCONNECTLINE

Service & Maintenance
miniFIT Domes A wax filter is integrated into all types of miniFit Domes. The domes must be replaced regularly or whenever needed.
Replacing the dome 1. Take off the old Dome using your fingernail. 2. Push the new Dome onto the Receiver. 3. Give it a push to secure it safely.
Make sure that child/family have extra domes when relevant.
Damper The Damper is placed in the hook on BTE 13 instruments.
It mainly works as an acoustic filter, shaping the frequency response, but also has the function of preventing moisture and cerumen from entering into the instrument.
If there is no sound in the instrument or the sound output is reduced, it may be caused by a clogged Damper and it must be replaced.
Replace the Damper as shown. Note: The Damper is not used with any other BTE instruments.
1 2 3
TABLE OF CONTENTS
22
THE SENSEI FAMILY WORKING WITH SENSEI SENSEI IN GENIE CONNECTLINE

ProWax Wax protection system for:• Custom instruments• Power Receiver Molds• miniFit LiteTips• miniFit Micro Molds Replace the wax filter if it is clogged or if there is no sound in the instrument.
ProWax miniFit Wax protection system for:• 60, 85 and 100 miniFit receivers Replace the wax filter if it is clogged or if there is no sound in the instrument.
23
Oticon Sensei Success ManualCONNECTLINE

Sensei In Genie
TABLE OF CONTENTS
24
THE SENSEI FAMILY WORKING WITH SENSEI SENSEI IN GENIE CONNECTLINE

Sensei in Genie
26 Cable Overview
26 Connecting the Programming Module to BTE and RITE
27 nEARcom
27 ExpressLink
28 Navigating in Genie
28 Family Step - Select Family
29 Selection Step - Select Instruments
30 Selection Step - Receiver Selection
32 Selection Step - Acoustics
33 Selection Step – Detect
34 Selection Step - Pediatric Settings
36 Fitting Step
38 Fitting Step – Automatics
40 Fitting Step - Other Fitting Tools
44 Fitting Step - EasyRECD™ i
50 Fitting Step - Program Manager
51 End Fitting
52 End Fitting - Buttons & Indicators
53 End Fitting -SmartFit Trainer™
54 End Fitting -Phone & DAI/FM
55 End Fitting -VoicePriority i™ and FM
56 End Fitting -Streamer Pro & FM
57 End Fitting -Printout
58 End Fitting -Validation Tools
25
Oticon Sensei Success ManualCONNECTLINE

Cable Overview Oticon Sensei is programmed using the Genie fitting software 2013.2 (or newer) which is compatible with NOAH 3.0 and NOAH 4.0. You will also need the Oticon programming cable #3 (right and left).
The drawings show how to connect the different styles when fitting hearing instruments with cables
The programming cable is attached to one of the three available programming devices: • HI-PRO • NOAHlink/nEARcom • Express Link
Connecting the Programming Module to BTE and RITE 1. Open the battery door on the instrument and slide the programming module into the guide as shown. Insert a fresh battery.
2. Close the battery door and attach the programming cable.
The grey EasyRECD™ programming module must be used to access the EasyRECD™ tool.
If EasyRECD™ will not be performed, the white programming module can be used.
TABLE OF CONTENTS
26
THE SENSEI FAMILY WORKING WITH SENSEI SENSEI IN GENIE CONNECTLINE

nEARcom For greater flexibility and comfort use nEARcom without cables to fit Oticon Sensei instruments.
NOTE: The EasyRECD feature cannot be accessed if nEARcom is used without cables.
Detect the instruments 1. Switch on the instruments using fresh batteries. 2. Place nEARcom on the table and place the instruments in the middle of the neck loop.3. Click Detect for cordless programming.
ExpressLink 1. Attach the USB B to the ExpressLink and connect it to the PC with the USB A as shown in the picture.
2. Attach the programming cables to the right and left connections on the ExpressLink.
Detect the instruments1. Switch the instruments on using fresh batteries. (Note that the miniBTE must be programmed without batteries.)
2. Attach the cables to the hearing instruments and ensure that ExpressLink is selected as programming unit in Genie.
3. Click ‘Detect’ to connect the instruments to Genie.
Instruments which have never been programmed must be assigned to the correct side – left and right – in Genie. Use a BEEP test as follows: To identify the instrument, place it in the middle of the neck loop and click ‘Beep’. The instrument will beep for 6 seconds.
While the instrument is beeping, remove it from nEARcom and listen to it.
If the instrument does not beep, return it to the middle of the neck loop, click the ‘Change side icon’ between the boxes with the detected instruments and click the same ‘Beep’. Listen to the instrument again.
Click ‘Continue’ and proceed with the programming.
27
Oticon Sensei Success ManualCONNECTLINE

Navigating in Genie The Organizer - horizontal navigation
Main programming steps
1. Child: Appears only when running Genie as a stand-alone application. 2. Counseling : Takes you to e-caps Pro if you have the program installed. 3. Family: Selection of all hearing instrument families. 4. Selection: Selection of instrument styles and features and entering of personal data. 5. Fitting: Viewing, optimizing, and fine tuning of personal settings. 6. End Fitting: Verifying and setting user operated buttons and linking and personalizing Streamer(s). Task Pane – Vertical NavigationWithin each Organizer step, there is a Task Pane that gives access to tools and links related to where you are in the fitting process.
Family Step - Select Family • Click Detect - if nEARcom is being used, choose between cabled or wireless detection• Genie will display what has been detected• Click Continue - Genie will take you to the Selection screen Note : If you are only fine tuning, click Fitting in the organizer panel after entering the Selection screen
TABLE OF CONTENTS
28
THE SENSEI FAMILY WORKING WITH SENSEI SENSEI IN GENIE CONNECTLINE

Selection Step - Select Instruments Oticon Sensei comes in BTE and RITE styles (Receiver In The Ear).
Oticon Sensei has a number of options. Not all options are available in all styles.
When style is selected, only the features available in that style will be visible. If a style has not been selected, select the relevant features wanted and Genie will display available instruments that match the criteria. The available features are: • Fitting Level • Battery size • Telecoil • Volume Control • Pushbutton • Auto Phone • Directionality • Cordless • Streamer
29
Oticon Sensei Success ManualCONNECTLINE

Selection Step - Receiver Selection Receiver fitting levels will be displayed when a RITE instrument is selected.
Select the fitting level that matches the child’s audiogram. Make sure the fitting level selected in Genie is identical to the fitting level of the physical receiver connected to the hearing instrument. If the selected and the actual fitting level do not match the output level of the instrument will not match the programmed settings and may cause damage to the child’s hearing. NOTE: Fitting levels on the receiver packaging are calculated using the VAC rationale. Fitting range graphs are calculated using the DSL rationale. Use the graph rather than the printed fitting level when selecting the appropriate receiver unit.
TABLE OF CONTENTS
30
THE SENSEI FAMILY WORKING WITH SENSEI SENSEI IN GENIE CONNECTLINE

NOTE: Fitting levels on the receiver packaging are cal-culated using the VAC rationale. Fitting range graphs are calculated using the DSL rationale. Use the graph rather than the printed fitting level when selecting the appro-priate receiver unit.
31
Oticon Sensei Success ManualCONNECTLINE

Selection Step - Acoustics The Acoustics tool allows you to define the ear mold characteristics.
Use the drop-down menus to select Hook/ Corda , Tubing, Vent size, and Domes. Make sure to Represcribe Settings in the bottom of the Acoustics screen for Genie to take the actual acoustics into account when calculating settings. NOTE: Sensei BTE instruments come with the damped adult ear hook by default. Only change this if the damper is removed. NOTE: The SmartFit Trainer feature is only available for closed vents with BTE instruments.
TABLE OF CONTENTS
32
THE SENSEI FAMILY WORKING WITH SENSEI SENSEI IN GENIE CONNECTLINE

Selection Step - Detect Clicking on the detect icon, either in the Selection Step or the Family Step, creates a connection between the instruments and Genie.
A number of pop-up screens will appear during the connection process.
WARNINGThe following warning may appear after you select Detect.
If the age of the child you are fitting is 0 – 36 months, Corda or RITE instruments should not be used.
These styles contain detachable parts that may rep-resent a choking hazard.
When fitting a child 0 – 36 months, the tamper resis-tant battery door should always be installed.
WARNING The following warning may appear after you select Detect.
When fitting a power instrument, ensure that the settings are appropriate for the child’s audiogram. A hearing instrument that is too loud, can cause damage to the child’s residual hearing.
33
Oticon Sensei Success ManualCONNECTLINE

Selection Step - Pediatric Settings
The Pediatric Settings dialog will appear after the hearing instruments have been detected.
The Pediatric default settings can be personalized. Use the Preferences dialog to specify your preferred setup. Go to Preferences, Edit Preferences, Fitting Defaults, Pediatric Settings.
This step only needs to be completed once when setting up Genie. Changes to prefer-ences will be saved when you click OK and applied the next time you log on.
TABLE OF CONTENTS
34
THE SENSEI FAMILY WORKING WITH SENSEI SENSEI IN GENIE CONNECTLINE

The Pediatric settings can be seen at any time in the fitting by selecting Show Pediatric Settings.
This will show the default preferences, as well as the current settings in the left and right hearing instruments.
35
Oticon Sensei Success ManualCONNECTLINE

Fitting Step
The connection bar indicates whether the instrument is either: • Not connected (grey) • Connected - Genie settings have been changed but not saved in the instrument (yellow) • Connected - Genie settings have been programmed and saved in the instrument (green)
The Adaptation Manager always defaults to level 3 in Pediatric fittings. Changing steps affects gain, compression and the frequency response.
ControlsSensei Pro instruments can be fine-tuned in each of 10 independent frequency channels. Sensei has 8 frequency channels available.
Soft (45 dB SPL), Moderate (65 dB SPL) and Loud (80 dB SPL) input levels are all adjustable. Select each frequency control by clicking the corresponding button in the table. By select-ing All, all gain controls will be selected. Adjust the gain controls in 1 dB steps in the selected fields.
The colors of the control values are blue (left) and red (right) when the device is at prescribed settings. If the control value is no longer at prescribed settings, the value turns black.
By clicking the arrows on top of the control panels, the frequency bands will condense into three regions: Low frequency (LF), Mid frequency (MF), and High frequency (HF).
TABLE OF CONTENTS
36
THE SENSEI FAMILY WORKING WITH SENSEI SENSEI IN GENIE CONNECTLINE

MPO control MPO can also be displayed by default. This is setup in Preferences, Edit Preferences, Customize Software, All Channels plus MPO.
Reserve Gain The VC Reserve Gain displays the volume range between the preferred level and the in-strument’s possible maximum gain in the range of 0-10 dB, at 2.5 dB steps. To modify the Reserve Gain, adjust the instrument’s gain or change the feedback limit.
The volume control range is 30 dB: -20 dB to maximum + 10 dB from the preferred level.
The volume control can be disabled in End Fitting> Buttons and Indicators> Volume Control.
Compression Ratios Click on the CR button between the right and left graphs to check the compression ratio.
The compression ratios change when the Soft, Moderate and Loud gain values are changed.
37
Oticon Sensei Success ManualCONNECTLINE

Fitting Step - Automatics
In the Automatics tool you can enable or disable the Automatics in Oticon Sensei instruments.Multiband Adaptive Directionality (Dir mode) is designed to provide benefit from directionality in situations where the Speech-to-Noise ratio can be improved. Through Binaural Broadband, the Multiband Adaptive Directionality in Oticon Sensei Pro is synchronized between right and left hearing instruments.
Surround Mode is designed to provide the best balance between spatial awareness of surrounding sounds and trying to emulate the natural pinna effect. Opti Omni is an omni-di-rectional mode which resembles the front-focused listening of the natural ear. Speech Omni has a more distinct front focus for better front/back segregation to help focus more on the speaker in front.
TABLE OF CONTENTS
38
THE SENSEI FAMILY WORKING WITH SENSEI SENSEI IN GENIE CONNECTLINE

Noise Reduction activates TriState Noise Management. This applies noise reduction based on the acoustical environment. Acoustic environments are classified into 3 states: 1. Speech only 2. Speech in noise 3. Noise only Binaural Broadband is available for Oticon Sensei Pro and controls the synchronization and coordination between the two hearing instruments. Synchronization refers to Directional Microphone function and Noise Reduction. Coordination refers to the program switch and volume control.
Binaural Broadband is set to on by default for binaural Sensei Pro fittings.
NOTE: if disabled this will also disable the binaural coordination of push button operations. For Sensei instruments, binaural coordination for program switch, volume control and mute function can be accessed in End Fitting> Buttons and Indicators.
39
Oticon Sensei Success ManualCONNECTLINE

Fitting Step - Other Fitting Tools
Feedback ManagerThe greater the gain (and hearing loss), the higher the risk of feedback. The Feedback Manager in Genie sets the gain response with a suitable feedback limit to prevent feedback. This tool allows you to measure, adjust and monitor feedback limits as well as compare previous and current feedback limits.
The feedback measurement is run from P1. The feedback limits will be applied to all programs in the hearing instrument.
When you go back to Controls in the Fitting step, the current feedback limits will be available at the curves displaying ‘Insertion Gain’ and ‘Gain, 2cc’ when clicking on the Show feedback limit button between the right and the left graphs (marked with a musical note).
TABLE OF CONTENTS
40
THE SENSEI FAMILY WORKING WITH SENSEI SENSEI IN GENIE CONNECTLINE
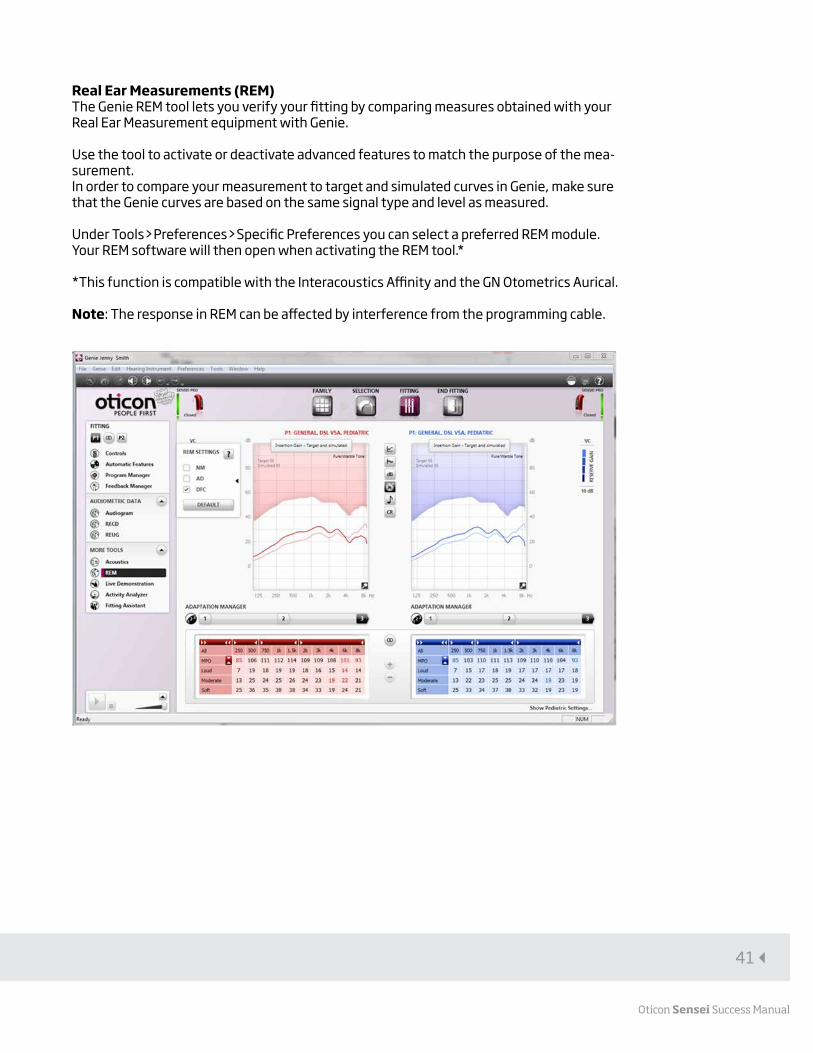
Real Ear Measurements (REM)The Genie REM tool lets you verify your fitting by comparing measures obtained with your Real Ear Measurement equipment with Genie.
Use the tool to activate or deactivate advanced features to match the purpose of the mea-surement.In order to compare your measurement to target and simulated curves in Genie, make sure that the Genie curves are based on the same signal type and level as measured.
Under Tools>Preferences>Specific Preferences you can select a preferred REM module. Your REM software will then open when activating the REM tool.*
*This function is compatible with the Interacoustics Affinity and the GN Otometrics Aurical.
Note: The response in REM can be affected by interference from the programming cable.
41
Oticon Sensei Success ManualCONNECTLINE

Live DemonstrationThe Live Demonstration Tool can be used to demonstrate the hearing instrument’s amplification, directionality, and noise management. Using the Live tool with parents can help them better understand how hearing instrument features work.
Activity AnalyzerActivity Analyzer displays instrument usage and environmental data. At a follow-up visit, the Activity Analyzer can be opened.
The tool is organized into 5 tabs:
1. Summary provides an overview of the usage and personal data.
2. Usage displays total instrument usage divided between programs.
3. Volume control is active for instruments with a volume control and analyses its use.
4. Signal processing summarizes the over-all sound levels for all general programs.
5. Configuration: Under Configuration you can disable Activity Analyzer.
TABLE OF CONTENTS
42
THE SENSEI FAMILY WORKING WITH SENSEI SENSEI IN GENIE CONNECTLINE

Fitting AssistantThe Fitting Assistant is a tool used if fine-tuning should be needed at the fitting or follow-up visit.
To operate the Fitting Assistant, select the tab that expresses the child’s complaint/parental observations and then a control (such as Loudness). Click the control to adjust it.
The adjustments made in the Fitting Assistant are immediately visible in the graphs. When you open the tool in the future, you can see how far from the starting point (the middle) the controls have been moved.
The Fitting Assistant can be used individually for each program in the instrument.
43
Oticon Sensei Success ManualCONNECTLINE

Fitting Step - EasyRECD™
EasyRECD™ is used to include the child’s individual ear canal acoustics into the hearing instrument fitting.
Taking into account the individual ear acoustics of the child provides the most precise gain prescription. Completing this step ensures precise correction factors are applied to the DSL gain prescription.
If this step is not completed, a predicted RECD measurement can be used, or an RECD measurement from external equipment can be directly imported.
Play the video to learn more about EasyRECD™.
TABLE OF CONTENTS
44
THE SENSEI FAMILY WORKING WITH SENSEI SENSEI IN GENIE CONNECTLINE

EasyRECD™ Open the EasyRECD™ tool and select Measure EasyRECD™.
EasyRECD™ is divided into 3 steps: 1. Calibrate 2. Measure 3. Finish
NOTE: In binaural fittings, the EasyRECD™ can be measured on both ears. Alternatively, the EasyRECD™ can be measured on one ear, and then transferred over to the alternative ear.
45
Oticon Sensei Success ManualCONNECTLINE

Help is available with the EasyRECD™ process.
Select How do I assemble the equipment? for a photographic instruction guide.
Select Show me detailed video for additional information.
TABLE OF CONTENTS
46
THE SENSEI FAMILY WORKING WITH SENSEI SENSEI IN GENIE CONNECTLINE

EasyRECD™ - Calibrate Step The Calibrate Step calibrates the Easy Probe Tube with the EasyRECD™ programming module and hearing instrument.
Connect the equipment as shown in the photographs. Ensure noise levels remain below the red indicator level during the calibration process.
NOTE: In binaural fittings, the EasyRECD™
can be measured on both ears. Alterna-tively, the EasyRECD™ can be measured on one ear, and then transferred over to the alternative ear. If EasyRECD™ will be measured binaurally, the calibration process must be complet-ed on both left and right ears.
47
Oticon Sensei Success ManualCONNECTLINE

EasyRECD™ - Measure Step The grey thick line and shaded area show the predicted RECD™ and typical measurement range for the child’s age.
Assemble the equipment as shown. See the How do I insert the equipment? photographs and video for more detailed information.
TABLE OF CONTENTS
48
THE SENSEI FAMILY WORKING WITH SENSEI SENSEI IN GENIE CONNECTLINE

When the equipment is correctly placed and the noise levels are below the red indicator line, press Start .
EasyRECD™ - Finish Step When the measurement is complete, select Finish.
Remove the equipment and select Finish at the bottom on the screen.
The following dialog will appear if the EasyRECD™ measurement is applied to the fitting and settings are recalculated.
Selecting YES applies the EasyRECD™ measurement to the fitting.
49
Oticon Sensei Success ManualCONNECTLINE

Fitting Step - Program Manager
Fitting Step - Program Manager In the Program Manager you can activate, configure, delete, and change the order of the programs. For general programs you can choose between and, NAL-NL1, NAL NL2, DSL v5a Pediatric and DSL v5a Adult.
PhoneTwo phone programs exist, Microphone (M) or Telecoil (T). Choose whether you want to activate the phone program on the left or right ear
MusicA Music program can be added for more natural music perception. This program turns off some of the automat-ics that can potentially impact the dynamics of music.
DAI and FMRITE and BTE instruments are compatible with DAI and FM shoes. When a DAI or FM shoe is attached to the instrument, the program automatically changes to DAI/FM+M.
When a DAI shoe or FM receiver is connected and the program switch is deactivated, only DAI+M/ FM+M (default) or FM only is available.
Important:If you want to provide access to more than one program when using FM and/or DAI, remember to uncheck “Automatically deactivate program switch when attaching DAI/FM shoe” in the End Fitting > Phone and Accessories > DAI/FM screen. ConnectLine If you are fitting Oticon Sensei with ConnectLine , adjustments to ConnectLine programs are done in the End Fitting step.
TABLE OF CONTENTS
50
THE SENSEI FAMILY WORKING WITH SENSEI SENSEI IN GENIE CONNECTLINE

End Fitting
Use this step to finalize the fitting session with your Pediatric child. The “End Fitting” step covers all tools re-lated to user operation of the instrument as well as Streamers. In this step you can see all relevant information about the current fitting, complete your programming of the instrument and exit Genie.
The Save and Exit screen contains information about Oticon Sensei instruments. It also gives you the oppor-tunity read the Streamer serial number. To link a Streamer to the instruments, click Read serial number and follow the instructions provided on the screen. It is possible to link two Streamers to the same instrument.
Note : If instruments are connected via HI-PRO you cannot use the automatic read-out. Instead, the serial number of the Streamer should be typed. The number is on the back of the Streamer. Click Save, Program and Exit before disconnecting the hearing instruments.
The following pop-up will appear after selecting Save, Program and Exit. Check the boxes to save the fitting in the hearing instruments and in Noah.
51
Oticon Sensei Success ManualCONNECTLINE

End Fitting - Buttons & Indicators
Buttons and Indicators The functionality of the available buttons, volume control, beeps and LED Visual Indicator are defined in this screen. Binaural Coordination links the functionality on both instruments.
TABLE OF CONTENTS
52
THE SENSEI FAMILY WORKING WITH SENSEI SENSEI IN GENIE CONNECTLINE

End Fitting - SmartFit Trainer™
This tool is used to help teach parents how to insert the ear mold into the child’s ear. While the Sensei Pro is testing the ear mold insertion, the LED indicator will remain on. Once a good insertion is achieved, the LED will turn off, and then begin slowly flashing to indicate it is in Program 1.
If a good insertion is not achieved, the LED indicator will blink rapidly for approximately 10 seconds.The LED indicator pattern can be demonstrated to parents by pressing Test
Play the video to learn more about SmartFit™ Trainer.
53
Oticon Sensei Success ManualCONNECTLINE
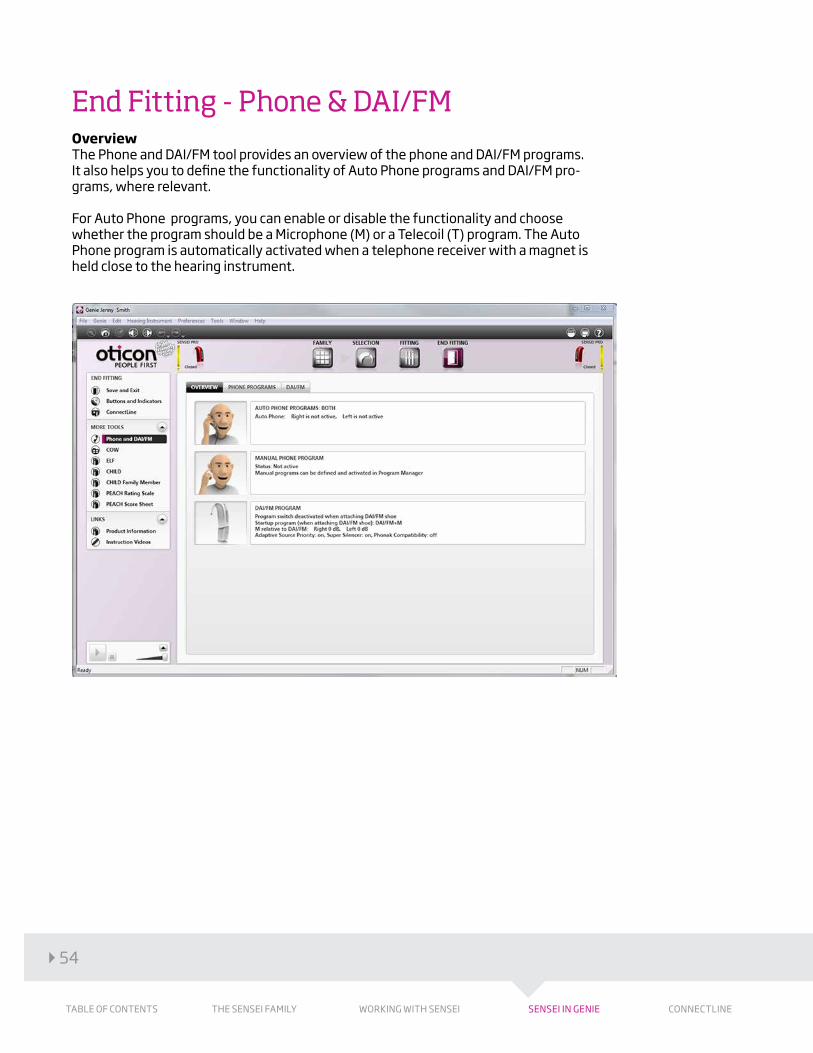
End Fitting - Phone & DAI/FM
Overview The Phone and DAI/FM tool provides an overview of the phone and DAI/FM programs. It also helps you to define the functionality of Auto Phone programs and DAI/FM pro-grams, where relevant.
For Auto Phone programs, you can enable or disable the functionality and choose whether the program should be a Microphone (M) or a Telecoil (T) program. The Auto Phone program is automatically activated when a telephone receiver with a magnet is held close to the hearing instrument.
TABLE OF CONTENTS
54
THE SENSEI FAMILY WORKING WITH SENSEI SENSEI IN GENIE CONNECTLINE

End Fitting - VoicePriority i™ and FM
Overview When an FM receiver us attached to Sensei, an FM program is automatically created.
Select the device that will be used with the hearing instrument, either FM, DAI or both.
NOTE: VoicePriority i should not be activated when used with “Dynamic” FM Receiver and Transmitter combinations if FM transparency measurements have not been completed.
Play the video to learn more about VoicePriority i™.
55
Oticon Sensei Success ManualCONNECTLINE

By selecting Automatically deactivate program switch when attaching DAI/FM shoe, the hearing instrument will also be in the FM or DAI program when the FM receiver or DAI shoe is attached.
FM VerificationThe FM settings have no effect on FM verification measurements.
End Fitting - Streamer Pro & FMA verification mode is available when fitting an FM receiver with Streamer Pro.
By enabling the FM Verification Standard feature, the system is set up to best match the FM frequency response with the hearing instrument microphone frequency response.
Comfort mode gives slightly more bass and a richer listening experience.
The Fuller/ Brighter tabs can be used to make slight adjustments to the Streamer Pro frequency response.
Play the video to learn more about Connectivity.
TABLE OF CONTENTS
56
THE SENSEI FAMILY WORKING WITH SENSEI SENSEI IN GENIE CONNECTLINE

End Fitting - Printout
User instructions can be created. These are useful to give to parents as they describe the hearing instrument set up.
The User instructions are divided into Left and Right and describe Programs, Volume Control, Mute and Warnings. The Beeps are depicted by ♪ , and the LED indicator pattern is indicated with ● .
57
Oticon Sensei Success ManualCONNECTLINE

End Fitting - Validation Tools
6 validation tools are available in Genie. The tools can be used to monitor the child’s progress and can be used as a counseling tool with parents during the hearing rehabilitation process.
COW - The Children’s Outcome Worksheets COW is designed to be used over a short period of time, during the selection and fitting process.
Use it to help work with the specific needs of the child as identified by the child, parents and teachers.
The three COW tabs briefly describe these needs and subsequently determine how well they are addressed by the rehabilitation program.
The COW can be accessed from the task pane in all Organizer steps except Fitting. The COW form consists of two parts: Needs Establishment and Outcome Assessment.
The form can be filled in directly in Genie, and saved. Alternatively it can be printed out.
There are worksheets for the Child, Teacher, and Parents.
TABLE OF CONTENTS
58
THE SENSEI FAMILY WORKING WITH SENSEI SENSEI IN GENIE CONNECTLINE

ELF - Early Listening Function ELF is a hearing discovery tool for parents and caregivers of very young children. It is intended for children 4 months to 3 years. The ELF has been designed to obtain an indication of the functional use of hearing in very young children.
The ELF has three primary purposes: 1. Parent involvement and empowerment 2. Estimating amplification benefit 3. Tracking improvements in auditory detection The purpose of the ELF is to help the parents or caregivers gather information on how the young child uses his or her hearing to detect sounds under various listening situations.
Click ELF in the task pane to access the file. It is located in both the Select Instruments and End Fitting steps, under More Tools.
The file includes explanatory information for your professional purposes as well as questionnaires for you and the parents.
CHILD - Children’s Home Inventory for Listening Difficulties The CHILD is a family-centered tool designed to reveal the commu-nication needs of children within the context of their home environ-ment. It can also be used to monitor how well a child is improving his or her listening skills within the home, which is the primary learning envi-ronment of young children. The CHILD is appropriate for use by families with children who are at a developmental level as low as age 3 to as old as approximately age 12. There is a version for both the child and a family member to complete. The CHILD questionnaire should be completed by family members who know the child’s habits well. There is also a version that the audi-ologist can use for an older child. Click CHILD in the task pane to access the file. It is located in both the Select Instruments and End Fitting steps, under More Tools. The file includes information for your professional purposes as well as questionnaires for you, the parents and child.
59
Oticon Sensei Success ManualCONNECTLINE
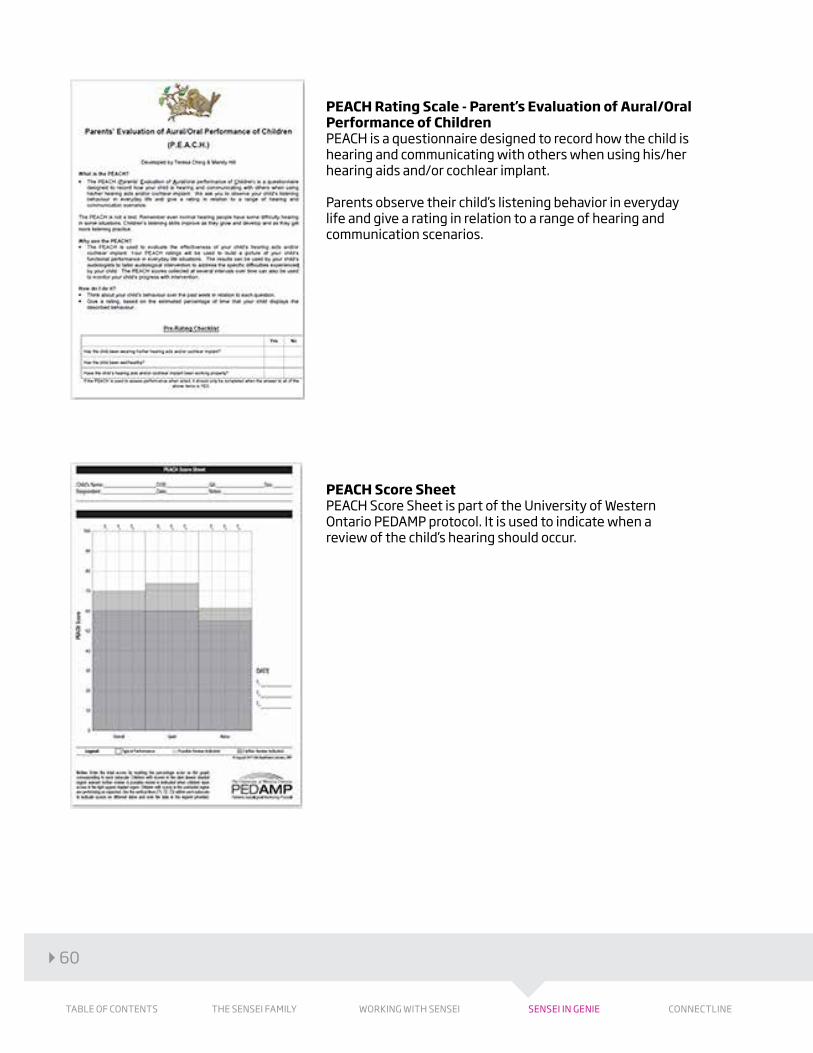
PEACH Rating Scale - Parent’s Evaluation of Aural/Oral Performance of Children PEACH is a questionnaire designed to record how the child is hearing and communicating with others when using his/her hearing aids and/or cochlear implant. Parents observe their child’s listening behavior in everyday life and give a rating in relation to a range of hearing and communication scenarios.
PEACH Score Sheet PEACH Score Sheet is part of the University of Western Ontario PEDAMP protocol. It is used to indicate when a review of the child’s hearing should occur.
TABLE OF CONTENTS
60
THE SENSEI FAMILY WORKING WITH SENSEI SENSEI IN GENIE CONNECTLINE

61
Oticon Sensei Success ManualCONNECTLINE

ConnectLine
TABLE OF CONTENTS
62
THE SENSEI FAMILY WORKING WITH SENSEI SENSEI IN GENIE CONNECTLINE

ConnectLine
64 One Connectivity System to Empower All Your Pediatric Patients
65 Fitting ConnectLine in Genie
66 The Phone Tab
67 The Microphone Tab
68 The TV Tab
69 The Audio Tab
70 The FM Tab
72 The Telecoil Tab
73 Streamer Settings
74 The Configuration Tab
76 The firmware Upgrade Tab
63
Oticon Sensei Success ManualCONNECTLINE
One Connectivity System to Empower All Your Pediatric Patients
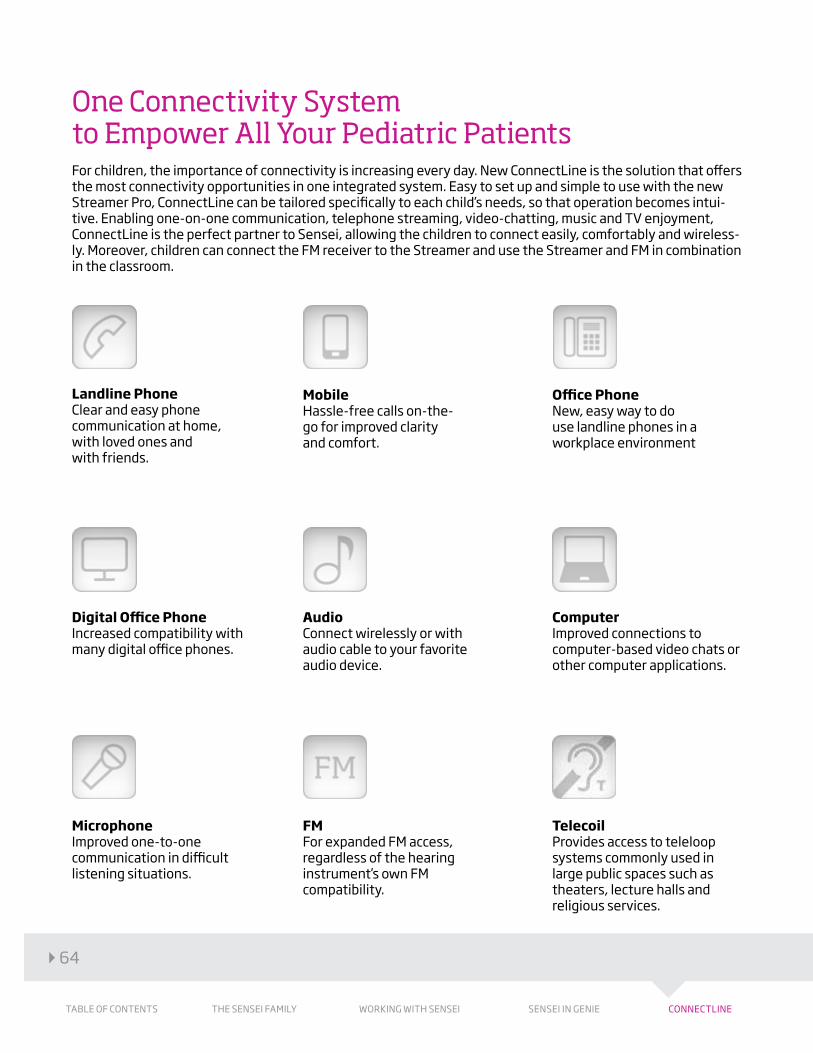
For children, the importance of connectivity is increasing every day. New ConnectLine is the solution that offers the most connectivity opportunities in one integrated system. Easy to set up and simple to use with the new Streamer Pro, ConnectLine can be tailored specifically to each child’s needs, so that operation becomes intui-tive. Enabling one-on-one communication, telephone streaming, video-chatting, music and TV enjoyment, ConnectLine is the perfect partner to Sensei, allowing the children to connect easily, comfortably and wireless-ly. Moreover, children can connect the FM receiver to the Streamer and use the Streamer and FM in combination in the classroom.
Landline PhoneClear and easy phone communication at home, with loved ones and with friends.
Digital Office Phone Increased compatibility with many digital office phones.
Microphone Improved one-to-one communication in difficult listening situations.
Audio Connect wirelessly or with audio cable to your favorite audio device.
FM For expanded FM access, regardless of the hearing instrument’s own FM compatibility.
Computer Improved connections to computer-based video chats or other computer applications.
Telecoil Provides access to teleloop systems commonly used in large public spaces such as theaters, lecture halls and religious services.
MobileHassle-free calls on-the-go for improved clarity and comfort.
Office PhoneNew, easy way to do use landline phones in a workplace environment
TABLE OF CONTENTS
64
THE SENSEI FAMILY WORKING WITH SENSEI SENSEI IN GENIE CONNECTLINE
Fitting ConnectLine in Genie
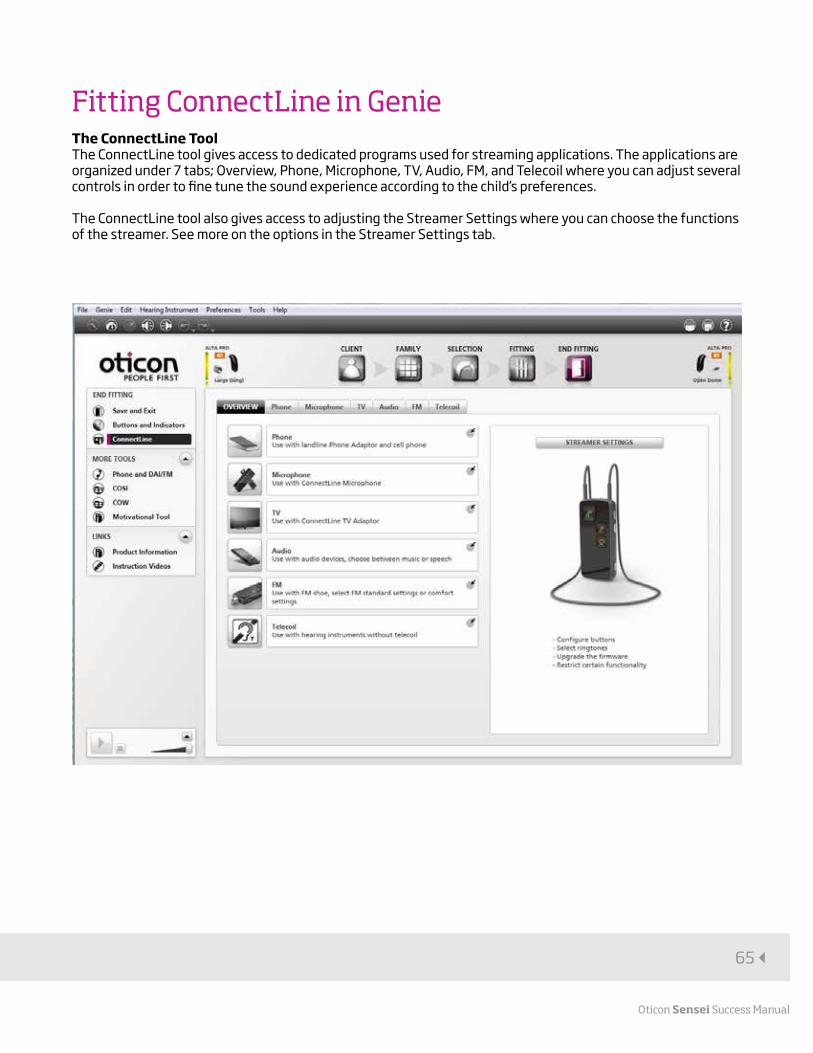
The ConnectLine Tool The ConnectLine tool gives access to dedicated programs used for streaming applications. The applications are organized under 7 tabs; Overview, Phone, Microphone, TV, Audio, FM, and Telecoil where you can adjust several controls in order to fine tune the sound experience according to the child’s preferences.
The ConnectLine tool also gives access to adjusting the Streamer Settings where you can choose the functions of the streamer. See more on the options in the Streamer Settings tab.
65
Oticon Sensei Success ManualCONNECTLINE
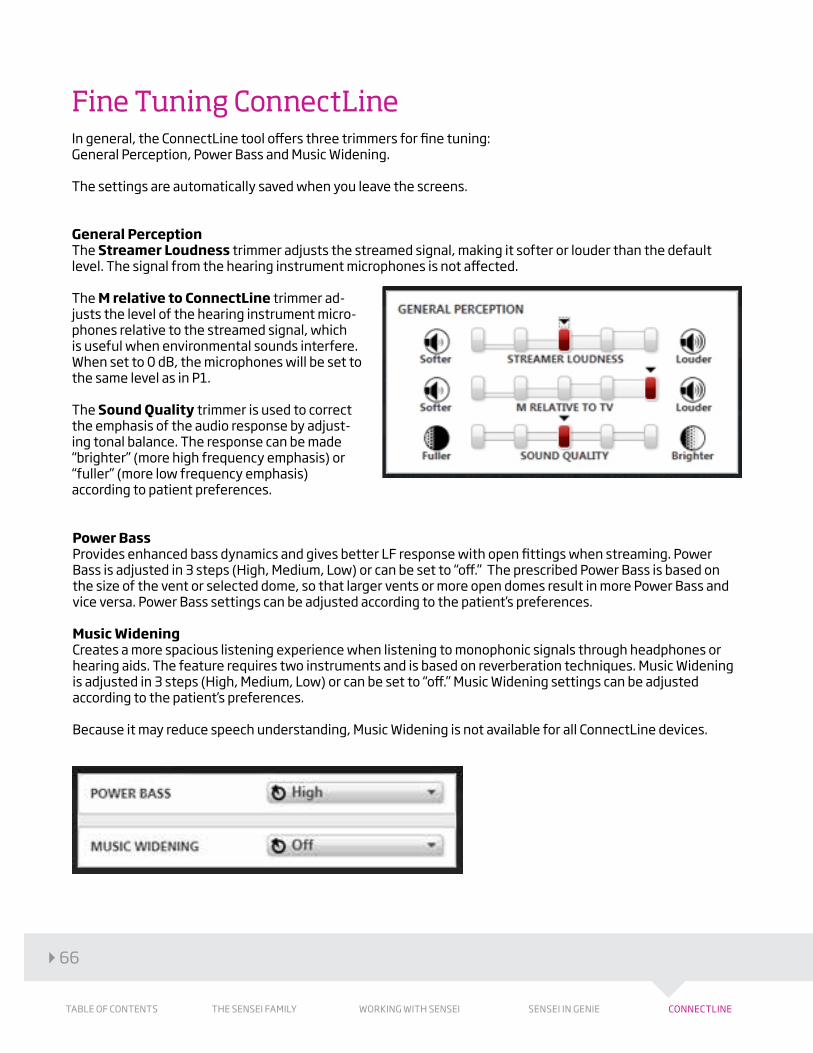
Fine Tuning ConnectLine
In general, the ConnectLine tool offers three trimmers for fine tuning: General Perception, Power Bass and Music Widening.
The settings are automatically saved when you leave the screens.
General PerceptionThe Streamer Loudness trimmer adjusts the streamed signal, making it softer or louder than the default level. The signal from the hearing instrument microphones is not affected.
The M relative to ConnectLine trimmer ad-justs the level of the hearing instrument micro-phones relative to the streamed signal, which is useful when environmental sounds interfere. When set to 0 dB, the microphones will be set to the same level as in P1.
The Sound Quality trimmer is used to correct the emphasis of the audio response by adjust-ing tonal balance. The response can be made “brighter” (more high frequency emphasis) or “fuller” (more low frequency emphasis) according to patient preferences.
Power BassProvides enhanced bass dynamics and gives better LF response with open fittings when streaming. Power Bass is adjusted in 3 steps (High, Medium, Low) or can be set to “off.” The prescribed Power Bass is based on the size of the vent or selected dome, so that larger vents or more open domes result in more Power Bass and vice versa. Power Bass settings can be adjusted according to the patient’s preferences.
Music WideningCreates a more spacious listening experience when listening to monophonic signals through headphones or hearing aids. The feature requires two instruments and is based on reverberation techniques. Music Widening is adjusted in 3 steps (High, Medium, Low) or can be set to “off.” Music Widening settings can be adjusted according to the patient’s preferences.
Because it may reduce speech understanding, Music Widening is not available for all ConnectLine devices.
TABLE OF CONTENTS
66
THE SENSEI FAMILY WORKING WITH SENSEI SENSEI IN GENIE CONNECTLINE

The Phone Tab
The Phone Tab enables fine tuning of the ConnectLine phone and/or cell phone applications. The adjustments are only applied to the instrument’s phone program used for streaming. It is used for all ConnectLine landline phone or cell phone conversations streamed to the patient’s Streamer.
General Perception: M relative to Phone: Typically, the level of the hearing instrument microphone should be lower/softer (-9 dB) than the phone to make it easier to focus on the phone conversation.
67
Oticon Sensei Success ManualCONNECTLINE

The Microphone Tab
The Microphone tab enables fine tuning of the ConnectLine Microphone application.
General PerceptionM relative to Microphone:Typically, the level of the hearing instrument microphone should be lower/softer than the ConnectLine Microphone (-6 dB) to focus on the speaker of interest.
TABLE OF CONTENTS
68
THE SENSEI FAMILY WORKING WITH SENSEI SENSEI IN GENIE CONNECTLINE

The TV Tab
The TV Tab enables fine tuning of the ConnectLine TV application.
General Perception: M relative to TV: Typically, the hearing instrument microphone and the TV should be equal (0 dB offset) to easily hear conversa-tions when watching TV.
Music Widening: For TV listening, Music Widening is set to “off” by default. This is a common pre-defined setting for all hearing loss levels. This is because most TV programs typically contain mostly speech, and Music Widening may com-promise speech understanding.
69
Oticon Sensei Success ManualCONNECTLINE

The Audio Tab
The Audio Tab enables fine tuning of wired input and wireless applications, such as music players.
Music or Speech Select “Music” or “Speech” depending on whether your patient usually listens to music or speech (e.g. audio books, or phone conversations via PC, etc.) with their audio device.
General Perception M relative to Audio: If “Music” is selected, the levels for the hearing instrument microphones and the Audio application should be equal (0 dB offset) in order to hear other relevant information from the surroundings while listening to the Audio device.
If “Speech” is selected, the hearing instrument microphone should be lower/softer than the Audio device (-6 dB) to focus on the speech signal.
Music Widening If “Music” is selected, Music Widening is set by default to Medium but can be changed according to the patient’s perception of or preference for reverb.
If “Speech” is selected, Music Widening is no longer an option.
TABLE OF CONTENTS
70
THE SENSEI FAMILY WORKING WITH SENSEI SENSEI IN GENIE CONNECTLINE

The FM Tab
The FM Tab enables fine tuning of the ConnectLine FM application.
Verification Standard or Comfort
• Verification Standard: Ensures that the settings in ConnectLine comply with Accredited Social Health Activists’ (ASHA) guidelines. This setting is the default for pediatric fittings (children from 0-16 years old). • Comfort: Includes a low frequency boost to compensate for leakage in open fittings. This setting is default for all fittings except pediatric.
General PerceptionM relative to FM:Typically, the level of the hearing instrument microphone and the FM should be equal (0 dB offset).
Power BassIf Verification Standard is selected, no adjustments are possible because the settings need to follow ASHA’s guidelines. If Comfort is selected, the settings can be changed according to the patient’s preferences.
71
Oticon Sensei Success ManualCONNECTLINE

The Telecoil Tab
The Telecoil Tab enables fine tuning of the ConnectLine Telecoil application.
General Perception M relative to Telecoil:Normally, the level for the hearing instrument microphone and the telecoil should be equal (0 dB).This is identical to a traditional M/T setting.
Music Widening Since Music Widening might influence speech understanding, it is set to Off by default. If the telecoil is primarily used for music listening, this may be changed according to the patient’s preferences for reverb.
TABLE OF CONTENTS
72
THE SENSEI FAMILY WORKING WITH SENSEI SENSEI IN GENIE CONNECTLINE

Streamer Settings
This tool lets you configure the Streamer Pro and make firmware upgrades to all Streamers. The tool can be accessed from the ConnectLine Overview screen, the menu bar, and as a stand-alone application from the Windows Start Menu.
The Streamer must be connected via a USB cable to make configurations and firmware upgrades. One or more Streamers can be connected to your PC. When a Streamer is connected, the serial number and Streamer version will be shown in the settings tool.
The Streamer settings are organized in 2 tabs: • The Configuration tab • The Firmware Upgrade tab
73
Oticon Sensei Success ManualCONNECTLINE

The Configuration Tab
Note: This tab is only available for Streamer Pro.
Streamer Pro can be customized to the individual user via the Configuration tab. Select which controls and functionalities suit the individual patient’s needs to provide them with the best possible solution. The Con-figuration tab is separated into four windows: Streamer Settings, Streamer Functionality, Streamer Reset and Phone Settings. Streamer Settings In this screen, Streamer settings can be individualized for specific patients’ preferences. Select the relevant options based on their needs and their combination of Streamer Pro and ConnectLine solutions.
Remote ControlThe Up and Down buttons (1) on Streamer Pro can be used for the following purposes:
• Volume control (short press) • Program change (medium press) • Mute (long press)
Select the functions relevant to your patient. Please note that the Streamer Pro can only be used as a remote control for hearing in-struments when not streaming sound from a ConnectLine solution.
Lights/JackThe front light indicators of the Streamer Pro can be turned on or off (visual indicators).
“Autostart from mini-jack/head set” button will ensure that the Streamer Pro automati-cally initiates streaming from a device when the mini-jack cable is connected (2).
If “Autostart” is disconnected, the AUX but-ton needs to be pressed to start streaming.
AUX button The built-in telecoil can be configured to be activated with either a short or long press on the AUX button (3). As default, the telecoil is activated with a long press.
TABLE OF CONTENTS
74
THE SENSEI FAMILY WORKING WITH SENSEI SENSEI IN GENIE CONNECTLINE

Streamer FunctionalityYou can choose the functionalities that Streamer Pro should include according to patient preferences: • Full functionality • Phone only • Microphone only • TV only • Remote only
By default, Streamer Pro will be set to ‘Full function-ality’ with no restrictions.
Streamer ResetAll Streamer Pro settings can be restored to factory settings by pressing “Restore to factory settings.” This can be done without losing existing pairings to hearing instruments and ConnectLine devices. Other settings and configurations will be cleared.
Phone SettingsWith Nera hearing instruments, two different ringtones can be chosen. This makes it pos-sible for the patient to differentiate between a call from a landline phone and a call from a cell phone. By default, both ring tones will be the same.
The Streamer Pro buttons can be pro-grammed to have different functionalities when using a cell phone: • Any front button answers call• Voice dial (short press phone)• Redial • Transfer call• Reject call• Music and notifications from cell/mobile phone (notifies the user about, e.g., text messages or calendar reminders via beeps in the hearing instruments)
75
Oticon Sensei Success ManualCONNECTLINE

The Firmware Upgrade Tab
The Upgrade tool allows for upgrading first generation Streamer and Streamer Pro directly from Streamer Settings. This ensures that the patient has the latest Streamer features and functions. From the Firmware Upgrade, an overview of released features with the respective firmware version can be found.
Upgrading To upgrade a Streamer’s firmware, please ensure that it is connected and charged.
Before you begin, please note:
• The upgrade may take up to 20 minutes for the first generation Streamer, during which time you cannot close the Upgrade Tool • Do not disconnect the USB cable during the upgrade • Do not let your computer go into standby or shut down during the upgrade • If you are using a laptop, run it on AC power during the upgrade
Click Upgrade to start upgrading the firmware in the Streamer.
TABLE OF CONTENTS
76
THE SENSEI FAMILY WORKING WITH SENSEI SENSEI IN GENIE CONNECTLINE

77
Oticon Sensei Success ManualCONNECTLINE

XXXX
XX /
04.1
0
www.oticonusa.com
People First is our promiseto empower peopleto communicate freely,interact naturally andparticipate actively
People First