Subtitles with ELAN
16
Robin Dittwald Institut für Linguistik Universität zu Köln Email: [email protected] June 2008 Subtitles with ELAN An Easy Guide
Transcript of Subtitles with ELAN
Robin Dittwald Institut für Linguistik Universität zu Köln Email: [email protected] June 2008
Subtitles with ELAN
An Easy Guide
Subtitles with ELAN Robin Dittwald
2
Table of Contents 1. Introduction ............................................................................................................................ 1
2. Necessary Software ................................................................................................................ 1
3. Creating subtitles.................................................................................................................... 2
3.1 ELAN ............................................................................................................................... 2
3.2 UTF-8 � UTF-16 ............................................................................................................ 2 3.3 SRT � SSA ..................................................................................................................... 2 3.4 Virtualdub – Adding subtitles .......................................................................................... 3 3.5 Virtualdub – Exporting for later MPEG compression...................................................... 4
3.6 Virtualdub – 16:9 letterboxed .......................................................................................... 5 3.7 Virtualdub – Exporting a compressed AVI...................................................................... 7 3.8 Virtualdub – Interlaced vs. Progressive ......................................................................... 11 3.9 Virtualdub – Further video tweaking ............................................................................. 12 3.10 Virtual Dub – More than one subtitle........................................................................... 13
4. Further reading and resources .............................................................................................. 14
Subtitles with ELAN Robin Dittwald
1
1. Introduction
This guide will explain how to create subtitles that are encoded into the video stream. This is often called hardcoded as you can’t switch off the subtitles. The subtitles are part of the video and can’t be separated from it. A DVD for example works in another way. The advantage of this method however is that you KNOW that your subtitles display correctly and always look the same, no matter where you play them. Especially certain Unicode-only characters might otherwise cause problems when played on different machines. If you want to display more than one subtitle (several languages for example) at once this might well be the ONLY way to achieve this. This guide will show you how to prepare very large raw AVI files as well as smaller compressed AVI files that you can easily carry around or even distribute via internet. The raw AVI files can later on be converted to MPEG2 files that can be used for creating a video DVD that plays in any DVD player. How to create a DVD is not covered in this guide. The raw AVI files should be compatible to most MPEG2 encoders or DVD authoring programs. If used within a Powerpoint presentation, MPEG1 is – as always – the most compatible option as other formats might require the installation of a codec. Keep in mind though that MPEG1 files are on the other hand of relatively poor quality and quite blurry. The major downside to this approach is the space needed on your hard drive and the slightly complicated workflow. Once familiar with the various steps it should however be quite easy to come up with satisfying results. Be prepared though that rendering the video files is often quite a lengthy process. Make sure you’ll use the fastest computer you can get a hold of. Even a usual double core machine quickly reaches its limit when it comes to video processing. The software that we will use is either freeware or even open source.
2. Necessary Software
You’ll need the following software: Babelpad VirtualDub 1.7.8 (other versions might work as well) VobSub 2.2.3 Lame MP3 ACM 3.98b6 XVID FFDSHOW VirtualDub doesn’t need to be installed. Simply copy it to your computer and start the EXE file. Install VobSub.

Subtitles with ELAN Robin Dittwald
2
Lame MP3 ACM has to be installed in a more ‚unusual‘ way. Go to the directory and right-click on the INF file. Choose install and follow the instructions. XVID and FFDSHOW may be installed separately or simply install the K-Lite Mega Codec Pack. If you do the latter you should uninstall any audio and video codecs previously. K-Lite Mega Codec Pack also is quite handy as you will be able to watch almost any video file that exists today afterwards.
3. Creating subtitles
3.1 ELAN First the respective annotation tier(s) have to be exported from ELAN. Do this via FILES �
EXPORT AS � SUBTITLES TEXT. Choose the tier(s) you want to export. Encoding of the file has to be Unicode, so choose either UTF-8 or UTF-16 (it doesn’t matter which one because it has to be changed later on anyway).
3.2 UTF-8 ���� UTF-16 In order for the subtitles to display correctly the srt-files have to be converted to UTF-16LE. This is necessary because the subtitle software I use doesn’t interpret ELAN’s srt-files quite right as they are encoded in UTF-16BE. You may do this with any Unicode text editor capable of saving UTF-16LE files, for example Babelpad. Open the subtitle file from before (subs.srt) with Babelpad and do SAVE AS right away. Encoding has to be changed to UTF-16. Byte Order: LITTLE ENDIAN and BYTE ORDER MARK. Newline: CR/LF PAIR. Save file.
3.3 SRT ���� SSA Now subtitles have to be converted from SRT format to SSA. VobSub has to be installed for this task. VobSub contains a little tool called SubResync. If you can’t find it in the start menu, you should be able to locate it at: C:\PROGRAM FILES\GABEST\VOBSUB\SUBRESYNC.EXE. Start SubResync and open “subs.srt”. Maximize your window. If you click on an annotation you should see a preview of the subtitles as they would display in a video. Unicode specific characters might not display correctly as you first have to select a Unicode compatible font. Click on EDIT and in the next windows click on the selected font (usually Arial on Windows machines). Now choose a Unicode font, e.g. Lucida Sans Unicode on Windows machines. Click ok and you will go back to the previous windows. Here you can change some stylistic properties. You may leave everything as is or change some settings. You can change or tweak these settings later on as well. Click OK and try in the main window if the subtitles display correctly now. If everything looks how it’s supposed to look go to SAVE AS. File type has to be changed to SUB
STATION ALPHA (*.SSA). Also check UNICODE OUTPUT. Now make sure that you change the file extension to SSA! Unfortunately SubResync doesn’t do this automatically. Save and exit.
Subtitles with ELAN Robin Dittwald
3
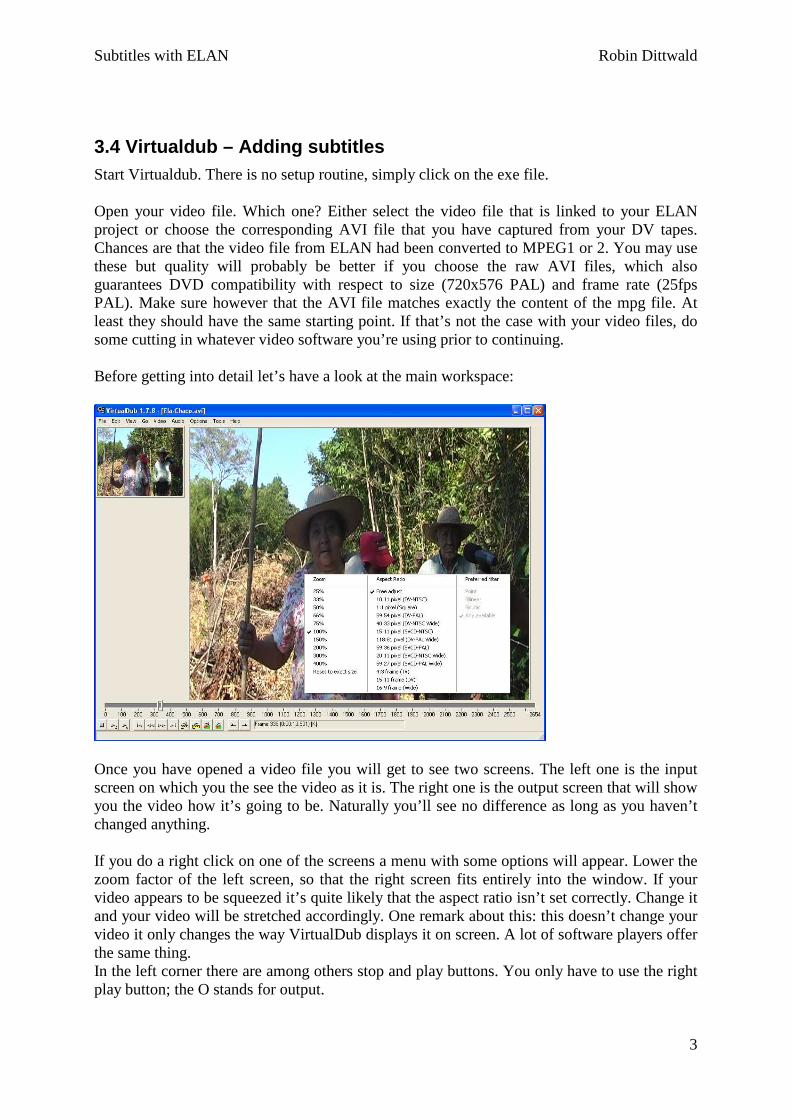
3.4 Virtualdub – Adding subtitles Start Virtualdub. There is no setup routine, simply click on the exe file. Open your video file. Which one? Either select the video file that is linked to your ELAN project or choose the corresponding AVI file that you have captured from your DV tapes. Chances are that the video file from ELAN had been converted to MPEG1 or 2. You may use these but quality will probably be better if you choose the raw AVI files, which also guarantees DVD compatibility with respect to size (720x576 PAL) and frame rate (25fps PAL). Make sure however that the AVI file matches exactly the content of the mpg file. At least they should have the same starting point. If that’s not the case with your video files, do some cutting in whatever video software you’re using prior to continuing. Before getting into detail let’s have a look at the main workspace:
Once you have opened a video file you will get to see two screens. The left one is the input screen on which you the see the video as it is. The right one is the output screen that will show you the video how it’s going to be. Naturally you’ll see no difference as long as you haven’t changed anything. If you do a right click on one of the screens a menu with some options will appear. Lower the zoom factor of the left screen, so that the right screen fits entirely into the window. If your video appears to be squeezed it’s quite likely that the aspect ratio isn’t set correctly. Change it and your video will be stretched accordingly. One remark about this: this doesn’t change your video it only changes the way VirtualDub displays it on screen. A lot of software players offer the same thing. In the left corner there are among others stop and play buttons. You only have to use the right play button; the O stands for output.
Subtitles with ELAN Robin Dittwald
4
With the slider you can move around on the timeline, but only when the video isn’t playing. If you want to do some cuttings, it’s best done here. Move the slider to your desired starting point and press the home key (Pos1 on some Keyboards). Move the slider further to the right and press the end key. If you export the video now, only the selected area will be exported. Now let’s change the video. Go to the VIDEO menu and select FULL PROCESSING MODE. Click again on VIDEO and then on FILTERS. Click ADD and select the TextSub filter. A small window will appear where you can open the subtitle file we created earlier. If you click on styles you can change settings over and over until you’re satisfied with the results. Play the video; subtitles should be displayed now.
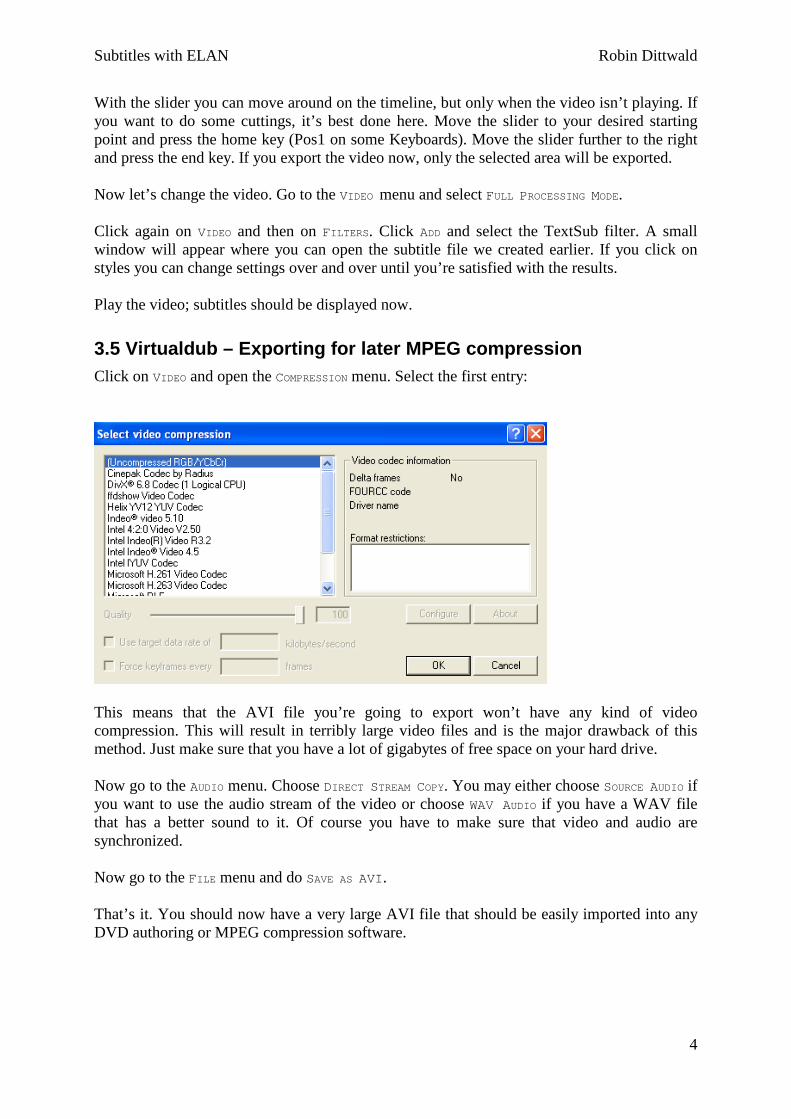
3.5 Virtualdub – Exporting for later MPEG compressi on Click on VIDEO and open the COMPRESSION menu. Select the first entry:
This means that the AVI file you’re going to export won’t have any kind of video compression. This will result in terribly large video files and is the major drawback of this method. Just make sure that you have a lot of gigabytes of free space on your hard drive. Now go to the AUDIO menu. Choose DIRECT STREAM COPY. You may either choose SOURCE AUDIO if you want to use the audio stream of the video or choose WAV AUDIO if you have a WAV file that has a better sound to it. Of course you have to make sure that video and audio are synchronized. Now go to the FILE menu and do SAVE AS AVI. That’s it. You should now have a very large AVI file that should be easily imported into any DVD authoring or MPEG compression software.
Subtitles with ELAN Robin Dittwald
5
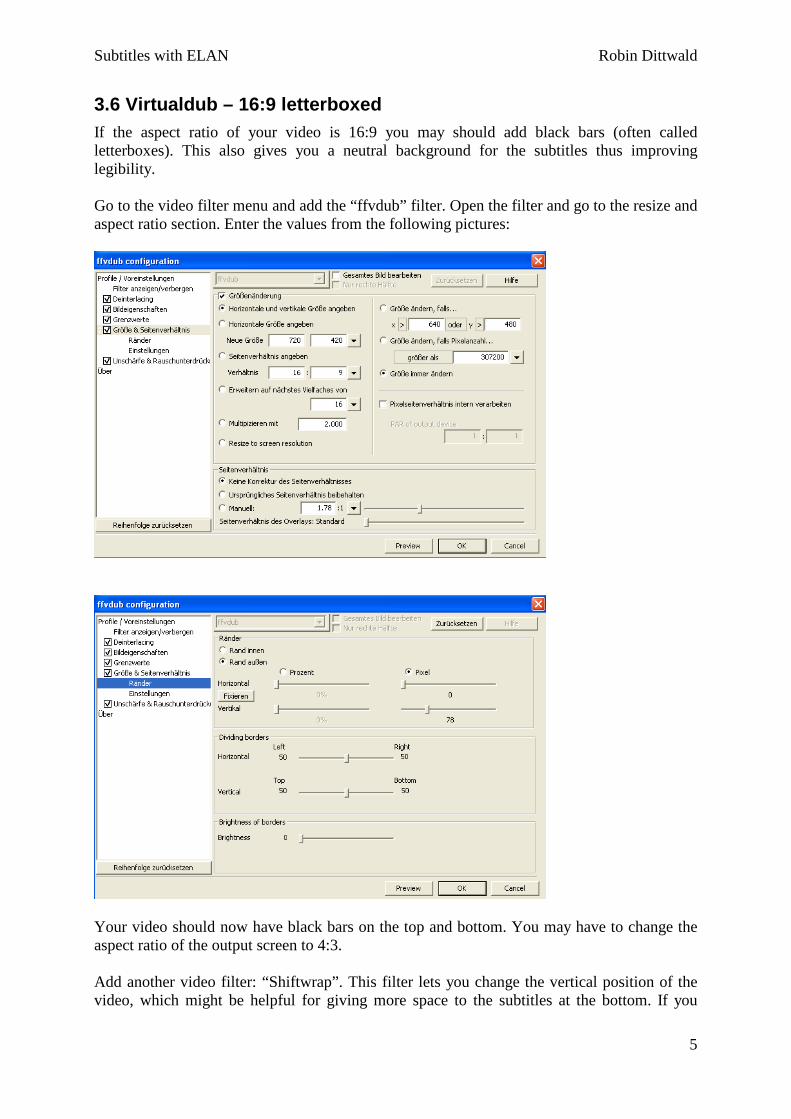
3.6 Virtualdub – 16:9 letterboxed If the aspect ratio of your video is 16:9 you may should add black bars (often called letterboxes). This also gives you a neutral background for the subtitles thus improving legibility. Go to the video filter menu and add the “ffvdub” filter. Open the filter and go to the resize and aspect ratio section. Enter the values from the following pictures:
Your video should now have black bars on the top and bottom. You may have to change the aspect ratio of the output screen to 4:3. Add another video filter: “Shiftwrap”. This filter lets you change the vertical position of the video, which might be helpful for giving more space to the subtitles at the bottom. If you
Subtitles with ELAN Robin Dittwald
6
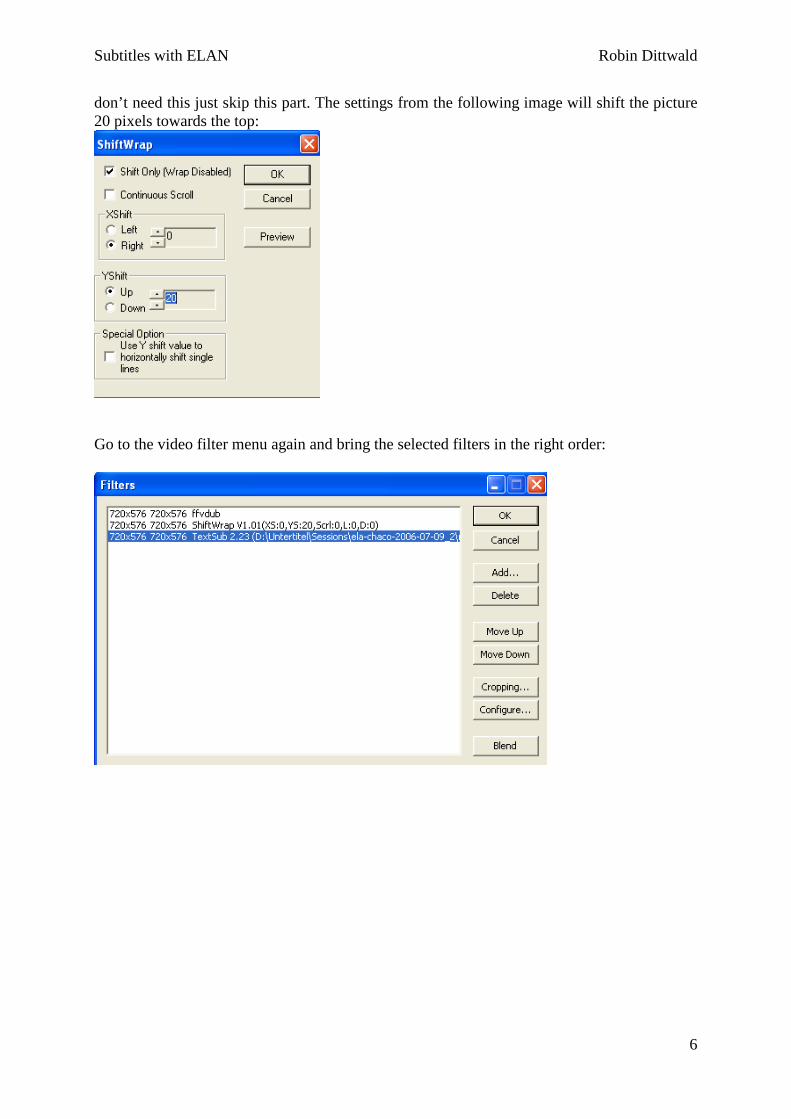
don’t need this just skip this part. The settings from the following image will shift the picture 20 pixels towards the top:
Go to the video filter menu again and bring the selected filters in the right order:
Subtitles with ELAN Robin Dittwald
7
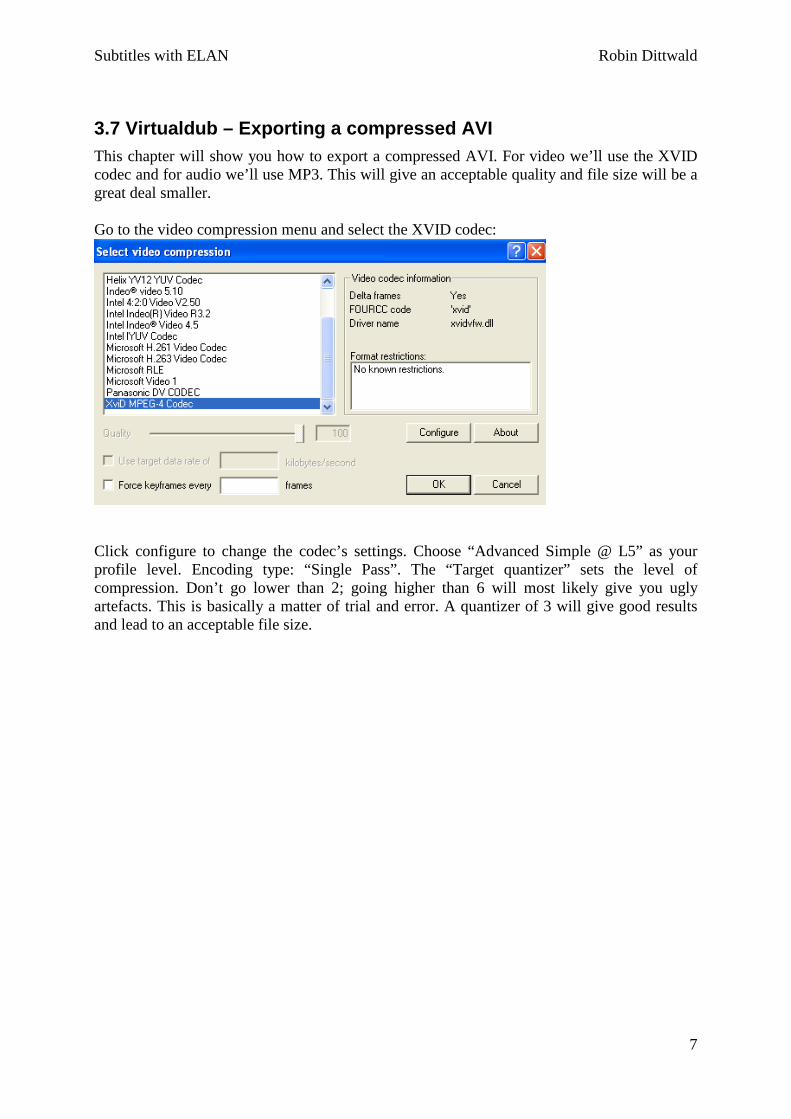
3.7 Virtualdub – Exporting a compressed AVI This chapter will show you how to export a compressed AVI. For video we’ll use the XVID codec and for audio we’ll use MP3. This will give an acceptable quality and file size will be a great deal smaller. Go to the video compression menu and select the XVID codec:
Click configure to change the codec’s settings. Choose “Advanced Simple @ L5” as your profile level. Encoding type: “Single Pass”. The “Target quantizer” sets the level of compression. Don’t go lower than 2; going higher than 6 will most likely give you ugly artefacts. This is basically a matter of trial and error. A quantizer of 3 will give good results and lead to an acceptable file size.
Subtitles with ELAN Robin Dittwald
8
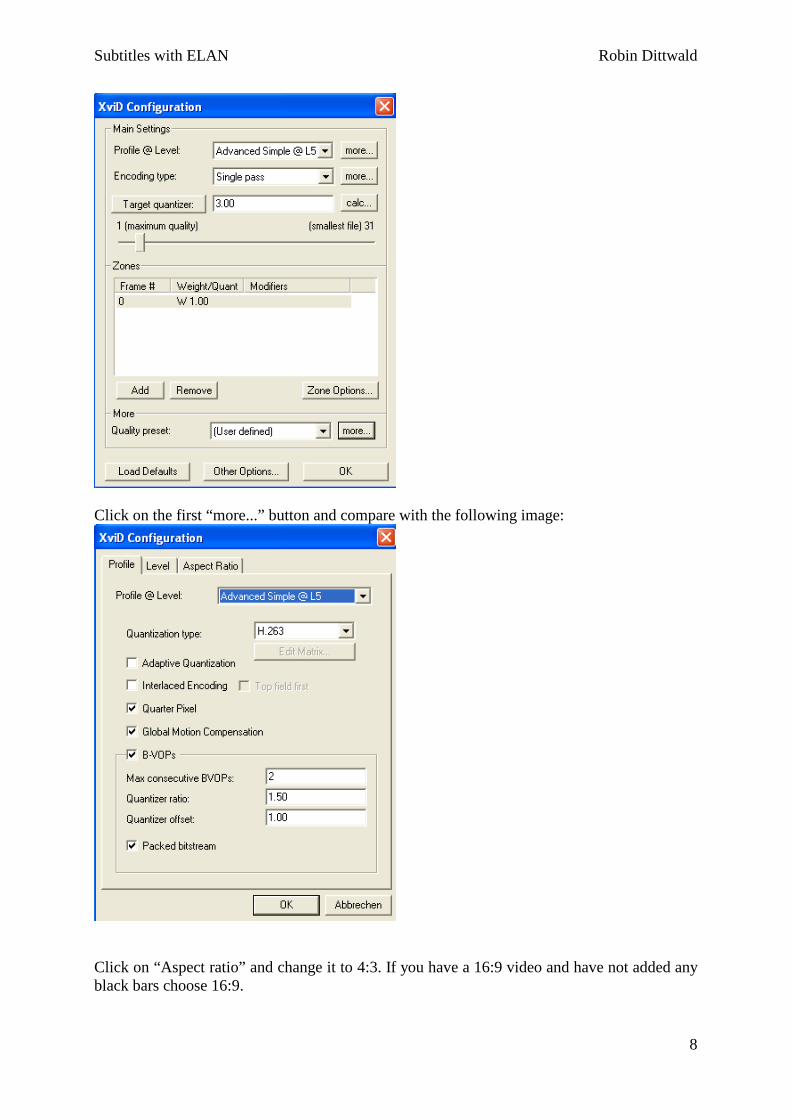
Click on the first “more...” button and compare with the following image:
Click on “Aspect ratio” and change it to 4:3. If you have a 16:9 video and have not added any black bars choose 16:9.
Subtitles with ELAN Robin Dittwald
9
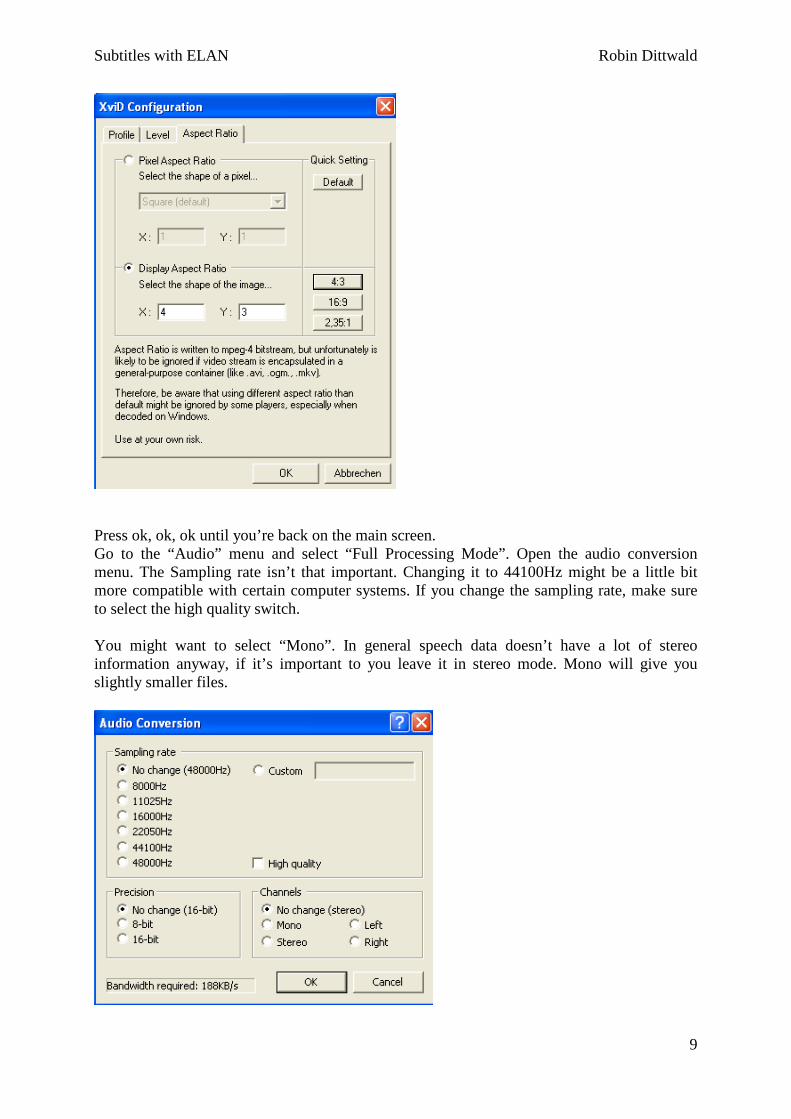
Press ok, ok, ok until you’re back on the main screen. Go to the “Audio” menu and select “Full Processing Mode”. Open the audio conversion menu. The Sampling rate isn’t that important. Changing it to 44100Hz might be a little bit more compatible with certain computer systems. If you change the sampling rate, make sure to select the high quality switch. You might want to select “Mono”. In general speech data doesn’t have a lot of stereo information anyway, if it’s important to you leave it in stereo mode. Mono will give you slightly smaller files.
Subtitles with ELAN Robin Dittwald
10
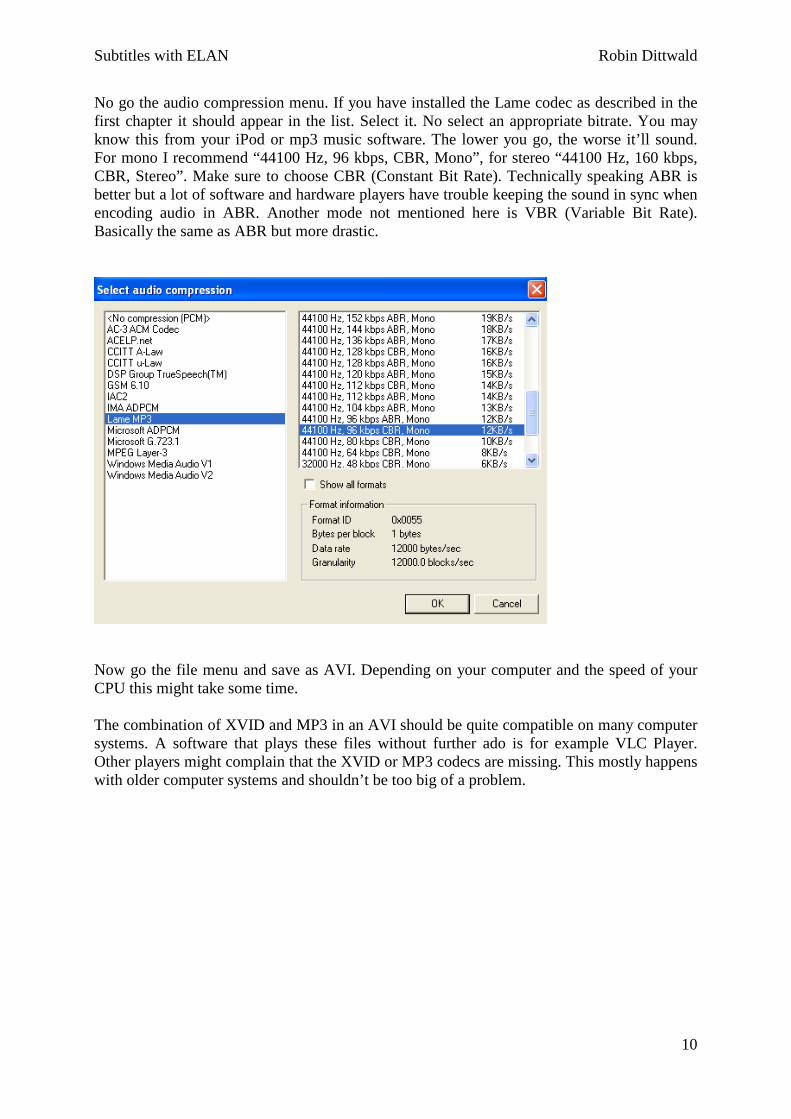
No go the audio compression menu. If you have installed the Lame codec as described in the first chapter it should appear in the list. Select it. No select an appropriate bitrate. You may know this from your iPod or mp3 music software. The lower you go, the worse it’ll sound. For mono I recommend “44100 Hz, 96 kbps, CBR, Mono”, for stereo “44100 Hz, 160 kbps, CBR, Stereo”. Make sure to choose CBR (Constant Bit Rate). Technically speaking ABR is better but a lot of software and hardware players have trouble keeping the sound in sync when encoding audio in ABR. Another mode not mentioned here is VBR (Variable Bit Rate). Basically the same as ABR but more drastic.
Now go the file menu and save as AVI. Depending on your computer and the speed of your CPU this might take some time. The combination of XVID and MP3 in an AVI should be quite compatible on many computer systems. A software that plays these files without further ado is for example VLC Player. Other players might complain that the XVID or MP3 codecs are missing. This mostly happens with older computer systems and shouldn’t be too big of a problem.
Subtitles with ELAN Robin Dittwald
11
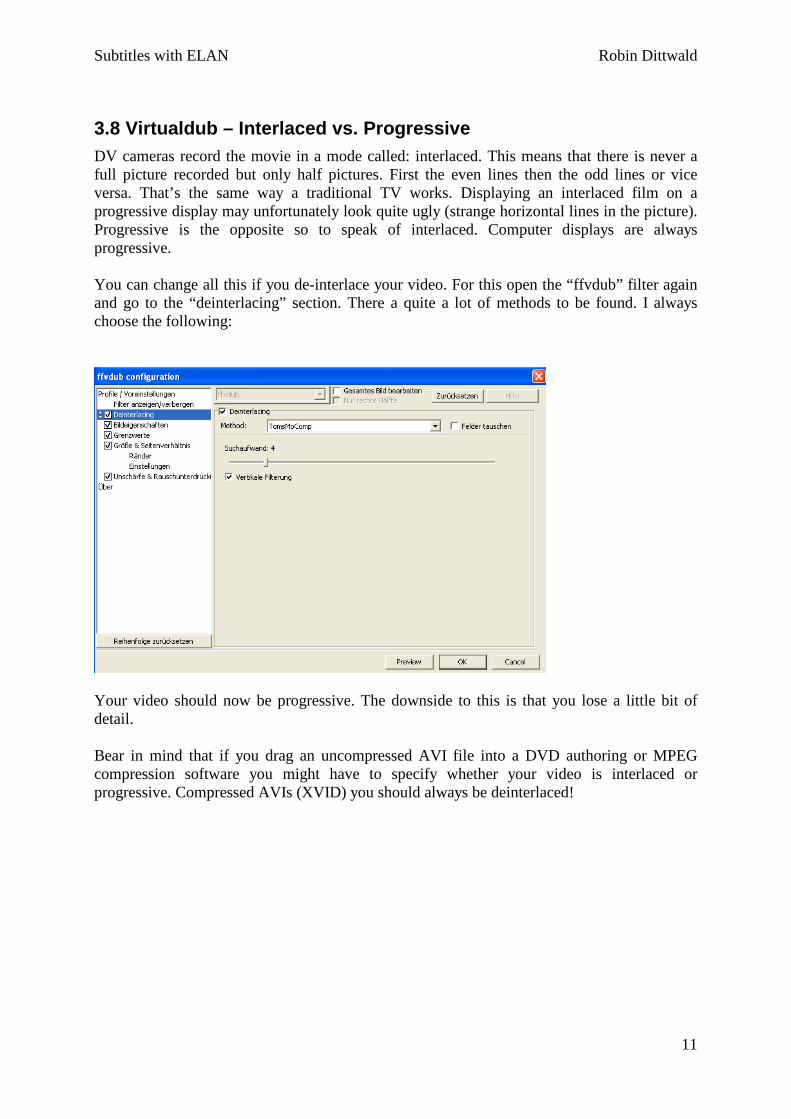
3.8 Virtualdub – Interlaced vs. Progressive DV cameras record the movie in a mode called: interlaced. This means that there is never a full picture recorded but only half pictures. First the even lines then the odd lines or vice versa. That’s the same way a traditional TV works. Displaying an interlaced film on a progressive display may unfortunately look quite ugly (strange horizontal lines in the picture). Progressive is the opposite so to speak of interlaced. Computer displays are always progressive. You can change all this if you de-interlace your video. For this open the “ffvdub” filter again and go to the “deinterlacing” section. There a quite a lot of methods to be found. I always choose the following:
Your video should now be progressive. The downside to this is that you lose a little bit of detail. Bear in mind that if you drag an uncompressed AVI file into a DVD authoring or MPEG compression software you might have to specify whether your video is interlaced or progressive. Compressed AVIs (XVID) you should always be deinterlaced!
Subtitles with ELAN Robin Dittwald
12
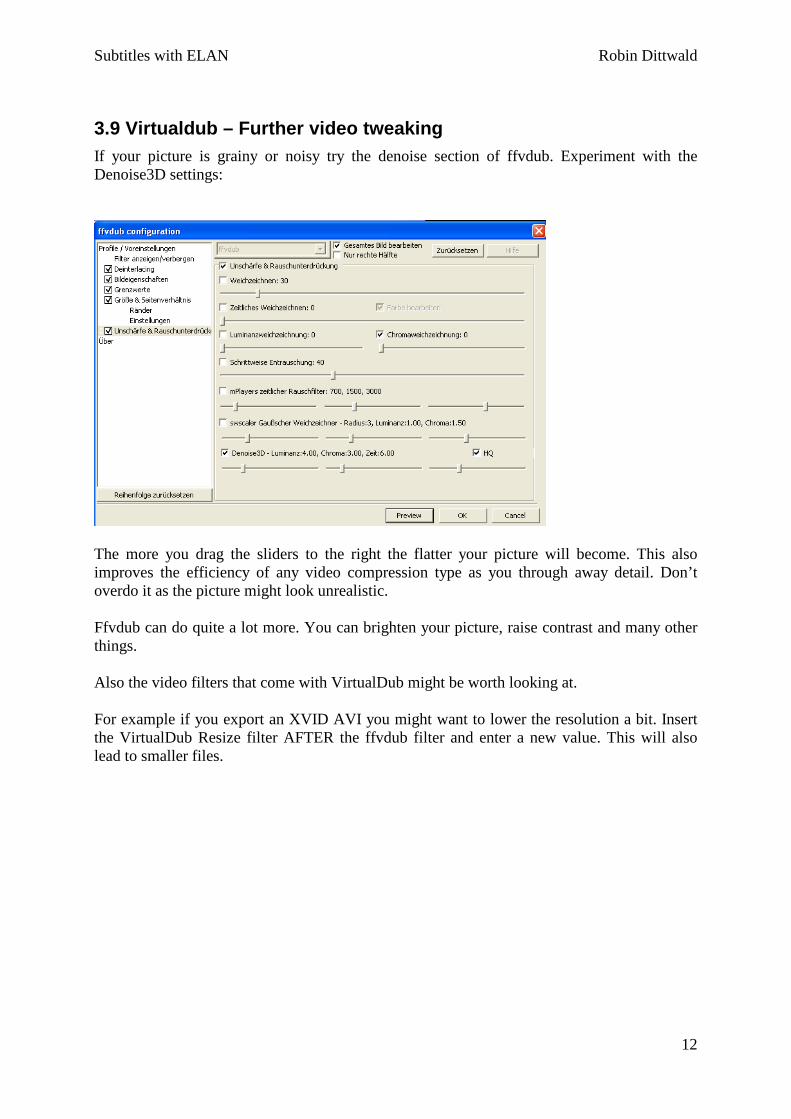
3.9 Virtualdub – Further video tweaking If your picture is grainy or noisy try the denoise section of ffvdub. Experiment with the Denoise3D settings:
The more you drag the sliders to the right the flatter your picture will become. This also improves the efficiency of any video compression type as you through away detail. Don’t overdo it as the picture might look unrealistic. Ffvdub can do quite a lot more. You can brighten your picture, raise contrast and many other things. Also the video filters that come with VirtualDub might be worth looking at. For example if you export an XVID AVI you might want to lower the resolution a bit. Insert the VirtualDub Resize filter AFTER the ffvdub filter and enter a new value. This will also lead to smaller files.
Subtitles with ELAN Robin Dittwald
13
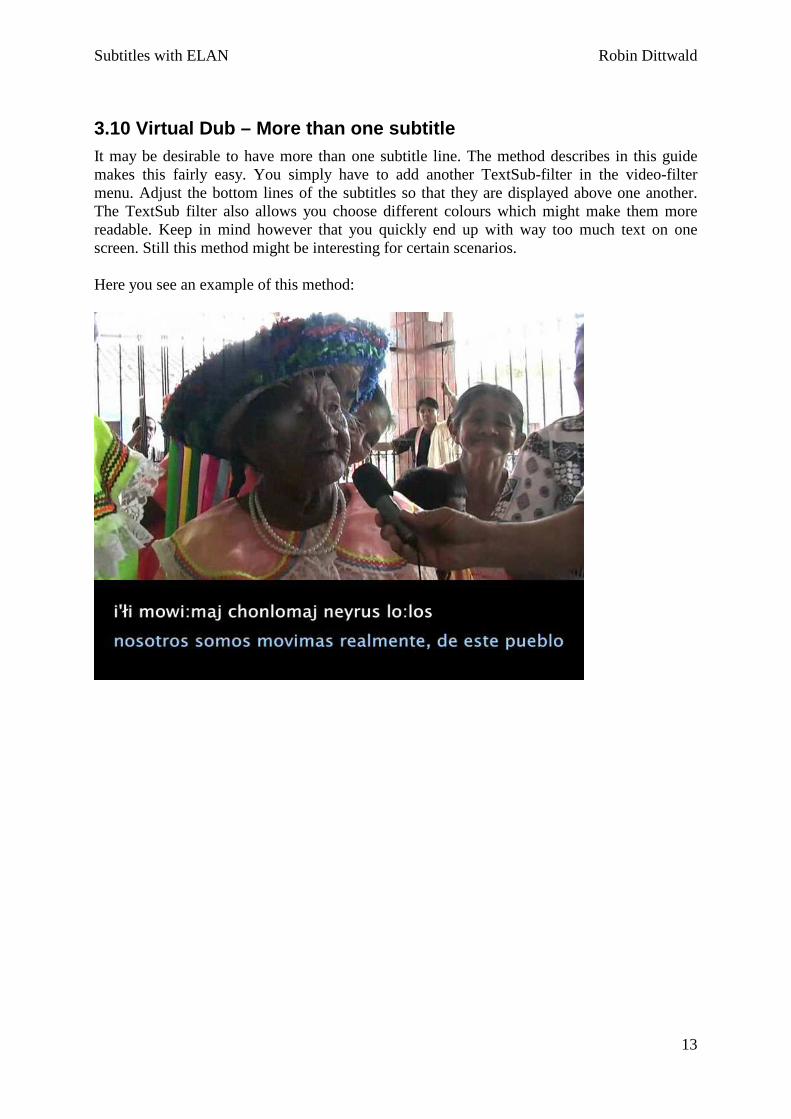
3.10 Virtual Dub – More than one subtitle It may be desirable to have more than one subtitle line. The method describes in this guide makes this fairly easy. You simply have to add another TextSub-filter in the video-filter menu. Adjust the bottom lines of the subtitles so that they are displayed above one another. The TextSub filter also allows you choose different colours which might make them more readable. Keep in mind however that you quickly end up with way too much text on one screen. Still this method might be interesting for certain scenarios. Here you see an example of this method:
Subtitles with ELAN Robin Dittwald
14
4. Further reading and resources
You’ll find most of the software at www.doom9.org which is also a very informative site with lots of guides concerning video. Other sites of interest might be: Aspect ratio explained: http://www.doom9.org/index.html?/aspectratios.htm Interlacing explained: http://www.100fps.com/ Another subtitle guide: http://forum.videohelp.com/topic338752.html#