STYLUS TOUGH-8000 / μ TOUGH-8000 Instruction...
82
DIGITAL CAMERA STYLUS TOUGH-8000 / µ TOUGH-8000 ● Thank you for purchasing an Olympus digital camera. Before you start to use your new camera, please read these instructions carefully to enjoy optimum performance and a longer service life. Keep this manual in a safe place for future reference. ● We recommend that you take test shots to get accustomed to your camera before taking important photographs. ● In the interest of continually improving products, Olympus reserves the right to update or modify information contained in this manual. ● The screen and camera illustrations shown in this manual were produced during the development stages and may differ from the actual product. Instruction Manual
Transcript of STYLUS TOUGH-8000 / μ TOUGH-8000 Instruction...

DIGITAL CAMERA
STYLUS TOUGH-8000 /µ TOUGH-8000
● ThankyouforpurchasinganOlympusdigitalcamera.Beforeyoustarttouseyournewcamera,pleasereadtheseinstructionscarefullytoenjoyoptimumperformanceanda longerservice life.Keepthismanual inasafeplaceforfuturereference.
● We recommend that you take test shots to get accustomed to yourcamerabeforetakingimportantphotographs.
● Intheinterestofcontinuallyimprovingproducts,Olympusreservestherighttoupdateormodifyinformationcontainedinthismanual.
● Thescreenandcameraillustrationsshowninthismanualwereproducedduringthedevelopmentstagesandmaydifferfromtheactualproduct.
Instruction Manual
� EN
Step5
Step2
Step4
Step3
How to Use the Camera“FourTypesofSettingOperations”(p.3)
Printing“Directprinting(PictBridge)”(p.51)“PrintReservations(DPOF)”(p.54)
Shooting and Playing Back Images“Shooting,Viewing,andErasing”(p.16)
Preparing the Camera“PreparingtheCamera”(p.10)
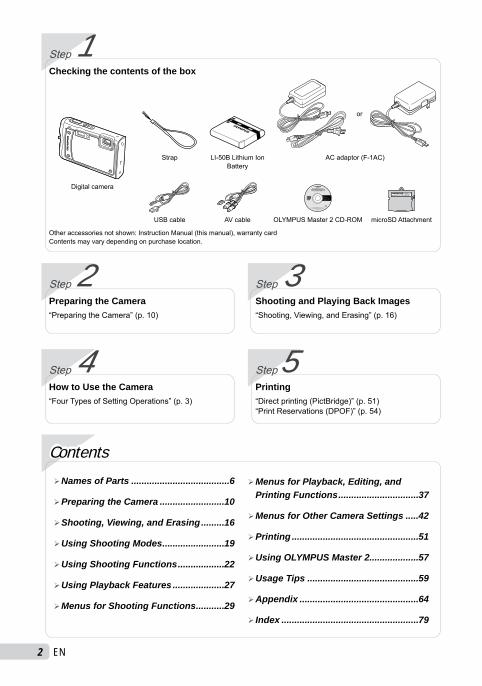
Step1Checking the contents of the box
Digitalcamera
or
Strap LI-50BLithiumIonBattery
ACadaptor(F-1AC)
USBcable AVcable OLYMPUSMaster2CD-ROM microSDAttachment
Otheraccessoriesnotshown:InstructionManual(thismanual),warrantycardContentsmayvarydependingonpurchaselocation.
ContentsNames of Parts ......................................6
Preparing the Camera .........................10
Shooting, Viewing, and Erasing .........16
Using Shooting Modes ........................19
Using Shooting Functions ..................22
Using Playback Features ....................27
Menus for Shooting Functions ...........29
Menus for Playback, Editing, and Printing Functions ...............................37
Menus for Other Camera Settings .....42
Printing .................................................51
Using OLYMPUS Master 2...................57
Usage Tips ...........................................59
Appendix ..............................................64
Index .....................................................79

1 SetthemodedialtoapositionotherthanA.
The symbolin“MenuSettings”(p.29to50)indicatesavailableshootingmodes.
2 Pressthebutton.Thisexampledescribeshowtosetthe[DIGITALZOOM].
MENUEXIT SET OK
CAMERA MENU
Shootingmodetopmenu
3 UseEFGHtoselectthedesiredmenu,andpresstheobutton.
PressingandholdingtheEbuttondisplaysanexplanation(menuguide)oftheselectedoption.
ISO
OFFOFF
12
CAMERA MENU
SET OK
AUTOo
FINE ZOOMDIGITAL ZOOM
DRIVE
AUTOWB
MENUEXIT
Submenu1
●
Please read “Menu Settings” (p. 29 to 50) while referring to this page.
buttonArrowpad
obutton
Buttonsinuse
4 UseEFtoselectthedesiredSubmenu1,andpresstheobutton.
12 ISO
OFFOFF
CAMERA MENU
AUTOo
FINE ZOOMDIGITAL ZOOM
DRIVE
AUTOWB
MENUEXIT SET OK
12 ISO
OFFOFF
CAMERA MENU
AUTOo
FINE ZOOMDIGITAL ZOOM
DRIVE
AUTOWB
MENU SET OKBACK
DIGITAL ZOOM
OFFON
Pagetab Submenu2
Toquicklymovetothedesiredsubmenu,pressGtohighlightthepagetab,andthenuseEF tomovethepagetab.PressH toreturntotheSubmenu1.
Somemenusincludesubmenusthatappearbypressingtheobutton.
5 UseEFtoselecttheSubmenu2,andpresstheobutton.Onceasettingisadjusted,thedisplayreturnstothepreviousscreen.
Theremaybeadditionaloperations.“MenuSettings”(p.29to50)
6 Pressthebuttontocompletethesetting.
●
Four Types of Setting Operations
Ebutton
Using the MenuVariouscamerasettingscanbeaccessedthroughthemenus,includingfunctionsusedduringshootingandplaybackandthedate/timeandscreendisplay.
Theremaybeunavailablemenusdependingontheotherrelatedsettingsortheselectedmode(p.33).
12 ISO
OFFON
CAMERA MENU
AUTOo
FINE ZOOMDIGITAL ZOOM
DRIVE
AUTOWB
MENUEXIT SET OK
�EN

� EN
Using the FUNC Menu (p. 25)FrequentlyusedshootingmenufunctionscanbesetwithlessstepsusingtheFUNCmenu.
Using the Direct ButtonsFrequentlyusedshootingfunctionscanbeaccessedusingthedirectbuttons.
Shutterbutton(p.15)
Zoombutton(p.22,p.27)
Fbutton(exposurecompensation)(p.23)&button(macro)(p.23)#button(flash)(p.22)Ybutton(self-timer)(p.24)
qbutton(playback)(p.17)
g/E/Ybutton(informationdisplaychange/menuguide/dateandtimecheck/LEDilluminator)(p.3,p.14,p.24)
o/Dbutton(panorama/tapcontrol/ShadowAdjustmentTechnology/multiwindow/erase)(p.18,p.26)
obutton(p.3,p.25)
Arrowpad
obutton
Buttonsinuse
Operating the camera by tapping the body (p. 49)Youcanoperatethecamerabytappingthebodywhen[TAPCONTROL]is[ON].
To set [TAP CONTROL] to [ON]
1 Tapthetopsurfaceofthecameratwice.The[TAPCONTROL]settingsscreendisplays.
2 Tapthetopsurfaceofthecameratwice.Thesettingisconfirmed.
●
●
x2&
ONOFF
TAP CONTROL
Tap the camera body to operatethe camera.

�EN �
1G SLIDESHOW............... p.372H PERFECTFIX............. p.373MBEAUTYFIX................ p.374I EDIT
Q(Resize)................ p.38P(Crop).................... p.38COLOREDIT............... p.38
MenusforPlayback,Editing,andPrintingFunctions Whenthemodedialissettotheqposition,settingscanbeadjusted.
MENUEXIT SET OK
PLAYBACK MENU
1
2
3
4
5
6
7
8
9
Playbackmodetopmenu
CALENDAR................. p.39INDEX.......................... p.39
5J PLAYBACKMENU0(Protect)............... p.39y(Rotate)................... p.40R(Addsoundtostillimages).................... p.40
6K ERASE......................... p.407L PRINTORDER............ p.418E SETUP*
*Sameas“MenusforShootingFunctions”
9F SILENTMODE............ p.50
1A IMAGEQUALITY......... p.292B CAMERAMENU
WB............................... p.30ISO.............................. p.30DRIVE.......................... p.31FINEZOOM................. p.31DIGITALZOOM........... p.31ESP/n....................... p.32AFMODE.................... p.32R(Soundrecording).... p.32IMAGESTABILIZER(Stillimages)/DISMOVIEMODE(Movies)................... p.32
SHADOWADJ............. p.333O SCENEMODE............. p.334N PANORAMA................. p.344P MOVIE......................... p.365D RESET......................... p.366E SETUP
MEMORYFORMAT/FORMAT.................. p.42
BACKUP...................... p.42W(Language)........ p.42PWONSETUP........... p.43MENUCOLOR............ p.43SOUNDSETTINGS..... p.44
RECVIEW................... p.44FILENAME.................. p.45PIXELMAPPING......... p.45s(Monitor)............... p.46X(Date/time)............ p.46DUALTIME................... p.46VIDEOOUT................. p.47POWERSAVE............. p.48LEDILLUMINATOR..... p.48MANOMETER............. p.48m/ft............................... p.48TAPCONTROL........... p.49
7F SILENTMODE............ p.50
Menu IndexMenusforShootingFunctions Whenthemodedialissettoashootingmodeposition(AKbn),settingscanbeadjusted.
MENUEXIT SET OK
CAMERA MENU
5
1
2
3 7
6
4
Shootingmodetopmenu
OnlyforPmodeMENUEXIT SET OK
CAMERA MENU
4
� EN
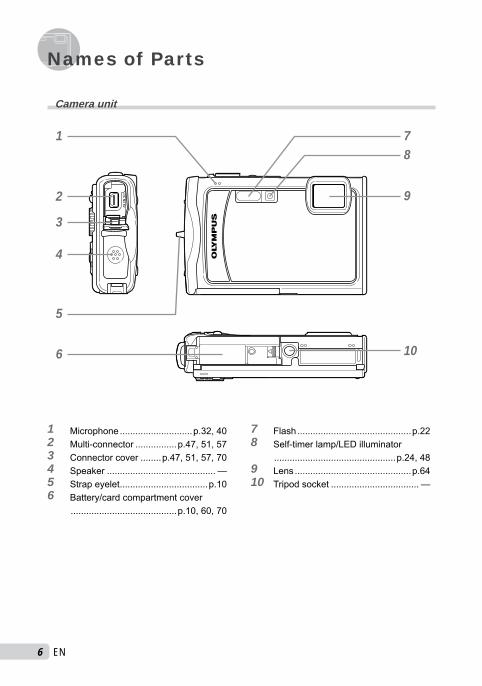
Names of Parts
1 Microphone............................p.32,402 Multi-connector................p.47,51,573 Connectorcover........p.47,51,57,704 Speaker.......................................... —5 Strapeyelet..................................p.106 Battery/cardcompartmentcover
.........................................p.10,60,70
Camera unit
1
2
3
4
6
5
78
9
10
7 Flash............................................p.228 Self-timerlamp/LEDilluminator
...............................................p.24,489 Lens.............................................p.6410 Tripodsocket.................................. —

�EN
1 82
5
3
9
6
7
4
1213
1011
1 nbutton.............................p.142 Underwatersensor..........p.19,26,303 Zoombutton...........................p.22,274 Monitor.........................p.8,16,46,595 Cardaccesslamp/
chargingindicator................p.66/p.126 button..............................p.3,57 DISP./E/Ybutton
(informationdisplaychange/menuguide/dateandtimecheck/LEDilluminator).................p.3,14,24
8 Shutterbutton........................p.16,59
9 Modedial.................p.3,5,16,17,1910 qbutton(playback)...................p.1711 obutton(OK/FUNC)..............p.3,2512 o/Dbutton(panorama/tapcontrol/
ShadowAdjustmentTechnology/multiwindow/erase)...............p.18,26
13 Arrowpad............................p.3,4,13Fbutton(exposurecompensation)........p.23&button(macro)....................p.23Ybutton(self-timer)...............p.24#button(flash).......................p.22

� EN
Monitor
Shooting mode display
12M
+2.0 1/30 F3.5
P
4IN
ISO1600
AFL
NORM
110
1415
1213
11
17192021 1618
272625242322
2 5 98763
+2.0 IN 00:34VGA
15
1
1415
11
17 161821
27
242322
2 544 983 6
960hPa0m
Stillimage Movie
1 Shootingmode.......................p.19,212 Flashmode..................................p.223 Silentmode..................................p.504 Imagestabilization(stillimages)/
Digitalimagestabilization(movies).....................................................p.32
5 Macro/supermacro/S-macroLEDmode.....................p.23
6 ShadowAdjustmentTechnology...p.337 AFlock.........................................p.198 Tapcontrol.........................p.4,34,499 Batterycheck.........................p.12,6010 Flashstandby/camerashakewarning/
flashcharge.................................p.5911 AFtargetmark.............................p.1612 Atmospheric/
hydraulicpressure.......................p.48
13 Altitude/waterdepth.....................p.4814 Soundrecord.........................p.21,3215 Dualtime......................................p.4616 Numberofstorablestillpictures/
remainingrecordingtime.........................................p.16,21,67
17 Currentmemory...........................p.6618 Self-timer.....................................p.2419 Aperturevalue.............................p.1620 Shutterspeed..............................p.1621 Exposurecompensation..............p.2322 Compression/Framerate.............p.2923 Imagesize...................................p.2924 Metering.......................................p.3225 Drive............................................p.3126 ISO...............................................p.3027 Whitebalance..............................p.30
�EN
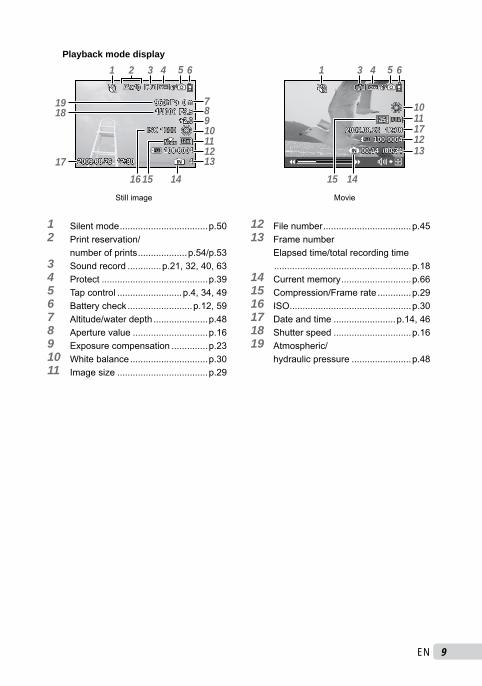
Playback mode display
12M
2009.08.26 12:30 4
+2.0F3.5
10
IN
x
100-0004NORM
1/1000
ISO 1600
2
1112
10
89
13
3 4 61
17
1819
141516
2009.08.26 12:30100-0004
00:14 /00:34IN
VGA15
1217
1011
13
3 4 61
1415
5 5
960hPa 0m 7
Stillimage Movie
1 Silentmode..................................p.502 Printreservation/
numberofprints...................p.54/p.533 Soundrecord.............p.21,32,40,634 Protect.........................................p.395 Tapcontrol.........................p.4,34,496 Batterycheck.........................p.12,597 Altitude/waterdepth.....................p.488 Aperturevalue.............................p.169 Exposurecompensation..............p.2310 Whitebalance..............................p.3011 Imagesize...................................p.29
12 Filenumber..................................p.4513 Framenumber
Elapsedtime/totalrecordingtime.....................................................p.18
14 Currentmemory...........................p.6615 Compression/Framerate.............p.2916 ISO...............................................p.3017 Dateandtime........................p.14,4618 Shutterspeed..............................p.1619 Atmospheric/
hydraulicpressure.......................p.48

10 EN
Preparing the Camera
2
Batterylockknob
Thebatteryhasfrontsideandbackside.Insertthebatteryinthecorrectdirectionasillustrated.Ifthebatteryisnotinsertedcorrectly,thecameradoesnotoperate.
Insertthebatterywhileslidingthebatterylockknobinthedirectionofthearrow.
Slidingthebatterylockknobinthedirectionofthearrowtounlock,andthenremovethebattery.
Besuretoturnoffthecamerawhenyouopenorclosethebattery/cardcompartmentcover.
Attaching the camera strap
Pullthestraptightsothatitdoesnotcomeloose.
Loading the battery and the xD-Picture Card™ (sold separately) into the camera
DonotinsertanythingotherthananxD-PictureCardorthemicroSDAttachmentintothecamera.
11
2
Battery/cardcompartmentcover

11EN
To remove the xD-Picture Card
1 2
Pressinthecarduntilitclicksandcomesoutslightly,andthengraspthecardtopullitout.
Charging the battery
TheincludedACadaptor(F-1AC/withanACcableorplug-intype)differsdependingontheregionwhereyoupurchasedthecamera.Ifyoureceivedaplug-intypeACadaptor,plugitdirectlyintoanACoutlet.
TheincludedACadaptor(F-1AC)hasbeendesignedtobeusedonlyforcharging.Makesurethatoperationssuchasshooting,viewingimagesandsoonarenotbeingusedwhiletheACadaptorisconnectedtothecamera.
Example: AC adaptor with an AC cable
1
ACoutletACcable
ACadaptor
3 NotchIndexarea
Insertthecardstraightinuntilitclicksintoplace.
Donottouchthecontactareaonthecard.
4
ThiscameraallowstheusertotakepicturesusingtheinternalmemoryevenwhennoxD-PictureCard(soldseparately)isinserted.“UsinganxD-PictureCard” (p.66) “Numberofstorablepictures(stillpictures)/continuousrecordinglength(movies)intheinternalmemoryandxD-Picturecard” (p.67)

1� EN
2Multi-connector
Connectorcover
3
ChargingindicatorLights(orange) :ChargingLights(blue) :Charged
Batterycomespartiallycharged.Beforeuse,besuretochargethebatteryuntilthechargingindicatorgoesoff(forapprox.2.5hours).
Ifthechargingindicatordoesnotlightoritblinks,theremaybecasesinwhichtheconnectionsarenotcorrect,orthebattery,camera,and/orACadaptormaybedamaged.
FordetailsonthebatteryandtheACadaptor,see“Battery,ACadaptor(included),Charger(soldseparately)”(p.64).
When to charge the batteryChargethebatterywhentheerrormessageshownbelowappears.
BATTERYEMPTY
Monitortopright Errormessage
Flashesinred
1�EN
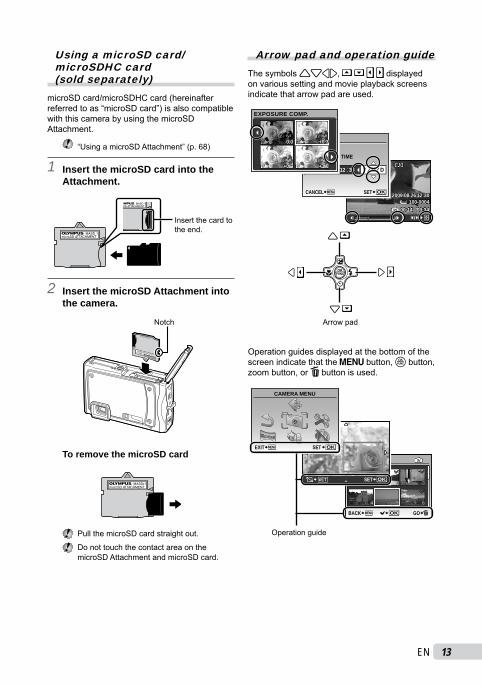
Using a microSD card/microSDHC card (sold separately)
microSDcard/microSDHCcard(hereinafterreferredtoas“microSDcard”)isalsocompatiblewiththiscamerabyusingthemicroSDAttachment.
“UsingamicroSDAttachment” (p.68)
1 Insert the microSD card into the Attachment.
Insertthecardtotheend.
2 Insert the microSD Attachment into the camera.
Notch
To remove the microSD card
PullthemicroSDcardstraightout.
DonottouchthecontactareaonthemicroSDAttachmentandmicroSDcard.
Arrow pad and operation guideThesymbols, displayedonvarioussettingandmovieplaybackscreensindicatethatarrowpadareused.
2009.08.26 12:30100-0004
00:14 /00:34IN
/
2008 08 26 12 30
OK
X
Y M D
TIME
MENUCANCEL SET
Y M D
0.0 +0.3
+0.7 +1.0
EXPOSURE COMP.
Arrowpad
Operationguidesdisplayedatthebottomofthescreenindicatethatthebutton,obutton,zoombutton,orDbuttonisused.
1
4
2
5
3
6
IN
OK MENUBACK GO
SEL. IMAGE
TW SET OK
MENUEXIT SET OK
CAMERA MENU
Operationguide

14 EN
Setting the date and timeThe date and time set here are saved to image file names, date prints, and other data.
1 Pressthenbuttontoturnonthecamera.
The date and time setting screen is displayed when the date and time are not set.
X
Y M
Y M D
D TIME
---- -- -- -- --
MENUCANCEL
Date and time setting screen
2 UseEFtoselecttheyearfor[Y].
2009 -- -- -- --
X
Y M
Y M D
D TIME
MENUCANCEL
3 PressHtosavethesettingfor[Y].
2009 -- -- -- --
X
Y M
Y M D
D TIME
MENUCANCEL
●
4 Asinsteps2and3,useEFGHandthebuttontoset[M](month),[D](day),and[TIME](hoursandminutes),and[Y/M/D](dateorder).
For precise time setting, press the button as the time signal strikes 00 seconds.
To change the date and time, adjust the setting from the menu. [X](Date/time)(p. 46)
TocheckthedateandtimePress the g button while the camera is turned off. The current time is displayed for approx. 3 seconds.
Changing the display languageThe language for the menu and error messages displayed on the monitor is selectable.
1 Pressthebutton,andpressEFGHtoselect[E](SETUP).
MENUEXIT SET OK
SETUP
2 Pressthebutton.
1234
BACKUP
NORMAL
SETUP
ENGLISHPW ON SETUPMENU COLOR
MEMORY FORMAT
MENUEXIT SET OK

1�EN
3 Use EF to select [W] and press the o button.
W
FRANCAISDEUTSCHESPAÑOLITALIANO
ENGLISH 日本語
OKSETBACK MENU
4 Use EFGH to select your language and press the o button.
5 Press the button.

1� EN
Shooting, Viewing, and Erasing
3 Hold the camera, and compose the shot.
1/400 F3.5
P
Horizontalgrip
Verticalgrip
Monitor
Whenholdingthecamera,takecarenottocovertheflashwithyourfingers,etc.
4 Press the shutter button halfway down to focus on the subject.Whenthecamerafocusesonthesubject,theexposureislocked(shutterspeedandaperturevaluearedisplayed),andtheAFtargetmarkchangestogreen.
ThecamerawasunabletofocusiftheAFtargetmarkflashesred.Tryfocusingagain.
1/400 F3.5
P
AFtargetmark
Presshalfway
ShutterspeedAperturevalue
“Focusing”(p.61)
●
●
Shooting with optimum aperture value and shutter speed (K mode)
Inthismode,automaticcamerashootingcanbeusedwhilealsoallowingchangestoawiderangeofothershootingmenufunctions,suchasexposurecompensation,whitebalance,andsoonwhenneeded.
1 Set the mode dial to K.
2 Press the n button to turn on the camera.
12M
P
4INNORM
Monitor(standbymodescreen)
Numberofstorablestillpictures(p.67)
Pressthenbuttonagaintoturnoffthecamera.

1�EN
5 To take the picture, gently press the shutter button all the way down while being careful not to shake the camera.
P
1/400 F3.5
Imagereviewscreen
Pressfully
To view images during shootingPressingtheqbuttonenablesplaybackofimages.Toreturntoshooting,eitherpresstheqbuttonagainorpresstheshutterbuttonhalfwaydown.
Youcanoperatethecamerabytappingthebodywhen[TAPCONTROL]is[ON].[TAPCONTROL](p.49)
To shoot movies“Shootingmovies(Amode)”(p.21)
Viewing images
1 Set the mode dial to q.
1IN
12M
2009.08.26 12:30100-0001NORM
Playbackimage
Framenumber
2 Use EFGH to select an image.Displays
10framesbeforethecurrentimage
Displaysnextimage
Displayspreviousimage
Displays10framesafterthecurrentimage
Thedisplaysizeoftheimagescanbechanged.“Indexview,calendarview,andclose-upview”(p.27)
To play back moviesSelectamovie,andpresstheobutton.
2009.08.26 12:30100-0004
4INMOVIE PLAY OK
Movie

1� EN
Operations during movie playbackVolume:Duringplayback,pressEF.Fast-forward/rewind:SelectwithGH.Eachtimeabuttonispressed,theplaybackspeedcyclesthrough2x,20x,andstandard(1x)speedinthedirectionofthepressedbutton.Pause:Presstheobutton.
2009.08.26 12:30100-0004
00:12 /00:34IN
Duringplayback
Elapsedtime/Totalrecordingtime
First (last) frame/frame advance:Duringpause,pressE todisplaythefirstframe,andpressFtodisplaythelastframe.PlaybackisreversedwhileGispressed,playbackoccursnormallywhileHispressed.Presstheobuttontoresumeplayback.
2009.08.26 12:30100-0004
00:14 /00:34IN
/
Duringpause
To stop movie playbackPressthe button.
Erasing images during playback (Single image erase)
1 Press the D button when the playback image to be erased is displayed.
ERASE
OK
IN
NOYES
SETCANCEL MENU
2 Press E to select [YES], and press the o button.
[KERASE](p.40)

1�EN
To take underwater photosSelect[UNDERWATERSNAPSHOT],[kUNDERWATERWIDE1],[lUNDERWATERWIDE2]*1,[HUNDERWATERMACRO].Whenthemodedialissettoduringunderwatershooting(i.e.,whiletheunderwatersensorisresponding),theabovementioned4modesappearbeforeothermodes.
*1 Whensetto[lUNDERWATERWIDE2],thefocusdistanceisautomaticallyfixedtoapprox.5.0m(16.4ft.).
Besuretouseanunderwatercasewhenusingthecameraatdepthsexceeding10m(32.8ft.).
When[MANOMETER](p.48)issetto[ON],thealtitude/waterdepth(atmospheric/hydraulicpressure)appearsontheshootingstandbymodescreenasaroughguide.“Shootingmodedisplay”(p.8)
“Importantinformationaboutwaterandshockresistantfeatures”(p.68)
To lock the focus distance for underwater shoots (AF lock)When[UNDERWATERSNAPSHOT],[kUNDERWATERWIDE1],or,[HUNDERWATERMACRO]isselected,pressF.
AFL
12M
4INNORM
^mark
Tocancel,pressFagaintoclearthe^mark.
Thissectiondescribestheavailableshootingmodes.Dependingonthemode,somesettingscanbechanged.Fordetailsonthefunctionsthatcanbeadjusted,see“MenusforShootingFunctions”onpage29.
Using the best mode for the shooting scene ( mode)
1 Set the mode dial to .
PORTRAIT
SET OKMENUEXIT
AnexplanationoftheselectedmodeisdisplayedwhiletheEbuttonispressedandheld.
2 Use EF to select the best shooting mode for the scene, and press the o button.
12M
4INNORM
Iconindicatingthescenemode
thatisset
Tochangetoanotherscenemode,usethemenu.[OSCENEMODE](p.33)
●
Using Shooting Modes

�0 EN
Enhancing skin tone and texture (b mode)
Thecamerafindsaperson’sfaceandgivestheskinasmooth,translucentlookfortakingthepicture.
1 Set the mode dial to b.
12M
4INNORM
bmodeindicator
2 Point the camera toward the subject. Check the frame appearing around the face detected by the camera, and then press the shutter button to take the picture.Theuneditedimageandeditedimagearebothsaved.
Iftheimagecannotberetouched,onlytheuneditedimageissaved.
Forsomesubjects,theframemaynotappear,maytakesometimetoappear,ortheeditingmaynotbeeffective.
The[IMAGESIZE]oftheretouchedimageislimitedto[J]orlower.
●
●
Shooting with automatic settings (A mode)
Thecamerawillautomaticallyselecttheoptimalshootingmodeforthescene.Thisisafullyautomaticmodethatallowsyoutotakeapicturesuitedtothescenebysimplypressingtheshutterbutton.SettingsintheshootingfunctionmenuarenotavailableinAmode.
1 Set the mode dial to A.
12M
4INNORM
iAUTO
Theindicatorchangestotheiconforthescenemodeselectedbythecamera.
Presstheshutterbuttonhalfwaydownorpressthegbuttontocheckwhichshootingmodethecamerahasautomaticallyselected.
Insomecases,thecameramaynotselectthedesiredshootingmode.
Whenthecameracannotidentifywhichistheoptimalmode,Pmodewillbeselected.
●
�1EN
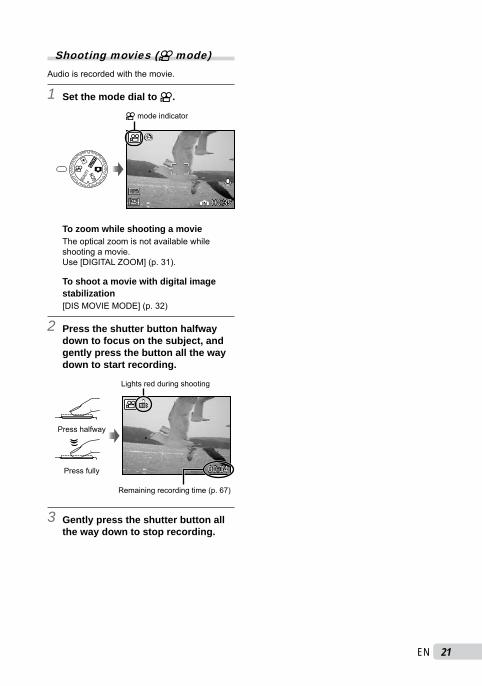
Shooting movies (n mode)Audioisrecordedwiththemovie.
1 Set the mode dial to n.
00:35QVGA
15 IN
Amodeindicator
To zoom while shooting a movieTheopticalzoomisnotavailablewhileshootingamovie.Use[DIGITALZOOM](p.31).
To shoot a movie with digital image stabilization[DISMOVIEMODE](p.32)
2 Press the shutter button halfway down to focus on the subject, and gently press the button all the way down to start recording.
Presshalfway
Pressfully 00:34
REC
Lightsredduringshooting
Remainingrecordingtime(p.67)
3 Gently press the shutter button all the way down to stop recording.

�� EN
Using Shooting Functions
Thezoombarappearanceidentifiesthestatusofthefinezoom/digitalzoom.
Finezoomrange
Digitalzoomrange
Whenusingopticalzoom
Whenusingfinezoom
Whenusingdigitalzoom
Opticalzoomrange
Using the flashTheflashfunctionscanbeselectedtobestmatchtheshootingconditionsandrenderthedesiredimage.
1 Press the # button. Youcanoperatethecamerabytappingthebodywhen[TAPCONTROL]is[ON].[TAPCONTROL](p.49)
P
OKOK
AUTO
SET
FLASH AUTOAUTO ! # $
Inadditiontothewidevarietyofshootingmodes,thecamerahasfunctionsthatbroadentheexpressiverangeandshootingoptionsavailabletothephotographer.
Using the optical zoomPressingthezoombuttonadjuststheshootingrange.
Pressingthewide(W)button
Pressingthetelephoto(T)button
12M
P
4INNORM
12M
P
4INNORM
W T W T
Zoombar
Opticalzoom:3.6×,Digitalzoom:5.0×.
Useof[IMAGESTABILIZER](Stillimage)/[DISMOVIEMODE](Movie)(p.32)isrecommendedwhenshootingwiththetelephotozoom.
To take larger images without reducing image quality[FINEZOOM](p.31)
To take larger images[DIGITALZOOM](p.31)

��EN
2 Use GH to select the setting option, and press the o button to set.
Item Description
FLASHAUTO Theflashfiresautomaticallyinlow-lightorbacklightconditions.
REDEYEThisemitspre-flashestoreducetheoccurrenceofredeyeinyourphotos.
FILLIN Theflashfiresregardlessoftheavailablelight.
FLASHOFF Theflashdoesnotfire.
Adjusting the brightness (Exposure compensation)
Thestandardbrightness(appropriateexposure)setbythecamerabasedontheshootingmode(exceptforA)canbeadjustedbrighterordarkertoobtainadesiredshot.
1 Press the F button.
0.0 +0.3
+0.7 +1.0
EXPOSURE COMP.
Exposurecompensationvalue
2 Use EFGH to select the desired brightness image, and press the o button.
Shooting closeups (Macro shooting)
Thisfunctionenablesthecameratofocusandshootsubjectsatclosedistances.
1 Press the & button. Youcanoperatethecamerabytappingthebodywhen[TAPCONTROL]is[ON].[TAPCONTROL](p.49)
P
OKOKSET
OFFOFF% &
OFFOFF
2 Use GH to select the setting option, and press the o button to set.
Item Description
OFF Macromodeisdeactivated.
MACROThisenablesshootingascloseas10cm/3.9in.*1(30cm/11.8in.*2)tothesubject.
SUPERMACRO*3
Thisenablesshootingascloseas2cm/0.8in.tothesubject.Subjectsat50cm/19.7in.orfarthercannotbebroughtintofocus.
S-MACROLED*3*4
TheLEDilluminatorlightsthearea7to20cm(2.8to7.9in.)fromthelens,whiletheshutterbuttonispressedhalfwaydown.
*1Whenthezoomisatthewidest(W)position.*2Whenthezoomisatthemosttelephoto(T)position.*3 Thezoomisautomaticallyfixed.*4 [ISO](p.30)isautomaticallyfixedto[AUTO].
Theflash(p.22)andzoom(p.22)cannotbesetwhen[%]or[O]isselected.

�� EN
Using the self-timerAftertheshutterbuttonispressedallthewaydown,thepictureistakenafteratimedelay.
1 Press the Y button.
OFF
P
OKOK
12M
NORM
SET
SELFTIMER
OFFON
YYY
2 Use EF to select the setting option, and press the o button to set.
Item Description
OFF Thiscancelstheself-timer.
ON
Theself-timerlampturnsonforapprox.10seconds,andthenblinksforapprox.2seconds,andthenthepictureistaken.
Self-timershootingisautomaticallycanceledafteroneshot.
To cancel the self-timer after it startsPresstheYbuttonagain.
Using the LED illuminatorInadarklocation,theLEDilluminatorcanbeusedasanauxiliarylighttoseethingsorcomposeshots.
1 Set [LED ILLUMINATOR] (p. 48) to [ON].
2 Press and hold the Y button down until the LED illuminator lights up.IfyouperformanoperationwhentheLEDilluminatorison,itwillilluminateuptoapprox.90seconds.
LEDilluminator
TheLEDilluminatorturnsoffifnooperationisperformedforapprox.30seconds.
Evenwhenthecamera’spoweristurnedoff,iftheYbuttonispresseduntiltheLEDilluminatorlightsup,itlightsfor30seconds.
To turn the LED illuminator offPressandholdtheYbuttondown,untiltheLEDilluminatorturnsoff.
●

��EN
Changing the shooting information display
Thedisplayofthescreeninformationcanbechangedtobestmatchthesituation,suchasfortheneedofclearviewofthescreenorformakingaprecisecompositionbyusingthegriddisplay.
1 Press the g button.Thedisplayedshootinginformationchangesintheordershownbeloweachtimethebuttonispressed.“Shootingmodedisplay”(p.8)
12M
+2.0
P
4IN
ISO1600
NORM
12M
+2.0
P
4IN
ISO1600
NORM
12M
+2.0
P
4IN
ISO1600
NORM
Normal
Noinformation
Histogram
Grid
Reading a histogram
Ifthepeakfillstoomuchoftheframe,theimagewillappearmostlywhite.
Ifthepeakfillstoomuchoftheframe,theimagewillappearmostlyblack.
Thegreensectionshowstheluminancedistributioninthecenterareaofthemonitor.
●
Using the FUNC menuTheFUNCmenuprovidesthefollowingmenufunctionsthatcanbequicklycalledandset.[WB](p.30)• [ESP/n](p.32)•[ISO](p.30)• [AIMAGEQUALITY](p.29)•[DRIVE](p.31)•
1 Press the o button.
n
12M ESP
ISOAUTO
WBAUTO
ESP
ESPNORM
P
2 Use EF to select the menu function and GH to select the setting option, and then press the o button to set.

�� EN
Quickly calling and using shooting functions
Thefollowingmenufunctionscanbequicklycalledandused.[PANORAMA](p.34)• [SHADOWADJ](p.33)•[TAPCONTROL](p.49)• [MULTIWINDOW](p.26)•
1 Press the o/D button.
PANORAMA
2 Use GH to select the menu function, and press the o button to set.
To use the effects preview screen (Multi window)Selectinganoptionfrom[ZOOM],[EXPOSURECOMP.],[WB]or[ESP/n]shows4previewimagesthatreflecttheadjustedvaluesoftheselectedshootingfunction.UseEFGHtoselectthedesiredimage,andpresstheobutton.
Brightening the monitor (Backlight boost)
Pressingandholdingtheo/Dbuttonbrightensthemonitor.Themonitorreturnstotheoriginalbrightnessifnooperationisperformedfor10seconds.
Duringunderwatershooting(i.e.,whiletheunderwatersensorisresponding),thebacklightboostoperatesautomatically.
��EN
Using Playback Features
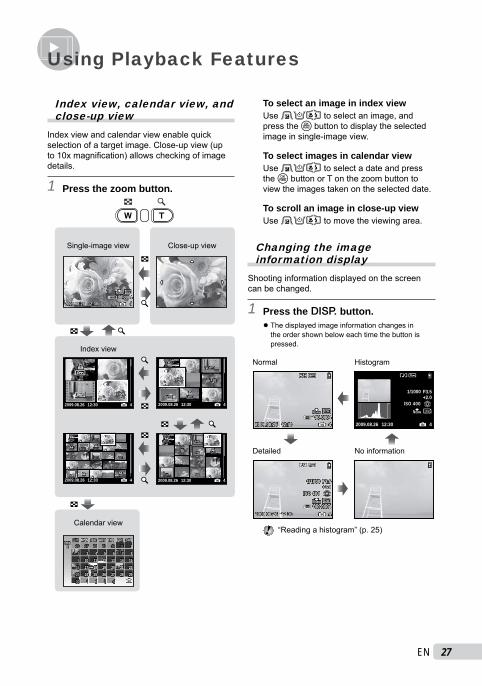
To select an image in index viewUseEFGHtoselectanimage,andpresstheobuttontodisplaytheselectedimageinsingle-imageview.
To select images in calendar viewUseEFGHtoselectadateandpresstheobuttonorTonthezoombuttontoviewtheimagestakenontheselecteddate.
To scroll an image in close-up viewUseEFGH tomovetheviewingarea.
Changing the image information display
Shootinginformationdisplayedonthescreencanbechanged.
1 Press the g button.Thedisplayedimageinformationchangesintheordershownbeloweachtimethebuttonispressed.
2009.08.26 12:30 4100-0004
IN
12MNORM
12M
2009.08.26 12:30 4100-0004
+2.0F3.51/1000
IN
ISO 400NORM
12M
2009.08.26 12:30
+2.0F3.5
4IN
NORM
1/1000
ISO 400
Normal
Detailed
Histogram
Noinformation
“Readingahistogram”(p.25)
●
Index view, calendar view, and close-up view
Indexviewandcalendarviewenablequickselectionofatargetimage.Close-upview(upto10xmagnification)allowscheckingofimagedetails.
1 Press the zoom button.
2009.08.26 4IN12:30 2009.08.26 12:30
10x
4IN
2009.08.26 12:30 4IN2009.08.26 12:30 4IN
4IN
12M
2009.08.26 12:30100-0004NORM
Indexview
Single-imageview Close-upview
8 26 27 28 29 30 31 1
SUN MON TUE WED THU FRI SAT2009
2 3 4 5 6 7 8
9 10 11 12 13 14 15
16 17 18 19 20 21 22
23 24 25 26 27 28 29
30 1 2 3 4 IN
Calendarview
�� EN
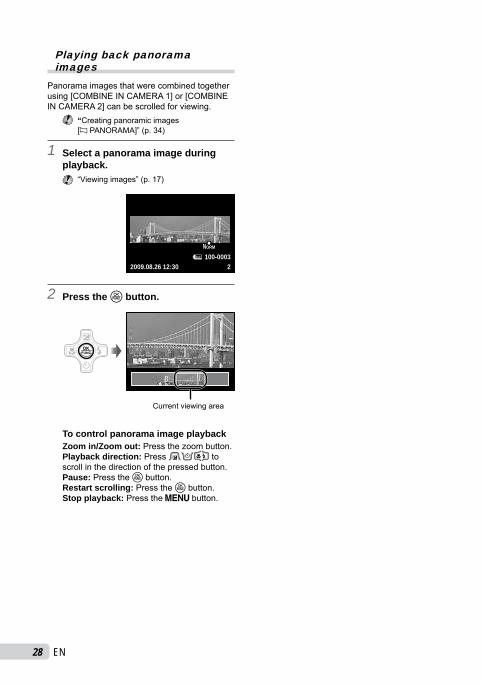
Playing back panorama images
Panoramaimagesthatwerecombinedtogetherusing[COMBINEINCAMERA1]or[COMBINEINCAMERA2]canbescrolledforviewing.
“Creatingpanoramicimages[NPANORAMA]”(p.34)
1 Select a panorama image during playback.
“Viewingimages”(p.17)
NORM
2009.08.26 12:30 2100-0003
2 Press the o button.
Currentviewingarea
To control panorama image playbackZoom in/Zoom out:Pressthezoombutton.Playback direction:PressEFGHtoscrollinthedirectionofthepressedbutton.Pause:Presstheobutton.Restart scrolling:Presstheobutton.Stop playback: Pressthebutton.

��EN
Adjust the settings for the functions while referring to “Using the Menu” (p. 3).
Menus for Shooting Functions
Whenthemodedialissettoashootingmodeposition(AKbA),settingscanbeadjusted.
indicatespositionsofthemodedialatwhichthefunctioncanbeset.
Thedefaultsettingsofthefunctionarehighlightedin .
Selecting the appropriate image quality for your application [A IMAGE QUALITY]AIMAGEQUALITY
:AKbA
Still images
Submenu 1 Submenu 2 Application
IMAGESIZE
12M(3968×2976) SuitableforprintingpicturesoverA3(11×17in.).
5M(2560×1920) SuitableforprintingpicturesatA4(8.5×11in.).
3M(2048×1536) SuitableforprintingpicturesuptoA4(8.5×11in.).
2M(1600×1200) SuitableforprintingpicturesatA5(5×7in.).
1M(1280×960) Suitableforprintingpicturesatpostcardsize.
VGA(640×480) SuitableforviewingpicturesonaTVorusingpicturesonemailsandwebsites.
16:9(1920×1080) SuitableforplayingpicturesonwidescreenTV.
COMPRESSIONFINE Shootingathighquality.NORMAL Shootingatnormalquality.
Movies
Submenu 1 Submenu 2 Application
IMAGESIZE VGA(640×480)/QVGA(320×240) Selecttheimagequalitybasedontheimagesizeandframerate.
Higherframeratesprovidesmoothermovies.FRAMERATE N30fps*1/
O15fps*1
*1 framespersecond
“Numberofstorablepictures(stillpictures)/continuousrecordinglength(movies)intheinternalmemoryandxD-PictureCard”(p.67)

�0 EN
Adjusting to a natural color scheme [WB]BCAMERAMENUWB
:KbA
Still images/ Movies (During non-water shooting)
Submenu 2 Application
AUTOThecameraautomaticallyadjuststhewhitebalanceaccordingtotheshootingscene.
5 Forshootingoutdoorsunderaclearsky
3 Forshootingoutdoorsunderacloudysky
1 Forshootingundertungstenlighting
wForshootingunderdaylightfluorescentlighting(householdlighting,etc.)
xForshootingunderneutralfluorescentlighting(desklamps,etc.)
y Forshootingunderwhitefluorescentlighting(offices,etc.)
Movies (During underwater shooting)
Submenu 2 ApplicationQ/R/S
Forshootingunderwater.
Selecting the ISO sensitivity [ISO]BCAMERAMENUISO
:K
AbbreviationfortheInternationalOrganizationforStandardization.ISOstandardsspecifythesensitivityfordigitalcamerasandfilm,thuscodessuchas“ISO100”areusedtorepresentsensitivity.
IntheISOsetting,althoughsmallervaluesresultinlesssensitivity,sharpimagescanbetakenunderfullylitconditions.Largervaluesresultinhighersensitivity,andimagescanbetakenatfastshutterspeedsevenunderdimlylitconditions.However,highsensitivityintroduceselectrostaticnoiseintotheresultingpicture,whichmaygiveitagrainyappearance.
Submenu 2 Application
AUTOThecameraautomaticallyadjuststhesensitivityaccordingtotheshootingscene.
HIGHISOAUTO
Thecamerausesahighersensitivitycomparedto[AUTO]tominimizeblurcausedbyamovingsubjectorbycamerashake.
64/100/200/400/800/1600
TheISO(sensitivity)settingisfixedbymanuallyselectingit.
�1EN
Adjust the settings for the functions while referring to “Using the Menu” (p. 3).
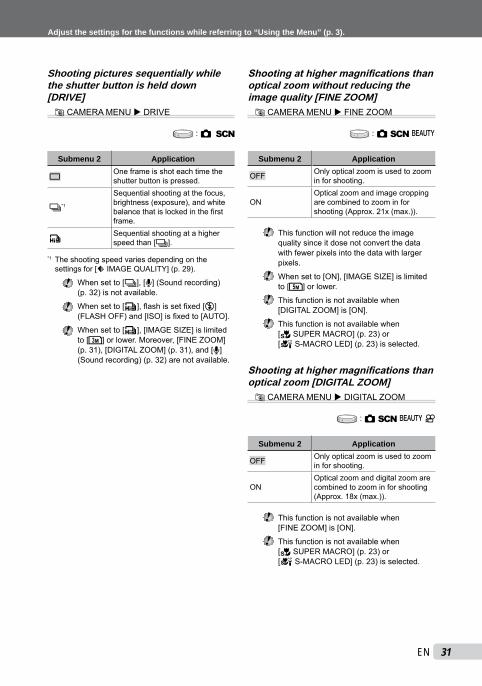
Shooting pictures sequentially while the shutter button is held down [DRIVE]BCAMERAMENUDRIVE
:K
Submenu 2 Application
oOneframeisshoteachtimetheshutterbuttonispressed.
j*1
Sequentialshootingatthefocus,brightness(exposure),andwhitebalancethatislockedinthefirstframe.
WSequentialshootingatahigherspeedthan[j].
*1 Theshootingspeedvariesdependingonthesettingsfor[AIMAGEQUALITY](p.29).
Whensetto[j],[R](Soundrecording)(p.32)isnotavailable.
Whensetto[W],flashissetfixed[$](FLASHOFF)and[ISO]isfixedto[AUTO].
Whensetto[W],[IMAGESIZE]islimitedto[I]orlower.Moreover,[FINEZOOM](p.31),[DIGITALZOOM](p.31),and[R] (Soundrecording) (p.32)arenotavailable.
Shooting at higher magnifications than optical zoom without reducing the image quality [FINE ZOOM]BCAMERAMENUFINEZOOM
:Kb
Submenu 2 Application
OFF Onlyopticalzoomisusedtozoominforshooting.
ONOpticalzoomandimagecroppingarecombinedtozoominforshooting(Approx.21x(max.)).
Thisfunctionwillnotreducetheimagequalitysinceitdosenotconvertthedatawithfewerpixelsintothedatawithlargerpixels.
Whensetto[ON],[IMAGESIZE]islimitedto[H]orlower.
Thisfunctionisnotavailablewhen[DIGITALZOOM]is[ON].
Thisfunctionisnotavailablewhen[%SUPERMACRO] (p.23)or[OS-MACROLED](p.23)isselected.
Shooting at higher magnifications than optical zoom [DIGITAL ZOOM]BCAMERAMENUDIGITALZOOM
:KbA
Submenu 2 Application
OFF Onlyopticalzoomisusedtozoominforshooting.
ONOpticalzoomanddigitalzoomarecombinedtozoominforshooting(Approx.18x(max.)).
Thisfunctionisnotavailablewhen[FINEZOOM]is[ON].
Thisfunctionisnotavailablewhen[% SUPERMACRO](p.23)or[OS-MACROLED](p.23)isselected.

�� EN
Selecting the range for measuring the brightness [ESP/n]BCAMERAMENUESP/n
:KA
Submenu 2 Application
ESP
Shootstoobtainabalancedbrightnessovertheentirescreen.(Metersthebrightnessatthecenterandsurroundingareasofthescreenseparately.)
n(spot) Shootsthesubjectatthecenterduringbacklighting.
Whensetto[ESP],thecentermayappeardarkwhenshootingagainststrongbacklighting.
Selecting the focusing area [AF MODE]BCAMERAMENUAFMODE
:K
Submenu 2 Application
FACEDETECT*1
Thisisusedfortakingpicturesofpeople.(Thecameraautomaticallydetectsafaceanddisplaysaframeonthemonitor).Presstheshutterbuttonhalfway,whenthecamerafocusesonafacetheAFtargetmarklightsgreen.WhentheAFtargetmarklightsorange,thisindicatesthecamerahasfocusedonsomethingotherthanaface.
iESP
Thisenablesyoutocomposetheshotwithoutworryingaboutthefocusingposition.Thecamerafindsthesubjecttofocusonandautomaticallyadjuststhefocus.
SPOT ThecamerafocusesonthesubjectwithintheAFtargetmark.
*1 Forsomesubjects,theframemaynotappearormaytakesometimetoappear.
Recording sound when shooting still images [R]BCAMERAMENUR
:K
Submenu 2 ApplicationOFF Nosoundisrecorded.
ON
Thecameraautomaticallystartsrecordingforapprox.4secondsaftertakingthepicture.Thisisusefulforrecordingnotesorcommentsaboutthepicture.
Whenrecording,aimthemicrophone(p.6)atthesourceofthesoundyouwanttorecord.
Reducing the blur caused by the camera shake when shooting [IMAGE STABILIZER] (still images) / [DIS MOVIE MODE] (movies)BCAMERAMENUIMAGESTABILIZER/DISMOVIEMODE
:KbA
Submenu 2 Application
OFF
Theimagestabilizerisdeactivated.This isrecommendedforshootingwhenthecamera isfixed inplaceonatripodorotherstablesurface.
ON Theimagestabilizerisactivated.
Thecamera’sdefaultsettingsare[IMAGESTABILIZER](stillimages)to[ON]and[DISMOVIEMODE](movies)to[OFF].
While[IMAGESTABILIZER](stillimages)issetto[ON],noisesmayoccurfromtheinsideofthecameraiftheshutterbuttonispressed.
Imagesmaynotbestabilizedifcamerashakeistoosevere.
Whentheshutterspeedisextremelyslow,suchaswhentakingstillshotsortakingpicturesatnight,thestabilizermaynotbeaseffective.
Whenshootingwhilethe[DISMOVIEMODE](movies)issetto[ON],theimagewillbeenlargedsomewhatbeforesaving.

��EN
Adjust the settings for the functions while referring to “Using the Menu” (p. 3).
Brightening the subject against backlight [SHADOW ADJ]BCAMERAMENUSHADOWADJ
:KbA
Submenu 2 Application
OFF Shootswithoutusing [SHADOWADJ].
ON
Thecamerafindsaperson’sfacethathasbeendarkenedbybacklightandmakesitappearbrighterfortakingthepicture.(Pointthecameratowardthesubject.Checktheframethatappearsaroundthefacedetectedbythecamera,andthenpresstheshutterbuttontotakethepicture.)
Forsomesubjects,theframemaynotappearormaytakesometimetoappear.
Whensetto[ON],[ESP/n](p.32)isautomaticallyfixedto[ESP],and[AFMODE](p.32)isautomaticallyfixedto[FACEDETECT].
Selecting a scene mode according to the shooting situation [O SCENE MODE]OSCENEMODE
:
Inmode,theoptimumshootingsettingsarepre-programmedforspecificshootingscenes.Forthisreason,settingsmaynotbechangedinsomemodes.
Submenu 1 ApplicationBPORTRAIT/FLANDSCAPE/GNIGHTSCENE*1/MNIGHT+PORTRAIT*1/CSPORT/NINDOOR/WCANDLE*1/RSELFPORTAIT/SSUNSET*1/XFIREWORKS*1/VCUISINE/dDOCUMENTS/qBEACH&SNOW/UNDERWATERSNAPSHOT/kUNDERWATERWIDE1/lUNDERWATERWIDE2/HUNDERWATERMACRO/YPRE-CAPTUREMOVIE/aSNOW
Thecameratakesapictureinthemodefortheshootingscene.
*1Whenthesubjectisdark,noisereductionisautomaticallyactivated.Thisapproximatelydoublestheshootingtime,duringwhichnootherpicturescanbetaken.
To shoot with the selected mode“Usingthebestmodefortheshootingscene(mode)”(p.19)
�� EN
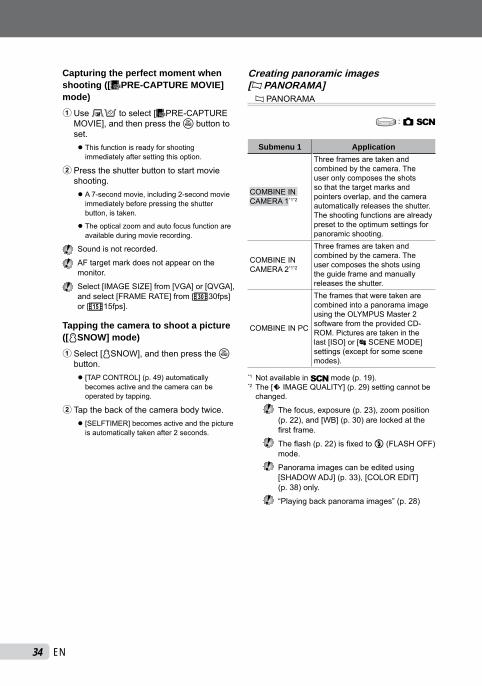
Capturing the perfect moment when shooting ([YPRE-CAPTURE MOVIE] mode)1UseEFtoselect[YPRE-CAPTURE
MOVIE],andthenpresstheobuttontoset.
Thisfunctionisreadyforshootingimmediatelyaftersettingthisoption.
2Presstheshutterbuttontostartmovieshooting.
A7-secondmovie,including2-secondmovieimmediatelybeforepressingtheshutterbutton,istaken.
Theopticalzoomandautofocusfunctionareavailableduringmovierecording.
Soundisnotrecorded.
AFtargetmarkdoesnotappearonthemonitor.
Select[IMAGESIZE]from[VGA]or[QVGA],andselect[FRAMERATE]from[N30fps]or[O15fps].
Tapping the camera to shoot a picture ([aSNOW] mode)1Select[aSNOW],andthenpresstheo
button.[TAPCONTROL](p.49)automaticallybecomesactiveandthecameracanbeoperatedbytapping.
2Tapthebackofthecamerabodytwice.[SELFTIMER]becomesactiveandthepictureisautomaticallytakenafter2seconds.
●
●
●
●
●
Creating panoramic images [N PANORAMA]NPANORAMA
:K
Submenu 1 Application
COMBINEINCAMERA1*1*2
Threeframesaretakenandcombinedbythecamera.Theuseronlycomposestheshotssothatthetargetmarksandpointersoverlap,andthecameraautomaticallyreleasestheshutter.Theshootingfunctionsarealreadypresettotheoptimumsettingsforpanoramicshooting.
COMBINEINCAMERA2*1*2
Threeframesaretakenandcombinedbythecamera.Theusercomposestheshotsusingtheguideframeandmanuallyreleasestheshutter.
COMBINEINPC
TheframesthatweretakenarecombinedintoapanoramaimageusingtheOLYMPUSMaster2softwarefromtheprovidedCD-ROM.Picturesaretakeninthelast[ISO]or[OSCENEMODE]settings(exceptforsomescenemodes).
*1Notavailableinmode(p.19).*2 The[AIMAGEQUALITY](p.29)settingcannotbechanged.
Thefocus,exposure(p.23),zoomposition(p.22),and[WB](p.30)arelockedatthefirstframe.
Theflash(p.22)isfixedto$(FLASHOFF)mode.
Panoramaimagescanbeeditedusing[SHADOWADJ](p.33),[COLOREDIT](p.38)only.
“Playingbackpanoramaimages”(p.28)
��EN
Adjust the settings for the functions while referring to “Using the Menu” (p. 3).
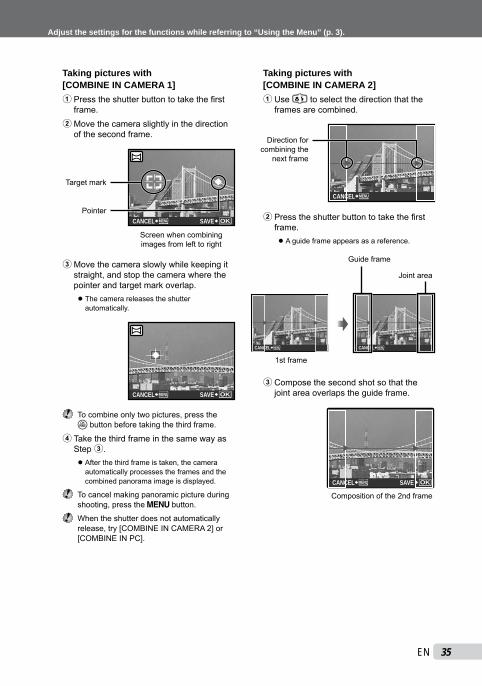
Taking pictures with [COMBINE IN CAMERA 1]1Presstheshutterbuttontotakethefirst
frame.2Movethecameraslightlyinthedirection
ofthesecondframe.
SAVE OKMENUCANCEL
Targetmark
Pointer
Screenwhencombiningimagesfromlefttoright
3Movethecameraslowlywhilekeepingitstraight,andstopthecamerawherethepointerandtargetmarkoverlap.
Thecamerareleasestheshutterautomatically.
SAVE OKMENUCANCEL
Tocombineonlytwopictures,presstheobuttonbeforetakingthethirdframe.
4TakethethirdframeinthesamewayasStep3.
Afterthethirdframeistaken,thecameraautomaticallyprocessestheframesandthecombinedpanoramaimageisdisplayed.
Tocancelmakingpanoramicpictureduringshooting,pressthebutton.
Whentheshutterdoesnotautomaticallyrelease,try[COMBINEINCAMERA2]or[COMBINEINPC].
●
●
Taking pictures with [COMBINE IN CAMERA 2]1UseGHtoselectthedirectionthatthe
framesarecombined.
MENUCANCEL
Directionforcombiningthe
nextframe
2Presstheshutterbuttontotakethefirstframe.
Aguideframeappearsasareference.
1stframe
MENUCANCEL MENUCANCEL
Guideframe
Jointarea
3Composethesecondshotsothatthejointareaoverlapstheguideframe.
Compositionofthe2ndframe
OKSAVEMENUCANCEL
●

�� EN
4Presstheshutterbuttontotakethesecondframe. Tocombineonlytwopictures,presstheobuttonbeforetakingthethirdframe.
5TakethethirdframeinthesamewayasSteps3to4.
Afterthethirdframeistaken,thecameraautomaticallyprocessestheframesandthecombinedpanoramaimageisdisplayed.
Tocancelmakingpanoramicpictureduringshooting,pressthebutton.
Taking pictures with [COMBINE IN PC]1UseEFGHtoselectthedirectionthat
theframesarecombined.2Presstheshutterbuttontotakethefirst
frame,andthencomposethesecondshot.
Composetheshotusingtheguideframesothatthetwoadjacentframesoverlap.
3RepeatStep2untilthenumberofrequiredframesaretaken,andthenpresstheobuttonwhenfinished. Whenthegmarkisdisplayed,youcannotcontinueshootinganyfurther.Panoramashootingispossibleforupto10frames.
RefertotheOLYMPUSMaster2helpguidefordetailsonhowtomakepanoramaimages.
Selecting movie shooting mode [P MOVIE]PMOVIE
:A
Submenu 1 Application
NON-WATERMOVIE
Theopticalzoomisnotavailableduringmovierecordingbutthesoundcanberecorded.
UNDERWATERMOVIE
Theopticalzoomisavailableduringmovierecordingbutthesoundcannotberecorded.
Firstthe[MOVIE]settingscreenappearswhenyousetthemodedialtoAduringunderwatershooting(i.e.,whiletheunderwatersensorisresponding).
●
●
Restoring the shooting functions to the default settings [D RESET]DRESET
:AKbA
Submenu 1 Application
YES
Restoresthefollowingmenufunctionstothedefaultsettings.Flash(p.22)Exposurecompensation(p.23)Macro(p.23)Self-timer(p.24)[AIMAGEQUALITY](p.29)Menufunctionsin[BCAMERAMENU](p.30to33)
••••••
NO Thecurrentsettingsarenotchanged.

��EN
Adjust the settings for the functions while referring to “Using the Menu” (p. 3).
Menus for Playback, Editing, and Printing Functions
Thedefaultsettingsofthefunctionarehighlightedin .
Whenthemodedialissettotheqposition,settingscanbeadjusted.
Playing back automatically [G SLIDESHOW]GSLIDESHOW
Submenu 1 Submenu 2 Submenu 3 ApplicationALL/STILLPICTURE/MOVIE/CALENDAR
NORMAL*1/FADER*1/SLIDE*1/ZOOM*1/date*2
OFF/1/2Selectstherangeofimagesfortheslideshow,thetypeoftransitioneffect([TYPE])usedbetweenimages,andthebackgroundmusic([BGM]).
*1Onlywhen[STILLPICTURE]isselectedinSubmenu1.*2Onlywhen[CALENDAR]isselectedinSubmenu1.
To start a slideshowAfterpressingtheobuttontomakethe[BGM]settings,theslideshowstarts.Tostoptheslideshow,presstheobuttonorthebutton.
[BGM]isnotavailablewhen[FSILENTMODE](p.50) issetto[ON].
Retouching images [H PERFECT FIX]HPERFECTFIX
Dependingonthepicture,theeditingmaynotbeeffective.
Theretouchingprocessmaylowertheimageresolution.
Submenu 1 Application
ALL[SHADOWADJ]and[REDEYEFIX]areappliedtogether.
SHADOWADJOnlysectionsdarkenedbybacklightinganddimlightingarebrightened.
REDEYEFIX Eyesthatarereddenedbytheflasharecorrected.
1UseEFtoselectacorrectionmethodandpresstheobutton.
2UseGHtoselectanimageforretouching,andpresstheo button.
Theretouchedimageissavedasaseparateimage.
●
Retouching the skin and eyes [M BEAUTY FIX]MBEAUTYFIX
Dependingonthepicture,theeditingmaynotbeeffective.
Submenu 1 Submenu 2 Application
ALL ―
[CLEARSKIN],[SPARKLEEYE]and[DRAMATICEYE]areappliedtogether.
CLEARSKIN SOFT/AVG/HARD
Makesskinlooksmoothandtranslucent.Selectthedesiredeffectfromamong3levels.
SPARKLEEYE ― Enhancesthecontrastoftheeyes.
DRAMATICEYE ― Enlargesthesubject’s
eyes.
1UseEFtoselectacorrectionmethod,andpresstheobutton.
2UseGHtoselectanimageforretouching,andpresstheobutton.
Theretouchedimageissavedasaseparateimage.
●
�� EN
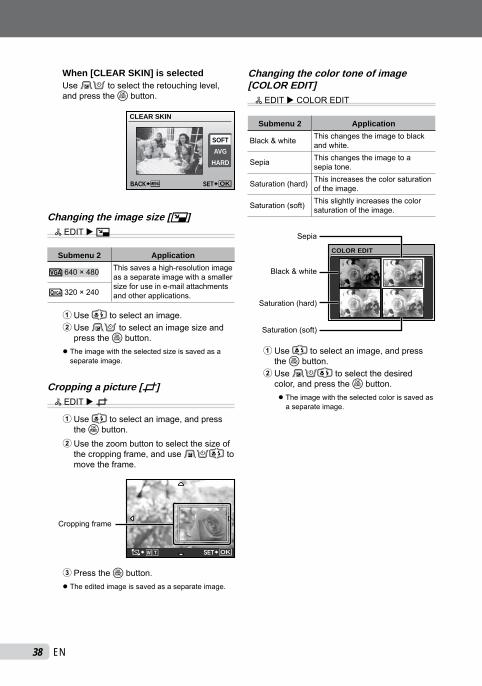
When [CLEAR SKIN] is selectedUseEFtoselecttheretouchinglevel,andpresstheobutton.
CLEAR SKIN
SOFTAVG
HARD
MENUBACK SET OK
Changing the image size [Q]IEDITQ
Submenu 2 Application
C640×480 Thissavesahigh-resolutionimageasaseparateimagewithasmallersizeforuseine-mailattachmentsandotherapplications.E320×240
1UseGH toselectanimage.2UseEFtoselectanimagesizeand
presstheobutton.Theimagewiththeselectedsizeissavedasaseparateimage.
Cropping a picture [P]IEDITP
1UseGH toselectanimage,andpresstheobutton.
2Usethezoombuttontoselectthesizeofthecroppingframe,anduseEFGH tomovetheframe.
TW SET OK
Croppingframe
3Presstheobutton.Theeditedimageissavedasaseparateimage.
●
●
Changing the color tone of image [COLOR EDIT]IEDITCOLOREDIT
Submenu 2 Application
Black&white Thischangestheimagetoblackandwhite.
Sepia Thischangestheimagetoasepiatone.
Saturation(hard) Thisincreasesthecolorsaturationoftheimage.
Saturation(soft) Thisslightlyincreasesthecolorsaturationoftheimage.
Black&white
COLOR EDIT
Sepia
Saturation(hard)
Saturation(soft)
1UseGH toselectanimage,andpresstheobutton.
2UseEFGHtoselectthedesiredcolor,andpresstheobutton.
Theimagewiththeselectedcolorissavedasaseparateimage.
●

��EN
Adjust the settings for the functions while referring to “Using the Menu” (p. 3).
Adding a calendar to an image [CALENDAR]IEDITCALENDAR
OK
CALENDAR
SET
1UseGH toselectanimage,andthenpresstheobutton.
2UseGH toselectacalendar,anduseEF toselecttheimageorientation,andpresstheobutton.
3UseEF toselecttheYearofthecalendar,andthenpressH.
4UseEFtoselecttheMonthofthecalendar,andthenpresstheobutton.Theeditedimageissavedasaseparateimage.●
Creating an index of 9 frames from a movie [INDEX]IEDITINDEX
1UseGH toselectamovie,andpresstheobutton.
INDEX
SET OKMENUBACK
Thisfunctionextracts9framesfromamovieandsavesthemasanewpicture(INDEX)containingthumbnailsofeachframe.
Protecting images [0]JPLAYBACKMENU0
Protectedimagescannotbeerasedby[ERASE](p.18),[SEL.IMAGE],or[ALLERASE](p.40),butallimagesareerasedby[MEMORYFORMAT]/[FORMAT](p.42).
Submenu 2 ApplicationOFF Imagescanbeerased.
ON
Imagesareprotectedsothattheycannotbeerasedexceptbyformattingoftheinternalmemory/card.
1UseGH toselectanimage.2UseEF toselect[ON].3Ifnecessary,repeatSteps1and2
toprotectotherimages,andpresstheobutton.
●

�0 EN
Rotating images [y]JPLAYBACKMENUy
Submenu 2 Application
U+90° Theimageisrotated90°clockwise.
V0° Theimageisnotrotated.
t–90° Theimageisrotated90°counter-clockwise.
1UseGHtoselectanimage.2UseEF toselecttherotationdirection.3Ifnecessary,repeatSteps1and2
toadjustsettingsforotherimages,andpresstheobutton. Thenewpictureorientationwillbesavedevenafterthepoweristurnedoff.
Adding sound to still images [R]JPLAYBACKMENUR
Submenu 2 Application
YES
Thecameraadds(records)soundforapprox.4secondswhileplayingbacktheimage.Thisisusefulforrecordingnotesorcommentsabouttheimage.
NO Nosoundisrecorded.
1UseGHtoselectanimage.2Aimthemicrophonetowardsthesound
source.
Microphone
3UseEF toselect[YES],andpresstheobutton.
Recordingstarts.●
Erasing images [K ERASE]KERASE
Checkeachpicturebeforeerasingtoavoiderasinganyimportantpicturesyoumaywanttokeep.
Submenu 1 Application
SEL.IMAGE Imagesareindividuallyselectedanderased.
ALLERASE Allimagesintheinternalmemoryorcardareerased.
Whenerasingpicturesintheinternalmemory,donotinsertthecardintothecamera.
Whenerasingpicturesfromthecard,insertacardintothecamerainadvance.
To individually select and erase images [SEL. IMAGE]1UseEF toselect[SEL.IMAGE],and
presstheobutton.2UseEFGH toselecttheimagetobe
erased,andpresstheobuttontoaddaRmarktotheimage.
1
4
2
5
3
6
IN
OKMENUBACK
SEL. IMAGE
GO
Rmark
3RepeatStep2toselecttheimagestobeerased,andthenpresstheDbuttontoerasetheselectedimages.
4UseEFtoselect[YES],andpresstheobutton.
TheimageswithaRmarkareerased.
To erase all images [ALL ERASE]1UseEF toselect[ALLERASE],and
presstheobutton.2UseEFtoselect[YES],andpresstheobutton.
●

�1EN
Adjust the settings for the functions while referring to “Using the Menu” (p. 3).
Saving print settings to the image data [L PRINT ORDER]LPRINTORDER
“PrintReservations(DPOF)”(p.54)
Printreservationcanonlybesetforstillimagesthatarerecordedtothecard.
�� EN
Menus for Other Camera Settings
Thedefaultsettingsofthefunctionarehighlightedin .
Erasing data completely [MEMORY FORMAT]/[FORMAT]ESETUPMEMORYFORMAT/FORMAT
Beforeformatting,checkthatnoimportantdataisleftintheinternalmemoryorcard.
Non-Olympuscardsandcardsthathavebeenformattedbyacomputermustbeformattedwiththiscamerabeforeuse.
Submenu 2 Application
YESCompletelyerasestheimagedataintheinternalmemory*1orcard(includingprotectedimages).
NO Cancelsformatting.
*1 Besuretoremovethecardbeforeformattingtheinternalmemory.
Copying images in the internal memory to the card [BACKUP]ESETUPBACKUP
Submenu 2 Application
YES Backsupimagedataintheinternalmemorytothecard.
NO Cancelsthebackup.
Ittakessometimetobackupdata.Checkthatthebatteryhassufficientpowerbeforestartingthebackup,oruseaseparatelysoldACadapter.“UsingaseparatelysoldACadapter”(p.65)
Changing the display language [W]ESETUPW
“Changingthedisplaylanguage”(p.14)
Submenu 2 Application
Languages*1Thelanguageforthemenusanderrormessagesdisplayedonthemonitorisselected.
*1 Theavailablelanguagesvarydependingonthecountryand/orregionwherethecamerawaspurchased.

��EN
Adjust the settings for the functions while referring to “Using the Menu” (p. 3).
Setting the startup display screen and sound when the camera is turned on [PW ON SETUP]ESETUPPWONSETUP
Submenu 2 Submenu 3 Application
SCREEN
OFF Noimageisdisplayed.1 Apresetimage*1isdisplayed.
2Astillimagestoredintheinternalmemoryorcardisregisteredfordisplay.(Thisoptionleadstothesetupscreen.)
VOLUME*2*3 OFF(Nosound)/LOW/HIGH Thevolumeofthestartupsoundisselected.
*1 Thisimagecannotbechanged.*2When[SCREEN]issetto[OFF],thissettingisnotavailable.*3When[FSILENTMODE](p.50)issetto[ON],thissettingisnotavailable.
To register a startup image1Select[2]inSubmenu3for[SCREEN],andpresstheobutton.2UseGH toselecttheimagetoberegistered,andpresstheobutton.
Selecting the menu screen color and background [MENU COLOR]ESETUPMENUCOLOR
Submenu 2 ApplicationNORMAL/COLOR1/COLOR2/COLOR3 Selectsthemenuscreencolororbackgroundimageaccordingtoyourpreference.

�� EN
Viewing the image immediately after shooting [REC VIEW]ESETUPRECVIEW
Submenu 2 Application
OFFTheimagebeingrecordedisnotdisplayed.Thisallowstheusertoprepareforthenextshotwhilefollowingthesubjectinthemonitoraftershooting.
ONTheimagebeingrecordedisdisplayed.Thisallowstheusertobrieflychecktheimagethatwasjusttaken.
Evenwhensetto[ON],youcanresumeshootingwhiletheimageisbeingdisplayed.
Selecting the camera sound and its volume [SOUND SETTINGS]ESETUPSOUNDSETTINGS
Submenu 2 Submenu 3 Submenu 4 Application
BEEPSOUNDTYPE 1/2 Selectstheoperatingsoundandvolume
ofthecamerabuttons(excepttheshutterbutton).VOLUME OFF(Nosound)/
LOW/HIGH
SHUTTERSOUNDSOUNDTYPE 1/2/3
Selectsthetypeandvolumeoftheshuttersound.VOLUME OFF(Nosound)/
LOW/HIGH
8 OFF(Nosound)/LOW/HIGH — Adjuststhewarningsoundvolume.
qVOLUME OFF(Nosound)/LOW/HIGH — Adjuststheimageplaybackvolume.
Toturnoffallsoundsatonce,adjustthesettingfrom[FSILENTMODE](p.50).

��EN
Adjust the settings for the functions while referring to “Using the Menu” (p. 3).
Resetting the file name numbers of pictures [FILE NAME]ESETUPFILENAME
Month:1toC(A=October,B=November,C=December)
Day:01to31
Pmdd
Foldername Foldername FilenameDCIM 100OLYMP
999OLYMP
Pmdd0001.jpg
Pmdd9999.jpg
Automaticnumbering
Automaticnumbering
Submenu 2 Application
RESET
Thisresetsthesequentialnumberforthefoldernameandfilenamewheneveranewcardisinserted.*1Thisisusefulwhengroupingimagesonseparatecards.
AUTO
Evenwhenanewcardisinserted,thiscontinuesthenumberingforthefoldernameandfilenamefromthepreviouscard.Thisisusefulformanagingallimagefoldernamesandfilesnameswithsequentialnumbers.
*1 Thenumberforthefoldernameisresetto100,andtheoneforthefilenameisresetto0001.
Adjusting the CCD and adjusting the image processing function [PIXEL MAPPING]ESETUPPIXELMAPPING
Thisfunctionhasalreadybeenadjustedatfactoryshipping,andnoadjustmentisneededrightafterpurchase.Approximatelyonceayearisrecommended.
Forbestresults,waitatleastoneminuteaftertakingorviewingpicturesbeforeperformingpixelmapping.Ifthecameraisturnedoffduringpixelmapping,besuretoperformitagain.
To adjust the CCD and the image processing functionPresstheobuttonwhen[START](Submenu2)isdisplayed.ThecamerachecksandadjuststheCCDandtheimageprocessingfunctionatthesametime.
●

�� EN
Adjusting the brightness of the monitor [s]ESETUPs
To adjust the monitor brightness1UseEF toadjustthebrightnesswhile
viewingthescreen,andthenpresstheo button.
s
SET OKMENUBACK
Setting the date and time [X]ESETUPX
“Settingthedateandtime”(p.14)
To select the date and time display order1PressH aftersetting“Minute”,anduse
EF toselectthedatedisplayorder.
2009 08 26 12 30
OK
X
Y M D
TIME
MENUCANCEL SET
Y M D
Dateorder
Setting the date and time for another time zone [DUALTIME]ESETUPDUALTIME
Bysetting[DUALTIME]to[ON]andsettingthedateandtime,thesetdateandtimeisreflectedintheimagefilenames,dateprintsandsoon.
Submenu 2
Submenu 3 Application
OFF —Switchestothedateandtimesetin[X](Date/time).
ON
(Proceedstothesettingscreen*1.)
Switchestothedateandtimethatweresetin[DUALTIME]whenusingthecamerainanothertimezone.
*1 Thesettingprocedureisidenticaltothatin“Settingthedateandtime”(p.14).
Thedatedisplayorderisthesameasthatsetwith[X].
��EN
Adjust the settings for the functions while referring to “Using the Menu” (p. 3).
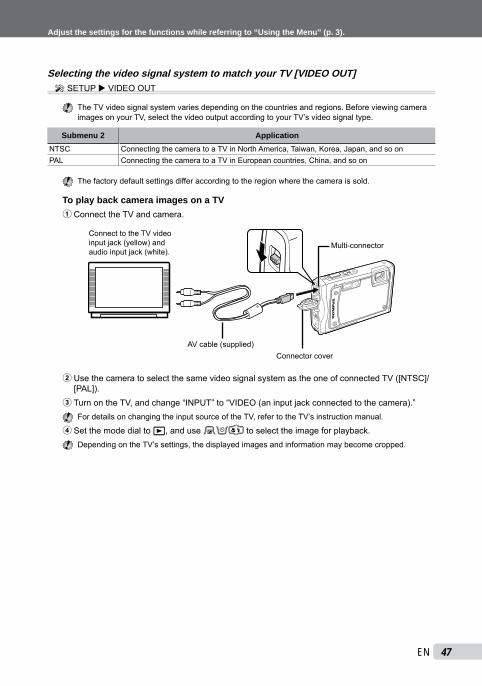
Selecting the video signal system to match your TV [VIDEO OUT]ESETUPVIDEOOUT
TheTVvideosignalsystemvariesdependingonthecountriesandregions.BeforeviewingcameraimagesonyourTV,selectthevideooutputaccordingtoyourTV’svideosignaltype.
Submenu 2 ApplicationNTSC ConnectingthecameratoaTVinNorthAmerica,Taiwan,Korea,Japan,andsoonPAL ConnectingthecameratoaTVinEuropeancountries,China,andsoon
Thefactorydefaultsettingsdifferaccordingtotheregionwherethecameraissold.
To play back camera images on a TV1ConnecttheTVandcamera.
ConnecttotheTVvideoinputjack(yellow)andaudioinputjack(white).
Multi-connector
AVcable(supplied)Connectorcover
2UsethecameratoselectthesamevideosignalsystemastheoneofconnectedTV([NTSC]/[PAL]).
3TurnontheTV,andchange“INPUT”to“VIDEO(aninputjackconnectedtothecamera).” FordetailsonchangingtheinputsourceoftheTV,refertotheTV’sinstructionmanual.
4Setthemodedialtoq,anduseEFGH toselecttheimageforplayback. DependingontheTV’ssettings,thedisplayedimagesandinformationmaybecomecropped.

�� EN
Saving battery power between shots [POWER SAVE]ESETUPPOWERSAVE
Submenu 2 Application
OFF Cancels[POWERSAVE].
ON
Whenthecameraisnotbeingusedforapprox.10seconds,themonitorautomaticallyturnsofftosavebatterypower.
To resume standby modePressanybuttonorturnthemodedial.
Using the LED illuminator as an auxiliary light [LED ILLUMINATOR]ESETUPLEDILLUMINATOR
Submenu 2 Application
OFF DisablestheLEDilluminator.
ON EnablestheLEDilluminator.
“UsingtheLEDilluminator”(p.24)
Displaying the current altitude/water depth (atmospheric/hydraulic pressure) [MANOMETER]ESETUPMANOMETER
Thereadingsmayhaveamarginoferrordependingonmeteorologicalconditions.Usethereadingsonlyforyourreference.
Submenu 2 Application
OFF Cancelsthemanometerdisplay.
ON
Displaysthecurrentaltitude/waterdepth(atmospheric/hydraulicpressure)intheshootingstandbymodescreen.(–10mto5,000m)
CALIBRATE Proceedtothesettingscreen.Seebelow.
Whensetto[ON],awarningmessageappearsinthemonitorasawaterdepthcloseto10m(32.8ft)isreached.
To adjust the altitude/water depth display
1Use12toselectthecurrentaltitude/waterdepth,andpresstheobuttontoset.
1200m
CALIBRATE
SET OKMENUBACK
Selecting the display units for the manometer [m/ft]ESETUPm/ft
Submenu 2 Applicationm Thisdisplaysinmeters.ft Thisdisplaysinfeet.
��EN
Adjust the settings for the functions while referring to “Using the Menu” (p. 3).
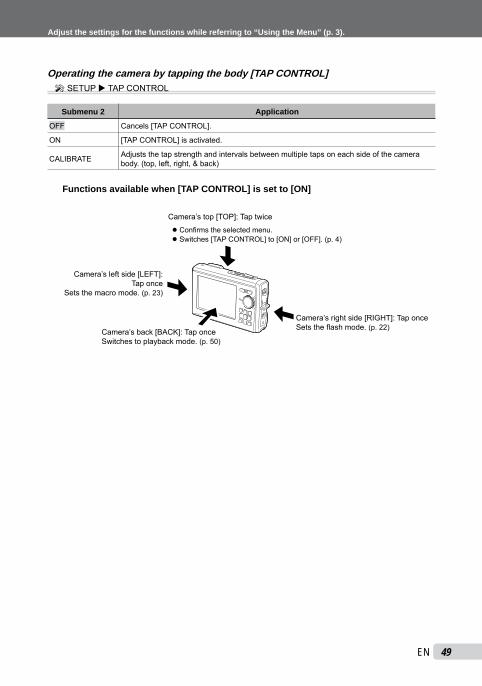
Operating the camera by tapping the body [TAP CONTROL]ESETUPTAPCONTROL
Submenu 2 Application
OFF Cancels[TAPCONTROL].
ON [TAPCONTROL]isactivated.
CALIBRATE Adjuststhetapstrengthandintervalsbetweenmultipletapsoneachsideofthecamerabody.(top,left,right,&back)
Functions available when [TAP CONTROL] is set to [ON]
Camera’stop[TOP]:Taptwice
Confirmstheselectedmenu.Switches[TAPCONTROL]to[ON]or[OFF].(p.4)
●●
Camera’srightside[RIGHT]:TaponceSetstheflashmode.(p.22)Camera’sback[BACK]:Taponce
Switchestoplaybackmode.(p.50)
Camera’sleftside[LEFT]:Taponce
Setsthemacromode.(p.23)
�0 EN
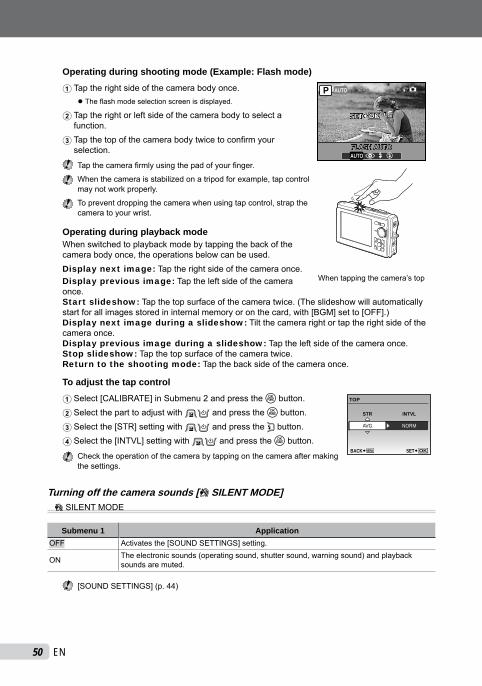
Operating during shooting mode (Example: Flash mode)
1Taptherightsideofthecamerabodyonce. P
OKOK
AUTO
SET
FLASH AUTOAUTO ! # $
//
Whentappingthecamera’stop
Theflashmodeselectionscreenisdisplayed.
2Taptherightorleftsideofthecamerabodytoselectafunction.
3Tapthetopofthecamerabodytwicetoconfirmyourselection.
Tapthecamerafirmlyusingthepadofyourfinger.
Whenthecameraisstabilizedonatripodforexample,tapcontrolmaynotworkproperly.
Topreventdroppingthecamerawhenusingtapcontrol,strapthecameratoyourwrist.
Operating during playback modeWhenswitchedtoplaybackmodebytappingthebackofthecamerabodyonce,theoperationsbelowcanbeused.Display next image:Taptherightsideofthecameraonce.Display previous image:Taptheleftsideofthecameraonce.Start slideshow:Tapthetopsurfaceofthecameratwice.(Theslideshowwillautomaticallystartforallimagesstoredininternalmemoryoronthecard,with[BGM]setto[OFF].)Display next image during a slideshow:Tiltthecamerarightortaptherightsideofthecameraonce.Display previous image during a slideshow:Taptheleftsideofthecameraonce.Stop slideshow:Tapthetopsurfaceofthecameratwice.Return to the shooting mode:Tapthebacksideofthecameraonce.
To adjust the tap control
1Select[CALIBRATE]inSubmenu2andpresstheobutton. TOP
SET OKMENUBACK
STR INTVL
NORMAVG
2SelecttheparttoadjustwithEFandpresstheobutton.3Selectthe[STR]settingwithEFandpresstheHbutton.
4Selectthe[INTVL]settingwithEFandpresstheobutton. Checktheoperationofthecamerabytappingonthecameraaftermakingthesettings.
Turning off the camera sounds [F SILENT MODE]FSILENTMODE
Submenu 1 ApplicationOFF Activatesthe[SOUNDSETTINGS]setting.
ON Theelectronicsounds(operatingsound,shuttersound,warningsound)andplaybacksoundsaremuted.
[SOUNDSETTINGS](p.44)
●

�1EN
Printing
2 Turn on the printer, and then connect the printer and camera.
Connectorcover
USBcable(supplied)
Multi-connector
OKPC / CUSTOM PRINTEASY PRINT START
Hbutton
3 Press H to start printing.
4 To print another image, use GH to select an image, and press the o button.
To exit printingAfteraselectedimageisdisplayedonthescreen,disconnecttheUSBcablefromthecameraandprinter.
PRINTEXIT OK
Direct printing (PictBridge*1)ByconnectingthecameratoaPictBridge-compatibleprinter,youcanprintimagesdirectlywithoutusingacomputer.TofindoutifyourprintersupportsPictBridge,refertotheprinter’sinstructionmanual.
*1 PictBridgeisastandardforconnectingdigitalcamerasandprintersofdifferentmakersandprintingoutpicturesdirectly.
Theprintingmodes,papersizes,andotherparametersthatcanbesetwiththecameravarydependingontheprinterthatisused.Fordetails,refertotheprinter’sinstructionmanual.
Fordetailsontheavailablepapertypes,loadingpaper,andinstallinginkcassettes,refertotheprinter’sinstructionmanual.
Printing images at the printer’s standard settings [EASY PRINT]
1 Display the image to be printed on the monitor.
“Viewingimages”(p.17)
Printingcanalsobestartedwhenthecameraisturnedoff.AfterperformingStep2,useEF toselect[EASYPRINT],presstheobutton.UseGH toselectanimage,andpresstheobutton.

�� EN
Changing the printer’s settings for printing [CUSTOM PRINT]
1 Follow Steps 1 and 2 for [EASY PRINT] (p. 51), then press the o button.
EASY PRINT
USB
SET OK
EXIT
CUSTOM PRINT
PC
2 Use EF to select [CUSTOM PRINT], and press the o button.
3 Use EF to select the print mode, and press the o button.
Submenu 2 Application
PRINT ThisprintstheimageselectedinStep6.
ALLPRINT Thisprintsallimagesstoredintheinternalmemoryorcard.
MULTIPRINT Thisprintsoneimageinamultiplelayoutformat.
ALLINDEXThisprintsanindexofallimagesstoredintheinternalmemoryorcard.
PRINTORDER*1 Thisprintsimagesbasedontheprintreservationdataonthecard.
*1 [PRINTORDER]isavailableonlywhenprintreservationshavebeenmade.“PrintReservations(DPOF)”(p.54)
4 Use EF to select [SIZE] (Submenu 3), and press H.
Ifthe[PRINTPAPER]screenisnotdisplayed,the[SIZE],[BORDERLESS],and[PICS/SHEET]aresettotheprinter’sstandard.
STANDARDSTANDARD
PRINTPAPER
SET OKMENUBACK
SIZE BORDERLESS
5 Use EF to select the [BORDERLESS] or [PICS/SHEET] settings, and press the o button.
Submenu 4 Application
OFF/ON*1
Theimageisprintedwithaborderaroundit([OFF]).Theimageisprintedtofilltheentirepaper([ON]).
(Thenumberofimagespersheetvariesdependingontheprinter.)
Thenumberofimagespersheet([PICS/SHEET])isselectableonlywhen[MULTIPRINT]isselectedinStep3.
*1 Theavailablesettingsfor[BORDERLESS]varydependingontheprinter.
If[STANDARD]isselectedinSteps4and5,theimageisprintedattheprinter’sstandardsettings.
100-0004
OK
4IN
SINGLEPRINT MOREPRINT

��EN
6 Use GH to select an image.
7 Press E to make a [SINGLE PRINT] reservation for the current image. Press F if you wish to adjust detailed printer settings for the current image.
To adjust detailed printer settings1UseEFGHtoadjustthedetailed
printersettings,andpresstheobutton.
1
PRINT INFO
SET OK
DATE
FILE NAME
<x
P
WITHOUT
WITHOUT
EXIT MENU
Submenu 5
Submenu 6 Application
<× 0to10 Thisselectsthenumberofprints.
DATE WITH/WITHOUT
Selecting[WITH]printstheimageswiththedate.Selecting[WITHOUT]printstheimageswithoutthedate.
FILENAME WITH/WITHOUT
Selecting[WITH]printsthefilenameontheimage.Selecting[WITHOUT]doesnotprintanyfilenameontheimage.
P
(Proceedstothesettingscreen.)
Thisselectsaportionoftheimageforprinting.
To crop an image [P]1Usethezoombuttontoselectthesize
ofthecroppingframe,useEFGHtomovetheframe,andthenpresstheobutton.
Croppingframe
TW SET OK
2UseEF toselect[OK],andpresstheobutton.
P
SET OKMENUBACK
CANCELOK
8 If necessary, repeat Steps 6 and 7 to select the image to be printed, make the detailed settings, and set [SINGLEPRINT].
9 Press the o button.
SET OKMENUBACK
PRINTCANCEL

�� EN
10 Use EF to select [PRINT], and press the o button.Printingstarts.
When[OPTIONSET]isselectedin[ALLPRINT]mode,[PRINTINFO]screenisdisplayed.
Whenprintingisfinished,the[PRINTMODESELECT]screenisdisplayed.
ALL PRINT
PRINT MODE SELECT
SET OK
ALL INDEXPRINT ORDER
MULTI PRINT
EXIT MENU
To cancel printing1Presstheobuttonwhile
[TRANSFERRING]isdisplayed.2UseEFtoselect[CANCEL],then
presstheobutton.
SET OK
CONTINUECANCEL
CANCEL OK
TRANSFERRING
11 Press the button.
12 When the message [REMOVE USB CABLE] is displayed, disconnect the USB cable from the camera and printer.
●●
●
Print Reservations (DPOF*1)Inprintreservations,thenumberofprintsanddateimprintoptionaresavedintheimageonthecard.ThisenableseasyprintingataprinterorprintshopsupportingDPOFbyusingonlytheprintreservationsonthecardwithoutacomputeroracamera.
*1 DPOFisastandardforstoringautomaticprintoutinformationfromdigitalcameras.
Printreservationscanbesetonlyfortheimagesstoredonthecard.Insertacardwithrecordedimagesbeforemakingprintreservations.
DPOFreservationssetbyanotherDPOFdevicecannotbechangedbythiscamera.Makechangesusingtheoriginaldevice.MakingnewDPOFreservationswiththiscamerawillerasethereservationsmadebytheotherdevice.
DPOFprintreservationscanbemadeforupto999imagespercard.
Single-frame print reservations [<]
1 Set the mode dial to q, and then press the button to display the top menu.
2 Use EFGH to select [L PRINT ORDER], and press the o button.
PRINT ORDER
SET OK
<U
EXIT MENU

��EN
3 Use EF to select [<], and press the o button.
x
12M
2009.08.26 12:30100-0004
4
0
NORM
SET OK
4 Use GH to select the image for print reservation. Use EF to select the quantity. Press the o button.
SET OKMENUBACK
DATETIME
NO
X
5 Use EF to select the [X] (date print) screen option, and press the o button.
Submenu 2 ApplicationNO Thisprintstheimageonly.
DATE Thisprintstheimagewiththeshootingdate.
TIME Thisprintstheimagewiththeshootingtime.
OKSETBACK MENU
PRINT ORDER
SET
CANCEL
1 ( 1)1 ( 1)
6 Use EF to select [SET], and press the o button.
Reserving one print each of all images on the card [U]
1 Follow Steps 1 and 2 in [<] (p. 54).
2 Use EF to select [U], and press the o button.
3 Follow Steps 5 to 6 in [<].
Resetting all print reservation data
1 Set the mode dial to q, and then press the button to display the top menu.
2 Use EFGH to select [L PRINT ORDER], and press the o button.
3 Select either [<] or [U], and press the o button.
OKSETBACK MENU
PRINT ORDER SETTING
PRINT ORDERED
RESETKEEP
4 Use EF to select [RESET], and press the o button.

�� EN
Resetting the print reservation data for selected images
1 Follow Steps 1 and 2 of “Resetting all print reservation data” (p. 55).
2 Use EF to select [<], and press the o button.
3 Use EF to select [KEEP] and press the o button.
4 Use GH to select the image with the print reservation you want to cancel. Use EF to set the print quantity to “0”.
5 If necessary, repeat Step 4, and then press the o button when finished.
6 Use EF to select the [X] (date print) screen option, and press the o button.Thesettingsareappliedtotheremainingimageswiththeprintreservationdata.
7 Use EF to select [SET], and press the o button.
●

��EN
Using OLYMPUS Master 2
3 Use EF to select [PC], and press the o button.Thecomputerautomaticallydetectsthecameraasanewdeviceonthefirstconnection.
WindowsAfterthecomputerdetectsthecamera,amessageindicatingthecompletionofthesettingappears.Confirmthemessageandclick“OK”.Thecameraisrecognizedasaremovabledisk.
MacintoshWheniPhotostarted,exitiPhotoandstartOLYMPUSMaster2.
Whilethecameraisconnectedtothecomputer,shootingfunctionsaredisabled.
ConnectingthecameratoacomputerviaaUSBhubmaycauseunstableoperation.
When[MTP]issetforthesubmenuthatappearsbypressingHafterselecting[PC]inStep3,imagescannotbetransferredtoacomputerusingOLYMPUSMaster2.
Starting OLYMPUS Master 2
1 Double-click the OLYMPUS Master 2 icon.
Windowsappearsonthedesktop.
MacintoshappearsintheOLYMPUSMaster2folder.
Browsewindowappearsafterstartingthesoftware.
WhenyoustartOLYMPUSMaster2forthefirsttimeafterinstallation,“DefaultSettings”and“Registration”screensappear.Followtheinstructionsonthescreen.
●
●
System requirements and installation of OLYMPUS Master 2InstalltheOLYMPUSMaster2softwarebyreferringtotheincludedinstallationguide.
Connecting the camera to a computer
1 Make sure the camera is turned off.Themonitorisoff.
2 Connect the camera to a computer.Thecameraautomaticallyturnson.
EASY PRINT
USB
SET OK
EXIT
CUSTOM PRINT
PC
Connectorcover
USBcable(supplied)
Multi-connector
Youcanchargethebatterybyselecting[EXIT]andpressingtheobutton. The[USB]screenabovedoesnotappearandchargingmayautomaticallystartincaseswherethereisaninsufficientchargeorthecameraisconnectedtoacomputerviaaUSBhub.
LocatethepositionoftheUSBportbyreferringtoyourcomputer’sinstructionsmanual.
●
●

�� EN
Operating OLYMPUS Master 2WhenOLYMPUSMaster2isstarted,QuickStartGuideappearsonthescreenthathelpsyoutohandlethecamerawithoutanyquestion.WhentheQuickStartGuideisnotdisplayed,click inthetoolbartoshowtheGuide.
Fordetailsontheoperation,refertothehelpguideofthesoftware.
Transferring and saving images without using OLYMPUS Master 2ThiscameraiscompatiblewiththeUSBMassStorageClass.Youcantransferandsavetheimagedataonyourcomputerwhilethecameraandthecomputerareconnected.
System requirementsWindows : Windows2000Professional/
XPHomeEdition/XPProfessional/Vista
Macintosh : MacOSXv10.3orlater OnacomputerrunningWindowsVista,if[MTP]issetforthesubmenuthatappearsbypressingHafterselecting[PC]inStep3of“Connectingthecameratoacomputer”(p.57),WindowsPhotoGallerywillbecomeavailable.
EvenifacomputerhasUSBports,properoperationisnotguaranteedinthefollowingcases.ComputerswithUSBportsinstalledusinganexpansioncard,etc.
Computerswithoutafactory-installedOSandhome-builtcomputers
●
●

---- -- -- -- --
X
Y M
Y M D
D TIME
MENUCANCEL
��EN
Usage Tips
Ifthecameradoesnotworkasintended,orifanerrormessageisdisplayedonthescreen,andyouareunsureofwhattodo,refertotheinformationbelowtofixtheproblem(s).
Troubleshooting
Battery“The camera does not work even when battery is installed”Insertrechargedbatteryinthecorrectdirection.
“Chargingthebattery”(p.11),“LoadingthebatteryandthexD-PictureCard™(soldseparately)intothecamera”(p.10)
Batteryperformancemayhavebeenreducedtemporarilyduetolowtemperature.Takethebatteryoutofthecamera,andwarmitbyputtingitinyourpocketforawhile.
Card/Internal memory“An error message is displayed”“Errormessage”(p.60)
Shutter button“No picture is taken when the shutter button is pressed”Cancelsleepmode.
Tosavebatterypower,thecameraautomaticallygoesintosleepmodeandthemonitorturnsoffifthereisnooperationafter3minuteswhenthecameraisturnedon.Nopictureistakeneveniftheshutterbuttonisfullypressedinthismode.Operatethezoombuttonorotherbuttonstorestorethecamerafromsleepmodebeforetakingapicture.Ifthecameraisleftfor15minutes,itautomaticallyturnsoff.Pressthenbuttontoturnonthecamera.
Setthemodedialtoapositionotherthanq.
Waituntil#(flashcharge)stopsblinkingbeforetakingpictures.
●
●
●
●●
Monitor“Difficult to see”Condensation*1mayhaveformed.Turnoffthepowerandwaitforthecamerabodytobecomeacclimatedtothesurroundingtemperatureanddryoutbeforetakingpictures.*1 Dewdropscanforminthecamerawhenitissuddenlytakenfromacoldlocationintoawarm,humidroom.
“Vertical lines appear on the screen”Verticallinesmayappearonthescreenattimessuchaswhenthecameraispointedatanextremelybrightsubjectunderaclearsky.Thelinesdonotappear,however,inthefinalimage.
“The light is caught in the picture”Shootingwithflashindarksituationsresultsinanimagewithmanyflashreflectionsondustintheair.
Date and time function“Date and time settings return to the default setting”Ifthebatteryisremovedandleftoutofthecameraforabout1day*2,thedateandtimesettingsreturntothedefaultsettingandmustbereset.*2 Thetimeuntilthedateandtimesettingsreturntothedefaultsettingvariesdependingonhowlongthebatteryhavebeenloaded.
“Settingthedateandtime”(p.14)
Others“Noises occur from the inside of the camera in shooting standby mode”Autofocusingoperationmaycauselensmovementnoisesevenifyoudonotmakeanycameraoperation.
●
●
●
●
●
�0 EN
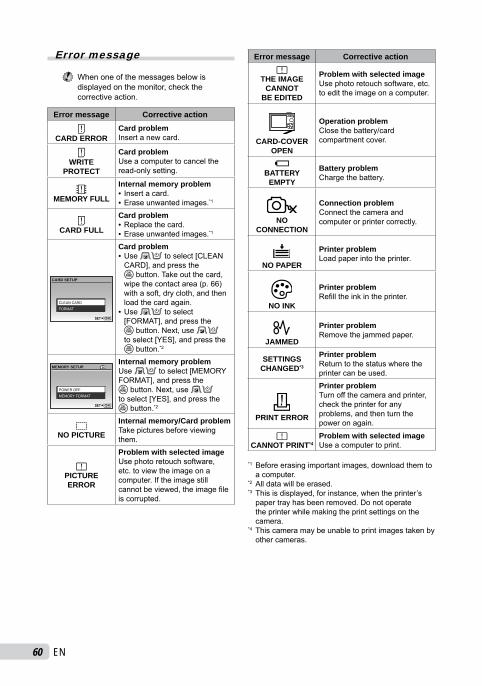
Error message
Whenoneofthemessagesbelowisdisplayedonthemonitor,checkthecorrectiveaction.
Error message Corrective action
qCARD ERROR
Card problemInsertanewcard.
qWRITE
PROTECT
Card problemUseacomputertocanceltheread-onlysetting.
>MEMORY FULL
Internal memory problemInsertacard.Eraseunwantedimages.*1
••
qCARD FULL
Card problemReplacethecard.Eraseunwantedimages.*1
••
OKSET
CARD SETUP
CLEAN CARDFORMAT
Card problemUseEFtoselect[CLEANCARD],andpresstheobutton.Takeoutthecard,wipethecontactarea(p.66)withasoft,drycloth,andthenloadthecardagain.UseEFtoselect[FORMAT],andpresstheobutton.Next,useEFtoselect[YES],andpresstheobutton.*2
•
•
IN
OKSET
MEMORY SETUP
POWER OFFMEMORY FORMAT
Internal memory problemUseEFtoselect[MEMORYFORMAT],andpresstheobutton.Next,useEFtoselect[YES],andpresstheobutton.*2
LNO PICTURE
Internal memory/Card problemTakepicturesbeforeviewingthem.
rPICTURE ERROR
Problem with selected imageUsephotoretouchsoftware,etc.toviewtheimageonacomputer.Iftheimagestillcannotbeviewed,theimagefileiscorrupted.
Error message Corrective actionr
THE IMAGE CANNOT
BE EDITED
Problem with selected imageUsephotoretouchsoftware,etc.toedittheimageonacomputer.
CARD-COVER OPEN
Operation problemClosethebattery/cardcompartmentcover.
gBATTERY
EMPTY
Battery problemChargethebattery.
NO CONNECTION
Connection problemConnectthecameraandcomputerorprintercorrectly.
NO PAPER
Printer problemLoadpaperintotheprinter.
NO INK
Printer problemRefilltheinkintheprinter.
JAMMED
Printer problemRemovethejammedpaper.
SETTINGS CHANGED*3
Printer problemReturntothestatuswheretheprintercanbeused.
PRINT ERROR
Printer problemTurnoffthecameraandprinter,checktheprinterforanyproblems,andthenturnthepoweronagain.
rCANNOT PRINT*4
Problem with selected imageUseacomputertoprint.
*1 Beforeerasingimportantimages,downloadthemtoacomputer.
*2 Alldatawillbeerased.*3 Thisisdisplayed,forinstance,whentheprinter’spapertrayhasbeenremoved.Donotoperatetheprinterwhilemakingtheprintsettingsonthecamera.
*4 Thiscameramaybeunabletoprintimagestakenbyothercameras.
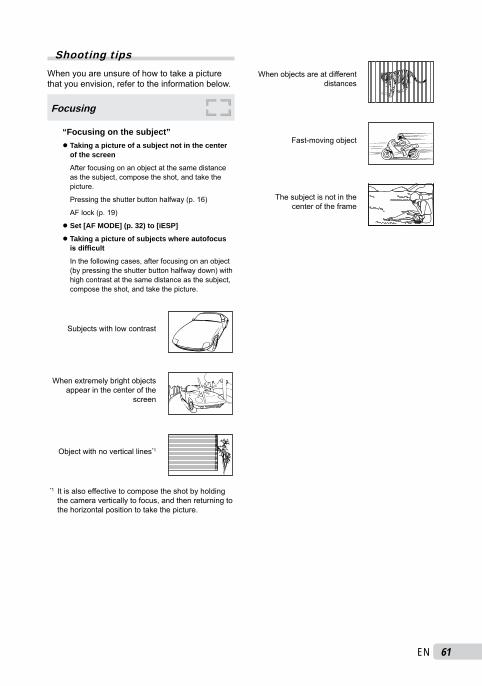
�1EN
Shooting tipsWhenyouareunsureofhowtotakeapicturethatyouenvision,refertotheinformationbelow.
Focusing
“Focusing on the subject”Taking a picture of a subject not in the center of the screen
Afterfocusingonanobjectatthesamedistanceasthesubject,composetheshot,andtakethepicture.
Pressingtheshutterbuttonhalfway(p.16)
AFlock(p.19)
Set [AF MODE] (p. 32) to [iESP]
Taking a picture of subjects where autofocus is difficult
Inthefollowingcases,afterfocusingonanobject(bypressingtheshutterbuttonhalfwaydown)withhighcontrastatthesamedistanceasthesubject,composetheshot,andtakethepicture.
Subjectswithlowcontrast
Whenextremelybrightobjectsappearinthecenterofthe
screen
Objectwithnoverticallines*1
*1 Itisalsoeffectivetocomposetheshotbyholdingthecameraverticallytofocus,andthenreturningtothehorizontalpositiontotakethepicture.
●
●●
Whenobjectsareatdifferentdistances
Fast-movingobject
Thesubjectisnotinthecenteroftheframe

�� EN
Camera shake
“Taking pictures (or movies) without camera shake”
Taking pictures using [IMAGE STABILIZER] (p. 32)
Whenapictureistakenofashadowysubject,theCCD*1shiftstocorrectforcamerashakeeveniftheISOspeedisnotincreased.Thisfunctionisalsoeffectivewhentakingpicturesatahighzoommagnification.*1 Adevicethattakeslightreceivedthroughthelensandconvertsitintoelectricsignals.
Shooting movies using [DIS MOVIE MODE] (p. 32)
Taking picture with [j SPORT] (p. 33)
Sinceyoucantakepictureswithahighshutterspeedbysetting[jSPORT],it’salsoeffectiveforblurrysubjects.
Taking pictures at a high ISO sensitivity
IfahighISOsensitivityisselected,picturescanbetakenatahighshutterspeedevenatlocationswhereaflashcannotbeused.
[ISO](p.30)
Exposure (brightness)
“Taking pictures with the right brightness”
Taking pictures of a subject against a backlight
Afaceagainstthebacklightisbrightened.
[SHADOWADJ](p.33)
Taking pictures using [FACE DETECT] for [AF MODE] (p. 32)
Appropriateexposureisobtainedforafaceagainstthebacklight,andthefaceisbrightened.
Taking pictures using [n] for [ESP/n] (p. 32)
Thepicturecanbetakenbasedonthebrightnessatthecenterofthemonitor,soit’snotaffectedbythelightinthebackground.
Taking pictures using [FILL IN] (p. 23) flash
Asubjectagainstabacklightisbrightened.
Taking pictures of a white beach or snow scene
Setthemodeto[qBEACH&SNOW], [aSNOW](p.33)
●
●
●
●
●
●
●
●
●
Taking pictures using exposure compensation (p. 23)
Adjustthebrightnesswhileviewingthescreenfortakingthepicture.Normally,takingpicturesofwhitesubjects(suchassnow)resultsinimagesthataredarkerthantheactualsubject.UsetheFbuttontoadjustinthepositive(+)directiontoexpresswhitesastheyappear.Whentakingpicturesofblacksubjects,ontheotherhand,itiseffectivetoadjustinthenegative(–)direction.
Color hue
“Taking pictures with colors at the same shade as they appear”
Taking pictures by selecting [WB] (p. 30)
BestresultsinmostenvironmentscannormallybeobtainedwiththeAUTOsetting,butforsomesubjects,youshouldtryexperimentingwithdifferentsettings.(Thisisespeciallytrueforsunshadeunderaclearsky,mixednaturalandartificiallightsettings,andsoon.)
Image quality
“Taking sharper pictures”Taking pictures with the optical zoom
Avoidusing[DIGITALZOOM](p.31)totakepictures.
Taking pictures at a low ISO sensitivity
IfthepictureistakenwithahighISOsensitivity,noise(smallcoloredspotsandcolorunevennessthatwerenotintheoriginalimage)canoccur,andtheimagecanappeargrainy.
[ISO](p.30)
Panorama
“Taking pictures so that the frames are stitched smoothly”
A tip for panoramic shooting
Takingpicturesbypivotingwiththecameraatthecenterpreventsshiftingoftheimage.Whentakingpicturesofcloseobjectsinparticular,pivotingwiththelensendatthecenterproducesfavorableresults.
[NPANORAMA](p.34)
●
●
●
●
●

��EN
Battery
“Making battery last longer”Avoid performing the following operations as much as possible as they use up battery power even if no pictures are actually taken
Repeatedlypressingtheshutterbuttonhalfway.
Repeatedlyusingthezoom.
Set [POWER SAVE] (p. 48) to [ON]
Playback/Editing tips
Playback
“Viewing images in the internal memory and card”
Remove the card when viewing pictures in the internal memory.
“LoadingthebatteryandthexD-PictureCard™(soldseparately)intothecamera”(p.10)
“UsingthemicroSDcard/microSDHCcard(soldseparately)”(p.13)
Editing
“Erasing the sound recorded to a still image”
Record over the sound with silence when playing back the image
[R](Addsoundtostillimages)(p.40)
●
●
●●
●
●
●
●

�� EN
Appendix
Battery, AC adaptor (included), Charger (sold separately)ThiscamerausesoneOlympuslithiumionbattery(LI-50B).Noothertypeofbatteriescanbeused.
Caution:Thereisariskofexplosionifthebatteryisreplacedwiththeincorrectbatterytype.Disposeoftheusedbatteryfollowingtheinstructionsin“BatteryHandlingPrecautions”(p.73).
Powerconsumptionbythecameravariesdependingonwhichfunctionsareused.Duringtheconditionsdescribedbelow,powerisconsumedcontinuouslyandthebatterybecomesexhaustedquickly.Thezoomisusedrepeatedly.Theshutterbuttonispressedhalfwayrepeatedlyinshootingmode,activatingtheautofocus.Apictureisdisplayedonthemonitorforanextendedperiodoftime.Thecameraisconnectedtoacomputerorprinter.
Usinganexhaustedbatterymaycausethecameratoturnoffwithoutdisplayingthebatterylevelwarning.Therechargeablebatteryisnotfullychargedatthetimeofpurchase.ChargethebatteryfullywiththeincludedACadapter(F-1AC)ortheseparatelysoldACadaptor(D-7AC)/charger(LI-50C)beforeuse.WhentheincludedACadaptor(F-1AC)isused,chargingusuallytakesapproximately2.5hours(variesonusage).TheincludedACadaptor(F-1AC)hasbeendesignedtobeusedonlyforcharging.Makesurethatoperationssuchasshooting,viewingimagesandsoonarenotbeingusedwhiletheACadaptorisconnectedtothecamera.TheincludedACadaptor(F-1AC)isdesignedtobeusedonlywiththiscamera.OthercamerascannotbechargedwiththisACadaptor.Forplug-intypeACadaptor:TheincludedACadaptor(F-1AC)isintendedtobecorrectlyorientatedinaverticalorfloormountposition.
•
•
•
••
•
•
•
•
•
•
•
•
Camera care
ExteriorWipegentlywithasoftcloth.Ifthecameraisverydirty,soaktheclothinmildsoapywaterandwringwell.Wipethecamerawiththedampclothandthendryitwithadrycloth.Ifyouhaveusedthecameraatthebeach,useaclothsoakedincleanwaterandwrungwell.Ifanydirt,dust,sand,orotherforeignmaterialadherestotheperipheryofthelenscoverafteruse,orthelenscoverdoesnotmovesmoothly,washthecamerausingthemethoddescribedonP.69.
MonitorWipegentlywithasoftcloth.
LensBlowdustoffthelenswithacommercialblower,thenwipegentlywithalenscleaner.
Battery/AC adaptorWipegentlywithasoft,drycloth.
Donotusestrongsolventssuchasbenzeneoralcohol,orchemicallytreatedcloth.
Moldmayformonthelenssurfaceifthelensisleftdirty.
StorageWhenstoringthecameraforextendedperiods,removethebattery,ACadapterandcard,andkeepinacool,dryplacethatiswellventilated.Periodicallyinsertthebatteryandtestthecamerafunctions.
Avoidleavingthecamerainplaceswherechemicalproductsarehandledsincethismayresultincorrosion.
•
•
•
•
•
•
•

��EN
Charging the battery by connecting the camera to a computer
Tochargethebattery,connectthecameratoacomputerviaUSBcable,select[EXIT]inthe[USB]screenbelow,andpresstheobutton.
EASY PRINT
USB
SET OK
EXIT
CUSTOM PRINT
PC
Ifthecameraisconnectedtoaprinteroranoldcomputer,theoperationmaybeunstable,orchargingmaytakelongerthanthatwiththeincludedACadaptor.Chargingtimevariesdependingontheperformanceofacomputerorprinter.(Theremaybecasesinwhichittakesapprox.10hours.)
Evenif[REMOVEUSBCABLE]isdisplayed,thebatteryischargingwhilethechargingindicatorislitinorange.BesuretoremovetheUSBcableafterthebatteryischarged(thechargingindicatorturnstoblue).
Ifthecamerawithoutabatteryisconnectedtoacomputer,byinsertingabatteryintothecamera,thecamerawillstartchargingwithoutshowingthe[USB]screenabove.
Using a separately sold AC adapter
AnACadapter(D-7AC/separatelysold)isusefulfortime-consumingtaskssuchasimagedownloadstoacomputerorwhenrunningaslideshowforalongperiodoftime.TouseaseparatelysoldACadapterforthiscamera,themulti-adapter(CB-MA1/separatelysold)isrequired.ThebatterycanalsobechargedbyconnectingthecamerawithitspowerturnedofftotheACadaptor.DonotuseanyotherACadapterwiththiscamera.
Using a separately sold charger
Acharger(LI-50C/separatelysold)canbeusedtochargethebattery.Inthiscase,removethebatteryfromthecameraandsetthebatterytothecharger.
Using your charger and AC adapter abroadThechargerandACadaptercanbeusedinmosthomeelectricalsourceswithintherangeof100Vto240VAC(50/60Hz)aroundtheworld.However,dependingonthecountryorareayouarein,theACwalloutletmaybeshapeddifferentlyandthechargerandACadaptermayrequireaplugadaptertomatchthewalloutlet.Fordetails,askatyourlocalelectricalshoportravelagent.DonotusetravelvoltageconvertersastheycoulddamageyourchargerandACadapter.
•
•

�� EN
Using an xD-Picture CardAcard(andinternalmemory)alsocorrespondstothefilmthatrecordsimagesinafilmcamera.Otherwise,therecordedimages(data)canbeerased,andretouchingisalsoavailablewiththeuseofacomputer.Cardscanberemovedfromthecameraandexchanged,butthisisnotpossiblewiththeinternalmemory.Useoflargercapacitycardsenablesyoutotakemorepictures.
Indexarea(Notescanbefilledin
here)
Contactarea(Contactsectionofthecardwiththeinternal
cameraterminal)
Donottouchthecontactareadirectly.
Cards compatible with this cameraxD-PictureCard(16MBto2GB)(TypeH/M/M+,Standard)
Using a new cardBeforeusinganon-Olympuscardoracardthatwasusedforanotherpurposeinacomputerorotherdevice,use[MEMORYFORMAT]/[FORMAT](p.42)toformatthecard.
Checking the image saving locationThememoryindicatorshowswhethertheinternalmemoryorcardisbeingusedduringshootingandplayback.
Current memory indicatorIN :InternalmemoryisbeingusedNone:Cardisbeingused
12M
2009.08.26 12:30 4100-0004
IN
NORM
Currentmemoryindicator
Playbackmode
12M
P
4INNORM
Shootingmode
Evenif[MEMORYFORMAT]/[FORMAT],[ERASE],[SEL.IMAGE],or[ALLERASE]isperformed,thedatainthecardisnotcompletelyerased.Whendisposingofthecard,damagethecardtopreventthedisclosureofpersonaldata.
Readout/recording process of the cardNeveropenthebattery/cardcompartmentcoverorunplugtheUSBcablewhilethecameraisreadingorwritingdata,whichisindicatedbyblinkingofthecardaccesslamp.Thiscannotonlydamagetheimagedatabutalsorendertheinternalmemoryorcardunusable.
Cardaccesslamp

��EN
Number of storable pictures (still pictures)/continuous recording length (movies) in the internal memory and xD-Picture Card
Still pictures
IMAGE SIZE COMPRES-SION
Number of storable still pictures
Internal memory Using a 1GB card (xD-Picture Card)
With sound Without sound With sound Without sound
m 3968×2976L 7 7 173 174M 15 15 340 343
H 2560×1920L 18 18 404 410M 36 37 820 841
I 2048×1536L 27 28 615 627M 55 58 1254 1305
J 1600×1200L 46 47 1031 1066M 87 93 1938 2063
K 1280×960L 70 74 1560 1640M 131 144 2907 3198
C 640×480L 228 271 4920 5815M 368 496 7996 10661
D 1920×1080L 42 44 954 984M 82 87 1827 1938
Movies
IMAGE SIZE FRAME RATE
Continuous recording length
Internal memory Using a 1 GB card (xD-Picture Card)
With sound Without sound With sound Without sound
C 640×480N 25sec. 25sec. 9min.21sec.* 9min.23sec.*O 49sec. 50sec. 18min.37sec. 18min.47sec.
E 320×240N 59sec. 59sec. 22min.3sec. 22min.17sec.O 1min.56sec. 1min.59sec. 43min.37sec. 44min.32sec.
When[MOVIE](p.36)issetto[NON-WATERMOVIE],see“Withsound”,andfor[UNDERWATERMOVIE],see“Withoutsound.”
Themaximumfilesizeofasinglemovieis2GB,regardlessofthecapacityofthecard.
*Themaximumlengthis10secondswhenusingaTypeMorStandardxD-PictureCard.

�� EN
Increasing the number of pictures that can be taken
Eithereraseunwantedimages,orconnectthecameratoacomputerorotherdevicetosavetheimages,andthenerasetheimagesintheinternalmemoryorcard.[ERASE](p.18),[SEL.IMAGE](p.40),[ALLERASE](p.40),[MEMORYFORMAT]/[FORMAT](p.42)
Using a microSD Attachment
DonotusetheattachmentwithOlympusdigitalcamerasthatdonotsupportthismicroSDAttachment,aswellaswithotherbrandsofdigitalcameras,computers,printers,andotherdevicesthatsupportxD-PictureCard.Doingsonotonlymaydamagethepicturestaken,butmayalsoresultinthemalfunctionofthedevice.
IfthemicroSDcardcannotberemoved,donotuseforce.Contactauthorizeddistributors/servicecenters.
Cards compatible with this cameramicroSDcard/microSDHCcard
ForalistoftestedmicroSDcards,pleasevisitourwebsite(http://www.olympus.com/).
Sending imagesYoucansendimagestoacomputerorprinterbyusingtheUSBcableprovidedwiththecamera.Tosenddatatootherdevices,removetheattachmentfromthecameraanduseacommerciallyavailablemicroSDcardadapter.
Handling precautionsDonottouchthecontactareaoftheattachmentormicroSDcard.Doingsomaycausefailureinreadingtheimages.Whenfingerprintsorstainsarefoundonthecontactarea,wipetheareawithasoftdrycloth.
Important information about water and shock resistant features
Water resistance:Thewaterprooffeatureiswarranted*1tooperateatdepthsupto10m(32.8feet)foruptoonehour.Thewaterprooffeaturemaybecompromisedifthecameraissubjecttosubstantialorexcessiveimpact.Shock resistance:Theanti-shockfeaturewarrants*2theoperationofthecameraagainstaccidentalimpactincurredfromeverydayuseofyourdigitalcompactcamera.Theanti-shockfeaturedoesnotunconditionallywarrantalldefectiveoperationorcosmeticdamage.Cosmeticdamage,suchasscratchesanddents,arenotcoveredunderthewarranty.Aswithanyelectronicdevice,propercareandmaintenancearerequiredtopreservetheintegrityandoperationofyourcamera.Tomaintaincameraperformance,pleasetakeyourcameratothenearestOlympusAuthorizedServiceCentertohaveitinspectedafteranymajorimpact.Intheeventthecameraisdamagedasaresultofnegligenceormisuse,thewarrantywillnotcovercostsassociatedwiththeserviceorrepairofyourcamera.Foradditionalinformationonourwarranty,pleasevisittotheOlympuswebsiteforyourlocalarea.Pleaseobservethefollowingcareinstructionsforyourcamera.
*1 AsdeterminedbyOlympuspressuretestingequipmentinaccordancewithIECStandardPublication529IPX8-Thismeansthatthecameracanbeusednormallyunderwaterataspecifiedwaterpressure.
*2 Thisanti-shockperformanceisconfirmedbyOlympus’testingconditionsinaccordancewithMIL-STD-810F,Method516.5,ProcedureIV(TransitDropTest).FormoredetailsofOlympus’testingconditions,pleaserefertotheOlympuswebsiteforyourlocalarea.

��EN
Before Use:Checkthecameraforforeignmaterialincludingdirt,dustorsand.Besuretoclosethebattery/cardcompartmentcoverandconnectorcoverfirmlysothateachlockmakesclickingsound.Donotopenthebattery/cardcompartmentcoverandconnectorcoverwithwethands,whileunderwater,orinadampordustyenvironment(e.g.beach).
After Use:Besuretowipeoffanyexcesswaterordebrisafterusingthecameraunderwater.After the camera is used under seawater, immerse the camera in a bucket containing fresh water for about 10 minutes (with the battery/card compartment cover and connector cover firmly closed). After that, dry the camera in a shade with good ventilation.Water drops may be observed on the inner surface of the battery/card compartment cover or connector cover after you open each cover. If any water drops are found, be sure to wipe them off before using the camera.
Notes after useForeignmaterialsmaybeattachedtotheperipheryofthelenscoverfromusingthecamerainconditionswithforeignmaterialssuchasdirt,dustorsand,orwhenthelenscoverisnotmovingsmoothly.Ifyoucontinuetousethecamerainsuchconditions,thelenscouldbecomedamagedorthelenscovercouldstickcausingadditionaldamagetothecamera.Toavoidsuchdamage,washthecamerausingthefollowingmethod.1Insertthebatteryandclosethebattery/
cardcompartmentcoverandconnectorcoverfirmlysothateachlockmakestheclickingsound.
2Fillabucketwithfreshwater,immersethecamerainthebucketwiththelenssurfacedownwardandshakethecamerathoroughly.
3Pressthenbuttonseveraltimesinthewaterandclose/openthelenscoverrepeatedly.
4Furthermore,shakethecamerafurtherwiththecoveropened.
•
•
•
•
•
•
•
FollowtheSteps1to4,thencheckifthelenscovermovessmoothly.Ifthelenscoverdoesnotmovesmoothly,rinsethelensfacebyplacingitdirectlyunderastrongstreamoftapwaterandpressingthenbuttonrepeatedly.
Storage and MaintenanceDonotleavethecamerainanenvironmentathightemperature(40°C(104°F)ormore)oratlowtemperature(-10°C(14°F)orless).Failuretodosomaybreakdownwaterresistance.Donotusechemicalsforcleaning,rustprevention,anti-fogging,repairing,etc.Failuretodosomaybreakdownwaterresistance.Do not leave the camera in water for a long time. Failure to do so will cause damage to the camera’s appearance and/or deteriorate water resistance. In order to preserve the water resistant feature, as with any underwater housing, it is recommended that the waterproof packing (and seals) are replaced annually. For the Olympus distributors or service stations where the waterproof packing can be replaced, visit Olympus website for your local area.
•
•
•
•

�0 EN
Closing Battery/card compartment cover and Connector cover
Battery/cardcompartmentcover
Connectorcover
Theincludedaccessories(e.g.ACadaptor)donotoffershockorwaterresistance.
SAFETY PRECAUTIONS
CAUTIONRISK OF ELECTRIC SHOCK
DO NOT OPEN
CAUTION:TOREDUCETHERISKOFELECTRICALSHOCK,DONOTREMOVECOVER(ORBACK).
NOUSER-SERVICEABLEPARTSINSIDE.REFERSERVICINGTOQUALIFIEDOLYMPUS
SERVICEPERSONNEL.
Anexclamationmarkenclosedinatrianglealertsyoutoimportantoperatingandmaintenanceinstructionsinthedocumentationprovidedwiththeproduct.
DANGER Iftheproductisusedwithoutobservingtheinformationgivenunderthissymbol,seriousinjuryordeathmayresult.
WARNING Iftheproductisusedwithoutobservingtheinformationgivenunderthissymbol,injuryordeathmayresult.
CAUTION Iftheproductisusedwithoutobservingtheinformationgivenunderthissymbol,minorpersonalinjury,damagetotheequipment,orlossofvaluabledatamayresult.
WARNING!TO AVOID THE RISK OF FIRE OR ELECTRICAL SHOCK, NEVER DISASSEMBLE, EXPOSE THIS PRODUCT TO WATER OR OPERATE IN A HIGH HUMIDITY ENVIRONMENT.
General PrecautionsRead All Instructions—Beforeyouusethe
product,readalloperatinginstructions.Saveallmanualsanddocumentationforfuturereference.
Cleaning—Alwaysunplugthisproductfromthewalloutletbeforecleaning.Useonlyadampclothforcleaning.Neveruseanytypeofliquidoraerosolcleaner,oranytypeoforganicsolventtocleanthisproduct.
Attachments—Foryoursafety,andtoavoiddamagingtheproduct,useonlyaccessoriesrecommendedbyOlympus.
Water and Moisture—Forprecautionsonproductswithweatherproofdesigns,readtheweatherproofingsections.
Location—Toavoiddamagetotheproduct,mounttheproductsecurelyonastabletripod,stand,orbracket.
Power Source—Connectthisproductonlytothepowersourcedescribedontheproductlabel.
Lightning—IfalightningstormoccurswhileusinganACadapter,removeitfromthewalloutletimmediately.
Foreign Objects—Toavoidpersonalinjury,neverinsertametalobjectintotheproduct.
Heat—Neveruseorstorethisproductnearanyheatsourcesuchasaradiator,heatregister,stove,oranytypeofequipmentorappliancethatgeneratesheat,includingstereoamplifiers.

�1EN
Handling the Camera WARNING
Do not use the camera near flammable or explosive gases.Do not use the flash and LED on people (infants, small children, etc.) at close range.Youmustbeatleast1m(3ft.)awayfromthefacesofyoursubjects.Firingtheflashtooclosetothesubject’seyescouldcauseamomentarylossofvision.
Keep young children and infants away from the camera.Alwaysuseandstorethecameraoutofthereachofyoungchildrenandinfantstopreventthefollowingdangeroussituationswhichcouldcauseseriousinjury:Becomingentangledinthecamerastrap,causingstrangulation.Accidentallyswallowingthebattery,cardsorothersmallparts.Accidentallyfiringtheflashintotheirowneyesorthoseofanotherchild.Accidentallybeinginjuredbythemovingpartsofthecamera.
Do not look at the sun or strong lights with the camera.Do not use or store the camera in dusty or humid places.Do not cover the flash with a hand while firing.Do not insert anything into the microSD Attachment other than the microSD card.ThisattachmentisexclusiveforuseofmicroSDcardsonly.Othertypesofcardscannotbeinstalled.Do not insert anything other than an xD-Picture Card or the microSD Attachment into the cameraIfyouinsertacardbymistake,suchasamicroSDcard,donotuseforce.Contactauthorizeddistributors/servicecenters.
•
•
•
•
•
•
•
•
•
•
•
••
•
CAUTIONStop using the camera immediately if you notice any unusual odors, noise, or smoke around it.Neverremovethebatterieswithbarehands,whichmaycauseafireorburnyourhands.
Do not leave the camera in places where it may be subject to extremely high temperatures.Doingsomaycausepartstodeteriorateand,insomecircumstances,causethecameratocatchfire.DonotusethechargerorACadapterifitiscovered(suchasablanket).Thiscouldcauseoverheating,resultinginfire.
Handle the camera with care to avoid getting a low-temperature burn.Whenthecameracontainsmetalparts,overheatingcanresultinalow-temperatureburn.Payattentiontothefollowing:Whenusedforalongperiod,thecamerawillgethot.Ifyouholdontothecamerainthisstate,alow-temperatureburnmaybecaused.Inplacessubjecttoextremelycoldtemperatures,thetemperatureofthecamera’sbodymaybelowerthantheenvironmentaltemperature.Ifpossible,weargloveswhenhandlingthecameraincoldtemperatures.
Be careful with the strap.Becarefulwiththestrapwhenyoucarrythecamera.Itcouldeasilycatchonstrayobjectsandcauseseriousdamage.
Do not touch the metallic parts of the camera for a long period of time at low temperatures.Thismaydamageyourskin.Atlowtemperatures,handlethecamerawhilewearinggloves.
•
•
•
•
•
•
•
•
••
•
•
�� EN
Battery Handling PrecautionsFollow these important guidelines to prevent batteries from leaking, overheating, burning, exploding, or causing electrical shocks or burns.
DANGERThecamerausesalithiumionbatteryspecifiedbyOlympus.ChargethebatterywiththespecifiedACadaptororcharger.DonotuseanyotherACadaptorsorchargers.Neverheatorincineratebatteries.Takeprecautionswhencarryingorstoringbatteriestopreventthemfromcomingintocontactwithanymetalobjectssuchasjewelry,pins,fasteners,etc.Neverstorebatterieswheretheywillbeexposedtodirectsunlight,orsubjectedtohightemperaturesinahotvehicle,nearaheatsource,etc.Topreventcausingbatteryleaksordamagingtheirterminals,carefullyfollowallinstructionsregardingtheuseofbatteries.Neverattempttodisassembleabatteryormodifyitinanyway,solder,etc.Ifbatteryfluidgetsintoyoureyes,flushyoureyesimmediatelywithclear,coldrunningwaterandseekmedicalattentionimmediately.Alwaysstorebatteriesoutofthereachofsmallchildren.Ifachildaccidentallyswallowsabattery,seekmedicalattentionimmediately.
WARNINGKeepbatteriesdryatalltimes.Topreventbatteriesfromleaking,overheating,orcausingafireorexplosion,useonlybatteriesrecommendedforusewiththisproduct.Insertthebatterycarefullyasdescribedintheoperatinginstructions.Ifrechargeablebatterieshavenotbeenrechargedwithinthespecifiedtime,stopchargingthemanddonotusethem.Donotuseabatteryifitiscrackedorbroken.Ifabatteryleaks,becomesdiscoloredordeformed,orbecomesabnormalinanyotherwayduringoperation,stopusingthecamera.Ifabatteryleaksfluidontoyourclothingorskin,removetheclothingandflushtheaffectedareawithclean,runningcoldwaterimmediately.Ifthefluidburnsyourskin,seekmedicalattentionimmediately.Neversubjectbatteriestostrongshocksorcontinuousvibration.
•
••
•
•
•
•
••
•
•
••
•
••
CAUTIONBeforeloading,alwaysinspectthebatterycarefullyforleaks,discoloration,warping,oranyotherabnormality.Thebatterymaybecomehotduringprolongeduse.Toavoidminorburns,donotremoveitimmediatelyafterusingthecamera.Alwaysunloadthebatteryfromthecamerabeforestoringthecameraforalongperiod.
Caution for Usage EnvironmentToprotectthehigh-precisiontechnologycontainedinthisproduct,neverleavethecameraintheplaceslistedbelow,nomatterifinuseorstorage:Placeswheretemperaturesand/orhumidityarehighorgothroughextremechanges.Directsunlight,beaches,lockedcars,ornearotherheatsources(stove,radiator,etc.)orhumidifiers.Insandyordustyenvironments.Nearflammableitemsorexplosives.Inwetplaces,suchasbathroomsorintherain.Whenusingproductswithweatherproofdesigns,readtheirmanualsaswell.Inplacespronetostrongvibrations.
Neverdropthecameraorsubjectittosevereshocksorvibrations.Whenmountedonatripod,adjustthepositionofthecamerawiththetripodhead.Donottwistthecamera.Donottouchelectriccontactsoncameras.Donotleavethecamerapointeddirectlyatthesun.Thismaycauselensorshuttercurtaindamage,colorfailure,ghostingontheCCD,ormaypossiblycausefires.Donotpushorpullseverelyonthelens.Beforestoringthecameraforalongperiod,removethebatteries.Selectacool,drylocationforstoragetopreventcondensationormoldfromforminginsidethecamera.Afterstorage,testthecamerabyturningitonandpressingtheshutterbuttontomakesurethatitisoperatingnormally.Alwaysobservetheoperatingenvironmentrestrictionsdescribedinthecamera’smanual.Thealtitude/depthmeasurementfunctionisnotapprovedbyanofficialinstitution.Usethereadingsonlyforyourreference.
•
•
•
•
•
•••
••
•
••
••
•
•
��EN
Battery Handling PrecautionsThiscamerausesalithiumionbatteryspecifiedbyOlympus.Donotuseanyothertypeofbattery.Ifthebattery’sterminalsgetwetorgreasy,cameracontactfailuremayresult.Wipethebatterywellwithadryclothbeforeuse.Alwayschargeabatterywhenusingitforthefirsttime,orifithasnotbeenusedforalongperiod.Whenoperatingthecamerawithbatterypoweratlowtemperatures,trytokeepthecameraandsparebatteryaswarmaspossible.Abatterythathasrundownatlowtemperaturesmayberestoredafteritiswarmedatroomtemperature.Thenumberofpicturesyoucantakemayvarydependingontheshootingconditionsorbattery.Beforegoingonalongtrip,andespeciallybeforetravelingabroad,purchaseextrabatteries.Arecommendedbatterymaybedifficulttoobtainwhiletraveling.Pleaserecyclebatteriestohelpsaveourplanet’sresources.Whenyouthrowawaydeadbatteries,besuretocovertheirterminalsandalwaysobservelocallawsandregulations.
•
•
•
•
•
•
•
LCD MonitorDonotpushthemonitorforcibly;otherwisetheimagemaybecomevague,resultinginaplaybackmodefailureordamagetothemonitor.Astripoflightmayappearonthetop/bottomofthemonitor,butthisisnotamalfunction.Whenasubjectisvieweddiagonallyinthecamera,theedgesmayappearzigzaggedonthemonitor.Thisisnotamalfunction;itwillbelessnoticeableinplaybackmode.Inplacessubjecttolowtemperatures,theLCDmonitormaytakealongtimetoturnonoritscolormaychangetemporarily.Whenusingthecamerainextremelycoldplaces,itisagoodideatooccasionallyplaceitinawarmplace.AnLCDmonitorexhibitingpoorperformanceduetolowtemperatureswillrecoverinnormaltemperatures.TheLCDusedforthemonitorismadewithhigh-precisiontechnology.However,blackspotsorbrightspotsoflightmayappearconstantlyontheLCDmonitor.Duetoitscharacteristicsortheangleatwhichyouareviewingthemonitor,thespotmaynotbeuniformincolorandbrightness.Thisisnotamalfunction.
Legal and Other NoticesOlympusmakesnorepresentationsorwarrantiesregardinganydamages,orbenefitexpectedbyusingthisunitlawfully,oranyrequestfromathirdperson,whicharecausedbytheinappropriateuseofthisproduct.Olympusmakesnorepresentationsorwarrantiesregardinganydamagesoranybenefitexpectedbyusingthisunitlawfullywhicharecausedbyerasingpicturedata.
•
•
•
•
•
•
•

�� EN
Disclaimer of WarrantyOlympusmakesnorepresentationsorwarranties,eitherexpressedorimplied,byorconcerninganycontentofthesewrittenmaterialsorsoftware,andinnoeventshallbeliableforanyimpliedwarrantyofmerchantabilityorfitnessforanyparticularpurposeorforanyconsequential,incidentalorindirectdamages(includingbutnotlimitedtodamagesforlossofbusinessprofits,businessinterruptionandlossofbusinessinformation)arisingfromtheuseorinabilitytousethesewrittenmaterialsorsoftwareorequipment.Somecountriesdonotallowtheexclusionorlimitationofliabilityforconsequentialorincidentaldamages,sotheabovelimitationsmaynotapplytoyou.Olympusreservesallrightstothismanual.
WarningUnauthorizedphotographingoruseofcopyrightedmaterialmayviolateapplicablecopyrightlaws.Olympusassumesnoresponsibilityforunauthorizedphotographing,useorotheractsthatinfringeupontherightsofcopyrightowners.
Copyright NoticeAllrightsreserved.Nopartofthesewrittenmaterialsorthissoftwaremaybereproducedorusedinanyformorbyanymeans,electronicormechanical,includingphotocopyingandrecordingortheuseofanytypeofinformationstorageandretrievalsystem,withoutthepriorwrittenpermissionofOlympus.Noliabilityisassumedwithrespecttotheuseoftheinformationcontainedinthesewrittenmaterialsorsoftware,orfordamagesresultingfromtheuseoftheinformationcontainedtherein.Olympusreservestherighttoalterthefeaturesandcontentsofthispublicationorsoftwarewithoutobligationoradvancenotice.
•
•
For customers in Europe“CE”markindicatesthatthisproductcomplieswiththeEuropeanrequirementsforsafety,health,environmentandcustomerprotection.“CE”markcamerasareintendedforsalesinEurope.
Thissymbol[crossed-outwheeledbinWEEEAnnexIV]indicatesseparatecollectionofwasteelectricalandelectronicequipmentintheEUcountries.Pleasedonotthrowtheequipmentintothedomesticrefuse.Pleaseusethereturnandcollectionsystemsavailableinyourcountryforthedisposalofthisproduct.
Thissymbol[crossed-outwheeledbinDirective2006/66/ECAnnexII]indicatesseparatecollectionofwastebatteriesintheEUcountries.Pleasedonotthrowthebatteriesintothedomesticrefuse.Pleaseusethereturnandcollectionsystemsavailableinyourcountryforthedisposalofthewastebatteries.
Use Only Dedicated Rechargeable Battery, Battery Charger and AC adaptorWestronglyrecommendthatyouuseonlythegenuineOlympusdedicatedrechargeablebattery,batterychargerandACadaptorwiththiscamera.Usinganon-genuinerechargeablebattery,batterychargerand/orACadaptormayresultinfireorpersonalinjuryduetoleakage,heating,ignitionordamagetothebattery.Olympusdoesnotassumeanyliabilityforaccidentsordamagethatmayresultfromtheuseofabattery,batterychargerand/orACadaptorthatarenotgenuineOlympusaccessories.
Provisions of warranty1 Ifthisproductprovestobedefective,although
ithasbeenusedproperly(inaccordancewiththewrittenSafetyPrecautionsandOperatinginstructionssuppliedwithit),duringaperiodoftwoyearsfromthedateofpurchasefromanauthorizedOlympusdistributorwithinthebusinessareaofOlympusImagingEuropaGmbHasstipulatedonthewebsite:http://www.olympus.comthisproductwillberepaired,oratOlympus’soptionreplaced,freeofcharge.ToclaimunderthiswarrantythecustomermusttaketheproductandthisWarrantyCertificatebeforetheendofthetwoyearwarrantyperiodtothedealerwheretheproductwaspurchasedoranyotherOlympusservicestationwithinthebusinessareaofOlympusImagingEuropaGmbHasstipulatedonthewebsite:http://www.olympus.com.DuringtheoneyearperiodoftheWorldWideWarrantythecustomermayturntheproductinatanyOlympusservicestation.PleasenoticethatnotinallcountriessuchOlympusservicestationexists.
��EN
2 ThecustomershalltransporttheproducttothedealerorOlympusauthorizedservicestationathisownriskandshallberesponsibleforanycostsincurredintransportingtheproduct.
3 Thiswarrantydoesnotcoverthefollowingandthecustomerwillberequiredtopayrepaircharge,evenfordefectsoccurringwithinthewarrantyperiodreferredtoabove.
Anydefectthatoccursduetomishandling(suchasanoperationperformedthatisnotmentionedintheSafetyPrecautionsorothersectionsoftheinstructions,etc.)Anydefectthatoccursduetorepair,modification,cleaning,etc.performedbyanyoneotherthanOlympusoranOlympusauthorizedservicestation.Anydefectordamagethatoccursduetotransport,afall,shock,etc.afterpurchaseoftheproduct.Anydefectordamagethatoccursduetofire,earthquake,flooddamage,thunderbolt,othernaturaldisasters,environmentalpollutionandirregularvoltagesources.Anydefectthatoccursduetocarelessorimproperstorage(suchaskeepingtheproductunderconditionsofhightemperatureandhumidity,nearinsectrepellentssuchasnaphthaleneorharmfuldrugs,etc.),impropermaintenance,etc.Anydefectthatoccursduetoexhaustedbatteries,etc.Anydefectthatoccursduetosand,mud,etc.enteringtheinsideoftheproductcasing.WhenthisWarrantyCertificateisnotreturnedwiththeproduct.WhenanyalterationswhatsoeveraremadetotheWarrantyCertificateregardingtheyear,monthanddateofpurchase,thecustomer’sname,thedealer’sname,andtheserialnumber.WhenproofofpurchaseisnotpresentedwiththisWarrantyCertificate.
a.
b.
c.
d.
e.
f.
g.
h.
i.
j.
4 ThisWarrantyappliestotheproductonly;theWarrantydoesnotapplytoanyotheraccessoryequipment,suchasthecase,strap,lenscapandbatteries.
5 Olympus’ssoleliabilityunderthiswarrantyshallbelimitedtorepairingorreplacingtheproduct.Anyliabilityforindirectorconsequentiallossordamageofanykindincurredorsufferedbythecustomerduetoadefectoftheproduct,andinparticularanylossordamagecausedtoanylenses,films,otherequipmentoraccessoriesusedwiththeproductorforanylossresultingfromadelayinrepairorlossofdata,isexcluded.Compellingregulationsbylawremainunaffectedbythis.
Notes regarding warranty maintenance
1 ThiswarrantywillonlybevalidiftheWarrantyCertificateisdulycompletedbyOlympusoranauthorizeddealerorotherdocumentscontainsufficientproof.Therefore,pleasemakesurethatyourname,thenameofthedealer,theserialnumberandtheyear,monthanddateofpurchaseareallcompletedortheoriginalinvoiceorthesalesreceipt(indicatingthedealer’sname,thedateofpurchaseandproducttype)isattachedtothisWarrantyCertificate.Olympusreservestherighttorefusefree-of-chargeserviceifneitherWarrantyCertificateiscompletednortheabovedocumentisattachedoriftheinformationcontainedinitisincompleteorillegible.
2 SincethisWarrantyCertificatewillnotbere-issued,keepitinasafeplace.
* Pleaserefertothelistonthewebsite:http://www.olympus.comfortheauthorizedinternationalOlympusservicenetwork.
TrademarksIBMisaregisteredtrademarkofInternationalBusinessMachinesCorporation.MicrosoftandWindowsareregisteredtrademarksofMicrosoftCorporation.MacintoshisatrademarkofAppleInc.xD-PictureCard™isatrademark.microSDisatrademarkoftheSDAssociation.Allothercompanyandproductnamesareregisteredtrademarksand/ortrademarksoftheirrespectiveowners.Thestandardsforcamerafilesystemsreferredtointhismanualarethe“DesignruleforCameraFilesystem/DCF”standardsstipulatedbytheJapanElectronicsandInformationTechnologyIndustriesAssociation(JEITA).
•
•
••••
•

�� EN
SPECIFICATIONS
Camera
Product type : Digitalcamera(forshootinganddisplaying)Recording system
Still pictures : Digitalrecording,JPEG(inaccordancewithDesignruleforCameraFilesystem(DCF))
Applicable standards : Exif2.2,DigitalPrintOrderFormat(DPOF),PRINTImageMatchingIII,PictBridge
Sound with still pictures : WaveformatMovie : AVIMotionJPEG
Memory : InternalmemoryxD-PictureCard(16MBto2GB)(TypeH/M/M+,Standard)microSDcard/microSDHCcard(withthesuppliedmicroSDAttachment)
No. of effective pixels : 12,000,000pixelsImage pickup device : 1/2.33”CCD(primarycolorfilter),12,700,000pixels(gross)Lens : Olympuslens5.0to18.2mm,f3.5to5.1
(equivalentto28to102mmona35mmcamera)Photometric system : DigitalESPmetering,spotmeteringsystemShutter speed : 4to1/2000sec.Shooting range : 0.5m(1.6ft.)to∞(W/T)(normal)
0.1m(0.3ft.)to∞(W),0.3m(1.0ft.)to∞(T)(macromode)0.02m(0.8in.)to0.5m(1.6ft.)(Wonly)(supermacromode)0.07m(2.8in.)to0.2m(0.7ft.)(Wonly)(S-macroLEDmode)
Monitor : 2.7”TFTcolorLCDdisplay,230,000dotsFlash charge time : Approx.3.5sec.(forfullflashdischargeatroomtemperatureusinga
newfullychargedbattery)Connector : Multi-connector(DC-INjackUSBconnector,A/VOUTjack)Automatic calendar system : 2000upto2099Water resistance
Type : EquivalenttoIECStandardpublication529IPX8(underOLYMPUStestconditions),availablein10m(32.8feet)deepwater
Meaning : Cameracannormallybeusedunderwaterataspecifiedwaterpressure.
Dust resistance : IECStandardpublication529IP6X(underOLYMPUStestconditions)Operating environment
Temperature : -10°Cto40°C(14°Fto104°F)(operation)/-20°Cto60°C(-4°Fto140°F)(storage)
Humidity : 30%to90%(operation)/10%to90%(storage)Power supply : OneOlympuslithiumionbattery(LI-50B)orOlympusACadapter
(D-7AC/separatelysold)Dimensions : 95.0mm(W)×61.7mm(H)×21.5mm(D)(3.7×2.4×0.8in.)
(excludingprotrusions)Weight : 182g(5.9oz)(excludingbatteryandcard)
“ShadowAdjustmentTechnology”functioncontainspatentedtechnologiesfromApicalLimited.

77EN
Lithium ion battery (LI-50B)
Product type : Lithium ion rechargeable batteryModel No. : LI-50BA/LI-50BBStandard voltage : DC 3.7 VStandard capacity : 925 mAhBattery life : Approx. 300 full charges (varies on usage)Operating environment
Temperature : 0°C to 40°C (32°F to 104°F) (charging)/-10°C to 60°C (14°F to 140°F) (operation)/-10°C to 35°C (14°F to 95°F) (storage)
Dimensions : 34.4 mm (W) × 40.0 mm (H) × 7.0 mm (D) (1.4 × 1.6 × 0.3 in.)Weight : Approx. 20 g (0.7 oz)
AC adaptor (F-1AC)
Model No. : F-1AC-1/F-1AC-2/F-1AC-3Power requirements : AC 100 to 240 V (50/60 Hz)Output : DC 5 V, 700 mACharging time : Approx. 2.5 hoursOperating environment
Temperature : 0°C to 40°C (32°F to 104°F) (operation)/-20°C to 60°C (-4°F to 140°F) (storage)
Dimensions : 48.0 mm (W) × 60.0 mm (H) × 21.0 mm (D) (1.9 × 2.4 × 0.8 in.) (F-1AC-1)/ 39.0 mm (W) × 67.0 mm (H) × 21.0 mm (D) (1.5 × 2.6 × 0.8 in.) (F-1AC-2)/50.0 mm (W) × 70.0 mm (H) × 21.0 mm (D) (2.0 × 2.8 × 0.8 in.) (F-1AC-3)
Weight : Approx. 80.0 g (2.8 oz) (F-1AC-1)/ Approx. 70.0 g (2.5 oz) (F-1AC-2)/ Approx. 90.0 g (3.2 oz) (F-1AC-3)
Connecting cord length
: Approx. 1.5 m (4.9 ft.)
Using in low temperaturesLow temperature operation of the optional Olympus xD-Picture Card and lithium ion battery are guaranteed to 0°C (32°F). However, the following have been tested for use with this product in temperatures up to -10°C (14°F).
Olympus xD-Picture Card
16MB 32MB 64MB 128MB 256MB 512MB 1GB 2GBStandard
TypeM/M+ TypeH
Operation confirmed
Olympus lithium ion batteryLI-50B
The number of storable still pictures is reduced in low temperatures.●

78 EN
microSD Attachment
Product type : Attachment for microSD cardOperating Environment
Temperature : -10°C to 40°C (14 to 104°F) (operation)/ -20°C to 65°C (-4 to 149°F) (storage)
Humidity : 95% and below (operation)/85% and below (storage)Dimensions : 25.0 mm (W) x 20.3 mm (H) x 1.7 mm (D) (1.0 × 0.8 × 0.07 in.)
(Handle:2.2 mm (0.09 in.))Weight : Approx. 0.9 g (0.03 oz)
Design and specifications subject to change without notice.

��EN
Index
CroppingapictureP....................38,53CUSTOMPRINT..................................52
D
DATE(X)...........................................55DATE(PRINTINFO).............................53DateandtimeX..........................14,46DIGITALZOOM....................................31Directprinting........................................51DisplaylanguageW..................14,42DISMOVIEMODE(Movies).................32DPOF....................................................54DRAMATICEYE...................................37DRIVE...................................................31DUALTIME............................................46
E
EASYPRINT........................................51EDITI............................................38,39Erase
ALLERASE....................................40ERASEK........................................40SEL.IMAGE....................................40Singleimageerase.........................18
ESP.......................................................32ESP/n................................................32Exposure...............................................16ExposurecompensationF..................23
F
FACEDETECT.....................................32FADER(SLIDESHOW).........................37FILENAME...........................................45Filename..............................................45FILENAME(PRINTINFO)...................53FILLIN#.............................................23FINE......................................................29FINEZOOM..........................................31FLASHAUTO.......................................23Flashcharge.........................................59Flashmode#......................................22FLASHOFF$.....................................23
A
ACadapter........................................2,65AFlock..................................................19AFMODE.............................................32ALL(PERFECTFIX).............................37ALL(SLIDESHOW)..............................37ALLINDEX...........................................52ALLPRINT............................................52All-imageprintreservationU..............55AUTO(FILENAME).............................45AUTO(ISO)..........................................30AUTO(WB)...........................................30AVcable............................................2,47
B
BACKUP...............................................42Battery............................2,10,59,63,64bmode.........................................20BEAUTYFIXM...................................37BEEP....................................................44BGM......................................................37Black&White.......................................38
C
CALENDAR..........................................39CALENDAR(SLIDESHOW).................37CALIBRATE..........................................49Calendarview.......................................27CAMERAMENUB..............................30Card..........................................10,13,66CLEARSKIN........................................37Close-upviewU..................................27Cloudyday3.....................................30COLOR1/2/3........................................43COLOREDIT........................................38COMBINEINCAMERA1......................34COMBINEINCAMERA2.....................34COMBINEINPC..................................34COMPRESSION...................................29Connection
ToComputer...................................57ToPrinter........................................51ToTelevision...................................47

80 EN
Fluorescent lamp1/2/3 wxy ..........30FORMAT ...............................................42Format ..................................................42FRAME RATE .......................................29FUNC menu ..........................................25
H
High speed sequential shooting W .....31Histogram display ...........................25, 27
I
A mode ...........................................20iESP ......................................................32IMAGE QUALITY A .............................29IMAGE SIZE .........................................29IMAGE STABILIZER (Still images) .......32INDEX ...................................................39Index view G .......................................27Information displays ........................25, 27Internal memory .............................. 11, 67ISO........................................................30
L
LED ILLUMINATOR ........................24, 48Lithium ion battery ..................................2
M
MACRO & ...........................................23Macro mode & .....................................23MEMORY FORMAT ..............................42Menu .......................................................3MENU COLOR .....................................43Menu guide .............................................3microSD Attachment ...................2, 13, 68microSD card ..................................13, 68microSDHC card .............................13, 68Monitor brightness adjustment s .......46MOVIE P .............................................36MOVIE (SLIDESHOW) .........................37MULTI PRINT .......................................52MULTI WINDOW ..................................26
N
NO (X) ...............................................55NORMAL ..............................................29NORMAL (MENU COLOR) ...................43NORMAL (SLIDESHOW) .....................37NTSC ....................................................47Number of prints (<x) ..........................53
O
OLYMPUS Master 2 .........................2, 57Optical zoom .........................................22
P
PAL .......................................................47PANORAMA N .....................................34Panorama playback ..............................28PC .........................................................57PERFECT FIX H ..................................37PictBridge .............................................51Picture rotation y .................................40PIXEL MAPPING ..................................45PLAYBACK MENU J .....................39, 40Playback mode q ...............................17Playback on a TV ..................................47POWER SAVE ......................................48PRINT ORDER .....................................52PRINT ORDER L ................................41Print reservations ..................................54Printing pictures ....................................51Protect 0 ...........................................39PW ON SETUP .....................................43
R
REC VIEW ............................................44REDEYE ! .......................................23REDEYE FIX ........................................37RESET D ..............................................36RESET (FILE NAME) ...........................45Resizing Q .........................................38

�1EN
S
Saturation(Hard)..................................38Saturation(Soft)....................................38(SCENEMODE)O...............19,33SCREEN...............................................43SELFTIMERY.....................................24Sepia.....................................................38Sequentialshootingj.......................31SETUPE.............................................42SHADOWADJ................................26,33Shootingmode......................................19Shootingmoviesn..............................21Shootingstillpictures
(Fullautomode)A....................20ShootingstillpicturesK.....................16SHUTTERSOUND...............................44SILENTMODEF.................................50Single-imageprintreservation<.........54Single-frameshootingo....................31SLIDE(SLIDESHOW)..........................37SLIDESHOWG...................................37S-MACROLEDO..............................23Soundrecording
AddingsoundtostillpicturesR......40RecordingsoundwithstillpicturesR ........................................................32
SOUNDSETTINGS..............................44SPARKLEEYE.....................................37SPOT(AFMODE)................................32Spotmeteringn.................................32STILLPICTURE(SLIDESHOW)..........37Strap.......................................................2Sunnyday5.......................................30SUPERMACRO%.............................23
T
TAPCONTROL.....................................49TIME(X)............................................55Topmenu................................................5Tungstenlight1..................................30Turnthecameraon........................14,16TYPE....................................................37
U
USBcable...................................2,51,57
V
VIDEOOUT..........................................47VOLUME...............................................43VOLUMEq........................................44
W
Warningsound8................................44WhitebalanceWB................................30
X
xD-PictureCard..............................10,66
Z
Zoom.....................................................22ZOOM(SLIDESHOW)..........................37

VN050201