Pasewark & Pasewark Microsoft Office 2003 BASICS 1 MICROSOFT WORD Lesson 1 — Word Basics.
Microsoft Office Word 2007 makes it easy to benefit from styles without having to
know much about them. However, you may want to know how styles work behind the
scenes, or you may want to know what's new with styles in Office Word 2007.
This article explains how styles work to save you time and make your document look
good, and it discusses the relationship between styles and two new features in Word
2007: Quick Styles and themes.
In this article
Styles save time and make your document look good
An assortment of style types
Styles, Quick Style sets, and themes: putting the pieces together
Customized styles
Styles save time and make your document lookgood
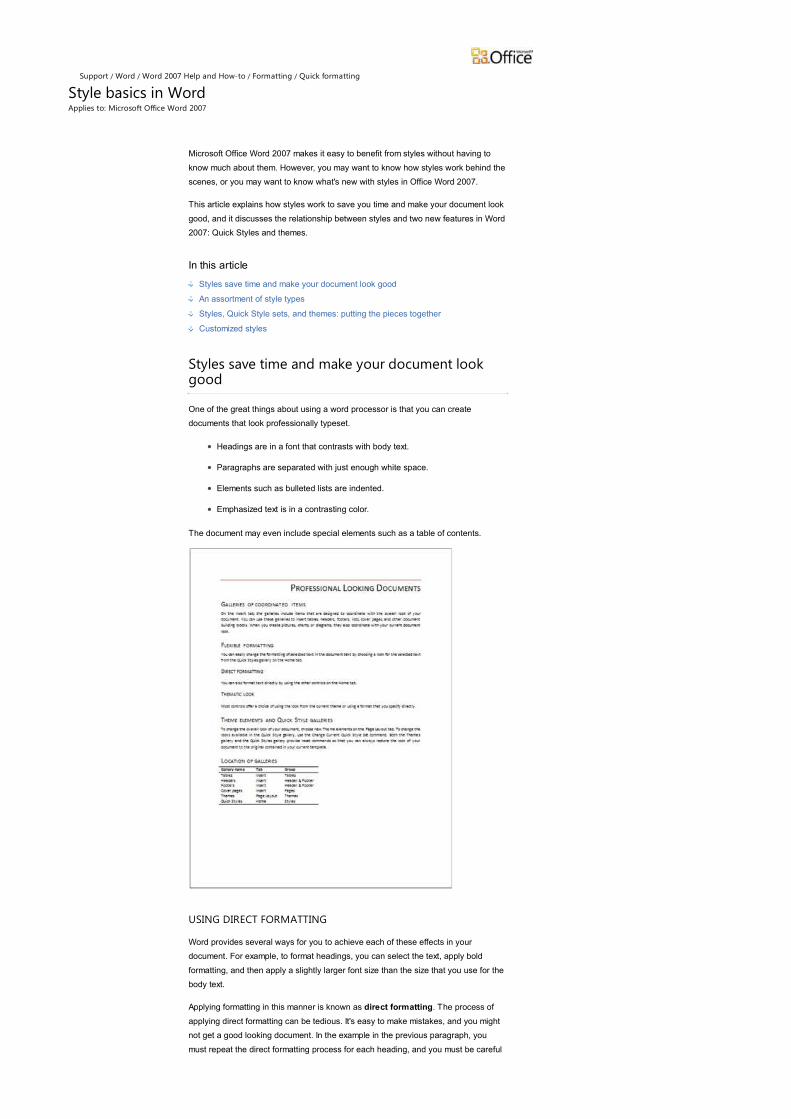
One of the great things about using a word processor is that you can create
documents that look professionally typeset.
Headings are in a font that contrasts with body text.
Paragraphs are separated with just enough white space.
Elements such as bulleted lists are indented.
Emphasized text is in a contrasting color.
The document may even include special elements such as a table of contents.
USING DIRECT FORMATTING
Word provides several ways for you to achieve each of these effects in your
document. For example, to format headings, you can select the text, apply bold
formatting, and then apply a slightly larger font size than the size that you use for the
body text.
Applying formatting in this manner is known as direct formatting. The process of
applying direct formatting can be tedious. It's easy to make mistakes, and you might
not get a good looking document. In the example in the previous paragraph, you
must repeat the direct formatting process for each heading, and you must be careful
Style basics in WordApplies to: Microsoft Office Word 2007
Support / Word / Word 2007 Help and How-to / Formatting / Quick formatting
to select the same font size every time.
If you want subheadings, you must decide how to differentiate the subheadings from
the headings (smaller size? italicize?) and repeat the direct formatting process for
each subheading. If you don't have expertise in design or typography, it may take
some time before you create a look that you like.
Furthermore, documents that are formatted by direct formatting are difficult to update.
If you want to change the look of the document, you must select each element and
apply the new formatting choices.
USING STYLES
By contrast, when you use styles to format your document, you can quickly and
easily apply a set of formatting choices consistently throughout your document.
A style is a set of formatting characteristics, such as font name, size, color, paragraph
alignment and spacing. Some styles even include borders and shading.
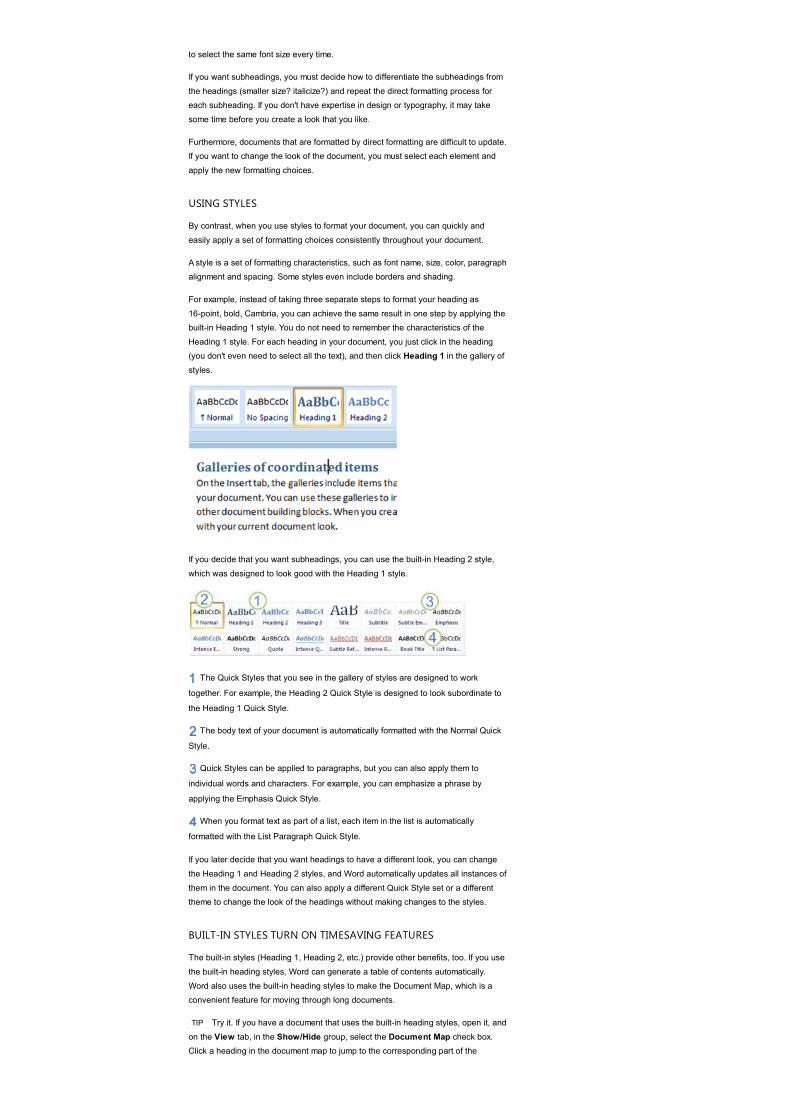
For example, instead of taking three separate steps to format your heading as
16-point, bold, Cambria, you can achieve the same result in one step by applying the
built-in Heading 1 style. You do not need to remember the characteristics of the
Heading 1 style. For each heading in your document, you just click in the heading
(you don't even need to select all the text), and then click Heading 1 in the gallery of
styles.
If you decide that you want subheadings, you can use the built-in Heading 2 style,
which was designed to look good with the Heading 1 style.
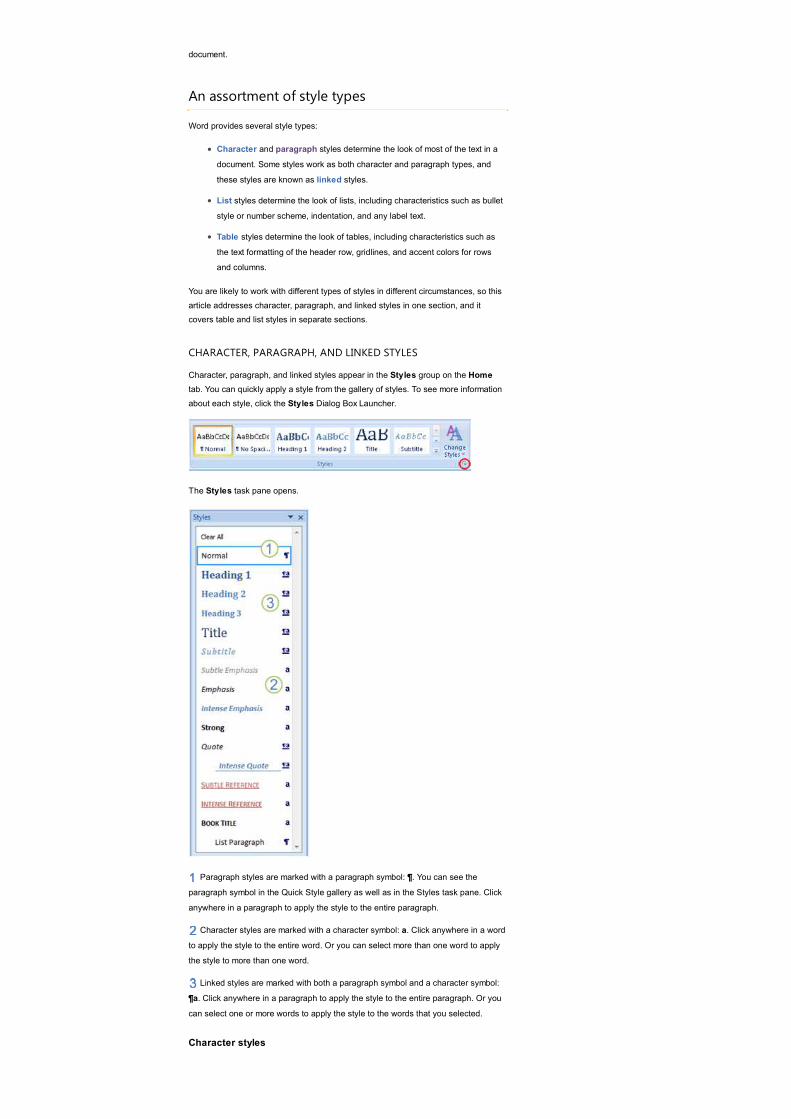
The Quick Styles that you see in the gallery of styles are designed to work
together. For example, the Heading 2 Quick Style is designed to look subordinate to
the Heading 1 Quick Style.
The body text of your document is automatically formatted with the Normal Quick
Style.
Quick Styles can be applied to paragraphs, but you can also apply them to
individual words and characters. For example, you can emphasize a phrase by
applying the Emphasis Quick Style.
When you format text as part of a list, each item in the list is automatically
formatted with the List Paragraph Quick Style.
If you later decide that you want headings to have a different look, you can change
the Heading 1 and Heading 2 styles, and Word automatically updates all instances of
them in the document. You can also apply a different Quick Style set or a different
theme to change the look of the headings without making changes to the styles.
BUILT-IN STYLES TURN ON TIMESAVING FEATURES
The built-in styles (Heading 1, Heading 2, etc.) provide other benefits, too. If you use
the built-in heading styles, Word can generate a table of contents automatically.
Word also uses the built-in heading styles to make the Document Map, which is a
convenient feature for moving through long documents.
TIP Try it. If you have a document that uses the built-in heading styles, open it, and
on the View tab, in the Show/Hide group, select the Document Map check box.
Click a heading in the document map to jump to the corresponding part of the
document.
An assortment of style types
Word provides several style types:
Character and paragraph styles determine the look of most of the text in a
document. Some styles work as both character and paragraph types, and
these styles are known as linked styles.
List styles determine the look of lists, including characteristics such as bullet
style or number scheme, indentation, and any label text.
Table styles determine the look of tables, including characteristics such as
the text formatting of the header row, gridlines, and accent colors for rows
and columns.
You are likely to work with different types of styles in different circumstances, so this
article addresses character, paragraph, and linked styles in one section, and it
covers table and list styles in separate sections.
CHARACTER, PARAGRAPH, AND LINKED STYLES
Character, paragraph, and linked styles appear in the Styles group on the Home
tab. You can quickly apply a style from the gallery of styles. To see more information
about each style, click the Styles Dialog Box Launcher.
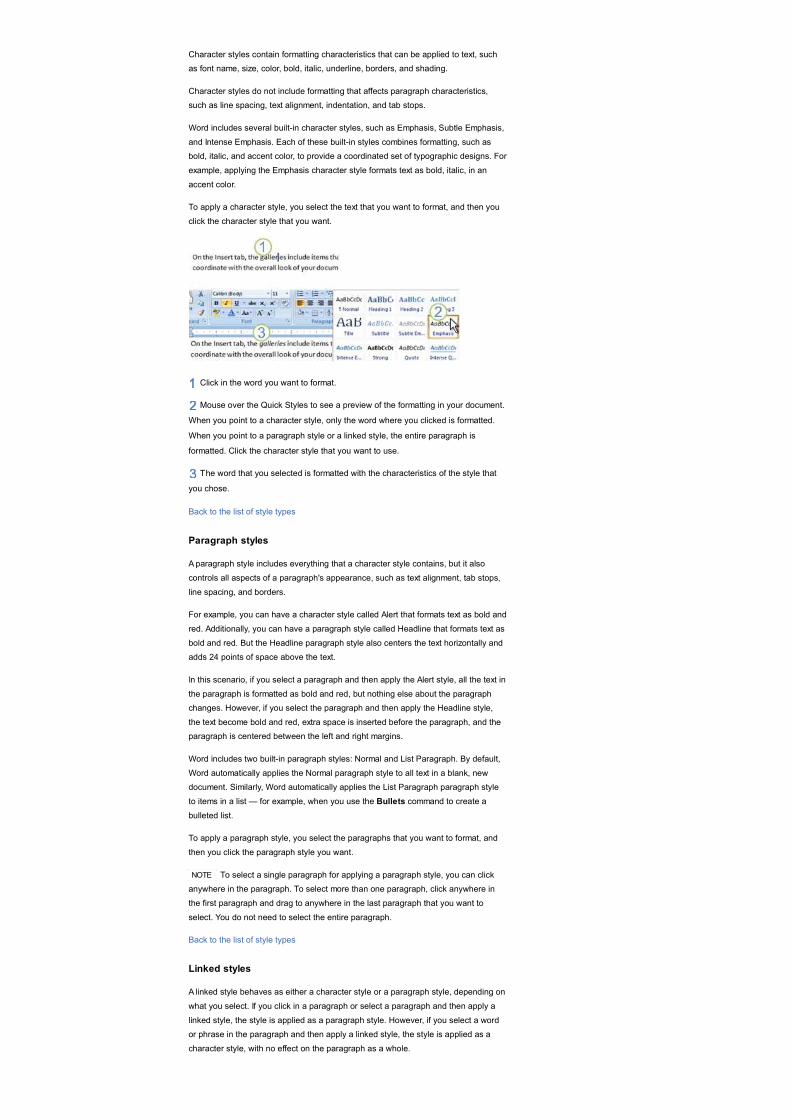
The Styles task pane opens.
Paragraph styles are marked with a paragraph symbol: ¶. You can see the
paragraph symbol in the Quick Style gallery as well as in the Styles task pane. Click
anywhere in a paragraph to apply the style to the entire paragraph.
Character styles are marked with a character symbol: a. Click anywhere in a word
to apply the style to the entire word. Or you can select more than one word to apply
the style to more than one word.
Linked styles are marked with both a paragraph symbol and a character symbol:
¶a. Click anywhere in a paragraph to apply the style to the entire paragraph. Or you
can select one or more words to apply the style to the words that you selected.
Character styles
Character styles contain formatting characteristics that can be applied to text, such
as font name, size, color, bold, italic, underline, borders, and shading.
Character styles do not include formatting that affects paragraph characteristics,
such as line spacing, text alignment, indentation, and tab stops.
Word includes several built-in character styles, such as Emphasis, Subtle Emphasis,
and Intense Emphasis. Each of these built-in styles combines formatting, such as
bold, italic, and accent color, to provide a coordinated set of typographic designs. For
example, applying the Emphasis character style formats text as bold, italic, in an
accent color.
To apply a character style, you select the text that you want to format, and then you
click the character style that you want.
Click in the word you want to format.
Mouse over the Quick Styles to see a preview of the formatting in your document.
When you point to a character style, only the word where you clicked is formatted.
When you point to a paragraph style or a linked style, the entire paragraph is
formatted. Click the character style that you want to use.
The word that you selected is formatted with the characteristics of the style that
you chose.
Back to the list of style types
Paragraph styles
A paragraph style includes everything that a character style contains, but it also
controls all aspects of a paragraph's appearance, such as text alignment, tab stops,
line spacing, and borders.
For example, you can have a character style called Alert that formats text as bold and
red. Additionally, you can have a paragraph style called Headline that formats text as
bold and red. But the Headline paragraph style also centers the text horizontally and
adds 24 points of space above the text.
In this scenario, if you select a paragraph and then apply the Alert style, all the text in
the paragraph is formatted as bold and red, but nothing else about the paragraph
changes. However, if you select the paragraph and then apply the Headline style,
the text become bold and red, extra space is inserted before the paragraph, and the
paragraph is centered between the left and right margins.
Word includes two built-in paragraph styles: Normal and List Paragraph. By default,
Word automatically applies the Normal paragraph style to all text in a blank, new
document. Similarly, Word automatically applies the List Paragraph paragraph style
to items in a list — for example, when you use the Bullets command to create a
bulleted list.
To apply a paragraph style, you select the paragraphs that you want to format, and
then you click the paragraph style you want.
NOTE To select a single paragraph for applying a paragraph style, you can click
anywhere in the paragraph. To select more than one paragraph, click anywhere in
the first paragraph and drag to anywhere in the last paragraph that you want to
select. You do not need to select the entire paragraph.
Back to the list of style types
Linked styles
A linked style behaves as either a character style or a paragraph style, depending on
what you select. If you click in a paragraph or select a paragraph and then apply a
linked style, the style is applied as a paragraph style. However, if you select a word
or phrase in the paragraph and then apply a linked style, the style is applied as a
character style, with no effect on the paragraph as a whole.
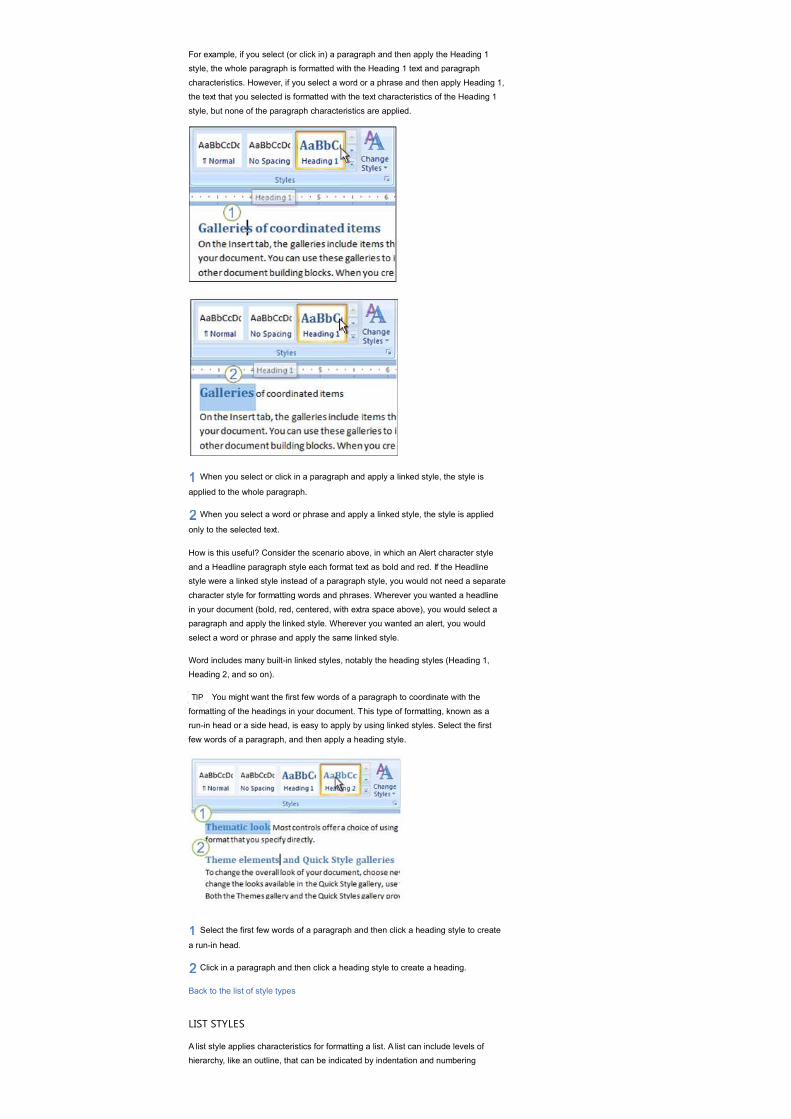
For example, if you select (or click in) a paragraph and then apply the Heading 1
style, the whole paragraph is formatted with the Heading 1 text and paragraph
characteristics. However, if you select a word or a phrase and then apply Heading 1,
the text that you selected is formatted with the text characteristics of the Heading 1
style, but none of the paragraph characteristics are applied.
When you select or click in a paragraph and apply a linked style, the style is
applied to the whole paragraph.
When you select a word or phrase and apply a linked style, the style is applied
only to the selected text.
How is this useful? Consider the scenario above, in which an Alert character style
and a Headline paragraph style each format text as bold and red. If the Headline
style were a linked style instead of a paragraph style, you would not need a separate
character style for formatting words and phrases. Wherever you wanted a headline
in your document (bold, red, centered, with extra space above), you would select a
paragraph and apply the linked style. Wherever you wanted an alert, you would
select a word or phrase and apply the same linked style.
Word includes many built-in linked styles, notably the heading styles (Heading 1,
Heading 2, and so on).
TIP You might want the first few words of a paragraph to coordinate with the
formatting of the headings in your document. This type of formatting, known as a
run-in head or a side head, is easy to apply by using linked styles. Select the first
few words of a paragraph, and then apply a heading style.
Select the first few words of a paragraph and then click a heading style to create
a run-in head.
Click in a paragraph and then click a heading style to create a heading.
Back to the list of style types
LIST STYLES
A list style applies characteristics for formatting a list. A list can include levels of
hierarchy, like an outline, that can be indicated by indentation and numbering
schemes. For example, level one in a multilevel list can be aligned against the margin
and can begin with an Arabic numeral followed by a period. Level two can be
indented slightly from the margin and can begin with a lowercase alphabetical
character followed by a closing parenthesis. Here is an example of a multilevel list
that is two levels deep:
1. This is the first item at level one.
a) This is the first item at level two, within the first item at level one.
b) This is the second item at level two, within the first item at level one.
2. This is the second item at level one.
a) This is the first item at level two, within the second item at level one.
3. This is the third item at level one.
a) This is the first item at level two, within the third item at level one.
b) This is the second item at level two, within the third item at level one.
c) This is the third item at level two, within the third item at level one.
A list style can define formatting for as many as nine levels of a list. The formatting
scheme can include paragraph indentation for each level of the list, any label text
(such as, "Item" or "Chapter"), and the numbering or bullet characters to use in the
list.
Unlike the other types of styles (paragraph, character, linked, and table), predefined
list styles are not available when you first create a document in Word.
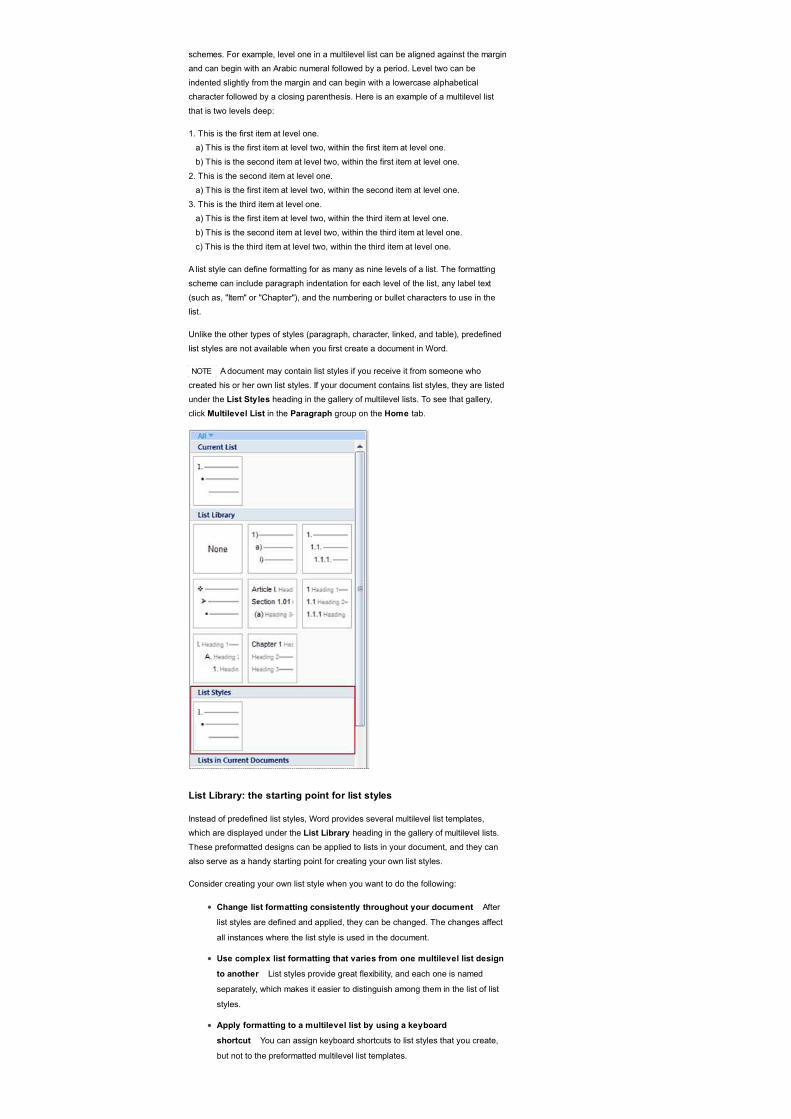
NOTE A document may contain list styles if you receive it from someone who
created his or her own list styles. If your document contains list styles, they are listed
under the List Styles heading in the gallery of multilevel lists. To see that gallery,
click Multilevel List in the Paragraph group on the Home tab.
List Library: the starting point for list styles
Instead of predefined list styles, Word provides several multilevel list templates,
which are displayed under the List Library heading in the gallery of multilevel lists.
These preformatted designs can be applied to lists in your document, and they can
also serve as a handy starting point for creating your own list styles.
Consider creating your own list style when you want to do the following:
Change list formatting consistently throughout your document After
list styles are defined and applied, they can be changed. The changes affect
all instances where the list style is used in the document.
Use complex list formatting that varies from one multilevel list design
to another List styles provide great flexibility, and each one is named
separately, which makes it easier to distinguish among them in the list of list
styles.
Apply formatting to a multilevel list by using a keyboard
shortcut You can assign keyboard shortcuts to list styles that you create,
but not to the preformatted multilevel list templates.
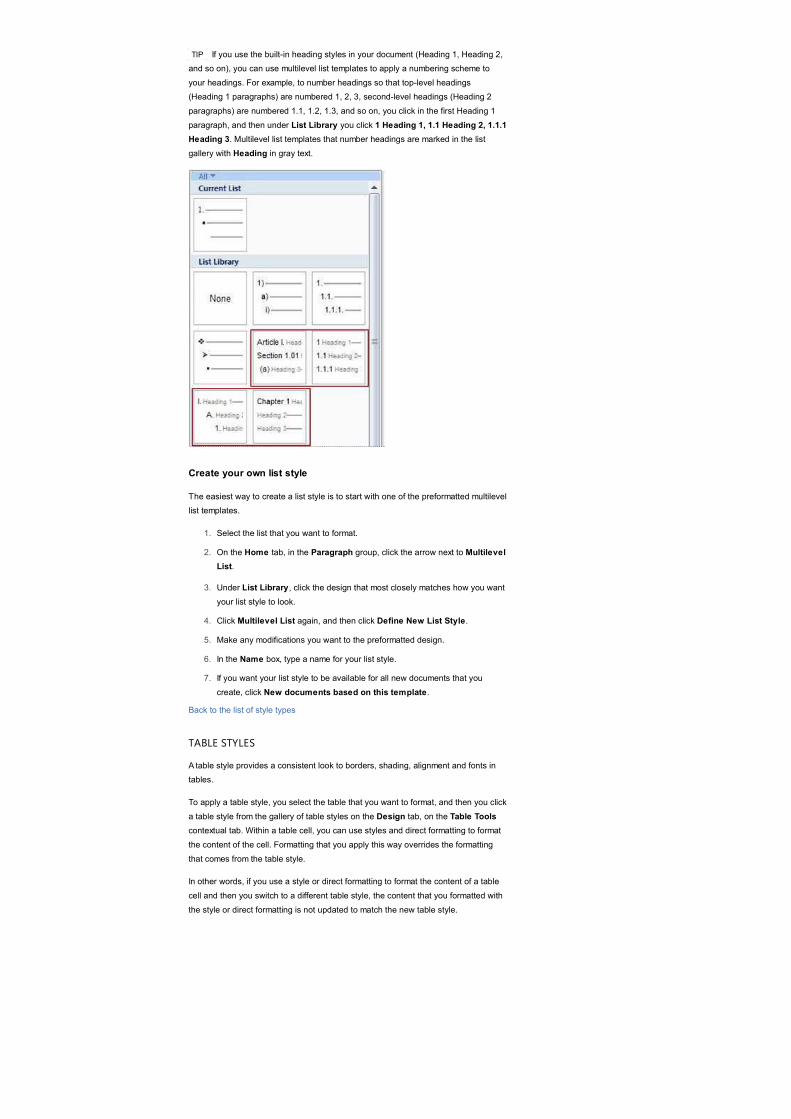
TIP If you use the built-in heading styles in your document (Heading 1, Heading 2,
and so on), you can use multilevel list templates to apply a numbering scheme to
your headings. For example, to number headings so that top-level headings
(Heading 1 paragraphs) are numbered 1, 2, 3, second-level headings (Heading 2
paragraphs) are numbered 1.1, 1.2, 1.3, and so on, you click in the first Heading 1
paragraph, and then under List Library you click 1 Heading 1, 1.1 Heading 2, 1.1.1
Heading 3. Multilevel list templates that number headings are marked in the list
gallery with Heading in gray text.
Create your own list style
The easiest way to create a list style is to start with one of the preformatted multilevel
list templates.
Select the list that you want to format.1.
On the Home tab, in the Paragraph group, click the arrow next to Multilevel
List.
2.
Under List Library, click the design that most closely matches how you want
your list style to look.
3.
Click Multilevel List again, and then click Define New List Style.4.
Make any modifications you want to the preformatted design.5.
In the Name box, type a name for your list style.6.
If you want your list style to be available for all new documents that you
create, click New documents based on this template.
7.
Back to the list of style types
TABLE STYLES
A table style provides a consistent look to borders, shading, alignment and fonts in
tables.
To apply a table style, you select the table that you want to format, and then you click
a table style from the gallery of table styles on the Design tab, on the Table Tools
contextual tab. Within a table cell, you can use styles and direct formatting to format
the content of the cell. Formatting that you apply this way overrides the formatting
that comes from the table style.
In other words, if you use a style or direct formatting to format the content of a table
cell and then you switch to a different table style, the content that you formatted with
the style or direct formatting is not updated to match the new table style.
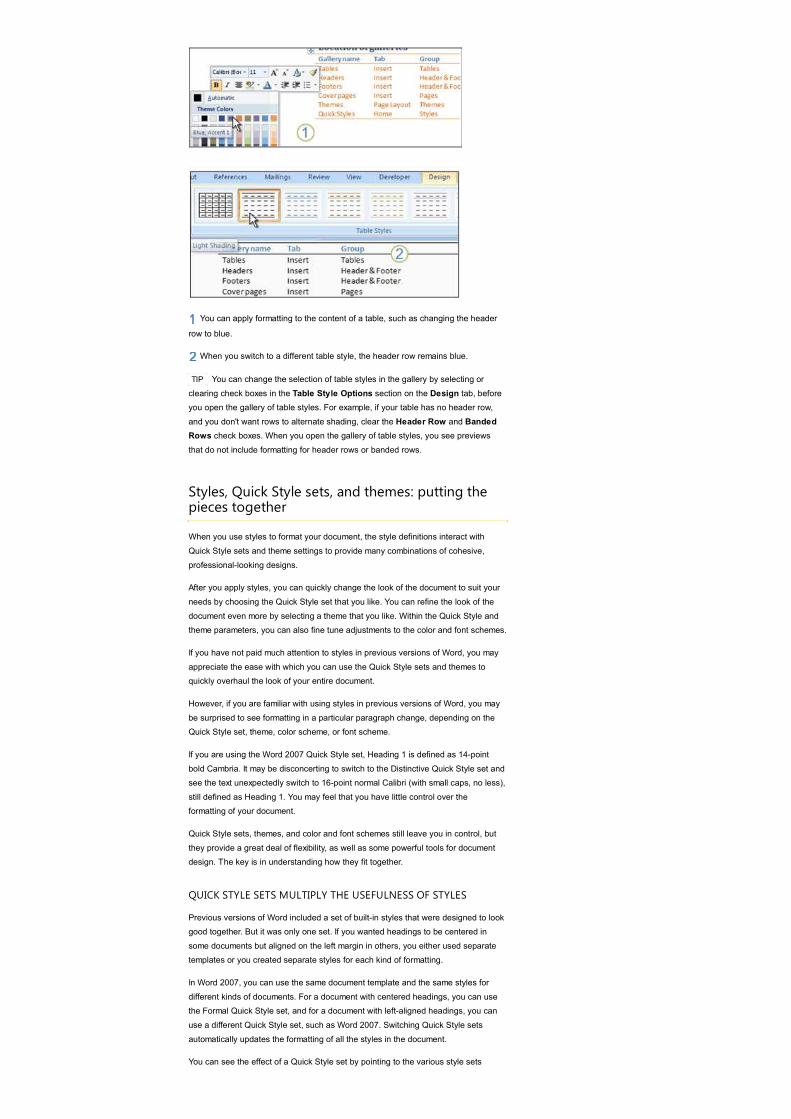
You can apply formatting to the content of a table, such as changing the header
row to blue.
When you switch to a different table style, the header row remains blue.
TIP You can change the selection of table styles in the gallery by selecting or
clearing check boxes in the Table Style Options section on the Design tab, before
you open the gallery of table styles. For example, if your table has no header row,
and you don't want rows to alternate shading, clear the Header Row and Banded
Rows check boxes. When you open the gallery of table styles, you see previews
that do not include formatting for header rows or banded rows.
Styles, Quick Style sets, and themes: putting thepieces together
When you use styles to format your document, the style definitions interact with
Quick Style sets and theme settings to provide many combinations of cohesive,
professional-looking designs.
After you apply styles, you can quickly change the look of the document to suit your
needs by choosing the Quick Style set that you like. You can refine the look of the
document even more by selecting a theme that you like. Within the Quick Style and
theme parameters, you can also fine tune adjustments to the color and font schemes.
If you have not paid much attention to styles in previous versions of Word, you may
appreciate the ease with which you can use the Quick Style sets and themes to
quickly overhaul the look of your entire document.
However, if you are familiar with using styles in previous versions of Word, you may
be surprised to see formatting in a particular paragraph change, depending on the
Quick Style set, theme, color scheme, or font scheme.
If you are using the Word 2007 Quick Style set, Heading 1 is defined as 14-point
bold Cambria. It may be disconcerting to switch to the Distinctive Quick Style set and
see the text unexpectedly switch to 16-point normal Calibri (with small caps, no less),
still defined as Heading 1. You may feel that you have little control over the
formatting of your document.
Quick Style sets, themes, and color and font schemes still leave you in control, but
they provide a great deal of flexibility, as well as some powerful tools for document
design. The key is in understanding how they fit together.
QUICK STYLE SETS MULTIPLY THE USEFULNESS OF STYLES
Previous versions of Word included a set of built-in styles that were designed to look
good together. But it was only one set. If you wanted headings to be centered in
some documents but aligned on the left margin in others, you either used separate
templates or you created separate styles for each kind of formatting.
In Word 2007, you can use the same document template and the same styles for
different kinds of documents. For a document with centered headings, you can use
the Formal Quick Style set, and for a document with left-aligned headings, you can
use a different Quick Style set, such as Word 2007. Switching Quick Style sets
automatically updates the formatting of all the styles in the document.
You can see the effect of a Quick Style set by pointing to the various style sets
before you click one. On the Home tab, in the Styles group, click Change Styles,
point to Style Set, and then point to the various style set names.
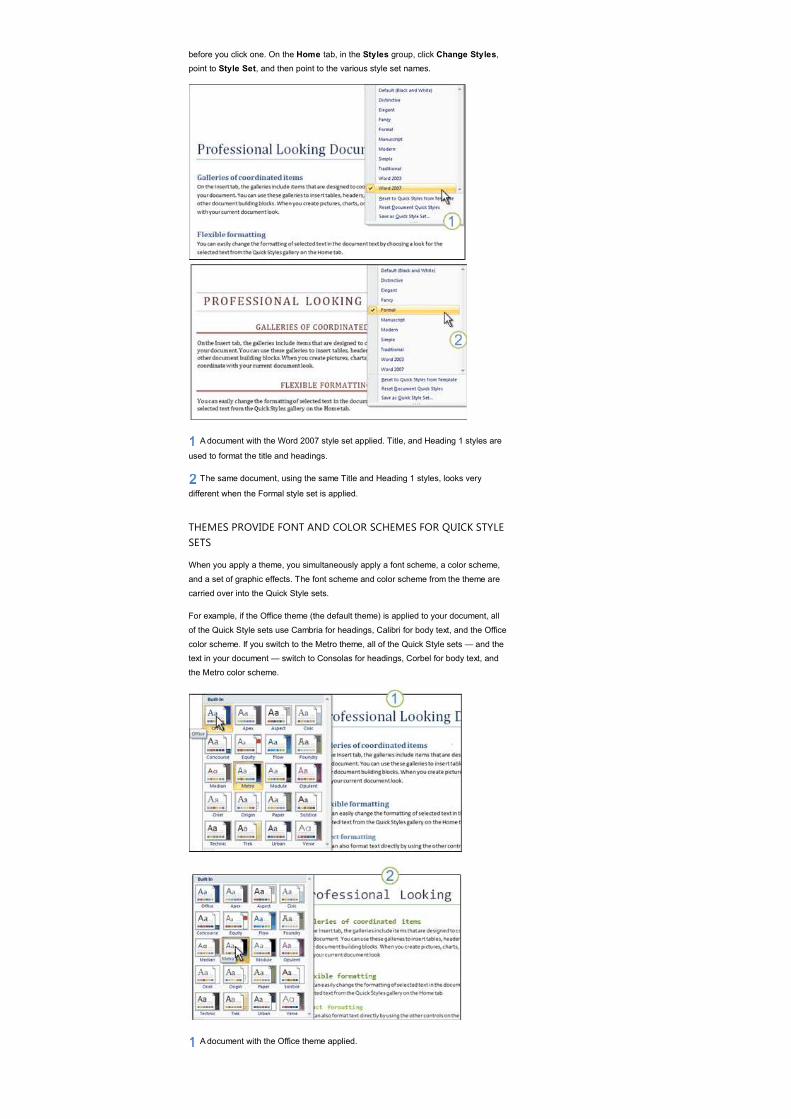
A document with the Word 2007 style set applied. Title, and Heading 1 styles are
used to format the title and headings.
The same document, using the same Title and Heading 1 styles, looks very
different when the Formal style set is applied.
THEMES PROVIDE FONT AND COLOR SCHEMES FOR QUICK STYLE
SETS
When you apply a theme, you simultaneously apply a font scheme, a color scheme,
and a set of graphic effects. The font scheme and color scheme from the theme are
carried over into the Quick Style sets.
For example, if the Office theme (the default theme) is applied to your document, all
of the Quick Style sets use Cambria for headings, Calibri for body text, and the Office
color scheme. If you switch to the Metro theme, all of the Quick Style sets — and the
text in your document — switch to Consolas for headings, Corbel for body text, and
the Metro color scheme.
A document with the Office theme applied.
The same document with the Metro theme applied switches to a different font set
and color scheme.
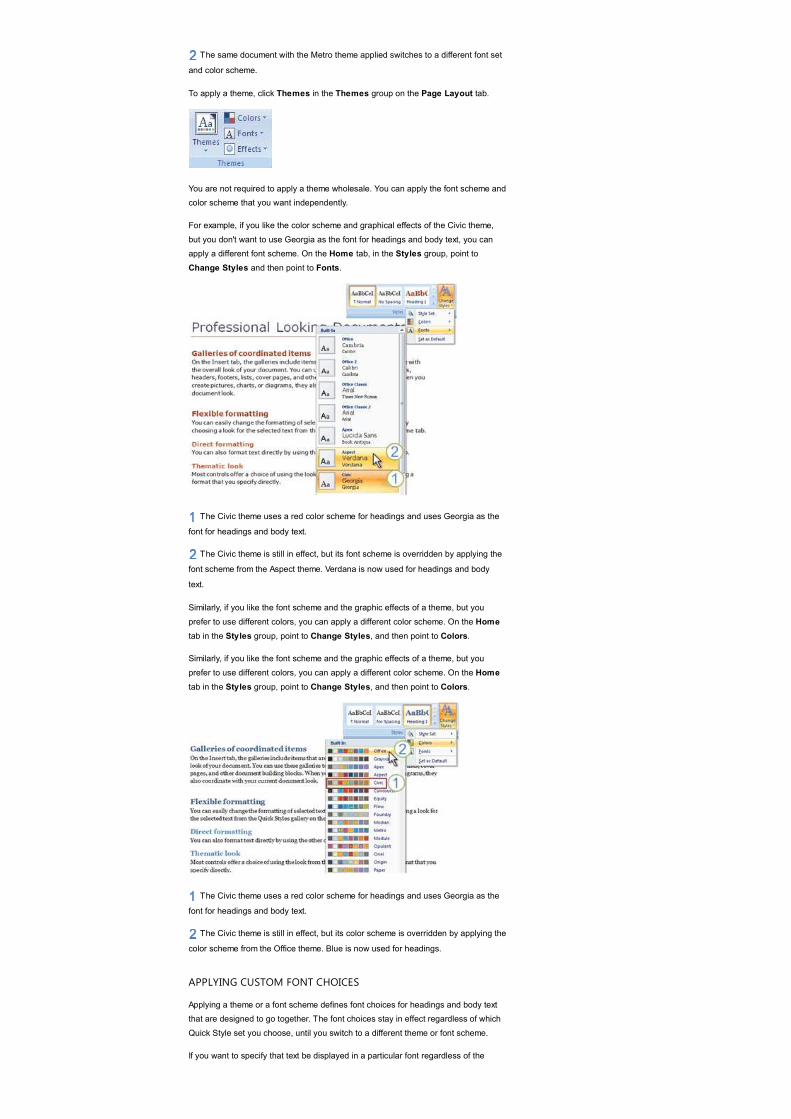
To apply a theme, click Themes in the Themes group on the Page Layout tab.
You are not required to apply a theme wholesale. You can apply the font scheme and
color scheme that you want independently.
For example, if you like the color scheme and graphical effects of the Civic theme,
but you don't want to use Georgia as the font for headings and body text, you can
apply a different font scheme. On the Home tab, in the Styles group, point to
Change Styles and then point to Fonts.
The Civic theme uses a red color scheme for headings and uses Georgia as the
font for headings and body text.
The Civic theme is still in effect, but its font scheme is overridden by applying the
font scheme from the Aspect theme. Verdana is now used for headings and body
text.
Similarly, if you like the font scheme and the graphic effects of a theme, but you
prefer to use different colors, you can apply a different color scheme. On the Home
tab in the Styles group, point to Change Styles, and then point to Colors.
Similarly, if you like the font scheme and the graphic effects of a theme, but you
prefer to use different colors, you can apply a different color scheme. On the Home
tab in the Styles group, point to Change Styles, and then point to Colors.
The Civic theme uses a red color scheme for headings and uses Georgia as the
font for headings and body text.
The Civic theme is still in effect, but its color scheme is overridden by applying the
color scheme from the Office theme. Blue is now used for headings.
APPLYING CUSTOM FONT CHOICES
Applying a theme or a font scheme defines font choices for headings and body text
that are designed to go together. The font choices stay in effect regardless of which
Quick Style set you choose, until you switch to a different theme or font scheme.
If you want to specify that text be displayed in a particular font regardless of the
theme or font scheme, create a custom style. Or you can use direct formatting by
selecting the text and applying the font that you want.
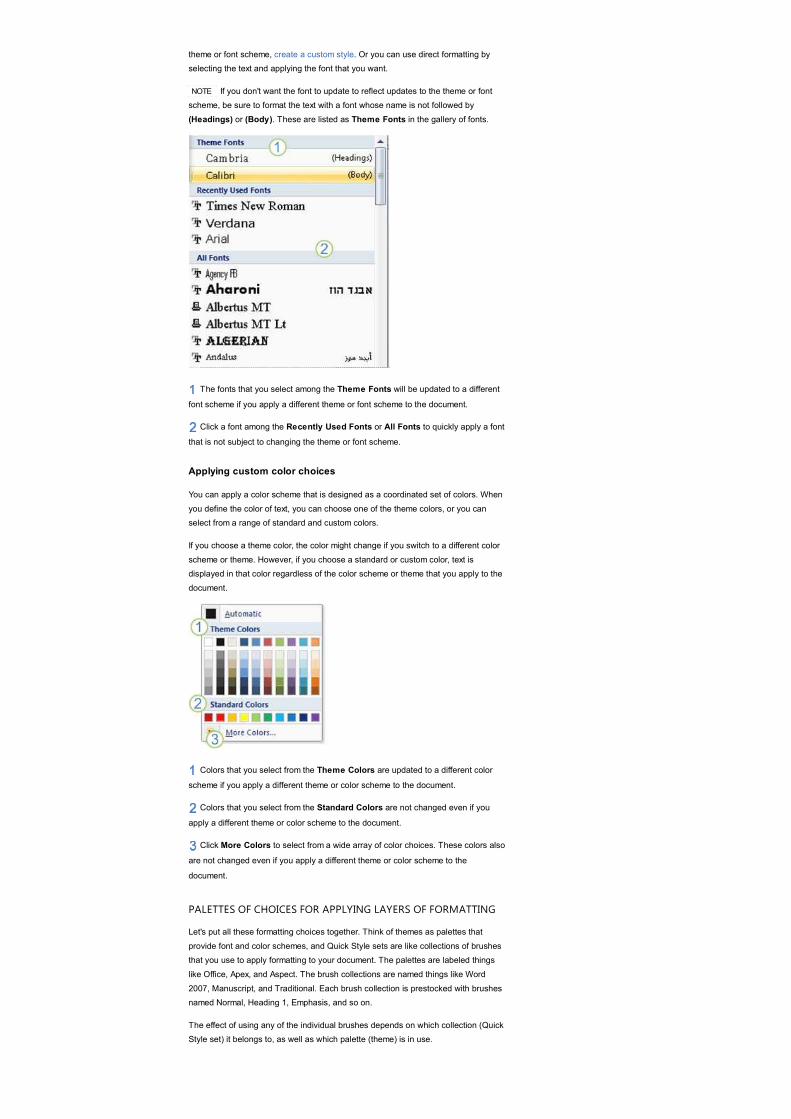
NOTE If you don't want the font to update to reflect updates to the theme or font
scheme, be sure to format the text with a font whose name is not followed by
(Headings) or (Body). These are listed as Theme Fonts in the gallery of fonts.
The fonts that you select among the Theme Fonts will be updated to a different
font scheme if you apply a different theme or font scheme to the document.
Click a font among the Recently Used Fonts or All Fonts to quickly apply a font
that is not subject to changing the theme or font scheme.
Applying custom color choices
You can apply a color scheme that is designed as a coordinated set of colors. When
you define the color of text, you can choose one of the theme colors, or you can
select from a range of standard and custom colors.
If you choose a theme color, the color might change if you switch to a different color
scheme or theme. However, if you choose a standard or custom color, text is
displayed in that color regardless of the color scheme or theme that you apply to the
document.
Colors that you select from the Theme Colors are updated to a different color
scheme if you apply a different theme or color scheme to the document.
Colors that you select from the Standard Colors are not changed even if you
apply a different theme or color scheme to the document.
Click More Colors to select from a wide array of color choices. These colors also
are not changed even if you apply a different theme or color scheme to the
document.
PALETTES OF CHOICES FOR APPLYING LAYERS OF FORMATTING
Let's put all these formatting choices together. Think of themes as palettes that
provide font and color schemes, and Quick Style sets are like collections of brushes
that you use to apply formatting to your document. The palettes are labeled things
like Office, Apex, and Aspect. The brush collections are named things like Word
2007, Manuscript, and Traditional. Each brush collection is prestocked with brushes
named Normal, Heading 1, Emphasis, and so on.
The effect of using any of the individual brushes depends on which collection (Quick
Style set) it belongs to, as well as which palette (theme) is in use.
When you apply brush strokes (styles) to your document, Word applies the
formatting in layers. Each layer overrides the previous layer, providing an increasing
degree of fine-tuning and a decreasing degree of flexibility.
The bottom layer is the Normal paragraph style. Text formatted as Normal can
automatically change its appearance when you switch themes or Quick Style sets.
The top layer is direct formatting. If you select a word and apply the standard red
color to it, the word remains red no matter what theme, Quick Style set, or style you
apply to it.
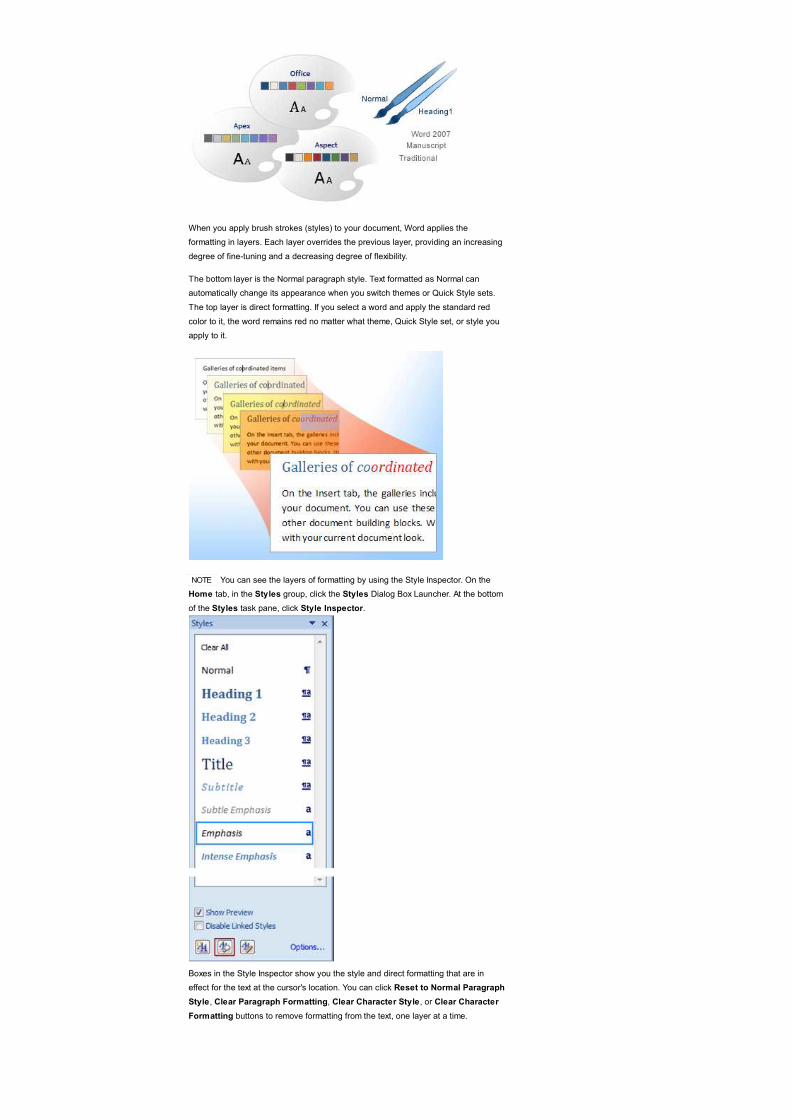
NOTE You can see the layers of formatting by using the Style Inspector. On the
Home tab, in the Styles group, click the Styles Dialog Box Launcher. At the bottom
of the Styles task pane, click Style Inspector.
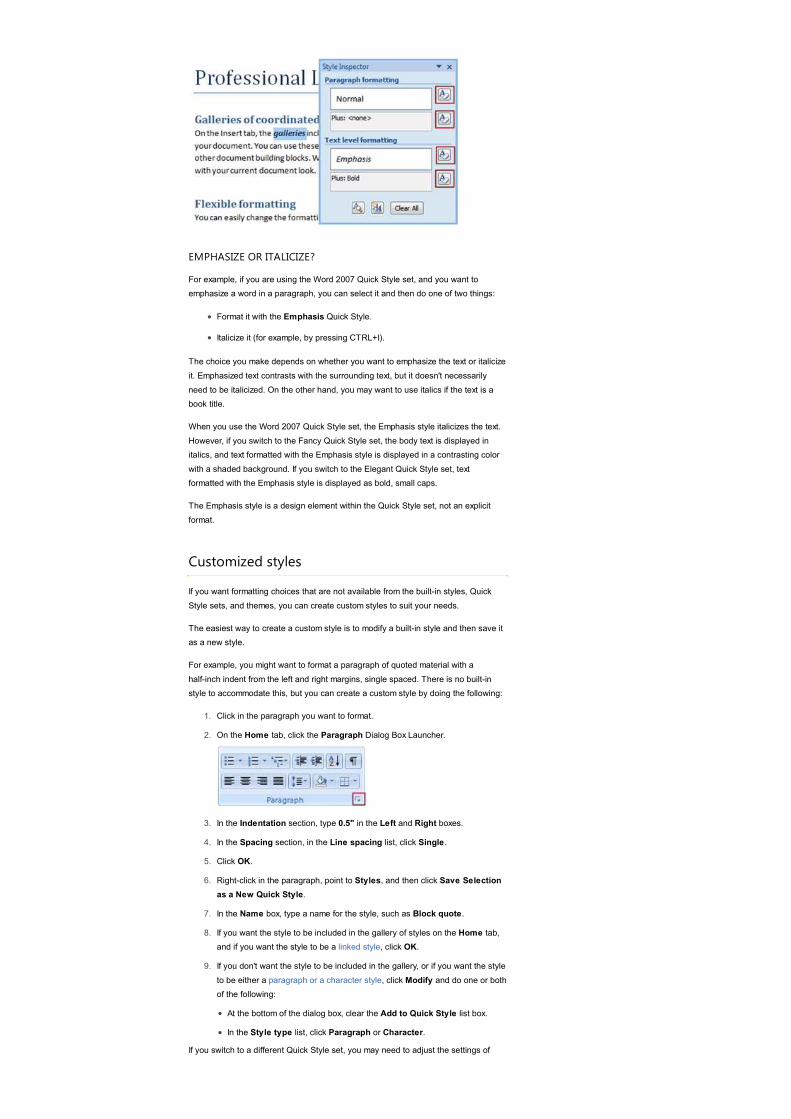
Boxes in the Style Inspector show you the style and direct formatting that are in
effect for the text at the cursor's location. You can click Reset to Normal Paragraph
Style, Clear Paragraph Formatting, Clear Character Style, or Clear Character
Formatting buttons to remove formatting from the text, one layer at a time.
EMPHASIZE OR ITALICIZE?
For example, if you are using the Word 2007 Quick Style set, and you want to
emphasize a word in a paragraph, you can select it and then do one of two things:
Format it with the Emphasis Quick Style.
Italicize it (for example, by pressing CTRL+I).
The choice you make depends on whether you want to emphasize the text or italicize
it. Emphasized text contrasts with the surrounding text, but it doesn't necessarily
need to be italicized. On the other hand, you may want to use italics if the text is a
book title.
When you use the Word 2007 Quick Style set, the Emphasis style italicizes the text.
However, if you switch to the Fancy Quick Style set, the body text is displayed in
italics, and text formatted with the Emphasis style is displayed in a contrasting color
with a shaded background. If you switch to the Elegant Quick Style set, text
formatted with the Emphasis style is displayed as bold, small caps.
The Emphasis style is a design element within the Quick Style set, not an explicit
format.
Customized styles
If you want formatting choices that are not available from the built-in styles, Quick
Style sets, and themes, you can create custom styles to suit your needs.
The easiest way to create a custom style is to modify a built-in style and then save it
as a new style.
For example, you might want to format a paragraph of quoted material with a
half-inch indent from the left and right margins, single spaced. There is no built-in
style to accommodate this, but you can create a custom style by doing the following:
Click in the paragraph you want to format.1.
On the Home tab, click the Paragraph Dialog Box Launcher.2.
In the Indentation section, type 0.5" in the Left and Right boxes.3.
In the Spacing section, in the Line spacing list, click Single.4.
Click OK.5.
Right-click in the paragraph, point to Styles, and then click Save Selection
as a New Quick Style.
6.
In the Name box, type a name for the style, such as Block quote.7.
If you want the style to be included in the gallery of styles on the Home tab,
and if you want the style to be a linked style, click OK.
8.
If you don't want the style to be included in the gallery, or if you want the style
to be either a paragraph or a character style, click Modify and do one or both
of the following:
9.
At the bottom of the dialog box, clear the Add to Quick Style list box.
In the Style type list, click Paragraph or Character.
If you switch to a different Quick Style set, you may need to adjust the settings of
your custom style. In the example here, if you create the Block quote style while the
Word 2007 Quick Style set is applied, and then you switch to the Traditional Quick
Style set, you can change the Block quote style to remove the first-line indentation
that the Traditional Quick Style set introduces. To change a style, do the following:
On the Home tab in the Styles group, right-click Block quote, and then
click Modify.
1.
Click Format, and then click Paragraph.2.
In the Indentation section, in the Special list, click (none).3.
The more characteristics that you specify for the style, the less the style is affected
by switching Quick Style sets or themes.
© 2011 Microsoft Corporation. All rights reserved.