STUPS DocumentationSTUPS Documentation, Release SNAPSHOT The STUPS platform is a set of tools and...
117
STUPS Documentation Release SNAPSHOT Zalando SE Sep 19, 2019
Transcript of STUPS DocumentationSTUPS Documentation, Release SNAPSHOT The STUPS platform is a set of tools and...

STUPS DocumentationRelease SNAPSHOT
Zalando SE
Sep 19, 2019


Contents
1 Introduction 31.1 What is STUPS? . . . . . . . . . . . . . . . . . . . . . . . . . . . . . . . . . . . . . . . . . . . . . 31.2 Why STUPS? . . . . . . . . . . . . . . . . . . . . . . . . . . . . . . . . . . . . . . . . . . . . . . . 4
2 Installation Guide 72.1 AWS - Account Setup . . . . . . . . . . . . . . . . . . . . . . . . . . . . . . . . . . . . . . . . . . 72.2 Account Configuration . . . . . . . . . . . . . . . . . . . . . . . . . . . . . . . . . . . . . . . . . . 82.3 Taupage AMI Creation . . . . . . . . . . . . . . . . . . . . . . . . . . . . . . . . . . . . . . . . . . 92.4 Service Deployments . . . . . . . . . . . . . . . . . . . . . . . . . . . . . . . . . . . . . . . . . . . 9
3 User’s Guide 153.1 Local Setup . . . . . . . . . . . . . . . . . . . . . . . . . . . . . . . . . . . . . . . . . . . . . . . . 153.2 Hello world / Walkthrough . . . . . . . . . . . . . . . . . . . . . . . . . . . . . . . . . . . . . . . . 163.3 Application Development . . . . . . . . . . . . . . . . . . . . . . . . . . . . . . . . . . . . . . . . 193.4 Key Encryption . . . . . . . . . . . . . . . . . . . . . . . . . . . . . . . . . . . . . . . . . . . . . . 213.5 Deployment . . . . . . . . . . . . . . . . . . . . . . . . . . . . . . . . . . . . . . . . . . . . . . . 223.6 SSH Access . . . . . . . . . . . . . . . . . . . . . . . . . . . . . . . . . . . . . . . . . . . . . . . 253.7 Access Control . . . . . . . . . . . . . . . . . . . . . . . . . . . . . . . . . . . . . . . . . . . . . . 273.8 AWS API . . . . . . . . . . . . . . . . . . . . . . . . . . . . . . . . . . . . . . . . . . . . . . . . . 343.9 Databases . . . . . . . . . . . . . . . . . . . . . . . . . . . . . . . . . . . . . . . . . . . . . . . . . 363.10 Storage . . . . . . . . . . . . . . . . . . . . . . . . . . . . . . . . . . . . . . . . . . . . . . . . . . 393.11 Monitoring . . . . . . . . . . . . . . . . . . . . . . . . . . . . . . . . . . . . . . . . . . . . . . . . 403.12 Maintenance . . . . . . . . . . . . . . . . . . . . . . . . . . . . . . . . . . . . . . . . . . . . . . . 413.13 Troubleshooting . . . . . . . . . . . . . . . . . . . . . . . . . . . . . . . . . . . . . . . . . . . . . 433.14 Standalone Deployment . . . . . . . . . . . . . . . . . . . . . . . . . . . . . . . . . . . . . . . . . 453.15 A hello world GPU example . . . . . . . . . . . . . . . . . . . . . . . . . . . . . . . . . . . . . . . 50
4 Components 534.1 berry . . . . . . . . . . . . . . . . . . . . . . . . . . . . . . . . . . . . . . . . . . . . . . . . . . . 534.2 even . . . . . . . . . . . . . . . . . . . . . . . . . . . . . . . . . . . . . . . . . . . . . . . . . . . . 544.3 fullstop. . . . . . . . . . . . . . . . . . . . . . . . . . . . . . . . . . . . . . . . . . . . . . . . . . . 554.4 Kio . . . . . . . . . . . . . . . . . . . . . . . . . . . . . . . . . . . . . . . . . . . . . . . . . . . . 594.5 Mai . . . . . . . . . . . . . . . . . . . . . . . . . . . . . . . . . . . . . . . . . . . . . . . . . . . . 594.6 mint . . . . . . . . . . . . . . . . . . . . . . . . . . . . . . . . . . . . . . . . . . . . . . . . . . . . 604.7 odd . . . . . . . . . . . . . . . . . . . . . . . . . . . . . . . . . . . . . . . . . . . . . . . . . . . . 624.8 Pier One . . . . . . . . . . . . . . . . . . . . . . . . . . . . . . . . . . . . . . . . . . . . . . . . . 624.9 Più . . . . . . . . . . . . . . . . . . . . . . . . . . . . . . . . . . . . . . . . . . . . . . . . . . . . 64
i

4.10 Senza . . . . . . . . . . . . . . . . . . . . . . . . . . . . . . . . . . . . . . . . . . . . . . . . . . . 654.11 Seven Seconds . . . . . . . . . . . . . . . . . . . . . . . . . . . . . . . . . . . . . . . . . . . . . . 754.12 Taupage . . . . . . . . . . . . . . . . . . . . . . . . . . . . . . . . . . . . . . . . . . . . . . . . . . 764.13 YOUR TURN . . . . . . . . . . . . . . . . . . . . . . . . . . . . . . . . . . . . . . . . . . . . . . 964.14 Zign . . . . . . . . . . . . . . . . . . . . . . . . . . . . . . . . . . . . . . . . . . . . . . . . . . . . 108
5 Appendix 1115.1 Docker Base Images . . . . . . . . . . . . . . . . . . . . . . . . . . . . . . . . . . . . . . . . . . . 1115.2 OAuth Integrations . . . . . . . . . . . . . . . . . . . . . . . . . . . . . . . . . . . . . . . . . . . . 1115.3 Appliances . . . . . . . . . . . . . . . . . . . . . . . . . . . . . . . . . . . . . . . . . . . . . . . . 112
6 Indices and tables 113
ii
STUPS Documentation, Release SNAPSHOT
The STUPS platform is a set of tools and components to provide a convenient and audit-compliant Platform-as-a-Service (PaaS) for multiple autonomous teams on top of Amazon Web Services (AWS).
Looking for our STUPS open source repositories? Check out https://github.com/zalando-stups .
Contents:
Contents 1

STUPS Documentation, Release SNAPSHOT
2 Contents
CHAPTER 1
Introduction
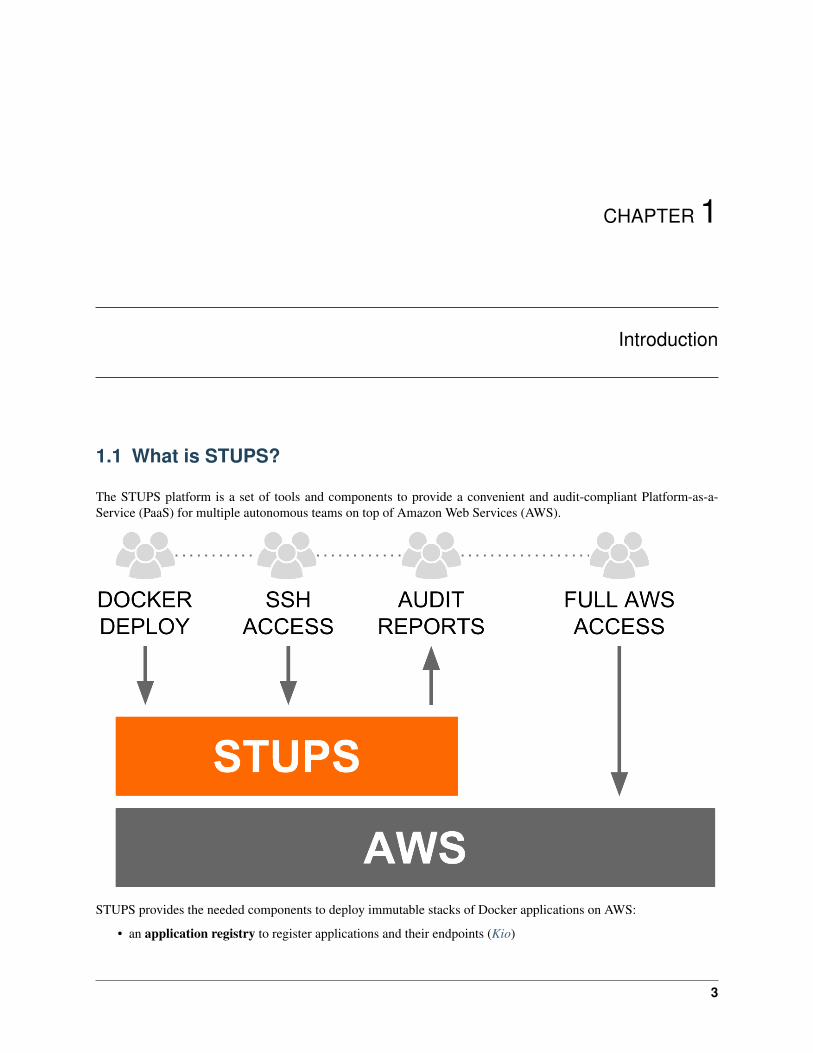
1.1 What is STUPS?
The STUPS platform is a set of tools and components to provide a convenient and audit-compliant Platform-as-a-Service (PaaS) for multiple autonomous teams on top of Amazon Web Services (AWS).
STUPS provides the needed components to deploy immutable stacks of Docker applications on AWS:
• an application registry to register applications and their endpoints (Kio)
3

STUPS Documentation, Release SNAPSHOT
• a private Docker registry to push deployment artifacts to (Pier One)
• a CLI tool to create temporary AWS credentials when using federated SAML logins (Mai)
• an AWS account configuration tool to set up team AWS accounts consistently (Seven Seconds)
• a base Amazon Machine Image (AMI) to run Docker containers in a safe and audit-compliant way (Taupage)
• a developer console UI to register and browse applications (YOUR TURN)
• tools to grant team members SSH access to EC2 instances in an audit-compliant way (Più and even & odd)
• a best practice CLI tool to deploy immutable application stacks using AWS CloudFormation (Senza)
• a reporting component to ensure compliance and transparency across all AWS team accounts (fullstop.)
• a framework for OAuth integration via secret distribution (mint & berry)
1.2 Why STUPS?
STUPS was created with a specific organization setup in mind:
• teams are first class citizens in the organization
• teams are self-organized
• all team members have equal rights
• teams are autonomous and can choose technologies as they think fit
• “team” is the main entity for ownership and security boundaries
This leads to choosing the one AWS account per team setup, because:
• AWS IAM policies do not properly constrain teams to only their resources in one big AWS account1
• AWS service limits do not allow independent teams to work isolated in one big AWS account2
This setup requires tooling to foster team autonomy while complying with company regulations:
• multiple AWS accounts need to be easily manageable
• compliance rules dictate that all changes to production systems need to be audited (“traceability”)
• applications need to have a secure way of communicating with each other across AWS accounts
The STUPS platform was created to facilitate the one AWS account per team setup and make the setup audit com-pliant:
• multiple AWS accounts can be configured by a single tool (Seven Seconds)
• transparency across AWS accounts is provided by a reporting tool (fullstop.)
• traceability of changes is ensured
• by using a standard way of deploying via Docker (Pier One, Taupage and Senza)
• by logging all human SSH access (even & odd)
• applications are secured via OAuth (mint & berry)
1 Not all AWS services/products are properly integrated with IAM, e.g. the Elastic Load Balancing (ELB) service only allows global grantingof ELB creation.
2 Team B might hit AWS service limits for production applications because team A spun up too many instances for performance testing.
4 Chapter 1. Introduction

STUPS Documentation, Release SNAPSHOT
1.2.1 Traceability
How to trace software changes from a running EC2 instance back to the specification:
• The running EC2 instance (running Taupage AMI) can be queried for its user data.
• The Taupage user data YAML contains the Docker image (immutable in Pier One) and the application ID
• The Docker image contains the SCM source information via scm-source.json. Pier One provides a specialREST endpoint to retrieve the SCM source information for any conforming Docker image.
• The Kio application registry contains either the specification for the application directly or the used ticket system.
• The SCM commit references specification tickets from the configured ticket system (if a ticket system is used)
1.2. Why STUPS? 5

STUPS Documentation, Release SNAPSHOT
6 Chapter 1. Introduction

CHAPTER 2
Installation Guide
How to install and configure the STUPS platform.
2.1 AWS - Account Setup
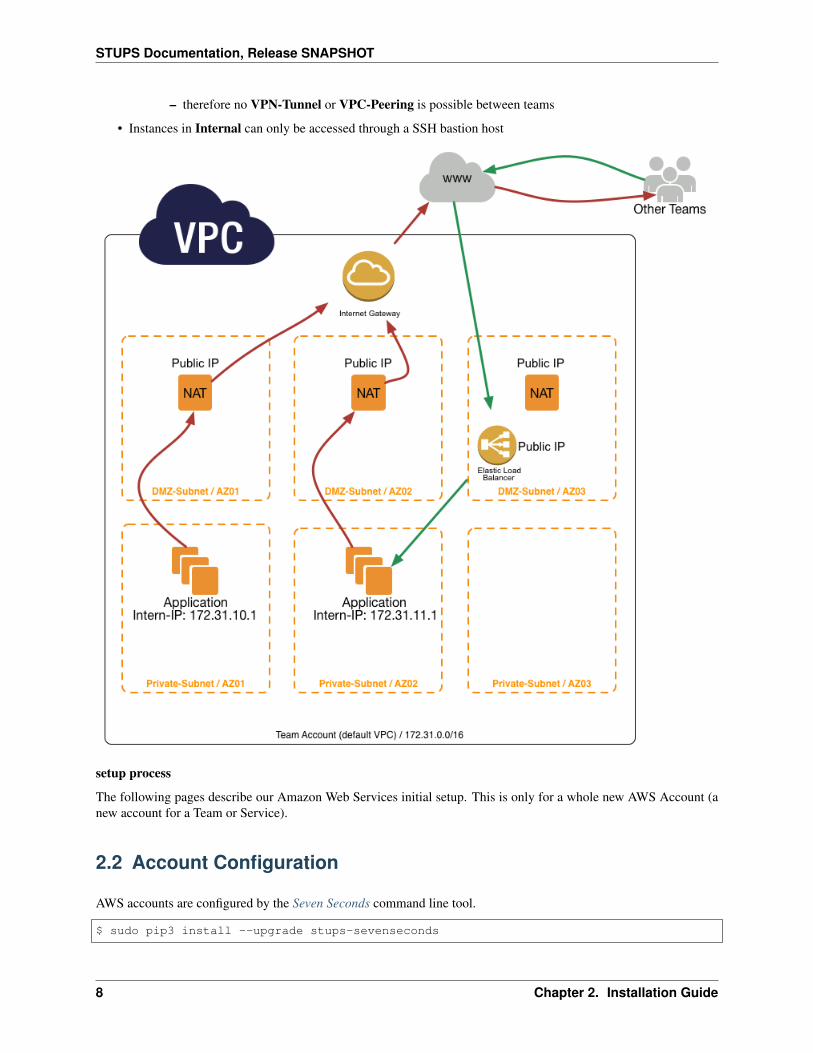
Our AWS VPC Account Setup
Attention: Nearly everything is public. Services have to communicate over secure transport layer (HTTPS, SSL,SSH etc.)
Take care of your Security Groups in the public DMZ subnets.
Only the public “DMZ” subnets have a direct connection to the internet. The communication with other teams isonly possible over the internet. Instances in a Private subnet can only talk to the internet via a NAT-Instance. TheNAT-instances are in multiple Availability Zones (AZ), therefore every PRIVATE SUBNET can communicate to theInternet.
If a Team want to talk to another Team they have to do this from the PRIVATE SUBNET over the Internet. Becauseonly the private subnet has the Elastic IP’s for outgoing traffic. The other Team can grant access to this IP’s, forexample in a Security Group of a ELB (Elastic Loadbalancer)
Main Points
• Communication between teams goes over the public network
• NAT-Instances get Elastic IP’s
– every team got 3 Public IP’s to communicate to the Internet
– Other Teams can use these IP’s to grant access to their Instances (mostly ELB)
• We will setup 2 different types of subnets DMZ and Internal
• Every Team got the same default Network 172.31.0.0/16
7
STUPS Documentation, Release SNAPSHOT
– therefore no VPN-Tunnel or VPC-Peering is possible between teams
• Instances in Internal can only be accessed through a SSH bastion host
setup process
The following pages describe our Amazon Web Services initial setup. This is only for a whole new AWS Account (anew account for a Team or Service).
2.2 Account Configuration
AWS accounts are configured by the Seven Seconds command line tool.
$ sudo pip3 install --upgrade stups-sevenseconds
8 Chapter 2. Installation Guide
STUPS Documentation, Release SNAPSHOT
2.2.1 Minimal Account Configuration
First you need to put your root access key credentials into ~/.aws/credentials for initial account configuration.
Next copy the minimal example configuration file to a new location and edit it:
$ git clone [email protected]:zalando-stups/sevenseconds.git$ cp sevenseconds/examples/example-minimal-configuration.yaml myconfig.yaml$ vim myconfig.yaml
Now run Seven Seconds on your new AWS account:
$ sevenseconds configure myconfig.yaml myaccount
2.2.2 Configuring Multiple Accounts
Seven Seconds can update all AWS team accounts one after each other:
$ sevenseconds configure --saml-user [email protected] configuration.yaml '*'
2.3 Taupage AMI Creation
How to build a new private Taupage AMI.
$ git clone [email protected]:zalando-stups/taupage.git$ mkdir my-taupage-config$ cp -r taupage/secret my-taupage-config$ cp taupage/config-stups-example.sh my-taupage-config/config-stups.sh
Generate a new SSH keypair to be used for the “granting-service” user. Store the private SSH key in a safe place (youwill need it later for deploying the “even” SSH access granting service, see how to deploy even). Copy the public SSHkey into my-taupage-config/secret/ssh-access-granting-service.pub.
Edit the example configuration files as needed:
$ vim my-taupage-config/config-stups.sh$ # edit my-taupage-config/secret/* files
Build a new Taupage AMI:
$ cd taupage$ ./create-ami.sh ../my-taupage-config/config-stups.sh
2.4 Service Deployments
How to deploy the STUPS infrastructure service components.
Note: We will assume you are using a dedicated AWS account for the STUPS infrastructure components with thehosted zone stups.example.org. You may also deploy the STUPS infrastructure components into different accounts;please change the URLs according to your setup.
2.3. Taupage AMI Creation 9
STUPS Documentation, Release SNAPSHOT
You will need the STUPS and AWS command line tools in order to install the STUPS infrastructure services:
$ sudo pip3 install --upgrade stups awscli
As the service components depend on each other, you will have to deploy them in a certain order:
• the OAuth2 Provider is required (at least indirectly) by all other services, so set it up first
• the Token Service is used by the Taupage base AMI
• the Team Service is used by all services implementing team permissions (e.g. even and Pier One)
• the User Service is required by the “even” SSH access granting service
• even allows SSH access for troubleshooting, so deploy it before the remaining services
• Pier One is used to store all Docker images, so deploy it next
• TODO: when to bootstrap “mint” and OAuth2 credentials?
2.4.1 OAuth2 Provider
Setting up the OAuth2 provider is highly vendor specific, please refer to your OAuth2 provider’s manual.
We provide a mock OAuth2 authorization server.
2.4.2 Token Service
The Token Service is a proxy to allow getting OAuth2 access tokens without client credentials.
TODO
We provide a simple mock Token Service.
Try out the Token Service with Zign:
$ zign token
2.4.3 Team Service
The Team Service allows getting team membership information. This is used by various components to restrict accessto the user’s own team(s).
We provide a simple mock Team Service.
Try out the Team Service with curl:
$ tok=$(zign token uid)$ curl -H "Authorization: Bearer $tok" https://team-service.stups.example.org/teams[{..}, ..]$ curl -H "Authorization: Bearer $tok" https://team-service.stups.example.org/user/→˓jdoe[{..}, ..]
10 Chapter 2. Installation Guide

STUPS Documentation, Release SNAPSHOT
2.4.4 User Service
The User Service acts as a SSH public key provider for the “even” SSH access granting service.
You can setup your own SSH public key provider by running a HTTP service which allows downloading OpenSSHpublic keys (suitably formatted for the authorized_keys file) by a simple GET request to an URL containing theuser’s ID (e.g. /users/{user}/ssh).
Try out the SSH public key endpoint with an existing user:
$ tok=$(zign token uid)$ curl -H "Authorization: Bearer $tok" https://user-service.stups.example.org/→˓employees/jdoe/sshssh-rsa AAAAB3NzaC1yc2EAAAABIwAAA..
2.4.5 even
The even service allows getting SSH access to any team server.
Create a new internal PostgreSQL cluster in RDS and create the “even” database.
Create the necessary security groups and IAM role by running “senza init”:
$ senza init even.yaml # we will overwrite even.yaml later anyway
Copy example Senza definition YAML and change the URLs to point to your IAM services.
$ wget -O even.yaml https://raw.githubusercontent.com/zalando-stups/even/master/→˓example-senza-definition.yaml$ vim even.yaml
Create a new KMS key for “even” and give the app-even IAM role permissions to use the KMS key. Encrypt theprivate SSH key of the “granting-service” Taupage user with KMS and put the cipher text (prefixed with “aws:kms:”)into even.yaml.
$ privkey=$(cat ~/.ssh/ssh-access-granting-service) # use the key generated when→˓building Taupage$ aws kms encrypt --key-id 123 --plaintext "$privkey" # encrypt with KMS
Deploy.
$ senza create even.yaml 1 $LATEST_VER
Try out the SSH granting service with Più.
2.4.6 Pier One
Pier One is STUPS’ Docker registry.
Create a new S3 bucket (e.g. exampleorg-stups-pierone-eu-west-1) to store the Docker images in.
Create a new internal PostgreSQL cluster in RDS with its own app-pierone-db security group and create the“pierone” database.
Create the necessary security groups and IAM role by running “senza init”:
2.4. Service Deployments 11

STUPS Documentation, Release SNAPSHOT
$ senza init pierone.yaml # we will overwrite pierone.yaml later anyway
Give the app-pierone security access to the RDS database (app-pierone-db security group).
Copy the example Senza definition YAML and change the bucket name and DB_SUBNAME.
$ wget -O pierone.yaml https://raw.githubusercontent.com/zalando-stups/pierone/master/→˓example-senza-definition.yaml$ vim pierone.yaml
Give the IAM role app-pierone write access to your S3 bucket. The IAM policy might look like:
{"Version": "2012-10-17","Statement": [
{"Sid": "AllowStoringDockerImages","Effect": "Allow","Action": [
"s3:ListBucket","s3:GetObject","s3:PutObject"
],"Resource": [
"arn:aws:s3:::exampleorg-stups-pierone-eu-west-1","arn:aws:s3:::exampleorg-stups-pierone-eu-west-1/*"
]}
]}
Deploy.
$ senza create pierone.yaml 1 $LATEST_VER
Try pushing a Docker image.
$ pierone login$ docker pull busybox$ docker tag busybox pierone.stups.example.org/myteam/busybox:0.1$ docker push pierone.stups.example.org/myteam/busybox:0.1
2.4.7 Kio
Kio is STUPS’ application registry.
Create a new internal PostgreSQL cluster in RDS and create the “kio” database.
Copy the example Senza definition YAML and change the DB_SUBNAME and URLs.
$ wget -O kio.yaml https://raw.githubusercontent.com/zalando-stups/kio/master/example-→˓senza-definition.yaml$ vim kio.yaml
12 Chapter 2. Installation Guide

STUPS Documentation, Release SNAPSHOT
2.4.8 essentials
TODO
2.4.9 mint Storage
TODO
2.4.10 mint Worker
TODO
2.4.11 YOUR TURN
YOUR TURN is STUPS’ developer console. It is a pure Javascript application including a very small backend.Currently it depends on the following STUPS services:
• Kio
• mint
• essentials
• Pier One
• fullstop.
You also need:
• an IAM solution that issues OAuth2 access tokens
• a team service
(See also the STUPS mocks for these.)
Copy the example Senza definition YAML and change the environment variables accordingly.
$ wget -O yourturn.yaml https://raw.githubusercontent.com/zalando-stups/yourturn/→˓master/example-senza.yaml$ vim yourturn.yaml
2.4.12 fullstop.
TODO
2.4. Service Deployments 13

STUPS Documentation, Release SNAPSHOT
14 Chapter 2. Installation Guide
CHAPTER 3
User’s Guide
How to use the STUPS platform.
3.1 Local Setup
This section describes how to set up your local machine to use the STUPS tools.
In general you will need:
• Python 3.4+
• Docker 1.11+
3.1.1 Linux
Python 3 is usually already installed on Ubuntu. You will need the PIP package manager to install STUPS tools:
$ sudo apt-get install python3-pip
Install Docker on Ubuntu according to the Docker on Ubuntu installation instructions.
Install the aws-cli
$ sudo pip3 install --upgrade awscli
Check that everything works by running:
$ python3 --version # should print Python 3.4.0 (or higher)$ docker info # should work without using sudo!
15

STUPS Documentation, Release SNAPSHOT
3.1.2 Mac
Local Environment
OS X users may need to set their locale environment to UTF-8:
# You can put these two commands in your local shell initialization script# e.g. ~/.bashrc or ~/.zshrcexport LC_ALL=en_US.utf-8export LANG=en_US.utf-8
Install Python and Docker
You can either use Homebrew or local-setup-macports to install Python 3.4 on Mac OS X.
Install Python 3 using Homebrew (pip3 already comes with this package)
$ brew install python3
Install Docker on Mac according to the Docker on Mac installation instructions, then install the aws commandlinetool.
$ brew install awscli
Check that everything works by running:
$ python3 --version # should print Python 3.4.0 (or higher)$ docker info # should work without using sudo!
3.2 Hello world / Walkthrough
Important: Please read Local Setup to make sure you installed Python and Docker correctly.
• Docker needs to be version 1.9 or higher
• Python 3.4 or higher including pip is required
• Make sure your console environment is UTF-8 (export LC_ALL=en_US.utf-8; exportLANG=en_US.utf-8)
This guide should show all steps for one sample application from birth to death. Please see the other sections in theUser’s Guide for more information about specific topics.
Install STUPS command line tools and configure them.
$ sudo pip3 install --upgrade stups$ stups configure
First of all clone this example project:
$ git clone https://github.com/zalando-stups/zalando-cheat-sheet-generator.git$ cd zalando-cheat-sheet-generator
Create this new application using the YOUR TURN web frontend:
16 Chapter 3. User’s Guide

STUPS Documentation, Release SNAPSHOT
https://yourturn.stups.example.org
Now you will need to create the scm-source.json file that links your Docker image to a specific git revision number.
$ ./generate-scm-source-json.sh
Let’s start the application and see if all works:
$ python3 -m http.server 8000http://localhost:8000/index.html?schema=schema/stups.json
Nice! Let’s build the Docker images:
Build with the Dockerfile in the repo.
$ docker build -t pierone.stups.example.org/<your-team>/zalando-cheat-sheet-→˓generator:0.1 .
And now see if it is listed locally:
$ docker images
Let’s also try if the docker images works!
$ docker run -p 8000:8000 -it pierone.stups.example.org/<your-team>/zalando-cheat-→˓sheet-generator:0.1# and test with this url: http://localhost:8000/index.html?schema=schema/stups.json
If all works, we are ready to login in Pier One and push it.
$ pierone login$ docker push pierone.stups.example.org/<your-team>/zalando-cheat-sheet-generator:0.1
Let’s check if we can find it in the Pier One repository (login needed if your token expired):
$ pierone login$ pierone tags <your-team> zalando-cheat-sheet-generator
Configure your application’s mint bucket (click on the “Access Control” button on your app’s page in YOUR TURN).
This will trigger the mint worker to write your app credentials to your mint bucket.
List AWS account:
$ mai list
Login via console to your AWS account:
$ mai login <account-name>
Wait for the first credentials to appear:
$ aws s3 ls s3://mint-example-bucket# there should be a new folder for your application
Deploy!
Create a Senza definition file for that (using the region you are on):
3.2. Hello world / Walkthrough 17
STUPS Documentation, Release SNAPSHOT
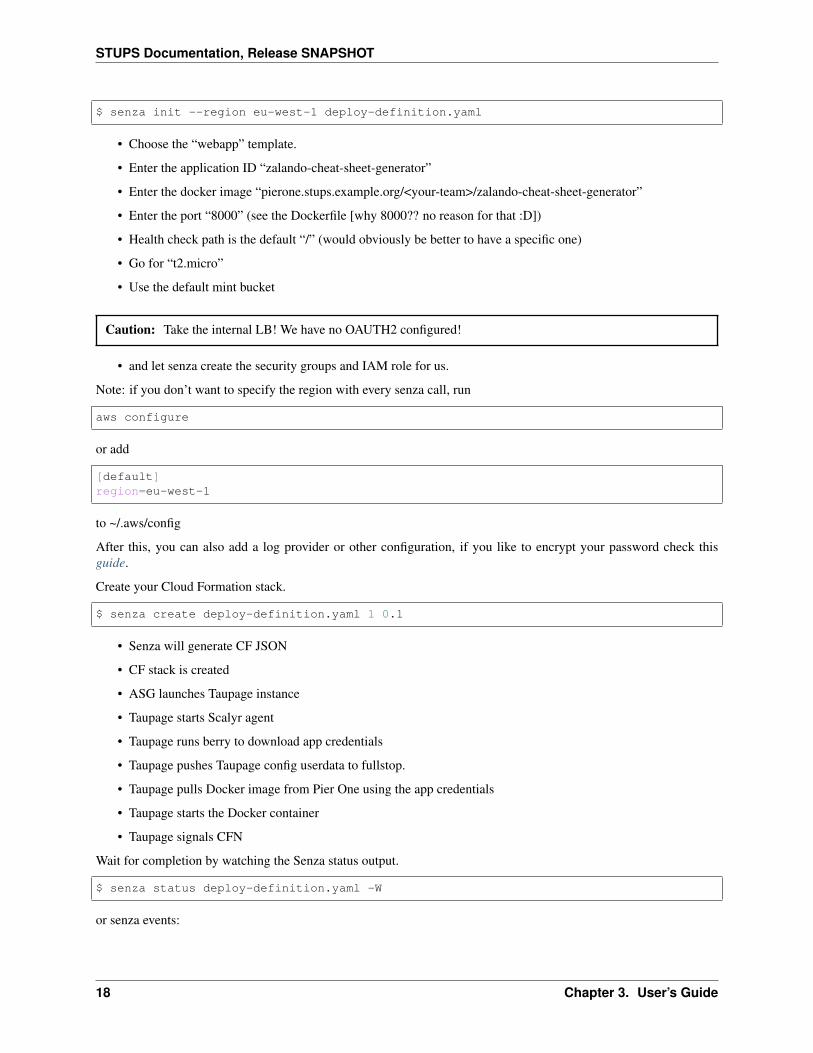
$ senza init --region eu-west-1 deploy-definition.yaml
• Choose the “webapp” template.
• Enter the application ID “zalando-cheat-sheet-generator”
• Enter the docker image “pierone.stups.example.org/<your-team>/zalando-cheat-sheet-generator”
• Enter the port “8000” (see the Dockerfile [why 8000?? no reason for that :D])
• Health check path is the default “/” (would obviously be better to have a specific one)
• Go for “t2.micro”
• Use the default mint bucket
Caution: Take the internal LB! We have no OAUTH2 configured!
• and let senza create the security groups and IAM role for us.
Note: if you don’t want to specify the region with every senza call, run
aws configure
or add
[default]region=eu-west-1
to ~/.aws/config
After this, you can also add a log provider or other configuration, if you like to encrypt your password check thisguide.
Create your Cloud Formation stack.
$ senza create deploy-definition.yaml 1 0.1
• Senza will generate CF JSON
• CF stack is created
• ASG launches Taupage instance
• Taupage starts Scalyr agent
• Taupage runs berry to download app credentials
• Taupage pushes Taupage config userdata to fullstop.
• Taupage pulls Docker image from Pier One using the app credentials
• Taupage starts the Docker container
• Taupage signals CFN
Wait for completion by watching the Senza status output.
$ senza status deploy-definition.yaml -W
or senza events:
18 Chapter 3. User’s Guide
STUPS Documentation, Release SNAPSHOT
$ senza events deploy-definition.yaml 1 -W
Important: In case of error go to your log provider, if you did not configure it. Go in aws, EC2 service, find yourinstance, right click, Instance Settings, Get System Log
Test stack.
$ curl -v http://<address>:8000/index.html?schema=schema/stups.json
Important: This will not work! Because of the missing OAUTH2 we have created an internal LB. To test it we willneed to follow the same guide as for a DB connection and than try again.
Get instance IP and use it in the ssh call below:
$ senza instances zalando-cheat-sheet-generator
Let us Più to the odd bastion host:
$ piu odd-eu-west-1.<your-team>.example.org "test zalando-cheat-sheet-generator→˓application"
$ ssh -L 63333:<ip-address>:8000 odd-eu-west-1.<your-team>.example.org
Now you can test via curl or browser:
$ curl -v http://localhost:63333/index.html?schema=schema/stups.json
Route 100% traffic to your new stack version 1.
$ senza traffic zalando-cheat-sheet-generator 1 100
Shut down the stack.
$ senza delete zalando-cheat-sheet-generator 1
3.3 Application Development
To be written. . .
• Applications should be developed as microservices which focus on small tasks.
• Applications should follow the Twelve-Factor App Principle.
• Application APIs should be RESTful
• Applications must be deployed as Docker artifacts
3.3.1 Docker
• Use one the existing Docker Base Images.
• Use Docker environment variables (-e KEY=val) for static configuration (e.g. database connection)
3.3. Application Development 19

STUPS Documentation, Release SNAPSHOT
• Log to STDOUT and rely on the host system to do log shipping
• Do not mutate Docker tags, i.e. treat all Docker tags (“versions”) as immutable and always push a new tag for anew application version (immutable tags are enforced by the Pier One registry)
3.3.2 scm-source.json
The final application deployment artifact (Docker image) must contain a scm-source.json file in the root direc-tory. This meta file is in JSON format and must reference the SCM source location the Docker image was built from.The JSON file should contain a single JSON dictionary with the following keys:
url The SCM URL in the format <SCM-PROVIDER>:<PROVIDER-SPECIFIC-REPO-LOCATION>.
revision The SCM revision, e.g. the full git commit sha1. The revision should end with the marker text ” (locallymodified)” for unclean working directories. This marker text ensures that no exact match for such revisions canbe found in the remote SCM repository.
author Name of the file’s author. The author is responsible for the correctness of the file’s contents.
status Optional SCM working directory status information. Might contain git status output for example.
Example:
{"url": "git:[email protected]:zalando/bastion-host.git","revision": "cd768599e1bb41c38279c26254feff5cf57bf967","author": "hjacobs","status": ""
}
An example implementation on how to generate the scm-source.json file with Bash:
#!/bin/bashREV=$(git rev-parse HEAD)URL=$(git config --get remote.origin.url)STATUS=$(git status --porcelain)if [ -n "$STATUS" ]; then
REV="$REV (locally modified)"fi# finally write hand-crafted JSON to scm-source.jsonecho '{"url": "git:'$URL'", "revision": "'$REV'", "author": "'$USER'", "status": "'→˓$STATUS'"}' > scm-source.json
There is a simple scm-source Python command line script available on PyPI to make it more convenient:
$ sudo pip3 install -U scm-source$ scm-source # generate scm-source.json in current directory
There are also plugins for Leiningen and Node that can automatically generate this file for you.
3.3.3 Logging
Applications should log to STDOUT. The runtime environment (Taupage) will do appropriate log shipping to a centrallog UI provider. Application logs must not contain any personal and/or sensitive information such as customer data,credentials or similar.
20 Chapter 3. User’s Guide
STUPS Documentation, Release SNAPSHOT
3.4 Key Encryption
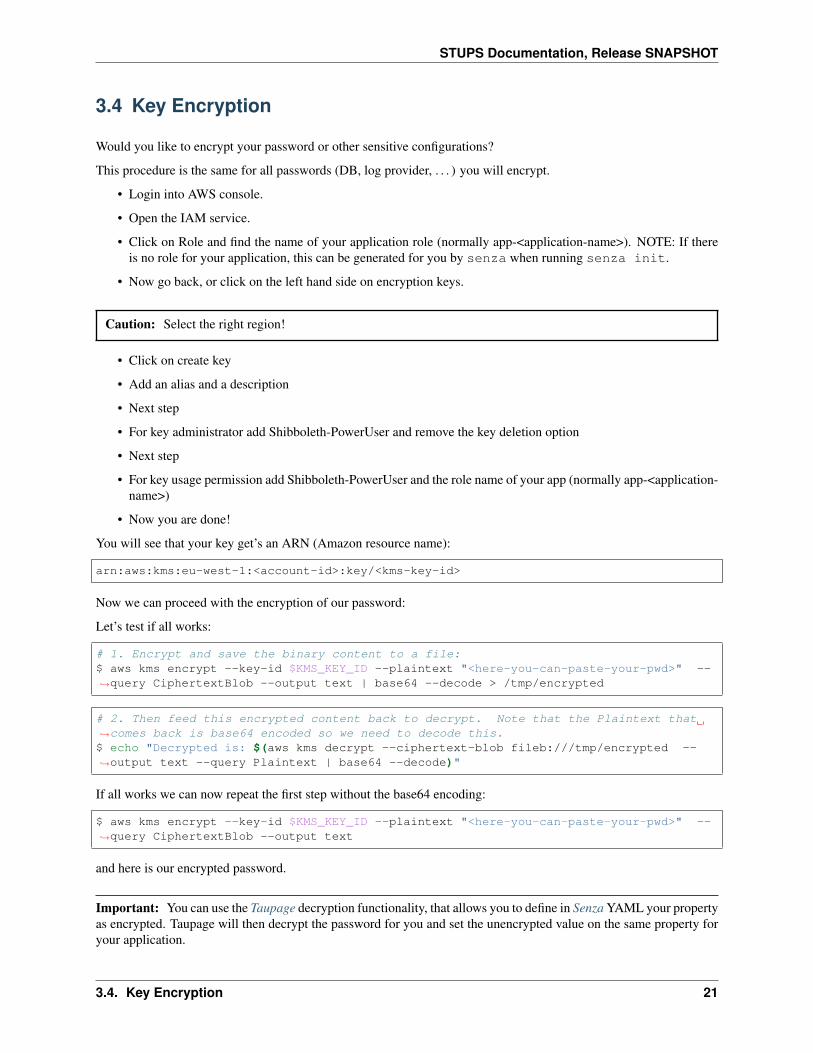
Would you like to encrypt your password or other sensitive configurations?
This procedure is the same for all passwords (DB, log provider, . . . ) you will encrypt.
• Login into AWS console.
• Open the IAM service.
• Click on Role and find the name of your application role (normally app-<application-name>). NOTE: If thereis no role for your application, this can be generated for you by senza when running senza init.
• Now go back, or click on the left hand side on encryption keys.
Caution: Select the right region!
• Click on create key
• Add an alias and a description
• Next step
• For key administrator add Shibboleth-PowerUser and remove the key deletion option
• Next step
• For key usage permission add Shibboleth-PowerUser and the role name of your app (normally app-<application-name>)
• Now you are done!
You will see that your key get’s an ARN (Amazon resource name):
arn:aws:kms:eu-west-1:<account-id>:key/<kms-key-id>
Now we can proceed with the encryption of our password:
Let’s test if all works:
# 1. Encrypt and save the binary content to a file:$ aws kms encrypt --key-id $KMS_KEY_ID --plaintext "<here-you-can-paste-your-pwd>" --→˓query CiphertextBlob --output text | base64 --decode > /tmp/encrypted
# 2. Then feed this encrypted content back to decrypt. Note that the Plaintext that→˓comes back is base64 encoded so we need to decode this.$ echo "Decrypted is: $(aws kms decrypt --ciphertext-blob fileb:///tmp/encrypted --→˓output text --query Plaintext | base64 --decode)"
If all works we can now repeat the first step without the base64 encoding:
$ aws kms encrypt --key-id $KMS_KEY_ID --plaintext "<here-you-can-paste-your-pwd>" --→˓query CiphertextBlob --output text
and here is our encrypted password.
Important: You can use the Taupage decryption functionality, that allows you to define in Senza YAML your propertyas encrypted. Taupage will then decrypt the password for you and set the unencrypted value on the same property foryour application.
3.4. Key Encryption 21

STUPS Documentation, Release SNAPSHOT
To do that define the value in the YAML as:
my_secret: "aws:kms:<here-the-encryption-result>"
3.5 Deployment
The Senza command line tools allows deploying application stacks. This page will guide you through the stepsnecessary to deploy a Docker-based application with Senza.
Senza was primarily designed to deploy immutable stacks of web applications:
Each immutable stack (application version) is a Cloud Formation stack with a load balancer (ELB), an auto scalinggroup and a versioned DNS domain. Traffic can be routed to different application versions by changing DNS weightsin Route53.
Deploying a new immutable application stack generally involves:
• building your application artifact (e.g. uber jar)
• creating a Docker image
• pushing the Docker image to the Pier One Docker registry
• creating the Cloud Formation stack with Senza (senza create)
• routing traffic to the new stack (senza traffic)
22 Chapter 3. User’s Guide

STUPS Documentation, Release SNAPSHOT
3.5.1 Prerequisites
First install Python 3.4 on your PC (Ubuntu 14.04 already has it installed, use Homebrew on Mac).
Note: OS X users may need to set their locale environment to UTF-8 with:
export LC_ALL=en_US.utf-8export LANG=en_US.utf-8
Please check the section Local Setup for details regarding installing necessary packages.
All required STUPS command line tools can be conveniently installed from PyPI using PIP:
$ sudo pip3 install --upgrade stups
If your STUPS administrator has set up autoconfig, all CLI tools should get configured with a single command:
$ stups configure
Otherwise, you will need the following information at hand:
• Pier One Docker registry URL (we will use https://pierone.stups.example.org here)
• SAML identity provider URL (for federated AWS login with Mai)
– your SAML username and password
• OAuth Token service URL (to acquire OAuth tokens, e.g. for Pier One)
– your OAuth realm’s username and password
3.5.2 Prepare the deployment artifact
First deploy the application’s artifact (Docker image) to Pier One, e.g.:
$ cd myapp # enter your application's source folder$ # please remember to generate the "scm-source.json",$ # which must be in your Docker image!$ docker build -t pierone.stups.example.org/myteam/myapp:0.1 .$ pierone login # login to Pier One using OAuth$ docker push pierone.stups.example.org/myteam/myapp:0.1
3.5.3 Create a new Senza definition
In order to call AWS endpoints and to create the Cloud Formation stack, we need to login with Mai:
$ mai create myteam # create a new profile (if you haven't done so)$ mai # login
Next you need to create a new Senza deployment definition YAML file. This can be done conveniently with the senzainit command:
$ senza init myapp.yaml
3.5. Deployment 23

STUPS Documentation, Release SNAPSHOT
Note: We assume you have your default AWS region ID (e.g. “eu-west-1”) configured in ~/.aws/config,alternatively you can pass the --region option to Senza. See the AWS CLI docs for details.
senza init will guide you through a bunch of questions. Use the “webapp” template and choose the defaultanswers to get a ready-to-use hello world application. Senza will also create the necessary security groups for you.
3.5.4 Deploying your application with Senza
Now we can create the application’s Cloud Formation stack with Senza:
$ senza create myapp.yaml 1 0.1 # will create stack version "1"
Note: The last parameter is a custom parameter “ImageVersion” defined in the SenzaInfo/Parameters section of theabove definition YAML.
The stack creation will take some time, we can use the events command to monitor the progress:
$ senza events myapp.yaml 1 --watch=2
The --watch option tells Senza to refresh the display every 2 seconds until we press CTRL-C.
The “events” command will eventually show CREATE_COMPLETE for the CloudFormation::Stack resourceif everything went well.
Senza also provides a wait command to wait for the stack creation to complete successfully:
$ senza wait myapp.yaml 1
The wait command is useful for automated scripts (e.g. in delivery pipelines) to actively wait for the deployment tofinish.
Senza allows printing the EC2 instance console output to help debugging boot problems:
$ senza console myapp.yaml 1 # print last 25 lines of console output for every→˓instance$ senza console 172.31.1.2 # print last 25 lines of console output for a single→˓instance
Note: Please note that the EC2 instance console output is not a live stream, i.e. the posted output is not continuouslyupdated; only when it is “likely” to be of the most value. This includes shortly after instance boot, after reboot, andwhen the instance terminates. See Getting Console Output and Rebooting Instances in the AWS docs for details.
Read the section SSH Access on how to get shell access to your EC2 instances (if needed).
3.5.5 Routing traffic to your application
Your new application stack should be accessible via the version domain, e.g. “myapp-1.example.org”. You can usethe version domain to verify that your application is working (e.g. via automated regression tests).
Eventually you want to route “real” traffic via the main domain (e.g. “myapp.example.org”) to your new applicationstack. This can be done via Senza‘s “traffic” command:
24 Chapter 3. User’s Guide

STUPS Documentation, Release SNAPSHOT
$ senza traffic myapp.yaml 1 100 # route 100% traffic to stack version 1
Use dig to check whether the DNS settings are already updated:
$ dig myapp-1.example.org> ;; ANSWER SECTION:
myapp.exmaple.org. 20 IN CNAME myapp-1-123456789.eu-west-1.elb.amazonaws.→˓com.$ # ^ this is good, myapp.example.org redirects to myapp-1.example.org
Depending on your physical location there might be a bunch of DNS caches between you and Amazon. Since they donot update quickly you can enforce to check the AMZN DNS. Look up the address of the nameservers in your AWSaccount (Route 53 -> example.org Hosted Zone Details -> Nameservers), they look like ns-123.awsdns-55.com.
$ dig myapp-1.example.org @ns-123.awsdns-55.com
3.5.6 ASCIIcast
View the following asciicast to see how a manual deployment looks like with Pier One and Senza. Use the player’sfullscreen mode to get the full terminal width:
3.6 SSH Access
Every team member can get access to any of the team’s EC2 instances by using the Più command line tool:
$ sudo pip3 install --upgrade stups-piu$ # assumptions: region is Ireland, team name is "myteam", private EC2 instance has→˓IP "172.31.146.1"$ piu 172.31.146.1 "Troubleshoot problem XY"# enter even URL (e.g. https://even.stups.example.org)# enter odd hostname "odd-eu-west-1.myteam.example.org"$ ssh -A odd-eu-west-1.myteam.example.org # agent-forwarding must be used!$ ssh 172.31.146.1 # jump from bastion to private instance
Tip: Use the --connect flag to directly connect to the EC2 instance so you do not need to execute the SSHcommand yourself.
Tip: Use the interactive mode to experience an easy way to access instances. This mode prompts you for the AWSregion where your instance is located, so it can present you a list of enumerated deployed stacks from which you canchoose the one you want to access and provide a reason for it.
To get the most of this mode, it’s recommended that piu is invoked with the --connect flag so you get intothe instance as soon as the odd host authorizes your request: $ piu request-access --interactive--connect. Alternatively, you can set the PIU_CONNECT and PIU_INTERACTIVE environment variablesin your shell profile so you can invoke the command with the mentioned features enabled just with: $ piurequest-access.
Tip: If executing a piu command results in a message Access to host odd-eu-west-1.myteam.example.org for user <myuser> was granted., but you get an error Permission denied
3.6. SSH Access 25
STUPS Documentation, Release SNAPSHOT
(publickey)., you can solve this by installing an ssh-agent and executing ssh-add prior to piu.
Tip: Use the --clip option to copy the output of piu to your clipboard. On Linux it requires the package xclip.On OSX it works out of the box.
Tip: Use senza instances to quickly get the IP address of your EC2 instance. See the Senza reference fordetails.
Più will remember the URL of even and the hostname of odd in the local config file (~/.config/piu/piu.yamlon Linux). You can overwrite settings on the command line:
$ piu 172.31.1.1 test -O odd-eu-west-1.myotherteam.example.org
Caution: All user actions are logged for auditing reasons, therefore all SSH sessions must be kept free of anysensitive and/or personal information.
Check the asciicast how using Più looks like:
3.6.1 Copying Files
As all access to an EC2 instance has to go through the odd SSH jump host, copying files from and to the EC2 instanceappears unnecessary hard at first.
Luckily OpenSSH’s scp supports jump hosts with the ProxyCommand configuration option:
$ scp -o ProxyCommand="ssh -W %h:%p odd-eu-west-1.myteam.example.org" mylocalfile.txt→˓172.31.146.1:
See also the OpenSSH Cookbook on Proxies and Jump Hosts.
3.6.2 SSH Access Revocation
SSH access will automatically be revoked by even after the request’s lifetime (default: 60 minutes) expired. You canspecify a non-default lifetime by using Più’s -t option.
3.6.3 Listing Access Requests
The even SSH access granting service stores all access requests and their status in a database. This information isexposed via REST and can be shown using Più’s “list-access-requests” command.
All current and historic access requests can be listed on the command line:
$ piu list # list the most recent requests to my odd host$ piu list -U jdoe -O '*' # list most recent requests by user "jdoe"$ piu list -O '*' -s GRANTED # show all active access requests
26 Chapter 3. User’s Guide
STUPS Documentation, Release SNAPSHOT
3.7 Access Control
The STUPS ecosystem integrates via OAuth 2.0 into your IAM solution and also provides first-class support fordeploying applications that support OAuth 2.0. This document gives you an overview of OAuth 2.0 concepts, howthey are integrated into the STUPS ecosystem and how you integrate them into your own application.
3.7.1 OAuth 2.0 concepts
OAuth 2.0 is a security standard, that focuses on the delegation of permissions. With some conventions it can alsoprovide authentication and authorization for you. To understand OAuth, you need to understand the 4 basic roles thattake part in OAuth flows:
Resource Owner
The resource owner is typically a human (but doesn’t have to be) that owns a resource (data). The resource ownershould be the only one, who can grant access to their resources.
A typical resource owner is a customer, who is the owner of their orders in a shop. Only they should decide, who canaccess their order information. Another example is an employee who owns his/her salary information.
A resource owner is everything, that can authenticate with the authorization server. This can include other servicestoo.
Resource Server
A resource server is a service, that stores data of resource owners and has to protect them. It is typically a RESTCRUD API, that provides access to certain information. The resource server will deny every access to a resource aslong as it does not get a valid proof, that the resource owner allows the access. Resource server mostly doesn’t havemuch logic besides validation.
Client
A client is a tool or service, that a resource owner wants to use to read or modify their resources. In order to getaccess to the resource owner’s resource, the client can ask the resource owner for their consent. If the resource ownergives their consent, the client will get a proof that it can forward to the resource server in order to access the resource.Clients contain some business logic which requires access to resources. They should not require any permission checksthemselves.
3.7. Access Control 27

STUPS Documentation, Release SNAPSHOT
Authorization Server
The authorization server is the central trusted authority of your ecosystem, which can authenticate resource owners,manage the delegation process and validate that permission delegations are valid.
Roles Overview
Abstract OAuth 2.0 Flow
This is not a real flow but should give you a basic understanding of how OAuth works. In this example, a shoe searchapplication can search for shoes for a customer and add them to the customer’s wishlist. The customer is obviouslythe resource owner of her wishlist. We also have a wishlist service that stores the customer’s wishlist, which is theresource server and the shoe search application is the client who wants to store shoes on behalf of the customer.
1. The customer searches for new shoes in the show search application and finds a new pair. The customer clickson the “save in my wishlist” button.
2. The shoe search application will now redirect the customer to the customer’s authorization server with theinformation to which page to come back if the customer authorized the action. The shoe search application alsotransmits which scopes it needs. Think of scopes as “permission to access a certain set of resources” - in thiscase it transmits the “whishlist.write” scope.
3. The customer will land on the login screen of their authorization server, put in their password and agree, thatthe shoe search application can have the “wishlist.write” scope. After agreeing, the authorization server willredirect the customer back to the previously submitted page of the shoe search application, including a proof,that the customer agreed.
4. The shoe search application can now take the proof and submit it along with the “store wishlist” call to thewishlist service.
5. The wishlist service can take the submitted proof and validate it by sending it to the authorization server. If theauthorization server confirms the validity of the proof, the wishlist service can go on and store the shoe in thecustomer’s wishlist.
Which role has my application?
Actually, your application can fulfill every role. It can be a resource server, a client and also a resource owner. It isalso not unlikely, that your application fulfills multiple roles at once. For example, for service-to-service authorization,where no human can be involved, your application will be resource owner and client at once in order to create accesstokens for itself. You should always try to be a client only and only work with delegated permissions as that frees youfrom doing authorization of any kind on your own or handling credentials.
3.7.2 STUPS concepts
STUPS works with a mental model around data access control. When defining access control, you have to think aboutaccess to data instead of access to actions. This way of thinking about access control nicely aligns with RESTfulservices as you always talk about data instead of the SOAP way of thinking, where you define everything in actions.
essentials is STUPS’ microservice that stores data about all your permission. It has the notion of resource types andscopes.
28 Chapter 3. User’s Guide
STUPS Documentation, Release SNAPSHOT
Resource Types
Resource types are a categorization of your resources. A typical resource type might be a “sales order” or “creditcard”.The actual resource will then later be an actual credit card or sales order.
Resource types define, who can own resources of this type. This is typically one user group like “customers” but canalso be multiple ones like “customers” and “employees”. It is also possible to define no resource owner at all forresources, that you just cannot locate in any user group like article information about shoes.
Scopes
Scopes define the type of access permission you have to a resource. They are always bound to a resource type. You candefine scopes like “creditcard.read” and “creditcard.write”, symbolizing read or write access to credit card information.Since in the real world, we cannot always ask the resource owner to grant us permission to access their resource, wehave to distinguish between permissions that a resource owner can grant and permissions, that special applications canobtain.
Resource Owner Scopes
The resource owner scope should always be the default choice. Permissions of this type can automatically be grantedby the resource owner to clients. Those are typically scopes like “sales_order.read” or “sales_order.write” that grantread or write access to a resource. Those scopes always have to be evaluated in the context of the resource owner bythe resource server. This means, the resource server has to check if permission for access was granted and that therequested resource is really owned by this particular resource owner.
Application Scopes
The opposite of resource owner scopes are application scopes, which are not bound to the context of the resourceowner. Typical applications scopes look like “sales_order.read_all” and are used by batch jobs that may do analyticson them. By default, no one can grant this scope and you have to assign your application this permission explicitly.
3.7.3 STUPS infrastructure
STUPS supports you to use OAuth 2.0 by handling secret distribution and access control management for you. mint &berry will automatically create service users for your registered applications in Kio and send their passwords to yourAWS account. mint will also create client configurations for your applications that you will need in order to ask forpermission. essentials store all basic information about possible access permissions.
3.7.4 Application integration
The following sections will give you a detailed technical introduction of how to implement the important OAuth 2.0roles with your application. You either implement a resource server or a client, depending on what you want to do.Those roles are strictly separated by the part they play in access control. This does not necessarily mean, that yourapplication itself only implements one role. Depending on your use cases, some flows require your application to be aclient, some require it to act as a resource server.
In the next steps, we will implement the handling of “sales orders” data in your ecosystem. Sales order data might beowned by customers and employees. We want to distinguish read and write access and we also need a batch job, thatanalyses all the orders.
3.7. Access Control 29

STUPS Documentation, Release SNAPSHOT
Helpful tooling
Before starting to integrate OAuth 2.0 in your application, you should install Zign. Zign is a command line tool, thatallows you to easily create OAuth 2.0 access tokens for yourself. This is especially helpful for testing resource servers.
$ sudo pip3 install --upgrade stups-zign
With the following command, you can generate an access token for yourself with all the scopes you specify:
$ zign token creditcard.read creditcard.write
You can name tokens, so that you can access them repeatedly without authenticating again every time:
$ zign token -n testing creditcard.read creditcard.write$ zign list$ zign token -n testing
Tip: You will probably often want to do HTTP requests with Zign access tokens. It’s easier to use HTTPie with theZign HTTPie plugin instead of curl:
$ sudo pip3 install --upgrade httpie-zign$ mkdir -p ~/.httpie && echo '{"default_options": ["--auth-type=zign"]}' > ~/.httpie/→˓config.json$ zign token -n mytok$ http -a mytok: https://example.org/oauth-secured-api
Zign will create an access token for your personal user (realm “/employee”) by default, but it can also be used tocreate service tokens (“/services” realm) by providing the service user’s credentials and setting the correct environmentvariables:
$ sudo pip3 install -U stups-berry stups-zign # install CLI tools$ berry -m mint-example-bucket -a myapp --once . # download OAuth credentials for→˓application "myapp" from S3$ export OAUTH2_ACCESS_TOKEN_URL=https://token.services.example.org/oauth2/access_→˓token?realm=/services$ export CREDENTIALS_DIR=. # user.json and client.json were downloaded into the→˓current directory$ zign token -n myapp pets.write # request service token with "pets.write" scope
Zign uses the Python Tokens library under the hood to create the service token. You can also use it directly from yourPython script:
#!/usr/bin/env python3
import tokens
# by default will use OAUTH2_ACCESS_TOKEN_URL and CREDENTIALS_DIR environment→˓variablestokens.configure()tokens.manage('myapp', ['uid', 'pets.write'])my_token = tokens.get('myapp')# ... do something with my_token :-)
30 Chapter 3. User’s Guide

STUPS Documentation, Release SNAPSHOT
Preparation of global meta data
Before integrating your application, you need to publish the basic metadata about your data in your ecosystem. Thishas to be done via the essentials microservice (which can be accessed via YOUR TURN).
We define the following new resource type:
• ID: sales_order
• Name: sales order
• Resource Owners:
– [x] Employees
– [x] Customers
For this resource type, we define the following scopes:
• sales_order.read
– ID: read
– Summary: grants read access
– [x] Resource Owner Scope
• sales_order.write
– ID: write
– Summary: grants write access
– [x] Resource Owner Scope
• sales_order.read_all
– ID: read_all
– Summary: grants read access to all orders
– [x] Application Scope
With this information published, every resource server can now grant access based on those permissions.
Implementing a resource server
If you are storing data, you are a resource server and have to protect those data. Luckily, this is the easiest role in theOAuth 2.0 flows. The requirements are pretty simple: you need to enforce that you get an access token, you have tovalidate the access token and authorize the access based on the information of the access token.
Execute the following commands to simulate a resource server:
$ TOKEN=$(zign token uid)$ curl "https://auth.example.com/oauth2/tokeninfo?access_token=$TOKEN"
Your output should look like the following JSON:
{"expires_in": 3515,"token_type": "Bearer","realm": "employees","scope": ["uid"
(continues on next page)
3.7. Access Control 31
STUPS Documentation, Release SNAPSHOT
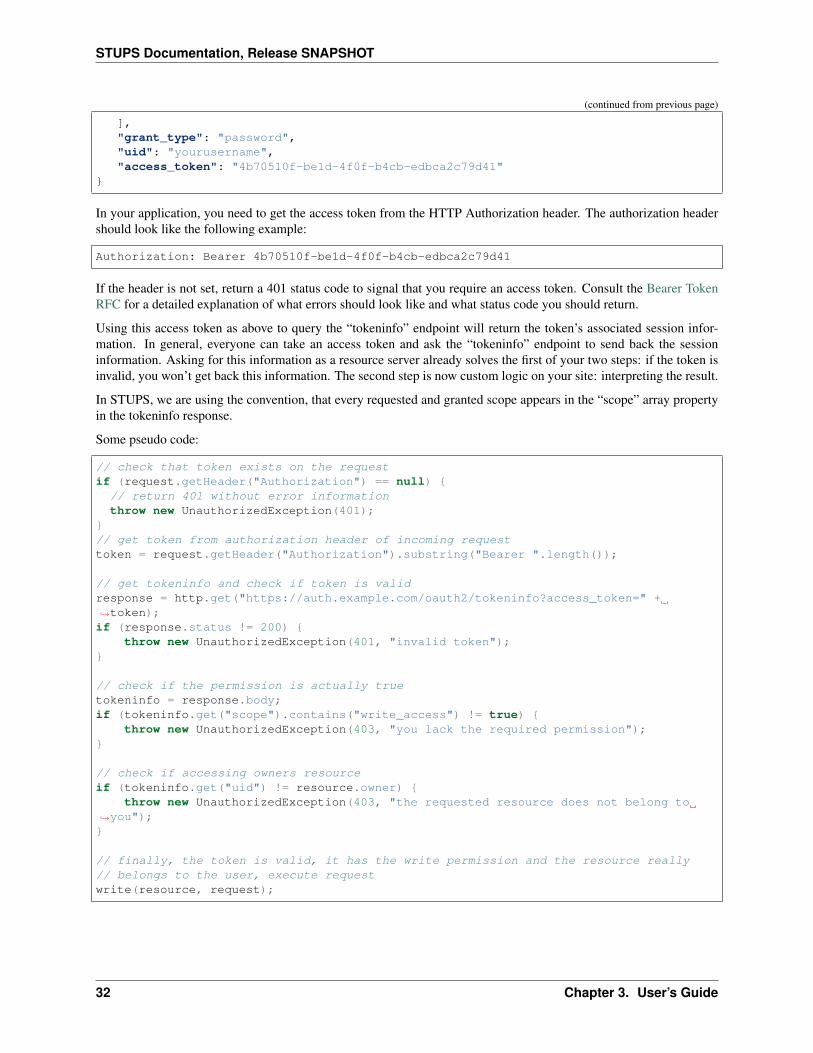
(continued from previous page)
],"grant_type": "password","uid": "yourusername","access_token": "4b70510f-be1d-4f0f-b4cb-edbca2c79d41"
}
In your application, you need to get the access token from the HTTP Authorization header. The authorization headershould look like the following example:
Authorization: Bearer 4b70510f-be1d-4f0f-b4cb-edbca2c79d41
If the header is not set, return a 401 status code to signal that you require an access token. Consult the Bearer TokenRFC for a detailed explanation of what errors should look like and what status code you should return.
Using this access token as above to query the “tokeninfo” endpoint will return the token’s associated session infor-mation. In general, everyone can take an access token and ask the “tokeninfo” endpoint to send back the sessioninformation. Asking for this information as a resource server already solves the first of your two steps: if the token isinvalid, you won’t get back this information. The second step is now custom logic on your site: interpreting the result.
In STUPS, we are using the convention, that every requested and granted scope appears in the “scope” array propertyin the tokeninfo response.
Some pseudo code:
// check that token exists on the requestif (request.getHeader("Authorization") == null) {// return 401 without error informationthrow new UnauthorizedException(401);
}// get token from authorization header of incoming requesttoken = request.getHeader("Authorization").substring("Bearer ".length());
// get tokeninfo and check if token is validresponse = http.get("https://auth.example.com/oauth2/tokeninfo?access_token=" +→˓token);if (response.status != 200) {
throw new UnauthorizedException(401, "invalid token");}
// check if the permission is actually truetokeninfo = response.body;if (tokeninfo.get("scope").contains("write_access") != true) {
throw new UnauthorizedException(403, "you lack the required permission");}
// check if accessing owners resourceif (tokeninfo.get("uid") != resource.owner) {
throw new UnauthorizedException(403, "the requested resource does not belong to→˓you");}
// finally, the token is valid, it has the write permission and the resource really// belongs to the user, execute requestwrite(resource, request);
32 Chapter 3. User’s Guide
STUPS Documentation, Release SNAPSHOT
Implementing a client: Asking resource owners for permission
Client implementations are the hardest part in OAuth 2.0. We really encourage you to use an existing library foryour programming language - there are plenty of them. There are three commonly used grant types (grant types are asynonym for flows):
Authorization Code Grant This should be the default whenever you want to implement a client. It is the most secureway to do OAuth 2.0. You will need a client ID and a client secret to use this grant type. When you get yourcredentials via mint, you will also get these client credentials in the “client.json”.
Implicit Grant This grant type is meant for situations, where you are not in control of the client’s environment andit is de facto untrusted. This is primarily the case for JavaScript only web apps or mobile applications. In bothcases the client code resides on a foreign device. Therefore the client code and configuration is not secret. Thisgrant type should only be used in those two cases. Try to use the Authorization Code Grant whenever possible.As the configuration cannot be considered secure, your client will also only require a client ID and not a clientsecret.
Resource Owner Password Credentials Grant There are only two use cases for the password grant. The passwordgrant enables a client to use the resource owner’s password directly to create tokens with it. This means, thatyour client really has to get the password of the owner - the main case you want to avoid normally with OAuth.
• The first use case of the password grant is around user convenience. Especially non technical people willget scared and lose trust if they get redirected to other pages to enter their passwords. Especially in ashop environment, you do not want to loose conversion rate by disturbing the user experience. It is alsonot desirable to ask a customer to grant some permissions. In this case, a shop frontend can act as thecustomer on behalf of him. The frontend will ask and get the password of the customer and can then createtokens on behalf of her. As the user’s password will get into the hands of your application, this should beavoided as much as possible because you also have to duplicate all the security measurements again thatare also done in your authorization server.
• The second use case is using service users as resource owners. See the next topic about using own permis-sions.
Implementing a client: Using own permissions
STUPS support service-to-service authorization via OAuth 2.0. This is useful in batch jobs, where you do not havethe possibility to ask the resource owner for permission to access their data. This means, that your application hasto somehow authenticate itself, so that a resource server can grant access. For this, mint will automatically createservice users for you. These service users have their own identity and also username and password that you can readin your “user.json”. You can assign this user permissions via YOUR TURN. A typical permission would look like“sales_order.read_all”.
Via the previously mentioned “password grant” you can now create access tokens for yourself with your own creden-tials and permissions. Instead of complex redirect flows like with humans, it is very simple to create a token if youhave the password of the resource owner (yourself in this case):
$ cat > request.json << "EOF"{
"grant_type": "password","username": "my-username","password": "my-password","scope": "uid sales_order.read_all"
}EOF
$ curl -X POST -u my-client-id:my-client-secret -d @request.json \"https://auth.example.com/oauth2/access_token?realm=services"
3.7. Access Control 33
STUPS Documentation, Release SNAPSHOT
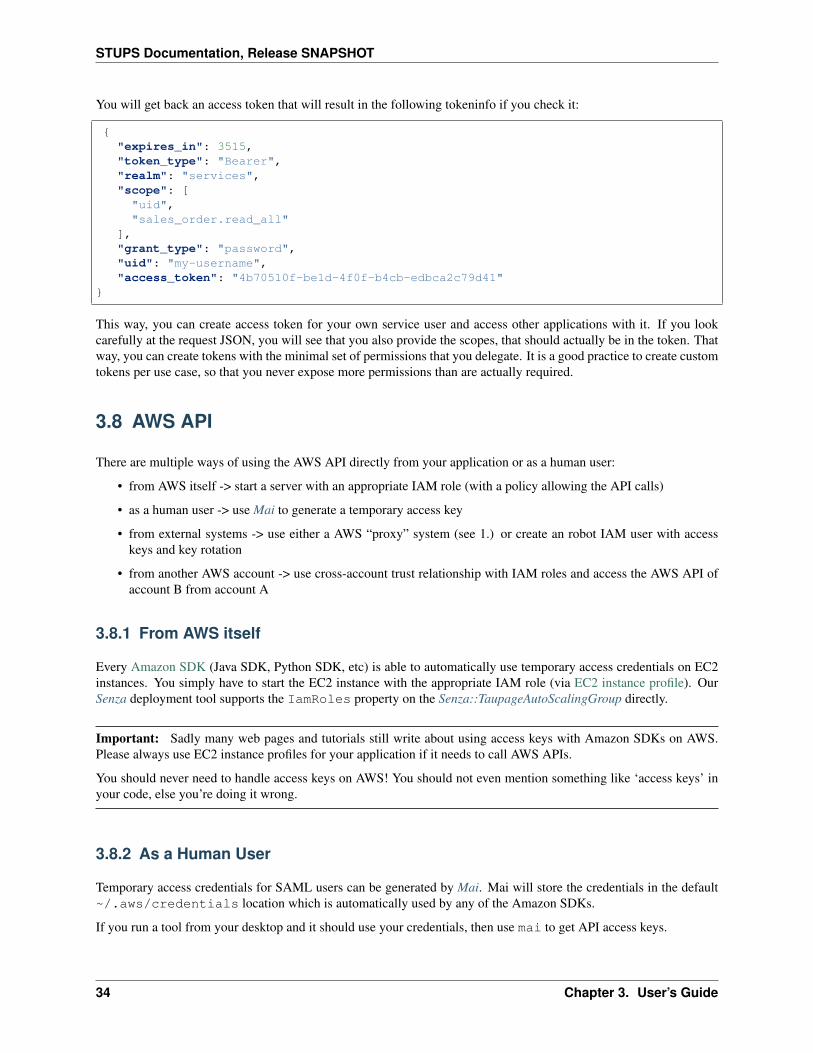
You will get back an access token that will result in the following tokeninfo if you check it:
{"expires_in": 3515,"token_type": "Bearer","realm": "services","scope": ["uid","sales_order.read_all"
],"grant_type": "password","uid": "my-username","access_token": "4b70510f-be1d-4f0f-b4cb-edbca2c79d41"
}
This way, you can create access token for your own service user and access other applications with it. If you lookcarefully at the request JSON, you will see that you also provide the scopes, that should actually be in the token. Thatway, you can create tokens with the minimal set of permissions that you delegate. It is a good practice to create customtokens per use case, so that you never expose more permissions than are actually required.
3.8 AWS API
There are multiple ways of using the AWS API directly from your application or as a human user:
• from AWS itself -> start a server with an appropriate IAM role (with a policy allowing the API calls)
• as a human user -> use Mai to generate a temporary access key
• from external systems -> use either a AWS “proxy” system (see 1.) or create an robot IAM user with accesskeys and key rotation
• from another AWS account -> use cross-account trust relationship with IAM roles and access the AWS API ofaccount B from account A
3.8.1 From AWS itself
Every Amazon SDK (Java SDK, Python SDK, etc) is able to automatically use temporary access credentials on EC2instances. You simply have to start the EC2 instance with the appropriate IAM role (via EC2 instance profile). OurSenza deployment tool supports the IamRoles property on the Senza::TaupageAutoScalingGroup directly.
Important: Sadly many web pages and tutorials still write about using access keys with Amazon SDKs on AWS.Please always use EC2 instance profiles for your application if it needs to call AWS APIs.
You should never need to handle access keys on AWS! You should not even mention something like ‘access keys’ inyour code, else you’re doing it wrong.
3.8.2 As a Human User
Temporary access credentials for SAML users can be generated by Mai. Mai will store the credentials in the default~/.aws/credentials location which is automatically used by any of the Amazon SDKs.
If you run a tool from your desktop and it should use your credentials, then use mai to get API access keys.
34 Chapter 3. User’s Guide
STUPS Documentation, Release SNAPSHOT
3.8.3 From External Systems
The preferred way is to create a well defined REST API microservice and deploy it on AWS with instance profile (seeSenza::TaupageAutoScalingGroup) and secure it via OAuth. Thus your external system (e.g. own data center) canaccess it without any AWS knowledge at all. This is a possible way for 90% of the use cases.
Only if this is not feasible you should consider creating IAM users with an access key rotation process.
3.8.4 From Another AWS Account
IAM roles can be used across accounts by defining a trust relationship policy.
Policy configuration:
{"Version": "2012-10-17","Statement": [{
"Sid": "","Effect": "Allow","Principal": {
"AWS": "arn:aws:iam::ACCOUNT_ID:root"},"Action": "sts:AssumeRole"
}]
}
if the role is also used by an application, to retrieve via Instance Profile the credentials, then you should also add theec2 service:
{"Version": "2012-10-17","Statement": [{
"Sid": "","Effect": "Allow","Principal": {
"Service": "ec2.amazonaws.com","AWS": "arn:aws:iam::ACCOUNT_ID:root"
},"Action": "sts:AssumeRole"
}]
}
As result you will have one Trusted Entity for the first option and two for the second one.
Trusted Entities:
• The account ACCOUNT_ID
and for the second option also
• The identity provider(s) ec2.amazonaws.com
This will let you retrive credentials from the Instance Profile.
3.8. AWS API 35

STUPS Documentation, Release SNAPSHOT
3.9 Databases
Databases should never be publicly available and hence reside in an internal subnet of your AWS account (See AccountConfiguration). This implies that you will have no chance to connect your local postgres client (e.g. psql or pgAdmin)directly to the host where your database server runs.
3.9.1 But how can I connect from my desktop to an internal RDS instance?
You can use your odd bastion host to establish an SSH tunnel and forward the remote database port (e.g. 5432) to anyfree port on your local machine. Afterwards you can simply connect your client application to this local port.
This small tutorial will guide you through the setup:
Assumptions
Database
• there is an RDS instance running with the internal endpoint mydb.1234abcd.eu-west-1.rds.amazonaws.com
– we will use a Postgres installation running on port 5432 in this example, but it should also work with anyother dbms and port
• the RDS instance’s security group permits inbound traffic on the db port (e.g. 5432) from the bastion host
Bastion host
• your bastion host is available at odd-eu-west-1.myteam.example.org
• your bastion host knows your SSH public key
– you can use Più to request access to the bastion host before proceeding with the tutorial (use piuodd-eu-west-1.myteam.example.org reason).
• your bastion host’s security group permits inbound traffic on port 22 from your local IP address (shouldalready be in place)
• your bastion host’s security group permits outbound traffic on the db port to your internal instances (shouldalready be in place)
Dig a tunnel
• Open a shell and establish an SSH tunnel to your database server like this:
$ ssh -L 63333:mydb.1234abcd.eu-west-1.rds.amazonaws.com:5432 odd-eu-west-1.→˓myteam.example.org
– the option -L opens the tunnel
– 63333 can be replaced by any free port on your local machine. It specifies your end of the tunnel.
– mydb.1234abcd.eu-west-1.rds.amazonaws.com:5432 is of course the endpoint of the ex-ample db instance and the other end of the tunnel. We can use the internal DNS name here, because it isfrom the bastion host’s perspective
– The last argument odd-eu-west-1.myteam.example.org is the SSH host, we will use as entranceinto our VPC and from there hop to the desired instance.
36 Chapter 3. User’s Guide

STUPS Documentation, Release SNAPSHOT
• Now your console should look like any ordinary SSH session on odd-eu-west-1.myteam.example.org with the small difference that, as long as you keep the session alive, the tunnel will also be there. There isnothing more work here.
• Open a new shell and try it out: (Do not close the ssh connection!)
$ psql -h localhost -p 63333 -U dbuser dbname
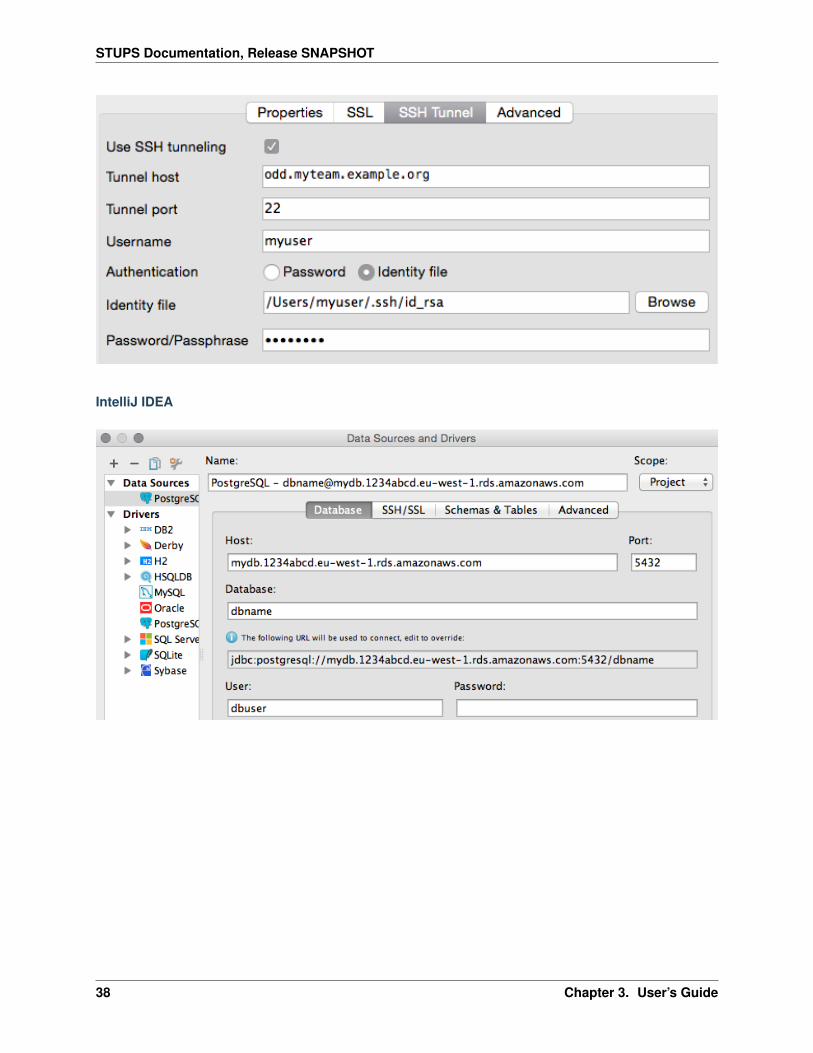
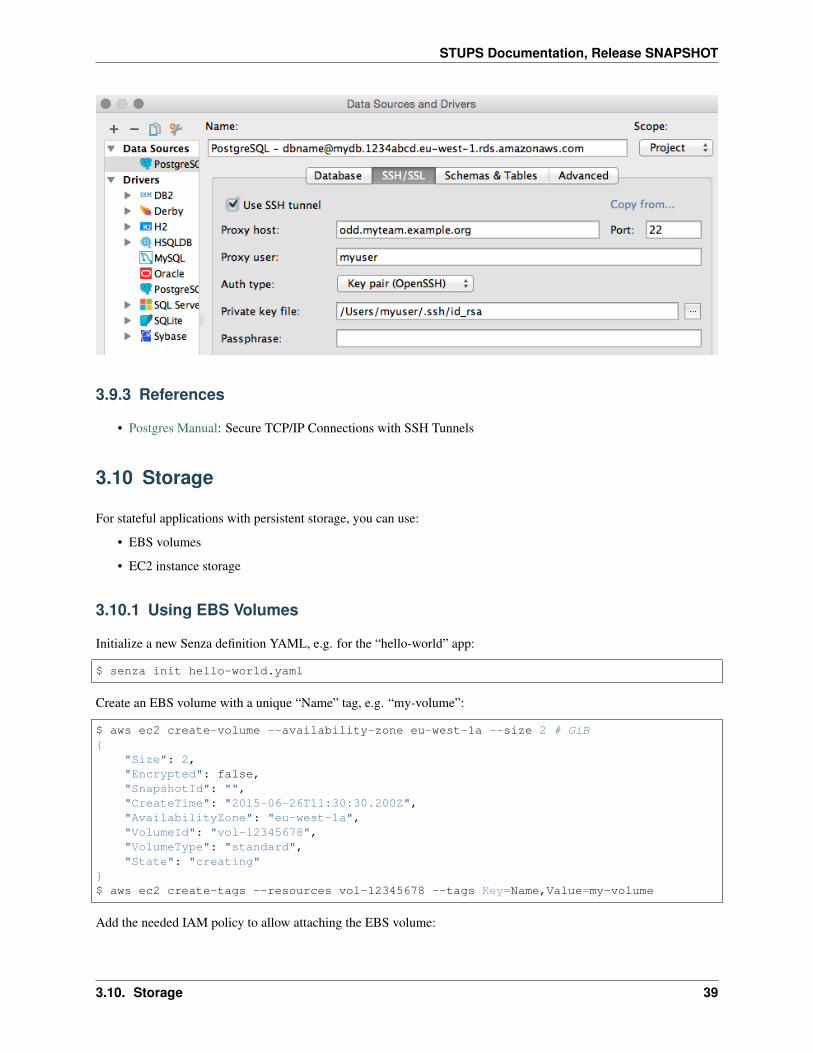
3.9.2 Tool Support
There are several database clients, that can do the SSH tunneling for you.
pgAdmin 3
3.9. Databases 37
STUPS Documentation, Release SNAPSHOT
IntelliJ IDEA
38 Chapter 3. User’s Guide
STUPS Documentation, Release SNAPSHOT
3.9.3 References
• Postgres Manual: Secure TCP/IP Connections with SSH Tunnels
3.10 Storage
For stateful applications with persistent storage, you can use:
• EBS volumes
• EC2 instance storage
3.10.1 Using EBS Volumes
Initialize a new Senza definition YAML, e.g. for the “hello-world” app:
$ senza init hello-world.yaml
Create an EBS volume with a unique “Name” tag, e.g. “my-volume”:
$ aws ec2 create-volume --availability-zone eu-west-1a --size 2 # GiB{
"Size": 2,"Encrypted": false,"SnapshotId": "","CreateTime": "2015-06-26T11:30:30.200Z","AvailabilityZone": "eu-west-1a","VolumeId": "vol-12345678","VolumeType": "standard","State": "creating"
}$ aws ec2 create-tags --resources vol-12345678 --tags Key=Name,Value=my-volume
Add the needed IAM policy to allow attaching the EBS volume:
3.10. Storage 39
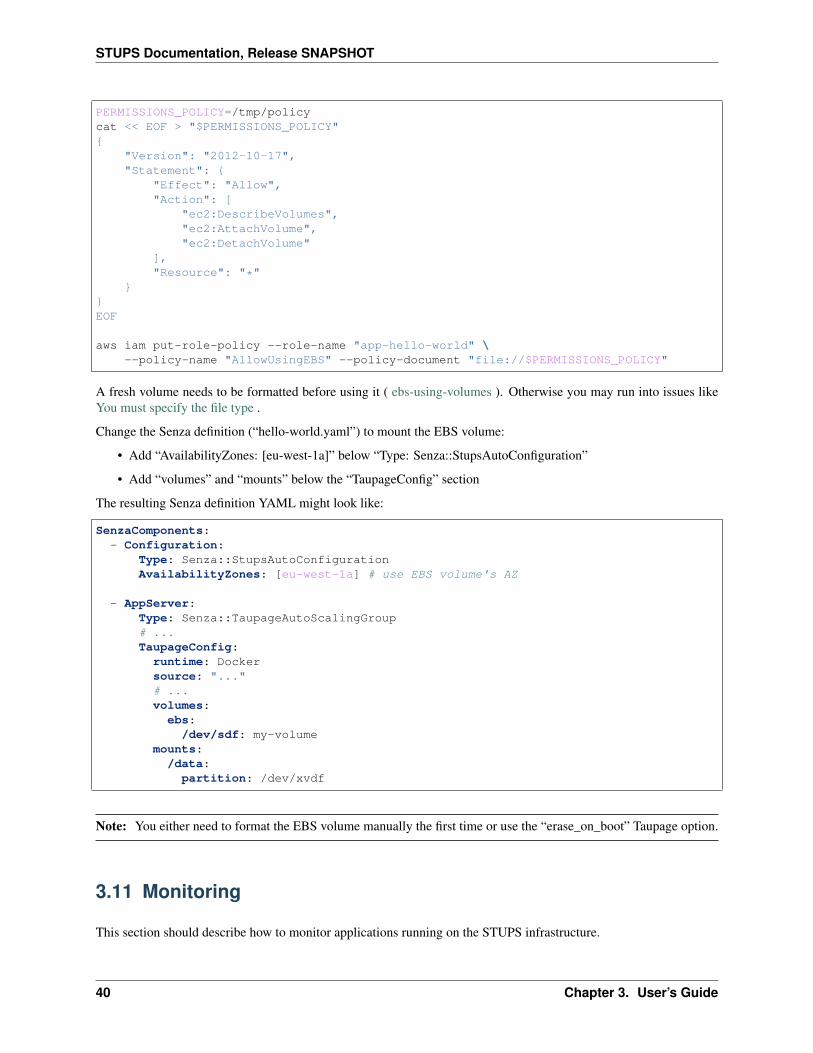
STUPS Documentation, Release SNAPSHOT
PERMISSIONS_POLICY=/tmp/policycat << EOF > "$PERMISSIONS_POLICY"{
"Version": "2012-10-17","Statement": {
"Effect": "Allow","Action": [
"ec2:DescribeVolumes","ec2:AttachVolume","ec2:DetachVolume"
],"Resource": "*"
}}EOF
aws iam put-role-policy --role-name "app-hello-world" \--policy-name "AllowUsingEBS" --policy-document "file://$PERMISSIONS_POLICY"
A fresh volume needs to be formatted before using it ( ebs-using-volumes ). Otherwise you may run into issues likeYou must specify the file type .
Change the Senza definition (“hello-world.yaml”) to mount the EBS volume:
• Add “AvailabilityZones: [eu-west-1a]” below “Type: Senza::StupsAutoConfiguration”
• Add “volumes” and “mounts” below the “TaupageConfig” section
The resulting Senza definition YAML might look like:
SenzaComponents:- Configuration:
Type: Senza::StupsAutoConfigurationAvailabilityZones: [eu-west-1a] # use EBS volume's AZ
- AppServer:Type: Senza::TaupageAutoScalingGroup# ...TaupageConfig:
runtime: Dockersource: "..."# ...volumes:ebs:/dev/sdf: my-volume
mounts:/data:
partition: /dev/xvdf
Note: You either need to format the EBS volume manually the first time or use the “erase_on_boot” Taupage option.
3.11 Monitoring
This section should describe how to monitor applications running on the STUPS infrastructure.
40 Chapter 3. User’s Guide
STUPS Documentation, Release SNAPSHOT
3.11.1 CloudWatch Metrics
The most basic monitoring can be achieved by the out-of-the-box AWS CloudWatch metrics. CloudWatch monitoringis automatically enabled for EC2 instances deployed with Senza.
CloudWatch EC2 metrics contain the following information:
• CPU Utilization
• Network traffic
• Disk throughput / operations per second - only for ephemeral storage, EBS volumes are not included
3.11.2 Taupage Monitoring Features
The Taupage AMI supports a few features for enhanced monitoring:
• Enhanced CloudWatch metrics to monitor memory and diskspace: enable withenhanced_cloudwatch_metrics property in Taupage config (this allows monitoring RAM usageand root filesystem on EBS)
• Prometheus Node Exporter to export system metrics: the Prometheus Node Exporter is automatically started onevery Taupage EC2 instance on port 9100
3.11.3 ZMON
The ZMON Zalando monitoring tool can be deployed into each AWS account to allow cross-team monitoring anddashboards. Make sure that ZMON appliance is allowed by security groups to connect to port 9100 of monitoredinstances.
ZMON allows querying arbitrary CloudWatch metrics using the “cloudwatch()” check command.
ZMON allows parsing the Prometheus metrics using the the “http().prometheus()” check command.
3.12 Maintenance
This section will cover the most frequent maintenance tasks you will face when running applications on the STUPSinfrastructure.
3.12.1 Finding the latest Taupage AMI
You should regularly (at least every month) check your running stacks for Taupage updates. Senza provides theconvenience images command to see all used and most recent Taupage AMIs in your AWS account.
$ senza images
# no abbreviation$ senza images -o tsv
Check the last column and identify all stacks still running with old AMIs. The next section explains how to updatethem.
3.12. Maintenance 41

STUPS Documentation, Release SNAPSHOT
3.12.2 Updating Taupage AMI
Senza allows updating launch configurations of running Cloud Formation stacks to use the latest Taupage AMI.
$ senza patch $STACK_NAME $STACK_VERSION --image=latest
The patch command will not affect any running EC2 instances, but all new instances launched in the respective AutoScaling Group of mystack will now use the latest Taupage AMI.
Example with output:
$ senza patch mystack v1 --image=latestPatching Auto Scaling Group mystack-v1-AppServer-8YHGQH3AXYMP.. OK
The Senza respawn-instances command allows performing a rolling update of all EC2 instances in the AutoScaling Group.
Caution: The respawn-instances command will terminate running instances and thus should only be runon stateless application stacks.
$ senza respawn-instances $STACK_NAME $STACK_VERSION
The process of respawn-instances is as follows:
• Suspend all ASG scaling activities
• Increase the ASG capacity by one (n+1).
• Wait for all n+1 instances to become healthy in associated ELB (if any)
• Terminate one old instance.
• Repeat until all n instances use the desired launch configuration.
• Reset the ASG capacity to the initial value (n)
• Resume all Scaling activities
Example with output:
$ senza respawn-instances mystack v12/2 instances need to be updated in mystack-v1-AppServer-8YHGQH3AXYMPSuspending scaling processes for mystack-v1-AppServer-8YHGQH3AXYMP.. OKScaling to 3 instances.. . . . . . . . . . . . . . . . . . . . . . . . . . . OKTerminating old instance i-04d79dbd939a1c7ca.. . . . . . . . OKScaling to 3 instances.. . . . . . . . . . . . . . . . . . . . . . . . . . . OKTerminating old instance i-09ad58c146807dcbd.. . . . . . . . OKResetting Auto Scaling Group to original capacity (2-4-2).. OKResuming scaling processes for mystack-v1-AppServer-8YHGQH3AXYMP.. OK
This process allows updating to the latest Taupage AMI without any downtime as long as:
• The application is stateless, i.e. EC2 instances can be terminated without losing data.
• The ELB has connection draining enabled, i.e. instance termination waits for all in-flight requests to complete
3.12.3 Updating Docker Image
You can update the launch configuration’s user data (Taupage YAML) to use a different Docker image:
42 Chapter 3. User’s Guide

STUPS Documentation, Release SNAPSHOT
$ senza patch mystack 1 --user-data 'source: pierone.example.org/myteam/myart:1.2'
Afterwards you can use the respawn-instances command to apply the change to all instances.
Please note that we generally recommend to use the Immutable Stack approach for stateless applications. We considerpatching the Docker Image in launch configurations only for “emergency” hot deploys where every minute counts.Deploying immutable stacks via fully automated Continuous Delivery pipelines is considered best practice.
3.12.4 Redeploying odd
The odd SSH bastion host is running a standard Taupage image and should be updated regularly. The odd setup differsfrom usual application deployments as it runs in a public DMZ subnet and uses a public Elastic IP To redeploy the oddSSH bastion host, you have to:
• start a new odd instance with the same launch configuration into one of the DMZ subnets.
• wait for it to be reachable (SSH port 22)
• detach the Elastic IP from the old odd
• attach the Elastic IP to the new odd instance
• shut down the old odd instance
3.13 Troubleshooting
3.13.1 Senza stack creation fails with Cloud Formation ValidationError
If Senza throws a Cloud Formation “ValidationError” at you when runnning senza create, you can use senzaprint to debug the problem:
$ senza create myapp.yaml 1 0.1{"Error":{"Code":"ValidationError","Message":"Template error: Mapping named→˓'LoadBalancerSubnets' is not present in the 'Mappings' section of template.","Type":→˓"Sender"},"RequestId":"..."}
$ senza print myapp.yaml 1 0.1 # first parameter is stack version, second is Docker→˓image tag{
"AWSTemplateFormatVersion": "2010-09-09","Description": "Hello World (ImageVersion: 0.1)","Mappings": {
"Images": {...
# long Cloud Formation JSON after here...
You can always do senza print to look at the generated Cloud Formation JSON. The print command does thesame as the create command, but it just prints the CF JSON.
Tip: You can use the jq command-line JSON processor to pretty-print the generated JSON:
$ senza print helloworld.yaml v1 1.0 | jq .
3.13. Troubleshooting 43

STUPS Documentation, Release SNAPSHOT
3.13.2 Senza stack is rolled back automatically (status ROLLBACK_COMPLETE)
If your freshly created Senza stack keeps get rolled back by Cloud Formation after a few minutes, you can try debug-ging the problem by disabling the automatic rollback:
$ senza create myapp.yaml 1 0.1# .. few minutes pass ..
$ senza status myapp.yaml 1Stack Name Ver. Status Inst.# Running Healthy LB Status HTTP Main DNSmyapp 1 ROLLBACK_COMPLETE 0 0 0 ERROR no
# first check the rollback reason$ senza events myapp.yaml 1 -o tsv# ...AutoScaling::AutoScalingGroup AppServer CREATE_FAILED Failed to receive 1→˓resource signal(s) within the specified duration# ...
$ senza create myapp.yaml 1 0.1 --disable-rollback# stack and EC2 instance(s) will stay up
Tip: Usually you can avoid SSH access and --disable-rollback by using a logging provider to see theTaupage syslog messages. The Taupage AMI supports logentries and Scalyr as logging providers.
By disabling the automatic Cloud Formation rollback-on-failure, you can troubleshoot the problem on the EC2 instancevia SSH. See the SSH Access section on how to “ssh” into your EC2 instance (running Taupage AMI).
Note: The most common rollback reason is a failing EC2 instance not notifying Cloud Formation in time, e.g.because the application could not start (Docker download failed, etc).
There are also less common failure reasons, e.g. when modifying the Senza stack definition by hand. Please check the“status_reason” column of senza events to see the Cloud Formation error message.
3.13.3 Permission issues when running Docker container on Taupage AMI
If you get permission issues (e.g. chown: changing ownership of foobar: Operation notpermitted) when running your Docker image on Taupage, you probably run a Docker image assuming to runas root. Taupage starts Docker containers with an unprivileged user by default. You can test your Docker imagelocally with docker run -u 998 .... Usually all apps (especially JVM-based applications) should be able torun as non-root. Sadly most Docker images from the official Docker Hub assume running as root.
It is recommended to grant appropriate (world) permissions to files inside your Docker image if needed. Statelessapplications usually have no need to write to disk, using the read_only: true Taupage config option is recom-mended.
If you really need to run your Docker container as root, you can use the root: true Taupage config option. Seethe Taupage reference for details.
44 Chapter 3. User’s Guide
STUPS Documentation, Release SNAPSHOT
3.13.4 I cannot access my EC2 instance via SSH
If you can get access to odd via Più, but accessing your private EC2 instance does not work: First check your server’ssecurity group. It must allow inbound traffic on TCP port 22 (SSH) from the “odd” bastion host.
If you get a “Permission denied (publickey)” error, check that your local SSH key agent is running:
$ ssh-add -l# this should list your private key(s) (e.g. id_rsa)
You might also try to login to the final EC2 instance using the “root” user as Taupage falls back to “root” in case ofdisk full:
$ ssh -A jdoe@odd-..$ ssh [email protected]..
3.13.5 How to read Docker logs on EC2
The Docker logs containing your application’s STDOUT are written to Syslog. After getting SSH Access to your EC2instance (running the Taupage AMI), you can grep them:
$ less -n /var/log/application.log
3.13.6 No internet connection (connection timeouts) on EC2 instance
If you get connection timeouts on your EC2 instance, e.g. the Docker image download or SSH access fails (cannotdownload public SSH key from even):
• If your EC2 instance runs in a DMZ subnet: instances in DMZ subnets have no internet connection unless youassign a public IP. Usually you should start instances in internal subnets only and only use ELBs in the DMZsubnets.
• If your EC2 instance runs in an Internal subnet: check that your subnet routing table and NAT instance isworking correctly.
Also check your instance’s security group whether it allows outbound traffic.
3.14 Standalone Deployment
Note: This section is only for users without an existing STUPS infrastructure!
Usually the STUPS deployment tooling relies on a completely configured STUPS environment, including:
• a specific STUPS AWS account VPC setup
• a private Pier One registry (OAuth secured)
• and a private Taupage AMI with baked in configuration
However, you can try out Senza deployments with a publicly available Taupage AMI.
This page will explain how to try out Senza with a default AWS VPC setup and the public Taupage AMI.
3.14. Standalone Deployment 45

STUPS Documentation, Release SNAPSHOT
3.14.1 Prerequisites
You need an fresh AWS account with:
• a default AWS VPC setup * VPC CIDR: 172.31.0.0/16 * all subnets are public and have an internet gateway
• a hosted zone in Route 53 (e.g. “*.stups.example.org”) (you don’t need to have nameserver delegation fortesting)
• a SSL server certificate for your domain (e.g. “*.stups.example.org”) uploaded to IAM and named after yourdomain (dots replaced with hyphens, i.e. “stups-example-org”). A self-signed certificate will also do for testing.
3.14.2 Installing Senza
First install Python 3.4 on your PC (Ubuntu 14.04 already has it installed, use Homebrew on Mac).
Note: OS X users may need to set their locale environment to UTF-8 with:
export LC_ALL=en_US.utf-8export LANG=en_US.utf-8
Senza can be installed from PyPI using PIP:
$ sudo pip3 install --upgrade stups-senza
Check that the installation went fine by printing Senza’s version number:
$ senza --version
3.14.3 Configuring AWS Credentials
Senza needs access to your AWS account, so make sure you have your IAM user’s access key in ~/.aws/credentials:
$ cat ~/.aws/credentials[default]aws_access_key_id = ASIAJK123456789aws_secret_access_key = Ygx123i56789abc
Senza uses the AWS CLI’s configuration file to know the AWS region you want to deploy to, so make sure you haveit set correctly:
$ cat ~/.aws/config[default]region = us-east-1
We will assume you have the AWS credentials and region (we use “us-east-1” in this example) correctly set for theremainder of this section.
Note: The public Taupage AMI (named “Taupage-Public-AMI-*”) used in this section is currently only available inUS East (N. Virginia) and EU (Ireland), i.e. other regions will not work (however, you can create your own privateTaupage AMI anywhere).
You can check the available Taupage AMIs with Senza’s “images” command, e.g.:
46 Chapter 3. User’s Guide

STUPS Documentation, Release SNAPSHOT
$ senza images # list available and used Taupage AMIsID Name Owner Description→˓ Stacks Inst.# Createdami-989e8ef0 Taupage-Public-AMI-20150512-181649 123456789123 [Copied ami-99412bee→˓from eu-west-1] Taupage-Pub.. hello-world-4 1 34d agoami-ad8272c6 Taupage-Public-AMI-20150615-111503 123456789123 STUPS' Taupage AMI with→˓Docker runtime 0 45m ago
Let’s try out that Senza can call our AWS API:
$ senza liStack Name Ver. Status Created Description
The senza list command should print an empty table (just column headers) as we haven’t deployed any CloudFormation stack yet.
3.14.4 Bootstrapping a new Senza Definition
A Senza definition is essentially a Cloud Formation template as YAML with support for custom Senza components.
We need to create a new Senza definition YAML file to deploy our “Hello World” application:
$ senza init helloworld.yamlPlease select the project template1) bgapp: Background app with single EC2 instance2) postgresapp: HA Postgres app, which needs an S3 bucket to store WAL files3) webapp: HTTP app with auto scaling, ELB and DNSPlease select (1-3): 3Application ID [hello-world]:Docker image without tag/version (e.g. "pierone.example.org/myteam/myapp") [stups/→˓hello-world]:HTTP port [8080]:HTTP health check path [/]:EC2 instance type [t2.micro]:Mint S3 bucket name [mint-example-bucket]:Checking security group app-hello-world.. OKSecurity group app-hello-world does not exist. Do you want Senza to create it now? [Y/→˓n]:Checking security group app-hello-world-lb.. OKSecurity group app-hello-world-lb does not exist. Do you want Senza to create it now?→˓[Y/n]:Checking IAM role app-hello-world.. OKCreating IAM role app-hello-world.. OKUpdating IAM role policy of app-hello-world.. OKGenerating Senza definition file helloworld.yaml.. OK
Senza init will ask you a bunch of question, for our “Hello World” example, you only have to choose the “webapp”template and confirm the default answers with “RETURN”.
The selected “webapp” template already takes care of creating the necessary security groups (“app-hello-world*”) andIAM role (“app-hello-world”).
Before we continue, we need to apply a tiny change to our Senza definition in order to deploy to the default AWS VPC(all public subnets):
3.14. Standalone Deployment 47
STUPS Documentation, Release SNAPSHOT
$ sed -i 's/AssociatePublicIpAddress:\s*false/AssociatePublicIpAddress: true/'→˓helloworld.yaml
We can check the generated Cloud Formation JSON by running senza print on our newly generated Senza defi-nition:
$ senza print helloworld.yaml v1 0.1 # first parameter is stack version, second is→˓Docker image tag{
"AWSTemplateFormatVersion": "2010-09-09","Description": "Hello World (ImageVersion: 0.1)","Mappings": {
"Images": {...
# long Cloud Formation JSON after here...
3.14.5 Optional: Configuring Application Logging
The Taupage AMI supports logentries and Scalyr as logging providers.
If you have a Scalyr account, you can easily tell Taupage to stream all application logs to Scalyr:
• Get the Scalyr account key from the Scalyr web ui (you can find the account key for example on the “Help” ->“Install Scalyr Agent” page)
• Insert a new line below “source: stups/hello-world. . . ” containing “scalyr_account_key: <YOUR SCALYRACCOUNT KEY>”
After deploying, your server’s Syslog (/var/log/syslog) and application output (/var/log/application.log) will be available in the Scalyr web UI:
3.14.6 Deploying a new Senza Application Stack
Let’s deploy a new immutable application stack using our Senza definition:
48 Chapter 3. User’s Guide
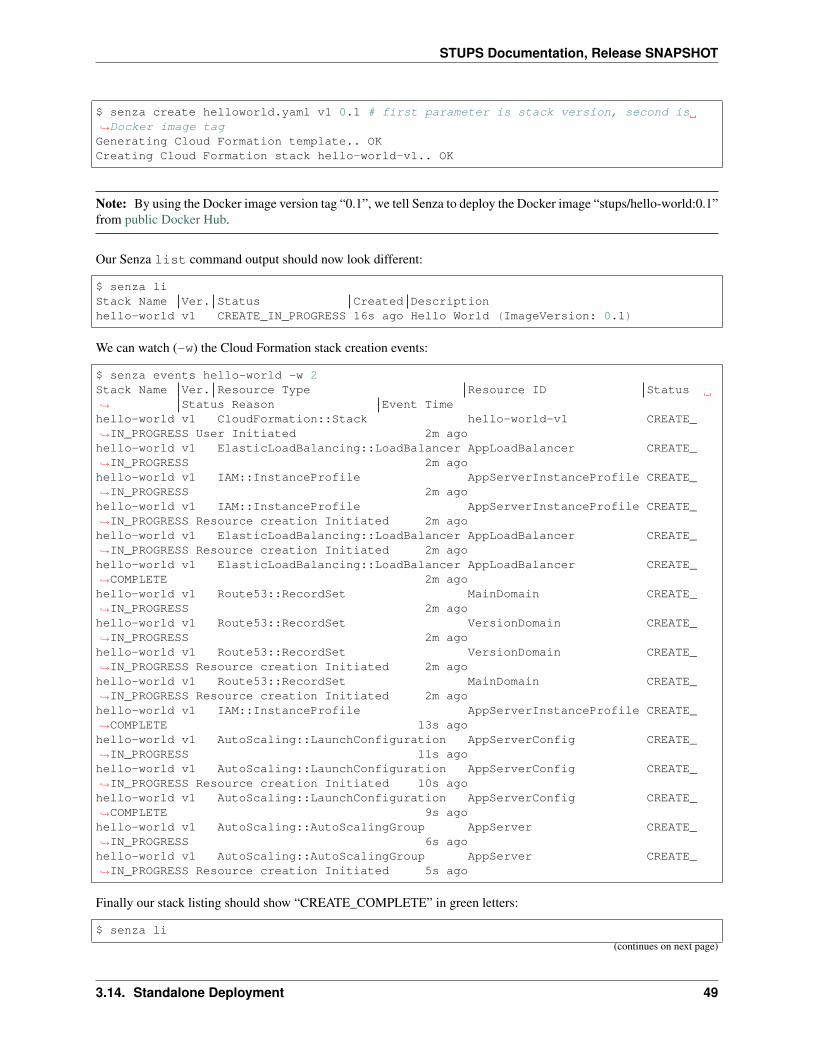
STUPS Documentation, Release SNAPSHOT
$ senza create helloworld.yaml v1 0.1 # first parameter is stack version, second is→˓Docker image tagGenerating Cloud Formation template.. OKCreating Cloud Formation stack hello-world-v1.. OK
Note: By using the Docker image version tag “0.1”, we tell Senza to deploy the Docker image “stups/hello-world:0.1”from public Docker Hub.
Our Senza list command output should now look different:
$ senza liStack Name Ver. Status Created Descriptionhello-world v1 CREATE_IN_PROGRESS 16s ago Hello World (ImageVersion: 0.1)
We can watch (-w) the Cloud Formation stack creation events:
$ senza events hello-world -w 2Stack Name Ver. Resource Type Resource ID Status→˓ Status Reason Event Timehello-world v1 CloudFormation::Stack hello-world-v1 CREATE_→˓IN_PROGRESS User Initiated 2m agohello-world v1 ElasticLoadBalancing::LoadBalancer AppLoadBalancer CREATE_→˓IN_PROGRESS 2m agohello-world v1 IAM::InstanceProfile AppServerInstanceProfile CREATE_→˓IN_PROGRESS 2m agohello-world v1 IAM::InstanceProfile AppServerInstanceProfile CREATE_→˓IN_PROGRESS Resource creation Initiated 2m agohello-world v1 ElasticLoadBalancing::LoadBalancer AppLoadBalancer CREATE_→˓IN_PROGRESS Resource creation Initiated 2m agohello-world v1 ElasticLoadBalancing::LoadBalancer AppLoadBalancer CREATE_→˓COMPLETE 2m agohello-world v1 Route53::RecordSet MainDomain CREATE_→˓IN_PROGRESS 2m agohello-world v1 Route53::RecordSet VersionDomain CREATE_→˓IN_PROGRESS 2m agohello-world v1 Route53::RecordSet VersionDomain CREATE_→˓IN_PROGRESS Resource creation Initiated 2m agohello-world v1 Route53::RecordSet MainDomain CREATE_→˓IN_PROGRESS Resource creation Initiated 2m agohello-world v1 IAM::InstanceProfile AppServerInstanceProfile CREATE_→˓COMPLETE 13s agohello-world v1 AutoScaling::LaunchConfiguration AppServerConfig CREATE_→˓IN_PROGRESS 11s agohello-world v1 AutoScaling::LaunchConfiguration AppServerConfig CREATE_→˓IN_PROGRESS Resource creation Initiated 10s agohello-world v1 AutoScaling::LaunchConfiguration AppServerConfig CREATE_→˓COMPLETE 9s agohello-world v1 AutoScaling::AutoScalingGroup AppServer CREATE_→˓IN_PROGRESS 6s agohello-world v1 AutoScaling::AutoScalingGroup AppServer CREATE_→˓IN_PROGRESS Resource creation Initiated 5s ago
Finally our stack listing should show “CREATE_COMPLETE” in green letters:
$ senza li
(continues on next page)
3.14. Standalone Deployment 49
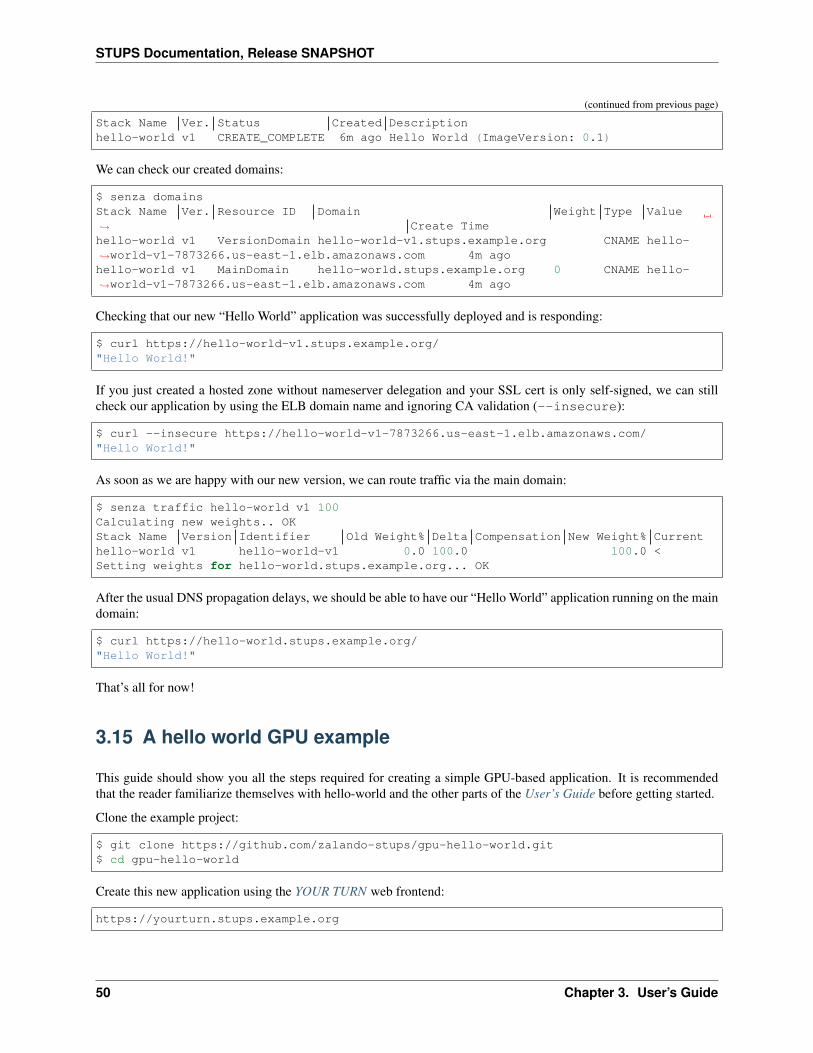
STUPS Documentation, Release SNAPSHOT
(continued from previous page)
Stack Name Ver. Status Created Descriptionhello-world v1 CREATE_COMPLETE 6m ago Hello World (ImageVersion: 0.1)
We can check our created domains:
$ senza domainsStack Name Ver. Resource ID Domain Weight Type Value→˓ Create Timehello-world v1 VersionDomain hello-world-v1.stups.example.org CNAME hello-→˓world-v1-7873266.us-east-1.elb.amazonaws.com 4m agohello-world v1 MainDomain hello-world.stups.example.org 0 CNAME hello-→˓world-v1-7873266.us-east-1.elb.amazonaws.com 4m ago
Checking that our new “Hello World” application was successfully deployed and is responding:
$ curl https://hello-world-v1.stups.example.org/"Hello World!"
If you just created a hosted zone without nameserver delegation and your SSL cert is only self-signed, we can stillcheck our application by using the ELB domain name and ignoring CA validation (--insecure):
$ curl --insecure https://hello-world-v1-7873266.us-east-1.elb.amazonaws.com/"Hello World!"
As soon as we are happy with our new version, we can route traffic via the main domain:
$ senza traffic hello-world v1 100Calculating new weights.. OKStack Name Version Identifier Old Weight% Delta Compensation New Weight% Currenthello-world v1 hello-world-v1 0.0 100.0 100.0 <Setting weights for hello-world.stups.example.org... OK
After the usual DNS propagation delays, we should be able to have our “Hello World” application running on the maindomain:
$ curl https://hello-world.stups.example.org/"Hello World!"
That’s all for now!
3.15 A hello world GPU example
This guide should show you all the steps required for creating a simple GPU-based application. It is recommendedthat the reader familiarize themselves with hello-world and the other parts of the User’s Guide before getting started.
Clone the example project:
$ git clone https://github.com/zalando-stups/gpu-hello-world.git$ cd gpu-hello-world
Create this new application using the YOUR TURN web frontend:
https://yourturn.stups.example.org
50 Chapter 3. User’s Guide

STUPS Documentation, Release SNAPSHOT
Now you will need to create the scm-source.json file that links your Docker image to a specific git revision number(here the scm-source Python package is used):
$ scm-source
Build the Docker image
$ docker build -t pierone.stups.example.org/<your-team>/gpu-hello-world:0.1 .
And now see if it is listed locally:
$ docker images
If you have nvidia-docker installed locally, the image can also be run:
$ docker run --rm -it pierone.stups.example.org/<your-team>/gpu-hello-world:0.1
which should show the expected output from nvidia-smi.
Note: Running with docker instead of nvidia-docker will show a /bin/sh: 1: nvidia-smi: not found message as thenvidia-smi tool used is part of the NVIDIA CUDA driver installiation which is not available when running with docker.
If all works, we are ready to login in Pier One and push it.
$ pierone login$ docker push pierone.stups.example.org/<your-team>/gpu-hello-world:0.1
Let’s check if we can find it in the Pier One repository (login needed if your token expired):
$ pierone login$ pierone tags <your-team> gpu-hello-world
Now let’s create the version in YOUR TURN for the application created:
https://yourturn.stups.example.org
Configure your application’s mint bucket (click on the “Access Control” button on your app’s page in YOUR TURN).
This will trigger the mint worker to write your app credentials to your mint bucket.
Deploy!
The repository contains an example Senza definition that can be used to deploy the Hello World example. If required,you can also add a log provider or other configuration options (like guide).
The Cloud Formation stack can be created by running:
$ senza create --region=eu-west-1 deploy-definition.yaml stackversion pierone.stups.→˓example.org/<your-team>/gpu-hello-world 0.1 example-mint-bucket-eu-west-1
Note that this assumes a stack version of stackversion and a Pier One image version of 0.1.
Once the stack has started up, you should be able to view the output in your log provider (if configured). If not,the instance can be accessed and the contents of the /var/log/application.log checked to confirm that the stack ran asexpected.
3.15. A hello world GPU example 51

STUPS Documentation, Release SNAPSHOT
52 Chapter 3. User’s Guide
CHAPTER 4
Components
4.1 berry
berry is the counterpart for mint. It is a small agent, that runs on a server and continuously checks for passwordchanges of an application’s service user. Berry downloads the application’s OAuth credentials from the given Mint S3bucket into the specified credentials directory. The application needs to periodically refresh its credentials from thecredentials directory.
Berry can run on multiple environments:
• Berry automatically runs on Taupage if the mint_bucket Taupage property is set
• Berry can run on non-AWS environments. In this case AWS credentials need to be provided.
4.1.1 Berry on Taupage
Berry starts automatically if the mint_bucket Taupage property is set. Berry will read its configuration (applicationID) from /etc/taupage.yaml. The EC2 instance needs to be started with an instance profile (IAM role) withpermissions to read from the Mint S3 bucket (senza init takes care of that). Credentials will be downloaded to/meta/credentials. Berry logs to syslog using the berry tag.
4.1.2 Berry on Non-AWS
Berry supports some convenience options to run on non-AWS environments:
• You can specify an alternate configuration file to read (-f option). This allows packaging a berry.yaml(defining application_id, mint_bucket and region) in the application’s deployment artifact to startBerry from the application’s start script.
53
STUPS Documentation, Release SNAPSHOT
• You can specify a special AWS credentials lookup file (-c option). This allows rolling out per-application AWScredentials centrally in your environment through some “secure” distribution mechanism (e.g. GPG + agent).
An example command line to start Berry for an instance of “myapp” might look like:
$ berry -f /webapps/myapp/berry.yaml -c /etc/aws-creds-by-app /webapps-data/myapp/→˓meta/credentials
The /webapps/myapp/berry.yaml file might look like:
---application_id: myappmint_bucket: mint-example-bucketregion: eu-central-1
The /etc/aws-creds-by-app file might look like:
# this file contains AWS access keys for berry# each line has three columns separated by colon (":"):# <application_id>:<access_key_id>:<secret_access_key>myapp:ABC123:xyz12332434sakotherapp:AAC456:yzf834509234uvw
The provided AWS access keys should only grant the least possible permissions, i.e. the “s3:GetObject” action to theapplication’s subfolder in the Mint S3 bucket. An example IAM policy might look like:
{"Version": "2012-10-17","Statement": [
{"Effect": "Allow","Action": [
"s3:GetObject"],"Resource": "arn:aws:s3:::mint-example-bucket/myapp/*"
}]
}
4.2 even
even allows requesting SSH access to EC2 instances.
4.2.1 How to use
See the section SSH Access on how to get SSH access to EC2 instances using the Più command line tool.
4.2.2 SSH access granting flow
This section explains how Più, even, odd and the IAM services (OAuth2 provider, Team Service and User Service)interact during the process of granting SSH access to a single odd SSH bastion host.
1. user “jdoe” gets OAuth2 access token from Token Service (done by Più)
54 Chapter 4. Components

STUPS Documentation, Release SNAPSHOT
2. user “jdoe” requests access to a specific odd SSH bastion host “odd.myteam.example.org” (HTTP POST to/access-requests, done by Più)
3. even authenticates the user by retrieving the “uid” (“jdoe”) from the OAuth2 tokeninfo endpoint
4. even authorizes the user “jdoe” by checking the team membership (member of “myteam”) and comparing therequested hostname (“odd.myteam.example.org) to the configured hostname template
5. even executes the SSH forced command “grant-ssh-access jdoe” on the odd host
6. the odd host downloads the user’s public SSH key from even (GET /public-keys/jdoe/sshkey.pub)
7. even retrieves the user’s public SSH key from the configured user service (simple HTTP endpoint to get publicSSH key by username)
8. the forced command on odd adds the user “jdoe” to the system and writes the authorized_keys file
9. the user “jdoe” finally logs into the odd host using their personal SSH key
4.2.3 Installation
See the STUPS Installation Guide section on even for details about deploying the “even” SSH access granting serviceinto your AWS account.
4.3 fullstop.
The latest documentation is available in the Fullstop github project page.
fullstop. AWS overview
4.3. fullstop. 55

STUPS Documentation, Release SNAPSHOT
fullstop. Architecture overview
56 Chapter 4. Components
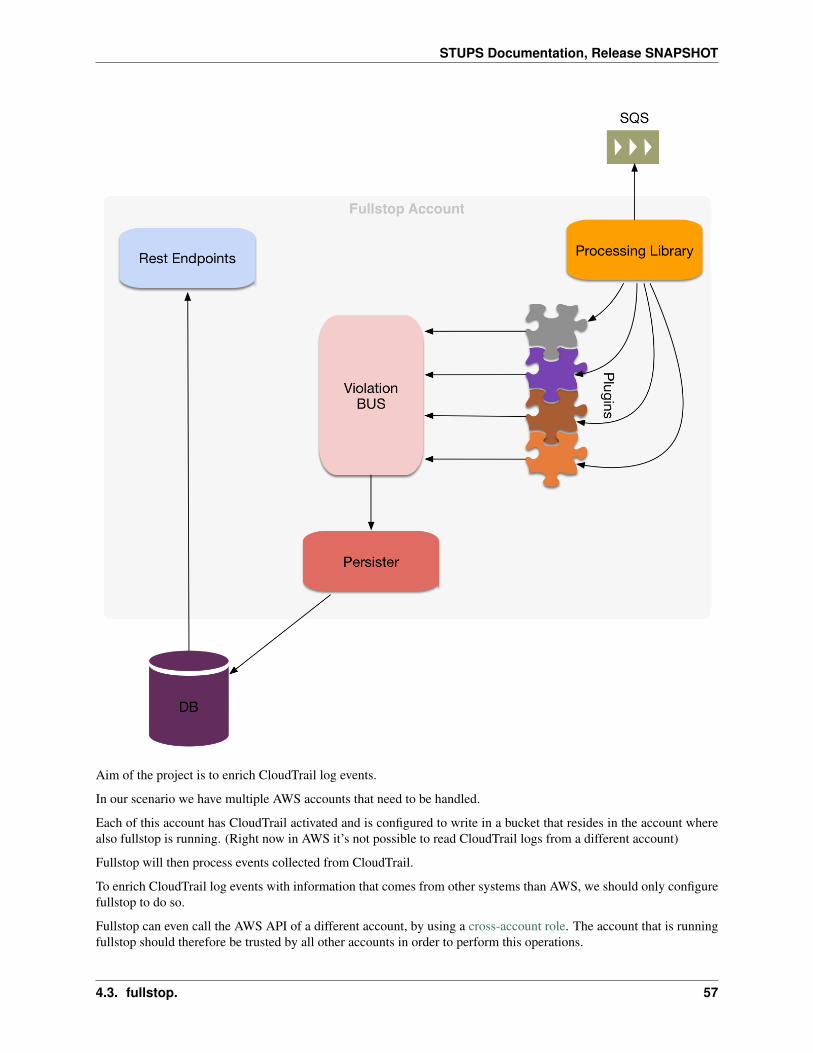
STUPS Documentation, Release SNAPSHOT
Aim of the project is to enrich CloudTrail log events.
In our scenario we have multiple AWS accounts that need to be handled.
Each of this account has CloudTrail activated and is configured to write in a bucket that resides in the account wherealso fullstop is running. (Right now in AWS it’s not possible to read CloudTrail logs from a different account)
Fullstop will then process events collected from CloudTrail.
To enrich CloudTrail log events with information that comes from other systems than AWS, we should only configurefullstop to do so.
Fullstop can even call the AWS API of a different account, by using a cross-account role. The account that is runningfullstop should therefore be trusted by all other accounts in order to perform this operations.
4.3. fullstop. 57
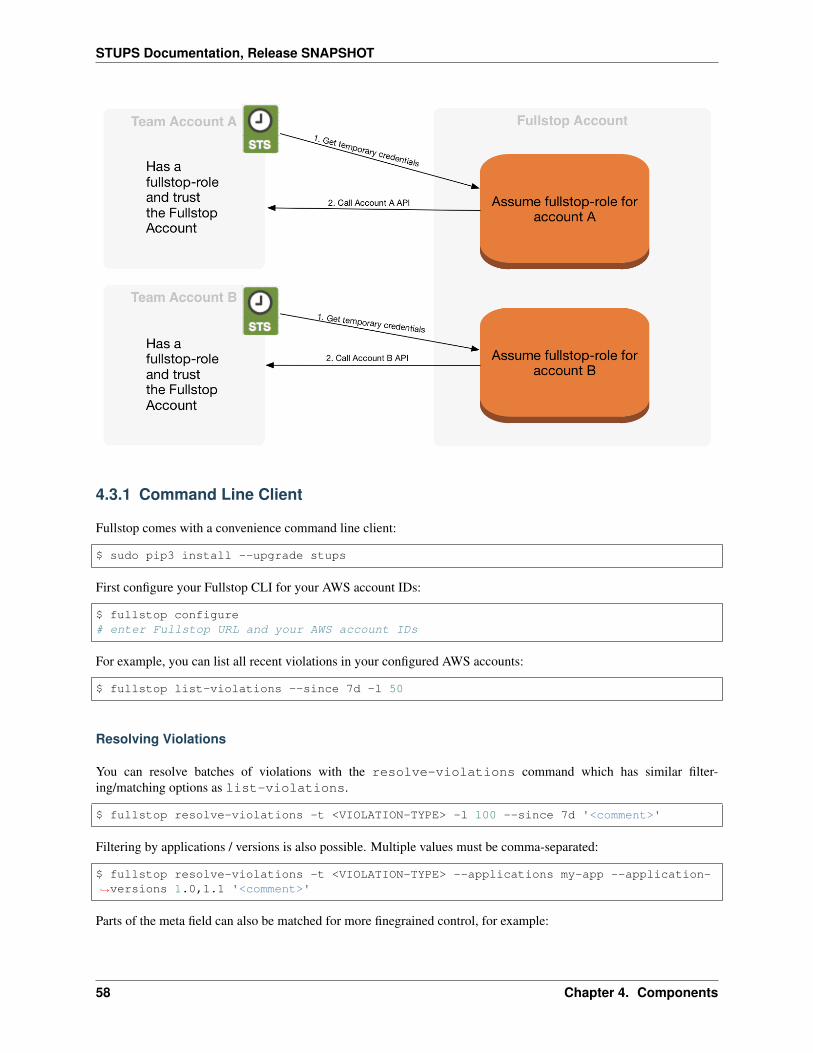
STUPS Documentation, Release SNAPSHOT
4.3.1 Command Line Client
Fullstop comes with a convenience command line client:
$ sudo pip3 install --upgrade stups
First configure your Fullstop CLI for your AWS account IDs:
$ fullstop configure# enter Fullstop URL and your AWS account IDs
For example, you can list all recent violations in your configured AWS accounts:
$ fullstop list-violations --since 7d -l 50
Resolving Violations
You can resolve batches of violations with the resolve-violations command which has similar filter-ing/matching options as list-violations.
$ fullstop resolve-violations -t <VIOLATION-TYPE> -l 100 --since 7d '<comment>'
Filtering by applications / versions is also possible. Multiple values must be comma-separated:
$ fullstop resolve-violations -t <VIOLATION-TYPE> --applications my-app --application-→˓versions 1.0,1.1 '<comment>'
Parts of the meta field can also be matched for more finegrained control, for example:
58 Chapter 4. Components
STUPS Documentation, Release SNAPSHOT
$ fullstop resolve-violations -t WRONG_AMI -m ami_name=another-ami 'My boss wants me→˓to do this'
4.4 Kio
Kio is STUPS’ application registry. Kio holds all basic information about applications.
Most services of STUPS rely on Kio for being the authoritative source for existing applications. Before you deploy anapplication in the STUPS infrastructure, you have to register it in Kio. You can use YOUR TURN to have a nice UI ontop of Kio or you can access it via command line tool or the REST API.
Registered applications get service users in your IAM solution by mint.
4.4.1 Command Line Client
Kio comes with a convenience command line client:
$ sudo pip3 install --upgrade stups$ stups configure # will configure Kio URL too
For example, you can list all applications, that are owner by a certain team:
$ kio app list --team myteam
You can view the details of one app:
$ kio app show myapp
You can also update properties of apps:
$ kio app update myapp active=false
4.4.2 Installation
See the STUPS Installation Guide section on Kio for details about deploying the Kio application registry into yourAWS account.
4.5 Mai
Mai is a command line utility to retrieve temporary AWS credentials.
4.5.1 Installation
Install or upgrade to the latest version of Mai () with PIP:
$ sudo pip3 install --upgrade stups-mai
4.4. Kio 59

STUPS Documentation, Release SNAPSHOT
4.5.2 How to use
Creating a new profile:
$ mai create myteam$ Identity provider URL: https://aws.example.org # Enter your Identity Provider URL$ SAML username: [email protected] # Enter your SAML username# answer the questions
Deleting a profile:
$ mai delete myteam
List profile(s):
$ mai list
Login profile(s):
$ mai login myteam
If you only have one profile, you can simply execute mai to login:
$ mai$ # credentials are now stored in ~/.aws/credentials$ aws ec2 describe-instances # example usage
You can set the default profile to use when running mai without arguments:
$ mai set-default myprofile
Tip: Mai commands can be abbreviated, i.e. the following commands are equivalent:
$ mai set myprof$ mai set-def myprof$ mai set-default myprof
Note: Mai will save its configuration in a YAML file in your home directory (~/.config/mai/mai.yaml onLinux, ~/Library/Application\ Support/mai/mai.yaml on OSX)
4.6 mint
mint is STUPS’ secret distributor and rotator. Its main task is to constantly rotate service passwords or API keys andprovide the secrets to the actual applications.
4.6.1 How it works
60 Chapter 4. Components

STUPS Documentation, Release SNAPSHOT
Step 0
A developer has to specify which AWS account the credentials of their application should get distributed to.
Step 1 + 2
At first, mint makes sure that every registered application has its own ‘service user’ in the IAM solution. It then alsodeletes all users that are either inactive or do not even exist in Kio.
Step 3 + 4
mint will regularly rotate the passwords and OAuth 2.0 credentials for all service users. The new secrets are thenstored in S3 buckets in the owning team’s AWS accounts, where each registered application has one directory. minthas write access to those directories for updating the secrets but no read access.
Step 5
Applications can download their current secrets from their directory on S3 using their instance profiles. A team hasto configure access to the correct credentials for their server. It is the application owner’s responsibility to assign thecorrect IAM profiles to the actual EC2 instances. berry can help with the permanent retrieval of the application’ssecrets.
The following picture demonstrates the exchange over S3:
4.6.2 API for applications
mint stores all credentials of an application in a directory in S3. If you know in which S3 bucket mint stores everything,you can construct the correct URLs to it:
• https://mints-s3-bucket.amazonaws.com/my-app-id/user.json
• https://mints-s3-bucket.amazonaws.com/my-app-id/client.json
<s3 bucket> / <app-id> / [user|client].json
The ‘user.json’ contains username and password of the service user. The ‘client.json’ contains the OAuth 2.0 clientcredentials. You should download the files via the AWS SDKs but you could also construct the HTTP request yourselfaccording to the Amazon documentation. The two files have the following content:
user.json:
{"application_username": "abc","application_password": "xyz"
}
client.json:
{"client_id": "foo","client_secret": "bar"
}
4.6. mint 61

STUPS Documentation, Release SNAPSHOT
Look at berry for automated download of these files for your application. Remember that these files change regularly.See also Taupage, which already integrates berry and provides the credentials files to your Docker image on the localfilesystem.
Note: In order to access other OAuth 2.0 protected services with your application, you need an access token. If yourIAM solution supports the Resource Owner Password Credentials Grant, then you can get an access token for yourselfwith the above credentials:
$ curl -u $client_id:$client_secret \-d "grant_type=password&username=$application_username&password=$application_
→˓password&scope=cn+uid" \https://your-oauth-provider/oauth2/access_token
4.7 odd
odd is the SSH bastion host which allows connecting to private EC2 instances from the outside world.
4.7.1 How to use
See the section SSH Access on how to get SSH access to the “odd” bastion host and private EC2 instances using thePiù command line tool.
4.7.2 SSH access granting flow
Details about the SSH access granting flow are described on the even page.
4.7.3 Installation
The “odd” bastion host is automatically set up in every STUPS AWS account by Seven Seconds.
4.8 Pier One
Pier One is STUPS’ Docker registry with immutable tags, repo permissions, S3 backend and OAuth 2.0. It differsfrom the public registry in that all tags and images are immutable which are required for reproducible deployments andfor internal and external audits. In addition, Pier One respects the notion of teams and allows access to namespacesbased on your team.
4.8.1 How to use it
Pier One is fully Docker compliant. You can push Docker images using the normal Docker command line client:
$ sudo pip3 install --upgrade stups-pierone$ pierone login # configures ~/.docker/config.json$ docker build -t pierone.stups.example.com/your-team-id/myapp:0.1 .$ docker push pierone.stups.example.com/your-team-id/myapp:0.1
62 Chapter 4. Components
STUPS Documentation, Release SNAPSHOT
How can I delete Docker images? Docker images cannot be deleted as Pier One tries to ensure immutable deploy-ment artifacts for audit compliance.
4.8.2 Permissions
Pier One allows you to push Docker images based on team permissions. Pushing to“pierone.stups.example.org/myteam/myapp:1.0” is allowed if at least one of the following is true:
• You are pushing with your own user (employee) credentials and you belong to the team “myteam”.
• A service user (application registered in Kio) is pushing and the OAuth token has the “application.write” scopeand the service user (application) is assigned to the team “myteam”.
• A service user is pushing and the OAuth token has the “application.write_all” scope.
4.8.3 Command Line Client
Pier One comes with a convenience command line client:
$ sudo pip3 install --upgrade stups-pierone$ pierone login # configures ~/.dockercfg
For example, you can list all your team artifacts:
$ pierone artifacts myteam
You can use the latest command to see the latest (by creation time) tag for a given artifact:
$ pierone latest myteam myapp1.8.5
How to configure
The command line client uses the OS’ default configuration location.
Linux:
$ cat ~/.config/pierone.yaml
Mac:
$ cat ~/Library/Application\ Support/pierone/pierone.yaml
Using the CLI for Service Users
The Pier One command line client automatically tries to use “service” tokens if the right environment variables areset:
OAUTH2_ACCESS_TOKEN_URL URL of the OAuth2 token endpoint, e.g. https://token.services.example.org/oauth2/access_token
CREDENTIALS_DIR Path to the OAuth2 service user credentials (user.json and client.json)
4.8. Pier One 63

STUPS Documentation, Release SNAPSHOT
See the Python tokens library for more information.
The service user needs to have the “application.write” scope granted. You can assign the “application.write” scope tothe service user (e.g. CI/CD application) in YOUR TURN.
Example how the CLI can be used in a CI/CD build pipeline:
# OAUTH2_ACCESS_TOKEN_URL must point to the correct OAuth2 token endpoint for service→˓usersexport OAUTH2_ACCESS_TOKEN_URL=https://token.services.example.org/oauth2/access_token# NOTE: CREDENTIALS_DIR is already automatically set by the Taupage AMIexport CREDENTIALS_DIR=/meta/credentialspierone login --url pierone.example.org # will write ~/.docker/config.json# pushing to the "myteam" repo will only work if "myteam" is assigned to the service→˓user (application)docker push pierone.example.org/myteam/myartifact:cd${BUILD_NUMBER}
4.8.4 Installation
See the STUPS Installation Guide section on Pier One for details about deploying Pier One into your AWS account.
4.9 Più
Più is the command line client for the even SSH access granting service.
4.9.1 Installation
Install or upgrade to the latest version of Più () with PIP:
$ sudo pip3 install --upgrade stups-piu
4.9.2 How to use
See the section SSH Access on how to get SSH access to EC2 instances with Più.
4.9.3 How to configure
• Linux:
$ cat ~/.config/piu.yaml
• Mac:
$ cat ~/Library/Application\ Support/piu/piu.yaml
An example configuration:
{even_url: 'https://even.example.com', odd_host: 'odd-eu-west-1.example.com'}
64 Chapter 4. Components

STUPS Documentation, Release SNAPSHOT
4.10 Senza
Senza is STUPS’ deployment tool to create and execute AWS CloudFormation templates in a sane way.
See the Deployment section for details on how to deploy applications using Senza, Pier One and Taupage.
4.10.1 Installation
Install or upgrade to the latest version of Senza () with PIP:
$ sudo pip3 install --upgrade stups-senza
4.10.2 Command Line Usage
Senza definitions can be bootstrapped conveniently to get started quickly:
$ senza init myapp.yaml
Cloud Formation stacks are created from Senza definitions with the create command:
$ senza create myapp.yaml 1 0.1-SNAPSHOT
You can disable the automatic Cloud Formation rollback-on-failure in order to do ‘post-mortem’ debugging (e.g. onan EC2 instance):
$ senza create --disable-rollback myerroneous-stack.yaml 1 0.1-SNAPSHOT
You can pass parameters from yaml file.
$ senza create --parameter-file parameters.yaml myapp.yaml 1 0.1-SNAPSHOT
Stacks can be listed using the list command:
$ senza list myapp.yaml # list only active stacks for myapp$ senza list myapp.yaml --all # list stacks for myapp (also deleted ones)$ senza list # list all active stacks$ senza list --all # list all stacks (including deleted ones)$ senza list "suite-.*" 1 # list stacks starting with "suite" and with version→˓"1"$ senza list ".*" 42 # list all stacks with version "42"$ senza list mystack ".*test" # list all stacks for "mystack" with version ending in→˓"test"
There are a few commands to get more detailed information about stacks:
$ senza resources myapp.yaml 1 # list all CF resources$ senza events myapp.yaml 1 # list all CF events$ senza instances myapp.yaml 1 # list EC2 instances and IPs$ senza console myapp.yaml 1 # get EC2 console output for all stack instances$ senza console 172.31.1.2 # get EC2 console output for single instance
Most commands take so-called STACK_REF arguments, you can either use an existing Senza definition YAML file (asshown above) or use the stack’s name and version, you can also use regular expressions to match multiple applicationsand versions:
4.10. Senza 65

STUPS Documentation, Release SNAPSHOT
$ senza inst # all instances, no STACK_REF argument given$ senza inst mystack # list instances for all versions of "mystack"$ senza inst mystack 1 # only list instances for "mystack" version "1"$ senza inst "suite-.*" 1 # list instances starting with "suite" and with→˓version "1"$ senza inst ".*" 42 # list all instances with version "42"$ senza inst mystack ".*test" # list all instances for "mystack" with version ending→˓in "test"
Traffic can be routed via Route53 DNS to your new stack:
$ senza traffic myapp.yaml # show traffic distribution$ senza traffic myapp.yaml 2 50 # give version 2 50% of traffic
Warning: Some clients use connection pools which - by default - reuse connections as long as there are requeststo be processed. In this case senza traffic won’t result in any redirection of the traffic, unfortunately. Toforce such clients to switch traffic from one stack to the other you might want to manually disable the load balancer(ELB) of the old stack, e.g. by changing the ELB listener port. This switches traffic entirely. Switching trafficslowly (via weighted DNS records) is only possible for NEW connections.
It is recommended to monitor the behavior of clients during traffic switching and if necessary to ask them toreconfigure their connection pools.
Stacks can be deleted when they are no longer used:
$ senza delete myapp.yaml 1$ senza del mystack # shortcut: delete the only version of "mystack"
Available Taupage AMIs and all other used AMIs can be listed to check whether old, outdated images are still in-useor if a new Taupage AMI is available:
$ senza images
Tip: All commands and subcommands can be abbreviated, i.e. the following lines are equivalent:
$ senza list$ senza l
Bash Completion
The programmable completion feature in Bash permits typing a partial command, then pressing the [Tab] key toautocomplete the command sequence. If multiple completions are possible, then [Tab] lists them all.
To activate bash completion for the Senza CLI, just run:
$ eval "$(_SENZA_COMPLETE=source senza)"
Put the eval line into your .bashrc:
$ echo 'eval "$(_SENZA_COMPLETE=source senza)"' >> ~/.bashrc
66 Chapter 4. Components

STUPS Documentation, Release SNAPSHOT
Controlling Command Output
The Senza CLI supports three different output formats:
text Default ANSI-colored output for human users.
json JSON output of tables for scripting.
tsv Print tables as tab-separated values (TSV).
JSON is best for handling the output programmatically via various languages or jq (a command-line JSON processor).The text format is easy for humans to read, and “tsv” format works well with traditional Unix text processing tools,such as sed, grep, and awk:
$ senza list --output json | jq .$ senza instances my-stack --output tsv | awk -F\\t '{ print $6 }'
4.10.3 Senza Definition
Senza definitions are Cloud Formation templates as YAML with added ‘components’ on top. A minimal Senza defi-nition without any Senza components would look like:
Description: "A minimal Cloud Formation stack creating a SQS queue"SenzaInfo:
StackName: exampleResources:
MyQueue:Type: AWS::SQS::Queue
Tip: Use senza init to quickly bootstrap a new Senza definition YAML for most common use cases (e.g. a webapplication).
During evaluation of the definition, mustache templating is applied with access to the rendered definition, includingthe SenzaInfo, SenzaComponents and Arguments key (containing all given arguments).
Senza Info
The SenzaInfo key must always be present in the definition YAML and configures global Senza behavior.
Available properties for the SenzaInfo section are:
StackName The stack name (required).
OperatorTopicId Optional SNS topic name or ARN for Cloud Formation notifications. This can used for exam-ple to send notifications about deployments to a mailing list.
Parameters Custom Senza definition parameters. This can be used to dynamically substitute variables in the CloudFormation template.
SpotinstAccessToken The access token required to create Elastigroups (optional). See the Senza::Elastigroupcomponent for more details. This property can be encrypted with KMS. It will be decrypted by the senza clientto generate the Cloud Formation template. The expected format is: “senza:kms:AQICAH. . . r0lbg==” where“senza:kms:” is the chosen prefix and the remainder is the encrypted secret.
Tip: Follow the vendor’s instructions to Create an API token.
4.10. Senza 67
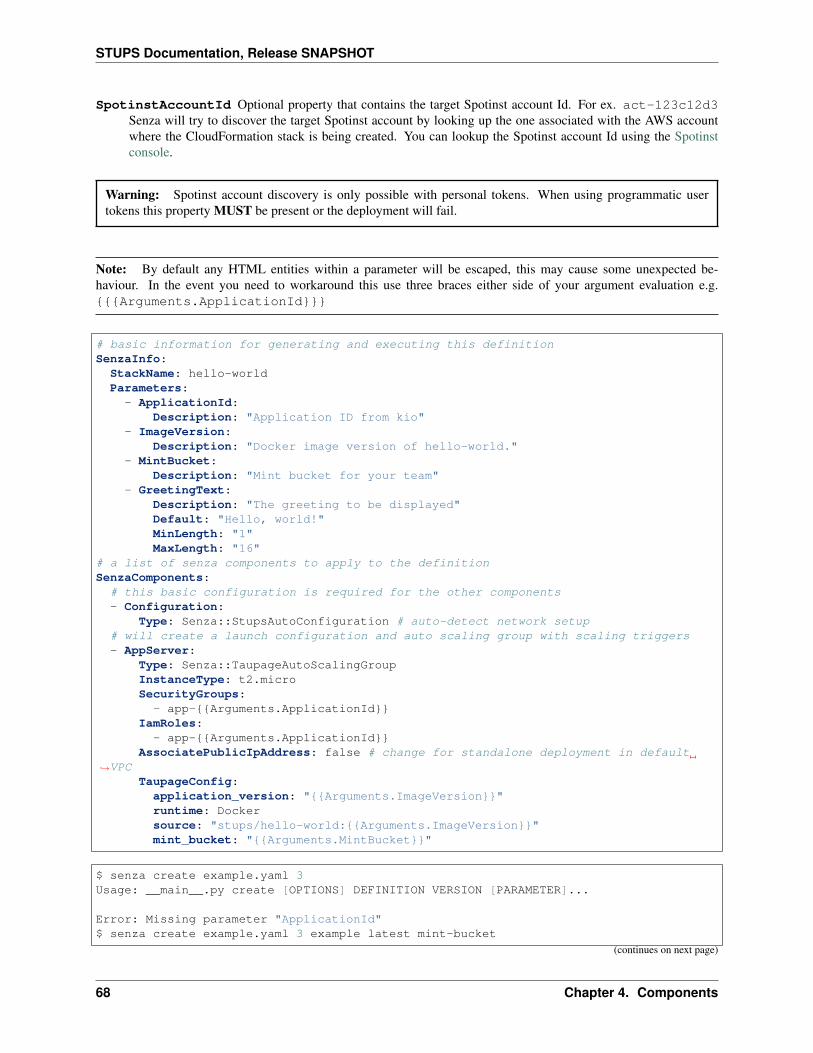
STUPS Documentation, Release SNAPSHOT
SpotinstAccountId Optional property that contains the target Spotinst account Id. For ex. act-123c12d3Senza will try to discover the target Spotinst account by looking up the one associated with the AWS accountwhere the CloudFormation stack is being created. You can lookup the Spotinst account Id using the Spotinstconsole.
Warning: Spotinst account discovery is only possible with personal tokens. When using programmatic usertokens this property MUST be present or the deployment will fail.
Note: By default any HTML entities within a parameter will be escaped, this may cause some unexpected be-haviour. In the event you need to workaround this use three braces either side of your argument evaluation e.g.{{{Arguments.ApplicationId}}}
# basic information for generating and executing this definitionSenzaInfo:StackName: hello-worldParameters:- ApplicationId:
Description: "Application ID from kio"- ImageVersion:
Description: "Docker image version of hello-world."- MintBucket:
Description: "Mint bucket for your team"- GreetingText:
Description: "The greeting to be displayed"Default: "Hello, world!"MinLength: "1"MaxLength: "16"
# a list of senza components to apply to the definitionSenzaComponents:# this basic configuration is required for the other components- Configuration:
Type: Senza::StupsAutoConfiguration # auto-detect network setup# will create a launch configuration and auto scaling group with scaling triggers- AppServer:
Type: Senza::TaupageAutoScalingGroupInstanceType: t2.microSecurityGroups:
- app-{{Arguments.ApplicationId}}IamRoles:
- app-{{Arguments.ApplicationId}}AssociatePublicIpAddress: false # change for standalone deployment in default
→˓VPCTaupageConfig:
application_version: "{{Arguments.ImageVersion}}"runtime: Dockersource: "stups/hello-world:{{Arguments.ImageVersion}}"mint_bucket: "{{Arguments.MintBucket}}"
$ senza create example.yaml 3Usage: __main__.py create [OPTIONS] DEFINITION VERSION [PARAMETER]...
Error: Missing parameter "ApplicationId"$ senza create example.yaml 3 example latest mint-bucket
(continues on next page)
68 Chapter 4. Components
STUPS Documentation, Release SNAPSHOT
(continued from previous page)
Generating Cloud Formation template.. OKCreating Cloud Formation stack hello-world-3.. OK
The parameters can also be specified by name, which might come handy in complex scenarios with sizeable numberof parameters, and also to make the command line more easily readable, for example:
$ senza create example.yaml 3 example MintBucket=<mint-bucket> ImageVersion=latest
Here, the ApplicationId is given as a positional parameter, then the two other parameters follow specified bytheir names. The named parameters on the command line can be given in any order, but no positional parameter isallowed to follow the named ones.
Note: The name=value named parameters are split on first = which makes it possible to still include a literal = inthe value part. This also means that if you have to include it in the parameter value, you need to pass this parameterwith the name, to prevent senza from treating the part of the parameter value before the first = as the parametername.
It is possible to pass any of the supported CloudFormation Properties such as AllowedPattern,AllowedValues, MinLength, MaxLength and many others. Senza itself will not enforce these but Cloud-Formation will evaluate the generated template and raise an exception if any of the Properties is not met. For example:
$ senza create example.yaml 3 example latest mint-bucket "Way too long greeting"Generating Cloud Formation template.. OKCreating Cloud Formation stack hello-world-3.. EXCEPTION OCCURRED: An error occurred→˓(ValidationError) when calling the CreateStack operation: Parameter 'GreetingText'→˓must contain at most 15 charactersTraceback (most recent call last):[...]
Any parameter may be given a default value using Default attribute. If a parameter was not specified on thecommand line (either as positional or named one), the default value is used. It makes sense to always put all parameterswhich have a default value at the bottom of the parameter definition list, otherwise one will be forced to specify all thefollowing parameters using a name=value as there would be no way to map them to proper position.
There is an option to pass parameters from file. The file needs to be formatted in yaml.
$ senza create --parameter-file parameters.yaml example.yaml 3 1.0-SNAPSHOT
Here is an example of a parameter file.
ApplicationId: example-app-idMintBucket: your-mint-bucket
You can also combine parameter file and parameters from command line, but you can’t have same parameter twice.The parameter can’t exist both on file and command line.
$ senza create --parameter-file parameters.yaml example.yaml 3 1.0-SNAPSHOT→˓Param=Example1
AccountInfo
The following properties are also available in Senza templates.
4.10. Senza 69

STUPS Documentation, Release SNAPSHOT
{{AccountInfo.Region}} : the AWS region where the stack is created. Ex: ‘eu-central-1’. Note: in manyplaces of a template, {“Ref” : “AWS::Region”} can also be used.
{{AccountInfo.AccountAlias}} : the alias name of the AWS account: ex: ‘super-team1-account’
{{AccountInfo.AccountID}} : the AWS account id: ex: ‘353272323354’
{{AccountInfo.TeamID}} : the team ID. Ex: ‘super-team1’.
{{AccountInfo.Domain}} : the AWS account domain: Ex: super-team1.net
Mappings
Mappings are essentially key-value pairs and behave exactly as CloudFormation Mappings. Use Mappings forImages, ServerSubnets or LoadBalancerSubnets. An Example:
Mappings:Images:
eu-west-1:MyImage: "ami-123123"
# (..)Image: MyImage
Senza Components
Components are predefined Cloud Formation snippets that are easy to configure and generate all the boilerplate JSONthat is required by Cloud Formation.
All Senza components must be configured in a list below the top-level “SenzaComponents” key, the structure is asfollows:
SenzaComponents:- ComponentName1:
Type: ComponentType1SomeComponentProperty: "some value"
- ComponentName2:Type: ComponentType2
Note: Please note that each list item below “SenzaComponents” is a map with only one key (the compo-nent name). The YAML “flow-style” syntax would be: SenzaComponents: [{CompName: {Type:CompType}}].
Senza::StupsAutoConfiguration
The StupsAutoConfiguration component type autodetects load balancer and server subnets by relying on STUPS’naming convention (DMZ subnets have “dmz” in their name). It also finds the latest Taupage AMIs and defines theimages which can be used by the “TaupageAutoScalingGroup” component.
Example usage:
SenzaComponents:- Configuration:
Type: Senza::StupsAutoConfiguration
70 Chapter 4. Components
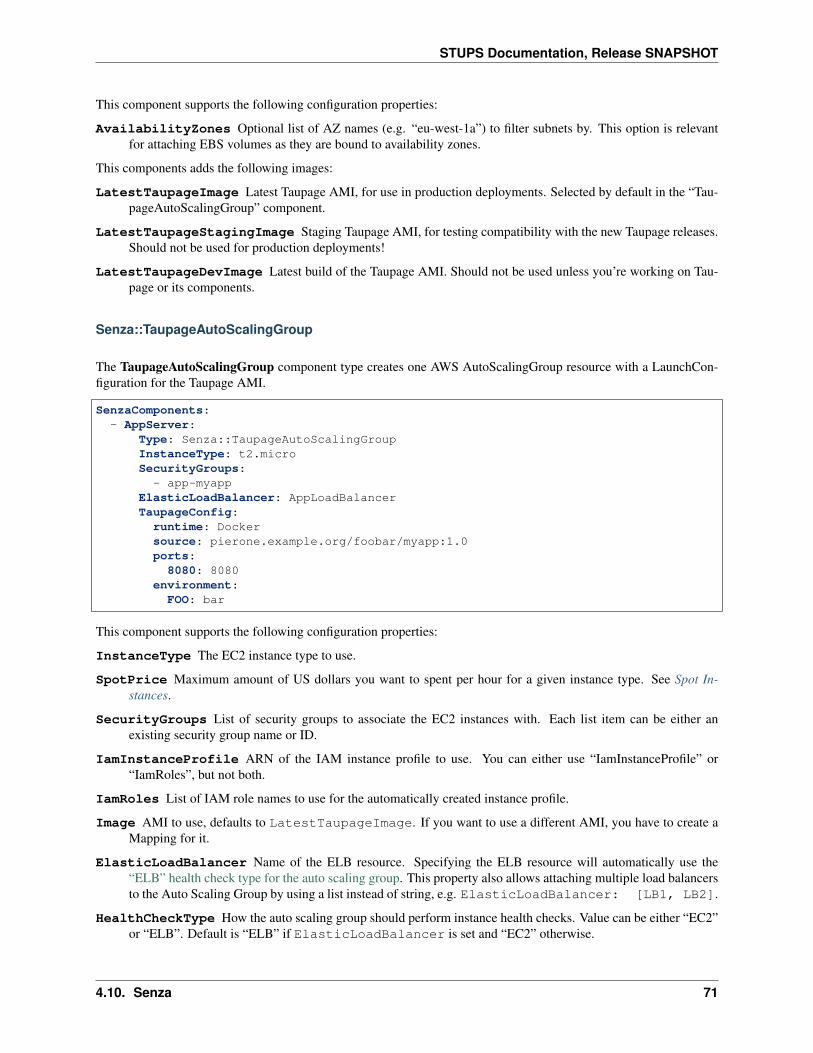
STUPS Documentation, Release SNAPSHOT
This component supports the following configuration properties:
AvailabilityZones Optional list of AZ names (e.g. “eu-west-1a”) to filter subnets by. This option is relevantfor attaching EBS volumes as they are bound to availability zones.
This components adds the following images:
LatestTaupageImage Latest Taupage AMI, for use in production deployments. Selected by default in the “Tau-pageAutoScalingGroup” component.
LatestTaupageStagingImage Staging Taupage AMI, for testing compatibility with the new Taupage releases.Should not be used for production deployments!
LatestTaupageDevImage Latest build of the Taupage AMI. Should not be used unless you’re working on Tau-page or its components.
Senza::TaupageAutoScalingGroup
The TaupageAutoScalingGroup component type creates one AWS AutoScalingGroup resource with a LaunchCon-figuration for the Taupage AMI.
SenzaComponents:- AppServer:
Type: Senza::TaupageAutoScalingGroupInstanceType: t2.microSecurityGroups:
- app-myappElasticLoadBalancer: AppLoadBalancerTaupageConfig:
runtime: Dockersource: pierone.example.org/foobar/myapp:1.0ports:8080: 8080
environment:FOO: bar
This component supports the following configuration properties:
InstanceType The EC2 instance type to use.
SpotPrice Maximum amount of US dollars you want to spent per hour for a given instance type. See Spot In-stances.
SecurityGroups List of security groups to associate the EC2 instances with. Each list item can be either anexisting security group name or ID.
IamInstanceProfile ARN of the IAM instance profile to use. You can either use “IamInstanceProfile” or“IamRoles”, but not both.
IamRoles List of IAM role names to use for the automatically created instance profile.
Image AMI to use, defaults to LatestTaupageImage. If you want to use a different AMI, you have to create aMapping for it.
ElasticLoadBalancer Name of the ELB resource. Specifying the ELB resource will automatically use the“ELB” health check type for the auto scaling group. This property also allows attaching multiple load balancersto the Auto Scaling Group by using a list instead of string, e.g. ElasticLoadBalancer: [LB1, LB2].
HealthCheckType How the auto scaling group should perform instance health checks. Value can be either “EC2”or “ELB”. Default is “ELB” if ElasticLoadBalancer is set and “EC2” otherwise.
4.10. Senza 71

STUPS Documentation, Release SNAPSHOT
HealthCheckGracePeriod The length of time in seconds after a new EC2 instance comes into service that AutoScaling starts checking its health.
TaupageConfig Taupage AMI config, see Taupage for details. At least the properties runtime (“Docker”) andsource (Docker image) are required. Usually you will want to specify ports and environment too.
AssociatePublicIpAddress Whether to associate EC2 instances with a public IP address. This boolean value(true/false) is false by default.
BlockDeviceMappings Specify additional EBS Devices you want to attach to the nodes. See for Option Mapbelow.
AutoScaling Map of auto scaling properties, see below.
AutoScaling
AutoScaling properties are:
Minimum Minimum number of instances to spawn.
Maximum Maximum number of instances to spawn.
DesiredCapacity Desired number of instances to spawn.
SuccessRequires During startup of the stack, define when your ASG is considered healthy by CloudFormation.Defaults to one healthy instance within 15 minutes. To change it to 4 healthy instances within 1 hour, 20 minutesand 30 seconds pass “4 within 1h20m30s” (you can omit hours/minutes/seconds as you please). Values that looklike integers will be used as healthy instance count, e.g. “2” would be interpreted as 2 healthy instances withinthe default timeout of 15 minutes.
MetricType Metric to do auto scaling on. This will create automatic Alarms in Cloudwatch for you. If supplied,must be either CPU, NetworkIn or NetworkOut. If not supplied, you’re Auto Scaling Group will notdynamically scale and you have to define you’re own alerts.
ScaleUpThreshold On which value of the metric to scale up. For the “CPU” metric: a value of 70 wouldmean 70% CPU usage. For network metrics a value of 100 would mean 100 bytes, but you can pass the unit(KB/GB/TB), e.g. “100 GB”.
ScaleDownThreshold On which value of the metric to scale down. For the “CPU” metric: a value of 40 wouldmean 40% CPU usage. For network metrics a value of 2 would mean 2 bytes, but you can pass the unit(KB/GB/TB), e.g. “2 GB”.
ScalingAdjustment How many instances are added/removed per scaling action. Defaults to 1.
Cooldown: After a scaling action occured, do not scale again for this amount of time in seconds. Defaults to 60 (oneminute).
Statistic Which statistic to track in order to decide when scaling thresholds are met. Defaults to “Average”, canalso be “SampleCount”, “Sum”, “Minimum”, “Maximum”.
Period Period over which statistic is calculated (in seconds), defaults to 300 (five minutes). It can be 10, 30 ormultiples of 60 seconds.
EvaluationPeriods The number of periods over which data is compared to the specified threshold. Defaults to2.
BlockDeviceMappings
BlockDeviceMappings properties are:
DeviceName For example: /dev/xvdk
Ebs Map of EBS Options, see below.
Ebs properties are:
72 Chapter 4. Components
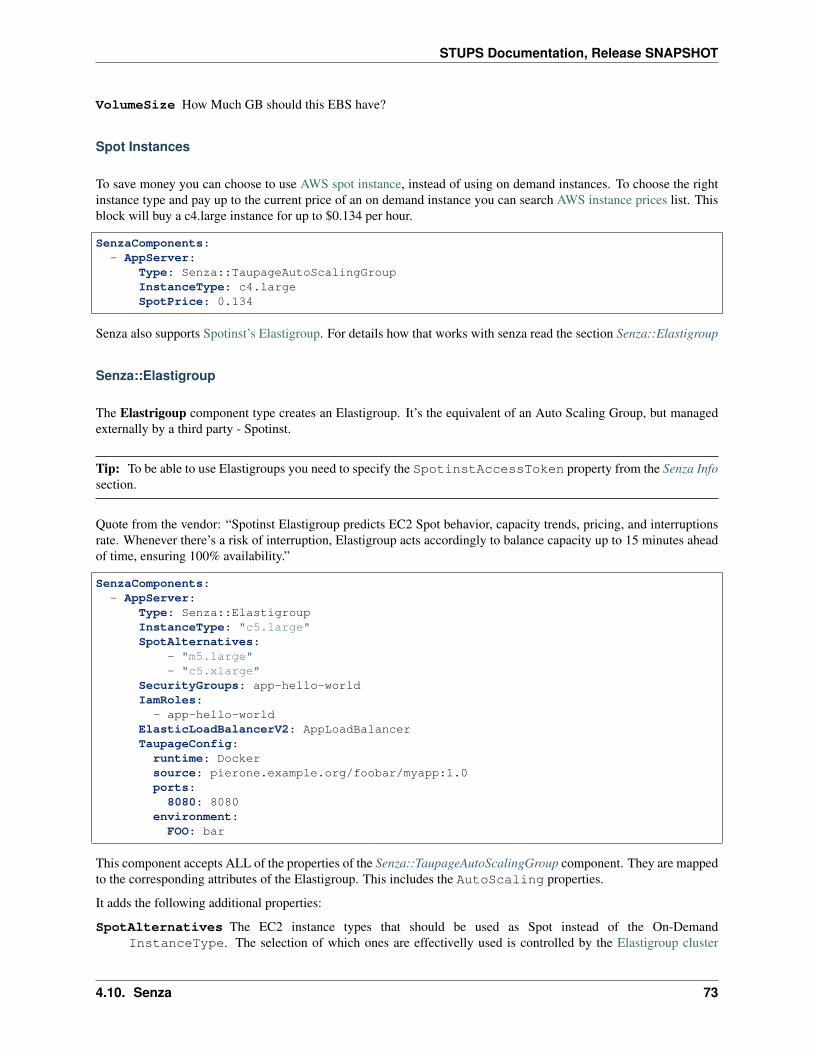
STUPS Documentation, Release SNAPSHOT
VolumeSize How Much GB should this EBS have?
Spot Instances
To save money you can choose to use AWS spot instance, instead of using on demand instances. To choose the rightinstance type and pay up to the current price of an on demand instance you can search AWS instance prices list. Thisblock will buy a c4.large instance for up to $0.134 per hour.
SenzaComponents:- AppServer:
Type: Senza::TaupageAutoScalingGroupInstanceType: c4.largeSpotPrice: 0.134
Senza also supports Spotinst’s Elastigroup. For details how that works with senza read the section Senza::Elastigroup
Senza::Elastigroup
The Elastrigoup component type creates an Elastigroup. It’s the equivalent of an Auto Scaling Group, but managedexternally by a third party - Spotinst.
Tip: To be able to use Elastigroups you need to specify the SpotinstAccessToken property from the Senza Infosection.
Quote from the vendor: “Spotinst Elastigroup predicts EC2 Spot behavior, capacity trends, pricing, and interruptionsrate. Whenever there’s a risk of interruption, Elastigroup acts accordingly to balance capacity up to 15 minutes aheadof time, ensuring 100% availability.”
SenzaComponents:- AppServer:
Type: Senza::ElastigroupInstanceType: "c5.large"SpotAlternatives:
- "m5.large"- "c5.xlarge"
SecurityGroups: app-hello-worldIamRoles:- app-hello-world
ElasticLoadBalancerV2: AppLoadBalancerTaupageConfig:
runtime: Dockersource: pierone.example.org/foobar/myapp:1.0ports:8080: 8080
environment:FOO: bar
This component accepts ALL of the properties of the Senza::TaupageAutoScalingGroup component. They are mappedto the corresponding attributes of the Elastigroup. This includes the AutoScaling properties.
It adds the following additional properties:
SpotAlternatives The EC2 instance types that should be used as Spot instead of the On-DemandInstanceType. The selection of which ones are effectivelly used is controlled by the Elastigroup cluster
4.10. Senza 73
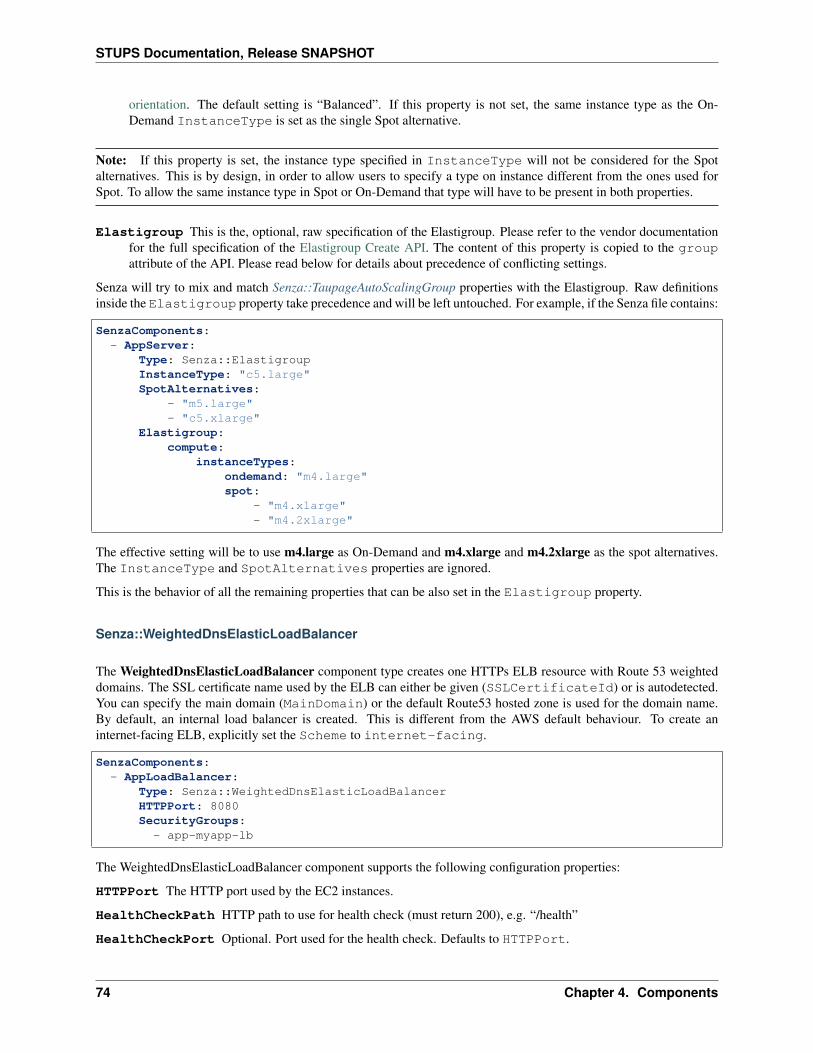
STUPS Documentation, Release SNAPSHOT
orientation. The default setting is “Balanced”. If this property is not set, the same instance type as the On-Demand InstanceType is set as the single Spot alternative.
Note: If this property is set, the instance type specified in InstanceType will not be considered for the Spotalternatives. This is by design, in order to allow users to specify a type on instance different from the ones used forSpot. To allow the same instance type in Spot or On-Demand that type will have to be present in both properties.
Elastigroup This is the, optional, raw specification of the Elastigroup. Please refer to the vendor documentationfor the full specification of the Elastigroup Create API. The content of this property is copied to the groupattribute of the API. Please read below for details about precedence of conflicting settings.
Senza will try to mix and match Senza::TaupageAutoScalingGroup properties with the Elastigroup. Raw definitionsinside the Elastigroup property take precedence and will be left untouched. For example, if the Senza file contains:
SenzaComponents:- AppServer:
Type: Senza::ElastigroupInstanceType: "c5.large"SpotAlternatives:
- "m5.large"- "c5.xlarge"
Elastigroup:compute:
instanceTypes:ondemand: "m4.large"spot:
- "m4.xlarge"- "m4.2xlarge"
The effective setting will be to use m4.large as On-Demand and m4.xlarge and m4.2xlarge as the spot alternatives.The InstanceType and SpotAlternatives properties are ignored.
This is the behavior of all the remaining properties that can be also set in the Elastigroup property.
Senza::WeightedDnsElasticLoadBalancer
The WeightedDnsElasticLoadBalancer component type creates one HTTPs ELB resource with Route 53 weighteddomains. The SSL certificate name used by the ELB can either be given (SSLCertificateId) or is autodetected.You can specify the main domain (MainDomain) or the default Route53 hosted zone is used for the domain name.By default, an internal load balancer is created. This is different from the AWS default behaviour. To create aninternet-facing ELB, explicitly set the Scheme to internet-facing.
SenzaComponents:- AppLoadBalancer:
Type: Senza::WeightedDnsElasticLoadBalancerHTTPPort: 8080SecurityGroups:
- app-myapp-lb
The WeightedDnsElasticLoadBalancer component supports the following configuration properties:
HTTPPort The HTTP port used by the EC2 instances.
HealthCheckPath HTTP path to use for health check (must return 200), e.g. “/health”
HealthCheckPort Optional. Port used for the health check. Defaults to HTTPPort.
74 Chapter 4. Components
STUPS Documentation, Release SNAPSHOT
SecurityGroups List of security groups to use for the ELB. The security groups must allow SSL traffic.
MainDomain Main domain to use, e.g. “myapp.example.org”
VersionDomain Version domain to use, e.g. “myapp-1.example.org”. You can use the usual templating feature tointegrate the stack version, e.g. myapp-{{SenzaInfo.StackVersion}}.example.org.
Scheme The load balancer scheme. Either internal or internet-facing. Defaults to internal.
SSLCertificateId Name or ARN ID of the uploaded SSL/TLS servercertificate to use, e.g. myapp-example-org-letsencrypt orarn:aws:acm:eu-central-1:123123123:certificate/abcdefgh-ijkl-mnop-qrst-uvwxyz012345.You can check available IAM server certificates with aws iam list-server-certificates. ForACM Certificate you must use aws acm list-certificates
Additionally, you can specify any of the valid AWS Cloud Formation ELB properties (e.g. to overwrite Listeners).
4.10.4 Cross-Stack References
Traditional CloudFormation templates only allow to reference resouces that are located in the same template. Thiscan be quite limiting. To compensate Senza selectively supports special cross-stack references in some places in yourtemplate, e.g. in SecurityGroups and IamRoles:
AppServer:Type: Senza::TaupageAutoScalingGroupInstanceType: c4.xlargeSecurityGroups:
- Stack: base-1LogicalId: ApplicationSecurityGroup
IamRoles:- Stack: base-1
LogicalId: ApplicationRole
These references allow for having an additional special stack per application that defines common security groups andIAM roles that are shared across different versions (in contrast to using senza init).
Another use case for cross-stack references if one needs to access outputs from other stacks inside the TaupageConfig:
# database.yaml..Outputs:
DatabaseHost:Value:
"Fn::GetAtt": [Database, Endpoint.Address]
# service.yaml..TaupageConfig:
environment:DB_HOST:
Stack: exchange-rate-database-2Output: DatabaseHost
4.11 Seven Seconds
Seven Seconds is a command line tool to configure AWS accounts for STUPS.
4.11. Seven Seconds 75

STUPS Documentation, Release SNAPSHOT
4.11.1 Installation
Install or upgrade to the latest version of Seven Seconds () with PIP:
$ sudo pip3 install --upgrade stups-sevenseconds
4.11.2 How to use
See the Account Configuration section on how to configure AWS accounts with Seven Seconds.
4.12 Taupage
Taupage is the base AMI allowing dockerized applications to run with STUPS.
As we want to foster immutable (and therefore deterministic and reproducible) deployments, we want to encourage theuse of Docker (and similar deployment technologies). The Taupage AMI is capable of starting a Docker container onboot. This will enable teams to deploy ‘what they want’ as long as they package it in a Docker image. The server willbe set up to have an optimal configuration including managed SSH access, audit logging, log collection, monitoringand reviewed security additions.
4.12.1 Using the Taupage AMI
There is currently no internal tooling but you can find the Taupage AMIs in your EC2 UI. They are maintained by theSTUPS team and regularly updated with the most recent security fixes and configuration improvements.
Note: The process of updating the AMI is not established nor discussed yet!
4.12.2 How to configure the AMI (configuration example)
The Taupage AMI uses the official cloud-init project to receive user configuration. Different to the standard, you cannot use the normal user data mimetypes (no #cloud-config, shell scripts, file uploads, URL lists, . . . ) but only our ownconfiguration format:
#taupage-ami-config
application_id: my-nginx-test-appapplication_version: "1.0"
runtime: Dockersource: "pierone.example.org/myteam/nginx:1.0"
dockercfg:"https://hub.docker.com":auth: foo1234email: [email protected]
ports:80: 80443: 443
(continues on next page)
76 Chapter 4. Components
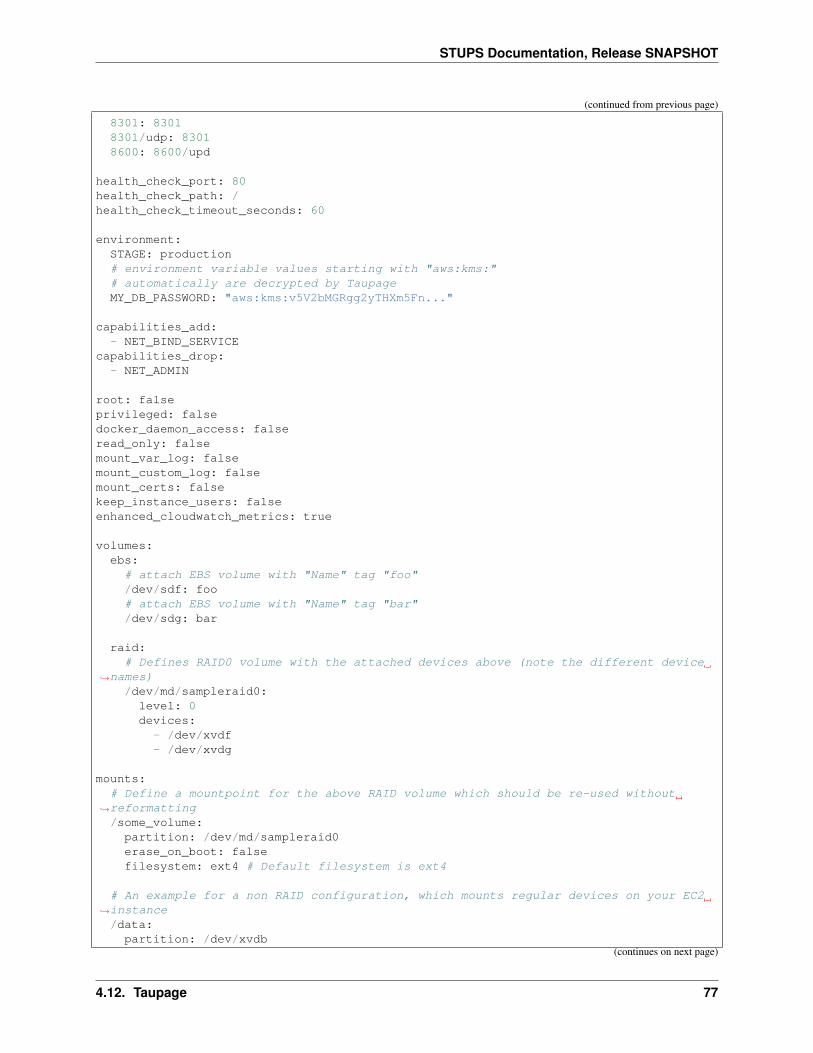
STUPS Documentation, Release SNAPSHOT
(continued from previous page)
8301: 83018301/udp: 83018600: 8600/upd
health_check_port: 80health_check_path: /health_check_timeout_seconds: 60
environment:STAGE: production# environment variable values starting with "aws:kms:"# automatically are decrypted by TaupageMY_DB_PASSWORD: "aws:kms:v5V2bMGRgg2yTHXm5Fn..."
capabilities_add:- NET_BIND_SERVICE
capabilities_drop:- NET_ADMIN
root: falseprivileged: falsedocker_daemon_access: falseread_only: falsemount_var_log: falsemount_custom_log: falsemount_certs: falsekeep_instance_users: falseenhanced_cloudwatch_metrics: true
volumes:ebs:# attach EBS volume with "Name" tag "foo"/dev/sdf: foo# attach EBS volume with "Name" tag "bar"/dev/sdg: bar
raid:# Defines RAID0 volume with the attached devices above (note the different device
→˓names)/dev/md/sampleraid0:
level: 0devices:
- /dev/xvdf- /dev/xvdg
mounts:# Define a mountpoint for the above RAID volume which should be re-used without
→˓reformatting/some_volume:partition: /dev/md/sampleraid0erase_on_boot: falsefilesystem: ext4 # Default filesystem is ext4
# An example for a non RAID configuration, which mounts regular devices on your EC2→˓instance/data:partition: /dev/xvdb
(continues on next page)
4.12. Taupage 77
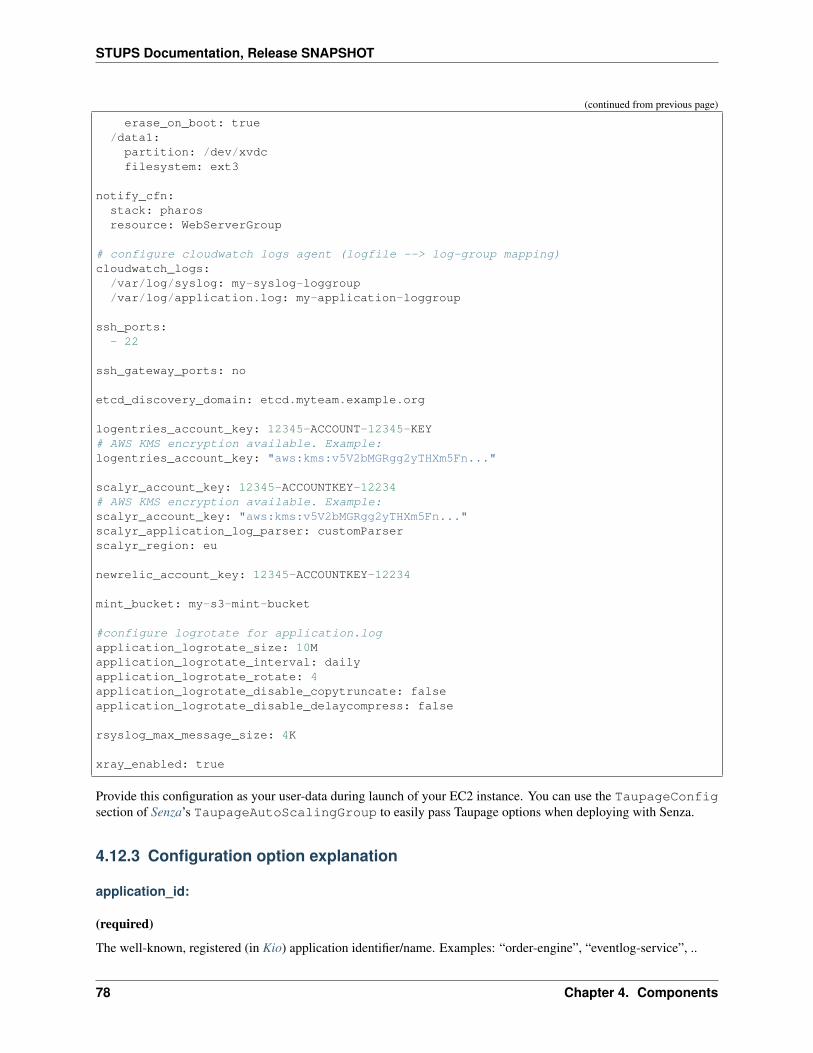
STUPS Documentation, Release SNAPSHOT
(continued from previous page)
erase_on_boot: true/data1:partition: /dev/xvdcfilesystem: ext3
notify_cfn:stack: pharosresource: WebServerGroup
# configure cloudwatch logs agent (logfile --> log-group mapping)cloudwatch_logs:
/var/log/syslog: my-syslog-loggroup/var/log/application.log: my-application-loggroup
ssh_ports:- 22
ssh_gateway_ports: no
etcd_discovery_domain: etcd.myteam.example.org
logentries_account_key: 12345-ACCOUNT-12345-KEY# AWS KMS encryption available. Example:logentries_account_key: "aws:kms:v5V2bMGRgg2yTHXm5Fn..."
scalyr_account_key: 12345-ACCOUNTKEY-12234# AWS KMS encryption available. Example:scalyr_account_key: "aws:kms:v5V2bMGRgg2yTHXm5Fn..."scalyr_application_log_parser: customParserscalyr_region: eu
newrelic_account_key: 12345-ACCOUNTKEY-12234
mint_bucket: my-s3-mint-bucket
#configure logrotate for application.logapplication_logrotate_size: 10Mapplication_logrotate_interval: dailyapplication_logrotate_rotate: 4application_logrotate_disable_copytruncate: falseapplication_logrotate_disable_delaycompress: false
rsyslog_max_message_size: 4K
xray_enabled: true
Provide this configuration as your user-data during launch of your EC2 instance. You can use the TaupageConfigsection of Senza’s TaupageAutoScalingGroup to easily pass Taupage options when deploying with Senza.
4.12.3 Configuration option explanation
application_id:
(required)
The well-known, registered (in Kio) application identifier/name. Examples: “order-engine”, “eventlog-service”, ..
78 Chapter 4. Components
STUPS Documentation, Release SNAPSHOT
application_version:
(required)
The application version string. Examples: “1.0”, “0.1-alpha”, ..
runtime:
(required)
What kind of deployment artifact you are using. Currently supported:
• Docker
source:
(required)
The source, the configured runtime uses to fetch your deployment artifact. For Docker, this is the Docker image.Usually this will point to a Docker image stored in Pier One.
Note:
If the registry part of source contains ‘pierone’: Taupage assumes it needs to pull the image from Pierone and usesOAuth2 credentials of the application set in application_id to authenticate the download of the (Docker) image.This requires a Mint/Berry setup and Pierone indeed.
If there is a dockercfg config key in the taupage.yaml: Taupage uses the credentials from dockercfg to do basicauth against a registry.
If there is neither pierone nor dockercfg: Taupage will not try to authenticate the download.
dockercfg:
(optional)
The intended content of ~/.dockercfg on a Taupage instance. This allows to configure authentication for non-Pieroneregistries which require basic auth. The following example shows a configuration for private docker hub protectedwith basic auth. ‘auth’ must contain a base64 encoded string in ‘<user>:<password>’ format.
Example:
dockercfg:
“https://hub.docker.com”: auth: <base64 encoded user:password>
email: [email protected]
ports:
(optional, default: no ports open)
A map of all ports that have to be opened from the container. The key is the public server port to open and its value isthe original port in your container. By default only TCP ports are opened. If you want to open UDP ports, you have tospecify UDP protocol as a part of value or key:
4.12. Taupage 79

STUPS Documentation, Release SNAPSHOT
ports:8301: 8301 # open 8301 tcp port8301/udp: 8301 # open 8301 udp port8600: 8600/upd # open 8600 udp port
health_check_path:
(optional)
HTTP path to check for status code 200. Taupage will wait at most health_check_timeout_seconds (default:60) until the health check endpoint becomes OK. The health check port is using the port from ports or can beoverwritten with health_check_port.
environment:
(optional)
A map of environment variables to set. Environment variable values starting with “aws:kms:” are automaticallydecrypted by Taupage using KMS (IAM role needs to allow decryption with the used KMS key).
To create a key on kms see here. After this, install the kmsclient and follow the instructions to encrypt avalue using the created key. Following this, add the encrypted value to the environment variable in the format“aws:kms:<encrypted_value>”
Example:
environment:STAGE: production# environment variable values starting with "aws:kms:"# automatically are decrypted by TaupageMY_DB_PASSWORD: "aws:kms:v5V2bMGRgg2yTHXm5Fn..."
capabilities_add:
(optional)
A list of capabilities to add to the execution (without the CAP_ prefix). See http://man7.org/linux/man-pages/man7/capabilities.7.html for available capabilities.
capabilities_drop:
(optional)
A list of capabilities to drop of the execution (without the CAP_ prefix). See http://man7.org/linux/man-pages/man7/capabilities.7.html for available capabilities.
hostname:
(optional)
TBD, Users can define hostname by themselves
80 Chapter 4. Components

STUPS Documentation, Release SNAPSHOT
networking:
(optional)
A type of networking to tell how docker networks a container. See https://docs.docker.com/articles/networking/#how-docker-networks-a-container for details.
Options are:
• bridge (default)
• host (This option also passes the hostname/instance name to the Docker container)
• container:NAME_or_ID
• none
root:
(optional, default: false)
Specifies, if the container has to run as root. By default, containers run as an unprivileged user. See the capabili-ties_add and prefer it always. This is only the last resort.
privileged:
(optional, default: false)
The container will run with –privileged option. See https://docs.docker.com/reference/run/#runtime-privilege-linux-capabilities-and-lxc-configuration for more details. Warning: this has serious secu-rity implications that you must understand and consider!
docker_daemon_access:
(optional, default: false)
Mount the /var/run/docker.sock into the running container. This way, you are able to use and control the Dockerdaemon of the host system. Warning: this has serious security implications that you must understand andconsider!
read_only:
(optional, default: false)
The container will run with –read-only option. Mount the container’s root filesystem as read only.
shm_size:
(optional, default: 64M)
The container will run with –shm-size option. To set /dev/shm size.
4.12. Taupage 81

STUPS Documentation, Release SNAPSHOT
mount_var_log:
(optional, default: false)
This will mount /var/log into the Docker container /var/log-host as read-only.
mount_custom_log:
(optional, default: false)
This will mount /var/log-custom into the Docker container /var/log as read-write.
mount_certs:
(optional, default: false)
This will mount /etc/ssl/certs into the Docker container as read-only.
keep_instance_users: true:
(optional, default: false)
This option allows you to keep the users on the instance, created by AWS. The ubuntu user, it’s authorized_keysand the root users authorized_keys will be deleted. Access to the instances will be granted via Even&Odd. Seehttps://docs.stups.io/en/latest/user-guide/ssh-access.html for more.
enhanced_cloudwatch_metrics: true
(optional, default: false)
This option allows you to enable enhanced Cloudwatch metrics, such as memory and disk space, which are out of thebox not enabled.
Note: This requires the AWS IAM policy “cloudwatch:PutMetricData”.
volumes:
(optional)
Allows you to configure volumes that can later be mounted. Volumes accepts two sub-configurations - EBS and RAID.
EBS
The EBS sub-configuration expects key-value pairs of device name to EBS volumes. The “Name” tag is used to findthe volumes.
Sample EBS volume configuration:
ebs:/dev/sdf: solr-repeater-volume/dev/sdg: backup-volume
82 Chapter 4. Components
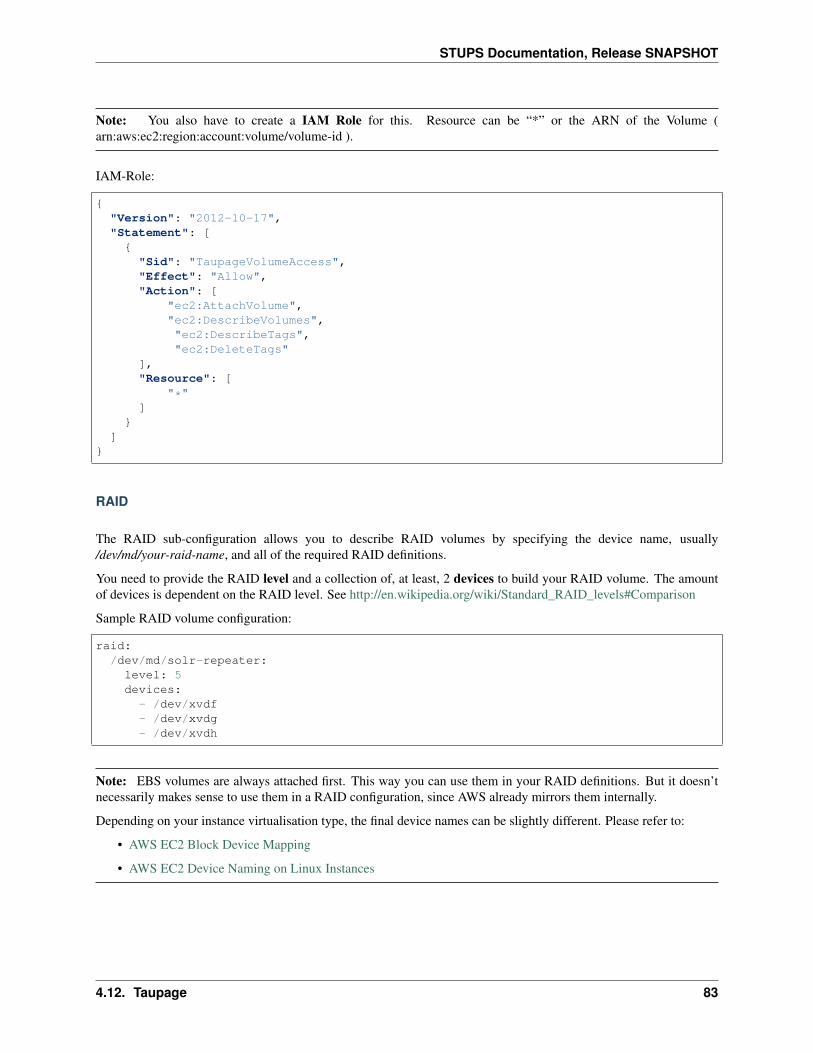
STUPS Documentation, Release SNAPSHOT
Note: You also have to create a IAM Role for this. Resource can be “*” or the ARN of the Volume (arn:aws:ec2:region:account:volume/volume-id ).
IAM-Role:
{"Version": "2012-10-17","Statement": [{
"Sid": "TaupageVolumeAccess","Effect": "Allow","Action": [
"ec2:AttachVolume","ec2:DescribeVolumes","ec2:DescribeTags","ec2:DeleteTags"
],"Resource": [
"*"]
}]
}
RAID
The RAID sub-configuration allows you to describe RAID volumes by specifying the device name, usually/dev/md/your-raid-name, and all of the required RAID definitions.
You need to provide the RAID level and a collection of, at least, 2 devices to build your RAID volume. The amountof devices is dependent on the RAID level. See http://en.wikipedia.org/wiki/Standard_RAID_levels#Comparison
Sample RAID volume configuration:
raid:/dev/md/solr-repeater:level: 5devices:
- /dev/xvdf- /dev/xvdg- /dev/xvdh
Note: EBS volumes are always attached first. This way you can use them in your RAID definitions. But it doesn’tnecessarily makes sense to use them in a RAID configuration, since AWS already mirrors them internally.
Depending on your instance virtualisation type, the final device names can be slightly different. Please refer to:
• AWS EC2 Block Device Mapping
• AWS EC2 Device Naming on Linux Instances
4.12. Taupage 83

STUPS Documentation, Release SNAPSHOT
mounts:
(optional)
A map of mount targets and their configurations. A mount target configuration has a partition to reference the volume,which can be defined in the volumes section. It is possible to specify a erase_on_boot flag.
• If it is set to true such partition will always be initialized on boot.
• If this flag is set to false such partition will never be initialized by Taupage.
• If this flag is not specified and partition refers to an EBS volume which has a tag Taupage:erase-on-boot withthe value True then the partition will be initialized.
This tag will be removed by Taupage to ensure that the partition is not erased in case the EC2 instance is restarted orthe volume is attached to a different EC2 instance.
Note: If you have specified the tag Taupage:erase-on-boot you also need to allow the actions ec2:DescribeTags andec2:DeleteTags in the policy document of the IAM role associated with your instance. See example policy.
Whenever a partition is initialized is will be formatted using the filesystem setting. If unspecified it will be formattedas ext4. If options setting is specified, its value will be provided to the command to mount the partition. If the rootsetting is false (that’s the default) the filesystem will be initialized with the internal unprivileged user as its owner.The mount point permissions are set to provide read and write access to group and others in all cases. This allows theruntime application to use the volume for read and write.
Sample mounts configuration:
mounts:/data/solr:partition: /dev/md/solr-repeateroptions: noatime,nodiratime,nobarriererase_on_boot: false
notify_cfn:
(optional)
Will send cloud formation the boot result if specified. If you specify it, you have to provide the stack name and thestack resource with which this server was booted. This helps cloud formation to know, if starting you server workedor not (else, it will run into a timeout, waiting for notifications to arrive).
If you would use the example stack http://docs.aws.amazon.com/AWSCloudFormation/latest/UserGuide/example-templates-autoscaling.html the resource name would be WebServerGroup.
cloudwatch_logs:
(optional)
Will configure the awslogs agent to stream logfiles to AWS Cloudwatch Logs service. One needs to define a mappingof logfiles to their destination loggroups. There will be a stream for each instance in each configured logfile/loggroup.
Documentation for Cloudwatch Logs: http://docs.aws.amazon.com/AmazonCloudWatch/latest/DeveloperGuide/WhatIsCloudWatchLogs.html
Example:
cloudwatch_logs: /var/log/application.log: my-application-loggroup
84 Chapter 4. Components
STUPS Documentation, Release SNAPSHOT
Will configure the awslogs daemon to stream the /var/log/application.log file into the my-application-loggroup.
ssh_ports:
(optional, default: 22)
List of SSH server ports. This option allows using alternative TCP ports for the OpenSSH server. This is useful if anapplication (runtime container) wants to use the default SSH port.
ssh_gateway_ports:
(optional)
Adds GatewayPorts config line to sshd_config which specifies whether remote hosts are allowed to connect to localforwarded ports. This is useful with value “yes” for example: GatewayPorts yes if reverse tunnel to the Taupageinstance is needed.
etcd_discovery_domain:
(optional)
DNS domain for etcd cluster discovery. Taupage will start a local etcd proxy if the etcd_discovery_domain isspecified. The proxy’s HTTP endpoint is passed in the ETCD_URL environment variable to the application, i.e. curl$ETCD_URL/v2/keys/ should list all keys. You need a running etcd cluster with DNS registration for this optionto work. All Nodes wich have the etcd_discovery_domain set will be dynamically added and removed to thetaupage key in the etcd service:
$ curl $ETCD_URL/v2/keys/taupage
logentries_account_key:
(optional)
Note: You can also use AWS KMS to encrypt your Logentries account key. See in the example above.
If you specify the Account Key from your logentries account, the Logentries Agent will be registered with yourAccount. And the Agent will follow these logs:
• /var/log/syslog
• /var/log/auth.log
• /var/log/application.log
You can get your Account Key from the Logentries Webinterface under /Account/Profile
scalyr_account_key
Deprecated. Please consider using a logging section.
(optional)
Options: see scalyr_account_key in logging
4.12. Taupage 85
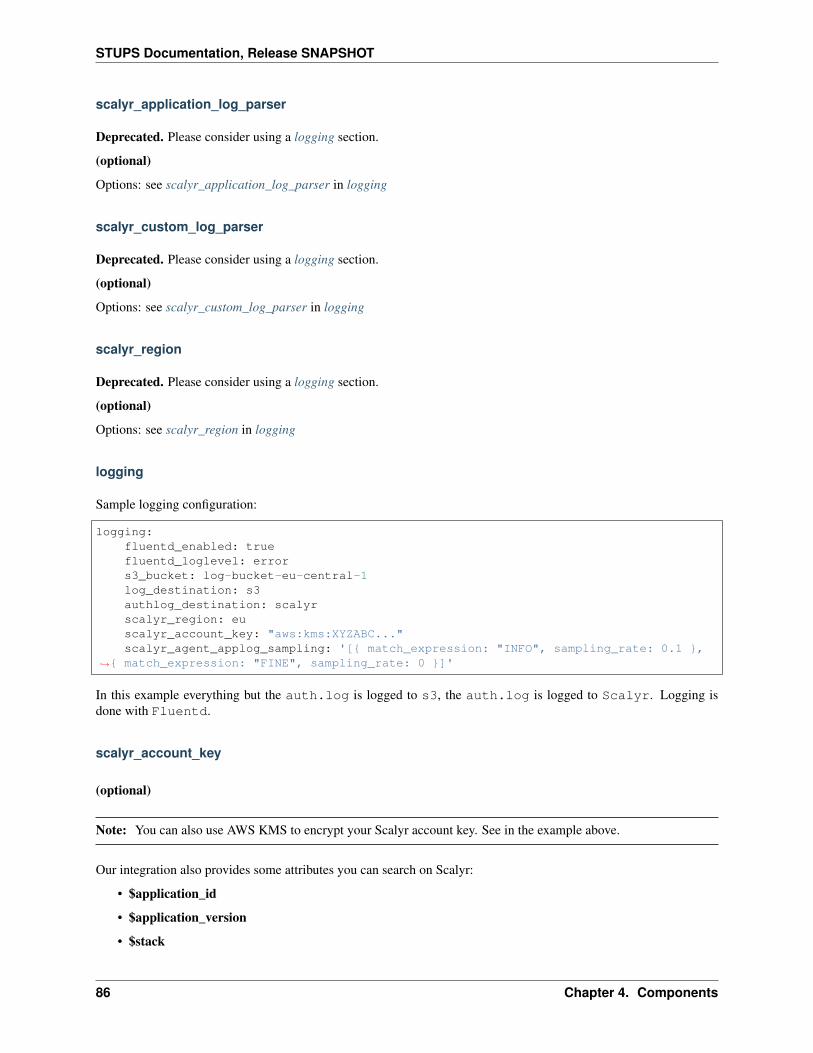
STUPS Documentation, Release SNAPSHOT
scalyr_application_log_parser
Deprecated. Please consider using a logging section.
(optional)
Options: see scalyr_application_log_parser in logging
scalyr_custom_log_parser
Deprecated. Please consider using a logging section.
(optional)
Options: see scalyr_custom_log_parser in logging
scalyr_region
Deprecated. Please consider using a logging section.
(optional)
Options: see scalyr_region in logging
logging
Sample logging configuration:
logging:fluentd_enabled: truefluentd_loglevel: errors3_bucket: log-bucket-eu-central-1log_destination: s3authlog_destination: scalyrscalyr_region: euscalyr_account_key: "aws:kms:XYZABC..."scalyr_agent_applog_sampling: '[{ match_expression: "INFO", sampling_rate: 0.1 },
→˓{ match_expression: "FINE", sampling_rate: 0 }]'
In this example everything but the auth.log is logged to s3, the auth.log is logged to Scalyr. Logging isdone with Fluentd.
scalyr_account_key
(optional)
Note: You can also use AWS KMS to encrypt your Scalyr account key. See in the example above.
Our integration also provides some attributes you can search on Scalyr:
• $application_id
• $application_version
• $stack
86 Chapter 4. Components

STUPS Documentation, Release SNAPSHOT
• $source
• $image
scalyr_application_log_parser
(optional)
If the application.log format differs heavily between multiple applications the parser definition used by Scalyr can beoverwritten here. The default value is slf4j.
scalyr_custom_log_parser
(optional)
If you enable mount_custom_log Scalyr will also pickup your custom logs and if your custom log format differsheavily between multiple applications the parser definition used by Scalyr can be overwritten here. The default valueis slf4j.
scalyr_region
(optional, default: eu)
scalyr_agent_enabled
(optional)
If fluentd_enabled is set to true it defaults to false, otherwise it defaults to true. If you want to use Scalyr Agent besidesFluentd, you have to specifically enable it for the files, too.
Note: For logs shipped with Scalyr Agent, JWT tokens will be automatically redacted. This functionality is notimplemented in Fluentd.
fluentd_enabled
(optional, default: false)
If set to true the Fluentd Agent will be started.
Note: By default Fluentd Agent will send all logs to scalyr. Use either Fluentd Agent or Scalyr Agent unless youknow what you are doing, otherwise you might send logs to scalyr twice.
All Fluentd options mentioned depend on this to be set to true.
Fluentd exposes metrics in prometheus format on port 9110. You might need to adjust your AWS security group toaccess it.
4.12. Taupage 87
STUPS Documentation, Release SNAPSHOT
fluentd_loglevel
(optional, default: error)
Specify Fluentd Agent loglevel, possible values are: fatal, error, warn, info, debug or trace.
Fluentd logfile can be found in /var/log/td-agent/td-agent.log
log_destination
(optional, default: s3)
Set destination for:
• /var/log/syslog
• /var/log/auth.log
• /var/log/application.log
Options: s3, rsyslog, scalyr, scalyr_s3 or none.
applog_destination
(optional)
Set destination for /var/log/application.log
Overrides setting in log_destination
Options: see log_destination
Defaults to the value you set in log_destination or to s3 if log_destination was not set.
syslog_destination
(optional)
Set destination for /var/log/syslog
Overrides setting in log_destination
Options: see log_destination
Defaults to the value you set in log_destination or to s3 if log_destination was not set.
authlog_destination
(optional)
Set destination for /var/log/auth.log
Overrides setting in log_destination
Options: see log_destination
Defaults to the value you set in log_destination or to s3 if log_destination was not set.
88 Chapter 4. Components

STUPS Documentation, Release SNAPSHOT
customlog_destination
(optional)
Set destination for custom log
Overrides setting in log_destination
Options: see log_destination
Defaults to the value you set in log_destination or to s3 if log_destination was not set.
use_scalyr_agent_all
(optional)
If you want to use Scalyr Agent and Fluentd at the same time set this to true to send all files to scalyr via ScalyrAgent.
use_scalyr_agent_applog
(optional)
If you want to use Scalyr Agent and Fluentd at the same time set this to true to send the application.log to scalyr viaScalyr Agent.
scalyr_agent_applog_sampling
(optional)
You can define Scalyr sampling rules <https://www.scalyr.com/help/scalyr-agent#filter> for the application.log. Mustbe a string with YAML-encoded list of sampling_rules.
use_scalyr_agent_syslog
(optional)
If you want to use Scalyr Agent and Fluentd at the same time set this to true to send the syslog to scalyr via ScalyrAgent.
scalyr_agent_syslog_sampling
(optional)
You can define Scalyr sampling rules <https://www.scalyr.com/help/scalyr-agent#filter> for the syslog log. Must be astring with YAML-encoded list of sampling_rules.
use_scalyr_agent_authlog
(optional)
If you want to use Scalyr Agent and Fluentd at the same time set this to true to send the auth.log to scalyr via ScalyrAgent.
4.12. Taupage 89

STUPS Documentation, Release SNAPSHOT
scalyr_agent_authlog_sampling
(optional)
You can define Scalyr sampling rules <https://www.scalyr.com/help/scalyr-agent#filter> for the auth.log. Must be astring with YAML-encoded list of sampling_rules.
use_scalyr_agent_customlog
(optional)
If you want to use Scalyr Agent and Fluentd at the same time set this to true to send the custom log to scalyr viaScalyr Agent.
scalyr_agent_customlog_sampling
(optional)
You can define Scalyr sampling rules <https://www.scalyr.com/help/scalyr-agent#filter> for the custom log. Must bea string with YAML-encoded list of sampling_rules.
applog_filter_exclude
(optional)
Lets you define a regex, if it matches somewhere in the log line the line will be dropped.
applog_filter_exclude: '/INFO:/'
This would exclude all lines containing INFO:
customlog_filter_exclude
(optional)
Same as applog_filter_exclude, but for custom logs.
s3_bucket
(optional)
Name of s3 bucket you want to send logs too.
Note: Make sure the ec2 instance can write to the bucket. Minimal permissions needed are putObject, getObject andlistBucket.
IAM-Role:
90 Chapter 4. Components

STUPS Documentation, Release SNAPSHOT
{"Version": "2012-10-17","Statement": [
{"Sid": "TaupageS3Logging0","Effect": "Allow","Action": "s3:ListBucket","Resource": "arn:aws:s3:::<bucket name>"
},{
"Sid": "TaupageS3Logging1","Effect": "Allow","Action": [
"s3:PutObject","s3:GetObject"
],"Resource": "arn:aws:s3:::<bucket name>/*"
}]
}
s3_timekey
(optional, default: 5m)
Specify time after which Buffer is flushed to s3 and a new file is written.
s3_region
(optional, default: eu-central-1)
Specify region your s3 bucket is in.
s3_raw_log_format
(optional, default: true)
If true loglines are written to S3 as is, otherwise they will be encapsulated in a JSON object.
s3_acl
(optional, default: bucket-owner-full-control)
Set permissions for the object in S3. Useful if you write logs to a bucket in a different account. Read more
Options: private, public-read, public-read-write (NOT RECOMMENDED!),authenticated-read, bucket-owner-read or bucket-owner-full-control.
rsyslog_host
(optional)
rsyslog destination Host.
4.12. Taupage 91
STUPS Documentation, Release SNAPSHOT
rsyslog_port
(optional, default: 514)
rsyslog_protocol
(optional, default: tcp)
rsyslog_severity
(optional, default: notice)
rsyslog_program
(optional, default: fluentd)
rsyslog_hostname
(optional)
Local hostname, defaults to actual local hostname
appdynamics_application
(optional)
If the AppDynamics Agent is integrated in Taupage you can enable AppDyanmics with this variable and set yourAppDynamics ApplicationName.
appdynamics_machineagent_tiername
(optional)
If you want to use log shipping without an App-Agent from AppDynamics you have to set the Tiername for theMachineAgent manually with this variable.
application_logrotate_*
(optional)
These are settings how logrotate will rotate your application.log file.
examples:
application_logrotate_size: 10Mapplication_logrotate_interval: weeklyapplication_logrotate_rotate: 4
explanation:
• application_logrotate_size
92 Chapter 4. Components

STUPS Documentation, Release SNAPSHOT
– Log files are rotated when they grow bigger than size bytes. If size is followed by M, thesize if assumed to be in megabytes. If the G suffix is used, the size is in gigabytes. If the kis used, the size is in kilobytes. So size 100, size 100k, and size 100M are all valid.
– Default: 256M
• application_logrotate_interval
– the time interval when logs will be rotated: hourly, daily, weekly, monthly, yearly is possi-ble.
– Default: weekly
• application_logrotate_rotate
– Log files are rotated count times before being removed or mailed to the address specifiedin a mail directive. If count is 0, old versions are removed rather than rotated.
– Default: 4
• application_logrotate_disable_copytruncate: true
– Deletes the copytruncate option and restores the default behavior.
– Default: False
• application_logrotate_disable_delaycompress: true
– Deletes the delaycompress option and restores the default behavior.
– Default: False
customlog_logrotate_*
(optional)
These are settings how logrotate will rotate your custom logs.
examples:
customlog_logrotate_size: 10Mcustomlog_logrotate_interval: weeklycustomlog_logrotate_rotate: 5
explanation:
• customlog_logrotate_size
– Log files are rotated when they grow bigger than size bytes. If size is followed by M, thesize if assumed to be in megabytes. If the G suffix is used, the size is in gigabytes. If the kis used, the size is in kilobytes. So size 100, size 100k, and size 100M are all valid.
– Default: 256M
• customlog_logrotate_interval
– the time interval when logs will be rotated: hourly, daily, weekly, monthly, yearly is possi-ble.
– Default: daily
• customlog_logrotate_rotate
– Log files are rotated count times before being removed or mailed to the address specifiedin a mail directive. If count is 0, old versions are removed rather than rotated.
4.12. Taupage 93
STUPS Documentation, Release SNAPSHOT
– Default: 5
rsyslog_application_log_format
(optional)
If you want to change how application logs get written via Docker’s syslog driver you can do this by using rsys-log_application_log_format.
By default timestamps, hostname and Docker container ID’s won’t be written by rsyslogd anymore, since most appli-cation logging libraries add timestamps too. This will avoid excessive logging. However, you can still use the legacyfall back solution rsyslog_application_log_format: legacy. This will bring back timestamps.
Also you’re still able to use custom settings as described below using rsyslog_application_log_format:"%hostname%%msg%\\n" for example.
Here is an example that changes the rsyslog format completely by avoiding logging of the timestamp and Dockercontainer identifier from: Dec 21 14:29:50 ip-172-31-13-217 docker/3fbbd1129d3e[936]: to ip-172-31-13-217log_message:
example:
rsyslog_application_log_format: "%hostname%%msg%\\n"
rsyslog_aws_metadata
(optional)
If set, AWS account ID and region will be added to log files. If you use Scalyr, make sure that your parsers handle thenew message formats correctly.
rsyslog_max_message_size
(optional)
You can set a custom value for the maximum size of syslog. You can find more about it here: http://www.rsyslog.com/doc/v8-stable/configuration/global/index.html
xray_enabled
(optional)
You can enable the AWS X-Ray agent. You can find more about it here: https://aws.amazon.com/xray/
4.12.4 Runtime environment
By default, your application will run as an unprivileged user, see the ‘root’ option.
Taupage integrates berry and exposes the credentials file to your application. Your application will have access tothe environment variable ‘CREDENTIALS_DIR’, which points to a local directory, containing the ‘user.json’ and‘client.json’ of the mint API. This way, you can authenticate yourself to your own IAM solution so that it can obtainits own access tokens.
94 Chapter 4. Components

STUPS Documentation, Release SNAPSHOT
4.12.5 Sending application mails
Mails which should be sent from applications can be sent out directly via Amazon SES. The only thing you need todo is create an IAM user and receive SMTP credentials. This can be done directly in the SES menu. Amazon alreadyprovides an example for Java: http://docs.aws.amazon.com/ses/latest/DeveloperGuide/send-using-smtp-java.html
In order to use SES for sending out mails into the world, you need to request a limit increase (100 = 50k mails/day) toget your account out of the sandbox mode.
4.12.6 AMI internals
This section gives you an overview of customization, the Taupage AMI contains on top of the Ubuntu Cloud Images.
Docker application logging
Application logs by Docker containers are streamed to syslog via Docker’s logging driver for syslog as described inthe Docker documentation: https://docs.docker.com/reference/run/#logging-driver-syslog
Managed SSH access
SSH access is managed with the even SSH access granting service. The AMI is set up to have automatic integration.Your SSH key pair choice on AWS will be ignored - temporary access can only be gained via the granting service. Alluser actions are logged for auditing reasons. See the SSH Access section in the User’s Guide for details.
4.12.7 Building your own AMI
You can build your own Taupage AMI using the code from the repository on GitHub https://github.com/zalando-stups/taupage In the repository you will find a configuration (config-stups-example.sh) file which you’ll have to adjust toyour needs.
See Taupage AMI Creation for details.
4.12.8 Support for NVIDIA GPUs
Taupage supports the use of NVIDIA CUDA-enabled GPUs if these are available on the EC2 host (e.g. G2 or P2instances). In this case, nvidia-docker is used as a drop-in replacement for Docker. This creates a Docker volumewhich contains the CUDA driver files installed on the host. This volume, as well as the required NVIDIA devicenodes, are mounted into the running container allowing GPU-enabled applications to be run.
Note:
• It is not required to install the NVIDIA drivers in the Docker image as these are supplied by nvidia-docker.
• The CUDA driver and runtime versions must be compatible (see: requirements).
Some further points to note for using GPU computing in a Docker container running in Taupage:
• GPU instances must be available in the AWS region where your application will be run (e.g.: eu-west-1).
• Ideally, the Docker image being run should be based on an NVIDIA CUDA image. This is not a strict require-ment, but does simplify development. A non-complete list of images is maintained here.
4.12. Taupage 95

STUPS Documentation, Release SNAPSHOT
• If custom Docker images are being used, consult the image inspection page for notes on image labels used bynvidia-docker.
4.13 YOUR TURN
YOUR TURN is the frontend for the STUPS infrastructure. It enables you to
• register your application in Kio
• define your resources and scopes in Essentials
• add your application into the OAuth security system (mint)
• search for Docker images in Pier One
At the moment YOUR TURN expects you to provide all of the STUPS infrastructure, but this will change in thefuture. Then you will be able to configure it so that it only needs the services of your choice (as far as serviceinterdependencies permit, e.g. mint checking back with Kio if an application exists in the first place).
The UI consists of three modules:
• The search
• Applications (using Kio, mint)
• Resource Types (using essentials)
They can be accessed via the sidebar, which also hosts information about the current user (via the provided OAuthtoken).
96 Chapter 4. Components

STUPS Documentation, Release SNAPSHOT
4.13. YOUR TURN 97
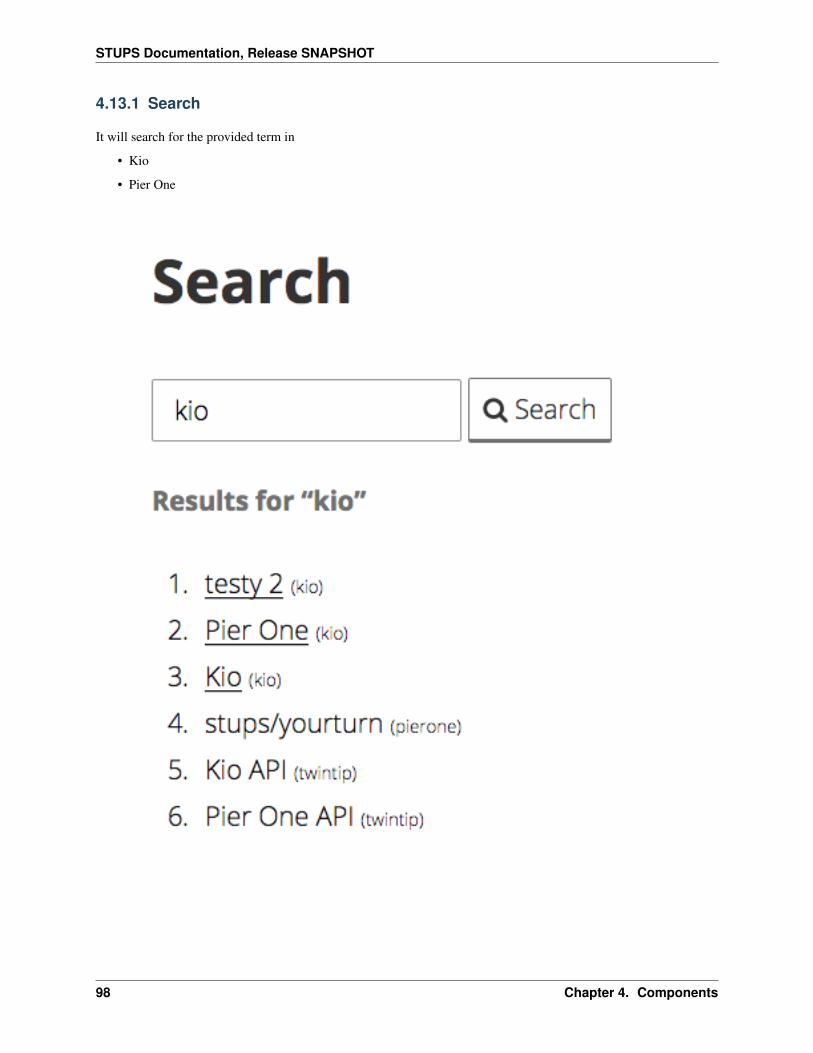
STUPS Documentation, Release SNAPSHOT
4.13.1 Search
It will search for the provided term in
• Kio
• Pier One
98 Chapter 4. Components

STUPS Documentation, Release SNAPSHOT
4.13.2 Application
At first you will see applications from Kio divided into
1. applications owned by your team and
2. applications owned by other teams
You can create a new application:
4.13. YOUR TURN 99
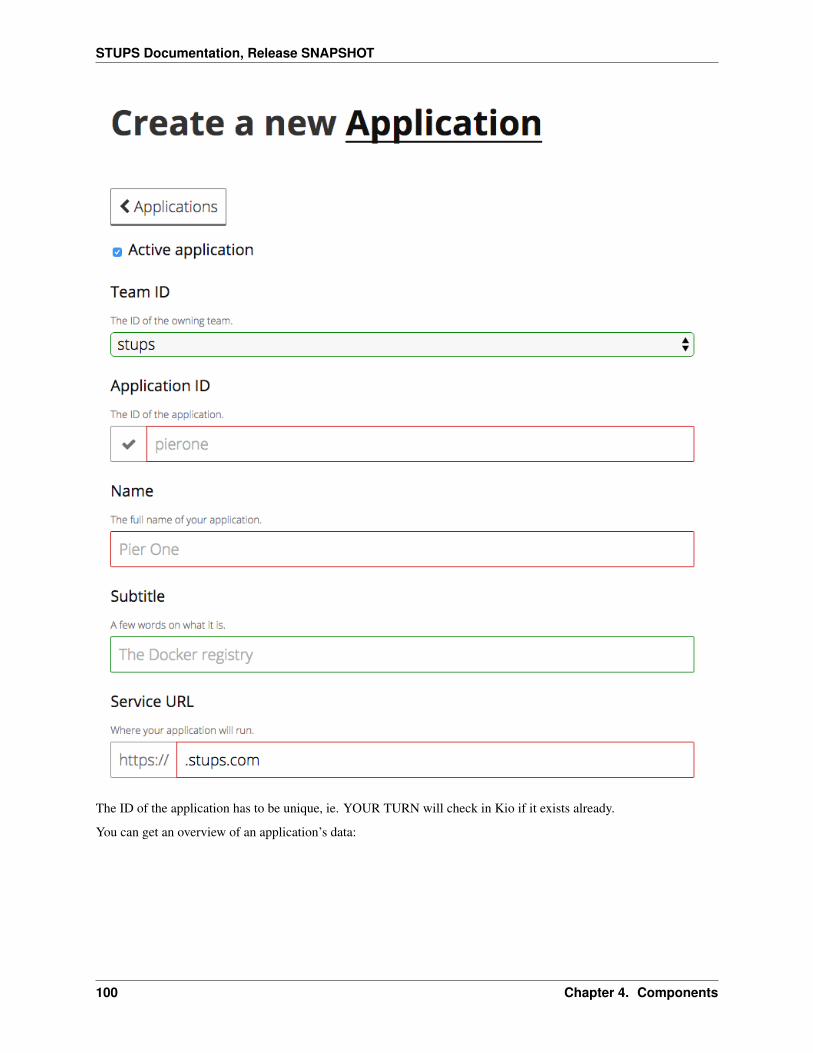
STUPS Documentation, Release SNAPSHOT
The ID of the application has to be unique, ie. YOUR TURN will check in Kio if it exists already.
You can get an overview of an application’s data:
100 Chapter 4. Components

STUPS Documentation, Release SNAPSHOT
Under “OAuth Client” you define the redirect URL of your application and which scopes it can ask for:
4.13. YOUR TURN 101
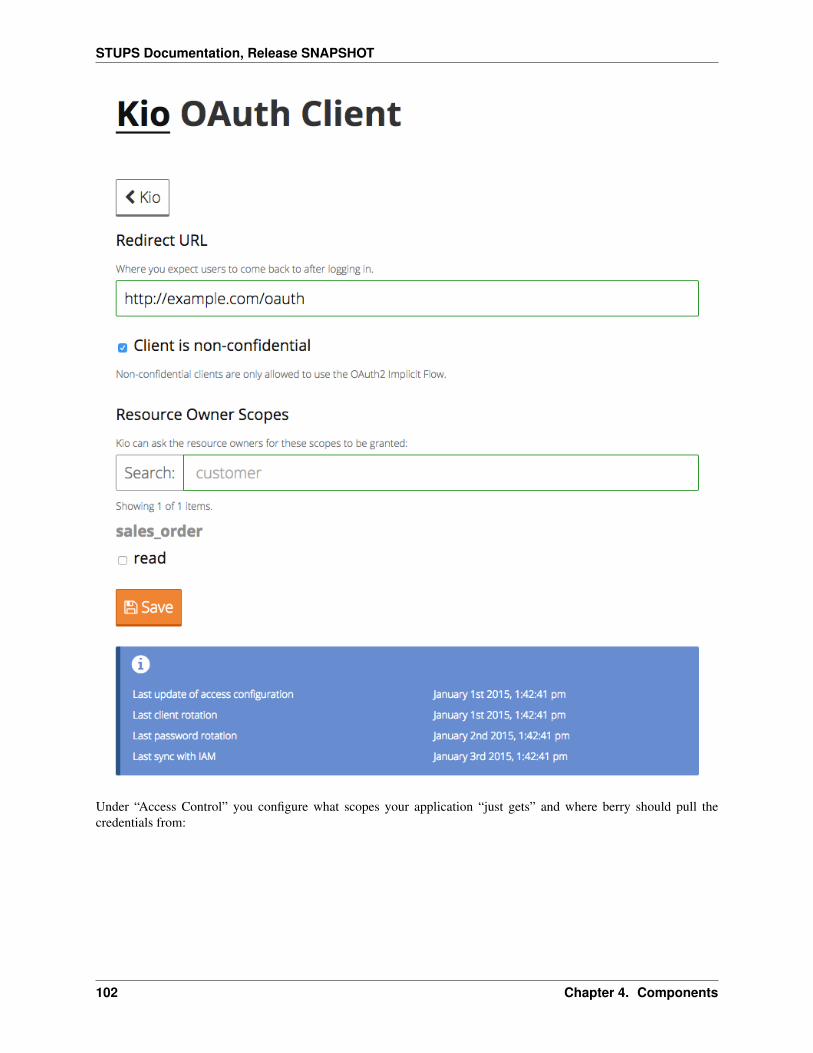
STUPS Documentation, Release SNAPSHOT
Under “Access Control” you configure what scopes your application “just gets” and where berry should pull thecredentials from:
102 Chapter 4. Components
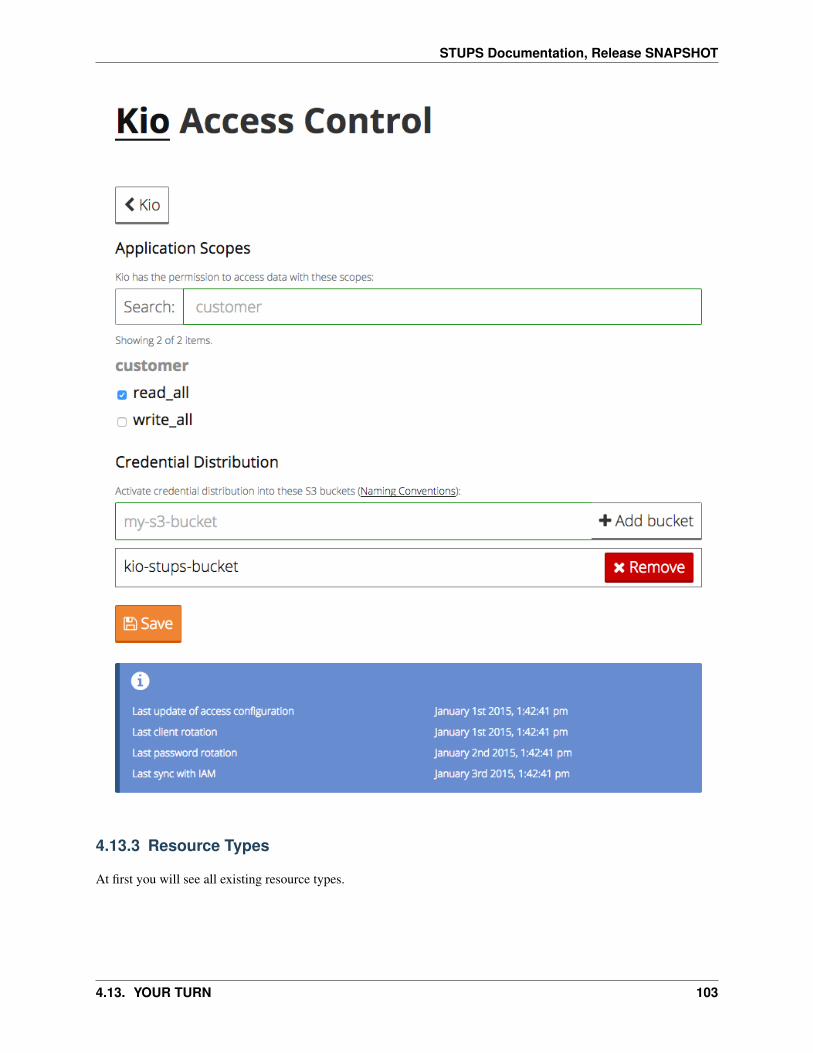
STUPS Documentation, Release SNAPSHOT
4.13.3 Resource Types
At first you will see all existing resource types.
4.13. YOUR TURN 103

STUPS Documentation, Release SNAPSHOT
You can create a new one:
104 Chapter 4. Components

STUPS Documentation, Release SNAPSHOT
Of course the ID has to be unique again.
You can view details of a resource type:
4.13. YOUR TURN 105
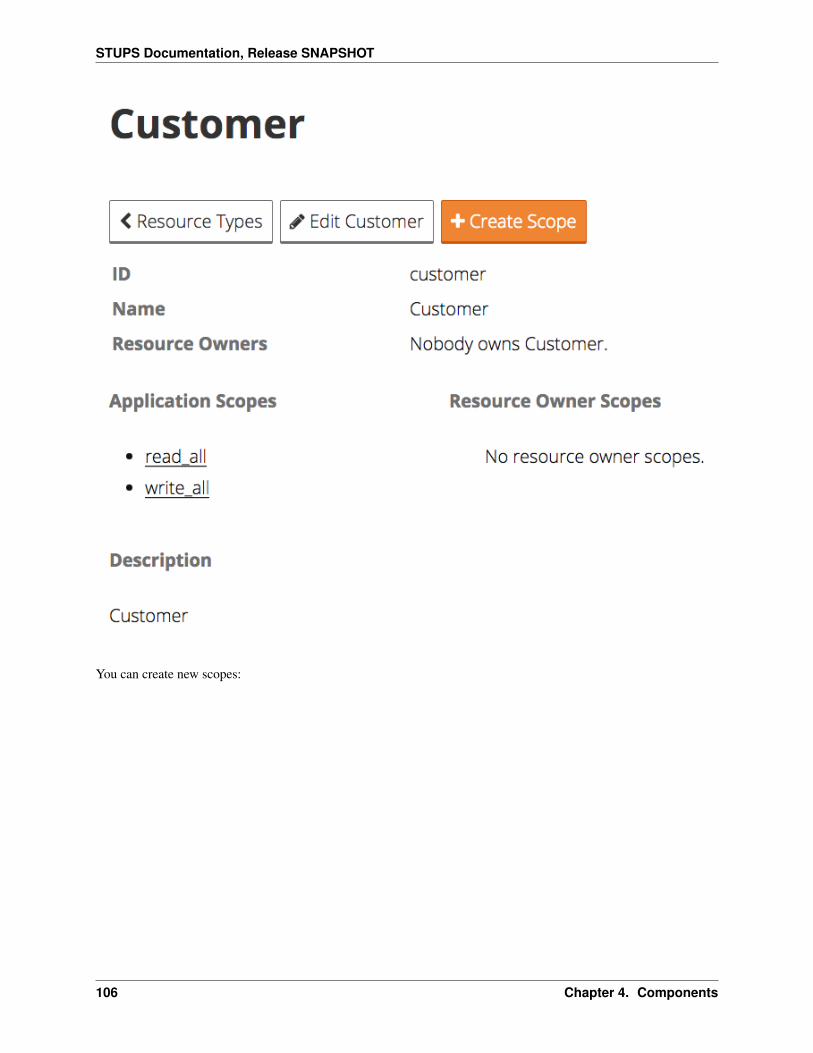
STUPS Documentation, Release SNAPSHOT
You can create new scopes:
106 Chapter 4. Components
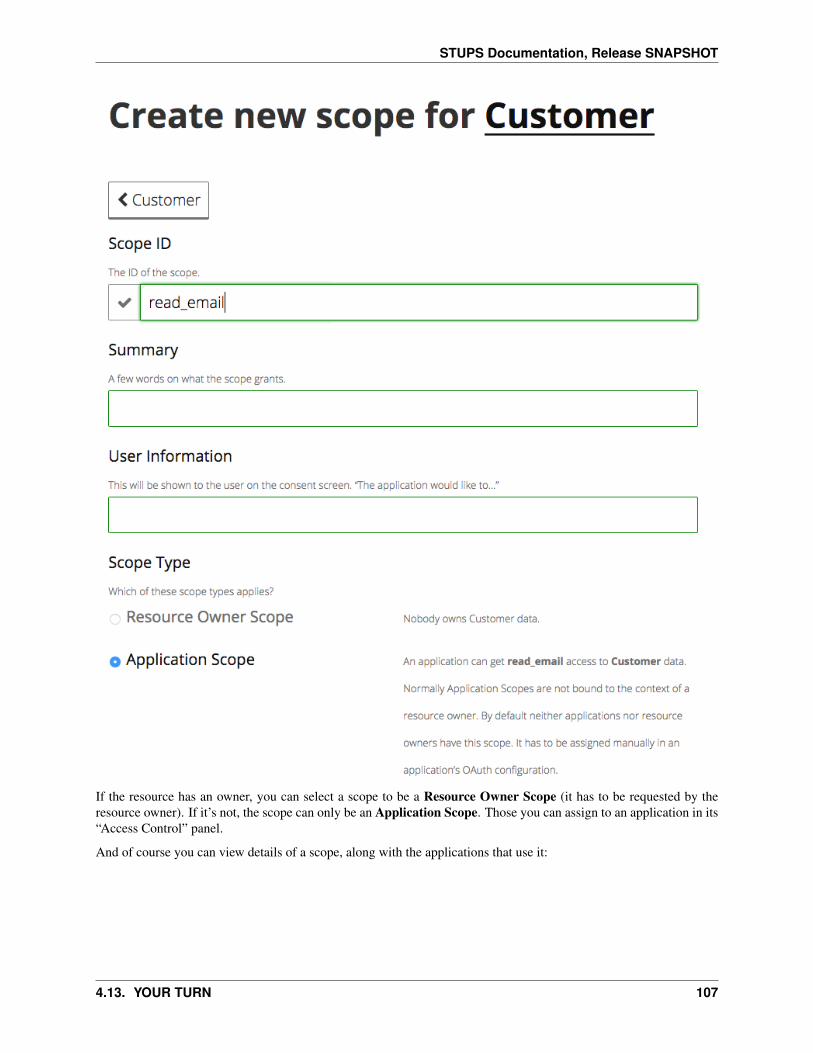
STUPS Documentation, Release SNAPSHOT
If the resource has an owner, you can select a scope to be a Resource Owner Scope (it has to be requested by theresource owner). If it’s not, the scope can only be an Application Scope. Those you can assign to an application in its“Access Control” panel.
And of course you can view details of a scope, along with the applications that use it:
4.13. YOUR TURN 107

STUPS Documentation, Release SNAPSHOT
4.14 Zign
Zign is the command line client to generate OAuth2 access tokens.
4.14.1 Installation
Install or upgrade to the latest version of Zign () with PIP:
$ sudo pip3 install --upgrade stups-zign
4.14.2 How to use
See the section Helpful tooling on how to retrieve access tokens with Zign.
4.14.3 Configuration
Zign stores its configuration in a YAML file in your home directory (~/.config/zign/zign.yaml on Linux,~/Library/Application\ Support/zign/zign.yaml on OSX).
The minimal configuration contains the Token Service URL:
{url: 'https://token.example.org/access_token'}
Zign uses the USER and ZIGN_USER environment variables to determine the username to use. You might want tooverwrite this in the configuration file:
108 Chapter 4. Components
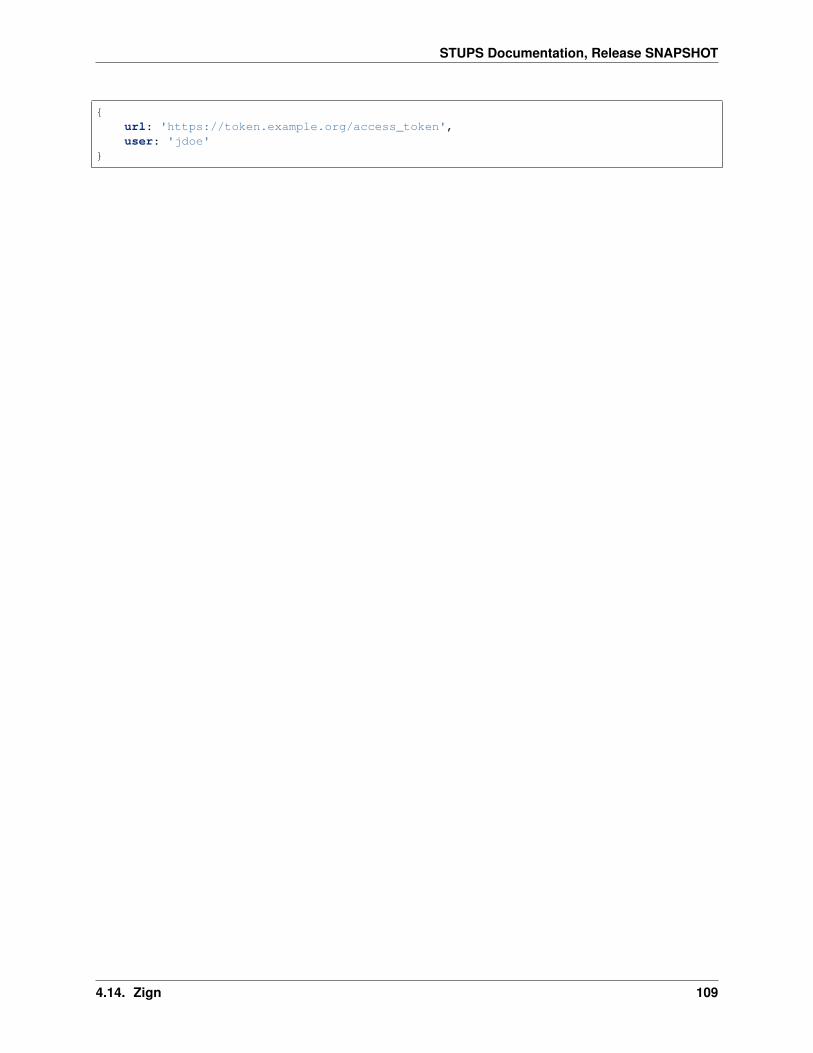
STUPS Documentation, Release SNAPSHOT
{url: 'https://token.example.org/access_token',user: 'jdoe'
}
4.14. Zign 109

STUPS Documentation, Release SNAPSHOT
110 Chapter 4. Components
CHAPTER 5
Appendix
Collection of helpful tools and links.
5.1 Docker Base Images
All Zalando Docker images include the Zalando CA and use immutable tags, i.e. each new image version will incre-ment the Docker tag version.
Name DescriptionUbuntu Ubuntu base imageOpenJDK Java 8 base image (Zalando CA is imported into Java TrustStore)Python Python 3.6 base imageNode.js Node.js base image
You can find the latest Docker image version using the Pier One CLI, e.g.:
$ latest=$(pierone latest stups openjdk --url registry.opensource.zalan.do)$ docker pull registry.opensource.zalan.do/stups/openjdk:$latest
5.2 OAuth Integrations
This page lists various OAuth integration tools and libraries.
111

STUPS Documentation, Release SNAPSHOT
Name DescriptionConnexion Python Swagger-first REST framework with OAuth support.Friboo Clojure Swagger-first REST framework with OAuth support.Tokens A Java library that keeps OAuth 2.0 service access tokens in memory.
Works with Taupage and berry out of the box.Python Tokens Python library to manage OAuth access tokens.
Works with Taupage and berry out of the box.Spring BootTokens
Spring-Boot integration for STUPS OAuth2 Tokens library.Works with Taupage and berry out of the box.
SpringOAuth2Support
Spring-OAuth2 STUPS Support.Allows securing resource servers implemented with Spring, as well as building API clients, thataccess OAuth2-protected resources, using Spring’s RestTemplate.
Spring SocialZAuth
Spring-Social support for Zalando OAuth provider.Allows securing UI frontends via OAuth Authorization Code redirect flow.
Zign Command line client to generate OAuth2 access tokensHTTPie Zign HTTPie plugin to use Zign OAuth2 tokensChromeOAuth BearerPlugin
Chrome browser plugin to inject OAuth 2 bearer tokens into outgoing HTTP requests (Autho-rization header).
Ginoauth2 OAuth2 middleware to use with Gin Framework.Node-tokens Like zalando-stups/tokens, but for Node.jsauthmosphere A library implemented in TypeScript to support OAuth2 workflows in JavaScript projects.
5.3 Appliances
There are a number of 3rd party appliances available for STUPS. Most appliances provide readily usable Senza defi-nitions and pre-built Docker images.
Name DescriptionBuku Kafka applianceCassandra Cassandra applianceetcd etcd cluster applianceExhibitor Runs an Exhibitor-managed ZooKeeper cluster using S3 for backups and automatic node discovery.Spark Spark applianceSpilo HA PostgreSQL applianceStups2go Go Continuous Delivery service
112 Chapter 5. Appendix

CHAPTER 6
Indices and tables
• genindex
• modindex
• search
113