Student Orienta on
78
Student Orientaon St. Jude Medical Center Educaon Department 101 E. Valencia Mesa Drive Fullerton, CA 92835 714-992-3000 ext. 3854 [email protected] Updated August 2017
Transcript of Student Orienta on

Student Orienta�on
St. Jude Medical Center
Educa�on Department
101 E. Valencia Mesa Drive
Fullerton, CA 92835
714-992-3000 ext. 3854
sjmceduca�[email protected]
Updated August 2017


0
Part I Nursing Student Welcome First Day Check-in Procedures, Standard of Conduct, Confidentiality, Polices & Procedures, Dress Code, Smoking Policy, Parking Policy, Cell Phone Etiquette, Alcohol Drug Prohibition, Student Health, Cafeteria, Medical Library & Resource Center, Emergency Code, Act FAST
Part II Providence St. Joseph Health, St. Jude Medical Center, Mission, Vision & Values, Cultural Compass, Definition of Care – Professional Practice Model PPM, Cultural Diversity and Sensitivity, Patient Rights and Responsibility, Condition H, Key Points of Service, HIPAA, Age Related Guidelines, Interpreter Services, Bioethics, National Patient Safety Goals, Universal Protocol, Adverse Events
Part III Prevention Measurements Fall Prevention, Safety, STAR Rounding, Infection Prevention & Control, Hand Hygiene and Personal Protective Equipment (PPE), Isolation Practices, Isolation Precautions, Emerging Infections, CLABSI, CAUTI, C.diff, MRSA, High Touch Areas
Part IV Clinical Procedure Guidelines (1.2) Pain Management, Admin of Influenza & Pneumococcal Vaccine, Linen Use, Restraints, Pressure Ulcer Prevention (HAPU/HAPI), Early Ambulation, Antiembolic Stocking (TED Stocking), Sequential Compression Device, Hill-Rom: Versacare Bed, Hill-Rom: Total Care Sports Bed (CCU only)
Part V Clinical Procedure Guidelines (2.2) IV therapy, Blood Transfusion, Medication, Narcotics/Opiates, Chest Tube & Central Supply
Part VI Documentation Electronically Medical Record (EMR), Abbreviated Terms
Part VII Employee Wellbeing & Safety Ergonomics : Basic Body Mechanicals, Workstation Wisdom, Know your Exposure Risk, Key Points About PPE, Preventing Transmission of Blood Borne Pathogens, BBP Exposure, TB Fit Testing (N-95), Particular Respirator (PAPR), Medical Waste Policy /Procedure, Hazardous Materials, Latex Allergy/ Reaction, Contact Dermatitis, Lift Team, Disaster Information
Part VIII Emergency Emergency Code, Reporting and Responding to a Fire, Electrical Safety
Table of Contents

Appendices: • Appendix A: Dress Code
• Appendix B: Student Parking Direction
• Appendix C: Campus Map
• Appendix D: Ambulation Policy & Procedure
• Appendix E: Student Confidentiality Agreement
• Appendix F: Orientation Confirmation (HIPAA Form)

Part I: Nursing Student Welcome

Part I: Nursing Student Welcome
On behalf of St. Jude Medical Center (SJMC), we are excited to be a part of your nursing clinical experience, whether this is your first encounter in nursing or your last semester we are committed to providing every student the best education experience. This orientation guide will be helpful in acquainting you with policies & procedures that are a part of organizational excellence at SJMC. FIRST DAY CHECK-IN PROCEDURES On your first day, please arrive at the time specified by your instructor. Your school identification name badge must be worn at all times while at SJMC identifying you as a student. All clinical students must wear WHITE uniforms with the school logo when at St. Jude Medical Center. Students and instructors must meet in the designated area that has been pre-arranged by the Education Department. STANDARDS OF CONDUCT SJMC and your school require professional and responsible conduct on the job. It is also important for you to work effectively with others and to carry out your assigned duties as required by your instructor/facilitator. CONFIDENTIALITY During the course of your assignment, you may have access to confidential information. Students shall not seek knowledge of, or disclose at any time, any confidential patient information. This applies to conversations with the patients and fellow employees and students during working hours as well as away from the medical center. Attached you will find a confidentiality statement that must be signed and returned to your instructor at your first pre-conference (APPENDIX E & F). POLICIES & PROCEDURES SJMC has all the hospital policies and procedures on Lucidoc. Your instructor will show you how to log on. DRESS CODE
• All students are to wear white uniforms • Artificial nails are not permitted by all healthcare workers who are engaged in direct, hands-
on patient care. • White undergarments when wearing white scrubs. • No backless clogs, sandals or boots. • Jewelry, makeup and fragrances must be worn in moderation. • Hair is to be neat, clean and secured in a manner to avoid contact with patients, to control
infection and to prevent interference with care. • For a detailed description, please refer to APPENDIX A: Dress Code
SMOKING POLICY SJMC is a non-smoking environment and smoking is totally banned inside and outside all medical center buildings.

PARKING POLICY Students and instructors are asked to park at the St. Jude Medical Plaza parking structures located at 2151 N. Harbor Blvd, 4th floor in a designated area. Student parking permit must be visible at all times; failure to do so may result in a parking citation. Any questions, contact the parking department at (714) 992-3000 Ext. 6757.
CELL PHONE ETIQUETTE Personal use of cell phones is prohibited while in the patient care areas. Students may carry their cell phones to communicate with their Instructor via phone conversation and/or texting. Students must have their cell phone ringer off during their clinical rotation. ALCOHOL & DRUG PROHIBITION SJMC recognizes the importance of maintaining a safe, efficient and helpful work environment for its employees, students, volunteers, and for the patients. Therefore, SJMC absolutely prohibits the unauthorized or illicit use, sale, purchase, transfer or possession of any alcohol or any drugs by its employees, students, or volunteers on medical center property at any time. STUDENT HEALTH Please do not come to the hospital if you are ill, or are becoming ill. We have a responsibility to prevent exposing patients to colds, flu and other common infections. During flu season (from November to March), students are required to show proof of the flu vaccine or must adhere to the declination procedure per hospital policy. CAFETERIA SJMC has a cafeteria onsite on the first floor. If you choose to bring your lunch, you may eat in the cafeteria or outside. Please do not eat at your workstation. It is critical that no patient information is discussed while in the cafeteria. If you purchase your meal in the cafeteria you will receive a 20% discount with your badge – specify that you are a student. MEDICAL LIBRARY & RESOURCE CENTER The Medical Library supports the patient care, research and continuing education needs of physicians, nurses and other hospital personnel. The Medical Library supports healthcare providers win their efforts to educate and inform patients and families within the hospital and the community. The Medical Library, also, works in cooperation with individuals in the community in their efforts to obtain professional or personal health information. The Medical Librarian is available during business hours on Monday, Wednesday & Friday. To contact the Medical Librarian, call 714-992-3000 ext. 3708.

EMERGENCY CODES
Act FAST
All St. Jude employees and students must be familiar with the symptoms of a stroke. The following FAST acronym will assist in identifying potential acute stroke symptoms. FAST stands for the signs and symptoms of stroke or brain attack and the appropriate action to take:
*Dial 3121 ALL Emergencies* Code Event RED Fire
BLUE (ADULT) Medical Emergency WHITE Medical Emergency (Pediatric)
YELLOW Bomb Threat GRAY Abusive/Assaultive Behavior
SILVER Person with a weapon and/or Hostage Situation PINK Infant Abduction
PURPLE Child Abduction/1year or older ORANGE Hazardous Material
GOLD Patient Missing/Elopement ACTIVE SHOOTER Active Shooter (Run, Hide & Fight) TRIAGE INTERNAL Internal Disaster TRIAGE EXTERNAL External Disaster SHELTER-IN-PLACE Toxic Cloud
STROKE Stroke (only called by RRN)
STEMI ST Elevation Myocardial Infarction (STEMI) patients requiring emergent cardiac intervention (only called by RRN)
MET Medical Emergency Team SEPSIS Sepsis (only called by RRN)

Part II: St. Jude Medical Center Introduction

Providence St. Joseph Health
As of July 2016, we are officially Providence St. Joseph Health! Providence Health & Services and St. Joseph Health came together to create healthier communities across the Western United States, especially for those most in need. This historic milestone builds upon two remarkable legacies that began more than a century ago. Our founders, the Sisters of Providence and the Sisters of St. Joseph of Orange were courageous women who brought health care and other social services to the American West when it was still a rugged frontier. That same pioneering and compassionate spirit is what compels and guides us today as we take this major step forward, together. A diverse family of organizations Combined, our 106,000 caregivers/employees, we serve in 50 hospitals, and hundreds of clinics, programs and services across Alaska, California, Montana, New Mexico, Oregon, Texas and Washington. The Providence St. Joseph Health family will include:
• Providence Health & Services • St. Joseph Health • Covenant Health and Covenant Medical Group in Texas • Facey Medical Group in Los Angeles • Hoag Health in Orange County • Kadlec Regional Medical Center in Southeast Washington • Pacific Medical Centers in Seattle • St. Joseph Heritage Healthcare in California • Swedish Health Services in Seattle • We are a diverse group of organizations united by a common calling to serve our
communities. Our diversity is a strength, and we will continue to honor and respect one another’s identities and heritages.
This structure will allow us to work together to lead a transformation in health care. Together, we will drive innovation and population health strategies more quickly to make a difference in the world.

St. Jude Medical Center
In 1931, the Sisters purchased Fullerton General Hospital, a 45-bed facility. The Sisters operated the hospital for over 20 years; however, they became frustrated with the limitations of the aging facility and closed its doors. In 1957, with the support of generous physicians, businesses and community members, St. Jude Hospital was built on 10 acres of hilltop property in Fullerton. The new 125-bed facility rivaled all other hospitals in Orange County and quickly developed a reputation for attracting the best and brightest physicians and staff members. For over 50 years St. Jude Medical Center (SJMC) has undergone multiple expansions, and today it’s considered to be one of Southern California’s most respected and technologically advanced hospitals with over 360 beds and an impressive array of services, such as the Virginia K. Crosson Cancer Center, Centers for Rehabilitation, Breast Center, Knott Family Endoscopy Center, Ann G. Fetters Diagnostic Imaging Center, Chest Pain Center and Sleep Disorders Institute. In 2009 SJMC opened a state South West Patient Tower. This state-of-the-art patient tower allows St. Jude to meet the community’s growing medical needs now and into the future, and provides a symbol of our commitment to lead through excellence and innovation. In addition, the St. Jude Medical Plaza, across the street from the Medical Center, doubled in size, bringing the latest innovations in outpatient care. In 2009, the expanded medical plaza began to offer an outpatient surgery center, expanded imaging center and medical offices. The new Northwest Patient Tower opened in the Fall 2014 that exemplifies another state- of- the- art patient tower to meet the needs for the community. Over the next 30 years virtually every aspect of the medical center will be rebuilt and redefined. But some things won’t ever change, such as our passionately held mission and values that inspire doctors, nurses and staff to go beyond simply curing illness and touch lives.

Mission, Vision and Values
The mission, vision, and values of the St. Joseph Health and SJMC provide the framework for our decisions and actions. They define our organizational culture, our shared purpose, and how we conduct ourselves with one another and with patients.
Mission To extend the healing ministry of Jesus in the tradition of the Sisters of St. Joseph of Orange by continually improving the health and quality of life of people in the communities we serve.
Core Values
Vision We bring people together to provide compassionate care, promote health improvement and create healthy communities.

SJMC Organization: Our Cultural Compass
Our Motto Our Family: Caring for your Family
This is our Commitment We are a healing ministry and our greatest calling is to provide clinical excellence,
genuine care and compassion. We promise to always help, heal and comfort in a safe environment, making a
difference in the lives we are entrusted to serve. Every encounter becomes sacred when we serve each individual with empathy and
dignity. The St. Jude Promise We value you as the hearts and hands of St. Jude. Your bring “our Commitment” to
life. We continually strive to earn your trust by living our values with integrity and
respect. We recognize and foster each individual’s talents, strengths and contributions to our mission.
Through communication and collaboration, we create a positive nurturing environment investing in relationships at all levels.
I Pledge 1. I serve each individual based on their unique needs and care for the whole person-
body, mind and spirit. 2. I am present in every encounter and build genuine personal connections. 3. I build trust by listening and I recognize that every voice matters. 4. I advocate for the vulnerable and those in need. 5. I own my positive attitude. 6. I am accountable to our team and collaborate across the organization. 7. I identify and solve problems, looking for innovative ways to improve. 8. I continually seek personal and professional growth. 9. I provide the highest quality care in a safe, clean and quiet environment. 10. I present myself as a professional in language, behavior and appearance. 11. I protect the privacy of those I serve. 12. I am a good steward of the resources entrusted to me.

Definition of Care
We believe the definition of nursing care at SJMC is embodied in the Professional Practice Model (PPM) called Center of Excellence. The PPM supports the practitioner in their professional practice. Nursing care is conducted by the professional RN and assisted in the endeavor by both licensed and unlicensed personnel. The PPM is a health care delivery system that is in collaboration with the state of California Nurse Practice Act, Title XXII of the California Code of Regulations and The Joint Commission. The PPM creates an environment that promotes and supports the RN being accountable for their professional practices, thus facilitates the development of the highest standards of professional nursing.
Professional Scope of Nursing
The Professional Scope of Nursing Practice relates to three categories of services that nurses deliver:
Delegated Category: • Services nurses deliver in response to a physician’s orders.
Interdependent Category: • Services nurses provide because the person has a certain health condition,
medical diagnosis or treatment plan. Independent Category:
• Services nurses provide because the person has a certain human response or nursing diagnosis.
The nursing process is an integral part of the nursing philosophy. It is also the primary variable in orienting new staff, providing continuing education, developing standards of nursing practice and care, driving the professional documentation system and monitoring and evaluating all staff performance. Philosophy The philosophy of the Nursing Services Department compliments the philosophy of SJMC, which emphasizes treating all people with DIGNITY, providing clinically superior and effective SERVICE, assuring EXCELLENCE in all aspects of care and providing an environment, which is JUSTICE to patients, staff and society.
SJMC Professional Practice Model
Center of Excellence

Each patient receives a holistic assessment (physical, spiritual, psychological, cognitive) on admission and an ongoing basis. A holistic assessment includes data collection and analysis of information for identification of the individual’s responses, needs or condition. This leads the RN to select the appropriate interdependent and independent standards of patient care and associated policies/procedures. Once the standards are selected, the individualized implementations of appropriate nursing interventions are initiated. The evaluation of outcomes of nursing care is the essential link in determining the effectiveness of a caregiver. This holistic re-assessment is focused on actual needs/outcomes accomplished by the patient and family.
In caring for patients throughout the healthcare continuum, we create a community of people who respect the rights of patients and families as well as colleagues. We build an environment that promotes the opportunity to grow professionally and personally. As members of an interdisciplinary team, we collaborate with our professional peers to assure that individual patient care is characterized by optimal quality and appropriate use of resources. Together, we bring healing, hope, support and care to those with whom we come into contact.
We recognize that individuals and their families entrust us with the responsibility to care for themselves and their loved ones. Trust encompasses both our professional competence and our personal compassion. We respect their rights to privacy and participation in treatment decisions. Frequently, we work with people who have diminished ability to speak or act on their own behalf. In those situations, we listen, assist with articulating their needs and advocate for them. Human dignity requires that we extend our personal caring, warmth and professional skills to everyone regardless of age, race, sex, social or economic status or reason for hospitalization. We respect our co-workers and build an atmosphere of mutual trust.
A commitment to excellence characterizes all aspects of our service. In our treatment plans and interactions with patients, we recognize that each person brings physical, social, spiritual and emotional life dimensions. We recognize that patient and family understandings of the disease process and the methods of treatment contribute to the healing and optimal well-being. In our interactions with physicians and other healthcare providers, we help assure that patients and their families have coordinated access to the expertise and skills necessary for comprehensive, person-centered care.
Our work environment rewards mutual respect, free exchange of ideas, dedication, innovation and teamwork. Our commitment to excellence is reinforced by ongoing personal and professional development. We believe that to ensure future quality care and nursing resources, we must provide a favorable teaching climate for nursing students and students of related disciplines. By judiciously managing time, personnel and material resources, we provide un-compromised quality in an effective manner. Our evaluation and quality systems monitor and enhance the efficacy and safety of our procedures.
We are committed to furthering the professional and ethical standards of nursing. In addition, we are committed to the enhancement of systems that support the individual professional nurse’s accountability for achieving patient outcomes and the recognition of excellence in patient care. In the sphere of bioethics, we contribute our insights in the broader discussions of patient rights and preferences and principles of ethical decision making. We contribute to the well being of the community through education and

participation in the community outreach programs. As members of a community of caregivers, we join with our peers to create an atmosphere where life is valued, contributions are acknowledged and the mission of SJMC and the Sisters of St. Joseph are carried out.
Cultural Diversity & Sensitivity
SJMC’s goal is to educate staff to become culturally competent by creating an awareness of the different rules of behavior encountered in various cultures. It is important to remember that these behaviors represent broad patterns of similarity among groups, rather than any type of ethnic stereotype. The purpose is to increase your awareness of cultural diversity.
Cultural Competency: A vital part of patient care
Providing good patient care in a culturally competent manner simply requires us to augment our customer service skills. Our goal is to integrate our own personal cultural history and work skills and to open ourselves to awareness. To assure that we meet the needs and expectations of our patients we should consider the following: Environment/Culture - Be aware of physical factors that might influence accessibility
to preventative healthcare, a patient’s social factors that may contribute to the success of treatment plans, and other symbolic influences, such as those factors that may cause shame or stigma.
Obtain background information on the patient - What is the patient’s degree of affiliation with their ethnic group? Specifically, what is the pattern of decision making in the family structure?
Obtain information about the patient’s particular problem or situation – What are their reasons for seeking help? What are some ideas about the reasons for the illness? Have the patient describe their previous treatment experiences. How has that shaped their expectation of health care (outcome)?
Discuss their expectations - What kind of treatment do you think you should receive? What are the most important results that you hope to receive? What have you experienced in the past? What would you like to include this time?
Obtain information on cultural factors that affect treatment - Determine the patient’s feelings/attitudes regarding: healing beliefs and practices, values, diet, relevant family processes, and other factors. Buddhism is the major religion attributed to the Vietnamese. The belief in the “hot and cold” conditions of illness and the eventual subsiding of the disease or its symptoms. There may be a tendency to be accepting of illness as part of a continuum of the life cycle. Certain patients may be hesitant because of stigma or social shame attributed to the nature of the disease.
Include Spirituality as part of the patient assessment- What role does religion play in the patient’s life? How do they feel about their illness in regards to their belief system? Is this illness considered a punishment? What kind of religious support would the patient like?

Minority patients and their families may have strong affiliations with their religious community. Invite their church leaders and spiritual guides to participate and advise the team on appropriate measures that will promote compliance and cooperation.
What is the patient’s readiness to undertake the role? - What are the patient’s motivations? What are their concerns about health matters in general? What is their willingness to seek and accept medical direction? How firm is their intention to comply with treatment programs? Do they maintain positive health activities?
Value of illness threat reduction (subjective estimates of) - What is the patient’s belief in the diagnosis? What is their perception of their vulnerability to illness in general? What is their fear about the extent of possible bodily harm, and the extent of possible interference with social roles? What is the presence of (or past experience with) symptoms? Will it affect their ability to function as the caretaker or breadwinner?
Caring About Cultural Competency
What Is Culture? Culture is the way of life of humans. It involves the way we do things and the
importance we place on symbols, thoughts, ideas and behaviors. Culture is often defined as one’s ethnicity or religious identification, it may also be
defined by age, race, sex, skin color, national origin, physical size, nationality or though processes.
Culture is the way of life of humans, and includes our customs, behaviors, communication style and the values that we place on material objects.
What Are Cultural Competencies?
Cultural competencies are skills to help you work with people of all cultures. These skills do not involve any kind of advanced education. The only criteria needed to be competent is to treat each person as an individual who deserves to be respected for their culture and belief traditions, even if they differ greatly from our own.
In healthcare, we need to focus on an individual’s views about health behaviors and treatment, how they interact with their families and communities, their food preferences, their views on death and other factors that determine the way that they accept treatment and instruction.
Patient Rights and Responsibilities
Our goal is to facilitate the healthcare of our patients through clear lines of communication among all members of the healthcare team. Our philosophy is that patients have a right to personal consideration, information about their care, and to fully participate in their care. Every SJMC patient has the right to:
• Considerate and respectful care, and to be made comfortable. You have the right to respect for your personal values and beliefs.

• Have family members (or other representative of your choosing) and your own physician notified promptly of your admission to the hospital.
• Know the name of the physician who has primary responsibility for coordinating your care and the names and professional relationships of other physicians and non-physicians who will see you.
• Receive information about your health status, diagnosis, prognosis, course of treatment, prospects for recovery and outcomes of care (including unanticipated outcomes) in terms you can understand. You have the right to effective communication and to participate in the development and implementation of your plan of care. You have the right to participate in ethical questions that arise in the course of your care, including issues of conflict resolution, withholding resuscitative service, and forgoing life-sustaining treatment.
• Make decisions regarding medical care, and receive as much information about any proposed treatment or procedure as you may need in order to give informed consent or to refuse a course of treatment. Except in emergencies, this information shall include a description of the procedure or treatment, the medically significant risks involved, alternate courses of treatment or non- treatment and the risks involved in each, and the name of the person who will carry out the procedure or treatment.
• Request or refuse treatment, to the extent permitted by law. However, you do not have the right to demand inappropriate or medically unnecessary treatment or services. You have the right to leave the hospital even against the advice of physicians, to the extent permitted by law.
• Be advised if the hospital/personal physician proposes to engage in or perform human experimentation affecting your care or treatment. You have the right to refuse to participate in such research projects.
• Reasonable responses to any reasonable requests made for service. • Appropriate assessment and management of your pain, information about pain,
pain relief measures and to participate in pain management decisions. You may request or reject the use of any or all modalities to relieve the pain, including opiate medication, if you suffer from severe chronic intractable pain. The doctor may refuse to prescribe opiate medications, but if so, must inform you that there are physicians who specialize in the treatment of severe chronic pain with methods that include the use of opiates.
• Formulate advance directives. This includes designating a decision maker if you become incapable of understanding a proposed treatment or become unable to communicate your wishes regarding care. Hospital staff and practitioners who provide care in the hospital shall comply with these directives. All patients’ rights apply to the person who has legal responsibility to make decisions regarding medical care on your behalf.
• Have personal privacy respected. Case discussion, consultation, examination and treatment are confidential and should be conducted discreetly. You have the right to be told the reason for the presence of any individual. You have the right to have visitors leave prior to an examination and when treatment issues are being discussed. Privacy curtains will be used in semi-private rooms.
• Confidential treatment of all communications and records pertaining to your care and stay in the hospital. You will receive a separate “Notice of Privacy Practices” the
first time we provide care explaining your privacy rights in detail and how we may use and disclose your protected health information.
• Receive care in a safe setting, free from mental, physical, sexual or verbal abuse and neglect, exploitation, harassment or humiliation. You have the right to access protective and advocacy services including notifying government agencies of neglect or abuse.
• Be free from restraints and seclusion of any form used as a means of coercion, discipline, convenience or retaliation by staff.
• Reasonable continuity of care and to know in advance the time and location of appointments as well as the identity of the persons providing care.
• Be informed by the physician, or a delegate of the physician, of continuing health care requirements and options following discharge from the hospital. You have the right to be involved in the development and implementation of your discharge plan. Upon your request, a friend or family member may be provided with this information also.
• Know which hospital rules and policies apply to your conduct while a patient. • Designate visitors of your choosing, if you have decision-making capacity, whether
or not the visitor is related by blood or marriage, unless: o No visitors are allowed. o The facility reasonably determines that the presence of a particular
visitor would endanger the health or safety of a patient, a member of the health facility staff, or other visitor to the health facility, or would significantly disrupt the operations of the facility.
o You have told the health facility staff that you no longer want a particular person to visit.
However, a health facility may establish reasonable restrictions upon visitation, including restrictions upon the hours of visitation and number of visitors.
• Have your wishes considered, if you lack decision-making capacity, for the purposes of determining who may visit. The method of that consideration will be disclosed in the hospital policy on visitation. At a minimum, the hospital shall include any persons living in your household.
• Examine and receive an explanation of the hospital’s bill regardless of the source of payment.
• Exercise these rights without regard to sex, race, color, religion, ancestry, national origin, age, disability, medical condition, marital status, sexual orientation, educational background, economic status or source of payment for care.
• File a grievance. If you want to file a grievance with this hospital, you may do so by writing or calling: SJMC Director of Patient Representative Department or by calling 714 992-3000 ext. 3464
• File a complaint with the California Department of Public Health (CDPH) regardless of whether you use the hospital’s grievance process:
California Department of Public Health 2150 Town Center Place #210
Anaheim, CA 92806 714 456-0630

Patient Responsibility
• The patient has the responsibility to provide accurate and complete information about present complaints, past illnesses, hospitalizations, medications, and other matters relating to his/her health. The patient is responsible for reporting whether he/she clearly comprehends a contemplated course of action and what is expected of him/her.
• If a patient accepts treatment the patient is responsible for cooperating in following the treatment plan recommended by the practitioner primarily responsible for his/her care. This may include following the instructions of nurses and allied health personnel as they carry out the coordinated plan of care, implement the responsible practitioner’s orders, and enforce the applicable hospital rules and regulations. The patient is responsible for keeping appointments and, when he is unable to do so for any reason, for notifying the responsible practitioner or hospital.
• The patient is responsible for his/her actions if he/she refuses treatment or does not follow the practitioner’s instructions.
• The patient is responsible for assuring that the financial obligations of his/her health care are fulfilled as promptly as possible.
• The patient is responsible for following hospital rules and regulations affecting patient care and conduct.
• The patient is responsible for being considerate of the rights of other patients and hospital personnel and for assisting in the control of noise, smoking, and the number of visitors. The patient is responsible for being respectful of the property of other persons and of the hospital.
If the patient has any questions about their rights or responsibilities, or if they have any concerns, complaints, or suggestions, they may call the hospital operator by dialing “0” and ask for the nursing supervisor.
Condition H
At SJMC, Condition H has been developed to ensure patients & family additional assistance when they perceive that the patient’s condition has worsened and the healthcare team is not recognizing the concern. Condition H empowers the patients and family member to access, care, decrease anxiety and improve patient safety, the extension number X2158.
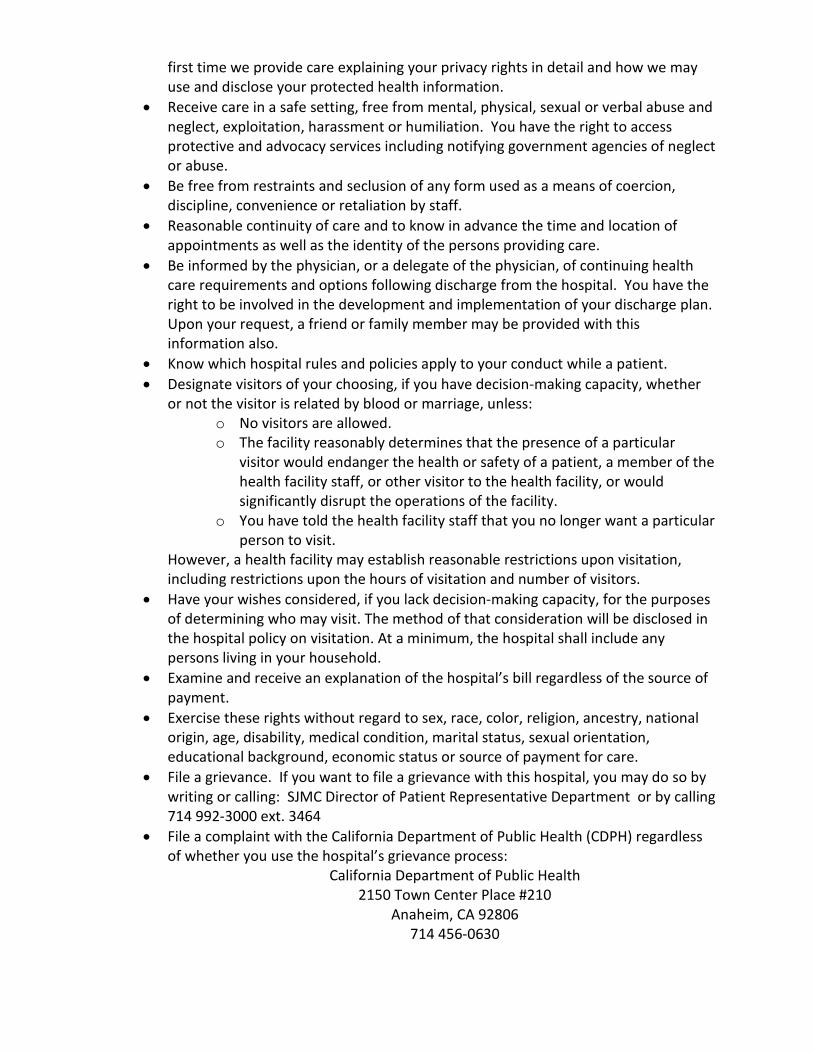
Key Points of Service
Welcome
• Introduce yourself and your role in a welcoming manner • Focus on their needs • Your body language including facial expressions, eye contact
and gestures, speaks louder than your words. If you words say one thing and your eyes say something else, the person will believe your body language.
• There is nothing more welcoming than a genuine smile, however, in some situations a smile is inappropriate. In those situations demonstrate warmth and concern through your expression and undivided attention.
Respect
• Listen carefully and let others finish their thoughts without interrupting
• Remember that disability or illness does not define the patient- that is someone’s friend or family member and is deserving of your empathy and complete attention.
Engage • Understand the needs. • Encourage others to ask questions and express concerns • Communicate well, use words and terms that are easily
understood by the patient.
Assist
• Be proactive and look for opportunities to relieve anxiety, anticipate needs and exceed expectations.
• Commit to excellent follow-through, recognizing that even small requests become important when you’re sick, in pain or injured.
• Before any interaction, especially when it involves sensitive procedures or discussions, explain what is going to happen and get his/her permission before continuing.
• If needed, involve others in meeting the needs of the patient, the family or team member.
Transition/Thank
• Explain the next steps in care or process, and make introductions when possible.
• Escort patients and family members so that they are not alone, lost or confused.
• Extend a genuine offer to be of further assistance. • Provide a thoughtful goodbye and if appropriate, thank the
individual for the opportunity to care for or serve them.

Patient Care Confidentiality/HIPAA
One of the most important rights of a patient is privacy. This means that everything you may know about the patient is confidential. Confidentiality means that the patient has the right to expect that all matters pertaining to their care will be disclosed only to those who need the information in order to give appropriate care. All patient information is confidential and is protected by the Patient Bill of Rights. Any discussion of patient information in public areas is a violation of hospital policy and requires disciplinary action. Patient records are to be seen only by appropriate hospital personnel. Sensitive information concerning personnel and management issues will be maintained in strictest confidence and utilized only by those authorized to review and act upon it. Any release of information about a patient must be controlled and governed by the rule, “Need to Know”. “What you see here, what you say here, let it stay here when you leave here.” SJMC maintains confidentiality of the patient’s medical record by: Not leaving patient information where it can be seen by anyone other than the
healthcare team. System generated access password codes for computers. Utilization of proper authorization of release of records to patient, physician,
attorney, and third person. Termination of access codes when an employee leaves. All paper goes into “shredder box”.
What is HIPAA? HIPAA is the acronym for the federal law known as the Health Insurance Portability and Accountability Act of 1996. HIPAA has three standard rules:
1. Privacy 2. Security 3. Electronic Data Interchange (EDI)
Upon HIPAA, “covered entities” (such as SJMC) must comply with the regulations that are enforced by the Office of Civil Rights & the California Department of Public Health (CDPH). The “Privacy Rule” under HIPAA Under the Privacy Rule, all medical records and any other individually identifiable” health information in any form, whether electronic, on paper, or oral is considered protected health information (PHI). Students and instructors are not to discuss patient information in the elevators, cafeteria and public areas. Standard One: Patient Rights Under the Privacy Rule, patients have significant rights to control how their health information is used and disclosed such as:

• The patient must be provided with a clear, written explanation of how the hospital may use and disclose their health information.
• The patient must be provided with the opportunity, upon their request, to see and receive copies of their records; request amendments; and obtain an accounting of disclosures as to their health information.
• The patient has the right to file a formal complaint with the hospital or with the CDPH, about violations of the provision of the Privacy Rule or the hospital’s policies & procedures.
Standard Two: Security Security standards under HIPAA set forth protection for health information that is stored or transmitted electronically. These include:
• Administrative Safeguards (policies & procedures, staff training) • Physical Safeguards (access controls, screensaver, locked filing cabinets, and
other physical safeguards). • Technical Security Measures (passwords, telephone confirmation when faxing
patient information, and automatic log off to computers when not in use) • Technical Security Mechanisms (controls to monitor access to patient
information, and the use of encryption in the transmission of electronic information)
Standard Three: Electronic Data Interchange (EDI) The HIPAA regulations establish National Transaction Standards to:
• Make the electronic data interchange process efficient, effective and secure. Disclosures for Treatment, Payment & Healthcare Operations SJMC must make reasonable efforts to use or disclose only the minimum necessary amount of protected health information in order to perform the functions of their job. New Challenges to Privacy Laws effective January 1, 2009 Increase patient privacy protections in California Requires providers to prevent breaches Requires providers to report breaches Penalties against providers for failure to prevent breaches No exceptions for good faith access by employees Defines “unauthorized access” to include the “inappropriate review or viewing” of
medical information.
Bioethics
There is an Adult and Perinatal “Ethics Ready Reference Grid” to assist with the clarification of ethical issues. The grid is located on the Lucidoc, Resource Links under Ethics. There are also staff members who are “Ethic ACES” (Assisting Colleagues with Ethical Situations) available to help identify potential ethical situations. Additionally, the Clinical Ethics Assistance Committee is available to assist clinical and healthcare professionals regarding ethical considerations. Anyone may request a consultation to help clarify a situation. To access the Clinical Ethics Assistance Committee,

contact the Nurse Manager of the patient’s assigned unit or the ARN. Your request for consult or clarification will occur within 24 hours.
Age-Related Guidelines
All patient assessments, interventions, and plans of care must be age appropriate to the patient’s physical, psychosocial and cognitive development.
Interpreter Services
SJMC provides interpreter services to assure non-English speaking and hearing impaired patients of their right to understand medical treatment and procedures, as well as to communicate their healthcare needs. Interpreter Services goal is to provide these patients the same access to services as all other patients.
A qualified volunteer staff interpreter is a bilingual medical or administrative professional who is knowledgeable in the subject matter and its terminology. These staff volunteer/interpreter’s have completed the SJHS-SC approved course or the SJHS approved language assessment tool. Qualified volunteer/interpreters are identified by a white diagonal badge with the words “Trained Volunteer Interpreter” written in red. Important Note: At no time should a nursing student translate for a patient or patient’s family. Contact the Interpreter Services Department at ext. 2882 or pager #714-355-7004. If using interpreter on wheels, be sure to document the interpreter # (same with the phone interpreter).
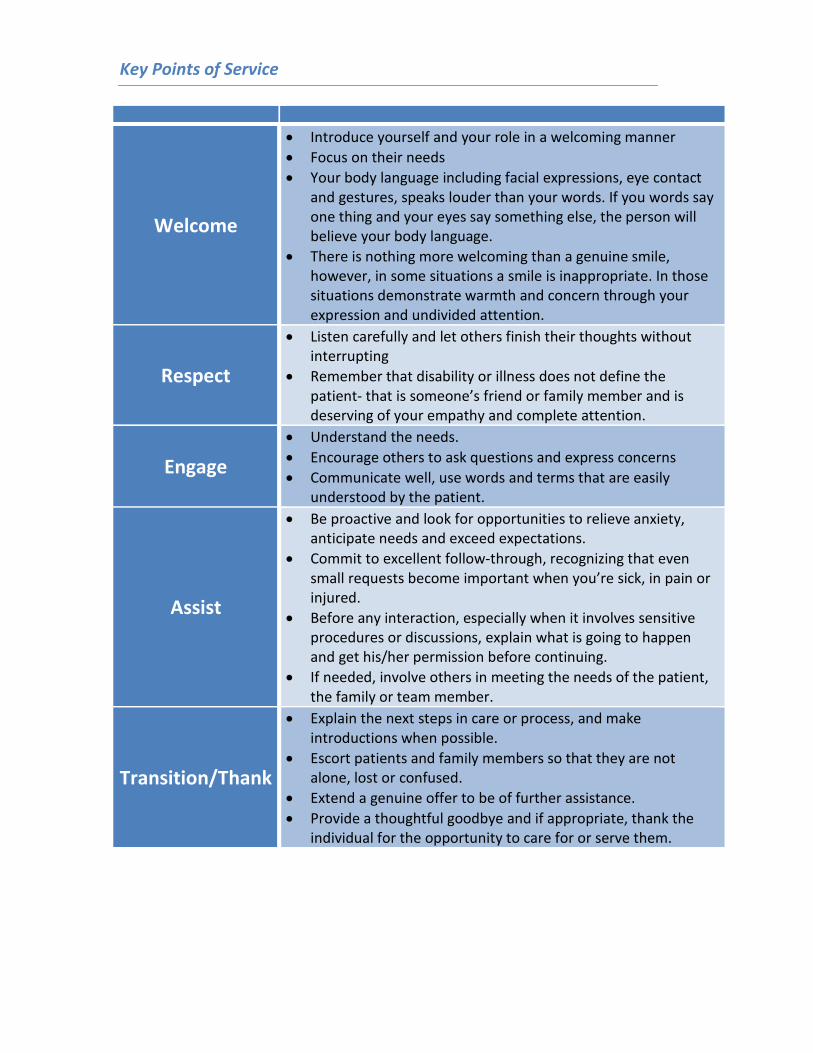
National Patient Safety Goals
SJMC places top priority on providing high quality and safe care and services to our patients. We utilized a performance improvement process to plan, assess, evaluate quality of care, improve patient care & safety, and continuously seek and act on opportunities to improve quality & value of services. The Joint Commission (TJC) emphasizes safety standards that we are to follow: This year, TJC is emphasizing the following National Patient Safety Goals for all hospitals to address:
Employees or physicians have the right to file a complaint regarding quality of care or safety concerns if they so desires. The Joint Commission can be reached at 1-800-994-6610.
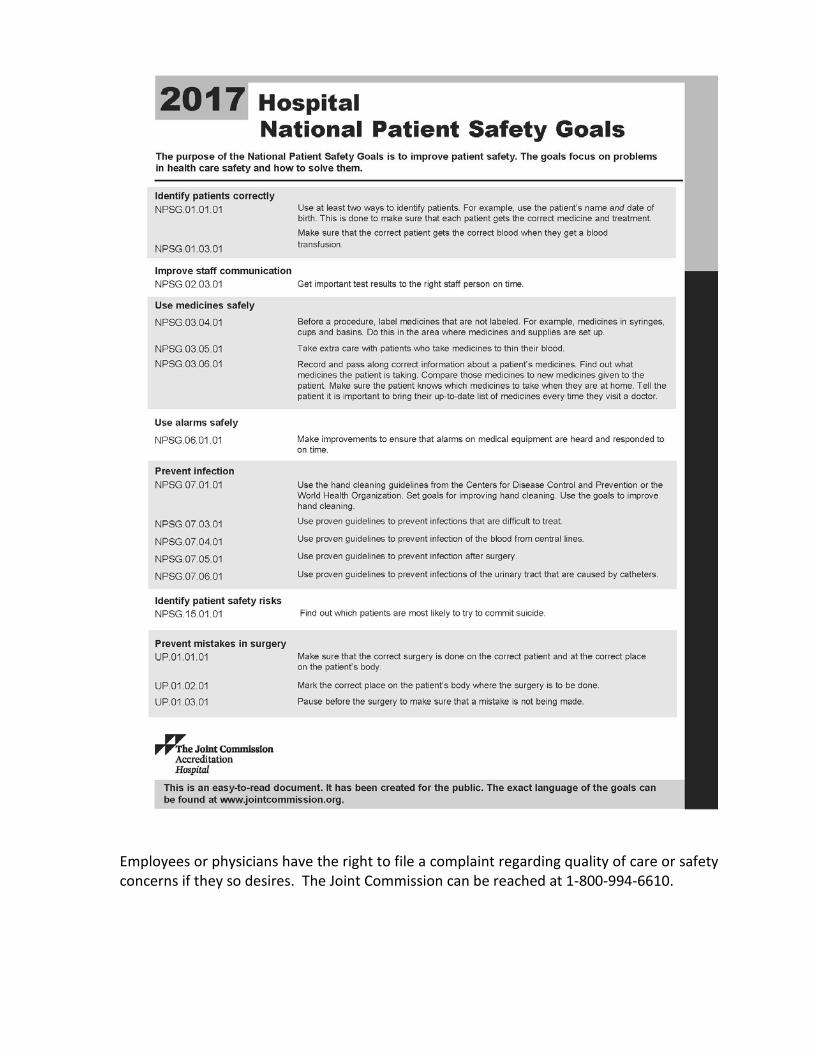
Universal Protocol/”Time Out”
The purpose of Univesal Protocol aka “Time Out” is to promote correct patient, correct procedure and correct surgical and invasive procedures through a three component process involving pre-operative/invasive procedural verification, surgical site marking when required and a formal “Time Out” process prior to the initiation of any surgical or invasive procedure. This protocol will need to be directly observed by the assigned RN. Pre-Procedure Verification At the Bedside:
• May be completed in conjunction with “Time Out” • Missing information or discrepancies must be addressed
Procedure/Surgical Areas: • Example: SAA, PACU, Cath Lab (complete all “10 Steps – see below)
Site Marking • Bedside/Surgical procedures involving laterality must be marked. • Marking must be completed by the person doing the procedure and using their
initials. • Marking should include the patient and/or family, parent/guardian/decision maker. • The mark must be visible after draping.
Steps of a “Time Out”
• Conduct a “Time Out” immediately prior to starting the procedure.
• All questions must be answered: 1. Verify correct patient 2. Verify correct procedure 3. Correct Side / Site 4. Mark is visible after application 5. Prophylactic antibiotics given
In our pursuit of patient safety and quality, it is the philosophy of SJMC to encourage and expect the reporting of issues, events and errors. The concept is called “no fear” reporting. It is important for staff and physicians to have a way to report any issues of concern that happen during the process of patient care. Information comes to us from several mechanisms: Patient feedback, suggestions and complaints. Physician feedback, suggestions and complaints. Staff feedback during our annual performance improvement and patient safety
climate survey, as well as at staff meetings, safety rounds, employee forums, or other conversations.
Literature and reports from other hospitals regarding areas that may need to be evaluated and monitored.
As a student at SJMC you have the right to report concern regarding patient care directly to The Joint Commission. They can be reached at 1-800-994-6610.

Ensuring Patient Safety The hospital will to the best of its ability, while the patient is receiving care at the facility, protect the patient from real or perceived abuse, neglect or exploitation from anyone, including staff, students volunteers, other patients, visitors and/or family members. The RL Solutions (Incident Report System (IRS) is used to communicate information about issues, events, occurrences or incidents. This information also enables the hospital to monitor, trend and improve performance. If an event or incident occurs, notify the Administrative Resource Nurse (ARN) to compete the on-line event notification process. Reportable events include those that directly or indirectly affect the quality of
patient care, safety and/or outcomes. Examples include: All patient falls, equipment or device issues, adverse medication reactions,
medication events, issues that occur during patient care diagnostic or treatment procedures, problems with identification procedures.
When a significant event has occurred, immediately inform the person in charge. In addition, Risk Management should be contacted at ext. 2235 immediately
whenever any adverse or unexpected outcome significantly alters the patient’s clinical course or plan of care.
Adverse Events
Your responsibility in Adverse Events
Reportable events include those that directly or indirectly affect the quality of patient care, safety and/or outcomes. Examples include:
• All patient falls, equipment or device issues, adverse medication reactions, medication events, issues that occur during patient care diagnostic or treatment procedures, problems with identification procedures.
Adverse Event: 1. Evaluate adverse event as soon as possible after the occurrence. 2. Notify your Unit Coordinator, Manager, ARN, and Quality Department (ext. 3609)
Risk Management (ext. 2235) no later than the end of your work day. 3. Complete a report in the IRS (see information below) no later than the end of your
work day. Actual or Potential Sentinel Event: This is a severe adverse event has resulted in death or major permanent loss of function.
1. Notify your Unit Coordinator, Manager, ARN, and Quality/RM immediately. 2. Complete a report in the IRS immediately.
For both types of events, ensure your documentation of the patient’s condition in the EMR is accurate, complete, and consistent with the IRS information.

Adverse Event Reporting RL Solutions (IRS system) SJMC uses RL solutions for the Incident Reporting System (IRS) as a method used to report any Adverse reactions or near misses. You can find the IRS log on under SJF Shortcuts. There is no log-in or password required. The average length of time needed to complete the IRS form is 2 minutes. The Incident Report System (IRS) is used to communicate information about issues, events, occurrences or incidents. This information also enables the hospital to monitor, trend and improve performance.

Part III:
Prevention Measurements

Falls Prevention
In an effort to promote safety, patients admitted to SJMC are assessed promptly for falls risk. Environmental and patient specific factors are assessed to determine patient fall risk. Environmental factors include lighting, patient footwear, room free of clutter, bed in low position, call bell, phone, and other patient personal items in reach. Patient specific factors include elimination issues, falls history, medications, mobility issues and mental status issues. Falls risk is assigned as low, medium, or high risk based on nursing assessment. Falls risk is re-assessed:
• Every shift • When transferred to another level of care • If a fall occurs during hospital stay • When any significant change in patient status occurs
Interventions are applied based on patient risk: Low risk interventions include:
• Orient patient to room • Bed in lowest position • Clear path to bathroom • Educate patient in falls
prevention • Call light within reach • Provide non-skid footwear • Educate family in falls
prevention • Phone, glasses within reach • No clutter in room
Moderate risk interventions include low fall risk and:
• Orientation/Reorientation • Encourage frequent visits
by family • Turn on night light • Update patient info on
white board • Instruct patient to call for help
to bathroom • Ambulation with assist at
regular intervals
• Provide Newspaper, TV, Radio
• Offer assistance for bathroom frequently
High risk interventions include low and moderate fall risk and:
• Orange armband on patient
• Magnet on unit white board
• Falls magnet on patient door
• Red socks on patient • Bed Alert • Room closer to nursing
station • Attendant for use of
bathroom • Chair Alert • Communicate falls risk • Fall Mats • Star Rounding

Communication of patient falls risk is part of all “hand off” communications among caregivers.
Best Practice: check your patient hourly for the “Five P’s”:
• Personal Needs • Position • Placement (items patient wants close to them- call bell, phone, etc.) • Pain • Prevention
Red Socks • Use for ALL patients who have been identified as HIGH FALLS RISK • Red socks are located on every nursing unit in the clean utility rooms • Red socks help to remind patients, staff, and visitors who is high falls risk • If you discover a patient who is:
o Alone o Out of bed o Wearing RED SOCKS
• Please immediately obtain help to assist the patient back to bed. • High fall risk kits with all needed items are available in clean utility room.
Safety
Report any of the following to your Clinical Coordinator:
o Any unsafe condition or act that you observe.
o Any defective or damaged equipment (remove from use and label).
o Any injuries. Complete the proper paperwork before leaving the hospital.
• Remove any foreign material you see on the floor, to prevent injury to others. • Walk; do not run in the halls. • Help keep hallways free of obstacles, such as carts and wheelchairs. All equipment
is to be kept on one side of the hallway. • Dispose of syringes and other sharp objects in the sharp container. Never recap
needles as this is when most accidental needle sticks occur. St. Joseph utilizes a needless system.
• Report all needle sticks and injuries to the Administrative Resource Nurse. • You may be exposed to hazardous materials on the nursing unit that you have been
assigned to. You have the right to know what these substances are by locating and reviewing information related to the products that we use via the MSDS manual located at each nursing station.
Place on outside patient room - one magnet per room.
HIGH FALL RISK

Students are to be involved in bedside shift report.

Infection Prevention & Control
SJMC has adopted a comprehensive and multi-focal Infection Prevention & Control Program. It involves every department and all personnel. The program strives to provide an environment that is as safe as possible from the hazards of transmission of infectious disease for all patients, employees, visitors, and physicians.
• The use of aseptic and sterile technique, observation of standard precautions, and maintenance of product sterility is required for all central line interactions.
• In the performance of procedures that result in the generation of droplets or splashing of blood and body fluids maximal sterile barrier protection should be employed including but not limited to gloves, mask, gown, cap, protective eyewear, and drapes.
• Limiting access to the catheter will decrease the risk for infection. • To obtain full antimicrobial effect, Antiseptics must be allowed to thoroughly dry. • Perform hand hygiene with antimicrobial soap or alcohol based hand rub before
and after every patient interaction. • Use 2% Chlorhexidine cloth to wash a large area surrounding insertion site to
reduce bacterial count on skin. For PICC lines, subclavian or IJ lines cleanse the upper torso, axilla areas, chest and arms. For femoral lines, cleans groin, lower abdomen, upper thighs and buttocks.
• All personnel in room during insertion must wear mask. * Refer to APPENDIX D for the Infection Prevention and Control Isolation Precaution Guidelines Infection control is for EVERYONE: Healthcare workers, patients and visitors. Please encourage appropriate infection control at all times!
Hand Hygiene and Personal Protective Equipment (PPE)
Hand washing is the single MOST important way to protect yourself, your family, and patients.
• The most effective method of preventing the transmission of infections • Promotes patient satisfaction, the patients want to see you wash your hands. • Be a hand hygiene advocate for your patient and hospital staff. Hand Hygiene with soap and running water
Recommended techniques:
• Soap and Water o Wet hands with water, apply soap, rub hands together for at least 15
seconds o Rinse and dry with disposable towel o Use towel to turn off faucet
• Hand Sanitizer o Apply to palm of one hand, rub hands together covering all surfaces until dry o Dispense enough sanitizer to cover your hands completely
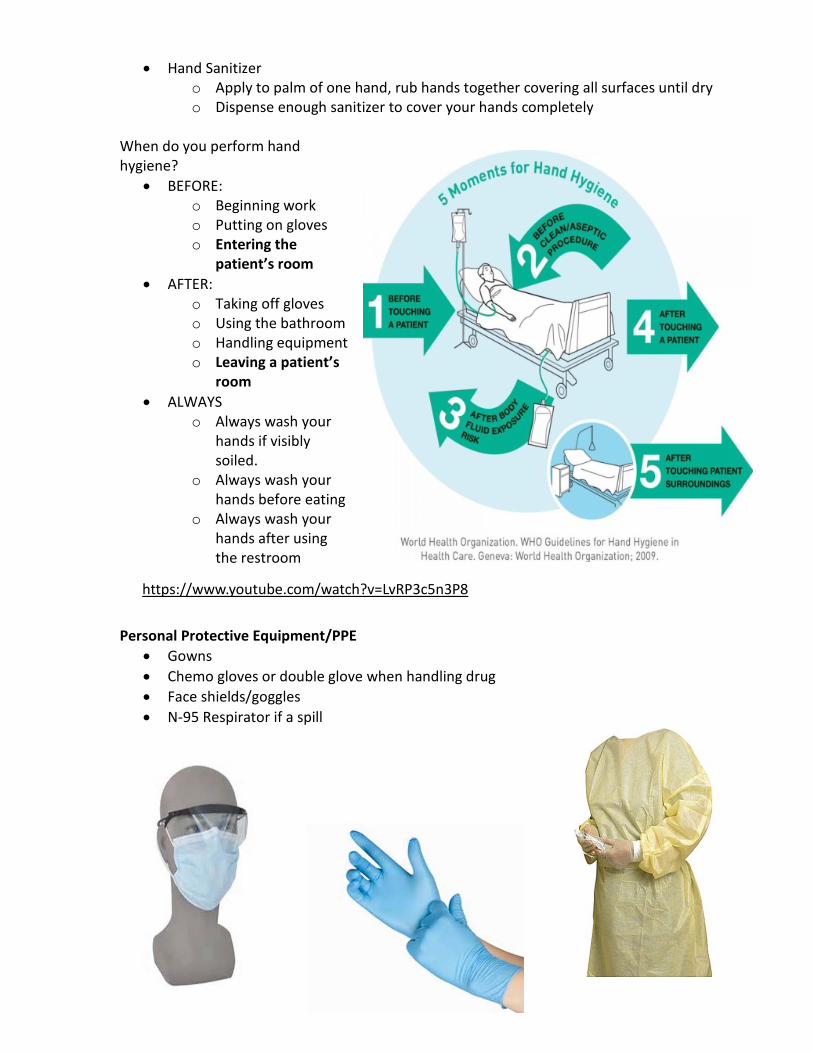
When do you perform hand hygiene?
• BEFORE: o Beginning work o Putting on gloves o Entering the
patient’s room • AFTER:
o Taking off gloves o Using the bathroom o Handling equipment o Leaving a patient’s
room • ALWAYS
o Always wash your hands if visibly soiled.
o Always wash your hands before eating
o Always wash your hands after using the restroom
Personal Protective Equipment/PPE
• Gowns • Chemo gloves or double glove when handling drug • Face shields/goggles • N-95 Respirator if a spill
https://www.youtube.com/watch?v=LvRP3c5n3P8


Isolation Practices
Standard Precautions • All patients are in standard precautions • We never know so….Consider each patient to be potentially infectious
Contact Precautions
• Wear gown and gloves • Used for multidrug resistant organisms
e.g. MRSA & VRE
Clostridium difficile (C.diff) Contact Precautions Characteristics:
• Diarrhea & abdominal pain • Forms spores • Prolonged environmental survival • These rooms MUST be cleaned with bleach • Wash hands with soap and water ONLY
Droplet Precautions
• Influenza • Mumps • Rubella • Pertussis • Meningococcal meningitis • Meningococcal pneumonia
Airborne Precautions
• Measles (Rubeola) • Varicella (Chickenpox) • Tuberculosis, pulmonary

Isolation Precautions
Southwest (SWT) and the North towers have isolation carts and tape outside the doorway. The NWT has the isolation carts and tape inside at the ‘Hand Hygiene” area.
C.diff Precaution - SWT & North Building
Other Isolation Precaution
C.diff Precaution - NWT Patient Room

Emerging Infections
In March 2016, the World Health Organization declared an end of the public health emergency of Ebola Viral Disease. However should there be a recurrence of this viral disease or any other, your Infection Control Department is committed to remaining up to date, knowledgeable and prepared. We work closely with the local health department to remain up to date on any concerns that are identified world-wide. SuperBugs causes life threatening diarrhea and occurs most often in people who had recent medical care and antibiotics. These infections are untreatable and hart to treat infections are on the rise which has a 50% mortality rate.
Central Line Associated Blood Stream Infections/CLABSI
A Central Line Associated Bloodstream Infection is a bloodstream infection that occurs in a patient with an IV catheter that is inserted into a large central vein and is in place greater than 2 days AND cannot be contributed to any other cause. Causes include contamination at insertion, during dressing change, when accessing lines or administering medications, blood withdrawal or when the dressing becomes loose, wet or bloody. Defined by the Centers for Disease Control (CDC)
• Central line in place > 2 days • Bloodstream infection that is not attributable to any other infection • Central line is any intravascular catheter that terminates in one of the great
vessels or in or near the heart and is used for infusion, withdrawal of blood or hemodynamic monitoring.
• Causes include: • Contamination at insertion • During dressing change • When accessing lines for administering medications and/or blood
withdrawal • When the dressing becomes loose, wet or bloody.
FACTs • An estimated 30,100 central line associated bloodstream infections occur
each year in the U.S. • Cause an increased risk of mortality by 12-25% • Prolong hospital length of stay by 8-19 days • Cost of an average of $43,500 per CLABSI
Tunneled Catheters
CLABSI Bundle-Recommended by CDC and SHEA • Meticulous hand hygiene prior to touching central line • Daily CHG bathing • Maximal sterile barrier precautions (mask, cap, gown, sterile gloves and
full body drape) for insertion • Scrub the hub or disinfect prior to each use • Replace dressings immediately when wet, loose or soiled • Use CHG sponge (Biopatch) • Daily review for necessity of central line
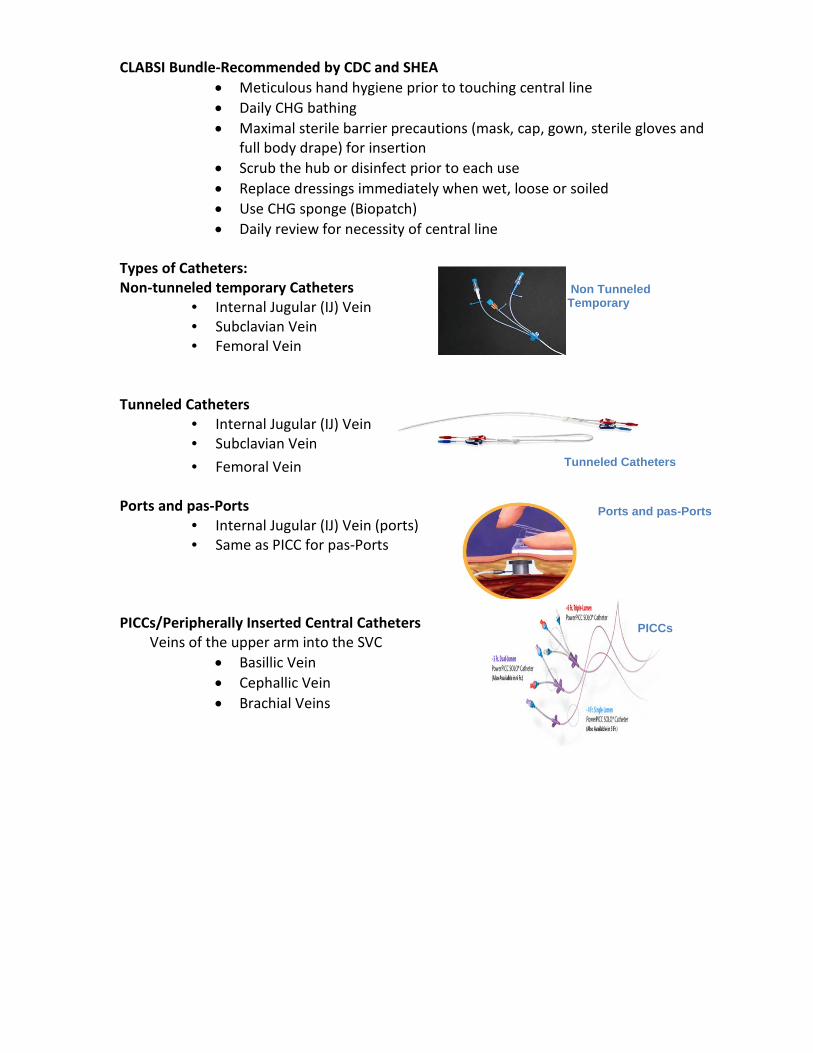
Types of Catheters: Non-tunneled temporary Catheters
• Internal Jugular (IJ) Vein • Subclavian Vein • Femoral Vein
Tunneled Catheters • Internal Jugular (IJ) Vein • Subclavian Vein • Femoral Vein
Ports and pas-Ports
• Internal Jugular (IJ) Vein (ports) • Same as PICC for pas-Ports
PICCs/Peripherally Inserted Central Catheters Veins of the upper arm into the SVC
• Basillic Vein • Cephallic Vein • Brachial Veins
Non Tunneled Temporary
Ports and pas-Ports
PICCs

Sunday Wednesday Campaign All tubing and caps changed Sunday and Wednesday. All Central line dressings changed on Sunday, or prn if soiled, loose or bloody. Site Care:
Chlorhexadine patch dressing under clear occlusive dressing (without gauze) to be changed every 7 days and PRN if wet, bloody, or loose. (Preferred dressing to be used)
Clear occlusive dressings/tape with gauze over central lines is to be changed every 24 hours and PRN if the dressing becomes wet, soiled or loose.
If catheter site is erythematous or has exudate increase dressing change to every 24 hours or as often as required to keep site dry and notify physician and vascular access device nurse.
If central line is used for dialysis, the dialysis nurse will change the dressing with the dialysis procedure. The dialysis nurse will use the designated central line dressing change kit and follow SJMC policy for dressing change at the times for dialysis.
If dialysis catheter is not being used for dialysis the RN assigned to patient will do the dressing change and use the designated central dressing change kit and follow SJMC policy for dressing changes.
Stat-locks and Chlorhexadine gluconate patch should be changed with each routine dressing change.
Tubing and injection cap changes:
Tubing changes are required every Wednesday/Sunday. Lipid containing solutions require tubing change as a closed system. Tubing changes are to occur simultaneously with the hanging of a new bag/bottle i.e., TPN every 24 hours and Propofol every 12 hours.
Blood tubing should be changed after completion of therapy. If another unit is to be transfused immediately, the same Y-type set may be used again. The filter may be used for up to 2 units of blood or until flow of blood becomes sluggish. Each unit of blood that is filtered for leukocytes at the time of transfusion requires a fresh filter, however, the Y-administration set may remain up to a 4 hour limit. A filter may not be used for longer than 4 hours. If infusion of two units will not be completed within the 4-hour limit, use a new Y-set and filter for the second unit.
Change tubing with each new bag of biohazardous solution (e.g. antineoplastic chemotherapy) per biohazardous (chemotherapy) precautions.
Injections caps are to be changed every Wednesday/Sunday, if disconnected from Catheter, if the integrity is compromised or if residual blood remains within the cap.
For central catheters all connections of tubing on injection caps must have luer locking devices.
Procedure All central line care must be supervised by a RN or the Instructor. Perform Hand Hygiene and utilize personal protective equipment. Prime new tubing or cap with designated solution or with normal saline. Clamp central catheter or extension set as appropriate.
Clean connection site with 1-3 alcohol swabs and allow drying. Insert new tubing or injection cap connector and secure connections Coil and tape catheter and tubing to prevent strain on the catheter sige. Document under intervention “change all tubing and central line caps”
Maintaining patency Catheters should be irrigated with every catheter interaction. Refer to Guidelines
for Vascular Access Device Routine irrigation/flushing shall be performed with the following:
a. Administration of blood and blood components b. Blood sampling c. Administration of incompatible medications or solutions d. Administration of medication e. Intermittent therapy f. When converting from continuous to intermittent therapies.
When using an open-ended central line intermittently (every 6 hours or less), saline lock is acceptable practice.
Site Care and Dressing Change All site care and dressing change must be supervised by a RN or the Instructor. Required Equipment:
1. Antimicrobial soap or alcohol based hand rub. 2. CVAD dressing change kit
Procedure: • Perform Hand Hygiene and utilize personal protective equipment. • Place patient in supine position, with his/her head turned away from site. • Open CVAD dressing change kit. • Don non-sterile gloves and mask • Remove old dressing • Perform hand hygiene • Don sterile gloves. • Use a Chloraprep swab in a back and forth scrubbing motion covering an area larger • Than the dressing. • Allow Chloraprep to air dry. Do not blow or blot dry. • Use skin protectant under location of stat-lock and around edge of dressing. Allow to
air Dry. Place Stat-lock on non sutured lines. Apply an occlusive dressing from the kit. Label dressing with date, time, and initials. Tape the tubing securely to prevent any strain on the catheter.
Documentation: Document in PCS

• Condition of catheter site • Dressing change
Catheter Associated Urinary Tract Infection (CAUTI)
All patients with an indwelling urinary catheter are at risk for developing a catheter associated urinary tract infection (CAUTI). CAUTI increases pain and suffering, morbidity & mortality, length of stay, and healthcare costs. Reduction of CAUTI To reduce CAUTI, THE followings steps are necessary.
• Appropriate Indications • Aseptic Insertion • Care of Catheter • Timely Removal
Care and Maintenance The CAUTI Bundle has the following precautions:
• Securement Device • Maintain a Closed System • Bag management • Peri-Care
Clostridium Difficile (C.diff)
C. difficile is a spore-forming, gram-positive anaerobic bacillus that produces two exotoxins: • toxin A and • toxin B
It is a common cause of antibiotic-associated diarrhea (AAD). It accounts for 15-25% of all episodes of AAD. The colonization rate is the following: Nursing home patients: up to 50% Hospitalized patients: Patients 10-20% Outpatients: 2-5% Characteristics C. difficile colonization* C. difficile infection
Patient has clinical symptoms NO Yes
Patient tests positive for C. difficile organism and/or its toxin
Organism Organism + toxin
Patient can transmit infection Yes but not as easily Yes
*More common than the C.difficile infection
MRSA Screening Standardized Procedure
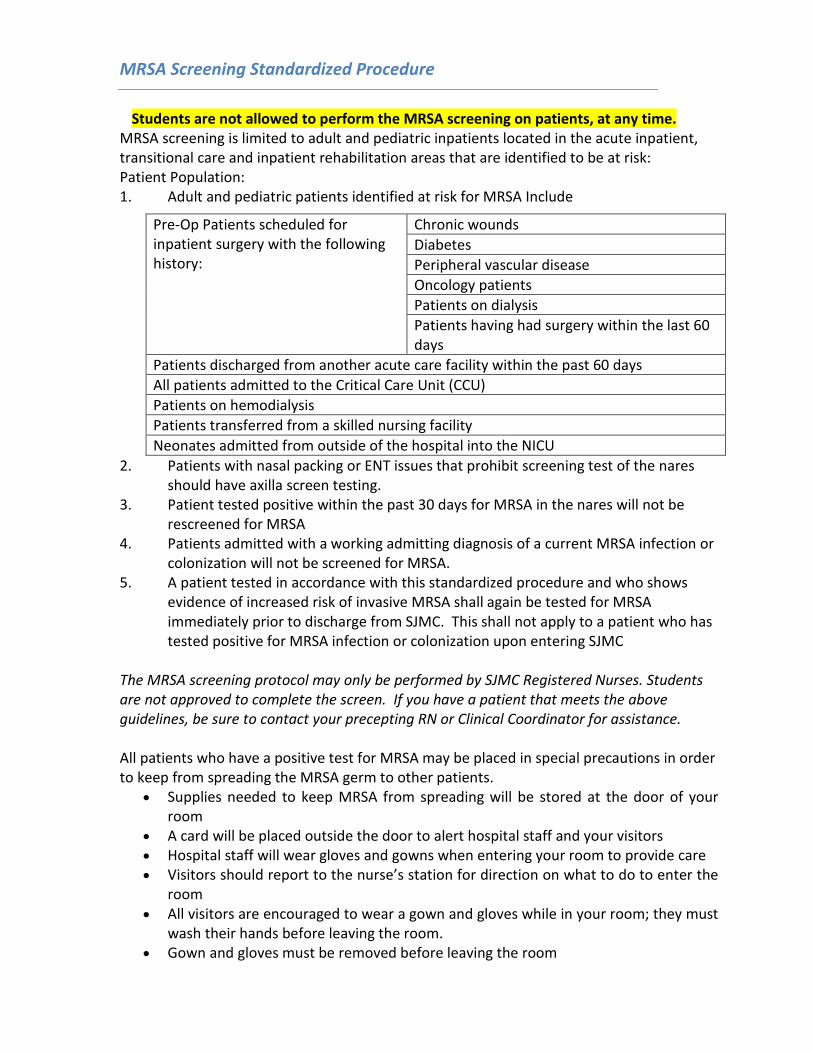
Students are not allowed to perform the MRSA screening on patients, at any time. MRSA screening is limited to adult and pediatric inpatients located in the acute inpatient, transitional care and inpatient rehabilitation areas that are identified to be at risk: Patient Population: 1. Adult and pediatric patients identified at risk for MRSA Include
2. Patients with nasal packing or ENT issues that prohibit screening test of the nares should have axilla screen testing.
3. Patient tested positive within the past 30 days for MRSA in the nares will not be rescreened for MRSA
4. Patients admitted with a working admitting diagnosis of a current MRSA infection or colonization will not be screened for MRSA.
5. A patient tested in accordance with this standardized procedure and who shows evidence of increased risk of invasive MRSA shall again be tested for MRSA immediately prior to discharge from SJMC. This shall not apply to a patient who has tested positive for MRSA infection or colonization upon entering SJMC
The MRSA screening protocol may only be performed by SJMC Registered Nurses. Students are not approved to complete the screen. If you have a patient that meets the above guidelines, be sure to contact your precepting RN or Clinical Coordinator for assistance. All patients who have a positive test for MRSA may be placed in special precautions in order to keep from spreading the MRSA germ to other patients.
• Supplies needed to keep MRSA from spreading will be stored at the door of your room
• A card will be placed outside the door to alert hospital staff and your visitors • Hospital staff will wear gloves and gowns when entering your room to provide care • Visitors should report to the nurse’s station for direction on what to do to enter the
room • All visitors are encouraged to wear a gown and gloves while in your room; they must
wash their hands before leaving the room. • Gown and gloves must be removed before leaving the room
Pre-Op Patients scheduled for inpatient surgery with the following history:
Chronic wounds Diabetes Peripheral vascular disease Oncology patients Patients on dialysis Patients having had surgery within the last 60 days
Patients discharged from another acute care facility within the past 60 days All patients admitted to the Critical Care Unit (CCU) Patients on hemodialysis Patients transferred from a skilled nursing facility Neonates admitted from outside of the hospital into the NICU

High Touch Areas
• Research shows that keeping the environment clean can reduce the transmission of infectious disease.
• High touch cleaning was instituted to prevent the spread of infectious illness to patients, staff, physicians and visitors.
• Cleaning of items or areas that are frequently touched by patients or healthcare workers. Items include overbed tables, call bells, bed rails, IV poles & telephones.
• Door inserts to determine if high touch areas are done by shift.

Part IV:
Clinical Procedure Guidelines (1.2)

Pain Management
Students will work closely with their preceptor and instructor on identifying presence of pain by utilizing the pain scale.
Self-Report Pain Tools
Administration of Influenza & Pneumococcal Vaccine to Inpatient Adults: Standardized Procedure
The Assessment and Administration of Influenza & Pneumococcal Vaccine to Inpatient Adults is a standardized procedure may only be performed by SJMC Registered Nurses. Students are not approved to complete the screen. If you have a patient that meets the above guidelines, be sure to contact your Clinical Coordinator for assistance. APPENDIX D
Linen Use:
EVS Aide • Fresh top sheet 7 fitted sheet • Fresh pillow and pillow case Nursing Staff • for warmth, the nurse will apply a fresh bath blanket against patient and top sheet • use Draw Sheet to lift/pull patients up in bed • Only use the blue absorbent cloth pads for incontinence patients Daily and PRN • Fresh gown • Fresh pillow cases

• Fresh towel and washcloth • Fresh draw sheet prn (*add chux if soilage is expected)
o Only use the blue absorbent cloth pads for incontinent patients • Document “Partial” linen change
Every Third Day, Weekly & PRN
o Fresh gown o Fresh pillow cases o Fresh towel and washcloth o Fresh draw sheet prn (*add chux if soilage is expected) o Fresh top sheets & fitted sheet o Document “Full” linen change
Take into room only what is needed. Fewer linens as possible, better for patient & bed surface. Bed Bath is given for comfort care for end of life patients and on designated floors.
Restraints
• Students are not allowed to apply or remove restraints at any time. • Restraints are utilized only as a therapeutic or safety measure to prevent harm to the
patient or others. • Least restrictive measures are always considered prior to the initiation of use of any
restrictive device or placement of restraints. • Notify the unit nurse instructor and/or Clinical Coordinator immediately to assist in
assessing the patient for safely. • You must have a physician order for restraints and notify the unit nurse instructor
and/or Clinical Coordinator. Examples of least restrictive measures/alternatives to restraints:
o Reduced environmental stimuli o Increased observation of patient o Relocate patient for more frequent observation o Increased diversionary activity o Identify potential cause: hearing or vision impairment, hunger, pain, position
needs o Cover or tape tubing and lines from sight or touch o Mittens are also available
Pressure Ulcer Prevention: Save Our Patients Skin (HAPU/HAPI)
• Prevention of Pressure Ulcers: o 4 eyes in 4 hours performed by the RN/Hospital Pressure Ulcer/HAPU o Implement Plan of Care (POC) for Braden Score of 18 or below o Turn patients every two hours

o Monitor boney prominences o Utilize pressure reducing devices EZ covers for 02 tubing to prevent skin
breakdown on tops of ears o Keep patients clean and dry o Use minimal linen under patients o Avoid adult briefs.
• Prevalence study is on designated Tuesdays, a photo is taken of all patients with pressure ulcers by the RN.
• This term is now referred to as HAPI (hospital acquired pressure injury)
Early Ambulation:
• Reduces risk of DVT, ileus, pressure ulcers, de-conditionally can make the difference between patients ability to return home vs. ECF
• MD order is not required when patient meets criteria: o Vital signs within normal limits o Able to follow simple commands o Adequate pain control o Previously ambulatory
• Expectation… o Ambulate 4 times per day o Up in chair 20 minutes or longer for meals
• Notify physician if patient is unable to tolerate • Consider obtaining an order for Physical Therapy • Consider use of assistive devices • Be sure patient has glasses on, if needed • Communicate ambulation needs with PCT • Document activity level:
o Distance ambulated o Amount of assistance required o Time spent in chair o Assistive devices o Discussions with physician
• Refer to Appendix H for Ambulation Policy and procedure
Antiembolic Stockings (TED Stockings)
• Physician order is required for antiembolic stockings • Measure for appropriate size of antiembolic stockings utilizing measuring tape
o Measure circumference of largest part of calf o Measure length from popliteal to heal o See sizing chart (picture as addendum)
• If patient refuses to wear stockings notify physician and document refusal • Stockings are to be removed once per shift for 1 hour
• Circulation and skin assessment is to be completed and documented at this time.
Sequential Compression Device
• The purpose of the Sequential Compression Device is to increase venous blood flow in the non-ambulatory patient in order to help prevent deep vein thrombosis and pulmonary embolism.
• Students are to ask for assistance from the RN or PCT in applying and removing Sequential Compression device.
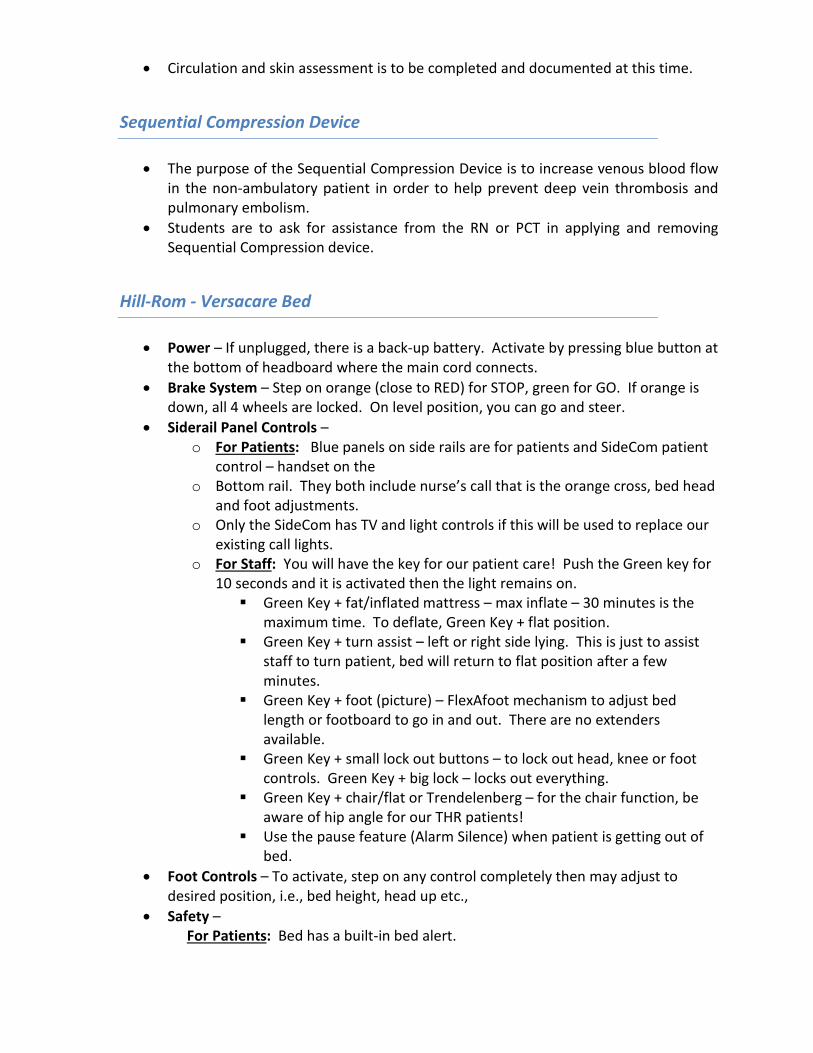
Hill-Rom - Versacare Bed
• Power – If unplugged, there is a back-up battery. Activate by pressing blue button at the bottom of headboard where the main cord connects.
• Brake System – Step on orange (close to RED) for STOP, green for GO. If orange is down, all 4 wheels are locked. On level position, you can go and steer.
• Siderail Panel Controls – o For Patients: Blue panels on side rails are for patients and SideCom patient
control – handset on the o Bottom rail. They both include nurse’s call that is the orange cross, bed head
and foot adjustments. o Only the SideCom has TV and light controls if this will be used to replace our
existing call lights. o For Staff: You will have the key for our patient care! Push the Green key for
10 seconds and it is activated then the light remains on. Green Key + fat/inflated mattress – max inflate – 30 minutes is the
maximum time. To deflate, Green Key + flat position. Green Key + turn assist – left or right side lying. This is just to assist
staff to turn patient, bed will return to flat position after a few minutes.
Green Key + foot (picture) – FlexAfoot mechanism to adjust bed length or footboard to go in and out. There are no extenders available.
Green Key + small lock out buttons – to lock out head, knee or foot controls. Green Key + big lock – locks out everything.
Green Key + chair/flat or Trendelenberg – for the chair function, be aware of hip angle for our THR patients!
Use the pause feature (Alarm Silence) when patient is getting out of bed.
• Foot Controls – To activate, step on any control completely then may adjust to desired position, i.e., bed height, head up etc.,
• Safety – For Patients: Bed has a built-in bed alert.

• Green Key + desired level alarm, press for a few seconds, it will blink 3 times and chirp. When lights are on that means you activated the bed alarm. If patient gets up, alarm goes off and will send alert to nurses’ station. To turn off, Green Key + blinking button.
For Staff: Bed will not work if Foley, cord or any object detected by sensor on bed frame. If light is flashing on the panel that means the sensor detects an obstruction. Clear bed frame area then bed will
reactivate. • Extras –
• CPR lever to put head down in a flat position quickly. If you hold this lever up, bed will go into Trendelenberg position. Headboard or footboard can be used for backboard.
• Scales – Directions are on the side rail if needed. To zero out scale, empty bed has to be made first (complete set of linens) press Green Key + hit 0.0 – will say “hold” then “calc” then will beep at zero.
Hill-Rom – Totalcare Spo2rts Bed (CCU only)
Demonstrate insertion and removal of the Rotation and Percussion & Vibration modules
Identify three ways to verify the modules are in or out of the bed Demonstrate proper patient placement for pulmonary therapies, state rationale Adjust Flexafoot™ for proper patient positioning, identify what happens to the
cushion State two ways to enter the patient’s weight for Rotation cushion setup Initiate Rotation Therapy via the Graphical Caregiver Interface® (CGI)
o Set rotation at Right o Left o Rotation Training o Start Therapy
Identify bed positions that will stop rotation therapy and sound alarm Initiate Percussion & Vibration Therapy via the Graphical Caregiver Interface(GCI)
o Set P&V at Position o Percussion o Vibration o Start Therapy
*Resume to previous therapy before P&V has stopped State the duration a Percussion & Vibration treatment must be in order to be
recorded in the Therapy Statistics State patient positions that can be used during Percussion & Vibration Identify 2 features that will override Rotation, Percussion & Vibration,
Normal/Standard & Opti-Rest Demonstrate how to check and delete the Therapy Statistics Activate from both side rails:
o Max Inflate o Turn Assist

o Normal Mode o Alarm Silence
Activate Opti-Rest Mode, state rationale for use Demonstrate how to adjust the Alarm Settings Demonstrate Full Chair ® position & Full Chair ® Egress Demonstrate CPR, and state what will happen to the surface once activated Demonstrate two ways to perform Trendelenburg Identify all menus that Rotation, Percussion and Vibration can be activated from Demonstrate scale functions:
o Zero o Weigh o Delayed Weigh o Change lbs. /kgs.
Locate drainage bag holders

Part V:
Clinical Procedure Guidelines (2.2)

IV Therapy
• All IV tubing and caps are changed every Wednesday and Sunday. Tubing is to be labeled to indicate the date and time to be changed again.
• IV sites are rotated every 96 hours unless there is a written order from the physician not to rotate the site or an infiltration occurs.
• IV medication is recorded on the electronic Medication Administration Record (MAR).
• PCA troubleshooting, changing PCA meds and reprogramming, contact the clinical coordinator for assistance. Document in Meditech. Double check including witness and signature is required for initial programming, program changes, changing of the syringe and wasting medication.
• Please note: All patients on a continuous/basal PCA dose are required per Policy and Procedure to be placed on continuous pulse oximetry.
• All IV solutions are to be infused via Admin and Charting the Alaris Pump with guardrails in use.
Labeling of IV Tubing
Pull cascade communication form Lucidoc
lavendar

Blood Transfusion
• Blood transfusion therapy is to restore circulation blood volume, replace clotting factors or to improve oxygen carry capacity.
• A physician’s order is required to warm blood, administer blood or blood components through central venous or under pressure.
• For a detailed description of blood transfusion policy and procedure, please refer to current policy on Lucidoc.
• All administration of blood products must be supervised by an RN or Instructor.
Medication
• Medications are administered utilizing the Bedside Medication Verification scanning process (refer to Bedside Medication Verification pocket reference guide.)
• Medication orders with dosage ranges are NOT acceptable and the nurse must clarify the order before the first dose is given. Contact RN for assistance.
• A co-signature is required for ALL Medications administered by a student, these medications are to be double checked and co-signed by the assigned RN or the instructor, as well as the administration of the high alert medications for example: Insulin, PCA, and Anticoagulants.
• All administration of medications must be supervised by an RN or Instructor.
Documentation of Medications • Medications are charted in the electronic Medication Administration Record (MAR).
The MAR is a 24-hour medication record. • If giving an injection, chart the site and time on the MAR. • When a patient is discharged, their unused medications are put into a bag marked
with the patient’s name and room number. This bag is then put in the pharmacy box for return to the pharmacy.
• STAT medications are administered within 30 minutes. • Computerized MARs are validated by the night RN shift for accuracy every 24 hours.
Check with charge nurse for process. • Each shift is responsible for 12-hour chart checks conducted by an RN. • New medication orders are entered via Meditech by the unit secretary, RN or via
CPOE. • All medication documentation must be co-signed by the RN (Preceptor) or
Instructor
Narcotics/Opiods
• Narcotic count in PYXIS must be correct before you leave at the change of shift. • Two RNs must witness and co-sign when wasting a narcotic. • Administration any form of narcotics must be supervised by a RN or the Instructor.

PCA &/or Epidural discontinuation &/or waste: 1. Obtain a second licensed clinical person (physician, RN, or instructor) to be your witness/co-signer. 2. Remove the syringe from the PCA/Epidural pump & proceed to the Pyxis station. 3. Login to Pyxis, select the waste icon, and locate patient 4. Select medication (see standard work for more details) 5. Ignore screen prompt “Remove” and select “Waste” icon from bottom left corner. 6. Enter the amount (mL) given. Pyxis will auto-calculate the quantity wasted. 7. Second RN enters witness/co-sign. 8. Both RN’s must:
a. Visually witness the quantity being wasted b. Confirm disposal into Pharmaceutical waste receptacle (blue and white) c. Document waste co-signature in Pyxis.
Chest Tubes
When the student is assigned a patient with a chest tube the care of the Chest Tube must be supervised by a RN or the Instructor.
Set up
• Use aseptic technique and always identify the patient by using two identifiers (Name & FM #) • Gather equipment
• From Central Supply (if not available in the unit): Chest tube insertion tray, chest tube (Trocar or non trocar) per MD order and the chest drainage unit (Atrium)
• From your Unit: Sterile water, ChloraPrep, local anesthetic, Xeroform “Vaseline” gauze, wide Elastoplast tape, sterile gloves, sterile 4x4 gauze, chest tube clamp, wall suction, suction canister, extension tubing
• Open collection system tray and follow directions to properly assemble. • Fill water seal chamber with sterile water (2 cm level or up to the line) • Fill suction chamber with sterile water to the prescribed level (usually - 20 cm H2O suction) • Maintain sterility of connection end of the chest drainage unit set up • Check suction equipment for patency and function prior to procedure • Observe Universal Protocol / “Time Out” prior to the procedure • Maintain the chest drainage unit in an upright position and below the patient’s chest level • Document all pertinent information and patient education

Maintenance
• Patient care and safety • Ensure chest dressing is secured and dry. • Ensure connection is secured: Two sites on patient, at the chest tube and chest drainage unit tubing junction. • Assess insertion site and surrounding skin for presence of subcutaneous air and signs of infection or inflammation with each dressing change everyday. • Monitor patient’s pain and intervene properly
• Equipment function • Ensure that the chest drainage unit is in secure upright position (hang from bed
frame or set on a floor stand) • Ensure that the tubing is patent and free of dependent loops (drainage
accumulating in dependent loops obstructs chest drainage into the collecting system and increases pressure within the lung).
• Check water level in suction and water seal chambers every shift and prn. • If fluid evaporates, instill the required amount to bring the fluid level to the
prescribed cm level. • Assess for air leaks in the system as indicated by constant bubbling in the
water seal chamber. • Assess for patent system: note fluctuations or tidaling of water level in the
water seal chamber. • Assess in the chest drainage unit:
• Collection chamber: amount and appearance of drainage • Water seal chamber: water level, bubbling, and fluctuations or tidaling • Suction chamber: water level
• When transporting patient, disconnect the chest drainage unit from the wall suction and maintain suction to gravity. DO NOT turn the suction control stopcock OFF (helps prevent tension pneumothorax).
• Drainage • Assess and document the amount and characteristic of chest tube drainage • Monitor chest tube drainage every 2 hours or more frequently in the
immediate post-operative period. • Document all pertinent information and patient education
Troubleshooting
• Patient suddenly experiences trouble breathing: • Check for occlusion /kinking of the tube and integrity of the line • Ensure that the suction control stopcock is in ON position
• Constant bubbling in the water seal chamber • Assess the insertion site for air leak • Assess for air leaks in the system. To assess location of a
leak, intermittently occlude for a moment (less than 1

minute) the chest tube or drainage tubing beginning at the insertion site and progressing to the chest drainage unit.
• Tubing Obstruction • Scan length of tube for signs of mechanical obstruction • IF CLOT EXISTS call physician. Per policy and procedure milking and stripping of
chest tubes can only be done with a specific physician order. • Dislodgment of chest tube/drainage system
• Junction of the chest tube and the drainage unit: immerse the end of the chest tube into a glass of water to maintain water seal
• Insertion site: • Instruct patient to take a deep breath and hold it until site is sealed • Immediately cover site with Vaseline gauze and sterile 4x4 dressing and tape
in place • Stay with patient and monitor for signs of tension pneumothorax
• Chest tube drainage system knocked over • Set up a new chest drainage unit
Central Services Items
Med/Surg units don’t charge individual floor stock but Central Supply does.

Part VI:
Documentation

Electronic Medical Record (EMR)
All charting/documentation must be supervised and co-signed by a RN or the Instructor. Charting / Documentation
• All charting is completed in the Meditech electronic charting system. Only approved symbols and abbreviations may be used for physician orders and free text areas.
• Scope of Documentation o Respiratory, Nutrition and Physical Rehab will document on their
designated record. o R.N. responsibilities include:
• Patient admission assessment • Initiation of identified referrals/consults • Initiation Plan of Care and Patient Education • Discharge teaching • Medication Administration Reconciliation
o Non-licensed personnel responsibilities include: • On admission, vital signs, weight and orient patient to
environment. Ongoing – v/s, weights, hygiene, I/O, or any procedure they are able to perform as per job description and/or training within scope of practice.
Content of Documentation
• Admission Assessment in Meditech o Initiated on all patients prior to surgery, special procedures or within 24
hours of admission o Reassessment is done based on change in patient’s condition and per unit
standard of care. o Allergy banding on ALL patients in addition to the white hospital ID band. o Record status of Advanced Directive for Health Care. o Orientation to room can be completed by non-licensed staff. o Identification Process, patient is to be instructed to decline any
medication/procedure unless his/her armband is checked each time. o Use virtual flow sheet to obtain documentation in the EMR of all ancillary
staff. • Plans of Care
o In Meditech initiate care plans for the problems identified. o Significant changes in the patient’s condition will be noted in your charting
and will need to be communicated to the physician immediately. • Discharge
Instructions can be found in the SJF Shortcuts under the Krames icon
Part VII:
Employee Wellbeing & Safety

Ergonomics: Basic Body Mechanics
Lift with your legs not your back. Your leg muscles are the most powerful muscles in your body. Keep your back straight. Bend your knees and lower your center of gravity for stability. Use of broad base for support. Stand with feet apart at least the width of your hips for side-to-side stability. Stand with one foot slightly forward of the other for forward-backward stability. Move as close to the object/person you will be lifting as possible. The weight of the object increases greatly by the distance it is held away from the body. Always lift straight up, balance the load, and then pivot with your feet toward the direction you wish to move. Lifting and twisting (no pivot) is the cause of 80% of all back injuries. Use a footstool, ladder, etc., to raise your hips (center of gravity) as near the object to be lifted from overhead. You should be able to see over the top of the object being lifted or as near as possible. Never reach above your shoulders--use a step stool or ladder. If you have sized up the situation and determined it is too much for one person, get assistance; do not attempt to do this task alone. Work as a team with other co-workers for large loads or heavy patients. Do not move more than one cart at a time. Remember, it is better to push than to pull, and better to pull than to lift.

Workstation Wisdom
Many of our recording and charting tasks in the hospital are accomplished using computers. In the same way as you make adjustments to your seating position when driving or riding in a vehicle, you need to know how to manipulate workstation equipment to provide a safe environment. Here are some pictures to help you position yourself correctly using desk-mounted or cart-mounted computer equipment:
• Patient Lifts Specific patient rooms in the NWT, 4th floor and 5th floor have ceiling lift equipment. 4th floor and 5th floor each have 2 bariatric rooms with bariatric lift and equipment
Know Your Exposure Risk
Know Your Exposure Risk Category 714-449-6420 CATEGORY ONE = HIGH RISK
If you work in SURGERY, have CONTACT WITH NEEDLES or work in the EMERGENCY DEPARTMENT, you have the highest chance of exposure to blood and other body fluids. You need to follow infection control guidelines.
CATEGORY TWO = LOW RISK You may have close contact with patients, but you’re not likely to come in contact with blood and other body fluids. You usually won’t have to wear PPE, but learn to anticipate when you could enter a more high-risk situation.
CATEGORY THREE = NO RISK Your routine work requires no contact with blood or other body fluids. In these situations, you are highly unlikely to contract viruses or bacteria, even from infected patients. As a general precaution, wash your hands before eating, drinking or smoking. No other infection control guidelines are required.

Prevention Transmission of Bloodborne Virus in Healthcare Setting
• Promote Hepatitis B vaccination • Treat all patients as potentially infectious • Use barriers to prevent blood/body fluid contact • Prevent percutaneous injuries • Hand Hygiene
BBP (Blood Borne Pathogens) - Student/Instructor Exposure
It can happen in an instant, but it can change your life forever • Reporting procedure
1. Wash site thoroughly with soap and water 2. Contact SJMC Employee Wellbeing (714-449-6213 – Exposure Hotline)
• Your name and your school • Your instructor’s name • The unit you were working in • The unit extension and your home phone number • What happened • Source patient’s name and medical record number
3. Instructor will provide student/instructor information to school affiliation occupational health.
Frequency of Percutaneous Injury in Healthcare Personnel
• Based on CDC estimates 384,325 percutaneous injuries are sustained by healthcare personnel in US hospitals annually.
• The number of injuries sustained outside of hospital settings is unknown. • Frequency of percutaneous injury varies by occupational group and healthcare
setting.
Tuberculosis (MTB) Fit Testing for TB Respirator Protection N95 Respirator
The student is not trained in the use of the N95 Respirator If a student is providing care to a patient in airborne isolation, the student will need supervision from the RN or instructor.

• All employees who work in “Airborne Precaution” rooms and have direct contact with patients admitted to “rule out” TB or who have active TB must be fitted for appropriate protective respirator.
• Patients with suspected Tuberculosis or who are admitted to rule out TB are placed in the Negative Pressure Rooms.
• When caring for patients with suspected TB you MUST wear your personally fitted protective respirator and use Standard Precautions plus Airborne Precautions. The “Airborne Precautions” sign is placed on the door. The door is to be kept CLOSED AT ALL TIMES.
• Please refer to the TB Control Plan in Infection Control
How to Apply a Particulate Respirator
• Select a fit tested respirator • Place over nose, mouth and chin • Fit flexible nose piece over nose bridge • Secure on head with elastic • Adjust to fit • Perform a fit check – • Inhale – respirator should collapse • Exhale – check for leakage around face
PAPRs (Positive Air Purifying Respirator)
The student is not trained in the use of the PAPR. If a student is providing care to a patient in airborne isolation, the student will need supervision from the RN or instructor.
WHO: All direct patient caregivers who are present during high hazard procedures. WHAT: Positive Air Purifying Respirator (PAPR) must be worn during aerosolizing procedures when the patient is suspected or confirmed with an Aerosol Transmissible Diseases (ATD) such as:
• Anthrax • Avian influenza • Disseminated Varicella disease/Varicella zoster and Herpes zoster virus • Localized disease in immunocompromised patient until disseminated
infection is ruled out • Measles(rubeola) • Monkeypox • Novel or unknown pathogens • Severe acute respiratory syndrome(SARS/SARS-associated coronavirus) • Smallpox • Tuberculosis(TB)/Mycobacterium tuberculosis-Extrapulmonary, draining

lesion; Pulmonary or laryngeal disease, confirmed; Pulmonary or laryngeal disease suspected
• Any other diseases for which the CDC or CDPH recommends airborne Infection isolation WHERE: In negative airflow rooms, if available, when a patient is undergoing any high hazard procedure such as:
• Sputum induction • Bronchoscopy • Aerosolized administration of medications(nebulized treatments) • Pulmonary Function tests • Autopsy • Clinical, surgical and Laboratory procedures that may aerosolize Pathogens • Intubation • Open circuit suctioning
WHEN: Starting September 1, 2010, PAPRs will be required for all direct patients care givers when present during high hazard procedures and 1 hour post procedure if providing care to the patient in the same negative airflow room in which the procedure was performed. WHY: To protect the direct patient caregiver against the release of pathogens into the air. HOW: See reverse side for PAPR use, cleaning and storage cycle.
Medical Waste Policy / Procedure
• Medical waste must be disposed of in a RED trash bag or sharps container as appropriate.
• All Sharps and glass. • Body parts, blood or body fluids. • Cultures and specimens from the laboratory and pathology. • Bloody dressings and drapes of such saturation that blood can be pulled off
or it cannot dry before reaching landfill. • Communicable contaminants. • Do not place a different colored bagged trash in the red bag. • Double bagging is not necessary unless there is a potential break or leak in the bag. • Most patient care items can be placed in regular trash receptacles. • Place all Solidified Fluids or “Isolyzed” solid waste into Red Bags.
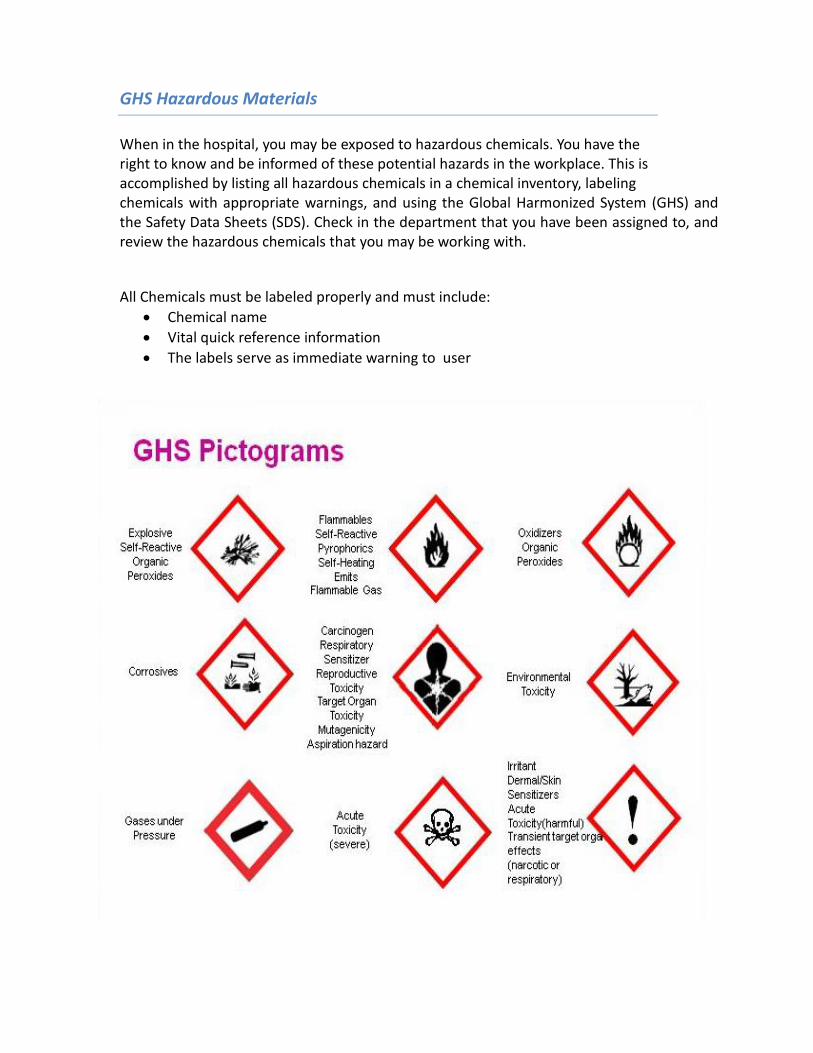
GHS Hazardous Materials
When in the hospital, you may be exposed to hazardous chemicals. You have the right to know and be informed of these potential hazards in the workplace. This is accomplished by listing all hazardous chemicals in a chemical inventory, labeling chemicals with appropriate warnings, and using the Global Harmonized System (GHS) and the Safety Data Sheets (SDS). Check in the department that you have been assigned to, and review the hazardous chemicals that you may be working with. All Chemicals must be labeled properly and must include:
• Chemical name • Vital quick reference information • The labels serve as immediate warning to user

Latex Allergy / Reaction
• SJMC is following current federal guidelines and moving toward a latex-free environment.
• All employees are screened for latex sensitivities before hire. • Latex sensitive employees will be additionally screened by Employee Health Services
to determine type of sensitivity. • Appropriate latex-free (PPE) will be provided as indicated. • Employees with allergic symptoms may be referred to an allergist for further
evaluation. • Report to Employee Health Services if signs and symptoms present
Latex Reactions There are three types of reactions to natural rubber latex:
• Irritant Contact Dermatitis • Type IV (delayed) Hypersensitivity • Type I (immediate) Hypersensitivity
It is useful to occasionally review the differences between the three, since latex avoidance is critical to those who have latex allergy. It is important to be aware of potential sources of natural rubber latex in the environment, understanding the difference between type IV and type I reactions can decrease the stress of vigilance.
Irritant Contact Dermatitis
• Irritant Contact Dermatitis is a common reaction and is not an allergy. Itchy, dry, and irritated hands are the result of frequent hand washing and incomplete drying, use of hand sanitizers, and friction irritation from glove powder. Anyone who wears powdered latex gloves can develop this; however, in atypical individuals, contact dermatitis can be a sign of impending hypersensitivity if exposure to latex continues.
• Type IV (delayed) Hypersensitivity is usually a sensitivity to chemicals used to make gloves, rather than to proteins from the natural rubber. Numerous chemicals are used in the manufacturing process, including antioxidants, emulsifiers, stabilizers, accelerators, stiffeners, colorants, and fragrances. Any of these can cause a contact dermatitis 24-48 hours after exposure which can spread to other areas, including the face, if touched. Symptoms usually resolve spontaneously. Type IV hypersensitivity is also called allergic contact dermatitis, T-cell-mediated allergy, or chemical allergy. It is estimated that 80% of people who develop Type I reactions experienced Type IV reactions first. Approximately 7-18% of the population has Type IV Hypersensitivity.

• Type I (immediate) Hypersensitivity is an allergy to natural rubber latex (Hevea brasiliensis) proteins that occurs as a response to exposure. Vasoactive mediators such as histamine are released, causing a spectrum of clinical symptoms including, among others, hives, nausea, abdominal cramping, and facial swelling with itchy and watery eyes. Emergency treatment for anaphylaxis may be required, and anyone who has experienced a Type I reaction attributable to latex exposure should wear a medical ID bracelet and carry an EpiPen. Type I reactions affect less than 1% of the population.
Disaster Information
• Report to the Clinical Coordinator in your assigned area for instructions. • Be ready for a change in assignment. Hospital will follow Disaster plans.
Helpful Phone Numbers
Biomedical 7777
Employee Wellbeing 714-449-6240
Clinical Excellence 3762
Central Help 4352
EVS 7777
Security 2550
Safety Officer 714-449-6219
Infection Control 3614
Engineering 7777

Part VIII:
Emergency

In the event of an emergency, report to your Instructor/Facilitator for a change in your assignment.
Reporting and Responding to a Fire
To respond rapidly and effectively use the RACE procedure.
R - Rescue • Remove persons in immediate danger
A - Activate Alarm • Pull alarm and dial 3121 to notify the hospital operator; if off-site, dial 911
C - Contain Fire • Close doors and windows to prevent smoke/fire spread
E - Extinguish (if possible) • Know location of fire extinguisher and how to use it.
Evacuate horizontally to the nearest smoke compartment if necessary.
The Fire Hose Cabinet includes an ABC fire extinguisher and a hose connection for Fire Department use.
To use a fire extinguisher - follow the four-step PASS procedure.
Pull the pin Aim the nozzle at base of fire Squeeze the handle Sweep the nozzle side to side across base of fire
Electrical Safety
Five steps to avoid electrical accidents: 1. The third prong on the power plug is one of the most important safety features on
some devices. Do not plug in hospital equipment without a third prong! 2. Do not use extension cords except in an approved emergency. 3. Do not unplug devices by pulling on the power cord. 4. Do not use obviously defective equipment. 5. Never use a device that is or has been wet or gives off small shocks.
Notify the staff nurse of any malfunctioning equipment.
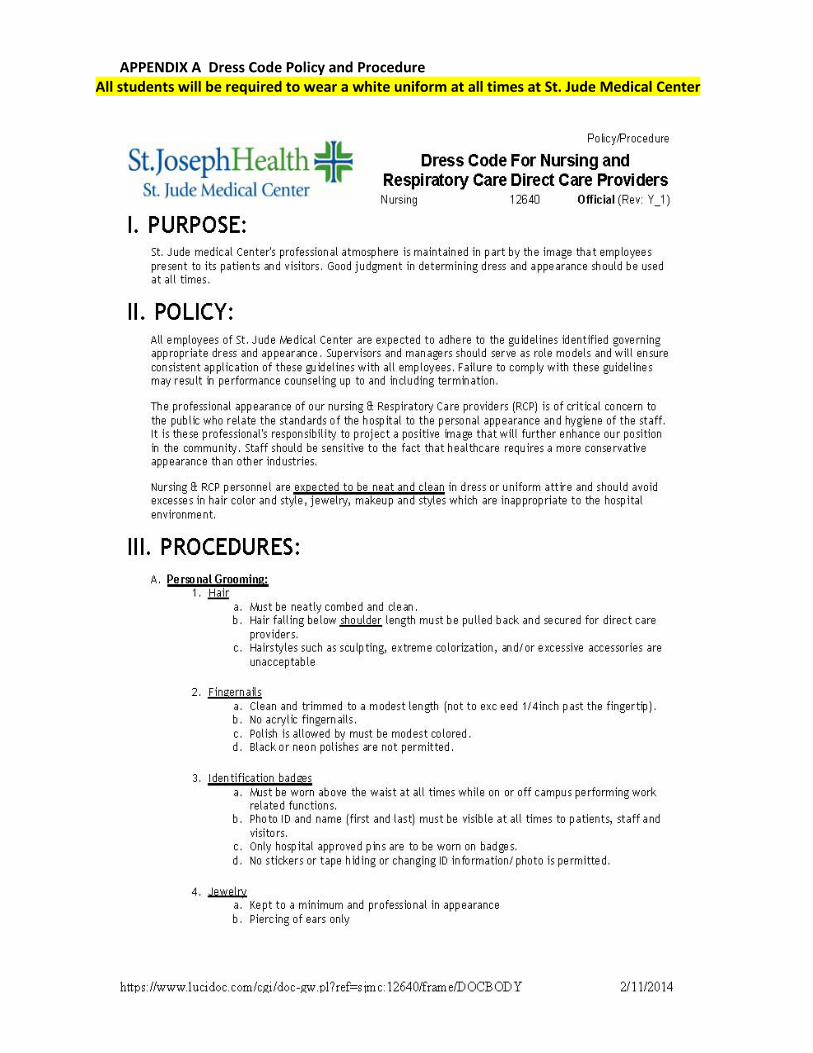
APPENDIX A Dress Code Policy and Procedure All students will be required to wear a white uniform at all times at St. Jude Medical Center
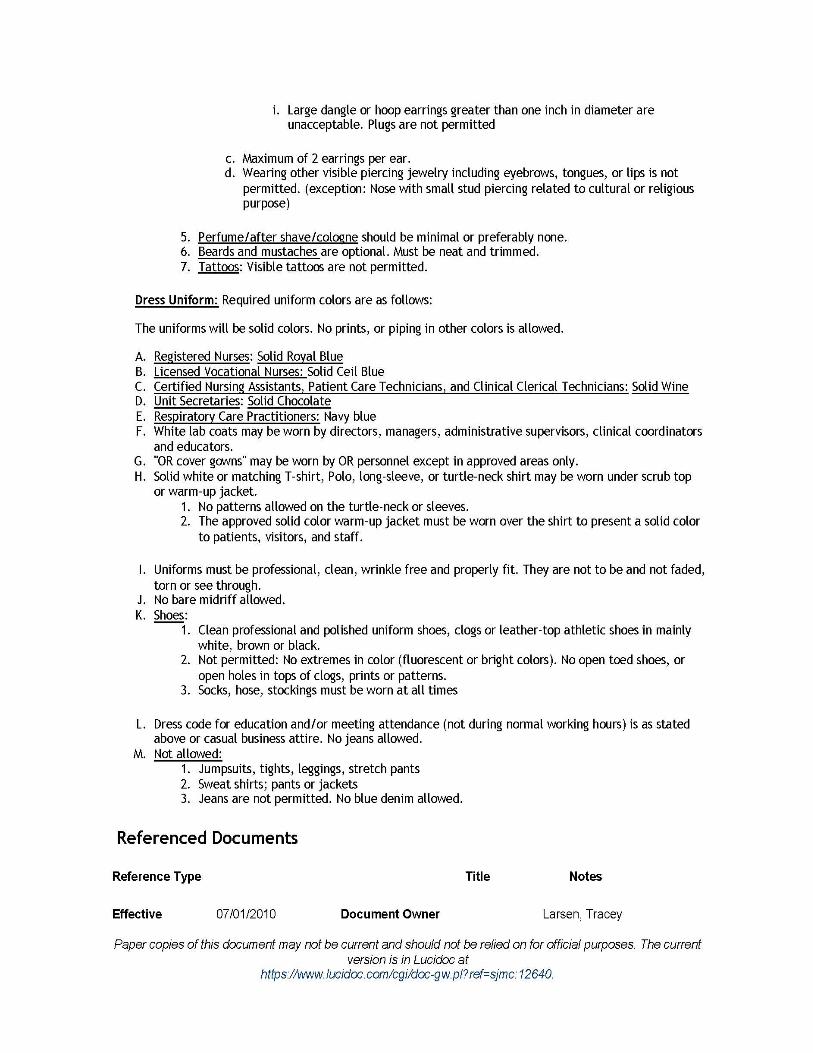
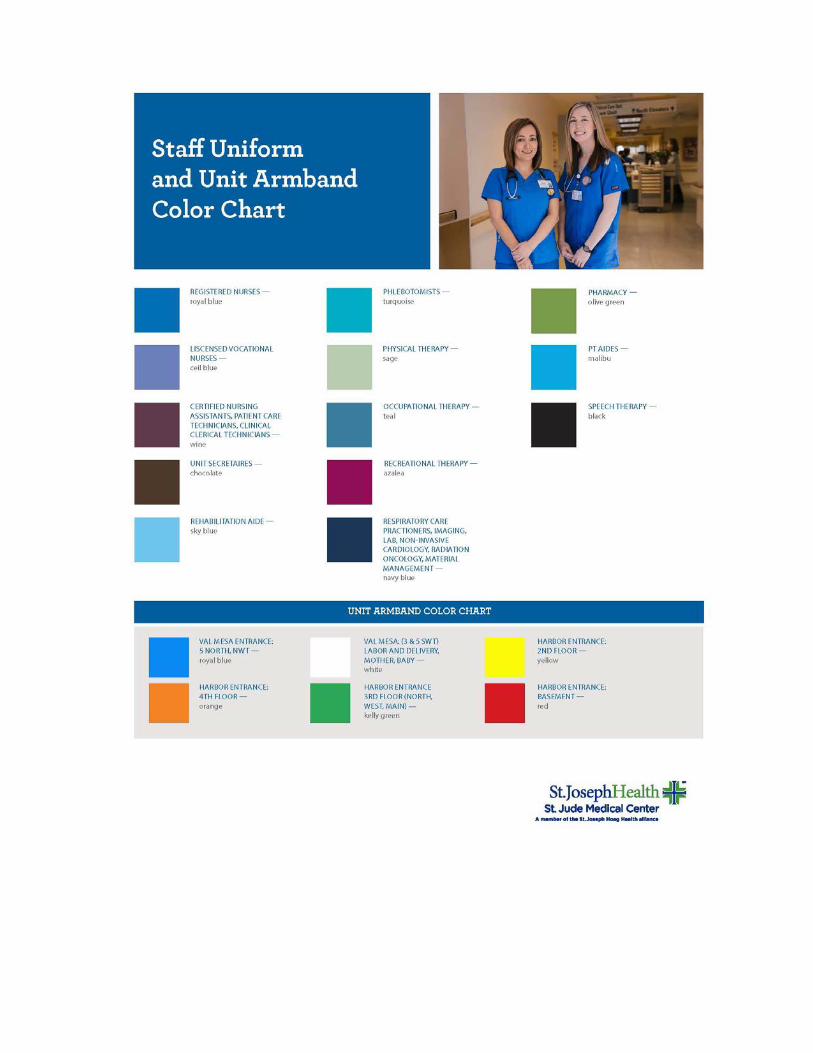

APPENDIX B: Student Parking
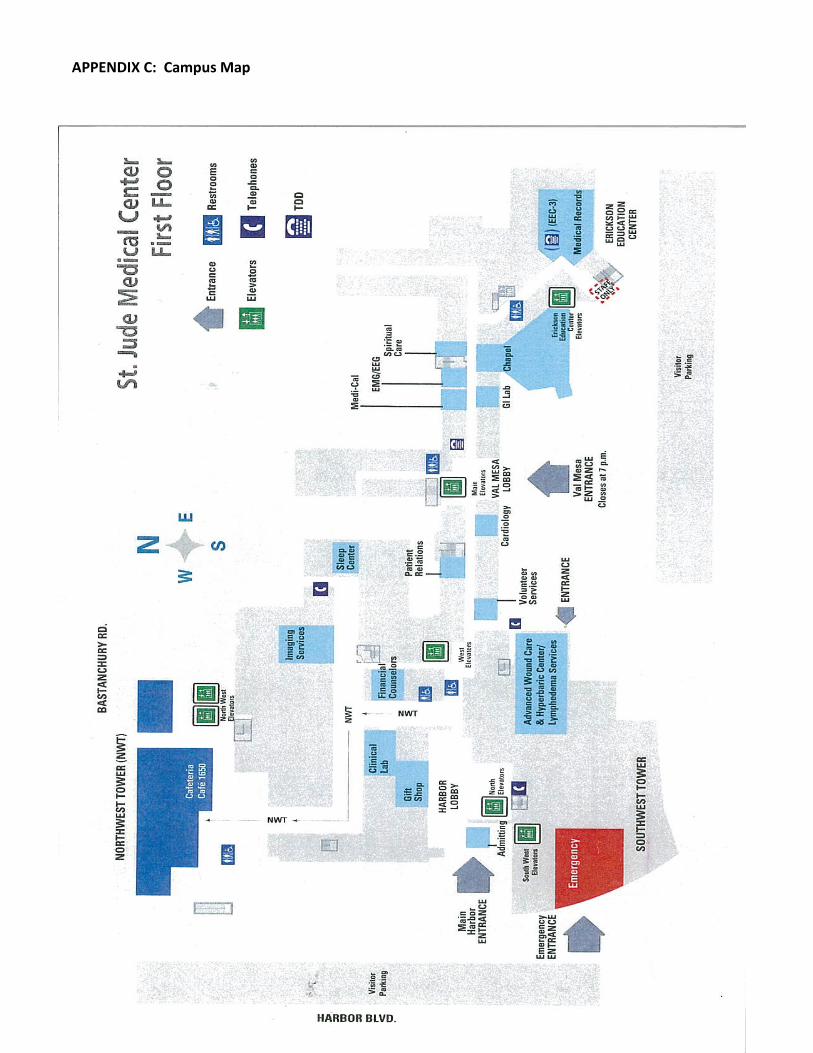
APPENDIX C: Campus Map

Appendix D Ambulation Policy and Procedure


![SX Superalloys For Turbine Blades Characterization ... · deviation from the [001] orienta- t ion (within the limit of about 150 ) have any effect on the alloy. strength creep Conversely,](https://static.fdocuments.in/doc/165x107/5f4306346f709f7d946c0818/sx-superalloys-for-turbine-blades-characterization-deviation-from-the-001.jpg)