Student Kaltura Quick Start Guide - University of...
6
1 Resource provided by the CECH Office of Innovative Technology and Learning Design Instructional Design Support Student Kaltura Quick Start Guide The Kaltura video server allows you to create, upload, and publish videos in your Blackboard courses. The quick start guide below walks you through the basics of Kaltura so that you can: 1. Upload video* 2. Produce and upload webcam recordings 3. Create and upload screencasts 4. Manage your media *Note: Video made available to students in Blackboard is FERPA and HIPPA compliant and is subject to the University’s policies regarding copyright and intellectual property rights. Please direct your questions on copyright or intellectual property rights to University Libraries. Add Media to a Discussion, Blog, or Assignment 1. Go to the Kaltura Mashups tool. a. Go to your discussion, blog, assignment link, etc., and look for the text-editing bar (known as the Text Editor). b. Select the Mashups button (see below). c. Select “Kaltura Media.” 2. Select the Add Media button in the upper right or left corner of the Kaltura window (see right) and choose the type of media you would like to add (webcam recording, media file, or screen recording). Click the Mashups button and then select Kaltura media.
Transcript of Student Kaltura Quick Start Guide - University of...

1 Resource provided by the CECH Office of Innovative Technology and Learning Design
Instructional Design Support
Student Kaltura Quick Start Guide The Kaltura video server allows you to create, upload, and publish videos in your Blackboard courses. The quick start guide below walks you through the basics of Kaltura so that you can:
1. Upload video* 2. Produce and upload webcam recordings 3. Create and upload screencasts 4. Manage your media
*Note: Video made available to students in Blackboard is FERPA and HIPPA compliant and is subject to the University’s policies regarding copyright and intellectual property rights. Please direct your questions on copyright or intellectual property rights to University Libraries.
Add Media to a Discussion, Blog, or Assignment
1. Go to the Kaltura Mashups tool. a. Go to your discussion, blog, assignment link, etc., and look for the text-editing
bar (known as the Text Editor). b. Select the Mashups button (see below). c. Select “Kaltura Media.”
2. Select the Add Media button in the upper right or left corner of the Kaltura window (see right) and choose the type of media you would like to add (webcam recording, media file, or screen recording).
Click the Mashups button and then select Kaltura media.
2 Resource provided by the CECH Office of Innovative Technology and Learning Design
Instructional Design Support
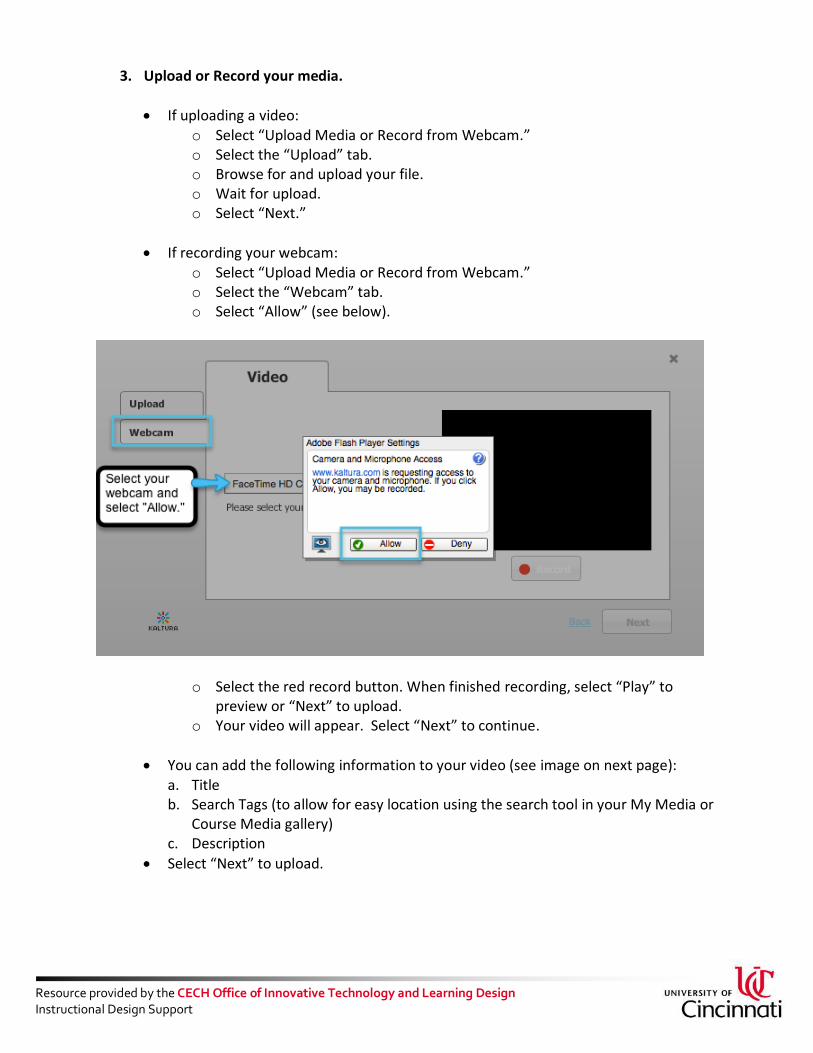
3. Upload or Record your media.
If uploading a video: o Select “Upload Media or Record from Webcam.” o Select the “Upload” tab. o Browse for and upload your file. o Wait for upload. o Select “Next.”
If recording your webcam: o Select “Upload Media or Record from Webcam.” o Select the “Webcam” tab. o Select “Allow” (see below).
o Select the red record button. When finished recording, select “Play” to preview or “Next” to upload.
o Your video will appear. Select “Next” to continue.
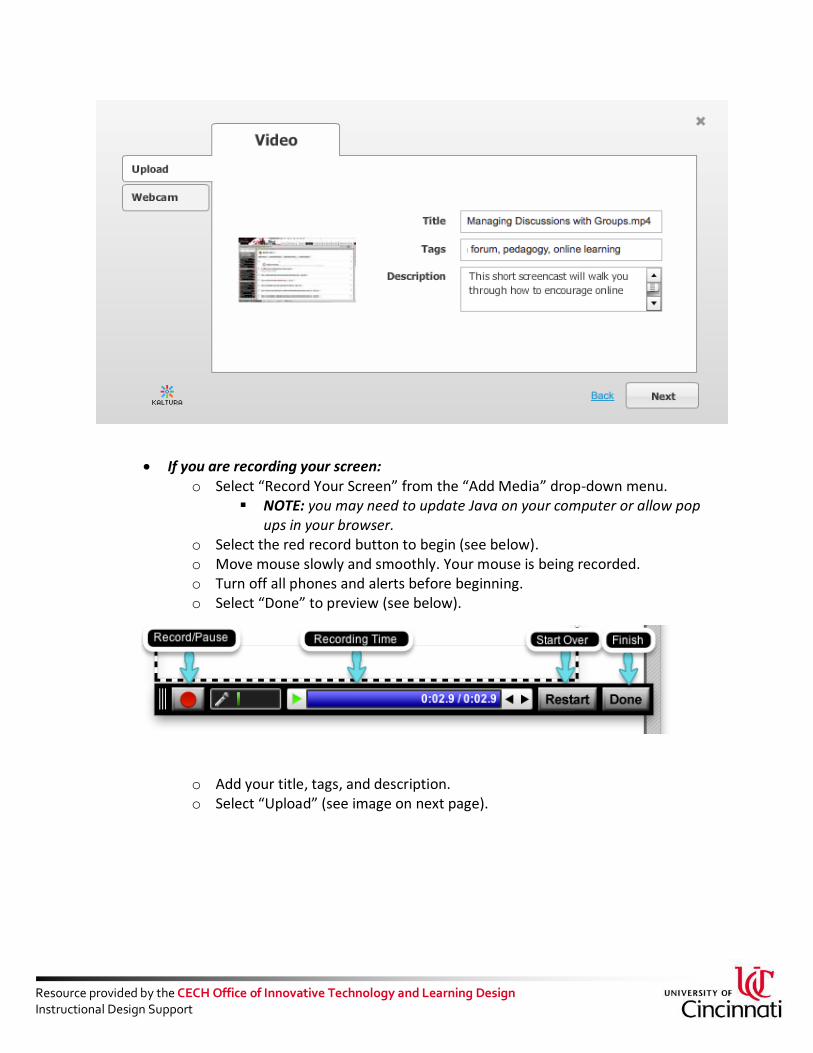
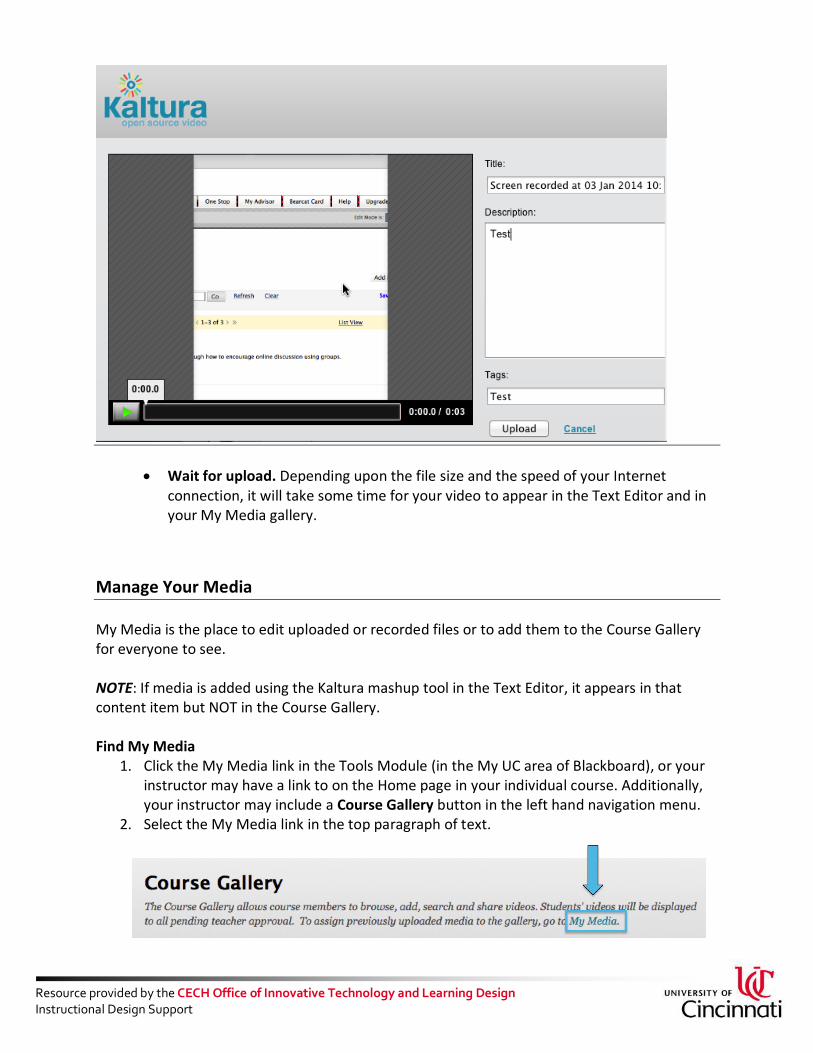
You can add the following information to your video (see image on next page): a. Title b. Search Tags (to allow for easy location using the search tool in your My Media or
Course Media gallery) c. Description
Select “Next” to upload.
3 Resource provided by the CECH Office of Innovative Technology and Learning Design
Instructional Design Support
If you are recording your screen: o Select “Record Your Screen” from the “Add Media” drop-down menu.
NOTE: you may need to update Java on your computer or allow pop ups in your browser.
o Select the red record button to begin (see below). o Move mouse slowly and smoothly. Your mouse is being recorded. o Turn off all phones and alerts before beginning. o Select “Done” to preview (see below).
o Add your title, tags, and description. o Select “Upload” (see image on next page).
4 Resource provided by the CECH Office of Innovative Technology and Learning Design
Instructional Design Support
Wait for upload. Depending upon the file size and the speed of your Internet connection, it will take some time for your video to appear in the Text Editor and in your My Media gallery.
Manage Your Media My Media is the place to edit uploaded or recorded files or to add them to the Course Gallery for everyone to see. NOTE: If media is added using the Kaltura mashup tool in the Text Editor, it appears in that content item but NOT in the Course Gallery. Find My Media
1. Click the My Media link in the Tools Module (in the My UC area of Blackboard), or your instructor may have a link to on the Home page in your individual course. Additionally, your instructor may include a Course Gallery button in the left hand navigation menu.
2. Select the My Media link in the top paragraph of text.
5 Resource provided by the CECH Office of Innovative Technology and Learning Design
Instructional Design Support
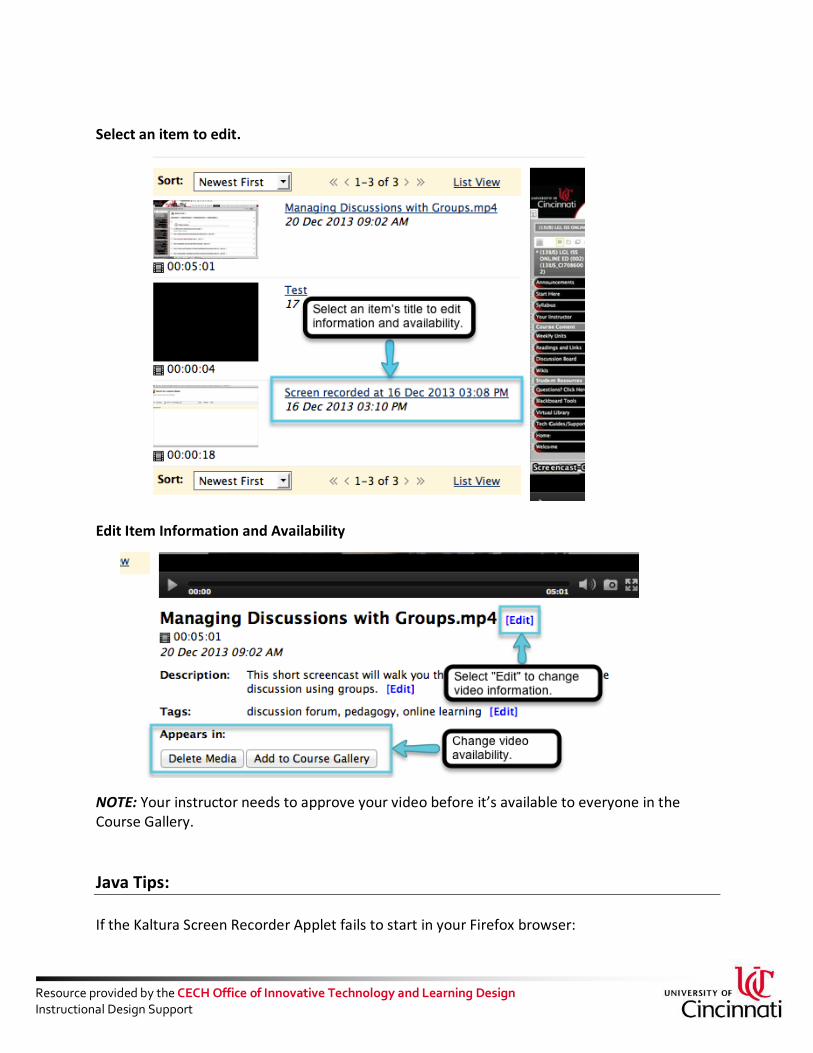
Select an item to edit.
Edit Item Information and Availability
NOTE: Your instructor needs to approve your video before it’s available to everyone in the Course Gallery.
Java Tips: If the Kaltura Screen Recorder Applet fails to start in your Firefox browser:

6 Resource provided by the CECH Office of Innovative Technology and Learning Design
Instructional Design Support
1. Check if the latest version of Java is installed on your computer: http://www.java.com/en/download/installed.jsp?detect=jre&try=
2. Click the battery icon to the left of the address bar and click Allow and Remember. 3. Make sure you have pop-up windows enabled in your browser. 4. Make sure Java is enabled in Firefox:
a. Select the Tools menu on the Firefox browser, and then click Add-ons. b. Make sure the Plugins tab is selected on the left, and scroll down to the Java
Applet Plug-in. c. Select Always Activate from the drop-down menu. d. Restart your browser to activate the changes.
5. Run the Applet. (You may have to reload the window first.) *Note: Sometimes the fail message appears, but the screen recorder opens a moment later.