
Student Employee Electronic PAF Guide - Texas...
17
Page 1 of 17 Student Employee Electronic PAF Guide Updated August 2015
Transcript of Student Employee Electronic PAF Guide - Texas...

Page 1 of 17
Student Employee Electronic PAF
Guide Updated August 2015
Page 2 of 17
Contents Overview and Purpose .......................................................................................................................................... 3
Department HPAF Homepage .............................................................................................................................. 4
Overview ........................................................................................................................................................... 4
Create Hourly PAF ................................................................................................................................................. 5
Instructions ....................................................................................................................................................... 5
Hire................................................................................................................................................................ 6
Termination .................................................................................................................................................. 7
Manage WorkStudy ...................................................................................................................................... 8
Pay Rate Change ........................................................................................................................................... 9
Supervisor Change ........................................................................................................................................ 9
Change Estimated Weekly Hours ................................................................................................................ 10
Review Hourly PAF .............................................................................................................................................. 11
Instructions ..................................................................................................................................................... 11
Proxy Access........................................................................................................................................................ 12
Instructions ..................................................................................................................................................... 12
Granting Access........................................................................................................................................... 12
Department Approvers ................................................................................................................................... 14
Review Current Jobs ........................................................................................................................................... 15
Instructions ..................................................................................................................................................... 15
Appendix A: Using the “Magnifying Glass” ......................................................................................................... 16
Example........................................................................................................................................................... 16
Appendix B: New Student Employee Hire Flowchart ......................................................................................... 17
Page 3 of 17
Overview and Purpose The Personnel Action Form (PAF) is a document used by Human Resources to facilitate any changes related to a student employee’s job. This includes actions such as hiring, termination, pay increases, additional pay, and promotions, just to name a few. Its intent is to be comprehensive, and as such, requires training for first time users.
In order to ease potential unfamiliarity with the requirements and jargon of the document, and also to simplify the process as a whole, we have implemented an electronic version of the PAF for student employees. By shifting to this medium, a number of benefits become available:
• Security
• Pre-populated fields
• Tracking
• Consolidation
Page 4 of 17
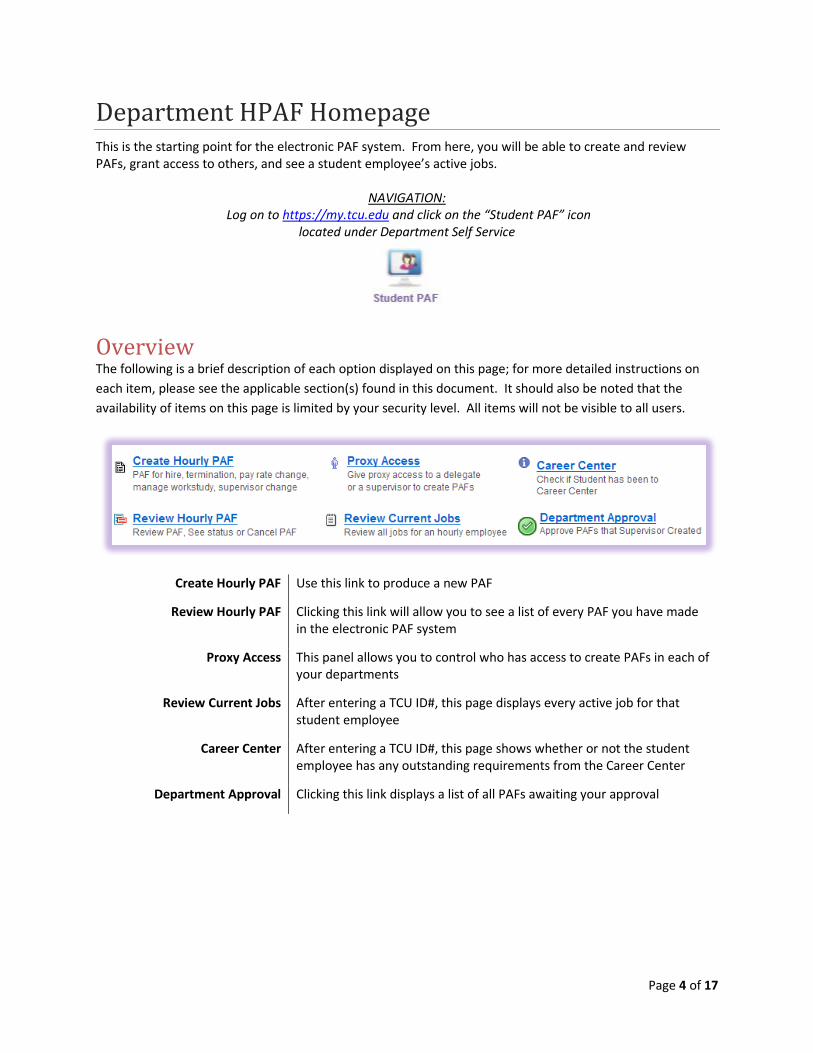
Department HPAF Homepage This is the starting point for the electronic PAF system. From here, you will be able to create and review PAFs, grant access to others, and see a student employee’s active jobs.
NAVIGATION: Log on to https://my.tcu.edu and click on the “Student PAF” icon
located under Department Self Service
Overview The following is a brief description of each option displayed on this page; for more detailed instructions on each item, please see the applicable section(s) found in this document. It should also be noted that the availability of items on this page is limited by your security level. All items will not be visible to all users.
Create Hourly PAF Use this link to produce a new PAF
Review Hourly PAF Clicking this link will allow you to see a list of every PAF you have made in the electronic PAF system
Proxy Access This panel allows you to control who has access to create PAFs in each of your departments
Review Current Jobs After entering a TCU ID#, this page displays every active job for that student employee
Career Center After entering a TCU ID#, this page shows whether or not the student employee has any outstanding requirements from the Career Center
Department Approval Clicking this link displays a list of all PAFs awaiting your approval
Page 5 of 17
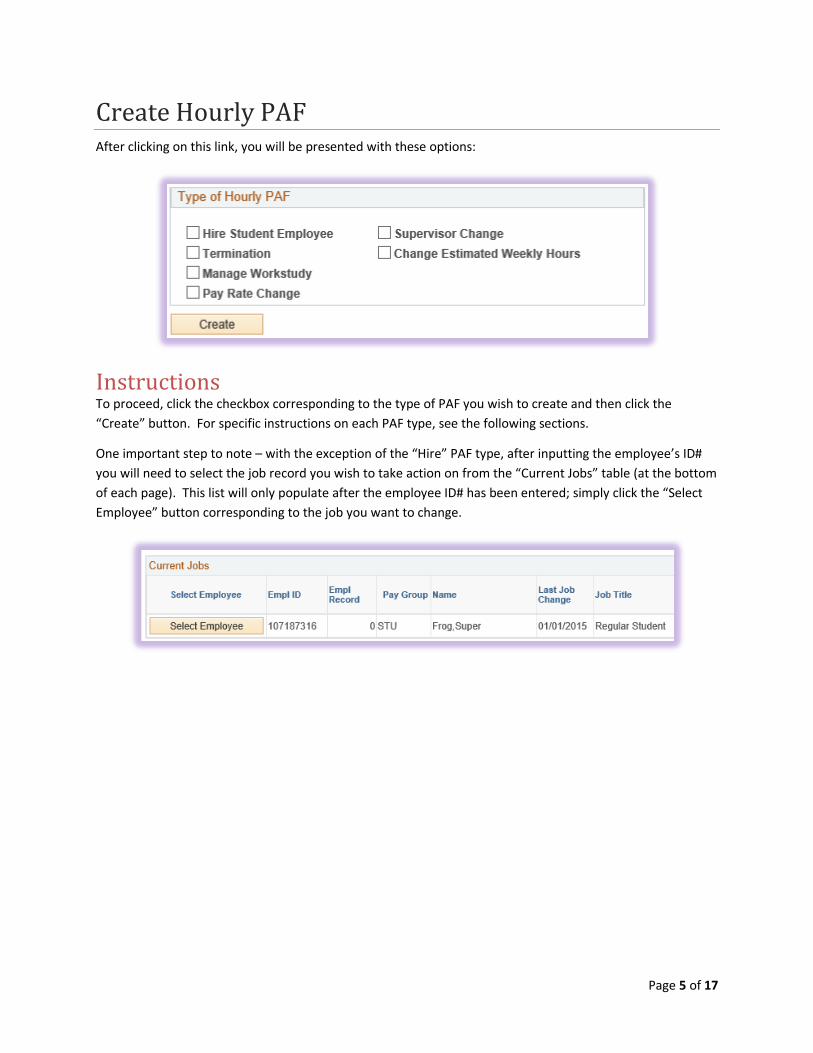
Create Hourly PAF After clicking on this link, you will be presented with these options:
Instructions To proceed, click the checkbox corresponding to the type of PAF you wish to create and then click the “Create” button. For specific instructions on each PAF type, see the following sections.
One important step to note – with the exception of the “Hire” PAF type, after inputting the employee’s ID# you will need to select the job record you wish to take action on from the “Current Jobs” table (at the bottom of each page). This list will only populate after the employee ID# has been entered; simply click the “Select Employee” button corresponding to the job you want to change.
Page 6 of 17
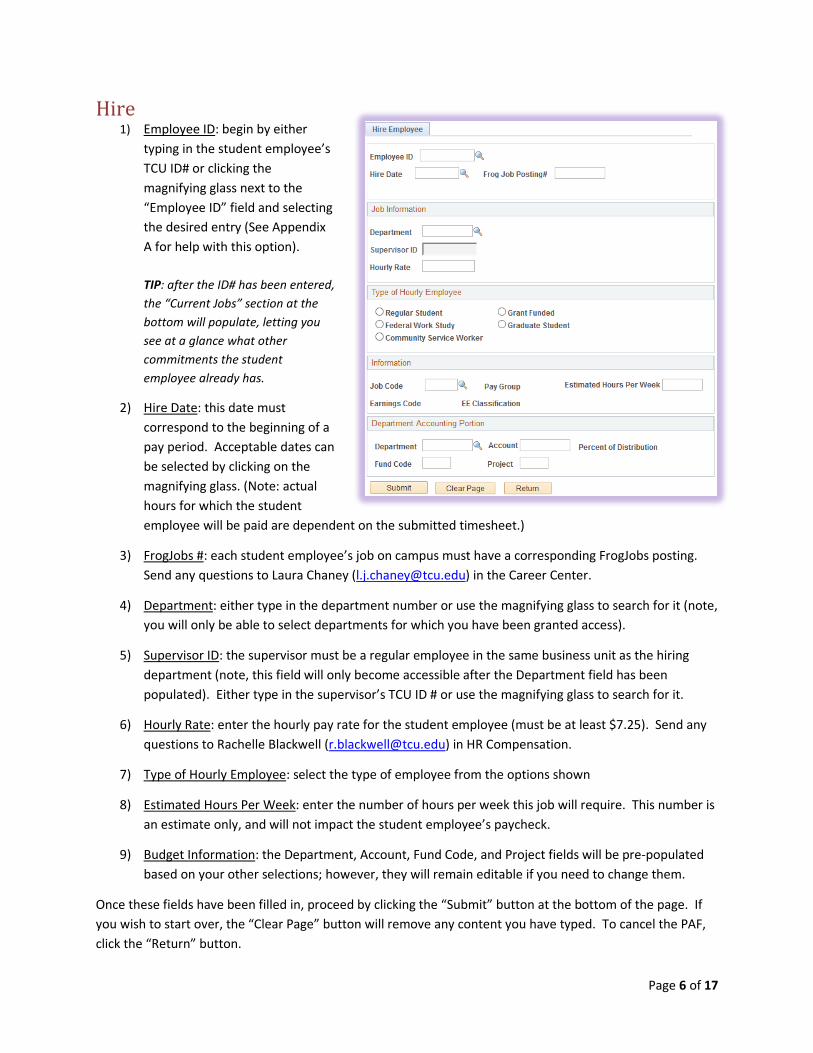
Hire 1) Employee ID: begin by either
typing in the student employee’s TCU ID# or clicking the magnifying glass next to the “Employee ID” field and selecting the desired entry (See Appendix A for help with this option). TIP: after the ID# has been entered, the “Current Jobs” section at the bottom will populate, letting you see at a glance what other commitments the student employee already has.
2) Hire Date: this date must correspond to the beginning of a pay period. Acceptable dates can be selected by clicking on the magnifying glass. (Note: actual hours for which the student employee will be paid are dependent on the submitted timesheet.)
3) FrogJobs #: each student employee’s job on campus must have a corresponding FrogJobs posting. Send any questions to Laura Chaney ([email protected]) in the Career Center.
4) Department: either type in the department number or use the magnifying glass to search for it (note, you will only be able to select departments for which you have been granted access).
5) Supervisor ID: the supervisor must be a regular employee in the same business unit as the hiring department (note, this field will only become accessible after the Department field has been populated). Either type in the supervisor’s TCU ID # or use the magnifying glass to search for it.
6) Hourly Rate: enter the hourly pay rate for the student employee (must be at least $7.25). Send any questions to Rachelle Blackwell ([email protected]) in HR Compensation.
7) Type of Hourly Employee: select the type of employee from the options shown
8) Estimated Hours Per Week: enter the number of hours per week this job will require. This number is an estimate only, and will not impact the student employee’s paycheck.
9) Budget Information: the Department, Account, Fund Code, and Project fields will be pre-populated based on your other selections; however, they will remain editable if you need to change them.
Once these fields have been filled in, proceed by clicking the “Submit” button at the bottom of the page. If you wish to start over, the “Clear Page” button will remove any content you have typed. To cancel the PAF, click the “Return” button.

Page 7 of 17
Termination 1) Employee ID: begin by either typing in the
student employee’s TCU ID# or clicking the magnifying glass next to the “Employee ID” field and selecting the desired entry (See Appendix A for help with this option).
2) Select Employee: once the student employee’s ID# has been entered, the “Current Jobs” table will be populated. From this table, select the job record you wish to take action upon.
3) Termination Date: this date must correspond to the beginning of a pay period. Acceptable dates can be selected by clicking on the magnifying glass.
4) Reason for Termination: click the magnifying glass and select the desired entry
Once these fields have been filled in, proceed by clicking the “Submit” button at the bottom of the page. If you wish to start over, the “Clear Page” button will remove any content you have typed. To cancel the PAF, click the “Return” button.

Page 8 of 17
Manage WorkStudy 1) Employee ID: begin by either typing in
the student employee’s TCU ID# or clicking the magnifying glass next to the “Employee ID” field and selecting the desired entry (See Appendix A for help with this option).
2) Select Employee: once the student employee’s ID# has been entered, the “Current Jobs” table will be populated. From this table, select the job record you wish to take action upon.
3) Effective Date: this date must correspond to the beginning of a pay period. Acceptable dates can be selected by clicking on the magnifying glass.
4) Activate/Inactivate Work Study: select the appropriate action. Depending on this selection, other entries will appear.
5) Select Earnings Code: if the “Activate WorkStudy” button has been selected, you will have the option to select “Change to Federal Work Study” or “Change to Community Service.” If the “Inactivate WorkStudy” button has been selected, “Change to Regular Pay” will automatically be selected for you.
6) Old Accounting Information: the current accounting information will be displayed here, broken down by Department, Fund Code, Account, and Project.
7) New Accounting Information: these values (Department, Fund Code, Account, and Project) will be pre-populated with the same values from the respective “Old Accounting Information” section. However, these values can be changed if necessary.
8) Former Supervisor ID: this field displays the student employee’s current supervisor ID and name.
9) New Supervisor ID: the supervisor must be a regular employee in the same business unit as the student employee’s current department. Either type in the supervisor’s TCU ID# or use the magnifying glass to search for it.
Once these fields have been filled in, proceed by clicking the “Submit” button at the bottom of the page. If you wish to start over, the “Clear Page” button will remove any content you have typed. To cancel the PAF, click the “Return” button.

Page 9 of 17
Pay Rate Change 1) Employee ID: begin by
either typing in the student employee’s TCU ID# or clicking the magnifying glass next to the “Employee ID” field and selecting the desired entry (See Appendix A for help with this option).
2) Select Employee: once the student employee’s ID# has been entered, the “Current Jobs” table will be populated. From this table, select the job record you wish to take action upon.
3) Effective Date: this date must correspond to the beginning of a pay period. Acceptable dates can be selected by clicking on the magnifying glass.
4) New Pay Rate: enter the student employee’s new hourly rate.
5) New Supervisor ID: the supervisor must be a regular employee in the same business unit as the student employee’s current department. Either type in the supervisor’s TCU ID # or use the magnifying glass to search for it.
Once these fields have been filled in, proceed by clicking the “Submit” button at the bottom of the page. If you wish to start over, the “Clear Page” button will remove any content you have typed. To cancel the PAF, click the “Return” button.
Supervisor Change 1) Employee ID: begin by either typing
in the student employee’s TCU ID# or clicking the magnifying glass next to the “Employee ID” field and selecting the desired entry (See Appendix A for help with this option).
2) Select Employee: once the student employee’s ID# has been entered, the “Current Jobs” table will be populated. From this table, select the job record you wish to take action upon.
3) Effective Date: this date must correspond to the beginning of a pay period. Acceptable dates can be selected by clicking on the magnifying glass.
Page 10 of 17
4) Former Supervisor: this field displays the student employee’s current supervisor ID and name.
5) New Supervisor: the supervisor must be a regular employee in the same business unit as the student employee’s current department. Either type in the supervisor’s TCU ID # or use the magnifying glass to search for it.
6) Estimated Worked Hours: if necessary, you can also update the student employee’s estimated weekly hours.
Once these fields have been filled in, proceed by clicking the “Submit” button at the bottom of the page. If you wish to start over, the “Clear Page” button will remove any content you have typed. To cancel the PAF, click the “Return” button.
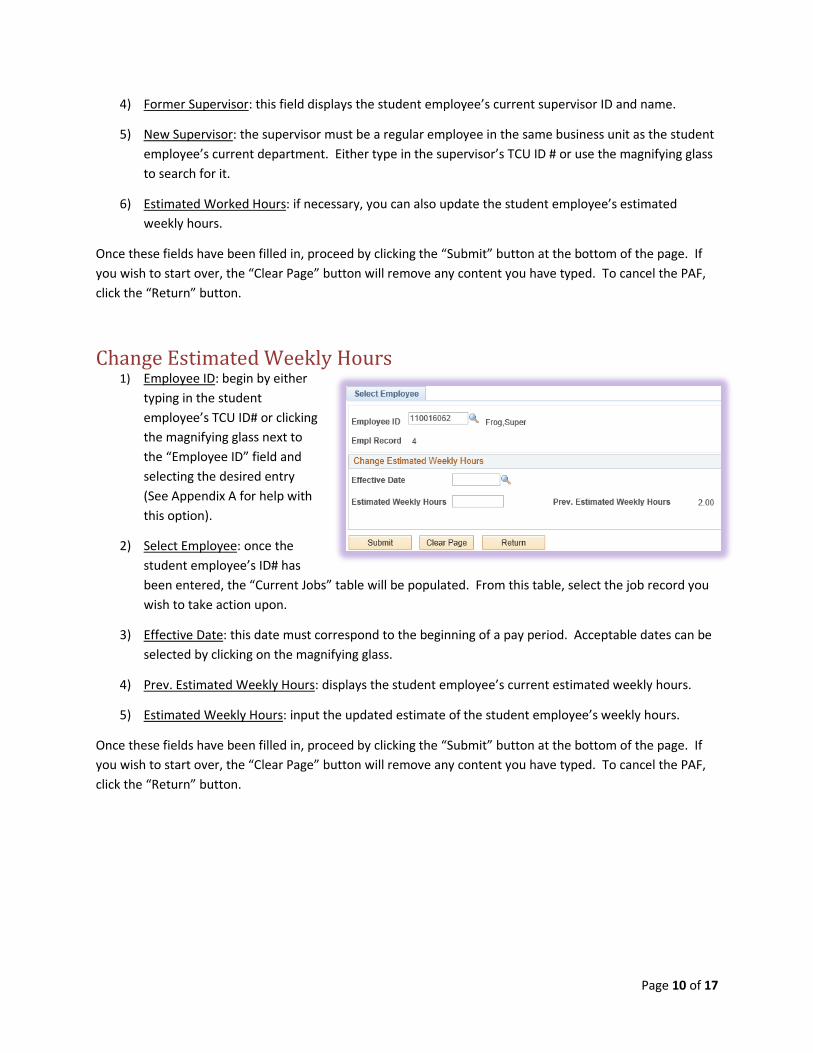
Change Estimated Weekly Hours 1) Employee ID: begin by either
typing in the student employee’s TCU ID# or clicking the magnifying glass next to the “Employee ID” field and selecting the desired entry (See Appendix A for help with this option).
2) Select Employee: once the student employee’s ID# has been entered, the “Current Jobs” table will be populated. From this table, select the job record you wish to take action upon.
3) Effective Date: this date must correspond to the beginning of a pay period. Acceptable dates can be selected by clicking on the magnifying glass.
4) Prev. Estimated Weekly Hours: displays the student employee’s current estimated weekly hours.
5) Estimated Weekly Hours: input the updated estimate of the student employee’s weekly hours.
Once these fields have been filled in, proceed by clicking the “Submit” button at the bottom of the page. If you wish to start over, the “Clear Page” button will remove any content you have typed. To cancel the PAF, click the “Return” button.
Page 11 of 17
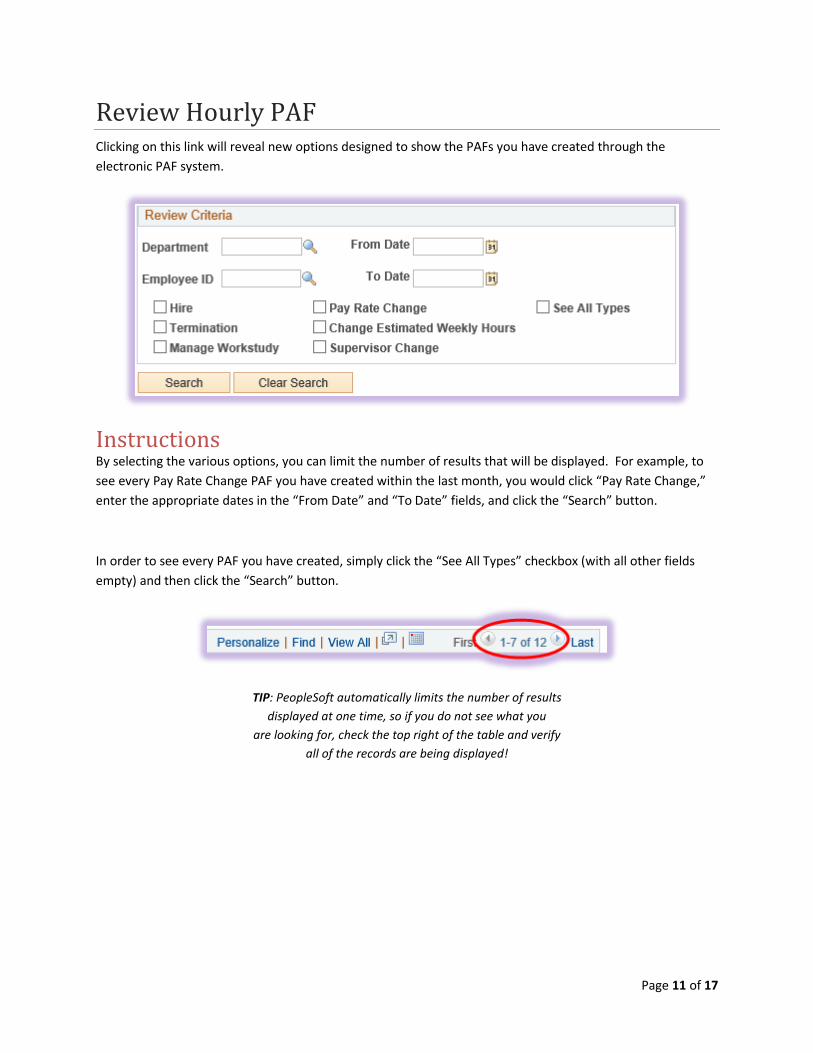
Review Hourly PAF Clicking on this link will reveal new options designed to show the PAFs you have created through the electronic PAF system.
Instructions By selecting the various options, you can limit the number of results that will be displayed. For example, to see every Pay Rate Change PAF you have created within the last month, you would click “Pay Rate Change,” enter the appropriate dates in the “From Date” and “To Date” fields, and click the “Search” button.
In order to see every PAF you have created, simply click the “See All Types” checkbox (with all other fields empty) and then click the “Search” button.
TIP: PeopleSoft automatically limits the number of results displayed at one time, so if you do not see what you
are looking for, check the top right of the table and verify all of the records are being displayed!

Page 12 of 17
Proxy Access This section is used to manage access to the electronic PAF system. Security access to this system is managed on a departmental level. Department managers are automatically granted access, and using this page, they have the ability to grant additional users the ability to access the electronic PAF system.
Instructions After clicking on this link, you will be presented with a search page. If you know the department’s number, type it into the “Department” field, or use the magnifying glass to search for it.
TIP: Leaving the “Department” field blank and clicking on the “Search” button will
display every department you have access to.
Granting Access Having selected the department, you will now be shown the users that have access to the electronic PAF system for that department. To switch between users, use the arrows along the top right of the Proxy/Supervisor Access window.
To grant access to another person, first click the “Add” link in the top right, then select the desired options that follow.
Page 13 of 17
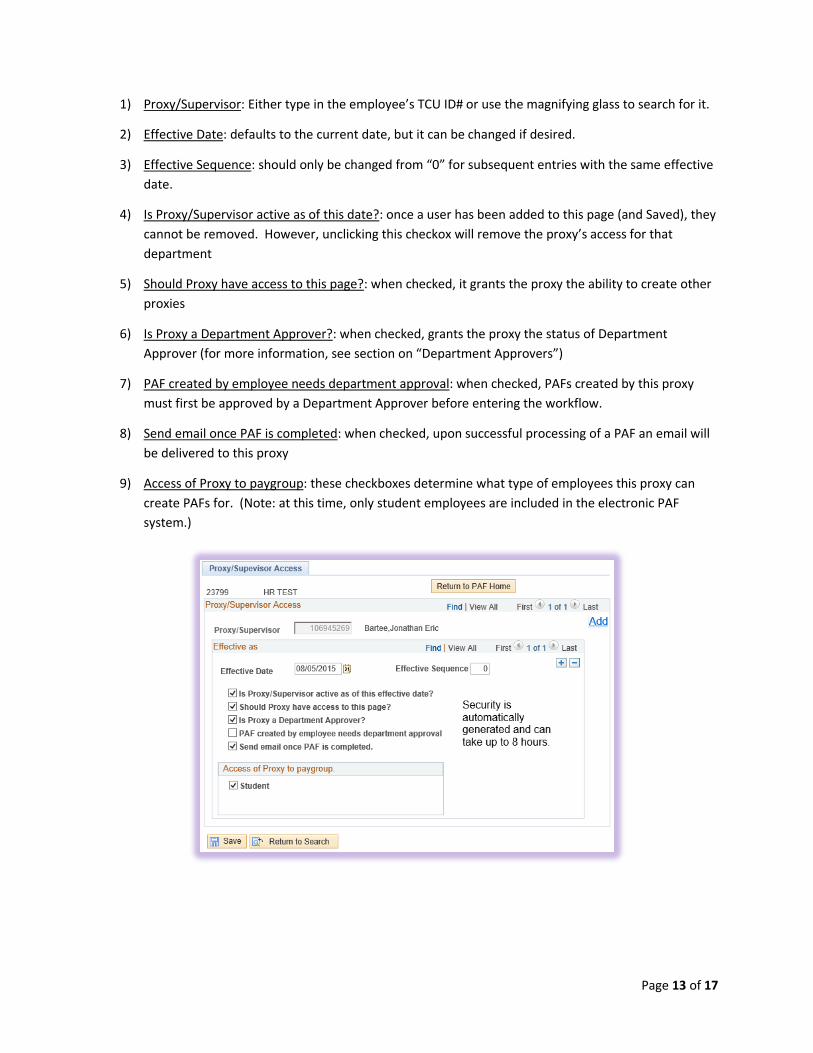
1) Proxy/Supervisor: Either type in the employee’s TCU ID# or use the magnifying glass to search for it.
2) Effective Date: defaults to the current date, but it can be changed if desired.
3) Effective Sequence: should only be changed from “0” for subsequent entries with the same effective date.
4) Is Proxy/Supervisor active as of this date?: once a user has been added to this page (and Saved), they cannot be removed. However, unclicking this checkox will remove the proxy’s access for that department
5) Should Proxy have access to this page?: when checked, it grants the proxy the ability to create other proxies
6) Is Proxy a Department Approver?: when checked, grants the proxy the status of Department Approver (for more information, see section on “Department Approvers”)
7) PAF created by employee needs department approval: when checked, PAFs created by this proxy must first be approved by a Department Approver before entering the workflow.
8) Send email once PAF is completed: when checked, upon successful processing of a PAF an email will be delivered to this proxy
9) Access of Proxy to paygroup: these checkboxes determine what type of employees this proxy can create PAFs for. (Note: at this time, only student employees are included in the electronic PAF system.)
Page 14 of 17
Department Approvers In the initial setup of the electronic PAF system, each department has a single proxy. That is, only one employee per department has the capability of creating a PAF.
However, depending on the reporting structure of your department and its number of employees, you may designate one or more additional employees as proxies. This has the benefit of spreading the workload, but can also add complexity in tracking what work has been done.
The Department Approver is an additional layer of scrutiny for the electronic PAF system. When setting up a proxy, there are two options for this role:
1) Is Proxy a Department Approver?: allows the proxy to approve PAFs submitted by other proxies of the same department.
2) PAF created by employee needs department approval: when this is checked, the proxy is allowed to create PAFs; however, it will not be processed until a Department Approver has approved it.
For example, a department manager may want an administrative assistant to create PAFs, but would like to review them before they are officially submitted. Picture a paper document sitting on the manager’s desk: this document must have the manager’s signature before it can be processed by HR, so until it is signed, it will stay on the manager’s desk. To utilize this functionality, select the “PAF created by employee needs department approval” option.
Any proxy user that has the “Is Proxy a Department Approver” option checked will have the ability to approve (‘sign’) PAFs for that department.
Page 15 of 17
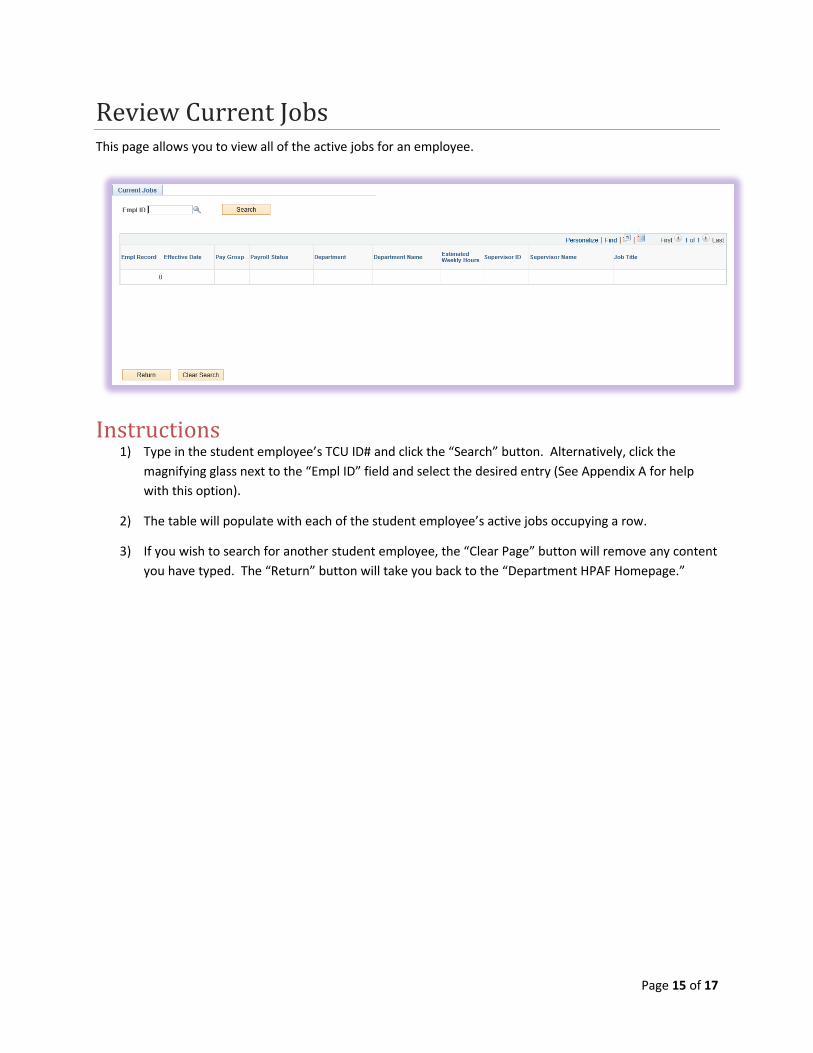
Review Current Jobs This page allows you to view all of the active jobs for an employee.
Instructions 1) Type in the student employee’s TCU ID# and click the “Search” button. Alternatively, click the
magnifying glass next to the “Empl ID” field and select the desired entry (See Appendix A for help with this option).
2) The table will populate with each of the student employee’s active jobs occupying a row.
3) If you wish to search for another student employee, the “Clear Page” button will remove any content you have typed. The “Return” button will take you back to the “Department HPAF Homepage.”
Page 16 of 17
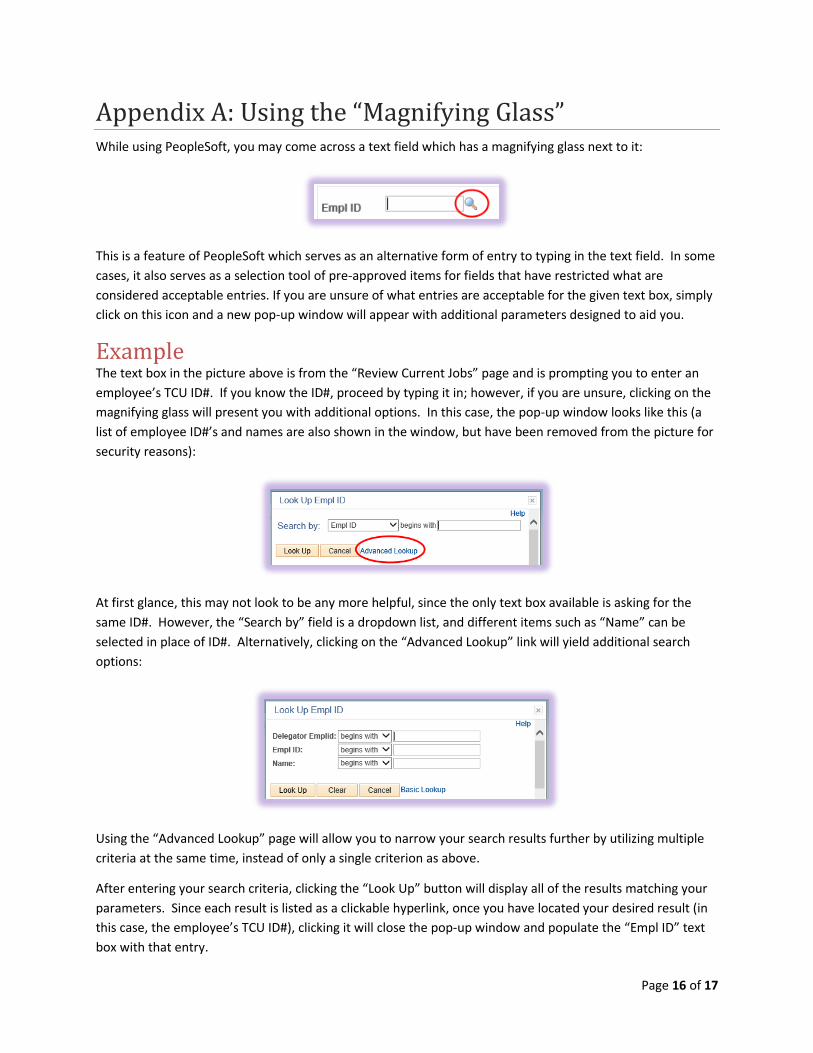
Appendix A: Using the “Magnifying Glass” While using PeopleSoft, you may come across a text field which has a magnifying glass next to it:
This is a feature of PeopleSoft which serves as an alternative form of entry to typing in the text field. In some cases, it also serves as a selection tool of pre-approved items for fields that have restricted what are considered acceptable entries. If you are unsure of what entries are acceptable for the given text box, simply click on this icon and a new pop-up window will appear with additional parameters designed to aid you.
Example The text box in the picture above is from the “Review Current Jobs” page and is prompting you to enter an employee’s TCU ID#. If you know the ID#, proceed by typing it in; however, if you are unsure, clicking on the magnifying glass will present you with additional options. In this case, the pop-up window looks like this (a list of employee ID#’s and names are also shown in the window, but have been removed from the picture for security reasons):
At first glance, this may not look to be any more helpful, since the only text box available is asking for the same ID#. However, the “Search by” field is a dropdown list, and different items such as “Name” can be selected in place of ID#. Alternatively, clicking on the “Advanced Lookup” link will yield additional search options:
Using the “Advanced Lookup” page will allow you to narrow your search results further by utilizing multiple criteria at the same time, instead of only a single criterion as above.
After entering your search criteria, clicking the “Look Up” button will display all of the results matching your parameters. Since each result is listed as a clickable hyperlink, once you have located your desired result (in this case, the employee’s TCU ID#), clicking it will close the pop-up window and populate the “Empl ID” text box with that entry.

Page 17 of 17
Appendix B: New Student Employee Hire Flowchart
Department posts job description,
receives FrogJobs #
Department selects student to hire
Student EE goes to Career Center, I-9
and SSN are verified, ePAF system
updated
Student EE sent to HR Payroll to
complete GLACIER paperwork
Student returns to Supervisor;
Department can now create ePAF
Is Student Employee paid by
Work Study?
ePAF routed to Financial Aid for
approval
Department is notified upon denial. A new ePAF must be
created.
Is Student Employee paid by
Grant funds?
ePAF routed to Research Accounting
for approval
ePAF is checked for errors by HR Data Control, then
processed
Yes
No
Yes
No
If denied
If denied
Is Student Employee
International?Yes
Student EE goes to International
Student Services
REMEMBER, the Student Employee will only be paid
for hours submitted on their time sheets!
No


![PROCESSING EMPLOYEES USING EPAF – ApproverS ...2012 [PROCESSING EMPLOYEES USING EPAF – APPROVERS & FYI HANDBOOK] What you need before you start: EPAF Training, Complete Banner](https://static.fdocuments.in/doc/165x107/6047374deef85b6f7b09a965/processing-employees-using-epaf-a-approvers-2012-processing-employees-using.jpg)


![[ Home ] [ PAF News ] [ Checklist ] [ PAF Feedback ] [ PAF ...€¦ · [ Home ] [ PAF News ] [ Checklist ] [ PAF Feedback ] [ PAF Search Page ] [ General aspects ] [ Case studies](https://static.fdocuments.in/doc/165x107/5f2c6cae89a8d014356437ba/-home-paf-news-checklist-paf-feedback-paf-home-paf-news.jpg)