StreetPilot 530 · c530 Tips and Shortcuts • To quickly return to the Menu page, touch and hold...
40
StreetPilot ® C530 ™ portable, affordable car navigation Owner’s Manual
Transcript of StreetPilot 530 · c530 Tips and Shortcuts • To quickly return to the Menu page, touch and hold...

StreetPilot® C530™
portable, affordable car navigation
Owner’s Manual

© 2006 Garmin Ltd. or its subsidiaries
Garmin International, Inc. 1200 East 151st Street, Olathe, Kansas 66062, U.S.A. Tel. 913/397.8200 or 800/800.1020 Fax 913/397.8282
Garmin (Europe) Ltd. Unit 5, The Quadrangle, Abbey Park Industrial Estate, Romsey, SO51 9DL, U.K. Tel. 44/0870.8501241 Fax 44/0870.8501251
Garmin Corporation No. 68, Jangshu 2nd Road, Shijr, Taipei County, Taiwan Tel. 886/2.2642.9199 Fax 886/2.2642.9099
All rights reserved. Except as expressly provided herein, no part of this manual may be reproduced, copied, transmitted, disseminated, downloaded or stored in any storage medium, for any purpose without the express prior written consent of Garmin. Garmin hereby grants permission to download a single copy of this manual onto a hard drive or other electronic storage medium to be viewed and to print one copy of this manual or of any revision hereto, provided that such electronic or printed copy of this manual must contain the complete text of this copyright notice and provided further that any unauthorized commercial distribution of this manual or any revision hereto is strictly prohibited.Information in this document is subject to change without notice. Garmin reserves the right to change or improve its products and to make changes in the content without obligation to notify any person or organization of such changes or improvements. Visit the Garmin Web site (www.garmin.com) for current updates and supplemental information concerning the use and operation of this and other Garmin products.Garmin®, MapSource®, and StreetPilot® are registered trademarks and c530™ and Garmin Lock™ are trademarks of Garmin Ltd. or its subsidiaries and may not be used without the express permission of Garmin.SiRF, SiRFstar and the SiRF logo are registered trademarks of SiRF Technology, Inc. SiRFstarIII and SiRF Powered are trademarks of SiRF Technology, Inc.Windows® is a registered trademark of Microsoft Corporation in the United States and/or other countries.
May 2006 Part Number 190-00688-00 Rev. A Printed in Taiwan

c530 Owner’s Manual i
PREFACE
PREFACEThank you for purchasing the Garmin® StreetPilot® c530™.
Manual ConventionsWhen you are instructed to “touch” something, use your finger to touch an item on the screen. You will see small arrows (>) used in the text. They indicate that you should touch a series of items. For example, if you see “touch Where to? > Favorites,” you should touch the Where to? button, and then touch Favorites.
c530 Tips and Shortcuts• To quickly return to the Menu page,
touch and hold Back.• Touch and to see more
choices.
Tell us how you like this manual! Fill out the Product Documentation Survey. Go to www.garmin.com/contactUs, and click Product Documentation Survey.
Quick Links• Finding an address: page 7• Viewing the Map page: page 12• Using the Garmin Lock™ anti-
theft feature: page 6• Transferring files to your c530:
pages 14–15• Adjusting the volume: page 6• Adjusting the brightness: page 6• Cleaning and storing your unit:
page 21
ii c530 Owner’s Manual
PREFACE
Preface ............................................iManual Conventions .......................... iQuick Links ........................................ iWarning ........................................... ivCaution .............................................vImportant Information .......................vProduct Registration ........................ viContact Garmin ............................... viSoftware License Agreement .......... vi
Getting Started ...............................1What’s in the Box? ...........................1Looking at Your c530 ........................1Step 1: Mounting the c530 ...............2Step 2: Configuring the c530 ............3Step 3: Acquiring Satellites ...............3Step 4: Using the c530 .....................3Finding Your Destination ..................4Following Your Route .......................5Adding a Stop to Your Route ............5Adding a Detour ...............................6Stopping the Route ...........................6Taking a Better Route .......................6Adjusting the Volume ........................6Adjusting the Brightness ...................6Locking Your c530 ............................6
Where To? ......................................7Finding an Address ...........................7Go! Page Options .............................7Go Home ..........................................8Finding Points of Interest ..................8Finding Recently Found Places ........9Favorites .........................................10Finding a Place Using the Map ...... 11Expanding Your Search .................. 11
Using the Main Pages .................12Map Page .......................................12Trip Information Page .....................13Turn List Page ................................13Next Turn Page ..............................13
Managing Files on Your c530 .....14Supported File Types .....................14Step 1: Insert an SD Card
(Optional) ...................................14Step 2: Connect the USB Cable .....14Step 3: Transfer Files to Your
c530 ...........................................15Step 4: Eject and Unplug the USB
Cable .........................................15Deleting Files from Your c530 ........15

c530 Owner’s Manual iii
PREFACE
Customizing the c530 .................16Changing the Map Settings ............16Changing the System Settings .......17Localizing Your c530 ......................17Changing the Navigation Settings ..18Customizing the Display .................19Restoring All Settings .....................19Clearing User Data .........................19
Appendix ......................................20Mounting on Your Dashboard .........20Resetting Your c530 .......................20Caring for Your c530 ......................21Changing the Fuse .........................22Using a Remote Antenna ...............22About Satellite Signals ...................22
Charging the c530 ..........................22Calibrating the Screen ...................22Battery Information ........................23Updating the c530 Software ...........23Purchasing and Loading Additional
MapSource Maps ......................24Loading MapSource Waypoints on
Your c530 ..................................24Custom POIs (Points of Interest) ....25Troubleshooting ..............................26Technical Specifications .................27FCC Compliance ............................28Declaration of Conformity ...............28
Index .............................................29
iv c530 Owner’s Manual
PREFACE
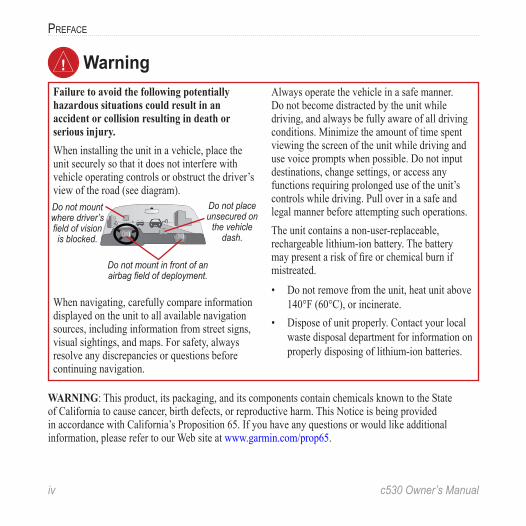
WarningFailure to avoid the following potentially hazardous situations could result in an accident or collision resulting in death or serious injury.When installing the unit in a vehicle, place the unit securely so that it does not interfere with vehicle operating controls or obstruct the driver’s view of the road (see diagram).Do not mount where driver’s field of vision is blocked.
Do not place unsecured on
the vehicle dash.
Do not mount in front of an airbag field of deployment.
When navigating, carefully compare information displayed on the unit to all available navigation sources, including information from street signs, visual sightings, and maps. For safety, always resolve any discrepancies or questions before continuing navigation.
Always operate the vehicle in a safe manner. Do not become distracted by the unit while driving, and always be fully aware of all driving conditions. Minimize the amount of time spent viewing the screen of the unit while driving and use voice prompts when possible. Do not input destinations, change settings, or access any functions requiring prolonged use of the unit’s controls while driving. Pull over in a safe and legal manner before attempting such operations.The unit contains a non-user-replaceable, rechargeable lithium-ion battery. The battery may present a risk of fire or chemical burn if mistreated.
• Do not remove from the unit, heat unit above 140°F (60°C), or incinerate.
• Dispose of unit properly. Contact your local waste disposal department for information on properly disposing of lithium-ion batteries.
WARNING: This product, its packaging, and its components contain chemicals known to the State of California to cause cancer, birth defects, or reproductive harm. This Notice is being provided in accordance with California’s Proposition 65. If you have any questions or would like additional information, please refer to our Web site at www.garmin.com/prop65.

c530 Owner’s Manual v
PREFACE
Failure to avoid the following potentially hazardous situations may result in injury or property damage.The unit is designed to provide you with route suggestions. It does not reflect road closures or road conditions, traffic congestion, weather conditions, or other factors that may affect safety or timing while driving.Use the unit only as a navigational aid. Do not attempt to use the unit for any purpose requiring precise measurement of direction, distance, location, or topography. This product should
not be used to determine ground proximity for aircraft navigation.The Global Positioning System (GPS) is operated by the United States government, which is solely responsible for its accuracy and maintenance. The government’s system is subject to changes which could affect the accuracy and performance of all GPS equipment, including the unit. Although the unit is a precision navigation device, any navigation device can be misused or misinterpreted and, therefore, become unsafe.
Caution
Important InformationMAP DATA INFORMATION: One of the goals of Garmin is to provide customers with the most complete and accurate cartography that is available to us at a reasonable cost. We use a combination of governmental and private data sources, which we identify in product literature and copyright messages displayed to the consumer. Virtually all data sources contain inaccurate or incomplete data to some degree. This is particularly true outside the United States, where complete and accurate digital data is either not available or prohibitively expensive. NOTICE TO DRIVERS IN CALIFORNIA AND MINNESOTA: State law prohibits drivers in California and Minnesota from using suction mounts on their windshields while operating motor vehicles. Refer to page 20 for instructions on using the included mounting disk with the suction cup mount. Garmin does not take any responsibility for any fines, penalties, or damages that may be incurred as a result of disregarding this notice. (See California Vehicle Code Section 26708(a); Minnesota Statutes 2005, Section 169.71.)NOTICE: This Category II radiocommunication device complies with Industry Canada Standard RSS-310.

vi c530 Owner’s Manual
PREFACE
Product RegistrationHelp us better support you by completing our online registration today! Connect to our Web site at www.garmin .com/registration.Use this area to record the serial number (8-digit number located on the back of the c530) in case your c530 needs service. Keep the original sales receipt, or a photocopy, in a safe place.Serial Number: ____ ____ ____ ____ ____ ____ ____ ____
Contact GarminContact Garmin if you have any questions while using your c530. In the U.S.A. contact Garmin Product Support by phone: 913/397.8200 or 800/800.1020, Monday–Friday, 8 AM–5 PM Central Time; or go to www.garmin.com/support, and click Product Support.In Europe, contact Garmin (Europe) Ltd. at 44/0870.8501241.
Software License AgreementBY USING THE c530, YOU AGREE TO BE BOUND BY THE TERMS AND CONDITIONS OF THE FOLLOWING SOFTWARE LICENSE AGREEMENT. PLEASE READ THIS AGREEMENT CAREFULLY.Garmin grants you a limited license to use the software embedded in this device (the “Software”) in binary executable form in the normal operation of the product. Title, ownership rights, and intellectual property rights in and to the Software remain in Garmin.You acknowledge that the Software is the property of Garmin and is protected under the United States of America copyright laws and international copyright treaties. You further acknowledge that the structure, organization, and code of the Software are valuable trade secrets of Garmin and that the Software in source code form remains a valuable trade secret of Garmin. You agree not to decompile, disassemble, modify, reverse assemble, reverse engineer, or reduce to human readable form the Software or any part thereof or create any derivative works based on the Software. You agree not to export or re-export the Software to any country in violation of the export control laws of the United States of America.
c530 Owner’s Manual 1
GETTING STARTED
GETTING STARTED
What’s in the Box?c530 unit and vehicle suction cup mount.12-Volt adapter to provide external power.USB cable to connect the c530 to your computer. Your c530 connects to your computer as a mass storage device (see page 14). Dashboard Disk to mount the suction cup mount on your dashboard (see page 20).Yellow Sheet that contains your unit’s serial number, registration number for registering on Garmin’s Web site, and unlock code for future reference.
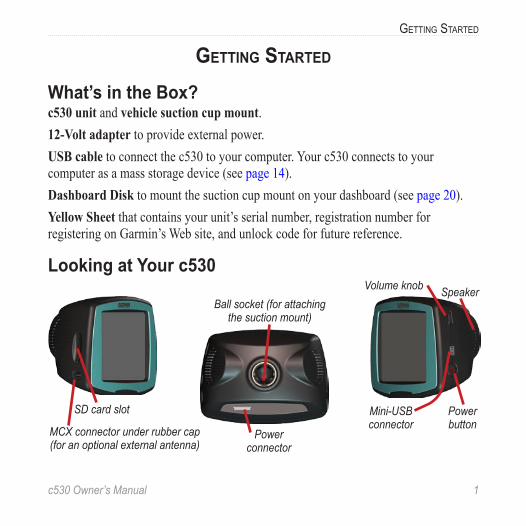
Looking at Your c530
SD card slot
MCX connector under rubber cap (for an optional external antenna)
Power button
Volume knob
Mini-USB connector
Power connector
Ball socket (for attaching the suction mount)
Speaker
2 c530 Owner’s Manual
GETTING STARTED
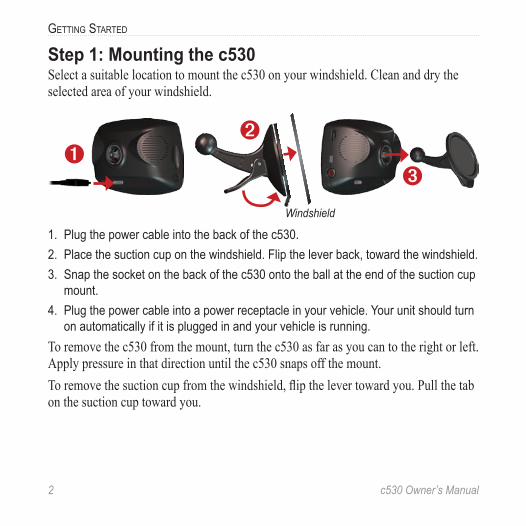
Step 1: Mounting the c530Select a suitable location to mount the c530 on your windshield. Clean and dry the selected area of your windshield.
➌➊
➋
Windshield
1. Plug the power cable into the back of the c530. 2. Place the suction cup on the windshield. Flip the lever back, toward the windshield. 3. Snap the socket on the back of the c530 onto the ball at the end of the suction cup
mount.4. Plug the power cable into a power receptacle in your vehicle. Your unit should turn
on automatically if it is plugged in and your vehicle is running.To remove the c530 from the mount, turn the c530 as far as you can to the right or left. Apply pressure in that direction until the c530 snaps off the mount. To remove the suction cup from the windshield, flip the lever toward you. Pull the tab on the suction cup toward you.

c530 Owner’s Manual 3
GETTING STARTED
Step 2: Configuring the c530To turn on your c530, press and hold the Power button on the side of the unit. Follow the on-screen instructions to configure your c530.
Step 3: Acquiring SatellitesGo outdoors to an open area, away from tall buildings and trees. Turn on the c530. Acquiring satellite signals may take a few minutes. The bars in the upper-left corner indicate satellite strength. When the bars are green, your c530 has acquired satellite signals; you can find your destination and go to it.
Step 4: Using the c530A Touch to find a destination.B Touch to view the map. C Touch to view traffic incidents, when an
FM traffic receiver is connected. D Touch to adjust the c530’s settings.E Touch to adjust the brightness of the
screen.
A
B
C D E
4 c530 Owner’s Manual
GETTING STARTED
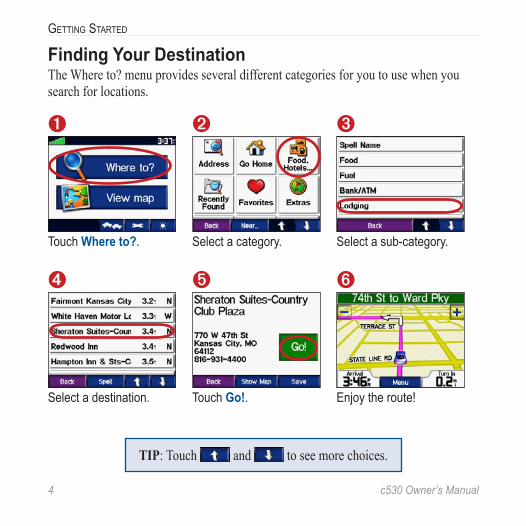
Finding Your DestinationThe Where to? menu provides several different categories for you to use when you search for locations.
Select a destination.
➍
Enjoy the route!
➏
Touch Go!.
➎
➌
Select a sub-category. Select a category.
➋➊
Touch Where to?.
TIP: Touch and to see more choices.
c530 Owner’s Manual 5
GETTING STARTED
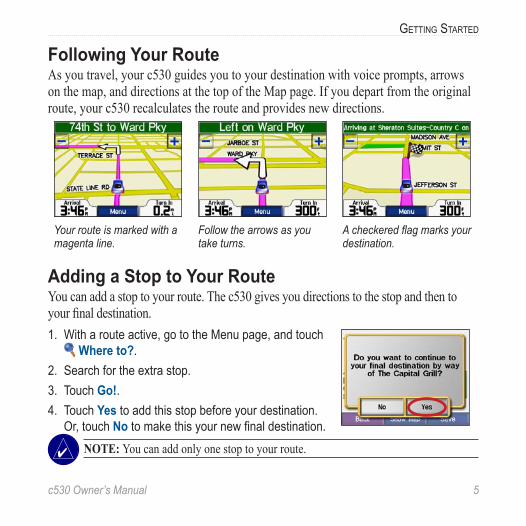
Following Your RouteAs you travel, your c530 guides you to your destination with voice prompts, arrows on the map, and directions at the top of the Map page. If you depart from the original route, your c530 recalculates the route and provides new directions.
A checkered flag marks your destination.
Follow the arrows as you take turns.
Your route is marked with a magenta line.
Adding a Stop to Your RouteYou can add a stop to your route. The c530 gives you directions to the stop and then to your final destination. 1. With a route active, go to the Menu page, and touch
Where to?. 2. Search for the extra stop.3. Touch Go!.4. Touch Yes to add this stop before your destination.
Or, touch No to make this your new final destination. NOTE: You can add only one stop to your route.
6 c530 Owner’s Manual
GETTING STARTED
Adding a DetourIf a road on your route is closed, you can take a detour. 1. With a route active, touch Menu. 2. Touch Detour.
Stopping the Route1. With a route active, touch Menu. 2. Touch Stop.
Taking a Better RouteAs you approach your destination, the c530 evaluates road options, which may result in a better route. When the c530 finds a better route, is displayed in the lower-right corner of the map. Touch
to take the better route.
Adjusting the VolumeTurn the volume knob on the right side of the unit to adjust the volume.
Adjusting the BrightnessOn the Menu page, touch . Touch
to lower the brightness and to raise it. Touch OK when you are done.
Locking Your c5301. On the Menu page, touch >
System. 2. Touch the button next to Garmin
Lock. Touch OK. 3. Enter a 4-digit PIN. Touch Yes. 4. Touch OK. Drive to a security
location, and touch Set.Each time you turn on the c530, enter the PIN or drive to the security location.
NOTE: If you forget your PIN and the security location, you must send your c530 to Garmin to get it unlocked.
What Is a Security Location?You can select any location, such as your home or office, for your security location. If you are at your security location, you do not need to enter a PIN. If you forget your PIN, drive to your security location to unlock the c530.
NOTE: To unlock your c530 at your security location, the c530 must have acquired satellite signals.

c530 Owner’s Manual 7
WHERE TO?
WHERE TO?The Where to? menu provides several different categories used to search for locations. To learn how to perform a simple search, see page 4.
Finding an Address1. From the Menu page, touch
Where to? > Address. 2. Select a state and city, if necessary.3. Type the address number. Touch
Done. 4. Type the street name until a list of
streets appears, or touch Done.5. Select the street.6. Select a city, if necessary.7. Select the address, if necessary. The
Go! page opens. 8. Touch Go! to create a route to this
address. TIP: You can search for a postal code. Enter the postal code instead of the city name. (Not all map data provides postal code searching.)
TIP: Finding an intersection is very similar to finding an address. Touch
Intersection, and enter the two street names.
Go! Page OptionsTouch an item in the search results list to view the Go! page.
Touch Go! to create a turn-by-turn route to this location. Touch Show Map to view this location on the map. If the GPS is off, touch Set Loc. to select this as your current location. Touch Save to save this location as one of your Favorites. See page 10.
8 c530 Owner’s Manual
WHERE TO?
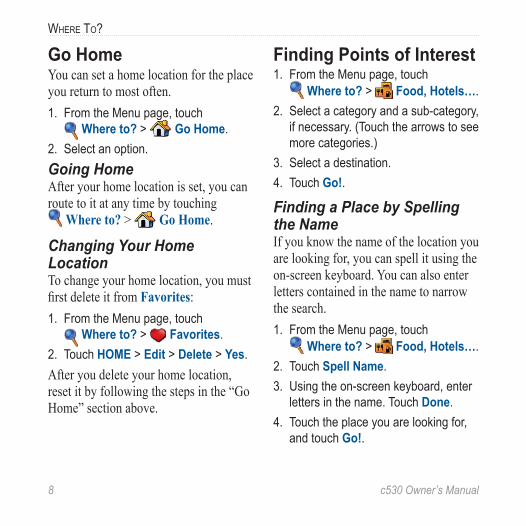
Go HomeYou can set a home location for the place you return to most often. 1. From the Menu page, touch
Where to? > Go Home.2. Select an option. Going HomeAfter your home location is set, you can route to it at any time by touching
Where to? > Go Home.
Changing Your Home LocationTo change your home location, you must first delete it from Favorites: 1. From the Menu page, touch
Where to? > Favorites.2. Touch HOME > Edit > Delete > Yes.After you delete your home location, reset it by following the steps in the “Go Home” section above.
Finding Points of Interest1. From the Menu page, touch
Where to? > Food, Hotels….2. Select a category and a sub-category,
if necessary. (Touch the arrows to see more categories.)
3. Select a destination. 4. Touch Go!.
Finding a Place by Spelling the Name If you know the name of the location you are looking for, you can spell it using the on-screen keyboard. You can also enter letters contained in the name to narrow the search. 1. From the Menu page, touch
Where to? > Food, Hotels….2. Touch Spell Name.3. Using the on-screen keyboard, enter
letters in the name. Touch Done. 4. Touch the place you are looking for,
and touch Go!.

c530 Owner’s Manual 9
WHERE TO?
Using the On-Screen KeyboardWhen an on-screen keyboard appears, touch a number or letter to enter it. Use the keyboard to spell words just like a computer keyboard.
Touch to enter numbers. Touch to delete the last character entered; touch and hold to delete the entire entry. Touch to change the keyboard mode to use diacritical characters or special characters.
Finding Recently Found PlacesYour c530 stores the last 50 of your recent finds in the Recently Found list. The most recently viewed places appear at the top of the list. From the Menu page, touch Where to? >
Recently Found to view your recently found items.
Deleting Recently Found PlacesTo remove all places from the Recently Found list, touch Clear. Then touch Yes.
NOTE: When you touch Clear, all items from the list are removed. It does not delete the actual place from your unit.
10 c530 Owner’s Manual
WHERE TO?
FavoritesYou can save places in your Favorites, so you can quickly find them and create routes to them. Your home location is also stored in Favorites.
Saving Places You Find1. After you have found a place you
want to save, touch Save. 2. Touch OK. The place is saved in
Favorites.
Finding Saved Places1. From the Menu page, touch
Where to?.2. Touch Favorites. Your saved
locations are listed. 3. Touch the place you are looking for,
and touch Go!.
Saving Your Current LocationFrom the Map page, touch the vehicle icon. Touch Yes to save your current location in Favorites.
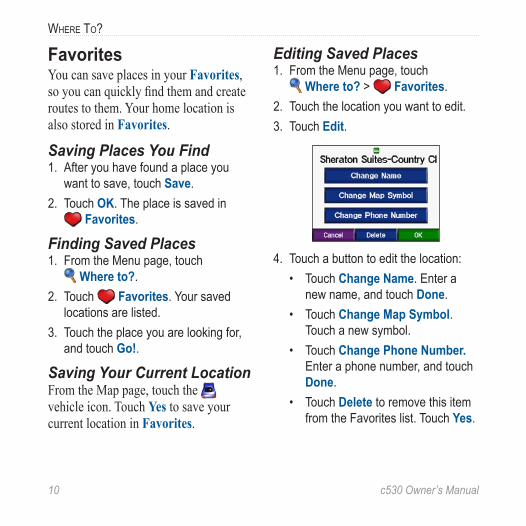
Editing Saved Places1. From the Menu page, touch
Where to? > Favorites. 2. Touch the location you want to edit. 3. Touch Edit.
4. Touch a button to edit the location:• Touch Change Name. Enter a
new name, and touch Done. • Touch Change Map Symbol.
Touch a new symbol.• Touch Change Phone Number.
Enter a phone number, and touch Done.
• Touch Delete to remove this item from the Favorites list. Touch Yes.
c530 Owner’s Manual 11
WHERE TO?
Finding a Place Using the MapUse the Browse Map page to view different parts of the map. Touch
Where to? > > Browse Map.
Tips for Browsing the Map• Touch the map and drag to view
different parts of the map. • Touch and to zoom in and out. • Touch any object on the map. An
arrow appears pointing at the object you selected.
• Touch Back to return to the previous screen.
• Touch Save to save this location to your Favorites.
• Touch Go to navigate to the selected location.
• If the GPS is off, touch Set Loc. to set your current location to the selected location.
Expanding Your Search1. From the Menu page, touch
Where to? > Near.2. Select an option:
• Where I Am Now—searches for places near your current location.
• A Different City—searches for places near the city you enter.
• My Current Route—searches for places along the route you are currently navigating.
• My Destination—searches for places near your current route destination.
3. Touch OK. NOTE: Your c530 automatically searches for places near your current location.

12 c530 Owner’s Manual
USING THE MAIN PAGES
USING THE MAIN PAGES
Map PageOn the Menu page, touch View map to open the Map page. The vehicle icon shows your current location.
Map Page while Navigating a Route
Touch Arrival or Speed to open the
Trip Information page.
Touch Turn In to open the Next Turn page.
Touch the text bar to open the Turn List page.
Touch to zoom out. Touch to zoom in.
Touch Menu to return to the Menu page.
To save your current location, touch the vehicle icon, and touch Yes.
Turn List Page Next Turn PageTrip Information Page

c530 Owner’s Manual 13
USING THE MAIN PAGES
Trip Information PageThe Trip Information page displays your current speed and provides helpful statistics about your trip. To view the Trip Information page, touch Speed or Arrival on the Map page.
Resetting Trip InformationIf you want accurate trip information, reset the trip information before beginning a trip. If you make frequent stops, leave the c530 turned on so it can accurately measure elapsed time during the trip. Touch Reset Trip to reset the information on the Trip Information page. Touch Reset Max to reset the maximum speed.
Turn List PageWhen you are navigating a route, the Turn List page displays turn-by-turn instructions for your entire route and the distance between turns. Touch the green text bar on the top of the Map page to open the Turn List page. Touch a turn on the list to view the Next Turn page for that turn. Touch Show Map to view the entire route on the Browse Map.
Next Turn PageWhen you are navigating a route, the Next Turn page shows the turn on the map and the distance and time left before you reach the turn. To view an upcoming turn on the map, touch Turn In on the Map page, or touch any turn from the Turn List page. Touch and to view other turns in the route. When you are finished viewing the Next Turn page, touch Back.
14 c530 Owner’s Manual
MANAGING FILES ON YOUR C530
MANAGING FILES ON YOUR C530
You can store files, such as JPEG image files, in the c530’s internal memory or on an optional SD card.
NOTE: The c530 is not compatible with Windows® 95, Windows 98, or Windows Me operating systems. This is a common limitation of most USB mass storage devices.
Supported File Types• JPEG and JPG image files for splash
screen (see page 19)• GPI custom POI files from Garmin’s
POI Loader (see page 25)• GPX waypoint files from Garmin’s
MapSource® (see page 24)• Maps from MapSource
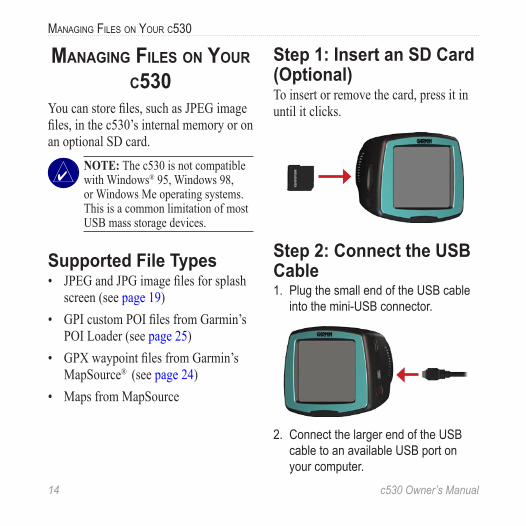
Step 1: Insert an SD Card (Optional)To insert or remove the card, press it in until it clicks.
Step 2: Connect the USB Cable1. Plug the small end of the USB cable
into the mini-USB connector.
2. Connect the larger end of the USB cable to an available USB port on your computer.
c530 Owner’s Manual 15
MANAGING FILES ON YOUR C530
Two additional drives appear in your computer’s list of drives. “Garmin” is the available storage in the c530’s internal memory. The other removable disk drive is the SD card.
NOTE: On some operating systems, the c530 drives may not be named automatically. See your operating system’s Help file to learn how to rename the drives.
Step 3: Transfer Files to Your c5301. Connect the c530 to your computer. 2. Double-click My Computer. 3. Browse your computer for the file you
want to copy. 4. Highlight the file, and select Edit >
Copy. 5. Open the “Garmin” drive or the SD
card drive.6. Select Edit > Paste. The file appears
in the list of files on the c530 memory or SD card.
Step 4: Eject and Unplug the USB CableWhen you are finished transferring files, double-click the Unplug or Eject icon in your Windows system tray. Select USB Mass Storage Device, and click Stop. Select the c530 drives, and click OK. You can unplug the USB cable from your c530 now.
Deleting Files from Your c530With the c530 connected to your computer, open My Computer. Open the “Garmin” or SD card drive. Highlight the file that you want to delete, and press the Delete key on your computer’s keyboard.
CAUTION: If you are not sure about a file’s purpose, do NOT delete it. Your c530 memory contains important system files that should NOT be deleted. Be especially cautious of files located in folders entitled “Garmin.”

16 c530 Owner’s Manual
CUSTOMIZING THE C530
CUSTOMIZING THE C5301. From the Menu page, touch .2. Touch the setting you want to change.
3. Touch the button next to the setting name to change it.
Changing the Map SettingsFrom the Menu page, touch >
Map.
Map Detail—adjust the amount of detail shown on the map. Showing more detail may cause the map to redraw slower. Map View—change the perspective of the map. • Track Up—display the map in 2
dimensions (2D) with your direction of travel at the top.
• North Up—display the map in 2D with North at the top.
• 3D—display the map in 3 dimensions (3D) in Track Up.
Vehicle—touch Change to change the icon used to display your position on the map. Touch the icon you want to use, and then touch OK. Download additional vehicle icons at www.garmin .com/vehicles.Map Info—view the maps loaded on your c530 and their version. Touch a map to enable (check mark) or disable (no check mark) that map. Restore—restore the original map settings.

c530 Owner’s Manual 17
CUSTOMIZING THE C530
Changing the System SettingsFrom the Menu page, touch >
System.
GPS Mode—enable and disable GPS and WAAS/EGNOS. See www .garmin.com/aboutGPS/waas.html for information about WAAS/EGNOS.Safe Mode—turn on or off Safe Mode. When your vehicle is moving, Safe Mode disables all functions that require significant operator attention and could become a distraction while driving. Garmin Lock—turn on Garmin Lock™ to lock your c530. Enter a 4-digit PIN, and set a security location. For more information, see page 6.
Proximity Alarms—turn on or off the alerts when you approach Custom POIs. This option is only visible if you have loaded Custom POIs. See page 25 for more information about Custom POIs. About—display your c530’s software version number, unit ID number, and audio version number. You need this information when you update the system software (see page 23) or purchase additional map data (see page 24).Restore—restore the system settings.
Localizing Your c530From the Menu page, touch >
Locale.
18 c530 Owner’s Manual
CUSTOMIZING THE C530
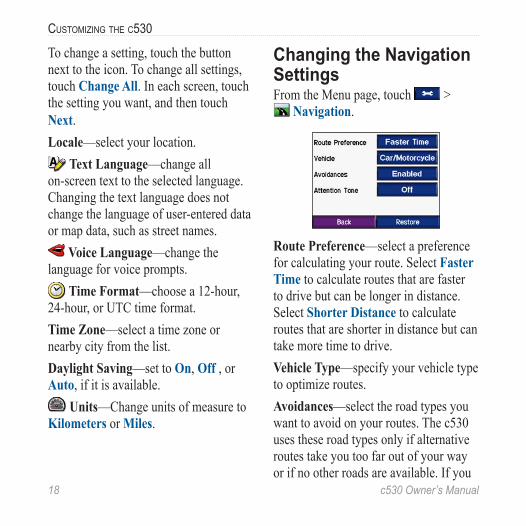
To change a setting, touch the button next to the icon. To change all settings, touch Change All. In each screen, touch the setting you want, and then touch Next. Locale—select your location.
Text Language—change all on-screen text to the selected language. Changing the text language does not change the language of user-entered data or map data, such as street names.
Voice Language—change the language for voice prompts.
Time Format—choose a 12-hour, 24-hour, or UTC time format.Time Zone—select a time zone or nearby city from the list. Daylight Saving—set to On, Off , or Auto, if it is available.
Units—Change units of measure to Kilometers or Miles.
Changing the Navigation SettingsFrom the Menu page, touch >
Navigation.
Route Preference—select a preference for calculating your route. Select Faster Time to calculate routes that are faster to drive but can be longer in distance. Select Shorter Distance to calculate routes that are shorter in distance but can take more time to drive.Vehicle Type—specify your vehicle type to optimize routes. Avoidances—select the road types you want to avoid on your routes. The c530 uses these road types only if alternative routes take you too far out of your way or if no other roads are available. If you

c530 Owner’s Manual 19
CUSTOMIZING THE C530
have an FM traffic receiver, you can also avoid traffic incidents.Attention Tone—turn on or off the attention tone.Restore—restore the original navigation settings.
Customizing the DisplayFrom the Menu page, touch >
Display.
Color Mode—select Daytime for a light background, Nighttime for a dark background, or Auto to automatically switch between the two. Splash Screen—select an image to be shown when you turn on the c530. First, load JPEG images using USB mass storage mode (see pages 14–15).
Screen Shot—enable Screen Shot mode. Touch the camera icon to take a picture of the screen. The picture bitmap file is saved in the Garmin\scrn folder on the “Garmin” drive.
Restoring All Settings1. From the Menu page, touch . 2. Touch Restore.
Clearing User Data CAUTION: This deletes all user-entered information.
1. Hold your finger on the lower-right corner of the c530’s screen while turning on the c530.
2. Keep your finger pressed until the pop-up window appears.
3. Touch Yes to clear all user data. All original settings are restored. Any items that you have saved are erased.
20 c530 Owner’s Manual
APPENDIX
APPENDIX
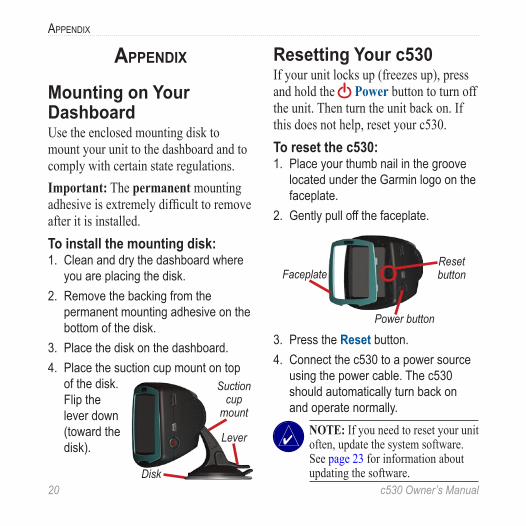
Mounting on Your DashboardUse the enclosed mounting disk to mount your unit to the dashboard and to comply with certain state regulations. Important: The permanent mounting adhesive is extremely difficult to remove after it is installed. To install the mounting disk:1. Clean and dry the dashboard where
you are placing the disk.2. Remove the backing from the
permanent mounting adhesive on the bottom of the disk.
3. Place the disk on the dashboard.4. Place the suction cup mount on top
of the disk. Flip the lever down (toward the disk).
Resetting Your c530If your unit locks up (freezes up), press and hold the Power button to turn off the unit. Then turn the unit back on. If this does not help, reset your c530. To reset the c530:1. Place your thumb nail in the groove
located under the Garmin logo on the faceplate.
2. Gently pull off the faceplate.
Reset button
Power button
Faceplate
3. Press the Reset button. 4. Connect the c530 to a power source
using the power cable. The c530 should automatically turn back on and operate normally.
NOTE: If you need to reset your unit often, update the system software. See page 23 for information about updating the software. Disk
Suction cup
mount
Lever

c530 Owner’s Manual 21
APPENDIX
Caring for Your c530 Your c530 contains sensitive electronic components that can be permanently damaged if exposed to excessive shock or vibration. To minimize the risk of damage to your c530, avoid dropping your unit and operating it in high-shock and high-vibration environments.
Cleaning the UnitThe c530 is constructed of high-quality materials and does not require user maintenance other than cleaning. Clean the unit’s outer casing (not the touch screen) using a cloth dampened with a mild detergent solution, and then wipe dry. Avoid chemical cleaners and solvents that can damage plastic components.
Cleaning the Touch ScreenClean the touch screen with a soft, clean, lint-free cloth. Use water, isopropyl alcohol, or eyeglass cleaner, if needed. Apply the liquid to the cloth, and then gently wipe the touch screen.
Protecting Your c530• Carry and store your c530 in the
included carry case. • Do not store the c530 where
prolonged exposure to extreme temperatures can occur (such as in the trunk of a car), because it can cause permanent damage.
• Do not expose the c530 to water. Contact with water can cause this unit to malfunction.
• Though a PDA stylus can also be used to operate the touch screen, never attempt this while operating a vehicle. Never use a hard or sharp object to operate the touch screen or damage may result.
Avoiding Theft• To avoid theft, remove the c530
and mount from visible sight when not in use. Remove the mark on the windshield left by the suction cup.
• Do not keep the c530 in the glove compartment; thieves look there.

22 c530 Owner’s Manual
APPENDIX
• Register your product at www.garmin.com/registration. This may help if your unit is stolen.
• Use the Garmin Lock™ feature. See page 6.
Changing the FuseAn AGC/3AG 2-Amp, high-breaking capacity, 1500 A-rated fuse is located at the tip of the vehicle adapter. Periodically, you may need to change the fuse. Unscrew the black, round end piece, and replace the fuse.
Using a Remote AntennaYou can use an optional external remote antenna (GA 25MCX). To purchase, go to the Garmin Web site at www.garmin .com/products/sp530, and click the Accessories link. Remove the weather cap from the antenna connector located on the left of the c530, and connect the antenna.
About Satellite SignalsYour c530 must acquire satellite signals to operate. If you are indoors, near tall buildings or trees, or in a parking garage, the c530 cannot acquire satellites. Go outside to an area free from tall obstructions to use your c530. When the c530 has acquired satellite signals, the signal strength bars on the Menu page are green . When it loses satellite signals, the bars turn red or disappear
. For more information about GPS, visit www.garmin.com/aboutGPS.
Charging the c530To charge the c530, connect the power cable to the c530 and a power source.
Calibrating the Screen If the touch screen is not responding properly, calibrate the touch screen. Turn the unit off. Press and hold the Power button for about one minute until the Calibration screen appears. Follow the on-screen instructions.
Unscrew
c530 Owner’s Manual 23
APPENDIX
Battery Information Your unit contains an internal (non-removable) lithium-ion battery. The battery should last up to 8 hours, depending on usage. The battery icon in the corner of the Menu page indicates the status of the internal battery. If the icon is not present, the c530 is connected to external power. Contact your local waste disposal department for information on properly disposing of the unit.
Maximizing the Battery Life• Turn off GPS ( > System
> GPS Mode > GPS Off) when you do not need to receive GPS signals, or use Normal mode when you do not need to use WAAS or EGNOS.
• Turn the backlight brightness down (on the Menu page, touch ).
• Do not leave your c530 in direct sunlight. Avoid prolonged exposure to excessive heat.
Updating the c530 SoftwareUse WebUpdater to update your c530 software. Go to www.garmin.com/products/webupdater to download the WebUpdater program. After downloading WebUpdater to your computer, connect your c530 to your computer, run WebUpdater, and follow the screen prompts. After confirming that you want to perform an update, WebUpdater automatically downloads the update and installs it on your c530. If you register your c530, you will receive notification of software and map updates. To register your c530, go to www.garmin.com/registration. You can also download software updates from www.garmin.com/products/sp530. Click Software Updates. Click Download next to the unit software. Read and agree to the terms. Click Download. Select Run (or Open). Your software is updated.
24 c530 Owner’s Manual
APPENDIX
Purchasing and Loading Additional MapSource MapsTo find out the version of the maps that are loaded on your c530, open the Menu page. Touch > Map > Map Info. To enable additional maps, you need your unit ID (see page 17) and serial number (see page vi). Check www.garmin.com/unlock/update .jsp to see if an update for your map software is available. You can also purchase additional MapSource map data from Garmin and load the maps on your c530’s internal memory or on an optional SD card. To load maps to your c530 memory or SD card, select the name for your “Garmin” drive or SD card drive. Refer to the MapSource Help file for more information about using MapSource and loading maps on your c530.
Loading MapSource Waypoints on Your c530Using MapSource, you can save locations (also called waypoints) and transfer them to your c530. For more information about creating waypoints in MapSource, see the Help file (press F1 to open the Help file). After you have created the waypoints, select File > Save. Select GPS eXchange Format (*.gpx) for the Save as Type. Click the Save button. With your c530 connected to your computer, copy the *.gpx file into the Garmin\gpx folder in the “Garmin” drive. The waypoints you created in MapSource are now in Where to? > Favorites.
c530 Owner’s Manual 25
APPENDIX
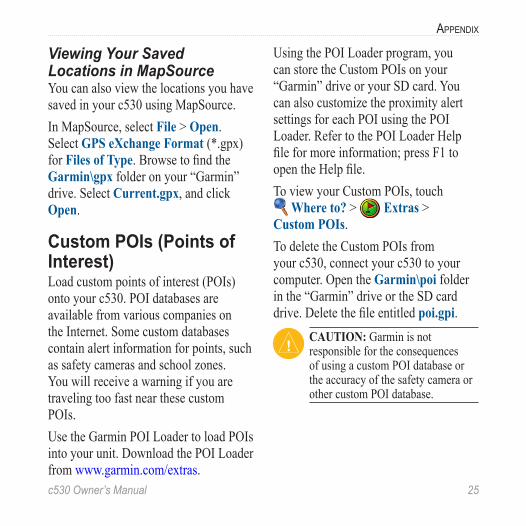
Viewing Your Saved Locations in MapSourceYou can also view the locations you have saved in your c530 using MapSource.In MapSource, select File > Open. Select GPS eXchange Format (*.gpx) for Files of Type. Browse to find the Garmin\gpx folder on your “Garmin” drive. Select Current.gpx, and click Open.
Custom POIs (Points of Interest)Load custom points of interest (POIs) onto your c530. POI databases are available from various companies on the Internet. Some custom databases contain alert information for points, such as safety cameras and school zones. You will receive a warning if you are traveling too fast near these custom POIs.Use the Garmin POI Loader to load POIs into your unit. Download the POI Loader from www.garmin.com/extras.
Using the POI Loader program, you can store the Custom POIs on your “Garmin” drive or your SD card. You can also customize the proximity alert settings for each POI using the POI Loader. Refer to the POI Loader Help file for more information; press F1 to open the Help file. To view your Custom POIs, touch
Where to? > Extras > Custom POIs. To delete the Custom POIs from your c530, connect your c530 to your computer. Open the Garmin\poi folder in the “Garmin” drive or the SD card drive. Delete the file entitled poi.gpi.
CAUTION: Garmin is not responsible for the consequences of using a custom POI database or the accuracy of the safety camera or other custom POI database.
26 c530 Owner’s Manual
APPENDIX
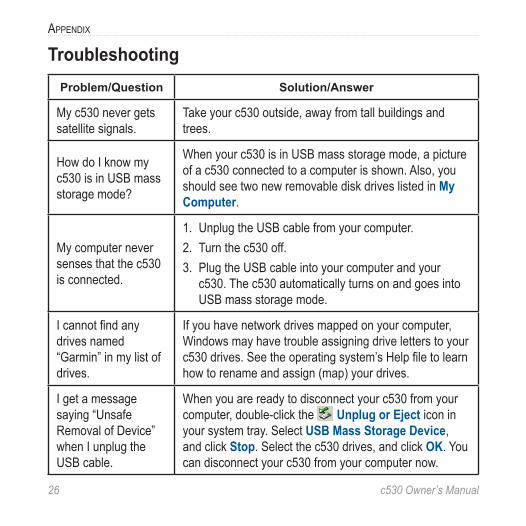
TroubleshootingProblem/Question Solution/Answer
My c530 never gets satellite signals.
Take your c530 outside, away from tall buildings and trees.
How do I know my c530 is in USB mass storage mode?
When your c530 is in USB mass storage mode, a picture of a c530 connected to a computer is shown. Also, you should see two new removable disk drives listed in My Computer.
My computer never senses that the c530 is connected.
1. Unplug the USB cable from your computer. 2. Turn the c530 off. 3. Plug the USB cable into your computer and your
c530. The c530 automatically turns on and goes into USB mass storage mode.
I cannot find any drives named “Garmin” in my list of drives.
If you have network drives mapped on your computer, Windows may have trouble assigning drive letters to your c530 drives. See the operating system’s Help file to learn how to rename and assign (map) your drives.
I get a message saying “Unsafe Removal of Device” when I unplug the USB cable.
When you are ready to disconnect your c530 from your computer, double-click the Unplug or Eject icon in your system tray. Select USB Mass Storage Device, and click Stop. Select the c530 drives, and click OK. You can disconnect your c530 from your computer now.

c530 Owner’s Manual 27
APPENDIX
Technical SpecificationsPhysical size: 4.4” W x 3.2” H x 2.2” D (11.2 x 8.2 x 5.6 cm)Weight: .59 pounds (269 g)Display: Automotive-grade, sunlight-readable, anti-glare TFT LCD display; 2.8” W x 2.1” H (7.2 cm x 5.4 cm); 320 x 240 pixels; touch screenCase: Not waterproofTemperature range: 32°F to 140°F (0°C to 60°C)Data storage: Internal memory and optional removable SD card. Data stored indefinitely.Computer interface: USB mass storage, plug-and-playCharge time: Approximately 4 hoursPower input: 12/24 VDCUsage: 15 W max. @ 13.8 VDCBattery life: up to 8 hours depending on usage
CAUTION: The c530 is not waterproof.
GPS Performance SpecificationsReceiver: WAAS enabledAcquisition times*: Warm: <1 sec Cold: <38 sec Factory Reset: <45 sec*On average for a stationary receiver with a clear view of the skyUpdate rate: 1/sec, continuousGPS accuracy:Position: <10 meters, typicalVelocity: 0.05 meter/sec RMSGPS (WAAS) accuracy:Position: <5 meters, typicalVelocity: 0.05 meter/sec RMSFor a complete list of specifications, see www.garmin.com/products/sp530/spec.html.

28 c530 Owner’s Manual
APPENDIX
FCC ComplianceThe unit complies with Part 15 of the FCC interference limits for Class B digital devices FOR HOME OR OFFICE USE. These limits are designed to provide more reasonable protection against harmful interference in a residential installation, and are more stringent than “outdoor” requirements.Operation of this device is subject to the following conditions: (1) This device may not cause harmful interference, and (2) this device must accept any interference received, including interference that may cause undesired operation.This equipment generates, uses, and can radiate radio frequency energy and, if not installed and used in accordance with the instructions, may cause harmful interference to radio communications. However, there is no guarantee that interference will not occur in a particular installation. If this equipment does cause harmful interference to radio or television reception, which can be determined by turning the equipment off and on, you are encouraged to try to correct the interference by one of the following measures:• Reorient or relocate the receiving antenna.• Increase the separation between the
equipment and the receiver.• Connect the equipment into an outlet on
a circuit different from that to which the receiver is connected.
• Consult an experienced radio/TV technician for help.
NOTE: The Garmin c530 has no user-serviceable parts. Repairs should only be made by an authorized Garmin service center.
NOTE: Unauthorized repairs or modifications could result in permanent damage to the equipment and void your warranty and your authority to operated this device under Part 15 regulations.
NOTE: The c530 is fastened shut with screws. Any attempt to open the case to change or modify the unit in any way voids your warranty and may result in permanent damage to the equipment.
Declaration of ConformityHereby, Garmin declares that this StreetPilot c-series product is in compliance with the essential requirements and other relevant provisions of Directive 1999/5/EC. To view the full Declaration of Conformity, see the Garmin Web site for your Garmin product: www.garmin.com/products/sp530. Click Manuals, and then select the Declaration of Conformity.

INDEX
c530 Owner’s Manual 29
INDEXSymbols2-D, 3-D map view 16AAbout button 17acquiring satellites 3aligning the touch screen 22antenna, external 22anti-theft feature 6, 17attention tone 19audio version 17avoiding road types 18avoiding traffic 19Bbattery 23better route 6brightness 6browsing the map 11, 25Ccalibrating the touch screen 22caring for your c530 21charging 22clearing user data 19computer connection 14configuring 3contact Garmin vicurrent location, saving 10customizing 16–19Custom POIs 25Ddaylight saving 18Declaration of Conformity 28
deletingall user data 19character 9custom POIs 25Favorites 10files 15recent finds list 9
detail maps 16diacritical characters 9disconnecting the USB cable 26driving directions 13Eediting saved places 10EGNOS 17ejecting the USB 15enabling detailed maps 16expanding your search 11external antenna 22Extras 25FFavorites 10FCC compliance 28files
deleting 15managing 14supported types 15transferring 14–15
finding placesby name 8by postal code 7intersection 7item on the map 11near another location 11
recent selections 9saved places (Favorites) 10
fuse, changing 22GGarmin Lock™ 6, 17, 22Go! page options 7going home 8–11GPS 23Hhome location 8Kkeyboard 9kilometers 18Llicense agreement viloading additional maps 24locked up, c530 is 20locking your c530 6Mmain menu page 3managing files 14–15map
browse 11customise 16moving 11software version 16update maps 23view 16zoom 11
MapSource 24MapSource waypoints 24Map Info button 16
INDEX
30 c530 Owner’s Manual
menu page 3miles 18mounting 2, 20Nnavigation settings 18Near button 11Next Turn page 13Oon-screen keyboard 9PPOIs, custom 25position icon 12–13, 16postal code 7proximity alarms 17Rrecently found locations 9
deleting 9finding 9
registering 22, 23remote antenna 22removable disk drive 15removing the mount 2resetting
the max speed 13the trip data 13
restoring settings 19routing preferences 18Ssafety camera database 25Safe Mode 17satellite signals 22
savingplaces you find 7, 10your current location 10, 11
school zone database 25SD card 14, 27security location 6serial number visettings, adjusting 16–19setting your location 7, 11show map 7software license agreement visoftware version 17special characters 9specifications 27spelling the name of a place 8stopping the USB 15storing your c530 21supported file types 14system settings 17Ttechnical specifications 27text language 18time zone 18touch screen
calibrating 22cleaning 21
Track Up 16traffic
avoid 19transferring files 14–15Trip Information page 13troubleshooting 26turn-by-turn directions 13
Uunit ID 17unit locked up 20updating software 23USB 1, 15
mass storage mode 14–15troubleshooting 26
Vvehicle icon 12–13, 16vehicle type 18voice language 18volume 6WWAAS 17warranty 31WebUpdater 23Zzoom 11
Limited WarrantyThis Garmin product is warranted to be free from defects in materials or workmanship for one year from the date of purchase. Within this period, Garmin will at its sole option repair or replace any components that fail in normal use. Such repairs or replacement will be made at no charge to the customer for parts or labor, provided that the customer shall be responsible for any transportation cost. This warranty does not cover failures due to abuse, misuse, accident, or unauthorized alteration or repairs.THE WARRANTIES AND REMEDIES CONTAINED HEREIN ARE EXCLUSIVE AND IN LIEU OF ALL OTHER WARRANTIES EXPRESS OR IMPLIED OR STATUTORY, INCLUDING ANY LIABILITY ARISING UNDER ANY WARRANTY OF MERCHANTABILITY OR FITNESS FOR A PARTICULAR PURPOSE, STATUTORY OR OTHERWISE. THIS WARRANTY GIVES YOU SPECIFIC LEGAL RIGHTS, WHICH MAY VARY FROM STATE TO STATE.IN NO EVENT SHALL GARMIN BE LIABLE FOR ANY INCIDENTAL, SPECIAL, INDIRECT, OR CONSEQUENTIAL DAMAGES, WHETHER RESULTING FROM THE USE, MISUSE, OR INABILITY TO USE THIS PRODUCT OR FROM DEFECTS IN THE PRODUCT. Some states do not allow the exclusion of incidental or consequential damages, so the above limitations may not apply to you.Garmin retains the exclusive right to repair or replace the unit or software or offer a full refund of the purchase price at its sole discretion. SUCH REMEDY
SHALL BE YOUR SOLE AND EXCLUSIVE REMEDY FOR ANY BREACH OF WARRANTY.To obtain warranty service, contact your local Garmin authorized dealer or call Garmin Product Support for shipping instructions and an RMA tracking number. The unit should be securely packed with the tracking number clearly written on the outside of the package. The unit should then be sent, freight charges prepaid, to any Garmin warranty service station. A copy of the original sales receipt is required as the proof of purchase for warranty repairs.Garmin International, Inc. Tel. 913/397.8200 Fax. 913/397.8282Garmin (Europe) Ltd. Tel. 44/0870.8501241 Fax 44/0870.8501251 Online Auction Purchases: Products sold through online auctions are not eligible for rebates or other special offers from Garmin. Online auction confirmations are not accepted for warranty verification. To obtain warranty service, an original or copy of the sales receipt from the original retailer is required. Garmin will not replace missing components from any package purchased through an online auction.International Purchases: A separate warranty is provided by international distributors for units purchased outside the United States. This warranty is provided by the local in-country distributor and this distributor provides local service for your unit. Distributor warranties are only valid in the area of intended distribution. Units purchased in the United States or Canada must be returned to the Garmin service center in the United Kingdom, the United States, Canada, or Taiwan for service.
For the latest free software updates (excluding map data) throughout the life of your Garmin products, visit the Garmin
Web site at www.garmin.com.
© 2006 Garmin Ltd. or its subsidiariesGarmin International, Inc.
1200 East 151st Street, Olathe, Kansas 66062, U.S.A.Garmin (Europe) Ltd.
Unit 5, The Quadrangle, Abbey Park Industrial Estate, Romsey, SO51 9DL, U.K.Garmin Corporation
No. 68, Jangshu 2nd Road, Shijr, Taipei County, Taiwanwww.garmin.com
Part Number 190-00688-00 Rev. A