Street Fighter Anniversary Edition Operator Manual -...
22
Street Fighter Anniversary Edition Operator Manual 040-SFOPERA-UCT Rev. A Version 2.00.11 www.globalvr.com http://service.globalvr.com [email protected] [email protected] Phone: 408.597.3435 Fax: 408.597.3431 © 2006 Global VR, Inc. All rights reserved. UltraCade, USBlinx, GLOBAL VR, and the GLOBAL VR logo are trademarks or registered trademarks of Global VR, Inc. Street Fighter is a registered trademark of Capcom U.S.A., Inc. All other trademarks are the property of their respective owners. Read this manual before use. Keep this manual with the machine at all times.
Transcript of Street Fighter Anniversary Edition Operator Manual -...

Street Fighter Anniversary Edition Operator Manual
040-SFOPERA-UCT Rev. A Version 2.00.11
www.globalvr.com http://service.globalvr.com [email protected] [email protected] Phone: 408.597.3435 Fax: 408.597.3431
© 2006 Global VR, Inc. All rights reserved. UltraCade, USBlinx, GLOBAL VR, and the GLOBAL VR logo are trademarks or registered trademarks of Global VR, Inc. Street Fighter is a registered trademark of Capcom U.S.A., Inc. All other trademarks are the property of their respective owners.
Read this manual before use. Keep this manual with the machine at all times.

Preface
Street Fighter Anniversary Edition Operator Manual Page 2 of 22 040-SFOPERA-UCT Rev. A 6/20/2006
Table of Contents
Preface.................................................................3 Safety..................................................................3
Warnings .........................................................4 Environmental Conditions ..............................4
FCC Notices (United States) ..............................4 Chapter 1 — Game Setup..................................5
1.1 Game Features.............................................5 1.2 Game Installation ........................................5
Chapter 2 — Operator Menu.............................6 2.1 Using the Operator Menus ..........................6 2.2 Operator Main Menu...................................7 2.3 Cabinet Setup ..............................................8
2.3.1 Sound Settings ......................................8 2.3.2 Credit/Coin Settings..............................9 2.3.3 Location Entry ....................................10 2.3.4 Timers Settings....................................11 2.3.5 Delete High Scores .............................11 2.3.6 Ad Loop ..............................................12 2.3.7 Reset Factory Defaults ........................12
2.4 Intelli-Tune™............................................12 2.5 Accounting Information ............................13
2.5.1 Sort Reports By...................................13 2.5.2 View Earnings Report .........................14 2.5.3 View Time Report ...............................14 2.5.4 DIP Switch Settings ............................15 2.5.5 Reset Report Data ...............................15
2.6 Diagnostics................................................16 2.6.1 Control Test.........................................16 2.6.2 JAMMA Test.......................................17 2.6.3 Sound Test...........................................18 2.6.4 Video Test ...........................................18
Appendix A — Wiring Schematic .....................19 Appendix B — License and Copyright
Information ......................................................20 Joshua Operating System .................................20
Appendix C — Warranty Information...............20 Warranty Service...........................................20
Technical Support................................................21
List of Figures
Figure 1. Operator Menu .......................................7 Figure 2. Cabinet Setup .........................................8 Figure 3. Sound Settings........................................8 Figure 4. Credit/Coin Settings...............................9 Figure 5. Location Entry Screen..........................10 Figure 6. Timers Menu ........................................11 Figure 7. Exit Menu Position...............................11 Figure 8. Intelli-Tune™ Settings.........................12 Figure 9. Accounting Information .......................13
Figure 10. Earnings Report and Time Report Screens.......................................................14
Figure 11. DIP Switch Settings ...........................15 Figure 12. Diagnostics.........................................16 Figure 13. Control Test Screen ............................16 Figure 14. JAMMA Test Screen ..........................17 Figure 15. Sound Test..........................................18 Figure 16. Video Test...........................................18

Preface
©2006 GLOBAL VR® 040-SFOPERA-UCT Rev. A 3/20/2006 Page 3 of 22
Preface
Safety Please read this page before preparing your arcade cabinet for game play.
The following safety instructions apply to all game operators and service personnel. Specific warnings and cautions will be included throughout this manual. Use the following safety guidelines to help protect the system from potential damage and to ensure your personal safety:
• Make sure that the switch on the back of the computer is set to match the AC power in use at your location:
− 115 volts / 60Hz in most of North and South America and some Far Eastern countries such as Japan, South Korea and Taiwan
− 230 volts / 50Hz in most of Europe, the Middle East and the Far East • To help prevent electric shock, plug the system into a properly grounded power source. These cables are equipped
with 3-prong plugs to help ensure proper grounding. Do not use adapter plugs or remove the grounding prong from a cable. If you must use an extension cable, use a 3-wire cable with properly grounded plugs.
• To help protect your system from sudden increases and decreases in electrical power, use a surge suppressor, line conditioner or Uninterruptible Power Supply (UPS).
• Be sure nothing rests on the system's cables and that the cables are not located where they can be stepped on or tripped over.
• Keep your system far away from radiators and other heat sources. • Do not block cooling vents.
Precautions for Game Operation
• The avoid injury and accidents, people who fall under the following categories should not play the game: − Those who need assistance when walking. − Those who have high blood pressure or a heart problem. − Those who have experienced muscle convulsions or loss of consciousness when playing a video game or similar
activities. − Those who have trouble in the neck or spinal cord. − Intoxicated persons. − Pregnant women. − Persons susceptible to motion sickness. − Persons who do not abide by the warning labels on the game.
• A player who has never been adversely affected by light stimulus might experience dizziness or headache when playing the game. Small children can be especially susceptible to these conditions. Caution guardians of small children to keep watch over their children during play.
• Instruct those who feel sick during play to see a doctor. • To avoid injury from falling objects, and electric shock due to spilled drinks, instruct players not to place heavy
items, food, or drinks on the product. • To avoid electric shock or short circuit, do not allow customers to put hands and fingers or extraneous matter in the
openings of the product. • To avoid risk of injury from falling, immediately stop customers from leaning against or climbing on the product.

Preface
Street Fighter Anniversary Edition Operator Manual Page 4 of 22 040-SFOPERA-UCT Rev. A 6/20/2006
Warnings
To avoid electrical shock, unplug the cabinet before performing installation or service procedures.
GLOBAL VR® assumes no liability for any damages or injuries incurred while setting up or servicing the cabinet. Only qualified service personnel should perform installation or service procedures!
Environmental Conditions Cabinet is intended for indoor use only. Be sure to keep the cabinet dry and maintain operating temperatures of 10°-40°C (50°-104°F).
FCC Notices (United States) Electromagnetic Interference (EMI) is any signal or emission radiated in free space or conducted along power or signal leads, that endangers the functioning of radio navigation or other safety service, or that seriously degrades, obstructs, or repeatedly interrupts a licensed radio communications service. Radio communications services include, but are not limited to, AM/FM commercial broadcast, television, cellular services, radar, air-traffic control, pager, and Personal Communication Services (PCS). These licensed services, along with unintentional radiators such as digital devices (including computer systems) contribute to the electromagnetic environment. Electromagnetic Compatibility (EMC) is the ability of items of electronic equipment to function properly together in the electronic environment. While this computer system has been designed and determined to be compliant with regulatory agency limits for EMI, there is no guarantee that interference will not occur in a particular installation. If this equipment does cause interference with radio communications services, which can be determined by turning the equipment off and on, you are encouraged to try to correct the interference by one or more of the following measures: • Re-orient the receiving antenna. • Relocate the cabinet relative to the receiver. • Plug the game into a different outlet so that the computer and the receiver are on different branch circuits. If necessary, consult a Regulatory EMC representative of GLOBAL VR® or an experienced radio/television technician for additional suggestions. You may find the FCC Interference Handbook, to be helpful. It is available from the U.S. Government Print Office, Washington, DC 20402. This device has been tested and complies with the limits for a Class A digital device pursuant to Part 15 of the FCC Rules. These limits are designed to provide reasonable protection against harmful interference when the equipment is operated in a commercial environment. This equipment generates, uses, and can radiate radio frequency energy. If not installed and used in accordance with the instruction manual, it may cause harmful interference with radio communications. Operation of this equipment in a residential area is likely to cause harmful interference, in which case you will be required to correct the interference at your own expense. Operation is subject to the following conditions: • This device may not cause harmful interference. • This device must accept any interference received, including interference that may cause undesired operation.

Chapter 1 — Game Setup
©2006 GLOBAL VR® 040-SFOPERA-UCT Rev. A 3/20/2006 Page 5 of 22
Chapter 1 — Game Setup
1.1 Game Features Congratulations on choosing Street Fighter Anniversary Edition (SFAE). Street Fighter Anniversary Edition provides the following benefits to operators: • Consistent earnings from proven, licensed games • Low purchase price • GLOBAL VR® reliability • Easy-to-use operator interface • Game instructions displayed automatically as the player selects a game
1.2 Game Installation 1. Be aware of the following precautions when setting up the game:
• Avoid rough handling of the game; the picture tube is fragile. • Install the game on a level surface. • Avoid installing the game where it will receive excessive sunlight or heat, to protect
the game from rising internal temperatures. • Do not install in a damp or dusty location.
2. Visually inspect the game to make sure it is in good condition. Please verify the following before turning the game on: • Inspect the cabinet exterior for any shipping damage, chips, dents, or broken parts. • Open the rear service door and check for any interior damage. • Check all major assemblies to assure they are mounted securely. • Make sure there is no damage to the wiring, and that all wires are properly connected. • Open control panel and inspect the computer system. • Check for loose foreign objects, especially metal objects that could cause electrical
problems. • Open the coin door and check the Service button to make sure it is not damaged.
3. Power on the cabinet and verify proper operation.
4. After you power the cabinet ON, the picture on the monitor may be temporarily distorted; this is caused by the change in the earth's magnetic field as you move the cabinet from one location to another. You can fix this problem by using the degaussing feature built into the monitor. If the monitor does not have a degaussing feature, you can use a degaussing coil to restore the color variations on your monitor. Refer to the video monitor manual for the manufacturer’s recommendations for adjusting the monitor.
5. Press the Service button to set up the game in the Operator Menu (refer to Chapter 2 for detailed information).
Chapter 2 — Operator Menu
Street Fighter Anniversary Edition Operator Manual Page 6 of 22 040-SFOPERA-UCT Rev. A 6/20/2006
Chapter 2 — Operator Menu
2.1 Using the Operator Menus All Street Fighter Anniversary Edition (SFAE) game audits, adjustments, and diagnostics are accessed through the operator menu.
Press the Service button behind the coin mech door, as shown in the figure below, to display the Operator Menu on the monitor.
Once in the Operator Menu, use the Player-1 joystick to move through the menu screens, and Player-1 Button-1 to select the menu items. Use the EXIT button on the control panel at any time to exit from a menu screen or to exit from the Operator menu.
The picture and steps below show an example of how to change a setting in the Operator Menu:
1. Press the Service button to enter the Operator Menu.
2. Use the Player-1 joystick to move the selection arrow up and down through the list of menus. Press Player-1 Button-1 to select a menu, as shown in part 1 and 2 in the picture above.
3. An adjustable game setting shows up in the operator menu as yellow text. Place the arrow next to the game setting and use the Player-1 joystick to scroll left or right to see the available options for the game setting, as shown by the arrows in part 3 and 4 in the picture above.
4. When you have the correct setting for the game option, use the Player-1 joystick to move up or down to another game setting. You do not need to press a button to confirm the change for the game option. Some menu items, when selected, will open another sub-menu with additional options.
5. When you finish changing settings, press the EXIT button to exit back to the attract mode.

Chapter 2 — Operator Menu
©2006 GLOBAL VR® 040-SFOPERA-UCT Rev. A 3/20/2006 Page 7 of 22
2.2 Operator Main Menu
Figure 1. Operator Menu
The Operator Main Menu is the default menu shown when you press the Service button. Each item listed here, except Language, opens a sub-menu with configuration settings.
• Language – This option defines what language the software will use for the Operator Menus. Use the Player-1 joystick to scroll left and right to choose a language. The options are English, French, German, Italian, Spanish, and Dutch.
• Cabinet Setup – Enter this sub-menu to adjust the Sound, Credit/Coin, Tournament, and Timer settings, or to delete high scores or restore the factory default settings. (See page 8.)
• Intelli-Tune – Enter this sub-menu to change how the cabinet automatically adjusts the difficulty settings so that the length of a game suits the operator's needs. (See page 12.)
• Accounting Information – Enter this sub-menu to view earnings reports, and adjust how the accounting information is sorted in the report. (See page 13.)
• Diagnostics – Enter this sub-menu to troubleshoot and test the Display, Sound, Player Controls, and JAMMA hardware on your cabinet. (See page 16.)

Chapter 2 — Operator Menu
Street Fighter Anniversary Edition Operator Manual Page 8 of 22 040-SFOPERA-UCT Rev. A 6/20/2006
2.3 Cabinet Setup The Cabinet Setup menu lets you adjust settings for the cabinet hardware devices. The subsections below provide detailed descriptions of each menu item.
Figure 2. Cabinet Setup
2.3.1 Sound Settings
This Sound Settings menu allows you to set the Sound Volume level between 1 and 10, turn the Attract Mode Volume On or Off. When the sound level is set to 0, you should hear no sound from the speakers. The Attract Mode volume plays at the same level as the Sound Volume. (See section 2.6.3 Sound Test on page 18 for help diagnosing sound problems.)
Figure 3. Sound Settings
Chapter 2 — Operator Menu
©2006 GLOBAL VR® 040-SFOPERA-UCT Rev. A 3/20/2006 Page 9 of 22
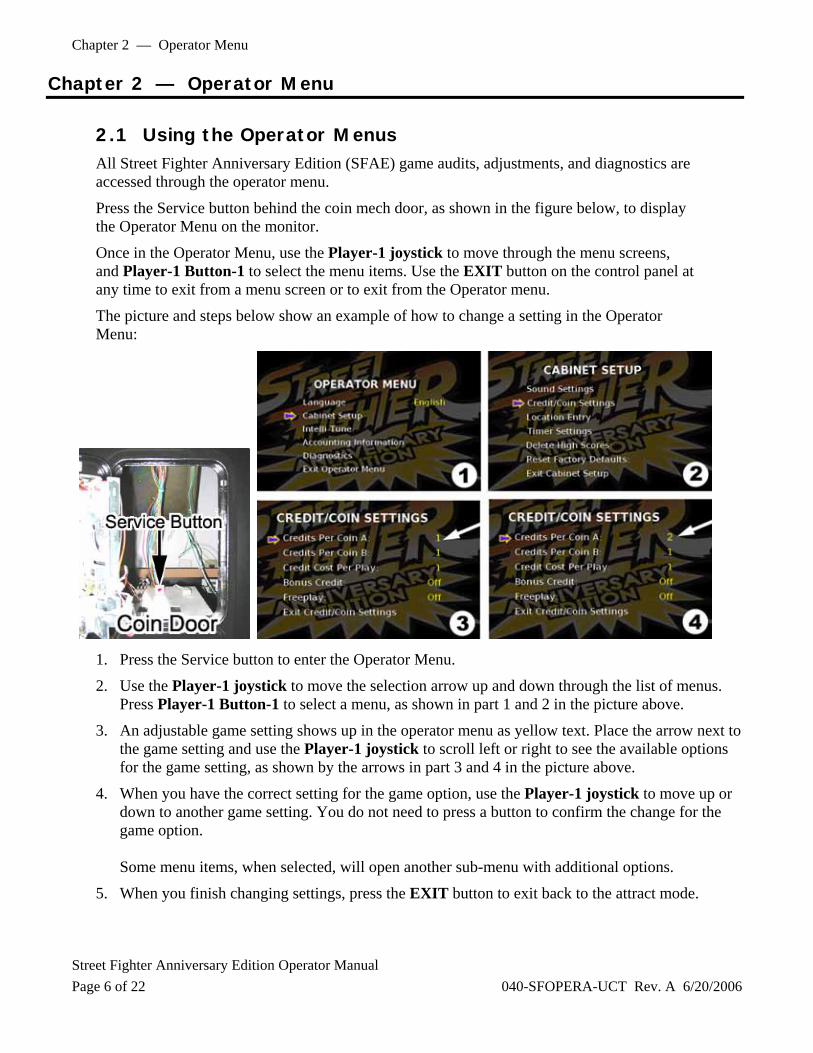
2.3.2 Credit/Coin Settings
The credit/coin settings are used to set the cost to play a game and control freeplay and the bonus credit.
Figure 4. Credit/Coin Settings
• Credits Per Coin A, and B - sets how many credits are given for each coin drop. Coin Drop A and Coin Drop B can be set to the same value, or independently.
• Credit Cost Per Play - defines how many credits are needed to start a single player game, the default setting is 1.
• Bonus Credit - gives an extra Bonus Credit if the player inputs 4 credits at one time. • Freeplay - allows players to play the cabinet for free.
Chapter 2 — Operator Menu
Street Fighter Anniversary Edition Operator Manual Page 10 of 22 040-SFOPERA-UCT Rev. A 6/20/2006
2.3.3 Location Entry
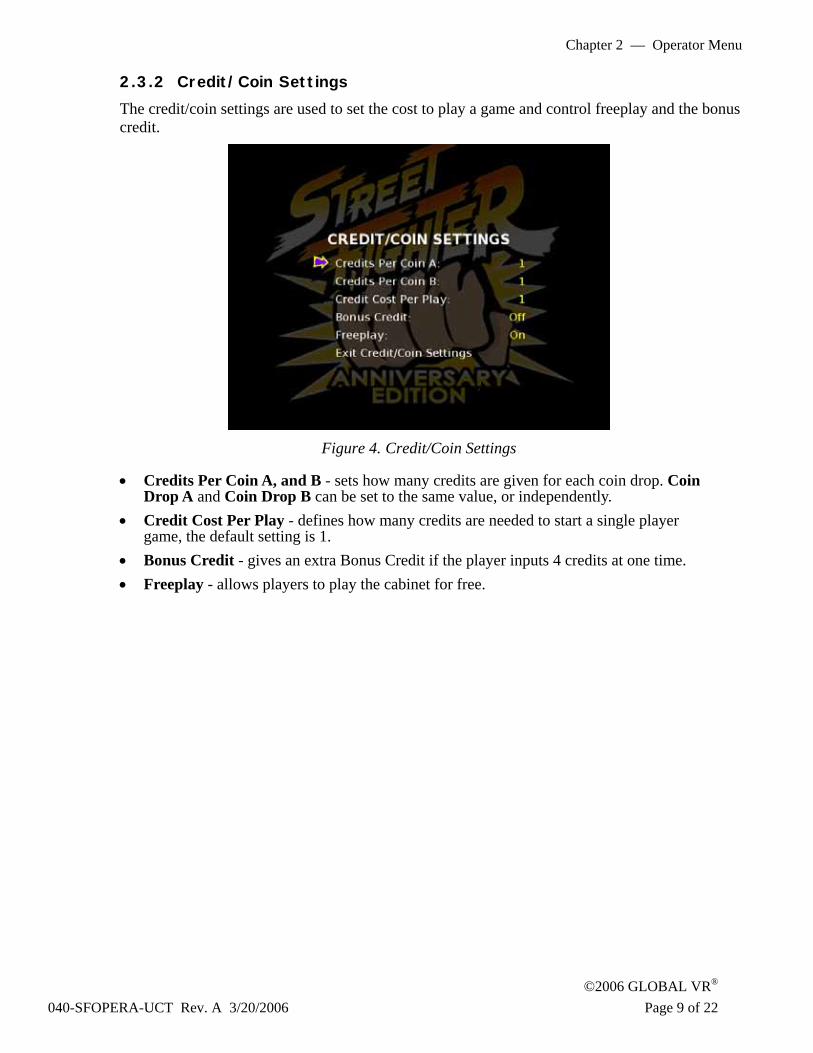
This screen allows the operator to name individual cabinets for the purpose of accounting identification. Perform the following steps to name your cabinet:
1. “Del” (delete) on the screen, and press Player-1 Button-1. This will erase the current name ("Factory" is the default).
2. Use the Player-1 Joystick to highlight each desired letter or number, and press Player-1 Button-1 to make the selection. If you make a mistake, highlight "Clr" and press Player-1 Button-1.
3. When you finish, highlight “Use” and press Player-1 Button-1 to make the name change official.
Figure 5. Location Entry Screen

Chapter 2 — Operator Menu
©2006 GLOBAL VR® 040-SFOPERA-UCT Rev. A 3/20/2006 Page 11 of 22
2.3.4 Timers Settings
The Timer Settings menu is used to set the amount of time the system will stay in a single game or on the Exit menu screen without any input from the player controls.
Figure 6. Timers Menu
Exit Menu After No Input – defines how long the software will wait before showing the Exit Menu screen if there is no input from a player during a game.
Exit Menu Default Position - defines whether the arrow is on YES or NO in the Exit Menu displayed when a player exits from a game. (The Exit Menu lets players select NO to return to the game, or YES to exit to the default attract mode.)
Figure 7. Exit Menu Position
2.3.5 Delete High Scores
Selecting this option from the cabinet setup menu will reset all games high scores to their factory defaults. When this action has been successfully completed, “Done” will appear on the screen to the right of the menu item

Chapter 2 — Operator Menu
Street Fighter Anniversary Edition Operator Manual Page 12 of 22 040-SFOPERA-UCT Rev. A 6/20/2006
2.3.6 Ad Loop
Selecting this option toggles the Ad Loop On or Off. If set to On, the ad loop runs during the Attract Mode.
2.3.7 Reset Factory Defaults
Selecting this option from the cabinet setup menu will reset all operator settings to their factory defaults. When this action has been successfully completed, “Done” will appear on the screen to the right of the menu item
2.4 Intelli-Tune™ Intelli-Tune allows the operator to set an average min and max play time for all the games installed on the cabinet. Intelli-Tune will then automatically adjust the difficulty of game play for each game title so that a player’s average play time meets the operator’s desired settings. Intelli-Tune works so that no game is too difficult for a beginning player to learn, or easy enough for an experienced player to be able to play through the entire game.
Figure 8. Intelli-Tune™ Settings
• Intelli-Tune Status - Use this setting to turn Intelli-Tune ON or OFF • Min Time/Credit – This defines the minimum amount of play time a player should
receive per credit played. Intelli-Tune then adjusts the game play difficulty so that each player should receive at least the set amount of game play time.
• Max Time/Credit – This defines the maximum amount of play time a player should receive per credit. Intelli-Tune then adjusts the game play difficulty so that each player should receive no more than the set amount of game play time.
• Update Cycle (plays) – This defines how many played games Intelli-Tune will average before adjusting the game difficulty. The shorter the cycle, the more often the game difficulty is adjusted.

Chapter 2 — Operator Menu
©2006 GLOBAL VR® 040-SFOPERA-UCT Rev. A 3/20/2006 Page 13 of 22
2.5 Accounting Information The Accounting Information menu allows you to access current and lifetime coin totals for each game installed on your system..
Figure 9. Accounting Information
2.5.1 Sort Reports By
You can select from several options for listing the games on the earnings and time reports. Highlight Sort Reports By and move the Player-1 joystick left or right to cycle through the options shown below: • Name - sort by name • $Curr - sort by ascending current coin drop • $Life - sort by ascending lifetime coin drop • FCurr - sort by current ascending freeplays • FLife - sort by lifetime ascending freeplays

Chapter 2 — Operator Menu
Street Fighter Anniversary Edition Operator Manual Page 14 of 22 040-SFOPERA-UCT Rev. A 6/20/2006
2.5.2 View Earnings Report
View Earnings Report displays current and lifetime coin-drop and freeplay records for each game. The last reset date is shown at the top of the current records column. Totals are shown at the bottom of each column. This screen also gives you access to the DIP switch settings menu.
Use the Player-1 joystick to scroll the window up or down if the game list is too long to display on the screen. Moving the joystick up and down will scroll one game at a time, while left and right will scroll one page at a time.
Press Player-1 Button-6 to enter the DIP switch settings menu for the selected game (see section 2.5.4 DIP Switch Settings.)
Figure 10. Earnings Report and Time Report Screens
2.5.3 View Time Report
View Time Report displays the current and lifetime play time for each game. The last reset date is shown at the top of the current records column. The “Average” column shows the average amount of time it takes to play one game, in minutes and seconds. The “Total” column displays the total amount of time that each game has been played, in hours and minutes. This screen also gives you access to the DIP switch settings menu.
Use the Player-1 joystick to scroll the window up or down if the game list is too long to display on the screen. Moving the joystick up and down will scroll one game at a time, while left and right will scroll one page at a time.
Press Player-1 Button-6 to enter the DIP switch settings menu for the selected game (see section 2.5.4 DIP Switch Settings.)
Chapter 2 — Operator Menu
©2006 GLOBAL VR® 040-SFOPERA-UCT Rev. A 3/20/2006 Page 15 of 22
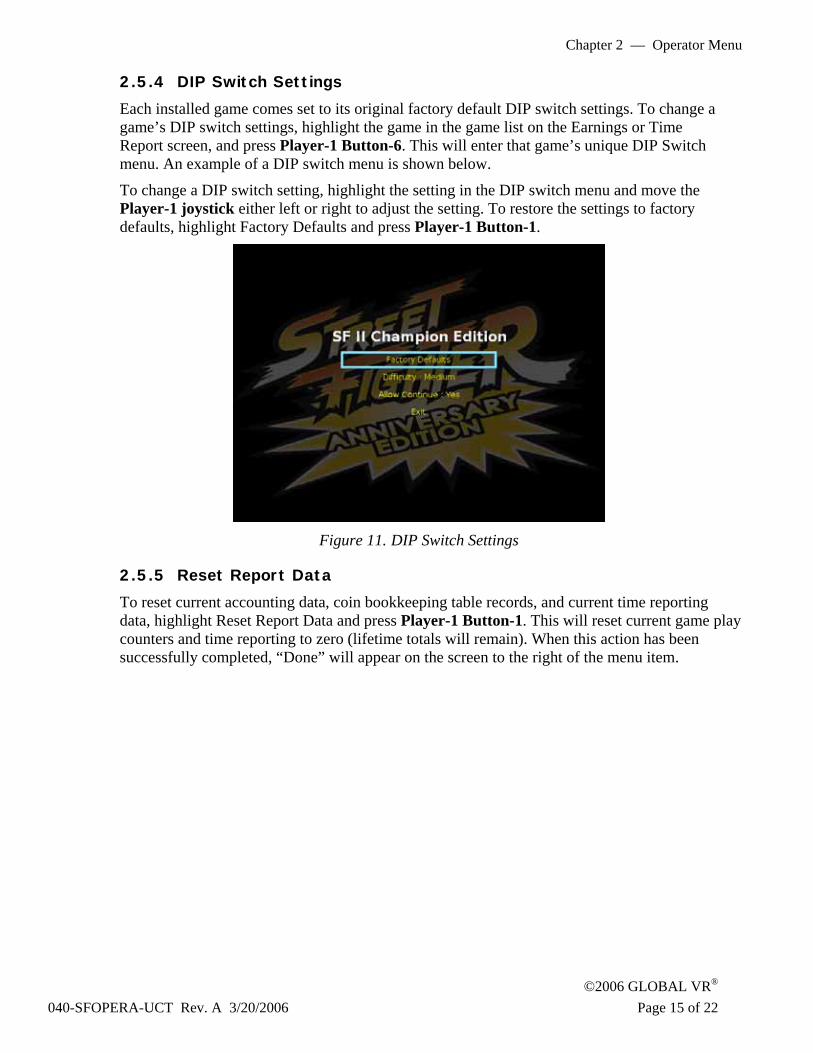
2.5.4 DIP Switch Settings
Each installed game comes set to its original factory default DIP switch settings. To change a game’s DIP switch settings, highlight the game in the game list on the Earnings or Time Report screen, and press Player-1 Button-6. This will enter that game’s unique DIP Switch menu. An example of a DIP switch menu is shown below.
To change a DIP switch setting, highlight the setting in the DIP switch menu and move the Player-1 joystick either left or right to adjust the setting. To restore the settings to factory defaults, highlight Factory Defaults and press Player-1 Button-1.
Figure 11. DIP Switch Settings
2.5.5 Reset Report Data
To reset current accounting data, coin bookkeeping table records, and current time reporting data, highlight Reset Report Data and press Player-1 Button-1. This will reset current game play counters and time reporting to zero (lifetime totals will remain). When this action has been successfully completed, “Done” will appear on the screen to the right of the menu item.
Chapter 2 — Operator Menu
Street Fighter Anniversary Edition Operator Manual Page 16 of 22 040-SFOPERA-UCT Rev. A 6/20/2006
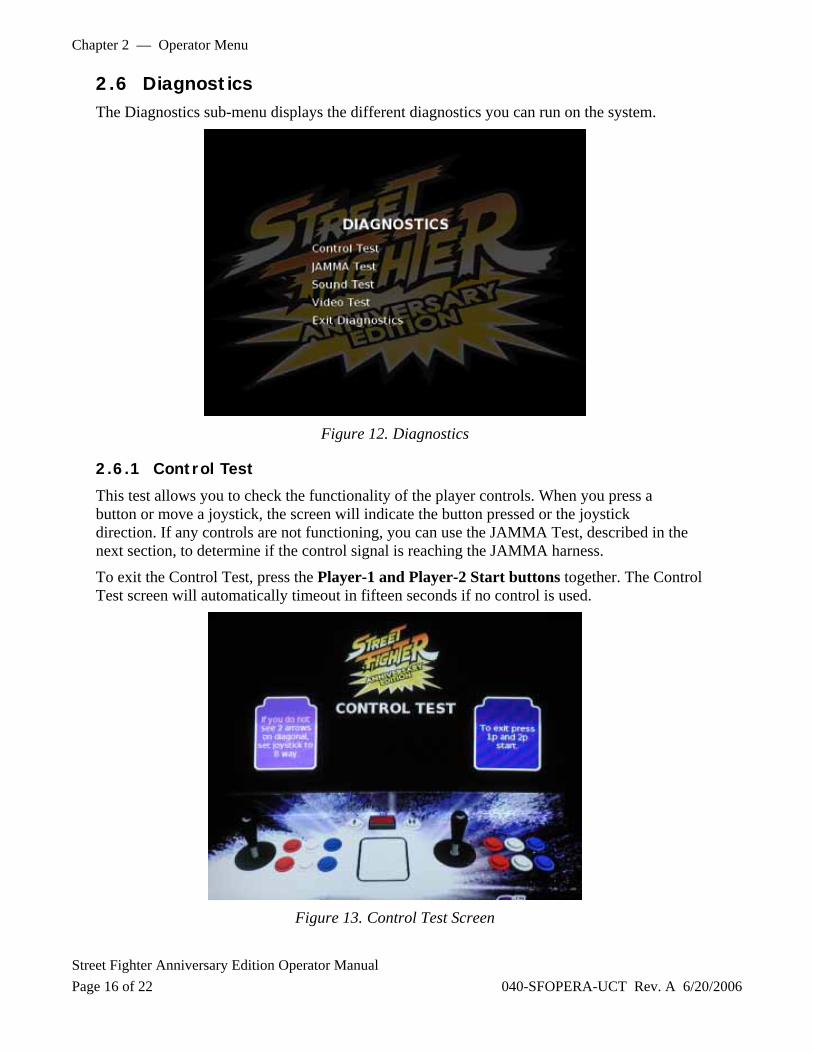
2.6 Diagnostics The Diagnostics sub-menu displays the different diagnostics you can run on the system.
Figure 12. Diagnostics
2.6.1 Control Test
This test allows you to check the functionality of the player controls. When you press a button or move a joystick, the screen will indicate the button pressed or the joystick direction. If any controls are not functioning, you can use the JAMMA Test, described in the next section, to determine if the control signal is reaching the JAMMA harness.
To exit the Control Test, press the Player-1 and Player-2 Start buttons together. The Control Test screen will automatically timeout in fifteen seconds if no control is used.
Figure 13. Control Test Screen

Chapter 2 — Operator Menu
©2006 GLOBAL VR® 040-SFOPERA-UCT Rev. A 3/20/2006 Page 17 of 22
2.6.2 JAMMA Test
The JAMMA Test lets you test the JAMMA connection for the player controls, coin mechs, and Service button. When you operate a control or coin mech, you will see an on-screen indicator next to the JAMMA pin that was activated. This test helps you pinpoint the problem when a device is not working.
To exit the JAMMA Test, press the Player-1 and Player-2 Start buttons together. The JAMMA Test screen will automatically timeout in fifteen seconds if no control is used.
Figure 14. JAMMA Test Screen
Chapter 2 — Operator Menu
Street Fighter Anniversary Edition Operator Manual Page 18 of 22 040-SFOPERA-UCT Rev. A 6/20/2006
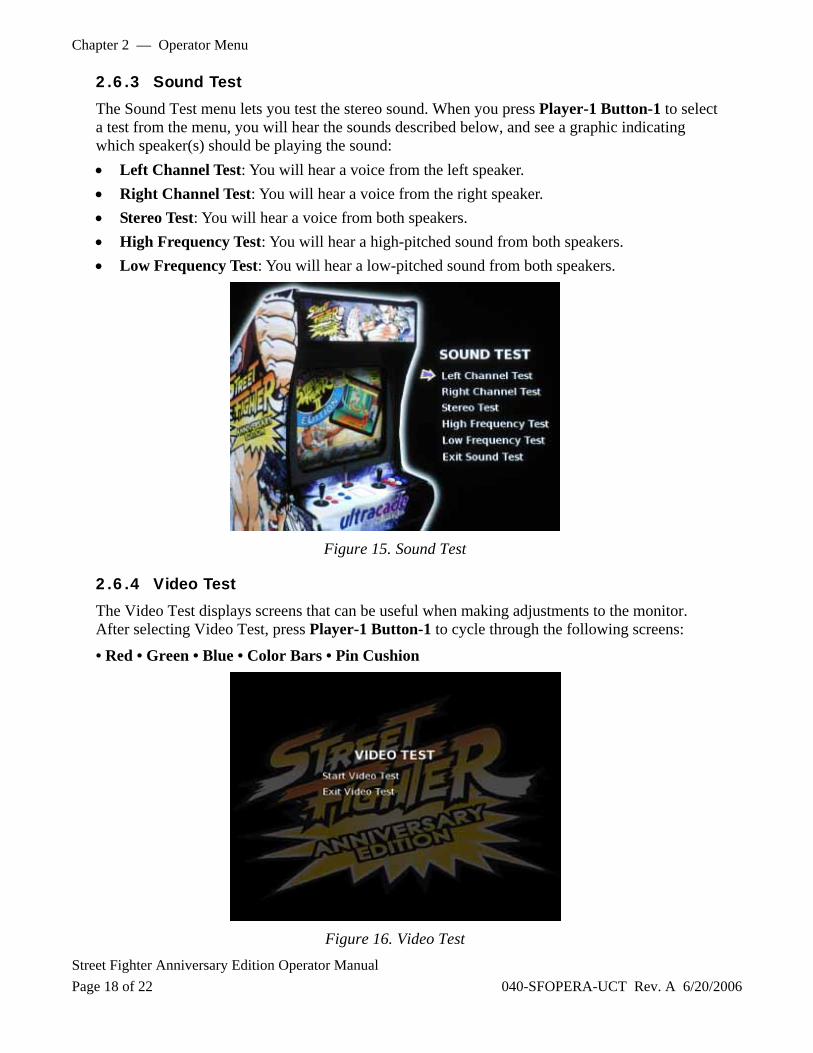
2.6.3 Sound Test
The Sound Test menu lets you test the stereo sound. When you press Player-1 Button-1 to select a test from the menu, you will hear the sounds described below, and see a graphic indicating which speaker(s) should be playing the sound: • Left Channel Test: You will hear a voice from the left speaker. • Right Channel Test: You will hear a voice from the right speaker. • Stereo Test: You will hear a voice from both speakers. • High Frequency Test: You will hear a high-pitched sound from both speakers. • Low Frequency Test: You will hear a low-pitched sound from both speakers.
Figure 15. Sound Test
2.6.4 Video Test
The Video Test displays screens that can be useful when making adjustments to the monitor. After selecting Video Test, press Player-1 Button-1 to cycle through the following screens:
• Red • Green • Blue • Color Bars • Pin Cushion
Figure 16. Video Test


Appendix A — Wiring Schematic
©2006 GLOBAL VR® 040-SFOPERA-UCT Rev. A 3/20/2006 Page 19 of 22
Appendix A — Wiring Schematic
Appendix B — License and Copyright Information
Street Fighter Anniversary Edition Operator Manual Page 20 of 22 040-SFOPERA-UCT Rev. A 6/20/2006
Appendix B — License and Copyright Information
Joshua Operating System The JoshuaOS™ is used under license from Joshua Technology, Inc. Joshua Technology, Inc. retains all rights to the code, trademarks, and copyrights. By accepting and operating a Street Fighter Anniversary Edition system, the owner/operator agrees to abide by all copyrights and trademarks, and not to attempt to decompile or modify the operating system in any way. Questions regarding this operating system should be directed GLOBAL VR® Technical Support. JoshuaOS is © 2001-2002 by Joshua Technology, Inc.
© 2004 Capcom U.S.A. Inc. All Worldwide Rights Reserved.
All rights in and to each game included in this compilation of video games, including all images, animations, video, audio, music, text, and programming contained in each individual game, are owned exclusively by Capcom U.S.A. Inc., and are protected to the full extent of applicable copyright laws.
© 2006 Global VR, Inc. All Worldwide Rights Reserved.
All rights and title in and to the game engine, including all attract mode images, user interface, emulation engine, cabinet design, and hardware systems are owned exclusively by Global VR, Inc., and are protected to the full extent of applicable copyright, trademark, patent, and other laws.
This product may not be reproduced, transmitted, or distributed by any means, for any purpose, without the express written permission of Capcom U.S.A., Inc. and Global VR, Inc.
Appendix C — Warranty Information
The Street Fighter Anniversary Edition cabinet is guaranteed from manufacturing defects. Street Fighter Anniversary Edition parts are guaranteed for 90 days.
Warranty Service
If you require warranty service, contact your distributor. If you purchased direct, contact GLOBAL VR® Technical Support (see the back page of this manual for contact information). If the Technical Support staff determines that your game is defective, a Return Merchandize Authorization (RMA) number will be issued.
Technical Support
©2006 GLOBAL VR® 040-SFOPERA-UCT Rev. A 3/20/2006 Page 21 of 22
Technical Support
Service & Parts
Hours: 7:00AM–5:00PM Pacific Time, Monday–Friday
Phone: 408.597.3435
Fax: 408.597.3437
E-mail: [email protected]
Website: http://service.globalvr.com
Free telephone, e-mail, and online support are provided for systems during the warranty period. GLOBAL VR® Technical Support can help you troubleshoot problems and diagnose defective parts. We can also answer questions about the operation of your game.
When you contact Technical Support, please provide the information listed below, as applicable, to assist the Technical Support representative in solving your problem quickly. For your convenience, space is provided to write important numbers.
• Cabinet Serial Number (as applicable):
• Software Version Number (from Operator Main Menu):
• Serial Number (from Operator Main Menu):
• Proof of Purchase information
• Your mailing address and telephone number
• A summary of the question or a detailed description of the problem
• Specific error message
• Date of latest install or upgrade
• Any changes made to the system
• For game-play issues, the game and number of players
To comment on this manual, please e-mail: [email protected]