PLM Heat Exchanger Install Instructions - Audi B8 B8.5 A4 S4

Street Density Transmission Mount Upgrade, B8/B8.5 Audi A4/S4/RS4, A5/S5/RS5, Q5/SQ5
Supplied Parts:
034Motorsport Street Density B8/B8.5 Audi A4/S4/RS4, A5/S5/RS5, Q5/SQ5 Transmission Mount Upgrade
Tools Needed:
Hands (2) (Opposable thumbs are mandatory!)
Philips Screwdriver
Flathead Screwdriver
T-25 Torx Driver
10mm Triple Square
12mm Triple Square
13mm Hex Socket
Torque Wrench
034Motorsport is proud to offer our Street Density Transmission Mount Upgrade for the B8/B8.5 Audi A4/S4/RS4 and
A5/S5/RS5! Installation of this upgraded mount should take approximately one hour.
This high durometer performance mount upgrade is designed to be a direct, drop-in replacement for the factory
damping medium, and limit unwanted transmission movement. By reducing slop, this upgrade ensures that you're
experiencing crisper shifts and a more connected driving experience. This upgrade may introduce some additional,
perceivable increase in noise and vibration transfer into the cabin, especially on vehicles equipped with the Tiptronic
transmission.
Step 1 – Raise the vehicle securely on jackstands, ramps, or a lift, in order to gain access to transmission mount
assembly. Make sure you have all tools necessary for installation of the Street Density Transmission Mount Upgrade.
Remove the two T25 Torx screws at the rear of the undercarriage tray, or remove the tray completely for more room.
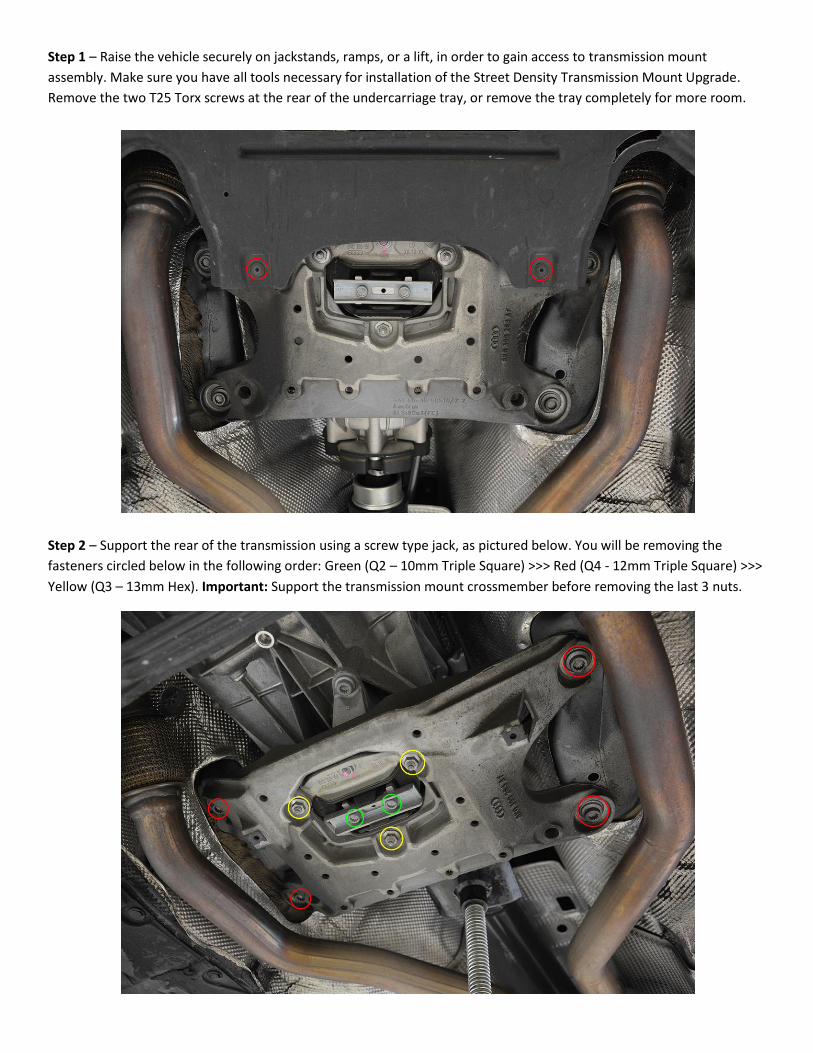
Step 2 – Support the rear of the transmission using a screw type jack, as pictured below. You will be removing the
fasteners circled below in the following order: Green (Q2 – 10mm Triple Square) >>> Red (Q4 - 12mm Triple Square) >>>
Yellow (Q3 – 13mm Hex). Important: Support the transmission mount crossmember before removing the last 3 nuts.

Step 3 – Remove the two 10mm Triple Square bolts securing the transmission mount limiter. Set these parts aside as
they will be reused later.
Step 4 – Remove the four 12mm Triple Square bolts securing the transmission mount assembly carrier/crossmember to
the chassis. Set these parts aside as they will be reused later. Only three nuts are now holding the crossmember in place,
so be sure to support it or hold onto it before moving on to the next step.

Step 5 – While holding or supporting the crossmember, remove the final three 13mm Hex nuts securing it to the
transmission mount assembly. Set these parts aside as they will be reused later.
Step 6 – Reinstall the factory transmission mount assembly carrier/crossmember to gain access to the factory
transmission mount. Set this part aside as it will be reused later.

Step 7 – Locate the factory transmission mount assembly, and remove the three 10mm Triple Square bolts securing it to
the transmission. Set these parts aside as they will be reused later.
Step 8 (Optional) – Take an awesome action shot of you removing one of these bolts, then remove the other two. Post
picture on Instagram using #lookwhaticando and #itwerkoncars before proceeding to the next step.

Step 9 – Remove the 13mm Hex nut securing the transmission mount to the transmission mount bracket. Set this part
aside as it will be reused later.
Step 10 – Separate the transmission mount from the transmission mount bracket.

Step 11 – Remove the 13mm Hex nut securing the transmission mount assembly to the rubber transmission mount that
you are replacing. Set this nut aside as it will be reused later.
Step 12 – Remove the factory rubber mount, and replace with the 034Motorsport Street Density Transmission Mount
Upgrade.

Step 13 – Secure the two parts together using the 13mm Hex nut you removed in Step 11. Torque to 20 Nm.
Step 14 – Reinstall the transmission mount bracket you separated in Step 10 using the 13mm Hex nut you removed in
Step 9. Please pay attention to the orientation of the bracket when reinstalling. Torque to 20 Nm.

Step 15 – Reinstall the transmission mount assembly using the three 10mm Triple Square bolts you removed in Step 7/8.
Torque to 40 Nm.
Step 16 – Reinstall the crossmember you removed in Step 6 by loosely threading on the three 13mm Hex nuts you
removed in Step 5.

Step 17 – Reinstall the four 12mm Triple Square bolts you removed in Step 4. Torque to 70 Nm. Torque the three 13mm
Hex nuts you threaded on in Step 16 to 20 Nm.
Step 18 – Reinstall the securing the transmission mount limiter you removed in Step 3 and torque the two 10mm Triple
Square bolts to 20 Nm. Better yet – replace it with a 034Motorsport B8/B8.5 Audi A4/S4/RS4, A5/S5/RS5, Q5/SQ5
Transmission Mount Insert Upgrade!

Step 19 – Marvel at your work, and remove the jack supporting the transmission.
Step 18 – Reinstall the undercarriage tray if you removed it, or just reinstall the two T25 Torx screws if you left it in
place. You’re all done! Enjoy further reduced drivetrain slop and improved launches, shifts, and throttle response!
Please let the new mount break in for ~200 miles to let some of the added vibrations subside.