Stratix 10 SoC Virtual Platform User Guide - Altera · PDF file1 Stratix 10 SoC Virtual...
27
Stratix 10 SoC Virtual Platform User Guide UG-20009 2016.10.07 Subscribe Send Feedback
Transcript of Stratix 10 SoC Virtual Platform User Guide - Altera · PDF file1 Stratix 10 SoC Virtual...

Stratix 10 SoC Virtual Platform UserGuideUG-200092016.10.07
SubscribeSend Feedback

Contents
1 Stratix 10 SoC Virtual Platform User Guide...................................................................... 31.1 Stratix 10 SoC Virtual Platform Features.................................................................... 31.2 Stratix 10 SoC Virtual Platform Block Diagram............................................................41.3 Recommended PC Requirements...............................................................................51.4 Installing the Stratix 10 SoC Virtual Platform..............................................................61.5 Installing and Booting a Pre-Built Linux Kernel for the Stratix 10 SoC Virtual Platform......71.6 Debugging Linux Applications with the GNU Debugger (GDB)....................................... 8
1.6.1 Installing Host Packages.............................................................................. 81.6.2 Installing Target Packages............................................................................81.6.3 Creating and Cross-Compiling an Application on Host...................................... 81.6.4 Moving the Application to the Target..............................................................91.6.5 Starting the gdbserver on the Target............................................................. 91.6.6 Debugging Using the GDB Client on the Host..................................................9
1.7 Network Connectivity for Stratix 10 SoC Virtual Platform............................................111.7.1 Determining the Target IP Address.............................................................. 121.7.2 Configuring the DNS Server........................................................................121.7.3 Initiating SSH from the Host to the Target.................................................... 131.7.4 Initiating SSH from the Target to the Host.................................................... 131.7.5 Transferring Files from the Host to the Target............................................... 13
1.8 Building a Custom Linux Kernel Using Angstrom........................................................141.8.1 Prerequisites for Building Linux................................................................... 141.8.2 Building Linux...........................................................................................141.8.3 Updating and Booting Linux with the Stratix 10 SoC Virtual Platform................16
1.9 Setting Up the Platform for Regression Testing..........................................................191.9.1 Running Multiple Virtual Platforms on the Same Host..................................... 191.9.2 Using More than One Parameters File...........................................................20
1.10 Extending the Platform with a Dynamic Library....................................................... 211.10.1 Building a Dynamic Library....................................................................... 211.10.2 Connecting the Dynamic Library to the Platform.......................................... 21
1.11 Appendix A: Modifying the parameters.txt File........................................................ 221.12 Appendix B: Memory and Interrupt Map................................................................. 23
1.12.1 Stratix 10 SoC Memory Map..................................................................... 231.12.2 Stratix 10 SoC Virtual Platform Host Interrupts........................................... 25
1.13 Revision History of Stratix 10 SoC Virtual Platform User Guide.................................. 27
Contents
Stratix 10 SoC Virtual Platform User Guide2
1 Stratix 10 SoC Virtual Platform User GuideThe Stratix® 10 SoC Virtual Platform is based on Mentor Graphics® Embeddedtechnology and enables early software development and verification for Intel®customers.
By allowing teams to work within a virtual platform framework, software developerscan gain system visibility without buying multiple development boards. You can usethe virtual platform to rapidly develop software before the actual silicon or boardbecomes available. You can use the virtual platform for:
• Early hardware driver development and partial validation
• Non-real time algorithm creation
• Application development
For Linux debug support, the GNU debugger (GDB) can be used with the Stratix 10SoC Virtual Platform.
Related Links
RocketBoards.org ForumFor support questions regarding the Stratix 10 SoC Virtual Platform, refer to theRocketboards.org community portal.
1.1 Stratix 10 SoC Virtual Platform Features
The Stratix 10 SoC Virtual Platform provides the following:
• A model of the Stratix 10 SoC device
• Partial modeling of the memory map and interrupt map for Stratix 10 SoC
• Early hardware driver development and validation
• Application debug with the GNU debugger
Intel provides a pre-built Linux kernel for use with the virtual platform. You candownload the kernel by visiting the Stratix 10 SoC VP Linux page on theRocketBoards.org.
Related Links
• Installing and Booting a Pre-Built Linux Kernel for the Stratix 10 SoC VirtualPlatform on page 7
• RocketBoards.org ForumFor support questions regarding the Stratix 10 SoC Virtual Platform, refer tothe Rocketboards.org community portal.
1 Stratix 10 SoC Virtual Platform User Guide
© 2016 Intel Corporation. All rights reserved. Intel, the Intel logo, Altera, Arria, Cyclone, Enpirion, MAX,Megacore, NIOS, Quartus and Stratix words and logos are trademarks of Intel Corporation in the US and/orother countries. Other marks and brands may be claimed as the property of others. Intel warrants performanceof its FPGA and semiconductor products to current specifications in accordance with Intel's standard warranty,but reserves the right to make changes to any products and services at any time without notice. Intel assumesno responsibility or liability arising out of the application or use of any information, product, or servicedescribed herein except as expressly agreed to in writing by Intel. Intel customers are advised to obtain thelatest version of device specifications before relying on any published information and before placing orders forproducts or services.
ISO9001:2008Registered

1.2 Stratix 10 SoC Virtual Platform Block Diagram
The figure below details the Stratix 10 SoC device.
Note: Modules that are modeled in the Stratix 10 SoC Virtual Platform are highlighted inyellow in the diagram. The light blue blocks represent the MPU subsystem and FPGAportion of the SoC.
Note: See the Stratix 10 SoC Virtual Platform Release Notes for information on whichmodeled modules have undergone functional verification testing.
Figure 1. Stratix 10 SoC Virtual Platform Block Diagram
ARM Cortex-A53 MPCore
CPU 0 CPU 1 CPU 2 CPU 3
Snoop Control Unit
1 MB L2 Cache
DAP
ETR
SD/MMC
EMAC(3)
USBOTG(2)
NANDFlash
Timer(4)
WatchdogTimer
(4)
UART
(2)GPIO
(2)SPI
(4)Clock
ManagerReset
ManagerTimestamp(secure)
SystemManager
L4, 32-Bit Bus
32-Bit
32-Bit
32-Bit
32-Bit
32-Bit
Main L3 Interconnect32-Bit
32-Bit
32-Bit32-Bit
32-Bit
64-Bit
STM
On-Chip RAM
DMA
HPS-to-FPGABridge
LightweightHPS-to-FPGA Bridge
L4, 3
2-Bi
t Bus
FPGA Portion
Slaves Slaves
128-Bit (ACE-Lite) 32-Bit (AXI)
FPGA-to-SDRAM
HPS to FPGA Lightweight HPS to FPGA
SDRAM L3 Interconnect
64-Bit
64-Bit
Cache Coherency Unit
128-Bit
128-Bit
SMMU TranslationControl
UnitAXI Bus
TBU
TBU
AXI Bus
AXI Bus
TBU
GIC
FPGA-to-HPSBridge
Masters
32-, 64- & 128-Bit (AXI)
FPGA to HPS
I C(5)
2Timestamp(non-secure)
I/OManager
SDM
TBU
Translation BufferUnit (TBU)
128-Bit128-Bit128-Bit
1 Stratix 10 SoC Virtual Platform User Guide
Stratix 10 SoC Virtual Platform User Guide4

Table 1. Modules Modeled in Stratix 10 SoC Virtual Platform
Module Description
Quad-core ARM® Cortex®-A53 MPCore™ processor Contains four Cortex-A53 with FPU support and a snoopcontrol unit (SCU)
ARM L2 Cache 1 megabyte (MB) of shared, unified cache memory
General Interrupt controller Provides partial support for the interrupt map
Memory module On-chip RAM
Two 16550-compatible UARTs Provides console input and output
Five I2C controllers Inter-Integrated Circuit (I2C) serial communication buscontrollers
Three Ethernet controllers Provides network connectivity for the virtual platform
Two USB 2.0 OTG controllers Supports device and host functions
Two SPI master controllers and two slave controllers Supports full and half-duplex mode
SD/MMC controller Interfaces to external SD and MMC flash cards and securedigital I/O devices
Clock Manager Provides software-programmable clock control to configureall clocks generated in the hard processor system (HPS)
System Manager Contains logic and registers to control system functions andother modules that need external control signals as part oftheir system integration
Reset Manager Generates module reset signals based on:• Reset requests from the various sources in the HPS and
FPGA fabric• Software writing to the reset module control registers
DMA Provides high-bandwidth data transfers for modules withoutintegrated DMA controllers. The DMA controller is based onthe ARM Corelink DMA Controller (DMA-330).
Four Timers General purpose timers connected to the level 4 (L4)peripheral bus
Four watchdog Timers Programmable watchdog timers to recover from systemlockup
Two GPIO Modules General purpose I/O interfaces
Related Links
• Appendix B: Memory and Interrupt Map on page 23For more details on modeling aspects in the Stratix 10 SoC Virtual Platform
• Stratix 10 SoC Virtual Platform Release Notes
1.3 Recommended PC Requirements
To run the virtual platform environment, your PC must meet the following minimumrequirements:
• Any 64-bit version of the Linux operating system. Intel has verified that theUbuntu 12.04 Linux distribution and the Red Hat® Enterprise 5.10 Linuxdistribution support the Stratix 10 SoC Virtual Platform.
• A minimum of 8 GB RAM, but 32 GB is recommended for optimal performance.
1 Stratix 10 SoC Virtual Platform User Guide
Stratix 10 SoC Virtual Platform User Guide5

1.4 Installing the Stratix 10 SoC Virtual Platform
You must have an account to gain access to the Download Center. You must also belogged in to continue.
You can download and install the Stratix 10 SoC Virtual Platform from Intel's softwaresite.
1. Download the Stratix 10 SoC Virtual Platform tar file (Stratix10_vp.tgz) fromthe Stratix 10 SoC Virtual Platform Download page to your chosen directory.
2. Uncompress the virtual platform by typing the following command:
tar zxvf Stratix10_vp.tgz
This command creates a directory named Stratix10_vp which contains aninstaller named install.sh.
install.sh is a simple script that runs install_s10socvp.exe for you.install_s10socvp.exe installs the virtual platform to your directory.
3. Install the Stratix 10 SoC Virtual Platform, using one of two methods:
Note: The directory ./altera should not exist prior to installation because theinstaller will not overwrite an existing directory.
• Method 1: Type the following command if you would like to read the End UserLicense Agreement before installation:
./Stratix10_vp/install.sh ./altera
The installer displays the following message:
Please press return to display the End User License Agreement
After the license agreement is displayed, answer y or n to the prompt:
Do you accept this End User License Agreement? [y/n]:
• Method 2: Type the following command if you would like to accept the EndUser License Agreement in advance:
./Stratix10_vp/install.sh -a ./altera
The Stratix 10 SoC Virtual Platform is now installed in ./altera.
1 Stratix 10 SoC Virtual Platform User Guide
Stratix 10 SoC Virtual Platform User Guide6

1.5 Installing and Booting a Pre-Built Linux Kernel for the Stratix10 SoC Virtual Platform
You can use the pre-built Linux kernel provided on RocketBoards.org to boot theStratix 10 SoC Virtual Platform.
1. Open a console and go to the directory where your virtual platform is installed:
cd <PATH_TO_VP_INSTALL_DIR>
2. At the Linux prompt, type the following command to download the Stratix 10 SoCVirtual Platform Linux images:
wget --no-cache http://rocketboards.org/foswiki/pub/Documentation/\Stratix10SoCVPLinux/linux-stratix10swvp-socfpga-4.5-angstrom-v2014.12-\swvp-1.3.tgz
3. Uncompress the tgz file by typing the following command:
tar xvzf ./linux-stratix10swvp-socfpga-4.5-angstrom-v2014.12-swvp-1.3.tgz
This command creates the following files under <PATH_TO_VP_INSTALL_DIR>:
• ./sd-angstrom-v2014.12-stratix10swvp.img: contains the SD/MMCroot file system image
• ./linux-system-sd.elf: contains the Linux kernel image
Note: If the .img file is not writeable, you will see this error message:
Cannot insert disk, file not found: ./sd-angstrom-v2014.12-stratix10swvp.img
4. To run the Stratix 10 SoC Virtual Platform with the default pre-built Linux binaries,type the following command:
cd <PATH_TO_VP_INSTALL_DIR>./run.exe
After the command completes, an Ångström prompt appears and you are at thelogin prompt. Login with a username of “root” and leave the password field blankto enter the root directory.
1 Stratix 10 SoC Virtual Platform User Guide
Stratix 10 SoC Virtual Platform User Guide7

1.6 Debugging Linux Applications with the GNU Debugger (GDB)
You can use GDB on the host to debug an application running on the Stratix 10 SoCVirtual Platform target.
1.6.1 Installing Host Packages
This procedure assumes Ubuntu is used on the host. Other operating systems requiredifferent commands.
This installation requires the GDB debugger and GNU C Compiler (GCC) cross compilerpackages.
Note: Ensure that you have downloaded the required package from Linaro™.
If Ubuntu is used as the host, the installation commands are:
sudo apt-get install gcc-aarch64-linux-gnusudo apt-get install gdb-multiarch
Related Links
Linaro Release page
1.6.2 Installing Target Packages
The target requires that only the gdbserver package is installed.
1. Boot the virtual platform as described in the "Installing and Booting a Pre-BuiltLinux Kernel for the Stratix 10 SoC Virtual Platform" section.
2. Edit /etc/resolv.conf to contain only one entry:
nameserver 192.168.0.3
3. Install the package by typing the following command:
opkg update
Related Links
• Installing and Booting a Pre-Built Linux Kernel for the Stratix 10 SoC VirtualPlatform on page 7
• Configuring the DNS Server on page 12To enable the target operating system to resolve Internet addresses, you mustconfigure the DNS server.
1.6.3 Creating and Cross-Compiling an Application on Host
1. Go to your home folder on the host and create a file named factorial.c thatcontains the following source code:
#include <stdio.h>
int factorial(int n) {
1 Stratix 10 SoC Virtual Platform User Guide
Stratix 10 SoC Virtual Platform User Guide8

if (n == 0) return 1; return n * factorial (n - 1);}
int main () { int i; int n; for (i = 0; i < 10; ++i) { n = factorial (i); printf ("factorial(%d) = %d\n", i, n); } return 0;}
2. Cross-compile the factorial.c file by typing the following command:
aarch64-linux-gnu-gcc factorial.c -ggdb -o factorial.out
1.6.4 Moving the Application to the Target
To move the application to the target, run the commands on the target:
cd ~scp host_user@host_name:host_path/factorial.out . scp host_user@host_name:host_path/factorial.c .
Note: Be sure to replace host_user, host_name and host_path with the actual values foryour host Linux PC.
1.6.5 Starting the gdbserver on the Target
Start the gdbserver on the target by typing the following commands:
cd ~gdbserver :8080 ./factorial.out
1.6.6 Debugging Using the GDB Client on the Host
1. Run the GDB client on the host:
gdb-multiarch ./factorial.outProcess ./factorial.out created; pid = 229Listening on port 8080
2. Connect GDB to the target.
Note: This example uses localhost:3624 instead of 192.168.0.9:8080 asdescribed in the VLAN port mapping in the "Network Connectivity" section.
(gdb) target remote localhost:3624Remote debugging using localhost:3624warning: Unable to find dynamic linker breakpoint function.
1 Stratix 10 SoC Virtual Platform User Guide
Stratix 10 SoC Virtual Platform User Guide9

GDB will be unable to debug shared library initializersand track explicitly loaded dynamic code.0x76fcfb00 in ?? ()
3. Use the following GDB sample commands to debug the code:
• b main: Set a breakpoint at the main function
• c: Continue until the breakpoint is hit
• s: Step one instruction
• b 14: Insert a breakpoint at line 14
• c typed multiple times: Run through iterations of the loop
• dis 2: disable breakpoint 2
• l: List code (short form of list)
The host console looks similar to the view below:
user@yorick:~/$ gdb-multiarch./factorial.outGNU gdb (Ubuntu 7.10-1ubuntu2) 7.10Copyright (C) 2015 Free Software Foundation, Inc. License GPLv3+: GNU GPL version 3 or later <http://gnu.org/licenses/gpl.html>...<more messages from GNU>...(gdb) target remote localhost:3624Remote debugging using localhost:3624Reading /lib/ld-linux-aarch64.so.1 from remote target...warning: File transfers from remote targets can be slow. Use "set sysroot" to access files locally instead.Reading /lib/ld-linux-aarch64.so.1 from remote target...Reading symbols from target:/lib/ld-linux-aarch64.so.1...Reading /lib/ld-2.20.so from remote target...Reading /lib/.debug/ld-2.20.so from remote target...(no debugging symbols found)...done.0x0000007fb7fd3d00 in ?? () from target:/lib/ld-linux-aarch64.so.1(gdb) b mainBreakpoint 1 at 0x400608: file factorial.c, line 12.(gdb) cContinuing.Reading /lib/libc.so.6 from remote target...Reading /lib/libc-2.20.so from remote target...Reading /lib/.debug/libc-2.20.so from remote target...
Breakpoint 1, main () at factorial.c:1212 for (i = 0; i < 10; ++i) {(gdb) list7 }89 int main () {10 int i;11 int n;12 for (i = 0; i < 10; ++i) {13 n = factorial (i);14 printf ("factorial(%d) = %d\n", i, n);15 }16 return 0;(gdb) b 14Breakpoint 2 at 0x40061c: file factorial.c, line 14.(gdb) cContinuing.
Breakpoint 2, main () at factorial.c:1414 printf ("factorial(%d) = %d\n", i, n);(gdb) s
1 Stratix 10 SoC Virtual Platform User Guide
Stratix 10 SoC Virtual Platform User Guide10

12 for (i = 0; i < 10; ++i) {(gdb) cContinuing.
Breakpoint 2, main () at factorial.c:1414 printf ("factorial(%d) = %d\n", i, n);(gdb) cContinuing.
Breakpoint 2, main () at factorial.c:1414 printf ("factorial(%d) = %d\n", i, n);(gdb) dis 2(gdb) cContinuing.[Inferior 1 (process 1460) exited normally](gdb) quit
The target console looks similar to the view below:
root@host:~# gdbserver :8080 ./factorial.outProcess ./factorial.out created; pid = 229Listening on port 8080Remote debugging from host 192.168.0.1factorial(0) = 1factorial(1) = 1factorial(2) = 2factorial(3) = 6factorial(4) = 24factorial(5) = 120factorial(6) = 720factorial(7) = 5040factorial(8) = 40320factorial(9) = 362880
Child exited with status 0
Related Links
Network Connectivity for Stratix 10 SoC Virtual Platform on page 11You can configure the Ethernet interface of the virtual platform to connect to theInternet.
1.7 Network Connectivity for Stratix 10 SoC Virtual Platform
You can configure the Ethernet interface of the virtual platform to connect to theInternet.
Network connectivity is configured in the parameters.txt file. The following code isan example of the virtual LAN (VLAN) parameter settings.
# ----------------------------------# Virtual LAN settings# ----------------------------------vlan:net = 192.168.0.0/24vlan:host = 192.168.0.1vlan:dns = 192.168.0.3
vlan:hostname = hostvlan:dhcpstart = 192.168.0.9vlan:macstart = 52:54:00:12:34:90
vlan:tcp_napt = :3624 => :8080 ;\ :5684 => :23 ;\ :5247 => :69 ;\
1 Stratix 10 SoC Virtual Platform User Guide
Stratix 10 SoC Virtual Platform User Guide11

:9547 => :22 ;\ :8524 => :21 ;\ :6527 => :53
vlan:udp_napt = :5248 => :69
Note the following parameters within the "VLAN" section of the file:
• vlan:dns - This parameter defines the Domain Name Server that is used by thetarget to resolve IP addresses. You must update the target file, /etc/resolv.conf, to direct it to use this DNS.
• vlan:dhcpstart - This parameter is the starting address provided by DHCPserver. It is the target that the operating system IP addresses.
• vlan:tcp_napt - This parameter maps the ports on the target to the ports onthe host. This mapping is required so that applications on the host can connect toapplications on the target. Applications on the target can connect to the outsideworld (including the host) with the actual IP addresses and ports.
The following sections describe how to use the networking feature of the virtualplatform.
1.7.1 Determining the Target IP Address
To determine the target IP address, you must run the ifconfig command on thetarget. The target IP address is returned by the VLAN DHCP that is configured as192.168.0.9 in the parameters.txt file. An example of determining the target IPaddress is shown below.
Note: The Stratix 10 Virtual Platform supports three Ethernet adapters. When you use DHCPto obtain IP addresses, it is standard behavior for only the first Ethernet adapter(eth0) to be assigned an IP address. If you require use of the other Ethernetadapters, assign static IP addresses to them, preferably in different subnets. Using thesame subnet for all three adapters may cause connectivity problems.
root@host:~# ifconfigeth0 Link encap:Ethernet HWaddr 52:54:00:12:34:57 inet addr:192.168.0.9 Bcast:192.168.0.255 Mask:255.255.255.0 UP BROADCAST RUNNING MULTICAST DYNAMIC MTU:1500 Metric:1 RX packets:221 errors:0 dropped:0 overruns:0 frame:0 TX packets:378 errors:0 dropped:0 overruns:0 carrier:0 collisions:0 txqueuelen:1000 RX bytes:43814 (42.7 KiB) TX bytes:37491 (36.6 KiB) Interrupt:10 Base address:0x8000 DMA chan:FF
1.7.2 Configuring the DNS Server
To enable the target operating system to resolve Internet addresses, you mustconfigure the DNS server.
1. Run Linux on the target.
2. From the target Linux console, edit the /etc/resolv.conf file so that the onlyentry that exists is:
nameserver 192.168.0.3
3. Test the network connectivity by typing:
1 Stratix 10 SoC Virtual Platform User Guide
Stratix 10 SoC Virtual Platform User Guide12

wget www.google.com
Note: Linux automatically creates the /etc/resolv.conf file and the file isoverwritten each time Linux is booted. Intel recommends that youincorporate the edits to the resolv.conf file in an initialization script thatcan run automatically each time Linux boots.
1.7.3 Initiating SSH from the Host to the Target
To initiate a secure shell (SSH) connection from the host to the target, you must usethe port mapping in the default parameters.txt file. In the defaultparameters.txt file, SSH port(22) is mapped to port 9547. Because of thismapping, the command to initiate an SSH from the host to the target must be:
ssh root@localhost -p 9547
1.7.4 Initiating SSH from the Target to the Host
To run on the target, connect to outside servers by using this standard call:
ssh host_user@host_name
1.7.5 Transferring Files from the Host to the Target
Use scp to move files from the host to the target:
scp -P 9547 filename root@localhost:~
1 Stratix 10 SoC Virtual Platform User Guide
Stratix 10 SoC Virtual Platform User Guide13

1.8 Building a Custom Linux Kernel Using Angstrom
If you want to customize your own Linux kernel, you can build a version of Linux usingÅngström. The following sections provide an example of how to compile the Linuxkernel and root file system using the Stratix 10 SoC device Ångström recipes.
1.8.1 Prerequisites for Building Linux
To build Linux on Ubuntu 12.04 LTS using Ångström, you must install certainpackages. To install these packages, type the following commands:
sudo apt-get install gawk wget git-core diffstat unzip texinfo gcc-multilib \build-essential chrpath libsdl1.2-dev xterm device-tree-compiler
Before building Linux, choose locations for the Stratix 10 SoC Virtual Platform, theÅngström distribution and the Linaro GNU toolchain. Assign variables to theselocations to be used with the tasks in this section. Customize the following variables toyour own path:
export SOCVP_PATH=~/altera/socvp/stratix10/1.3export ANGSTROM_PATH=~/angstromexport TOOLCHAIN_PATH=~/toolchain
Related Links
Yocto Project DocumentationFor more information about the packages that are pre-installed, refer to the YoctoProject Documentation website.
1.8.2 Building Linux
1. Set the default shell to bash. Select No when you are prompted to use dash asthe system shell:
sudo dpkg-reconfigure dash
1 Stratix 10 SoC Virtual Platform User Guide
Stratix 10 SoC Virtual Platform User Guide14

Figure 2. Bash Shell Configuration
2. To compile Linux using Ångström, type the following commands:
mkdir ${ANGSTROM_PATH}cd ${ANGSTROM_PATH} git clone git://github.com/altera-opensource/angstrom-socfpga.gitcd angstrom-socfpgagit checkout angstrom-v2014.12-socfpga
3. Configure your environment by typing the following commands:
export KERNEL_PROVIDER="linux-altera"MACHINE=stratix10swvp ./oebb.sh config stratix10swvp
If you want to build a specific version of Linux, add the kernel tag to thecommands:
export KERNEL_PROVIDER="linux-altera"export KERNEL_TAG="89bdd29f15aed586571bf900fc04120fb6c108c9" MACHINE=stratix10swvp ./oebb.sh config stratix10swvp
You can access a list of valid kernel tags in the git repository found here. In theCode tab, select the socfpga-4.5 branch from the Branch:master drop downmenu. Then click the commits link above the Branch:master pull down to seethe individual commits. You can copy the full kernel tag to the clip board byselecting the Copy the full SHA clipboard icon to the left of the individual kernelnumber.
You can access commits on branches other than the socfpga-4.5 in a similarmanner.
4. Build the kernel:
source environment-angstrom-v2014.12export BB_ENV_EXTRAWHITE="${BB_ENV_EXTRAWHITE} KERNEL_PROVIDER"MACHINE=stratix10swvp bitbake virtual/kernel console-image
1 Stratix 10 SoC Virtual Platform User Guide
Stratix 10 SoC Virtual Platform User Guide15

If you exported a KERNEL_TAG in the previous step, use these commands:
source environment-angstrom-v2014.12export BB_ENV_EXTRAWHITE="${BB_ENV_EXTRAWHITE} KERNEL_PROVIDER KERNEL_TAG"MACHINE=stratix10swvp bitbake virtual/kernel console-image
Note: Some third-party sources may not be present during the build process atremote repositories and may prevent this command from working. If thisissue occurs, the build command may fail with an error similar to thisexample case for gumstix source code:
IOError: file ${ANGSTROM_PATH}/angstrom-socfpga/sources/meta-gumstix-community/conf/layer.conf not found
ERROR: Unable to parse ${ANGSTROM_PATH}/angstrom-socfpga/sources/meta-gumstix-community/conf/layer.conf: file <PATH_TO_ANGSTROM_DIR>/angstrom-socfpga/sources/meta-gumstix-community/conf/layer.conf not found
To correct this error, you must edit the ${ANGSTROM_PATH}/angstrom-socfpga/conf/bblayers.conf file and remove the source of the error.In the example above, removing the following line from bblayers.confallows the build to complete:
${TOPDIR}/sources/meta-gumstix-community
1.8.3 Updating and Booting Linux with the Stratix 10 SoC Virtual Platform
The following sections list the instructions for updating and replacing the default Linuximages created by the Stratix 10 SoC Virtual Platform with your Ångström buildimages.
1.8.3.1 Prerequisites for Updating Linux for the Virtual Platform
The Linaro GNU toolchain (cross-compiler for ARM) must be installed to update thevirtual platform Linux binaries.
1. Please run the following commands to install the Linaro GNU toolchain:
mkdir ${TOOLCHAIN_PATH}cd ${TOOLCHAIN_PATH}wget https://releases.linaro.org/15.06/components/toolchain/binaries/\4.8/aarch64-linux-gnu/gcc-linaro-4.8-2015.06-x86_64_aarch64-linux-gnu.tar.xztar xf gcc-linaro-4.8-2015.06-x86_64_aarch64-linux-gnu.tar.xz
1 Stratix 10 SoC Virtual Platform User Guide
Stratix 10 SoC Virtual Platform User Guide16

1.8.3.2 Updating the Stratix 10 SoC Virtual Platform Linux Kernel Image
1. Get the build tools from Rocketboards:
cd ${SOCVP_PATH}/Softwarewget --no-cache http://rocketboards.org/foswiki/pub/Documentation/\Stratix10SoCVPLinux/build_tools.tgztar xf build_tools.tgz
2. Compress the console image:
cd ${ANGSTROM_PATH}/angstrom-socfpga/deploy/glibc/images/stratix10swvp/gzip -c console-image-stratix10swvp.cpio> \console-imagestratix10swvp.cpio.gz
3. Build the Linux ELF file:
export PATH=\${TOOLCHAIN_PATH}/gcc-linaro-4.8-2015.06-x86_64_aarch64-linux-gnu/bin:\$PATH
export CROSS_COMPILE=aarch64-linux-gnu-
cd ${SOCVP_PATH}/Software/stratix10/sw
./build.sh \${ANGSTROM_PATH}/angstrom-socfpga/deploy/glibc/images/stratix10swvp/Image \${ANGSTROM_PATH}/angstrom-socfpga/deploy/glibc/images/stratix10swvp/\stratix10_swvp.dtb \${ANGSTROM_PATH}/angstrom-socfpga/deploy/glibc/images/stratix10swvp/consoleimage-\stratix10swvp.cpio.gz \linux-system-sd.elf \aarch64-linux-gnu-
These steps create the linux-system-sd.elf file. Copy this file to the ${SOCVP_PATH} directory.
When the build.sh script has completed, you can run the virtual platform using theinstructions in the Executing the Stratix 10 SoC Virtual Platform section.
Related Links
Executing the Stratix 10 SoC Virtual Platform on page 18
1.8.3.3 Creating an SD Card Image for Stratix 10 SoC Virtual Platform
1. To create a file named sd-angstrom-v2014.12-stratix10swvp.img that canbe used as the SD card image, type the following:
cd ${SOCVP_PATH}/Software/stratix10/linux/buildsocvpsd./buildsd.sh ${ANGSTROM_PATH} \ stratix10swvp stratix10_swvp
This file must be writeable by the user who runs the virtual platform. To give theuser write permissions, type:
sudo chown $USER:$USER sd-angstrom-v2014.12-stratix10swvp.img
2. Move the new file to the ${SOCVP_PATH} directory.
1 Stratix 10 SoC Virtual Platform User Guide
Stratix 10 SoC Virtual Platform User Guide17

1.8.3.4 Executing the Stratix 10 SoC Virtual Platform
1. To run the Stratix 10 SoC Virtual Platform, type the following command:
cd ${SOCVP_PATH}./run.exe
After the command executes, an Ångström prompt displays and you are in theroot directory.
1.8.3.5 Exiting the Stratix 10 SoC Virtual Platform
Similar to all Linux systems, you must gracefully shut down the Stratix 10 SoC VirtualPlatform.
Because the SD card image is writable, you can corrupt the image if you select Ctrl-Cto exit the platform. The next time you boot the platform, you may encounter errorslike this:
[FAILED] Failed to start File System Check on Root Device.See 'systemctl status systemd-fsck-root.service' for details....<more>...systemd-shutdown[1]: Sending SIGKILL to remaining processes...systemd-shutdown[1]: Unmounting file systems.systemd-shutdown[1]: All filesystems unmounted....<more>...systems-shutdown[1]: Rebooting.reboot: Restarting systemReboot failed -- System halted
For a graceful shutdown, use any of these commands:
• halt
• poweroff
• init 0
• reboot -p
• shutdown
1 Stratix 10 SoC Virtual Platform User Guide
Stratix 10 SoC Virtual Platform User Guide18
1.9 Setting Up the Platform for Regression Testing
The Software Virtual Platform can be configured for regression testing, runningwithout user interaction in an automated environment.
To do this, you must change the parameters.txt file to redirect input and output.Normally, the console_type is set to xterm for user interaction, but it can be set tobatch to run on automated systems. Adding these lines to the parameters fileconfigures the platform for automation, take input from a script called testinput,and send output to a log file called testoutput.
console_type = batch console_script_path = ./testinput console_log_path = ./testoutput
The testinput file uses a very simple set of commands that receives certain input andthen sends a response. An example testinput file that logs into the system and runsthe telnet daemon is shown below:
receive "host login:" send "root\n" receive "root@host:~#" send "telnetd\n"
The testinput file is optional, but can be used to setup or start a test. Output fromconsole is saved to the testoutput file.
1.9.1 Running Multiple Virtual Platforms on the Same Host
If you choose to run more than one virtual platform on the same host, modify the vlansettings in the parameters file so that no host port is mapped twice. For example, oneinvocation might use these settings:
vlan:tcp_napt = :3624 => :8080 ;\ :5684 => :23 ;\ :5247 => :69 ;\ :9547 => :22 ;\ :8524 => :21 ;\ :6527 => :53
vlan:udp_napt = :5248 => :69
And another invocation might use these settings:
vlan:tcp_napt = :3625 => :8080 ;\ :5685 => :23 ;\ :5248 => :69 ;\ :9548 => :22 ;\ :8525 => :21 ;\ :6528 => :53
vlan:udp_napt = :5249 => :69
1 Stratix 10 SoC Virtual Platform User Guide
Stratix 10 SoC Virtual Platform User Guide19

1.9.2 Using More than One Parameters File
You may choose to put all of the parameters that do not change in one file, andinclude other files specific to a test. To do this, the specific parameters should be putinto a separate file. For example, if you create a testparams.txt file, your top levelparameters.txt file should be modified to include both the base file and the specificfile as shown:
@include $DIRNAME/parameters_$env(VISTA_PLATFORM_NAME).txt @include $DIRNAME/testparams.txt
1 Stratix 10 SoC Virtual Platform User Guide
Stratix 10 SoC Virtual Platform User Guide20

1.10 Extending the Platform with a Dynamic Library
The virtual platform can be extended to add new models of hardware in the memoryspace. This can be used to simulate new hardware before the hardware is actuallydeveloped. This could be used to simulate the programmers’ view of an FPGA, allowingthe programmer to develop code for an FPGA model before the FPGA is available.
1.10.1 Building a Dynamic Library
The distribution contains a sample dynamic library in the Software/External_function directory. To build it, change to that directory on your hostsystem and run make. You must have a GCC compiler in your path. TheExternal_function directory contains a Readme.txt file that explains how to usethe simple example.
1.10.2 Connecting the Dynamic Library to the Platform
Once built, the dynamic library is connected to the platform by specifying the locationof the dynamic library in the parameters.txt file. These values in the file shouldpoint to the dynamic library:
# ----------------------------------# External function library# ----------------------------------Stratix10_top.ext_inst.dynamic_library = \ $DIRNAME/Software/External_function/example.so
In this case, the dynamic library in use is the sample External_function libraryincluded with the platform.
1 Stratix 10 SoC Virtual Platform User Guide
Stratix 10 SoC Virtual Platform User Guide21
1.11 Appendix A: Modifying the parameters.txt File
You must modify the parameters.txt file to fit the requirements of your designbefore executing the virtual platform with Linux.
The Stratix 10 SoC Virtual Platform uses two parameter files.
• parameters.txt contains the most commonly modified parameters.
— File pointers
— Console setup
— Warnings and message controls
— Network configuration
• extended_parameters.txt contains system parameters that are not commonlymodified. This file includes parameters that align the memory map andinterconnect to the physical Stratix 10 SoC device.
— SystemC settings
— Processor subsystem settings
— Interconnect address ranges
— Port settings
— Clocks
Note: Modifying extended_parameters.txt can have adverse effects on software stacksand platform compatibility with the physical Stratix 10 SoC device.
Refer to the "Network Connectivity for Stratix 10 SoC Virtual Platform" section formore information about configuring parameters.txt for Internet communication.
Related Links
Network Connectivity for Stratix 10 SoC Virtual Platform on page 11You can configure the Ethernet interface of the virtual platform to connect to theInternet.
1 Stratix 10 SoC Virtual Platform User Guide
Stratix 10 SoC Virtual Platform User Guide22
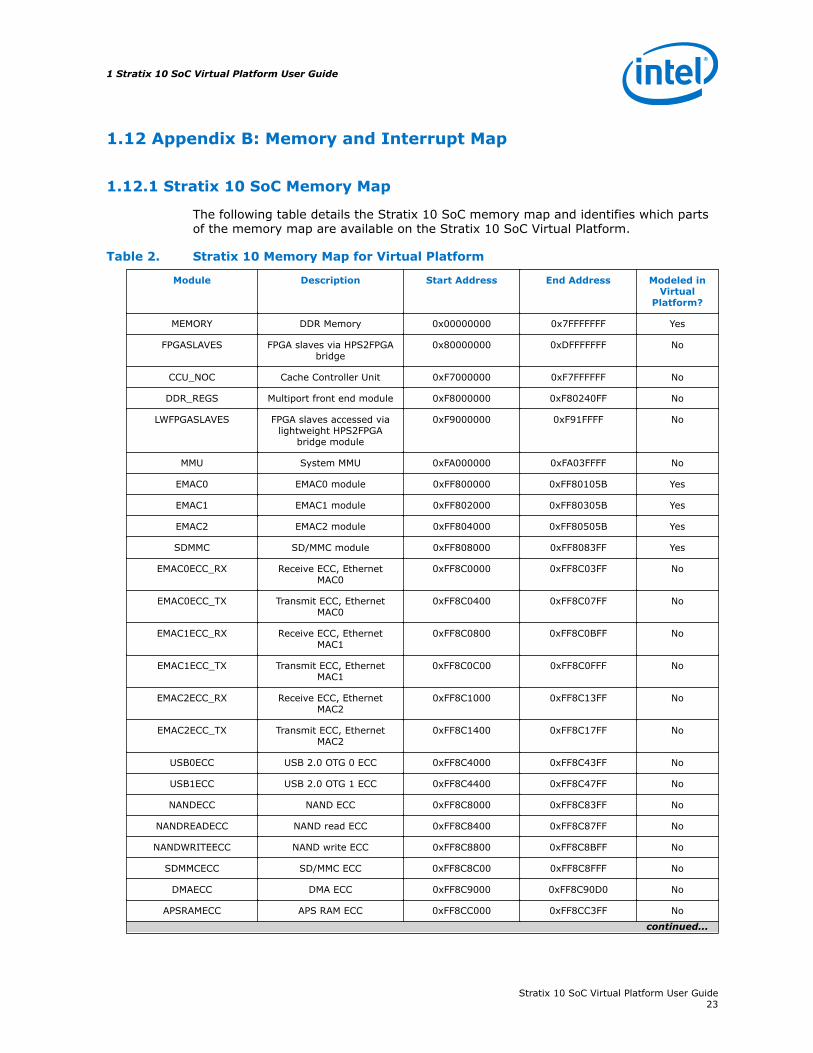
1.12 Appendix B: Memory and Interrupt Map
1.12.1 Stratix 10 SoC Memory Map
The following table details the Stratix 10 SoC memory map and identifies which partsof the memory map are available on the Stratix 10 SoC Virtual Platform.
Table 2. Stratix 10 Memory Map for Virtual Platform
Module Description Start Address End Address Modeled inVirtual
Platform?
MEMORY DDR Memory 0x00000000 0x7FFFFFFF Yes
FPGASLAVES FPGA slaves via HPS2FPGAbridge
0x80000000 0xDFFFFFFF No
CCU_NOC Cache Controller Unit 0xF7000000 0xF7FFFFFF No
DDR_REGS Multiport front end module 0xF8000000 0xF80240FF No
LWFPGASLAVES FPGA slaves accessed vialightweight HPS2FPGA
bridge module
0xF9000000 0xF91FFFF No
MMU System MMU 0xFA000000 0xFA03FFFF No
EMAC0 EMAC0 module 0xFF800000 0xFF80105B Yes
EMAC1 EMAC1 module 0xFF802000 0xFF80305B Yes
EMAC2 EMAC2 module 0xFF804000 0xFF80505B Yes
SDMMC SD/MMC module 0xFF808000 0xFF8083FF Yes
EMAC0ECC_RX Receive ECC, EthernetMAC0
0xFF8C0000 0xFF8C03FF No
EMAC0ECC_TX Transmit ECC, EthernetMAC0
0xFF8C0400 0xFF8C07FF No
EMAC1ECC_RX Receive ECC, EthernetMAC1
0xFF8C0800 0xFF8C0BFF No
EMAC1ECC_TX Transmit ECC, EthernetMAC1
0xFF8C0C00 0xFF8C0FFF No
EMAC2ECC_RX Receive ECC, EthernetMAC2
0xFF8C1000 0xFF8C13FF No
EMAC2ECC_TX Transmit ECC, EthernetMAC2
0xFF8C1400 0xFF8C17FF No
USB0ECC USB 2.0 OTG 0 ECC 0xFF8C4000 0xFF8C43FF No
USB1ECC USB 2.0 OTG 1 ECC 0xFF8C4400 0xFF8C47FF No
NANDECC NAND ECC 0xFF8C8000 0xFF8C83FF No
NANDREADECC NAND read ECC 0xFF8C8400 0xFF8C87FF No
NANDWRITEECC NAND write ECC 0xFF8C8800 0xFF8C8BFF No
SDMMCECC SD/MMC ECC 0xFF8C8C00 0xFF8C8FFF No
DMAECC DMA ECC 0xFF8C9000 0xFF8C90D0 No
APSRAMECC APS RAM ECC 0xFF8CC000 0xFF8CC3FF No
continued...
1 Stratix 10 SoC Virtual Platform User Guide
Stratix 10 SoC Virtual Platform User Guide23

Module Description Start Address End Address Modeled inVirtual
Platform?
PSI Protocol specific interface(PSI) debug
0xFFA44400 0xFFA47FFF No
USB0 USB 2.0 OTG 0 controllermodule registers
0xFFB00000 0xFFB3CFFF Yes1
USB1 USB 2.0 OTG 1 controllermodule register
0xFFB40000 0xFFB7CFFF Yes1
NANDREGS NAND controller moduleregisters
0xFFB80000 0xFFB807D3 No
NANDDATA NAND controller moduledata
0xFFB90000 0xFFB9FFFF No
UART0 UART0 module 0xFFC02000 0xFFC020FF Yes
UART1 UART1 module 0xFFC02100 0xFFC021FF Yes
I2C0 I2C0 module 0xFFC02800 0xFFC028FF Yes
I2C1 I2C1 module 0xFFC02900 0xFFC029FF Yes
I2C2 I2C2 module 0xFFC02A00 0xFFC02AFF Yes
I2C3 I2C3 module 0xFFC02B00 0xFFC02BFF Yes
I2C4 I2C4 module 0xFFC02C00 0xFFC02CFF Yes
SPTIMER0 SP Timer0 module 0xFFC03000 0xFFC030FF Yes
SPTIMER1 SP Timer1 module 0xFFC03100 0xFFC031FF Yes
GPIO0 GPIO0 module 0xFFC03200 0xFFC0327F Yes
GPIO1 GPIO1 module 0xFFC03300 0xFFC0337F Yes
TMR_SYS0 System Timer0 module 0xFFD00000 0xFFD000FF Yes
TMR_SYS1 System Timer1 module 0xFFD00100 0xFFD001FF Yes
WDT0 Watchdog0 module 0xFFD00200 0xFFD002FF Yes
WDT1 Watchdog 1 module 0xFFD00300 0xFFD003FF Yes
WDT2 Watchdog2 module 0xFFD00400 0xFFD004FF Yes
WDT3 Watchdog3 module 0xFFD00500 0xFFD005FF Yes
CLKMGR Clock manager module 0xFFD10000 0xFFD10147 Yes
RSTMGR Reset manager module 0xFFD11000 0xFFD110FF Yes
SYSMGR System manager module 0xFFD12000 0xFFD124FF Yes
PINMUX I/O manager 0xFFD13000 0xFFD13FFF Yes
MAINPRB NoC main probe 0xFFD22000 0xFFD223FF No
MAINATB NoC Advanced Trace Bus(ATB) Endpoint
0xFFD22800 0xFFD2287F No
QOSMAIN NoC quality-of-service(QoS) main
0xFFD24000 0xFFD2427F No
continued...
1 USB data FIFO is not included in model
1 Stratix 10 SoC Virtual Platform User Guide
Stratix 10 SoC Virtual Platform User Guide24

Module Description Start Address End Address Modeled inVirtual
Platform?
DMA_NS Non-secure DMA 0xFFDA0000 0xFFDA0FFF Yes
DMA_S Secure DMA 0xFFDA1000 0xFFDA1FFF No
SPI0 SPI module 0 slave 0xFFDA2000 0xFFDA20FF Yes
SPI1 SPI module 1 slave 0xFFDA3000 0xFFDA30FF Yes
SPI2 SPI module 0 master 0xFFDA4000 0xFFDA40FF Yes
SPI3 SPI module 1 master 0xFFDA5000 0xFFDA50FF Yes
OCRAM On-chip RAM module 0xFFE00000 0xFFE3FFFF Yes
GIC General Interrupt Controller 0xFFFC1000 0xFFFC7FFF Yes
1.12.2 Stratix 10 SoC Virtual Platform Host Interrupts
The table below lists the host interrupts available to the Stratix 10 SoC VirtualPlatform.
Table 3. Stratix 10 SoC Virtual Platform Interrupt Map
Stratix 10 SoC Virtual PlatformInterrupt Request Number
Source Description
15 SYSMGR System manager interrupt request
81 DMANS_IRQ0 Non-secure DMA interrupt request 0
82 DMANS_IRQ1 Non-secure DMA interrupt request 1
83 DMANS_IRQ2 Non-secure DMA interrupt request 2
84 DMANS_IRQ3 Non-secure DMA interrupt request 3
85 DMANS_IRQ4 Non-secure DMA interrupt request 4
86 DMANS_IRQ5 Non-secure DMA interrupt request 5
87 DMANS_IRQ6 Non-secure DMA interrupt request 6
88 DMANS_IRQ7 Non-secure DMA interrupt request 7
89 DMA_IRQ_Abort Non-secure DMA abort interrupt
90 EMAC0 EMAC0 combined interrupt request
91 EMAC1 EMAC1 combined interrupt request
92 EMAC2 EMAC2 combined interrupt request
93 USB0 USB0 interrupt request
94 USB1 USB1 interrupt request
96 SDMMC SDMMC interrupt request
99 SPI0 SPIM0 interrupt request
100 SPI1 SPIM1 interrupt request
101 SPI2 SPIS0 interrupt request
102 SPI3 SPIS1 interrupt request
continued...
1 Stratix 10 SoC Virtual Platform User Guide
Stratix 10 SoC Virtual Platform User Guide25

Stratix 10 SoC Virtual PlatformInterrupt Request Number
Source Description
103 I2C0 I2C0 interrupt request
104 I2C1 I2C1 interrupt request
105 I2C2 I2C2 interrupt request
106 I2C3 I2C3 interrupt request
107 I2C4 I2C4 interrupt request
108 UART0 UART0 interrupt request
109 UART1 UART1 interrupt request
110 GPIO0 GPIO0 interrupt request
111 GPIO1 GPIO1 interrupt request
113 TIMER0 SP Timer0 interrupt request
114 TIMER1 SP Timer1 interrupt request
115 TIMER2 System Timer0 interrupt request
116 TIMER3 System Timer1 interrupt request
117 L4WD0 Watchdog timer 0 interrupt request
118 L4WD1 Watchdog timer 1 interrupt request
119 CLKMGR Clock manager interrupt request
120 RSTMGR Reset manager interrupt request
125 L4WD2 Watchdog timer 2 interrupt request
126 L4WD3 Watchdog timer 3 interrupt request
128-134, 136-169 SMMU System MMU interrupt request
1 Stratix 10 SoC Virtual Platform User Guide
Stratix 10 SoC Virtual Platform User Guide26
1.13 Revision History of Stratix 10 SoC Virtual Platform User Guide
Date Version Changes
October 2016 2016.10.07 • Updated Stratix 10 SoC Virtual Platform Block Diagram• Updated Installing the Stratix 10 SoC Virtual Platform section• Updated Installing and Booting Pre-Built Linux for the Stratix 10 SoC
Virtual Platform section• Updated Installing Target Packages section• Updated Building Linux section• Updated tasks in Prerequisites for Updating Linux for the Stratix 10 SoC
Virtual Platform• Updated Updating the Stratix 10 SoC Virtual Platform Linux Kernel
Image section• Added Creating an SD Card Image for the Stratix 10 SoC Virtual
Platform subsection to the Updating and Booting Linux with the Stratix10 SoC Virtual Platform section
July 2016 2016.07.15 • Replaced parameters_Stratix 10.txt filename withparameters.txt throughout the document
• Removed Creating and SD Card Image for Stratix 10 SoC VirtualPlatform section
• Updated Appendix A: Modifying the parameters.txt File
April 2016 2016.04.29 • Updated Stratix 10 SoC Virtual Platform Block Diagram• Updated steps in "Installing and Booting a Pre-Built Linux Kernel for the
Stratix 10 SoC Virtual Platform."• Modified steps in "Building Linux" section• Updated "Debugging Using the GDB Client on Host"• Added "Creating an SD Card Image for Stratix 10 SoC Virtual Platform"• Added "Executing the Stratix 10 SoC Virtual Platform" section• Modified "Stratix 10 SoC Memory Map"
March 2016 2016.03.04 • Updated Stratix 10 SoC Virtual Platform Block Diagram• Modified "Modules Modeled in Stratix 10 SoC Virtual Platform" table in
"Stratix 10 SoC Virtual Platform Block Diagram" section• Modified code in "Installing and Booting a Pre-Built Linux Kernel for the
Stratix 10 SoC Virtual Platform"• Updated "Network Connectivity for Stratix 10 SoC Virtual Platform"• Modified code in "Prerequisites for Updating Linux for the Virtual
Platform"• Corrected port mapping in "Initiating ssh from the Host to the Target"• Updated "Appendix B: Memory and Interrupt Map"• Removed "Appendix C: Known Issues"
January 2016 2016.01.11 Corrected the link for the Stratix 10 SoC Virtual Platform download page.
December 2015 2015.12.07 Added the "Setting up the Platform for Regression Testing" and "Extendingthe Platform with a Dynamic Library" sections.
November 2015 2015.11.13 • Updated the block diagram• Updated Appendix B• Added Appendix C for known issues
October 2015 2015.10.07 Initial release
1 Stratix 10 SoC Virtual Platform User Guide
Stratix 10 SoC Virtual Platform User Guide27