STOPPY - STOPPY H - EasyGates Ltdmanuals.easygates.co.uk/PDF/bft/StoppyPersio1English09-09.pdf ·...
12
D811319 ver. 11 17-09-09 I GB F D E P DISSUASORE DI PASSAGGIO E SOSTA ANTI-TRANSITING AND WAITING RETRACTABLE BOLLARD BORNE ANTI-ACCES ET ANTI-STATIONNEMENT VERSENKBARER POLLER ZUR SPERRUNG VON DURCHFAHRTEN UND HALTEZONEN DISUASOR DE TRANSITO Y ESTACIONAMIENTO CONDICIONADOR DE TRÂNSITO e ESTACIONAMENTO STOPPY - STOPPY H Via Lago di Vico, 44 36015 Schio (VI) Tel.naz. 0445 696511 Tel.int. +39 0445 696533 Fax 0445 696522 Internet: www.bft.it E-mail: [email protected] 8 027908 186416 ISTRUZIONI D’USO E DI INSTALLAZIONE INSTALLATION AND USER’S MANUAL INSTRUCTIONS D’UTILISATION ET D’INSTALLATION INSTALLATIONS-UND GEBRAUCHSANLEITUNG INSTRUCCIONES DE USO Y DE INSTALACION INSTRUÇÕES DE USO E DE INSTALAÇÃO
Transcript of STOPPY - STOPPY H - EasyGates Ltdmanuals.easygates.co.uk/PDF/bft/StoppyPersio1English09-09.pdf ·...

D811319 ver. 11 17-09-09
I
GB
F
D
E
P
DISSUASORE DI PASSAGGIO E SOSTA
ANTI-TRANSITING AND WAITING RETRACTABLE BOLLARD
BORNE ANTI-ACCES ET ANTI-STATIONNEMENT
VERSENKBARER POLLER ZUR SPERRUNG VON DURCHFAHRTEN UND HALTEZONEN
DISUASOR DE TRANSITO y ESTACIONAMIENTO
CONDICIONADOR DE TRÂNSITO e ESTACIONAMENTO
STOPPY - STOPPY H
Via Lago di Vico, 4436015 Schio (VI)Tel.naz. 0445 696511Tel.int. +39 0445 696533Fax 0445 696522Internet: www.bft.itE-mail: [email protected]
8 027908 186416
ISTRUZIONI D’USO E DI INSTALLAZIONEINSTALLATION AND USER’S MANUALINSTRUCTIONS D’UTILISATION ET D’INSTALLATIONINSTALLATIONS-UND GEBRAUCHSANLEITUNGINSTRUCCIONES DE USO Y DE INSTALACIONINSTRUÇÕES DE USO E DE INSTALAÇÃO

2 - STOPPY - Ver. 11
D81
1319
_11
USER’S MANUALENGLISH
Thank you for buying this product, our company is sure that you will be more than satisfied with its performance. This product is supplied with a “Warnings” leaflet and an “Instruction Manual”. These should both be read carefully as they provide important information about safety, installation, operation and maintenance. This product complies with recognised technical standards and safety regulations. We declare that it is in conformity with the following European Directives: 2004/108/EEC, 2006/108/EEC, 98/37/EEC (and subsequent amendments).
1) GENERAL OUTLINEUnderground anti-waiting bollard, compact and sturdy.It consists of a steel rod coated with reflecting material, and powered by an oil-bath motor.Entirely protected by a steel cylinder with cataphoresis coating which should be fitted underground.The PERSEO N control panel allows up to four bollards to be controlled simultaneously.In addition to the base STOPPy version, series “L” models, equipped with blinking signal lights, the approved version series “O” models and series “F” models with permanent anti-transiting bollard are also available. On request, “R” series provided with a heated resistor which also allows the bollard to be used in particularly cold climates (as much as –25°C) and “A” series provided with a magnetic sensor for connection to an antitheft system.Accessories:Electric brake buffer battery kit, which allows the bollard to be kept in the access closed position even when the mains power is off.
2) SAFETYIf correctly installed and used, this automation device satisfies the re-quired safety level standards. However, it is advisable to observe some practical rules in order to avoid accidental problems.Before using the automation device, carefully read the operation instruc-tions and keep them for future reference.• Keepchildren,personsandthingsoutsidetheautomationworking
range, particularly during operation.• Keepradiocontrolsorothercontroldevicesoutofchildren’sreach,
in order to avoid any unintentional automation activation.• Donotintentionallyopposetherodmovement.• Donotmodifytheautomationcomponents.• Incaseofmalfunction,activatethecut-outswitchestodisconnect
the power supply, batteries included, in order to gain access to the automation device, and request the assistance of a qualified person (installer).
• Beforeproceedingtoanyexternalcleaningoperation,activatethecut-out switches to disconnect the mains powers supply and the batteries, if provided.
• Keepthephotocellopticalcomponentsandlightsignaldevicesclean.Check that none of the safety devices (photocells) are obscured by branches or shrubs.
• Foranydirectassistancetotheautomationsystem,requestthehelpof a qualified person (installer).
• Have qualified personnel inspect the automation system once ayear.
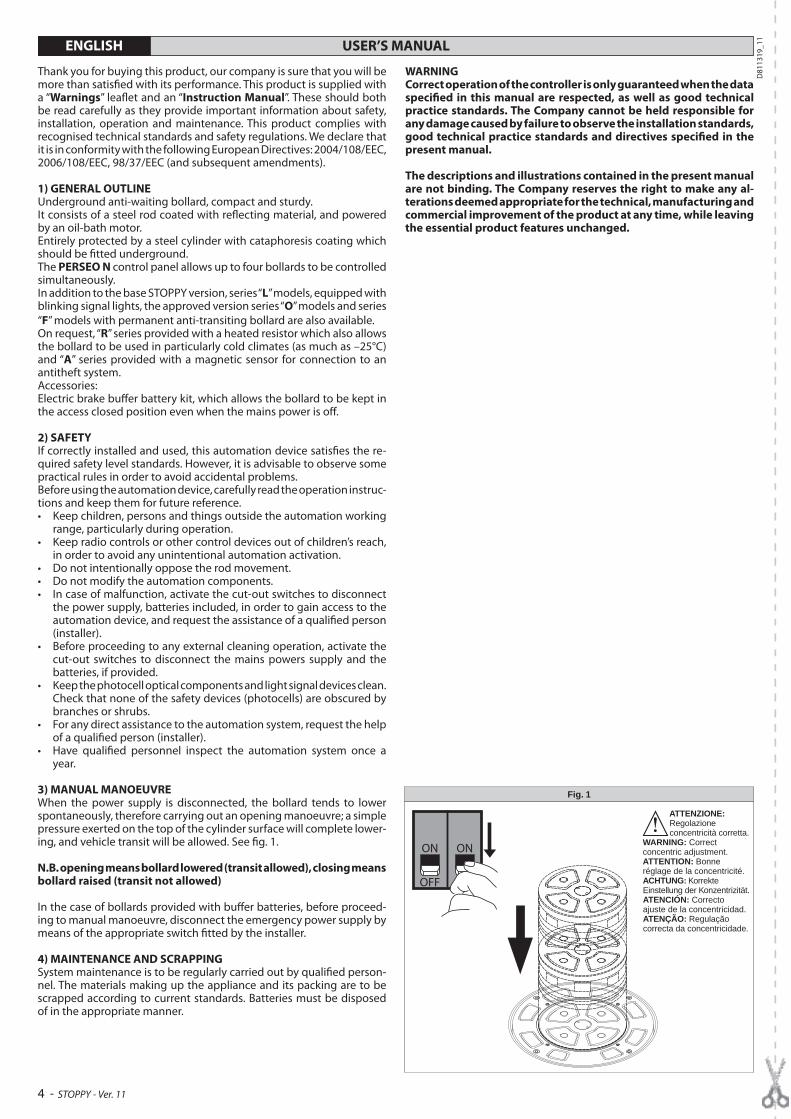
3) MANUAL MANOEUVREWhen the power supply is disconnected, the bollard tends to lower spontaneously, therefore carrying out an opening manoeuvre; a simple pressure exerted on the top of the cylinder surface will complete lower-ing, and vehicle transit will be allowed. See fig. 1.
N.B. opening means bollard lowered (transit allowed), closing means bollard raised (transit not allowed)
In the case of bollards provided with buffer batteries, before proceed-ing to manual manoeuvre, disconnect the emergency power supply by means of the appropriate switch fitted by the installer.
4) MAINTENANCE AND SCRAPPINGSystem maintenance is to be regularly carried out by qualified person-nel. The materials making up the appliance and its packing are to be scrapped according to current standards. Batteries must be disposed of in the appropriate manner.
WARNINGCorrect operation of the controller is only guaranteed when the data specified in this manual are respected, as well as good technical practice standards. The Company cannot be held responsible for any damage caused by failure to observe the installation standards, good technical practice standards and directives specified in the present manual.
The descriptions and illustrations contained in the present manual are not binding. The Company reserves the right to make any al-terations deemed appropriate for the technical, manufacturing and commercial improvement of the product at any time, while leaving the essential product features unchanged.
Fig. 1
ATTENZIONE: Regolazione concentricità corretta.
WARNING: Correct concentric adjustment.ATTENTION: Bonne réglage de la concentricité.ACHTUNG: Korrekte Einstellung der Konzentrizität.ATENCIÓN: Correcto ajuste de la concentricidad.ATENÇÃO: Regulação correcta da concentricidade.
ON
OFF
ON
4 - STOPPY - Ver. 11
D81
1319
_11

INSTALLATION MANUALENGLISHThank you for buying this product, our company is sure that you will be more than satisfied with its performance. This product is supplied with a “Warnings” leaflet and an “Instruction Manual”. These should both be read carefully as they provide important information about safety, installation, operation and maintenance. This product complies with recognised technical standards and safety regulations. We declare that it is in conformity with the following European Directives: 2004/108/EEC, 2006/108/EEC, 98/37/EEC (and subsequent amendments).
1) GENERAL SAFETYWARNING! An incorrect installation or improper use of the product can cause damage to persons, animals or things.The Company declines all responsibility for any consequences resulting from improper use of the product, or use which is different from that expected and specified in the present documentation.• The“Warnings”leafletand“Instructionbooklet”suppliedwiththisproduct
should be read carefully as they provide important information about safety, installation, use and maintenance.
• Scrappackingmaterials(plastic,cardboard,polystyreneetc)accordingtotheprovisions set out by current standards. Keep nylon or polystyrene bags out of children’s reach.
• Keeptheseinstallationinstructionstogetherwiththetechnicalbrochureforfuture reference.
• Thisproductwasexclusivelydesignedandmanufacturedfortheusespecifiedin the present documentation. Any other use not specified in this documen-tation could damage the product and be dangerous. The Company declines all responsibility for any consequences resulting from improper use of the product, or use which is different from that expected and specified in the present documentation.
• Donotinstalltheproductinpotentiallyexplosiveatmosphereorwhereverthere is a fire risk.
• TheconstructioncomponentsofthisproductmustcomplywiththefollowingEuropean Directives: 2004/108/CEE, 2006/108/EEC, 98/37 EEC and subsequent amendments. As for all non-EEC countries, the above-mentioned standards as well as the current national standards should be respected in order to achieve a good safety level.
• TheCompanydeclinesallresponsibilityforanyconsequencesresultingfromfailure to observe Good Technical Practice when installing the device described in the present manual.
• The installationmustcomplywith theprovisionssetoutby the followingEuropean Directives: 2004/108/CEE, 2006/108/EEC, 98/37 EEC and subsequent amendments.
• Disconnecttheelectricalsupplybeforecarryingoutanyworkontheinstal-lation. Also disconnect any buffer batteries, if fitted.
• Fitanomnipolarormagnetothermalswitchonthemainspowersupply,hav-ing a contact opening distance equal to or greater than 3,5 mm. Also fit an adequate cut-out device for the buffer batteries.
• Checkthatadifferentialswitchwitha0.03Athresholdisfittedjustbeforethepower supply mains.
• Checkthatearthingiscarriedoutcorrectly:connectallmetalpartsoftheclosingmechanism and all system components provided with an earth terminal.
• Fitallthesafetydevices(photocells,electricedgesetc.)whichareneededto protect the area from any danger caused by squashing, conveying and shearing.
• Positionatleastoneluminoussignalindicationdevice(blinker)whereitcanbe easily seen, and fix a Warning sign next to the structure.
• TheCompanydeclinesallresponsibilitywithrespecttotheautomationsafetyand correct operation when other producers’ components are used.
• Onlyuseoriginalpartsforanymaintenanceorrepairoperation.• Donotmodifytheautomationcomponents,unlessexplicitlyauthorisedby
the Company.• Instructtheproductuseraboutthecontrolsystemsprovidedandthemanual
opening operation in case of emergency.• Do not allow persons or children to remain within the automation operation area.• Keepradiocontrolorothercontroldevicesoutofchildren’sreach,inorderto
avoid unintentional automation activation.• Theusermustavoidanyattempttocarryoutworkorrepairontheautomation
system, and always request the assistance of qualified personnel.• Anythingwhichisnotexpresslyprovidedforinthepresentinstructions,is
not allowed.• Installationmustbecarriedoutusingthesafetydevicesandcontrolsprescribed
by the EN 12978 Standard.
2) GENERAL OUTLINEUnderground anti-waiting bollard, compact and sturdy.It consists of a steel rod coated with reflecting material, and powered by an oil-bath motor.Entirely protected by a steel cylinder with cataphoresis coating which should be fitted underground.The PERSEO N control panel allows up to four bollards to be controlled simul-
taneously.In addition to the base STOPPy version, series “L” models, equipped with blinking signal lights, the approved version series “O” models and series “F” models with permanent anti-transiting bollard are also available. On request, “R” series provided with a heated resistor which also allows the bollard to be used in particularly cold climates (as much as –25°C) and “A” series provided with a magnetic sensor for connection to an antitheft system.Accessories:Electric brake buffer battery kit, which allows the bollard to be kept in the access closed position even when the mains power is off.
3) TECHNICAL SPECIFICATIONS FOR STOPPY ACTUATOR Motor: .................................................................................................230V~ ±10% 50/60 Hz*Capacitor: ..............................................................................................................................10 µFPower input .........................................................................................................................270 WLimit switch ..........................................................................................magnetic reed sensor Absorption: .....................................................................................1.4 A (230V) 2.4 A (110V)Work frequency: ..........................................................................................................1500/24hOperating force: ..........................................................................................700 N/m (~70 kg)Degree of protection:.......................................................................................................... IP67Control panel ..............................................................................................................PERSEO NElectric brake:....................................................................................................................24VWorking time: ............................................................................................... 6s+slow-down**Working temperature ........................................................................................–15°C + 60°CWorking temperature for “R” versions .........................................................–25°C + 60°CFront impact resistance on rod raised by 350 mm: ................................... 8,000 Joule
(50% breakagepossibility)Front impact resistance on rod raised by 350 mm “O” version: ..........10,500 Joule
(50% breakagepossibility)Static Load: ........................................Max. sustainable weight with raised rod: 300kg
Max. sustainable weight with lowered rod: 15,000 kgDynamic Load: ............................................................................. Max. raising force : 100kgWeight: ...................................................................................................................... 90 kg ca.***Dimensions : .................................................................................................................. see fig. 1Manual manoeuvre: ..........................When the current is off, it becomes reversible.(* other voltages available on request)(** 9s+slow-down STOPPy H)(*** 110 kg ca. STOPPy H)
4) TECHNICAL SPECIFICATIONS FOR PERSEO N CONTROL PANELPower supply: .................................................................................. 230V~ ±10% 50/60Hz*Absorbed current: ....................................................................... 6A max (with 4 bollards)Maximum no. of motors: ........................................... up to 4 STOPPY bollards (Fig.8)Dimensions: .............................................................................................................see figure 4Fuses: ..................................................................................F2: T315 mA / F3: T2A / F4: T2A(* other voltages available on request)
WARNING! The 100V 50 and 60Hz control units can control two anti-transiting bollards in parallel only, instead of four.
5) PRELIMINARY CHECKSCheck that the installation base is stable and level.For correct operation, the bollard does not require precise verticality; however, to obtain a good aesthetic result, it is advisable to proceed to levelling the instal-lation area so as to ensure that the rod stroke is perfectly vertical.
6) FOUNDATION DIGGING AND BOLLARD POSITIONING• Proceedasshowninfig.2.• Carryoutelectricalinstallation(seeparagraph7).
7) ELECTRICAL INSTALLATION SET-UPLay out the electrical installation as shown in fig. 3, making reference to the current CEI 64-8, IEC 364 (HD 384 harmonised) electrical standards, and other national standards.
WARNING! For connection of the control panel to the mains, use a multicolour cable having a minimum 3x1.5 sq mm cross section of the type set out by the current standards. For example, if the cable is installed outside (in the open air), it must be at least equal to H07RN-F, whereas, if it is installed inside (in a raceway), it must be at least equal to H05 VV-F and have a 3x1.5 sq mm cross section.To connect the bollard to the control panel, use cable supplied as standard and already wired inside the bollard. Should the cable be too short, join it inside a watertight box, using two separate cables for low voltage and mains voltage connections.Particular attention must be paid in separating and fixing the wiring, so that the low voltage and mains voltage cables are prevented from coming into contact.Connect the control and safety devices in compliance with the installation techni-
12 - STOPPY - Ver. 11
D81
1319
_11

INSTALLATION MANUAL ENGLISHcal standards mentioned previously.Fig. 3 shows the number of connections and their cross section for an approximate length of 100 metres: in case of longer cables, calculate the cross section for the true automation load.Example of installation:I Type-approved omnipolar circuit breaker, which must be adequately
rated and have at least 3,5 mm contact opening, provided with protec-tion against overloads and short circuits. If not already installed, place a type-approved differential switch with a 0.03A threshold just before the automation system.
QR Control panel and incorporated receiverS Key selectorAL Blinker with tuned antennaM BollardP Wall-mounted pushbutton panelFte, Fre Pair of photocellsT 1-2-4 channel transmitterSF Red and green traffic lightsSM Magnetic coilNOTE: The choice of the type and number of safety devices to be installed depends on the particular use and installation location.
8) TERMINAL BOARD CONNECTIONSHaving passed adequate electric cables through the raceways, and fixed the various automation components in the chosen points, these must be connected according to the indications given in the diagrams below.Carry out connection of the phase, neutral and earth (compulsory) wires. The protection (earth) wire with yellow/green insulating sheath must be connected to the appropriate terminals marked by the earthing symbol.The automation system must only be commissioned after all the safety devices have been connected and inspected.Here follows the description of the PERSEO N mod. control unit supplied as standard (fig. 4).CN11-2 Single-phase mains supply (1=L) (2=N)3-4-5 Motor connection (3 opening - black wire, 4 common - blue wire, 5 clos-
ing - brown wire) up to 4 motors in parallel N.B. opening means bollard lowered (transit allowed), closing means bol-
lard raised (transit not allowed)6-7-8 Traffic light output (6 green, 8 red, 7 common) 230V 25+25W max9-10 Blinker output 230VCN211-12 Electric brake outputs 24V (up to 4 in parallel) white wires13-14 Buffer battery board input at 12 Vd.c. to maintain electric brake with mains
power off15-16 STOPPy signalling LED outputs 24V~ (up to 4 in parallel) 0.8 A max yellow
wires17-18 AUX (contact NO) It is used to avail of a N.O. clean contact with capacity
of 250V 5A max., activated intermittently as N.O.-N.C. adjustable from 0 to 10 seconds before the bollard raises, throughout all movements and 2 secondsbefore lowering. It proves particularly useful to command luminous and acoustic indicators.
Only For Stoppy O: To power the bollard horn, jumper terminals 18-19 and connect the two
orange cables to terminals 17-20 (Fig. 4).19-20 Supply to accessories 24 V~ 1 A maxCN321-22 Photocell input (NC contact) active on closing23-24 Stop command input (NC contact) - stops the manoeuvre and leaves the
bollard released. A subsequent Start command always activates bollard opening, unless already opened, in which case it controls closing.
24-25 Opening limit switch input - green wires26-29 Start command input (NO contact, 2-step logic: open-close) - with the
bollard raised, the Start command initiates the lowering manoeuvre, dur-ing which this command is not active; with the bollard lowered, the Start command initiates the manoeuvre, and during rod raising, a new Start command interrupts the manoeuvre and controls lowering.
27-29 Open command input (NO contact) The contact “open” also acts as safety device in that, after the bollard has
beeen lowered, it deactivates the closing and start command, interrupting also the automatic re-closing until it is released.
28-29 Close command input (NO contact)
30-31 CN4 Heating resistorTerminal preset for supplying the heating resistor (230V~100W max) on the “R” series models. Allows the bollard to be used even in particularly cold climates. However, even with the heating resistor installed, it may be necessary to remove any layers of ice which have formed on the bollard surface (red wires).
32-33 CN6 Antitheft devicePresetting of reed sensor located on the flange of the “A” series bollard. Allows the bollard to be connected to an external antitheft device. In the case of an at-tempt to tamper with the bollard, the sensor activates the alarm system (orange wires, NC contact). CN8 Radio Receiver Connection for single and double-channel radio receiverThe second channel is always connected to the close command (see dip-switch 5 configuration).The first channel can be configured, by means of the J1 jumper (see fig. 4), as:• Start with 2-step logic: open-close see Start command description in the paragraph concerning terminal board connections.• Openonly accepts the opening command.To control closing and opening by means of two different keys on a double-channel transmitter, use a double-channel receiver and move the J1 jumper on the PERSEO N control panel to the Open position.
34-35 CN9 AntennaAntenna input (35 signal, 34 braid). RG58 Cable.
The components - Heating resistor (red cables), Electric brake (white cables), LED lights (yellow cables), Opening limit switches (green cables) and Anti-theft contact (orange cables) - are not polarised, therefore the position of the cables of the same colour is interchangeable.
9) CONNECTION TO SEVERAL MOTORSRefer to Fig. 9 for the connection to several motors.The motor capacitors must be connected in parallel. To do this, cut the CM con-nector of the capacitor and use an auxiliary external terminal board.The limit switches must be connected in series as indicated in Fig. 9. The electric brakes must be connected in parallel as indicated in Fig. 9. The connections must be completed in a workmanlike manner.
DIP-SWITCH CONFIGURATION1 T LAVORO
LEAVE THE DIP1 OFF!2 T PAUSAEnables subsequent automatic closingOFF= excluded ON= dwell time to be entered and set by means
of appropriate trimmer (dwell time) from 2s to 120s
3 SET PAUSAEnables Start and Close commands during dwell timeOFF= disabled ON= enabled4 SET APStart command only valid when activated after Open commandOFF= independent inputs ON= restricted inputs5 SET CHClosing commandOFF= impulse activated ON= impulse released6 PRELAMPPre-flashing function on flashing light, traffic light and AUX output OFF= excluded ON= Before each lowering phase, it activates the
flashing light and the AUX output for 2 seconds and before each raising phase it activates the flashing light and the AUX output (adjustable with AUX trimmer) and alte nates the green and red lamps of the traffic light for 0 to 10 seconds.
7 LED OK APOperation of LED lights with bollard raisedOFF= fixed lights ON= blinking at 1s8 LED OK CHOperation of LED lights with bollard loweredOFF= fixed lights ON= blinking at 0,5sJ2
Device select50 cm= STOPPY70 cm= STOPPY H
TRIMMER SETTINGT AUX It adjusts the duration, from 0 to 10 seconds, of the pre-flashing func-
tion of the flashing light, traffic light and activation of the clean AUX contact between terminals 17-18 before the bollard rises.
V RALL Sets the approaching speed towards the mechanical closing liminting
STOPPY- Ver. 11 - 13
D81
1319
_11

INSTALLATION MANUALENGLISHdevice (on opening the slow-down is steady).
TPAUSA Sets the dwell time from 2s to 120s.
10) CONCENTRICITY SETTING UPFor correct operation, proceed to setting up the cylinder concentricity in order that, during the opening and closing manoeuvres, movement occurs smoothly, regularly and without oscillation. To set up the cylinder, proceed as follows:Use a no.4 Allen key to unscrew and remove dowels A (fig. 5).Insert a no.3 flathead screwdriver (DIN 0,8x5) and turn it one way or the other until obtaining concentricity (fig. 5).During this phase concentricity can be checked visually, making sure that the distance between the cylinder and external flange is as uniform as possible. Then proceed to a practical check, carrying out a few manoeuvres during which the cylinder movement can be checked. Screw the 4 dowels in tight.
WARNING! Concentricity is very important for the correct operation and life of the actuator; it is to be first calibrated during the installation phase, checked after 6 months and then every year.Operation with marked eccentricity could lead to deterioration of the rod seals.
11) DISASSEMBLYShould it be necessary to gain access to the bollard internal components or motor, refer to fig. 6 and proceed as follows:1 Disconnect the electrical supply before carrying out any operation on the
system. Also disconnect any buffer batteries, if fitted. 2 Use a no.6 Allen key to unscrew and remove 4 external screws A, and a no.4
Allen key to remove dowels B.3 Remove external flange C. 4 Use special wrench D (supplied) to unscrew and remove central block E.5 Use a no.13 socket spanner to unscrew and remove underlying nut F and
respective washers. 6 At this point, use a small screwdriver as a lever on the junction between
cylinder and cap to remove the upper part of cylinder G.7 If the model is supplied with signal indication lights, these must be discon-
nected. Then unscrew piston pin H, and subsequently the Faston connec-tions.
8 Take out cylinder I, using a cable or a hook passing through the upper cylinder holes.
Do not place your hands in the upper holes to take out or put back the cylinder (the presence of centre pin L could cause injuries). Withdraw the signal light connection cable from the cylinder.
9 Withdraw 4 adjustment pins M from supports N, and then withdraw supports N from adjustment bracket O.
10 It is now possible to take out the entire motor unit and proceed to any inspec-tions or repairs needed.
12) ASSEMBLY1 Check that adjustment brackets O are completely screwed onto lower bracket
P, in order that it might be easier to set up concentricity after assembly is completed.
2 Reposition the motor unit on the bottom of the cylinder, making sure that the cable is not squashed under the lower plate. For this purpose, we advise you to tie a wire to the cable to keep it raised during motor positioning; later you can proceed to arrange the exceeding cable under upper flange Q, so that it does not interfere with the rod stroke. Also check the alignment of adjustment pins M with reference to the holes in the cylinder, in order for positioning of flange C to take place without any problems.
3 Proceed to repositioning 4 supports N on the adjustment brackets, as well as adjustment pins M.
4 Insert cylinder I, using a cable or a hook passing through the upper cylinder holes. Do not place your hands in the upper holes to take out or put back the cylinder (the presence of central pin L could cause injuries). In the case of bollards supplied with signal lights, provide for the power supply cable to pass through (this operation can be made easier by tying a wire to the connection pin). Mechanical end-of-stroke R is fitted to the bottom of the cylinder; during re-assembly, the position of the end-of-stroke referred to sensor S must be respected. In the case of bollards provided with alarm sensors, pay attention to the position of magnet T fitted to the flange, which must coincide with the position of sensor U fixed to the cylinder.
5 Reconnect the light supply Faston connections and retighten piston pin H. The signal indication lights are not polarised, therefore the position of the contacts is irrelevant.
6 Reposition the upper part of cylinder G and fix nut F by means of a no.13 socket spanner.
7 Use special wrench D to screw central block E.8 Use a no.6 Allen key to tighten 4 external screws A, and a no.4 Allen key to
tighten dowels B.
WARNING! After each disassembly and assembly operation, proceed to checking concentricity.
13) MANUAL MANOEUVREWhen the power supply is disconnected, the bollard tends to lower spontane-ously, therefore carrying out an opening manoeuvre; a simple pressure carried out on the top cylinder surface will complete lowering, and vehicle transit will be allowed. See fig. 8.To prevent the cylinder from lowering when the mains power is off, a buffer battery system is required. In this case, the installer must fit a battery cut-out switch, in order to allow manual manoeuvre to be carried out when the mains power is off. The installer undertakes to instruct the user on correct automation use, highlight-ing the operations to be carried out in case of emergency.
14) MALFUNCTIONS. CAUSES AND REMEDIES• Ifthebollarddoesnotmovesmoothly,proceedtosettingupconcentricity
(see paragraph 9).• Iftheroddoesnotmoveup,checkthatthemainspowersupplyison,any
buffer batteries supplied are efficient, and the fuses are in good condition; also check the motor connections to the control panel.
• If the roddoesnotmovedown, it isprobable that anOpencommand isconstantly given from the control panel or other external device. Therefore temporarily disconnect all the external devices in order to identify the cause of the problem. If the rod still remains raised, proceed to disconnecting the power supply and then checking the control panel. Anyway, when the power supply is off, the rod should spontaneously tend to lower; if this does not happen, proceed to disassembly (paragraph 10) in order to identify any mechanical problems preventing the lowering manoeuvre.
15) DISMANTLINGWhen the automation device is disassembled to be reassembled on another site, proceed as follows:• Disconnectthepowersupplyandtheentireelectricalinstallation• Removethebollard,takingcarenottodamagethesheathwhichistoprotect
the electric cables during the digging operations. • Disassemblethecontrolpanelandalltheinstallationcomponents.• Inthecasewheresomeofthecomponentscannotberemovedoraredam-
aged, they must be replaced.
16) MAINTENANCE AND SCRAPPINGSystem maintenance is to be regularly carried out by qualified personnel. The materials making up the appliance and its packing are to be scrapped according to current standards. Batteries must be disposed of in the appropriate manner.
WARNINGCorrect operation of the controller is only guaranteed when the data specified in this manual are respected, as well as good technical practice standards. The Company cannot be held responsible for any damage caused by failure to observe the installation standards, good technical practice standards and directives specified in the present manual.
The descriptions and illustrations contained in the present manual are not binding. The Company reserves the right to make any alterations deemed appropriate for the technical, manufacturing and commercial improvement of the product at any time, while leaving the essential product features unchanged.
14 - STOPPY - Ver. 11
D81
1319
_11

Filo terraGround surface levelHauteur au solBodenniveauNivel del pavimento
A B C D E F
AL
2x1mm2
4x1mm2
13x1mm2
3x1mm2
3x1mm2
3x1mm2
2x1,5mm2
RG58
3x1,5mm2
QR
I
P
Fte
S
M
Fre
T
SF
SM
SM
*
*
* 700 mm STOPPY H** 1175 mm STOPPY H
**49
0
10 m
D
C
E
F
A B
700
Ø 8
00 x
100
0
150
H2O
10 m
H2O
Ø125
** ** **
*
A Fondazione, Foundation, Fondation, Fundament, Fosa, Fosa
B
C
Posa tubo in cemento, Laying the cement tube, Pose tube en ciment, legen des zementrohrs, Colocaciòn tubo de cemento
C DDrenaggio, Drainage, Drainage, Drainage, Drenaje
Sabbia fine, Fine sand, Sable fin, Feiner sand, Arena fina
1300
Fig. 1 Fig. 2
Fig. 3
*
* 1175 mm STOPPY H
* 1400 mm STOPPY H
* 1350 mm STOPPY H** Ø 800 x 1250 mm STOPPY H*** 950 mm STOPPY H
* 1400 mm STOPPY H** 1250 mm STOPPY H*** 1175 mm STOPPY H
10 m
1000 91
5
200
1300
****
*
STOPPY- Ver. 11 - 27
D81
1319
_11

Fig. 4
PERSEO
BT
LED
AUX
AUX
NO
STOPPY GNDGiallo-verdeYellow-GreneJaune-VertGelbe-GrüneAmarillos-VerdesAmarelos-Verdes
DIP SWITCH J250 cm: STOPPY70 cm: STOPPY H
1
F N230V
~
AP
CH
C
C
CO
M
24V
ac
FTC
CO
M
STO
P
CO
M
FTC
STO
P
FCA
STA
RT
AP
RI
CH
IUD
I
FCA
STA
RT
AP
RI
CH
IUD
I
CO
M
2
M
V RSL
EF BT LED AUX
3 4 5 6 7 8 9 10 11 12 13 14 15 16 17 18 19 20 21
CN3
CN9
CN8
CN7
CN6
ANTIFURTO
F4OUT 24V
T2A
F3EF
T2A
F2LG 12V
T315 mA
TRASFORMATORERESISTENZA230 V RISCALDANTE
F N
IN OUT
CN5
CN4
30 31 32 33
CON.RX
P1 P2
J2
TR1
T.LA
VOR
OT.
PAU
SASE
T PA
USA
SET
APSE
T C
HPR
ELAM
P.LE
D O
K AP
LED
OK
CH
TR2
TR3
START
T.AUX
ON
V.RALL. T.PAUSA
RESET
70CM 50CM
CN2CN1
F1 LINECM
TRC1
TRC2
TRC3
START APRI
J1
TRC4
GND
EA
RT
H
GND
GND
CN3CN2
22 23 24 25 26 27 28 29
PERSEO
CN1
1
2
3
4
5
6
7
8
9
10
L
N
M
ANT.
STOP
COM
FTC
COM
NC
NC
FCA
START
NO
NOAPRINOCHIUDI
ALARM
COM
NO
NC
COM
V
R
40W max.
CN2
11
12
13
14
15
16
17
18
19
20
EF
30
31
24V
24V
17
18
19
20
CN3
CN4
32
33
CN6
34
35
CN9
21
22
23
24
25
26
27
28
29
TENSIONE DI RETE - MAINS VOLTAGE - TENSION DE LIGNENETZSPANNUNG - TENSIÓN DE RED - TENSÃO DE REDE3 - Nero/Black/Noir/Schwartz/Negro/Preto4 - Blu/Blue/Bleu/Blau/Azul/Azul Escuro5 - Marrone/Brown/Brun/Braun/Marròn/Castanho30 - Rosso/Red/Rouges/Rot/Rojos/Vermelos31 - Rosso/Red/Rouges/Rot/Rojos/Vermelos
SOLO PER STOPPY O - ONLY FOR STOPPY O - UNIQUEMENT POUR LE MODELE O - NUR STOPPY O - UNICAMENTE PARA STOPPY O - ALLEEN VOOR STOPPY O
Marrone/Brown/Brun/Braun/Marròn/CastanhoBianco/White/Blanc/Weiße/Blanco/Branco
Verde/Green/Vert/Grüne/Verdes/Verdes
Verde/Green/Vert/Grüne/Verdes/Verdes Rosso/Red/Rouges/Rot/Rojos/Vermelos
Rosso/Red/Rouges/Rot/Rojos/Vermelos
Arancio/Orange/Oranges/Orangefarbene/Naranjas/Cor-de-LaranjaArancio/Orange/Oranges/Orangefarbene/Naranjas/Cor-de-Laranja
ALARM
NC
32
33
CN6
Arancio/Orange/Oranges/Orangefarbene/Naranjas/Cor-de-Laranja
Arancio/Orange/Oranges/Orangefarbene/Naranjas/Cor-de-Laranja
Arancio/Orange/Oranges/Orangefarbene/Naranjas/Cor-de-Laranja
BASSA TENSIONE - LOW VOLTAGE - BASSE TENSIONKLEINSPANNUNG - BAJA TENSIÓN - BAIXA TENSÃO11 - Bianco/White/Blanc/Weiße/Blanco/Branco12 - Bianco/White/Blanc/Weiße/Blanco/Branco15 - Giallo/Yellow/Jaune/Gelbe/Amarillos/Amarelos16 - Giallo/Yellow/Jaune/Gelbe/Amarillos/Amarelos 24 - Verde/Green/Vert/Grüne/Verdes/Verdes25 - Verde/Green/Vert/Grüne/Verdes/Verdes32 - Arancio/Orange/Oranges/Orangefarbene/Naranjas/Cor-de-Laranja33 - Arancio/Orange/Oranges/Orangefarbene/Naranjas/Cor-de-Laranja
Nero/Black/Noir/Schwartz/Negro/Preto
Blu/Blue/Bleu/Blau/Azul/Azul Escuro
Bianco/White/Blanc/Weiße/Blanco/Branco
Giallo/Yellow/Jaune/Gelbe/Amarillos/Amarelos
Giallo/Yellow/Jaune/Gelbe/Amarillos/Amarelos
28 - STOPPY - Ver. 11
D81
1319
_11

Fig. 5
NO
OK
1
2
3
STOPPY- Ver. 11 - 29
D81
1319
_11

Fig. 6
Fig. 8Fig. 7
B
C
D
E
G
H
R
S
T
U
I
L
M
N
O
Q
P
F
A
ATTENZIONE: Rimuovere l’anello di protezione in gomma prima della messa in funzione.
WARNING: Remove the protective rubber ring before use.ATTENTION: Retirez l’anneau de protection en caoutchouc avant la mise en service.ACHTUNG: Entfernen Sie vor der Inbetrieb-nahme den Schutzring aus Gummi.ATENCIÓN: Antes de poner en funcionamiento, quitar el anillo de protección de goma.ATENÇÃO: Remover o anel de protecção de borracha antes de colocar em funcionamento.
ATTENZIONE: Regolazione concentricità corretta.WARNING: Correct concentric adjustment.ATTENTION: Bonne réglage de la concentricité.ACHTUNG: Korrekte Einstellung der Konzentrizität.ATENCIÓN: Correcto ajuste de la concentricidad.ATENÇÃO: Regulação correcta da concentricidade.
ON
OFF
ON
30 - STOPPY - Ver. 11
D81
1319
_11

Fig. 9
BT
LED
LED1 LED2 LED3 LED4
AUX
NO
AP
CH
C
CN11
2
3
4
5
6
7
8
9
10
L
N
STOP
COM
FCA
FTC
START
APRI
CHIUDI
ALARM
COM
COM
V
R
40W max.
CN211
12
13
14
15
16
17
18
19
20
EF
EF1
30
31
24V
CN3
CN4
32
33
CN6
21
22
23
24
25
26
27
28
29
Marrone/Brown/Brun/Braun/Marròn/Castanho
Bianco/White/BlancWeiße/Blanco/Branco
Verde/Green/VertGrüne/Verdes/Verdes
Rosso/Red/RougesRot/Rojos/Vermelos
Arancio/Orange/OrangesOrangefarbene/Naranjas/Cor-de-Laranja
Nero/Black/Noir/Schwartz/Negro/Preto
Blu/Blue/Bleu/Blau/Azul/Azul Escuro
Giallo/Yellow/JauneGelbe/Amarillos/Amarelos
EF2 EF3 EF4
FCA1
NO
FCA2
NO
FCA3
NO
FCA4
NO
AL.1
NC
AL.2
NC
AL.3
NC
AL.4
NC
R1 R2 R3 R4
STOPPY1
STOPPY2
STOPPY3
STOPPY4
M1
C
M2
C
M3
C
M4
C
ANT.34
35CN9
STOPPY- Ver. 11 - 31
D81
1319
_11