Stitch and Glue 101Stitch and Glue Basic Tutorial 1. Overview 2. Draw the Panels 3. Cut and Assemble...
28
Stitch and Glue 101 Copyright 2016 TwoMorrow Holdings LLC Stitch and Glue Basic Tutorial 1. Overview 2. Draw the Panels 3. Cut and Assemble the Panels 4. Epoxy Glue 5. Hull Assembly 6. Frames and Fiberglass 7. Seats and Rubrail 8. Outside Glass and Keel 9. Fairing and Sanding 10. Paint 11. Final Details and Launch This stitch and glue tutorial shows the building of a typical small boat, the FL12. The FL12 is a version of our successful FL11. A prototype was built to test the new assembly method. Pictures were taken and this new HowTo file shows every step of the construction, from reading the blueprints to the final coats of paint. This tutorial is an excellent introduction to stitch and glue boat building, whatever the size of boat you intend to build. Almost all the techniques described below can be used for other designs including large sail and power boats. Definition: A stitch and glue boat hull is made of plywood panels assembled with fiberglass tape. Contrary to traditional boat building in which molds define the hull shape, in stitch and glue, the hull panels define the shape. This is important to remember: let the plywood panels take their natural fair shape. Another major difference with wooden boat building is that the framing of a stitch and glue boat is made of fiberglass. Just as in production fiberglass boats, in our designs, the chine, keel, bow, etc., are made of fiberglass.
Transcript of Stitch and Glue 101Stitch and Glue Basic Tutorial 1. Overview 2. Draw the Panels 3. Cut and Assemble...

Stitch and Glue 101
Copyright 2016 TwoMorrow Holdings LLC
Stitch and Glue Basic Tutorial
1. Overview
2. Draw the Panels
3. Cut and Assemble the Panels
4. Epoxy Glue
5. Hull Assembly
6. Frames and Fiberglass
7. Seats and Rubrail
8. Outside Glass and Keel
9. Fairing and Sanding
10. Paint
11. Final Details and Launch
This stitch and glue tutorial shows the building of a typical small boat, the FL12. The FL12 is a version of our
successful FL11. A prototype was built to test the new assembly method. Pictures were taken and this new
HowTo file shows every step of the construction, from reading the blueprints to the final coats of paint.
This tutorial is an excellent introduction to stitch and glue boat building, whatever the size of boat you intend
to build. Almost all the techniques described below can be used for other designs including large sail and
power boats.
Definition:
A stitch and glue boat hull is made of plywood panels assembled with fiberglass tape. Contrary to traditional
boat building in which molds define the hull shape, in stitch and glue, the hull panels define the shape. This is
important to remember: let the plywood panels take their natural fair shape. Another major difference with
wooden boat building is that the framing of a stitch and glue boat is made of fiberglass. Just as in production
fiberglass boats, in our designs, the chine, keel, bow, etc., are made of fiberglass.

Stitch and Glue 101
Copyright 2016 TwoMorrow Holdings LLC
Building Method Outline:
This How-To file is divided into sections and follows the steps taken to build the boat:
-Cut the plywood panels for the sides and bottom
-Assemble the panels with butt blocks
-Cut the frames and transom
-Assemble the hull: sides and bottom around frames and transom
-Build the fiberglass seams on putty fillets
-Install the seat tops
-Build the rubrail
-Fair the hull
-Install skeg (keel)
-Sand and paint
You may be familiar with the standard stitch and glue hull assembly method. The hull panels are bent around
some frames. This is sometimes called the sharpie assembly method.
Step by Step:
1. Cut the side panels and assem-
ble them with butt blocks.
2. Attach the side panels together
at the bow and insert the transom
panel at the other end.
3. Insert all the frames between the
sides.
4. Flip the hull over and cover the
sides with the bottom panel.
5. Flip the hull and fiberglass inside
6. Cover the seats and foredeck, fi-
berglass edges, flip and fiberglass
outside.
7. Finish by installing rubrail, op-
tional breasthook etc.

Stitch and Glue 101
Copyright 2016 TwoMorrow Holdings LLC
Cutting the Panels:
Let’s start by drawing the shape of the panels on the plywood, one side panel first.
How to draw a panel (side) on the plywood:
Blueprints or Patterns?
Blueprints can be intimidating for first time builders and many assume that full size patterns will be easier. This
is not true: full size patterns lines are difficult to transfer to plywood and patterns are inaccurate. Patterns are
difficult to handle and position precisely. With humidity and temperature variations, the paper patterns shrink
and stretch up to 2% and this means a few inches in the case of the FL12. Full size patterns and dimensions
are provided with most of our small boat plans. You choose the method you prefer but, in this file, we will
explain how to use dimensions. Transferring plans dimensions to the plywood is easy when done one step at
a time. We will work not only one panel or one curve at a time but one point at a time. To draw curves, we
will mark points and then join them with a batten or PVC pipe. This method produces accurate and fair curves.
Plywood Layout:
Let’s look at the plans page that shows the nesting of the panels on the plywood:
The drawing shows two side panels and some other boat parts nested on two sheets of plywood. The side
panel is longer than one sheet of plywood. It is made of two pieces joined with a butt block. We will line up
two sheets lengthwise to draw the panel.
As you can see, one side of the panel is straight and coincides with the edge of the plywood sheet. That
straight line will become the nice sheer curve when bent.
Terminology:
As seen in the diagram, here are some of the basic building
terms for parts of a boat, and where to locate them.
Using Dimensions? Then mark points.

Stitch and Glue 101
Copyright 2016 TwoMorrow Holdings LLC
The panels drawing shows the dimensions of
the side panels. The two ends are straight lines:
we will mark the corners and draw a line be-
tween the points. The chine side is slightly
curved. To draw that curve, we will mark points
and join them with a smooth curve.
To locate the points, we will draw vertical lines
every 24” and measure a distance from the
lower edge of the plywood sheet. Note the di-
mension text “Typ”, this means unless another
distance is shown, the distance between lines
is the Typical distance.
In this case, the typical vertical lines start in the
middle, between the two plywood sheets. We will
start by drawing those vertical lines. Remember,
take it one step at a time. In this case, let’s just
draw those lines, nothing else.
Mark a point every 24” along the edge of the ply-
wood. We don’t need a square to draw the ver-
tical lines, let’s use the plywood sheets.
Slide one sheet of plywood over the other, keep
the edges lined up, draw a line along the short
edge. All your vertical lines will be perfectly
square.

Stitch and Glue 101
Copyright 2016 TwoMorrow Holdings LLC
This is how it looks with all the lines marked. Next
step: let’s put our plywood sheets together to
draw the panels.
Along each vertical line we will mark the points that outline the
shape of the side panel. We start with points for the curved side:
the chine edge of the panel. The distances from the edge are
clearly marked.
In this case, the first point is at 16” from the edge, the next one
is at 14 ¾”.
Draw all the points.

Stitch and Glue 101
Copyright 2016 TwoMorrow Holdings LLC
The ends of the chine are a bit different. The tip of the bow and
transom are not on a Typical line. The plans show how far they
are lengthwise.
In this case, you measure 8” from the previous typical line. Be-
ware, the dimensions may be different on your plan, this is just an
example.
Draw a vertical line at that distance. Along that
new line at 8”, we show the vertical distance (off-
set) along that line: 12-5/8”. Measure and mark
the location of that point. It is the end of the chine
curve, a corner of the transom.
To draw the transom edge of the side panel, we
need a second point, the end of the sheer side.
That point, along the edge of the plywood is also
not on a typical 24” line. The plans show how far
that point is from the last typical line. Mark the
end of the sheer line. Now, join the two end points
and you have the transom side.

Stitch and Glue 101
Copyright 2016 TwoMorrow Holdings LLC
Proceed the same way at the bow: draw a vertical line,
mark a point and join your two points. This is your bow edge.
Now we have three of the sides: the two ends and the
sheer edge. Next, we will draw the curved side of the
panel, the chine side. We have the two ends and marked
all the points in between.
All that is left to do is to draw a nice curve. We will do that
with a few nails and a batten. Drive a nail in the plywood at
each point of that line. Let’s start at the bow.
To draw a fair curve, we use a PVC pipe. The pipe is curved around
the nail points. Note how we use weights to keep the pipe in place.
Ideally, we should use a longer pipe.
Assemble the Panels
Cut the First Panel
With the entire outline drawn, we are ready to cut
the first side panel. We use a circular saw with the
cut depth adjusted just at the thickness of the
panel. This produces a much smoother curve
than a jigsaw.

Stitch and Glue 101
Copyright 2016 TwoMorrow Holdings LLC
When the first side is cut, we use it as a pattern to draw the second
side. Check your nesting drawing for the best layout on the plywood.
The Bottom Panel:
We will use the same method to draw and cut the bottom panel:
along lines every 24”, we mark distances, drive nails in those
points and draw a nice curve with a PVC batten. The only differ-
ence is that instead of measuring distances from the edge of the
plywood, we will measure from a centerline. The plans show the
location of that centerline. Use the same technique as before to
draw that centerline: use a plywood panel as a straight edge.
Cut the Bottom Panel.
Now that the pieces for the side and bottom panels are cut, we
must assemble them with butt blocks to make long, one-piece
panels.
Making Long Panels with Butt Blocks:
Long panels are made of several pieces glued to-
gether with butt blocks. Butt blocks are pieces of
plywood of the same thickness than the panels,
epoxy glued. In the case of the FL12, the butt
blocks do not cover the whole seam. Let's start by
assembling a side panel.

Stitch and Glue 101
Copyright 2016 TwoMorrow Holdings LLC
Gluing the Panels:
Note that the layout shows the panels as a mirror image: beware
not to glue a butt block on the outside of the boat!
Before applying the glue, we recommend priming the plywood
with liquid resin. When we say resin, we mean a mix of resin and
hardener, not just the resin part. Epoxy resin is always made by
mixing two parts, the resin and the hardener.
Epoxy resin is easy to use. The resin looks like a thick varnish. You
must mix the two parts, resins and hardener before application.
Apply the mixed resin to the plywood or fiberglass and after a few
hours, the resin will become hard and strong. See our separate
resin and fiberglass HowTo files for details and experiment with our
trial kit.
Note the paper under the seam to prevent the parts to
become glued to the shop floor. Plastic sheeting is
even better. The butt blocks are generously coated
with epoxy glue.
Epoxy glue is liquid epoxy resin mixed with woodflour to
a peanut butter consistency. See the HowTo files
about resin, glue, and putty to learn more about mixing
those ingredients.
Glue the butt block to the panels and puts some
weights on the butt blocks. Do not apply too much
pressure. Epoxy does not require a tight fit quite
the opposite. If you push all the glue out with too
much pressure, the bond will fail.
Wait a few hours for the epoxy to cure, ideally overnight.
During that time, you can cut the frames and transom. The
frames are made of straight lines. They are easier to draw and
to cut than the side and bottom panels. You probably will not
need it but there is a separate detailed HowTo file that shows
how to draw a frame on the plywood and cut it.
Stitch and Glue 101
Copyright 2016 TwoMorrow Holdings LLC
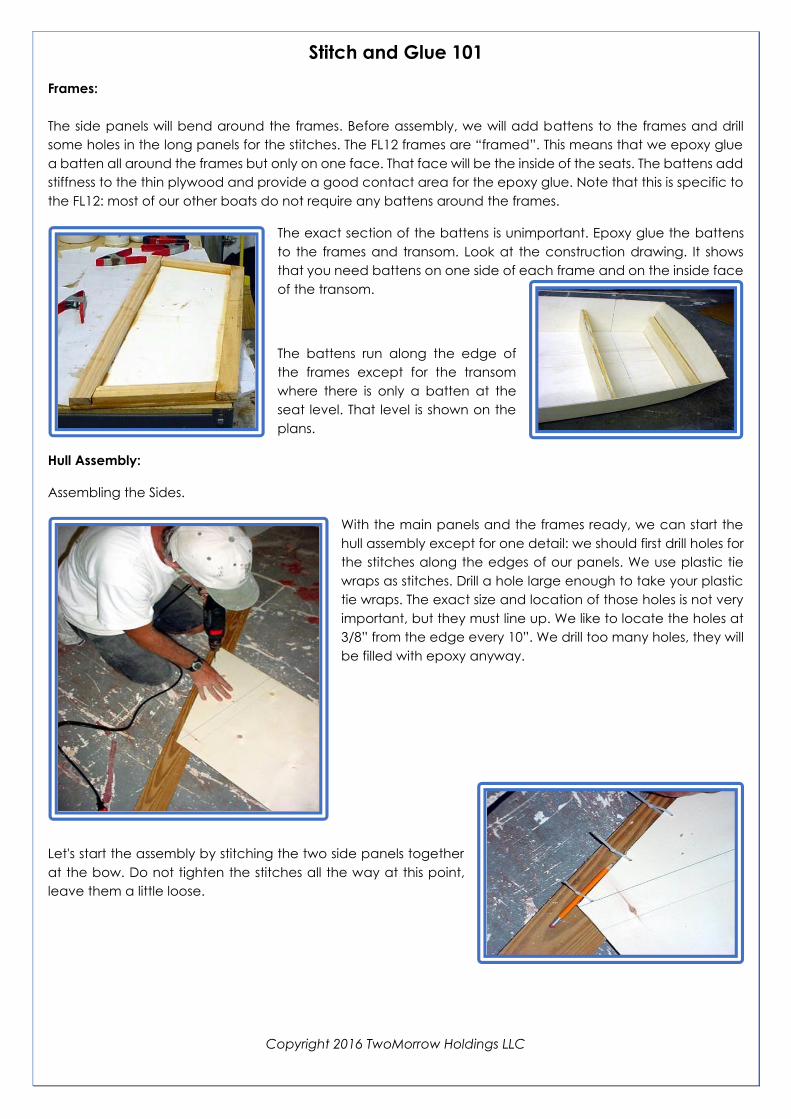
Frames:
The side panels will bend around the frames. Before assembly, we will add battens to the frames and drill
some holes in the long panels for the stitches. The FL12 frames are “framed”. This means that we epoxy glue
a batten all around the frames but only on one face. That face will be the inside of the seats. The battens add
stiffness to the thin plywood and provide a good contact area for the epoxy glue. Note that this is specific to
the FL12: most of our other boats do not require any battens around the frames.
The exact section of the battens is unimportant. Epoxy glue the battens
to the frames and transom. Look at the construction drawing. It shows
that you need battens on one side of each frame and on the inside face
of the transom.
The battens run along the edge of
the frames except for the transom
where there is only a batten at the
seat level. That level is shown on the
plans.
Hull Assembly:
Assembling the Sides.
With the main panels and the frames ready, we can start the
hull assembly except for one detail: we should first drill holes for
the stitches along the edges of our panels. We use plastic tie
wraps as stitches. Drill a hole large enough to take your plastic
tie wraps. The exact size and location of those holes is not very
important, but they must line up. We like to locate the holes at
3/8” from the edge every 10”. We drill too many holes, they will
be filled with epoxy anyway.
Let's start the assembly by stitching the two side panels together
at the bow. Do not tighten the stitches all the way at this point,
leave them a little loose.

Stitch and Glue 101
Copyright 2016 TwoMorrow Holdings LLC
The side panels are now stitched together at the bow. Turn them on
edge and insert the transom between them.
Transom and Frames Assembly:
Stitch the side to the transom. Note that the stitches are loose. We do not try to align panels perfectly at this
stage.
Insert one of the mid seat frames between the sides. Note that the
battens are inside of the future seat box and that we push the frame
against the butt block. The butt block is a locator.
Insert the second mid seat frame, push it against the butt block.
The frames are held in position by the pressure of the side panels, but we will secure each frame by driving
two screws into each side through the side panel in the framing. Do not drive the screws all the way through,
that would create a flat spot in the side. Those screws are temporary, we will remove them later.
No epoxy glue is used at this point, all parts are fitted dry first. Two more frames must be installed: the front
and rear seat frames. To position those frames in the boat, we will use the seat tops. Let's cut the seat tops
first.
Aligning with the Seat Tops:
In most of our boats, we recommend assembling the hull before cutting the seat tops. The reason is that small
mistakes may creep in and it is safer to check measurements against an assembled hull but the FL12 is so
simple that we can make an exception. The dimensions for the seat tops are shown on the plans. Except for
the bow seat top, we show those parts with four straight sides. The curvature of the sides along the hull is so
small that it doesn't make sense to try to cut a curve. The edge will be covered by fiberglass tape anyway
and a gap is good with our building materials. This is not wooden boat building. We do not want tight fitting
parts. We need a small gap between parts for the epoxy to bond.
Stitch and Glue 101
Copyright 2016 TwoMorrow Holdings LLC
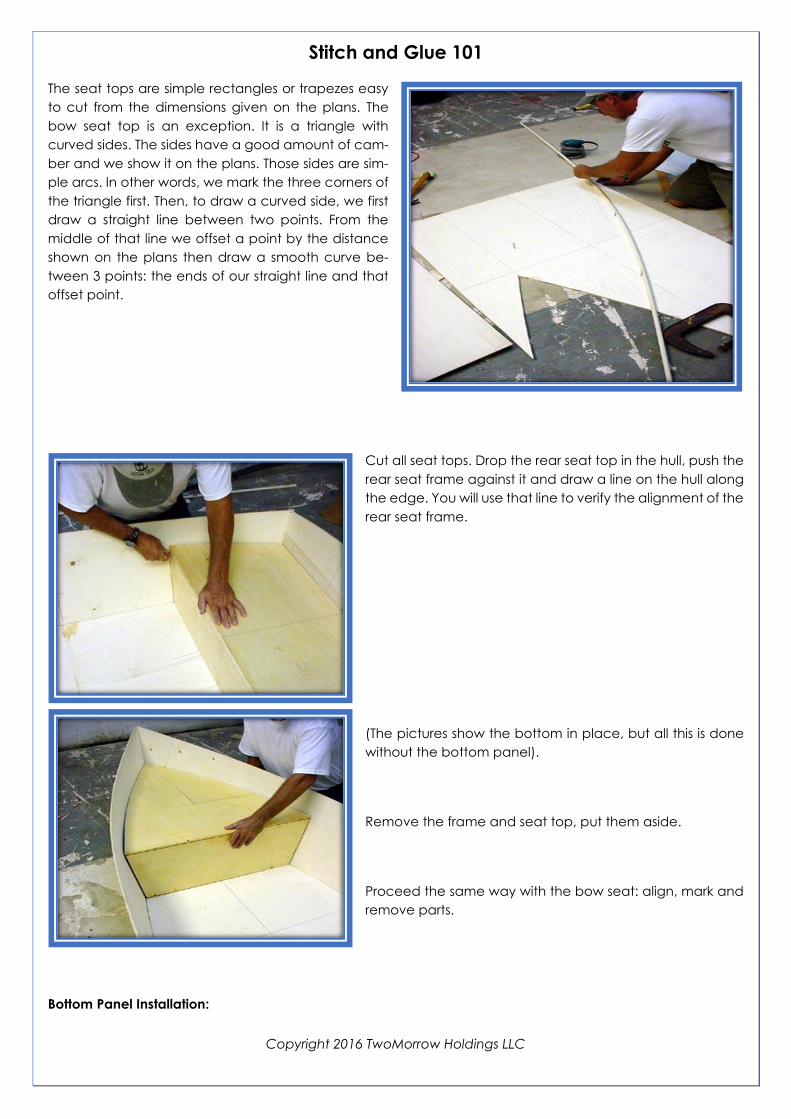
The seat tops are simple rectangles or trapezes easy
to cut from the dimensions given on the plans. The
bow seat top is an exception. It is a triangle with
curved sides. The sides have a good amount of cam-
ber and we show it on the plans. Those sides are sim-
ple arcs. In other words, we mark the three corners of
the triangle first. Then, to draw a curved side, we first
draw a straight line between two points. From the
middle of that line we offset a point by the distance
shown on the plans then draw a smooth curve be-
tween 3 points: the ends of our straight line and that
offset point.
Cut all seat tops. Drop the rear seat top in the hull, push the
rear seat frame against it and draw a line on the hull along
the edge. You will use that line to verify the alignment of the
rear seat frame.
(The pictures show the bottom in place, but all this is done
without the bottom panel).
Remove the frame and seat top, put them aside.
Proceed the same way with the bow seat: align, mark and
remove parts.
Bottom Panel Installation:

Stitch and Glue 101
Copyright 2016 TwoMorrow Holdings LLC
Carefully flip the whole assembly, bottom side up:
A few notes:
-Only the transom and the two mid frames are in place in this picture.
We will add the two other frames and line them up with the marks we
drew on the sides.
-We support the mid frames with blocks.
-There is no need to check diagonals: the bottom panel will straighten
the assembly.
With all the frames installed, the bottom panel is installed over the
sides. Note the weight in the middle and the clamps to keep the
panel in place while we tape it. Ideally, the bottom panel and the
sides are joined along their inside edge, but great precision is not re-
quired. A gap of up to ½” is acceptable. The strength of the chine
comes from the fiberglass tape, not from a wood assembly.
All outside seams are taped. We prefer to use sturdy duct tape, but
masking tape will work. You will probably not need stitches between
the sides and bottom.
Flip the hull over again.

Stitch and Glue 101
Copyright 2016 TwoMorrow Holdings LLC
Gluing the Frames to the Hull:
The next step is to epoxy glue all the frames to the hull side and bottom. We will proceed one frame at a time.
For each frame, the steps are as follow:
-Remove the frame.
-Prime the hull with epoxy resin.
-Apply epoxy glue to the edge of the frame (bat-
ten).
-Install the frame in the hull.
-Remove the excess resin that comes out of the
glued joint.
-Brush some more epoxy over the glued seam
you just made.
No fiberglass is used in this step. Note that we prime (pre coat)
all surfaces with epoxy resin before applying the glue and that
we smoothen the glued joint with liquid resin. This gives a nice
finish and eliminate the need for sanding. Proceed one frame
at a time: if you remove all the frames at once, the hull will lose
its shape.
Stitch and Glue 101
Copyright 2016 TwoMorrow Holdings LLC
Fiberglass:
Hull Fiberglass Seams:
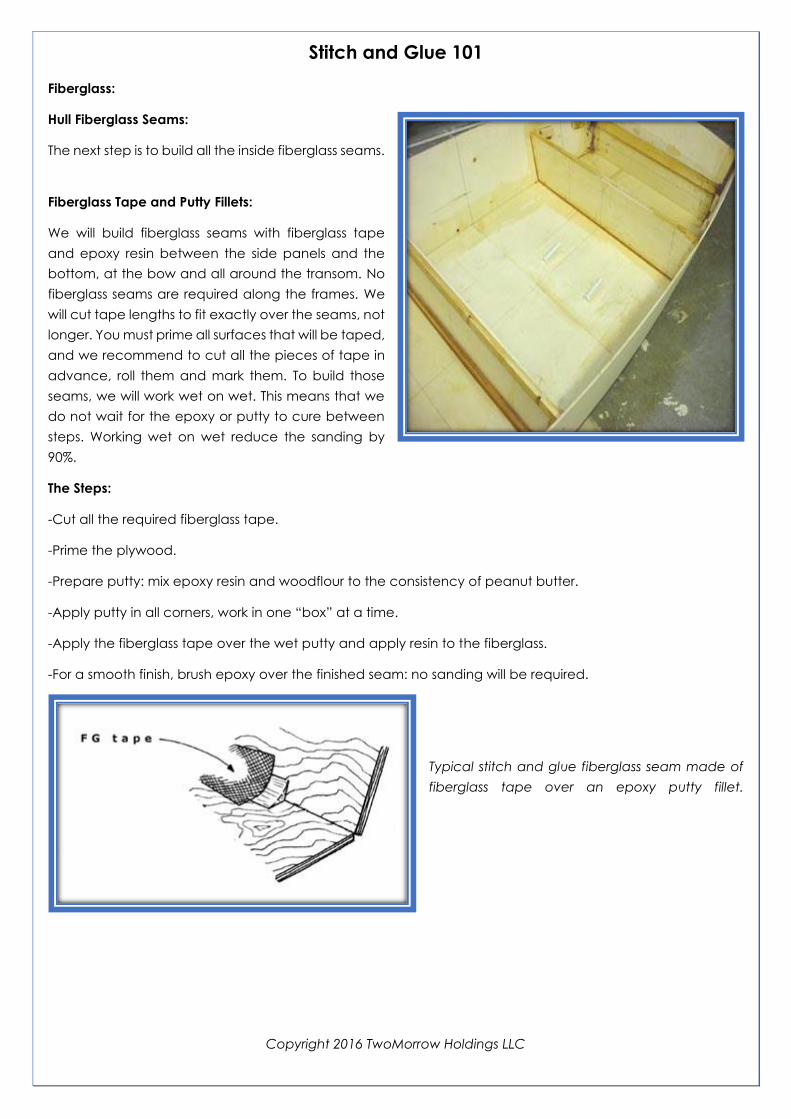
The next step is to build all the inside fiberglass seams.
Fiberglass Tape and Putty Fillets:
We will build fiberglass seams with fiberglass tape
and epoxy resin between the side panels and the
bottom, at the bow and all around the transom. No
fiberglass seams are required along the frames. We
will cut tape lengths to fit exactly over the seams, not
longer. You must prime all surfaces that will be taped,
and we recommend to cut all the pieces of tape in
advance, roll them and mark them. To build those
seams, we will work wet on wet. This means that we
do not wait for the epoxy or putty to cure between
steps. Working wet on wet reduce the sanding by
90%.
The Steps:
-Cut all the required fiberglass tape.
-Prime the plywood.
-Prepare putty: mix epoxy resin and woodflour to the consistency of peanut butter.
-Apply putty in all corners, work in one “box” at a time.
-Apply the fiberglass tape over the wet putty and apply resin to the fiberglass.
-For a smooth finish, brush epoxy over the finished seam: no sanding will be required.
Typical stitch and glue fiberglass seam made of
fiberglass tape over an epoxy putty fillet.
Stitch and Glue 101
Copyright 2016 TwoMorrow Holdings LLC
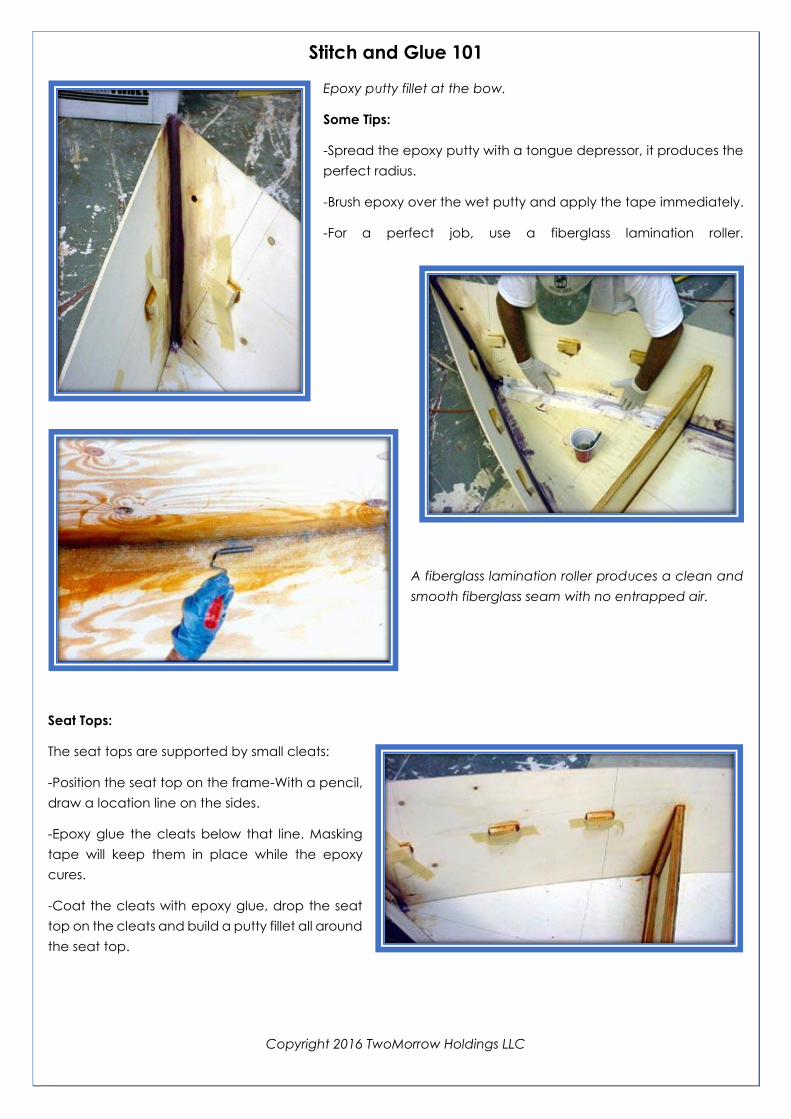
Epoxy putty fillet at the bow.
Some Tips:
-Spread the epoxy putty with a tongue depressor, it produces the
perfect radius.
-Brush epoxy over the wet putty and apply the tape immediately.
-For a perfect job, use a fiberglass lamination roller.
A fiberglass lamination roller produces a clean and
smooth fiberglass seam with no entrapped air.
Seat Tops:
The seat tops are supported by small cleats:
-Position the seat top on the frame-With a pencil,
draw a location line on the sides.
-Epoxy glue the cleats below that line. Masking
tape will keep them in place while the epoxy
cures.
-Coat the cleats with epoxy glue, drop the seat
top on the cleats and build a putty fillet all around
the seat top.

Stitch and Glue 101
Copyright 2016 TwoMorrow Holdings LLC
Fiberglass the seams between the seat tops and the
side panels. The procedure is identical for all the seat
tops. Let's not forget to coat all faces of all parts with
epoxy resin before installing them in the boat. Every
inch must be saturated with epoxy resin.
In this picture, note the clamps. This hull is fitted with
an optional clamping board for use with a small out-
board: we double the transom plywood above the
seat. The inside fiberglass is now complete.
Rubrail:
Before proceeding to the outside fiberglassing, we will build
the rubrail. The rubrail can be added at this stage or later,
after fiberglassing the outside. The rubrail adds tremendous
stiffness and strength to the hull and will make turning the
boat over much easier.
We specify a laminated rubrail this means that the rubrail is
made of 3 layers of thin plywood epoxy glued on top of each
other. Do not replace it with a solid one-piece rubrail. The
laminated part is stronger, easier to bend and can be made
from scrap plywood. The rubrail is made of strips of 1/4" ply-
wood, 1-1/2" wide. The length of the plywood doesn't matter
as smaller pieces are combined to cover the full length with
offset seams between the pieces.
The picture shows plywood strips for the rubrail, coated with epoxy resin.

Stitch and Glue 101
Copyright 2016 TwoMorrow Holdings LLC
You can use staples or clamps to glue the plywood
strips.
Note the homemade clamps cut from a 3" PVC pipe.
The ends of the rubrail are trimmed, the edges rounded with a
grinder and the rubrail is generously coated with epoxy.
The hull is now ready for the outside fiberglass work.
Flip the hull over.
Outside Fiberglass:
All outside seams will be covered with fiberglass tape.
Before applying the tape, we fill the small gap between the two
parts of the side and bottom panels with epoxy putty. This gap is
the seam under the butt blocks.
Proceed the same way for the inside seam except that we do
not need a putty fillet. Instead, we round all corner with a quick
pass of a grinder or sander to a radius of ½“.

Stitch and Glue 101
Copyright 2016 TwoMorrow Holdings LLC
Prepare your fiberglass tape lengths, prime the plywood and
apply the tape in epoxy resin. Note the slit in the tape at the bow:
this will produce a smooth corner without air bubbles.
Use two plastic putty knives to stretch the tape around the edge
and squeeze out the excess resin.
For a smooth finish, apply a plastic sheet over the
wet epoxy. Plain polyethylene is perfect. Use a
rubber roller to press the plastic over the resin, This
will make the edge of the tape almost invisible
and greatly reduce the need for sanding. The
plastic does not stick to epoxy and is easy to
remove after the resin cure.
Our builders have nicknamed that technique
“poor man's peel ply“.
This completes the fiberglass work on the hull. Our
next step will be the installation of the keel.
Keel:
The correct name for this part is skeg, but we will
use the name keel.
Some builders prefer to install the keel after fairing
the hull. On a small boat like the FL12, the keel is
not in the way of faring and we will install it now.
Stitch and Glue 101
Copyright 2016 TwoMorrow Holdings LLC
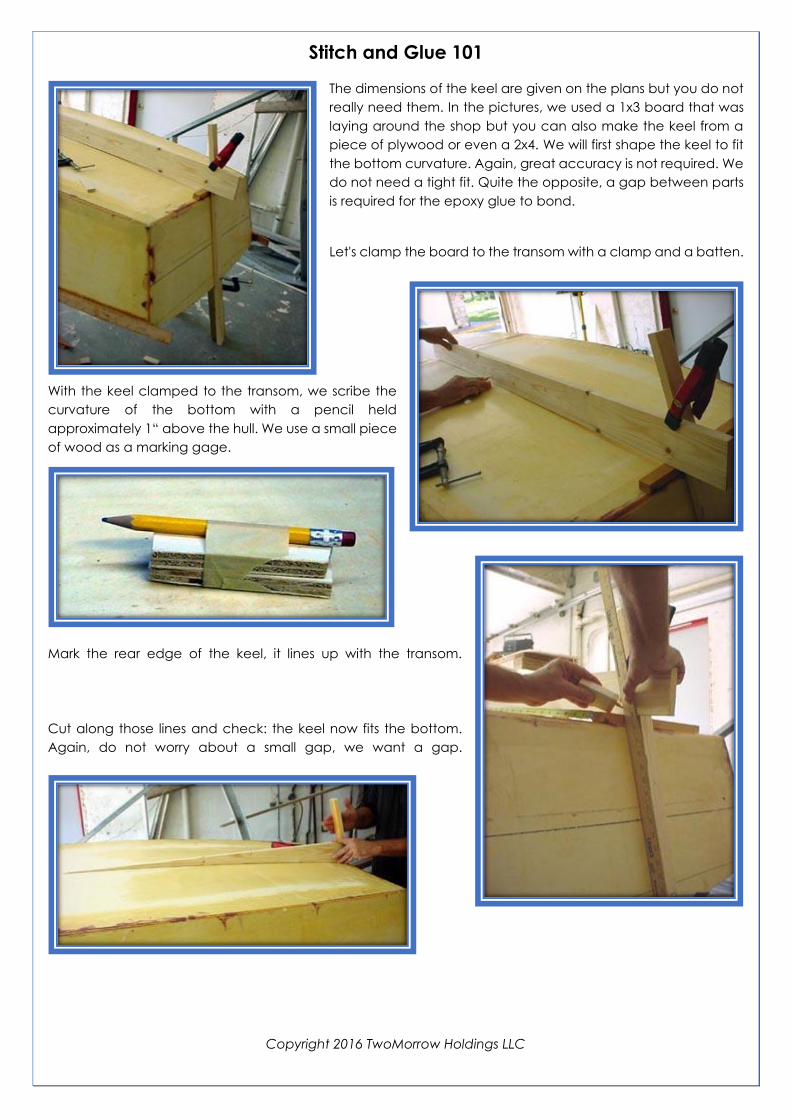
The dimensions of the keel are given on the plans but you do not
really need them. In the pictures, we used a 1x3 board that was
laying around the shop but you can also make the keel from a
piece of plywood or even a 2x4. We will first shape the keel to fit
the bottom curvature. Again, great accuracy is not required. We
do not need a tight fit. Quite the opposite, a gap between parts
is required for the epoxy glue to bond.
Let's clamp the board to the transom with a clamp and a batten.
With the keel clamped to the transom, we scribe the
curvature of the bottom with a pencil held
approximately 1“ above the hull. We use a small piece
of wood as a marking gage.
Mark the rear edge of the keel, it lines up with the transom.
Cut along those lines and check: the keel now fits the bottom.
Again, do not worry about a small gap, we want a gap.

Stitch and Glue 101
Copyright 2016 TwoMorrow Holdings LLC
To finish, round the lower tip of the keel. Note the “tool“ used to
draw the curve.
Round all edges, epoxy glue the keel to the bottom (duct tape will
keep it place during the cure) and apply fiberglass tape between
keel and bottom.
All this was done without taking any
measurements.
Finish Fairing:
Before fairing, check that all surfaces inside and outside are coated with epoxy resin. Fairing is not absolutely
required. If you are satisfied with a work boat finish, a quick sanding and paint will be sufficient, but most
builders will fair to a certain degree for a better finish. Fairing is a twostep process. The first step is fairing for a
smooth, fair hull. During that stage we correct the unevenness of parts of the hull. We grind down high spots
like the edge of the tape and fill low spots, along the edge of the tape. During that stage, we will use coarse
grit sandpaper: from 40 to 80 grit. Gaps and low spots will be filled with a fairing putty, ideally QuickFair.
Fairing Putty, Comments and Recommendations:
You can make your own fairing compound from epoxy resin mixed with a filler or work with a premixed putty
like QuickFair. The fairing putty must be made with epoxy resin. Auto body shop putties like Bondo are unac-
ceptable. Those polyester based putties do not bond properly to epoxy, they will flake off.
Prepare your own putty using a filler made of a mix of micro balloons and colloidal silica. Silica cures to a very
hard finish but is required in the mix for thixotropy. Without it, the putty would run or sag along vertical surfaces.
Do not waste time with weird putty recipes, fillers are cheap, use what works. Recipes to make your own
fairing putty are listed on our web site.
Premixed putties have advantages. Not only are they easier to use but they cure much faster than home-
made putties and are much easier to sand. If you make your own fairing putty, you may have to wait between
24 and 72 hours for a complete cure. You can't sand an uncured putty; it will clog the sanding disk. QuickFair
will cure and be ready to sand in a few hours.
Check fairness before applying putty. This is done by running a straight edge on the bottom or bending a
batten along the sides.

Stitch and Glue 101
Copyright 2016 TwoMorrow Holdings LLC
This picture is not a good example: normally we use an alu-
minum beam, 2" on edge, 8 to 10' long and run it at a 20-
degree angle with the keel.
This picture shows QuickFair applied along the taped
seam. Thanks to our "poor man's peel ply", there is very little
to fill. We use wide flexible plastic putty knives to apply the
putty.
How to Mix QuickFair:
If you make your own putty, mix your resin as usual and add
fillers to the desired consistency: make a firm putty or a slurry
depending on the job.
To mix QuickFair is faster and easier. QuickFair is made of
two components, a dark and a white paste.
You must use two volumes of the dark paste for one volume
of the white one. We devised an easy way to measure.
Take two wood strips of the same width (paint stirrers) and
mark them every inch. One inch of white paste will be mixed
with two inches of dark paste. We have measured many
batches that way and they always cured perfectly. Mix until
you obtain a homogeneous color and apply.

Stitch and Glue 101
Copyright 2016 TwoMorrow Holdings LLC
Sanding:
The sanding is usually done with a DA: a dual action random orbital
sander. This is the tool that you will probably use the most during
the building of our boats.
After a few passes, your hull should be fair and ready for the primer.
The goal of fairing with putty is not to obtain a surface ready to paint but to eliminate all high and low spots,
to produce a fair surface. We do not try to go any further than 80 grit with the QuickFair. The final fairing will
be done with sanding primer also called high build primer. The high build primer will cover sanding scratches,
small imperfections but will not fill large low spots. You have to decide when your surface is fair and ready for
the primer.
Primer:
The primer can be applied with a roller or sprayed on. Spray-
ing is much faster and can be done with an inexpensive HVLP
spray gun. We recommend our System Three primer. It is 100%
compatible with epoxy resins. Our S3 primer is an epoxy resin.
Amine Problems:
During the building of this boat, we assumed that you used quality resins like the ones sold at BoatBuilderCen-
tral.com. Most of our resins have a low amine content or no amine blush. We also recommend working wet
on wet and this eliminates most amine problems. However, if you use other resin brands or wait several days
between fiberglass work, you must take in account amine blush. Amines are part of some epoxy hardeners.
During the cure, part of those amines may not combine with the other components and migrate towards the
surface. As long as the epoxy cross linking reaction is happening, amines will continue to migrate to the sur-
faces. That reaction (cure) can take several days depending on the temperature. This means that you can
apply a coat of epoxy on a previous coat that is hard but only a few hours old without worrying about amine
blush because the amine will continue to migrate through the new coat. However, if the cure is complete,
let's say 2 days or more, there may be a thin film of amine residue on the surface. That amine blush will prevent
further layers of resin or paint to bond properly to the substrate. In that case, you should lightly sand the surface

Stitch and Glue 101
Copyright 2016 TwoMorrow Holdings LLC
and wash the amine off with a wet rag or sponge. How important is it? It depends a lot on the resin. Our
System Three Silver Tip and our MarinEpoxy with slow hardeners will not blush and do not require any removal
of the amine. Our other resins will have a small amount of blush and should be washed off if the last coat has
cured since more than 24 hours. Some major brand name expensive epoxies produce a strong amine blush.
In case of doubt, sand and wash. Amine blush feel and look like a light whitish greasy film. It is very obvious
with some types of resins. Again, if you work wet on wet or on one of our resins that is cured since less than
one day, do not worry, apply the next coat be it resin or primer without sanding.
Back to the paint.
You should apply several coats of primer before starting to sand. This will build up some thickness to cover the
imperfection. Allow the primer to cure a few hours, not more than a day. The primer will become very hard in
a few days and we want to sand before it reaches that stage.
Before sanding, we recommend using either
cheap spray paint or dye maker ink to coat the
primer. That “marking” coat will show low spots
and the sanding paper scratches.
See picture to the right which clearly shows that there is still a ridge
along the fiberglass tape and some low spots. Those areas can be
filled with more primer. As you progress, reduce the grit of the sand-
ing paper. An amateur builder will probably be satisfied with 150
grit at the primer stage.

Stitch and Glue 101
Copyright 2016 TwoMorrow Holdings LLC
Some details like a seat locker with a lid should be finished before applying the final coats of paint.
Top Coat and Non-Skid:
The final painting is straight forward. It can be done by brushing or spraying. You can apply non-skid on the
sole and foredeck: use masking tape to define a non-skid area and apply paint mixed with non-skid powder.
You can apply non-skid on the sole and foredeck: use
masking tape to define a non-skid area and apply paint
mixed with non-skid powder.
Non skid is some type of sand mixed paint. You can adjust
the roughness by varying the amount of non skid additive.
A nice touch is to use a slightly darker paint for the
non skid and cut round corners.

Stitch and Glue 101
Copyright 2016 TwoMorrow Holdings LLC
Boot Stripe:
A boot stripe is easy to paint.
On a level floor, block your boat level and using a stick, mark the
boot stripe every 10 inches. Join the marks with masking tape.
Add tape along the other edge and paint.
The final touch is to spray a few coats of Clear
Coat over the whole job. For a perfect gloss, sand
between coats.

Stitch and Glue 101
Copyright 2016 TwoMorrow Holdings LLC
Final Details:
Our boat is ready to go but we skipped some final
details worth showing: a painter and oarlocks.
Painter:
The painter is a line which goes through a hole drilled in the bow.
The hole has been coated with epoxy and painted inside.
A good knot is all that we need, no hardware required.
Oarlocks:
The oarlocks are mounted on a plywood pad
epoxy glued to the inside of the hull. That pad is
made of scrap plywood. Dimensions and
location are shown on the plans.

Stitch and Glue 101
Copyright 2016 TwoMorrow Holdings LLC
Note how the finished boat does not show any butt blocks or wooden framing: it has simple and clean lines.
It looks good and is easy to keep clean.
The average builder can build an FL12 ready to paint in less than 20 hours but considering that the epoxy
must cure at some point, those 20 hours will be spread over 2 or 3 week-ends.