STICKING PROFILES: 5 YEAR LIMITED WARRANTY · Cove & Bead Sticking • Additional styles and sizes...
2
Colonist Textured Surface Cove & Bead Sticking Craftsman lll Smooth Surface Craftsman Sticking Madison Smooth Surface Craftsman Sticking Smooth Colonist Smooth Surface Cove & Bead Sticking Monroe Smooth Surface Craftsman Sticking Carrara Smooth Surface Cove & Bead Sticking Caiman Smooth Surface Cove & Bead Sticking • Additional styles and sizes available, many available within 5-7 days • Custom machining available with our complete millwork shop on site. We can match your existing specs • Many jamb sizes and types available • Many hardware colors in stock and ready for your selection. Including extended flush bolts for 8/0 double doors • Solid core available in all styles • 7/0 and 8/0 doors available. Extended flush bolts available for an additional fee • 1-3/4" door thickness available in all styles • 20 minute, 45 minute, 60 minute fire labels available • Inquire within for lead times on all special order options. • Solid core doors provide warmth and reduce noise transmission by 50% STICKING PROFILES: Cove & Bead Sticking Craftsman Sticking 3-5 DAY PRODUCTION • 6/8 HT • 1-3/8" THICK 4-9/16" PRIMED JAMB • 3-1/2" DULL BRASS HINGES OG STOP • 2-1/8" FACE BORE - 2-3/8" BACK SET SINGLE DOOR WIDTH DOUBLE DOOR WIDTH* HEIGHT DOOR SIZE 1/6 2/0 2/4 2/6 2/8 3/0 3/0 4/0 4/8 5/0 5/4 6/0 6/8 ROUGH OPENING 20" 26" 30" 32" 34" 38" 38" 50" 58" 62" 66" 74" 82-1/4" SINGLE DOORS * Astragal Units Add 1/2" PREHUNG UNITS INCLUDE: DOUBLE DOOR OPTIONS: DOUBLE BULLET CATCH • ASTRAGAL & FLUSH BOLT HANDINGS RIGHT HAND LEFT HAND DOUBLE DOORS BOTH HANDS ACTIVE (BALL CATCH UNIT) RIGHT HAND ACTIVE LEFT HAND ACTIVE (ASTRAGAL WITH FLUSH BOLT UNIT) 5 YEAR LIMITED WARRANTY
Transcript of STICKING PROFILES: 5 YEAR LIMITED WARRANTY · Cove & Bead Sticking • Additional styles and sizes...

Colonist Textured Surface
Cove & Bead Sticking
Craftsman lll Smooth Surface
Craftsman Sticking
Madison Smooth Surface
Craftsman Sticking
Smooth Colonist Smooth Surface
Cove & Bead Sticking
Monroe Smooth Surface
Craftsman Sticking
Carrara Smooth Surface
Cove & Bead Sticking
Caiman Smooth Surface
Cove & Bead Sticking
• Additional styles and sizes available, many available within 5-7 days
• Custom machining available with our complete millwork shop on site. We can match your existing specs
• Many jamb sizes and types available
• Many hardware colors in stock and ready for your selection. Including extended flush bolts for 8/0 double doors
• Solid core available in all styles
• 7/0 and 8/0 doors available. Extended flush bolts available for an additional fee
• 1-3/4" door thickness available in all styles
• 20 minute, 45 minute, 60 minute fire labels available
• Inquire within for lead times on all special order options.
• Solid core doors provide warmth and reduce noise transmission by 50%
STICKING PROFILES: Cove & Bead Sticking Craftsman Sticking
3-5 DAY PRODUCTION • 6/8 HT • 1-3/8" THICK
4-9/16" PRIMED JAMB • 3-1/2" DULL BRASS HINGES
OG STOP • 2-1/8" FACE BORE - 2-3/8" BACK SET
SINGLE DOOR WIDTH DOUBLE DOOR WIDTH* HEIGHT
DOOR SIZE 1/6 2/0 2/4 2/6 2/8 3/0 3/0 4/0 4/8 5/0 5/4 6/0 6/8
ROUGH OPENING 20" 26" 30" 32" 34" 38" 38" 50" 58" 62" 66" 74" 82-1/4"
SINGLE DOORS
* Astragal Units Add 1/2"
PREHUNG UNITS INCLUDE:
DOUBLE DOOR OPTIONS:DOUBLE BULLET CATCH • ASTRAGAL & FLUSH BOLT
HANDINGS
RIGHT HAND
LEFT HAND
DOUBLE DOORS
BOTH HANDS ACTIVE (BALL CATCH UNIT)
RIGHT HAND ACTIVE LEFT HAND ACTIVE(ASTRAGAL WITH FLUSH BOLT UNIT)
5 YEAR LIMITED WARRANTY
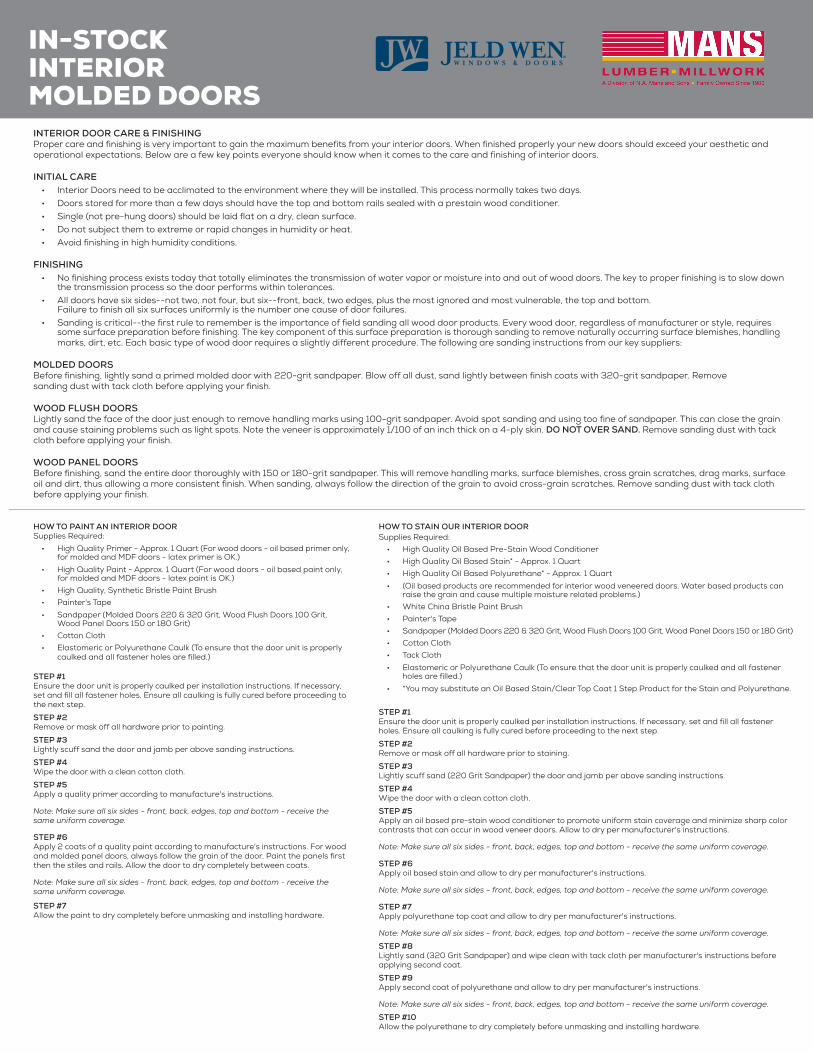
INTERIOR DOOR CARE & FINISHING Proper care and finishing is very important to gain the maximum benefits from your interior doors. When finished properly your new doors should exceed your aesthetic and operational expectations. Below are a few key points everyone should know when it comes to the care and finishing of interior doors.
INITIAL CARE• Interior Doors need to be acclimated to the environment where they will be installed. This process normally takes two days.• Doors stored for more than a few days should have the top and bottom rails sealed with a prestain wood conditioner.• Single (not pre-hung doors) should be laid flat on a dry, clean surface.• Do not subject them to extreme or rapid changes in humidity or heat.• Avoid finishing in high humidity conditions.
FINISHING• No finishing process exists today that totally eliminates the transmission of water vapor or moisture into and out of wood doors. The key to proper finishing is to slow down
the transmission process so the door performs within tolerances.• All doors have six sides--not two, not four, but six--front, back, two edges, plus the most ignored and most vulnerable, the top and bottom.
Failure to finish all six surfaces uniformly is the number one cause of door failures.• Sanding is critical--the first rule to remember is the importance of field sanding all wood door products. Every wood door, regardless of manufacturer or style, requires
some surface preparation before finishing. The key component of this surface preparation is thorough sanding to remove naturally occurring surface blemishes, handling marks, dirt, etc. Each basic type of wood door requires a slightly different procedure. The following are sanding instructions from our key suppliers:
MOLDED DOORS Before finishing, lightly sand a primed molded door with 220-grit sandpaper. Blow off all dust, sand lightly between finish coats with 320-grit sandpaper. Remove sanding dust with tack cloth before applying your finish.
WOOD FLUSH DOORS Lightly sand the face of the door just enough to remove handling marks using 100-grit sandpaper. Avoid spot sanding and using too fine of sandpaper. This can close the grain and cause staining problems such as light spots. Note the veneer is approximately 1/100 of an inch thick on a 4-ply skin. DO NOT OVER SAND. Remove sanding dust with tack cloth before applying your finish.
WOOD PANEL DOORS Before finishing, sand the entire door thoroughly with 150 or 180-grit sandpaper. This will remove handling marks, surface blemishes, cross grain scratches, drag marks, surface oil and dirt, thus allowing a more consistent finish. When sanding, always follow the direction of the grain to avoid cross-grain scratches. Remove sanding dust with tack cloth before applying your finish.
IN-STOCK INTERIOR MOLDED DOORS
HOW TO PAINT AN INTERIOR DOOR Supplies Required:
• High Quality Primer - Approx. 1 Quart (For wood doors - oil based primer only, for molded and MDF doors - latex primer is OK.)
• High Quality Paint - Approx. 1 Quart (For wood doors - oil based paint only, for molded and MDF doors - latex paint is OK.)
• High Quality, Synthetic Bristle Paint Brush• Painter's Tape• Sandpaper (Molded Doors 220 & 320 Grit, Wood Flush Doors 100 Grit,
Wood Panel Doors 150 or 180 Grit)• Cotton Cloth• Elastomeric or Polyurethane Caulk (To ensure that the door unit is properly
caulked and all fastener holes are filled.)
STEP #1 Ensure the door unit is properly caulked per installation instructions. If necessary, set and fill all fastener holes. Ensure all caulking is fully cured before proceeding to the next step.
STEP #2 Remove or mask off all hardware prior to painting.
STEP #3 Lightly scuff sand the door and jamb per above sanding instructions.
STEP #4 Wipe the door with a clean cotton cloth.
STEP #5 Apply a quality primer according to manufacture's instructions.
Note: Make sure all six sides - front, back, edges, top and bottom - receive the same uniform coverage.
STEP #6 Apply 2 coats of a quality paint according to manufacture's instructions. For wood and molded panel doors, always follow the grain of the door. Paint the panels first then the stiles and rails. Allow the door to dry completely between coats.
Note: Make sure all six sides - front, back, edges, top and bottom - receive the same uniform coverage.
STEP #7 Allow the paint to dry completely before unmasking and installing hardware.
HOW TO STAIN OUR INTERIOR DOOR Supplies Required:
• High Quality Oil Based Pre-Stain Wood Conditioner• High Quality Oil Based Stain* - Approx. 1 Quart• High Quality Oil Based Polyurethane* - Approx. 1 Quart• (Oil based products are recommended for interior wood veneered doors. Water based products can
raise the grain and cause multiple moisture related problems.)• White China Bristle Paint Brush• Painter's Tape• Sandpaper (Molded Doors 220 & 320 Grit, Wood Flush Doors 100 Grit, Wood Panel Doors 150 or 180 Grit)• Cotton Cloth• Tack Cloth• Elastomeric or Polyurethane Caulk (To ensure that the door unit is properly caulked and all fastener
holes are filled.)• *You may substitute an Oil Based Stain/Clear Top Coat 1 Step Product for the Stain and Polyurethane.
STEP #1 Ensure the door unit is properly caulked per installation instructions. If necessary, set and fill all fastener holes. Ensure all caulking is fully cured before proceeding to the next step.
STEP #2 Remove or mask off all hardware prior to staining.
STEP #3 Lightly scuff sand (220 Grit Sandpaper) the door and jamb per above sanding instructions.
STEP #4 Wipe the door with a clean cotton cloth.
STEP #5 Apply an oil based pre-stain wood conditioner to promote uniform stain coverage and minimize sharp color contrasts that can occur in wood veneer doors. Allow to dry per manufacturer's instructions.
Note: Make sure all six sides - front, back, edges, top and bottom - receive the same uniform coverage. STEP #6 Apply oil based stain and allow to dry per manufacturer's instructions.
Note: Make sure all six sides - front, back, edges, top and bottom - receive the same uniform coverage.
STEP #7 Apply polyurethane top coat and allow to dry per manufacturer's instructions.
Note: Make sure all six sides - front, back, edges, top and bottom - receive the same uniform coverage.
STEP #8 Lightly sand (320 Grit Sandpaper) and wipe clean with tack cloth per manufacturer's instructions before applying second coat.
STEP #9 Apply second coat of polyurethane and allow to dry per manufacturer's instructions.
Note: Make sure all six sides - front, back, edges, top and bottom - receive the same uniform coverage.
STEP #10 Allow the polyurethane to dry completely before unmasking and installing hardware.