steps for building dynamic pages en - WV DHHR · ColdFusion MX 7 Getting Started Experience...
47
ColdFusion MX 7 Getting Started Experience Tutorial Page 1 of 47 Steps for Building Dynamic Pages This document outlines step-by-step directions for building a dynamic Macromedia ColdFusion MX 7 database-driven web page that pulls data from multiple database tables and references images stored on the server. The steps for this tutorial are: STEP 1: Setting Up the Development Environment STEP 2: Setting Up Dreamweaver MX 2004 STEP 3: Starting With Static HTML, and Reviewing the Database Data STEP 4: Connecting the Database to ColdFusion STEP 5: Learning Some Structured Query Language (SQL) Statements STEP 6: Writing ColdFusion Code STEP 7: Optimizing the Code with ColdFusion Components (CFCs) The page you build in this tutorial displays artwork by various artists. Figure 1. Final web page with alphabetized database- driven content displayed in three columns STEP 1: Setting Up the Development Environment Before you start this tutorial, you should first review the animated slideshows available in the ColdFusion and Dreamweaver Development Overview section of the ColdFusion MX 7 Getting Started Experience website. These
Transcript of steps for building dynamic pages en - WV DHHR · ColdFusion MX 7 Getting Started Experience...

ColdFusion MX 7 Getting Started Experience Tutorial Page 1 of 47
Steps for Building Dynamic Pages This document outlines step-by-step directions for building a dynamic Macromedia ColdFusion MX 7 database-driven web page that pulls data from multiple database tables and references images stored on the server. The steps for this tutorial are: STEP 1: Setting Up the Development Environment STEP 2: Setting Up Dreamweaver MX 2004 STEP 3: Starting With Static HTML, and Reviewing the Database Data STEP 4: Connecting the Database to ColdFusion STEP 5: Learning Some Structured Query Language (SQL) Statements STEP 6: Writing ColdFusion Code STEP 7: Optimizing the Code with ColdFusion Components (CFCs) The page you build in this tutorial displays artwork by various artists. Figure 1. Final web page with alphabetized database-driven content displayed in three columns
STEP 1: Setting Up the Development Environment Before you start this tutorial, you should first review the animated slideshows available in the ColdFusion and Dreamweaver Development Overview section of the ColdFusion MX 7 Getting Started Experience website. These
ColdFusion MX 7 Getting Started Experience Tutorial Page 2 of 47 slideshows illustrate the relationship between ColdFusion and Dreamweaver MX 2004, as well as their relationship to the server and development environments. Dreamweaver MX 2004 is not required for this tutorial, but it is recommended. This tutorial takes advantage of new features available only in this version, and all screenshots and directions use it as well. You can download a trial version of Dreamweaver MX 2004 at http://www.macromedia.com/downloads. This tutorial was written specifically for use on a Windows platform, since ColdFusion MX 7 is not available on a standard installation of Macintosh, and Dreamweaver MX 2004 is not available for UNIX users. However, if you are a Macintosh or UNIX user, you will still find this tutorial useful. UNIX users especially can take advantage of these instructions by typing code rather than using the Dreamweaver MX 2004 tools. Because you have access to this document, we assume that you have successfully installed ColdFusion MX 7 as well as the ColdFusion MX 7 Getting Started Experience. However, if you do not have ColdFusion MX 7 server installed, you can download it from: http://www.macromedia.com/downloads/. When you install ColdFusion, choose the server configuration and select the built-in web server.
Learning Point: Development server The server configuration with the built-in web server is a great option for development purposes. However, the built-in web server is not intended for use as a production web server. This tutorial is written specifically for the server configuration. However, with slight variations you can use it with any ColdFusion MX 7 configuration. 1. Install ColdFusion using the server configuration and specify use of the built-in web server. Also make sure to install
the Getting Started Experience, the sample applications, and Dreamweaver Extensions. 2. Locate the C:\CFusionMX7\wwwroot\CFIDE\gettingstarted\tutorial directory. The directory contains two files and a
subdirectory called images.
The subdirectory stores all the images for all the art pieces and the logo for the Art Galleria. The cftutorial.mdb file is the Microsoft Access database that stores the data you need for this tutorial. The file index.htm is the static HTML page that you use to begin your journey towards building a dynamic web page.
Learning Point: Directory structure You should not use the directory structure in this tutorial in the real world, because databases should not be stored with other site files. See the Explore Real-World Example Applications section of the ColdFusion MX 7 Getting Started Experience to review coding guidelines for setting up your directory structure.
STEP 2: Setting Up Dreamweaver MX 2004 Follow the steps below to create a website in Dreamweaver. 1. Open Dreamweaver MX 2004.

ColdFusion MX 7 Getting Started Experience Tutorial Page 3 of 47 Figure 2. The Dreamweaver MX 2004 interface
2. Select Site > Manage Sites from the menu bar. Figure 3. Site menu
3. When the Manage Sites dialog box appears, click the New… button and then select Site. Figures 4a & 4b. Creating a new site
4. The Site Definition dialog box appears. Make sure you are using the Basic tab, which is a wizard for setting up the
site. Name the site ColdFusion MX 7 Tutorial and then click Next.

ColdFusion MX 7 Getting Started Experience Tutorial Page 4 of 47 Figure 5. Site Definition wizard
5. Make sure Yes, I want to use a server technology is selected and that ColdFusion is the server
technology, and then click Next. Figure 6. Selecting ColdFusion as the server technology
6. In the next dialog box, choose to Edit and test locally, since you are working with a locally installed version
of ColdFusion. If you used the built-in server that came with the installation, store your files in the C:\CFusionMX7\wwwroot\CFIDE\gettingstarted\tutorial\ directory.

ColdFusion MX 7 Getting Started Experience Tutorial Page 5 of 47 Figure 7. Working locally
Learning Point: Understanding the directory structure C:\CFusionMX7 is the default installation directory for ColdFusion MX 7 on Windows. If you installed the built-in web server, the wwwroot directory is the location where ColdFusion MX 7 looks for files by default. However, if you installed a different web server, store your files in that web server’s web root directory. For instance, with Microsoft Internet Information Server (IIS), the default directory is C:\Inetpub\wwwroot. Regardless of what web server you use, ColdFusion MX 7 still uses its own web root to do some internal processing, so do not remove that directory. The CFIDE directory contains the ColdFusion MX Administrator, the ColdFusion MX 7 Getting Started Experience, and other files. 7. Click Next and then, if you used the built-in web server that, use one of the following URLs as the URL you use to
browse the root of the site:
http://localhost:8500/cfide/gettingstarted/tutorial/ http://127.0.0.1:8500/cfide/gettingstarted/tutorial/

ColdFusion MX 7 Getting Started Experience Tutorial Page 6 of 47 Figure 8. Setting the path for viewing your files through a browser window
Learning Point: Deconstructing the URL If you access a web page over the Internet, you might use a domain name or an IP address like: http://www.macromedia.com/ http://216.104.212.88/ In this case, the domain name and the IP address are equivalent. IP addresses are normally not publicized, however, because they might change and are more difficult to remember than domain names. (Note that to be technically accurate, macromedia.com is the domain name, while www is the host name.) When you’re working locally on your own computer, 127.0.0.1 is the IP address that refers to the local computer. The term localhost is the equivalent host name. :8500 refers to the port that is used for browsing ColdFusion MX 7 web pages when you choose to install the built-in web server. By default, most websites use port 80 (http://www.macromedia.com:80), but since this is the default, it is not necessary to explicitly declare the port. When you are using a ColdFusion local server, however, the built-in web server, on port 8500, is used to help ensure that the ColdFusion development environment does not conflict with other web configurations that are installed on your computer. Therefore, you must specify the port in the URL when you request pages through the built-in web server. You set this path in Dreamweaver MX 2004 so that when you choose to browse the page from within Dreamweaver, it opens the file appropriately in the browser. 8. Click Test URL to make sure that your URL is correct.

ColdFusion MX 7 Getting Started Experience Tutorial Page 7 of 47
Learning Point: Possible error message When you test, you might end up with an error: Figure 9. Possible server testing error
Remember that this URL with the port specified does not work if you have not used the built-in server that came with ColdFusion MX 7. Try instead: http://localhost/cfide/gettingstarted/tutorial/ or http://127.0.0.1 /cfide/gettingstarted/tutorial/. 9. Click OK in the testing results window and then click Next in the wizard. 10. This tutorial is targeted for local development, so select No when prompted regarding whether you would like to copy
files to another server.

ColdFusion MX 7 Getting Started Experience Tutorial Page 8 of 47 Figure 10. You are not moving files to a remote server
11. Click Next to see the Site Definition summary, and then click Done to finish. Figure 11. Reviewing Site Definition summary
Your site files are now displayed in the Dreamweaver MX 2004 Files panel.

ColdFusion MX 7 Getting Started Experience Tutorial Page 9 of 47 Figure 12. The Files panel contains the site files
STEP 3: Starting With Static HTML, and Reviewing the Database Data 1. Open the index.htm page provided, and make sure you’re in Design view. Figure 13. The index.htm page in Design view
There are two rows of art gallery images.
2. Switch to Code view by clicking on the icon as shown in the figure below.

ColdFusion MX 7 Getting Started Experience Tutorial Page 10 of 47 Figure 14. The index.htm page in Code view
There are two rows of data with three cells in each row. Each cell contains references to images as well as specific information about the artwork. Note: If you want to add more artwork, you have to do so manually, because this is a static HTML page.
3. Return to Design view, right-click in the first cell of the first row, and choose Table > Insert Rows or Columns.
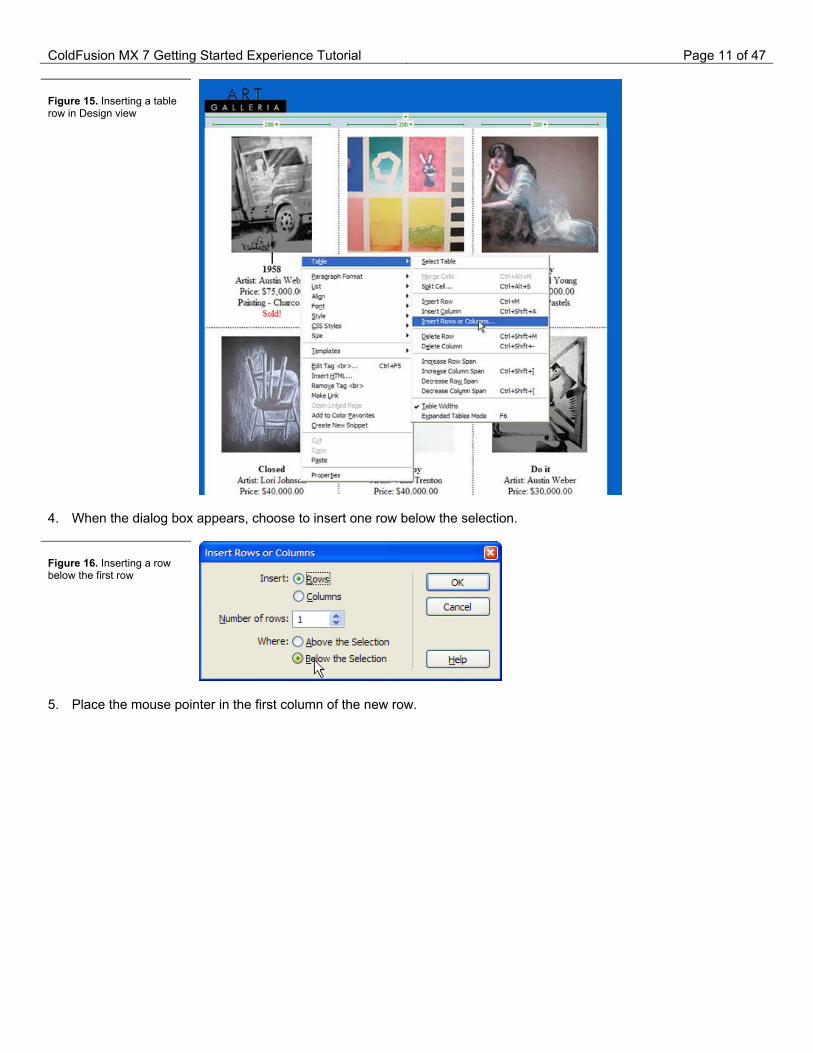
ColdFusion MX 7 Getting Started Experience Tutorial Page 11 of 47 Figure 15. Inserting a table row in Design view
4. When the dialog box appears, choose to insert one row below the selection. Figure 16. Inserting a row below the first row
5. Place the mouse pointer in the first column of the new row.

ColdFusion MX 7 Getting Started Experience Tutorial Page 12 of 47 Figure 17. The new row
6. Open the images directory in the Files panel to the right of the page display. 7. Locate the file jeff01.jpg, and then drag it from the Files panel to the first column of the new row.

ColdFusion MX 7 Getting Started Experience Tutorial Page 13 of 47 Figure 18. Dragging the image to the first cell of the second row
8. Now that the image is in the table, press the Enter key, type Bowl of Flowers and, with the text still highlighted,
click on the bold icon in the Properties panel below the page. If you do not see the Properties panel, you can open it by selecting Window > Properties from the menu bar.
Figure 19. Bowl of Flowers

ColdFusion MX 7 Getting Started Experience Tutorial Page 14 of 47 9. Enter the remaining text for that artwork:
Bowl of Flowers Artist: Jeff Baclawski Price: $11,800 Painting - Acrylic Sold!
Learning Point: Inserting carriage returns When you press the Enter key, you insert the paragraph tags (<p></p>) into your HTML. To enter a single carriage return, hold down the Shift key while you press the Enter key. This inserts an HTML break tag (<br>). Be sure to change the color of the word Sold! to red by using the Properties panel, as the following figure shows. Figure 20. Adding color to text
10. Enter the next two artwork images and details using the following data:
aiden01.jpg Charles Artist: Aiden Donolan Price: $10,000.00 Painting - Pastels/Charcoal Sold! lori01.jpg Christmas Artist: Lori Johnson Price: $54,000.00 Painting - Pastels Sold!
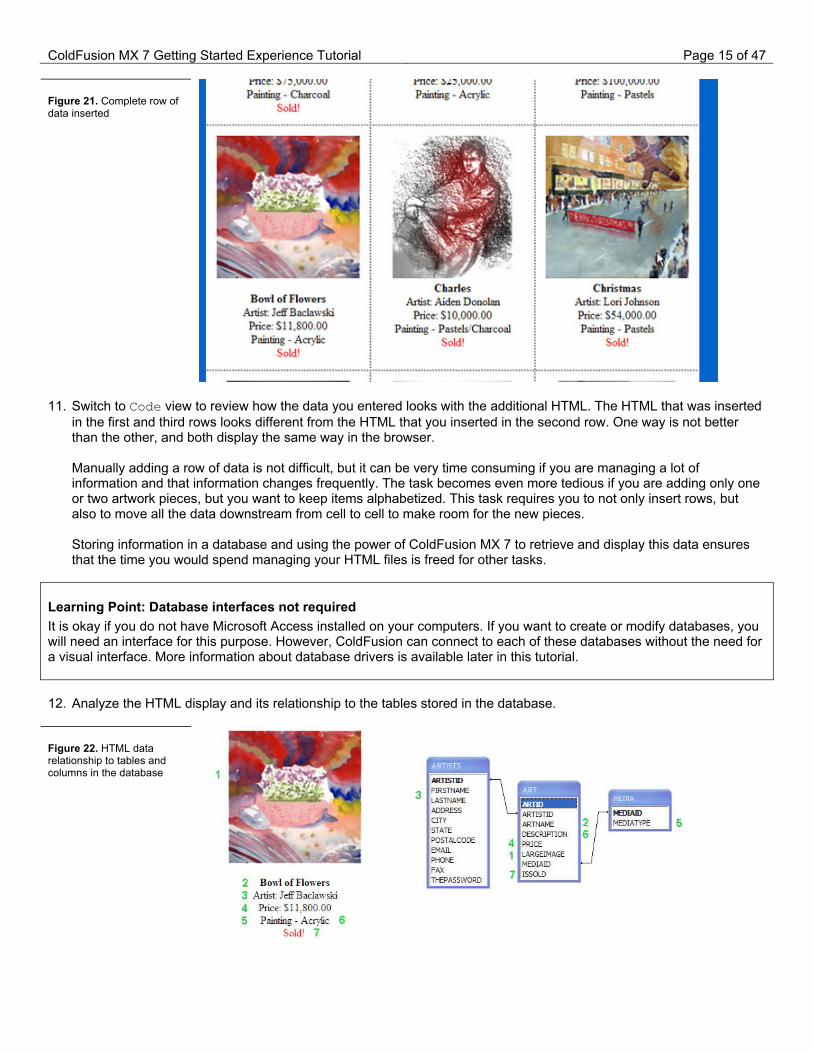
ColdFusion MX 7 Getting Started Experience Tutorial Page 15 of 47 Figure 21. Complete row of data inserted
11. Switch to Code view to review how the data you entered looks with the additional HTML. The HTML that was inserted
in the first and third rows looks different from the HTML that you inserted in the second row. One way is not better than the other, and both display the same way in the browser.
Manually adding a row of data is not difficult, but it can be very time consuming if you are managing a lot of information and that information changes frequently. The task becomes even more tedious if you are adding only one or two artwork pieces, but you want to keep items alphabetized. This task requires you to not only insert rows, but also to move all the data downstream from cell to cell to make room for the new pieces. Storing information in a database and using the power of ColdFusion MX 7 to retrieve and display this data ensures that the time you would spend managing your HTML files is freed for other tasks.
Learning Point: Database interfaces not required It is okay if you do not have Microsoft Access installed on your computers. If you want to create or modify databases, you will need an interface for this purpose. However, ColdFusion can connect to each of these databases without the need for a visual interface. More information about database drivers is available later in this tutorial. 12. Analyze the HTML display and its relationship to the tables stored in the database. Figure 22. HTML data relationship to tables and columns in the database

ColdFusion MX 7 Getting Started Experience Tutorial Page 16 of 47 STEP 4: Connecting the Database to ColdFusion There are two ways to register the database with ColdFusion MX. Before ColdFusion MX 7, you had to use the ColdFusion MX Administrator. With Dreamweaver MX 2004 and ColdFusion MX 7, there is an easier way for developers to perform the same task, inside Dreamweaver. This step shows how to do it both ways.
Database registration from within Dreamweaver See the Code Snippets by Feature and Tasks section of the ColdFusion MX 7 Getting Started Experience for an animated instructional demonstration of this feature.
Learning Point: ColdFusion MX 7 Extensions for Dreamweaver MX 2004 The Dreamweaver database registration feature is only available on Dreamweaver MX 2004 and only with the ColdFusion MX 7 installation. If you had Dreamweaver MX 2004 installed at the time of ColdFusion MX 7 installation, the installer prompted you to install these extensions. If you do not have it, you can download it at http://www.macromedia.com. 1. Make sure that the index.htm page is open. 2. Open the Database tab of the Application panel by selecting Windows > Databases from the menu bar. Figure 23. Open Databases tab
3. In the Databases tab, click the document type link to open the Choose Document Type dialog box. Select ColdFusion
from the drop-down list and click the OK button. Figure 24. Open Choose Document Type dialog box

ColdFusion MX 7 Getting Started Experience Tutorial Page 17 of 47 4. Notice that the page was renamed to index.cfm. Save it. Figure 25. index.htm is renamed index.cfm
5. Click on the testing server link in the Databases tab to bring up the Site Definition for ColdFusion MX 7 Tutorial dialog
box. The settings are correct since you defined them earlier. Click OK. Figure 26. Confirm testing server settings
6. Click on the RDS login link in the Databases tab to open the Login to ColdFusion Remote Development Services
(RDS) dialog box. Type the RDS password you defined during installation.

ColdFusion MX 7 Getting Started Experience Tutorial Page 18 of 47 Figure 27. Enter the RDS password
Learning Point: Administrator and RDS passwords When you installed ColdFusion MX 7 you were prompted to set an administrator password as well as an RDS password. If you did not set an RDS password you must log into the ColdFusion Administrator to set one up. Go to Start > Programs > Macromedia > Macromedia ColdFusion MX 7 > Administrator. 7. Notice the Databases tab now displays all the data sources registered with ColdFusion MX 7. Figure 28. Registered ColdFusion MX 7 data sources
Learning Point: Data sources You can think of a data source as the registration profile that ColdFusion MX 7 uses to communicate with the database. When you assign the data source a name, you are registering that name as the alias for the database that ColdFusion will use. 8. Click the + in the Databases tab of the Application panel and select Microsoft Access with Unicode Connection.

ColdFusion MX 7 Getting Started Experience Tutorial Page 19 of 47 Figure 29. Choose to add a database using the Microsoft Access Unicode driver
9. When the dialog box appears, specify cftutorial as the Data Source Name, and the filename and location
(C:\CFusionMX7\wwwroot\CFIDE\gettingstarted\tutorial\cftutorial.mdb). Figure 30. Register the database
10. Click Test to make sure that the database registration was successful. Click OK. Figure 31. Test the database connection
11. The Databases tab lists the cftutorial data source. Click on the plus (+) sign next to it to view more details.

ColdFusion MX 7 Getting Started Experience Tutorial Page 20 of 47 Figure 32. Drill down into the details of the new data source registration to see the database tables and columns
Database registration using the ColdFusion Administrator If you have already registered the database using the steps above for Dreamweaver MX 2004, you do not need to perform the following steps. These steps register the database using the ColdFusion Administrator. 1. On Windows, open the ColdFusion Administrator by selecting Start > Programs > Macromedia > Macromedia
ColdFusion MX 7 > Administrator, or by entering http://127.0.0.1:8500/CFIDE/administrator/index.cfm into a browser window.
2. When the ColdFusion Administrator is open, log in using the password you supplied during the ColdFusion MX 7
installation.
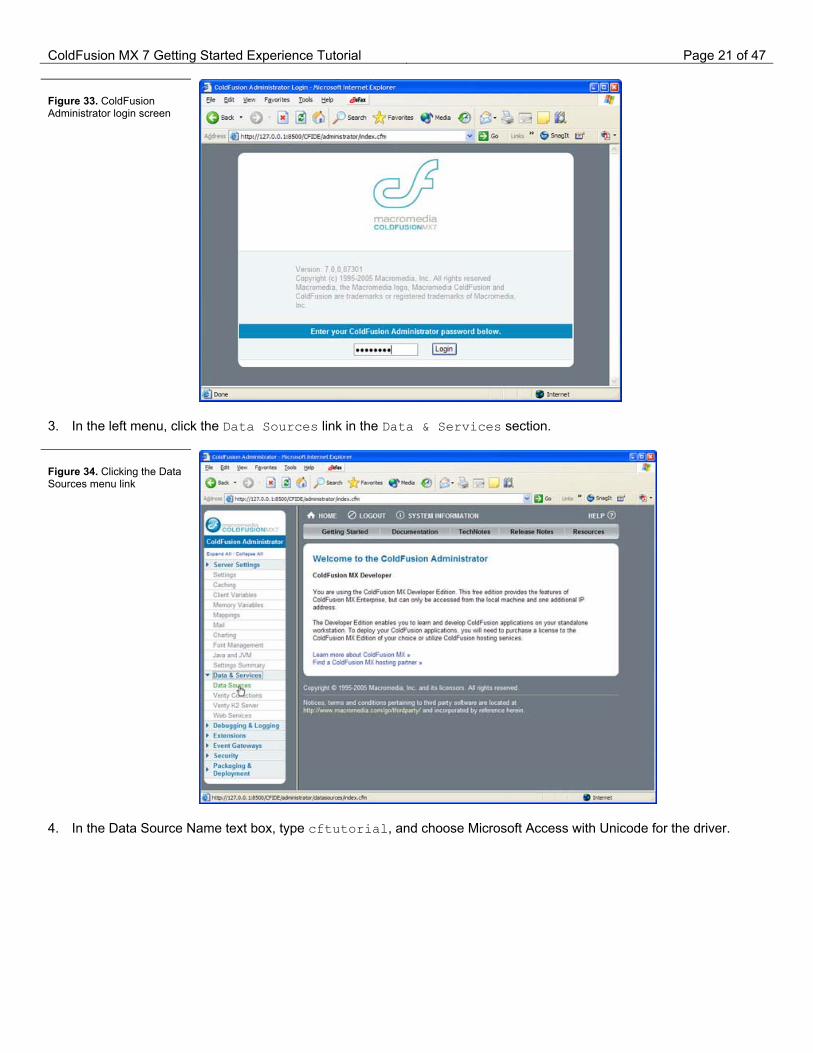
ColdFusion MX 7 Getting Started Experience Tutorial Page 21 of 47 Figure 33. ColdFusion Administrator login screen
3. In the left menu, click the Data Sources link in the Data & Services section. Figure 34. Clicking the Data Sources menu link
4. In the Data Source Name text box, type cftutorial, and choose Microsoft Access with Unicode for the driver.

ColdFusion MX 7 Getting Started Experience Tutorial Page 22 of 47 Figure 35. Naming the data source profile and selecting a database driver
Learning Point: Database drivers When developers create a database, they usually use a visual interface tool to input and manipulate data and design the database. Other applications, like ColdFusion MX 7, do not use a visual interface to interact with the database. Instead, they use a database driver. ColdFusion MX 7 comes installed with some default drivers. This tutorial example uses the Microsoft Access with Unicode driver because it does not require the ODBC service to be running. When you register a data source, you must be prepared to enter specific information that the database driver requires. 5. Click the Add button. 6. Click the Browse Server button in the driver profile.

ColdFusion MX 7 Getting Started Experience Tutorial Page 23 of 47 Figure 36. Clicking the Browse server button to locate the database
7. Browse the directory structure to locate the cftutorial.mdb file in
C:\CFusionMX7\wwwroot\CFIDE\gettingstarted\tutorial. Figure 37. Selecting the database
8. Click Apply after you select the file, and then click the Submit button on the data source registration.

ColdFusion MX 7 Getting Started Experience Tutorial Page 24 of 47 Figure 38. Submitting the new profile that connects the database to the cftutorial data source name
9. Verify that the registration was successful by reviewing the message returned at the top of the page. Figure 39. Data source registration verification message
The data source name you gave is essentially an alias that ColdFusion now understands for the database. Anywhere you reference it in a ColdFusion application, ColdFusion will understand to which database you would like to connect.
STEP 5: Learning Some Structured Query Language (SQL) Statements To retrieve information from the database, you use Structured Query Language (SQL). 1. Make sure the index.htm page is open. 2. If you did not already do so when registering the database in the last section, save the file as index.cfm.

ColdFusion MX 7 Getting Started Experience Tutorial Page 25 of 47 Figure 40. Saving the index.htm page as a ColdFusion page
Saving a file as a CFM file does not require you to put ColdFusion code into it. However, it does mean that ColdFusion MX 7 will always scan the document to see if there are any ColdFusion commands in it.
3. Click the Preview/Debug in browser button on the page toolbar, or press the F12 key to access the Windows
keyboard shortcut for the same action. This launches your new index.cfm page in a browser window. (It looks exactly the same as the index.htm page, since you have not made any changes to the code yet.)
Figure 41. Choosing to preview the index.cfm page in a browser 4. Return to Code view to start writing a SQL statement to select the fields you need from the database. (See the
following figure and the relationships diagram on the right.) Figure 42. Reviewing relationship between data and display
5. Select the needed fields from any table in the relationships diagram (to the right above). Start with the fields in the first
table listed, the ARTISTS table. In Dreamweaver’s Code View, above the <!DOCTYPE> tag, type the following two lines of code:
SELECT FIRSTNAME, LASTNAME FROM ARTISTS

ColdFusion MX 7 Getting Started Experience Tutorial Page 26 of 47
Learning Point: Database case sensitivity The column and table names in the preceding figures are in all capital letters. This is not a requirement; it is a convention that many database developers use. Microsoft Access is not case-sensitive, but other databases are. By following an all caps methodology for the database and SQL statements, you can be sure that if you move your data and statements to a different database system, it will most likely work even if the other database is case-sensitive. See the Explore Real World Example Applications section of the ColdFusion MX 7 Getting Started Experience for other best practices. 6. Add the fields from the ART table: ARTNAME, DESCRIPTION, PRICE, LARGEIMAGE, ISSOLD. Also add the table name
itself to the FROM statement. Your statement now looks like this: SELECT FIRSTNAME, LASTNAME, ARTNAME, DESCRIPTION, PRICE, LARGEIMAGE, ISSOLD FROM ARTISTS, ART
ColdFusion MX 7 Getting Started Experience Tutorial Page 27 of 47
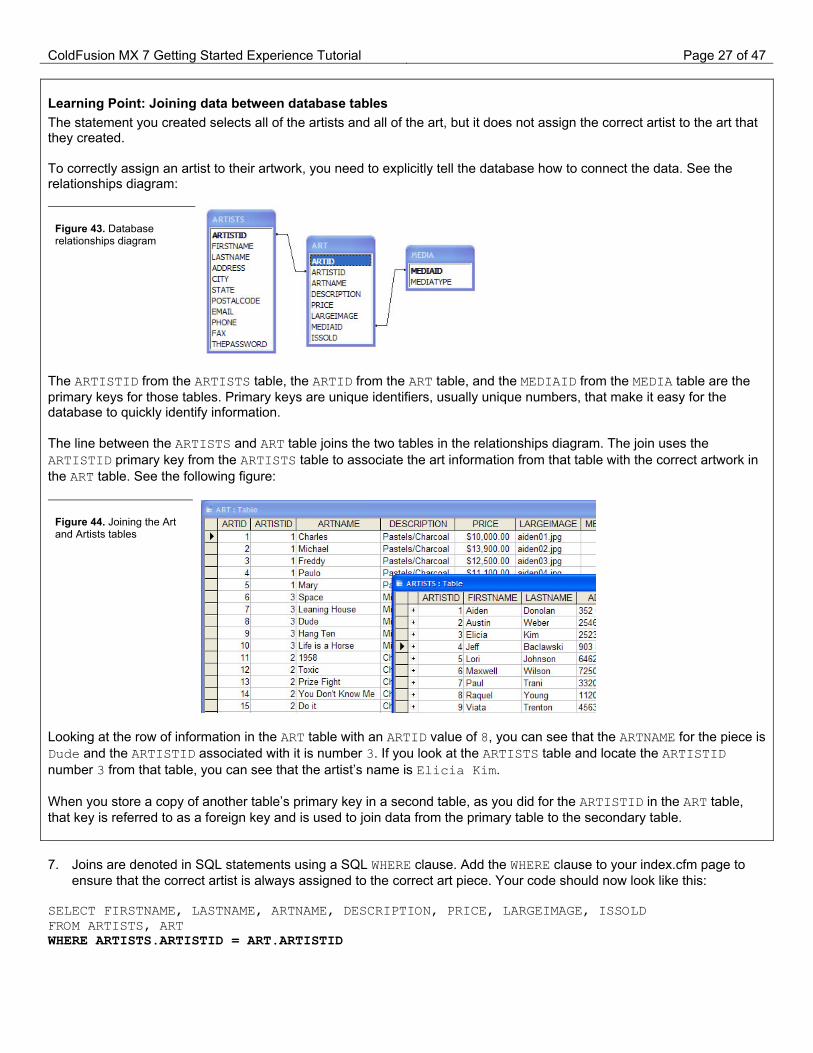
Learning Point: Joining data between database tables The statement you created selects all of the artists and all of the art, but it does not assign the correct artist to the art that they created. To correctly assign an artist to their artwork, you need to explicitly tell the database how to connect the data. See the relationships diagram: Figure 43. Database relationships diagram
The ARTISTID from the ARTISTS table, the ARTID from the ART table, and the MEDIAID from the MEDIA table are the primary keys for those tables. Primary keys are unique identifiers, usually unique numbers, that make it easy for the database to quickly identify information. The line between the ARTISTS and ART table joins the two tables in the relationships diagram. The join uses the ARTISTID primary key from the ARTISTS table to associate the art information from that table with the correct artwork in the ART table. See the following figure: Figure 44. Joining the Art and Artists tables
Looking at the row of information in the ART table with an ARTID value of 8, you can see that the ARTNAME for the piece is Dude and the ARTISTID associated with it is number 3. If you look at the ARTISTS table and locate the ARTISTID number 3 from that table, you can see that the artist’s name is Elicia Kim. When you store a copy of another table’s primary key in a second table, as you did for the ARTISTID in the ART table, that key is referred to as a foreign key and is used to join data from the primary table to the secondary table. 7. Joins are denoted in SQL statements using a SQL WHERE clause. Add the WHERE clause to your index.cfm page to
ensure that the correct artist is always assigned to the correct art piece. Your code should now look like this: SELECT FIRSTNAME, LASTNAME, ARTNAME, DESCRIPTION, PRICE, LARGEIMAGE, ISSOLD FROM ARTISTS, ART WHERE ARTISTS.ARTISTID = ART.ARTISTID
ColdFusion MX 7 Getting Started Experience Tutorial Page 28 of 47
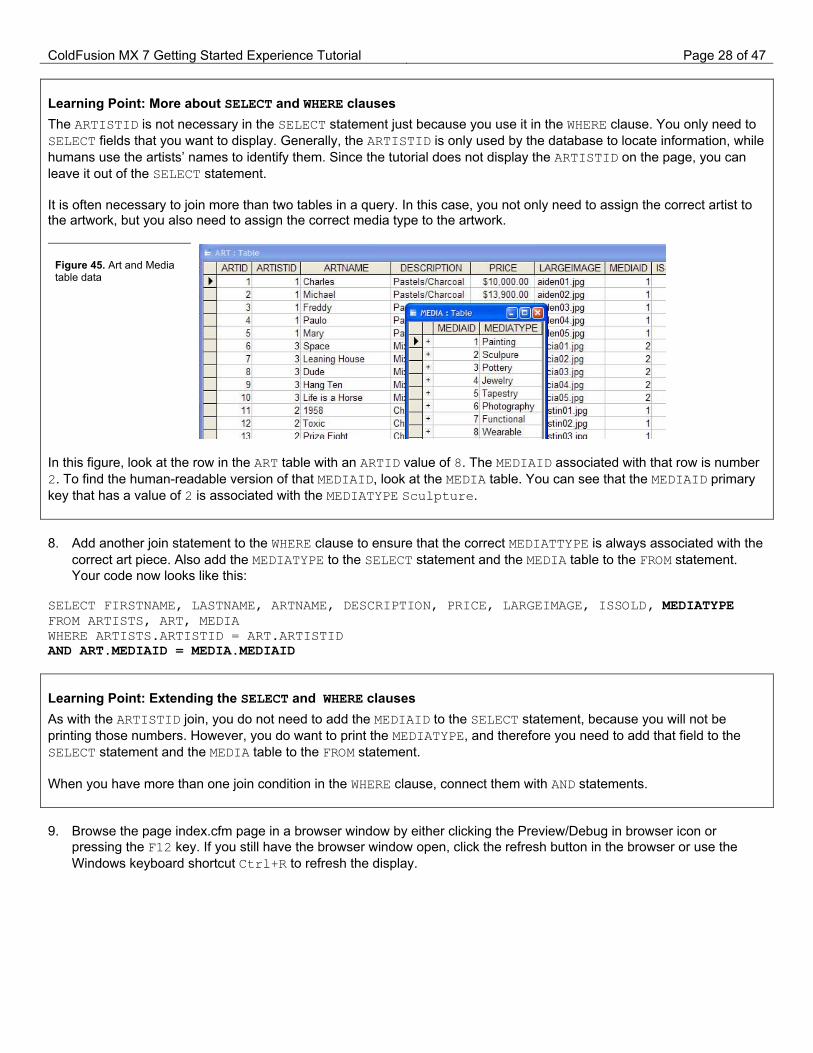
Learning Point: More about SELECT and WHERE clauses The ARTISTID is not necessary in the SELECT statement just because you use it in the WHERE clause. You only need to SELECT fields that you want to display. Generally, the ARTISTID is only used by the database to locate information, while humans use the artists’ names to identify them. Since the tutorial does not display the ARTISTID on the page, you can leave it out of the SELECT statement. It is often necessary to join more than two tables in a query. In this case, you not only need to assign the correct artist to the artwork, but you also need to assign the correct media type to the artwork. Figure 45. Art and Media table data
In this figure, look at the row in the ART table with an ARTID value of 8. The MEDIAID associated with that row is number 2. To find the human-readable version of that MEDIAID, look at the MEDIA table. You can see that the MEDIAID primary key that has a value of 2 is associated with the MEDIATYPE Sculpture. 8. Add another join statement to the WHERE clause to ensure that the correct MEDIATTYPE is always associated with the
correct art piece. Also add the MEDIATYPE to the SELECT statement and the MEDIA table to the FROM statement. Your code now looks like this:
SELECT FIRSTNAME, LASTNAME, ARTNAME, DESCRIPTION, PRICE, LARGEIMAGE, ISSOLD, MEDIATYPE FROM ARTISTS, ART, MEDIA WHERE ARTISTS.ARTISTID = ART.ARTISTID AND ART.MEDIAID = MEDIA.MEDIAID
Learning Point: Extending the SELECT and WHERE clauses As with the ARTISTID join, you do not need to add the MEDIAID to the SELECT statement, because you will not be printing those numbers. However, you do want to print the MEDIATYPE, and therefore you need to add that field to the SELECT statement and the MEDIA table to the FROM statement. When you have more than one join condition in the WHERE clause, connect them with AND statements. 9. Browse the page index.cfm page in a browser window by either clicking the Preview/Debug in browser icon or
pressing the F12 key. If you still have the browser window open, click the refresh button in the browser or use the Windows keyboard shortcut Ctrl+R to refresh the display.

ColdFusion MX 7 Getting Started Experience Tutorial Page 29 of 47 Figure 46. The SQL statement shows in the browser
The SQL statement you created is added to the top of the HTML page. 10. Right-click on the page and choose to view the source of the page. This shows you the HTML that the browser is
interpreting. Figure 47. Viewing the source of the page
11. Review the HTML that you see. Your SQL statement is treated as plain text by the browser. Figure 48. The SQL statement also appears in the HTML code
Rather than having the browser display the SQL statement, you need ColdFusion MX 7 to recognize and process it as a call to the database to retrieve information. In the next section, you add ColdFusion code for this purpose.
STEP 6: Writing ColdFusion Code In this section, you add ColdFusion Markup Language (CFML) to the index.cfm page. CFML is very similar to HTML; however, instead of being interpreted by the browser on the user’s computer, it is interpreted by ColdFusion M and then
ColdFusion MX 7 Getting Started Experience Tutorial Page 30 of 47 stripped out of the HTML page so that the browser never sees any ColdFusion code. For an overview of how ColdFusion interacts with the server and browser environments, see the ColdFusion and Dreamweaver Development Overview animations section of the ColdFusion MX 7 Getting Started Experience.
Learning Point: What ColdFusion processes ColdFusion ignores all HTML or text in your pages and only processes CFML tags, functions and variables. 1. Ensure that the index.cfm file is open in Code view. 2. ColdFusion MX 7 ignored the SQL statement you placed at the top of the index.cfm page, because it assumed that it
is just plain text that you wanted to display on the page. You must surround the SQL statement with the ColdFusion cfquery tag to instruct ColdFusion to send the SQL statement to the database. Add the cfquery tags around the SQL statements as the following code shows:
<cfquery name="artwork" datasource="cftutorial"> SELECT FIRSTNAME, LASTNAME, ARTNAME, DESCRIPTION, PRICE, LARGEIMAGE, ISSOLD, MEDIATYPE FROM ARTISTS, ART, MEDIA WHERE ARTISTS.ARTISTID = ART.ARTISTID AND ART.MEDIAID = MEDIA.MEDIAID </cfquery>
Learning Point: Using cfquery to access the database When ColdFusion MX 7 processes this index.cfm page and encounters the cfquery tag, it passes the SQL statement to the appropriate database for processing. The database that it will communicate with is referenced through the datasource argument of the cfquery tag. In the tutorial example, this is the cftutorial data source. Recall that in Step 5 of this tutorial, you associated the cftutorial data source with the Microsoft Access cftutorial.mdb. That means that anytime you want ColdFusion to talk to that database, you just need to reference the data source by name. ColdFusion passes the SQL statement that is between the cfquery tags to the data source listed in the datasource attribute. In the case of the SELECT statement, you expect that data to be returned. But where will that data be stored? You also use the name attribute of the cfquery tag. You use it to create and name a variable to store all of the data retrieved from the database. You can think of it as a container sitting in the ColdFusion server’s memory to hold all of the data. This is also referred to as a result set or query. 3. Save the index.cfm page and view it in the browser. (The SQL statement no longer displays on the page.)
Learning Point: Always save your ColdFusion pages When using Dreamweaver to create HTML pages, you might have noticed that saving the page to view your changes is not always required. This is not the case with ColdFusion pages. You must save them or your changes will not appear when you browse your page. 4. Right-click on the background of the page and choose to view the source. The cfquery tags and the SQL statement
do not appear.

ColdFusion MX 7 Getting Started Experience Tutorial Page 31 of 47
Learning Point: ColdFusion code never reaches the browser All CFML is stripped out of the page after ColdFusion MX 7 processes it. This ensures that the CFML never displays in the browser, which it is not programmed to understand. If you ever see any CFML in your HTML pages, you know that something is wrong with your code!
The cfquery tag connects to the cftutorial data source, and returns the data in the artwork variable declared in the name argument. So why isn’t anything showing up on the page? You need to add code to actually display the data.
5. Use the cfdump debugging tag to see what is being stored in the artwork variable. Simply pass the variable name
into the var attribute of the tag. <cfquery name="artwork" datasource="cftutorial"> SELECT FIRSTNAME, LASTNAME, ARTNAME, DESCRIPTION, PRICE, LARGEIMAGE, ISSOLD, MEDIATYPE FROM ARTISTS, ART, MEDIA WHERE ARTISTS.ARTISTID = ART.ARTISTID AND ART.MEDIAID = MEDIA.MEDIAID </cfquery> <cfdump var="#artwork#">
Learning Point: Number (#) signs This is the first time you have encountered the ColdFusion use of number signs in your code. In this case, they are used around a variable to tell ColdFusion not to literally display the word artwork, but rather, display what is stored in the artwork variable. Try it with and without the number signs to see what happens. 6. Save and then browse the page again to see the results of the cfdump tag. Figure 49. Query result set shown using the cfdump debugging tool
Learning Point: cfdump cfdump is a useful debugging tool that allows you to quickly determine the contents of a complex variable like this query resultset.

ColdFusion MX 7 Getting Started Experience Tutorial Page 32 of 47 7. Since you have verified that the data is being retrieved from the database, you no longer need the cfdump tag.
However, rather than remove it (since you might need it again), you can just use a ColdFusion comment to comment it out of the page, as the following figure shows. Doing so tells ColdFusion to ignore that command.
<cfquery name="artwork" datasource="cftutorial"> SELECT FIRSTNAME, LASTNAME, ARTNAME, DESCRIPTION, PRICE, LARGEIMAGE, ISSOLD, MEDIATYPE FROM ARTISTS, ART, MEDIA WHERE ARTISTS.ARTISTID = ART.ARTISTID AND ART.MEDIAID = MEDIA.MEDIAID </cfquery> <!--- <cfdump var="#artwork#"> --->
Learning Point: CFML comments HTML comments have only two dashes on each side of the comment; CFML comments have three dashes. <!-- this is an HTML comment --> <!--- this is a CFML comment ---> However, the difference between an HTML and a CFML comment is profound. CFML comments, like other ColdFusion tags and variables, are stripped out of the page. Therefore, you can use CFML comments liberally without worrying about them showing up in the browser’s view source. 8. You need to display the database data in the table. To start, remove all of the rows except for one and all of the cells
in that one row except for one, as the following code shows:
<table border="0" cellpadding="15" cellspacing="0" bgcolor="#FFFFFF"> <tr> <td valign="top" align="center" width="200"> <img src="images/austin01.jpg" width="200" height="200"><br> <strong>1958</strong><br> Artist: Austin Weber<br> Price: $75,000.00<br> Painting - Charcoal<br> <font color="#FF0000">Sold!</font> </td> </tr> </table>
You will use CFML to generate all of the rows and cells that you need.
9. Replace the image filename, artwork name, artist’s name, price, media type, description, and sold status with the data
that was retrieved in the artwork variable. Do this by referencing the variables and surrounding them with number signs, as the following figure shows:
<table border="0" cellpadding="15" cellspacing="0" bgcolor="#FFFFFF"> <tr> <td valign="top" align="center" width="200"> <img src="images/#artwork.largeImage#" width="200" height="200"><br> <strong>#artwork.artName#</strong><br> Artist: #artwork.firstName# #artwork.lastName#<br> Price: #artwork.price#<br> #artwork.mediaType# - #artwork.description#<br> <font color="#FF0000">#artwork.isSold#</font> </td> </tr> </table>

ColdFusion MX 7 Getting Started Experience Tutorial Page 33 of 47
Learning Point: Deconstructing the query variable syntax Keep in mind the following rules regarding correct query variable syntax: • Surround variables with number signs (#). • Remove all spaces. • Prefix the variable name by using the cfquery tag’s name attribute value (in this case, artwork). • Follow the prefix with a period. • Follow the period with the column name from the SELECT statement that you want to display. Remember that ColdFusion is not case-sensitive, so while the column names are in all caps in the SELECT statement, you write them here in mixed case. The case does not matter, but the coding methodology for this project uses mixed case for ColdFusion variables. To see other methodology guidelines, see the Explore Real World Example Applications section of the ColdFusion MX 7 Getting Started Experience. 10. Save the index.cfm page and browse it. Figure 50. Variables don’t get processed properly just because you put number signs (#) around them.
Again, ColdFusion treats the variables as text. This is because number signs alone do not signal a ColdFusion variable, because they are often used in regular text that might appear on the page.
11. In order for ColdFusion to recognize that the number signs are variable indicators, you surround the section with cfoutput tags, as the following code shows:
<table border="0" cellpadding="15" cellspacing="0" bgcolor="#FFFFFF"> <tr> <td valign="top" align="center" width="200"> <cfoutput> <img src="images/#artwork.largeImage#" width="200" height="200"><br> <strong>#artwork.artName#</strong><br> Artist: #artwork.firstName# #artwork.lastName#<br> Price: #artwork.price#<br> #artwork.mediaType# - #artwork.description#<br> <font color="#FF0000">#artwork.isSold#</font> </cfoutput> </td>

ColdFusion MX 7 Getting Started Experience Tutorial Page 34 of 47 </tr> </table> 12. Save and browse the index.cfm page. You might get an error if you used the hex value #FF0000 for the color red
instead of using the word red for the value. Figure 51. The extra number sign (#) used in the font color’s hex value causes ColdFusion to throw an error
The message cites a possible missing ending number sign (#) on line 32. (Your line number might be slightly different.)
13. If you used the hex value instead of the word red, modify the code <font color="#FF0000"> to include two
number signs (##FF0000). This escapes the number sign, essentially telling ColdFusion that this is a number sign that you want it to ignore, since it is not a ColdFusion variable but needs to be printed in the HTML.
14. Save and browse the page again to display one art piece. Figure 52. A record of data from the database displayed in the browser

ColdFusion MX 7 Getting Started Experience Tutorial Page 35 of 47
The price is not formatted correctly and the number 1 appears instead of the word Sold. You will fix these problems shortly. But first, recall from the cfdump results that there was more than just one art piece returned from the database.
15. Return to the opening cfoutput tag and modify it to explicitly name the artwork variable as the query, as the
following code shows: <table border="0" cellpadding="15" cellspacing="0" bgcolor="#FFFFFF"> <tr> <td valign="top" align="center" width="200"> <cfoutput query="artwork"> <img src="images/#artwork.largeImage#" width="200" height="200"><br> <strong>#artwork.artName#</strong><br> Artist: #artwork.firstName# #artwork.lastName#<br> Price: #artwork.price#<br> #artwork.mediaType# - #artwork.description#<br> <font color="##FF0000">#artwork.isSold#</font> </cfoutput> </td> </tr> </table> 16. Save and browse the index.cfm page to see all of the artwork displayed in the browser. Then view the source. Figure 53. The query attribute to the cfoutput tag tells ColdFusion to loop through all the records from the database
The query attribute of the cfoutput tag tells the ColdFusion server to loop over all the results that have been returned from the database. The browser view source shows that the ColdFusion server has not only looped over the results of the query to display every record, but has also stripped out all the variables and CFML tags to leave just HTML. The double- number signs in the font color have been reduced to one number sign.

ColdFusion MX 7 Getting Started Experience Tutorial Page 36 of 47
Learning Point: cfoutput tag placement The placement of the cfoutput tags is significant. As you can see from the browser’s view source, this tag loops over HTML tags as well as ColdFusion tags and variables to produce the final HTML code. In other words, everything between the <cfoutput> and </cfoutput> tags is looped. 17. Leaving all of the output in one table cell makes it difficult to manage the spacing and display of the content. Move the
<cfoutput> and </cfoutput> tags so that they sandwich the table row tr tags, as the following code shows: <table border="0" cellpadding="15" cellspacing="0" bgcolor="#FFFFFF"> <cfoutput query="artwork"> <tr> <td valign="top" align="center" width="200"> <img src="images/#artwork.largeImage#" width="200" height="200"><br> <strong>#artwork.artName#</strong><br> Artist: #artwork.firstName# #artwork.lastName#<br> Price: #artwork.price#<br> #artwork.mediaType# - #artwork.description#<br> <font color="##FF0000">#artwork.isSold#</font> </td> </tr> </cfoutput> </table> 18. Save and browse the page, and then view the page source. Figure 54. The cfoutput loops around the table row, repeating all the HTML while inserting the data from the database
The display does not look very different, although you can see additional spacing between the text and the image that follows it. Viewing the source gives more insight into what has happened. You can see that now each artwork block is enclosed within individual cells, which are in turn enclosed within individual rows as the placement of the cfoutput tags would suggest.

ColdFusion MX 7 Getting Started Experience Tutorial Page 37 of 47
Learning Point: Conditional processing Now that you have successfully displayed all the information from the database, it is time to improve the display. Rather than having just one long column of artwork, it would be more efficient to be able to browse the pieces in a 3-column grid. As you recall, doing this with static HTML would be extremely tedious, forcing you to cut and paste each piece of data to move it to a different cell. Using the power of ColdFusion, you can make this happen in just a few lines of code. Consider the following: • Every time you query the database and get data returned, ColdFusion creates a special variable that numbers each
record returned. In this example, the variable is artwork.currentRow. As the cfoutput tag loops over each record for display, you can access this special variable to determine which row is currently being processed. Keep in mind that this record is in no way associated with any primary key from a database table.
• You want data to be displayed with three columns per row. In HTML terms, you want something like the following:
<table> <tr> <td></td> <td></td> <td></td> </tr> </table> This means that you only want the opening tr tag to be generated by ColdFusion before the first, fourth, seventh record, and so on, being processed, and that you only want the closing tr tag to be generated by ColdFusion after the third, sixth, ninth record, and so on.
• ColdFusion has arithmetic operators that allow you to perform calculations. The mod operator would be useful in this
case; it takes a number, divides it by another number, and gives you the remainder after division. For example:
1 mod 3 = 1 (1 divided by 3 gives you a remainder of 1) 2 mod 3 = 2 (2 divided by 3 gives you a remainder of 2) 3 mod 3 = 0 (3 divided by 3 gives you a remainder of 0) 4 mod 3 = 1 (4 divided by 3 gives you a remainder of 1) 5 mod 3 = 2 6 mod 3 = 0 7 mod 3 = 1 8 mod 3 = 2 9 mod 3 = 0 Remember that you need the opening tr tags to be generated before the first, fourth, and seventh records. From the preceding calculations, you can see that each one of these numbers divided by 3 gives you a remainder of 1. Similarly, you want the closing tr tags to be generated after the third, sixth, and ninth records. You can see that each one of these numbers divided by 3 gives you a remainder of 0. As each record is being processed, you need to tell ColdFusion MX 7, “If the current row being displayed has a remainder of 1 after you divide it by 3, print an opening tr tag before you create the table cell.” Likewise, you also need to tell ColdFusion, “If the current row being displayed has a remainder of 0 after you divide it by 3, print a closing tr tag after you create the table cell.”
• One of the ColdFusion tags that tells ColdFusion to perform different tasks based on a condition is the cfif tag; for
example:
<cfif artwork.currentRow mod 3 eq 1> <tr> </cfif>

ColdFusion MX 7 Getting Started Experience Tutorial Page 38 of 47
The cfif tag in this case translates to “if the current row being processed from the artwork query result set gives a remainder of 1 after it is divided by 3, print a tr tag to the HTML.”
Using conditional processing with arithmetic operations is a powerful tool for your ColdFusion applications. 19. Add conditional statements around both the opening tr and the ending tr tags, as the following code shows: <table border="0" cellpadding="15" cellspacing="0" bgcolor="#FFFFFF"> <cfoutput query="artwork"> <cfif artwork.currentrow mod 3 eq 1>
<tr> </cfif> <td valign="top" align="center" width="200"> <img src="images/#artwork.largeImage#" width="200" height="200"><br> <strong>#artwork.artName#</strong><br> Artist: #artwork.firstName# #artwork.lastName#<br> Price: #artwork.price#<br> #artwork.mediaType# - #artwork.description#<br> <font color="##FF0000">#artwork.isSold#</font> </td> <cfif artwork.currentrow mod 3 eq 0>
</tr> </cfif> </cfoutput> </table>
Learning Point: Rules for using the Number signs The artwork.currentRow variable does not need to be surrounded by number signs (#) when it is inside a cfif tag. You can think of the use of number signs as necessary when it’s potentially unclear to ColdFusion what is a variable and what is not. Consider these rules: • Number signs are necessary between beginning and ending cfoutput tags, because variables are intermingled with
plain text and HTML tags, and ColdFusion MX 7 needs to be told what to evaluate and what not to evaluate. • Number signs are not necessary inside a cfif tag, because ColdFusion knows to only expect ColdFusion variables
and expressions there. • Number signs are necessary between beginning and ending cfif tags because, like with cfoutput tags, variables
are intermingled with plain text and HTML tags. • Number signs are sometimes necessary in a tag’s attribute values, as in the case of <cfdump var="#artwork#">,
to clarify to ColdFusion that you want the value treated as a variable rather than a literal string. In the last two bullets, a distinction is made between variables between tags and variables inside a tag’s attributes. 20. Save and browse the page, and then view the page source.

ColdFusion MX 7 Getting Started Experience Tutorial Page 39 of 47 Figure 55. The HTML reflects the three displayed columns
ColdFusion MX 7 is smart enough to dynamically determine where a row should start and end, based on a little mathematical equation. You can easily change the display to two or even four columns by modifying the cfif statements, rather than cutting-and-pasting hundreds of lines of HTML code.
21. Next, format the price. Simply modify the price variable to use the dollarFormat() function, as the following code
shows, and then browse the page to view the results. Price: #dollarFormat(artwork.price)#<br> Figure 56. Displaying the price with a dollar sign
Learning Point: ColdFusion functions ColdFusion MX 7 comes with a library of hundreds of functions for manipulating variables. These functions allow you to easily manage numbers, dates, and even complex variables like structures and arrays. The formatting of functions still includes number signs, as well as the variable that you want to target; however, the variables are now enclosed within parentheses to make it clear to the ColdFusion server exactly what should be processed. 22. The isSold database column stores a yes as a one (1) and a no as a zero (0). While this is more efficient for the
database, it is not great for your site visitors. Rather than simply printing out the artwork.isSold variable, you can make use of the cfif tag here, to print out the word Sold! in red letters if the artwork.isSold variable is equal to 1. See the following code and figure:

ColdFusion MX 7 Getting Started Experience Tutorial Page 40 of 47
Learning Point: Boolean values and cfif Boolean variables store true (1) or false (0) values. Conditional statements must evaluate to true or false. Therefore, if a variables stores a value of 1, ColdFusion will also interpret it as a true statement. <font color="##FF0000"> <cfif artwork.isSold> Sold! </cfif> </font> Figure 57. Displaying the word Sold! in the browser
The word Sold! only appears where needed.
Now imagine you created this page as static HTML; when you show it to your client, she says, “Very nice, but could you please alphabetize the display by the art piece name?” This would take you a long time to modify in static HTML, even using the easy Dreamweaver interface. With ColdFusion, this is a small change to the query.
23. Modify the SQL statement in the cfquery tag to include an ORDER BY clause, which tells the database to
alphabetize the results by the column specified, as the following code shows: <cfquery name="artwork" datasource="cftutorial"> SELECT FIRSTNAME, LASTNAME, ARTNAME, DESCRIPTION, PRICE, LARGEIMAGE, ISSOLD, MEDIATYPE FROM ARTISTS, ART, MEDIA WHERE ARTISTS.ARTISTID = ART.ARTISTID AND ART.MEDIAID = MEDIA.MEDIAID ORDER BY ARTNAME </cfquery> 24. Save and browse your page.
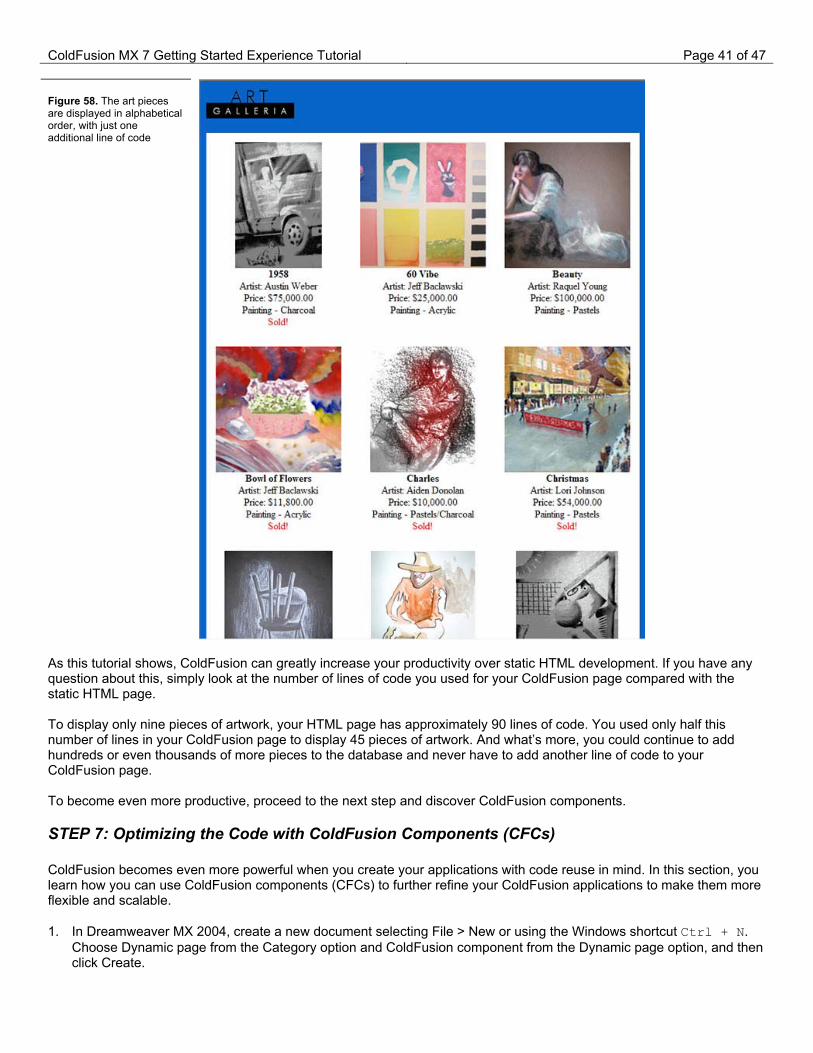
ColdFusion MX 7 Getting Started Experience Tutorial Page 41 of 47 Figure 58. The art pieces are displayed in alphabetical order, with just one additional line of code
As this tutorial shows, ColdFusion can greatly increase your productivity over static HTML development. If you have any question about this, simply look at the number of lines of code you used for your ColdFusion page compared with the static HTML page. To display only nine pieces of artwork, your HTML page has approximately 90 lines of code. You used only half this number of lines in your ColdFusion page to display 45 pieces of artwork. And what’s more, you could continue to add hundreds or even thousands of more pieces to the database and never have to add another line of code to your ColdFusion page. To become even more productive, proceed to the next step and discover ColdFusion components.
STEP 7: Optimizing the Code with ColdFusion Components (CFCs) ColdFusion becomes even more powerful when you create your applications with code reuse in mind. In this section, you learn how you can use ColdFusion components (CFCs) to further refine your ColdFusion applications to make them more flexible and scalable. 1. In Dreamweaver MX 2004, create a new document selecting File > New or using the Windows shortcut Ctrl + N.
Choose Dynamic page from the Category option and ColdFusion component from the Dynamic page option, and then click Create.
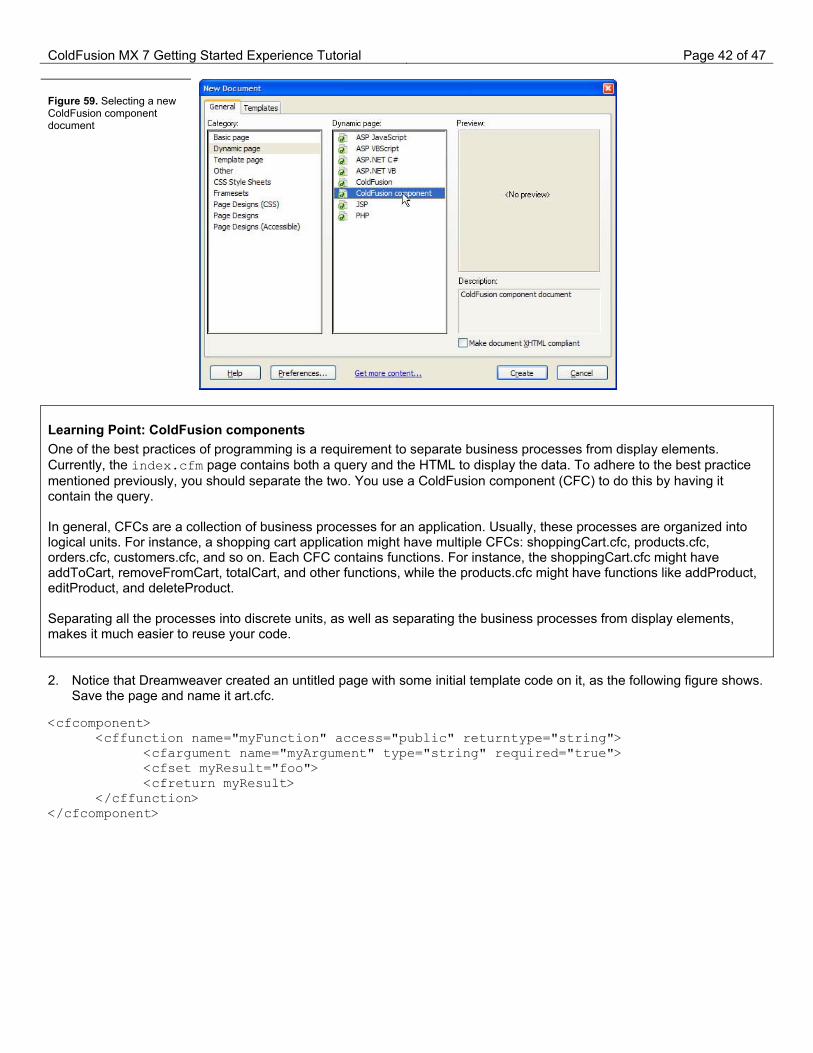
ColdFusion MX 7 Getting Started Experience Tutorial Page 42 of 47 Figure 59. Selecting a new ColdFusion component document
Learning Point: ColdFusion components One of the best practices of programming is a requirement to separate business processes from display elements. Currently, the index.cfm page contains both a query and the HTML to display the data. To adhere to the best practice mentioned previously, you should separate the two. You use a ColdFusion component (CFC) to do this by having it contain the query. In general, CFCs are a collection of business processes for an application. Usually, these processes are organized into logical units. For instance, a shopping cart application might have multiple CFCs: shoppingCart.cfc, products.cfc, orders.cfc, customers.cfc, and so on. Each CFC contains functions. For instance, the shoppingCart.cfc might have addToCart, removeFromCart, totalCart, and other functions, while the products.cfc might have functions like addProduct, editProduct, and deleteProduct. Separating all the processes into discrete units, as well as separating the business processes from display elements, makes it much easier to reuse your code. 2. Notice that Dreamweaver created an untitled page with some initial template code on it, as the following figure shows.
Save the page and name it art.cfc. <cfcomponent> <cffunction name="myFunction" access="public" returntype="string"> <cfargument name="myArgument" type="string" required="true"> <cfset myResult="foo"> <cfreturn myResult> </cffunction> </cfcomponent>

ColdFusion MX 7 Getting Started Experience Tutorial Page 43 of 47 Figure 61. Saving the page as art.cfc
3. Modify the default CFC template to better reflect your needs. Start by setting the returntype attribute of the
cffunction tag to query, and naming the function getArtwork. Having the access attribute set to public means that any server can access this function.
4. Delete the cfargument tag, because you do not need it for this function. 5. Modify the cfset tag so that it reads <cfset var artwork="">.
Learning Point: Creating variables You use the cfset tag to create variables; for example: <cfset firstName="Bart"> <cfset lastName="Simpson"> You use the cfset tag in the CFC to create, or initialize, the artwork variable. Recall that artwork is also the name of the query on the index.cfm page. You are going to move the query from the index.cfm page into this function, and the best practice for naming queries inside of functions is to first initialize them using the cfset tag. In other words, the artwork variable you just created in the cfset tag is actually just a preparatory space for the query that will eventually populate it. 6. Update the cfreturn tag so that it references the artwork variable instead of the myResults variable, as the
following code shows: <cfcomponent> <cffunction name="getArtwork" access="public" returntype="query"> <cfset artwork=""> <cfreturn artwork> </cffunction> </cfcomponent>
Learning Point: CFM and CFC relationship As mentioned earlier, CFCs only contain the business logic for an application. From the index.cfm page, you call the getArtwork function, to request that the data be returned to that page. The cfreturn tag is vital for this purpose. In this example, it is set to return the variable, artwork, which you declared in the cffunction tag’s returntype attribute as a query.

ColdFusion MX 7 Getting Started Experience Tutorial Page 44 of 47 7. Cut the query from the index.cfm page and paste it into the getArtwork function, between the cfset and the
cfreturn tags, as the following code shows: <cfcomponent> <cffunction name="getArtwork" access="public" returntype="query"> <cfset artwork=""> <cfquery name="artwork" datasource="cftutorial"> SELECT FIRSTNAME, LASTNAME, ARTNAME, DESCRIPTION, PRICE, LARGEIMAGE, ISSOLD, MEDIATYPE FROM ARTISTS, ART, MEDIA WHERE ARTISTS.ARTISTID = ART.ARTISTID AND ART.MEDIAID = MEDIA.MEDIAID </cfquery> <cfreturn artwork> </cffunction> </cfcomponent>
The cfreturn tag returns a query when the cffunction tag is called. 8. Save art.cfc. 9. The function is complete and now you can see it from the index.cfm page. Make sure that the index.cfm page is
open and that the Application panel is open on the Components tab, as the following figure shows. If it is not, you can open it by selecting Window > Components from the menu bar.
10. Select the CF Components option from the drop-down list as shown in the following figure. Figure 62. Opening the Components panel
11. If prompted to do so, enter the RDS password you assigned when you installed ColdFusion MX 7. Click OK after you type your password, and wait while Dreamweaver finds all of the components on your server.

ColdFusion MX 7 Getting Started Experience Tutorial Page 45 of 47 Figure 63. Viewing all components in the Components panel
This list shows all of the CFCs on the server. To make the display more useful, you can choose to view only the components assigned to your site.
Learning Point: ColdFusion MX 7 Extensions for Dreamweaver MX 2004 The site-specific components explorer is only available on Dreamweaver MX 2004 and only with the ColdFusion MX 7 installation. If you had Dreamweaver MX 2004 installed at the time of ColdFusion MX 7 installation, this extension may have been installed for you. If you do not have it, you can download it at http://www.macromedia.com. 12. Click the Show only current site’s CFCs icon, which is the house icon between the plus sign and the world icon, as the
following figure shows: Figure 64. Clicking the icon to display only icons in the current site
13. Click the plus sign next to cftutorial, and then click the plus sign next to art, so that you can see the getArtwork()
function.

ColdFusion MX 7 Getting Started Experience Tutorial Page 46 of 47 Figure 65. Viewing only the getArtwork() function in the art CFC
Learning Point: Locating CFCs CFCs are referenced based on their relationship to the web root of the server. In this case, you are using the built-in ColdFusion MX 7 web server, so the directory structure is c:\cfusionmx\wwwroot\cfide\gettingstarted\tutorial\. The tutorial listed in the Components panel refers to the tutorial directory inside wwwroot. The word art refers to the Art.cfc component in the tutorial directory, and the words query getArtwork() refer to the getArtwork function within the Art.cfc component that has a return type of query. 14. Return to the index.cfm page and drag the getArtwork() function from the Components tab to the top of the
index.cfm page, where the query used to be. Figure 66. Dragging the getArtwork() function to the index.cfm page
15. Review the code that is inserted. <cfinvoke component="CFIDE.gettingstarted.tutorial.art" method="getArtwork" returnvariable="getArtworkRet"> </cfinvoke>
Learning Point: the cfinvoke tag You use the cfinvoke tag to call functions inside of CFCs. The component attribute locates the CFC based on its relationship to the web root, just like the Components tab. Usually directories and files in paths are separated by forward or back slashes, but when referring to a CFC, they are separated by periods and the CFC, in this case art.cfc, is listed without its file extension. The method attribute refers to the function in the CFC that you would like to call, in this case, getArtwork. The returnvariable attribute of the cfinvoke tag has a similar purpose as the name attribute of a cfquery tag. It creates and names a variable to hold all of the values returned from the CFC. By default, Dreamweaver automatically names the variable with the method name, followed by the letters Ret, which is shorthand for the word return.

ColdFusion MX 7 Getting Started Experience Tutorial Page 47 of 47 16. If you leave the returnvariable attribute named getArtworkRet, you need to change all of the ColdFusion
variables in the HTML code to reflect this change. Instead, it is easier to rename the returnvariable to artwork. Modify the cfinvoke tag as the following code shows
<cfinvoke component="CFIDE.gettingstarted.tutorial.art" method="getArtwork" returnvariable="artwork"> </cfinvoke> 17. Save and browse the index.cfm page to see that it runs as it did before, when the cfquery tag was in the page. Figure 78. The final index.cfm page using the cfinvoke tag to grab the information from the database for display
When you stored the cfquery in the index.cfm page, it was only available to that page. If you wanted to reuse the query for another page, you would have to create a separate cfquery for the second page. Now that you have created the CFC, you can use it in other pages by simply using the cfinvoke tag.
Next Step This tutorial has introduced you to ColdFusion. To further your exploration, review the sample applications and code snippets available in the ColdFusion MX 7 Getting Started Experience (http://localhost:8500/cfide/gettingstarted/experience/).