
Step-by-Step Instructions for Making the Wall-hung...
17
1 © 2007 Woodworker’s Journal When a piece of furniture has an air and look of simplicity, you can be sure that it deftly conceals the complexity of its making. I wanted this piece to express that understated appearance in the following ways: • its proportions were just right so you hardly gave them a second thought; • the straight grain and color match came from flawless boards from an extraordinary tree; • the shadows cast by its simple rebates subtly framed and emphasized the parts; • the exposed joinery clearly explained its purpose and sat comfortably within the proportion of the whole. Also see Harvesting the Parts, Woodworker’s Journal, April 2005. Step-by-Step Instructions for Making the Wall-hung Bookcase Harvest the Parts 1. To get a feel for the log I put the 12 pieces back together in order on the bench. 2. With all the boards on display I could begin the selection process. 4. Begin selection with the longest boards. Here the sides are butt jolnted and clamped together. 3. Shelf parts cut to length. The grain is straight and aligned with the edges. The remaining task is to make them into matching shelves 10" wide. 5. Here are some of the tapered cuts made in the quest for boards with the grain aligned with the edges. 1 2 4 3 5
-
Upload
trinhthuan -
Category
Documents
-
view
215 -
download
0
Transcript of Step-by-Step Instructions for Making the Wall-hung...

1© 2007 Woodworker’s Journal
When a piece of furniture has an air and look ofsimplicity, you can be sure that it deftly conceals thecomplexity of its making. I wanted this piece toexpress that understated appearance in the followingways:
• its proportions were just right so you hardly gavethem a second thought;
• the straight grain and color match came from
flawless boards from an extraordinary tree;• the shadows cast by its simple rebates subtly
framed and emphasized the parts;• the exposed joinery clearly explained its purpose
and sat comfortably within the proportion of thewhole.
Also see Harvesting the Parts, Woodworker’sJournal, April 2005.
Step-by-Step Instructions for Making the Wall-hung Bookcase
Harvest the Parts
1. To get a feel for the log I put the 12 piecesback together in order on the bench.
2. With all the boards ondisplay I could begin theselection process.
4. Begin selection with the longest boards.Here the sides are butt jolnted and clampedtogether.
3. Shelf parts cut tolength. The grain isstraight and alignedwith the edges. Theremaining task is tomake them intomatching shelves10" wide.
5. Here are some ofthe tapered cutsmade in the questfor boards with thegrain aligned withthe edges.
1
2
4
3
5

© 2007 Woodworker’s Journal2
Mark the Joints: The Ends
On the inside face, knife across the shelf positionsand the shelf thickness. The thickness should bemarked 1/32" less than the thickness of the shelfstock. Try square goes only against the the backedge—the face edge. Pencil across the outside face toposition the joints.
Also see Marking Tools for Exacting Joints,Woodworkers Journal, August 2001, and Ian’s Must-have Measuring Tools, Woodworker’s Journal,December 2004.
Select and number the shelves on the back edge.Knife the shoulder lines on the first shelf but do notknife the front edge and 3/4" from front edge top and
bottom. This is because of the “overhanging” shelf.Mark the shoulder lines of the remaining shelves, onthe back edge from the first shelf.
Prepare the StockPrepare the Stock means get each part to width,
thickness, and length.Start by making a face side on each board, usually
done on a jointer. Check with straightedge andwinding sticks that it is:
• flat in length• flat in width• out of windingThe face side should be either the inside or
underside face. Mark it with a face side mark.Make a face edge on one edge of the board. Also
done on a jointer with a fence square to the bed.
Check with straightedge, try square, and windingsticks that it is:
• flat in length• flat in width• out of winding• at right angles to the face sideMark it with a face edge mark.
Also see Marking Up for Success: Prepare theStock, Woodworker’s Journal, February 2001.
Mark the Joints: The Shelves
3© 2007 Woodworker’s Journal
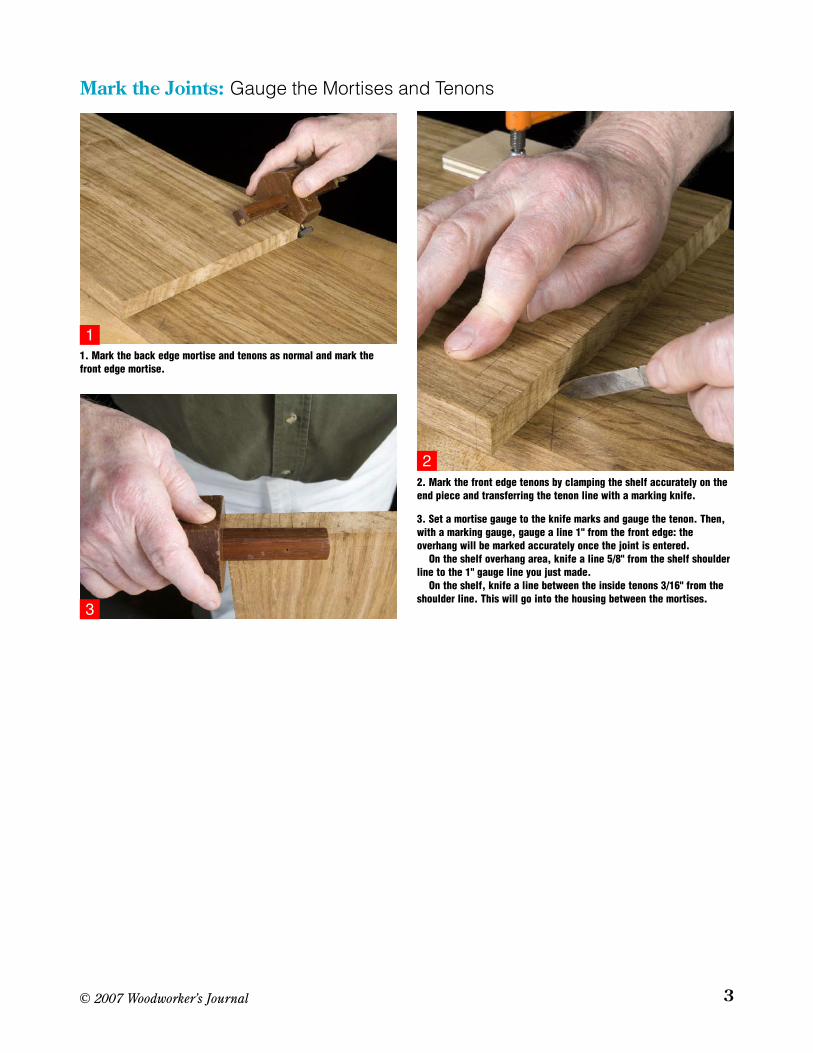
Mark the Joints: Gauge the Mortises and Tenons
1. Mark the back edge mortise and tenons as normal and mark thefront edge mortise.
3. Set a mortise gauge to the knife marks and gauge the tenon. Then,with a marking gauge, gauge a line 1" from the front edge: theoverhang will be marked accurately once the joint is entered.
On the shelf overhang area, knife a line 5/8" from the shelf shoulderline to the 1" gauge line you just made.
On the shelf, knife a line between the inside tenons 3/16" from theshoulder line. This will go into the housing between the mortises.
2. Mark the front edge tenons by clamping the shelf accurately on theend piece and transferring the tenon line with a marking knife.
1
3
2

© 2007 Woodworker’s Journal4
1. An early difficulty posed by this parcel of English brown oak wasthat a normal mortise chisel, top, caused collapse and tearout of thetissue as it was driven. The solution was a bevel edge bench chiselwith a low grinding and sharpening angle. However, the bench chisel’sthin blade doesn’t allow you to lever the handle back and accuratelyream out the side of the mortise as you would with a mortise chisel.So, although the ends were cut square and free of tearout, thesidewalls had to be trimmed in a separate operation.
2. Given 3/4" materialand a sharp chisel, youdon’t have to hit hard,but you have to make alot of cuts tocompensate for notbeing able to ream thesides (see photo 3). Imade the joint sittingdown—not a normalposition for me, butit’s a fussy time-consuming little jointthat must beapproached from bothsides. Sometimes it’snice to be able to sitdown on the job.
3. Lots of cuts arerequired to makea mortise in thisfragile material.
4. Becauselevering with abench chisel isimpractical, thewalls have notbeen reamedclean.
Cut the Joints: Chop the Mortises
6. A vertical positionis preferable toworking with theboard horizontal onthe bench. With theboard upright in thevise, you can seethrough the joint tomake the mortise endwalls dead flat andaccurate.
5. Clean up the sidewalls with a chiselbut start the cutbelow the surface.
1
2
3 4
5 6

5© 2007 Woodworker’s Journal
Cut the Joints: Saw the Tenons1. You know howtight you made themortise gauge spursto the chisel. Nowyou have to decidewhere to make thesawcut relative tothe gauge line. Startthe sawcut on the farside of the board andwatch it cometowards you, splittingthe line. Notice thegrip on the saw. Theindex finger pointedforward gives yougreater control. 2. Saw straight down the line, keeping the teeth parallel to the bench.
Your sawcut should stop at the same distance from the shoulder linefront and back.
3 & 4. Remove the waste with acoping saw. Grip the saw with twohands. Stand square to the work,feet apart, and bent into the workfor good vision. Use steady sawstrokes the length of the blade.
1
2
3
5. Remove the waste by horizontalparing. Place the chisel in the knifeline and chisel upwards to the faredge.
6. Turn the workpiece around andand horizontal pare from theopposite side, leaving a roof-likeshape in the middle.
4
5 6

© 2007 Woodworker’s Journal6
Cut the Joints: Rout the Housing2. Clamp theworkpiece firmly inplace. Position therouter at the far sideand pull it towardsyou. It doesn’t takea lot of strength. It’sa slow because youhave to make newknife lines and resetthe cutter depthafter every cross-board travel. Chiselthe sides clean andto width after you’vemade the housing todepth.
3. Make a router jigthat will leave 1/16"of uncut materialeach side of thehousing. It’s quickerthan making andpositioning the jigabsolutelyaccurately.
4. Clean the housingby vertical paringwith a wide chiselwhether you rout bymachine or hand.
2
3 4
7. Remove the roof-like shape by horizontal paring.
8. You can now enter the tenons into the mortises at an angle to check for anyinaccuracy.
7
8
Cut the Joints: Saw the Tenons continued
1. Cut the housing by hand or machine. If youuse a hand router, make auxiliary lines justinside the shelf knife lines. The hand routerwill not sever the fibers free; you have to dothat first with a knife.
1

7© 2007 Woodworker’s Journal
Fit the Shelves
1. Making the housing too narrow for theshelf thickness is the normal hand furnituretechnique. The shelf is then planed to fit. Inthis way you remove the machine planermarks, fit the shelf, and make it ready topolish in one operation.2. Use a straightedge and a vernier to get thenecessary accuracy.
3. The joints will enter only so far becausethe front overhang prevents closure.
6. Saw the overhang line like a tenon.
1 2
3
5. Set a marking gauge to the line and markthe overhang.
5 64. You can knife the line exactly to mark theoverhang with the shelf entered.
4
8. Clean up the shoulder.
7. Remove the waste.
7 8
© 2007 Woodworker’s Journal8
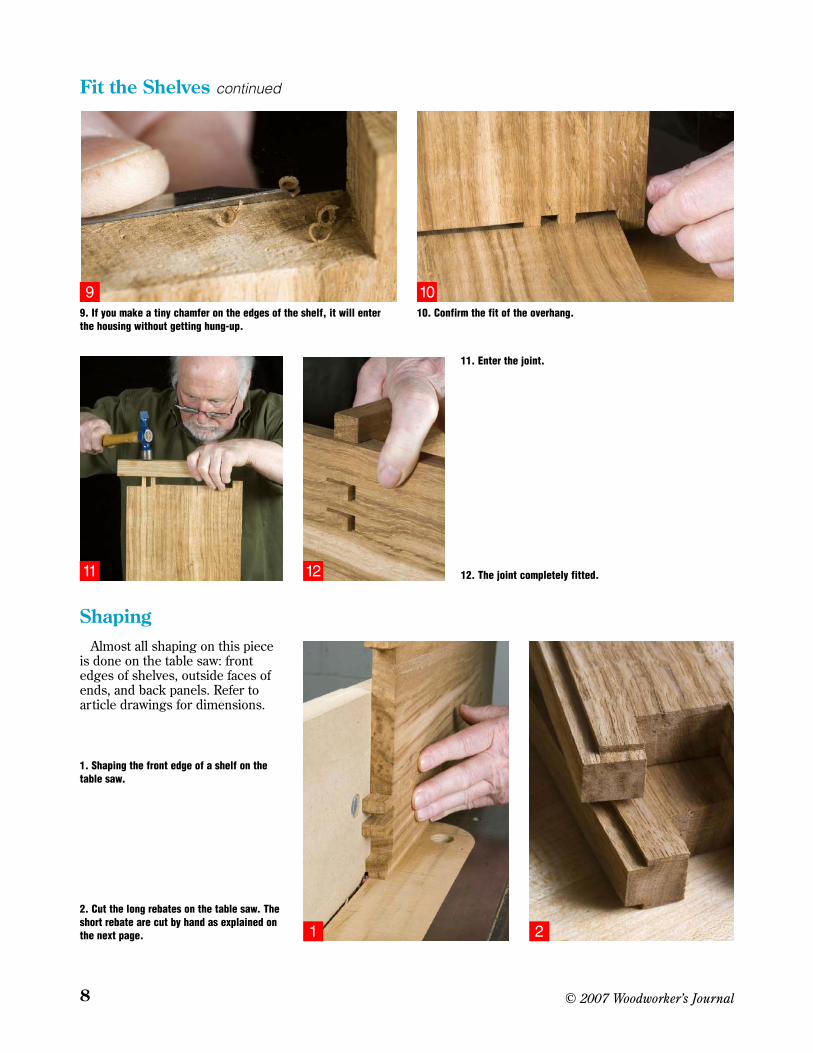
10. Confirm the fit of the overhang.
11. Enter the joint.
12. The joint completely fitted.
Shaping
1. Shaping the front edge of a shelf on thetable saw.
Almost all shaping on this pieceis done on the table saw: frontedges of shelves, outside faces ofends, and back panels. Refer toarticle drawings for dimensions.
2. Cut the long rebates on the table saw. Theshort rebate are cut by hand as explained onthe next page.
9. If you make a tiny chamfer on the edges of the shelf, it will enterthe housing without getting hung-up.
Fit the Shelves continued
9 10
11 12
1 2

9© 2007 Woodworker’s Journal
Handwork on the Front Edge of the Shelf
1 & 2. Knife around the shelf overhang at the correct length and angle.
3. Saw the overhang to lengthwith a dozuki saw.
4. Clean up with a chisel.
5. Knife the end rebate. 6. Saw to line with dozuki saw: fine kerf andslow cut.
7. Chisel to finish lines.
1 2
3 4
5 6 7

© 2007 Woodworker’s Journal10
Saw the Wedge Kerf in the Tenons
1. With a marking gauge make a deep mark inthe ends of the tenons on each side. Pencilgauge a line down the edge.
2. Clamp the workpiece verticalin the vise. You can feel thegauge line. Start the cut withthe teeth in contact with bothtenons.
3. Saw down, keeping the teethhorizontal. End at the housinginsert.
Open the Mortises to Accept the Wedge
1. I calculated the amount by which I wouldtypically open a mortise of this dimension—more details later!—then measured andmarked it.
2. Knife these lines across only the mortiseopening.
3. With the workpiece held upright in thevise, cut the gradient to within 1/8" of theinside edge.
4. Cutting the mortise gradients viewed frominside the bookcase.
2
3
4
1
2
3
1
11© 2007 Woodworker’s Journal
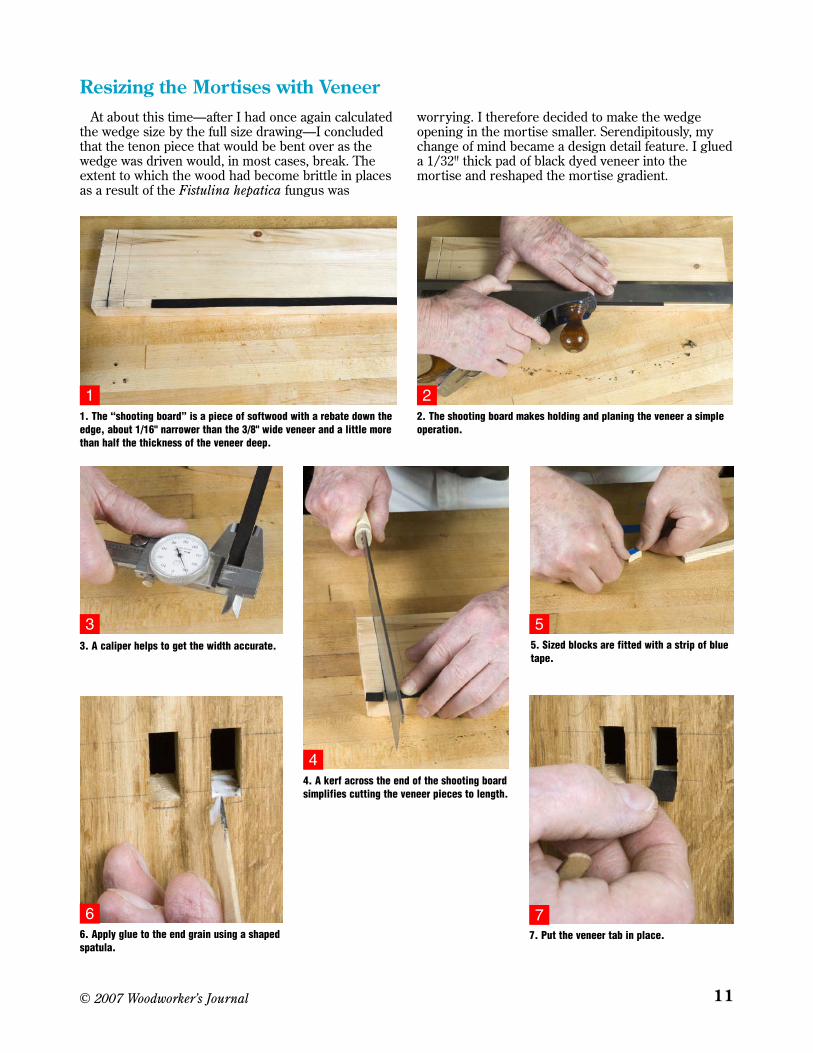
Resizing the Mortises with Veneer
2. The shooting board makes holding and planing the veneer a simpleoperation.
3. A caliper helps to get the width accurate.
4. A kerf across the end of the shooting boardsimplifies cutting the veneer pieces to length.
3
1. The “shooting board” is a piece of softwood with a rebate down theedge, about 1/16" narrower than the 3/8" wide veneer and a little morethan half the thickness of the veneer deep.
1
4
2
At about this time—after I had once again calculatedthe wedge size by the full size drawing—I concludedthat the tenon piece that would be bent over as thewedge was driven would, in most cases, break. Theextent to which the wood had become brittle in placesas a result of the Fistulina hepatica fungus was
worrying. I therefore decided to make the wedgeopening in the mortise smaller. Serendipitously, mychange of mind became a design detail feature. I glueda 1/32" thick pad of black dyed veneer into themortise and reshaped the mortise gradient.
5. Sized blocks are fitted with a strip of bluetape.
5
7. Put the veneer tab in place.
76. Apply glue to the end grain using a shapedspatula.
6

Make the wedges from a board about 5" wide andplaned to the thickness of the tenon.
The wedges don’t taper to a sharp or feather edge asyou might expect. Instead they have a flat end which isequal to the width of the saw kerf. The wedge is sized tofill the saw kerf in the tenon and the opening in the mor-tise when its length is equal to the length of the kerf inthe tenon. It’s made about half as long again as the kerflength so that any damage incurred when driving ithome won’t matter.
I determined the size and shape of the wedge bymaking a full size drawing, then setting a sliding bevel tothe angle needed. After marking the length of thewedges on the wedge stock, mark the first wedge on theend with the sliding bevel. (See photo 1.) After it’s cut,mark the second wedge from the end of the stock usinga try square. Leave a kerf thickness, square a line down,then cut the second wedge. Go across the stock in thisway (see photo 3), then saw off all the wedges at once.
Refer to article drawing. Following is the step-by-stepprocedure for making wedges.
1. Prepare wedge stock to thickness.2. Mark length lines.3. Mark wedge #1.4. Saw wedge. (The procedure is always the same:
mark first, then saw—you can’t mark more than onewedge at a time.
5. Mark wedge #2.6. Saw wedge.7. Mark wedge #3.8. Saw wedge.9. Once you have cut to the width of the wedge
stock, saw off all wedges at once. (See photo 4.)
© 2007 Woodworker’s Journal12
Make the Wedges
Resizing the Mortises with Veneer continued
10. Trim outer edge of veneer flush.9. After the glue has dried the mortise mustbe reshaped.
8. Position the clamping block and tape itdown.
8 9 10
1. Mark wedge with sliding bevel.
1

13© 2007 Woodworker’s Journal
Make the Wedges continued
2. Saw wedge.
2
3. Continue the mark-and-cut sequence until you have sawn the width of the wedge stock. Inthis case, the result is a total of 28 wedges ready to be sawn from the wedge stock.
4. Lay the wedge stock on a sawing boardand saw off all the wedges.
3
4 5. Collect and select the wedges.There will be size variations: just right, too big, and the oddone too small. Discard the too small. The too big are quickly corrected by putting the wedgeagainst the end stop of a sawing board and removing the excess with a chisel.
5

© 2007 Woodworker’s Journal14
Make the Back
Refer to article drawings. The back slats are loose inthe groove, about 1/32" between pieces, and screwedinto shelves #2 and #3.
Prepare the slats to size: thickness is 9/16"; length isthe opening between the top and bottom shelf plus1/2"; width depends on how you decide to fill thedistance between shoulder lines of the shelves.
Groove shelves #1 and #4 to drawing dimensions.Saw 9/16" off the backs of shelves #2 and #3.
Knife the end shoulder lines on the back slats.Gauge the “tenon.”Saw the tenon on the table saw. Fit the tenon. See
photo 2Saw the edge rebate.Saw the end rebate. Clean up rebates with a
shoulder plane. See photos 3 & 4.After the glue-up, screw back slats to shelves. See
photo 5.
1. I made twobookcases: one hadfour back slats andthe other had five.1
3 & 4. I used a small shoulder plane to clean up the rebates. 5. After the glue-up, equally space back slats with business cards andscrew to shelves #2 and #3.
3
4 5
2. Check that theback slats fiteasily into theirgrooves.
2

15© 2007 Woodworker’s Journal
Clean up and Polish the Parts
All the parts except the outsides of the two endswere cleaned up and polished before assembly. The
ends had been planed to finish prior to sawing therebates. I used shellac and beeswax as the finish.
1 & 3. The piece is clamped firmly to the bench, making it easy to cutoff the excess on the joints and plane them clean. This procedure isonly possible if the bench is rigid and the edge is square.
2. The back of a dozuki makes an ideal guide to saw parallel to thesurface of the workpiece without damaging it.
In truth I left more length on the tenon that I should have—about3/32". However, don’t be tempted to make the length of the tenonexactly the depth of the mortise. If you do, when the edge piece of thetenon is bent over by the wedge, it will describe an arc and sit belowthe surface.
1
2
3
© 2007 Woodworker’s Journal16
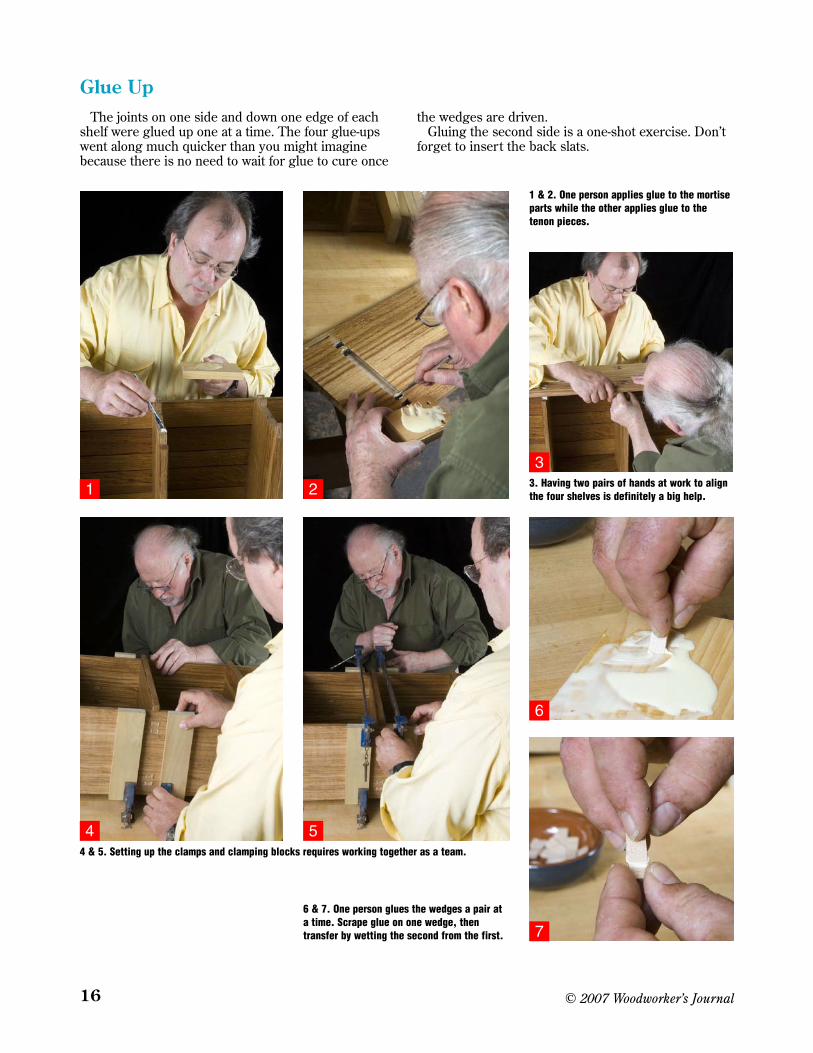
Glue UpThe joints on one side and down one edge of each
shelf were glued up one at a time. The four glue-upswent along much quicker than you might imaginebecause there is no need to wait for glue to cure once
the wedges are driven.Gluing the second side is a one-shot exercise. Don’t
forget to insert the back slats.
1 & 2. One person applies glue to the mortiseparts while the other applies glue to thetenon pieces.
3. Having two pairs of hands at work to alignthe four shelves is definitely a big help.
4 & 5. Setting up the clamps and clamping blocks requires working together as a team.
6 & 7. One person glues the wedges a pair ata time. Scrape glue on one wedge, thentransfer by wetting the second from the first.
1 2
3
4 5
6
7

17© 2007 Woodworker’s Journal
Glue Up continued
8. The wedges can be pushed in by hand about half way… 9. …and driven home with an 8 oz Warringtoncross-peen hammer.
8 9
Hang the Bookcase
1. The bookcase was screwed to the wall. A stud was convenientlylocated on the left side but on the right I had to open the wall andinsert a softwood pad. The blue tape marks the position of thebookcase.
2. Detail of the insertedsoftwood pad required to screwthe right side of the bookcase.
1
2