Step By Step development of Custom Workflow with · PDF fileStep By Step development of Custom...
40
Step By Step development of Custom Workflow with Custom Task Form In SharePoint 2010, you can create three different types of workflow, List Workflow, Site Workflow and Reusable workflow. In this document, I am going to tell you that how to create a custom site workflow with custom content types. 1. Open Visual Studio 2010, Create new project, and expand SharePoint Node in Installed Templates and select 2010, then select Sequential Workflow as shown in figure. 2. When you press Ok, it will take you to another screen, where you specify the site. Only Deploy as Farm Solution radio button will be enabled. Press Next to continue.
Transcript of Step By Step development of Custom Workflow with · PDF fileStep By Step development of Custom...

Step By Step development of Custom Workflow with Custom Task Form
In SharePoint 2010, you can create three different types of workflow, List Workflow, Site Workflow and
Reusable workflow.
In this document, I am going to tell you that how to create a custom site workflow with custom content
types.
1. Open Visual Studio 2010, Create new project, and expand SharePoint Node in Installed Templates
and select 2010, then select Sequential Workflow as shown in figure.
2. When you press Ok, it will take you to another screen, where you specify the site. Only Deploy as
Farm Solution radio button will be enabled. Press Next to continue.

3. Now you have two options, List workflow and Site Workflow.
a. List Workflow are used for List only
b. Site workflows are for external sources, like databases and WCF services.
4. Now rename the workflow, and select site workflow and press Next.

5. Do not remove the check, use the default settings. If you uncheck the checkbox, then you cannot
view your tasks.

6. Again use the default option, that user can manually start the workflow, and press finish. Other two
option are only enabled in case of using List workflows.

7. Now Check the Workflow Project Structure. OnWorkflowactivated1 is the default activity which will
be started when the workflow starts. On right side, you can see the set of controls in toolbar, and
workflow files in the Solution Explorer on left side. Now I am going to rename the Workflow as
CustWorkflow.
8. Renamed the workflow and its .cs files, and then compile it to verify no error occurred. This step is
optional and you can also use the default naming.
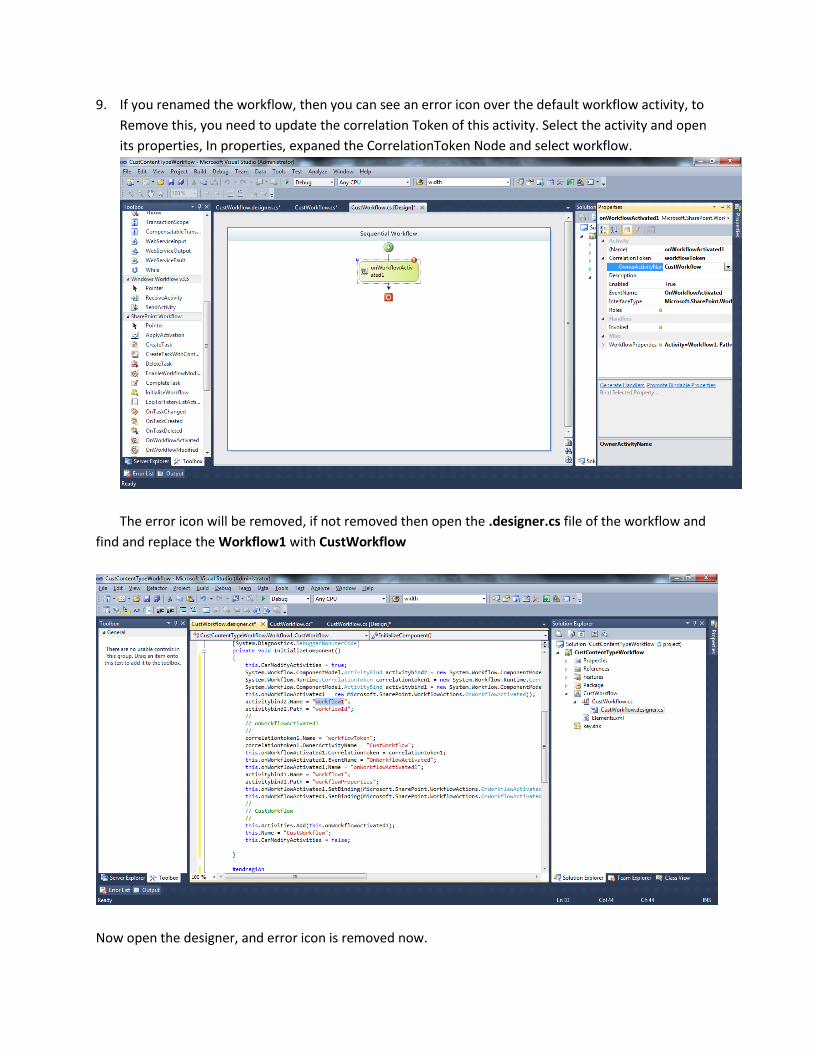
9. If you renamed the workflow, then you can see an error icon over the default workflow activity, to
Remove this, you need to update the correlation Token of this activity. Select the activity and open
its properties, In properties, expaned the CorrelationToken Node and select workflow.
The error icon will be removed, if not removed then open the .designer.cs file of the workflow and
find and replace the Workflow1 with CustWorkflow
Now open the designer, and error icon is removed now.

10. Drag a CreateTaskWithContentType on the designer .
For using a TaskWithContentType, You need to add a Content Type to the workflow. Right Click on the
workflow project, and select add New Item.
From New Item Window, Add a new content Type to the workflow.

When you Add a new content type, it will asked for the base content type. From dropdown list, select
Task and press Finish Button.
In Elements.XML of content Type, You can see the ID of Content Type is
0x01080008462a61d1be4289b1b8dc99c9833cef, in comments above the content Type line in

elements.xml, you can see the Task parent content Type is 0x0108, but for Workflow task we use
0x010801, so now replaced the GUID with 0x0108010008462a61d1be4289b1b8dc99c9833cef.
Back to workflow Designer, Select the createTaskWithContentType1 and open its properties. Add a new
Correlation Token, and Expand the node and select the workflow name. In ContentType Id, enter the ID
of content type which we addded in previous step.

11. Now, in Property window, select TaskId, press the browse button and Bind a new Field to the Task
Id.
Similarly, add a new TaskProperty Field. After Adding TaskId and TaskProperty fields, you can expand
the nodes and can see the below screen.

12. Add an event to the Task from property window or by simply double clicking on the task and add
the following line of code
ContentTypeTaskId = Guid.NewGuid();
ContentTypeTaskProperties.AssignedTo = "Avanza\\Adnan.amin"; ContentTypeTaskProperties.DueDate = DateTime.Now.AddDays(2); ContentTypeTaskProperties.Title = "Content Type Test Task 1"; ContentTypeTaskProperties.SendEmailNotification = true;

Assign a new Guid to TaskId, and Set the Assignto and and other fields to TaskProperties. You can also
set the email alerts to the user by making SendEmailNotification property to true.
These task steps assign assing a task to a user, which will be shown in the task List of the user. (Same
steps will be followed for other users).
Note: for sending email from sharepoint, you must configure the outgoing emails through in the Central
Administration.
13. To hold the task, so that user can perform an action, add a while activity from the toolbar.
14. Create a class level bool variable in code behind and add a declaritve rule to the while condition.
This will be used to hold the task on user task List.
Create a bool variable in code behind

Now select the while activity and select the property condition.
From property window, First select the Devlartive Rule Condition,
And then expand the Condition node, and select the browse button in ConditionName.

Add a new rule

Now add the rule condition in the editor and press Ok.
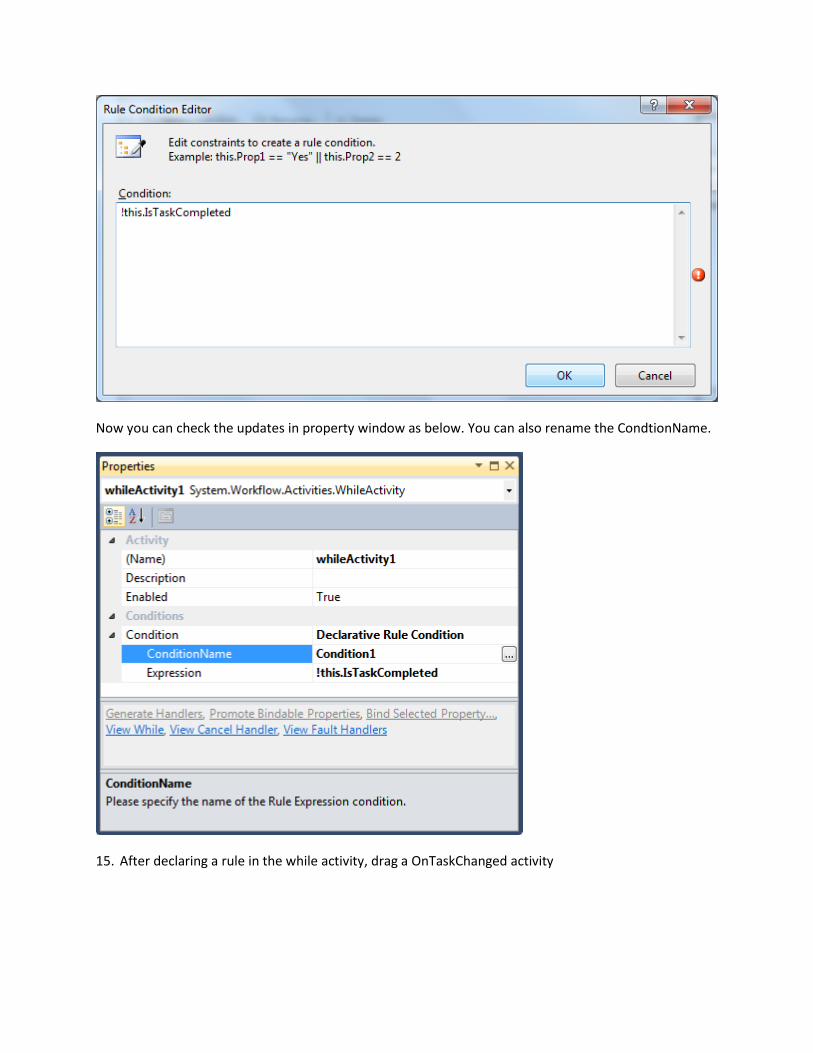
Now you can check the updates in property window as below. You can also rename the CondtionName.
15. After declaring a rule in the while activity, drag a OnTaskChanged activity

Now set the properties of onTaskChanged activity. Use the same CorrelationToken which is created for
CreateTaskWithContentType1 and also select the same TaskId (TaskId will be same for all steps).

Now create the fields for AfterProperties and BeforeProperties. These will be used to follow the update
in task. These properties will be created in the similar way as we created TaskId & Taskproperties. And
also invoke the event for the activity.

Now go to the event code and right this line.
this.IsTaskCompleted = AfterProperties.ExtendedProperties.Contains("IsApproved");

This condition will hold the workflow at this steps until unless the condition get true. This condition will
get true when user perform an action from the Task List.
16. Drag TaskCompleted activity to the designer below the while activity as shown in the figure.
Now, set the properties of CompleteTask1, Use the same Correlation Token and TaskID, and then invoke
the activity Event.

In this event we will set that what we need to do after completion of this task. create a new boolean
variable at class level and name it as IsSpproved. And In task Completed event, write the follow code
if (AfterProperties.ExtendedProperties.Contains("IsApproved")) this.IsApproved = Convert.ToBoolean(AfterProperties.ExtendedProperties["IsApproved"]);

This will be used to proceed the workflow to next step according to the action.
Below picture shows a complete task Activity
Now we have to add another task, and have to follow the same steps.
Note: Correlation Token will be different for each Task ( Include CreateTaskWithContentType,
onTaskChanged& CompleteTask). TaskID, TaskProperties, AfterProperties and BeforeProperties will be
same for all steps.
17. Add an if Confition below the Complete task to add another task.

Set the condtion of If Block, as create a declarative rule which. And if IsApprove is true then move to
next step else terminate the workflow.
Add the condtion.

18. Now drag the CreateTaskWithContentType on the workflow

And create a new Correlation Token and set the other properties as like in the First Task and invoke the
event.

Now assign the user to whom this workflow will be assigned in the event. Right the following line of
code:
ContentTypeTaskId = Guid.NewGuid();
ContentTypeTaskProperties.AssignedTo = "Avanza\\Adnan.amin"; ContentTypeTaskProperties.DueDate = DateTime.Now.AddDays(2); ContentTypeTaskProperties.Title = "Content Type Test Task 1"; ContentTypeTaskProperties.SendEmailNotification = true
Similary, add while activity and then add OnTaskChanged and CompleteTask activites and set their
properties. And workflow be look as below
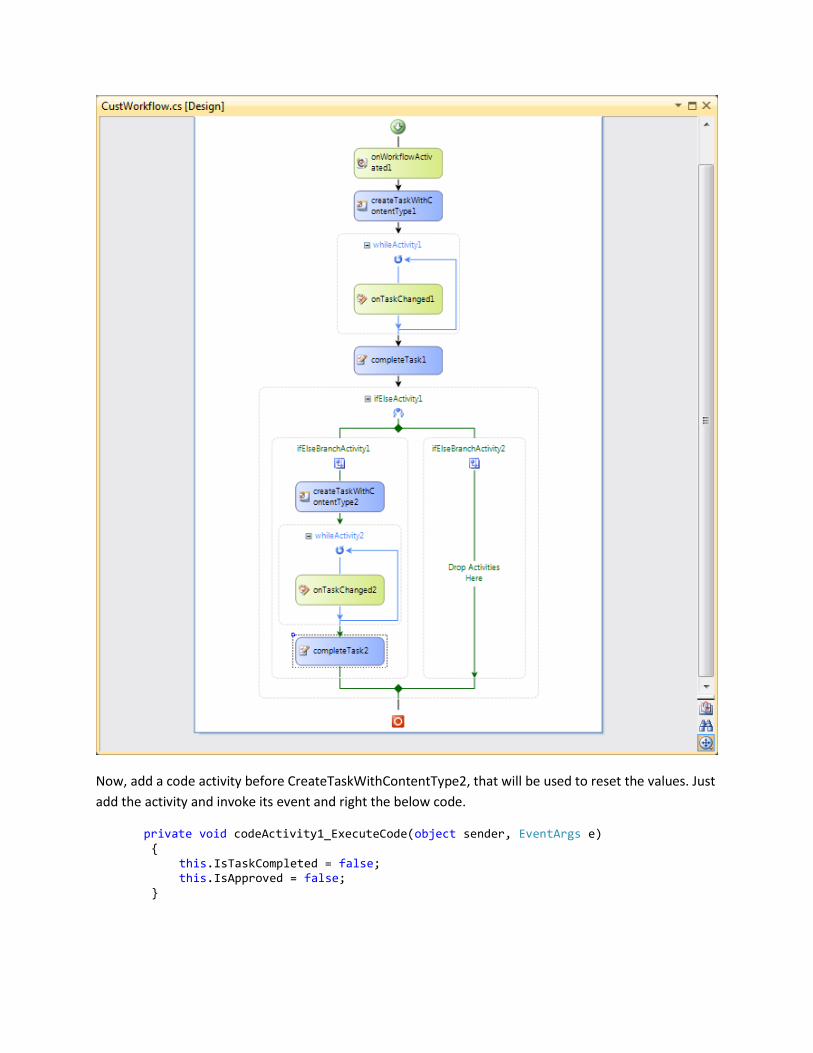
Now, add a code activity before CreateTaskWithContentType2, that will be used to reset the values. Just
add the activity and invoke its event and right the below code.
private void codeActivity1_ExecuteCode(object sender, EventArgs e) { this.IsTaskCompleted = false; this.IsApproved = false; }

19. After all these steps, build and deploy the workflow.
Initiating & View form of Workflow
To initiate the workflow, you need to create an initiate form for the workflow, you can add a
default initiate form by right click on workflow Node, and then create item and choose Initiate
form. This will create the Initiate form for the workflow. But to Create a custom aspx page to
initiate workflow, I am going to add a Visual Webpart Project to the solution. It’s not necessary

to add a visual webpart project, I am just separting the form pages from workflow application,
and using Visual Webpart Project type just to Map folders.
1. Add a new Visal Web Part project to the solution and then specify the SP site and press
finish Button.

2. Delete the VisualWebPart1 from the solution explorer.

3. And add Mapped layout Folder, this will be mapped with the _layouts folder of Sharepoint.

4. After adding the layout folder, expand the Layout folder node. You can see another folder
there, Right click on that folder and Add New Item. Add an Applciation page and Name it
WFInitiate.aspx

5. You can add you form content in this page at Main Placeholder. To make it simple, I am just
adding a button control to the page and then will call its onclick event to initiate the
workflow.
Add these two namespaces on top of the code behind file.
using System.Web; using Microsoft.SharePoint.Workflow; using Microsoft.SharePoint.Utilities;
And add below code in the button click event. This will initiate the workflow.
protected void btnInitiate_Click(object sender, EventArgs e) { SPSecurity.RunWithElevatedPrivileges(delegate() { using (SPSite site = new SPSite(SPContext.Current.Site.ID)) { using (SPWeb web = site.OpenWeb(SPContext.Current.Web.ID)) { Guid baseId = new Guid("31fcd9ce-eb4b-42a6-87ff-e17864f5b8e3"); var assoc = web.WorkflowAssociations.GetAssociationByBaseID(baseId); //this is the call to start the workflow if (assoc != null) { //pass any string value to the workflow page, like user names. string associateXML = ""; var result = site.WorkflowManager.StartWorkflow(null, assoc, associateXML, SPWorkflowRunOptions.Synchronous);

} } } }); //this will redirect the page after workflow initiations SPUtility.Redirect(SPContext.Current.Web.Url, SPRedirectFlags.UseSource, HttpContext.Current); }
BaseId is the id of workflow. You can get BaseId by Expanding the workflow node, you can find a Elements.xml file. Open it, there will be a Workflow element, which have the an Id attribute which is called the base ID.

Now deploy then Visual Webpart project and open the WFInitiate page to initiate the
workflow.
The URL will be, http://siteURL/_layouts/WorkflowPages/wfinitiate.aspx
Now, I can see the initiated work in the task list.

But if I click on the tasklist item, it will show a default view page of the task list. I have to
show the my custom page instead of this. For this I have to create a custom page which will be
shown when clicked on the task list.
6. Now add a new application page in the layouts folder (where you created the initiate page)
and name it as WFView.aspx, and add two button controls in it and name them as Approve
& Reject respectively.
7. In code behind, write the below code:
Import these namespaces on top of the view page.
using System.Collections; using Microsoft.SharePoint; using Microsoft.SharePoint.Utilities; using System.Web;
Create a class level variable of SPListItem protected SPListItem _TaskListItem;
Create a method and call it on page load.
private void GetTaskListInformation() {
// Get the Task List that we are attached to, by converting the Guid Parameter into a Guid string _paramSPListGuid = Request.Params["List"]; string _paramTaskListItemID = Request.Params["ID"]; SPList _TaskListAttachedTo = SPContext.Current.Web.Lists[new Guid(_paramSPListGuid)]; this._TaskListItem = _TaskListAttachedTo.GetItemById(System.Convert.ToInt16(_paramTaskListItemID));
}
After this method, create another method, which will be called on the button clicks, and they
will update the workflow.
void UpdateTask(bool isVerfied) { Hashtable taskHash = new Hashtable(); // Task data is sent via a Hash Table taskHash["IsApproved"] = isVerfied; taskHash["TaskStatus"] = "Verified"; // Sending/Updating a Built in Value taskHash["Title"] = "If want to update title"; taskHash["PercentComplete"] = "1"; // The value 1 for PercentComplete = 100%. .9 = 90% SPWorkflowTask.AlterTask(this._TaskListItem, taskHash, true); // Send the data to the task list, by altering the tasks value }
Now call the methods in the respective event, this will set the true or false to the IsApproval
property which will be then called the workflow.
8. After all these steps, Build and deploy the webpart proeject to deploy pages to the
workflow.
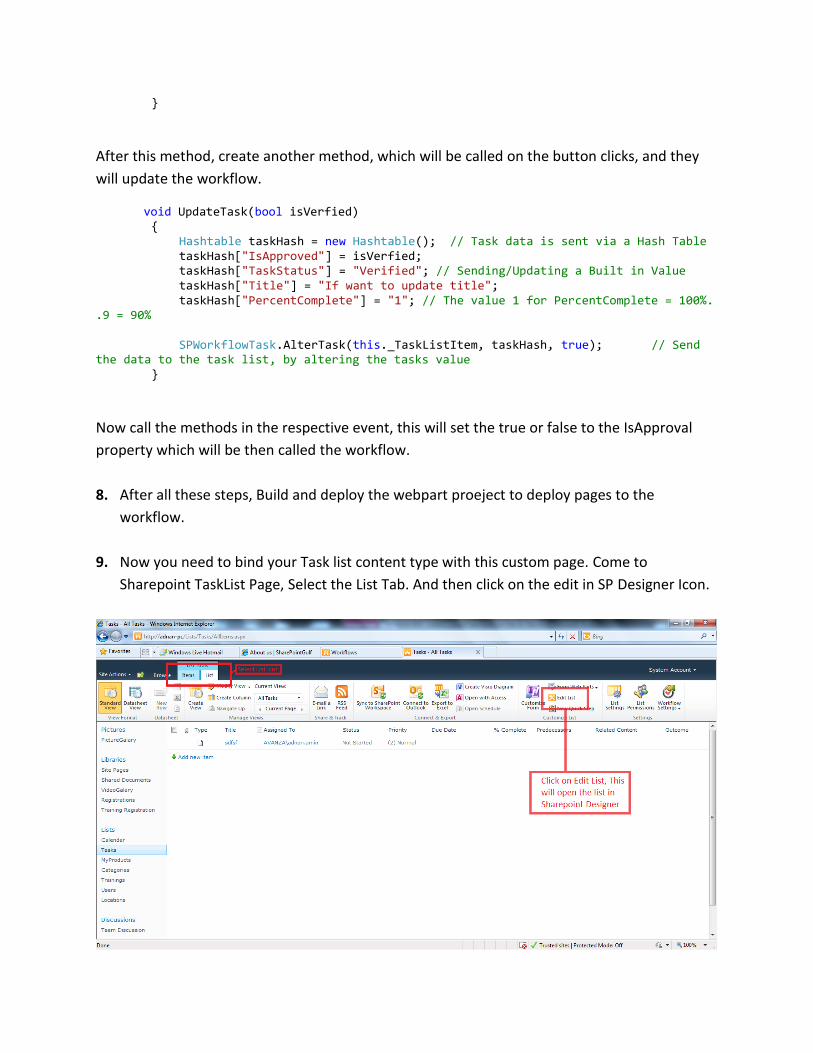
9. Now you need to bind your Task list content type with this custom page. Come to
Sharepoint TaskList Page, Select the List Tab. And then click on the edit in SP Designer Icon.

Click the Edit List Button and open the list page in sharepoint to customize. Task list page will
show you the default Add, Edit and View pages.
Scroll down the page, You can see content types section, if your content type is not listed then
add it manually.
Select the content type from the Content Type Picker window.

After adding your content type to the task List, simply click on the newly added content type,
you will see below screen, from this screen, you can show custom forms for edit and view on
task list.

By default it will show the default Task list forms, Just add your custom forms links. Now user
can approve/reject tasks though custom forms. I am just using the same form for all three
actions.
Now Initiate a new workflow, after initiation, check the tasklist page. When you click on content
type task, it will show you the custom view page Dialog.
This is how you can create a custom workflow and how can you bind it with custom approval
forms. You can create multiple approver form by simply adding separate Content Type on each
task.