
Starter and Alternator - Information
27
Getting to know Starters and Alternators... Version 1.0 Copyright © 2010 Autocosmosbiz (Pty) Ltd
description
basics
Transcript of Starter and Alternator - Information
Getting to know Starters
and Alternators...
Version 1.0
Copyright © 2010 Autocosmosbiz (Pty) Ltd
Starters and Alternators
Definitions...
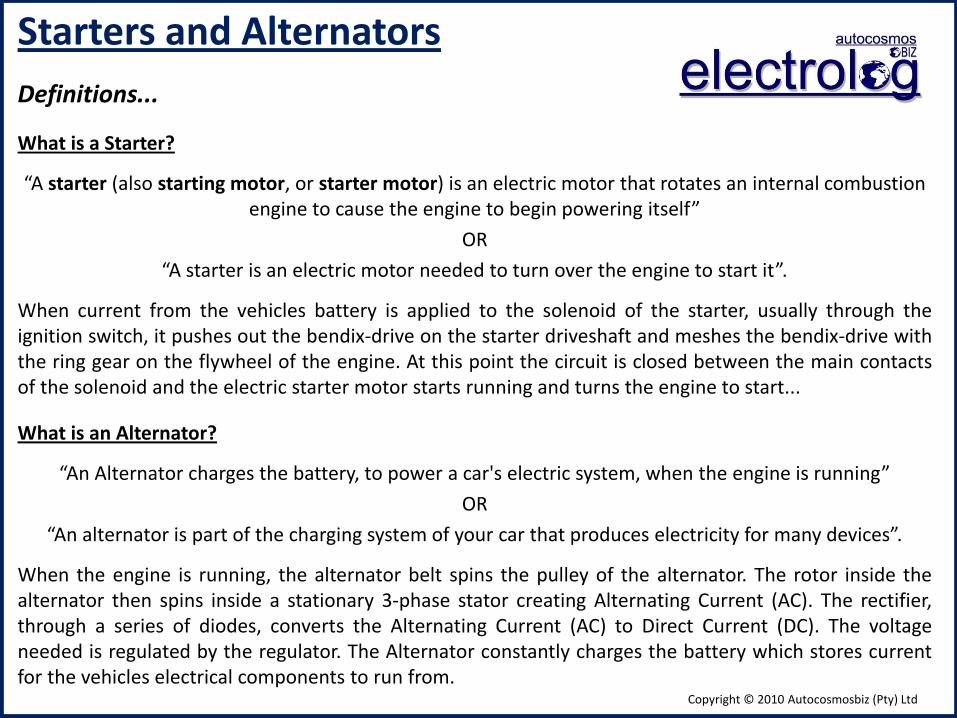
What is a Starter?
“A starter (also starting motor, or starter motor) is an electric motor that rotates an internal combustion engine to cause the engine to begin powering itself”
OR
“A starter is an electric motor needed to turn over the engine to start it”.
When current from the vehicles battery is applied to the solenoid of the starter, usually through the ignition switch, it pushes out the bendix-drive on the starter driveshaft and meshes the bendix-drive with the ring gear on the flywheel of the engine. At this point the circuit is closed between the main contacts of the solenoid and the electric starter motor starts running and turns the engine to start...
What is an Alternator?
“An Alternator charges the battery, to power a car's electric system, when the engine is running”
OR
“An alternator is part of the charging system of your car that produces electricity for many devices”.
When the engine is running, the alternator belt spins the pulley of the alternator. The rotor inside the alternator then spins inside a stationary 3-phase stator creating Alternating Current (AC). The rectifier, through a series of diodes, converts the Alternating Current (AC) to Direct Current (DC). The voltage needed is regulated by the regulator. The Alternator constantly charges the battery which stores current for the vehicles electrical components to run from.
Copyright © 2010 Autocosmosbiz (Pty) Ltd
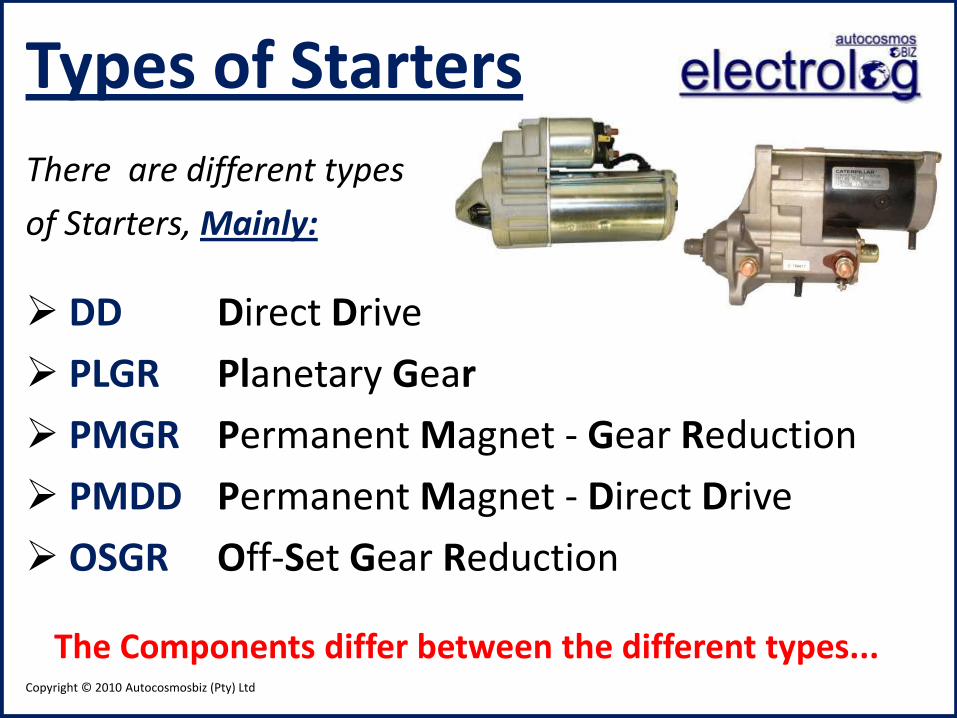
Types of Starters
There are different types
of Starters, Mainly:
DD Direct Drive
PLGR Planetary Gear
PMGR Permanent Magnet - Gear Reduction
PMDD Permanent Magnet - Direct Drive
OSGR Off-Set Gear Reduction
The Components differ between the different types...
Copyright © 2010 Autocosmosbiz (Pty) Ltd
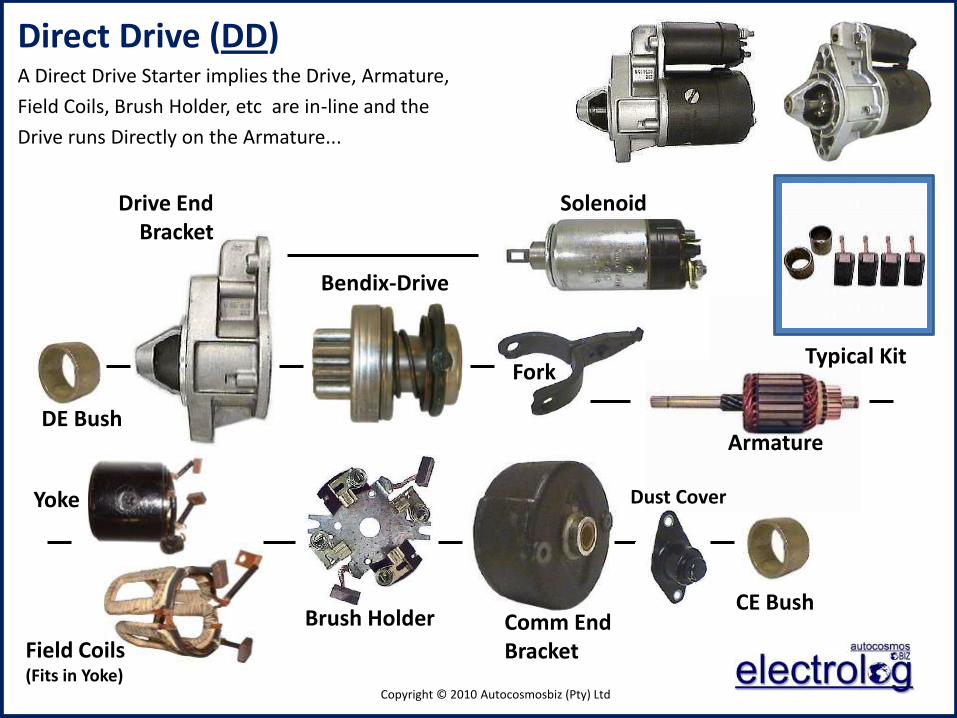
Direct Drive (DD) A Direct Drive Starter implies the Drive, Armature,
Field Coils, Brush Holder, etc are in-line and the
Drive runs Directly on the Armature...
Typical Kit
Bendix-Drive
Drive End Bracket
DE Bush
Solenoid
Fork
Armature
Field Coils (Fits in Yoke)
Brush Holder Comm End Bracket
Yoke
CE Bush
Dust Cover
Copyright © 2010 Autocosmosbiz (Pty) Ltd
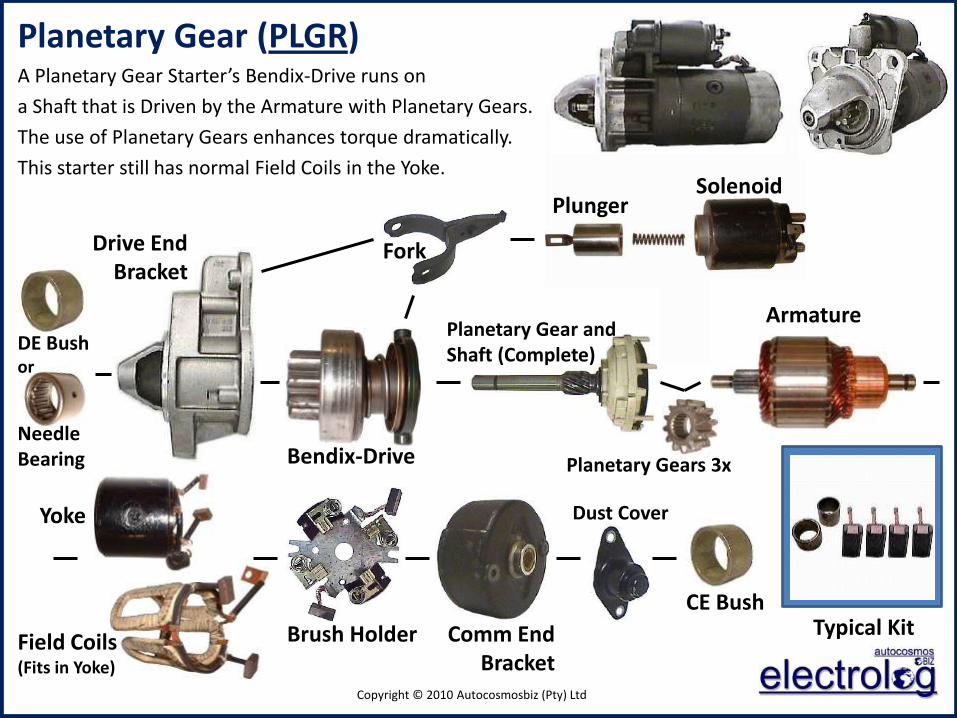
Planetary Gear (PLGR) A Planetary Gear Starter’s Bendix-Drive runs on
a Shaft that is Driven by the Armature with Planetary Gears.
The use of Planetary Gears enhances torque dramatically.
This starter still has normal Field Coils in the Yoke.
Typical Kit
Drive End Bracket
Solenoid
Armature
Field Coils (Fits in Yoke)
Brush Holder Comm End Bracket
CE Bush
Yoke
Fork
Planetary Gears 3x
Planetary Gear and Shaft (Complete)
Bendix-Drive
Plunger
Dust Cover
DE Bush or
Needle Bearing
Copyright © 2010 Autocosmosbiz (Pty) Ltd
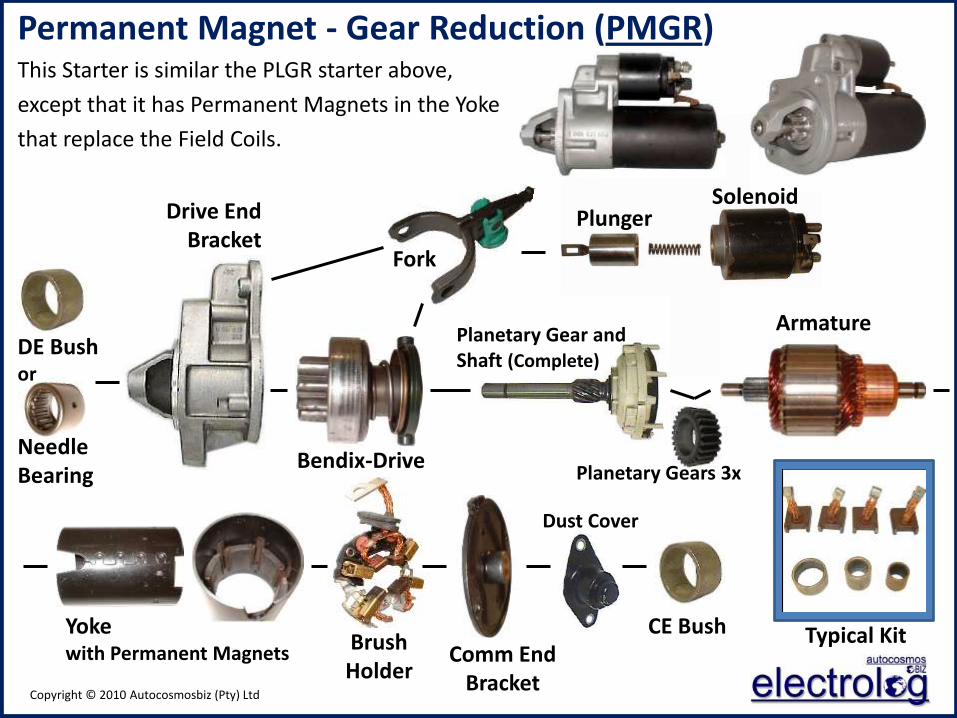
Permanent Magnet - Gear Reduction (PMGR) This Starter is similar the PLGR starter above,
except that it has Permanent Magnets in the Yoke
that replace the Field Coils.
Typical Kit
Drive End Bracket
CE Bush
Solenoid
Armature
Brush Holder
Comm End Bracket
Fork
Planetary Gears 3x
Planetary Gear and Shaft (Complete)
Bendix-Drive
Plunger
Yoke with Permanent Magnets
Dust Cover
DE Bush or
Needle Bearing
Copyright © 2010 Autocosmosbiz (Pty) Ltd
Typical Kit
Drive End Bracket
CE Bush
Solenoid
Armature
Brush Holder
Comm End Bracket
Fork
Bendix-Drive
Plunger
Yoke with Permanent Magnets
Dust Cover
DE Bush or
Needle Bearing
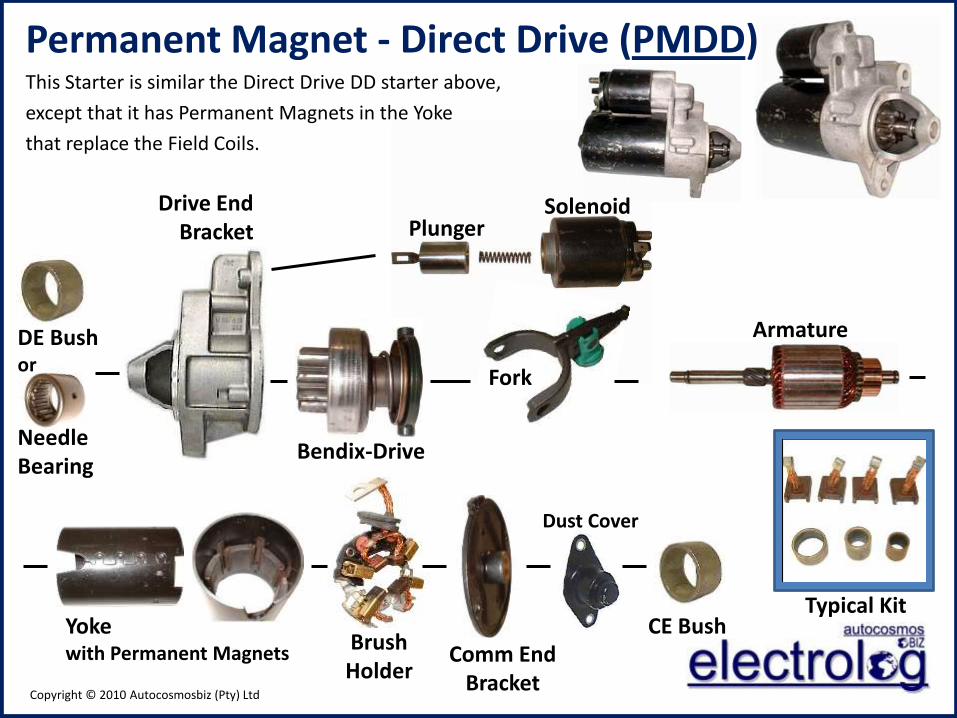
Permanent Magnet - Direct Drive (PMDD) This Starter is similar the Direct Drive DD starter above,
except that it has Permanent Magnets in the Yoke
that replace the Field Coils.
Copyright © 2010 Autocosmosbiz (Pty) Ltd
Typical Kit
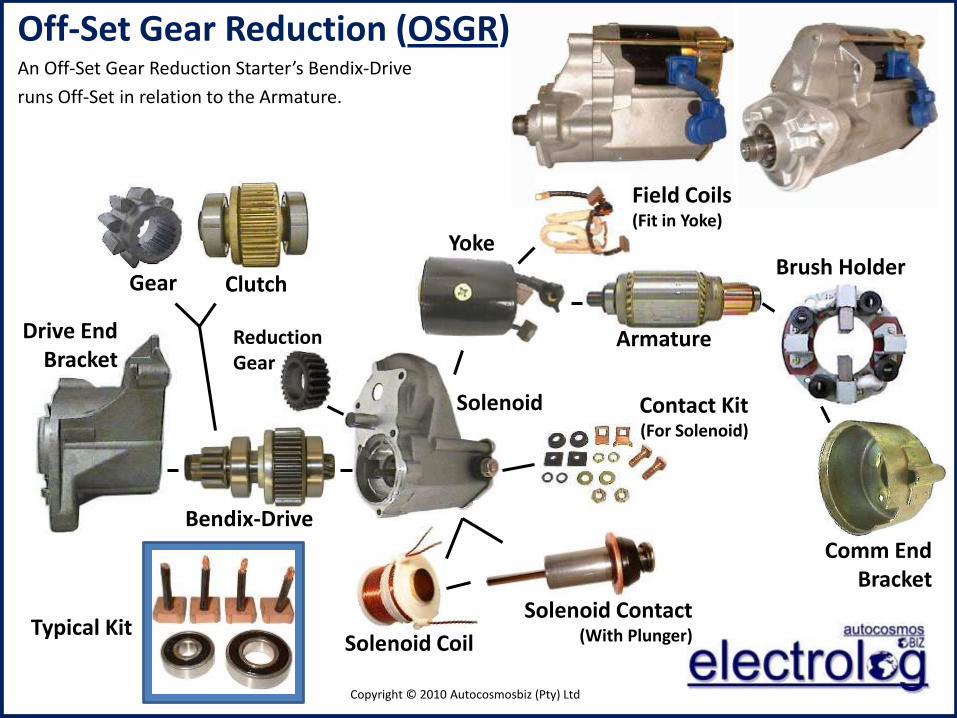
Off-Set Gear Reduction (OSGR) An Off-Set Gear Reduction Starter’s Bendix-Drive
runs Off-Set in relation to the Armature.
Drive End
Bracket
Solenoid
Bendix-Drive
Gear Clutch
Armature
Field Coils (Fit in Yoke)
Brush Holder
Comm End Bracket
Yoke
Reduction Gear
Solenoid Contact (With Plunger) Solenoid Coil
Contact Kit (For Solenoid)
Copyright © 2010 Autocosmosbiz (Pty) Ltd
Starter - Need to Knows
Using Alternative Starters for an Application:
When replacing one Starter with another Unit (using an alternative make or type) there are a number of things to keep in mind to make sure you supply or use a starter that will effectively replace the unit that came off the vehicle.
1. Make sure which direction the starter turns, Clock-Wise or Anti-Clock. The easiest way to determine this is the starter will always turn in the direction that the Bendix-Drive Slips.
2. Confirm Voltage of the Unit, 12V, 24V, etc. If there are no markings or indications of the voltage on the unit or solenoid ask the client to make sure. If the client is unsure its normally safe to ask how many batteries the vehicle has. If it’s one battery on the vehicle, its normally 12V and if its two batteries, its normally 24V.
3. The Kilowatts of the Starter are important. Simply put the Kilowatts (kw) of a starter is the power of the starter (Newton Force). The higher the kilowatts the stronger the starter. That said, always replace a starter with another unit that has the same or more kilowatts than the original. Example, Diesel engines normally have a higher kw rating starter, as more power is needed to turn a diesel engine than a petrol engine. Although a petrol engine and a diesel engine might have the same mounting requirements for a starter that fits perfectly for both applications, the petrol starter is more than likely to have a lower kilowatt rating than the diesel equivalent. It would not be wise in this case to replace the diesel unit with a petrol one if the kw are not known.
4. Number of Teeth and OD of Bendix-Drive Gear, to be safe, must be the same. There are scenarios where starters with different numbers of Teeth and Gear OD can replace each other (In this case it is advised to get a professional opinion on which ones actually can be used to replace each other).
Copyright © 2010 Autocosmosbiz (Pty) Ltd
Starter - Need to Knows
Using Alternative Starters for an Application (Continued):
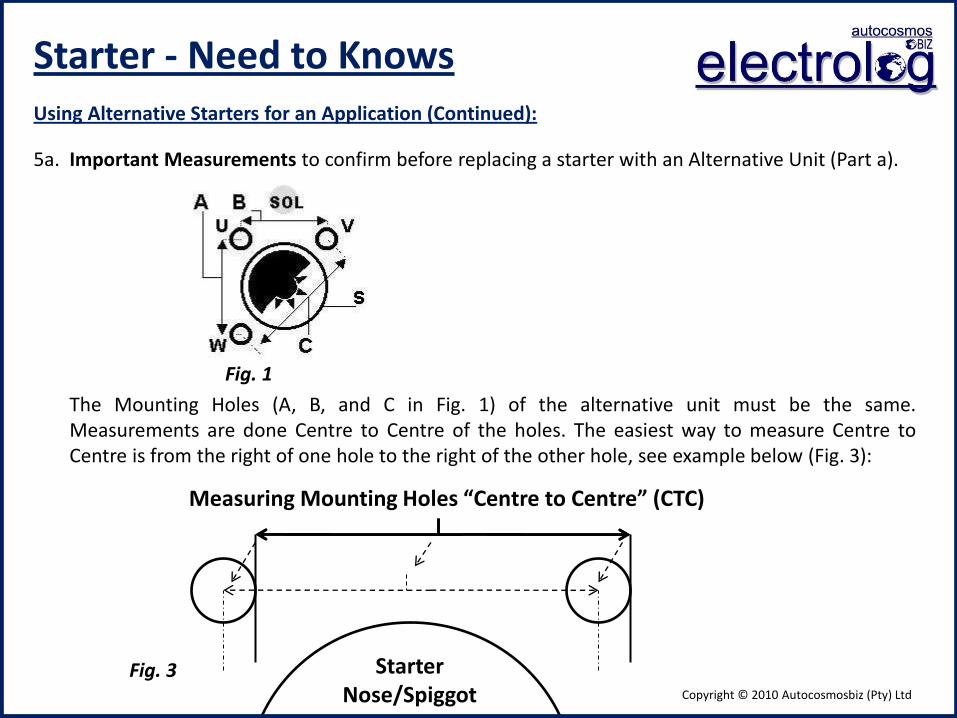
5a. Important Measurements to confirm before replacing a starter with an Alternative Unit (Part a).
Fig. 1
The Mounting Holes (A, B, and C in Fig. 1) of the alternative unit must be the same. Measurements are done Centre to Centre of the holes. The easiest way to measure Centre to Centre is from the right of one hole to the right of the other hole, see example below (Fig. 3):
Fig. 3 Starter Nose/Spiggot
Measuring Mounting Holes “Centre to Centre” (CTC)
Copyright © 2010 Autocosmosbiz (Pty) Ltd
Starter - Need to Knows
Using Alternative Starters for an Application (5 Continued):
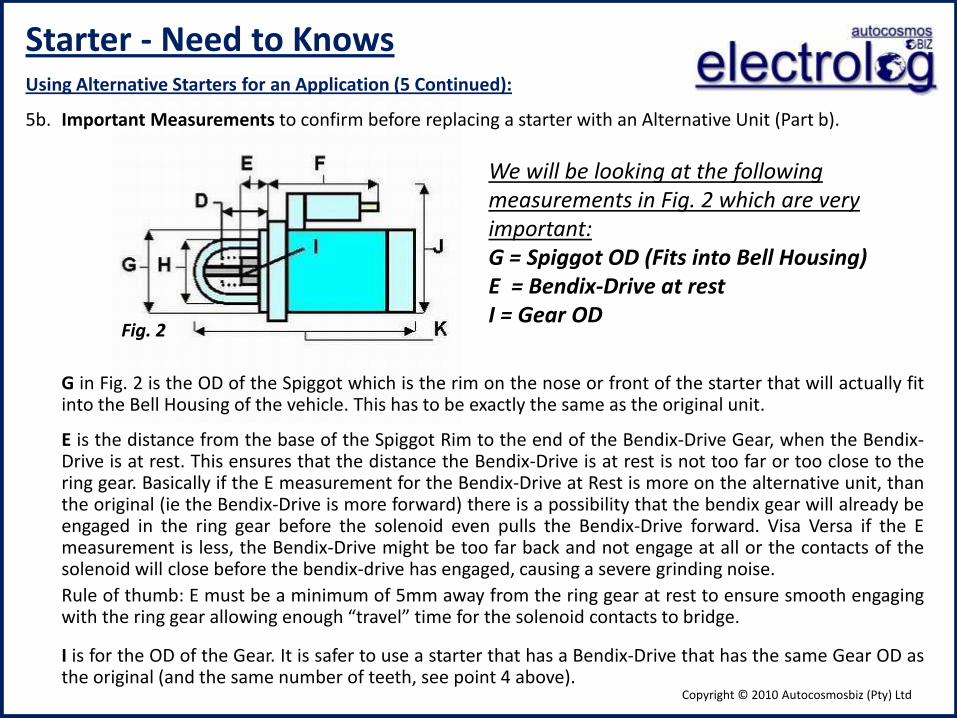
5b. Important Measurements to confirm before replacing a starter with an Alternative Unit (Part b).
Fig. 2
G in Fig. 2 is the OD of the Spiggot which is the rim on the nose or front of the starter that will actually fit into the Bell Housing of the vehicle. This has to be exactly the same as the original unit.
E is the distance from the base of the Spiggot Rim to the end of the Bendix-Drive Gear, when the Bendix-Drive is at rest. This ensures that the distance the Bendix-Drive is at rest is not too far or too close to the ring gear. Basically if the E measurement for the Bendix-Drive at Rest is more on the alternative unit, than the original (ie the Bendix-Drive is more forward) there is a possibility that the bendix gear will already be engaged in the ring gear before the solenoid even pulls the Bendix-Drive forward. Visa Versa if the E measurement is less, the Bendix-Drive might be too far back and not engage at all or the contacts of the solenoid will close before the bendix-drive has engaged, causing a severe grinding noise.
Rule of thumb: E must be a minimum of 5mm away from the ring gear at rest to ensure smooth engaging with the ring gear allowing enough “travel” time for the solenoid contacts to bridge.
I is for the OD of the Gear. It is safer to use a starter that has a Bendix-Drive that has the same Gear OD as the original (and the same number of teeth, see point 4 above).
We will be looking at the following measurements in Fig. 2 which are very important: G = Spiggot OD (Fits into Bell Housing) E = Bendix-Drive at rest I = Gear OD
Copyright © 2010 Autocosmosbiz (Pty) Ltd
Starter - Need to Knows
Using Alternative Starters for an Application (Continued):
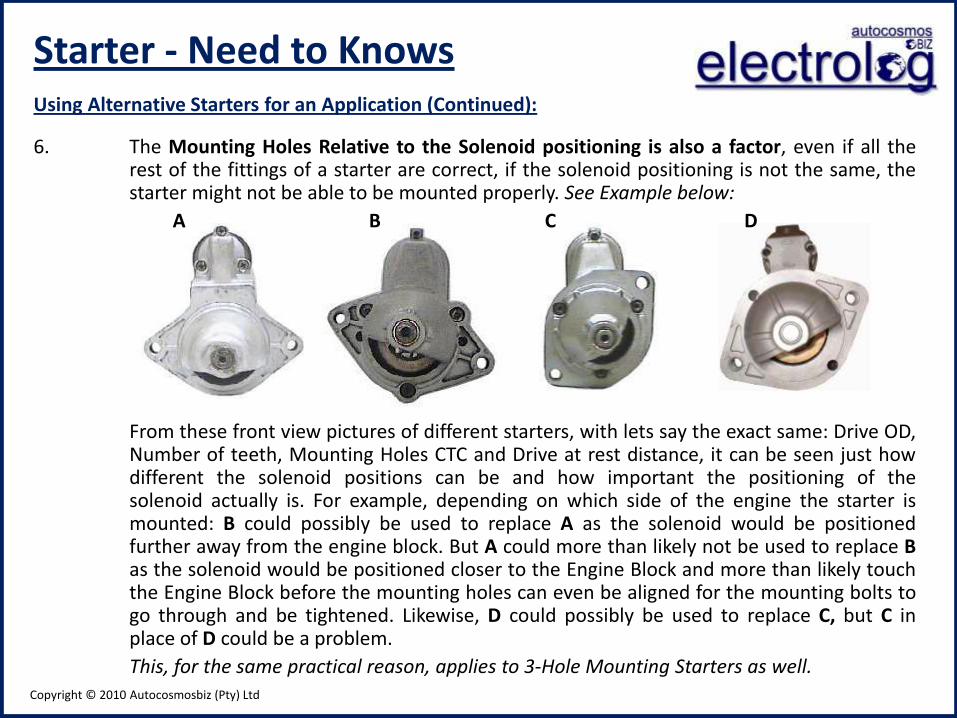
6. The Mounting Holes Relative to the Solenoid positioning is also a factor, even if all the rest of the fittings of a starter are correct, if the solenoid positioning is not the same, the starter might not be able to be mounted properly. See Example below:
A B C D
From these front view pictures of different starters, with lets say the exact same: Drive OD, Number of teeth, Mounting Holes CTC and Drive at rest distance, it can be seen just how different the solenoid positions can be and how important the positioning of the solenoid actually is. For example, depending on which side of the engine the starter is mounted: B could possibly be used to replace A as the solenoid would be positioned further away from the engine block. But A could more than likely not be used to replace B as the solenoid would be positioned closer to the Engine Block and more than likely touch the Engine Block before the mounting holes can even be aligned for the mounting bolts to go through and be tightened. Likewise, D could possibly be used to replace C, but C in place of D could be a problem.
This, for the same practical reason, applies to 3-Hole Mounting Starters as well.
Copyright © 2010 Autocosmosbiz (Pty) Ltd
Starter - Need to Knows
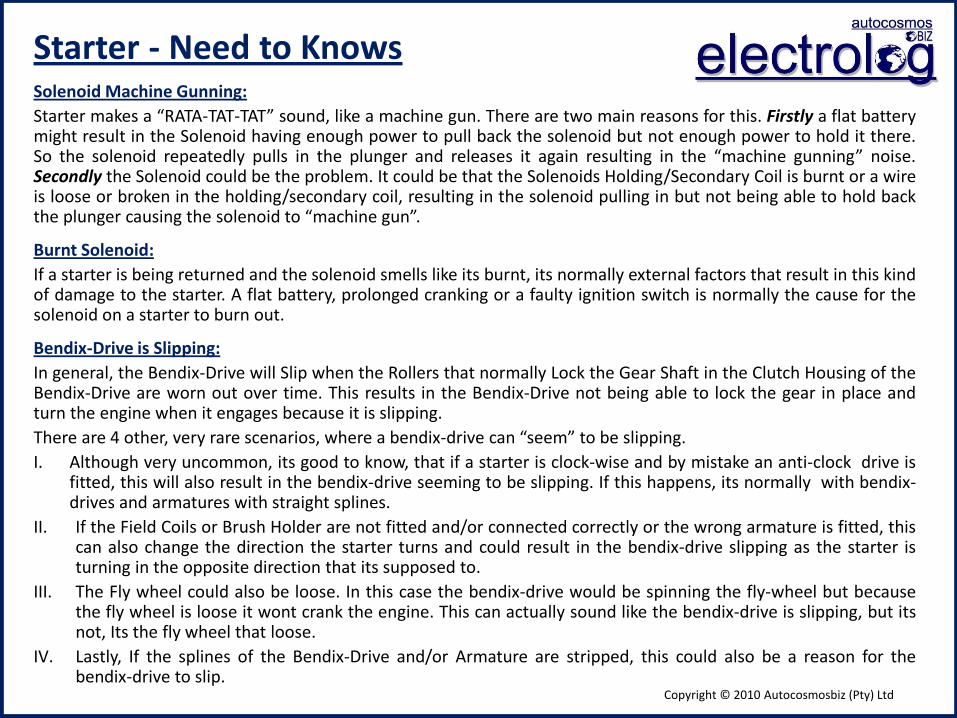
Solenoid Machine Gunning:
Starter makes a “RATA-TAT-TAT” sound, like a machine gun. There are two main reasons for this. Firstly a flat battery might result in the Solenoid having enough power to pull back the solenoid but not enough power to hold it there. So the solenoid repeatedly pulls in the plunger and releases it again resulting in the “machine gunning” noise. Secondly the Solenoid could be the problem. It could be that the Solenoids Holding/Secondary Coil is burnt or a wire is loose or broken in the holding/secondary coil, resulting in the solenoid pulling in but not being able to hold back the plunger causing the solenoid to “machine gun”.
Burnt Solenoid:
If a starter is being returned and the solenoid smells like its burnt, its normally external factors that result in this kind of damage to the starter. A flat battery, prolonged cranking or a faulty ignition switch is normally the cause for the solenoid on a starter to burn out.
Bendix-Drive is Slipping:
In general, the Bendix-Drive will Slip when the Rollers that normally Lock the Gear Shaft in the Clutch Housing of the Bendix-Drive are worn out over time. This results in the Bendix-Drive not being able to lock the gear in place and turn the engine when it engages because it is slipping.
There are 4 other, very rare scenarios, where a bendix-drive can “seem” to be slipping.
I. Although very uncommon, its good to know, that if a starter is clock-wise and by mistake an anti-clock drive is fitted, this will also result in the bendix-drive seeming to be slipping. If this happens, its normally with bendix-drives and armatures with straight splines.
II. If the Field Coils or Brush Holder are not fitted and/or connected correctly or the wrong armature is fitted, this can also change the direction the starter turns and could result in the bendix-drive slipping as the starter is turning in the opposite direction that its supposed to.
III. The Fly wheel could also be loose. In this case the bendix-drive would be spinning the fly-wheel but because the fly wheel is loose it wont crank the engine. This can actually sound like the bendix-drive is slipping, but its not, Its the fly wheel that loose.
IV. Lastly, If the splines of the Bendix-Drive and/or Armature are stripped, this could also be a reason for the bendix-drive to slip.
Copyright © 2010 Autocosmosbiz (Pty) Ltd
Starter - Need to Knows
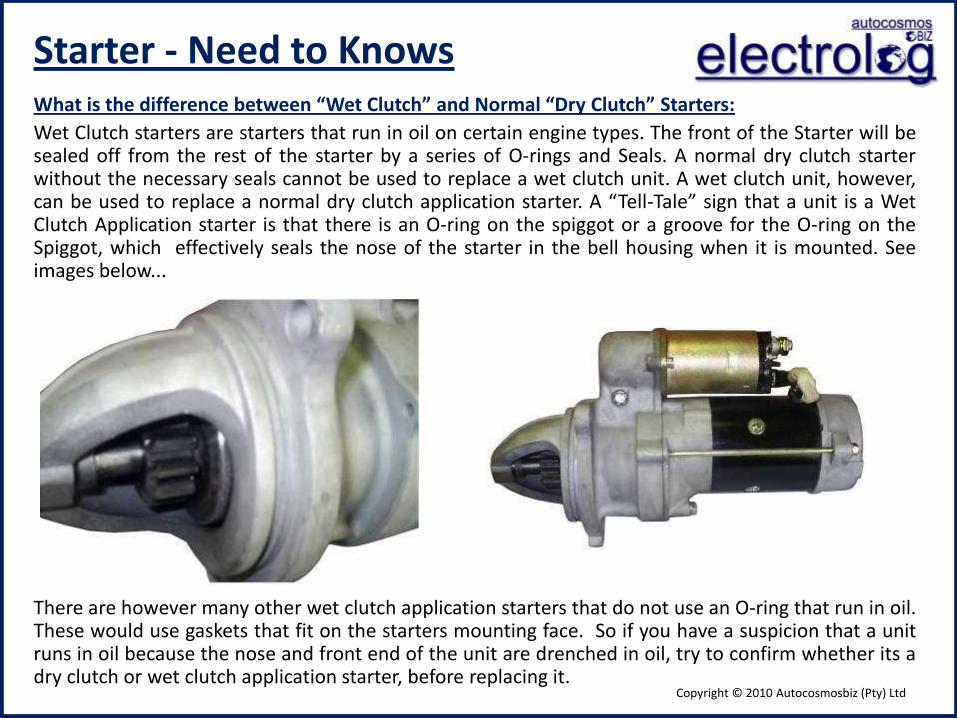
What is the difference between “Wet Clutch” and Normal “Dry Clutch” Starters:
Wet Clutch starters are starters that run in oil on certain engine types. The front of the Starter will be sealed off from the rest of the starter by a series of O-rings and Seals. A normal dry clutch starter without the necessary seals cannot be used to replace a wet clutch unit. A wet clutch unit, however, can be used to replace a normal dry clutch application starter. A “Tell-Tale” sign that a unit is a Wet Clutch Application starter is that there is an O-ring on the spiggot or a groove for the O-ring on the Spiggot, which effectively seals the nose of the starter in the bell housing when it is mounted. See images below...
There are however many other wet clutch application starters that do not use an O-ring that run in oil. These would use gaskets that fit on the starters mounting face. So if you have a suspicion that a unit runs in oil because the nose and front end of the unit are drenched in oil, try to confirm whether its a dry clutch or wet clutch application starter, before replacing it.
Copyright © 2010 Autocosmosbiz (Pty) Ltd
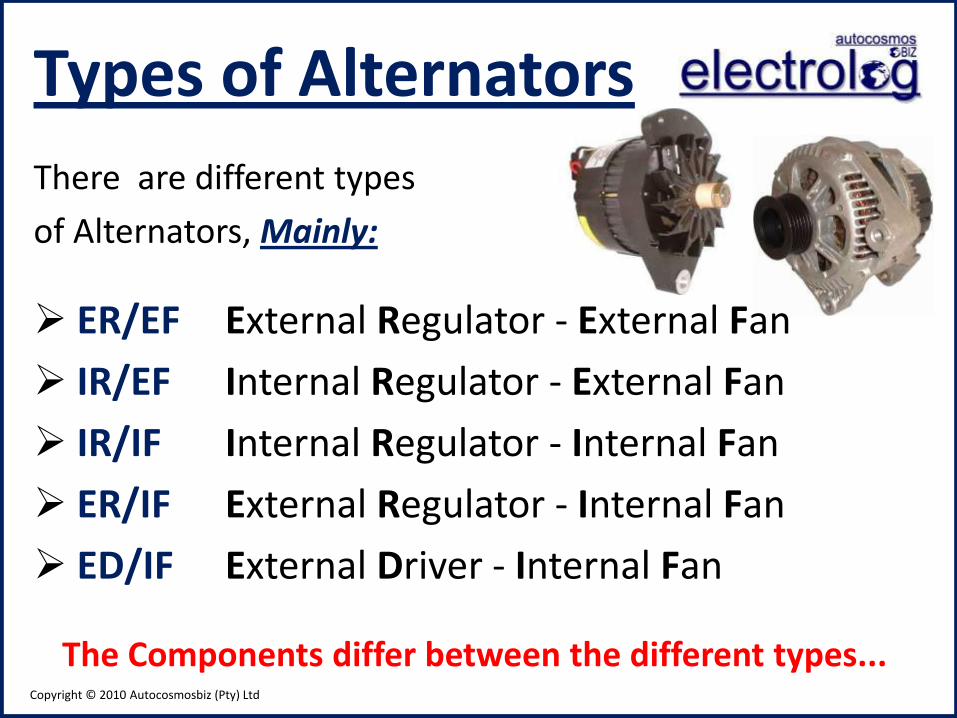
Types of Alternators
There are different types
of Alternators, Mainly:
ER/EF External Regulator - External Fan
IR/EF Internal Regulator - External Fan
IR/IF Internal Regulator - Internal Fan
ER/IF External Regulator - Internal Fan
ED/IF External Driver - Internal Fan
The Components differ between the different types...
Copyright © 2010 Autocosmosbiz (Pty) Ltd
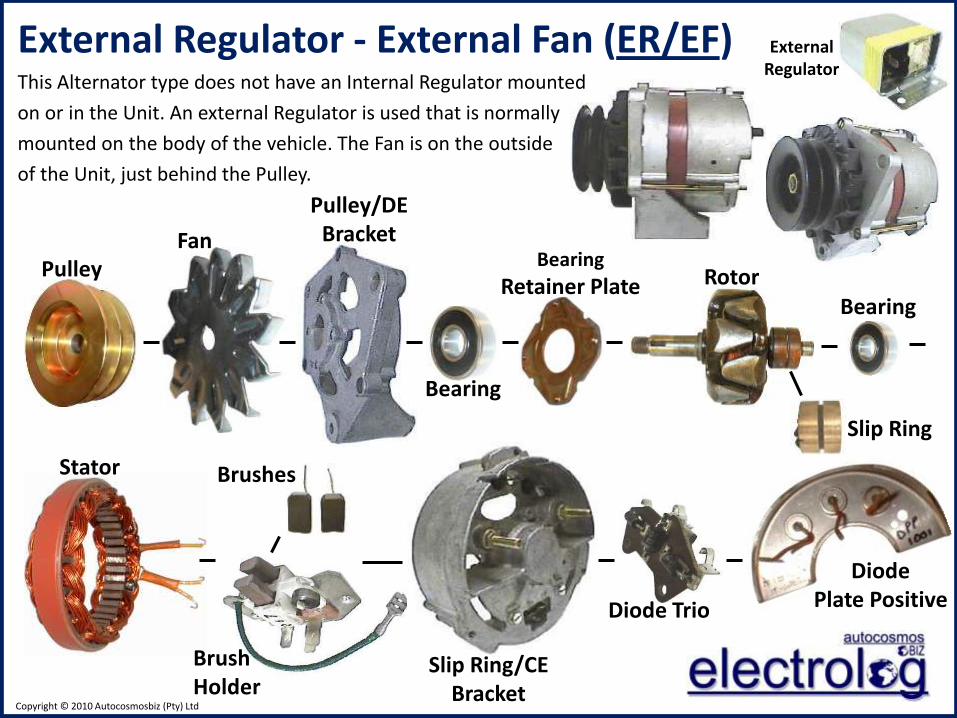
External Regulator - External Fan (ER/EF) This Alternator type does not have an Internal Regulator mounted
on or in the Unit. An external Regulator is used that is normally
mounted on the body of the vehicle. The Fan is on the outside
of the Unit, just behind the Pulley.
Slip Ring/CE Bracket
Bearing
Pulley
Pulley/DE Bracket
Stator
Rotor
Brushes
Slip Ring
Diode Trio
Diode Plate Positive
Brush Holder
Fan Bearing
Retainer Plate Bearing
External Regulator
Copyright © 2010 Autocosmosbiz (Pty) Ltd
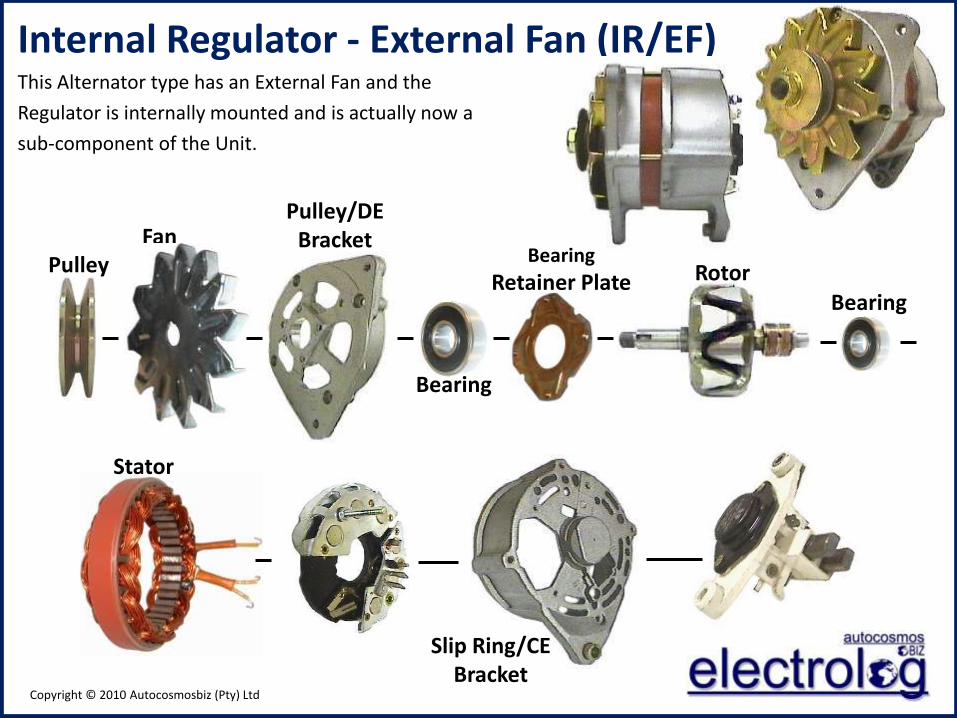
Internal Regulator - External Fan (IR/EF) This Alternator type has an External Fan and the
Regulator is internally mounted and is actually now a
sub-component of the Unit.
Slip Ring/CE Bracket
Bearing
Pulley
Pulley/DE Bracket
Stator
Rotor
Fan Bearing
Retainer Plate Bearing
Copyright © 2010 Autocosmosbiz (Pty) Ltd
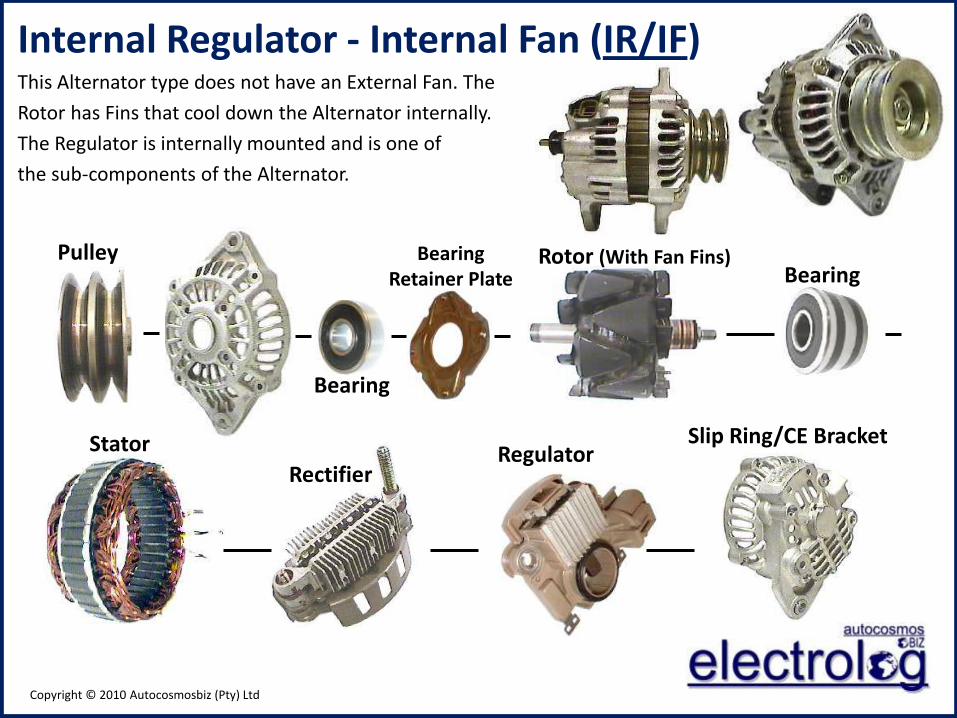
Bearing
Pulley Rotor (With Fan Fins) Bearing Retainer Plate Bearing
Internal Regulator - Internal Fan (IR/IF) This Alternator type does not have an External Fan. The
Rotor has Fins that cool down the Alternator internally.
The Regulator is internally mounted and is one of
the sub-components of the Alternator.
Slip Ring/CE Bracket Regulator
Rectifier
Stator
Copyright © 2010 Autocosmosbiz (Pty) Ltd
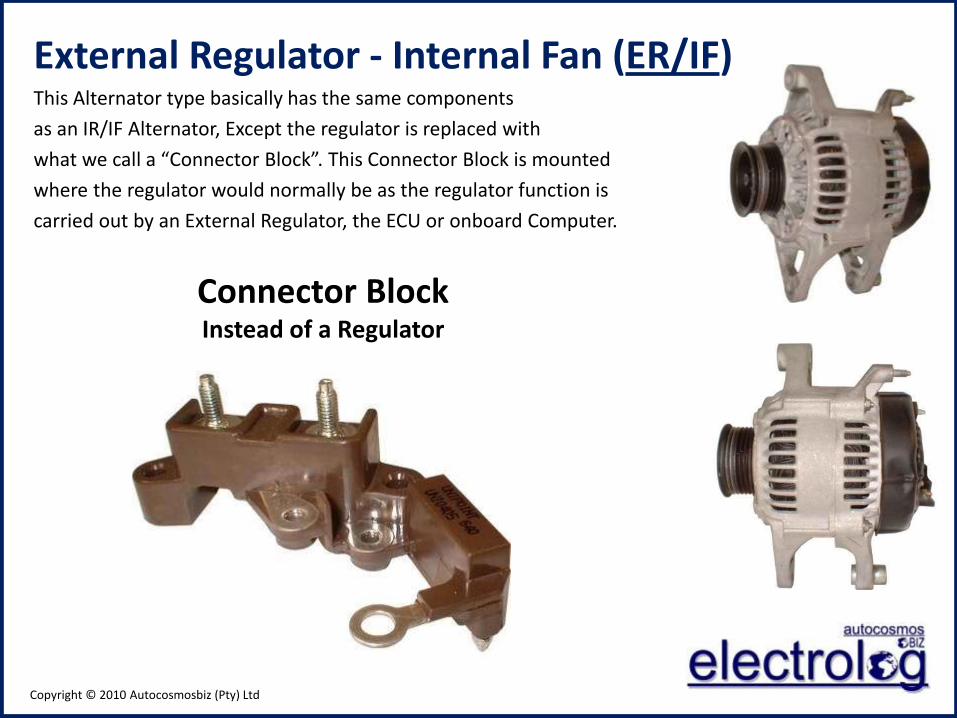
External Regulator - Internal Fan (ER/IF) This Alternator type basically has the same components
as an IR/IF Alternator, Except the regulator is replaced with
what we call a “Connector Block”. This Connector Block is mounted
where the regulator would normally be as the regulator function is
carried out by an External Regulator, the ECU or onboard Computer.
Connector Block Instead of a Regulator
Copyright © 2010 Autocosmosbiz (Pty) Ltd
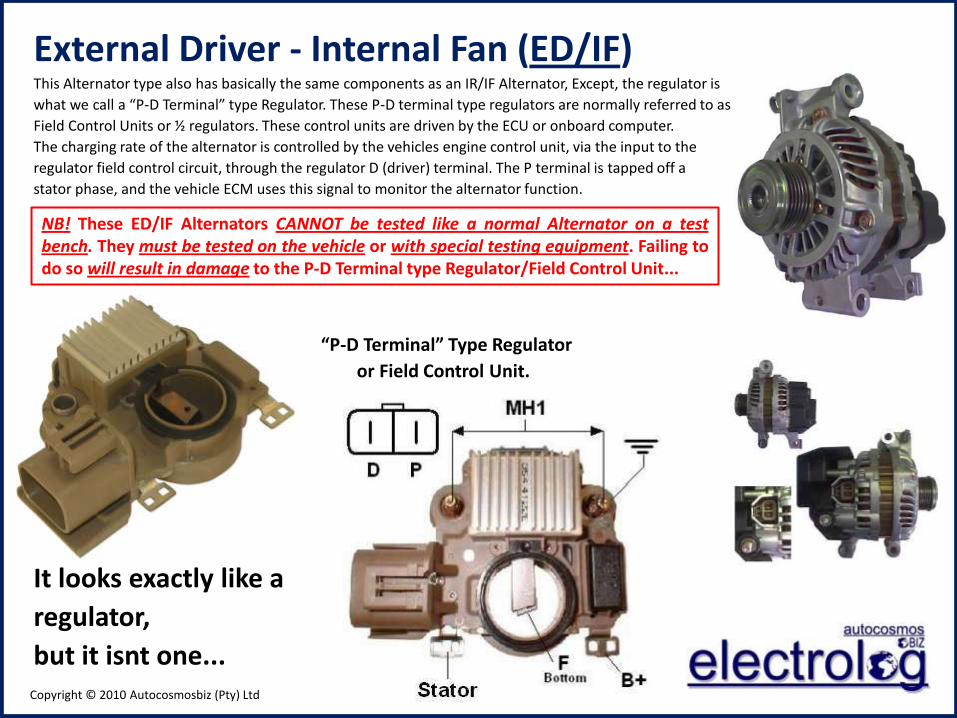
External Driver - Internal Fan (ED/IF) This Alternator type also has basically the same components as an IR/IF Alternator, Except, the regulator is
what we call a “P-D Terminal” type Regulator. These P-D terminal type regulators are normally referred to as
Field Control Units or ½ regulators. These control units are driven by the ECU or onboard computer.
The charging rate of the alternator is controlled by the vehicles engine control unit, via the input to the
regulator field control circuit, through the regulator D (driver) terminal. The P terminal is tapped off a
stator phase, and the vehicle ECM uses this signal to monitor the alternator function.
“P-D Terminal” Type Regulator
or Field Control Unit.
It looks exactly like a
regulator,
but it isnt one...
NB! These ED/IF Alternators CANNOT be tested like a normal Alternator on a test bench. They must be tested on the vehicle or with special testing equipment. Failing to do so will result in damage to the P-D Terminal type Regulator/Field Control Unit...
Copyright © 2010 Autocosmosbiz (Pty) Ltd
Alternator - Need to Knows
Using Alternative Alternators for an Application
When replacing one Alternator with another (using an alternative make or type) there are a number of things to keep in mind to make sure you supply or use an Alternator that will effectively replace the unit that came off the vehicle.
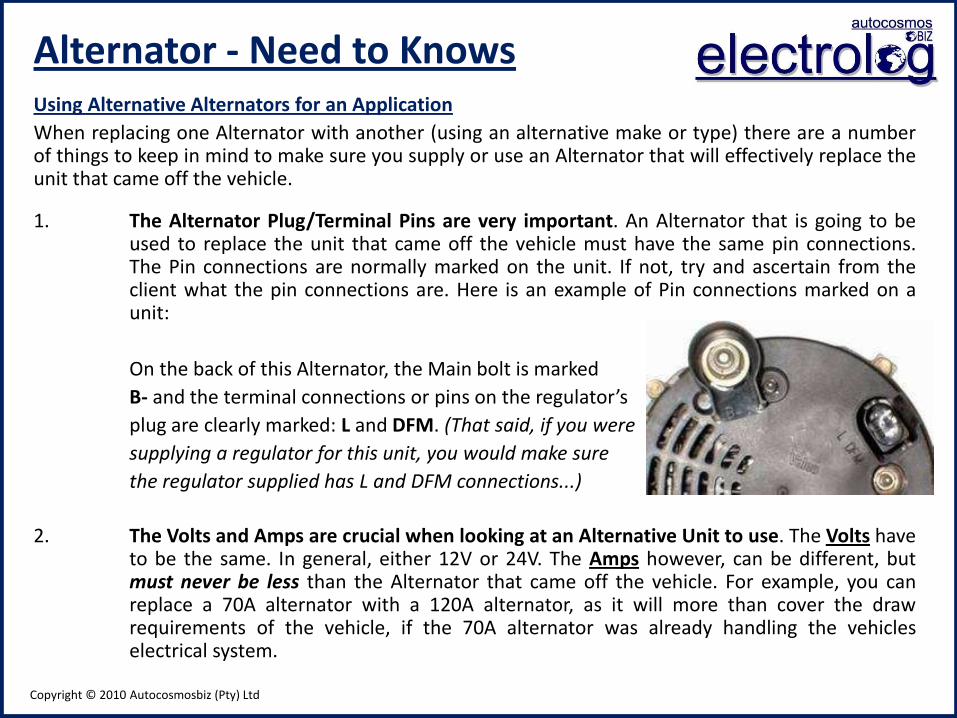
1. The Alternator Plug/Terminal Pins are very important. An Alternator that is going to be used to replace the unit that came off the vehicle must have the same pin connections. The Pin connections are normally marked on the unit. If not, try and ascertain from the client what the pin connections are. Here is an example of Pin connections marked on a unit:
On the back of this Alternator, the Main bolt is marked
B- and the terminal connections or pins on the regulator’s
plug are clearly marked: L and DFM. (That said, if you were
supplying a regulator for this unit, you would make sure
the regulator supplied has L and DFM connections...)
2. The Volts and Amps are crucial when looking at an Alternative Unit to use. The Volts have to be the same. In general, either 12V or 24V. The Amps however, can be different, but must never be less than the Alternator that came off the vehicle. For example, you can replace a 70A alternator with a 120A alternator, as it will more than cover the draw requirements of the vehicle, if the 70A alternator was already handling the vehicles electrical system.
Copyright © 2010 Autocosmosbiz (Pty) Ltd
Alternator - Need to Knows
Using Alternative Alternators for an Application (Continued...)
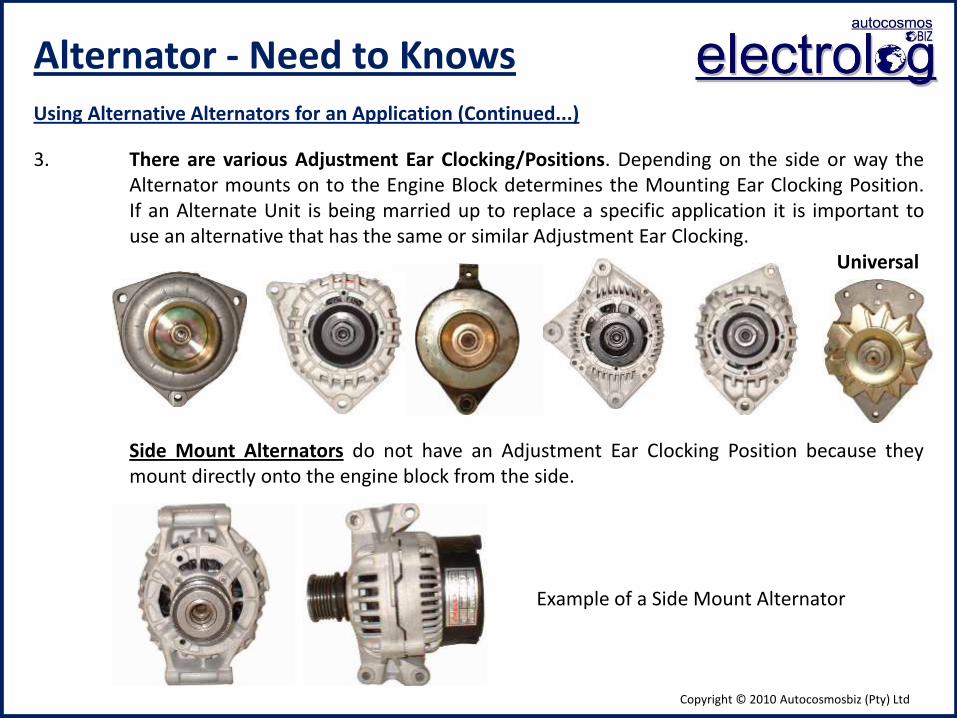
3. There are various Adjustment Ear Clocking/Positions. Depending on the side or way the Alternator mounts on to the Engine Block determines the Mounting Ear Clocking Position. If an Alternate Unit is being married up to replace a specific application it is important to use an alternative that has the same or similar Adjustment Ear Clocking.
Side Mount Alternators do not have an Adjustment Ear Clocking Position because they mount directly onto the engine block from the side.
Example of a Side Mount Alternator
Universal
Copyright © 2010 Autocosmosbiz (Pty) Ltd
Alternator - Need to Knows
Using Alternative Alternators for an Application (Continued...)
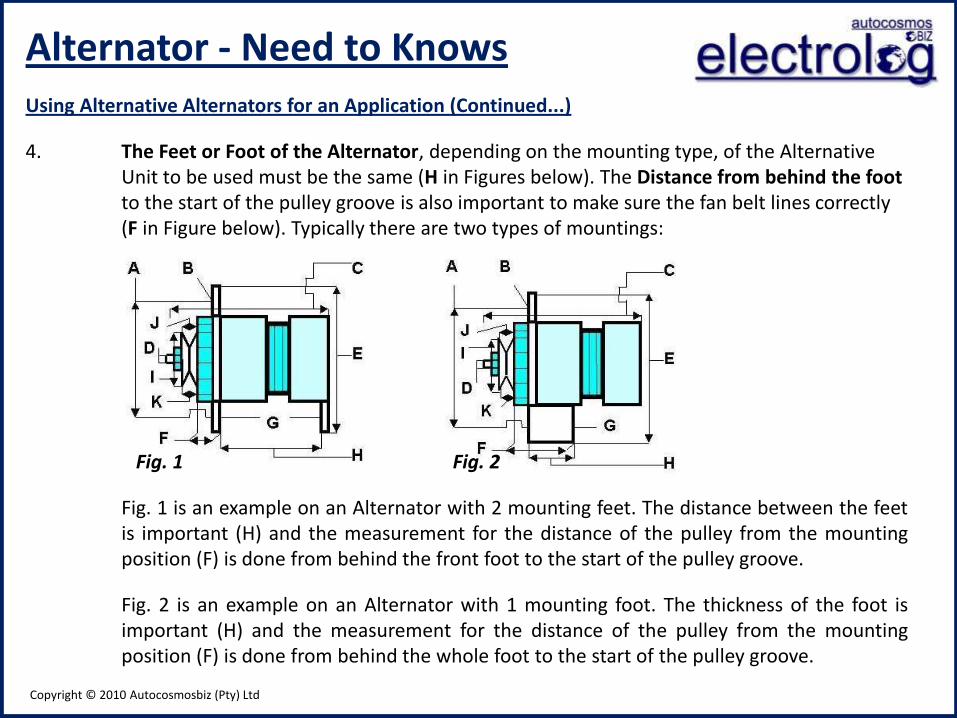
4. The Feet or Foot of the Alternator, depending on the mounting type, of the Alternative Unit to be used must be the same (H in Figures below). The Distance from behind the foot to the start of the pulley groove is also important to make sure the fan belt lines correctly (F in Figure below). Typically there are two types of mountings:
Fig. 1 Fig. 2
Fig. 1 is an example on an Alternator with 2 mounting feet. The distance between the feet is important (H) and the measurement for the distance of the pulley from the mounting position (F) is done from behind the front foot to the start of the pulley groove.
Fig. 2 is an example on an Alternator with 1 mounting foot. The thickness of the foot is important (H) and the measurement for the distance of the pulley from the mounting position (F) is done from behind the whole foot to the start of the pulley groove.
Copyright © 2010 Autocosmosbiz (Pty) Ltd
Alternator - Need to Knows
Using Alternative Alternators for an Application (Continued...)
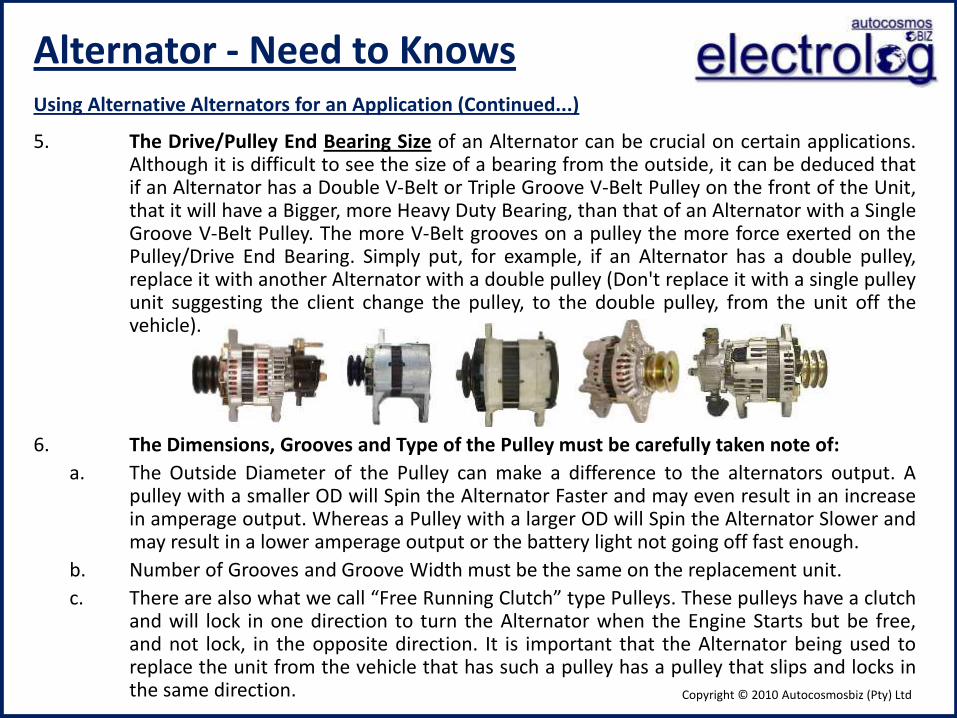
5. The Drive/Pulley End Bearing Size of an Alternator can be crucial on certain applications. Although it is difficult to see the size of a bearing from the outside, it can be deduced that if an Alternator has a Double V-Belt or Triple Groove V-Belt Pulley on the front of the Unit, that it will have a Bigger, more Heavy Duty Bearing, than that of an Alternator with a Single Groove V-Belt Pulley. The more V-Belt grooves on a pulley the more force exerted on the Pulley/Drive End Bearing. Simply put, for example, if an Alternator has a double pulley, replace it with another Alternator with a double pulley (Don't replace it with a single pulley unit suggesting the client change the pulley, to the double pulley, from the unit off the vehicle).
6. The Dimensions, Grooves and Type of the Pulley must be carefully taken note of:
a. The Outside Diameter of the Pulley can make a difference to the alternators output. A pulley with a smaller OD will Spin the Alternator Faster and may even result in an increase in amperage output. Whereas a Pulley with a larger OD will Spin the Alternator Slower and may result in a lower amperage output or the battery light not going off fast enough.
b. Number of Grooves and Groove Width must be the same on the replacement unit.
c. There are also what we call “Free Running Clutch” type Pulleys. These pulleys have a clutch and will lock in one direction to turn the Alternator when the Engine Starts but be free, and not lock, in the opposite direction. It is important that the Alternator being used to replace the unit from the vehicle that has such a pulley has a pulley that slips and locks in the same direction. Copyright © 2010 Autocosmosbiz (Pty) Ltd
Alternator - Need to Knows
Using Alternative Alternators for an Application (Continued...)
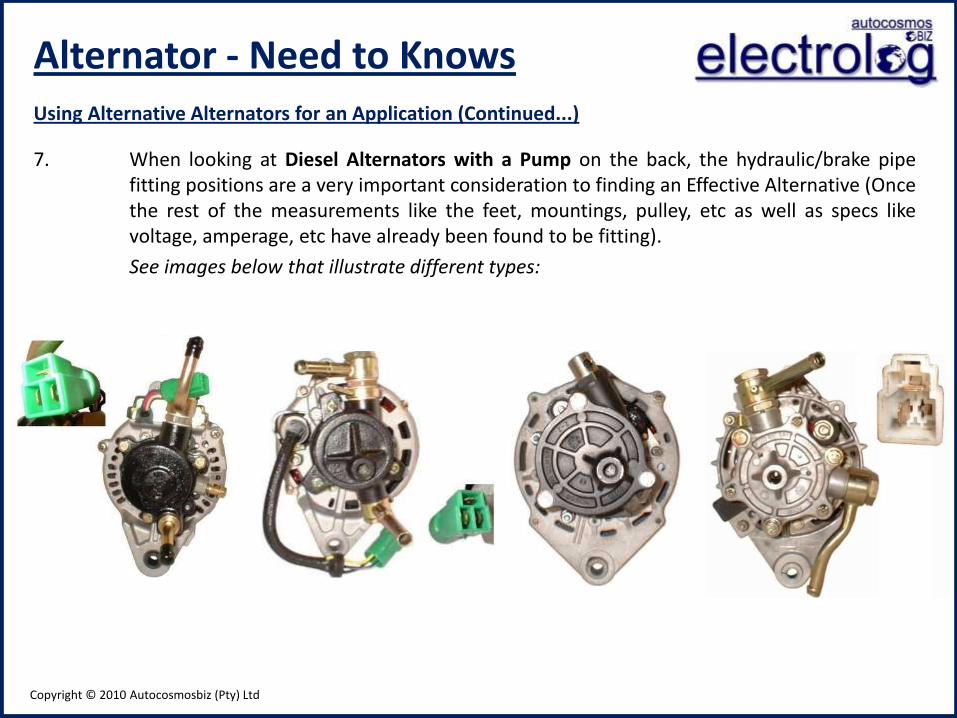
7. When looking at Diesel Alternators with a Pump on the back, the hydraulic/brake pipe fitting positions are a very important consideration to finding an Effective Alternative (Once the rest of the measurements like the feet, mountings, pulley, etc as well as specs like voltage, amperage, etc have already been found to be fitting).
See images below that illustrate different types:
Copyright © 2010 Autocosmosbiz (Pty) Ltd

Alternator - Need to Knows
Dust Proof, Totally Enclosed Alternators:
There are very dusty vehicle applications, for example on mines, earthmoving machinery, etc that use Alternators that are Totally Enclosed. These are Special Alternators designed to be Dust Proof and to be able to run Without Ventilation through the Alternator. They normally have “Heat-Sink” type fins on the outside of the housings to cool down the unit. See Pics Below:
Oil and Watercooled Alternators:
There are a number of oil- and water-cooled alternators that have entered the market in recent years. They can look like this:
Copyright © 2010 Autocosmosbiz (Pty) Ltd
Please Note:
The information supplied herewith is very general and in practice there may be many more variations to the examples given. Its important to remember that the fundamentals generally stay the same. Having a better understanding of the fundamentals allows logic to be applied to almost any situation or task. Going back to basics and looking from a position of general understanding and know how normally allows for well calculated and confident decisions to be made.
We hope you have found this information to be valuable, at least a little interesting and that you have learnt something that makes your day to day tasks that much more efficient, effective and downright fun.
If you have any suggestions or requests for information that we may be able to assist you with or that we could do for you, similar to this initiative, please feel free to email me at: [email protected].
Please pass this on to all your staff and anyone that you think might benefit from it...
Enjoy...
Kind Regards,
Kerrie Gregoriou Managing Director
Tel: +27 (0)12 327 6210
Web: www.autocosmos.co.za Breaking the Information Barrier...
Copyright © 2010 Autocosmosbiz (Pty) Ltd