Start a webshop Do It Yourself Guide, by Bertil...
37
Start_a_webshop_Do_It_Yourself_Guide_by_Bertil_Palmqvist.pdf Start a webshop Do It Yourself Guide, by Bertil Palmqvist Contents Introduction......................................................................................................................................1 Prerequisites ......................................................................................................................................................... 1 Step 1 Order website, domain name and create the store's e-mail accounts....................................2 Step 2 Download the osCommerce webshop software and unzip................................................... 3 Step 3 Install osCommerce online store on your website................................................................3 Step 4 Install the language pack and select the default language.................................................. 17 Step 5 Install Currencies and select the default currency.............................................................. 25 Step 6 Order a Corporate PayPal account Generate A PayPal API and activate it in the webshop ....................................................................................................................................................... 27 Step 7 Configure your Locations / Taxes..................................................................................... 33 Step 8 Add your own categories and products in the webshop..................................................... 33 Step 9 Try that everything is working, do test orders.................................................................... 35 Step 10 Set the Web Shop “live” Good luck! If you need further assistance please contact us....36 Introduction Want to open a shop on the internet? With some computer experience you can do it yourself at a very low cost. The software you need is available as open source software for FREE. The only thing you need to pay for is space on a web hosting provider for your web shop and a domain name annual fee . It only costs together about $ 50 per year. Several things need to be done to get a shop started on the internet, and they must be done in the right order for the start to take place smoothly, and that the result should work correctly. If you follow this description, it will all work. I have chosen to describe how to use osCommerce webshop software, but others such as Magento, PrestaShop, OpenCart, ZenCart, Tomato Cart and Others are used in similar ways, follow their documentation in such cases. Prerequisites Can you do it all by yourself ? You must have some computer skills to install , add products and manage an online shop, all installation and configuration is done via a ftp-program and your web 1
Transcript of Start a webshop Do It Yourself Guide, by Bertil...
Start_a_webshop_Do_It_Yourself_Guide_by_Bertil_Palmqvist.pdf
Start a webshop Do It Yourself Guide, by Bertil Palmqvist
ContentsIntroduction......................................................................................................................................1Prerequisites .........................................................................................................................................................1Step 1 Order website, domain name and create the store's e-mail accounts....................................2Step 2 Download the osCommerce webshop software and unzip...................................................3Step 3 Install osCommerce online store on your website................................................................3Step 4 Install the language pack and select the default language..................................................17Step 5 Install Currencies and select the default currency..............................................................25Step 6 Order a Corporate PayPal account Generate A PayPal API and activate it in the webshop.......................................................................................................................................................27Step 7 Configure your Locations / Taxes.....................................................................................33Step 8 Add your own categories and products in the webshop.....................................................33Step 9 Try that everything is working, do test orders....................................................................35Step 10 Set the Web Shop “live” Good luck! If you need further assistance please contact us....36
Introduction
Want to open a shop on the internet? With some computer experience you can do it yourself at a very low cost. The software you need is available as open source software for FREE. The only thing you need to pay for is space on a web hosting provider for your web shop and a domain name annual fee . It only costs together about $ 50 per year. Several things need to be done to get a shop started on the internet, and they must be done in the right order for the start to take place smoothly, and that the result should work correctly. If you follow this description, it will all work. I have chosen to describe how to use osCommerce webshop software, but others such as Magento, PrestaShop, OpenCart, ZenCart, Tomato Cart and Others are used in similar ways, follow their documentation in such cases.
Prerequisites
Can you do it all by yourself ? You must have some computer skills to install , add products and manage an online shop, all installation and configuration is done via a ftp-program and your web
1
Start_a_webshop_Do_It_Yourself_Guide_by_Bertil_Palmqvist.pdf
browser. You don't have to be a software programmer, but you need to know how to use some important programmes mainly: FileZilla FTP client, GIMP or some other image editor, Mozilla Thunderbird e-mail client, LibreOffice Writer word processor and a web browser of your choice. If you do not have sufficient computer skills , you might ask a friend for help. You can also get direct help from us at http://shopwebshop.eu/ complete the Contact Us form in the information box with your questions. Some parts require you to have an incorporated company (Creating a PayPal Business Account).You should have your own computer with broadband internet connection. I personally use a computer with a Linux operating system, but Windows will also work. The default character encoding should be Unicode (UTF -8) and NOT Western ( ISO-8859- 1) and NOT Western ( Windows 1252 ) or any other , because then you will have problems with the text that you type in for the product descriptions , etc. Some browsers can not interpret special caracters eg åäö but shows strange characters instead . There should be at least 50 MB of free hard disk space on your computer. You should have the following software, or similar, installed on your computer: FileZilla ( FTP file transfer) , GIMP ( for editing the product images and logos ) , Web browser ( for logging in to the online store's admin interface) , I recommend Mozilla Firefox , Opera or SeaMonkey , unzip ( or some other program to unzip . zip archive files ), an email client (to receive messages from clients and notices of purchase) , I recommend Mozilla Thunderbird. A word processor for the language you will use in your store. I recommend LibreOffice, get the version for your native language, that you will use in your shop .
Step 1 Order website, domain name and create the store's e-mail accounts
Select any web hosting provider , but compare prices and functionality before ordering, the requirements for the webshop software application is specified in the osComerce documentation. Briefly , they are: osCommerce webshop can be installed on a server running a PHP enabled web server, eg apache and have a MySQL database server and run a sendmail mail server . I can recommend http://one.com for I personally have used them for several years and are happy with them. When you order the space at your web hosting provider they usually offer choice of domain names. The choice of domain name depends on what kind of business you will engage in the online store. If the sale is only going to address customers in one country such as Sweden it might be best to choose a domain name from the .se domain, eg <company name>.se . Try to find a domain name that is available . Hint , try to find a name that is as short as possible, so you all your email addresses will be as short as possible . If the sale is to take place in Europe , you can choose a domain name from .eu domain. Keep in mind that the domain name must not contain special characters such as åäö .After you receive confirmation of your order , it usually takes a few days , then you should log into the control panel of the web hosting provider with the login information you received from them . The data for ftp login and mysql database login is very important , keep them in a safe place , they will be used when you install, configure, and administer the online store . Now you need to create one or more email accounts that your online store will use for receiving messages that customers enter the contact us form , and that will be used when creating your PayPal corporate account like [email protected] , or [email protected] . Add these email accounts in your regular email client (Mozilla Thunderbird) !
2
Start_a_webshop_Do_It_Yourself_Guide_by_Bertil_Palmqvist.pdf
Step 2 Download the osCommerce webshop software and unzip
Click the link below to access the osCommerce web site:http://www.oscommerce.com/ProductsHere you should download the latest software , when this document was created , it is osCommerce Online Merchant version 2.3.x , the selection box is displaying v2.3.3.4 Full Package . Click the Download button. Select Save file , and create a folder eg oscommerce2334 and press save . It 's FREE . It is in English . If you want it in another language you have to install a language pack for that language later on.When the zip file is downloaded , it is in the directory you created oscommerce2334 .Go there and unpack it !$ cd oscommerce2334On a Linux system , you can use unzip or gunzip :$ unzip oscommerce-2.3.3.4.zip$ ls oscommerce - 2.3.3.4 oscommerce - 2.3.3.4.zip$ cd oscommerce - 2.3.3.4 /$ lscatalog documentation.pdf LICENSE STANDARDCHANGELOG extras release_notes.pdf
In the directory oscommerce-2.3.3.4 you will transfer everything to the root of your web page in the next step. The most importent thing that contain the software is the catalog directory.
On a Windows computer, you use the built- extract all ... option in the Explorer, and then extract and extract to extract from the zip file.
Step 3 Install osCommerce online store on your website
Start the FileZilla program. Create a login into your web page as follows , you will need it later when you install language packs and manage backups :Open the site manager in the File menu or click on the icon " Open site manager " that exists directly under the File menu. Now you need to use the FTP login information that you got from your web hosting provider it looks like this:
FTP:Host: ftp. <your_domainname>Username (User ) : <your_domainname or email-address> Password ( Password) : ********
3
Start_a_webshop_Do_It_Yourself_Guide_by_Bertil_Palmqvist.pdf
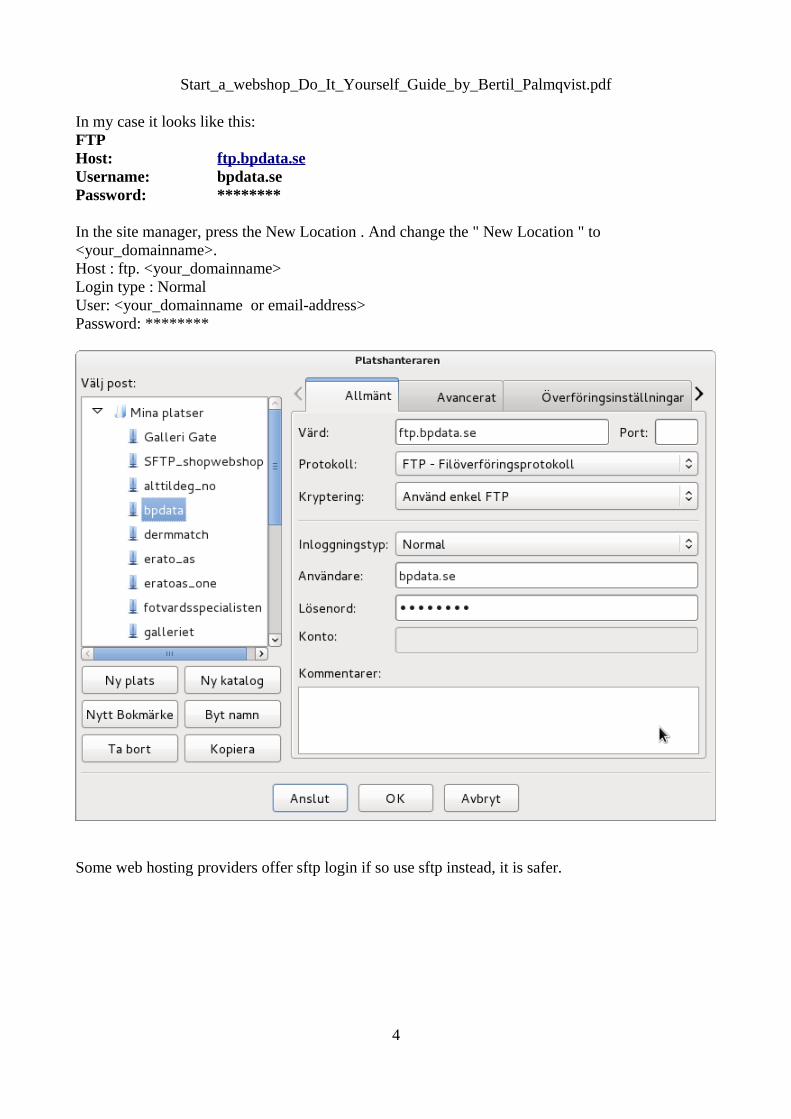
In my case it looks like this:FTP Host: ftp.bpdata.se Username: bpdata.sePassword: ********
In the site manager, press the New Location . And change the " New Location " to <your_domainname>.Host : ftp. <your_domainname>Login type : NormalUser: <your_domainname or email-address> Password: ********
Some web hosting providers offer sftp login if so use sftp instead, it is safer.
4
Start_a_webshop_Do_It_Yourself_Guide_by_Bertil_Palmqvist.pdf
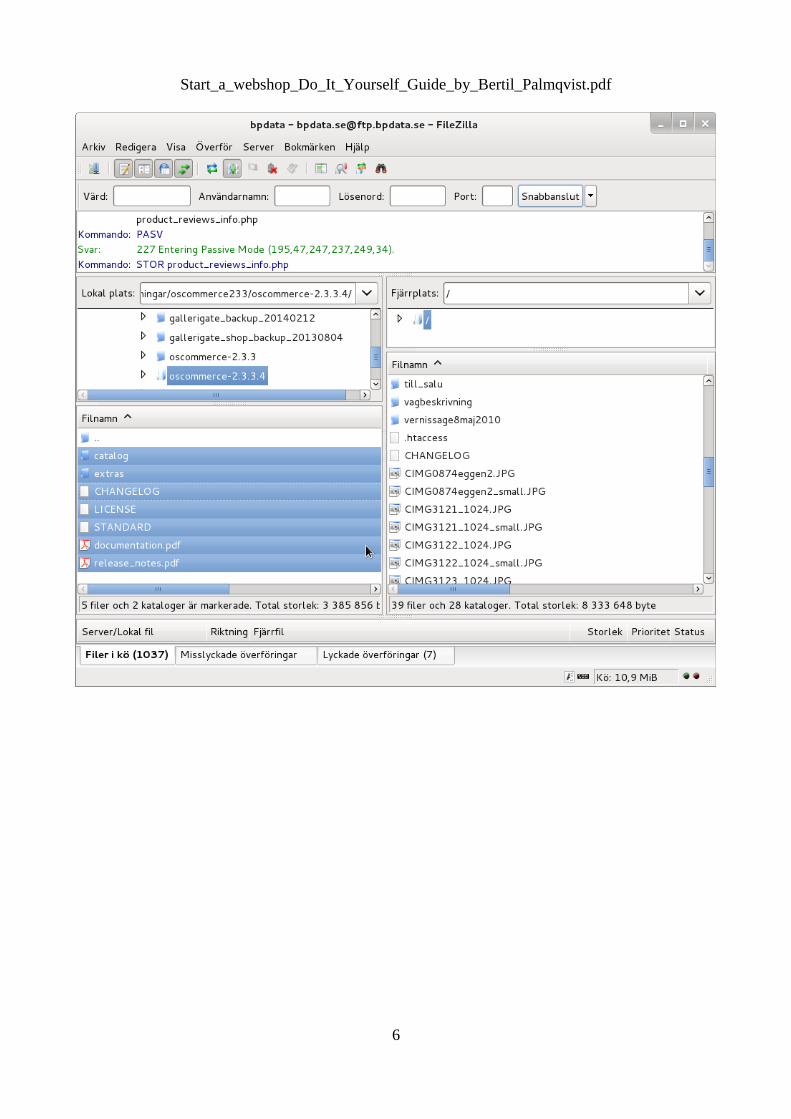
Press OK, then the sites login data is saved so that you can easily connect to this ftp connection later.Now try to set up ftp connection by opening the site manager and press <your_domainname> and then click the Connect button. If everything works , you should now see your html root ( Remote Location: / ) on the right side of FileZilla . And an empty File name box below .Navigate now on the left side of FileZilla to the folder you where you downloaded oscommerce - 2.3.3.4 to namely the oscommerce – 2.3.3.4 directory.
If your web hosting provider demands the top index file to reside in your root directory, you can transfer the contents under the catalog directory to the root. Another way to do this is to add an indexfile to the root later on that links down into the catalog directory.
Copy everything by drag and drop from the left side to the right side on top of listed files ( not directories), it takes a while to move all the files. Wait until the transfer has completed. Make sure you don't drop it in some existing directory eg if you already have a website that you want to keep and just add a web shop to it.
5
Start_a_webshop_Do_It_Yourself_Guide_by_Bertil_Palmqvist.pdf
6
Start_a_webshop_Do_It_Yourself_Guide_by_Bertil_Palmqvist.pdf
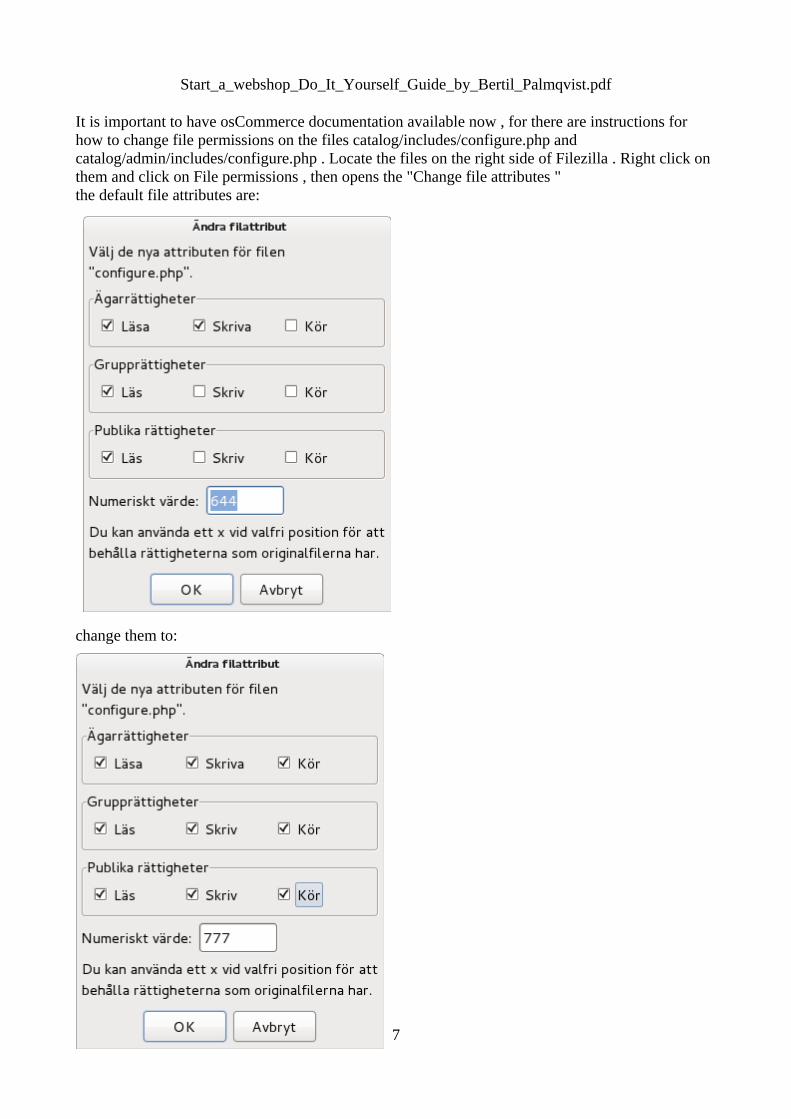
It is important to have osCommerce documentation available now , for there are instructions for how to change file permissions on the files catalog/includes/configure.php and catalog/admin/includes/configure.php . Locate the files on the right side of Filezilla . Right click on them and click on File permissions , then opens the "Change file attributes "the default file attributes are:
change them to:
7
Start_a_webshop_Do_It_Yourself_Guide_by_Bertil_Palmqvist.pdf
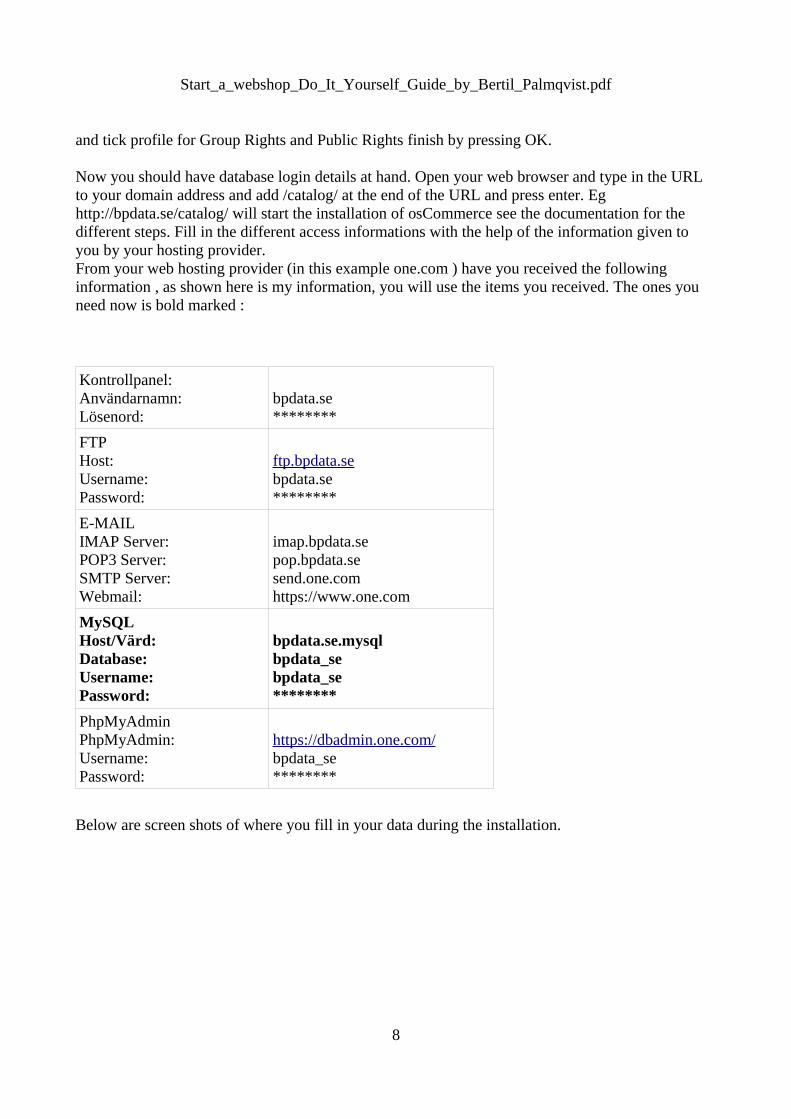
and tick profile for Group Rights and Public Rights finish by pressing OK.
Now you should have database login details at hand. Open your web browser and type in the URL to your domain address and add /catalog/ at the end of the URL and press enter. Eg http://bpdata.se/catalog/ will start the installation of osCommerce see the documentation for the different steps. Fill in the different access informations with the help of the information given to you by your hosting provider.From your web hosting provider (in this example one.com ) have you received the following information , as shown here is my information, you will use the items you received. The ones you need now is bold marked :
Kontrollpanel:Användarnamn:Lösenord:
bpdata.se********
FTP Host:Username:Password:
ftp.bpdata.se bpdata.se********
E-MAILIMAP Server:POP3 Server:SMTP Server:Webmail:
imap.bpdata.sepop.bpdata.sesend.one.comhttps://www.one.com
MySQLHost/Värd:Database:Username:Password:
bpdata.se.mysqlbpdata_sebpdata_se********
PhpMyAdminPhpMyAdmin:Username:Password:
https://dbadmin.one.com/bpdata_se********
Below are screen shots of where you fill in your data during the installation.
8
Start_a_webshop_Do_It_Yourself_Guide_by_Bertil_Palmqvist.pdf
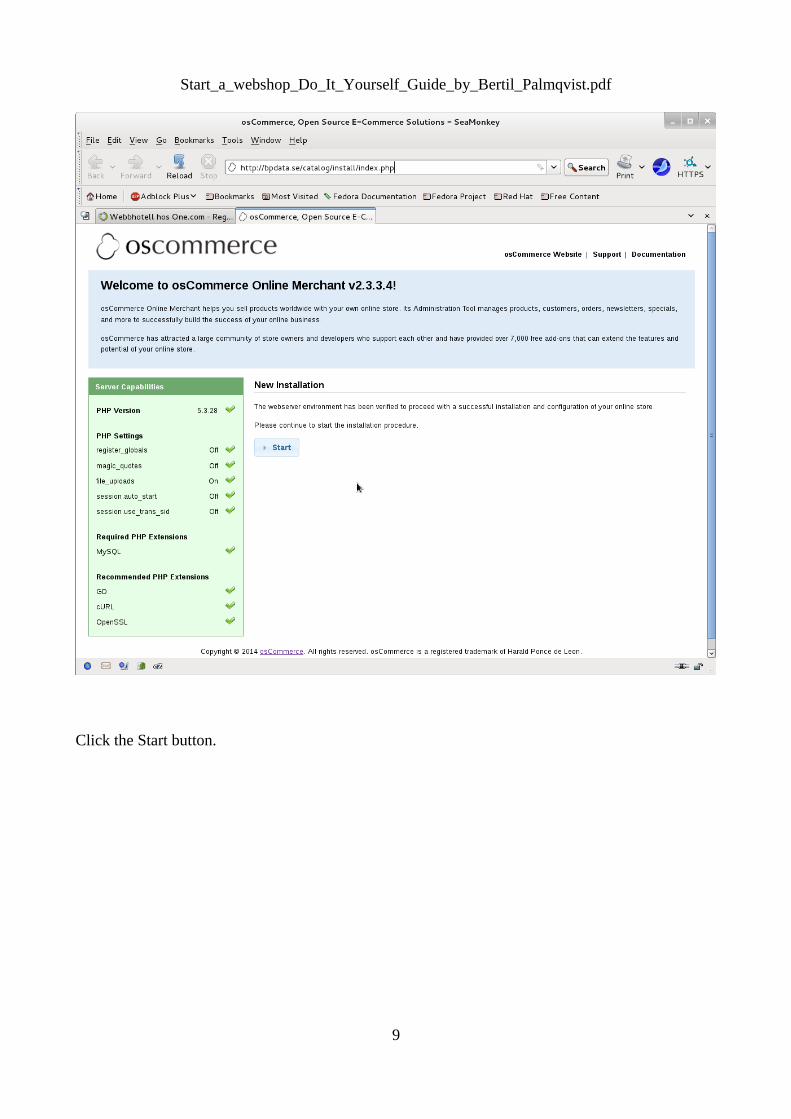
Click the Start button.
9
Start_a_webshop_Do_It_Yourself_Guide_by_Bertil_Palmqvist.pdf
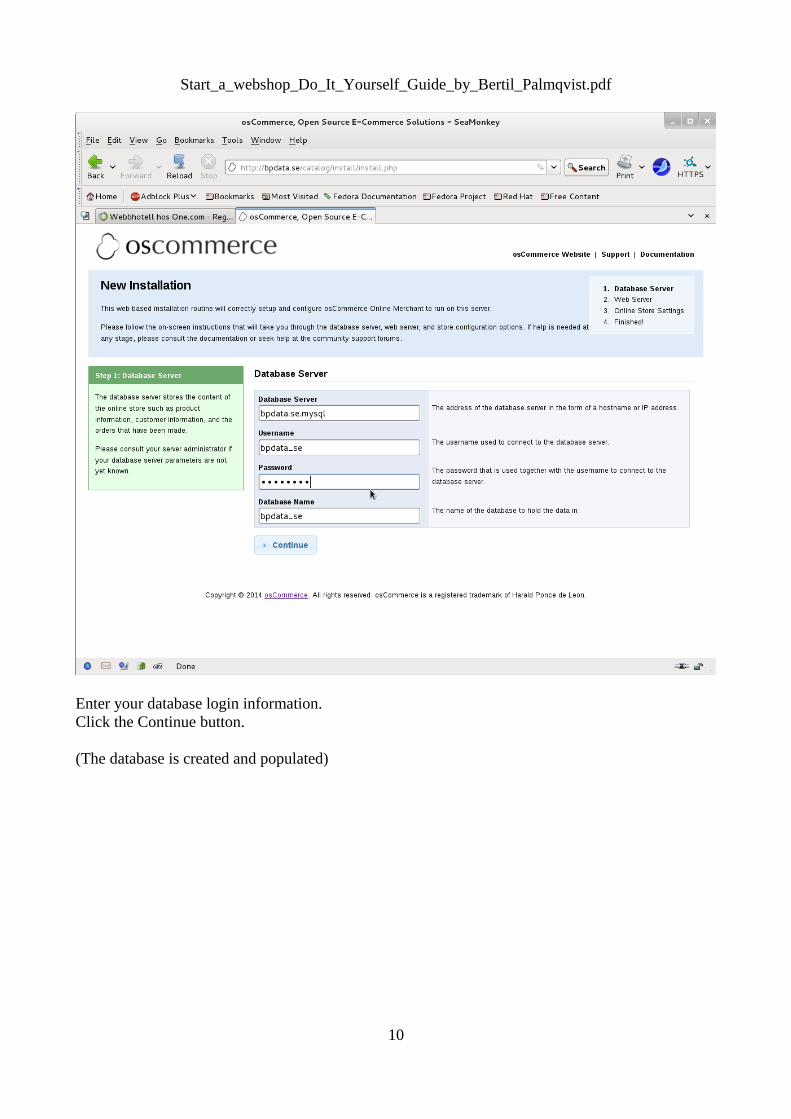
Enter your database login information.Click the Continue button.
(The database is created and populated)
10
Start_a_webshop_Do_It_Yourself_Guide_by_Bertil_Palmqvist.pdf
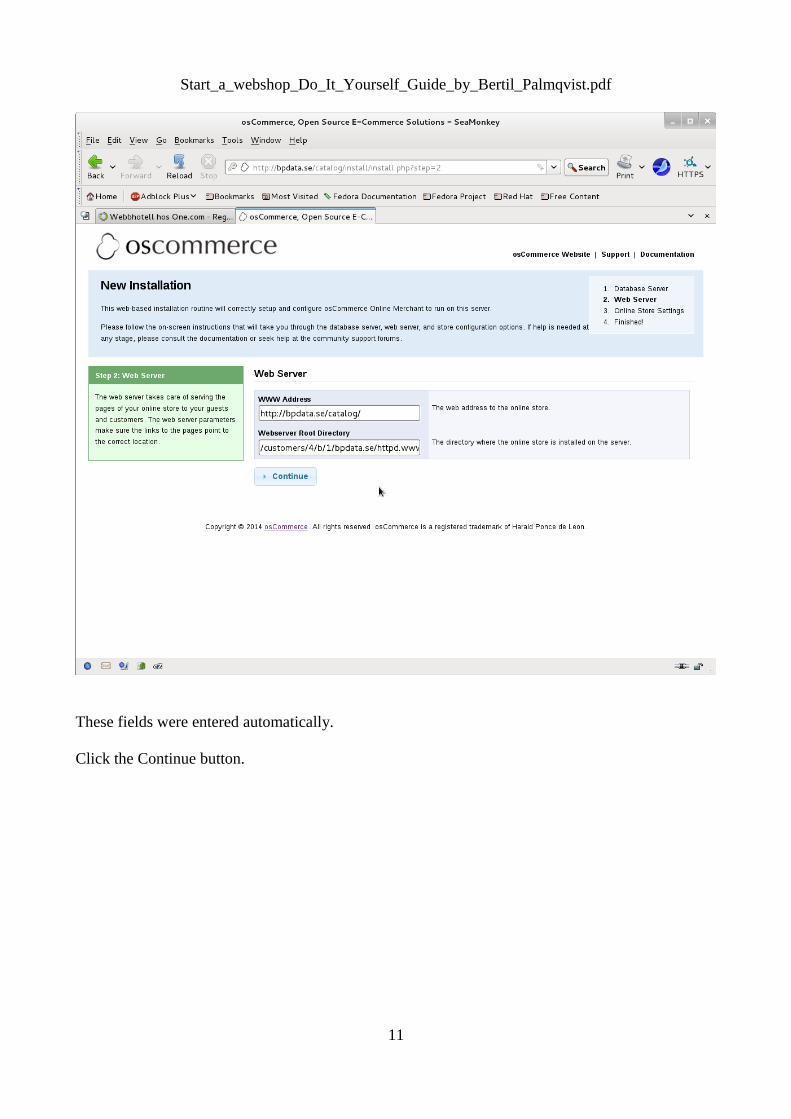
These fields were entered automatically.
Click the Continue button.
11
Start_a_webshop_Do_It_Yourself_Guide_by_Bertil_Palmqvist.pdf
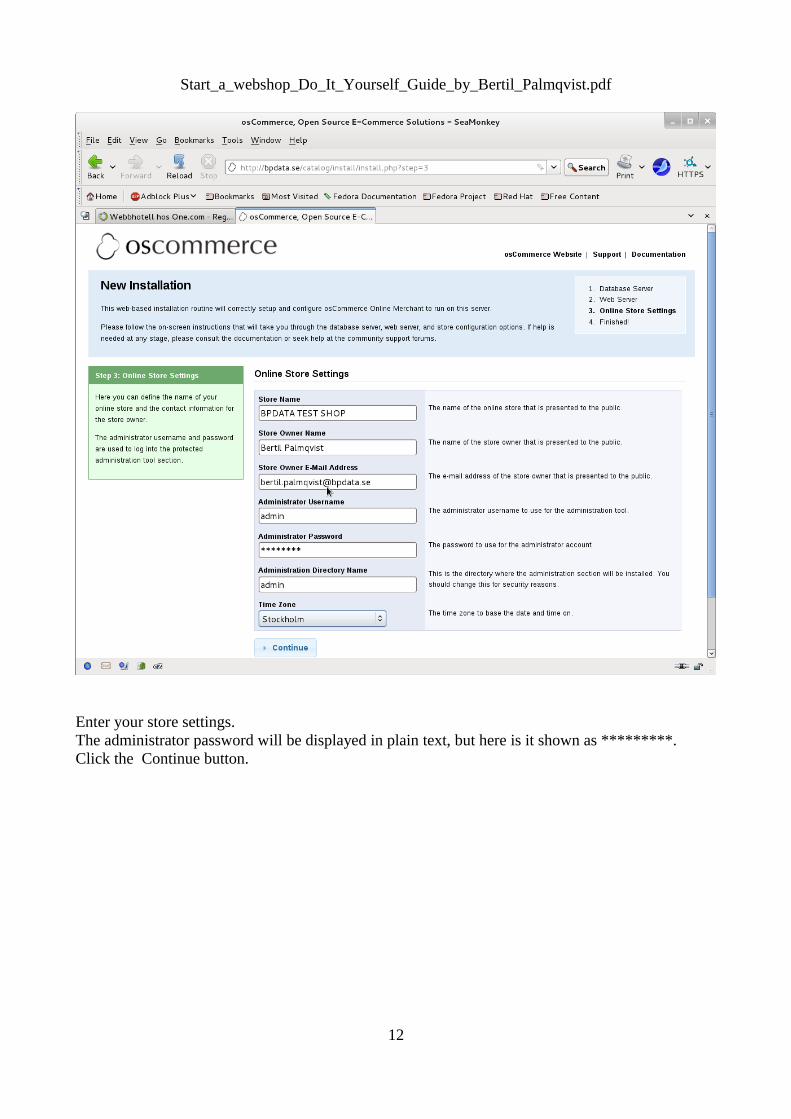
Enter your store settings.The administrator password will be displayed in plain text, but here is it shown as *********.Click the Continue button.
12
Start_a_webshop_Do_It_Yourself_Guide_by_Bertil_Palmqvist.pdf
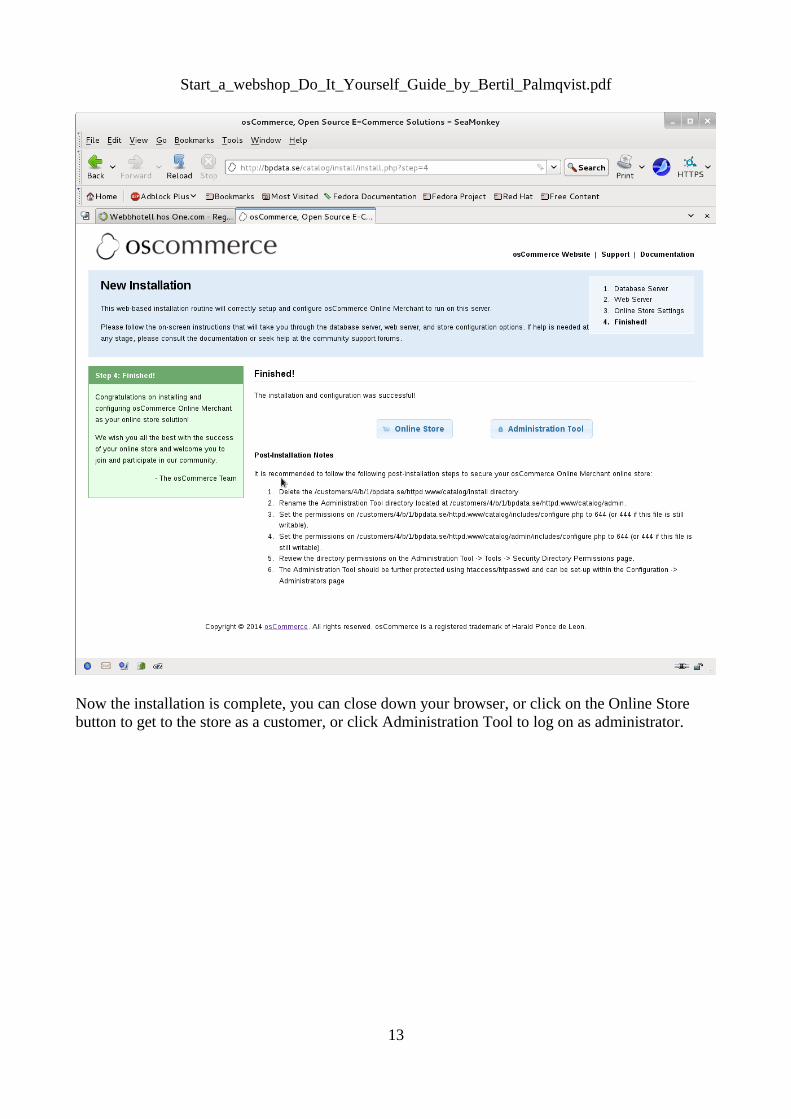
Now the installation is complete, you can close down your browser, or click on the Online Store button to get to the store as a customer, or click Administration Tool to log on as administrator.
13
Start_a_webshop_Do_It_Yourself_Guide_by_Bertil_Palmqvist.pdf
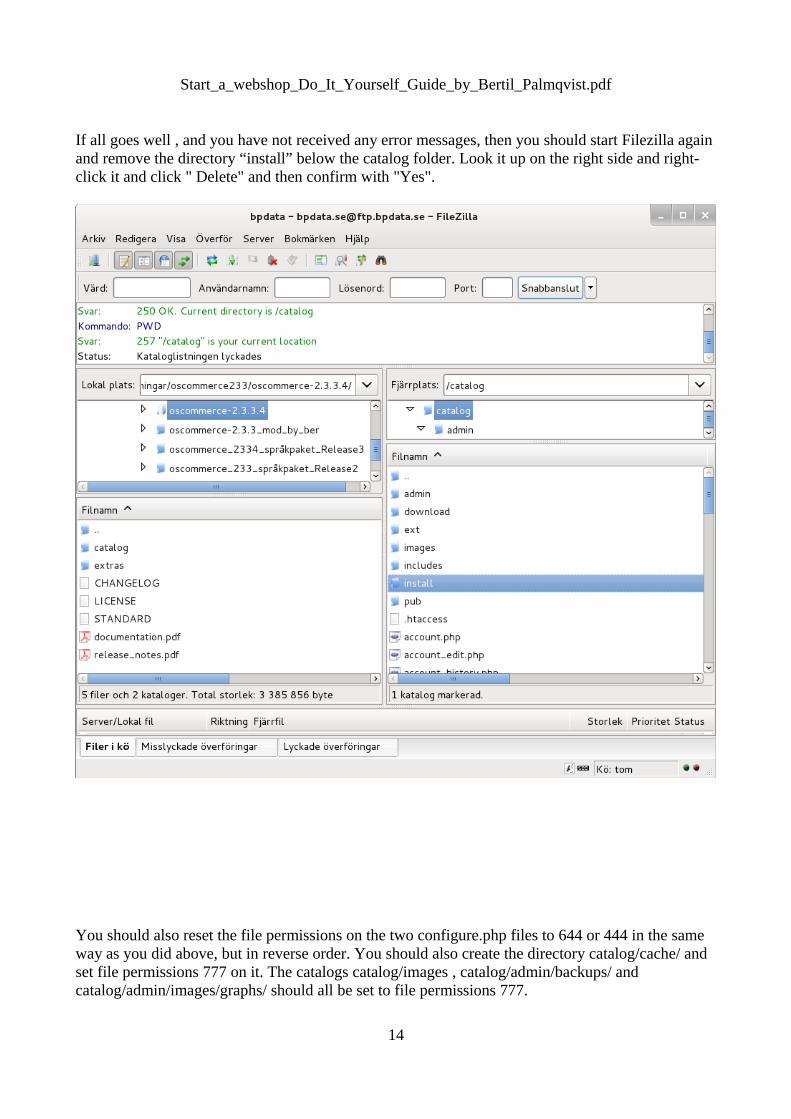
If all goes well , and you have not received any error messages, then you should start Filezilla again and remove the directory “install” below the catalog folder. Look it up on the right side and right-click it and click " Delete" and then confirm with "Yes".
You should also reset the file permissions on the two configure.php files to 644 or 444 in the same way as you did above, but in reverse order. You should also create the directory catalog/cache/ and set file permissions 777 on it. The catalogs catalog/images , catalog/admin/backups/ and catalog/admin/images/graphs/ should all be set to file permissions 777.
14
Start_a_webshop_Do_It_Yourself_Guide_by_Bertil_Palmqvist.pdf
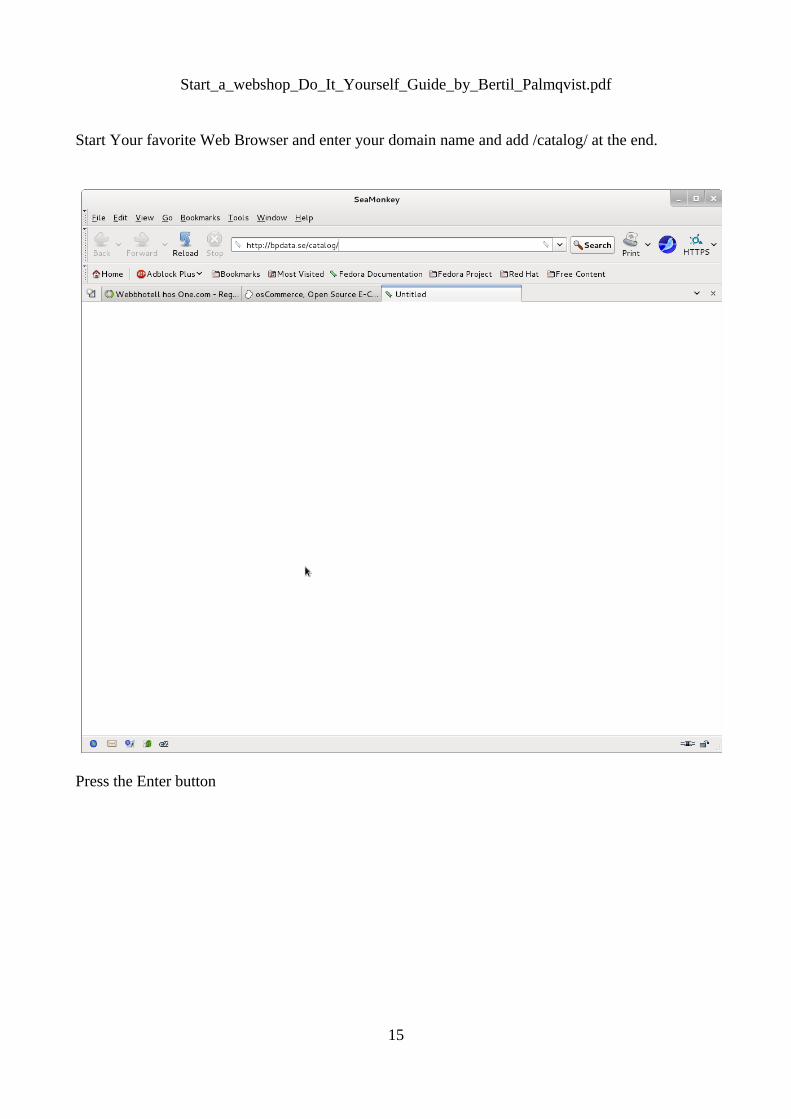
Start Your favorite Web Browser and enter your domain name and add /catalog/ at the end.
Press the Enter button
15

Start_a_webshop_Do_It_Yourself_Guide_by_Bertil_Palmqvist.pdf
You should see the webshop with example categories and products . It should look this way, with your store name where it says "BPDATA TEST SHOP" or else something is wrong :
16
Start_a_webshop_Do_It_Yourself_Guide_by_Bertil_Palmqvist.pdf
You should later delete the examples and add your own categories and products. It may be helpful to look at how they are laid out and especially how product attributes are set up before you remove them .
Step 4 Install the language pack and select the default language.
If the online store customer and administrator interface will be in English only, you do not need to install any language pack because English is the default language that comes with a basic installation of osCommerce-2.3.3.4. If so go to Step 7!
If the merchant's language should be something other than English, or if there will be multiple languages installed, then do the following steps:Note: The images in this guide are from when I installed the Norwegian language pack, but other languages are installed the same way, just replace ”norwegian” with ”other language”
If you have renamed the admin directory, you must copy the files and directories, as follows:
file catalog/includes/languages/norwegian.phpdirectory catalog/includes/languages/norwegian/tocatalog/includes/languages
and
file catalog/admin/includes/languages/norwegian.phpdirectory catalog/admin/includes/languages/norwegian/tocatalog/<your new admin directory name>/includes/languages
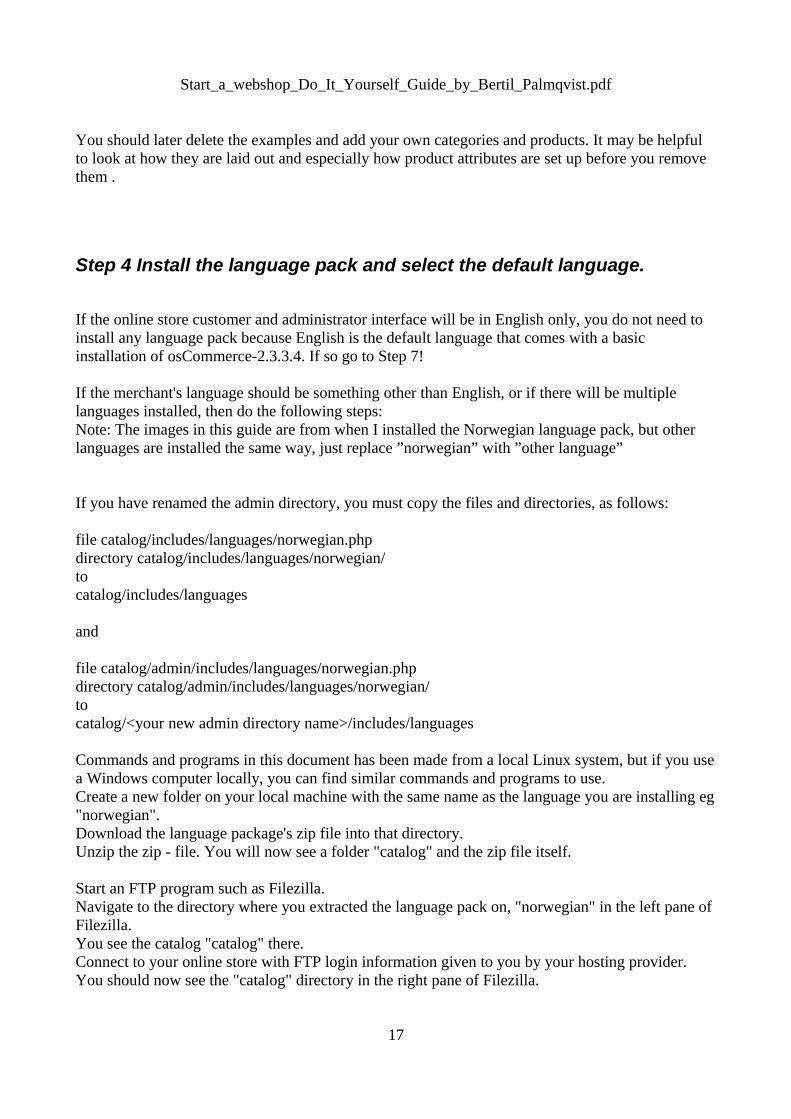
Commands and programs in this document has been made from a local Linux system, but if you use a Windows computer locally, you can find similar commands and programs to use. Create a new folder on your local machine with the same name as the language you are installing eg "norwegian". Download the language package's zip file into that directory. Unzip the zip - file. You will now see a folder "catalog" and the zip file itself.
Start an FTP program such as Filezilla. Navigate to the directory where you extracted the language pack on, "norwegian" in the left pane of Filezilla. You see the catalog "catalog" there. Connect to your online store with FTP login information given to you by your hosting provider. You should now see the "catalog" directory in the right pane of Filezilla.
17
Start_a_webshop_Do_It_Yourself_Guide_by_Bertil_Palmqvist.pdf
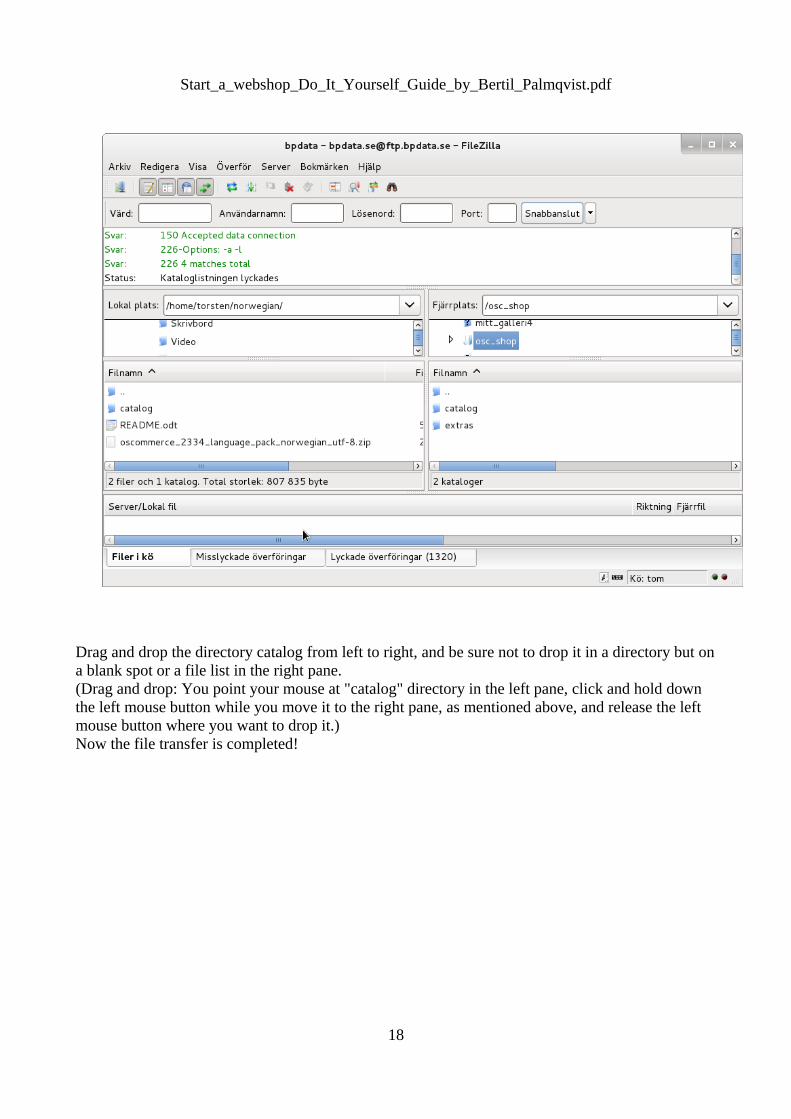
Drag and drop the directory catalog from left to right, and be sure not to drop it in a directory but on a blank spot or a file list in the right pane. (Drag and drop: You point your mouse at "catalog" directory in the left pane, click and hold down the left mouse button while you move it to the right pane, as mentioned above, and release the left mouse button where you want to drop it.) Now the file transfer is completed!
18
Start_a_webshop_Do_It_Yourself_Guide_by_Bertil_Palmqvist.pdf
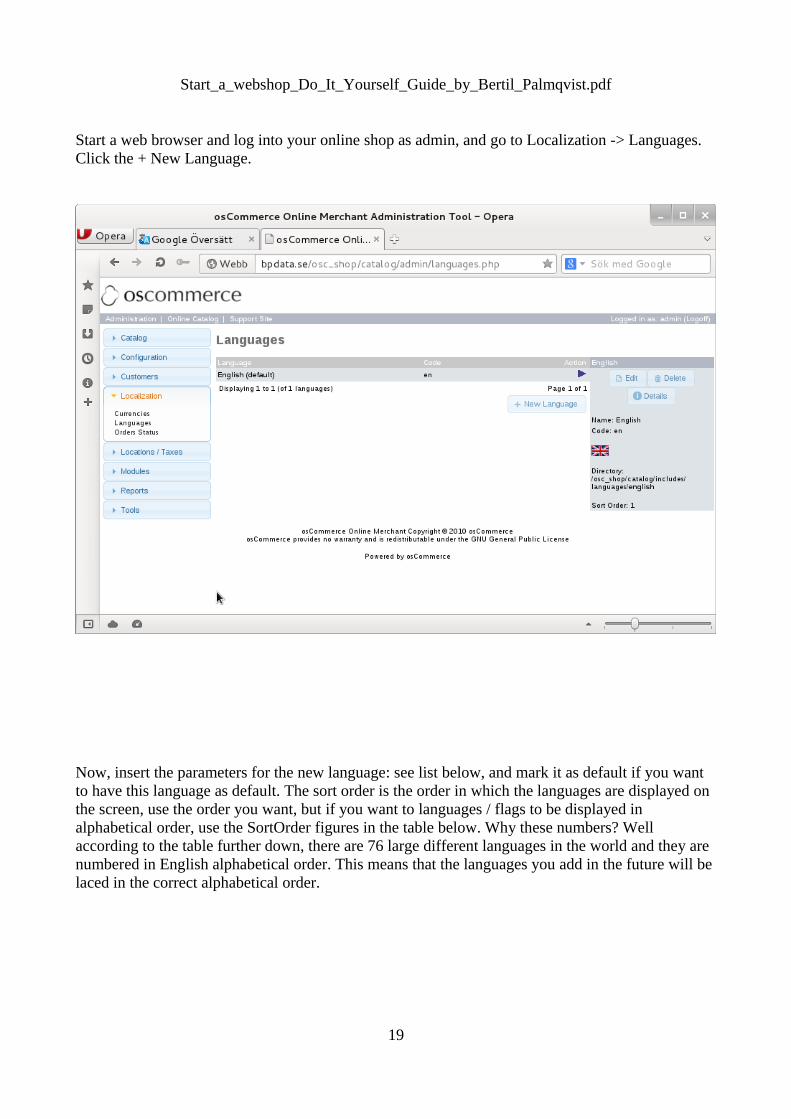
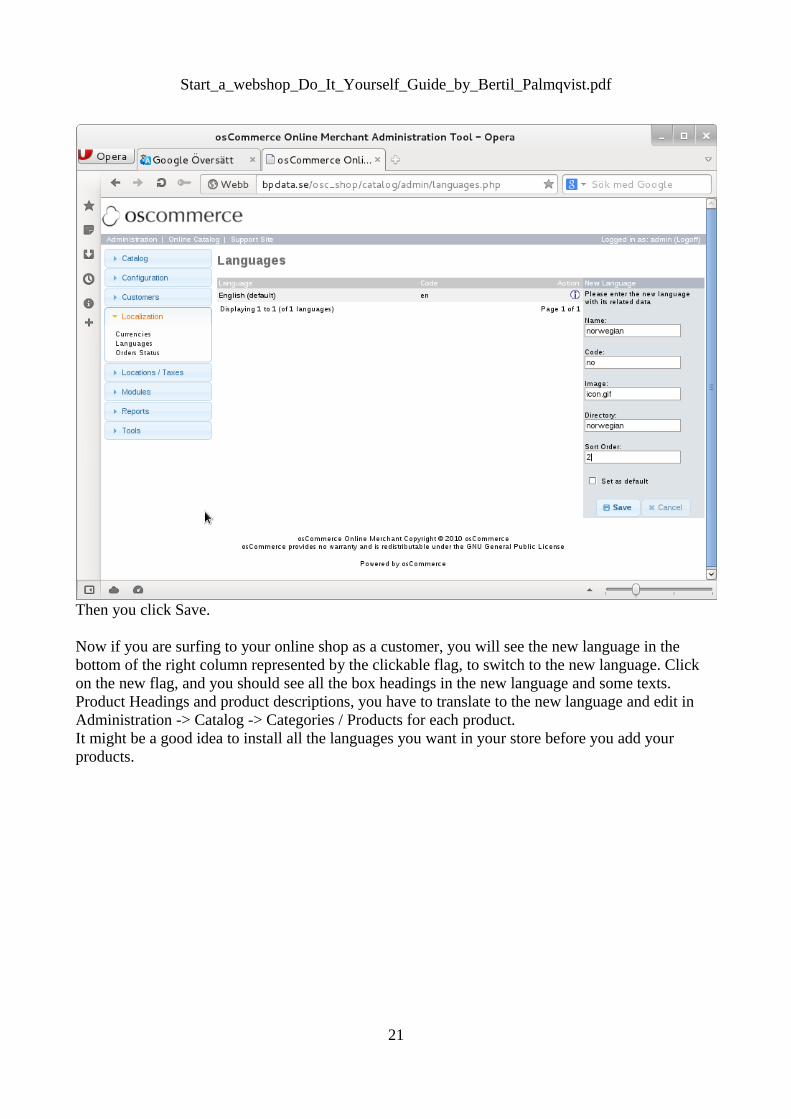
Start a web browser and log into your online shop as admin, and go to Localization -> Languages. Click the + New Language.
Now, insert the parameters for the new language: see list below, and mark it as default if you want to have this language as default. The sort order is the order in which the languages are displayed on the screen, use the order you want, but if you want to languages / flags to be displayed in alphabetical order, use the SortOrder figures in the table below. Why these numbers? Well according to the table further down, there are 76 large different languages in the world and they are numbered in English alphabetical order. This means that the languages you add in the future will be laced in the correct alphabetical order.
19
Start_a_webshop_Do_It_Yourself_Guide_by_Bertil_Palmqvist.pdf
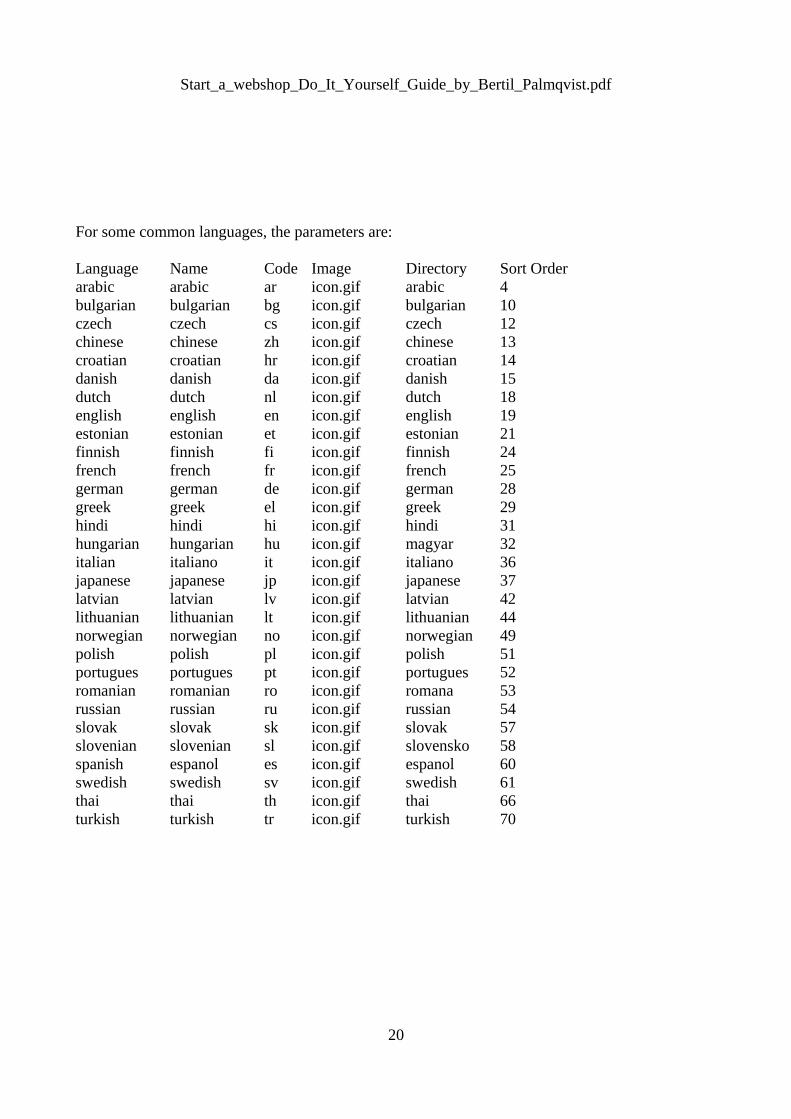
For some common languages, the parameters are:
Language Name Code Image Directory Sort Orderarabic arabic ar icon.gif arabic 4bulgarian bulgarian bg icon.gif bulgarian 10czech czech cs icon.gif czech 12chinese chinese zh icon.gif chinese 13croatian croatian hr icon.gif croatian 14danish danish da icon.gif danish 15dutch dutch nl icon.gif dutch 18english english en icon.gif english 19estonian estonian et icon.gif estonian 21finnish finnish fi icon.gif finnish 24french french fr icon.gif french 25german german de icon.gif german 28greek greek el icon.gif greek 29hindi hindi hi icon.gif hindi 31hungarian hungarian hu icon.gif magyar 32italian italiano it icon.gif italiano 36japanese japanese jp icon.gif japanese 37latvian latvian lv icon.gif latvian 42lithuanian lithuanian lt icon.gif lithuanian 44norwegian norwegian no icon.gif norwegian 49polish polish pl icon.gif polish 51portugues portugues pt icon.gif portugues 52romanian romanian ro icon.gif romana 53russian russian ru icon.gif russian 54slovak slovak sk icon.gif slovak 57slovenian slovenian sl icon.gif slovensko 58spanish espanol es icon.gif espanol 60swedish swedish sv icon.gif swedish 61thai thai th icon.gif thai 66turkish turkish tr icon.gif turkish 70
20
Start_a_webshop_Do_It_Yourself_Guide_by_Bertil_Palmqvist.pdf
Then you click Save.
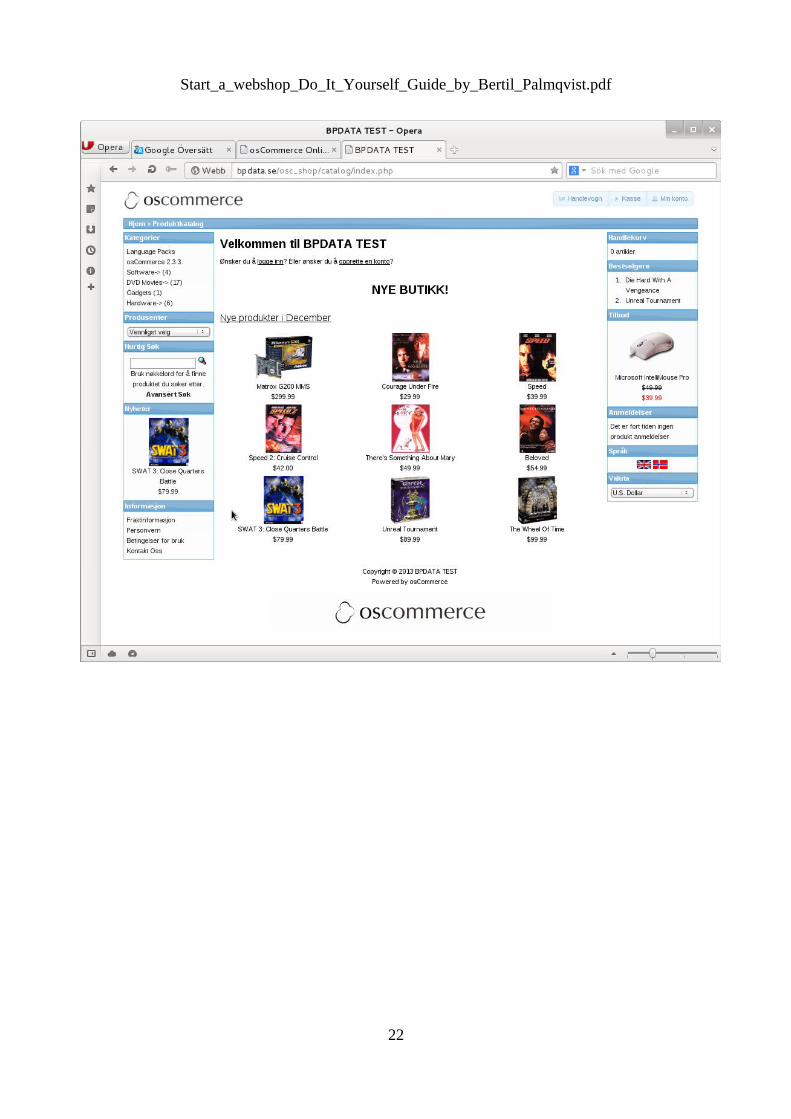
Now if you are surfing to your online shop as a customer, you will see the new language in the bottom of the right column represented by the clickable flag, to switch to the new language. Click on the new flag, and you should see all the box headings in the new language and some texts. Product Headings and product descriptions, you have to translate to the new language and edit in Administration -> Catalog -> Categories / Products for each product. It might be a good idea to install all the languages you want in your store before you add your products.
21
Start_a_webshop_Do_It_Yourself_Guide_by_Bertil_Palmqvist.pdf
22
Start_a_webshop_Do_It_Yourself_Guide_by_Bertil_Palmqvist.pdf
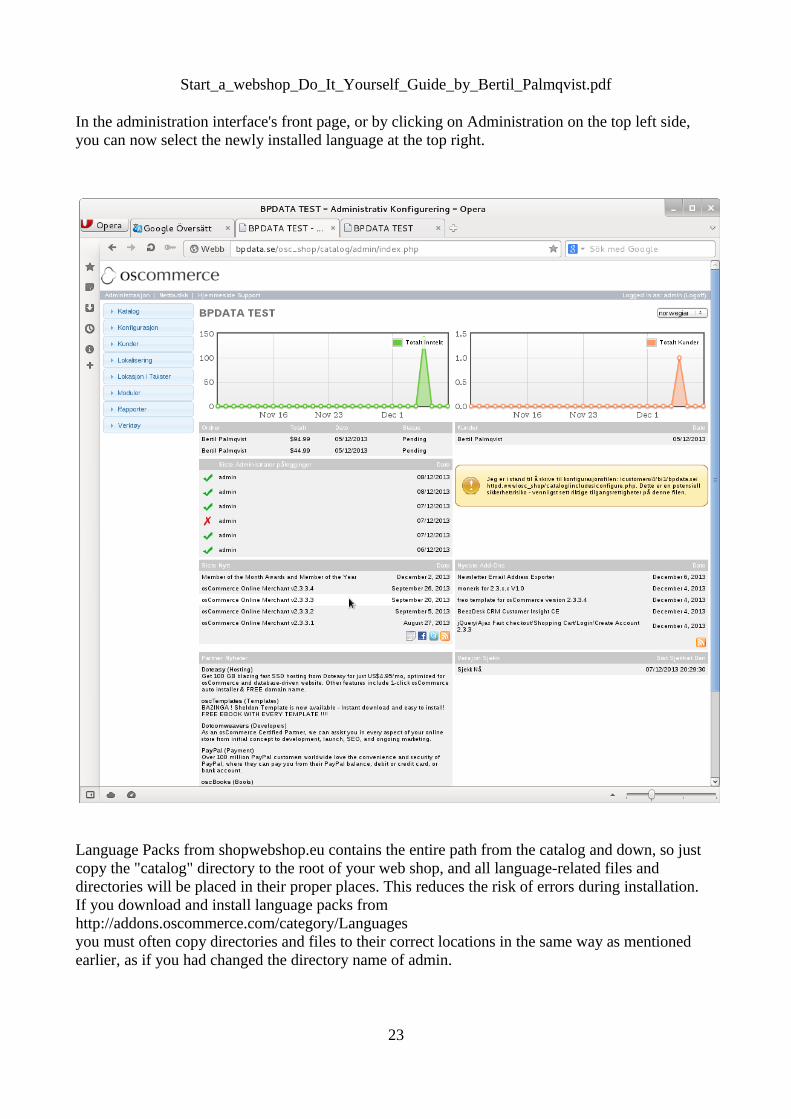
In the administration interface's front page, or by clicking on Administration on the top left side, you can now select the newly installed language at the top right.
Language Packs from shopwebshop.eu contains the entire path from the catalog and down, so just copy the "catalog" directory to the root of your web shop, and all language-related files and directories will be placed in their proper places. This reduces the risk of errors during installation. If you download and install language packs from http://addons.oscommerce.com/category/Languages you must often copy directories and files to their correct locations in the same way as mentioned earlier, as if you had changed the directory name of admin.
23
Start_a_webshop_Do_It_Yourself_Guide_by_Bertil_Palmqvist.pdf
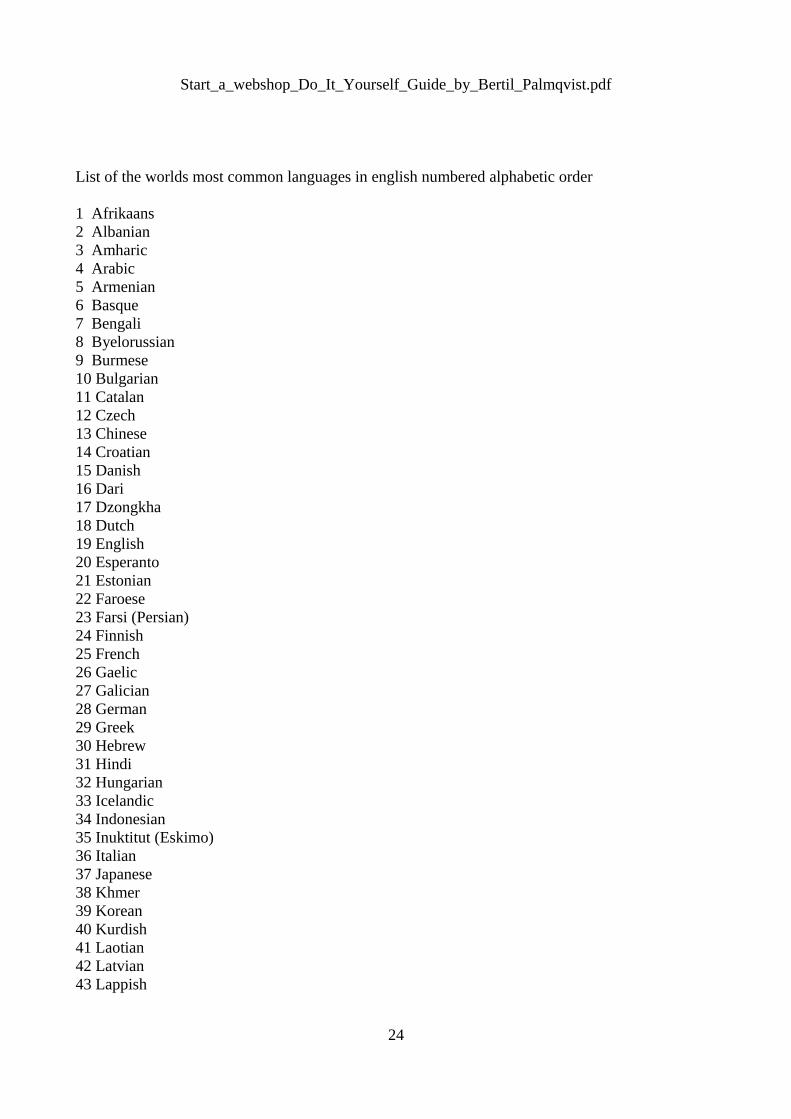
List of the worlds most common languages in english numbered alphabetic order
1 Afrikaans 2 Albanian 3 Amharic 4 Arabic 5 Armenian 6 Basque 7 Bengali 8 Byelorussian 9 Burmese 10 Bulgarian 11 Catalan 12 Czech 13 Chinese 14 Croatian 15 Danish 16 Dari 17 Dzongkha 18 Dutch 19 English 20 Esperanto 21 Estonian 22 Faroese 23 Farsi (Persian) 24 Finnish 25 French 26 Gaelic 27 Galician 28 German 29 Greek 30 Hebrew 31 Hindi 32 Hungarian 33 Icelandic 34 Indonesian 35 Inuktitut (Eskimo) 36 Italian 37 Japanese 38 Khmer 39 Korean 40 Kurdish 41 Laotian 42 Latvian 43 Lappish
24
Start_a_webshop_Do_It_Yourself_Guide_by_Bertil_Palmqvist.pdf
44 Lithuanian 45 Macedonian 46 Malay 47 Maltese 48 Nepali 49 Norwegian50 Pashto 51 Polish 52 Portuguese 53 Romanian 54 Russian 55 Scots 56 Serbian 57 Slovak 58 Slovenian 59 Somali 60 Spanish 61 Swedish 62 Swahili 63 Tagalog-Filipino 64 Tajik 65 Tamil 66 Thai 67 Tibetan 68 Tigrinya 69 Tongan 70 Turkish 71 Turkmen 72 Ucrainian 73 Urdu 74 Uzbek 75 Vietnamese 76 Welsh
Step 5 Install Currencies and select the default currency
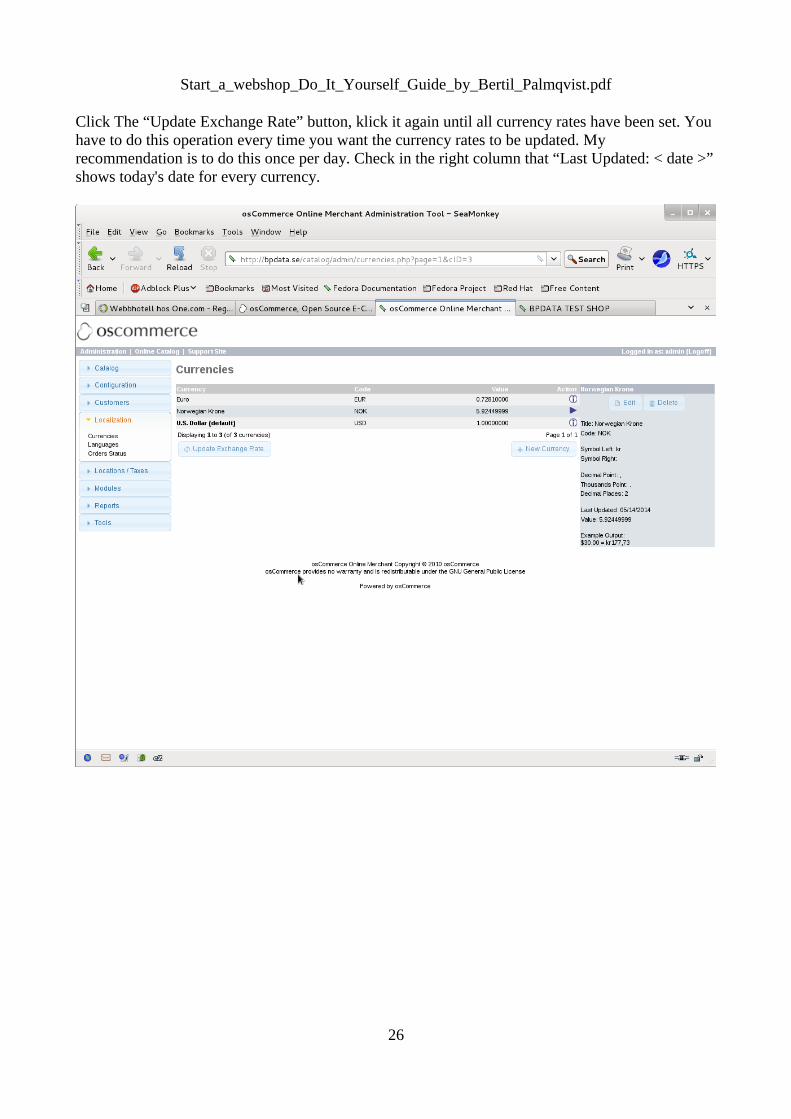
The currencies that are already installed by default are USD, EUR.Install currency Norwegian Krone (or currency of your choice) and set it as the default in the manner described here. Other currencies is installed similarly. Log in as Administrator (admin) on your webshop go to Localization -> Currencies Click New Currency select in - Common Currencies - the menu: [NOK] Norwegian Krone. All data for the currency SEK will automatically be filled in. If there is a currency you want to add that is not in the menu, you get to fill in all the data yourself. Check the box "Set as default ..." if you want it to be the shops default currency. Click Save.
The currencies that have been added will no longer appear in the "- Common Currencies -" menu.
25
Start_a_webshop_Do_It_Yourself_Guide_by_Bertil_Palmqvist.pdf
Click The “Update Exchange Rate” button, klick it again until all currency rates have been set. You have to do this operation every time you want the currency rates to be updated. My recommendation is to do this once per day. Check in the right column that “Last Updated: < date >” shows today's date for every currency.
26

Start_a_webshop_Do_It_Yourself_Guide_by_Bertil_Palmqvist.pdf
Step 6 Order a Corporate PayPal account Generate A PayPal API and activate it in the webshop
There are many countries and currencies that are not offered by PayPal. Among others are most of the Arab countries and their currencies not accepted by PayPal, but some will be later on. If your currency is not accepted by PayPal then use USD. The currencies that are accepted today by PayPal is:
AUD australian dollar BRL brasilian real (reais) CAD canadian dollar CHF swiss franc CZK czech krona DKK danish krona EUR euro (several european countries)GBP brittish pound HKD hong kong dollar HUF hungarian forint ILS israeli shekel JPY japanese yen MXN mexican peso MYR malaysian ringgit NOK norwegian crown NZD new zealand dollar PHP philippine peso PLN polish zloty RUB russian rubel SEK swedish krona SGD singapore dollar THB thai baht TRY turkish lira TWD taiwan dollar USD u.s. dollar
You must have a valid and working e-mail address to use for logging in to PayPal. You need to verify your email address during the creation. If it takes too much time, you are logged out and have to start all over from scratch! Web pages can be in English or your native language.
Create a PayPal Business Account
If you already have a PayPal Business account, login to your paypal account and go to the "Request API data" below.
If you do not have a PayPal business account, start a web browser and type in the url:
27
Start_a_webshop_Do_It_Yourself_Guide_by_Bertil_Palmqvist.pdf
http://paypal.com , click on Company , click on Create Account in the middle of the page.PayPalSign up for a Business account ... appearsClick the Create New AccountYour business is located in.SwedenClick on Create New Account
Business Type: Private companyBusiness Name : " Your company name "Address: ' Your street address "Postal code: " Your zip code "City : 'Your city '
Country Sweden (In your case your country will be shown)
Category : "Your firm's activities "Subcategory : "Activity Category"Business URL: "Your online store 's URL" (In my case : www.gallerigate.com)
Business owner contact informationFill in the information set applies to you, below I show my data .
First Name: BertilLast Name: PalmqvistCountry of citizenship : SwedenWork phone: 0706779711Mobile number: 0706779711Home addressSame as Business Address
press the Continue
Business account signupCreate a PayPal business account login
Email address : [email protected] : **********Re - enter password: **********Security question 1answerSecurity question 2answer
A code is displayed graphically enter the codeEnter the code
Confirm User agreement by checking the box .
28
Start_a_webshop_Do_It_Yourself_Guide_by_Bertil_Palmqvist.pdf
Click the button at the bottom
If it succeeds, the box
Congratulations! You now have a PayPal Business Account.
Use <email adress> to log in to paypal ...
Shortly you will receive an email from PayPal asking you to confirm your email address. Click on the yellow button Confirm Email in the email, it brings up a login page in your browser where you can type your password to confirm email address. You will be logged into your PayPal account. Log out. DONE!
Request API data
Log in to your PayPal business account Go to My Profile My sales tool API access To the right Option 2 Click on "Request API data" Request an API signature is checked Click "Accept and send" Then the following: (Here I show my example, you will get different values)
References API signature API username info_api1.gallerigate.com API password XTLSPBWXR2KL76G4U Signature K lBRgTsRE7K9LH32MhDEhUt0832ADF.akHeWkAcSXkxbK0g6hnLYpd Request Date Fri September 13 2013 21:11:48 CEST (UTC +2)
Copy and paste into a document on your PC the API username, API password and Signature. These should be pasted in the webshop later. Note that the signature is not copied if you copy an entire paragraph. Copy it for itself. Click Done Now your account is ready to use. There are more settings that you can do at a later date. Logout at the top right.
29
Start_a_webshop_Do_It_Yourself_Guide_by_Bertil_Palmqvist.pdf
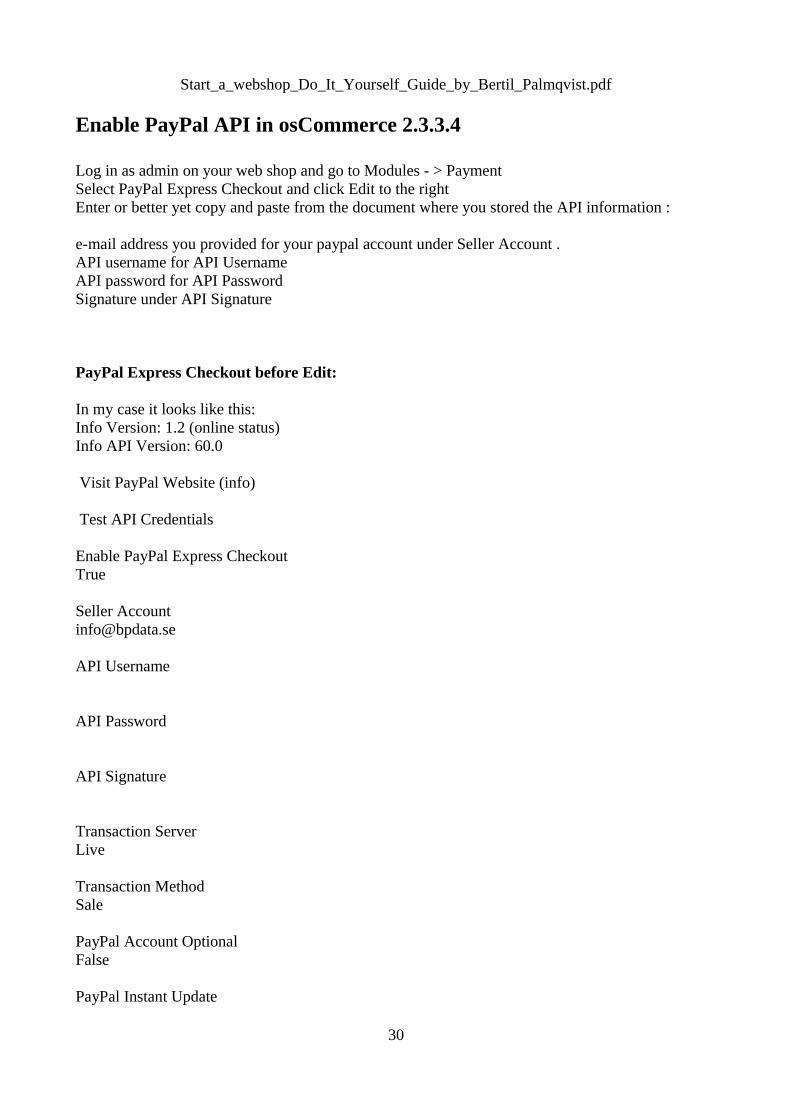
Enable PayPal API in osCommerce 2.3.3.4
Log in as admin on your web shop and go to Modules - > PaymentSelect PayPal Express Checkout and click Edit to the rightEnter or better yet copy and paste from the document where you stored the API information :
e-mail address you provided for your paypal account under Seller Account .API username for API UsernameAPI password for API PasswordSignature under API Signature
PayPal Express Checkout before Edit:
In my case it looks like this:Info Version: 1.2 (online status) Info API Version: 60.0
Visit PayPal Website (info)
Test API Credentials
Enable PayPal Express Checkout True
Seller Account [email protected]
API Username
API Password
API Signature
Transaction Server Live
Transaction Method Sale
PayPal Account Optional False
PayPal Instant Update
30
Start_a_webshop_Do_It_Yourself_Guide_by_Bertil_Palmqvist.pdf
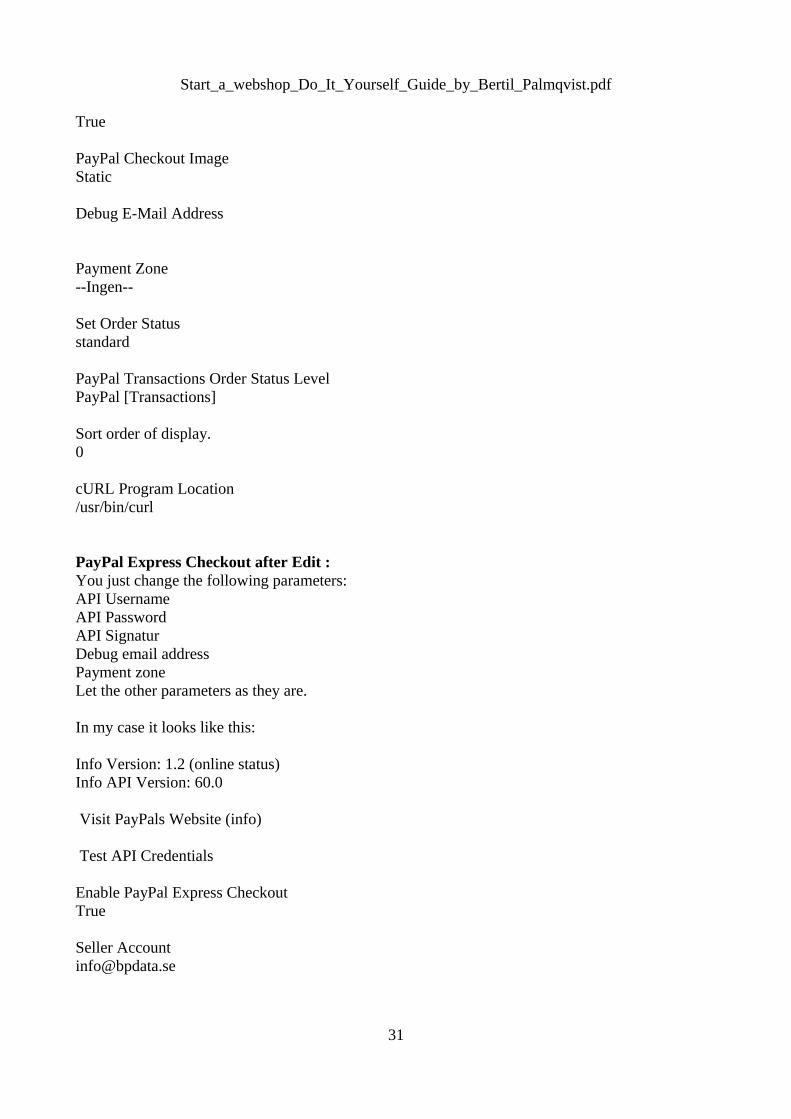
True
PayPal Checkout Image Static
Debug E-Mail Address
Payment Zone --Ingen--
Set Order Status standard
PayPal Transactions Order Status Level PayPal [Transactions]
Sort order of display. 0
cURL Program Location /usr/bin/curl
PayPal Express Checkout after Edit :You just change the following parameters: API UsernameAPI PasswordAPI SignaturDebug email addressPayment zoneLet the other parameters as they are.
In my case it looks like this:
Info Version: 1.2 (online status) Info API Version: 60.0
Visit PayPals Website (info)
Test API Credentials
Enable PayPal Express Checkout True
Seller Account [email protected]
31
Start_a_webshop_Do_It_Yourself_Guide_by_Bertil_Palmqvist.pdf
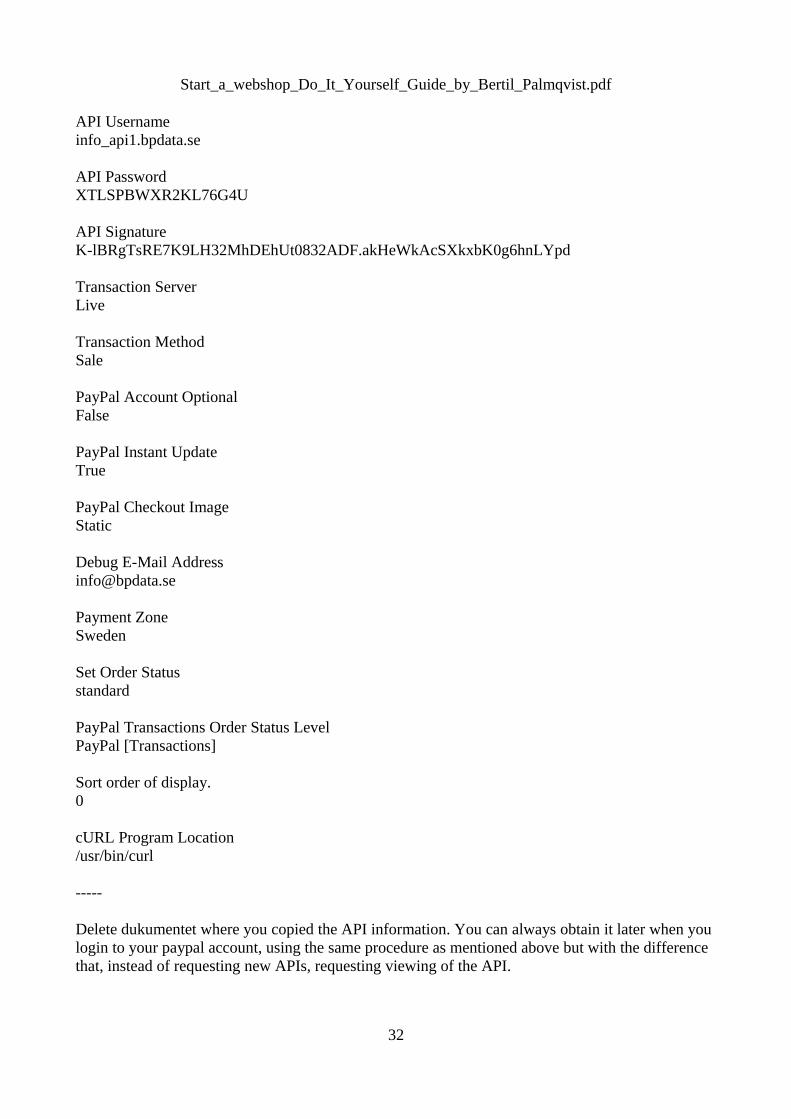
API Username info_api1.bpdata.se
API Password XTLSPBWXR2KL76G4U
API Signature K-lBRgTsRE7K9LH32MhDEhUt0832ADF.akHeWkAcSXkxbK0g6hnLYpd
Transaction Server Live
Transaction Method Sale PayPal Account Optional False
PayPal Instant Update True
PayPal Checkout Image Static
Debug E-Mail Address [email protected]
Payment Zone Sweden
Set Order Status standard
PayPal Transactions Order Status Level PayPal [Transactions]
Sort order of display. 0
cURL Program Location /usr/bin/curl
-----
Delete dukumentet where you copied the API information. You can always obtain it later when you login to your paypal account, using the same procedure as mentioned above but with the difference that, instead of requesting new APIs, requesting viewing of the API.
32
Start_a_webshop_Do_It_Yourself_Guide_by_Bertil_Palmqvist.pdf
Test different paypal payments by paying with debit cards , credit cards and another paypal account by entering a test product with a low price such as $ 2. Then go to your webshop as a customer, create an account, an shop the test product with a different PayPal account, then with a VISA card, and then with a MasterCard card. Check your email at your shops email address, and at your email customer for confirmation emails. Then check your PalPal Business account that the payment reached it. (Possibly you can use the sandbox for testing , but I think it 's better to test with actual payments.)
Step 7 Configure your Locations / Taxes
Log in to your webshop as administrator. Click on Locations / Taxes.
Leave countries as it is, you do not need to change anything there.
a) Click the Zones. Only Austria, Canada, Germany, Spain, Switzerland, the United States has zones that are used for various taxes and shipping costs. If the countries to deal with does not exist, create a zone for this country: Click on + New Zone. Examples of Sweden (with 25% VAT tax) (no different zones of taxes): Zones Name: sweden Zones Code: SE Country: Sweden (select it from the drop-down menu) Click Save.
b) Click the Tax Zones. Click + Insert. Enter the Zone Name: sweden and Description: sweden. Click Save.
c) Click the Tax Classes. Click the + New tax class. Enter for Tax Tax class title: swedish goods and Description: swedish goods. Click Save.
d) Click the Tax rates. Click the + New tax rate. Specify the name tax class in the pull down menu: swedish goods, Zone from the pull down menu: sweden, Tax Rate (%): 25, Description: Svensk moms, Priority: 1., Click Save.
e) Go to Configuration -> My Store Change Country to the new country, in this case Sweden. To do this: Select Country row, click Edit and select Sweden from the pull down menu, and click save. Change Zone to the new zone, in this case sweden. To do this: Select the Zone row, click Edit and select sweden from the pull down menu, and click save.
Now you can use this setting for your new Swedish products deposited in your shop using the Tax Class: english goods (in the dropdown menu). When you insert Gross price for products will net price to be automatically filled in with the tax deductions.
NOTE! Because these parameters are interdependent and saved in the database, settings must be in the correct order as stated above. If something goes wrong or you need to change a setting, first delete all six settings and start over with paragraph a) through e). If you only change one single
33
Start_a_webshop_Do_It_Yourself_Guide_by_Bertil_Palmqvist.pdf
setting for themselves, it can sometimes be that the tax or the payment method will stop running or the price does not include tax, even if Display Prices with Tax is set to "true" in My Store.
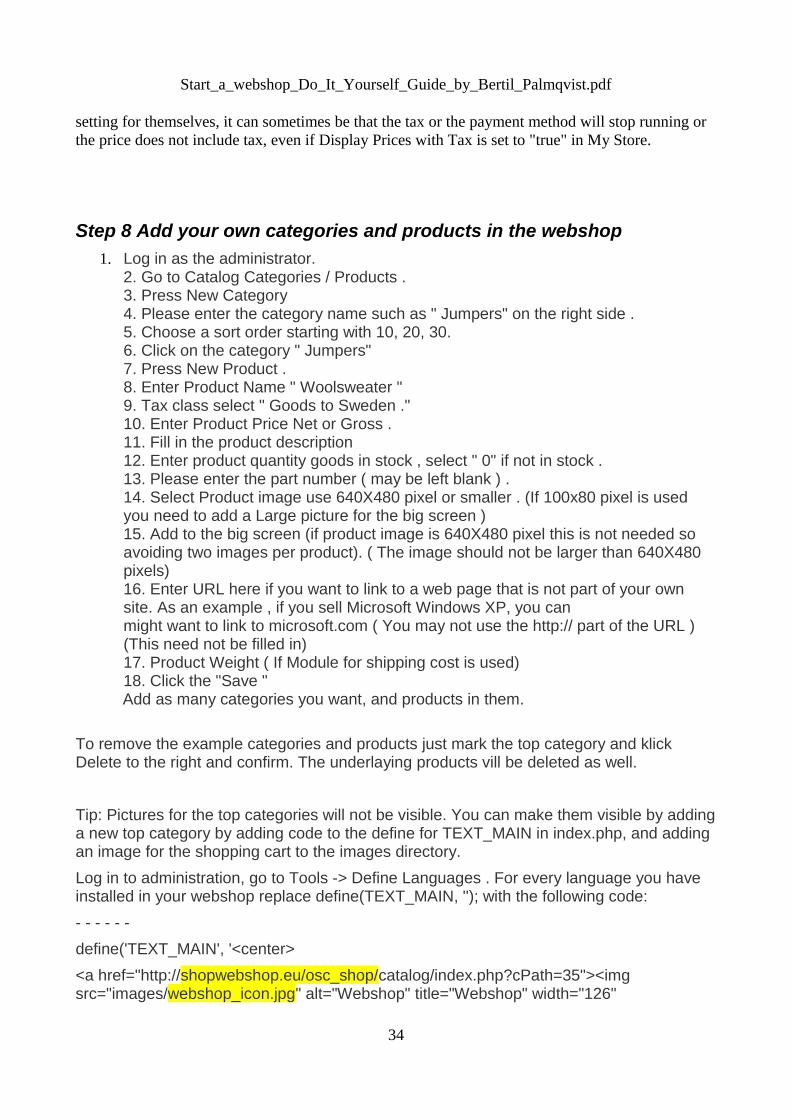
Step 8 Add your own categories and products in the webshop
1. Log in as the administrator.2. Go to Catalog Categories / Products .3. Press New Category4. Please enter the category name such as " Jumpers" on the right side .5. Choose a sort order starting with 10, 20, 30.6. Click on the category " Jumpers"7. Press New Product .8. Enter Product Name " Woolsweater "9. Tax class select " Goods to Sweden ."10. Enter Product Price Net or Gross .11. Fill in the product description12. Enter product quantity goods in stock , select " 0" if not in stock .13. Please enter the part number ( may be left blank ) .14. Select Product image use 640X480 pixel or smaller . (If 100x80 pixel is used you need to add a Large picture for the big screen )15. Add to the big screen (if product image is 640X480 pixel this is not needed so avoiding two images per product). ( The image should not be larger than 640X480 pixels)16. Enter URL here if you want to link to a web page that is not part of your own site. As an example , if you sell Microsoft Windows XP, you canmight want to link to microsoft.com ( You may not use the http:// part of the URL )(This need not be filled in)17. Product Weight ( If Module for shipping cost is used)18. Click the "Save "Add as many categories you want, and products in them.
To remove the example categories and products just mark the top category and klick Delete to the right and confirm. The underlaying products vill be deleted as well.
Tip: Pictures for the top categories will not be visible. You can make them visible by adding a new top category by adding code to the define for TEXT_MAIN in index.php, and adding an image for the shopping cart to the images directory.
Log in to administration, go to Tools -> Define Languages . For every language you have installed in your webshop replace define(TEXT_MAIN, ''); with the following code:
- - - - - -
define('TEXT_MAIN', '<center>
<a href="http://shopwebshop.eu/osc_shop/catalog/index.php?cPath=35"><img src="images/webshop_icon.jpg" alt="Webshop" title="Webshop" width="126"
34
Start_a_webshop_Do_It_Yourself_Guide_by_Bertil_Palmqvist.pdf
height="92" /><br />Webshop</a>
</center> ');
- - - - - -
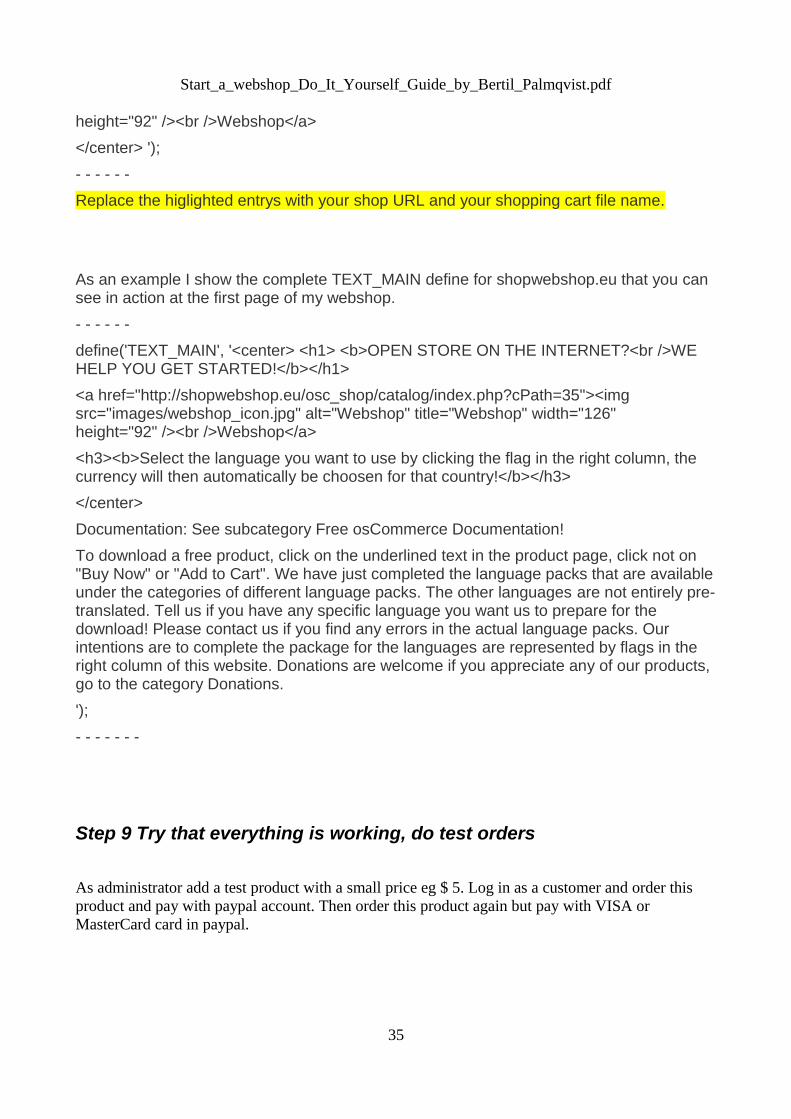
Replace the higlighted entrys with your shop URL and your shopping cart file name.
As an example I show the complete TEXT_MAIN define for shopwebshop.eu that you can see in action at the first page of my webshop.
- - - - - -
define('TEXT_MAIN', '<center> <h1> <b>OPEN STORE ON THE INTERNET?<br />WE HELP YOU GET STARTED!</b></h1>
<a href="http://shopwebshop.eu/osc_shop/catalog/index.php?cPath=35"><img src="images/webshop_icon.jpg" alt="Webshop" title="Webshop" width="126" height="92" /><br />Webshop</a>
<h3><b>Select the language you want to use by clicking the flag in the right column, the currency will then automatically be choosen for that country!</b></h3>
</center>
Documentation: See subcategory Free osCommerce Documentation!
To download a free product, click on the underlined text in the product page, click not on "Buy Now" or "Add to Cart". We have just completed the language packs that are available under the categories of different language packs. The other languages are not entirely pre-translated. Tell us if you have any specific language you want us to prepare for the download! Please contact us if you find any errors in the actual language packs. Our intentions are to complete the package for the languages are represented by flags in the right column of this website. Donations are welcome if you appreciate any of our products, go to the category Donations.
');
- - - - - - -
Step 9 Try that everything is working, do test orders
As administrator add a test product with a small price eg $ 5. Log in as a customer and order this product and pay with paypal account. Then order this product again but pay with VISA or MasterCard card in paypal.
35
Start_a_webshop_Do_It_Yourself_Guide_by_Bertil_Palmqvist.pdf
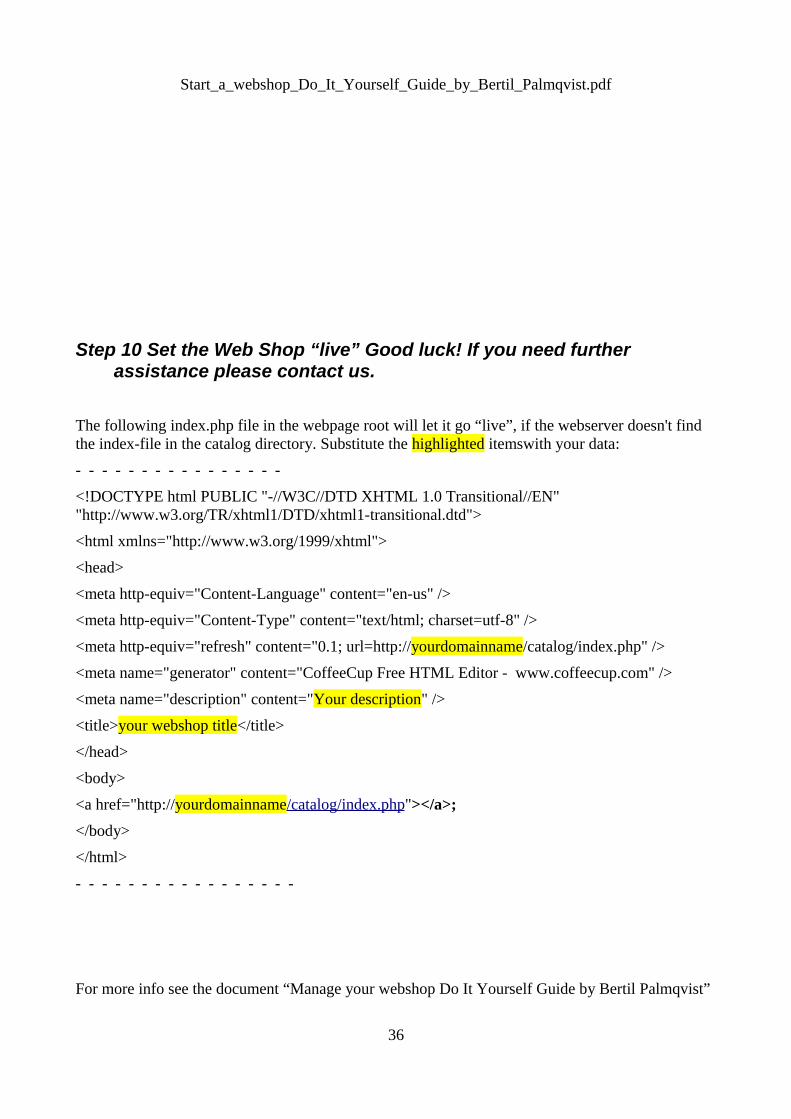
Step 10 Set the Web Shop “live” Good luck! If you need further assistance please contact us.
The following index.php file in the webpage root will let it go “live”, if the webserver doesn't find the index-file in the catalog directory. Substitute the highlighted itemswith your data:
- - - - - - - - - - - - - - - -
<!DOCTYPE html PUBLIC "-//W3C//DTD XHTML 1.0 Transitional//EN" "http://www.w3.org/TR/xhtml1/DTD/xhtml1-transitional.dtd">
<html xmlns="http://www.w3.org/1999/xhtml">
<head>
<meta http-equiv="Content-Language" content="en-us" />
<meta http-equiv="Content-Type" content="text/html; charset=utf-8" />
<meta http-equiv="refresh" content="0.1; url=http://yourdomainname/catalog/index.php" />
<meta name="generator" content="CoffeeCup Free HTML Editor - www.coffeecup.com" />
<meta name="description" content="Your description" />
<title>your webshop title</title>
</head>
<body>
<a href="http://yourdomainname/catalog/index.php"></a>;
</body>
</html>
- - - - - - - - - - - - - - - - -
For more info see the document “Manage your webshop Do It Yourself Guide by Bertil Palmqvist”
36

Start_a_webshop_Do_It_Yourself_Guide_by_Bertil_Palmqvist.pdf
which will be put on http://shopwebshop.eu later.
Free help is available at:
http://shopwebshop.eu/osc_shop/catalog/contact_us.php
37