StarBoard T-15XL - Telephone systems, handsets, headsets ... · StarBoard T-15XL Notices...
27
StarBoard T-15XL User’s Guide How to Request a User’s Guide When requesting a separate copy of this user’s guide, specify T258-2-201. Read this user’s guide and carefully retain it for future reference. Before using this product, carefully read and fully understand the safety instructions. Store this User’s Guide nearby for ease of reference. T258-2-201 Hitachi Software Engineering Co., Ltd.
Transcript of StarBoard T-15XL - Telephone systems, handsets, headsets ... · StarBoard T-15XL Notices...
StarBoard T-15XL User’s Guide
How to Request a User’s Guide
When requesting a separate copy of this user’s guide, specify T258-2-201.
Read this user’s guide and carefully retain it for future reference. Before using this product, carefully read and fully understand the safety instructions. Store this User’s Guide nearby for ease of reference.
T258-2-201
Hitachi Software Engineering Co., Ltd.

StarBoard T-15XL
Notices Reproduction or reprinting, without permission, of this manual or any part thereof is prohibited. The contents of this manual are subject to change without prior notice. Every effort has been made to ensure that this manual is complete and correct. However, should any questionable points, mistakes, etc., come to your attention, please inform the vendor. Please be advised in advance that this company will assume no responsibility for losses, etc., resulting from the operation of this product, regardless of the preceding clauses. FCC Warning
The user is cautioned that changes and modifications made to the equipment without approval of the manufacturer could void the user's authority to operate this equipment.
This Class B digital apparatus complies with Canadian ICES-003. Cet appareil numérique de la classe B est conforme à la norme NMB-003 du Canada.
Disclaimers Hitachi Software Engineering Co., Ltd. assumes no liability and makes no warranty, either express or implicit, regarding the contents of this user’s guide. Also, the company makes no warranty as to the product’s suitability, merchantability or fitness for a particular intended use. All products of Hitachi Software Engineering Co., Ltd., described in this user’s guide are presently for sale or are site-licensed. Users who purchased the aforesaid product(s) will bear the costs of all required services, repairs, and damages resulting from defects in this product, and will bear the costs of direct or indirect damages (including the loss of profits or required information) that resulted from the product defects. Moreover, Hitachi Software Engineering Co., Ltd., retains the right to revise this user’s guide and to modify the contents thereof, without any obligation to notify anyone.
1
StarBoard T-15XL
Product Assurance Provisions This product is limited to use in the United States and Canada markets. For warranty details, refer to Appendix 3.2 at the end of this user’s guide. This first edition of the user’s guide (T258-2-201) is for the following products: 98-037-10080 (StarBoard T-15XL) The StarBoard T-15XL incorporates AIPTEK’s 15-inch LCD monitor integrated digitizer technology. Windows, Windows 98, Windows Me, Windows NT 4.0, Windows 2000, Windows XP and PowerPoint are trademarks of Microsoft Corporation (U.S.) and in other countries. Other trademarks and product names are trademarks and/or registered trademarks of their respective holders. Manual Creation Dates
February 2004, First Edition T258-2-201
All Rights Reserved. Copyright © 2004 Hitachi Software Engineering Co., Ltd.
2
Safe HandlingStarBoard T-15XL
Safe Handling
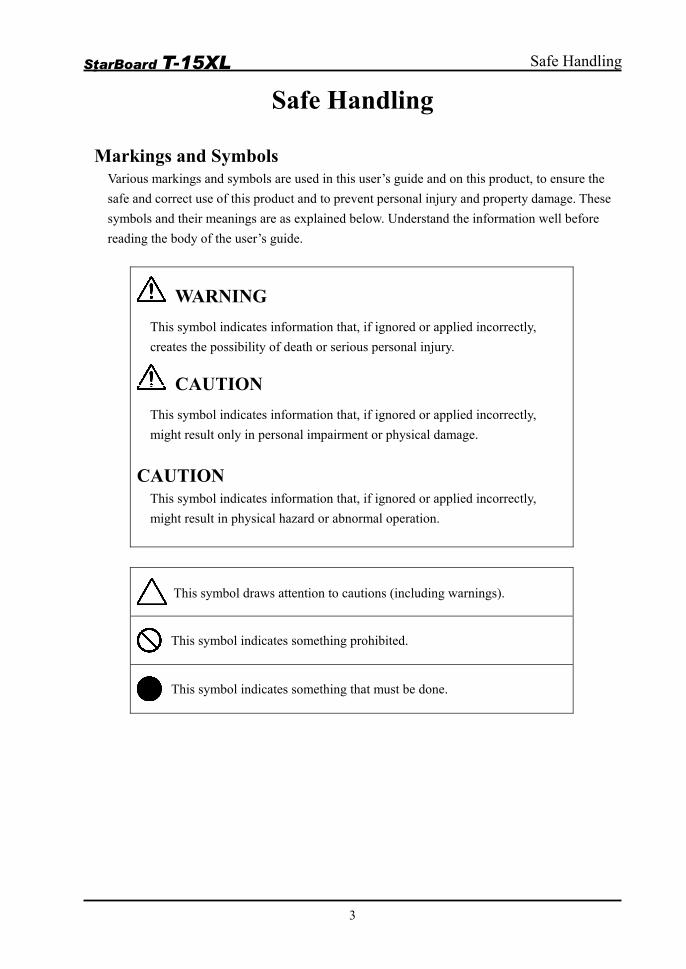
Markings and Symbols Various markings and symbols are used in this user’s guide and on this product, to ensure the safe and correct use of this product and to prevent personal injury and property damage. These symbols and their meanings are as explained below. Understand the information well before reading the body of the user’s guide.
WARNING This symbol indicates information that, if ignored or applied incorrectly, creates the possibility of death or serious personal injury.
CAUTION This symbol indicates information that, if ignored or applied incorrectly, might result only in personal impairment or physical damage.
CAUTION This symbol indicates information that, if ignored or applied incorrectly, might result in physical hazard or abnormal operation.
This symbol draws attention to cautions (including warnings).
This symbol indicates something prohibited.
This symbol indicates something that must be done.
3

Safe HandlingStarBoard T-15XL
Always comply with them. Safety Precautions
WARNINGS
Securely insert the power plug into the power outlet.
If it is not plugged in securely, overheating will occur, possibly resulting in electric shock or fire.
Before moving this product, detach the power plug and the power cable.
The power cable might be damaged, possibly resulting in electric shock or fire.
Do not plug in the power plug with a wet hand.
Electric shock will result.
When plugging in or unplugging the power plug, hold the plug.
If the power cord is pulled, it might be damaged, possibly resulting in electric shock or fire.
Before cleaning this product, unplug the power plug.
Electric shock sometimes results.
Periodically clean the power plug to remove dust.
If a dirty plug is plugged into an outlet, fire or electric shock might result.
Do not use this product near water.
Electric shock will result. Be careful about the locations of the power cable, etc.
The power cable might trip someone, possibly causing the product to fall, etc., thereby causing injury or product failure. Be careful with their locations. Do not damage, break, process, or forcibly
bend the power cable.
The power cable will be dam-aged, resulting in fire or electric shock.
Use the product at the indicated power supply voltage.
If the product is used at a power sup-ply voltage other than the one indi-cated, it will fail, resulting in fire or electric shock.
4
Safe HandlingStarBoard T-15XL
Always comply with them. Safety Precautions
WARNINGS
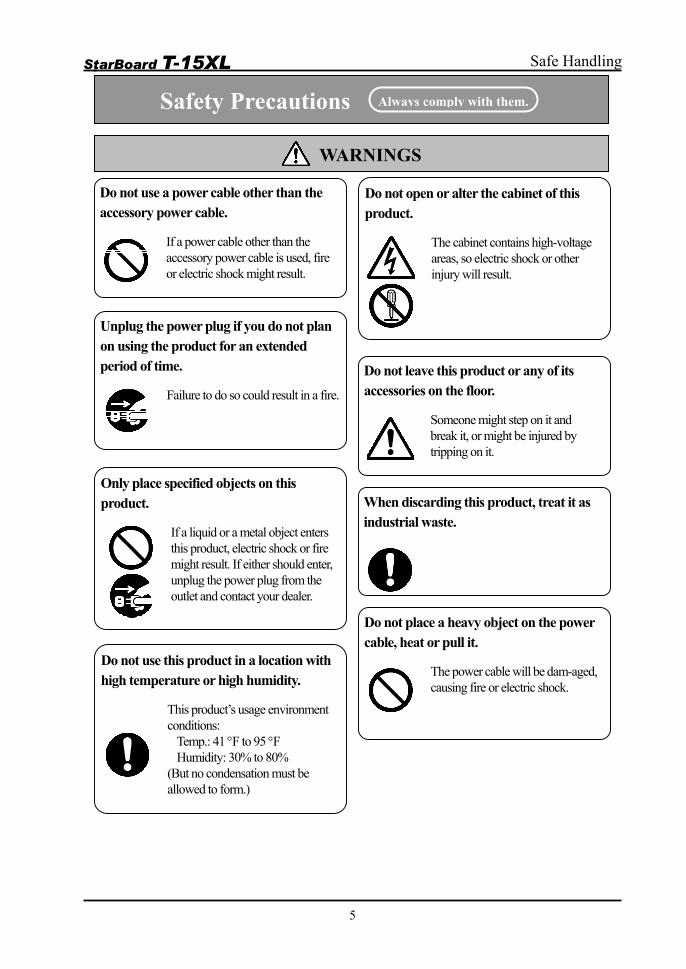
Do not use a power cable other than the accessory power cable.
If a power cable other than the accessory power cable is used, fire or electric shock might result.
Do not open or alter the cabinet of this product.
The cabinet contains high-voltage areas, so electric shock or other injury will result.
Unplug the power plug if you do not plan on using the product for an extended period of time.
Failure to do so could result in a fire.
Do not leave this product or any of its accessories on the floor.
Someone might step on it and break it, or might be injured by tripping on it.
Only place specified objects on this product.
If a liquid or a metal object enters this product, electric shock or fire might result. If either should enter, unplug the power plug from the outlet and contact your dealer.
When discarding this product, treat it as industrial waste.
Do not place a heavy object on the power cable, heat or pull it.
The power cable will be dam-aged, causing fire or electric shock.
Do not use this product in a location with high temperature or high humidity.
This product’s usage environment conditions:
Temp.: 41 °F to 95 °F Humidity: 30% to 80%
(But no condensation must be allowed to form.)
5
Safe HandlingStarBoard T-15XL
Always comply with them. Always comply with them. Safety Precautions
S
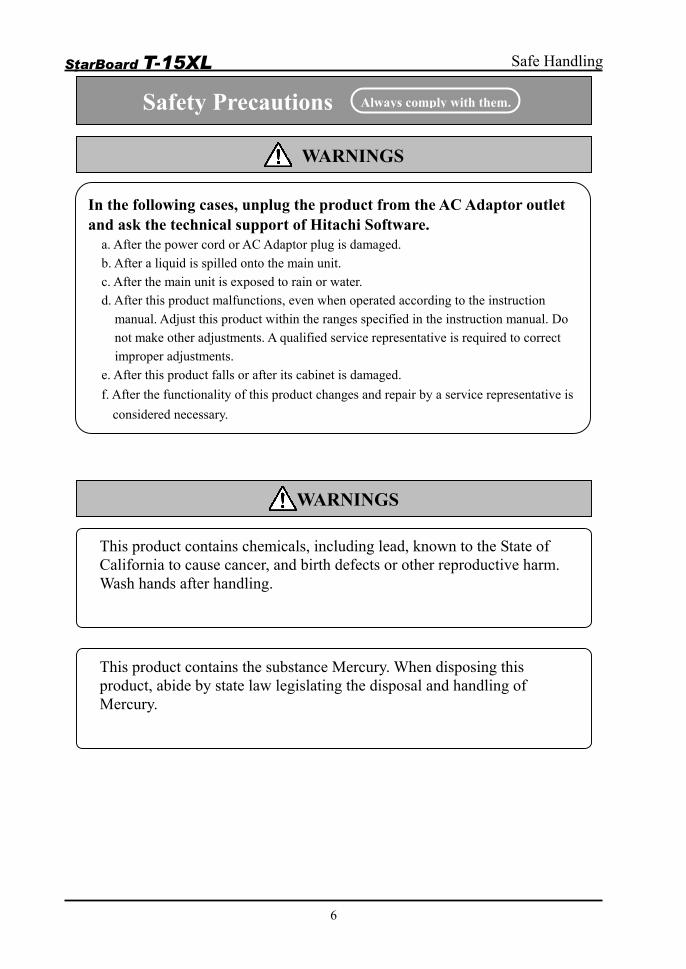
In the following cases, unand ask the technical sup
a. After the power cord or ACb. After a liquid is spilled ontc. After the main unit is expod. After this product malfunc
manual. Adjust this producnot make other adjustmentimproper adjustments.
e. After this product falls or af. After the functionality of th
considered necessary.
This product contains chCalifornia to cause canceWash hands after handlin
This product contains theproduct, abide by state laMercury.
WARNING
plug the product from the AC Adaptor outlet port of Hitachi Software. Adaptor plug is damaged. o the main unit. sed to rain or water. tions, even when operated according to the instruction t within the ranges specified in the instruction manual. Do s. A qualified service representative is required to correct
fter its cabinet is damaged. is product changes and repair by a service representative is
e
w
WARNINGS
micals, including lead, known to the State of r, and birth defects or other reproductive harm. g.
substance Mercury. When disposing this legislating the disposal and handling of
6
Safe HandlingStarBoard T-15XL
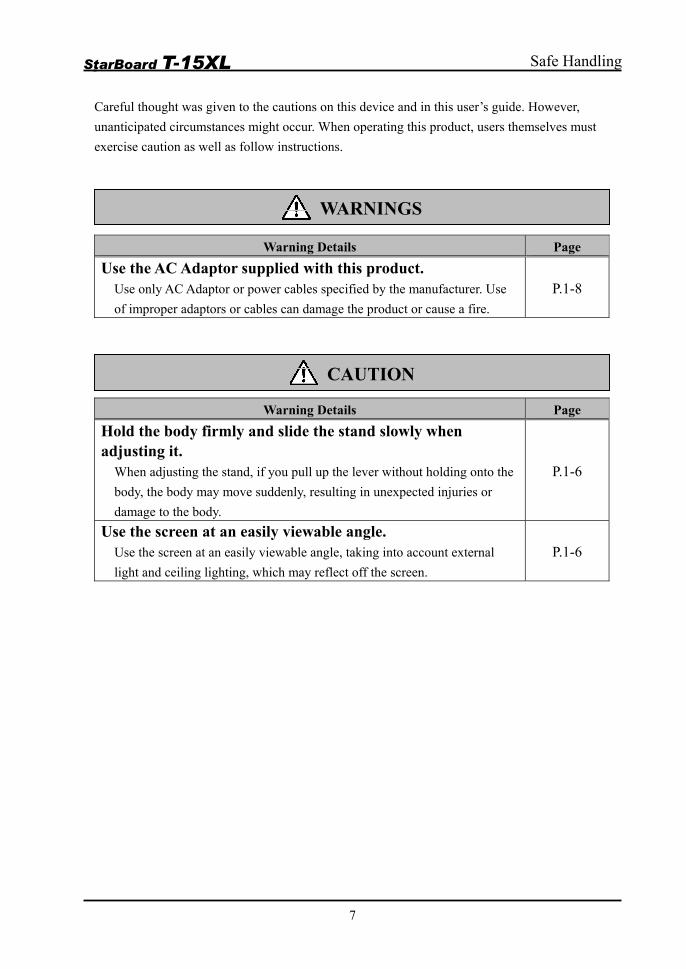
Careful thought was given to the cautions on this device and in this user’s guide. However, unanticipated circumstances might occur. When operating this product, users themselves must exercise caution as well as follow instructions.
WARNINGS
Warning Details Page
Use the AC Adaptor supplied with this product. Use only AC Adaptor or power cables specified by the manufacturer. Use of improper adaptors or cables can damage the product or cause a fire.
P.1-8
Wa
Hold the body firmly and sadjusting it.
When adjusting the stand, if yobody, the body may move sudddamage to the body.
Use the screen at an easily Use the screen at an easily viewlight and ceiling lighting, which
CAUTION
rning Details Page
lide the stand slowly when
u pull up the lever without holding onto the enly, resulting in unexpected injuries or
P.1-6
viewable angle. able angle, taking into account external may reflect off the screen.
P.1-6
7
ContentsStarBoard T-15XL
Contents 1. Introduction................................................................................................. 1-1
1.1 Parts Check ......................................................................................................... 1-1 1.2 Part Names and Functions .................................................................................. 1-2
1.2.1 Front Screen...............................................................................................................1-2 1.2.2 Front Switch Panel.....................................................................................................1-3 1.2.3 Connector Panel.........................................................................................................1-4
1.3 Assembly and Setup............................................................................................ 1-5 1.3.1 Adjusting the Stand....................................................................................................1-5 1.3.2 Attaching the Pen Holder ...........................................................................................1-7 1.3.3 Connection Procedure................................................................................................1-8
2. Usage Procedures ........................................................................................ 2-1 2.1 Turning the StarBoard On................................................................................... 2-1 2.2 Using the Stylus Pen ........................................................................................... 2-2
2.2.1 Basic Stylus Pen Operations ......................................................................................2-2 2.2.2 Stylus Pen Settings.....................................................................................................2-2 2.2.3 Changing the battery in the stylus pen .......................................................................2-3 2.2.4 Replacing the Stylus Pen Tip .....................................................................................2-3
2.3 Using the OSD Menu.......................................................................................... 2-4 2.3.1 OSD Buttons and Their Functions .............................................................................2-4 2.3.2 OSD Adjustment Options ..........................................................................................2-5
3. Appendix ...................................................................................................... 3-1 3.1 System Specifications ......................................................................................... 3-1 3.2 Provisions of Product Warranty .......................................................................... 3-2
8
StarBoard T-15XL Introduction
1. Introduction 1.1 Parts Check
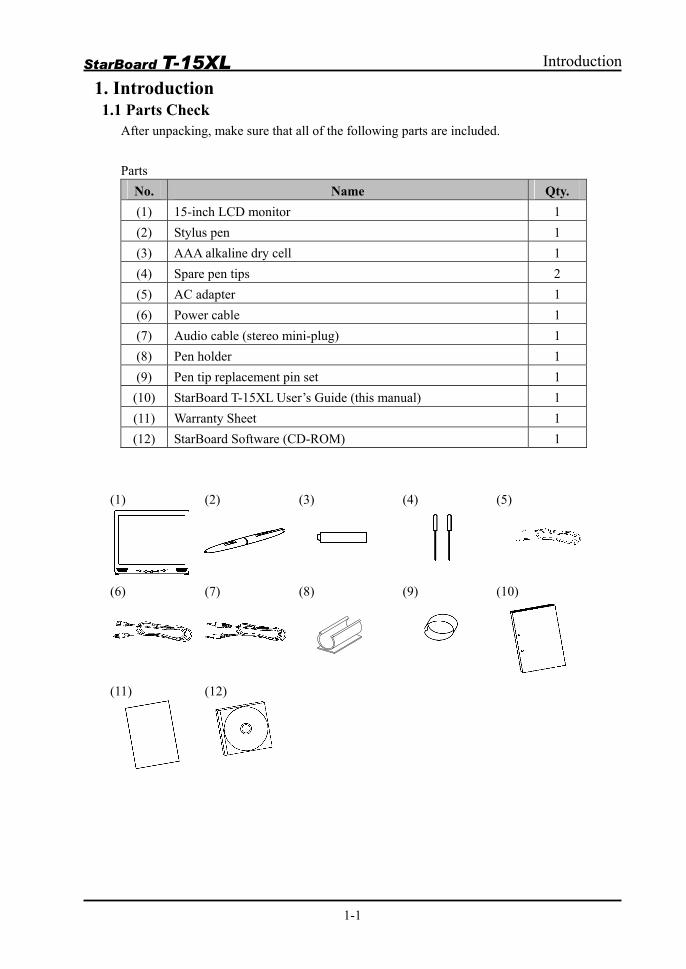
After unpacking, make sure that all of the following parts are included.
Parts No. Name Qty. (1) 15-inch LCD monitor 1 (2) Stylus pen 1 (3) AAA alkaline dry cell 1 (4) Spare pen tips 2 (5) AC adapter 1 (6) Power cable 1 (7) Audio cable (stereo mini-plug) 1 (8) Pen holder 1 (9) Pen tip replacement pin set 1
(10) StarBoard T-15XL User’s Guide (this manual) 1 (11) Warranty Sheet 1 (12) StarBoard Software (CD-ROM) 1
(1)
(2)
(3)
(4)
(5)
(6)
(7)
(8)
(9)
(10)
(11)
(12)
1-1
StarBoard T-15XL Introduction
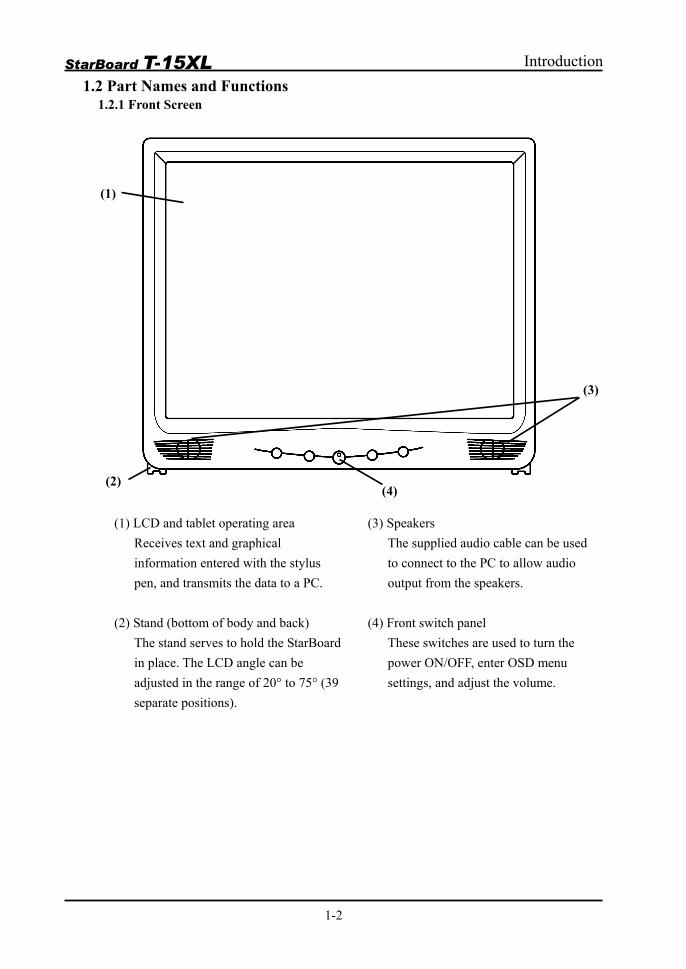
1.2 Part Names and Functions 1.2.1 Front Screen
(1)
(2)
(3)
(4)
(1) LCD and tablet operating area Receives text and graphical information entered with the stylus pen, and transmits the data to a PC.
(2) Stand (bottom of body and back) The stand serves to hold the StarBoard in place. The LCD angle can be adjusted in the range of 20° to 75° (39 separate positions).
(3) Speakers The supplied audio cable can be used to connect to the PC to allow audio output from the speakers.
(4) Front switch panel These switches are used to turn the power ON/OFF, enter OSD menu settings, and adjust the volume.
1-2
StarBoard T-15XL Introduction
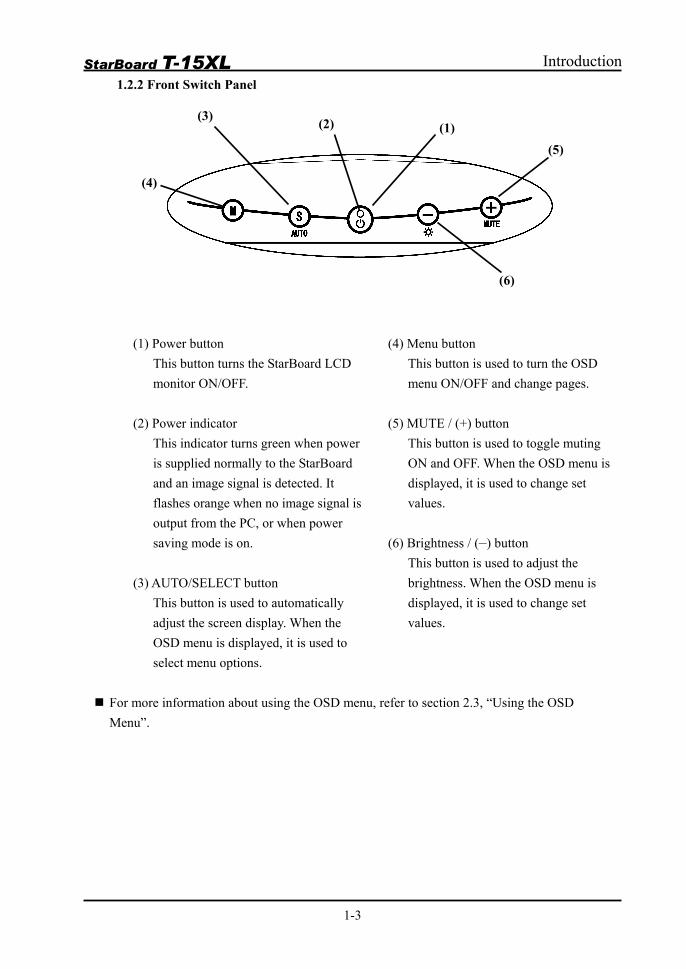
1.2.2 Front Switch Panel
(6)
(5)
(4)
(2) (1)(3)
(1) Power button This button turns the StarBoard LCD monitor ON/OFF.
(2) Power indicator This indicator turns green when power is supplied normally to the StarBoard and an image signal is detected. It flashes orange when no image signal is output from the PC, or when power saving mode is on.
(3) AUTO/SELECT button This button is used to automatically adjust the screen display. When the OSD menu is displayed, it is used to select menu options.
(4) Menu button This button is used to turn the OSD menu ON/OFF and change pages.
(5) MUTE / (+) button This button is used to toggle muting ON and OFF. When the OSD menu is displayed, it is used to change set values.
(6) Brightness / (–) button This button is used to adjust the brightness. When the OSD menu is displayed, it is used to change set values.
For more information about using the OSD menu, refer to section 2.3, “Using the OSD Menu”.
1-3

StarBoard T-15XL Introduction
1.2.3 Connector Panel
(2) (1)
(5)
(4)
(3)
View of StarBoard Back Side
(1) RGB cable This cable connects to the RGB port on the PC.
(2) USB cable This cable connects to a USB port on the PC.
(3) Power Connector The AC adaptor connector is connected to this connector.
(4) Audio input port This port is used to output PC audio from the StarBoard speakers. The included audio cable is connected to this port.
(5) Audio output port This port is used to output the audio signal input to the StarBoard to headphones, external speakers with a built-in amp, etc. (Headphones, speakers with a built-in amp, and the audio cable are not included.)
1-4
StarBoard T-15XL Introduction
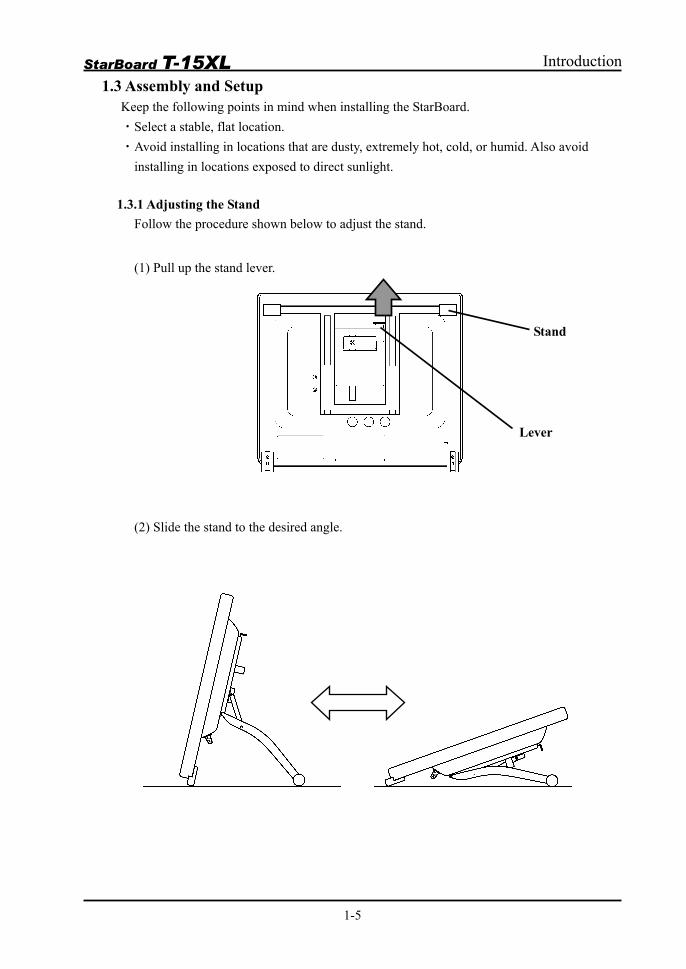
1.3 Assembly and Setup Keep the following points in mind when installing the StarBoard. ・Select a stable, flat location. ・Avoid installing in locations that are dusty, extremely hot, cold, or humid. Also avoid
installing in locations exposed to direct sunlight.
1.3.1 Adjusting the Stand Follow the procedure shown below to adjust the stand.
(1) Pull up the stand lever.
(2) Slide the stand to the desired angle.
Lever
Stand
1-5
StarBoard T-15XL Introduction
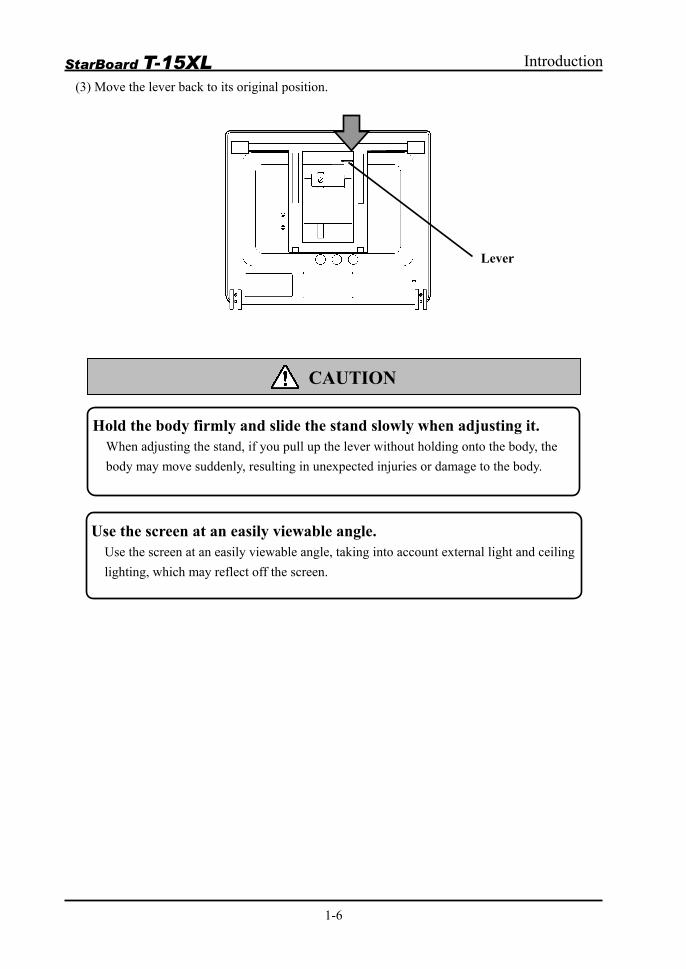
(3) Move the lever back to its original position.
Lever
Hold the body firmly andWhen adjusting the stand, if ybody may move suddenly, res
Use the screen at an easilUse the screen at an easily vielighting, which may reflect of
CAUTION
slide the stand slowly when adjusting it. ou pull up the lever without holding onto the body, the ulting in unexpected injuries or damage to the body.
y viewable angle. wable angle, taking into account external light and ceiling f the screen.
1-6
StarBoard T-15XL Introduction
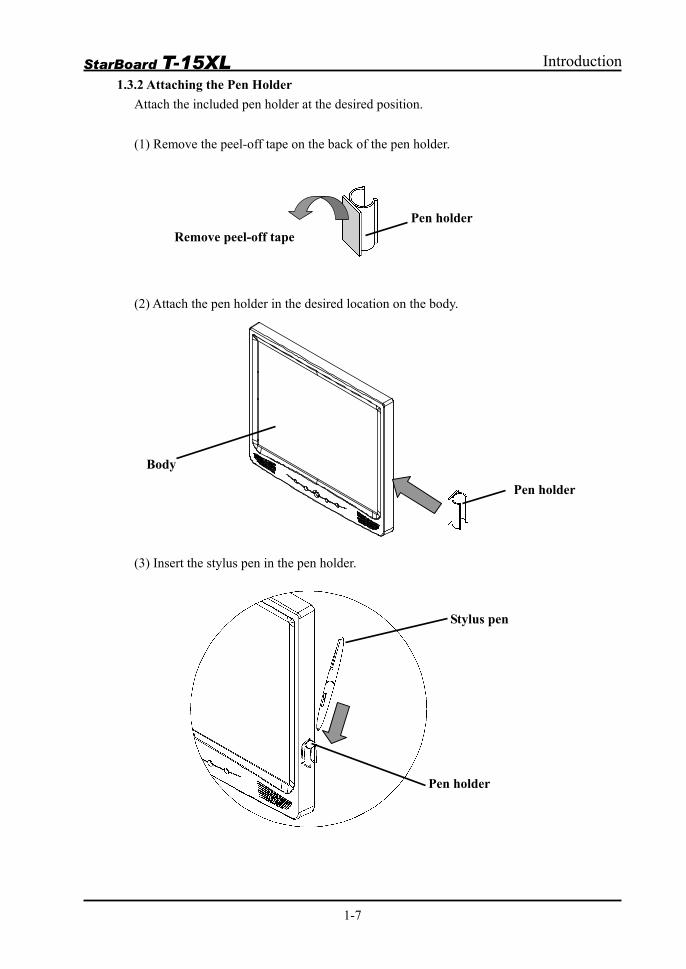
1.3.2 Attaching the Pen Holder Attach the included pen holder at the desired position.
(1) Remove the peel-off tape on the back of the pen holder.
Pen holder e
(2) Atta
Body
(3) Inse
Remove peel-off tap
ch the pen holder in the desired location on the body.
Pen holder
rt the stylus pen in the pen holder.
Pen holder
Stylus pen
1-7
StarBoard T-15XL Introduction
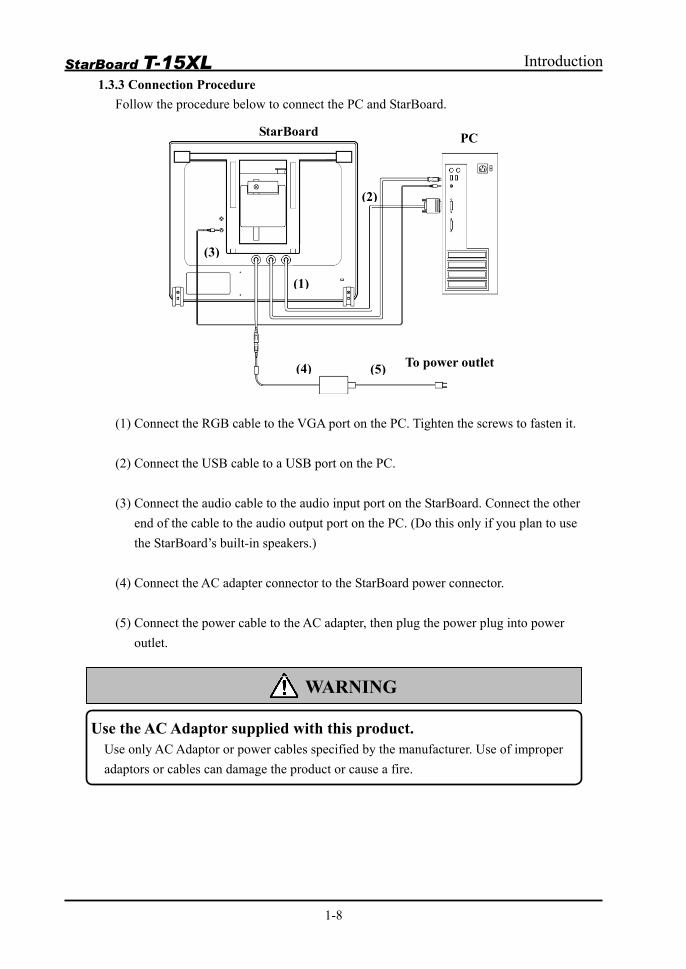
1.3.3 Connection Procedure Follow the procedure below to connect the PC and StarBoard.
To power outlet
StarBoard
(5) (4)
(1)
(3)
(2)
(1) Connect the RGB cable to the VGA port on the PC. Tighten the screws to fasten it. (2) Connect the USB cable to a USB port on the PC. (3) Connect the audio cable to the audio input port on the StarBoard. Connect the other
end of the cable to the audio output port on the PC. (Do this only if you plan to use the StarBoard’s built-in speakers.)
(4) Connect the AC adapter connector to the StarBoard power connector. (5) Connect the power cable to the AC adapter, then plug the power plug into power
outlet.
Use the AC Adaptor suppUse only AC Adaptor or poweadaptors or cables can damage
WARNING
lied with this product. r cables specified by the manufactu the product or cause a fire.
1-8
PC
rer. Use of improper
StarBoard T-15XL Usage
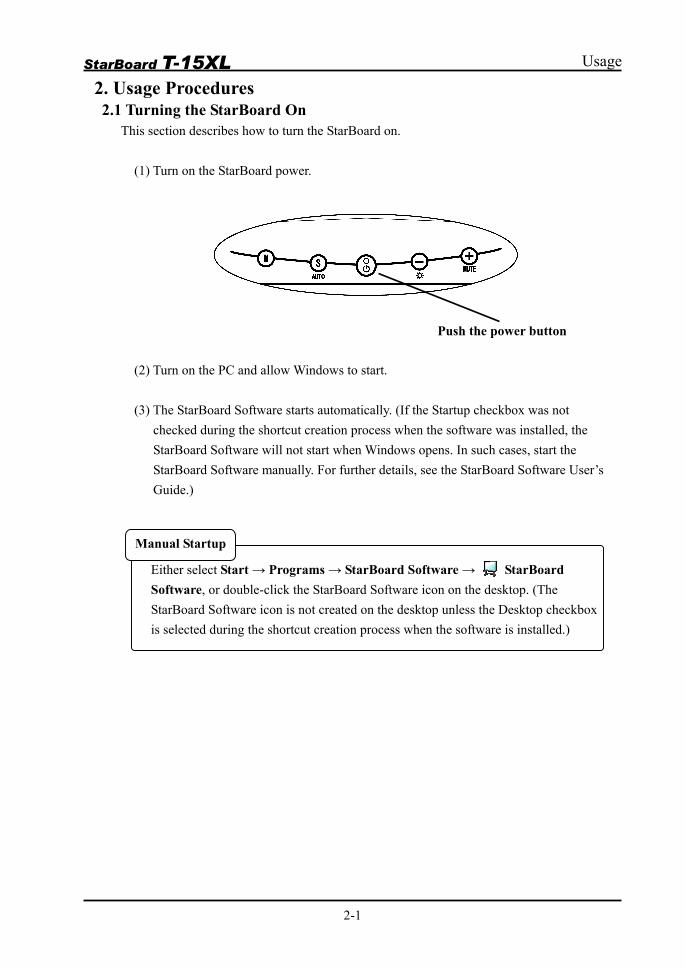
2. Usage Procedures 2.1 Turning the StarBoard On
This section describes how to turn the StarBoard on.
(1) Turn on the StarBoard power.
(2) Turn on the PC and allow Windows to start. (3) The StarBoard Software starts automatically. (If the Startup checkbox was not
checked during the shortcut creation process when the software was installed, the StarBoard Software will not start when Windows opens. In such cases, start the StarBoard Software manually. For further details, see the StarBoard Software User’s Guide.)
Push the power button
Either select Start → Programs → StarBoard Software → StarBoard Software, or double-click the StarBoard Software icon on the desktop. (The StarBoard Software icon is not created on the desktop unless the Desktop checkbox is selected during the shortcut creation process when the software is installed.)
Manual Startup
2-1
StarBoard T-15XL Usage
2.2 Using the Stylus Pen This section describes how to use the StarBoard stylus pen.
2.2.1 Basic Stylus Pen Operations
The stylus pen can be used in the same way as a mouse. Under the stylus pen’s default settings, the pen tip button is set to correspond to the left mouse button. When Windows is open, the pen tip button may be used to perform the following mouse actions.
・Clicking
Press the pen tip against the display with a suitable amount of force and then release it quickly.
・Double-clicking Press the pen tip against the display with a suitable amount of force and then release it, two times in a row.
・Dragging Press the pen tip against the display with a suitable amount of force and then move the pen while keeping it pressed against the display (without releasing it from the display).
The permitted stylus pen input angle range is 30° in any direction from a position where the stylus pen is perpendicular to the display surface. Note that if the pen is tilted at an angle greater than 30°, its coordinates may not be input correctly.
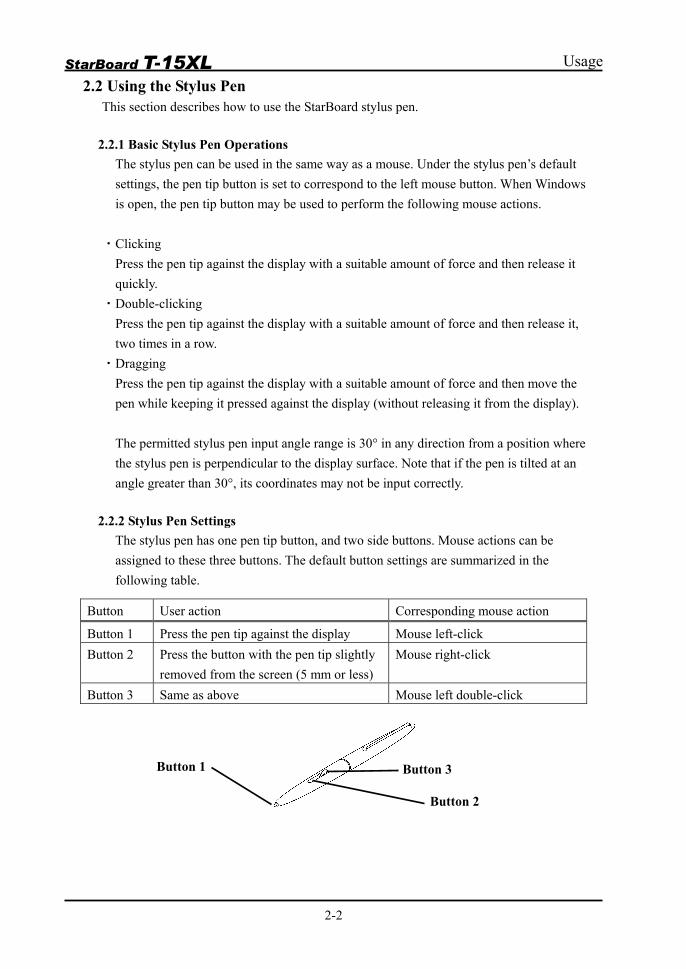
2.2.2 Stylus Pen Settings
The stylus pen has one pen tip button, and two side buttons. Mouse actions can be assigned to these three buttons. The default button settings are summarized in the following table.
Button User action Corresponding mouse action
Button 1 Press the pen tip against the display Mouse left-click Button 2 Press the button with the pen tip slightly
removed from the screen (5 mm or less) Mouse right-click
Button 3 Same as above Mouse left double-click
1
Button
Button 2
Button 3
2-2
StarBoard T-15XL Usage
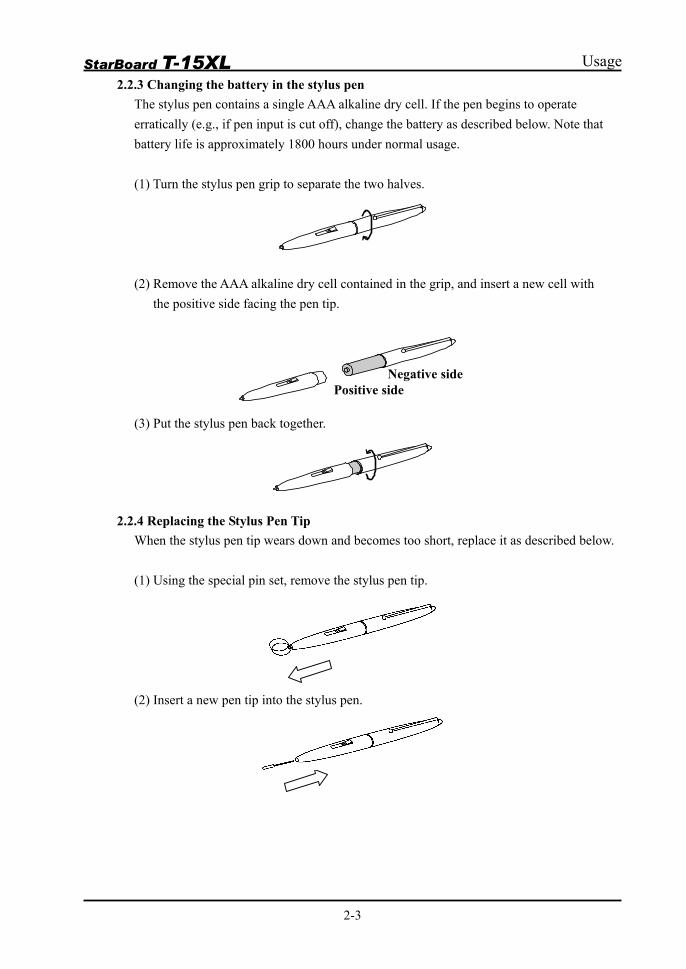
2.2.3 Changing the battery in the stylus pen The stylus pen contains a single AAA alkaline dry cell. If the pen begins to operate erratically (e.g., if pen input is cut off), change the battery as described below. Note that battery life is approximately 1800 hours under normal usage.
(1) Turn the stylus pen grip to separate the two halves.
(2) Remove the AAA alkaline dry cell contained in the grip, and insert a new cell with the positive side facing the pen tip.
Positive sideNegative side
(3) Put the stylus pen back together.
2.2.4 Replacing the Stylus Pen Tip When the stylus pen tip wears down and becomes too short, replace it as described below.
(1) Using the special pin set, remove the stylus pen tip.
(2) Insert a new pen tip into the stylus pen.
2-3
StarBoard T-15XL Usage
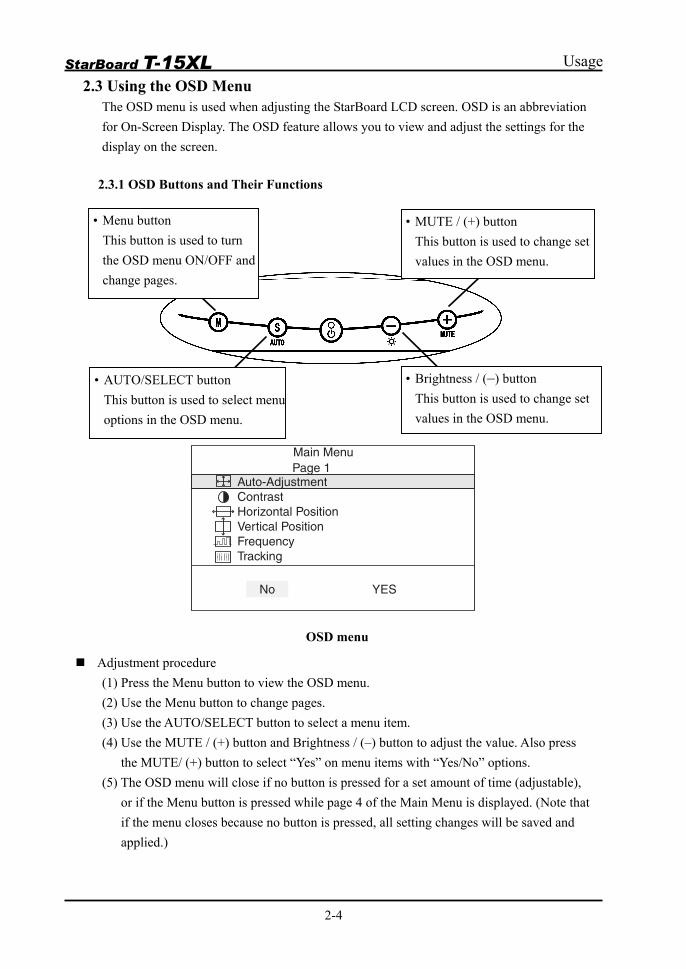
2.3 Using the OSD Menu The OSD menu is used when adjusting the StarBoard LCD screen. OSD is an abbreviation for On-Screen Display. The OSD feature allows you to view and adjust the settings for the display on the screen.
2.3.1 OSD Buttons and Their Functions
• AUTO/SELECT button This button is used to select menu options in the OSD menu.
• Menu button
This button is used to turn the OSD menu ON/OFF and change pages.
• MUTE / (+) button This button is used to change set values in the OSD menu.
• Brightness / (–) button This button is used to change set values in the OSD menu.
Main MenuPage 1
No YES
Auto-AdjustmentContrastHorizontal PositionVertical PositionFrequencyTracking
OSD menu Adjustment procedure
(1) Press the Menu button to view the OSD menu. (2) Use the Menu button to change pages. (3) Use the AUTO/SELECT button to select a menu item. (4) Use the MUTE / (+) button and Brightness / (–) button to adjust the value. Also press
the MUTE/ (+) button to select “Yes” on menu items with “Yes/No” options. (5) The OSD menu will close if no button is pressed for a set amount of time (adjustable),
or if the Menu button is pressed while page 4 of the Main Menu is displayed. (Note that if the menu closes because no button is pressed, all setting changes will be saved and applied.)
2-4

StarBoard T-15XL Usage
2.3.2 OSD Adjustment Options (1) Page 1 Auto-Adjustment: Used to adjust the screen automatically. Contrast: Used to adjust the color contrast. The higher the setting, the brighter the
screen will be. Horizontal Position: Used to adjust the horizontal position of the screen. Vertical Position: Used to adjust the vertical position of the screen. Frequency: Used to adjust the horizontal size of the screen. Tracking: Used to adjust the sampling timing (phase) for converting the analogue
input signal to a digital input signal.
Main MenuPage 1
No YES
Auto-AdjustmentContrastHorizontal PositionVertical PositionFrequencyTracking
(2) Page 2 Display Mode: Used to display the current display resolution, horizontal frequency, and
vertical frequency. OSD Off-Time: Used to set the amount of time, which must elapse before the OSD menu
closes automatically. Language: Used to select the display language. The following languages are available:
English, German, Italian, French, Spanish, and Japanese. Text-Graphic: Used to switch between a display mode designed for displaying text, and a
display mode designed for displaying graphics. Reset: Used to reset the settings to their default values.
2-5
StarBoard T-15XL Usage
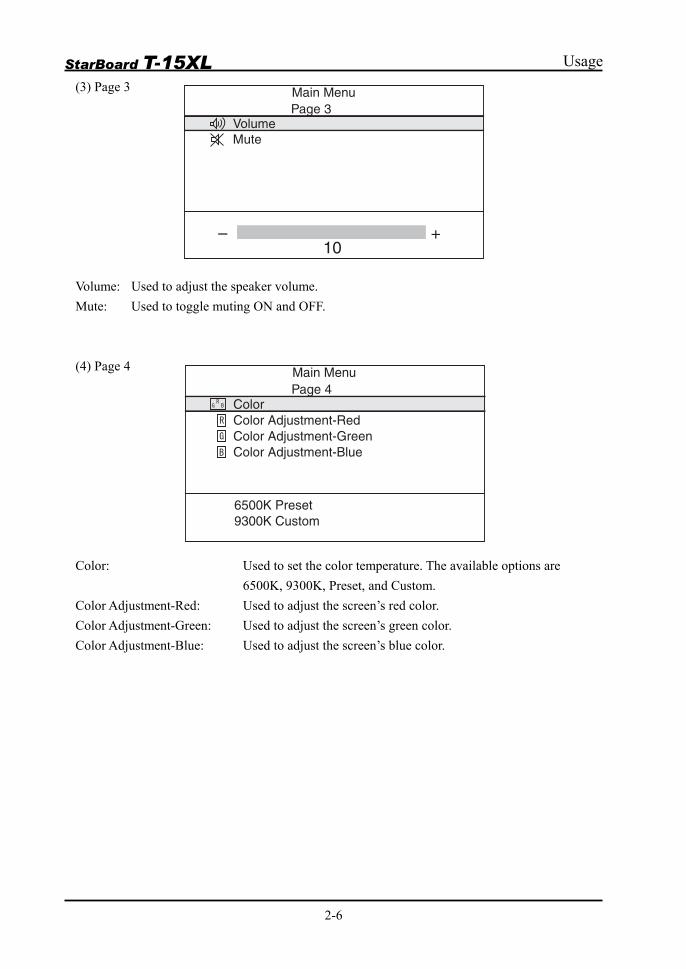
(3) Page 3 Main MenuPage 3
VolumeMute
10– +
Volume: Used to adjust the speaker volume. Mute: Used to toggle muting ON and OFF. (4) Page 4 Main Menu
Page 4ColorColor Adjustment-RedColor Adjustment-GreenColor Adjustment-Blue
6500K Preset9300K Custom
Color: Used to set the color temperature. The available options are
6500K, 9300K, Preset, and Custom. Color Adjustment-Red: Used to adjust the screen’s red color. Color Adjustment-Green: Used to adjust the screen’s green color. Color Adjustment-Blue: Used to adjust the screen’s blue color.
2-6
StarBoard T-15XL Appendix
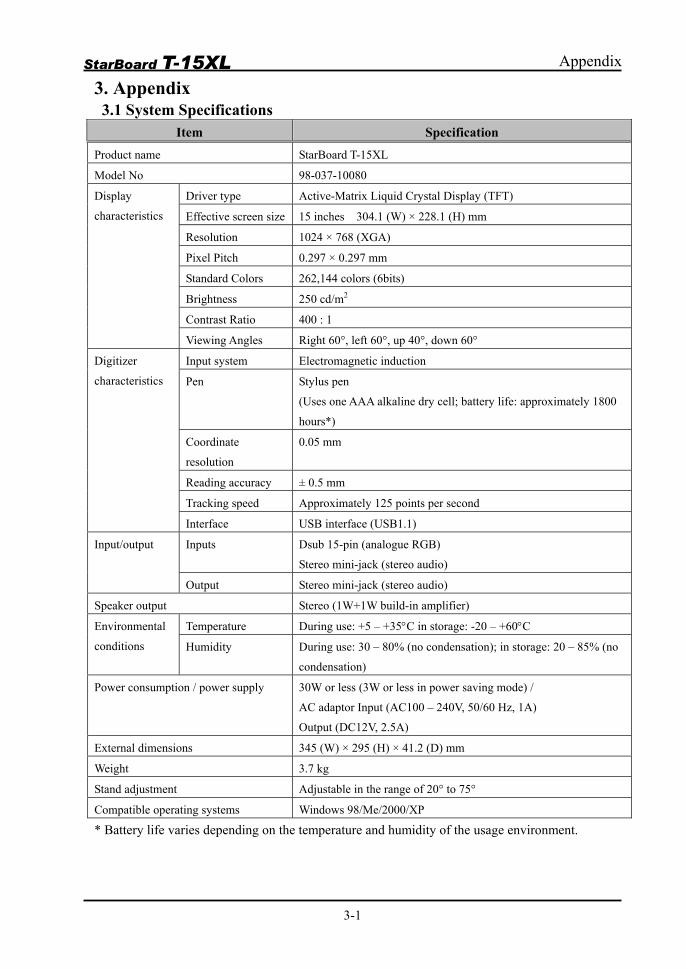
3. Appendix 3.1 System Specifications
Item Specification
Product name StarBoard T-15XL
Model No 98-037-10080
Driver type Active-Matrix Liquid Crystal Display (TFT)
Effective screen size 15 inches 304.1 (W) × 228.1 (H) mm
Resolution 1024 × 768 (XGA)
Pixel Pitch 0.297 × 0.297 mm
Standard Colors 262,144 colors (6bits)
Brightness 250 cd/m2
Contrast Ratio 400 : 1
Display
characteristics
Viewing Angles Right 60°, left 60°, up 40°, down 60°
Input system Electromagnetic induction
Pen Stylus pen
(Uses one AAA alkaline dry cell; battery life: approximately 1800
hours*)
Coordinate
resolution 0.05 mm
Reading accuracy ± 0.5 mm
Tracking speed Approximately 125 points per second
Digitizer
characteristics
Interface USB interface (USB1.1)
Inputs Dsub 15-pin (analogue RGB)
Stereo mini-jack (stereo audio)
Input/output
Output Stereo mini-jack (stereo audio)
Speaker output Stereo (1W+1W build-in amplifier)
Temperature During use: +5 – +35°C in storage: -20 – +60°C Environmental
conditions Humidity During use: 30 – 80% (no condensation); in storage: 20 – 85% (no
condensation)
Power consumption / power supply 30W or less (3W or less in power saving mode) /
AC adaptor Input (AC100 – 240V, 50/60 Hz, 1A)
Output (DC12V, 2.5A)
External dimensions 345 (W) × 295 (H) × 41.2 (D) mm
Weight 3.7 kg
Stand adjustment Adjustable in the range of 20° to 75°
Compatible operating systems Windows 98/Me/2000/XP
* Battery life varies depending on the temperature and humidity of the usage environment.
3-1
StarBoard T-15XL Appendix
3.2 Provisions of Product Warranty 1. During the free warranty service period, if a malfunction occurs during normal use, the
malfunction will be corrected without charge, according to the provisions of the warranty. Furthermore, if the customer registration card accompanying the warranty is not returned to our company, the customer information will not be registered, so free repairs might be unavailable. After receiving this product, please immediately fill out and return this customer registration card.
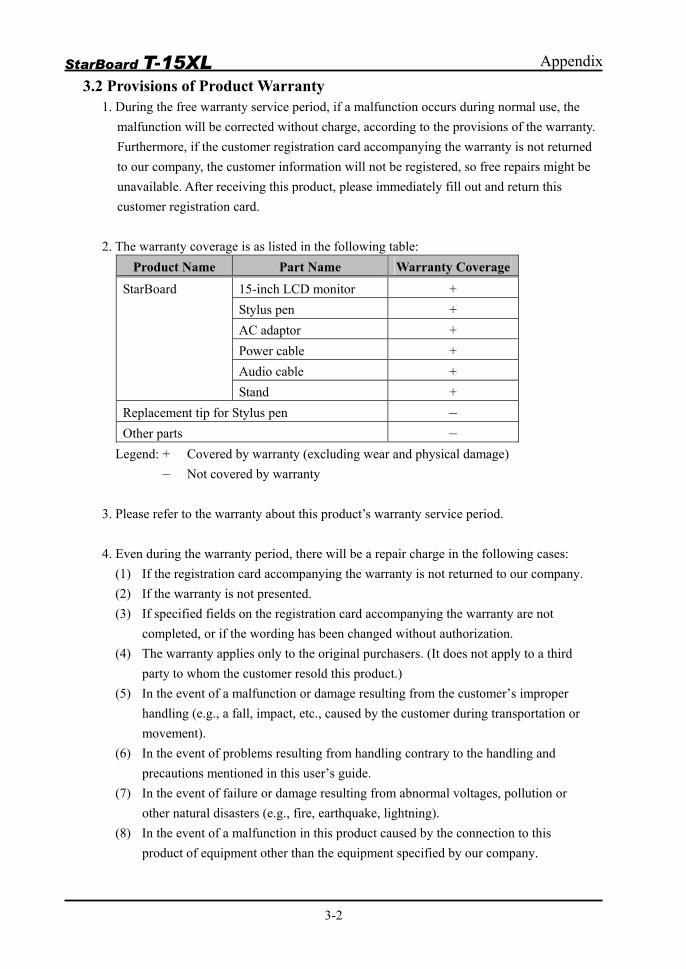
2. The warranty coverage is as listed in the following table:
Legend: + Covered by warranty (excluding wear and physical damage)
Product Name Part Name Warranty Coverage
15-inch LCD monitor + Stylus pen + AC adaptor + Power cable + Audio cable +
StarBoard
Stand + Replacement tip for Stylus pen – Other parts –
– Not covered by warranty 3. Please refer to the warranty about this product’s warranty service period.
4. Even during the warranty period, there will be a repair charge in the following cases:
(1) If the registration card accompanying the warranty is not returned to our company. (2) If the warranty is not presented. (3) If specified fields on the registration card accompanying the warranty are not
completed, or if the wording has been changed without authorization. (4) The warranty applies only to the original purchasers. (It does not apply to a third
party to whom the customer resold this product.) (5) In the event of a malfunction or damage resulting from the customer’s improper
handling (e.g., a fall, impact, etc., caused by the customer during transportation or movement).
(6) In the event of problems resulting from handling contrary to the handling and precautions mentioned in this user’s guide.
(7) In the event of failure or damage resulting from abnormal voltages, pollution or other natural disasters (e.g., fire, earthquake, lightning).
(8) In the event of a malfunction in this product caused by the connection to this product of equipment other than the equipment specified by our company.
3-2
StarBoard T-15XL Appendix
(9) In the event that there is no abnormality in this product, but a defect in a part other than this product was detected or remedied.
(10) In the event of ordinary wear and tear, wear, deterioration, etc., of consumables, even during normal use.
5. If this product malfunctions, review the contents of this user’s guide. If the problems
remain irreparable, contact technical support. Technical support will determine whether or not the product must be repaired, so please contact them. If the customer sends the product to our company without RMA (Return Merchandise Authorization) number, it might not be covered by warranty.
6. As a rule, the customer is responsible for shipping charges required to send all or part of
the product for repair, etc. Our company will assume responsibility for the return shipping to the customer.
7. This warranty does not cover labor fees for repair-associated equipment assembly or
disassembly. 8. Incidental damage caused by the failure of this product (e.g., loss of profit that should
have resulted from the use of this product) is outside the scope of this warranty. 9. The aforementioned provisions define this warranty, and they supersede those of all
express or implied warranties that include legal defect liability.
3-3