Standard ERP - Amazon Web Services · • Make sure that all your telephony queues are being...
34
December 2014 Version 8.0, Windows Standard ERP Communicator
Transcript of Standard ERP - Amazon Web Services · • Make sure that all your telephony queues are being...

December 2014Version 8.0, Windows
Standard ERPCommunicator

Table of ContentsINTRODUCTION TO COMMUNICATOR ...............................................................................2OVERVIEW...............................................................................................................................3SETTINGS................................................................................................................................6
Skype...............................................................................................................................................6Asterisk............................................................................................................................................8
GETTING IN TOUCH WITH YOUR CONTACTS ...................................................................11Making a voice call........................................................................................................................11Receiving a voice call....................................................................................................................11Sending an SMS............................................................................................................................12Communications within the company...........................................................................................12
Sending E-mails.......................................................................................................................................................... 13
KNOW TO WHOM YOU ARE TALKING: CUSTOMER STATUS AND MAPS........................14CREATING A CONTACT HISTORY.......................................................................................15HANDLING YOUR TELEPHONY LINES: QUEUE STATUS..................................................16CONFIGURING AN ASTERISK SERVER..............................................................................18
PBX Connection.............................................................................................................................18Dialing Settings..............................................................................................................................20Rules..............................................................................................................................................21Remote Administration..................................................................................................................22Asterisk..........................................................................................................................................23Sending configuration to the server..............................................................................................23Asterisk users.................................................................................................................................24Contact records.............................................................................................................................26SIP Trunks......................................................................................................................................26Queues and Menus.......................................................................................................................28
QUESTIONS: USERS............................................................................................................31QUESTIONS: ADMINISTRATORS.........................................................................................31EXERCISE – ADMINISTRATORS:.........................................................................................31EXERCISE – USERS:.............................................................................................................31
Technical glossary.........................................................................................................................32APPENDIX .............................................................................................................................33
Terminology between different versions of English language......................................................33
Standard ERP - Communicator page 1/33

INTRODUCTION TO COMMUNICATOR
Communicator is a simple yet powerful tool designed to accomplish two tasks: 1) making immediately available any information you might need concerning your customers while you are talking to them, and 2) acting as a centralized communication platform. Whether relations with your customers are handled via telephone, e-mail or chat, Communicator allows you to consult previous conversations, possible outstanding invoices or orders as well as potential leads to follow up with that specific customer.
From Communicator, you are able to contact any customer through every possible channel, and always have their information at your fingertips. This tool also handles internal communications; you will for example be able to start a quick chat with a colleague while talking to a customer on the phone, or put the customer on hold in order to make a call to consult with the relevant department. Should it be needed, you may also merge phone calls into a conference call.
After going through this guide, you will be able to
• Use Communicator to reach any of your contacts through any channel available (telephone, VoIP systems, Skype, e-mail, chat or SMS).
• Run reports on the state of any given customer at any moment during a conversation.
• Track the communications record between your company and any customer.
• Use advanced telephony features like conferencing, transferring or putting calls on hold.
• Use different channels of communication simultaneously to reach the information you need at any moment.
• Make sure that all your telephony queues are being staffed properly, e.g. help descs etc.
Communicator is a tool which is integrated in Standard ERP by HansaWorld. Any information your company has entered regarding its customers is always available to you through this tool. At the same time, you may add new data or modify existing information from Communicator.
Standard ERP - Communicator page 2/33
OVERVIEW
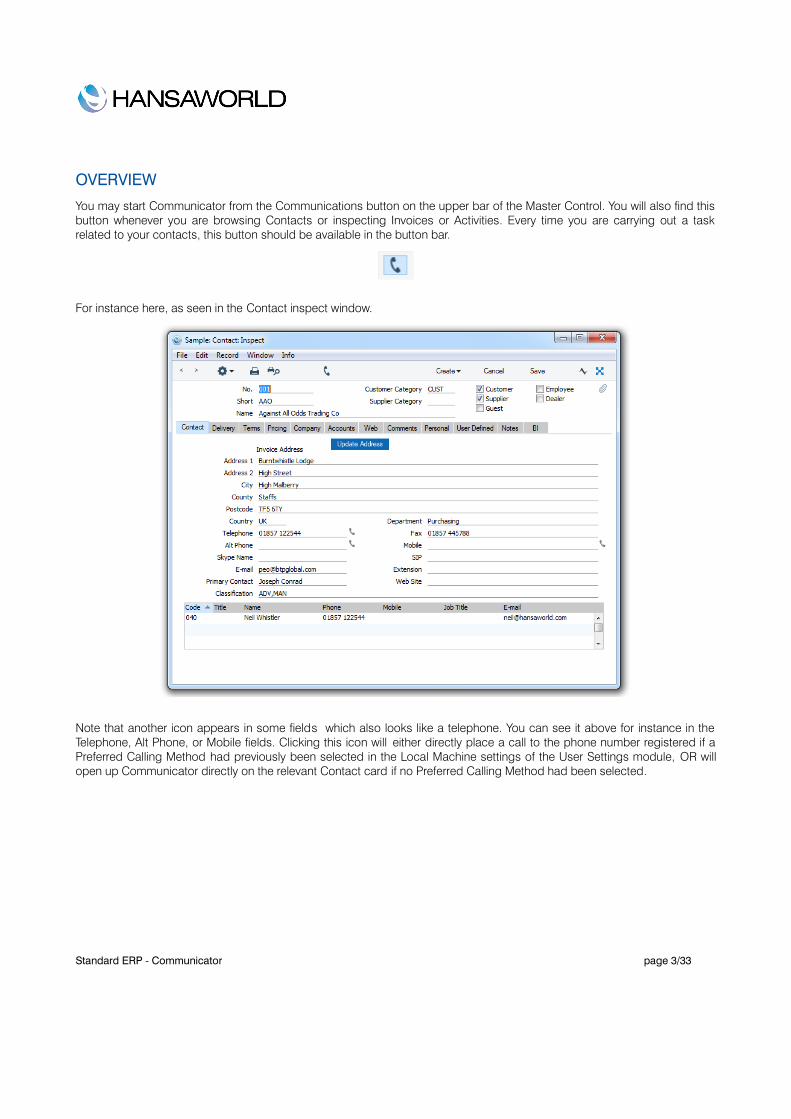
You may start Communicator from the Communications button on the upper bar of the Master Control. You will also find this button whenever you are browsing Contacts or inspecting Invoices or Activities. Every time you are carrying out a task related to your contacts, this button should be available in the button bar.
For instance here, as seen in the Contact inspect window.
Note that another icon appears in some fields which also looks like a telephone. You can see it above for instance in the Telephone, Alt Phone, or Mobile fields. Clicking this icon will either directly place a call to the phone number registered if a Preferred Calling Method had previously been selected in the Local Machine settings of the User Settings module, OR will open up Communicator directly on the relevant Contact card if no Preferred Calling Method had been selected.
Standard ERP - Communicator page 3/33

On top of the Communicator window, there is a button bar giving you access to the following functions:
New: Click on this button to access the Contacts register and enter a new contact. The new contact will be stored within the company's contact list.
Company / Personal: Use this button to switch between the company's contacts and those you have entered for yourself to have a quicker access to either of them. The ones entered by yourself are the ones that have your user initials in the Salesperson field of the Contact Card.
Who Is Online: This button opens a window displaying a list of your company contacts currently online. From this new window, you may click on the name of any of your colleagues to access different ways of reaching them. One click more will connect you with them through the facility of your choice (e.g. E-mail or Skype).
Customer Status: Upon selecting a contact from the contact list and clicking this button, a report on the last activities your company has carried out with this customer will be listed. Information will be gathered from other modules, and for instance can include paid or outstanding Invoices.
Queue Status: This button will allow you to access the Asterisk Queue Status report. From this report, you are able to see the availability of the agents serving the different queues you have configured from the Telephony module. In this way, you can easily make sure that at least one agent is connected to each queue, and that your telephone lines are properly taken care of. This report is further explained later in this document.
Standard ERP - Communicator page 4/33
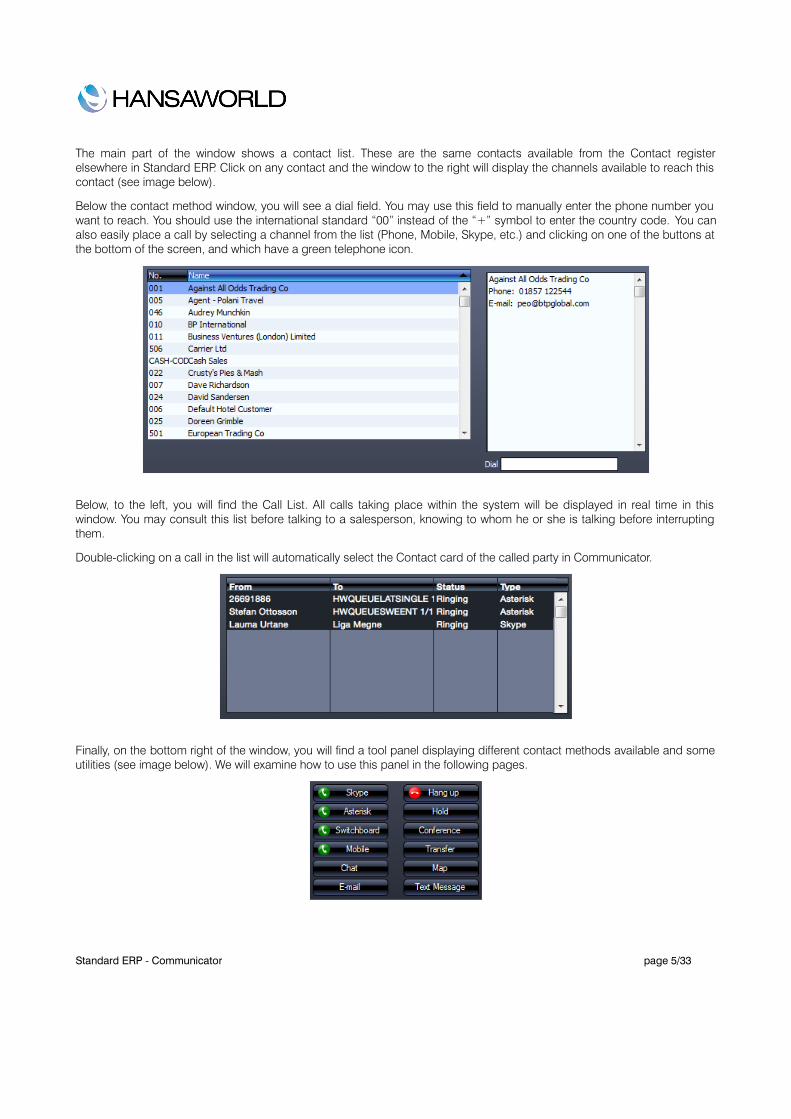
The main part of the window shows a contact list. These are the same contacts available from the Contact register elsewhere in Standard ERP. Click on any contact and the window to the right will display the channels available to reach this contact (see image below).
Below the contact method window, you will see a dial field. You may use this field to manually enter the phone number you want to reach. You should use the international standard “00” instead of the “+” symbol to enter the country code. You can also easily place a call by selecting a channel from the list (Phone, Mobile, Skype, etc.) and clicking on one of the buttons at the bottom of the screen, and which have a green telephone icon.
Below, to the left, you will find the Call List. All calls taking place within the system will be displayed in real time in this window. You may consult this list before talking to a salesperson, knowing to whom he or she is talking before interrupting them.
Double-clicking on a call in the list will automatically select the Contact card of the called party in Communicator.
Finally, on the bottom right of the window, you will find a tool panel displaying different contact methods available and some utilities (see image below). We will examine how to use this panel in the following pages.
Standard ERP - Communicator page 5/33

SETTINGSThis section will explain the necessary settings to get Communicator working with Skype and Asterisk (SIP).
Skype
The first time you start Standard ERP on a client machine, if Skype is running, after a minute or so, you will see Standard ERP asking for the authorization to connect to Skype using its API. Accept and your Skype client will now be connected to Standard ERP and allow you to handle your communications from within Standard ERP using Skype.
In the case where you answered “Deny access” by accident, open Skype, Tools menu, Options, Advanced settings, Manage other programs' access to Skype.
Select the HansaWorld program entry and click Change. You can then answer again. In the case where you have several HansaWorld entries, select and click Remove for each one of them in turn. Restart Skype and Standard ERP and you will be
Standard ERP - Communicator page 6/33

asked again whether you want to integrate with Skype or not.
If you do not get asked about Skype integration at start up, navigate in Standard ERP to the User Settings Module and open the Local Machine setting, under the Integrations tab. If the Connect to Skype option is set to No, change it to Not decided yet. If it is set to Yes, then you should verify in Skype itself that Standard ERP is allowed to use the API (see above).
If Skype is your preferred way of reaching your Contacts, you may select Skype as the Prefe rred Calling Method in the same window.
Finally, you should make sure that your contact card is filled in with your Skype address as can be seen below. You can do this from the Communicator window by searching for your contact card. If it is not, double-click on your name in the contact list and your Contact card will open, ready to be edited.
Standard ERP - Communicator page 7/33

Asterisk
In order to use your Asterisk server in conjunction with Standard ERP, your system administrator need to administer the proper setup in the Telephony module. This is covered later in this document.
From a user's point of view, the integration with Asterisk is done in the following way:
First, you should ask your IT department for your SIP account details. Normally, a username, password, and server address (or server name) should be enough. There can be small variations depending on the exact setup in your company (you might for instance be given a domain name as well, or a caller ID, for instance).
Secondly, you should verify that your user has a contact card and that its SIP extension is filled in correctly.
From the Communicator window, search for your name, click on it, and verify that there is an entry for SIP, like in the below example. If it is not the case, ask your IT department or system administrator for the exact value to enter in the SIP field on your contact card. It should normally be your_username@server_name. You can access your contact card by double-clicking on your name in the Communicator's contact list.
You should then setup your SIP client to connect to your Asterisk (SIP) server. Examples of SIP clients are Zoiper, Eye-Beam, X-Lite, and Telephone. SIP clients can run on physical phones, mobile phones, or computers. Ask your IT department for the recommended SIP client for your company and how to configure it using the information given in the first step.
Standard ERP - Communicator page 8/33

If Asterisk is your preferred way to get in touch with your Contacts, you should set it up in the User Settings module, under the Integrations tab of the Local Machine setting:
Standard ERP - Communicator page 9/33

If your company is using a system of Queues and Menus to answer incoming calls from your customers, partners, and suppliers, there are a number of short numbers for you to get acquainted with. These numbers will be used to log in to a queue (as in, become available to answer calls coming into that queue) and log out of a queue.
Whenever you are assigned to a queue by your manager, ask for the Queue ID as defined in the system (more on this later in this document in the section Configuring an Asterisk Server). To log in to that queue at the beginning of your shift, dial *country code*X1* where X is the Queue ID. To log out of that same queue at the end of your shift, dial *country code*X0* on your SIP client. Finally, to log out of all queues, dial *country code*00*.
After dialing these numbers, you should hear a voice message confirming that you are indeed in the queue or have indeed left the queue. You may also verify this using the “Queue Status” button of the Communicator window. Read more on this later in this document in the section named Handling Your Telephony lines: Queue Status.
Standard ERP - Communicator page 10/33

GETTING IN TOUCH WITH YOUR CONTACTS To establish communication with one of your contacts, select their name from the contact list, choose a method of communication in the right window (do not forget this step) and click on a method of communication in the button panel below. You may also just double click the contact information to start the call using your defined Preferred Calling Method.
Making a voice call
Skype, TAPI Switchboard, SIP or your company's own private branch exchange (PBX, Asterisk) are the voice call options supported by Communicator. To learn more about SIP and PBX integration with Communicator, you should consult with your company's technical support department.
During a Skype or telephone conversation, you may choose to put the call on hold by clicking on the Hold button. Clicking it again will open the line again for conversation.
If you want to transfer the call, select from the Contact List the person to whom you want to transfer the call. Then select the channel through which you want to make the transfer, (Skype, SIP or Asterisk) and click the Transfer button. You may not transfer a Skype call which you have initiated.
To create a conference call with different contacts, start a call with one of them. Put the contact on hold and start a new call with another contact you wish to include in the conference call. Repeat this process with every person you want to include in the conference call. Once you are talking to the last person to be included in the call, click on the Conference button, and all calls on hold will join the ongoing conversation. You need to have at least one call in progress to open a conference call.
To hang up, simply click on the Hang up button.
The Mobile button is intended to be used with a Symbian mobile client for Standard ERP. Pushing it will start a phone call from the same phone you are using to connect to Standard ERP.
Note that, the fact that the above features (putting on hold or transferring calls for instance) are present from Communicator does not prevent you from using similar functions from within Skype or your SIP client for, instance.
Receiving a voice call
Every time you receive a call, Communicator will display the caller ID on the Call List window allowing you to consider how to proceed with the call. Anyone connected to the Standard ERP system can see who is talking to whom in real time.
To answer a call from Skype, simply click on the Skype button. You can only answer an incoming call through Asterisk using your soft client (e.g. eyeBeam, X-Lite) or hard phone. Pushing the Asterisk button will not answer the call. It is important to note that there is an essential difference between Skype, SIP/Asterisk, and TAPI integrations. Whereas Skype Integration connects to the local Skype client running on your machine, the other type of integrations connect directly to a remote telephony server. This explains in part the different behaviors depending on the telephony method chosen.
Standard ERP - Communicator page 11/33

Sending an SMS
If you want to send an SMS to a contact’s mobile phone, all you need to do is to select the contact's mobile number and click the Text SMS button. A Text SMS window will open where you can insert your message. The recipient of the message will receive it as if it had sent from your mobile number by default. This is only for informational purposes and you will not be billed for this. You may change this by inserting an alternative number in the Text SMS window.
HansaWorld offers text messaging as a Cloud Service. Please ask your local office if your company is interested in subscribing to this service.
Communications within the company
After checking which of your co-workers are online through the Who Is Online button, you may click on their name to bring up a chat window shared with that Contact.
The chat button bar allows you, from left to right, to add more co-workers to the chat, find out how who is currently in this chat, try to catch their attention by making noise in their computers, saving the chat log and browse the conversation line by line.
Standard ERP - Communicator page 12/33
Sending E-mails
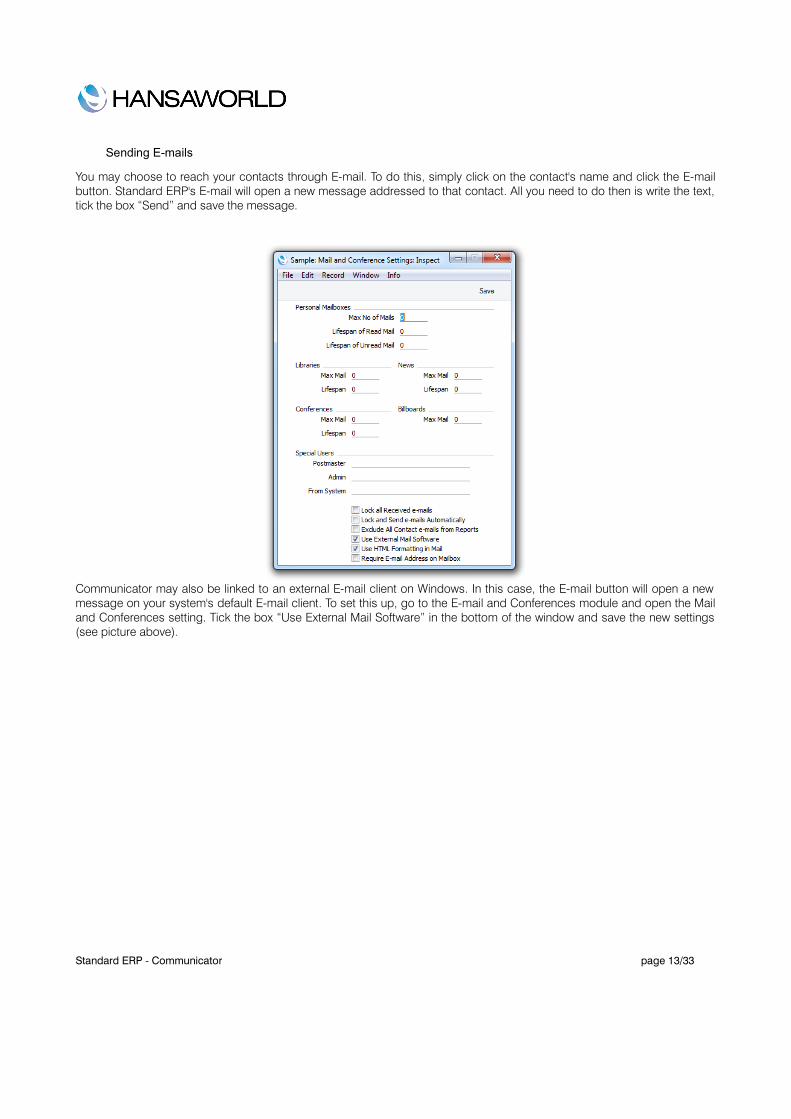
You may choose to reach your contacts through E-mail. To do this, simply click on the contact's name and click the E-mail button. Standard ERP's E-mail will open a new message addressed to that contact. All you need to do then is write the text, tick the box “Send” and save the message.
Communicator may also be linked to an external E-mail client on Windows. In this case, the E-mail button will open a new message on your system's default E-mail client. To set this up, go to the E-mail and Conferences module and open the Mail and Conferences setting. Tick the box “Use External Mail Software” in the bottom of the window and save the new settings (see picture above).
Standard ERP - Communicator page 13/33
KNOW TO WHOM YOU ARE TALKING: CUSTOMER STATUS AND MAPS
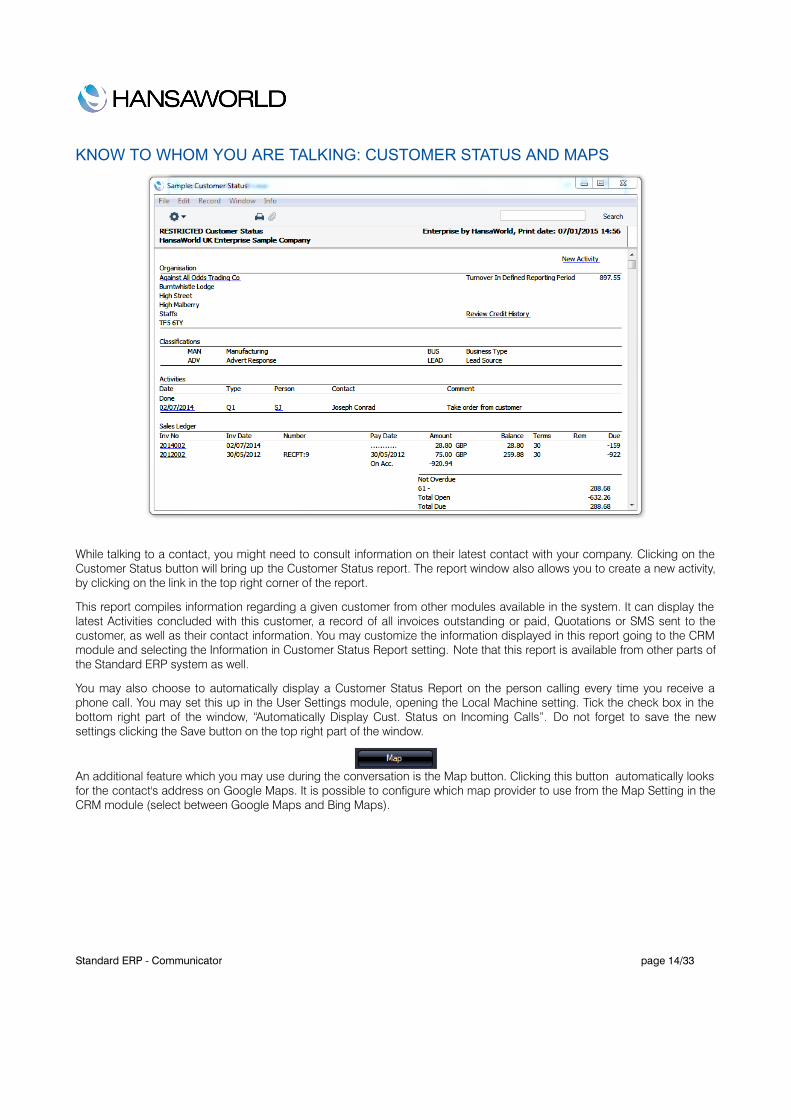
While talking to a contact, you might need to consult information on their latest contact with your company. Clicking on the Customer Status button will bring up the Customer Status report. The report window also allows you to create a new activity, by clicking on the link in the top right corner of the report.
This report compiles information regarding a given customer from other modules available in the system. It can display the latest Activities concluded with this customer, a record of all invoices outstanding or paid, Quotations or SMS sent to the customer, as well as their contact information. You may customize the information displayed in this report going to the CRM module and selecting the Information in Customer Status Report setting. Note that this report is available from other parts of the Standard ERP system as well.
You may also choose to automatically display a Customer Status Report on the person calling every time you receive a phone call. You may set this up in the User Settings module, opening the Local Machine setting. Tick the check box in the bottom right part of the window, “Automatically Display Cust. Status on Incoming Calls”. Do not forget to save the new settings clicking the Save button on the top right part of the window.
An additional feature which you may use during the conversation is the Map button. Clicking this button automatically looks for the contact's address on Google Maps. It is possible to configure which map provider to use from the Map Setting in the CRM module (select between Google Maps and Bing Maps).
Standard ERP - Communicator page 14/33

CREATING A CONTACT HISTORY
At the start of every outgoing or incoming phone call, Communicator automatically creates a new activity in the Task Manager. During or after the call, you may start filling it with any relevant information you want to record about the conversation. Phone call activities will display a phone icon on the left column of the Task Manager.
What activity type will be used when creating a new activity will depend on what was configured in the Settings Activity Types, Subsystems of the CRM module and on the call method used (e.g. Skype, Asterisk). It is also possible for the system to create new activities to record missed calls.
Standard ERP - Communicator page 15/33

HANDLING YOUR TELEPHONY LINES: QUEUE STATUS
From Communicator, it is possible to open the Asterisk Queue Status report specification window. To do this, click on the Queue Status button in Communicator next to the Customer Status button. This report is also accessible from the Telephony module.
This report will show you, for a given PBX Connection, the different telephony queues and the agents available to answer the calls coming into these queues. PBX stands for Private Branch Exchange; and a PBX Connection represents the connection of Standard ERP to a VoIP server (e.g. Asterisk).
Standard ERP – Communicator 16/33

The report presents, for each queue, the different agents logged into the queue and their status. The different statuses are:
Available: The agent is logged in and ready to take a new call
Ringing: The agent's phone or soft client is currently ringing from an incoming call
Disconnected: The agent is logged in the queue but has lost connectivity with the server. This could indicate a network issue or simply that the agent has turned off their soft client or disconnected their phone.
Busy: The agent is logged in the queue and currently on a call
Note that the report does not show the users or agents connected to the server but only those logged in to a queue. It is possible that an agent logged in to a queue and disconnected from the server. In this case, the agent will appear as disconnected.
Note also that there might very well be agents connected to the server but logged in to no queue.
It is also important to remember that due to the fallback mechanism in place in Standard ERP's telephony system, an agent logged in to the server but not logged in to a queue might very well receive a call if no one is available to answer calls in a queue. Agents should therefore use this report to determine whether they are logged in to a queue or not, and NOT rely on the fact that they are receiving calls from that queue.
In general, whenever receiving calls for a queue in which an agent does not believe he or she is logged in, the agent should endeavor to find who is scheduled to be answering that queue at that time.
If only the name of a queue is displayed but no agent is listed below, then no agent is currently logged in to the queue. See example below.
Finally, it is very important to realize that the report does not show the number of calls, ongoing or ringing, for a given queue.
Running the report in Detailed view will give you, in addition to the above information: the SIP address of the agent, the number of calls taken since they joined the queue, and the date and time of the last call they answered, if any.
Standard ERP – Communicator 17/33

CONFIGURING AN ASTERISK SERVERFrom Standard ERP's Telephony module, it is possible to fully configure an Asterisk server, whether it is installed locally on the same server as Standard ERP (only applicable on a Linux-based server) or on a separate remote server. It is also possible to integrate Standard ERP with an existing Asterisk server without managing its configuration directly from Standard ERP. Below are the steps required for a full integration, and will not explain what steps are required for local, remote, and existing servers.
PBX Connection
The basic setting for integrating your Standard ERP system with an Asterisk server is a PBX Connection. A PBX Connection represents a connection to a unique actual VoIP Server.
To start with, you should create a new PBX Connection from the Telephony module in the PBX Connection register.
A PBX Connection is defined primarily by:
Code: The PBX unique identifier.
Comment: A descriptive text.
Type: The type of VoIP server to connect to; this can be chosen from a variety of Asterisk versions, TrixBox, Digium Switchvox, VPBX and 3CX Phone System 12 etc.
Hostname: The hostname for the server being used.
Host IP address: The IP address for the server being used.
Port: The port through which the Asterisk's Management Interface (AMI) can be reached (5038 by default for Asterisk)
Username: Username to connect to the AMI.
Password: Password to connect to the AMI.
Standard ERP – Communicator 18/33

Closed: A PBX Connection can be closed when it is no longer in use or valid.
In the case of a locally or remotely installed Asterisk server, the Type should be Asterisk 1.8 (AMI). The username and password can be freely set as they will be configured in the server for you.
In case you are connecting to an existing server, the port, username, and password should match the content of your server's manager.conf file. Here is an example of manager configuration usable with Standard ERP:
[general]
enabled=yes
port=5038
bindaddr=0.0.0.0
allowmultiplelogin=yes
displayconnects=yes
timestampevents=yes
[myadmin]
secret=passwordxyz
deny=0.0.0.0/0.0.0.0
permit=1.2.3.4
read=system,call,originate
write=system,call,originate
In this case Port would be 5038, username myadmin and password passwordxyz. You should replace 1.2.3.4 by the IP address of your Standard ERP server.
A PBX Connection has other fields organized in four tabs, and which are used when managing a local or remote server entirely from Standard ERP. Administrators using an existing server fully managed by some external means should skip over to the Contact records section.
Standard ERP – Communicator 19/33

Dialing Settings
Under this tab, you can configure the various telephony prefixes in use in your system.
International Dial Prefix: To dial out of your country.
Country Code: To dial in your country.
Default Area Code: To dial in your local area.
External Line Prefix: To dial out of your organization.
Skip Digit for International Calls: As its name indicates, you may also define digits to skip when dialing internationally.
These parameters are used to place and receive calls, and to identify contacts based on their caller ID, including when using IAX (see below).
Standard ERP – Communicator 20/33

Rules
This Tab allows to define a number of rules from various types:
Ignore SIP Channel: In case of an existing server, this will ignore possible intermediary SIP channels to handle calls and instead only care about the end points. The Identifier is the name of the intermediary SIP channel to ignore.
No Act For Calls Between Extensions Shorter Than: Disables the automatic Activity creation for internal calls (detected by the short length of internal extensions). This is only applicable for PBX Connections of the Type Digium SwitchVox. The Identifier is the maximum length.
Track number: Not used.
Unique callers only: With this option, only one call will be displayed in Communicator even if there is more than one call from or to the number configured in Identifier.
Standard ERP – Communicator 21/33

Remote Administration
From this tab, you can define the following:
Remote User: Linux user that will be used to copy the Asterisk configuration files to a remote server
Remote Configuration Directory: The path where to copy said configuration files. As such, it is important that the directory is writable by the Linux user and that your Standard ERP server has been set up to be able to connect directly to the remote Asterisk server without needing to enter a password (namely set up a Public Key Authentication between both servers).
Standard ERP – Communicator 22/33

Asterisk
From this final tab, you can enable the connection of your Asterisk server to other Asterisk server using IAX (Inter-Asterisk eXchange).
Enable Inter-Asterisk eXchange (IAX): By ticking this option, you will allow all other PBX Connections configured in Standard ERP and set to use IAX to connect to this particular server as well as allow this server to connect to all other servers enabled for IAX and configured in Standard ERP.
IAX Password: The password used by this server to connect to other IAX servers.
Sending configuration to the server
This section only applies to the local and remote servers situations.
After completing the above configuration of a PBX Connection, you can already send the configuration to an Asterisk server.
If you are running a local server, you can dump the configuration files by using the Local Asterisk Server settings from the Telephony module.
First, you will need to install the Asterisk server by selecting Setup Asterisk Server in the Operation Menu. This will give you a warning pop-up reading “Starting download and installation of Asterisk server”. Click OK. This will download the binaries for the Asterisk Server from the HansaWorld servers and install them on your local server. The server will then be started. You should never have to use Setup Asterisk Server again after this.
Standard ERP – Communicator 23/33
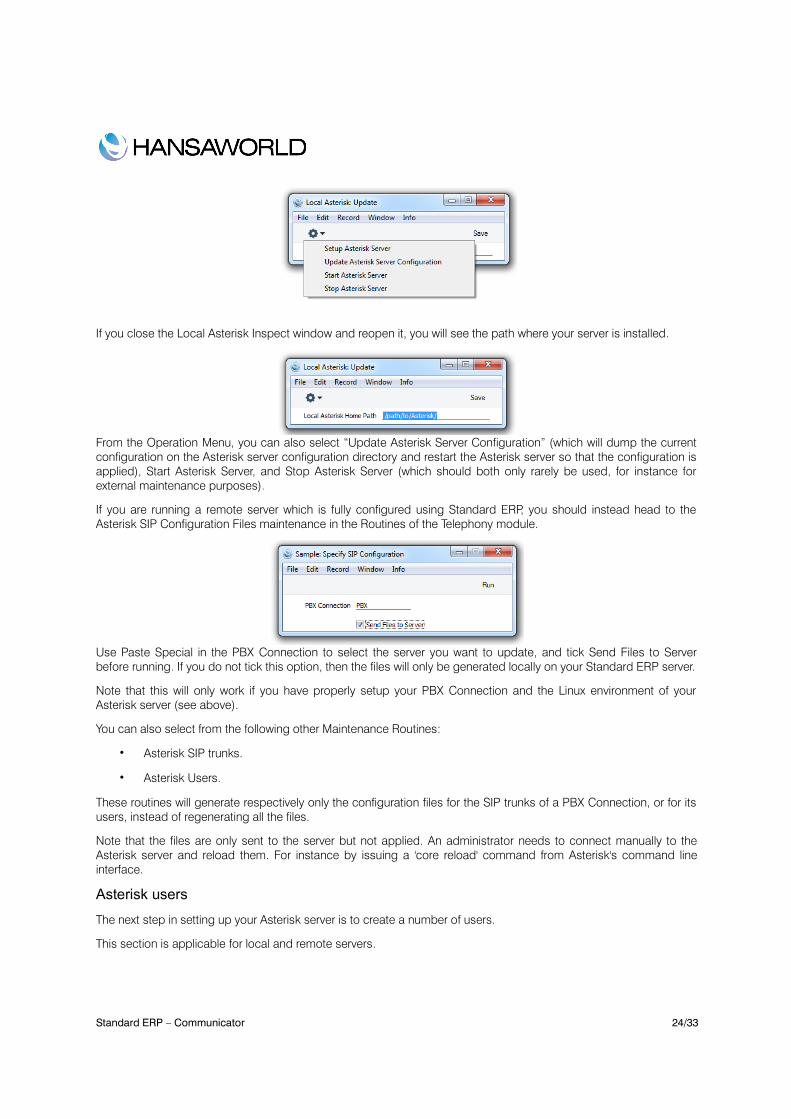
If you close the Local Asterisk Inspect window and reopen it, you will see the path where your server is installed.
From the Operation Menu, you can also select “Update Asterisk Server Configuration” (which will dump the current configuration on the Asterisk server configuration directory and restart the Asterisk server so that the configuration is applied), Start Asterisk Server, and Stop Asterisk Server (which should both only rarely be used, for instance for external maintenance purposes).
If you are running a remote server which is fully configured using Standard ERP, you should instead head to the Asterisk SIP Configuration Files maintenance in the Routines of the Telephony module.
Use Paste Special in the PBX Connection to select the server you want to update, and tick Send Files to Server before running. If you do not tick this option, then the files will only be generated locally on your Standard ERP server.
Note that this will only work if you have properly setup your PBX Connection and the Linux environment of your Asterisk server (see above).
You can also select from the following other Maintenance Routines:
• Asterisk SIP trunks.
• Asterisk Users.
These routines will generate respectively only the configuration files for the SIP trunks of a PBX Connection, or for its users, instead of regenerating all the files.
Note that the files are only sent to the server but not applied. An administrator needs to connect manually to the Asterisk server and reload them. For instance by issuing a 'core reload' command from Asterisk's command line interface.
Asterisk users
The next step in setting up your Asterisk server is to create a number of users.
This section is applicable for local and remote servers.
Standard ERP – Communicator 24/33

From the Telephony module, you can create new Asterisk Users for your employees or partners.
For each user, you can define:
PBX Connections: One or more servers on which the user will be created and allowed to connect to. Leave blank to create the user on all PBX Connections configured.
Name: A descriptive name.
Username: Will be used to configure their SIP client.
Password: Will be used to configure their SIP client.
Group: No longer used.
Caller ID number: The display number that might be shown to the party this user is calling. Note that this can easily be overridden by the configuration of a SIP client or SIP trunk. Especially when dialing out to international telephone numbers, Caller ID numbers are likely to get lost.
Caller ID name: The display name that might be shown to the party this user is calling. Note that this can easily be overridden by the configuration of a SIP client or SIP trunk. Especially when dialing out to a mobile or landline telephone number, plain text display names will be lost.
Closed: A closed user will simply not be configured on the server and as such, it will not be possible to connect to the server using that user.
No Queue Fallback: If an Asterisk User is marked as not being part of Queue Fallback, then that user will not be called when a queue is not staffed but is receiving a phone call.
Note that after creating one (or more) Asterisk users, it is necessary to send the configuration to the server, as described above.
Standard ERP – Communicator 25/33

Contact records
This section is applicable for all types of servers: local, remote, and existing.
As of now, Asterisk users and Standard ERP users (Persons), and their contact cards are not connected and as such, Contact cards for your users will need to be filled in manually with their SIP contact details.
In the SIP field of the contact record pertaining to your Asterisk user should be filled in as username@hostname. Where username comes from the Asterisk User record, and hostname from the PBX Connection record.
SIP Trunks
This section is applicable for local and remote servers.
At this point of the configuration, you can place calls between users of your Asterisk server. To reach out to the outside world, you will need a SIP trunk or VoIP trunk. Each country usually has several providers that can help you get started. As Asterisk is a commonly used VoIP server platform, it is easy to get help from your provider in general. A simple Internet search should allow you to find a number of SIP providers for your country.
Using the information provided by your subscriber, you will be able to fill in the SIP Trunk record necessary for you to place calls to the rest of the world. A SIP provider will usually be able to sell you the usage of one, or more phone numbers that your contacts will be able to call to reach you. In some cases, your SIP provider might also allow you to place outgoing calls. Make sure to carefully select the SIP provider that is able to provide you with the capabilities you need to run your business smoothly.
Setting up a SIP trunk comes with a wide array of technical possibilities, a number of which are supported in Standard ERP. We will detail some of those here but it is not possible to list all the possible technical configurations one can encounter.
Code: Select a unique code for your SIP trunk.
Standard ERP – Communicator 26/33

PBX Connection: Paste Special the PBX connection on which you want this SIP trunk to be terminated.
Host: Fill in the host name or IP address provided by your SIP provider here. It might be that host and domain have the same value.
Domain: Fill in the domain name provided by your SIP provider here. It might be that host and domain have the same value.
Username: Fill in the username provided by your SIP provider here.
Password: Fill in the information provided by your SIP provider here.
Skip Digit for International Calls: This parameters operates similarly to that set in the PBX Connection but will apply to calls using the SIP trunk.
Country Code: This parameters operates similarly to that set in PBX Connection but will apply to calls using the SIP trunk.
Caller ID: The caller ID of your SIP trunk provider (optional).
Allow anonymous calls: Lets the system accept anonymous calls coming from your providers.
Allowed IPs: Only incoming calls coming from these IP addresses will be allowed. Please check with your SIP provider to only open the minimum number of addresses. (optional but important security point).
Inbound phone numbers: A SIP provider may very well provide you several telephone numbers using the same SIP trunks. In certain cases, you will be given unique identifiers for each one of them. They should be filled in here. It might be that the usernames and passwords are the same as above.
Trunk type: Set to Outbound calls only if you intend to input a separate configuration for Inbound Phone Numbers in the matrix as described just above. Set to In- and outbound calls if you do not have a separate configuration for Inbound Phone Numbers.
IAX: Select this if your SIP trunk provider is providing you services using an Asterisk IAX trunk.
Standard ERP – Communicator 27/33

Queues and Menus
This section is applicable for local and remote servers.
Most of us are familiar with the telephony lines operated by large companies. A welcome Menu plays when you call into the support line of a company, after pushing a few digits on your phone and listening to a few more voice Menu messages, you are placed in a Queue. Thanks to Standard ERP's integration with Asterisk, your company can easily benefit from such technology.
In Standard ERP's terminology, a Menu is used to select between different queues or menus; and a Queue is used to put in relation agents answering calls and external callers. Queues and Menus share a number of settings (Phone Numbers, Opening Times) and capabilities (Playing a sound upon arrival, when closed, etc.).
Instructions for users to use queues can be found earlier in the document.
A Queue contains the following information:
Code: A unique identifier in Standard ERP
Queue ID: A unique identifier in Asterisk which will be used by your employees to connect to the queue and start answering calls.
SIP Trunk: The SIP trunk from where the calls will be arriving.
Description: A free-text comment.
Phone Number: (Optional) in the case where you want a direct number for callers to reach the queue without going through a Menu. Note: you can play a greetings message even in the case where callers go straight to a queue. You do not need a Menu to play a welcome message.
Fallback number: An optional number to call in the case i) no agent is available in the queue AND ii) no one is logged in to the Asterisk server or everyone who is logged in is marked with “No Queue Fallback”.
Open from/until: it is possible to define two sets of opening hours (to include the possibility of a lunch break for instance). In case only one set of opening hours is needed, use the first pair of “Open from”/”Open until” fields and leave the second pair blank.
Standard ERP – Communicator 28/33

A Menu contains the following information:
Code: A unique identifier.
SIP Trunk: The SIP trunk from where the calls will be arriving.
Description: A free-text comment.
Phone Number: The phone number for your contacts to dial in order to access the Menu. Optional in case the Menu is accessed via another Menu.
Open from/until: It is possible to define two sets of opening hours (to include the possibility of a lunch break for instance). In case only one set of opening hours is needed, use the first pair of “Open from”/”Open until” fields and leave the second pair blank.
Repeat every (s): The number of seconds between repeats of the message explaining to the caller his or her possible choices.
A matrix finally allows you to configure the different Menus and Queues reachable from this Menu:
Number: The digit to press for the user to enter the selected Queue or Menu. Note that in the case pressing the digit leads to entering a Queue, the digit need not be the same as the Queue ID defined in the Queue.
Queue: Paste Special to an existing Queue (note, if you select this, you should not select a Menu as well).
Menu: Paste Special to an existing Menu (note, if you select this, you should not select a Queue as well).
Comment: A free-text comment as a reminder of what the selected Queue or Menu might be.
Using Menus, you can cascade multiple levels of Menus. However, once a caller has joined a Queue, he or she will not be able to go back to another Queue or Menu.
The last remaining part of the configuration is now to assign sound files to be played to guide your callers through your Menus and Queues.
Whereas all the previous configuration was done in Registers of the Telephony module, sounds will be configured from the Settings of the Telephony module. More precisely, from the PBX Sounds setting.
Standard ERP – Communicator 29/33

First, create a new PBX Sound. Then in Event, use Paste Special to select the type of Event that will trigger the sound file to play. The Event you select will affect whether you are selecting a Queue or a Menu in the following field. Available Events are:
Initial Queue Message: Played as an initial greeting when a caller reaches a Queue.
Line Busy: Played after 30 seconds of a caller waiting in a Queue.
Menu Closed: Played whenever a caller arrives to a Menu outside of the defined opening hours
Menu Message: Played as an initial greeting when a caller enters a Menu (should also describes the options available from the Menu and the digits associated with each function).
Music on Hold: Music to play while the caller is waiting in a Queue.
Queue Closed: Played whenever a caller arrives to a Queue outside of the defined opening hours.
Once an Event is selected, use Paste Special to select the Queue/Menu where the sound file should be used. Only one Queue or Menu can be selected. After Saving the Record, you can now attach a file to the Record following the usual way of dragging and dropping the file over the paperclip icon or into the Document Manager window which you can open by double-clicking the paperclip icon.
Note: the attached sound file must be a mono.wav file, sampled at 8kHz.
Remember to send the configuration to the server once done. The sound files will be copied during that stage a s well.
Standard ERP – Communicator 30/33

QUESTIONS: USERS• What are the different telephony technologies that can be integrated with Standard ERP?
• Name two easy ways to call your contacts directly from within Standard ERP.
• How would you log into queue number 2 of your Sweden-based (country code = 46) Asterisk Server?
• You are not logged in to any queue today but you are receiving calls on your SIP client for one of the queues. How is this possible?
• What does it mean if an agent is listed as “Disconnected” in the Queue Status Report?
• You are not abled to initiate Skype calls from Communicator. What could be the reasons for that?
• How can you establish a three-way call using Communicator?
• Where can you define the information to be presented on the Customer Status Report?
QUESTIONS: ADMINISTRATORS• Whether you are using a local, remote, or existing Asterisk Server, you need to create at least one Record in
the Telephony module. What kind of Record is it?
• What record do you need to create in the Telephony module to be able to call the outside world from your Asterisk server?
• Queues and menus:
▪ Can a queue lead to a menu?
▪ Can a menu lead to a menu?
▪ Can a queue lead to a queue?
▪ Can a menu lead to a queue?
• Describe the fallback mechanism when a Queue is unstaffed.
EXERCISE – ADMINISTRATORS:1. Setup a Standard ERP server on a Linux platform using sample data, and setup a local server with one user per participant in the exercise.
2. Setup a menu leading to three queues (optionally using a greeting message – Keep in mind the sound file format!)
EXERCISE – USERS:1. Sit in groups of two. Initiate a call from Communicator to your colleague via Skype and make sure the
corresponding activity is created.
2. After having completed the Administrator exercise 1: in groups of two, place calls to each other with your properly configured SIP clients, using Communicator, and directly from the SIP client. Note how either way, the calls are listed in the Communicator either way.
3. After having completed the Administrator exercise 1: in groups of two, setup the system to create activities
Standard ERP - Communicator page 31/33

automatically and show Customer Status Report upon receiving a call. Then place calls to each other with your properly configured SIP clients, using Communicator. Note how either way, the calls are listed in the Communicator either way.
4. After having completed the Administrator exercise 2: in groups of two, have one of you logged in to a queue and the second of you call the menu and navigate to the queue that is staffed. Using the Queue Status Report, verify that the status of the one of you who is serving the queue is properly reported when on a call and idle.
Technical glossary
This document discusses of advanced technical matters related to telephony, as such, the reader can here find a short glossary of the words used:
AMI: Asterisk Management Interface, it is the standard management interface of Asterisk over TCP IP. With it, you are able to control the PBX, originate calls, check mailbox status, monitor channels and queues as well as execute Asterisk commands.
Asterisk: a very popular open source VoIP server which can be used to handle VoIP calls using a variety of protocols, including SIP
Caller ID: this is the text and/or telephone number that is presented on a ringing phone to indicate who placed the incoming call. When this information is not provided, the call is said to be anonymous. When dealing with a VoIP system, the Caller ID can easily be altered, configured, or tempered with – at least when compared with the general usage of the Caller ID in a mobile network by an average user.
IAX: Inter-Asterisk eXchange, a way of connecting several Asterisk servers together
SIP: Session Initiation Protocol, a protocol commonly used in VoIP to place calls. Note that this protocol does not handle the actual audio delivery of a VoIP call.
VoIP: Voice over IP (Internet Protocol), a generic term encompassing the technologies necessary to allow voice communications to be done over IP networks, such as Internet
PABX, PBX, IPBX, VPBX: Private (Automatic) Branch Exchange (sometimes qualified of IP PBX or Virtual PBX), is a telephone system that serves a private organization and performs concentration of central office lines or trunks and provides intercommunication between a large number of telephone stations in the organization
TAPI: Telephony Application Programming Interface, a Microsoft Windows API which provides computer telephony integration and enables PCs running Microsoft Windows to use telephone services.
Trunk, SIP Trunk, Trunk lines: When dealing with a PBX, trunk lines are the phone lines coming into the PBX from the telephone provider.
Standard ERP - Communicator page 32/33

APPENDIX
Terminology between different versions of English language
The language used in this material is British English. There can be slight differences between other versions of the English language, which can lead to confusions. This table should help to clear these up. Sorted alphabetically
British USA Canada Australia + New Zealand
Singapore
Cheque Check Cheque Cheque Cheque
Colour/coloured Color/colored Colour/coloured Colour/coloured Colour/coloured
Credit Note(CN) Credit Memo (CN) Credit Memo (CM) Credit Note (CN) Credit Note
Dialogue Dialog
Instalment Installment
Jewellery Jewelry Jewellery Jewellery Jewellery
Licence (noun) License Licence Licence Licence
Mileage Claim Miles Way Lists Mileage Claim Mileage Claim
Miles Miles KM KM KM
Mobile Cell Mobile Mobile Mobile
Nominal Ledger (NL) General Ledger (GL) General Ledger (GL) General Ledger (GL) General Ledger (GL)
Post Code ZIP Code Post Code Post Code Post Code
Profit and Loss Statement
Income Statement Income Statement Statement of Profit or Loss
Statement of Profit or Loss
Purchase Ledger Payable (PL = AP) Payable (PL = AP) Purchase Ledger Purchase Ledger
Sales Ledger Receivable (SL=AR) Receivable (SL=AR) Sales Ledger Sales Ledger
Salesman Salesperson Salesperson Salesman Salesperson
Stock Inventory Inventory Stock Inventory
Stocktake Inventory Count Inventory Count Stocktake Inventory Count
Stock Depreciation Inventory Adjustment Inventory Adjustment Stock Depreciation Inventory Adjustment
Supplier Vendor Vendor Supplier Vendor
Turnover Revenue Revenue Revenue Revenue
VAT Sales Tax or Tax Tax (or GST/PST) GST GST/SST/HST
Standard ERP - Communicator page 33/33