Staging Guide for Cisco Unified ICM/Contact Center ... · Staging Guide for Cisco Unified...
114
Staging Guide for Cisco Unified ICM/Contact Center Enterprise, Release 11.6(1) First Published: 2017-08-24 Americas Headquarters Cisco Systems, Inc. 170 West Tasman Drive San Jose, CA 95134-1706 USA http://www.cisco.com Tel: 408 526-4000 800 553-NETS (6387) Fax: 408 527-0883
Transcript of Staging Guide for Cisco Unified ICM/Contact Center ... · Staging Guide for Cisco Unified...

Staging Guide for Cisco Unified ICM/Contact Center Enterprise,Release 11.6(1)First Published: 2017-08-24
Americas HeadquartersCisco Systems, Inc.170 West Tasman DriveSan Jose, CA 95134-1706USAhttp://www.cisco.comTel: 408 526-4000 800 553-NETS (6387)Fax: 408 527-0883

THE SPECIFICATIONS AND INFORMATION REGARDING THE PRODUCTS IN THIS MANUAL ARE SUBJECT TO CHANGE WITHOUT NOTICE. ALL STATEMENTS,INFORMATION, AND RECOMMENDATIONS IN THIS MANUAL ARE BELIEVED TO BE ACCURATE BUT ARE PRESENTED WITHOUT WARRANTY OF ANY KIND,EXPRESS OR IMPLIED. USERS MUST TAKE FULL RESPONSIBILITY FOR THEIR APPLICATION OF ANY PRODUCTS.
THE SOFTWARE LICENSE AND LIMITEDWARRANTY FOR THE ACCOMPANYING PRODUCT ARE SET FORTH IN THE INFORMATION PACKET THAT SHIPPED WITHTHE PRODUCT AND ARE INCORPORATED HEREIN BY THIS REFERENCE. IF YOU ARE UNABLE TO LOCATE THE SOFTWARE LICENSE OR LIMITED WARRANTY,CONTACT YOUR CISCO REPRESENTATIVE FOR A COPY.
The Cisco implementation of TCP header compression is an adaptation of a program developed by the University of California, Berkeley (UCB) as part of UCB's public domain versionof the UNIX operating system. All rights reserved. Copyright © 1981, Regents of the University of California.
NOTWITHSTANDINGANYOTHERWARRANTYHEREIN, ALL DOCUMENT FILES AND SOFTWARE OF THESE SUPPLIERS ARE PROVIDED “AS IS"WITH ALL FAULTS.CISCO AND THE ABOVE-NAMED SUPPLIERS DISCLAIM ALL WARRANTIES, EXPRESSED OR IMPLIED, INCLUDING, WITHOUT LIMITATION, THOSE OFMERCHANTABILITY, FITNESS FORA PARTICULAR PURPOSEANDNONINFRINGEMENTORARISING FROMACOURSEOFDEALING, USAGE, OR TRADE PRACTICE.
IN NO EVENT SHALL CISCO OR ITS SUPPLIERS BE LIABLE FOR ANY INDIRECT, SPECIAL, CONSEQUENTIAL, OR INCIDENTAL DAMAGES, INCLUDING, WITHOUTLIMITATION, LOST PROFITS OR LOSS OR DAMAGE TO DATA ARISING OUT OF THE USE OR INABILITY TO USE THIS MANUAL, EVEN IF CISCO OR ITS SUPPLIERSHAVE BEEN ADVISED OF THE POSSIBILITY OF SUCH DAMAGES.
Any Internet Protocol (IP) addresses and phone numbers used in this document are not intended to be actual addresses and phone numbers. Any examples, command display output, networktopology diagrams, and other figures included in the document are shown for illustrative purposes only. Any use of actual IP addresses or phone numbers in illustrative content is unintentionaland coincidental.
Cisco and the Cisco logo are trademarks or registered trademarks of Cisco and/or its affiliates in the U.S. and other countries. To view a list of Cisco trademarks, go to this URL: http://www.cisco.com/go/trademarks. Third-party trademarks mentioned are the property of their respective owners. The use of the word partner does not imply a partnershiprelationship between Cisco and any other company. (1110R)
© 2017 Cisco Systems, Inc. All rights reserved.
C O N T E N T S
P r e f a c e Preface ix
Change History ix
About This Guide x
Audience x
Related Documents x
Obtaining Documentation and Submitting a Service Request xi
Field Alerts and Field Notices xi
Documentation Feedback xi
Conventions xi
C H A P T E R 1 Active Directory and ICM/CCE 1
Active Directory for Unified ICM/CCE 1
Single Sign On (SSO) Support 1
Active Directory Support by Unified CCE 2
Benefits of Active Directory 2
Support for Corporate Domain Installations 2
No Domain Administrator Requirement 3
Flexible and Consistent Permissions 3
Streamlined Administration 3
Standard Windows Naming Conventions 3
Active Directory and Microsoft Windows Server 3
Active Directory Domain Services 3
RWDC Authentication 3
RWDC LDAP Read 4
RWDC LDAP Write 4
RWDC Password Change 4
Restartable Active Directory Domain Services 4
Staging Guide for Cisco Unified ICM/Contact Center Enterprise, Release 11.6(1) iii

C H A P T E R 2 Domain Requirements and Supported Topologies 5
Microsoft Active Directory Tools 5
Run dcdiag.exe 6
Run repadmin.exe 7
Domain Requirements 8
Requirements for Group Policy in AD 9
Group Policy Overview 9
Group Policy Settings 9
Unified ICM Server Domain Requirements 9
Block Policy Inheritance 10
Prevent Use of Improper Policies 11
Install the Administration Client on a Different Domain in a Single Forest 11
DNS Requirements 12
Global Catalog Requirements 12
Supported Topologies 12
Multiple Forests Not Supported 13
Single Forest, Single Tree, and Single Domain Benefits and Usage Scenarios 14
Single Domain Model 14
Advantages of Single Domain Model 14
Single Domain Topology Design 15
Single Tree Multiple Child Domains 16
When to Add Additional Domains 17
Multiple-Tree Topology 19
Multiple Tree Forests 19
Multiple Trees in a Single Forest Model 20
Business Requirements 20
When to Choose a Multiple Tree Domain Model 21
Additional Considerations for Topology Design 21
Single Domain 21
Single Tree, Multiple Domains 21
Single Forest, Multiple Trees 22
Additional Considerations 22
Domain Name System 23
Configure Active Directory Sites 24
Staging Guide for Cisco Unified ICM/Contact Center Enterprise, Release 11.6(1)iv
Contents
Assign Global Catalog and Configure Time Source 24
Configure DNS Server on Forest Root Domain Controller 25
C H A P T E R 3 Organization Units 27
What Is an OU? 27
OU Hierarchies 27
Cisco Root OU 28
Facility OU 29
Instance OU 29
Unified ICM Instance OU 29
Security Groups 30
Security Groups and OUs 30
Security Groups Described 31
Security Group Names and Members 32
Config Security Group 32
Setup Security Group 33
OU Hierarchies and Security 34
Service Security Group 36
C H A P T E R 4 User Migration Tool 39
User Migration Tool Prerequisites 39
User Migration Tool Features 40
Migration Scenarios 40
Internationalization (I18n) and Localization (L10n) Considerations 41
Security Considerations 41
User Migration Steps 41
Export Users from the Source Domain 42
Import Users into the Target Domain 42
Change Domain Name 43
User Migration Tool Modes 43
Mode Considerations 45
Export Mode 45
Import Mode 46
Verify Mode 47
Content Parameter Descriptions 48
Staging Guide for Cisco Unified ICM/Contact Center Enterprise, Release 11.6(1) v
Contents
Users from Trusted Domains 48
User Migration Tool Troubleshooting 49
User Migration Tool Error Messages 49
C H A P T E R 5 Service Account Manager 53
Service Account Management 53
Other Considerations 54
Permissions 54
Domain Restriction 54
AD Update Failures 54
Logging 55
Service Account Memberships Setup for CICM Replication 55
Service Account Manager End User Interfaces 55
Service Account Manager GUI Dialog Boxes 55
Service Account Manager –Main Dialog Box 56
Service Account Manager – Edit Service Account dialog box 62
Service Account Manager – Command Line Interface 63
Silent Setup for Default Service Accounts 63
Set Service Account Memberships for CICM Replication 64
Service Account Manager 64
Create New Account for Single Service 64
Update Existing Account for Single Service 65
Create New Accounts for More Than One Service 65
Update Existing Account for More Than One Service 66
Fix Account Displaying Group Membership Missing State 67
C H A P T E R 6 Prepare to Work with Active Directory 69
Perform Preliminary Steps 69
Domain Manager and OU Hierarchy 69
C H A P T E R 7 Domain Manager 71
Domain Manager Tool Functionality 71
Open the Domain Manager 72
Domain Manager Window 73
View Domains 75
Staging Guide for Cisco Unified ICM/Contact Center Enterprise, Release 11.6(1)vi
Contents
Add Domain to a View 77
Remove Domain from a View 78
Create or Add Cisco Root 78
Remove Cisco Root 80
Create or Add Facility OU 81
Remove Facility OU 81
Create Instance OU 82
Remove Instance OU 84
Security Groups 84
Add Users to Security Group 86
Remove Members from Security Group 88
Organizational Unit Validation Errors Dialog Box 89
C H A P T E R 8 Staging Prerequisites 91
System Design Specification 91
Platform Hardware and Software 92
Set Staging Environment 93
Set Persistent Static Routes 93
A P P E N D I X A Domain Controller Installation on MS Windows Server 95
Install Domain Controller on Microsoft Windows Server 95
A P P E N D I X B Moving the Cisco Root OU 97
Introduction 97
Definitions 97
Cisco Root OU 97
Domain Manager 97
Requirements and Prerequisites 97
Preparatory Steps 98
Transfer Cisco Root OU to Another OU 99
Staging Guide for Cisco Unified ICM/Contact Center Enterprise, Release 11.6(1) vii
Contents

Staging Guide for Cisco Unified ICM/Contact Center Enterprise, Release 11.6(1)viii
Contents

Preface
• Change History, page ix
• About This Guide, page x
• Audience, page x
• Related Documents, page x
• Obtaining Documentation and Submitting a Service Request, page xi
• Field Alerts and Field Notices, page xi
• Documentation Feedback, page xi
• Conventions, page xi
Change HistoryThis table lists changes made to this guide. Most recent changes appear at the top.
DateSeeChange
August, 2017Initial Release of Document for Release 11.6(1)
Modified theWindows ServerStaging chapter.
UserMigration Tool FeaturesAdded a note in UserMigration Tool Features topicstating that User Migrationtool is not applicable for SSOusers.
Staging Guide for Cisco Unified ICM/Contact Center Enterprise, Release 11.6(1) ix
About This GuideThis document contains system diagrams, staging steps and sample test cases for supported models of UnifiedICM/CCE. The supported models are:
• Dedicated Forest/Domain Model
• Child Domain Model
• Hosted Network Applications Manager (NAM)/ Customer ICM (CICM) Model
This document is for individuals responsible for staging deployments of Cisco contact centers. Individualsmust be trained on the use and functions of Unified ICM/CCE as well as Microsoft Windows Server,Active Directory (AD), and DNS. This document does not provide detailed Cisco Unified IntelligentContact Management Enterprise (Unified ICM), Hosted NAM/CICM, or Microsoft Windows Serverspecific information. You can find this information elsewhere in specific documentation from Cisco orMicrosoft.
Note
AudienceIndividuals utilizing this document must have knowledge and experience with the followingtools/software/hardware to stage the system software as described in this document:
• Cisco Unified ICM Scripting and Configuration Tools
• Third-party software (if installed)
• Microsoft Windows Server and Windows Active Directory administration
• Microsoft SQL Server administration
Related DocumentsLinkDocument or Resource
https://www.cisco.com/c/en/us/support/customer-collaboration/unified-contact-center-enterprise/products-installation-guides-list.html
Cisco Unified Contact Center Enterprise Installationand Upgrade Guide
Staging Guide for Cisco Unified ICM/Contact Center Enterprise, Release 11.6(1)x
PrefaceAbout This Guide
Obtaining Documentation and Submitting a Service RequestFor information on obtaining documentation, using the Cisco Bug Search Tool (BST), submitting a servicerequest, and gathering additional information, seeWhat's New in Cisco Product Documentation at http://www.cisco.com/c/en/us/td/docs/general/whatsnew/whatsnew.html.
Subscribe toWhat's New in Cisco Product Documentation, which lists all new and revised Cisco technicaldocumentation as an RSS feed and delivers content directly to your desktop using a reader application. TheRSS feeds are a free service.
Field Alerts and Field NoticesCisco can modify its products or determine key processes to be important. These changes are announcedthrough use of the Cisco Field Alerts and Cisco Field Notices. You can register to receive Field Alerts andField Notices through the Product Alert Tool on Cisco.com. This tool enables you to create a profile to receiveannouncements by selecting all products of interest.
Sign in www.cisco.com and then access the tool at https://www.cisco.com/cisco/support/notifications.html.
Documentation FeedbackTo provide comments about this document, send an email message to the following address:[email protected]
We appreciate your comments.
ConventionsThis document uses the following conventions:
DescriptionConvention
Boldface font is used to indicate commands, such as user entries, keys, buttons,and folder and submenu names. For example:
• Choose Edit > Find.
• Click Finish.
boldface font
Italic font is used to indicate the following:
• To introduce a new term. Example: A skill group is a collection of agentswho share similar skills.
• A syntax value that the user must replace. Example: IF (condition, true-value,false-value)
• A book title. Example: See the Cisco Unified Contact Center EnterpriseInstallation and Upgrade Guide.
italic font
Staging Guide for Cisco Unified ICM/Contact Center Enterprise, Release 11.6(1) xi
PrefaceObtaining Documentation and Submitting a Service Request
DescriptionConvention
Window font, such as Courier, is used for the following:
• Text as it appears in code or that the window displays. Example:<html><title>Cisco Systems, Inc. </title></html>
window font
Angle brackets are used to indicate the following:
• For arguments where the context does not allow italic, such as ASCII output.
• A character string that the user enters but that does not appear on the windowsuch as a password.
< >
Staging Guide for Cisco Unified ICM/Contact Center Enterprise, Release 11.6(1)xii
PrefaceConventions
C H A P T E R 1Active Directory and ICM/CCE
• Active Directory for Unified ICM/CCE, page 1
• Active Directory Support by Unified CCE, page 2
• Benefits of Active Directory, page 2
• Active Directory and Microsoft Windows Server, page 3
Active Directory for Unified ICM/CCEMicrosoft Windows Active Directory (AD) is a Windows Directory Service that provides a central repositoryto manage network resources. Unified ICM uses AD to control user access rights to perform setup,configuration, and reporting tasks. AD also grants permissions for different components of the system softwareto interact; for example, it grants permissions for a Distributor to read the Logger database.
This document provides details of how the system software uses AD.
This document does not provide detailed information on AD. Unified ICM administrators must be familiarwith the Microsoft AD documentation on the Microsoft Windows Server website.
Note
This guide uses the term “Unified ICM” to generically refer to Cisco Unified Contact Center Enterprise(Unified CCE) and Cisco Unified Intelligent Contact Management (Unified ICM). You can use eitherUnified CCE or Unified ICM for advanced call control, such as IP switching and transfers to agents. Bothprovide call center agent-management capabilities and call scripting capabilities. Scripts running in eitherenvironment can access Unified CVP applications.
Note
Single Sign On (SSO) SupportSSO allows users to sign in to one application and then securely access other authorized applications withouta prompt to resupply user credentials. As an agent or supervisor, when you login to a Unified CCE solutionweb component using a username and password, SSO provides a security token that allows you to securely
Staging Guide for Cisco Unified ICM/Contact Center Enterprise, Release 11.6(1) 1

access all other web based application and services need not provide your login credentials repeatedly fromthe same web browser instance. If you move to a different browser you need to re-authenticate the SSO.
Unified CCE Solution requires an Identity Provider(IdP) to interface with Microsoft Active Directory (AD).Irrespective of the IdP used to interface with the identity source, the Active Directory infrastructure is amandatory component for SSO. In an SSO deployment, AD is still required to support Unified CCEadministrator sign-ins.
Unified CCE no longer creates or deletes Active Directory user accounts. You can manage these user accountswithin their active Directory infrastructure
Single sign-on (SSO) is an authentication and authorization process. (Authentication proves that you are theuser you say that you are, and authorization verifies that you are allowed to do what you are trying to do.)SSO allows users to sign in to one application and then securely access other authorized applications withouta prompt to resupply user credentials. SSO permits Cisco supervisors or agents to sign on only once with ausername and password to gain access to all of their Cisco browser-based applications and services within asingle browser instance. By using SSO, Cisco administrators can manage all users from a common userdirectory and enforce password policies for all users consistently.
To enable SSO, the Unified CCE solution requires an Identity Provider (IdP) in addition to Active Directory(AD). The IdP stores user profiles and provides authentication services to support SSO sign-ins to the contactcenter solution. However, the IdP does not replace AD. In an SSO deployment, AD is still required to supportUnified CCE administrator sign-ins.
For detailed information about SSO in the contact center solution, see the Cisco Unified Contact CenterEnterprise Features Guide.
Active Directory Support by Unified CCEUnified CCE to facilitate the upgrade from the release earlier than 11.x, Unified ICM/CCE supports activedirectory on Windows Server 2008 R2 and 20012 R2.
For detailed information on supported platforms for Unified ICM, see:
• Virtualization for Unified Contact Center Enterprise at http://www.cisco.com/c/dam/en/us/td/docs/voice_ip_comm/uc_system/virtualization/virtualization-unified-contact-center-enterprise.html
• Unified CCE Solution Compatibility Matrix at https://www.cisco.com/c/en/us/support/customer-collaboration/unified-contact-center-enterprise/products-device-support-tables-list.html
Benefits of Active Directory
Support for Corporate Domain InstallationsUse the existing AD functionality in your network to control access to Unified ICM functions by co-locatingUnified ICM in an existing Windows domain (except the domain controller). Control access to functions inan existing Windows domain, including the corporate domain, and utilize the AD functionality your networkalready supports. Decide where to place the collocated resources in your Organizational-Unit (OU) hierarchy.
Related Topics
What Is an OU?, on page 27
Staging Guide for Cisco Unified ICM/Contact Center Enterprise, Release 11.6(1)2
Active Directory and ICM/CCEActive Directory Support by Unified CCE
No Domain Administrator RequirementYou only need to be a local machine administrator to belong to the setup group for any VM for which youare installing a component.
You can determine which users in your corporate domain have access rights to perform specific tasks withthe Domain Manager.
For more information, see the chapter Domain Manager.
Flexible and Consistent PermissionsThe OU hierarchy allows you to define a consistent set of permissions for users to perform configuration,scripting, and reporting tasks.
You can grant these privileges to any trusted AD user.
Streamlined AdministrationUnified ICM uses AD to control permissions for all users so that administrators do not need to enter redundantuser information. Unified ICM relies on AD for setup, configuration, and reporting permissions; User Listtool use is reduced.
Standard Windows Naming ConventionsAD supports standard Windows naming conventions.
By default, there are no specific naming requirements for the Unified ICM usernames or the domain name.Certain features, like SSO, can impose requirements. Check the feature documentation for details.
Active Directory and Microsoft Windows ServerUnified ICM/CCE supports Active Directory on Microsoft Windows Server. Unified ICM/CCE does notsupport Read Only Domain Controller (RODC) in its deployments.
SeeMicrosoft's documentation at https://docs.microsoft.com/en-us/windows-server/windows-server-versionsfor details on setting up Windows Server.
Active Directory Domain ServicesActive Directory Domain Services form the core area for authentication of user configuration information.Active Directory Domain Services also hold information about objects stored in the domain.
RWDC AuthenticationThe Unified ICM/CCE application user must be authenticated if the client machines are connected to RWDC.
Staging Guide for Cisco Unified ICM/Contact Center Enterprise, Release 11.6(1) 3
Active Directory and ICM/CCENo Domain Administrator Requirement
RWDC LDAP ReadUnified ICM/CCEmust perform the LDAP read operation successfully when the client is connected to RWDC.LDAP Read operations happen when Unified ICM/CCE Configuration applications read the data from theActive Directory. Unified ICM/CCE issues LDAP ADSI calls to perform this.
RWDC LDAP WriteUnified ICM/CCE must perform the LDAP Write operation successfully when the client is connected to aRWDC. LDAPWrite operations occur when Unified ICM/CCEConfiguration applications issue LDAPADSIcalls to write the data to the Active Directory.
RWDC Password ChangeUnified ICM/CCE must be able to change the password for the Unified ICM/CCE users through theConfiguration application when the clients are connected to RWDC.
Restartable Active Directory Domain ServicesPreviously, there was no provision to restart Active Directory separately. As a part of this new enhancement,you can stop and restart the Active Directory Domain Services without restarting the domain controller.
Currently, appropriate error messages are not shown because we do not check the running of Active DirectoryDomain Services and its dependent services before performing the Active Directory related operations.
Because Unified ICM/CCE does not use theMicrosoftWindows Server LDAP library, no error displays whenyou restart Active Directory Domain Services.
Staging Guide for Cisco Unified ICM/Contact Center Enterprise, Release 11.6(1)4
Active Directory and ICM/CCERWDC LDAP Read
C H A P T E R 2Domain Requirements and Supported Topologies
• Microsoft Active Directory Tools, page 5
• Run dcdiag.exe, page 6
• Run repadmin.exe, page 7
• Domain Requirements, page 8
• Requirements for Group Policy in AD, page 9
• DNS Requirements, page 12
• Global Catalog Requirements, page 12
• Supported Topologies, page 12
• Domain Name System, page 23
• Configure Active Directory Sites, page 24
• Assign Global Catalog and Configure Time Source , page 24
• Configure DNS Server on Forest Root Domain Controller, page 25
Microsoft Active Directory ToolsBefore you install Unified ICM in a new or existing AD environment, ensure that the environment is stable.As a rule, for all domain controllers in a forest, monitor replication, server, and AD health daily using theMicrosoft System Center OperationsManager or an equivalent monitoring application. For information aboutusing Operations Manager to monitor AD, see the Operations Manager Monitoring Scenarios for the currentversion of Operations Manager on the Microsoft TechNet website.
Microsoft provides several tools that you can use to ensure AD health and connectivity and that yourenvironment is ready for Unified ICM. Some of the tools which you can use to check the health are as follows:
• dcdiag
• repadmin
Staging Guide for Cisco Unified ICM/Contact Center Enterprise, Release 11.6(1) 5

Table 1: Microsoft AD Tools
Command LinePurposeTool
dcdiag /v /e
/f:dcdiag.txt
Run this tool onthe enterprisedomain.
Note
• Generates a report on AD health.
• Verifies connectivity, replication, topologyintegrity, inter-site health, and trust verification.
• Checks Network Card (NC) head securitydescriptors, net logon rights, and roles.
• Locates or gets the domain controller.
dcdiag.exe
repadmin /showrepl *
/csv >showrepl.csv• Retrieves the replication status of all domaincontrollers in a spreadsheet.
• Verifies DNS infrastructure, Kerberos,Windows time service (W32time), remoteprocedure call (RPC), and network connectivity.
repadmin.exe
Your network administrator or a qualified AD expert (for example, Microsoft Support Services), shouldevaluate the reports that these tools generate.
Note
After you install the tools, run the following setups:
• dcdiag.exe
• repadmin.exe
Run dcdiag.exeProcedure
Step 1 Choose Start > Run.Step 2 Type cmd.Step 3 Press Enter.
A command console opens.
Step 4 At the prompt, enter dcdiag.exe /e /v /f:dcdiag.txt.If you use the /e option, run dcdiag.exe at the root level. If you do not use the “/e” option, rundcdiag.exe on each individual domain controller.
Note
Staging Guide for Cisco Unified ICM/Contact Center Enterprise, Release 11.6(1)6
Domain Requirements and Supported TopologiesRun dcdiag.exe

The application creates the text file dcdiag.txt in the folder containing dcdiag.exe.
Step 5 Open the text file and note any items that are prefaced with “Warning” or “Error.”Step 6 Correct all the issues, then rerun dcdiag.exe to ensure that no issues remain.
Run repadmin.exeProcedure
Step 1 Choose Start > Run.Step 2 Type cmd.Step 3 Press Enter.
A command console opens.
Step 4 At the prompt, enter repadmin.exe /showrepl * /csv >showrepl.csv.Step 5 Open Excel and choose File > Open.
Depending on your version of Excel, the menu cascades may be slightly different.Note
Step 6 In the “Files of type” section, click Text Files (*.prn;*.txt;*.csv).Step 7 In the “Look in” section, navigate to showrepl.csv, then click Open.Step 8 In the Excel spreadsheet, right-click the column heading for showrepl_COLUMNS (column A), then click
Hide.Step 9 In the Excel spreadsheet, right-click the column heading for Transport Type, then click Hide.Step 10 Select the row just under the column headings, then chooseWindows > Freeze Pane.Step 11 Click the upper-left corner of the spreadsheet to highlight the entire spreadsheet. Choose Data > Filter >
AutoFilter.Step 12 In the heading of the Last Success column, click the down arrow, then click Sort Ascending.Step 13 In the heading of the Source DC column, click the down arrow, then click Custom.
In the Custom AutoFilter dialog box, complete the custom filter as follows:
1 Under Source DC, click does not contain.
2 In the corresponding text box, enter del to filter deleted domain controllers from the spreadsheet.
Step 14 In the heading of the Last Failure column, click the down arrow, then click Custom.In the Custom AutoFilter dialog box, complete the custom filter as follows:
1 Under Last Failure, click does not equal.
2 In the corresponding text box, enter 0 to filter for only domain controllers that are experiencing failures.
For every domain controller in the forest, the spreadsheet shows the following:
• Source replication partner
• The time that replication last occurred
Staging Guide for Cisco Unified ICM/Contact Center Enterprise, Release 11.6(1) 7
Domain Requirements and Supported TopologiesRun repadmin.exe
• The time that the last replication failure occurred for each naming context (directory partition)
Step 15 Use Autofilter in Excel to view the replication health for the following:
•Working domain controllers only
• Failing domain controllers only
• Domain controllers that are the least, or most recent
You can observe the replication partners that replicate successfully.
Step 16 Locate and resolve all errors.Step 17 Rerun repadmin.exe to ensure that no issues remain.
Domain Requirements
The Domain Controller and DNS servers can not be co-located on any Unified ICM component and mustbe installed on a separate server.
Warning
Unified ICM Requirements for AD:
• Authenticated users require credentials of a domain account with write privileges to the ICM OU.
• Microsoft AD tools or Domain Manager are the only supported tools for provisioning AD.
Permissions are needed during setup for creation of Service Logon accounts.Note
• You cannot create Unified ICM servers in the Unified ICM OU hierarchy.
• You can only apply the Unified ICM group policy template to OUs containing the Unified ICM servers.
• Single-label DNS domain names (such as “ICM”) are not supported when you use them with UnifiedICM/CCE. Multi-part names such as ICM.org, ICM.net, ICM.com, or sales.ICM.org are acceptable.
For additional information, see Information about configuring Windows for domainswith single-label DNS names.
Note
• Requires no AD schema changes. Authenticated users require read access to the contents of AD.
Staging Guide for Cisco Unified ICM/Contact Center Enterprise, Release 11.6(1)8
Domain Requirements and Supported TopologiesDomain Requirements

Requirements for Group Policy in ADGroup Policy plays a pivotal role in ADmanagement. Group Policy directly affects the function of distributedapplications like Unified ICM. This section explains Group Policy and defines requirements to ensure properfunctioning of your Cisco applications related to Unified ICM servers.
Group Policy OverviewAdministrators can manage computers centrally through AD and Group Policy. Using Group Policy to delivermanaged computing environments allows administrators to work more efficiently because of the centralized,'one-to-many management' it enables. Group Policy defines the settings and allows actions for users andcomputers. It can create desktops that are tailored to user job responsibilities and level of experience withcomputers. Unified ICM uses this centralized, organized structure to help ease the administrative burden andcreate an easily identifiable structure for troubleshooting. However, some settings can adversely affect UnifiedICM and the Unified ICM servers ability to function. Therefore, youmust control the OU structure for UnifiedICM components and ensure adherence to a standard.
Group Policy SettingsAdministrators use Group Policy to define specific configurations for groups of users and computers bycreating Group Policy settings. These settings are specified through the Group Policy Object Editor tool(known as GPedit.msc) and are present in a Group Policy Object (GPO), which is in turn linked to ADcontainers (such as sites, domains, or OUs). In this way, Group Policy settings are applied to the users andcomputers in the AD containers. For more information on Group Policy management, see Group PolicyManagement Console at https://technet.microsoft.com/en-us/library/cc753298(v=ws.11).aspx.
Unified ICM Server Domain RequirementsYou can move all Unified ICM servers into a separate OU to ensure proper functioning of the Unified ICMapplication and to improve security. You must clearly identify the OU as Cisco_ICM_Servers (or a similarclearly identifiable name) and documented in accordance with your corporate policy.
Staging Guide for Cisco Unified ICM/Contact Center Enterprise, Release 11.6(1) 9
Domain Requirements and Supported TopologiesRequirements for Group Policy in AD
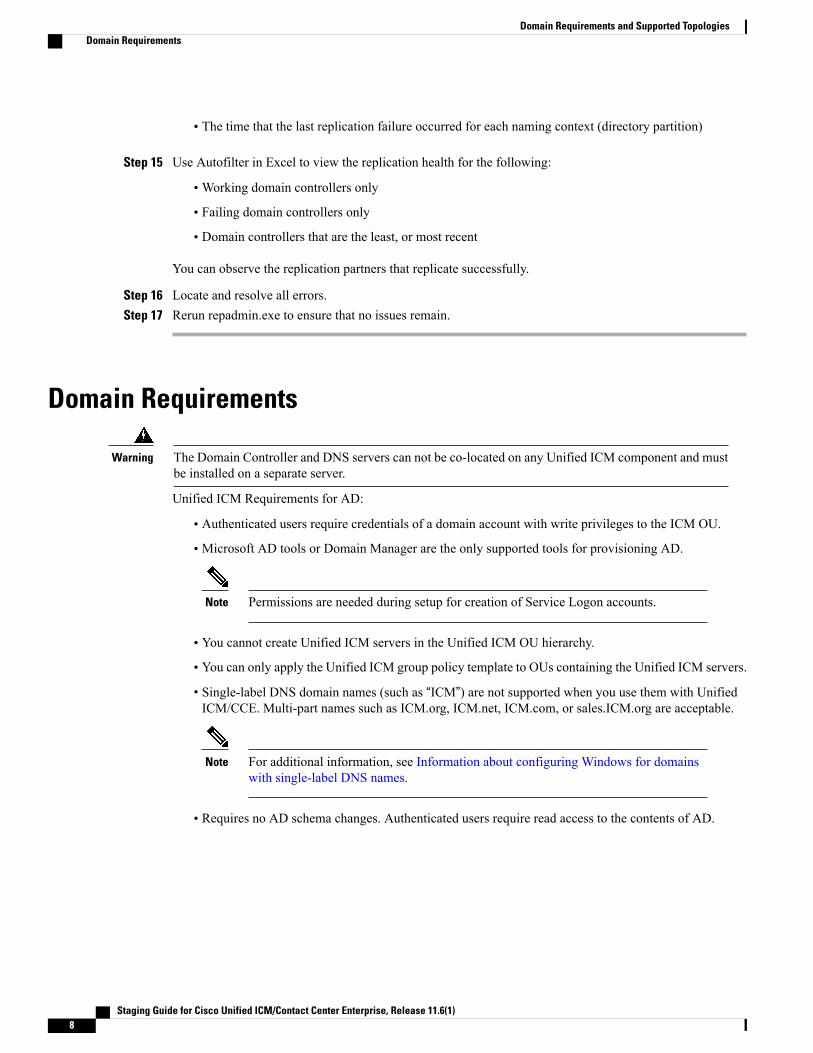
Create this OU either at the same level as the computer or at the Cisco ICMRoot OU. If you are unfamiliarwith AD, engage your Domain Administrator to assist you with Group Policy deployments.
Note
Figure 1: Group Policy Deployments
After you apply the Group Policy to the OU, youmust prevent propagation of default or customGroup Policiesto this OU. You can use block inheritance to prevent this propagation. For details, see Block Policy Inheritance,on page 10.
Verify that a global Enforced policy is not applied in the domain. For details, see Prevent Use of ImproperPolicies, on page 11.
You cannot block enforced GPO links from the parent container.
Block Policy InheritanceYou can block inheritance for a domain or organizational unit. Blocking inheritance prevents Group Policyobjects (GPOs) that are linked to higher sites, domains, or organizational units from being automaticallyinherited by the child-level. If a domain or OU is set to block inheritance, it appears with a blue exclamationmark in the console tree.
Procedure
Step 1 In the Group PolicyManagement Console (GPMC) console tree, double-click the forest containing the domainor organizational unit (OU) for which you want to block inheritance for GPO links.
Step 2 To block inheritance for an OU, double-clickDomains, double-click the domain containing the OU, and thenright-click the OU.
Step 3 Choose Block Inheritance.
Staging Guide for Cisco Unified ICM/Contact Center Enterprise, Release 11.6(1)10
Domain Requirements and Supported TopologiesBlock Policy Inheritance

Prevent Use of Improper PoliciesYou must prevent improper policies from being propagated. If the Enforced option is selected in a GroupPolicy Object being applied to a Cisco OU, a parent object enabled the option, which takes precedence overblock policy inheritance. You must uncheck the Enforced option on all parent OUs or Group Policy Objects.
Procedure
Step 1 Select a parent OU or Group Policy Object from the Group Policy Management console tree.The Default Domain Policy opens in the right pane.
Step 2 In the Links section, locate the domain, and note whether the Enforced option is enabled (Yes if enabled,No if not).
Step 3 If the option is enabled, right-click on Yes and deselect the Enforced option.
Install the Administration Client on a Different Domain in a Single ForestYou can install the Administration client on a different domain other than the Central Controller domainwithin a single forest.
Before you begin:
• A transitive trust must exist between the Administration client domain and Central Controller domain.
• An ICM domain user from the Central Controller domain must be granted local administrator privilegeon the Administration client machine.
The following steps are only required when the AdminClientInstaller is in a different domain than theCentral Controller.
Note
Procedure
Step 1 Log in to the Administration client machine using the credentials from the Central Controller domain user,which is a part of local administrators group.
Step 2 Find the fully qualified domain name of the Central Controller domain.Step 3 Install the Administration client.Step 4 Launch the Administration client setup.
The Log in page appears.Step 5 Log in with your Active Directory user name and password.
The log in fails because you are attempting to log in from a non-UCCE domain.Step 6 Log in again with your Active Directory user name and password and the fully qualified UCCE domain name
that you obtained in step 2.You will now be able to log in to the Administration client.
Staging Guide for Cisco Unified ICM/Contact Center Enterprise, Release 11.6(1) 11
Domain Requirements and Supported TopologiesPrevent Use of Improper Policies
DNS RequirementsThe following are DNS requirements:
• AD Integrated Zone for both forward and reverse lookup zones.
• Enterprise level Standard Secondary Zone for the Unified ICM/Unified CCH Child Domain model orthe Unified ICMH/ Unified CCH Domain model.
• Manually add all additional addresses (high, privates, private highs, and so forth) to the forward lookupzone in DNS along with associated PTR records.
• Corporate DNS servers have forwarding enabled to the AD servers (if using Corporate DNS servers asopposed to the Domain Controllers for name resolution).
Global Catalog RequirementsIn a multi-domain forest, a Global Catalog is required at each AD site. The Global Catalog is a central repositoryof domain information in an AD forest. A significant performance degradations and failure happen withoutthe local or Global Catalog. It is important for every AD query to search each domain in the forest. Themulti-site deployments are required to query across WAN links.
Contact center enterprise solutions use the Global Catalog for Active Directory. All domains in the AD Forestin which the Unified CCE Hosts reside must publish the Global Catalog for that domain. This includes alldomains with which your solution interacts, for example, Authentication, user lookup, and group lookup.
This does not imply cross-forest operation. Cross-forest operation is not supported.Note
Supported TopologiesUnified ICME/Unified CCH systems support the following AD topologies:
• Single Domain
◦Unified ICM/Unified CCH in the Corporate domain
◦Unified ICM/Unified CCH in a child domain of the Corporate domain
◦Unified ICM/Unified CCH as a standalone domain
◦Unified ICM/ Unified CCH as a tree root
A forest is a collection of AD domains that provide a namespace and control boundary within AD.
Unified ICMH/Unified CCH systems support the following AD topologies:
• Single Domain
Staging Guide for Cisco Unified ICM/Contact Center Enterprise, Release 11.6(1)12
Domain Requirements and Supported TopologiesDNS Requirements
◦NAM/CICM/Customer HDSs in a single domain
• Single Forest, Single Tree
◦NAM as a parent domain
• CICM as the NAM child, Customer HDS as the CICM child
• CICM and Customer HDS in a single domain as the NAM child
◦You can have an Administration client in a different domain from the Unified ICM/CCE instancein the same tree.
• Single Forest, Multiple Tree
You can have an Administration client in a different domain from the Unified ICM/CCEinstance in the same tree.
Note
Use the following example to determine how your domain structure looks before installing the DomainController.
This information is intended for the individuals responsible for:
• Configuring the AD Domain and Forest Topologies
• Staging new deployments of Unified ICMH/Unified CCH or Hosted NAM/CICMonMicrosoftWindowsServer
You must train the administrators of your Unified ICMH/Unified CCH system on the use and functions of:
• Unified ICMH/Unified CCH
• Microsoft Windows Server
• AD
• DNS
This section does not provide detailed Unified ICME, NAM/CICM, or Microsoft Windows Server specificinformation. You can find this information elsewhere in Cisco and Microsoft documentation. Individualsusing this document must have at least intermediate knowledge and experience with AD.
The ability to integrate Unified ICM into existing infrastructures is one of the premises of Unified ICM. Youcan mitigate the impact that the unique environments in these existing infrastructures have on Unified ICMwith minor adjustments to the support schema.
For more information, see the chapter Organizational Units.
Multiple Forests Not Supported"Multiple forests" means two or more forests in a given environment that share resources through manuallycreated trust relationships. All Unified CCE nodes, services, and users must reside in the same AD forest.
For additional information, see Security Guide for Cisco Unified ICM/Contact Center Enterprise.
Staging Guide for Cisco Unified ICM/Contact Center Enterprise, Release 11.6(1) 13
Domain Requirements and Supported TopologiesMultiple Forests Not Supported
UseMicrosoft Services or third-partyMicrosoft partner professional services to mitigate anyMicrosoft specificissues that might arise, as domain topologies vary.
Single Forest, Single Tree, and Single Domain Benefits and Usage ScenariosThe following are the benefits of using Single Forest, Single Tree, and Single Domain:
• Benefits
◦Simple setup
◦High stability
◦Smallest AD footprint
◦Least deployment-to-complexity ratio
◦Easiest support profile
• Sample usage scenarios
◦Enterprise Deployment
Single Domain ModelThis type of domain structure has one major advantage over the other models: simplicity. A single securityboundary defines the borders of the domain and all objects are located within that boundary. You do not needto establish trust relationships between other domains. Group Policy execution is easier due to this simplestructure.
When designing the newActive Directory structure from amultiple domain NT style structure, it was generallybelieved you could not consolidate on a single domain model. AD changes this. The capacity to span multipledomains in a single forest is improved and simplified.
Advantages of Single Domain ModelThe single domain model is ideal for many Unified ICM deployments. The first advantage of a single domainstructure is simplicity. When you add unnecessary complexity to a system architecture you introduce potentialrisk, and make it difficult to troubleshoot. A simpler, single AD domain structure reduces the administrationcosts and minimizes setbacks.
Another advantage is centralized administration. Organizations with a strong central IT structure want thecapability to consolidate their control over their entire IT and user structure. Because NT domains were notable to scale to these levels, the central control that organizations wanted was not available. Now, AD andthe single domain model allow for a high level of administrative control, including the capability to delegatetasks to lower sets of administrators.
Unified ICM benefits from this design because AD traversal queries are limited to the single domain. As aresult, request processing time is reduced. AD controls access and provides security which dramaticallyimproves the overall performance of Unified ICM.
Staging Guide for Cisco Unified ICM/Contact Center Enterprise, Release 11.6(1)14
Domain Requirements and Supported TopologiesSingle Forest, Single Tree, and Single Domain Benefits and Usage Scenarios
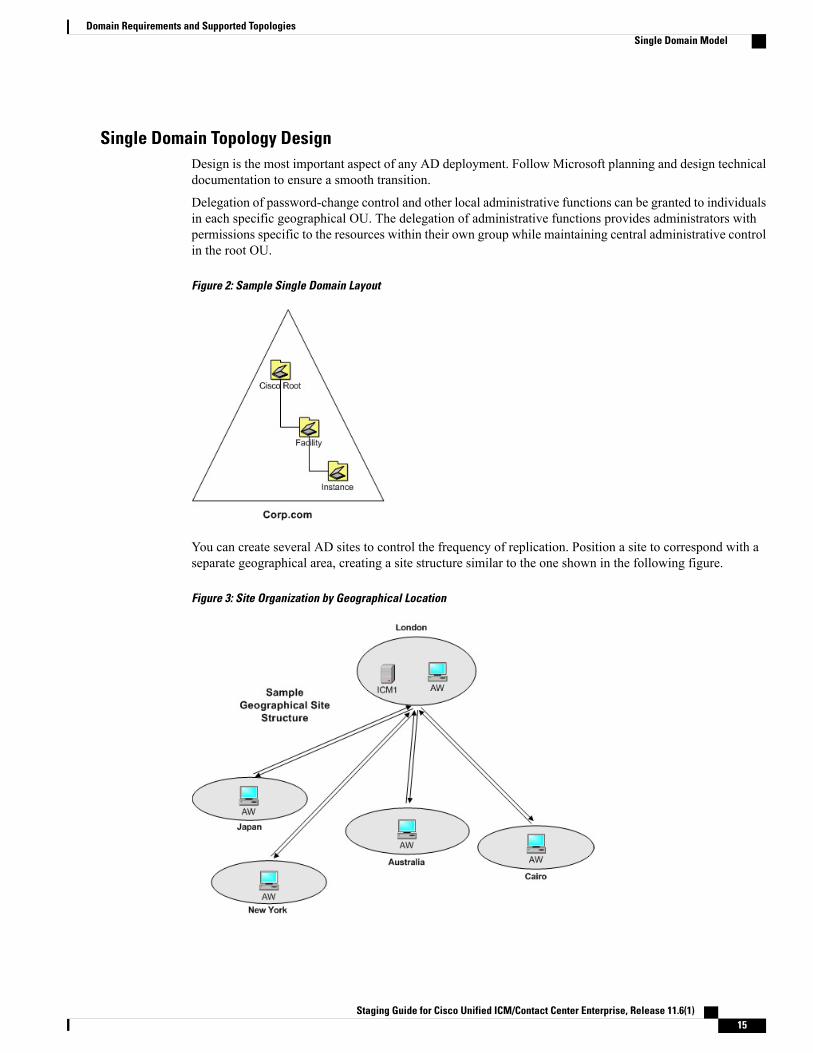
Single Domain Topology DesignDesign is the most important aspect of any AD deployment. Follow Microsoft planning and design technicaldocumentation to ensure a smooth transition.
Delegation of password-change control and other local administrative functions can be granted to individualsin each specific geographical OU. The delegation of administrative functions provides administrators withpermissions specific to the resources within their own group while maintaining central administrative controlin the root OU.
Figure 2: Sample Single Domain Layout
You can create several AD sites to control the frequency of replication. Position a site to correspond with aseparate geographical area, creating a site structure similar to the one shown in the following figure.
Figure 3: Site Organization by Geographical Location
Staging Guide for Cisco Unified ICM/Contact Center Enterprise, Release 11.6(1) 15
Domain Requirements and Supported TopologiesSingle Domain Model
Create separate sites to help throttle replication traffic and reduce the load placed on the WAN links betweenthe sites. For more details about site links and replication, see How Active Director Replication TopologyWorks.
This type of single domain design is ideal for both large and small organizations. Multiple domain use isreduced as delegation of administration is now accomplished by using OUs and Group Policy objects, andthe throttling of replication is accomplished through AD sites.
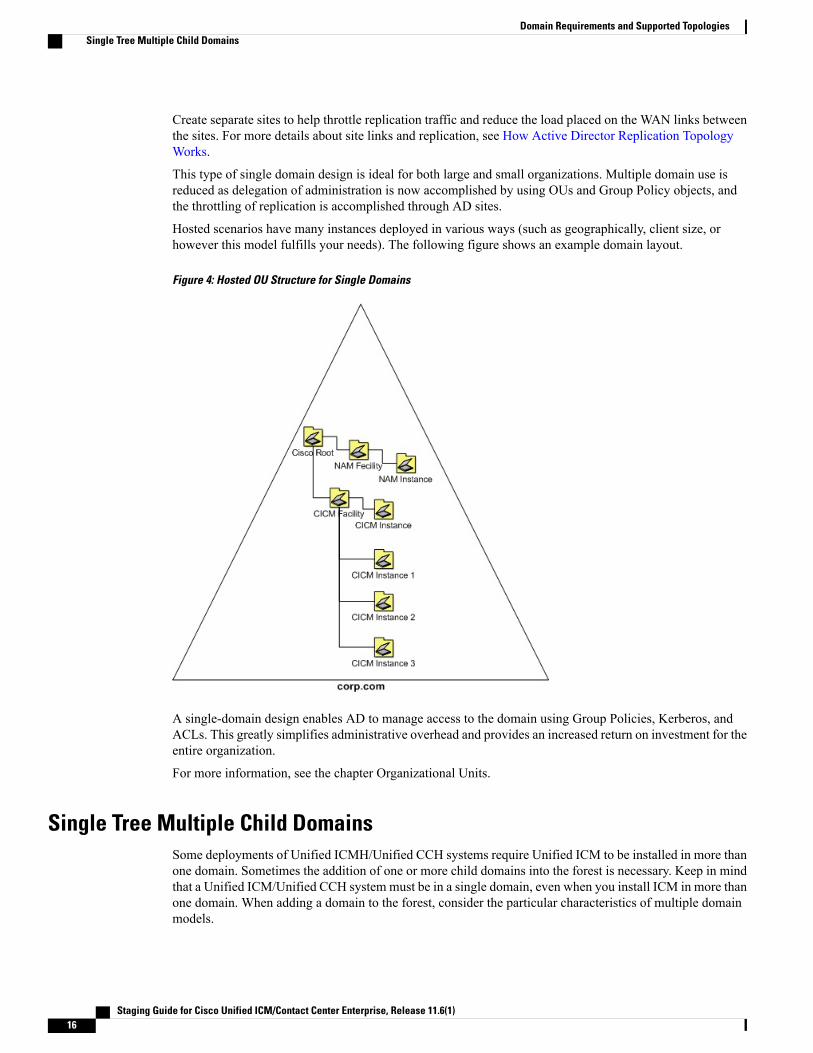
Hosted scenarios have many instances deployed in various ways (such as geographically, client size, orhowever this model fulfills your needs). The following figure shows an example domain layout.
Figure 4: Hosted OU Structure for Single Domains
A single-domain design enables AD to manage access to the domain using Group Policies, Kerberos, andACLs. This greatly simplifies administrative overhead and provides an increased return on investment for theentire organization.
For more information, see the chapter Organizational Units.
Single Tree Multiple Child DomainsSome deployments of Unified ICMH/Unified CCH systems require Unified ICM to be installed in more thanone domain. Sometimes the addition of one or more child domains into the forest is necessary. Keep in mindthat a Unified ICM/Unified CCH system must be in a single domain, even when you install ICM in more thanone domain. When adding a domain to the forest, consider the particular characteristics of multiple domainmodels.
Staging Guide for Cisco Unified ICM/Contact Center Enterprise, Release 11.6(1)16
Domain Requirements and Supported TopologiesSingle Tree Multiple Child Domains
By default, two-way transitive trusts exist between the child domain and the parent domain in AD. However,this two-way transitive trust does not mean that resource access is automatically granted to members of otherdomains. For example, a user in the child domain is not automatically granted any rights in the parent domain.Explicitly define all rights by using groups. Understanding this concept helps to determine the requirementsof domain addition.
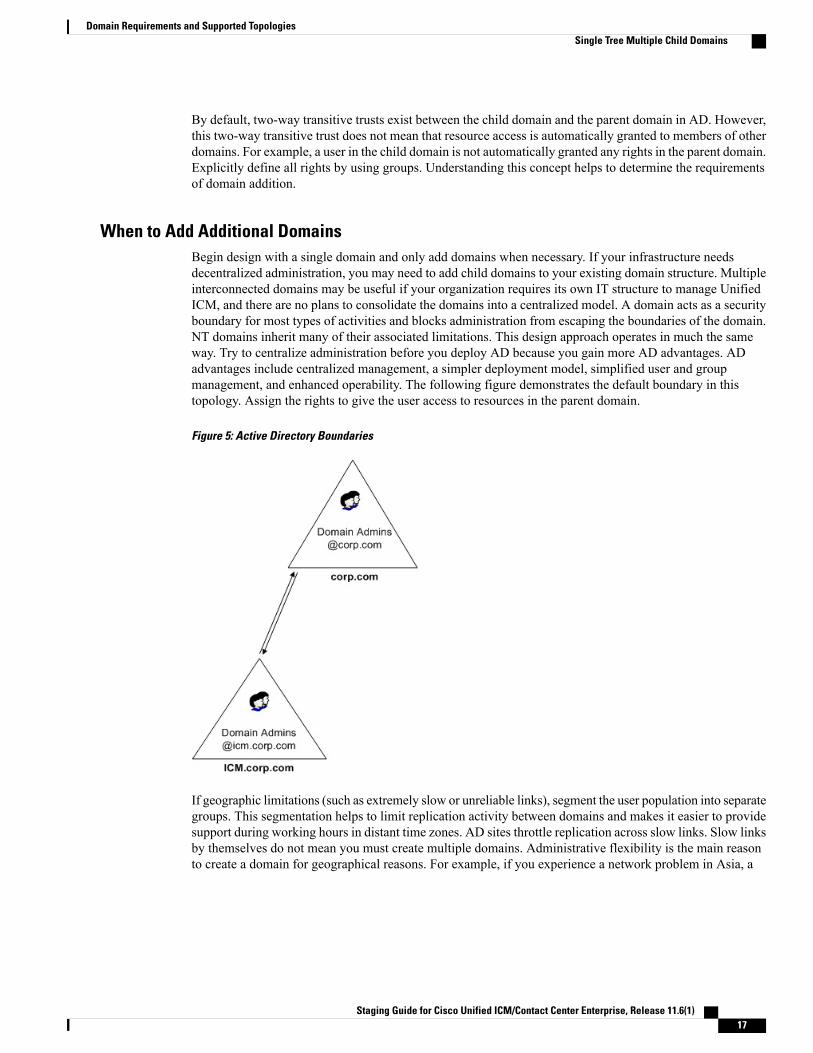
When to Add Additional DomainsBegin design with a single domain and only add domains when necessary. If your infrastructure needsdecentralized administration, you may need to add child domains to your existing domain structure. Multipleinterconnected domains may be useful if your organization requires its own IT structure to manage UnifiedICM, and there are no plans to consolidate the domains into a centralized model. A domain acts as a securityboundary for most types of activities and blocks administration from escaping the boundaries of the domain.NT domains inherit many of their associated limitations. This design approach operates in much the sameway. Try to centralize administration before you deploy AD because you gain more AD advantages. ADadvantages include centralized management, a simpler deployment model, simplified user and groupmanagement, and enhanced operability. The following figure demonstrates the default boundary in thistopology. Assign the rights to give the user access to resources in the parent domain.
Figure 5: Active Directory Boundaries
If geographic limitations (such as extremely slow or unreliable links), segment the user population into separategroups. This segmentation helps to limit replication activity between domains and makes it easier to providesupport during working hours in distant time zones. AD sites throttle replication across slow links. Slow linksby themselves do not mean you must create multiple domains. Administrative flexibility is the main reasonto create a domain for geographical reasons. For example, if you experience a network problem in Asia, a
Staging Guide for Cisco Unified ICM/Contact Center Enterprise, Release 11.6(1) 17
Domain Requirements and Supported TopologiesSingle Tree Multiple Child Domains
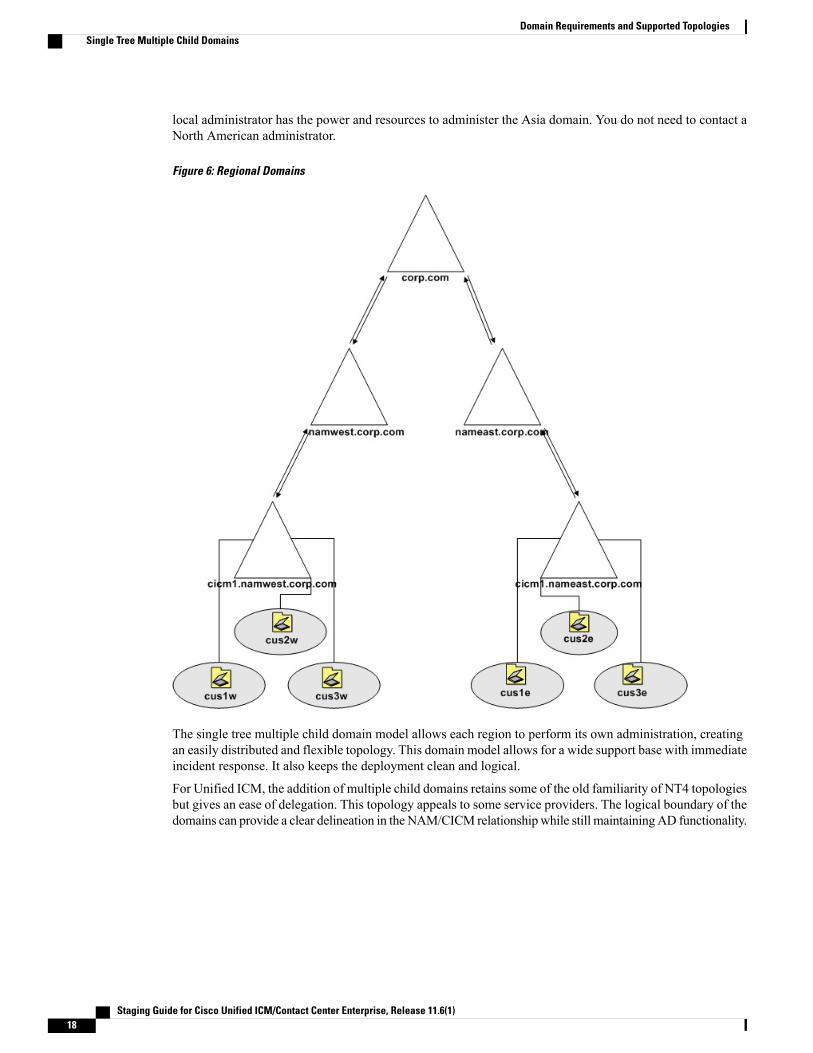
local administrator has the power and resources to administer the Asia domain. You do not need to contact aNorth American administrator.
Figure 6: Regional Domains
The single tree multiple child domain model allows each region to perform its own administration, creatingan easily distributed and flexible topology. This domain model allows for a wide support base with immediateincident response. It also keeps the deployment clean and logical.
For Unified ICM, the addition of multiple child domains retains some of the old familiarity of NT4 topologiesbut gives an ease of delegation. This topology appeals to some service providers. The logical boundary of thedomains can provide a clear delineation in the NAM/CICM relationshipwhile still maintainingAD functionality.
Staging Guide for Cisco Unified ICM/Contact Center Enterprise, Release 11.6(1)18
Domain Requirements and Supported TopologiesSingle Tree Multiple Child Domains
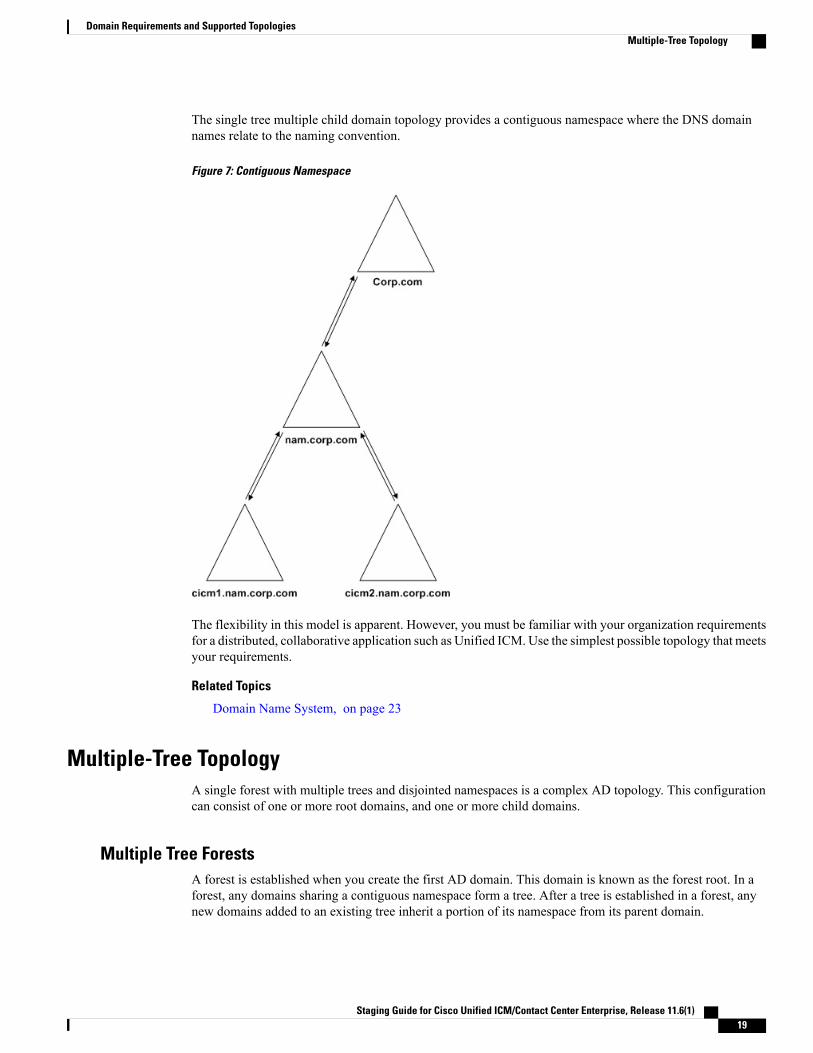
The single tree multiple child domain topology provides a contiguous namespace where the DNS domainnames relate to the naming convention.
Figure 7: Contiguous Namespace
The flexibility in this model is apparent. However, you must be familiar with your organization requirementsfor a distributed, collaborative application such as Unified ICM. Use the simplest possible topology that meetsyour requirements.
Related Topics
Domain Name System, on page 23
Multiple-Tree TopologyA single forest with multiple trees and disjointed namespaces is a complex AD topology. This configurationcan consist of one or more root domains, and one or more child domains.
Multiple Tree ForestsA forest is established when you create the first AD domain. This domain is known as the forest root. In aforest, any domains sharing a contiguous namespace form a tree. After a tree is established in a forest, anynew domains added to an existing tree inherit a portion of its namespace from its parent domain.
Staging Guide for Cisco Unified ICM/Contact Center Enterprise, Release 11.6(1) 19
Domain Requirements and Supported TopologiesMultiple-Tree Topology

Any domain added to the forest that maintains a unique namespace form a new tree in the forest. An AD forestcan consist of one or many trees in a single forest. In some instances, multiple trees are required so that acompany can meet its business requirements.
Multiple Trees in a Single Forest ModelIf your organization moves to an AD environment and uses an external namespace for its design, then youcan integrate the external namespace into a single AD forest. Use multiple trees in a single forest toaccommodate multiple DNS namespaces.
One of the most misunderstood characteristics of AD is the difference between a contiguous forest and acontiguous DNS namespace. You can integrate multiple DNS namespaces into a single AD forest as separatetrees in the forest as indicated by the following figure.
Figure 8: Simple Multiple Tree Topology
Only one domain in this design is the forest root (Corp.com in the preceding figure). Only this domain controlsaccess to the forest schema. All the other domains shown (including the subdomains of Corpbusiness.com,and the domains occupying different DNS structures) are members of the same forest. All trust relationshipsbetween the domains are transitive, and the trusts flow from one domain to another.
Business RequirementsEnsure that you plan a simple domain structure. If a business does not require multiple trees, do not increasethe difficulty by creating an elaborate multiple-tree structure. However, sometimes multiple trees are requiredand this requirement is decided only after a thorough assessment of the business. When considering a multipletree structure, keep the following requirements in mind:
DNS Names
If a business comprises of different subsidiaries, or has partnered with other businesses that maintain theirdistinct public identities as well as separate (noncontiguous) DNS names, you might have to create multipletrees in a single forest.
Staging Guide for Cisco Unified ICM/Contact Center Enterprise, Release 11.6(1)20
Domain Requirements and Supported TopologiesMultiple-Tree Topology
When to Choose a Multiple Tree Domain ModelIf your organization currently operates multiple units under separate DNS namespaces, consider a multipletree design. If you simply use multiple DNS namespaces, you are not automatically a candidate for this domaindesign. For example, suppose that you own five separate DNS namespaces. Then you decide to create an ADstructure based on a new namespace that is contiguous throughout your organization. When you consolidateyour AD under this single domain, you simplify the logical structure of your environment and keep your DNSnamespaces separate from AD.
If your organization extensively uses its separate namespaces, consider the following design. Each domaintree in the forest can then maintain a certain degree of autonomy, both perceived and real. This type of designoften satisfies branch office administrator needs.
The preceding domain design is logically more convoluted. Technically this domain design carries the samefunctionality as any other single forest design model. You set up all the domains with two-way transitivetrusts to the root domain and share a common schema and global catalog. The difference is that they all useseparate DNS namespaces. Reflect the separate DNS namespace use in the zones that exist on your DNSserver.
Additional Considerations for Topology DesignThe preceding sections provide a general overview of the considerations necessary when you choose a topologyfor Unified ICM in a corporate environment. Other considerations might arise, depending on a corporation'sinternal directives. The following topics include additional considerations for topology design.
Single DomainIn general, a Windows domain structure must be as simple as possible. The simplest approach is to create justone domain.
A single domain approach benefits:
• Most straightforward design
• Requires the least replication traffic
• Provides a minimum of administrative complexity
◦Requires the fewest domain administrators
◦Requires the fewest domain controllers
◦Allows administrative control at low levels in the domain by creating OUs and OU-leveladministrators—does not require a domain administrator to perform most tasks
Single Tree, Multiple DomainsA more complex structure is a root domain with domains beneath it.
Single tree, multiple domain approach provides the following benefit: the domain administrator of the rootdomain has complete power over the AD tree.
However, consider the following drawbacks when you use the single tree, multiple domain approach:
Staging Guide for Cisco Unified ICM/Contact Center Enterprise, Release 11.6(1) 21
Domain Requirements and Supported TopologiesAdditional Considerations for Topology Design
• More complex than a single domain
• Creates more replication traffic
• Requires more domain controllers than a single domain
• Requires more domain administrators than a single domain
• Setting tree-wide Group Policies requires using site Group Policy Objects (GPOs) or replicateddomain/OU GPOs
• Tree could become complex if you create too many child domains
Single Forest, Multiple TreesIf the DNS names are contiguous for all domains in a forest, they can belong to a single domain tree. If theirDNS names are not contiguous, create separate domain trees. So, if one domain tree is sufficient, there is noinherent need to create multiple trees.
Before using a single forest, multiple tree approach, consider the following drawbacks:
• Far more complex than a single domain
• Creates substantially more replication traffic
• Requires more domain controllers than a single domain
• Requires more domain administrators than a single domain
• Requires using site Group Policy Objects (GPOs) to set Group Policies
Additional Considerations
Security
Some organizations separate business units to provide security. This perception is a holdover from WindowsNT4 where the domain boundary did provide the security. AD, however, provides layers of actual security.These layers are all customizable, and you can set them up in any of the supported topologies.
Corporate Directives
Many organizations have standard policies and procedures that they are accustomed to using as a Globalstandard. Unified ICM is a robust application and might be sensitive to some of these directives. For instance,some organizations have daily or weekly reboot policies for domain controllers. This situation requires a firmunderstanding of the effect AD has on the domain structure. If you turn all of the Domain Controllers offsimultaneously, anything that relies on AD breaks. To avoid this problem, stagger the Domain Controllerreboots so at least one domain controller per domain remains online at any given time.
Many variations and unique policies can impact Unified ICM. The procedures detailed in this guide delineatethe best possible methods of deploying and maintaining Unified ICM. Review your company policies andcompare themwith the requirements established in this guide. If conflicts arise, correct them before deployment.
Staging Guide for Cisco Unified ICM/Contact Center Enterprise, Release 11.6(1)22
Domain Requirements and Supported TopologiesAdditional Considerations for Topology Design
Domain Name SystemAD integrates with the Domain Name System (DNS) as follows:
• AD and DNS have the same hierarchical structure.
Although separate and executed differently for different purposes, an organization namespace for DNSand AD have an identical structure.
• You can store DNS zones in AD.If you use the Microsoft Windows Server DNS Server service, you can store primary zone files in ADfor replication to other AD controllers.
• AD uses DNS as a locator service, resolving AD domain, site, and service names to an IP address.
To log on to an AD domain, an AD client queries their configured DNS server for the IP address of theLightweight Directory Access Protocol (LDAP) service running on a domain controller for a specifieddomain.
You can use dcdiag.exe to troubleshoot client computers that cannot locate a domaincontroller. This tool can help determine both server and client DNS mis-configurations.
Note
While AD is integrated with DNS and shares the same namespace structure, it is important to understand theirdifferences:
• DNS is a name resolution service.DNS clients send DNS name queries to their configured DNS server. The DNS server receives the namequery and either resolves the name query through locally stored files or consults another DNS serverfor resolution. DNS does not require AD to function.
• AD is a directory service.
AD provides an information repository and services to make information available to users andapplications. AD clients send queries to domain controllers using the Lightweight Directory AccessProtocol (LDAP). An AD client queries DNS to locate a domain controller. AD requires DNS to function.
Follow the Microsoft method for AD to create lookup zones and to configuring DNS servers:
• Select AD Integrated Zone for both forward and reverse lookup zones.
• Listen only on a single Visible IP address (DNS – Properties – interfaces tab).
• Select the Allow Dynamic updates and Only Secure updates options.
• Limit zone transfers to limited and trusted servers only.
• Add all additional addresses manually (high, privates, private highs) in DNS as a Host record.
• If you use Corporate DNS servers rather than the Domain Controllers for name resolution, ensure thatthe Corporate DNS servers have forwarding enabled to the AD servers.
Staging Guide for Cisco Unified ICM/Contact Center Enterprise, Release 11.6(1) 23
Domain Requirements and Supported TopologiesDomain Name System
Configure Active Directory SitesOn Unified ICM Root Domain Controller:
Procedure
Step 1 Choose Start > Programs > Administrative Tools > AD Sites and Services.Step 2 Rename the default first site name as per AD Site Plan in Unified ICM System Diagram.
a) For a geographically separated DC, right-click Sites.b) Select New Site.c) Enter the site name of the additional domain controller based on the Unified ICM System Diagram.
Step 3 Create subnets for each DC site:a) Right-click the Subnets folder and select New Subnet.b) Enter the subnet address and mask, respective to the LAN at the Domain Controller Site.c) Highlight the Site Name associated with that subnet.
Step 4 Expand the Servers folder from the original first site folder.a) For each Server you need to move to a different site, right-click on server name, selectMove and highlight
the Site you want to move it to.
Step 5 Expand Inter-Site Transport under Sites.a) Open the IP folder and select DEFAULTIPSITELINK from the right pane.b) Right-click and select Properties. Ensure that both sites are added as entries in the Sites in this Site Link
window.c) Change the Replicate Every value to 15 minutes.
Assign Global Catalog and Configure Time SourceTo assign Global Catalogs and configure the time source per your Unified ICM System Diagram and theUnified ICM/CCE System Design Specification for your setup:
Procedure
Step 1 Open Active Directory Sites and Services.Step 2 Connect to the Domain Controller designated as the Global Catalog.Step 3 Right-click NTDS Settings and select Properties. Select Global Catalog.Step 4 Move FSMO roles, as indicated in your Unified ICM System Diagram and the Unified ICM/CCE System
Design Specification for your setup.Step 5 The Forest Time Source defaults to the PDC Emulator, which is originally created on the Forest Root Domain
Controller.If the PDC Emulator moved to another Domain Controller, redefine the Time Source as either that server, oruse an external Time Source.
Staging Guide for Cisco Unified ICM/Contact Center Enterprise, Release 11.6(1)24
Domain Requirements and Supported TopologiesConfigure Active Directory Sites
a) On the Server currently running the PDC Emulator, run the following command: Net time /setsntp: <DNSName of Time Source>.
b) To synchronize a Server to the Time source, see the procedure available on the Microsoft Website (http://support.microsoft.com/kb/816042).
Windows Server 2008 R2 or Windows Server 2012 R2 domain controllers that publish theirGlobal Catalogs are required to be used. The preferred DNS servers must not be manuallychanged. It is important that all the other DNS Servers must have delegation set up with theDNS server of the forest Root Primary Domain Controller.
Important
Configure DNS Server on Forest Root Domain ControllerProcedure
Step 1 Choose Start > Programs > Administrative Tools > DNS.Step 2 Expand Hostname Tree.Step 3 Expand Forward Lookup Zones.Step 4 Select the machine name, then right-click and select Properties.Step 5 On the Interfaces tab, selectListen onOnly the following IP addresses and remove all but the visible machine
address.Step 6 Complete the configuration of AD Integrated Forward and Reverse Lookup Zones.
• Select the Unified ICM Domain zone name under Forward Lookup Zones, right-click and selectProperties.
• On the General tab, for Allow Dynamic Updates, select Only Secure Updates from the menu.
• Only use the Zone Transfers tab when a Trust exists between this domain and another domain. You needto Transfer Zone updates from this AD Integrated Zone to a Standard Secondary Zone on the DNSServers in the other domain. Select Allow Zone Transfers, then select only to the following serversand enter the IP Addresses of the DNS Servers in the other domain.
• To configure the required Reverse Lookup Zones, repeat Step 13 below for each Unified ICM domainlevel network within the Forward Lookup Zone.
Networks within a Forward Lookup Zone include all visible and private networks utilized withina DNS Zone. These networks define Reverse Lookup Zones relative to the Forward LookupZone.
Note
Step 7 Under the Server Name, right-click on Reverse Lookup Zones and select New Zone.Step 8 Within the New Zone wizard, select Active Directory Integrated.Step 9 In the Reverse Lookup Zone window, select Network ID and enter the required number of octets for the
Reverse Lookup Zone. The Reverse Lookup Zone Name is automatically entered.Step 10 Repeat the Steps below for each Unified ICM domain Reverse Lookup Zone.
a) Select the Zone name under Reverse Lookup Zones, then right–click and select Properties.
Staging Guide for Cisco Unified ICM/Contact Center Enterprise, Release 11.6(1) 25
Domain Requirements and Supported TopologiesConfigure DNS Server on Forest Root Domain Controller
b) On the General tab, for Allow Dynamic Updates, select Only Secure Updates from the menu.
Step 11 Manually complete the DNS Host and PTR records.a) Manually enter the hostnames for the machines that house ICM nodes, as well as all NICs and Peripherals
for which Web Setup requires hostname resolution, into the appropriate DNS Forward Lookup Zone.b) On the DNS Server, right-click on the Forward lookup Zone Name and selectNewHost. (The hostname
of this Root Domain Controller is already in the file.)c) Add all Unified ICM hostnames (visible, visible high, private, private high, SAN) and their associated IP
Addresses. Check the box to create an associated PTR Record (reverse lookup zone record).d) Manually enter any Peripherals (ACDs/VRUs) and NICs accessed by the Unified ICM using hostname
resolution in the Forward Lookup Zone.
Staging Guide for Cisco Unified ICM/Contact Center Enterprise, Release 11.6(1)26
Domain Requirements and Supported TopologiesConfigure DNS Server on Forest Root Domain Controller
C H A P T E R 3Organization Units
• What Is an OU?, page 27
• OU Hierarchies, page 27
• Cisco Root OU, page 28
• Facility OU, page 29
• Instance OU, page 29
• Security Groups, page 30
What Is an OU?An OU is a container in the AD domain that can contain other OUs, as well as users, computers, groups, andso on. OUs are a way to organize your objects into containers based on a logical structure. The OU designenables you to assign a flexible administrative model that eases the support and management of a large,distributed enterprise. The OU design is also used for setting up security groups.
AD controls permission to create an OU. Typically, the Domain Administrator has rights to create OUs at theroot of the domain, then delegates control of those OUs to other users. After the Domain Administratordelegates a user OU control, the user has permission to create the Cisco Root OU.
Related Topics
Security Groups, on page 30
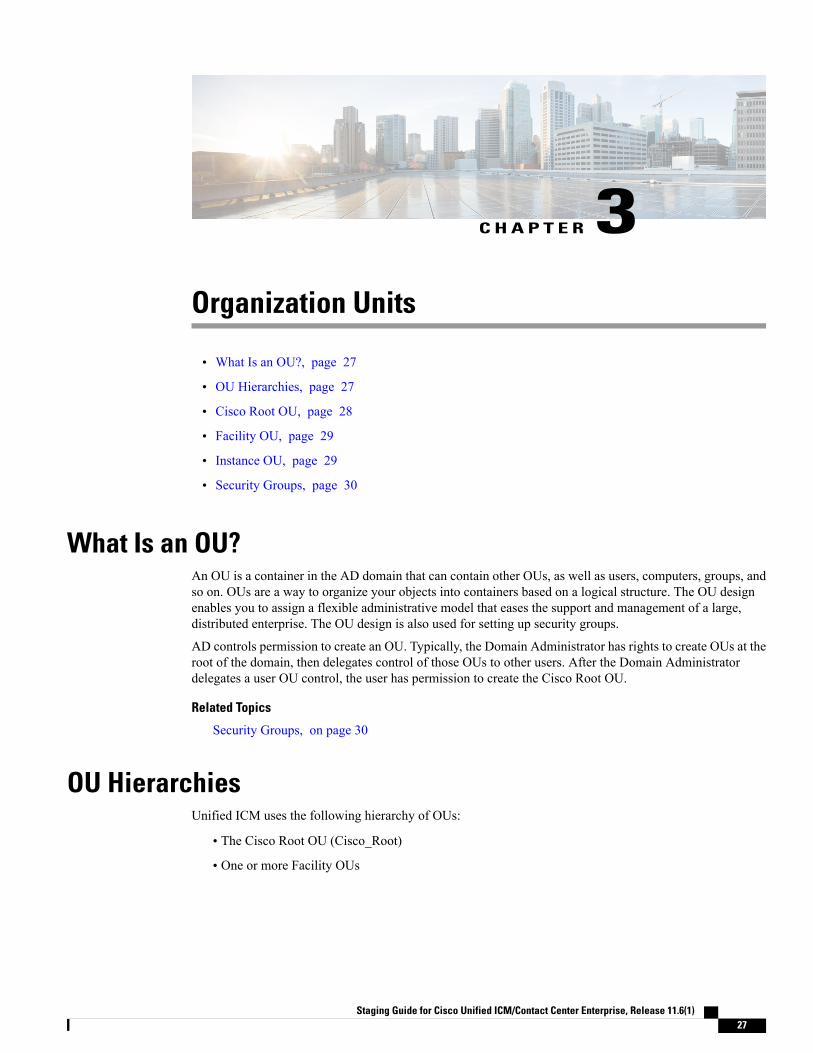
OU HierarchiesUnified ICM uses the following hierarchy of OUs:
• The Cisco Root OU (Cisco_Root)
• One or more Facility OUs
Staging Guide for Cisco Unified ICM/Contact Center Enterprise, Release 11.6(1) 27
• One or more Instance OUs
Figure 9: Organizational Unit (OU) Hierarchy
All objects that Unified ICM requires are created in OUs on the domain. You can place the OU hierarchy thatthe Unified ICM creates at the Root of the domain, or in another OU. Servers are not placed in this OUhierarchy. You can place servers in other OUs on the domain.
Note • The system software always uses a Cisco Root OU named “Cisco_ICM” (see preceding figure).
• The Domain Admin is a member of the Config, and Setup in the Cisco Root OU.
• Installing Unified ICM in the corporate domain is now a supported environment.
Related Topics
Security Groups and OUs, on page 30Cisco Root OU, on page 28Facility OU, on page 29Instance OU, on page 29
Cisco Root OUYou can place the Cisco Root OU at any level within the domain. Software components locate the Cisco RootOU by searching for its name.
The Cisco Root OU contains one or more Facility OUs.
What is the Cisco Root OU?
• Unified ICM always uses a Cisco Root OU named “Cisco_ICM”.
Staging Guide for Cisco Unified ICM/Contact Center Enterprise, Release 11.6(1)28
Organization UnitsCisco Root OU
• The OU containing all domain resources created by Unified ICM.
• Defines permissions for all Unified ICM instances.
• Only one Cisco Root OU can exist in each domain
For more information, see Appendix B - Moving the Cisco Root OU.
Related Topics
Facility OU, on page 29Create or Add Cisco Root, on page 78
Facility OUA Facility OU is a group of Instance OUs that are organizationally related or have similar management needs.Permissions defined for a Facility OU propagate to each Instance OU contained in that facility.
The Facility OU provides an administrative separation between Unified ICM instances. For example, youmight have different Facility OUs for Lab and Production Unified ICM instances; or in a Unified ICMHdeployment, you might have separate Facility OUs for NAM and CICM instances.
A Facility OU inherits the permissions set for the containing Cisco Root OU. You can then specify differentuser permissions specific to that Facility.
Facility OU names must be 32 characters or less.Note
Related Topics
Instance OU, on page 29Cisco Root OU, on page 28
Instance OUAn Instance OU inherits the permissions set for the containing Facility OU. You can then specify differentuser permissions specific to that instance.
Related Topics
Facility OU, on page 29
Unified ICM Instance OUA Unified ICM instance is a single installation of the system software. It consists of several components(including the CallRouter, the Logger, Administration & Data Server, and Peripheral Gateways), some ofwhich might be duplexed.
An Instance OU:
• Is the representation of a Unified ICM instance.
Staging Guide for Cisco Unified ICM/Contact Center Enterprise, Release 11.6(1) 29
Organization UnitsFacility OU
◦Each Unified ICM instance has an associated Instance OU.
• Defines permissions for that instance as part of that Instance OU.An Instance OU inherits the permissions set for the containing Facility OU; you can then specify differentuser permissions specific to that Instance.
• Is named by the user according to the following rules:
◦Limited to 5 characters
◦Alphanumeric characters only
◦Can not start with a numeric character
◦Some instance names are reserved (local and sddsn)
Related Topics
Facility OU, on page 29
Security Groups
Security Groups and OUsEach OU in the OU hierarchy has associated security groups.
Security groups permissions are inherited down the chain in the OU hierarchy. For example, users added toa security group for a Facility OU have the privileges of that security group for all Instance OUs containedin that Facility OU.
Each OU has the following security groups:
• Config Security Group
• Setup Security Group
In addition to the preceding list, Instance OUs also contain the Service Security Group.
Microsoft limits the number of cascading groups in the OU hierarchy. For more information, seeMicrosoftActive Directory Maximum Limits - Scalability article at http://technet.microsoft.com/en-us/library/active-directory-maximum-limits-scalability(v=WS.10).aspx.
Warning
Users who are local administrators for the server automatically can perform configuration tasks. Therefore,only users who are members of the Setup Security Group must be local administrators.
Warning
Staging Guide for Cisco Unified ICM/Contact Center Enterprise, Release 11.6(1)30
Organization UnitsSecurity Groups
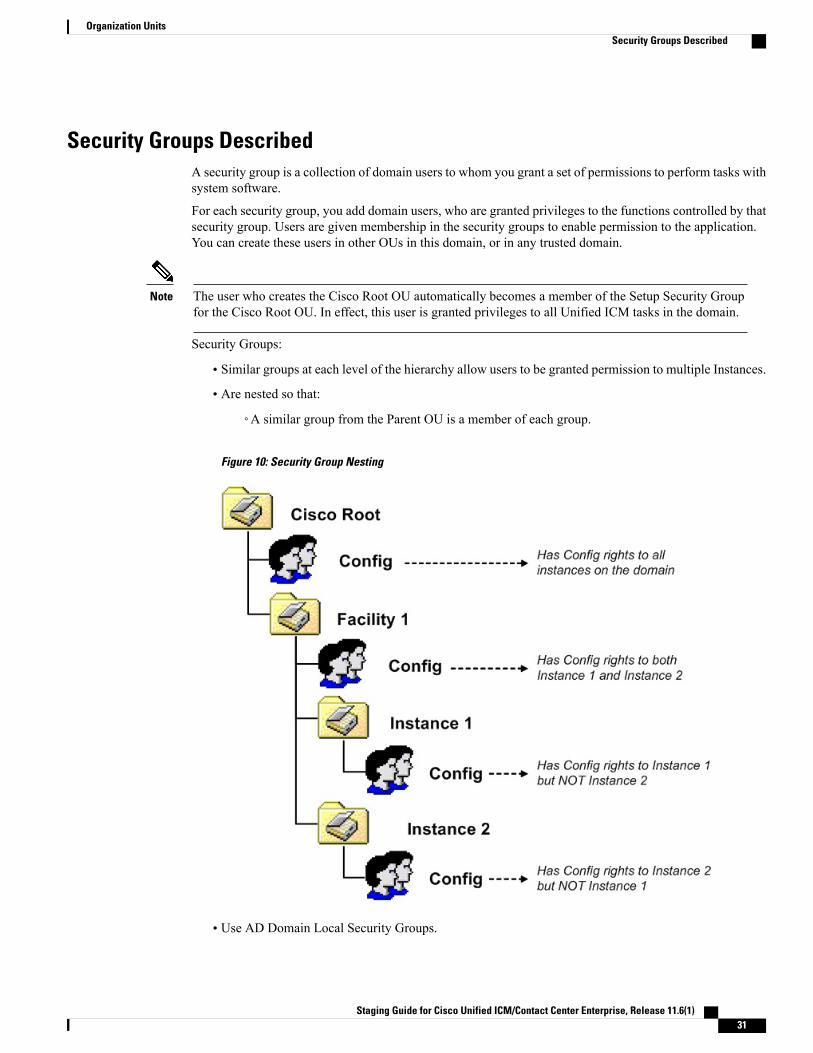
Security Groups DescribedA security group is a collection of domain users to whom you grant a set of permissions to perform tasks withsystem software.
For each security group, you add domain users, who are granted privileges to the functions controlled by thatsecurity group. Users are given membership in the security groups to enable permission to the application.You can create these users in other OUs in this domain, or in any trusted domain.
The user who creates the Cisco Root OU automatically becomes a member of the Setup Security Groupfor the Cisco Root OU. In effect, this user is granted privileges to all Unified ICM tasks in the domain.
Note
Security Groups:
• Similar groups at each level of the hierarchy allow users to be granted permission to multiple Instances.
• Are nested so that:
◦A similar group from the Parent OU is a member of each group.
Figure 10: Security Group Nesting
• Use AD Domain Local Security Groups.
Staging Guide for Cisco Unified ICM/Contact Center Enterprise, Release 11.6(1) 31
Organization UnitsSecurity Groups Described
Related Topics
Add Users to Security Group, on page 86
Security Group Names and MembersThe function names of the security groups are Setup, Config, and Service. Group names must be unique inAD. Combining the names of levels of the hierarchy with the function name helps allow a unique name to begenerated.
Names of the security groups created by OUs at various levels include:
• Root: Cisco_ICM_<function>
• Facility: <Facility>_<function>
• Instance: <Facility>_<Instance>_<function>
NetBIOS names truncate if needed and random digits are appended.
Security Group Members:
• You can add any user from a trusted domain to a group.
• Group nesting allows for groups outside the OU hierarchy.
Config Security GroupThe Config Security Group controls access privileges to the common Unified ICM configuration tasks.
Domain users whom you added to a Config Security Group have access to the following applications at thatpoint in the OU hierarchy and below:
• Configuration Manager
Config users can only perform AD operations using the User List tool (provided theyhave AD permissions to do so). Members of the Setup Group automatically have thepermissions required to use the User List tool.
Note
• Script Editor
• Internet Script Editor
• Database Access
◦SQL Permission granted to the Configuration group instead of to individual users. Database accessis given explicitly to the Instance level group. Group nesting gives this access to Facility and Rootconfiguration members.
Added to the GeoTelGroup role on the Administration & Data Server DB.
Staging Guide for Cisco Unified ICM/Contact Center Enterprise, Release 11.6(1)32
Organization UnitsSecurity Group Names and Members
For Administration & Data Server DBs only. Not for Logger DBs and HDSs.Note
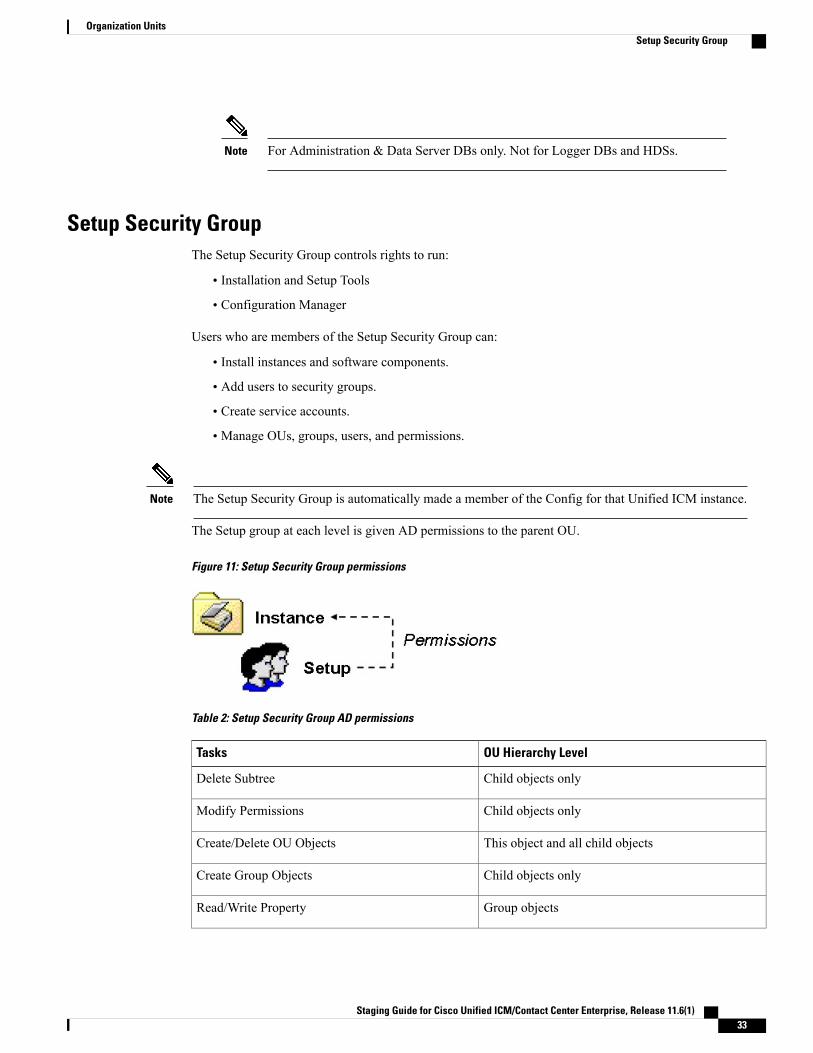
Setup Security GroupThe Setup Security Group controls rights to run:
• Installation and Setup Tools
• Configuration Manager
Users who are members of the Setup Security Group can:
• Install instances and software components.
• Add users to security groups.
• Create service accounts.
• Manage OUs, groups, users, and permissions.
The Setup Security Group is automatically made a member of the Config for that Unified ICM instance.Note
The Setup group at each level is given AD permissions to the parent OU.
Figure 11: Setup Security Group permissions
Table 2: Setup Security Group AD permissions
OU Hierarchy LevelTasks
Child objects onlyDelete Subtree
Child objects onlyModify Permissions
This object and all child objectsCreate/Delete OU Objects
Child objects onlyCreate Group Objects
Group objectsRead/Write Property
Staging Guide for Cisco Unified ICM/Contact Center Enterprise, Release 11.6(1) 33
Organization UnitsSetup Security Group
OU Hierarchy LevelTasks
This object and all child objectsSpecial: Create/Delete User Objects
For more information see the chapter Service Account Manager.
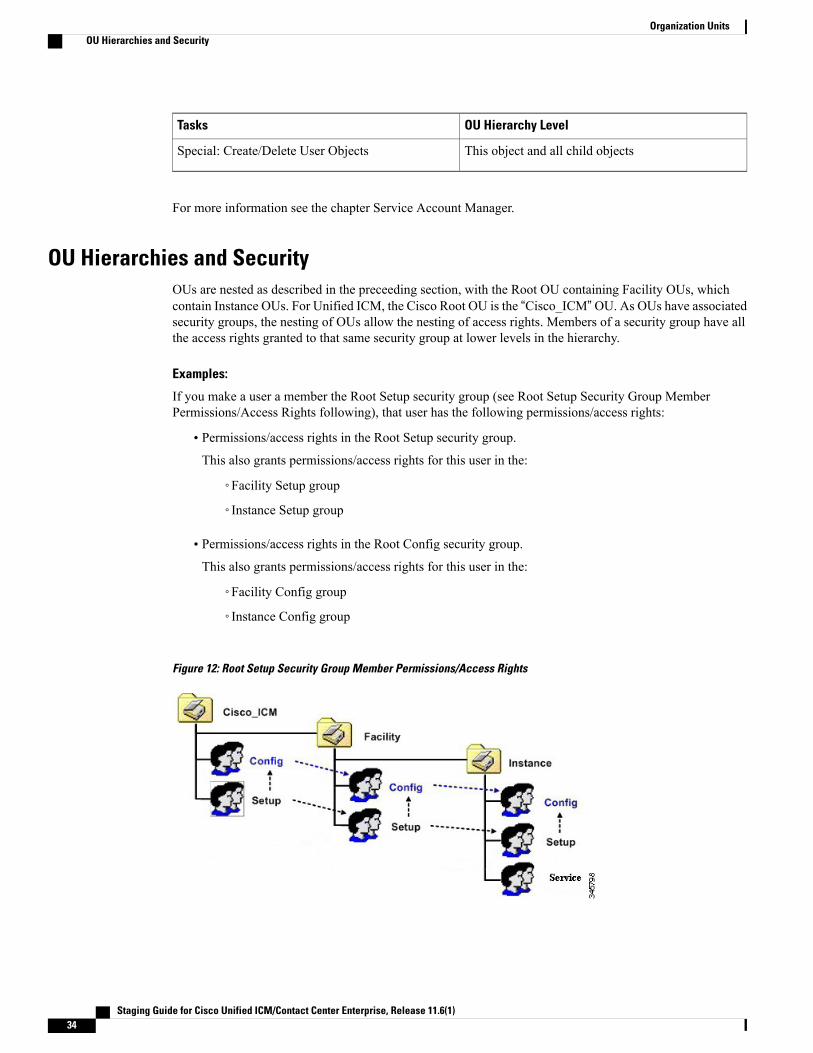
OU Hierarchies and SecurityOUs are nested as described in the preceeding section, with the Root OU containing Facility OUs, whichcontain Instance OUs. For Unified ICM, the Cisco Root OU is the “Cisco_ICM”OU. As OUs have associatedsecurity groups, the nesting of OUs allow the nesting of access rights. Members of a security group have allthe access rights granted to that same security group at lower levels in the hierarchy.
Examples:
If you make a user a member the Root Setup security group (see Root Setup Security Group MemberPermissions/Access Rights following), that user has the following permissions/access rights:
• Permissions/access rights in the Root Setup security group.This also grants permissions/access rights for this user in the:
◦Facility Setup group
◦Instance Setup group
• Permissions/access rights in the Root Config security group.This also grants permissions/access rights for this user in the:
◦Facility Config group
◦Instance Config group
Figure 12: Root Setup Security Group Member Permissions/Access Rights
Staging Guide for Cisco Unified ICM/Contact Center Enterprise, Release 11.6(1)34
Organization UnitsOU Hierarchies and Security
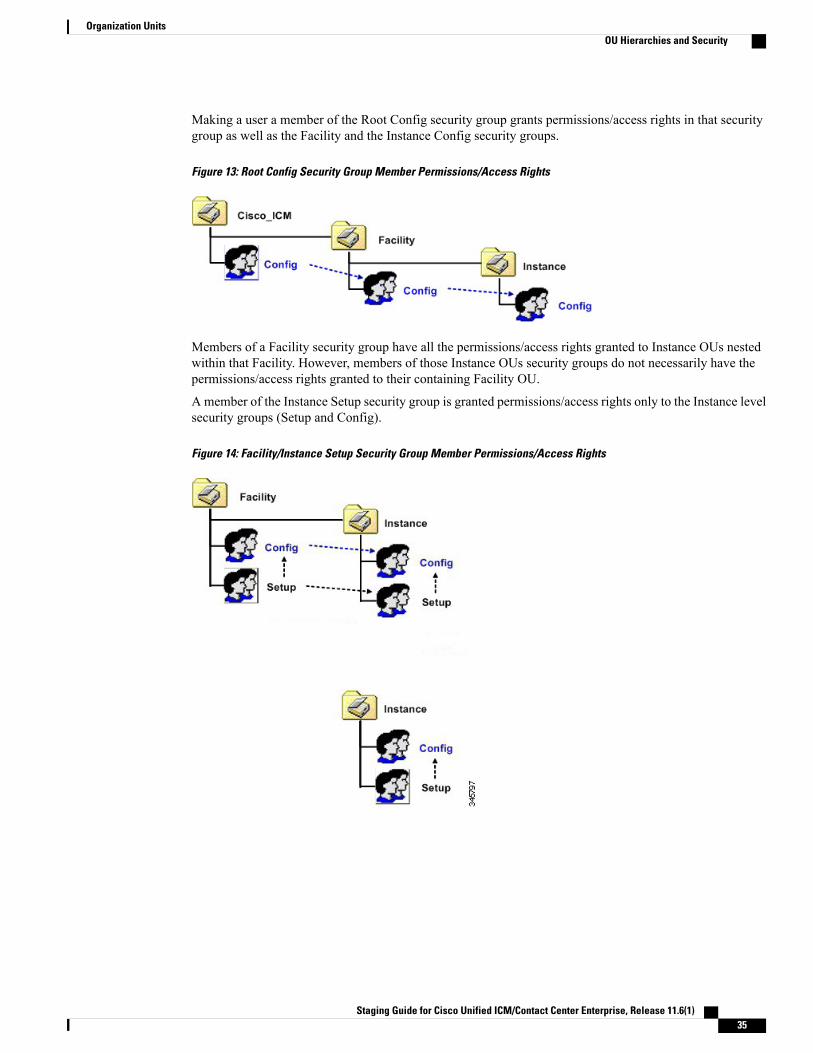
Making a user a member of the Root Config security group grants permissions/access rights in that securitygroup as well as the Facility and the Instance Config security groups.
Figure 13: Root Config Security Group Member Permissions/Access Rights
Members of a Facility security group have all the permissions/access rights granted to Instance OUs nestedwithin that Facility. However, members of those Instance OUs security groups do not necessarily have thepermissions/access rights granted to their containing Facility OU.
A member of the Instance Setup security group is granted permissions/access rights only to the Instance levelsecurity groups (Setup and Config).
Figure 14: Facility/Instance Setup Security Group Member Permissions/Access Rights
Staging Guide for Cisco Unified ICM/Contact Center Enterprise, Release 11.6(1) 35
Organization UnitsOU Hierarchies and Security
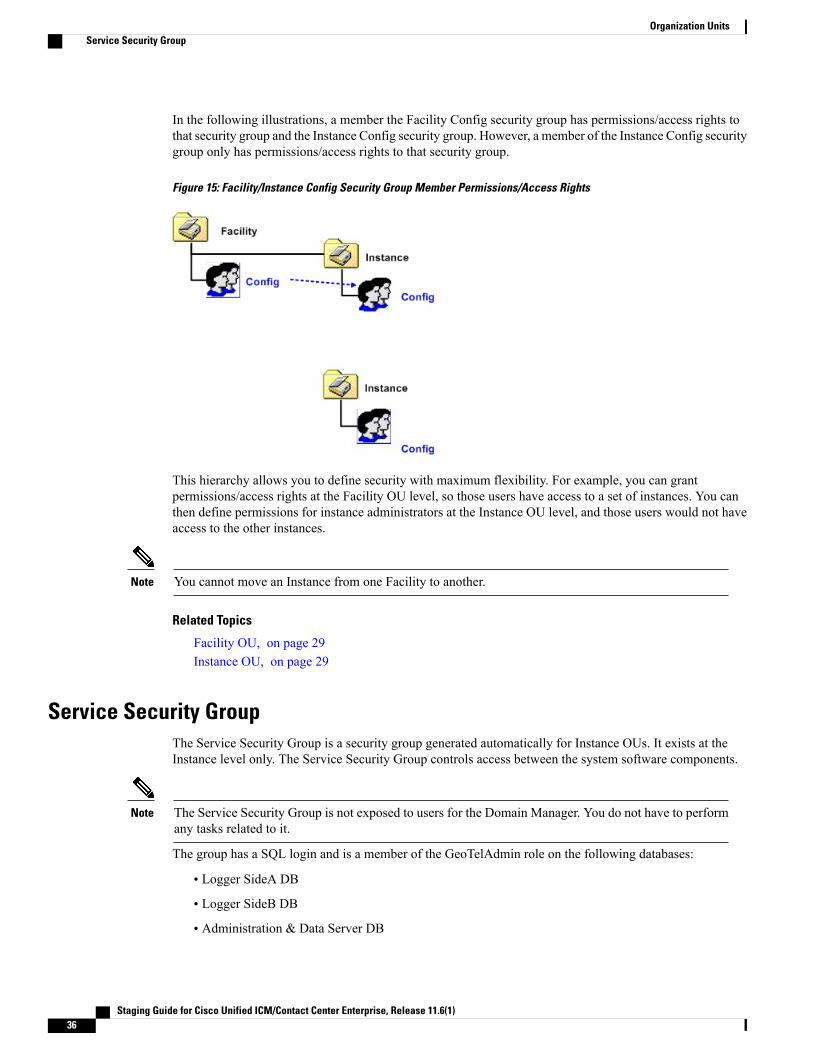
In the following illustrations, a member the Facility Config security group has permissions/access rights tothat security group and the Instance Config security group. However, a member of the Instance Config securitygroup only has permissions/access rights to that security group.
Figure 15: Facility/Instance Config Security Group Member Permissions/Access Rights
This hierarchy allows you to define security with maximum flexibility. For example, you can grantpermissions/access rights at the Facility OU level, so those users have access to a set of instances. You canthen define permissions for instance administrators at the Instance OU level, and those users would not haveaccess to the other instances.
You cannot move an Instance from one Facility to another.Note
Related Topics
Facility OU, on page 29Instance OU, on page 29
Service Security GroupThe Service Security Group is a security group generated automatically for Instance OUs. It exists at theInstance level only. The Service Security Group controls access between the system software components.
The Service Security Group is not exposed to users for the Domain Manager. You do not have to performany tasks related to it.
Note
The group has a SQL login and is a member of the GeoTelAdmin role on the following databases:
• Logger SideA DB
• Logger SideB DB
• Administration & Data Server DB
Staging Guide for Cisco Unified ICM/Contact Center Enterprise, Release 11.6(1)36
Organization UnitsService Security Group

• HDS
• Outbound Option DB
The Service Account Manager creates Service Logon Accounts in the Instance OU for the following services:
• Logger
• Distributor
• Tomcat
Service Logon Accounts
• You do not have to randomly generate passwords. You can provide passwords and save them in AD oron the local machine, or save them on both.
• Passwords are 64 characters long and include:
◦English upper case characters (A..Z)
◦English lower case characters (a..z)
◦Base 10 digits (0..9)
◦Non-alphanumeric characters (! @ # % ^ & * ( ) [ ] { } ` ~ - + ? . , ; : ' < >)
• Are added to local Administrators group.
• Are given rights to Logon as a Service.
• DNS names are comprised of: <Instance component machine>Possible components are the:
◦Distributor (NetBIOS name is Distrib)
◦LoggerA
◦LoggerB
◦Tomcat
• NetBIOS names are comprised of: <instance component-#####>where ##### is used to represent digits added to ensure the NetBIOS name is comprised of the full 20characters allowed to help ensure, but not guarantee its uniqueness. The list of possible components isthe same as those for the DNS names except as indicated above.
Related Topics
Instance OU, on page 29
Staging Guide for Cisco Unified ICM/Contact Center Enterprise, Release 11.6(1) 37
Organization UnitsService Security Group

Staging Guide for Cisco Unified ICM/Contact Center Enterprise, Release 11.6(1)38
Organization UnitsService Security Group
C H A P T E R 4User Migration Tool
• User Migration Tool Prerequisites, page 39
• User Migration Tool Features, page 40
• Migration Scenarios, page 40
• Internationalization (I18n) and Localization (L10n) Considerations, page 41
• Security Considerations, page 41
• User Migration Steps, page 41
• User Migration Tool Modes, page 43
• Users from Trusted Domains, page 48
• User Migration Tool Troubleshooting, page 49
User Migration Tool PrerequisitesYou must meet the following prerequisites before you run the User Migration Tool:
• In the target domain, run DomainManager. Lay out the Unified ICMOU hierarchy and create the UnifiedICM security groups for each Unified ICM instance before you run the User Migration Tool.
• Import the exported Unified ICM registry from the source Logger system to the target Logger system.
• Back up the Logger database from the source Logger system and restore it on the target Logger systembefore you run the User Migration Tool in the target domain.
• If users from an external domain are members of the Unified ICM security groups at the source domain,use the“Active Directory Domains and Trusts” tool to establish the trust relationship. Establish the trustrelationship between the target domain and the external domain that corresponds to the trust relationshipthat existed between the source domain and the external domain.
• If you move the Unified ICM server to a new domain, make sure that the SQL Server migrates to thenew domain before you run the User Migration Tool.
• In the source domain, the user who runs the User Migration Tool must be a domain user and a memberof the local system administrator group.
Staging Guide for Cisco Unified ICM/Contact Center Enterprise, Release 11.6(1) 39
• In the target domain, the user who runs the User Migration Tool must have the following privileges:
◦The user must be a member of the local system administrator group.
◦The user must be a domain user.
◦The user must have at least one of the following privileges set:
◦a domain administrator
◦a member of the Cisco_ICM_Setup (Root) security group
• Access the external domain to migrate the membership of Unified ICM users who belong to an externaldomain. Access requires external domain user account credentials with read privileges.
User Migration Tool FeaturesThe User Migration Tool provides the following features:
• Migrates AD user accounts from an old (source) domain to a new (target) domain to the same, or adifferent, Unified ICM facility.
• Adds the user account in the corresponding Unified ICM security groups in the target domain.
• Updates the Logger database with the Globally Unique Identifier (GUID) of the user account from thetarget domain.
• Migrates the Unified ICM security group membership of Foreign Security Principals to the new domain.
• Migrates the Unified ICM security group membership of user accounts to another facility in the currentdomain.
User Migration Tool is not applicable for SSO users.Note
Migration ScenariosUse the User Migration Tool in the following migration scenarios:
• Technology Refresh upgrades on machines in a target domain.
• Technology Refresh upgrades on machines in a different Unified ICM Facility OU in a target domain.
• Moving machines with pre-installed Unified ICM components to a target domain.
• Moving machines with pre-installed Unified ICM components to a different Unified ICM Facility OUin the target domain.
• Moving machines with pre-installed Unified ICM components to a target domain and performing aCommon Ground (CG) upgrade.
• Moving machines with pre-installed Unified ICM components to a different Unified ICM Facility OUin the target domain and performing a Common Ground upgrade.
Staging Guide for Cisco Unified ICM/Contact Center Enterprise, Release 11.6(1)40
User Migration ToolUser Migration Tool Features
• Migration of user accounts to a different Unified ICM Facility OU in the same domain.
Internationalization (I18n) and Localization (L10n) ConsiderationsIn the localized version of Unified ICM/CCE, you can store the usernames in non-Western European characters(but not in Unicode) in the Unified ICM/CCE database, but the Active directory Common Name (First, Last,Middle), sAMAccount Name, User Principal Name, Organizational Unit (OU) and domain names are alwaysin Western European character set and must not include Unicode or multi-byte characters.
The User Migration Tool is able to perform user migration for localized systems.
Security ConsiderationsThe User Migration Tool connects to the Logger Database using Windows Authentication.
In the source domain, the user running the User Migration Tool must be a domain user and a member of thelocal system administrator group.
In the target domain, the user running the User Migration Tool must have the following privileges:
• The user must be a member of the local system administrator group.
• The user must be a domain user.
• In addition, at least one of the following privileges must be set. The user must be:
◦a domain administrator
◦a member of the Cisco_ICM_Setup (Root) security group
Migration of the membership of system users who belong to an external domain with one-way trust, requirescredentials of an external domain user account with read privileges (such as a domain user account) to accessthe external domain.
User Migration StepsThe User Migration Tool first runs in the source domain in Export mode. In this mode, it reads the users fromthe Logger database and the nine (9) security groups, then exports the user information (such as Usernameand UserGroupID) and the security group membership from the source AD folder. The UMT looks at theLogger database for each user found and looks at all nine (9) security groups to find the user groupmemberships(the Setup and Config security groups in the Root, Facility, and Instance OUs). The user information foundis added to the flat file.
For users belonging to the external domain, the User Migration Tool needs credentials to connect to theexternal domain. The UMT looks for the users in the external domain. If the UMT finds them, it determinesthe security group membership for the user in the source domain and exports the information.
The UMT also looks at the Instance security groups (Setup and Config) to find any user accounts. If the UMTfinds user accounts, it adds that user information to the flat file as well.
The User Migration Tool then runs in the target domain in an Import mode. In this mode, it reads the file thatwas generated during Export mode and does the migration for all the users that belong to the source domain.
Staging Guide for Cisco Unified ICM/Contact Center Enterprise, Release 11.6(1) 41
User Migration ToolInternationalization (I18n) and Localization (L10n) Considerations
During this mode, it looks for the users in the target domain and, if they are not found, creates the user accountsin the Instance OU. It fixes the group membership for the user and updates the database (if necessary) withthe target domain name and the user's GUID from the target domain. In order to perform migration of theusers belonging to an external domain, the User Migration Tool needs credentials to connect to the externaldomain. It looks for the users in the external domain and, if they are found, it fixes the security groupmembership for the user in the target domain.
The following are the steps involved when using the User Migration Tool.
Export Users from the Source Domain
Procedure
Step 1 Back up the Logger database for each Unified ICM/CCE instance using Microsoft SQL Server tools.Step 2 On the Logger system, for each installed Logger instance, execute the User Migration Tool in Export mode.
An output file (umt_<Facility name>_<logger database name>.bin) is generated in the directory from whichthe tool is executed.
Step 3 In a Technology Refresh upgrade scenario:a) Copy the output file to the Logger system in the target domain (to the folder from which you run the User
Migration Tool on the target system).b) Back up and export the registry on the source system.c) Check the log file for any errors.
Import Users into the Target Domain
Procedure
Step 1 If the Unified ICM/CCE services are running, shut them down.Step 2 If you need to change the domain name in a Common Ground upgrade scenario, see Change Domain Name,
on page 43 and proceed to Step 4.Step 3 In a Technology Refresh upgrade scenario:
a) Make sure that the exported file exists in the Logger system.b) Restore the Logger database that was copied from the source Logger system using Microsoft SQL Server
tools.c) Import the Unified ICM/CCE registry exported from the source domain.
Step 4 Run the User Migration Tool in Import mode for each Logger instance to migrate users.Step 5 (Optional) Run the User Migration Tool in verify mode to validate the migration.Step 6 For duplex Logger systems, run the ICMDBA tool to synchronize sides A and B.Step 7 Restart the Unified ICM/CCE services if they were previously running.
Staging Guide for Cisco Unified ICM/Contact Center Enterprise, Release 11.6(1)42
User Migration ToolExport Users from the Source Domain
Change Domain NameTo change the domain for a system, you must have the necessary permissions. To change the domain for allinstances on the machine, complete the following steps:
Procedure
Step 1 Open the Web Setup tool.Step 2 Click the Instance Management tab.Step 3 Delete any instances and facilities that you do not want to use in the new domain.Step 4 Open the Domain Manager tool and ensure that the instances and facilities that are defined match what is
actually on the machine. Failure to do this causes the Web Setup Change Domain operation to fail.Step 5 Select the instance to be modified, and then click Change Domain.
The Change Domain page opens, displaying the currently configured domain and the new domain name ofthe machine.
Step 6 Click Save. A query is sent to confirm that you want to change the domain.Step 7 Click Yes. If successful, you return to the Instance List page.
If the instance does not exist, you must create it using the Domain Manager. Create the instance under theselected Facility in the new domain.
User Migration Tool ModesThe User Migration Tool provides functions in the following modes:
• Export
◦Runs on the Logger system in the source domain.
◦Exports user account details from the Logger database and Instance security groups to a filegenerated in the same directory in which the tool was run.
Names the exported file by combining the tool name (umt), the ICM Facility name, and the Loggerdatabase name (umt_<Facility name>_<Logger database name>.bin).
The exported file contains the source domain name. It also contains Unified ICM instance specificparameters such as the Unified ICM Facility name, Unified ICM instance name, and Loggerdatabase name. You do not need to specify these parameters during the Import mode because theyare contained in the exported file.
• Import
◦Imports user account details from the exported file.
◦Updates AD and the Logger database (if necessary).
Staging Guide for Cisco Unified ICM/Contact Center Enterprise, Release 11.6(1) 43
User Migration ToolChange Domain Name
Due to the need to replicate new user accounts and AD security group memberships,wait 15 minutes after an Import completes before you run the User Migration Tool inVerify mode.
Note
• Verify
◦Runs on the Logger system in the target domain after you perform an Import.
◦Validates the import.
Help is available by entering usermigration.exe with either no arguments or the /help argument. Thiscommand displays the command line syntax, and all modes and parameters are displayed.
Note
The User Migration Tool also generates a report file in the same directory that the tool is run. The name ofthe report file consists of the name of the exported file suffixed with “.rpt” (umt_<Facility name>_<Loggerdatabase name>.rpt).
The report file contains the following information:
• In the Export mode:
◦the name of the user account that is exported
◦all the Unified ICM security groups that the user account is a member of
• In the Import mode:
◦the name of the user account that is created in AD
◦all the security groups added to the user account.
In addition, every time the User Migration Tool runs, it generates a log file in C:\temp. The name of thelog file contains the current time-stamp and is prefixed with “UMT” (for example: UMT2008619141550.log).
The log file contains the User Migration Tool execution results in three categories:
• Info
•Warning
• Error
Runtime messages are also displayed in the command window while the User Migration Tool runs.
Related Topics
Export Mode, on page 45Import Mode, on page 46Verify Mode, on page 47
Staging Guide for Cisco Unified ICM/Contact Center Enterprise, Release 11.6(1)44
User Migration ToolUser Migration Tool Modes
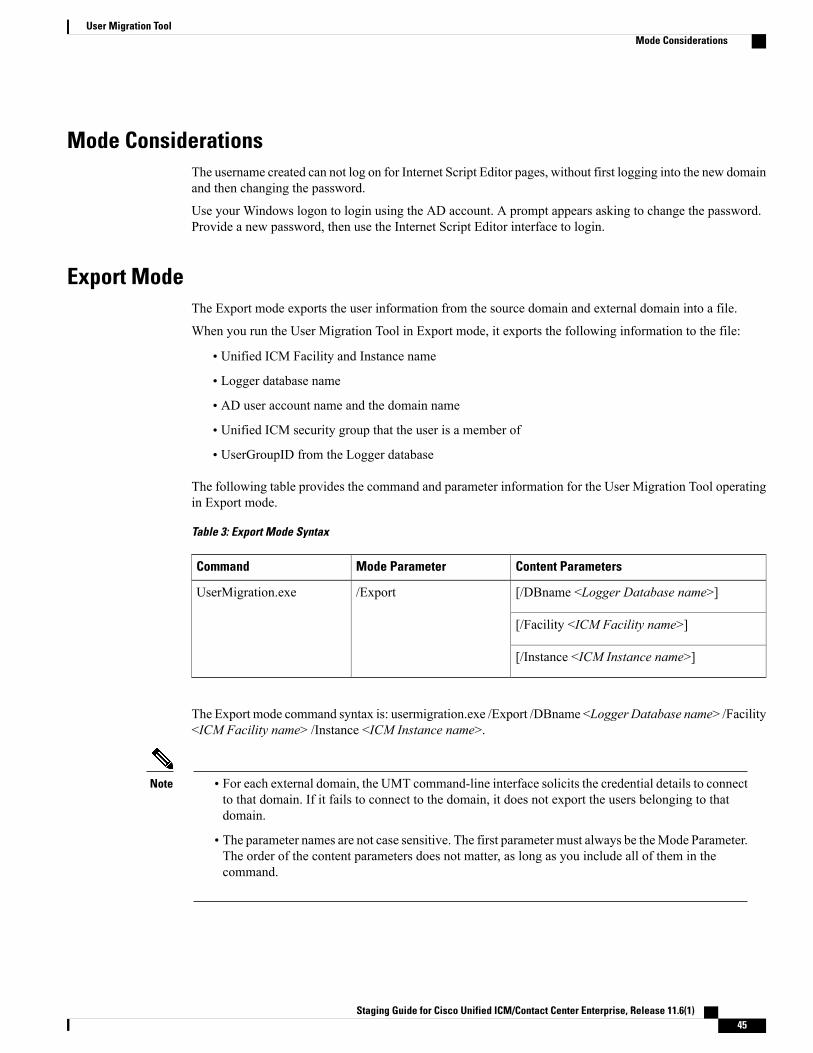
Mode ConsiderationsThe username created can not log on for Internet Script Editor pages, without first logging into the new domainand then changing the password.
Use your Windows logon to login using the AD account. A prompt appears asking to change the password.Provide a new password, then use the Internet Script Editor interface to login.
Export ModeThe Export mode exports the user information from the source domain and external domain into a file.
When you run the User Migration Tool in Export mode, it exports the following information to the file:
• Unified ICM Facility and Instance name
• Logger database name
• AD user account name and the domain name
• Unified ICM security group that the user is a member of
• UserGroupID from the Logger database
The following table provides the command and parameter information for the User Migration Tool operatingin Export mode.
Table 3: Export Mode Syntax
Content ParametersMode ParameterCommand
[/DBname <Logger Database name>]/ExportUserMigration.exe
[/Facility <ICM Facility name>]
[/Instance <ICM Instance name>]
The Export mode command syntax is: usermigration.exe /Export /DBname <Logger Database name> /Facility<ICM Facility name> /Instance <ICM Instance name>.
Note • For each external domain, the UMT command-line interface solicits the credential details to connectto that domain. If it fails to connect to the domain, it does not export the users belonging to thatdomain.
• The parameter names are not case sensitive. The first parameter must always be theMode Parameter.The order of the content parameters does not matter, as long as you include all of them in thecommand.
Staging Guide for Cisco Unified ICM/Contact Center Enterprise, Release 11.6(1) 45
User Migration ToolMode Considerations
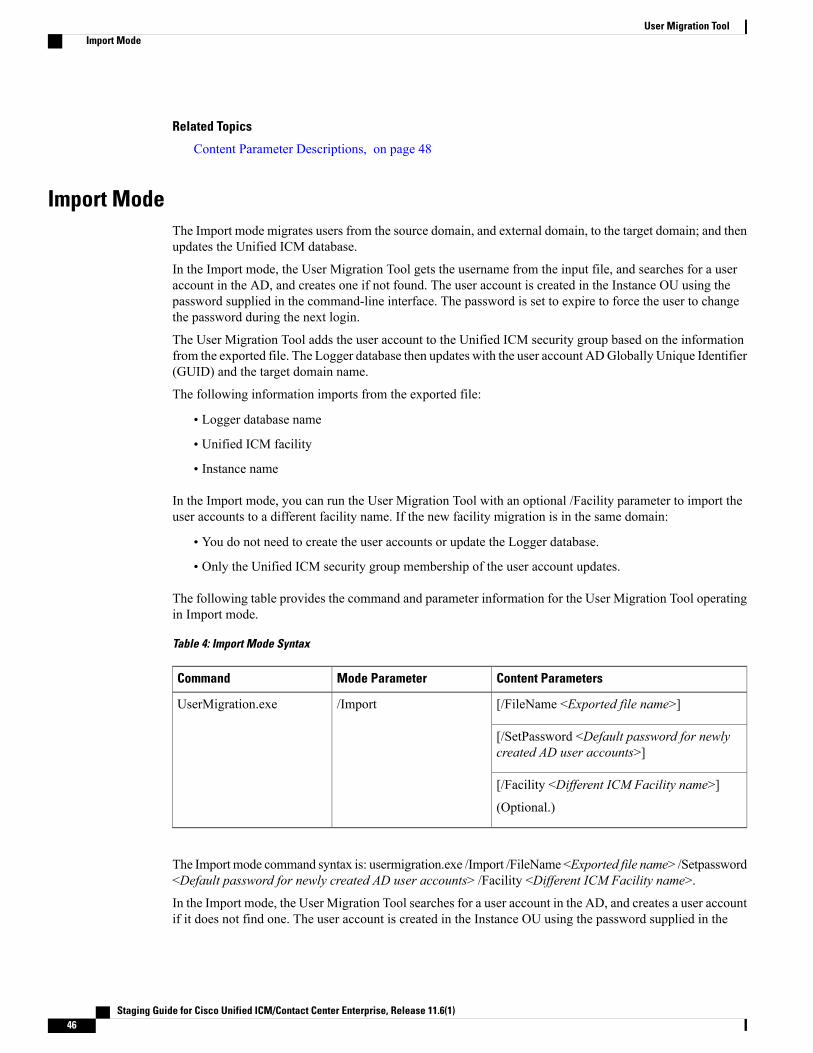
Related Topics
Content Parameter Descriptions, on page 48
Import ModeThe Import mode migrates users from the source domain, and external domain, to the target domain; and thenupdates the Unified ICM database.
In the Import mode, the User Migration Tool gets the username from the input file, and searches for a useraccount in the AD, and creates one if not found. The user account is created in the Instance OU using thepassword supplied in the command-line interface. The password is set to expire to force the user to changethe password during the next login.
The User Migration Tool adds the user account to the Unified ICM security group based on the informationfrom the exported file. The Logger database then updates with the user account ADGlobally Unique Identifier(GUID) and the target domain name.
The following information imports from the exported file:
• Logger database name
• Unified ICM facility
• Instance name
In the Import mode, you can run the User Migration Tool with an optional /Facility parameter to import theuser accounts to a different facility name. If the new facility migration is in the same domain:
• You do not need to create the user accounts or update the Logger database.
• Only the Unified ICM security group membership of the user account updates.
The following table provides the command and parameter information for the User Migration Tool operatingin Import mode.
Table 4: Import Mode Syntax
Content ParametersMode ParameterCommand
[/FileName <Exported file name>]/ImportUserMigration.exe
[/SetPassword <Default password for newlycreated AD user accounts>]
[/Facility <Different ICM Facility name>]
(Optional.)
The Import mode command syntax is: usermigration.exe /Import /FileName <Exported file name> /Setpassword<Default password for newly created AD user accounts> /Facility <Different ICM Facility name>.
In the Import mode, the User Migration Tool searches for a user account in the AD, and creates a user accountif it does not find one. The user account is created in the Instance OU using the password supplied in the
Staging Guide for Cisco Unified ICM/Contact Center Enterprise, Release 11.6(1)46
User Migration ToolImport Mode
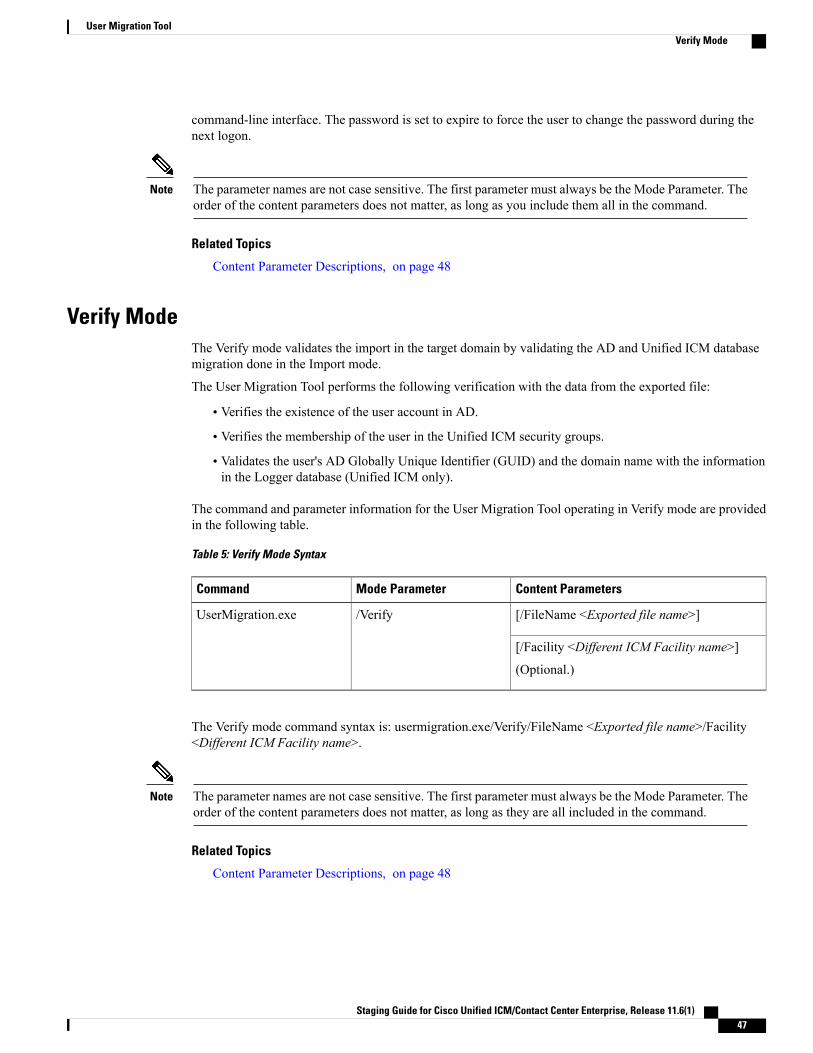
command-line interface. The password is set to expire to force the user to change the password during thenext logon.
The parameter names are not case sensitive. The first parameter must always be the Mode Parameter. Theorder of the content parameters does not matter, as long as you include them all in the command.
Note
Related Topics
Content Parameter Descriptions, on page 48
Verify ModeThe Verify mode validates the import in the target domain by validating the AD and Unified ICM databasemigration done in the Import mode.
The User Migration Tool performs the following verification with the data from the exported file:
• Verifies the existence of the user account in AD.
• Verifies the membership of the user in the Unified ICM security groups.
• Validates the user's AD Globally Unique Identifier (GUID) and the domain name with the informationin the Logger database (Unified ICM only).
The command and parameter information for the User Migration Tool operating in Verify mode are providedin the following table.
Table 5: Verify Mode Syntax
Content ParametersMode ParameterCommand
[/FileName <Exported file name>]/VerifyUserMigration.exe
[/Facility <Different ICM Facility name>]
(Optional.)
The Verify mode command syntax is: usermigration.exe/Verify/FileName <Exported file name>/Facility<Different ICM Facility name>.
The parameter names are not case sensitive. The first parameter must always be the Mode Parameter. Theorder of the content parameters does not matter, as long as they are all included in the command.
Note
Related Topics
Content Parameter Descriptions, on page 48
Staging Guide for Cisco Unified ICM/Contact Center Enterprise, Release 11.6(1) 47
User Migration ToolVerify Mode
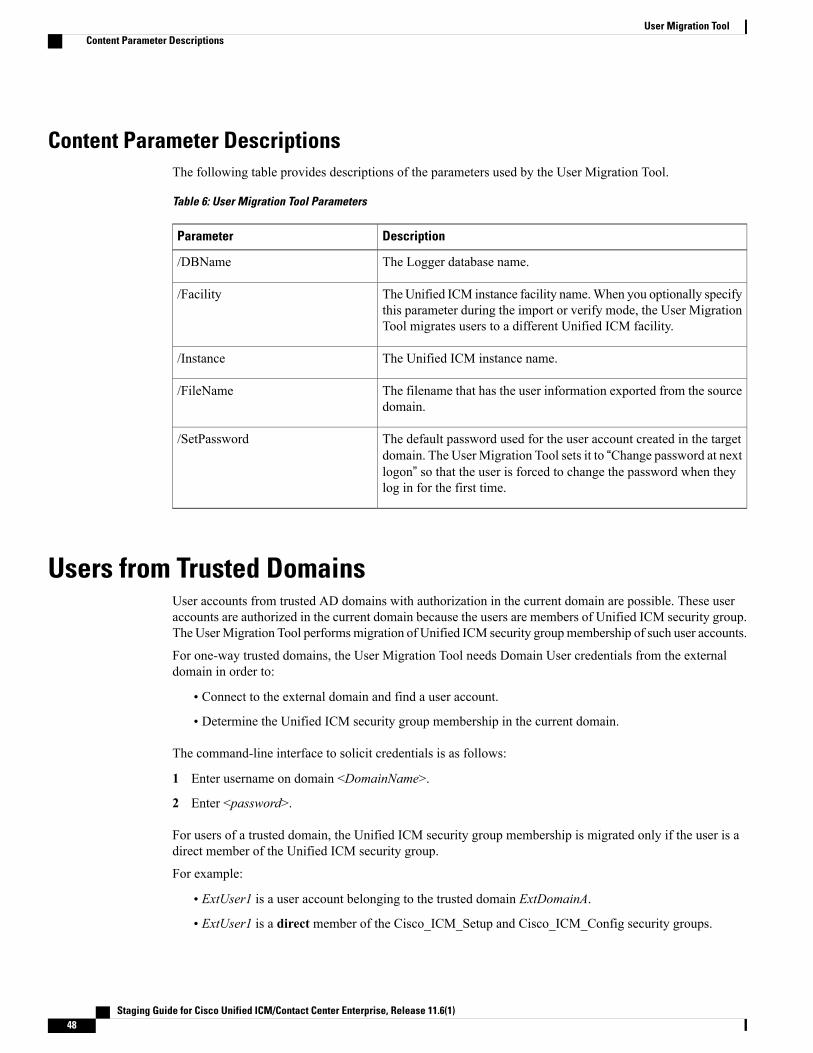
Content Parameter DescriptionsThe following table provides descriptions of the parameters used by the User Migration Tool.
Table 6: User Migration Tool Parameters
DescriptionParameter
The Logger database name./DBName
TheUnified ICM instance facility name.When you optionally specifythis parameter during the import or verify mode, the User MigrationTool migrates users to a different Unified ICM facility.
/Facility
The Unified ICM instance name./Instance
The filename that has the user information exported from the sourcedomain.
/FileName
The default password used for the user account created in the targetdomain. The UserMigration Tool sets it to “Change password at nextlogon” so that the user is forced to change the password when theylog in for the first time.
/SetPassword
Users from Trusted DomainsUser accounts from trusted AD domains with authorization in the current domain are possible. These useraccounts are authorized in the current domain because the users are members of Unified ICM security group.The UserMigration Tool performsmigration of Unified ICM security groupmembership of such user accounts.
For one-way trusted domains, the User Migration Tool needs Domain User credentials from the externaldomain in order to:
• Connect to the external domain and find a user account.
• Determine the Unified ICM security group membership in the current domain.
The command-line interface to solicit credentials is as follows:
1 Enter username on domain <DomainName>.
2 Enter <password>.
For users of a trusted domain, the Unified ICM security group membership is migrated only if the user is adirect member of the Unified ICM security group.
For example:
• ExtUser1 is a user account belonging to the trusted domain ExtDomainA.
• ExtUser1 is a direct member of the Cisco_ICM_Setup and Cisco_ICM_Config security groups.
Staging Guide for Cisco Unified ICM/Contact Center Enterprise, Release 11.6(1)48
User Migration ToolContent Parameter Descriptions
• ExtUser1 is a member of the security group FOO.
This restriction does not exist for users belonging to the current (source) domain.Note
As a result, when the Unified ICM security group membership of ExtUser1 is migrated, only theCisco_ICM_Setup and the Cisco_ICM_Config security groups are selected.
To migrate Unified ICM security group membership of users belonging to a one-way trusted domain, theremust be at least one user from that domain in the Logger database. Otherwise, the UMT skips migration forthe one-way trusted domain.
The UMT knows that it needs to connect to a one-way trusted domain only if it is referenced in the Loggerdatabase. Unless it connects/authenticates to the one-way trusted domain, it cannot determine if users fromthat domain are a member of the Unified ICM security groups.
User Migration Tool TroubleshootingThis section provides troubleshooting information for the User Migration Tool.
User Migration Tool Error MessagesThe following table provides solutions for User Migration Tool error messages.
Table 7: User Migration Tool Error Messages
SolutionError Message
Verify that the Logger database exists and that you canauthenticate it using Windows authentication.
Cannot connect or authenticate to theLogger database.
Verify that the Domain controller is up and running and thelogged-in user is a member of the Domain Users group.
Cannot connect or authenticate to theCurrent domain.
Verify that the logged-in user has the required permissions torun in Import mode. The logged-in user must be a LocalAdministrator and a member of the Setup security group in thedomain. The specified password in the /Setpassword parametermust satisfy the domain's password policy requirements.
Cannot add the user account to a UnifiedICM security group.
Verify that the logged-in user has the required permissions torun in Import mode. The logged-in user must be a localadministrator and a member of the Setup security group in thedomain.
Cannot create user account in the targetdomain.
Run the User Migration Tool again on the source system togenerate a new export file.
The exported binary file is corrupted.
Staging Guide for Cisco Unified ICM/Contact Center Enterprise, Release 11.6(1) 49
User Migration ToolUser Migration Tool Troubleshooting
SolutionError Message
Ensure that the exported file is available in the directory fromwhere the tool is run.
The exported binary file could not befound in the directory where the UserMigration Tool is running.
Verify that the Logger database is not corrupted.Failure while reading from the Loggerdatabase.
Verify that the logged-in user has writable permissions for thedatabase. The logged-in user must be a local administrator anda member of the Setup security group in the domain.
Failure while updating the Loggerdatabase.
The exported binary file is corrupted. Run the User MigrationTool in Export mode again on the source system to generate anew export file.
Failure while reading from the exportedbinary file.
Ensure that the logged-in user has write permissions in thecurrent directory.
Failure while writing to the binary fileduring export.
Run Domain Manager tool and create Setup security groups,and re-run the User Migration Tool.
One or more of the Unified ICM OU ismissing in the current domain.
Run the Domain Manager tool and create the Setup securitygroups, then re-run the User Migration Tool.
One or more of the Unified ICM securitygroups do(es) not exist in the currentdomain.
The logged-in user must be a Local Administrator. The logged-inuser must be a member of the Domain Users group in the currentdomain. For import, the logged-in user must be a member ofCisco_ICM_Setup security group.
The logged-in user has insufficientcredentials.
Fix the Logger database and re-run the User Migration Tool.The Logger database is corrupted.
The User Migration Tool must be run on a system that is in adomain.
The system is either running stand-alone,or in a workgroup.
You must use the same version of the User Migration Tool forboth modes of the migration.
Mismatch of version between the UserMigration Tool and the exported file.
Disable the configuration changes manually, then run the tool.The UserMigration Tool could not disableconfiguration changes.
You cannot run the User Migration Tool in Import mode underthe same Unified ICM facility and domain that it was exportedfrom. You must run it under a different Unified ICM facility inthe same domain, or on a different domain.
Incorrect usage of the User MigrationTool.
Ensure the hostname or IP address of the router is correct.The Router system is not reachable forremote registry access.
Staging Guide for Cisco Unified ICM/Contact Center Enterprise, Release 11.6(1)50
User Migration ToolUser Migration Tool Error Messages

Staging Guide for Cisco Unified ICM/Contact Center Enterprise, Release 11.6(1) 51
User Migration ToolUser Migration Tool Error Messages

Staging Guide for Cisco Unified ICM/Contact Center Enterprise, Release 11.6(1)52
User Migration ToolUser Migration Tool Error Messages
C H A P T E R 5Service Account Manager
• Service Account Management, page 53
• Service Account Manager End User Interfaces, page 55
• Service Account Manager GUI Dialog Boxes, page 55
• Service Account Manager –Main Dialog Box, page 56
• Service Account Manager – Edit Service Account dialog box, page 62
• Service Account Manager – Command Line Interface, page 63
• Service Account Manager, page 64
Service Account ManagementThe Service Account Manager serves three purposes. It allows you to:
1 Create new accounts with random passwords.
2 Use existing AD accounts as Unified ICM service accounts.
3 Provide an interface to modify Unified ICM service account passwords.
Staging Guide for Cisco Unified ICM/Contact Center Enterprise, Release 11.6(1) 53
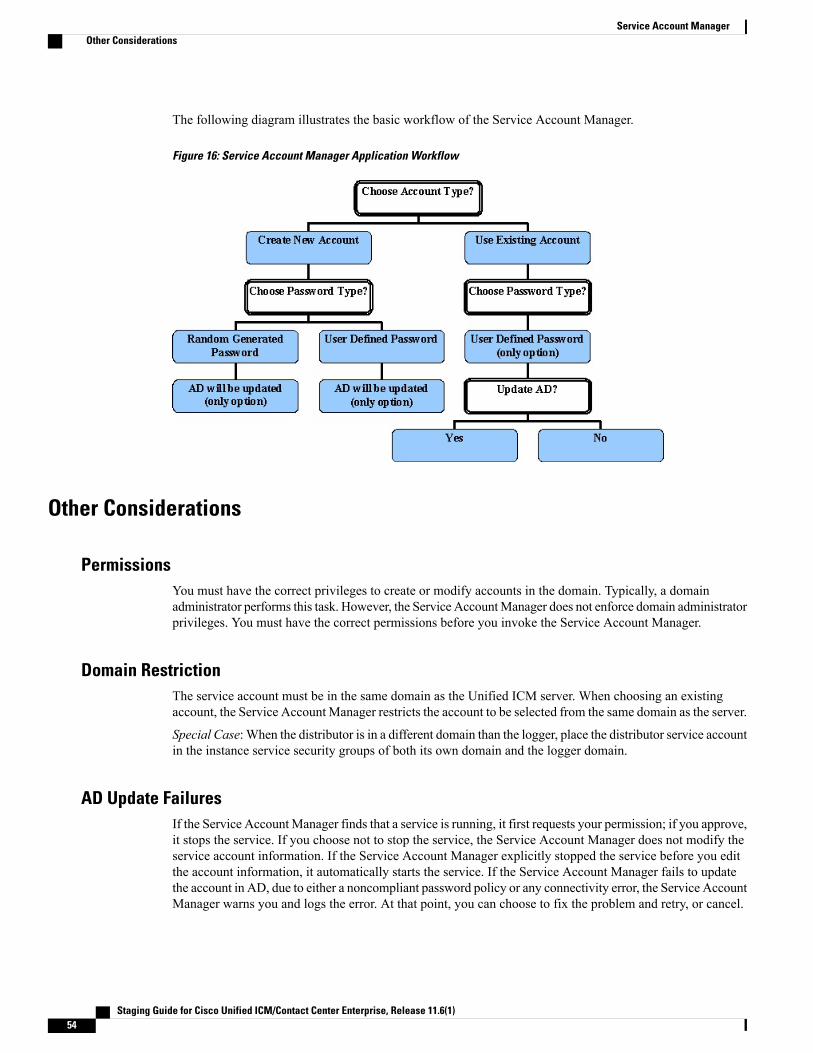
The following diagram illustrates the basic workflow of the Service Account Manager.
Figure 16: Service Account Manager Application Workflow
Other Considerations
PermissionsYou must have the correct privileges to create or modify accounts in the domain. Typically, a domainadministrator performs this task. However, the Service AccountManager does not enforce domain administratorprivileges. You must have the correct permissions before you invoke the Service Account Manager.
Domain RestrictionThe service account must be in the same domain as the Unified ICM server. When choosing an existingaccount, the Service Account Manager restricts the account to be selected from the same domain as the server.
Special Case: When the distributor is in a different domain than the logger, place the distributor service accountin the instance service security groups of both its own domain and the logger domain.
AD Update FailuresIf the Service AccountManager finds that a service is running, it first requests your permission; if you approve,it stops the service. If you choose not to stop the service, the Service Account Manager does not modify theservice account information. If the Service Account Manager explicitly stopped the service before you editthe account information, it automatically starts the service. If the Service Account Manager fails to updatethe account in AD, due to either a noncompliant password policy or any connectivity error, the Service AccountManager warns you and logs the error. At that point, you can choose to fix the problem and retry, or cancel.
Staging Guide for Cisco Unified ICM/Contact Center Enterprise, Release 11.6(1)54
Service Account ManagerOther Considerations

LoggingThe application maintains its own log file, when you invoke it as a standalone application. If you invoke itthrough the Web Setup tool, logs write to the Websetup log files only.
Service Account Memberships Setup for CICM ReplicationWhen the application is invoked from the standalone NAM's Logger servers (sides A and B), the commandline is as follows:ServiceAccountManager/SrcInstance<InstanceName>/DestDomain<DomainName>/DestFacility<FacilityName>/DestInstance<InstanceName>
Service Account Manager End User InterfacesThe Service Account Manager has two user interfaces:
• The Graphical User Interface consisting of the following dialogs boxes:
• Main
• Edit Service Account
• The Command Line Interface
Related Topics
Service Account Manager GUI Dialog Boxes, on page 55Service Account Manager –Main Dialog Box, on page 56Service Account Manager – Edit Service Account dialog box, on page 62Service Account Manager – Command Line Interface, on page 63
Service Account Manager GUI Dialog BoxesYou can find a shortcut to the application in Windows Start > Programs > Cisco Unified ICM-CCE-CCHTools folder.
The Service Account Manager has two dialog boxes:
Staging Guide for Cisco Unified ICM/Contact Center Enterprise, Release 11.6(1) 55
Service Account ManagerService Account Memberships Setup for CICM Replication
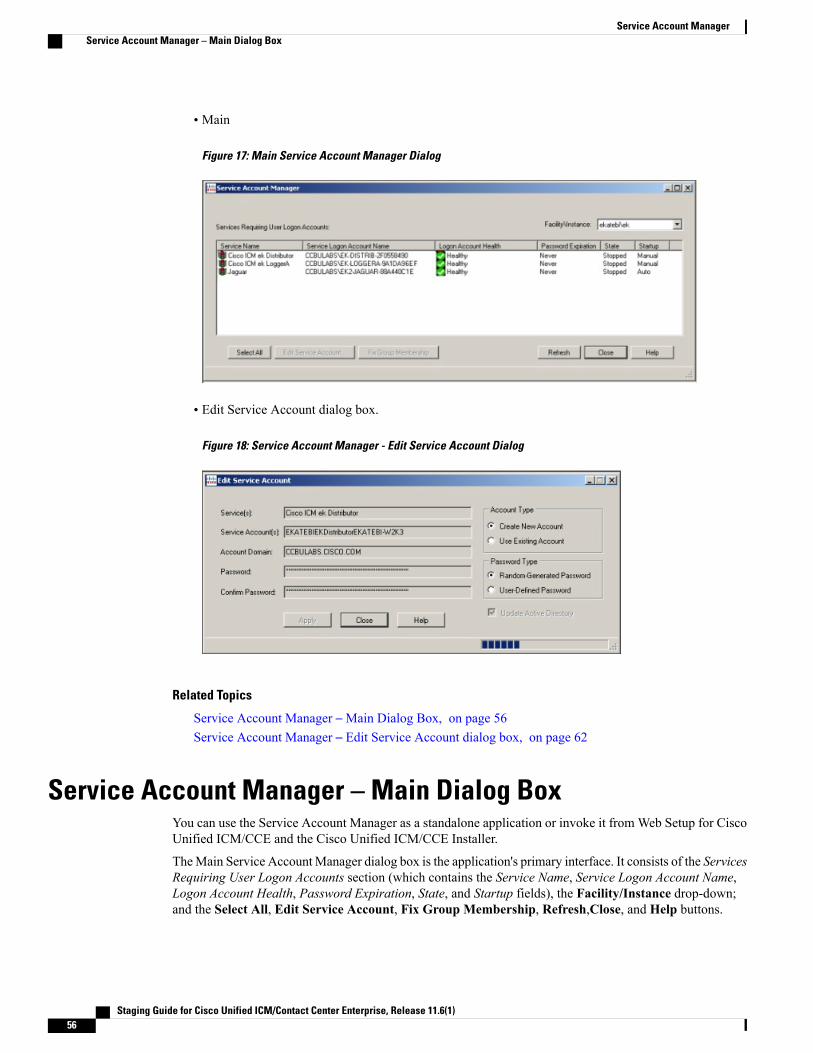
• Main
Figure 17: Main Service Account Manager Dialog
• Edit Service Account dialog box.
Figure 18: Service Account Manager - Edit Service Account Dialog
Related Topics
Service Account Manager –Main Dialog Box, on page 56Service Account Manager – Edit Service Account dialog box, on page 62
Service Account Manager – Main Dialog BoxYou can use the Service Account Manager as a standalone application or invoke it fromWeb Setup for CiscoUnified ICM/CCE and the Cisco Unified ICM/CCE Installer.
TheMain Service AccountManager dialog box is the application's primary interface. It consists of the ServicesRequiring User Logon Accounts section (which contains the Service Name, Service Logon Account Name,Logon Account Health, Password Expiration, State, and Startup fields), the Facility/Instance drop-down;and the Select All, Edit Service Account, Fix Group Membership, Refresh,Close, and Help buttons.
Staging Guide for Cisco Unified ICM/Contact Center Enterprise, Release 11.6(1)56
Service Account ManagerService Account Manager – Main Dialog Box
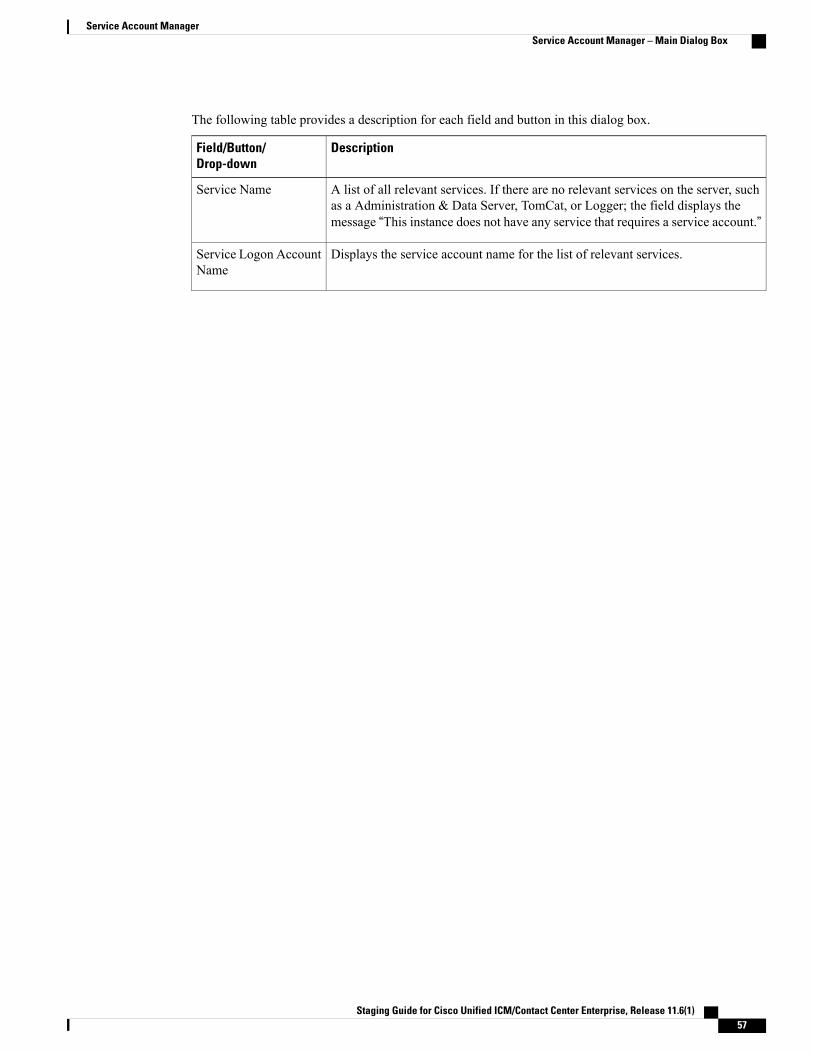
The following table provides a description for each field and button in this dialog box.
DescriptionField/Button/Drop-down
A list of all relevant services. If there are no relevant services on the server, suchas a Administration & Data Server, TomCat, or Logger; the field displays themessage “This instance does not have any service that requires a service account.”
Service Name
Displays the service account name for the list of relevant services.Service Logon AccountName
Staging Guide for Cisco Unified ICM/Contact Center Enterprise, Release 11.6(1) 57
Service Account ManagerService Account Manager – Main Dialog Box

DescriptionField/Button/Drop-down
The Service Account Manager has an account health check mechanism. When theapplication starts, it scans all relevant Unified ICM services and flags them asindicated below.
• Green
◦Healthy Account: the service account state is normal.
• Yellow
◦Password Warning: the password is due to expire in less than 7 days.
• Red
◦Invalid Account: service has an invalid account associated with it.
◦Password Expired: service account password has expired.
◦Group Membership Missing: service account is missing from therequired domain or local security groups.
◦Account not associated with service: service account created but notreplicated, hence not associated yet.
Logon Account Health
Staging Guide for Cisco Unified ICM/Contact Center Enterprise, Release 11.6(1)58
Service Account ManagerService Account Manager – Main Dialog Box
DescriptionField/Button/Drop-down
The following messages could appear in the Health column.
• Healthy
◦Only applies to the service account, not the service itself.
◦The account is a member of the required Unified ICM/CCE/CCHsecurity groups.
◦The account has been validated to start a service.
◦If the account password is changed outside of the Service AccountManager application, Healthy would be displayed even though theservice might not actually be healthy because this application cannotdetect the change.
• Need to create service account
◦The Service Account Manager must be used to create a service accountfor each service.
• Account not in Instance Domain
◦The Service Account Manager is capable of detecting whether or nota service account exists in the domain.
• Account Disabled
◦In AD an account can be enabled or disabled. This message indicatesthat the account is disabled in the domain.
• Password Expired
• Account not a member of the Instance Service Group
• Service Group not a member of local Administrators group
• Central Controller (sideA ) Domain name is unknown (Administration &Data Server only)
◦Administration & Data Servers can be in a different domain than theCentral Controller. When Fixed Group is selected, you are queried forthe domain name of the Central Controller if it is different than that ofthe Administration & Data Server.
• Central Controller (sideA ) Domain is not trusted or trust is not two-way(Administration & Data Server only)
◦There must be a two-way trust between the Central Controller and theAdministration & Data Server. SAM detects the lack of the trustrelationship and displays this message. SAM might detect this issue,but is unable to fix it.
Staging Guide for Cisco Unified ICM/Contact Center Enterprise, Release 11.6(1) 59
Service Account ManagerService Account Manager – Main Dialog Box
DescriptionField/Button/Drop-down
Account not a member of LoggerA Domain Service Group (Administration& Data Server only)•
◦If the Administration & Data Server is on a different domain than theCentral Controller, it applies the Administration&Data Server's DomainService Group to both itself and the Central Controller.
• Central Controller (sideB ) Domain name is unknown (Administration &Data Server only)
◦Administration & Data Servers can be in a different domain than theCentral Controller. When Fixed Group is selected, you are queried forthe domain name of the Central Controller if it is different than that ofthe Administration & Data Server.
• Central Controller (sideB ) Domain is not trusted or trust is not two-way(Administration & Data Server only)
◦There must be a two-way trust between the Central Controller and theDisributor. SAM detects the lack of the trust relationship and displaysthis message. SAM might detect this issue, but is unable to fix it.
• Account not a member of LoggerB Domain Service Group (Administration& Data Server only)
◦If the Administration & Data Server is on a different domain than theCentral Controller, it applies the Administration&Data Server's DomainService Group to both itself and the Central Controller.
• Account not associated with service
◦When SAM associates an account with a service it might run intoreplication issues. Use Edit and select Associate the account with aservice rather than selecting editing from the beginning.
• Service not validated for starting
◦When SAM validates a service it might run into replication issues. UseValidate to successfully start the service.
• Password About To Expire
◦Check thePassword Expiration option to determine the validity periodof the password. The Service Account Manager can then be used toreset the password for this pre-existing account.
Staging Guide for Cisco Unified ICM/Contact Center Enterprise, Release 11.6(1)60
Service Account ManagerService Account Manager – Main Dialog Box
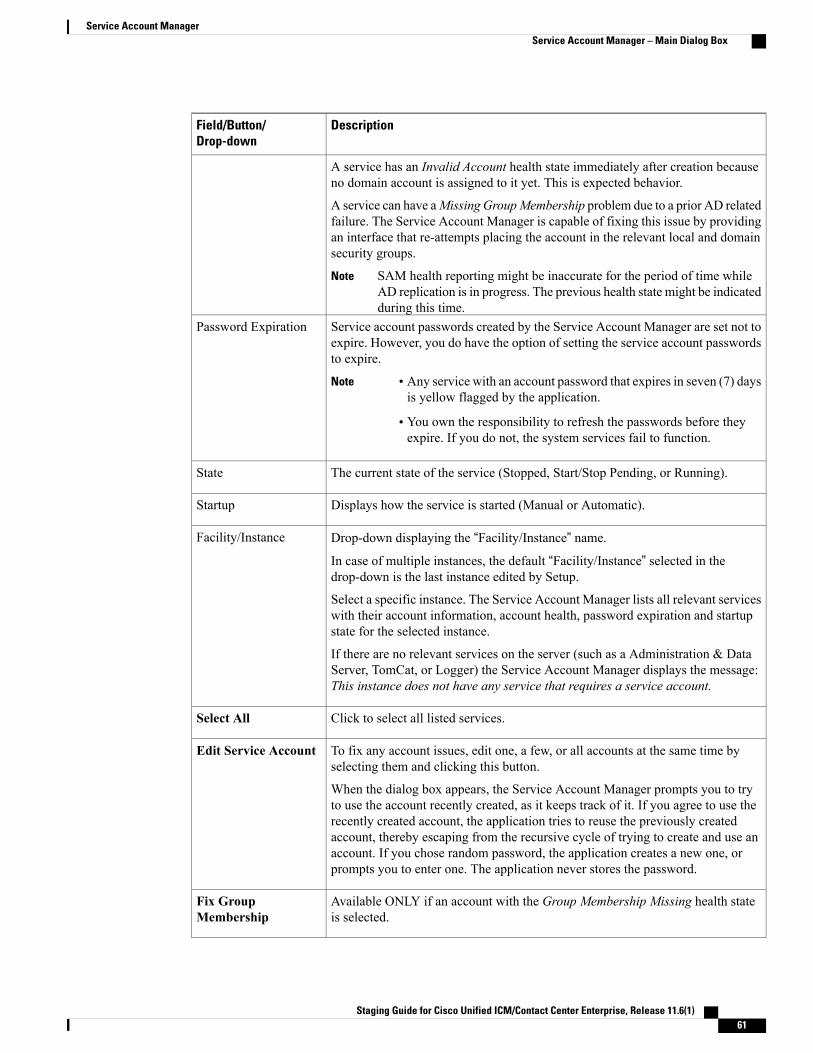
DescriptionField/Button/Drop-down
A service has an Invalid Account health state immediately after creation becauseno domain account is assigned to it yet. This is expected behavior.
A service can have aMissing GroupMembership problem due to a prior AD relatedfailure. The Service Account Manager is capable of fixing this issue by providingan interface that re-attempts placing the account in the relevant local and domainsecurity groups.
SAM health reporting might be inaccurate for the period of time whileAD replication is in progress. The previous health state might be indicatedduring this time.
Note
Service account passwords created by the Service Account Manager are set not toexpire. However, you do have the option of setting the service account passwordsto expire.
Note • Any service with an account password that expires in seven (7) daysis yellow flagged by the application.
• You own the responsibility to refresh the passwords before theyexpire. If you do not, the system services fail to function.
Password Expiration
The current state of the service (Stopped, Start/Stop Pending, or Running).State
Displays how the service is started (Manual or Automatic).Startup
Drop-down displaying the “Facility/Instance” name.In case of multiple instances, the default “Facility/Instance” selected in thedrop-down is the last instance edited by Setup.
Select a specific instance. The Service Account Manager lists all relevant serviceswith their account information, account health, password expiration and startupstate for the selected instance.
If there are no relevant services on the server (such as a Administration & DataServer, TomCat, or Logger) the Service Account Manager displays the message:This instance does not have any service that requires a service account.
Facility/Instance
Click to select all listed services.Select All
To fix any account issues, edit one, a few, or all accounts at the same time byselecting them and clicking this button.
When the dialog box appears, the Service Account Manager prompts you to tryto use the account recently created, as it keeps track of it. If you agree to use therecently created account, the application tries to reuse the previously createdaccount, thereby escaping from the recursive cycle of trying to create and use anaccount. If you chose random password, the application creates a new one, orprompts you to enter one. The application never stores the password.
Edit Service Account
Available ONLY if an account with the Group Membership Missing health stateis selected.
Fix GroupMembership
Staging Guide for Cisco Unified ICM/Contact Center Enterprise, Release 11.6(1) 61
Service Account ManagerService Account Manager – Main Dialog Box
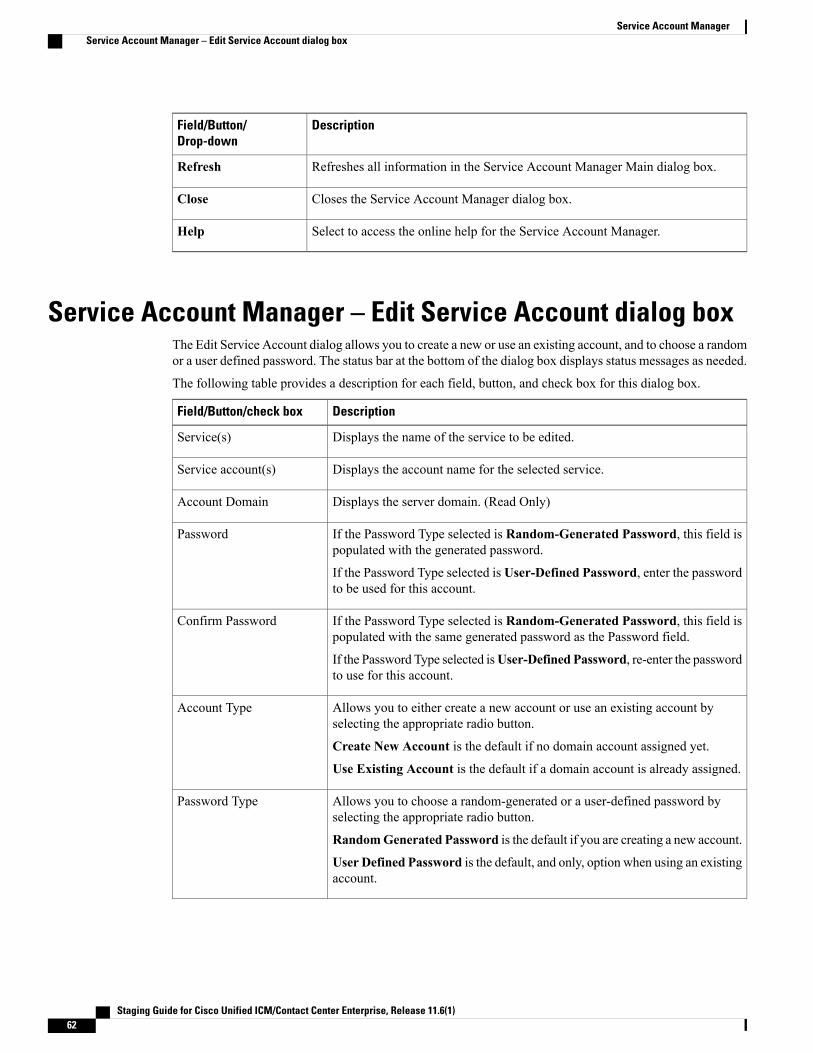
DescriptionField/Button/Drop-down
Refreshes all information in the Service Account Manager Main dialog box.Refresh
Closes the Service Account Manager dialog box.Close
Select to access the online help for the Service Account Manager.Help
Service Account Manager – Edit Service Account dialog boxThe Edit Service Account dialog allows you to create a new or use an existing account, and to choose a randomor a user defined password. The status bar at the bottom of the dialog box displays status messages as needed.
The following table provides a description for each field, button, and check box for this dialog box.
DescriptionField/Button/check box
Displays the name of the service to be edited.Service(s)
Displays the account name for the selected service.Service account(s)
Displays the server domain. (Read Only)Account Domain
If the Password Type selected is Random-Generated Password, this field ispopulated with the generated password.
If the Password Type selected is User-Defined Password, enter the passwordto be used for this account.
Password
If the Password Type selected is Random-Generated Password, this field ispopulated with the same generated password as the Password field.
If the Password Type selected isUser-Defined Password, re-enter the passwordto use for this account.
Confirm Password
Allows you to either create a new account or use an existing account byselecting the appropriate radio button.
Create New Account is the default if no domain account assigned yet.
Use Existing Account is the default if a domain account is already assigned.
Account Type
Allows you to choose a random-generated or a user-defined password byselecting the appropriate radio button.
RandomGenerated Password is the default if you are creating a new account.
User Defined Password is the default, and only, option when using an existingaccount.
Password Type
Staging Guide for Cisco Unified ICM/Contact Center Enterprise, Release 11.6(1)62
Service Account ManagerService Account Manager – Edit Service Account dialog box
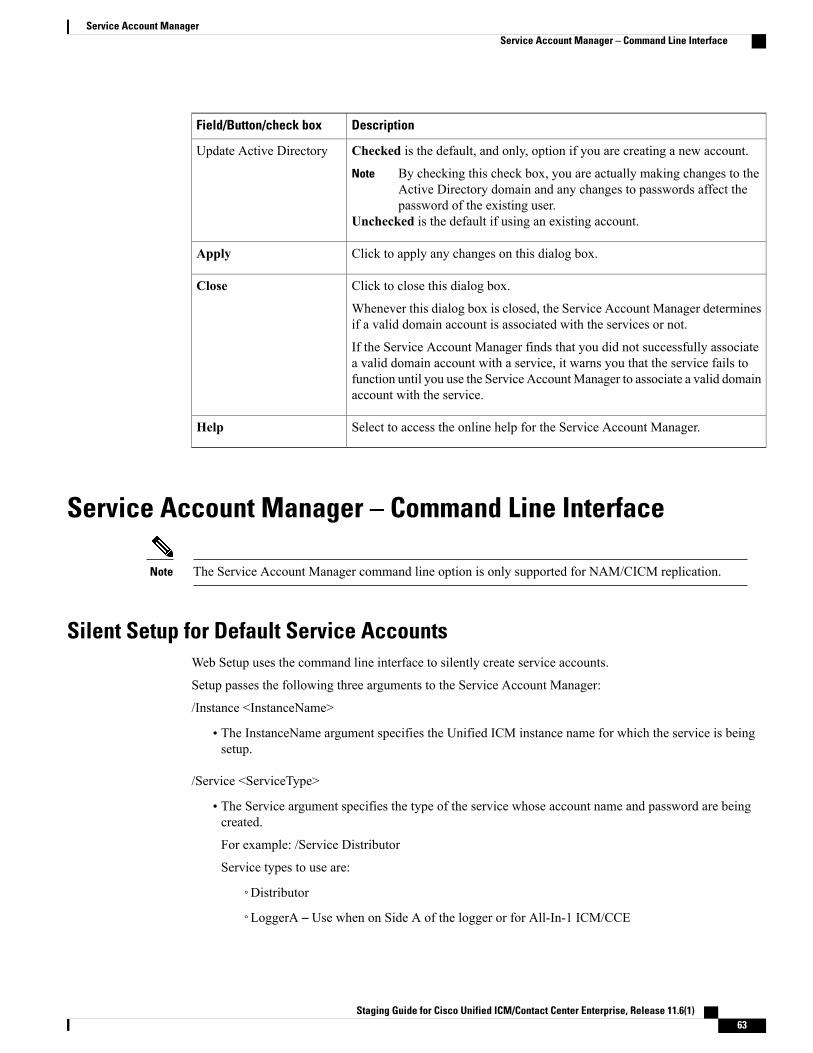
DescriptionField/Button/check box
Checked is the default, and only, option if you are creating a new account.
By checking this check box, you are actually making changes to theActive Directory domain and any changes to passwords affect thepassword of the existing user.
Note
Unchecked is the default if using an existing account.
Update Active Directory
Click to apply any changes on this dialog box.Apply
Click to close this dialog box.
Whenever this dialog box is closed, the Service Account Manager determinesif a valid domain account is associated with the services or not.
If the Service Account Manager finds that you did not successfully associatea valid domain account with a service, it warns you that the service fails tofunction until you use the Service AccountManager to associate a valid domainaccount with the service.
Close
Select to access the online help for the Service Account Manager.Help
Service Account Manager – Command Line Interface
The Service Account Manager command line option is only supported for NAM/CICM replication.Note
Silent Setup for Default Service AccountsWeb Setup uses the command line interface to silently create service accounts.
Setup passes the following three arguments to the Service Account Manager:
/Instance <InstanceName>
• The InstanceName argument specifies the Unified ICM instance name for which the service is beingsetup.
/Service <ServiceType>
• The Service argument specifies the type of the service whose account name and password are beingcreated.
For example: /Service Distributor
Service types to use are:
◦Distributor
◦LoggerA – Use when on Side A of the logger or for All-In-1 ICM/CCE
Staging Guide for Cisco Unified ICM/Contact Center Enterprise, Release 11.6(1) 63
Service Account ManagerService Account Manager – Command Line Interface
◦LoggerB – Use when on Side B of the logger only
/Log <Path\LogFileName>
• The Log argument specifies the log file name and the path where the log is appended. Typically, WebSetup and Cisco Unified ICM/CCE/CCH Installer passes their own log file name to append the logs.The Service Account Manager also maintains its own log file in the temp folder.
Note • If any one of the arguments is missing or incorrect, the Service Account Manager returns an errorto Setup.
• If Setup needs to create accounts for more than one service, it invokes the Service Account Managermultiple times using the command line interface.
Set Service Account Memberships for CICM ReplicationWhen upgrading the Unified ICMH to Unified ICM 9.0 (or later), the CICM replication process (CRPL) doesnot have proper permission to make configuration updates to customer instances without manually configuringthe Active Directory.
This configuration entails adding the standalone NAM's logger service accounts to the service groups of theCICMs. Thus the standalone NAM's service account has the permissions necessary to update the database ofthe CICM.
One function the Service AccountManager provides is to automate themanual configuration steps (as describedat https://www.cisco.com/c/en/us/support/docs/voice-unified-communications/unified-contact-center-hosted/70536-crpl-fails.html). This functionality is exposed through the Service Account Manager command-lineinterface as described in the Set Service Account Memberships for CICM Replication section.
Typically this functionality is utilized through two batch files (one for the A side and the other for the B side)where there is an entry for each CICM as a destination (/Dest). Each time the Web Setup is executed, runningthe batch file enables you to configure the Active Directory permissions properly.
Service Account Manager
Create New Account for Single Service
Procedure
Step 1 Select a single service from Main Service Account Manager dialog box.Step 2 Click Edit Service Account.
The Edit Service Account dialog box opens.
Step 3 Select Create New Account.
Staging Guide for Cisco Unified ICM/Contact Center Enterprise, Release 11.6(1)64
Service Account ManagerSet Service Account Memberships for CICM Replication
If no domain account is associated with the service, then Create New Account is selected by default.
Step 4 Enter a password or have one generated randomly.Random-Generated Password is selected by default.
Step 5 Click Apply.The Service Account Manager creates a new account in AD with a password.
If the account name exists, the Service AccountManager asks you to either recreate it, or update the password.
The application associates the account with the service on the server. It places the account in the requireddomain security group and local security group, and sets the required permissions. Service account is recreated,or just the password changes, based on your selection before you click Apply.
If the Service Account Manager fails to put the account in domain security group, it asks you to rerunthe application 20 minutes later to give AD time to replicate the account.
Note
Update Existing Account for Single Service
Procedure
Step 1 Select a single service from Main Service Account Manager dialog box.Step 2 Click Edit Service Account.
The Edit Service Account dialog box opens.
Step 3 Select Use Existing Account.If a domain account is associated with the service, Use Existing Account is selected by default.
Step 4 Enter a password.Step 5 Choose whether to update the password in AD.Step 6 Click Apply.
If previously selected, the Service Account Manager updates the password in AD. It updates the service onthe server with the new account information.
The Service Account Manager then places the account in required domain security group and local securitygroup, and sets the required permissions.
If the Service Account Manager fails to put the account in domain security group, the applicationasks you to rerun the application 20 minutes later to give AD time to replicate the account.
Note
Create New Accounts for More Than One Service
Procedure
Step 1 Select multiple services or click Select All.Use the normalWindows conventions for selecting all or multiple services.Note
Staging Guide for Cisco Unified ICM/Contact Center Enterprise, Release 11.6(1) 65
Service Account ManagerUpdate Existing Account for Single Service
Step 2 Click Edit Service Account.The Edit Service Account dialog box opens.
The Service Name column lists all services. Because multiple services are selected, Use Existing Accountis selected by default.
Step 3 Click Create New Account.A separate service account is created for each service.
Step 4 Enter a password, or have one generated randomly.If you choose to enter a password, then the same password is shared across all accounts.
If you choose to randomize the password, a separate random password is generated for each account.
Step 5 Click Apply.The Service Account Manager creates multiple accounts in AD with the password. The application associateseach account with the respective service on the server. It places the accounts in the required domain securitygroup and local security group, and sets the required permissions.
If the Service Account Manager fails to put the account in domain security group, it asks you to rerunthe application 20 minutes later to give AD time to replicate the account.
Note
Update Existing Account for More Than One Service
Procedure
Step 1 Select multiple services or click Select All on the Main Service Account Manager dialog box.Step 2 Click Edit Service Account.
The Edit Service Account dialog box opens.
The Service Name column lists all services. Because multiple services are selected, Use Existing Accountis selected by default.
Step 3 Enter an account name.Step 4 Enter a password.Step 5 Choose whether to update the password in AD.Step 6 Click Apply.
If previously selected, the Service Account Manager updates the password in AD. It updates the service onthe server with the new account information.
The Service Account Manager then places the account in required domain security group and local securitygroup, and sets the required permissions.
If the Service Account Manager fails to put the account in domain security group, the applicationasks you to rerun the application 20 minutes later to give AD time to replicate the account.
Note
Staging Guide for Cisco Unified ICM/Contact Center Enterprise, Release 11.6(1)66
Service Account ManagerUpdate Existing Account for More Than One Service
Fix Account Displaying Group Membership Missing StateFix Group Membership is only enabled when an account in the “Group Membership Missing” health stateis selected.
Procedure
Step 1 Select the unhealthy accounts displaying the “Group Membership Missing” state.Step 2 Click Fix Group Membership.
If any of the selected account is not in the “Group Membership Missing” state, Fix Group Membership isdisabled.
Step 3 Click Apply.The Service Account Manager then places the account in required domain security group and local securitygroup, and sets the required permissions.
If the Service Account Manager fails to place the accounts in the groups, it provides an appropriateerror.
Note
Staging Guide for Cisco Unified ICM/Contact Center Enterprise, Release 11.6(1) 67
Service Account ManagerFix Account Displaying Group Membership Missing State

Staging Guide for Cisco Unified ICM/Contact Center Enterprise, Release 11.6(1)68
Service Account ManagerFix Account Displaying Group Membership Missing State
C H A P T E R 6Prepare to Work with Active Directory
• Perform Preliminary Steps, page 69
• Domain Manager and OU Hierarchy, page 69
Perform Preliminary StepsPerform the following steps before beginning to work with Active Directory.
The Domain Administrator must first create the root OU “Cisco_ICM”. You need not be a DomainAdministrator to create the Cisco Root OU if that OU is going to be created in a nested OU (for example,Applications -> Voice Applications…), the Domain Administrator can create a parent OU with delegatedrights to create Cisco_ICM Root OU.
Warning
Procedure
Step 1 Review the system software staging guidelines.Step 2 Ensure that you have installed Microsoft Windows.Step 3 If you are installing a Logger or Distributor/HDSAdministration &Data Servers, ensure that you have already
installed Microsoft SQL Server with the required service pack.
Related Topics
Create or Add Cisco Root, on page 78
Domain Manager and OU Hierarchy• The Instance is not just a name in the registry.
• Adding an Instance only requires selecting a Facility and an Instance OU from the domain.
Staging Guide for Cisco Unified ICM/Contact Center Enterprise, Release 11.6(1) 69
◦First, create the OU hierarchy when you install or upgrade the first server.
◦Then, choose an existing Instance from that hierarchy.
When you add an instance, you add that instance's Setup security group to the localAdministrators group on that machine. When you remove an instance, it also removesthis security group.
Note
• Integrated use of the Domain Manager
When Domain Manager creates Instance OUs, user accounts in old Unified ICM/CCE security groups areautomatically copied to new security groups in the new instance OU. The old groups are not modified.
Staging Guide for Cisco Unified ICM/Contact Center Enterprise, Release 11.6(1)70
Prepare to Work with Active DirectoryDomain Manager and OU Hierarchy
C H A P T E R 7Domain Manager
• Domain Manager Tool Functionality, page 71
• Open the Domain Manager, page 72
• Domain Manager Window, page 73
• Security Groups, page 84
• Add Users to Security Group, page 86
• Remove Members from Security Group, page 88
• Organizational Unit Validation Errors Dialog Box, page 89
Domain Manager Tool FunctionalityThe Domain Manager Tool performs the following functions:
• Creates a Cisco Root OU named Cisco_ICM in the domain. After Domain Manager creates this rootOU, it also creates two domain local security groups:
◦Cisco_ICM_Config
◦Cisco_ICM_Setup
• Creates a facility OU under the Cisco Root OU, and creates two domain local security groups:
◦<Facility name>_Config
◦<Facility name>_Setup
The Domain Manager adds the <Facility name>_Setup group to the <Facility name>_Config group.The Domain Manager also adds security groups as follows:
◦Adds Cisco_ICM_Config group to <Facility name>_Config
◦Adds Cisco_ICM_Setup group to <Facility name>_Setup
• Creates an instance OU under each facility OU, and creates three domain local security groups:
Staging Guide for Cisco Unified ICM/Contact Center Enterprise, Release 11.6(1) 71
◦<Facility name>_<Instance name>_Config
◦<Facility name>_<Instance name>_Setup
◦<Facility name>_<Instance name>_Service
The Domain Manager also performs the following operations:
◦Adds <Facility name>_<Instance name>_Setup to <Facility name>_<Instance name>_Config,because the setup group needs the permissions for the config group.
◦<Facility name>_Config group to <Facility name>_<Instance name>_Config
◦<Facility name>_Setup group to <Facility name>_<Instance name>_Setup
The config security group has domain read write permission, so that the user in that group can create ausers group as well as OUs in the domain.
For more information, see the chapter Organizational Units.
Open the Domain ManagerTo run the Domain Manager, you must be a Domain admin or a domain user who has domain read writepermission, so you can create OUs and groups.
Procedure
You can open the Domain Manager in the following ways:
• Open the Domain Manager application from the Cisco Unified Tools folder.
• Access through Start > Programs > Cisco Unified CCE Tools > Domain Manager.
When the Domain Manager dialog box opens, multiple domains might display in the domain tree in theleft pane of the dialog box. The default domain displayed is the domain the current user is logged into.
Note
Staging Guide for Cisco Unified ICM/Contact Center Enterprise, Release 11.6(1)72
Domain ManagerOpen the Domain Manager

Domain Manager WindowTheDomainManager dialog box displays the current domain and the Cisco Unified ICM related OUs containedin the domain.
Figure 19: Domain Manager Dialog Box
Domain Manager Tree
The Domain Manager tree display provides a quick view of the Unified ICM created AD OUs and groups inthe selected domains. You can display Multiple domains in the tree. The default domain displayed is thecurrent machine domain. When you first expand a domain node, it is validated. The OU Validation Errorsdialog box appears only if the error is due to missing or incorrect OU hierarchy information.
A context menu displays when you right-click any object in the Domain Manager tree. These menus provideadditional functionality specific to the following level:
• Domains
◦Add Cisco Root
◦Refresh
• Cisco Root
◦Remove Cisco Root
Staging Guide for Cisco Unified ICM/Contact Center Enterprise, Release 11.6(1) 73
Domain ManagerDomain Manager Window
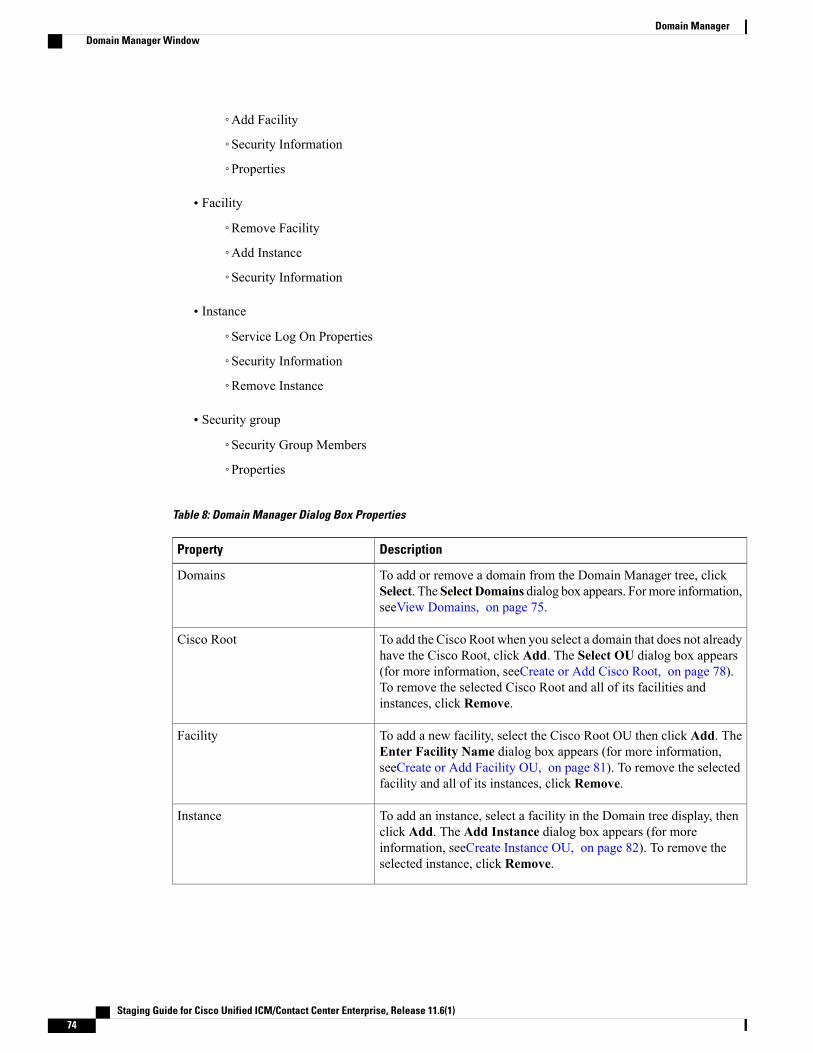
◦Add Facility
◦Security Information
◦Properties
• Facility
◦Remove Facility
◦Add Instance
◦Security Information
• Instance
◦Service Log On Properties
◦Security Information
◦Remove Instance
• Security group
◦Security Group Members
◦Properties
Table 8: Domain Manager Dialog Box Properties
DescriptionProperty
To add or remove a domain from the Domain Manager tree, clickSelect. The Select Domains dialog box appears. Formore information,seeView Domains, on page 75.
Domains
To add the Cisco Root when you select a domain that does not alreadyhave the Cisco Root, click Add. The Select OU dialog box appears(for more information, seeCreate or Add Cisco Root, on page 78).To remove the selected Cisco Root and all of its facilities andinstances, click Remove.
Cisco Root
To add a new facility, select the Cisco Root OU then click Add. TheEnter Facility Name dialog box appears (for more information,seeCreate or Add Facility OU, on page 81). To remove the selectedfacility and all of its instances, click Remove.
Facility
To add an instance, select a facility in the Domain tree display, thenclick Add. The Add Instance dialog box appears (for moreinformation, seeCreate Instance OU, on page 82). To remove theselected instance, click Remove.
Instance
Staging Guide for Cisco Unified ICM/Contact Center Enterprise, Release 11.6(1)74
Domain ManagerDomain Manager Window
DescriptionProperty
ClickMembers to display the Security GroupMembers dialog box(for more information, seeAdd Users to Security Group, on page 86)where you assign users to security groups.
Security group
Related Topics
View Domains, on page 75Add Domain to a View, on page 77Remove Domain from a View, on page 78Create or Add Cisco Root, on page 78Create or Add Facility OU, on page 81Remove Facility OU, on page 81Create Instance OU, on page 82Remove Instance OU, on page 84Add Users to Security Group, on page 86Remove Members from Security Group, on page 88
View Domains
Procedure
Step 1 Open the Domain Manager.Step 2 In the right top pane of the Domain Manager, click Select.
Staging Guide for Cisco Unified ICM/Contact Center Enterprise, Release 11.6(1) 75
Domain ManagerView Domains
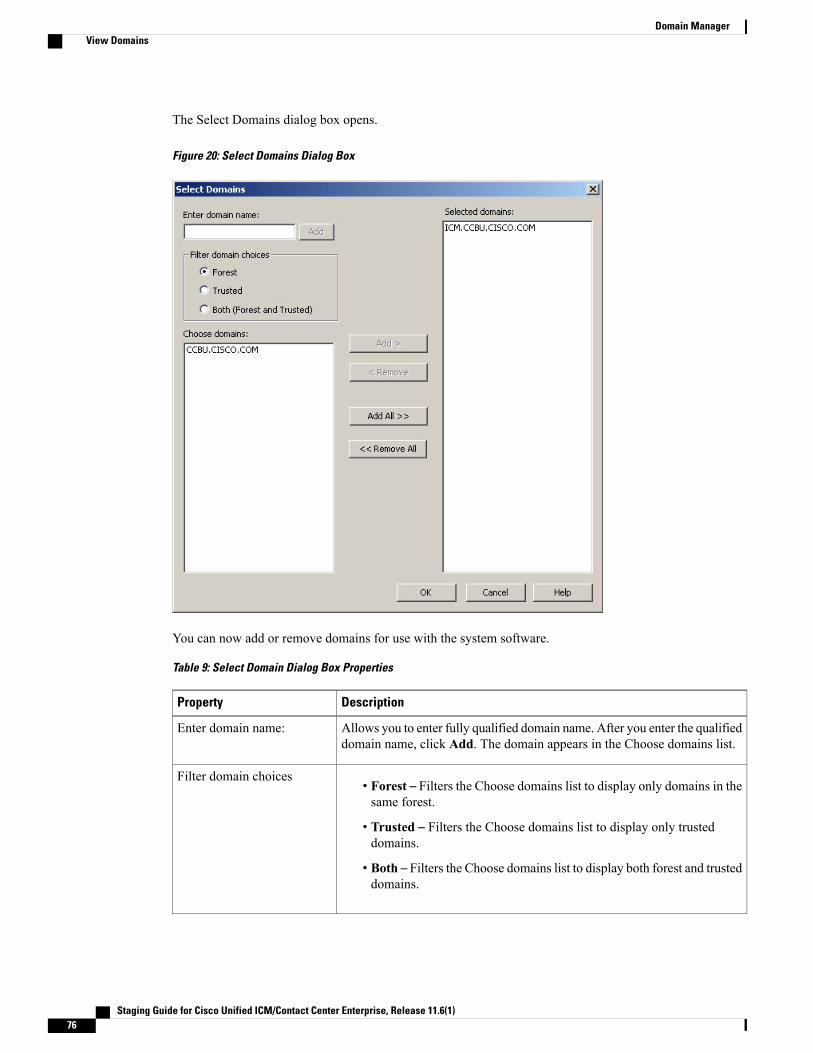
The Select Domains dialog box opens.
Figure 20: Select Domains Dialog Box
You can now add or remove domains for use with the system software.
Table 9: Select Domain Dialog Box Properties
DescriptionProperty
Allows you to enter fully qualified domain name. After you enter the qualifieddomain name, click Add. The domain appears in the Choose domains list.
Enter domain name:
• Forest – Filters the Choose domains list to display only domains in thesame forest.
• Trusted – Filters the Choose domains list to display only trusteddomains.
• Both – Filters the Choose domains list to display both forest and trusteddomains.
Filter domain choices
Staging Guide for Cisco Unified ICM/Contact Center Enterprise, Release 11.6(1)76
Domain ManagerView Domains
DescriptionProperty
Choose a domain from the displayed list:
• Add >— Adds domains selected in the Choose domains list to theSelected domains list.
• < Remove— Removes selected domains from the Selected domainslist.
• Add All >>— Adds all the domains in the Choose domains list to theSelected domains list.
• << Remove All—Moves all the domains from the Selected domainslist to the Choose domains list.
Choose domains:
Displays a list of all the selected domains.Selected domains:
For more information, see the chapter Domain Manager.
Related Topics
Add Domain to a View, on page 77Remove Domain from a View, on page 78
Add Domain to a ViewYou can add domains by using the controls in the Select Domains dialog box. Follow these steps to add adomain:
Procedure
Step 1 In the left pane under Choose domains, select one or more domains.Step 2 Click Add > to add the selected domains, or click Add All >> to add all the domains.
You can also manually type in a domain to add to a view instead of clicking.
Step 3 In the field under Enter domain name, enter the fully qualified domain name to add.Step 4 Click Add.Step 5 Click OK.
The added domains now appear in the Domain Manager dialog box. You can then add the Cisco Root OU.
Related Topics
View Domains, on page 75Domain Manager Window, on page 73Create or Add Cisco Root, on page 78
Staging Guide for Cisco Unified ICM/Contact Center Enterprise, Release 11.6(1) 77
Domain ManagerAdd Domain to a View
Remove Domain from a ViewYou can remove domains by using the controls in the Select Domains dialog box. Follow these steps to removea domain:
Procedure
Step 1 In the Select Domains dialog box, in right pane under Selected domains:, select one or more domains.Step 2 Click <Remove to remove the selected domains, or click <<Remove All to remove all the domains.Step 3 Click OK.
The removed domains no longer appear in the Domain Manager dialog box.
Related Topics
View Domains, on page 75
Create or Add Cisco RootYou can create the Cisco Root OU either in the domain root, or beneath another OU in the domain.
The user who creates the Cisco Root OU automatically becomes a member of the Setup Security Groupfor the Cisco Root OU. In effect, this user is granted privileges to all Unified ICM tasks in the domain.
Note
Procedure
Step 1 Select the domain you want to add.If the current domain, which the Domain Manager loads by default, is not the domain to which you want toadd a root, then add a domain to the view.
Step 2 Click the Cisco Root Add button. This displays the Select OU dialog box.Step 3 Click Add to add the Root.
Staging Guide for Cisco Unified ICM/Contact Center Enterprise, Release 11.6(1)78
Domain ManagerRemove Domain from a View
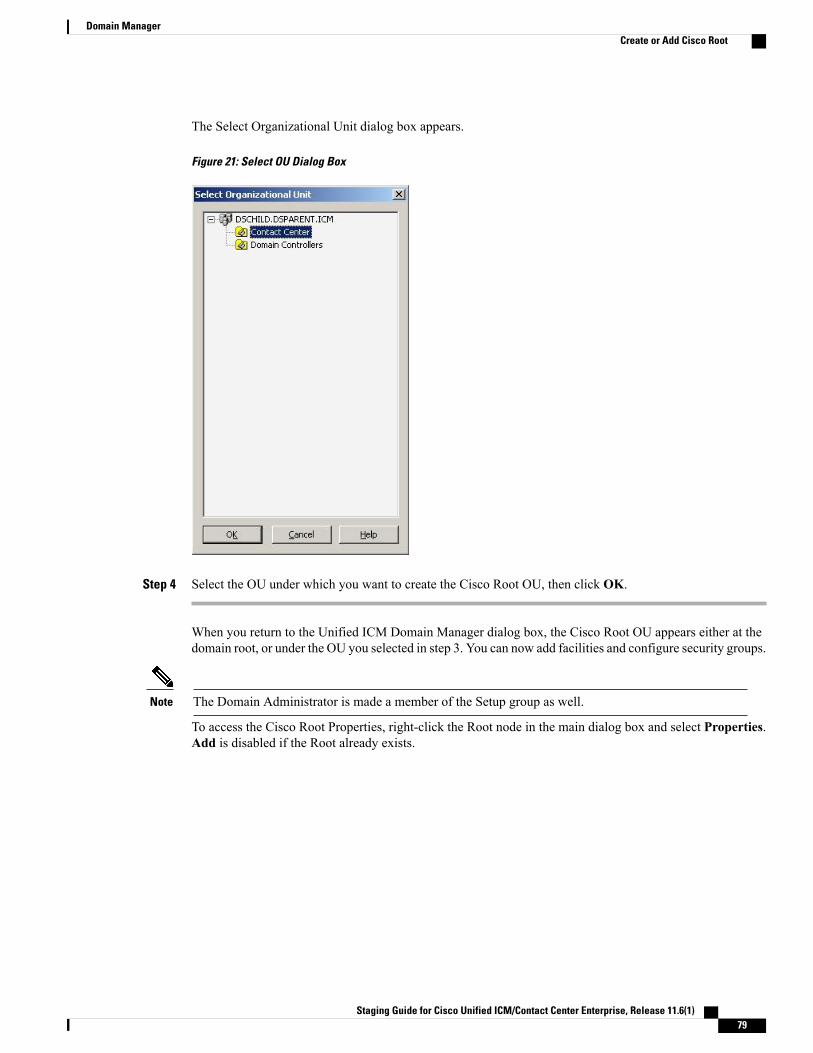
The Select Organizational Unit dialog box appears.
Figure 21: Select OU Dialog Box
Step 4 Select the OU under which you want to create the Cisco Root OU, then click OK.
When you return to the Unified ICM Domain Manager dialog box, the Cisco Root OU appears either at thedomain root, or under the OU you selected in step 3. You can now add facilities and configure security groups.
The Domain Administrator is made a member of the Setup group as well.Note
To access the Cisco Root Properties, right-click the Root node in the main dialog box and select Properties.Add is disabled if the Root already exists.
Staging Guide for Cisco Unified ICM/Contact Center Enterprise, Release 11.6(1) 79
Domain ManagerCreate or Add Cisco Root
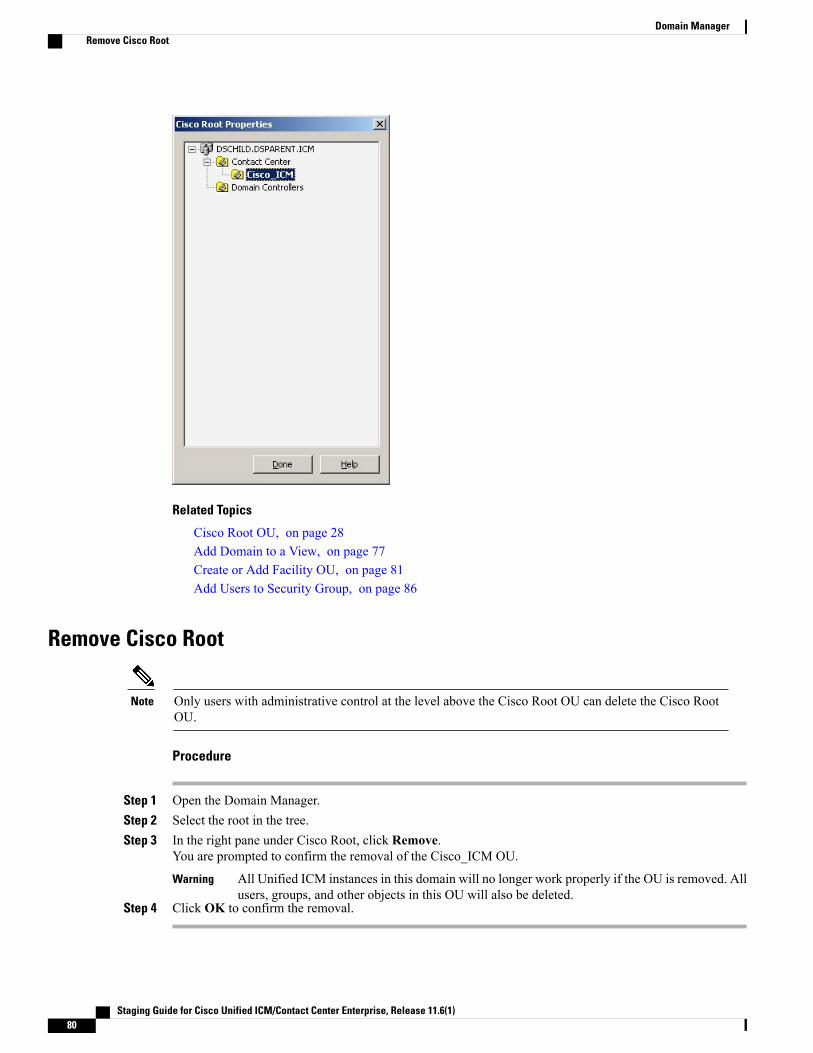
Related Topics
Cisco Root OU, on page 28Add Domain to a View, on page 77Create or Add Facility OU, on page 81Add Users to Security Group, on page 86
Remove Cisco Root
Only users with administrative control at the level above the Cisco Root OU can delete the Cisco RootOU.
Note
Procedure
Step 1 Open the Domain Manager.Step 2 Select the root in the tree.Step 3 In the right pane under Cisco Root, click Remove.
You are prompted to confirm the removal of the Cisco_ICM OU.
All Unified ICM instances in this domain will no longer work properly if the OU is removed. Allusers, groups, and other objects in this OU will also be deleted.
Warning
Step 4 Click OK to confirm the removal.
Staging Guide for Cisco Unified ICM/Contact Center Enterprise, Release 11.6(1)80
Domain ManagerRemove Cisco Root
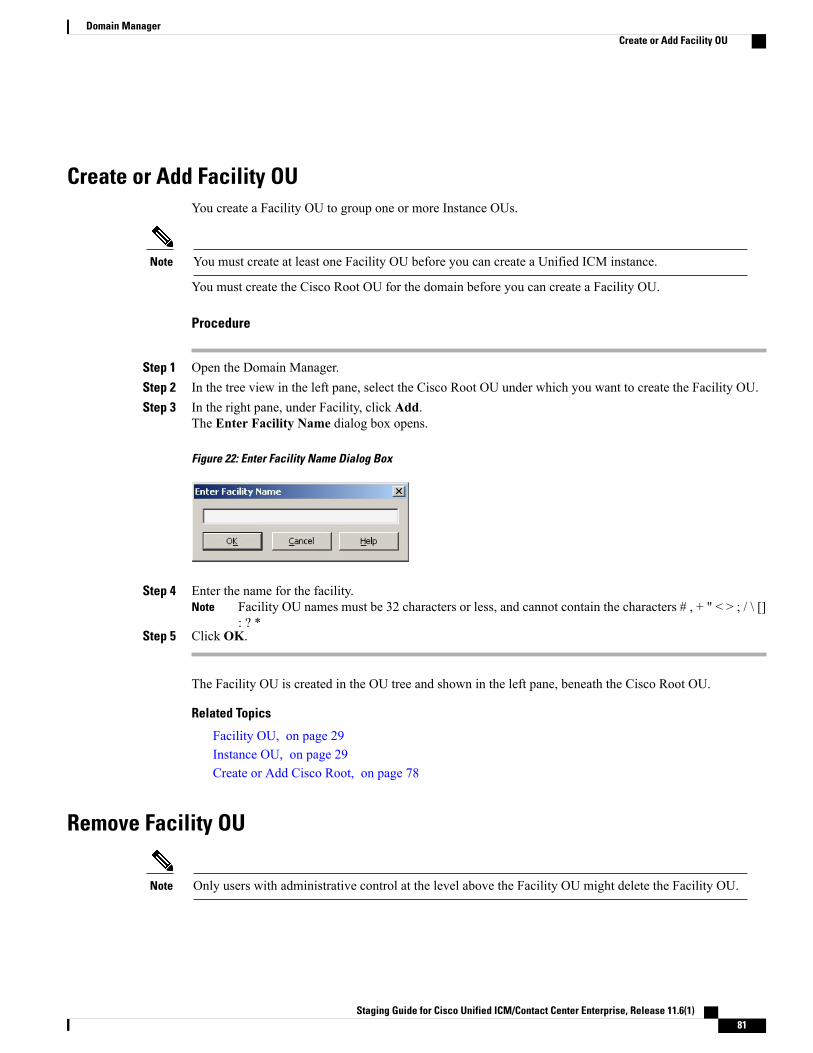
Create or Add Facility OUYou create a Facility OU to group one or more Instance OUs.
You must create at least one Facility OU before you can create a Unified ICM instance.Note
You must create the Cisco Root OU for the domain before you can create a Facility OU.
Procedure
Step 1 Open the Domain Manager.Step 2 In the tree view in the left pane, select the Cisco Root OU under which you want to create the Facility OU.Step 3 In the right pane, under Facility, click Add.
The Enter Facility Name dialog box opens.
Figure 22: Enter Facility Name Dialog Box
Step 4 Enter the name for the facility.Facility OU names must be 32 characters or less, and cannot contain the characters # , + " < > ; / \ []: ? *
Note
Step 5 Click OK.
The Facility OU is created in the OU tree and shown in the left pane, beneath the Cisco Root OU.
Related Topics
Facility OU, on page 29Instance OU, on page 29Create or Add Cisco Root, on page 78
Remove Facility OU
Only users with administrative control at the level above the Facility OU might delete the Facility OU.Note
Staging Guide for Cisco Unified ICM/Contact Center Enterprise, Release 11.6(1) 81
Domain ManagerCreate or Add Facility OU
Procedure
Step 1 Open the Domain Manager.Step 2 In the tree view in the left pane, navigate down the tree to find and select the Facility OU you want to delete.Step 3 In the right pane, under Facility, click Remove.
You are prompted to confirm the removal.
All Unified ICM instances in this facility will no longer work properly if the OU is removed. Allusers, groups, and other objects in this OU will also be deleted.
Warning
Step 4 Click OK to confirm the removal.
The Facility OU is removed from the tree.
Create Instance OUYou can create an Instance OU while creating a Unified ICM instance, or before you create the Unified ICMinstance.
Procedure
Step 1 Open the Domain Manager.Step 2 In the tree view in the left pane, navigate to and select the Facility OU under which you want to create the
Instance OU.Step 3 In the right pane, under Instance, click Add.
Staging Guide for Cisco Unified ICM/Contact Center Enterprise, Release 11.6(1)82
Domain ManagerCreate Instance OU
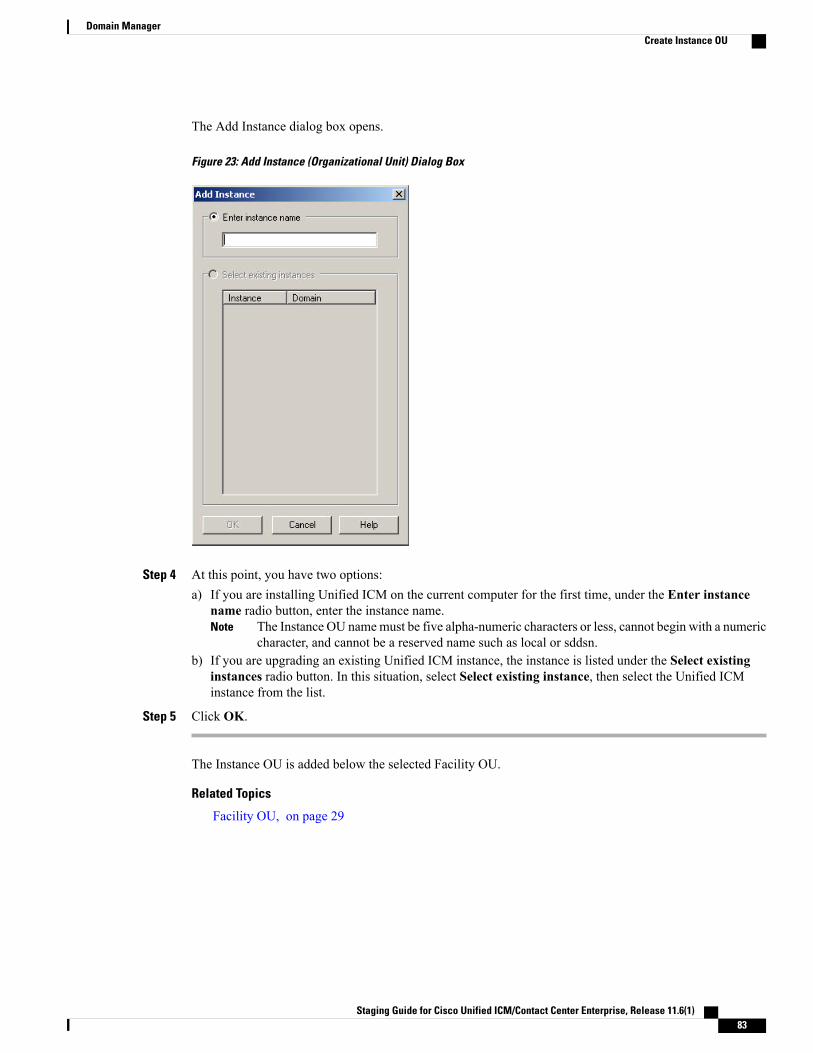
The Add Instance dialog box opens.
Figure 23: Add Instance (Organizational Unit) Dialog Box
Step 4 At this point, you have two options:a) If you are installing Unified ICM on the current computer for the first time, under the Enter instance
name radio button, enter the instance name.The Instance OU namemust be five alpha-numeric characters or less, cannot begin with a numericcharacter, and cannot be a reserved name such as local or sddsn.
Note
b) If you are upgrading an existing Unified ICM instance, the instance is listed under the Select existinginstances radio button. In this situation, select Select existing instance, then select the Unified ICMinstance from the list.
Step 5 Click OK.
The Instance OU is added below the selected Facility OU.
Related Topics
Facility OU, on page 29
Staging Guide for Cisco Unified ICM/Contact Center Enterprise, Release 11.6(1) 83
Domain ManagerCreate Instance OU
Remove Instance OU
Procedure
Step 1 Open the Domain Manager.Step 2 In the tree view in the left pane, navigate down the tree to find and select the Instance OU you want to delete.Step 3 In the right pane, under Instance, click Remove.
You are prompted to confirm the removal.
This Unified ICM instance will no longer work properly if the OU is removed. All users, groups,and other objects in this OU will also be deleted.
Warning
Step 4 Click OK to confirm the removal.
The Instance OU is removed from the tree.
Security GroupsA security group is a collection of domain users to whom you grant a set of permissions to perform tasks withthe system software.
For each security group, you add a set of domain users who are granted privileges to the functions controlledby that security group. The Security Group Members dialog box displays the list of groups that are members
Staging Guide for Cisco Unified ICM/Contact Center Enterprise, Release 11.6(1)84
Domain ManagerRemove Instance OU
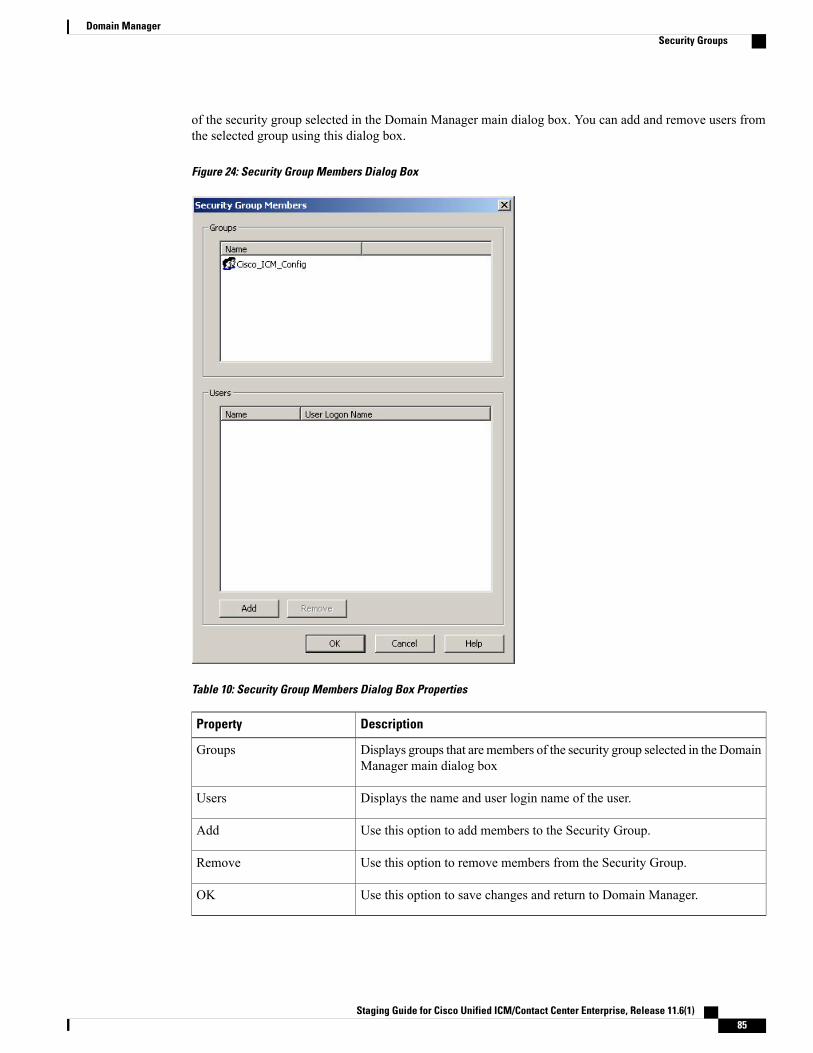
of the security group selected in the Domain Manager main dialog box. You can add and remove users fromthe selected group using this dialog box.
Figure 24: Security Group Members Dialog Box
Table 10: Security Group Members Dialog Box Properties
DescriptionProperty
Displays groups that aremembers of the security group selected in the DomainManager main dialog box
Groups
Displays the name and user login name of the user.Users
Use this option to add members to the Security Group.Add
Use this option to remove members from the Security Group.Remove
Use this option to save changes and return to Domain Manager.OK
Staging Guide for Cisco Unified ICM/Contact Center Enterprise, Release 11.6(1) 85
Domain ManagerSecurity Groups
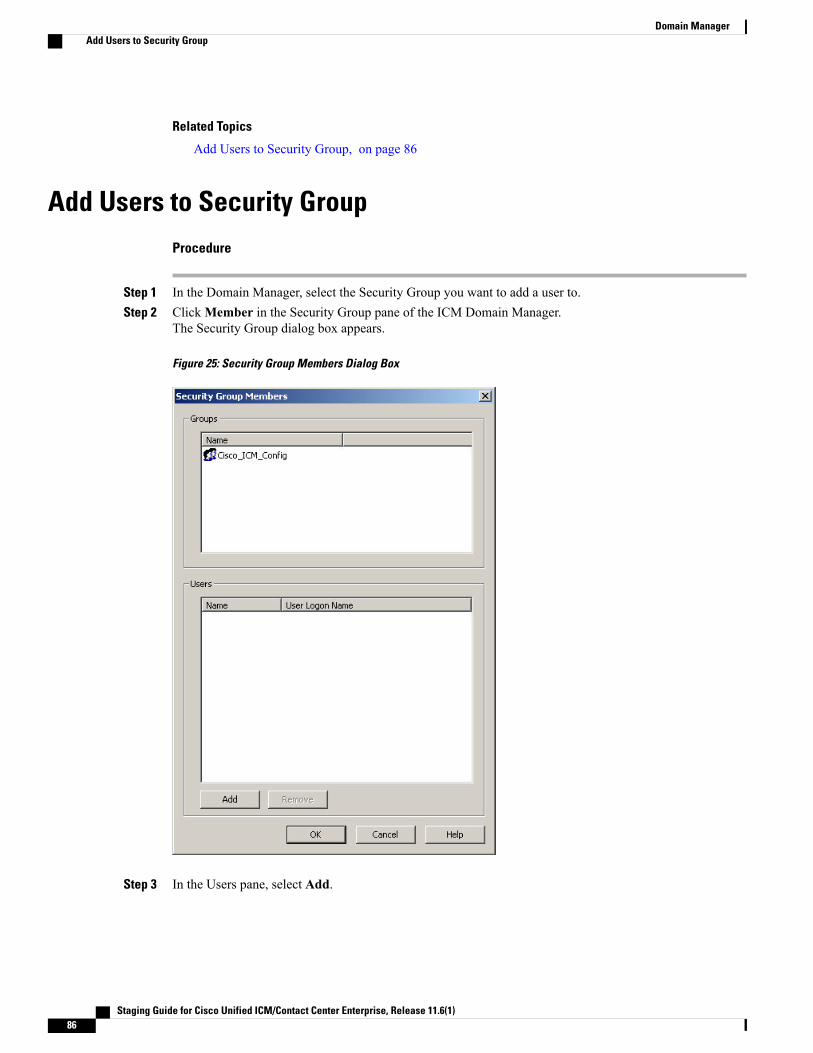
Related Topics
Add Users to Security Group, on page 86
Add Users to Security GroupProcedure
Step 1 In the Domain Manager, select the Security Group you want to add a user to.Step 2 ClickMember in the Security Group pane of the ICM Domain Manager.
The Security Group dialog box appears.
Figure 25: Security Group Members Dialog Box
Step 3 In the Users pane, select Add.
Staging Guide for Cisco Unified ICM/Contact Center Enterprise, Release 11.6(1)86
Domain ManagerAdd Users to Security Group
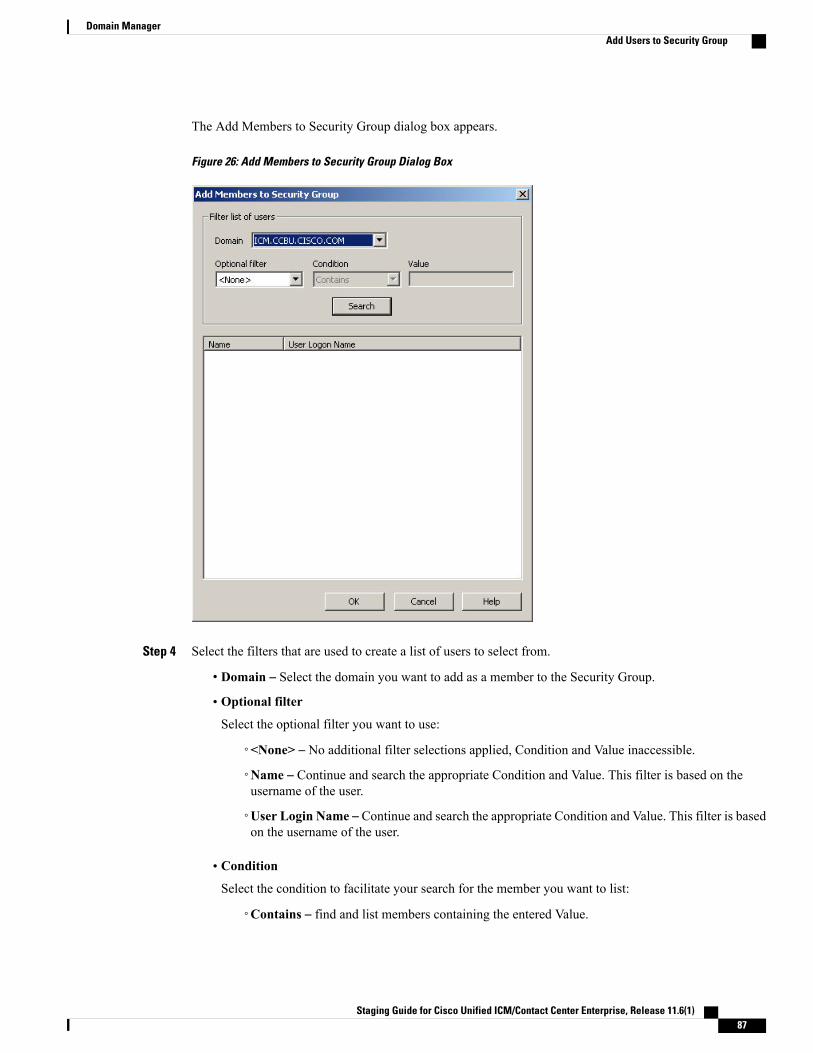
The Add Members to Security Group dialog box appears.
Figure 26: Add Members to Security Group Dialog Box
Step 4 Select the filters that are used to create a list of users to select from.
• Domain – Select the domain you want to add as a member to the Security Group.
• Optional filterSelect the optional filter you want to use:
◦<None> – No additional filter selections applied, Condition and Value inaccessible.
◦Name – Continue and search the appropriate Condition and Value. This filter is based on theusername of the user.
◦User Login Name – Continue and search the appropriate Condition and Value. This filter is basedon the username of the user.
• ConditionSelect the condition to facilitate your search for the member you want to list:
◦Contains – find and list members containing the entered Value.
Staging Guide for Cisco Unified ICM/Contact Center Enterprise, Release 11.6(1) 87
Domain ManagerAdd Users to Security Group
◦Starts with – find and list members whose name or user login name starts with the entered Value.
◦Ends with – find and list members whose name or user logon name ends with the entered Value.
• ValueEnter the appropriate value to search on, for example, enter the first name of the user you want to add.This value provides a list of members with that name for you to choose from.
Step 5 Select the member you want to add to the Security Group from the displayed list.Step 6 Click OK to add the selected member to the Security Group.
Remove Members from Security GroupProcedure
Step 1 In the Domain Manager, select the Security Group from which you want to remove members.Step 2 In the Security Group pane of the Domain Manager dialog box, selectMembers.
The Security Group dialog box appears.
Step 3 In the Users pane, select the member you want to remove from the Security Group.Step 4 Click Remove.Step 5 Click OK to remove the selected member from the Security Group.
Staging Guide for Cisco Unified ICM/Contact Center Enterprise, Release 11.6(1)88
Domain ManagerRemove Members from Security Group
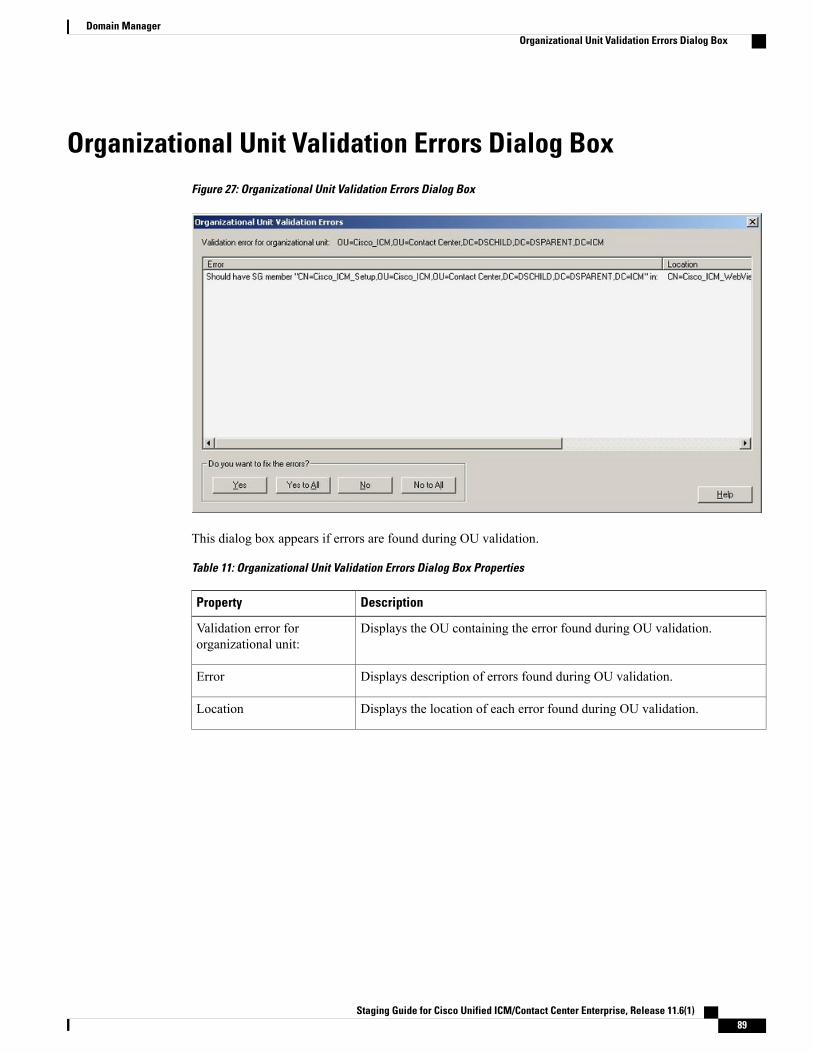
Organizational Unit Validation Errors Dialog BoxFigure 27: Organizational Unit Validation Errors Dialog Box
This dialog box appears if errors are found during OU validation.
Table 11: Organizational Unit Validation Errors Dialog Box Properties
DescriptionProperty
Displays the OU containing the error found during OU validation.Validation error fororganizational unit:
Displays description of errors found during OU validation.Error
Displays the location of each error found during OU validation.Location
Staging Guide for Cisco Unified ICM/Contact Center Enterprise, Release 11.6(1) 89
Domain ManagerOrganizational Unit Validation Errors Dialog Box
DescriptionProperty
Four possible responses:
• Yes – Fixes the displayed error then attempts to sequentially validatethe next OU. If more errors are found, you return to this dialog box.
• Yes to All – Recursively fixes the displayed error and any errors foundduring sequential validation attempts for other ICM OUs withoutreturning to this dialog box.
• No – Does not fix the displayed error but attempts to sequentiallyvalidate the next OU. If more errors are found, you return to this dialogbox.
• No to All – Does not fix the displayed error but recursively validatesthe OUs and logs any additional errors without returning you to thisdialog box.
Do you want to fix the errors?
Staging Guide for Cisco Unified ICM/Contact Center Enterprise, Release 11.6(1)90
Domain ManagerOrganizational Unit Validation Errors Dialog Box

C H A P T E R 8Staging Prerequisites
• System Design Specification, page 91
• Platform Hardware and Software, page 92
• Set Staging Environment, page 93
• Set Persistent Static Routes, page 93
System Design SpecificationBefore you begin the Unified ICM staging process, ensure that a Unified ICM/Cisco Unified Contact CenterEnterprise System Design Specification is created and approved.
Persons creating and approving this specification must be familiar with the following:
•Windows Operating System
◦AD
◦Security concepts
◦Network configuration and operation
• SQL Server
◦Enterprise Manager
◦Query Analyzer
◦SQL scripting
• Unified ICM/Cisco Unified Contact Center Enterprise
◦Unified ICM/Cisco Unified Contact Center Enterprise Nodes (Router, Logger, Administration &Data Server, PGs)
◦HDS Schema knowledge
◦Deployment models
Staging Guide for Cisco Unified ICM/Contact Center Enterprise, Release 11.6(1) 91
◦The appropriate release of theUnified CCE Solution Compatibility Matrix and Solution DesignGuide for Cisco Unified Contact Center Enterprise.
The System Design Specification must contain the following specifications:
• Description of Unified ICM Sites and Nodes
• Data Communications Infrastructure
• Event Notification and Remote Access Points
• Naming Conventions
• IP Addressing Scheme
• AD Plan, including:
◦AD Sites
◦Global Catalog Servers
◦Domain Controllers
◦Trust Relationships
◦Domain Members
◦Standalone Servers
◦Time Source
• DNS Plan (follow Microsoft Best Practices), including:
◦DNS Servers and Clients
◦DNS Forward and Reverse Lookup Zones and Records
• System Diagrams
• Configuration Settings, including:
◦Physical Controller IDs
◦Logical Controller IDs
◦Peripheral Controller IDs
• Third-party Host Forms –A section containing the detailed build information for each server containingthe entries and values for fields which are different from defaults presented during third-party softwareinstallation and setup. Some examples of this information include: Network Card configuration andbinding order, Drive Partitioning Information, System Properties, and passwords.
Platform Hardware and SoftwareDuring the SystemDesign phase of the Unified ICM/CCE deployment, you define the hardware specifications,virtualization environment, and third-party software requirements. For supported third-party software, see theUnified CCE Solution Compatibility Matrix at https://www.cisco.com/c/en/us/support/customer-collaboration/
Staging Guide for Cisco Unified ICM/Contact Center Enterprise, Release 11.6(1)92
Staging PrerequisitesPlatform Hardware and Software
unified-contact-center-enterprise/products-device-support-tables-list.html. For information about UnifiedICM/CCE virtualized systems, see the Virtualization for Unified Contact Center Enterprise at http://www.cisco.com/c/dam/en/us/td/docs/voice_ip_comm/uc_system/virtualization/virtualization-unified-contact-center-enterprise.html.
Set Staging EnvironmentProcedure
Step 1 Stage all computers in racks or on a work surface.Step 2 Ensure that all software CDs, driver software, and documentation are in the work area.Step 3 Ensure that you have all software license numbers available.Step 4 Ensure that the Unified ICM network is in place and tested.
Check that:
• All LAN switches are configured for required subnets per the System Design Specification
• All IP Routers are configured as required
• There is IP connectivity between all subnets
• Required Ethernet connections are in place between ICM software servers and LAN switches
• Required packet prioritization is configured on IP Routers
Step 5 Ensure that assigned engineers follow the specifications in these documents:
• Solution Design Guide for Cisco Unified Contact Center Enterprise at http://www.cisco.com/c/en/us/support/customer-collaboration/unified-contact-center-enterprise/products-implementation-design-guides-list.html
• Virtualization for Unified Contact Center Enterprise at http://www.cisco.com/c/dam/en/us/td/docs/voice_ip_comm/uc_system/virtualization/virtualization-unified-contact-center-enterprise.html
• Unified CCE Solution Compatibility Matrix at https://www.cisco.com/c/en/us/support/customer-collaboration/unified-contact-center-enterprise/products-device-support-tables-list.html
Set Persistent Static RoutesFor geographically distributed Central Controller sites, redundant CallRouter, Logger, and Peripheral Gatewaycomponents typically have a Private IP WAN connection between Side A and Side B. Windows only allowsone default gateway for each VM (which sends the Private Network traffic to the Public Network). So, youadd a Static Route to all the VMs running the CallRouter, Logger, and PG applications.
To create a persistent static route with the route add command, you need the destination subnet, the subnetmask, the local gateway IP, and the interface number of the local Private Network interface:
Staging Guide for Cisco Unified ICM/Contact Center Enterprise, Release 11.6(1) 93
Staging PrerequisitesSet Staging Environment

route add <destination subnet> mask <subnet mask> <gateway IP> IF <interface number> -p
You must launch the DOS prompt as an administrator to run the commands in this procedure.
Procedure
Step 1 On each CallRouter, Logger, or PG VM, run ipconfig /all.Record the IPv4 Address, Subnet Mask, and Physical Address (MAC address) for the PrivateNetwork interface.
Step 2 On each of these VMs, run route print –4.Record the Interface for the Private Network. You can identify the correct interface by looking for itsPhysical Address (MAC address).
Step 3 On each of these VMs, run route add <destination subnet> mask <subnet mask> <gateway IP> IF
<interface number> -p to add a persistent static route for the remote Private Network.
Staging Guide for Cisco Unified ICM/Contact Center Enterprise, Release 11.6(1)94
Staging PrerequisitesSet Persistent Static Routes
A P P E N D I X ADomain Controller Installation on MS WindowsServer
• Install Domain Controller on Microsoft Windows Server, page 95
Install Domain Controller on Microsoft Windows ServerBefore you install the Domain Controller, ensure that the host has a static IP address and then configure thePreferred DNS Server at that static IP address.
See Microsoft documentation on Microsoft Windows Server at http://technet.microsoft.com/en-us/library/dn283324.aspx web site for instructions on installing Domain Controller on Microsoft Windows Server.
Related Topics
Supported Topologies, on page 12
Staging Guide for Cisco Unified ICM/Contact Center Enterprise, Release 11.6(1) 95

Staging Guide for Cisco Unified ICM/Contact Center Enterprise, Release 11.6(1)96
Domain Controller Installation on MS Windows ServerInstall Domain Controller on Microsoft Windows Server
A P P E N D I X BMoving the Cisco Root OU
• Introduction, page 97
IntroductionThis section describes the instructions to move the Cisco Root OU safely from one OU to another within thesame domain. The procedure involves moving the OU in which ICM is installed to another (created or existing)OU, and then moving the Unified ICM into the destination OU.
Moving the Cisco Root OU is only supported if the OU is moved within the same domain. Transferringan OU from one domain to another is not supported.
Warning
DefinitionsThis section defines the terms used in the movement of Cisco Root OU:
Cisco Root OUThe OU contains all Unified ICM created domain resources. The OU defines the permissions for all UnifiedICM instances. When you use this tool, you determine which uses a Cisco Root OU named “Cisco_ICM”.Only one Cisco Root OU exists in each domain.
Domain ManagerA tool for creating all Cisco OUs along with their associated groups and permissions. This tool helps you todetermine which users in your corporate domain have access rights to perform Unified ICM-related tasks.
Requirements and PrerequisitesThe instructions in this document are subject to the following requirements and prerequisites:
Staging Guide for Cisco Unified ICM/Contact Center Enterprise, Release 11.6(1) 97
• The OU might only be transferred to a new location within the same domain.
• Stop all Unified ICMServices and applications before following these instructions. For duplexed systems,stop both the primary and secondary systems.
• Obtain and record the Instance Number of each Unified ICM instance on the system.
Preparatory StepsBefore moving the OU:
1 Stop all Unified ICM Services before removing the OU.
2 Reset the permissions for the users using the User List Tool.
• Run Web Setup to edit each component of each instance to reset the service account to the new OU.
• Start all Unified ICM Services.
• Run the Configuration Manager tool.
• Run the User List tool and re-establish the permissions for individual users to ensure all the usersin the User List Tools have the correct permissions.
Staging Guide for Cisco Unified ICM/Contact Center Enterprise, Release 11.6(1)98
Moving the Cisco Root OUPreparatory Steps
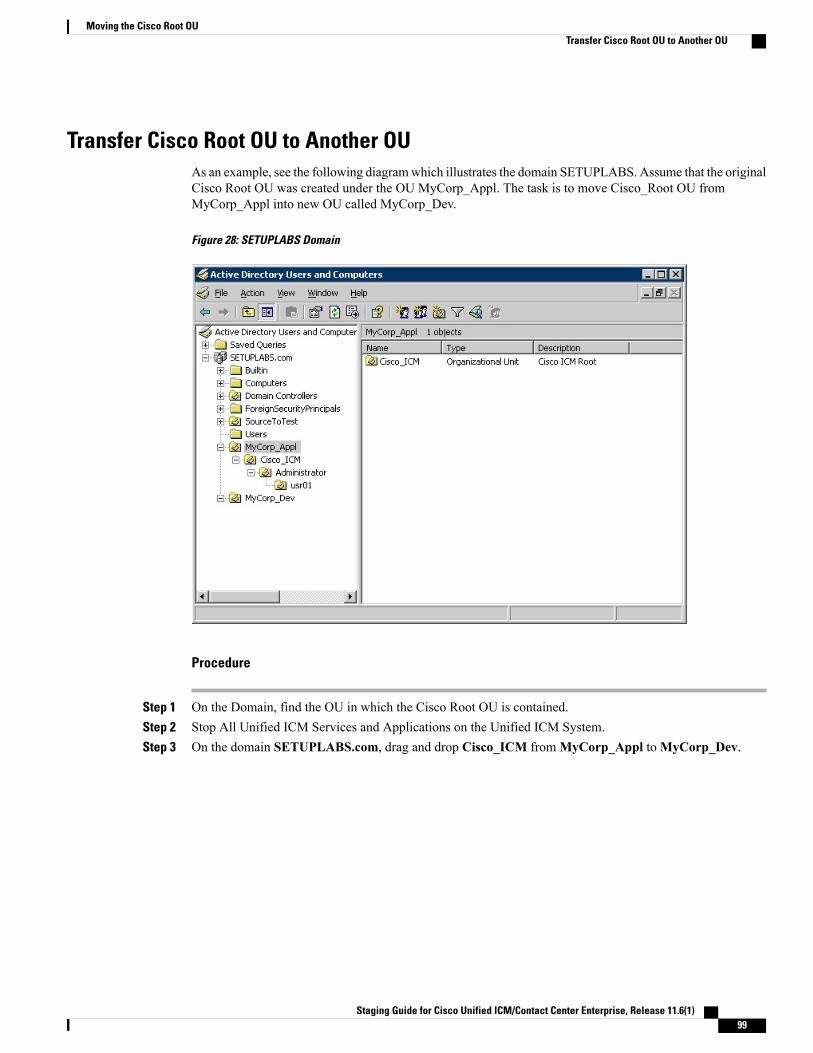
Transfer Cisco Root OU to Another OUAs an example, see the following diagramwhich illustrates the domain SETUPLABS. Assume that the originalCisco Root OU was created under the OU MyCorp_Appl. The task is to move Cisco_Root OU fromMyCorp_Appl into new OU called MyCorp_Dev.
Figure 28: SETUPLABS Domain
Procedure
Step 1 On the Domain, find the OU in which the Cisco Root OU is contained.Step 2 Stop All Unified ICM Services and Applications on the Unified ICM System.Step 3 On the domain SETUPLABS.com, drag and drop Cisco_ICM fromMyCorp_Appl toMyCorp_Dev.
Staging Guide for Cisco Unified ICM/Contact Center Enterprise, Release 11.6(1) 99
Moving the Cisco Root OUTransfer Cisco Root OU to Another OU
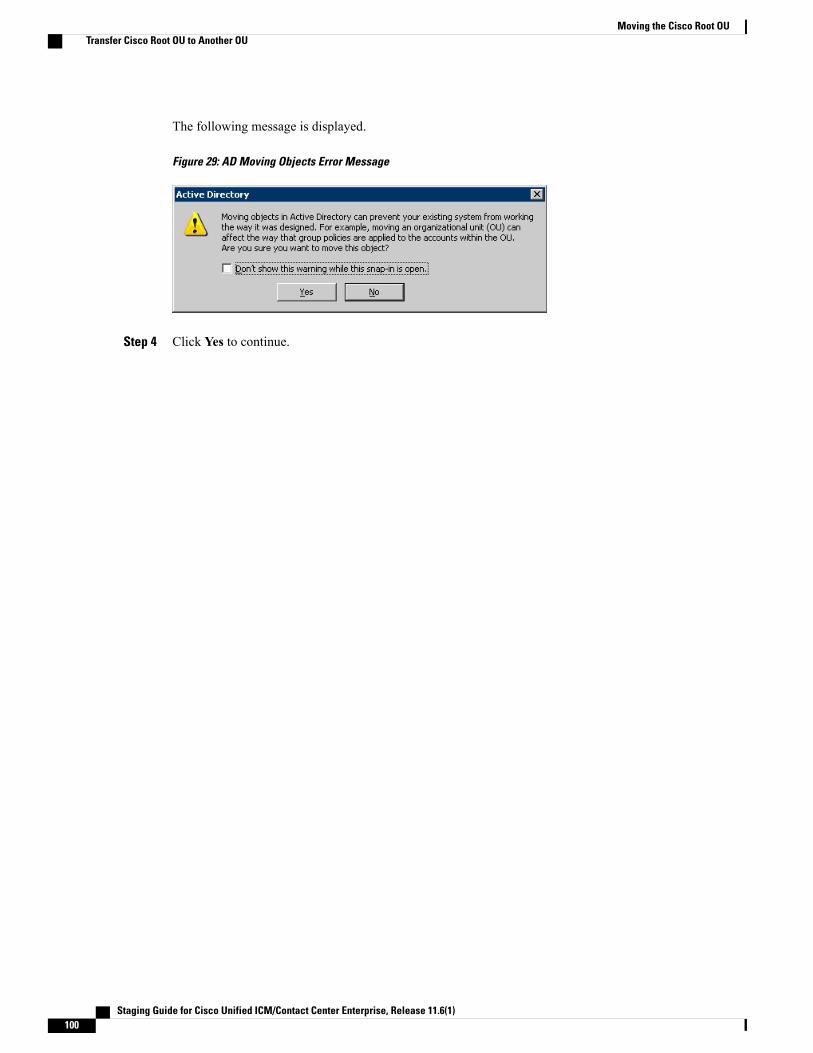
The following message is displayed.
Figure 29: AD Moving Objects Error Message
Step 4 Click Yes to continue.
Staging Guide for Cisco Unified ICM/Contact Center Enterprise, Release 11.6(1)100
Moving the Cisco Root OUTransfer Cisco Root OU to Another OU
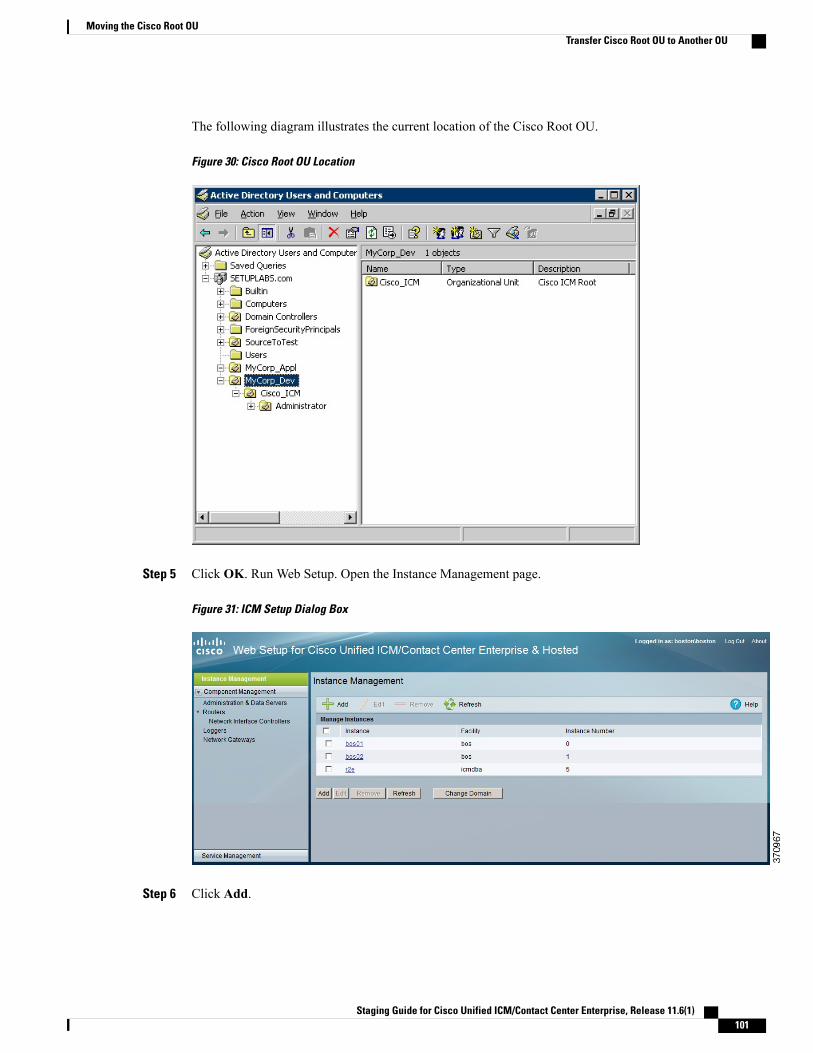
The following diagram illustrates the current location of the Cisco Root OU.
Figure 30: Cisco Root OU Location
Step 5 Click OK. Run Web Setup. Open the Instance Management page.
Figure 31: ICM Setup Dialog Box
Step 6 Click Add.
Staging Guide for Cisco Unified ICM/Contact Center Enterprise, Release 11.6(1) 101
Moving the Cisco Root OUTransfer Cisco Root OU to Another OU
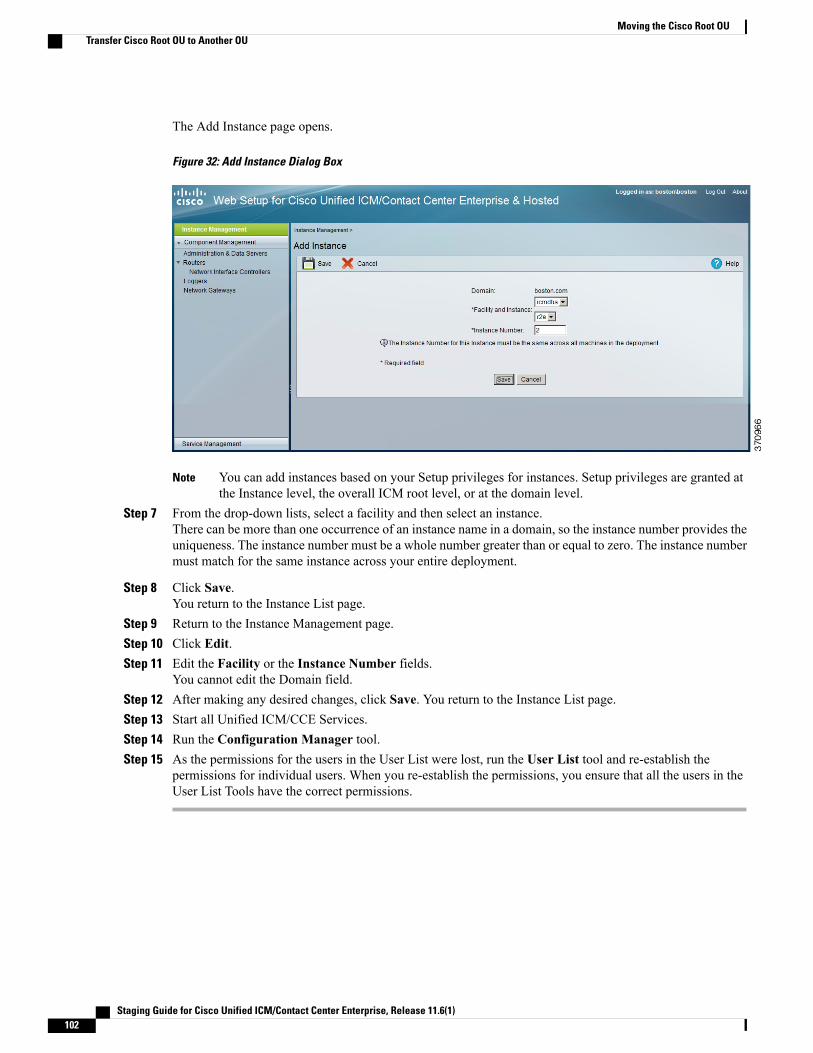
The Add Instance page opens.
Figure 32: Add Instance Dialog Box
You can add instances based on your Setup privileges for instances. Setup privileges are granted atthe Instance level, the overall ICM root level, or at the domain level.
Note
Step 7 From the drop-down lists, select a facility and then select an instance.There can be more than one occurrence of an instance name in a domain, so the instance number provides theuniqueness. The instance number must be a whole number greater than or equal to zero. The instance numbermust match for the same instance across your entire deployment.
Step 8 Click Save.You return to the Instance List page.
Step 9 Return to the Instance Management page.Step 10 Click Edit.Step 11 Edit the Facility or the Instance Number fields.
You cannot edit the Domain field.Step 12 After making any desired changes, click Save. You return to the Instance List page.Step 13 Start all Unified ICM/CCE Services.Step 14 Run the Configuration Manager tool.Step 15 As the permissions for the users in the User List were lost, run the User List tool and re-establish the
permissions for individual users. When you re-establish the permissions, you ensure that all the users in theUser List Tools have the correct permissions.
Staging Guide for Cisco Unified ICM/Contact Center Enterprise, Release 11.6(1)102
Moving the Cisco Root OUTransfer Cisco Root OU to Another OU