SSD5 User Manual - download.stevenslatedrums.comdownload.stevenslatedrums.com/ssd5/SSD5 User...
20
User Manual STEVEN SLATE DRUMS 5
Transcript of SSD5 User Manual - download.stevenslatedrums.comdownload.stevenslatedrums.com/ssd5/SSD5 User...

User ManualSTEVEN SLATE DRUMS 5

CONTENTS
User Manual
stevenslatedrums.com
Introduction
Sampler
Operation
Settings
Construct Kit
Edit Instrument
Articulations
Dynamics
Microphone Section
ADSR
Mixer
Mixer Routing
Mapping
Grooves
2
4
5
5
7
9
11
11
12
13
14
15
17
19
11
INTRODUCTIONSteven Slate Drums 5, or SSD5 is the next generation virtual drum plugin. It consists of a drum sampler and an instrument library.
SSD5’s library comes with over 400 instruments in it, ranging from acoustic drums, to percussion, to electronic drum samples.
Drum instruments are made up of 24 bit multi-mic WAV samples packed into our proprie-tary format with revolutionary lossless compression. This allows us to decrease the size of the instruments up to 3 times by saving hard disk space and RAM.
SSD5 drum instruments have up to 24 velocity layers, which are drum hits sampled from softest to hardest. SSD5 also comes with 12 alterations or round-robin hits which are multiple hits within one velocity layer. The purpose of alternating hits is to make the samples sound more realistic and natural. Typically with alternating hits, it’s impossible to detect sampled drums because the hits are not repeating. This will eliminate most common complaint from using sampled drum instruments, the machine gun effect. In addition to our very detailed drum samples, the SSD5 Sampler is the only sampler on the market with intelligent playback. This is physically modelled after real life acoustic drums and drumming. While all other virtual drums use the classic approach to sample playback called the “polyphonic playback,” which is just samples playing independently and stacking up until they reach polyphony voice limit, the SSD5 sampler models the behavior of a real drum kit. Samples in SSD5 interact with each other and do not stack up like they would in polyphonic playback. Every new hit depends on all the previous hits and on what kit pieces are playing at the moment.
Depending on type of drum and library, the SSD5 instruments may have a different amount of mics in each instrument. For example, the newest Deluxe 2 library has up to two direct mics per shell.
This means the kick would have “Kick In” and “Kick Out” samples, and the Snare would have “Snare Top” and “Snare Bottom” samples, etc.
The SSD5 instrument library has different categories including instruments from previous versions of Steven Slate Drums, so users can always have access to their favorite sounds, even from first versions of Steven Slate Drums:
SSD5 Deluxe 2: The newest instruments recorded for SSD5. These are the most detailed instruments with more velocities, alternating hits and articulations. A wide array of improvements have been implemented from previous versions of Steven Slate Drums. The samples are unprocessed with the exception of slight EQ and compres-sion. All the overheads are unprocessed (except for a mellow high-pass). The room mics are only processed with light and subtle compression as well as a gentle mid cut, which allows them to sit much better in the mix.
SSD5 Deluxe 1: The sample pack recorded for SSD4. They were the first Steven Slate samples with almost no processing. The only processing is a small mid cut in some of the samples.
SSD5 Classic Vol.1 and Vol.2: The old Steven Slate samples. Unlike newer samples, these don’t contain overhead mics. They contain one mono direct mic and one stereo room mic. The samples are fairly heavily processed, but still with a lot of room to sculpt and shape your own sound out of them.
SSD5 Classic Signature: Older Steven Slate drum samples with similar characteristics as Vol.1 and Vol.2, but the drum tones are significant as they are modelled after famous drum sounds heard on various hit records.
SSD5 Electronic: A set of SSD5 samples that consist of electronic drum sounds.
User Manual
stevenslatedrums.com
User Manual
stevenslatedrums.com2

Steven Slate Drums 5, or SSD5 is the next generation virtual drum plugin. It consists of a drum sampler and an instrument library.
SSD5’s library comes with over 400 instruments in it, ranging from acoustic drums, to percussion, to electronic drum samples.
Drum instruments are made up of 24 bit multi-mic WAV samples packed into our proprie-tary format with revolutionary lossless compression. This allows us to decrease the size of the instruments up to 3 times by saving hard disk space and RAM.
SSD5 drum instruments have up to 24 velocity layers, which are drum hits sampled from softest to hardest. SSD5 also comes with 12 alterations or round-robin hits which are multiple hits within one velocity layer. The purpose of alternating hits is to make the samples sound more realistic and natural. Typically with alternating hits, it’s impossible to detect sampled drums because the hits are not repeating. This will eliminate most common complaint from using sampled drum instruments, the machine gun effect. In addition to our very detailed drum samples, the SSD5 Sampler is the only sampler on the market with intelligent playback. This is physically modelled after real life acoustic drums and drumming. While all other virtual drums use the classic approach to sample playback called the “polyphonic playback,” which is just samples playing independently and stacking up until they reach polyphony voice limit, the SSD5 sampler models the behavior of a real drum kit. Samples in SSD5 interact with each other and do not stack up like they would in polyphonic playback. Every new hit depends on all the previous hits and on what kit pieces are playing at the moment.
Depending on type of drum and library, the SSD5 instruments may have a different amount of mics in each instrument. For example, the newest Deluxe 2 library has up to two direct mics per shell.
This means the kick would have “Kick In” and “Kick Out” samples, and the Snare would have “Snare Top” and “Snare Bottom” samples, etc.
The SSD5 instrument library has different categories including instruments from previous versions of Steven Slate Drums, so users can always have access to their favorite sounds, even from first versions of Steven Slate Drums:
SSD5 Deluxe 2: The newest instruments recorded for SSD5. These are the most detailed instruments with more velocities, alternating hits and articulations. A wide array of improvements have been implemented from previous versions of Steven Slate Drums. The samples are unprocessed with the exception of slight EQ and compres-sion. All the overheads are unprocessed (except for a mellow high-pass). The room mics are only processed with light and subtle compression as well as a gentle mid cut, which allows them to sit much better in the mix.
SSD5 Deluxe 1: The sample pack recorded for SSD4. They were the first Steven Slate samples with almost no processing. The only processing is a small mid cut in some of the samples.
SSD5 Classic Vol.1 and Vol.2: The old Steven Slate samples. Unlike newer samples, these don’t contain overhead mics. They contain one mono direct mic and one stereo room mic. The samples are fairly heavily processed, but still with a lot of room to sculpt and shape your own sound out of them.
SSD5 Classic Signature: Older Steven Slate drum samples with similar characteristics as Vol.1 and Vol.2, but the drum tones are significant as they are modelled after famous drum sounds heard on various hit records.
SSD5 Electronic: A set of SSD5 samples that consist of electronic drum sounds.
User Manual
stevenslatedrums.com
User Manual
stevenslatedrums.com3

SAMPLERThe SSD5 Sampler is the simple, powerful, and effective sample player for the SSD5 library.
It’s very easy to operate this plugin and achieve your desired results. The sampler has two global sections (Pic 1):
Navigation: Switch sections as well as do some basic operations. There is also a display for memory usage and Snare Mode
Functional Controls and Settings: For some sections the right panel will be split into a top and bottom section, where top may have browser, or functional controls for instruments mics and articulations, and bottom panel, which displays virtual drum kit, or mixer depending on section opened at the moment.
Pic 1 (SSD5 Sampler)
1
2
User Manual
stevenslatedrums.com4

Operation
Drag and Drop to load instruments into pads and virtual drums and to re-map in drop MIDI grooves to DAW from the groove player.
Double-Click button to load kit preset, or to reset a control (such as a knob, or fader)
Right-Click on virtual drums to remove instrument.
^⌘+Left-Click (ctrl/cmd+left-click) on virtual instrument to remove instrument. Addi-tionally for knob/fader fine-tune as well as selecting groups of faders in Mixer. It can also can be used on ADSR screen to copy mics settings.
⌥+Left-Click (alt+left-click) to reset controls such as knobs or faders. It can also can be used on ADSR screen to paste mics settings.
SettingsFirst, you’ll need to select your Base-Directory. You’ll only need License Files for expansion packs. (see Pic 02)
Pic 2 (Settings)
User Manual
stevenslatedrums.com5

Base Directory: Navigate to the folder that contains your SSD5 Library. Once select-ed, the samples will be available in the Construct Kit area.
Version Number: Displays the version of sampler.
View: Cells View and Kit View. The Cells View displays virtual drums as pads, in which you can load instruments. The Kit View show a virtual drum kit with Kick, Snare, (4) Toms, Hi-Hat, Splash, (2) Crashes, Ride and a China. On the left and right sides of the Kit View there are 20 additional small pads to load instruments in.
License Files: SSD5 Sampler houses all of our expansion packs. Most of our packs come with personalized license files. After installing an expansion pack, add the license to the Sampler in order to use this pack. Press “Set License File” button to add a license files to SSD5. Press Check Licenses Availability to check the license files.
Drumkit Detail: This section allows for determining how much alterations, or round robin hits, will be utilized into RAM for each instrument. The purpose of this setting is to save memory if needed.
Resampling Quality: Sets the quality of resampling while working in a sample rate other than 44.1 kHz. “Maximum” is recommended if CPU power is not an issue.
Disk Streaming: Allows the sampler to read the drum instruments from the hard drive, instead of fully loading them into memory. The buffer size determines the amount of each instrument that is cached into memory. The disk streaming feature allows for saving memory, but is not recommended unless memory space is at a premium. Even with fast hard drive speeds, it is possible to have some sound drop outs due to high hard drive load.
Respect OS Display Scaling: Determines the behavior of the sampler interface, or GUI with no non-standard DPIs, or graphics scale, including systems with a Retina set.
Master Volume: Determines the overall sampler’s output volume.Ambient Mic Volume: Determines the amount of ambient layering present in the audition path. Usually ambient mics will be much lower in volume than direct mics, but inside the instrument the mics are relatively similar in volume. Due to this, while auditioning, they may have sounded strange. Lowering their volume in this section lets you find the comfortable balance between direct mics and ambient mics for audition instruments in browser.
Let’s move on to working with drum sounds…
1
2
3
4
5
6
7
8
9
User Manual
stevenslatedrums.com6
Construct Kit
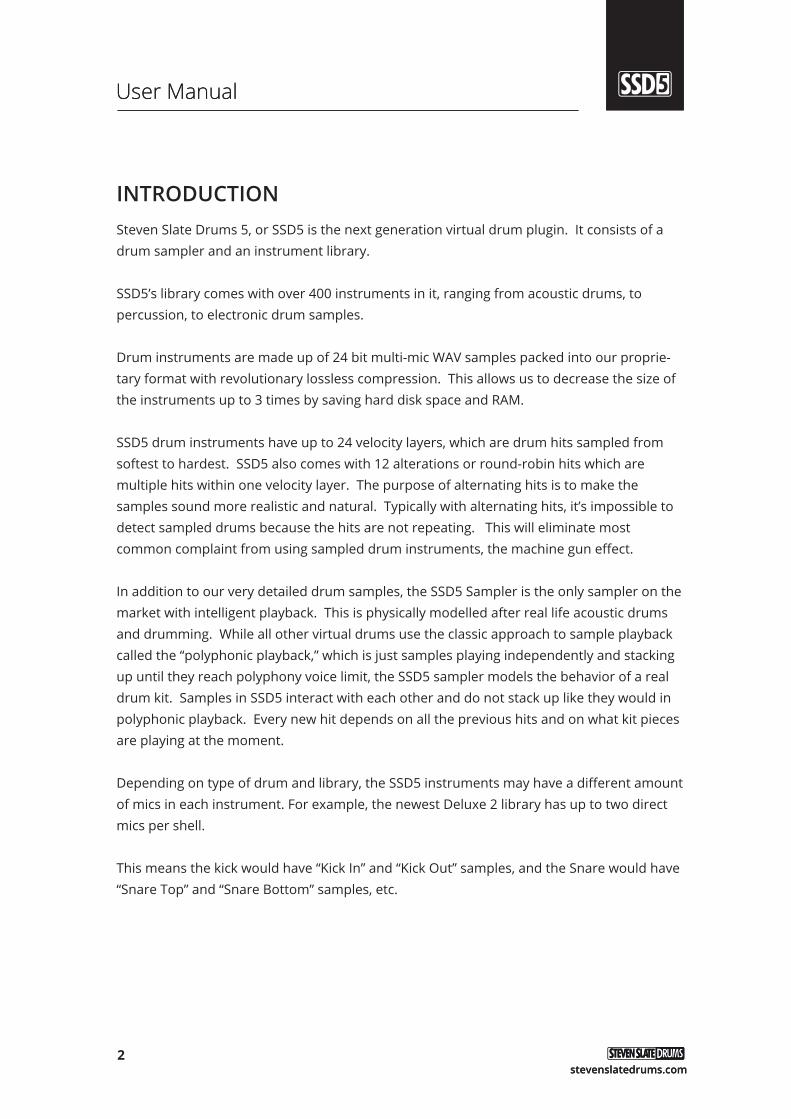
On the left panel select the Construct Kit button. This section contains a browser on top and virtual drums graphic below (Pic 3).
Clear Kit and Save Kit: Clear Kit allows you remove all instruments and samples loaded at the moment, resets the mixer, and will start you from a default setting. Save Kit allows you save your kit preset and use it in the future.
Instruments and Samples: They let you switch between the instruments loading screen and the user samples loading screen.
Instruments and Kits: Provides the option to switch between two browsers on the top panel.
Refresh: This will refresh your library. If you download a new expansion pack, you’ll drop it into your base directory, and refresh to update your sample library.
Audition: When browsing instruments, you’re able to hear them before loading them into your kit by enabling the Audition mode.
Pic 3 (Construct Kit)
1
2
3
4
5
User Manual
stevenslatedrums.com7

NOTE: Instruments such as Hi-Hats, and Rides do take some time to audition; around 0.5s depending on disk speed
Loading Drum Instruments: Drag the instrument from the browser and drop it onto the desired virtual drum, or side sample slot. SSD5 comes with a vast array of drum samples, and by utilizing blending and layering, you have an infinite number of possibilities. For example blending two different Snares will create the equivalent of a new Snare sound. It’s very easy to layer drums with SSD5 even if they are from different expansion packs.
Preset Kits: SSD5 includes a wide variety of pre-mixed, fully assembled, diverse preset kits. Kits allow you to double-click on a kit preset in order to load an entire drum kit. You can load kit presets one over another, no need to clear kit before loading the next one.
Pic 04 (Kit Browser)
SSD5 has also the option to import 16 bit & 24 bit 44.1 kHz WAV files. They are located inside the SSD5Library folder entitled “OneShotSamplesData.” Your SSD5 library already comes with a few WAVs as examples. You can link different folders with your own One-Shots as well. The One-Shot samples are available by selecting “Samples” on the left hand side menu.
Pic 5 (Samples Browser)
User Manual
stevenslatedrums.com8

Edit Instrument
After you’ve assembled your virtual drum kit or preset, the next section you will want to us is the Edit Instrument area. You can fine tune some of the characteristics of the instru-ments such as velocity curves, articulation volume, mic volume, pan, etc. (Pic 6)
Pic 6 (Edit Instrument)To edit an instrument, select the instrument below. After it’s done, you will see the name of the instrument in the left corner of the top panel as well as picture of the drum just below the name (Pic 7).
User Manual
stevenslatedrums.com9

Instrument Volume: Adjusts the volume of the entire instrument.
Instrument Tune: Allows for the changing of the pitch of the instrument.
Instrument Phase: Flips the phase of the whole instrument. This gives you more flexibility when setting up phase.
NOTE: Usually in similar plugins, users only have the possibility of flipping phase only on select microphones, such as direct microphones, OH or Room. Additionally, SSD5 allows you to flip the global phase of the entire instrument, which is a feature that is missing from some of the other samplers on the current market. In other popular samplers, flipping the phase on rooms and overheads flips the phase on the whole channel, which forces the phase of the rooms and overheads to flip on all instruments.
Pic 7 (Instrument Adjustments)
User Manual
stevenslatedrums.com10

Articulation Name: Displays the name of the current articulation. Additionally, by clicking on a name you can audition this articulation. You’re also available to audition the articula-tion at different velocities depending on where the name bar is clicked. The articulation is softer with a click on the left side of the bar, and harder to the right.
Articulation Volume: Adjusts the volume for each articulation separately. This option lets you fine tune the volume of any articulation included in instrument such as Hi-Hat pedal, or Snare Sidestick.
Articulations
Dynamics
Dynamics: Allows you adjust the volume spread of soft hits compared to hard hits. It allows you quickly control the volume intensity of soft hits samples without adjust-ing MIDI velocity values. This feature allows flexibility during mixing, and allows you to quickly change the dynamic perception.
Velocity Curve: This will shift velocity inside the plugin after receiving data from your MIDI track. It aids in adjust-ing the velocities being triggered. For example, a “Velocity” value of 50 provides exact velocities for 0-127 (64=64 and 112=112). With a “Velocity” value of 80, the MIDI velocity 64 on your MIDI track will be ≈ 85 in SSD5 and will trigger the articulation intensity globally across the instrument.
Pic 8 (Articulations)
Pic 9 (Dynamics)
User Manual
stevenslatedrums.com11

Range Max/Range Min: Determines the hardest and softest allowed velocity in the instru-ment that can be triggered. This can help you adjust the character of instrument for the specific genre, or style.
For example - when searching for a gentle vintage sound, set “Range Max” to 105. This forces the instrument to scale back louder hits above 105 to a maximum velocity of 105 (127=105) . The same applies in the opposite direction if you set the “Range Min” to 35, your intensity will be scaled a bit higher (0=35). Limiting the velocity range will not decrease dynamic range. The samples’ volume will be scaled accordingly, preserving the entire dynamic range of the mic.
On/Off: Enables or disables the individual articulation.
Name: Name of articulation inside the instrument. Clicking with highlight the articu-lation in brown.
Routing: You can adjust the routing of individual mics. This will open up the possibili-ty of sending various instruments into various Slate Rooms or seperate outputs to adjust individually throughout your daw via Multi-Out (see Mixer Routing).
Volume: Corresponds to individual mic.
Pan: Adjusts the proportion between the left and right channel in the stereo field.
Pic 10 (Microphones)
Microphone Section
1
2
3
4
5
User Manual
stevenslatedrums.com12

ADSR
ADSR (Attack, Decay, Sustain, Release) - The SSD5 Sampler is the only sampler on the market currently, that allows you to set the curve shape for each phase of the curve. It allows you shape the sound of the instrument in thousands of different ways. This opening endless possibilities for sound design.
On/Off: Enables the ADSR envelope.
Link: Links all the mics. ADSR will be same for all mics within the instrument.
Attack: Controls the Attack time on instrument curve.
Decay: Controls the Decay time that shapes the signal before reaching Sustain phase. Combining with Decay Curve setting lets you shape sounds similarly to transient processors, or compressors.
Sustain: Sets the time of the sustain. Release: Controls the time of release; similar to using a fade out.
Attack Curve: Controls the shape of the attack opening a wide array of possibilities.
Decay Curve: Controls the shape of the decay; similar to dynamic processors.
Sustain Volume: Controls the volume in sustain phase
Release Curve: Controls the shape of instrument release; similar to a fade out curve.
Note: It is also possible to copy and paste the ADSR settings from one instrument to another. To copy, hold ^⌘ (PC-Control/Win) and left click on the curve display. Then hold ⌥ (PC-ALT) and left click on curve display. This manipulation copies and pastes the curve of all the mics in the original instrument, instead of just (1) microphone.
Pic 11 (ADSR)
1
2
3
4
5
6
7
8
9
10
User Manual
stevenslatedrums.com13

Mixer
The mixer section allows you to easily mix and route your microphones into the DAW.Select the desired mixer strip to view and edit the corresponding instrument. The top Mixer section is a mirror of “Edit Instrument”, allowing editing for the instruments parame-ters.To select multiple mixer strips, select the strip headers while holding ⌘ Command (Mac) or ^ Control (PC).
The mix strips contain standard channel strip parameters that are seen in all popular DAWs: Mic Name - Library Name - Volume Fader - Pan - Solo - Mute - Phase
Routing Destination: Allows you to route the instrument signal to multiple output sourc-es. This utilizes Multi-Out feature, which allows routing after SSD5 in your DAW. Multi-Out allows for external DAW processing with either Slate Digital plugins or any other 3rd party plugin!
Pic 12 (Mixer)
User Manual
stevenslatedrums.com14

Mixer Color Coding
Mixer Routing
Routing can be achieved manually, via selecting outputs for each mic, or automatically via Routing Presets. Using Multi-Out grants flexibility and unlocks the possibility that allows for the most powerful and detailed drum sound.
SSD5 has 16 stereo and 16 mono for a total of 48 total routing channels. The track count is dependent on your DAW’s limitations. For example, Logic only allows for 16 individual outputs.
Manual Routing: Select on the output name on the bottom of each mixer strip, then select the desired output.
Routing Presets: Select the current routing preset, and choose the desired preset. (Pic 14)
Pic 13 (Color Coding)
Blue:Direct or Close Mics
Pink:Aux Channels
Violet:Ambient Mics
Bronze:One-Shot samples
User Manual
stevenslatedrums.com15

In the Routing Preset menu, select a desired preset, or choose Manage Presets... This is the option that user routing presets can be loaded and saved from.
SSD5 Routing is not just the ability to route mics into the DAW, but also route them inside the SSD5. For example: If you’re using primarily Deluxe 2 instruments loaded, except for the snare, you’ll have Room A and B available, while Classic and Deluxe 1 instruments have just one room mic. If you have a snare sound consisting of Deluxe 1 and Classic samples, you can route the Deluxe 1 room into Room A and Classic room into Room B using Mics panel.
SSD5 now comes with an SLR channel. The SLR channel is the bleed from the kick and toms into the snare bottom mic. It can be routed into the same output as your direct snare mic, in order to make the bleed characteristic sound just like a real acoustic drums recording.
Pic 14 (Routing Presets)
User Manual
stevenslatedrums.com16

Mapping has two subsections, or modes:
Kit Mapping: Allows the ability to change the MIDI note associated with any SSD5 Instrument
Input Converter: Modifies the “virtual note” that corresponds to the instrument
Kit Mapping
Kit Mapping allows you to map your drum kit to certain notes and CCs. When the Input Converter is untouched, the notes displayed in Kit Mapping are the actual notes, so the MIDI note numbers inside SSD5 are equal to note numbers in your DAW.
Remapping articulations in Kit Mapping involves dragging and dropping the articulation onto desired note. The mapping you’re creating here will be saved with the kit preset as well as the DAW project file.
Pic 15 (Mapping)
Mapping
User Manual
stevenslatedrums.com17

Input Converter
Using this tool forces the notes inside SSD5 to become “virtual”. For example, the MIDI note inside the sampler “D2” can be triggered with“C3” in your DAW’s pianoroll. This is done to keep the drum kit mapping inside the SSD5 consistent, while also maintaining the ability to create and use different mapping presets inside SSD5.
Input Converter: To convert any note inside SSD5 to a different note inside your DAW, drag-and-drop the note in right column to the note in left column.
In addition to remapping, there is the ability to duplicate the note. To do this, hold the ⌘ Command (Mac) or ^ Control (PC) key and drag-and-drop the note. To remove duplicated notes, drag them to their original note.
Bottom Mapping Section:Factory Reset: Resets input converter.Set as Default: This sets the current preset as default. Save Preset: Save the current mapping preset.Load Preset: Loads a mapping preset.
Pic 16 (Input Converter)
User Manual
stevenslatedrums.com18

The Grooves section of SSD5 will assist you in creating the perfect drum track.
The core library has 5 styles to choose from. There are even more “songs” inside each style. The “song” is a collection of grooves played with a similar feel and broken down to sections such as Intro, Verse, Chorus, etc..
Playback section
Pic 17 (Grooves)
Grooves
Autoplay: Plays back the groove when selectedPlayStopsLoop: Loops the current groove
1/2x: Toggles playback at half speed1x: Toggles playback at normal speed2x: Toggles playback at double speedDynamics: Adjusts the dynamics of the selected groove
Drag-and-drop the groove to export the MIDI region directly to your MIDI track inside your DAW
Note: The Speed and Dynamics modifiers will be applied to the MIDI velocities when you drag them into a MIDI Track in your DAW.
User Manual
stevenslatedrums.com19