SQL Anywhere 11 New Features Guide - Community … use Visual Studio 2008 and ADO.NET 3.5 including...
22
SQL Anywhere 11 New Features Guide A whitepaper from Sybase iAnywhere
Transcript of SQL Anywhere 11 New Features Guide - Community … use Visual Studio 2008 and ADO.NET 3.5 including...
SQL Anywhere 11 New Features Guide A whitepaper from Sybase iAnywhere
CONTENTS
Product Highlights 3 Getting Started 3 SQL Anywhere 11 Samples 4 Embedded Full Text Search................................................................................................... 4 Immediately Maintained Materialized Views ............................................................................ 6 Offload Reporting Capabilities to Mirrored Servers................................................................... 9 Relay Server ...................................................................................................................... 11 UltraLite New Features ....................................................................................................... 12 MobiLink SynchroNization with MySQL ................................................................................. 14 ADO.NET 3.5, ADO.NET Entity Framework, and Visual Studio 2008 Support ............................ 16 JSON Web Services Support................................................................................................ 19
Summary 20 Contact Information 21

PRODUCT HIGHLIGHTS
SQL Anywhere 11 provides high-performance software for all locations outside the data center
where people require database access.
The performance, reliability, and scalability demands on frontline databases are intense, and to
meet them SQL Anywhere makes the most of the capabilities of today’s handheld, laptop, desktop, and
server machines. To exploit the multi-core features of modern chips, SQL Anywhere 11 offers enhanced
parallel query capabilities. It automatically carries out time-consuming operations, including sorting and
index scanning in parallel. Indexing has been improved by using compression (which cuts I/O
requirements) and by the ability to retrieve data straight from the index. OLTP operations are faster
than ever thanks to new technology that reduces transaction log contention.
SQL Anywhere already supported features typically found only in enterprise-level and enterprise-
price databases, such as materialized views and OLAP queries. Additions to these features make a class
of application called “frontline analytics” possible. The increased parallelism described in the previous
paragraph is part of this effort. SQL Anywhere’s materialized views are now maintained automatically,
as soon as data referred to in the views changes, making them an even more powerful tool for handling
demanding queries. In addition, SQL Anywhere 11 sports an embedded full text search capability that,
like other features of SQL Anywhere, is designed for easy deployment and embeddability, requiring
none of the additional modules or engines that other full-text search implementations demand.
Moving data to and from the frontlines is another area to which SQL Anywhere 11 brings new
capabilities. Its MobiLink data synchronization technology provides additional scalability with enhanced
failover and load balancing. A new Relay Server makes it easier and more secure than ever to
synchronize through firewalls. And you can now work with data on more devices than ever before as
SQL Anywhere provides support for BlackBerry, Embedded Linux, Windows Mobile 6, and J2ME smart
phones using its UltraLite database technology for small devices.
SQL Anywhere has always been a database designed for developers. The SQL Anywhere 11 release
continues this tradition by ensuring developers can use the right tools and languages for their particular
job. Stored procedures can now be written in C/C++, Java, .NET, or Perl. Microsoft-focused developers
can use Visual Studio 2008 and ADO.NET 3.5 including the ADO.NET Entity Framework.
Web developers will also find much to appreciate in SQL Anywhere 11. Bi-directional data
synchronization to MySQL is now supported, in addition to SQL Anywhere and the standard enterprise
databases. Also, SQL Anywhere’s novel built-in HTTP server now enables JSON-formatted web services
(in addition to SOAP and other formats) and is able to easily process PHP pages.
GETTING STARTED
To install SQL Anywhere 11:
1. Register and download a free copy of SQL Anywhere 11 Developer Edition from this web site:
http://www.sybase.com/detail?id=1016644.
2. Run the installation file and follow the instructions in the setup program.

www.sybase.com/ianywhere 4
SQL ANYWHERE 11 SAMPLES
To help you understand the new features within SQL Anywhere 11, a set of samples has been
included inside the compressed archive SA11NewFeatureGuide.zip. When working with these samples,
you must extract the files from the archive using folder names. All sample files should be extracted to
the folder C:\SA11NewFeatureGuide.
The online documentation provides additional samples that highlight the new features of SQL
Anywhere 11.
The remainder of this document provides instructions on how to walk through each of the samples.
Some of the following samples use the Interactive SQL graphical tool, which is included in the SQL
Anywhere install. Interactive SQL can be launched from the following location:
• Start > Programs > SQL Anywhere 11 > Interactive SQL
The script files in the samples use the SQL Anywhere 11 environment variable SQLANY11, which is
set to the location of your SQL Anywhere 11 installation folder. By default, this value is C:\Program
Files\SQL Anywhere 11.
EMBEDDED FULL TEXT SEARCH
More and more, people in the frontlines need to deal with semi-structured data in their daily
interactions: text documents, messages, and so on. SQL Anywhere now supports full text search and it
is built right into the database—no add-ons are required. Full text search can quickly find all instances
of a term (word) in a database without having to scan table rows and without having to know which
column a term is stored in.
Embedded Full Text Search Sample
This sample demonstrates how to set up full text search in SQL Anywhere 11 and how the new
CONTAINS clause is used to perform the search.
1. Start Interactive SQL and connect to the SQL Anywhere 11 Demo database via ODBC: open a
command prompt and run the following command:
dbisql -c "dsn=SQL Anywhere 11 Demo"
2. Create a text configuration object called myTxtConfig by executing the following statement (by
pressing F5):
CREATE TEXT CONFIGURATION myTxtConfig FROM default_char;
Remember to include the FROM clause to specify the text configuration object to use as a
template.
3. Customize the text object by adding a stop list (terms to ignore when indexing), setting the
minimum term length to 4, and setting the maximum term length to 30. This is done in three
separate ALTER TEXT CONFIGURATION statements, as follows:
ALTER TEXT CONFIGURATION myTxtConfig

www.sybase.com/ianywhere 5
STOPLIST 'because about therefore only';
ALTER TEXT CONFIGURATION myTxtConfig
MINIMUM TERM LENGTH 4;
ALTER TEXT CONFIGURATION myTxtConfig
MAXIMUM TERM LENGTH 30;
4. Create a text index that references the myTxtConfig text configuration object based on the Name
and Description columns for the Products table. For the sample, assume the data in the table is not
expected to change often, so a refresh interval of 24 hours is adequate.
CREATE TEXT INDEX myTxtIdx ON Products ( Name, Description )
CONFIGURATION myTxtConfig
AUTO REFRESH EVERY 24 HOURS;
5. Initialize the text index:
REFRESH TEXT INDEX myTxtIdx ON Products;
6. Test the text index using a few different queries. The first query returns all products whose
description contain the words cotton or caps:
SELECT ID, Name, Description, Quantity
FROM Products
WHERE CONTAINS ( Products.Description, 'cotton | caps' );
The second query demonstrates how to use a full text search in the select list of a query:
SELECT IF CONTAINS ( Description, 'cotton' )
THEN 1
ELSE 0
ENDIF AS Results
FROM Products;
The third query shows how to view a score related to how closely the resulting row matches the
desired search string, and then use that information to order the result set:
SELECT Products.Description, ct.*
FROM Products CONTAINS ( Products.Description, 'caps OR cotton' ) ct
ORDER BY ct.score DESC;

www.sybase.com/ianywhere 6
In addition to being able to search for multiple terms across multiple columns and phrases, and
being able to do proximity searching (see the online documentation for examples), full text search can
significantly improve the performance of searching for single terms in text fields. The following graph
compares the execution time of performing a simple search of a LONG VARCHAR field using a standard
WHERE clause (LIKE) versus using full text search (CONTAINS statement). For this example, a
database of size 500 MB was used. Notice the execution time when using full text search (2 seconds) is
much faster than without using it (20 seconds).
IMMEDIATELY MAINTAINED MATERIALIZED VIEWS
A materialized view (MV) stores the results from a query as a base table in the database. It is
typically used to store computed results from queries that aggregate large amounts of data from base
tables. The main advantage of an MV compared with other database objects, such as views and tables,
lies with its interaction with the optimizer. Materialized views store results from costly queries and can
improve performance by doing the intensive work in advance.
In SQL Anywhere 10, a materialized view became stale as soon as the base tables on which the
view was based changed. A manual refresh of the view had to be executed periodically to update the
MV contents. In addition, when the MV was refreshed, the contents of the MV were deleted and
replaced with the result set of the new query.
With SQL Anywhere 11, materialized views can be configured to automatically keep themselves up
to date. This means that when the underlying tables on which the MV is based are changed
(insert/update/delete), the MV is also updated to reflect the changes made. There is no need for the
MV to be deleted and re-populated.
Immediately Maintained Materialized Views Sample
This sample demonstrates immediate maintenance of materialized views. This feature decreases the
amount of effort required for a developer to use materialized views in applications and increases the
optimizer’s ability to take advantage of the MV during optimization.
1. Start Interactive SQL and connect to the SQL Anywhere 11 Demo database via ODBC.

www.sybase.com/ianywhere 7
2. Create a materialized view under the “groupo” user for the amount of each product sold (in units
and dollars) by size and year, and declare this view to be a manual refresh view. Execute the
following SQL statements:
CREATE MATERIALIZED VIEW groupo.mv_manualrefresh AS
SELECT year( s.shipdate ) AS yr, p.name AS name, p.size AS size,
SUM( s.quantity ) AS total_quantity,
SUM( p.unitprice ) AS total_price,
COUNT( * ) AS num_records
FROM salesorderitems s, products p
WHERE p.id = s.productid
GROUP BY name, size, yr;
CREATE UNIQUE INDEX mvidx ON groupo.mv_manualrefresh( yr, name, size );
ALTER MATERIALIZED VIEW groupo.mv_manualrefresh MANUAL REFRESH;
3. Create another materialized view for the amount of each product sold (in units and dollars) by size
and year, but this time declare the view to be automatically refreshable (notice the use of the
keywords IMMEDIATE REFRESH):
CREATE MATERIALIZED VIEW groupo.mv_autorefresh AS
SELECT year( s.shipdate ) AS yr, p.name AS name, p.size AS size,
SUM( s.quantity ) AS total_quantity,
SUM( p.unitprice ) AS total_price,
COUNT( * ) AS num_records
FROM salesorderitems s, products p
WHERE p.id = s.productid
GROUP BY name, size, yr;
CREATE UNIQUE INDEX mvidx ON groupo.mv_autorefresh( yr, name, size );
ALTER MATERIALIZED VIEW groupo.mv_autorefresh IMMEDIATE REFRESH;
4. Execute the following SQL statements to populate the materialized views:
REFRESH MATERIALIZED VIEW groupo.mv_manualrefresh;
REFRESH MATERIALIZED VIEW groupo.mv_autorefresh;
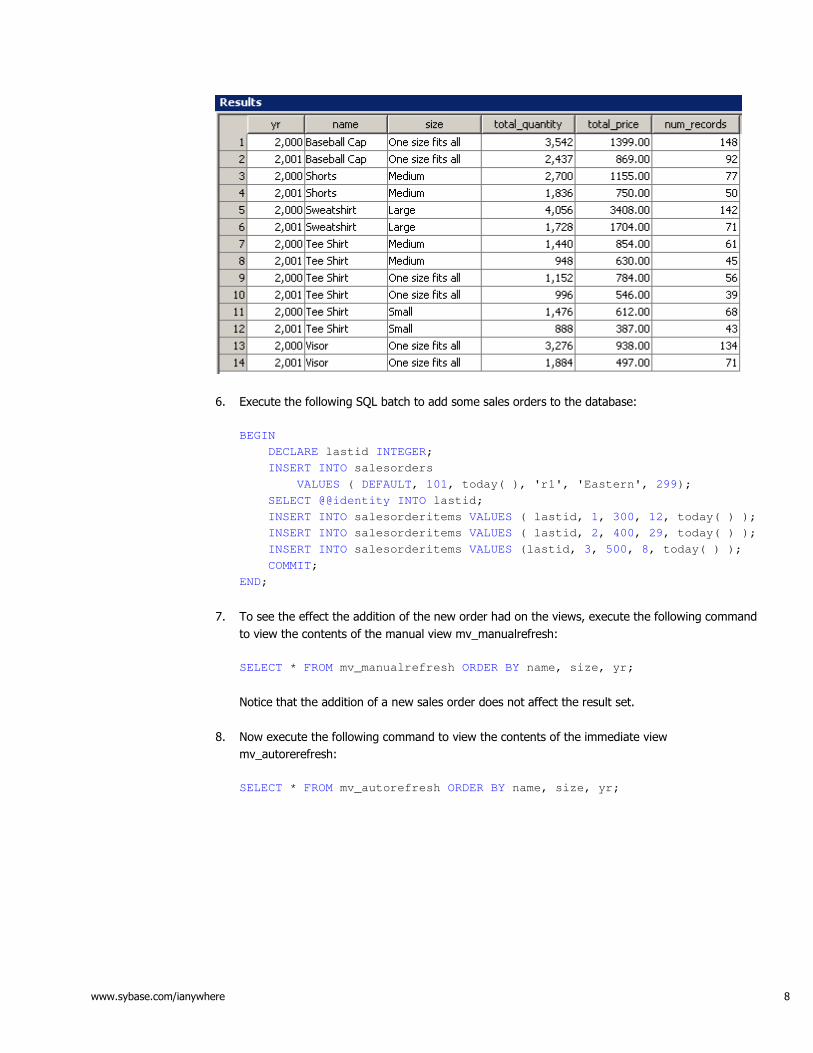
5. Execute the following query to retrieve the contents of the view:
SELECT * FROM mv_manualrefresh ORDER BY name, size, yr;
www.sybase.com/ianywhere 8
6. Execute the following SQL batch to add some sales orders to the database:
BEGIN
DECLARE lastid INTEGER;
INSERT INTO salesorders
VALUES ( DEFAULT, 101, today( ), 'r1', 'Eastern', 299);
SELECT @@identity INTO lastid;
INSERT INTO salesorderitems VALUES ( lastid, 1, 300, 12, today( ) );
INSERT INTO salesorderitems VALUES ( lastid, 2, 400, 29, today( ) );
INSERT INTO salesorderitems VALUES (lastid, 3, 500, 8, today( ) );
COMMIT;
END;
7. To see the effect the addition of the new order had on the views, execute the following command
to view the contents of the manual view mv_manualrefresh:
SELECT * FROM mv_manualrefresh ORDER BY name, size, yr;
Notice that the addition of a new sales order does not affect the result set.
8. Now execute the following command to view the contents of the immediate view
mv_autorerefresh:
SELECT * FROM mv_autorefresh ORDER BY name, size, yr;

www.sybase.com/ianywhere 9
Notice that the materialized view has automatically been updated to reflect the addition of a new
sales order.
OFFLOAD REPORTING CAPABILITIES TO MIRRORED SERVERS
Database mirroring is a configuration of three database servers, running on separate computers
that maintain separate copies of the database and transaction log files. The primary server and mirror
server each maintain a copy of these files, while the third server, called the arbiter server, is used when
it is necessary to determine which of the other two servers can take ownership of the database.
To make better use of your hardware, SQL Anywhere 11 allows you to make connections to the
mirror database to execute queries. This enables you to offload potentially resource heavy reporting
operations to the mirror server, while leaving the primary server available to service OLTP traffic.
Read-Only Mirror Server Sample
Location: C:\SA11NewFeatureGuide\ReadOnlyMirror
This sample demonstrates how to set up database mirroring, how failover occurs, and how to make
use of the mirror server for read-only purposes.
1. Open a command prompt, navigate to C:\SA11NewFeatureGuide\ReadOnlyMirror, and then run the
file setup.bat.
This script initializes the demo database and set up the mirroring environment.
2. Start the arbiter server by running the file arbiter.bat.
3. Start the primary server by running the file server1.bat.

www.sybase.com/ianywhere 10
The command line uses the new option -sm. This option is used to provide an alternate server
name for the mirror server, which must be specified when connecting to the read-only mirror. The
-sn argument continues to provide the alternate server name for making connections to the
primary server.
4. Start the mirror server by running the file server2.bat.
Once all the servers have started, you can examine the messages in the various server windows,
as well as the contents of the state files (.\Mirror\*.txt) to determine which server is the primary
and which one is the mirror.
5. Start Interactive SQL and connect to the primary server by running the following command at a
command prompt:
dbisql -c “uid=DBA;pwd=sql;eng=mirrordemo;links=tcpip”
6. Execute the following SQL statement to determine which server (server1 or server2) you are
connected to:
SELECT PROPERTY( 'ServerName' ), DB_PROPERTY( 'ArbiterState' ),
DB_PROPERTY( 'MirrorState' ), DB_PROPERTY( 'PartnerState' );
The name of the primary server appears in the result set.
7. Add sample data to the demo database by executing the following statements:
CREATE TABLE test ( col1 INTEGER, col2 CHAR(32) );
INSERT INTO test VALUES( 1, 'Hello from '+PROPERTY( 'ServerName' ) );
COMMIT;
8. Start another instance of Interactive SQL and this time connect to the mirror server by running the
following at a Command Prompt:
dbisql -c “uid=DBA;pwd=sql;eng=mirrorreadonly;links=tcpip”
9. Execute the following SQL statement to determine which server (server1 or server2) you are
connected to:
SELECT PROPERTY( 'ServerName' ), DB_PROPERTY( 'ArbiterState' ),
DB_PROPERTY( 'MirrorState' ), DB_PROPERTY('PartnerState' );
The name of the mirror server should appear in the result set.
10. Run a query against the mirror demo database by executing the following SQL statement:
SELECT * FROM test;
Note that the test table and data were transferred from the primary to the mirror server.
www.sybase.com/ianywhere 11
11. Initiate failover by stopping the primary server identified in step 3 (click Shut Down in the database
server messages window or by using the Windows Task Manager to end its task.
If a warning message appears indicating that the server still has one connection, choose to shut
down anyway (click Yes).
Note: The database server dialog is opened by double-clicking the SQL Anywhere server icon
located in the system tray.
12. The Interactive SQL session for the primary server (started in step 5) is disconnected. Note that
the Interactive SQL session for the read-only mirror server is still active. In fact, now that the
mirror server has been promoted to primary, your read-only connection automatically becomes
read/write. You can verify this by executing the following SQL statement:
INSERT INTO test VALUES( 1, 'Hello from '+PROPERTY( 'ServerName' ) );
COMMIT;
13. View the contents of the test table:
SELECT * FROM test;
14. You can restart server1 again by running the file server1.bat. Note that server2 continues to be the
primary server until either server2 is shut down, or server2 is instructed to become the mirror
server.
This concludes the demonstration. Shut down Interactive SQL and all remaining server windows.
Run the file clean.bat to delete the files generated for this example.
RELAY SERVER
The relay server facilitates communication between mobile devices and mobile middleware servers
in a way that easily integrates with existing firewall configurations and policies. It also provides a
mechanism to enable a load-balanced and fault-tolerant environment for mobile middleware servers.
The relay server delivers a common communication architecture for mobile devices communicating with
MobiLink, Afaria, and OneBridge.
Relay Server Architecture
The relay server is implemented as a set of web extensions and therefore requires a web server to
run. The relay server requires that the connection from the corporate LAN to the relay server be
initiated from inside the corporate LAN.

www.sybase.com/ianywhere 12
The relay server contains two web extensions: a client extension and a server extension. The client
extension handles client requests made from applications running on mobile devices. The server
extension handles requests made by the outbound enabler on behalf of a backend server. The
outbound enabler, RSOE, runs on the same machine as the backend server. Its primary function is to
initiate an outbound connection to the relay server on behalf of the backend server. There is one
outbound enabler per backend server.
Two web servers are supported: IIS 6 on Windows and Apache 2.2.6 on Linux. Since the relay
server is a web extension running in a web server, all communication is performed using HTTP(s),
which easily integrates with existing corporate firewall configurations and policies. The connection from
the corporate LAN to the relay server is initiated from inside the corporate LAN, and this provides a
more secure deployment environment because it does not require inbound connections from the DMZ
into the corporate LAN.
ULTRALITE NEW FEATURES
SQL Anywhere 11 provides several new features to the UltraLite database. Together, these features
make synchronization less obtrusive and more flexible. The ability to synchronize at any time and with
minimal user interruption is particularly important in applications that take advantage of wireless
networks to keep data moving rapidly throughout a mobile system.
The UltraLite Concurrent Synchronization Sample
Location: C:\SA11NewFeatureGuide\UltraLite
This sample illustrates several new features in UltraLite:
• The ability to initiate synchronization using a SQL statement.
Mobile
Device
Relay
Server
Web
Server
DMZ
External Firewall Internal Firewall
Relay
Server
Backend
Server
Corporate
LAN Internet
RSOE MobiLink
Server

www.sybase.com/ianywhere 13
• The ability to initiate a synchronization even with uncommitted changes to the database.
• The ability to work with the data in the database during synchronization.
• The ability to tune the visibility of data being synchronized.
• The ability to store synchronization parameters in a database, as a synchronization profile.
1. Start Interactive SQL and disable the fast start option:
• Choose Tools > Options.
• On the General tab, clear the Enable Fast Launcher option, and then click OK.
This sample uses two instances of Interactive SQL, with each one accessing a single database
concurrently. The fast start option prevents the ODBC driver from doing this.
2. Close Interactive SQL.
3. Open a command prompt, navigate to C:\SA11NewFeatureGuide\UltraLite, and then run the file
clean.bat to delete any old databases.
4. The build.bat file takes a parameter that is the number of rows in the table. For this sample, you
need a synchronization that takes approximately 20 seconds to complete. Depending on your
machine, this may be approximately 500,000 rows. Build the database by executing this command:
build 500000
5. Start MobiLink by running the file mobilink.bat.
6. Run the file isql.bat.
This opens two instances of Interactive SQL and connects them to the same database.
Use the left instance of Interactive SQL to look at the database and the right instance to carry out
synchronization commands.
Resize and move the two instances of Interactive SQL so that they are side-by-side.
7. In the left instance of Interactive SQL, open the file left.sql: from the File menu, choose Open and
load that file.
8. Follow the same steps in the right instance, but this time use the file right.sql.
Built-in synchronization has always been a key benefit of UltraLite. But synchronization has been
changing over the years; the increasing use of wireless networks means that data is moved more
frequently to and from mobile devices. SQL Anywhere 11 features several enhancements to
UltraLite that make frequent background synchronizations available to developers.
A second set of features makes synchronization easier for developers. In particular, there is a
SYNCHRONIZE SQL statement and the ability to store synchronization parameters in the database in
a synchronization profile. This sample uses these developer features to illustrate the concurrent
synchronization capabilities of UltraLite in SQL Anywhere 11.

www.sybase.com/ianywhere 14
9. A simple synchronization.
Steps 1 to 6 in the SQL scripts. Execute these steps in turn by selecting the SQL statement and
pressing F9.
Make sure to run step 6 (in left instance of Interactive SQL) repeatedly while step 5 is running (in
right instance of Interactive SQL). You will see the row count increase.
10. Hiding rows during synchronization.
Steps 7 to 10 in the SQL scripts. Execute these steps in turn by selecting the SQL statement and
pressing F9.
Note that now the row count goes from 0 to complete.
11. Synchronization with open transactions.
Steps 11 to 17 in the SQL scripts. Execute these steps in turn by selecting the SQL statement and
pressing F9.
Note that the sync transaction is distinct from the data modification, as you can see by doing a
ROLLBACK at the end.
This completes this demonstration. Close both instances of Interactive SQL and run the file
clean.bat.
MOBILINK SYNCHRONIZATION WITH MYSQL
MySQL 5.0 is now a supported consolidated database for SQL Anywhere 11. The support provides
full bi-directional synchronization between SQL Anywhere or UltraLite remote databases and a MySQL
5.0 consolidated database running the InnoDB storage engine.
MySQL 5.0 Synchronization Tutorial
Location: C:\SA11NewFeatureGuide\SyncMySQL
This tutorial outlines the steps that are required to set up MobiLink synchronization with MySQL 5.0.
Support for MySQL in SQL Anywhere 11 is for Windows (X86/x64) and Linux (x86/x64).
Requirements:
• MySQL 5.0 Community or Enterprise Server – Generally Available (GA) Release
• MySQL Connector/ODBC Driver 5.1.3
• MySQL Administrator
1. Use the MySQL Administrator to configure the MySQL database to use the InnoDB storage engine.
2. Create a consolidated MySQL database called sa11. At a command prompt, navigate to
C:\SA11NewFeatureGuide\MySQL5.0_SA11\cons, and then run the file create_db.bat.

www.sybase.com/ianywhere 15
3. Create the MobiLink system tables in the MySQL database. From the folder
C:\SA11NewFeatureGuide\MySQL5.0_SA11\cons, run the file create_MLTables.bat.
4. Create the consolidated database schema, including the tables, triggers, stored procedures, and
table scripts for MobiLink synchronization. From the folder
C:\SA11NewFeatureGuide\MySQL5.0_SA11\cons, run the file create_schema.bat.
5. Configure a data source (ODBC) to connect to the MySQL 5.0 database server. Open the ODBC
Data Source Administrator and add a new user DSN. Use the following options:
• Data Source Name: sa11_ML
• Description: MobiLink MySQL Demo
• Server: <type_your_server_name_here>
• User: root
• Password: sql
• Database: sa11
Test the connection to ensure everything is configured properly.
6. Start the MobiLink server. From the folder C:\SA11NewFeatureGuide\MySQL5.0_SA11\cons, run
the file setup_MLServer.bat.
7. Create a SQL Anywhere 11 remote database. From the folder
C:\SA11NewFeatureGuide\MySQL5.0_SA11\rem, run the file setup.bat. This script does the
following tasks:
• Initiates a new SQL Anywhere 11 database
• Creates an ODBC data source to connect to the SQL Anywhere database
• Starts the remote SQL Anywhere database
• Creates the remote database schema, including the synchronization information
• Inserts test data into the remote database
• Starts the MobiLink client to synchronize the new data to the consolidated MySQL database
8. Shut down the first MobiLink client window.
9. Insert new test data into the remote database. From the folder
C:\SA11NewFeatureGuide\MySQL5.0_SA11\rem, run the file sync.bat.
You can now see the inserted data in the consolidated MySQL database using the MySQL
Administrator.
This completes the tutorial. Shut down the MobiLink client and server dialogs. To summarize, the
following steps were taken to enable MobiLink synchronization:
• Configure a MySQL 5.0 database to use the InnoDB storage engine
• Create the consolidated database and added the MobiLink system tables
• Configure the MySQL Connector/ODBC driver
• Start the MobiLink synchronization Server

www.sybase.com/ianywhere 16
• Create the SQL Anywhere remote database
• Configure the SQL Anywhere 11 ODBC driver
• Insert test data into the remote database
• Synchronize
ADO.NET 3.5, ADO.NET ENTITY FRAMEWORK, AND VISUAL STUDIO 2008 SUPPORT
Building on SQL Anywhere’s rich tradition of supporting Microsoft data access standards, SQL
Anywhere 11 has added support for ADO.NET 3.5 and the ADO.NET Entity Framework, an object-
relational mapping technology. There is also SQL Anywhere Explorer support in Visual Studio 2008,
which allows developers to remain within their Visual Studio environment when developing SQL
Anywhere and UltraLite applications.
ADO.NET Entity Framework Tutorial
Location: C:\SA11NewFeatureGuide\PanoramaEDM
This sample demonstrates SQL Anywhere 11 capability to retrieve data from an ADO.NET entity
data model using the following three methods: EntityClient provider, object services, and LINQ to
entities.
Requirements:
• Visual Studio 2008
• Microsoft .NET Framework 3.5 with Service Pack 1
• SQL Anywhere 11 with EBF #1490 or higher. SQL Anywhere EBFs can be downloaded from
the following web site: http://downloads.sybase.com/swd/base.do?client=support.
1. Start Visual Studio 2008 and open the solution PanoramaEDM.sln.
2. In the Solution Explorer, open the entity data model DemoDB.edmx.
The EDM Designer appears and displays a visual representation of the model based on the SQL
Anywhere 11 demo database.
This EDM was generated using the SQL Anywhere .NET Data Provider.
3. Build and run the sample. The main dialog appears.

www.sybase.com/ianywhere 17
The data grid object listing the customers is populated using a data source based on the EDM
object you defined for the demo database.
4. Click the Get Products button.
The list of products is retrieved from the database using the EntityClient Provider. The relevant C#
code for this operation is as follows:
var saEntities = new DemoDBModel.DemoDBEntities();
// Query EDM using the EntityClient Provider and Entity SQL
var saConn = new EntityConnection("Name=DemoDBEntities");
var saCmd = new EntityCommand(
@"SELECT DISTINCT p.Name
FROM DemoDBEntities.Products as p", saConn);
saConn.Open();
var saReader =
saCmd.ExecuteReader(CommandBehavior.SequentialAccess);
// Loop through result set & add product name to the list box
while (saReader.Read())
{
listBoxProducts.Items.Add(saReader.GetString(0));
} // while
The EntityClient provider simply runs the query against the demo EDM model. Without using the
Entity Framework, the query must be executed against a SQL Anywhere connection object.

www.sybase.com/ianywhere 18
5. Click the Get Contacts button.
The list of contacts that appears is formatted using the first name followed by the last name. These
are stored in two different columns inside the database. The relevant C# code for this operations is
as follows:
var saEntities = new DemoDBModel.DemoDBEntities();
// Query the EDM using Object Services
var contacts = saEntities.CreateQuery<DbDataRecord>(
@"SELECT c.GivenName, c.Surname
FROM DemoDBEntities.Contacts as c");
// Add the contact's first and last names to the list box
foreach (var record in contacts)
{
listBoxContacts.Items.Add(
record.GetString(0) + " " + record.GetString(1));
} // foreach
This time use Object Services and Entity SQL to query the demo EDM model and then loop through
the result set to parse the returned data as appropriate.
6. Click the Get Central Orders button.
The list of orders placed for the central region appears. The relevant C# code for this operation is
as follows:
var saEntities = new DemoDBModel.DemoDBEntities();;
// Query the EDM using LINQ to Entities
var orders = from o in saEntities.SalesOrders
where o.Region == "Central"
select o;
// Add the sales order's number and date to the list box
foreach (var so in orders)
{
listBoxOrders.Items.Add(
"Order #" + so.ID + " placed on " + so.OrderDate);
} // foreach
The list of orders is retrieved using LINQ to entities, which simplifies the query building process
because you can take advantage of Visual Studio’s IntelliSense functionality to drill down and see
the different properties of the demo EDM.
This concludes the tutorial. Close the sample application and shut down Visual Studio.

www.sybase.com/ianywhere 19
JSON WEB SERVICES SUPPORT
JSON (JavaScript Object Notation) is a simple, lightweight data exchange format that is ideal for
representing and exchanging data structures. Although it is programming language independent, JSON
is most often used with JavaScript because a JSON object can be simply evaluated to recreate and use
the data structure. SQL Anywhere 11 allows web service requests, through its built-in HTTP server, to
return JSON formatted result sets. The result set is returned as an array of key-value pairs, with each
key corresponding to a column in the result set.
JSON Web Services Sample
Location: C:\SA11NewFeatureGuide\JSON
This sample uses the SQL Anywhere demo database to return a list of employees in JSON format
and display it in the browser. The JSON list is evaluated and the names of the employees are printed.
The JSON list of employees is obtained through an Ajax request back to the server. This example uses
SQL Anywhere's built-in HTTP server and requires a JavaScript-enabled Internet browser.
1. Ensure that no database servers are running. Shut them down if they are.
2. At a command prompt, navigate to C:\SA11NewFeatureGuide\JSON.
3. Copy the SQL Anywhere 11 demo database to the local directory by running this command:
copy “%SQLANYSAMP11%\demo.db” .
4. Start the demo database with the HTTP server. The following command starts the HTTP server on
port 8080 (use a different port if necessary):
dbsrv11 demo.db -xs "http(port=8080)"
5. Open Interactive SQL and connect to the demo database by running the following command:
dbisql -c “eng=demo;uid=DBA;pwd=sql”
6. Create a stored procedure that reads the HTML page from the local directory. Copy the following
code and paste it into Interactive SQL. Press F5 to execute it.
CREATE PROCEDURE sp_root()
BEGIN
CALL dbo.sa_set_http_header( 'Content-Type', 'text/html' );
SELECT xp_read_file( 'json.html');
END;
7. Create the root web service that returns the HTML page. Copy the following code and paste into
Interactive SQL. Press F5 to execute it.
CREATE SERVICE "root"
TYPE 'RAW'
AUTHORIZATION OFF
USER DBA
AS CALL sp_root();

www.sybase.com/ianywhere 20
8. Create the employees web service that is called by the file json.html. Copy the following code and
paste it into Interactive SQL. Press F5 to execute it.
CREATE SERVICE "employees"
TYPE 'JSON'
AUTHORIZATION OFF
USER DBA
AS SELECT * FROM "Employees";
9. Open an Internet browser and navigate to http://localhost:8080/demo/.
10. Click the Get Employees button to issue an Ajax request to the employees web service. The list of
employees from the demo database is displayed.
For more details on how the JSON response is used, examine the contents of the file json.html. This
concludes the sample; shut down the Internet browser, Interactive SQL and the database server.
SUMMARY
SQL Anywhere 11 introduces new features to meet the performance, reliability, and scalability
demands of frontline databases. It also provides new functionality for accelerating business intelligence,
analysis, and reporting in those environments. SQL Anywhere 11 continues to enhance its advanced
synchronization capabilities by improving the flexibility and ease of implementing heterogeneous data
synchronization solutions. SQL Anywhere 11 ensures that developers can use the right tools and
languages to successfully complete their projects.

www.sybase.com/ianywhere 21
CONTACT INFORMATION
For more information about SQL Anywhere 11, refer to the following web site
http://www.sybase.com/products/databasemanagement/sqlanywhere. You can also contact us by
sending an e-mail message to the following address: [email protected].

www.sybase.com/ianywhere 22
COPYRIGHT © 2008 IANYWHERE SOLUTIONS, INC. ALL RIGHTS RESERVED. SYBASE, AFARIA, SQL ANYWHERE,
ADAPTIVE SERVER ANYWHERE, MOBILINK, ULTRALITE, AND M-BUSINESS ANYWHERE ARE TRADEMARKS OF
SYBASE, INC. ALL OTHER TRADEMARKS ARE PROPERTY OF THEIR RESPECTIVE OWNERS.