Springlok Flashing Installation Instructions - Fry Reglet · Counter Flashing Removal: 1). Insert...
17
Springlok Flashing Installation Instructions
Transcript of Springlok Flashing Installation Instructions - Fry Reglet · Counter Flashing Removal: 1). Insert...

Springlok FlashingInstallation Instructions

Fry Reglet Springlok® Flashing SystemType: CO-Concrete
Description: Reglet & counter fl ashing system (2 piece, spring-action type). Available in copper, stainless steel, aluminum & galvanized steel.
Application: CAST-IN-PLACE CONCRETE. Not recommended for tilt-up construction (re-quires special provisions to ensure proper alignment between concrete panels).
Special Features: Factory-provided removable foam insert protects slot from obstruction during concrete pours.
Installation
General: 1). Install to heights on drawings; 2). Install reglets, then counter fl ashings; 3) See instructions titled Factory-Fabricated Corners and Lap Joint & End Cap Erection.
Reglets: 1). Install before pouring concrete; 2). Install factory fabricated inside & outside corners before installing straight lengths; 3). Fasten straight lengths to forms 16” o.c. max. using staples, screws or wire ties; 4). Make sure that reglets are right side up and that removable foam inserts are in place; 5). For proper alignment use factory provided clips at all joints; 6). Fasten reglets tight to forms to prevent leakage of wet concrete into slots; 7). After removal of forms, remove inserts before installing counter fl ashings.
Counter Flashings: 1). Verify that counter fl ashing is not bent or deformed, and that horizontal
Fry Reglet Corp / 12342 Hawkins Street, Santa Fe Springs, CA 90670 / 562.903.9500 / fax 562.944.4707 1377 Stonefi eld Court, Alpharetta, GA 30004 / 770.521.9660 / fax 770.521.9034
IMPORTANT NOTICE: Information contained herein is believed to be reliable, but no representation, guarantees or warranties of any kind are made as to its accuracy, suitability for particular applications or the results to be obtained therefrom. Before using, user shall determine products suitability for users intended use and shall assume all risk and liability in connection therewith. FRY REGLET DISCLAIMS ALL WARRAN-TIES, EXPRESS OR IMPLIED, INCLUDING BUT NOT LIMITED TO ANY IMPLIED WARRANTIES OF MERCHANTABILITY OR FITNESS FOR A PARTICULAR USE.
FOAM BACKER ROD
5 1/8"
7 Min.
“SPRINGLOK” COUNTER FLASHING
“CO” REGLET
NOTE:1). Lap adjacent lengths of counter fl ashing 3”
FACE OF CONCRETE
BASE FLASHING
ROOF MEMBRANE
CANT
7/09-2

Fry Reglet Springlok® Flashing SystemType: CO-Concrete
Installation - cont.
dimension, measured from face of wall to apex of “V” shape of fl ashing, is 3/4” (dimension “A”); 2). Install factory mitered inside and outside corners before installing straight lengths; 3). remove foam inserts from reglets; 4). Maintaining constant horizontal pressure against face of wall, apply upward pressure with palm of hand until fl ashing snaps into reglet; 5). Lap 3” min.
Fry Reglet Corp / 12342 Hawkins Street, Santa Fe Springs, CA 90670 / 562.903.9500 / fax 562.944.4707 1377 Stonefi eld Court, Alpharetta, GA 30004 / 770.521.9660 / fax 770.521.9034
IMPORTANT NOTICE: Information contained herein is believed to be reliable, but no representation, guarantees or warranties of any kind are made as to its accuracy, suitability for particular applications or the results to be obtained therefrom. Before using, user shall determine products suitability for users intended use and shall assume all risk and liability in connection therewith. FRY REGLET DISCLAIMS ALL WARRAN-TIES, EXPRESS OR IMPLIED, INCLUDING BUT NOT LIMITED TO ANY IMPLIED WARRANTIES OF MERCHANTABILITY OR FITNESS FOR A PARTICULAR USE.
StaplesAfter removal of forms, cut exposed ends of staples fl ush with face of concrete.
Counter Flashing Removal: 1). Insert putty knife at one end of counter fl ashing between coun-ter fl ashing and reglet; 2). Apply slight pressure against counter fl ashing to force it away from face of reglet; 3). Press down on counter fl ashing to slide it out from under reglet.
ScrewsCarefully align and drill 1/4” screw holes in forms. Drive screws through holes to engage rear face of reglet. Tighten to secure reglet tight to forms. Remove screws prior to removing forms.
Wire TiesCarefully align and drill holes for wire ties. Slip wire through holes and around rear face of reglet. Twist ends to secure reglet tight to forms. Cut ties prior to removing forms, cut exposed ends fl ush with face of concrete.
A
REGLETFOAM INSERT
FRY REGLETSTAPLE
FOAM INSERT
#8 SHEET METALSCREW
REGLETREGLET
FOAM INSERT
WIRE TIE
7/09-3
Fry Reglet Springlok® Flashing SystemType: MA-Masonry
Description: Reglet & counter fl ashing system (2 piece, spring-action type). Reglet with 1-1/2” fl ange and counter fl ashing are available in copper, stainless steel, aluminum & galvanized steel. Reglet with 4’ fl ange is available in copper, stainless steel, aluminum & galvanized steel.
Application: BRICK or CONCRETE MASONRY UNIT (CMU).
Special Features: Reglet is available with 1-1/2” horizontal fl ange (Reglet Type MA-1.5) for brick and 4” horizontal fl ange (Reglet Type MA-4) for CMU.
Installation
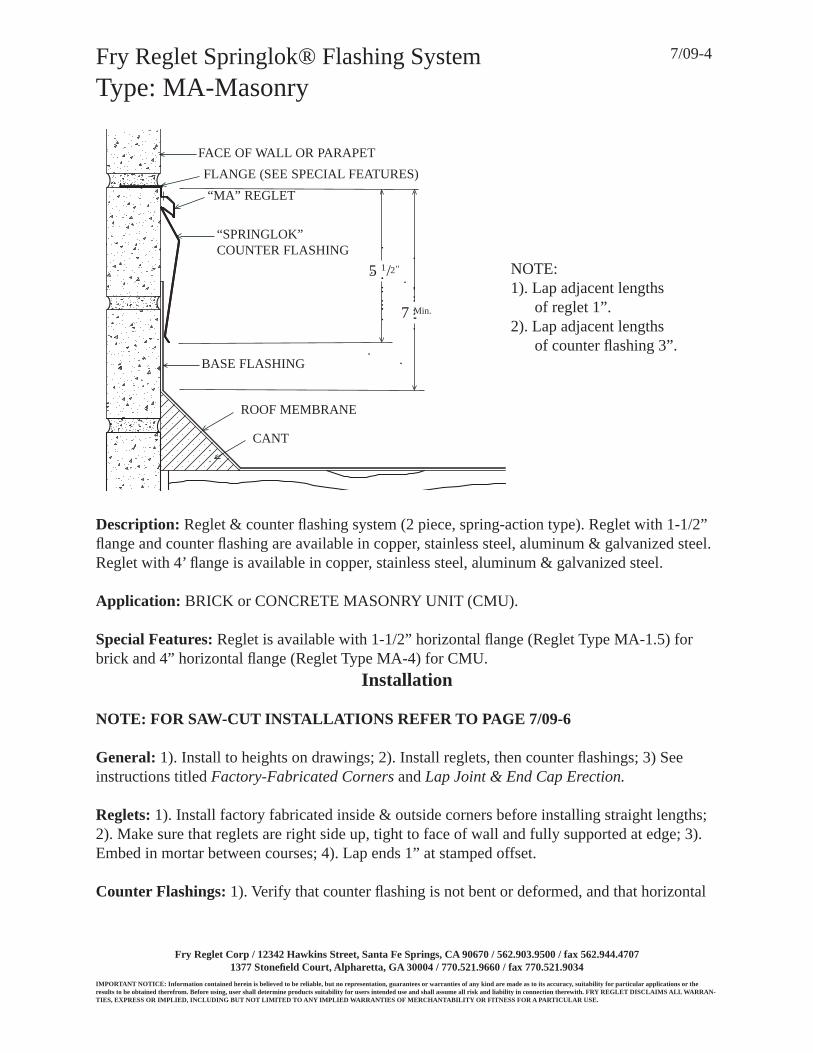
NOTE: FOR SAW-CUT INSTALLATIONS REFER TO PAGE 7/09-6
General: 1). Install to heights on drawings; 2). Install reglets, then counter fl ashings; 3) See instructions titled Factory-Fabricated Corners and Lap Joint & End Cap Erection.
Reglets: 1). Install factory fabricated inside & outside corners before installing straight lengths; 2). Make sure that reglets are right side up, tight to face of wall and fully supported at edge; 3). Embed in mortar between courses; 4). Lap ends 1” at stamped offset.
Counter Flashings: 1). Verify that counter fl ashing is not bent or deformed, and that horizontal
Fry Reglet Corp / 12342 Hawkins Street, Santa Fe Springs, CA 90670 / 562.903.9500 / fax 562.944.4707 1377 Stonefi eld Court, Alpharetta, GA 30004 / 770.521.9660 / fax 770.521.9034
IMPORTANT NOTICE: Information contained herein is believed to be reliable, but no representation, guarantees or warranties of any kind are made as to its accuracy, suitability for particular applications or the results to be obtained therefrom. Before using, user shall determine products suitability for users intended use and shall assume all risk and liability in connection therewith. FRY REGLET DISCLAIMS ALL WARRAN-TIES, EXPRESS OR IMPLIED, INCLUDING BUT NOT LIMITED TO ANY IMPLIED WARRANTIES OF MERCHANTABILITY OR FITNESS FOR A PARTICULAR USE.
NOTE:1). Lap adjacent lengths of reglet 1”.2). Lap adjacent lengths of counter fl ashing 3”.
5 1/2"
7 Min.
“SPRINGLOK” COUNTER FLASHING
“MA” REGLET
FACE OF WALL OR PARAPET
BASE FLASHING
ROOF MEMBRANE
CANT
FLANGE (SEE SPECIAL FEATURES)
7/09-4

Fry Reglet Springlok® Flashing SystemType: MA-Masonry
Installation - cont.
dimension, measured from face of wall to apex of “V” shape of fl ashing, is 3/4” (dimension “A”); 2). Install factory mitered inside and outside corners before installing straight lengths; 3). Maintaining constant horizontal pressure against face of wall, apply upward pressure with palm of hand until fl ashing snaps into reglet; 4). Lap 3” min.
Fry Reglet Corp / 12342 Hawkins Street, Santa Fe Springs, CA 90670 / 562.903.9500 / fax 562.944.4707 1377 Stonefi eld Court, Alpharetta, GA 30004 / 770.521.9660 / fax 770.521.9034
IMPORTANT NOTICE: Information contained herein is believed to be reliable, but no representation, guarantees or warranties of any kind are made as to its accuracy, suitability for particular applications or the results to be obtained therefrom. Before using, user shall determine products suitability for users intended use and shall assume all risk and liability in connection therewith. FRY REGLET DISCLAIMS ALL WARRAN-TIES, EXPRESS OR IMPLIED, INCLUDING BUT NOT LIMITED TO ANY IMPLIED WARRANTIES OF MERCHANTABILITY OR FITNESS FOR A PARTICULAR USE.
Counter Flashing Removal: 1). Insert putty knife at one end of counter fl ashing between coun-ter fl ashing and reglet; 2). Apply slight pressure against counter fl ashing to force it away from face of reglet; 3). Press down on counter fl ashing to slide it out from under reglet.
A
7/09-5
Fry Reglet Springlok® Flashing SystemType: MA-Masonry Saw-Cut Installation
Fry Reglet Corp / 12342 Hawkins Street, Santa Fe Springs, CA 90670 / 562.903.9500 / fax 562.944.4707 1377 Stonefi eld Court, Alpharetta, GA 30004 / 770.521.9660 / fax 770.521.9034
IMPORTANT NOTICE: Information contained herein is believed to be reliable, but no representation, guarantees or warranties of any kind are made as to its accuracy, suitability for particular applications or the results to be obtained therefrom. Before using, user shall determine products suitability for users intended use and shall assume all risk and liability in connection therewith. FRY REGLET DISCLAIMS ALL WARRAN-TIES, EXPRESS OR IMPLIED, INCLUDING BUT NOT LIMITED TO ANY IMPLIED WARRANTIES OF MERCHANTABILITY OR FITNESS FOR A PARTICULAR USE.
7/09-6
LEAD SHIMS BY OTHERS
1/8” X 1-1/2” SAW-CUT GROVE IN MASONRY OR CONCRETE WITH SILICONE OXIDE OR DIAMOND BLADE.
CAULK AS REQUIRED
“MA” MASONRY REGLET
BASE FLASHING ATTACHED PER MANUFACTURES INSTRUCTIONS.
ROOFING SYSTEM BY OTHERS.

Fry Reglet Springlok® Flashing SystemType: SM-Surface Mount
Description: Reglet & counter fl ashing system (2 piece, spring-action type). Aavailable in cop-per, stainless steel, aluminum & galvanized steel.
Application: SURFACE MOUNT (pre-cast concrete, tilt-up concrete and retrofi t applications over concrete, brick and CMU). Requires sealant (silicon, polyurethane, or polyvinyl sulfi de).
Special Features: Reglet supplied with neoprene-faced stainless steel washer for proper fasten-ing.
Installation
General: 1). Install to heights on drawings; 2). Clean substrate thoroughly before installing fl ashing system; 3). Seal substrate before installing fl ashing system; 4). Install reglets, then coun-ter fl ashings; 5) See instructions titled Factory-Fabricated Corners and Lap Joint & End Cap Erection.
Reglets: 1). Install factory fabricated inside & outside corners before installing straight lengths; 2). Place sealant in groove on rear face; 3). Place fastener through factory-drilled slot, and fasten in place; 4). Make sure that reglets are right side up; 5). Protect from damage during fastening; 6). Lap ends 1” at stamped offset; 7). Seal groove between top of reglet and wall; 8). Seal all laps.
Counter Flashings: 1). Verify that counter fl ashing is not bent or deformed, and that horizontalFry Reglet Corp / 12342 Hawkins Street, Santa Fe Springs, CA 90670 / 562.903.9500 / fax 562.944.4707
1377 Stonefi eld Court, Alpharetta, GA 30004 / 770.521.9660 / fax 770.521.9034IMPORTANT NOTICE: Information contained herein is believed to be reliable, but no representation, guarantees or warranties of any kind are made as to its accuracy, suitability for particular applications or the results to be obtained therefrom. Before using, user shall determine products suitability for users intended use and shall assume all risk and liability in connection therewith. FRY REGLET DISCLAIMS ALL WARRAN-TIES, EXPRESS OR IMPLIED, INCLUDING BUT NOT LIMITED TO ANY IMPLIED WARRANTIES OF MERCHANTABILITY OR FITNESS FOR A PARTICULAR USE.
NOTE:1). Lap adjacent lengths of reglet 1”.2). Lap adjacent lengths of counter fl ashing 3”.3). Fastener: A. Concrete substrate only: 1” drive pin. B. Concrete, brick or CMU substrate: rawl lite spike. C. Metal or Wood Framing: #8 x 1” Tek Screw
5 1/4"
7 Min.
“SPRINGLOK” COUNTER FLASHING
“SM” REGLET
FACE OF WALL OR PARAPET
BASE FLASHING
ROOF MEMBRANE
CANT
2 1/2"
SEALANT (SILICONE, POLYURETHANE, POLYVINYL SULFIDE)FASTENER (INSTALL WITH FACTORY SUPPLIED NEOPRENE BACKED STAINLESS STEEL WASHER)
7/09-7

Fry Reglet Springlok® Flashing SystemType: SM-Surface Mount
Installation - cont.
dimension, measured from face of wall to apex of “V” shape of fl ashing, is 3/4” (dimension “A”); 2). Install factory mitered inside and outside corners before installing straight lengths; 3). Maintain constant horizontal pressure against face of wall, apply upward pressure with palm of hand until fl ashing snaps into reglet; 4). Lap 3” min.
Fry Reglet Corp / 12342 Hawkins Street, Santa Fe Springs, CA 90670 / 562.903.9500 / fax 562.944.4707 1377 Stonefi eld Court, Alpharetta, GA 30004 / 770.521.9660 / fax 770.521.9034
IMPORTANT NOTICE: Information contained herein is believed to be reliable, but no representation, guarantees or warranties of any kind are made as to its accuracy, suitability for particular applications or the results to be obtained therefrom. Before using, user shall determine products suitability for users intended use and shall assume all risk and liability in connection therewith. FRY REGLET DISCLAIMS ALL WARRAN-TIES, EXPRESS OR IMPLIED, INCLUDING BUT NOT LIMITED TO ANY IMPLIED WARRANTIES OF MERCHANTABILITY OR FITNESS FOR A PARTICULAR USE.
Counter Flashing Removal: 1). Insert putty knife at one end of counter fl ashing between coun-ter fl ashing and reglet; 2). Apply slight pressure against counter fl ashing to force it away from face of reglet; 3). Press down on counter fl ashing to slide it out from under reglet.
A
7/09-8

Fry Reglet Springlok® Flashing SystemType: ST-Stucco (With Counter Flashing Backer Board)
Description: Reglet & counter fl ashing system (2 piece, spring-action type). Available in copper, stainless steel, aluminum & galvanized steel.
Application: Stucco. Requires backer board.
Installation
General: 1). Install to heights on drawings; 2). Install reglets, then counter fl ashings; 3). Install backer board to heights indicated for reglets before installing reglets; 4). Secure backer boards in place with approved fasteners; 5) See instructions titled Factory-Fabricated Corners and Lap Joint & End Cap Erection.
Reglets: 1). Install factory fabricated inside & outside corners before installing straight lengths; 2). Install reglets before lathing; 3). Make sure that reglets are right side up; 5). Be sure to install lathing and membrane so they will be able to lap vertical fl ange; 5). Install horizontal fl ange tight to top of backer board; 6). Lap ends 1” at stamped offset.
Counter Flashings: 1). Verify that counter fl ashing is not bent or deformed, and that horizontal
Fry Reglet Corp / 12342 Hawkins Street, Santa Fe Springs, CA 90670 / 562.903.9500 / fax 562.944.4707 1377 Stonefi eld Court, Alpharetta, GA 30004 / 770.521.9660 / fax 770.521.9034
IMPORTANT NOTICE: Information contained herein is believed to be reliable, but no representation, guarantees or warranties of any kind are made as to its accuracy, suitability for particular applications or the results to be obtained therefrom. Before using, user shall determine products suitability for users intended use and shall assume all risk and liability in connection therewith. FRY REGLET DISCLAIMS ALL WARRAN-TIES, EXPRESS OR IMPLIED, INCLUDING BUT NOT LIMITED TO ANY IMPLIED WARRANTIES OF MERCHANTABILITY OR FITNESS FOR A PARTICULAR USE.
NOTE:1). Lap adjacent lengths of reglet 1”.2). Lap adjacent lengths of counter fl ashing 3”.3). Fastener: A. Concrete substrate only: 1” drive pin. B. Concrete, brick or CMU substrate: rawl lite spike. C. Metal or Wood Framing: #8 x 1” Tek Screw
5 1/4"
7 Min.
“SPRINGLOK” COUNTER FLASHING
“ST” REGLET
FACE OF WALL
BASE FLASHING
ROOF MEMBRANE
CANT
FASTENER
BACKER(5/8” - 3/4”)
7/8”
7/09-9

Fry Reglet Springlok® Flashing SystemType: ST-Stucco (With Counter Flashing Backer Board)
Installation - cont.
dimension, measured from face of wall to apex of “V” shape of fl ashing, is 3/4” (dimension “A”); 2). Install factory mitered inside and outside corners before installing straight lengths; 3). Maintain constant horizontal pressure against face of wall, apply upward pressure with palm of hand until fl ashing snaps into reglet; 4). Lap 3” min.
Fry Reglet Corp / 12342 Hawkins Street, Santa Fe Springs, CA 90670 / 562.903.9500 / fax 562.944.4707 1377 Stonefi eld Court, Alpharetta, GA 30004 / 770.521.9660 / fax 770.521.9034
IMPORTANT NOTICE: Information contained herein is believed to be reliable, but no representation, guarantees or warranties of any kind are made as to its accuracy, suitability for particular applications or the results to be obtained therefrom. Before using, user shall determine products suitability for users intended use and shall assume all risk and liability in connection therewith. FRY REGLET DISCLAIMS ALL WARRAN-TIES, EXPRESS OR IMPLIED, INCLUDING BUT NOT LIMITED TO ANY IMPLIED WARRANTIES OF MERCHANTABILITY OR FITNESS FOR A PARTICULAR USE.
Counter Flashing Removal: 1). Insert putty knife at one end of counter fl ashing between coun-ter fl ashing and reglet; 2). Apply slight pressure against counter fl ashing to force it away from face of reglet; 3). Press down on counter fl ashing to slide it out from under reglet.
A
7/09-10

Fry Reglet Springlok® Flashing SystemType: STX - Stucco (Backer Board NOT Required)
Description: Reglet & counter fl ashing system (2 piece, spring-action type). Available in copper, stainless steel, aluminum & galvanized steel.
Application: Stucco.
Installation
General: 1). Install to heights on drawings; 2). Install reglets, then counter fl ashings.
Reglets: 1). Install factory fabricated inside & outside corners before installing straight lengths; 2). Install reglets before lathing; 3). Make sure that reglets are right side up; 4). Be sure to in-stall lathing and membrane so they will be able to lap vertical fl ange; 5). Lap ends 1” at stamped offset.
Counter Flashings: 1). Verify that counter fl ashing is not bent or deformed, and that horizontal
Fry Reglet Corp / 12342 Hawkins Street, Santa Fe Springs, CA 90670 / 562.903.9500 / fax 562.944.4707 1377 Stonefi eld Court, Alpharetta, GA 30004 / 770.521.9660 / fax 770.521.9034
IMPORTANT NOTICE: Information contained herein is believed to be reliable, but no representation, guarantees or warranties of any kind are made as to its accuracy, suitability for particular applications or the results to be obtained therefrom. Before using, user shall determine products suitability for users intended use and shall assume all risk and liability in connection therewith. FRY REGLET DISCLAIMS ALL WARRAN-TIES, EXPRESS OR IMPLIED, INCLUDING BUT NOT LIMITED TO ANY IMPLIED WARRANTIES OF MERCHANTABILITY OR FITNESS FOR A PARTICULAR USE.
NOTE:1). Lap adjacent lengths of reglet 1”.2). Lap adjacent lengths of counter fl ashing 3”.3). Fastener: A. Concrete substrate only: 1” drive pin. B. Concrete, brick or CMU substrate: rawl lite spike. C. Metal or Wood Framing: #8 x 1” Tek Screw
2 1/2"
5 1/4"
7 Min.
“SPRINGLOK” COUNTER FLASHING
“STX” REGLET
FACE OF WALL
BASE FLASHING
ROOF MEMBRANE
CANT
FASTENER
7/09-11
Fry Reglet Springlok® Flashing SystemType: STX - Stucco (Backer Board NOT Required)
Installation - cont.
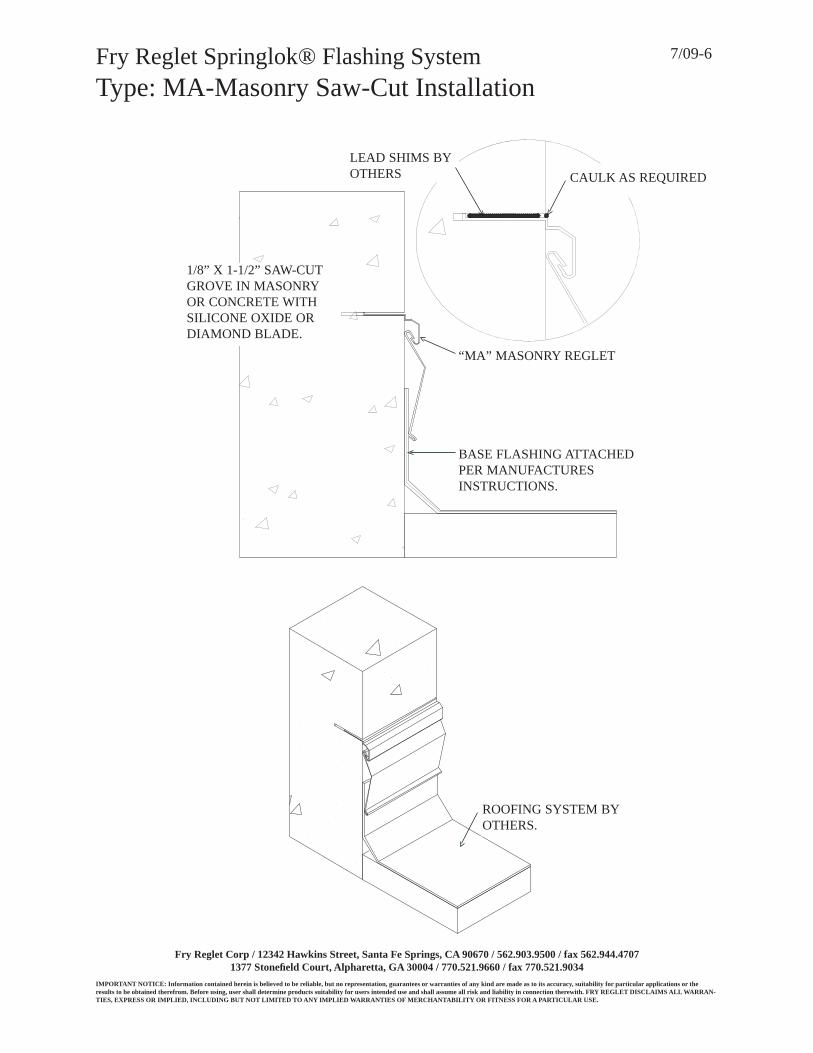
dimension, measured from face of wall to apex of “V” shape of fl ashing, is 3/4” (dimension “A”); 2). Install factory mitered inside and outside corners before installing straight lengths; 3). Maintain constant horizontal pressure against face of wall, apply upward pressure with palm of hand until fl ashing snaps into reglet; 4). Lap 3” min.
Fry Reglet Corp / 12342 Hawkins Street, Santa Fe Springs, CA 90670 / 562.903.9500 / fax 562.944.4707 1377 Stonefi eld Court, Alpharetta, GA 30004 / 770.521.9660 / fax 770.521.9034
IMPORTANT NOTICE: Information contained herein is believed to be reliable, but no representation, guarantees or warranties of any kind are made as to its accuracy, suitability for particular applications or the results to be obtained therefrom. Before using, user shall determine products suitability for users intended use and shall assume all risk and liability in connection therewith. FRY REGLET DISCLAIMS ALL WARRAN-TIES, EXPRESS OR IMPLIED, INCLUDING BUT NOT LIMITED TO ANY IMPLIED WARRANTIES OF MERCHANTABILITY OR FITNESS FOR A PARTICULAR USE.
Counter Flashing Removal: 1). Insert putty knife at one end of counter fl ashing between coun-ter fl ashing and reglet; 2). Apply slight pressure against counter fl ashing to force it away from face of reglet; 3). Press down on counter fl ashing to slide it out from under reglet.
A
7/09-12

Fry Reglet Springlok® Flashing SystemFactory Fabricated Corners
Description: Mitered & factory-welded inside & outside corners. Available for all system types (CO, MA, ST, SM & STX). Available in copper, stainless steel galvanized steel. Not available in aluminum.
Aluminum Systems: When installing aluminum straight lengths, use stainless steel corners.
Application: All Systems & All Corners (Inside & Outside). Type SM outside corner only is shown above.
90- Degree Corners: Standard for all Springlok® Flashing Systems.
Acute & Obtuse Intersections: Available by special order.
Installation
General: 1). Install at all corners; 2). Install to heights on drawings; 3). Install prior to installing straight lengths.
Reglets: 1). Install in accordance with procedures reccommended for particular system.
Counter Flashings: 1). Install in accordance with procedures reccommended for particular sys-tem.
Fry Reglet Corp / 12342 Hawkins Street, Santa Fe Springs, CA 90670 / 562.903.9500 / fax 562.944.4707 1377 Stonefi eld Court, Alpharetta, GA 30004 / 770.521.9660 / fax 770.521.9034
IMPORTANT NOTICE: Information contained herein is believed to be reliable, but no representation, guarantees or warranties of any kind are made as to its accuracy, suitability for particular applications or the results to be obtained therefrom. Before using, user shall determine products suitability for users intended use and shall assume all risk and liability in connection therewith. FRY REGLET DISCLAIMS ALL WARRAN-TIES, EXPRESS OR IMPLIED, INCLUDING BUT NOT LIMITED TO ANY IMPLIED WARRANTIES OF MERCHANTABILITY OR FITNESS FOR A PARTICULAR USE.
1” OFFSET
REGLET CORNER(OUTSIDE CORNERILLUSTRATED)
COUNTER FLASHINGCORNER (OUTSIDE CORNER ILLUSTRATED)
FACTORY NOTCH TO ACCEPT DRIP FLANGE OF LAPPING COUNTER FLASHING
“SM” REGLET ILLUSTRATED
7/09-13
Fry Reglet Springlok® Flashing SystemFactory Fabricated Corners
Installation - cont.
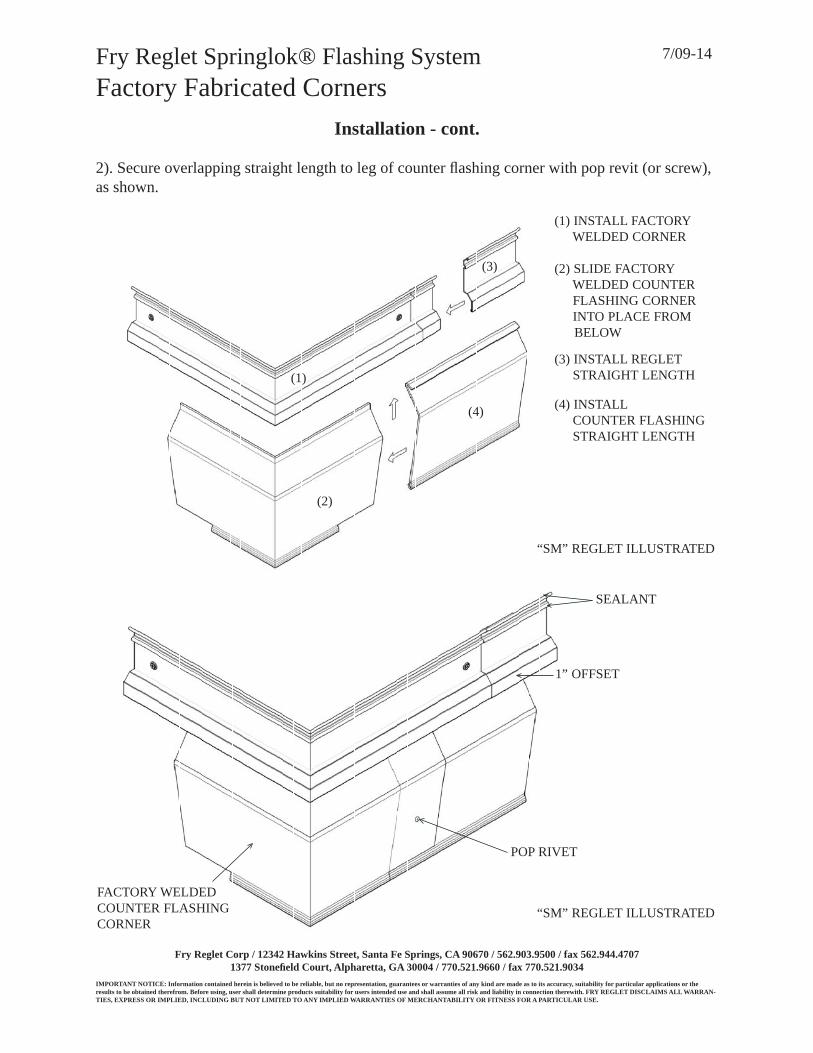
2). Secure overlapping straight length to leg of counter fl ashing corner with pop revit (or screw), as shown.
Fry Reglet Corp / 12342 Hawkins Street, Santa Fe Springs, CA 90670 / 562.903.9500 / fax 562.944.4707 1377 Stonefi eld Court, Alpharetta, GA 30004 / 770.521.9660 / fax 770.521.9034
IMPORTANT NOTICE: Information contained herein is believed to be reliable, but no representation, guarantees or warranties of any kind are made as to its accuracy, suitability for particular applications or the results to be obtained therefrom. Before using, user shall determine products suitability for users intended use and shall assume all risk and liability in connection therewith. FRY REGLET DISCLAIMS ALL WARRAN-TIES, EXPRESS OR IMPLIED, INCLUDING BUT NOT LIMITED TO ANY IMPLIED WARRANTIES OF MERCHANTABILITY OR FITNESS FOR A PARTICULAR USE.
(1) INSTALL FACTORY WELDED CORNER
(1)
(2)
(2) SLIDE FACTORY WELDED COUNTER FLASHING CORNER INTO PLACE FROM B BELOW
(3) INSTALL REGLET STRAIGHT LENGTH
(3)
(4) (4) INSTALL COUNTER FLASHING STRAIGHT LENGTH
“SM” REGLET ILLUSTRATED
“SM” REGLET ILLUSTRATED
POP RIVET
SEALANT
1” OFFSET
FACTORY WELDED COUNTER FLASHING CORNER
7/09-14

Fry Reglet Springlok® Flashing SystemLap Joint
Description: For all systems, counter fl ashings are supplied with a 3” notch. The lap joint is fi eld-assembled using this notch, and, in reglet types MA, SM, ST & STX, a 1” stamped offset. Type CO reglet has no offset; it forms a tight-fi tting butt joint. When installing Type CO reglets, only the counter fl ashings laps.
Application: All joints between straight lengths.
Erection
General: 1). When trimming reglet and counter fl ashing straight lengths to fi t, do not cut ends that have been factory formed for lapping; 2). The offset (in reglet lengths) and notch (in counter fl ashing lengths) are located at the right end.
Reglets: 1). Carefully install so that overlapping end fi ts securely over offset; 2). Seal all laps.
Counter Flashings: 1). Carefully install so that overlapping end fi ts securely into notch; Seal all laps.
Fry Reglet Corp / 12342 Hawkins Street, Santa Fe Springs, CA 90670 / 562.903.9500 / fax 562.944.4707 1377 Stonefi eld Court, Alpharetta, GA 30004 / 770.521.9660 / fax 770.521.9034
IMPORTANT NOTICE: Information contained herein is believed to be reliable, but no representation, guarantees or warranties of any kind are made as to its accuracy, suitability for particular applications or the results to be obtained therefrom. Before using, user shall determine products suitability for users intended use and shall assume all risk and liability in connection therewith. FRY REGLET DISCLAIMS ALL WARRAN-TIES, EXPRESS OR IMPLIED, INCLUDING BUT NOT LIMITED TO ANY IMPLIED WARRANTIES OF MERCHANTABILITY OR FITNESS FOR A PARTICULAR USE.
3” NOTCH
“SM” REGLET ILLUSTRATED
LAP COUNTER FLASHING 3”
LAP REGLETS 1”
7/09-15

Fry Reglet Springlok® Flashing SystemEnd Cap
Description: The end-cap is fi eld-erected using a factory-provided foam insert. This insert is available for all systems. It functions as a backer for sealant.
Application: All Systems, where reglet and fl ashing system is terminated or is discontinuous. Requires sealant (silicon, polyurethane, or polyvinyl sulfi de).
Installation
General: 1). Insert factory-provided 1” wide foam insert into space behind fl ashing system at end of fl ashing system; 2). Exposed face of foam insert should be 1/8” - 1/4” inside end of fl ash-ing system; 3). Make sure that insert is snugly in place, and fi lls gap behind both counter fl ashing and reglet; 4). Using foam insert as sealant backer, thoroughly seal end of run, making sure that entire exposed end of fl ashing system is sealed.
Fry Reglet Corp / 12342 Hawkins Street, Santa Fe Springs, CA 90670 / 562.903.9500 / fax 562.944.4707 1377 Stonefi eld Court, Alpharetta, GA 30004 / 770.521.9660 / fax 770.521.9034
IMPORTANT NOTICE: Information contained herein is believed to be reliable, but no representation, guarantees or warranties of any kind are made as to its accuracy, suitability for particular applications or the results to be obtained therefrom. Before using, user shall determine products suitability for users intended use and shall assume all risk and liability in connection therewith. FRY REGLET DISCLAIMS ALL WARRAN-TIES, EXPRESS OR IMPLIED, INCLUDING BUT NOT LIMITED TO ANY IMPLIED WARRANTIES OF MERCHANTABILITY OR FITNESS FOR A PARTICULAR USE.
SEALANT
“SM” REGLET
FACTORY PROVIDED FOAM INSERT FOR BACKER (DASHED LINE INDICATES POSITION WHEN INSTALLED)
“SM” REGLET ILLUSTRATED
SEALANT (OVER ENTIRE END OF SYSTEM)
7/09-16
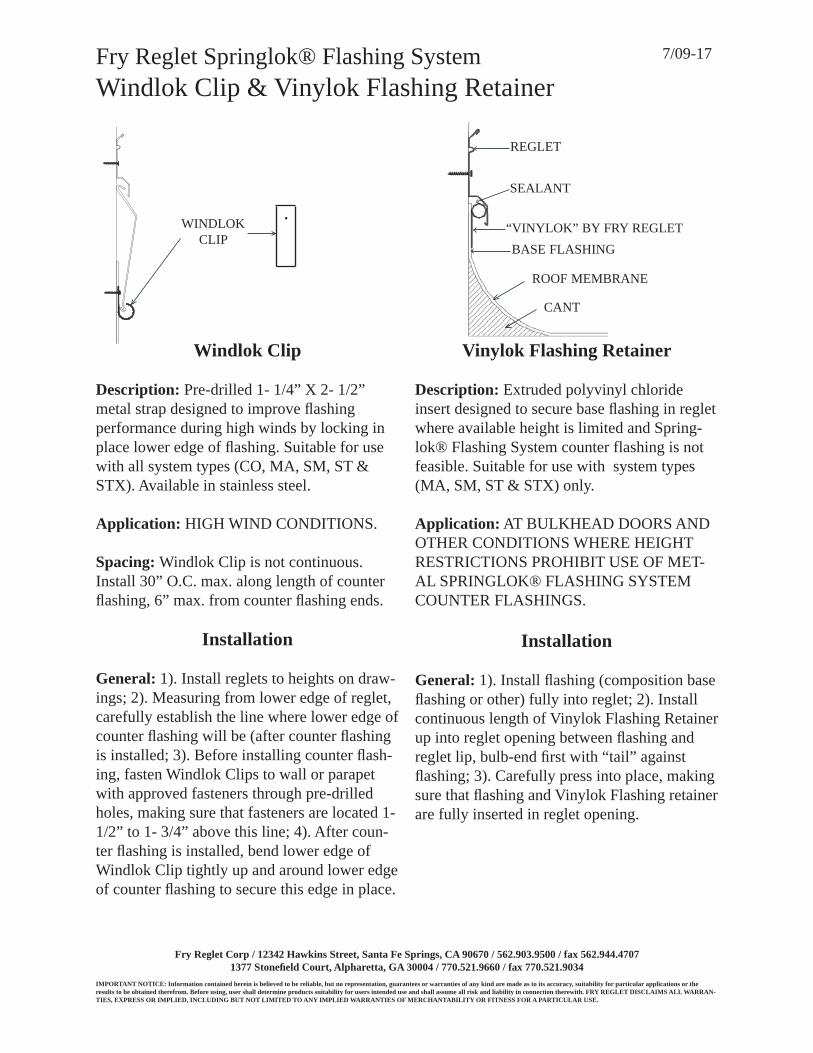
Fry Reglet Springlok® Flashing SystemWindlok Clip & Vinylok Flashing Retainer
Windlok Clip
Description: Pre-drilled 1- 1/4” X 2- 1/2” metal strap designed to improve fl ashing performance during high winds by locking in place lower edge of fl ashing. Suitable for use with all system types (CO, MA, SM, ST & STX). Available in stainless steel.
Application: HIGH WIND CONDITIONS.
Spacing: Windlok Clip is not continuous. Install 30” O.C. max. along length of counter fl ashing, 6” max. from counter fl ashing ends.
Installation
General: 1). Install reglets to heights on draw-ings; 2). Measuring from lower edge of reglet, carefully establish the line where lower edge of counter fl ashing will be (after counter fl ashing is installed; 3). Before installing counter fl ash-ing, fasten Windlok Clips to wall or parapet with approved fasteners through pre-drilled holes, making sure that fasteners are located 1- 1/2” to 1- 3/4” above this line; 4). After coun-ter fl ashing is installed, bend lower edge of Windlok Clip tightly up and around lower edge of counter fl ashing to secure this edge in place.
Fry Reglet Corp / 12342 Hawkins Street, Santa Fe Springs, CA 90670 / 562.903.9500 / fax 562.944.4707 1377 Stonefi eld Court, Alpharetta, GA 30004 / 770.521.9660 / fax 770.521.9034
IMPORTANT NOTICE: Information contained herein is believed to be reliable, but no representation, guarantees or warranties of any kind are made as to its accuracy, suitability for particular applications or the results to be obtained therefrom. Before using, user shall determine products suitability for users intended use and shall assume all risk and liability in connection therewith. FRY REGLET DISCLAIMS ALL WARRAN-TIES, EXPRESS OR IMPLIED, INCLUDING BUT NOT LIMITED TO ANY IMPLIED WARRANTIES OF MERCHANTABILITY OR FITNESS FOR A PARTICULAR USE.
Vinylok Flashing Retainer
Description: Extruded polyvinyl chloride insert designed to secure base fl ashing in reglet where available height is limited and Spring-lok® Flashing System counter flashing is not feasible. Suitable for use with system types (MA, SM, ST & STX) only.
Application: AT BULKHEAD DOORS AND OTHER CONDITIONS WHERE HEIGHT RESTRICTIONS PROHIBIT USE OF MET-AL SPRINGLOK® FLASHING SYSTEM COUNTER FLASHINGS.
Installation
General: 1). Install fl ashing (composition base fl ashing or other) fully into reglet; 2). Install continuous length of Vinylok Flashing Retainer up into reglet opening between fl ashing and reglet lip, bulb-end fi rst with “tail” against fl ashing; 3). Carefully press into place, making sure that fl ashing and Vinylok Flashing retainer are fully inserted in reglet opening.
WINDLOKCLIP
REGLET
BASE FLASHING“VINYLOK” BY FRY REGLET
SEALANT
ROOF MEMBRANE
CANT
7/09-17