
spine = .75” Configuringptgmedia.pearsoncmg.com/images/9780735684775/... · real-world mastery of...
82
Exam Ref Joli Ballew 70 687 Configuring Windows 8.1
Transcript of spine = .75” Configuringptgmedia.pearsoncmg.com/images/9780735684775/... · real-world mastery of...

Exam RefAuthor AuthorAuthor
2p
Celebrating 30 years!
Prepare for Microsoft Exam 70-410—and help demonstrate your real-world mastery of implementing and configuring Windows Server 2012 core services. Designed for experienced IT professionals ready to advance their status, Exam Ref focuses on the critical thinking and decision-making acumen needed for success at the MCSA level.
Focus on the expertise measured by these objectives:• Install and Configure Servers• Configure Server Roles and Features• Configure Hyper-V• Deploy and Configure Core Network Services• Install and Administer Active Directory• Create and Manage Group Policy
This Microsoft Exam Ref:• Organizes its coverage by exam objectives.• Features strategic, what-if scenarios to challenge you.• Includes a 15% exam discount from Microsoft. Offer expires 12/31/XXXX. Details inside.
Advanced Windows Store App Development Using HTML5 and JavaScript
Advanced Window
s Store App D
evelopment U
sing HTM
L5 and JavaScript
Joli Ballew
About the ExamExam 70-410 is one of three Microsoft exams focused on the skills and knowledge necessary to implement a core Windows Server 2012 infrastructure into an existing enterprise environment.
About Microsoft CertificationThe new Microsoft Certified Solutions Associate (MCSA) certifications validate the core technical skills required to build a sustainable career in IT.
Exams 70-410, 70-411, and 70-412 are required for the MCSA: Windows Server 2012 certification.
See full details at: microsoft.com/learning/certification
About the AuthorCraig Zacker is an educator and edi-tor who has written or contributed to dozens of books on operating systems, networking, and PC hardware. He is coauthor of the Microsoft Training Kit for Exam 70-686 and author of Windows Small Business Server 2011 Administrator’s Pocket Consultant.
Exam Ref
70-482
Exam Ref 70-482
70 687
Configuring Windows 8.1
microsoft.com/mspress
Certification/Windows Server0 000000 000000
ISBN: 978-0-7356-xxxx-x
9 0 0 0 0 U.S.A. $39.99Canada $41.99
[Recommended ]
spine = .75”

PUBLISHED BYMicrosoft PressA Division of Microsoft CorporationOne Microsoft WayRedmond, Washington 98052-6399
Copyright © 2014 by Joli Ballew
All rights reserved. No part of the contents of this book may be reproduced or transmitted in any form or by any means without the written permission of the publisher.
Library of Congress Control Number: 2014931890ISBN: 978-0-7356-8477-5
Printed and bound in the United States of America.
Microsoft Press books are available through booksellers and distributors worldwide. If you need support related to this book, email Microsoft Press Book Support at [email protected]. Please tell us what you think of this book at http://www.microsoft.com/learning/booksurvey.
Microsoft and the trademarks listed at http://www.microsoft.com/en-us/legal/intellectualproperty/Trademarks/EN-US.aspx are trademarks of the Microsoft group of companies. All other marks are property of their respective owners.
The example companies, organizations, products, domain names, email addresses, logos, people, places, and events depicted herein are fi ctitious. No association with any real company, organization, product, domain name, email address, logo, person, place, or event is intended or should be inferred.
This book expresses the author’s views and opinions. The information contained in this book is provided without any express, statutory, or implied warranties. Neither the authors, Microsoft Corporation, nor its resellers, or distributors will be held liable for any damages caused or alleged to be caused either directly or indirectly by this book.
Acquisitions Editor: Anne HamiltonDevelopmental Editor: Karen SzallEditorial Production: nSight, Inc.Technical Reviewer: Randall Galloway; Technical Review services provided by Content Master, a member of CM Group, Ltd.Copyeditor: Teresa HortonIndexer: Lucie HaskinsCover: Twist Creative • Seattle
Third Printing: January 2015

Contents at a glance
Introduction xiii
Preparing for the exam xvi
CHAPTER 1 Install and upgrade to Windows 8.1 1
CHAPTER 2 Configure hardware and applications 53
CHAPTER 3 Configure network connectivity 123
CHAPTER 4 Configure access to resources 171
CHAPTER 5 Configure remote access and mobility 231
CHAPTER 6 Monitor and maintain Windows clients 277
CHAPTER 7 Configure system and data options 329
Index 349


v
Contents
Introduction xiiiMicrosoft certifications xiii
Acknowledgments xiv
Errata & book support xiv
We want to hear from you xv
Stay in touch xv
Preparing for the exam xvi
Chapter 1 Install and upgrade to Windows 8.1 1Objective 1.1: Evaluate hardware readiness and compatibility. . . . . . . . . . . 2
Choose the ideal Windows 8.1 edition 2
Perform readiness tests 5
Choose an installation option (clean or upgrade) 10
Objective summary 13
Objective review 13
Objective 1.2: Install Windows 8.1 . . . . . . . . . . . . . . . . . . . . . . . . . . . . . . . . . 15
Perform manual installations and upgrades 15
Perform a clean installation 16
Upgrade from Windows 7 17
Upgrade from Windows 8 19
Migrate from previous versions of Windows 20
Install additional Windows features 21
Install as Windows To Go and to VHD 25
Explore the custom Windows 8.1 installation 32
What do you think of this book? We want to hear from you! Microsoft is interested in hearing your feedback so we can continually improve our books and learning resources for you. To participate in a brief online survey, please visit:
www.microsoft.com/learning/booksurvey/

vi Contents
Objective summary 33
Objective review 34
Objective 1.3: Migrate and configure user data . . . . . . . . . . . . . . . . . . . . . . 34
Use Windows Easy Transfer 35
Configure folder location 40
Configure profiles 42
Objective review 46
Chapter summary . . . . . . . . . . . . . . . . . . . . . . . . . . . . . . . . . . . . . . . . . . . . . . . . 47
Answers . . . . . . . . . . . . . . . . . . . . . . . . . . . . . . . . . . . . . . . . . . . . . . . . . . . . . . . . . 49
Objective 1.1: Thought experiment 49
Objective 1.1: Review 49
Objective 1.2: Thought experiment 50
Objective 1.2: Review 50
Objective 1.3: Thought experiment 51
Objective 1.3: Review 52
Chapter 2 Configure hardware and applications 53Objective 2.1: Configure devices and device drivers . . . . . . . . . . . . . . . . . . 53
Install and manage drivers with Device Manager 54
Configure devices 60
Use Pnputil.exe to manage the Driver Store 65
Create a driver update policy 66
Objective summary 68
Objective review 68
Objective 2.2: Install and configure desktop apps and Windows Store apps . . . . . . . . . . . . . . . . . . . . . . . . . . . . . . . . . . . . . . . . . . . . . . . . . . . . 70
Install and repair applications 73
Manage access to the Windows Store 76
Objective summary 79
Objective review 80
Objective 2.3: Control access to local hardware and applications . . . . . . . 81
Configure application restrictions using AppLocker 81
Configure application restrictions using Software Restriction Policies 83
viiContents
Manage installation of and access to removable devices 84
Configure Assigned Access 86
Objective summary 88
Objective review 88
Objective 2.4: Configure Internet Explorer 11 and Internet Explorer for the desktop . . . . . . . . . . . . . . . . . . . . . . . . . . . . . . . . . . . . . . . . . . . . . . . 90
Configure Compatibility View and explore Group Policy settings 90
Configure security and privacy settings 92
Manage add-ons, toolbars, extensions, search providers, and more 94
Configure Download Manager 96
Objective summary 97
Objective review 97
Objective 2.5: Configure Hyper-V . . . . . . . . . . . . . . . . . . . . . . . . . . . . . . . . . . 98
Create and configure a virtual machine 99
Create and manage checkpoints 107
Create and configure virtual switches 108
Create and configure virtual disks 110
Move a virtual machine 111
Objective summary 113
Objective review 114
Chapter summary . . . . . . . . . . . . . . . . . . . . . . . . . . . . . . . . . . . . . . . . . . . . . . . 115
Answers . . . . . . . . . . . . . . . . . . . . . . . . . . . . . . . . . . . . . . . . . . . . . . . . . . . . . . . . 116
Objective 2.1: Thought experiment 116
Objective 2.1: Review 116
Objective 2.2: Thought experiment 117
Objective 2.2: Review 117
Objective 2.3: Thought experiment 118
Objective 2.3 Review 118
Objective 2.4: Thought experiment 119
Objective 2.4: Review 120
Objective 2.5: Thought experiment 121
Objective 2.5: Review 121

viii Contents
Chapter 3 Configure network connectivity 123Objective 3.1: Configure IP settings . . . . . . . . . . . . . . . . . . . . . . . . . . . . . . . . 123
Configure IP settings 124
Objective summary 133
Objective review 133
Objective 3.2: Configure networking settings . . . . . . . . . . . . . . . . . . . . . . .134
Connect to a wireless network 134
Manage preferred wireless networks 136
Configure location-aware printing 137
Configure network adapters 139
Objective summary 141
Objective review 141
Objective 3.3: Configure and maintain network security . . . . . . . . . . . . . 142
Configure Network Discovery 142
Configure Windows Firewall 144
Configure Windows Firewall with Advanced Security 145
Configure connection security rules (IPsec) 150
Create authenticated exceptions 151
Objective summary 153
Objective review 153
Objective 3.4: Configure remote management . . . . . . . . . . . . . . . . . . . . . . 154
Configure and use Remote Assistance and Remote Desktop 155
Make modifications remotely using an MMC 159
Explore Remote Management tools and configure settings 160
Objective summary 163
Objective review 163
Chapter summary . . . . . . . . . . . . . . . . . . . . . . . . . . . . . . . . . . . . . . . . . . . . . . .164
Answers . . . . . . . . . . . . . . . . . . . . . . . . . . . . . . . . . . . . . . . . . . . . . . . . . . . . . . . . 165
Objective 3.1: Thought experiment 165
Objective 3.1: Review 165
Objective 3.2: Thought experiment 166
Objective 3.2: Review 166
Objective 3.3: Thought experiment 167
Objective 3.3: Review 167

ixContents
Objective 3.4: Thought experiment 168
Objective 3.4: Review 168
Chapter 4 Configure access to resources 171Objective 4.1: Configure shared resources . . . . . . . . . . . . . . . . . . . . . . . . . . 171
Configure HomeGroup settings 172
Configure shared folder permissions 174
Configure file libraries 180
Configure shared printers 181
Set up and configure SkyDrive 184
Objective summary 188
Objective review 188
Objective 4.2: Configure file and folder access . . . . . . . . . . . . . . . . . . . . . . 189
Configure NTFS permissions 190
Configure disk quotas 195
Encrypt files and folders using EFS 197
Configure object access auditing 199
Objective summary 204
Objective review 205
Objective 4.3: Configure authentication and authorization . . . . . . . . . . .206
Set up and configure a Microsoft account 206
Configure authentication in workgroups and domains 208
Configure virtual smart cards and biometrics 211
Configure user rights 214
Manage credentials and certificates 215
Configure User Account Control behavior 221
Objective summary 223
Objective review 223
Chapter summary . . . . . . . . . . . . . . . . . . . . . . . . . . . . . . . . . . . . . . . . . . . . . . . 225
Answers . . . . . . . . . . . . . . . . . . . . . . . . . . . . . . . . . . . . . . . . . . . . . . . . . . . . . . . . 226
Objective 4.1: Thought experiment 226
Objective 4.1: Review 226
Objective 4.2: Thought experiment 227
Objective 4.2: Review 227

x Contents
Objective 4.3: Thought experiment 228
Objective 4.3: Review 228
Chapter 5 Configure remote access and mobility 231Objective 5.1: Configure remote connections . . . . . . . . . . . . . . . . . . . . . . . 231
Configure remote authentication 232
Configure Remote Desktop settings 234
Configure VPN connections and authentication 236
Enable VPN Reconnect 237
Configure broadband tethering 238
Objective summary 241
Objective review 241
Objective 5.2: Configure mobility options . . . . . . . . . . . . . . . . . . . . . . . . . . 242
Configure offline file policies 243
Configure power policies 246
Configure sync options 249
Configure Wi-Fi Direct 254
Configure Windows To Go 255
Objective summary 260
Objective review 260
Objective 5.3: Configure security for mobile devices . . . . . . . . . . . . . . . . . 262
Configure BitLocker 262
Configure BitLocker To Go 267
Configure startup key storage 269
Objective summary 270
Objective review 271
Chapter summary . . . . . . . . . . . . . . . . . . . . . . . . . . . . . . . . . . . . . . . . . . . . . . . 272
Answers . . . . . . . . . . . . . . . . . . . . . . . . . . . . . . . . . . . . . . . . . . . . . . . . . . . . . . . . 273
Objective 5.1: Thought experiment 273
Objective 5.1: Review 273
Objective 5.2: Thought experiment 274
Objective 5.2: Review 274
Objective 5.3: Thought experiment 275
Objective 5.3: Review 276

xiContents
Chapter 6 Monitor and maintain Windows clients 277Objective 6.1: Configure and manage updates . . . . . . . . . . . . . . . . . . . . . . 277
Update Windows Store apps 278
Configure update settings 280
Manage update history 282
Roll back updates 283
Configure Windows Update policies 284
Objective summary 290
Objective review 290
Objective 6.2: Manage local storage . . . . . . . . . . . . . . . . . . . . . . . . . . . . . . . 291
Manage disk volumes 292
Manage file system fragmentation 299
Manage Storage Spaces 300
Objective summary 302
Objective review 302
Objective 6.3: Monitor system performance . . . . . . . . . . . . . . . . . . . . . . . . 303
Configure Task Manager 304
Monitor system resources 308
Configure indexing options 309
Configure and analyze event logs 311
Configure event subscriptions 314
Optimize networking performance 316
Objective summary 321
Objective review 322
Chapter summary . . . . . . . . . . . . . . . . . . . . . . . . . . . . . . . . . . . . . . . . . . . . . . . 323
Answers . . . . . . . . . . . . . . . . . . . . . . . . . . . . . . . . . . . . . . . . . . . . . . . . . . . . . . . . 324
Objective 6.1: Thought experiment 324
Objective 6.1: Review 324
Objective 6.2: Thought experiment 325
Objective 6.2: Review 325
Objective 6.3: Thought experiment 327
Objective 6.3: Review 327

xii Contents
Chapter 7 Configure system and data options 329Objective 7.1: Configure system recovery . . . . . . . . . . . . . . . . . . . . . . . . . . 329
Perform a driver rollback 330
Configure a recovery drive 330
Configure System Restore and create a restore point 333
Perform a refresh or recycle 334
Objective summary 336
Objective review 336
Objective 7.2: Configure file recovery . . . . . . . . . . . . . . . . . . . . . . . . . . . . . . 337
Recover files from SkyDrive 337
Configure File History 339
Restore previous versions of files and folders 342
Objective summary 343
Objective review 343
Chapter summary . . . . . . . . . . . . . . . . . . . . . . . . . . . . . . . . . . . . . . . . . . . . . . .344
Answers . . . . . . . . . . . . . . . . . . . . . . . . . . . . . . . . . . . . . . . . . . . . . . . . . . . . . . . .345
Objective 7.1: Thought experiment 345
Objective 7.1: Review 345
Objective 7.2: Thought experiment 346
Objective 7.2: Review 346
Index 349
What do you think of this book? We want to hear from you! Microsoft is interested in hearing your feedback so we can continually improve our books and learning resources for you. To participate in a brief online survey, please visit:
www.microsoft.com/learning/booksurvey/

xiii
IntroductionThe Confi guring Windows 8.1 exam (70-687) is separated into seven sets of objectives. This book contains seven chapters that clearly detail what those objectives are and what you can expect to see on the exam. While most certifi cation books focus on how to perform tasks as they relate to the exam objectives, this book covers the general, high-level knowledge you need to know to answer questions regarding why and when you’d actually perform those tasks.
We assume you’ve been working in a related industry for a while and have the general knowledge needed to support Windows 8.1; we assume you feel almost ready to take the exam. Thus, in this book you’ll only see how-to steps and walkthroughs when we feel that it’s something you might not have done before or might be confusing. For example, we include steps that show how to set up a virtual machine and install an operating system on it, as well
steps for installing a device driver or confi guring Windows Update. We’ll also include things you might not think you need to study or even know; we’ll offer exam tips that include com-mand-line tools and parameters and PowerShell commands for performing tasks, and we’ll offer links to resources on the internet we feel would benefi t you on the job and on the exam.
This book covers every exam objective, but it does not cover every exam question. Only the Microsoft exam team has access to the exam questions themselves and Microsoft regu-larly adds new questions to the exam, making it impossible to cover specifi c questions. You should consider this book a supplement to your relevant real-world experience and other study materials. If you encounter a topic in this book that you do not feel completely com-fortable with, use the links you’ll fi nd in the text to fi nd more information and take the time to research and study the topic. Great information is available on MSDN, TechNet, and in blogs and forums.
Microsoft certifi cationsMicrosoft certifi cations distinguish you by proving your command of a broad set of skills and experience with current Microsoft products and technologies. The exams and corresponding certifi cations are developed to validate your mastery of critical competencies as you design and develop, or implement and support, solutions with Microsoft products and technologies both on-premises and in the cloud. Certifi cation brings a variety of benefi ts to the individual and to employers and organizations.
as steps that walk you through confi guring options for VPN Reconnect, but we won’t offer

xiv Introduction
MORE INFO ALL MICROSOFT CERTIFICATIONS
For information about Microsoft certifications, including a full list of available certifica-tions, go to http://www.microsoft.com/learning/en/us/certification/cert-default.aspx.
AcknowledgmentsI’d like to thank the people at Microsoft Press for having faith in my work once again, and for selecting me to write this book. I enjoy writing for the Microsoft team, specifically with Karen Szall, my acquisitions and project editor. She is positive, informative, and friendly, and is always around when I need her. (She’s also very patient when I completely ruin a writing template or accidentally edit it!) I’d also like to thank my technical editor, Randall Galloway, for meticulously reading every word and correcting my missteps. Of course, the book would not flow as you would expect without a copy editor, and mine was incredible; thanks Teresa Horton.
Finally, I’d like to acknowledge my family, including Cosmo, Jennifer, my dad, Andrew, and even little Allie, for being patient while I work my odd hours and sometimes stay in my “writer’s head” long after my work is complete for the day. I’d also like to call out my literary agents and representatives, including Stacey Barone, Katrina Bevin, and Renee Midrack at Studio B.
Errata & book supportWe’ve made every effort to ensure the accuracy of this book and its companion content. Any errors that have been reported since this book was published are listed at:
http://aka.ms/ER687R2/errata
If you find an error that is not already listed, you can report it to us through the same page.
If you need additional support, email Microsoft Press Book Support at [email protected].
Please note that product support for Microsoft software is not offered through the addresses above.

xvIntroduction
We want to hear from youAt Microsoft Press, your satisfaction is our top priority, and your feedback our most valuable asset. Please tell us what you think of this book at:
http://aka.ms/tellpress
The survey is short, and we read every one of your comments and ideas. Thanks in advance for your input!
Stay in touchLet’s keep the conversation going! We’re on Twitter: http://twitter.com/MicrosoftPress.

xvi Introduction
Preparing for the examMicrosoft certification exams are a great way to build your resume and let the world know about your level of expertise. Certification exams validate your on-the-job experience and product knowledge. Although there is no substitute for on-the-job experience, preparation through study and hands-on practice can help you prepare for the exam. We recommend that you augment your exam preparation plan by using a combination of available study materials and courses. For example, you might use the Exam Ref and another study guide for your “at home” preparation, and take a Microsoft Official Curriculum course for the classroom experience. Choose the combination that you think works best for you.

123
C H A P T E R 3
Configure network connectivityIn almost all instances and scenarios, using a computer to complete tasks involves con-necting to a network of some sort, even if it’s just to access the Internet or back up your work someplace other than your own PC. In many cases, it’s a local area network in a small business, and the resources are configured as a workgroup. In homes, networked comput-ers are often configured as homegroups. The purpose of both of these types of networks is frequently to share an Internet connection and files, folders, printers, and other resources. In both cases and in nearly all scenarios, the users control their own data and manage resources locally.
In other scenarios, a network is the foundation for an enterprise, complete with Active Directory domain controllers that authenticate users centrally and secure network resources. These larger networks can contain additional servers that manage storage, email, faxes, printers, and so on as well. It’s important for all of the resources to be managed as a whole to keep everything secure and available, among other things.
No matter what kind of network you’re dealing with though, the underlying skills in which you must be proficient are mostly the same. You need to be able to configure IP and network settings and you need to know how to configure and maintain the security of the network. Sometimes, you also need to configure ways to manage the workstations in your network remotely.
Objectives in this chapter: ■ Objective 3.1: Configure IP settings
■ Objective 3.2: Configure networking settings
■ Objective 3.3: Configure and maintain network security
■ Objective 3.4: Configure remote management
Objective 3.1: Configure IP settings
Networks are groups of computers and other resources. Networks can be public, private, or domains, and security settings are applied to your Windows 8.1 computer when you con-nect. Once connected, each resource that is connected to the network (computer, network

124 CHAPTER 3 Configure network connectivity
printer, server, or other host) must acquire (or have previously been assigned) an exclusive address that will define it on that network. These addresses are unique, and you can’t have two hosts on the same network with the same address. This makes addressing a very impor-tant part of configuring networks.
Unique addresses are also required of hosts that connect directly to the Internet such as servers in Internet service providers (ISPs), entities with their own domain name such as http://www.microsoft.com, and so on. Individual computers that are positioned (virtually) behind routers, modems, or networks that share an Internet connection for the purpose of giving those computers access don’t connect directly and thus don’t have this requirement. In these cases, other technologies are used for addressing, like Network Address Translation (NAT).
Because computers communicate and are defined by a numerical address and not a name, and because requiring users to type the address to access hosts would be cumbersome if not impossible, there is a technology in place that enables users to type a computer name instead of an address to get to a website. This is called resolving an address and is handled by Domain Name System (DNS). You’ll learn about all of these things in this objective, as well as how to resolve connectivity issues when they arise.
This objective covers how to: ■ Connect to a network
■ Configure network locations
■ Configure name resolution
■ Resolve connectivity issues
Configure IP settingsEvery computer (host) on a network (even the Internet) must have a unique Internet Protocol (IP) address. This address, when it’s configured as an IPv4 address, is a 32-bit number that is styled as four sets of octets. An example is 192.168.4.20. The IP address (combined with the proper subnet, something like 255.255.255.0) defines the network and the host. Because every resource on a network must have a defined address, you need to know how to con-figure those addresses. There are two ways to get an address to a resource: You can define it manually or it can be assigned by a Dynamic Host Configuration Protocol (DHCP) server. When an address can’t be assigned this way, Windows will assign its own IP address using a technology called Automatic Private IP Addressing (APIPA).
EXAM TIP
Make sure to review the IP address ranges for Class A, B, and C and have an idea of how many networks and hosts each offers. Know their default subnet masks, too. Beyond that, know the private addresses available for local networks (192.x.x.x, 172.x.x.x, and 10.x.x.x for Class C, B, and A, respectively).

Objective 3.1: Configure IP settings CHAPTER 3 125
Explore the Local Area Network Connections Properties dialog boxFigure 3-1 shows the Local Area Network Connections Properties dialog box for a Wi-Fi adapter, where you can configure networking. On the Networking tab you can access the available networking options, including TCP/IPv4, selected here.
FIGURE 3-1 You can configure networking using the the Local Area Network Connections Properties dialog box.
EXAM TIP
You might be asked how to configure IPv4 or IPv6 addresses from the command line. The command to do this is Netsh. Make sure you understand the options associated with this command. You might be asked to select the proper command to apply a static address for a host, among other things. That command would look like this: “netsh interface ipv4 set address “Ethernet” static 192.168.5.12 255.255.255.0 192.168.1.10”. If you want the address to come from a DHCP server, the command would look more like this: “netsh interface ipv4 set address name="Ethernet" source=dhcp”.
Explore the options available from the dialog boxes shown in Figure 3-1 as time allows. Make sure you understand the terms listed here before continuing:
■ APIPA This is a link-local (IP) address that is assigned by Windows when no other addressing mechanism can be found. This enables the host to function on the local network segment. Routers do not forward packets from these kinds of addresses.

126 CHAPTER 3 Configure network connectivity
■ Default Gateway This hardware or software device lets hosts connect to other networks. Often that network is the Internet, but it could also be another network seg-ment in an enterprise domain.
■ DHCP DHCP is a networking protocol that dynamically configures IP addresses for hosts on a network. A DHCP server assigns these addresses. These IP addresses are generally granted for a specified interval and must be renewed when the interval is up.
MORE INFO DHCP
To learn more about DHCP, refer to this article: http://technet.microsoft.com/en-us /library/cc726865(v=WS.10).aspx.
■ DHCP Scope A DHCP scope is a consecutive range of possible IP addresses that can be offered to hosts on a subnet (part of a network).
■ DNS DNS is a service that enables users to type the name of the host to which they want to connect instead of its IP address. A DNS server resolves the name.
■ IPv4 This is an IP address that consists of 32 bits, notated by four 8-bit octets. It has two parts: the network ID and the host ID. The network ID describes the network, and the host ID defines the specific device on it. IPv4 addresses can be Unicast, Broadcast, or Multicast. See Subnet mask, next.
■ Subnet mask This 32-bit number, notated by four 8-bit octets that consist of a set of 1s followed by a set of 0s, is used to define which part of the IPv4 address is the network ID and which part is the host ID. The 1s denote the network; the 0s the host. The default subnet masks are in the form 255.0.0.0 for Class A addresses, 255.255.0.0 for Class B addresses, and 255.255.255.0 for Class C addresses. Translated to binary, 255.0.0.0 looks like this: 11111111 00000000 00000000 00000000.
■ IPv6 The available IPv4 address combinations are dwindling, thus the need for a bet-ter option. IPv6 is that option. Instead of a 32-bit space, it’s a 128-bit space with 16-bit boundaries. This allows for many more addresses. An IPv6 address can look like this: 21DA:D3:0:2F3B:2AA:FF:FE28:9C5A.
EXAM TIP
You install network support (Client For Microsoft Networks, QoS Scheduler, File And Printer Sharing For Microsoft Networks, TCP/IPv4, TCP/IPv6, and others) from the Local Area Network Connections Properties dialog box. Know what is installed by default and how to install others.

Objective 3.1: Configure IP settings CHAPTER 3 127
Connect to a network The first time you connect to a local network, you are prompted to choose from one of these options:
■ No, Don’t Turn On Sharing Or Connect To Devices This option is intended for public networks and hot spots (libraries, coffee shops). The user’s computer can’t be seen or accessed by others, and the user can’t see other computers also accessing the network.
■ Yes, Turn On Sharing And Connect To Devices This option is intended for private, trusted networks (home, work) and homegroups. Computers sit behind a trusted router and do not connect to the Internet directly.
These two options do not appear when you connect to an Active Directory Domain Services domain. However, when they do appear and when you choose an option, settings are configured automatically for network discovery, file and printer sharing, the state of the firewall, apps that can accept incoming connections, and so on. (Computers configured as Private or Domain have network discovery enabled; Public networks do not.)
If, for whatever reason, you are not prompted to connect to a known network, you can connect manually. To connect to a network manually, follow these steps:
1. Press the Windows key+I to open the Settings charm.
2. Click the Network icon.
3. Select the network from the list and click Connect.
4. If prompted, type the password or passcode to join the network.
If you need to connect to a network that’s hidden and not broadcasting its Service Set Identifier (SSID), follow these steps:
1. Open the Network And Sharing Center.
2. Click Set Up A New Connection Or Network.
3. Click Manually Connect To A Wireless Network. Click Next.
4. Input the network name (SSID), the security type, the encryption type, and the security key as applicable and enable other options as desired (see Figure 3-2).
5. Click Next. The connection should be enabled.

128 CHAPTER 3 Configure network connectivity
FIGURE 3-2 Connect to a network manually.
MORE INFO CONNECT TO A WORKPLACE
One of the options in the Network And Sharing Wizard that walks you through connect-ing to a hidden network is Connect To A Workplace. You’d choose this option to set up a virtual private network (VPN). VPNs are covered in Chapter 5, “Configure remote access and mobility.”
Configure network locationsWhen you connect to a local area network and opt to share or not share on it, Windows auto-matically configures the settings for the network location. If you’ve joined a homegroup on the network, settings are also applied for you. Windows will always err on the side of caution when it can’t determine the location type though, and occasionally you’ll find that the loca-tion is configured incorrectly.
To make changes to the network location, if that location is a homegroup, you can run the Homegroup Troubleshooter. This might never happen in a homegroup, but it’s worth noting that the Homegroup Troubleshooter is an option. If the location is a local network in a work-group, you make changes in the PC Settings as follows:
1. Open PC Settings.
2. Click Network.
3. From the Connections pane, click the network to change.
4. Set Find Devices And Content to Off. See Figure 3-3.

Objective 3.1: Configure IP settings CHAPTER 3 129
FIGURE 3-3 Make changes to network location in PC Settings, from Network.
NOTE ADVANCED SHARING
You can configure advanced sharing from the Network And Sharing Center by clicking Change Advanced Sharing Settings. From there you can change settings for the various profiles available, including Private, Guest Or Public, and All Network. Settings include net-work discovery, file and print sharing, and various settings for public folder sharing, media streaming, encryption for file sharing, and password-protected sharing.
Configure name resolutionComputers are represented by their unique IP address, and you can communicate with them using that address if you like. One way to communicate with an IP address is to do so at a command line. For instance, you can type something like ping 192.168.4.5 to troubleshoot connectivity to another host on a local area network segment. Communicating this way is cumbersome, at least in real life. (Ping is defined in the next section, “Resolve connectivity issues.”)
DNS enables users to type names instead of numbers, and the process is called name reso-lution. DNS servers store information about the names and addresses of Internet computers, and the lists they maintain are distributed among thousands of DNS servers available on the Internet, which are placed all over the world. The name resolution request is forwarded to

130 CHAPTER 3 Configure network connectivity
one of these servers, and if the name can’t be resolved it’s passed to another and another, until it is.
You can configure a host to use a specific DNS server in the connection’s Properties dialog box. On a domain with a unique DNS server that the host is required to use, this is necessary. It might also be necessary in a VPN or in a virtual machine.
Resolve connectivity issuesWhen a host can’t reach a network, that host has connectivity issues. The issue might be isolated to only that device; perhaps the computer’s Ethernet cable has come unplugged or the computer’s wireless features have been disabled. Maybe there is an IP address conflict on the network and the user’s IP address needs to be released and renewed. Often, using the troubleshooting tools in the Network And Sharing Center can uncover the problem and offer a solution. If the issue isn’t isolated, though, you have larger problems. A network server, gateway, or other necessary resource might be down, a network segment or physical back-bone might be damaged, or there could be an issue that is caused by the ISP, cloud services, or other technologies that are out of your control. In this section you’ll learn three ways to troubleshoot a connectivity problem. You can use the Network And Sharing Center, the Action Center, or command-line tools.
NOTE VIEWING CONNECTION STATUS
To view the status of any connection, open the Network And Sharing Center, then click Change Adapter Settings. Double-click the icon that represents the connected network and click Details. In the dialog box that appears, you can view the physical address, DHCP information, and IP addresses. You can even see the IP address of the DNS server, default gateway, and DHCP server, along with when the DHCP lease was obtained and when it must be renewed.
NETWORK AND SHARING CENTERThe Network And Sharing Center enables you to view the status of your active networks. If there’s a problem, you can click Troubleshoot Problems to see if the Network And Sharing Center can resolve it. Sometimes it can, by releasing and renewing the IP address, resetting adapter settings, or uncovering a simple problem such as a disconnected Ethernet cable (which you can then reconnect).
If a problem exists but can’t be resolved automatically, you can choose from a list of trou-bleshooting options that include solving problems connecting to websites, accessing shared folders, finding computers or files in a homegroup, finding and fixing problems with wireless adapters, and troubleshooting incoming connections. Figure 3-4 shows this. When you select any option and start the troubleshooter, it generally finds the problem and performs the repair or prompts you to authorize the repair. It might also require you to do something first, like insert an Ethernet cable into the Ethernet port on the computer.

Objective 3.1: Configure IP settings CHAPTER 3 131
FIGURE 3-4 Use the Network And Sharing Center to troubleshoot a connectivity problem.
ACTION CENTER TROUBLESHOOTING TOOLSIf the Network And Sharing Center can’t help you determine or resolve the problem, you can check the Action Center. Again you’ll see a troubleshooting option. Here you can trouble-shoot problems related to the network and to other things like hardware and sound or system and security. However, you might find something more valuable. Perhaps the net-work interface card’s driver needs to be updated. Action Center will alert you to this in most instances. You can also review problems with the network firewall, virus protection, Internet security settings, network access protection, and the user’s Microsoft Account, among other things. Sometimes you can resolve odd connectivity problems here.
COMMAND-LINE TOOLSWhen the Network And Sharing Center and the Action Center can’t help resolve a connec-tivity problem, it’s likely a more complex issue. Perhaps a domain’s (or network segment’s) gateway is offline. Perhaps a router failed. Perhaps the DNS server isn’t available or has been incorrectly configured on the host. Perhaps the unique, corporate, IP address of the computer has been changed to an APIPA address because of a currently unresolved network issue. When these kinds of problems exist, you can use command-line tools to resolve them.
Here are some of the tools you can use:
■ Ping This tool verifies IP-level connectivity to another TCP/IP computer. To do this, it sends Internet Control Message Protocol (ICMP) Echo Request messages to the recipi-ent. The receipt of these messages is displayed, along with round-trip times, if the con-nection is successful. Ping is the primary command used to troubleshoot connectivity, reachability, and name resolution.

132 CHAPTER 3 Configure network connectivity
■ Ipconfig and Ipconfig /all This displays all current TCP/IP network configuration values. It can also refresh DHCP and DNS settings. Used without the /all parameter, Ipconfig displays IPv4 and IPv6 addresses, the subnet mask, and the default gateway for all adapters installed on the host. Common parameters are /release, /renew, and /flushdns.
■ Tracert This tool determines the path taken to a destination and shows information about each hop a packet takes to get to where it’s going. A hop is a pass through a router. You can use this information to see where the transmission fails.
■ Netstat This displays a list of active TCP connections and the ports on which the computer is listening. It also displays Ethernet statistics, the IP routing table, and IPv4 and IPv6 statistics.
■ Netsh This enables you to make changes to the network configuration of the current computer at the command line.
■ Nslookup This tool displays information that you can use to diagnose problems with DNS.
EXAM TIP
You should review as many command-line tools as time allows. You will see these on the exam, and they might include more obscure tools such as Icacls, Attrib, Cipher, Fsutil, Auditpol, and others, along with associated parameters. (You might also see commands associated with deployment outlined in Chapter 2, “Configure hardware and applications,” including DISM, DiskPart, Fdisk, BCDboot, and more.) Visit this page on TechNet to see a list of common command-line tools and their uses: http://technet.microsoft.com/en-us /library/cc754340.aspx#BKMK_a.
Thought experimentTroubleshooting network connectionsIn this thought experiment, apply what you’ve learned about this objective. You can find answers to these questions in the “Answers” section at the end of this chapter.
You are troubleshooting connectivity problems on a new laptop that has been added to a local, small business network that already includes eight other comput-ers. Three of these eight are laptops that have always connected without issues. The new laptop can connect when plugged in directly to the router with an Ethernet cable, but it cannot connect wirelessly.
Answer the following questions related to how you would troubleshoot this issue:
1. What do you suspect is causing this problem?

Objective 3.1: Configure IP settings CHAPTER 3 133
2. Do you think that the troubleshooter in the Network And Sharing Center can resolve this problem?
3. If the Internet Connection troubleshooter uncovers the issue but can’t resolve it, where would you turn next and why?
Objective summary ■ When you connect to a local network, you choose the network type and security set-
tings are automatically configured. You are not prompted when you join a domain.
■ After you connect to a network, your computer is given a unique IP address on that network segment. Every host connected to a network must have an IP address.
■ Name resolution, handled by DNS, lets users type friendly names like http://www .microsoft.com instead of its IP address.
■ When connectivity problems ensue, you can troubleshoot the issue by using the Network And Sharing Center, Action Center, and various command-line tools.
Objective reviewAnswer the following questions to test your knowledge of the information in this objective. You can find the answers to these questions and explanations of why each answer choice is correct or incorrect in the “Answers” section at the end of this chapter.
1. What is the purpose of DNS?
A. To automatically assign IP addresses to hosts on a local network or network segment
B. To transmit IPv6 traffic over an IPv4 network
C. To resolve host names into IP addresses
D. To assign an APIPA address when an IP address isn’t available from a DHCP server
2. How can you apply a static IP address to a host on a network, such as a computer or network printer? (Choose all that apply.)
A. From the host adapter’s Properties dialog box
B. In the Action Center, in the Security options
C. By using the Netsh command at a command prompt
D. From the Advanced Sharing Settings in the Network And Sharing Center
3. You need to access information for a specific network adapter, including the physical address, DHCP configuration, IPv4 and IPv6 addresses, applicable subnet mask, and the addresses configured for the DNS Server, DHCP server, default gateway, and when the DHCP lease must be renewed. Which command-line tool would you use?

134 CHAPTER 3 Configure network connectivity
A. Ipconfig
B. Ipconfig /all
C. Ping
D. Tracert
4. How do you change a configured network location in Windows 8.1?
A. From the host adapter’s Properties dialog box.
B. In the Action Center, in the Maintenance options.
C. From the Settings charm, right-click the network, click Forget This Network, then reconnect.
D. From PC Settings, Network.
Objective 3.2: Configure networking settings
There are various networking settings you can configure. You can connect to wireless and broadband networks and manage the list of wireless networks to which you’ve connected previously. You can configure location-aware printing to enable users to print to the desired local printer automatically. You can configure network adapters, too, to reconfigure default settings and tweak performance.
This objective covers how to: ■ Connect to a wireless network
■ Manage preferred wireless networks
■ Configure location-aware printing
■ Configure network adapters
Connect to a wireless networkWhen a wireless network is available, you will likely be prompted to join it. This is especially true of mobile devices, although the prompt might not appear until you try to connect to the Internet. When you opt to connect, the process is often as simple as typing the password, if applicable. You learned in the previous section that you can connect to a network using the Set Up A New Connection Or Network option as well, by working through the wizard pro-vided. When you connect this way, you are prompted to type the network name (SSID) and password and select the applicable security settings. There is another way not yet discussed, and that’s the simplest option of all: connecting to a network from the Settings charm.
To connect to a network from the Settings charm, follow these steps:

Objective 3.2: Configure networking settings CHAPTER 3 135
1. Press the Windows key+I to open the Settings charm and click the Network icon. See Figure 3-5. (You can also click the Network icon in the taskbar’s system tray on the desktop.)
FIGURE 3-5 Click the Network icon to see the available networks.
2. Click the desired network. You can see and connect to available VPN and broadband connections here, too.
3. If desired, click Connect Automatically.
4. Click Connect. (You might be prompted to apply sharing options.)
5. If prompted:
A. Type the password and click Next.
B. Click Yes or No as applicable and click OK. See Figure 3-6.
FIGURE 3-6 In some instances you might be prompted to choose some options before you actu-ally connect.

136 CHAPTER 3 Configure network connectivity
EXAM TIP
You used to be able to right-click a network connection from the Settings charm and the list of networks you find there and forget a network. This enabled you to start fresh with network settings for that network the next time you connect. You can’t do that anymore. If you want to forget a network, refer to the directions in the next section, “Manage pre-ferred wireless networks.”
Manage preferred wireless networks Windows 8.1 keeps track of all of the networks to which you connect and prioritizes them automatically. When you have more than one connection option, Windows 8.1 determines which type it will connect to in this order: Ethernet, Wi-Fi, and then mobile broadband. To be clear, when all of these exist, it selects Ethernet. Otherwise, it selects Wi-Fi. If both become unavailable, then it connects with broadband (and will do so automatically if you’ve config-ured it to). With regard to the wireless networks to which you’ve connected in the past, when more than one of those is available at a given time, Windows 8.1 connects to the last one you used.
If you’re connected to a network automatically but want to choose another, click it from the list of networks. You can access this list by clicking the Network icon in the taskbar’s system tray on the desktop or by clicking the Network icon from the Settings charm. See Figure 3-7.
FIGURE 3-7 Switch networks from the Network list.
Objective 3.2: Configure networking settings CHAPTER 3 137
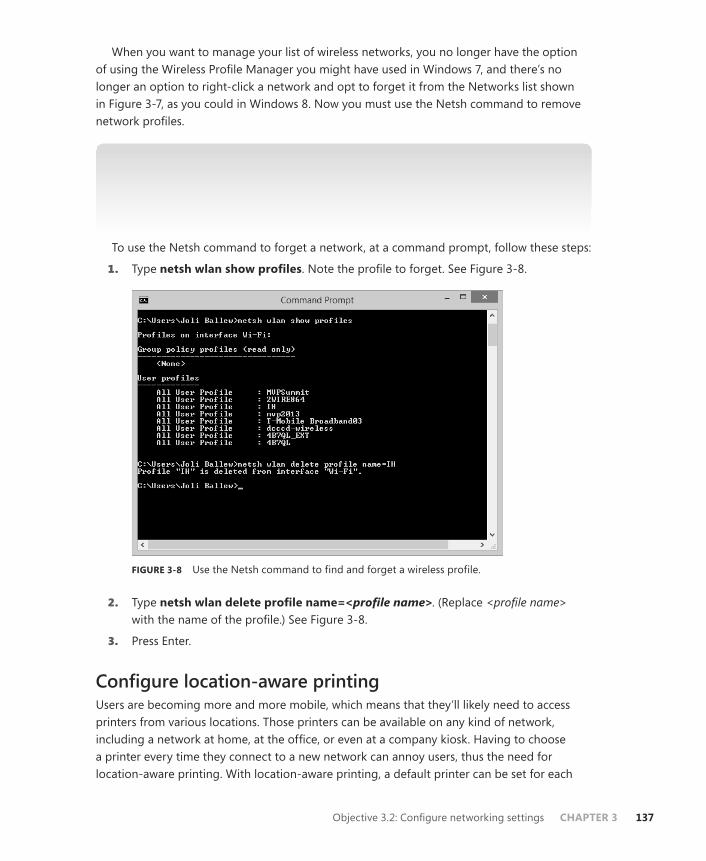
When you want to manage your list of wireless networks, you no longer have the option of using the Wireless Profile Manager you might have used in Windows 7, and there’s no longer an option to right-click a network and opt to forget it from the Networks list shown in Figure 3-7, as you could in Windows 8. Now you must use the Netsh command to remove network profiles.
NOTE FORGETTING A CONNECTION
You can forget a network from the Network list in one, specific instance. Try to connect to a network to which you have connected before, and when the connection fails, opt to forget that connection.
To use the Netsh command to forget a network, at a command prompt, follow these steps:
1. Type netsh wlan show profiles. Note the profile to forget. See Figure 3-8.
FIGURE 3-8 Use the Netsh command to find and forget a wireless profile.
2. Type netsh wlan delete profile name=<profile name>. (Replace <profile name> with the name of the profile.) See Figure 3-8.
3. Press Enter.
Configure location-aware printingUsers are becoming more and more mobile, which means that they’ll likely need to access printers from various locations. Those printers can be available on any kind of network, including a network at home, at the office, or even at a company kiosk. Having to choose a printer every time they connect to a new network can annoy users, thus the need for location-aware printing. With location-aware printing, a default printer can be set for each

138 CHAPTER 3 Configure network connectivity
location from which the user prints. This also keeps the user from accidentally printing to the wrong printer, which poses a security issue if the printed data is confidential.
EXAM TIP
Location-aware printing uses the Network Location Awareness service and the Network List service to determine the network location. The former collects and maintains network configuration information, and the latter identifies the network to which the computer is connected. If this feature doesn’t work, be aware that you need to check to make sure these services are running.
To configure location-aware printing, follow these steps:
1. Open the Devices And Printers window.
2. On the menu bar, click Manage Default Printers. (You won’t see this option on a desk-top computer or if a default printer is not installed.)
3. Select Change My Default Printer When I Change Networks.
4. In the Select Network drop-down list, choose a network to configure as shown in Figure 3-9.
FIGURE 3-9 Open Devices And Printers, select a printer, and click Manage Default Printers to configure location-aware printing.
5. From the Select Printer drop-down list, select the printer to use.

Objective 3.2: Configure networking settings CHAPTER 3 139
6. Click Add.
7. To remove an entry, select it in the list of items you’ve added and click Remove.
Configure network adaptersA network adapter is a NIC. Depending on the type, it can transmit data via Ethernet, Wi-Fi, or both. You access the available adapters from the Network And Sharing Center by clicking Change Adapter Settings in the task pane on the left. From there it’s easy to tell which net-work adapter is being used. Figure 3-10 shows that the Wi-Fi adapter is connected. You can right-click an entry to access the options available for it.
FIGURE 3-10 The Network Connections window shows the available adapters.
When you right-click an adapter in the Network Connections window, you can do any of the following:
■ Enable or disable the adapter. (This can help you solve connection problems or keep wireless adapters from searching for networks when you don’t need them to.)
■ Connect to or disconnect from the associated network.
■ See the status of the adapter or connection. (You can use this to view the number of bytes sent and received, to diagnose connection problems, to view signal quality and speed, and to view the SSID, among other things.)
■ Diagnose problems with the adapter or connection. (You can use this to run an auto-mated tool that can assist in diagnosing connection problems.)
■ Bridge two or more connections. (You must select two connections that are LAN or High Speed Internet connections that are not being used by Internet Connection Sharing. A network bridge is a network device that connects to multiple network segments.)

140 CHAPTER 3 Configure network connectivity
■ Create a shortcut to the adapter for easier access.
■ Delete the entry, if the option is available.
■ Rename the adapter.
■ View the adapter’s properties. (You’ll see the familiar Properties dialog box you learned about earlier in this chapter. From there you can see the type of connection the adapter uses and install or uninstall protocols, Hyper-V Extensible Virtual Switch, Microsoft LLDP Protocol Driver, and more. When you select an option, you can view additional properties.)
Explore the options available from the adapters on a computer to which you have access. Make sure to click Configure in any Wi-Fi Properties dialog box to view the advanced options. You can, for instance, configure the computer to turn off that device to conserve power or to allow the device to wake up the computer (on the Power Management tab). You can also view events (Events tab), see adapter and driver details (Details, Driver, and General tabs), and view advanced configuration options (Advanced tab).
Thought experimentSelect the best Windows 8 edition based on a client’s needsIn this thought experiment, apply what you’ve learned about this objective. You can find answers to these questions in the “Answers” section at the end of this chapter.
You support multiple mobile users. They connect to a dozen wireless networks a month and print to the printers on those networks regularly. Users complain that they have to choose their printers manually when a part of those networks and that sometimes they choose the wrong ones. Not only is this annoying, but because they print sensitive documents it’s also a security issue for your company.
Beyond that, users have connected to wireless networks they’d rather have their laptops forget. The list of networks is quite long and they want you to remove entries for networks they’ll never use again (or networks that offered poor con-nectivity, such as one they have connected to in the past at a hotel or conference center). In the case of networks with poor connections, they’d rather default to broadband.
Regarding this scenario, answer the following questions:
1. What feature do you enable on the users’ Windows 8.1 laptops to enable the network connection to define the printer to which the users will print by default, and what two services does this feature rely on?
2. When a user is in a hotel where she’s stayed before, and that user has also con-nected to the hotel’s free Wi-Fi, what must you do to forget that network so that the user can default to broadband when she stays there next time?

Objective 3.2: Configure networking settings CHAPTER 3 141
Objective summary ■ There are several ways to connect to a wireless network including using Control Panel,
the Network icon in the desktop’s taskbar, and the network icon from the Settings charm.
■ There is a default priority for networks to which the user has previously connected: Ethernet, Wi-Fi, and mobile broadband. When there are two or more wireless connec-tions available, Windows defaults to the last one used. You can manage networks by using the Netsh command.
■ Location-aware printing lets users configure a default printer for each network they connect to.
■ Each network adapter has options available for configuration. You can access these by right-clicking the network adapter in Network Connections and selecting an option from the shortcut menu.
Objective reviewAnswer the following questions to test your knowledge of the information in this objective. You can find the answers to these questions and explanations of why each answer choice is correct or incorrect in the “Answers” section at the end of this chapter.
1. A user has these connections available: an Ethernet connection, three Wi-Fi connec-tions, and a broadband connection. Which will Windows 8.1 default to?
A. Ethernet.
B. The last wireless connection the user connected to.
C. Broadband.
D. The user will be prompted.
2. You need to configure the advanced properties of a wireless adapter; specifically, you need to make changes to the AdHoc 11n and Receive Buffer options. Where do you do this? (Choose two; each represents half of the answer.)
A. Right-click the adapter in the Network Connections window and click Properties. Click Configure.
B. Right-click the Wi-Fi adapter in the Network Connections window and click Properties. Click Install.
C. Right-click the Wi-Fi adapter in the Network Connections window and click Status. Click Wireless Properties.
D. Apply the changes from the Wi-Fi adapter’s Properties dialog box on the Advanced tab.
3. You need to use the Netsh command to forget a network. Which of the following is true regarding the Netsh command? (Choose all that apply.)
A. It must be typed in an elevated Windows PowerShell session.

142 CHAPTER 3 Configure network connectivity
B. It must be typed at a command prompt.
C. It must be typed at a command prompt with elevated privileges.
D. You must use the parameter wlan delete profile=<profile name>.
E. You must use the parameter wlan remove profile=<profile name>.
4. A client needs to connect to a wireless network that isn’t broadcasting its SSID. How can you connect?
A. Use the command netsh wlan add profile=<profile name> to connect to the network.
B. In the Network And Sharing Center, use the Set Up A New Connection Or Network option.
C. From the Settings charm, click the Network icon. Then, click the network to add.
D. Open the Network And Sharing Center and click Troubleshoot Problems. Click Network Adapters. Resolve the problem with the network adapter and then con-nect when prompted.
Objective 3.3: Configure and maintain network security
There are a lot of ways to secure a stand-alone computer, but most of the options on which you’ll be tested in this objective are in the firewall settings. There are other places to secure a computer, of course, including but not limited to applying group policies, enabling Windows Defender or some other anti-malware software, selecting the appropriate network type when connecting, and even requiring complex passwords. Here, though, we’ll concentrate on what will be tested, as detailed next.
This objective covers how to: ■ Configure Network Discovery
■ Configure Windows Firewall
■ Configure Windows Firewall with Advanced Security
■ Configure connection security rules (IPsec)
■ Create authenticated exceptions
Configure Network DiscoveryBy default, Network Discovery is enabled for private and domain networks and disabled for public ones. Network Discovery enables a computer to locate other computers on a net-work and allows computers on the network to see it as well. This is fine when the network is trusted, but it isn’t a good idea when the network is not. By having these settings and others

Objective 3.3: Configure and maintain network security CHAPTER 3 143
already configured for the various network types, along with the applicable settings for ports and protocols, the network administrator does not have to configure every aspect of a con-nection manually. There is one caveat. Even if Network Discovery is disabled, a Windows 8.1 computer can still access network resources if the user knows the names and locations of those resources (because they can’t be discovered by browsing).
It is possible to make changes to how Network Discovery is configured. You do this from the Network And Sharing Center by following this procedure:
1. Open the Network And Sharing Center.
2. In the left pane, click Change Advanced Sharing Settings.
3. Click the down arrow, if applicable, beside the network type for which to change the settings: Private or Guest Or Public.
4. Make the desired change for Network Discovery settings. Note the other options. See Figure 3-11.
5. Click Save Changes, not shown.
FIGURE 3-11 Enable and disable Network Discovery for a network type from the Network And Sharing Center.

144 CHAPTER 3 Configure network connectivity
Configure Windows FirewallWindows Firewall is a software solution that comes with Windows 8.1 that creates a virtual barrier between a computer and the network to which it is connected for the purpose of protecting the computer from unwanted incoming traffic (data) and protecting the network from unwanted outgoing traffic (data). The firewall allows specific types of data to enter and exit the computer and blocks others, and settings are configured by default (but they can be changed). This type of protection is called filtering. The filters are generally based on IP addresses, ports, and protocols.
■ IP Address IP addresses are assigned to every computer and network resource con-nected directly to the network. The firewall can block or allow traffic based on an IP address of a resource (or a scope of addresses).
■ Port Port numbers identify the application that is running on the computer. For example, port 21 is associated with the File Transfer Protocol (FTP), port 25 is associ-ated with Simple Mail Transfer Protocol (SMTP), port 53 is associated with DNS, port 80 is associated with Hypertext Transfer Protocol (HTTP), and port 443 is associated with HTTPS (HTTP Secure).
■ Protocol Protocols are used to define the type of packet being sent or received. Common protocols are TCP, Telnet, FTP, HTTP, Post Office Protocol 3 (POP3), Internet Message Access Protocol (IMAP), HTTPS, and User Datagram Protocol (UDP). (You should be familiar with the most common protocols before taking the exam.)
Although there are plenty of rules already configured for the firewall, you can create your own inbound and outbound rules based on ports, protocols, programs, and more to config-ure the firewall to suit your exact needs. You’ll learn how later in this chapter.
Monitor the Windows FirewallYou can monitor the state of the Windows Firewall in Control Panel. It’s easy to tell from here if the firewall is on or off, what incoming connections are blocked by default, what is the active network, and how you are currently notified when the firewall takes action. It’s all avail-able in the main window. To make basic changes to the state of the firewall, in the left pane click Turn Windows Firewall On Or Off. From there you can change settings for both private and public networks. There are two options for each:
■ Turn On Windows Firewall (this is selected by default)
■ Block All Incoming Connections, Including Those In The List Of Allowed Apps
■ Notify Me When Windows Firewall Blocks A New App (This is selected by default.)
■ Turn Off Windows Firewall (not recommended)
What you’ll be most interested in as a network administrator, though, at least from this window, are the options available in the left pane. Specifically, you’ll use the Allow An App Or Feature Through Windows Firewall and Advanced Settings options. You’ll learn about the Advanced Settings in the next section, but here we discuss allowing an app through the firewall that is blocked by default.

Objective 3.3: Configure and maintain network security CHAPTER 3 145
Allow an app through the Windows FirewallSome data generated with and by specific apps is already allowed to pass through the Windows Firewall. You can see which apps are allowed by clicking Allow Apps To Communicate Through Windows Firewall in the left pane of the Windows Firewall window in Control Panel. As you scroll through the list, you’ll see many apps you recognize, including Bing Food & Drink, Games, Maps, Music, Windows Media Player, and so on. See Figure 3-12. (Once you click Change Settings and give administrator approval, the Change Settings option will appear unavailable and the options in this list will be editable, as you see here.) You will also notice that some apps are not enabled by default, including Windows Media Player Network Sharing Service (Internet), Windows Remote Management, Remote Shutdown, Connect To A Network Projector, and so on.
FIGURE 3-12 By default, some apps are already allowed through Windows Firewall.
To allow an app through the firewall or stop one from getting through, select the check box under the appropriate network profile for which it should be configured. As shown in Figure 3-12, there are two options for each: Private and Public. If you don’t see the app you want to allow or block, click Allow Another App. You can then select the desired app from the Add An App dialog box.
Configure Windows Firewall with Advanced Security Although you can configure a few options in the main Windows Firewall window, the real power lies with Windows Firewall with Advanced Security, shown in Figure 3-13. You can open this window in various ways, one of which is to click Advanced Settings in the Windows Firewall window shown in Figure 3-13.

146 CHAPTER 3 Configure network connectivity
FIGURE 3-13 Windows Firewall with Advanced Security offers many more options than Windows Firewall.
Once opened, there are several options and terms with which you need to be familiar.
■ In the left pane (note that the items in the middle and right panes change based on what you’ve selected here):
■ Inbound Rules Lists all configured inbound rules and enables you to double-click any item in the list and reconfigure it as desired. Some app rules are predefined and can’t be modified much, although they can be disabled. Explore the other tabs as time allows. You can also right-click Inbound Rules in the left pane and create your own custom rule. Rule types include Program, Port, Predefined, and Custom, and they are detailed later in this section.
■ Outbound Rules Offers the same options as Inbound Rules, but these apply to outgoing data. You can also right-click Outbound Rules in the left pane and create your own custom rule. Rule types include Program, Port, Predefined, and Custom, and they are detailed later in this section.
■ Connection Security Rules Connection security rules you create manually appear here. Connection security rules establish how computers must authenticate before any data can be sent. IP Security (IPsec) standards define how data is secured while it is in transit over a TCP/IP network, and you can require a connection use
Objective 3.3: Configure and maintain network security CHAPTER 3 147
this type of authentication before computers can send data, if desired. You’ll learn more about connection security rules in the next section.
■ Monitoring Offers information about the active firewall status, state, general set-tings, and more for both the private and public profile types.
■ In the right pane (what you see depends on what you’ve selected in the left pane):
■ Import/Export/Restore/Diagnose/Repair Policies Enables you to manage the settings you’ve configured for your firewall. Polices use the .wfw extension.
■ New Rules Enables you to start the applicable Rule Wizard to create a new rule. You can also do this from the Action menu.
■ Filter By Enables you to filter rules by Domain Profile, Private Profile, or Public Profile. You can also filter by state: Enabled or Disabled. Use this to narrow the rules listed to only those you want to view.
■ View Enables you to customize how and what you view in the middle pane of the Windows Firewall with Advanced Security window.
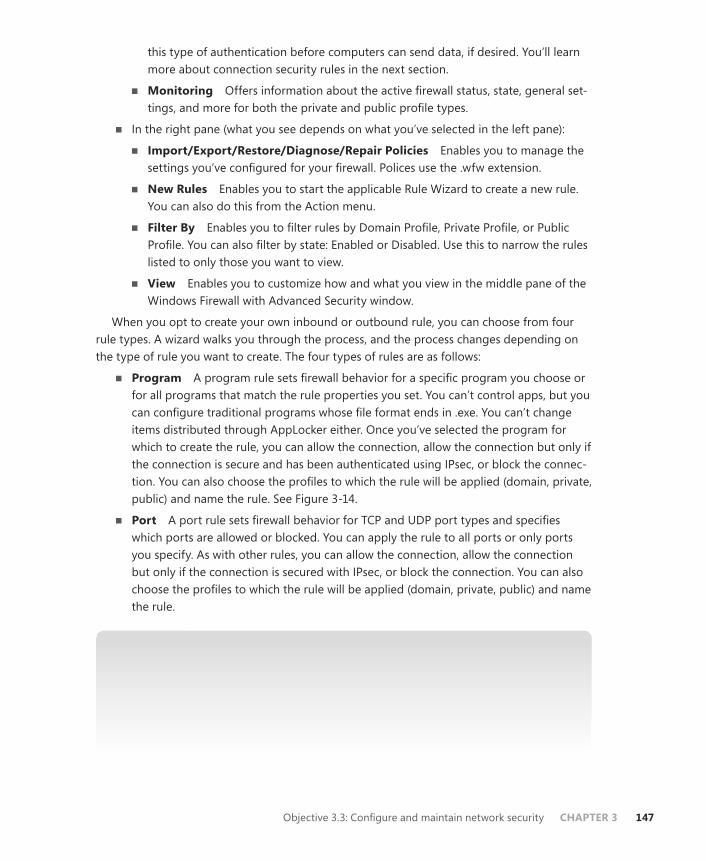
When you opt to create your own inbound or outbound rule, you can choose from four rule types. A wizard walks you through the process, and the process changes depending on the type of rule you want to create. The four types of rules are as follows:
■ Program A program rule sets firewall behavior for a specific program you choose or for all programs that match the rule properties you set. You can’t control apps, but you can configure traditional programs whose file format ends in .exe. You can’t change items distributed through AppLocker either. Once you’ve selected the program for which to create the rule, you can allow the connection, allow the connection but only if the connection is secure and has been authenticated using IPsec, or block the connec-tion. You can also choose the profiles to which the rule will be applied (domain, private, public) and name the rule. See Figure 3-14.
■ Port A port rule sets firewall behavior for TCP and UDP port types and specifies which ports are allowed or blocked. You can apply the rule to all ports or only ports you specify. As with other rules, you can allow the connection, allow the connection but only if the connection is secured with IPsec, or block the connection. You can also choose the profiles to which the rule will be applied (domain, private, public) and name the rule.
MORE INFO CONNECTIVITY AND SECURITY
When you create inbound and outbound rules, and when you opt to allow the connec-tion only if the connection is secured by authenticating the connection with IPsec, the connection will be secured using the settings in the IPsec properties and applicable rules in the Connection Security Rules node. The next section covers how to create con-nection security rules.

148 CHAPTER 3 Configure network connectivity
■ Predefined A predefined rule sets firewall behavior for a program or service that you select from a list of rules that are already defined by Windows.
■ Custom A custom rule is one you create from scratch, defining every aspect of the rule. Use this if the first three rule types don’t offer the kind of rule you need.
FIGURE 3-14 The New Inbound Rule Wizard walks you through the creation process.
EXAM TIP
When you are working inside the Windows Firewall With Advanced Security window and subsequent dialog boxes, you have access to and can configure rules for every profile, even if they aren’t active. This includes Private, Public, and Domain profiles.
EXAM TIP
We’re not sure if you’ll be asked questions regarding how to create a rule. Thus, you should spend a few minutes working through the wizard a few times, selecting different rule types each time to become familiar with the process.
There are other areas to explore. With Windows Firewall With Advanced Security selected in the left pane and using the Overview section of the middle pane, click Windows Firewall Properties to see the dialog box shown in Figure 3-15. From there you can make changes to

Objective 3.3: Configure and maintain network security CHAPTER 3 149
the firewall and the profiles, even if you aren’t connected to the type of network you want to configure.
FIGURE 3-15 Use the Windows Firewall With Advanced Security dialog box to configure settings for specific profiles.
In Figure 3-15, the Domain Profile tab is selected. If you want to, you can configure the firewall to be turned off when connected to a domain network. Additionally, you can strengthen the settings for the Public profile and customize settings for the Private profile. Finally, you can customize IPsec defaults, exemptions, and tunnel authorization on the IPsec Settings tab. Make sure to explore all areas of this dialog box and research any terms you are not familiar with.
EXAM TIP
When Windows 8.1 is coupled with Windows Server 2012, new firewall features are avail-able, including the following:
■ Internet Key Exchange version 2 (IKEv2) for IPsec transport mode
■ Windows Store app network isolation
■ Windows PowerShell cmdlets for Windows Firewall

150 CHAPTER 3 Configure network connectivity
Configure connection security rules (IPsec)You can create your own connection security rules in the Windows Firewall With Advanced Security window. When you do, you can create inbound and outbound rules that use the settings you’ve configured when you opt to create a rule that will allow the connection only if it is secured with IPsec. To begin, right-click Connection Security Rules (located just below Outbound Rules) in the shortcut list and click New Rule. See Figure 3-16.
FIGURE 3-16 Create a new Connection Security rule.
There are several steps involved in creating a rule, and there is a wizard to guide you. The wizard pages that appear depend on the choices you make on the prior page. For instance, if on the first page where you choose a rule type, you choose Isolation, there are four additional steps to work through: Set the requirements, choose the authentication method, choose the profiles to which to apply the rule, and name the rule. However, if you choose to create an authentication exemption rule, you’ll be prompted to add the remote computers for which you want to configure authentication requirements before you can continue.
MORE INFO THE PRIMARY BENEFIT OF USING IPSEC
IPsec is used to securely transmit data between computers. The primary benefit of securing information using IPsec is that all programs and services using IP for data transport can be protected.
Because there are numerous combinations of rule types and options, we can’t possibly go through every scenario. However, you should be familiar with the options and the rule types.
■ Isolation Use this rule type to create a rule restricting connections based on cre-dentials, such as domain membership, computer status or health, or compliance with policies, among other things. You can opt to request authentication for inbound and

Objective 3.3: Configure and maintain network security CHAPTER 3 151
outbound connections, to require authentication for inbound and request for out-bound, or to require authentication for all connections. Following that, you select the type of authentication to use. You can choose from the defaults already configured or use the appropriate Kerberos or advanced authentication method.
■ Authentication Exemption Use this rule type to create a rule to state what connec-tion types can be excluded from authentication. You can apply the rule to a single IP address, a subnet, an IP address range, or from a predefined set of computers (such as DHCP or DNS servers, to name a few). With that done, you can choose the profiles to which to apply the rule (domain, private, public) and name the rule.
■ Server-To-Server Use this rule type to create a rule that applies to named IP addresses or to all IP addresses to request authentication for inbound and outbound connections, to require authentication for inbound and request for outbound, or to require authentication for all connections. You also choose the authentication method, which might be a certificate from a certificate authority or a health certificate issued from Network Access Protection. You can do this to protect specific computers (serv-ers) from interacting with each other.
■ Tunnel Use this rule type to create a rule that authenticates connections between two computers by using tunnel mode in IPsec, perhaps between two computers such as client-to-gateway or gateway-to-client. You can opt to exempt IPsec-protected con-nections and choose the authentication requirements, too.
■ Custom Use this rule type to create a custom rule if the previous options don’t offer what you need.
EXAM TIP
Connection Security rules specify how and when authentication occurs, but they do not allow those connections. To allow a connection, you must create an inbound or outbound rule. During the inbound or outbound rule creation, you choose the required conditions for the connection, including requiring that the connections have been authenticated by using IPsec. When you do, connections will be secured using the settings in the IPsec prop-erties and rules in the Connection Security Rule node.
Create authenticated exceptionsWhen you configure a rule to allow traffic only when the connection between the commu-nicating computers is secured using IPsec, you are creating an authenticated exception. You configure this option from the application Action page of the Rule Wizard when creating an inbound or outbound rule. When you choose the Allow The Connection If It Is Secure option on the Action page, you are configuring the rule to allow the connection using the settings in IPsec properties and rules in the Connection Security Rule node.

152 CHAPTER 3 Configure network connectivity
To create an inbound rule that applies to a single TCP port (Telnet, port 23) and create an authenticated exception for it, follow these steps:
1. In Windows Firewall with Advanced Security, select and then right-click Inbound Rules.
2. Click New Rule.
3. For the rule type, click Port and then click Next.
4. On the Protocol And Ports page, leave TCP selected and in the Specific Local Ports box, type 23. Click Next.
5. For the action to take, select Allow The Connection If It Is Secure and click Next.
6. To configure authorized users or authorized exceptions, select the applicable check box, click Add, and use the Select Users Or Groups dialog box to add the applicable entries.
7. Repeat step 6 for authorized computers and exceptions. Click Next.
8. Choose the profiles to which the rules should apply. Click Next. Name the rule. Click Finish.
IMPORTANT WHAT WILL BE ON THE EXAM
This book covers the objectives presented in the list of objectives for the exam. However, the Microsoft certification page for this exam clearly states, “Please note that the ques-tions may test on, but will not be limited to, the topics described in the bulleted text.” This means that you’ll see questions on items that aren’t addressed here, and we can’t even guess at what those might be. However, to provide an example, you might see questions that ask you about the different types of Wi-Fi authentication, including Temporal Key Integrity Protocol (TKIP), Advanced Encryption System (AES), and the various Wi-Fi Pro-tected Access (WPA) options. Likewise, you might be faced with questions that require you to know a specific file extension, such as .wfw, which is the file type used when you export a Windows Firewall policy. You might be expected to know a little about Branch Cache or Direct Access, too.
Because there is no way for us to address all of these things in a single book, it is vital you study and prepare for aspects other than what’s offered here. To find out where to access additional resources, visit http://www.microsoft.com/learning/en-us/exam-70-687.aspx and under Skills Measured, click Show All. For each objective there is a list of additional prepa-ration resources. Review that list and become familiar with the options presented.

Objective 3.3: Configure and maintain network security CHAPTER 3 153
Thought experimentConfigure Media Player sharing over the Internet In this thought experiment, apply what you’ve learned about this objective. You can find answers to these questions in the “Answers” section at the end of this chapter.
A client has a large library of media that contains thousands of music files. He wants to share that media in such a way as to be able to access it over the Internet from another computer he owns and keeps at his office. He’s enabled the appropriate options in Media Player on both computers. However, he can’t get sharing to work.
1. What do you need to do regarding the firewall so that this client can allow Media Player to share music files over the Internet?
2. Will you perform the required task in Windows Firewall or Windows Firewall with Advanced Security?
3. Will you need to be logged on as an Administrator to do this?
Objective summary ■ In Windows Firewall you can view the settings for private and public networks and
make basic changes to the settings there. You can also disable the firewall there.
■ You can make changes to how Network Discovery is configured for the available public and private profiles using the Advanced Sharing Settings in the Network And Sharing Center.
■ In Windows Firewall, apps are either allowed through the firewall or not. You can cre-ate exceptions to configure specific apps to be able to get through the firewall.
■ Windows Firewall with Advanced Security offers many more options for administrators, including configuring their own inbound, outbound, and connection security rules; configuring authenticated exceptions; and making changes to existing firewall settings.
Objective reviewAnswer the following questions to test your knowledge of the information in this objective. You can find the answers to these questions and explanations of why each answer choice is correct or incorrect in the “Answers” section at the end of this chapter.
1. When you create an inbound or outbound rule in Windows Firewall with Advanced Security and you choose the Allow The Connection If It Is Secure option on the Action page of the New Rule Wizard, what type of authentication requirements must be met before data can be transferred to and from the connecting computers?
A. Connections must be authenticated with IPsec and use null encapsulation.
B. Connections can be protected by IPsec, but they don’t have to be.

154 CHAPTER 3 Configure network connectivity
C. Connections must require privacy and must be encrypted.
D. Connections will be secured using the settings in IPsec properties and rules in the Connection Security Rule node.
2. When you create a Connection Security rule in Windows Firewall with Advanced Security, what can you use an isolation rule for? (Choose all that apply.)
A. You can restrict connections based on domain membership.
B. You can restrict connections based on the health status of the computer.
C. You can require a tunnel be created.
D. You can use the rule to isolate a subnet based on a scope of IP addresses.
3. Where do you disable Network Discovery for the Private network profile?
A. In the Network And Sharing Center, from Adapter Settings
B. In Windows Firewall, from Advanced Settings
C. In the Network And Sharing Center, from Advanced Properties
D. In Windows Firewall with Advanced Security, from the Windows Firewall Properties dialog box
4. Where can you view a list of active firewall rules?
A. In the Network And Sharing Center, from Adapter Settings
B. In Windows Firewall, from Advanced Settings
C. In the Network And Sharing Center, from Advanced Properties
D. In Windows Firewall with Advanced Security, from the Monitoring option
Objective 3.4: Configure remote management
With remote management tools and technologies, a network administrator can access a computer on the network, take control of it, and perform tasks on it, without having to be physically in front of the computer. This saves both time and money by reducing the number of trips required to service problematic computers. Users can also remotely access their own computers for the purpose of working at them while not physically sitting in front of them.
This objective covers how to: ■ Configure and use Remote Assistance and Remote Desktop
■ Make modifications remotely using an MMC
■ Explore Remote Management Tools and configure settings
■ Make modifications remotely using Windows PowerShell

Objective 3.4: Configure remote management CHAPTER 3 155
Configure and use Remote Assistance and Remote DesktopThere are two technologies both you and end users can employ to remotely access and man-age a computer. Remote Assistance is one of those, and it enables a technician to take control of a computer to troubleshoot and perform maintenance tasks without having to physically travel to the problematic machine. This enables the technician to resolve problems without leaving his home or office. The end user must be there to authorize this, and the user can end the session at any time. This technology is generally used only to troubleshoot remote computers and is not used for telecommuting or accessing files or folders.
Remote Desktop is another remote option. Remote Desktop enables users to connect to their office computer from home for the purpose of telecommuting and accessing files and folders remotely. Once the connection is made, the remote computer is locked so that no one else can access it. The user can do anything that would be possible while sitting in front of the computer (short of pressing physical buttons or picking up print jobs), including running desktop programs and accessing files and folders. In another scenario, network administrators use this technology to service file servers, print servers, domain controllers, and so on without having to physically travel to the machine.
Remote Access and Remote Desktop are built-in, user-friendly tools. However, there are a few settings to take note of before sitting for the exam. You need to know how to enable or disable these features on an end user’s computer; you need to understand what options are available when configuring a remote desktop session; and you need to know how to config-ure and hold a remote assistance session.
Enable or disable remote featuresBy default, Remote Assistance connections are enabled for a Windows 8.1 computer and Remote Desktop connections are disabled. You can change both in the System Properties dialog box, shown in Figure 3-17. You can open this dialog box in many ways. One is to type System on the Start screen and click System in the results. In the System dialog box, click Advanced System Settings or Remote Settings in the left pane. The options you want to con-figure are on the Remote tab. (If you plan to access this computer via Remote Desktop, enable the option now.)

156 CHAPTER 3 Configure network connectivity
FIGURE 3-17 Use the System Properties dialog box to allow or disallow Remote Assistance and Remote Desktop sessions.
EXAM TIP
You can’t access a computer remotely using Remote Desktop if the computer is in sleep or hibernation mode. Thus, if asked about why a Remote Desktop session can’t be enabled, even though the technology has worked before, consider this as an answer option. (You might also want to make changes to the Power Options in Control Panel to overcome this issue.)
Explore Remote Desktop optionsYou and your end users can access the Remote Desktop Connection dialog box by typing Remote on the Start screen and clicking Remote Desktop Connection in the results. When the dialog box opens, click Show Options to access all of the options shown in Figure 3-18.

Objective 3.4: Configure remote management CHAPTER 3 157
FIGURE 3-18 The Remote Desktop Connection dialog box offers several options.
The available tabs offer the options you need to configure your Remote Desktop connection:
■ General Use the settings on this tab to specify the computer name and, optionally, the user name and to save connection settings.
■ Display Use the settings on this tab to choose the size of the remote desktop, which is set to Large by default. You can also choose the color depth. If your user is connect-ing over a free and fast network, these default settings are fine. However, for users who access their desktop over metered mobile broadband, you should opt for more bandwidth-friendly settings.
■ Local Resources Use this tab to configure settings for audio (perhaps to disable audio altogether), whether access to printers and the Clipboard should be enabled, and when to enable Windows key combinations, among other things.
■ Programs Use this tab to name a program that should start when the connection is made.
■ Experience Use the settings on this tab to configure how the network should be configured to optimize performance. By default, Windows automatically detects the settings, but in the case of metered connections, you might want to change this to a specific setting such as low-speed broadband. When you manually configure this set-ting, you can configure what options you want to allow, including but not limited to the desktop background and menu and window animation. By default, Reconnect If The Connection Is Dropped is enabled, but it can be changed if desired.

158 CHAPTER 3 Configure network connectivity
■ Advanced Use this tab to configure authentication options. Authentication is what verifies that the user is connecting to the intended remote computer. Options are Warn Me, Connect And Don’t Warn Me, and Do Not Connect. You can also configure the Connect From Anywhere setting, where you can specify that the user must connect to a dedicated remote desktop gateway server.
With the desired configuration set, you can now use the General tab to connect. You need to know the name of the computer to which to connect, though, and in a domain this can be a bit complicated. As you can see in Figure 3-18, that computer name looks something like this: computername.domainname.com. On a local area connection, the name is simply the computer name. Whatever the case, you also need to have the credentials to log on. In the case of Remote Desktop, that’s the user name and password. Take note, though, that the user name will have to be something like \\computername\username. You can’t just type the user name and get connected. To disconnect while in an active session, just click the X in the upper-right corner.
Configure and use Remote AssistanceTo use Remote Assistance, the user must be at the problematic computer. A Remote Assistance session must be initiated by that user, and the user must approve the connection before it can be made. The key word to search for from the Start screen to initiate a Remote Assistance session is “invite,” not “Remote Assistance” as you might guess. The user needs to access the Invite Someone To Connect To Your PC And Help You, Or Offer To Help Someone Else option from the Start screen in the results. The user can also search for “Invite” or “Remote Assistance” in Control Panel. However the user gets there, the user must click Invite Someone You Trust To Help You in the Windows Remote Assistance dialog box shown in Figure 3-19.
FIGURE 3-19 The user must initiate a Remote Assistance session.

Objective 3.4: Configure remote management CHAPTER 3 159
The user then has three options: Save This Invitation As A File (the user saves the file and gets that file using her method of choice to the help and support team); Use Email To Send An Invitation (the user sends the invitation using an email client on the machine but cannot send it using any form of web-based email); and Use Easy Connect (the easiest option if it is enabled by the help and support team). Because one of the objectives on the exam is to configure Remote Assistance (which we’ve done) including Easy Connect (which we haven’t done), we’ll look at the Easy Connect option here. However, you also should understand how the other two options work.
When the user opts for Easy Connect, an Easy Connect password appears. The user only needs to relay that password to the help and support team. This can be done by phone, fax, email, or even text. The support technician can then send a connection request, which the user then accepts. Both of these items are shown in Figure 3-20. Once the connection is made, the “Expert” can ask to control the computer to resolve the problem, train the user, or perform other tasks.
FIGURE 3-20 Use Easy Connect to get help quickly and easily using Remote Desktop.
Make modifications remotely using an MMCAlthough the Microsoft Management Consoles (MMCs) available in Windows 8.1 are all con-figured to manage local resources by default, you use them to make modifications on remote machines using Computer Management or built-in MMCs.
To see how to connect to another computer to manage it, open Computer Management; in the left pane, right-click Computer Management (Local); and click Connect To Another Computer. In the dialog box that appears, verify that Another Computer is selected, type the name of the computer to which to connect, and click OK. Wait while the connection is made. If you are prompted to enable something to pass through the firewall in Windows Firewall

160 CHAPTER 3 Configure network connectivity
with Advanced Policy or enable a policy setting in Group Policy, do so. Then, click the desired item to manage in the left pane and make configuration changes as desired in the right pane. See Figure 3-21.
FIGURE 3-21 Use Computer Management to connect to and manage another computer on your network.
Explore Remote Management tools and configure settingsWindows Remote Management (WinRM) is a Windows 8.1 service that enables a network administrator to execute commands on networked computers remotely, using Windows PowerShell and Windows Remote Shell (WinRS.exe). There are Group Policy settings related to the WinRM Service and Windows Remote Shell you’ll want to familiarize yourself with as well.
Enable Remote ManagementTo use the Remote Management tools, you must enable them from a command prompt or use Group Policy on each computer you want to manage (including the one you’ll use to manage and the ones that need to be managed). The Group Policy setting is located here: Computer Configuration, Policies, Administrative Templates, Windows Components, Windows Remote Management (WinRM), WinRM Service container. You need to enable this for each Group Policy object to manage. It’s easier to enable this from a command prompt, though.
To enable Remote Management, follow these steps:
1. Open an elevated command prompt.
2. Type winrm quickconfig and press Enter.
3. When prompted to make these changes, type y and press Enter again.
4. When prompted again, type y and press Enter. See Figure 3-22.
5. Close the command prompt window.
EXAM TIP
If you get a question about why the WinRM command won’t work, it might be because the network type is set to Public. The network type must be Private or Domain.

Objective 3.4: Configure remote management CHAPTER 3 161
FIGURE 3-22 Enable Remote Management.
Execute commands from a command promptWith WinRM enabled, WinRS is used at an elevated command prompt (or a Windows PowerShell session) using the WinRS command. Here are some of the applicable parameters:
■ –r:computer Use this parameter to specify the computer on which to perform com-mands. You can use a NetBIOS name or a fully qualified domain name (FQDN).
■ [-u:user] Use this parameter to specify the account you’ll use to perform the com-mand on the remote computer. This needs to be an account on the remote computer.
■ [-p:password] Use this parameter to specify the password associated with the user account name. (You’ll be prompted if you don’t enter it here.)
■ Command Use this parameter to specify the commands to use along with any addi-tional associated parameters.
■ More succinctly: winrs [/<parameter>[:<value>]] <command>.
There are other options beyond typing the computer, user, and password while using WinRS, although these are the most common. To see additional commands and syntax, refer to this page: http://technet.microsoft.com/en-us/library/hh875630.aspx.
Make modifications remotely using Windows PowerShellYou can use Windows PowerShell v3 to remotely manage another computer, using an elevated Windows PowerShell session. If you enabled WinRM at a command prompt as instructed earlier, Windows PowerShell is ready to receive commands. To execute a Windows PowerShell command on a remote computer, you use the following syntax: icm computer

162 CHAPTER 3 Configure network connectivity
{command}, where the computer is the remote computer name and the command is the Windows PowerShell command you want to use. ICM is short for Invoke-Command. To see more about the syntax in a Windows PowerShell session, type Winrs /? and icm -?.
MORE INFO ICM SYNTAX
For more information about ICM syntax, refer to this page on Technet: http://technet .microsoft.com/en-us/library/hh849719.aspx.
Access the applicable Group Policy settingsThe Windows Remote Shell Group Policy settings are located here on a domain server: Computer Configuration, Policies, Administrative Templates, Windows Components, Windows Remote Shell container. You’ll need to configure any desired settings for each Group Policy object you manage. You can use these settings to change the default behavior of WinRS.
Some of the settings you might want to review include Allow Remote Shell Access, Specify Idle Timeout, and Specify Shell Timeout. These are available in the R2 update for Windows Server 2012.
The WinRM Service Group Policy settings are located here on a domain server: Computer Configuration, Policies, Administrative Templates, Windows Components, Windows Remote Management (WinRM), WinRM Service.
Some of the settings you might want to review include Allow Remote Server Management Through WinRM, Allow Basic Authentication, Allow Unencrypted Traffic, and Turn On Compatibility HTTP Listener. These are located in the R2 update for Windows Server 2012.
Thought experiment Choose the applicable remote management toolIn this thought experiment, apply what you’ve learned about this objective. You can find answers to these questions in the “Answers” section at the end of this chapter.
You have a client who needs help with several items, including configuring her Windows 8.1 computer to boot directly to the desktop, installing a network printer, and setting her favorite pages as home pages in Internet Explorer on the desktop. You are in your office across the company complex, about a quarter of a mile away. You don’t want to walk over there.
Answer the following questions regarding this scenario:
1. Should you use Remote Assistance, Remote Desktop, or Remote Management Tools?
2. Does the user need to be at her computer to receive your help?
3. What must the user do before you can help her?

Objective 3.4: Configure remote management CHAPTER 3 163
Objective summary ■ Remote Assistance can be used to troubleshoot problematic computers without having
to physically access them. The user must be present, send an invitation, and accept your help when you offer it.
■ Remote Desktop is a technology that enables end users to access their desktop when they are away from it. This can be configured so that a user can work from home or on the road when circumstances require it.
■ It is possible to remotely manage a computer from a command line and in a Windows PowerShell session. Remote Management must be enabled on each computer first.
Objective reviewAnswer the following questions to test your knowledge of the information in this objective. You can find the answers to these questions and explanations of why each answer choice is correct or incorrect in the “Answers” section at the end of this chapter.
1. You’ve created an MMC and added three snap-ins. Each snap-in is exactly like the oth-ers, except they are each configured to manage a different networked computer. Only one works. What would you suspect is the problem? (Choose all that apply.)
A. You can only use one instance of a snap-in per MMC.
B. Windows Firewall is blocking access on the other two client computers.
C. Remote Management isn’t enabled on the client computer.
D. You don’t have appropriate credentials on the two computers that aren’t allowing access.
2. What command is used to start the Windows Remote Management service from a command prompt?
A. Winrs quickconfig
B. Winrm [computername] quickconfig
C. Winrm quickconfig
D. Winrs startconfig
3. You are trying to connect to your office computer using Remote Desktop. You are at home. You can’t connect. What could be the problem? (Choose all that apply.)
A. You need to allow Remote Desktop connections on your office computer.
B. The remote computer is asleep or hibernating.
C. You typed the computer name or password incorrectly.
D. You failed to configure the options in the Remote Desktop Connection window, specifically the options located on the Experience tab.

164 CHAPTER 3 Configure network connectivity
4. How can you use the WinRS command to remotely manage a computer? (Choose all that apply.)
A. You can’t. You have to use the WinRM command.
B. By using the Group Policy Management Editor.
C. From an elevated command prompt.
D. In an elevated Windows PowerShell session.
Chapter summary
■ A computer must have a unique IP address to communicate on a network; those addresses can be static, be assigned by DHCP, or come from Windows from APIPA.
■ Location-aware printing enables you to configure what printer users should print to based on the network to which they are currently connected.
■ You can make changes to IP addresses and name DNS servers, among other things, in a network adapter’s Properties dialog box.
■ Various network management tools are available, including command-line tools like Netsh, graphical tools like the Network And Sharing Center, and troubleshooting command-line tools like Ping and Tracert.
■ Windows Firewall and Windows Firewall with Advanced Security let you control all aspects of the firewall. You can allow apps through the firewall and create your own inbound, outbound, and connection security rules, too.
■ Several remote management tools are available, including Remote Assistance, Remote Desktop, and Remote Management Tools.

Answers CHAPTER 3 165
Answers
This section contains the solutions to the thought experiments and answers to the objective review questions in this chapter.
Objective 3.1: Thought experiment1. There is probably something wrong with the wireless adapter. Maybe it isn’t enabled or
needs an updated driver to work.
2. Probably. The Network And Sharing Center Internet Connection troubleshooter can discover that the Wi-Fi adapter is disabled, although it might not know why. If the adapter is functional, it can enable it with administrator approval.
3. You can try the Action Center to see if a new driver is available for the Wi-Fi adapter. If not, you can try to locate one using Device Manager. You can also refer to the manu-facturer’s website to find out how to enable the Wi-Fi adapter, if that is the problem.
Objective 3.1: Review1. Correct Answer: C
A. Incorrect. This is handled by a DHCP server.
B. Incorrect. There are technologies to handle this, including various tunneling options, but it is not the job of DNS.
C. Correct. DNS is responsible for this.
D. Incorrect. APIPA is performed by Windows to assign an IP address when one isn’t available.
2. Correct Answers: A and C
A. Correct. You can assign a static IP address from the adapter’s Properties dialog box.
B. Incorrect. You cannot assign an IP address here, although you can review the set-tings configured for the Network Firewall, Internet Security Settings, and so on.
C. Correct. Netsh can be used to assign IP addresses to hosts.
D. Incorrect. You cannot assign IP addresses in the Network And Sharing Center.
3. Correct Answer: B
A. Incorrect. This will display some, but not all, of the required information.
B. Correct. This will display the required information.
C. Incorrect. Ping is used to test connectivity between one host and another.
D. Incorrect. Tracert is used to determine the path a packet takes to get to its destination.

166 CHAPTER 3 Configure network connectivity
4. Correct Answer: D
A. Incorrect. You cannot change the network location here, but you can change many other settings, including assigning a static IP address.
B. Incorrect. This is not the proper place to change the network location. This is where you check for solutions to problems you’ve encountered.
C. Incorrect. This was how you changed the network location in Windows 8, but is no longer available in Windows 8.1.
D. Correct. This is the proper way to change the network location in Windows 8.1.
Objective 3.2: Thought experiment1. Location-aware printing. This feature enables default printers to be configured based
on the network the user is connected to. Location-aware printing uses the Network Location Awareness service and the Network List service to determine the network location.
2. Use the Netsh command to show the list of wireless profiles and then use this com-mand to forget specific networks: Type netsh wlan delete profile name=<profile name>.
Objective 3.2: Review1. Correct Answer: A
A. Correct. Windows always chooses Ethernet if it’s available over other networking options.
B. Incorrect. If there were only three wireless connections but no Ethernet, this would be correct, but Windows defaults to Ethernet when it is available.
C. Incorrect. Broadband is used as a last resort. Ethernet and Wi-Fi are chosen before broadband.
D. Incorrect. The user will not be prompted to connect to an Ethernet network, and Ethernet is what Windows will use.
2. Correct Answers: A and D
A. Correct. This is the first step to making the required configuration changes.
B. Incorrect. You do not need to install anything to make the required changes.
C. Incorrect. This is not the proper option for making the required changes.
D. Correct. This is the second step to making the required configuration changes.
3. Correct Answers: B and D
A. Incorrect. Netsh is not a Windows PowerShell command.
B. Correct. Netsh is a command-line command.

Answers CHAPTER 3 167
C. Incorrect. You do not need elevated privileges to use Netsh.
D. Correct. This is the proper syntax.
4. Correct Answer: B
A. Incorrect. Add is not a valid Netsh parameter.
B. Correct. This is where you set up a new network.
C. Incorrect. The network name will not appear in this list if it is not broadcasting its SSID.
D. Incorrect. Using a troubleshooting tool won’t help you connect to a network that is not broadcasting its SSID.
Objective 3.3: Thought experiment1. You need to create an exception for the Media Player Network Sharing Server
(Internet) in Windows Firewall.
2. You can perform this task in Windows Firewall. You will create an app exception.
3. Yes. You must be able to input Administrator credentials or be logged on as an Administrator to enable Change Settings in Windows Firewall.
Objective 3.3: Review1. Correct Answer: D
A. Incorrect. Although IPsec plays a role, null encapsulation is an option if you choose Custom after selecting the Allow The Connection If It Is Secure option. However, it is not required.
B. Incorrect. This is the setting for Allow Connection, not Allow The Connection If It Is Secure.
C. Incorrect. This is an option if you choose Custom after selecting the Allow The Connection If It Is Secure option. Privacy and encryption are not required in this scenario.
D. Correct. This is called an authenticated exception.
2. Correct Answers: A and B
A. Correct. This is true; you can restrict connections based on domain membership.
B. Correct. This is true; you can restrict connections based on the health of the computer.
C. Incorrect. If this were true, you’d be creating a Tunnel rule.
D. Incorrect. You can name IP scopes of addresses in rules, such as server-to-server, but not with an isolation rule.

168 CHAPTER 3 Configure network connectivity
3. Correct Answer: C
A. Incorrect. You make these changes in the Network And Sharing Center, from Advanced Properties.
B. Incorrect. You make these changes in the Network And Sharing Center, from Advanced Properties.
C. Correct. Yes, this is where you make these changes.
D. Incorrect. You make these changes in the Network And Sharing Center, from Advanced Properties.
4. Correct Answer: D
A. Incorrect. The rules are listed in Windows Firewall with Advanced Security.
B. Incorrect. The rules are listed in Windows Firewall with Advanced Security.
C. Incorrect. The rules are listed in Windows Firewall with Advanced Security.
D. Correct. Yes, this is where you can view a list of active firewall rules.
Objective 3.4: Thought experiment1. Remote Assistance is the best tool to use here.
2. Yes, the user needs to be present so that she can accept your help when you offer it.
3. She must relay an invitation to you. She must also accept your help when you offer it.
Objective 3.4: Review1. Correct Answers: B and D
A. Incorrect. You can have multiple instances of the same snap-in in a single console.
B. Correct. It is most likely a firewall issue.
C. Incorrect. Windows Remote Management (WinRM) does not have to be enabled for this technology to work.
D. Correct. You must have the proper credentials to gain access to remote data.
2. Correct Answer: C
A. Incorrect. WinRM is used for Remote Management, not WinRS.
B. Incorrect. You don’t type the computer name when enabling WinRM.
C. Correct. This is the correct syntax.
D. Incorrect. Startconfig is not a valid parameter.
3. Correct Answers: A, B, and C
A. Correct. This could be the problem because the option to accept Remote Desktop connections must be enabled.
B. Correct. The computer must be awake.

Answers CHAPTER 3 169
C. Correct. This is a common mistake. You can’t connect if you don’t type the proper credentials.
D. Incorrect. The settings here are configured with default settings. You don’t have to change them.
4. Correct Answers: C and D
A. Incorrect. WinRM is used to enable Remote Management. WinRS is used to send commands.
B. Incorrect. Although you can enable Remote Management in the Group Policy Management Editor, you can’t send commands from there.
C. Correct. You can use WinRS at a command line.
D. Correct. You can use WinRS in a Windows PowerShell session.


349
Index
Numbers and Symbols$ (dollar sign), 1783-D printing support, 53DES (Triple DES), 232, 23432-bit operating systems
device drivers and, 57in-place upgrades and, 4Windows PE and, 37–38
64-bit operating systemsclean installations and, 4device drivers and, 57unsigned drivers and, 64Windows PE and, 37–38
Aaccelerators, managing in IE11, 94–95access control
for apps, 72–73configuring authentication and authorization, 206–225configuring file and folder access, 189–205configuring shared resources, 171–189for hardware, 81–89, 118–119objective summary and review, 118–119, 227–229for removable devices, 84–86for Windows Store, 76–79
access control entries (ACEs), 191access control lists (ACLs), 108Account Lockout Duration policy, 210Account Lockout Threshold policy, 211ACEs (access control entries), 191ACLs (access control lists), 108ACT (Application Compatibility Toolkit), 9, 38, 75–76ACT LOG Processing Service, 76Action Center
installing device drivers, 57
optimizing network performance, 316troubleshooting tools, 131
Active Directory Domain Services domain, 127, 171Active Directory permissions, 190Add-AppxPackage cmdlet, 279Add Counters dialog box, 318–320address resolution, 124, 129–130ADK (Assessment and Deployment Toolkit)
described, 21, 32USMT support, 37Volume Activation Management Tool, 38Windows PE support, 37
Administrators groupbacking up from command line, 341configuring user rights, 214editing permissions for, 193–194installing device drivers, 67shared printers, 183tokens and, 221
Advanced Attributes dialog box, 197–198Advanced Encryption System (AES), 152Advanced Options dialog box, 310advanced permissions, 191–195Advanced Properties dialog box, 238Advanced Security Settings For dialog box, 192–193, 195, 201advanced sharing, 129, 175, 243Advanced Sharing dialog box, 175, 243Advanced Startup
additional information, 335described, 335installing unsigned drivers, 63–64rebooting using devices, 258Windows RE and, 331–333
AES (Advanced Encryption System), 152alerts for audited events, 203All Network profile, 129Allow permission, 175, 183, 191Always Offline mode, 243–244Any folder sharing, 175–178

350
Multifactor Authentication for BYOD support, 5objective summary and review, 223–225, 228–229protocols supporting, 233–234remote authentication, 232–234setting up and configuring Microsoft account, 206–207smart cards and, 211–212
Authentication Exemption rule type, 151authorization. See authentication and authorizationAutomatic Private IP Addressing (APIPA), 124–125Automatic Updates policies, 286–289automating installations, 21AutoPlay settings, changing, 72
Bbacking up
certificates, 219from command line, 341credentials, 218data, 35File History feature, 334, 339–341system image, 334, 341
Backup Operator account, 341Base-64 format, 220basic permissions, 191–195.bat file extension, 81–82BCDboot command, 31, 132biometrics, 5, 212–214BitLocker
additional information, 3comparing Windows 8.1 editions, 5configuring, 262–267described, 199Group Policy settings, 266TPM and, 214USMT and, 40
BitLocker To Go, 5, 266–269BranchCache, 5, 152, 238broadband tethering, 5, 238–240broadcast addresses, 126
C.cat file extension, 65Certificate Export Wizard, 198, 219–220
Certificate Manager (certmgr.msc), 198–199, 218–219
certificate rules, 83
APIPA (Automatic Private IP Addressing), 124–125AppData folder, 43Application Compatibility Manager, 76Application Compatibility Toolkit (ACT), 9, 38, 75–76Application log, 311–312applications (apps)
allowing through Windows Firewall, 145associating file types with, 72automatic updates, 5, 278configuring, 70–73configuring restrictions using AppLocker, 81–82configuring restrictions using Software Restriction Policies, 83–84installing and repairing, 73–76managing access to Windows Store, 76–79objective summary and review, 79–80, 117–118saving credentials, 216screen resolution and, 3sideloading technique, 4, 79, 279updating Windows Store, 278–279
AppLockerapplying rules, 81comparing Windows 8.1 editions, 5configuring app restrictions, 81–82controlling updates, 279disabling access to Windows Store, 76
.appx file extension, 79, 81ARP/ND Poisoning (spoofing) protection, 108Assessment and Deployment Toolkit (ADK)
described, 21, 32USMT support, 37Volume Activation Management Tool, 38Windows PE support, 37
Assigned Access feature, 4, 86–88Attrib tool, 132Audit Object Access Properties dialog box, 201auditing, object access, 199–204Auditing Entry For dialog box, 202Auditpool tool, 132authenticated exceptions, 151–152authentication and authorization
biometrics and, 213–214configuring for VPNs, 236–237configuring in workgroups and domains, 208–211configuring User Account Control behavior, 221–222configuring user rights, 214–215configuring virtual smart cards and biometrics, 211–214connection security rules and, 150–151described, 206managing credentials and certificates, 215–220
APIPA (Automatic Private IP Addressing)

351
compmgmt.msc (Computer Management Console)accessing Device Manager, 54making modifications remotely, 159–160shortcuts opening, 78System Tools node, 54viewing groups, 214
Computer Management Console (compmgmt.msc)accessing Device Manager, 54accessing Disk Management, 293accessing Event Viewer, 311making modifications remotely, 159–160shortcuts opening, 78System Tools node, 54viewing groups, 214
Configure Automatic Updates policy, 286–289Config.xml file, 39Connect To A Workplace dialog box, 236connection security rules, 146–147, 150–151connectivity, network. See network connectivityContacts folder, 43Control Panel
biometric devices, 213changing level of UAC, 221configuring BitLocker, 264–266configuring BitLocker To Go, 267–268configuring update settings, 280–281creating Microsoft account, 207Default Programs window, 70–71Devices And Printers window, 60–61, 138–139, 181–183File History window, 334, 339–341installing Client Hyper-V, 99installing Windows features, 21–25Program Compatibility Troubleshooter, 9–10switching power plans, 246
Copype.cmd, 32counters, performance, 318–320.crd file extension, 217Create A Shared Folder Wizard, 179Create A Windows To Go Workspace Wizard, 259Create Custom View dialog box, 313Credential Locker, 216–217Credential Manager, 216–218credential roaming, 217–218credentials
configuring BitLocker, 264described, 215managing, 215–218personal hotspots and, 239saving, 216storing at command line, 217UAC prompt and, 221
certificatesbacking up, 219certificate rules, 83described, 215, 218exporting, 198–199, 219–220managing, 215, 218–220personal encryption, 197–198
certmgr.msc (Certificate Manager), 198–199, 218–219Challenge-Handshake Authentication Protocol (CHAP), 233Change permission, 175, 177, 189CHAP (Challenge-Handshake Authentication Protocol), 233Check Disk tool, 277, 298checkpoints, creating and managing, 107–108child disks, 108Chkdsk command, 298Cipher tool, 132, 199clean installations
64-bit operating systems and, 4choosing, 10–13described, 15performing, 16–17
Client Hyper-Vcomparing Windows 8.1 editions, 4creating and configuring virtual disks, 110–111creating and configuring virtual machines, 99–107creating and configuring virtual switches, 108–110creating and managing checkpoints, 107–108described, 98–99evaluating compatibility, 9installing, 99minimum requirements, 6moving virtual machines, 111–112objective summary and review, 113–114, 121–122
.cmd file extension, 81–82Cmdkey tool, 217collector computers, 314collector initiated subscriptions, 314–315.com file extension, 81command line. See also specific tools
backing up from, 341executing commands from, 160managing encryption from, 199sharing from, 178storing credentials at, 217
compatibilityApplication Compatibility Toolkit, 9, 38, 75–76evaluating for hardware, 8–10Program Compatibility Troubleshooter, 9–10, 73
Compatibility View (IE11), 90–91Compatibility View Settings dialog box, 91
credentials

352
creating driver update policy, 66–68device lockdown technology, 86–87driver rollback, 59, 330installing and managing drivers with Device Manager, 54–59managing Driver Store with Pnputil.exe, 65–66managing installation and access to removable devices, 84–86objective summary and review, 68–69, 116–117virtual machines and, 109
Devices And Printers window (Control Panel)adding printers, 181–183configuring devices, 60–61configuring location-aware printing, 138–139
DHCP (Dynamic Host Configuration Protocol), 124, 126, 130DHCP Guard Protection, 108differencing disks, 108digital signatures, 62–64DirectAccess, 5, 152, 238Disable-ComputerRestore cmdlet, 333Disable Inheritance button, 192, 194Disk Cleanup tool, 277, 298Disk Defragmenter tool, 277, 299–300Disk Management (diskmgmt.msc)
creating multiboot systems, 16described, 277, 293–296installing to VHDs, 27–31shortcuts opening, 78
disk quotas, 195–196disk space. See hard disk spacedisk volumes. See also Disk Management (diskmgmt .msc)
Check Disk tool, 277, 298common terminology, 292–293creating, 295–296Disk Cleanup tool, 277, 298DiskPart command, 132, 296–298types supported, 293viewing options for, 294
diskmgmt.msc (Disk Management)creating multiboot systems, 16described, 277, 293–296installing to VHDs, 27–31shortcuts opening, 78
DiskPart command, 132, 296–298DISM (Deployment Imaging Servicing and Management), 31–32, 38, 132Distinguished Encoding Rules (DER) format, 220DLL (dynamic link library), 65, 82DNS (Domain Name System)
described, 126
Critical events, 311Critical updates, 283Cryptographic Message Syntax Standard, 220Cumulative Security Updates, 283custom installations, 16–17, 21, 32–33Custom rule type, 151custom rules, 148Custom.xml file, 39
DData Collector Sets, 320Data Encryption Standard (DES), 232, 234Data Recovery Agents (DRAs), 268–269DCHP scope, 126default gateways, 126Default Programs window (Control Panel), 70–71Deny permission, 175, 177, 191, 194Deployment Imaging Servicing and Management (DISM), 31–32, 38, 132DER (Distinguished Encoding Rules) format, 220DES (Data Encryption Standard), 232, 234desktop apps. See also applications (apps)
accessing SkyDrive, 185ACT support, 75configuring IE11 for, 90–92
Desktop folder, 43, 180Desktop library, 180device lockdown technology, 86–87Device Manager
accessing, 54Action menu, 55–56biometric hardware support, 213changing views, 56described, 54determining hardware conflicts, 56–57disabling and rolling back drivers, 59expanding nodes, 54–55File menu, 55Help menu, 55installing and uninstalling drivers, 57–59installing legacy hardware, 59menus supported, 55–56performing driver rollback, 330View menu, 55
Device Stage, 61–64devices and device drivers
automatic app updates, 5configuring devices, 60–64configuring recovery drives, 330–333
Critical events

353
Store Passwords Using Reversible Encryption policy, 210
Enforce Password History policy, 209Error events, 311Ethernet network connections, 136, 316evaluating hardware readiness and compatibility
choosing ideal Windows 8.1 edition, 2–5choosing installation options, 10–13cost considerations, 10objective summary and review, 13, 49–50performing readiness tests, 5–10
event logs, 311–313event subscriptions, 314–316event trace data, 320Event Trace Sessions, 320Event Viewer (eventvwr.msc)
configuring and analyzing event logs, 311–313configuring event subscriptions, 314–316creating custom views in, 313object access auditing and, 200, 202–203shortcuts opening, 78
events, audited, 203eventvwr.msc (Event Viewer)
configuring and analyzing event logs, 311–313configuring event subscriptions, 314–316creating custom views in, 313object access auditing and, 200, 202–203shortcuts opening, 78
Everyone group, 176–177, 183Exchange ActiveSync, 5.exe file extension, 81–82exFAT file system, 267, 293explicit permissions, 191, 194exporting certificates, 198–199, 219–220extended partitions, 292–293Extensible Authentication Protocol (EAP), 232–234Extensible Authentication Protocol-Transport Layer Security (EAP-TLS), 233Extensible Firmware Interface (EFI) boot partitioning, 292extensions, managing in IE11, 94–95external virtual switches, 108
FFamily Safety feature, 5FAT file system
configuring BitLocker To Go, 267converting partitions, 298disk quotas and, 189, 195
name/address resolution and, 124, 129–130performance monitoring, 305port number filtering, 144
Documents folder, 180Documents library, 180dollar sign ($), 178Domain Name System (DNS)
described, 126name/address resolution and, 124, 129–130performance monitoring, 305port number filtering, 144
Domain profile, 148–149domains
configuring authentication in, 208–211credentials and, 216Domain Join feature, 4evaluating readiness in, 9Microsoft account in, 207
Download Manager (IE11), 96Downloads folder, 44, 180Downloads library, 180DRAs (Data Recovery Agents), 268–269Driver Store, 65–66Dynamic Host Configuration Protocol (DHCP), 124, 126, 130dynamic link library (DLL), 65, 82
EEAP (Extensible Authentication Protocol), 232–234EAP-MSCHAPv3, 233EAP-TLS (Extensible Authentication Protocol-Transport Layer Security), 233Echo Request messages (ICMP), 131EFI (Extensible Firmware Interface) boot partitioning, 292EFS (Encrypting File System), 197–199, 262elevated privileges, 221–222Enable-ComputerRestore cmdlet, 333Enable-WindowsOptionalFeature cmdlet, 99Encrypting File System (EFS), 197–199, 262encryption
AES support, 152automatic app updates, 5DES support, 232, 234EFS support, 197–199, 262FAT32 file system and, 189, 197managing from command line, 199personal encryption certificates, 197reversible, 210
FAT file system

354
managing fragmentation, 299–300File Transfer Protocol (FTP), 144file types
associating with programs, 71–72managing with AppLocker, 82
filtering, Windows Firewall, 144, 147firewalls. See Windows Firewall; Windows Firewall With Advanced Securityfolder redirection, 40–42folders. See file and folder managementFormat-Volume cmdlet, 297Forwarded Events log, 312FQDNs (fully qualified domain names), 287fragmentation, file system, 299–300Fsutil tool, 132, 196, 296FTP (File Transfer Protocol), 144Full Control permission, 175, 177, 189, 191fully qualified domain names (FQDNs), 287
GGet-AppxPackage cmdlet, 279Get-ComputerRestorePoint cmdlet, 333Get-SmbShare cmdlet, 179gpedit.msc (Group Policy Editor)
accessing removable device policies, 84AppLocker rules, 81–82biometrics settings, 213disabling access to Windows Store, 77–78Software Restriction Policies, 83
GPMC (Group Policy Management Console)disabling Windows Store access, 77enabling Always Offline mode, 244–245managing smart cards, 211
GPT (GUID Partition Table), 214, 292–293Grant-SmbShareAccess cmdlet, 179graphics adapters, minimum requirements, 3, 6Group Policy
app update settings, 278–279biometric hardware, 213BitLocker settings, 266BitLocker To Go settings, 266comparing Windows 8.1 editions, 4described, 20driver update policy, 67event forwarding setting, 316File History settings, 341forced reboots, 82InPrivate Browsing settings, 93Internet Explorer 11 settings, 91–92Microsoft account and, 207
disk volumes and, 293encrypting files and folders and, 189, 197Fsutil tool and, 296NTFS permission inheritance and, 194object access auditing and, 189securing network resources, 176
FAT32 file systemconfiguring BitLocker To Go, 267disk quotas and, 189disk volumes and, 293encrypting files and folders and, 189, 197Fsutil tool and, 296NTFS permission inheritance and, 194object access auditing and, 189securing network resources, 176
Favorites folder, 44Fdisk command, 132features (Windows), installing, 21–25FhManagew.exe tool, 341file and folder management. See also permissions
associating file types with apps, 72configuring disk quotas, 195–196configuring file libraries, 180–181configuring file recovery, 337–342configuring mobility options, 242–261configuring object access auditing, 199–204configuring shared folder permissions, 174–180encryption using EFS, 197–199, 262executable file rule collections, 81–82folder redirection, 40–42managing file system fragmentation, 299–300managing file types with AppLocker, 82objective summary and review, 204–205, 227–228offline file policies, 243–245syncing files, 245syncing folders, 243
File Explorerconfiguring disk quotas, 196Share tab, 173showing libraries in, 180syncing folders, 243
file hash rules, 82–83File History feature, 334, 339–341file recovery
described, 337File History and, 334, 339–341objective summary and review, 343–344, 346–347restoring previous versions of files and folders, 342SkyDrive support, 337–339
File Signature Verification tool (Sigverif.exe), 62, 78file systems. See also specific file systems
converting partitions between, 298
FAT32 file system

355
HTTP Secure (HTTPS), 144, 315HTTPS (HTTP Secure), 144, 315Hyper-V. See also Client Hyper-V
creating and configuring virtual disks, 110–111creating and configuring virtual machines, 99–107creating and configuring virtual switches, 108–110creating and managing checkpoints, 107–108described, 98–99Integration Services package, 106–107moving virtual machines, 111–112objective summary and review, 113–114, 121–122
Hyper-V Administrators group, 214Hyper-V Manager
creating and configuring virtual switches, 109creating and managing checkpoints, 107–108creating virtual disks, 111creating virtual machines, 100–102moving virtual machines, 111–112
Hypertext Transfer Protocol (HTTP), 144, 315hypervisors, 38, 98–99
IIcacls tool, 132, 195ICM (Invoke-Command cmdlet), 162ICMP (Internet Control Message Protocol), 131IKE (Internet Key Exchange), 232–234IMAP (Internet Message Access Protocol), 144import-module.appx, 79Import Virtual Machine Wizard, 112Important updates, 283importing virtual machines, 112in-place upgrades, 4, 10–13inbound rules, 146–147, 150–151Indexing Options dialog box, 309–310.inf file extension, 65Information events, 311inherited permissions, 191, 194InPrivate Browsing, 93installing device drivers, 57–59installing Windows 8.1
custom installations, 16–17, 21, 32–33described, 15installation options, 10–13installing additional Windows features, 21–25installing as Windows To Go, 25–27installing to VHD, 27–31migrating from previous versions of Windows, 20–21objective summary and review, 33–34, 50–51performing clean installations, 16–17
Offline Files, 244password creation, 208power policies, 248, 286remote management and, 160–162sideloading technique, 79Windows Store access, 76–79Windows To Go settings, 257Windows Update settings, 284–289WinRM settings, 162WSUS server, 282
Group Policy Editor (gpedit.msc)accessing removable device policies, 84AppLocker rules, 81–82biometrics settings, 213disabling access to Windows Store, 77–78Software Restriction Policies, 83
Group Policy Management Console (GPMC)disabling Windows Store access, 77enabling Always Offline mode, 244–245managing smart cards, 211
Guest Or Public profile, 129Guests group, 214GUID Partition Table (GPT), 214, 292–293
Hhard disk space
configuring disk quotas, 195–196managing disk volumes, 292–299minimum requirements, 3, 6
hardware. See also devices and device driversconfiguring Hyper-V, 98–99, 121–122configuring Internet Explorer for desktop, 90–98, 119–121controlling access to, 81–89, 118–119evaluating compatibility, 8–10evaluating readiness, 2–14, 49–50hard disk space, 3, 6, 195–196, 292–299installing and configuring apps, 70–80, 117–118installing legacy, 59minimum requirements, 3
Homegroup Troubleshooter, 128homegroups
configuring settings, 172–174Homegroup Troubleshooter, 128shared printers and, 181user names and passwords, 216
HomeUsers group, 191, 214hosted networks, 254HTTP (Hypertext Transfer Protocol), 144, 315
installing Windows 8.1

356
J.js file extension, 81–82
Kkeyboards
adding layout for languages, 25switching between, 25
LL2TP (Layer 2 Tunneling Protocol), 232, 234languages
adding, 23–24adding keyboard layout for, 25changing display language, 24downloading and installing language packs, 24switching between keyboards, 25
Layer 2 Tunneling Protocol (L2TP), 232, 234legacy hardware, installing, 59licensing, volume, 11, 21Links folder, 44List Folder Contents permission, 191Lite-Touch, High-Volume Deployment strategy, 21LoadState command, 37, 39–40Local Area Network Connections Properties dialog box, 125–126Local Group Policy Editor
accessing, 78configuring biometrics, 213configuring BitLocker, 263configuring IE11 settings, 93configuring Windows Update settings, 284–289controlling driver installation, 67creating power policies, 248disabling Windows Store access, 76–77object access auditing, 200Windows To Go settings, 257
Local Security PolicyAccount Lockout policies, 210–211creating password policies, 208–210defining UAC configuration, 221–222local security settings, 214viewing user rights, 214
Local Security Settings (secpol.msc), 78, 208–211LOCAL SERVICE group, 214local storage
described, 291
performing manual installations and upgrades, 15–16upgrading from Windows 7, 11, 17–18upgrading from Windows 8, 11–12, 19–20upgrading from Windows Vista, 11, 20upgrading from Windows XP, 11, 20
InstantGo feature, 5Integration Services package, 106–107internal virtual switches, 109Internet Control Message Protocol (ICMP), 131Internet Explorer 11
automatic app updates, 5Compatibility Test Tool, 76configuring Compatibility View, 90–91configuring Download Manager, 96configuring security and privacy settings, 92–93Group Policy settings, 91–92Manage Add-On dialog box, 94–95objective summary and review, 119–121
Internet Key Exchange (IKE), 232–234Internet Message Access Protocol (IMAP), 144Internet Options dialog box, 92, 95Internet service providers (ISPs), 124Internetwork Packet Exchange/Sequenced Packet Exchange (IPX/SPX), 38Invoke-Command cmdlet (ICM), 162IP addresses
configuring devices, 60configuring name resolution, 129–130configuring network locations, 128–129configuring settings, 123–124connecting to networks, 127–128Local Area Network Connection Properties dialog box, 125–126objective summary and review, 133–134, 165–166Port Access Control Lists and, 108resolving connectivity issues, 130–132viewing, 130Windows Firewall filtering, 144
Ipconfig tool, 132IPsec (IP Security extension)
benefits of, 150configuring connection security rules, 150–151L2TP support, 232Windows Firewall With Advanced Security and, 147, 149
IPv4 addresses, 125–126IPv6 addresses, 125–126, 172IPX/SPX (Internetwork Packet Exchange/Sequenced Packet Exchange), 38Isolation rule type, 150–151ISPs (Internet service providers), 124
InstantGo feature

357
user data, 34–40, 46–47, 51–52MigUser.xml file, 39migwiz. See WET (Windows Easy Transfer)Minimum Password Age policy, 209Minimum Password Length policy, 209–210MiraCast Wireless Display standard, 5mirror storage spaces, 300–301mirrored volumes, 293MMCs (Microsoft Management Consoles)
Certificate Manager, 198–199, 218–219Local Security Policy, 208–211making modifications remotely, 159–160Shared Folders snap-in, 179
mobile devicesconfiguring BitLocker, 262–267configuring security for, 262–271, 275–276mobile broadband network connections, 5, 136, 238–240personal hotspots, 5, 238–239
mobility optionsconfiguring Offline Files policies, 243–245configuring power policies, 246–248configuring sync options, 249–253configuring Wi-Fi Direct, 254–255configuring Windows To Go, 255–259described, 242–243
Modify permission, 191monitoring
resources, 308system performance, 303–322, 327–328Windows Firewall, 144, 147
Move Folder dialog box, 41MS App-V (Microsoft Application Virtualization soft-ware), 9MS-CHAP (Microsoft Challenge Handshake Authentication Protocol), 232–233Msconfig tool (System Configuration tool), 78, 306–307, 332–333.msi file extension, 81–82MSIExec command. See Windows Installermsinfo32.exe (System Information tool), 6–7.msp file extension, 81–82.mst file extension, 81mstsc.exe. See Remote Desktop Connection dialog boxmulticast addresses, 126Music folder, 180Music library, 180My Documents folder, 44My Music folder, 44My Pictures folder, 44My Videos folder, 44
managing disk volumes, 292–299managing file system fragmentation, 299–300objective summary and review, 301–303, 325–326Storage Spaces, 4, 300–301
local user profiles, 43–44location-aware printing, 137–139logs, event, 311–313
MMAC addresses, 60, 108Malicious Software Removal Tool, 283Manage Add-On dialog box, 94–95Manage-BDE, 266–267Manage Documents permission, 182–183Manage This Printer permission, 182–183mandatory user profiles, 46manual installations and upgrades, 15–16Master Boot Record (MBR), 292–293Maximum Password Age policy, 209MBR (Master Boot Record), 292–293MDT (Microsoft Deployment Toolkit), 21, 39Media Center, 22Media Player, 4memory management
minimum requirements, 3, 6optimizing network performance, 316
metered connections, 58Microsoft account
accessing SkyDrive data, 184–185credentials and, 216–218described, 42minimum requirements, 5setting up and configuring, 206–207syncing, 42–43
Microsoft Application Virtualization software (MS App-V), 9Microsoft Challenge Handshake Authentication Protocol (MS-CHAP), 232–233Microsoft Deployment Toolkit (MDT), 21, 39Microsoft Management Consoles (MMCs)
Certificate Manager, 198–199, 218–219Local Security Policy, 208–211making modifications remotely, 159–160Shared Folders, 179
Microsoft SQL Server, 76Microsoft SQL Server Express, 76MigApp.xml file, 39MigDocs.xml file, 39migrating
from previous versions of Windows, 20–21
My Videos folder

358
New-Partition cmdlet, 297New Simple Volume Wizard, 295–296New-SmbShare cmdlet, 179New Technology File System (NTFS)
configuring BitLocker To Go, 267configuring disk quotas, 195–196configuring object access auditing, 199–204configuring permissions, 175, 190–195converting partitions, 298disk volumes and, 293encryption using EFS, 197–199Fsutil tool and, 296objective summary and review, 204–205, 227–228
New Virtual Machine Wizard, 102–103NFC (Near Field Communication), 184NICs (network interface cards), 108, 139–140notifications, update, 287–288Nslookup tool, 132NTFS (New Technology File System)
configuring BitLocker To Go, 267configuring disk quotas, 195–196configuring object access auditing, 199–204configuring permissions, 175, 190–195converting partitions, 298disk volumes and, 293encryption using EFS, 197–199Fsutil tool and, 296objective summary and review, 204–205, 227–228
NTFS permissionsbasic and advanced permissions, 191–195configuring, 190–195described, 175–176, 189moving and copying, 194Share permissions and, 177–178, 189, 191
Oobject access auditing, 199–204.ocx file extension, 82Offline Files dialog box, 249Offline Files policies, 243–245Offline mode, 243Offline Settings dialog box, 243Offline.xml file, 40OneDrive. See SkyDriveOptional updates, 283Oscdimg.exe tool, 32, 38outbound rules, 146–147, 150–151
Nname resolution, 124, 129–130NAP (Network Access Protection), 238NAT (Network Address Translation), 124native-boot VHDs, 27Near Field Communication (NFC), 184net share command, 178Netsh tool
configuring IP addresses, 125described, 132forgetting networks, 137pairing compatible devices, 254
Netstat tool, 132Network Access Protection (NAP), 238network adapters, configuring, 139–140Network Address Translation (NAT), 124Network And Sharing Center
accessing network adapters, 139advanced sharing, 129configuring Network Discovery, 143creating and joining homegroups, 172–173creating VPNs, 236Public folder sharing, 174–175troubleshooting tools, 130–131viewing connection status, 130
Network And Sharing Wizard, 128network connectivity
configuring and maintaining network security, 142–154configuring IP settings, 123–134, 165–166configuring location-aware printing, 137–139configuring network adapters, 139–140configuring remote connections, 231–242, 273–274configuring remote management, 154–164, 168–169connecting to wireless networks, 134–136connectivity options, 127–128forgetting connections, 137managing preferred wireless networks, 136–137objective summary and review, 165–169optimizing network performance, 316–321resolving issues, 130–132troubleshooting, 317–318viewing status, 130
Network Discovery, 142–143network interface cards (NICs), 108, 139–140Network List service, 138Network Location Awareness service, 138network locations, configuring, 128–129network traffic monitoring, 108network zone rules, 83New Inbound Rule Wizard, 148
name resolution

359
terminology and rules, 190–191user rights and, 215
Permissions Entry For dialog box, 193Permissions For dialog box, 190–191personal encryption certificates, 197–198personal hotspots, 238–239Personal Identity Verification (PIV) standard, 211Personal Information Exchange (PFX) format, 220PFX (Personal Information Exchange) format, 220Pictures folder, 180Pictures library, 180PID (Process ID), 309Ping tool, 129, 131PIV (Personal Identity Verification) standard, 211PKCS #7 format, 220PKCS #12 format, 220PKI (Public Key Infrastructure), 197Pnputil.exe tool, 58, 65–66Point-to-Point Protocol (PPP), 232, 234Point-to-Point Tunneling Protocol (PPTP), 232, 234POP3 (Post Office Protocol 3), 144Port Access Control Lists (ACLs), 108port numbers, firewall filtering, 144port rules, 147Post Office Protocol 3 (POP3), 144Power Management feature, 286power policies, 246–248, 286Powercfg.exe tool, 247PPP (Point-to-Point Protocol), 232, 234PPTP (Point-to-Point Tunneling Protocol), 232, 234predefined rules, 148primary partitions, 292print devices, 184Print permission, 182–183print servers, 184printer control language (PCL), 184printer pool, 184printer priority, 184printing and printers
3-D printing support, 5common terms, 184configuring shared printers, 181–184location-aware, 137–139
privacy, configuring IE11 settings, 92–93private IP addresses, 124private keys, 197–198Private profile, 129, 148–149private virtual switches, 109private VLANs, 108Process ID (PID), 309processors, minimum requirements, 3
Ppackaged apps, rule collections, 81–82PAP (Password Authentication Protocol), 233parent disks, 108parity storage spaces, 300–301partitions
common terminology, 292–293converting between file systems, 298EFI, 292multiboot systems and, 16shrinking, 295viewing options for, 294
Password Authentication Protocol (PAP), 233Password Must Meet Complexity Requirements policy, 210password protected sharing, 184passwords
Account Lockout policies, 210–211creating password policies, 208–210managing, 216–218password protected sharing, 184protecting authentication and, 208startup key storage and, 269
path rules, 82–83PC Settings
configuring sync options in, 251–252switching from local to Microsoft account, 207viewing update settings, 280
PCL (printer control language), 184PEAP (Protected Extensible Authentication Protocol), 232–233perfmon.msc (Performance Monitor), 78, 318–321performance counters, 318–320Performance Monitor (perfmon.msc), 78, 318–321performance monitoring
described, 303event logs, 310–313event subscriptions, 314–316indexing options, 309–310networking performance, 316–321objective summary and review, 321–322, 327–328system resources, 308Task Manager, 78, 304–307
permissions. See also NTFS permissions; Share permissions
ACT LOG Processing Service, 76assigning, 183configuring for homegroups, 172–173configuring for shared folders, 174–180inheritance, 191, 194
processors, minimum requirements

360
recycling computers, 334–335refreshing computers, 334–335Registry permissions, 190remote access and mobility
configuring mobility options, 242–261, 274–275configuring remote connections, 231–242, 273–274configuring security for mobile devices, 262–271, 275–276
Remote Assistanceconfiguring and using, 158–159described, 155enabling or disabling remote features, 155–156
remote authentication, 232–234Remote Desktop
configuring settings, 234–236described, 155–156options supported, 156–158
Remote Desktop Client, 5Remote Desktop Connection dialog box
Advanced tab, 158described, 156Display tab, 157Experience tab, 157General tab, 157–158Local Resources tab, 157opening, 235–236Programs tab, 157
Remote Desktop Host, 5Remote Desktop Protocol (RDP), 234remote management
configuring and using Remote Assistance and Remote Desktop, 155–159configuring settings and exploring tools, 160–162making modifications using MMCs, 159–160objective summary and review, 163–164, 168–169, 272–276Remote Business Data Removal, 5
removable devices, managing installation and access to, 84–86Remove-AppxPackage cmdlet, 279Remove-PhysicalDisk cmdlet, 301Remove-SmbShare cmdlet, 179Repair-VirtualDisk cmdlet, 301Reset Account Counter After policy, 211resmon.exe (Resource Monitor), 307–309Resource Monitor (resmon.exe), 307–309resources
configuring authentication and authorization, 206–225configuring file and folder access, 189–205configuring shared, 171–189monitoring, 308
product IDs, 105profiles, user. See user profilesProgram Compatibility Troubleshooter, 9–10, 73program rules, 147Properties dialog box
device drivers, 56, 58–59devices, 55–56, 58–59, 61–62disk drives, 298disk volumes, 294distribution, 299–300Driver tab, 56, 58–59enabling object auditing, 201event subscriptions, 315events, 203folders, 40–41, 175–176, 197–198network connection, 130printers, 183resources, 56–57, 189–191Resources tab, 56–57system, 155–156, 333–334user profiles, 44–45VPN connections, 233–234, 237–238wireless networks, 140
Protected Extensible Authentication Protocol (PEAP), 232–233protocols, firewall filtering, 144.ps1 file extension, 82.ps2 file extension, 81Public folders, 174–175, 180Public Key Infrastructure (PKI), 197public keys, 197Public profile, 148–149publisher rules, 82
Rradio-frequency identification (RFID), 184RAID technology, 293, 300RDP (Remote Desktop Protocol), 234Read & Execute permission, 191Read permission, 175, 177, 189, 191readiness tests, 5–10rebooting computers, 87, 89Recimg.exe tool, 335Recommended updates, 283recovery. See file recovery; system recoveryRecovery Drive Wizard, 331recovery drives, 330–333recovery keys, 264, 269Recycle Bin, 338
product IDs

361
Security log, 312Security Policy, 207, 214security principal, 191Security updates, 283Select A Destination dialog box, 41Select Users Or Groups dialog box, 215Serial ATA (SATA), 300Serial Attached SCSI (SAS), 300Server Message Block (SMB), 179Server-To-Server rule type, 151Service Pack updates, 283Service Set Identifier (SSID), 127, 134, 305Set-Disk cmdlet, 297Set-Partition cmdlet, 297Set-PhysicalDisk cmdlet, 301Set-SmbShare cmdlet, 179Settings charm
connecting to networks from, 134–136disabling automatic app updates, 278opening, 76, 127, 278SkyDrive app and, 185
Setup log, 312Setup.exe, 17Share permissions
characteristics of, 175–176described, 175, 189limitations, 177NTFS permissions and, 177–178, 189, 191
shared broadband connections, 238–240shared folders
Any folder sharing, 175–178described, 171Public folder sharing, 174–175sharing from command line, 178
Shared Folders snap-in, 178shared personal hotspots, 238–239shared printers
adding and configuring, 181–182homegroups and, 181sharing and configuring manually, 183–184
shared resourcesconfiguring file libraries, 180–181configuring homegroup settings, 172–174configuring shared folder permissions, 174–180configuring shared printers, 181–184described, 171objective summary and review, 188–189, 226–227setting up and configuring SkyDrive, 184–187
shortcut keysconnecting to networks, 134–135opening features, 78opening Run dialog box, 198
objective summary and review, 226–229ownership of, 195viewing by connection, 56viewing by type, 56
restore points, 333–334restoring files. See file recovery; system recoveryreversible encryption, 210RFID (radio-frequency identification), 184roaming credentials, 217–218roaming user profiles, 44–45rolling back
device drivers, 59, 330updates, 283–284
rule collections, 81–82Rule Wizard, 147–148, 151Run dialog box, 198
SSANs (storage area networks), 301SAS (Serial Attached SCSI), 300SATA (Serial ATA), 300Saved Games folder, 44ScanState command, 37, 39–40scardsvr (Smart Card Service), 212SCCM (System Center Configuration Manager), 287scheduled installations, 288–289screen resolution, multiple apps and, 3scripts, rule collections, 81–82search providers, managing in IE11, 94–95Searches folder, 44Second Level Address Translation (SLAT), 6secpol.msc (Local Security Settings), 78, 208–211Secure Boot, 3, 214Secure Desktop, 217, 221Secure Socket Tunneling Protocol (SSTP), 233–234Secure Sockets Layer (SSL), 233security
configuring BitLocker, 262–267configuring for mobile devices, 262–271, 275–276configuring IE11 settings, 92–93configuring Network Discovery, 142–143configuring Windows Firewall, 144–145configuring Windows Firewall With Advanced Security, 145–149connection security rules, 146–147, 150–151creating authenticated exceptions, 151–152elevated privileges, 221–222object access auditing, 199–204objective summary and review, 153–154, 167–168
shortcut keys

362
startup keys and, 269Storage Spaces, 4, 300–301
Storage Spaces, 4, 300–301Store Passwords Using Reversible Encryption policy, 210striped volumes, 293SUA (Standard User Analyzer), 76subnet masks, 124, 126subscriptions, event, 314–316Sync Center, 249–251sync options
configuring in PC Settings, 251–252configuring with Sync Center, 249–251configuring with Work Folders, 252–253described, 249syncing folders, 243
.sys file extension, 65Sysprep command, 32System Center Configuration Manager (SCCM), 287System Configuration dialog box, 307, 333System Configuration tool (Msconfig.exe), 78, 306–307, 332–333system image backup, 334, 341System Image Manager (SIM), 32, 38System Information tool (msinfo32.exe), 6–7System log, 312system performance, monitoring. See performance monitoringsystem recovery
configuring recovery drives, 330–333creating restore points, 333–334described, 329objective summary and review, 336–337, 345–346performing driver rollback, 330performing refresh or recycle, 334–335System Restore, 333–334
System Restore, 333–334
TTask Manager (taskmgr tool)
App History tab, 306described, 78, 304Details tab, 307opening, 304Performance tab, 305–307Processes tab, 304–305Services tab, 307Startup tab, 306Users tab, 307
taskmgr tool (Task Manager)App History tab, 306
opening Settings charm, 76, 127, 134, 278rebooting computers, 87, 89switching between keyboards, 25
Shrink dialog box, 295shrinking partitions, 295Shut Down Windows dialog box, 285side-by-side migration, 35sideloading technique, 4, 79, 279Sigverif.exe (File Signature Verification tool), 62, 78SIM (System Image Manager), 32, 38Simple Mail Transfer Protocol (SMTP), 144simple storage spaces, 300simple volumes, 293, 295–296SkyDrive
accessing, 206additional information, 339described, 185name change for, 172, 251recovering files from, 337–339setting up and configuring, 184–187shared resources and, 171syncing settings, 43types of data saved, 186
SLAT (Second Level Address Translation), 6Slmgr command, 279Smart Card Service (scardsvr), 212smart cards, 211–212, 233–234Smart Screen control, 5, 214SMB (Server Message Block), 179SMTP (Simple Mail Transfer Protocol), 144snapshots, 107Software Restriction Policies, 81, 83–84source computer initiated subscriptions, 314–316source computers, 314spanned volumes, 293Special Permissions permission, 183Specify Intranet Microsoft Update Service Location policy, 282SQL Server, 76SQL Server Express, 76SSID (Service Set Identifier), 127, 134, 305SSL (Secure Sockets Layer), 233SSTP (Secure Socket Tunneling Protocol), 233–234Standard accounts, 221Standard User Analyzer (SUA), 76startup keys, 263–264, 269storage area networks (SANs), 301storage management. See also SkyDrive
credentials at command line, 217managing disk volumes, 292–299managing file system fragmentation, 299–300objective summary and review, 301–303, 325–326
Shrink dialog box

363
virtual smart cards, 212Windows To Go and, 26, 256
Trusted Publisher certificate store, 289Tunnel rule type, 151
UUAC (User Account Control)
biometric devices and, 213configuring behavior, 221–222testing issues with SUA, 76
UDP (User Datagram Protocol), 144, 147UEFI (Unified Extensible Firmware Interface), 214, 263unicast addresses, 126Unified Extensible Firmware Interface (UEFI), 214, 263uninstalling device drivers, 57–59unsigned drivers, 62–63, 66Update Driver Software dialog box, 58upgrades and updates
automating, 21configuring and managing updates, 277–289configuring update settings, 280–282device drivers, 65–66hiding, 284in-place, 4, 10–13managing update history, 282–283objective summary and review, 290–291, 324–325optimizing network performance, 317performing manually, 15–16recovery drives and, 331rolling back updates, 283–284supported paths, 11–12testing apps for compatibility with, 76updating default apps, 278updating Windows Store apps, 278–279from Windows 7, 11, 17–18from Windows 8, 11–12, 19–20Windows Update, 57–58, 213, 277, 284–289from Windows Vista, 11, 20from Windows XP, 11, 20
User Account Control (UAC)biometric devices and, 213configuring behavior, 221–222testing issues with SUA, 76
user dataconfiguring, 40–47, 51–52migrating, 34–40, 51–52objective summary and review, 46–47, 51–52
User Datagram Protocol (UDP), 144, 147user profiles
advanced sharing and, 129
described, 78, 304Details tab, 307opening, 304Performance tab, 305–307Processes tab, 304–305Services tab, 307Startup tab, 306Users tab, 307
TCP/IPconnection security rules, 146event log subscriptions, 315installing network support for, 126Ipconfig tool and, 132monitoring performance statistics, 318Netstat tool and, 132Ping tool and, 131port rules, 147shared printers and, 182VPN connections and, 237Windows PE and, 38
Telnet protocol, 144Temporal Key Integrity Protocol (TKIP), 152test machines, setting up, 9, 66thick images, 21thin images, 21thin provisioning, 301TKIP (Temporal Key Integrity Protocol), 152tokens, 221toolbars, managing in IE11, 94–95touch features, minimum requirements, 5TPM (Trusted Platform Model)
BitLocker and, 214, 263–264startup key storage, 269virtual smart cards, 212Windows To Go and, 26, 256
trace sessions, 320Tracert tool, 132tracking protection, managing in IE11, 94–95Triple DES (3DES), 232, 234troubleshooting
Action Center tools, 131hardware, 56–57Homegroup Troubleshooter, 128Network And Sharing Center tools, 130–131network performance, 317–318with recovery drives, 330resolving network connectivity issues, 130–132unsigned drivers, 62–63
Trusted Boot, 5Trusted Platform Model (TPM)
BitLocker and, 214, 263–264startup key storage, 269
user profiles

364
virtual private networks (VPNs)automatic app updates, 5configuring connections and authentication, 236–237described, 236protocols supported, 232–233setting up, 128
virtual smart cards, 211–212Virtual Switch Manager, 109virtual switches, 108–110VLANs (virtual local area networks), 108VMs (virtual machines)
configuring, 103–105creating, 100–103described, 98–99device drivers and, 109importing, 112Integration Services package, 106–107making changes to, 102moving, 111–112product IDs, 105trunk mode to, 108VHDs and, 27
Volume Activation Management Tool (VAMT), 38volume licensing, 11, 21volumes, disk. See disk volumesVPN Reconnect, 233–234, 237–238VPNs (virtual private networks)
automatic app updates, 5configuring connections and authentication, 236–237described, 236protocols supported, 232–233setting up, 128
WWarning events, 311WDS (Windows Deployment Services), 21, 38Web Authentication Broker, 217Wecutil command, 314WET (Windows Easy Transfer), 16, 20–21, 35–36.wfw file extension, 147Wi-Fi Direct, 254–255Wi-Fi network connections
connection process, 5, 136optimizing network performance, 317
Wi-Fi Protected Access (WPA), 152Windows 7
choosing installation options, 10–11
described, 42local, 43–44mandatory, 46Microsoft account, 42–43roaming, 44–45
user rightsconfiguring, 214–215described, 214permissions and, 215
User State Migration Tool (USMT), 16, 21, 35–40Users group
configuring NTFS permissions for, 191configuring user rights, 214installing device drivers, 67
USMT (User State Migration Tool), 16, 21, 35–40UsmtUtils tool, 39
VVAMT (Volume Activation Management Tool), 38.vbs file extension, 81–82VDI (Virtual Desktop Infrastructure), 3, 5Verbose events, 311VHD Boot, 4VHD format, 110–111VHDs (virtual hard disks)
creating and configuring, 110–111differencing disks, 108installing to, 25, 27–31
VHDX format, 110–111Videos folder, 180Videos library, 180Virtual Desktop Infrastructure (VDI), 3, 5virtual hard disks (VHDs)
creating and configuring, 110–111differencing disks, 108installing to, 25
virtual local area networks (VLANs), 108virtual machines (VMs)
configuring, 103–105creating, 100–103described, 98–99device drivers and, 109importing, 112Integration Services package, 106–107making changes to, 102moving, 111–112product IDs, 105trunk mode to, 108VHDs and, 27
user rights

365
monitoring, 144, 147Windows Firewall With Advanced Security
configuring, 145–149configuring connection security rules, 150–151configuring event subscriptions, 315
Windows Firewall With Advanced Security dialog box, 149–151Windows Installer
installing and repairing applications, 73–74rule collections, 81–82Windows PE and, 38
Windows Live ID. See Microsoft accountWindows Malicious Software Removal Tool, 283Windows Management Instrumentation (WMI), 264Windows Media Player, 4Windows Network Diagnostics Wizard, 317–318Windows PE (Windows Preinstallation Environment), 37–38Windows Performance Toolkit (WPT), 38Windows Power Management feature, 286Windows PowerShell. See also specific cmdlets
creating and managing shares, 179–180creating workspaces, 259enabling Hyper-V, 99making modifications remotely, 161–162managing disk volumes, 297managing Storage Spaces, 301managing System Restore, 333sideloading and, 279
Windows Public Key Infrastructure (PKI), 197Windows Recovery Environment (Windows RE)
additional information, 332Advanced Startup and, 331–333Windows To Go and, 26, 256
Windows Remote Assistance dialog box, 158–159Windows Remote Management (WinRM)
accessing Group Policy settings, 162configuring event subscriptions, 315enabling remote management, 160–161executing commands from command prompt, 160making modifications remotely with Windows PowerShell, 161–162
Windows Remote Shell (WinRS.exe), 160–161Windows RT, 2, 4–5Windows Server 2003, 232Windows Server 2008, 232–233Windows Server 2012, 233Windows Server Update Services (WSUS), 281–282Windows SmartScreen, 5, 214Windows Store
automatic app updates, 5Credential Locker and, 217
File Recovery feature, 339Software Restriction Policies, 83upgrading from, 11, 17–18VPN protocols supported, 232–233
Windows 8recovery drives, 331saving credentials, 216Software Restriction Policies, 83upgrading from, 11–12, 19–20VPN protocols supported, 232–233
Windows 8.1comparing edition features, 4–5described, 2installing, 15–34, 50–51recovery drives, 331Start screen, 18unsigned drivers and, 64updating default apps, 278upgrade paths for, 11–12, 19VPN protocols supported, 232–233
Windows 8.1 Enterprise, 3–5, 11Windows 8.1 Professional
comparing edition features, 4–5described, 2–3supported upgrade paths, 11, 19
Windows 8.1 Upgrade Assistant, 7–8Windows Assessment and Deployment Toolkit (ADK)
described, 21, 32USMT support, 37Volume Activation Management Tool, 38Windows PE support, 37
Windows Assessment Services, 38Windows Assessment Toolkit, 38Windows Backup And Restore feature, 339Windows Biometric Framework, 212–213Windows clients
configuring and managing updates, 277–291, 324–325managing local storage, 291–303, 325–326monitoring system performance, 303–322, 327–328objective summary and review, 323–328
Windows Defender, 283Windows Deployment Services (WDS), 21, 38Windows Easy Transfer (WET), 16, 20–21, 35–36Windows Embedded feature, 87Windows Event Collector service, 314Windows Features dialog box, 100Windows Firewall
allowing apps through, 145configuring event subscriptions, 315described, 144filtering, 144, 147
Windows Store
366
automatic app updates, 5described, 249, 252–253requirements for, 253
workgroupsconfiguring authentication in, 208–211user names and passwords, 216
workplacesconnecting to, 128Workplace Join feature, 5
workspacescreating with Windows PowerShell, 259creating with Windows To Go, 259
WPA (Wi-Fi Protected Access), 152WPT (Windows Performance Toolkit), 38Write permission, 191WSUS (Windows Server Update Services), 281–282
XX.509 standard, 220XML files, 39
ZZero-Touch, High-Volume Deployment strategy, 21
device lockdown technology, 86installing and configuring apps, 70–81managing access to, 76–79minimum requirements, 5updating apps, 278–279upgrade options from, 19
Windows System Image Manager (SIM), 32, 38Windows To Go, 25–27, 255–259Windows To Go Creator, 5Windows To Go Startup Options dialog box, 258Windows Update
biometric hardware support, 213configuring policies, 284–289configuring update settings, 280–281described, 277installing device drivers, 57–58managing update history, 282–283optimizing network performance, 316rolling back updates, 283–284
Windows Upgrade Assistant, 7Windows Vault, 216Windows Vista
Software Restriction Policies, 83upgrading from, 11, 20VPN protocols supported, 232–233Windows Easy Transfer Wizard, 36
Windows XPSoftware Restriction Policies, 83upgrading from, 11, 20VPN protocols supported, 232Windows Easy Transfer Wizard, 36
Winrm command, 315WinRM (Windows Remote Management)
accessing Group Policy settings, 162configuring event subscriptions, 315enabling remote management, 160–161executing commands from command prompt, 160making modifications remotely with Windows PowerShell, 161–162
WinRS.exe (Windows Remote Shell), 160–161wireless devices
adding wireless printers, 182configuring, 60–62Hyper-V and, 110resolving connectivity issues, 130
wireless networksconnecting to, 134–136managing preferred, 136–137
Wireless Profile Manager, 137WMI (Windows Management Instrumentation), 264Work Folders
additional information, 253
Windows System Image Manager (SIM)