SPECIAL ISSUE - Eastern Empireeastern-empire.com/downloads/Tau COD.pdf · Lucky for me the Cities...
8
SPECIAL ISSUE A CITIES OF DEATH MODELLING WORKSHOP The Cities of Death expansion not only creates an exciting new way to play Warhammer 40,000 but offers up a whole host of modelling opportunities for your army. Passionate converter Sebastian Stuart explains some projects for Tau players. Sebastian: After adding a few new units to my Tau force for the army Showcase in WD313, I was looking for my next project. Lucky for me the Cities of Death expansion was released and the artwork and hobby ideas contained within sent my imagination into overdrive! I was inspired by the challenge of creating Stratagems and new units for my army that would remain true to the Tau mindset and their existing technology. Considering the background of the Tau, you soon realise they simply do not have the manpower to secure whole urban war zones, but they have the technology to remotely monitor their enemies movements and rapidly deploy Tau forces to deal with threats. I decided to collect a new Combat Patrol as well as modelling some Stratagems. I could see all forms of high tech gadgets and urban combat gear, born of Japanese animation and science fiction action movies. The new urban Combat Patrol I was about to create, would have to bristle with ultra-cool wargear and anything I built had to be compact and smoothly constructed like other Tau wargear. My main aim from the outset was to ensure anything I built could be readily duplicated by any Tau collector. With my designs and parts limitations in mind, I set to building a swathe of special Issue wargear and Stratagems. Keep in mind that I also add some random pieces of plastic to build up detail and keep things unique and original. You need a sharp hobby knife (blunt is dangerous) with a retractable blade. Some fine grit sand paper, to smooth the curved cut of the ankle joint, or use a needle file. Also some 1mm wire and a 1mm drill bit with a hand drill. Follow the red line of the diagram, scouring along the edge of the shin armour. Repeat this with some pressure, circling about the ankle. This will weaken the section, allowing you to snap them apart. Clean the cut areas of the leg and foot. When you decide on a new angle for the foot, pin it to the ankle and fill the gap with Greenstuff. Adjusting Stealth Suit feet STEALTH SUITS I pondered for a while on how to improve something that looked great as it is. Then I realised, for a small ultra-fast jet-packing Battlesuit, they’re all standing about. This wouldn’t do, particularly in a city fight where staying put means dying where you stand. They are not the easiest models to alter but altering the angle of the feet creates a sense of movement. The following diagram explains how easy it is to remove the feet and then repose the legs to get dynamic rushing poses for your XV-25 Stealth suits. C o n v e r t e d p o s e 112 WHITE DWARF TAU MODELLING Firstly be safe and careful when cutting the ankle.
Transcript of SPECIAL ISSUE - Eastern Empireeastern-empire.com/downloads/Tau COD.pdf · Lucky for me the Cities...

SPECIAL ISSUEA CITIES OF DEATH MODELLING WORKSHOP
The Cities of Death expansionnot only creates an exciting newway to play Warhammer 40,000but offers up a whole host ofmodelling opportunities for yourarmy. Passionate converterSebastian Stuart explains someprojects for Tau players.
Sebastian: After adding a few new units tomy Tau force for the army Showcase inWD313, I was looking for my nextproject. Lucky for me the Cities of Deathexpansion was released and the artworkand hobby ideas contained within sentmy imagination into overdrive! I wasinspired by the challenge of creatingStratagems and new units for my armythat would remain true to the Tau mindsetand their existing technology.
Considering the background of the Tau,you soon realise they simply do not havethe manpower to secure whole urban warzones, but they have the technology toremotely monitor their enemiesmovements and rapidly deploy Tau forcesto deal with threats.
I decided to collect a new Combat Patrolas well as modelling some Stratagems. Icould see all forms of high tech gadgetsand urban combat gear, born of Japaneseanimation and science fiction actionmovies. The new urban Combat Patrol Iwas about to create, would have to bristlewith ultra-cool wargear and anything Ibuilt had to be compact and smoothlyconstructed like other Tau wargear.
My main aim from the outset was toensure anything I built could be readilyduplicated by any Tau collector. With mydesigns and parts limitations in mind, I setto building a swathe of special Issuewargear and Stratagems. Keep in mindthat I also add some random pieces ofplastic to build up detail and keep thingsunique and original.
You need a sharp hobby knife (blunt isdangerous) with a retractable blade. Somefine grit sand paper, to smooth the curvedcut of the ankle joint, or use a needle file.Also some 1mm wire and a 1mm drill bitwith a hand drill.
Follow the red line of the diagram, scouringalong the edge of the shin armour. Repeatthis with some pressure, circling about theankle. This will weaken the section,allowing you to snap them apart.Clean the cut areas of the leg and foot.When you decide on a new angle for thefoot, pin it to the ankle and fill the gap withGreenstuff.
Adjusting Stealth Suit feet
STEALTH SUITSI pondered for a while on how to improvesomething that looked great as it is. ThenI realised, for a small ultra-fast jet-packingBattlesuit, they’re all standing about. Thiswouldn’t do, particularly in a city fightwhere staying put means dying whereyou stand.
They are not the easiest models to alterbut altering the angle of the feet creates asense of movement. The followingdiagram explains how easy it is to removethe feet and then repose the legs to getdynamic rushing poses for your XV-25Stealth suits.
Converted pos
e
112 WHITE DWARF TAU MODELLING
Firstly be safe and carefulwhen cutting the ankle.
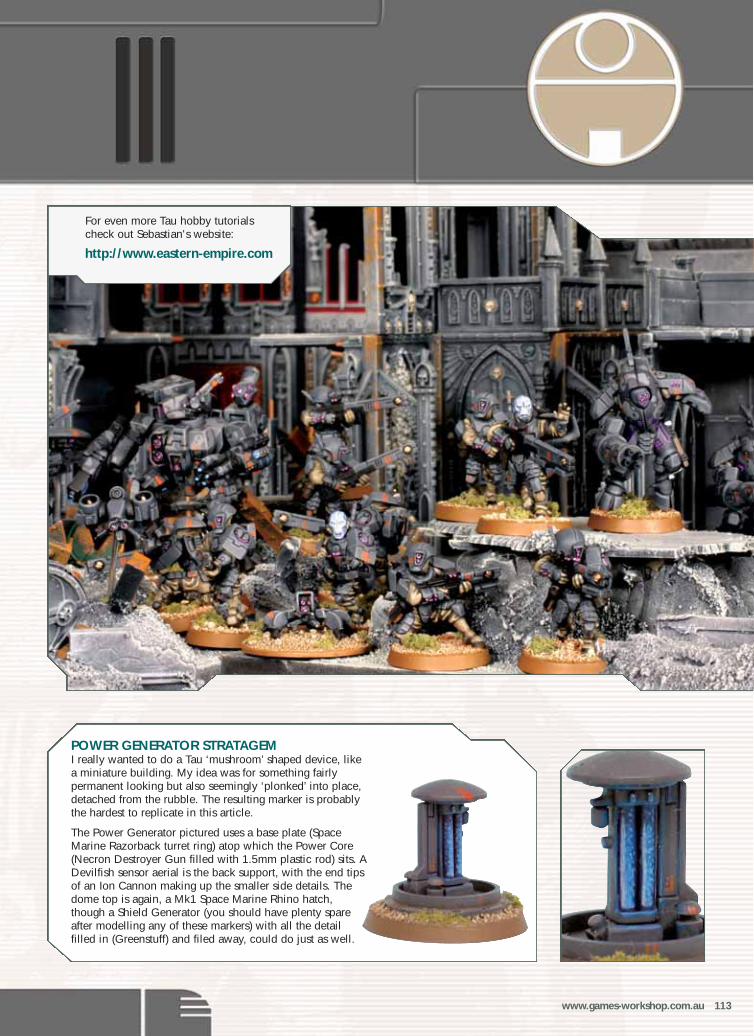
POWER GENERATOR STRATAGEMI really wanted to do a Tau ‘mushroom’ shaped device, likea miniature building. My idea was for something fairlypermanent looking but also seemingly ‘plonked’ into place,detached from the rubble. The resulting marker is probablythe hardest to replicate in this article.
The Power Generator pictured uses a base plate (SpaceMarine Razorback turret ring) atop which the Power Core(Necron Destroyer Gun filled with 1.5mm plastic rod) sits. ADevilfish sensor aerial is the back support, with the end tipsof an Ion Cannon making up the smaller side details. Thedome top is again, a Mk1 Space Marine Rhino hatch,though a Shield Generator (you should have plenty spareafter modelling any of these markers) with all the detailfilled in (Greenstuff) and filed away, could do just as well.
http://www.eastern-empire.com
For even more Tau hobby tutorialscheck out Sebastian's website:
www.games-workshop.com.au 113
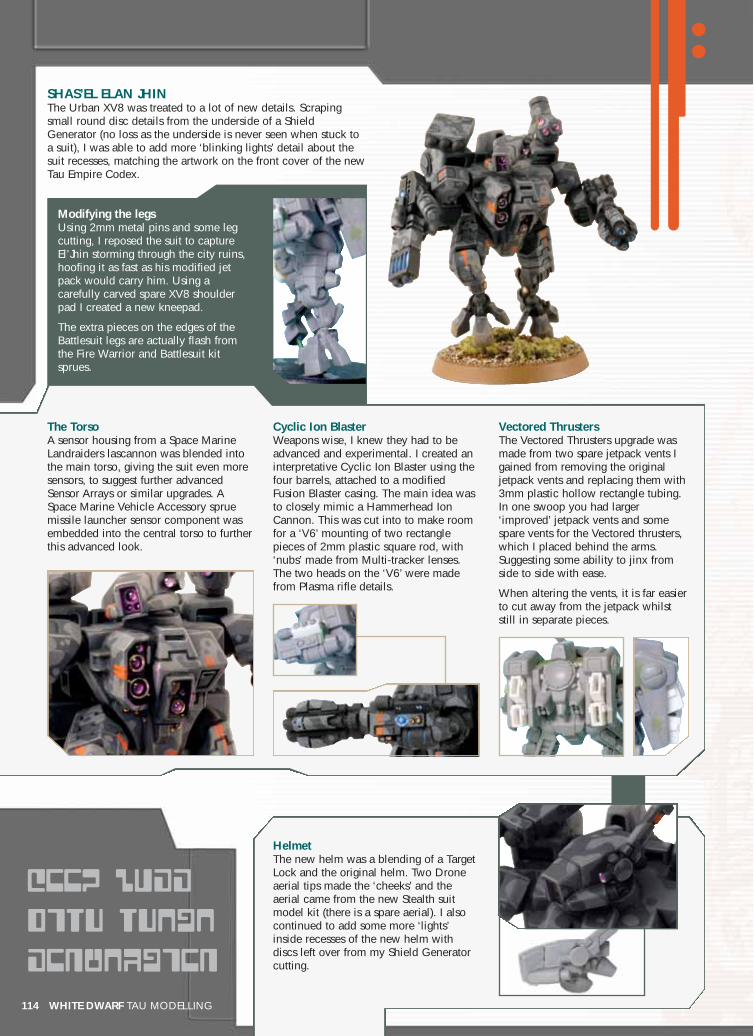
SHAS’EL ELAN JHINThe Urban XV8 was treated to a lot of new details. Scrapingsmall round disc details from the underside of a ShieldGenerator (no loss as the underside is never seen when stuck toa suit), I was able to add more ‘blinking lights’ detail about thesuit recesses, matching the artwork on the front cover of the newTau Empire Codex.
The TorsoA sensor housing from a Space MarineLandraiders lascannon was blended intothe main torso, giving the suit even moresensors, to suggest further advancedSensor Arrays or similar upgrades. ASpace Marine Vehicle Accessory spruemissile launcher sensor component wasembedded into the central torso to furtherthis advanced look.
Vectored ThrustersThe Vectored Thrusters upgrade wasmade from two spare jetpack vents Igained from removing the originaljetpack vents and replacing them with3mm plastic hollow rectangle tubing.In one swoop you had larger‘improved’ jetpack vents and somespare vents for the Vectored thrusters,which I placed behind the arms.Suggesting some ability to jinx fromside to side with ease.
When altering the vents, it is far easierto cut away from the jetpack whilststill in separate pieces.
Modifying the legsUsing 2mm metal pins and some legcutting, I reposed the suit to captureEl’Jhin storming through the city ruins,hoofing it as fast as his modified jetpack would carry him. Using acarefully carved spare XV8 shoulderpad I created a new kneepad.
The extra pieces on the edges of theBattlesuit legs are actually flash fromthe Fire Warrior and Battlesuit kitsprues.
Cyclic Ion BlasterWeapons wise, I knew they had to beadvanced and experimental. I created aninterpretative Cyclic Ion Blaster using thefour barrels, attached to a modifiedFusion Blaster casing. The main idea wasto closely mimic a Hammerhead IonCannon. This was cut into to make roomfor a ‘V6’ mounting of two rectanglepieces of 2mm plastic square rod, with‘nubs’ made from Multi-tracker lenses.The two heads on the ‘V6’ were madefrom Plasma rifle details.
HelmetThe new helm was a blending of a TargetLock and the original helm. Two Droneaerial tips made the ‘cheeks’ and theaerial came from the new Stealth suitmodel kit (there is a spare aerial). I alsocontinued to add some more ‘lights’inside recesses of the new helm withdiscs left over from my Shield Generatorcutting.
GOOD LUCK
WITH THESE
CONVERSION
114 WHITE DWARF TAU MODELLING
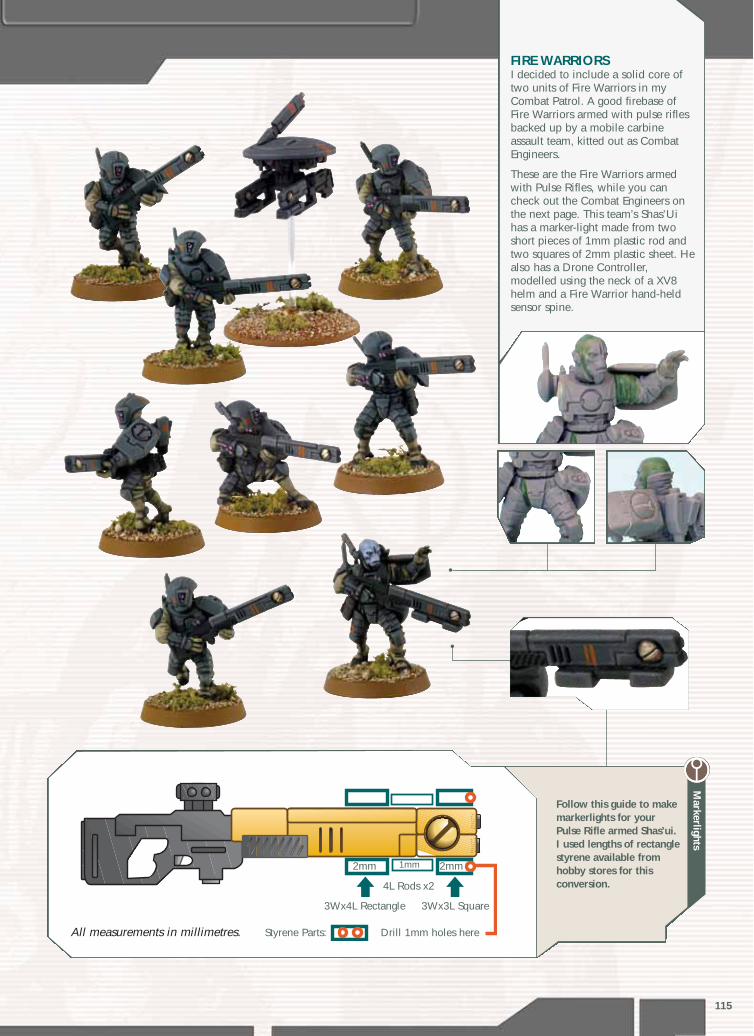
FIRE WARRIORSI decided to include a solid core oftwo units of Fire Warriors in myCombat Patrol. A good firebase ofFire Warriors armed with pulse riflesbacked up by a mobile carbineassault team, kitted out as CombatEngineers.
These are the Fire Warriors armedwith Pulse Rifles, while you cancheck out the Combat Engineers onthe next page. This team’s Shas’Uihas a marker-light made from twoshort pieces of 1mm plastic rod andtwo squares of 2mm plastic sheet. Healso has a Drone Controller,modelled using the neck of a XV8helm and a Fire Warrior hand-heldsensor spine.
Follow this guide to makemarkerlights for yourPulse Rifle armed Shas’ui.I used lengths of rectanglestyrene available fromhobby stores for thisconversion.
All measurements in millimetres. Styrene Parts: Drill 1mm holes here
2mm 2mm1mm
3Wx4L Rectangle 3Wx3L Square
4L Rods x2
Markerlights
115

URBAN COLOUR SCHEMEI decided to try a new colour schemefor my Tau, something more organicusing greys, with the majority of lensesbeing purple for an eerie, spectralfeeling. With some internet research Idiscovered the mottled patterns foundon some seagull eggs. Within a fewminutes I tried this on a panel withnifty, plausible and very alien results.My Battlesuit was painted upcompletely in the mottle camouflage,breaking up his bulky Battlesuit formconvincingly. This worked well onStealth Suit’s broad front armour also.
However, the Fire Warrior's finer detailwould be lost using the camouflagepattern, so I opted to use the basecolours as their uniforms. Whencomplete, they have a very sombre anddark finish, perfect for the shadowedruins of a city ravaged by war.
Painting the miniaturesI chose dark greys to allow for sharp lightgrey highlights, this was to contrast withthe khaki fatigues and also allow theSa’Cean markings to stand out on thearmour in Blazing Orange.
The basecoat grey of the armour is a mixof 75/25 Chaos Black and Codex grey,which I then made a pot of using amixing pot. The lighter shade is 50/50Chaos Black and Codex Grey, followedby highlights on panel edges of pureCodex Grey. For the camouflage, Ipainted the mottle pattern with 50/50Codex Grey andFortress Grey mix.Then I added‘speckles’ in thepattern with my50/50 mix of ChaosBlack and CodexGrey.
OBSERVATION POINTSTRATAGEM
116 WHITE DWARF TAU MODELLING
Run’Al Kor’VesaHidden Observer DroneNicknamed the ‘Peeper’, this is thesimplest marker I made. Using a ShieldGenerator and a pair of Imperial Guardbinoculars underneath you have thedrone. He pops up from a hidden turretcupola ring which I blended onto a25mm disc of plastic, using greenstuff tobuild up the edges to match the shape ofa flying base.
Al’Yon’Kor’VesaSmall Hunter DroneMy idea was to make a non-disc shapeddrone that appeared fast and agile, withan organic design. I decided on thedragonfly. Using two Space MarineVehicle Accessory Missile Launchermuzzle pieces and two of the sprue flashparts I like, I made jet engines. These areattached to a Target Lock (set backwards)with an Imperial Guard Tank Accessorysprue pair of binoculars (cut in half) tomake the sensor eyes.
The ‘head’ underside is a random piece ofsprue I shaped to give the head piecesome bulk and add a insect like mandibleshape.
The tail is made from a Tau flamer, the‘lighting’ tip glued against the Target lock,like a hinge. I bent this to one side to addsome motion to the model. The tail tipdetail is a part of the original Tau flamer.All the sensor spines were cut from spareFire Warrrior hand held sensor devices.
Al’Ma’Caor’Yon’Kor’VesaSmall Spider DroneFollowing an organic design I created aspider-like drone. The parts I used for thisconversion are a Multi-tracker, a SpaceMarine Vehicle Sprue missile launchersensor a Target Lock, a few Fire Warriorhand held sensor spines and three Burstcannon muzzles to make the drone.
The Multi Tracker is the abdomen, TargetLock as the thorax and the six legs werethe end half disc’s of the Burst Cannons.Shaved and cut just right, they made greatlegs, with the muzzle tips becoming thepadded feet ends.
COMMAND CENTRESTRATAGEMI figured that Battlesuits haveadvanced enough communications,so I decided a trooper level drone,supporting the Fire Warriors wouldseem more appropriate as aCommand Centre Stratagem marker.
I used an aerial from the new MarkerDrone on the Stealth Suit sprue,some peg-like details made with1mm plastic rods and Burst Cannonmuzzle ends. The lower disc hingesare made from Burst cannon casingdetails and the actual underside discis from a Space Marine Mark I Rhinohatch. Whilst not readily availableanymore, you could use anotherDrone with the underside detailsremoved. To this I added an ImperialGuard Tank Searchlight, this makesup the display screen.

The fatigues are a dark mix of 60/40Chaos Black andGraveyard Earth, thena lighter mix 40/60 tohighlight. This issharply highlightedwith a mix of 75/25Graveyard Earth andBleached Bone.
For the lenses I usedTentacle Pink andLiche Purple. The‘glow’ effect aboutthese lights is a washof Liche Purple.
The weapons glow isLightning Blue,watered down andthen painted into therecesses. When dry Imixed a lighter shade
with Skull White and then very carefullypaint a dot or a line through the blue(Fusion Blaster for example).
Any metals arecompleted withDwarf Bronze base,then a 50/50 mix ofDwarf Bronze/Burnished Gold andthen highlighted withShining Gold.
When using BlazingOrange for Sa’ceanmarkings, I find aslightly watered downmix works best. Applyonce to get the linepositions, leave it todry then re-apply tofinish the lines. This gives a bolder,smoother finish to the lines.
You will need an Ungor head, aTau bare head, Greenstuff, glue,sculpting tool and a hobby knife.
Carefully shave away the Ungorheads features (horns, hair andnose) and then cut the face away.Cut away the Tau head completelyjust leaving the collar. Now gluethe Ungor’s face to the collar anduse Greenstuff to sculpt the back ofthe head.
Bare H
eaded Tau
COMBAT ENGINEERSTo model the Combat EngineersStratagem on my Fire Warriors I modifieda hand scanner into a Jammer usingPlasma Rifle and Tau Flamer detailsadded on. Breaching charges were madefrom Imperial Guard Tank smokelaunchers, with a 2.5mm disc of plasticon the end tips.
With all their extra equipment such assmoke grenades and wire cutters, the FireWarriors need somewhere to carry it all.For this I made use of quivers from thenew Dwarf plastics. These pieces actuallywork really well and fit in with the Tauartwork, especially the colour vignette inthe main Rulebook. With some carefulshaving, you can easily recreate the bagon his right hip below the helmet. Madefor Dwarfs, these quivers in turn fit verywell about the small torsos of Tau FireWarriors.
Ungor nose area is smoothed withGreenstuff. Flatten then make a slitimpression for the Tau nasal feature.
Beastmen Ungor face
Tau collar
Greenstuff
Jammers disruptenemy booby traps.
Smoke Grenadesand breachingcharges.
The Cities of Death expansion is your completeguide to urban warfare in the 41st Millennium.
This is a colour swatch of the camouflagescheme Sebastian designed for his urban Tau.
www.games-workshop.com.au 117

The inspiration for Sebastian's auxiliariescame from reading small hints in the Taucodex that they have several racesincorporated into their empire. Sebastianimagines the Lion looking Shea’shi (racename) to be a noble warrior race whohave a bitter history of fighting the Orks.When fighting for the Tau they are knownas Shea’vesa.
Sebastian: I generally use my auxiliaryunits as objectives (rescue the colonistallies etc) or ‘count’s as’ replacementfigures for my Fire Warriors.
This shea’la has been trained as a pulserifle specialist. More notable in these
images is the Shea’vesa variant bodyarmour. A simple body armourmodification of cooling vanes monitoredby a small power unit, allows Shea’lawarriors to wear Tau light armour withoutundue bodyheat being created by thecombination of their light downy fur andcombat exertion.
This Shea’la wears traditional shoulderarmour, with a Tau emblem disc in placeof their usual tribe glyphs. I have modifieda Beastmen Gor head and legs usingGreenstuff to make the conversion. Thecooling vanes are made from SpaceMarine smoke launchers.
EXPANDINGANEMPIRE
Shea’vesa auxiliary warriors
I have used magnets to allow me to changethe weapon and equipment options on thenew Piranha light skimmer.
Using 3mm v 2mm small magnets, I put oneunder each wing for the seekers missiles.Another has been put under the tail for theDecoy Launcher. And finally the chin turrethas one to allow mw to swap between afusion gun and burst cannon.
PIRANHA
118 WHITE DWARF TAU MODELLING
Fusion gun front half
Burst Cannon front half
Burst Cannon rear half
We first featuredSebastian’s Tau Armyin White Dwarf 313.Here we presentsome additions he hasmade to his originalCadre. To check outSebastian's originalarmy showcase askyour local HobbyCentre for a backissue.

This inspired conversion of an Earth Castetechnician and his Repair Drone adds alotof character to Sebastian's Tau collection.
Sebastian: I really enjoy making characterbased objectives for my Tau, and theymake great objective markers for games. Iwas inspired to try my hand at creating anEarth Caste miniature after seeing theForgeworld Air caste pilots, as well asdrawing some real world inspiration fromthe highly respected Japaneseconstruction workers known as the Tobi.
I also decided to create a bulky RepairDrone to accompany him on hisbattlefield repairs. I also wanted to makethe Drone and the Earth Caste technicianfrom parts easily sourced.
The Earth Caste technician received somegreenstuff work on his chest armour,shoulder badge and goggles, but apartfrom that, is made up entirely of sparebits. I blended Tau hooves onto CadianTank Commander legs. A Fire Warriorprovided the torso, the hole in the backcovered with detail from a TauBurstcannon. This is finished with somegreenstuff work to create a new seam linein the armour chest.
To Fire Warrior arms are added
Catachan/Empire Militia human hands.Greenstuff is used for the goggles on anbare Tau head. His ear guards are a detailpiece shaved off the top of a Tau Flamer.The packs are a mix of Space Marinesmall ammo pouches and the new Dwarfplastics quiver and Thunderer pouches.
The hovering personal assistant wasinspired by the Tau codex artwork below.The idea is that the PDA would slitherabout the damaged Tank or Battlesuit,jacking into various onboard computerports to do a systems check on whateverthe technician is repairing.
Both the Repair Drone and the PDA aremade up of alot ofdifferent parts fromthe Tau and SpaceMarine ranges. Thesepieces are a littlemore complex tomake but if you wantto know exactly howI went about makingthem make sure youcheck out theweblink to my onlinearticle above.
www.games-workshop.com.au/whitedwarf
Earth caste Tech and Repair Drone
Check out this army and othersfrom past Army showcases as wellas other information about WhiteDwarf online.
119www.games-workshop.com.au