SPEC Power and Temperature Measurement Setup … Performance Evaluation Corporation (SPEC) Power and...
31
SPECpower Committee Standard Performance Evaluation Corporation (SPEC) Power and Temperature Measurement Setup Guide 7001 Heritage Village Plaza, Suite 225 Gainesville, VA 20155, USA
-
Upload
trinhtuong -
Category
Documents
-
view
218 -
download
0
Transcript of SPEC Power and Temperature Measurement Setup … Performance Evaluation Corporation (SPEC) Power and...

SPECpower Committee
Standard Performance Evaluation Corporation (SPEC)
Power and Temperature Measurement Setup Guide 7001 Heritage Village Plaza, Suite 225 Gainesville, VA 20155, USA

SPEC – Power and Performance Power and Temperature Measurement Setup Guide
09 January 2017 page 2 of 31 Copyright © 2007-2017 SPEC
Table of Contents
1. Introduction ............................................................................................................................... 4 2. General Power Analyzer Setup Information ........................................................................... 4
2.1 Initial Device Setup ............................................................................................................. 4 2.2 Power Analyzer Connection Types ..................................................................................... 4
2.2.1 Serial Ports .................................................................................................................. 4 2.2.1.1 Serial Cables ........................................................................................................ 5 2.2.1.2 Baud Rates ........................................................................................................... 5 2.2.1.3 USB-Serial adapters ............................................................................................. 5
2.2.2 USB Ports .................................................................................................................... 5 2.2.2.1 USBTMC ............................................................................................................... 5 2.2.2.2 Yokogawa USB .................................................................................................... 6
2.2.3 GPIB Interfaces ............................................................................................................ 6 2.2.3.1 GPIB-USB Adapters ............................................................................................. 6 2.2.3.2 Virtual COM port GPIB adapters .......................................................................... 6
2.2.4 Ethernet Interfaces....................................................................................................... 6 2.3 Starting PTDaemon on the Controller System .................................................................... 7 2.4 Using Multiple Power Analyzers ......................................................................................... 7 2.5 Configuration for Compliant SPECpower Measurements ................................................... 8 2.6 Managing Measurement Uncertainty .................................................................................. 8 2.7 Restrictions of Currently Accepted Power Analyzers ....................................................... 10 2.8 Capability List of Currently Accepted Power Analyzers .................................................... 11 2.9 Calibration Requirements.................................................................................................. 15 2.10 Multi-channel Power Analyzers ......................................................................................... 15 2.11 3-Phase Power Considerations ........................................................................................ 16 2.12 External Current Sensors and Current Transformers ....................................................... 16
3. Power Analyzer Setup Information for Accepted Devices ................................................. 17 3.1 Chroma 66202 .................................................................................................................. 17
3.1.1 Hardware Configuration ............................................................................................. 17 3.1.2 Range Setting and Uncertainty Calculation ............................................................... 17
3.2 Chroma 66203 and 66204 ................................................................................................ 17 3.2.1 Hardware Configuration ............................................................................................. 17
3.3 Hioki 3334, PW3335, PW3336, PW3337.......................................................................... 17 3.3.1 General Hardware Configuration ............................................................................... 17 3.3.2 RS232 Interface ......................................................................................................... 18 3.3.3 Range Setting and Uncertainty Calculation ............................................................... 18 3.3.4 Multi-Channel Measurements .................................................................................... 18
3.4 Infratek 101A, 107A-1Channel, 107A-3Channel .............................................................. 18 3.4.1 Hardware Configuration ............................................................................................. 18 3.4.2 Range Setting and Uncertainty Calculation ............................................................... 18 3.4.3 Multi-Channel Measurements .................................................................................... 19
3.5 Instek GPM-8212 .............................................................................................................. 19 3.5.1 Hardware Configuration ............................................................................................. 19 3.5.2 Range Setting and Uncertainty Calculation ............................................................... 19
3.6 Newtons 4th PPA5x0, PPA15x0 and PPA55x0 ................................................................. 19
3.6.1 Hardware Configuration ............................................................................................. 19 3.7 Tektronix PA1000 .............................................................................................................. 19
3.7.1 Hardware Configuration ............................................................................................. 19 3.8 Voltech PM1000+ .............................................................................................................. 20
3.8.1 Hardware Configuration ............................................................................................. 20 3.8.2 Range Setting and Uncertainty Calculation ............................................................... 20
3.9 Xitron 2802 ........................................................................................................................ 20 3.9.1 Hardware Configuration ............................................................................................. 20 3.9.2 Multi-Channel Measurements .................................................................................... 21

SPEC – Power and Performance Power and Temperature Measurement Setup Guide
09 January 2017 page 3 of 31 Copyright © 2007-2017 SPEC
3.10 Yokogawa WT210 ............................................................................................................. 21 3.10.1 Hardware Configuration ............................................................................................. 21
3.11 Yokogawa WT310/310e and WT330/330e ....................................................................... 22 3.11.1 Hardware Configuration ............................................................................................. 22 3.11.2 3-Phase Measurements ............................................................................................. 22
3.12 Yokogawa WT500 and WT1800 ....................................................................................... 23 3.12.1 Hardware Configuration ............................................................................................. 23 3.12.2 Multi-Channel Measurements .................................................................................... 23 3.12.3 3-Phase Measurements ............................................................................................. 23
3.13 ZES LMG95, LMG450, LMG500 ....................................................................................... 23 3.13.1 Hardware Configuration ............................................................................................. 23 3.13.2 Range Setting and Uncertainty Calculation ............................................................... 24 3.13.3 Multi-Channel Measurements .................................................................................... 24
4. Temperature Sensor Setup Information for Accepted Devices ......................................... 26 4.1 Digi Watchport/H and Watchport/T ................................................................................... 26
4.1.1 Hardware Connection ................................................................................................ 26 4.1.2 Windows Software Configuration ............................................................................... 26 4.1.3 Linux Software Configuration ..................................................................................... 26
4.2 Temperature@lert ............................................................................................................. 26 4.2.1 Hardware Connection ................................................................................................ 26 4.2.2 Windows Software Configuration ............................................................................... 27 4.2.3 Linux/Other Software Configuration........................................................................... 27
4.3 iButtonLink LinkUSBi + T-Sense/T-Probe ......................................................................... 27 4.3.1 Hardware Connection ................................................................................................ 27 4.3.2 Windows Software Configuration ............................................................................... 27
5. Troubleshooting ...................................................................................................................... 28 6. Disclaimer ................................................................................................................................ 28 Appendix A: Configuring the Prologix GPIB-USB-Virtual COM Port Adapter ........................ 29 Appendix B: Setup Instructions for Unsupported Devices ....................................................... 30
SVN Revision: 1542 SVN Date: 2017/01/20 11:04:18
SPEC – Power and Performance Power and Temperature Measurement Setup Guide
09 January 2017 page 4 of 31 Copyright © 2007-2017 SPEC
1. Introduction This practical guide will explain how to set up and run power analyzers and temperature sensors to communicate with SPEC’s Power/Temperature Daemon (PTDaemon) on a controller system. It also describes the configuration requirements to measure conforming results for the various SPECpower benchmarks and tools. This document is a companion to the associated SPECpower User Guides. The underlying principles of SPEC power measurements may be found in the SPEC Power_and_Performance_Benchmark Methodology document. Throughout this document ”SPECpower” is used as a synonym for the various SPEC benchmarks and tools which provide power measurements, such as SPECpower_ssj2008 and SERT. BE SURE to read, understand, and follow all of the safety rules and installation instructions that come with your power analyzer and system under test (SUT). To check for possible updates to this document, please see http://www.spec.org/power/docs/SPEC-Power_Measurement_Setup_Guide.pdf.
2. General Power Analyzer Setup Information 2.1 Initial Device Setup The first step in setting up any measurement device is to get the device communications to the controller system functioning using the vendor-supplied software. Follow the manufacturers’ instructions for hardware connection, device driver, and software installation. If the device cannot be controlled using the manufacturer’s software, do not proceed to the next step. Instead, contact the manufacturer for technical support. This document will NOT cover the electrical connections required for proper power measurement. Please refer to the documentation supplied with your device, and contact the manufacturer if additional information is needed. 2.2 Power Analyzer Connection Types 2.2.1 Serial Ports Standard RS-232 connections are one of the most common analyzer interfaces. Many analyzers have a DB-9 or DB-25 serial connection. The DB-9 connector on many computers may be connected directly to a DB-9 or DB-25 serial connection on the analyzer. Some devices require a cross-over or “null modem” cable. Refer to manufacturers’ instructions or the device-specific instructions below. Serial port naming standards for popular operating systems:
Windows: COM1, COM2, … COM9
Linux: /dev/ttyS0, /dev/ttyS1, …
Solaris: /dev/ttya, /dev/ttyb … (Solaris is only supported in PTDaemon versions 1.4.0 or lower)
The default connection type for PTDaemon is serial. No command-line option is used to specify a serial connection, and the serial port name (as listed in the examples above) is used for the ”port” argument to PTDaemon. If you will be using a serial connection on the power analyzer, please see the corresponding power analyzer section below for specifics regarding required serial settings such as baud rate, etc.

SPEC – Power and Performance Power and Temperature Measurement Setup Guide
09 January 2017 page 5 of 31 Copyright © 2007-2017 SPEC
2.2.1.1 Serial Cables Some analyzers have serial port hardware that is very sensitive to noise and correct signals. Please ensure that you have a high-quality serial cable and that ALL signals are interconnected. Timeouts, missed readings, and connection failures can occur with cables that do not implement the full set of RS232 signals. 2.2.1.2 Baud Rates Each device has a baud rate programmed in PTDaemon that can be found in the device’s section of this document. However, starting with version 1.6.0, the default baud rate can be overridden using the command-line parameter “-B <baud rate>”. 2.2.1.3 USB-Serial adapters Standard RS-232 serial ports are becoming less common on computers due to space constraints. However, there are many inexpensive USB-serial adapters on the market today. Windows drivers available for those devices allow the user to see additional “virtual” serial ports, such as COM7. Many of these same adapters will also work on Linux. If the Linux distribution includes the “usbserial” driver, it is likely to autodetect and enable the adapter. Typically the device name will be created as /dev/ttyUSB0. Use “dmesg” to find the port your analyzer uses. Note: USB-Serial converters may not ship with 64-bit Windows drivers. Some users have reported success using the 64-bit drivers found at the following website: http://www.serialgear.com/USB-Serial-adapter-drivers-windows-mac-linux.cfm. This website is not affiliated with SPEC, and SPEC will not provide support related to these drivers. Use at your own risk. 2.2.2 USB Ports Power analyzers available with USB data communications capability typically may be connected to a USB port on the controller system. Many such analyzers are USBTMC-compliant and can be controlled by Windows or Linux hosts with the appropriate USBTMC drivers. Others can be controlled using vendor-supplied drivers. 2.2.2.1 USBTMC Many Yokogawa analyzers, and other USBTMC-compliant devices such as the Tektronix PA1000 and the Chroma 66203 and 66204, can be controlled by Linux systems using Agilent’s USBTMC driver (available from Agilent and also included in many recent Linux distributions). In this case the device will appear to PTDaemon as a serial port using /dev/usbtmc<#>. This feature is supported in PTDaemon version 1.4.2 and higher. These same analyzers can also be controlled by Windows systems using Keysight’s IO Libraries suite (www.keysight.com/find/iosuite). Simply installing the IO Libraries Suite in its “typical configuration” should provide the shared libraries and drivers needed for PTDaemon to connect to USBTMC devices. USBTMC devices discovered by the Keysight suite will be numbered sequentially starting at 1. PTDaemon provides the “-U” argument for Windows USBTMC usage, so a typical command would be ‘ptd-windows-x86 -U 49 1” for a Yokogawa WT310 which was the only USBTMC device connected to the system. This feature is supported in PTDaemon version 1.8.1 and higher. If the Keysight IO Libraries installed correctly, your USBTMC device should be listed in the “Instruments” panel of the Keysight Connection Expert.
SPEC – Power and Performance Power and Temperature Measurement Setup Guide
09 January 2017 page 6 of 31 Copyright © 2007-2017 SPEC
There may be conflicts between the Keysight drivers and other drivers such as the Yokogawa YKMUSB driver or other VISA implementions that use USB devices, so installation of more than one library at a time is not recommended. Yokogawa Ethernet support through the TMCTL libraries should not conflict with Keysight USBTMC. 2.2.2.2 Yokogawa USB Yokogawa’s WT310, WT330, WT500 and WT1800 can also be controlled by a Windows host over a USB connection by PTDaemon using Yokogawa’s drivers. See the associated setup sections for further information. 2.2.3 GPIB Interfaces Many instruments have a GPIB / IEEE488 interface option available. Several vendors sell adapters that allow PC connections to GPIB, either via USB, PCI, PCIe or other hardware interface. Those adapters fall into two categories: one type that communicates via proprietary drivers and DLLs, and another type that presents a “virtual communications port” interface to the operating system. 2.2.3.1 GPIB-USB Adapters PTDaemon has been tested with National Instruments’ NI488.2 GPIB-USB-HS adapter and NI-488.2 software, and the Agilent 82357A USB/GPIB adapter. If the software and drivers are installed correctly, PTDaemon can access GPIB devices through the “gpib-32.dll” interface for National Instruments, or the “agt-32.dll” interface for the Agilent device. It is likely that PTDaemon will also work with NI adapters other than the USB version, as long as they are supported by NI-488.2 drivers, but no others have been tested. When starting PTDaemon to communicate with an analyzer using one of these adapters, the “-g” argument must be used to specify GPIB, and the analyzer’s GPIB address is used rather than a COM port for the device number. The SPEC PTDaemon GPIB device support is currently only available with Microsoft Windows operating systems. 2.2.3.2 Virtual COM port GPIB adapters The Prologix GPIB-USB Controller converts GPIB interfaces to a physical USB connection on the controller system which is viewed by the Windows OS as a virtual COM port. See Appendix A for information on configuring the Prologix device to communicate with your power analyzer. When starting PTDaemon to communicate with an analyzer using one of these adapters, the virtual COM port should be used as the interface, and the “-g” parameter should NOT be used, since PTDaemon views this as a serial device. This device is only supported under Microsoft Windows operating systems. 2.2.4 Ethernet Interfaces Power analyzers available with Ethernet communications capability typically can connect via a network to the host computer. Some such analyzers have proprietary protocols and can be controlled by SPEC’s PTDaemon if vendor-supplied drivers are available. Others use standard protocols and can be controlled directly by PTDaemon.

SPEC – Power and Performance Power and Temperature Measurement Setup Guide
09 January 2017 page 7 of 31 Copyright © 2007-2017 SPEC
The Tektronix PA1000 and many of the Hioki analyzers can be controlled via TCP/IP directly by PTDaemon using the “-n” option. See the setup section for the specific analyzers for further information. Many Yokogawa analyzers can be controlled via their Ethernet port by PTDaemon using Yokogawa drivers. See the associated analyzer’s setup section for further information. 2.3 Starting PTDaemon on the Controller System After the analyzer is connected appropriately to the controller system CCS and turned on, the PTDaemon may be started. The command line format is: ptd [options] <device-type-#> <device-port> <device-type-#>: With –h option a list of all available power and temperature devices is shown. <device-port>: The device-port number, e.g. COM1 for Windows or /dev/ttys0 for Linux. The following options are available: -h Print usage message -? Print usage message -p port Network port, default 8888 -q Quiet mode, minimal output to console -s Enable additional statistics output -v Increase general debug output (may be repeated) -m Increase meter-specific debug output (may be repeated) -l logfile Log standard output to logfile -C <dd/mm/yyyy or yyyy-mm-dd> Specify analyzer calibration date -e Use extended logfile format -d debugfile Log debug output to file -D Enable DC measurement -B <value> Set non-default baud rate to be used with serial device -t Temperature mode, default is power mode -V <value> Set analyzer voltage range to lowest needed for value or autorange if value = 'a'\n" -A <value> Set analyzer ampere range to lowest needed for value or autorange if value = 'a'\n" -u List unsupported devices that may work -c <channel> Select channel number for multichannel analyzers operating in single channel mode -n Use TCPIPv4 ethernet interface Options only available on Windows: -g Use GPIB-USB interface (default is RS232) -b <port> Set GPIB board number (default is 0) -y Use Yokogawa USB or Ethernet interface -U Use Keysight/Agilent USBTMC interface 2.4 Using Multiple Power Analyzers When utilizing multiple power analyzers to measure one or more SUTs, the procedure for connecting each power analyzer is similar to connecting a single SUT/single power analyzer configuration. For each connected power analyzer a unique PTDaemon instance must be started with the appropriate parameters. If multiple PTDaemon instances are run on the same controller, they must each be assigned a unique TCP/IP port number using the “-p” command-line switch.

SPEC – Power and Performance Power and Temperature Measurement Setup Guide
09 January 2017 page 8 of 31 Copyright © 2007-2017 SPEC
2.5 Configuration for Compliant SPECpower Measurements Please be aware to always check http://www.spec.org/power/docs/SPECpower-Device_List.html for the latest information! On the above website you find a list of power measuring devices that have been tested by SPEC and that are accepted for use in the measurement of “compliant results” as they passed the SPECpower Analyzer Acceptance Test. Additionally also the minimum PTDaemon version required for publishable results for the various benchmarks using PTDaemon, changes over time and is specified in the SPEC Power Temperature Daemon (PTDaemon) Update Process. This update process is also documented on the website above. Compliant results are those that meet all the requirements specified in the Run and Reporting Rules of the various SPECpower benchmarks. Additionally restrictions for some individual analyzer types for conforming SPECpower measurements, e.g. to the PTDaemon version or allowed range settings, are listed in chapter 2.6. There are also analyzer types which may operate successfully with the PTDaemon but are not accepted for compliant SPECpower benchmark runs. They are available for research purposes only. A complete list of all tested analyzers including all accepted analyzers is displayed using the “-u” (unsupported) flag, PTDaemon –u. Support is not available from SPEC for use of any unsupported analyzer types. 2.6 Managing Measurement Uncertainty Another very important issue of measuring compliant power data is the configuration of the correct volt and ampere ranges appropriate to the measurement environment to avoid inaccurate or even invalid values. For compliant SPECpower benchmark runs, specific uncertainty requirements have to be guaranteed according to the SPECpower Run and Reporting Rules. The uncertainty of a measured power value depends on how well the configured volt and ampere ranges fit to this value. The formulas to calculate the uncertainty often directly include the configured volt and ampere ranges. Selecting the volt range is quite easy as the voltage depends only on the power source and does not change during the test. Selecting the ampere range is more complex, because it differs with the SUT’s power consumption during the benchmark run. A large difference between different load levels may even require individual ampere range settings for each level. PTDaemon has the ability to select the closest range appropriate for a requested value. The information is maintained on a per-analyzer basis. For example, if you specify a range of 2.2A and the analyzer in use has ranges of 0.5, 1.0, 2.0 and 5.0A, PTDaemon will set the analyzer to the 5.0A range. There are three ways to set the volt and ampere ranges of the analyzer:
manual range setting: For instructions read the manufacturer’s manual. PTDaemon cannot read range settings for some power analyzers such as the Instek GPM-8212; compliant runs cannot be produced using manual range settings for these analyzers.
fixed range setting via PTDaemon command line input parameters: When starting the PTDaemon the volt and ampere ranges can be set by selecting the command line flags –A and –V. For example, using the parameter “-A 1.6” will cause PTDaemon to set the current range to the next highest range that can legally measure 1.6A for the analyzer model in use.

SPEC – Power and Performance Power and Temperature Measurement Setup Guide
09 January 2017 page 9 of 31 Copyright © 2007-2017 SPEC
dynamic range setting via benchmark command interface: Most SPECpower benchmarks provide the ability to set ranges dynamically through configuration parameters. For instructions read the user guide for the associated benchmark. This is the only recommended technique since it gives the ability to set different ranges for different load levels.
Selecting auto-range mode does not provide compliant measurement results for any currently accepted analyzer types. There are two main reasons:
Changing the range in auto-range mode often needs so much time that several samples of the active measurement may be missed during the setting.
In auto-range mode the current ranges have to be read by the analyzer to compute the current uncertainty value. Not all analyzers provide this capability, and even those that do are not able to guarantee that the range readings were those used for the measurement values at that point of time.
The capabilities in range setting, uncertainty calculation and auto-range compliance are listed in section 2.7. To configure the benchmark to minimize uncertainty, a few simple steps should be followed:
First, run the benchmark with the power analyzer voltage range set to the voltage in use, and the current range set to either “auto” or the highest range expected.
Next, examine the output files to determine the average current used during each benchmark load level
Finally, set the benchmark-specific power analyzer range configurations to values appropriate for the current of each load level. A small amount of margin should be maintained so that the measurement does not end up “over-ranging”. For example, if the average current during a measurement is 0.95A, it may be necessary to set the range to a value larger than 1.0A.
SPEC – Power and Performance Power and Temperature Measurement Setup Guide
09 January 2017 page 10 of 31 Copyright © 2007-2017 SPEC
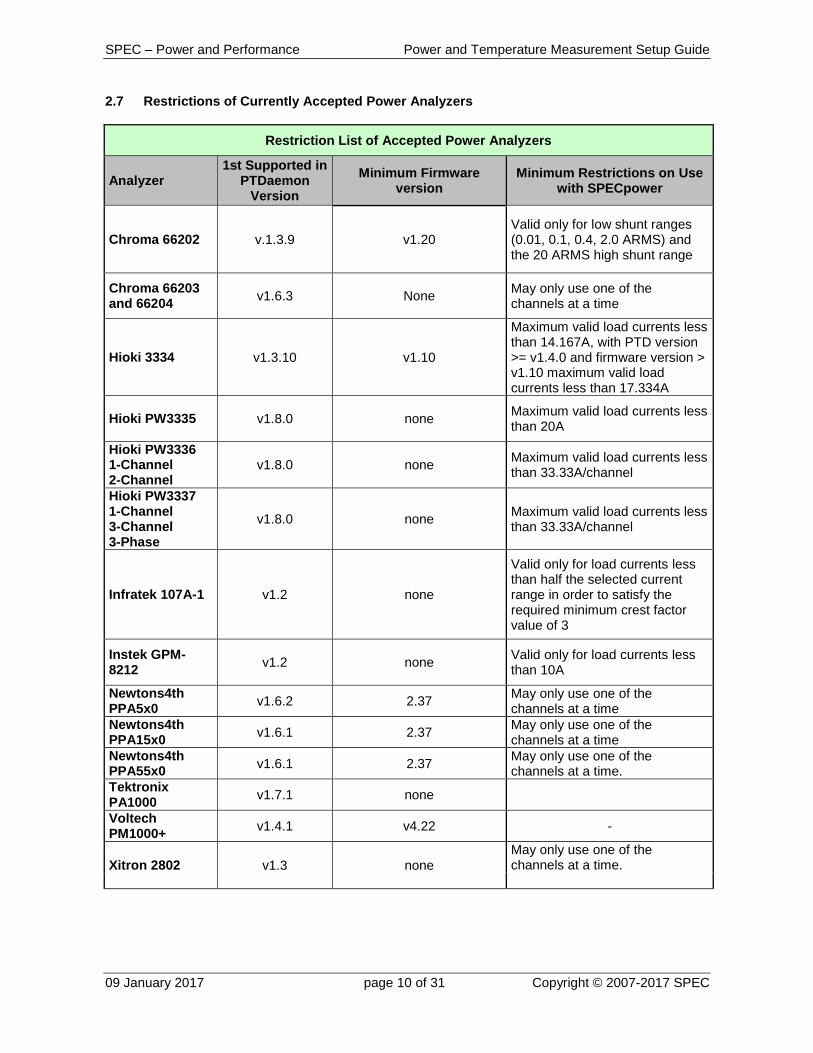
2.7 Restrictions of Currently Accepted Power Analyzers
Restriction List of Accepted Power Analyzers
Analyzer 1st Supported in
PTDaemon Version
Minimum Firmware version
Minimum Restrictions on Use with SPECpower
Chroma 66202 v.1.3.9 v1.20 Valid only for low shunt ranges (0.01, 0.1, 0.4, 2.0 ARMS) and the 20 ARMS high shunt range
Chroma 66203 and 66204
v1.6.3 None May only use one of the channels at a time
Hioki 3334 v1.3.10 v1.10
Maximum valid load currents less than 14.167A, with PTD version >= v1.4.0 and firmware version > v1.10 maximum valid load currents less than 17.334A
Hioki PW3335 v1.8.0 none Maximum valid load currents less than 20A
Hioki PW3336 1-Channel 2-Channel
v1.8.0 none Maximum valid load currents less than 33.33A/channel
Hioki PW3337 1-Channel 3-Channel 3-Phase
v1.8.0 none Maximum valid load currents less than 33.33A/channel
Infratek 107A-1 v1.2 none
Valid only for load currents less than half the selected current range in order to satisfy the required minimum crest factor value of 3
Instek GPM-8212
v1.2 none Valid only for load currents less than 10A
Newtons4th PPA5x0
v1.6.2 2.37 May only use one of the channels at a time
Newtons4th PPA15x0
v1.6.1 2.37 May only use one of the channels at a time
Newtons4th PPA55x0
v1.6.1 2.37 May only use one of the channels at a time.
Tektronix PA1000
v1.7.1 none
Voltech PM1000+
v1.4.1 v4.22 -
Xitron 2802 v1.3 none
May only use one of the channels at a time.
SPEC – Power and Performance Power and Temperature Measurement Setup Guide
09 January 2017 page 11 of 31 Copyright © 2007-2017 SPEC
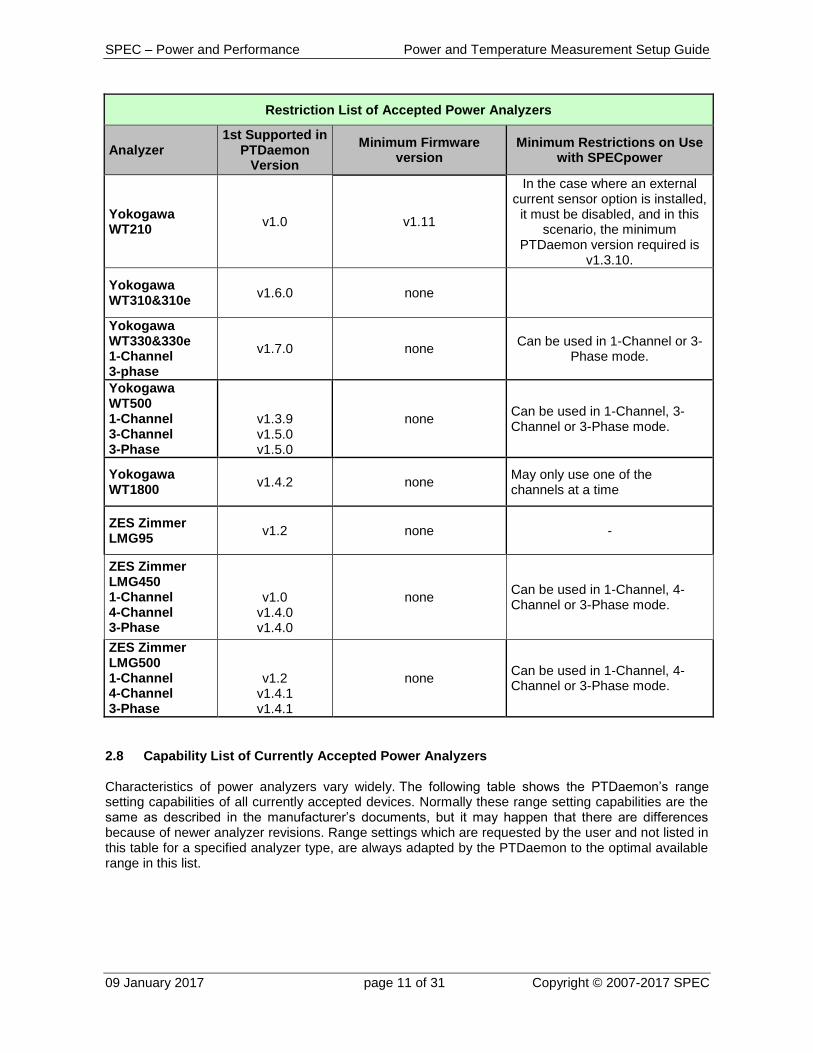
Restriction List of Accepted Power Analyzers
Analyzer 1st Supported in
PTDaemon Version
Minimum Firmware version
Minimum Restrictions on Use with SPECpower
Yokogawa WT210
v1.0 v1.11
In the case where an external current sensor option is installed,
it must be disabled, and in this scenario, the minimum
PTDaemon version required is v1.3.10.
Yokogawa WT310&310e
v1.6.0 none
Yokogawa WT330&330e 1-Channel 3-phase
v1.7.0 none Can be used in 1-Channel or 3-
Phase mode.
Yokogawa WT500 1-Channel 3-Channel 3-Phase
v1.3.9 v1.5.0 v1.5.0
none Can be used in 1-Channel, 3-Channel or 3-Phase mode.
Yokogawa WT1800
v1.4.2 none May only use one of the channels at a time
ZES Zimmer LMG95
v1.2 none -
ZES Zimmer LMG450 1-Channel 4-Channel 3-Phase
v1.0 v1.4.0 v1.4.0
none Can be used in 1-Channel, 4-Channel or 3-Phase mode.
ZES Zimmer LMG500 1-Channel 4-Channel 3-Phase
v1.2 v1.4.1 v1.4.1
none Can be used in 1-Channel, 4-Channel or 3-Phase mode.
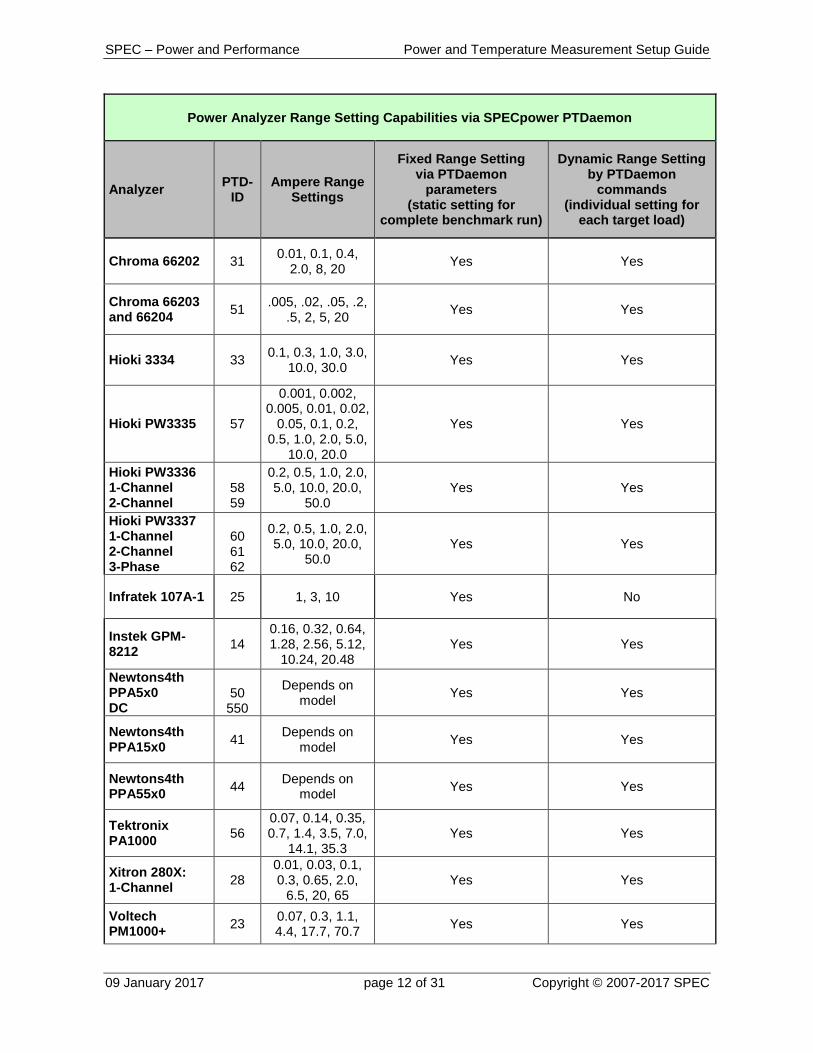
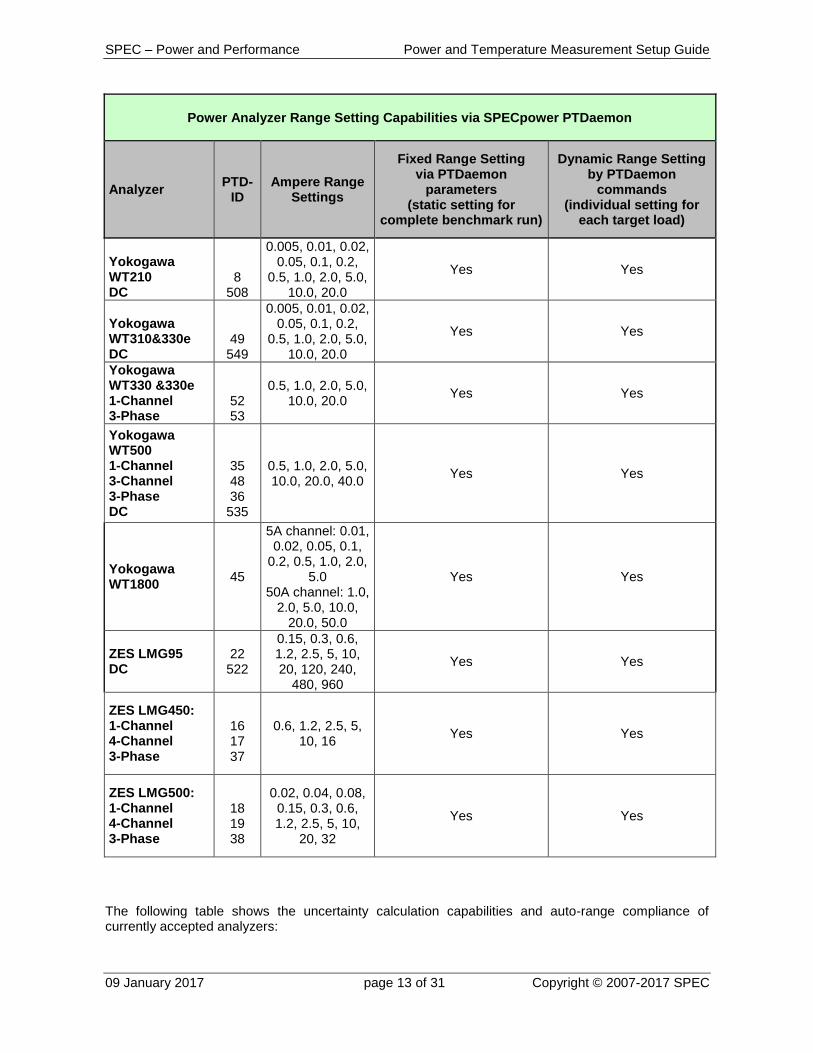
2.8 Capability List of Currently Accepted Power Analyzers Characteristics of power analyzers vary widely. The following table shows the PTDaemon’s range setting capabilities of all currently accepted devices. Normally these range setting capabilities are the same as described in the manufacturer’s documents, but it may happen that there are differences because of newer analyzer revisions. Range settings which are requested by the user and not listed in this table for a specified analyzer type, are always adapted by the PTDaemon to the optimal available range in this list.
SPEC – Power and Performance Power and Temperature Measurement Setup Guide
09 January 2017 page 12 of 31 Copyright © 2007-2017 SPEC
Power Analyzer Range Setting Capabilities via SPECpower PTDaemon
Analyzer PTD-
ID Ampere Range
Settings
Fixed Range Setting via PTDaemon
parameters (static setting for
complete benchmark run)
Dynamic Range Setting by PTDaemon
commands (individual setting for
each target load)
Chroma 66202 31 0.01, 0.1, 0.4,
2.0, 8, 20 Yes Yes
Chroma 66203 and 66204
51 .005, .02, .05, .2,
.5, 2, 5, 20 Yes Yes
Hioki 3334 33 0.1, 0.3, 1.0, 3.0,
10.0, 30.0 Yes Yes
Hioki PW3335 57
0.001, 0.002, 0.005, 0.01, 0.02,
0.05, 0.1, 0.2, 0.5, 1.0, 2.0, 5.0,
10.0, 20.0
Yes Yes
Hioki PW3336 1-Channel 2-Channel
58 59
0.2, 0.5, 1.0, 2.0, 5.0, 10.0, 20.0,
50.0 Yes Yes
Hioki PW3337 1-Channel 2-Channel 3-Phase
60 61 62
0.2, 0.5, 1.0, 2.0, 5.0, 10.0, 20.0,
50.0 Yes Yes
Infratek 107A-1 25 1, 3, 10 Yes No
Instek GPM-8212
14 0.16, 0.32, 0.64, 1.28, 2.56, 5.12,
10.24, 20.48 Yes Yes
Newtons4th PPA5x0 DC
50 550
Depends on model
Yes Yes
Newtons4th PPA15x0
41 Depends on
model Yes Yes
Newtons4th PPA55x0
44 Depends on
model Yes Yes
Tektronix PA1000
56 0.07, 0.14, 0.35, 0.7, 1.4, 3.5, 7.0,
14.1, 35.3 Yes Yes
Xitron 280X: 1-Channel
28 0.01, 0.03, 0.1, 0.3, 0.65, 2.0,
6.5, 20, 65 Yes Yes
Voltech PM1000+
23 0.07, 0.3, 1.1, 4.4, 17.7, 70.7
Yes Yes
SPEC – Power and Performance Power and Temperature Measurement Setup Guide
09 January 2017 page 13 of 31 Copyright © 2007-2017 SPEC
Power Analyzer Range Setting Capabilities via SPECpower PTDaemon
Analyzer PTD-
ID Ampere Range
Settings
Fixed Range Setting via PTDaemon
parameters (static setting for
complete benchmark run)
Dynamic Range Setting by PTDaemon
commands (individual setting for
each target load)
Yokogawa WT210 DC
8 508
0.005, 0.01, 0.02, 0.05, 0.1, 0.2,
0.5, 1.0, 2.0, 5.0, 10.0, 20.0
Yes Yes
Yokogawa WT310&330e DC
49 549
0.005, 0.01, 0.02, 0.05, 0.1, 0.2,
0.5, 1.0, 2.0, 5.0, 10.0, 20.0
Yes Yes
Yokogawa WT330 &330e 1-Channel 3-Phase
52 53
0.5, 1.0, 2.0, 5.0, 10.0, 20.0
Yes Yes
Yokogawa WT500 1-Channel 3-Channel 3-Phase DC
35 48 36
535
0.5, 1.0, 2.0, 5.0, 10.0, 20.0, 40.0
Yes Yes
Yokogawa WT1800
45
5A channel: 0.01, 0.02, 0.05, 0.1,
0.2, 0.5, 1.0, 2.0, 5.0
50A channel: 1.0, 2.0, 5.0, 10.0,
20.0, 50.0
Yes Yes
ZES LMG95 DC
22 522
0.15, 0.3, 0.6, 1.2, 2.5, 5, 10, 20, 120, 240,
480, 960
Yes Yes
ZES LMG450: 1-Channel 4-Channel 3-Phase
16 17 37
0.6, 1.2, 2.5, 5, 10, 16
Yes Yes
ZES LMG500: 1-Channel 4-Channel 3-Phase
18 19 38
0.02, 0.04, 0.08, 0.15, 0.3, 0.6, 1.2, 2.5, 5, 10,
20, 32
Yes Yes
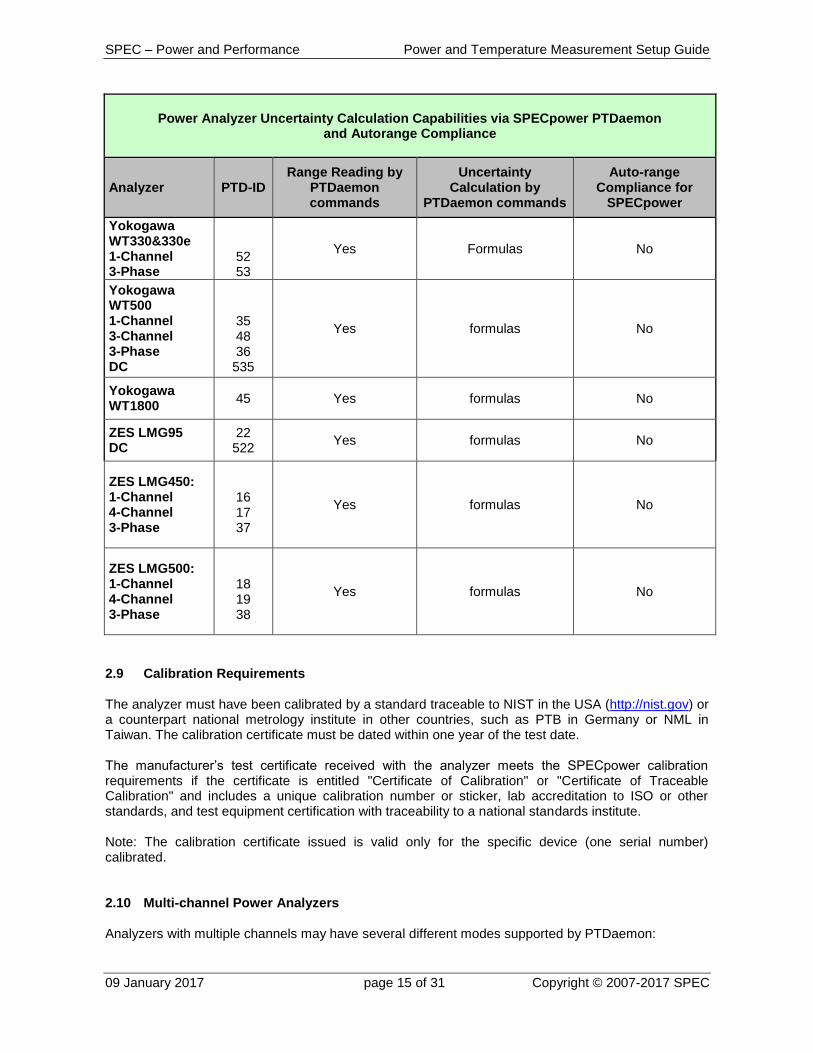
The following table shows the uncertainty calculation capabilities and auto-range compliance of currently accepted analyzers:

SPEC – Power and Performance Power and Temperature Measurement Setup Guide
09 January 2017 page 14 of 31 Copyright © 2007-2017 SPEC
Power Analyzer Uncertainty Calculation Capabilities via SPECpower PTDaemon and Autorange Compliance
Analyzer PTD-ID Range Reading by
PTDaemon commands
Uncertainty Calculation by
PTDaemon commands
Auto-range Compliance for
SPECpower
Chroma 6620x 31 Yes formulas, only if not auto-range mode
No
Chroma 66203 and 66204
51 Yes formulas, only if not auto-range mode
No
Hioki 3334 33 Yes formulas No
Hioki PW3335 57 Yes formulas No
Hioki PW3336 1-Channel 2-Channel
58 59
Yes formulas No
Hioki PW3337 1-Channel 2-Channel 3-Phase
60 61 62
Yes formulas No
Infratek 107A-1
25 only if not auto-range
mode formulas, only if not auto-range mode
No
Instek GPM-8212
14 only if range was set
via PTDdaemon formulas, only if not
autorange mode No
Newtons4th PPA5x0 DC
50 550
Yes Formulas No
Newtons4th PPA15x0
41 Yes formulas No
Newtons4th PPA55x0
44 Yes Formulas No
Tektronix PA1000
56 Yes Formulas No
Xitron 280X: 1-Channel
28 only if range was set
via PTDdaemon estimation of worst case No
Voltech PM1000+
23 Yes formulas No
Yokogawa WT210 DC
8 508
Yes formulas No
Yokogawa WT310&330e DC
49 549
Yes formulas No
SPEC – Power and Performance Power and Temperature Measurement Setup Guide
09 January 2017 page 15 of 31 Copyright © 2007-2017 SPEC
Power Analyzer Uncertainty Calculation Capabilities via SPECpower PTDaemon and Autorange Compliance
Analyzer PTD-ID Range Reading by
PTDaemon commands
Uncertainty Calculation by
PTDaemon commands
Auto-range Compliance for
SPECpower
Yokogawa WT330&330e 1-Channel 3-Phase
52 53
Yes Formulas No
Yokogawa WT500 1-Channel 3-Channel 3-Phase DC
35 48 36 535
Yes formulas No
Yokogawa WT1800
45 Yes formulas No
ZES LMG95 DC
22 522
Yes formulas No
ZES LMG450: 1-Channel 4-Channel 3-Phase
16 17 37
Yes formulas No
ZES LMG500: 1-Channel 4-Channel 3-Phase
18 19 38
Yes formulas No
2.9 Calibration Requirements The analyzer must have been calibrated by a standard traceable to NIST in the USA (http://nist.gov) or a counterpart national metrology institute in other countries, such as PTB in Germany or NML in Taiwan. The calibration certificate must be dated within one year of the test date. The manufacturer’s test certificate received with the analyzer meets the SPECpower calibration requirements if the certificate is entitled "Certificate of Calibration" or "Certificate of Traceable Calibration" and includes a unique calibration number or sticker, lab accreditation to ISO or other standards, and test equipment certification with traceability to a national standards institute. Note: The calibration certificate issued is valid only for the specific device (one serial number) calibrated. 2.10 Multi-channel Power Analyzers Analyzers with multiple channels may have several different modes supported by PTDaemon:

SPEC – Power and Performance Power and Temperature Measurement Setup Guide
09 January 2017 page 16 of 31 Copyright © 2007-2017 SPEC
1-Channel: Only a single channel (usually user-specified) may be used at one time
3-Phase: 3 channels may be configured to measure 3-phase power and report the aggregate values as a single “virtual channel”.
Multi-Channel: all channels may be configured independently and report per-channel values via PTDaemon; benchmarks are responsible for aggregating the values from the different channels
The multi-channel features are not yet integrated into all SPECpower benchmarks. For example, SPECpower_ssj2008 only supports the 3-Phase mode with the restriction that for all channels the range settings have to be identical. In this case only the data of the sum channel calculated by the analyzer from the individual channels are reported. The calculation formulas are explained in the SPEC Power_and_Performance_Benchmark Methodology document. The appropriate range settings of the individual channels can be estimated by the following formulas: Estimated ampere range: Expected maximum ampere / sqrt(3) Estimated volt range: Expected maximum volt / sqrt(3) 2.11 3-Phase Power Considerations The only 3-phase wiring scheme supported for compliant measurements with PTDaemon is 3-phase 4-wire. This is the only wiring scheme in which uncertainty can be calculated properly. Additionally, the loads on each phase must be similar to achieve measurements with low uncertainty, since ranges are set identically on each channel and uncertainty has terms proportional to range/reading. In order to simplify measurement of 3-phase power source, PTDaemon does some work behind the scenes to make 3-phase range settings function similarly to a single-phase load from the user point of view, while hiding the details of the individual channel settings. Ranges (both voltage and current) should be specified as the aggregate 3-phase values, and PTDaemon will program the individual channels as appropriate. A user-specified voltage or current will be divided by the square root of 3, and the resulting value used for each single channel’s range. Range settings will also be reported in the same way for consistency. This allows automatic range-setting processes such as that implemented in SPEC’s SERT tool to function properly without user intervention. 2.12 External Current Sensors and Current Transformers PTDaemon does not support the use of external current sensors or current transformers. There are a number of reasons behind this decision.
There are too many opportunities for accidental or deliberate erroneous readings using external sensors.
There is no way to programmatically detect a connected external sensor model to verify that settings are correct.
There is very little demand for their use on computer servers when there are a number of supported analyzers that can measure 30A or more per channel for single or three-phase power.
The added uncertainty of the external devices can push total uncertainty over 1%, which does not meet our requirements.
Adding support for external sensors would result in an explosion in code complexity due to the need to add multiple variations for uncertainty calculations and range settings for every supported sensor.
SPEC – Power and Performance Power and Temperature Measurement Setup Guide
09 January 2017 page 17 of 31 Copyright © 2007-2017 SPEC
3. Power Analyzer Setup Information for Accepted Devices The following instructions provide information specific to use of SPEC’s PTDaemon with each accepted device. The manufacturer’s documentation should be the primary reference for all subsections (hardware configuration and input connection) for which specific information is not provided. Interfaces documented below are those that have been tested by SPEC. Other interfaces may be available from the associated vendor but have not been tested by SPEC. An up to date list of power analyzers and temperature sensors which are accepted for SPECpower submissions can be found at the following URL: http://www.spec.org/power/docs/SPECpower-Device_List.html 3.1 Chroma 66202 3.1.1 Hardware Configuration
GPIB – Set GPIB device address per Chroma User’s Manual
Input Connection – Direct input only
Firmware Version - Analyzer firmware version must be v1.20 or higher. 3.1.2 Range Setting and Uncertainty Calculation For SPECpower, measurement results from the Chroma 66202 are valid only if the following requirements have been satisfied:
Low shunt ranges must be one of the following: 0.01, 0.1, 0.4, 2.0 ARMS. All other low shunt ranges will result in invalid benchmark runs.
The only high shunt range that can be used is the 20ARMS range. 3.2 Chroma 66203 and 66204 3.2.1 Hardware Configuration
GPIB – Set GPIB device address per Chroma User’s Manual
Input Connection – Direct input only 3.3 Hioki 3334, PW3335, PW3336, PW3337 3.3.1 General Hardware Configuration
Connect the analyzer according to the manufacturer’s instruction manual (chapter 2 and 3) and reset the analyzer to factory defaults. The following connections are available:
RS232
GPIB - available but not yet tested
LAN - not available for Hioki 3334 Note: The Hioki’s display is locked when the PTDaemon is started. After stopping the PTDaemon you have to press special buttons (please see the instruction manual) to reuse it.

SPEC – Power and Performance Power and Temperature Measurement Setup Guide
09 January 2017 page 18 of 31 Copyright © 2007-2017 SPEC
3.3.2 RS232 Interface The analyzer’s baud rate has to be configured according to the default baud rate configuration in PTDaemon:
Analyzer Hioki 3334 Hioki PW3335 Hioki PW3336 Hioki PW3337
Baud rate 9600 9600 38400 38400
Alternatively you can also define the PTDaemon baud rate via the –B command line (see chapter 2.2.1.2). 3.3.3 Range Setting and Uncertainty Calculation For SPECpower, measurement results from the Hioki 3334 are valid only for load currents less than 14.167A to ensure that a crest factor of at least 3 can be supported. This limit is increased to 17.334A with firmware versions > v1.10. For Hioki PW3335 the limit is 20A, for Hioki PW3336/7 33.33A. 3.3.4 Multi-Channel Measurements The Hioki PW3336 and Hioki PW3337 analyzers can also be used as 2/3-channel analyzers by PTDaemon providing the measurement data of all individual channels. The sum value of power of all individual channels is calculated and also provided by PTDaemon. The Hioki PW3337 can also be used in the 3-Phase mode now providing the calculated sum values of watts, volts, amps and power factor. More information of the range settings in 3-phase mode can be found in chapter 2.10. 3.4 Infratek 101A, 107A-1Channel, 107A-3Channel 3.4.1 Hardware Configuration Connect the analyzer according to the manufacturer’s manual. Note: The 107A’s display is locked when the PTDaemon is started. After stopping the PTDaemon you have to turn the analyzer off and on to reuse it.
RS232 - The Infratek’s RS232 interface is configured to the correct parameters by default (Baud:9600, Parity:None, Terminator:CR, Handshake:None, IEEE_address:n/a). Only the interface parameters of the Infratek 107A can be changed by the user. Instructions are described in the manufacturer’s manual (chapter 6.4 Setting Interface Parameters).
Input Connection - For Infratek 107A there are two input channels available. For instructions how to select and configure the input channel that fits best to your environment, read the manufacturer’s manual (chapter 4.6). To measure valid power data the connected physical input channel has also to be selected manually on the display.
Firmware Version - There are no restrictions to any firmware versions. 3.4.2 Range Setting and Uncertainty Calculation Instructions on how to configure the range setting are given in the manufacturer’s manual (chapter 5.2.1 for Infratek 101A or chapter 5.2.2 for Infratek 107A: Range Selection, Auto Range Selection). The 101A supports range setting via PTDaemon command interface and PTDaemon input parameters. The 107A only supports range setting via PTDaemon input parameters, as after being started it is no longer configurable. So there is no possibility to configure the range setting for every individual load

SPEC – Power and Performance Power and Temperature Measurement Setup Guide
09 January 2017 page 19 of 31 Copyright © 2007-2017 SPEC
level of the SPECpower benchmark. If the electrical power differs between every load level in a larger range, this may cause problems to get valid measurement data. For SPECpower, measurement results from the Infratek 107A are only valid for load currents less than half the selected current range in order to satisfy the required minimum crest factor value of 3. Both analyzers provide uncertainty checking by the PTDaemon. 3.4.3 Multi-Channel Measurements The 107A-3Channel analyzer can only be used as a single-channel analyzer with PTDaemon. Only channel 1 is evaluated. 3.5 Instek GPM-8212 3.5.1 Hardware Configuration
RS232 – Use default settings
Input Connection – Direct input only
Firmware Version
3.5.2 Range Setting and Uncertainty Calculation For SPECpower, measurement results from the Instek GPM-8212 are only valid for load currents less than 10A in order to satisfy accuracy requirements. Since the Instek software interface does not allow reading of voltage and current ranges, manual setting of ranges via the device’s front panel will not produce valid results. 3.6 Newtons 4
th PPA5x0, PPA15x0 and PPA55x0
3.6.1 Hardware Configuration The PPA series of analyzers should be preconfigured using the keypad buttons prior to use with the PTDaemon software.
RS232 - The analyzer’s serial communications settings should be configured from the front panel. Use the “Remote” key to enter the communications settings menu; select RS232, and then set the baud rate to 19200.
3.7 Tektronix PA1000 3.7.1 Hardware Configuration The PA1000 should be preconfigured using the keypad prior to use with the PTDaemon software.
Ethernet – use the front panel to configure a static IP address on your local network, or configure the device for DHCP and read the IP address from the status menus.
GPIB – use the front panel to configure the GPIB address
USB – (Linux only) – no special configuration is needed

SPEC – Power and Performance Power and Temperature Measurement Setup Guide
09 January 2017 page 20 of 31 Copyright © 2007-2017 SPEC
3.8 Voltech PM1000+ 3.8.1 Hardware Configuration The PM1000+ should be preconfigured using their keypad buttons prior to use with the PTDaemon software. First, reset the analyzer to factory default. Note: Once PTDaemon 'connects' to the PM1000+, the front panel is 'locked' to avoid inadvertent changes during a SPECpower benchmark run. To re-enable the front panel, exit PTDaemon and the front panel should be enabled again.
RS232 - For RS-232 connections, a cable with DB9 Female and DB25 Male connectors and straight through (not null modem) capability are required. The analyzer’s serial communications settings should be configured for 19200 baud before use with PTDaemon
GPIB - The GPIB address of the analyzer can be viewed and changed via the front-panel command buttons. That address is used as the “port” number for use with the “-g” command-line argument with true GPIB adapters. For GPIB connections with a virtual COM port driver, see Appendix A. Connect the converter to the GPIB interface of the analyzer, and connect the controller.
3.8.2 Range Setting and Uncertainty Calculation To avoid bad samples due to auto ranging, set up the analyzer for the voltage and current ranges expected during the test. 3.9 Xitron 2802 3.9.1 Hardware Configuration The Xitron 2802 should be preconfigured using the keypad buttons before using the device for benchmark testing. The analyzer should also be configured to use the correct port (GPIB or RS232) depending on which option is available.
RS232 - For RS-232 connections, a serial cable with DB9 Female and DB25 Male connectors and null modem capability are required. The analyzer’s serial communications settings should be configured as follows:
o Press the “menu” key o in display window use the Up/down arrow keys to select “Setup System”; Press enter o In display window use the Up/down arrow keys to select “RS232 Baud Rate”; Press
enter o In display window use the Up/Down arrow keys to select a baud rate of 115200; Press
enter. o Press the “menu” key twice to return to the main display
GPIB - For GPIB (IEEE488) connections, the analyzer’s serial communications settings should be configured as follows:
o Press the “menu” key. o In display window use the Up/Down arrow keys to select “Setup System”; Press enter. o In display window use the Up/Down arrow keys to select “IEEE488 Address”; Press
enter. o In display window use the Up/Down arrow keys to select a unique numeric address for
the analyzer; Press enter. o Press the “menu” key twice to return to the main display.

SPEC – Power and Performance Power and Temperature Measurement Setup Guide
09 January 2017 page 21 of 31 Copyright © 2007-2017 SPEC
Input Connection – Direct input only. Configure the device to match your electrical wiring configuration as follows:
o Press the “menu” key. o In display window use the Up/Down arrow keys to select “Channel Configuration”;
Press enter. o In display window use the Up/Down arrow keys to select the option that matches your
wiring configuration. Options are 1, 2, or 3 phases, 3 wire, or Independent Channels. Press enter.
o Press the “menu” key twice to return to the main display.
Firmware Version - You can examine the firmware version installed in the meter as follows:
o Press the “menu” key. o In display window use the Up/Down arrow keys to select “About...”; Press enter. o The firmware version will be printed on the screen. For information on upgrading the
firmware, consult the manufacturer. o Press the “menu” key twice to return to the main display
3.9.2 Multi-Channel Measurements Only one of the Xitron 2802 channels may be used at a time with PTDaemon. 3.10 Yokogawa WT210 3.10.1 Hardware Configuration PTDaemon requires a minimum WT210 firmware version of 1.11 (released in March 2004) to function properly, since that is the first version that supports the crest factor features. The WT210 should be preconfigured using the keypad buttons prior to use with the PTDaemon software. First, reset the analyzer to factory default.
RS232 - For RS-232 connections, a cable with DB9 Female and DB25 Male connectors and null modem capability are required. The analyzer’s serial communications settings should be configured for a baud rate of 9600 as follows:
1. Press the “local” key 2. in display window “C” use the Up/down arrow keys to select 488.2; Press enter 3. In display window “A” use the Up/down arrow keys to select “hand 0”; Press enter 4. In display window “B” use the Up/down arrow keys to select “For 0”; Press enter 5. In display window “C” use the Up/down arrow keys to select “b 9600”; Press enter
GPIB - The GPIB address of the analyzer can be viewed and changed via the front-panel command buttons. That address is used as the “port” number for use with the “-g” command-line argument with true GPIB adapters. For GPIB connections with a virtual COM port driver, see Appendix A. Connect the converter to the GPIB interface of the analyzer, and connect the controller.
Input Connection – Only the direct input terminals of the WT210 are supported by PTDaemon.
Note: Once PTDaemon 'connects' to the WT210, the front panel is 'locked' to avoid inadvertent changes during a SPECpower benchmark run. To re-enable the front panel, exit PTDaemon and on

SPEC – Power and Performance Power and Temperature Measurement Setup Guide
09 January 2017 page 22 of 31 Copyright © 2007-2017 SPEC
the WT210 front panel, press the Stop (integrate) button then the Reset button. Front panel operations should be enabled again.
3.11 Yokogawa WT310/310e and WT330/330e PTDaemon automatically detects whether the analyzer is the standard or enhanced “e” version and adjusts measurement uncertainty appropriately. The enhanced uncertainty is calculated properly starting with PTDaemon version 1.8.0. 3.11.1 Hardware Configuration The WT310 should be preconfigured using the keypad buttons prior to use with the PTDaemon software. First, reset the analyzer to factory defaults.
RS232 - For RS-232 connections, a cable with null modem capability is required. The analyzer’s serial communications settings should be configured for 9600 baud with LF terminator.
GPIB - The GPIB address of the analyzer can be viewed and changed via the front-panel command buttons. That address is used as the “port” number for use with the “-g” command-line argument with true GPIB adapters. For GPIB connections with a virtual COM port driver, see Appendix A. Connect the converter to the GPIB interface of the analyzer, and connect the controller.
Ethernet - PTDaemon supports Ethernet communication with the WT310 on Windows operating systems via use of Yokogawa’s TMCTL DLL, which can be requested from Yokogawa support channels or downloaded from Yokogawa’s web site. With TMCTL installed on the controller system, use the “-y” command-line parameter with the IP address as the “port” parameter. For example, “ptd-windows-x86 –y 49 192.168.0.3”. The analyzer’s IP configuration can be set from the front panel controls.
USB - PTDaemon supports USB communication with the WT310 on Windows operating systems via use of Yokogawa’s TMCTL DLL and YKUSB driver, which can be requested from Yokogawa support channels or downloaded from Yokogawa’s web site. With TMCTL installed on the controller system, use the “-y” command-line parameter with the analyzer’s serial number as the “port” parameter. For example, “ptd-windows-x86 –y 35 WX503020”. PTDaemon also supports USB communication on Linux, in this case using Agilent’s USBTMC driver (included in some recent Linux distributions). The analyzer will appear as a device such as /dev/usbtmc0, and PTDaemon treats that device just as any other serial port.
Input Connection – Only the direct input terminals of the WT310 are supported by PTDaemon.
3.11.2 3-Phase Measurements In order to facilitate measurement of 3-phase power sources with the WT330, PTDaemon does some work behind the scenes to make a 3-phase load appear identical to a single-phase load from the user point of view. Ranges (both voltage and current) should be specified as the aggregate 3-phase values, and PTDaemon will program the individual channels as appropriate. For example, a user-specified voltage or current will be divided by the square root of 3, and the resulting value used for a single channel’s range.

SPEC – Power and Performance Power and Temperature Measurement Setup Guide
09 January 2017 page 23 of 31 Copyright © 2007-2017 SPEC
3.12 Yokogawa WT500 and WT1800 3.12.1 Hardware Configuration
GPIB – The GPIB address of the analyzer may be set from the front panel configuration menus. For GPIB connections with a virtual COM port driver, see Appendix A.
Ethernet - PTDaemon supports Ethernet communication with the WT500 and WT1800 on Windows operating systems via use of Yokogawa’s TMCTL DLL, which can be requested from Yokogawa support channels or downloaded from Yokogawa’s web site. With TMCTL installed on the controller system, use the “-y” command-line parameter with the IP address as the “port” parameter. For example, “ptd-windows-x86 –y 35 192.168.0.3”. The analyzer’s IP configuration can be set from the front panel controls.
USB - PTDaemon supports USB communication with the WT500 and WT1800 on Windows operating systems via use of Yokogawa’s TMCTL DLL and YKUSB driver, which can be requested from Yokogawa support channels or downloaded from Yokogawa’s web site. With TMCTL installed on the controller system, use the “-y” command-line parameter with the analyzer’s serial number as the “port” parameter. For example, “ptd-windows-x86 –y 35 WX503020”. PTDaemon also supports USB communication on Linux, in this case using Agilent’s USBTMC driver (included in some recent Linux distributions). The analyzer will appear as a device such as /dev/usbtmc0, and PTDaemon treats that device just as any other serial port.
3.12.2 Multi-Channel Measurements The WT500 can also be used as 3-channel and 3-phase analyzers by PTDaemon, providing the measurement data of the individual channels and the sum channel. Using the 3-Phase mode all calculated sum values of watts, volts, amps etc. are valid. Using the 3-channel mode only the sum value of power is calculated and provides a valid result. Other sum values, e.g. volts and amps are marked as invalid, because the formulas for those calculations may provide incorrect results. 3.12.3 3-Phase Measurements In order to facilitate measurement of 3-phase power sources with the WT330, PTDaemon does some work behind the scenes to make a 3-phase load appear identical to a single-phase load from the user point of view. Ranges (both voltage and current) should be specified as the aggregate 3-phase values, and PTDaemon will program the individual channels as appropriate. For example, a user-specified voltage or current will be divided by the square root of 3, and the resulting value used for a single channel’s range. 3.13 ZES LMG95, LMG450, LMG500 There are three types of ZES LMG power analyzers supported by the SPECpower PTDaemon. The LMG95 provides one-channel measurements, while LMG450 and LMG500 can be used for 1-channel, 4-channel or 3-phase measurements. 3.13.1 Hardware Configuration After connecting and turning on the ZES LMG according to the manufacturer’s manual the analyzer has to be configured correctly. Note:
The analyzer can be connected to the CCS via the ComA interface using a 1:1 cable or via the ComB interface using a null modem cable (manufacturer’s manual section 4.4.2.1.1). In rare

SPEC – Power and Performance Power and Temperature Measurement Setup Guide
09 January 2017 page 24 of 31 Copyright © 2007-2017 SPEC
cases when measuring in multichannel mode and lots of data are transferred you may see connection timeouts running the PTDaemon. This might be caused by poor quality of the serial or null modem cable. Exchanging the serial or null modem cable against a higher quality one can fix this problem. For high data transfer rates between LMG power analyzers and CCS it is recommended to attach a USB-serial adapter to the power analyzer and to use a USB cable to connect to a CCS USB port. Also reducing the baud rate of the analyzer to 9600 and setting the PTDaemon baud rate configuration accordingly via the –B option might help.
Before configuring a LMG analyzer reset the device to default parameters by pressing the two lower softkeys when switching it on. In general the analyzer stores the actual settings, so this has always to be done after using it in an environment other than SPEC benchmarks or tools.
The ZES LMG’s RS232 interface has to be configured for “19200 Baud, <lf>, Echo off, RTS/CTS” before use with PTDaemon. Instructions how to configure the interface are described in the manufacturer’s manual (chapter 4.4.2 IF/IO). The baud rate configured with PTDaemon via –B option and configured on the ZES analyzer must always be the same.
Note: “19200 Baud” is the default setting of ZES analyzers in PTDaemon versions higher than 1.6.1. The default baud rate of PTDaemon versions 1.6.1 and lower is 57600.
The GPIB interface is available and supported by PTDaemon, but not yet tested on ZES LMGs.
The ZES LMGs have one input connection for each available channel. For physical connection read the manufacturer’s manual (chapters 1-3).
There are no restrictions to specific firmware versions. Nevertheless it is recommended to update to the latest firmware version available on the manufacturer’s web site.
During measurement periods the analyzer buttons are locked by PTDaemon. If PTDaemon is not stopped via “X” command, the analyzer has to be turned “off” and “on” again before reuse.
3.13.2 Range Setting and Uncertainty Calculation Be careful in selecting the correct ranges which fit best to your measurement environment to avoid inaccurate or even invalid values. Uncertainty calculation for ZES LMGs by PTDaemon is only available if the measured values during the benchmark lie in between 10% and 110% of the configured range, so these limits have to be kept for conforming measurements. Instructions how to configure the range setting manually are described in the manufacturer’s manual (chapter 5.2 Measuring ranges(Range)). All accepted ZES LMG power analyzers support range setting via PTDaemon command interface or PTDaemon input parameters. All accepted ZES LMG power analyzers provide uncertainty checking by the PTDaemon. 3.13.3 Multi-Channel Measurements The ZES LMG450 and ZES LMG500 analyzers can also be used as 4-channel and 3-phase analyzers by PTDaemon, providing the measurement data of the individual channels and the sum channel. Using the 3-Phase mode all calculated sum values of watts, volts, amps etc. are valid. Using the 4-channel-mode only the sum value of power is calculated and provides a valid result. Other sum values, e.g. volts and amps are marked as invalid, because in general the formulas for those calculations may provide incorrect results.

SPEC – Power and Performance Power and Temperature Measurement Setup Guide
09 January 2017 page 25 of 31 Copyright © 2007-2017 SPEC
Note: In case of 3-phase measurements the ranges (both voltage and current) of each individual channel can be estimated by the following formulas (see also chapter 2.9): Estimated individual channel ampere range= Expected maximum (sum) ampere / sqrt(3) Estimated individual channel volt range= Expected maximum (sum) volt / sqrt(3) When setting the ranges manually all individual channels of the analyzer have to be configured separately. The PTDaemon allows setting the ranges of all individual channels in one step: Configuring the estimated ampere/volt range without defining any channel id results in the same range setting for all individual channels. With future versions of PTDaemon the “overall” range will be defined as the aggregated 3-phase range, meaning the product “range of the individual channel * sqrt(3)”. Then the individual range of each channel will be recalculated and automatically set to this calculated value.
SPEC – Power and Performance Power and Temperature Measurement Setup Guide
09 January 2017 page 26 of 31 Copyright © 2007-2017 SPEC
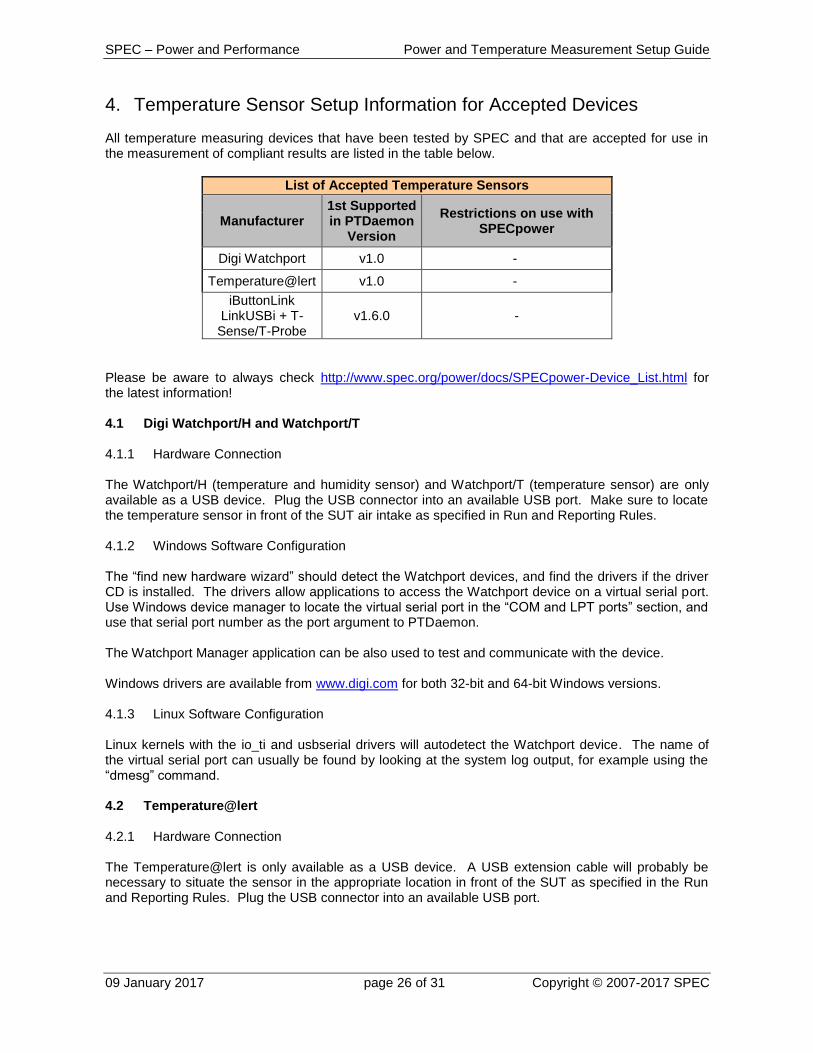
4. Temperature Sensor Setup Information for Accepted Devices All temperature measuring devices that have been tested by SPEC and that are accepted for use in the measurement of compliant results are listed in the table below.
List of Accepted Temperature Sensors
Manufacturer 1st Supported in PTDaemon
Version
Restrictions on use with SPECpower
Digi Watchport v1.0 -
Temperature@lert v1.0 -
iButtonLink LinkUSBi + T-Sense/T-Probe
v1.6.0 -
Please be aware to always check http://www.spec.org/power/docs/SPECpower-Device_List.html for the latest information! 4.1 Digi Watchport/H and Watchport/T 4.1.1 Hardware Connection The Watchport/H (temperature and humidity sensor) and Watchport/T (temperature sensor) are only available as a USB device. Plug the USB connector into an available USB port. Make sure to locate the temperature sensor in front of the SUT air intake as specified in Run and Reporting Rules. 4.1.2 Windows Software Configuration The “find new hardware wizard” should detect the Watchport devices, and find the drivers if the driver CD is installed. The drivers allow applications to access the Watchport device on a virtual serial port. Use Windows device manager to locate the virtual serial port in the “COM and LPT ports” section, and use that serial port number as the port argument to PTDaemon. The Watchport Manager application can be also used to test and communicate with the device. Windows drivers are available from www.digi.com for both 32-bit and 64-bit Windows versions. 4.1.3 Linux Software Configuration Linux kernels with the io_ti and usbserial drivers will autodetect the Watchport device. The name of the virtual serial port can usually be found by looking at the system log output, for example using the “dmesg” command. 4.2 Temperature@lert 4.2.1 Hardware Connection The Temperature@lert is only available as a USB device. A USB extension cable will probably be necessary to situate the sensor in the appropriate location in front of the SUT as specified in the Run and Reporting Rules. Plug the USB connector into an available USB port.
SPEC – Power and Performance Power and Temperature Measurement Setup Guide
09 January 2017 page 27 of 31 Copyright © 2007-2017 SPEC
4.2.2 Windows Software Configuration “Virtual Serial Port” drivers for most Windows versions may be downloaded from http://ftdichip.com/Drivers/VCP.htm. Once the driver is installed, a virtual serial port will be found in Windows’ Device Manager. The COM port number found in Device Manager should be used as the port argument to PTDaemon. 4.2.3 Linux/Other Software Configuration Linux kernels 2.6.9 and beyond already include “Virtual Serial Port” drivers that support the Temperature@lert. Drivers for other Linux versions, as well as for MacOS, are available at http://ftdichip.com/Drivers/VCP.htm. Once the driver is installed, the name of the virtual serial port can usually be found by looking at the system log output, for example using the “dmesg” command. 4.3 iButtonLink LinkUSBi + T-Sense/T-Probe PTDaemon supports the iButtonLink LinkUSBi controller with either the T-Sense® or T-Probe sensor. These devices are only supported under Windows operating systems. 4.3.1 Hardware Connection The LinkUSBi controller is only available as a USB device. When using the T-Sense sensor, a standard Ethernet cable may be used to connect the controller to the sensor; the T-Probe sensor includes a cable to connect directly to the controller. 4.3.2 Windows Software Configuration Communication with the LinkUSBi device requires the installation of both 1-wire and virtual com port drivers. First, before connecting the LinkUSBi to the controller system, download and install the 1-wire drivers for your OS from http://www.maximintegrated.com/products/ibutton/software/tmex/download_drivers.cfm. A reboot may be required after the driver installation. Second, connect the LinkUSBi to the controller system. Normally, the Windows “Found New Hardware Wizard” can find the correct drivers automatically. If not, you can download the drivers from http://www.ftdichip.com/Drivers/VCP.htm and install them manually. After the virtual com port drivers have been installed, you should be able to find the port number by looking at the COM port list in Windows Device Manager. This virtual COM port should then be provided to PTDaemon as the “port” parameter.

SPEC – Power and Performance Power and Temperature Measurement Setup Guide
09 January 2017 page 28 of 31 Copyright © 2007-2017 SPEC
5. Troubleshooting For further help with troubleshooting specific issues with PTDaemon, please refer to the FAQ of the benchmark you are using it with. If you are unable to connect to a measurement device, please contact the device manufacturer for further support. A common cause of issues between measurement devices and PTDaemon is that a device has been reconfigured by other software or manually to non-default settings. If you have trouble with device communications, or are not able to receive measurement data, try resetting the device to factory defaults per the manufacturer’s instructions. If you are able to connect to a measurement device using the manufacturer’s software, but not using SPEC’s PTDaemon, and the device is on SPEC’s list of valid configurations, DO NOT contact the manufacturer. If you are unable to find an answer in the benchmark FAQ, contact SPEC via the support information found in your benchmark documentation.
6. Disclaimer Product and service names mentioned herein may be the trademarks of their respective owners.

SPEC – Power and Performance Power and Temperature Measurement Setup Guide
09 January 2017 page 29 of 31 Copyright © 2007-2017 SPEC
Appendix A: Configuring the Prologix GPIB-USB-Virtual COM Port Adapter
When using the Prologix device, the GPIB address used by the device to communicate with the power analyzer must be set manually using the following steps:
1. Connect the converter to the GPIB interface of the analyzer, and connect the controller system to the converter with a standard USB cable.
2. Download the driver at this URL, http://www.ftdichip.com/Drivers/VCP.htm, and install it onto the controller system. This driver will map the Prologix device to a virtual com port in windows. (for example, com3).
3. Open a Windows Hyperterm session with the Prologix device (com3) with settings of 9600,8,no,1,no.
4. Send the command "++addr" to see what GPIB address the Prologix device is currently set to control. For the purpose of these instructions, a returned value of 5 (which is usually the case) will be used.
5. Determine the GPIB address of your power analyzer. For example, on the Yokogawa WT210, press Local, scroll to 488.2 with the up and down arrows, and press Enter. It should now show what GPIB address the WT210 is currently set to listen on. For the purposes of these instructions, a returned value of 10 will be used.
6. Now, make sure the GPIB addresses of both the power analyzer and the Prologix device are the same. You can use either of the following:
a. Change the address of the Prologix device to match that of the analyzer by sending the command "++addr 10" or
b. Change the address of the analyzer to 5 – in the WT210 case by using the arrow keys on the front display, and then press Enter.
7. Close the hyperterm session.
SPEC – Power and Performance Power and Temperature Measurement Setup Guide
09 January 2017 page 30 of 31 Copyright © 2007-2017 SPEC
Appendix B: Setup Instructions for Unsupported Devices Christ Elektronik CLM3000 With CLM3000 up to three phases can be measured. Use the device #20 (Christelektronik CLM3000:1-Ch) for measurements of one phase and device #21 (Christelektronik CLM3000:3-Ch) for measurements of three phases. Both types are not accepted for conforming SPECpower measurements. Hardware Configuration After connecting and turning on the CLM3000 according to the manufacturer’s manual you have to do the following manual configuration on the analyzer’s display:
1. Press the “door” on the touch screen 2. Press “Menu” 3. You may change the language to English by pressing “language” and selecting “En” and
return 4. Press “Setup”
a. Configure the serial interface to “block mode”, this means the analyzer itself sends measurement data. Press “save” and return. Notice that this configuration setting is permanent over Power ON/OFF.
5. Press “User power values and measurement time” a. Press delete and return
6. Press the “door” Now the analyzer is correctly configured and you should see reasonable power values on the display. When starting the PTDaemon you may have problems with connecting to the CLM3000 because of missing synchronization in rare cases. It may help to just restart the PTDaemon for several times. If it still doesn’t work, try to turn the analyzer off and on and to disable and enable the Com port via the device manager.
RS232 - The analyzer’s RS232 interface is not configurable.
Input Connection - The CLM300s don’t have several input channels to be selected. For physical connection read the manufacturer’s manual.
Firmware Version - There are no restrictions to any firmware versions. Range Setting and Uncertainty Calculation The CLM3000s don’t support individual range setting neither manually nor via PTDaemon. Also uncertainty calculation is not provided by PTDaemon. The maximum current range per phase is 16A. Multi-Channel Measurements Read the manufacturer’s manual on how to connect the analyzer to 3 phases and use PTDdaemon-ID 21 for measurements. Voltech PM100 Hardware Configuration
RS232 - The PM100’s RS232 interface should be configured for 9600 baud before use with PTDaemon.

SPEC – Power and Performance Power and Temperature Measurement Setup Guide
09 January 2017 page 31 of 31 Copyright © 2007-2017 SPEC
Voltech PM3000 Hardware Configuration
RS232 - The PM3000’s RS232 interface should be configured for 9600 baud before use with PTDaemon.