Source-Connect Standard 3.5 User Guide
33
Source-Connect ® Standard 3.5 User Guide © 2004-2011 http://source-elements.com 1 Source-Connect ® Standard 3.5 User Guide
-
Upload
scribd4474 -
Category
Documents
-
view
224 -
download
0
Transcript of Source-Connect Standard 3.5 User Guide

8/8/2019 Source-Connect Standard 3.5 User Guide
http://slidepdf.com/reader/full/source-connect-standard-35-user-guide 1/33
Source-Connect® Standard 3.5 User Guide © 2004-2011 http://source-elements.com 1
Source-Connect®
Standard 3.5 User Guide

8/8/2019 Source-Connect Standard 3.5 User Guide
http://slidepdf.com/reader/full/source-connect-standard-35-user-guide 2/33
Source-Connect® Standard 3.5 User Guide © 2004-2011 http://source-elements.com 2
Source-Connect® Standard 3.5 User Guide
1. Introducing Source-Connect
Source-Connect Standard 3.5 is a standalone application for Mac OSX 10.4 – 10.6
that supports high-quality recording and monitoring of audio signals over theinternet.
About Source-ConnectSource-Connect provides professional studio access to the encoding and decodingof high quality, real-time audio streaming from within your editing environment,along with Remote Transport Sync (RTS), for remote synchronization of recordingsessions.
To reduce the channel bandwidth requirements while maintaining low delay and highquality communications, Source-Connect uses a state-of-the-art AAC codec
developed by Fraunhofer IIS.
In addition to streaming and RTS capabilities, Source-Connect also providesContacts management and Instant Messaging features. You can add or removecontacts and edit your personal settings and profile by logging in to your account onthe Source-Connect website.
What’s new in Source-Connect Standard 3.5?
Source-Connect Standard 3.5 is now a fully standalone application.
For an overview of the new features in Source-Connect 3.5 see:
http://www.source-elements.com/source-connect/standard
For a general overview of the Source-Connect versions and features see:http://www.source-elements.com/source-connect/features

8/8/2019 Source-Connect Standard 3.5 User Guide
http://slidepdf.com/reader/full/source-connect-standard-35-user-guide 3/33
Source-Connect® Standard 3.5 User Guide © 2004-2011 http://source-elements.com 3
2. Installation
2.1: System requirements
Supported Host Versions and Hardware
Currently only support for Mac OSX 10.4 (Tiger), 10.5 (Leopard) and 10.6 (SnowLeopard) is available.
Source-Connect Standard supports all core-audio drivers as of the writing of thismanual.
Minimum recommended configurations:
Minimum support is available for:
1ghz G4, 2GB RAM, OSX 10.4 or higher.
We recommend a G5 or higher and 2GB ram or more for best performance.
Source-Connect supported sample-rates:Source-Connect currently only supports 44.1khz and 48khz.
Source-Connect supported bit-rates:
Source-Connect supports 16bit and 24bit sessions.
Compatibility Source-Connect Standard 3.5 is compatible to connect with all available versions of Source-Connect, including Pro. See section X for connection limitation whenworking with Source-Connect Pro.
2.2: Network configuration To establish an audio session between two studios, direct peer-to-peer
communication is required between two hosts each running Source-Connect.Internet communication occurs over the UDP protocol, which is a low level and veryfast Internet Protocol. It is therefore required that your firewall and/or router isconfigured properly to enable such communication.
For most operations you will open UDP 6000-6001 in your firewall and/or portforward these ports to your computer’s IP address.
Please review the online Network Guide for specific details on getting your Networkconfigured for Source-Connect:
http://source-elements.com/networkguide

8/8/2019 Source-Connect Standard 3.5 User Guide
http://slidepdf.com/reader/full/source-connect-standard-35-user-guide 4/33
Source-Connect® Standard 3.5 User Guide © 2004-2011 http://source-elements.com 4
Bandwidth:
Source-Connect requires an Internet connection with bandwidth of at least 300 kbpsin both directions. You may need to configure your firewall and/or router if you areinside a network or have an active firewall. Corporate firewalls and routers may beable to provide QoS services to increase your application bandwidth. Please refer to
our detailed network-specific information if you have difficulty connectingsuccessfully.
You can get an idea of your bandwidth via Internet Speed test sites, such ashttp://www.speakeasy.net/speedtest . However, please note that a report from a sitein California does not mean that you will be getting the same bandwidth whenconnecting to a peer in, say, Australia.
Additional firewall information:
Source-Connect will make outgoing requests from any available TCP port to ports 80and 5222 on our server (www.source-elements.com). All TCP ports should beallowed to make outgoing connections to and from the firewall. Most networks allowthese connections by default.
For additional information on configuring your network, please refer to:
http://source-elements.com/networkguide
You will find here an illustrated step-by-step guide on configuring your network,along with Advanced documentation for IT administrators.
For detailed assistance please contact Support.
2.3: Downloading and Installing Source-Connect
All Source Elements software is obtained by download directly from your account onthe website.
To get access to the Downloads page you will need:
1. A physical iLok dongle2. A valid evaluation or purchased license for Source-Connect
For more information on the iLok:http://source-elements.com/iLok
If you requested an evaluation license, or purchased a license you should have alsocreated a new Source Elements account at the same time. Use this account to loginto your account and download the software.
If you did not receive an account please contact Support.
8/8/2019 Source-Connect Standard 3.5 User Guide
http://slidepdf.com/reader/full/source-connect-standard-35-user-guide 5/33
Source-Connect® Standard 3.5 User Guide © 2004-2011 http://source-elements.com 5
Installing Source-Connect
You should now have downloaded the correct software for your iLok license.
Launch the installer and follow the instructions. Newer versions of Source-Connectwill install over existing installations.
Installing InterLok Extensions:
You must have the InterLok Extensions installed to allow Source-Connect torecognise your iLok. InterLok extensions are installed with the Installer Application.The installer will not overwrite extensions which are more recent, and will onlyupgrade older versions. You may need to restart the computer if this is the first timeyou have installed the InterLok Extensions.
Installing ReWire
Some systems will have a previous installation of ReWire, and the permissions will besuch that Source-Connect cannot install the required components. If you encountera failed installation issue, it is likely due to this. To install Source-Connect you canchoose to either not include ReWire in the install process via unselecting it from the‘Custom’ panel of the installer, or remove any previous ReWire components fromyour system. Remove the following folder:
/Library/Application Support/Propllerheads Software
And Source-Connect will be able to complete the installation. Note that if you haveexisting ReWire components for other programs, for example Melodyne or Reason,you should backup, rather than delete, this folder and restore when required.
Uninstalling on Mac OSX
To uninstall Source-Connect, open the Installer image and run the Uninstallerpackage. This will not remove your settings and Q Manager folder. To manuallyremove all your stored Source-Connect and Q Manager data delete this folder:
/Library/Application Support/SourceElements

8/8/2019 Source-Connect Standard 3.5 User Guide
http://slidepdf.com/reader/full/source-connect-standard-35-user-guide 6/33
Source-Connect® Standard 3.5 User Guide © 2004-2011 http://source-elements.com 6
3. Setup and Settings
3.1: Basics
The following is a quick guide, which does not include working with Auto-Restore or
Remote Transport Sync. See the section 7 in this guide for information on workingwith these technologies.
Basic steps in using Source-Connect are as follows:
1. Launch the Source-Connect application.
2. Log in with your username and password.
3. Select your send quality and sample-rate.
4. Set up your audio I/O in your System Preferences. Source-Connect
Standard 3.5 uses your System Preferences audio to determine which audiodevice to use.
5. Select an online contact in your Contacts list and press ‘Connect’ in theStatus (top) panel. This will connect both studios with a real-timestreaming-audio session. Instant Messaging will be activated between theconnected partners, and if the sample rate and channels are the same (e.g.48khz mono), RTS (Remote Transport Sync) will also be enabled. During thesession, you send compressed audio data to each other over the Internet.Be advised that if either user does not have sufficient bandwidth or hasexcess packet loss there is a possibility of an audible dropout. To minimizedropouts, see the support documentation online. You can also work withthe Q Manager to ensure Auto-Restore provides clean recordings every
time. Your connection partner must be using Source-Connect Pro for this.
6. Disconnect. This will end your audio session with the remote studio.
7. Log out.
3.2 Audio Input and Output
Source-Connect Standard 3.5 uses your System Preferences audio to determinewhich audio device to use. Simply open your System Preferences from the Applemenu at the top left of the computer, and choose Sound. Then select your audio I/Odevice for both input and output.
Contact our support team for assistance if required.
3.3: About Source-Connect
The About Box provides information on which version of Source-Connect you haveinstalled. To view the About box, go to the Apple menubar, click on Source-Connect

8/8/2019 Source-Connect Standard 3.5 User Guide
http://slidepdf.com/reader/full/source-connect-standard-35-user-guide 7/33
Source-Connect® Standard 3.5 User Guide © 2004-2011 http://source-elements.com 7
and then ‘About Source-Connect Pro’:
Opening the About Box:
3.5: Setting session parameters - Overview
To modify your settings, select the Settings tab.
Audio OptionsYou will set your Audio I/O settings here, including what bitrate to send, whether tosend and receive in Mono or Stereo, and the sample rate of 44.1khz or 48khz.
Multi-Channel DevicesIMPORTANT: Working with multi-channel audio devices means that you must haveyour input/microphone signal in Channel 1 of your device for Mono, and Channel 1& 2 in your device for Stereo. Source-Connect only listens to channels 1 and 2.
A note on network capacity / bandwidthUltimately the actual capability of your network connection will determine theconsistency of your sending and receiving reception. However you can optimize thequality of reception with the Audio Options setting you choose to use.
See next page for a screenshot and overview of the Audio Options menu.

8/8/2019 Source-Connect Standard 3.5 User Guide
http://slidepdf.com/reader/full/source-connect-standard-35-user-guide 8/33
Source-Connect® Standard 3.5 User Guide © 2004-2011 http://source-elements.com 8
The following parameters can be specified:
• Sample rate (44.1khz or 48khz)• Send quality (Low, Medium, High)• Mono or Stereo
Sample rateSource-Connect will try to switch the hardware sample rate automatically to thesetting you choose. If the audio sounds as if it is pitch-shifted, you should set this tothe specific sample rate of your audio device.
Send qualitySource-Connect has three available quality settings: Low, Medium and High.
Low: 48kbps AAC. Use when you are monitoring, or if there is insufficint bandwidth for higher quality
settings.
Medium: 64kbs AAC.Use when monitoring, or your connection partner does not need high quality audio.
High: 96kbps AACISDN-standard compatible. Recommended for most cases.
Mono / StereoUse mono when recording voice or other single-mic signals. Use Stereo formonitoring/recording music.

8/8/2019 Source-Connect Standard 3.5 User Guide
http://slidepdf.com/reader/full/source-connect-standard-35-user-guide 9/33
Source-Connect® Standard 3.5 User Guide © 2004-2011 http://source-elements.com 9
3.6 Setting up your Audio Device in System Preferences
Setting up your audio settings is simple – Source-Connect uses whatever is set inyour System Preferences.
You can change your audio device on the fly, while connected, as long as the devicesupports your current sample rate as set in Source-Connect.
1. Open your System Preferences and go to the Sound panel.
2. Choose the audio I/O device you wish to use and make sureyou are getting a signal. Adjust the levels as needed on yourdevice.
Multi-Channel Devices
IMPORTANT:
Working with multi-channel audio devices means that you must have yourinput/microphone signal in Channel 1 of your device for Mono, and Channel 1 & 2 inyour device for Stereo. Source-Connect only listens to channels 1 and 2.

8/8/2019 Source-Connect Standard 3.5 User Guide
http://slidepdf.com/reader/full/source-connect-standard-35-user-guide 10/33
Source-Connect® Standard 3.5 User Guide © 2004-2011 http://source-elements.com 10
4. Your Profile and Contacts
4.1: Configuring your Profile
Your Contacts list and profile is managed on the Source-Connect website under your
Account, which you can access by pressing the ‘Go to online account’ in the Loginpanel, or logging in to your account directly online. You can choose whatinformation to display (or not to display). Your basic profile information is availableto your Contacts via the Source-Connect software and, depending on the level of privacy you choose, may be viewable to all other users of Source-Connect.
See the Account and Profile pages for available options:
http://source-elements.com/account
http://source-elements.com/profile
4.2: Managing your Contacts list online
To add a new Contact, simply search or browse for the contact you wish to add andclick on the ‘Add contact’ button:
http://source-elements.com/contacts
IMPORTANT: Newly added Contacts may not be immediately visible in your listwhile you are logged in to the Source-Connect plug-in. If you have added a newContact, or know that a Contact has added you, please log out, and log back in torefresh the list. The website will let you know if you need to do this once you add anew Contact.

8/8/2019 Source-Connect Standard 3.5 User Guide
http://slidepdf.com/reader/full/source-connect-standard-35-user-guide 11/33
Source-Connect® Standard 3.5 User Guide © 2004-2011 http://source-elements.com 11
5. Using Source-Connect
5.1: Logging in
To login, enter your username and password and press the “Log in” button. If your
login is successful, the Status panel will change its view: it will now show that youare able to establish an audio session.
5.2 Establishing a session
Upon logging in, the Contacts panel will list all the users you have in your Contactslist. Detailed user information is shown by double clicking on the name. A slidingpanel will appear, click again on the name or the panel to close.
Before connecting to a user and establishing an audio session, it is alwaysrecommended that you check your settings.
To initiate an audio session, select the user in the Contacts panel with whom thesession is to be established. It is only possible to connect to users who have Onlinestatus: that is, the users who are online and not already engaged in a session.Upon selecting a user in the list, double click on the username in your Contactspanel. You will see that their name, email address and any personal details they mayhave provided appear a new sliding window from the Contacts panel. This can helpyou to confirm that you are actually connecting to the user you want. Click on thenew panel window to close the sliding panel.

8/8/2019 Source-Connect Standard 3.5 User Guide
http://slidepdf.com/reader/full/source-connect-standard-35-user-guide 12/33

8/8/2019 Source-Connect Standard 3.5 User Guide
http://slidepdf.com/reader/full/source-connect-standard-35-user-guide 13/33
Source-Connect® Standard 3.5 User Guide © 2004-2011 http://source-elements.com 13
5.3 Network timeouts
Request timeout: 30 secondsThis is the time required to reply to the confirmation dialog when establishing audiosession. If you make a request, and see that your user stays listed as ‘busy’, youknow that they are online, but are away from their computer. You can cancel yourrequest at any time by pressing disconnect.
Streaming timeoutIf the audio session is established but no audio data is received your ‘receiving’blinker light will stop blinking to let you know that the network is not sending youany audio. If this happens during your session, try disconnecting and reconnectingwith a lower bitrate and resilience setting.
Source-Connect session timeoutSource-Connect keeps your connection alive indefinitely, until you either log out,close your Pro Tools session or disconnect your network. In some cases you mayreceive a dialogue ‘Connection reset by peer’: this means you were unexpectedly
disconnected – usually because your network was no longer responding. Go aheadand reconnect. If the problem persists it is due to insufficient bandwidth resources.
Automatic reconnection in case of Network failureSource-Connect will also recognize if the connection has been lost with the Source-Connect servers. If this is the case, it will not disconnect your session automatically,but continue to assume that your Contact partner is still available. Once the serverconnection is restored you will see an Instant Message stating this. This is a newfeature designed to help in cases where network anomalies stop you from making aserver connection, but you may still have peer-to-peer network service and you cancontinue with your audio session.
8/8/2019 Source-Connect Standard 3.5 User Guide
http://slidepdf.com/reader/full/source-connect-standard-35-user-guide 14/33
Source-Connect® Standard 3.5 User Guide © 2004-2011 http://source-elements.com 14
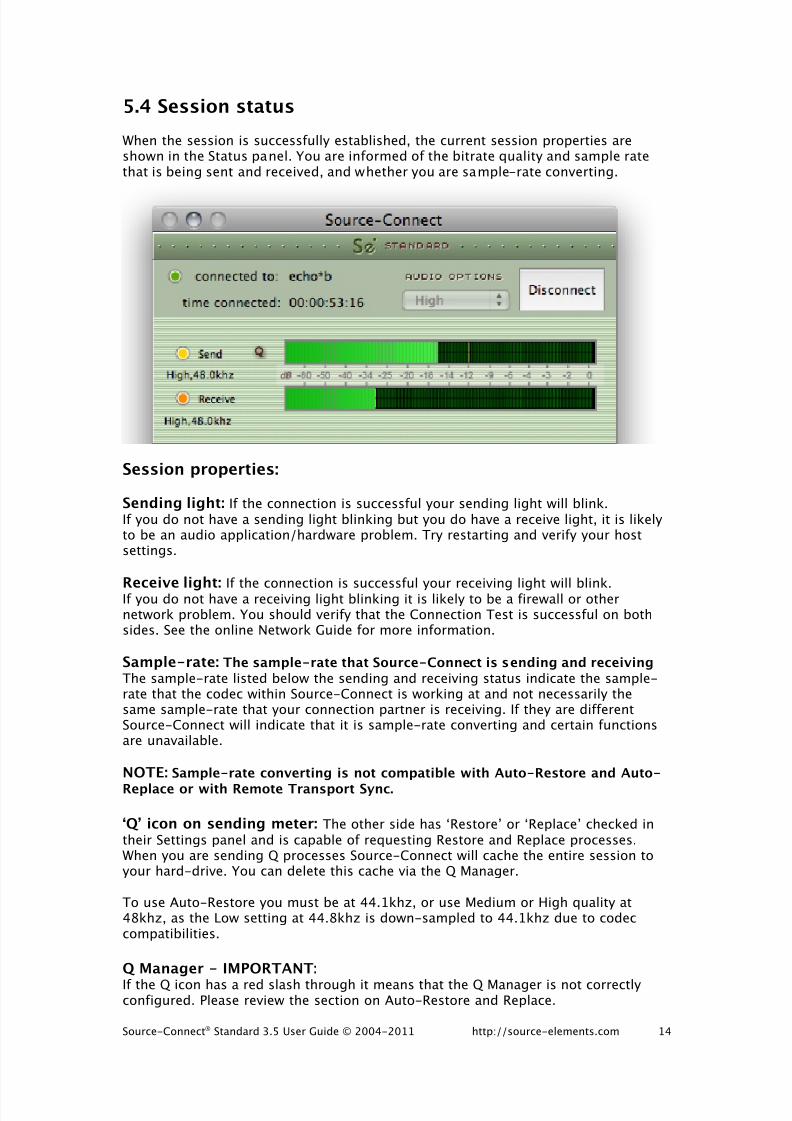
5.4 Session status
When the session is successfully established, the current session properties areshown in the Status panel. You are informed of the bitrate quality and sample ratethat is being sent and received, and whether you are sample-rate converting.
Session properties:
Sending light: If the connection is successful your sending light will blink.If you do not have a sending light blinking but you do have a receive light, it is likelyto be an audio application/hardware problem. Try restarting and verify your hostsettings.
Receive light: If the connection is successful your receiving light will blink.If you do not have a receiving light blinking it is likely to be a firewall or othernetwork problem. You should verify that the Connection Test is successful on bothsides. See the online Network Guide for more information.
Sample-rate: The sample-rate that Source-Connect is sending and receivingThe sample-rate listed below the sending and receiving status indicate the sample-rate that the codec within Source-Connect is working at and not necessarily thesame sample-rate that your connection partner is receiving. If they are differentSource-Connect will indicate that it is sample-rate converting and certain functionsare unavailable.
NOTE: Sample-rate converting is not compatible with Auto-Restore and Auto-
Replace or with Remote Transport Sync.
‘Q’ icon on sending meter: The other side has ‘Restore’ or ‘Replace’ checked intheir Settings panel and is capable of requesting Restore and Replace processes.When you are sending Q processes Source-Connect will cache the entire session toyour hard-drive. You can delete this cache via the Q Manager.
To use Auto-Restore you must be at 44.1khz, or use Medium or High quality at48khz, as the Low setting at 44.8khz is down-sampled to 44.1khz due to codeccompatibilities.
Q Manager - IMPORTANT:
If the Q icon has a red slash through it means that the Q Manager is not correctlyconfigured. Please review the section on Auto-Restore and Replace.

8/8/2019 Source-Connect Standard 3.5 User Guide
http://slidepdf.com/reader/full/source-connect-standard-35-user-guide 15/33
Source-Connect® Standard 3.5 User Guide © 2004-2011 http://source-elements.com 15
5.5 Instant Messaging
During an audio session it is often useful to exchange instant messages with remoteuser, for example if you are not able to send or receive a signal for any reason, oryou do not wish to interrupt the audio signal with a message to the other side.
To send a message, type in the lower textbox at the bottom of Instant Messagingpanel and enter your message. Press either enter or return key or click the Sendbutton. Sent and received messages appear in the text display panel above.

8/8/2019 Source-Connect Standard 3.5 User Guide
http://slidepdf.com/reader/full/source-connect-standard-35-user-guide 16/33
Source-Connect® Standard 3.5 User Guide © 2004-2011 http://source-elements.com 16
5.6 Remote Transport Sync (RTS)
Access the RTS panel by clicking on the RTS bar.
RTS is an integrated method of synchronizing remotely connected Pro Toolstransports. Purpose-built for ADR, over-dubbing and remote monitoring RTS makesdistance collaboration easier and more efficient than it’s ever been. Source-Connect3.5.1 implements several new features and now includes support for Tempo maps.
The following is a very brief overview. For specific instructions and screenshots,please see the comprehensive Remote Transport Sync FAQ:
http://source-elements.com/support/rts
How to enable RTS:
1. Create a new mono Audio track.2. From the Inserts->RTAS-> Instruments menu, instantiate ‘Se ReWire’.(Note: you do not have to select an output in this plugin).
3. When you establish a session over Source-Connect the SEND and RECEIVEbuttons will now be enabled in the RTS panel.
Using RTS
To use RTS, one user must be in SEND mode and the other in RECEIVE. The RECEIVEuser has no transport controls - effectively they are now slaved to the SEND userwho has 2 possible types of operation: ADR mode or Mix/review mode.
Source-Connect Standard can only send ADR mode, but can receive both ADRand Mix/Review modes.
Source-Connect Pro can send both ADR or Mix/review modes.
This means that to use RTS with Source-Connect Standard when sending, you mustpress Play on the RTS panel in Source-Connect. You cannot press play in your host /DAW application.
Please review the Remote Transport Sync FAQ for details on ADR or Mix/reviewmodes and running an RTS session: http://source-elements.com/support/rts

8/8/2019 Source-Connect Standard 3.5 User Guide
http://slidepdf.com/reader/full/source-connect-standard-35-user-guide 17/33
Source-Connect® Standard 3.5 User Guide © 2004-2011 http://source-elements.com 17
5.7 Closing a Source-Connect session
A Source-Connect session can be disconnected by pressing the Disconnect button inStatus panel, by logging out, or quitting Source-Connect.
5.8 Logging out of Source-Connect
Logging out can be performed manually by pressing the Log out button at the verybottom of the Source-Connect window. Once you are logged out, you can log inagain at any time and with any valid Source-Connect account.
5.9 Privacy
Once you have established a connection and you are sending and receiving audio,you are sending data directly to and only from your remote user. Instant Messagesare not captured or stored on our servers.
For a comprehensive outline of our Privacy policy, please read:http://source-elements.com/privacy

8/8/2019 Source-Connect Standard 3.5 User Guide
http://slidepdf.com/reader/full/source-connect-standard-35-user-guide 18/33
Source-Connect® Standard 3.5 User Guide © 2004-2011 http://source-elements.com 18
6. The Q Manager: Auto-Restore
This section provides a complete overview on using Source-Connect 3.5.1 withAuto-Restore. With Source-Connect 3.5 and 3.2, a new version of the Q Manager isinstalled, providing easier and faster Restore and Replace operations, plus severaladditional back-up options.
This section is divided into 12 parts:
6.1 Ultra-QuickStart Guide6.2Lifecycle of a recording6.3 Launching the Q Manager6.4 What is Auto-Restore?6.5 Comprehensive Q Manager interface overview6.6 Activity: Cancel all6.7 Q Menubar options6.8 Invalid Q Manager settings and warnings
6.9 Troubleshooting6.10 Common Q Manager issues
The online Q Manager Help guide is also available directly from on the Q Managersetup panel and will take you to the comprehensive Q Manager guide online. You canrefer to this guide whenever needed for quick help, or feel free to contact supportfor an overview and demo session.
If you have any questions on working with the Q Manager and
Auto-Restore and Auto-Replace please contact Support.

8/8/2019 Source-Connect Standard 3.5 User Guide
http://slidepdf.com/reader/full/source-connect-standard-35-user-guide 19/33
Source-Connect® Standard 3.5 User Guide © 2004-2011 http://source-elements.com 19
6.1 Ultra-QuickStart Guide
This section is provided for the most common case uses when your connectionpartner is using Source-Connect Pro. The Q Manager will not be functional if both sides are using Source-Connect Standard.
1. Launch Source-Connect Standard
2. The Q manager will login automatically.
2. Connect to a Source-Connect Pro user. Check that you have a Q icon on the Sendstatus, next to the blinking Send light.
5. Have your connection partner record a test file – it should show up immediately intheir Q Requests. In most cases the file will return on the status of your connectionpartner’s Activity panel” ‘Restore not required’, meaning that your connection isstable.
In cases where your connection is not the most stable, or you are recording very longfiles where the chance of a drop-out is more possible, your connection partner’sstatus should come back saying Restored, and you’re good to go!
6.2. ‘Lifecycle’ of a recording
This section is a step-by-step guide to why you would want to use Source-Connectwith Auto-Restore. It shows how the Q Manager works by describing the ‘lifecycle’ of a file recorded in Pro Tools and the subsequent restore and final replace process.
1. Request a Source-Connect session
When you request a Source-Connect session with a Source-Connect Pro user, youwill be shown a dialog indicating that you are requested to send Restore data.

8/8/2019 Source-Connect Standard 3.5 User Guide
http://slidepdf.com/reader/full/source-connect-standard-35-user-guide 20/33
Source-Connect® Standard 3.5 User Guide © 2004-2011 http://source-elements.com 20
2. Ready to record
Once you accept you have now established a Source-Connect session with Restoreenabled. You should now see a Q icon to the left of the Send meter, indicating thatyou can send Restore data.
3. Recording an audio file
In this example we are sending a sine-tone signal via the Signal Generator plug-in tobe recorded, and for the purposes of demonstration we are causing a significantnumber of dropped packets. You can see on the waveform in the timeline when therecording is significantly degraded: this is the audio received by your connectionpartner that they are recording from you, and the drop-outs are caused by anunstable internet connection.
What your connection partner sees when recording a drop-out:
IMPORTANT: If your connection partner is not sure on how to record with Restore
enabled, please refer them to the Source-Connect Pro documentation or contact
Support for a demonstration. It is recommended that all Source-Connect Pro userenable Auto-Restore to ensure perfect recordings, every time.

8/8/2019 Source-Connect Standard 3.5 User Guide
http://slidepdf.com/reader/full/source-connect-standard-35-user-guide 21/33
Source-Connect® Standard 3.5 User Guide © 2004-2011 http://source-elements.com 21
4. Restoring the audio file in the background
Once you stop recording the Q Manager on the other side will start the restoreprocess if required. Your connection partner can continue recording multiple files asthe restore process does not interrupt your session in any way.
5. Taking a look at the restored file
Since we have recorded a sine-tone signal, it is simple to see visually how the restoreprocess works. If your connection partner selects the filename in the Pro Tools binand chooses ‘Recalculate waveform overviews’ they can now compare the files beforeand after the restore process visually:
Before and after the restore process:
They can now see (and hear on playback) that they have a completely restored audiofile with perfect playback.

8/8/2019 Source-Connect Standard 3.5 User Guide
http://slidepdf.com/reader/full/source-connect-standard-35-user-guide 22/33
Source-Connect® Standard 3.5 User Guide © 2004-2011 http://source-elements.com 22
6.3 Launching the Q Manager
Launching Source-Connect and the Q Manager
When you launch Source-Connect and login, open the Q Manager via the ‘Q
Manager’ button at the very bottom. The Q Manager will open, and automaticallylogin to your Source Elements account. You can then establish a connection withyour Source-Connect partner.
6.4. What is Auto-Restore?
With traditional long-distance recording, whether with Source-Connect, ISDN or anynetwork-based transmission, the send signal is subject to various issues which maycause dropped packets and therefore ‘glitches’ in your recorded audio. Previouslythe only method to ensure a fully complete recording was to ensure your connectionpartner was also recording locally, so you could transfer this audio after your sessionand manually replace it in your edit.
Source-Connect with Q is the only available automated method to ensure that yourrecordings are perfect every time, with our Auto-Restore functionality.
How does it work?
First, an overview of how audio is transferred and recorded over packet-basedtransmission lines.

8/8/2019 Source-Connect Standard 3.5 User Guide
http://slidepdf.com/reader/full/source-connect-standard-35-user-guide 23/33
Source-Connect® Standard 3.5 User Guide © 2004-2011 http://source-elements.com 23
1. The audio signal is sent through Source-Connect, and is split into packets.2. These packets are sent sequentially to your connected partner over the
internet. 3. If a network error occurs, a packet may not arrive in time.4. If this occurs you will hear a minor glitch in the received audio signal.Source-Connect has built-in error correction modes to try and resolve these dropped
packet issues in realtime, however under certain circumstances a packet may not beretrieved in time to recover the signal before it is recorded.
Auto-Restore resolves this problem by working in the background in non-realtimeand restoring your recorded audio files.
5. The audio file is scanned when recording completes.6. If any missing packets are detected they are requested from your connected
partner, who has stored them during the connection.7. Your file is restored and is now available for flawless playback.

8/8/2019 Source-Connect Standard 3.5 User Guide
http://slidepdf.com/reader/full/source-connect-standard-35-user-guide 24/33
Source-Connect® Standard 3.5 User Guide © 2004-2011 http://source-elements.com 24
6.5. Comprehensive Q Manager interface overview
This section is a complete overview of all available options and their functions.
Settings panel
1. Login status
Verify that your account is logged in. If you have a login error, check your internetsettings or contact support.

8/8/2019 Source-Connect Standard 3.5 User Guide
http://slidepdf.com/reader/full/source-connect-standard-35-user-guide 25/33
Source-Connect® Standard 3.5 User Guide © 2004-2011 http://source-elements.com 25
2. Login mode
In most cases you will leave Login mode on Auto. If your system is used by otherusers, you may wish to set a Manual login mode so that a single Source Elementsaccount is used for all Q processes. This means that if another Source-Connect userwas using your system for a session, previous session data will still be able to beaccessed by their connection partners after you have logged in to Source-Connect.
3. Options
The options menu applies to the Session and Files that have accumulated as yourconnection partner on Source-Connect Pro is recording you.
Rename SessionThe default session name is the date and time it was created. Rename it here.

8/8/2019 Source-Connect Standard 3.5 User Guide
http://slidepdf.com/reader/full/source-connect-standard-35-user-guide 26/33
Source-Connect® Standard 3.5 User Guide © 2004-2011 http://source-elements.com 26
Delete selected sessionThis removes the session from the disk – once it has been removed your connectionpartner can no longer request Restore data for this session. Useful for freeing updisk space if required, without deleting newer sessions.
Delete all session data from disk
Same as the Delete all Session Data button on the lower section of the panel. Thisoption is not available when you are currently connected with Source-Connect.
4. Session and file history
Each time you establish a connection with Source-Connect a new session is createdin the Q manager. If Restore data is requested, that session becomes visible so youcan verify the status of the request. If any network issues are encountered you willbe given an error. For support with any errors encountered please contact support.
Each upload process will show a progress bar and the current status. The currentlyactive session will be displayed in blue lettering, for easy viewing. When the uploadis completed successfully the status will be ‘Done’.
The current disk usage is displayed to help you know when you may need to allocateadditional resources, or delete the session data from disk (see further in thissection).
5. File and session info
Detailed information about the session, who it was with, time information and lengthof session. Useful if you are looking for a particular session to get it’s status.

8/8/2019 Source-Connect Standard 3.5 User Guide
http://slidepdf.com/reader/full/source-connect-standard-35-user-guide 27/33
Source-Connect® Standard 3.5 User Guide © 2004-2011 http://source-elements.com 27
6. Delete all upload session data
Each time that you establish a session where your connection partner has selectedRestore and/or Replace, Source-Connect will immediately begin storing all sessiondata in compressed form. This can quickly fill a harddrive: at the rate of 56MB perhour.
The Q Manager helps you keep track of your hard drive availability by letting youknow when you have less than 20% available.
You can choose to delete this stored upload data at any time, and once you havedeleted this data your connection partner will not be able to request any Restore orReplace processes. Please ensure that your connection partner has receivedeverything they need before you delete this data.
If you choose to delete your session data while connected, your current session willnot be deleted. This can be useful if you find you are running out of drive space andcannot reestablish the session.
7. Q Manager version and Help
This shows your installed version of the Q Manager. Source Elements periodicallyreleases updates, so if you are having any issues please contact Support with thisinformation.
To get more online help about the Q Manager, click on the Help button to open thespecific support site for Source-Connect Standard and the Q Manager.
8. Shut down Q
Press this to shut down the Q Manager. You can also Quit via the icon on the Dock,or use the File menu.
Once the Q Manager is shut down, any requests made to you from your connectionpartner will not be communicated and they will receive a process error.
6.6 Activity: Cancel all
If a transfer is in process and you need to conserve bandwidth or no longer wish forthe process to continue, the Cancel All button will pause all transfers currently inprocess.
Your connection partner can request to resume any transfers again at any time,however transfers will be reset so any data that has been uploaded or downloadedwill begin again.
8/8/2019 Source-Connect Standard 3.5 User Guide
http://slidepdf.com/reader/full/source-connect-standard-35-user-guide 28/33
Source-Connect® Standard 3.5 User Guide © 2004-2011 http://source-elements.com 28
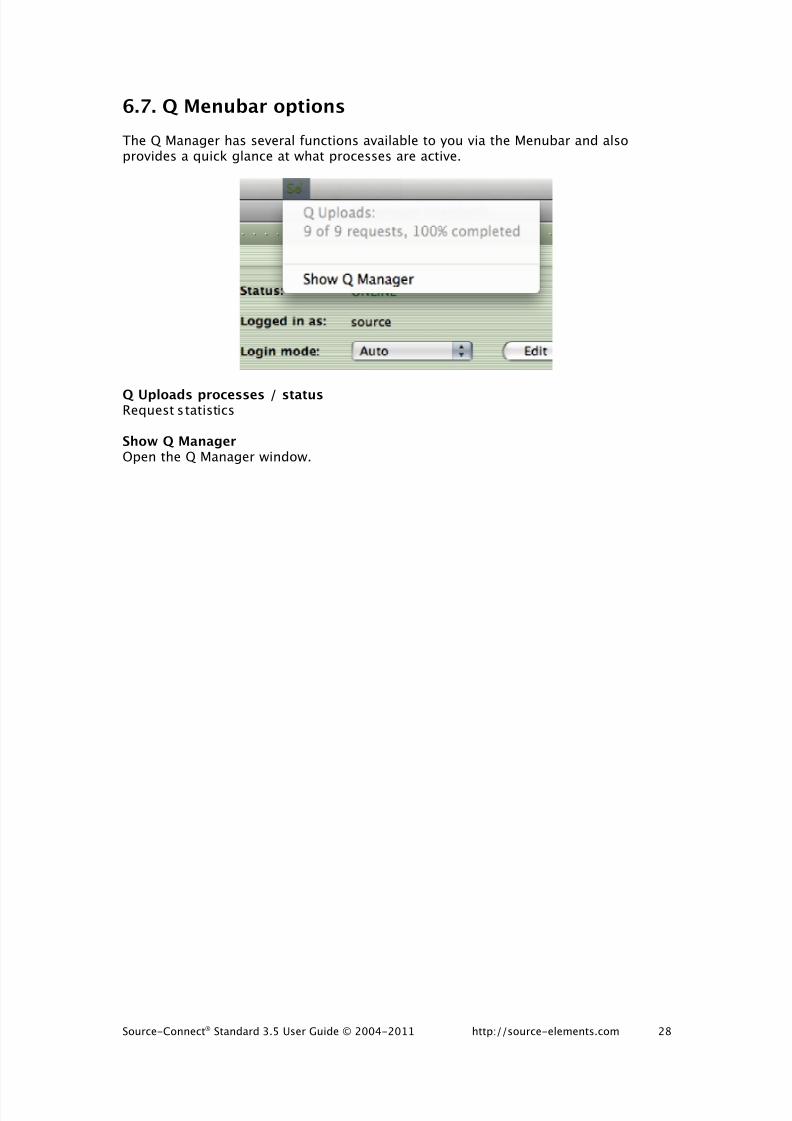
6.7. Q Menubar options
The Q Manager has several functions available to you via the Menubar and alsoprovides a quick glance at what processes are active.
Q Uploads processes / statusRequest statistics
Show Q ManagerOpen the Q Manager window.

8/8/2019 Source-Connect Standard 3.5 User Guide
http://slidepdf.com/reader/full/source-connect-standard-35-user-guide 29/33
Source-Connect® Standard 3.5 User Guide © 2004-2011 http://source-elements.com 29
6.8 Invalid Q Manager settings and warnings
If your Q Manager settings are invalid for some reason, you’ll be given a dialogwarning. Possible warnings are:
• Invalid username or password• Duplicate login, possibly on different machines• Q Manager is unable to connect to the internet
Invalid username or password
This means that your username and password are incorrectly entered, or yourusername has not be validated to work with Source-Connect 3.0. If you are sure thatyour username and password are correct, you can validate your details for 3.0 simplyby visiting the Download page on the Source Elements website:
http://source-elements.com/downloads
Then click on the Download page for your Source-Connect version. The usernameand password that you are logging into Support with will now be validated to workwith the Q Manager.
Duplicate login on different machines

8/8/2019 Source-Connect Standard 3.5 User Guide
http://slidepdf.com/reader/full/source-connect-standard-35-user-guide 30/33
Source-Connect® Standard 3.5 User Guide © 2004-2011 http://source-elements.com 30
If you see this error, it means that another computer is currently logged in with yourusername and password. If you choose to continue the other machine will be loggedout. It will get this same message, so be aware that if someone else is seeing thisyou may have an issue of both of you not being able to login. It can also mean thatyour computer restarted unexpectedly, and the Q Manager did not manually log out,
in which case ignore this message and continue with your login.
Q Manager cannot connect to the Internet
If the Q Manager cannot connect to the internet, perhaps due to a firewall settings orother network configuration issues, the status will be Offline. Check that your
internet connection is working, and if you have a built-in firewall you will need toallow access to the Q Manager and Q Daemon.
8/8/2019 Source-Connect Standard 3.5 User Guide
http://slidepdf.com/reader/full/source-connect-standard-35-user-guide 31/33
Source-Connect® Standard 3.5 User Guide © 2004-2011 http://source-elements.com 31
6.9 Troubleshooting
For each file and process there is a status. For successful files the status will be‘Done’. If you see that the status for a file, or files, is ‘Failed’ it means that either youor your connection partner has invalid settings or a component is not properlyinstalled or configured.
There are various reasons as to why a file may fail to replace or restore. Usually theissue is due to incorrect Network settings on your connection partner’s end – havethem verify their FTP settings or contact Support.
Q Manager errors are rare, and generally mean that the other side is offline, orhas moved or deleted the Q data. Contact support with any specific questions,we will be able to provide detailed information on a case-by-case basis.
6.10 Common Q Manager issues
A comprehensive guide is available online:
http://source-elements.com/support/q
The following are common reasons why Auto-Restore may fail.
Verify the following:
1. Check that Q is enabled. You should have a Q icon to the left of your Source-Connect receiving meter if you are the recording end, and on the Sending meter if you are the sending end. Verify that the Restore and/or Replace checkboxes arechecked in the Source-Connect Pro Settings panel before establishing a connection.
2. It is important that your connection partner using Source-Connect properlyunderstands how to use the Auto-Restore feature with their recording host.
3. Q Manager should be launched: make sure you can view the Q Manager via theMenuBar icon and see the Q Manager window when the Q Manager is the front-most
facing application. 6. Files should be recorded while Source-Connect session was established.Files recorded when Source-Connect is not established will not appear forprocessing in your connection partner’s Q Manager.
7. Sample-rate converting is not supported. Verify your connection is not sample-rate converting.

8/8/2019 Source-Connect Standard 3.5 User Guide
http://slidepdf.com/reader/full/source-connect-standard-35-user-guide 32/33
Source-Connect® Standard 3.5 User Guide © 2004-2011 http://source-elements.com 32
7. Troubleshooting Source-Connect and Known Issues
7.1 Known Issues
CPU speed / RAM configurations:
Source-Connect performs best on a minimum of a 1ghz G4 with at least 1GB RAM. If your computer is configured lower than this, you may experience difficulty whilereading and writing to disk, and your Pro Tools or VST host may tell you that youhave insufficient resources. Because USB devices (for example, if you are using anMbox for your audio I/O) also require additional resources we recommend runningSource-Connect on newer machines.
It is not recommended that you connect your audio devices via a USB hub unless thehub is self-powered.
Network bandwidth:
The most common cause of difficulty is insufficient network resources. Assumingyour network has sufficient bandwidth the issue may be due to internal congestion,for example an FTP server is running or other people are heavily using the network.A common fix for this is to install a dedicated DSL line, or apply QoS (‘Quality of Service’) settings on the router.
For further details and tools see the Support section online or contact Support.
7.2 Reporting Issues
To report an issue, please provide the following information:
1. Source-Connect build number (available from the About box)2. System configuration (Operating system, computer hardware)3. DAW version and hardware e.g. Pro Tools HD 8.0.1, Digi1924. Network configuration i.e. LAN, DSL, wireless etc5. Source-Connect settings: username, bitrate, buffer and port.6. Bandwidth report, for example from http://speakeasy.net/speedtest 7. Description of what action(s) you were taking when the issue occurred, for
example who you were connected to and what the settings were.
Technical Support is available via email, telephone and directly over Source-Connect.

8/8/2019 Source-Connect Standard 3.5 User Guide
http://slidepdf.com/reader/full/source-connect-standard-35-user-guide 33/33
8. Contact Support
Contact Source Elements for technical and general support:
Please use the online support available on our website as the first stop for alltechnical and other questions. If your question is not answered you may contact usvia telephone or email.
Online support:http://www.source-elements.com/support
Online forum:http://source-elements.com/forum
Telephone:
Chicago: +1 312 706 5555London: +44 (0)20 7193 8755Sydney: +61 (02) 8005 5903
Telephone hours: 6am - 6pm Central Time US (Chicago time).
After hours:Please leave a message with your name and phone number and we will return yourcall as soon as possible. If we can’t take your call immediately we call back at leastthe same day, if not earlier. We can also schedule an appointment for a convenienttime for you.
Email:
Technical support: [email protected]: sales@source- elements.comGeneral: [email protected]
When emailing Support, please provide us with the information required to resolvethe issue: for example, your Source-Connect login, computer type, host version, andas much detail about the problem you are having as possible. This will assist us inresponding to you with relevant assistance more rapidly.
Mailing address:
Source Elements LLC515 N. State St25th FloorChicago, Illinois 60654United States