Sony Virtuoso Major and Soloist Digital Language...
28
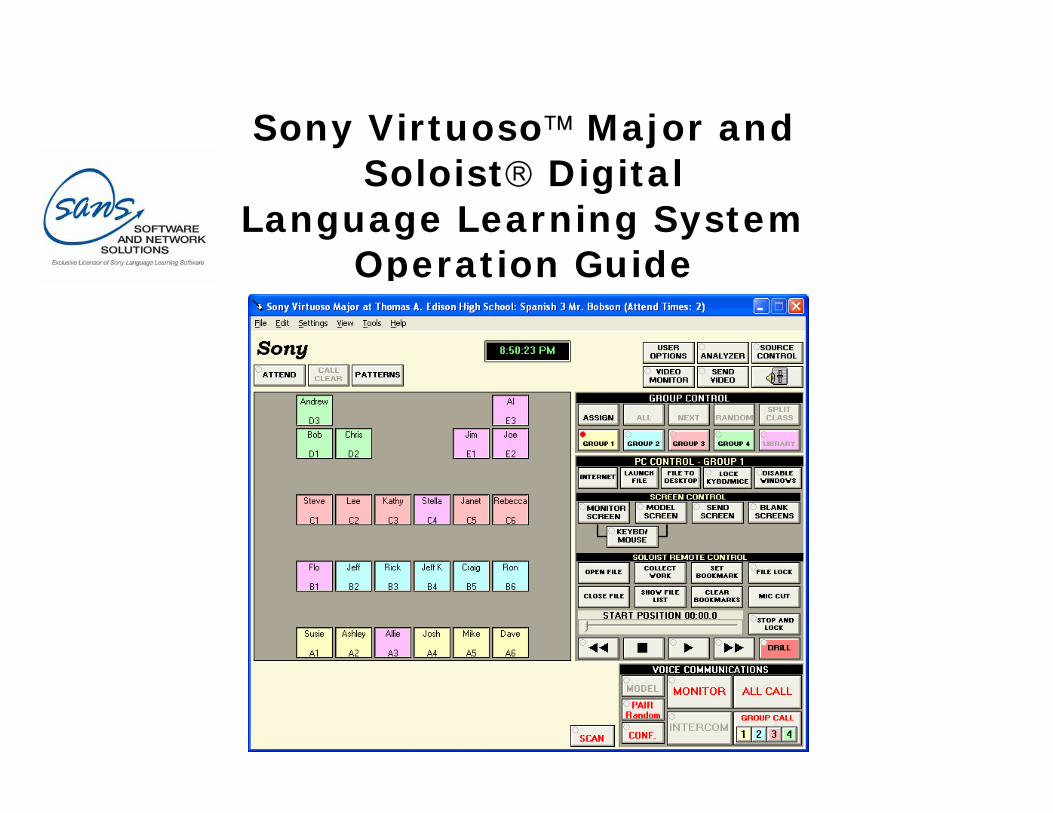
Sony Virtuoso™ Major and Soloist® Digital Language Learning System Operation Guide
-
Upload
trinhtuong -
Category
Documents
-
view
229 -
download
3
Transcript of Sony Virtuoso Major and Soloist Digital Language...
Sony Virtuoso™ Major and Soloist® Digital
Language Learning System Operation Guide
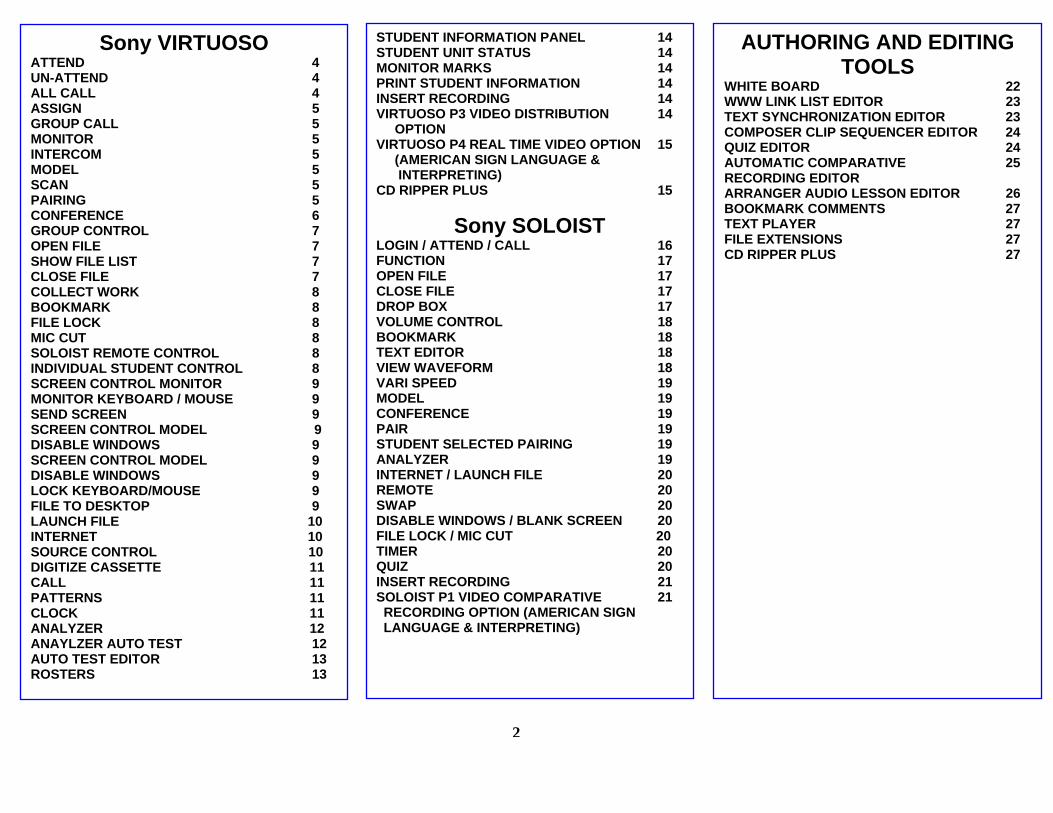
Sony VIRTUOSO ATTEND 4 UN-ATTEND 4 ALL CALL 4 ASSIGN 5 GROUP CALL 5 MONITOR 5 INTERCOM 5 MODEL 5 SCAN 5 PAIRING 5 CONFERENCE 6 GROUP CONTROL 7 OPEN FILE 7 SHOW FILE LIST 7 CLOSE FILE 7 COLLECT WORK 8 BOOKMARK 8 FILE LOCK 8 MIC CUT 8 SOLOIST REMOTE CONTROL 8 INDIVIDUAL STUDENT CONTROL 8 SCREEN CONTROL MONITOR 9 MONITOR KEYBOARD / MOUSE 9 SEND SCREEN 9 SCREEN CONTROL MODEL 9 DISABLE WINDOWS 9 SCREEN CONTROL MODEL 9 DISABLE WINDOWS 9 LOCK KEYBOARD/MOUSE 9 FILE TO DESKTOP 9 LAUNCH FILE 10 INTERNET 10 SOURCE CONTROL 10 DIGITIZE CASSETTE 11 CALL 11 PATTERNS 11 CLOCK 11 ANALYZER 12 ANAYLZER AUTO TEST 12 AUTO TEST EDITOR 13 ROSTERS 13
STUDENT INFORMATION PANEL 14 STUDENT UNIT STATUS 14 MONITOR MARKS 14 PRINT STUDENT INFORMATION 14INSERT RECORDING 14 VIRTUOSO P3 VIDEO DISTRIBUTION 14 OPTION VIRTUOSO P4 REAL TIME VIDEO OPTION 15 (AMERICAN SIGN LANGUAGE & INTERPRETING) CD RIPPER PLUS 15
Sony SOLOIST LOGIN / ATTEND / CALL 16 FUNCTION 17 OPEN FILE 17 CLOSE FILE 17 DROP BOX 17 VOLUME CONTROL 18 BOOKMARK 18 TEXT EDITOR 18 VIEW WAVEFORM 18 VARI SPEED 19 MODEL 19 CONFERENCE 19 PAIR 19 STUDENT SELECTED PAIRING 19 ANALYZER 19 INTERNET / LAUNCH FILE 20 REMOTE 20 SWAP 20 DISABLE WINDOWS / BLANK SCREEN 20 FILE LOCK / MIC CUT 20 TIMER 20 QUIZ 20 INSERT RECORDING 21 SOLOIST P1 VIDEO COMPARATIVE 21 RECORDING OPTION (AMERICAN SIGN LANGUAGE & INTERPRETING)
AUTHORING AND EDITING TOOLS
WHITE BOARD 22 WWW LINK LIST EDITOR 23 TEXT SYNCHRONIZATION EDITOR 23 COMPOSER CLIP SEQUENCER EDITOR 24 QUIZ EDITOR 24 AUTOMATIC COMPARATIVE 25 RECORDING EDITOR ARRANGER AUDIO LESSON EDITOR 26 BOOKMARK COMMENTS 27 TEXT PLAYER 27 FILE EXTENSIONS 27 CD RIPPER PLUS 27
2
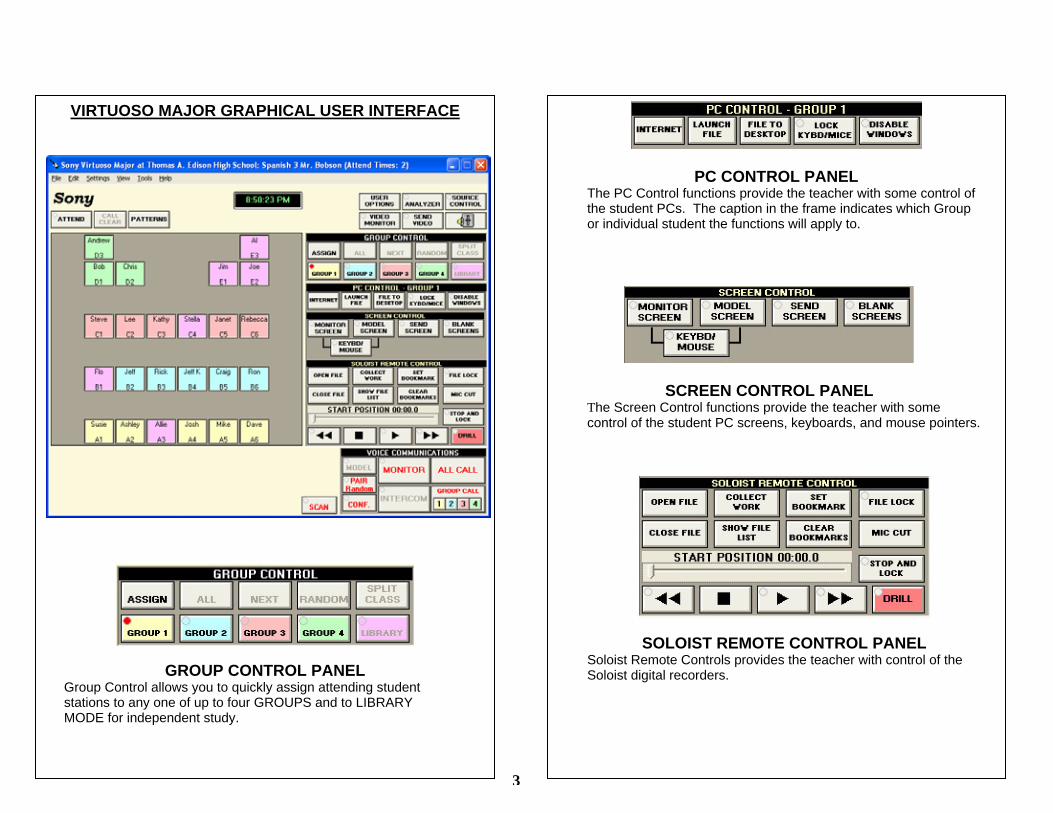
VIRTUOSO MAJOR GRAPHICAL USER INTERFACE
GROUP CONTROL PANEL Group Control allows you to quickly assign attending student stations to any one of up to four GROUPS and to LIBRARY MODE for independent study.
PC CONTROL PANEL The PC Control functions provide the teacher with some control of the student PCs. The caption in the frame indicates which Group or individual student the functions will apply to.
SCREEN CONTROL PANEL The Screen Control functions provide the teacher with some control of the student PC screens, keyboards, and mouse pointers.
SOLOIST REMOTE CONTROL PANEL Soloist Remote Controls provides the teacher with control of the Soloist digital recorders.
3
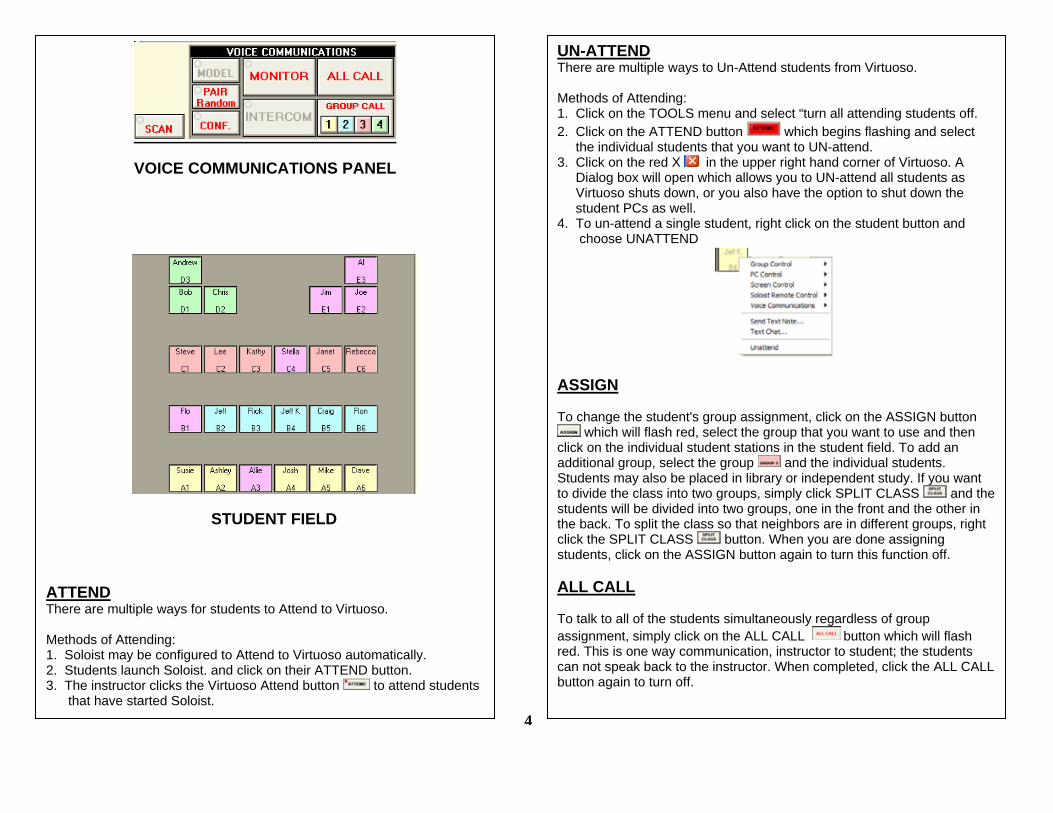
VOICE COMMUNICATIONS PANEL
STUDENT FIELD ATTEND There are multiple ways for students to Attend to Virtuoso. Methods of Attending: 1. Soloist may be configured to Attend to Virtuoso automatically. 2. Students launch Soloist. and click on their ATTEND button. 3. The instructor clicks the Virtuoso Attend button to attend students that have started Soloist.
UN-ATTEND There are multiple ways to Un-Attend students from Virtuoso. Methods of Attending: 1. Click on the TOOLS menu and select “turn all attending students off. 2. Click on the ATTEND button which begins flashing and select the individual students that you want to UN-attend. 3. Click on the red X in the upper right hand corner of Virtuoso. A Dialog box will open which allows you to UN-attend all students as Virtuoso shuts down, or you also have the option to shut down the student PCs as well. 4. To un-attend a single student, right click on the student button and choose UNATTEND
ASSIGN To change the student's group assignment, click on the ASSIGN button
which will flash red, select the group that you want to use and then click on the individual student stations in the student field. To add an additional group, select the group and the individual students. Students may also be placed in library or independent study. If you want to divide the class into two groups, simply click SPLIT CLASS and the students will be divided into two groups, one in the front and the other in the back. To split the class so that neighbors are in different groups, right click the SPLIT CLASS button. When you are done assigning students, click on the ASSIGN button again to turn this function off. ALL CALL To talk to all of the students simultaneously regardless of group assignment, simply click on the ALL CALL button which will flash red. This is one way communication, instructor to student; the students can not speak back to the instructor. When completed, click the ALL CALL button again to turn off.
4
ASSIGN To change the student's group assignment, click on the ASSIGN button
which will flash red, select the group that you want to use and then click on the individual student stations in the student field. To add an additional group, select the group and the individual students. Students may also be placed in library or independent study. If you want to divide the class into two groups, simply click Split Class and the students will be divided into two groups. When you are done assigning students, click on the ASSIGN button again to turn this function off. GROUP CALL
GROUP CALL is similar to ALL CALL in that it is one way communication; instructor to student. The difference is that you speak only to students in a particular group. Students assigned to library are not considered to be in a group so there is no group call for those students. When completed, click the GROUP CALL button again to turn off. MONITOR (LISTEN)
To monitor an individual student, select the student in the student field and click on the voice communication MONITOR button (this button may be labeled LISTEN ). A colored border turns on around the selected student. This will allow you to listen to the selected student undetected without clicking, popping, etc. When finished listening to this student, you can select a different student to listen to. When you are done monitoring, un-select the last student and monitor button. INTERCOM To intercom with a student, select the student by clicking on his/her icon
in the student field and then on the INTERCOM button . This will allow the instructor and student to have a private telephone style conversation. When finished, click on the Intercom button again and release the student. If you now want to go back to monitor students, you must again select the MONITOR button.
MODEL Click on the settings tab and choose MODEL. You can choose for the model to go to all students except library or only students in the same group as the model. You can also allow the models audio file to play with the model. When you have made your selections, click OK, chose the
student and click MODEL . Functions can be combined, a pair can be a model. SCAN Scan allows you to scan 1 student at a time in audio or 1, 4, 9 or 16 student screens at a time. To change the number of screens, choose the PC Screen Control/Scanning tab in User Options.
PAIRING Virtuoso Major has a variety of ways to Pair students. To choose the various options, press the keyboard SHIFT while clicking the PAIR button
or click the settings tab and then choose Pair. The Pair dialog box opens.
To use Pairing 1. Click on the groups that you want in Pairs. 2. Decide if you want to display the partner’s names to each other. 3. Decide if you want to share keyboards and mouse and in what size
window. 5
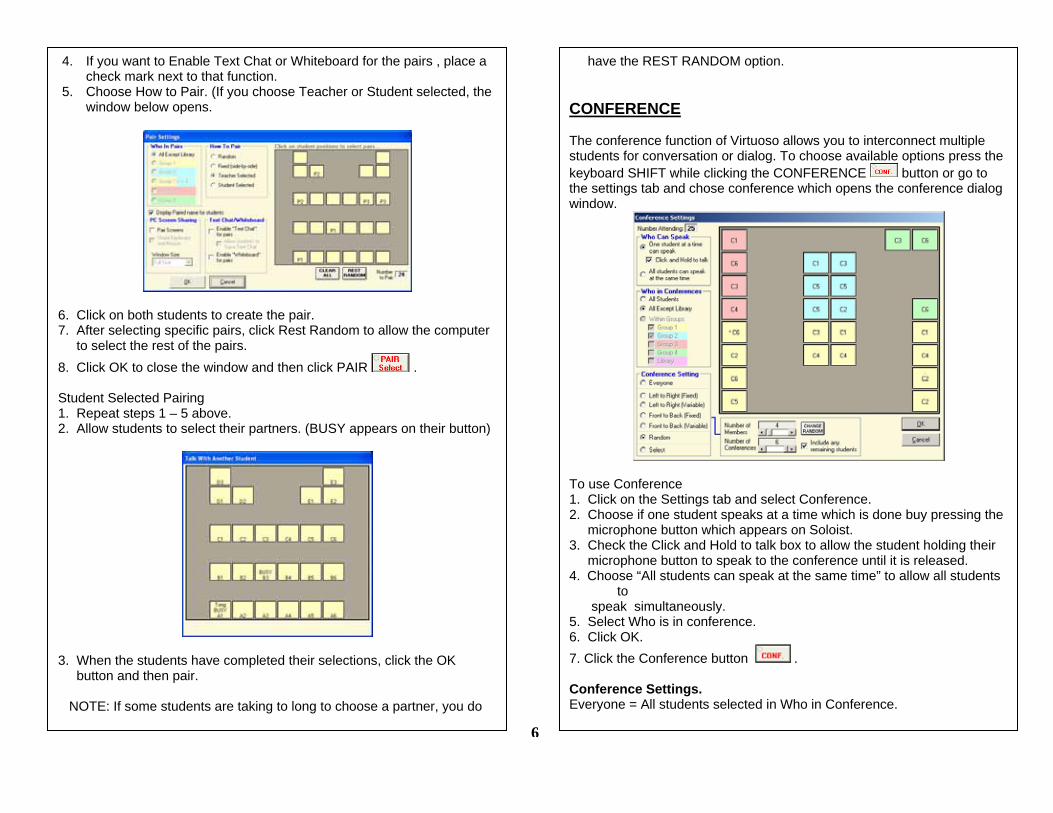
4. If you want to Enable Text Chat or Whiteboard for the pairs , place a check mark next to that function.
5. Choose How to Pair. (If you choose Teacher or Student selected, the window below opens.
6. Click on both students to create the pair. 7. After selecting specific pairs, click Rest Random to allow the computer to select the rest of the pairs. 8. Click OK to close the window and then click PAIR . Student Selected Pairing 1. Repeat steps 1 – 5 above. 2. Allow students to select their partners. (BUSY appears on their button)
3. When the students have completed their selections, click the OK button and then pair. NOTE: If some students are taking to long to choose a partner, you do
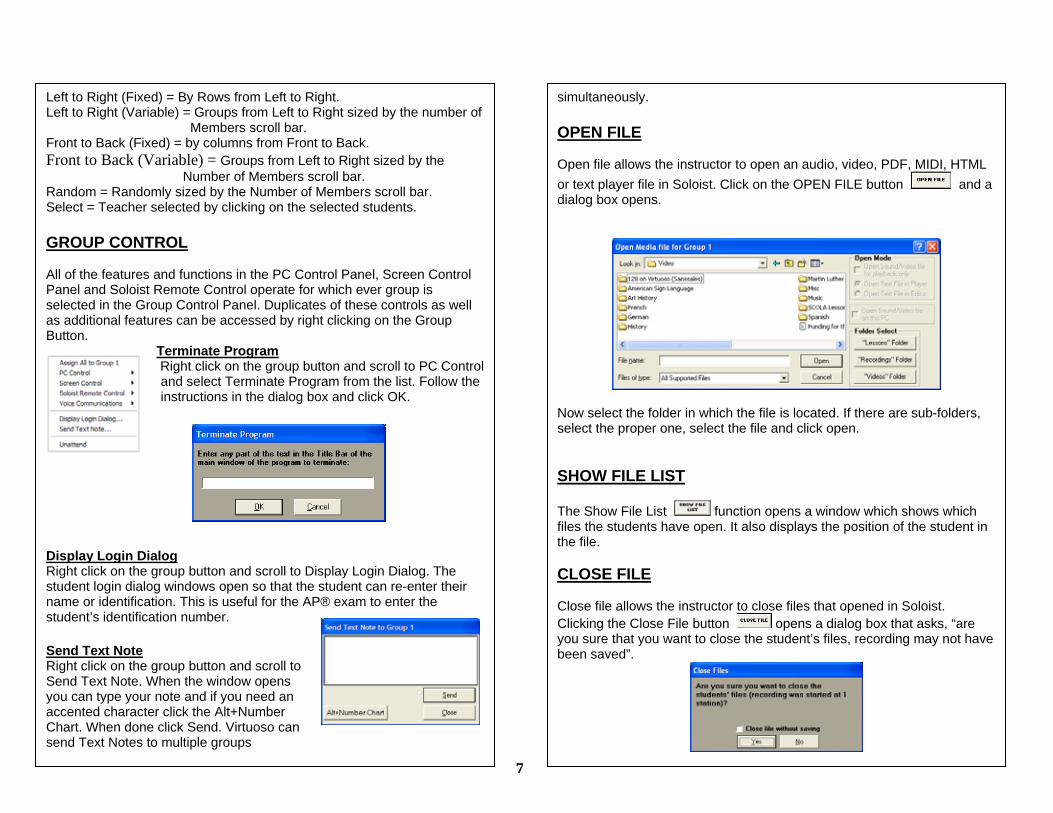
have the REST RANDOM option. CONFERENCE The conference function of Virtuoso allows you to interconnect multiple students for conversation or dialog. To choose available options press the keyboard SHIFT while clicking the CONFERENCE button or go to the settings tab and chose conference which opens the conference dialog window.
To use Conference 1. Click on the Settings tab and select Conference. 2. Choose if one student speaks at a time which is done buy pressing the microphone button which appears on Soloist. 3. Check the Click and Hold to talk box to allow the student holding their microphone button to speak to the conference until it is released. 4. Choose “All students can speak at the same time” to allow all students
to speak simultaneously. 5. Select Who is in conference. 6. Click OK. 7. Click the Conference button . Conference Settings. Everyone = All students selected in Who in Conference.
6
Left to Right (Fixed) = By Rows from Left to Right. Left to Right (Variable) = Groups from Left to Right sized by the number of Members scroll bar. Front to Back (Fixed) = by columns from Front to Back. Front to Back (Variable) = Groups from Left to Right sized by the Number of Members scroll bar. Random = Randomly sized by the Number of Members scroll bar. Select = Teacher selected by clicking on the selected students. GROUP CONTROL All of the features and functions in the PC Control Panel, Screen Control Panel and Soloist Remote Control operate for which ever group is selected in the Group Control Panel. Duplicates of these controls as well as additional features can be accessed by right clicking on the Group Button. Terminate Program Right click on the group button and scroll to PC Control and select Terminate Program from the list. Follow the instructions in the dialog box and click OK. Display Login Dialog Right click on the group button and scroll to Display Login Dialog. The student login dialog windows open so that the student can re-enter their name or identification. This is useful for the AP® exam to enter the student’s identification number. Send Text Note Right click on the group button and scroll to Send Text Note. When the window opens you can type your note and if you need an accented character click the Alt+Number Chart. When done click Send. Virtuoso can send Text Notes to multiple groups
simultaneously. OPEN FILE Open file allows the instructor to open an audio, video, PDF, MIDI, HTML or text player file in Soloist. Click on the OPEN FILE button and a dialog box opens.
Now select the folder in which the file is located. If there are sub-folders, select the proper one, select the file and click open. SHOW FILE LIST The Show File List function opens a window which shows which files the students have open. It also displays the position of the student in the file. CLOSE FILE Close file allows the instructor to close files that opened in Soloist. Clicking the Close File button opens a dialog box that asks, “are you sure that you want to close the student’s files, recording may not have been saved”.
7
You can choose Yes or No or close files without saving. COLLECT WORK To Collect Student Work 1. Click the Collect Work button and the dialog box opens.
2. Select the folder that you want the files to be collected in. 3. Select the collection file properties. 4. Decide if you want to close the files after collecting and to name them
with only the user ID. 5. Decide if you want to collect the recording to the students CD-R. 6. Select the file format, WAV or MP3. 7. Click the collect button. SET BOOKMARK By clicking on the Set Bookmark button you can set up to fifty bookmarks on the student recorders. The clear bookmarks button allows you to clear all bookmarks on the student recorders whether they are set by the instructor or students. FILE LOCK By clicking on File Lock button the Open and Close files buttons, Text Editor and Help buttons on Soloist are removed.
MIC CUT The Mic Cut function turns off the student microphone. SOLOIST REMOTE FUNCTION CONTROLS Virtuoso contains Soloist remote control function buttons by group. They include Rewind , Stop , Play , Fast Forward , Drill Record , Stop and Lock and Start Position
. By clicking on any of these buttons, that function is activated on Soloist. By choosing the Start Position, you can select a starting point for all of the recorders in the group. Stop and Lock control removes all function controls on the student recorder. By right clicking on the DRILL button, you can decide whether the student recorders will be in FULL record (program and student track), DRILL record (record on student track only) or INSERT recording (inserting student response time in the content file). This is useful when using recordings that weren’t designed for student responses. On the Student Control tab in User Options you can select to “Sound tone for students upon recording start”. INDIVIDUAL STUDENT CONTROL Many of the control functions that are accomplished by group can also be accomplished for an individual student. By right clicking on the student’s icon, a window opens.
GROUP CONTROL = Group Assignment , PC CONTROL = Launch File and Copy File to Desktop. SCREEN CONTROL = Monitor, Keyboard/Mouse and Model. SOLOIST REMOTE CONTROL = Open File, Close File, Collect
8
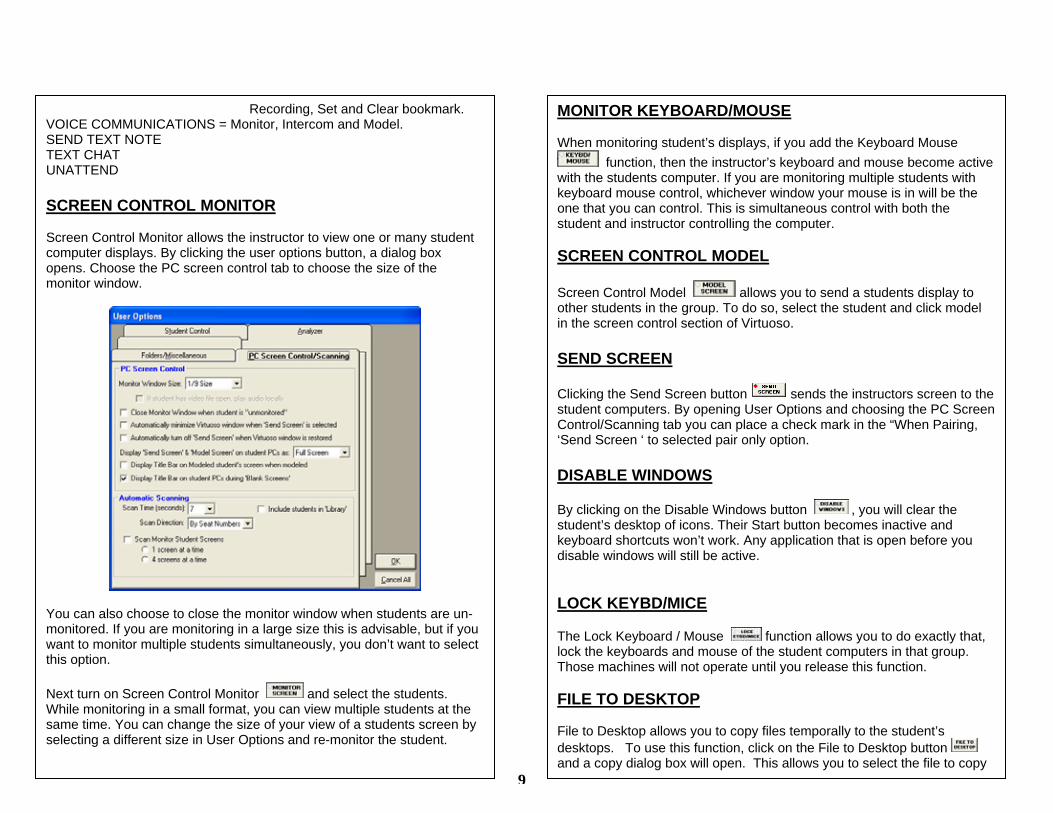
Recording, Set and Clear bookmark. VOICE COMMUNICATIONS = Monitor, Intercom and Model. SEND TEXT NOTE TEXT CHAT UNATTEND SCREEN CONTROL MONITOR Screen Control Monitor allows the instructor to view one or many student computer displays. By clicking the user options button, a dialog box opens. Choose the PC screen control tab to choose the size of the monitor window.
You can also choose to close the monitor window when students are un-monitored. If you are monitoring in a large size this is advisable, but if you want to monitor multiple students simultaneously, you don’t want to select this option. Next turn on Screen Control Monitor and select the students. While monitoring in a small format, you can view multiple students at the same time. You can change the size of your view of a students screen by selecting a different size in User Options and re-monitor the student.
MONITOR KEYBOARD/MOUSE When monitoring student’s displays, if you add the Keyboard Mouse
function, then the instructor’s keyboard and mouse become active with the students computer. If you are monitoring multiple students with keyboard mouse control, whichever window your mouse is in will be the one that you can control. This is simultaneous control with both the student and instructor controlling the computer. SCREEN CONTROL MODEL Screen Control Model allows you to send a students display to other students in the group. To do so, select the student and click model in the screen control section of Virtuoso. SEND SCREEN Clicking the Send Screen button sends the instructors screen to the student computers. By opening User Options and choosing the PC Screen Control/Scanning tab you can place a check mark in the “When Pairing, ‘Send Screen ‘ to selected pair only option. DISABLE WINDOWS By clicking on the Disable Windows button , you will clear the student’s desktop of icons. Their Start button becomes inactive and keyboard shortcuts won’t work. Any application that is open before you disable windows will still be active. LOCK KEYBD/MICE The Lock Keyboard / Mouse function allows you to do exactly that, lock the keyboards and mouse of the student computers in that group. Those machines will not operate until you release this function. FILE TO DESKTOP File to Desktop allows you to copy files temporally to the student’s desktops. To use this function, click on the File to Desktop button and a copy dialog box will open. This allows you to select the file to copy
9
to the student computers. The files must be in a folder that the students have permission to. Select the desired file and click on copy. You may repeat this as many times as required. LAUNCH FILE Launch File allows you to open a file for the students outside of Soloist. The file can be of any type assuming that the required application is installed on the student computer. INTERNET Virtuoso provides internet control for student stations. By clicking on the Internet button , a browser opens on the instructors screen.
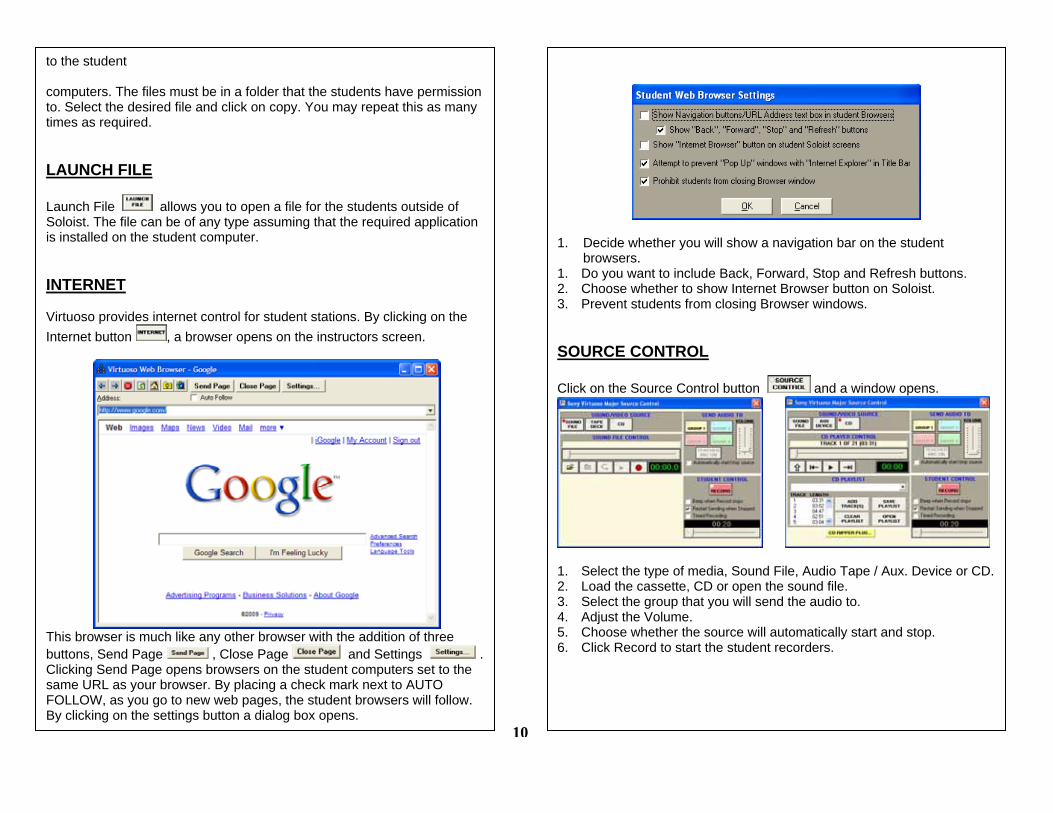
This browser is much like any other browser with the addition of three buttons, Send Page , Close Page and Settings . Clicking Send Page opens browsers on the student computers set to the same URL as your browser. By placing a check mark next to AUTO FOLLOW, as you go to new web pages, the student browsers will follow. By clicking on the settings button a dialog box opens.
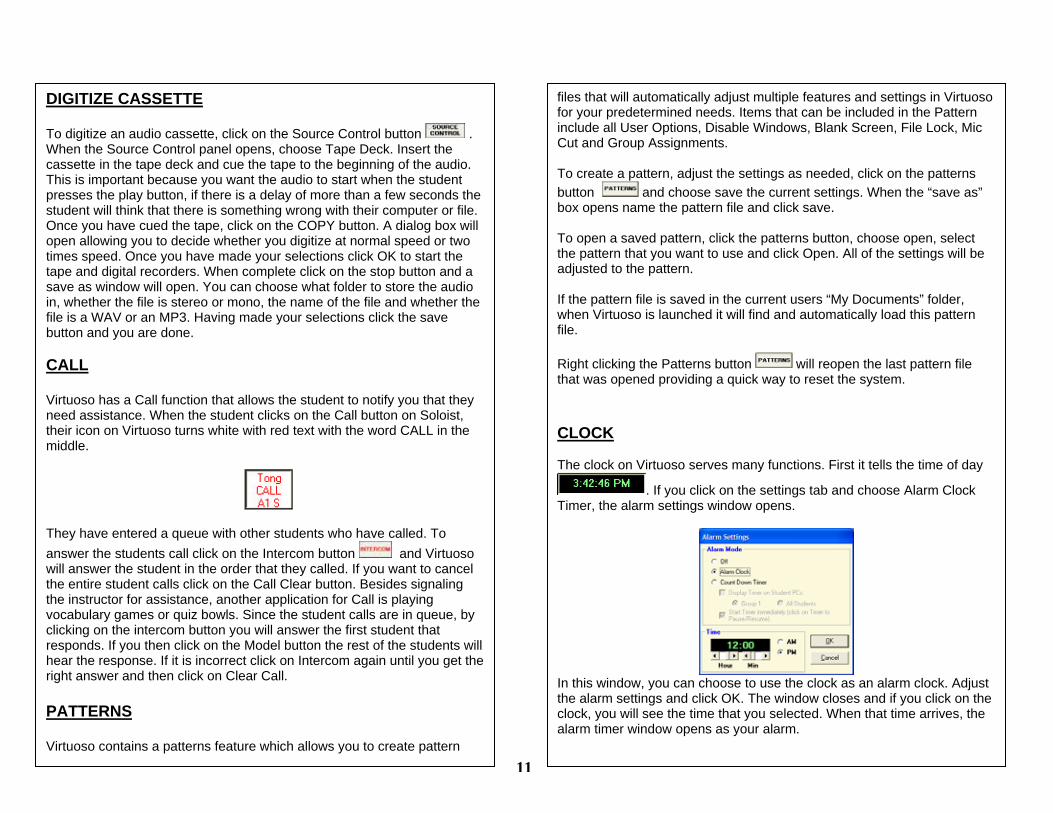
1. Decide whether you will show a navigation bar on the student browsers. 1. Do you want to include Back, Forward, Stop and Refresh buttons. 2. Choose whether to show Internet Browser button on Soloist. 3. Prevent students from closing Browser windows. SOURCE CONTROL Click on the Source Control button and a window opens.
1. Select the type of media, Sound File, Audio Tape / Aux. Device or CD. 2. Load the cassette, CD or open the sound file. 3. Select the group that you will send the audio to. 4. Adjust the Volume. 5. Choose whether the source will automatically start and stop. 6. Click Record to start the student recorders.
10
11
DIGITIZE CASSETTE To digitize an audio cassette, click on the Source Control button . When the Source Control panel opens, choose Tape Deck. Insert the cassette in the tape deck and cue the tape to the beginning of the audio. This is important because you want the audio to start when the student presses the play button, if there is a delay of more than a few seconds the student will think that there is something wrong with their computer or file. Once you have cued the tape, click on the COPY button. A dialog box will open allowing you to decide whether you digitize at normal speed or two times speed. Once you have made your selections click OK to start the tape and digital recorders. When complete click on the stop button and a save as window will open. You can choose what folder to store the audio in, whether the file is stereo or mono, the name of the file and whether the file is a WAV or an MP3. Having made your selections click the save button and you are done. CALL Virtuoso has a Call function that allows the student to notify you that they need assistance. When the student clicks on the Call button on Soloist, their icon on Virtuoso turns white with red text with the word CALL in the middle.
They have entered a queue with other students who have called. To answer the students call click on the Intercom button and Virtuoso will answer the student in the order that they called. If you want to cancel the entire student calls click on the Call Clear button. Besides signaling the instructor for assistance, another application for Call is playing vocabulary games or quiz bowls. Since the student calls are in queue, by clicking on the intercom button you will answer the first student that responds. If you then click on the Model button the rest of the students will hear the response. If it is incorrect click on Intercom again until you get the right answer and then click on Clear Call. PATTERNS Virtuoso contains a patterns feature which allows you to create pattern
files that will automatically adjust multiple features and settings in Virtuoso for your predetermined needs. Items that can be included in the Pattern include all User Options, Disable Windows, Blank Screen, File Lock, Mic Cut and Group Assignments. To create a pattern, adjust the settings as needed, click on the patterns button and choose save the current settings. When the “save as” box opens name the pattern file and click save. To open a saved pattern, click the patterns button, choose open, select the pattern that you want to use and click Open. All of the settings will be adjusted to the pattern. If the pattern file is saved in the current users “My Documents” folder, when Virtuoso is launched it will find and automatically load this pattern file. Right clicking the Patterns button will reopen the last pattern file that was opened providing a quick way to reset the system. CLOCK The clock on Virtuoso serves many functions. First it tells the time of day
. If you click on the settings tab and choose Alarm Clock Timer, the alarm settings window opens.
In this window, you can choose to use the clock as an alarm clock. Adjust the alarm settings and click OK. The window closes and if you click on the clock, you will see the time that you selected. When that time arrives, the alarm timer window opens as your alarm.
12
You can also choose to use the clock as a count down timer.
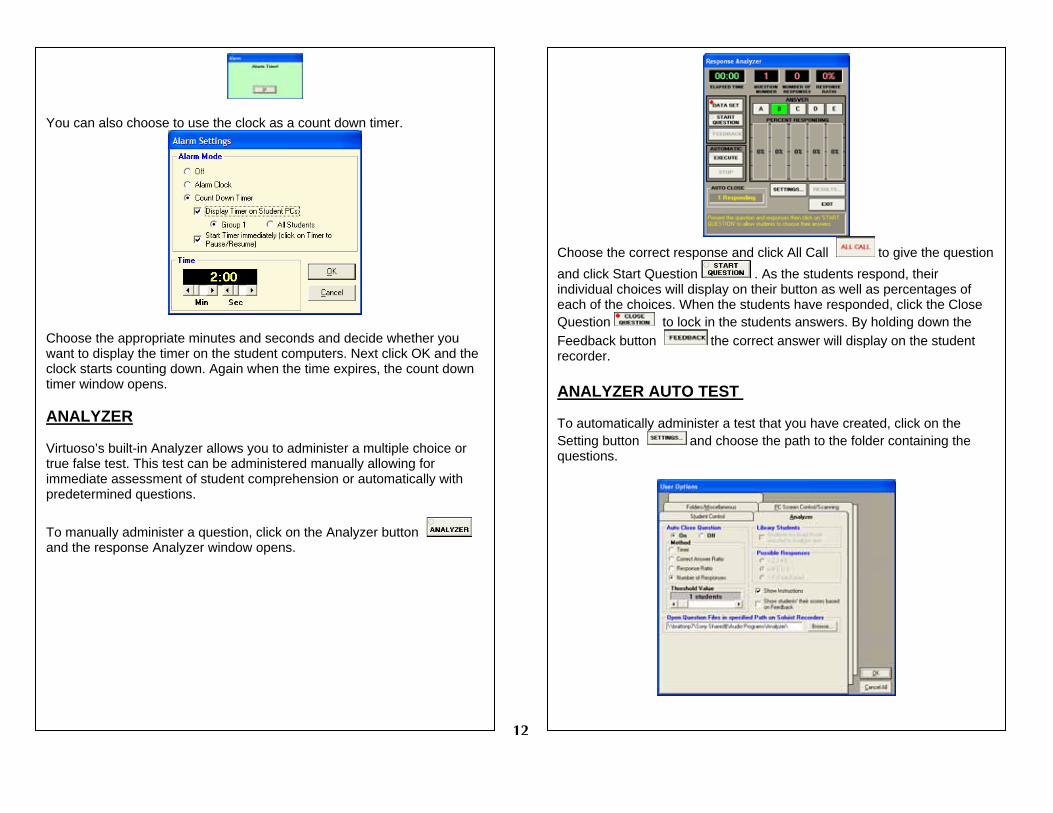
Choose the appropriate minutes and seconds and decide whether you want to display the timer on the student computers. Next click OK and the clock starts counting down. Again when the time expires, the count down timer window opens. ANALYZER Virtuoso’s built-in Analyzer allows you to administer a multiple choice or true false test. This test can be administered manually allowing for immediate assessment of student comprehension or automatically with predetermined questions.
To manually administer a question, click on the Analyzer button and the response Analyzer window opens.
Choose the correct response and click All Call to give the question and click Start Question . As the students respond, their individual choices will display on their button as well as percentages of each of the choices. When the students have responded, click the Close Question to lock in the students answers. By holding down the Feedback button the correct answer will display on the student recorder. ANALYZER AUTO TEST To automatically administer a test that you have created, click on the Setting button and choose the path to the folder containing the questions.
This must be a folder that the students have access to such as the folder that contains the original audio programs. Now click OK and choose the Execute button to select the test that you want to give and click open. The test will automatically begin based on the parameters that you have chosen. When complete click on the Results button and the student and class results will be displayed. In this window you can decide whether to archive the students scores, the class summary, student detail information for all or selected students and save this to file or print the data. When complete, choose the close button and exit. AUTO TEST EDITOR To create an automated test you first must create your question material. Questions can be WAV, MP3. ASCII.TEXT or Rich Text files. Each file should be named as QUESTION insert number and the file extension. Both an audio and text file can be named with the same question number so that both will open at the same time. Once questions have been created, open the analyzer auto test editor.
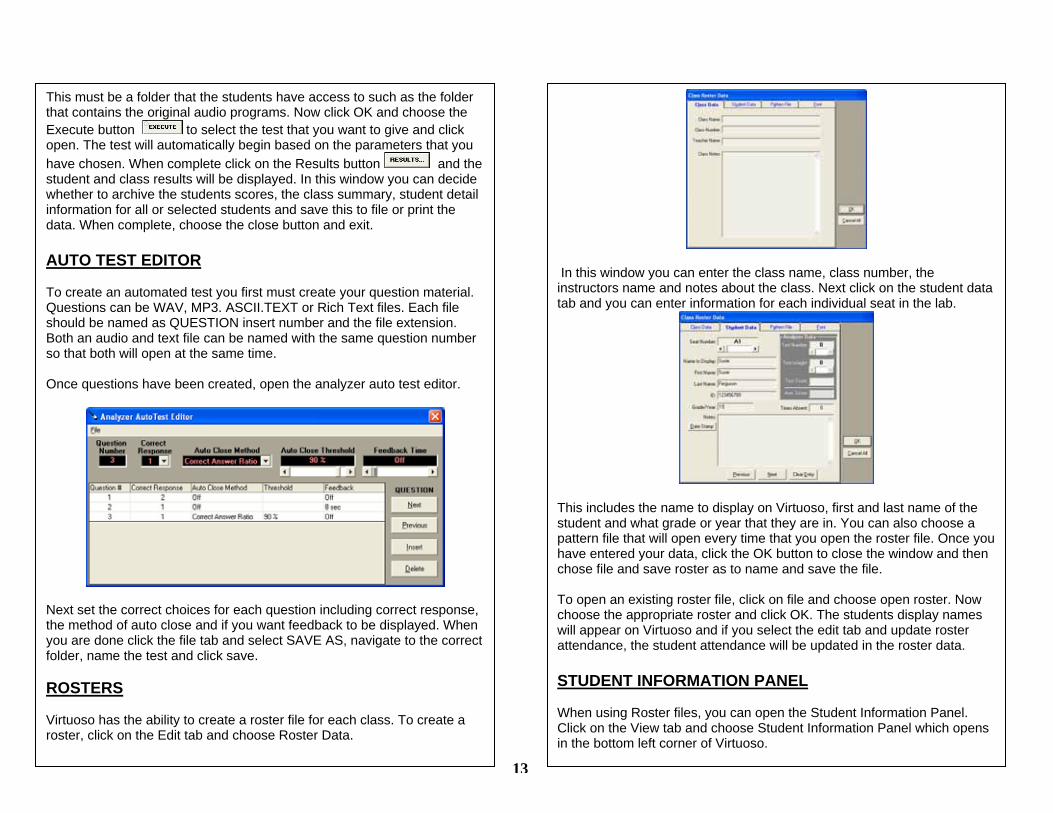
Next set the correct choices for each question including correct response, the method of auto close and if you want feedback to be displayed. When you are done click the file tab and select SAVE AS, navigate to the correct folder, name the test and click save. ROSTERS Virtuoso has the ability to create a roster file for each class. To create a roster, click on the Edit tab and choose Roster Data.
In this window you can enter the class name, class number, the instructors name and notes about the class. Next click on the student data tab and you can enter information for each individual seat in the lab.
This includes the name to display on Virtuoso, first and last name of the student and what grade or year that they are in. You can also choose a pattern file that will open every time that you open the roster file. Once you have entered your data, click the OK button to close the window and then chose file and save roster as to name and save the file. To open an existing roster file, click on file and choose open roster. Now choose the appropriate roster and click OK. The students display names will appear on Virtuoso and if you select the edit tab and update roster attendance, the student attendance will be updated in the roster data. STUDENT INFORMATION PANEL When using Roster files, you can open the Student Information Panel. Click on the View tab and choose Student Information Panel which opens in the bottom left corner of Virtuoso.
13
14
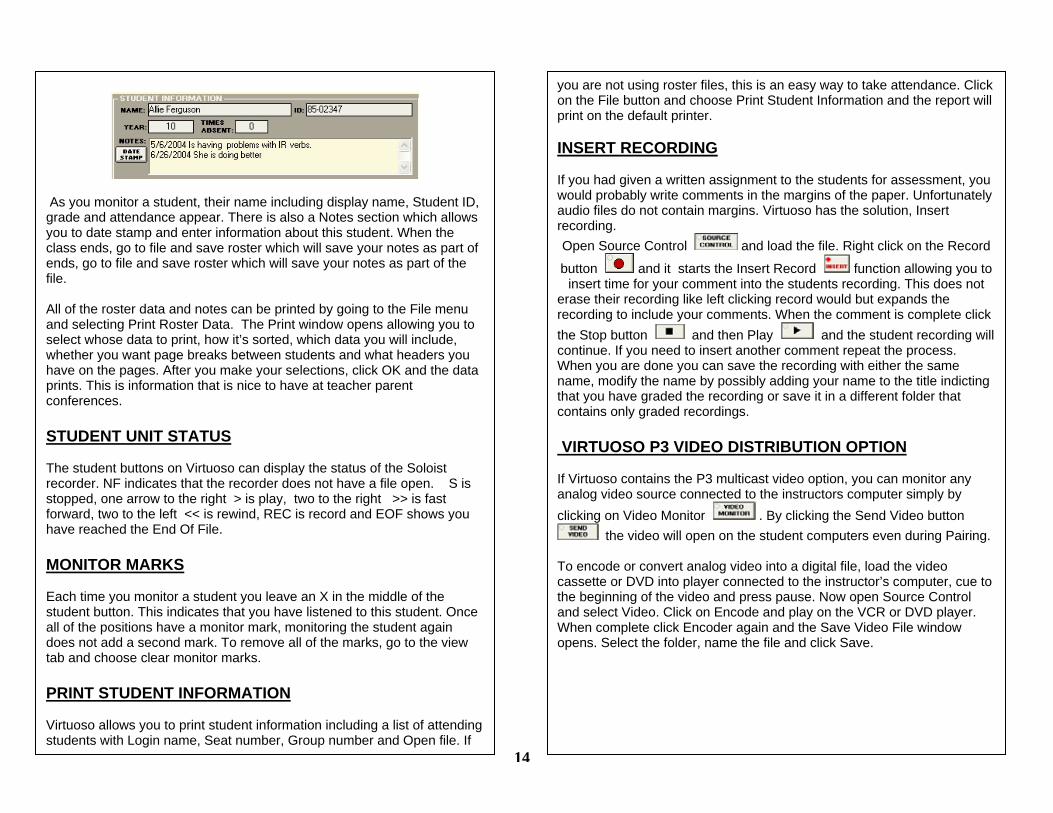
As you monitor a student, their name including display name, Student ID, grade and attendance appear. There is also a Notes section which allows you to date stamp and enter information about this student. When the class ends, go to file and save roster which will save your notes as part of ends, go to file and save roster which will save your notes as part of the file. All of the roster data and notes can be printed by going to the File menu and selecting Print Roster Data. The Print window opens allowing you to select whose data to print, how it’s sorted, which data you will include, whether you want page breaks between students and what headers you have on the pages. After you make your selections, click OK and the data prints. This is information that is nice to have at teacher parent conferences. STUDENT UNIT STATUS The student buttons on Virtuoso can display the status of the Soloist recorder. NF indicates that the recorder does not have a file open. S is stopped, one arrow to the right > is play, two to the right >> is fast forward, two to the left << is rewind, REC is record and EOF shows you have reached the End Of File. MONITOR MARKS Each time you monitor a student you leave an X in the middle of the student button. This indicates that you have listened to this student. Once all of the positions have a monitor mark, monitoring the student again does not add a second mark. To remove all of the marks, go to the view tab and choose clear monitor marks. PRINT STUDENT INFORMATION Virtuoso allows you to print student information including a list of attending students with Login name, Seat number, Group number and Open file. If
you are not using roster files, this is an easy way to take attendance. Click on the File button and choose Print Student Information and the report will print on the default printer. INSERT RECORDING If you had given a written assignment to the students for assessment, you would probably write comments in the margins of the paper. Unfortunately audio files do not contain margins. Virtuoso has the solution, Insert recording. Open Source Control and load the file. Right click on the Record
button and it starts the Insert Record function allowing you to insert time for your comment into the students recording. This does not
erase their recording like left clicking record would but expands the recording to include your comments. When the comment is complete click the Stop button and then Play and the student recording will continue. If you need to insert another comment repeat the process. When you are done you can save the recording with either the same name, modify the name by possibly adding your name to the title indicting that you have graded the recording or save it in a different folder that contains only graded recordings. VIRTUOSO P3 VIDEO DISTRIBUTION OPTION If Virtuoso contains the P3 multicast video option, you can monitor any analog video source connected to the instructors computer simply by clicking on Video Monitor . By clicking the Send Video button
the video will open on the student computers even during Pairing. To encode or convert analog video into a digital file, load the video cassette or DVD into player connected to the instructor’s computer, cue to the beginning of the video and press pause. Now open Source Control and select Video. Click on Encode and play on the VCR or DVD player. When complete click Encoder again and the Save Video File window opens. Select the folder, name the file and click Save.
15
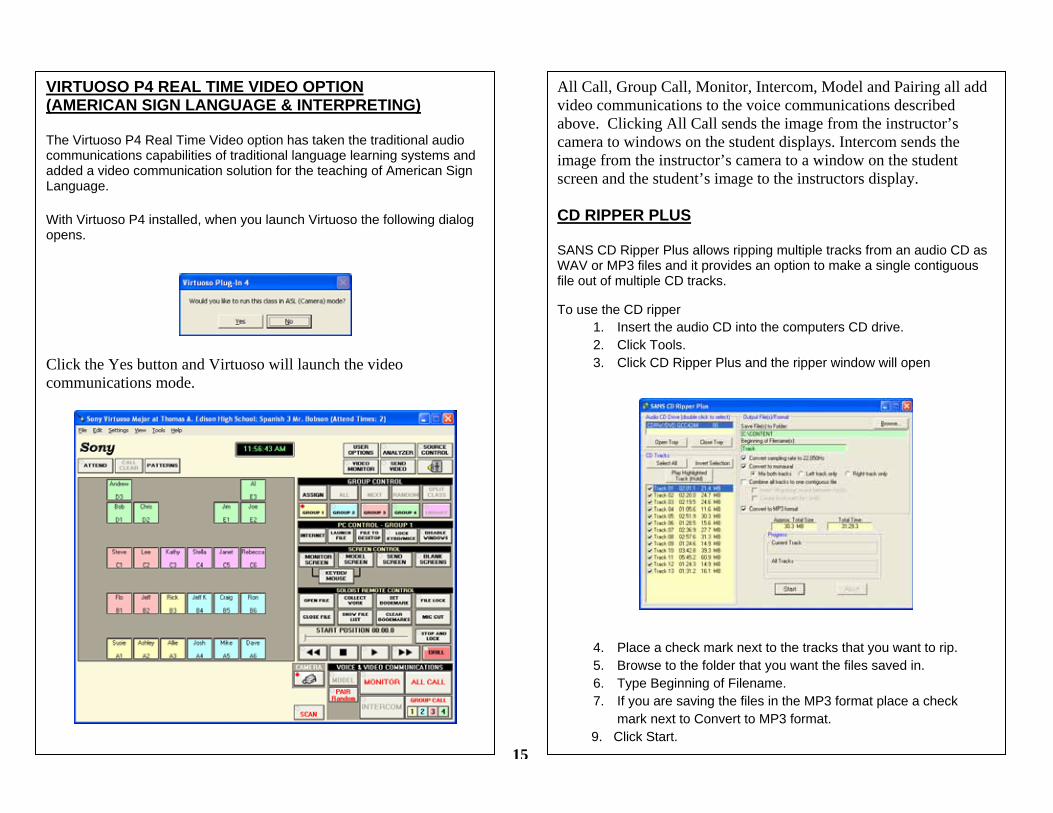
VIRTUOSO P4 REAL TIME VIDEO OPTION (AMERICAN SIGN LANGUAGE & INTERPRETING) The Virtuoso P4 Real Time Video option has taken the traditional audio communications capabilities of traditional language learning systems and added a video communication solution for the teaching of American Sign Language. With Virtuoso P4 installed, when you launch Virtuoso the following dialog opens.
Click the Yes button and Virtuoso will launch the video communications mode.
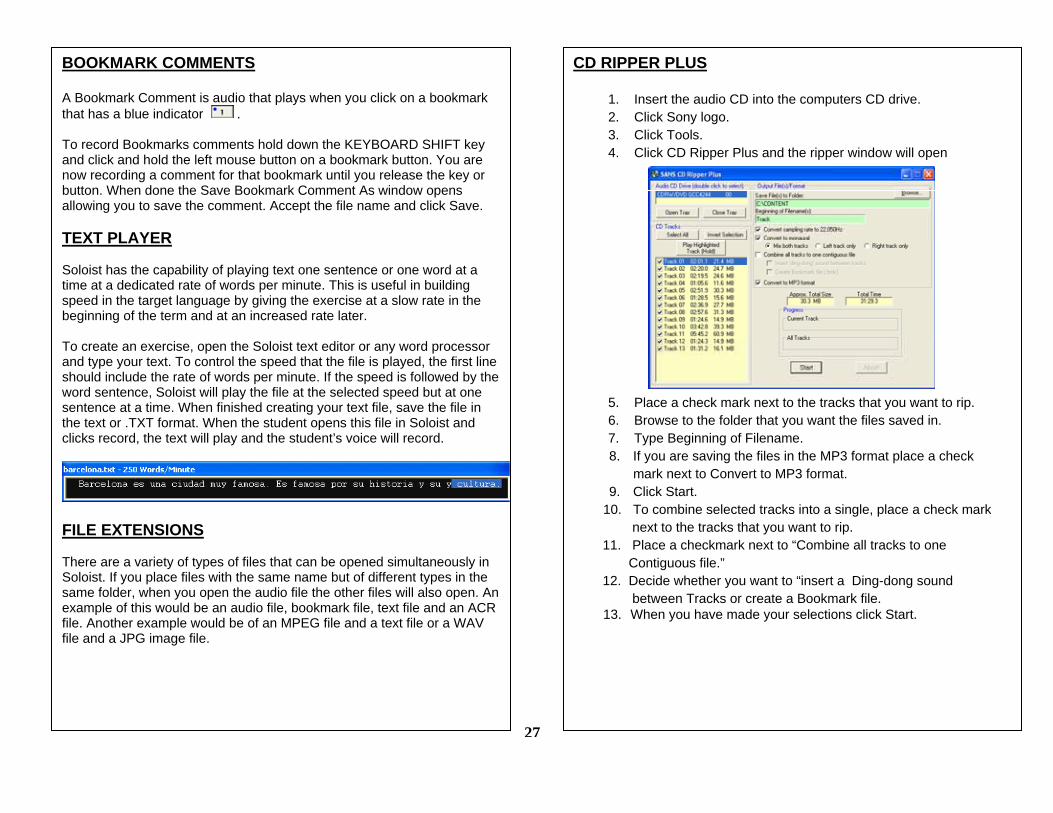
All Call, Group Call, Monitor, Intercom, Model and Pairing all add video communications to the voice communications described above. Clicking All Call sends the image from the instructor’s camera to windows on the student displays. Intercom sends the image from the instructor’s camera to a window on the student screen and the student’s image to the instructors display. CD RIPPER PLUS SANS CD Ripper Plus allows ripping multiple tracks from an audio CD as WAV or MP3 files and it provides an option to make a single contiguous file out of multiple CD tracks.
To use the CD ripper 1. Insert the audio CD into the computers CD drive. 2. Click Tools. 3. Click CD Ripper Plus and the ripper window will open
4. Place a check mark next to the tracks that you want to rip. 5. Browse to the folder that you want the files saved in. 6. Type Beginning of Filename. 7. If you are saving the files in the MP3 format place a check
mark next to Convert to MP3 format. 9. Click Start.
10. To combine selected tracks into a single, place a check mark next to the tracks that you want to rip.
11. Place a checkmark next to “Combine all tracks to one Contiguous file.”
12. Decide whether you want to “insert a Ding-dong sound between Tracks or create a Bookmark file. 13. When you have made your selections click Start.
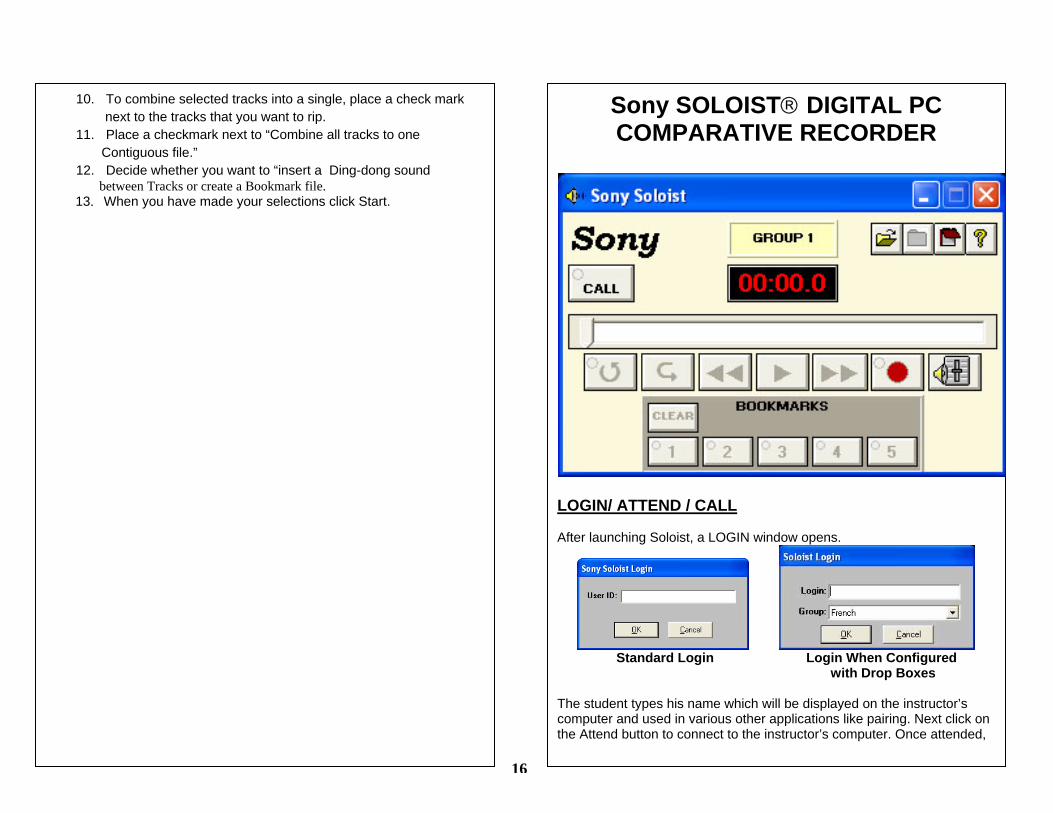
Sony SOLOIST® DIGITAL PC COMPARATIVE RECORDER
LOGIN/ ATTEND / CALL After launching Soloist, a LOGIN window opens.
Standard Login Login When Configured with Drop Boxes The student types his name which will be displayed on the instructor’s computer and used in various other applications like pairing. Next click on the Attend button to connect to the instructor’s computer. Once attended,
16
17
this button will be replaced with a Call button which allows you to ask the instructor for assistance. FUNCTION Soloist contains the functions of a cassette recorder. The Play button
becomes the stop button when a file is playing. Two arrows to the right is fast forward , two arrows to the left is rewind , and the red circle is record . This is the Repeat button which allows you to repeat the last sentence or phrase by clicking on it. The A B repeat function allows you to select a segment to repeat. If you click it once it flashes and a blue line appears in the scroll bar
. Clicking it a second time selects the end of the segment and Soloist repeats until you click another button. Soloist also contains a scroll bar that allows you to select a specific point within the recording. Right clicking on the Fast Forward button during playback of a silent portion, Soloist will automatically advance to the next audio portion. OPEN FILE
To open a file in Soloist, click the Open File button and select Lesson Folder, Recordings Folder or Video Folder. After you choose the category you will see folders for the various languages or instructors. Click on the desired folder, choose the file and click open. The file will be copied to your computer. If it is an MP3 file it will either automatically convert to WAV or the record button will display MP3 to WAV. If you just want to listen to it, press play, but if you need to record you must click MP3 to
WAV to convert to WAV before recording. CLOSE FILE To Close a file that you have been listening to, click the Close File button
and it will close. If you have been recording, when you click the Close File button a window opens asking if you want to permanently save sound recording before closing? If you want to, select YES and the Save As
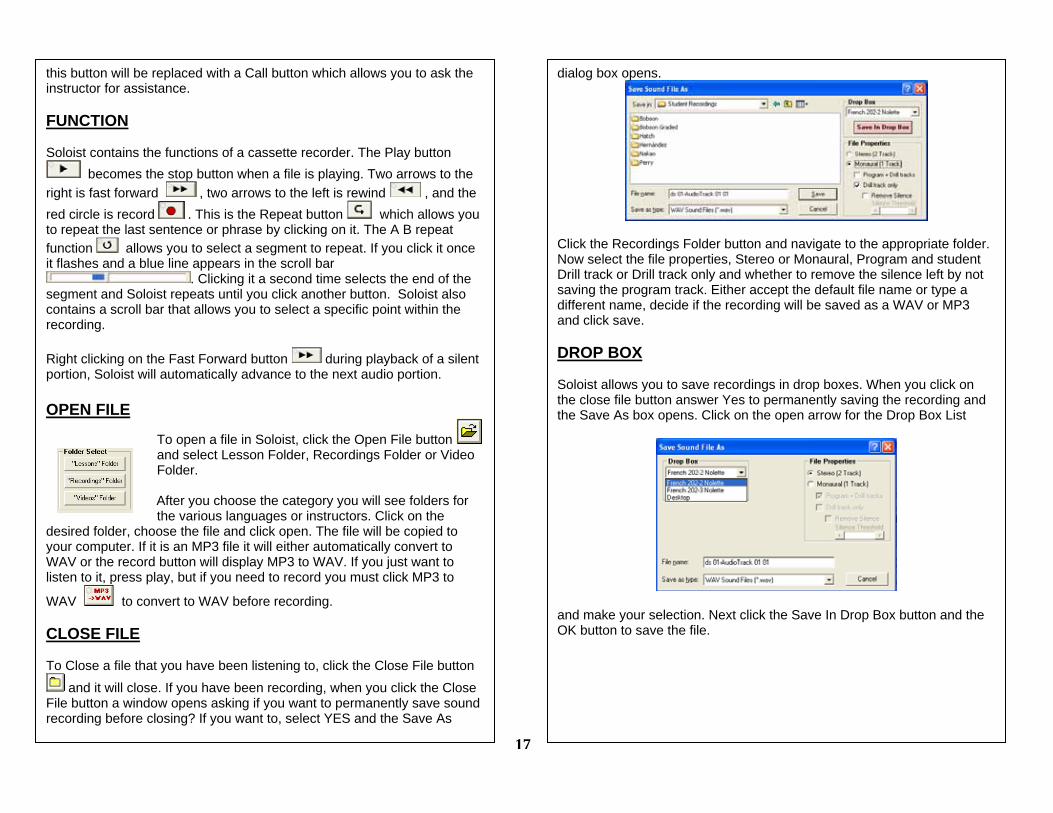
dialog box opens.
Click the Recordings Folder button and navigate to the appropriate folder. Now select the file properties, Stereo or Monaural, Program and student Drill track or Drill track only and whether to remove the silence left by not saving the program track. Either accept the default file name or type a different name, decide if the recording will be saved as a WAV or MP3 and click save. DROP BOX Soloist allows you to save recordings in drop boxes. When you click on the close file button answer Yes to permanently saving the recording and the Save As box opens. Click on the open arrow for the Drop Box List
and make your selection. Next click the Save In Drop Box button and the OK button to save the file.
VOLUME CONTROL
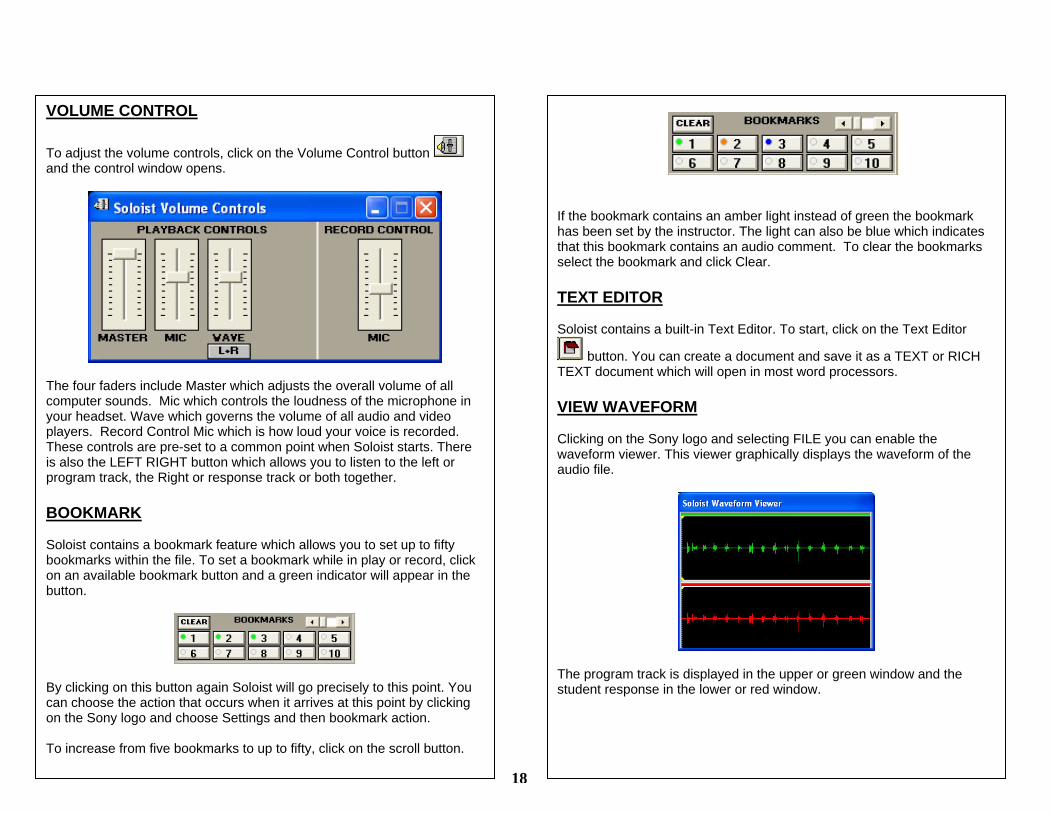
To adjust the volume controls, click on the Volume Control button and the control window opens.
The four faders include Master which adjusts the overall volume of all computer sounds. Mic which controls the loudness of the microphone in your headset. Wave which governs the volume of all audio and video players. Record Control Mic which is how loud your voice is recorded. These controls are pre-set to a common point when Soloist starts. There is also the LEFT RIGHT button which allows you to listen to the left or program track, the Right or response track or both together. BOOKMARK Soloist contains a bookmark feature which allows you to set up to fifty bookmarks within the file. To set a bookmark while in play or record, click on an available bookmark button and a green indicator will appear in the button.
By clicking on this button again Soloist will go precisely to this point. You can choose the action that occurs when it arrives at this point by clicking on the Sony logo and choose Settings and then bookmark action. To increase from five bookmarks to up to fifty, click on the scroll button.
If the bookmark contains an amber light instead of green the bookmark has been set by the instructor. The light can also be blue which indicates that this bookmark contains an audio comment. To clear the bookmarks select the bookmark and click Clear. TEXT EDITOR Soloist contains a built-in Text Editor. To start, click on the Text Editor
button. You can create a document and save it as a TEXT or RICH TEXT document which will open in most word processors. VIEW WAVEFORM Clicking on the Sony logo and selecting FILE you can enable the waveform viewer. This viewer graphically displays the waveform of the audio file.
The program track is displayed in the upper or green window and the student response in the lower or red window.
18
VARI SPEED By clicking on the Sony logo and selecting Tools you can turn on Vari Speed, a variable speed control which allows you to speed up or slow Speed, a variable speed control which allows you to speed up or slow down the audio file playback.
To record a Bookmark Comment, hold down the keyboard Shift key while clicking on the bookmark. Soloist will start recording the comment and will continue until you press the keyboard Space Bar. The bookmark button will have a Blue indicator. MODEL
Should the tape counter in Soloist start flashing Model , the instructor has chosen you to be the example for others in the class. CONFERENCE When running Soloist the instructor can put the student in a Conference
group. When this happens Conference is displayed in the
group window and there may be a Microphone button which appears on Soloist. To speak to the other members of the conference click the microphone button. This will stay active until another student pushes their button. The instructor can configure conference so that if you click and hold the microphone button another student can not take the floor until you release your button. PAIR In Soloist the instructor can pair you with another student. Your partners name may appear in the group window. Triplet may also be displayed indicating that you have two partners.
STUDENT SELECTED PAIRING The instructor can enable student selected pairing allowing students to select their partner. A window opens on the student computer displaying the attending students. To select your partner click on that student’s button. If the students button displays BUSY then that student has been chosen by someone else.
ANALYZER The instructor can use Soloist as part of a response analyzer, a way to administer a multiple choice or true false test. When the instructor initiates this function, your bookmark buttons are replaced with the analyzer choices.
Questions for the test may be audio, text, graphics or a combination of these. When the test begins the question number will be displayed on Soloist and you can make your selection. You can change your selection only as long as the instructor keeps the answer period open. You may see an entire choice button turn green which indicates the correct answer.
19
INTERNET/LAUNCH FILE While running Soloist, the instructor can open an internet browser for you The browser will just appear on your computer. Likewise, the instructor can open files in applications other than Soloist like a Word document. In this case, the application loads automatically without the student doing anything. REMOTE In Soloist, the instructor has the option to take control of the student computer including mouse and keyboard functions. SWAP The instructor can pair students including their computer displays, mice
and keyboards. When this happens, a Swap button appears on Soloist that allows you to change from your computer screen to your partners. DISABLE WINDOWS / BLANK SCREEN Should the icons on your desktop disappear, the instructor has disabled windows. At this point the Start button is inactive and keyboard shortcuts don’t work. The instructor can re-enable these icons and buttons. The instructor can also blank your screen which turns your screen black except for the SANS logo.
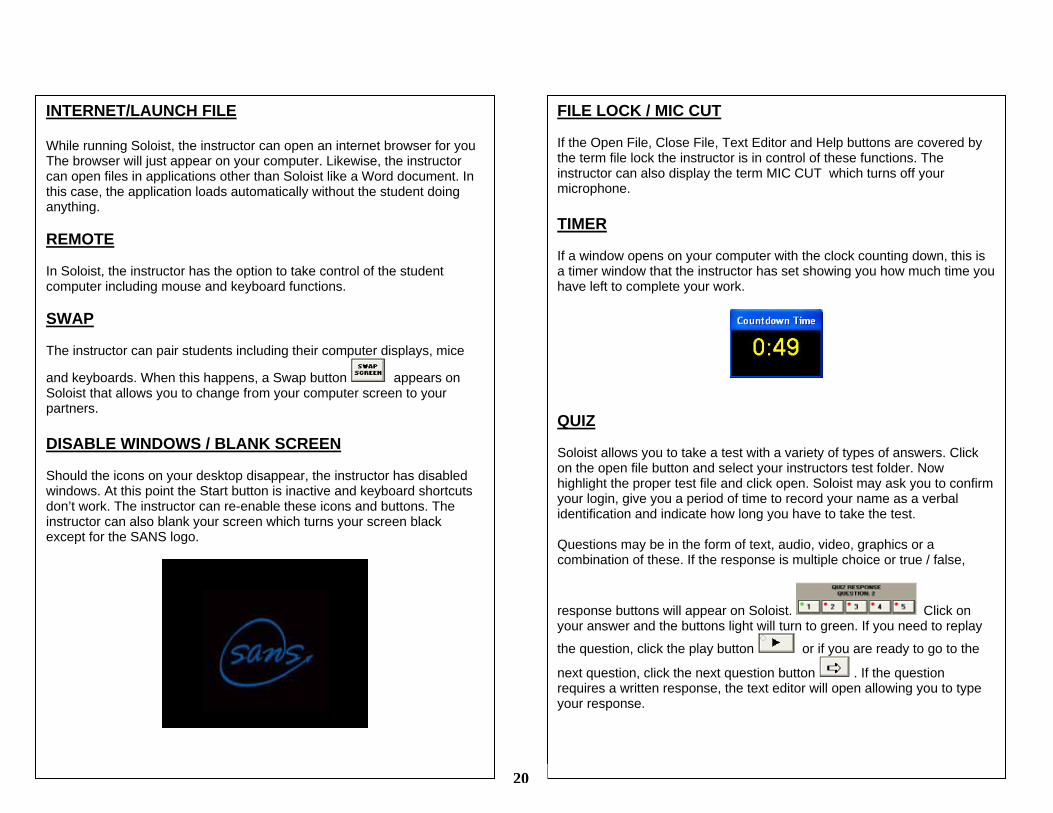
FILE LOCK / MIC CUT If the Open File, Close File, Text Editor and Help buttons are covered by the term file lock the instructor is in control of these functions. The instructor can also display the term MIC CUT which turns off your microphone. TIMER If a window opens on your computer with the clock counting down, this is a timer window that the instructor has set showing you how much time you have left to complete your work.
QUIZ Soloist allows you to take a test with a variety of types of answers. Click on the open file button and select your instructors test folder. Now highlight the proper test file and click open. Soloist may ask you to confirm your login, give you a period of time to record your name as a verbal identification and indicate how long you have to take the test. Questions may be in the form of text, audio, video, graphics or a combination of these. If the response is multiple choice or true / false,
response buttons will appear on Soloist. Click on your answer and the buttons light will turn to green. If you need to replay
the question, click the play button or if you are ready to go to the
next question, click the next question button . If the question requires a written response, the text editor will open allowing you to type your response.
20
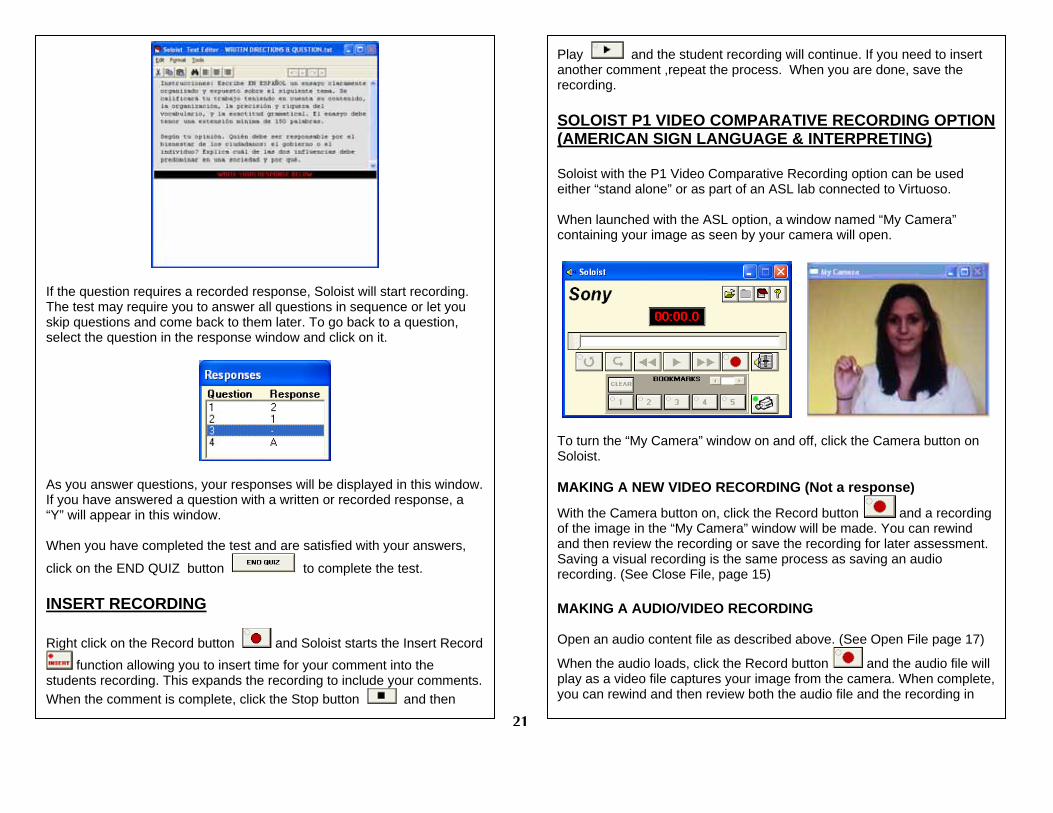
If the question requires a recorded response, Soloist will start recording. The test may require you to answer all questions in sequence or let you skip questions and come back to them later. To go back to a question, select the question in the response window and click on it.
As you answer questions, your responses will be displayed in this window. If you have answered a question with a written or recorded response, a “Y” will appear in this window. When you have completed the test and are satisfied with your answers,
click on the END QUIZ button to complete the test. INSERT RECORDING
Right click on the Record button and Soloist starts the Insert Record function allowing you to insert time for your comment into the
students recording. This expands the recording to include your comments. When the comment is complete, click the Stop button and then
Play and the student recording will continue. If you need to insert another comment ,repeat the process. When you are done, save the recording. SOLOIST P1 VIDEO COMPARATIVE RECORDING OPTION (AMERICAN SIGN LANGUAGE & INTERPRETING) Soloist with the P1 Video Comparative Recording option can be used either “stand alone” or as part of an ASL lab connected to Virtuoso. When launched with the ASL option, a window named “My Camera” containing your image as seen by your camera will open.
To turn the “My Camera” window on and off, click the Camera button on Soloist. MAKING A NEW VIDEO RECORDING (Not a response)
With the Camera button on, click the Record button and a recording of the image in the “My Camera” window will be made. You can rewind and then review the recording or save the recording for later assessment. Saving a visual recording is the same process as saving an audio recording. (See Close File, page 15) MAKING A AUDIO/VIDEO RECORDING Open an audio content file as described above. (See Open File page 17)
When the audio loads, click the Record button and the audio file will play as a video file captures your image from the camera. When complete, you can rewind and then review both the audio file and the recording in
21
sync or save the recording for later assessment. Saving a visual recording is the same process as saving an audio recording. When you save the video recording, two files are saved. The first file is the actual video file and contains the avi extension. The second file is a “pointer” file with the extension of asl. Once the files have been saved, if you open the video file it plays by itself. If you open the pointer file, it will load both the original content and the video file and play them in sync. MAKING A VIDEO/VIDEO RECORDING This process is the same as “Making an Audio/Video Recording” as described above but the content file is a video file not an audio file. Open a video content file as described above. When the video loads in
Soloist, click the Record button and the video content file will play as a video file captures your image from the camera. When complete, you can rewind and then review both the content file and the recording in sync or save the recording for later assessment. Saving a visual recording is the same process as saving an audio recording. When you save the video recording, two files are saved. The first file is the actual video file and contains the avi extension. The second file is a “pointer” file with the extension of asl. Once the files have been saved, if you open the video file it plays by itself. If you open the pointer file, it will load both the original content and the video file and play them in sync. CAMERA ADJUSTMENT The Soloist P1 ASL camera has only one manual adjustment, Focus. To adjust the focus of the camera rotate, the focus ring (lens) to the left or right until you are happy with the on-screen image.
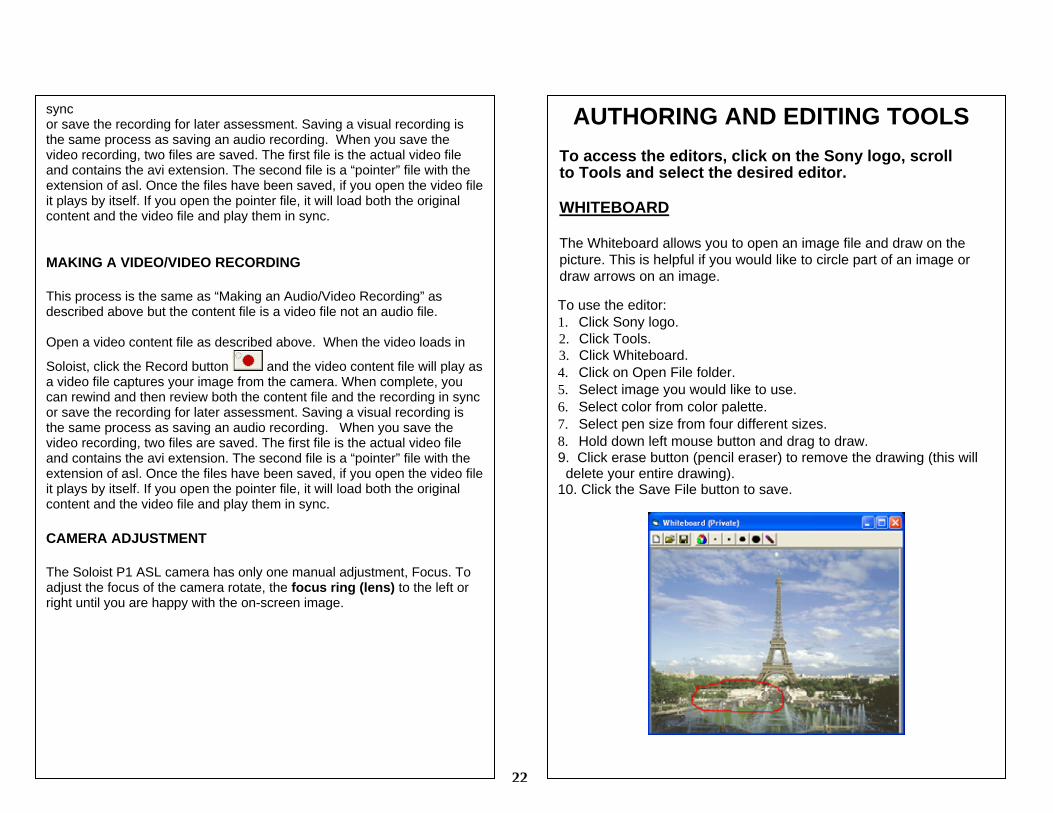
AUTHORING AND EDITING TOOLS To access the editors, click on the Sony logo, scroll to Tools and select the desired editor. WHITEBOARD The Whiteboard allows you to open an image file and draw on the picture. This is helpful if you would like to circle part of an image or draw arrows on an image.
To use the editor: 1. Click Sony logo. 2. Click Tools. 3. Click Whiteboard. 4. Click on Open File folder. 5. Select image you would like to use. 6. Select color from color palette. 7. Select pen size from four different sizes. 8. Hold down left mouse button and drag to draw. 9. Click erase button (pencil eraser) to remove the drawing (this will delete your entire drawing). 10. Click the Save File button to save.
22
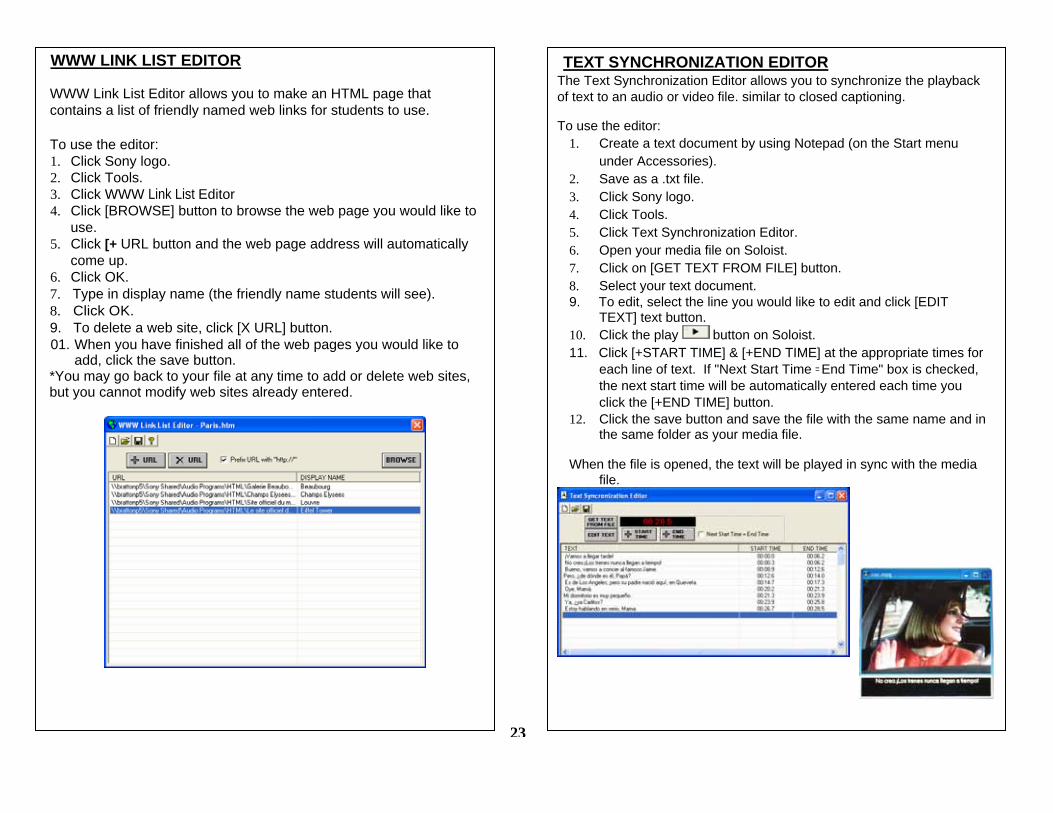
WWW LINK LIST EDITOR WWW Link List Editor allows you to make an HTML page that contains a list of friendly named web links for students to use. To use the editor: 1. Click Sony logo. 2. Click Tools. 3. Click WWW Link List Editor 4. Click [BROWSE] button to browse the web page you would like to
use. 5. Click [+ URL button and the web page address will automatically
come up. 6. Click OK. 7. Type in display name (the friendly name students will see). 8. Click OK. 9. To delete a web site, click [X URL] button. 01. When you have finished all of the web pages you would like to
add, click the save button. *You may go back to your file at any time to add or delete web sites, but you cannot modify web sites already entered.
TEXT SYNCHRONIZATION EDITORThe Text Synchronization Editor allows you to synchronize the playback of text to an audio or video file. similar to closed captioning.
To use the editor: 1. Create a text document by using Notepad (on the Start menu
under Accessories). 2. Save as a .txt file. 3. Click Sony logo. 4. Click Tools. 5. Click Text Synchronization Editor. 6. Open your media file on Soloist. 7. Click on [GET TEXT FROM FILE] button. 8. Select your text document. 9. To edit, select the line you would like to edit and click [EDIT
TEXT] text button. 10. Click the play button on Soloist. 11. Click [+START TIME] & [+END TIME] at the appropriate times for
each line of text. If "Next Start Time = End Time" box is checked, the next start time will be automatically entered each time you click the [+END TIME] button.
12. Click the save button and save the file with the same name and in the same folder as your media file.
When the file is opened, the text will be played in sync with the media file.
23
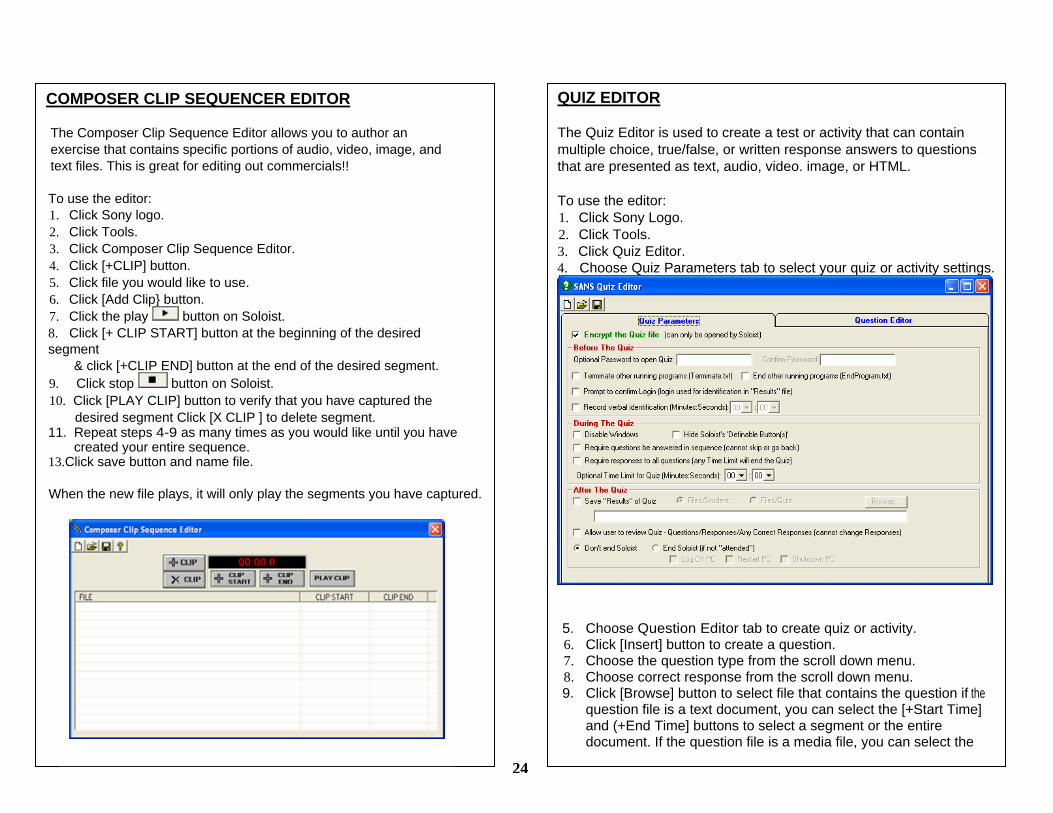
COMPOSER CLIP SEQUENCER EDITOR The Composer Clip Sequence Editor allows you to author an exercise that contains specific portions of audio, video, image, and text files. This is great for editing out commercials!!
To use the editor: 1. Click Sony logo. 2. Click Tools. 3. Click Composer Clip Sequence Editor. 4. Click [+CLIP] button. 5. Click file you would like to use. 6. Click [Add Clip} button. 7. Click the play button on Soloist. 8. Click [+ CLIP START] button at the beginning of the desired segment & click [+CLIP END] button at the end of the desired segment. 9. Click stop button on Soloist. 10. Click [PLAY CLIP] button to verify that you have captured the desired segment Click [X CLIP ] to delete segment. 11. Repeat steps 4-9 as many times as you would like until you have created your entire sequence. 13. Click save button and name file.
When the new file plays, it will only play the segments you have captured.
QUIZ EDITOR The Quiz Editor is used to create a test or activity that can contain multiple choice, true/false, or written response answers to questions that are presented as text, audio, video. image, or HTML. To use the editor: 1. Click Sony Logo. 2. Click Tools. 3. Click Quiz Editor. 4. Choose Quiz Parameters tab to select your quiz or activity settings.
5. Choose Question Editor tab to create quiz or activity. 6. Click [Insert] button to create a question. 7. Choose the question type from the scroll down menu. 8. Choose correct response from the scroll down menu. 9. Click [Browse] button to select file that contains the question if the question file is a text document, you can select the [+Start Time]
and (+End Time] buttons to select a segment or the entire document. If the question file is a media file, you can select the
24
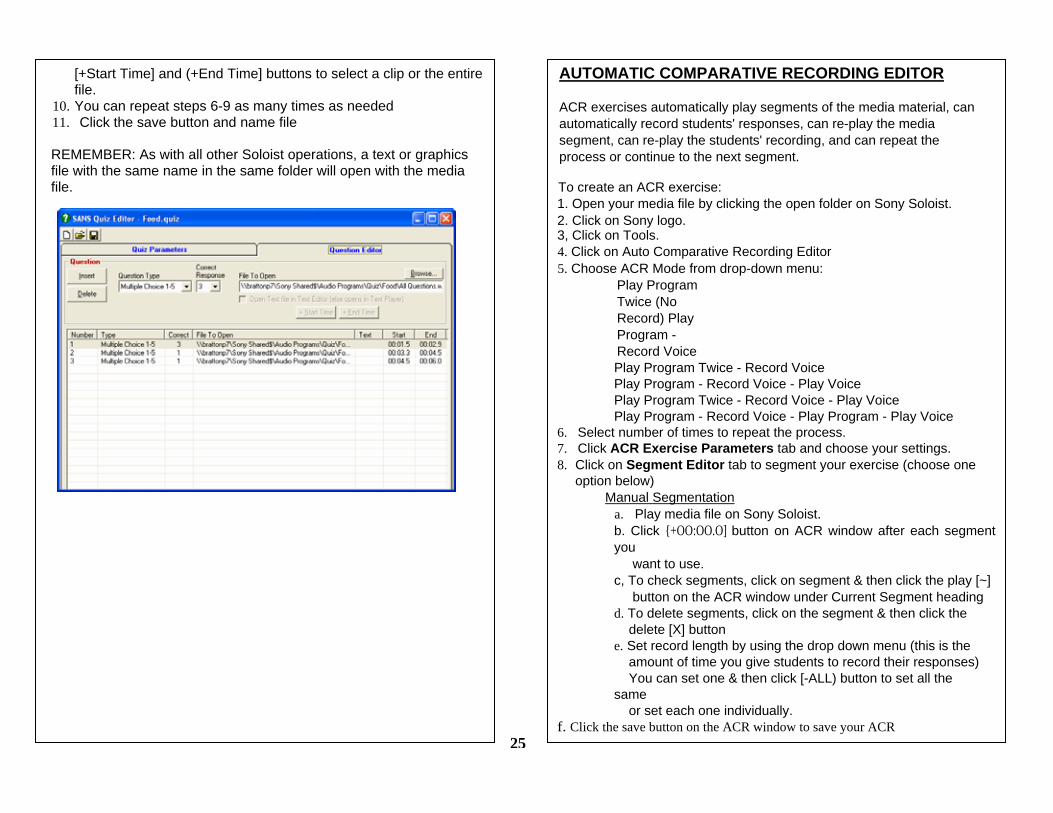
[+Start Time] and (+End Time] buttons to select a clip or the entire file. 10. You can repeat steps 6-9 as many times as needed 11. Click the save button and name file
REMEMBER: As with all other Soloist operations, a text or graphics file with the same name in the same folder will open with the media file.
AUTOMATIC COMPARATIVE RECORDING EDITOR ACR exercises automatically play segments of the media material, can automatically record students' responses, can re-play the media segment, can re-play the students' recording, and can repeat the process or continue to the next segment.
To create an ACR exercise: 1. Open your media file by clicking the open folder on Sony Soloist. 2. Click on Sony logo. 3, Click on Tools. 4. Click on Auto Comparative Recording Editor 5. Choose ACR Mode from drop-down menu:
Play Program Twice (No Record) Play Program - Record Voice Play Program Twice - Record Voice Play Program - Record Voice - Play Voice Play Program Twice - Record Voice - Play Voice Play Program - Record Voice - Play Program - Play Voice
6. Select number of times to repeat the process. 7. Click ACR Exercise Parameters tab and choose your settings. 8. Click on Segment Editor tab to segment your exercise (choose one
option below) Manual Segmentation
a. Play media file on Sony Soloist. b. Click {+OO:OO.O] button on ACR window after each segment you want to use. c, To check segments, click on segment & then click the play [~] button on the ACR window under Current Segment heading d. To delete segments, click on the segment & then click the delete [X] button e. Set record length by using the drop down menu (this is the amount of time you give students to record their responses) You can set one & then click [-ALL) button to set all the same or set each one individually.
f. Click the save button on the ACR window to save your ACR
25

exercise. (You must save it with the same name as your original media file.) Automatic Segmentation (Difficult to use - Not recommended) a. Click the play [~] button on the ACR window under
Automatic Segmentation heading. b. Click the [Sensitivity] button to set more or less sensitivity to
silence c. Set record length by using the drop down menu (this is the amount of time you give students to record their responses) You can set one & then click [---+ALL) button to set all the same or set each one individually. d. Click the save button on the ACR window to save your ACR exercise. (You must save it with the same name as your original media file.)
a. Click [+8ookmarks] button and the program will automatically segment according to your preset bookmarks b. Set record length by using the drop down menu (this is the amount of time you give students to record their responses) You can set one & then click [-ALL] button to set all the same or set each one individually. c. Click the save button on the ACR window to save your ACR exercise. (You must save it with the same name as your original media file.) When students open the filet a window will pop up explaining that it is an AGR exercise. The clock counter on Sony Soloist will be green when in the play program mode, it will be red when in the record voice mode and it will be amber when in the student response mode,
ARRANGER AUDIO LESSON EDITOR Arranger Audio Lesson Editor allows you to edit audio as easily as editing a text document in a word processor. To use the editor: 1. Click on Sony logo. 2. Click on Tools. 3. Click Arranger Audio Lesson Editor 4. Open the WAV file in Soloist. 5. Choose one or both tracks and the file is displayed graphically. 6. Click Play to listen to the file as a position bar scrolls across the
wave form showing the position in the recording. 7. To select the audio to edit, click on a point and drag to the end point.
8. Click the Cut , Copy or Paste button. 9. Once you have selected a segment you can also use the Increase
or Decrease Volume, Erase Sound , Insert Silence
or Fade In or Fade Out functions. When you are done editing click on the close file button and save the file.
26
BOOKMARK COMMENTS A Bookmark Comment is audio that plays when you click on a bookmark that has a blue indicator . To record Bookmarks comments hold down the KEYBOARD SHIFT key and click and hold the left mouse button on a bookmark button. You are now recording a comment for that bookmark until you release the key or button. When done the Save Bookmark Comment As window opens allowing you to save the comment. Accept the file name and click Save. TEXT PLAYER Soloist has the capability of playing text one sentence or one word at a time at a dedicated rate of words per minute. This is useful in building speed in the target language by giving the exercise at a slow rate in the beginning of the term and at an increased rate later. To create an exercise, open the Soloist text editor or any word processor and type your text. To control the speed that the file is played, the first line should include the rate of words per minute. If the speed is followed by the word sentence, Soloist will play the file at the selected speed but at one sentence at a time. When finished creating your text file, save the file in the text or .TXT format. When the student opens this file in Soloist and clicks record, the text will play and the student’s voice will record.
FILE EXTENSIONS There are a variety of types of files that can be opened simultaneously in Soloist. If you place files with the same name but of different types in the same folder, when you open the audio file the other files will also open. An example of this would be an audio file, bookmark file, text file and an ACR file. Another example would be of an MPEG file and a text file or a WAV file and a JPG image file.
CD RIPPER PLUS 1. Insert the audio CD into the computers CD drive. 2. Click Sony logo. 3. Click Tools. 4. Click CD Ripper Plus and the ripper window will open
5. Place a check mark next to the tracks that you want to rip. 6. Browse to the folder that you want the files saved in. 7. Type Beginning of Filename. 8. If you are saving the files in the MP3 format place a check
mark next to Convert to MP3 format. 9. Click Start.
10. To combine selected tracks into a single, place a check mark next to the tracks that you want to rip. 11. Place a checkmark next to “Combine all tracks to one Contiguous file.” 12. Decide whether you want to “insert a Ding-dong sound between Tracks or create a Bookmark file.
13. When you have made your selections click Start.
27

©2009 SANS Inc. All Rights Reserved. Unauthorized distribution of the materials contained herein is prohibited. Virtuoso and Soloist are trademarks of Sony Electronics Inc. Virtuoso and Soloist software incorporate SANS and Sony
technology.