Sony PlayStation 3D Display Indicator Light Bar …...Sony PlayStation 3D Display Indicator Light...
5
Sony PlayStation 3D Display Indicator Light Bar Replacement This guide will show you how to replace the indicator light bar. Written By: Kyle Franck Sony PlayStation 3D Display Indicator Light Bar Replacement Draft: 2016-01-25 Guide ID: 51723 - This document was generated on 2019-11-19 03:19:24 PM (MST). © iFixit — CC BY-NC-SA pt.iFixit.com Page 1 of 5
Transcript of Sony PlayStation 3D Display Indicator Light Bar …...Sony PlayStation 3D Display Indicator Light...

Sony PlayStation 3D Display Indicator LightBar Replacement
This guide will show you how to replace the indicator light bar.
Written By: Kyle Franck
Sony PlayStation 3D Display Indicator Light Bar Replacement Draft: 2016-01-25Guide ID: 51723 -
This document was generated on 2019-11-19 03:19:24 PM (MST).
© iFixit — CC BY-NC-SA pt.iFixit.com Page 1 of 5

INTRODUCTION
This repair may be needed if your device functions properly, but the indicator lights do not work.
TOOLS:Metal Spudger (1)Phillips #2 Screwdriver (1)iFixit Opening Tools (1)
Sony PlayStation 3D Display Indicator Light Bar Replacement Draft: 2016-01-25Guide ID: 51723 -
This document was generated on 2019-11-19 03:19:24 PM (MST).
© iFixit — CC BY-NC-SA pt.iFixit.com Page 2 of 5

Step 1 — Rear Case
Remove the base by pushing in the button and sliding out the unit.
Step 2
Remove USB port cover from back plate with a metal spudger.
This will prevent the cover from falling under the back plate once it is removed.
Sony PlayStation 3D Display Indicator Light Bar Replacement Draft: 2016-01-25Guide ID: 51723 -
This document was generated on 2019-11-19 03:19:24 PM (MST).
© iFixit — CC BY-NC-SA pt.iFixit.com Page 3 of 5
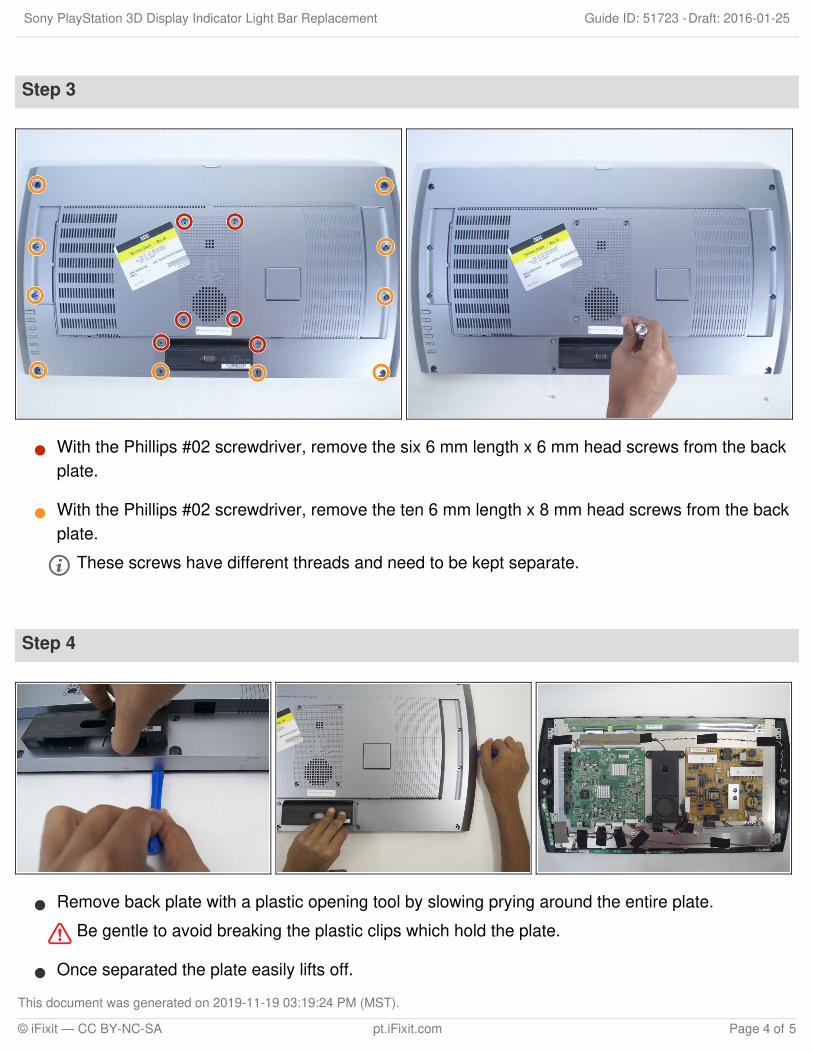
Step 3
With the Phillips #02 screwdriver, remove the six 6 mm length x 6 mm head screws from the backplate.
With the Phillips #02 screwdriver, remove the ten 6 mm length x 8 mm head screws from the backplate.
These screws have different threads and need to be kept separate.
Step 4
Remove back plate with a plastic opening tool by slowing prying around the entire plate.
Be gentle to avoid breaking the plastic clips which hold the plate.
Once separated the plate easily lifts off.
Sony PlayStation 3D Display Indicator Light Bar Replacement Draft: 2016-01-25Guide ID: 51723 -
This document was generated on 2019-11-19 03:19:24 PM (MST).
© iFixit — CC BY-NC-SA pt.iFixit.com Page 4 of 5

To reassemble your device, follow these instructions in reverse order.
Step 5 — Indicator Light Bar
With the Phillips #02 screwdriver, remove the two 5mm length x 5mm head screws located on theleft and right side of the light bar board.
Step 6
Remove the light bar by depressing the tab on the white data connector.
Sony PlayStation 3D Display Indicator Light Bar Replacement Draft: 2016-01-25Guide ID: 51723 -
This document was generated on 2019-11-19 03:19:24 PM (MST).
© iFixit — CC BY-NC-SA pt.iFixit.com Page 5 of 5