
Solar PV Training & Referral Manual - SNVTraining & Referral Manual 07 Solar PV (Photovoltaics) -...
62
Solar PV Training & Referral Manual Developed by SNV for the Rural Solar Market Development
Transcript of Solar PV Training & Referral Manual - SNVTraining & Referral Manual 07 Solar PV (Photovoltaics) -...
Solar PV Training& Referral Manual
Developed by SNV for the Rural Solar Market Development
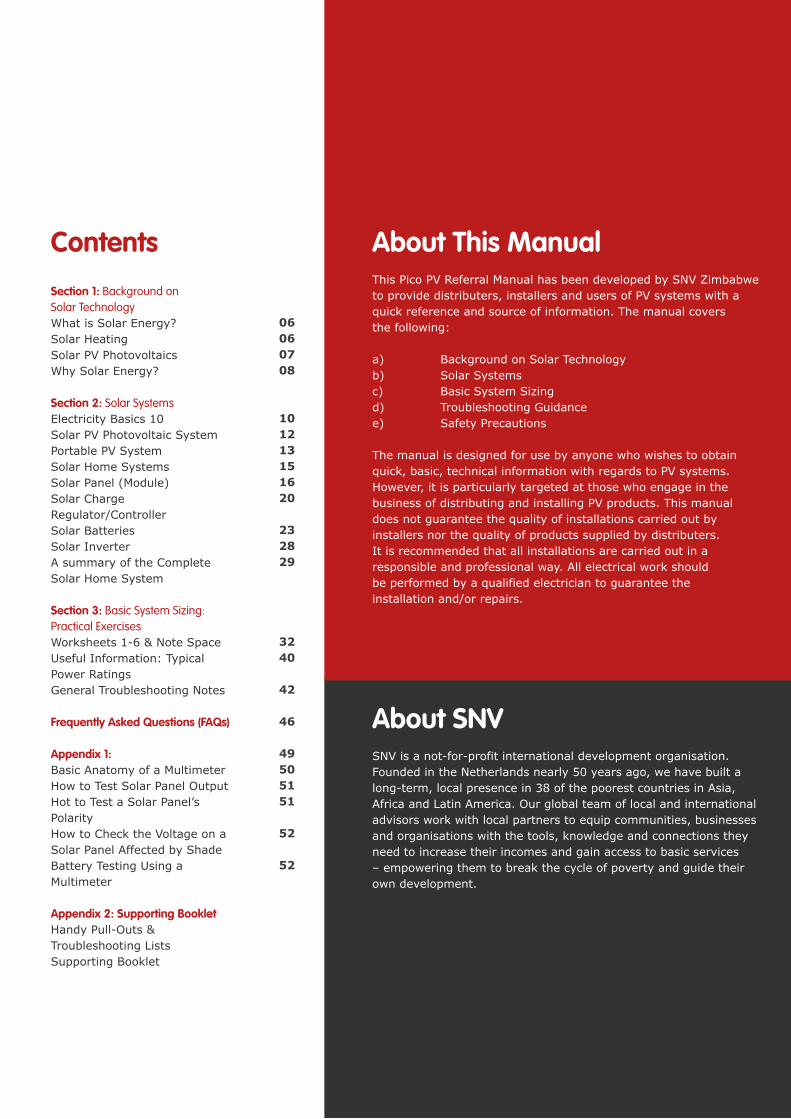
About This ManualThis Pico PV Referral Manual has been developed by SNV Zimbabwe to provide distributers, installers and users of PV systems with a quick reference and source of information. The manual coversthe following:
a) Background on Solar Technologyb) Solar Systemsc) Basic System Sizingd) Troubleshooting Guidancee) Safety Precautions
The manual is designed for use by anyone who wishes to obtain quick, basic, technical information with regards to PV systems. However, it is particularly targeted at those who engage in the business of distributing and installing PV products. This manualdoes not guarantee the quality of installations carried out by installers nor the quality of products supplied by distributers.It is recommended that all installations are carried out in a responsible and professional way. All electrical work shouldbe performed by a qualified electrician to guarantee theinstallation and/or repairs.
About SNVSNV is a not-for-profit international development organisation. Founded in the Netherlands nearly 50 years ago, we have built a long-term, local presence in 38 of the poorest countries in Asia, Africa and Latin America. Our global team of local and international advisors work with local partners to equip communities, businesses and organisations with the tools, knowledge and connections they need to increase their incomes and gain access to basic services– empowering them to break the cycle of poverty and guide their own development.
ContentsSection 1: Background onSolar TechnologyWhat is Solar Energy?Solar HeatingSolar PV PhotovoltaicsWhy Solar Energy?
Section 2: Solar SystemsElectricity Basics 10Solar PV Photovoltaic SystemPortable PV SystemSolar Home SystemsSolar Panel (Module)Solar Charge Regulator/ControllerSolar BatteriesSolar InverterA summary of the Complete Solar Home System
Section 3: Basic System Sizing:Practical ExercisesWorksheets 1-6 & Note SpaceUseful Information: Typical Power RatingsGeneral Troubleshooting Notes
Frequently Asked Questions (FAQs)
Appendix 1:Basic Anatomy of a MultimeterHow to Test Solar Panel OutputHot to Test a Solar Panel’s PolarityHow to Check the Voltage on a Solar Panel Affected by Shade Battery Testing Using a Multimeter
Appendix 2: Supporting BookletHandy Pull-Outs & Troubleshooting ListsSupporting Booklet
06060708
101213151620
232829
3240
42
46
49505151
52
52
03 Training & Referral Manual
ABBREVIATIONS
Degrees Celcius
Amperes
Alternating Current
Ampere hours
Direct Current
Energy
Frequently Asked Question
Gigawatt hour
Current
Kilowatt
Kilowatt hour
Metres per second
Megajoule
Megawatt
Non-Governmental Organisation
Power
Petajoule
Photvoltaic
Resistance
Rural Electrification Agency
Solar home system
Standard Test Conditions
Television
Volts
Watts per square metre
Watt hour
°C
A
AC
Ah
DC
E
FAQ
GWh
I
kW
kWh
m/s
MJ
MW
NGO
P
PJ
PV
R
REA
SHS
STC
TV
V
W/m2
Wh

SECTION 1:
Background on Solar TechnologyIn this Unit:
What is Solar Energy?
Solar Heating
Solar PV Photovoltaics
Why Solar Energy?
06
Section 1: Background on Solar Technology
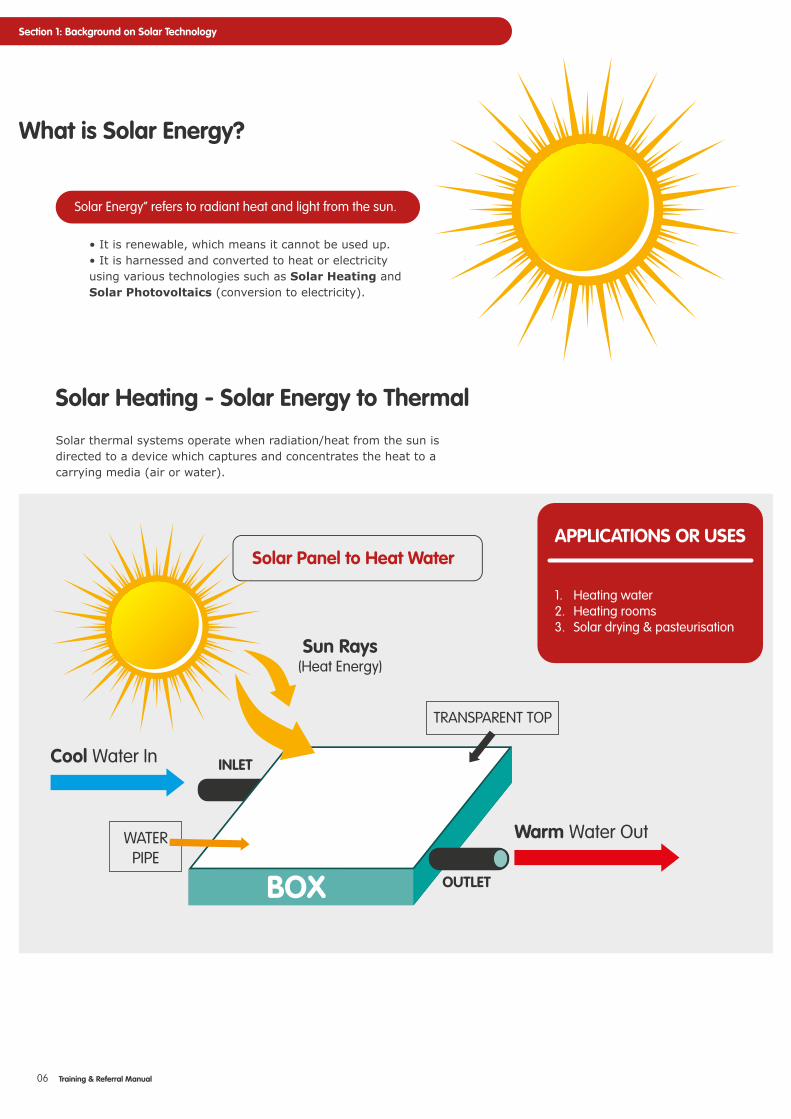
What is Solar Energy?
Solar Energy” refers to radiant heat and light from the sun.
• It is renewable, which means it cannot be used up.• It is harnessed and converted to heat or electricity using various technologies such as Solar Heating and Solar Photovoltaics (conversion to electricity).
Solar Heating - Solar Energy to Thermal
Solar thermal systems operate when radiation/heat from the sun is directed to a device which captures and concentrates the heat to a carrying media (air or water).
APPLICATIONS OR USES
1. Heating water2. Heating rooms3. Solar drying & pasteurisation
Training & Referral Manual
Solar Panel to Heat Water
Sun Rays(Heat Energy)
BOX
TRANSPARENT TOP
OUTLET
INLET
Warm Water Out
Cool Water In
WATERPIPE
07Training & Referral Manual
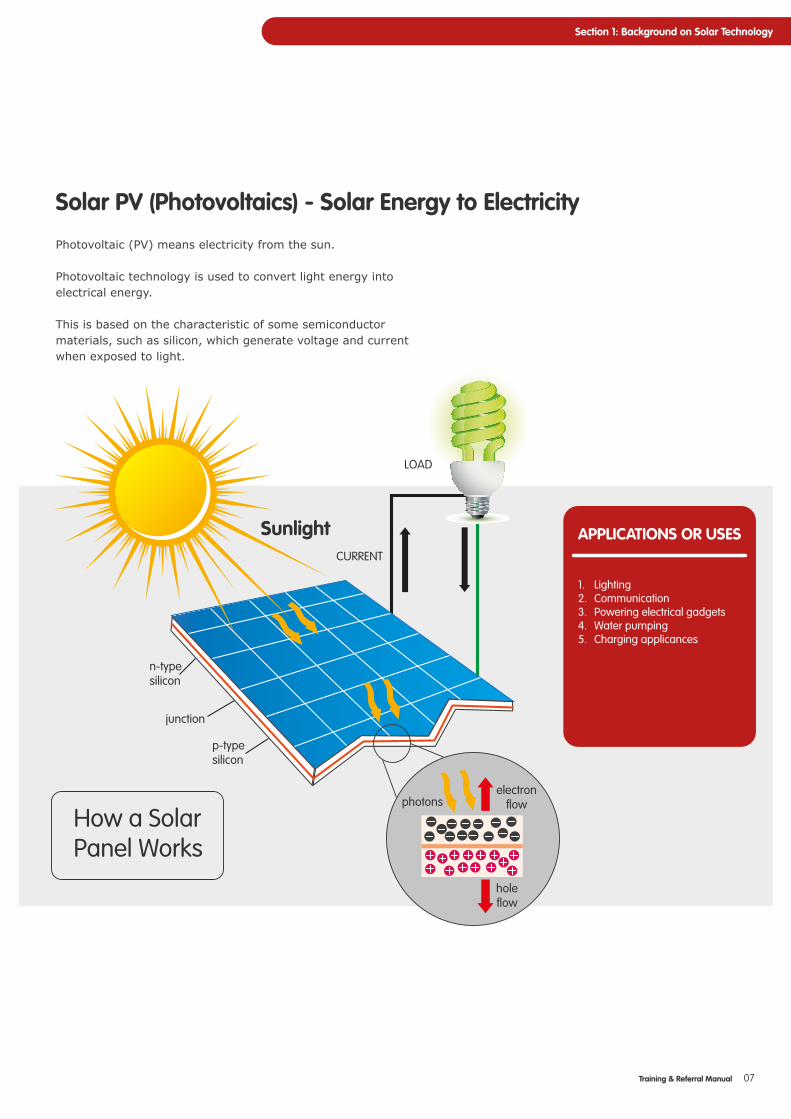
Solar PV (Photovoltaics) - Solar Energy to Electricity
Photovoltaic (PV) means electricity from the sun.
Photovoltaic technology is used to convert light energy into electrical energy.
This is based on the characteristic of some semiconductor materials, such as silicon, which generate voltage and current when exposed to light.
Section 1: Background on Solar Technology
Sunlight
How a SolarPanel Works
LOAD
CURRENT
n-typesilicon
p-typesilicon
junction
photonselectron
flow
holeflow
APPLICATIONS OR USES
1. Lighting2. Communication3. Powering electrical gadgets4. Water pumping5. Charging applicances
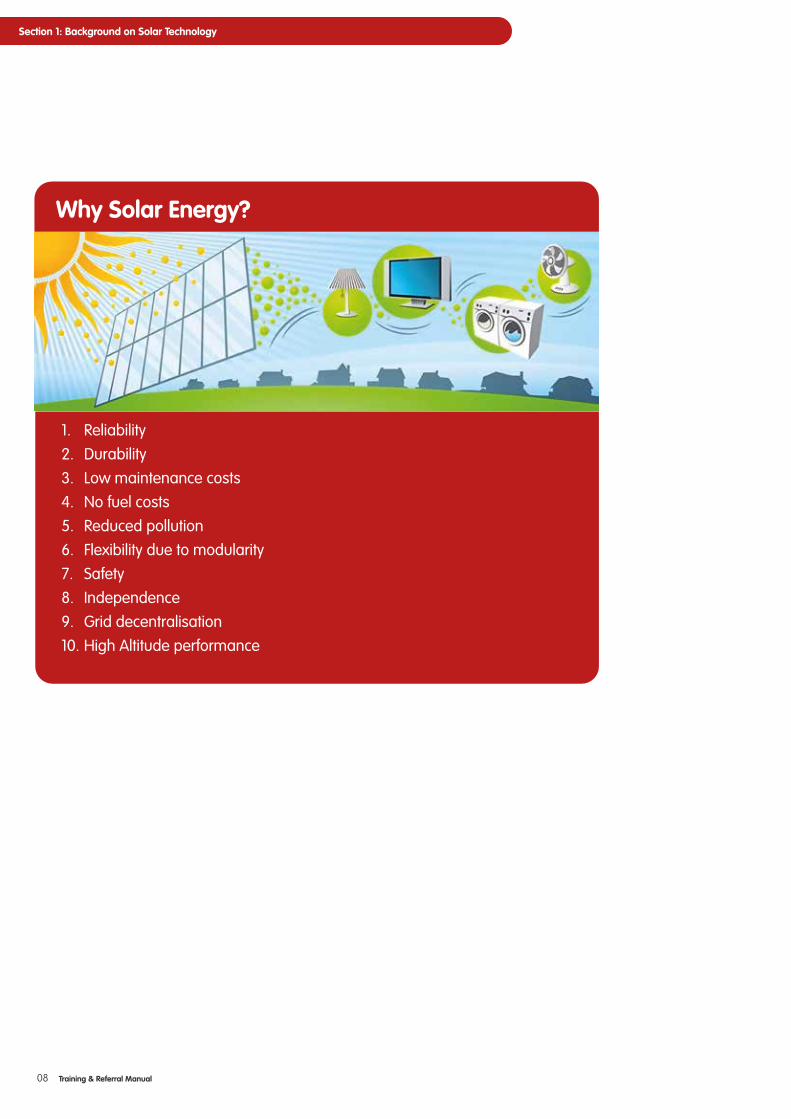
Why Solar Energy?
1. Reliability 2. Durability3. Low maintenance costs4. No fuel costs5. Reduced pollution6. Flexibility due to modularity7. Safety 8. Independence 9. Grid decentralisation10. High Altitude performance
08 Training & Referral Manual
Section 1: Background on Solar Technology
SECTION 2:
Solar SystemsIn this Unit:
Electricity Basics
Solar PV Photovoltaic System
Portable PV System
Solar Home Systems
Solar Panel (Module)
Solar Charge Regulator/Controller
Solar Batteries
Solar Inverter
A summary of the Complete Solar Home System
10 Training & Referral Manual
Section 2: Solar Systems
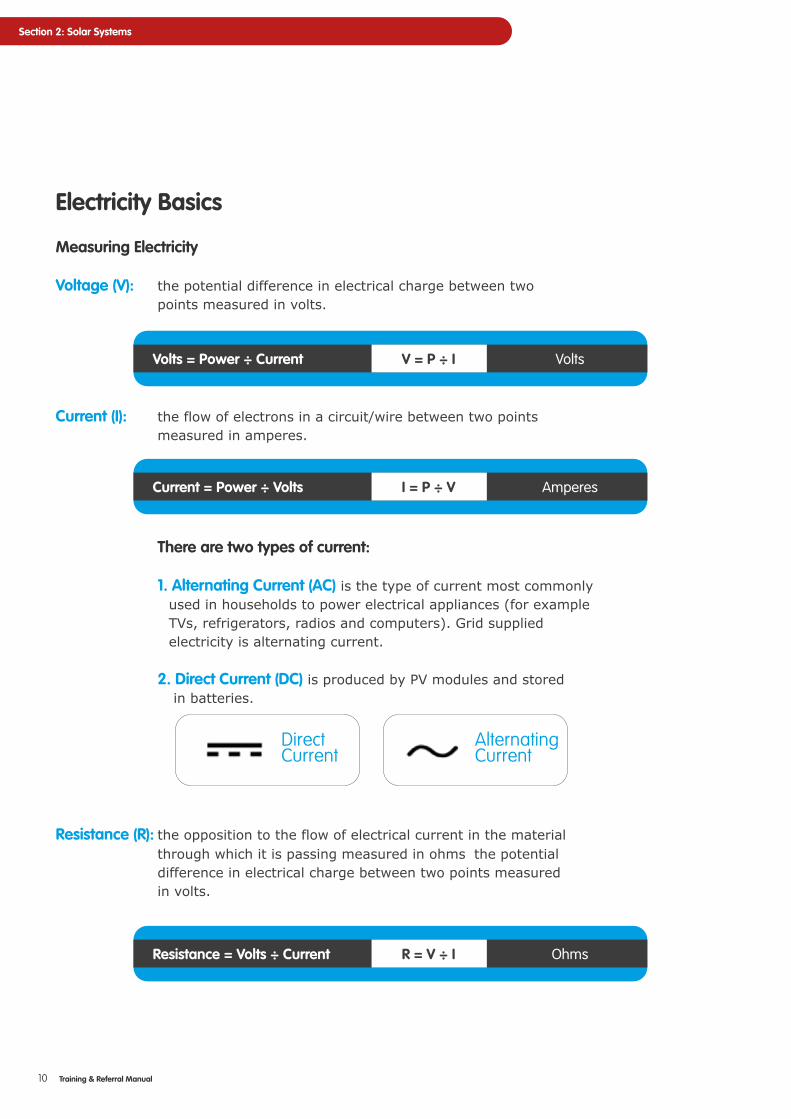
Electricity Basics
Measuring Electricity
Voltage (V): the potential difference in electrical charge between two points measured in volts.
Current (I): the flow of electrons in a circuit/wire between two points measured in amperes.
There are two types of current:
1. Alternating Current (AC) is the type of current most commonly used in households to power electrical appliances (for example TVs, refrigerators, radios and computers). Grid supplied electricity is alternating current.
2. Direct Current (DC) is produced by PV modules and stored in batteries.
Volts
Amperes
Volts = Power ÷ Current V = P ÷ I Volts
Current = Power ÷ Volts I = P ÷ V Amperes
DirectCurrent
AlternatingCurrent
Resistance (R): the opposition to the flow of electrical current in the material through which it is passing measured in ohms the potential difference in electrical charge between two points measured in volts.
Resistance = Volts ÷ Current R = V ÷ I Ohms
Watts vs Watt-Hours
A watt is the amount of powerthat a solar panel can produce orthat a light bulb consumes.
WATTS (Power)
A watt-hour is the amount of energythat a solar panel can produce or a lightbulb can consume in a certain anumberof hours.
WATT-HOURS (Energy)
11Training & Referral Manual
Section 2: Solar Systems
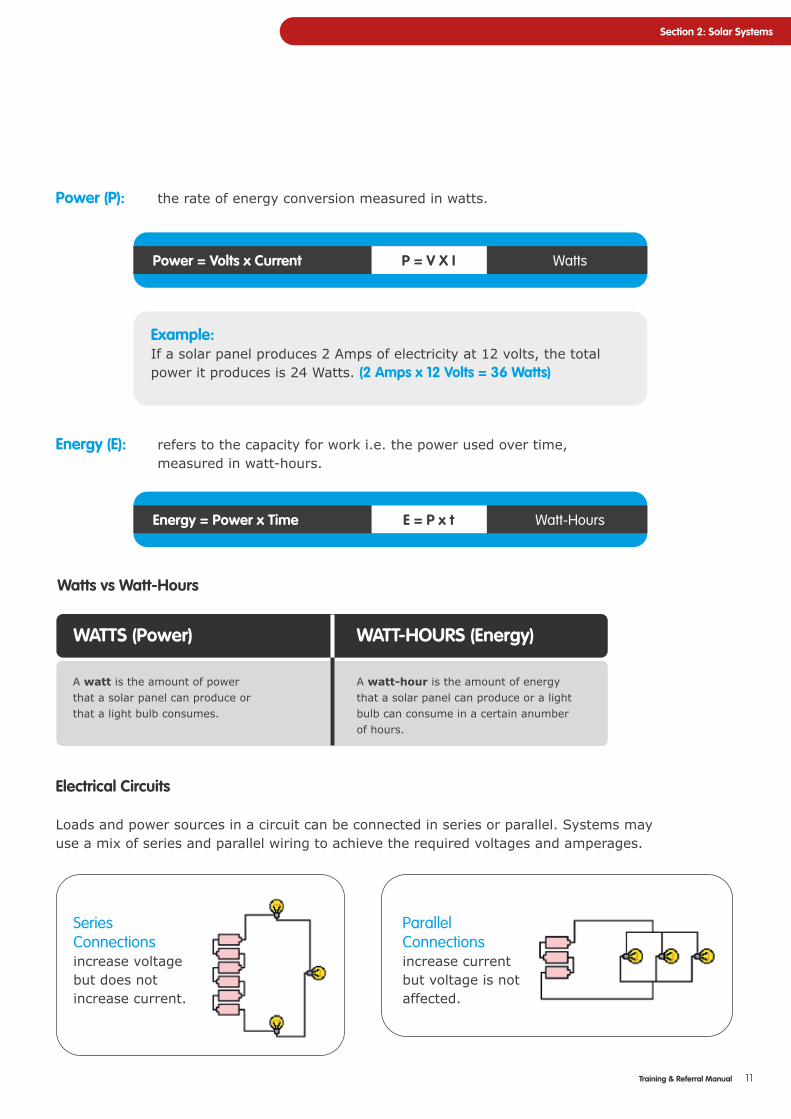
Power (P): the rate of energy conversion measured in watts.
Energy (E): refers to the capacity for work i.e. the power used over time, measured in watt-hours.
Volts
Power = Volts x Current P = V X I Watts
Energy = Power x Time E = P x t Watt-Hours
Example:If a solar panel produces 2 Amps of electricity at 12 volts, the total power it produces is 24 Watts. (2 Amps x 12 Volts = 36 Watts)
Electrical Circuits
Loads and power sources in a circuit can be connected in series or parallel. Systems may use a mix of series and parallel wiring to achieve the required voltages and amperages.
SeriesConnectionsincrease voltage but does not increase current.
ParallelConnections increase current but voltage is not affected.

12 Training & Referral Manual
Section 2: Solar Systems
Solar Photovoltaic (PV) System
A Solar PV System converts solar energy in form of light to electrical energy by the use of a solar module (solar panel).
Solar Irradiancefrom the Sun
SolarPanel
ChargeController
BatterySystem
DC POWER
AC POWER
(and/or)
ElectricCurrent
Inverter
Photovoltaic systems consist of some or all of the following components:
• Solar Panel - Converts sunlight to electricity
• Battery(s) - Store electricity
• Charge Controller - Manages the flow of electricity between the solar
panel battery and load
• Inverter - Converts DC power from the solar panel and battery to AC power.
• Load - Application for electricity, e.g. lights, computer, radio, TV
• Wires - Connect the other
13Training & Referral Manual
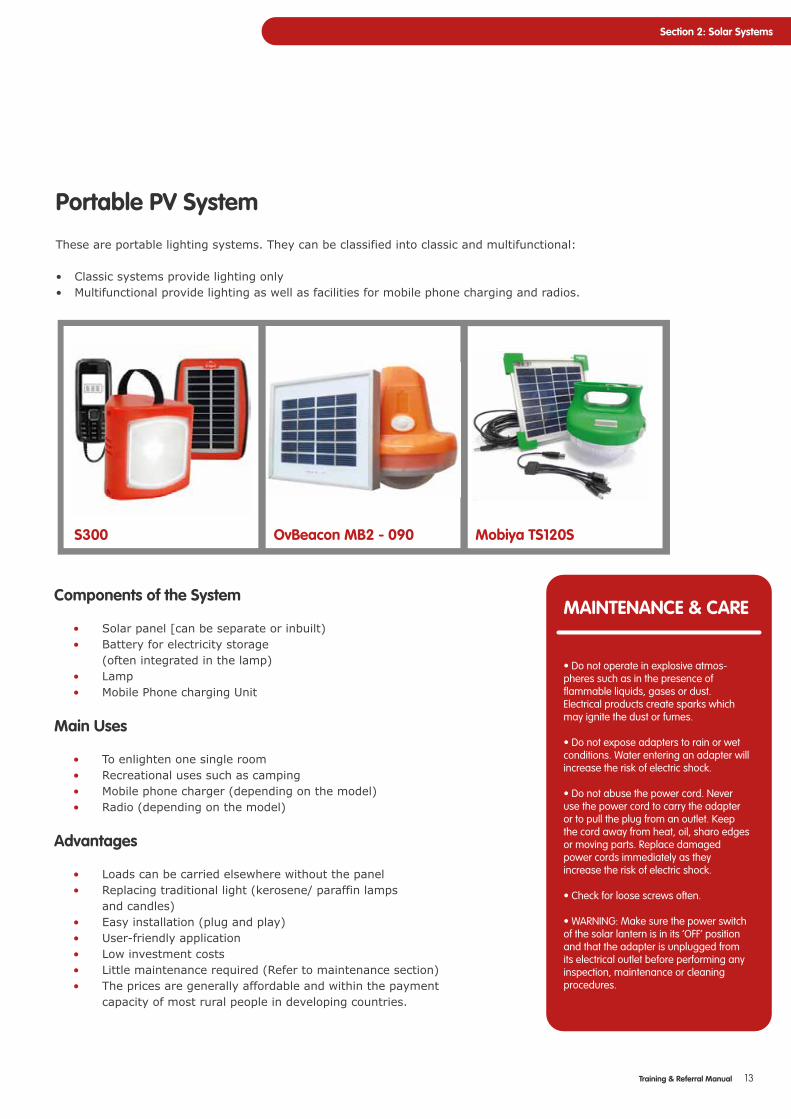
Portable PV System
These are portable lighting systems. They can be classified into classic and multifunctional:
• Classic systems provide lighting only • Multifunctional provide lighting as well as facilities for mobile phone charging and radios.
Section 2: Solar Systems
Components of the System
• Solar panel [can be separate or inbuilt) • Battery for electricity storage (often integrated in the lamp) • Lamp • Mobile Phone charging Unit
Main Uses
• To enlighten one single room • Recreational uses such as camping • Mobile phone charger (depending on the model) • Radio (depending on the model)
Advantages
• Loads can be carried elsewhere without the panel • Replacing traditional light (kerosene/ paraffin lamps and candles) • Easy installation (plug and play) • User-friendly application • Low investment costs • Little maintenance required (Refer to maintenance section) • The prices are generally affordable and within the payment capacity of most rural people in developing countries.
MAINTENANCE & CARE
• Do not operate in explosive atmos-pheres such as in the presence of flammable liquids, gases or dust. Electrical products create sparks which may ignite the dust or fumes.
• Do not expose adapters to rain or wet conditions. Water entering an adapter will increase the risk of electric shock.
• Do not abuse the power cord. Never use the power cord to carry the adapter or to pull the plug from an outlet. Keep the cord away from heat, oil, sharo edges or moving parts. Replace damaged power cords immediately as they increase the risk of electric shock.
• Check for loose screws often.
• WARNING: Make sure the power switch of the solar lantern is in its ‘OFF’ position and that the adapter is unplugged from its electrical outlet before performing any inspection, maintenance or cleaning procedures.
D20S300 OvBeacon MB2 - 090 Mobiya TS120S
14 Training & Referral Manual
Section 2: Solar Systems
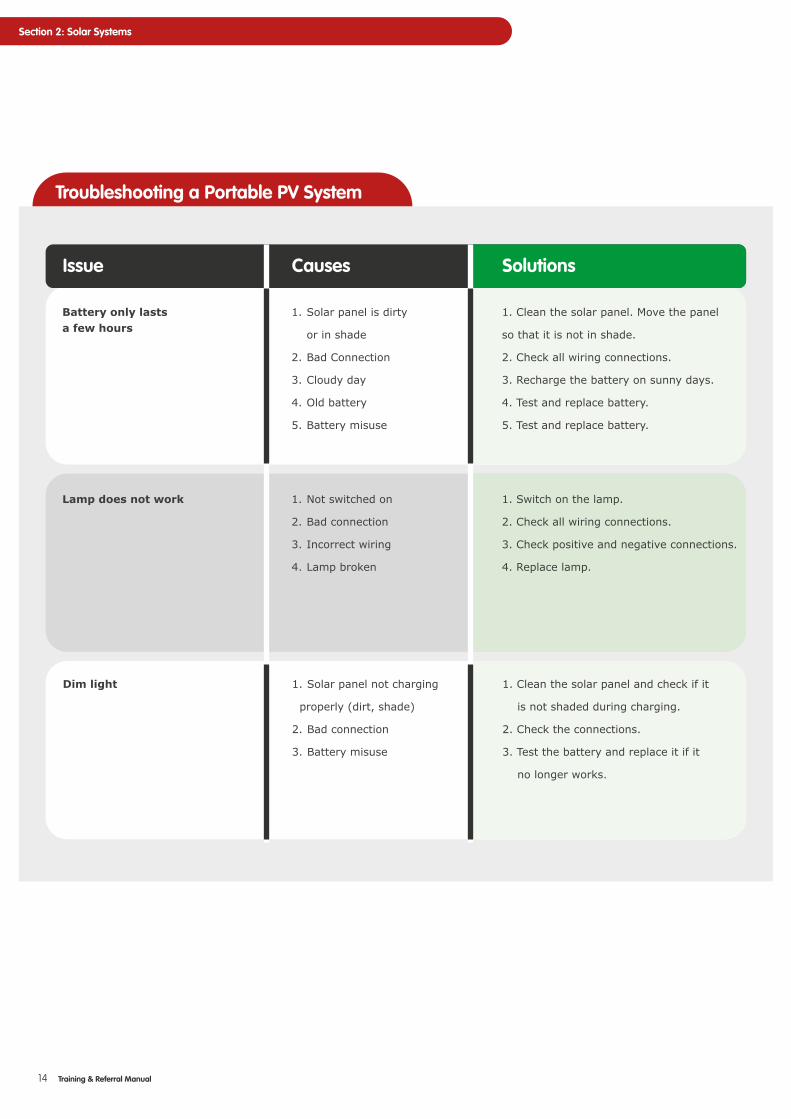
Troubleshooting a Portable PV System
Battery only lastsa few hours
Issue
Lamp does not work
Dim light
1. Solar panel is dirty
or in shade
2. Bad Connection
3. Cloudy day
4. Old battery
5. Battery misuse
Causes
1. Not switched on
2. Bad connection
3. Incorrect wiring
4. Lamp broken
1. Solar panel not charging
properly (dirt, shade)
2. Bad connection
3. Battery misuse
1. Clean the solar panel. Move the panel
so that it is not in shade.
2. Check all wiring connections.
3. Recharge the battery on sunny days.
4. Test and replace battery.
5. Test and replace battery.
Solutions
1. Switch on the lamp.
2. Check all wiring connections.
3. Check positive and negative connections.
4. Replace lamp.
1. Clean the solar panel and check if it
is not shaded during charging.
2. Check the connections.
3. Test the battery and replace it if it
no longer works.
15Training & Referral Manual
Section 2: Solar Systems
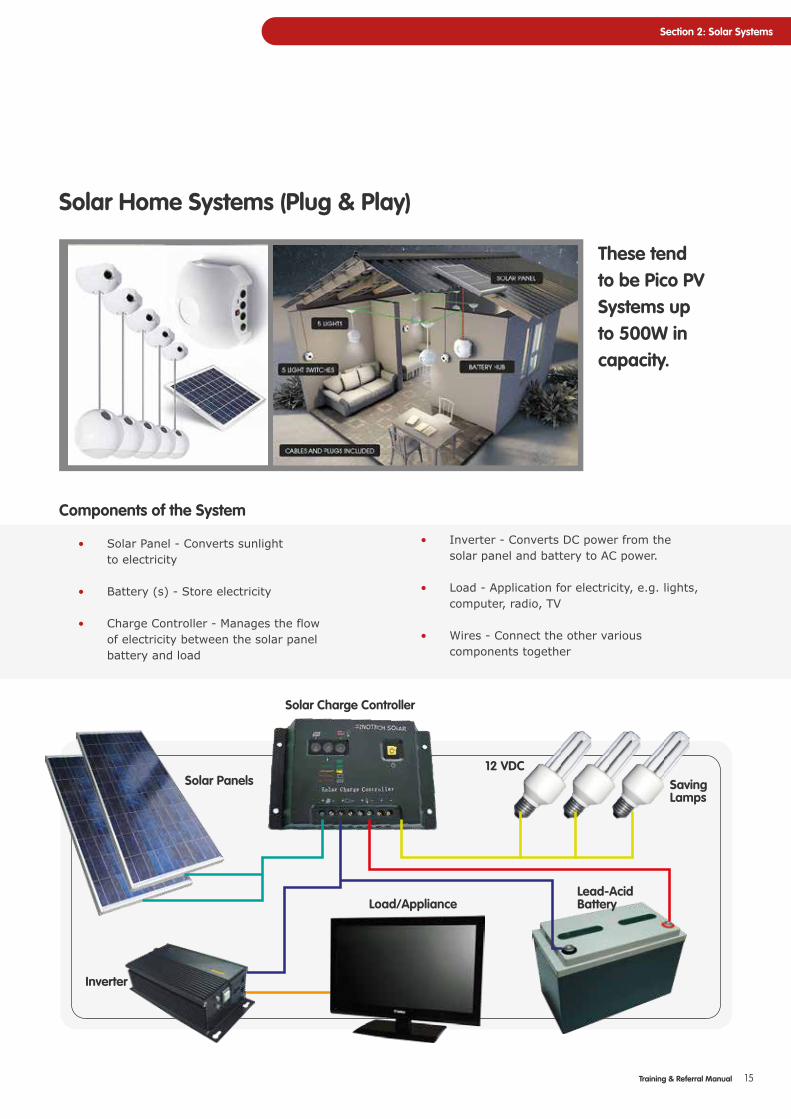
Components of the System
• Solar Panel - Converts sunlight to electricity
• Battery (s) - Store electricity
• Charge Controller - Manages the flow of electricity between the solar panel battery and load
Solar Home Systems (Plug & Play)
• Inverter - Converts DC power from the solar panel and battery to AC power.
• Load - Application for electricity, e.g. lights, computer, radio, TV
• Wires - Connect the other various components together
These tend to be Pico PV Systems up to 500W in capacity.
Load/Appliance
Inverter
Solar Panels SavingLamps
Solar Charge Controller
12 VDC
Lead-AcidBattery
16 Training & Referral Manual
Section 2: Solar Systems
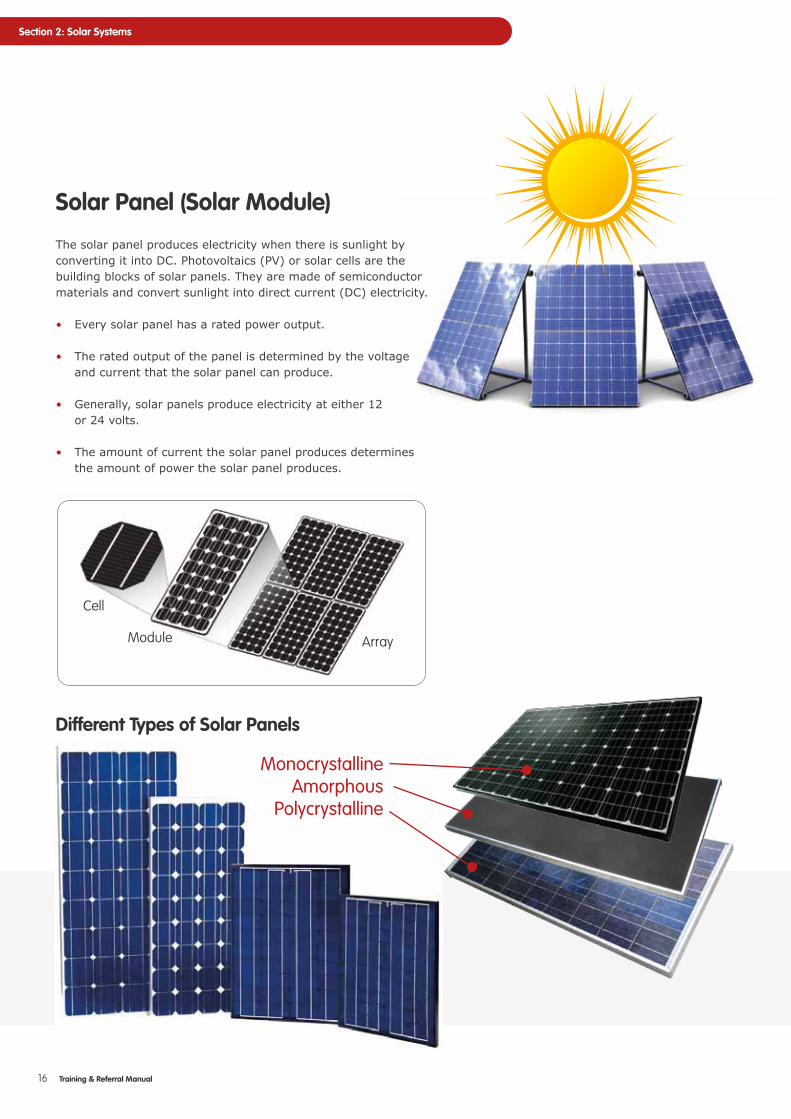
Solar Panel (Solar Module)
The solar panel produces electricity when there is sunlight by converting it into DC. Photovoltaics (PV) or solar cells are the building blocks of solar panels. They are made of semiconductor materials and convert sunlight into direct current (DC) electricity.
• Every solar panel has a rated power output.
• The rated output of the panel is determined by the voltage and current that the solar panel can produce.
• Generally, solar panels produce electricity at either 12 or 24 volts.
• The amount of current the solar panel produces determines the amount of power the solar panel produces.
Cell
ArrayModule
Different Types of Solar Panels
MonocrystallineAmorphous
Polycrystalline
17Training & Referral Manual
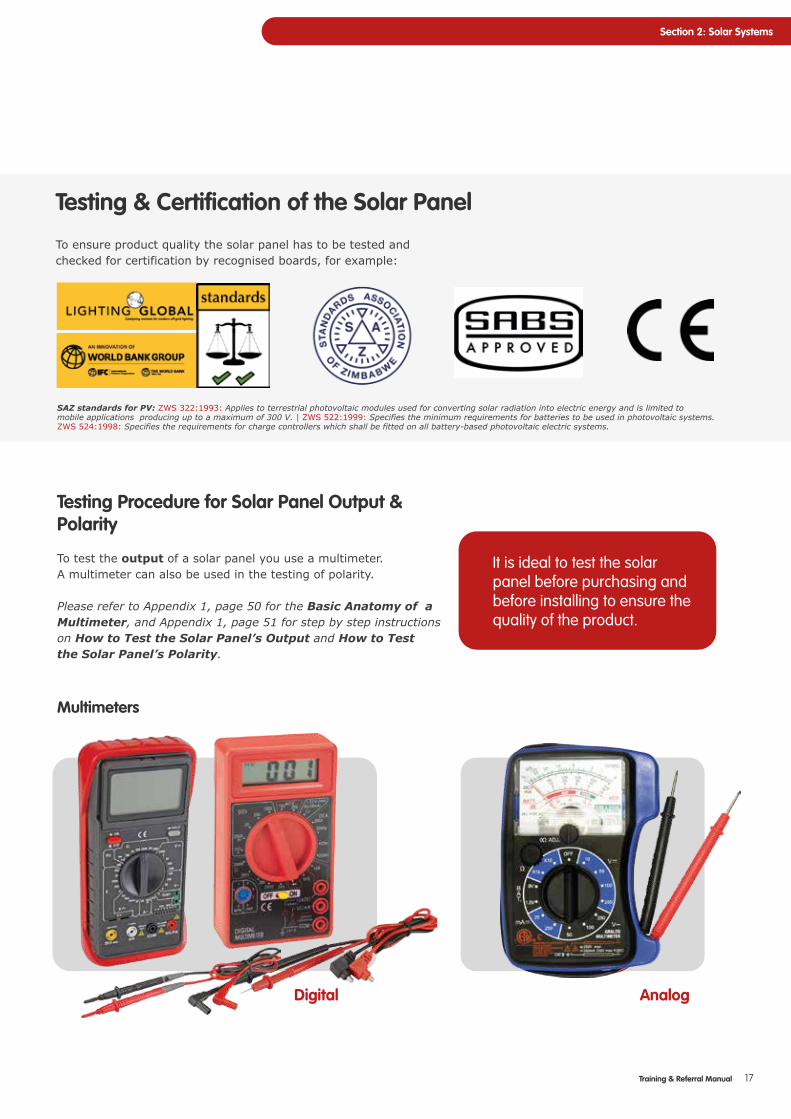
Testing & Certification of the Solar Panel
To ensure product quality the solar panel has to be tested and checked for certification by recognised boards, for example:
Section 2: Solar Systems
Testing Procedure for Solar Panel Output & Polarity
To test the output of a solar panel you use a multimeter.A multimeter can also be used in the testing of polarity.
Please refer to Appendix 1, page 50 for the Basic Anatomy of a Multimeter, and Appendix 1, page 51 for step by step instructionson How to Test the Solar Panel’s Output and How to Testthe Solar Panel’s Polarity.
It is ideal to test the solar panel before purchasing andbefore installing to ensure the quality of the product.
SAZ standards for PV: ZWS 322:1993: Applies to terrestrial photovoltaic modules used for converting solar radiation into electric energy and is limited tomobile applications producing up to a maximum of 300 V. | ZWS 522:1999: Specifies the minimum requirements for batteries to be used in photovoltaic systems.ZWS 524:1998: Specifies the requirements for charge controllers which shall be fitted on all battery-based photovoltaic electric systems.
Multimeters
Digital Analog
18 Training & Referral Manual
Section 2: Solar Systems
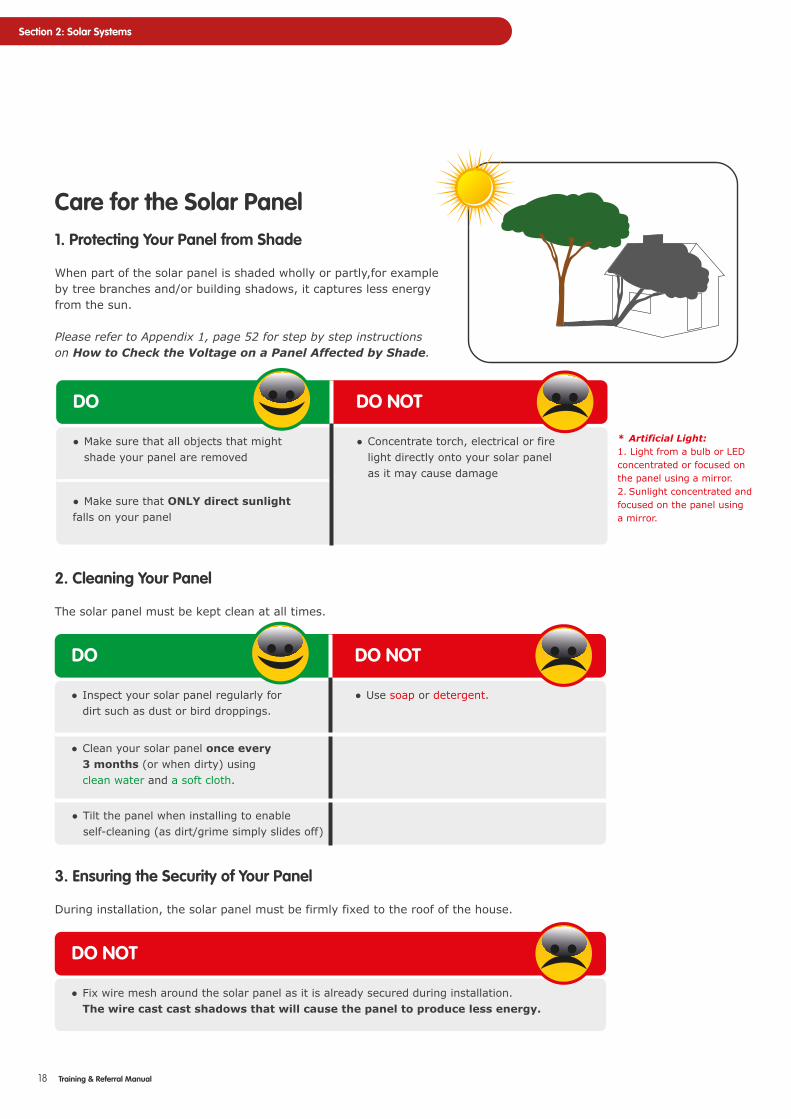
2. Cleaning Your Panel
The solar panel must be kept clean at all times.
● Inspect your solar panel regularly for dirt such as dust or bird droppings.
DO
● Use soap or detergent.
DO NOT
● Clean your solar panel once every 3 months (or when dirty) using clean water and a soft cloth.
3. Ensuring the Security of Your Panel
During installation, the solar panel must be firmly fixed to the roof of the house.
● Fix wire mesh around the solar panel as it is already secured during installation. The wire cast cast shadows that will cause the panel to produce less energy.
DO NOT
● Tilt the panel when installing to enable self-cleaning (as dirt/grime simply slides off)
Care for the Solar Panel1. Protecting Your Panel from Shade
When part of the solar panel is shaded wholly or partly,for example by tree branches and/or building shadows, it captures less energy from the sun.
Please refer to Appendix 1, page 52 for step by step instructions on How to Check the Voltage on a Panel Affected by Shade.
● Make sure that all objects that might shade your panel are removed
DO
● Concentrate torch, electrical or fire light directly onto your solar panel as it may cause damage
DO NOT
● Make sure that ONLY direct sunlightfalls on your panel
* Artificial Light:1. Light from a bulb or LEDconcentrated or focused onthe panel using a mirror.2. Sunlight concentrated andfocused on the panel usinga mirror.
19Training & Referral Manual
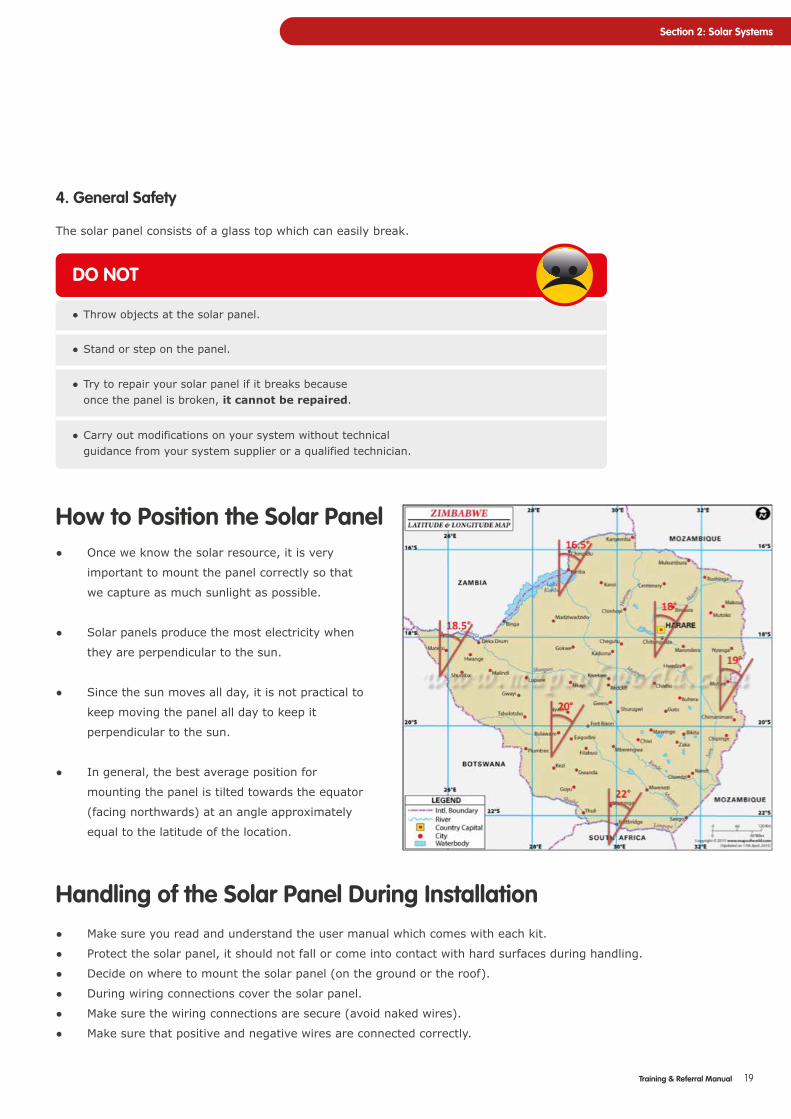
How to Position the Solar Panel● Once we know the solar resource, it is very
important to mount the panel correctly so that
we capture as much sunlight as possible.
● Solar panels produce the most electricity when
they are perpendicular to the sun.
● Since the sun moves all day, it is not practical to
keep moving the panel all day to keep it
perpendicular to the sun.
● In general, the best average position for
mounting the panel is tilted towards the equator
(facing northwards) at an angle approximately
equal to the latitude of the location.
Section 2: Solar Systems
Handling of the Solar Panel During Installation● Make sure you read and understand the user manual which comes with each kit.
● Protect the solar panel, it should not fall or come into contact with hard surfaces during handling.
● Decide on where to mount the solar panel (on the ground or the roof).
● During wiring connections cover the solar panel.
● Make sure the wiring connections are secure (avoid naked wires).
● Make sure that positive and negative wires are connected correctly.
4. General Safety
The solar panel consists of a glass top which can easily break.
● Throw objects at the solar panel.
DO NOT
● Stand or step on the panel.
● Try to repair your solar panel if it breaks because once the panel is broken, it cannot be repaired.
● Carry out modifications on your system without technical guidance from your system supplier or a qualified technician.
20 Training & Referral Manual
Section 2: Solar Systems
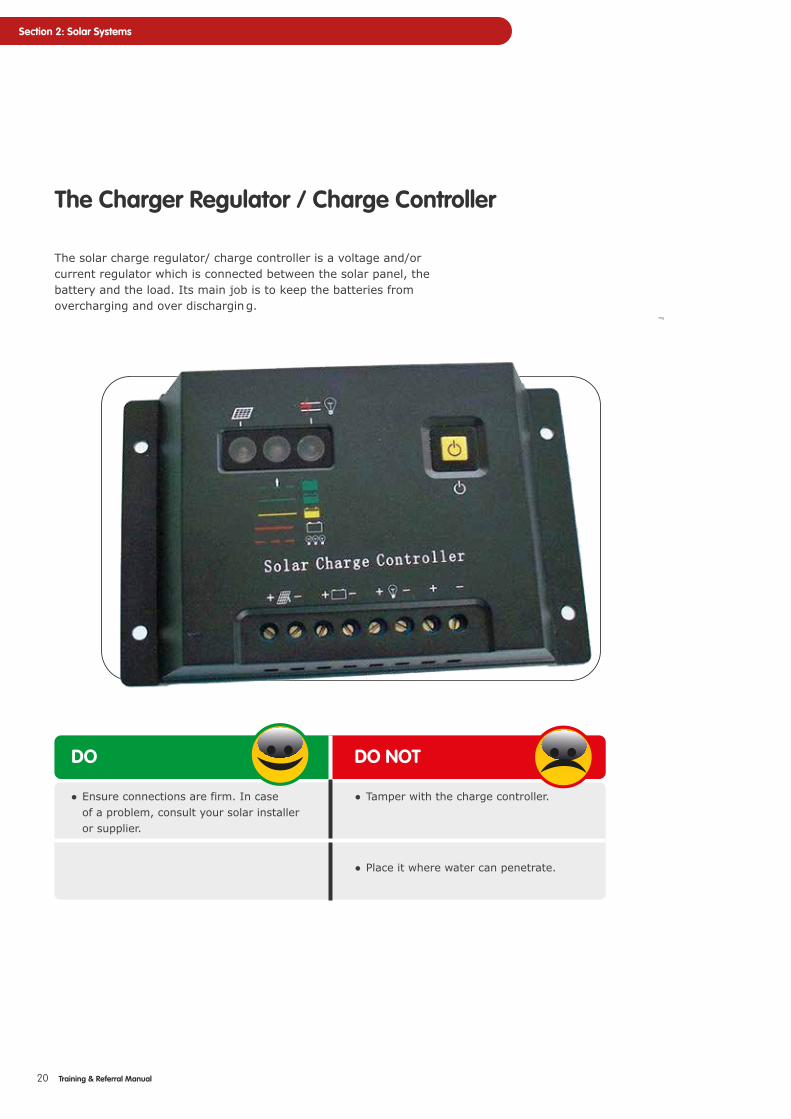
The Charger Regulator / Charge Controller
● Ensure connections are firm. In case of a problem, consult your solar installer or supplier.
DO
● Tamper with the charge controller.
DO NOT
● Place it where water can penetrate.
The solar charge regulator/ charge controller is a voltage and/or current regulator which is connected between the solar panel, the battery and the load. Its main job is to keep the batteries from overcharging and over dischargin g.
21Training & Referral Manual
Section 2: Solar Systems
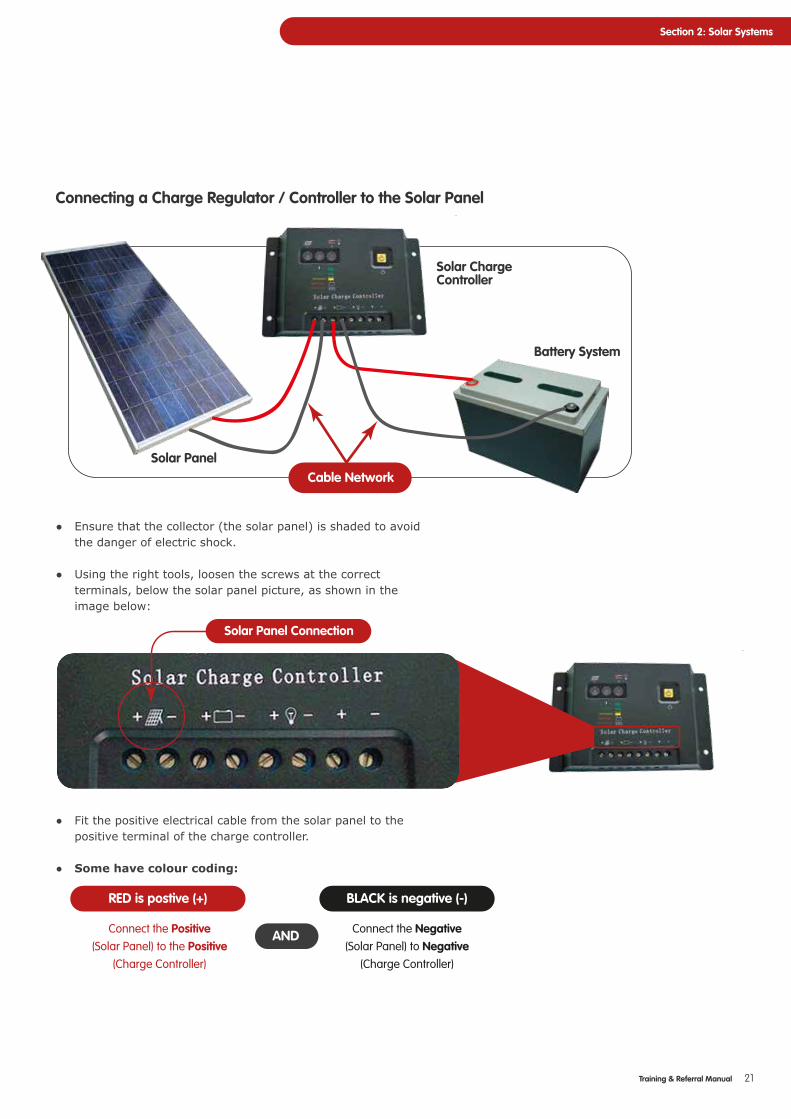
Connecting a Charge Regulator / Controller to the Solar Panel
● Ensure that the collector (the solar panel) is shaded to avoid the danger of electric shock.
● Using the right tools, loosen the screws at the correct terminals, below the solar panel picture, as shown in the image below:
● Fit the positive electrical cable from the solar panel to the positive terminal of the charge controller.
● Some have colour coding:
Connect the Positive(Solar Panel) to the Positive
(Charge Controller)
RED is postive (+) BLACK is negative (-)
Connect the Negative(Solar Panel) to Negative
(Charge Controller)
AND
Solar Panel
Solar ChargeController
Battery System
Cable Network
Solar Panel Connection

22 Training & Referral Manual
Section 2: Solar Systems
Why Use a Charge Controller?
● It monitors the battery voltage● It stops charging when the battery is fully charged● It extends battery life● It regulates power from the solar panels, protecting the battery from overcharging. Overcharging damages batteries and reduces battery life● It prevents overly deep discharge which damages the batteries● It protects your appliances and gadgets
Dangers of Bypassing a Charge Controller
Bypassing the charger controller will cause:
● damage of batteries because there is no regulation of power● damage of electrical appliances
● Inspect the cable network every 3 to 5 years to ensure ther are no exposed wires.
DO
● Try to make connections when you are not sure. Seek expert advice and help.
DO NOT
● Protect your solar wiring from damage as this can result in the failure of your system.
Care for the Cable Network
● Avoid short-circuiting your cables as this can lead to system damage.
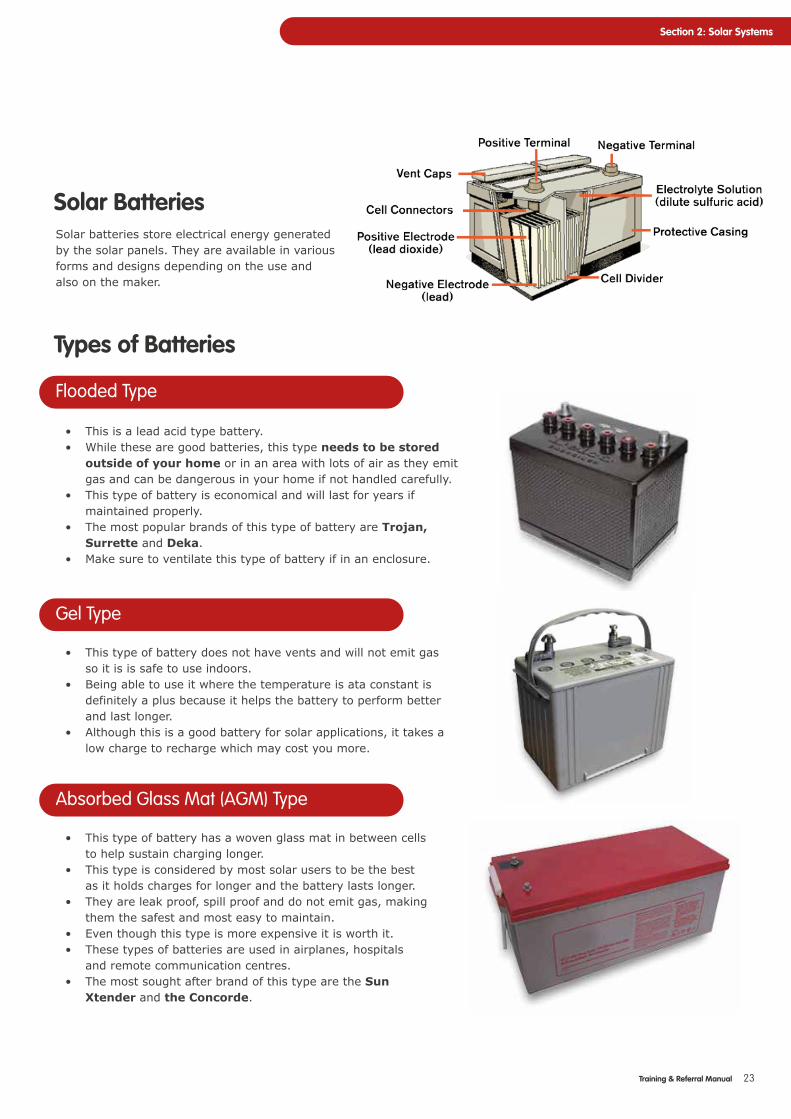
Solar BatteriesSolar batteries store electrical energy generated by the solar panels. They are available in various forms and designs depending on the use and also on the maker.
• This is a lead acid type battery. • While these are good batteries, this type needs to be stored outside of your home or in an area with lots of air as they emit gas and can be dangerous in your home if not handled carefully. • This type of battery is economical and will last for years if maintained properly. • The most popular brands of this type of battery are Trojan, Surrette and Deka. • Make sure to ventilate this type of battery if in an enclosure.
Types of Batteries
Flooded Type
• This type of battery does not have vents and will not emit gas so it is is safe to use indoors. • Being able to use it where the temperature is ata constant is definitely a plus because it helps the battery to perform better and last longer. • Although this is a good battery for solar applications, it takes a low charge to recharge which may cost you more.
Gel Type
• This type of battery has a woven glass mat in between cells to help sustain charging longer. • This type is considered by most solar users to be the best as it holds charges for longer and the battery lasts longer. • They are leak proof, spill proof and do not emit gas, making them the safest and most easy to maintain. • Even though this type is more expensive it is worth it. • These types of batteries are used in airplanes, hospitals and remote communication centres. • The most sought after brand of this type are the Sun Xtender and the Concorde.
Absorbed Glass Mat (AGM) Type
23Training & Referral Manual
Section 2: Solar Systems
24 Training & Referral Manual
Section 2: Solar Systems
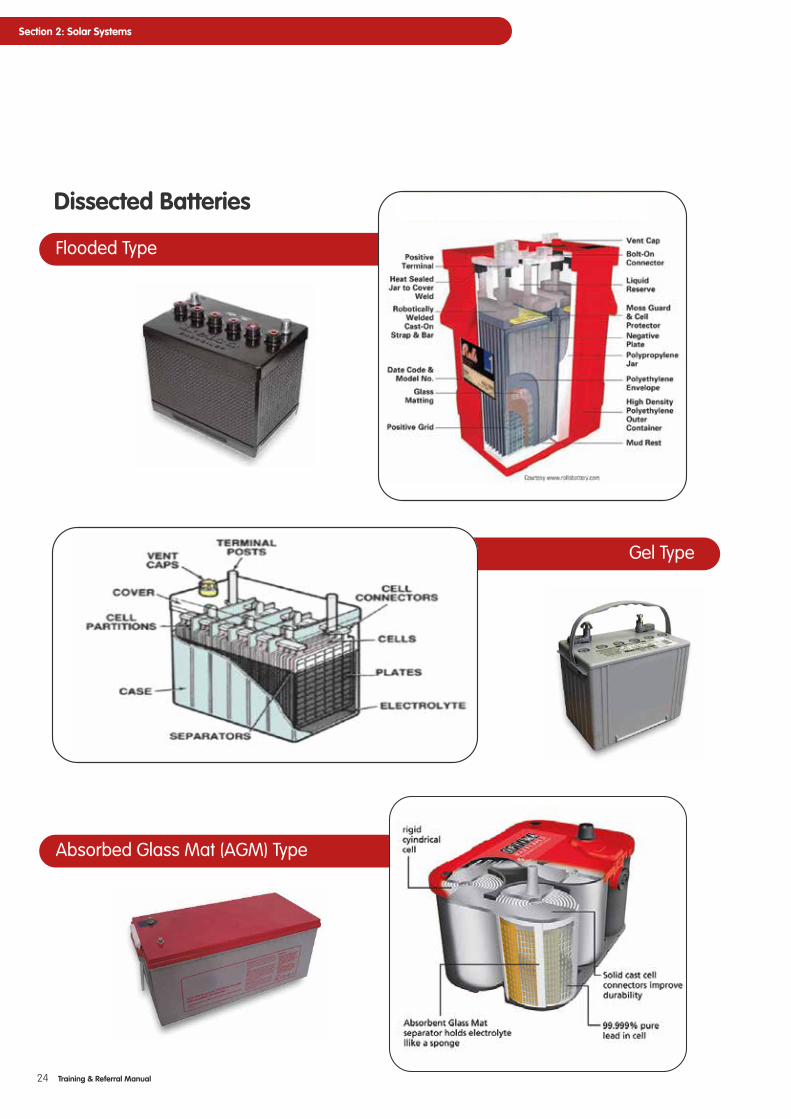
Dissected Batteries
Flooded Type
Gel Type
Absorbed Glass Mat (AGM) Type

25Training & Referral Manual
Section 2: Solar Systems
Connecting a Battery to a Solar System
● Before you begin the process of connecting, please ensure that the panel is shaded/covered (no sunshine reaching the collector) to avoid danger of electrical shock.
● Using the right tools, loosen the screws for the battery connections on the battery section as indicated by the arrow in the image below:
● Fit the cable to the positive terminal of the charge controller and to the positive terminal of the battery.● Fit the cable to the negative terminal of the charge controller and to the negative terminal of the battery.
The connections are displayed on the diagram on the next page.
Why Not Use the Car Battery?• Its capacity is too small for continuous charging so they would not last very long.• It might seem like a good idea in the beginning because of cost, but you'll pay for it in 9 months or so. • Car type batteries discharge too quickly and don't last very long. In addition, after they get discharged to a certain extent they don't work well at all.
Conclusion: DO NOT USE CAR BATTERIES ON YOUR SOLAR SYSTEM
Battery Testing
Please refer to Appendix 1, page 52 for step by step instructions on Battery Testing Using a Multimeter.
Battery Connection
26 Training & Referral Manual
Section 2: Solar Systems
DO
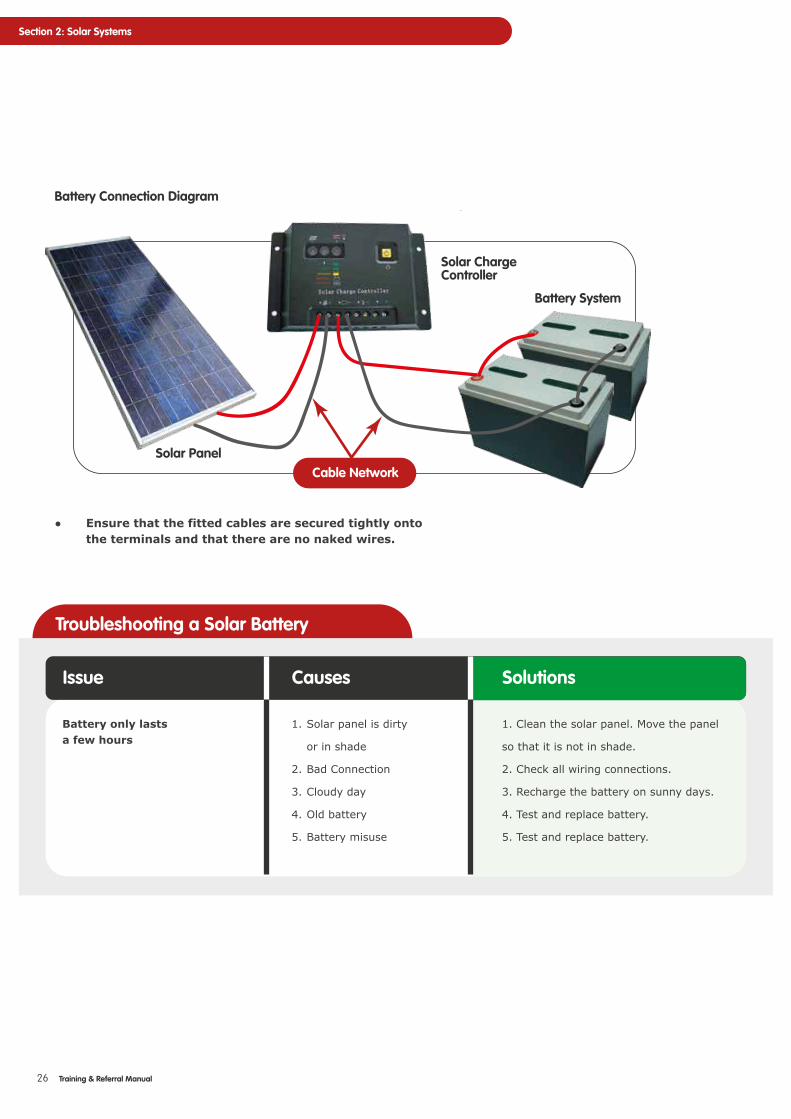
Battery Connection Diagram
● Ensure that the fitted cables are secured tightly onto the terminals and that there are no naked wires.
Troubleshooting a Solar Battery
Battery only lastsa few hours
Issue
1. Solar panel is dirty
or in shade
2. Bad Connection
3. Cloudy day
4. Old battery
5. Battery misuse
Causes
Solar Panel
Solar ChargeController
Battery System
Cable Network
1. Clean the solar panel. Move the panel
so that it is not in shade.
2. Check all wiring connections.
3. Recharge the battery on sunny days.
4. Test and replace battery.
5. Test and replace battery.
Solutions
27Training & Referral Manual
Section 2: Solar Systems
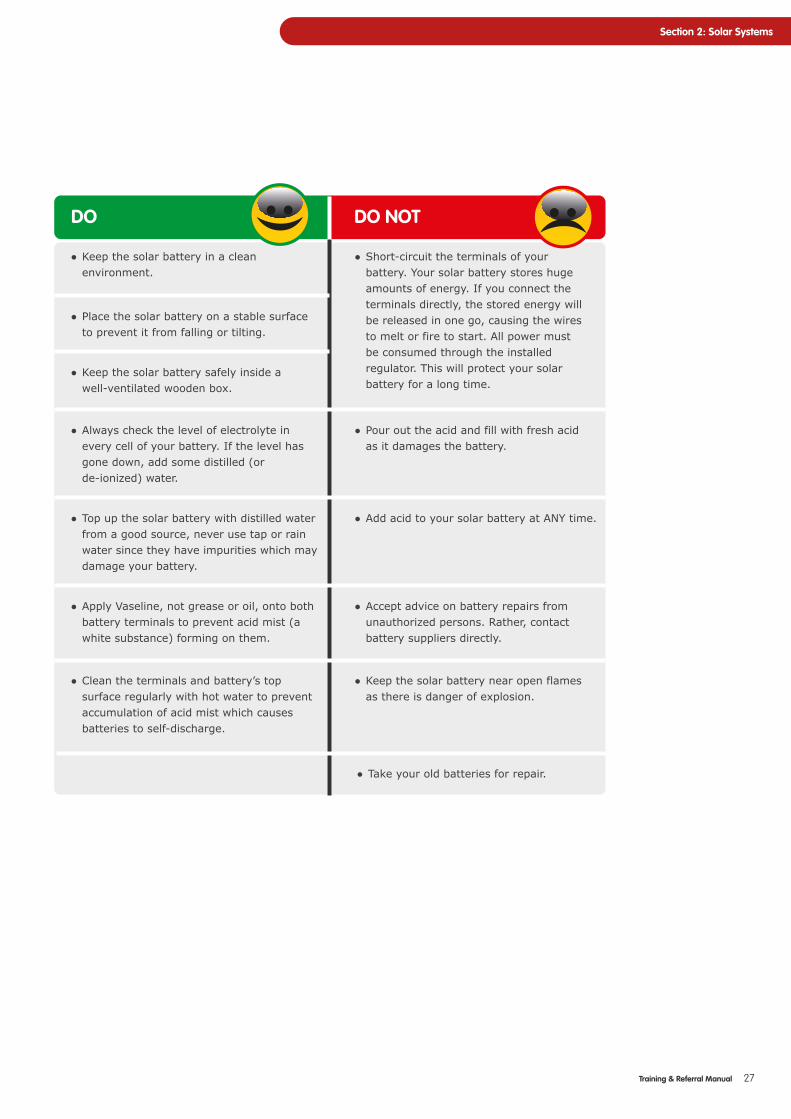
● Keep the solar battery in a clean environment.
DO
● Short-circuit the terminals of your battery. Your solar battery stores huge amounts of energy. If you connect the terminals directly, the stored energy will be released in one go, causing the wires to melt or fire to start. All power must be consumed through the installed regulator. This will protect your solar battery for a long time.
DO NOT
● Place the solar battery on a stable surface to prevent it from falling or tilting.
● Keep the solar battery safely inside a well-ventilated wooden box.
● Always check the level of electrolyte in every cell of your battery. If the level has gone down, add some distilled (or de-ionized) water.
● Top up the solar battery with distilled water from a good source, never use tap or rain water since they have impurities which may damage your battery.
● Apply Vaseline, not grease or oil, onto both battery terminals to prevent acid mist (a white substance) forming on them.
● Clean the terminals and battery’s top surface regularly with hot water to prevent accumulation of acid mist which causes batteries to self-discharge.
● Pour out the acid and fill with fresh acid as it damages the battery.
● Add acid to your solar battery at ANY time.
● Accept advice on battery repairs from unauthorized persons. Rather, contact battery suppliers directly.
● Keep the solar battery near open flames as there is danger of explosion.
● Take your old batteries for repair.
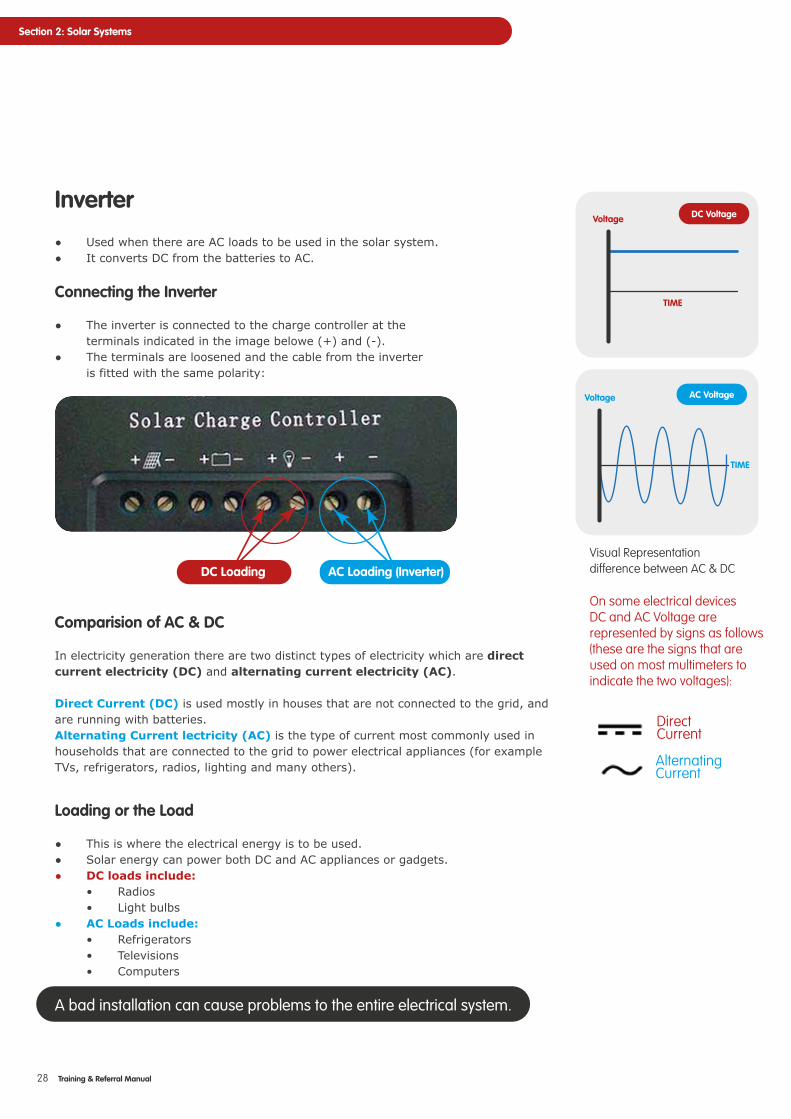
Inverter
● Used when there are AC loads to be used in the solar system.● It converts DC from the batteries to AC.
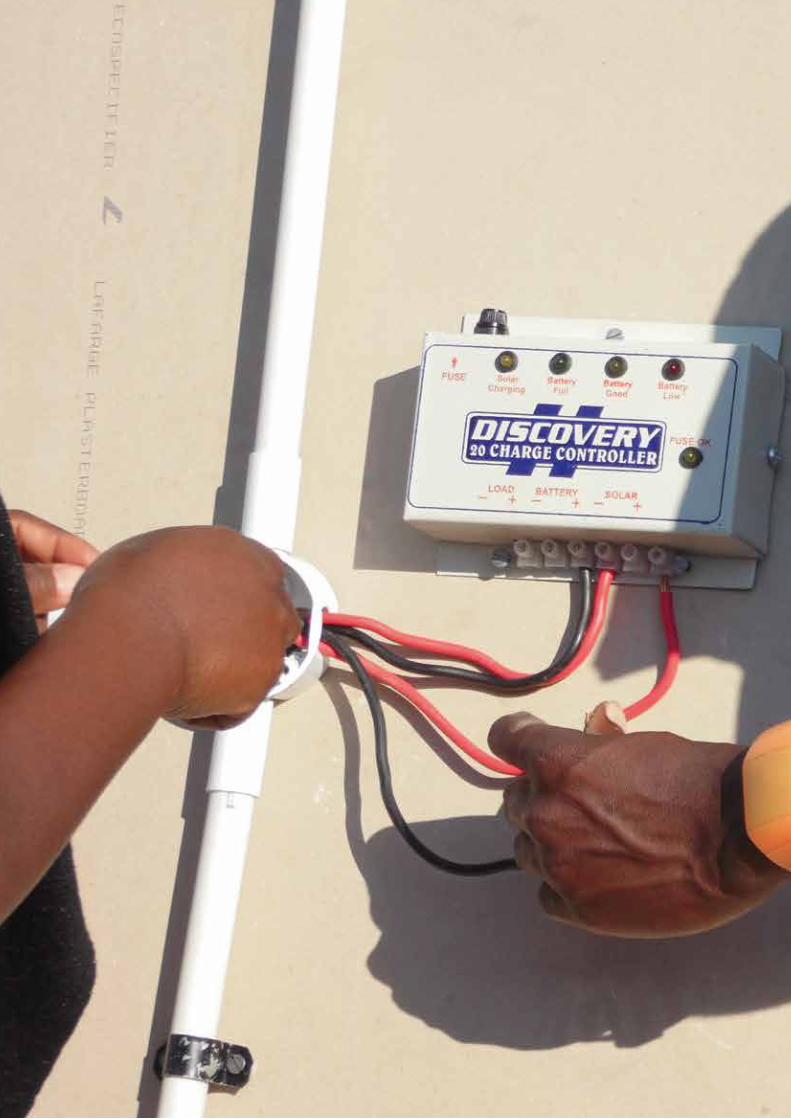
Connecting the Inverter
● The inverter is connected to the charge controller at the terminals indicated in the image belowe (+) and (-).● The terminals are loosened and the cable from the inverter is fitted with the same polarity:
28 Training & Referral Manual
Section 2: Solar Systems
DC Loading AC Loading (Inverter)
Comparision of AC & DC
In electricity generation there are two distinct types of electricity which are direct current electricity (DC) and alternating current electricity (AC).
Direct Current (DC) is used mostly in houses that are not connected to the grid, and are running with batteries.Alternating Current lectricity (AC) is the type of current most commonly used in households that are connected to the grid to power electrical appliances (for example TVs, refrigerators, radios, lighting and many others).
Loading or the Load
● This is where the electrical energy is to be used.● Solar energy can power both DC and AC appliances or gadgets.● DC loads include: • Radios • Light bulbs● AC Loads include: • Refrigerators • Televisions • Computers
A bad installation can cause problems to the entire electrical system.
Visual Representationdifference between AC & DC
DC VoltageVoltage
TIME
AC VoltageVoltage
TIME
On some electrical devicesDC and AC Voltage arerepresented by signs as follows(these are the signs that areused on most multimeters toindicate the two voltages):
DirectCurrent
AlternatingCurrent

A Summary of the Complete Solar System
Gel Type • Radiation is converted into electrical energy (as DC) by the solar panels. • The solar panels are connected to the charge controller so as to regulate the battery charging. • Power is distributed from the charge controller to the inverter and also to DC loads. • The battery is also connected to the charger controller and the inverter. • AC loads are then connected to the inverter.
29Training & Referral Manual
Section 2: Solar Systems
The Solar Charge Controller thus forms the CENTRAL UNIT of
the entire Solar System - protecting the whole system.
Load/Appliance
Inverter
Solar Panels SavingLamps
Solar Charge Controller
12 VDC
Lead-AcidBattery
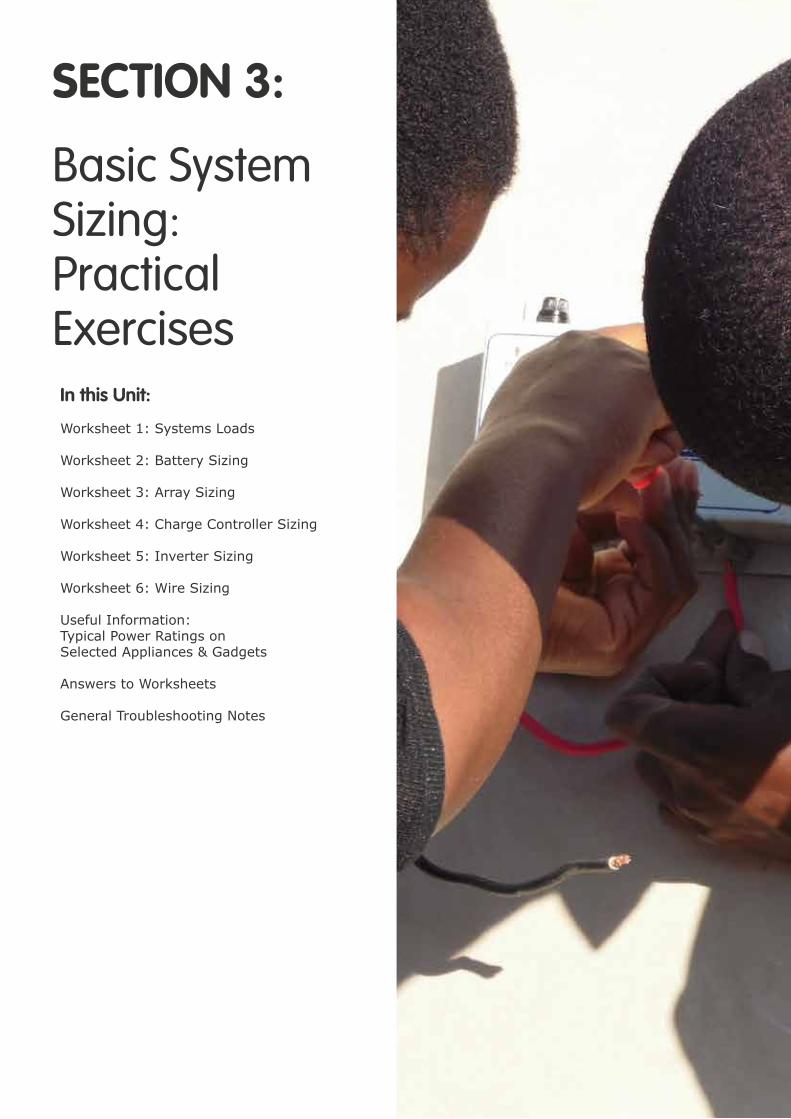
SECTION 3:
Basic System Sizing: Practical ExercisesIn this Unit:
Worksheet 1: Systems Loads
Worksheet 2: Battery Sizing
Worksheet 3: Array Sizing
Worksheet 4: Charge Controller Sizing
Worksheet 5: Inverter Sizing
Worksheet 6: Wire Sizing
Useful Information:Typical Power Ratings onSelected Appliances & Gadgets
Answers to Worksheets
General Troubleshooting Notes
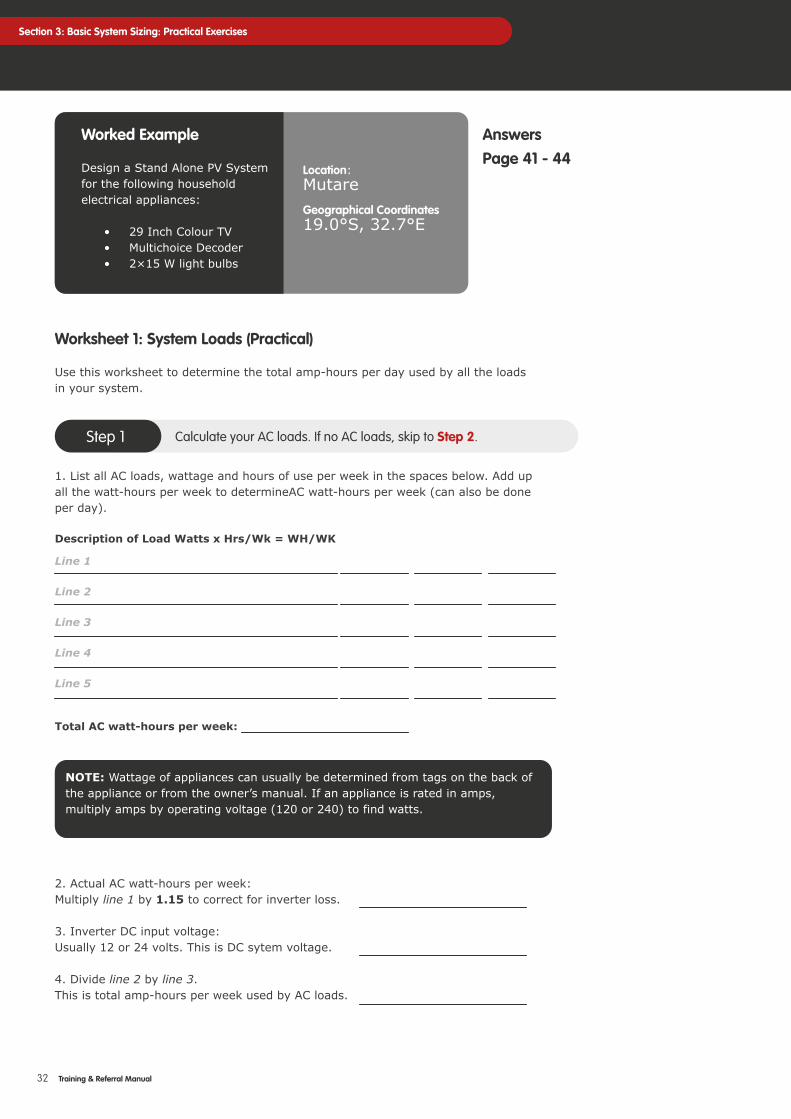
Worksheet 1: System Loads (Practical)
Use this worksheet to determine the total amp-hours per day used by all the loads in your system.
32 Training & Referral Manual
Section 3: Basic System Sizing: Practical Exercises
Step 1 Calculate your AC loads. If no AC loads, skip to Step 2.
1. List all AC loads, wattage and hours of use per week in the spaces below. Add upall the watt-hours per week to determineAC watt-hours per week (can also be doneper day).
Description of Load Watts x Hrs/Wk = WH/WK
Total AC watt-hours per week:
NOTE: Wattage of appliances can usually be determined from tags on the back of the appliance or from the owner’s manual. If an appliance is rated in amps, multiply amps by operating voltage (120 or 240) to find watts.
2. Actual AC watt-hours per week:Multiply line 1 by 1.15 to correct for inverter loss.
3. Inverter DC input voltage:Usually 12 or 24 volts. This is DC sytem voltage.
4. Divide line 2 by line 3.This is total amp-hours per week used by AC loads.
Line 1
Line 2
Line 3
Line 4
Line 5
Worked Example
Design a Stand Alone PV System for the following household electrical appliances:
• 29 Inch Colour TV • Multichoice Decoder • 2×15 W light bulbs
Location:MutareGeographical Coordinates19.0°S, 32.7°E
AnswersPage 41 - 44

33Training & Referral Manual
Section 3: Basic System Sizing: Practical Exercises
Step 2 Calculate your DC loads (Loads which use Direct Current)
5. List all DC loads in the spaces below.
Description of Load Watts x Hrs/Wk = WH/WK
Total watt-hours per week:
Line 6
Line 7
Line 8
Line 9
Line 10
6. DC system voltage. Usually 12 or 24 volts.
7. Total amp-hours per week usedby DC loads. Divide line 5 by line 6.
8. Total amp-hours per week usedby AC loads from line 4.
9. Add lines 7 and 8. This is the totalamp-hours per week used by all loads.
10. Divide line 9 by 7 days.
This is the total average amp-hours per day.
NOTES

34 Training & Referral Manual
Section 3: Basic System Sizing: Practical Exercises
Worksheet 2: Battery Sizing
Use this worksheet to determine what size battery is required for your system.
1. Total amp hours per day required fromSystems Load Worksheet, line 10.
2. Maximum number of continuous days of cloudyweather expected in your area during one year.(5 to 10 days in most areas)
3. Multiply line 1 by line 2.
4. Divide line 3 by 0.8 to maintain a 20% reserveafter deep discharge period. If no special condition,skip to line 10.
5. Select the multiplier below which corresponds withthe batteries’ wintertime average ambient temperature.
Battery Temperature Multiplier
BatteryTemperature ºC26.721.215.610.04.4-1.1-6.7
Multiplier
1.001.041.111.191.301.401.59
6. Multiply line 4 by line 5. This is your optimum battery size.
7. Amp-hours of battery chosen (i.e. L16 is 360 amp hours).
8. Divide line 6 by line 7. This is the total number of batteries in parallel required.
9. Round off to the next highest whole number.
10. Divide the system voltage by the battery voltage.
11. Multiply line 9 by line 10.
This is the total number of batteries required.

35Training & Referral Manual
Section 3: Basic System Sizing: Practical Exercises
NOTES
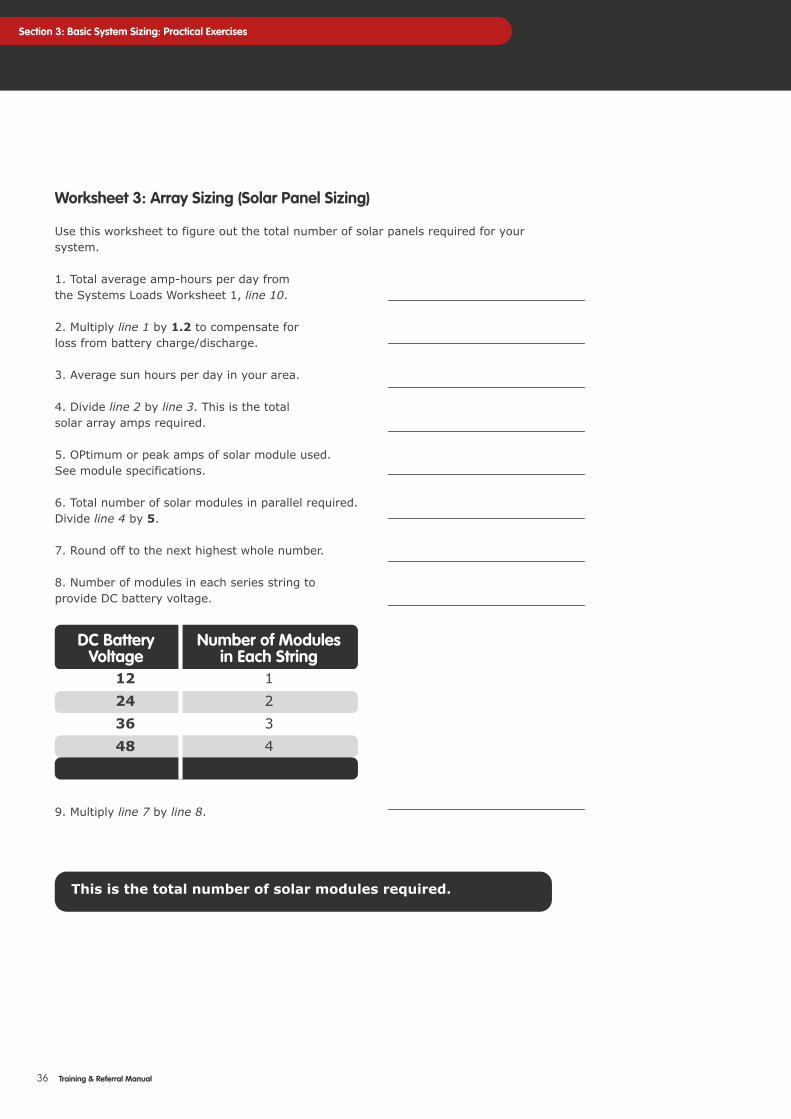
Worksheet 3: Array Sizing (Solar Panel Sizing)
Use this worksheet to figure out the total number of solar panels required for your system.
1. Total average amp-hours per day fromthe Systems Loads Worksheet 1, line 10.
2. Multiply line 1 by 1.2 to compensate forloss from battery charge/discharge.
3. Average sun hours per day in your area.
4. Divide line 2 by line 3. This is the totalsolar array amps required.
5. OPtimum or peak amps of solar module used.See module specifications.
6. Total number of solar modules in parallel required.Divide line 4 by 5.
7. Round off to the next highest whole number.
8. Number of modules in each series string toprovide DC battery voltage.
36 Training & Referral Manual
Section 3: Basic System Sizing: Practical Exercises
DC BatteryVoltage
12243648
Number of Modulesin Each String
1234
9. Multiply line 7 by line 8.
This is the total number of solar modules required.

37Training & Referral Manual
Section 3: Basic System Sizing: Practical Exercises
NOTES
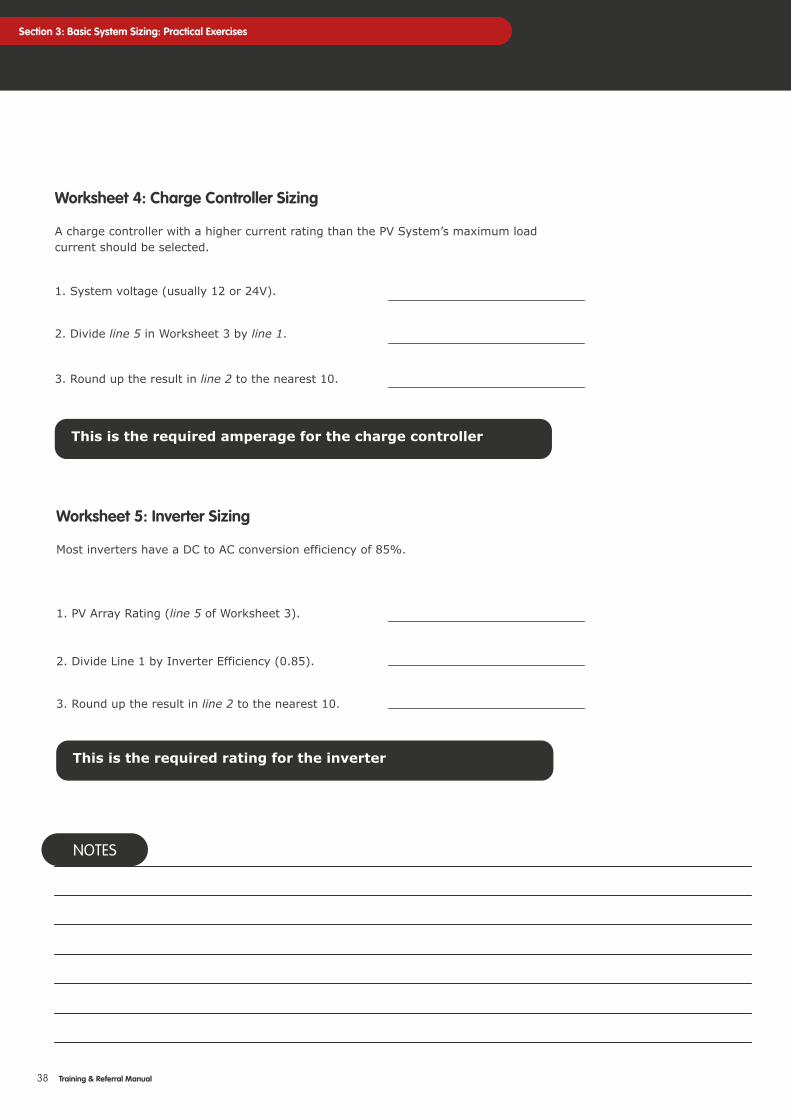
Worksheet 4: Charge Controller Sizing
A charge controller with a higher current rating than the PV System’s maximum load current should be selected.
1. System voltage (usually 12 or 24V).
2. Divide line 5 in Worksheet 3 by line 1.
3. Round up the result in line 2 to the nearest 10.
38 Training & Referral Manual
Section 3: Basic System Sizing: Practical Exercises
This is the required amperage for the charge controller
Worksheet 5: Inverter Sizing
Most inverters have a DC to AC conversion efficiency of 85%.
1. PV Array Rating (line 5 of Worksheet 3).
2. Divide Line 1 by Inverter Efficiency (0.85).
3. Round up the result in line 2 to the nearest 10.
This is the required rating for the inverter
NOTES
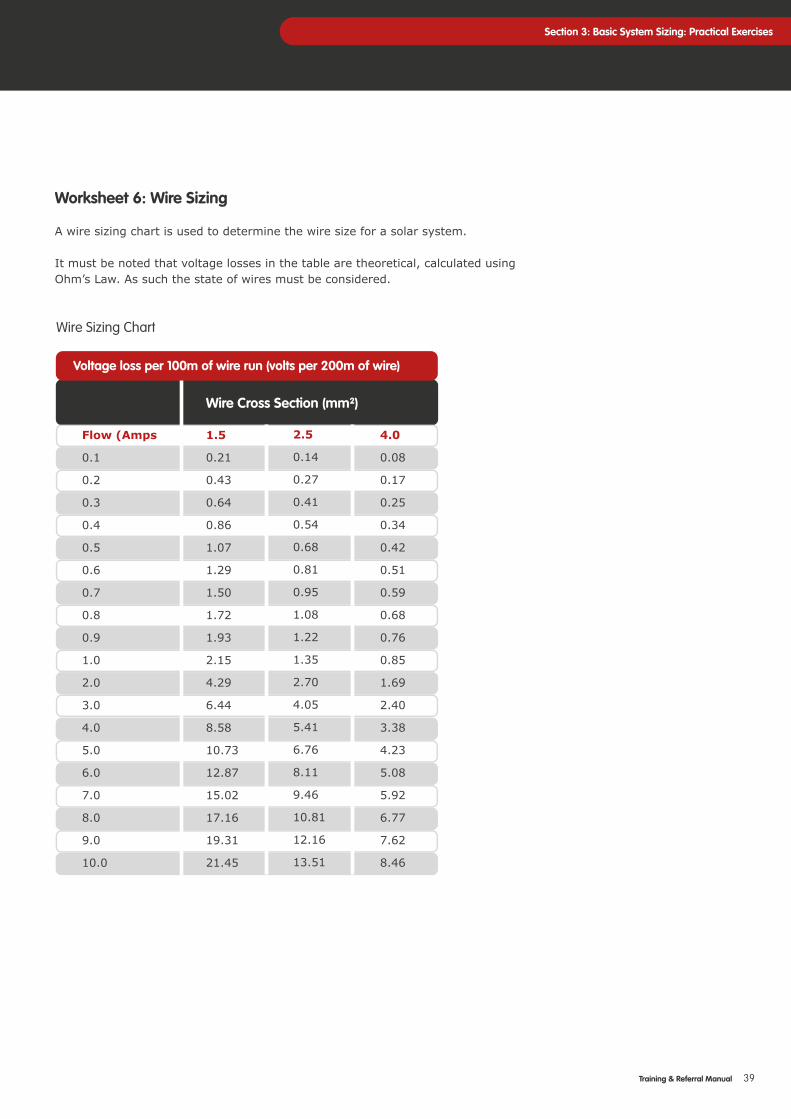
Worksheet 6: Wire Sizing
A wire sizing chart is used to determine the wire size for a solar system.
It must be noted that voltage losses in the table are theoretical, calculated using Ohm’s Law. As such the state of wires must be considered.
39Training & Referral Manual
Wire Cross Section (mm²)
Flow (Amps
0.1
0.2
0.3
0.4
0.5
0.6
0.7
0.8
0.9
1.0
2.0
3.0
4.0
5.0
6.0
7.0
8.0
9.0
10.0
1.5
0.21
0.43
0.64
0.86
1.07
1.29
1.50
1.72
1.93
2.15
4.29
6.44
8.58
10.73
12.87
15.02
17.16
19.31
21.45
2.5
0.14
0.27
0.41
0.54
0.68
0.81
0.95
1.08
1.22
1.35
2.70
4.05
5.41
6.76
8.11
9.46
10.81
12.16
13.51
4.0
0.08
0.17
0.25
0.34
0.42
0.51
0.59
0.68
0.76
0.85
1.69
2.40
3.38
4.23
5.08
5.92
6.77
7.62
8.46
Voltage loss per 100m of wire run (volts per 200m of wire)
Wire Sizing Chart
Section 3: Basic System Sizing: Practical Exercises
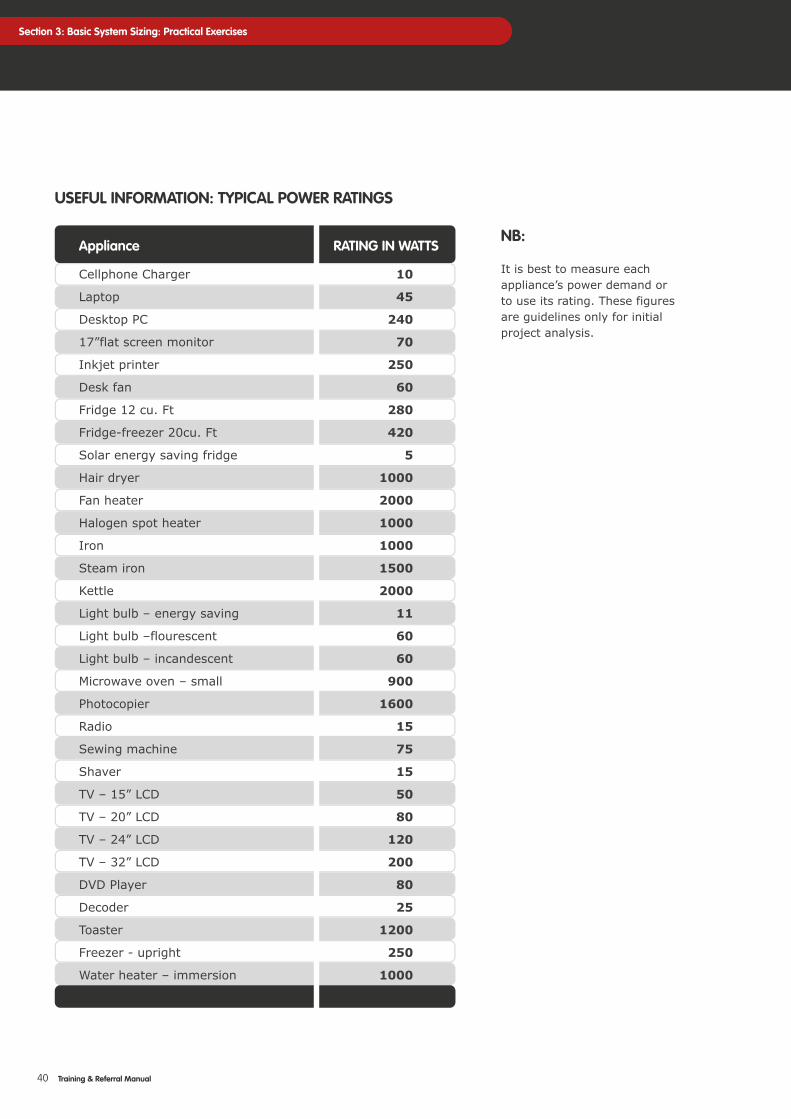
USEFUL INFORMATION: TYPICAL POWER RATINGS
40 Training & Referral Manual
Section 3: Basic System Sizing: Practical Exercises
Appliance RATING IN WATTS
Cellphone Charger
Laptop
Desktop PC
17”flat screen monitor
Inkjet printer
Desk fan
Fridge 12 cu. Ft
Fridge-freezer 20cu. Ft
Solar energy saving fridge
Hair dryer
Fan heater
Halogen spot heater
Iron
Steam iron
Kettle
Light bulb – energy saving
Light bulb –flourescent
Light bulb – incandescent
Microwave oven – small
Photocopier
Radio
Sewing machine
Shaver
TV – 15” LCD
TV – 20” LCD
TV – 24” LCD
TV – 32” LCD
DVD Player
Decoder
Toaster
Freezer - upright
Water heater – immersion
10
45
240
70
250
60
280
420
5
1000
2000
1000
1000
1500
2000
11
60
60
900
1600
15
75
15
50
80
120
200
80
25
1200
250
1000
NB:
It is best to measure each appliance’s power demand orto use its rating. These figuresare guidelines only for initialproject analysis.
Section 3: Basic System Sizing: Practical Exercises
41Training & Referral Manual
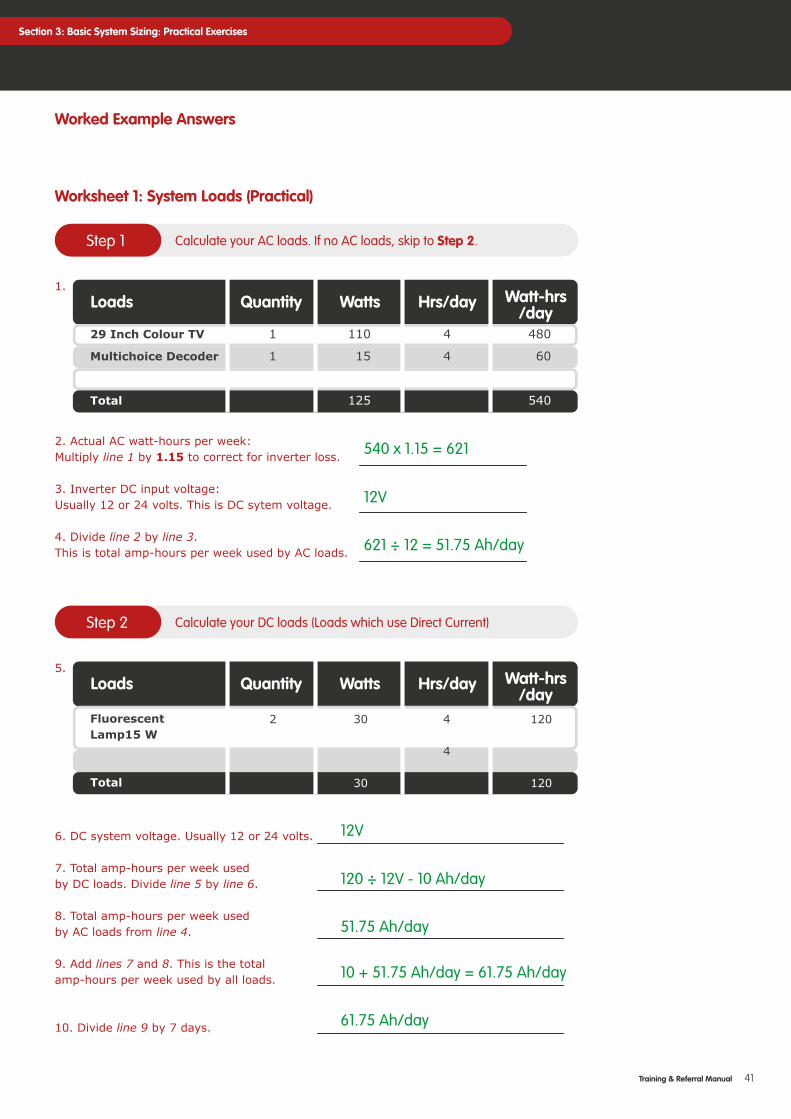
Worksheet 1: System Loads (Practical)
Step 1 Calculate your AC loads. If no AC loads, skip to Step 2.
1.
2. Actual AC watt-hours per week:Multiply line 1 by 1.15 to correct for inverter loss.
3. Inverter DC input voltage:Usually 12 or 24 volts. This is DC sytem voltage.
4. Divide line 2 by line 3.This is total amp-hours per week used by AC loads.
Loads
29 Inch Colour TV
Multichoice Decoder
Total
Quantity
1
1
Watts
110
15
125
Hrs/day
4
4
Watt-hrs/day
480
60
540
540 x 1.15 = 621
12V
621 ÷ 12 = 51.75 Ah/day
Worked Example Answers
Step 2 Calculate your DC loads (Loads which use Direct Current)
5.Loads
FluorescentLamp15 W
Total
Quantity
2
Watts
30
30
Hrs/day
4
4
Watt-hrs/day
120
120
6. DC system voltage. Usually 12 or 24 volts.
7. Total amp-hours per week usedby DC loads. Divide line 5 by line 6.
8. Total amp-hours per week usedby AC loads from line 4.
9. Add lines 7 and 8. This is the totalamp-hours per week used by all loads.
10. Divide line 9 by 7 days.
12V
120 ÷ 12V - 10 Ah/day
51.75 Ah/day
10 + 51.75 Ah/day = 61.75 Ah/day
61.75 Ah/day
42 Training & Referral Manual
Section 3: Basic System Sizing: Practical Exercises
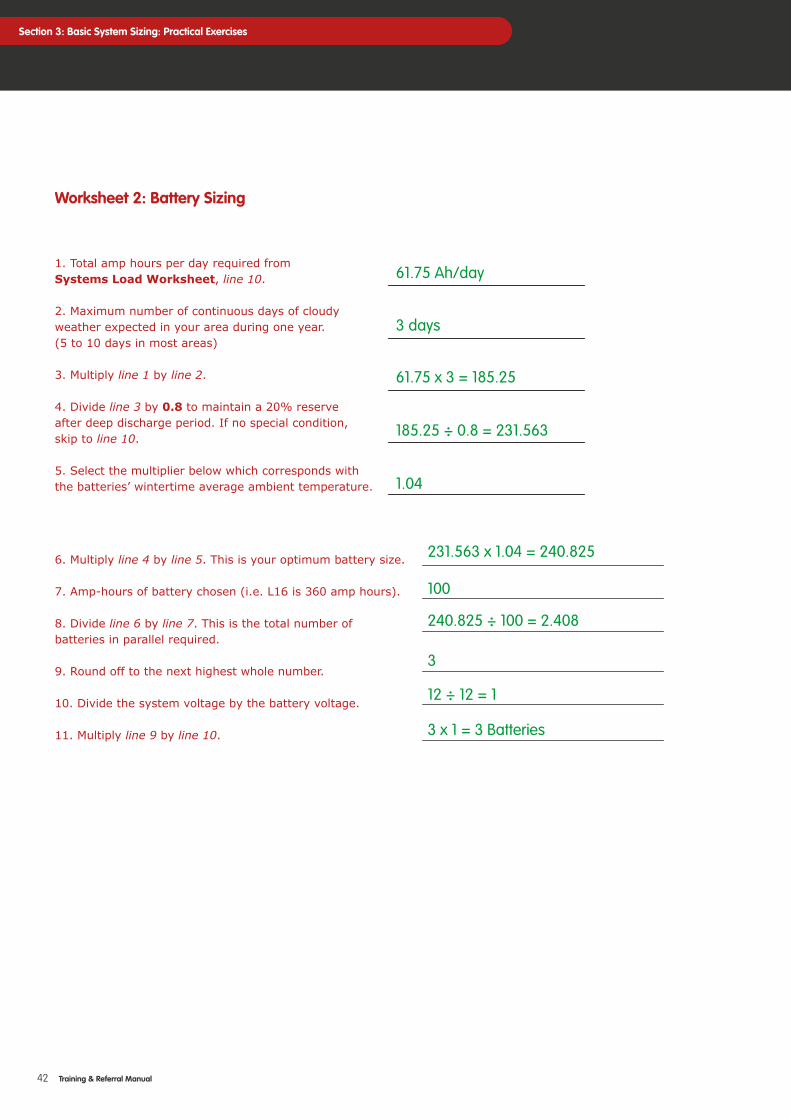
Worksheet 2: Battery Sizing
1. Total amp hours per day required fromSystems Load Worksheet, line 10.
2. Maximum number of continuous days of cloudyweather expected in your area during one year.(5 to 10 days in most areas)
3. Multiply line 1 by line 2.
4. Divide line 3 by 0.8 to maintain a 20% reserveafter deep discharge period. If no special condition,skip to line 10.
5. Select the multiplier below which corresponds withthe batteries’ wintertime average ambient temperature.
6. Multiply line 4 by line 5. This is your optimum battery size.
7. Amp-hours of battery chosen (i.e. L16 is 360 amp hours).
8. Divide line 6 by line 7. This is the total number ofbatteries in parallel required.
9. Round off to the next highest whole number.
10. Divide the system voltage by the battery voltage.
11. Multiply line 9 by line 10.
61.75 Ah/day
3 days
61.75 x 3 = 185.25
185.25 ÷ 0.8 = 231.563
1.04
231.563 x 1.04 = 240.825
100
240.825 ÷ 100 = 2.408
3
12 ÷ 12 = 1
3 x 1 = 3 Batteries
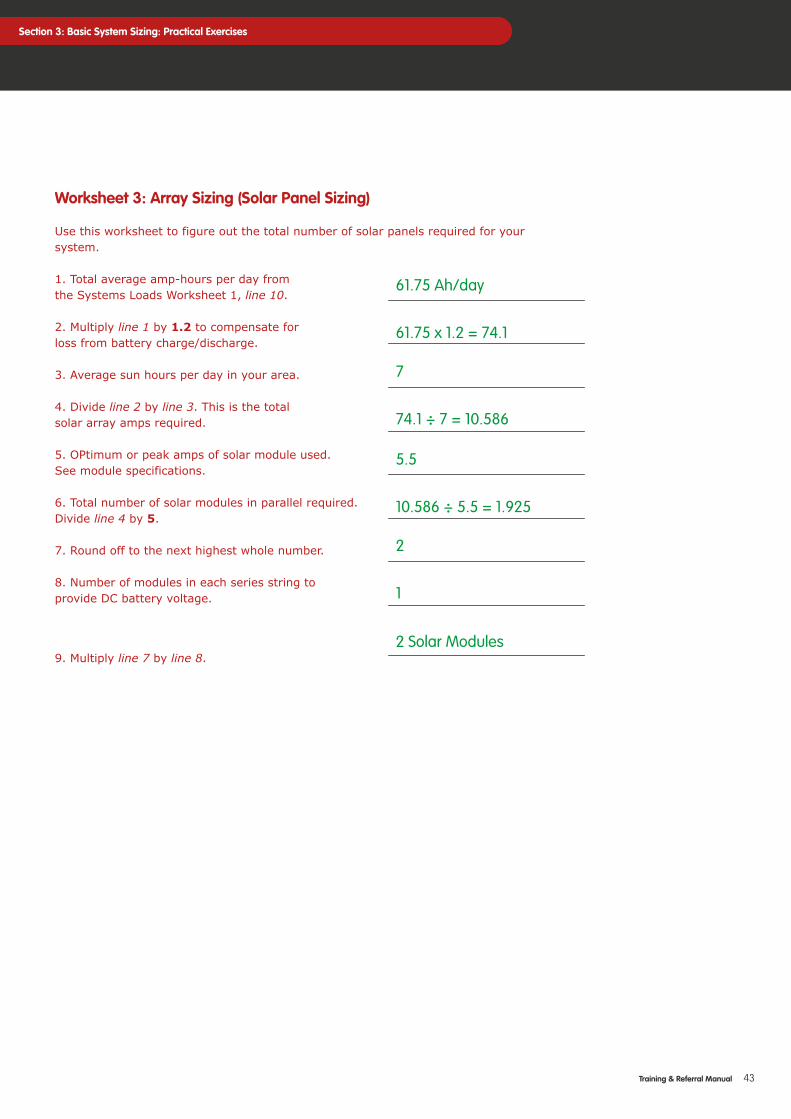
Worksheet 3: Array Sizing (Solar Panel Sizing)
Use this worksheet to figure out the total number of solar panels required for your system.
1. Total average amp-hours per day fromthe Systems Loads Worksheet 1, line 10.
2. Multiply line 1 by 1.2 to compensate forloss from battery charge/discharge.
3. Average sun hours per day in your area.
4. Divide line 2 by line 3. This is the totalsolar array amps required.
5. OPtimum or peak amps of solar module used.See module specifications.
6. Total number of solar modules in parallel required.Divide line 4 by 5.
7. Round off to the next highest whole number.
8. Number of modules in each series string toprovide DC battery voltage.
Section 3: Basic System Sizing: Practical Exercises
9. Multiply line 7 by line 8.
43Training & Referral Manual
61.75 Ah/day
61.75 x 1.2 = 74.1
7
74.1 ÷ 7 = 10.586
5.5
10.586 ÷ 5.5 = 1.925
2
1
2 Solar Modules
44 Training & Referral Manual
Section 3: Basic System Sizing: Practical Exercises
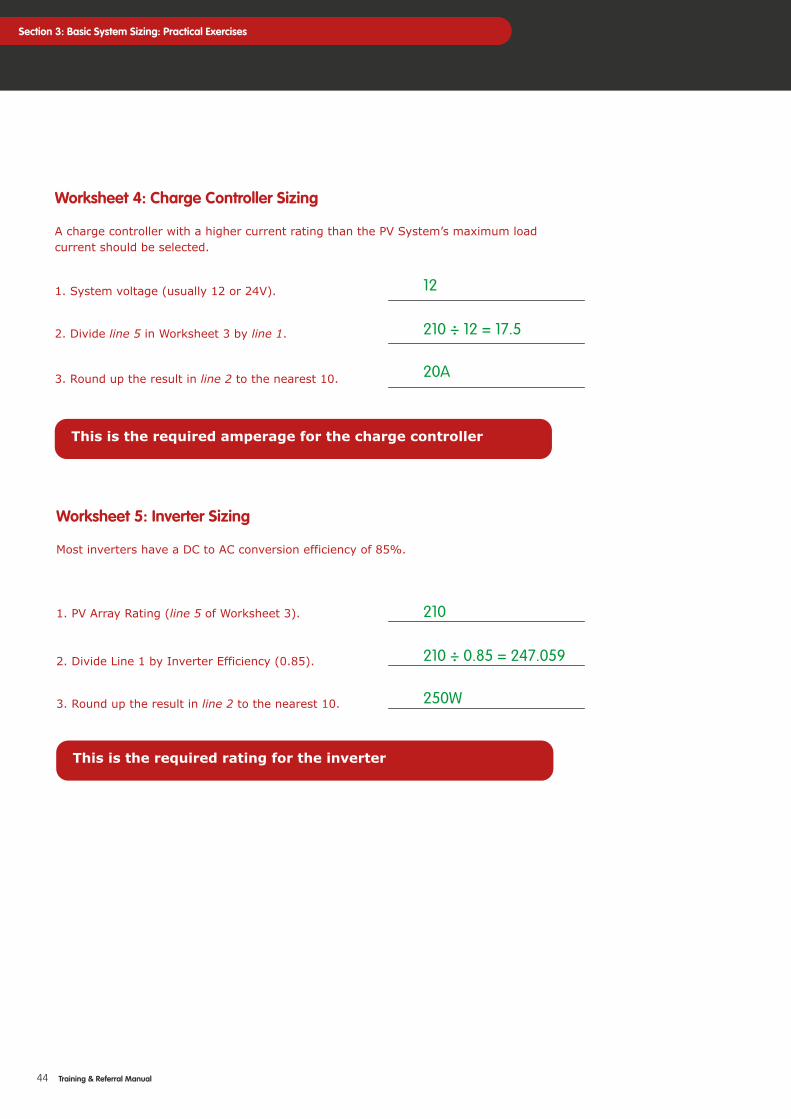
12
210 ÷ 12 = 17.5
20A
Worksheet 4: Charge Controller Sizing
A charge controller with a higher current rating than the PV System’s maximum load current should be selected.
1. System voltage (usually 12 or 24V).
2. Divide line 5 in Worksheet 3 by line 1.
3. Round up the result in line 2 to the nearest 10.
This is the required amperage for the charge controller
Worksheet 5: Inverter Sizing
Most inverters have a DC to AC conversion efficiency of 85%.
1. PV Array Rating (line 5 of Worksheet 3).
2. Divide Line 1 by Inverter Efficiency (0.85).
3. Round up the result in line 2 to the nearest 10.
This is the required rating for the inverter
210
210 ÷ 0.85 = 247.059
250W

45Training & Referral Manual
Section 3: Basic System Sizing: Practical Exercises
NOTES
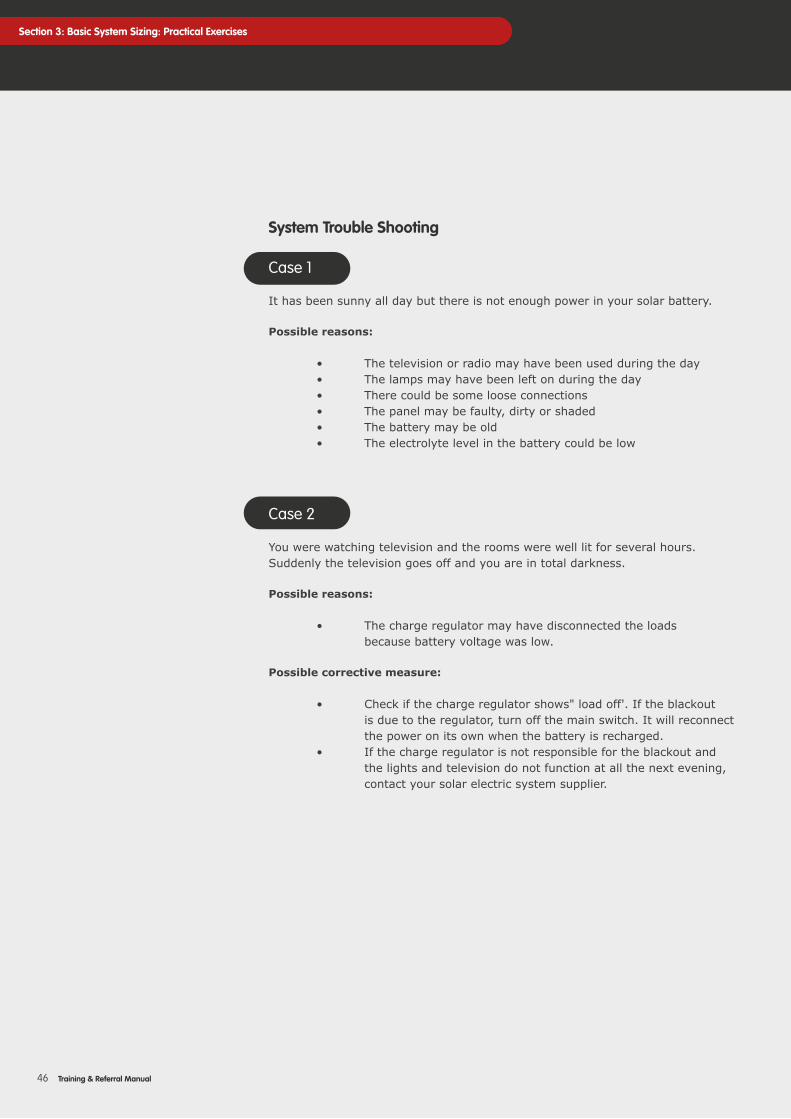
System Trouble Shooting
Case 1
It has been sunny all day but there is not enough power in your solar battery.
Possible reasons:
• The television or radio may have been used during the day • The lamps may have been left on during the day • There could be some loose connections • The panel may be faulty, dirty or shaded • The battery may be old • The electrolyte level in the battery could be low
Case 2
You were watching television and the rooms were well lit for several hours.Suddenly the television goes off and you are in total darkness.
Possible reasons:
• The charge regulator may have disconnected the loads because battery voltage was low.
Possible corrective measure:
• Check if the charge regulator shows" load off'. If the blackout is due to the regulator, turn off the main switch. It will reconnect the power on its own when the battery is recharged. • If the charge regulator is not responsible for the blackout and the lights and television do not function at all the next evening, contact your solar electric system supplier.
46 Training & Referral Manual
Section 3: Basic System Sizing: Practical Exercises
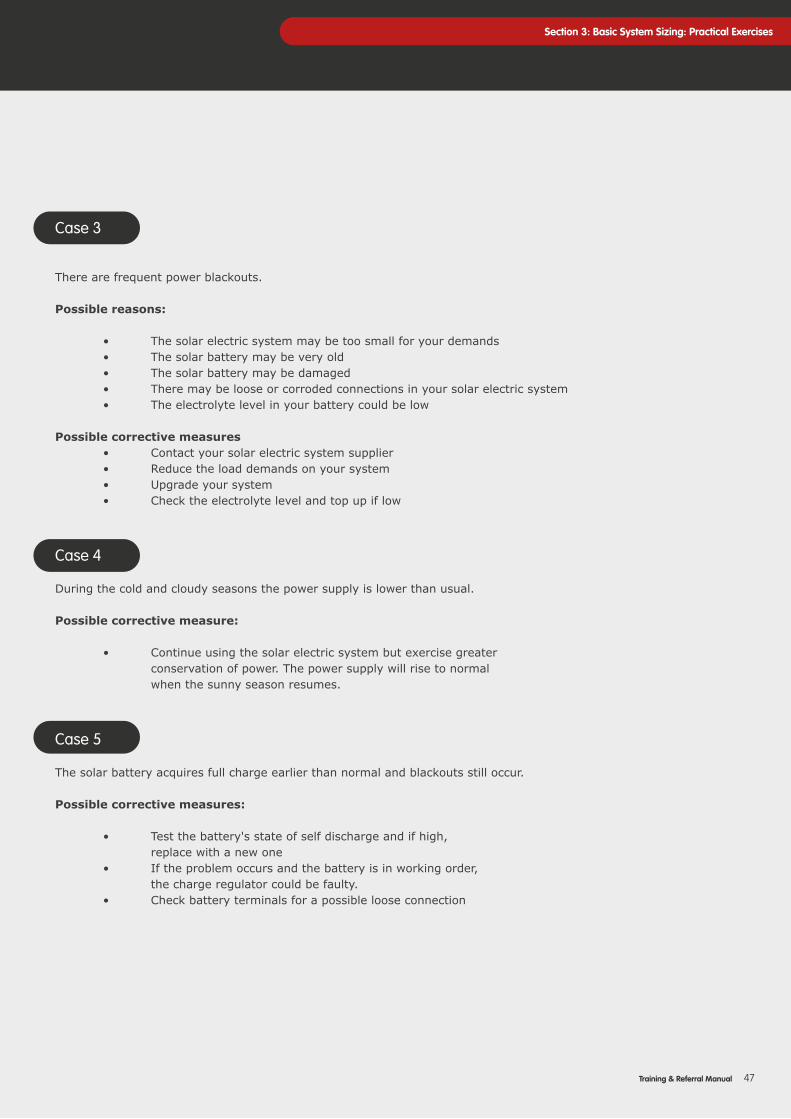
Case 3
There are frequent power blackouts.
Possible reasons:
• The solar electric system may be too small for your demands • The solar battery may be very old • The solar battery may be damaged • There may be loose or corroded connections in your solar electric system • The electrolyte level in your battery could be low
Possible corrective measures • Contact your solar electric system supplier • Reduce the load demands on your system • Upgrade your system • Check the electrolyte level and top up if low
Case 4
During the cold and cloudy seasons the power supply is lower than usual.
Possible corrective measure:
• Continue using the solar electric system but exercise greater conservation of power. The power supply will rise to normal when the sunny season resumes.
Case 5
The solar battery acquires full charge earlier than normal and blackouts still occur.
Possible corrective measures:
• Test the battery's state of self discharge and if high, replace with a new one • If the problem occurs and the battery is in working order, the charge regulator could be faulty. • Check battery terminals for a possible loose connection
47Training & Referral Manual
Section 3: Basic System Sizing: Practical Exercises

BLANK
FAQs
FrequentlyAskedQuestionson Solar PV
50 Training & Referral Manual
Frequently Asked Questions (FAQs)
Frequently Asked Questions
Q1. Where can I get the solar lanterns?Answer: Solar lanterns are sold and distributed by various solar supplier companies such as D-Light, Barefoot, One Degree Solar, Sun Transfer, and Sunlar among many others. In most cases, the solar supplier companies have offices or sales executives in major towns. In other cases, suppliers use courier companies or deliver orders to towns that are nearest to their retailers.
Q2. Where do I find the suppliers? Do I need to travel far to buy stock?Answer: You do not need to travel to their offices or their distribution centres in order to place your order. You can use their sales executives on the ground to place the order.
Q3. Who are the best suppliers? Which are the fast movingproducts in the market? Answer: A good supplier is one who meets your needs within the shortest time. How fast a product moves will all depend on your: convincing power, marketing skills and avenues, positioning and networks and how well you understand your marketand customers.
Q4. How do I deal with suppliers to ensure my orders are delivered on time? Answer: Most suppliers will work hard to ensure you are served on time,and in case there is a delay, remember that they are only a call away.
Q5. How do I pay the suppliers when buying stock from them?Answer: It is highly advisable that you pay for your order through the provided channels. Do not give cash to suppliers/agents on the ground.
Q6. How long should it take for the order to be delivered after Imake the payment?Answer: Most solar supplier companies will meet your order within 5 days.
Q7. In case delivery of the order takes longer than expected, how do I deal with the customers who keep asking for the lanterns? Answer: Good customer care is important in such times. Understanding your customer, promising them what is possible, but also assuring them that you are taking care of their order is very important.
Q8. What are the wholesale prices of the various solar lanterns? Answer: Most solar supplier companies will give you their price lists. They will give a wholesale price and a recommended retail price.
Q9. How do I price my solar lanterns to cover my costs and make a profit? Answer: Solar Supplier companies will give a recommended retail price which guides you on the retail price and the margins. Ensure that you consider the following factors when you price: cater for the cost of the product, the expenses incurred to get the product to the customer and your profit margin.
Q10. How do I raise capital for the solar business? Answer: Solar business is a business like any other. Capital for solar business is raised using sources that you have come across. These include: savings, donations from friends and relatives, loans among others.
51Training & Referral Manual
Frequently Asked Questions (FAQs)
Q11. If I were to get a loan from a financial institution to expand my solar business, what are some of the factors financial institutions would consider? Answer: For you to access a bank loan to expand your business, your business must be bankable. It must meet the C ‘S of Credit - Capacity, Capital, Character, Collateral, Cash Flow and Conditions.
Q12. Can I get the solar lanterns on credit and then pay after I have sold? Answer:A few supplier companies will allow trade credit – where they supply portable lanterns on credit and allow you to pay them later. Most of them will have you pay before sending your order, making it very important for you to maintain a healthy cash flow in your solar business.
Q13. How do I market my solar lanterns? Answer: There are many avenues that you can use to market solar lanterns. However, it is important to note that a market does not have to be physical. A market is a place with a buyer, a seller and a product, a place where a transaction can take place. This means that if a solar entrepreneur meets a potential buyer by a road side, it is a market. This makes personal selling a very effective way of selling solar lanterns. Different avenues can however be used to reach out to more customers:• Self-help groups• Institutions like schools and churches• Financial institutions• Using promoter model
Q14. How do I convince people to buy my solar lanterns whereas some have installed electricity?Answer: It is always important to know the benefits of using solar energy in relation to other sources of energy. Ensure that you have the benefits at you finger tips. These include: low cost, readily available, green energy, no pollution. For example, during black-outs households using solar energy are well lit.
Q15. There are many types of solar lamps in the market, some are cheap - especially those from China. Why should I sell the ones that are more expensive?Answer: Cheap at times can be very expensive. We advocate for products approved by Lighting Africa,a joint initiative of IFC and the World Bank that accelerates the development of markets for clean off-grid lighting products in Sub-Saharan Africa. These products have been tested over time. For these products, the supplier gives a warranty and in cases of default, the products can be returned and replaced during the warranty period.
Q16. How do I manage to maintain a healthy cash flow yet customers get the products on credit?Answer:It is the work of the business manager to maintain a healthy cash flow for the business. Cash flow is the daily fuel that runs a business and without it, a business will die. Healthy cash flow enablesa business person manage the daily operations of a business. Selling on credit denies a business the fuel to run the day to day operations of a business. If you keep selling all your solar lanterns on credit, you will soon be out of business.
Q17. How do I deal with solar lanterns that have been returned by customers because they are not functioning?Answer: Most Solar Lighting Africa approved products are sold on a warranty. A warranty is a representation made by a seller or company to a purchaser of a product or service that a refund,repair, or replacement will be made if the product or service proves defective or unsatisfactory, especially within a given time period. This means that a solar lantern that does not function wellwithin the warranty period can be returned to the manufacturer and replaced at no extra cost.The defect should however not be caused by the purchaser.
Q18. Do I have to keep records of all the solar lanterns I sell? Isn’t it a very hard job?Answer: Record keeping is an important aspect of the business. It is only through record keepingthat an entrepreneur can tell the performance of their business.

APPENDIX 1
Additional Notes &‘How To’ TestsIn Appendix 1:
Basic Anatomy of a Multimeter
How to Test Solar Panel Output
Hot to Test a Solar Panel’s Polarity
How to Check the Voltage on a Solar Panel Affected by Shade
Battery Testing Using a Multimeter
APPENDIX 2
Handy PulloutsIn Appendix 2: (Separate Booklet)
Complete Solar Home System
How to Care for Your Solar Panel
Solar Batteries
Safety During Installation, Operation & Maintenance
54 Training & Referral Manual
APPENDIX 1: Additional Notes & “How To’ Tests
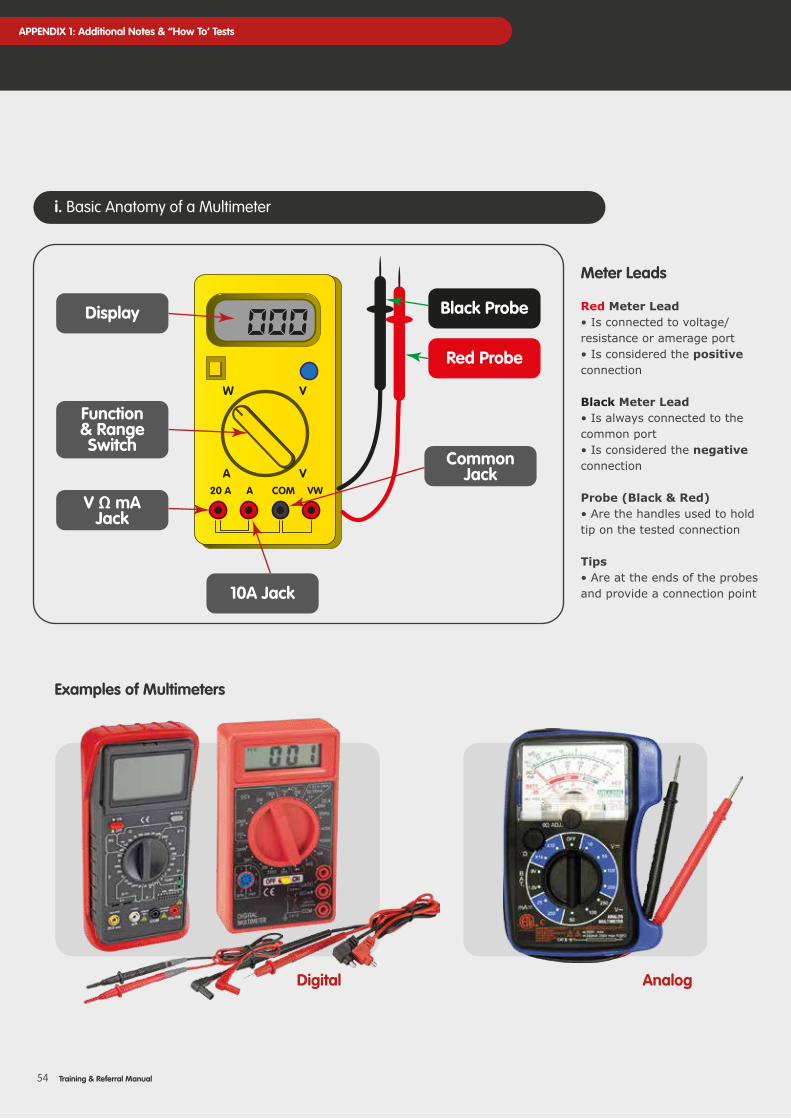
Meter Leads
Red Meter Lead• Is connected to voltage/resistance or amerage port• Is considered the positive connection
Black Meter Lead• Is always connected to the common port• Is considered the negative connection
Probe (Black & Red)• Are the handles used to holdtip on the tested connection
Tips• Are at the ends of the probes and provide a connection point
i. Basic Anatomy of a Multimeter
Display
Red Probe
Black Probe
10A Jack
CommonJack
Function& RangeSwitch
V Ω mAJack
W V
VA20 A VWCOMA
Digital Analog
Examples of Multimeters
55Training & Referral Manual
APPENDIX 1: Additional Notes & “How To’ Tests
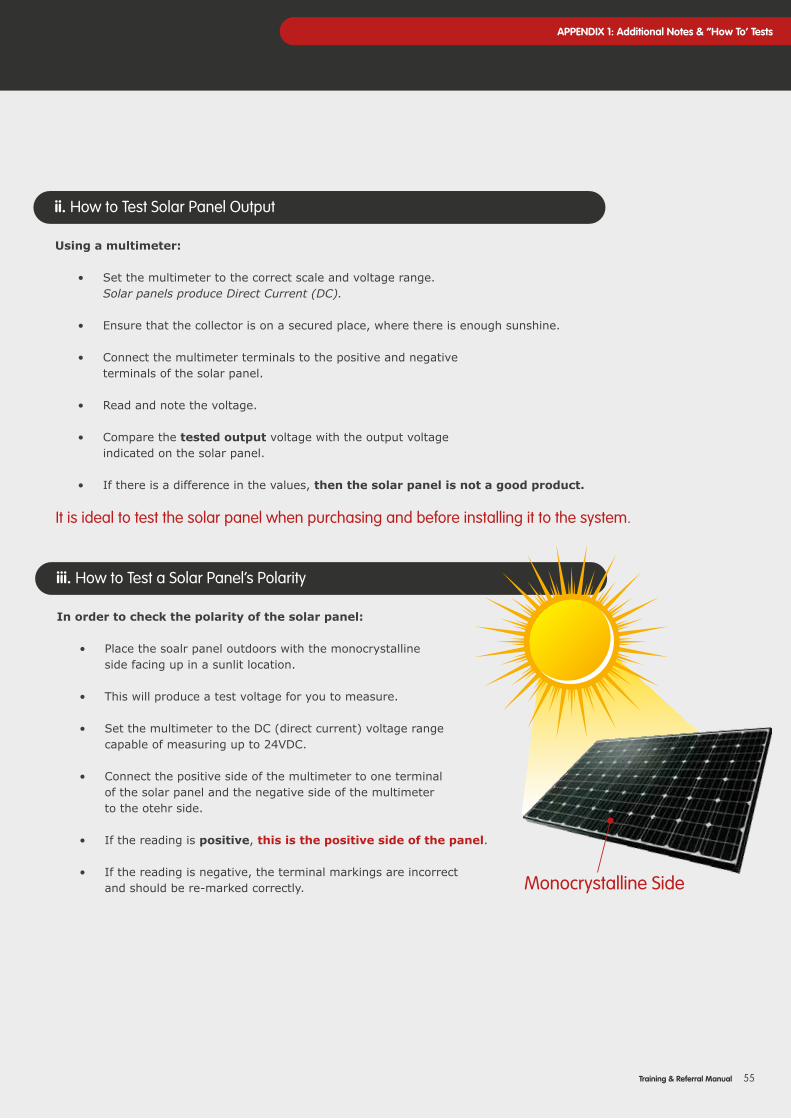
Using a multimeter:
• Set the multimeter to the correct scale and voltage range. Solar panels produce Direct Current (DC).
• Ensure that the collector is on a secured place, where there is enough sunshine.
• Connect the multimeter terminals to the positive and negative terminals of the solar panel.
• Read and note the voltage.
• Compare the tested output voltage with the output voltage indicated on the solar panel.
• If there is a difference in the values, then the solar panel is not a good product.
ii. How to Test Solar Panel Output
It is ideal to test the solar panel when purchasing and before installing it to the system.
In order to check the polarity of the solar panel:
• Place the soalr panel outdoors with the monocrystalline side facing up in a sunlit location.
• This will produce a test voltage for you to measure.
• Set the multimeter to the DC (direct current) voltage range capable of measuring up to 24VDC.
• Connect the positive side of the multimeter to one terminal of the solar panel and the negative side of the multimeter to the otehr side.
• If the reading is positive, this is the positive side of the panel.
• If the reading is negative, the terminal markings are incorrect and should be re-marked correctly.
iii. How to Test a Solar Panel’s Polarity
Monocrystalline Side

This can be done using a solar water pump or using amultimeter:
• Ensure that the multimeter is at the correct scale and within the range of the solar panel’s voltage.
• Place the colector in a position that it can receive maximum radiation.
• Connect the multimeter on the positive and negative terminals of the solar panel.
• Note the voltage and recird it.
• Do not remove the multimeter from the terminals.
• Shade the solar panel, starting from one end to the other.
• Take note of the voltage change until the solar panel is fully shaded.
iv. How to Check the Voltage on a Solar Panel Affected by Shade
• Use a multimeter.
• Set the multimeter to the correct scale (DC, direct current).
• Connect the multimeter to the positive and negative terminals of the battery.
• Read the voltage as indicated on the multimeter.
v. Battery Testing Using a Multimeter
56 Training & Referral Manual
APPENDIX 1: Additional Notes & “How To’ Tests
57Training & Referral Manual
Section 1: Background on Solar Technology
NOTES
58 Training & Referral Manual
Section 1: Background on Solar Technology
NOTES

59Training & Referral Manual
Section 1: Background on Solar Technology
NOTES

60 Training & Referral Manual
Section 1: Background on Solar Technology
NOTES

Copyright 2015


![Solar Photovoltaic (PV) Cells 2 on solar PV [Compatibility Mode].pdf · Solar Photovoltaic (PV) Cells A supplement topic to: Micro-opti l Stical Sensors - A MEMS for electric power](https://static.fdocuments.in/doc/165x107/5a7150997f8b9a9d538cc26f/solar-photovoltaic-pv-cellswwwengrsjsuedutrhsuchapter-2-on-solar-pv-compatibility.jpg)
