Solar Heater Installation
11
The SolarSheat 1500G/1500GS/1501GS – Flush Roof Mount Installation Manual By Your Solar Home, Inc. Version 1.0 December 28, 2006 All building, plumbing, electrical, and safety codes supersede the instructions in this manual. The manufacturer assumes no li ability for improper installa tion. Use this manual at your own risk.
-
Upload
organic-mechanic -
Category
Documents
-
view
222 -
download
0
Transcript of Solar Heater Installation

8/6/2019 Solar Heater Installation
http://slidepdf.com/reader/full/solar-heater-installation 1/11
The SolarSheat
1500G/1500GS/1501GS –
Flush Roof Mount
Installation ManualBy
Your Solar Home, Inc.
Version 1.0
December 28, 2006 All building, plumbing, electrical, and safety codes supersede the instructions in this manual.
The manufacturer assumes no liability for improper installation. Use this manual at your own risk.

8/6/2019 Solar Heater Installation
http://slidepdf.com/reader/full/solar-heater-installation 2/11
This installation manual describes the flush roof mount installation of the 1500G, 1500GS, and1501GS.
Equipment for proper installation:• jig saw – bi-metal blade if necessary, for ducts’ holes
• Drill
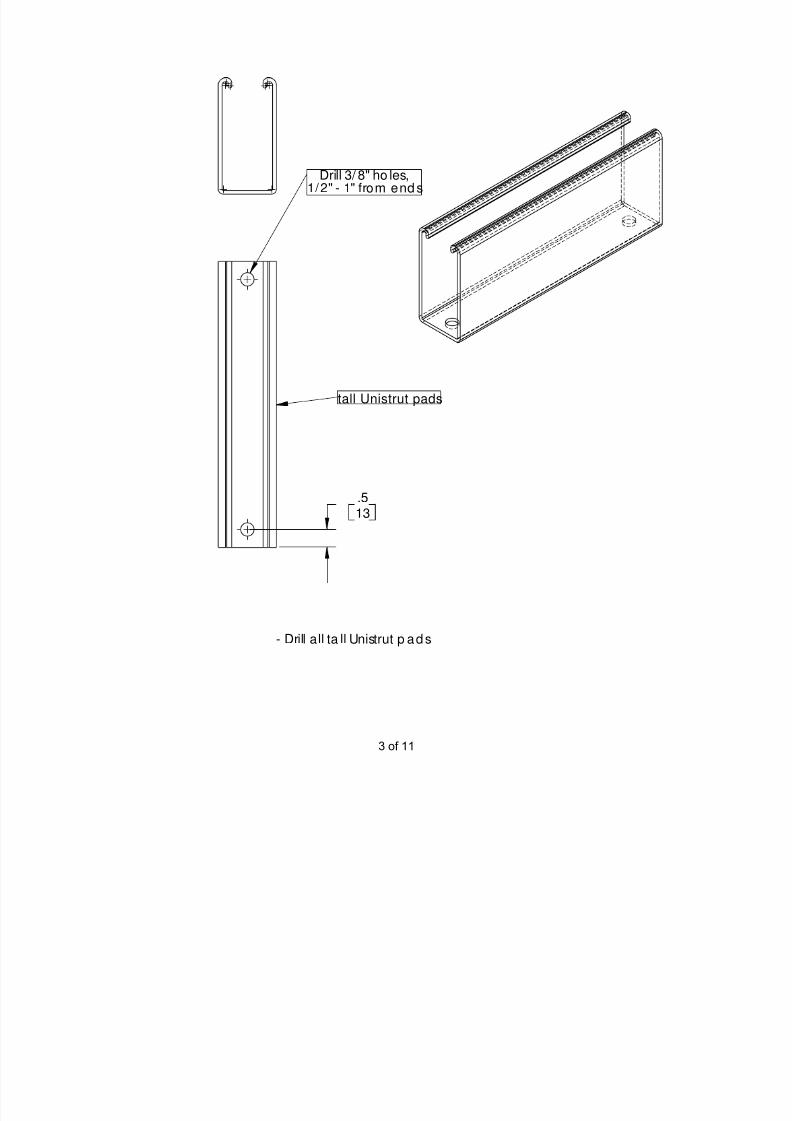
• 3/8” metal drill bit for tall unistrut pads
• 3/16” drill bit for pilot holes for 3/8” lag bolts
• prying tool for shingles
• Socket (square) driver bit for wall grill screws (if applicable) • 9/16” hex socket driver for 3/8” lag bolts • Utility knife for cutting template and shingles • Small flat head screw driver for thermostat’s wire terminals • Metal strapping for securing duct to roof rafters • Wood screws for screwing metal strapping to roof rafter • Self drilling #8, or #10 x ¾” for screwing collars to Solarsheat and metal strapping to duct • Tape for taping the template on the roof • Outdoor sealant – high quality outdoor silicon and outdoor polyurethane sealant
• Caulk gun • Measuring Tape • Level
• Clean rags – temporarily needed to plug up duct only to stop drywall/wood dust fromentering collector if house is under construction, turn off thermostat. Remove rags fromduct & turn on thermostat when construction is complete & construction dust has beencleaned up.
• Ducting (type, size, & length depends on individual situation)2 of 11
8/6/2019 Solar Heater Installation
http://slidepdf.com/reader/full/solar-heater-installation 3/11
- Drill all ta ll Unistrut p ads
1/2" - 1" from end sDrill 3/ 8" ho les,
tall Unistrut pads
.513
3 of 11

8/6/2019 Solar Heater Installation
http://slidepdf.com/reader/full/solar-heater-installation 4/11
- Tape te mp la te temporarily to roof
- Slip a p iec e of sc rap shing le under the Unistrut ta ll pad - this c an he lp red uc e- Plac e a Unistrut ta ll pad over the edge o f templa te
- Be c areful of elec tric a l wires or other obstruc tionshave a top or bo ttom, and c an b e mounted in any direc tion- A SolarSheat 1500GS or 1501GS does no t ha ve a PV sec tion, nor do they
template
Duct ho le (ho t a ir supp ly)
- Loc ate SolarShea t duc t holes shown on templa te b etw ee n roo f ra fters- A Sola rSheat 1500G should b e mounte d with PV sec tion on top
over ed ge o f
Roof Rafter
Ta ll Pad
Tem p la te
wear on the shingle(s) below the Unistrut ta ll pad .
- Collec to r c an b e insta lled "land sc ape" style as well as "porta it", as shown
- Find roof ra fte rs
Unistrut
p iec e o f sc rap shing le
Ce nte r Ta ll Pad
4 of 11

8/6/2019 Solar Heater Installation
http://slidepdf.com/reader/full/solar-heater-installation 5/11
tall pad
lag bo lt
sc rap shing le
Return air duc t ho le
Pilot ho le (3/ 16")in c enter of ra fter
Supp ly a ir duc t ho le
- Drill p ilot ho les throug h the 2 holes made in the Unistrut, the roo f, and themidd le of the roo f ra fters- Injec t p lenty of outdoo r grad e p olyuretha ne into the p ilot ho les- Sc rew in 3/8" x 3" lag bolts to hold the pads loc a tion ove r the p ilot holes- Plac e next unistrut pad ove r the a pprop ria te rafte r, c entering itover the edg e of the temp late.- Rep ea t the a bove step s for rema ining pads- For 5" duc t, cut a 5-1/2" - 6" hole through temp la te and
shingles with a ut ility knive .- Cut d uc t ho les throug h roo f de c king with a jig saw- Remove te mp la te- Tighten a ll lag bolts dow n.- Surround and c over the head of the lag boltswith plenty of outd oo r, high grade silic oneor polyurethane
5 of 11

8/6/2019 Solar Heater Installation
http://slidepdf.com/reader/full/solar-heater-installation 6/11
Shingles should extend a t leastto m iddle of rubb er c one
- lift shingles above ea c h duc t ho le enoug h to slip flashing under.- doub le c hec k flashings' loc a tion by p lac ing temp la te 's holes ove r flashinbefo re na iling .- nail flashing d own- co ver nails with outdoo r grade polyuretha ne/ roo fing sea lant- lay shingles bac k ove r flashing
Trim fla shing with sc issorsab ove the ridge ma rked
for the d uc t size (5")
Keep long er portion offlashing pointing up the slop e
6 of 11

8/6/2019 Solar Heater Installation
http://slidepdf.com/reader/full/solar-heater-installation 7/11
Bac kdraft d am pe r
5" duc t
5" Ad ap ter Colla r
Foa m tap e
# 8 x 3/4" sc rew
(NOT INCLUDED)
Cut d uc t ho le in SolarShea t b ac king
Roof Rafter
- Cut ho les in SolarSheat b ac king insulation using a knife- Insta ll Duc t Kit a s shown b elow (for ca thedra l c eilings, if the d ista nc ebetw een the interior d rywa ll surfac e-to- exterior roo f surfac e is grea terthan ~7", long er leng ths of duc t will be nee ded )-For a Sola rShea t 1500G, run thermosta t w ire throug h ne arest p assive roof a ttic vc ut ho le in sc ree n (if ap p lic ab le), and fasten to roof ra fter inside. Alterna tivelyinsta ll a "goo se nec k" flashing and run thermosta t w ire throug h it, sea ling withsp ray foa m.
SolarSheat
App ly outdoor gradesilicon to entireinner lip / ed ge
Ap p ly outd oo r g rade silic on
entire d uc t sea m o n allduc ts (if ap p lic ab le)
Strap duc t to rafte rsusing sc rews & strapp ing
(NOT INCLUDED)
App ly outd oo r grad e silic one toentire d uc t seem o n all duc ts(if applicable)
Sea l a ll joints with o utd oorgrade silicon
7 of 11

8/6/2019 Solar Heater Installation
http://slidepdf.com/reader/full/solar-heater-installation 8/11
Collec tor Clamp
3/8" x 1 1/ 4' hex bolt
3/ 8" Sp ring Nut
inc luded with the c ollec tor itself. See the fa n'selec tric a l diagram for thermo sta t's c onnec tion.
- Clamp c ollec tor dow n to Unistrut ta ll Padsusing collector clamps, bolts, and spring nuts
- Connec t thermosta t w ire to thermosta t(Red wire to RH, White wire to WH)- For SolarSheat 1501 GS, see the fa n'selec tric a l diagram for thermo sta t's c onnec tion.- For SolarShea t 1500GS, no fa n, no r control is
8 of 11

8/6/2019 Solar Heater Installation
http://slidepdf.com/reader/full/solar-heater-installation 9/11
Grill/ Diffusor
For Ca thedra l Ce ilings:- Insta ll g rills/ d iffusors
9 of 11

8/6/2019 Solar Heater Installation
http://slidepdf.com/reader/full/solar-heater-installation 10/11
fa n
different,
5" - R12insulated
(may appea r
on fan type)depending
duct
c eiling d iffusor
For Att ics:- For the Sola rShea t 1500G, an Inline fan is need ed when to ta l duc t leng th ismo re tha n ~6'.- All fans should b e loc a ted next to Sola rsheat intake duc t. This way it w ill"push" a ir through Solarhea t(s) - so a s to he lp leng then fan life- see elec tric a l d iagram(s)for the fan's elec tric a l c onne c tion- Run R-12 Insulate d duc t between Sola rShea t, fan (if ap p lic ab le), and c eiling d iffusors
10 of 11

8/6/2019 Solar Heater Installation
http://slidepdf.com/reader/full/solar-heater-installation 11/11
Co ng ra tula tions. You ha ve insta lled the SolarShea t 1500G, 1500GS, or 1501GSon your roo f.
11 of 11