Solar Electricity Handbook - SGBMsgbm.in/ebooks/me/SolarElectricity.pdf · Solar Electricity...
1130
Transcript of Solar Electricity Handbook - SGBMsgbm.in/ebooks/me/SolarElectricity.pdf · Solar Electricity...


Solar Electricity HandbookA simple, practical guide to solarenergy: how to design and install
photovoltaic solar electric systems
2012 EditionMichael Boxwell
www.GreenstreamPublishing.com

Greenstream Publishing12 Poplar Grove, Ryton onDunsmore, Warwickshire, CV83QE. United Kingdom
Copyright © Michael Boxwell2009–2012
Published by GreenstreamPublishing 2012
Smashwords Edition: ISBN 978-1-907670-23-7
Kindle Edition: ISBN 978-1-907670-22-0
First Edition – published April2009

Second Edition – publishedNovember 2009
Third Edition – published March2010
Fourth Edition – published January2011
Fifth Edition – published October2011
Sixth Edition – published February2012
Editor: Sheila GlasbeyMichael Boxwell asserts the moralright to be identified as the author
of this work.A catalogue record for this book isavailable from the British Library.

Whilst we have tried to ensure theaccuracy of the contents in thisbook, the author or publishers
cannot be held responsible for anyerrors or omissions found therein.All rights reserved. No part of this
publication may be reproduced,stored in a retrieval system, or
transmitted, in any form or by anymeans, electronic, mechanical,
photocopying, recording orotherwise, without the priorpermission of the publishers.

Table of Contents
Table of ContentsIntroducing Solar Energy
Who this book is aimed atThe rapidly changing world ofsolar energySolar electricity and solar heatingThe source of solar powerThe principles of solar electricityUnderstanding the terminologySetting expectations for solarelectricityWhy choose a solar electricsystem?Cost-justifying solar

Solar power and wind powerFuel cellsGrid-tied solar electric systemsSolar electricity and theenvironment
Environmental efficiency:comparing supply and demand
In conclusionA Brief Introduction to Electricity
Don’t panicA brief introduction to electricityHow to measure electricityThe relationship between volts,amps, ohms, watts and watt-hours
VoltsPower

EnergyA word for non-electriciansIn conclusion
The Four Configurations for SolarPower
Stand-alone/off-gridExamples of simple stand-alonesystems
Grid-tieAn example of a grid-tie system
Grid-tie with power backup (gridinteractive)
An example of a grid interactivesystem
Grid fallbackAn example of a grid fallback

systemGrid failover
How grid-tie systems differ fromstand-aloneIn conclusion
Components of a Solar ElectricSystem
Solar panelsBatteriesControllerInverterElectrical devicesConnecting everything together
A stand-alone systemA grid-tie system using a singlecentral inverterA grid-tie system using multiple

micro-invertersIn conclusion
The Design ProcessShort-cutting the design workSolar energy and emotionsIn conclusion
Scoping the ProjectDesigning grid-tie or grid fallbacksystems
Comparing supply with demandFleshing out the scopeProducing a power analysis
A word of warningWhen you are ready to proceedCalculating inefficiencies
Adding the inefficiencies to our

power analysisWhen do you need to use the solarsystem?Keeping it simpleImproving the scopeIn conclusion
Calculating Solar EnergyWhat is solar energy?
Why is this useful?Calculating solar irradianceCapturing more of the sun’senergyThe impact of tilting solarpanels on solar irradianceCalculating the optimum tilt forsolar panelsGetting the best from solar

panels at different times of theyearPositioning your solar panelsUsing solar irradiance to workout how much energy a solarpanel will generateUsing solar irradiance to giveyou an approximate guide for therequired power capacity of yoursolar array
Solar panels and shadeSolar array power pointefficienciesThe effects of temperature onsolar panels
Temperature impact on solarperformance in Austin, Texas

during the summer monthsWorking out an approximate cost
What if the figures do not addup?
Working out dimensionsIn conclusion
Surveying Your SiteWhat we want to achieve
What you will needFirst impressions
Drawing a rough sketch of thesite
Positioning the solar arrayRoof-mountingGround-mountingPole-mountingSplitting the solar array into

several smaller arraysIdentifying the path of the sunacross the skyShading
Professional tools for obstacleanalysisCell phone applicationsUsing paper and pencil
Future proof your systemWhat if there are shadingobstructions?
Positioning batteries, controllersand invertersCablingSite survey for the holiday homeIn conclusion

Understanding the ComponentsHow to use these chapters
Common components for allsystemsSolar panels
Amorphous solar panelsPolycrystalline solar panelsMonocrystalline solar panelsWhich solar panel technology isbest?What to look for when choosinga solar panelBuying cheap solar panelsSecond-hand solar PV panelsFresnel lenses and mirrors
Solar panel mountingsSolar trackers
Solar array cablesFuses and isolation switchesGround fault protection
Components for Grid-Tie systemsHigh voltage in-seriesLow voltage systemsMicro-inverter systems
Grid-tie solar panelsGrid-tie inverters
Input voltagePower ratingPower trackingMultiple stringsDiagnostics and reportinginformationBuilt-in safety
Installation options andoperating environmentBuying from eBay
Components for Stand-AloneSystems
Calculate your optimum voltageVoltages and currentsWhat voltages can I run at?How to work out what voltageyou should be running at
How to calculate your currentCalculating cable thicknesses
Converting wire sizes:Mixing and matching solar panelsBatteries
Types of batteries

Battery configurationsBattery lifespanHoldoverCalculating how long a set ofbatteries will lastSecond-hand batteriesBuilding your battery bankBattery safety
Solar controllerBalancing the batteriesAllow for expansionMaximum power point trackingGround fault protectionBackup powerUsing multiple controllers
InvertersBattery bank voltage
Power ratingWaveformInstallation options andoperating environmentGround fault protection
CablesBattery cablesAppliance cabling
Plugs and socketsAppliances
LightingRefrigerationMicrowave ovensTelevisions, DVDs, computergames consoles and musicMusic systemsDishwashers, washing machines

and tumble dryersAir conditioning systems
Reputable brand namesSolar panel manufacturers andbrandsSolar controller and invertermanufacturers and brandsBattery manufacturers andbrands
Shopping list for the holiday homeIn conclusion
Planning, regulations and approvalsNational and internationalstandards for solar componentsInstallation regulationsGetting your electricity supplierinvolved

Solar grants and selling yourpower
General information aboutgrants, tax credits and feed-intariffs
In conclusionDetailed Design
Safety is designed inWhat is the worst that canhappen with a solar installation?Grounding your electricsDC ElectricsAC electricsHigh temperaturesThink safety
Solar array design

Solar array design – stand-alonesystemsSolar array design – grid-tiesystems with micro-invertersSolar array design – grid-tiesystems with a single inverter
BatteriesControllerInverterDevices
Specifics for a grid fallbacksystemCircuit protection
Earthing (grounding)DC circuit protectionAC circuit protection
Cable sizing and selection

Sizing your cablesProtecting cable runsDesigning your system to keepyour cables runs as short aspossibleSelecting solar cableController cableBattery interconnection cables
Some sample wiring diagramsThe holiday home wiringdiagram
The next stepSolar frame mountingPositioning batteriesPlanning the installationIn conclusion

InstallationHave you read the instructions?Safety
Your First Aid kitChemical clean-up kitConsidering the general publicWorking at heightHandlingWorking with batteriesGlovesElectrical safety
Assembling your toolkitPreparing your siteTesting your solar panelsInstalling the solar array
Cleaning the panelsAssembly and connections

Roof-mounting a solar arrayFinal wiring
Installing the batteriesPre-installationPositioning the batteriesVentilationAccessInsulationConnections
Installing the control equipmentInstalling a grid-tie systemCommissioning the system
Programming your solarcontrollerTesting your system
Charging up your batteriesConnecting your devices
In conclusionTroubleshooting
Keep safeCommon faultsExcessive power usage
SolutionsInsufficient power generation
SolutionsDamaged wiring/ poorconnectionsWeak battery
Changing batteriesInverter issues
Maintaining Your SystemAs requiredEvery month

Every three monthsEvery six monthsEvery yearAt the start of each winter
Internet SupportTools available on the website
Online project analysisMonthly insolation figuresSolar angle calculatorSolar resourcesQuestions and answersAuthor online!Solar articles
A Final WordAppendix A – Crystalline SolarPanels and Shading

Types of obstructionDesigning shade-tolerant solarsystems
Track the shadeIncreasing the number of solarpanelsPanel orientationChoice of solar panelUse micro-invertersDesign a parallel solar arrayDesign a multi-string solar array
Other optionsIf all else fails...In conclusion
Appendix B – Solar InsolationUnderstanding this information

Solar insolation values –AustraliaSolar insolation values –CanadaSolar insolation values – IrelandSolar insolation values – NewZealandSolar insolation values – UnitedKingdomSolar insolation values – UnitedStates of America
Appendix C – Typical PowerRequirements
Household and officeGarden and DIYCaravans, boats and recreational

vehiclesAppendix D – Living Off-Grid
A solar electric system inconjunction with grid electricity
Appendix E – Other Solar ProjectsGrid fallback system/ gridfailover systemPortable solar power unitSolar boatSolar shed lightSolar electric bikes
Appendix F – Building Your OwnSolar Panels (and Why YouShouldn’t)

Introducing SolarEnergy
Ninety-three million miles fromEarth, our sun is 333,000 times thesize of our planet. It has a diameterof 865,000 miles, a surfacetemperature of 5,600°C and a coretemperature of 15,000,000°C. It is ahuge mass of constant nuclearactivity.Directly or indirectly, our sunprovides all the power we need toexist and supports all life forms.The sun drives our climate and our

weather. Without it, our worldwould be a frozen wasteland of ice-covered rock.Solar electricity is a wonderfulconcept. Taking power from the sunand using it to power electricalequipment is a terrific idea. Thereare no ongoing electricity bills, noreliance on a power socket: a freeand everlasting source of energythat does not harm the planet!Of course, the reality is a littledifferent from that. Yet generatingelectricity from sunlight alone is apowerful resource, withapplications and benefits throughout

the world.But how does it work? For what isit suitable? What are thelimitations? How much does itcost? How do you install it? Thisbook answers all these questionsand shows you how to use thepower of the sun to generateelectricity yourself.Along the way, I will also expose afew myths about some of the wilderclaims made about solar energy andI will show you where solar powermay only be part of the solution.Although undoubtedly there aresome significant environmental

benefits of solar electricity, I willalso be talking about where itsenvironmental credentials havebeen oversold.I will keep the descriptions asstraightforward as possible. Thereis some mathematics and scienceinvolved. This is essential to allowyou to plan a solar electricinstallation successfully. However,none of it is complicated and thereare plenty of short-cuts to keepthings simple.The book includes a number ofexample projects to show how youcan use solar electricity. Some of

these are very straightforward, suchas providing electrical light for ashed or garage, for example, orfitting a solar panel to the roof of acaravan or boat. Others are morecomplicated, such as installingphotovoltaic solar panels to ahouse.I also show some rather moreunusual examples, such as thepossibilities for solar electricmotorbikes and cars. These areexamples of what can be achievedusing solar power alone, along witha little ingenuity and determination.I have used one main example

throughout the book: providingsolar-generated electricity for aholiday home which does not haveaccess to an electricity supply fromthe grid. I have created this exampleto show the issues and pitfalls thatyou may encounter along the way,based on real life issues andpractical experience.A website accompanies this book.It has lots of useful information,along with lists of suppliers and asuite of online solar energycalculators that will simplify thecost analysis and design processes.The website is at

www.SolarElectricityHandbook.com

Who this book is aimedatIf you simply want to gain anunderstanding about how solarelectricity works then this handbookwill provide you with everythingyou need to know.If you are planning to install yourown stand-alone solar powersystem, this handbook is acomprehensive source ofinformation that will help youunderstand solar and guide you inthe design and installation of yourown solar electric system.

Solar has a big application forintegrating into electrical products:mobile phones, laptop computers,portable radios. Even light electriccars can use solar energy to providesome or all of their powerrequirements, depending on theapplication. If you are a designer,looking to see how you canintegrate solar into your product,this book will give you a groundingin the technology that you will needto get you started.If you are specifically looking toinstall a grid-tie system, i.e. a solarenergy system that will feed

electricity back into your localpower grid, this book will provideyou with a good foundation and willallow you to carry out the design ofyour system. You will still need tocheck the local planning laws andany other local legislationsurrounding the installation of solarenergy systems, and you will haveto understand the building ofelectrical systems. In somecountries, you specifically need tobe certified in order to carry out thephysical installation of a grid-tiesystem.If you are planning to install larger,commercial–size systems, or if you

are hoping to install grid-tie solarsystems professionally, then thisbook will serve as a goodintroduction, but you will need togrow your knowledge further. Thisbook gives you the foundations youneed in order to build thisknowledge, but there are specialskills required when designing andimplementing larger scale solarsystems that go far beyond what isrequired for smaller systems andare beyond the scope of this book.If you are planning your own solarinstallation, it will help if you havesome DIY skills. Whilst I include a

chapter that explains the basics ofelectricity, a familiarity with wiringis also of benefit for smallerprojects and you will require athorough understanding of electricalsystems if you are planning a largerproject such as powering a housewith solar.

The rapidly changingworld of solar energyI wrote the first edition of this bookearly in 2009. It is not a long timeago. Yet this 2012 issue is the sixthedition. In every edition, I have hadto rewrite significant sections of thebook and significantly update thewebsite in order to keep up with therapid pace of change.The rapid improvement in thetechnology and the freefall in costssince early 2009 have transformedthe industry. Systems that werecompletely unaffordable orimpractical just two or three years

ago are now cost-effective andachievable.Solar panels available today aresmaller, more robust and bettervalue for money than ever before.For many more applications, solaris now the most cost-effective wayto generate electricity.Over the coming years, all the signsare that the technology and theindustry will continue to evolve at asimilar pace. By 2015, solar willbe the cheapest form of electricitygenerator, undercutting traditionallylow-cost electricity generators suchas coal-fired power stations. We
are likely to see solar energyincorporated into more everydayobjects such as laptop computers,mobile phones, backpacks andclothing. Meanwhile, solar energyis causing a revolution for largeareas of Asia and Africa, whereentire communities are now gainingaccess to electricity for the firsttime.As an easy-to-use and low-carbonenergy generator, solar is withoutequal. Its potential for changing theway we think about energy in thefuture is huge. For families andbusinesses in rural African andAsian villages, it is creating a

revolution.

Solar electricity and solarheatingSolar electricity is produced fromsunlight shining on photovoltaicsolar panels. This is different tosolar hot water or solar heatingsystems, where the power of the sunis used to heat water or air.Solar heating systems are beyondthe remit of this book. That said,there is some useful information onsurveying and positioning yoursolar panels later on that is relevantto both solar photovoltaics andsolar heating systems.

If you are planning to use solarpower to generate heat, solarheating systems are far moreefficient than solar electricity,requiring far smaller panels togenerate the same amount of energy.Solar electricity is often referred toas photovoltaic solar, or PV solar.This describes the way thatelectricity is generated in a solarpanel.For the purposes of this book,whenever I refer to solar panels Iam talking about photovoltaic solarpanels for generating electricity,and not solar heating systems.

The source of solarpowerDeep in the centre of the sun,intense nuclear activity generateshuge amounts of radiation. In turn,this radiation generates light energycalled photons. These photons haveno physical mass of their own, butcarry huge amounts of energy andmomentum.Different photons carry differentwavelengths of light. Some photonswill carry non-visible light (infra-red and ultra-violet), whilst otherswill carry visible light (whitelight).

Over time, these photons push outfrom the centre of the sun. It cantake one million years for a photonto push out to the surface from thecore. Once they reach the sun’ssurface, these photons rush throughspace at a speed of 670 millionmiles per hour. They reach earth inaround eight minutes.On their journey from the sun toearth, photons can collide with andbe deflected by other particles, andare destroyed on contact withanything that can absorb radiation,generating heat. That is why youfeel warm on a sunny day: your

body is absorbing photons from thesun.Our atmosphere absorbs many ofthese photons before they reach thesurface of the earth. That is one ofthe two reasons that the sun feels somuch hotter in the middle of theday. The sun is overhead and thephotons have to travel through athinner layer of atmosphere to reachus, compared to the end of the daywhen the sun is setting and thephotons have to travel through amuch thicker layer of atmosphere.This is also one of the two reasonswhy a sunny day in winter is so

much colder than a sunny day insummer. In winter, when yourlocation on the earth is tilted awayfrom the sun, the photons have totravel through a much thicker layerof atmosphere to reach us.

(The other reason that the sun ishotter during the middle of the daythan at the end is because theintensity of photons is much higher

at midday. When the sun is low inthe sky, these photons are spreadover a greater distance simply bythe angle of your location on earthrelative to the sun.)

The principles of solarelectricityA solar panel generates electricityusing the photovoltaic effect, aphenomenon discovered in the early19th century when scientistsobserved that certain materialsproduced an electric current whenexposed to light.Two layers of a semi-conductingmaterial are combined to create thiseffect. One layer has to have adepleted number of electrons. Whenexposed to sunlight, the layers ofmaterial absorb the photons. This

excites the electrons, causing someof them to ‘jump’ from one layer tothe other, generating an electricalcharge.The semi-conducting material usedto build a solar cell is silicon, cutinto very thin wafers. Some of thesewafers are then ‘doped’ tocontaminate them, thereby creatingan electron imbalance in the wafers.The wafers are then alignedtogether to make a solar cell.Conductive metal strips attached tothe cells take the electrical current.When a photon hit the solar cell, itcan do one of three things: it can be

absorbed by the cell, reflected offthe cell or pass straight through thecell.It is when a photon is absorbed bythe silicon that an electrical currentis generated. The more photons (i.e.the greater intensity of light) that areabsorbed by the solar cell, thegreater the current generated.Solar cells generate most of theirelectricity from direct sunlight.However, they also generateelectricity on cloudy days and somesystems can even generate verysmall amounts of electricity onbright moonlit nights.

Individual solar cells typically onlygenerate tiny amounts of electricalenergy. To make useful amounts ofelectricity, these cells areconnected together to make a solarmodule, otherwise known as a solarpanel or, to be more precise, aphotovoltaic module.

Understanding theterminologyIn this book, I use various termssuch as ‘solar electricity’, ‘solarenergy’ and ‘solar power’. Here iswhat I mean when I am talkingabout these terms:Solar power is a general term forgenerating power, whether heat orelectricity, from the power of thesun.Solar energy refers to the energygenerated from solar power,whether electrical or as heat.Solar electricity refers to

generating electrical power usingphotovoltaic solar panels.Solar heating refers to generatinghot water or warm air using solarheating panels or ground-sourceheat pumps.

Setting expectations forsolar electricitySolar power is a useful way ofgenerating modest amounts ofelectricity, so long as there is agood amount of sunlight availableand your location is free fromobstacles such as trees and otherbuildings that will shade the solarpanel from the sun.Solar experts will tell you that solarelectricity is normally onlycost-effective where there is noother source of electricityavailable.

Whilst this is often the case, thereare plenty of exceptions to this rule.Often solar electricity can beextremely practical and can saveyou money over the more traditionalalternatives. Some examples mightinclude:
· Installing a light or a powersource somewhere where it istricky to get a standardelectricity supply, such as inthe garden, shed or remotegarage
· Creating a reliable andcontinuous power sourcewhere the standard electricity

supply is unreliable becauseof regular power cuts
· Building a mobile powersource that you can take withyou, such as a power sourcefor use whilst camping,working on outdoor DIYprojects or working on abuilding site
· Creating green energy foryour own use and sellingsurplus energy productionback to the electricitysuppliers through a feed-intariff
The amount of energy you need to

generate has a direct bearing on thesize and cost of a solar electricsystem. The more electricity youneed, the more difficult and moreexpensive your system willbecome.If your requirements for solarelectricity are to run a few lights, torun some relatively low-powerelectrical equipment such as alaptop computer, a small TV, acompact fridge and a few othersmall bits and pieces, then if youhave a suitable location you canachieve what you want with solar.On the other hand, if you want to

run high-power equipment such asfan heaters, washing machines andpower tools, you are likely to findthat the costs will rapidly get out ofcontrol.As I mentioned earlier, solarelectricity is not well suited togenerating heat: heating rooms,cooking and heating water all takeup significant amounts of energy.Using electricity to generate thisheat is extremely inefficient. Insteadof using solar electricity to generateheat, you should consider a solarhot water heating system, andheating and cooking with gas orsolid fuels.

It is possible to power the averagefamily home purely on solarelectricity without making any cutsin your current electricityconsumption. However, it is notcheap, and you will need a lot ofroof space to fit all the panels! It isusually a good idea to carefullyevaluate your electricity usage andmake savings where you can beforeyou proceed.Most households and businesses arevery inefficient with their electricalusage. Spending some time firstidentifying where electricity iswasted and eliminating this waste is

an absolute necessity if you want toimplement solar electricitycost-effectively.This is especially true if you live incooler climates, such as NorthernEurope or Canada, where thewinter months produce much lowerlevels of solar energy. In the UnitedKingdom, for instance, the roof ofthe average-sized home is not largeenough to hold all the solar panelsthat would be required to providethe electricity used by the averagehousehold throughout the year. Inthis instance, making energy savingsis essential.

For other applications, a solarelectric installation is much morecost-effective. For instance, nomatter which country you live in,providing electricity for a holidayhome is well within the capabilitiesof a solar electric system, so longas heating and cooking are cateredfor using gas or solid fuels and thesite is in a sunny position with littleor no shade. In this scenario, a solarelectric system may be morecost-effective than installing aconventional electricity supply ifthe house is off-grid and is notclose to a grid electricityconnection.

If your requirements are moremodest, such as providing light fora lock-up garage, for example, thereare off-the-shelf packages to do thisfor a very reasonable cost. Around£70–£100 ($110–$160) willprovide you with a lighting systemfor a shed or small garage, whilst£200 ($300) will provide you witha system big enough for lightinglarge stables or a workshop.This is far cheaper than installing aconventional electricity supply intoa building, which can be expensiveeven when a local supply isavailable just outside the door.

Low-cost solar panels are alsoideal for charging up batteries incaravans and recreational vehiclesor on boats, ensuring that thebatteries get a trickle chargebetween trips and keeping thebatteries in tip-top condition whilstthe caravan or boat is not in use.
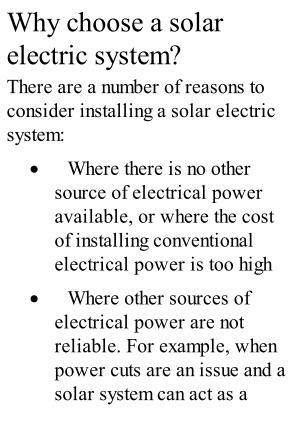
Why choose a solarelectric system?There are a number of reasons toconsider installing a solar electricsystem:
· Where there is no othersource of electrical poweravailable, or where the costof installing conventionalelectrical power is too high
· Where other sources ofelectrical power are notreliable. For example, whenpower cuts are an issue and asolar system can act as a

cost-effective contingency
· When a solar electricsystem is the most convenientand safest option. Forexample, installing lowvoltage solar lighting in agarden or providing courtesylighting in a remote location
· You can become entirelyself sufficient with your ownelectrical power
· Once installed, solar powerprovides virtually free powerwithout damaging theenvironment

Cost-justifying solarCalculating the true cost ofinstalling a solar electric systemdepends on various factors:
· The power of the sun atyour location at differenttimes of the year
· How much energy you needto generate
· How good your site is forcapturing sunlight
Compared to other power sources,solar electric systems typicallyhave a comparatively high capitalcost, but a low ongoing maintenance

cost.To create a comparison withalternative power sources, you willoften need to calculate a payback ofcosts over a period of a few yearsin order to justify the initial cost ofa solar electric system.On all but the simplest ofinstallations, you will need to carryout a survey on your site and carryout some of the design work beforeyou can ascertain the total cost ofinstalling a photovoltaic system. Donot panic: this is not as frighteningas it sounds. It is not difficult and Icover it in detail in later chapters.

We can then use this figure to puttogether a cost-justification on yourproject to compare with thealternatives.

Solar power and windpowerWind turbines can be a goodalternative to solar power, butprobably achieve their best whenimplemented together with a solarsystem: a small wind turbine cangenerate electricity in a breeze evenwhen the sun is not shining.Small wind turbines do have somedisadvantages. Firstly, they are verysite-specific, requiring higher thanaverage wind speeds and minimalturbulence. They must be higherthan surrounding buildings andaway from tall trees. If you live on

a windswept farm or close to thecoast, a wind turbine can workwell. If you live in a built-up areaor close to trees or main roads, youwill find a wind turbine unsuitablefor your needs.Compared to the large windturbines used by the powercompanies, small wind turbines arenot particularly efficient. If you areplanning to install a small windturbine in combination with a solarelectric system, a smaller windturbine that generates a few watts ofpower at lower wind speeds isusually better than a large wind

turbine that generates lots of powerat high wind speeds.

Fuel cellsFuel cells can be a good way tosupplement solar energy, especiallyfor solar electric projects thatrequire additional power in thewinter months, when solar energy isat a premium.A fuel cell works like a generator.It uses a fuel mixture such asmethanol, hydrogen or zinc to createelectricity.Unlike a generator, a fuel cellcreates energy through chemicalreactions rather than throughburning fuel in a mechanical engine.These chemical reactions are far

more carbon-efficient than agenerator.Fuel cells are extremely quiet,although rarely completely silent,and produce water as their onlyemission. This makes them suitablefor indoor use with little or noventilation.

Grid-tied solar electricsystemsGrid-tied solar electric systemsconnect directly into the electricitygrid. When the sun is shining duringthe day, excess electricity feeds intothe grid. During the evening andnight, when the solar panels are notproviding sufficient power,electricity is taken from the grid asrequired.Grid-tied solar electric systemseffectively create a micro powerstation. Electricity can be used byother people as well as yourself. Insome countries, owners of grid-tied

solar electric systems receivepayment for each kilowatt of powerthey sell to the electricityproviders.Because a grid-tied solar electricsystem becomes part of the utilitygrid, the system will switch off inthe event of a power cut. It does thisto stop any current flowing backinto the grid, which could be fatalfor engineers repairing a fault.

Solar electricity and theenvironmentOnce installed, a solar electricsystem is a low-carbon electricitygenerator: the sunlight is free andthe system maintenance is extremelylow.There is a carbon footprintassociated with the manufacture ofsolar panels, and in the past thisfootprint has been quite high,mainly due to the relatively smallvolumes of panels beingmanufactured and the chemicalsrequired for the ‘doping’ of thesilicon in the panels.
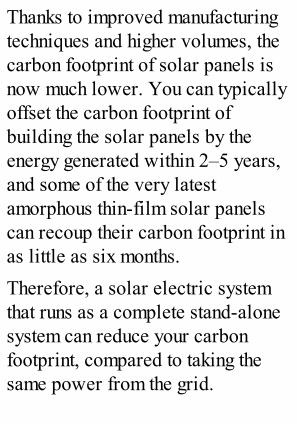
Thanks to improved manufacturingtechniques and higher volumes, thecarbon footprint of solar panels isnow much lower. You can typicallyoffset the carbon footprint ofbuilding the solar panels by theenergy generated within 2–5 years,and some of the very latestamorphous thin-film solar panelscan recoup their carbon footprint inas little as six months.Therefore, a solar electric systemthat runs as a complete stand-alonesystem can reduce your carbonfootprint, compared to taking thesame power from the grid.

Grid-tied solar systems are slightlydifferent in their environmentalbenefit, and their environmentalpayback varies quite dramaticallyfrom region to region, depending ona number of factors:
· How grid electricity isgenerated by the powercompanies in your area (coal,gas, nuclear, hydro, wind orsolar)
· Whether or not yourelectricity generationcoincides with the peakelectricity demand in yourarea (such as air conditioning

usage in hot climates, or highelectrical usage by nearbyheavy industry)
It is therefore much more difficult toput an accurate environmentalpayback figure on grid-tied solarsystems.It is undeniably true that somepeople who have grid-tied solarpower actually make no differenceto the carbon footprint of theirhome. In colder climates, themajority of electricity consumptionis in the evenings and during thewinter. If you have grid-tie solarbut sell most of your energy to the

utility companies during the day inthe summer and then buy it back toconsume in the evenings and in thewinter, you are making little or nodifference to the overall carbonfootprint of your home. In effect,you are selling your electricitywhen there is a surplus and buyingit back when there is high demandand all the power stations areworking at full load.In warmer climates, solar energycan make a difference. In a hot area,peak energy consumption tends tooccur on sunny days as people try tokeep cool with air conditioning. Inthis scenario, peak electricity

demand occurs at the same time aspeak energy production from a solararray, and a grid-tie solar systemcan be a perfect fit.If you live in a colder climate, thisdoes not mean that there is no pointin installing a grid-tie solar system.It does mean that you need to take agood hard look at how and whenyou consume electricity. Do not justassume that because you can havesolar panels on the roof of yourhouse, you are automaticallyhelping the environment.From an environmental perspective,if you wish to get the very best out

of a grid-tie system, you should tryto achieve the following:
· Use the power you generatefor yourself
· Use solar energy for highload applications such asclothes washing
· Reduce your own powerconsumption from the gridduring times of peak demand
Environmental efficiency:comparing supply anddemandThere is an online calculator that

will allow you to map yourelectricity usage over a period of ayear and compare it with the amountof sunlight available to your home.Designed specifically for grid-tieinstallations, this calculator allowsyou to see how close a fit solarenergy is in terms of supply anddemand.Whilst this online calculator is nosubstitute for a detailed electricalusage survey and research into theexact source of the electricitysupplied to you at your location, itwill give you a good indication ofthe likely environmentalperformance of a solar energy

system.To use this online calculator, youwill need to collate informationabout your electricity usage foreach month of the year. You willusually find this information on yourelectricity bill or by contacting yourelectricity provider. Then visitwww.SolarElectricityHandbook.comfollow the links to the Grid-TieSolar Calculator in the OnlineCalculators section and fill in theonline questionnaire.

In conclusion· Solar electricity can be a
great source of power whereyour power requirements aremodest, there is no othersource of electricity easilyavailable and you have agood amount of sunshine
· Solar electricity is not thesame as solar heating
· Solar panels absorb photonsfrom sunlight to generateelectricity
· Direct sunlight generates themost electricity. Dull days

still generate some power
· Solar electricity is unlikelyto generate enough electricityto power the average familyhome, unless majoreconomies in the householdpower requirements are madefirst
· Larger solar electricsystems have a comparativelyhigh capital cost, but theongoing maintenance costsare very low
· Smaller solar electricsystem can actually beextremely cost-effective to

buy and install, even whencompared to a conventionalelectricity supply
· It can be much cheaperusing solar electricity at aremote building, rather thanconnecting it to aconventional grid electricitysupply
· Stand-alone solar energysystems can have a bigenvironmental benefit if theynegate the need for aconnection to grid power
· Grid-tie solar energysystems have an

environmental benefit insunny climates where typicalelectricity usage patterns aresimilar to the supply ofsunlight
· In colder regions, whereelectricity usage is highestwhen sunlight is in shortsupply, the environmentalbenefits are less certain
A Brief Introductionto Electricity
Before we can start playing withsolar power, we need to talk aboutelectricity. To be more precise, weneed to talk about voltage, current,resistance, power and energy.Having these terms clear in yourhead will help you to understandyour solar system. It will also giveyou confidence that you are doingthe right thing when it comes todesigning and installing yoursystem.

Don’t panicIf you have not looked at electricssince you were learning physics atschool, some of the principles ofelectricity can be a bit daunting tostart with. Do not worry if you donot fully grasp everything on yourfirst read through.
There are a few calculations thatI show on the next few pages, but Iam not expecting you to rememberthem all! Whenever I use thesecalculations later on in the book, Ishow all my workings and, ofcourse, you can refer back to thischapter as you gain more

knowledge on solar energy.Furthermore, the website thataccompanies this book includes anumber of online tools that you canuse to work through most of thecalculations involved in designing asolar electric system. You will notbe spending hours with a slide-ruleand reams of paper working all thisout by yourself.

A brief introduction toelectricityWhen you think of electricity, whatdo you think of? Do you think of abattery that is storing electricity?Do you think of giant overheadpylons transporting electricity? Doyou think of power stations that aregenerating electricity? Or do youthink of a device like a kettle ortelevision set or electric motor thatis consuming electricity?The word electricity actuallycovers a number of differentphysical effects, all of which arerelated but distinct from each other.

These effects are electric charge,electric current, electric potentialand electromagnetism:
· An electric charge is abuild-up of electrical energy.It is measured in coulombs. Innature, you can witness anelectric charge in staticelectricity or in a lightningstrike. A battery stores anelectric charge
· An electric current is theflow of an electric charge,such as the flow of electricitythrough a cable. It ismeasured in amps

· An electric potential refersto the potential difference inelectrical energy betweentwo points, such as betweenthe positive tip and thenegative tip of a battery. It ismeasured in volts. Thegreater the electric potential(volts), the greater capacityfor work the electricity has
· Electromagnetism is therelationship betweenelectricity and magnetism,which enables electricalenergy to be generated frommechanical energy (such as in

a generator) and enablesmechanical energy to begenerated from electricalenergy (such as in an electricmotor)

How to measureelectricityVoltage refers to the potentialdifference between two points. Agood example of this is an AAbattery: the voltage is the differencebetween the positive tip and thenegative end of the battery. Voltageis measured in volts and has thesymbol ‘V’.Current is the flow of electrons in acircuit. Current is measured inamps (A) and has the symbol ‘I’. Ifyou check a power supply, it willtypically show the current on thesupply itself.

Resistance is the opposition to anelectrical current in the material thecurrent is flowing through.Resistance is measured in ohms andhas the symbol ‘R’.Power measures the rate of energyconversion. It is measured in watts(W) and has the symbol ‘P’. Youwill see watts advertised whenbuying a kettle or vacuum cleaner:the higher the wattage, the morepower the device consumes and thefaster (hopefully) it does its job.Energy refers to the capacity forwork: power multiplied by time.Energy has the symbol ‘E’. Energy

is usually measured in joules (ajoule equals one watt-second), butelectrical energy is usually shownas watt-hours (Wh), or kilowatt-hours (kWh), where 1 kWh = 1,000Wh.
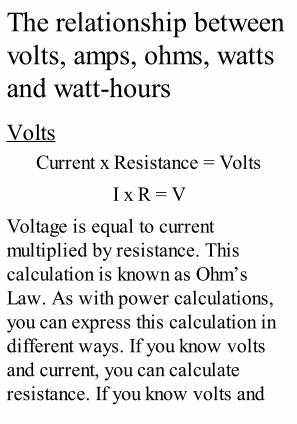
The relationship betweenvolts, amps, ohms, wattsand watt-hoursVolts
Current x Resistance = VoltsI x R = V
Voltage is equal to currentmultiplied by resistance. Thiscalculation is known as Ohm’sLaw. As with power calculations,you can express this calculation indifferent ways. If you know voltsand current, you can calculateresistance. If you know volts and

resistance, you can calculatecurrent:
Volts ÷ Resistance = CurrentV ÷ R = I
Volts ÷ Current = ResistanceV ÷ I = R
PowerVolts x Current = Power
V x I = PPower is measured in watts. Itequals volts times current. A 12-volt circuit with a 4-amp currentequals 48 watts of power (12 x 4 =48).

Based on this calculation, we canalso work out voltage if we knowpower and current, and current ifwe know voltage and power:
Power ÷ Current = VoltsP ÷ I = V
Example: A 48-watt motor with a4-amp current is running at 12 volts.
48 watts ÷ 4 amps = 12 voltsCurrent = Power ÷ Volts
I = P ÷ VExample: a 48-watt motor with a12-volt supply requires a 4-ampcurrent.

48 watts ÷ 12 volts = 4 ampsPower (watts) is also equal to thesquare of the current multiplied bythe resistance:
Current² x Resistance = PowerI² x R = P
EnergyEnergy is a measurement of powerover a period of time. It shows howmuch power is used, or generated,by a device, typically over a periodof an hour. In electrical systems, itis measured in watt-hours (Wh) andkilowatt-hours (kWh).A device that uses 50 watts of

power, has an energy demand of50Wh per hour. A solar panel thatcan generate 50 watts of power perhour, has an energy creationpotential of 50Wh per hour.However, because solar energygeneration is so variable, based ontemperature, weather conditions,the time of day and so on, a newfigure is now often shownspecifically for solar systems: awatt-peak (Wp) rating.A watt-peak rating shows howmuch power can be generated by asolar panel at its peak rating. It hasbeen introduced to highlight the fact
that the amount of energy a solarpanel can generate is variable andto remind consumers that a solarpanel rated at 50 watts is not goingto be producing 50 watt-hours ofenergy every single hour of everysingle day.

A word for non-electriciansRealistically, if you are new toelectrical systems, you should notbe planning to install a big solarenergy system yourself. If you wanta low-voltage system to mount tothe roof of a boat, garden shed orbarn, or if you want to play with thetechnology and have some fun, thengreat: this book will tell youeverything you need to know.However, if the limit of yourelectrical knowledge is wiring aplug or replacing a fuse, you shouldnot be thinking of physically wiring

and installing a solar energy systemyourself without learning moreabout electrical systems andelectrical safety first.Furthermore, if you are planning toinstall a solar energy system to theroof of a house, be aware that inmany parts of the world you need tohave electrical qualifications inorder to carry out even simplehousehold wiring.That does not mean that you cannotspecify a solar energy system,calculate the size you need and buythe necessary hardware for a bigproject. It does mean that you are

going to need to employ a specialistto check your design and carry outthe installation.

In conclusion· Understanding the basic
rules of electricity makes itmuch easier to put together asolar electric system
· As with many things in life,a bit of theory makes a lotmore sense when you startapplying it in practice
· If this is your firstintroduction to electricity,you may find it useful to runthrough it a couple of times
· You may also find it usefulto bookmark this section and
refer back to it as you read on
· You will also find that,once you have learned a bitmore about solar electricsystems, some of the termsand calculations will start tomake a bit more sense.
· If you are not an electrician,be realistic in what you canachieve. Electrics can bedangerous and you do notwant to get it wrong. You cando most of the design workyourself, but you are going toneed to get a specialist in tocheck your design and carry

out the installation.

The FourConfigurations for
Solar Power
There are four differentconfigurations you can choose fromwhen creating a solar electricityinstallation. These are stand-alone(sometimes referred to as off-grid),grid-tie, grid-tie with power backup(also known as grid interactive)and grid fallback.Here is a brief introduction to thesedifferent configurations:

Stand-alone/off-gridWorldwide, stand-alone solarphotovoltaic installations are themost popular type of solarinstallation there is. It is what solarphotovoltaics were originallycreated for: to provide power at alocation where there is no othersource easily available.Whether it is powering a shed light,providing power for a pocketcalculator or powering a completeoff-grid home, stand-alone systemsfundamentally all work in the sameway: the solar panel generatespower, the energy is stored in a

battery and then used as required.In general, stand-alone systems arecomparatively small systems,typically with a peak powergeneration of under one kilowatt.Almost everyone can benefit from astand-alone solar system forsomething, even if it is something asmundane as providing an outsidelight somewhere. Even if you areplanning on something much biggerand grander, it is often a good ideato start with a very small andsimple stand-alone system first.Learn the basics and then progressfrom there.

Examples of simple stand-alone systemsThe vending machineByBox is a manufacturer ofelectronic lockers. These aretypically used for left luggage atrailway stations or at airports, orsituated at shopping malls or fuelstations and used as part of adelivery service for people tocollect internet deliveries, so theydo not need to wait at home.One of the biggest issues withelectronic lockers has often beenfinding suitable locations to placethem where a power source is

available. ByBox overcame thisissue by building an electroniclocker with a solar roof to providepermanent power to the locker.The solar roof provides power to aset of batteries inside the locker.When not in use, the locker itself isin standby mode, thereby consumingminimal power. When a customerwishes to use the locker, they pressthe START button and use thelocker as normal.The benefit to ByBox has beentwofold: they can install a lockerbank in any location, without anydependence on a power supply.

Secondly, the cost of the solarpanels and controllers is often lessthan the cost of installing a separateelectricity supply, even if there isone nearby.Recreational vehiclesHolidaying with recreationalvehicles or caravans is on theincrease, and solar energy ischanging the way people are goingon holiday.In the past, most RV owners electedto stay on larger sites, whichprovided access to electricity andother facilities. As recreationalvehicles themselves become more

luxurious, however, people are nowchoosing to travel to more remotelocations and live entirely ‘off-grid’, using solar energy to provideelectricity wherever they happen tobe. Solar is being used to provideall the comforts of home, whilstoffering holidaymakers the freedomto stay wherever they want.

Grid-tieGrid-tie is gaining popularity inEurope and the United States. Thisis due to the availability of grants toreduce the installation costs and theability to earn money by sellingelectricity back into the electricitycompanies through a feed-in tariff.Feed-in tariff schemes vary aroundthe world and are not availableeverywhere. Where they exist, yourlocal electricity company buyselectricity from solar producers atan agreed rate per kilowatt-hour. Insome countries, this price has beenset at an inflated rate by government

in order to encourage people toinstall solar. In other countries andregions, the price is agreed by theelectricity companies themselves.In a grid-tie system, your home runson solar power during the day. Anysurplus energy that you produce isthen fed into the grid. In theevenings and at night, when yoursolar energy system is notproducing electricity, you then buyyour power from the electricitycompanies in the usual way.The benefit of grid-tie solarinstallations is that they reduce yourreliance on the big electricity

companies and ensure that more ofyour electricity is produced in anenvironmentally efficient way.One disadvantage of most grid-tiesystems is that if there is a powercut, power from your solar array isalso cut.Grid-tie can work especially wellin hot, sunny climates, where peakdemand for electricity from the gridoften coincides with the sun shining,thanks to the high power demand ofair conditioning units. Grid-tie alsoworks well where the owners usemost of the power themselves.

An example of a grid-tiesystemSi Gelatos is a small Florida-basedice-cream manufacturer. In 2007,they installed solar panels on theroof of their factory to providepower and offset some of the energyused in running their cold storagefacility.“Running industrial freezers isextremely expensive and consumesa lot of power,” explains DanFoster of Si Gelatos. “Realistically,we could not hope to generate all ofthe power from solar, but we felt itwas important to reduce our overall

power demand and solar allowedus to do that.”Cold storage facilities consumemost of their power during the dayin the summer, when solar isrunning at its peak. Since installingsolar power, Si Gelatos has seen itsoverall energy consumption drop by40% and now hardly takes anypower from the utilities during peakoperating times.“Solar has done three things for ourbusiness,” says Dan. “Firstly, it is avery visible sign for our staff thatwe are serious about theenvironment. This in turn has made

our employees more aware that theyneed to do their bit by making surelights and equipment are switchedoff when they are not needed.Secondly, it shows our customersthat we care for the environment,which has definitely been good forgoodwill and sales. Thirdly, andmost importantly, we’re genuinelymaking a real contribution to theenvironment, by reducing ourelectricity demand at the time ofday when everyone else’s demandfor electricity is high as well.”

Grid-tie with powerbackup (grid interactive)Grid-tie with power backup – alsoknown as a grid interactive system– combines a grid-tie installationwith a bank of batteries.As with grid-tie, the concept is thatyou use power from your solararray when the sun shines and sellthe surplus to the power companies.Unlike a standard grid-tie system,however, a battery bank providescontingency for power cuts so thatyou can continue to use power fromyour system.
Typically, you would set up‘protected circuits’ within yourbuilding that will continue toreceive power during a poweroutage. This ensures that essentialpower remains available forrunning lights, refrigeration andheating controllers, for example,whilst backup power is not wastedon inessential items such astelevisions and radios.If there is a potential for mainpower to be lost for several days, itis also possible to design a systemto incorporate other powergenerators into a grid interactive

system, such as a generator. Thiswould allow a grid interactivesystem to work as a highly efficientuninterruptable power supply(UPS) for extended periods of time.The cost of a grid-tie system withpower backup is higher than astandard grid-tie system, because ofthe additional cost of batteries andbattery controllers. Typically,having power backup will add12–20% of additional costs over astandard grid-tie system.As with normal grid-tie systems, itis possible to sell surplus powerback to the utility companies in

some countries, allowing you toearn an income from your solarenergy system.
An example of a gridinteractive systemGrid interactive systems are gainingpopularity with rural farms in theUnited Kingdom, where even shortpower blackouts can causesignificant disruption.Traditionally, farms have counteredthis by using generators to providelight and power. However, between2009 and 2011, when the UKGovernment were offering large

incentives for installing solarpower, many farmers fitted gridinteractive systems onto theirbuildings, providing themselveswith an income by sellingelectricity to the electricity utilitycompanies and giving themselvesbackup power in case of a powerblackout.The additional cost of installing agrid interactive system over astandard grid-tie system is morethan offset by the low running costsand ease of use of the system.Farmers do not need to buy and rungenerators and the system is almostentirely maintenance-free. This is a

big contrast with generator systems,which need to be tested and runregularly in order to ensure they areworking effectively.

Grid fallbackGrid fallback is a lesser-knownsystem that makes a lot of sense forsmaller household solar powersystems. For most household solarinstallations where solar is beinginstalled for technical orenvironmental reasons, gridfallback is my preferred solution.Operationally it is effective, it iscost-effective and it isenvironmentally extremely efficient.With a grid fallback system, thesolar array generates power, whichin turn charges a battery bank.Energy is taken from the battery and

run through an inverter to powerone or more circuits from thedistribution panel in the house.When the batteries run flat, thesystem automatically switches backto the grid power supply. The solararray then recharges the batteriesand the system switches back tosolar power.With a grid fallback system, you donot sell electricity back to theelectricity companies. All thepower that you generate, you useyourself. This means that some ofthe grants that are available forsolar installations in some countries

may not be available to you. It alsomeans that you cannot benefit fromselling your electricity back to theelectricity companies.For this reason, grid fallback makesmore sense in countries where thereis no feed-in tariff available, suchas India, or in countries likeAustralia that have financialincentives available for both grid-tied and off-grid systems.Grid fallback systems provide mostof the benefits of a grid interactivesystem, with the additional benefitthat you use your own power whenyou need it, rather than when the sun

is shining. This reduces yourreliance on external electricitysupplies during peak load periods,which ensures that your system hasan overall environmental benefit.The other significant benefit of agrid fallback system is cost: youcan genuinely build a useful gridfallback system to power one ormore circuits within a house for avery small investment and expand itas budget allows. I have seen gridfallback systems installed for under£400 ($680), providing a usefulamount of power for a home. Incomparison, even a very modestgrid-tie system costs several

thousands of pounds.There is a crossover point where agrid-tie system works out morecost-effective than a grid fallbacksystem. At present, that crossoverpoint is around the 1kWh mark: ifyour system is capable ofgenerating more than 1kW ofelectricity per hour, a grid-tiesystem may be more cost-effective.If your system generates less than1kW of electricity per hour, a gridfallback system is almost certainlycheaper.Unless you are looking to invest asignificant amount of money on a

larger grid-tie system in order toproduce more than 1 kW of powerper hour, or if you want to takeadvantage of feed-in tariffs, a gridfallback solution is certainly worthinvestigating as an alternative.
An example of a grid fallbacksystemBack in 2001, Colin Metcalfeinstalled a solar panel onto the roofof his garage, in order to charge anold car battery, which in turnpowered a single light and a smallinverter. After a power cut thatwinter, Colin decided to expand hissystem in order to provide basic

power to his house.“I wanted to ensure I always hadenough power in my home to powerlights and to ensure my heatingsystem would work,” explainedColin. “I have gas heating, but thecontrollers are all electric, whichmeans that if there is a power cut, Ihave no heating at all. In addition, Iliked the idea of free electricity thatwas generated in anenvironmentally friendly way.”Colin upgraded his system bit bybit, as funds allowed. “Anelectrician fitted a new distributionpanel (consumer unit) for my

essential circuits, and this wasconnected up to the main panel viaan automatic transfer switch. Then Iadded additional solar panels andbatteries over the years as I couldafford them.”This automatic transfer switchmeant the essential circuits wouldreceive power from the solar arrayor the batteries while power wasavailable, but switch back to utilitypower when the batteries ran flat.Originally, the system providedaround half the power he needed,but as he has added to the system,more and more of his power nowcomes from his solar array. “Today

I have around 1.4kW of solarpanels on the roof of my garage,”says Colin. “They look a bit odd asno two panels are alike, as I havebought them bit by bit as fundsallow, but they now provide all thepower I need around the year for allmy essential circuits.”
Grid failoverAlternatively, you can configure agrid fallback system as a gridfailover system.A grid failover system kicks inwhen there is a power failure fromyour main electricity supply. In

effect, it is an uninterruptablepower supply, generating its powerfrom solar energy.The benefit of this configuration isthat if you have a power cut, youhave contingency power. Thedisadvantage of this configuration isthat you are not using solar powerfor your day-to-day use.Although rare in Europe andAmerica, grid failover systems usedto be more common in countrieswhere power failures arecommonplace. In Africa and inmany parts of Asia, grid failoversystems reduce the reliance on

power generators for lighting andbasic electricity needs.However, in most cases, customershave found that a grid fallback orgrid interactive system is moresuitable for their needs. I am awareof two grid failover systems thathave been installed in the past: bothof these have since beenreconfigured as grid fallbacksystems.

How grid-tie systemsdiffer from stand-aloneGenerally, stand-alone and smallergrid fallback systems run at lowvoltages, typically between 12 and48 volts. This is because batteriesare low-voltage units and sobuilding a stand-alone system at alow voltage is a simple, flexibleand safe approach.Grid-tie systems tend to be largerinstallations, often generatingseveral kilowatts of electricity eachhour. As the electricity is requiredas a high-voltage supply, it is moreefficient to connect multiple solar
panels together to produce a highvoltage circuit, rather than use aninverter to step up the voltage. Thishigh-voltage DC power is thenconverted into an AC current by asuitable grid-tie inverter.Grid-tie systems either link multiplesolar panels together to produce asolar array voltage of severalhundred volts before running to theinverter, or have a small inverterconnected to each solar panel tocreate a high-voltage AC supplyfrom each panel.The benefit of this high voltage isefficiency. There is less power loss

running high-voltage, low-currentelectricity through cables from thesolar array.For stand-alone battery-basedsystems, low-voltage is the bestsolution, as the battery banks tend towork better as low-voltage energystores. For grid-tie systems wherethe energy is not being stored in abattery bank, the higher-voltagesystems are the best solution.Neither approach is inherently‘better’: it all depends on the typeof system you are designing.

In conclusion· Solar can be used in a
number of different ways andfor many differentapplications
· Stand-alone systems are thesimplest and easiest tounderstand. They tend to becomparatively small systems,providing power where noother power source is easilyavailable
· With grid-tie, your solarenergy system generateselectricity that is then used
normally. Any excesselectricity production isexported onto the grid
· Grid-tie with power backup(also known as gridinteractive) provides youwith the benefits of a grid-tiesystem with the added benefitthat power remains availableeven if electricity to your areais cut off
· Grid fallback systems havemore in common with stand-alone systems than grid-tiesystems. In design they arevery similar to stand-alone
systems, with an inverterrunning from a bank ofbatteries and an automatictransfer switch to switchpower between the solarenergy system and the gridpower supply
· Grid failover systems arecomparatively rare now, butprovide uninterruptablepower supplies using solar asthe backup source
· Grid-tie systems have adifferent design to stand-alone systems. They tend tobe high-voltage systems,

whereas stand-alone systemsrun at much lower voltages
Components of aSolar Electric System
Before I get into the detail aboutplanning and designing solarelectric systems, it is worthdescribing all the differentcomponents of a system andexplaining how they fit together.Once you have read this chapter,you will have a reasonable grasp ofhow a solar energy system fitstogether.I deliberately do not go into muchdetail at this stage: all I am doing is

providing an overview for now.The detail can come later.

Solar panelsThe heart of a solar electric systemis the solar panel itself. There arevarious types of solar panel and Iwill describe them all in detail lateron.Solar panels or, more accurately,photovoltaic solar panels, generateelectricity from the sun. The morepowerful the sun’s energy, the morepower you get, although solarpanels continue to generate smallamounts of electricity in the shade.Most solar panels are made up ofindividual solar cells, connectedtogether. A typical solar cell will

only produce around half a volt, soby connecting them together inseries inside the panel, a moreuseful voltage is achieved.Most solar panels are rated as 12-volt solar panels, althoughhigher-voltage panels are alsoavailable. A 12-volt solar panelproduces around 14–18 volts whenput under load. This allows a singlesolar panel to charge up a 12-voltbattery.Incidentally, if you connect avoltmeter up to a solar panel whenit is not under load, you may wellsee voltage readings of up to 26

volts. This is normal in an ‘opencircuit’ on a solar panel. As soon asyou connect the solar panel into acircuit, this voltage level will dropto around 14–18 volts.Solar panels can be linked togetherto create a solar array. Connectingmultiple panels together allows youto produce a higher current or to runat a higher voltage:
· Connecting the panels inseries allows a solar array torun at a higher voltage.Typically, 24 volts or 48volts in a stand-alone system,or up to several hundred volts

in a grid-tie system
· Connecting the panels inparallel allows a solar arrayto produce more power whilemaintaining the same voltageas the individual panels
· When you connect multiplepanels together, the power ofthe overall system increases,irrespective of whether theyare connected in series or inparallel
In a solar array where the solarpanels are connected in series (asshown in the following diagrams),you add the voltages of each panel

together and add the wattage ofeach panel together to calculate themaximum amount of power andvoltage the solar array willgenerate.
A solar array madeof four solar panelsconnected in series.If each individualpanel is rated as a

12-volt, 12-wattpanel, this solar
array would be ratedas a 48-volt, 48-wattarray with a 1 amp
current.In a solar array where the panelsare connected in parallel (as shownin the diagram below), you take theaverage voltage of all the solarpanels and you add the wattage ofeach panel to calculate themaximum amount of power thesolar array will generate.

A solar array madeof four solar panels
connected inparallel. With eachpanel rated as a 12-volt, 12-watt panel,
this solar arraywould be rated as a
12-volt, 48-wattarray with a 4 amp

current.I will go into more detail laterabout choosing the correct voltagefor your system.

BatteriesExcept in a grid-tie system, wherethe solar array connects directly toan inverter, solar panels rarelypower electrical equipmentdirectly. This is because the amountof power the solar panel collectsvaries depending on the strength ofsunlight. This makes the powersource too variable for mostelectrical equipment to cope with.In a grid-tie system, the inverterhandles this variability: if demandoutstrips supply, you will get powerfrom both the grid and your solarsystem. For a stand-alone or a grid

fallback system, batteries store theenergy and provide a constantpower source for your electricalequipment.Typically, this energy is stored in‘deep cycle’ lead acid batteries.These look similar to car batteriesbut have a different internal design.This design allows them to beheavily discharged and rechargedseveral hundred times over.Most lead acid batteries are 6-voltor 12-volt batteries and, like solarpanels, these can be connectedtogether to form a larger batterybank. Like solar panels, multiple

batteries used in series increase thecapacity and the voltage of a batterybank. Multiple batteries connectedin parallel increase the capacitywhilst keeping the voltage the same.

ControllerIf you are using batteries, your solarelectric system is going to require acontroller in order to manage theflow of electricity (the current) intoand out of the battery.If your system overcharges thebatteries, this will damage andeventually destroy them. Likewise,if your system completelydischarges the batteries, this willquite rapidly destroy them. A solarcontroller prevents this fromhappening.There are a few instances where asmall solar electric system does not

require a controller. An example ofthis is a small ‘battery top-up’ solarpanel that is used to keep a carbattery in peak condition when thecar is not being used. These solarpanels are too small to damage thebattery when the battery is fullycharged.In the majority of instances,however, a solar electric systemwill require a controller in order tomanage the charge and discharge ofbatteries and keep them in goodcondition.

InverterThe electricity generated by a solarelectric system is direct current(DC). Electricity from the grid ishigh-voltage alternating current(AC).If you are planning to run equipmentthat runs from grid-voltageelectricity from your solar electricsystem, you will need an inverter toconvert the current from DC to ACand convert the voltage to the samevoltage as you get from the grid.Traditionally, there is usually onecentral inverter in a solar system,either connecting directly to the

solar array in a grid-tie system, orto the battery pack in an off-gridsystem. A more recent invention hasbeen the micro inverter.Micro-inverters are connected toindividual solar panels so that eachindividual panel provides ahigh-voltage alternating current.Solar panels with micro-invertersare typically only used with grid-tiesystems and are not suitable forsystems with battery backup. Forgrid-tie systems, they do offer somesignificant benefits over the moretraditional ‘big box’ inverter,although the up-front cost iscurrently higher.

Inverters are a big subject all ontheir own. I will come back todescribe them in much more detaillater on in the book.

Electrical devicesThe final element of your solarelectric system is the devices youplan to power. Theoretically,anything that you can power withelectricity can be powered by solar.However, many electrical devicesare very power hungry, whichmakes running them on solar energyvery expensive!Of course, this may not be so muchof an issue if you are installing agrid-tie system: if you have veryenergy-intensive appliances thatyou only use for short periods, theimpact to your system is low. In

comparison, running high-powerappliances on an off-grid systemmeans you have to have a morepowerful off-grid solar energysystem to cope with the peakdemand.Low-voltage devicesMost off-grid solar systems run atlow voltages. Unless you areplanning a pure grid-tie installation,you may wish to consider running atleast some of your devices directlyfrom your DC supply rather thanrunning everything through aninverter. This has the benefit ofgreater efficiency.

Thanks to the caravanning andboating communities, lots ofequipment is available to run from a12-volt or 24-volt supply: lightbulbs, refrigerators, ovens, kettles,toasters, coffee machines,hairdryers, vacuum cleaners,televisions, radios, air conditioningunits, washing machines and laptopcomputers are all available to runon 12-volt or 24-volt power.In addition, thanks to the recentuptake in solar installations, somespecialist manufacturers arebuilding ultra low-energyappliances, such as refrigerators,

freezers and washing machines,specifically for people installingsolar and wind turbine systems.You can also charge up mostportable items such as MP3 playersand mobile phones from a 12-voltsupply.High-voltage devicesIf running everything at low voltageis not an option, or if you are usinga grid-tie system, you use aninverter to run your electricaldevices.

Connecting everythingtogetherA stand-alone system
The simplified block diagramabove shows a simple stand-alone

solar electric system. Whilst thedetail will vary, this design formsthe basis of most stand-alonesystems and is typical of theinstallations you will find incaravans, boats and buildings thatdo not have a conventional powersupply.This design provides bothlow-voltage DC power for runningsmaller electrical devices andappliances such as laptopcomputers and lighting, plus ahigher-voltage AC supply forrunning larger devices such aslarger televisions and kitchenappliances.
In this diagram, the arrows showthe flow of current. The solarpanels provide the energy, which isfed into the solar controller. Thesolar controller charges thebatteries. The controller alsosupplies power to the low-voltagedevices, using either the solarpanels or the batteries as the sourceof this power.The AC inverter takes its powerdirectly from the battery andprovides the high-voltage ACpower supply.
A grid-tie system using a

single central inverter
This simplified block diagramshows a simple grid-tie system,typical of the type installed in manyhomes today. The solar panels areconnected to the grid-tie inverter,

which feeds the energy into themain supply. Electricity can be usedby devices in the building or fedback out onto the grid, depending ondemand.The grid-tie inverter monitors thepower feed from the grid. If itdetects a power cut, it also cutspower from the solar panels toensure that no energy is fed back outonto the grid.The grid-tie meter monitors howmuch energy is taken from the gridand how much is fed back into thegrid using the solar energy system.

A grid-tie system usingmultiple micro-invertersA grid-tie system using micro-inverters is similar to the oneabove, except that each solar panelis connected to its own inverter,and the inverters themselves aredaisy-chained together, convertingthe low-voltage DC power fromeach solar panel into a high-voltageAC power supply.


In conclusion· There are various
components that make up asolar electric system
· Multiple solar panels canbe joined together to create amore powerful solar array.
· In a stand-alone system, theelectricity is stored inbatteries to provide an energystore and provide a moreconstant power source. Acontroller manages thebatteries, ensuring thebatteries do not get

overcharged by the solararray and are notover-discharged by thedevices taking current fromthem
· An inverter takes the DCcurrent from the solar energysystem and converts it into ahigh-voltage AC current thatis suitable for runningdevices that require gridpower
· Generally, it is moreefficient to use the electricityas a DC supply than an ACsupply


The Design Process
No matter what your solar energysystem is for, there are seven stepsin the design of every successfulsolar electric installation:
· Scope the project
· Calculate the amount ofenergy you need
· Calculate the amount ofsolar energy available
· Survey your site
· Size up the solar electricsystem

· Select the right componentsand work out full costs
· Produce the detailed designThe design process can be mademore complicated, or simplified,based on the size of the project. Ifyou are simply installing an off-the-shelf shed light, for instance, youcan probably complete the wholedesign in around twenty minutes. If,on the other hand, you are lookingto install a solar electric system in abusiness to provide emergency sitepower in the case of a power cut,your design work is likely to takeconsiderably more time.

Whether your solar electric systemis going to be large or small,whether you are buying anoff-the-shelf solar lighting kit ordesigning something from scratch, itis worth following this basic designprocess every time. This is trueeven if you are installing an off-the-shelf system. This ensures that youwill always get the best from yoursystem and will provide you withthe reassurance that your solarenergy system will achieveeverything you need it to do.

Short-cutting the designworkHaving said that doing the designwork is important, there are someuseful online tools to help make theprocess as easy as possible.Once you have scoped your project,the Solar Electricity Handbookwebsite(www.SolarElectricityHandbook.comincludes a number of online toolsand calculators that will help youcarry out much of the design work.The solar irradiance tables andsolar angle calculators will allow

you to work out how much solarenergy is available at your location,whilst the off-grid project analysisand grid-tie project analysisquestionnaires will each generateand e-mail to you a full report foryour proposed system, includingcalculating the size of system yourequire and providing a costestimate.Of course, there is a limit to howmuch a set of online solar tools canhelp you in isolation, so you willstill need to carry out a site surveyand go through componentsselection and detailed designyourself, but these tools will allow
you to try several differentconfigurations and play out ‘whatif’ scenarios quickly and easily.Incidentally, whilst some of thesetools ask you for an e-mail address(in order to send you your report),your e-mail address is not storedanywhere on the system. Other thanthe report that you request, you willnever receive unsolicited e-mailsbecause of entering your e-mailaddress.

Solar energy andemotionsDesign can often seem to be apurely analytical and rationalprocess. It should not be. All greatdesigns start with a dream.For many people, choosing solarenergy is often an emotionaldecision: they want a solar energysystem for reasons other than justthe purely practical. Some peoplewant solar energy because theywant to ‘do their bit’ for theenvironment, others want the verylatest technology, or want to usesolar simply because it can be

done. Others want solar energybecause they see the opportunity toearn money. I suspect that for mosthomeowners, the reasons are acombination of the above.It is so important that the emotionalreasons for wanting something arenot ignored. We are not robots. Ouremotions should be celebrated, notsuppressed: the Wright brothersbuilt the first aircraft because theywanted to reach the sky. NASA senta man to the moon because theywanted to go further than anyonehad ever done before. Neitherundertaking could be argued as

purely rational; they were theresults of big dreams.It is important to acknowledge thatthere are often hidden reasons forwanting solar energy. Sadly, thesereasons often do not make it downonto a sheet of paper in a designdocument or onto a computerspreadsheet. Sometimes, the personmaking the decision for buyingsolar energy is secretly worried thatif they voice their dreams, they willappear in some way irrational.The reality is that it is often a goodthing if there is an emotionalelement to wanting a solar energy

system. By documenting thesereasons, you will end up with abetter solution. For instance, if theenvironmental benefits are top ofyour agenda, you will use yoursolar energy system in a differentway to somebody who is looking atsolar purely as a businessinvestment.By acknowledging these reasonsand incorporating them into thedesign of your system, you will endup with a far better system. Notonly will you have a system thatworks in a practical sense, it willalso achieve your dream.

In conclusion· No matter how big or small
your project, it is important todesign it properly
· There are online toolsavailable to help you with thecalculations and to speed upthe work
· Do not ignore the emotionalreasons for wanting a solarenergy system. You are ahuman being: you are allowedto dream

Scoping the Project
As with any project, before youstart, you need to know what youwant to achieve. In fact, it is one ofthe most important parts of thewhole project. Get it wrong and youwill end up with a system that willnot do what you need it to.
It is usually best to keep yourscope simple to start with. You canthen flesh it out with more detaillater.
Here are some examples of asuitable scope:

· To power a light and aburglar alarm in a shed on anallotment
· To provide power forlighting, a kettle, a radio andsome handheld power tools ina workshop that has noconventional electricalconnection
· To provide enough powerfor lighting, refrigeration anda TV in a holiday caravan
· To provide lighting andpower to run four laptopcomputers and the telephone

system in an office during apower cut
· To charge up an electricbike between uses
· To provide an off-gridholiday home with its entireelectricity requirements
· To reduce my carbonfootprint by producingelectricity for all my homerequirements
· To run an electric carentirely on solar energy
From your scope, you can startfleshing this out to provide some

initial estimates on powerrequirements.
As mentioned in the previouschapter, I have created two onlineSolar Project Analysis tools, onefor grid-tie systems and one for off-grid systems. You can find both ofthese tools on my websitewww.SolarElectricityHandbook.comYou will still need to collect thebasic information to work with, butall the hard work is done for you.This tool will produce a completeproject scope, work out the likelyperformance of your solar energysystem and provide some ballparkcost estimates.

For the purpose of these next fewchapters, I am going to use theexample of providing a small off-grid holiday home with its entireelectricity requirements.This is a big project. In reality ifyou have little or no experience ofsolar electric systems or householdelectrics you would be best startingwith something smaller. Goingcompletely off-grid is an ambitiousproject, but for the purposes ofteaching solar electric systemdesign, it is a perfect example: itrequires a detailed design thatcovers all of the aspects of

designing a solar energy system.

Designing grid-tie or gridfallback systemsFor our sample project, grid-tie isnot an option as we are using solarpower as an alternative toconnecting our site to the electricitygrid.However, grid-tie is becoming apopular option, especially in thesouthern states of the United Statesand in European countries likeSpain, Germany and the UnitedKingdom where generousgovernment subsidies and feed-intariffs are available.

In terms of scoping the project, itmakes little difference whether youare planning a grid-tie or gridfallback system or not: the steps youneed to go through are the same.The only exception, of course, isthat you do not need to take intoaccount battery efficiencies withgrid-tie.The biggest difference with a grid-tie or grid fallback system is thatyou do not have to rely on yoursolar system providing you with allyour electricity requirements: youwill not be plunged into darkness ifyou use more electricity than you

generate.This means that you can start with asmall grid-tie or grid fallbacksystem and expand it later on asfunds allow.Despite that, it is still a good ideato go through a power analysis aspart of the design. Even if you donot intend to produce all the poweryou need with solar, having apower analysis will allow you tobenchmark your system and willhelp you size your grid-tie system ifyou aim to reduce your carbonfootprint by providing theelectricity companies with as much

power as you buy back.Most grid-tie systems are sized toprovide more power than you needduring the summer and less than youneed during the winter. Over aperiod of a year, the aim is togenerate as much power as you use,although on a month-by-month basisthis may not always be the case.Many solar companies claim thatthis then provides you with a‘carbon neutral’ system: you areselling your excess power to theelectricity companies and thenbuying the same amount ofelectricity back when you need it.

If this is what you are planning todo with your grid-tie system, yourscope is much simpler. You need toget your electricity bills for the pastyear and make a note of how muchelectricity you have used over theyear. Then divide this figure by thenumber of days in the year to workout a daily energy usage and ensureyour system generates this as anaverage over the period of a year.Because you are not generatingenough electricity during the wintermonths in a carbon neutral grid-tiesystem, you need fewer solar panelsthan you would need to create an

entirely stand-alone system.
Comparing supply withdemandIf you are designing a grid-tiesystem, it can be interesting tocompare the supply of solar energywith your electricity usage pattern.By comparing supply with demand,you can see how closely solarenergy production matches yourown usage and this, in turn, can beused as an indicator to identify howenvironmentally beneficial solarenergy is for you.To do this, you will need to
ascertain your monthly electricityusage for each month of the year.Your electricity supplier mayalready provide you with thisinformation on your electricity bill.If not, you should be able to requestthis from them.Once you have this information,visitwww.SolarElectricityHandbook.comand fill in the Grid-Tie SolarProject Analysis, including yourindividual monthly consumptionfigures. In the report that is e-mailed to you, you will see a chartthat allows you to see how closelyyour electricity usage maps onto

solar energy production.This report will also provide youwith an approximate estimate forthe carbon footprint for eachkilowatt-hour of electricity youproduce from your solar array,based on the production andinstallation of your solar array andthe likely amount of energy that itwill generate during its lifetime.Based on this, it is possible to seewhether installing solar energy islikely to produce real-worldenvironmental savings.

Fleshing out the scopeNow we know the outline scope ofour project, we need to quantifyexactly what we need to achieveand work out some estimates forenergy consumption.Our holiday home is a small two-bedroom cottage with a solid fuelcooker and boiler. The cost ofconnecting the cottage to the grid is£4,500 (around $7,200) and Isuspect that solar electric powercould work out significantlycheaper.The cottage is mainly used in thespring, summer and autumn, with

only a few weekend visits duringthe winter.Electricity is required for lightingin each room, plus a courtesy lightin the porch, a fridge in the kitchenand a small television in the sittingroom. There also needs to besurplus electricity for charging up amobile phone or MP3 player andfor the occasional use of a laptopcomputer.Now we have decided whatdevices we need to power, we needto find out how much energy eachdevice needs, and estimate the dailyusage of each item.

In order to keep efficiency high andcosts low, we are going to workwith low-voltage electricswherever possible. The benefits ofusing low-volt devices rather thanhigher grid-voltage are twofold:
· We are not losing efficiencyby converting low-volt DCelectrics to grid-voltage ACelectrics through an inverter.
· Many electronic devicesthat plug into a grid-voltagesocket require a transformerto reduce the power backdown to a low DC current,thereby creating a second

level of inefficiencyMany household devices, likesmaller televisions, music systems,computer games consoles andlaptop computers, have externaltransformers. It is possible to buytransformers that run on 12-volt or24-volt electrics rather than the ACvoltages we get from grid power,and using these is the most efficientway of providing low-voltagepower to these devices.There can be disadvantages oflow-voltage configurations,however, and they are not the rightapproach for every project:

· If running everything at12–24 volts requires asignificant amount ofadditional rewiring, the costof carrying out the rewiringcan be much higher than thecost of an inverter and aslightly larger solar array
· If the cable running betweenyour batteries and yourdevices is too long, you willget greater power lossesthrough the cable at lowervoltages than you will athigher voltages
If you already have wiring in place
to work at grid-level voltages, it isoften more appropriate to run asystem at grid voltage using aninverter, rather than running thewhole system at low voltage. If youhave no wiring in place, running thesystem at 12 or 24 volts is oftenmore suitable.

Producing a poweranalysisThe next step is to investigate yourpower requirements by carrying outa power analysis, where youmeasure your power consumption inwatt-hours.
You can find out the wattage ofhousehold appliances in one of fourways:
· Check the rear of theappliance, or on the powersupply
· Check the product manual

· Measure the watts using awatt meter
· Find a ballpark figure forsimilar items
Often a power supply will show anoutput current in amps rather thanthe number of watts the deviceconsumes. If the power supply alsoshows the output voltage, you canwork out the wattage by multiplyingthe voltage by the current (amps):
Power (watts) = Volts x Current(amps)
P = V x IFor example, if you have a mobile

phone charger that uses 1.2 amps at5 volts, you can multiply 1.2 ampsby 5 volts to work out the number ofwatts: in this example, it equals 6watts of power. If I plugged thischarger in for one hour, I would use6 watt-hours of energy.A watt meter is a useful tool formeasuring the energy requirementsof any device that runs onhigh-voltage AC power from thegrid. The watt meter plugs into thewall socket and the appliance plugsinto the watt meter. An LCD displayon the watt meter then displays theamount of power the device isusing. This is the most accurate way

of measuring your true powerconsumption.Finding a ballpark figure for similardevices is the least accurate way offinding out the power requirementand should only be done as a lastresort. A list of power ratings forsome common householdappliances is included in AppendixC.Once you have a list of the powerrequirements for each electricaldevice, draw up a table listing eachdevice, whether the device uses12-volt or grid voltage, and thepower requirement in watts.

Then put an estimate in hours forhow long you will use each deviceeach day and multiply the watts byhours to create a total watt-hourenergy requirement for each item.You should also factor in any‘phantom loads’ on the system. Aphantom load is the name given todevices that use power even whenthey are switched off. Televisionsin standby mode are one suchexample, but any device that has apower supply built into the plugalso has a phantom load. Theseitems should be unplugged orswitched off at the switch when not

in use. However, you may wish tofactor in a small amount of powerfor items in standby mode, to takeinto account the times you forget toswitch something off.If you have a gas-powered centralheating system, remember that mostcentral heating systems have anelectric pump and the centralheating controller will requireelectricity as well. A typical centralheating pump uses around 60 wattsof power a day, whilst a centralheating controller can use between2 and 24 watts a day.Once complete, your power

analysis will look like this:
Device Voltage
Living room lighting 12V
Kitchen lighting 12V
Hallway lighting 12V
Bathroom lighting 12V
Bedroom 1 lighting 12V
Bedroom 2 lighting 12V
Porch light 12V
Small fridge 12V
TV 12V

Laptop computer 12V
Charging cell phones andMP3 players
12V
Phantom loads 12V
Total Energy Requirement a day (watt-hours)
A word of warningIn the headlong enthusiasm forimplementing a solar electricsystem, it is very easy tounderestimate the amount ofelectricity you need at this stage.To be sure that you do not leavesomething out which you regretlater, I suggest you have a break at

this point. Then return and reviewyour power analysis.It can help to show this list tosomebody else in order to get theirinput as well. It is very easy to getemotionally involved in your solarproject, and having a second pair ofeyes can make a world ofdifference later on.

When you are ready toproceedWe now know exactly how muchenergy we need to store in order toprovide one day of power. For ourholiday home example, that equatesto 662 watt-hours per day.There is one more thing to take intoaccount: the efficiency of theoverall system.Batteries, inverters and resistancein the circuits all reduce theefficiency of our solar electricsystem. We must consider theseinefficiencies and add them to our

power analysis.

Calculating inefficienciesBatteries do not return 100% of theenergy used to charge them. TheCharge Cycle Efficiency of thebattery measures the percentage ofenergy available from the batterycompared to the amount of energyused to charge it.
Charge cycle efficiency is not afixed figure, as the efficiency canvary depending on how quickly youcharge and discharge the battery.However, most solar applicationsdo not overstress batteries and sothe standard charge cycle efficiencyfigures are usually sufficient.

Approximate charge cycleefficiency figures are normallyavailable from the batterymanufacturers. However, forindustrial quality ‘traction’batteries, you can assume 95%efficiency, whilst gel batteries andleisure batteries are usually in theregion of 90%.If you are using an inverter in yoursystem, you need to factor in theinefficiencies of the inverter. Again,the actual figures should beavailable from the manufacturer buttypically, you will find that aninverter is around 90% efficient.
Adding the inefficiencies toour power analysisIn our holiday home example, thereis no inverter. If there were, wewould need to add 10% for inverterinefficiencies for everygrid-powered device.We are using batteries. We need toadd 5% to the total energyrequirement to take charge cycleefficiency into account.5% of 662 equals 33 watts. Addthis to our power analysis, and ourtotal watt-hour requirementbecomes 695 watt-hours per day.

When do you need to usethe solar system?It is important to work out at whattimes of year you will be using yoursolar electric system most. Forinstance, if you are planning to useyour system full time during thedepths of winter, your solar electricsystem needs to be able to provideall your electricity even during thedull days of winter.A holiday home is often in regularuse during the spring, summer andautumn, but left empty for periodsof time during the winter.

This means that, during winter, wedo not need our solar electricsystem to provide enough electricityfor full occupancy. We need enoughcapacity in the batteries to provideenough electricity for, say, theoccasional long weekend. The solararray can then recharge the batteriesagain, once the home is empty.We might also decide that, if weneeded additional electricity inwinter, we could have a smallstandby generator on hand to givethe batteries a boost charge.For the purposes of our holidayhome, our system must provide

enough electricity for fulloccupancy from March to Octoberand occasional weekend use fromNovember until February.

Keeping it simpleYou have seen what needs to betaken into account when creating apower analysis and calculating theinefficiencies. If you are planning touse the online tools to help you,now is the time to use them.Visitwww.SolarElectricityHandbook.comand follow the links to either theOff-Grid or Grid-Tied SolarProject Analysis tools, which canbe found in the Online Calculatorssection. This will allow you toenter your devices on the poweranalysis, select the months you want
your system to work and select yourlocation from a worldwide list. Thesystem will automatically e-mailyou a detailed solar analysis reportwith all the calculations worked outfor you.
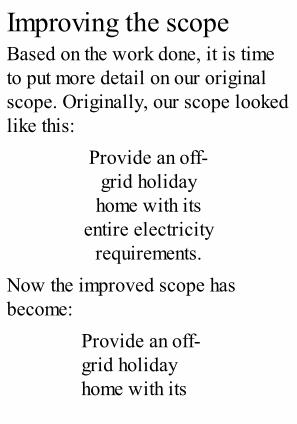
Improving the scopeBased on the work done, it is timeto put more detail on our originalscope. Originally, our scope lookedlike this:
Provide an off-grid holiday
home with itsentire electricity
requirements.Now the improved scope hasbecome:
Provide an off-grid holidayhome with its

entire electricityrequirements,providing powerfor lighting,refrigeration,TV, laptopcomputer andvarious sundries,which equals695 watt-hoursof electricityconsumption perday.The system mustprovide enoughpower foroccupation from

March untilOctober, plusoccasionalweekend useduring thewinter.
There is now a focus for theproject. We know what we need toachieve for a solar electric systemto work. Now we need to go to thesite and see if what we want to dois achievable.

In conclusion· Getting the scope right is
important for the wholeproject
· Start by keeping it simpleand then flesh it out bycalculating the energyrequirements for all thedevices you need to power
· If you are designing a grid-tie system, you do not need togo into so much detail: youcan get the usage informationfrom your electricitycompany. It is probably

included on your electricitybill
· If you are designing a grid-tie system, you can make areasonable estimate of itsenvironmental benefit bycomparing solar energysupply with your demand on amonth-by-month basis
· Do not forget to factor in‘phantom loads’
· Because solar electricsystems run at low voltages,running your devices at lowvoltage is more efficient thaninverting the voltage to grid

levels first
· Thanks to the popularity ofcaravans and boats, there is alarge selection of 12-voltappliances available. If youare planning a stand-alone orgrid fallback system, you maywish to use these in yoursolar electric system ratherthan less efficientgrid-voltage appliances
· Even if you are planning agrid-tie system, it is stilluseful to carry out a detailedpower analysis
· Do not forget to factor in

inefficiencies for batteriesand inverters
· Take into account the timesof year that you need to useyour solar electric system
· Once you have completedthis stage, you will knowwhat the project needs toachieve in order to besuccessful

Calculating SolarEnergy
The next two chapters are just asuseful for people wishing to installa solar hot water system as they arefor people wishing to install solarelectricity.Whenever I refer to solar panel orsolar array (multiple solar electricpanels) in these two chapters, theinformation is equally valid forsolar electricity and solar hotwater.

What is solar energy?Solar energy is a combination of thehours of sunlight you get at your siteand the strength of that sunlight.This varies depending on the timeof year and where you live.This combination of hours andstrength of sunlight is called solarinsolation or solar irradiance, andthe results can be expressed aswatts per square metre (W/m²) or,more usefully, in kilowatt-hours persquare metre spread over the periodof a day (kWh/m²/day). One squaremetre is equal to 9.9 square feet.

Why is this useful?Photovoltaic solar panels quote theexpected number of watts of powerthey can generate, based on a solarirradiance of 1,000 watts persquare metre. This figure is oftenshown as a watts-peak (Wp) figureand shows how much power thesolar panel can produce in idealconditions. A solar irradiance of1,000 watts per square metre iswhat you could expect to receive atsolar noon in the middle of summerat the equator. It is not an averagereading that you could expect toachieve on a daily basis.

However, once you know the solarirradiance for your area, quoted asa daily average (i.e. the number ofkilowatt-hours per square metre perday), you can multiply this figure bythe wattage of the solar panel togive you an idea of the daily amountof energy you can expect your solarpanels to provide.
Calculating solar irradianceSolar irradiance varies significantlyfrom one place to another andchanges throughout the year. Inorder to come up with somereasonable estimates, you needirradiance figures for each month of

the year for your specific location.Thanks to NASA, calculating yourown solar irradiance is simple.NASA’s network of weathersatellites has been monitoring thesolar irradiance across the surfaceof the earth for many decades. Theirfigures have taken into account theupper atmospheric conditions,average cloud cover and surfacetemperature, and are based onsample readings every three hoursfor the past quarter of a decade.They cover the entire globe.For reference, I have compiled thisinformation for different regions

across the United States, Canada,Australia, New Zealand, the UnitedKingdom and Ireland in AppendixB.The website goes further. We haveincorporated solar irradiance chartsfor every major town and city inevery country in the world: simplyselect your location from apull-down list of countries andcities and you can view theirradiance figures for your exactarea.Using the information in AppendixB, here are the solar irradiancefigures for London in the United

Kingdom, shown on a month-by-month basis. They show the averagedaily irradiance, based on mountingthe solar array flat on the ground:
Jan Feb Mar Apr May
0.75 1.37 2.31 3.57 4.59
These figures show how manyhours of equivalent midday sun weget over the period of an averageday of each month. In the chartabove, you can see that inDecember we get the equivalent of0.6 of an hour of midday sun (36minutes), whilst in June we get theequivalent of 4.86 hours of midday
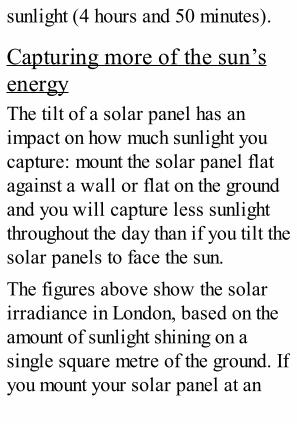
sunlight (4 hours and 50 minutes).
Capturing more of the sun’senergyThe tilt of a solar panel has animpact on how much sunlight youcapture: mount the solar panel flatagainst a wall or flat on the groundand you will capture less sunlightthroughout the day than if you tilt thesolar panels to face the sun.The figures above show the solarirradiance in London, based on theamount of sunlight shining on asingle square metre of the ground. Ifyou mount your solar panel at an

angle, tilted towards the sun, youcan capture more sunlight andtherefore generate more power.This is especially true in the wintermonths, when the sun is low in thesky.The reason for this is simple: whenthe sun is high in the sky theintensity of sunlight is high. Whenthe sun is low in the sky the sunlightis spread over a greater surfacearea:

This diagram showsthe different
intensity of lightdepending on the
angle of sun in thesky. When the sun isdirectly overhead, a
1m-wide shaft ofsunlight will cover a

1m-wide area on theground. When the
sun is low in the sky– in this example, I
am using an angle of30° towards the sun– a 1m-wide shaft ofsunlight will cover a2m-wide area on theground. This meansthe intensity of thesunlight is half as
much when the sun isat an angle of 30°compared to theintensity of the
sunlight when the

sun is directlyoverhead.
The impact of tilting solarpanels on solar irradianceIf we tilt our solar panels towardsthe sun, it means we can capturemore of the sun’s energy to convertinto electricity. Often the angle ofthis tilt is determined for you by theangle of an existing roof. However,for every location there are optimalangles at which to mount your solararray, in order to capture as muchsolar energy as possible.Using London as an example again,

this chart shows the difference inperformance of solar panels, basedon the angle at which they aremounted. The angles I have shownare flat on the ground, uprightagainst a wall, and mounted atdifferent angles designed to get theoptimal amount of solar irradianceat different times of the year (Iexplain the relevance of thesespecific angles in a moment):

Flat
Jan Feb Mar Apr May
0.75 1.37 2.31 3.57 4.59
Upright
Jan Feb Mar Apr May
1.20 1.80 2.18 2.58 2.70
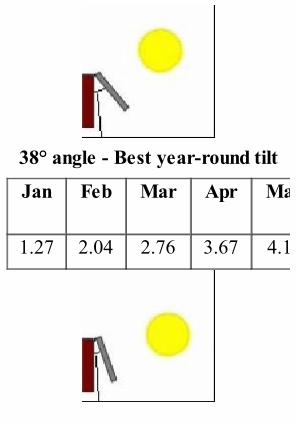
38° angle - Best year-round tilt
Jan Feb Mar Apr May
1.27 2.04 2.76 3.67 4.17

23° angle - Best winter tilt
Jan Feb Mar Apr May
1.30 2.03 2.62 3.34 3.66
53° angle - Best summer tilt
Jan Feb Mar Apr May
1.19 1.95 2.77 3.84 4.52

Adjusting the tilt manually eachmonth
Jan Feb Mar Apr May
1.3022° tilt
2.0530° tilt
2.7838° tilt
3.8646° tilt
4.7054° tilt
Note: All angles aregiven in degrees

from vertical and arelocation specific.
Look at the difference in theperformance based on the tilt of thesolar panel. In particular, look atthe difference in performance in thedepths of winter and in the height ofsummer.It is easy to see that some anglesprovide better performance inwinter; others provide betterperformance in summer, whilstothers provide a good compromiseall-year-round solution.
Calculating the optimum tilt

for solar panelsBecause of the 23½° tilt of the earthrelative to the sun, the optimum tiltof your solar panels will varythroughout the year, depending onthe season. In some installations, itis feasible to adjust the tilt of thesolar panels each month, whilst inothers it is necessary to have thearray fixed in position.To calculate the optimum tilt ofyour solar panels, you can use thefollowing sum:
90° – your latitude = optimumfixed year-round setting
This angle is the optimum tilt for
fixed solar panels forall-year-round power generation.This does not mean that you willget the maximum power outputevery single month: it means thatacross the whole year, this tilt willgive you the best compromise,generating electricity all the yearround.
Getting the best from solarpanels at different times of theyearDepending on when you want to useyour solar energy, you may chooseto use a different tilt in order toimprove power output at a given

point in the year. Each month of theyear, the angle of the sun in the skychanges by 7.8° – higher in thesummer and lower in the winter. Byadjusting the tilt of your solar panelto track the sun, you can tweak theperformance of your systemaccording to your requirements.You may want to do this for anumber of reasons:
· For a stand alone, off-grid system, you oftenneed to get as much powergeneration during thewinter months as possibleto counter the reduction in

natural light
· When installing a grid-tie system in a coolclimate, where the focus ison reducing your carbonfootprint, you can chooseto boost your electricityproduction in winter, tooffset the amount ofelectricity you need to buywhen demand is at itshighest
· When installing a grid-tie system where the focusis on making the mostprofit by selling your

power, you can choose totilt your solar panels at asummer setting and therebyproduce the maximumamount of energy possibleover the course of the year
You can see this monthly optimumangle (rounded to the nearest wholedegree) on the bottom row of theprevious table.Optimum winter settingsHere is an example of how youcould tweak your system.Performance of a solar system is atits worst during the winter months.However, by tilting your panels to

capture as much of the sunlight aspossible during the winter, you cansignificantly boost the amount ofpower you generate at this time.Based on the Northern Hemisphere,an optimum winter tilt for solarpanels is the optimum angle forNovember and January. For theSouthern Hemisphere, the optimumwinter tilt is May and July:
90° – your latitude – 15.6° =optimum winter setting
As you can see from the previoustable, if you tilt your solar panels atthis angle, you will sacrifice someof your power generation capability
during the summer months.However, as you are generating somuch more power during thesummer than you are in the winter,this may not be an issue.More importantly, compared toleaving the panels on a flat surface,you are almost doubling the amountof power you can generate duringthe three bleakest months of theyear. This means you can reduce thenumber of solar panels you need toinstall.Optimum summer settingsIf you wish to get the best output ofyour system overall, you will find

that you will get slightly moreenergy, when measured over thecourse of the whole year, by anglingyour solar panels to an optimumsummer time tilt.In warm climates, where maximumenergy consumption is during hotweather, angling your panels to getthe maximum amount of sunlightduring the height of summer can bethe best solution, both financiallyand environmentally.For Northern Hemisphere countries,the optimum summer time tilt is theoptimum angle for May and July.For Southern Hemisphere countries,

the optimum summer time tilt is theoptimum angle for November andJanuary:
90° – your latitude + 15.6° =optimum summer setting
Positioning your solar panelsRegardless of where you live, thesun always rises from the east andsets in the west. If you live in theNorthern Hemisphere, solar panelswill always work best if they aresouth-facing. In the SouthernHemisphere, solar panels work bestif they are north-facing.However, it is not always possible

to position your solar panels so theyare facing exactly the right way. Forinstance, if you want to install solarpanels on the roof of the house, andthe roof faces east/west, then it maynot be practical to install solarpanels in any other location.Thanks to improved solar paneldesign over the past decade, this isnot as big a problem as was oncethe case. Whilst the figure variesslightly in different parts of theworld, from one solar panelmanufacturer to another and duringthe different seasons of the year, theaverage efficiency drop of a solarpanel mounted away from due south

(due north in the SouthernHemisphere) is around 1.1% forevery five degrees.This means that if your panels facedue east or due west, you canexpect around 20% loss ofefficiency compared to facing yourpanels in the optimum position.You can even face your panels inthe completely opposite direction –north in the Northern Hemisphere orsouth in the Southern Hemisphere –losing around 40% of the efficiencyof your solar array by doing so.


For the NorthernHemisphere, thischart shows the
approximateefficiency loss by not
facing your panelsdirectly south. For
SouthernHemisphere
countries, the chartshould be reversed.
Using solar irradiance to workout how much energy a solarpanel will generateBased on these figures, we cancalculate on a monthly basis how

much power a solar panel will giveus per day, by multiplying themonthly solar irradiance figure bythe stated wattage of the panel:Solar Irradiance x Panel Wattage =
Watt-hours per dayAs we now know, the solarirradiance figure depends on themonth and the angle for the solarpanel. Assuming we have a 20-wattsolar panel, mounted flat on theground, here are the calculations forLondon in December and June:

Flat
December June
0.60 x 20W =12 Wh of energyper day
4.86 x20W = 97 Whof energy perday
As you can see, there is a bigdifference in the amount of energyyou can generate in the middle ofsummer, compared to winter. In the

example above, over eight times theamount of energy is generated in theheight of summer compared to thedepths of winter.Here are the same calculationsagain, but with the solar panelsangled at 38° for bestall-year-round performance. Notethe significant improvement inwinter performance and the slightlyreduced summer performance:

38° angle
December June
1.05 x 20W =21 Wh of energyper day
4.20 x20W = 84 Whof energy perday
Using solar irradiance to giveyou an approximate guide forthe required power capacity ofyour solar arrayIn the same way that you can workout how much energy a solar panelwill generate per day, you can usesolar irradiance to give you an

approximate guide for the requiredcapacity of solar array that youneed.I say an approximate guide, becausethe actual capacity will also needto take into account:
· The peculiarities of yoursite
· The location and angles ofyour solar panels
· Any obstacles blocking thesunlight at different times ofyear
I cover all this in the next chapterwhen I look at the site survey.

Nevertheless, it can be useful tocarry out this calculation in order toestablish a ballpark cost for yoursolar electric system. Thecalculation is simple: take thefigure you calculated for your totalnumber of watt-hours per day anddivide it by the solar irradiancefigure for the worst month that yourequire your system to work.Using our holiday home as anexample, we can look at our watt-hours per day figure of 695Wh/dayand then divide this number by theworst month on our irradiance chart(December). It is worth doing thisbased on mounting the solar panel

at different angles, to see how theperformances compare:
Flat
695÷ 0.6 =1159watts
If wehave oursolar panelslaid flat, wewould needa 1,159-watt solararray topower ourhome inDecember.
695÷ 1.01
If wemount the

Upright = 688watts
solar panelsverticallyagainst awall, wecouldgenerate thesameamount ofpower witha 688-wattsolar array.
38°angle
Best
695÷ 1.05= 661watts
Angledtowards theequator, wecouldgenerate the

year-round tilt
sameamount ofpower witha 661-wattsolar array.
23°angle
Bestwinter tilt
695÷ 1.08= 643watts
With theoptimumwinter tilt,we can usea 643-wattsolar array.
695÷ 0.97= 716
Angledtowards thesummer sun,

53°angle
Bestsummer
tilt
watts we wouldrequire a716-wattsolar arrayto providepower inDecember
Tiltadjusted
eachmonth
695÷ 1.08= 643watts
With thetilt of thesolar paneladjustedeach month,we can usea 643-wattsolar array,the same asthe best

winter tiltsettings.
This chart tells us that to providefull power for our holiday home inDecember, we require a solar arraywith a generation capacity ofbetween 643 watts and 1159 watts,depending on the tilt of the solarpanels.But remember our scope. We onlywant to use the home full time fromMarch to October. The solarelectric system only needs toprovide enough electricity for along weekend during the winter.
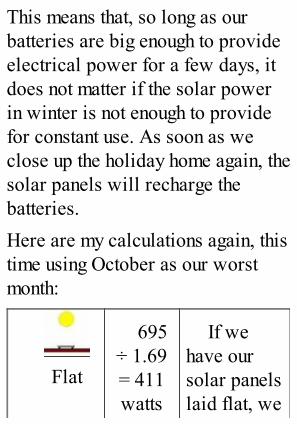
This means that, so long as ourbatteries are big enough to provideelectrical power for a few days, itdoes not matter if the solar powerin winter is not enough to providefor constant use. As soon as weclose up the holiday home again, thesolar panels will recharge thebatteries.Here are my calculations again, thistime using October as our worstmonth:
Flat
695÷ 1.69= 411watts
If wehave oursolar panelslaid flat, we
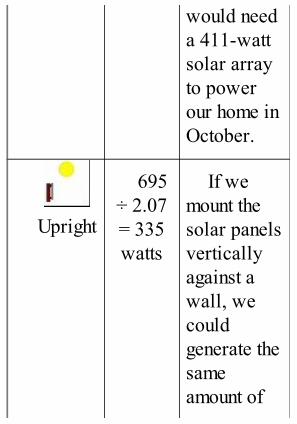
would needa 411-wattsolar arrayto powerour home inOctober.
Upright
695÷ 2.07= 335watts
If wemount thesolar panelsverticallyagainst awall, wecouldgenerate thesameamount of

power witha 335-wattsolar array.
38°angle
Bestyear-
round tilt
695÷ 2.41= 288watts
Angledtowards theequator, wecouldgenerate thesameamount ofpower witha 288-wattsolar array.
695÷ 2.37
With theoptimum

23°angle
Bestwinter tilt
= 293watts
winter tilt,we can usea 293-wattsolar array.
53°angle
Bestsummer
tilt
695÷ 2.33= 298watts
Angledtowards thesummer sun,we wouldrequire a298-wattsolar arrayto providepower inOctober
695 With the

Tiltadjusted
eachmonth
÷ 2.41= 288watts
tilt of thesolar paneladjustedeach month,we can usea 288-wattsolar array,the same asthe bestyear-roundtilt settings.
This chart tells us that we require asolar array with a generationcapacity of between 288 watts and411 watts, depending on the tilt ofthe solar panels. Compared to our

earlier calculations for generatingpower throughout the year, it ismuch lower. We have just savedourselves a significant amount ofmoney.You can also see that during thesummer months, the solar electricsystem will generate considerablymore electricity than we will needto run our holiday home. That isfine. Too much is better than notenough and it allows for theoccasions when a light is leftswitched on or a TV is left onstandby.

Solar panels and shadeThe biggest negative impact onsolar energy production is shade.Even if only a very small amount ofyour solar array is in shade, theimpact on the performance of yourwhole system can have a very bigeffect.Unlike solar thermal (hot water)systems, the loss of power throughshading is much greater than theamount of the panel that is in shade.With solar thermal systems, if 5%of the panel is in shade, you losearound 5% of the powerproduction.
Depending on the exactcircumstances, even if only 5% of aphotovoltaic solar panel is inshade, it is possible to lose50–80% of power production fromyour entire solar array.For this reason, it is hugelyimportant that your solar energysystem remains out of shadethroughout the day. Sometimes thisis not possible, and this requiressome additional design work inorder to keep the effect of shade onyour system to a minimum.I cover shade in much more detailin Appendix A, including an

explanation of why shade has such abig impact on energy production.For now, it is just important toknow that shading can significantlyaffect the amount of energy you canget from your solar energy system.

Solar array power pointefficienciesNow we know the theoretical sizeof our solar panels. However, wehave not taken into account theefficiencies of the panelsthemselves or the efficiencies of thecontroller or inverter that handlesthem.Solar panels are rated on their‘peak power output’. Peak poweron a solar panel in bright sunlight isnormally generated at between 14and 20 volts. This voltage can go upand down quite significantly,depending on the amount of sunlight

available.This swing in voltage gets muchhigher if you have multiple solarpanels connected together in series– or if you are using ahigher-voltage solar panel. It iscommon for a solar array withfifteen or twenty panels connectedin series to have voltage swings ofseveral hundred volts when a cloudobscures the sun for a few seconds!Managing this voltage swing can bedone in one of two ways. The cheapand simple method is to cut thevoltage down to a setting that thesolar panel can easily maintain. For

instance, a solar panel rated at 12volts will usually maintain avoltage level of at least 14 voltsduring daylight hours. A chargecontroller or inverter that cuts thevoltage down to this level will thenalways be able to use this power.The disadvantage of this approachis that, as you cut the voltage, thewattage drops with it, meaning youcan lose a significant amount ofenergy.In terms of the amount of energy youcan capture, as opposed to what thesolar array collects, this method canreduce the efficiency of a solararray by around 25%.

A better solution is to usecontrollers and inverters thatincorporate Maximum Power PointTracking (MPPT). Maximumpower point tracking adjusts thevoltage from the solar array toprovide the correct voltage for thebatteries or for the inverter in orderto remove this inefficiency.Maximum power point trackers aretypically 90–95% efficient. Overthe past three years, the price ofMPPT controllers and inverters hasdropped and the availability hasincreased to the point where it isalmost always worth buying an

MPPT controller and inverter forall but the very smallest andsimplest solar installations.Incidentally, you only need anMPPT inverter for grid-tie systemswhere you are powering theinverter directly from the solarpanels. You do not require anMPPT inverter if you are planningto run the inverter through a batterybank.To take into account power pointefficiencies, you need to divideyour calculation by 0.9 if you planto use a MPPT controller orinverter, and by 0.75 if you plan to

use a non-MPPT controller orinverter:
Non MPPTcontroller/inverter
calculation
MPPTcontroller/inverter
calculations
Flatsolarpanel
Solarpanel at38° tilt
Flatsolarpanel
panel at38° tilt
411watts ÷0.75 =
548wattsolarpanel
288watts ÷0.75 =
384wattsolarpanel
411watts ÷0.9 = 456wattsolarpanel
watts ÷0.9 = 320wattsolarpanel

The effects oftemperature on solarpanelsSolar panels will generate lesspower when exposed to hightemperatures compared to whenthey are in a cooler climate. SolarPV systems can often generate moreelectricity on a day with a coolwind and a hazy sun than when thesun is blazing and the temperature ishigh.When solar panels are given awattage rating, they are tested at25°C (77°F) against a 1,000 W/m²

light source. At a coolertemperature, the solar panel willgenerate more electricity, whilst ata warmer temperature the samesolar panel will generate less.As solar panels are exposed to thesun, they heat up, mainly due to theinfrared radiation they areabsorbing. As solar panels aredark, they can heat up quiteconsiderably. In a hot climate, asolar panel can quite easily heat upto 80–90°C (160–175°F).Solar panel manufacturers provideinformation to show the effects oftemperature on their panels. Called
a temperature coefficient of powerrating, it is shown as a percentageof total power reduction per 1°Cincrease in temperature.Typically, this figure will be in theregion of 0.5%, which means thatfor every 1°C increase intemperature, you will lose 0.5%efficiency from your solar array,whilst for every 1°C decrease intemperature you will improve theefficiency of your solar array by0.5%.Assuming a temperature coefficientof power rating of 0.5%, this is theimpact on performance for a 100W

solar panel at differenttemperatures:
5°c /41°F
15°c/59°F
25°c/77°F
Paneloutput fora 100Wsolarpanel
110W 105W 100W
Percentagegain/loss
10% 5% 0%
In northern Europe and Canada,high temperature is not a significantfactor when designing a solar

system. However, in southern statesof America and in Africa, India,Australia and the Middle East,where temperatures aresignificantly above 25°C (77°F) formuch of the year, the temperature ofthe solar panels may be animportant factor when planning yoursystem.If you are designing a system forall-year-round use, then in allfairness a slight dip in performanceat the height of summer is probablynot an issue for you. If that is thecase, you do not need to considertemperature within the design ofyour system and you can skip this

information.If your ambient temperature is highduring the times of year you need toget maximum performance fromyour solar panels, then you willneed to account for temperature inyour design.You can help reduce thetemperature of your solar panels byensuring a free flow of air bothabove and below the panels. If youare planning to mount your solarpanels on a roof, make sure there isa gap of around 7–10cm (3–4")below the panels, to allow a flowof air around them. Alternatively,

you can consider mounting thepanels on a pole, which will alsoaid cooling.For a roof-top installation, if theaverage air temperature at aparticular time of year is25°C/77°F or above, multiply thistemperature in Celsius by 1.4 inorder to get a likely solar paneltemperature. For a pole-mountedinstallation, multiply your airtemperature by 1.2 in order tocalculate the likely solar paneltemperature. Then increase yourwattage requirements by thepercentage loss shown in thetemperature coefficient of power

rating shown on your solar panels,in order to work out the wattage youneed your solar panels to generate.
Temperature impact on solarperformance in Austin, Texasduring the summer monthsBy way of an example, here is atable for Austin in Texas. Thisshows average air temperatures foreach month of the year, theestimated solar panel temperaturefor the hottest months of the yearand the impact on the performanceon the solar array, assuming atemperature coefficient of powerrating of 0.5%.

Jan Feb
Averagemonthlytemperature
49°F10°C
53°F12°C
Likely roof-mountedtemperature ofsolar array (Celsius x 1.4)
Performanceimpact for roof-mountedsolar:
Likely pole-

mountedtemperature ofsolar array(Celsius x 1.2)
Performanceimpact forpole- mountedsolar:
The Performance Impactcalculations in rows 3 and 5 of theabove table are calculated using thefollowing formula:(Estimated Solar Panel Temp °C –
25°C) x (–Temp Coefficient ofPower Rating)

So, for July, the calculation forroof-mounted solar was (41°C –25°C) x (–0.5) = –8%For around five months of the year,the ambient temperature in Austin isgreater than 25°C/77°F. Duringthese months, the higher temperaturewill mean lower power output froma solar array. If you are designing asystem that must operate atmaximum efficiency during theheight of summer, you will need toincrease the size of your solar arrayby the percentages shown, in orderto handle this performancedecrease.
You can find the average ambientair temperature for your location byvisiting The Weather Channelwebsite at www.weather.com. Thisexcellent site provides averagemonthly temperatures for towns andcities across the world, shown inyour choice of Fahrenheit orCelsius.Our example holiday home projectis in the United Kingdom, where thetemperature is below 25°C for mostof the year. In addition, our solardesign will produce more powerthan we need during the summermonths. As a result, we can ignore

temperature in our particularproject.

Working out anapproximate costIt is worth stressing again that thesefigures are only approximate at thisstage. We have not yet taken intoaccount the site itself and we areassuming that shading will not be anissue.If you are planning to do thephysical installation yourself, asolar electric system consisting ofsolar array, controller and batterycosts around £4.00 ($6.20 US) perwatt, +/– 15%.A grid-tie system is cheaper to

install than a stand-alone system, asyou do not need to budget forbatteries. You will, however, needa qualified electrician to certify thesystem before use. In mostcountries, you will also need all thecomponents used in your solarinstallation to be certified assuitable for grid installation. If youare planning grid-tie, budget around£2.00–£3.00 ($3.10–$4.60 US) perwatt, +/– 15%.For our holiday home installation,we need 320 watts of solarelectricity if we tilt the solar panelstowards the sun, or 456 watts if wemount the panels flat. Our rough
estimate suggests a total system costof around £1,280 ($1,970 US), +/–15% for tilted panels, or £1,824($2,800 US) +/– 15% for a flatpanel installation.If you remember, the cost to connectthis holiday home to a conventionalelectricity supply was £4,500($7,200). Therefore, installing solarenergy is the cheaper option forproviding electricity for our home.
What if the figures do not addup?In some installations, you will getto this stage and find out that a solar

electric system simply isunaffordable. This is notuncommon. I was asked to calculatethe viability for using 100% solarenergy at an industrial unit once,and came up with a ballpark figureof £33½m (around $54m)!When this happens, you can do oneof two things: walk away, or goback to your original scope and seewhat can be changed.The best thing to do is go back tothe original power analysis and seewhat savings you can make. Look atthe efficiencies of the equipmentyou are using and see if you can

make savings by usinglower-energy equipment orchanging the way equipment isused.If you are absolutely determined toimplement a solar electric system,there is usually a way to do it.However, you may need to beruthless as to what you have toleave out.In the example of the industrial unit,the underlying requirement was toprovide emergency lighting andpower for a cluster of computerservers if there was a power cut.The cost for implementing this

system was around £32,500($52,000): comparable in cost toinstalling and maintaining on-siteemergency generators and UPSequipment.
Working out dimensionsNow we know the capacity of thesolar panels, we can work out anapproximate size of our solar array.This is extremely useful informationto know before we carry out oursite survey: the solar panels have togo somewhere. We need to be ableto find enough suitable space forthem where they will receiveuninterrupted sunshine in a safelocation.There are two main technologies ofsolar panels on the market:amorphous and crystalline solarpanels. I will explain the

characteristics and the advantagesand disadvantages of each, later on.For the purposes of working outhow much space you’re going toneed to fit the solar panels, youneed to know that a 1m²(approximately 9.9 square feet)amorphous solar panel generates inthe region of 60 watts, whilst a 1m²crystalline solar panel generates inthe region of 160 watts.Therefore, for our holiday home,we are looking for a location wherewe can fit between 5 and 7.6m²(49–75 square feet) of amorphoussolar panels or 2–3m² (20–29

square feet) of crystalline solarpanels.

In conclusion· By calculating the amount of
solar energy theoreticallyavailable at our site, we cancalculate ballpark costs forour solar electric system
· There are variousinefficiencies that must beconsidered when planningyour system. If you do nottake these into account, yoursystem may not generateenough power
· It is not unusual for theseballpark costs to be far too

expensive on your firstattempt. The answer is tolook closely at your originalscope and see what can be cutin order to produce a cost-effective solution
· As well as working outballpark costs, thesecalculations also help uswork out the approximatedimensions of the solar array.This means we know howmuch space we need to findwhen we are carrying out asite survey

Surveying Your Site
The site survey is one of the mostimportant aspects of designing asuccessful solar system. It willidentify whether or not your site issuitable for solar. If it is, the surveyidentifies the ideal position toinstall your system, ensuring thatyou get the best value for moneyand the best possible performance.

What we want to achieveFor a solar electric system to workwell, we need the site survey toanswer two questions:
· Is there anywhere on the sitethat is suitable for positioningmy solar array?
· Do nearby obstacles such astrees and buildings shade outtoo much sunlight?
The first question might at firstsound daft but, depending on yourproject, it can make the differencebetween a solar energy systembeing viable or not.

By answering the second question,you can identify how much of theavailable sunlight you will be ableto capture. It is vitally importantthat you answer this question. Thenumber one reason for solar energyfailing to reach expectations isobstacles blocking out sunlight,which dramatically reduces theefficiency of the system.To answer this second question, weneed to be able to plot the positionof the sun through the sky atdifferent times of the year. Duringthe winter, the sun is much lower inthe sky than it is during the summer

months. It is important to ensure thatthe solar array can receive directsunlight throughout the day duringthe winter.
What you will needYou will need a compass, aprotractor, a spirit level and a tapemeasure.Inevitably a ladder is required ifyou are planning to mount the solararray on a roof. A camera can alsobe extremely useful forphotographing the site. If you havean iPhone or an Android cell phone,you can also download some cheapsoftware that will help you identify

the path of the sun across the skyand assist with obstacle analysis.I also find it useful to get somelarge cardboard boxes. Open themout and cut them into the rough sizeof your proposed solar array. Thiscan help you when finding alocation for your solar panels. It isfar easier to envisage what theinstallation will look like and it canhelp highlight any installation issuesthat you might otherwise havemissed.If you have never done a solar sitesurvey before, it does help if youvisit the site on a sunny day.

Once you have more experiencewith doing solar site surveys, youwill find it does not actually makemuch difference whether you doyour site survey on a sunny day oran overcast day. As part of the sitesurvey, we manually plot the sun’sposition across the sky, so once youhave more experience, sunnyweather actually makes littledifference to the quality of thesurvey.

First impressionsWhen you first arrive on the site,the first thing to check is that thelayout of the site gives it access tosunlight.We will use a more scientificapproach for checking for shadelater, but a quick look first oftenhighlights problems without needingto carry out a more in-depth survey.If you are in the NorthernHemisphere, look from east,through south and to the west toensure there are no obviousobstructions that can block thesunshine, such as trees and other

buildings. If you are in the SouthernHemisphere, you need to checkfrom east, through north to west forobstructions. If you are standing onthe equator, the sun passesoverhead, so only obstructions inthe east and west are important.Be very careful not to look directlyat the sun, even for a few moments,whilst you are carrying out thissurvey. Even in the middle ofwinter, retina burn can causepermanent damage to your eyesight.Look around the site and identify allthe different options for positioningthe solar array. If you are

considering mounting your solararray on a roof, remember that theworld looks a very different placefrom a roof-top, and obstructionsthat are a problem standing on theground look very different whenyou are at roof height.
Drawing a rough sketch of thesiteIt can be helpful to draw up a roughsketch of the site. It does not have tobe accurate, but it can be a usefultool to have, both during the sitesurvey and afterwards when you aredesigning your system.

Include all properties and trees thatare close to your site and not justthose on your land. Include treesthat are too small to worry aboutnow, but may become a problem ina few years’ time. Also make a noteof which way is north.

Positioning the solararrayYour next task is to identify the bestlocation to position your solararray. Whilst you may already havea good idea where you want toinstall your solar panels, it isalways a good idea to consider allthe different options available toyou.As we discovered in the lastchapter, solar arrays perform attheir best when tilted towards thesun.If you are planning to install solar

energy for a building, then the roofof the building can often be asuitable place to install the solararray. This is effective where theroof is south-facing or where theroof is flat and you can fit thepanels using angled mountings.Other alternatives are to mountsolar panels on a wall. This canwork well with longer, slimmerpanels that can be mounted at anangle without protruding too far outfrom the wall itself. Alternatively,solar panels can be ground-mountedor mounted on a pole.When considering a position for

your solar array, you need toconsider how easy it is going to beto clean the solar panels. Solarpanels do not need to be spotless,but dirt and grime will reduce theefficiency of your solar system overtime, so while you are looking atmounting solutions it is definitelyworth considering how you canaccess your panels to give them aquick wash every few months.
Roof-mountingIf you are planning to mount yoursolar array on a roof, you need togain access to the roof to check itssuitability.
Use a compass to check thedirection of the roof. If it is notdirectly facing south, you may needto construct an angled support inorder to get the panels angledcorrectly.You will also need to find out thepitch of the roof. Professionals usea tool called a Roof Angle Finderto calculate this. Roof angle finders(also called Magnetic PolycastProtractors) are low-cost toolsavailable from builders’ merchants.You press the angle finder upagainst the rafters underneath theroof and the angle finder will show

the angle in degrees.Alternatively, you can calculate theangle using a protractor at the baseof a roof rafter underneath the roofitself.Solar panels in themselves are notheavy: 15–20 kilograms (33–44pounds) at most. Yet when multiplepanels are combined with a frame,especially if that frame is angled,the overall weight can become quitesignificant.Check the structure of the roof.Ensure that it is strong enough totake the solar array and to ascertainwhat fixings you will need. It is

difficult to provide general adviceon roof structures and fixings. Thereare so many different roof designs itis not possible for me to providemuch useful information on thissubject. If you are not certain aboutthe suitability of your roof, ask abuilder or an architect to assessyour roof for you.Roof-mounting kits are availablefrom solar panel suppliers.Alternatively, you can make yourown.If it does not compromise yoursolar design, it can be quite usefulto mount your solar panels at the

lowest part of the roof. This canmake it considerably easier to keepthe panels clean: most windowcleaners will happily washeasily-accessible solar panels ifthey are situated at the bottom of theroof, and telescopic windowcleaner kits are available to reachsolar panels at the lower end of aroof structure.Measure and record the overallroof-space available for a solararray. It is also a good idea to usethe cardboard cut-outs you madeearlier and place these on the roofto give a ‘look and feel’ for theinstallation and help you identify

any installation issues you may havewith positioning and mounting thesolar array.
Ground-mountingIf you want to mount your solararray on the ground, you will need aframe onto which you can mountyour solar panels. Most solar panelsuppliers can supply suitableframes or you can fabricate yourown on site.There are benefits for a ground-mounted solar array: you can easilykeep the panels clean and you canuse a frame to change the angle of

the array at different times of yearto track the height of the sun in thesky.Take a note of ground conditions, asyou will need to build foundationsfor your frame.Incidentally, you can buyground-mounted solar frames thatcan also move the panel to track thesun across the sky during the day.These Solar Trackers can increasethe amount of sunlight captured byaround 15–20% in winter and up to55% in summer.Unfortunately, at present,commercial solar trackers are

expensive. Unless space is at anabsolute premium, you would bebetter to spend your money on abigger solar array.However, for a keen DIY engineerwho likes the idea of a challenge, asolar tracker that moves the array toface the sun as it moves across thesky during the day could be a usefuland interesting project to do. Thereare various sites on the internet,such as instructables.com, wherekeen hobbyists have built their ownsolar trackers and provideinstructions on how to make them.
Pole-mounting

Another option for mounting a solarpanel is to affix one on a pole.Because of the weight and size ofthe solar panel, you will need anextremely good foundation and aheavyweight pole, in order towithstand the wind.You can mount up to 600-wattarrays using single-pole mountings.Larger arrays can be pole-mountedusing frames constructed using twoor four poles.Most suppliers of solar panels andassociated equipment can providesuitable poles.

Splitting the solar array intoseveral smaller arraysIt may be that when you get to thesite, you find that there is no onespace available that will allow youto install all the solar panels youneed. If this is the case, it ispossible to split your single solararray into several smaller arrays.This means, for instance, that youcould have two sets of panelsmounted on different roof pitches,or some mounted on a roof andsome from a pole.If you do this, you are creating twoseparate solar energy systems,

which you then have to linktogether. For a grid-tie system, youwould require either a micro-inverter system or an inverter thatcan accept inputs from more thanone solar array. For a stand-alonesystem, you would require a batterycontroller for each separate solararray.

Identifying the path ofthe sun across the skyOnce you have identified a suitableposition for your solar array, it istime to be a little more scientific inensuring there are no obstructionsthat will block sunlight at differenttimes of the day, or at certain timesof the year.The path of the sun across the skychanges throughout the year. This iswhy carrying out a site survey is soimportant: you cannot just check tosee where the sun is shining today.The height and position of the sunconstantly changes throughout the

year.Each year, there are two days in theyear when the day is exactly twelvehours long. These two days are 21st
March and 21st September, thesolar equinoxes. On theseequinoxes the sun rises due east ofthe equator and sets due west of theequator. At solar noon on theequinox, exactly six hours after thesun has risen, the angle of the sun is90° minus the local latitude.In the Northern Hemisphere (i.e.north of the equator), the longestday of the year is 21st June and the

shortest day of the year is 21stDecember. These two days are thesummer and winter solsticesrespectively.On the summer solstice, the angle ofthe sun is 23.5° higher than it is onthe equinox, whilst on the wintersolstice the angle is 23.5° lowerthan on the equinox.These two extremes are due to thetilt of the earth, relative to its orbitaround the sun. In the NorthernHemisphere, the summer solsticeoccurs when the North Pole is tiltedtowards the sun, and the wintersolstice occurs when the North Pole

is tilted away from the sun.

Figure 4: This chartshows the different
paths of the sun fromsunrise to sunset at
different times of theyear from the
NorthernHemisphere. The
intersection betweenN, S, E and W is your
location.We will take London in the UnitedKingdom as an example. London’slatitude is 51°. On the equinox, theangle of the sun at noon will be 39°(90° – 51°). On the summer
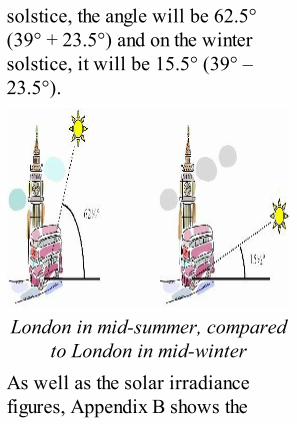
solstice, the angle will be 62.5°(39° + 23.5°) and on the wintersolstice, it will be 15.5° (39° –23.5°).
London in mid-summer, comparedto London in mid-winter
As well as the solar irradiancefigures, Appendix B shows the
height of the sun in the sky at noonat different times of the year and theoptimum tilts for solar panels forthe United States, Canada,Australia, New Zealand, UnitedKingdom and Ireland.For more detailed information onsun heights on a monthly basis, orfor information for other countries,visitwww.SolarElectricityHandbook.comand follow the link to the solarpanel angle calculator.
ShadingAs mentioned in a previous chapter,shading can have a very significantimpact on the performance of yoursolar energy system. Even a tinyamount of shading can have a hugeimpact on the amount of energy thatyour system is able to generate.Therefore, it is important that yoursolar array remains shade-freewhenever possible.You can carry out this analysis invarious ways. You can use aprofessional obstacle analysis tool,you can download an obstacleanalysis tool onto your cell phone

or you can use paper and pencil tocome up with a rough plan.
Professional tools for obstacleanalysisIn the past, a product called a SolarPathfinder was one of the besttools you could get. This was aplastic unit with an angle chartmounted on the top. A glass domewas then placed on top of the chart.You would mount the unit onto atripod at the desired location.Obstacles were reflected in theglass bubble and this would allowyou to manually plot the obstacleson the chart and then manually work

out your shading issues.The Solar Pathfinder is surprisinglyeffective, as it can be easily movedaround in order to find the bestlocation for solar panels. Manyprofessional solar installers stilluse a Solar Pathfinder for quickchecks, despite also using the moreexpensive and advanced electronicequipment to provide a moredetailed analysis.Some solar suppliers can rent you aSolar Pathfinder for a small dailyor weekly fee and can do themanual calculations for you onceyou have plotted the obstacles.

Today there are electronic systemsthat use GPS, tilt switches andaccelerometers to do this workelectronically. They are expensiveto buy or rent on a daily basis. Theydo provide extremelycomprehensive solar analysis,however, and if you plan to take upsolar installations professionally,they are a worthwhile investment.The best known is the Asset fromWiley Electronics and the SunEyefrom Solmetric. My personalpreference is SunEye, as I find theunit simpler, but both products do asimilar job.

Cell phone applicationsWhilst they are very good, thesetools are overkill for smaller solarinstallations and are often verycomplicated to use. Thankfully,modern smart phones provide theprocessing power and functionalityto do a similar job. A fewcompanies have now developedsolar shade analysis software to runon these mobile phones. These usethe phone’s built-in GPS, compass,accelerometer and camera to recorda complete shade analysis in amatter of a few moments.If you have an iPhone, you can

download a product calledSolmetric IPV. Costing $29.99, thisapplication handles your obstacletracking, automatically providingcharts showing your shadinganalysis throughout the year. Thedetail of reporting is not as great assome of the other electronic tools,but more and more professionalsare now using this software. Itprovides most of the functions thatyou get with a more expensivesystem, but in a package that iseasier to use and far cheaper to buy.You can find out more aboutSolmetric IPV fromwww.solmetric.com and the

software can be downloaded fromthe iTunes website.Alternatively, there is an Androidphone download called SolarShading, produced by ComovingMagnetics. Costing $15 on theAndroid Market, this applicationprovides you with a completeshading analysis throughout theyear, presenting the information ineasy-to-read charts.

Above: Examples ofon-screen reports
from Solmetric IPVrunning on the

iPhone.Below: Screen-shotsfrom Solar Shading,running on Android
phones.

Using paper and pencilFinally, if you do not have access toa professional tool or a suitablemobile phone, you can use the old-fashioned method of paper andpencil. Go to the position whereyou are planning to put your solararray and find due south with acompass. Looking from the sameheight as your proposed location,and working from east to west,check there are no obstacles, suchas trees or buildings, that can shadethe sun at different times of the dayor when the sun is at its lowestwinter height.

To do this, you will need to find outwhat position the sun rises and setsat different times of the year.Thankfully, this is easy to find out.The solar angle calculator whichyou can find atwww.SolarElectricityHandbook.comincludes this information, making iteasy to identify the path of the sun atthese different times of the year.For a simple one-off site survey, theeasiest way to identify potentialobstructions is to use a protractorand pencil. Tape the pencil to thecentre of the protractor where allthe lines meet, in such a way that

the other end of the pencil can bemoved across the protractor. Youcan use this protractor to check thefield of view, using the pencil as an‘aimer’ to show the angle of the sunin the sky based on different timesof the year.
Be very careful not to look directly

at the sun, even for a few moments,whilst you are carrying out thissurvey. Even in the middle ofwinter, retina burn can causepermanent damage to your eyesight.Your survey needs to ensure thereare no obstacles in the depths ofwinter, when the sun is only a fewdegrees up in the sky.
In the case of London, on the 21stDecember the sun will be only15½° high at midday (at due south)and lower than that for the rest ofthe day.If there are obstacles that areblocking visibility of the sun, find

another location. Alternatively, findother ways around the obstacle,such as mounting the solar arrayhigher up on a frame.Of course, if you do not need yoursolar system to produce muchpower during the winter months thismay not be a problem for you.However, make sure obstacles donot shade your system for the timesof year when you need power.

Future proof your systemYou do need to consider the futurewhen installing a solar electricsystem. The system will have alifetime of at least 20 years, so asfar as possible you need to ensurethat the system will be effective forthat length of time.When scanning the horizon, takeinto account that trees and hedgeswill grow during the lifetime of thesystem. A small spruce in a nearbygarden could grow into a monster inthe space of a few years, and if thatis a risk, it is best to know about itnow, rather than have a nasty

surprise a few years down the line.See if there is any planned buildingwork nearby that may overshadowyour site and try to assess thelikelihood of future building workthat could have an impact onshading.It is also worth finding out if fog orheavy mist is a problem at certaintimes of the year. The efficiency ofyour solar array will becompromised if the site has regularproblems with heavy mist.
What if there are shadingobstructions?

If there are obstructions that shadeyour proposed location, and thereare no other locations that aresuitable for solar, you need toascertain at what point during theday the obstructions occur.
Anything due south (or due northin the Southern Hemisphere) is amajor problem, as this will be theposition of the sun when theintensity of the sunlight is at itshighest. Core power generationoccurs between 9am and 3pm. Ifyou have shading either before 9amor after 3pm, you will lose around20% of your capability in the

summer, or 40% of your capabilityif you have shading both before 9amand after 3pm.
During the winter, the differenceis not so great. If you have shadingbefore 9am or after 3pm during thewinter, you will probably lose onlyaround 5–10% of your generatingcapabilities during this time.
If you have shading during yourcore power generation times, youneed to give serious thought as towhether you should continue with asolar implementation: theperformance of your solar systemwill be severely compromised.

If you do have significantshading issues and you want to findout the exact impact of theseobstructions on your solar array,you are going to need to use aprofessional tool for obstacleanalysis. The electronic tools willbe able to quantify exactly what theimpact of the shade is on yoursystem at different times of the year.If obstructions occur for part of theday, such as during the morning orduring the afternoon, you canconsider increasing the number ofsolar panels you purchase andangling them away from the
obstruction in order to increasetheir collection of sunlight duringthe unobstructed parts of the day.
Alternatively, you may be betteroff investigating other energyoptions, such as wind power or fuelcells, either instead of using solaror in combination with a smallersolar electric system.
Appendix A looks at the issue ofshading in a lot more detail andexplains how you can work aroundobstruction issues. It is always bestto avoid shade as far as possible,because workarounds can becomecostly. However, if you cannot

eliminate shade altogether, it neednot write off solar as a solution thatcan work for you.

Positioning batteries,controllers and invertersYou need to identify a suitablelocation for batteries. This could bea room within a building, in agarage or garden shed, or in aweatherproof battery housing.It is important to try to keep all thehardware close together, in order tokeep the cable lengths as short aspossible. By ‘hardware’, I amreferring to the solar array itself,batteries, controller and inverter.For the batteries, inverter andcontroller, you are looking for a

location that fits the followingcriteria:
· Water- and weather proof
· Not affected by directsunlight
· Insulated to protect againstextremes of temperature
· Facilities to ventilate gasesfrom the batteries
· Protected from sources ofignition
· Away from children, petsand rodents
Lead acid batteries give off very

small quantities of hydrogen whencharging. Hydrogen is explosive.You must ensure that, whereveryour batteries are stored, the areareceives adequate externalventilation to ensure these gasescannot build up.Because of the extremely highpotential currents involved withlead acid batteries, the batteriesmust be in a secure area away fromchildren and pets.For all of the above reasons,batteries are often mounted onheavy-duty racking, which is thenmade secure using an open-mesh

cage. Alternatively, you canpurchase purpose-built batteryenclosures from solar or batterysuppliers.Controllers and inverters need to bemounted as close to the batteries aspossible. These are oftenwall-mounted, but can also bemounted to racking.Large inverters can be extremelyheavy, so if you are planning towall-mount one, make sure that thewall is load-bearing and able totake the weight.

CablingWhile you are on site, considerlikely routes for cables, especiallythe heavy-duty cables that link thesolar array, controller, batteries andinverter together. Try to keep cablelengths as short as possible, aslonger cables mean lowerefficiency. Measure the lengths ofthese cables so that you canascertain the correct specificationfor cables when you start planningthe installation.

Site survey for theholiday homeBack to our holiday home example:based on our previous calculations,our holiday home needs a solararray capable of generating 320watt-hours of energy, if we anglethe array towards the sun. Thissolar array will take upapproximately 2m² (18 sq. ft) ofsurface area.Our site survey for the holidayhome showed the main pitch of theroof is facing east to west. This isnot ideal for a solar array. Theeastern side of the roof has a

chimney. There is shade from a talltree that obscures part of the west-facing part of the roof. There is nospace on the gable end of the roof tofit the required solar panels.


Map of the holidayhome, identifying
likely obstacles anda suitable positionfor the solar array
An old shed close to the house has asouth-facing roof, but only a 20°pitch. A tree shades the shed formost of the mornings for ninemonths of the year. Furthermore, thecondition of the shed means that itwould need significant remedialwork should we decide to use it.There is a farm to the east of thehouse, with a large barn and anumber of trees bordering the

house, the tallest of which isapproximately 30 feet (10m) tall.One of these trees provides shadeto the shed and part of the rear ofthe house during the winter, andmay provide more shade during therest of the year if it continues togrow.The garden is south-facing andreceives sunlight throughout theyear.We decide to install the solar arrayin the rear garden, constructing asuitable 1.2m (4 feet) tall gardenstore with a south-facing pitchedroof of approximately 52°

(allowing us to tilt the solar array at38° from vertical for best year-round sunshine). Our solar housewill hold the batteries andcontroller and will have adequateventilation to ensure that the smallamounts of hydrogen generated bythe batteries can escape. Bybuilding our own structure, we caninstall the solar array at theoptimum tilt to capture as muchsunlight as possible. This means oursolar array is compact and keepsour costs to a minimum.The solar house will be locatedaround 10m (33 feet) from thehouse and shielded from the house

by a new shrubbery.The cable lengths between the solararray and the solar controller areapproximately 2m (6½ feet). Thecable length between the solarcontroller and the batteries is lessthan 1m (3 feet). The cable lengthbetween the solar house and thehome is 12m (40 feet). There is afurther 10m (33 feet) of cablinginside the house.These longer cable lengths are notideal. Cable runs should be as shortas possible in order to reducepower losses through the cable.However, we cannot position the

solar array any nearer to the house.We will have to address thisparticular problem through ourdesign.

In conclusion· There is a lot to do on a site
survey. It is important. Spendtime; get it right.
· Drawing a map and takingphotographs can help with thesite survey and are invaluablefor the next stage, when westart designing our newsystem.
· Solar panels can beroof-mounted, mounted with aframe on the ground or on apole.
· Once you have identified a

location for the panels, checkfor obstructions that willshade the panels throughoutthe year.
· These obstructions are mostlikely to be an issue duringthe winter months, when solarenergy is at a premium.
· Identify a suitable space forbatteries, controller andinverter.
· Plan the cable runs and themeasure the length of therequired cables.
· Cables should be as short as

possible, in order to reducethe voltage losses through thesystem. If long cable lengthsare necessitated by thepositioning of the solar array,we may need to run oursystem at a higher voltage tocompensate.

Understanding theComponents
Once you have completed your sitesurvey, you know all the facts: howmuch power you need to generate,the suitability of your site andapproximately how much it is goingto cost you.Now you need to look at thedifferent technologies and productsthat are available, to see what bestsuits you and your application.Your choice of components and thedesign of your system will depend
on whether you are designing astand-alone system (which alsoincludes grid fallback and gridfailover systems), or a grid-tiesystem that exports energy to thegrid.Because there are differences in thedesign of stand-alone and grid-tiesystems, I have split this sectioninto four chapters. This chapterlooks at components that arecommon to both grid-tie systemsand stand-alone systems. The nextchapter looks specifically at whatyou require for grid-tie systems.The third chapter looks specificallyat stand-alone systems and systems

that incorporate their own batterystore, whilst the fourth chapterlooks at the component certificationand regulations that you need to takeinto account when selecting solarenergy equipment.
How to use these chaptersThese next three chapters will gointo much more detail about thedifferent options available to you.There is a bewildering choice ofsolar panels, batteries, controllers,inverters and cables.These chapters explain thetechnology in a lot more detail, so

you can go and talk sensibly tosuppliers and understand what theyare saying.

Common components forall systemsCore to all solar energy systems arethe solar panels themselves. Mostsolar panels can be used for eithergrid-tie or stand-alone use, andalthough recently somemanufacturers have releasedhigher-voltage solar panelsdesigned specifically for grid-tieapplications, the criteria forchoosing one solar panel overanother remain the same.

Solar panelsThere are three differenttechnologies used for producingsolar panels. Each has its own setof benefits and disadvantages.For the purpose of this handbook, Iam ignoring the expensive solarcells used on satellites and inresearch laboratories and focusingon the photovoltaic panels that areavailable commercially atreasonable cost today.
Amorphous solar panelsThe cheapest solar technology isamorphous solar panels, also

known as thin-film solar panels.These panels have had a badreputation in the past, with poorproduct reliability and questionablelifespan. This has often been downto the chemistries used in olderdesigns of panel breaking downunder extremes of temperature overa period of a few years, or the poorquality of materials used in theproduction of cheap panels.Thankfully, this technology hasmatured significantly over the pastfive years and amorphous solar isnow regarded as being highlyreliable, with some significant

benefits over traditional solarpanels. Big name manufacturerssuch as Mitsubishi, Sanyo andSharp now manufacture high-qualityamorphous solar panels, along withsome exceptionally good specialistmanufacturers such as SolarFrontier and Uni-Solar. Somemanufacturers now even offer a ten-or twenty-year warranty on theiramorphous panels.On paper, amorphous solar panelsare the least-efficient panelsavailable, typically convertingaround 6–8% of available sunlightto electricity. This means that youneed twice as much space available

for installing amorphous solarpanels compared to crystallinepanels.However, amorphous panels aregood at generating power even onovercast and extremely dull days. Ingeneral, they are also far better inextreme temperature conditions,with significantly less power loss athigher temperatures than other solarpanel technologies.Unlike other solar paneltechnologies, amorphous solarpanels provide excellentperformance even when partiallyshaded. Whilst a best-case scenario

is to eliminate shading wheneverand wherever possible, amorphouspanels continue to operate at a highlevel of efficiency even if part ofthe array is in shade.Amorphous panels can also bemanufactured into a shape ormounted on a curved surface. Theycan be made to be hard-wearingenough to be fitted onto surfacesthat can be walked on. A few solarmanufacturers have startedmanufacturing amorphous solar rooftiles (or shingles), so that new-build houses can incorporate solarinto the structure of the roof.

This combination makes amorphouspanels suitable for integration intoconsumer products such as mobilephones and laptop computers, andfor mobile products such as the roofof an RV or caravan, where themanufacturer has no control overwhere the products are placed orhow they are used.Amorphous panels are the cheapestpanels to manufacture and a numberof manufacturers are now screen-printing low-cost amorphous solarfilms. Over the past three years,amorphous solar panel costs havedropped by around 30% each year.

They are expected to drop to aroundhalf their current (2012) cost by2015.Because of their lower efficiency,an amorphous solar panel has to bemuch larger than the equivalentpolycrystalline solar panel. As aresult, amorphous solar panels canonly be used either where there isno size restriction on the solar arrayor where the overall powerrequirement is very low.In terms of environmental impact,amorphous panels tend to have amuch lower carbon footprint atpoint of production, compared to

other solar panels. A typical carbonpayback for an amorphous solarpanel would be in the region of12–30 months.Most amorphous solar panels havecomparatively low power outputs.These panels can work well forsmaller installations of up to around300-watt outputs, but not so wellfor larger installations: largernumbers of panels will be requiredand the additional expense inmounting and wiring theseadditional panels starts to outweightheir cost advantage.Consequently, amorphous solar

panels are often more suited toOEM applications, as an energysource built into a manufacturedproduct, or for large-scalecommercial installations where thepanels are incorporated into thestructure of a roof-space on a newbuild.Some of the most exciting advancesin solar technologies over the pastthree years have come fromamorphous technology. Products asdiverse as mobile phones, laptopcomputers, clothing and roofingmaterials have all had amorphoussolar panels built into them. Anexciting technology, amorphous

solar is going to get better andbetter over the coming years.
Polycrystalline solar panelsPolycrystalline solar panels aremade from multiple solar cells,each made from wafers of siliconcrystals. They are far more efficientthan amorphous solar panels indirect sunlight, with efficiencylevels of 13–18%.Consequently, polycrystalline solarpanels are often around one third ofthe physical size of an equivalentamorphous panel, which can makethem easier to fit in many

installations.Polycrystalline solar panelstypically have a life expectancy ofabout 25 years. This can often beexceeded: commercial solar panelsonly became available in the late1970s and early 1980s and many ofthese panels are still perfectlyfunctional and in use to this day.The manufacturing process forpolycrystalline solar panels iscomplicated. As a result,polycrystalline solar panels areexpensive to purchase, often costing20–30% more than amorphous solarpanels. The environmental impact

of production is also higher thanamorphous panels, with a typicalcarbon payback of 3–5 years.Prices for polycrystalline solarpanels are dropping, thanks to boththe increase in manufacturingcapacity over the past few yearsand the increasing popularity forlarger screen televisions, which usethe same specification glass. Forthe past five years, prices havebeen dropping by around 25% peryear. They will undoubtedlycontinue to reduce in price as thecost of amorphous solar technologycontinues to drop.

Monocrystalline solar panelsMonocrystalline solar panels aremade from multiple smaller solarcells, each made from a singlewafer of silicon crystal. These arethe most efficient solar panelsavailable today, with efficiencylevels of 15–24%.Monocrystalline solar panels havethe same characteristics aspolycrystalline solar panels.Because of their efficiencies, theyare the smallest solar panels (perwatt) available.Monocrystalline solar panels arethe most expensive solar panels to

manufacture and therefore to buy.They typically cost 35–50% morethan the equivalent polycrystallinesolar panels.
Which solar panel technologyis best?For most applications,polycrystalline panels offer the bestsolution, with reasonable value formoney and a compact size.Amorphous panels can be a goodchoice for smaller installationswhere space is not an issue. Theyare usually not practical forgenerating more than a few hundred

watts of power because of theiroverall size, unless you have anextremely large area that you cancover with solar panels.
What to look for whenchoosing a solar panelNot all solar panels are createdequal, and it is worth buying aquality branded product over anunbranded one. Cheaper, unbrandedsolar panels may not live up to yourexpectations, especially whencollecting energy on cloudy days.If you are spending a lot of moneybuying a solar energy system that

needs to last many years, it isadvisable to purchase from a knownbrand such as Kyocera, Panasonic,Clear Skies, Hyundai, Sanyo,Mitsubishi, Solar Frontier or Sharp.My personal recommendation isKyocera polycrystalline solarpanels, or Mitsubishi or SolarFrontier amorphous panels. I havefound these to be particularly good.
Buying cheap solar panelsNot all solar energy systems have tolast ten or twenty years. If you arelooking for a small, cheap system toprovide power to an RV orcaravan, or your requirements are
modest, such as installing a light ina shed, buying a cheap solar panelmay well be the right option foryou.The quality of the cheaper solarpanels has improved significantlyover the past few years. Six orseven years ago, buying a cheap,unbranded Chinese-made productwas a recipe for disaster. Many ofthe panels were poorly assembled,allowing water to seep through theframes and damaging the solarcells. A lot of them used plateglass, often a thin, low-grade glassthat becomes clouded over time andis easily chipped or broken. The

cells used by these manufacturerswere often sub-standard reject cellsand often degraded very quickly.Thankfully, most of these problemsare now resolved and if you buy acheap solar panel on eBay, you arelikely to have a good product thatwill reliably generate power forfive to ten years, and in allprobability a lot longer. If you arebuying a solar panel from amanufacturer you have never heardof, here is a checklist of things tolook for:Buy bigger than you think you’llneed

If you are buying a very cheap solarpanel, you are likely to be saving asmuch as 50% of the price whencompared to buying a brandedproduct. However, expect it todegrade slightly more quickly than abranded unit, and do not expect it tobe quite so efficient.To counter this, buy a solar panelwith a higher watt rating (oftenshown as a watt peak, or Wp,rating) than you actually need, orbuy additional solar panels if youare purchasing an entire array. Aimfor 15% more power than youwould otherwise have bought. You

will still save a lot of money, butyou will have an extra bit ofassurance that the system will be upto the task.WarrantyWith cheap solar panels, you’re notgoing to get a five-, ten- ortwenty-year warranty, but youshould still expect a one- ortwo-year warranty with any solarpanel you buy. Check to see exactlywhat the warranty offers.You are looking for a warranty thatguarantees a minimum output undercontrolled conditions. The standardacross the industry is to guarantee
80% of the quoted output undercontrolled conditions.If you have a warranty claim, alsocheck to see how you can claim onthat warranty. Shipping a brokensolar panel half way around theworld and paying for returncarriage is likely to cost as much asbuying a new solar panel.GlassIf you are buying a solar panel thatis going to be fitted to a movingvehicle, or if you are buying aphysically large solar panel, makesure that the solar panel usestempered glass.

Tempered, or toughened, glass isaround eight times stronger thanplate glass. This makes it far morerobust. If your glass is chipped onyour solar panel, you willimmediately see a significant dropin power output. If water gets intothe solar panel itself, it can create ashort circuit and becomes a firehazard. Water and electricity do notmix.It is worth noting that someamorphous solar panels cannot usetempered glass because of the waythe thin film is applied to the glass.Some manufacturers reduce this

problem by using thicker plateglass.
Second-hand solar PV panelsFrom time to time, second-handsolar panels appear for sale. Theyappear on eBay or are sold by solarequipment suppliers or buildingsalvage yards.So long as they come from areputable brand, second-hand solarpanels can be extremely good valuefor money and even old panels thatare 25–30 years old may still givemany more years of useful service.Although good quality solar panelsshould provide at least 25 years

service, nobody knows how muchlonger they will last. The earlycommercially available solarpanels (which are now over 30years old) are still workingextremely well, typically workingat around 80–90% of their originalcapacity.There are, however, a few points tolook out for if you are consideringbuying second-hand solar PVpanels:
· Never buy second-handsolar PV panels unseen. Takea multi-meter with you andtest them outside to make sure

you are getting a reasonablevoltage and wattage reading
· Check the panels and rejectany with chipped or brokenglass. Also reject any panelswhere the solar cellsthemselves are peeling awayfrom the glass or havecondensation between theglass and the solar cell
· The efficiency of oldersolar PV panels issignificantly lower than newpanels. 30 years ago, the mostefficient solar panels wereonly around 5–6% efficient,

compared to 13–24%efficiency levels today.10–15 years ago, most solarpanels were around 10–12%efficient
· Consequently, a solar PVpanel from the early 1980s islikely to be three times thesize and weight of anequivalent modern crystallinepanel
· These second-hand panelswill not have any of the safetycertification ratings that youget with new solar panels.This may cause issues with

building regulations orbuilding insurance, if you areinstalling these onto abuilding as part of a newsolar installation
Fresnel lenses and mirrorsA very brief word here aboutFresnel lenses and mirrors. TheFresnel lens was invented forlighthouses, as a way of projectinga light over a long distance. It doesthis by refracting the light to make ita concentrated beam. Scientistshave been experimenting withFresnel lenses in conjunction withsolar panels for concentrating the

power of the sunlight and focusingit on a solar panel.In effect, by concentrating thesunlight into a smaller area andincreasing the solar irradiance,significantly more energy can becaptured by the solar panel, therebyimproving its efficiency quiteimpressively.However, there are problems withthis technology. Most specifically,the heat build-up is quiteconsiderable and, in testing, manysolar panels have been destroyedby the excessive heat generated bythe Fresnel lens. This is especially

true of Fresnel lenses built byenthusiastic amateurs.There are one or two companiesnow promoting Fresnel solarpanels. These panels tend to bequite large and bulky. Due to theheat build-up, they also need to bevery carefully mounted, withadequate ventilation around thepanel. There are also questionsabout the long-term reliability ofFresnel solar panels. My advicewould be to avoid these until otherpeople have tried them for a numberof years and found out how reliablethey really are.

As an alternative, mirrors orpolished metal can be a useful wayof reflecting additional sunlightback onto solar panels andtherefore increasing the solarirradiance. However, you must takecare to ensure that the reflectedlight does not dazzle anyone. Thepracticalities of mounting, safetyand ensuring that people are notdazzled by the reflected sunlightnormally dissuade people fromusing mirrors in this way.

Solar panel mountingsYou can either fabricate your ownmounting for your solar panels, orpurchase a ready-made modularsystem.The design of the system must takeinto account wind loading, so that itis not damaged or destroyed in highwinds. If you are installing solar ina hot climate, your mounting mustalso ensure there is adequateventilation behind the panel toavoid excessive heat build-up.Your support structure needs to beable to set the angle of the solararray for optimal positioning

towards the sun.If you have not installed solarelectric systems before, it is usuallya good idea to buy a modularsupport structure from the samesupplier as your solar panels. Onceyou have more experience, you canthen choose to fabricate your own,if you prefer.
Solar trackersFor ground- or pole-mounted solararrays, you can buy solar trackersthat track the path of the sun acrossthe sky and move the solar panelsso they are facing the sun at alltimes.

The benefits of solar trackers arethat they increase the amount ofsunlight the solar panels cancapture. They increase energycapture by up to 55% during thesummer months and by around15–20% during the winter months.Unfortunately, the cost of thesesolar trackers means that they arerarely cost-effective. It is usuallyfar cheaper to buy a larger solararray than it is to buy a solartracker. Only if space is at apremium are solar trackerscurrently viable.

Solar array cablesSolar array cables connect yoursolar panels together and connectyour solar array to the solarcontroller.These cables are often referred toas ‘array interconnects’. You canpurchase them already made up tospecified lengths or make them upyourself. The cables are extremelyheavy duty and resistant to hightemperatures and ultra-violet light.They also have a tough, extra-thickinsulation to make them less proneto animal damage.If you are planning to wire your

solar array in parallel rather than inseries, you need to ensure that yoursolar array cables can cope with thecurrent that you are going to begenerating through your solar array.If you are designing a paralleldesign system, I explain how youcan calculate the size of cablerequired in the chapter on stand-alone system components.

Fuses and isolationswitchesThe ability to isolate parts of thesystem is important, especiallywhile installing the system andcarrying out maintenance. Evencomparatively low voltages can bedangerous to work on.Even small systems shouldincorporate a fuse between thebatteries and the controller and/orinverter. If something goes wrongwith the system, far better to blow acheap fuse than fry a battery or asolar controller.

For all but the smallest systems, youwill also need to incorporateisolation switches into your solardesign. This will allow a batterybank to be disconnected formaintenance purposes. For anyinstallation with more than onesolar panel, and for all grid-connected systems, an isolationswitch to disconnect the solar arrayshould also be installed: I wouldrecommend installing an isolationswitch on the solar array for allsolar arrays capable of generatingover 100 watts of power.If your solar panels are mounted

some way from your inverter orcontroller, it can also be a goodidea to have an isolation switchfitted next to the solar panels, aswell as one fitted next to theinverter or controller. You can theneasily disconnect the solar panelsfrom the rest of the system formaintenance or in case of anemergency.Ensure that the isolation switch youchoose is capable of handlinghigh-current DC circuits, withcontacts that will not arc. Suitableisolation switches are availablefrom any solar supplier.
If you are planning a grid-connectedsystem, you will also need ACisolation switches to allow you todisconnect the inverter from thegrid supply. You will require anisolation switch next to the inverter,and a second one next to thedistribution panel.

Ground fault protectionGround fault protection ensures thatif there is a short within the solararray, the current flow is cut offimmediately. This averts the risk ofdamage to either the controller orthe solar array, and significantlyreduces the risk of electrocution.Ground fault protection works bymeasuring the current entering andexiting a circuit. If everything isworking correctly, the current inshould equal the current out.However, if there is a ‘leak’ or apartial short circuit, the system willsee a difference in current and

immediately shut down. A partialshort circuit could occur if a solarpanel was broken or if somebodytouched an exposed cable.Most solar inverters and solarcontrollers incorporate ground faultprotection, using a ResidualCurrent Device (RCD) built intothe unit (note: RCDs are known asGround Fault Interrupters – GFIs– in the United States and Canada).Many experts say that it is prudentto install a separate ground faultprotector, even if the controller orinverter has ground fault protectionbuilt in. As the cost of an RCD orGFI is low and the benefits they

provide are high, this is goodadvice.You will require separate groundfault protection for your DC and ACcircuits:
· For anything larger than100-watt solar panel systems,and for all systems mountedto a building, you shouldinstall ground fault protectionbetween your solar panelsand your controller orinverter
· If you are installing a DCpower supply into a buildingfor running appliances, you

must install ground faultprotection between yourcontroller and this powersupply
· If you are using an inverter,you should install groundfault protection between yourinverter and any load
There are specific RCD units forDC circuits and these are stockedby solar panel suppliers.

Components for Grid-Tie systems
Before discussing the componentsrequired for a grid-tie system inmore detail, it is useful to look athow a grid-tie system is configured.There are three basic designs forgrid-tie solar energy systems:
· High-voltage in-seriessystems
· Low-voltage systems
· Micro-inverter systems

High voltage in-seriesThis is the most popularconfiguration for a grid-tie systemtoday. Solar panels are connectedtogether in series, producing ahigh-voltage DC power. This isthen fed into a central inverter toconvert the power into an ACsource, which in turn is connectedinto the standard building electricalsystem:
A simplified block

diagram showing thebasic layout of ahigh voltage in-
series solar energysystem
This design is the mostcost-effective design for grid-tiesystems. It is relativelystraightforward to install, simple tomaintain, and components arereadily available. By running thesolar array at high voltage, it is alsovery efficient, with minimal lossesthrough the array itself and allowingthe inverter to run at a very highlevel of efficiency. This is why thisdesign is currently so popular

within the grid-tie solar industry.This high-voltage DC power has thebenefit of great efficiency, butcomes with a number of verysignificant safety risks. Voltages ashigh as 600 volts in North Americaand 1,000 volts in Europe arecommon: voltages that can veryeasily be fatal on contact.These high voltages can also causesignificant problems if there isdamage to the wiring between solarpanels, either due to a mistakeduring installation, through animaldamage, or simply through wearover time. If a damaged cable
generates a high-voltage, directcurrent electric arc whilst thepanels are in direct sunlight, theimmensely high temperatures caneasily melt metal and are a potentialfire hazard.Connecting solar panels in seriesalso has a significant disadvantage:when connected in series, the solararray is only as strong as itsweakest link. If you have a damagedsolar panel, shade blocking light toa few solar cells, or a damagedcable, the output of the entire solararray drops to the output of thatweakest link.

Low voltage systemsIt is for these reasons that, inprevious editions of this book, Ihave advocated lower-voltage solararrays for many grid-tie systems.This was achieved by runningshorter series of solar panels andhaving multiple strings running inparallel. These are much safer thanthe very high voltage systemsusually installed, lose little inefficiency and are inherently moretolerant of shade.

A simplified blockdiagram showing the
basic layout of alow-voltage solar
energy system wheremultiple strings ofsolar panels are
connected in parallelThis design tends to be more

expensive to install than an in-series design. You will either needto buy a grid-tie inverter that canaccept multiple strings of solarpanels, or buy a separate inverterfor each string.I no longer advocate this approach,because there is now anotheralternative available that, in myopinion, renders both high-voltagein-series and low-voltage systemsredundant:
Micro-inverter systemsMicro-inverter systems have beenaround for a few years now, butuntil very recently had not gained

popularity, mainly due to theirhigher cost.However, with the huge growth inthe popularity of grid-tie systemsaround the world, micro-invertersystems have become far morewidespread as the benefits of thistechnology have become moreapparent. Prices for micro-invertersystems are dropping fast and arenow comparable to high-voltage in-series systems.In a micro-inverter system, eachsolar panel has its own inverter,converting its output to AC power.In effect, each solar panel becomes
its own independent solar energysystem.In the majority of micro-invertersystems, the inverter itself ismounted outside, bolted to theframe that also holds the solar panelin place. The individual solarpanels are connected to an ACpower cable that runs alongside thesolar array and then feeds directlyinto the building’s electricalsystem.

A simplified blockdiagram showing the
basic layout of amicro-inverter
systemThere are some very significantbenefits of micro-inverter systemsover other forms of grid-tiesystems:

· As each solar panel runs asan independent unit, if onepanel is under-performing,either because of damage orsimply because it is shaded, itdoes not affect the outputfrom any of the other panels
· Because there is nohigh-voltage DC powerrunning from one panel to thenext, safety is less of an issue
· Installation, fault-findingand maintenance also becomesignificantly easier
· It is easy to expand your

grid-tie system in the future,as budget allows
· More flexible solar panelinstallation – you can havesolar panels mounted indifferent locations and facingin different directions
Whilst today, series-connectedsolar systems with a centralinverter are still the standard modelfor installing grid-tie systems, theindustry is moving towards micro-inverter technology as a far bettermodel.

Now you have a clearer idea ofhow a grid-tie system is puttogether, it is time to look at thecomponents available in moredetail.

Grid-tie solar panelsIn the past, when most solar energysystems were stand-alone systems,almost every solar panel you couldbuy was rated for a 12-volt output.Whilst this is still true for smallerpanels, there are nowhigher-voltage configurationsavailable for larger solar panels.As grid-tie systems have becomemore popular, higher-voltage solarpanels have become available.Many solar panels of 150Wpcapacity and over are rated for a24-volt output and somemanufacturers are now building

solar panels with rated outputs ofbetween 48 volts and 120 volts.These higher voltages are wellsuited to grid-tie installations. Byrunning your solar array at a highervoltage, you can keep the currentflow low, which improves theefficiency of the overall system.Using high-voltage solar panelsalso gives you the option to connectmultiple solar panels in parallelrather than in series, whilstretaining the benefit of thehigh-voltage current.The 24-volt and 48-volt solarpanels can work with many micro-

inverter systems, too. Theoretically,this would allow a micro-invertersystem to run more efficiently,although in practice the differencesseem to be marginal.

Grid-tie invertersGrid-tie inverters convert the DCpower from your solar energysystem into AC power, and convertthe voltage to the same as the grid.This allows you to connect yoursystem into the grid, enabling you tobecome a mini power station andsupply your electricity to theelectricity companies.You cannot use an ordinary inverterfor grid-tie applications. There area number of reasons for this:
· Grid-tie inverters have towork in conjunction with thegrid, in order to be able to

export electricity to it. TheAC pure sine waveformgenerated by the inverter hasto be perfectly coordinatedwith the waveform from thegrid
· There is an additional safetyfeature with grid-tie invertersto cut off power from thesolar array if the grid shutsdown
· Grid-tie inverters areconnected directly to thesolar panels. In an in-seriessystem, this means the inputvoltage from the panels can

fluctuate wildly, oftenjumping or dropping byseveral hundred volts in aninstant. Non grid-tie inverterscannot cope with suchmassive voltage jumps
· In many countries, grid-tieinverters have to be certifiedfor use with the grid
There are a number of things toconsider when purchasing a grid-tieinverter:
· Input voltage
· Power rating
· Power tracking

· How many strings theinverter can support
· Diagnostics and reportinginformation
· Inbuilt safety systems
· Installation options andoperating environment
· Certification and localregulations
Input voltageYour choice of inverter will have alarge voltage range in order to copewith the huge fluctuation of voltagethat a solar array can provide. From

this voltage range, you will be ableto identify how many solar panelsthe inverter can cope with, whenconnected in series.You need to remember that the ratedvoltage of a solar panel is not themaximum voltage that the solarpanel can generate. The voltagefrom a single 12-volt solar panelcan fluctuate anywhere from 12volts on a very dull day, up toaround 20 volts in intense overheadsunlight. If you have a 48-volt solarpanel, or four 12-volt solar panelsconnected together in series, thevoltage swing can be between 48volts and 88 volts.

In addition to this, a solar panel canproduce significantly highervoltages in an open circuit – i.e.when the solar array is generatingpower but the power is not beingused. Depending on your solarpanel, it is possible for a single 12-volt solar panel to generate 26 voltsin an open circuit.As you can see from the tablebelow, the higher the nominalvoltage from your solar array, thegreater the voltage fluctuation canbe:
Numberof 12-
Nominalsolar
Lowvoltage
Peakvoltage

voltsolar
panels
arrayvoltage
on dullday
inintensesunlight
1 12-volt 12volts
20volts
2 24-volt 24volts
40volts
4 48-volt 48volts
80volts
6 72-volt 72volts
120volts
8 96-volt 96volts
160volts
10 120-volt 120 200

volts volts
15 180-volt 180volts
300volts
20 240-volt 240volts
400volts
25 300-volt 300volts
500volts
30 360-volt 360volts
600volts
35 420-volts
420volts
700volts
40 480-volts
480volts
800volts
Note: the maximum open-circuit
voltage allowable in the UnitedStates for grid-tied systems is 600volts, whilst in Europe it isadvisable that your system does notexceed 1,000 volts. You mustensure that your system neverexceeds this.As you can see from this table, if aheavy cloud blocks the sun on anotherwise clear day, you can see avoltage drop of several hundredvolts in an instant. When the cloudpasses over, the voltage shootsback up again.It is important to ensure that thesolar panel will work with the peak

voltage of your solar array and notjust the nominal voltage of yourarray. If you exceed the peakvoltage of your inverter, theinverter will shut down to avoiddamage. In extreme cases, youcould damage or destroy yourinverter by exceeding the inputvoltage rating.In addition to the standard inputvoltage range, your inverter willalso show a maximum voltagerating. This maximum voltage ratingrelates to the maximum open circuitvoltage of your solar array. Youmust ensure that the open circuitvoltage of your array does not
exceed the maximum voltage ofyour inverter.
Power ratingThere are two power ratings on agrid-tie inverter:
· Input power rating – theminimum and maximumamount of power the invertercan accept from the solararray
· Output power rating – themaximum amount of powerand current the inverter cangenerate as an AC output
Input power rating

The input power rating shows theminimum and maximum wattagerange the inverter can work with. Inthe main, the wider the range, themore efficient your inverter is.The specification on an inverterwill typically show three figures forinput power rating:
· A nominal power rating,shown in watts
· A minimum and maximumpower range
· A start-up power ratingThe nominal power rating showsthe maximum amount of power that

the inverter can convert into an ACoutput. If you exceed this figure onyour solar array, the additionalpower will be lost and convertedinto heat. Exceed this figure forlong and your inverter may shutdown to avoid overheating.The minimum power rating showsthe minimum amount of power thatyour solar array must generate inorder for the inverter to startproducing power. The maximumpower rating shows the maximumamount of power that can be fedinto the inverter before you riskdamaging your inverter.

The start-up power rating is theminimum amount of power the solarinverter requires to power itself. Ifthe solar array produces less thanthis amount of power, the inverterwill switch off.Because of the wide variation in thepower a solar panel can produce, itis good practice to buy a biggergrid-tie inverter than you actuallyneed. Remember that whilst a solarpanel has a watt-peak (Wp) rating,in ideal conditions the panel itselfmay slightly exceed this rating in areal world environment.Output power rating

The output power rating is themaximum continuous AC power thatthe inverter can generate. Theoutput power information will showvoltage, nominal output power inwatts, the maximum output currentin amps and the alternating currentfrequency.For North America, the grid voltageis nominally set at 110 volts, with afrequency of 60 Hz. For themajority of the rest of the world, thegrid voltage is nominally set at 230volts, with a frequency of 50 Hz. Inboth cases, it is normal to get somevariation in voltage and frequency.

The output power rating will alsoshow the maximum efficiency ratingof the inverter, given as apercentage. This rating is usually inthe region of 90–94% with moderngrid-tie inverters. If you areshopping on a budget, you mustcheck this rating: some very cheapgrid-tie inverters may besignificantly less efficient.
Power trackingAs discussed on previously, theefficiency of the solar arraydepends on how efficiently thefluctuating voltage is handled byyour inverter.

If you are purchasing a grid-tieinverter, you should invest in onethat incorporates maximum powerpoint tracking (MPPT). Maximumpower point tracking can providean additional 15–20% of energywhen compared to a non-MPPTinverter.Today, MPPT is the norm, but thereare a few older designs of inverterstill on the market, often sold atbargain prices online. No matterhow cheap these inverters are, theperformance loss rarely makes thema worthwhile investment.
Multiple strings

A ‘string’ of solar panels is simplyan array of solar panels connectedin series. Some inverters allow youto connect more than one string ofsolar panels. These two strings thenwork as separate arrays, but feedthe power through the sameinverter.
With multiplestrings, you can mix
and match solar

panels and locatethem in physically
separate areas if youso wish. The two
strings runcompletely
independently ofeach other
With a multiple string system, yourtwo solar arrays workindependently from each other. Thismeans that you can have twodifferent sizes of array withdifferent solar panels, or have thetwo arrays mounted at differentorientations. If one array is partiallyshaded, the performance does not

affect the second array.This is different to connectingmultiple strings together to create aserial/parallel hybrid. If you havemultiple strings connected together,the two strings are still linked. Youneed to have identical setups onboth strings and the panels need tobe facing the same way. Failure todo this will result in lower solarperformance.

Here we have twostrings of solar
panels, connectedtogether in parallel
to feed a singlestring inverter. Thetwo strings have tomatch each other. If
one string iscompromised, forinstance due to
shading, the secondstring is also
affected. (Note: youwould not normallywire a grid-tie solar
array in this way.
Instead, you wouldconnect everythingin series on a single
string.)Multiple strings are of benefit in thefollowing situations:
· Where you wish to fit twodifferent sizes of solar panel
· Fitting solar panels facing atdifferent orientations, such ason a roof that has twodifferent pitches
· Resolving shading issues.Solar panels that are in shadeat certain times of the day can

be put onto a separate stringso as not to affect the outputof the rest of the system
Whilst an inverter that can handlemultiple strings does have itsbenefits, there is usually anadditional cost for multi-stringinverters. If you are considering amulti-string inverter, you areprobably better off choosing amicro-inverter system where everysolar panel has its own inverter.
Diagnostics and reportinginformationAlmost all inverters provide a level

of diagnostics and reportinginformation, either using a smalldisplay built into the inverter itself,a series of LEDs on the front panelof the inverter, a separatemonitoring unit that plugs into theinverter, or by allowing you toconnect a PC to the inverter.Some inverters even have a built-ininternet connection, allowing themto connect to a wireless network.This means your system canprovide you with updates via e-mail, via a built-in website, or evensend updates to your mobile phone.In some cases, these systems can beremotely monitored by the solar
inverter supplier, who can thennotify you if there are any potentialissues with your system.If you have a micro-inverter systemwith multiple inverters, thediagnostics and reporting system isusually a separate box, which iseither connected to the AC power atthe point where the solar arrayconnects to your distribution panel,or it communicates wirelessly withthe micro-inverters. This ensuresthat you have one centralinformation point for your inverters.As a bare minimum, you want aninverter that can tell you if your

system is working and provide youwith an indication of what may bethe problem if a fault is detected.The diagnostics should be able togive you enough information toenable to you identify a fault withyour system, such as:
· Insufficient or excess powerfrom the solar array
· Grid connection issues
· Grid voltage or frequencyissues
· OverheatingMost solar inverters will provideyou with much more information,

allowing you to see the voltage andcurrent from your solar array andthe amount of AC power beinggenerated at that moment. They willalso be able to show the amount ofenergy generated by the system,both for that day and since thesystem was installed.
Built-in safetyMost inverters incorporate safetyshutdown systems as part of theinverter itself. It is common forinverters to have ground faultprotection built in. As mentioned inthe previous chapter, even if yourinverter does provide this, it is still

good practice to install additionalground fault protection when youdesign your system. This isincorporated into your system usinga Residual Current Device (RCD).RCDs are known as Ground FaultInterrupters (GFIs) in the UnitedStates and Canada.A grid-tie inverter will alsomonitor the power from the grid andshut down if it detects a power cut(sometimes referred to as ‘IslandProtection’).This power shutdown ensures thatyour solar energy system does notcontinue to feed power into the grid

if there is a power cut. This is anecessary safety requirement: ifworkers are attempting to repair apower outage, they riskelectrocution if power is being fedinto the grid from your solar arraywhile they are working.Inverters should also shut down orderate if the internal temperaturegets too high, in order to avoidpermanent damage.
Installation options andoperating environmentInverters tend to be heavy units.They need to be mounted securely

on a wall or bolted to the floor.They can generate a significantamount of heat, especially whenrunning close to their rated output,and require good airflow around theunits to keep them cool.You can purchase inverters foreither indoor or outdoorinstallation. If you are looking atinstalling an inverter outdoors,check that the inverter is sealedagainst dust and water ingress,rated to at least IP64.Overheating inverters is the numberone reason for grid-tie systemsfailing. As an inverter gets hotter, it

provides less power, and if thetemperature continues to rise, itwill eventually shut down to avoidpermanent damage. When choosingan inverter, check its operatingtemperatures and consider how youcan ensure your system remainswithin these limits.Inverters should always be installedin a well-ventilated area, awayfrom the ceiling and with aclearance around each side, the topand the bottom. They cannot beinstalled in a sealed cupboard.Some inverters have the option ofan external heat sink ortemperature-controlled cooling fans

to help keep the inverter cool.Most inverters do make a smallamount of noise. This is typically acontinuous low-level hum. It isusually only noticeable if thesurrounding area is quiet. However,for this reason, inverters are notusually installed inside the livingspace in a home or in an officeenvironment. Instead, considerinstalling your inverter in a garageor on an outside wall of yourbuilding.Occasionally, the sound made bythe inverter has been known toresonate with the wall, amplifying
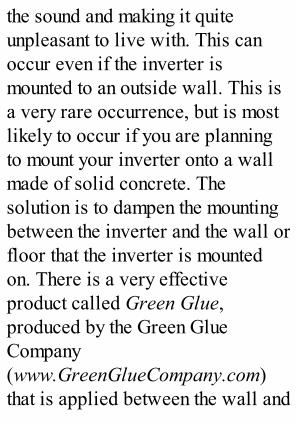
the sound and making it quiteunpleasant to live with. This canoccur even if the inverter ismounted to an outside wall. This isa very rare occurrence, but is mostlikely to occur if you are planningto mount your inverter onto a wallmade of solid concrete. Thesolution is to dampen the mountingbetween the inverter and the wall orfloor that the inverter is mountedon. There is a very effectiveproduct called Green Glue,produced by the Green GlueCompany(www.GreenGlueCompany.com)that is applied between the wall and

the inverter. When it is compressedby remounting the inverter, the gluespreads out to form a soundisolation barrier that is particularlyeffective at blocking outlow-resonance vibrations.
Buying from eBaySome companies and individualshave been selling non-approvedgrid-tie inverters online, mostcommonly on eBay. These are oftensold at a bargain price, bundledwith a cheap solar panel and oftenadvertised as a ‘micro grid-tiesystem’.The sellers claim that these systems

are designed for amateurinstallation. The inverter plugs intothe household electricity supplythrough a normal domestic powersocket, and the systems lookexceptionally easy to install anduse. The sellers often claim that youcan use these systems to sell powerback to the utility companies andthat they can be used to run themeter backwards.These systems are highly dangerousand must be avoided. For a start,the equipment has inevitably notbeen certified for grid-tie use in anycountry. More importantly, the use

of these systems is illegal in theUnited States, Canada, Australiaand most of the EuropeanCommunity, because of the way theinverters connect to the householdelectricity supply, using a domesticpower plug in reverse.This means that the household plughas grid-level AC power runningthrough it. This is extremely highrisk and directly contravenes basicelectrical safety legislation. In theUK, for instance, this is directly incontravention with BS7671:2008(amd 1, 2011) 551.7.2 (ii). Thecatastrophic and potentially fatalresults should somebody unplug the

cable and accidentally touch theunshielded plug do not bear thinkingabout.Never design any electrical systemthat risks grid-level AC powerrunning through exposedconnectors. The lives of the peoplearound you are worth far more thansaving a few pounds.
Components forStand-Alone Systems
If you are designing a stand-alonesystem, there is a lot more designwork and planning involved thanthere is for a similarly-sized grid-tie system. It is more critical tomake sure your stand-alone systemworks: while a grid-tie system willnot let you down if you do notgenerate enough energy, a stand-alone system will.As well as considering andplanning all the physical side of

fitting the solar panels, routing thecabling and handling the safetyaspects, you will also need toconsider the voltage that yoursystem will run at and design abattery system to store your energy.

Calculate your optimumvoltageSolar panels and batteries arenormally both 12 volts, so logicallyyou would think that it would makethe most sense to run your system at12 volts.For small systems, you would beright. However, there are somelimitations of 12-volt systems.Therefore, we now need to identifythe optimum voltage for yoursystem.If you are still not comfortable withvolts, watts, currents and

resistance, now would be a goodtime to re-read Chapter 2: A BriefIntroduction to Electricity.
Voltages and currentsCurrent is calculated as wattsdivided by volts. When you run atlow voltages, your current is muchhigher than when you run at highervoltages.Take a normal household low-energy light bulb as an example. A12W light bulb running fromgrid-level voltages is consuming 12watts of power per hour. Thecurrent required to power this lightbulb at 230 volts is 0.05 amps

(12W ÷ 230V = 0.05 amps) and at110 volts is 0.1 amps (12W ÷ 110v= 0.1 amps).If you run the same wattage lightbulb from a 12-volt battery, you arestill only consuming 12 watts ofpower per hour, but this time thecurrent you require is 1 amp (12W÷ 12V = 1 amp).If you run the same wattage lightbulb from a 24-volt battery, youhalve the amps. You now onlyrequire ½ amp (12W ÷ 24V = ½amp).“So what?” I hear you say. “Whocares? At the end of the day, we’re

using the same amount of energy,whatever the voltage.”The issue is resistance. Resistanceis the opposition to an electricalcurrent in the material the current isrunning through. Think of it asfriction on the movement ofelectrons through a wire. Ifresistance is too high, the result ispower loss. By increasing yourvoltage, you can reduce yourcurrent and thereby reduceresistance.You can counter the resistance byusing thicker cabling, but you soonget to the point where the size of the

cabling becomes impractical. Atthis point, it is time to change to ahigher voltage.
What voltages can I run at?For either a stand-alone or a gridfallback system, the most commonvoltages to run a solar electricsystem at are 12 volts, 24 volts or48 volts.As a rule, the most efficient way torun an electrical circuit is to keepyour voltage high and your currentlow. That is why the grid runs atsuch high voltages: it is the onlyway to keep losses to a minimumover long distances.

However, you also need to factorcost into the equation: 12-volt and24-volt systems are far cheaper toimplement than higher voltagesystems, as the components aremore readily available, and at alower cost. 12-volt and 24-voltdevices and appliances are alsoeasily available, whereas 48-voltdevices and appliances are rarer.It is unusual to go beyond 48 voltsfor stand-alone systems. Whilst youcan go higher, inverters andcontrollers that work at othervoltages tend to be extremelyexpensive and only suitable for

specialist applications.For a grid-tie system, you do havethe option to run your solar array ata much higher voltage, byconnecting lots of solar panelstogether in series. Grid-tie invertersare available that work anywherefrom 12 volts up to 1,000 volts. Ingrid-tie systems, the voltage you runat depends on the number of solarpanels you use.
How to work out what voltageyou should be running atYour choice of voltage isdetermined by the amount of current

(amps) that you are generating withyour solar array or by the amount ofcurrent (amps) that you are using inyour load at any one time.To cope with bigger currents, youneed bigger cabling and a morepowerful solar controller. You willalso have greater resistance inlonger runs of cabling, reducing theefficiency of your system, which inturn means you need to generatemore power.In our system, we are proposing a12m (40 feet) long cable run fromthe solar array to the house, pluscabling within the house.

Higher currents can also reduce thelifespan of your batteries. Thisshould be a consideration where thecurrent drain or charge from abattery is likely to exceed 1/10th ofits amp-hour rating.We will look at battery sizing lateron, as current draw is a factor inchoosing the right size of battery. Itmay be that you need to look atmore than one voltage option at thisstage, such as 12-volt and 24-volt,and decide which one is right foryou later on. Finally, if you areplanning to use an inverter toconvert your battery voltage to a
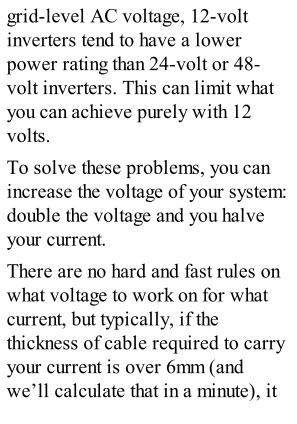
grid-level AC voltage, 12-voltinverters tend to have a lowerpower rating than 24-volt or 48-volt inverters. This can limit whatyou can achieve purely with 12volts.To solve these problems, you canincrease the voltage of your system:double the voltage and you halveyour current.There are no hard and fast rules onwhat voltage to work on for whatcurrent, but typically, if thethickness of cable required to carryyour current is over 6mm (andwe’ll calculate that in a minute), it

is time to consider increasing thevoltage.
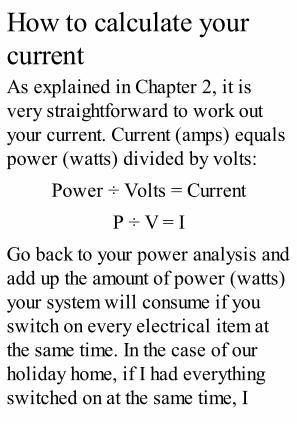
How to calculate yourcurrentAs explained in Chapter 2, it isvery straightforward to work outyour current. Current (amps) equalspower (watts) divided by volts:
Power ÷ Volts = CurrentP ÷ V = I
Go back to your power analysis andadd up the amount of power (watts)your system will consume if youswitch on every electrical item atthe same time. In the case of ourholiday home, if I had everythingswitched on at the same time, I

would be consuming 169 watts ofelectricity.Using the holiday home as anexample, let us calculate the currentbased on both 12 volts and 24 volts,to give us a good idea of what thedifferent currents look like.Using the above formula, 169 wattsdivided by 12 volts equals 14.08amps. 169 watts divided by 24volts equals 7.04 amps.Likewise, we need to look at thesolar array and work out how manyamps the array is providing to thesystem. We need a 320-watt solararray. 320 watts divided by 12

volts equals 26.67 amps. 320 wattsdivided by 24 volts equals 13.33amps.

Calculating cablethicknessesI will go into more detail on cablinglater, but for now, we need toascertain the thickness of cable wewill need for our system.For our holiday home, we need a12m (40 feet) cable to run from thesolar controller to the house itself.Inside the house, there will bedifferent circuits for lighting andappliances, but the longest cablerun inside the house is a further 10m(33 feet).That means the longest cable run is
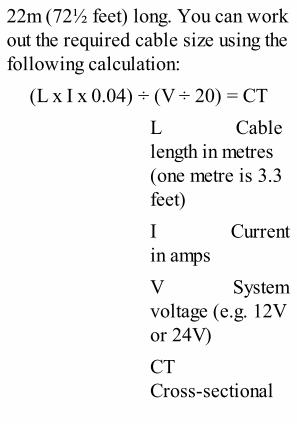
22m (72½ feet) long. You can workout the required cable size using thefollowing calculation:
(L x I x 0.04) ÷ (V ÷ 20) = CTL Cablelength in metres(one metre is 3.3feet)I Currentin ampsV Systemvoltage (e.g. 12Vor 24V)CT Cross-sectional

area of the cablein mm²
So calculating the cable thicknessfor a 12-volt system:
(22m x 14.08A x 0.04) ÷ (12V ÷20) = 20.65mm²
Here is the same calculation for a24-volt system:(22m x 7.04A x 0.04) ÷ (24V ÷ 20)
= 5.15mm²And just for sake of completeness,here is the same calculation for a48-volt system:(22m x 3.52A x 0.04) ÷ (48V ÷ 20)
= 1.63mm²

Converting wire sizes:To convert cross-sectional area toAmerican Wire Gauge or to workout the cable diameter in inches ormillimetres, use the followingtable:
Cross-Sectional
Area(mm²)
AmericanWire
Gauge(AWG)
Diameter(inches)
107.16 0000 0.46
84.97 000 0.4096
67.4 00 0.3648
53.46 0 0.3249

42.39 1 0.2893
33.61 2 0.2576
26.65 3 0.2294
21.14 4 0.2043
16.76 5 0.1819
13.29 6 0.162
10.55 7 0.1443
8.36 8 0.1285
6.63 9 0.1144
5.26 10 0.1019
4.17 11 0.0907
3.31 12 0.0808

2.63 13 0.072
2.08 14 0.0641
1.65 15 0.0571
1.31 16 0.0508
1.04 17 0.0453
0.82 18 0.0403
0.65 19 0.0359
0.52 20 0.032
0.41 21 0.0285
0.33 22 0.0254
0.26 23 0.0226

0.2 24 0.0201
0.16 25 0.0179
0.13 26 0.0159
From these figures you can see theanswer straightaway. Our cablelengths are so great that we cannotpractically run our system at 12volts. The nearest match for20.65mm² cables is 21.14mm². Thisis AWG 4 cable, with a cablediameter of 5.19mm. Cable this sizeis thick, heavy, inflexible, hard tosource and very expensive.This means we would need to layextremely thick AWG 4 cables from

the solar array and around ourhouse to overcome the resistance.This would be expensive, inflexibleand difficult to install.Realistically, due to cable sizing,we are going to need to use either24 volts or 48 volts for our solarelectric system.

Mixing and matchingsolar panelsWhen specifying your solar array,you should keep to one type ofpanel rather than mixing andmatching them. If you want a100-watt array, for example, youcould create this with one 100-wattsolar panel, two 50-watt solarpanels or five 20-watt solar panels.If you do wish to use different solarpanels in your array, you can do soby running two sets of panels inparallel with each other and eitherconnecting them into a controllerthat can handle more than one feed,
or by using more than onecontroller. This can be a useful wayof creating the right wattage system,rather than spending more moneybuying bigger solar panels thatgenerate more power than youactually need.The result is slightly morecomplicated wiring, but it is often amore cost-effective solution to dothis than to buy a larger capacitysolar array than you actually need.The two diagrams below showdifferent ways of connecting twosolar panels of different sizes to thesame system. Both these systems

are running at 12 volts, using twodifferent sized panels to create a140 watt system
This first system uses
a single controller.The controller hastwo separate input
feeds. The two solarpanels work
independently ofeach other and thecontroller handles
the mismatch inpower output

This second systemuses two controllers.
The secondcontroller is used to

provide additionalpower to the
batteries for thesmaller solar panel.
These solutions are effective if youare planning to start small and addto your solar energy system whenneeds and budget allows. It meansthat you can collect an assortment ofsolar panels over time and put themto good use within your one solarenergy system.If you end up with two differentmakes of solar panels with identicalratings, put them on their ownseparate circuits. Solar panels from

different manufacturers are not allidentical in their operating voltagesor performances, so putting twodifferent makes and models of solarpanel on the same circuit is likely tocompromise the performance ofboth panels, even if thespecification of the two panels issimilar.If you buy multiple controllers foryour solar energy system, to handledifferent makes, models and sizesof solar panel, you only need onemain controller to handle the poweroutput from the batteries. Yourother controllers can be muchcheaper and simpler pieces of

equipment as they are only handlingthe power feed into the batteries. Ifyou wish, you can even use asimple solar regulator that simplycuts off charging when the batteriesare full, although these are usuallynot as efficient as a proper solarinverter.Not all solar panels are 12-voltpanels. Many solar panels are nowdesigned predominantly for grid-tieinstallation only and are availablein many different voltageconfigurations. Solar panels withvoltage ratings of up to 120 voltsare on the market, although the most

common are 12-volt, 24-volt and48-volt.12-volt panels remain the mostcommonly available panels and arethe most popular for stand-aloneapplications. If your stand-alonesolar electric system runs at avoltage other than 12 volts, you caneither install multiple solar panelsin order to boost the system voltage,or choose higher-voltage solarpanels. For example, if you wanteda 200-watt 24-volt solar array, youcould achieve this in various ways,including:
· Using two 12-volt, 100-watt

solar panels, connected inseries
· Using one 24-volt, 200-wattsolar panel
When choosing a solar array, youneed to consider:
· The physical size: will it fitinto the space available?
· The support structure:ready-made supports mayonly fit certain combinationsof panels
· How much cabling you willneed to assemble the array

· The system voltage: if youare not running at 12 volts,you will need multiple solarpanels in order to build thesystem to the correct voltageas well as wattage

BatteriesThere are a number of differentoptions when it comes to batteries,and a number of specialist batterysuppliers who can advise you onthe best options for your solarinstallation.Lead acid batteries usually come aseither 6-volt or 12-volt batteries,although other voltages are alsoavailable. Batteries can beconnected together in series toincrease the voltage, or in parallelto keep the same voltage butincrease the capacity.The capacity of a battery is

measured in amp-hours. The amp-hour rating shows how many hoursthe battery will take a specificdrain: for instance, a 100-amp-hourbattery has a theoretical capacity topower a 1-amp device for 100hours, or a 100-amp device for 1hour.I say theoretical, because thereality is that lead acid batteriesprovide more energy whendischarged slowly: a 100-amp-hourbattery will often provide 20–25%less power if discharged over afive-hour period, compared todischarge over a twenty-hourperiod.

Secondly, a lead acid battery mustnot be run completely flat. Aminimum of 20% state of charge(SOC) should be maintained in alead acid battery at all times toensure the battery is not damaged.For best overall battery life, youshould design your system so thatthe battery charge rarely goesbelow 50%.
Types of batteriesThere are three types of lead acidbattery:
· ‘Wet’ batteries requirechecking and topping up with

distilled water, but performbetter and have a longerlifespan than other batteries
· AGM batteries require nomaintenance but have ashorter overall life
· Gel batteries are alsomaintenance-free, do not emithydrogen during charging andprovide a reasonable overalllife. They can be placed ontheir side or used on the move
In the past, most installers haverecommended industrial quality‘wet’ batteries for all solarinstallations. These provide the best

long-term performance and thelowest cost. Often called tractionbatteries (as they are heavy-dutybatteries used in electric vehicles),they can often have a lifespan of8–10 years for a solar installation.A lower cost option to theindustrial-quality traction battery isthe leisure battery, as used incaravans and boats. These aretypically either wet batteries orAGM batteries. Their lifespan isconsiderably shorter than tractionbatteries, often requiringreplacement after 3–4 years andsignificantly less in intensiveapplications.

The third option is the gel battery.These have the benefit of beingentirely maintenance-free. They arealso completely sealed and do notemit hydrogen gas. In the past, gelbatteries have not been particularlyreliable in solar installations,tending to require replacement after1–2 years. However, more recently,smaller gel batteries have seensignificant improvements inlifespan and they now arecomparable to AGM batteries. Theprice has also droppedsignificantly.Gel batteries are not suitable for

big solar applications with a powerdrain of more than around 400 watt-hours, but they can provide anexcellent, zero-maintenancealternative to wet batteries forsmaller applications.If your solar project requiresbatteries of 50 amp-hour capacityor less, gel batteries are a verygood alternative to tractionbatteries.Not all battery makes are the same.From my experience, the very bestbattery manufacturers for solarenergy installations are Crown andTrojan, both of whom have
excellent batteries specificallydesigned for solar installations. Ifonly the very best will do and youare prepared to pay the premium,the Optima ‘yellow top’ batteriesprovide the benefits of AGMbatteries in a smaller, lighterbattery with some of the bestoverall performance figures of anybattery available today.
Battery configurationsYou can use one or more batteriesfor power storage. Like solarpanels, you can wire your batteriesin parallel in order to increase theircapacity or in series in order to

increase their voltage.Unlike solar panels, which you canmix and match to create your array,you need to use the samespecification and size of batteries tomake up your battery bank. Mixingbattery capacities and types willmean that some batteries will neverget fully charged and some batterieswill get discharged more than theyshould be. As a result, mixingbattery capacities and types cansignificantly shorten the lifespan ofthe entire battery bank.
Battery lifespanBatteries do not last forever, and at

some stage in the life of your solarelectric system, you will need toreplace them. Obviously, we wantto have a battery system that willlast as long as possible and so weneed to find out about the lifespanof the batteries we use.There are two ways of measuringthe lifespan of a battery, both ofwhich tell you something differentabout the battery.
· Cycle Life is expressed as anumber of cycles to aparticular depth of discharge
· Life in Float Service showshow many years the battery

will last if it is stored,charged up regularly, butnever used
Cycle lifeEvery time you discharge andrecharge a battery, you cycle thatbattery. After a number of cycles,the chemistry in the battery willstart to break down and eventuallythe battery will need replacing.The cycle life will show how manycycles the batteries will last beforethey need to be replaced. The life isshown to a ‘depth of discharge’(DOD), and the manufacturers willnormally provide a graph or a table

showing cycle life verses the depthof discharge.Typical figures that you will see forcycle life may look like this:
CYCLELIFE 20%DOD 1600cycles 40%DOD 1200cycles 50%DOD 1000cycles

80%DOD 350cycles
As you can see, the battery will lastmuch longer if you keep your depthof discharge low.For this reason, it can often bebetter to specify a larger battery, orbank of batteries, rather than asmaller set of batteries. Mostexperts recommend that you installenough batteries to ensure that yoursystem does not usually dischargeyour batteries beyond 50% of theircapacity.The second benefit of a larger bank

of batteries is that this gives youmore flexibility with your powerusage. If you need to use moreelectricity for a few days than youoriginally planned for, you knowyou can do this without running outof energy.
HoldoverWhen considering batteries, youneed to consider how long you wantyour system to work while the solararray is not providing any charge atall. This time span is calledholdover.Unless you live inside the Arctic orAntarctic Circles (both of which

provide excellent solar energyduring their respective summers,incidentally), there is no such thingas a day without sun. Even in thedepths of winter, you will receivesome charge from your solar array.You may find there are times whenthe solar array does not provide allthe energy you require. It istherefore important to consider howmany days holdover you want thebatteries to be able to providepower for, should the solar arraynot be generating all the energy youneed.For most applications, a figure of

between three days and five days isusually sufficient.In our holiday home, we aredeliberately not providing enoughsolar energy for the system to run24/7 during the winter months.During the winter, we want thebatteries to provide enough powerto last a long weekend. Thebatteries will then be rechargedwhen the holiday home is no longeroccupied and the solar panel cangradually recharge the system.For this purpose, I have erred onthe side of caution and suggested afive-day holdover period for our

system.
Calculating how long a set ofbatteries will lastCalculating how long a set ofbatteries will last for yourapplication is not a precise science.It is impossible to predict thenumber of discharges, as this willdepend on the conditions thebatteries are kept in and how youuse the system over a period ofyears.Nevertheless, you can come up witha reasonably good prediction forhow long the batteries should last.

This calculation will allow you toidentify the type and size ofbatteries you should be using.First, write down your daily energyrequirements. In the case of ourholiday home, we are looking at adaily energy requirement of 695watt-hours.Then, consider the holdover. In thiscase, we want to provide five daysof power. If we multiply 695 watt-hours a day by 5 days, we get astorage requirement of 3,475 watt-hours of energy.Batteries are rated in amp-hoursrather than watt-hours. To convert
watt-hours to amp-hours, we dividethe watt-hour figure by the batteryvoltage.If we are planning to run our systemat 12 volts, we divide 3,475 by 12to give us 290 amp-hours at 12volts. If we are planning to run oursystem at 24 volts by wiring twobatteries in series, we divide 3,475by 24 to give us 145 amp-hours at24 volts.We do not want to completelydischarge our batteries, as this willdamage them. So we need to look atour cycle life to see how manycycles we want. We then use this to

work out the capacity of thebatteries we need.On a daily basis during the spring,summer and autumn, we areexpecting the solar array torecharge the batteries fully everysingle day: it is unlikely that thebatteries will be discharged bymore than 10–20%.However, during the winter months,we could have a situation where thebatteries get run down over aperiod of several days before thesolar panels get a chance to top thebatteries back up again.So for four months of the year, we

need to take the worst-casescenario where the batteries mayget discharged down to 80% depthof discharge over a five day periodand then recharged by the solararray.The batteries will allow us to dothis 350 times before they come tothe end of their useful life.350 cycles multiplied by 5 days =1,750 days = 58 monthsAs this scenario will only happenduring the four months fromNovember to February, thesebatteries will last us for around14½ years before reaching the end

of their cycle life.In reality, the Life in Float Servicefigure (i.e. the maximum shelf-life)for batteries is likely to be aroundten years, which means that, for thisapplication, they will fail beforethey reach their cycle life.Based on our energy requirementsof 145 amp-hours at 24 volts, and amaximum discharge of 80%, we cancalculate that we need a batterycapacity of 145 ÷ 0.8 = 181.25amp-hours at 24 volts.
Second-hand batteriesThere is a good supply of

second-hand batteries available.These are often available as ex-UPS batteries (UPS =Uninterruptable Power Supplies) orex-electric vehicle batteries.Whilst these will not have thelifespan of new batteries, they canbe extremely cheap to buy, oftenselling at their scrap value. If youare working to a tight budget andyour power demands are not great,this is a very good way to savemoney.Do not ‘mix and match’ differentmakes and models of batteries. Usethe same make and model of battery

throughout your battery bank. Iwould also advise against using amixture of new and used batteries.This is a false economy as the lifeof your new batteries may becompromised by the older ones.If you are considering second-handbatteries, try and find out how manycycles they have had and howdeeply they have been discharged.Many UPS batteries have hardlybeen cycled and have rarely beendischarged during their lives.If buying ex-electric vehiclebatteries, remember these have hada very hard life with heavy loads.

However, ex-electric vehiclebatteries can continue to providegood service for lower- demandapplications: if your total load isless than 1kW, these batteries canprovide good service.If possible, try and test second-handbatteries before you buy them.Ensure they are fully charged up,and then use a battery load tester onthem to see how they perform.If your second-hand batteries havenot been deep cycled many times,the chances are they will not have avery long charge life when you firstget them. To ‘wake them up’,
connect a solar controller or aninverter to them and put alow-power device onto the batteryto drain it to around 20% state ofcharge. Then charge the battery upagain using a trickle charge andrepeat.After three deep cycles, you willhave recovered much of thecapacity of your second-handbatteries.If using second-hand batteries,expect them to provide half of theiradvertised capacity. So if they areadvertised as 100-amp-hourbatteries, assume they will only

give you 50 amp-hours of use. In thecase of ex-electric vehiclebatteries, assume only one-thirdcapacity.The chances are, they will give youmuch more than this, but better to behappy with the performance of yoursecond-hand batteries than to bedisappointed because they are notas good as new ones.
Building your battery bankBecause we are running our systemat 24 volts, we will need two12-volt batteries connected inseries to create our battery bank.

We therefore need two 12-voltbatteries of 181.25 amp-hours eachin order to create the desiredbattery bank.It is unlikely that you are going tofind a battery of exactly 181.25amp-hours, so we need to find abattery that is at least 181.25 amp-hours in size.When looking for batteries, youneed to consider the weight of thebatteries. A single 12-volt batteryof that size will weigh in the regionof 50kg (over 110 pounds)!Safely moving a battery of that sizeis not easy. You do not want to

injure yourself in the process. Abetter solution would be to buymultiple smaller batteries andconnect them together to provide therequired capacity.Because batteries contain acid, theyshould be installed in a battery tray,so that any acid leaks may becontained. In Australia and Canada,regulations state that batteries mustbe enclosed in a ventilated,lockable and vermin-proofenclosure.As it is not possible to buy 181.25amp-hour batteries, I have decidedto use four 100-amp-hour 12-volt

batteries, giving me a battery bankwith a total capacity of 200amp-hours at 24 volts.12-volt, 100-amp-hour batteries arestill not lightweight. They caneasily weigh 30kg (66 pounds)each, so do not be afraid to usemore, lighter-weight batteries, ifyou are at all concerned.To build this battery bank, you canuse four 100-amp-hour, 12-voltbatteries, with two sets of batteriesconnected in series, and thenconnect both series in parallel, asshown below:

Four 100-amp-hour12V batteries. I have
paired up thebatteries to make
two sets of 100-amp-hour 24V batteries,and then connected

each pair in parallelto provide a
200-amp-hourcapacity at 24 volts.
If I were putting together a 12-voltbattery system instead of a 24-voltbattery system, I could wiretogether multiple 12-volt batteriesin parallel in order to provide thehigher capacity without increasingthe voltage:

Four 100-amp-hour12V batteries
connected in parallelto provide a
400-amp-hour 12Vbattery bank.
Battery safetyWhen choosing batteries, you needto consider the safety aspects of

batteries. With the exception of gelbatteries, all lead acid batteriesproduce hydrogen, which needs tobe ventilated. Batteries can also bevery heavy and care is needed whenlifting or moving them. Finally, dueto the highly acidic nature ofbatteries, protective clothing shouldbe worn whenever batteries arebeing worked on, and a chemicalclean-up kit should be kept nearby.I will go into more detail abouthandling batteries during thechapter on installation.

Solar controllerThe solar controller looks after thebatteries and stops them eitherbeing overcharged by the solararray or over-discharged by thedevices running off the batteries.Many solar controllers also includean LCD status screen so you cancheck the current battery charge andsee how much power the solararray is generating.Your choice of solar controller willdepend on four things:
· System voltage
· The current of the solar

array (measured in amps)
· The maximum current of theload (measured in amps)
· The level of detail yourequire from the statusdisplay
Some solar experts will sometimesadd a fifth item to that list: batterytype. To be fair, this was a problemwith some older solar controllers,which only worked with specificbattery types. Modern solarcontrollers work with all types oflead acid battery without aproblem, although you may need totell your solar controller what type

of batteries you are using when youare setting up the system.All but the very cheapest solarcontrollers provide basicinformation on an LCD screen thatallows you to see how much poweryou have generated compared tohow much energy you are using, andcan also show the current chargestored in the battery. Some solarcontrollers include more detailedinformation that allows you tocheck on a daily basis how yourpower generation and usagecompares.
Balancing the batteries

Another important function of asolar controller is to manage thecharge in each battery and to ensureeach battery is properly charged up.As batteries get older, the charge ofeach battery will start to vary. Thismeans that some batteries willcharge and discharge at differentrates to others. If left over time, theoverall life of the batteries willdeteriorate.Intelligent solar controllers canmanage these variations bybalancing, or equalizing, thebatteries they are charging. On mostcontrollers, you need to manually

activate a balance as part of aroutine inspection.
Allow for expansionWhen looking at solar controllers, itis worth buying one with a highercurrent rating than you actuallyneed.This allows you extra flexibility toadd additional loads or additionalpanels to your solar array in thefuture without having the additionalexpense of replacing your solarcontroller.
Maximum power pointtracking

More expensive solar controllersincorporate a technology calledmaximum power point tracking(MPPT). An MPPT controlleradjusts the voltage being receivedfrom the solar array to provide theoptimum voltage for charging thebatteries without significant loss ofwatts from the voltage conversion.If you have an MPPT controller,you can capture around 20% moreof the power generated by the solararray compared to a more basiccontroller.If you have less than 120W of solarpanels, it can work out cheaper to
buy extra solar panels rather thanspend the extra money on an MPPTcontroller. However, pricescontinue to fall and, if you have thechoice, a controller with maximumpower point tracking is aworthwhile investment.
Ground fault protectionMany solar controllers includeground fault protection. In the caseof a short from the solar array, aResidual Current Device (RCD)will cut off the current flowbetween the solar array and thecontroller, thereby averting the riskof damage to either the controller or
the solar array.In the United States and Canada,RCDs are also known as GroundFault Interrupters (GFIs).For anything larger than 100-wattsolar panel systems, and for allsystems mounted to a building, youneed to incorporate a separateRCD/GFI into your system if you donot have ground fault protectionbuilt into your controller.
Backup powerSome controllers have one extrauseful feature: the facility to start upan emergency generator if the

batteries run too low and the solararray is not providing enoughpower to cope with the load.This can be a useful facility forsites where the system must not failat any time, or for coping withunexpected additional loads.Whilst this may not seem soenvironmentally friendly, manygenerators are now available thatrun on bio-diesel or bio-ethanol.Alternatively, you can use anenvironmentally friendly fuel cellsystem instead of a generator. Thesetend to run on bio-methanol or zincand only emit water and oxygen.

Using multiple controllersSometimes it is desirable to havemultiple controllers on your solarenergy system. For instance, youmay want to install solar panels indifferent locations or facing indifferent directions, or you mayhave mismatched solar panels thatyou want to use. If you need to havemultiple controllers, only one needsto have the expensive features suchas battery balancing. The othercontrollers can be much simplerregulators that simply provide anadditional charge to the batteriesand switch off when the batteriesare fully charged.


InvertersWe are not using an inverter withour holiday home, but many solarapplications do require an inverterto switch up the voltage to grid-level AC current.
An inverter for stand-alonesystems is a different piece ofequipment to a grid-tie solarinverter. With a grid-tie inverter,your power is feeding into the gridand has to work in conjunction withthe grid. The inverter connectsdirectly to your solar panels andswitches off when the solar panelsno longer produce enough energy.

With a stand-alone system, yourpower is entirely separate from thegrid. The inverter connects to yourbattery bank and switches off whenthe battery bank is running low oncharge.
There are three things toconsider when purchasing aninverter:
· Battery bank voltage
· Power rating
· Waveform
Battery bank voltageDifferent inverters require a

different input voltage. Smallerinverters, providing up to 3kW ofpower, are available for 12-voltsystems. Larger inverters tend torequire higher voltages.
Power ratingThe power rating is the maximumcontinuous power that the invertercan supply to all the loads on thesystem. You can calculate this byadding up the wattages of all thedevices that are switched on at anyone time. It is worth adding amargin for error to this figure.Inverters will not run beyond theirmaximum continuous power rating
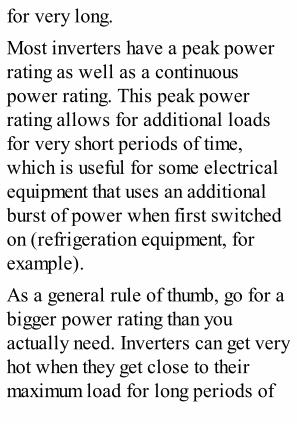
for very long.Most inverters have a peak powerrating as well as a continuouspower rating. This peak powerrating allows for additional loadsfor very short periods of time,which is useful for some electricalequipment that uses an additionalburst of power when first switchedon (refrigeration equipment, forexample).As a general rule of thumb, go for abigger power rating than youactually need. Inverters can get veryhot when they get close to theirmaximum load for long periods of

time. Many professionalsrecommend that you buy an inverterthat has a continuous power ratingthat is at least one third higher thanyou plan to use.
WaveformWaveform relates to the quality ofthe alternating current (AC) signalthat an inverter provides.Lower-cost inverters often providea modified sine wave signal(sometimes advertised as aquasi-sine wave). More expensiveinverters provide a pure sine wavesignal.

Modified sine wave inverters tendto be considerably cheaper and alsotend to have a higher peak powerrating.However, some equipment may notoperate correctly with a modifiedsine wave inverter. Some powersupplies, such as those used forlaptop computers and portabletelevisions, may not work at all,while some music systems emit abuzz when run from a modified sinewave inverter.These faults are eliminated with apure sine wave inverter, whichproduces AC electricity with an

identical waveform to the standarddomestic electricity supplyprovided by the grid.
Installation options andoperating environmentSmall inverters with a continuouspower rating of less than 3kW arelightweight units and are oftensimply placed on a shelf or a desk.Medium-sized inverters tend to beheavy units that need to be mountedsecurely on a wall. Largerinverters, rated at 10kW or above,may need to be bolted to a floor.All inverters generate a significant

amount of heat, especially whenrunning close to their rated output,and require good airflow around theunit.Most off-grid inverters aredesigned to be installed inside.Outdoor inverters are available, butthey are expensive and may bedifficult to source. If you arelooking at installing an inverteroutdoors, check that the inverter issealed against dust and wateringress, rated to at least IP64.Overheating inverters is the numberone reason for any solar systemfailing. As an inverter gets hotter,

they provide less power, and if thetemperature continues to rise theywill eventually shut down to avoidpermanent damage. When choosingan inverter, check its operatingtemperatures and consider how youcan ensure your system remainswithin these limits.Inverters should always be installedin a well-ventilated area, awayfrom the ceiling and with aclearance around each side, the topand the bottom. They cannot beinstalled in a sealed cupboard.Some inverters have the option ofan external heat sink, ortemperature-controlled cooling fans

to help keep the inverter cool.If your inverter is producing morethan around 500 watts of power, itis likely to make a very smallamount of noise. This is typically acontinuous low-level hum. This isusually only noticeable if thesurrounding area is quiet. However,for this reason, inverters are notusually installed inside the livingspace in a home or in an officeenvironment. Instead, considerinstalling your inverter in a garage,or on an outside wall of yourbuilding.Occasionally, with larger inverters,

the sound made by the inverter hasbeen known to resonate with thewall, amplifying the sound andmaking it quite unpleasant to livewith, even if the inverter is mountedto an outside wall or the wall of agarage. This is a very rareoccurrence, but is most likely tooccur if you are planning to mountyour inverter onto a wall made outof solid concrete. The solution is todampen the mounting between theinverter and the wall or floor thatthe inverter is mounted onto. Thereis a very effective product calledGreen Glue, produced by the GreenGlue Company

(www.GreenGlueCompany.com)that is applied between the wall andthe inverter. When it is compressedby remounting the inverter, the gluespreads out to form a soundisolation barrier that is particularlyeffective at blocking outlow-resonance vibrations.
Ground fault protectionMost inverters now include groundfault protection. All inverters mustalways be grounded. If your chosengrid-tie inverter does notincorporate ground fault protection,you need to incorporate this intoyour system using a Residual

Current Device (RCD). RCDs areknown as Ground FaultInterrupters (GFIs) in the UnitedStates and Canada.

CablesIt is easy to overlook them, butcables have a vital part to play inensuring a successful solar electricsystem.There are three different sets ofcables that you need to consider:
· Solar array cables
· Battery cables
· Appliance cablingSolar array cabling has alreadybeen discussed. For stand-alonesystems, the battery and appliancecabling also needs to be correctly

specified.For all cabling, make sure that youalways use cable that can cope withthe maximum amount of current(amps) that you are planning towork with.Take into account that you may wishto expand your system at some pointin the future, and use a higherampere cable than you actually needin order to make future expansion assimple as possible.
Battery cablesBattery cables are used to connectbatteries to the solar controller and

to the inverter. They are also usedto connect multiple batteriestogether.Battery interconnect cable isavailable ready-made up frombattery suppliers, or you can makethem up yourself. You shouldalways ensure that you use thecorrect battery connectors toconnect a cable to a battery.
Appliance cablingIf you are using an inverter to runyour appliances at grid-levelvoltage, you can use standarddomestic wiring, wired in the sameway as you would wire them for

connection to domestic AC power.If you are running cabling for12-volt or 24-volt operation, youcan wire your devices up using thesame wiring structure as you woulduse for grid-level voltage, althoughyou may need to use larger cablesthroughout to cope with the highercurrent.In a house, you would typicallyhave a number of circuits fordifferent electrical equipment: onefor downstairs lighting, one forupstairs lighting and one or two forappliances, depending on how manyyou have. This has the benefit of

keeping each individual cable runas short as possible, as well asreducing the amount of current thateach circuit needs to handle.As we have already learnt,low-voltage systems lose asignificant amount of power throughcabling. The reason for this is thatthe current (amps) is much higherand the power lost through the cableis proportional to the square of thecurrent. You therefore need to keepyour cable runs as short aspossible, especially the cable runswith the highest current throughput.I have already mentioned how you
can calculate suitable cablethicknesses for your solar arrayearlier in this chapter. You use thesame calculation for calculatingcable thicknesses for appliancecabling.

Plugs and socketsFor 12-volt or 24-volt circuits witha current of less than 30 amps, youcan use the same standard switchesand light sockets as you do fornormal domestic power.However, you must not use thestandard domestic plugs andsockets for attaching low-voltagedevices to your low-voltage circuit.If you do, you run the risk that yourlow-voltage devices couldaccidentally be plugged into ahigh-voltage circuit, which couldhave disastrous consequences.Instead, you have the choice of
using non-standard plugs andsockets or of using the same 12-voltplugs and sockets as used incaravans and boats.These low-voltage sockets do notneed to have a separate earth(ground) wire, as the negative cableshould always be earthed(grounded) on a DC circuit system.

AppliancesSo far, I have talked a lot about12-volt appliances, but you can buymost low-voltage appliances foreither 12-volt or 24-volt and a lotof them are switchable between 12and 24 volts.Compared to appliances that runfrom grid-level voltages, you oftenpay more for low-voltageappliances. This is not always thecase, however, and with carefulshopping around, items liketelevisions, DVD players, radiosand laptop computers need not costany more to buy than standard
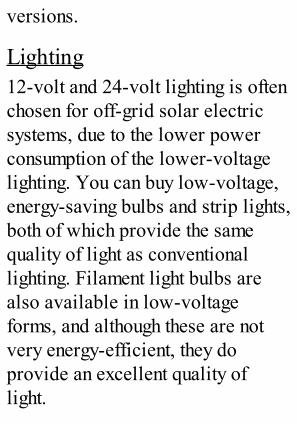
versions.
Lighting12-volt and 24-volt lighting is oftenchosen for off-grid solar electricsystems, due to the lower powerconsumption of the lower-voltagelighting. You can buy low-voltage,energy-saving bulbs and strip lights,both of which provide the samequality of light as conventionallighting. Filament light bulbs arealso available in low-voltageforms, and although these are notvery energy-efficient, they doprovide an excellent quality oflight.

You can buy a lot of 12-voltlighting from ordinary hardwarestores. Many kitchen and bathroomlights work at low voltage and willwork just as well from a 12-voltbattery supply as they will from the12-volt AC transformers typicallyused with this lighting. Diachronicflood lamps, halogen spot lamps,strip lamps and LED lights often runat 12 volts, giving you an excellentchoice. Buying these from ahardware store rather than from aspecialist solar supplier can alsosave a considerable amount ofmoney.

RefrigerationA good selection of refrigeratorsand freezers are available that willrun from 12-volt and 24-volt powersupplies. Some refrigerators willrun on both low-voltage DC andgrid-level AC voltage, and somecan run from a bottled gas supply aswell.Unlike most other devices that youwill use, refrigerators need to runall the time. This means that,although the power consumptioncan be quite low, the overall energyconsumption is comparatively high.There are three types of
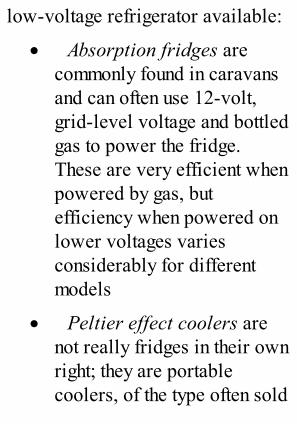
low-voltage refrigerator available:
· Absorption fridges arecommonly found in caravansand can often use 12-volt,grid-level voltage and bottledgas to power the fridge.These are very efficient whenpowered by gas, butefficiency when powered onlower voltages variesconsiderably for differentmodels
· Peltier effect coolers arenot really fridges in their ownright; they are portablecoolers, of the type often sold

in car accessory shops andpowered by the 12-volt in-caraccessory socket. Whilstthese are cheap, most of themare not very efficient. Avoidusing these for solarapplications
· Compressor fridges use thesame technology asrefrigerators in the home.They are the most efficient forlow-voltage operation. Theyare more expensive than othertypes but their efficiency issignificantly better: manymodels now consume less
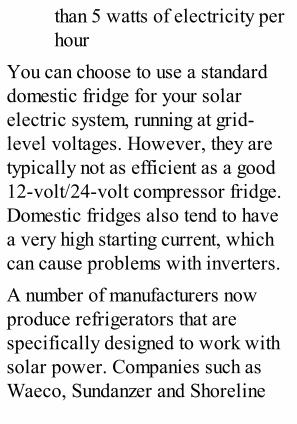
than 5 watts of electricity perhour
You can choose to use a standarddomestic fridge for your solarelectric system, running at grid-level voltages. However, they aretypically not as efficient as a good12-volt/24-volt compressor fridge.Domestic fridges also tend to havea very high starting current, whichcan cause problems with inverters.A number of manufacturers nowproduce refrigerators that arespecifically designed to work withsolar power. Companies such asWaeco, Sundanzer and Shoreline

produce a range of refrigerators andfreezers suitable for home, medicaland business use.If you wish to use a standarddomestic fridge, speak to thesupplier of your inverter to makesure the inverter is suitable. Manyrefrigerators have a very high start-up current and you may need to buya larger inverter that can handle thissudden demand.
Microwave ovensStandard domestic microwaveovens consume a lot more powerthan their rated power: their ratedpower is output power, not input.

You will find the input power onthe power label on the back of theunit, or you will be able to measureit using a watt meter.Typically, the input power for amicrowave oven is 50% higher thanits rated power.Low-voltage microwave ovens areavailable, often sold for use incaravans and recreational vehicles(RVs). They tend to be slightlysmaller than normal domesticmicrowaves and have a lowerpower rating, so cooking times willincrease, but they are much moreenergy-efficient.

Televisions, DVDs, computergames consoles and musicFlat screen LCD televisions andDVD players designed for 12-voltor 24-volt operation are availablefrom boating, camping and leisureshops. These tend to be quiteexpensive, often costing as much as50% more than equivalent domestictelevisions and DVD players.However, many domestic LCDtelevisions (with screens up to 24-inch) and DVD players often haveexternal power supplies and manyof them are rated for a 12-voltinput. Some investigations at your
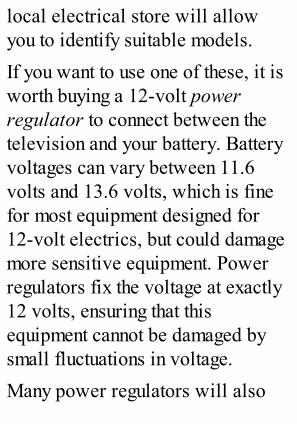
local electrical store will allowyou to identify suitable models.If you want to use one of these, it isworth buying a 12-volt powerregulator to connect between thetelevision and your battery. Batteryvoltages can vary between 11.6volts and 13.6 volts, which is finefor most equipment designed for12-volt electrics, but could damagemore sensitive equipment. Powerregulators fix the voltage at exactly12 volts, ensuring that thisequipment cannot be damaged bysmall fluctuations in voltage.Many power regulators will also

allow you to run 12-volt devicesfrom a 24-volt circuit, and are muchmore efficient than more traditionaltransformers.Power regulators also allow you toswitch from one voltage to otherlow voltages, if required. Forexample, the Sony PlayStation 3games console uses 8.5 volts, andwith a suitable power regulator youcan power one very effectivelyfrom 12-volt batteries.Power regulators can step upvoltages as well as step down. Asuitable power regulator can switchthe voltage from a solar battery

bank to an output voltage ofbetween 1½ volts and 40 volts,depending on the specification ofthe regulator.This means that many normalhousehold items with externalpower supplies, such as smallertelevisions, laptop computers, DVDplayers, music systems andcomputer games, to name but a few,can be connected directly to yoursolar power system.
Music systemsLike televisions and DVD players,many music systems have anexternal power supply, and a power

regulator can be used in place of theexternal power supply to power amusic system.Alternatively, you can build yourown built-in music system using in-car components. This can be veryeffective, both in terms of soundquality and price, with the addedbenefit that you can hide thespeakers in the ceiling.Using a music system with aninverter which has a modified sinewave can be problematic. Musicsystems designed to run at grid-level voltages expect to work on apure sine wave system and may

buzz or hum if used with a modifiedsine wave inverter.
Dishwashers, washingmachines and tumble dryersDishwashers, washing machinesand tumble dryers tend to be verypower hungry.There are small washing machines,twin tubs and cool-air dryersavailable that run on low voltage,but these are really only suitable forsmall amounts of washing. Theymay be fine in a holiday home or ina small house for one person, butare not suitable for the weekly

washing for a family of four.If you need to run a washingmachine from a solar electricsystem, you are going to need aninverter to run it. The amount ofenergy that washing machinesconsume really does vary from onemodel to the next. Anenergy-efficient model may only use1,100 watts, whereas an oldermodel may use almost three timesthis amount.The same is true for dishwashers.Energy-efficient models may onlyuse 500 watts, whereas oldermodels may use nearer 2,500 watts.

If you need to run a dishwasher, youwill need to use an inverter.Tumble dryers are hugely energyinefficient and should be avoided ifat all possible. Most of them usebetween 2,000 and 3,000 watts ofelectricity and run for at least onehour per drying cycle.There are various alternatives totumble dryers. These range from thetraditional clothes line or clothesairer to the more high-tech low-energy convection heating dryersthat can dry your clothes in aroundhalf an hour with minimal amountsof power.

If you really must have a tumbledryer, you may wish to consider abottled gas powered tumble dryer.These are more energy-efficientthan electric tumble dryers and willnot put such a strain on your solarelectric system.
Air conditioning systemsOver the past couple of years, anumber of manufacturers have beenlaunching solar powered airconditioning and air coolingsystems.Air conditioning has traditionallybeen very power hungry. For thisreason, solar powered air

conditioning has been unaffordable,as a large solar array has beenrequired simply to run thecompressors.In response, manufacturers havedeveloped more efficient airconditioning systems, designed torun from a DC power source.Companies such as Austin Solar,Solar AC, Securus, Sunsource,Sedna Aire, Hitachi and LG haveall announced air conditioning unitsdesigned to work with solar energy.Other manufacturers havedeveloped evaporative air coolersthat use a fraction of the power of
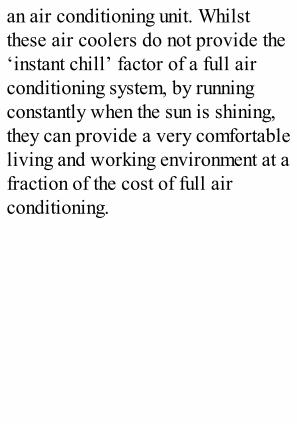
an air conditioning unit. Whilstthese air coolers do not provide the‘instant chill’ factor of a full airconditioning system, by runningconstantly when the sun is shining,they can provide a very comfortableliving and working environment at afraction of the cost of full airconditioning.

Reputable brand namesMost solar manufacturers are nothousehold names, and as such it isdifficult for someone outside theindustry to know which brands havethe best reputation.Of course, this is a subjective listand simply because a manufacturerdoes not appear on this list, it doesnot mean the brand or the product isnot good.
Solar panel manufacturers andbrandsAtlantis Energy, BP Solar,Canadian Solar, Clear Skies, EPV,

Evergreen, Conergy, G.E. Electric,Hitachi, ICP, Kaneka, Kyocera,Mitsubishi, Power Up, REC Solar,Sanyo, Sharp, Solar World,Spectrolab, Suntech, Uni-solar.
Solar controller and invertermanufacturers and brandsApollo Solar, Blue Sky, Enphase,Ever Solar, Exeltech, Fronius,Kaco, Magnum, Mastervolt,Morningstar, Outback, PowerFilm,PV Powered, SMA, Solectria,Sterling, Steca, SunnyBoy, Xantrex.
Battery manufacturers andbrands

East Penn, Chloride, Crown,EnerSys, Exide, Giant,GreenPower, Hawker, ManBatt,Newmax, Odyssey, Optima,Panasonic, PowerKing, Tanya,Trojan, US Battery, Yuasa.

Shopping list for theholiday homeBecause our solar electric system isbeing installed in the garden, 10metres (33 feet) away from thehouse, we have worked out that weneed to run our system at 24 voltsrather than 12 volts, due to the highlevels of losses in the system.I have already calculated that I need320 watts of power from my solararray at 24 volts. To achieve this, Iwill need to connect 12-volt solarpanels in series to make a 24-voltsystem.

There are various different optionsavailable to make a 320-watt, 24-volt solar array. After checkingwith a number of suppliers, I havecome up with the following options:
· Buy two 160-watt panelsfor a total of 320 watts ofpower – total cost £499($768 US)
· Buy four 80-watt panels fora total of 320 watts of power– total cost £434 ($668 US)
· Buy eight 40-watt panels fora total of 320 watts of power– total cost £640 ($985 US)

· Buy six 60-watt panels for atotal of 360 watts of power) –total cost £580 ($893 US)
It is really worth shopping aroundand finding the best price. Pricescan vary dramatically from onesupplier to another and I have seenmany cases where one supplier isselling a solar panel for over twicethe price it is available fromelsewhere.Depending on what configuration Ibuy (and where I buy it), solarpanel prices for the differentcombinations vary between £434($668 US) and £640 ($985).

Based on price and convenience, Ihave decided to go for the cheapestoption and buy four Clear Skies 80-watt polycrystalline solar panels.Because I am running at 24 voltsand at a relatively low current, Ihave a good choice of solarcontrollers without spending afortune. I decided to buy a StecaMPPT controller, whichincorporates a built-in LCD displayso I can see how much charge mybatteries have at any one time. Thecost of this controller is £225($350).

This drawing showshow I intend to wireup my solar array. Iwill pair two sets ofpanels together inseries to bring thevoltage up from 12
volts per panel to 24volts per pair. I then
connect the pairs

together in parallelto maintain the 24
volts but to increasethe power of the
system to a total of320 watts
I calculated that I needed 181Ah of24-volt battery storage. I havedecided to go for four Trojan 12V,105Ah batteries, which I willconnect together in pairs to provideme 210 Ah of power at 24 volts.The cost of these batteries is £560($860).

This drawing showshow I intend to wire
up my batteries. Iwill pair two sets ofbatteries together inseries to bring thevoltage up to 24
volts per pair. I thenconnect the pairs
together in parallelto maintain the 24

volts but to increasemy storage capacityto 210 amp-hours at
24 voltsMy Steca controller incorporatesGround Fault Protection, but I havedecided to install a separate RCD(GFI) unit as well. It is a ‘belt andbraces’ approach, but RCDs areextremely cheap and I feel it isworth the extra money. I still need away of isolating the solar arraymanually. I choose to install threeDC isolation switches: one betweenmy controller and the solar array,one between my solar controllerand my batteries and one between

my controller and my distributionbox. This allows me to isolate eachpart of my system separately, formaintenance or in case of anemergency.For lighting, I have decided on24-volt energy saving compactfluorescent light bulbs for insideuse and a 24-volt halogen bulkheadlight for an outdoor light. Theenergy saving compact fluorescentlight bulbs look identical to grid-powered energy saving light bulbsand provide the same level oflighting as their grid-poweredequivalents. Bulbs cost around

£8/$13 each and I can use the samelight switches and fittings as Iwould for lights powered by thegrid.I have decided to use a ShorelineRR14 battery-powered fridge,which can run on either 12-volt or24-volt power supplies. This has aclaimed average powerconsumption of 6 watts per hourand costs £380 ($610).For television, I have chosen aMeos 19-inch flat screen TV withbuilt-in DVD player. The Meos TVcan run on 12-volt or 24-volt powerand has an average power

consumption of 45 watts. This isslightly higher than I was originallyplanning for (I was planning to buya model with a 40 watt powerconsumption), but not by enough tobe of any great concern.At this stage, I now know the maincomponents I am going to be usingfor my holiday home. I have notgone into all the details, such ascables and configuration. We needto complete that as we plan thedetailed design for our solar energysystem.

In conclusion· When choosing solar
panels, buy from a reputablemanufacturer. Theperformance of thehigh-quality panels,especially in overcastconditions, is often better thanthe cheaper panels, and theimproved build qualityshould ensure a longer life
· Lead acid batteries come invarious types and sizes. Youcan calculate the optimumsize of battery based on cyclelife when operating on your
system
· The voltage you run yoursystem at will depend on thesize of current you want torun through it. High-currentsystems are less efficient thanlow-current systems, andlow- current inverters andcontrollers are inevitablycheaper
· Allow for future expansionin your system by buying abigger controller and inverterthan you currently need,unless you are absolutelycertain your requirements are

not going to change in thefuture
· Many appliances anddevices are available inlow-voltage versions as wellas grid-level voltageversions. Generally, thelow-voltage versions tend tobe more efficient
· When wiring in 12-volt or24-volt sockets, do not usestandard domestic powersockets. If you do, you arerunning the risk oflow-voltage devices beingplugged into grid-level

voltage sockets, which couldhave disastrous consequences

Planning, regulationsand approvals
Depending on where you livearound the world, there aredifferent planning requirements,regulations and approvals neededfor installing a solar energy system.Some countries have little or noregulation in place; other countrieshave extremely tight regulations. Insome countries, the regulationschange from one region to another.Consequently, it is impossible toprovide every bit of relevant

information here. Instead, weprovide much of this information onwww.SolarElectricityHandbook.comYou will also be able to findinformation from your localplanning authority and electricityproviders.Wherever you live around theworld, there is a simple mantra fordealing with authority when itcomes to building and electricalregulations and approvals: if indoubt, ask. Ignorance is never anexcuse.In the case of a solar installation,the people you need to speak to are

your local planning office, yourbuildings insurance provider and, ifyou are building a grid-tie system,your local electricity company. Notonly will they be able to helpensure you do not fall foul of anyregulation; you will often find theyare a helpful and useful source ofinformation in their own right.

National andinternational standardsfor solar componentsIn the United States, Canada,Australia and across Europe, solarpanels and inverters must complywith specific standards in order tobe used in a grid-tie system. Theunits are tested to ensure that theyconform to these standards beforethey are allowed on sale.Across Europe, solar panels haveto be certified to IEC safetystandard IEC 61730 andperformance standards IEC 61215

or IEC 61646. Solar grid-tieinverters have to conform to IEC62109. Some European countrieshave additional certification. InGermany, grid-tie inverters musthave a VDE126 certification, whilstin the United Kingdom, grid tieinverters that produce fewer than 16amps of peak power (3.6kW) musthave G83/1 certification, and largerinverters require the much morecomplicated G59/1 certification.Also in the United Kingdom, solarpanels and inverters have to becertified by the Micro generationCertificate Scheme (MCS) in orderto be eligible for feed-in tariffs and

other financial incentives.In the United States, solar panels,solar cables and inverters have tohave UL certification. Solar panelsmust conform to the UL 1703standard. Grid-tie inverters mustconform to UL 1741 and solarcabling must conform to UL 4703 orUL 854 (USE-2). If you are usingbatteries in your design, thebatteries must conform to either UL1989, UL 2054, UL-SU 2580 orUL-SU 1973.In Canada, solar panels mustconform to safety standardULC/ORD-C1703-1 and design

standards CAN/CSA C61215-08 orCAN/CSA C61646-2, whilst grid-tie inverters must conform to CSAC22.2 No. 107.1. Batteries mustconform to CAN/CSA F382-M89(R2004).In Australia, solar panels mustconform to AS/NZS5033, whilstgrid-tie inverters must conform toAS4777. If you are planning astand-alone system in a building,your system must also conform toAS4509. If you are planning amobile system, for instance in acaravan or recreational vehicle,your system must conform toAS3001.

It is worth noting that, in all of theseregions, no differentiation is madebetween grid-tie solar and stand-alone systems for componentselection. If you are building a solarenergy system that is to be fitted toa building, your system must usecertified components in order tocomply with building and electricalsafety regulations in these regions.If you use non-approved equipmentin a grid-tie system in thesecountries, you will not be allowedto connect your system to the grid.You are also likely to be incontravention of building

regulations and may invalidate yourbuildings insurance.

Installation regulationsIn many countries, including theUnited States, Canada, Australia,New Zealand and throughout mostof the European Union, you cannotwork on building electrics unlessyou are a qualified electrician.Some countries allow you to workon electrics, but your work has tobe checked and certified by aqualified electrician beforecommissioning.In the main, low-voltage DCcircuits are excluded from thislegislation, but it is worth ensuringthat this is the case in your region.

In many countries, there areadditional qualifications forelectricians that allow them toinstall and certify solar energysystems. In most countries, it is notyet a legal requirement to haveadditional training in order toinstall photovoltaic systems.However, if you wish to get accessto government subsidies, feed-intariffs or renewable energycertificates, you will almostcertainly need to have your systeminstalled, or at least checked, testedand certified, by qualified solarinstallation specialists. This iscertainly the case in the United

Kingdom and Australia. In theUnited States, subsidies vary fromstate to state, and often from countyto county.
Getting your electricitysupplier involvedIf you are planning a grid-tiesystem, it is worth getting yourelectricity supplier involved in yourproject earlier rather than later.Sometimes they have their ownrequirements or lists of approvedequipment. They often havespecialists you can speak to, whocan give you extra advice andsupport.In most parts of the world, yourelectricity company will usuallyneed to be involved while yoursystem is being installed, replacing

your current electricity meter with aspecific import/export meter andcarrying out the final inspectionbefore approving your system.Some electricity companies willonly accept feed-in connectionsfrom professional solar PVinstallers. Almost all electricityproviders insist that the installationis inspected and signed off, eitherby a certified solar installer or byone of their own inspectors, beforethey will accept your connectiononto the grid.

Solar grants and sellingyour powerAround the world, governments areencouraging the take-up of solarenergy. Financial assistance comesthrough various different schemes,and researching what is availablecan be confusing andtime-consuming.The different types of schemes thatare offered in different places aredescribed in more detail below.The specific schemes for grants andthe amount of money you canreceive for installing solar powerand selling your electricity vary

from country to country, and oftenfrom county to county. Manycountries are currently reviewingtheir schemes, which means thatinformation that is current onemonth will be out of date the next.The Solar Electricity Handbookwebsite has information on specificfinancial incentive schemes forvarious countries, as this can bekept more up-to-date than the book.
General information aboutgrants, tax credits and feed-intariffsWhilst some schemes are flexible

over who is allowed to install yoursolar energy system, most schemeswork in conjunction with agoverning body that insists that yoursystem is installed by one of theirmembers.In some cases, individuals havebeen able to get their system signedoff by a solar energy company inorder to claim the financialincentives. However, this is often atthe discretion of the solar installers,and many will refuse outright.In general, financial incentives arebeing offered through four differentmechanisms:

· Feed-in tariffs
· Tax credits
· Renewable EnergyCertificates (RECs)
· Remote installationallowances
Feed-in tariffsIf you have a grid-tie solar energysystem, you can often sell yourpower back to the electricitycompanies. This is done through afeed-in tariff, where the electricityproviders agree to buy your surpluspower at an agreed rate.

In some countries, feed-in tariffsare set by the electricity companiesand can vary throughout the day,depending on supply and demand.In other countries, feed-in tariffs arefixed by the government, often at apremium rate in order tocompensate solar owners for theup-front cost of installing theirsystems.In many cases, the governmentguarantees the value of feed-intariffs for a minimum number ofyears, thereby guaranteeing thatowners make a return on theirinvestments. A common theme with

governments is to set a very highvalue for feed-in tariffs initially andthen to reduce the feed-in tariffvalues for new customerssignificantly after two years. Thishas happened in Spain, Portugal,Germany, Hong Kong and now theUnited Kingdom. The message isthis: if you are offered guaranteedlong-term feed-in tariffs at a verygood and guaranteed rate of return,take up the offer: the scheme isunlikely to remain available formore than two years.Tax creditsA second option for compensating

solar energy owners is a tax creditscheme where all or part of theinstallation cost of a solar energysystem may be offset against tax. Insome countries, these schemes areonly available to businesses; inothers they are available toindividuals as well.With a tax credit, you pay for theinstallation up front, but thenreceive part or all of the moneyback through tax credits over one,two or three years.The United States of America arecurrently offering tax credits forpeople installing solar energy

systems through the Federal TaxCredits for Consumer EnergyEfficiency scheme. There areadditional tax credits available insome states and counties.Renewable Energy Certificates(RECs)Renewable Energy Certificates aretradable certificates that prove thata certain amount of energy wasgenerated from renewable sources.These certificates can be boughtand sold on the open market.Whoever owns the certificate canclaim to have bought electricityfrom a renewable resource.

There are two markets for buyingrenewable energy certificates:
· The voluntary sector –where individuals andcompanies elect to buy greenelectricity and pay a premiumto do so
· The electricity providersthemselves, who aremandated by governments toprovide a certain percentageof their electricity from greensources
In some countries, individuals andsmall businesses who install solarenergy systems are eligible to

receive renewable energycertificates for the energy theyproduce. In many cases, renewableenergy certificates are available forboth grid-tie and stand-alonesystems.In some countries, governmentshave encouraged the take-up ofsmall-scale solar by providing amultiplier for small solargenerators. Under these schemes,solar energy owners can receivetwo, three or even five times thenumber of renewable energycertificates for the energy theyproduce, ensuring that owners canearn money from their small-scale

solar energy systems.Renewable energy certificates arealso known as Green Tags in theUnited States and TradableRenewable Certificates (TRCs) inSouth Africa and New Zealand.Remote installation allowancesRemote installation allowances areoffered in a few countries. Theytend to be available for individualsand businesses with premises inremote areas, where the cost ofconnecting these buildings to thegrid is very high.By their very nature, these systems

are stand-alone, off-gridapplications. A good example of thesort of scheme on offer is theAustralian model that providescredits for people installing solarwhere the cost of connecting theirpremises to the grid is greater thanAUS $30,000, or the distancebetween the premises and the gridis greater than 1 km.How much money is available, andhow it is paid, varies from onescheme to another. In Australia, theremote installation allowance isoffered by multiplying the numberof renewable energy certificatesthat owners can receive for their

system.

In conclusion· There are different rules
and regulations for installingsolar power depending onwhere you live
· You have to comply withthe building regulations andelectrical regulations that arein force in your region
· You will be able to findhelp by talking to your localplanning office and yourelectricity provider. You willalso need to talk to yourbuilding insurance company
· There are many national andinternational standards forsolar energy systems,covering both the actualphysical hardware and how itis installed
· In many places around theworld there are financialincentives available for solarenergy providers. Theseschemes vary, but tend to fallinto four camps: feed-intariffs, tax credits, renewableenergy certificates and remoteinstallation allowances
· What incentives are

available, and their value,changes regularly. Check thewebsite for up-to-dateinformation

Detailed Design
By now, you know whatcomponents you are going to use foryour solar project. The next step isto work on your detailed design:effectively, a picture of what youwant to build. Even for simpleprojects, it makes sense to draw upa diagram before installation.The benefits of drawing a wiringdiagram are numerous:
· It ensures that nothing hasbeen overlooked
· It will assist in the cable

sizing process
· It helps ensure nothing getsforgotten in the installation(especially where there is agroup of people workingtogether on site)
· It provides usefuldocumentation formaintaining the system in thefuture
The wiring diagram will bedifferent for each installation andwill vary depending on whatcomponents are used. Read theproduct documentation for eachcomponent for information on how

it must be wired.If you have not yet chosen yourexact components at this stage,draw a general diagram but makesure that you flesh this out into adetailed document before theinstallation goes ahead.

A sample wiringdiagram for a simplestand-alone lighting
systemWhen drawing up your wiringdiagrams, you will need toremember the following:

Safety is designed inIt is easy to forget that solar energycan be dangerous. We are workingwith electricity and whilst anyindividual component may only below-voltage, some of the currentsinvolved can be quite significant.Furthermore, connecting multiplesolar panels or batteries together inseries can very quickly create ahigh voltage. It is thereforeimportant that safety be taken intoaccount during the detailed designphase of the project, as well asduring installation.When designing the system, ask
yourself this question:“What’s the worst that can
happen?”Solar energy systems are relativelystraightforward and the design ofall the components you will usewill keep risks to an absoluteminimum. Nevertheless, there arepotential risks. If you are aware ofthese risks, you can take steps toeradicate them in your design.
What is the worst that canhappen with a solarinstallation?With solar energy, we will be

working in a few risk areas: DCelectrics from the solar array, highcurrents from batteries, ACelectrics if you are using aninverter, and high temperaturesfrom the solar panels themselves.Each of these risk areas can poseproblems, both in isolation andwhen combined. It is worthconsidering these risks to ensurethat you can design out as many ofthem as possible.
Grounding your electricsExcept for a very small system,such as rigging up a light in a shed,a solar energy system should

always be earthed (grounded). Thismeans running a wire from anegative terminal to an earthing rod(known as a grounding rod inNorth America) that is rammed intothe ground.An earthing rod (grounding rod) is a1m (3 foot) long metal pole,typically made of copper. They areavailable from all electricalwholesalers and builders’merchants.Connections to a ground preventbuild-up of static electricity and canhelp prevent contact with highvoltages if the circuit gets damaged.
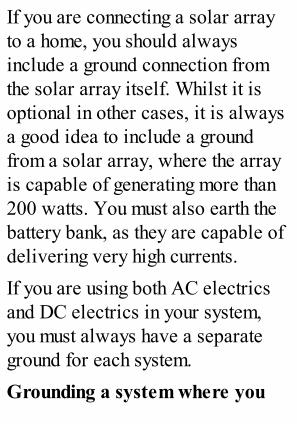
If you are connecting a solar arrayto a home, you should alwaysinclude a ground connection fromthe solar array itself. Whilst it isoptional in other cases, it is alwaysa good idea to include a groundfrom a solar array, where the arrayis capable of generating more than200 watts. You must also earth thebattery bank, as they are capable ofdelivering very high currents.If you are using both AC electricsand DC electrics in your system,you must always have a separateground for each system.Grounding a system where you

cannot connect to the groundThere may be instances where youare building a system where noconnection to the ground ispossible. For instance, a portablesolar charging unit that can becarried anywhere, or a solarpowered boat.Typically, these designs are verysmall, using only DC electrics andrunning only a few amps of current.If your solar array is less than 100watts, your system runs at 12 voltsand you are drawing less than 10amps of current, you are unlikely toneed a common earth for all your

components.For larger systems, a ground planeis often used. A ground plane is ahigh-capacity cable connected tothe negative pole on the battery, towhich every other componentrequiring a ground is alsoconnected. A thick, heavy-dutybattery interconnection cable isoften used as a ground plane cable,with thinner wires connecting tothis ground plane cable from everyother component requiring an earth.As an alternative to a high-capacitycable, depending on what you areinstalling your solar system on, you

can use a metal frame as thecommon ground for your system. Instandard car electrics, for example,the ground plane is the car bodyitself.
DC ElectricsDirect current electricity typicallyruns at relatively low voltages: weare all familiar with AA batteriesand low-voltage transformers usedfor charging up devices such asmobile phones. We know that if wetouch the positive and negativenodes on an AA battery we are notgoing to electrocute ourselves.However, direct current electricity

can be extremely dangerous, even atcomparatively low voltages.Around the world, a small numberof people are killed every year bylicking 9-volt batteries, because ofthe electric jolt they receive. Scalethat up to an industrial grade heavy-duty 12-volt traction battery,capable of delivering over 1,000amps of current, or a solar arraycapable of producing hundreds ofvolts on an open circuit, and it iseasy to see that there is a real riskinvolved with DC electrics.If you are electrocuted with ACpower, the alternating current

means that whilst the shock can befatal, the most likely outcome is thatyou will be thrown back and let go.If you are electrocuted with DCpower, there is a constant chargerunning through you. This meansyou cannot let go. If you areelectrocuted with very high currentDC, the injury is more likely to befatal than a similar shock with ACpower.Because of the low current from asingle solar panel, you are unlikelyto notice any jolt if you short-circuitthe panel and your fingers get in theway. However, wire up multiplesolar panels together and it is a

different story. Four solar panelsconnected in series produce anominal 48 volts. The peak voltageis nearer 80–100 volts. At thislevel, a shock could prove fatal fora young child or an elderly person.The current thinking with grid-tiesolar systems is to connect manysolar panels together in series,creating a very high-voltage DCcircuit. Whilst there are some(small) efficiency benefits ofrunning the system at very highvoltage, there are risks as well,both during the installation and theongoing maintenance of the system.

There are issues with the 12-voltbatteries too. Industrial grade,heavy-duty batteries can easilydeliver a charge of 1,000 amps fora short period. Short out a batterywith a spanner and it will be redhot in just a few seconds. In fact,the current delivery is so great it ispossible to weld metal using asingle 12-volt battery.The big risk with DC electrics iselectrocuting yourself (or somebodyelse) or causing a short circuit,which in turn could cause a fire.Solar panels generate electricity allthe time, often including a small

current at night, and cannot simplybe switched off. Therefore, thereneed to be manual DC circuitbreakers (also called isolationswitches) to isolate the solar panelsfrom the rest of the circuit, plus agood ground and a ground faultprotection system to automaticallyswitch off the system should a shortcircuit occur.If your system is running at a highvoltage, you may want to considermultiple DC circuit breakers/isolation switches betweenindividual solar panels. This meansthat, as well as shutting off theoverall circuit, you can reduce the

voltage of the solar array down tothat of a single panel or a smallgroup of panels. This can be ofbenefit when maintaining the solararray, or in the case of anemergency.A short circuit in a solar array canhappen for many reasons.Sometimes it is because of amistake during installation, but itcan also occur as a result of generalwear and tear (especially withinstallations where the tilt of thesolar panels is adjusted regularly)or as a result of animal damagesuch as bird mess corroding cables

or junction boxes, or a fox chewingthrough a cable.Short circuits can also occur whereyou are using unsuitable cabling.Solar interconnection cabling isresistant to UV rays and hightemperatures, and the shielding isusually reinforced to reduce the riskof animal damage. Always usesolar interconnection cabling forwiring your array and for thecabling between the array and yoursolar controller or inverter.When a short circuit does occur,there is often not a complete loss ofpower. Instead, power generation

drops as resistance builds up. Thereis a build-up of heat at the point offailure. If you have a ground faultprotection system such as an RCDor GFI in place, the system shouldswitch itself off automatically atthis point, before any furtherdamage is caused.If you do not have a ground faultprotection system in place, the heatbuild-up can become quite intense,in some cases as high as severalhundred degrees. There have beendocumented instances where thisheat build-up has started a fire.If a fire does break out, you need to
be able to isolate the system asquickly as possible. Because asolar array cannot be switched off(it always generates powerwhenever there is light) there havebeen cases where the fire brigadehave not been able to put out a firegenerated by a fault in a solar arraybecause there has been no way ofswitching it off. Isolating the solararray quickly, using a DC circuitbreaker, resolves this problem.However, remember that, even ifyou isolate the solar array, you arestill generating power within thesolar array. If you have many solarpanels, the voltage and the current

can still be quite considerable. Theability to shut down the array byfitting DC circuit breakers withinthe array can significantly reducethis power, rendering the system farsafer if there is an emergency.
AC electricsAC electrical safety is the same ashousehold electrical safety. It ishigh-voltage and in many countriesyou are not allowed to work with itunless you are suitably qualified.You will need to install two ACisolation switches: one switchbetween the inverter and the

distribution panel to isolate thesolar system completely, and oneswitch between your grid-feed andyour distribution panel to isolateyour system from the grid if you arerunning a grid-tie system.If you are planning a grid-tieinstallation, you will need to speakwith your electricity supplier, asthere will often be additionalrequirements that you will need toincorporate. Your inverter willneed to be a specific grid-tie systemthat switches off in the case of agrid power cut. This ensures thatpower is not fed back into the gridfrom your solar system in the case

of a power failure, which couldotherwise prove fatal for anengineer working on restoringpower.
High temperaturesWe have already touched on therisk of high temperatures with asolar array. Solar panels are blackand face the sun: they can thereforeget very hot on a warm day. It maynot be hot enough to fry an egg, butin many climates it can certainly behot enough to burn skin.So make sure your solar array isinstalled in a place where it cannot

be touched by curious children. Ifthe solar panels are close to theground, make sure there is someprotection to keep people awayfrom it.The high temperatures become moreof a problem if there is a faultwithin the solar array or with thewires running between solar panels.If a cable or a solar panel becomesdamaged, there can be significantheat build-up. As alreadymentioned, this heat build-up canlead to a fire.A residual current device (RCD),otherwise known as a ground fault

interrupter (GFI) should avert thisproblem, allowing you toinvestigate the issue beforesignificant damage occurs.However, manual DC circuitbreakers should also be installed inorder to override the system in caseof an emergency.
Think safetyThat is the end of the safety lecturefor now. I will touch on safety againwhen we come to installation, butfor now, please remember thatsafety does not happen by accident.Consider the safety aspects whenyou are designing your system and

you will end up with a safe system.The additional cost of a few ACand DC circuit breakers, an earthingrod/ grounding rod, an RCD/ GFIand getting the right cables is notgoing to break the bank. It is moneywell worth spending.

Solar array designAll solar panels in an array mustface in the same direction. Thisensures that each cell receives thesame amount of light, which isimportant for optimum powerproduction.Sometimes, you may want to installsolar panels in different locations,such as on two different pitches ofroof. In this instance, you need tokeep the two banks of solar panelsseparate, running them as twoseparate arrays, either by feedingthem into an inverter or controllerthat can handle more than one solar

input, or by feeding them into twoseparate inverters or controllers.If you wish to mix and matchdifferent sizes of solar panel, youwill also need to set these up inseparate arrays and wire theseseparately, either using an inverteror controller that can handle morethan one solar input, or using twoseparate inverters or controllers.If you are designing a grid-tiesystem, where you are consideringdifferent sizes or orientations ofsolar panels, you should seriouslyconsider a micro-inverter systemwhere each solar panel has its own

inverter.
Solar array design – stand-alone systemsIf you have more than one solarpanel and you are running yoursolar electric system at 12 volts,then you will need to wire yourpanels together in parallel in orderto increase your capacity withoutincreasing the overall voltage.If you are running your solarelectric system at higher voltages,you either need to buyhigher-voltage solar panels, or youwill need more than one solar

panel, wired in series to increasethe voltage of the solar panels to thevoltage of your overall system:
· For a 24-volt system, youhave the choice of using 24-volt solar panels, or two 12-volt solar panels connected inseries
· For a 48-volt system, youcan use one 48-volt solarpanel, two 24-volt solarpanels connected in series, orfour 12-volt solar panelsconnected in series
Once you have reached the voltagethat you want, you can then run the

panels both in series and inparallel, connecting strings ofpanels together in series to reachyour desired voltage, and thenconnecting multiple strings togetherin parallel to increase yourcapacity:

A sample diagram ofa 24-volt array
where two sets oftwo 12-volt solar
panels are connectedin series in order to
create a 24-voltarray and the twoarrays are then
connected in parallelto create a morepowerful 24-volt
array.
Solar array design – grid-tiesystems with micro-invertersIf you are designing a grid-tie

system and using micro-inverters,your design is extremely simple.Each solar panel becomes a self-sufficient solar energy system, eachfeeding power into its own micro-inverter. The micro-invertersconvert the energy to AC and feed itinto the main AC circuit.
Solar array design – grid-tiesystems with a single inverter

If you are designing a grid-tiesystem with a single inverter, youwill typically be connecting allyour solar panels in series and thenfeeding this high-voltage DC powerinto an inverter.
A simplified blockdiagram of a typicalgrid-tie system using
a single inverter.The residual current
device (RCD)
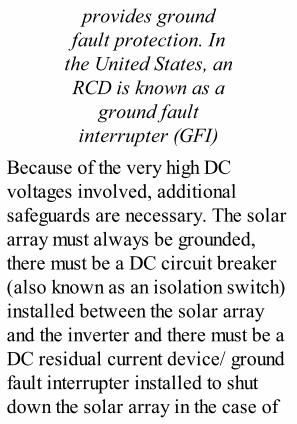
provides groundfault protection. In
the United States, anRCD is known as a
ground faultinterrupter (GFI)
Because of the very high DCvoltages involved, additionalsafeguards are necessary. The solararray must always be grounded,there must be a DC circuit breaker(also known as an isolation switch)installed between the solar arrayand the inverter and there must be aDC residual current device/ groundfault interrupter installed to shutdown the solar array in the case of

a short circuit.In the diagram below, there aresixteen solar panels connected inseries. Assuming each solar panelproduces a 12-volt output, thissystem will run at a nominal 192volts, with a peak power in theregion of 320 volts and an opencircuit voltage of 416 volts.Because of the very high voltages, Ihave decided to install additionalDC circuit breakers in the middle ofthe solar array in order to reducethe voltage within the array if Iswitch them off. This makes thesystem safer during maintenance

and can reduce the risk of fire orelectrocution in case of anemergency.The diagram shows two ACisolation switches: one switchbetween the inverter and thedistribution panel to isolate thesolar system completely from yourhouse and one switch to isolateyour building from the grid.

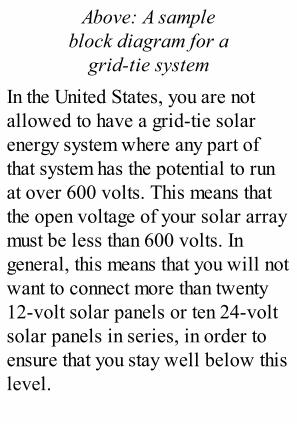
Above: A sampleblock diagram for a
grid-tie systemIn the United States, you are notallowed to have a grid-tie solarenergy system where any part ofthat system has the potential to runat over 600 volts. This means thatthe open voltage of your solar arraymust be less than 600 volts. Ingeneral, this means that you will notwant to connect more than twenty12-volt solar panels or ten 24-voltsolar panels in series, in order toensure that you stay well below thislevel.

In Europe, it is advisable that youropen circuit voltage remains under1,000 volts. In general, this meansthat you will not want to connectmore than thirty 12-volt solarpanels, or fifteen 24-volt solarpanels in series.If you are running close to this limit,there are three options, which Ihave listed in order of preference:
· Install a micro-invertersystem
· Install a multi-string system,either using an inverter thathandles more than one solarfeed, or by using two separate
inverters
· Wire your solar panels in aparallel/series hybrid

BatteriesBatteries are wired in a similarway to your solar array. You canwire up multiple 12-volt batteriesin parallel to build a 12-volt systemwith higher energy capacity, or youcan wire multiple batteries in seriesto build a higher-voltage system.When wiring batteries together inparallel, it is important to wirethem up so that you take the positiveconnection off the first battery in thebank and the negative connectionoff the last battery in the bank.This ensures equal energy drain andcharging across the entire battery

bank. If you use the same battery inthe bank for negative and positiveconnections to the controller andinverter, you drain this first batteryfaster than the rest of the batteries inthe bank. The first battery also getsthe biggest recharge from the solararray.This shortens the life of the batteryand means all the batteries in thebank end up out of balance. Otherbatteries in the bank never get fullycharged by the solar array, as thefirst battery will report being fullycharged first and the controller willthen switch the power off ratherthan continuing to charge the rest of

the batteries in the bank. The resultis that the batteries end up with ashorter lifespan.


How to wirebatteries in parallel:the diagram on theleft, where power
feed for both positiveand negative is takenoff the first batteryin the bank, shows
how not to do it – itwill lead to poor
battery performanceand premature
battery failure. Thediagram on the right,
where the positivefeed is taken off thefirst battery in the
bank and thenegative feed istaken off the last
battery in the bank,is correct and will
lead to a morebalanced system with
a significantlylonger life.
ControllerA controller will have connectionsto the solar array, to the batterybank and to DC loads. Althoughcontrollers tend not to have thesame heat problems as inverters,they can get warm in use. Make sure

they are installed in an area withgood ventilation around them and ina location where they can be easilychecked.
InverterWhere an inverter is used in astand-alone or grid fallback system,it is connected directly to thebattery bank and not through thecontroller.Make sure that you design yoursystem so that the inverter is in awell-ventilated area. Take intoaccount the weight of the inverterand ensure that it is installed in alocation where it can easily be

checked.
DevicesDevices are connected to theinverter if they require grid-levelvoltage, or to the controller if theyare low-voltage DC devices. Theyare never connected directly to thesolar array or the batteries.

Specifics for a gridfallback systemBecause a grid fallback systemdoes not connect your solar energysystem to the grid, you are lessrestricted as to the components youcan use.You must still adhere to basicwiring legislation for your country.In some countries (such as theUnited Kingdom, for instance) thiscan mean having the finalconnection into your buildingelectricity supply installed by afully qualified electrician, but thisis significantly cheaper than having

a grid-tie system installed andinspected.The design for a grid fallbacksystem is very similar to a stand-alone solar system, i.e. solarpanels, solar controller andbatteries. The only difference iswhat happens after the batteries.The advantage of a grid fallbacksystem is that it can work in threeways: it can provide power for anentire building, it can providepower for specific circuits within abuilding or it can provide powerfor a single circuit within abuilding.

More information and a samplecircuit diagram for grid fallbackconfigurations are included inAppendix E.

Circuit protectionCircuit protection is required in anysystem to ensure the system shutsdown safely in the event of a shortcircuit. It is as valid on low-voltagesystems as it is on high-voltagesystems.A low-voltage system can causemajor problems simply because ofthe huge current that a 12-voltbattery can generate: in excess of1,000 amps in a short burst caneasily cause a severe shock andeven death or serious injury in somecases.In the case of a short circuit, your

wiring will get extremely hot andstart melting within seconds unlesssuitable protection has been fitted.This can cause fire or burns, andnecessary protection should befitted to ensure that no damage tothe system occurs as a result of anaccidental short circuit.
Earthing (grounding)In all systems, the negative terminalon the battery should be adequatelyearthed (referred to as grounded inNorth America). If there is nosuitable earth available, agrounding rod or ground planeshould be installed.

DC circuit protectionFor very small systems generatingless than 100 watts of power, thefuse built into the controller willnormally be sufficient for basiccircuit protection. In a largersystem, where feed for some DCdevices does not go through acontroller, a fuse should beincorporated on the battery positiveterminal.Where you fit a fuse to the battery,you must ensure that all currentfrom the battery has to pass throughthat terminal.In DC systems with multiple

circuits, it is advisable to fit fusesto each of these circuits. If you areusing 12 volts or 24 volts, you canuse the same fuses and circuitbreakers as you would for normaldomestic power circuits. Forhigher-voltage DC systems, youmust use specialist DC fuses.When connecting devices to yourDC circuits, you do not need toinclude a separate earth (ground)for each device, as the negative isalready earthed at the batteries.Fit an isolation switch (DCdisconnect switch) between yoursolar array and your inverter or

controller. Fit a second isolationswitch between your batteries andyour controller and inverter.Unless your controller or inverteralready incorporates one, youshould fit a DC residual currentdevice/ ground fault interrupterbetween your solar array and yourcontroller or inverter.
AC circuit protectionAC circuits should be fed through adistribution panel (otherwiseknown as a consumer unit). Thisdistribution panel should be earthed(grounded) and should incorporatean earth leakage trip with a residual

current device (RCD), otherwiseknown as a ground fault interrupter.
As you will have earthed yourDC components, you must use aseparate earth (ground) for ACcircuits.You must also install an ACdisconnect switch (isolationswitch) between your inverter andyour distribution panel. In the caseof a grid-tie system, this is normallya legal requirement, but it is goodpractice anyway.The wiring in the building shouldfollow normal wiring practices.You should use a qualified

electrician for installing and signingoff all grid-level voltage work.

Cable sizing andselectionOnce you have your wiringdiagram, it is worth making noteson cable lengths for each part of thediagram, and making notes on whatcables you will use for each part ofthe installation.
Sizing your cablesThis section is repeated from theprevious chapter. I make noapologies for this, as cable sizing isone of the biggest mistakes thatpeople make when installing a solarelectric system.

Low-voltage systems lose asignificant amount of power throughcabling. This is because currents(amps) are higher to make up for thelack of voltage. Ohms law tells usthat the power lost through the cableis proportional to the square of thecurrent: the higher the current, thegreater the resistance. To overcomethis resistance, we must use thickercables.Wherever you are usinglow-voltage cabling (from the solararray to the controller, and to alllow-voltage DC equipment) youneed to ensure you are using thecorrect size of cable: if the cable

size is too small, you will get asignificant voltage drop that cancause your system to fail.You can work out the requiredcable size using the followingcalculation:
(Length x I x 0.04) ÷ (V ÷ 20) =Cable Thickness
Length : Cable length in metres (1m= 3.3 feet)I : Current in ampsV : System voltage

(e.g. 12 volts or 24 volts)Cable Thickness: Cross-sectional area of thecable in mm²
The cable thickness you are usingshould be at least the same size asthe result of this calculation. Neveruse smaller cable, as you will see agreater voltage drop with a smallercable, which could cause some ofyour devices not to work properly.
Protecting cable runsWhen planning cable layouts, youneed to ensure they are protectedfrom unwanted attention from

animals and children and frompossible vandalism.Rats and foxes chewing throughcable insulation can be a bigproblem in some installations. Thiscan be resolved by using rodentprotected cabling. Using conduit isoften a good idea as well,especially if you can use steelconduit or thin-wall electricalmetallic tubing (EMT) to protectcables.
Designing your system to keepyour cables runs as short aspossible

If you have multiple devicesrunning in different physical areas,you can have multiple cable runsrunning in parallel in order to keepthe cable runs as short as possible,rather than extending the length ofone cable to run across multipleareas.By doing this, you achieve twothings: you are reducing the overalllength of each cable and you aresplitting the load between more thanone circuit. The benefit of doingthis is that you can reduce thethickness of each cable required,which can make installation easier.

If you are doing this in a house, youcan use a distribution panel(otherwise known as a consumerunit) for creating each circuit.In the holiday home, for instance, itwould make sense to run theupstairs lighting on a differentcircuit to the downstairs lighting.Likewise, it would make sense torun separate circuits for poweringappliances upstairs and downstairs.In the case of the holiday home, byincreasing the number of circuits itbecomes possible to use standard2.5mm domestic ‘twin and earth’cable for wiring the house, rather

than more specialist cables. Notonly does this simplify theinstallation, it keeps costs down.
Selecting solar cableA common fault withpoorly-designed or poorly-installedsolar energy systems is under-performance where there is no clearsource for the problem. Inparticular, this tends to occuraround two to three years after thesystem was first installed.The source of the problem is ofteneither bird droppings or UV damageon cables leading from the solarpanels to the inverters. This is
usually caused by not using solarinterconnection cables, which havea much tougher insulation that is UVprotected, designed to withstandhigh temperatures and can withstandacidic bird droppings.It is vital that you use specific solarinterconnection cable to connectyour solar panels together and forlinking your solar panels to yourinverter or controller. If you are notsure, look for cable that conforms tothe UL 4703 or UL 854 (USE-2)specification for PV cabling. Thisis available from all solarequipment suppliers.

Controller cableWhen calculating the thickness ofcable to go between the controllerand the battery, you need to take thecurrent flow into the battery fromthe solar array as well as the flowout of it (peak flow into the batteryis normally much higher than flowout).
Battery interconnection cablesYou can buy battery interconnectioncables with the correct batteryterminal connectors from yourbattery supplier. Because the flowof current between batteries can bevery significant indeed, I tend to use

the thickest interconnection cables Ican buy for connection betweenbatteries.

Some sample wiringdiagramsAs ever, a picture can be worth athousand words, so here are somebasic designs and diagrams to helpgive you a clearer understanding ofhow you connect a solar electricsystem together.

Above: A simplesolar installation: a
light with lightswitch, a small radio
and a simpleintruder alarm –

perfect for a gardenshed or a small lock-up garage. Becauseit is a small system,you may choose notto fit an isolation
switch. Because thesystem is very small,I have decided onlyto fit a fuse betweenthe controller and
the battery

This is an interestingproject – a solar
powered river boat.Electric boats are
gaining inpopularity, thanks totheir virtually silentrunning and lack ofvibration. The only

downside isrecharging thebatteries. Here,solar panels are
used to recharge thebatteries, chargingthem up during theweek to provide allthe power required
for a weekendmessing about on theriver. The total cost
of this completesystem was less than
the cost of atraditional outboardengine and fuel tank
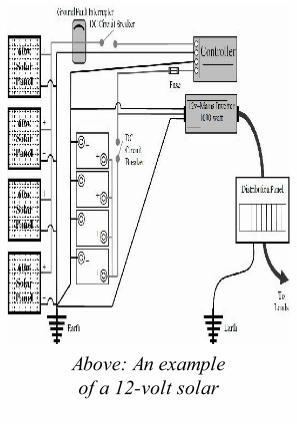
Above: An exampleof a 12-volt solar

system running anAC inverter to
provide a normalbuilding electricity
supply in an off-gridinstallation. Below:
the same system,wired at 24 volts

The holiday home wiringdiagram


The next stepOnce you have your wiringdiagram, it is time to start addingcables, battery terminal clamps,fuses, isolation switches, earthingrods (referred to as grounding rodsin North America) and, in this case,a distribution panel (otherwiseknown as a consumer unit) to yourshopping list. It can help to addmore detail to your wiring diagramas well, noting the locations ofappliances and sockets, and thelengths of cables at each point.

Solar frame mountingThere are off-the-shelf solar arrayframes available, and your solarpanel supplier will be able toadvise you on your best solution.Sometimes, however, these are notsuitable for your project. In thiscase, you will either have tofabricate something yourself (angleiron is a useful material for thisjob) or get a bespoke mountingmade specifically for you.Solar panels in themselves are notheavy, but you do need to take intoaccount the effect of wind loadingson your mounting structure. If the

wind can blow underneath the solararray it will generate a ‘lift’,attempting to pull the array up offthe framework. However, a gapbeneath the solar array is useful toensure the array itself does not gettoo hot. This is especially importantin warm climates, where theefficiency of the solar panelsthemselves drops as they get hotter.Making sure the mounting is strongenough is especially important asthe solar array itself is normallymounted at an optimal angle tocapture the noonday sun. This oftenmeans that, even if you areinstalling your solar array onto an

existing roof, you may want toinstall the solar panels at a slightlydifferent angle to the roof itself inorder to get the best performanceout of your system.It is therefore imperative that yoursolar array mounting frame is strongenough to survive 20 years plus in aharsh environment and can besecurely mounted.If you are mounting your solar arrayon a roof, you must be certain thatyour roof is strong enough to takethis. If you are not certain aboutthis, ask a builder, structuralsurveyor or architect to assess your

roof.If you are planning to mount yoursolar array on a pole or on aground-mounted frame, you willneed to make plans for some goodstrong foundations. Hammeringsome tent pegs into the ground tohold a ground-mounted frame willnot last five minutes in a strongwind, and a pole will quickly blowdown if you only use a bucket ofcement to hold it in place.You should build a good foundationconsisting of a strong concrete baseon a compacted hardcore sub-baseto hold a ground-mounted frame,

and the frame itself should beanchored using suitable groundanchors, bolted using 25cm–30cm(10"–12") bolts.For a pole, follow the advice givenby the manufacturers. Typically,they need to be set in a concretefoundation that is at least 3 feet(1m) deep, and quite oftensignificantly more.To mount your solar panels ontoyour frame, make sure you use high-tensile bolts and self-locking nuts toprevent loosening due to windvibration.If your solar array is going to be

easily accessible, you may wish toconsider an adjustable solarmounting system so you can adjustthe angle of tilt throughout the year.You can then increase the tilt duringthe winter in order to capture morewinter sun, and decrease the tiltduring the spring and summer inorder to improve performanceduring those seasons.For the holiday home project, thesolar array is to be fitted to aspecially constructed garden storewith an angled roof. The benefit ofthis approach is that we can buildthe store at the optimum position tocapture the sun. We can also install

the batteries and solar controllervery close to the solar array. Inother words, we are creating an ‘allin one’ power station.There are a number of regional shedand garden building manufacturerswho will build a garden store likethis to your specification. A goodquality store, so long as it is treatedevery 2–3 years, will easily last25–30 years.If you go this route, make sure yourchosen manufacturer knows whatyou are planning to use it for. Youneed to specify the followingthings:
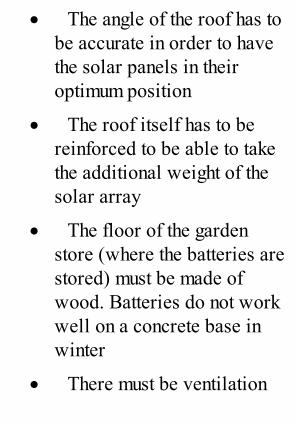
· The angle of the roof has tobe accurate in order to havethe solar panels in theiroptimum position
· The roof itself has to bereinforced to be able to takethe additional weight of thesolar array
· The floor of the gardenstore (where the batteries arestored) must be made ofwood. Batteries do not workwell on a concrete base inwinter
· There must be ventilation

built into the store in order toallow the hydrogen gasgenerated by the batteries todisperse safely through thetop of the roof
· The door to the garden storeitself should be large enoughfor you to easily install, checkand maintain the batteries
· You should considerinsulating the floor, walls andceiling in the garden store,either using polystyrene(Styrofoam) sheets or loftinsulation. This will helpkeep the batteries from getting

too cold in winter or too hotin summer
A garden store will still require asolid concrete foundation.Consideration of rainwater runoff isalso important, to ensure the gardenstore does not end up standing in apool of water.

Positioning batteriesYou will have already identified asuitable location for your batteries.As discussed on the chapter on sitesurveys, your location needs to fitthe following criteria:
· Water- and weather-proof
· Not affected by directsunlight
· Insulated to protect againstextremes of temperature
· Facilities to ventilate gases
· Protected from sources ofignition

· Away from children andpets
Lead acid batteries give off verysmall quantities of explosivehydrogen gas when charging. Youmust ensure that, wherever yourbatteries are stored, the areareceives adequate externalventilation so that these gasescannot build up.Because of the extremely highpotential currents involved withlead acid batteries, the batteriesmust be in a secure area away fromchildren and pets.Do not install batteries directly onto

a concrete floor. In extremely coldweather, concrete can cause anadditional temperature drop insidethe batteries that will adverselyaffect performance.You need to ensure that yourbatteries are accessible for regularchecks and maintenance. Manydeep-cycle batteries requirewatering several times each yearand connections must be checkedregularly to ensure they have notcorroded.For all of the above reasons,batteries are often mounted onheavy-duty racking, which is then

made secure using an open-meshcage.If you are installing your batteriesin an area that can get very cold orvery hot, you should also insulateyour batteries. Extremetemperatures adversely affect theperformance of batteries, so if yourbatteries are likely to be in an areawhere the temperature drops below8°C (46°F) or rise above 40°C(104°F), you should considerproviding insulation. If thetemperature is likely to drop belowfreezing, you must provide it.You can use polystyrene

(Styrofoam) sheets underneath andaround the sides of the batteries tokeep them insulated. Alternatively,foil-backed bubble-wrap insulation(available from any DIY store inthe insulation section) is eveneasier to use and has the benefit thatit does not disintegrate if you everget battery acid splashed on it.Never insulate the top of thebatteries, as this will stop themfrom venting properly and maycause shorts in the batteries if theinsulating material you use isconductive.

Planning the installationBy now, you should have acomplete shopping list for all thecomponents you need. You shouldknow where everything is to bepositioned and what you need to inorder to proceed.Before placing any equipmentorders, go back to your site andcheck everything one last time.Make sure that where you plannedto site your array, controller,batteries and so on is still suitableand that you have not overlookedanything.Once you are entirely satisfied that

everything is right, place yourorders for your equipment.Bear in mind that some specialistequipment is often only built toorder and may not be availablestraight away. If you requirebespoke items such as solarmounting frames, or, as in the caseof the holiday home, a completegarden store made up for mountingthe solar panels and holding thebatteries and controller, take intoaccount that this could take a fewweeks to be built for you.

In conclusion· The detailed design ensures
you have not overlooked anyarea of the design
· Consider the safety aspectsof your system in your design.At each stage, ask yourself“What is the worst that canhappen?” and then designaround the problems
· The wiring diagram helpsyou envisage how theinstallation will work
· You need to keep cable runsas short as practically

possible. You can do this byrunning several cables inparallel, either directly fromthe controller, through ajunction box or through adistribution panel
· Splitting the cables intoparallel circuits also meansyou reduce the current loadon each circuit, therebyreducing resistance andimproving the efficiency ofyour system
· If you are using an inverterto run at grid-level voltages,a qualified electrician is

required to handle theelectrical installation.However, your wiringdiagram will help yourelectrician to envisage howyour solar electric systemshould work
· You need to design yourbattery storage area to ensureyour batteries can perform tothe best of their ability

Installation
Congratulations on getting this far.If you are doing this for real, youwill now have a garage or gardenshed full of solar panels, batteries,cables, controllers, isolationswitches, RCDs and whatnots. Theplanning stage is over and the fun isabout to begin.Before you get your screwdriverand drill out, there are just a fewhousekeeping items to get out of theway first…

Have you read theinstructions?No, of course you haven’t. Whoreads instructions anyway? Well,on this occasion, it is worth readingthrough the instructions that comewith your new toys so that youknow what you are playing with.Pay particular attention to the solarcontroller and the inverter: thereare many settings on mostcontrollers and you need to makesure you get them right.

SafetyThere are a few safety notices weought to go through. Some of thesemay not be relevant to you, but readthem all first, just to make sure.Remember, you are working withelectricity, dangerous chemicals
and heavy but fragile objects. It isbetter to be safe than sorry.
Your First Aid kitYou will need a good First Aid kiton hand, including some items thatyou will not normally have in aregular First Aid kit. Mostspecifically, you will need an eye-

wash and a wash kit or gel that canbe applied to skin in case of contactwith battery acid.
Chemical clean-up kitYou will be working with lead acidbatteries that contain chemicals thatare hazardous to health. You willrequire the following:
· A chemical clean-up kitsuitable for cleaning upbattery acids in the case of aspill
· A supply of strongpolythene bags
· A good supply of rags/

disposable wipes to mop upany battery spillages
Chemical clean-up kits andchemical First Aid kits areavailable from most batterywholesalers and industrial toolsuppliers. They only cost a fewpounds. You probably will not needthem but, if nothing else, they buyyou peace of mind.
Considering the general publicIf you are working in an area wherethe general public has access, youshould use barriers or fencing, andsignage to cordon off the area.Clear diversion signage should

explain an alternative route.In this scenario, I wouldrecommend employing aprofessional team of builders tocarry out the installation work onyour behalf. They will alreadyunderstand the implications ofworking in a public area and therelevant Health and Safetyregulations.Even if you do not have to considerthe general public, you should stillconsider the people around you.Children love to get involved withthese sorts of projects and therereally can be some safety issues

involved. Keep children out of theway, and let anyone in the vicinityknow that you are working withhigh voltages and to keep away.
Working at heightYou are very likely to be workingat height and quite possiblycrawling around on slantedrooftops.Make sure you are using suitableclimbing equipment (ladders,crawler boards, safety harnesses,scaffolding). You can hire anythingthat you do not have at reasonableprices.

If you have any concerns aboutworking at heights, or if you areworking beyond your area ofcompetence at any time, rememberthere is no shame in hiring aprofessional. A professionalbuilder can fit a solar array to aroof in 2–3 hours. This is typicallyless than half the time it takes anamateur DIY enthusiast.
HandlingBatteries, large inverters and solararrays can be heavy. Solar panelsthemselves may not be heavy intheir own right, but when several ofthem are mounted on a frame and

then lifted they are heavy, bulky andfragile.Moving and installing much of thisequipment is a two-person job as aminimum. More people can beuseful when lifting a solar arrayinto position.
Working with batteriesLead acid batteries are extremelyheavy, in some cases weighing asmuch as an adult. Use proper liftinggear to move them, and look afteryour back.Heavier batteries quite often havehoops in the top case. To lift a
battery, I tend to use a piece of ropethreaded through these hoops tocreate a carrying handle. Thismeans I can carry a battery close tothe ground and reduce the need tobend over to lift it.Lead acid batteries contain acid.Unless they are gel batteries, theacid is in liquid form. It isextremely corrosive and extremelydangerous to health. Splashes ofliquid from the batteries can causesevere chemical burns and must bedealt with immediately.When working with lead acidbatteries, stay safe:

· ALWAYS wear protectiveclothing, including overalls,eye protection (eitherprotective glasses or a full-face shield) and protectivegloves. I would also adviseyou to wear steel toe-cappedshoes
· Keep batteries upright at alltimes
· Do not drop a battery. If youdo, the likelihood is that thebattery has been damaged. Inthe worst-case scenario, thecasing could be cracked orbroken

· If you drop a battery, placeit immediately in a spill tray(a heavy-duty deepgreenhouse watering tray canbe used if necessary) andcheck for damage and leaks
· If you have a damagedbattery, both the battery andthe spill tray must bedouble-bagged in sealedpolythene bags and marked ashazardous waste
· If you have a spillage froma battery, mop up the spillageimmediately using rags ordisposable wipes. Place
these rags in a polythene bag,seal it and mark it ashazardous waste
· If any spillage from abattery comes into contactwith clothing, removeclothing immediately anddispose of it in polythenebags
· If any spillage from abattery comes into contactwith the eyes, washrepeatedly with eye-wash andseek urgent medical help
· If any spillage from abattery comes into contact

with the skin, wash offimmediately with water,apply an anti-acid wash,cream or gel to stop burningand then seek urgent medicalhelp
· If you end up with batteryacid in your mouth, wash yourmouth out with milk. DONOT swallow the milk. Spitit out. Then seek urgentmedical help
· Do not smoke nearbatteries, and ensure that thearea where you are storingthe batteries is ventilated

· Prevent arcing or shortcircuits on battery terminals.Batteries can provide a hugecurrent very quickly. Shouldyou short-circuit a batterywith a spanner, the spanner islikely to be red hot within afew seconds and could easilylead to fire or explosion.Remove any rings, braceletsor watches you may bewearing and keep tools a safedistance away from batteries
GlovesYou need two different sets ofgloves for installing your solar

array: a set of chemical gloves formoving batteries and a set ofelectrical protection gloves forwiring up your solar system.
When choosing suitablechemical gloves for working withbatteries, consider the following:
· The gloves need to be quitestrong, as lifting and movingbatteries is hard on gloves
· A good grip is important
· Buy a glove with a mediumor long cuff length, in order toprotect both the hands andforearms

· The gloves should be madeof a suitable material toprotect against battery acid
The Health and Safety Executivewebsite suggest that 0.4mm-thickneoprene gloves will give suitableprotection through a full shift. If youdo splash your gloves whileworking with batteries, make sureyou wash them or replace themimmediately, in order to avoidtransferring acid to other parts ofyour body.Electrically-insulated protectiongloves give protection whenworking with high voltages. These

are vitally important when workingwith high-voltage solar arrays andare recommended for allinstallations.Electrically-insulated gloves comewith different ratings to provideprotection at different voltages:
· Class 00 gloves provideprotection for up to 500 volts
· Class 0 gloves provideprotection for up to 1,000volts
· Class 1 gloves provideprotection for up to 7,500volts

· Class 2 gloves provideprotection for up to 17,000volts
· Class 3 gloves provideprotection for up to 26,500volts
For most solar installations, Class00 or Class 0 gloves are the mostappropriate. Remember that theopen circuit voltage of a solar arraycan be more than double thenominal voltage of the solar array:twenty solar panels connected inseries may only have a nominalvoltage of 240 volts, but the opencircuit voltage could be over 500

volts.Like chemical gloves, choosegloves with a medium or long cufflength to protect both your handsand forearms.If your electrically-insulated glovesare splashed with battery acid,remove and replace the glovesimmediately.All electrically-insulated glovesshould be visually inspected andchecked for tears and holes beforeuse. Class 1–3 gloves require fullelectrical testing every six months.
Electrical safety

I make no apologies for repeatingmy mantra about electrical safety.Electrical safety is extremelyimportant when installing a solarelectric system.Solar panels generate electricitywhenever they are exposed tosunlight. The voltage of a solarpanel on an ‘open’ circuit issignificantly higher than the systemvoltage. A 12-volt solar panel cangenerate a 22–26 volt current whennot connected.Connect several solar panels inseries and the voltage can get todangerous levels very quickly: a
24-volt solar array can generate45–55 volts, which can provide anasty shock in the wrongcircumstances, whilst a 48-voltsolar array can easily generatevoltages of 90–110 volts when notconnected. These voltages can belethal to anyone with a heartcondition, or to children, the elderlyor pets.Solar systems produce DC voltage.Unlike AC voltage, if you areelectrocuted from a direct current,you will not be able to let go.Batteries can produce currentsmeasuring thousands of amps. A
short circuit will generate hugeamounts of heat very quickly andcould result in fire or explosion.Remove any rings, bracelets orwatches you may be wearing andkeep tools away from batteries.The output from an inverter is ACgrid-level voltage and can be lethal.Treat it with the same respect asyou would any other grid-levelelectricity supply.In many countries, it is law that ifyou are connecting an inverter intoa household electrical system, youmust use a qualified electrician tocertify your installation.
Assembling your toolkitAs well as your trusty set of DIYtools, you will need an electricalmulti-meter or volt meter in orderto test your installation at differentstages. You should useelectrically-insulated screwdriverswhilst wiring up the solar array,and a test light circuit tester can beuseful.There are a few sundries that youought to have as well:
· Cable ties are very usefulfor holding cables in place.They can keep cable runs tidyand are often good for

temporary as well aspermanent use
· A water- and dirt-repellentglass polish or wax, forcleaning solar panels
· Petroleum jelly is used onelectrical connections onsolar panels and batteries inorder to seal them frommoisture and to ensure a goodconnection

Preparing your siteAs mentioned in the previouschapter, you may need to considerfoundations for ground- orpole-mounting a solar array, orstrengthening an existing roofstructure if you are installing yoursolar array on a roof.If you are installing your batteriesin an area where there is no suitableearth (ground), you should install anearthing rod (grounding rod) asclose to the batteries as is practical.
Testing your solar panelsNow the fun begins. Start byunpacking your solar PV panels andcarry out a visual inspection tomake sure they are not damaged inany way.Chipped or cracked glass cansignificantly reduce theperformance of the solar panels, sothey should be replaced if there isany visible damage to the panel.Damage to the frame is not such aproblem, so long as the damagewill not allow water ingress to thepanel and does not stop the solarpanel from being securely mounted

in position.Next, check the voltage on the panelusing your multi-meter, set to anappropriate DC voltage range.Solar PV panels generate a muchhigher voltage on an ‘open’ circuit(i.e. when the panel is notconnected to anything) than they dowhen connected to a ‘closed’circuit. So do not be surprised ifyour multi-meter records an openvoltage of 20–26 volts for a singlepanel.

Installing the solar arrayCleaning the panelsIt is a good idea to clean the glasson the front of the panels first, usinga water- and dirt-repellent glasspolish or wax. These glass polishesensure that rain and dirt do not stickto the glass, thereby reducing theperformance of your solar array.They are available from any DIYstore and many supermarkets andcar accessories stores.
Assembly and connectionsSome roof-mounted solar mountingkits are designed to be fitted to your

roof before fitting the solar panels.Others are designed to have thesolar panels mounted to the fixingkits before being mounted to theroof.With a pole-mounted system, youtypically erect your pole first andthen fit the solar panels once thepole is in position.A ground-based mounting system isthe easiest to install, as there is noheavy lifting.Typically, you mount and wire thesolar panels at the same time. If youare stepping up the voltage of yoursystem by wiring the panels in

series, wire up the required numberof panels in series first (i.e. sets oftwo panels for 24 volts, sets of fourfor 48 volts).Once you have wired up a set ofpanels in series, test them usingyour multi-meter, set to a voltagesetting to check that you have theexpected voltage (20 volts plus fora 12-volt system, 40 volts plus for a24-volt system and 80 volts plus fora 48-volt system).Take care when taking thesemeasurements, as 40 volts andabove can give a nasty shock in thewrong circumstances.

Once you have wired each seriescorrectly, make up the parallelconnections and then test the entirearray using your multi-meter, set tothe appropriate voltage setting.If you have panels of differentcapacities, treat the different sets ofpanels as separate arrays. Do notwire panels of different capacitiestogether, either in series or parallel.Instead, connect the arrays togetherat the controller.Once you have completed testing,make the array safe so that no onecan get an electric shock byaccident from the system. To do

this, connect the positive andnegative cables from the solar arraytogether to short-circuit the array.This will not damage the array andcould prevent a nasty shock.
Roof-mounting a solar arrayIf you are roof-mounting a solararray, you will normally have to fita rail or mounting to the roof beforeattaching the solar array.Once this is in place, it is time to fitthe array itself. Make sure you haveenough people on hand to be able tolift the array onto the roof withouttwisting or bending it. Personally, Iwould always leave this job to

professional builders, but the bestway seems to be to have twoladders and two people lifting thearray up between them, one on eachladder, or using scaffolding.
Final wiringOnce your solar array is in position,route the cable down to where thesolar controller is to be installed.For safety purposes, ensure that thecables to the solar array remainshorted whilst you do this.If you are installing a DC isolationswitch and a residual currentdevice (known as a ground faultinterrupter in North America),

install them between the solar arrayand the controller.Once you have the cables inposition, un-short the positive andnegative cables and check with ameter to ensure you have theexpected voltage readings. Thenshort the cables again until you areready to install the solar controller.

Installing the batteriesPre-installationBefore installing the batteries, youmay need to give them a refreshercharge before using them for thefirst time.You can do this in one of two ways.You can use a battery charger tocharge up the batteries, or you caninstall the system and then leave thesolar panels to fully charge up thebatteries for a day or so beforecommissioning the rest of thesystem.Put a sticker on each battery with an

installation date. This will be usefulin years to come for maintenanceand troubleshooting.
Positioning the batteriesThe batteries need to be positionedso they are upright, cannot fall overand are away from members of thepublic, children and any sources ofignition.For insulation and heating purposes,batteries should not be stooddirectly on a concrete floor: duringthe winter months, a slab ofconcrete can get extremely cold andits cooling effects can havedetrimental effects on batteries. I

prefer to mount batteries on awooden floor or shelf.
VentilationIf there is little or no ventilation inthe area where the batteries aresituated, this must be implementedbefore the batteries are sited.As batteries vent hydrogen, whichis lighter than air, the gas will riseup. The ventilation should bedesigned so that the hydrogen isvented out of the battery area as itrises.
AccessIt is important that the battery area

is easily accessible, not just forinstalling the batteries(remembering that the batteriesthemselves are heavy), but also forroutinely checking the batteries.
InsulationAs mentioned earlier, if you areinstalling your batteries in an areathat can get very cold or very hot,you should insulate your batteries.Polystyrene (Styrofoam) sheets orfoil-backed bubble-wrap can beused underneath and around thesides of the batteries to keep theminsulated. DO NOT INSULATETHE TOP OF THE BATTERIES as

this will stop them from ventingproperly and may cause shorts inthe batteries if the insulatingmaterial you use is conductive.
ConnectionsOnce the batteries are in place,wire up the interconnection leadsbetween the batteries to form acomplete battery bank.Always use the correct terminalsfor the batteries you are using andmake sure the cables provide agood connection. You should usebattery interconnection cablesprofessionally manufactured for the

batteries you are using.Use petroleum jelly around themountings to seal it from moistureand ensure a good connection.Next, add an earth (ground) to thenegative terminal. If there is noearth already available, install anearthing rod (grounding rod) asclose as possible to the batteries.Now check the outputs at either endof the batteries using a multi-meterto ensure you are getting the correctvoltage. A fully-charged batteryshould be showing a charge ofaround 13–14 volts per battery.

Installing the controlequipmentThe next step is to install the solarcontroller and the power inverter ifyou are using one.Mount these close to the batteries.Ideally they should be mountedwithin a metre (3 feet), in order tokeep cable runs as short aspossible.Most solar controllers include asmall LCD display and a number ofbuttons to configure the controller.Make sure the solar controller iseasily accessible and that you can

read the display.Some solar controllers that work atmultiple voltages have a switch toset the voltage you are working at.Others are auto-sensing. Eitherway, check your documentation tomake sure you install the solarcontroller in accordance with themanufacturer’s instructions. If youhave to set the voltage manually,make sure you do this now, ratherthan when you have wired up yoursystem.Inverters can get very hot in use andadequate ventilation should beprovided. They are normally

mounted vertically on a wall, inorder to provide natural ventilation.The installation guide that comeswith your particular make ofinverter will tell you what isrequired.Some inverters require an earth(ground) in addition to the earth onthe negative terminal on the battery.If this is the case, connect a 2.5mm²green-yellow earth cable from theinverter to your earth rod (groundrod).If you are installing a DC isolationswitch between the solar panels andyour control equipment, connect that

up first and make sure it is switchedoff.Once you have mounted thecontroller and inverter, connect thenegative cables to the battery,taking care that you are connectingthe cables to the correct polarity.Then un-short the positive andnegative cables from the solar arrayand connect the negative cable fromthe solar array to the solarcontroller, again taking care toensure the cable is connected to thecorrect polarity.Now double-check the wiring.Make sure you have connected the

cables to the right places.Double-check that you haveconnected your negative cable fromyour solar array to the negativesolar input connection on your solarcontroller. Then double-check thatyou have connected your negativecable from your battery to thenegative battery input on your solarcontroller and your inverter. Onlythen should you start wiring up yourpositive connections.Start with the battery connection. Ifyou are planning to install a fuseand DC isolation switch into thiscable, make sure that your fuse andswitch work for both the solar

controller and the inverter (if youare using one). Connect the inverterand the solar controller ends firstand double-check that you have gotyour wiring correct, both visuallyand by checking voltages with avolt meter, before you connect upthe battery bank.Finally, connect up the positiveconnection from your solar array tothe solar controller. At this point,your solar controller should powerup and you should start readingcharging information from thescreen.Congratulations. You have a

working solar power station!

Installing a grid-tiesystemBefore starting to install yourgrid-tie system, you must havealready made arrangements withyour electricity provider for them toset you up as a renewable energygenerator.Regulations and agreements varyfrom region to region and fromelectricity provider to electricityprovider, but at the very least theywill need to install an export meterto your building in order toaccurately meter how much energyyou are providing. They will also

ask for an inspection certificatefrom a qualified electrician, toconfirm that the work has been doneto an acceptable standard.Physically, installing a grid-tiesystem is very similar to installingany other solar energy system,except, of course, you do not haveany batteries to work with.However, you do have to be carefulwhile wiring up the high-voltagesolar array. When the solar array isbeing connected up you can have avoltage build-up of several hundredvolts, which can quite easily provefatal. If building a high-voltage

array, cover the solar panels whileyou are working on them and wearelectrically-insulated gloves at alltimes.

Commissioning thesystemOnce you have stopped dancingaround the garden in excitement, itis time to test what you have doneso far and configure your solarcontroller.
Programming your solarcontrollerThe type of solar controller youhave will determine exactly whatyou need to configure. It may be thatyou do not need to configureanything at all, but either way youshould check the documentation that

came with the solar controller tosee what you need to do.Typically, you will need to tell yoursolar controller what type ofbatteries you are using. You mayalso need to tell your solarcontroller the maximum andminimum voltage levels to showwhen the batteries are fully chargedor fully discharged. You shouldhave this information from yourbattery supplier, or you cannormally download full batteryspecification sheets from theinternet.
Testing your system

You can test your solar controllerby checking the positive andnegative terminals on the outputconnectors on the controller usingyour multi-meter. Switch the multi-meter to DC voltage and ensure youare getting the correct voltage out ofthe solar controller.If you have an inverter, plug asimple device such as a table lampinto the AC socket and check that itworks.If your inverter does not work,switch it off and check yourconnections to the battery. If theyare all in order, check again with a

different device.
Charging up yourbatteriesIf you have not carried out arefresher charge on your batteriesbefore installing them, switch offyour inverter and leave your systemfor at least 24 hours in order to givethe batteries a good charge.

Connecting your devicesOnce you have your solar powerstation up and running and yourbatteries are fully charged, it is timeto connect your devices.If you are wiring a house usinglow-voltage equipment, it is worthfollowing the same guidelines asyou would for installinggrid-voltage circuits.For low-voltage applications, youdo not need to have yourinstallation tested by a qualifiedelectrician, but many people chooseto do so in order to make sure thereare no mishaps.
The biggest difference between ACwiring and DC wiring is that you donot need to have a separate earth(ground) with DC electrics, as thenegative connection is earthed bothat the battery and, if you are usingone, at the distribution panel.If you are using 12-volt or 24-voltlow-voltage circuits, you can usethe same distribution panels,switches and light fittings as youwould in a grid-powered home. Asalready suggested, do not use thesame power sockets forlow-voltage appliances as you usefor grid-powered appliances. If you

do, you run the risk that low-voltageappliances could be pluggeddirectly into a high-voltage socket,with disastrous consequences.

In conclusion· Once you have done all
your preparation, theinstallation should bestraightforward
· Heed the safety warningsand make sure you areprepared with the correctsafety clothing and access tochemical clean-up andsuitable First Aid in case ofacid spills
· Solar arrays are both fragileand expensive. Look afterthem
· The most likely thing thatcan go wrong is wiring upsomething wrongly.Double-check eachconnection
· Check each stage bymeasuring the voltage with amulti-meter to make sure youare getting the voltage youexpect. If you are not, inspectthe wiring and check eachconnection in turn

Troubleshooting
Once your solar electric system isin place, it should give you manyyears of untroubled service. If itdoes not, you will need totroubleshoot the system to find outwhat is going wrong and why.

Keep safeAll the safety warnings that go withinstallation also relate totroubleshooting. Remember thatsolar arrays will generateelectricity almost all the time(except in complete darkness), andbatteries do not have an ‘off’switch.

Common faultsUnless you keep an eye on yoursolar energy system, problems canoften go undetected for months.Only if you have a stand-alonesystem and the power switches offwill you find out that you have aproblem.The faults are typically to be foundin one of the following areas:
· Excessive power usage –i.e. you are using more powerthan you anticipated
· Insufficient powergeneration – i.e. you are not

generating as much power asyou expected
· Damaged wiring/ poorconnections
· Weak batteries
· Obstructions (shading)
· Faulty earth (ground)
· Inverter faultsObstructions are a big subject bythemselves, and I cover this in muchmore detail in Appendix A. Otherfaults are covered below.

Excessive power usageThis is the most common reason forsolar electric systems failing: theoriginal investigationsunderestimated the amount of powerthat was required.Almost all solar controllersprovide basic information on anLCD screen that allows you to seehow much power you havegenerated compared to how muchenergy you are using, and shows theamount of charge currently stored inthe battery bank. Some solarcontrollers include more detailedinformation that allows you to

check on a daily basis how yourpower generation and power usagecompares.Using this information, you cancheck your power drain to see if itis higher than you originallyexpected.If you have an inverter in yoursystem, you will also need tomeasure this information from yourinverter. Some inverters have anLCD display and can provide thisinformation, but if your system doesnot provide this, you can use a plug-in watt meter to measure yourpower consumption over a period

of time.If your solar controller or yourinverter does not provide thisinformation, you can buy a multi-meter with data loggingcapabilities. These will allow youto measure the current drain fromthe solar controller and/or yourinverter over a period of time (youwould typically want to measurethis over a period of a day).Attach the multi-meter across theleads from your batteries to yoursolar controller and inverter. Logthe information for at least 24hours. This will allow you identify

how much power is actually beingused.Some data logging multi-meterswill plot a chart showing currentdrain at different times of the day,which can also help you identifywhen the drain is highest.
SolutionsIf you have identified that you areusing more power than you wereoriginally anticipating, you havethree choices:
· Reduce your power load
· Increase the size of yoursolar array

· Add another power source(such as a fuel cell, windturbine or generator) to top upyour solar electric systemwhen necessary
Insufficient powergenerationIf you have done your homeworkcorrectly, you should not have aproblem with insufficient powergeneration when the system isrelatively new.However, over a period of a fewyears, the solar panels and batterieswill degrade in their performance(batteries more so than the solarpanels), whilst new obstructionsthat cut out sunlight may now becausing problems.You may also be suffering with

excessive dirt on the solar panelsthemselves, which can significantlyreduce the amount of energy thesolar array can generate. Pigeonsand cats are the worst culprits forthis!Your site may have a newobstruction that is blocking sunlightat a certain time of day: a tree thathas grown substantially since youcarried out the original site survey,for instance.Alternatively, you may have made amistake with the original site surveyand not identified an obstruction.Unfortunately, this is the most

common mistake made byinexperienced solar installers. It isalso the most expensive problem tofix. This is why carrying out the sitesurvey is so important.To identify if your system is notgenerating as much power asoriginally expected, check the inputreadings on your solar controller tosee how much power has beengenerated by your solar panels on adaily basis. If your solar controllercannot provide this information, usea multi-meter with data logger torecord the amount of energycaptured by the solar panels over athree-to-five day period.

SolutionsIf you have identified that you arenot generating as much power asyou should be, start by checkingyour solar array. Check for damageon the solar array and then give thearray a good wash with warm,soapy water and polish using awater- and dirt-repellent glasspolish or wax.Check all the wiring. Make sure thatthere is no unexplained highresistance in any of the solar panelsor on any run of wiring. It could bea faulty connection or a damaged

cable that is causing the problems.Carry out another site survey andensure there are no obstructionsbetween the solar array and the sun.Double-check that the array itself isin the right position to capture thesun at solar noon. Finally, checkthat the array is at the optimumangle to collect sunlight.If you are experiencing theseproblems only at a certain time ofthe year, it is worth adjusting theangle of the solar panel to providethe maximum potential powergeneration during this time, even ifthis means compromising power
output at other times of year.Check the voltage at the solar arrayusing a multi-meter. Then checkagain at the solar controller. If thereis a significant voltage dropbetween the two, the resistance inyour cable is too high and you arelosing significant efficiency as aresult. This could be due to aninadequate cable installed in thefirst place, or damage in the cable.If possible, reduce the length of thecable and test again. Alternatively,replace the cable with a larger andbetter quality cable.If none of that works, you have

three choices:
· Reduce your power load
· Increase the size of yoursolar array
· Add another power source(such as a fuel cell, windturbine or generator) to top upyour solar electric systemwhen necessary

Damaged wiring/ poorconnectionsIf you have damaged wiring or apoor connection, this can have somevery strange effects on your system.If you have odd symptoms that donot seem to add up to anything inparticular, then wiring problems orpoor connections are your mostlikely culprit.Examples of some of the symptomsof a loose connection or damagedwiring are:
· A sudden drop in solarenergy in very warm or very

cold weather. This is oftendue to a loose connection ordamaged wiring in the solararray or between the solararray and the solar controller
· Sudden or intermittent lossof power when you arerunning high loads. Thissuggests a loose connectionbetween batteries, or betweenthe batteries and solarcontroller or inverter
· Sudden or intermittent lossof power on particularlywarm days after the solararray has been in the sun for a

period of time. This suggestsa loose connectionsomewhere in the array, adamaged panel or highresistance in a cable
· Significantly lower levelsof power generation from thesolar array suggest a loosewire connection or a shortcircuit between solar panelswithin the array
· A significant voltage dropon the cable between thesolar array and the solarcontroller suggests either aninadequate cable or damage

to the cable itself
· Likewise, a significantvoltage drop on the cablebetween the solar controllerand your low-voltage devicessuggests an inadequate cableor damage to the cable itself
· If you find a cable that isvery warm to the touch, itsuggests the internalresistance in that cable ishigh. The cable should bereplaced immediately
Unfortunately, diagnosing exactlywhere the fault is can betime-consuming. You will require a

multi-meter, a test light and plentyof time.Your first task is to identify whichpart of the system is failing. A solarcontroller that can tell you inputsand outputs is useful here. Theinformation from this will tell youwhether your solar array isunderperforming or the devices arejust not getting the power they need.Once you know which part of thesystem to concentrate on, measurethe resistance of each cable usingthe ohm setting on your multi-meter.If the internal resistance is higherthan you would expect, replace it. If

any cable is excessively hot,replace it. The problem could becaused either by having aninadequate cable in the first place(i.e. too small) or by internaldamage to the cable.Next, check all the connections inthe part of the system you arelooking at. Make sure the quality ofthe connections is good. Make surethat all cables are terminated withproper terminators or soldered.Make sure there is no water ingress.

Weak batteryThe symptoms of a weak battery arethat either the system does not giveyou as much power as you need, oryou get intermittent power failureswhen you switch on a device.In extreme cases, a faulty batterycan actually reverse its polarity andpull down the efficiency of theentire bank.Weak battery problems first showthemselves in cold weather andwhen the batteries are discharged tobelow 50–60% capacity. In warmweather, or when the batteries arecharged up, weak batteries can

quite often continue to give goodservice for many months or years.If your solar controller shows thatyou are getting enough power infrom your solar array to cope withyour loads, then your most likelysuspect is a weak battery withinyour battery bank, or a badconnection between two batteries.Start with the cheap and easy stuff.Clean all your battery terminals,check your battery interconnectioncables, make sure the cableterminators are fitting tightly on thebatteries and coat each terminalwith a layer of petroleum jelly in

order to ensure good connectivityand protection from water ingress.Then check the water levels in yourbatteries (if they are ‘wet’batteries). Top up as necessary.Check to make sure that eachbattery in your battery bank isshowing a similar voltage. If thereis a disparity of more than 0.7 volts,it suggests that you may need tobalance your batteries.If, however, you are seeing adisparity on one battery of 2 voltsor over, it is likely that you have afailed cell within that battery. Youwill probably find that this battery

is also abnormally hot. Replace thatbattery immediately.If your solar controller has thefacility to balance batteries, thenuse this. If not, top up the charge onthe weaker batteries, using anappropriate battery charger, untilall batteries are reading a similarvoltage.If you are still experiencingproblems after carrying out thesetests, you will need to run a loadtest on all your batteries in turn. Todo this, make sure all your batteriesare fully charged up, disconnect thebatteries from each other and use a

battery load tester (you can hirethese cheaply from tool hirecompanies). This load tester willidentify any weak batteries withinyour bank.
Changing batteriesIf all your batteries are severalyears old and you believe they aregetting to the end of their usefullives, it is probably worth replacingthe whole battery bank in one go.Badly worn batteries and newbatteries do not necessarily mixwell, because of the voltagedifference. If you mix new andused, you can easily end up with a

bank where some of the batteriesnever fully charge up.If you have a bank of part-wornbatteries and one battery has failedprematurely, it may be worthfinding a second-hand battery of thesame make and model as yours.Many battery suppliers can supplyyou with second-hand batteries: notonly are they much cheaper thannew, but because the second-handbattery will also be worn, it willhave similar charging anddischarging characteristics to yourexisting bank, which can help it beddown into your system.

If you cannot find a part-wornbattery, you can use a new one, butmake sure you use the same makeand model as the other batteries inyour bank. Never mix and matchdifferent models of batteries, asthey all have slightly differentcharacteristics.If you add a new battery to a part-worn bank, you may find the life ofthe new battery is less than youwould expect if you replaced allthem. Over a few months of use, theperformance of the new battery islikely to degrade to similar levelsto the other batteries in the bank.
Before changing your battery, makesure that all of your batteries (bothnew and old) are fully charged.Put a label on the new battery,noting the date it was changed. Thiswill come in useful in future yearswhen testing and replacingbatteries.Once you have replaced yourbattery, take your old one to yourlocal scrap merchants. Lead acidbatteries have a good scrap valueand they can be 100% recycled tomake new batteries.
Inverter issuesThe symptoms of inverter issuescan include:
· Buzzing or humming soundsfrom some electronicequipment when poweredfrom the inverter
· Failure of some equipmentto run from the inverter
· Regular tripping of circuits
· Sudden loss of powerIf you are experiencing buzzing orhumming sounds from electronicequipment when powered from the

inverter, or if some equipment isnot running at all, it suggests that theinverter is not producing a pure ACsine wave. If you have a grid-tiesystem, the AC pure sine waveformgenerated by the inverter may not beperfectly coordinated with thewaveform from the grid. Thiswould suggest poor quality powerfrom the grid, a grounding issue or afaulty inverter.If you have a stand-alone systemand have purchased a modified sinewave inverter (or quasi-sine wave),it may be that you cannot resolvethese issues without replacing theinverter. Some electronic

equipment, such as laptopcomputers and portable televisions,may not work at all using amodified sine wave inverter, whilstother equipment will emit a buzzwhen run from these inverters.If you have sudden and unexplainedtripping of circuits when runningfrom an inverter, or experiencesudden loss of power, there are anumber of things to check:
· Does the tripping occurwhen a heavy-load appliancesuch as a fridge switchesitself on or off?
· Does the tripping occur

when the inverter cuts in atthe start of the day or when itcuts out at the end of the day?
· Does the tripping occurmore often on very warmdays or after heavy rain?
Unfortunately, circuit tripping andsudden power loss often onlyoccurs when a combination ofevents occur, which can makediagnosis time-consuming anddifficult to get right.The most common reasons forcircuit tripping or sudden powerloss are temperature-related issues.Inverters can generate a huge

amount of heat. The hotter they get,the less power they produce. If theinverter is running too hot, a suddenpeak demand can be enough to shutthe inverter down momentarily. Ifthe inverter runs too hot for toolong, it will shut down for a longerperiod of time in order to cool.If this is the case, you are going tohave to provide your inverter withmore ventilation. If you cannot keepit cool, it may also mean that yourequire a more powerful inverter inorder to cope with the load.If the issue occurs during suddenrain or on very hot days, you may

also have a grounding problem.Check the inverter with a PATtester to ensure that you are notgetting a ground leakage from theinverter itself. If you are, check allthe connections from the DC inputof your inverter.

Maintaining YourSystem
There is very little maintenance tobe carried out on a solar electricsystem. There are some basicchecks that should be carried out ona regular basis. Typically theseshould take no more than a fewminutes to carry out.
As required· Clean the solar array. This
actually takes very littleeffort: unless you live in a

very dry and dusty part of theworld, the rain will usuallydo a very good job ofwashing your solar panelsclean on a regular basis
· Telescopic window cleanerkits are available to cleansolar arrays mounted onlower sections of a roof. Ifyou can easily access thepanels, a dirt- andrain-repellent glass polishcan help keep your solararray cleaner for longer
· If you have a thick layer ofsnow on your solar array,

brush it off! A thick blanket ofsnow very quickly stops yoursolar array from producingany energy at all
Every month· If your solar controller or
inverter includes a displaythat shows power input andpower output, check theperformance of your solararray. Check that it is in linewith your expectations for thetime of year. It is worthkeeping a log of theperformance so you cancompare it from one year to

the next
· If there is an unexplaineddrop in performance, cleanthe solar array, visually checkthe condition of the cablesand balance the batteries. Ifthe performance does notimprove, follow thetroubleshooting guide forfurther assistance
Every three months· Check the ventilation in the
battery box
· Check the battery area isstill weatherproof and there

are no leaks from thebatteries
· Clean dirt and dust off thetop of batteries
· Visually check all thebattery connectors. Make surethey are tightly-fitting. Cleanand protect them withpetroleum jelly whererequired
· Check the electrolyte levelin batteries and top up withdistilled water whererequired
Every six months

· If you have a multi-batterysystem and your solarcontroller has the facilities todo so, balance the batterybank
· Once the batteries arebalanced, use a volt meter ormulti-meter to check thevoltage on each individualbattery. Ensure the voltagesare within 0.7 volts of eachother
· If one or more battery has abig difference in voltage,follow the instructions onweak batteries in the

troubleshooting section of thisbook
Every year· If you have a battery bank
with more than two batteries,swap the order of thebatteries in your bank. Placethe batteries that were in themiddle of your bank at eitherend and the batteries thatwere at either end of yourbank in the middle. Thenbalance them
· This will ensure that all thebatteries get even wear

throughout their lifetime andthereby increase the overalllifespan of the batteries
At the start of each winter· Check the insulation around
the batteries
· Check that the area aroundthe batteries is free ofrodents. Mice and rats like tokeep warm, and insulationaround batteries is a temptingtarget. If they have found yourbatteries, they are likely tognaw the cabling as well
· Clean the solar array to

ensure you get the bestpossible performance at theworst time of the year

Internet Support
A free website supports this book.It provides up-to-the-minuteinformation and online solar energycalculators to help simplify the costanalysis and design of your solarelectric system.To visit this site, go to thefollowing address:www.SolarElectricityHandbook.com


Tools available on thewebsiteOnline project analysisThe online project analysis tool onthis site takes away a lot of thecalculations that are involved withdesigning a new solar electricsystem, including estimating the sizeand type of solar panel, the size andtype of battery, the thickness oflow-voltage cable required andproviding cost and timescaleestimates.To use the online project analysis,you will need to have completed

your power analysis (see thechapter on Project Scoping), andideally completed your wholeproject scope. The solar calculatorwill factor in the systeminefficiencies and produce athirteen-page analysis for yourproject.
Monthly insolation figuresMonthly solar insolation figures forevery country in the world areincluded on the website. These canbe accessed by selecting yourcountry and the name of yournearest town or city from a list.Every country in the world is

included.The solar insolation figures usedare monthly averages based onthree-hourly samples taken over a22-year period.
Solar angle calculatorThe solar angle calculator showsthe optimum angle for your solarpanel on a month-by-month basis,and shows where the sun will riseand set at different times of theyear.
Solar resourcesA directory of solar suppliers isincluded on the website, along with

links for finding out the very latestabout grant schemes and sellingyour electricity back to theelectricity companies.
Questions and answersThe site includes an extensive listof questions posted on the site byother site visitors, along with myanswers. These questions andanswers cover almost everyconceivable area of solar designand installation and are worth abrowse. If you have a question ofyour own, post it on the site.
Author online!

If you have noticed a mistake in thebook, or feel a topic has not beencovered in enough detail, I wouldwelcome your feedback.This handbook is updated on ayearly basis and any suggestionsyou have for the next edition wouldbe gratefully received.The website also includes an ‘askme a question’ facility, so you canget in touch with any otherquestions you may have, or simplybrowse through the questions andanswers in the Frequently AskedQuestions section.

Solar articlesNew articles about solar power areregularly added to our articlessection.

A Final Word
Solar electric power is an excellentand practical resource. It can beharnessed relatively easily andeffectively.It is not without its drawbacks andit is not suitable for everyapplication. To get the best out of asolar electric system, it is importantto do your planning first and to bemeticulous with detail. Only thenwill you have a system that willperform properly.From an enthusiast’s perspective,

designing and building a solarelectric system from scratch isinteresting, educational and fun. Ifyou are tempted to have a go, startwith something small like a shedlight, and feel free to experimentwith different ideas.If you are a professional architector builder, you should now have aclear idea of how solar energy canbe used in your projects: itsbenefits and its drawbacks.It is quite amazing, the first time youconnect a solar panel up to anelectrical item such as a light bulband watch it power up straight

away. Even though you know it isgoing to work, there is somethingalmost magical about watching asystem that generates electricityseemingly from thin air!Teaching children about solarelectricity is also fun. There aresmall solar powered kits suitablefor children. These can beassembled by little fingers and theyteach the fundamentals of electricityand solar power in a fun andinteresting way.If this book has inspired you toinstall a solar electric systemyourself, then it has served its
purpose. I wish you the very bestfor your project.
All the best Michael BoxwellJanuary, 2012

Appendix A –Crystalline Solar
Panels and Shading
As mentioned a few times in thisbook, shading is a big issue withcrystalline photovoltaic panels. Asmall amount of shading has a bigimpact on the amount of electricalpower generated by your solarsystem.Unlike solar thermal (hot water)systems, the loss of power throughshading is much greater than theamount of the panel that is in shade.

With solar thermal systems, if only5% of the panel is in shade, youlose less than 5% of the powerproduction. With amorphous(thin-film) PV panels, you wouldusually lose 15–20% of the powerproduction in a similar scenario.With crystalline solar panels, thedifference is significantly more andin some instances can bring powergeneration down to zero, even if theamount of the panel in shade issmall.The reason for this is in theconstruction of the solar panelitself. A crystalline solar panel is

made up of a number of individualsolar cells. Typically, each of thesecells generates ½ volt of potentialenergy. These cells are connectedtogether in series to increase thevoltage to a more useful levelinside the solar panel. Eachindividual solar panel has one ormore strings of solar cells.Because these strings of cells areconnected in series, a solar panel isonly as good as its weakest cell. Ifone cell produces a weak output, allthe other cells within the string arecompromised as well. This meansthat if you have a ‘soft shade’ suchas a distant tree branch, creating a

soft dappled shade across just oneor two cells on a solar panel, theeffect can be to reduce the output ofthe whole string to a similar levelto a dull, overcast day.Worse happens when you have amore direct shadow, creating abigger contrast between light andshade. When even one cell is incomplete shade and the remainderare in bright sunlight, the shadedcell short-circuits as the flow ofelectrons within the cell goes intoreverse.However, because the cell isconnected in series with the other

cells in the panel, current is forcedthrough the reversed cell. In thisscenario, the reversed cell absorbsthe power produced by the othercells in the panel, generating heatand creating a hotspot within thesolar panel.The amount of power that isabsorbed by a single reversed cellis disproportionate to the amount ofpower a single cell can generate. Asingle cell may only produce ½ voltof potential energy, but can absorb6–8 volts when it has gone intoreversal.If unchecked, a solar cell left in this

state can easily be destroyed. Thehot spot generated by the blockedcell can very quickly reachdangerous temperature levels too,and amateur home-built solarpanels have been known to burstinto flames precisely for thisreason.Thankfully, solar panelmanufacturers have a solution tothis problem in order to avoid thepanel itself becoming damaged. Allprofessionally manufacturedcrystalline solar panels have in-built protection to route poweraround a string of cells where oneor more of the cells are in reversal.
If your solar panel has only a singlestring of solar cells within it, thiseffectively means the entire solarpanel is bypassed and produces nopower at all. If your solar panel hastwo strings of solar cells, it meansthe power output of the panel ishalved.Because a solar array is typicallyput together by installing multiplesolar panels in series, the effects ofshading on just part of one panelimpacts the performance of theentire solar array.

Types of obstructionShade can be broken down into twocategories: soft shade and hardshade.A soft shade is a distant obstructionwhere the shadow is dispersed ordiffused, which significantlyreduces the amount of light reachingthe solar cells. A shadow from atree would be classed as a softshade.Hard shade is an obstruction thatblocks out light from reaching thesolar cell completely. Birddroppings, fallen leaves or a treebranch sitting on top of the glass

would be classed as a hard shade.Where cells are soft shaded, youwill see a significant drop off inenergy production. Effectively, theproduction of the entire array willdrop down to a similar level to adull day.Where cells are hard shaded, theproduction of the entire array willdrop down to the same level as theaffected cells: if the cells arecovered completely, you may see acomplete power shutdown(depending on how shade-tolerantyour solar panels are). If the cellsare only partially covered, you will

see a significant drop in energyproduction.

Designing shade-tolerantsolar systemsIf you cannot avoid shade in yoursolar energy system, the solution isto design a shade-tolerant system.In other words, you have to designyour system in such a way that theeffect of shade on any one part ofyour system has as small an effecton the overall array as possible.Designing shade-tolerant solararrays is a complex subject and aspecialist area even amongst solardesign experts. There are entirebooks written on this subject alone.Consequently, it is not possible to

cover the whole subject here.However, it is possible to design abasic solar energy system with areasonable level of shade tolerancewithout a huge amount of specialistknowledge.If you need to design a system thatwill continue to perform well inpartially shaded conditions, thereare options available to you:
Track the shadeFirst, you should never design asystem that will have to cope withhard shading. Solar panels shouldbe mounted so that they are notcovered in leaves and so they can

be inspected and cleaned of anyhard obstructions if necessary. Ifthere is a permanent obstruction thatwill be creating a hard shade, youshould not be installing solar panelsin that particular location.
If you have a soft shade, for howmuch of the day does this shadeyour panels? Remember, even a softshade over a small area can have abig impact. Typical core powergeneration times for solar energyduring the summer are three hourseither side of solar noon (i.e.between 9am and 3pm, if your timezone equates to solar time). If you

have shading either before thisperiod or after it, you will losearound 20% of your capability inthe summer, or 40% of yourcapability if you have shading inboth the early morning and lateafternoon.
During the winter, the differenceis not so great. Because the sun islower in the sky and the intensity ofthe sunlight is significantly lower,almost all of your power isgenerated during the core powergeneration times. If you haveshading before 9am or after 3pmduring the winter, you willprobably be losing only around

5–10% of your generatingcapabilities.
However, if you are sufferingfrom shade within the core powergeneration times, you are going toseverely compromise theperformance of your system. Theexact impact on the performance ofyour system will vary according toyour location, the severity ofshading and the type of solar panelsyou are using, but in general terms,this is how much of your solarenergy production you can expect tolose from one hour of shadingduring core power generation

times:
Period ofShading
Winterloss (%)
Summerloss (%)
9am–10am(2–3 hoursbefore solarnoon)
3% 6%
10am–11am (1–2hours beforesolar noon)
15% 10%
11am–solarnoon
27% 14%
Solarnoon–1pm
27% 14%

1pm–2pm(1–2 hoursafter solarnoon)
15% 10%
2pm–3pm(2–3 hoursafter solarnoon)
3% 6%
This table shows theapproximate
performance lossfrom your system if it
is shaded for onehour during coreproduction times

As you see, you can lose asignificant amount of energyproduction due to shading duringthe middle of the day. This is whyshading during the middle of the dayis the number one reason for solararrays failing to live up toexpectations.However, because you can nowquantify the impact of the shading, itis possible to do something tocounter the effects.
Increasing the number of solarpanelsThe first option is the most obvious:

if you have the space, you canincrease the number of solar panelsyou install in order to counter theperiods of shade.This is not always possible, eitherbecause of space or costrestrictions. Also, it is not alwaysthe most efficient way of gettingaround the problem.
Panel orientationIf shade affects you at a particulartime of the day, consider anglingyour solar panels away from theobstruction. This will increase theireffectiveness during theunobstructed parts of the day and
reduce or remove the impact of theobstruction in the first place. Thereduction in power generation fromangling the panels away from duesouth is often less than the impacton shading if you can eliminate theshade problem altogether.
Choice of solar panelAnother option is to chooseamorphous (thin-film) solar panels.Amorphous solar panels do notsuffer from cell reversal in the sameway that crystalline solar panels do,and consequently provide far bettershade tolerance.Because of their lower efficiency
levels, you will need to take intoaccount that you will require aroundtwice as much physical space toinstall amorphous solar panels. Ifspace is not an issue, usingamorphous solar panels is likely tobe the simplest and most cost-effective solution for stand-alonesolar installations.Sharp, Mitsubishi, Uni-Solar, SolarFrontier and Sanyo nowmanufacture high-quality amorphoussolar panels that offer excellentperformance and reliability.
Use micro-inverters

If you are building a grid-tiesystem, possibly the best solution isto use micro-inverters, where eachpanel has its own power inverterand is a full solar energy system inits own right.With a micro-inverter system, eachsolar panel runs entirelyindependently of every other solarpanel. If shade affects one panel,none of the other panels is affectedin any way.Using micro-inverters also meansthat you can have solar panelsfacing in different directions fromeach other. For instance, if you are

installing solar panels on a roof andyour roof has multiple pitches andangles, you can choose to installyour solar array on more than onepart of the roof using a micro-inverter system.This approach gives you greaterflexibility as to where you mountsolar panels: it may even bepossible to avoid your shadingissues altogether.
Design a parallel solar arrayBy connecting solar panels inparallel rather than in series, youcan reduce the overall effect ofshading on just one or two parts of

the array. In a parallel system, whenone solar panel is in shade, thepower outputs of other panels in thearray are not affected.If you are designing a grid-tie solarenergy system and want ahigh-voltage system, it is possibleto achieve this with a parallel arrayby using high-voltage grid-tiespecific solar panels. A number ofmanufacturers now offer thesepanels, often producing over 100volts from a single panel. Otherpanels are available that provideeither 24-volt or 48-volt output, andthese can be suitable for larger

stand-alone solar energy systemsthat require more than 12 volts.
Design a multi-string solararrayInstead of designing your system tohave just one set of solar panelsconnected in series, you can designyour system to have multiple seriesof solar panels. Controllers andinverters are available that allowyou to have multiple strings of solarpanels, or you can have a controlleror inverter for each individualstring.In effect, this means you end up

with two smaller solar powersystems, rather than one. This maymean you can face your twodifferent sets of solar arrays atdifferent angles, giving you theopportunity to mount them inentirely different locations if you sowish.In this scenario, you can designyour system so that partial shadingwill only affect one of your stringsrather than your entire array. Aswith micro-inverters, such anapproach may even allow you toavoid the shading issue altogether.

Other optionsThere are other options, but thedesigns can become extremelycomplicated and are really in thedomain of highly specialist solardesigners. If you are designing ashade-tolerant solar energy systemand the above options will not workfor you, it is time to call in a solarshading specialist.Unless you have significant shadingissues, you can usually designaround the problems using one ofthe options I have suggested here,or by using a combination ofoptions to come up with a workable

solution. Over the past few years, Ihave designed a number ofshade-tolerant systems, includingsystems that are designed to work inan entirely shaded environment allyear round. With careful planning, itis often possible to overcome theissues.

If all else fails...Sometimes it is not possible todesign around shading problems. Inthis scenario, it requires a rethink ofwhat you can achieve using solar.This is an issue that I have with myown home. My house is on the edgeof ancient woodland. For most ofthe year, my home is almost entirelyshaded by the tall trees thatsurround it. Even in the height ofsummer, the sun does not reach mygarden until mid-afternoon.This shading means I could neverrun my own home completely fromsolar power. However, I have

designed a smaller solar energysystem that provides me withenough energy to run my lightingand provide backup power in caseof a power cut.I have achieved this by installingamorphous solar panels onto theback of my home, facing south-westto catch the afternoon and eveningsun. Despite receiving very littlesunlight, this system providesenough electricity to provide mewith my lighting and backup powerrequirements throughout the year,even in the depths of winter.

In conclusion· Shade is a big problem for
solar energy – especially ifusing crystalline solar panels
· Even a very small amount ofshade can have a big impacton your system
· Amorphous solar panelsalso suffer in shade, but not tothe same extent as crystallinepanels
· If you have shade duringcore power generatingperiods of the day – typicallythe three hours either side of

solar noon – you will lose avery significant amount ofyour potential powergeneration
· There are things you can doto reduce the impact ofshading, either through yourchoice of materials or yoursystem design
· In some cases where youhave very significant shadingissues, you may need toreconsider what you canrealistically achieve withsolar

Appendix B – SolarInsolation
Solar insolation shows the dailyamount of energy from the sun youcan expect per square metre at yourlocation, averaged out over theperiod of a month. The figures arepresented as an average irradiance,measured in kilowatt-hours persquare metre spread over the periodof a day (kWh/m²/day).Averages have been collated over a22-year period between 1983 and2005, based on a three-hour sample

rate.The book only shows solarinsolation figures for the UnitedStates, Canada, Australia, NewZealand, UK and Ireland. Whilst Ihave tried to show this informationas clearly as possible, theinformation is in tabular form whichdoes not display well on somesmaller eBook readers. Moredetailed information can beaccessed atwww.SolarElectricityHandbook.comwith figures for every major townand city in every country in theworld, thereby allowing you toaccess information that is specific

to your area.

Understanding thisinformationThe amount of energy you capturefrom the sun differs, depending onthe tilt of the solar panels. If youmount your solar panelshorizontally or vertically, you willcapture less energy than if you facethem due south (due north in theSouthern Hemisphere) and tilt themtowards the sun.The tables on the following pagesshow the irradiance figures basedon mounting your solar panels at thefollowing angles:

· Flat (horizontal)
· Upright
· Tilted towards the equatorfor best year-roundperformance
· Tilted for best performanceduring the winter months
· Tilted for best performanceduring the summer months
· Tilted with the angleadjusted each monththroughout the year
Where the figures show the panelstilted at a fixed angle, I show this

angle in the left hand column as theangle adjustment from an upright(vertical) position. On the bottomrow, where the optimum tiltchanges each month, I show thisangle underneath each month’sirradiance figures. Please note: allangles are in degrees fromvertical.For a more detailed explanation ofthese figures, refer to the chapter onCalculating Solar Energy.
Solar insolation values –AustraliaNew South Wales

Jan Feb Mar Apr
Flat -90°
5.91 5.25 4.48 3.56
Upright- 0°
2.34 2.56 2.93 3.36
56°angleYear-roundtilt
5.38 5.11 4.84 4.42
40°angleBestwintertilt
4.74 4.66 4.62 4.45

72°angleBestsummertilt
5.78 5.32 4.82 4.16
Tiltadjustedeachmonth
5.7872°
5.3464°
4.8456°
4.4748°
Northern Territory
Jan Feb Mar Apr
Flat -90°
5.83 5.18 5.07 4.81
Upright 2.43 1.81 2.28 3.09

- 0°
73°angleYear-roundtilt
5.85 5.04 5.13 5.15
57°angleBestwintertilt
5.58 4.68 4.94 5.21
89°angleBestsummer
5.84 5.18 5.08 4.84

tiltTiltadjustedeachmonth
5.8489°
5.1881°
5.1373°
5.2265°
Queensland
Jan Feb Mar Apr
Flat -90°
6.19 5.39 4.95 3.98
Upright- 0°
2.09 2.28 2.81 3.22
62°angleYear-round
5.65 5.22 5.19 4.61

tilt
46°angleBestwintertilt
4.98 4.78 4.96 4.63
78°angleBestsummertilt
6.06 5.41 5.15 4.34
Tiltadjustedeachmonth
6.0678°
5.4270°
5.1962°
4.6554°

South Australia
Jan Feb Mar Apr
Flat -90°
6.81 6.18 4.91 3.75
Upright- 0°
2.54 2.94 3.32 3.72
55°angleYear-roundtilt
6.15 6.05 5.42 4.80
39°angleBestwinter
5.36 5.49 5.19 4.86

tilt
71°angleBestsummertilt
6.65 6.31 5.37 4.49
Tiltadjustedeachmonth
6.6571°
6.3263°
5.4255°
4.8747°
Victoria
Jan Feb Mar Apr
Flat -90°
6.36 5.83 4.51 3.23

Upright- 0°
2.62 3.00 3.24 3.35
52°angleYear-roundtilt
5.75 5.74 5.04 4.22
36°angleBestwintertilt
5.02 5.20 4.81 4.25
68°angleBest
6.22 6.00 5.01 3.97

summertiltTiltadjustedeachmonth
6.2268°
6.0260°
5.0452°
4.2744°
Western Australia
Jan Feb Mar Apr
Flat -90°
8.41 7.49 5.93 4.34
Upright- 0°
2.46 3.08 3.76 4.12
58°angleYear-
7.51 7.31 6.53 5.46

roundtilt
42°angleBestwintertilt
6.47 6.61 6.28 5.55
74°angleBestsummertilt
8.18 7.62 6.43 5.07
Tiltadjustedeach
8.1874°
7.6366°
6.5358°
5.5650°

month
Solar insolation values –CanadaAlberta
Jan Feb Mar Apr
Flat -90°
0.79 1.70 3.15 4.56
Upright- 0°
1.58 2.60 3.52 3.63
36°angleYear-roundtilt
1.61 2.84 4.26 5.00

20°angleBestwintertilt
1.66 2.85 4.09 4.55
52°angleBestsummertilt
1.47 2.69 4.21 5.20
Tiltadjustedeachmonth
1.6620°
2.8628°
4.2636°
5.2144°
British Columbia

Jan Feb Mar Apr
Flat -90°
1.00 1.88 2.9 4.18
Upright- 0°
1.52 2.44 2.73 2.93
42°angleYear-roundtilt
1.63 2.78 3.52 4.34
26°angleBestwintertilt
1.67 2.78 3.37 3.97

58°angleBestsummertilt
1.51 2.63 3.50 4.52
Tiltadjustedeachmonth
1.6726°
2.8034°
3.5242°
4.5350°
Manitoba
Jan Feb Mar Apr
Flat -90°
1.24 2.17 3.43 4.74
Upright 2.15 3.01 3.50 3.48
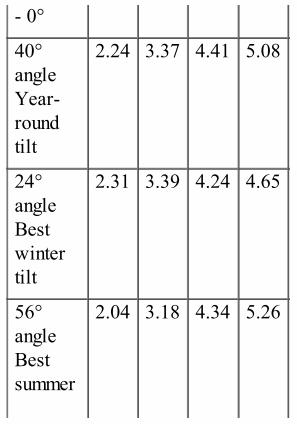
- 0°
40°angleYear-roundtilt
2.24 3.37 4.41 5.08
24°angleBestwintertilt
2.31 3.39 4.24 4.65
56°angleBestsummer
2.04 3.18 4.34 5.26

tiltTiltadjustedeachmonth
2.3124°
3.4132°
4.4140°
5.2648°
New Brunswick
Jan Feb Mar Apr
Flat -90°
1.61 2.46 3.68 4.46
Upright- 0°
2.53 3.11 3.45 3.03
45°angleYear-round
2.67 3.59 4.52 4.69

tilt
29°angleBestwintertilt
2.77 3.61 4.37 4.30
61°angleBestsummertilt
2.43 3.37 4.45 4.84
Tiltadjustedeachmonth
2.7729°
3.6237°
4.5245°
4.8553°

Newfoundland and Labrador
Jan Feb Mar Apr
Flat -90°
1.23 2.07 3.27 4.16
Upright- 0°
1.91 2.68 3.12 2.87
43°angleYear-roundtilt
2.03 3.06 4.03 4.30
27°angleBestwinter
2.09 3.07 3.88 3.94

tilt
59°angleBestsummertilt
1.87 2.89 3.99 4.47
Tiltadjustedeachmonth
2.0927°
3.0835°
4.0343°
4.4851°
Nova Scotia
Jan Feb Mar Apr
Flat -90°
1.54 2.39 3.47 4.29

Upright- 0°
2.85 3.27 3.34 2.84
45°angleYear-roundtilt
2.89 3.70 4.39 4.45
29°angleBestwintertilt
3.06 3.77 4.26 4.09
61°angleBest
2.56 3.42 4.28 4.61

summertiltTiltadjustedeachmonth
3.0629°
3.7837°
4.3945°
4.6153°
Ontario
Jan Feb Mar Apr
Flat -90°
1.53 2.35 3.29 4.35
Upright- 0°
2.63 3.04 3.02 2.83
46°angleYear-
2.71 3.50 4.04 4.50

roundtilt
30°angleBestwintertilt
2.85 3.55 3.91 4.13
62°angleBestsummertilt
2.41 3.25 3.96 4.65
Tiltadjustedeach
2.8530°
3.5638°
4.0446°
4.6654°

month
Prince Edward Island
Jan Feb Mar Apr
Flat -90°
1.35 2.10 3.22 4.28
Upright- 0°
2.09 2.63 2.98 2.9
44°angleYear-roundtilt
2.21 3.04 3.90 4.42
28°angle
2.29 3.05 3.75 4.05
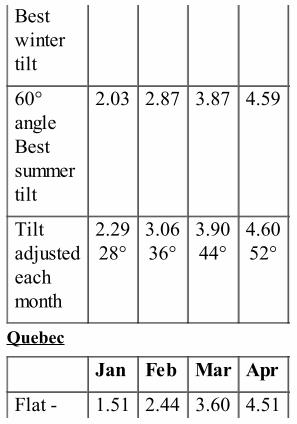
Bestwintertilt
60°angleBestsummertilt
2.03 2.87 3.87 4.59
Tiltadjustedeachmonth
2.2928°
3.0636°
3.9044°
4.6052°
Quebec
Jan Feb Mar Apr
Flat - 1.51 2.44 3.60 4.51

90°
Upright- 0°
2.42 3.16 3.44 3.10
43°angleYear-roundtilt
2.55 3.61 4.46 4.7
27°angleBestwintertilt
2.64 3.64 4.31 4.31
59°angle
2.33 3.40 4.40 4.87

Bestsummertilt
Tiltadjustedeachmonth
2.6427°
3.6535°
4.4643°
4.8851°
Saskatchewan
Jan Feb Mar Apr
Flat -90°
1.11 1.98 3.25 4.79
Upright- 0°
1.94 2.77 3.32 3.57
40° 2.02 3.10 4.16 5.15

angleYear-roundtilt
24°angleBestwintertilt
2.08 3.11 4.00 4.71
56°angleBestsummertilt
1.85 2.92 4.11 5.34
Tilt 2.08 3.12 4.16 5.35
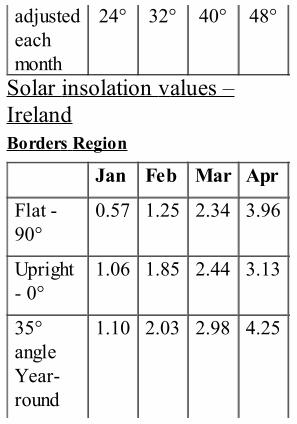
adjustedeachmonth
24° 32° 40° 48°
Solar insolation values –IrelandBorders Region
Jan Feb Mar Apr
Flat -90°
0.57 1.25 2.34 3.96
Upright- 0°
1.06 1.85 2.44 3.13
35°angleYear-round
1.10 2.03 2.98 4.25

tilt
19°angleBestwintertilt
1.12 2.02 2.83 3.87
51°angleBestsummertilt
1.01 1.94 2.98 4.44
Tiltadjustedeachmonth
1.1219°
2.0427°
2.9835°
4.4643°

Dublin, The Midlands andMidlands-East Regions
Flat -90°
0.62 1.19 2.09 3.34
Upright- 0°
1.03 1.59 1.97 2.45
37°angleYear-roundtilt
1.08 1.78 2.48 3.42
21°angleBestwinter
1.10 1.77 2.34 3.10

tilt
53°angleBestsummertilt
1.01 1.71 2.50 3.59
Tiltadjustedeachmonth
1.1021°
1.7929°
2.4837°
3.6245°
South-East, West and South WestRegions
Flat -90°
0.67 1.26 2.15 3.46
Upright 1.06 1.65 2.00 2.52

- 0°
38°angleYear-roundtilt
1.13 1.86 2.53 3.54
22°angleBestwintertilt
1.15 1.84 2.40 3.22
54°angleBestsummer
1.05 1.79 2.55 3.72
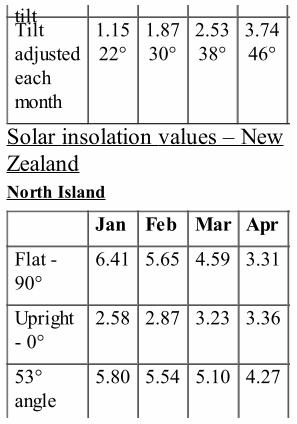
tiltTiltadjustedeachmonth
1.1522°
1.8730°
2.5338°
3.7446°
Solar insolation values – NewZealandNorth Island
Jan Feb Mar Apr
Flat -90°
6.41 5.65 4.59 3.31
Upright- 0°
2.58 2.87 3.23 3.36
53°angle
5.80 5.54 5.10 4.27

Year-roundtilt
37°angleBestwintertilt
5.07 5.03 4.87 4.3
69°angleBestsummertilt
6.27 5.79 5.06 4.02
Tiltadjusted
6.2769°
5.8161°
5.1053°
4.3245°

eachmonth
South Island
Jan Feb Mar Apr
Flat -90°
5.75 5.01 3.92 2.67
Upright- 0°
2.75 2.94 3.18 3.14
46°angleYear-roundtilt
5.21 4.98 4.56 3.77
30°angle
4.54 4.50 4.34 3.78
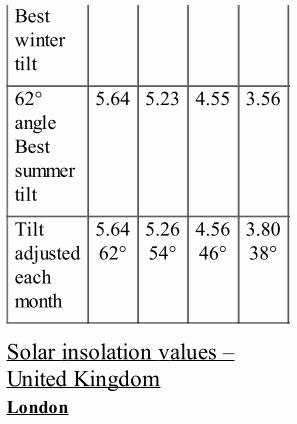
Bestwintertilt
62°angleBestsummertilt
5.64 5.23 4.55 3.56
Tiltadjustedeachmonth
5.6462°
5.2654°
4.5646°
3.8038°
Solar insolation values –United KingdomLondon

Jan Feb Mar Apr
Flat -90°
0.75 1.37 2.31 3.57
Upright- 0°
1.20 1.80 2.18 2.58
38°angleYear-roundtilt
1.27 2.04 2.76 3.67
22°angleBestwintertilt
1.30 2.03 2.62 3.34
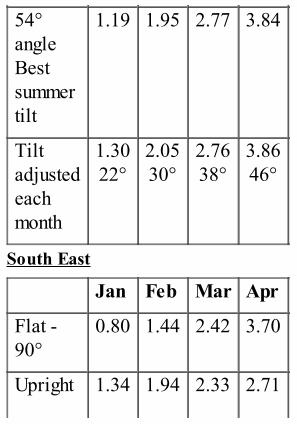
54°angleBestsummertilt
1.19 1.95 2.77 3.84
Tiltadjustedeachmonth
1.3022°
2.0530°
2.7638°
3.8646°
South East
Jan Feb Mar Apr
Flat -90°
0.80 1.44 2.42 3.70
Upright 1.34 1.94 2.33 2.71

- 0°
38°angleYear-roundtilt
1.41 2.18 2.94 3.84
22°angleBestwintertilt
1.44 2.18 2.81 3.5
54°angleBestsummer
1.30 2.08 2.94 4.01

tiltTiltadjustedeachmonth
1.4422°
2.2030°
2.9438°
4.0346°
South West
Jan Feb Mar Apr
Flat -90°
0.81 1.51 2.49 3.91
Upright- 0°
1.26 1.98 2.36 2.83
39°angleYear-round
1.34 2.25 3.00 4.07

tilt
23°angleBestwintertilt
1.37 2.24 2.86 3.72
55°angleBestsummertilt
1.25 2.14 3.00 4.24
Tiltadjustedeachmonth
1.3723°
2.2631°
3.0039°
4.2647°

East of England
Jan Feb Mar Apr
Flat -90°
0.72 1.34 2.37 3.60
Upright- 0°
1.18 1.80 2.30 2.63
38°angleYear-roundtilt
1.25 2.03 2.89 3.71
22°angleBestwinter
1.27 2.02 2.74 3.38

tilt
54°angleBestsummertilt
1.16 1.94 2.90 3.89
Tiltadjustedeachmonth
1.2722°
2.0430°
2.8938°
3.9146°
East Midlands
Jan Feb Mar Apr
Flat -90°
0.64 1.31 2.20 3.37
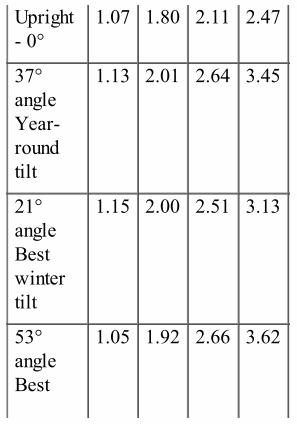
Upright- 0°
1.07 1.80 2.11 2.47
37°angleYear-roundtilt
1.13 2.01 2.64 3.45
21°angleBestwintertilt
1.15 2.00 2.51 3.13
53°angleBest
1.05 1.92 2.66 3.62

summertiltTiltadjustedeachmonth
1.1521°
2.0229°
2.6437°
3.6545°
West Midlands
Jan Feb Mar Apr
Flat -90°
0.71 1.35 2.28 3.47
Upright- 0°
1.18 1.84 2.18 2.54
38°angleYear-
1.24 2.06 2.74 3.56

roundtilt
22°angleBestwintertilt
1.26 2.05 2.60 3.25
54°angleBestsummertilt
1.15 1.97 2.75 3.73
Tiltadjustedeach
1.2622°
2.0730°
2.7438°
3.7646°

month
North-East England
Jan Feb Mar Apr
Flat -90°
0.61 1.35 2.45 3.88
Upright- 0°
1.17 2.03 2.61 3.04
35°angleYear-roundtilt
1.21 2.23 3.17 4.14
19°angle
1.24 2.22 3.03 3.76

Bestwintertilt
51°angleBestsummertilt
1.11 2.12 3.17 4.33
Tiltadjustedeachmonth
1.2419°
2.2427°
3.1735°
4.3643°
North-West England
Jan Feb Mar Apr
Flat - 0.66 1.32 2.30 3.63
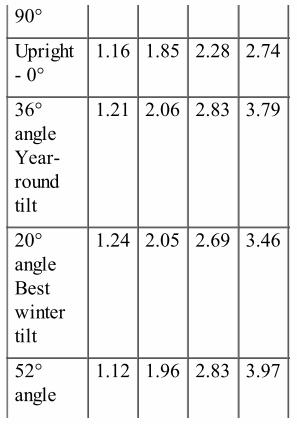
90°
Upright- 0°
1.16 1.85 2.28 2.74
36°angleYear-roundtilt
1.21 2.06 2.83 3.79
20°angleBestwintertilt
1.24 2.05 2.69 3.46
52°angle
1.12 1.96 2.83 3.97

Bestsummertilt
Tiltadjustedeachmonth
1.2420°
2.0728°
2.8336°
3.9944°
Yorkshire and the Humber
Jan Feb Mar Apr
Flat -90°
0.62 1.30 2.30 3.51
Upright- 0°
1.12 1.86 2.31 2.64
36° 1.16 2.06 2.85 3.64

angleYear-roundtilt
20°angleBestwintertilt
1.19 2.04 2.71 3.31
52°angleBestsummertilt
1.08 1.96 2.86 3.82
Tilt 1.19 2.06 2.85 3.85

adjustedeachmonth
20° 28° 36° 44°
Central and Southern Scotland
Jan Feb Mar Apr
Flat -90°
0.51 1.16 2.03 3.22
Upright- 0°
0.99 1.75 2.05 2.46
34°angleYear-roundtilt
1.02 1.91 2.51 3.32
18° 1.04 1.90 2.37 3.00

angleBestwintertilt
50°angleBestsummertilt
0.94 1.83 2.53 3.49
Tiltadjustedeachmonth
1.0418°
1.9226°
2.5134°
3.5342°
North Scotland
Jan Feb Mar Apr

Flat -90°
0.47 1.11 2.05 3.30
Upright- 0°
0.99 1.74 2.16 2.59
33°angleYear-roundtilt
1.00 1.88 2.62 3.44
17°angleBestwintertilt
1.03 1.87 2.46 3.12
49° 0.92 1.80 2.61 3.62

angleBestsummertilt
Tiltadjustedeachmonth
1.0317°
1.8925°
2.6233°
3.6641°
South Wales
Jan Feb Mar Apr
Flat -90°
0.72 1.33 2.21 3.52
Upright- 0°
1.14 1.74 2.04 2.54

38°angleYear-roundtilt
1.21 1.97 2.59 3.61
22°angleBestwintertilt
1.23 1.96 2.46 3.29
54°angleBestsummertilt
1.13 1.89 2.61 3.78

Tiltadjustedeachmonth
1.2322°
1.9830°
2.5938°
3.8046°
North Wales
Jan Feb Mar Apr
Flat -90°
0.66 1.32 2.30 3.63
Upright- 0°
1.14 1.83 2.26 2.72
37°angleYear-roundtilt
1.19 2.04 2.81 3.78

21°angleBestwintertilt
1.22 2.03 2.68 3.44
53°angleBestsummertilt
1.11 1.95 2.82 3.96
Tiltadjustedeachmonth
1.2221°
2.0529°
2.8137°
3.9845°
Northern Ireland

Jan Feb Mar Apr
Flat -90°
0.61 1.25 2.15 3.39
Upright- 0°
1.09 1.79 2.12 2.55
35°angleYear-roundtilt
1.13 1.98 2.62 3.51
19°angleBestwintertilt
1.16 1.97 2.49 3.19

51°angleBestsummertilt
1.05 1.89 2.64 3.68
Tiltadjustedeachmonth
1.1619°
1.9927°
2.6235°
3.7143°
Solar insolation values –United States of AmericaAlabama
Jan Feb Mar Apr
Flat - 2.32 2.9 4.06 5.01

90°
Upright- 0°
2.94 2.85 3.06 2.67
58°angleYear-roundtilt
3.29 3.64 4.60 5.04
42°angleBestwintertilt
3.45 3.68 4.46 4.65
74°angle
2.96 3.42 4.5 5.18

Bestsummertilt
Tiltadjustedeachmonth
3.4542°
3.6950°
4.6058°
5.1866°
Alaska
Jan Feb Mar Apr
Flat -90°
0.40 1.07 2.22 3.73
Upright- 0°
0.88 1.75 2.51 3.09
32° 0.89 1.89 2.97 4.06

angleYear-roundtilt
16°angleBestwintertilt
0.92 1.88 2.83 3.68
48°angleBestsummertilt
0.82 1.80 2.97 4.25
Tilt 0.92 1.90 2.97 4.27

adjustedeachmonth
16° 24° 32° 40°
Arizona
Jan Feb Mar Apr
Flat -90°
3.20 4.07 5.45 6.62
Upright- 0°
4.63 4.59 4.29 3.33
57°angleYear-roundtilt
4.92 5.55 6.45 6.83
41° 5.28 5.74 6.34 6.33

angleBestwintertilt
73°angleBestsummertilt
4.28 5.04 6.20 6.96
Tiltadjustedeachmonth
5.2841°
5.7449°
6.4557°
6.9765°
Arkansas
Jan Feb Mar Apr

Flat -90°
2.39 3.03 4.01 5.19
Upright- 0°
3.14 3.09 3.07 2.80
55°angleYear-roundtilt
3.45 3.88 4.56 5.24
39°angleBestwintertilt
3.64 3.94 4.44 4.84
71° 3.08 3.62 4.46 5.38

angleBestsummertilt
Tiltadjustedeachmonth
3.6439°
3.9447°
4.5655°
5.3863°
California
Jan Feb Mar Apr
Flat -90°
2.18 3.09 4.65 6.08
Upright- 0°
3.35 3.68 4.09 3.53
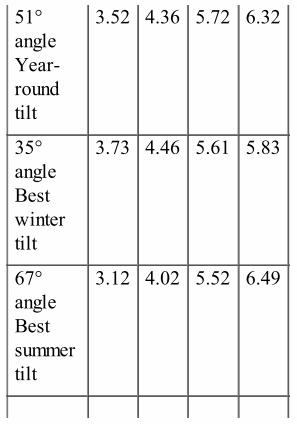
51°angleYear-roundtilt
3.52 4.36 5.72 6.32
35°angleBestwintertilt
3.73 4.46 5.61 5.83
67°angleBestsummertilt
3.12 4.02 5.52 6.49

Tiltadjustedeachmonth
3.7335°
4.4643°
5.7251°
6.4959°
Colorado
Jan Feb Mar Apr
Flat -90°
2.41 3.27 4.49 5.42
Upright- 0°
4.20 4.18 4.05 3.25
50°angleYear-roundtilt
4.27 4.85 5.58 5.62

34°angleBestwintertilt
4.58 4.99 5.47 5.17
66°angleBestsummertilt
3.72 4.43 5.39 5.78
Tiltadjustedeachmonth
4.5834°
4.9942°
5.5850°
5.7858°
Connecticut

Jan Feb Mar Apr
Flat -90°
1.88 2.73 3.76 4.52
Upright- 0°
3.20 3.50 3.41 2.83
48°angleYear-roundtilt
3.29 4.05 4.62 4.65
32°angleBestwintertilt
3.49 4.14 4.50 4.28

64°angleBestsummertilt
2.91 3.73 4.50 4.80
Tiltadjustedeachmonth
3.4932°
4.1440°
4.6248°
4.8056°
Delaware
Jan Feb Mar Apr
Flat -90°
1.97 2.73 3.69 4.65
Upright 2.99 3.16 3.10 2.77

- 0°
51°angleYear-roundtilt
3.17 3.78 4.35 4.73
35°angleBestwintertilt
3.34 3.84 4.22 4.36
67°angleBestsummer
2.82 3.52 4.26 4.89

tiltTiltadjustedeachmonth
3.3435°
3.8543°
4.3551°
4.8959°
Florida
Jan Feb Mar Apr
Flat -90°
3.56 4.44 5.29 6.11
Upright- 0°
4.03 4.07 3.44 2.62
63°angleYear-round
4.66 5.39 5.80 6.11

tilt
47°angleBestwintertilt
4.96 5.56 5.69 5.68
79°angleBestsummertilt
4.11 4.94 5.61 6.23
Tiltadjustedeachmonth
4.9647°
5.5655°
5.8063°
6.2371°

Georgia
Jan Feb Mar Apr
Flat -90°
2.50 3.12 4.28 5.19
Upright- 0°
3.21 3.14 3.23 2.74
56°angleYear-roundtilt
3.55 3.96 4.86 5.24
40°angleBestwinter
3.74 4.02 4.74 4.86

tilt
72°angleBestsummertilt
3.17 3.69 4.74 5.38
Tiltadjustedeachmonth
3.7440°
4.0348°
4.8656°
5.3864°
Hawaii
Jan Feb Mar Apr
Flat -90°
4.09 5.06 5.85 6.58

Upright- 0°
4.06 4.12 3.33 2.33
69°angleYear-roundtilt
4.98 5.84 6.24 6.50
53°angleBestwintertilt
5.29 6.03 6.13 6.04
85°angleBest
4.40 5.34 6.03 6.62

summertiltTiltadjustedeachmonth
5.2953°
6.0361°
6.2469°
6.6377°
Idaho
Jan Feb Mar Apr
Flat -90°
1.72 2.66 4.07 5.38
Upright- 0°
3.17 3.67 4.01 3.53
47°angleYear-
3.21 4.15 5.28 5.72

roundtilt
31°angleBestwintertilt
3.41 4.25 5.16 5.26
63°angleBestsummertilt
2.83 3.82 5.10 5.88
Tiltadjustedeach
3.4131°
4.2539°
5.2847°
5.8855°

month
Illinois
Jan Feb Mar Apr
Flat -90°
1.92 2.55 3.62 4.69
Upright- 0°
2.91 2.91 3.06 2.83
50°angleYear-roundtilt
3.08 3.48 4.28 4.80
34°angle
3.24 3.53 4.15 4.42
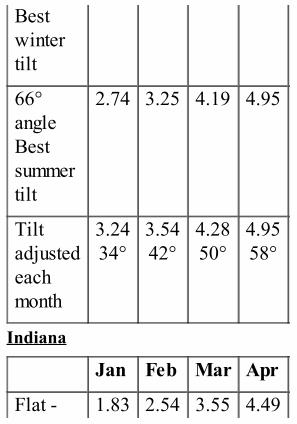
Bestwintertilt
66°angleBestsummertilt
2.74 3.25 4.19 4.95
Tiltadjustedeachmonth
3.2434°
3.5442°
4.2850°
4.9558°
Indiana
Jan Feb Mar Apr
Flat - 1.83 2.54 3.55 4.49

90°
Upright- 0°
2.70 2.89 2.99 2.70
50°angleYear-roundtilt
2.87 3.46 4.18 4.57
34°angleBestwintertilt
3.02 3.51 4.05 4.21
66°angle
2.57 3.24 4.10 4.71

Bestsummertilt
Tiltadjustedeachmonth
3.0234°
3.5242°
4.1850°
4.7258°
Iowa
Jan Feb Mar Apr
Flat -90°
1.91 2.56 3.62 4.56
Upright- 0°
3.26 3.15 3.23 2.84
48° 3.35 3.68 4.40 4.68

angleYear-roundtilt
32°angleBestwintertilt
3.55 3.74 4.27 4.31
64°angleBestsummertilt
2.96 3.42 4.30 4.84
Tilt 3.55 3.75 4.40 4.84

adjustedeachmonth
32° 40° 48° 56°
Kansas
Jan Feb Mar Apr
Flat -90°
2.15 2.72 3.91 4.80
Upright- 0°
3.40 3.13 3.32 2.84
51°angleYear-roundtilt
3.57 3.75 4.66 4.89
35° 3.78 3.81 4.53 4.50

angleBestwintertilt
67°angleBestsummertilt
3.16 3.50 4.55 5.05
Tiltadjustedeachmonth
3.7835°
3.8143°
4.6651°
5.0659°
Louisiana
Jan Feb Mar Apr
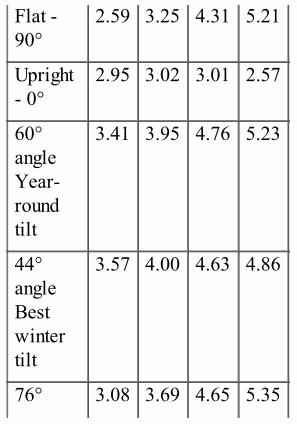
Flat -90°
2.59 3.25 4.31 5.21
Upright- 0°
2.95 3.02 3.01 2.57
60°angleYear-roundtilt
3.41 3.95 4.76 5.23
44°angleBestwintertilt
3.57 4.00 4.63 4.86
76° 3.08 3.69 4.65 5.35
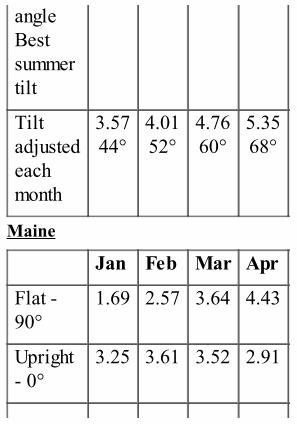
angleBestsummertilt
Tiltadjustedeachmonth
3.5744°
4.0152°
4.7660°
5.3568°
Maine
Jan Feb Mar Apr
Flat -90°
1.69 2.57 3.64 4.43
Upright- 0°
3.25 3.61 3.52 2.91

46°angleYear-roundtilt
3.28 4.07 4.63 4.59
30°angleBestwintertilt
3.48 4.16 4.50 4.21
62°angleBestsummertilt
2.88 3.75 4.52 4.76

Tiltadjustedeachmonth
3.4830°
4.1638°
4.6346°
4.7654°
Maryland
Jan Feb Mar Apr
Flat -90°
1.94 2.68 3.67 4.63
Upright- 0°
2.89 3.06 3.06 2.75
51°angleYear-roundtilt
3.09 3.68 4.31 4.70

35°angleBestwintertilt
3.24 3.73 4.18 4.33
67°angleBestsummertilt
2.76 3.44 4.23 4.86
Tiltadjustedeachmonth
3.2435°
3.7443°
4.3151°
4.8759°
Massachusetts

Jan Feb Mar Apr
Flat -90°
1.80 2.62 3.61 4.46
Upright- 0°
3.15 3.40 3.30 2.83
48°angleYear-roundtilt
3.22 3.91 4.44 4.59
32°angleBestwintertilt
3.42 3.99 4.32 4.22

64°angleBestsummertilt
2.85 3.62 4.34 4.74
Tiltadjustedeachmonth
3.4232°
3.9940°
4.4448°
4.7556°
Michigan
Jan Feb Mar Apr
Flat -90°
1.78 2.51 3.44 4.45
Upright 3.13 3.22 3.11 2.84

- 0°
47°angleYear-roundtilt
3.20 3.71 4.20 4.59
31°angleBestwintertilt
3.39 3.78 4.07 4.22
63°angleBestsummer
2.83 3.44 4.11 4.74

tiltTiltadjustedeachmonth
3.3931°
3.7839°
4.2047°
4.7455°
Minnesota
Jan Feb Mar Apr
Flat -90°
1.71 2.55 3.44 4.54
Upright- 0°
3.41 3.65 3.33 3.03
45°angleYear-round
3.39 4.08 4.36 4.76

tilt
29°angleBestwintertilt
3.62 4.18 4.24 4.37
61°angleBestsummertilt
2.97 3.74 4.25 4.91
Tiltadjustedeachmonth
3.6229°
4.1837°
4.3645°
4.9253°

Mississippi
Jan Feb Mar Apr
Flat -90°
2.52 3.24 4.24 5.34
Upright- 0°
3.08 3.20 3.09 2.72
58°angleYear-roundtilt
3.48 4.07 4.75 5.39
42°angleBestwinter
3.66 4.14 4.62 5.00

tilt
74°angleBestsummertilt
3.12 3.79 4.64 5.52
Tiltadjustedeachmonth
3.6642°
4.1450°
4.7558°
5.5266°
Missouri
Jan Feb Mar Apr
Flat -90°
2.09 2.71 3.85 4.94

Upright- 0°
3.13 3.04 3.21 2.90
51°angleYear-roundtilt
3.32 3.67 4.54 5.05
35°angleBestwintertilt
3.51 3.72 4.41 4.65
67°angleBest
2.95 3.42 4.43 5.20
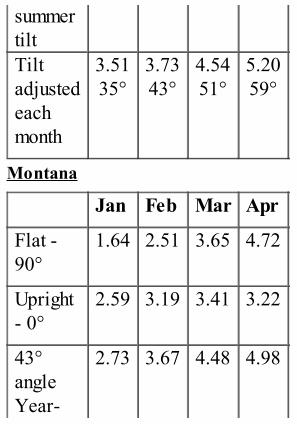
summertiltTiltadjustedeachmonth
3.5135°
3.7343°
4.5451°
5.2059°
Montana
Jan Feb Mar Apr
Flat -90°
1.64 2.51 3.65 4.72
Upright- 0°
2.59 3.19 3.41 3.22
43°angleYear-
2.73 3.67 4.48 4.98

roundtilt
27°angleBestwintertilt
2.83 3.69 4.33 4.58
59°angleBestsummertilt
2.48 3.45 4.41 5.14
Tiltadjustedeach
2.8327°
3.7135°
4.4843°
5.1551°

month
Nebraska
Jan Feb Mar Apr
Flat -90°
2.09 2.68 3.83 4.78
Upright- 0°
3.55 3.26 3.39 2.93
49°angleYear-roundtilt
3.65 3.82 4.65 4.91
33°angle
3.88 3.90 4.53 4.53

Bestwintertilt
65°angleBestsummertilt
3.20 3.55 4.53 5.07
Tiltadjustedeachmonth
3.8833°
3.9041°
4.6549°
5.0757°
Nevada
Jan Feb Mar Apr
Flat - 2.29 3.15 4.61 5.85

90°
Upright- 0°
3.84 3.94 4.16 3.48
51°angleYear-roundtilt
3.95 4.60 5.75 6.10
35°angleBestwintertilt
4.21 4.72 5.64 5.61
67°angle
3.46 4.22 5.55 6.26

Bestsummertilt
Tiltadjustedeachmonth
4.2135°
4.7243°
5.7551°
6.2659°
New Hampshire
Jan Feb Mar Apr
Flat -90°
1.74 2.62 3.61 4.43
Upright- 0°
3.17 3.54 3.38 2.85
47° 3.23 4.03 4.51 4.57

angleYear-roundtilt
31°angleBestwintertilt
3.42 4.12 4.38 4.20
63°angleBestsummertilt
2.85 3.72 4.40 4.73
Tilt 3.42 4.12 4.51 4.74

adjustedeachmonth
31° 39° 47° 55°
New Jersey
Jan Feb Mar Apr
Flat -90°
1.92 2.71 3.69 4.57
Upright- 0°
3.03 3.25 3.18 2.77
50°angleYear-roundtilt
3.18 3.84 4.41 4.66
34° 3.35 3.91 4.28 4.28

angleBestwintertilt
66°angleBestsummertilt
2.82 3.57 4.32 4.81
Tiltadjustedeachmonth
3.3534°
3.9142°
4.4150°
4.8258°
New Mexico
Jan Feb Mar Apr

Flat -90°
3.04 3.85 5.14 6.32
Upright- 0°
4.80 4.49 4.27 3.39
54°angleYear-roundtilt
4.98 5.39 6.20 6.48
38°angleBestwintertilt
5.36 5.56 6.10 5.98
70° 4.31 4.91 5.96 6.65

angleBestsummertilt
Tiltadjustedeachmonth
5.3638°
5.5646°
6.2054°
6.6562°
New York
Jan Feb Mar Apr
Flat -90°
1.74 2.60 3.57 4.34
Upright- 0°
3.02 3.39 3.27 2.76

47°angleYear-roundtilt
3.09 3.89 4.40 4.46
31°angleBestwintertilt
3.28 3.97 4.27 4.10
63°angleBestsummertilt
2.74 3.60 4.29 4.61

Tiltadjustedeachmonth
3.2831°
3.9739°
4.4047°
4.6255°
North Carolina
Jan Feb Mar Apr
Flat -90°
2.43 3.05 4.20 5.22
Upright- 0°
3.39 3.24 3.33 2.87
54°angleYear-roundtilt
3.66 4.00 4.87 5.29

38°angleBestwintertilt
3.87 4.07 4.75 4.89
70°angleBestsummertilt
3.24 3.72 4.74 5.44
Tiltadjustedeachmonth
3.8738°
4.0746°
4.8754°
5.4462°
North Dakota

Jan Feb Mar Apr
Flat -90°
1.48 2.35 3.47 4.77
Upright- 0°
2.36 3.02 3.29 3.29
43°angleYear-roundtilt
2.49 3.46 4.28 5.01
27°angleBestwintertilt
2.58 3.48 4.13 4.60
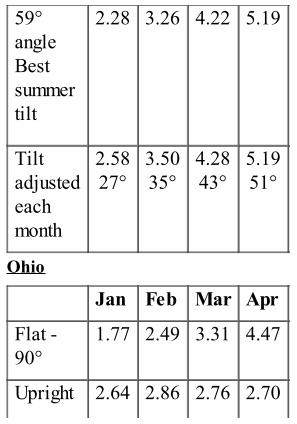
59°angleBestsummertilt
2.28 3.26 4.22 5.19
Tiltadjustedeachmonth
2.5827°
3.5035°
4.2843°
5.1951°
Ohio
Jan Feb Mar Apr
Flat -90°
1.77 2.49 3.31 4.47
Upright 2.64 2.86 2.76 2.70

- 0°
50°angleYear-roundtilt
2.81 3.43 3.86 4.54
34°angleBestwintertilt
2.95 3.47 3.73 4.17
66°angleBestsummer
2.53 3.21 3.80 4.69

tiltTiltadjustedeachmonth
2.9534°
3.4742°
3.8650°
4.7058°
Oklahoma
Jan Feb Mar Apr
Flat -90°
2.59 3.20 4.29 5.40
Upright- 0°
3.70 3.43 3.39 2.94
54°angleYear-round
3.97 4.23 4.98 5.47

tilt
38°angleBestwintertilt
4.21 4.31 4.86 5.05
70°angleBestsummertilt
3.50 3.92 4.85 5.63
Tiltadjustedeachmonth
4.2138°
4.3146°
4.9854°
5.6362°
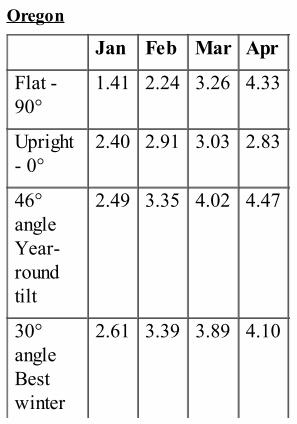
Oregon
Jan Feb Mar Apr
Flat -90°
1.41 2.24 3.26 4.33
Upright- 0°
2.40 2.91 3.03 2.83
46°angleYear-roundtilt
2.49 3.35 4.02 4.47
30°angleBestwinter
2.61 3.39 3.89 4.10

tilt
62°angleBestsummertilt
2.23 3.12 3.95 4.64
Tiltadjustedeachmonth
2.6130°
3.4038°
4.0246°
4.6454°
Pennsylvania
Jan Feb Mar Apr
Flat -90°
1.87 2.65 3.52 4.32

Upright- 0°
2.91 3.16 3.00 2.63
50°angleYear-roundtilt
3.07 3.74 4.17 4.38
34°angleBestwintertilt
3.23 3.80 4.04 4.03
66°angleBest
2.73 3.48 4.09 4.53

summertiltTiltadjustedeachmonth
3.2334°
3.8042°
4.1750°
4.5458°
Rhode Island
Jan Feb Mar Apr
Flat -90°
1.89 2.69 3.75 4.54
Upright- 0°
3.25 3.44 3.40 2.85
48°angleYear-
3.33 3.97 4.61 4.67

roundtilt
32°angleBestwintertilt
3.53 4.06 4.49 4.30
64°angleBestsummertilt
2.93 3.67 4.49 4.82
Tiltadjustedeach
3.5332°
4.0640°
4.6148°
4.8256°

month
South Carolina
Jan Feb Mar Apr
Flat -90°
2.52 3.14 4.28 5.41
Upright- 0°
3.33 3.19 3.26 2.85
56°angleYear-roundtilt
3.67 4.03 4.89 5.47
40°angle
3.87 4.09 4.76 5.05

Bestwintertilt
72°angleBestsummertilt
3.27 3.76 4.77 5.62
Tiltadjustedeachmonth
3.8740°
4.0948°
4.8956°
5.6264°
South Dakota
Jan Feb Mar Apr
Flat - 1.75 2.54 3.61 4.79

90°
Upright- 0°
3.44 3.52 3.48 3.16
46°angleYear-roundtilt
3.45 3.98 4.58 5.02
30°angleBestwintertilt
3.68 4.07 4.45 4.60
62°angle
3.03 3.67 4.47 5.19

Bestsummertilt
Tiltadjustedeachmonth
3.6830°
4.0738°
4.5846°
5.1954°
Tennessee
Jan Feb Mar Apr
Flat -90°
2.06 2.72 3.83 4.97
Upright- 0°
2.72 2.81 3.00 2.77
54° 3.00 3.51 4.38 5.02
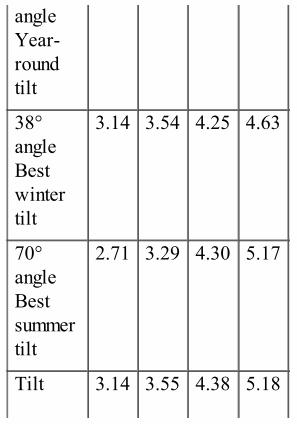
angleYear-roundtilt
38°angleBestwintertilt
3.14 3.54 4.25 4.63
70°angleBestsummertilt
2.71 3.29 4.30 5.17
Tilt 3.14 3.55 4.38 5.18

adjustedeachmonth
38° 46° 54° 62°
Texas
Jan Feb Mar Apr
Flat -90°
2.83 3.41 4.40 5.25
Upright- 0°
3.35 3.21 3.07 2.57
60°angleYear-roundtilt
3.82 4.18 4.86 5.27
44° 4.03 4.25 4.74 4.89

angleBestwintertilt
76°angleBestsummertilt
3.41 3.89 4.75 5.39
Tiltadjustedeachmonth
4.0344°
4.2552°
4.8660°
5.3968°
Utah
Jan Feb Mar Apr

Flat -90°
2.31 3.11 4.47 5.54
Upright- 0°
4.10 3.99 4.10 3.36
50°angleYear-roundtilt
4.17 4.62 5.61 5.76
34°angleBestwintertilt
4.46 4.74 5.49 5.30
66° 3.64 4.24 5.42 5.93

angleBestsummertilt
Tiltadjustedeachmonth
4.4634°
4.7442°
5.6150°
5.9358°
Vermont
Jan Feb Mar Apr
Flat -90°
1.61 2.53 3.54 4.34
Upright- 0°
3.06 3.55 3.42 2.87

46°angleYear-roundtilt
3.08 4.00 4.49 4.51
30°angleBestwintertilt
3.27 4.09 4.37 4.14
62°angleBestsummertilt
2.72 3.68 4.38 4.66

Tiltadjustedeachmonth
3.2730°
4.0938°
4.4946°
4.6754°
Virginia
Jan Feb Mar Apr
Flat -90°
2.17 2.83 3.89 4.76
Upright- 0°
3.11 3.10 3.15 2.73
53°angleYear-roundtilt
3.34 3.79 4.53 4.82
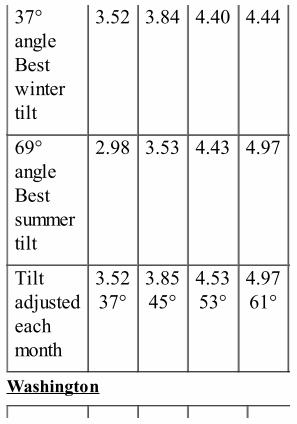
37°angleBestwintertilt
3.52 3.84 4.40 4.44
69°angleBestsummertilt
2.98 3.53 4.43 4.97
Tiltadjustedeachmonth
3.5237°
3.8545°
4.5353°
4.9761°
Washington

Jan Feb Mar Apr
Flat -90°
1.06 1.93 2.94 4.05
Upright- 0°
1.55 2.42 2.69 2.76
43°angleYear-roundtilt
1.68 2.79 3.52 4.15
27°angleBestwintertilt
1.72 2.79 3.37 3.80

59°angleBestsummertilt
1.56 2.65 3.50 4.33
Tiltadjustedeachmonth
1.7227°
2.8135°
3.53243°
4.3451°
West Virginia
Jan Feb Mar Apr
Flat -90°
1.85 2.49 3.51 4.58
Upright 2.56 2.66 2.84 2.68

- 0°
52°angleYear-roundtilt
2.79 3.27 4.05 4.64
36°angleBestwintertilt
2.91 3.29 3.92 4.27
68°angleBestsummer
2.51 3.07 3.98 4.79

tiltTiltadjustedeachmonth
2.9136°
3.3044°
4.0552°
4.7960°
Wisconsin
Jan Feb Mar Apr
Flat -90°
1.80 2.67 3.58 4.49
Upright- 0°
3.34 3.63 3.34 2.89
47°angleYear-round
3.39 4.13 4.45 4.64

tilt
31°angleBestwintertilt
3.60 4.22 4.32 4.25
63°angleBestsummertilt
2.98 3.81 4.35 4.80
Tiltadjustedeachmonth
3.6031°
4.2239°
4.4547°
4.8055°

Wyoming
Jan Feb Mar Apr
Flat -90°
2.13 2.92 4.10 5.13
Upright- 0°
3.81 3.78 3.76 3.18
49°angleYear-roundtilt
3.88 4.37 5.12 5.32
33°angleBestwinter
4.13 4.47 4.99 4.89

tilt
65°angleBestsummertilt
3.39 4.02 4.97 5.49
Tiltadjustedeachmonth
4.1333°
4.4741°
5.1249°
5.4957°

Appendix C – TypicalPower Requirements
When creating your power analysis,you need to establish the powerrequirements for your system. Thebest way is to measure the actualpower consumption using a wattmeter.Finding a ballpark figure for similardevices is the least accurate way offinding out your true powerrequirements. However, for aninitial project analysis it can be auseful way of getting some

information quickly:

Household and office
Air conditioning – 2500wAir cooling – 700wCell phone charger – 10wCentral heating pump – 800wCentral heating controller – 20wClothes dryer – 2750wCoffee maker – espresso – 1200wCoffee percolator – 600wComputer systems:– Broadband modem – 25w

– Broadband and wireless – 50w– Desktop PC – 240w– Document scanner – 40w– Laptop – 45w– Monitor – 17" flat screen – 70w– Monitor – 19" flat screen – 85w– Monitor – 22" flat screen – 120w– Netbook – 15w– Network hub – large – 100w– Network hub – small – 20w– Inkjet printer – 250w– Laser printer – 350w– Server – large – 2200w

– Server – small – 1200wDeep fat fryer – 1450wDishwasher – 1200wElectric blanket – double – 100wElectric blanket – single – 50wElectric cooker – 10000wElectric toothbrush – 1wFan – ceiling – 80wFan – desk – 60wFish tank – 5wFood mixer – 130wFridge – 12 cu. ft. – 280wFridge – caravan fridge – 110w

Fridge – solar energy saving – 5wFridge-freezer – 16 cu. ft. – 350wFridge-freezer – 20 cu. ft. – 420wHair dryer – 1000wHeater – fan – 2000wHeater – halogen spot heater –1000wHeater – oil filled radiator –1000wHeater – underfloor (per m²) – 80wIron – 1000wIron – steam – 1500wIron – travel – 600w

Kettle – 2000wKettle – travel – 700wLightbulb – energy saving – 11wLightbulb – fluorescent – 60wLightbulb – halogen – 50wLightbulb – incandescent – 60wMicrowave oven – large – 1400wMicrowave oven – small – 900wMusic system – large – 250wMusic system – small – 80wPhotocopier – 1600wPower shower – 240wRadio – 15w

Sewing machine – 75wShaver – 15wSlow cooker – 200wTelevision:– LCD 15" – 50w– LCD 20" – 80w– LCD 24" – 120w– LCD 32" – 200w– DVD player – 80w– Set top box – 25w– Video games console – 45wToaster – 1200wUpright freezer – 250w

Vacuum cleaner - 700wWashing machine – 550wWater heater – immersion – 1000w

Garden and DIY
Concrete mixer – 1400wDrill:– Bench drill – 1500w– Hammer drill – 1150w– Handheld drill – 700w– Cordless drill charger – 100wElectric bike charger – 100wFlood light:– Halogen – large – 500w– Halogen – small – 150w

– Fluorescent – 36w– LED – 5wHedge trimmer – 500wLathe – small – 650wLathe – large – 900wLawn mower:– Cylinder mower – small – 400w– Cylinder mower – large – 700w– Hover mower – small – 900w– Hover mower – large – 1400wLawn raker – 400wPond:– Small filter – 20w
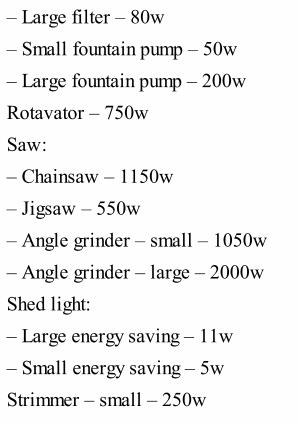
– Large filter – 80w– Small fountain pump – 50w– Large fountain pump – 200wRotavator – 750wSaw:– Chainsaw – 1150w– Jigsaw – 550w– Angle grinder – small – 1050w– Angle grinder – large – 2000wShed light:– Large energy saving – 11w– Small energy saving – 5wStrimmer – small – 250w

Strimmer – large – 500w

Caravans, boats andrecreational vehicles
Air cooling – 400wAir heating – 750wCoffee percolator – 400wFridge:– Cool box – small – 50w– Cool box – large – 120w– Electric/gas fridge – 110w– Low energy solar fridge – 5wKettle – 700w

Fluorescent light – 10wHalogen lighting – 10wLED lighting – 5w

Appendix D – LivingOff-Grid
Living off-grid is an aspiration formany people. You may want to‘grow your own’ electricity and notbe reliant on electricity companies.You may live in the middle ofnowhere and be unable to get anoutside electricity supply. Whateveryour motive, there are manyattractions for using solar power tocreate complete self-sufficiency.Do not confuse living off-grid witha grid-tie installation and achieving

a balance where energy exported tothe grid minus energy importedfrom the grid equals a zero overallimport of electricity. A genuinelyoff-grid system means you use theelectricity you generate every timeyou switch on a light bulb or turn onthe TV. If you do not have enoughelectricity, nothing happens.Before you start, be under noillusions. This is going to be anexpensive project and for mostpeople it will involve making somesignificant compromises on powerusage in order to make living off-grid a reality.

In this book, I have been using theexample of a holiday home. Thedifference between a holiday homeand a main home is significant: ifyou are planning to live off-grid allthe time, you may not be so willingto give up some of the creaturecomforts that this entails.Compromises that you may beprepared to accept for a few daysor weeks may not be so desirablefor a home you are living in forfifty-two weeks a year.Remember that a solar electricsystem is a long-term investment,but will require long-term

compromises as well. You will nothave limitless electricity availablewhen you have a solar electricsystem, and this can mean limitingyour choices later on. If you havechildren at home, consider theirneeds as well: they will increase asthey become teenagers and they maynot be so happy about making thesame compromises that you are.You need to be able to provideenough power to live through thewinter as well as the summer. Youwill probably use more electricityduring the winter than the summer:more lighting and more time spentinside the house mean higher power

requirements.Most off-grid installations involvea variety of power sources: a solarelectric system, a wind turbine andpossibly a hydro-generation systemif you have a fast-flowing streamwith a steep enough drop. Of thesetechnologies, only hydro on asuitable stream has the ability togenerate electricity 24 hours a day,seven days a week.In addition to using solar, wind andhydro for electrical generation, asolar water system will help heatup water and a ground source heatpump may be used to help heat the

home.When installing these systems in ahome, it is important to have afailover system in place. A failoveris simply a power backup so that ifthe power generation is insufficientto cope with your needs, a backupsystem cuts in.Diesel generators are often used forthis purpose. Some of the moreexpensive solar controllers have thefacility to work with a dieselgenerator, automatically starting upthe generator in order to charge upyour batteries if the battery bankruns too low on power. Advanced

solar controllers with this facilitycan link this in with a timer to makesure the generator does not startrunning at night when the noise maybe inappropriate.

A solar electric system inconjunction with gridelectricityTraditionally, it has rarely madeeconomic sense to install a solarelectric system for this purpose.This has changed over the past threeyears, with the availability offinancial assistance in many parts ofthe world.
If you are considering installinga system purely on environmentalgrounds, make sure that what youare installing actually does make adifference to the environment. If you

are planning to sell back electricityto the utility grids during the day,then unless peak demand forelectricity in your area coincideswith the times your solar system isgenerating electricity, you areactually unlikely to be making anyreal difference whatsoever.
A solar energy system in thesouthern states of America canmake a difference to theenvironment, as peak demand forelectricity tends to be when the sunis shining and everyone is runningair conditioning units. A grid-tiesolar energy system in the UnitedKingdom is unlikely to make a real

difference to the environment unlessyou are using the electricityyourself or you live in an industrialarea where there is high demand forelectricity during the day.
If you are in the United Kingdomor Canada and are installing a solarenergy system for the primarymotive of reducing your carbonimpact, a grid fallback system is themost environmentally friendlysolution. In this scenario, you do notexport energy back to the grid, butstore it and use it yourself. Whenthe batteries have run down, yourpower supply switches back to the

grid. There is more information ongrid fallback in Appendix E.
There may be other factors thatmake solar energy useful. Forexample, ensuring an electricalsupply in an area with frequentpower cuts, using the solar systemin conjunction with an electric car,or for environmental reasons wherethe environmental benefits of thesystem have been properlyassessed.One of the benefits of building asystem to work in conjunction witha conventional power supply is thatyou can take it step by step,

implementing a smaller system andgrowing it as and when financesallow.As outlined in Chapter Three, thereare three ways to build a solarelectric system in conjunction withthe grid: a grid-tie system, a gridinteractive system and gridfallback.You can choose to link your solararray into the grid as a grid-tiedsystem if you wish, so that yousupply electricity to the grid whenyour solar array is generating themajority of its electricity and youuse the grid as your battery. It is

worth noting that if there is a powercut in your area, your solar electricsystem will be switched off as asafety precaution, which means youwill not be able to use the powerfrom your solar electric system torun your home, should there be apower cut.Alternatively, you can design astand-alone solar electric system torun some of your circuits in yourhouse, either at grid-level ACvoltage or on a DC low-voltagesystem. Lighting is a popular circuitto choose, as it is a relatively lowdemand circuit to start with.
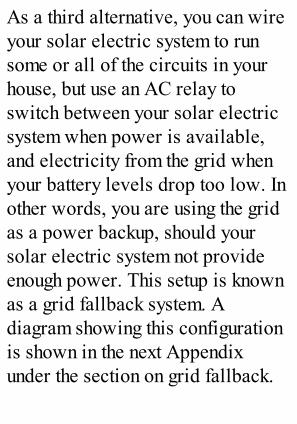
As a third alternative, you can wireyour solar electric system to runsome or all of the circuits in yourhouse, but use an AC relay toswitch between your solar electricsystem when power is available,and electricity from the grid whenyour battery levels drop too low. Inother words, you are using the gridas a power backup, should yoursolar electric system not provideenough power. This setup is knownas a grid fallback system. Adiagram showing this configurationis shown in the next Appendixunder the section on grid fallback.

Appendix E – OtherSolar Projects
Grid fallback system/grid failover systemGrid fallback and grid failover areboth often overlooked as aconfiguration for solar power. Boththese systems provide AC power toa building alongside the normalelectricity supply and provide thebenefit of continued poweravailability in the case of a powercut.

For smaller systems, a solarelectric emergency power systemcan be cost-competitive withinstalling an emergency powergenerator and uninterruptablepower supplies. A solar electricemergency power system also hasthe benefit of providing power allof the time, thereby reducingongoing electricity bills as well asproviding power backup.The difference between a gridfallback system and a grid failoversystem is in the configuration of thesystem. A grid fallback systemprovides solar power for as much

of the time as possible, onlyswitching back to the grid when thebatteries are flat. A grid failoversystem cuts in when there is apower cut.Most backup power systemsprovide limited power to help tidepremises over a short-term powercut of 24 hours or less. Typically, abackup power system wouldprovide lighting, enough electricityto run a heating system and enoughelectricity for a few essentialdevices.As with all other solar projects, youmust start with a project scope. An

example scope for a backup powerproject in a small business could beto provide electricity for lightingand for four PCs and to run the gascentral heating for a maximum ofone day in the event of a powerfailure.If your premises have a number ofappliances that have a high-energyuse, such as open fridges andfreezer units, for example, it isprobably not cost-effective to usesolar power for a backup powersource.Installing any backup power systemwill require a certain amount of
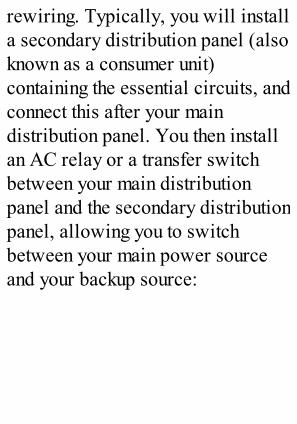
rewiring. Typically, you will installa secondary distribution panel (alsoknown as a consumer unit)containing the essential circuits, andconnect this after your maindistribution panel. You then installan AC relay or a transfer switchbetween your main distributionpanel and the secondary distributionpanel, allowing you to switchbetween your main power sourceand your backup source:

In this above diagram, a secondconsumer box has been wired intothe electrical system, with powerfeeds from both the main consumerbox and an inverter connected to asolar system.

Switching between the two powerfeeds is an automatic transfer box.If you are configuring this system tobe a grid fallback system, thistransfer box is configured to takepower from the solar system whenit is available, but then switchesback to grid-sourced electricity ifthe batteries on the solar systemhave run down.This provides a backup for criticalpower when the normal electricitysupply is not available, but alsouses the power from the solarsystem to run your devices whenthis is available.

If you are configuring this system tobe a grid failover system, thetransfer box is configured to takepower from the normal electricitysupply when it is available, but thenswitches to power from the solarsystem if it is not.One issue with this system is thatwhen the transfer box switchesbetween one power source and theother, there may be a very short lossof power of around 1/20 of asecond. This will cause lights toflicker momentarily, and in somecases may reset electronicequipment such as computers, TVs

and DVD players.Many modern transfer boxestransfer power so quickly that thisis not a problem. However, if youdo experience this problem it canbe resolved by installing a smalluninterruptable power supply(UPS) on any equipment affected inthis way.You can buy fully built-upautomatic transfer boxes, or you canbuild your own relatively easilyand cheaply using a high-voltageAC Double-Pole/ Double-Throw(DPDT) Power Relay, wired sothat when the inverter is providing

power, the relay takes power fromthe solar system, and when theinverter switches off, the relayswitches the power supply back tothe normal electricity supply.

Portable solar power unitA popular and simple project, abriefcase-sized portable power unitallows you to take electricity withyou wherever you go. They arepopular with people who gocamping, or with repair people whoneed to take small power tools tolocations where they cannot alwaysget access to electrical power.In essence, a portable power unitcomprises four components: a smallsolar panel, a solar controller, asealed lead acid gel battery and aninverter, all built into a briefcase.Many people who build them add

extra bits as well. A couple of lightbulbs are a popular addition, as is acigarette lighter adapter to run12-volt car accessories.For safety purposes, it is importantto use a sealed lead acid gel batteryfor this application, so that you canplace the unit on its side, ifnecessary, without it leaking.For occasional use, a portable solarpower unit can be a goodalternative to a petrol generator:they are silent in operation andextremely easy to use. Theirdisadvantage is that, once thebattery is flat, you cannot use it until

it is fully charged up again and onsolar power alone this can takeseveral days.For this reason, solar poweredgenerators often include an externalcharger so they can be charged upquickly when necessary.
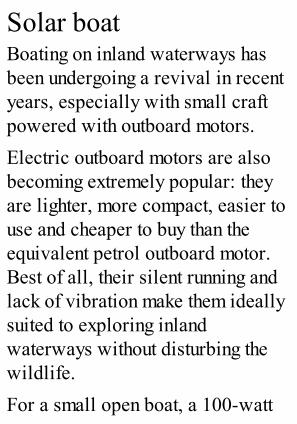
Solar boatBoating on inland waterways hasbeen undergoing a revival in recentyears, especially with small craftpowered with outboard motors.Electric outboard motors are alsobecoming extremely popular: theyare lighter, more compact, easier touse and cheaper to buy than theequivalent petrol outboard motor.Best of all, their silent running andlack of vibration make them ideallysuited to exploring inlandwaterways without disturbing thewildlife.For a small open boat, a 100-watt

electric motor will power the boateffectively. Depending on what theyare made from, small, lightweightboats can be exceptionally light – a5m (15 foot) boat may weigh aslittle as 20kg (44 pounds), whilst asimple ‘cabin cruiser’ constructedfrom alloy may weigh as little as80kg (175 pounds). Consequently,they do not require a lot of power toprovide ample performance.An 80 amp-hour leisure battery willprovide around eight hours ofconstant motor use before runningflat. This is more than enough formost leisure activity. Because mostboats are typically only used at

weekends during the summer, asolar panel can be a goodalternative to lugging around aheavy battery (the battery can quiteeasily weigh more than the rest ofthe boat!).Provided the boat is moored in anarea where it will capture directsunlight, a 50–60 watt panel isnormally sufficient to charge up thebatteries over a period of a week,without any external power source.

Solar shed lightThere are several off-the-shelfpackages available for installingsolar shed lights and these oftenoffer excellent value for moneywhen bought as a kit rather thanbuying the individual componentsseparately.However, the manufacturers ofthese kits tend to state the bestpossible performance of theirsystems based on optimumconditions. Consequently, manypeople are disappointed when the‘four hours daily usage’ turns out tobe closer to twenty minutes in the

middle of winter.Of course, if you have done aproper site survey and design, youwill have identified this problembefore you bought the system. If youneed longer usage, you can then buya second solar panel when you buythe kit in order to provide enoughsolar energy.

Solar electric bikesElectric bikes and motorbikes aregaining in popularity and are anexcellent way of getting around onshorter journeys.Electric bikes with pedals and a toppower-assisted speed of 15mph areroad-legal across Europe,Australia, Canada and the UnitedStates. You can ride an electricbike from the age of fourteen.Legally, they are regarded asnormal bicycles and do not requiretax or insurance. They typicallyhave 200-watt or 250-watt motors(up to 750-watt motors are legal in

North America). Most electricbikes have removable battery packsso they can be charged up off thebike and usually have a totalcapacity of 330–400 watt-hours anda range of 12–24 miles (20–40km).Thanks to their relatively smallbattery packs, a number of ownershave built a solar array that fits ontoa garage or shed roof to charge uptheir bike batteries. This isespecially useful when you havetwo battery packs. One can be lefton charge while the second is in useon the bike.A number of people have also fitted

solar panels onto electric trikes inorder to power the trike while it ison the move. Depending on the sizeof trike and the space available, itis usually possible to fit up toaround 100 watts of solar panels toa trike, whilst some of the load-carrying trikes and rickshaws haveenough space for around 200 wattsof solar panels. Such a systemwould provide enough power todrive 15–20 miles during thewinter, and potentially an almostunlimited range during the summer,making them a very practical andenvironmentally friendly form ofpersonal transport.

Whilst the solar-only range may notseem that great, there are manydrivers who live in a sunny climateand only use their cars for shortjourneys a few times each week.For these people, it could mean thatalmost all their driving could bepowered from the sun.Even in colder climates such as theUnited Kingdom and NorthernCanada, solar power has its uses inextending the range of these cars: bytrickle-charging the batteries duringthe daytime, the batteries maintaintheir optimum temperature, therebyensuring a good range even in cold
conditions.Meanwhile, a number of electriccar owners have already made theircars solar powered by charging uptheir cars from a larger home-basedsolar array, providing truly greenmotoring for much greaterdistances. Several electric carclubs have built very small andlightweight solar powered electriccars and tricycles and at least oneelectric car owners’ club isplanning to provide a solar roof tofit to existing electric cars in thecoming year.

Appendix F –Building Your OwnSolar Panels (and
Why You Shouldn’t)
A number of people have asked meabout building their own solarpanels from individual solar cellsand asked for my opinion on anumber of websites that makeclaims that you can build enoughsolar panels to power your homefor around $200 (£120).I have a huge amount of respect for

people with the aptitude and theability to build their ownequipment. These people oftenderive a great deal of personalsatisfaction from being able to say,“I built that myself.” Largely, thesepeople are to be encouraged. If youwant to build your own solarpanels, however, I would advisecaution.There have been many claims madefrom certain websites that say it ispossible to build your own solarpanels and run your entire house onsolar for an outlay of $200 or less,selling excess power back to theutility grid and even generating an

income from solar.Most of the claims made by thesewebsites are either false ormisleading. When you subscribe tothese services, you typicallyreceive the following:
· Instructions on how to builda solar panel that are virtuallyidentical to instructions thatare available free from siteslike instructables.com
· Information on tax creditsand rebates for installingsolar PV in the United States.(However, these credits andrebates are not applicable for

home-built equipment. Thewebsites omit to tell youthat.)
· A list of companies andeBay sellers who will sellyou individual solar cells
Many of the websites claim, or atleast imply, that you can run yourhome on a solar panel built foraround $200. In reality, this amountwill buy you enough solar cells tobuild a solar panel producing60–120 watts, which is certainlynot enough to allow you to run yourhome on solar power.Leaving aside the obvious point that

you can buy a cheap, butprofessionally built 60–100 wattsolar panel with five-year warrantyand anticipated 25-year lifespan foraround $200 (£120) if you shoparound, there are various reasonswhy it is not a good idea to buildyour own solar panels using thisinformation:
· A solar panel is a precisionpiece of equipment, designedto survive outside fordecades of inclement weatherand huge temperaturevariation including intenseheat

· Professionally manufacturedsolar panels use specificallydesigned components. Theyare built in a clean roomenvironment to very highstandards. For example, theglass is a special temperedproduct designed to withstandhuge temperatures and ensuremaximum light penetrationwith zero refraction
· The solar cells you can buyfrom sellers on eBay arefactory seconds, rejected bythe factory. Many of them areblemished or chipped and

damaged. They are extremelyfragile, almost as thin aspaper, brittle like glass andvery easy to break
· Unless you are an expert atsoldering techniques, you arelikely to create a cold solderjoint between one or moresolar cells. Cold solder jointsinside a solar panel are likelyto create a high temperaturearc, which can start a fire
· There are severaldocumented cases wherehome-made solar panels havecaught fire and caused

damage to people’s homes.These fires are typicallycaused by poor qualitysoldering or the use of wrongmaterials
· Many of the websitespromoting home-made solarpanels claim that you canpower your house with them.In the United States,connecting home-made panelsto your household electricswould be in violation of theNational Electric Code andyou would therefore not beallowed a permit to install

them
· Many of these websitesimply that you can also sellyour power back to the utilitycompanies. It is actuallyillegal to install non-approved power generationequipment to the utility grid inmany countries, includingboth the United States and theUnited Kingdom
· The tax credits and rebatesthat are available forinstalling solar PV on yourhome are not available forhome-built solar panels

Many people who make their ownsolar panels have found that theyfail after a few months due tomoisture penetration, or fail afteronly a few days or weeks due tohigh temperature arcing and panelfailure.Most instructions recommendbuilding a frame out of wood andcovering it with Plexiglas oracrylic. This is extremely badadvice:
· Never build a solar panelframe and backing out ofwood. This is dangerousbecause of the intense heat

build-up in a solar panel. Ona hot and sunny day, thesurface temperature of thepanel can exceed 90°C(175°F). If there is anyadditional heat build-upwithin the panel due to shortcircuits or poor qualitysoldering, these spottemperatures could be as highas 800°C (1,472°F). At thesesorts of temperatures, you caneasily start a fire
· Do not use Plexiglas oracrylic to cover your home-made solar panel. Tiny

imperfections in the materialcan lead to light refractionsand intense heat build-up onelements within the panel.Plexiglas and acrylic can alsodistort under hightemperatures, increasing theselight refractions over time.The effect can be like amagnifying glass,concentrating the intensity ofthe sunlight onto a small spoton the solar cell, which couldresult in fire
If you wish to build a small solarpanel for fun, as a way of learningmore about the technology, then you

can get instructions on how to dothis free of charge from manywebsites such asinstructables.com. Build a smallone as a fun project if you so wish.You will learn a lot about thetechnology by doing so. However:
· Treat your project as alearning exercise, not as aserious attempt to generateelectricity
· Never build a solar panelwith a wood frame
· Treat your home-made solarpanel as a fire hazard

· Do not mount yourcompleted home-made solarpanel as a permanent fixture
· Only use your home-madesolar panel undersupervision, checkingregularly for heat build-up onthe solar panel or frame.Remember that the front of thesolar panel may get extremelyhot, especially on hot, sunnydays. Do not touch the solarpanel with your fingers
· Visually check yourhome-made solar panel everytime you plug it in to ensure

there is no moisturepenetration. If you spotmoisture penetration, stopusing the solar panelimmediately
· Use the cheapest solarcharge controller you can findfor your project. Thewarranty will be invalidatedon the controller by using ahome-made panel, but at leastif you damage a cheapcontroller you haven’tdamaged an expensive one
· Never charge batteriesusing your home-made solar

panel without using a solarcharge controller
· Never run an inverterdirectly from yourhome-made solar panel