Software Technical Reference - hp.com · List of tables Table 1-1 Features of the HP LaserJet 1022...
146
HP LaserJet 1022, 1022n, 1022nw Software Technical Reference
Transcript of Software Technical Reference - hp.com · List of tables Table 1-1 Features of the HP LaserJet 1022...
HP LaserJet 1022, 1022n, 1022nwSoftware Technical Reference

HP LaserJet 1022 Series printer
Software Technical Reference

Copyright
© 2005 Copyright Hewlett-PackardDevelopment Company, L.P.
Reproduction, adaptation or translationwithout prior written permission isprohibited, except as allowed under thecopyright laws.
The information contained herein is subjectto change without notice.
The only warranties for HP products andservices are set forth in the expresswarranty statements accompanying suchproducts and services. Nothing hereinshould be construed as constituting anadditional warranty. HP shall not be liablefor technical or editorial errors or omissionscontained herein.
Edition 1, 4/2005
Trademarks
Adobe® and Acrobat® are trademarks ofAdobe Systems Incorporated.
EnergyStar® and the Energy Star logo®are US registered marks of the UnitedStates Environmental Protection Agency.
Linux is a U.S. registered trademark ofLinus Torvalds.
Microsoft®, Windows®, and Windows NT®are U.S. registered trademarks of MicrosoftCorporation.
Pentium® is a registered trademark of IntelCorporation or its subsidiaries in the UnitedStates and other countries.
UNIX® is a registered trademark of TheOpen Group.

Table of contents
1 IntroductionPurpose and scope..................................................................................................................................2HP LaserJet 1022 Series model comparison..........................................................................................3Software availability and fulfillment.........................................................................................................5
In-box file layout......................................................................................................................5HP LaserJet 1022 software CD, Windows partition...............................................5
CD language groupings and part number..............................................................................5Ordering software...................................................................................................................7
Documentation availability and localization.............................................................................................8
2 Windows software overviewWindows operating systems..................................................................................................................12
Supported Windows operating systems...............................................................................12Supported operating systems..............................................................................12Driver-only supported operating systems............................................................12
Windows system requirements.............................................................................................12Windows supported operating system requirements...........................................13
Printing from other operating systems..................................................................................13Software component information...........................................................................................................14
Printing-system software features........................................................................................14Software component availability...........................................................................................14Software component localization..........................................................................................15
HP Software Update utility.....................................................................................................................17HP Print Screen utility............................................................................................................................19
Installation.............................................................................................................................19Activating the utility...............................................................................................................19Features................................................................................................................................19HP Order Reminder utility.....................................................................................................21
Available printer configurations.............................................................................................................23Software features by connection type..................................................................................23
Direct connection.................................................................................................23Network connection options (HP LaserJet 1022n and HP LaserJet 1022nwprinters only).........................................................................................................23
Local connection that uses Microsoft peer-to-peer networking(Windows only) ...................................................................................23Networked by using the internal HP network port(HP LaserJet 1022n and HP LaserJet 1022nw printers only).............24Networked by using the external HP network port..............................24
Port communication...............................................................................................................................25
ENWW iii

Overview...............................................................................................................................25USB port connections...........................................................................................................25Device conflicts in Windows.................................................................................................25
Opening the Windows Device Manager..............................................................25Check for device conflicts....................................................................................26Guidelines for troubleshooting and resolving device conflicts.............................26
3 Macintosh software overview and installationSupported Macintosh operating systems..............................................................................................28Macintosh printing-system software for the HP LaserJet 1022 printer.................................................29
Macintosh component descriptions......................................................................................29PDEs....................................................................................................................29
In-box file layout....................................................................................................................29HP LaserJet 1022 software CD, Macintosh partition...........................................29
Software components for Macintosh....................................................................................29Software component availability for Macintosh....................................................................30Software component localization..........................................................................................30Ordering software for Macintosh...........................................................................................32
System requirements (Macintosh).........................................................................................................33Installation overview..............................................................................................................................34Installation options.................................................................................................................................35
Macintosh installation instructions for direct connections.....................................................35Direct-connection installation instructions for Mac OS X, V10.2 and later..........35
Macintosh installation instructions for networked computers...............................................35Network installation instructions for Mac OS X, V10.2 and later.........................36
Installation dialog-box options for Macintosh........................................................................................37
4 Windows driver featuresHost-based features..............................................................................................................................46
Access to drivers...................................................................................................................46Help system..........................................................................................................................46
What's this? Help.................................................................................................47Context-sensitive Help.........................................................................................47Constraint messages...........................................................................................47
Driver tab features................................................................................................................47Printing Preferences tab set.................................................................................48
Paper/Quality tab features...................................................................48Quick Sets...........................................................................49
Default Print Settings.........................................49Type new Quick Set name here........................49
Paper Options group box....................................................50Size is:................................................................50Custom...............................................................51
Name.................................................52Save, Delete, or Rename..................53Paper Size (width and heightcontrols).............................................54Custom width and height controllimits..................................................54Units..................................................54
iv ENWW

OK.....................................................54Use different paper check box...........................55Source Is: drop-down menu...............................55Type is: drop-down menu..................................55Use different paper options................................56
Back Cover options...........................57First Page and Other Pagesoptions...............................................58
Document preview image...................................................59Effects tab features.............................................................................59
Quick Sets...........................................................................60Fit to Page options group box.............................................60
Print Document On setting.................................60Scale to Fit option..............................................60% of Normal Size option....................................61
Document preview image...................................................61Watermarks group box.......................................................62
Current Watermarks...........................................63Watermark Message..........................................64Message Angle..................................................64Font Attribute......................................................64
Name.................................................64Color..................................................64Shading.............................................65Size....................................................65Style...................................................65Default settings..................................65
Finishing tab features..........................................................................65Quick Sets...........................................................................66Document Options..............................................................66
Print on Both Sides (Manually) option...............67Manually printing on both sides.........67
Flip Pages Up.....................................................67Booklet layout.....................................................68
Book and Booklet printing.................68Printing a Booklet..............................69Printing a Book..................................69
Pages per Sheet................................................69Print Page Borders.............................................69Page Order.........................................................69
Document preview image...................................................70Print Quality........................................................................70
Print Quality drop-down menu...........................71Print All Text as Black........................................71Economode........................................................71
Basics tab features..............................................................................71Quick Sets...........................................................................72Copies group box................................................................72Orientation..........................................................................73
Portrait option button..........................................73
ENWW v

Landscape option button....................................73Rotated check box.............................................73
Document preview image...................................................73About button.......................................................................74
Printer Properties tab set.....................................................................................74Configure tab features.........................................................................74Quick Sets...........................................................................................75Jam Recovery......................................................................................76Status Messages.................................................................................76Cleaning Page.....................................................................................76Print Density........................................................................................76Courier Font Type................................................................................76Properties tab features - Windows 98 SE and Windows Me..............76
5 HP Embedded Web Server (HP LaserJet 1022n and HP LaserJet 1022nw printers only)Using HP Embedded Web Server (EWS).............................................................................................80
To open the HP Embedded Web Server..............................................................................80HP EWS tabs.........................................................................................................................................81
Information tab......................................................................................................................81Device Status page..............................................................................................81Device Configuration page...................................................................................81
Settings tab...........................................................................................................................82Print Settings page...............................................................................................82
Networking tab......................................................................................................................84IP Configuration page..........................................................................................84Advanced page....................................................................................................84
mDNS page..........................................................................................................................85Password page.....................................................................................................................86Other links.............................................................................................................................86
HP Instant Support...............................................................................................86Product Registration.............................................................................................86Order Supplies page............................................................................................86Product Support page..........................................................................................86
6 Windows software installationInstallation overview .............................................................................................................................88Installation options.................................................................................................................................89
Windows installation for direct connections..........................................................................89Setting up Windows sharing (peer-to-peer networking)......................................89
Setting up the host computer running Windows 98 SE, WindowsMe, or Windows 2000..........................................................................90Setting up the host computer running Windows XP............................90Setting up client computers running Windows 98 SE, WindowsMe, or Windows 2000..........................................................................91Setting up client computers running Windows XP..............................91
Installation instructions for networked computers................................................................92Installing the software on networked computers (HP LaserJet 1022n andHP LaserJet 1022nw printers only)......................................................................92
Installing the printer driver only.............................................................................................92Printer-driver installation for Windows 98 SE......................................................92
vi ENWW

Printer-driver installation for Windows 2000 or XP..............................................93Plug-n-Play...........................................................................................................................93Add Printer Wizard................................................................................................................93
Installation dialog-box options for Windows..........................................................................................94Installing the software before the printer is connected to the computer...............................94Installing the software when the printer is already connected to a computer....................109
Uninstall...............................................................................................................................................119Uninstall instructions for Windows......................................................................................119
Uninstalling using the HP program group (recommended)...............................119Uninstalling using Windows Add/Remove programs feature.............................121Removing the HP Software Update utility..........................................................125
Index....................................................................................................................................................................127
ENWW vii

viii ENWW
List of tables
Table 1-1 Features of the HP LaserJet 1022 Series models...........................................................................3Table 1-2 CD language groupings for Windows installation............................................................................6Table 1-3 User documentation availability and localization.............................................................................8Table 2-1 Software component availability for the HP LaserJet 1022 Series printer.....................................14Table 2-2 Language key A-I...........................................................................................................................15Table 2-3 Software component localization by language, A-I........................................................................15Table 2-4 Languagekey, L-Z..........................................................................................................................16Table 2-5 Software component localization by language, K-Z ......................................................................16Table 3-1 Software components for Macintosh..............................................................................................30Table 3-2 Software component availability for Macintosh..............................................................................30Table 3-3 CD language groupings for Macintosh...........................................................................................30Table 4-1 Name drop-down menu text strings...............................................................................................53Table 4-2 Host-based custom media sizes....................................................................................................54Table 4-3 OK dialog box text strings..............................................................................................................55Table 4-4 Standard media types....................................................................................................................56Table 4-5 Page orientation.............................................................................................................................68
ENWW ix

x ENWW

List of figures
Figure 2-1 Welcome screen - HP Software Update........................................................................................17Figure 2-2 New software is available screen - HP Software Update..............................................................18Figure 2-3 HP Print Screen - system tray icon................................................................................................19Figure 2-4 HP Print Screen - configuration dialog box....................................................................................20Figure 2-5 HP Cartridge Order Reminder screen............................................................................................22Figure 3-1 Step 1 - Insert the HP LaserJet 1022 printing-system software CD..............................................37Figure 3-2 Step 2 - Run the HP LaserJet 1022 printing-system software CD................................................37Figure 3-3 Step 3 - Main CD screen................................................................................................................38Figure 3-4 Step 4 - License agreement, screen 1...........................................................................................39Figure 3-5 Software License Agreement, screen 2.........................................................................................39Figure 3-6 Step 5 - Select a destination..........................................................................................................40Figure 3-7 Step 6 – Easy Install process.........................................................................................................41Figure 3-8 Step 7 - Authenticate......................................................................................................................41Figure 3-9 Step 8 - Install files.........................................................................................................................42Figure 3-10 Step 9 - Installation completed.......................................................................................................43Figure 4-1 A typical constraint message.........................................................................................................47Figure 4-2 Paper/Quality tab............................................................................................................................48Figure 4-3 Paper Options group box...............................................................................................................50Figure 4-4 Custom Paper Size dialog box.......................................................................................................51Figure 4-5 Back Cover setting.........................................................................................................................57Figure 4-6 First Page and Other Page options................................................................................................58Figure 4-7 Effects tab.......................................................................................................................................59Figure 4-8 Preview images - Legal on Letter; Scale to Fit off (left) and on (right)..........................................61Figure 4-9 Watermark Details..........................................................................................................................63Figure 4-10 Finishing tab...................................................................................................................................66Figure 4-11 Print on Both Sides Instructions.....................................................................................................67Figure 4-12 Page-order preview images...........................................................................................................70Figure 4-13 Basics tab.......................................................................................................................................72Figure 4-14 About This Driver dialog box..........................................................................................................74Figure 4-15 Configure tab..................................................................................................................................75Figure 4-16 Properties tabs - Windows 98 SE..................................................................................................77Figure 5-1 Device Status page........................................................................................................................81Figure 5-2 Device Configuration page.............................................................................................................82Figure 5-3 Print Settings page.........................................................................................................................83Figure 5-4 IP Configuration page.....................................................................................................................84Figure 5-5 Advanced page..............................................................................................................................85Figure 5-6 mDNS page....................................................................................................................................85Figure 5-7 Password page...............................................................................................................................86Figure 6-1 Step 1 - CD Browser screen..........................................................................................................94Figure 6-2 Step 2 - HP Software License Agreement screen.........................................................................95
ENWW xi
Figure 6-3 Step 3 - Model Selection screen....................................................................................................96Figure 6-4 Step 4 - Printer Connection screen................................................................................................97Figure 6-5 Step 5 - Identify Printer screen.......................................................................................................98Figure 6-6 Step 6 - Firewalls screen................................................................................................................99Figure 6-7 Step 7 - Printer Found screen......................................................................................................100Figure 6-8 Step 8 - Confirm Settings screen.................................................................................................101Figure 6-9 Step 9 - Confirm Changing Setting screen..................................................................................102Figure 6-10 Step 10 - Set Network Protocol screen........................................................................................103Figure 6-11 Step 11 - Check Cable Connection screen..................................................................................104Figure 6-12 Step 12 - Specify Printer screen..................................................................................................105Figure 6-13 Step 13 - Start Copying Files screen...........................................................................................106Figure 6-14 Step 14 - Installation Status screen.............................................................................................106Figure 6-15 Step 15 - USB Cable Connect screen.........................................................................................107Figure 6-16 Step 16 - Finish screen................................................................................................................107Figure 6-17 Step 17 - Registration screen.......................................................................................................108Figure 6-18 Step 18 - Exit Setup screen.........................................................................................................108Figure 6-19 Step 1 - Add Printer Wizard Welcome Screen.............................................................................109Figure 6-20 Step 2 - Local or Network Printer screen.....................................................................................110Figure 6-21 Step 3 - Select the Printer Port screen........................................................................................111Figure 6-22 Step 4 - Manufacturer and model screen.....................................................................................112Figure 6-23 Step 5 - Install from Disk..............................................................................................................112Figure 6-24 Step 6 - Select the correct language............................................................................................113Figure 6-25 Step 7 - Select the .INF file..........................................................................................................113Figure 6-26 Step 8 - Install from Disk, screen 2..............................................................................................114Figure 6-27 Step 9 - Manufacturer and model screen 2..................................................................................114Figure 6-28 Step 10 - Name Your Printer screen............................................................................................115Figure 6-29 Step 11 - Printer Sharing screen..................................................................................................116Figure 6-30 Step 12 - Print Test Page screen.................................................................................................117Figure 6-31 Step 13 - Completing the Add Printer Wizard screen..................................................................118Figure 6-32 Welcome to the LaserJet 1020 series uninstall Wizard dialog box............................................119Figure 6-33 Remove the Program dialog box..................................................................................................120Figure 6-34 Uninstalling the HP LaserJet 1020 series dialog box.................................................................120Figure 6-35 Restart dialog box........................................................................................................................121Figure 6-36 Windows Control Panel................................................................................................................122Figure 6-37 Windows Change or Remove programs......................................................................................123Figure 6-38 Remove the Program dialog box..................................................................................................124Figure 6-39 Uninstalling the HP LaserJet 1020 series dialog box.................................................................124Figure 6-40 Restart dialog box........................................................................................................................125
xii ENWW
1 Introduction
This chapter provides information about the following topics:
● Purpose and scope
● HP LaserJet 1022 Series model comparison
● Software availability and fulfillment
● Documentation availability and localization
ENWW 1
Intr
oduc
tion
Purpose and scopeThis software technical reference (STR) provides information about and troubleshooting tips for theprinting-system software for the HP LaserJet 1022 Series printer, which includes the following models:
■ HP LaserJet 1022 printer
■ HP LaserJet 1022n printer
■ HP LaserJet 1022nw printer
This document is prepared in an electronic format to serve as a quick-reference tool for CustomerCare Center (CCC) agents, support engineers, system administrators, management informationsystems (MIS) personnel, and end users, as appropriate.
NOTE This STR describes drivers that are shipped on the printing-system software CD thatcomes with the product. This STR does not cover drivers that will become available on theWeb.
The following information is included in this STR:
■ Overview of drivers and operating systems
■ Procedures for installing and uninstalling software components
NOTE An addendum to this STR describes system modification information, including filelists and changes to registry keys.
2 Chapter 1 Introduction ENWW
Introduction

HP LaserJet 1022 Series model comparisonThe following table compares features of the product models that are described in this STR.
Table 1-1 Features of the HP LaserJet 1022 Series models
Feature HP LaserJet 1022 HP LaserJet 1022n HP LaserJet 1022nw
HP Product number Q5912A Q5913A Q5914A
Memory ■ 8 megabytes (MB) of randomaccess memory (RAM)
■ 8 MB of RAM ■ 8 MB of RAM
Speed ■ Prints up to 19 pages perminute (ppm) for letter-sizepaper
■ Prints up to 18 ppm for A4-sizepaper
■ First-page-out speed: lessthan 8 seconds
■ Prints up to 19 ppm for letter-size paper
■ Prints up to 18 ppm for A4-sizepaper
■ First-page-out speed: lessthan 8 seconds
■ Prints up to 19 ppm for letter-size paper
■ Prints up to 18 ppm for A4-sizepaper
■ First-page-out speed: lessthan 8 seconds
Connectivity ■ Universal serial bus (USB) 2.0compatible
■ USB 2.0 compatible
■ HP network port
■ USB 2.0 compatible
■ HP network port
■ Wireless
Paper-handling ■ One 10-sheet priority input slot(tray 1)
■ One 250-sheet tray (tray 2) forstandard media sizes
■ One 10-sheet priority input slot(tray 1)
■ One 250-sheet tray (tray 2) forstandard media sizes
■ One 10-sheet priority input slot(tray 1)
■ One 250-sheet tray (tray 2) forstandard media sizes
Print ■ 600 dots per inch (dpi)
■ FastRes 1200: 600x600 dpi
■ ProRes 1200: 1200x1200 dpi
■ Image ResolutionEnhancement Technology(ImageREt)
■ Host-based
■ PCL 5e1
■ 2000-page capacity black printcartridge
■ EconoMode (saves toner)
■ 600 dots per inch (dpi)
■ FastRes 1200: 600x600 dpi
■ ProRes 1200: 1200x1200 dpi
■ ImageREt
■ Host-based
■ PCL 5e1
■ 2000-page capacity black printcartridge
■ EconoMode (saves toner)
■ 600 dots per inch (dpi)
■ FastRes 1200: 600x600 dpi
■ ProRes 1200: 1200x1200 dpi
■ ImageREt
■ Host-based
■ PCL 5e1
■ 2000-page capacity black printcartridge
■ EconoMode (saves toner)
Internal fonts 26 Intelifont 26 Intelifont 26 Intelifont
Control panel ■ Three light-emitting diodes(LEDs)
■ Two buttons
■ Three light-emitting diodes(LEDs)
■ Two buttons
■ Three light-emitting diodes(LEDs)
■ Two buttons
ENWW HP LaserJet 1022 Series model comparison 3
Intr
oduc
tion
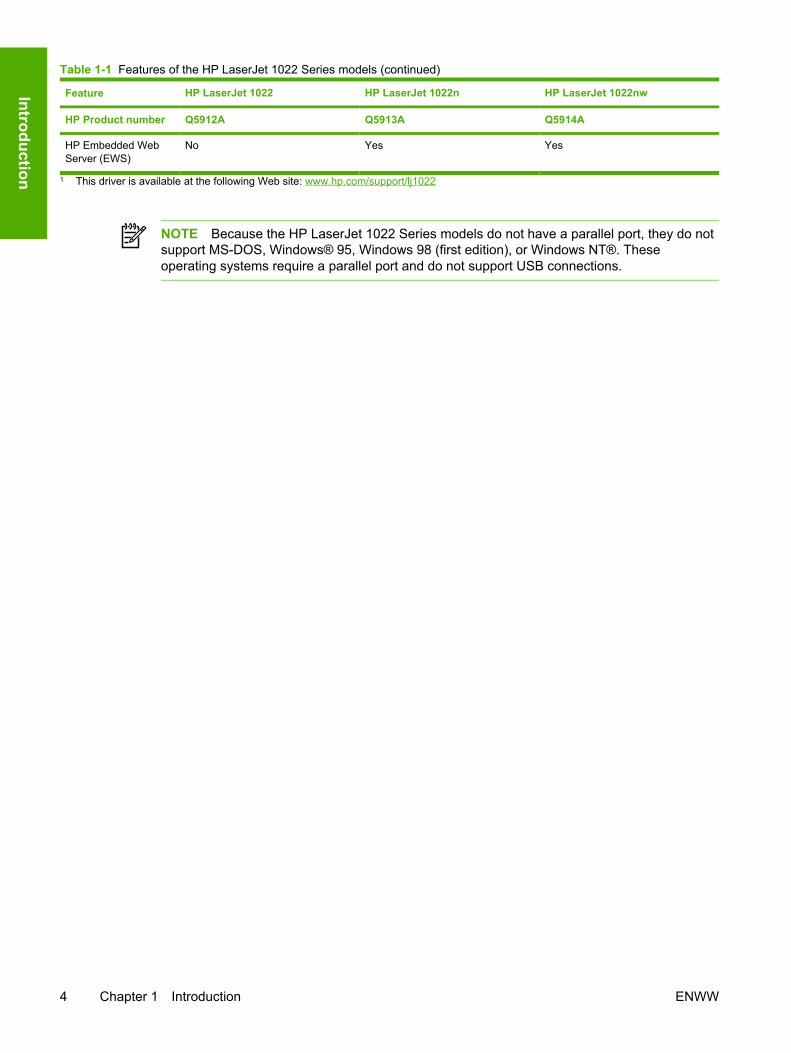
Feature HP LaserJet 1022 HP LaserJet 1022n HP LaserJet 1022nw
HP Product number Q5912A Q5913A Q5914A
HP Embedded WebServer (EWS)
No Yes Yes
1 This driver is available at the following Web site: www.hp.com/support/lj1022
NOTE Because the HP LaserJet 1022 Series models do not have a parallel port, they do notsupport MS-DOS, Windows® 95, Windows 98 (first edition), or Windows NT®. Theseoperating systems require a parallel port and do not support USB connections.
Table 1-1 Features of the HP LaserJet 1022 Series models (continued)
4 Chapter 1 Introduction ENWW
Introduction

Software availability and fulfillmentThe software CD for the HP LaserJet 1022 Series printer contains a variety of files for installing theprinting-system software on your computer. This section describes the files that are available on thesoftware CD, as well as additional support and fulfillment information.
In-box file layoutThe HP LaserJet 1022 printing-system software consists of two partitions: one for installation onWindows® operating systems and the other for Macintosh operating systems. The files in eachpartition include both documentation files and files that are required to install and uninstall thesystems. For information about the file layout for the Macintosh partition of the HP LaserJet 1022software CD, see the HP LaserJet 1022 software CD, Macintosh partition section of this guide.
HP LaserJet 1022 software CD, Windows partitionThe HP LaserJet 1022 printing-system software is delivered on a CD that is included with theproduct. The CD include the following files:
■ Installation files
■ Uninstall files
■ Printer driver
■ Online Help
■ OrderReminder
■ .CHM version of the HP LaserJet 1022 User Guide
■ .PDF version of the HP LaserJet 1022 User Guide
■ Registration link
■ Readme
■ Late-breaking readme (English only)
■ Status-message files
■ Media-output-jam simulator files
To view the directories and support files, insert the HP LaserJet 1022 printing-system software CDinto the CD-ROM drive on your computer, right-click Start, click Explore, and then select the CD-ROM drive.
CD language groupings and part numberThe following table presents the Windows installation part number and language groups that areincluded on the software CD for the product.
ENWW Software availability and fulfillment 5
Intr
oduc
tion

Table 1-2 CD language groupings for Windows installation
CD Part Number Languages
1 Q5912-60104 ■ Arabic
■ Bahasa
■ Bulgarian
■ Catalan
■ Croatian
■ Czech
■ Danish
■ Dutch
■ English
■ Estonian
■ Finnish
■ French
■ German
■ Greek
■ Hebrew
■ Hungarian
■ Italian
■ Kazakh
■ Korean
■ Latvian
■ Lithuanian
■ Norwegian
■ Polish
■ Portuguese, Brazilian
■ Romanian
■ Russian
■ Simplified Chinese
■ Slovak
■ Slovenian
■ Spanish
■ Swedish
6 Chapter 1 Introduction ENWW
Introduction
CD Part Number Languages
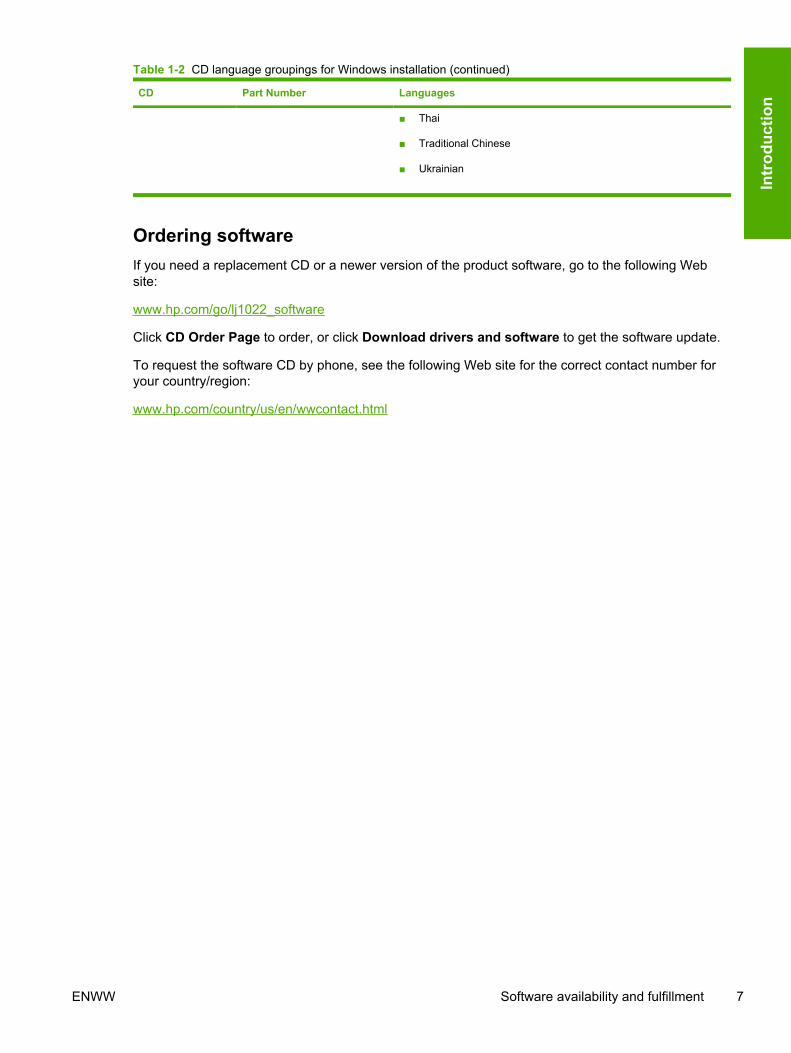
■ Thai
■ Traditional Chinese
■ Ukrainian
Ordering softwareIf you need a replacement CD or a newer version of the product software, go to the following Website:
www.hp.com/go/lj1022_software
Click CD Order Page to order, or click Download drivers and software to get the software update.
To request the software CD by phone, see the following Web site for the correct contact number foryour country/region:
www.hp.com/country/us/en/wwcontact.html
Table 1-2 CD language groupings for Windows installation (continued)
ENWW Software availability and fulfillment 7
Intr
oduc
tion
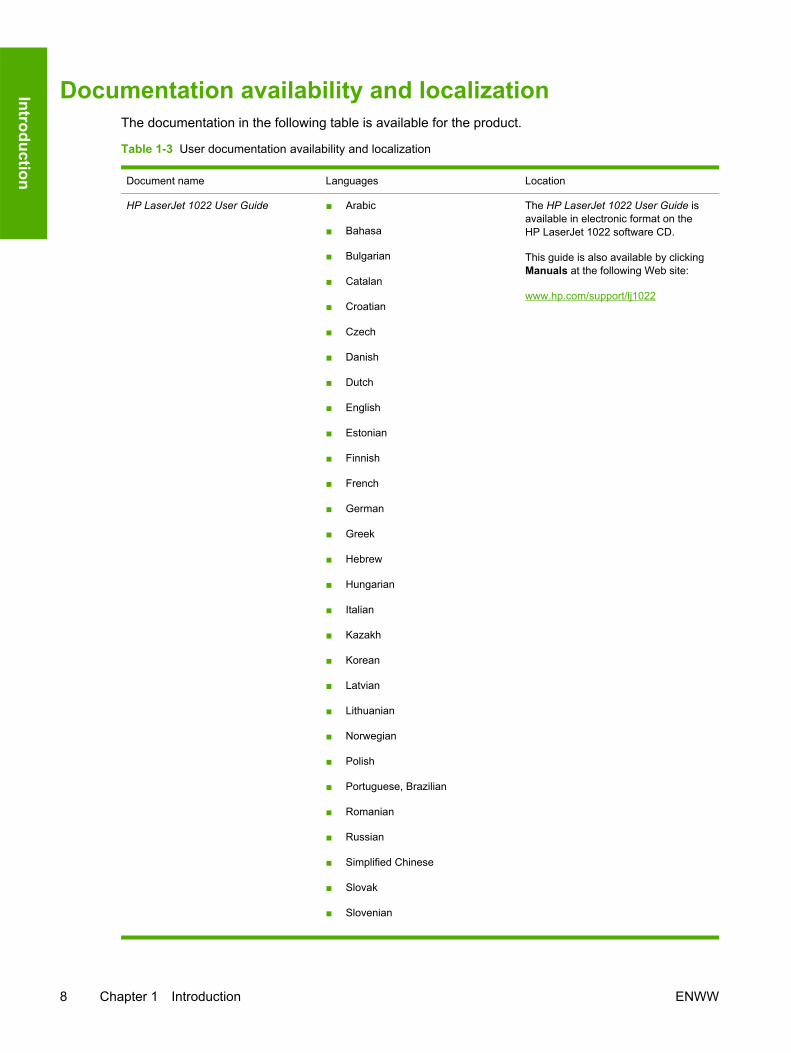
Documentation availability and localizationThe documentation in the following table is available for the product.
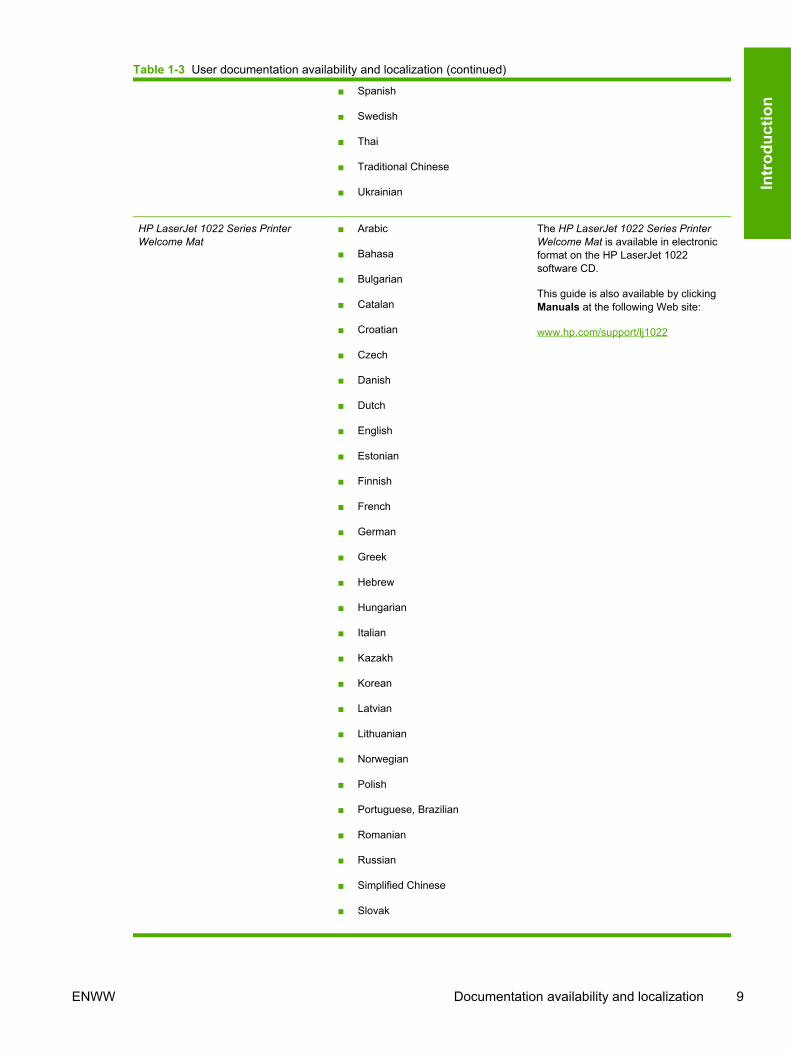
Table 1-3 User documentation availability and localization
Document name Languages Location
HP LaserJet 1022 User Guide ■ Arabic
■ Bahasa
■ Bulgarian
■ Catalan
■ Croatian
■ Czech
■ Danish
■ Dutch
■ English
■ Estonian
■ Finnish
■ French
■ German
■ Greek
■ Hebrew
■ Hungarian
■ Italian
■ Kazakh
■ Korean
■ Latvian
■ Lithuanian
■ Norwegian
■ Polish
■ Portuguese, Brazilian
■ Romanian
■ Russian
■ Simplified Chinese
■ Slovak
■ Slovenian
The HP LaserJet 1022 User Guide isavailable in electronic format on theHP LaserJet 1022 software CD.
This guide is also available by clickingManuals at the following Web site:
www.hp.com/support/lj1022
8 Chapter 1 Introduction ENWW
Introduction
■ Spanish
■ Swedish
■ Thai
■ Traditional Chinese
■ Ukrainian
HP LaserJet 1022 Series PrinterWelcome Mat
■ Arabic
■ Bahasa
■ Bulgarian
■ Catalan
■ Croatian
■ Czech
■ Danish
■ Dutch
■ English
■ Estonian
■ Finnish
■ French
■ German
■ Greek
■ Hebrew
■ Hungarian
■ Italian
■ Kazakh
■ Korean
■ Latvian
■ Lithuanian
■ Norwegian
■ Polish
■ Portuguese, Brazilian
■ Romanian
■ Russian
■ Simplified Chinese
■ Slovak
The HP LaserJet 1022 Series PrinterWelcome Mat is available in electronicformat on the HP LaserJet 1022software CD.
This guide is also available by clickingManuals at the following Web site:
www.hp.com/support/lj1022
Table 1-3 User documentation availability and localization (continued)
ENWW Documentation availability and localization 9
Intr
oduc
tion

■ Slovenian
■ Spanish
■ Swedish
■ Thai
■ Traditional Chinese
■ Ukrainian
HP LaserJet 1022 Series PrintingSystem Install Notes
English The HP LaserJet 1022 Series PrintingSystem Install Notes are available inelectronic format on theHP LaserJet 1022 software CD.
Table 1-3 User documentation availability and localization (continued)
10 Chapter 1 Introduction ENWW
Introduction

2 Windows software overview
This chapter provides information about the following topics:
● Windows operating systems
● Software component information
● HP Software Update utility
● HP Print Screen utility
● Available printer configurations
● Port communication
NOTE For information about the HP LaserJet 1022 printing-system software for Macintoshsystems, see Macintosh software overview and installation.
ENWW 11
Win
dow
s ov
ervi
ew

Windows operating systemsThis section contains information about the following topics:
● Supported Windows operating systems
● Windows system requirements
● Printing from other operating systems
Supported Windows operating systemsThe HP LaserJet 1022 Series printing-system software supports the following operating systems.
Supported operating systemsThe following Windows operating systems are fully supported through the software installer anddrivers available on the software CD that comes with the HP LaserJet 1022 Series printer:
■ Microsoft ® Windows 98 SE
■ Microsoft Windows Millennium Edition (Windows Me)
■ Microsoft Windows 2000
■ Microsoft Windows XP (32-bit)
■ Microsoft Windows Longhorn 32
NOTE Because the HP LaserJet 1022 series product models do not have a parallel port,they do not support MS-DOS, Windows 95, Windows 98 (first edition), or Windows NT. Theseoperating systems require a parallel port and do not support USB connections.
Driver-only supported operating systemsThe following Windows operating system has print-driver-only support by the HP LaserJet 1022printing-system software:
■ Microsoft Windows 2003 Server (32-bit) - print driver included on the printing-system CD
Windows system requirementsFor print-driver-only support, the HP LaserJet 1022 printing-system software has the followingminimum system requirements.
12 Chapter 2 Windows software overview ENWW
Window
s overview
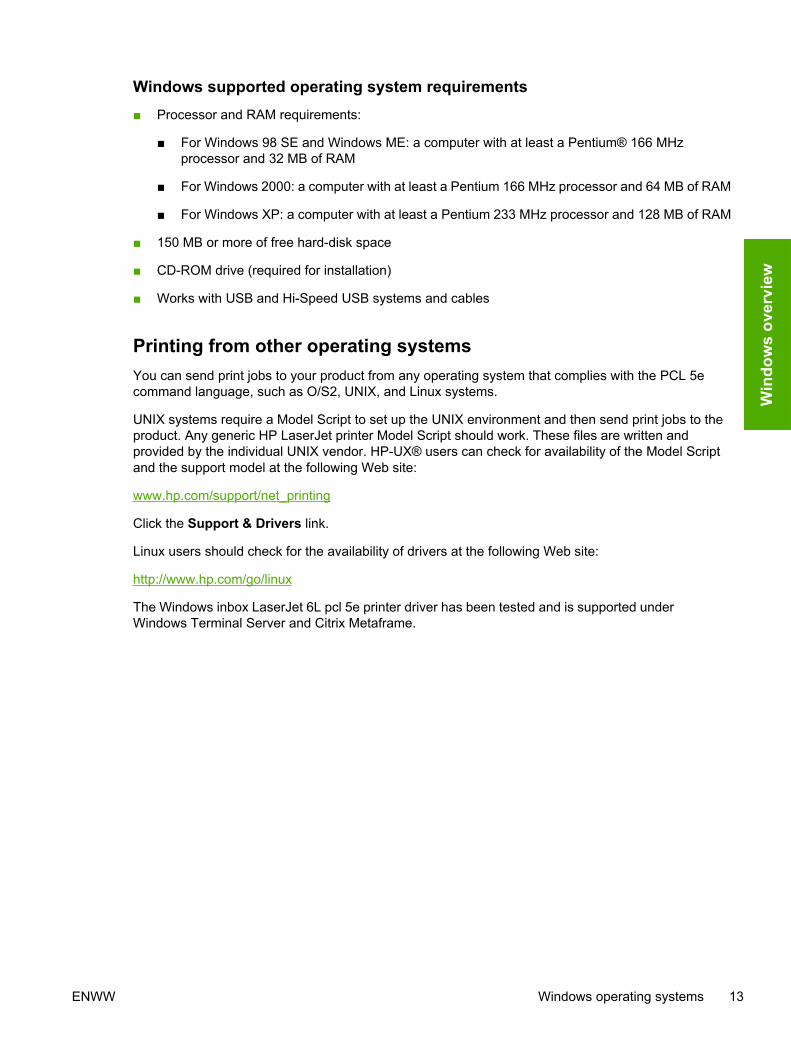
Windows supported operating system requirements■ Processor and RAM requirements:
■ For Windows 98 SE and Windows ME: a computer with at least a Pentium® 166 MHzprocessor and 32 MB of RAM
■ For Windows 2000: a computer with at least a Pentium 166 MHz processor and 64 MB of RAM
■ For Windows XP: a computer with at least a Pentium 233 MHz processor and 128 MB of RAM
■ 150 MB or more of free hard-disk space
■ CD-ROM drive (required for installation)
■ Works with USB and Hi-Speed USB systems and cables
Printing from other operating systemsYou can send print jobs to your product from any operating system that complies with the PCL 5ecommand language, such as O/S2, UNIX, and Linux systems.
UNIX systems require a Model Script to set up the UNIX environment and then send print jobs to theproduct. Any generic HP LaserJet printer Model Script should work. These files are written andprovided by the individual UNIX vendor. HP-UX® users can check for availability of the Model Scriptand the support model at the following Web site:
www.hp.com/support/net_printing
Click the Support & Drivers link.
Linux users should check for the availability of drivers at the following Web site:
http://www.hp.com/go/linux
The Windows inbox LaserJet 6L pcl 5e printer driver has been tested and is supported underWindows Terminal Server and Citrix Metaframe.
ENWW Windows operating systems 13
Win
dow
s ov
ervi
ew

Software component informationThis section contains information about the following topics:
● Printing-system software features
● Software component availability
● Software component localization
Printing-system software featuresThe printing-system software for the HP LaserJet 1022 printer includes the following features:
■ New Installer. The product includes a new installer that improves the software installationprocess and supports either a hardware-first or a software-first installation.
■ Software-first is the recommended installation method.
■ In a hardware-first installation, the HP LaserJet 1022 printing-system software uses twoseparate installers, which run together to set up the port and the printing-system softwarecorrectly. If you cancel the installation after the hardware-first plug-and-play installer finishes,your installation consists of the print driver only.
■ HP Software Update utility. The HP Software Update utility is a software program that locatesthe latest updates that you need for the HP hardware and software installed on your system, andgives you the choice of which updates to install.
■ HP Print Screen utility. The HP Print Screen utility is a software program that you can use toprint the current screen of the PC to the default printer. You can also use the HP Print Screenfeature to save the screen to an image file.
■ HP Order Reminder utility. The HP Order Reminder utility is a software program that you canuse to set specific times for reminders to check the current level of toner in the print cartridge. HPOrder Reminder also contains a link to a Web page that helps you order supplies online from areseller of your choice.
Software component availabilityThe following table lists the availability of the HP LaserJet 1022 printing-system softwarecomponents by operating system.
NOTE In the following table, "98 SE/Me" refers to Windows 98 SE and Windows Me; "2K/XP" refers to Windows 2000 and Windows XP.
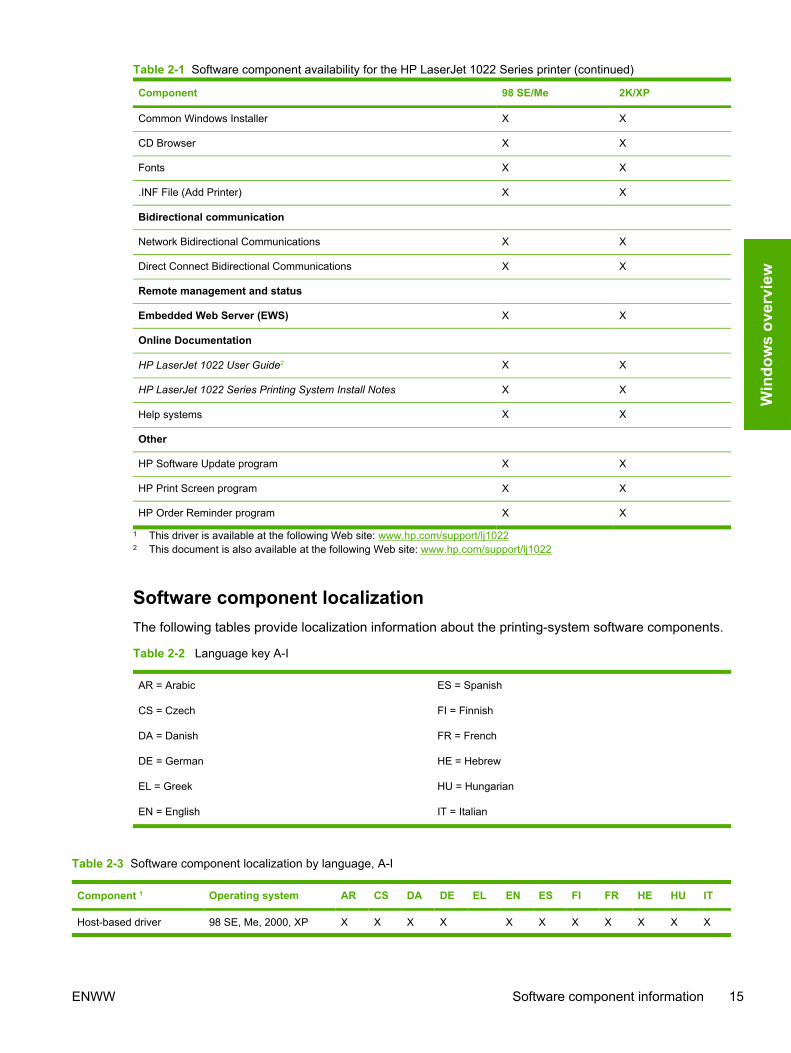
Table 2-1 Software component availability for the HP LaserJet 1022 Series printer
Component 98 SE/Me 2K/XP
Drivers
Host-based driver X X
PCL 5e driver1 X X
Installers
14 Chapter 2 Windows software overview ENWW
Window
s overview
Component 98 SE/Me 2K/XP
Common Windows Installer X X
CD Browser X X
Fonts X X
.INF File (Add Printer) X X
Bidirectional communication
Network Bidirectional Communications X X
Direct Connect Bidirectional Communications X X
Remote management and status
Embedded Web Server (EWS) X X
Online Documentation
HP LaserJet 1022 User Guide2 X X
HP LaserJet 1022 Series Printing System Install Notes X X
Help systems X X
Other
HP Software Update program X X
HP Print Screen program X X
HP Order Reminder program X X
1 This driver is available at the following Web site: www.hp.com/support/lj10222 This document is also available at the following Web site: www.hp.com/support/lj1022
Software component localizationThe following tables provide localization information about the printing-system software components.
Table 2-2 Language key A-I
AR = Arabic
CS = Czech
DA = Danish
DE = German
EL = Greek
EN = English
ES = Spanish
FI = Finnish
FR = French
HE = Hebrew
HU = Hungarian
IT = Italian
Table 2-3 Software component localization by language, A-I
Component 1 Operating system AR CS DA DE EL EN ES FI FR HE HU IT
Host-based driver 98 SE, Me, 2000, XP X X X X X X X X X X X
Table 2-1 Software component availability for the HP LaserJet 1022 Series printer (continued)
ENWW Software component information 15
Win
dow
s ov
ervi
ew

Component 1 Operating system AR CS DA DE EL EN ES FI FR HE HU IT
pcl 5e driver (useWindows inbox 6Lprinter driver)
98 SE, Me X X X X X X X X X X X X
Common WindowsInstaller
98 SE, Me, 2000, XP X X X X X X X X X X X X
Online manuals 98 SE, Me, 2000, XP X X X X X X X X X X X
Online Help 98 SE, Me, 2000, XP X X X X X X X X X X X X
1 Components that are not available in a specific language are supported in English.
Table 2-4 Languagekey, L-Z
KO = Korean
NL = Dutch
NO = Norwegian
PL = Polish
PT = Portuguese
RU = Russian
SV = Swedish
TH = Thai
TR = Turkish
ZHCN = Simplified Chinese
ZHTW = Traditional Chinese
Table 2-5 Software component localization by language, K-Z
Component 1 Operating system KO NL NO PL PT RU SV TH TR ZHCN ZHTW
Host-based driver 98 SE, Me, 2000, XP X X X X X X X X X X X
pcl 5e driver (useWindows inbox 6Lprinter driver)
98 SE, Me X X X X X X X X X X X
Common WindowsInstaller
98 SE, Me, 2000, XP X X X X X X X X X X X
Online manuals 98 SE, Me, 2000, XP X X X X X X X X X X X
Online Help 98 SE, Me, 2000, XP X X X X X X X X X X X
1 Components that are not available in a specific language are supported in English.
Table 2-3 Software component localization by language, A-I (continued)
16 Chapter 2 Windows software overview ENWW
Window
s overview

HP Software Update utilityThe HP Software Update utility is installed with the HP LaserJet 1022 printing-system software. TheHP Software Update utility provides an easy and convenient way to keep your HP software programsand HP products up-to-date. The HP Software Update utility locates the latest updates that you needfor the HP hardware and software installed on your system, and gives you the choice of whichupdates to install.
To gain access to the HP Software Update utility, click Start, click Programs, select HP, and thenclick HP Software Update.
From the Welcome screen, you can perform the following tasks:
■ Configure the HP Software Update utility
■ View the data that the HP Software Update utility has collected
■ View HP’s privacy policy
■ View frequently asked questions about the HP Software Update utility
■ View the End User License Agreement
■ Send feedback to HP
The following illustration shows the Welcome screen for the HP Software Update utility.
Figure 2-1 Welcome screen - HP Software Update
NOTE At the time of the writing of this manual the only update available is an update to HPSoftware Update Version 3.0.1.
ENWW HP Software Update utility 17
Win
dow
s ov
ervi
ew
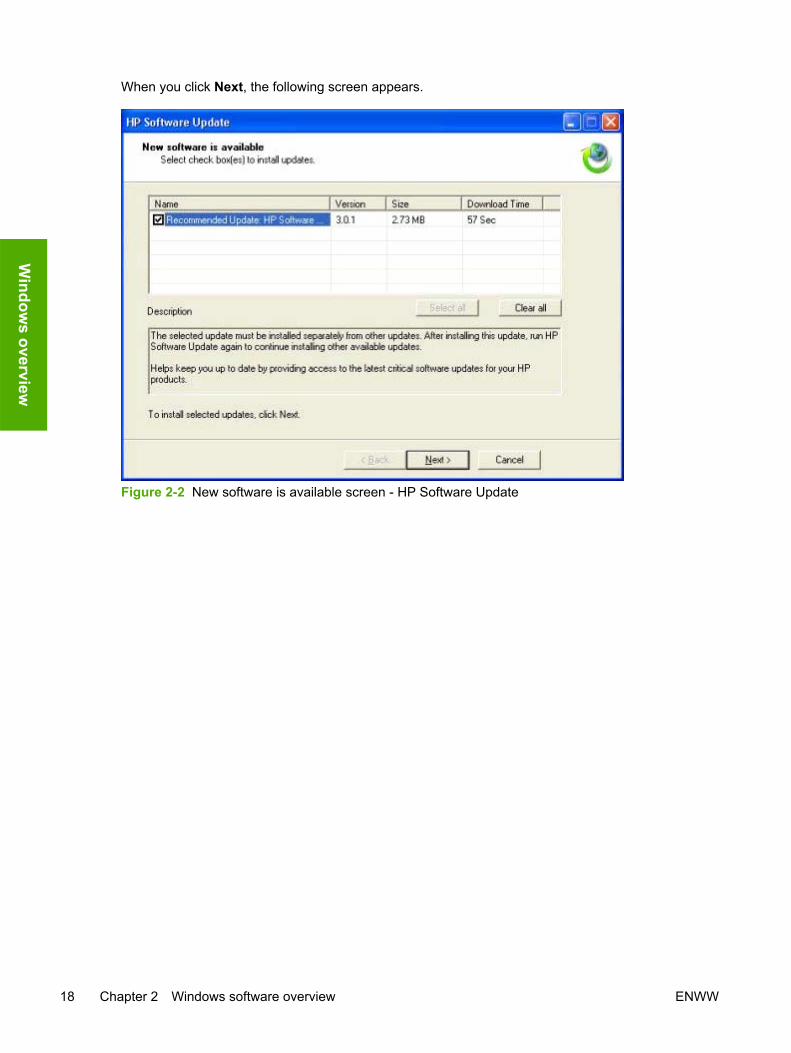
When you click Next, the following screen appears.
Figure 2-2 New software is available screen - HP Software Update
18 Chapter 2 Windows software overview ENWW
Window
s overview

HP Print Screen utilityHP Print Screen is utility software that you can use to print the current computer screen on thedefault printer. You can also use the utility to save the screen to an image file.
Installation
NOTE Administrator installations do not install the HP Print Screen program or the HP WebUpdate utility.
HP Print Screen is a self-contained software program that is installed silently when you install theHP LaserJet 1022 printing-system software.
To open the HP Print Screen utility, click Start, click Programs, select HP, and then click HP PrintScreen. The configuration dialog box provides the option to run the HP Print Screen utility whenWindows is started.
The following path is the installation location for the HP Print Screen utility:
<preferred location>\HP\HP PRINT SCREEN
HP Print Screen is removed from your computer when you uninstall the HP LaserJet 1022 printing-system software.
The HP Print Screen utility supports the same operating systems as the printing-system software. Tosee a list of supported operating systems, see Supported Windows operating systems.
Activating the utilityThe HP Print Screen utility can only be started by clicking Start, clicking Programs, selecting HP,and then clicking HP Print Screen. The utility then runs as a system-tray icon, and you can print thecurrent screen when you press the PrtScn key or the Alt + PrtScn key combination on the keyboard.
NOTE The configuration dialog box also appears when you press the PrtScn key or the Alt +PrtScn key combination on the keyboard
The configuration dialog box can be opened in any of the following ways:
■ Click Start, click Programs, select HP, and then click HP Print Screen.
■ Press the PrtScn key or the Alt + PrtScn key combination on the keyboard after the HP PrintScreen icon appears in the system tray.
■ Mouse over the HP Print screen icon in the system tray, right-click, and then click Configure inthe context menu.
FeaturesWhen the software starts, the HP Print Screen icon appears in the system tray.
Figure 2-3 HP Print Screen - system tray icon
ENWW HP Print Screen utility 19
Win
dow
s ov
ervi
ew

When this icon is visible, a configuration dialog box appears when you press the PrtScn key or theAlt+ PrtScn key combination on the keyboard.
Figure 2-4 HP Print Screen - configuration dialog box
In the configuration dialog box, you can perform the following tasks:
■ Print the current screen by clicking Print Screen.
■ Save the screen to an image file by clicking Save Screen ... .
■ The keys that you press on the keyboard determine the current screen. If you use the HPPrint Screen interface, the entire desktop is captured. If you press the Alt + PrtScn keycombination on your keyboard, the active window is captured.
■ After the HP Print Screen utility is started, pressing thePrtScn key or the Alt + PrtScn keycombination does not update the HP Print Screen dialog box.
■ The HP Print Screen preview always shows the clipboard content (in bitmap format only) thatwas there before you opened the HP Print Screen dialog box.
■ Control the orientation of the screen before sending the print job to the default printer orbefore saving to an image file.
■ Enable or disable the option to have the HP Print Screen utility run automatically when you startWindows.
■ If you have selected the Automatically print when the Print Screen button is pressed option,and then pressed the PrtScn key or the Alt + PrtScn key combination on your keyboard, the HPPrint Screen utility dialog box does not appear, but the screen capture is sent automatically tothe default printer.
20 Chapter 2 Windows software overview ENWW
Window
s overview

■ All of the setting in this dialog box are retained unless they are changed within the configurationor for a specific job. The following are the default values for the settings:
■ Do not start with Windows
■ Orientation is landscape
■ Automatically open the configuration dialog box when you press the PrtScn key or the Alt +PrtScn key combination on your computer keyboard
■ Context-sensitive help opens when you click ? and then click the configuration dialog box controlthat you want information about.
■ The HP Print Screen utility is localized in the following languages:
■ Czech
■ Danish
■ Dutch
■ English
■ Finnish
■ French
■ German
■ Greek
■ Hungarian
■ Italian
■ Korean
■ Norwegian
■ Polish
■ Portuguese (Brazilian)
■ Russian
■ Spanish
■ Swedish
■ Simplified Chinese
■ Traditional Chinese
■ Turkish
HP Order Reminder utilityThe HP Order Reminder utility is installed with the HP LaserJet 1022 printing-system software. TheHP Order Reminder utility provides an easy and convenient way to set specific times for reminders to
ENWW HP Print Screen utility 21
Win
dow
s ov
ervi
ew
check the current level of toner in the print cartridge. You can also use the utility to disable thereminder.
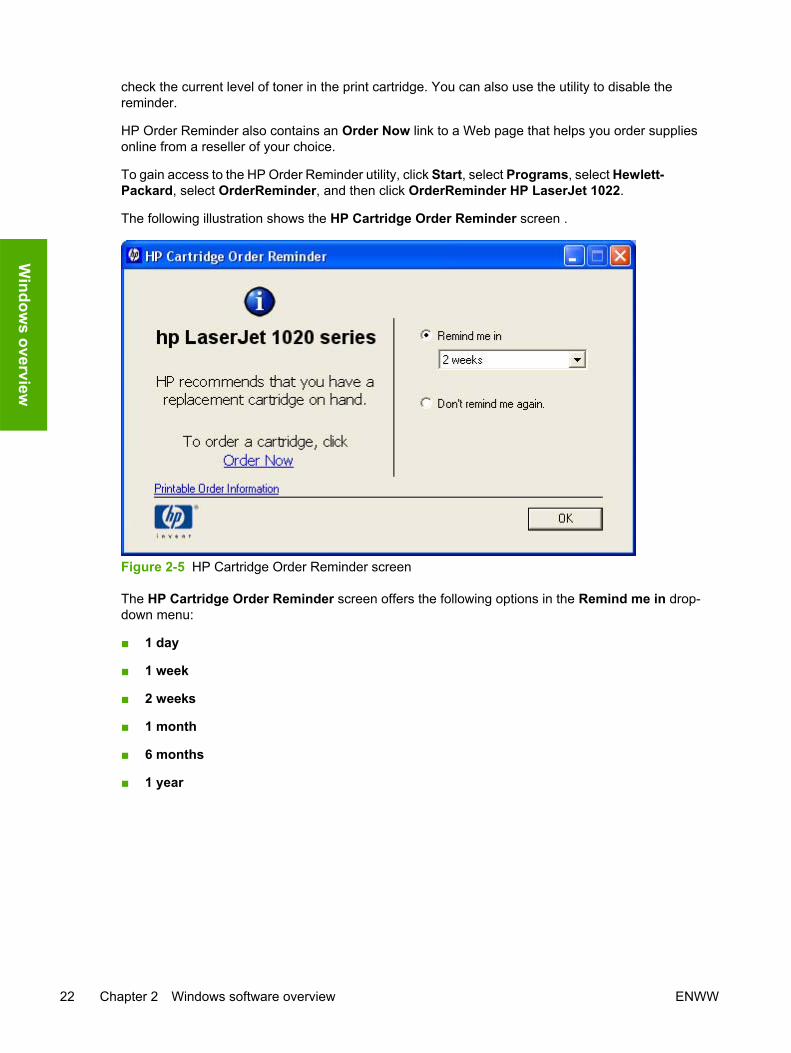
HP Order Reminder also contains an Order Now link to a Web page that helps you order suppliesonline from a reseller of your choice.
To gain access to the HP Order Reminder utility, click Start, select Programs, select Hewlett-Packard, select OrderReminder, and then click OrderReminder HP LaserJet 1022.
The following illustration shows the HP Cartridge Order Reminder screen .
Figure 2-5 HP Cartridge Order Reminder screen
The HP Cartridge Order Reminder screen offers the following options in the Remind me in drop-down menu:
■ 1 day
■ 1 week
■ 2 weeks
■ 1 month
■ 6 months
■ 1 year
22 Chapter 2 Windows software overview ENWW
Window
s overview
Available printer configurationsThis section contains information about the following topics:
■ Software features by connection type
■ Supported configurations
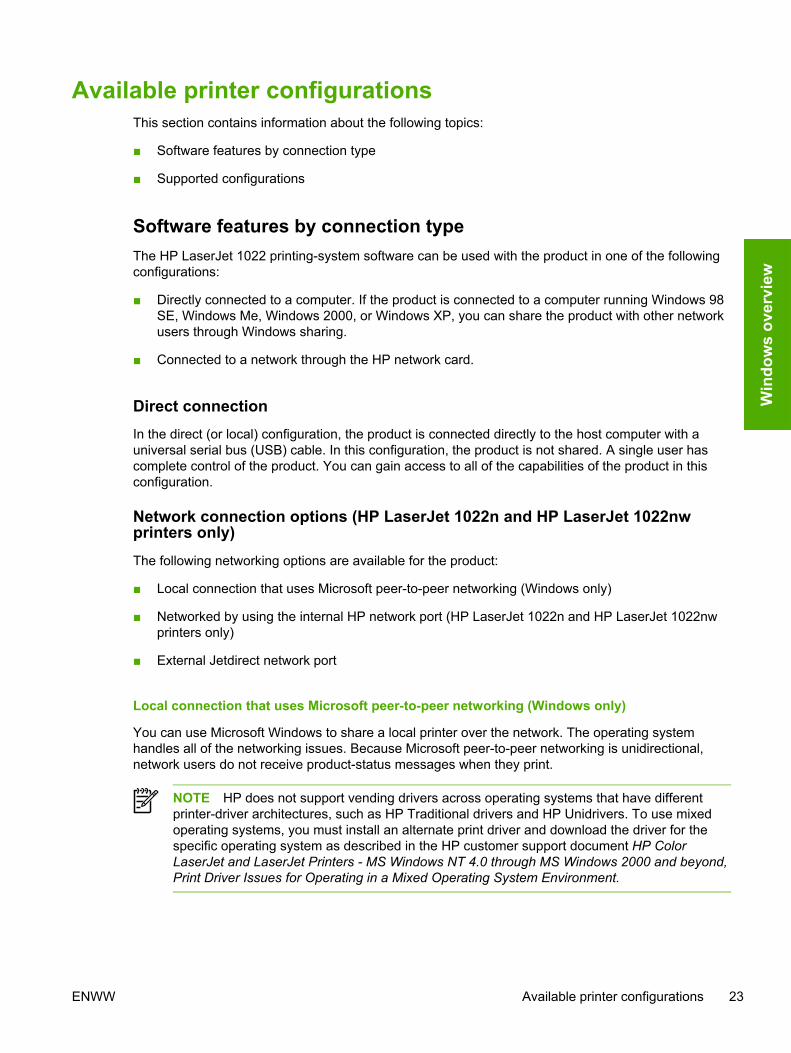
Software features by connection typeThe HP LaserJet 1022 printing-system software can be used with the product in one of the followingconfigurations:
■ Directly connected to a computer. If the product is connected to a computer running Windows 98SE, Windows Me, Windows 2000, or Windows XP, you can share the product with other networkusers through Windows sharing.
■ Connected to a network through the HP network card.
Direct connectionIn the direct (or local) configuration, the product is connected directly to the host computer with auniversal serial bus (USB) cable. In this configuration, the product is not shared. A single user hascomplete control of the product. You can gain access to all of the capabilities of the product in thisconfiguration.
Network connection options (HP LaserJet 1022n and HP LaserJet 1022nwprinters only)The following networking options are available for the product:
■ Local connection that uses Microsoft peer-to-peer networking (Windows only)
■ Networked by using the internal HP network port (HP LaserJet 1022n and HP LaserJet 1022nwprinters only)
■ External Jetdirect network port
Local connection that uses Microsoft peer-to-peer networking (Windows only)
You can use Microsoft Windows to share a local printer over the network. The operating systemhandles all of the networking issues. Because Microsoft peer-to-peer networking is unidirectional,network users do not receive product-status messages when they print.
NOTE HP does not support vending drivers across operating systems that have differentprinter-driver architectures, such as HP Traditional drivers and HP Unidrivers. To use mixedoperating systems, you must install an alternate print driver and download the driver for thespecific operating system as described in the HP customer support document HP ColorLaserJet and LaserJet Printers - MS Windows NT 4.0 through MS Windows 2000 and beyond,Print Driver Issues for Operating in a Mixed Operating System Environment.
ENWW Available printer configurations 23
Win
dow
s ov
ervi
ew

Networked by using the internal HP network port (HP LaserJet 1022n and HP LaserJet 1022nwprinters only)
In this configuration, your HP LaserJet 1022n or HP LaserJet 1022nw printer is connected to anetwork through the internal HP network port that comes standard with the product. The product canbe under the direct control of a single user or in a common area with other networked resources. Allusers on operating systems that support the full printer software have access to the full functionalityof the product.
Networked by using the external HP network port
In this configuration, your HP LaserJet 1022 printer is connected to a network through the externalHP network port that can be added to the product. The product can be under the direct control of asingle user or in a common area with other networked resources. All users on operating systems thatsupport the full printer software have access to the full functionality of the product.
24 Chapter 2 Windows software overview ENWW
Window
s overview

Port communicationThis section provides information about the following topics:
● Overview
● USB port connections
● Device conflicts in Windows
OverviewThe product can be connected through the USB port.
NOTE For the HP LaserJet 1022n or HP LaserJet 1022nw models, use the HP network portto connect multiple computers to a single HP LaserJet 1022 Series printer.
USB port connectionsUSB 2.0 is an input/output mode that both Windows and Macintosh computers support. A widevariety of consumer devices, such as digital cameras and scanners, also support USB. Note that theHP LaserJet 1022 Series printer is compatible with USB 2.0 specifications.
A distinction exists between a USB Host and a USB Device. The HP LaserJet 1022Series printer is aUSB Device. Models can only connect to a USB Host or a USB Hub.
Device conflicts in WindowsWhen two-way communication cannot be established with the product, the Windows DeviceManager might show a conflict. Conflicts should be resolved immediately, and before continuing totroubleshoot two-way communication issues. The following sections contain a few guidelines foridentifying and resolving these conflicts.
NOTE This process applies to both USB and parallel port devices. However, USB devicesare only supported in Windows 98 SE, Windows Me, Windows 2000, and Windows XP.
Opening the Windows Device ManagerFollow these steps to open the Windows Device Manager.
1 For Windows 98 SE, Windows Me, and Windows 2000, click Start, click Settings, and then clickControl Panel.
For Windows XP, click Start, and then click Control Panel.
2 Double-click the System icon.
3 On the Hardware tab, click Device Manager.
NOTE In Windows 98 SE, click the Device Manager tab.
ENWW Port communication 25
Win
dow
s ov
ervi
ew
Check for device conflictsFollow these steps to check for device conflicts.
1 Look for devices that appear on the list with a yellow exclamation mark (!) or a red X.
2 Identify port conflicts by double-clicking Port or by clicking the plus sign (+). Conflicts hereusually interfere with two-way communication.
3 To check the status of a device, click the device name, and then click Properties. The DeviceStatus appears in the middle of the dialog box.
4 To check the Conflicting Device list, click the device name, and then click Properties. Click theResources tab, and look at the Conflicting Device list at the bottom of the dialog box.
5 Click the plus sign (+) to the left of Open the Other Devices. Misidentified or noncategorizeddevices appear here.
Guidelines for troubleshooting and resolving device conflictsFollow these steps for resolving device conflicts.
1 If the conflicting device is no longer present in the list of devices, click the device name, clickRemove, and then click Yes. Click Yes to restart Windows.
2 If the conflicting device is a duplicate (and one of the duplicate listings does not show a conflict),click the name(s) of the device(s) that have a conflict, click Remove, and then click Yes. ClickYes to restart Windows.
NOTE You might not need to restart the computer in Windows 2000 or Windows XP,depending on the type of port conflict that you are resolving.
3 If a device has a conflict and you have the driver for that device, remove the device and thenreinstall it. After removing the device, restart the computer. When Windows reinstalls devices, itusually finds nonconflicting resources.
26 Chapter 2 Windows software overview ENWW
Window
s overview

3 Macintosh software overview andinstallation
NOTE This chapter covers information about the HP LaserJet 1022 printing-system softwarefor Macintosh. For information about Windows installations, see Windows software installation.
This chapter provides information about the following topics:
● Supported Macintosh operating systems
● Macintosh printing-system software for the HP LaserJet 1022 printer
● System requirements (Macintosh)
● Installation overview
● Installation options
● Installation dialog-box options for Macintosh
ENWW 27
Mac
into
sh
Supported Macintosh operating systemsThe Macintosh printing-system software for the HP LaserJet 1022 printer supports Mac OS X, V10.2and later.
28 Chapter 3 Macintosh software overview and installation ENWW
Macintosh
Macintosh printing-system software for theHP LaserJet 1022 printer
This section provides information about the following topics:
● Macintosh component descriptions
● In-box file layout
● Software components for Macintosh
● Software component availability for Macintosh
● Software component localization
● Ordering software for Macintosh
Macintosh component descriptionsThe HP LaserJet 1022 printing solution for Macintosh uses the Print Center for OS X.2, or the PrinterSetup Utility for OS X.3, which are provided with the operating system. It also uses an HP host-based driver to determine the features that the product supports.
PDEsPrinter Dialog Extensions (PDEs) are code plug-ins (for Mac OS X, V10.2 and later) that provideaccess to product features, such as number of copies, duplexing, and print quality settings.
In-box file layoutThe HP LaserJet 1022 printing-system software consists of two partitions: one for installation onWindows operating systems, the other for Macintosh operating systems. The files include bothdocumentation files and files that are required to install and uninstall the systems. For informationabout the file layout for the Windows partition of the HP LaserJet 1022 printing-system CD, see theSoftware availability and fulfillment section of this guide.
HP LaserJet 1022 software CD, Macintosh partitionThe files contained in the Macintosh partition of the HP LaserJet 1022 printing-system software CDare grouped by language and reside in the following directories and folders:
■ Root directory (contains the README.HTML file)
■ HP LaserJet 1022 folder (contains the installers)
■ PDF (contains guides and manuals in .PDF format)
■ hp Laserjet Screen Fonts folder
Software components for MacintoshThe following table lists the HP LaserJet 1022 software components that are available for computersrunning the Macintosh operating system.
ENWW Macintosh printing-system software for the HP LaserJet 1022 printer 29
Mac
into
sh

Table 3-1 Software components for Macintosh
Component Description
Installer software Installs the HP LaserJet 1022 host-based driver
Driver software Is used to print from your HP LaserJet 1022
Online Help Provides help for the HP LaserJet 1022 printing-systemsoftware
The user documentation for these products is included onthe installation CD in Adobe Acrobat .PDF format
Software component availability for MacintoshThe following table lists the availability of the HP LaserJet 1022 printing-system softwarecomponents for Macintosh.
Table 3-2 Software component availability for Macintosh
Component Macintosh
Drivers
HP Host-Based Driver X
Installers
HP Host-Based Driver Installer X
Online Documentation
HP LaserJet 1022 User Guide X
HP LaserJet 1022 Series Printing System Install Notes X
Help systems X
Software component localizationThe following table presents the Macintosh installation part numbers and language groups that areincluded on the software CDs for the product.
Table 3-3 CD language groupings for Macintosh
CD Part Number Languages
1 Q5912-60104 ■ Arabic
■ Bahasa
■ Bulgarian
■ Catalan
■ Croatian
■ Czech
30 Chapter 3 Macintosh software overview and installation ENWW
Macintosh

CD Part Number Languages
■ Danish
■ Dutch
■ English
■ Estonian
■ Finnish
■ French
■ German
■ Greek
■ Hebrew
■ Hungarian
■ Italian
■ Kazakh
■ Korean
■ Latvian
■ Lithuanian
■ Norwegian
■ Polish
■ Portuguese, Brazilian
■ Romanian
■ Russian
■ Simplified Chinese
■ Slovak
■ Slovenian
■ Spanish
■ Swedish
■ Thai
■ Traditional Chinese
■ Ukrainian
Table 3-3 CD language groupings for Macintosh (continued)
ENWW Macintosh printing-system software for the HP LaserJet 1022 printer 31
Mac
into
sh

Ordering software for MacintoshIf you need a replacement CD or a newer version of the printing-system software, go to the followingWeb site:
■ www.hp.com/support/lj1022
On the product Web site, click CD Order Page to order a replacement CD. Click Download driversand software to get the software update.
To request the software CD by phone, see the following Web site for the correct contact number foryour country/region:
www.hp.com/country/us/en/wwcontact.html
32 Chapter 3 Macintosh software overview and installation ENWW
Macintosh

System requirements (Macintosh)The HP LaserJet 1022 printing-system software has the following minimum system requirements:
■ Mac OS X, V10.2 and later
■ Macintosh computer (Power PC processor), such as an iMac; a Power Macintosh G3, G4, or G5;an eMac; or an iBook
■ RAM: For Mac OS X, V10.2 and later, the minimum system memory is 128 MB. These areminimum system requirements for memory. An additional 32 MB of free memory is optimum forinstallation.
■ 150 MB or more of free hard-disk space
■ A CD-ROM drive (required for installation)
ENWW System requirements (Macintosh) 33
Mac
into
sh
Installation overviewThe printing-system software for the HP LaserJet 1022 is shipped on one CD. On Mac OS systems,the HP Installer program installs the HP LaserJet 1022 printing-system software from the CD ontothe hard disk.
On Mac OS systems, your HP LaserJet 1022 uses the HP Installer. This Installer provides an EasyInstall option, which installs only the HP LaserJet 1022 printing-system software on the currentsystem startup drive that contains the active System folder.
34 Chapter 3 Macintosh software overview and installation ENWW
Macintosh

Installation optionsThe HP LaserJet 1022 printing-system software can be used in one of the following configurations:
■ Directly connected to a computer. This configuration provides the most printer functionality.
■ Connected to a network through the HP internal network port.
Macintosh installation instructions for direct connectionsThis section provides information about the following topic:
■ Installation instructions for Mac OS X, V10.2 and later
NOTE Install the software before connecting the product to the computer.
Direct-connection installation instructions for Mac OS X, V10.2 and laterUse the instructions below to install the software on a Macintosh computer running Mac OS X, V10.2and later.
1 Insert the HP LaserJet 1022 printing-system software CD into your CD-ROM drive.
2 Run the installer CD.
3 Open the Print Center or Printer Setup Utility (for Mac OS X, V10.3.x) by clicking HD, clickingApplications, clicking Utilities, and then clicking Print Center or Printer Setup Utility.
4 If the HP LaserJet 1022 Series printer appears in the list of printers, go to step 9. If it does notappear in the list of printers, go to step 5.
5 Click the Printers menu, and then click Add Printer... .
6 Select USB in the drop-down list.
7 In the Printer Model box, click HP LaserJet 1022, and then click Add.
8 Select HP LaserJet 1022 in the Printers menu, and then click Make Default.
9 Print a page from any program to make sure that the software is correctly installed.
NOTE If the installation fails, see the HP LaserJet 1022 Series Printing System InstallNotes on the HP LaserJet 1022 printing-system software CD, see the flyer that came inthe box with your printer, or go to the following Web site for help or more information:
www.hp.com/support/lj1022
Macintosh installation instructions for networked computersTo install the HP LaserJet 1022 printing-system software on networked Macintosh operatingsystems, follow the instructions for your operating system.
ENWW Installation options 35
Mac
into
sh

Network installation instructions for Mac OS X, V10.2 and laterUse the instructions below to install the software on a Macintosh computer that is running Mac OS X,V10.2 and later, and is connected to a network.
1 The HP LaserJet 1022n and HP LaserJet 1022nw models have an HP network port for networkconnection. For a 10/100 Base-T network, connect a twisted-pair network cable between theprinter and an active network port.
2 At the product control panel, make sure that the Ready light is on. Press the Go button for 5seconds to print a Configuration page, an HP Jetdirect page, and a Supplies Status page.
NOTE If no HP Jetdirect page was printed, wait 30 seconds for the network card toinitialize, and then try to print the page again.
3 Insert the HP LaserJet 1022 printing-system software CD into your CD-ROM drive.
4 Run the installer CD.
5 Open the Print Center or Printer Setup Utility (for Mac OS X, V10.3.x) by clicking HD, clickingApplications, clicking Utilities, and then clicking Print Center or Printer Setup Utility.
6 Open the Printers menu, and then click Add Printer... .
7 Select Rendezvous in the drop-down list.
8 In the Printer Model box, click HP LaserJet 1022, and then click Add.
9 Print a page from any program to make sure that the software is correctly installed.
NOTE If the installation fails, see the HP LaserJet 1022 Series Printing System InstallNotes on the HP LaserJet 1022 printing-system software CD, see the flyer that came inthe box with your printer, or go the following Web site for help or more information:
www.hp.com/support/lj1022.
36 Chapter 3 Macintosh software overview and installation ENWW
Macintosh
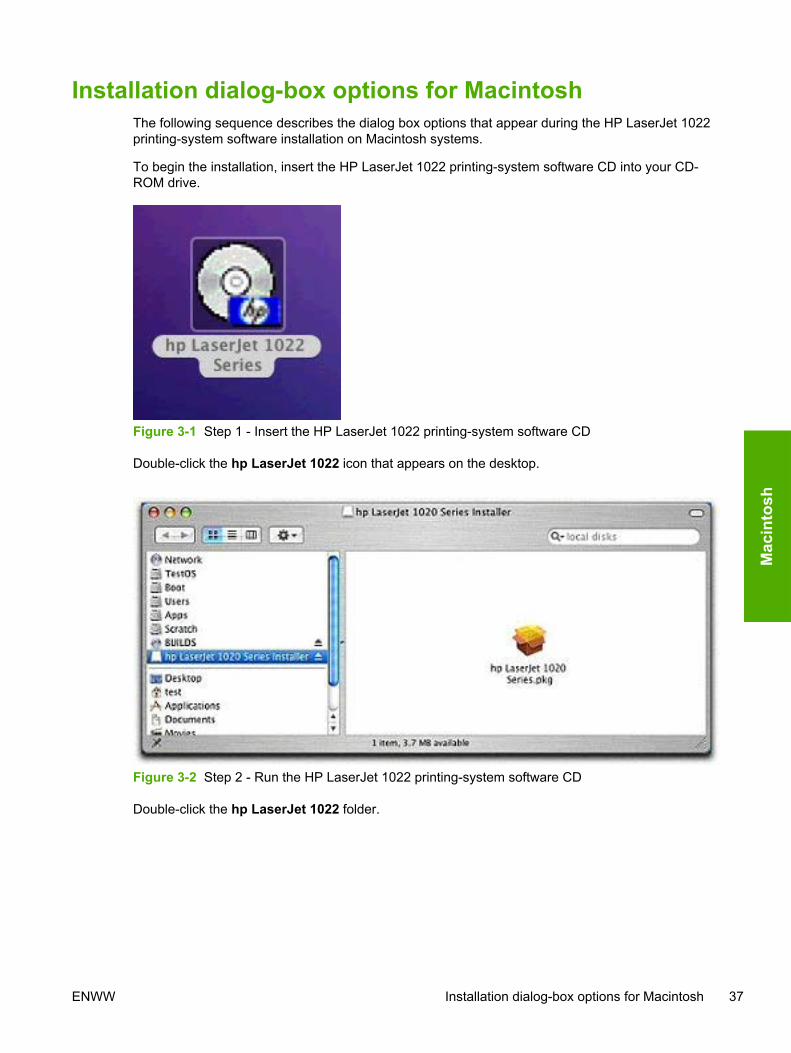
Installation dialog-box options for MacintoshThe following sequence describes the dialog box options that appear during the HP LaserJet 1022printing-system software installation on Macintosh systems.
To begin the installation, insert the HP LaserJet 1022 printing-system software CD into your CD-ROM drive.
Figure 3-1 Step 1 - Insert the HP LaserJet 1022 printing-system software CD
Double-click the hp LaserJet 1022 icon that appears on the desktop.
Figure 3-2 Step 2 - Run the HP LaserJet 1022 printing-system software CD
Double-click the hp LaserJet 1022 folder.
ENWW Installation dialog-box options for Macintosh 37
Mac
into
sh

Figure 3-3 Step 3 - Main CD screen
Click Continue.
38 Chapter 3 Macintosh software overview and installation ENWW
Macintosh
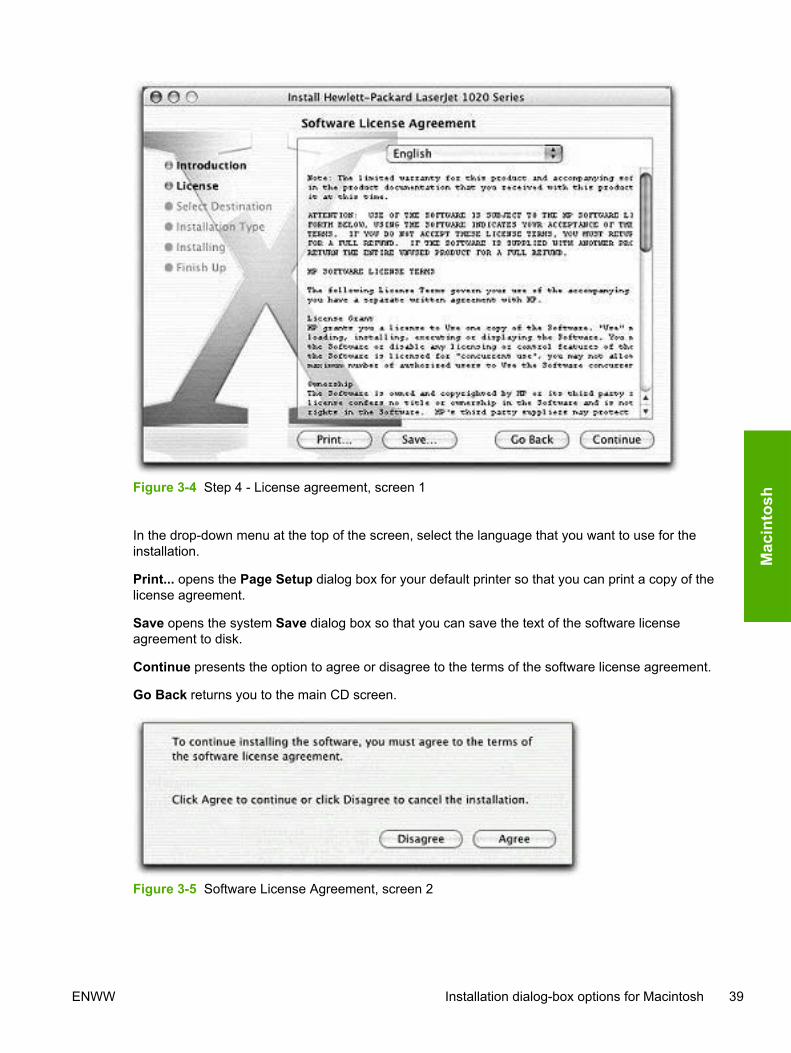
Figure 3-4 Step 4 - License agreement, screen 1
In the drop-down menu at the top of the screen, select the language that you want to use for theinstallation.
Print... opens the Page Setup dialog box for your default printer so that you can print a copy of thelicense agreement.
Save opens the system Save dialog box so that you can save the text of the software licenseagreement to disk.
Continue presents the option to agree or disagree to the terms of the software license agreement.
Go Back returns you to the main CD screen.
Figure 3-5 Software License Agreement, screen 2
ENWW Installation dialog-box options for Macintosh 39
Mac
into
sh

Figure 3-6 Step 5 - Select a destination
Select the drive on which you want to install the software.
40 Chapter 3 Macintosh software overview and installation ENWW
Macintosh

Figure 3-7 Step 6 – Easy Install process
The Easy Install option is the default.
Click Go Back to select a different destination.
Click Install to begin the installation process.
Figure 3-8 Step 7 - Authenticate
Type your username and the password that provides administrator privileges, and then click OK tocontinue.
Click Cancel to close the installer.
ENWW Installation dialog-box options for Macintosh 41
Mac
into
sh

Figure 3-9 Step 8 - Install files
The Installing dialog box appears, showing the progress of the installation.
42 Chapter 3 Macintosh software overview and installation ENWW
Macintosh
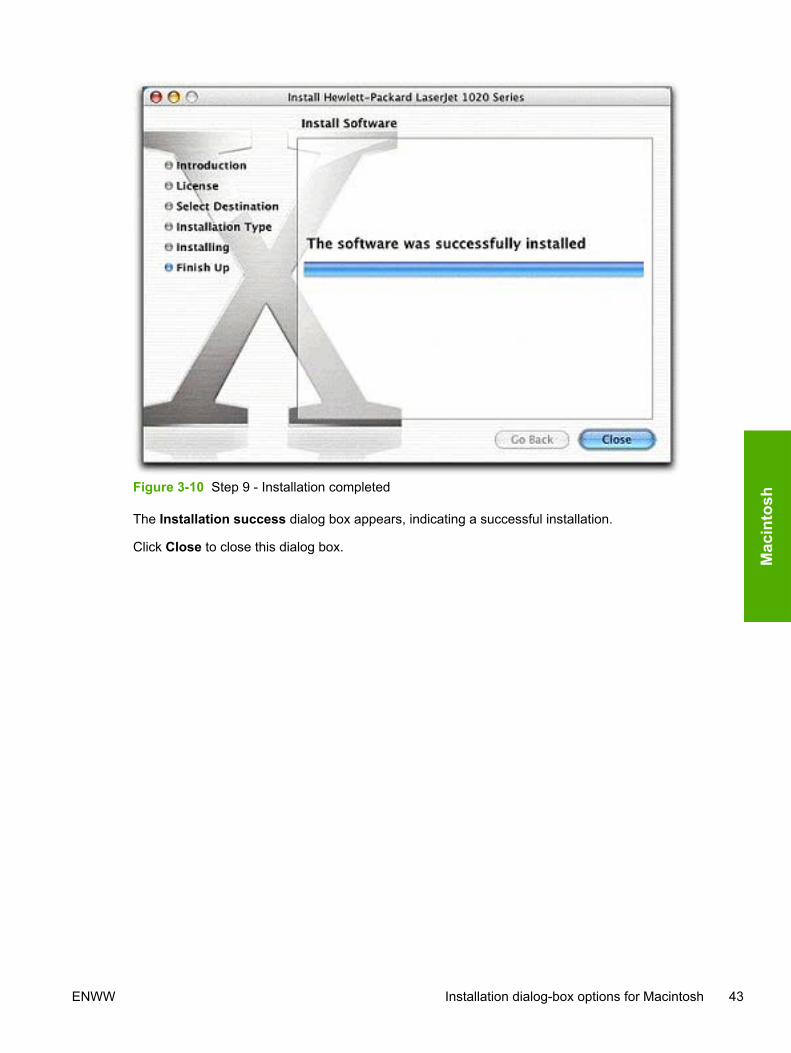
Figure 3-10 Step 9 - Installation completed
The Installation success dialog box appears, indicating a successful installation.
Click Close to close this dialog box.
ENWW Installation dialog-box options for Macintosh 43
Mac
into
sh

44 Chapter 3 Macintosh software overview and installation ENWW
Macintosh

4 Windows driver features
This chapter provides information about the following topic:
● Host-based features
ENWW 45
Win
dow
s dr
iver
feat
ures

Host-based featuresNOTE Host-based printing differs from PCL printing by computing the print job on the hostcomputer rather than computing the print job in the product formatter.
This section contains the following information:
■ Access to drivers
■ Help system
■ Driver-tab features
Access to driversTo gain access to driver settings from within most software programs, click File, click Print, and thenclick Properties. The appearance and names of the driver tab can vary, depending on the operatingsystem. These settings apply only while the software program is open.
You can also control the drivers directly from the Printers folder. These settings change the defaultsettings that are used across all software programs.
■ In Windows 2000, click Start, click Settings, click Printers, right-click the product name, andthen click Printing Preferences to gain access to the same set of driver tabs that the softwareprogram controls.
■ In Windows XP, click Start, click Printers and Faxes (Windows XP Professional) or Printersand Other Hardware Devices (Windows XP Home), right-click the product name, and then clickPrinting Preferences to gain access to the same set of driver tabs that the software programcontrols.
If, after right-clicking the product name, you click Properties, you gain access to a different set oftabs that control the driver behavior and driver connections. For information about the Propertiestabs that are described in this chapter, see the Printer Properties tab set section.
Help systemThe Host-based driver includes a full-featured Help system to provide assistance with printing andconfiguration options. The following Help options are available:
■ What's this? Help
■ Context-sensitive Help
■ Constraint messages
46 Chapter 4 Windows driver features ENWW
Window
s driver features

What's this? Help"What's this?" Help is supported in Windows 2000 and Windows XP. You can gain access to "What'sthis?" Help messages in any of the following ways:
■ Right-click a control or option and then click What's this?, and a pop-up Help window appears.
■ Click the ? button at the upper-right corner of the frame, next to the X, to change the cursor to anarrow with a question mark. Use this special cursor to select a control or option, and the pop-upHelp window for that feature appears.
■ Press the F1 key, and the Help window for the currently selected control or option appears.
Context-sensitive HelpPress the Help button on a driver tab or in a dialog box, and context-sensitive Help appears.
Constraint messagesConstraint messages are unsolicited messages that appear in response to specific actions that youtake. These messages alert you to selections that are illogical or impossible given the capabilities ofthe product or the current settings of other controls. For example, if you click Print on Both Sides(Manually) and then change the media type to Transparency, a message appears asking you toresolve this conflict.
Figure 4-1 A typical constraint message
Whenever a constraint message appears with Restore my previous settings and Keep thissetting, and I will change it later buttons, the interpretation of the buttons is as follows:
■ Clicking OK accepts the change that was just made, and the driver then resets the conflictingcontrol to a setting that is compatible with the new value.
■ Clicking Cancel rejects the change that was just made, and the control remains set at itsprevious value.
Driver tab featuresThis section describes the options that are available on each tab of the Host-based driver interfaces.The following information is included:
■ Printing Preferences tab set
■ Printer Properties tab set
ENWW Host-based features 47
Win
dow
s dr
iver
feat
ures

Printing Preferences tab setThe Printing Preferences tabs contain information for formatting documents for the product. Youcan gain access to the Printing Preferences tabs either through your software program or throughthe Windows Printers folder. For more information, see the Access to drivers section for Windows2000 and Windows XP.
The following tabs are included in the Printing Preferences tab set:
■ Paper/Quality tab
■ Effects tab
■ Finishing tab
■ Basics tab
Paper/Quality tab features
Use the Paper/Quality tab to specify the size, type, and source of the print media. You can also usethis tab to configure different media-selection choices for the first page, other pages, and back coverof the document. The following illustration shows the Paper/Quality tab.
Figure 4-2 Paper/Quality tab
48 Chapter 4 Windows driver features ENWW
Window
s driver features

The Paper/Quality tab contains the following controls:
■ Quick Sets group box
■ Paper Options group box
■ Document preview image
Quick Sets
The first group box in the upper portion of the Paper/Quality tab is Quick Sets. Any change to theQuick Sets group box that is made on the Paper/Quality tab affects all of the Printing Preferencesdriver tabs (the Paper/Quality, Effects, Finishing, and Basics tabs) because they are all the samecontrol.
Use the Quick Sets setting to store the current combination of driver settings that are on all of theother print driver tabs. Quick Sets are either preset by using network-administrator settings or user-defined printing specifications (such as media size, pages per sheet, and so on).
NOTE Administrators can predefine Quick Sets for their users. These administrator QuickSets are defined on the server and are available to users, but usually cannot be modified byusers. Users can also define Quick Sets for their own use. User-defined Quick Sets aredescribed later in this section.
The following selections are available in the Quick Sets drop-down menu:
■ Defaults
■ Type new Quick Set name here
Default Print Settings
When you select Defaults, nearly all of the settings are restored to the combination that existed afterthe driver was installed (the original settings). However, if the attribute combinations that areassociated with watermark definitions or custom media sizes quick sets have been changed ordeleted, the original settings are not restored.
Defaults appears in the Quick Sets menu automatically if no other driver settings have beenchanged since the driver was installed, or if all of the driver settings match the original settings.Otherwise, the setting in the Quick Sets menu is the same label that appeared when you last closedthe printing Properties dialog box by clicking OK.
Type new Quick Set name here
By default, the Quick Sets menu is set to Defaults. When you change any of the default settings onany of the Printing Preferences driver tabs and you want to save the configuration as a Quick Set,highlight the words Untitled, type the name that you want for your new Quick Set, and then clickSave. Quick Sets are saved in the system registry. To delete a Quick Set, select it from the drop-down menu and then click Delete.
NOTE Administrators can predefine Quick Sets for their users. These administrator QuickSets are defined on the server and are available to users, but usually cannot be modified byusers. Users can also define Quick Sets for their own use. User-defined Quick Sets aredescribed later in this section.
ENWW Host-based features 49
Win
dow
s dr
iver
feat
ures

You can store a maximum of 25 Quick Sets on a particular system. If you attempt to save too many,a message box appears that reads, "There are too many Quick Sets defined. Please delete somebefore adding new ones."
Paper Options group box
The settings specified in the Paper Options group box on the Paper/Quality tab apply to all of thepages of the document. The following illustration shows the Paper Options group box and theselections available by default.
Figure 4-3 Paper Options group box
The appearance of the Paper Options group box changes when the Use different paper check boxis selected. The settings in the Paper Options group box are described below in the following order:
■ Size is:
■ Custom
■ Source Is: drop-down menu
■ Type is: drop-down menu
■ Use different paper options
Size is:
The Size is: setting is a drop-down menu that lists all of the supported media sizes.
You can specify a size for all the settings in the Paper Options group box. You must use the samemedia size for the entire print job. That is, if the print job uses Letter-size media, any option that youselect from the available Use different paper options must also use Letter-size media.
NOTE Certain software programs can override the size command and specify differentmedia sizes within a single document.
For the Other Pages and Back Cover settings, you can select a source (tray) and media type thatdiffer from the settings selected for First Page. If a conflict exists among media source, media size,
50 Chapter 4 Windows driver features ENWW
Window
s driver features

and/or media type, and you choose to keep the conflicting settings, the settings are processed in thefollowing order: media size, media type, and then media source.
Because driver settings are overridden by media-size settings in most software programs, it isgenerally best to use the driver to set media size only for software programs that lack a media-sizesetting, such as NotePad, or when you are producing a book or a booklet that does not requiredifferent media sizes.
NOTE When you use a software program that has a media-size setting, you can specifydifferent media sizes within a single document by using the Use different paper options. Formore information, see Use different paper options.
Custom
The Custom Paper Size dialog box appears when you click the Custom button on the Paper/Quality tab. The following illustration shows the initial appearance of the Custom Paper Size dialogbox.
NOTE The Custom button is not available when Use different paper is selected and anysetting other than First Page is also selected.
Figure 4-4 Custom Paper Size dialog box
When the Custom Paper Size dialog box appears, the drop-down menu in the Name group containsone of two things, depending on the current media-size selection on the Paper/Quality tab:
■ If the media-size selection is a previously defined custom size, then the drop-down menucontains the name of that custom size.
■ If the media-size selection is a standard media size, then the drop-down menu shows the defaultname Untitled for a custom media size.
ENWW Host-based features 51
Win
dow
s dr
iver
feat
ures

NOTE In Windows 98 SE and Windows Me, two names for the same size media can coexist(for example, "big" and "BIG" can both be used as names for custom-size media measuring8.4 inches x 11 inches). In Windows NT 4.0, Windows 2000, and Windows XP, bothuppercase and lowercase names can be used, but they cannot be used to name the samemedia size.
The new name is compared only against the list of user-defined custom media-size names, and notagainst the standard media-size names.
The complete set of titles for this button and the specific characteristics that determine its title andcapabilities are discussed in the Save, Delete, or Rename section.
Name
The Name drop-down menu shows the name of the custom media size that was selected mostrecently. Use the Name drop-down menu to select from the list of currently defined custom mediasizes, or to type a new name for a custom media size.
The name that appears in the Name drop-down menu is one of three things, depending on thefollowing conditions:
■ If a saved custom media size has been selected from the drop-down menu and the othercontrols in the dialog box have not been changed since then, the Name drop-down menu showsthe name of the last selected custom media size.
■ If the width or height controls have been changed since a custom size was selected or saved, orif a saved media size has just been deleted, then the Name drop-down menu shows the defaultname of Untitled.
■ If a new name has been typed into the Name drop-down menu for the purpose of saving a newsize or renaming an existing size, then that new name will remain in the drop-down menu until asaved custom media size has been selected from the drop-down menu.
If you type a new name into the Name drop-down menu, but then do not click the Save button, youshould be able to change the width and height values without losing the name. However, if a savedmedia-size name is selected from the drop-down menu, any unsaved name or size values are lostwithout warning, and replaced by the values of the selected custom media size.
52 Chapter 4 Windows driver features ENWW
Window
s driver features
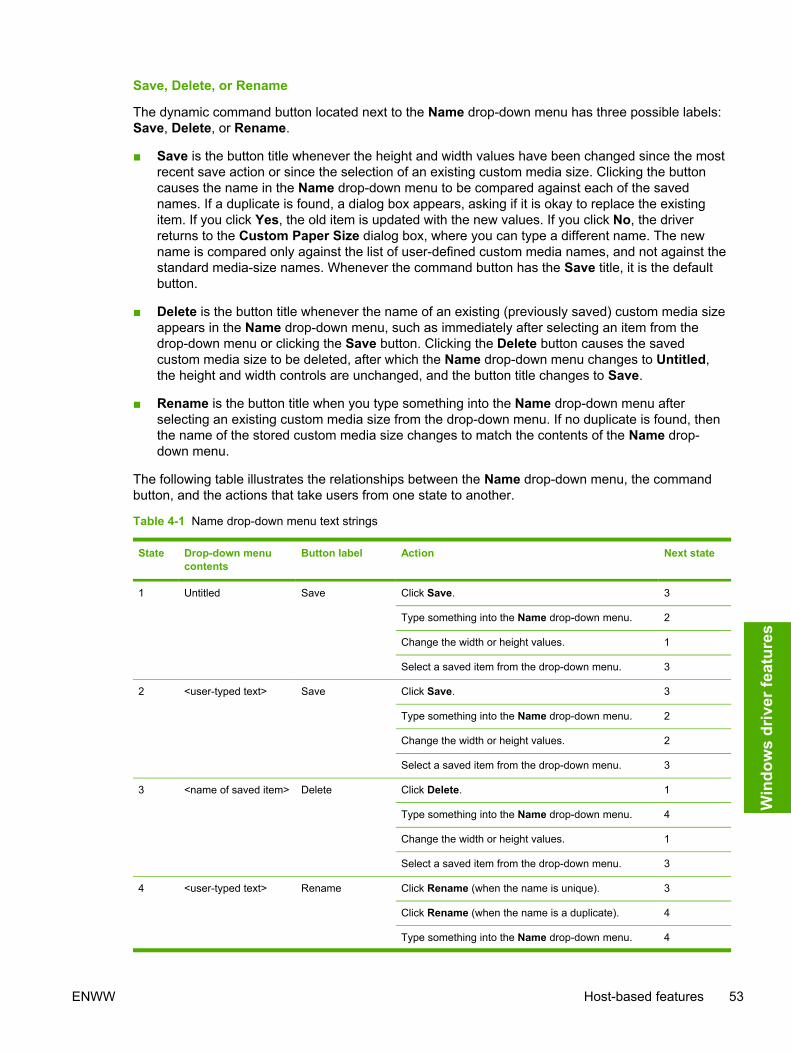
Save, Delete, or Rename
The dynamic command button located next to the Name drop-down menu has three possible labels:Save, Delete, or Rename.
■ Save is the button title whenever the height and width values have been changed since the mostrecent save action or since the selection of an existing custom media size. Clicking the buttoncauses the name in the Name drop-down menu to be compared against each of the savednames. If a duplicate is found, a dialog box appears, asking if it is okay to replace the existingitem. If you click Yes, the old item is updated with the new values. If you click No, the driverreturns to the Custom Paper Size dialog box, where you can type a different name. The newname is compared only against the list of user-defined custom media names, and not against thestandard media-size names. Whenever the command button has the Save title, it is the defaultbutton.
■ Delete is the button title whenever the name of an existing (previously saved) custom media sizeappears in the Name drop-down menu, such as immediately after selecting an item from thedrop-down menu or clicking the Save button. Clicking the Delete button causes the savedcustom media size to be deleted, after which the Name drop-down menu changes to Untitled,the height and width controls are unchanged, and the button title changes to Save.
■ Rename is the button title when you type something into the Name drop-down menu afterselecting an existing custom media size from the drop-down menu. If no duplicate is found, thenthe name of the stored custom media size changes to match the contents of the Name drop-down menu.
The following table illustrates the relationships between the Name drop-down menu, the commandbutton, and the actions that take users from one state to another.
Table 4-1 Name drop-down menu text strings
State Drop-down menucontents
Button label Action Next state
1 Untitled Save Click Save. 3
Type something into the Name drop-down menu. 2
Change the width or height values. 1
Select a saved item from the drop-down menu. 3
2 <user-typed text> Save Click Save. 3
Type something into the Name drop-down menu. 2
Change the width or height values. 2
Select a saved item from the drop-down menu. 3
3 <name of saved item> Delete Click Delete. 1
Type something into the Name drop-down menu. 4
Change the width or height values. 1
Select a saved item from the drop-down menu. 3
4 <user-typed text> Rename Click Rename (when the name is unique). 3
Click Rename (when the name is a duplicate). 4
Type something into the Name drop-down menu. 4
ENWW Host-based features 53
Win
dow
s dr
iver
feat
ures

State Drop-down menucontents
Button label Action Next state
Change the width or height values. 2
Select a saved item from the drop-down menu. 3
Paper Size (width and height controls)
The width and height values can be changed either by typing numeric strings into the edit boxes, orby using the up and down arrows.
Any entry that is greater than the maximum limits of the width and height control is rounded down tothe maximum valid entry, while any entry that is smaller than the minimum limits of the width andheight control is rounded up to the minimum valid entry.
If units are in millimeters, the custom media-size range minimum is the limit rounded up to thenearest whole millimeter. The custom media-size range maximum is the limit rounded down to thenearest whole millimeter. Any non-numerical entry reverts to the last valid entry. Width and heightentries are validated when the focus has changed.
The resolution of each control is one millimeter or one-tenth of an inch, depending on the currentmeasurement units. Clicking the up and down arrows increases or decreases the current value bythe increment amount (within the allowed range of values). The computer determines the rate atwhich the values change.
Unit indicator labels change dynamically to indicate inches or millimeters, depending on themeasurement units the driver is currently using. To change measurement units, click the dynamicMeasurement Units button (either Use Inches or Use Millimeters).
Custom width and height control limits
The minimum media size for the HP LaserJet 1022 is 76.2 x 127 mm (3 x 5 inches) and themaximum is 216 x 356 mm (8.5 x 14 inches). The following table summarizes media size limits foreach media-handling device.
Table 4-2 Host-based custom media sizes
Tray Dimensions Minimum Maximum
Tray 1 (10-sheet priorityinput slot)
Width 76.2 mm (3 inches) 216 mm (8.5 inches)
Height 127 mm (5 inches) 356 mm (14 inches)
Tray 2 (250-sheet) Width 148 mm (5.83 inches) 216 mm (8.5 inches)
Height 210 mm (8.27 inches) 356 mm (14 inches)
Units
Select the Inches or Millimeters button to show the unit of measurement in either standard (inches)or metric (millimeters).
OK
The OK button closes the Custom Paper Size dialog box according to the logic in the followingtable. In all cases, any custom media sizes that are successfully saved (and not renamed or deleted)
Table 4-1 Name drop-down menu text strings (continued)
54 Chapter 4 Windows driver features ENWW
Window
s driver features

while the dialog box is open will remain in the Size is: drop-down menu on the Paper/Quality tab.The following table lists options that appear when you click the OK button.
Table 4-3 OK dialog box text strings
If the drop-down menu contains And the button says Then this happens when you clickthe OK button
Custom Save The dialog box closes, but you lose thechanges that were not saved.
The current media size remains thesame as it was when the Custombutton was selected.
<user-typed text> Save The dialog box closes, but you lose thechanges that were not saved.
The current media size remains thesame as it was when the Custombutton was selected.
<name of saved item> Delete The dialog box closes, and the currentmedia size is set to that which was lastshown in the drop-down menu.
<user-typed text> Rename The dialog box closes, but you lose thechanges that were not saved.
The current media size remains thesame as it was when the Custombutton was selected.
Use different paper check box
When the Use different paper check box is selected and different options are configured, the Sizeis:, Source is:, and Type is: menus change, offering a variety of options. For more information, seeUse different paper check box.
Source Is: drop-down menu
The Source is: setting specifies the source tray to use for printing a document. The list of sourcetrays depends on the printer accessories. Any optional source trays that are installed through theDevice Settings tab also appear here.
The Source is: drop-down menu can contain the following options:
■ Auto Select
■ Manual Feed
The default setting is Auto Select. When this setting is selected, the product uses the source traythat supports the media size that you have selected. If you select a source tray other than AutoSelect, make sure that the correct media size is loaded in the source tray.
Type is: drop-down menu
The Type is: drop-down menu shows all of the media types that the product supports.
The following standard media types appear in the list.
ENWW Host-based features 55
Win
dow
s dr
iver
feat
ures

Table 4-4 Standard media types
Media type
Bond Paper
Cardstock (106 to 163 g/m2 or 28 to 43 lb.)
Color
Envelope
Heavy (90 to 105 g/m2 or 24 to 28 lb.)
Labels
Letterhead
Light (< 75 g/m2)
Plain
Preprinted
Prepunched
Recycled
Rough Paper
Transparency
Vellum
The default setting is Unspecified, and the program selects the media type. If you select a differentsetting, make sure that the correct media type is loaded in the tray you selected in the Source is:setting.
Use different paper options
You can print books that include different types of print media by using the Use different paperoptions.
When you select the Use different paper check box, the following settings can appear in the groupbox, along with associated options:
■ First Page
■ Other Pages
■ Back Cover
To use Use different paper options, you must configure the setting for the print job. Each option forthe Use different paper setting is described in the sections that follow this procedure. Use theprocedure to configure the setting.
56 Chapter 4 Windows driver features ENWW
Window
s driver features

To configure the Use different paper options for a print job
For each option, you can set a different tray in the Source Is: drop-down menu. For some options,the Type is: drop-down menu is also available.
1 To use different media or cover stock, select the Use different paper check box. A list of optionsappears in the dialog box. The full set of selections is visible when you scroll by using the downarrow button to the right of the list.
2 To use different media for the pages within the print job, select the appropriate option (FirstPage, Other Pages, or Back Cover) in the dialog box.
3 Click OK to print.
NOTE You must use the same size of media for the entire print job. All options that youselect from the available Use different paper options use the size selected in the First Pagesettings.
When you change the type and source of the media and covers, the settings you selectremain configured until you close the software program.
Each option for the Use different paper setting is described in the following sections, in the orderthey appear in the pane below the Use different paper check box.
Back Cover options
The following illustration shows the Back Cover setting and options that you use to include a blankor preprinted back cover on a document.
Figure 4-5 Back Cover setting
The Back Cover options are as follows:
■ Source is: drop-down menu
■ Type is: drop-down menu
ENWW Host-based features 57
Win
dow
s dr
iver
feat
ures

NOTE The Back Cover options are not available when the Booklet Layout setting isenabled on the Finishing tab. For two-page-per-sheet (2-up) booklet printing, you can includea cover by selecting different media for the first page only. The back cover setting isunavailable, because this page would be printed in the middle of a booklet.
The Source is: setting specifies the source tray to use for adding a back cover to the document. Thelist of source trays depends on the product accessories. Any optional trays that are installed throughthe Configure tab also appear here. For more information about the Source is: setting, see theSource Is: drop-down menu section of this chapter.
The Type is: drop-down menu shows all of the media types that the product supports. For moreinformation about the Type is: drop-down menu settings, see the Type is: in the Type is: drop-downmenu section of this chapter.
First Page and Other Pages options
Use these options to select an alternative media size, type, or source for the first page or otherpages of a document. The following illustration shows the appearance of the Paper Options groupbox when you select the Use different paper check box.
Figure 4-6 First Page and Other Page options
The First Page, and Other Pages options are as follows:
■ Size is: drop-down menu
■ Source is: drop-down menu
■ Type is: drop-down menu
The Size is: driver setting for the first page applies to the entire print job. When this is set for theFirst Page option, the setting becomes unavailable for all the other Use different paper options.
The Source is: setting specifies the source tray to use for printing a document. The list of sourcetrays depends on the product accessories. Any optional source trays that are installed through theDevice Settings tab also appear here.
The Type is: drop-down menu shows all of the media types that the product supports.
58 Chapter 4 Windows driver features ENWW
Window
s driver features

Document preview image
The document preview image is a line-drawn image of a page that represents graphics and text. Thedocument preview image is always oriented so that the contents of the page are right-side up. Thedocument preview image appears in the upper-right corner of the Paper/Quality, Effects, Finishing,and Basics tabs.
Switching between tabs does not change the location or appearance of the document previewimage. When you move the mouse over the document preview image, the mouse cursor changesfrom an arrow to a gloved hand. You can toggle between portrait and landscape page orientation byclicking on the image.
Effects tab features
Use the Effects tab to create unique media effects such as scaling and watermarks. The followingillustration shows the Effects tab.
Figure 4-7 Effects tab
The Effects tab contains the following controls:
■ Quick Sets group box
■ Fit to Page group box
■ Document preview image
ENWW Host-based features 59
Win
dow
s dr
iver
feat
ures

■ Watermarks group box
Quick Sets
Use the Quick Sets control to store the current combination of driver settings that are found on all ofthe other Printing Preferences driver tabs. Quick sets are either preset or user-defined printingspecifications, such as media size and pages per sheet. For more information, see Quick Sets in thePaper/Quality tab section of this guide.
Fit to Page options group box
The Fit to Page group box consists of the following controls:
■ Print Document On setting
■ Scale to Fit option
■ % of Normal Size setting
Print Document On setting
Select the Print Document On option button to format the document for one media size and thenprint the document on a different media size, with or without scaling the image to fit the new mediasize.
The Print Document On control is disabled by either of the following conditions:
■ The % of Normal Size value is not 100.
■ The Pages per Sheet value (on the Finishing tab) is not 1.
When Print Document On is selected, the drop-down menu shows the media sizes on which youcan print. The list contains all of the standard media sizes that the selected media source supportsand any custom media sizes that you have created. When Print Document On is selected, Scale toFit is automatically selected.
Scale to Fit option
The Scale to Fit option box specifies whether each formatted document page image is scaled to fitthe target media size. By default, Scale to Fit is selected when Print Document On is selected. Ifthe setting is turned off, then the document page images will not be scaled, and are instead centeredat full size on the target media. If the document size is larger than the target media size, then thedocument image is clipped. If it is smaller, then it is centered within the target media. The followingillustration shows preview images for a document that has been formatted for legal-size media withthe Print Document On check box selected, and the target size specified as Letter.
60 Chapter 4 Windows driver features ENWW
Window
s driver features

Figure 4-8 Preview images - Legal on Letter; Scale to Fit off (left) and on (right)
When the size for which the document is formatted (that is, the logical size) differs from the targetsize, the preview image uses a dashed gray line to show the boundaries of the logical page inrelation to the target page size.
% of Normal Size option
The % of Normal Size option provides a slider bar to use for scaling the percentage setting. Thedefault setting in the entry box is 100 percent of normal size. Normal size is defined as the mediasize that is selected within the driver or what the driver receives from the software program (if thesoftware program does not negotiate the media size with the driver). The driver scales the page bythe appropriate factor and sends it to the product.
The limits of the range are from 25 percent to 400 percent, and any values outside of the range areadjusted to those limits as soon as the focus is removed from the control (that is, when the Tab keyis pressed or another control is selected).
Any change to the scale also changes the page preview, which increases or decreases from theupper-left corner of the preview.
The slider bar controls the scale directly. The value in the edit box changes as the scroll bar indicatoris dragged, and the preview image is updated to the new image scale. Each click on the scroll bararrows increases or decreases the scale by one percent. Each click on the slider bar affects thescale by 10 percent.
You cannot achieve an exact value by dragging the scroll bar indicator at the default Windowsresolution. Use the scroll bar indicator to approximate the value that you want, and then use thescroll bar arrows to refine the value.
The following settings disable % of Normal Size:
■ Print Document On (on the Effects tab) is selected
■ Pages per Sheet (on the Finishing tab) is not 1
Document preview image
The document preview image is a line-drawn image of a page that represents graphics and text. Thedocument preview image is always oriented so that the contents of the page are right-side up. Thedocument preview image appears in the upper-right corner of the Finishing, Effects, and Paper/Quality tabs.
Switching between tabs does not change the location or appearance of the document previewimage. When you move the mouse over the document preview image, the mouse cursor changes
ENWW Host-based features 61
Win
dow
s dr
iver
feat
ures

from an arrow to a gloved hand. You can toggle between portrait and landscape page orientation byclicking the document preview image.
Watermarks group box
Use the Watermarks feature to choose a watermark, create your own custom watermarks (textonly), or edit an existing watermark. The following watermarks are preset in the driver:
■ (none)
■ Confidential
■ Draft
■ SAMPLE
The drop-down menu shows alphabetically sorted watermarks that are currently available on thesystem, plus the string "(none)", which indicates that no watermark is selected. This is the defaultsetting. Any watermark selected from this list appears in the preview image.
When the First Page Only check box is selected, the watermark is printed only on the first page ofthe document. The First Page Only check box is disabled when the current watermark selection is(none).
Watermarks are applied to logical pages. For example, when Pages per Sheet is set to 4 and FirstPage Only is turned off, four watermarks appear on the physical page (one on each logical page).
Click Edit, and the Watermark Details dialog box appears.
62 Chapter 4 Windows driver features ENWW
Window
s driver features

Figure 4-9 Watermark Details
The dialog box shows a preview image and provides options for creating a new watermark andcontrolling the message angle and font attributes.
Click OK to accept all of the changes that are made in the Watermark Details dialog box. However,clicking Cancel does not cancel all of the changes. If you make changes to a watermark, and thenselect a different watermark or click New, all of the changes that you made to the previouswatermark are saved, and only the current, unsaved changes can be canceled.
Current Watermarks
The Current Watermarks group box contains a list of available watermarks, both predefinedwatermarks made available in the driver and any new watermarks that you have created.
To create a new watermark, click New. The new watermark appears in the Current Watermarks listand in the Watermark Message edit box as Untitled until you name it. The name that you type inthe Watermark Message field appears in the Current Watermarks group box in the WatermarkDetails dialog box and in the Watermarks group box on the Effects tab.
To name the new watermark, type the selected watermark text in the Watermark Message edit box.To delete a watermark, select the watermark in the Current Watermarks list and click Delete. Awarning appears asking whether you are sure you want to delete the selected item. Click Cancel ifyou want to keep the watermark. Click OK to delete the selected watermark.
ENWW Host-based features 63
Win
dow
s dr
iver
feat
ures
NOTE You can have no more that 30 watermarks in the Current Watermarks list at onetime. When the limit of 30 watermarks is reached, the New button is disabled, and a BubbleHelp appears that explains why the button is disabled and how to enable it.
To edit an existing watermark, select the watermark in the Current Watermarks list. If you changethe Watermark Message for that watermark, you are, in effect, creating a new watermark.
Watermark Message
The Watermark Message is also the name that identifies the watermark in the Current Watermarkslist, except when more than one watermark has the same message. For example, you might wantseveral different watermarks with the message DRAFT, each with a different typeface or font size.When this occurs, the string is appended with a space, a pound sign, and a number (for example,Draft #2). When a number is added, the number two is used first, but if the resulting name is also inthe list, then the number increases until the name is unique (Draft #3, Draft #4, and so on).
Message Angle
Use the controls in the Message Angle group box to print the watermark in different orientations inrelation to the text. The settings are Diagonal, Horizontal, or Angle (custom). The default isDiagonal. All three settings automatically center the watermark string within the page; the selectionof a particular setting affects only the angle of the string placement. Diagonal places the text along aline that spans the lower-left to upper-right corners of the page. Horizontal places the text along aline that spans the mid-left and mid-right edges of the page. Angle places the text at the specifiedangle across the page.
Font Attribute
Use the controls in the Font Attributes group box to change the font and the shading, size, and styleof the font.
The Font Attributes group box contains the following controls:
■ Name drop-down menu
■ Color drop-down menu
■ Shading drop-down menu
■ Size spin box
■ Style drop-down menu
Name
The Name drop-down menu lists fonts that are currently installed on the system. The default islanguage-dependent.
Color
The default Gray setting is the only setting available from the Color drop-down menu.
64 Chapter 4 Windows driver features ENWW
Window
s driver features

Shading
The default Shading setting for new and preset watermarks is Very Light. The following range ofshades is available from the Shading drop-down menu.
■ Lightest
■ Very Light (default)
■ Light
■ Medium Light
■ Medium
■ Medium Dark
■ Dark
■ Very Dark
■ Darkest
These values represent the intensity of the gray that is used. A choice of Light produces a lightlysaturated gray watermark. A choice of Lightest produces the lightest shade of watermark; Darkestproduces a black watermark.
Size
Font sizes from 1 to 999 points are available from the Size menu. The default point size is language-dependent. The choice of Regular, Bold, Italic, and Bold Italic is available from the Style drop-down menu.
Style
The choice of Regular, Bold, Italic, and Bold Italic is available from the Style drop-down menu.The default Style setting for new and preset watermarks is Regular.
Default settings
The default settings for new watermarks are Arial font, Gray color, Very Light shading, 80 points,and Regular style. The default settings for preset watermarks are Arial font, Very Light shading,and Bold style. The default point size for preset watermarks is language-dependent, and varies.
Finishing tab features
Use the Finishing tab to print booklets and control the media output. The following illustration showsthe Finishing tab.
ENWW Host-based features 65
Win
dow
s dr
iver
feat
ures

Figure 4-10 Finishing tab
The Finishing tab contains the following controls:
■ Quick Sets group box
■ Document Options group box
■ Document preview image
■ Print Quality group box
Quick Sets
Use the Quick Sets control to store the current combination of driver settings that are found on allother Printing Preferences driver tabs. Quick sets are either preset or user-defined printingspecifications, such as media size and pages per sheet. For more information, see Quick Sets in thePaper/Quality tab section of this guide.
Document Options
The Document Options group box contains the following controls:
■ Print on Both Sides (Manually) check box
■ Flip Pages Up option
66 Chapter 4 Windows driver features ENWW
Window
s driver features

■ Booklet Printing drop-down menu
■ Pages per Sheet drop-down menu
■ Print Page Borders check box
■ Page Order drop-down menu
Print on Both Sides (Manually) option
The default setting for the Print on Both Sides (Manually) option is off (not selected). SelectingPrint on Both Sides (Manually) makes the Flip Pages Up and Booklet Printing options available.
Manually printing on both sides
Follow these steps to manually print on both sides:
1 Print all of the even-numbered pages in your document. Some software programs have aselection in the Print dialog box that you can use to specify printing even- or odd-numberedpages.
2 Follow the instruction on the Print on Both Sides Instructions dialog box.
Figure 4-11 Print on Both Sides Instructions
Flip Pages Up
The Flip Pages Up check box, which is available only when Print on Both Sides is selected, isused to specify the duplex-binding option. By default, the Flip Pages Up check box is not selected.
ENWW Host-based features 67
Win
dow
s dr
iver
feat
ures

The following table demonstrates the results of selecting this box, depending on the mediaorientation that you selected on the Finishing tab.
Table 4-5 Page orientation
Orientation (Finishing tab) Flip Pages Up selected Flip Pages Up not selected
Portrait Short-edge binding Long-edge binding
Landscape Long-edge binding Short-edge binding
When Print on Both Sides (Manually) is selected, the document preview image changes to show aspiral binding along either the left edge or the top edge of the page. In addition, a folded-over cornerappears in the lower-right portion of the preview image, indicating that printing occurs on the backside. An arrow on the folded-over corner points in the direction that the pages would be flipped if theywere bound together.
Short-side binding is for print jobs with pages that read by flipping over like the pages of a note pad.Long-side binding is for print jobs with pages that read by turning like the pages of a book.
Booklet layout
The Booklet Layout drop-down menu, visible when Print on Both Sides is selected, offers choicesthat are based on the current media size. The default setting for the Booklet Printing drop-downmenu is Off.
■ Left Edge Binding
■ Right Edge Binding
When you select Left Edge Binding or Right Edge Binding, the document preview image changesto show the location of the binding. If the Pages per Sheet setting is on the default setting of 1, itautomatically changes to 2 pages per sheet. If you change the Pages per Sheet setting manually to4, 6, 9, or 16 pages per sheet, the booklet setting is disabled. See the Printing a Booklet section ofthis chapter for more information.
The Booklet Layout setting is disabled when A6 or B6 (JIS) is selected as the media size, and anincompatibility error message appears when you click OK to close the driver.
Book and Booklet printing
The HP LaserJet 1022 supports book and booklet printing.
A book is a print job consisting of at least two pages that can have a different media type for the firstpage, other pages, or back cover. Use the First Page, Other Pages, and Back Cover settings onthe Paper/Quality tab (available when you select the Use different paper check box) to selectdifferent media for these pages.
A booklet is a print job that places two pages on each side of a sheet that can be folded into abooklet that is half the size of the media type. Use the Booklet Layout drop-down menu on theFinishing tab to control booklet settings.
68 Chapter 4 Windows driver features ENWW
Window
s driver features

Printing a Booklet
Complete the following steps to print a booklet.
1 Click File, click Print, and then click Properties.
2 Click the Finishing tab and select the Print on Both Sides (Manually) check box.
3 In the Booklet Layout drop-down menu, select the type of booklet printing that you want (forexample, Right Edge Binding).
4 Click OK in the print driver.
5 Click OK in the print dialog box to print.
Printing a Book
You can print a book in which the first page, other pages, and back cover have different media types.For more information, see the Paper/Quality tab features section of this chapter.
Pages per Sheet
Use the Pages per Sheet option to select the number of pages that you want to print on a singlesheet of media. If you choose to print more than one page per sheet, the pages appear smaller andare arranged on the sheet in the order that they would otherwise be printed. The Pages per Sheetdrop-down menu provides six settings:
■ 1 page per sheet (default)
■ 2 pages per sheet
■ 4 pages per sheet
■ 6 pages per sheet
■ 9 pages per sheet
■ 16 pages per sheet
NOTE When you select an option other than 2 pages per sheet, booklet printing isunavailable.
Print Page Borders
Related controls indented beneath the Pages per Sheet edit box are Print Page Borders and PageOrder, which become active when Pages per Sheet is greater than 1.
Print Page Borders sets a line around each page image on a printed sheet to help visually definethe borders of each logical page.
Page Order
The Page Order drop-down menu contains four selections:
■ Right, then Down
■ Down, then Right
ENWW Host-based features 69
Win
dow
s dr
iver
feat
ures

■ Left, then Down
■ Down, then Left
The preview document image changes to reflect alterations in these settings, as shown by theexamples in the following illustration.
Figure 4-12 Page-order preview images
■ 2 pages per sheet
■ 4 pages per sheet
■ 6 pages per sheet
■ 9 pages per sheet
■ 16 pages per sheet
Document preview image
The document preview image is a line-drawn image of a page that represents graphics and text. Thedocument preview image is always oriented so that the contents of the page are right-side-up. Thedocument preview image appears in the upper-right corner of the Paper/Quality, Effects, Finishing,and Basics tabs.
Switching between tabs does not change the location or appearance of the document previewimage. When you move the mouse over the document preview image, the mouse cursor changesfrom an arrow to a gloved hand. You can toggle between portrait and landscape page orientation byclicking the document preview image.
Print Quality
Print quality settings affect how light or dark the print is on the page and the style for printinggraphics. You can also use the print quality settings to optimize the print quality for a specific mediatype.
The Print Quality group box contains the following controls:
■ Print Quality drop-down menu
■ Print All Text as Black
■ Economode
70 Chapter 4 Windows driver features ENWW
Window
s driver features
Print Quality drop-down menu
You can change the setting to accommodate the type of job that you are printing. The following arethe settings:
■ ProRes 1200 This setting uses ProRes 1200 to provide fine-line detail at 1200 x 1200 dpi.
■ FastRes 1200 This setting uses FastRes 1200 to provide 600 x 600 x 2. This is the defaultsetting.
■ 600 dpi This setting provides 600 x 600 dpi.
Print All Text as Black
The Print All Text as Black feature is Disabled by default. When Enabled is selected, the driverprints all text as black regardless of the original document text color. Color text is printed as black,except for white text, which remains white. White text is a reliable method of printing reversetypeface against a dark background. This setting does not affect graphic images on the page, nordoes it affect any text that is part of a graphic.
Economode
EconoMode is a feature that allows the product to use less toner per page. Selecting this option willextend the life of the toner supply and will reduce cost per page. However, it will also reduce printquality. The printed image is lighter, but it is adequate for printing drafts or proofs.
HP does not recommend the full-time use of EconoMode. If EconoMode is used full-time when theaverage toner coverage is significantly less than 5 percent, it is possible that the toner supply willoutlast the mechanical parts in the print cartridge. If print quality begins to degrade under thesecircumstances, you must install a new print cartridge, even if there is toner supply remaining in thecartridge.
Basics tab features
The Basics tab provides options for setting the number of copies to be printed and the orientation ofthe print job. You can also use the Basics tab to retrieve information about the driver. The followingillustration shows the Basics tab.
ENWW Host-based features 71
Win
dow
s dr
iver
feat
ures

Figure 4-13 Basics tab
The Basics tab contains the following controls:
■ Quick Sets group box
■ Copies group box
■ Orientation group box
■ Document preview image
■ About button
Quick Sets
Use the Quick Sets control to store the current combination of driver settings that are found on all ofthe other Printing Preferences driver tabs. Quick sets are either preset or user-defined printingspecifications, such as media size and pages per sheet. For more information, see Quick Sets in thePaper/Quality tab section of this guide.
Copies group box
The Copies feature allows you to specify the number of copies to print.
The number of copies you request appears in the Copies box. You can select the number by typingin the box or by using the up and down arrows to the right of the edit box. Valid entries are numbers
72 Chapter 4 Windows driver features ENWW
Window
s driver features

from 1 to 999 . The copies value will not advance from the maximum number (999) to 1 when the uparrow is used, or change from 1 to the maximum number (999) when the down arrow is used. Invalidentries into the edit box (such as non-numerical input, numbers less than 1 or greater than themaximum allowed) are changed to the last valid value entered when you click on another group boxor leave the Basics tab. The default number of copies is 1.
Because you can set the number of copies that you want from some software programs, conflictsbetween the software program that you are using and the driver can arise. In most cases, thesoftware program and the driver communicate, so that the number of copies set in one location (suchas the program) will appear in the other (such as the driver). For some programs, this communicationdoes not take place, and the copies values are treated independently. For these programs, setting 10copies in the program and then setting 10 copies in the driver will result in 100 copies (10 x 10) beingprinted. It is recommended that you set the number of copies in the program wherever possible.
Orientation
Orientation refers to the layout of the image on the page, and does not affect the manner in whichmedia is fed into the printer. You can specify the orientation of the print job.
Orientation can toggle between portrait and landscape by left-clicking the preview image. If youcheck Rotate by 180 degrees, there is no change in the preview image.
The Orientation group box contains the following options:
■ Portrait option button
■ Landscape option button
■ Rotated check box
Portrait option button
Select this feature to print your document in Portrait orientation. This is the default setting.
Landscape option button
Select this feature to print your document in Landscape orientation.
Rotated check box
Select this feature to rotate the document image on the media 180 degrees. For example, if thereturn address on an envelope is smudged, try this setting and feed the envelope so that the returnaddress area is fed first into the printer.
Document preview image
The document preview image is a line-drawn image of a page that represents graphics and text. Thedocument preview image is always oriented so that the contents of the page are right-side up. Thedocument preview image appears in the upper-right corner of the Finishing, Effects, and Paper/Quality tabs.
Switching between tabs does not change the location or appearance of the document previewimage. When you move the mouse over the document preview image, the mouse cursor changesfrom an arrow to a gloved hand. You can toggle between portrait and landscape page orientation byclicking the document preview image.
ENWW Host-based features 73
Win
dow
s dr
iver
feat
ures

About button
Click the About button on the Basics tab or select the HP logo on any of the driver property pagesto open the About dialog box. To close the About box, click OK, press ESC, press ALT + F4, orpress ENTER. The figure below shows the About box. The information varies according toHP LaserJet 1022 model number, driver, date, and versions.
Figure 4-14 About This Driver dialog box
Printer Properties tab setThe printer Properties tab set contains information about and options for configuring the printer. Togain access to the printer Properties tabs, click Start on the Windows task bar, click Settings, andthen click Printers for Windows 2000 or Printers and Faxes for Windows XP. Right-click theproduct name, and then click Properties.
The following HP printer driver tab is included in the printer Properties tab set:
■ Configure tab features
NOTE The printer Properties tab set also includes Windows-specific tabs. For informationabout those tabs, see the documentation that came with your computer.
Configure tab features
The Configure tab contains controls for
74 Chapter 4 Windows driver features ENWW
Window
s driver features

Figure 4-15 Configure tab
The Configure tab contains the following controls:
■ Quick Sets group box
■ Jam Recovery buttons
■ Status Messages buttons
■ Cleaning Page
■ Print Density control
■ Courier Font Type buttons
Quick Sets
Use the Quick Sets control to store the current combination of driver settings that are found on all ofthe other Printing Preferences driver tabs. Quick sets are either preset or user-defined printingspecifications, such as media size and pages per sheet. For more information, see Quick Sets in thePaper/Quality tab section of this guide.
ENWW Host-based features 75
Win
dow
s dr
iver
feat
ures

Jam Recovery
Select On to reprint a page if a paper jam occurs. Select Off to not reprint a page if a paper jamoccurs. Off is the default setting.
NOTE Jobs print faster when Off is selected.
Status Messages
Select On to allow error messages to display on the computer screen during error conditions. SelectOff to not allow error messages to display on the computer screen during error conditions. On is thedefault setting.
NOTE The paper-out message still appears when Off is selected
Cleaning Page
Click Start to launch the cleaning page process. This process cleans the product paper path andtakes approximately two minutes to complete.
Print Density
Use this control to specify how much toner is put on the page. 3 is the default setting.
Courier Font Type
Select Regular to print any text by using TrueType Courier or Courier New with normal weight.Select Dark to print any text by using TrueType Courier or Courier New with a dark weight butwithout changing the font attributes in a program. Regular is the default setting.
Properties tab features - Windows 98 SE and Windows Me
In Windows 98 SE and Windows Me, clickStart, selectSettings, click Printers, right-click the productname, click Properties, and then click Printing Preferences to gain access to all of the print-drivertabs.
The following figure shows the Properties tabs in Windows 98 SE.
76 Chapter 4 Windows driver features ENWW
Window
s driver features

Figure 4-16 Properties tabs - Windows 98 SE
ENWW Host-based features 77
Win
dow
s dr
iver
feat
ures
78 Chapter 4 Windows driver features ENWW
Window
s driver features

5 HP Embedded Web Server(HP LaserJet 1022n andHP LaserJet 1022nw printers only)
The HP Embedded Web Server (HP EWS) is a standard feature for the HP LaserJet 1022n andHP LaserJet 1022nw printers. The HP EWS provides a simple, easy-to-use solution for one-to-oneproduct management. In offices that have a limited number of products, remote management ofprinting devices can be accomplished without installing any management software.
The HP EWS can be directly accessed on the HP LaserJet 1022n and HP LaserJet 1022nw printers.You do not need to install any software on the computer. You only need to have a supported Webbrowser. To use the HP EWS, you must have Apple Safari, Microsoft Internet Explorer V5.5 andlater, or Netscape Navigator V4.75 and later.
NOTE The HP EWS does not provide e-mail or status alerts. The HP EWS is available inEnglish only.
This chapter provides information about the following topics:
● Using HP Embedded Web Server (EWS)
● HP EWS tabs
ENWW 79 Embe
dded
Web
Ser
ver
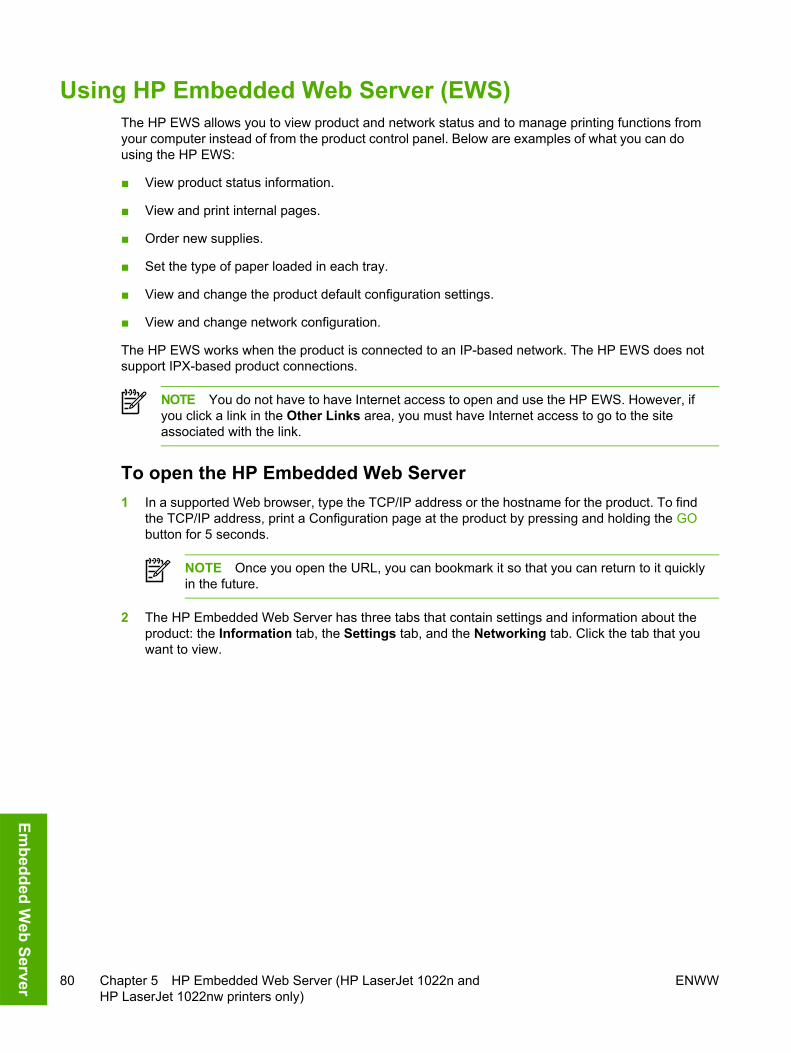
Using HP Embedded Web Server (EWS)The HP EWS allows you to view product and network status and to manage printing functions fromyour computer instead of from the product control panel. Below are examples of what you can dousing the HP EWS:
■ View product status information.
■ View and print internal pages.
■ Order new supplies.
■ Set the type of paper loaded in each tray.
■ View and change the product default configuration settings.
■ View and change network configuration.
The HP EWS works when the product is connected to an IP-based network. The HP EWS does notsupport IPX-based product connections.
NOTE You do not have to have Internet access to open and use the HP EWS. However, ifyou click a link in the Other Links area, you must have Internet access to go to the siteassociated with the link.
To open the HP Embedded Web Server1 In a supported Web browser, type the TCP/IP address or the hostname for the product. To find
the TCP/IP address, print a Configuration page at the product by pressing and holding the GObutton for 5 seconds.
NOTE Once you open the URL, you can bookmark it so that you can return to it quicklyin the future.
2 The HP Embedded Web Server has three tabs that contain settings and information about theproduct: the Information tab, the Settings tab, and the Networking tab. Click the tab that youwant to view.
80 Chapter 5 HP Embedded Web Server (HP LaserJet 1022n andHP LaserJet 1022nw printers only)
ENWW
Embedded W
eb Server

HP EWS tabsEach screen in the HP EWS has a frame that contains a top banner, category tabs, a left-alignednavigation menu bar, and a main-content area. Selecting one of the category tabs causes thecorresponding left-aligned navigation bar to appear. The left-aligned navigation menu includes linksto content that is appropriate for that tab. The main-content area shows information and opensoptions in response to navigation tab selections and menu bar selections.
Information tabThe Information tab contains the following pages:
■ Device Status page
■ Configuration page
Device Status pageThe Device Status page shows product status, network identification information and basic productinformation.
Figure 5-1 Device Status page
Device Configuration pageThe Device Configuration page shows the values of all of the product settings and otherconfiguration settings.
ENWW HP EWS tabs 81 Embe
dded
Web
Ser
ver

Figure 5-2 Device Configuration page
Settings tabThe Settings tab contains the Print Settings page.
Print Settings pageUse the Print Settings page to configure the print settings and the PCL settings for the product.
82 Chapter 5 HP Embedded Web Server (HP LaserJet 1022n andHP LaserJet 1022nw printers only)
ENWW
Embedded W
eb Server

Figure 5-3 Print Settings page
ENWW HP EWS tabs 83 Embe
dded
Web
Ser
ver

Networking tabThe Networking tab contains the following pages:
■ IP Configuration page
■ Advanced page
■ mDNS page
■ Password page
IP Configuration pageUse the IP Configuration page to configure the TCP/IP address and the WINS server address forthe product.
Figure 5-4 IP Configuration page
Advanced pageUse the Advanced page to configure advanced network settings for the product.
84 Chapter 5 HP Embedded Web Server (HP LaserJet 1022n andHP LaserJet 1022nw printers only)
ENWW
Embedded W
eb Server

Figure 5-5 Advanced page
mDNS pagemDNS is used on small networks for IP address and name resolution where a conventional DNSserver is not available. Use the mDNS page to configure mDNS settings for the product.
Figure 5-6 mDNS page
ENWW HP EWS tabs 85 Embe
dded
Web
Ser
ver
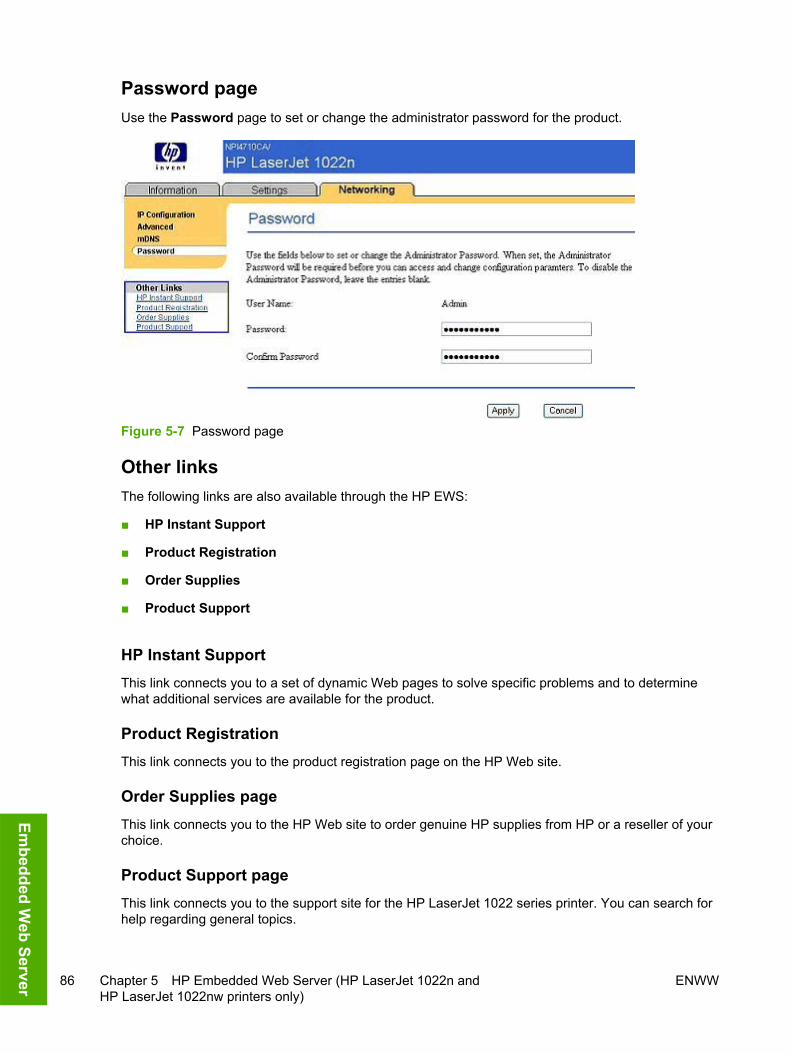
Password pageUse the Password page to set or change the administrator password for the product.
Figure 5-7 Password page
Other linksThe following links are also available through the HP EWS:
■ HP Instant Support
■ Product Registration
■ Order Supplies
■ Product Support
HP Instant SupportThis link connects you to a set of dynamic Web pages to solve specific problems and to determinewhat additional services are available for the product.
Product RegistrationThis link connects you to the product registration page on the HP Web site.
Order Supplies pageThis link connects you to the HP Web site to order genuine HP supplies from HP or a reseller of yourchoice.
Product Support pageThis link connects you to the support site for the HP LaserJet 1022 series printer. You can search forhelp regarding general topics.
86 Chapter 5 HP Embedded Web Server (HP LaserJet 1022n andHP LaserJet 1022nw printers only)
ENWW
Embedded W
eb Server
6 Windows software installation
NOTE This chapter covers information about the HP LaserJet 1022 printing-system softwarefor Windows. For information about Macintosh installations, see Macintosh software overviewand installation.
This chapter provides information about the following topics:
● Installation overview
● Installation options
● Installation dialog-box options for Windows
● Uninstall
ENWW 87
Win
dow
s so
ftwar
ein
stal
latio
n

Installation overviewThe software for the HP LaserJet 1022 Series printer is shipped on one CD. On Windows systems,the Setup program installs the HP LaserJet 1022 printing-system software from the CD onto the harddisk and updates the Windows files.
On all of the supported platforms, a series of query dialog boxes guides you through the installationprocess. You are asked to provide information about your computer environment. The Installerguides you through the installation, whether you are configuring a directly-connected or a networkedproduct.
88 Chapter 6 Windows software installation ENWW
Window
s software
installation

Installation optionsThe HP LaserJet 1022 printing-system software can be used in the following configurations:
■ You install the HP LaserJet 1022 printing-system software on a computer that is directlyconnected to the product through a USB port. On Windows systems, you can share yourHP LaserJet 1022 Series printer with other users on your network.
■ The HP LaserJet 1022 Series printer is directly connected to a computer and you install only theprinter driver.
■ You install the HP LaserJet 1022 printing-system software on a computer that has access to alocal area network (LAN). The HP LaserJet 1022n and HP LaserJet 1022nw printers connect toa LAN through an internal HP network port.
HP recommends that you install the software before connecting the product to the computer(software-first installation). However, if the product is already connected to the computer, you caninstall the software by using the Plug-n-Play method or by using the Add Printer Wizard. For moreinformation, see Plug-n-Play and Add Printer Wizard.
Windows installation for direct connectionsUse the following instructions to install the product software on a computer that is running Windows98 SE, Windows Me, Windows 2000, or Windows XP (32-bit only).
NOTE Set up and turn on the product before installing the printing-system software. Do notconnect the product to the computer until the software installation program prompts you to doso.
NOTE You must have administrator privileges to install the printing-system software onWindows 2000 or Windows XP.
1 Close all of the programs that are open on the computer.
2 Insert the HP LaserJet 1022 printing-system software CD into the CD-ROM drive.
NOTE If your CD does not start automatically, click Start, click Run, and then browse toand double-click the SETUP.EXE file in the root directory of the CD.
3 Click Next and follow the onscreen prompts.
4 When the installation is nearly complete, the Finish dialog box appears and you can print a testpage. Click the Print Test Page check box, and then click Finish to finish the installation andprint a test page.
5 If you are prompted to restart your computer, click Yes.
Setting up Windows sharing (peer-to-peer networking)
NOTE This section describes procedures for sharing a product using Microsoft WindowsSharing (peer-to-peer networking). Peer-to-peer networking is a feature of Microsoft operatingsystems, not of HP print drivers. If these procedures are not successful, or for moreinformation about peer-to-peer networking procedures, contact Microsoft at the following Website: www.microsoft.com
ENWW Installation options 89
Win
dow
s so
ftwar
ein
stal
latio
n

This section contains instructions for using Windows sharing to make the product available tonetwork users when the product is directly connected to a host computer.
NOTE Using Windows sharing, the person using the computer directly connected to theproduct can allow other users on the network to print to the product.
When the product is shared, install the printer drivers on all of the computers that you want toprint to the product.
When you have set up the host computer to share your product, you must also configure the clientcomputers. Perform the following steps at the computers of all other network users who want to printto the product.
Setting up the host computer running Windows 98 SE, Windows Me, or Windows 2000
At the computer that is directly connected to the product, perform the following steps:
1 Click Start, click Settings, and then click Printers.
2 In the printer list, right-click the icon for your HP LaserJet 1022 Series printer, and then clickSharing.
NOTE If Sharing does not appear on the right-click menu, you must first enable printersharing for Windows 98 SE or Windows Me. Follow these steps:
1. Click Start, click Settings, and then click Control Panel.
2. Double-click the Network icon.
3. On the General tab, click File and Print Sharing.
4. Click the I want to be able to allow others to print to my printers check box, andthen click OK.
5. Click OK again, and then close the Control Panel. If you are prompted to restart yourcomputer, click Yes.
3 On the Sharing tab, click the Share As option button, and then type a name for the product inthe Share Name field. Click OK.
Setting up the host computer running Windows XP
At the computer that is directly connected to the product, perform the following steps:
1 Click Start, and then click Printers and Faxes.
2 In the printer list, right-click the icon for your HP LaserJet 1022 Series printer, and then clickSharing.
3 On the Sharing tab, click the Share this printer option button, and then type a name for theproduct in the Share Name field. Click OK.
4 Click the Ports tab. Click to clear the Enable bidirectional support check box, and then click OK.
90 Chapter 6 Windows software installation ENWW
Window
s software
installation

Setting up client computers running Windows 98 SE, Windows Me, or Windows 2000
1 Click Start, click Settings, and then click Printers.
2 Double-click the Add Printer icon to open the Add Printer wizard.
3 Click Next to start the wizard.
4 Click the Network Printer option button, and then click Next.
5 Type in the path and share name of the HP LaserJet 1022 Series printer to which you want toconnect.
- OR -
Click Browse and navigate to find the HP LaserJet 1022 Series printer to which you want toconnect.
Click Next.
6 Click the Yes or No option button when asked if you want to use this product as your defaultprinter for Windows-based programs, and then click Next.
7 Click Finish to complete the installation and close the Add Printer wizard.
NOTE You might need the product software CD to complete the printer driverinstallations.
Setting up client computers running Windows XP
1 Click Start, and then click Printers and Faxes.
2 On the left-hand column, under Printer Tasks, click Add a printer to open the Add Printerwizard.
3 Click Next to start the wizard.
4 Click the A network printer or a printer attached to another computer option button, and thenclick Next.
5 Type in the path and share name of the HP LaserJet 1022 Series printer to which you want toconnect.
- OR -
Click Browse and navigate to find the HP LaserJet 1022 Series printer to which you want toconnect.
Click Next.
6 Click the Yes or No option button when asked if you want to use this product as your defaultprinter for Windows-based programs, and then click Next.
7 Click Finish to complete the installation and close the Add Printer wizard.
ENWW Installation options 91
Win
dow
s so
ftwar
ein
stal
latio
n

Installation instructions for networked computersThis section provides information about the following topics:
■ Installing the software on networked computers (HP LaserJet 1022n and HP LaserJet 1022nwprinters only)
■ Installing the print driver only
Installing the software on networked computers (HP LaserJet 1022n andHP LaserJet 1022nw printers only)Each computer that has the HP LaserJet 1022 printing-system software installed can use all of theproduct features that are available over a network connection through the internal network port thatcomes as standard equipment on the HP LaserJet 1022n and HP LaserJet 1022nw models.
To install the HP LaserJet 1022 printing-system software on networked Windows operating systems,follow these steps:
NOTE You must have administrator privileges to install the software on Windows 2000 orWindows XP.
1 Close all of the programs that are open on the computer.
2 Insert the HP LaserJet 1022 printing-system software CD into the CD-ROM drive.
NOTE If the CD does not start automatically, click Start, click Run, and then browse toand double-click the HPSETUP.EXE file in the root directory of the CD.
3 Click Next and follow the onscreen prompts.
4 When the Installer software prompts you to select how the product will be connected, selectConnected via the network, and then click Next. Follow the instructions on the screen.
5 When the installation is nearly complete, a setup screen appears that asks whether or not youwant to print a test page. Click Yes.
6 If you are prompted to restart the computer, click Yes.
Installing the printer driver only
NOTE If the product is directly connected to another user's computer, the product must beshared from that computer by using Windows sharing.
Use the following instructions to install the printer driver only.
Printer-driver installation for Windows 98 SE1 From the Start menu, click Settings, and then click Printers.
2 Double-click Add Printer, and then click Next.
3 When asked if the product is a local or network printer, click Network Printer , and then click Next.
4 Click Have Disk from the wizard screen that appears.
92 Chapter 6 Windows software installation ENWW
Window
s software
installation

5 Insert the CD into the CD-ROM drive. Navigate to the X:\<language>\DRIVERS folder (where Xis the letter of your CD-ROM drive and <language> is your chosen installation language).
6 Double-click the .INF file that you find in that folder.
7 Complete the installation. When prompted, print a test page to ensure that the printer driver isinstalled properly.
Printer-driver installation for Windows 2000 or XP1 From the Start menu, click Settings, and then click Printers.
NOTE For Windows XP, click Start, and then click Printers and Faxes.
2 Double-click Add Printer, and then click Next.
3 When asked if the product is a local or network printer, click Network Printer, and then click Next.
4 You might need to first select the printer from the list of printers or type an IP address. If theprinter driver is not available, the Add Printer Wizard dialog box appears. Click Have Disk fromthe wizard screen.
5 Insert the CD into the CD-ROM drive. Navigate to the X:\<language>\DRIVERS folder (where Xis the letter of your CD-ROM drive and <language> is your chosen installation language).
6 Double-click the .INF file that you find in that folder.
7 Complete the installation. When prompted, print a test page to ensure that the printer driver isinstalled properly.
Plug-n-PlayIf the product is already connected to a computer when you begin installing the software, Windowsautomatically detects the product and uses Plug-n-Play to install the product. During this process,Plug-n-Play calls the Add Printer Wizard to automatically install the printer driver and the USB port.At the end of the Add Printer Wizard, you are given the option to install the additional support files.
Add Printer Wizard
NOTE This procedure is not recommended if you are using Windows 98 SE or ME becausethe Add Printer Wizard does not install the USB port for these operating systems.
If the product is already connected to a computer when you begin installing the software, Windowsautomatically detects the product and uses Plug-n-Play to install the printer driver. If you prefer, youcan cancel Plug-n-Play and run the Add Printer Wizard manually to install the printer driver. At theend of the Add Printer Wizard, you are given the option to install the additional support files.
If you are using Windows 98 SE or ME, you must also unplug the USB cable from the product andthen plug it in again so that Windows can use Plug-n-Play to install the USB port.
ENWW Installation options 93
Win
dow
s so
ftwar
ein
stal
latio
n

Installation dialog-box options for WindowsHP recommends that you install the software before connecting the product to the computer.However, it is possible to install the software if the product is already connected by using Plug-n-Playand the Add Printer Wizard. The following sections show the dialog box options that appear duringthe HP LaserJet 1022 printing-system software installation on Windows operating systems.
Installing the software before the printer is connected to thecomputer
NOTE HP recommends that you install the software before connecting theHP LaserJet 1022 Series printer to the computer (software-first installation). Theseinstructions are for a software-first installation.
These instructions are intended to be used the first time that you install the HP LaserJet 1022printing-system software.
Figure 6-1 Step 1 - CD Browser screen
This dialog box includes three command buttons that lead to three different paths:
Documentation. Click this link to launch your Web browser and go to the Hewlett-PackardLaserJet 1020 Series Products Software Readme File .
Next takes you to the Software License Agreement screen (Step 2).
94 Chapter 6 Windows software installation ENWW
Window
s software
installation

Figure 6-2 Step 2 - HP Software License Agreement screen
Back returns you to the Welcome dialog box (Step 1).
Yes takes you to the Model dialog box (Step 3).
No takes you to the Exit Setup dialog box (Step 18).
ENWW Installation dialog-box options for Windows 95
Win
dow
s so
ftwar
ein
stal
latio
n
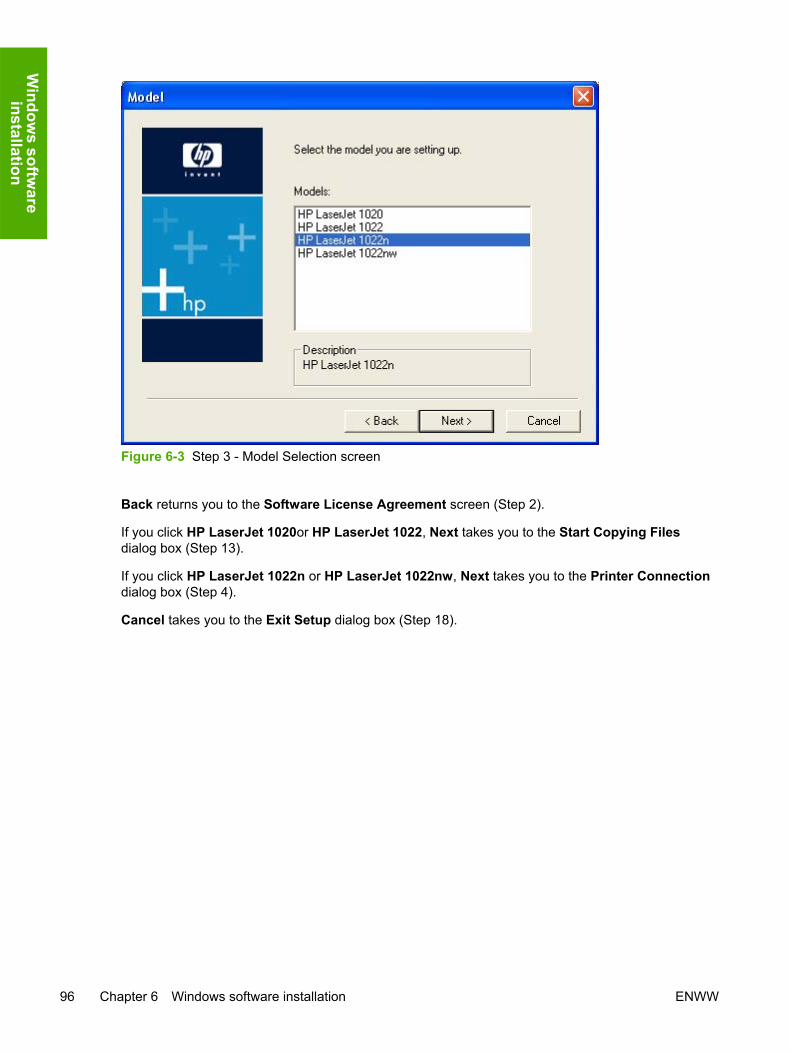
Figure 6-3 Step 3 - Model Selection screen
Back returns you to the Software License Agreement screen (Step 2).
If you click HP LaserJet 1020or HP LaserJet 1022, Next takes you to the Start Copying Filesdialog box (Step 13).
If you click HP LaserJet 1022n or HP LaserJet 1022nw, Next takes you to the Printer Connectiondialog box (Step 4).
Cancel takes you to the Exit Setup dialog box (Step 18).
96 Chapter 6 Windows software installation ENWW
Window
s software
installation

Figure 6-4 Step 4 - Printer Connection screen
If you click Connected directly to this computer (a direct connection), Next causes the Installer tolook for new hardware, and then takes you to the Start Copying Files dialog box (Step 13).
If you click Connected via the network or Connected via wireless, Next takes you to the IdentifyPrinter dialog box (Step 5).
NOTE The Connected via wireless option is available for the HP LaserJet 1022nw modelonly.
Back returns you to the Model dialog box (Step 3).
Cancel takes you to the Exit Setup dialog (Step 18).
ENWW Installation dialog-box options for Windows 97
Win
dow
s so
ftwar
ein
stal
latio
n

Figure 6-5 Step 5 - Identify Printer screen
NOTE If you are installing a direct-connection to the printer, go to Step 13.
Clicking the Search from a list of detected printers (recommended) option, and then clicking Nexttakes you to the Notice about Firewalls dialog box (Step 6).
Clicking the Specify a printer by address option, and then clicking Next takes you to the SpecifyPrinter dialog box (Step 12).
Help initiates the online Help system.
Back returns you to the Printer Connection dialog box (Step 4).
Cancel takes you to the Exit Setup dialog box (Step 18).
98 Chapter 6 Windows software installation ENWW
Window
s software
installation

Figure 6-6 Step 6 - Firewalls screen
Back returns you to the Identify Printer dialog box (Step 5).
Next takes you to the Printer Found dialog box (Step 7).
Cancel takes you to the Exit Setup dialog box (Step 18).
ENWW Installation dialog-box options for Windows 99
Win
dow
s so
ftwar
ein
stal
latio
n

Figure 6-7 Step 7 - Printer Found screen
Clicking the Yes, install this printer. option button, and then clicking Next takes you to the ConfirmSettings dialog box (Step 8).
Clicking the No, install a different printer. option button, and then clicking Next takes you to theCheck Cable Connection dialog box (Step 11).
Help initiates the online Help system.
Back returns you to the Identify Printer dialog box (Step 5).
Cancel takes you to the Exit Setup dialog box (Step 18).
NOTE If more than one HP LaserJet 1022 Series printer is installed on the network, a list willappear from which you can select the specific HP LaserJet 1022 Series printer that you wantto connect to.
100 Chapter 6 Windows software installation ENWW
Window
s software
installation

Figure 6-8 Step 8 - Confirm Settings screen
Next takes you to the Start Copying Files dialog box (Step 13).
Clicking Change TCP/IP Settings takes you to the Confirm Changing Setting dialog box (Step 9).
Help initiates the online Help system.
Back returns you to the Printer Found dialog box (Step 7).
Cancel takes you to the Exit Setup dialog box (Step 18).
ENWW Installation dialog-box options for Windows 101
Win
dow
s so
ftwar
ein
stal
latio
n
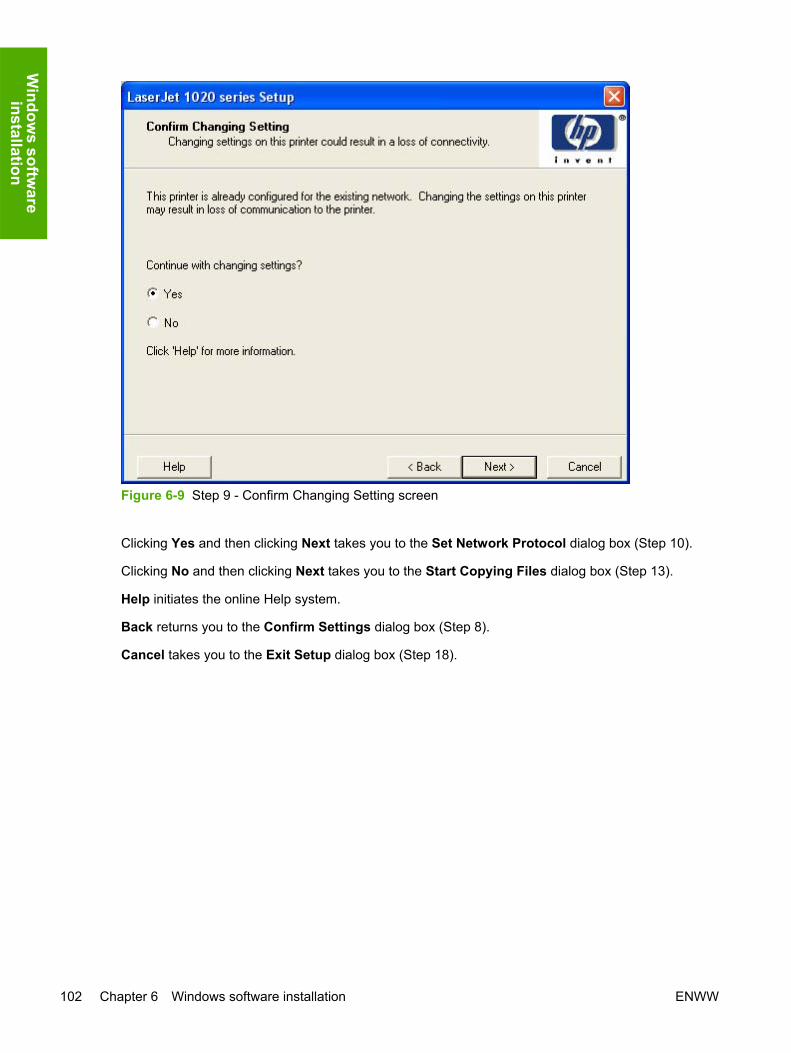
Figure 6-9 Step 9 - Confirm Changing Setting screen
Clicking Yes and then clicking Next takes you to the Set Network Protocol dialog box (Step 10).
Clicking No and then clicking Next takes you to the Start Copying Files dialog box (Step 13).
Help initiates the online Help system.
Back returns you to the Confirm Settings dialog box (Step 8).
Cancel takes you to the Exit Setup dialog box (Step 18).
102 Chapter 6 Windows software installation ENWW
Window
s software
installation

Figure 6-10 Step 10 - Set Network Protocol screen
Clicking the Network Protocol drop-down menu displays a list of network protocols for you tochoose from.
Clicking Change Settings allows you to change the network settings.
Next takes you to the Start Copying Files dialog box (Step 13).
Help initiates the online Help system.
Back returns you to the Confirm Changing Setting dialog box (Step 9).
Cancel takes you to the Exit Setup dialog box (Step 18).
NOTE Use this screen to configure an unconfigured network card.
ENWW Installation dialog-box options for Windows 103
Win
dow
s so
ftwar
ein
stal
latio
n

Figure 6-11 Step 11 - Check Cable Connection screen
Clicking the Search again option button, and then clicking Next searches the network again andthen takes you to the Printer Found dialog box (Step 7).
Clicking the Specify a printer by address option button, and then clicking Next takes you to theSpecify Printer dialog box (Step 12).
Help initiates the online Help system.
Back returns you to the Set Network Protocol dialog box (Step 10).
Cancel takes you to the Exit Setup dialog box (Step 18).
104 Chapter 6 Windows software installation ENWW
Window
s software
installation

Figure 6-12 Step 12 - Specify Printer screen
Entering any of the addresses and then clicking Next takes you to the Printer Found dialog box(Step 7).
Help initiates the online Help system.
Back returns you to the Specify Printer dialog box (Step 12).
Cancel takes you to the Exit Setup dialog box (Step 18).
ENWW Installation dialog-box options for Windows 105
Win
dow
s so
ftwar
ein
stal
latio
n

Figure 6-13 Step 13 - Start Copying Files screen
Clicking Next starts the installation process and takes you to the Installation Status dialog box(Step 14).
Back returns you to the Specify Printer dialog box (Step 13).
Cancel takes you to the Exit Setup dialog (Step 18).
Figure 6-14 Step 14 - Installation Status screen
NOTE During the installation process, the status bar refreshes several times.
106 Chapter 6 Windows software installation ENWW
Window
s software
installation

Figure 6-15 Step 15 - USB Cable Connect screen
Back returns you to the Start Copying Files dialog box (Step 13).
Figure 6-16 Step 16 - Finish screen
ENWW Installation dialog-box options for Windows 107
Win
dow
s so
ftwar
ein
stal
latio
n
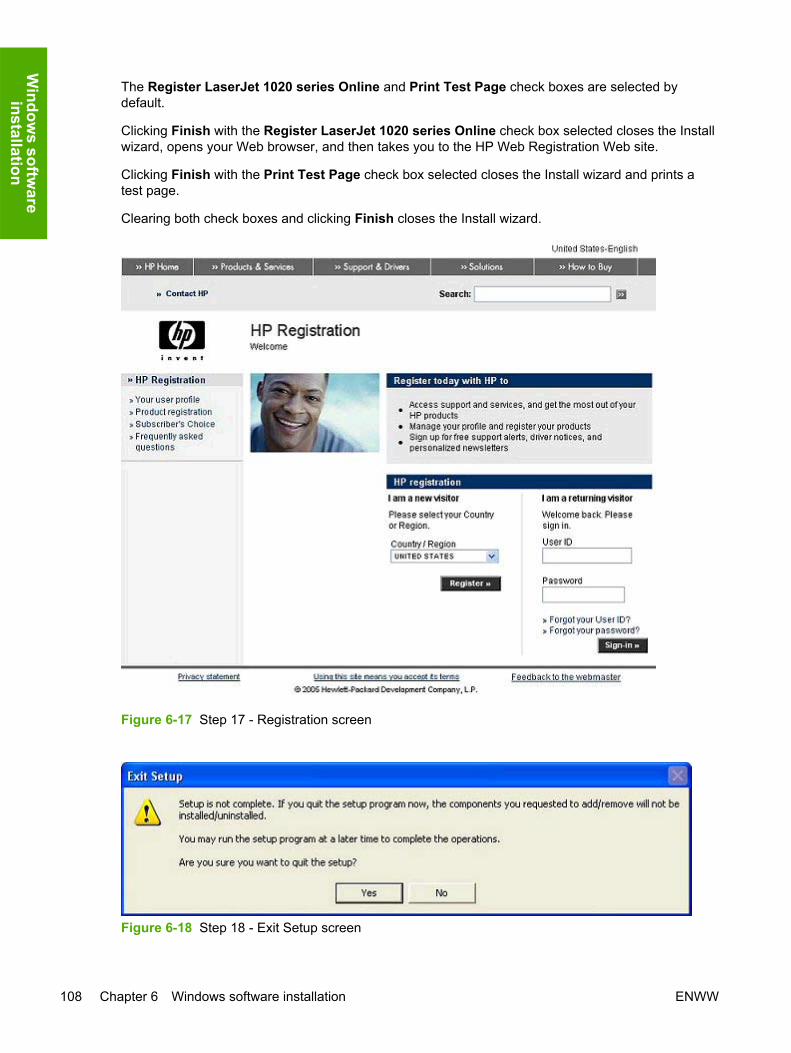
The Register LaserJet 1020 series Online and Print Test Page check boxes are selected bydefault.
Clicking Finish with the Register LaserJet 1020 series Online check box selected closes the Installwizard, opens your Web browser, and then takes you to the HP Web Registration Web site.
Clicking Finish with the Print Test Page check box selected closes the Install wizard and prints atest page.
Clearing both check boxes and clicking Finish closes the Install wizard.
Figure 6-17 Step 17 - Registration screen
Figure 6-18 Step 18 - Exit Setup screen
108 Chapter 6 Windows software installation ENWW
Window
s software
installation

Yes cancels the print-driver installation.
No returns you to the last open screen of the installer.
Installing the software when the printer is already connected to acomputerIf the product is already connected to a computer when you begin installing the software, Windowsautomatically detects the product and uses Plug-n-Play to install the printer driver. During thisprocess, Plug-n-Play calls the Add Printer Wizard to automatically install the printer driver and theUSB port. When Plug-n-Play completes, you are given the option to install the additional support files.
If you prefer, you can cancel Plug-n-Play and run the Add Printer Wizard manually to install theprinter driver. This procedure is not recommended if you are using Windows 98 SE or Me becausethe Add Printer Wizard does not install the USB port for these operating systems. If you are usingWindows 98 SE or Me, when the Add Printer Wizard completes you must unplug the USB cable fromthe product and then plug it in again so that Windows can use Plug-n-Play to install the USB port.
At the end of the Add Printer Wizard, you are given the option to install the additional support files.
This section shows the dialog box options that appear during the Add Printer Wizard.
Figure 6-19 Step 1 - Add Printer Wizard Welcome Screen
Next takes you to the Local or Network Printer dialog box.
Cancel exits the Add Printer Wizard.
ENWW Installation dialog-box options for Windows 109
Win
dow
s so
ftwar
ein
stal
latio
n
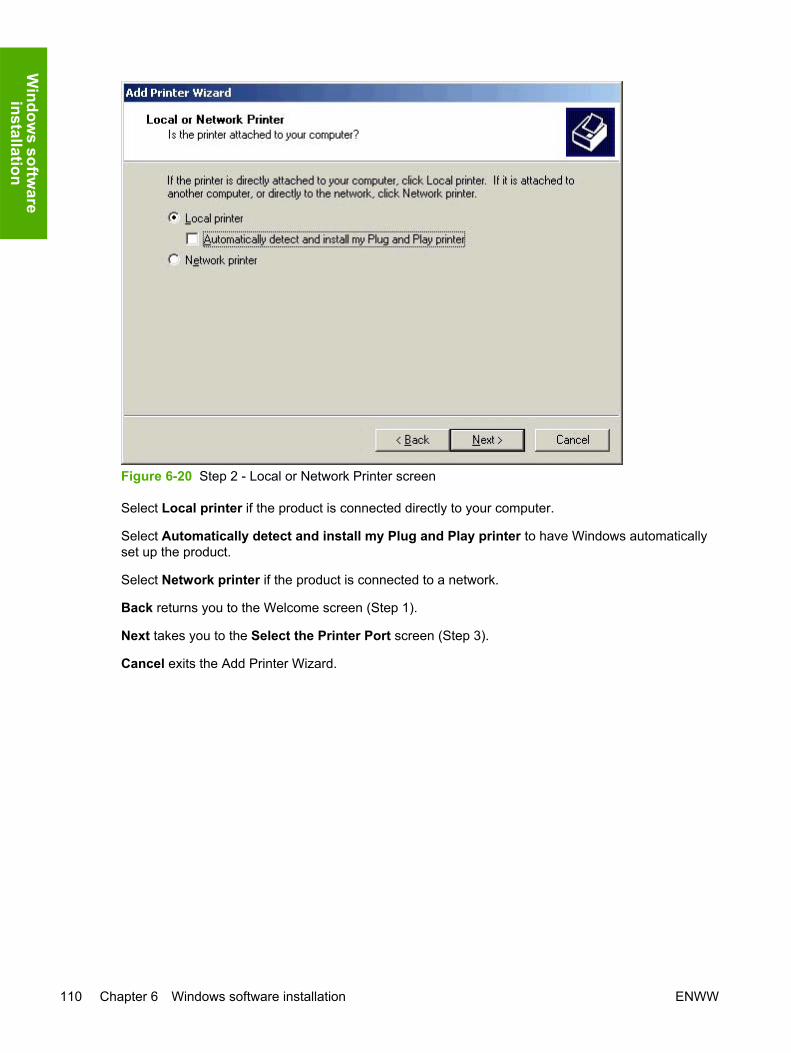
Figure 6-20 Step 2 - Local or Network Printer screen
Select Local printer if the product is connected directly to your computer.
Select Automatically detect and install my Plug and Play printer to have Windows automaticallyset up the product.
Select Network printer if the product is connected to a network.
Back returns you to the Welcome screen (Step 1).
Next takes you to the Select the Printer Port screen (Step 3).
Cancel exits the Add Printer Wizard.
110 Chapter 6 Windows software installation ENWW
Window
s software
installation

Figure 6-21 Step 3 - Select the Printer Port screen
Select Use the following port to use an existing port on your computer.
Select Create a new port to add a new port.
Click Next to continue.
ENWW Installation dialog-box options for Windows 111
Win
dow
s so
ftwar
ein
stal
latio
n

Figure 6-22 Step 4 - Manufacturer and model screen
Click Have Disk... to install the software from the CD-ROM.
Figure 6-23 Step 5 - Install from Disk
Click Browse to begin searching for the driver file that is on the CD-ROM.
112 Chapter 6 Windows software installation ENWW
Window
s software
installation
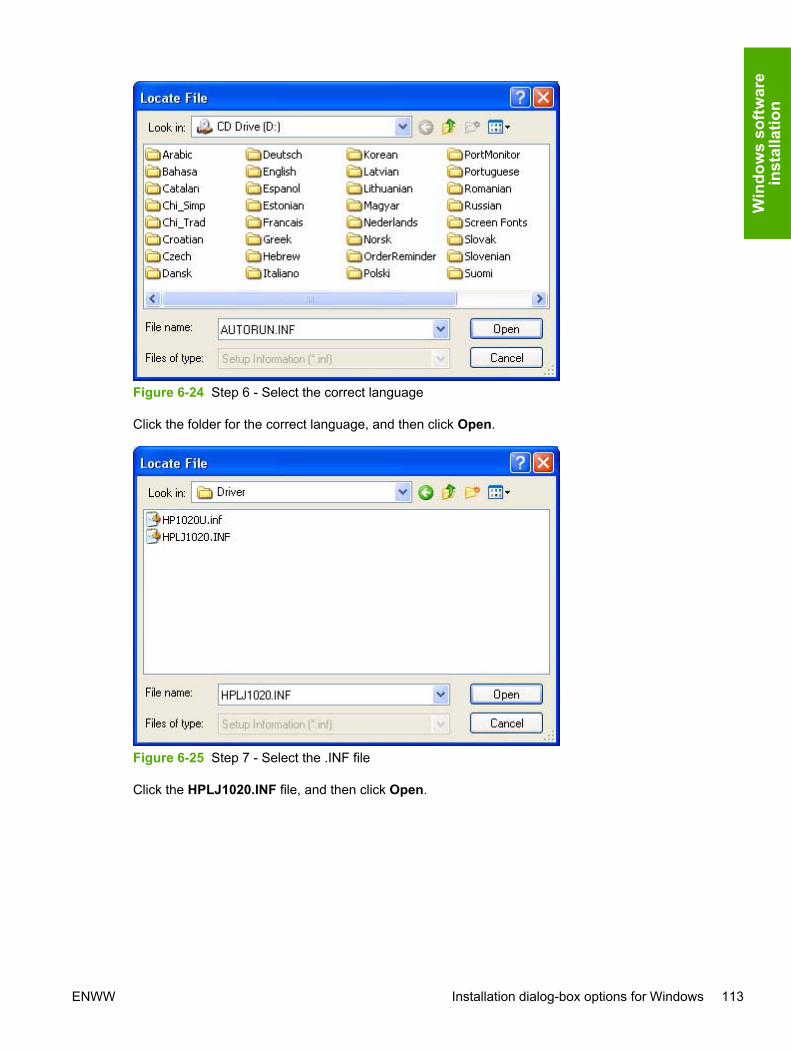
Figure 6-24 Step 6 - Select the correct language
Click the folder for the correct language, and then click Open.
Figure 6-25 Step 7 - Select the .INF file
Click the HPLJ1020.INF file, and then click Open.
ENWW Installation dialog-box options for Windows 113
Win
dow
s so
ftwar
ein
stal
latio
n
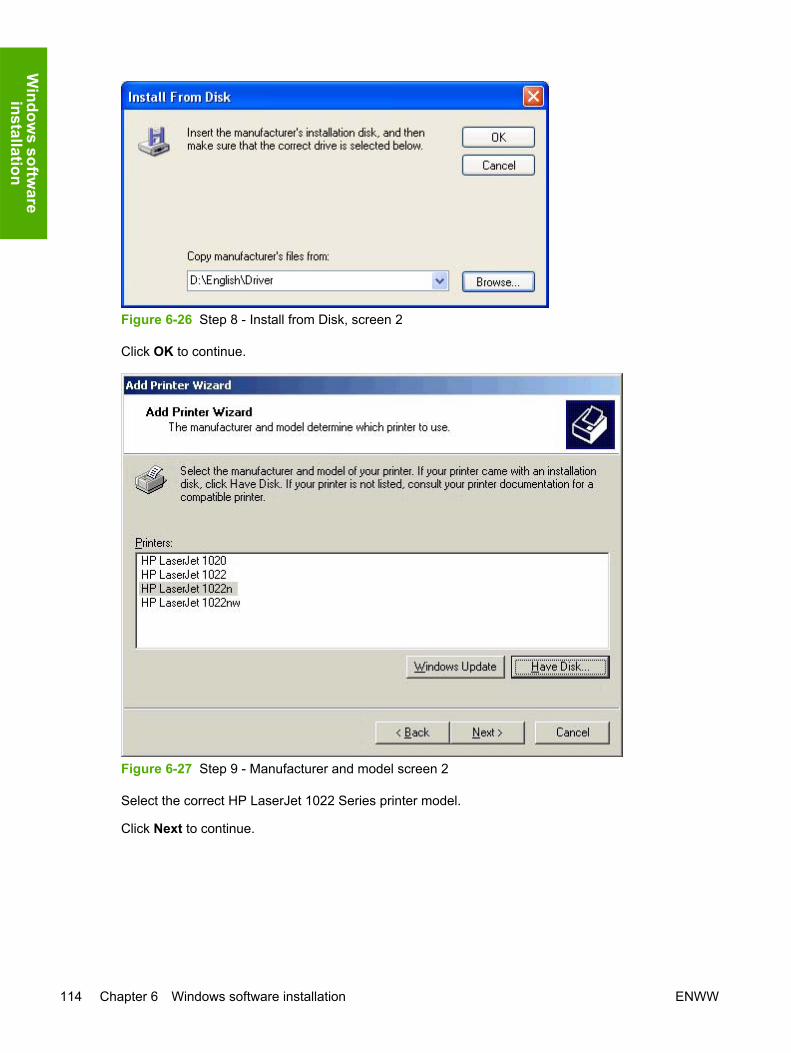
Figure 6-26 Step 8 - Install from Disk, screen 2
Click OK to continue.
Figure 6-27 Step 9 - Manufacturer and model screen 2
Select the correct HP LaserJet 1022 Series printer model.
Click Next to continue.
114 Chapter 6 Windows software installation ENWW
Window
s software
installation

Figure 6-28 Step 10 - Name Your Printer screen
Type a name for the product.
Click Next to continue.
ENWW Installation dialog-box options for Windows 115
Win
dow
s so
ftwar
ein
stal
latio
n
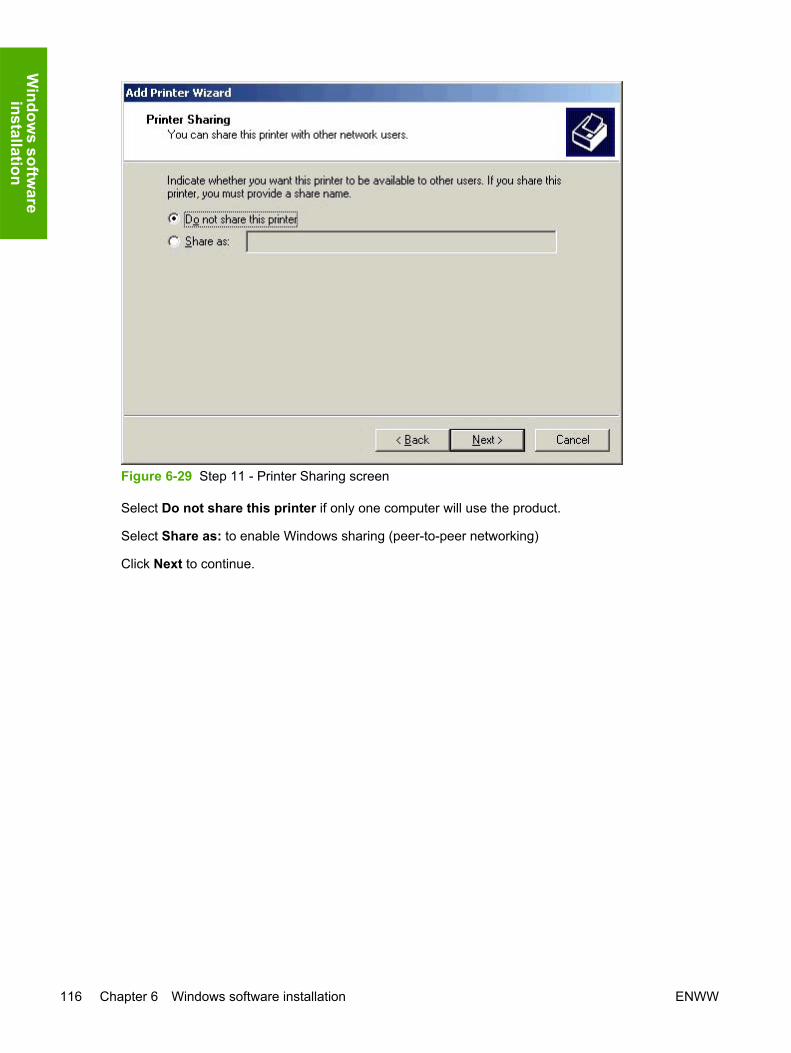
Figure 6-29 Step 11 - Printer Sharing screen
Select Do not share this printer if only one computer will use the product.
Select Share as: to enable Windows sharing (peer-to-peer networking)
Click Next to continue.
116 Chapter 6 Windows software installation ENWW
Window
s software
installation
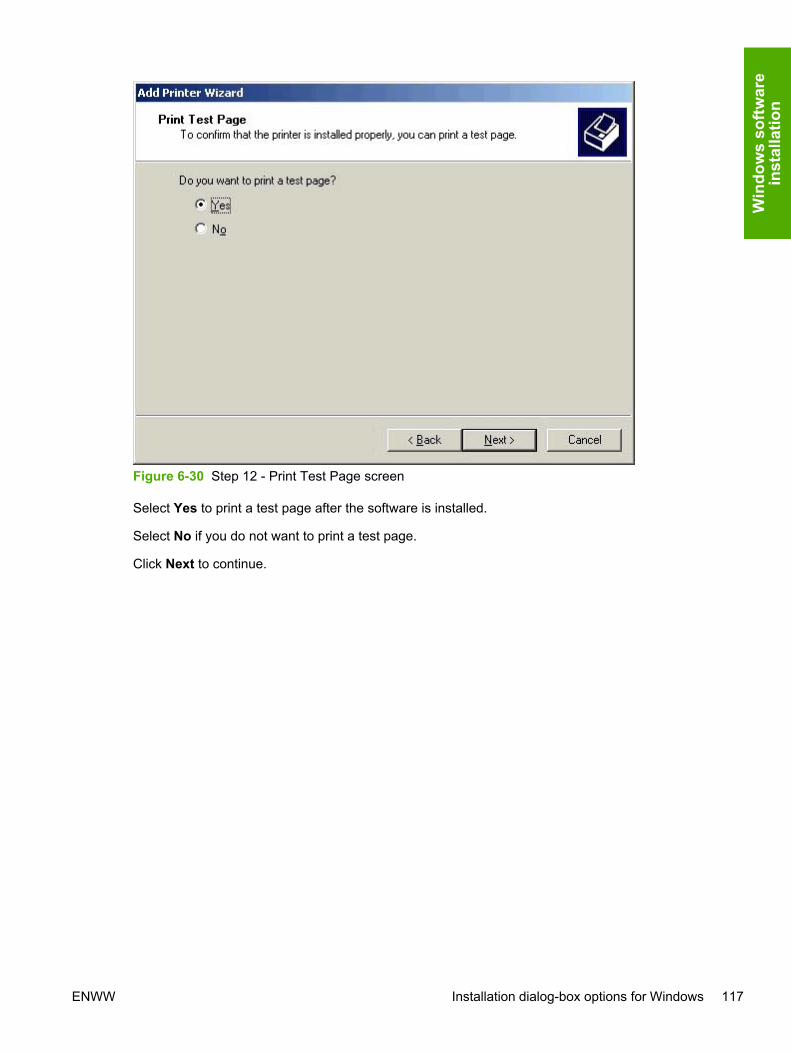
Figure 6-30 Step 12 - Print Test Page screen
Select Yes to print a test page after the software is installed.
Select No if you do not want to print a test page.
Click Next to continue.
ENWW Installation dialog-box options for Windows 117
Win
dow
s so
ftwar
ein
stal
latio
n

Figure 6-31 Step 13 - Completing the Add Printer Wizard screen
Click Finish to complete the Add Printer Wizard.
118 Chapter 6 Windows software installation ENWW
Window
s software
installation

UninstallThis section provides information about the following topics:
● Uninstall instructions for Windows
Uninstall instructions for WindowsChoose one of the following two methods to uninstall the HP LaserJet 1022 printing-system software:
■ Uninstalling using the HP program group (recommended)
■ Uninstalling using the Windows Add/Remove Program feature
Uninstalling using the HP program group (recommended)
NOTE To uninstall the software from Windows 2000 or XP, you must log on withadministrator privileges.
1 Close all of the programs that are open on the computer.
2 Click Start, click Programs, select HP, select HP LaserJet 1020 series, and then clickUninstall LaserJet 1020 series.
3 The Welcome to the LaserJet 1020 series uninstall Wizard dialog box appears.
Figure 6-32 Welcome to the LaserJet 1020 series uninstall Wizard dialog box
Click Next to continue.
ENWW Uninstall 119
Win
dow
s so
ftwar
ein
stal
latio
n

4 The LaserJet 1020 series printer driver uninstall information. dialog box appears.
Figure 6-33 Remove the Program dialog box
Click Next to begin the uninstall process.
5 The Uninstalling the HP LaserJet 1020 series dialog box appears.
Figure 6-34 Uninstalling the HP LaserJet 1020 series dialog box
The progress bar reflects the status of the uninstall process.
120 Chapter 6 Windows software installation ENWW
Window
s software
installation

6 The Restart dialog box appears.
Figure 6-35 Restart dialog box
Click Yes, I want to restart my computer now. to restart your computer and finish the uninstallprocess.
Uninstalling using Windows Add/Remove programs featureFollow these steps to uninstall the HP LaserJet 1022 printing-system software by using the WindowsAdd/Remove programs feature.
NOTE Using this uninstall method, you do not need the HP LaserJet 1022 printing-systemsoftware CD.
NOTE To uninstall the software from Windows 2000 or XP, you must log on withadministrator privileges.
1 Close all of the programs that are open on the computer.
ENWW Uninstall 121
Win
dow
s so
ftwar
ein
stal
latio
n

2 For Windows 98 SE, Windows Me, or Windows 2000, click Start, click Settings, click ControlPanel, and then double-click Add/Remove programs
For Windows XP, click Start, click Control Panel, and then double-click Add/Remove programs.
Figure 6-36 Windows Control Panel
122 Chapter 6 Windows software installation ENWW
Window
s software
installation

3 Click Change or Remove Programs, click LaserJet 1020 series, and then click Change/Remove.
Figure 6-37 Windows Change or Remove programs
ENWW Uninstall 123
Win
dow
s so
ftwar
ein
stal
latio
n

4 The Remove the Program dialog box appears.
Figure 6-38 Remove the Program dialog box
Click Next to begin the uninstall process.
5 The Uninstalling the HP LaserJet 1020 series dialog box appears.
Figure 6-39 Uninstalling the HP LaserJet 1020 series dialog box
The progress bar reflects the status of the uninstall process.
124 Chapter 6 Windows software installation ENWW
Window
s software
installation

6 The Restart dialog box appears.
Figure 6-40 Restart dialog box
Click Yes, I want to restart my computer now. to restart your computer and finish the uninstallprocess.
This uninstall method does not automatically remove the HP Software Update utility. To remove theHP Software Update utility, click No, I will restart my computer later. here and then follow theinstructions in the Removing the HP Software Update utility section.
Removing the HP Software Update utilityFollow these instructions to remove the HP Software Update utility from your computer.
1 For Windows 98 SE, Windows Me, or Windows 2000, click Start, click Settings, click ControlPanel, and then double-click Add/Remove programs.
For Windows XP, click Start, click Control Panel, and then double-click Add/Remove programs.
2 Click Change or Remove programs, click HP Software Update, and then click Remove.
3 The Remove the Program dialog box appears. Click Remove to begin the uninstall process.
4 The Uninstalling the HP LaserJet 1020 series dialog box appears. The progress bar reflectsthe status of the uninstall process.
5 When the uninstall process is completed, the Finish dialog box appears. Click Finish to continue.
6 The Restart dialog box appears. Click Yes to restart your computer and finish the uninstallprocess.
ENWW Uninstall 125
Win
dow
s so
ftwar
ein
stal
latio
n

126 Chapter 6 Windows software installation ENWW
Window
s software
installation

Index
Symbols/Numerics% of Normal Size option 61
AAbout button 74Add Printer Wizard 93, 109administrator Quick Sets 49Advanced page, EWS 84Apple Macintosh. See Macintoshapplications, driver settings 46
Bback cover, paper for 56Basics tab 71bidirectional communication
device conflicts, troubleshooting25
Windows operating systemssupported 15
binding options 67black, printing text as 71Booklet Layout settings 68both sides, printing on 67
Ccable connection screen 104cartridges, page capacities 3CD
directory structure, Macintosh29
directory structure, Windows 5languages 5ordering 7ordering for Macintosh 32
CD Browser screen 94Check cable connection screen
104components, software
Macintosh 29Windows 14
Configure tab 74Confirm Changing Setting screen
102Confirm Settings screen 101conflicts, device 25connection type, Windows
installation dialog box 97connection types 23constraint messages 47context-sensitive Help 47Copies, number of 72covers, different paper for 56custom paper sizes 51customer support
HP Instant Support page, EWS86
Product Support page, EWS 86
DDevice Configuration page, EWS
81device conflicts 25Device Settings page, EWS 81dialog boxes, Macintosh installation
37dialog boxes, Windows installation
CD Browser 94Check cable connection 104Confirm Changing Setting 102Confirm Settings 101Exit Setup 108Finish 107Firewalls screen 99HP Software License
Agreement 95Identify Printer 98Installation Status 106Model Selection 96Printer Connection 97Printer Found 100
Registration 108Set Network Protocol 103Specify Printer 105Start Copying Files 106USB Cable Connect 107
direct connections 23directory structure, CD
Macintosh 29Windows 5
Document Options 66document preview image 59documentation
CD directory structure 29localized versions 8operating systems supported
15, 30dots per inch (dpi)
settings 70specifications 3
double-sided printing 67dpi (dots per inch)
settings 70specifications 3
driversHelp system, Windows 46installing Windows 92localized versions 15, 30Macintosh 30operating systems supported
14, 30settings, accessing 46version number 74
duplexing (manually) 67
EEasy Install option, Macintosh 34EconoMode 70Effects tab 59EWS
Advanced page 84
ENWW Index 127

Device Configuration page 81Device Settings page 81HP Instant Support page 86Information tab 81IP Configuration page 84mDNS page 85Networking tab 84Order Supplies page 86Password page 86Print Settings page 82Product Registration page 86Product Support page 86Settings tab 82
Exit Setup screen 108
FFastRes settings 70features
model comparison 3Windows printing-system
software 14files, included on installation CD
Macintosh 29Windows 5
Finish screen 107Finishing tab 65Firewalls screen 99first page out 3first page, paper for 56Fit to Page options 60Flip Pages Up 67fulfillment centers 7, 32
HHelp
localized versions 15Macintosh 30operating systems supported
15, 30Windows driver 46
host-based driverHelp system, Windows 46installing Windows 92localized versions 15, 30Macintosh 30operating systems supported
14, 30settings, accessing 46version number 74
HP Instant Support page, EWS 86
HP Print Screen utility 19HP Software License Agreement
screen 95HP Software Update Utility 17HP Software Update utility 125
IIdentify Printer screen 98in-box file layout
Macintosh 29Windows 5
inches, settings 54Information tab, EWS 81installation
dialog boxes, Macintosh 37dialog boxes, Windows 94driver-only 92Macintosh software 34networks, Macintosh 35networks, Windows 92Windows software 88, 89
installation notes 15Installation Status screen 106installers
localized versions 15Macintosh 30Windows, included 14Windows, new features 14
IP Configuration page, EWS 84
Llandscape orientation
Flip Pages Up 67settings 73
languages, localized versionsCDs 5documentation 8HP Print Screen utility 21key to abbreviations 15, 16Macintosh software
components 30ordering software 7software components 15
license agreementMacintosh 39Windows 95
Linux support 13localized versions
CDs 5documentation 8
HP Print Screen utility 21key to abbreviations 15, 16Macintosh software
components 30ordering software 7software components 15
MMacintosh
components, software 29dialog boxes, installation 37directory structure on
installation CD 29installers 30installing software 34networks, installing software 35operating systems supported
28PDEs 29PPDs 30software license agreement 39system requirements 33
manualslocalized versions 8operating systems supported
15, 30mDNS page, EWS 85measurement units 54media
& of Normal Size option 61custom sizes 51Fit to Page options 60Pages per Sheet 69Paper Options 50Paper/Quality tab 48Print Document On settings 60Print on Both Sides (Manually)
67Scale to Fit option 60Size is settings 50Source is 55tray capacities 3Type is settings 55Use different paper options 56
memoryMacintosh system requirements
33product, included 3Windows system requirements
12
128 Index ENWW

Microsoft Windows. See Windowsmillimeters, settings 54Model Selection screen 96models, feature comparison 3
NNetworking tab, EWS 84networks
features available 23installing software, Windows 92Macintosh, installing software
35peer-to-peer, setting up 89ports 3Set Network Protocol screen
103number of copies 72
OO/S2 support 13operating systems supported
Macintosh 28UNIX, Linux, and OS/2 13Windows 12
Order Supplies page, EWS 86ordering software 7, 32orientation
Flip Pages Up 67settings 73
Ppage orientation
Flip Pages Up 67settings 73
pages per minute 3Pages per Sheet settings 69paper
& of Normal Size option 61custom sizes 51Fit to Page options 60Pages per Sheet 69Print Document On settings 60Print on Both Sides (Manually)
67Scale to Fit option 60Size is settings 50Source is 55tray capacities 3Type is settings 55Use different paper options 56
paper handling features 3Paper Options 50Paper/Quality tab 48parallel ports, not supported 4part numbers
documentation 8software CDs 7
Password page, EWS 86PDEs (Printer Dialog Extensions)
29peer-to-peer networking 23, 89Percent of Normal Size option 61Plug-n-Play 93, 109portrait orientation
Flip Pages Up 67settings 73
portsconnecting 25device conflicts 25operating systems supported 4specifications 3
PPDslocalized versions 30
preview image 59Print All Text as Black 71print cartridges, page capacities 3Print Document On settings 60Print on Both Sides (Manually) 67Print Quality tab 70Print Screen utility 19Print Settings page, EWS 82Printer Connection screen 97Printer Dialog Extensions (PDEs)
29printer drivers. See driversPrinter Found screen 100Printer Properties tabs 74Printing Preferences tabs 48Product Registration page, EWS
86Product Support page, EWS 86programs, driver settings 46ProRes settings 70
Qquality 70Quick Sets 49
RRAM
included 3Macintosh system requirements
33Windows system requirements
12registration page 86Registration screen 108release notes 30removing software
HP Software Update utility 125using Add/Remove programs
121using HP program group 119
resizing settings 60resolution
settings 70specifications 3
ROM, included 3Rotate by 180 degrees 73
SScale to Fit option 60screen capture utility 19Set Network Protocol screen 103Settings tab, EWS 82settings, driver
accessing 46Quick Sets 49
sharingfeatures available 23setting up 89
Size is option 50software license agreement
Macintosh 39Windows 95
software, ordering 7, 32Source is settings 55Specify Printer screen 105speed specifications 3Start Copying Files screen 106supplies, ordering 86support
HP Instant Support page, EWS86
Product Support page, EWS 86system requirements
Macintosh 33Windows 12
ENWW Index 129
Ttext, printing as black 71trays
capacities 3custom paper sizes 54Source is settings 55
troubleshootingconstraint messages 47device conflicts 25
two-sided printing 67Type is settings 55
Uuninstalling
HP Software Update utility 125Windows software using Add/
Remove programs 121Windows software using HP
program group 119units of measurement 54UNIX support 13Update utility 17, 125USB Cable Connect screen 107USB port
Add Printer Wizard 93, 109device conflicts 25devices vs. hubs 25operating systems supported 4specifications 3
Use different paper options 56user guides
localized versions 8operating systems supported
15, 30
Vversion number, driver 74
Wwatermarks 62Web sites
Linux support 13ordering software 7UNIX support 13
What's this Help 47Windows
Add Printer Wizard 93, 109component availability 14connection types 23device conflicts 25dialog boxes, installation 94
directory structure oninstallation CD 5
driver-only installation 92installation options 88installers 14installing software 89networks, installing software 92new features for 14operating systems supported
12Plug-n-Play 93, 109sharing, setting up 89system requirements 12uninstalling product software
using Add/Remove programs121
uninstalling product softwareusing HP program group 119
uninstalling software using HPSoftware Update utility 125
130 Index ENWW


© 2005 Hewlett-Packard Development Company, L.P.
www.hp.com