Software manual V. 1. 5. 1 - osram.de fileManual EASY Color Control software Osram Gmbh December...
22
Manual EASY Color Control software Osram Gmbh December 2012 page 1 Software manual V. 1.5.1
Transcript of Software manual V. 1. 5. 1 - osram.de fileManual EASY Color Control software Osram Gmbh December...

Manual EASY Color Control software Osram Gmbh
December 2012 page 1
Software manual V. 1.5.1

Manual EASY Color Control software Osram GmbH
December 2012 page 2
EASY Color Control Manual
Content
1 Introduction........................................................................................................................................ 3
2 System requirements.......................................................................................................................... 4
3 Software installation ........................................................................................................................... 5
4 USB driver installation ........................................................................................................................ 6
5 Start program..................................................................................................................................... 7
6 Window elements ............................................................................................................................... 9
7 Tab Setup........................................................................................................................................ 10
8 Tab Scene ....................................................................................................................................... 14
9 Tab Sequence ................................................................................................................................. 17
10 Tab Program (Non addressed mode only) .......................................................................................... 19
11 Expert functions ............................................................................................................................... 21
12 Practical hints .................................................................................................................................. 22
13 Appendix ......................................................................................................................................... 22
Hint:
You'll find a PDF copy of this manual on the included C D.

Manual EASY Color Control software Osram Gmbh
December 2012 page 3
1 Introduction The software „EASY Color Control“ for Microsoft Windows enables the configuration of up to 16 DALI EASY / OT
EASY (up to 64 using the “EASY System Coupler”) control units and EASY DMX SO control units. Therefore the
EASY control units have to be connected with the PC (=online-mode1). The configuration can also be prepared
without connection to the control units (=offline-mode2).
Figure 1: Overview EASY Color Control light managem ent system
EASY Color Control Software supports the following functions:
1. System test (only online-mode)
2. Addressing the EASY control units or set specific control unit parameters, see tab Setup (only online-mode)
3. Setting of colours and light scenes, see tab Scene
4. Generating automatic scene sequences, see tab Sequence
5. Generating orders of different sequences as programmes, see tab Program
6. Visualisation of the system status on the PC (only online-mode)
7. Loading and saving all settings from/to a file
1 In online-mode all settings have direct effect on the control units, e.g., colour changes appear immediately 2 In offline-mode exists no direct connection to the equipment, but the PC allows a preview and gives a first impression of the result.
In offline-mode specific functions are deactivated or have only limited functionality.

Manual EASY Color Control software Osram Gmbh
December 2012 page 4
2 System requirements To use the EASY Color Control Software, you need the following hardware and software:
• PC with Pentium II-processor with at least 233 MHz or similar
(Pentium III–processor or similar recommended)
at least 1GHz for Windows 7
• Windows 2000 Service Pack 4 / Windows XP Service Pack 3 / Windows Vista or Windows 7 - 32bit / 64bit
Microsoft operating systems versions
• At least 128 MB RAM for Windows 2000 or 256 MB RAM for Windows XP or 512 MB RAM for Windows Vista
or 1 GB RAM for Windows 7
• At least 20 MB free capacity on the hard drive
• SVGA-screen with a resolution of 1024x768 or higher and at least 65536 colours (16-Bit)
• CD-ROM drive
• At least one free USB-port for the online-mode

Manual EASY Color Control software Osram Gmbh
December 2012 page 5
3 Software installation Please put the enclosed CD into the drive and the setup program will usually start automatically (if not, please open
Windows Explorer, change to CD drive and double click on the file „Setup_OSRAM_EASY_Color_Control“).
DO NOT plug in the enclosed EASY USB adapter.
EASY Color Control Software is available in English, German, French, Spain and Italian. Please choose your
language. An installation assistant guides you through the installation process.
Figure 2: Start of the installation process
After successful installation an icon will be installed on the desktop. Furthermore EASY Color Control Software can be
found in the “Start” menu � Programs � OSRAM � EASY Color Control.
Figure 3: Start menu for EASY Color Control Softwar e

Manual EASY Color Control software Osram Gmbh
December 2012 page 6
4 USB driver installation Please plug the EASY USB adapter into the free USB port of your PC. Windows driver installation wizard starts
automatically. The driver is located on the enclosed CD, please use automatic driver search (recommended) or
manually select your CD drive for the driver search. Possibly a note about missing driver signature is displayed,
please confirm to proceed the installation process.
Figure 4: Driver Installation wizard
Note: A backup of the driver is copied into the EASY Color Control installation folder.

Manual EASY Color Control software Osram GmbH
December 2012 page 7
5 Start program At launch EASY Color Control Software searches for connected EASY control units. When the software has detected
the correct number of control units, they can be addressed individually. The following cases are differentiated:
1. No USB Adapter connected (EASY Color Control Softw are starts in offline-mode)
Figure 5: Info message, no USB Adapter found
2. No control units were found (EASY Color Control So ftware starts in offline-mode)
Figure 6: Info message when no EASY control units w ere found
3. Units founded in different function mode (EASY Col or Control Software starts in offline-mode)
Figure 7: Info message when Control units are in di fferent modes.
Note:
If the above warning message appears when configuring installations where one EASY Touch Panel is present switch
off and on the Touch Panel.
4. EASY Color Control Software starts in online-mode
When EASY Color Control Software starts successfully in the online mode, initially connected EASY control units
were searched for. This can last up to several minutes – depending on the number of control units. By interruption of
the search process, the software starts the offline-mode. If control units without addresses are found (e.g. first
operation), a note occurs and the possibility to allocate addresses is offered (recommended).

Manual EASY Color Control software Osram Gmbh
December 2012 page 8
Figure 8: Searching for EASY control units
Note:
If one or more control units is / are not found, please check the connection wiring and restart the address allocation
via tab Setup.
Manual EASY Color Control software Osram Gmbh
December 2012 page 9
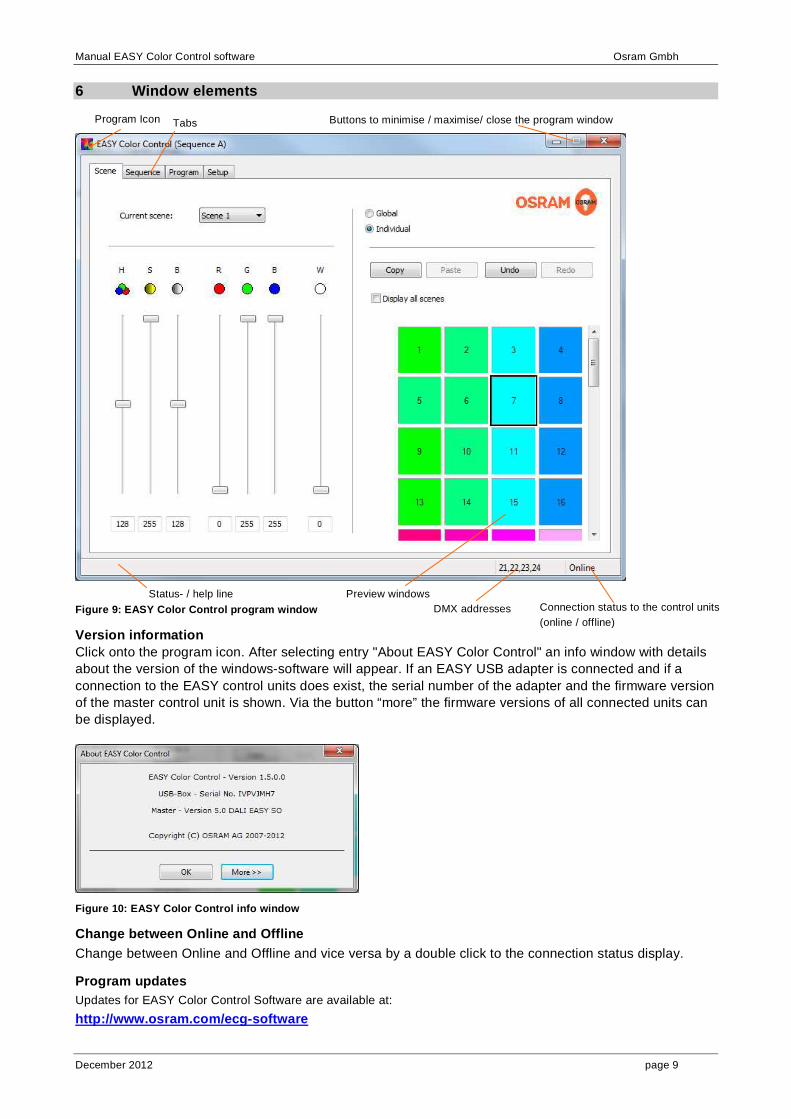
6 Window elements
Figure 9: EASY Color Control program window
Version information Click onto the program icon. After selecting entry "About EASY Color Control" an info window with details about the version of the windows-software will appear. If an EASY USB adapter is connected and if a connection to the EASY control units does exist, the serial number of the adapter and the firmware version of the master control unit is shown. Via the button “more” the firmware versions of all connected units can be displayed.
Figure 10: EASY Color Control info window
Change between Online and Offline Change between Online and Offline and vice versa by a double click to the connection status display.
Program updates Updates for EASY Color Control Software are available at:
http://www.osram.com/ecg-software
Buttons to minimise / maximise/ close the program window Tabs Program Icon
Status- / help line Preview windows DMX addresses Connection status to the control units
(online / offline)

Manual EASY Color Control software Osram Gmbh
December 2012 page 10
7 Tab Setup Via the tab Setup it is possible to adapt the EASY Color Control user interface to the installed system. Also the
behaviour of the control units can be configured.
Test of the connected control units (online only) All channels can be switched on and dimmed central via the central “Test” slider. Check that all luminaires which are
connected with the EASY control units change their brightness when you move the slider. Otherwise check the wiring.
Figure 11: Tab Setup
Address allocation for the control units (online on ly) All or only the new control units can be addressed via the corresponding buttons. The second option is mainly
provided for the extension of existing systems or the exchange of control units.
At the start of the addressing all control units are set to their minimal brightness. Afterwards all units are set to their
maximal brightness as soon as a valid address was assigned. Thus it is possible to check which unit is already found
and addressed. Please note that the allocation of the preview windows to the corresponding control units is by pure
chance.
Every unit, belonging to EASY DMX SO, shows the asso ciated DMX addresses in the bottom of the software
page (see Figure 8). Depending on “Output configuration” settings, 2, 3 or 4 DMX addresses are associated to each
units.
• 2 channels warm white and cold white
• 3 channels white
• 3 channels (red, green, blue)
• 4 channels (red, green, blue, white)
• 4 channels white
⇒ 2 Consecutive DMX addresses per unit
⇒ 3 Consecutive DMX addresses per unit
⇒ 3 Consecutive DMX addresses per unit
⇒ 4 Consecutive DMX addresses per unit
⇒ 4 Consecutive DMX addresses per unit

Manual EASY Color Control software Osram Gmbh
December 2012 page 11
Allocation of the preview window / control units (o nly online)
The order of the preview windows should correspond with the real structure / placement in the EASY system.
Therefore the addresses can be re-sorted:
1. Select one of the preview windows with a mouse click
2. Check which unit of the real system was selected
3. When the allocation is not correct, you have to pull the selected field via Drag & Drop to the according
position. Thereby the allocation of the two relevant fields is interchanged. Check the other allocations in this
way one after the other.
Re-sorting allows exchanging the order of DMX units without changing the physical DMX addresses either match the
preview to the real placement or correct mismatch of physical DMX addressing.
Enabling and Disabling preview windows (only offlin e)
In the offline mode you can activate / deactivate the (virtual) control units via a click onto the corresponding preview
window. With this function you can define the required assembly of the control units which is conform with the existing
/ planned system.
Figure 12: Activation / Deactivation of preview win dows in the offline mode

Manual EASY Color Control software Osram Gmbh
December 2012 page 12
Figure 13: Enabling / Disabling of DMX units (onlin e)
Enabling / Disabling of non existing DMX units (only online).
In online mode DMX units can be enabled/disabled via a double click onto the corresponding preview window. The
function allows creating a consistency preview that corresponds to the installed DMX units (dimmer or fixture
controlled by DMX protocol). By disable function, the related scenes are not lost and the DMX output is set to Ø DMX
value (typically to minimum light level that correspond to no light output).
Language selection
By selection of the corresponding entry, the language can be changed without new installation. The new language will
be valid after the next program start.
Configuration of the visualisation
There are five possibilities available under „output configuration". This enables an individual visualisation of the
software to match with the real system type.
• 2 channels (warm white and cold white) = channels 1 and 3 of the control units
• 3 channels white
• 3 channels (red, green, blue) = channels 1 up to 3 of the control units
• 4 channels (red, green, blue, white)
• 4 channels (warm white, cool white)
• 4 channels white
Configuration of the switching behaviour in the sequ ence mode (only online)
The adjustment „switch off lamps at level 0“ indicates if the light sources of the system are switched off in the
sequence mode or if they stay in a minimal dim position.
The option „switch off lamps at level 0“ should only be selected, when it is sure that a frequent switching operation
does not harm the light source. It is recommended not to select this option when fluorescent lamps are used in fast
sequences.

Manual EASY Color Control software Osram Gmbh
December 2012 page 13
Note about DALI EASY SO : this selection will allow the lamps to switch off and the relay to commutate when
operating in sequencer mode. This might reduce the life span of the lamps and devices internal relay.
Configuration of the dimming curve of OT EASY control units (online only)
By checking the “linear curve the dimming curve for OT EASY units can be changed from a logarithmic one (default) to a linear one. A linear curve is ideal for uniform fading, a logarithmic curve allows smooth and precise setting of colours and low dimming states.
Attention: changing the dimming curve resets the control units, scene and sequence settings will be deleted.
Configuration of system behaviour when a DALI EASY c ontrol unit fails (online only)
The adjustment of “System failure level indicates how the lighting operates by an interruption of the DALI control signal (e.g. by a power interrupt of the DALI EASY control unit). When you use the EASY control unit for the control of a general lighting system, you should select a value that guarantees an adequate brightness.
Selection of active sequence (online only)
EASY control units support up to 4 different sequences A..D with up to 16 scenes each. Via the drop down list the corresponding sequence and scene set can be selected. The active sequence and scene set is displayed in the title bar of the EASY Color Control window.
When the sequence and scene set is changed (e.g. from A to B) all corresponding settings are downloaded from the control units automatically.
Permanent Heating mode of DALI EASY SO (only online)
Enabling/Disabling of permanent heating mode on selected DALI EASY SO. When all DALI EASY SO units are selected, from the combo box, three permanent heating status are possible: - check box is selected, means permanent heating mode is active on all DALI EASY SO devices - check box is not selected, means permanent heating mode is deactivate on all DALI EASY SO devices - check box is undefined, DALI EASY SO devices are in different mode
Addressed mode (only Offline)
Enabling/Disabling of addressed mode on selected DALI EASY SO.
Reset the system (only online)
Use the reset push button if you want to reset the system. Furthermore the scenes and sequence settings of all control units and of their addresses (optional) can be reset.
After the selection of the reset push button a window appears. In this window you can select which of the following actions you want to carry out:
• Reset of the scenes and sequences of all control units (addresses will not change)
• Remove addresses and perform a complete reset to the delivery state
Figure 14: Selection menu after pressing the Reset button

Manual EASY Color Control software Osram Gmbh
December 2012 page 14
8 Tab Scene The tab scene is displayed direct after the program start. It enables the selection and adjustment of up to 16 scenes.
This scenes can be selected via a ‚Drop Down’ list. Every change of the actual scenes in the online mode is directly
accomplished and saved by the control units.
Figure 15: Tab scene after the selection and indivi dual setting of control unit 1, scene 1
Every unit, belonging to EASY DMX SO, shows the related DMX addresses bottom of the page. Each address is
associated to the related scroll bar (in the example R=1, G=2, B=3) in order to give the user the full control of each
DMX channel.
Selection of control units
Click onto the corresponding preview window to select a certain control unit and to adjust it individually. The selected
preview window is highlighted through a black frame. All control units behave similar when the option „Global“ is
selected. The adjustment of the scene for the last selected control unit will be assigned onto all other control units.
All adjustments which are conducted onto the register card Scene will only affect the selected control unit(s).

Manual EASY Color Control software Osram Gmbh
December 2012 page 15
Configuration of colours
A colour can be changed via the three sliders red (R), green (G) and blue (B) or via the three sliders hue (H),
saturation (S) and brightness (B). Both settings affect each other. Each colour is displayed in the range from 0 up to
255. Additional the percentage value is shown in the status line. If the display option 4 channels is selected it is also
possible to set up the brightness of the white channel (W) via a slider. The effect of the white channel is not shown in
the preview window. Alternatively it is possible to select the colour via the windows colour dialog. Double click onto
the preview window to open it.
Figure 16: Setting of a colour via the windows colo ur dialog after double clicking onto a preview wind ow
Configuration of white lighting
If the option 4 channels white ( or 3 channels white) from the tab Setup is selected, a slider for adjustment of each channel is displayed, so the brightness of each channel can be set individually. The preview window is split into 4 (or 3) squares which correspond with one channel each.
Figure 17: Tab scene, display option 4 channels white

Manual EASY Color Control software Osram Gmbh
December 2012 page 16
Setting of the colour temperature
If the display option 2 channels or 4 channels (warm white, cool white) on the Setup tab is selected, the slider for
the both white tones warm white (WW) and cool white (CW) as well as the two sliders for hue (H) and brightness (B)
are displayed. In 2 channels, the warm white channel is equal with CH1 and the cool white with CH3 of the
corresponding control unit. In 4 channels (warm white, cool white), the warm white channel is equal with CH1 and
CH2, the cool white with CH3 and CH4 of the corresponding control unit. In 4 channels (warm white, cool white)
CH1 and CH2 (respectively CH3 and CH4) have always the same value.
Figure 18: Tab Scene, display option 2 channels
Copying of colours between control units
Colours can be copied via Drag & Drop. Click onto the preview window whose colour should be transferred to another
unit. Keep mouse button pressed and draw the mouse pointer to the preview window on which the settings should be
transferred. Then release the mouse button. Alternatively you can use the buttons “copy” and “insert” as well as the
short cut keys <Ctrl> + <C> for copy and <Ctrl> + <V> for insert.
Display of all scenes
The display option which shows large-scale preview windows and therefore only one scene, can be changed to the
alternative option „Display all scenes“. This display option shows all scenes simultaneously. Therefore it enables: a
single colour copy, a single scene copy and a complete control unit scene settings. For the selection of a control unit
or respectively a scene you have to move the mouse over the number of the required control unit or respective of the
required scene. Click onto the number which then is highlighted. Now the line or respective the column is marked and
can be copied onto a new line / column via Drag & Drop.
Undo and redo of last changes
The last changes can be cancelled or re established via the buttons ”undo“ and "redo“.

Manual EASY Color Control software Osram Gmbh
December 2012 page 17
9 Tab Sequence The Tab sequence enables an automatic fade between the scenes which were created under the Tab scene .
Individual / Global selection (only addressed mode)
Individual : any change on the sequence tab has influence only to the selected control unit. All sequence timing
information are stored in the selected control unit only.
Global : any change on the sequence tab has influence to all the connected control units. Sequence timing information
are the same for all units and are stored in every control unit.
Warning: switching from Individual to Global means to copy all the sequence time from selected unit to all the other
units. Timings of other units are lost.
Individual selection is disabled in Non-addressed mode. In Non-addressed mode, sequence timing information are the
same for all units and are stored only in the master control unit.
Scenes timing and sequence operation
An individual fade time (time to reach the final scene values) and static time (time until the start of the next fade
process) can be set for each scene. Each scene which should be part of the sequence has to be enabled via the
check box “Active”. All scenes not marked as “Active” will be left out in the sequence process. Furthermore you can
set a “start fade time“ for every sequence. This start fade time can be used once instead of the fade time of the first
active scene when the sequence is started. At repetitions of the sequence the normal fade time of the first scene will
be used again. Therefore you can achieve an individual fade between two different sequences.
Global Mode (non addressed mode) Individual Mode (A ddressed mode)
Figure 19: Tab sequence, option display all scenes
Transfer of the time settings for all scenes
If the fade time and/or the static time should be the same for all active scenes, you have to press <Ctrl> + <ENTER>
at the same time, directly after you have entered the corresponding time.
Display of all scenes
The display option which shows a large-scale preview windows and therefore only one scene, can be changed to the
alternative option Display all scenes . This display option shows all scenes at the same time.
Non-addressed mode : timing settings are the same for all units. Copy function is disabled.
Addressed mode :
Global: timing settings are the same for all units. Copy function is disabled.
Individual: timing settings depend by the selected unit. Timing settings can be copied. This can be realised by Drag &
Drop operation or alternatively by using the corresponding buttons or the shortcuts.

Manual EASY Color Control software Osram GmbH
December 2012 page 18
Play back of a sequence (Non-addressed mode only)
Play back of a sequence can be started by the button “play”. The buttons with the double and triple "play"-symbol start
the sequence with a 10- or 100-times faster speed rate. A running sequence can be paused by the “pause"-button or
stopped by the “stop"-button. After pushing the “pause"-button, you can continue the sequence at the same point by
pressing the “play"-button. After stopping the sequence and pressing the “play"-button the sequence will start again
with the first active scene. If the EASY Color control window is closed or the PC adapter is disconnected during
playback, the sequence is continued by the control units independently and is restarted after a mains interruption
automatically.
Figure 20: Buttons for play back of a sequence, pla y (speed x1, x10, x100), pause and stop (from left to right)
Saving and reloading sequences
Sequences and scenes can be saved and reloaded to/from the computer by using the corresponding buttons. The
saved data files have the extension “*.mesf”. In this manner sequence and scene settings can easily be transferred
from one EASY system to other EASY systems.
Note:
From EASY Color Control software version 1.5 file extension is “*.mesf”. Files with “*.esf” extension, created by older software versions, can be still opened. The name of the data file, which is loaded at the moment, is shown in the program window head line. Note:
If you have accidentally done changes in the EASY system, you could re-establish the condition before the program-start by opening the data file AutoSaveStart.mesf in the directory “C:\Documents and Settings\<User>\My Documents\OSRAM\EASY Color Control”. If you should have forgotten to store the changes as a data file, you could find the last settings in the data file AutoSaveExit.mesf in the same directory. This data file contains all changes, which have been conducted until closing the program.
Figure 21: Data file dialogue window for saving the sequence and scene settings
Undo and redo of last changes
The last changes can be cancelled or re-established via the buttons ”undo“ and "redo“.
Sequence examples
Examples of EASY Color Control sequences can be found on the CD enclosed or in the internet under
http://www.osram.com/ecg-software

Manual EASY Color Control software Osram Gmbh
December 2012 page 19
10 Tab Program (Non addressed mode only) This tab allows the creation of programs. A program is a series of sequences, which can be played in the online
mode, if a computer is connected. Before play back of a new sequence, the settings have to be transferred to the
control units. This transfer may last up to several minutes, depending on the number of control units. The sequences
and the runtime are shown in form of an editable list.
Figure 22: Tab program
Create a program
Adding a sequence
Push the “add” button and choose the desired sequence data file in the file dialogue window. The selected sequence
will be added at the end of the program list.
Insert a sequence
Mark an entry in the program list, push the “Insert” button and choose the desired sequence data file in file dialogue
window. The sequence will be inserted above the marked entry in the program list. If the marked and the new
sequences are the same, the repetition counter of this sequence will be increased.
Copy and paste
By pushing the “copy” button the marked sequence will be copied to the clipboard. In the following paste process the
sequence will be pasted above the marked entry. If the marked and the new sequence are the same, the repetition
counter of this sequence will be increased.

Manual EASY Color Control software Osram Gmbh
December 2012 page 20
Cutting
By cutting a sequence this sequence will be copied into the clipboard and the repetition counter of the marked
sequence will be decreased. If the repetition counter reaches “0”, the sequence will be deleted from the list.
Exporting sequences out of a program list
You can extract sequence data files via “export” and save the exported sequence as a *.esf file.
Saving and reloading of programs
A program can be saved and reloaded as a data file. Program data files have the ending *.epf (Easy Program File).
The data file name of the actual loaded program is shown in the program window head line.
Play settings
Fading between the sequences
Via the option “fade to black in“ a dark phase can be inserted between the sequences. The cross fade time can be set
from 0.1s up to 9.9 seconds.
Endless loop
If this option is selected, the program is played endless.
Program cycles
If “Endless loop” is not active, the number of program cycles can be set here.
End action
At the end of a program the "End action" is performed. If the option "Endless loop" is chosen, the program will restart
after the last sequence.
The "End action" is also performed after a manual stop.
Automatic program start and stop
Based on the Windows clock a program can be started and stopped at a predefined time. To activate this function, set
the desired time of the day and enable the corresponding check box.
Combine sequences
If this option is selected, up to 4 sequences may be loaded block wise to the sequence layers A..D. By this the
sequence playback does not need to be interrupted by reload processes. With this option a sequence with up to 64
scenes can be achieved.
The option “Combine sequences” is stored in the Easy control units. So it is possible to play combined sequences
also without a connected PC by starting “Sequence A” with the Easy remote control or the Easy push button coupler.
The selected number of “Program cycles” is also used in this mode. At the end of the program all channels are
switched off automatically.
Play back of a program
A program is started by the “play” button and begins with the marked entry. The buttons with the double and triple
play-symbol cause a start with a 10- or 100-times faster speed rate. A running program can be paused by the “pause”
button or stopped with the “stop” button. After pushing the “pause” button you can continue the sequence at the same
point by pressing the “play” button. After stopping the sequence and pressing the “play” button again the sequence
will restart with the actually marked entry.
By pressing the “stop” button” twice, the program will reset to the beginning and the first entry will be marked.
In the mode “Combine sequences” the program always starts with the first sequence in the program window.
Note:
The duration of a non-stopped program play back depends on the computer performance and the stability of the
installed Windows system.

Manual EASY Color Control software Osram Gmbh
December 2012 page 21
11 Expert functions Beyond the basic functions in chapters 1 to 10 there are additional ‘Expert’ functions for sophisticated users available.
These functions can be activated by the command line parameters.
Command line options
To use the expert functions the corresponding command line option (see appendix) has to be entered at the desktop
link of the EASY Color Control software.
It is recommended to generate a copy of the original desktop link. For that right click on the existing symbol and
choose ‘copy’ from the menu. Now right click on the windows desktop and the select ‘paste’. Then right click on the
new symbol and choose ‘properties’, add the command line option in the ‘target’ field without deleting the exiting entry
(e. g. “-SequenceB”). Command line option and existing entry are separated by a ‘space’.
Figure 23: Command line entry
Selection of a specific EASY USB adapter
If you connect several EASY USB adapters to the computer at the same time, every program start will set a
connection to the next, not yet used adapter. This means that you can control several adapters at the same time by
starting the program several times. By adding the serial number of the adapter via the command line parameter “–
USBBoxNNNNNNNN“ (N stands for the serial number) you can specify the connection between the EASY Color
Control and an individual USB Adapter. To avoid a re entry of the serial number, it is recommended to copy the EASY
Color Control Desktop link and generate a separate link for every adapter. Every link should contain the
corresponding parameter information and should be labelled different. In front of the parameter you have to insert a
blank as a separator.
Automatic program operation after Windows start
Copy the EASY Color Control link into the “Autostart” folder of the Windows system and add the command line
parameter “-Auto<Filename>“. In front of the parameter you have to insert a blank as a separator.

Manual EASY Color Control software Osram Gmbh
December 2012 page 22
12 Practical hints
1. Disconnection of the EASY control units
If a data transfer failure occurs (for example the USB connection is disconnected or the connection between USB
adapter and the EASY system is interrupted), the EASY Color Control software will show an error message and
will change from the online mode into the offline mode. Please close the EASY Color Control software and check
the wiring. Afterwards start the software again. This is the only way to get into the online mode again.
2. Remote diagnostics for EASY Color Control installatio ns
The data file types *.mesf and *.mepf are ASCII data files and can be displayed and edited in any text editor.
In this way failed functions can be checked and may be corrected without the direct on site attendance.
3. Creating identical EASY systems
With the function “save” you can create an complete image of the system settings. Therefore it is possible to
transfer all information with the *.mesf and *.mepf files and “duplicate” system configuration.
4. Change a sequence in an existing program
To change a sequence in a program you have to save the data file via “export”. This data file can be reloaded,
edited and saved via the tab sequence. The saved data file has to be inserted on the program tab instead of the
original sequence into the program via “Insert”.
13 Appendix
EASY Color Control keyboard shortcuts:
• <Ctrl> + <Tab> Choose next tab
• <Ctrl> + <Shift> + <Tab> Choose last tab
• <Ctrl> + <Q> Exit software
• <Ctrl> + <I> Show information
• <Ctrl> + <Z> Undo changes
• <Ctrl> + <Y> Redo changes
• <Ctrl> + <C> Copy
• <Ctrl> + <V> Paste
EASY Color Control Commandline-Options (mind small and capital letters):
• -Offline Software starts in the Offline-Mode
• -SequenceA Software controls sequence A
• -SequenceB Software controls sequence B
• -SequenceC Software controls sequence C
• -SequenceD Software controls sequence D
• -USBBox<Serial number> Software connects with the correspondent USB
Adapter
• -Auto<Program name> Software starts with the corresponding
program data file (*.mepf)
• -EASYDMXSO-DEFAULTADDR (Default) Addressed operation of EASY DMX SO
• -EASYDMXSO-SINGLEADDR Single addressed operation of EASY DMX SO